plasma tv owner’s manual - · pdf fileplasma tv please read this ... tv speakers on/ off...
TRANSCRIPT

OWNER’S MANUALPLASMA TV MODELS4422PPGG22******5500PPGG22******5500PPGG33******6600PPGG33******4422PPGG66******5500PPGG66******5500PPGG77******6600PPGG77******
PLASMA TV
Please read this manual carefully before operatingyour TV. Retain it for future reference.Record model number and serial number of the TV. Refer to the label on the back cover and quote thisinformation.To your dealer when requiring service.
IIDD NNuummbbeerr((ss)):: 5495: 60PG30FD-AA5496: 50PG30FD-AA5205: 50PG60UD-AA5206: 42PG60UD-AA5209: 42PG20D-AA5210 : 50PG20D-AA5522: 60PG70FD-AB5523: 50PG70FD-AB
DVB is a registered trademark of the DVB Project
TThhiiss pprroodduucctt qquuaall ii ff iieess ffoorr EENNEERRGGYY SSTTAARRiinn tthhee ““ffaaccttoorryy ddeeffaauulltt ((HHoommee mmooddee))””sseettttiinngg aanndd tthhiiss iiss tthhee sseettttiinngg iinn wwhhiicchhppoowweerr ssaavviinnggss wwii ll ll bbee aacchhiieevveedd..


1
ACCESSORIESA
CC
ES
SO
RIE
S
Ensure that the following accessories are included with your TV. If an accessory is missing, please contact the
dealer where you purchased the product.
Owner’s Manual Batteries
Remote Control
Power Cord
Polishing ClothPolishing cloth for use on
the screen.
This feature is not available for all models.
* Lightly wipe any stains or fingerprints on thesurface of the TV with the polishing cloth.
Do not use excessive force. This may causescratching or discolouration.
RATIO
(only 50PG6***,50/60PG7*** )
Except 50PG6***, 50/60PG7***
42PG6*** : 1EA50/60PG3*** : 2EA42PG2*** : 1EA50PG2*** : 2EA
(only 50/60PG3***,42/50PG2***)
Cable management clip
Protection Cover
(only 42/50PG6***,50/60PG7***)
A Image shown may differ from your TV.
or
Cable Holder
or
Ferrite Core(This feature is not available
for all models.)
Ferrite core can be used to reduce the electromagneticwave when connecting the power cord.The closer the location of the ferrite core to the powerplug, the better it is.
Use of ferrite core (This feature is not available for all models.)
Install the power plug closely.

2
CONTENTS
CO
NT
EN
TS
ACCESSORIES . . . . . . . . . . . . . . . . . . . . . . . . . . . . . . . . . . . . . . . . . . . . . 1
PREPARATION
Front Panel Controls..................................................... 4
Back Panel Information ................................................ 5
Back Cover for Wire Arrangement ............................ 6
Desktop Pedestal Installation ..................................... 9
Swivel Stand ................................................................... 9
Wall Mount: Horizontal Installation........................ 10
Please set it up carefully so the product does notfall over. ........................................................................... 11
Antenna Connection................................................... 12
EXTERNAL EQUIPMENT SETUP
HD Receiver Setup ...................................................... 13
DVD Setup..................................................................... 15
VCR Setup ..................................................................... 18
AV Output Setup ........................................................ 20
Digital Audio Out Setup............................................ 21
Other A/V Source Setup .......................................... 22
USB in Setup ................................................................ 23
PC Setup........................................................................ 24
- Screen Setup for PC Mode .............................. 27
WATCHING TV / PROGRAMME CONTROL
Remote Control Key Functions................................ 32
Turning on the TV....................................................... 36
Programme Selection ................................................ 36
Volume Adjustment ................................................... 36
Quick Menu ................................................................. 37
On-Screen Menus Selection and Adjustment..... 38
Auto Programme Tuning............................................ 39
Manual Programme Tuning (In Digital Mode)..... 40
Manual Programme Tuning (In Analogue Mode) ... 41
Programme Edit ........................................................... 43
Booster........................................................................... 46
Software Update.......................................................... 47
Diagnostics ................................................................... 48
Selecting the Programme Table............................... 49
Input List........................................................................ 50
................................................................. 51
Input Label .................................................................... 54
AV Mode........................................................................ 55
TO USE THE USB DEVICE
When connecting the USB device.......................... 56
Photo List ...................................................................... 57
Music List........................................................................61
EPG (ELECTRONIC PROGRAMMEGUIDE) (IN DIGITAL MODE)
- Switch on/off EPG ............................................... 64
- Select a programme............................................. 64
- Button Function in NOW/NEXT Guide Mode 65
- Button Function in 7 Day Guide Mode.......... 65
- Button Function in Date Change Mode......... 65
- Button Function in Extended Description Box . 66
- Button Function in Remind Setting Mode................. 66
- Button Function in Remind List Mode ............. 66
PICTURE CONTROL
Picture Size (Aspect Ratio) Control....................... 67
Preset Picture Settings
- Picture Mode-Preset............................................ 69
- Auto Colour Tone Control
(Cool/Medium/Warm) ........................................ 70
Manual Picture Adjustment
- Picture Mode-User option................................. 71
- Picture Mode-Expert Control ........................... 72
Picture Improvement Technology........................... 73
Advanced - Film Mode............................................... 74
Advanced - Black(Darkness) Level ......................... 75
Picture Reset................................................................. 76
Image Sticking Minimization (ISM) Method .........77
Power Saving Picture Mode...................................... 78

3
CO
NT
EN
TS
SOUND & LANGUAGE CONTROL
Auto Volume Leveller.................................................. 79
Preset Sound Settings - Sound Mode................... 80
Sound Setting Adjustment - User Mode .............. 81
Clear Voice .................................................................... 82
Balance........................................................................... 83
TV Speakers On/ Off Setup......................................84
Selecting Digital Audio Out ..................................... 85
Audio Reset................................................................... 86
Stereo Reception (In Analogue Mode Only) ...... 87
Speaker Sound Output Selection........................... 87
TIME SETTING
Clock Setup .................................................................. 88
Auto On/ Off Timer Setting..................................... 89
Auto Shut-off Setting ................................................. 90
Time Zone Setup......................................................... 91
Sleep Timer Setting..................................................... 91
PARENTAL CONTROL / RATINGS
Set Password & Lock System................................... 92
Block Programme......................................................... 93
Parental Control .......................................................... 94
Key Lock......................................................................... 95
TELETEXT
Switch On/Off ............................................................. 96
SIMPLE Text .................................................................. 96
TOP Text........................................................................ 96
FASTEXT........................................................................ 97
Special Teletext Functions......................................... 97
APPENDIX
Troubleshooting........................................................... 98
Maintenance ............................................................. 100
Product Specifications ............................................. 101
Programming the Remote Control ....................... 102
IR Codes ...................................................................... 103
External Control Through RS-232C .................... 105
Open Source Software Notice ............................... 112
Open Source License ................................................ 113

4
PREPARATION
PR
EPA
RA
TIO
N
FRONT PANEL CONTROLS
� Image shown may differ from your TV� If your TV has a protection film attached, remove the film and then wipe the product with a polishing cloth.
OKMENUINPUT P PROGRAMMEVOLUMEMENU OKINPUT
OKOKMENUMENUINPUTINPUT P
OKMENUINPUT P
Remote Control Sensor
POWER Button
Power/Standby Indicator
• illuminates red in standby mode.
• illuminates green when the TV isswitched on.
5
PR
EPA
RA
TIO
N
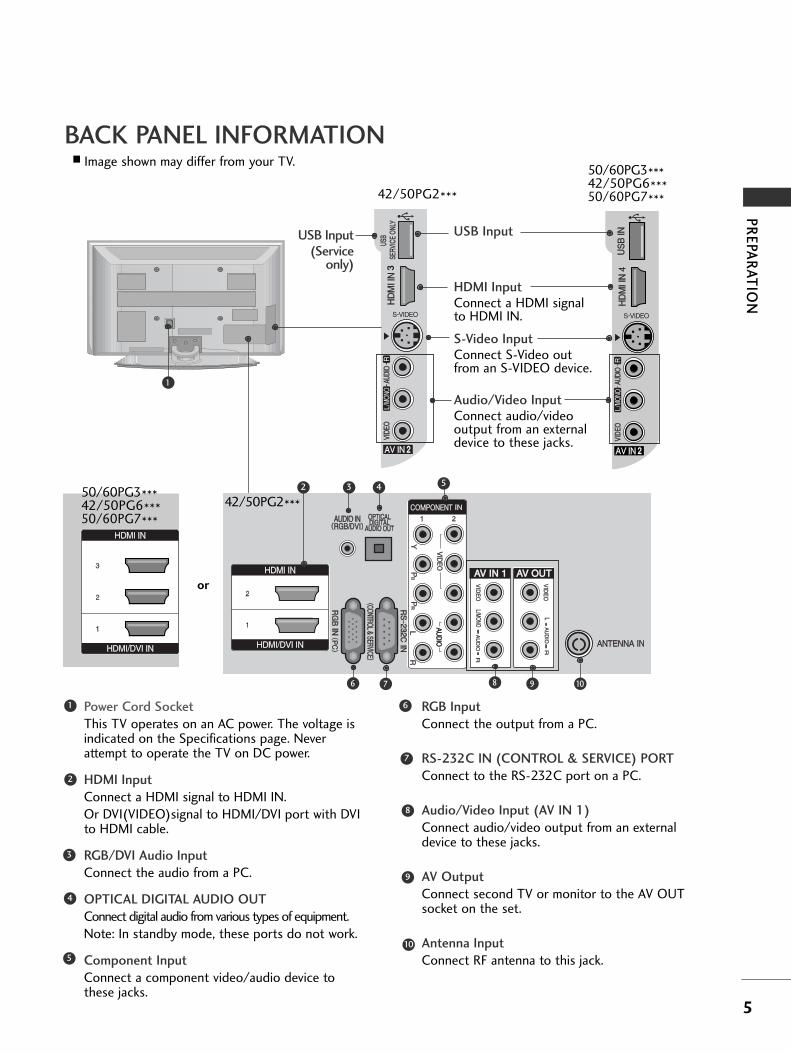
BACK PANEL INFORMATION
AV IN 1 AV OUT
L/MONOR
AU
DIO
VID
EO
LR
AU
DIO
VID
EO
2
Power Cord Socket
This TV operates on an AC power. The voltage isindicated on the Specifications page. Neverattempt to operate the TV on DC power.
HDMI Input
Connect a HDMI signal to HDMI IN.Or DVI(VIDEO)signal to HDMI/DVI port with DVIto HDMI cable.
RGB/DVI Audio Input
Connect the audio from a PC.
OPTICAL DIGITAL AUDIO OUT
Connect digital audio from various types of equipment. Note: In standby mode, these ports do not work.
Component Input
Connect a component video/audio device tothese jacks.
RGB Input
Connect the output from a PC.
RS-232C IN (CONTROL & SERVICE) PORT
Connect to the RS-232C port on a PC.
Audio/Video Input (AV IN 1)
Connect audio/video output from an externaldevice to these jacks.
AV Output
Connect second TV or monitor to the AV OUTsocket on the set.
Antenna Input
Connect RF antenna to this jack.
1
2
3
4
6
7
8
9
1
A Image shown may differ from your TV.
5
AV IN 1AV IN 1 AV OUTAV OUT
L/L/MONOMONO
RA
UD
IOA
UD
IOV
IDE
OV
IDE
O
LR
AU
DIO
AU
DIO
VID
EO
VID
EO
22
US
BSE
RVIC
E ON
LY
2 3 4 5
106 7 8 9
AV IN 1 AV OUT
L/MONOR
AU
DIO
VID
EO
LR
AU
DIO
VID
EO
2
42/50PG2***50/60PG3***42/50PG6***50/60PG7***
10
AV IN 1 AV OUT
L/MONOR
AU
DIO
VID
EO
LR
AU
DIO
VID
EO
22
3
US
BUS
BSE
RVIC
E ON
LYSE
RVIC
E ON
LY
42/50PG2***
USB Input(Service
only)
AV IN 1 AV OUTL/MONO
RA
UD
IOV
IDE
O
LR
AU
DIO
VID
EO
2
USB Input
HDMI InputConnect a HDMI signalto HDMI IN.
S-Video InputConnect S-Video outfrom an S-VIDEO device.
Audio/Video InputConnect audio/videooutput from an externaldevice to these jacks.
50/60PG3***42/50PG6***50/60PG7***
or

6
PREPARATION
PR
EPA
RA
TIO
N
BACK COVER FOR WIRE ARRANGEMENT� Image shown may differ from your TV.
Connect the cables as necessary.
To connect additional equipment, see theEEXXTTEERRNNAALL EEQQUUIIPPMMEENNTT SSEETTUUPP section.
1
Install the CCAABBLLEE MMAANNAAGGEEMMEENNTT CCLLIIPP as shown.2
Hold the CCAABBLLEE MMAANNAAGGEEMMEENNTT CCLLIIPP with both hands and pull it upward.
* For the 42PG6*** model, press the center of the CABLE MANAGEMENT CLIP and then lift it.
How to remove the cable management clip
CABLE MANAGEMENT CLIP
Fix the CCaabbllee HHoollddeerras shown and bundlethe cables.
42PG6***

7
PR
EPA
RA
TIO
N
Connect the cables as necessary.
To connect additional equipment, see theEEXXTTEERRNNAALL EEQQUUIIPPMMEENNTT SSEETTUUPP section.
1
Install the CCAABBLLEE MMAANNAAGGEEMMEENNTT CCLLIIPP as shown.2
CABLE MANAGEMENT CLIP
50PG6***, 50/60PG7***
Hold the CCAABBLLEE MMAANNAAGGEEMMEENNTT CCLLIIPP with both hands and pull it upward.
How to remove the cable management clip
Separate CABLE MANAGEMENT from TV bypressing two latches.

8
PREPARATION
PR
EPA
RA
TIO
N
How to remove the cable management clip
� Image shown may differ from your TV.
Connect the cables as necessary.
To connect additional equipment, see theEXTERNAL EQUIPMENT SETUP section.
Install the CABLE MANAGEMENT CLIP asshown.
If your TV has the CABLE HOLDER, install itas shown and bundle the cables.
1
2
NOTE!
GG Do not use the CABLE MANAGEMENT CLIP to lift the TV.
- If the TV is dropped, you may be injured or the TV may be damaged.
Hold the CCAABBLLEE MMAANNAAGGEEMMEENNTT CCLLIIPP with both hands and pull it upward.
42/50PG2***, 50/60PG3***
CABLE MANAGEMENT CLIP
CABLE HOLDER
9
PR
EPA
RA
TIO
N
OKMENUINPUT P
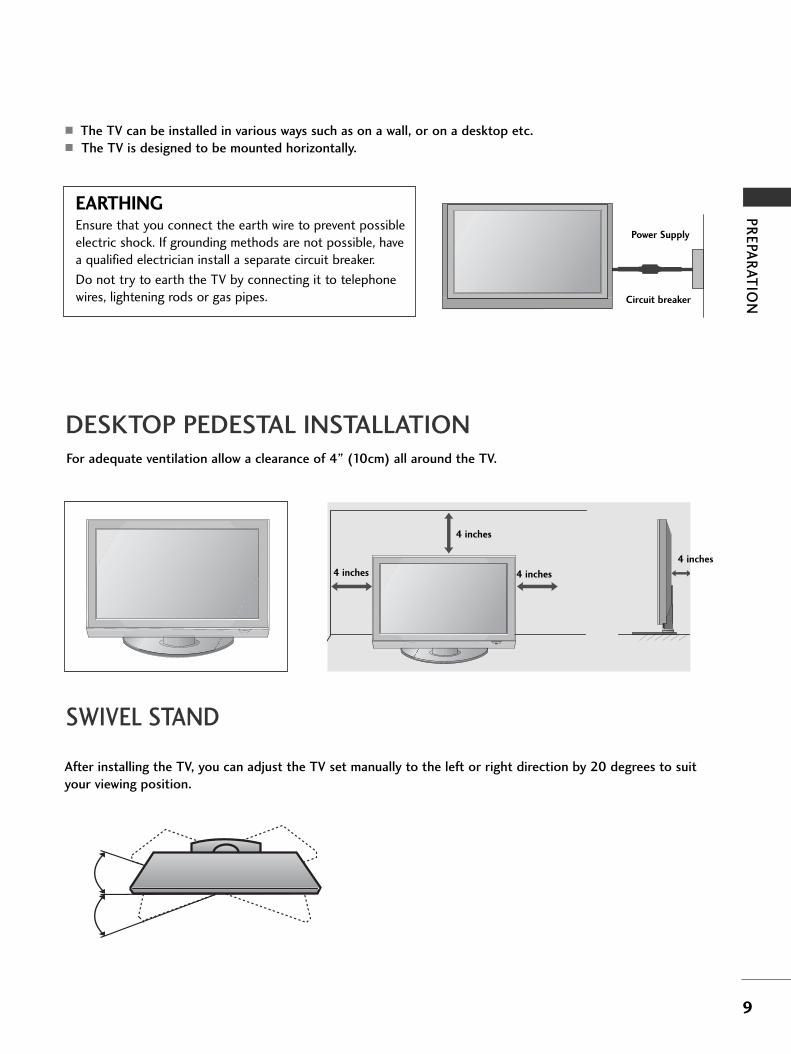
DESKTOP PEDESTAL INSTALLATIONFor adequate ventilation allow a clearance of 4” (10cm) all around the TV.
A The TV can be installed in various ways such as on a wall, or on a desktop etc.A The TV is designed to be mounted horizontally.
Power Supply
Circuit breaker
EARTHINGEnsure that you connect the earth wire to prevent possibleelectric shock. If grounding methods are not possible, havea qualified electrician install a separate circuit breaker.
Do not try to earth the TV by connecting it to telephonewires, lightening rods or gas pipes.
4 inches
4 inches
4 inches
4 inches
SWIVEL STAND
After installing the TV, you can adjust the TV set manually to the left or right direction by 20 degrees to suit
your viewing position.

10
PREPARATION
PR
EPA
RA
TIO
N
WALL MOUNT: HORIZONTAL INSTALLATION
For adequate ventilation allow a clearance of 4” (10cm) all around the TV. We recommend that you use a
wall mounting bracket of LG brand when mounting the TV to a wall.
4 inches
4 inches
4 inches
4 inches
4 inches
NOT USING THE DESK-TYPE STAND
When installing the wall-mounted unit, use the
protection cover for desk-type stand installation.
Insert the PROTECTION COVER into the TV until
clicking sound.
� Image shown may differ from your TV.

11
PR
EPA
RA
TIO
N
PLEASE SET IT UP CAREFULLY SO THE PRODUCT DOESNOT FALL OVER.
2
1
A You should purchase necessary components to fix the TV to the wall on the market.A Position the TV close to the wall to avoid the possibility of it falling when pushed.A The instructions shown below are a safer way to set up the TV, which is to fix it to the wall, avoiding the
possibility of it falling forwards if pulled. This will prevent the TV from falling forward and causing injury.This will also prevent the TV from damage. Ensure that children do not climb or hang from the TV.
NOTE!
G When moving the TV undo the cords first.
G Use a platform or cabinet strong and large enough to support the size and weight of the TV.
G To use the TV safely make sure that the height of the bracket on the wall and on the TV is the same.
2
3
1
1
2
Use the eye-bolts or TV brackets/bolts to fix the product to the wall as shown in the picture.
(If your TV has bolts in the eyebolts, loosen then bolts.)
* Insert the eye-bolts or TV brackets/bolts and tighten them securely in the upper holes.
Secure the wall brackets with the bolts on the wall. Match the height of the bracket that is mounted on thewall.
3 Use a sturdy rope to tie the product. It is safer to tie the rope so it becomes horizontal betweenthe wall and the product.

AV IN 1 AV OUT
L/MONOR
AU
DIO
VID
EO
LR
AU
DIO
VID
EO
2
AV IN 1 AV OUT
L/MONOR
AU
DIO
VID
EO
LR
AU
DIO
VID
EO
2
12
PREPARATION
PR
EPA
RA
TIO
N
ANTENNA CONNECTION
AV IN 1 AV OUT
L/MONOR
AU
DIO
VID
EO
LR
AU
DIO
VID
EO
2
� For optimum picture quality, adjust antenna direction.
� An antenna cable and converter are not supplied.
� To prevent damage do not connect to the mains outlet until all connections are made between the devices.
Multi-family Dwellings/Apartments(Connect to wall antenna socket)
Single-family Dwellings /Houses(Connect to wall jack for outdoor antenna)
OutdoorAntenna(VHF, UHF)
Wall
Antenna
Socket
RF Coaxial Wire (75 ohm)
Antenna
UHF
Signal
Amplifier
VHF
� In poor signal areas, to achieve better picture quality it may be necessary to install a signal amplifier to theantenna as shown above.
� If signal needs to be split for two TVs, use an antenna signal splitter for connection.
13
EXTERNAL EQUIPMENT SETUPE
XT
ER
NA
L EQ
UIP
ME
NT
SE
TU
P
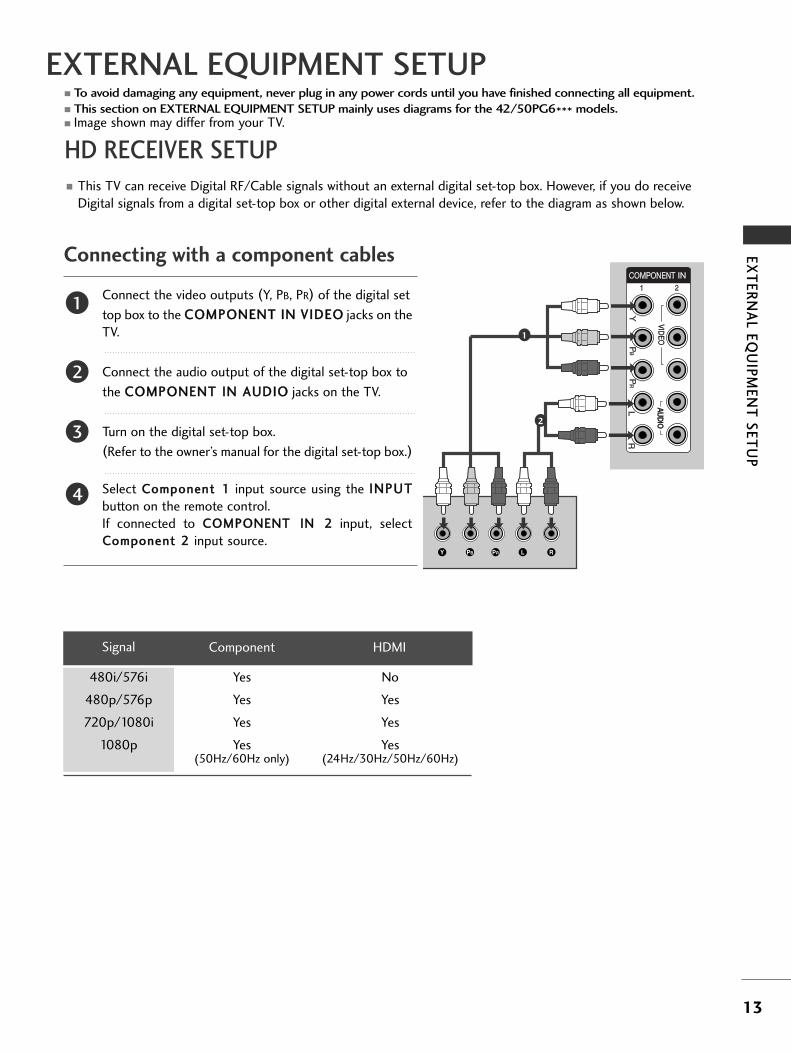
HD RECEIVER SETUP
� To avoid damaging any equipment, never plug in any power cords until you have finished connecting all equipment.� This section on EXTERNAL EQUIPMENT SETUP mainly uses diagrams for the 42/50PG6*** models.� Image shown may differ from your TV.
Connecting with a component cables
AV IN 1 AV OUT
L/MONOR
AU
DIO
VID
EO
LR
AU
DIO
VID
EO
1
2
Signal
480i/576i
480p/576p
720p/1080i
1080p
Component
Yes
Yes
Yes
Yes (50Hz/60Hz only)
HDMI
No
Yes
Yes
Yes(24Hz/30Hz/50Hz/60Hz)
� This TV can receive Digital RF/Cable signals without an external digital set-top box. However, if you do receiveDigital signals from a digital set-top box or other digital external device, refer to the diagram as shown below.
Connect the video outputs (Y, PB, PR) of the digital set
top box to the CCOOMMPPOONNEENNTT IINN VVIIDDEEOO jacks on theTV.
Connect the audio output of the digital set-top box to
the CCOOMMPPOONNEENNTT IINN AAUUDDIIOO jacks on the TV.
Turn on the digital set-top box.
(Refer to the owner’s manual for the digital set-top box.)
Select CCoommppoonneenntt 11 input source using the IINNPPUUTT
button on the remote control.If connected to CCOOMMPPOONNEENNTT IINN 22 input, selectCCoommppoonneenntt 22 input source.
2
3
4
1

14
EXTERNAL EQUIPMENT SETUP
EX
TE
RN
AL E
QU
IPM
EN
T S
ET
UP
Connecting a set-top box with an HDMI cable
AV IN 1 AV OUT
L/MONOR
AU
DIO
VID
EO
LR
AU
DIO
VID
EO
1
Connecting with an HDMI to DVI cable
AVV IN 1 AV OUT
L/L/MONOMONO
RA
UD
IOA
UD
IOV
IDE
OV
IDE
O
LR
AU
DIO
VID
EO
1 2
Connect the digital set-top box to HHDDMMII//DDVVII IINN 11,HHDDMMII IINN 22, HHDDMMII IINN 33 or HHDDMMII IINN 44(except42/50PG2***) jack on the TV.
Turn on the digital set-top box.
(Refer to the owner’s manual for the digital set-top box.)
Select HHDDMMII11, HHDDMMII22, HHDDMMII33 or HHDDMMII44(except42/50PG2***) input source using the IINNPPUUTT buttonon the remote control.
2
3
1
Connect the digital set-top box to HHDDMMII//DDVVII IINN 11
jack on the TV.
Connect the audio output of the digital set-top box tothe AAUUDDIIOO IINN ((RRGGBB//DDVVII)) jack on the TV.
Turn on the digital set-top box. (Refer to the owner’smanual for the digital set-top box.)
Select HHDDMMII11 input source using the IINNPPUUTT buttonon the remote control.
2
3
4
1

15
EX
TE
RN
AL E
QU
IPM
EN
T S
ET
UP
DVD SETUP
Connecting with a component cables
2
Component Input ports
To achieve better picture quality, connect a DVD player to the component input ports as shown below.
Component ports on the TV Y PB PR
Video output ports
on DVD player
Y
Y
Y
Y
PB
B-Y
Cb
Pb
PR
R-Y
Cr
Pr
1
2
Connect the video outputs (Y, PB, PR) of the DVD to theCCOOMMPPOONNEENNTT IINN VVIIDDEEOO jacks on the TV.
Connect the audio outputs of the DVD to the
CCOOMMPPOONNEENNTT IINN AAUUDDIIOO jacks on the TV.
Turn on the DVD player, insert a DVD.
Select CCoommppoonneenntt 11 input source using the IINNPPUUTT
button on the remote control.If connected to CCOOMMPPOONNEENNTT IINN 22 input, selectCCoommppoonneenntt 22 input source.
Refer to the DVD player's manual for operatinginstructions.
2
3
4
5
1

16
EXTERNAL EQUIPMENT SETUP
EX
TE
RN
AL E
QU
IPM
EN
T S
ET
UP
Connecting with a S-Video cable
L RS-VIDEOVIDEO
OUTPUTSWITCH
ANT IN
ANT OUT
2
Connect the S-VIDEO output of the DVD to the SS --VVIIDDEEOO input on the TV.
Connect the audio outputs of the DVD to the AAUUDDIIOO
input jacks on the TV.
Turn on the DVD player, insert a DVD.
Select AAVV22 input source using the IINNPPUUTT button onthe remote control.
Refer to the DVD player's manual for operatinginstructions.
2
3
4
5
1
1 2

17
EX
TE
RN
AL E
QU
IPM
EN
T S
ET
UP
2
Connecting the HDMI cable
Connect the HDMI output of the DVD to theHHDDMMII//DDVVII IINN 11, HHDDMMII IINN 22, HHDDMMII IINN 33 or HHDDMMIIIINN 44(except 42/50PG2***) jack on the TV.
Select HHDDMMII11, HHDDMMII22, HHDDMMII33 or HHDDMMII44(except42/50PG2***) input source using the IINNPPUUTT buttonon the remote control.
Refer to the DVD player's manual for operating
instructions.
2
3
1
1
GGThe TV can receive video and audio signals simultaneouslywhen using a HDMI cable.
GG If the DVD does not support Auto HDMI, you must set theoutput resolution appropriately.
NOTE!

VCR SETUP
� To avoid picture noise (interference), allow adequate distance between the VCR and TV.
� Typically a frozen still picture from a VCR. If 4:3 picture format is used for an extended period the fixed
images on the sides of the screen may remain visible.
AV IN 1 AV OUT
L/MONOR
AU
DIO
VID
EO
LR
AU
DIO
VID
EO
AV IN 1 AV OUT
L/MONOR
AU
DIO
AU
DIO
VID
EO
LR
AU
DIO
AU
DIO
VID
EO
OUTPUTSWITCHANT IN
RS-VIDEO VIDEOANT OUT L
2
2
Wall Jack
Antenna
1
2
Connecting with a RF Cable
18
EXTERNAL EQUIPMENT SETUP
EX
TE
RN
AL E
QU
IPM
EN
T S
ET
UP
Connect the AANNTT OOUUTT socket of the VCR to the AANNTTEENNNNAA IINN socket on the TV.
Connect the antenna cable to the AANNTT IINN socket of the VCR.
Press the PPLLAAYY button on the VCR and match the appropriate channel between the TV and VCR forviewing.
2
3
1

19
EX
TE
RN
AL E
QU
IPM
EN
T S
ET
UP
Connecting with an RCA cable
L RS-VIDEO VIDEO
OUTPUTSWITCH
ANT IN
ANT OUT
AV IN 1 AV OUT
L/MONOR
AU
DIO
VID
EO
LR
AU
DIO
VID
EO
AV IN 1 AV OUT
L/MONOR
AU
DIO
VID
EO
LR
AU
DIO
VID
EO
2
2
Connect the AAUUDDIIOO/VVIIDDEEOO jacks between TV andVCR. Match the jack colours (Video = yellow, Audio Left= white, and Audio Right = red)
Insert a video tape into the VCR and press PLAY onthe VCR. (Refer to the VCR owner’s manual.)
Select AAVV22 input source using the IINNPPUUTT button onthe remote control.If connected to AAVV IINN 11 input, select AAVV11 inputsource.
1
2
3
GG If you have a mono VCR, connect the audio cable from theVCR to the AAUUDDIIOO LL//MMOONNOO jack of the TV.
NOTE!
1
GG If both S-VIDEO and VIDEO sockets have been connected tothe S-VHS VCR simultaneously, only the S-VIDEO can bereceived.
NOTE!
AV IN 1 AV OUT
L/MONOR
AU
DIO
VID
EO
LR
AU
DIO
VID
EO
AV IN 1 AV OUT
L/MONOR
AU
DIO
VID
EO
LR
AU
DIO
VID
EO
2
L RS-VIDEOVIDEO
OUTPUTSWITCH
ANT IN
ANT OUT
2
Connecting with a S-Video cable
Connect the S-VIDEO output of the VCR to the SS --VVIIDDEEOO input on the TV set. The picture quality isimproved; compared to normal composite (RCA cable)input.
Connect the audio outputs of the VCR to the AAUUDDIIOO
input jacks on the TV.
Insert a video tape into the VCR and press PLAY on theVCR. (Refer to the VCR owner’s manual.)
Select AAVV22 input source with using the IINNPPUUTT button onthe remote control.
2
3
4
1
1 2

20
EXTERNAL EQUIPMENT SETUP
EX
TE
RN
AL E
QU
IPM
EN
T S
ET
UP
AV OUTPUT SETUP
The TV has a special signal output capability which allows you
to hook up the second TV or monitor.
Connect the second TV or monitor to the TV’s AAVV OOUUTT
jacks.
See the Operating Manual of the second TV or monitorfor further details regarding that device’s input settings.
GG Only Digital, Analogue mode can be used for AV out.Component, RGB, HDMI input sources cannot be used forAV out.
GG We recommend to use the AV OUT jacks for VCR recording.
NOTE!
2
1
AV OUTAV OUT
LR
AU
DIO
AU
DIO
VID
EO
VID
EO
1AV IN 1
L/MONOR
AU
DIO
VID
EO
L RVIDEO
1

21
EX
TE
RN
AL E
QU
IPM
EN
T S
ET
UP
DIGITAL AUDIO OUT SETUPSending the TV’s audio signal to external audio equipment via the Digital Audio Output (Optical) port.
GDo not look into the optical output port. Looking at thelaser beam may damage your vision.
CAUTION
AV IN 1V IN 1 AV OUT
L/L/MONOMONO
RA
UD
IOA
UD
IOV
IDE
OV
IDE
O
LR
AU
DIO
VID
EO
Connect one end of an optical cable to the TV DigitalAudio (Optical) Output port.
Connect the other end of the optical cable to thedigital audio (optical) input on the audio equipment.
Set the “TV Speaker option - Off ” in the AUDIOmenu.(Gpp..8844). Refer to the external audio equipmentinstruction manual for operation.
2
3
1
1
2
GG When connecting with external audio equipments, such asamplifiers or speakers, please turn the TV speakers off.
NOTE!

22
EXTERNAL EQUIPMENT SETUP
EX
TE
RN
AL E
QU
IPM
EN
T S
ET
UP
OTHER A/V SOURCE SETUP
Connect the AAUUDDIIOO/VVIIDDEEOO jacks between TV and external equipment. Match the jack colours .
(Video = yellow, Audio Left = white, and Audio Right = red)
Select AAVV22 input source with using the IINNPPUUTT button on the remote control.If connected to AAVV IINN 11 input, select AAVV11 input source.
Operate the corresponding external equipment.
Refer to external equipment operating guide.
L RVIDEO
2
Camcorder
Video Game Set
1
1
2
3

23
EX
TE
RN
AL E
QU
IPM
EN
T S
ET
UP
USB IN SETUP
2
Connect the USB device to the UUSSBB IINN jacks on the side of TV.
After connecting the UUSSBB IINN jacks, you use the UUSSBB function. (GG pp..5566)2
1
1
Except 42/50PG2***

24
EXTERNAL EQUIPMENT SETUP
EX
TE
RN
AL E
QU
IPM
EN
T S
ET
UP
PC SETUP
This TV provides Plug and Play capability, meaning that the PC adjusts automatically to the TV's settings.
Connecting with a D-sub 15 pin cable
AV IN 1 AV OUT
L/MONOR
AU
DIO
VID
EO
LR
AU
DIO
VID
EO
AUDIO RGB OUTPUT
AV IN 1 AV OUT
L/MONOR
AU
DIO
VID
EO
LR
AU
DIO
VID
EO
12
4
Connect the RGB output of the PC to the RRGGBB IINN((PPCC)) jack on the TV.
Connect the PC audio output to the AAUUDDIIOO IINN((RRGGBB//DDVVII)) jack on the TV.
Turn on the PC and the TV
Select RRGGBB input source using the INPUT button onthe remote control.
2
3
1
AV IN 1 AV OUT
L/MONOR
AU
DIO
VID
EO
LR
AU
DIO
VID
EO
AV IN 1 AV OUT
L/MONOR
AU
DIO
VID
EO
LR
AU
DIO
VID
EO
DVI-PC OUTPUT AUDIO
Connecting with a HDMI to DVI cable
1 2
4
Connect the DVI output of the PC to the HHDDMMII//DDVVIIIINN11 jack on the TV.
Connect the PC audio output to the AAUUDDIIOO IINN((RRGGBB//DDVVII)) jack on the TV.
Turn on the PC and the TV.
Select HHDDMMII11 input source using the INPUT buttonon the remote control.
2
3
1

25
EX
TE
RN
AL E
QU
IPM
EN
T S
ET
UP
Supported Display Resolution
RGB-PC, HDMI/DVI-PC mode
ResolutionHorizontal
Frequency(kHz)Vertical
Frequency(Hz)
HDMI/DVI-DTV mode
59.94
60
59.94
60
50.00
50.00
59.94
60
50.00
59.94
60
24.00
30
50.00
59.94
60
31.649
31.469
31.47
31.50
31.25
37.50
44.96
45.00
28.125
33.72
33.75
27.00
33.75
56.25
67.433
67.50
ResolutionHorizontal
Frequency(kHz)Vertical
Frequency(Hz)
640x480
720x480
720x576
1280x720
1920x1080
70.08
59.94
60.31
60.00
59.87
59.8
60.02
59.979
59.934
31.468
31.469
37.879
48.363
47.78
47.72
63.98
65.317
66.587
720x400
640x480
800x600
1024x768
1280x768
1360x768
1280x1024
1400x1050
1920x1080
(only 50/60PG3***, 50/60PG7***)

26
EXTERNAL EQUIPMENT SETUP
EX
TE
RN
AL E
QU
IPM
EN
T S
ET
UP
NOTE!
G To enjoy vivid picture and sound, connect a PC to
the TV.
G Avoid keeping a fixed image on the set’s screen for
prolonged periods of time. The fixed image may
become permanently imprinted on the screen; use
a screen saver when possible.
G Connect the PC to the RGB (PC) or HDMI IN (or
HDMI/DVI IN) port of the TV; change the resolu-
tion.
G There may be interference relating to resolution,
vertical pattern, contrast or brightness in PC mode.
Change the PC mode to another resolution or
change the refresh rate to another rate or adjust
the brightness and contrast on the menu until the
picture is clear.
If the refresh rate of the PC graphic card can not be
changed, change the PC graphic card or consult
the manufacturer of the PC graphic card.
G The synchronization input waveform for Horizontal
and Vertical frequencies are separate.
G Connect the signal cable from the monitor output
port of the PC to the RGB (PC) port of the TV or the
signal cable from the HDMI output port of the PC to
the HDMI IN (or HDMI/DVI IN) port on the TV.
G Connect the audio cable from the PC to the Audio
input on the TV. (Audio cables are not included
with the TV).
G If using a sound card, adjust PC sound as required.
G This TV uses a VESA Plug and Play Solution. The
TV provides EDID data to the PC system with a
DDC protocol. The PC adjusts automatically when
using this TV.
G DDC protocol is preset for RGB (Analogue RGB),
HDMI (Digital RGB) mode.
G If required, adjust the settings for Plug and Play
functionality
G If the graphic card on the PC does not output ana-
logue and digital RGB simultaneously, connect only
one of either RGB or HDMI IN (or HDMI/DVI IN)
to display the PC output on the TV.
G If graphic card on the PC does output analogue
and digital RGB simultaneously, set the TV to either
RGB or HDMI; (the other mode is set to Plug and
Play automatically by the TV.)
G DOS mode may not work depending on the video
card if you use a HDMI to DVI cable.
G If you use too long an RGB-PC cable, there may be
interference on the screen. We recommend using
under 5m of cable. This provides the best picture
quality.
G If connected HDMI(1080p, over 12bit) to HDMI
jack on the side, screen may abnormal.

27
EX
TE
RN
AL E
QU
IPM
EN
T S
ET
UP
1MENU
Screen Setup for PC mode
Returns Position, Size and Phase to the factory default settings.
This function works in the following mode : RGB[PC].
Screen Reset
Select PPIICCTTUURREE.
Select SSCCRREEEENN.
3Select RReesseett.
4
To Set
Auto Config.
SCREEN Move Prev.RETURN
Resolution
Position
Size
Phase
Reset G
OKMove
• Contrast 50
• Brightness 50
• Sharpness 50
• Colour 50
• Tint 0
• Advanced Control
• Picture Reset
Screen
PICTURE
E
Screen
2OK
OK
R G
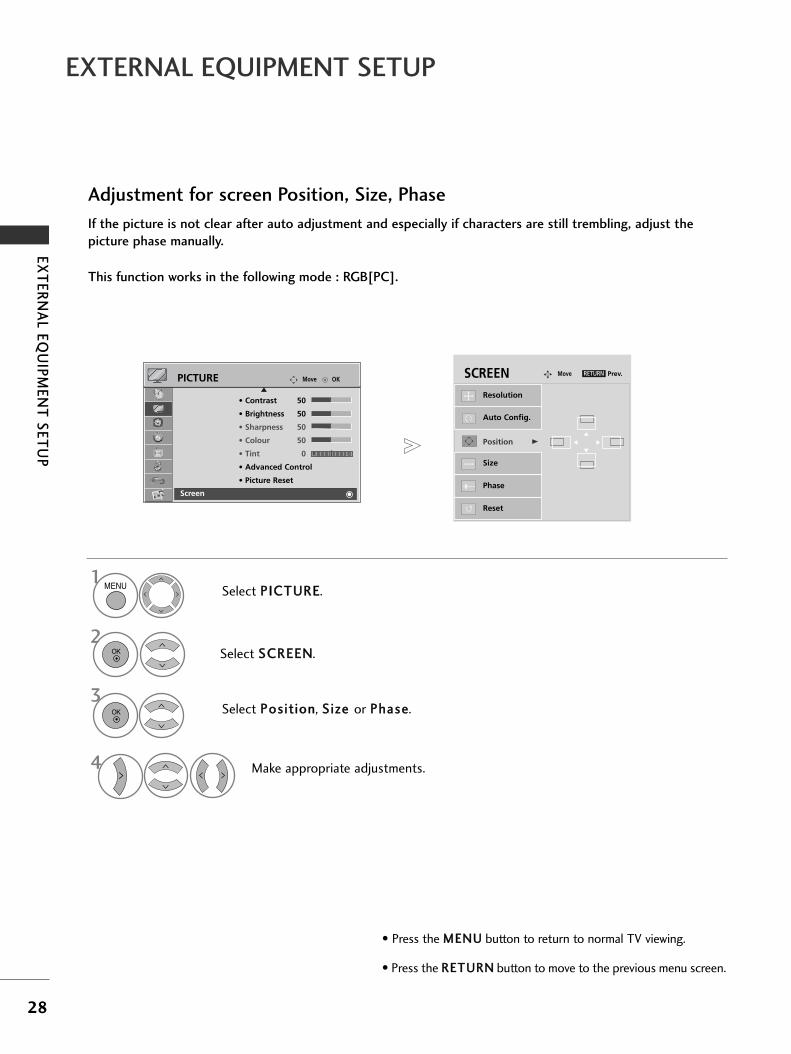
• Press the MMEENNUU button to return to normal TV viewing.
• Press the RREETTUURRNN button to move to the previous menu screen.
Yes No
OK Select YYeess.
5OK Run RReesseett.
28
EXTERNAL EQUIPMENT SETUP
EX
TE
RN
AL E
QU
IPM
EN
T S
ET
UP
If the picture is not clear after auto adjustment and especially if characters are still trembling, adjust the
picture phase manually.
This function works in the following mode : RGB[PC].
Adjustment for screen Position, Size, Phase
Select PPIICCTTUURREE.
Select SSCCRREEEENN.
Select PPoossiitt iioonn, SSiizzee or PPhhaassee.
Make appropriate adjustments.
Auto Config.
Resolution
Position G
Size
Phase
Reset
GF
D
E
OKMove
• Contrast 50
• Brightness 50
• Sharpness 50
• Colour 50
• Tint 0
• Advanced Control
• Picture Reset
Screen
PICTURE
E
Screen
SCREEN Move Prev.
1MENU
3
4
2OK
OK
R G
• Press the MMEENNUU button to return to normal TV viewing.
• Press the RREETTUURRNN button to move to the previous menu screen.
RETURN

29
EX
TE
RN
AL E
QU
IPM
EN
T S
ET
UP
To view a normal picture, match the resolution of RGB mode and selection of PC mode.
This function works in the following mode: RGB[PC]
Selecting Resolution
Select PPIICCTTUURREE.
Select SSCCRREEEENN.
Select RReessoolluuttiioonn.
Select the desired resolution.
1024 x 768
1280 x 768
1360 x 768Auto Config.
Resolution G
Position
Size
Phase
Reset
OKMove
• Contrast 50
• Brightness 50
• Sharpness 50
• Colour 50
• Tint 0
• Advanced Control
• Picture Reset
Screen
PICTURE
E
Screen
SCREEN Move Prev.
1MENU
3
4
2OK
OK
R G
• Press the MMEENNUU button to return to normal TV viewing.
• Press the RREETTUURRNN button to move to the previous menu screen.
RETURN

30
EXTERNAL EQUIPMENT SETUP
EX
TE
RN
AL E
QU
IPM
EN
T S
ET
UP
Automatically adjusts picture position and minimizes image instability. After adjustment, if the image is still
not correct, your TV is functioning properly but needs further adjustment.
AAuuttoo ccoonnffiigguurree
This function is for automatic adjustment of the screen position, clock, and phase The displayed image will
be unstable for a few seconds while the auto configuration is in progress.
Auto Configure (RGB [PC] mode only)
• If the position of the image is still not correct,try Auto adjustment again.
• If picture needs to be adjusted again after Autoadjustment in RGB (PC), you can adjust thePPoossiitt iioonn, SSiizzee or PPhhaassee.
Select PPIICCTTUURREE.
Select SSCCRREEEENN.
Select AAuuttoo CCoonnff iigg...
OKMove
• Contrast 50
• Brightness 50
• Sharpness 50
• Colour 50
• Tint 0
• Advanced Control
• Picture Reset
Screen
PICTURE
E
Screen
Auto Config. G
Resolution
Position
Size
Phase
Reset
SCREEN Move Prev.
To Set
1MENU
3
2OK
OK
R G
• Press the MMEENNUU button to return to normal TV viewing.
• Press the RREETTUURRNN button to move to the previous menu screen.
RETURN
Yes No
4OK Select YYeess.
5OK Run AAuuttoo CCoonnff iigg...

31
EX
TE
RN
AL E
QU
IPM
EN
T S
ET
UP
Initializing (Reset to original factory settings)
This function operates in current mode.To initialize the adjusted value.
When the LLoocckk SSyysstteemm menu is “OOnn”, the message to enter the password appears.
• In LLoocckk SSyysstteemm ”OO nn”, if you forget your password,press ‘7’, ‘7’, ‘7’, ‘7’ on the remote control handset.
Select OOPPTTIIOONN.
Select FFaaccttoorryy RReesseett.
1MENU
3
2OK
OK
• Press the MMEENNUU button to return to normal TV viewing.
• Press the RREETTUURRNN button to move to the previous menu screen.
OKMove
Subtitle : On
Input Label
SIMPLINK : On
Key Lock : Off
Set ID : 1
ISM Method : Normal
Power Saving : Level 0
Factory Reset
OPTION
Factory Reset
OKMove
Subtitle : On
Input Label
SIMPLINK : Off
Key Lock : Off
Set ID : 1
ISM Method
Power Saving
Factory Reset
OPTION
Factory Reset
Enter Password
Close
* * * *

32
WA
TC
HIN
G T
V / P
RO
GR
AM
ME
CO
NT
RO
L
WATCHING TV / PROGRAMME CONTROL
REMOTE CONTROL KEY FUNCTIONSWhen using the remote control, aim it at the remote control sensor on the TV.
RATIO
RATIO
POWER
INPUT
TV/RAD
Selects your desired picture format.
See a list of AV devices connected to TV.When you toggle this button, the Simplink menu appearsat the screen.
Switches the TV on from standby or off to standby.
External input mode rotate in regular sequence.Switches the TV on from standby.
Selects Radio, TV and DTV channel.
Q. MENU
MENU
GUIDE
Select the desired quick menu source.
Selects a menu.Clears all on-screen displays and returns to TV viewingfrom any menu.
Shows programme schedule.
THUMBSTICK(Up/Down/Left
Right)
OK
Allows you to navigate the on-screen menus and adjustthe system settings to your preference.
Accepts your selection or displays the current mode.
RETURN(EXIT)
INFO i
AV MODE
Allows the user to move return one step in an interac-tive application, EPG or other user interaction function.
Shows the present screen information.
It helps you select and set images and sounds whenconnecting AV devices.
Coloured buttons
These buttons are used for teletext (on TTEELLEETTEEXXTT
models only) , PPrrooggrraammmmee eeddiitt.
TELETEXTBUTTONS
SUBTITLE
These buttons are used for teletext.
For further details, see the ‘Teletext’ section.
Recalls your preferred subtitle in digital mode.
1
1

33
WA
TC
HIN
G T
V / P
RO
GR
AM
ME
CO
NT
RO
L
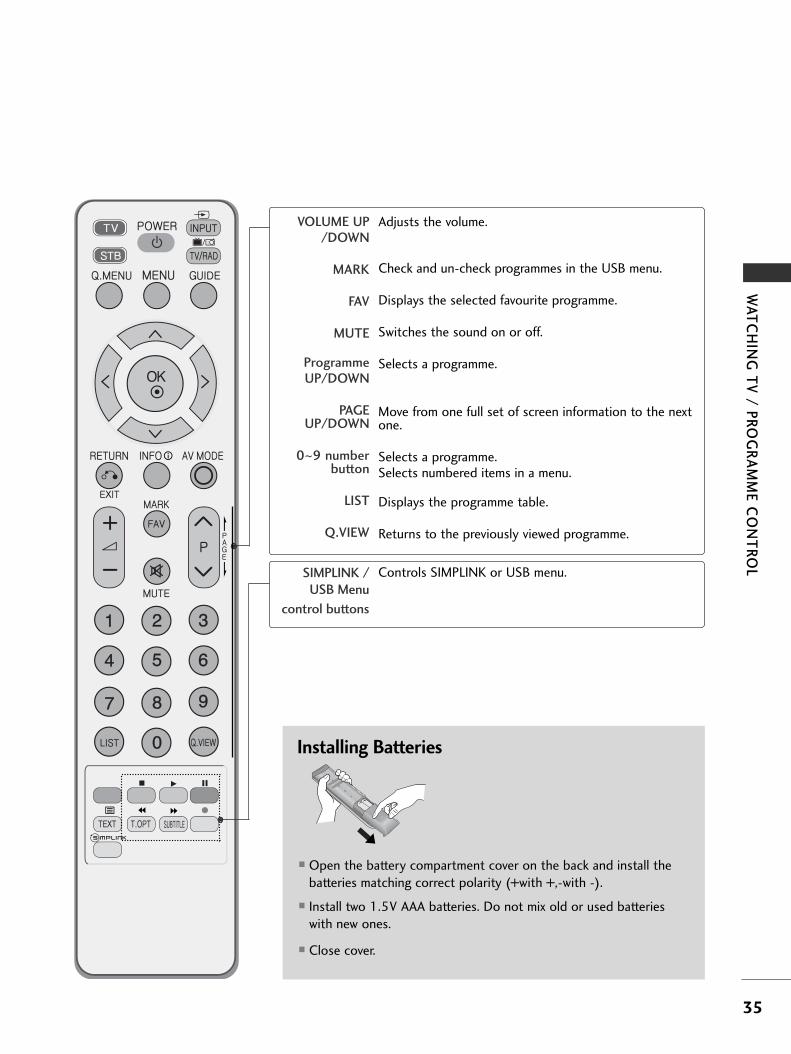
RATIO VOLUME UP/DOWN
MARK
FAV
MUTE
ProgrammeUP/DOWN
PAGEUP/DOWN
0~9 numberbutton
LIST
Q.VIEW
Adjusts the volume.
Check and un-check programmes in the USB menu.
Displays the selected favourite programme.
Switches the sound on or off.
Selects a programme.
Move from one full set of screen information to the nextone.
Selects a programme.Selects numbered items in a menu.
Displays the programme table.
Returns to the previously viewed programme.
Installing Batteries
� Open the battery compartment cover on the back and install thebatteries matching correct polarity (+with +,-with -).
� Install two 1.5V AAA batteries. Do not mix old or used batterieswith new ones.
� Close cover.
SIMPLINK /USB Menu
control buttons
Controls SIMPLINK or USB menu.

34
WATCHING TV / PROGRAMME CONTROL
WA
TC
HIN
G T
V / P
RO
GR
AM
ME
CO
NT
RO
L
REMOTE CONTROL KEY FUNCTIONSWhen using the remote control, aim it at the remote control sensor on the TV.
MODE
POWER
INPUT
TV/RAD
Selects the remote operating modes.
Switches the TV on from standby or off to standby.
External input mode rotate in regular sequence.Switches the TV on from standby.
Selects Radio, TV and DTV channel.
Q. MENU
MENU
GUIDE
Select the desired quick menu source.
Selects a menu.Clears all on-screen displays and returns to TV viewingfrom any menu.
Shows programme schedule.
THUMBSTICK(Up/Down/Left
Right)
OK
Allows you to navigate the on-screen menus and adjustthe system settings to your preference.
Accepts your selection or displays the current mode.
RETURN(EXIT)
INFO i
AV MODE
Allows the user to move return one step in an interac-tive application, EPG or other user interaction function.
Shows the present screen information.
It helps you select and set images and sounds whenconnecting AV devices.
Coloured buttons
These buttons are used for teletext (on TTEELLEETTEEXXTT
models only) , PPrrooggrraammmmee eeddiitt.
TELETEXTBUTTONS
SUBTITLE
These buttons are used for teletext.
For further details, see the ‘Teletext’ section.
Recalls your preferred subtitle in digital mode.
See a list of AV devices connected to TV.When you toggle this button, the Simplink menu appearsat the screen.
1
1
22
35
WA
TC
HIN
G T
V / P
RO
GR
AM
ME
CO
NT
RO
L
VOLUME UP/DOWN
MARK
FAV
MUTE
ProgrammeUP/DOWN
PAGEUP/DOWN
0~9 numberbutton
LIST
Q.VIEW
Adjusts the volume.
Check and un-check programmes in the USB menu.
Displays the selected favourite programme.
Switches the sound on or off.
Selects a programme.
Move from one full set of screen information to the nextone.
Selects a programme.Selects numbered items in a menu.
Displays the programme table.
Returns to the previously viewed programme.
Installing Batteries
� Open the battery compartment cover on the back and install thebatteries matching correct polarity (+with +,-with -).
� Install two 1.5V AAA batteries. Do not mix old or used batterieswith new ones.
� Close cover.
SIMPLINK /USB Menu
control buttons
Controls SIMPLINK or USB menu.
36
WATCHING TV / PROGRAMME CONTROL
WA
TC
HIN
G T
V / P
RO
GR
AM
ME
CO
NT
RO
L
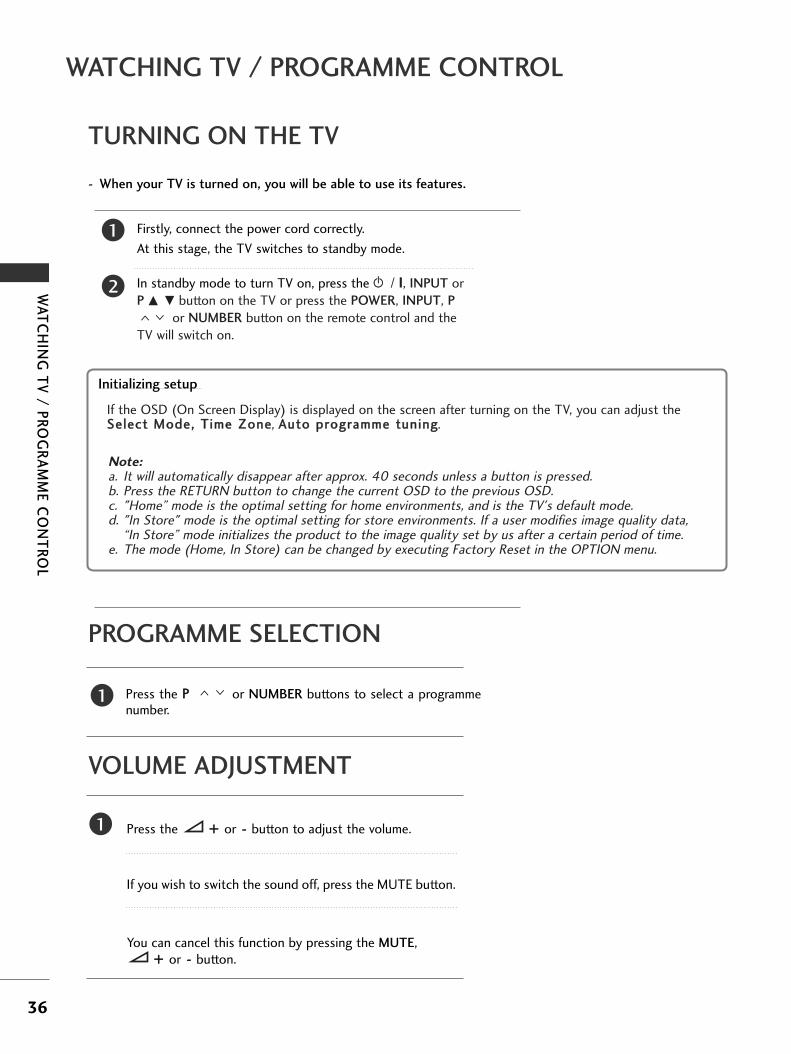
TURNING ON THE TV
Firstly, connect the power cord correctly.
At this stage, the TV switches to standby mode.
In standby mode to turn TV on, press the rr / I, INPUT orP D E button on the TV or press the POWER, INPUT, P
or NUMBER button on the remote control and theTV will switch on.
2
1
- When your TV is turned on, you will be able to use its features.
PROGRAMME SELECTION
Press the PP or NUMBER buttons to select a programmenumber.
1
VOLUME ADJUSTMENT
Press the ++ or -- button to adjust the volume.
If you wish to switch the sound off, press the MUTE button.
You can cancel this function by pressing the MUTE, ++ or -- button.
1
Initializing setup
Note: a. It will automatically disappear after approx. 40 seconds unless a button is pressed.b. Press the RETURN button to change the current OSD to the previous OSD.c. "Home” mode is the optimal setting for home environments, and is the TV's default mode.d. "In Store" mode is the optimal setting for store environments. If a user modifies image quality data,
“In Store” mode initializes the product to the image quality set by us after a certain period of time.e. The mode (Home, In Store) can be changed by executing Factory Reset in the OPTION menu.
If the OSD (On Screen Display) is displayed on the screen after turning on the TV, you can adjust theSSeelleecctt MMooddee,, TTiimmee ZZoonnee, AAuuttoo pprrooggrraammmmee ttuunniinngg.

37
WA
TC
HIN
G T
V / P
RO
GR
AM
ME
CO
NT
RO
L
• AAssppeecctt RRaattiioo: Selects your desired picture format.For Zoom Setting, select 14:9, Zoom1 and Zoom2 inRatio Menu. After completing Zoom Setting, the dis-play goes back to Q.Menu.
• PPoowweerr SSaavviinngg: Adjusts screen brightness to reducethe power consumption of the TV.
• CClleeaarr VVooiiccee : By differentiating the human soundrange from others, it helps users listen to humanvoices better.
• PPiiccttuurree MMooddee : Selects your desired Picture Mode.
• SSoouunndd MMooddee : It is a feature to automatically set thesound combination which it deems the best for theimages being watched. Selects your desired SoundMode.
• AAuuddiioo : Selects the sound output.• SSlleeeepp TTiimmeerr : Sets the sleep timer.• UUSSBB EEjjeecctt : Select “USB Eject” in order to eject USB
device.(except 42/50PG2***)
QUICK MENU
Display each menu.
Select your desired Source.
Your TV's OSD (On Screen Display) may differ slightly from that shown in this manual.
Q.Menu (Quick Menu) is a menu of features which users might use frequently.
1Q. MENU
3
2OK
OK
• Press the QQ..MMEENNUU button to return to normal TV viewing.
• Press the RREETTUURRNN button to move to the previous menu screen.
or
Q.Menu
Close
FF 0 GG
16:9
Zoom Setting
Standard
on
Standard
MONO
Off
Aspect Ratio
Power Saving
Clear Voice
Picture Mode
Sound Mode
Audio
Sleep Timer
USB Eject Eject
Q.Menu
Close
FF 0 GG
16:9
Zoom Setting
Standard
on
Standard
MONO
Off
Aspect Ratio
Power Saving
Clear Voice
Picture Mode
Sound Mode
Audio
Sleep Timer
Only 42/50PG2***
38
WATCHING TV / PROGRAMME CONTROL
WA
TC
HIN
G T
V / P
RO
GR
AM
ME
CO
NT
RO
L
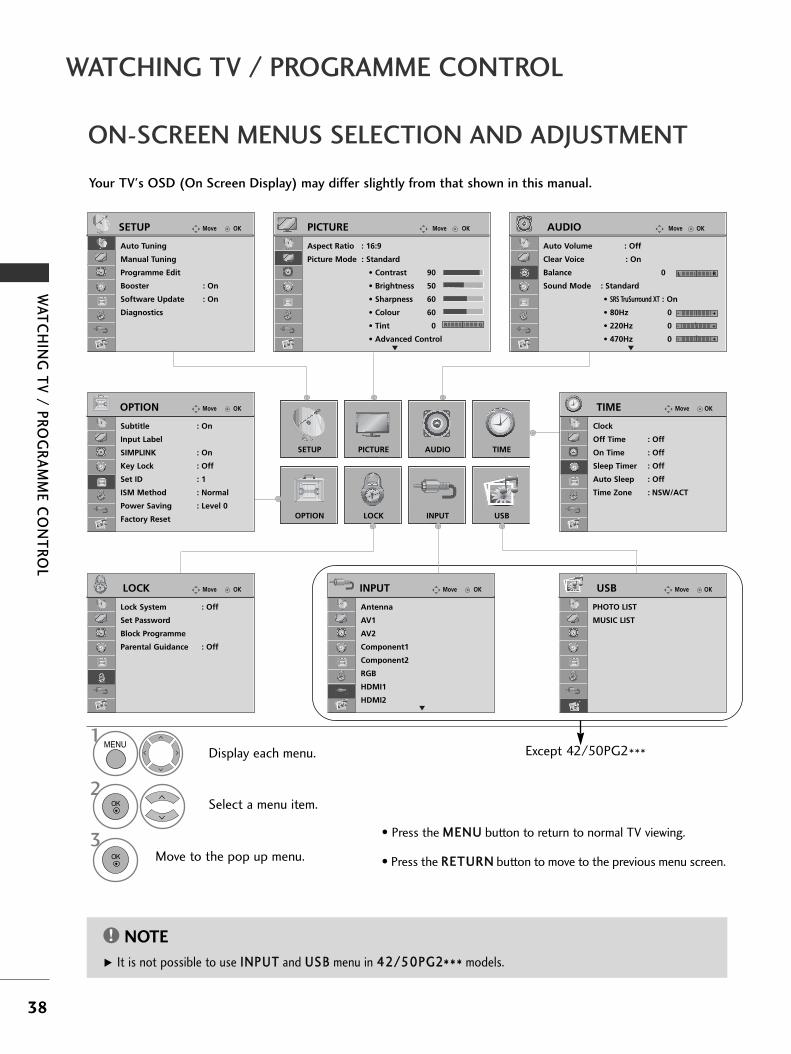
ON-SCREEN MENUS SELECTION AND ADJUSTMENT
Your TV's OSD (On Screen Display) may differ slightly from that shown in this manual.
OKMove
Auto Tuning
Manual Tuning
Programme Edit
Booster : On
Software Update : On
Diagnostics
SETUP
SETUP
OPTION
PICTURE
LOCK
AUDIO
INPUT
TIME
USB
OKMove
Aspect Ratio : 16:9
Picture Mode : Standard
• Contrast 90
• Brightness 50
• Sharpness 60
• Colour 60
• Tint 0
• Advanced Control
PICTURE
E
OKMove
Auto Volume : Off
Clear Voice : On
Balance 0
Sound Mode : Standard
• SRS TruSurround XT : On
• 80Hz 0
• 220Hz 0
• 470Hz 0
AUDIO
E
L R
- +
- +
- +
OKMove
Clock
Off Time : Off
On Time : Off
Sleep Timer : Off
Auto Sleep : Off
Time Zone : NSW/ACT
TIME
OKMove
PHOTO LIST
MUSIC LIST
USBOKMove
Antenna
AV1
AV2
Component1
Component2
RGB
HDMI1
HDMI2
INPUT
E
OKMove
Lock System : Off
Set Password
Block Programme
Parental Guidance : Off
LOCK
OKMove
Subtitle : On
Input Label
SIMPLINK : On
Key Lock : Off
Set ID : 1
ISM Method : Normal
Power Saving : Level 0
Factory Reset
OPTION
NOTE!
G It is not possible to use IINNPPUUTT and UUSSBB menu in 4422//5500PPGG22****** models.
Display each menu.
Select a menu item.
Move to the pop up menu.
1MENU
3
2OK
OK
• Press the MMEENNUU button to return to normal TV viewing.
• Press the RREETTUURRNN button to move to the previous menu screen.
Except 42/50PG2***
R G

39
WA
TC
HIN
G T
V / P
RO
GR
AM
ME
CO
NT
RO
L
AUTO PROGRAMME TUNING
Use this to automatically find and store all available programmes.
When you start auto programming, all previously stored service information will be deleted.
• Use NUMBER buttons to input a 4-digit pass-word in LLoocckk SSyysstteemm ‘OO nn’.
• If you wish to keep on auto tuning select YYEESS
using the button. Then, press the OK but-ton. Otherwise select NN OO.
Select SSEETTUUPP.
Select AAuuttoo TTuunniinngg.
Select YYeess.
Run AAuuttoo ttuunniinngg.
OKMove
Auto Tuning
Manual Tuning
Programme Edit
Booster : On
Software Update : On
Diagnostics
SETUP
Auto Tuning
OKMove
Auto Tuning
Manual Tuning
Programme Edit
Booster : On
Software Update : On
Diagnostics
SETUP
Auto Tuning
All service-information will be updated. Continue?
Yes No
1MENU
3
2OK
OK
4OK
• Press the MMEENNUU button to return to normal TV viewing.
• Press the RREETTUURRNN button to move to the previous menu screen.

40
WATCHING TV / PROGRAMME CONTROL
WA
TC
HIN
G T
V / P
RO
GR
AM
ME
CO
NT
RO
L
MANUAL PROGRAMME TUNING (IN DIGITAL MODE)
Manual Tuning lets you manually add a programme to your programme list.
• Use NUMBER buttons to input a 4-digit pass-word in LLoocckk SSyysstteemm ‘OO nn’.
Select SSEETTUUPP.
Select MMaannuuaall TTuunniinngg.
Select DDTTVV.
Select the desired channel number.
OKMove
Auto Tuning
Manual Tuning
Programme Edit
Booster : On
Software Update : On
Diagnostics
SETUP
Manual Tuning
OKMove
Auto Tuning
Manual Tuning
Programme Edit
Booster : On
Software Update : On
Diagnostics
SETUP
Manual Tuning
Your receiver will add thischannel to your channel list.
VHF CH.
Bad Normal Good
FF DTV GG
8
Close
Update
1MENU
3
4
2OK
OK
• Press the MMEENNUU button to return to normal TV viewing.
• Press the RREETTUURRNN button to move to the previous menu screen.

41
WA
TC
HIN
G T
V / P
RO
GR
AM
ME
CO
NT
RO
L
MANUAL PROGRAMME TUNING (IN ANALOGUE MODE)
Manual Tuning lets you manually tune and arrange the stations in whatever order you desire.
• Use NUMBER buttons to input a 4-digit password in LLoocckk SSyysstteemm ‘OO nn’.• To store another channel, repeat steps 4 to 9.
Select SSEETTUUPP.
Select MMaannuuaall TTuunniinngg.
Select TT VV.
Select the desired pro-gramme number on.
Select VV//UUHHFF or CCaabbllee.
Commence searching.
Select the desiredchannel number.or
OKMove
Auto Tuning
Manual Tuning
Programme Edit
Booster : On
Software Update : On
Diagnostics
SETUP
Manual Tuning
OKMove
Auto Tuning
Manual Tuning
Programme Edit
Booster : On
Software Update : On
Diagnostics
SETUP
Manual Tuning
Storage
FF TV GG
3
Band V/UHF
Channel
Fine FF GG
FF GGSearch
0
Name C 02
Close
Store
Select SSttoorree1
4 5 6
7 8
0
9
2 3
1MENU
3
4
2OK
OK
or
5
6
7
1
4 5 6
7 8
0
9
2 3
8OK
• Press the MMEENNUU button to return to normal TV viewing.
• Press the RREETTUURRNN button to move to the previous menu screen.

42
WATCHING TV / PROGRAMME CONTROL
WA
TC
HIN
G T
V / P
RO
GR
AM
ME
CO
NT
RO
L
Normally fine tuning is only necessary if reception is poor.
A Fine Tuning
Select TT VV.
Select FF iinnee.
You can assign a station name with five characters to each programme number.
A Assigning a station name
Select SSEETTUUPP.
Select MMaannuuaall TTuunniinngg.
Select TT VV.
Select NNaammee.
6
Select SSEETTUUPP.
Select MMaannuuaall TTuunniinngg.
OKMove
Auto Tuning
Manual Tuning
Programme Edit
Booster : On
Software Update : On
Diagnostics
SETUP
Manual Tuning
OKMove
Auto Tuning
Manual Tuning
Programme Edit
Booster : On
Software Update : On
Diagnostics
SETUP
Manual Tuning
Storage
FF TV GG
3
Band V/UHF
Channel
Fine FF GG
FF GGSearch
0
Name C 02
Close
Store
7
Select CClloossee..
Select SSttoorree6
Fine tune for the best picture andsound.
1MENU
3
2OK
OK
4
1MENU
3
2OK
OK
4
5
OK
5 Select the position and makeyour choice of the second char-acter, and so on.You can use an the alphabet AAto ZZ, the number 00 to 99, +/ -,and blank.
OK
OK
OK
• Press the MMEENNUU button to return to normal TV viewing.
• Press the RREETTUURRNN button to move to the previous menu screen.
OK
Select SSttoorree..
43
WA
TC
HIN
G T
V / P
RO
GR
AM
ME
CO
NT
RO
L
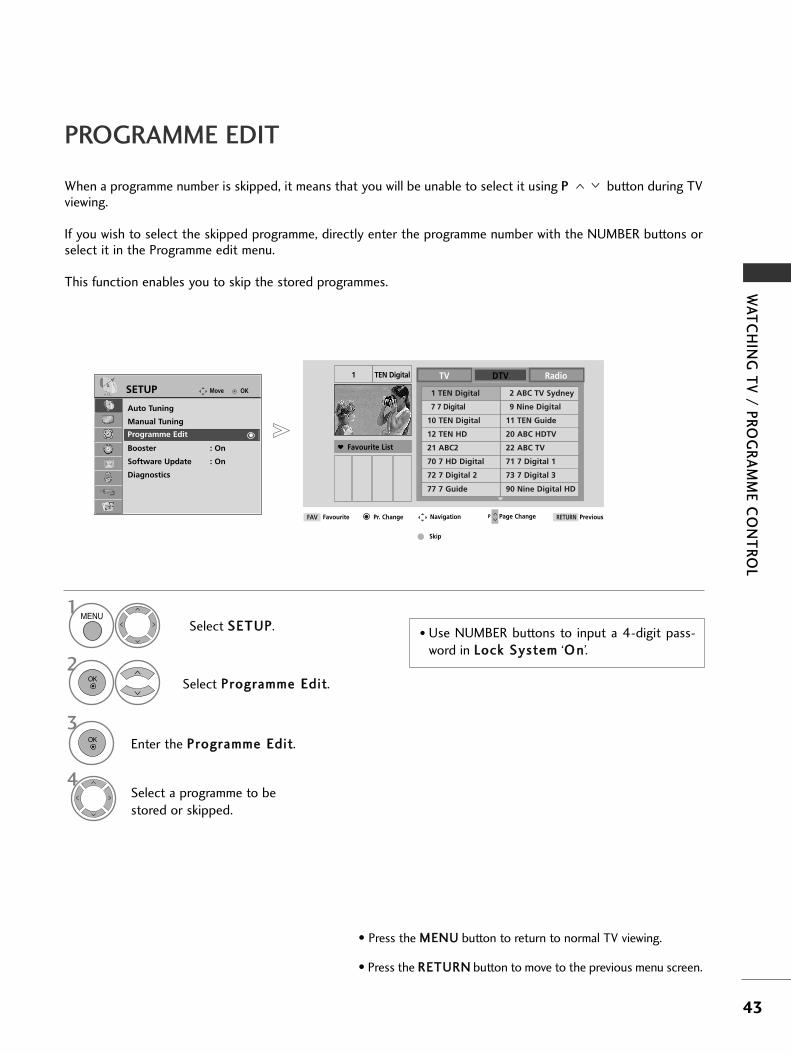
PROGRAMME EDIT
When a programme number is skipped, it means that you will be unable to select it using P button during TVviewing.
If you wish to select the skipped programme, directly enter the programme number with the NUMBER buttons orselect it in the Programme edit menu.
This function enables you to skip the stored programmes.
• Use NUMBER buttons to input a 4-digit pass-word in LLoocckk SSyysstteemm ‘OO nn’.
Select SSEETTUUPP.
Select PPrrooggrraammmmee EEddiitt.
Enter the PPrrooggrraammmmee EEddiitt.
Select a programme to bestored or skipped.
1MENU
3
2OK
OK
4
• Press the MMEENNUU button to return to normal TV viewing.
• Press the RREETTUURRNN button to move to the previous menu screen.
TEN Digital1
Favourite List
Favourite Pr. Change Page ChangeP
TV DTV Radio
1 TEN Digital 2 ABC TV Sydney
7 7 Digital 9 Nine Digital
10 TEN Digital 11 TEN Guide
12 TEN HD 20 ABC HDTV
21 ABC2 22 ABC TV
70 7 HD Digital 71 7 Digital 1
72 7 Digital 2 73 7 Digital 3
77 7 Guide 90 Nine Digital HDE
FAV Navigation PreviousRETURN
Skip
OKMove
Auto Tuning
Manual Tuning
Programme Edit
Booster : On
Software Update : On
Diagnostics
SETUP
Programme Edit

44
WATCHING TV / PROGRAMME CONTROL
WA
TC
HIN
G T
V / P
RO
GR
AM
ME
CO
NT
RO
L
A Skipping a programme number
Select a programme number to be skipped.
2BLUEBLUE Turn the skipped programme number to blue.
3BLUEBLUE Release the skipped programme.
1
• When programmes are to be skipped, skippedprogramme shows in blue and these pro-grammes will not be selected by the PP
buttons during TV viewing.• If you wish to select a skipped programme, directly
enter the programme number with the NUMBER but-
tons or select it in the programme edit or EPG.
A Selecting favourite programme
Select your favourite pro-gramme number.
1FAV
MARK • This will automatically include the selected pro-gramme into your favourite programme list.
(IN DTV/RADIO MODE)

45
WA
TC
HIN
G T
V / P
RO
GR
AM
ME
CO
NT
RO
L
This function enables you to delete or skip the stored programmes.You can also move some channels and use other programme numbers.
A Selecting a Favourite Programme
Select your favourite pro-gramme number.
1• The selected programme will be added to the
favourite programme list.
(IN TV MODE)
A Deleting a programme
Select a programme number to be Deleted.
2REDRED Turn the deleted programme number to red.
3REDRED Release the deleted programme.
1
A Skipping a programme number
Select a programme number to be skipped.
2BLUEBLUE Turn the skipped programme number to blue.
3BLUEBLUE Release the skipped programme.
1
• The selected programme is deleted, all the fol-lowing programmes are shifted up one
A Moving a programme
Select a programme number to be moved.
Turn the moved programme number to YELLOW.
3YELLYELLOOWW Release the moved programme.
1
• When a programme number is skipped it meansthat you will be unable to select it using the PR
button during normal TV viewing. • If you wish to select a skipped programme, directly
enter the programme number with the NUMBER but-
tons or select it in the programme edit or EPG.
2YELLYELLOOWW
FAV
MARK

46
WATCHING TV / PROGRAMME CONTROL
WA
TC
HIN
G T
V / P
RO
GR
AM
ME
CO
NT
RO
L
BOOSTER
If reception is poor select Booster to On.When the signal is strong, select “Off”.
Select SSEETTUUPP.
Select BBoooosstteerr.
Select OOnn or OOff ff.
Save.
OKMove
Auto Tuning
Manual Tuning
Programme Edit
Booster : On
Software Update : On
Diagnostics
SETUP
Booster : On
OKMove
Auto Tuning
Manual Tuning
Programme Edit
Booster : On
Software Update : On
Diagnostics
SETUP
Booster : OnOff
OnOn
1MENU
3
2OK
OK
4OK
• Press the MMEENNUU button to return to normal TV viewing.
• Press the RREETTUURRNN button to move to the previous menu screen.

47
WA
TC
HIN
G T
V / P
RO
GR
AM
ME
CO
NT
RO
L
SOFTWARE UPDATE
Software Update means software can be downloaded through the digital terrestrial broadcasting system.
* When setting “Software Update”
Occasionally, a transmission ofupdated digital software infor-mation will result in the followingmenu on the TV screen.
After the Software Update iscomplete, the System restarts.
- During Progress of a Software Update, please note the following:• Power to the TV must not be interrupted.• The TV must not be switched off. • The antenna must not be disconnected. • After Software Update, you can confirm the updated software version in Diagnostics menu.
Select SSEETTUUPP.
Select SSooffttwwaarree UUppddaattee.
Select OOnn or OOff ff.• If you select OO nn, a user con-
firm message box will be dis-played to notify that new soft-ware is found.
Save.
OKMove
Auto Tuning
Manual Tuning
Programme Edit
Booster : On
Software Update : On
Diagnostics
SETUP
Software Update : On
OKMove
Auto Tuning
Manual Tuning
Programme Edit
Booster : On
Software Update : On
Diagnostics
SETUP
Software Update : OnOff
OnOn
1MENU
2OK
3OK
4OK
Select the YYEESS using the button and you will see the follow-ing picture.
When the Software Updatemenu is “OOff ff”, the message tochange it to “OO nn” appears.
When the power is turned off, downloading starts. When the power is turned on while updating, the progress status is displayed.

48
WATCHING TV / PROGRAMME CONTROL
WA
TC
HIN
G T
V / P
RO
GR
AM
ME
CO
NT
RO
L
DIAGNOSTICS
This function enables you to view information on the Manufacturer, Model/Type and Software Version.
This displays the information and signal strength of the tuned MUX.This displays the signal information and service name of the selected MUX.
Select SSEETTUUPP.
Select DDiiaaggnnoossttiiccss.
Display the information of Channel.
Display Manufacturer, Model/Type and Software Version.
OKMove
Auto Tuning
Manual Tuning
Programme Edit
Booster : On
Software Update : On
Diagnostics
SETUP
Diagnostics
1MENU
3
2OK
OK
4OK
Engineering DiagnosticsManufacturer : LG Electronics Inc.Model/Type : 42PG60UDSoftware Version : V1.10.00
Popup
Ch 9A
Ch 43
Prev.RETURN ExitMENU
Ch 8
E
D
• Press the MMEENNUU button to return to normal TV viewing.
• Press the RREETTUURRNN button to move to the previous menu screen.

49
WA
TC
HIN
G T
V / P
RO
GR
AM
ME
CO
NT
RO
L
SELECTING THE PROGRAMME TABLE
You can check which programmes are stored in the memory by displaying the programme table.
Displayed when theLocked Programme.
Mini Glossary
Display the PROGRAMME LIST.
Select a programme.
2Switch to the chosen programme number.
1LIST
A Displaying programme LIST
A Selecting a programme in the programme list
• You may find some blue programmes. Thesehave been set up to be skipped by auto pro-gramming or in the programme edit mode.
• Some programmes with the channel numbershown in the programme LIST indicate there isno station name assigned.
Turn the pages.2
Return to normal TV viewing.
A Paging through a programme list
1Display the Favourite Programme table.
A Displaying the favourite programme table
Programme List
1 TEN Digital
9 Nine Digital
10 TEN Digital
ExitRETURN
1
1
OK
PPAGE
FAV
MARK
From the programme you are current-ly watching, the mode will changefrom TV to DTV to Radio.
TV/RAD
LIST
50
WATCHING TV / PROGRAMME CONTROL
WA
TC
HIN
G T
V / P
RO
GR
AM
ME
CO
NT
RO
L
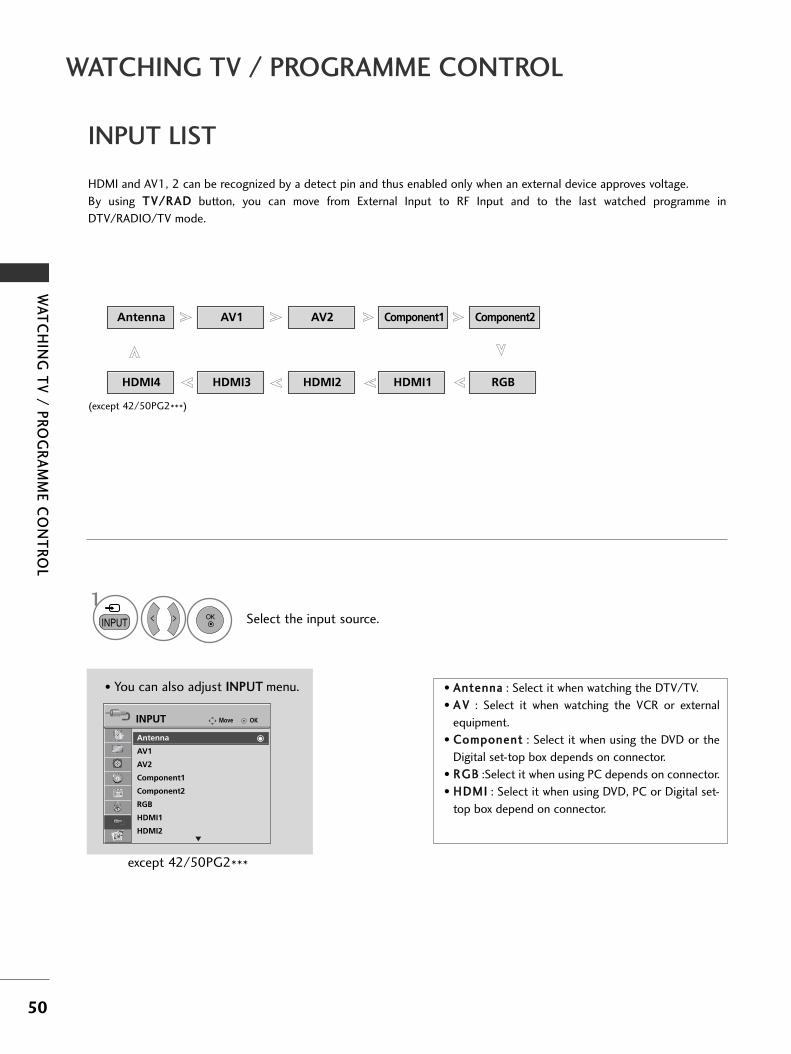
INPUT LIST
HDMI and AV1, 2 can be recognized by a detect pin and thus enabled only when an external device approves voltage.
By using TTVV//RRAADD button, you can move from External Input to RF Input and to the last watched programme in
DTV/RADIO/TV mode.
Antenna AV1 AV2 Component1 Component2
HDMI4 HDMI3 HDMI2 HDMI1 RGB
(except 42/50PG2***)
Select the input source.1
INPUT
• AAnntteennnnaa : Select it when watching the DTV/TV.
• AA VV : Select it when watching the VCR or external
equipment.
• CCoommppoonneenntt : Select it when using the DVD or the
Digital set-top box depends on connector.
• RRGGBB :Select it when using PC depends on connector.
• HHDDMMII : Select it when using DVD, PC or Digital set-
top box depend on connector.
OK
OKMove
Antenna
AV1
AV2
Component1
Component2
RGB
HDMI1
HDMI2
INPUT
E
Antenna
• You can also adjust IINNPPUUTT menu.
except 42/50PG2***

51
WA
TC
HIN
G T
V / P
RO
GR
AM
ME
CO
NT
RO
L
This function operates only with devices with the SIMPLINK logo.
Please check the SIMPLINK logo.
The product might not function properly when using it with other products with HDMI-CEC function.
This allows you to control and play other AV devices connected to the display through HDMI cable
without additional cables and settings.
If you do not want SIMPLINK menu, select “OOff ff”.
SIMPLINK function is not supported by HDMI IN 3(only 42/50PG2***) and HDMI IN 4(only50/60PG3***, 42/50PG6***, 50/60PG7***) input.
Select OOPPTTIIOONN.
Select SSIIMMPPLLIINNKK.
Select OOnn or OOff ff.
Save.
1MENU
3
2OK
OK
4OK
• Press the MMEENNUU button to return to normal TV viewing.
• Press the RREETTUURRNN button to move to the previous menu screen.
OKMove
Subtitle : On
Input Label
SIMPLINK : On
Key Lock : Off
Set ID : 1
ISM Method : Normal
Power Saving : Level 0
Factory Reset
OPTION
SIMPLINK : On
OKMove
Subtitle : On
Input Label
SIMPLINK : On
Key Lock : Off
Set ID : 1
ISM Method : Normal
Power Saving : Level 0
Factory Reset
OPTION
Off
OnOnSIMPLINK : On

52
WATCHING TV / PROGRAMME CONTROL
WA
TC
HIN
G T
V / P
RO
GR
AM
ME
CO
NT
RO
L
DDiisscc ppllaayybbaacckkControl connected AV devices by pressing the , OK, G, A, ll ll, FF and GG buttons.(The Ô button does not pro-vide such functions.)
DDiirreecctt PPllaayy After connecting AV devices to the TV, you can directly control the devices and play media without additional settings.
SSeelleecctt AAVV ddeevviicceeEnables you to select one of the AV devices connected to the TV and operate it.
PPoowweerr ooffff aallll ddeevviicceessWhen you switch off the TV, all connected devices are turned off.
SSwwiittcchh aauuddiioo--oouutt Offers an easy way to switch audio-out.
SSyynncc PPoowweerr oonnWhen you play the connected AV device, TV will automatically turn on.
** A device, which is connected to the TV through a HDMI cable but does not support SIMPLINK, does not provide this function.
SIMPLINK Functions
Selected Device
When no device is connect-ed (displayed in gray)
When a device is connected(displayed in bright colour)
1
2
3
4
5
SIMPLINK Menu
Press the button and then OK button to select the desired SIMPLINK source.
TTVV vviieewwiinngg :: Switch to the previous TV programmeregardless of the current mode.
DDIISSCC ppllaayybbaacckk :: Select and play connected discs.
When multiple discs are available, the titles of discs areconveniently displayed at the bottom of the screen.
VVCCRR ppllaayybbaacckk :: Play and control the connectedVCR.
HHDDDD RReeccoorrddiinnggss ppllaayybbaacckk :: Play and controlrecordings stored in HDD.
AAuuddiioo OOuutt ttoo HHoommee tthheeaattrree//AAuuddiioo OOuutt ttoo TTVV::
Select Home theatre or TV speaker for Audio Out.
1
2
3
4
5
• HHoommee tthheeaattrree: Only one supported at a time• DDVVDD,, RReeccoorrddeerr: Up to three supported at a time• VVCCRR: Only one supported at a time
OKF G Change Device

53
WA
TC
HIN
G T
V / P
RO
GR
AM
ME
CO
NT
RO
L
NOTE!
GG Connect the HDMI/DVI IN or HDMI IN terminal of the TV to the rear terminal (HDMI terminal) of the SIMPLINKdevice with the HDMI cable.
GG After connecting the HDMI terminal for the home theatre with the SIMPLINK function using the above method,connect the DIGITAL AUDIO OUT terminal on the back of the TV to the DIGITAL AUDIO IN terminal on the backof the SIMPLINK device with the OPTICAL cable.
GG When operating an external device with SIMPLINK, press the TV button from the MODE buttons on the remotecontrol.
GG When you switch the Input source using the INPUT button on the remote control, you can stop the operation of adevice controlled by SIMPLINK
GG When you select or operate a media device with home theatre function, the speaker automatically switches tohome theatre speaker (HT speaker).

54
WATCHING TV / PROGRAMME CONTROL
WA
TC
HIN
G T
V / P
RO
GR
AM
ME
CO
NT
RO
L
INPUT LABEL
Selects a label for each input source.
Select OOPPTTIIOONN.
Select IInnppuutt LLaabbeell.
Select the source.
Select the label.
1MENU
3
2OK
OK
4
• Press the MMEENNUU button to return to normal TV viewing.
• Press the RREETTUURRNN button to move to the previous menu screen.
OKMove
Subtitle : On
Input Label
SIMPLINK : On
Key Lock : Off
Set ID : 1
ISM Method : Normal
Power Saving : Level 0
Factory Reset
OPTION
Input Label
OKMove
Subtitle : On
Input Label
SIMPLINK : On
Key Lock : Off
Set ID : 1
ISM Method : Normal
Power Saving : Level 0
Factory Reset
OPTION
Input Label
Close
AV1
AV2
Component1
Component2
RGB
HDMI1
HDMI2
HDMI3
HDMI4
(except 42/50PG2***)
F G

55
WA
TC
HIN
G T
V / P
RO
GR
AM
ME
CO
NT
RO
L
AV MODE
You can select the optimal images and sounds when connecting AV devices to external input.
1AV MODE
2
• If you select CCiinneemmaa MMooddee in AAVV mmooddee, CCiinneemmaa mode will beselected both for PPiiccttuurree MMooddee and SSoouunndd MMooddee in PPIICCTTUURREE
menu and AAUUDDIIOO menu respectively.• If you select “OOff ff” in AAVV mmooddee, the picture and image which you ini-
tially set will be selected.
Off Cinema
Game Sport
Press the AAVV MMOODDEE button repeatedly to select the desired source.
OK

56
TO
US
E T
HE
US
B D
EV
ICE
TO USE THE USB DEVICE
Precautions when using the USB device
GG Only a USB storage device is recognizable.
GG If the USB storage device is connected through a USB hub, the device is not recognizable.
GG A USB storage device using an automatic recognition programme may not be recognized.
GG A USB storage device which uses its own driver may not be recognized.
GG The recognition speed of a USB storage device may depend on each device.
GG Please do not turn off the TV or unplug the USB device when the connected USB storage device is working.When such device is suddenly separated or unplugged, the stored files or the USB storage device may be dam-aged.
GG Please do not connect the USB storage device which was artificially maneuvered on the PC. The device maycause the product to malfunction or fail to be played. Never forget to use only a USB storage device which hasnormal music files or image files.
GG Please use only a USB storage device which was formatted as a FAT32 file system provided with the Windowsoperating system. In case of a storage device formatted as a different utility programme which is not supportedby Windows, it may not be recognized.
GG Please connect power to a USB storage device which requires an external power supply. If not, the device maynot be recognized.
GG Please connect a USB storage device with cable is offered by USB maker. If connected with cable is not offeredby USB maker or an excessively long cable, the device may not be recognized.
GG Some USB storage devices may not be supported or operated smoothly.
GG File alignment method of USB storage device is similar to Window XP and filename can recognize up to 100English characters.
GG Please up the important file because a data of USB device may be damaged. Data management is consumer'sresponsibility and in consequence the manufactures does not cover the product bearing data damage.
When connecting the USB device
When you connect a USB device, this screen is displayed, automatically.
In USB device, you can not add a new folder or delete the existing folder.
When removing the USB device
Connect the USB device to the UUSSBB IINN
jacks on the side of TV.
3
Select PPHHOOTTOO LLIISSTT or MMUUSSIICC LLIISSTT
1
USB memory stick
PHOTO LIST MUSIC LIST
Select UUSSBB EEjjeecctt.
Select the USB Eject menu before removing theUSB device.
2
OK
1Q. MENU
2OK
• It doesn’t support USB HDD• This TV Supports on JPEG and MP3.
This function is not available for all models.
57
TO
US
E T
HE
US
B D
EV
ICE
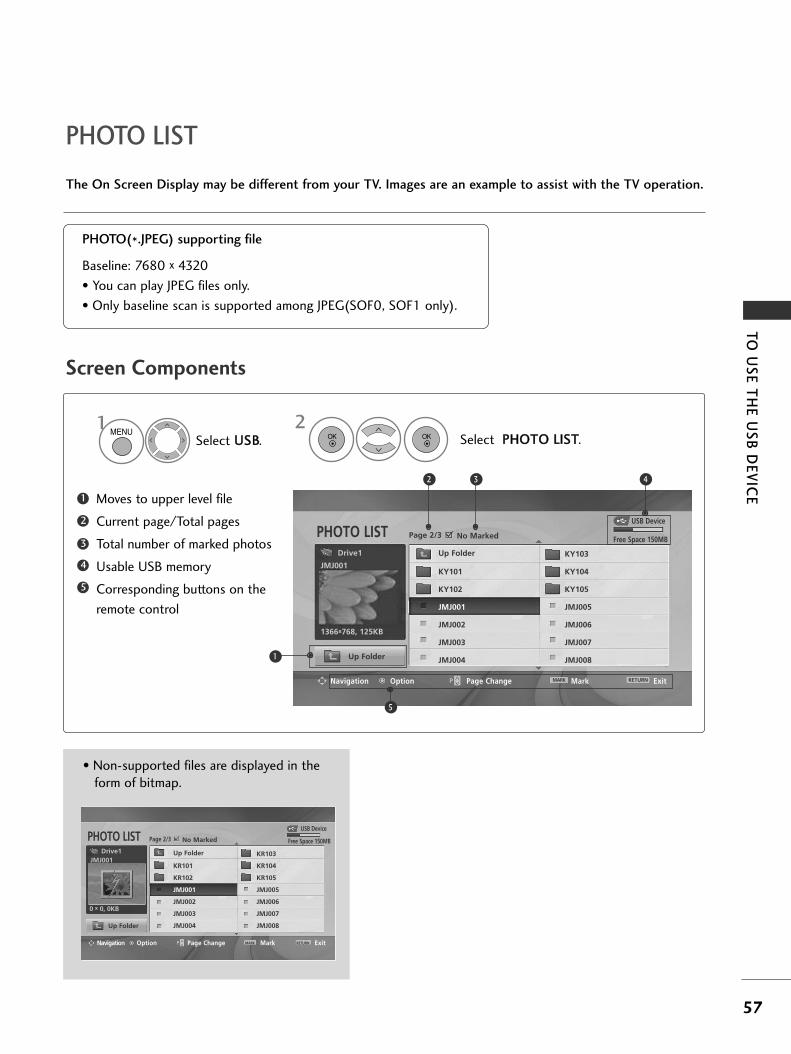
Screen Components
The On Screen Display may be different from your TV. Images are an example to assist with the TV operation.
Moves to upper level file
Current page/Total pages
Total number of marked photos
Usable USB memory
Corresponding buttons on the
remote control
1
3
4
5
2
PHOTO LIST
PHOTO(*.JPEG) supporting file
Baseline: 7680 x 4320
• You can play JPEG files only.
• Only baseline scan is supported among JPEG(SOF0, SOF1 only).
USB Device
Page 2/3 No MarkedPHOTO LIST
Up Folder
Free Space 150MB
Navigation Option Page Change Mark Exit
1366x768, 125KB
KY101
KY102
JMJ001
JMJ002
JMJ003
JMJ004
KY103
KY104
KY105
JMJ005
JMJ006
JMJ007
JMJ008
Up Folder
2 3 4
5
1
Select UUSSBB. Select PPHHOOTTOO LLIISSTT.2
Drive1
1MENU
OK OK
MARK RETURN
JMJ001
USB Device
Page 2/3 No MarkedPHOTO LIST
Up Folder
Free Space 150MB
Navigation Option Page Change Mark Exit
0 x 0, 0KB
KR101
KR102
JMJ001
JMJ002
JMJ003
JMJ004
KR103
KR104
KR105
JMJ005
JMJ006
JMJ007
JMJ008
Up FolderDrive1
MARK RETURN
• Non-supported files are displayed in theform of bitmap.
JMJ001
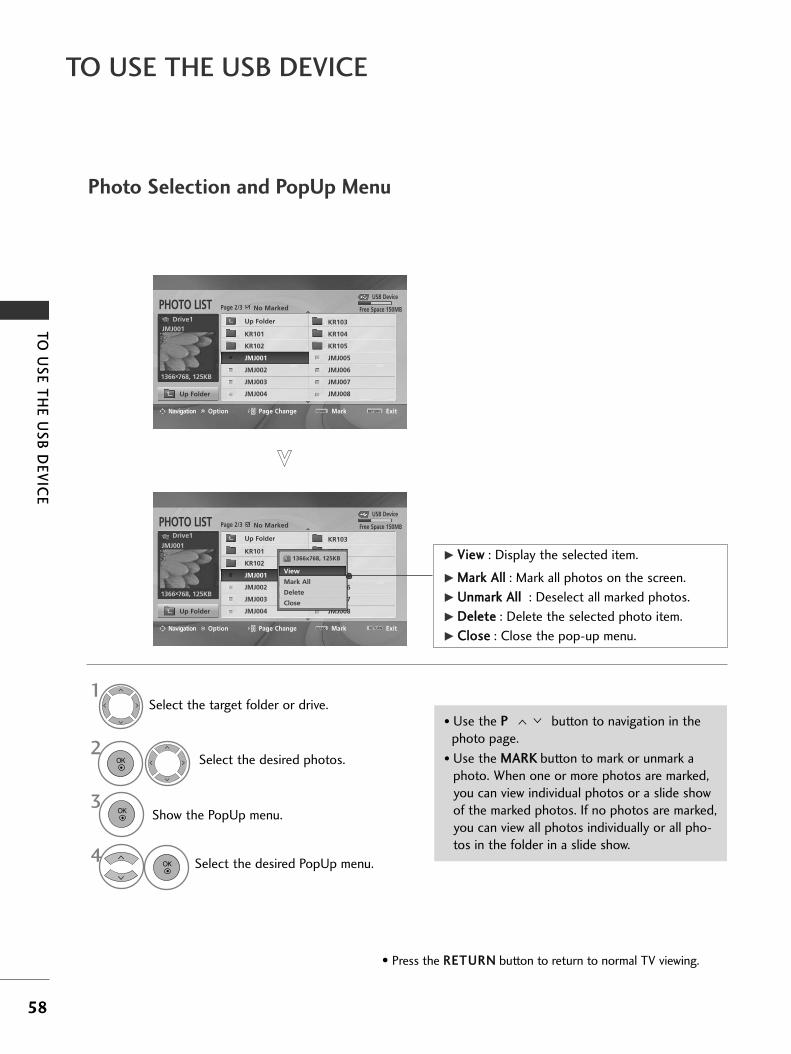
58
TO USE THE USB DEVICE
TO
US
E T
HE
US
B D
EV
ICE
Photo Selection and PopUp Menu
USB Device
Page 2/3 No MarkedPHOTO LIST
Up Folder
Free Space 150MB
Navigation Option Page Change Mark Exit
1366x768, 125KB
KR101
KR102
JMJ001
JMJ002
JMJ003
JMJ004
KR103
KR104
KR105
JMJ005
JMJ006
JMJ007
JMJ008
Up Folder
USB Device
Page 2/3 No MarkedPHOTO LIST
Up Folder
Free Space 150MB
Navigation Option Page Change Mark Exit
1366x768, 125KB
KR101
KR102
JMJ001
JMJ002
JMJ003
JMJ004
KR103
KR104
KR105
JMJ005
JMJ006
JMJ007
JMJ008
Up Folder
1366x768, 125KB
View
Mark All
Delete
Close
GG VViieeww : Display the selected item.
GG MMaarrkk AAllll : Mark all photos on the screen.
GG UUnnmmaarrkk AAllll : Deselect all marked photos.
GG DDeelleettee : Delete the selected photo item.
GG CClloossee : Close the pop-up menu.
Select the target folder or drive.
Select the desired photos.2
Show the PopUp menu.3
1
• Use the PP button to navigation in thephoto page.
• Use the MMAARRKK button to mark or unmark aphoto. When one or more photos are marked,you can view individual photos or a slide showof the marked photos. If no photos are marked,you can view all photos individually or all pho-tos in the folder in a slide show.
Drive1
Drive1
4 Select the desired PopUp menu.
OK
OK
OK
• Press the RREETTUURRNN button to return to normal TV viewing.
MARK RETURN
MARK RETURN
JMJ001
JMJ001

59
TO
US
E T
HE
US
B D
EV
ICE
Set up the menu in Full-Sized Screen
You can change the settings to display photos stored on a USB device, on a full-sized screen.
Detailed operations are available on full-sized photo view screen.
• Use the PP button to navigation in thephoto page.
USB Device
Page 2/3 No MarkedPHOTO LIST
Up Folder
Free Space 150MB
Navigation Option Page Change Mark Exit
1366x768, 125KB
KR101
KR102
JMJ001
JMJ002
JMJ003
JMJ004
KR103
KR104
KR105
JMJ005
JMJ006
JMJ007
JMJ008
Up Folder
1366x768, 125KB
View
Mark All
Delete
Close
The aspect ratio of a photo may change the size of the photo dis-played on the screen in full size.
Press the RREETTUURRNN button to move to the previous menu screen.
1/17
Slideshow BGM Delete Option Close
USB Device
Page 2/3 No MarkedPHOTO LIST
Up Folder
Free Space 150MB
Navigation Option Page Change Mark Exit
1366x768, 125KB
KR101
KR102
JMJ001
JMJ002
JMJ003
JMJ004
KR103
KR104
KR105
JMJ005
JMJ006
JMJ007
JMJ008
Up FolderDrive1
Drive1
Select the target folder or drive.
Select the desired photos.
Show the PopUp menu.
5
Select VViieeww..
The selected photo is displayed infull size.
2
3
1
4
OK
OK
OK
MARK RETURN
MARK RETURN
JMJ001
JMJ001
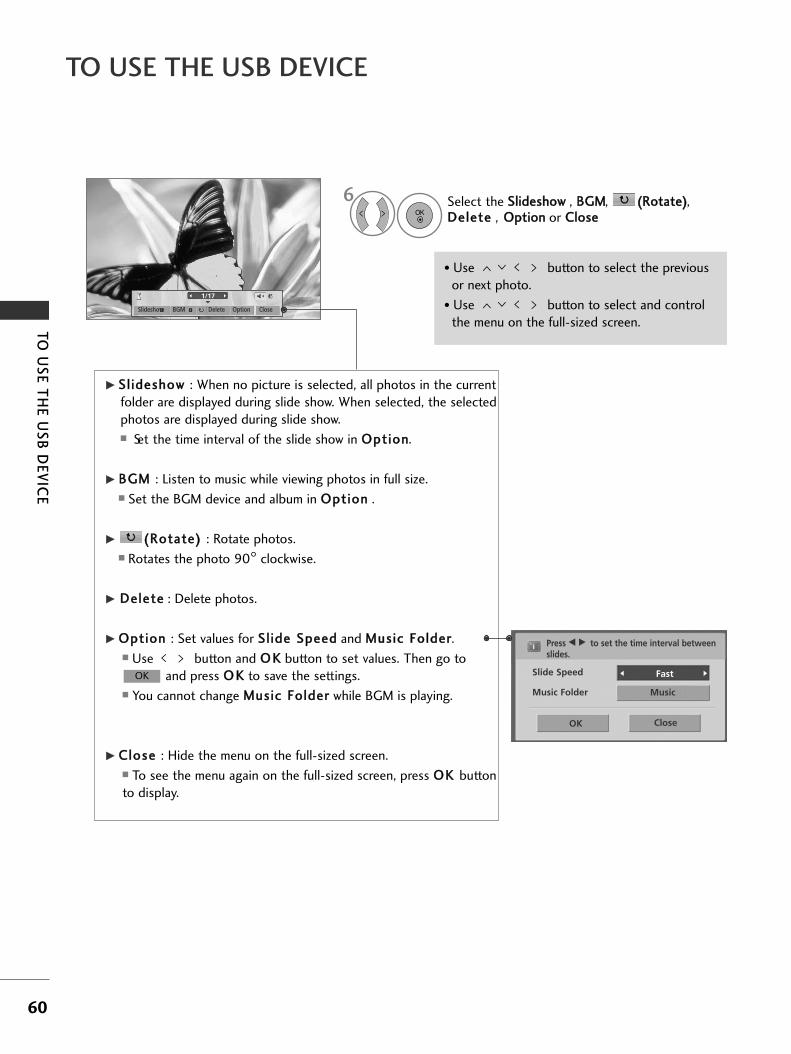
60
TO USE THE USB DEVICE
TO
US
E T
HE
US
B D
EV
ICE
1/17
Slideshow BGM Delete Option Close
GG SSll iiddeesshhooww : When no picture is selected, all photos in the currentfolder are displayed during slide show. When selected, the selectedphotos are displayed during slide show.� Set the time interval of the slide show in OOppttiioonn.
GG BBGGMM : Listen to music while viewing photos in full size. � Set the BGM device and album in OOppttiioonn .
GG ((RRoottaattee)) : Rotate photos.� Rotates the photo 90° clockwise.
GG DDeelleettee : Delete photos.
GG OOppttiioonn : Set values for SSll iiddee SSppeeeedd and MMuussiicc FFoollddeerr. � Use button and OO KK button to set values. Then go to
and press OO KK to save the settings.� You cannot change MMuussiicc FFoollddeerr while BGM is playing.
GG CClloossee : Hide the menu on the full-sized screen.� To see the menu again on the full-sized screen, press OOKK buttonto display.
OK
Select the SSlliiddeesshhooww , BBGGMM, ((RRoottaattee)), DDeelleettee , OOppttiioonn or CClloossee
Press FF GG to set the time interval betweenslides.
Slide Speed Fast
Close
MusicMusic Folder
OK
• Use button to select the previousor next photo.
• Use button to select and controlthe menu on the full-sized screen.
OK
6
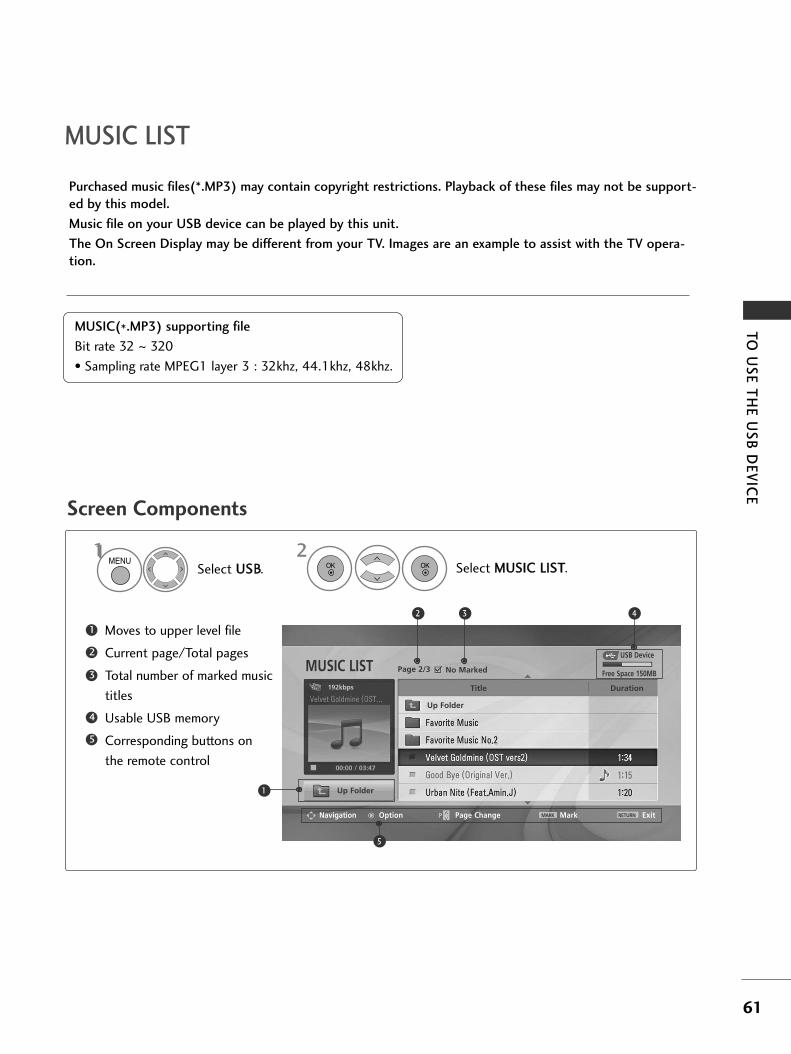
61
TO
US
E T
HE
US
B D
EV
ICE
MUSIC LIST
Purchased music files(*.MP3) may contain copyright restrictions. Playback of these files may not be support-
ed by this model.
Music file on your USB device can be played by this unit.
The On Screen Display may be different from your TV. Images are an example to assist with the TV opera-
tion.
Screen Components
MUSIC(*.MP3) supporting file
Bit rate 32 ~ 320
• Sampling rate MPEG1 layer 3 : 32khz, 44.1khz, 48khz.
USB Device
Page 2/3 No MarkedMUSIC LIST
Up Folder
Free Space 150MB
Navigation Option Page Change Mark Exit
Up Folder
2 3 4
5
1
Moves to upper level file
Current page/Total pages
Total number of marked music
titles
Usable USB memory
Corresponding buttons on
the remote control
1
3
4
5
2
Select UUSSBB. Select MMUUSSIICC LLIISSTT.1 2
192kbps
1MENU
OK OK
MARK RETURN
Title Duration
00:00 / 03:47

62
TO USE THE USB DEVICE
TO
US
E T
HE
US
B D
EV
ICE
USB Device
Page 2/3 No MarkedMUSIC LIST
Up Folder
Free Space 150MB
Navigation Option Page Change Mark Exit
Up Folder4395KB1Kbps
Play
Play with Photo
Mark All
Delete
Close
Music Selection and PopUp Menu
GG PPllaayy (During stop) : Play the selected musictitles.
Once a music finishes playing, the next select-ed one will be played. When there are noselected music titles to play, the next one inthe current folder will be played. If you go to adifferent folder and press the OO KK button, thecurrent music in playback will stop.
GG PPllaayy MMaarrkkeedd : Play the selected music titles.Once a music finishes playing, the next select-ed one will be played automatically.
GG SSttoopp PPllaayy (During playback) : Stop the play-ing of music titles.
GG PPllaayy wwiitthh PPhhoottoo : Start playing the selectedmusic title and then move to the Photo List.
GG MMaarrkk AAll ll : Mark all music title in the folder.
GG UUnnmmaarrkk AAll ll : Deselect all marked music titles.
GG DDeelleettee : Delete the selected music titles.
GG CClloossee : Close the pop-up menu.
• Use the PP button to navigation in themusic page.
• Use MMAARRKK button to mark or unmark a music.When one or more music files are marked, themarked music title will be played in sequence.For example, if you want to listen to only onemusic repeatedly, just mark the music only andplay it. If no music is marked, all the music inthe folder will be played in sequence.
As shown , up to 6 music titles are listed per page.
USB Device
Page 2/3 No MarkedMUSIC LIST
Up Folder
Free Space 150MB
Navigation Option Page Change Mark Exit
Up Folder
192kbps
192kbps
Select the target folder or drive.
Select the desired music title.
Show the PopUp menu.
Select the desired PopUp menu.
2
3
1
4
OK
OK
OK
• Press the RREETTUURRNN button to return to normal TV viewing.
MARK RETURN
MARK RETURN
Title Duration
Title Duration
00:00 / 03:47
00:00 / 03:47
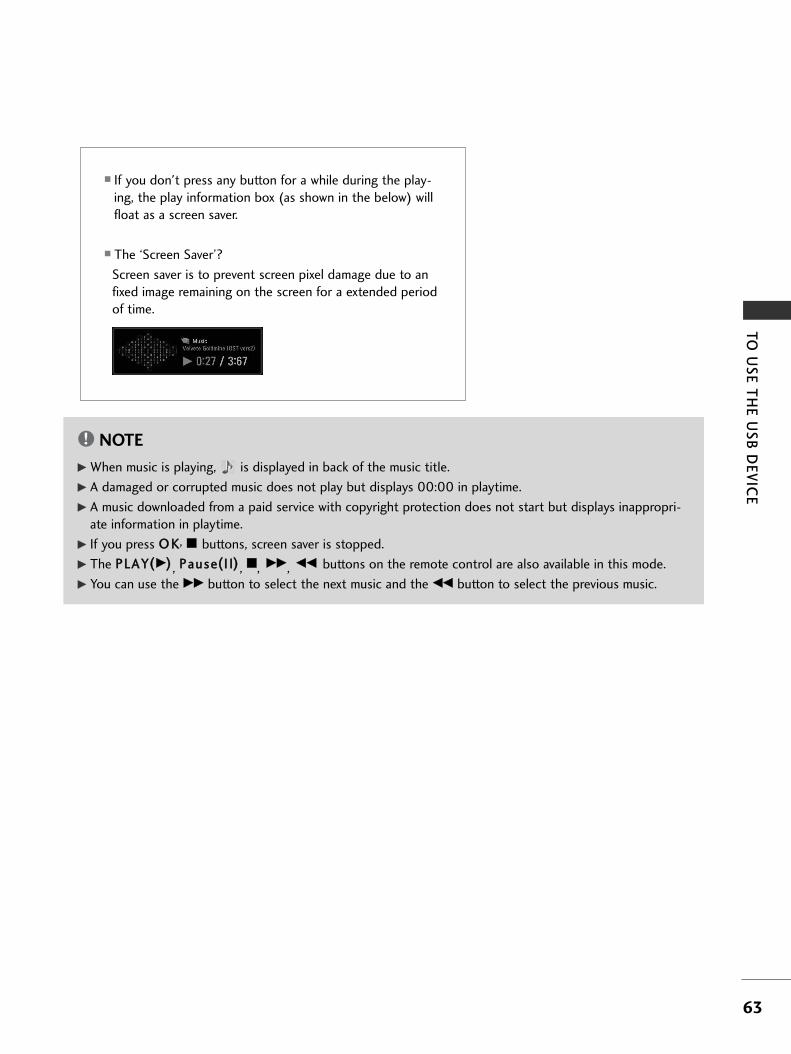
63
TO
US
E T
HE
US
B D
EV
ICE
� If you don't press any button for a while during the play-ing, the play information box (as shown in the below) willfloat as a screen saver.
� The ‘Screen Saver’?
Screen saver is to prevent screen pixel damage due to anfixed image remaining on the screen for a extended periodof time.
NOTE!
GG When music is playing, is displayed in back of the music title.
GG A damaged or corrupted music does not play but displays 00:00 in playtime.
GG A music downloaded from a paid service with copyright protection does not start but displays inappropri-ate information in playtime.
GG If you press OO KK, AA buttons, screen saver is stopped.
GG The PPLLAAYY((GG)), PPaauussee((II II)), AA, GGGG, FFFF buttons on the remote control are also available in this mode.
GG You can use the GGGG button to select the next music and the FFFF button to select the previous music.
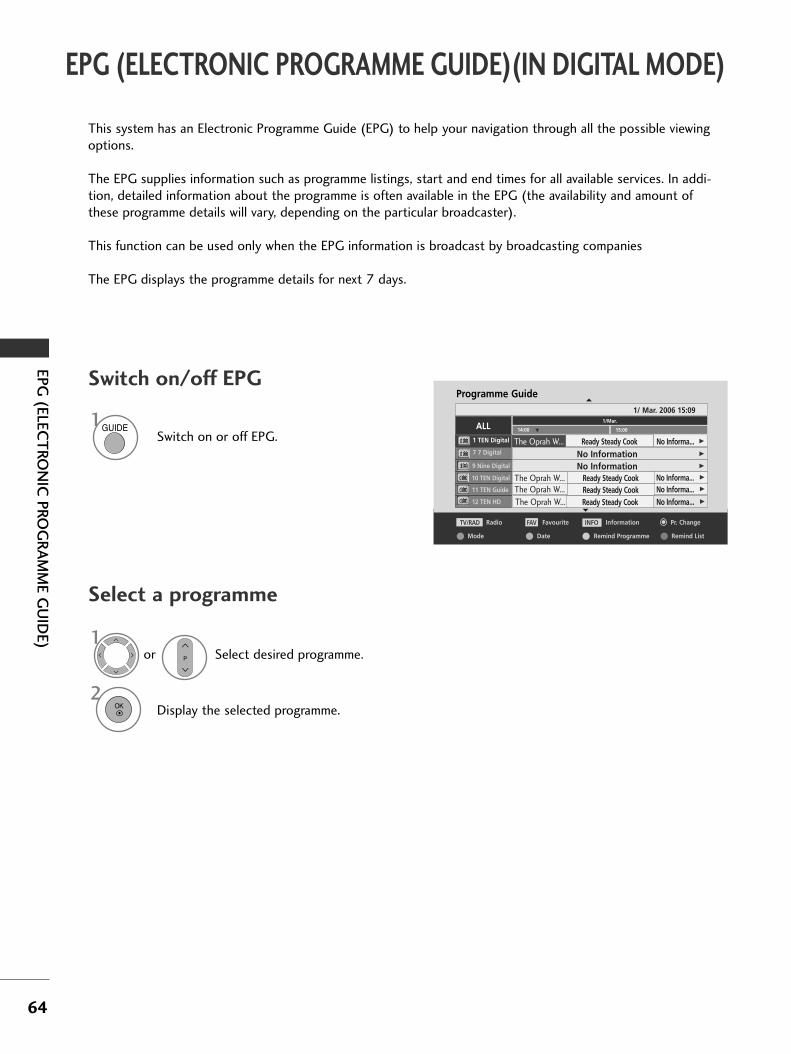
64
EPG (ELECTRONIC PROGRAMME GUIDE)(IN DIGITAL MODE)
EP
G (E
LEC
TR
ON
IC P
RO
GR
AM
ME G
UID
E)
This system has an Electronic Programme Guide (EPG) to help your navigation through all the possible viewingoptions.
The EPG supplies information such as programme listings, start and end times for all available services. In addi-tion, detailed information about the programme is often available in the EPG (the availability and amount ofthese programme details will vary, depending on the particular broadcaster).
This function can be used only when the EPG information is broadcast by broadcasting companies
The EPG displays the programme details for next 7 days.
Switch on or off EPG.1GUIDE
Switch on/off EPG
Select desired programme.1
Display the selected programme.2
Select a programme
or P
OK
Programme Guide
ALL1 TEN Digital
7 7 Digital
The Oprah W... No Informa... G
9 Nine Digital
The Oprah W... No Informa... GReady Steady Cook
10 TEN Digital
11 TEN Guide
12 TEN HD
Radio Pr. Change
E
TV/RAD FavouriteFAV
Mode Date Remind Programme Remind List
InformationINFO
1 TEN Digital
E
No Informa... GThe Oprah W...
No Informa... G
No Information GNo Information G
The Oprah W...
1/Mar.
14:00 EE 15:00
1/ Mar. 2006 15:09
Ready Steady Cook
Ready Steady CookReady Steady Cook

65
EP
G (E
LEC
TR
ON
IC P
RO
GR
AM
ME G
UID
E)
Button Function in 7 Day Guide Mode
Button Function in Date Change Mode
Change EPG mode.REDRED
Change to the selected programme. Select TV or RADIO Programme.TV/RAD
Detail information on or offSelect NOW or NEXT Programme.
Select the Broadcast Programme.
Enter Timer Remind setting mode.YELLYELLOOWW
Button Function in NOW/NEXT Guide Mode
Page Up/Down.
Switch off EPG.or
Change EPG mode.REDRED
Enter Timer Remind list mode.BLUEBLUE
Enter Date setting mode.GREENGREEN
Switch off Date setting mode.GREENGREEN
Change to the selected programme.
Change to the selected date.
Select TV or RADIO Programme.
Detail information on or off
Select NOW or NEXT Programme.
Select a date.
Select the Broadcast Programme.
Switch off Date setting mode.
Enter Timer Remind setting mode.YELLYELLOOWW
Page Up/Down.
Switch off EPG.or
Switch off EPG.or
P
P
GUIDE
GUIDE
GUIDE
OK
OK
OK
TV/RAD
Enter Timer Remind list mode.BLUEBLUE

66
EP
G (E
LEC
TR
ON
IC P
RO
GR
AM
ME G
UID
E)
EPG (ELECTRONIC PROGRAMME GUIDE)(IN DIGITAL MODE)
Button Function in Extended Description Box
Button Function in Remind Setting Mode
Button Function in Remind List Mode
Text Up/Down.
Function setting.
Select RReemmiinndd LLiisstt.
Enter Timer Remind setting mode.YELLYELLOOWW
Change to Guide or Timer list mode.YELLYELLOOWW
Add new Manual Timer setting mode.YELLYELLOOWW
The detail information on or off.
Switch off EPG.or
Save Timer Remind.
Select Service, Date or Start time.
Enter RReemmiinndd LLiisstt editing mode.GREENGREEN
Delete the selected item.REDRED
Change to Guide mode.BLUEBLUE
GUIDE
OK

67
PIC
TU
RE
CO
NT
RO
L
PICTURE CONTROL
• 1166::99
The following selection will allow you toadjust the picture horizontally, in linearproportion, to fill the entire screen(useful forviewing 4:3 formatted DVDs)
• JJuusstt SSccaann
Following Selection will lead to you view thepicture of best quality without loss of originalpicture in high resolution image.
Note : If there are noise in original Picture,You can see the noise at the edge.
• OOrriiggiinnaall
When your TV receives a wide screen signal itwill automatically change to the pictureformat broadcast.
• 44::33
The following selection will allow you to viewa picture with an original 4:3 aspect ration,gray bars will appear on both the left andright of the screen.
PICTURE SIZE (ASPECT RATIO) CONTROL
You can watch the screen in various picture formats; 16:9, Just Scan,
Original, 4:3, 14:9 and Zoom1/2.
If a fixed image is displayed on the screen for a long time, that fixed image
may become imprinted on the screen and remain visible.
You can adjust the enlarge proportion using button.
This function works in the following signal.
• You can also adjust AAssppeecctt RRaattiioo in the PPIICC--TTUURREE menu.
• For Zoom Setting, select 14:9, Zoom1 andZoom2 in Ratio Menu. After completing ZoomSetting, the display goes back to Q.Menu.
Select AAssppeecctt RRaattiioo.
Select the desired picture format.
1Q. MENU
2OK
Just Scan
Original

68
PICTURE CONTROL
PIC
TU
RE
CO
NT
RO
L
• 1144::99
You can view a picture format of 14:9 or ageneral TV programme in the 14:9 mode. The14:9 screen is viewed in the same way as in4:3, but is magnified to the left and right.
• ZZoooomm11
The following selection will allow you to viewthe picture without any alteration, while fillingthe entire screen. However, the top andbottom of the picture will be cropped.
• ZZoooomm22
Choose Zoom 2 when you wish the picture tobe altered, both horizontally extended andvertically cropped. The picture adopting acompromise between alteration and screencoverage.
NOTE!
GG You can only select 44::33, 1166::99 (Wide), 1144::99, ZZoooomm 11//22 in Component, HDMI mode.
GG You can only select 44::33, 1166::99 (Wide) in RGB mode only.
GG In HDMI/Component (over 720p) mode, JJuusstt SSccaann is available.
GG JJuusstt SSccaann function only operates in DTV HD level(576p or above).

69
PIC
TU
RE
CO
NT
RO
L
OKMove
Aspect Ratio : 16:9
Picture Mode : Standard
• Contrast 90
• Brightness 50
• Sharpness 60
• Colour 60
• Tint 0
• Advanced Control
PICTURE
E
Picture Mode : Standard
PRESET PICTURE SETTINGS
Picture Mode-Preset
Select PPIICCTTUURREE.
Select PPiiccttuurree MMooddee.
Select VViivv iidd, SSttaannddaarrdd, CCiinneemmaa,SSppoorrtt or GGaammee..
• PPiiccttuurree MMooddee adjusts the TV for the best pic-ture appearance. Select the preset value in thePPiiccttuurree MMooddee menu based on the programmecategory.
• You can also adjust PPiiccttuurree MMooddee in the QQ..MMeennuu.
OKMove
Aspect Ratio : 16:9
Picture Mode : Standard
• Contrast 90
• Brightness 50
• Sharpness 60
• Colour 60
• Tint 0
• Advanced Control
PICTURE
E
Picture Mode : Standard
1MENU
3
2OK
OK
• Press the MMEENNUU button to return to normal TV viewing.
• Press the RREETTUURRNN button to move to the previous menu screen.
R G R G
Vivid
Standard
Cinema
Sport
Game
Expert1
Expert2
Standard

70
PICTURE CONTROL
PIC
TU
RE
CO
NT
RO
L
OKMove
• Contrast 90
• Brightness 50
• Sharpness 60
• Colour 60
• Tint 0
• Advanced Control
• Picture Reset
Screen
PICTURE
• Advanced Control
OKMove
• Contrast 90
• Brightness 50
• Sharpness 60
• Colour 60
• Tint 0
• Advanced Control
• Picture Reset
Screen
PICTURE
E E
• Advanced Control
Auto Colour Tone Control (Cool/Medium/Warm)
Choose one of three automatic colour adjustments. Set to warm to enhance hotter colours such as red, or set tocool to see less intense colours with more blue.
Select PPIICCTTUURREE.
Select AAddvvaanncceedd CCoonnttrrooll.
Select CCoolloouurr TTeemmppeerraattuurree.
Select either CCooooll, MMeeddiiuumm or WWaarrmm.
Colour Temperature FF Medium GG
Fresh Contrast High
Fresh Colour High
Noise Reduction Medium
Gamma Medium
Black Level Auto
Film Mode Off
Close
1MENU
3
4
2OK
OK
• Press the MMEENNUU button to return to normal TV viewing.
• Press the RREETTUURRNN button to move to the previous menu screen.
R G

71
PIC
TU
RE
CO
NT
RO
L
MANUAL PICTURE ADJUSTMENT
Picture Mode-User option
OKMove
Aspect Ratio : 16:9
Picture Mode : Standard
• Contrast 90
• Brightness 50
• Sharpness 60
• Colour 60
• Tint 0
• Advanced Control
PICTURE
E
NOTE!GG You cannot adjust colour, sharpness and tint in the RGB-PC mode.
Select PPIICCTTUURREE.
Select PPiiccttuurree MMooddee.
Select CCoonnttrraasstt, BBrr iigghhttnneessss, SShhaarrppnneessss, CCoolloouurr or TTiinntt.
Make appropriate adjustments.
Select VViivv iidd, SSttaannddaarrdd, CCiinneemmaa, SSppoorrtt or GGaammee..
• CCoonnttrraasstt
Adjusts the difference between light and dark levels in the picture.• BBrriigghhttnneessss
Increases or decreases the amount of white in the picture.• SShhaarrppnneessss
Adjusts the level of crispness in the edges between the light and dark areas of the picture.
The lower the level, the softer the image.• CCoolloouurr
Adjusts intensity of all colours.• TTiinntt
Adjusts the balance between red and green levels.
OKMove
Aspect Ratio : 16:9
Picture Mode : Standard
• Contrast 90
• Brightness 50
• Sharpness 60
• Colour 60
• Tint 0
• Advanced Control
PICTURE
E
Picture Mode : StandardVivid
Standard
Cinema
Sport
Game
Expert1
Expert2
Standard
1MENU
3
2OK
OK
4OK
5OK
Picture Mode : Standard
• Press the MMEENNUU button to return to normal TV viewing.
• Press the RREETTUURRNN button to move to the previous menu screen.
R G

72
PICTURE CONTROL
PIC
TU
RE
CO
NT
RO
L
OKMove
• Contrast 50
• Brightness 50
• Sharpness 50
• Colour 50
• Tint 0
• Expert Control
• Picture Reset
Screen
PICTURE
• Expert Control
E
Select your desired Source.
OKMove
Aspect Ratio : 16:9
Picture Mode : Standard
• Contrast 90
• Brightness 50
• Sharpness 60
• Colour 60
• Tint 0
• Expert Control
PICTURE
E
Picture Mode : Expert1
Picture Mode-Expert Control
Select PPIICCTTUURREE.
Select PPiiccttuurree MMooddee.
Select EExxppeerrtt CCoonnttrrooll.
Make appropriate adjustments.
Select EExxppeerrtt11 or EExxppeerrtt22.
By segmenting categories, EExxppeerrtt11 and EExxppeerrtt22 provide more categories which users can set as they see fit,
offering the optimal picture quality for users.
1MENU
3
2OK
OK
4OK
5OK
6
R G
Vivid
Standard
Cinema
Sport
Game
Expert1
Expert2
Expert1
• Press the MMEENNUU button to return to normal TV viewing.
• Press the RREETTUURRNN button to move to the previous menu screen.
FF Off GGFresh Contrast
Noise Reduction Low
Gamma
White Balance
Low
Colour Standard HD
Black Level Auto
Film Mode Off
Warm
• Red Contrast 0
Close
E
• Green Contrast 0
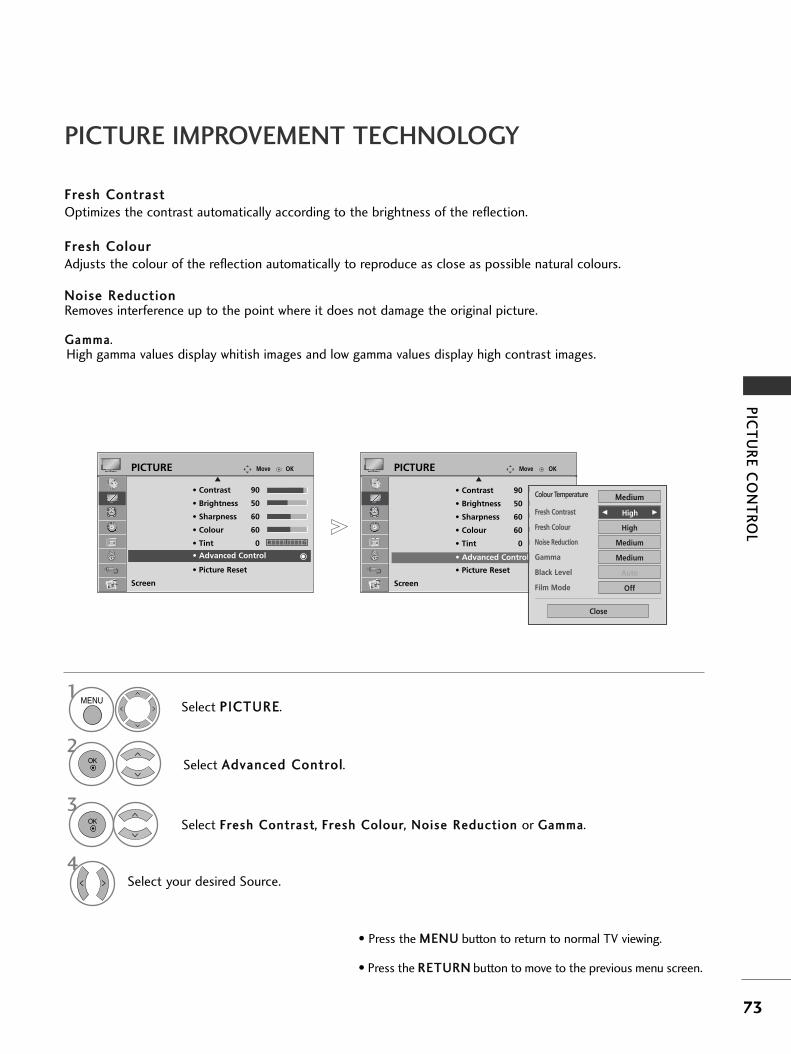
73
PIC
TU
RE
CO
NT
RO
L
OKMove
• Contrast 90
• Brightness 50
• Sharpness 60
• Colour 60
• Tint 0
• Advanced Control
• Picture Reset
Screen
PICTURE
• Advanced Control
OKMove
• Contrast 90
• Brightness 50
• Sharpness 60
• Colour 60
• Tint 0
• Advanced Control
• Picture Reset
Screen
PICTURE
E E
• Advanced Control
PICTURE IMPROVEMENT TECHNOLOGY
FFrreesshh CCoonnttrraassttOptimizes the contrast automatically according to the brightness of the reflection.
FFrreesshh CCoolloouurrAdjusts the colour of the reflection automatically to reproduce as close as possible natural colours.
NNooiissee RReedduuccttiioonnRemoves interference up to the point where it does not damage the original picture.
GGaammmmaa.High gamma values display whitish images and low gamma values display high contrast images.
Select PPIICCTTUURREE.
Select AAddvvaanncceedd CCoonnttrrooll.
Select FFrreesshh CCoonnttrraasstt,, FFrreesshh CCoolloouurr,, NNooiissee RReedduuccttiioonn or GGaammmmaa.
Select your desired Source.
1MENU
3
2OK
OK
4
• Press the MMEENNUU button to return to normal TV viewing.
• Press the RREETTUURRNN button to move to the previous menu screen.
Colour Temperature
FF High GGFresh Contrast
Medium
Fresh Colour High
Noise Reduction Medium
Gamma Medium
Black Level Auto
Film Mode Off
Close
R G

74
PICTURE CONTROL
PIC
TU
RE
CO
NT
RO
L
OKMove
• Contrast 50
• Brightness 50
• Sharpness 50
• Colour 50
• Tint 0
• Advanced Control
• Picture Reset
Screen
PICTURE
• Advanced Control
OKMove
• Contrast 90
• Brightness 50
• Sharpness 60
• Colour 60
• Tint 0
• Advanced Control
• Picture Reset
Screen
PICTURE
E E
• Advanced Control
ADVANCED - FILM MODE
Select PPIICCTTUURREE.
Select AAddvvaanncceedd CCoonnttrrooll.
Select FFii llmm MMooddee..
Select OO nn or OOff ff.
To set the TV up for the best picture quality for viewing films.
This feature operates only in TV, AV and Component 480i/576i/1080i mode.
1MENU
3
2OK
OK
4
• Press the MMEENNUU button to return to normal TV viewing.
• Press the RREETTUURRNN button to move to the previous menu screen.
Colour Temperature
Fresh Contrast High
Fresh Colour High
Noise Reduction Medium
Medium
Gamma Medium
Black Level Auto
Close
FF Off GGFilm Mode
R G

75
PIC
TU
RE
CO
NT
RO
L
OKMove
• Contrast 90
• Brightness 50
• Sharpness 60
• Colour 60
• Tint 0
• Advanced Control
• Picture Reset
Screen
PICTURE
• Advanced Control
OKMove
• Contrast 90
• Brightness 50
• Sharpness 60
• Colour 60
• Tint 0
• Advanced Control
• Picture Reset
Screen
PICTURE
E E
• Advanced Control
When you view a film this function adjusts the TV to best picture quality.
This function works in the following mode: AV (NTSC-M), HDMI or Component .
ADVANCED - BLACK(DARKNESS) LEVEL
Select PPIICCTTUURREE.
Select AAddvvaanncceedd CCoonnttrrooll.
Select BBllaacckk LLeevveell.
Select LLooww or HHiigghh.
• LLooww : The reflection of the screen gets darker.• HHiigghh : The reflection of the screen gets
brighter.• AAuuttoo : Realizing the black level of the screen
and set it to High or Low automatically.
1MENU
3
2OK
OK
4
• Press the MMEENNUU button to return to normal TV viewing.
• Press the RREETTUURRNN button to move to the previous menu screen.
Colour Temperature
Fresh Contrast High
Fresh Colour High
Noise Reduction Medium
Medium
Gamma Medium
Black Level
Off
Close
Auto
Film Mode
R G

76
PICTURE CONTROL
PIC
TU
RE
CO
NT
RO
L
PICTURE RESET
Settings of the selected picture modes return to the default factory settings.
Select PPIICCTTUURREE.
Select PPiiccttuurree RReesseett.
Initialize the adjusted value.
OKMove
• Contrast 90
• Brightness 50
• Sharpness 60
• Colour 60
• Tint 0
• Advanced Control
• Picture Reset
Screen
PICTURE
• Picture Reset
OKMove
• Contrast 90
• Brightness 50
• Sharpness 60
• Colour 60
• Tint 0
• Advanced Control
• Picture Reset
Screen
PICTURE
E E
• Picture Reset
1MENU
3
2OK
OK
• Press the MMEENNUU button to return to normal TV viewing.
• Press the RREETTUURRNN button to move to the previous menu screen.
R G R G
Resetting video configuration...ii

77
PIC
TU
RE
CO
NT
RO
L
IMAGE STICKING MINIMIZATION (ISM) METHOD
4
A frozen or still picture from a PC/Video game displayed on the screen for prolonged periods will result in a
ghost image remaining even when you change the image. Avoid allowing a fixed image to remain on the
screen for prolonged periods.
WWhhiittee WWaasshh
White wash removes permanent images from the screen.
Note: An excessive permanent image may be impossible to clear entirely with White Wash.
OOrrbbiitteerr
Orbiter may help prevent ghost images. However, it is best not to allow any fixed image to remain on the
screen. To avoid a permanent image on the screen, the screen will move every 2 minutes.
IInnvveerrssiioonn
This function inverts the panel colour of the screen. The panel colour is automatically inverted every 30
minutes.
Select OOPPTTIIOONN.
Select IISSMM MMeetthhoodd.
Select NNoorrmmaall ,, OOrrbbiitteerr,, IInnvveerrssiioonn or WWhhiittee WWaasshh..
Save.
• If you do not need this function, set NNoorrmmaall ..
1MENU
3
2OK
OK
OK
• Press the MMEENNUU button to return to normal TV viewing.
• Press the RREETTUURRNN button to move to the previous menu screen.
OKMove
Subtitle : On
Input Label
SIMPLINK : On
Key Lock : Off
Set ID : 1
ISM Method : Normal
Power Saving : Level 0
Factory Reset
OPTION
ISM Method
OKMove
Subtitle : On
Input Label
SIMPLINK : On
Key Lock : Off
Set ID : 1
ISM Method : Normal
Power Saving : Level 0
Factory Reset
OPTION
ISM Method
Normal
Orbiter
Inversion
White Wash
Normal

78
PICTURE CONTROL
PIC
TU
RE
CO
NT
RO
L
POWER SAVING PICTURE MODE
This function allows you to reduce the power consumption of the TV.
Select OOPPTTIIOONN.
Select PPoowweerr SSaavviinngg.
Select LLeevveell 00,, LLeevveell 11,, LLeevveell 22,,LLeevveell 33 or LLeevveell 44.
Save.
• Level 0 is the brightest.• You can also adjust PPoowweerr SSaavviinngg in the QQ..
MMeennuu.
4
1MENU
3
2OK
OK
OK
• Press the MMEENNUU button to return to normal TV viewing.
• Press the RREETTUURRNN button to move to the previous menu screen.
OKMove
Subtitle : On
Input Label
SIMPLINK : On
Key Lock : Off
Set ID : 1
ISM Method : Normal
Power Saving : Level 0
Factory Reset
OPTION
Power Saving
OKMove
Subtitle : On
Input Label
SIMPLINK : On
Key Lock : Off
Set ID : 1
ISM Method : Normal
Power Saving : Level 0
Factory Reset
OPTION
Power Saving
Level 0
Level 1
Level 2
Level 3
Level 4
Level 0
NOTE!GG The default factory setting complies with the EEnneerrggyy ssttaarr requirements and is adjusted to the
comfortable level to be viewed at home.You can increase the brightness of your screen by adjusting the Power Saving Level or by setting thePPiiccttuurree MMooddee.

79
SO
UN
D &
LAN
GU
AG
E C
ON
TR
OL
SOUND & LANGUAGE CONTROL
AUTO VOLUME LEVELLER
AVL automatically remains on the same level of volume if you change programmes.
Select AAUUDDIIOO.
Select AAuuttoo VVoolluummee.
Select OO nn or OOff ff.
1MENU
3
2OK
OK
• Press the MMEENNUU button to return to normal TV viewing.
• Press the RREETTUURRNN button to move to the previous menu screen.
OKMove
Auto Volume : Off
Clear Voice : On
Balance 0
Sound Mode : Standard
• SRS TruSurround XT : On
• 80Hz 0
• 220Hz 0
• 470Hz 0
AUDIO
E
L R
OKMove
Auto Volume : Off
Clear Voice : On
Balance 0
Sound Mode : Standard
• SRS TruSurround XT : On
• 80Hz 0
• 220Hz 0
• 470Hz 0
AUDIO
E
L R
Auto Volume : Off Auto Volume : Off Off
OnOn
- +
- +
- +
- +
- +
- +

80
SOUND & LANGUAGE CONTROL
SO
UN
D &
LAN
GU
AG
E C
ON
TR
OL
PRESET SOUND SETTINGS-SOUND MODE
You can select your preferred sound setting; Standard, Music, Cinema, Sport or Game and you can also adjustthe frequency of the equalizer.
Sound Mode lets you enjoy the best sound without any Special adjustment as the TV sets the appropriate soundoptions based on the programme content.
Standard, Music, Cinema, Sport and Game are preset for optimum sound quality at the factory.
Select AAUUDDIIOO.
Select SSoouunndd MMooddee.
Select SSttaannddaarrdd,, MMuussiicc,, CCiinneemmaa,, SSppoorrtt or GGaammee.
• You can also adjust SSoouunndd MMooddee in the QQ..MMeennuu.
1MENU
3
2OK
OK
• Press the MMEENNUU button to return to normal TV viewing.
• Press the RREETTUURRNN button to move to the previous menu screen.
OKMove
Auto Volume : Off
Clear Voice : On
Balance 0
Sound Mode : Standard
• SRS TruSurround XT : On
• 80Hz 0
• 220Hz 0
• 470Hz 0
AUDIO
E
L R
OKMove
Auto Volume : Off
Clear Voice : On
Balance 0
Sound Mode : Standard
• SRS TruSurround XT : On
• 80Hz 0
• 220Hz 0
• 470Hz 0
AUDIO
E
L R
Sound Mode Standard Sound Mode : Standard
- +
- +
- +
- +
- +
- +
Standard
Music
Cinema
Sport
Game
Standard

81
SO
UN
D &
LAN
GU
AG
E C
ON
TR
OL
OKMove
Auto Volume : Off
Clear Voice : On
Balance 0
Sound Mode : Standard
• SRS TruSurround XT : On
• 80Hz 0
• 220Hz 0
• 470Hz 0
AUDIO
E
L R
OKMove
Auto Volume : Off
Clear Voice : On
Balance 0
Sound Mode : Standard
• SRS TruSurround XT : On
• 80Hz 0
• 220Hz 0
• 470Hz 0
AUDIO
E
L R
GG is a trademark of SRS Labs, Inc.
GG TruSurround XT technology is incorporated under license from SRS Labs, Inc.
R
TruSurround XT
SOUND SETTING ADJUSTMENT -USER MODE
SRS TRUSURROUND XT
Adjusting the audio equalizer.
Select AAUUDDIIOO.
Select SSoouunndd MMooddee.
Select SSttaannddaarrdd,, MMuussiicc,, CCiinneemmaa,, SSppoorrtt or GGaammee.
Set the desired sound level.
Select a frequency band.
Sound Mode Standard (User) Sound Mode : Standard (User)
Select AAUUDDIIOO.
Select SSRRSS TTrruuSSuurrrroouunndd XXTT.
Select OO nn or OOff ff.
1MENU
3
2OK
OK
1MENU
3
2OK
OK
4OK
OK 5
SSRRSS TTrruuSSuurrrroouunndd XXTT Select this option tosound realistic.
- +
- +
- +
- +
- +
- +
Standard
Music
Cinema
Sport
Game
Standard (User)

82
SOUND & LANGUAGE CONTROL
SO
UN
D &
LAN
GU
AG
E C
ON
TR
OL
OKMove
Auto Volume : Off
Clear Voice : On
Balance 0
Sound Mode : Standard
• SRS TruSurround XT : On
• 80Hz 0
• 220Hz 0
• 470Hz 0
AUDIO
E
L R
OKMove
Auto Volume : Off
Clear Voice : On
Balance 0
Sound Mode : Standard
• SRS TruSurround XT : On
• 80Hz 0
• 220Hz 0
• 470Hz 0
AUDIO
E
L R
CLEAR VOICE
By differentiating the human sound range from others, it helps users listen to human voices better.
Select AAUUDDIIOO.
Select CClleeaarr VVooiiccee.
Clear Voice : Off Clear Voice : OffOff
OnOn
Select OO nn or OOff ff.
1MENU
3
2OK
OK
• Press the MMEENNUU button to return to normal TV viewing.
• Press the RREETTUURRNN button to move to the previous menu screen.
• If you select “OO nn” for CClleeaarr VVooiiccee, SSRRSSTTrruuSSuurrrroouunndd XXTT feature will not work.
- +
- +
- +
- +
- +
- +

83
SO
UN
D &
LAN
GU
AG
E C
ON
TR
OL
OKMove
Auto Volume : Off
Clear Voice : On
Balance 0
Sound Mode : Standard
• SRS TruSurround XT : On
• 80Hz 0
• 220Hz 0
• 470Hz 0
AUDIO
E
L R
OKMove
Auto Volume : Off
Clear Voice : On
Balance 0
Sound Mode : Standard
• SRS TruSurround XT : On
• 80Hz 0
• 220Hz 0
• 470Hz 0
AUDIO
E
L RBalance 0 L RBalance 0
BALANCE
You can adjust the sound balance of the speakers to preferred levels.
Select AAUUDDIIOO.
Select BBaallaannccee.
Make desired adjustment.
Close
Balance 0 L RFF GGL R
1MENU
3
2OK
OK
• Press the MMEENNUU button to return to normal TV viewing.
• Press the RREETTUURRNN button to move to the previous menu screen.
- +
- +
- +
- +
- +
- +
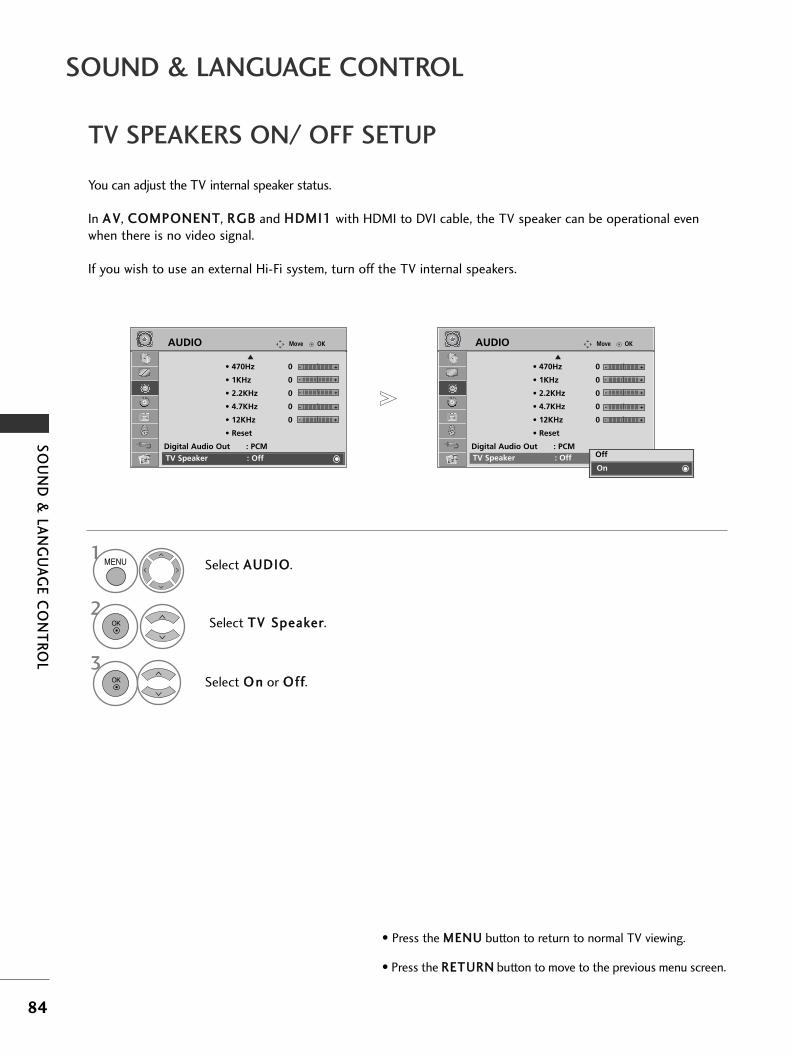
84
SOUND & LANGUAGE CONTROL
SO
UN
D &
LAN
GU
AG
E C
ON
TR
OL
TV SPEAKERS ON/ OFF SETUP
You can adjust the TV internal speaker status.
In AA VV, CCOOMMPPOONNEENNTT, RRGGBB and HHDDMMII11 with HDMI to DVI cable, the TV speaker can be operational evenwhen there is no video signal.
If you wish to use an external Hi-Fi system, turn off the TV internal speakers.
Select AAUUDDIIOO.
Select TTVV SSppeeaakkeerr.
Select OO nn or OOff ff.
1MENU
3
2OK
OK
• Press the MMEENNUU button to return to normal TV viewing.
• Press the RREETTUURRNN button to move to the previous menu screen.
OKMove
• 470Hz 0
• 1KHz 0
• 2.2KHz 0
• 4.7KHz 0
• 12KHz 0
• Reset
Digital Audio Out : PCM
TV Speaker : On
AUDIO
E
OKMove
• 470Hz 0
• 1KHz 0
• 2.2KHz 0
• 4.7KHz 0
• 12KHz 0
• Reset
Digital Audio Out : PCM
TV Speaker : On
AUDIO
E
TV Speaker : Off TV Speaker : Off Off
OnOn
- +
- +
- +
- +
- +
- +
- +
- +
- +
- +

85
SO
UN
D &
LAN
GU
AG
E C
ON
TR
OL
OKMove
• 470Hz 0
• 1KHz 0
• 2.2KHz 0
• 4.7KHz 0
• 12KHz 0
• Reset
Digital Audio Out : PCM
TV Speaker : On
AUDIO
E
OKMove
• 470Hz 0
• 1KHz 0
• 2.2KHz 0
• 4.7KHz 0
• 12KHz 0
• Reset
Digital Audio Out : PCM
TV Speaker : On
AUDIO
E
Digital Audio Out : PCM Digital Audio Out : PCMDolby Digital
PCM
Dolby Digital
Select AAUUDDIIOO.
Select DDiiggiittaall AAuuddiioo OOuutt.
Select DDoollbbyy DDiiggiittaall or PPCCMM.
SELECTING DIGITAL AUDIO OUT
This function allows you to select your preferred Digital Audio Output.The TV can only output DOLBY Digital if a channel is broadcast with Dolby Digital audio.When Dolby digital is available, selecting Dolby Digital in the Digital Audio Out menu will set SPDIF output toDolby Digital If Dolby Digital is selected in the digital audio out menu when dolby digital is not available, SPDIF output will bePCM.Even if both Dolby Digital and Audio language have been set in a channel which broadcast Dolby Digital Audio,only Dolby Digital will be played.
Manufactured under license fromDolby Laboratories. “Dolby “andthe double-D symbol are trade-marks of Dolby Laboratories.
1MENU
3
2OK
OK
• Press the MMEENNUU button to return to normal TV viewing.
• Press the RREETTUURRNN button to move to the previous menu screen.
- +
- +
- +
- +
- +
- +
- +
- +
- +
- +
• There is a possibility that when HDMI mode, someDVD player do not make SPDIF sound, At thattime, set the output of the digital audio of theDVD player to PCM.
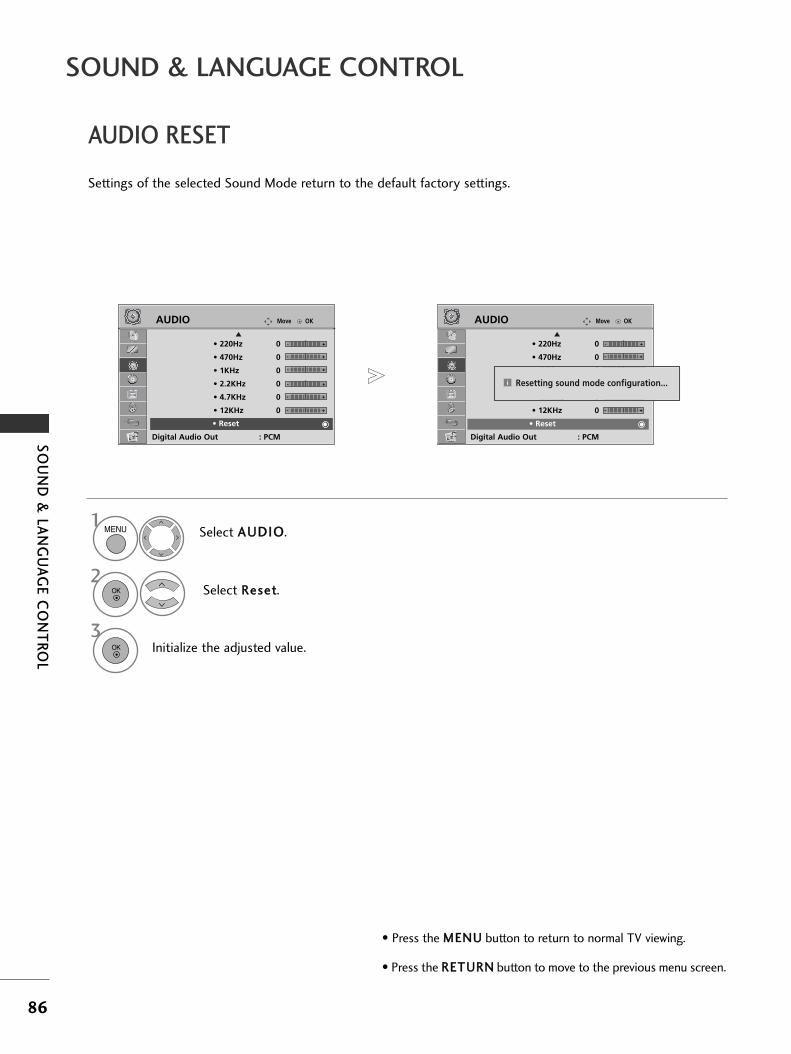
86
SOUND & LANGUAGE CONTROL
SO
UN
D &
LAN
GU
AG
E C
ON
TR
OL
OKMove
• 220Hz 0
• 470Hz 0
• 1KHz 0
• 2.2KHz 0
• 4.7KHz 0
• 12KHz 0
• Reset
Digital Audio Out : PCM
AUDIO
E
OKMove
• 220Hz 0
• 470Hz 0
• 1KHz 0
• 2.2KHz 0
• 4.7KHz 0
• 12KHz 0
• Reset
Digital Audio Out : PCM
AUDIO
E
• Reset • Reset
Settings of the selected Sound Mode return to the default factory settings.
Select AAUUDDIIOO.
Select RReesseett.
Initialize the adjusted value.
AUDIO RESET
1MENU
3
2OK
OK
• Press the MMEENNUU button to return to normal TV viewing.
• Press the RREETTUURRNN button to move to the previous menu screen.
- +
- +
- +
- +
- +
- +
- +
- +
- +
- +
- +
- +
Resetting sound mode configuration...ii
87
SO
UN
D &
LAN
GU
AG
E C
ON
TR
OL
STEREO RECEPTION (IN ANALOGUE MODE ONLY)
AA MMoonnoo ssoouunndd sseelleeccttiioonn
If the stereo signal is weak in stereo reception, you can switch to mono. In mono reception, the clarity of
sound is improved. To switch back to stereo.
BBrrooaaddccaasstt
Mono
Stereo
OOnn SSccrreeeenn DDiissppllaayy
MMOONNOO
MMOONNOO // SSTTEERREEOO
When a programme is selected, the sound information for the station appears with the programme number
and station name.
Select AAuuddiioo.
Selects the sound output.
1Q. MENU
2OK
SPEAKER SOUND OUTPUT SELECTION
In AV, Component, RGB and HDMI mode, you can select output sound for the left and right loudspeakers.
Select the sound output.
LL++RR:: Audio signal from audio L input is sent to the left loudspeaker and audio signal from audio R input is
sent to the right loudspeaker.
LL++LL:: Audio signal from audio L input is sent to left and right loudspeakers.
RR++RR:: Audio signal from audio R input is sent to left and right loudspeakers.

88
TIM
E S
ET
TIN
G
TIME SETTING
CLOCK SETUP
The clock is set automatically when receiving a digital signal. (You can set the clock manually only if the TV has noDTV signal.)
You must set the time correctly before using on/off timer function.
Select TTIIMMEE.
Select CClloocckk.
Select either the year, date, or time option.
Set the year, date, and time options.
OKMove
Clock
Off Time : Off
On Time : Off
Sleep Timer : Off
Auto Sleep : Off
Time Zone : NSW/ACT
TIME OKMove
Clock
Off Time : Off
On Time : Off
Sleep Timer : Off
Auto Sleep : Off
Time Zone : NSW/ACT
TIME
ClockClockDate 01
Month Mar.
Year 2007
Hour 16
Minute 09
Close
1MENU
3
4
2OK
OK
• Press the MMEENNUU button to return to normal TV viewing.
• Press the RREETTUURRNN button to move to the previous menu screen.

89
TIM
E S
ET
TIN
G
AUTO ON/OFF TIMER SETTING
The Off time function automatically switches the TV to standby at a preset time.Two hours after the TV is switched on by the on time function it will automatically switch back to standby modeunless a button has been pressed.
The Off time function overrides the On timer function if both are set to the same time.The TV must be in standby mode for the On timer to work.
Select TTIIMMEE.
Select OOffff TTiimmee or OOnn TTiimmee.
Select RReeppeeaatt.
Set the hour.
Set the minutes.
Select OOff ff, OOnnccee, DDaaii llyy, MMoonn ~ FFrr ii,MMoonn ~ SSaatt, SSaatt ~ SSuunn or SSuunn.
• To cancel OOnn//OOffff TTiimmee function, select OOff ff.• For On Time function only
Select MMooddee.
Select TTVV, DDTTVV or RRaaddiioo.
Set the programme.
Adjust volume level atswitch-on.
OKMove
Clock
Off Time : Off
On Time : Off
Sleep Timer : Off
Auto Sleep : Off
Time Zone : NSW/ACT
TIME OKMove
Clock
Off Time :
Off
On Time : Off
Sleep Timer : Off
Auto Sleep : Off
Time Zone : NSW/ACT
TIME
On Time : OffOn Time : OffRepeat FF Off GG
Hour 00
Minute 00
Mode TV
Programme 1
Volume 30
Close
1MENU
3
4
2OK
OK
5
6
1
2
OK
3
4
• Press the MMEENNUU button to return to normal TV viewing.
• Press the RREETTUURRNN button to move to the previous menu screen.
29/Jan. 2008 15:27

90
TIME SETTING
TIM
E S
ET
TIN
G
AUTO SHUT-OFF SETTING
If the TV is switched on and there is no input signal, it will switch off automatically after 10 minutes.
Select TTIIMMEE.
Select AAuuttoo SSlleeeepp.
Select OOff ff or OO nn.
OKMove
Clock
Off Time : Off
On Time : Off
Sleep Timer : Off
Auto Sleep : Off
Time Zone : NSW/ACT
TIME OKMove
Clock
Off Time : Off
On Time : Off
Sleep Timer : Off
Auto Sleep : Off
Time Zone : NSW/ACT
TIME
Auto Sleep : OffAuto Sleep : OffOff
OnOn
1MENU
3
2OK
OK
• Press the MMEENNUU button to return to normal TV viewing.
• Press the RREETTUURRNN button to move to the previous menu screen.
91
TIM
E S
ET
TIN
G
TIME ZONE SETUP
When you select a Time Zone city, the TV time is set by the time offset information based on Time Zone andGMT (Greenwich Mean Time) which is received with the broadcast signal and the time is set automatically by adigital signal.
Select TTIIMMEE.
Select TTiimmee ZZoonnee.
Select your viewing area time zone.
Confirm it.
1MENU
3
2OK
OK OK
4OK OK
You do not have to remember to switch the TV off before you go to sleep.The sleep timer automatically switches the TV to standby after the preset time has elapsed.
SLEEP TIMER SETTING
• When you switch the TV off, the preset sleep timer is cancelled.
• You can also adjust SSlleeeepp TTiimmeerr in the TTIIMMEE menu.
Select SSlleeeepp TTiimmeerr.
Select OOff ff, 11 00, 22 00, 33 00, 66 00, 99 00, 112200, 118800 or 224400 MMiinn.
1Q. MENU
2OK
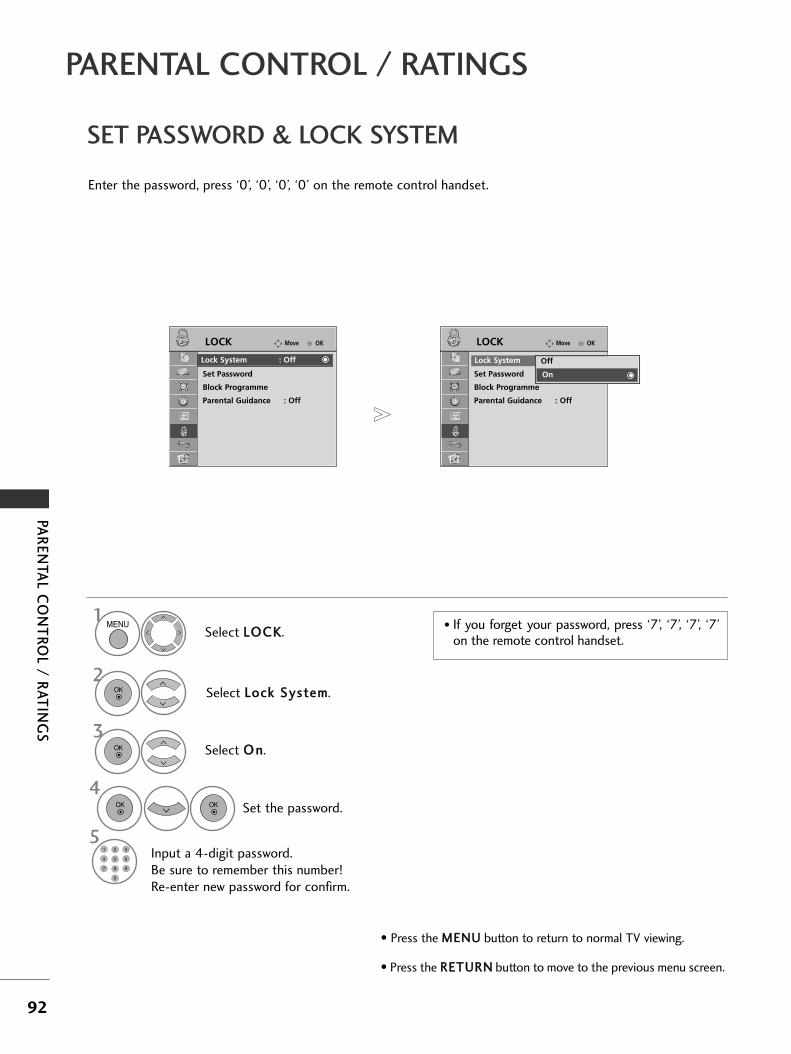
92
PAR
EN
TAL C
ON
TR
OL / R
AT
ING
S
PARENTAL CONTROL / RATINGS
SET PASSWORD & LOCK SYSTEM
Enter the password, press ‘0’, ‘0’, ‘0’, ‘0’ on the remote control handset.
Select LLOOCCKK.
Select LLoocckk SSyysstteemm.
Select OO nn.
Set the password.
Input a 4-digit password.Be sure to remember this number!Re-enter new password for confirm.
• If you forget your password, press ‘7’, ‘7’, ‘7’, ‘7’on the remote control handset.
OKMove
Lock System : Off
Set Password
Block Programme
Parental Guidance : Off
LOCK OKMove
Lock System : Off
Set Password
Block Programme
Parental Guidance : Off
LOCK
Lock System : OffLock System : Off Off
OnOn
1MENU
3
2OK
OK
4
5
OK OK
1
4 5 6
7 8
0
9
2 3
• Press the MMEENNUU button to return to normal TV viewing.
• Press the RREETTUURRNN button to move to the previous menu screen.

93
PAR
EN
TAL C
ON
TR
OL / R
AT
ING
S
TEN Digital1
Pr. Change Page ChangeP
TV DTV Radio
1 TEN Digital 7 7 Digital
9 Nine Digital 10 TEN Digital
11 TEN Guide 12 TEN HD
70 7 HD Digital 71 7 Digital 1
72 7 Digital 2 73 7 Digital 3
Navigation PreviousReturn
Block/Unblock
BLOCK PROGRAMME
Blocks any programmes that you do not want to watch or that you do not want your children to watch.
It is available to use this function in LLoocckk SSyysstteemm ”OO nn”.
Select LLOOCCKK.
Select BBlloocckk PPrrooggrraammmmee.
Enter the BBlloocckk PPrrooggrraammmmee.
Select a programme to be locked.
OKMove
Lock System : Off
Set Password
Block Program
Parental Guidance : Off
LOCK
Block Programme
1MENU
3
2OK
OK
4
• Press the MMEENNUU button to return to normal TV viewing.
• Press the RREETTUURRNN button to move to the previous menu screen.
GREENGREEN

94
PARENTAL CONTROL / RATINGS
PAR
EN
TAL C
ON
TR
OL / R
AT
ING
S
OKMove
Lock System : Off
Set Password
Block Programme
Parental Guidance
LOCK OKMove
Lock System : On
Set Password
Block Programme
Parental Guidance
LOCK
Parental GuidanceParental Guidance : Off
PARENTAL CONTROL
This function operates according to information from the broadcasting station. Therefore if the signal has incor-rect information, this function does not operate.
A password is required to gain access to this menu.
This set is programmed to remember which option it was last set to even if you switch the set off.
Prevents children from watching certain adult’s TV programmes, according to the ratings limit set.
Select LLOOCCKK.
Select PPaarreennttaall GGuuiiddaannccee.
Make appropriate adjustments.
Save.
FF G GG
Close
1MENU
3
2OK
OK
4OK
• Press the MMEENNUU button to return to normal TV viewing.
• Press the RREETTUURRNN button to move to the previous menu screen.

95
PAR
EN
TAL C
ON
TR
OL / R
AT
ING
S
KEY LOCK
The TV can be set so that the remote control is required to control it. This feature can be used to prevent unau-thorized viewing.
Select OOPPTTIIOONN.
Select KKeeyy LLoocckk.
Select OOnn or OOff ff.
Save.
• In KKeeyy LLoocckk ‘OO nn’, if the TV is turned off, press the rr / I,INPUT, P D or E button on the TV or POWER, INPUT, P
or NUMBER buttons on the remote control then theset will be turned on.
• With the KKeeyy LLoocckk OOnn, the display ‘ KKeeyy LLoocckkOOnn ’ appears on the screen if any button on the frontpanel is pressed while viewing the TV.
1MENU
3
2OK
OK
4OK
• Press the MMEENNUU button to return to normal TV viewing.
• Press the RREETTUURRNN button to move to the previous menu screen.
OKMove
Subtitle : On
Input Label
SIMPLINK : On
Key Lock : Off
Set ID : 1
ISM Method : Normal
Power Saving : Level 0
Factory Reset
OPTION
Key Lock : On
OKMove
Subtitle : On
Input Label
SIMPLINK : On
Key Lock : Off
Set ID : 1
ISM Method : Normal
Power Saving : Level 0
Factory Reset
OPTION
Off
OnOnKey Lock : Off

96
TE
LET
EX
T
TELETEXT
TThhiiss ffeeaattuurree iiss nnoott aavvaaii llaabbllee iinn aall ll ccoouunnttrriieess..
TOP TEXT
The user guide displays four fields-red, green, yellow and blue at the bottom of the screen. The yellow field denotes the next group and the blue field indicates the next block.
AA Block / group / page selection
With the blue button you can progress from block to block.
Use the yellow button to proceed to the next group with automatic overflow to the next block.
With the green button you can proceed to the next existing page with automatic overflow to the next group.
Alternatively the P button can be used.
The red button returns to the previous selection. Alternatively the P button can be used.
AA Direct page selection
As with SIMPLE teletext mode, you can select a page by entering it as a three digit number using the NUMBERbuttons in TOP mode.
44
1
2
3
Press the TTEEXXTT button to switch to teletext. The initial page or last page viewed appears on the screen.
Two page numbers, TV station name, date and time are displayed on the screen headline. The first page numberindicates your selection, while the second shows the current page displayed.
Press the TTEEXXTT button to switch off teletext. The previous mode reappears.
SWITCH ON/OFF
AA Page selection
Enter the desired page number as a three digit number with the NUMBER buttons. If during selection youpress a wrong number, you must complete the three digit number and then re-enter the correct page number.
The P button can be used to select the preceding or following page.
SIMPLE TEXT
1
2
Teletext is a free service broadcast by most TV stations which gives up-to-the-minute information on news,
weather, television programmes, share prices and many other topics.
The teletext decoder of this TV can support the SIMPLE, TOP and FASTEXT systems. SIMPLE (standard tele-
text) consists of a number of pages which are selected by directly entering the corresponding page number.
TOP and FASTEXT are more modern methods allowing quick and easy selection of teletext information.
(IN DIGITAL MODE ONLY)

97
TE
LET
EX
T
SPECIAL TELETEXT FUNCTIONS
AA RREEVVEEAALL
Select this menu to display concealed information, such as solutions to riddles or puzzles.
AA UUPPDDAATTEE
Displays the TV picture on the screen while waiting for a new teletext page. The display will appear at the top lefthand corner of the screen. When the updated page is available then display will change to the page number. Selectthis menu again to view the updated teletext page.
AA TTIIMMEE
When viewing a TV programme, Select this menu to display the time at the top right hand corner of the screen.
In the teletext mode, press this button to select a sub page number. The sub page number is displayed at the bot-tom of the screen. To hold or change the sub page, press the RED/GREEN, // or NUMBER buttons.
AA HHOOLLDD
Stops the automatic page change which will occur if a teletext page consists of 2 or more sub pages. The num-ber of sub pages and the sub page displayed is, usually, shown on the screen below the time. When this menu isselected the stop symbol is displayed at the top left-hand corner of the screen and the automatic page changeis inactive.
AA IINNDDEEXXSelect the each index page.
?
FASTEXTThe teletext pages are colour coded along the bottom of the screen and are selected by pressing the correspond-ing coloured button.
AA Page selection
Press the TT..OOPPTT button and then use button to select menu. Display the index page.
You can select the pages which are colour coded along the bottom line with corresponding coloured buttons.
AS with SIMPLE teletext mode, you can select a page by entering its three digit page number with the NUM-BER buttons in FASTEXT mode.
The P button can be used to select the preceding or following page.
i
44
1
2
3
� Press the TT.. OOPPTT button and then use button to select the TTeexxtt OOppttiioonn menu.
i
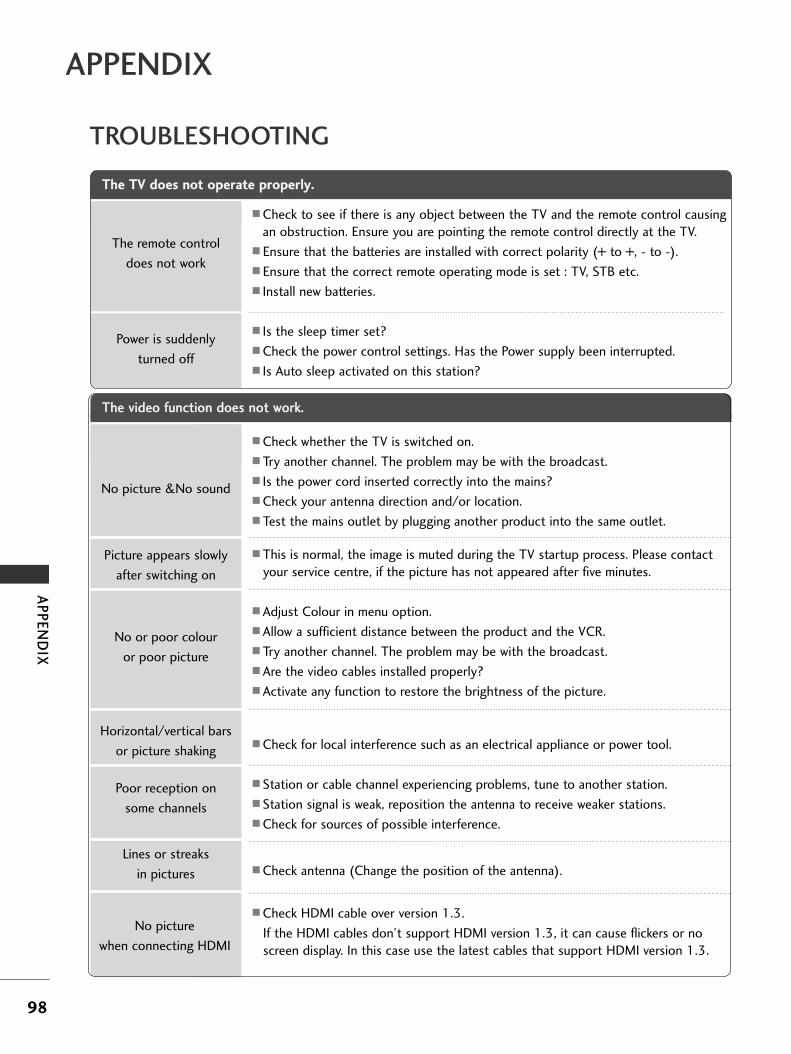
98
AP
PE
ND
IX
APPENDIX
TROUBLESHOOTING
No picture &No sound
No or poor colour
or poor picture
Poor reception on
some channels
Lines or streaks
in pictures
Horizontal/vertical bars
or picture shaking
Picture appears slowly
after switching on
A Check whether the TV is switched on.
A Try another channel. The problem may be with the broadcast.
A Is the power cord inserted correctly into the mains?
A Check your antenna direction and/or location.
A Test the mains outlet by plugging another product into the same outlet.
A This is normal, the image is muted during the TV startup process. Please contactyour service centre, if the picture has not appeared after five minutes.
A Adjust Colour in menu option.
A Allow a sufficient distance between the product and the VCR.
A Try another channel. The problem may be with the broadcast.
A Are the video cables installed properly?
A Activate any function to restore the brightness of the picture.
A Check for local interference such as an electrical appliance or power tool.
A Station or cable channel experiencing problems, tune to another station.
A Station signal is weak, reposition the antenna to receive weaker stations.
A Check for sources of possible interference.
A Check antenna (Change the position of the antenna).
A Check HDMI cable over version 1.3.
If the HDMI cables don’t support HDMI version 1.3, it can cause flickers or noscreen display. In this case use the latest cables that support HDMI version 1.3.
TThhee TTVV ddooeess nnoott ooppeerraattee pprrooppeerrllyy..
The remote control
does not work
Power is suddenly
turned off
A Check to see if there is any object between the TV and the remote control causingan obstruction. Ensure you are pointing the remote control directly at the TV.
A Ensure that the batteries are installed with correct polarity (+ to +, - to -).
A Ensure that the correct remote operating mode is set : TV, STB etc.
A Install new batteries.
A Is the sleep timer set?
A Check the power control settings. Has the Power supply been interrupted.
A Is Auto sleep activated on this station?
TThhee vviiddeeoo ffuunnccttiioonn ddooeess nnoott wwoorrkk..
No picture
when connecting HDMI

99
AP
PE
ND
IX
TThheerree iiss aa pprroobblleemm iinn PPCC mmooddee.. ((OOnnllyy PPCC mmooddee aapppplliieedd))
A Adjust resolution, horizontal frequency, or vertical frequency.
A Check the input source.
A Use Auto configure or adjust clock, phase, or H/V position. (Option)
A Check the signal cable.
A Reinstall the PC video card.
The signal is out of range
(Invalid format)
Screen colour is unstableor single colour
Vertical bar or stripe on
background &Horizontal Noise &Incorrect position
TThhee aauuddiioo ffuunnccttiioonn ddooeess nnoott wwoorrkk..
A Press the ++ or -- button.
A Sound muted? Press MUTE button.
A Try another channel. The problem may be with the broadcast.
A Are the audio cables installed properly?
A Adjust BBaallaannccee in menu option.
A A change in ambient humidity or temperature may result in an unusual noisewhen the product is switched on or off and does not indicate a fault with theproduct.
A Check HDMI cable over version 1.3.
A Check USB cable over version 2.0.
Picture OK & No sound
Unusual sound frominside
the product
No output from one
of the speakers
No sound when connecting HDMI
or USB*This feature is not available for all models.
TThheerree iiss aa pprroobblleemm iinn PPIICCTTUURREE sseettttiinnggss..
A It means that the TV is currently set to IInn SSttoorree mode.
To switch to HHoommee mode you should do the followings:
From the TV Menu, choose OOPPTTIIOONN -> FFaaccttoorryy RReesseett -> YYeess (wait for a fewseconds for the TV to download again) -> OSD "WWEELLCCOOMMEE" appears -> PressOO KK button -> Choose HHoommee -> Select TTiimmee ZZoonnee -> Press OO KK button.
Program search will begin automatically (You can stop the search by pressingthe OO KK button). Now you have completed switching to the HHoommee mode.
When the user changesthe picture settings, the
TV automatically convertsback to the initial settingsafter a certain period of
time.
100
APPENDIX
AP
PE
ND
IX
MAINTENANCE
Early malfunctions can be prevented. Careful and regular cleaning can prolong the life of your new TV.
Caution: Be sure to switch the power off and unplug the power cord before you begin any cleaning.
Cleaning the Screen
A good way to keep the dust off your screen for a while is to wet a soft cloth in a mixture of lukewarm waterand a little fabric softener or dish washing detergent. Wring the cloth until it is almost dry, and then use itto wipe the screen.
Ensure there is no excess water on the screen. Allow any water or dampness to evaporate before switching on.
Cleaning the CabinetATo remove dirt or dust, wipe the cabinet with a soft, dry, lint-free cloth.
ADo not to use a wet cloth.
Extended Absence
G If you expect to leave your TV dormant for prolonged periods (such as a holiday), unplug the powercord to protect against possible damage from lightning or power surges.
CAUTION
2
1

101
AP
PE
ND
IX
1044.4 x 735.4 x 308.0 mm
41.1x 28.9 x 12.1 inches
1044.4 x 680.6 x 79.6 mm
41.1 x 26.7 x 3.1 inches
28 kg / 61.7 lbs
25 kg / 55 lbs
AC100-240V~ 50/60Hz
1235.6 x 849.3 x 364.1 mm
48.6 x 33.4x 14.3inches
1235.6 x 792.8 x 79.6 mm
48.6x 31.2 x 3.1 inches
43.65 kg / 96.2 lbs
39.7kg / 87.5lbs
AC100-240V~ 50/60Hz
1468 x 1009.1 x 413.9 mm
57.8 x 39.7 x 16.3 inches
1468 x 949.5 x 88.5 mm
57.8 x 37.4 x 3.5 inches
80.6 kg / 177.7 lbs
72.6 kg / 160.1 lbs
AC100-240V~ 50/60Hz
MODELS
Dimensions(Width x Height x Depth)
Weight
Operating Temperature
Operating Humidity
Storage Temperature
Storage Humidity
Environment condition
Power requirement
Television System
Program Coverage
External Antenna Impedance
PAL B/G, DVB-T
VHF 0-12, UHF 20-75, CATV 02-44, DTV 06-12, 27-69
75 ohm
32 ~ 104°F (0 ~ 40°C)
Less than 80%
-4 ~ 140°F (-20 ~ 60°C)
Less than 85%
with stand
without stand
with stand
without stand
Dimensions(Width x Height x Depth)
Weight
Power requirement
with stand
without stand
with stand
without stand
42PG6***
42PG60UD-AA
50PG6***
50PG60UD-AA
60PG3***
60PG30FD-AA
MODELS
� The specifications shown above may be changed without prior notice for quality improvement.
1040 x 731.3 x 308 mm
40.9x 28.7 x 12.1 inches
1040 x 677 x 86 mm
40.9 x 26.6 x 3.4 inches
27.3 kg / 60.1 lbs
24.4 kg / 53.8 lbs
AC100-240V~ 50/60Hz
1224.7 x 849 x 364 mm
48.2 x 33.4x 14.3inches
1224.7 x 790 x 86 mm
48.2x 31.1 x 3.4 inches
41.8 kg / 92.2 lbs
37.8kg / 83.3lbs
AC100-240V~ 50/60Hz
1235.6 x 849.3 x 364.1 mm
48.6 x 33.4x 14.3inches
1235.6 x 792.8 x 79.6 mm
48.6x 31.2 x 3.1 inches
45.7 kg / 100.7 lbs
41.7kg / 91.9 lbs
AC100-240V~ 50/60Hz
1455 x 985 x 414 mm
57.3 x 38.8 x 16.3 inches
1455 x 924.8 x 84.1 mm
57.3 x 36.4 x 3.3 inches
62.4 kg / 137.6 lbs
54.9 kg / 121.0 lbs
AC100-240V~ 50/60Hz
42PG2***
42PG20D-AA
50PG2***
50PG20D-AA
50PG7***
50PG70FD-AB
60PG7***
60PG70FD-AB
PRODUCT SPECIFICATIONS
1232 x 850 x 363.6 mm
48.5 x 33.5x 14.3inches
1232 x 793 x 84 mm
48.5x 31.2 x 3.3 inches
42.3 kg / 93.3 lbs
38.3kg / 84.4lbs
AC100-240V~ 50/60Hz
50PG3***
50PG30FD-AA

102
APPENDIX
AP
PE
ND
IX
PROGRAMMING THE REMOTE CONTROL
Programming a code into a remote mode
Testing your remote control.To find out whether your remote control can operate other components without programming, turn on acomponent such as a STB and press the corresponding mode button (such as a SSTTBB) on the remote con-trol, while pointing at the component. Test the POWER and P buttons to see if the componentresponds correctly. If the component does not operate correctly, the remote control requires programmingto operate the device.
Switch on the component to be programmed, then press the corresponding mode button (such as SSTTBB)on the remote control. The remote control button of the desired device is illumintated.
Press the MMEENNUU and MMUUTTE buttons simultaneously, the remote control is ready to be programmed withthe code.
Enter a code number using the number buttons on the remote control. Programming code numbers for thecorresponding component can be found on the following pages. If the code is correct, the device will turn off.
Press the MMEENNUU button to store the code.
Test the remote control functions to see if the component responds correctly. If not, repeat from step 2.
The remote control is a multi brand or universal remote. It can be programmed. to operate most remotecontrolled devices from other manufacturers.
Note that the remote control may not control all models from other brands.
1
2
3
4
5
6
This function is not available for all models.
Brand Codes Brand Codes Brand Codes
HDSTB
ALPHASTAR DSR 123
AMPLICA 050
BIRDVIEW 051 126 129
CHANNEL MASTER 013 014 015 018
036 055
CHAPARRAL 008 009 012 077
CITOH 054
CURTIS MATHES 050 145
DRAKE 005 006 007 010
011 052 112 116
141
DX ANTENNA 024 046 056 076
ECHOSTAR 038 040 057 058
093 094 095 096
097 098 099 100
122
ELECTRO HOME 089
EUROPLUS 114
FUJITSU 017 021 022 027
133 134
GENERAL INSTRUMENT 003 004 016 029
031 059 101
HITACHI 139 140
HOUSTON TRACKER 033 037 039 051
057 104
HUGHES 068
JANIEL 060 147
JERROLD 061
KATHREIN 108
LEGEND 057
LG 001
LUTRON 132
LUXOR 062 144
MACOM 010 059 063 064
065
MEMOREX 057
NEXTWAVE 028 124 125
NORSAT 069 070
PACE SKY SATELLITE 143
PANASONIC 060 142
PANSAT 121
PERSONAL CABLE 117
PHILIPS 071
PICO 105
PRESIDENT 019 102
PRIMESTAR 030 110 111
PROSAT 072
RCA 066 106
REALISTIC 043 074
SAMSUNG 123
SATELLITE SERVICE CO 028 035 047 057
085
SCIENTIFIC ATLANTA 032 138
SONY 103
STARCAST 041
SUPER GUIDE 020 124 125
TEECOM 023 026 075 087
088 090 107 130
137
TOSHIBA 002 127
UNIDEN 016 025 042 043
044 045 048 049
078 079 080 086
10 135 136
VIEWSTAR 115
WINEGARD 128 146
ZENITH 081 082 083 084
091 120

103
AP
PE
ND
IX
IR CODES
A Configuration of frame
1st frame
Repeat frame
A Lead code
A Repeat code
A BBiitt ddeessccrriippttiioonn
A FFrraammee iinntteerrvvaall :: TTff
The waveform is transmitted as long as a key is depressed.
C0 C1 C2 C3 C4 C5 C6 C7 C0 C1 C2 C3 C4 C5 C6 C7 D0 D1 D2 D3 D4 D5 D6 D7 D0 D1 D2 D3 D4 D5 D6 D7
Lead code Low custom code High custom code Data code Data code
Repeat codeTf
4.5 ms
9 ms
2.25 ms 9 ms
0.55 ms
0.56 ms
1.12 ms
0.56 ms
2.24 ms
Tf Tf
Tf=108ms @455KHz
Bit ”0” Bit ”1”
1. How to Connect
A Connect your wired remote control to the Remote Control port on the TV.
2. Remote Control IR Codes
A Output waveform
Single pulse, modulated with 37.917KHz signal at 455KHz
T1
Tc Carrier frequency
FCAR = 1/TC = fOSC/12
Duty ratio = T1/TC = 1/3

104
APPENDIX
AP
PE
ND
IX
CCooddee ((HHeexxaa)) FFuunncctt iioonn NNoottee
POWER INPUTTV/RADIOQ.MENUMENUGUIDELeft ( )Right ( )Up ( )Down ( )OK( )RETURN/EXITINFO iAV MODE
+-
P P FAVMUTENumber Key 0~9LISTQ.VIEWRED KeyGREEN KeyYELLOW KeyBLUE KeyTEXTT.OptionSUBTITLEÔ(Record)SIMPLINKRATIO
R/C BUTTON (POWER ON/OFF)R/C BUTTONR/C BUTTONR/C BUTTONR/C BUTTONR/C BUTTONR/C BUTTONR/C BUTTONR/C BUTTONR/C BUTTONR/C BUTTONR/C BUTTONR/C BUTTONR/C BUTTONR/C BUTTONR/C BUTTONR/C BUTTONR/C BUTTONR/C BUTTONR/C BUTTONR/C BUTTONR/C BUTTONR/C BUTTONR/C BUTTONR/C BUTTONR/C BUTTONR/C BUTTONR/C BUTTONR/C BUTTONR/C BUTTONR/C BUTTONR/C BUTTONR/C BUTTON
080Bf04543AB070640414428AA30020300011E09
10 ~19531A72716361202139BD7E79

105
AP
PE
ND
IX
EXTERNAL CONTROL THROUGH RS-232C
RS-232C Setup
Connect the RS-232C (serial port) input jack to an
external control device (such as a computer or an A/V
control system) to control the product’s functions
externally.
Connect the serial port of the control device to the
RS-232C jack on the product back panel.
Note: RS-232C connection cables are not supplied
with the product.
Type of Connector; D-Sub 9-Pin Male
No. Pin Name
1 No connection
2 RXD (Receive data)
3 TXD (Transmit data)
4 DTR (DTE side ready)
5 GND
6 DSR (DCE side ready)
7 RTS (Ready to send)
8 CTS (Clear to send)
9 No Connection
AV IN 1V IN 1 AV OUTV OUT
L/L/MONOMONO
RA
UD
IOA
UD
IOV
IDE
OV
IDE
O
LR
AU
DIO
AU
DIO
VID
EO
VID
EO
1 5
6 9
RS-232C Configurations
7-Wire Configurations (Standard RS-232C cable)
PC TV
RXD 2 3 TXD
TXD 3 2 RXD
GND 5 5 GND
DTR 4 6 DSR
DSR 6 4 DTR
RTS 7 8 CTS
CTS 8 7 RTS
D-Sub 9 D-Sub 9
3-Wire Configurations(Not standard)
PC TV
RXD 2 3 TXD
TXD 3 2 RXD
GND 5 5 GND
DTR 4 6 DTR
DSR 6 4 DSR
RTS 7 7 RTS
CTS 8 8 CTS
D-Sub 9 D-Sub 9

106
APPENDIX
AP
PE
ND
IX
Use this function to specify a set ID number.
Refer to ‘Real Data Mapping’. G pp..111100
Set ID
Select OOPPTTIIOONN.
Select SSeett IIDD.
adjust SSeett IIDD to choose the desired TV ID number.
The adjustment range of SET ID is 1~99.
OKMove
Subtitle : On
Input Label
SIMPLINK : On
Key Lock : Off
Set ID : 1
ISM Method : Normal
Power Saving : Level 0
Factory Reset
OPTION
Set ID
OKMove
Subtitle : On
Input Label
SIMPLINK : On
Key Lock : Off
Set ID : 1
ISM Method : Normal
Power Saving : Level 0
Factory Reset
OPTION
Set ID : 1FF 1 GG
Close
1MENU
3
2OK
OK
• Press BBAACCKK to move to the previous menu screen.
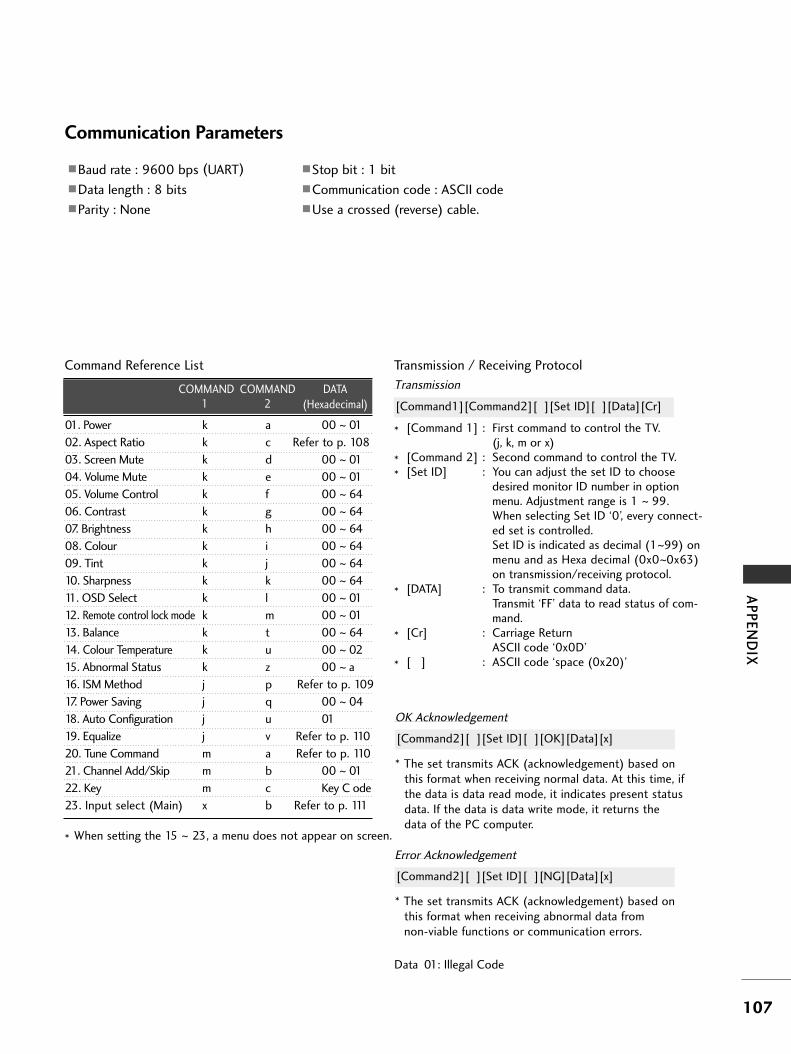
107
AP
PE
ND
IX
Data 01: Illegal Code
01. Power k a 00 ~ 01
02. Aspect Ratio k c Refer to p. 108
03. Screen Mute k d 00 ~ 01
04. Volume Mute k e 00 ~ 01
05. Volume Control k f 00 ~ 64
06. Contrast k g 00 ~ 64
07. Brightness k h 00 ~ 64
08. Colour k i 00 ~ 64
09. Tint k j 00 ~ 64
10. Sharpness k k 00 ~ 64
11. OSD Select k l 00 ~ 01
12. Remote control lock mode k m 00 ~ 01
13. Balance k t 00 ~ 64
14. Colour Temperature k u 00 ~ 02
15. Abnormal Status k z 00 ~ a
16. ISM Method j p Refer to p. 109
17. Power Saving j q 00 ~ 04
18. Auto Configuration j u 01
19. Equalize j v Refer to p. 110
20. Tune Command m a Refer to p. 110
21. Channel Add/Skip m b 00 ~ 01
22. Key m c Key C ode
23. Input select (Main) x b Refer to p. 111
Communication Parameters
ABaud rate : 9600 bps (UART)
AData length : 8 bits
AParity : None
AStop bit : 1 bit
ACommunication code : ASCII code
AUse a crossed (reverse) cable.
Transmission
* [Command 1] : First command to control the TV.(j, k, m or x)
* [Command 2] : Second command to control the TV.
* [Set ID] : You can adjust the set ID to choosedesired monitor ID number in optionmenu. Adjustment range is 1 ~ 99. When selecting Set ID ‘0’, every connect-ed set is controlled.Set ID is indicated as decimal (1~99) onmenu and as Hexa decimal (0x0~0x63)on transmission/receiving protocol.
* [DATA] : To transmit command data.Transmit ‘FF’ data to read status of com-mand.
* [Cr] : Carriage ReturnASCII code ‘0x0D’
* [ ] : ASCII code ‘space (0x20)’
[Command1][Command2][ ][Set ID][ ][Data][Cr]
OK Acknowledgement
* The set transmits ACK (acknowledgement) based onthis format when receiving normal data. At this time, ifthe data is data read mode, it indicates present statusdata. If the data is data write mode, it returns thedata of the PC computer.
[Command2][ ][Set ID][ ][OK][Data][x]
Error Acknowledgement
* The set transmits ACK (acknowledgement) based onthis format when receiving abnormal data from non-viable functions or communication errors.
[Command2][ ][Set ID][ ][NG][Data][x]
Transmission / Receiving ProtocolCommand Reference List
COMMAND1
COMMAND2
DATA(Hexadecimal)
* When setting the 15 ~ 23, a menu does not appear on screen.

108
APPENDIX
AP
PE
ND
IX
0088.. CCoolloouurr ((CCoommmmaanndd:: kk ii))
G To adjust the screen colour.You can also adjust colour in the PICTURE menu.
Transmission
Data Min : 00 ~ Max : 64
* Refer to ‘Real data mapping 1’. See page 110.
[k][i][ ][Set ID][ ][Data][Cr]
Ack
[i][ ][Set ID][ ][OK/NG][Data][x]
0044.. VVoolluummee MMuuttee ((CCoommmmaanndd:: kk ee))
G To control volume mute on/off.You can also adjust mute using the MUTE button onremote control.
Transmission
Data 00 : Volume mute on (Volume off)01 : Volume mute off (Volume on)
[k][e][ ][Set ID][ ][Data][Cr]
Ack
[e][ ][Set ID][ ][OK/NG][Data][x]
0022.. AAssppeecctt RRaattiioo ((CCoommmmaanndd:: kk cc)) ((MMaaiinn PPiiccttuurree SSiizzee))
G To adjust the screen format. (Main picture format)You can also adjust the screen format using theAAssppeecctt RRaattiioo in the Q.MENU. or PICTURE menu.
Transmission
Data 01 : Normal screen (4:3) 02 : Wide screen (16:9) 04 : Zoom1
05 : Zoom206 : Original07 : 14:909 : Just Scan
[k][c][ ][Set ID][ ][Data][Cr]
Ack
* Using the PC input, you select either 16:9 or 4:3screen aspect ratio.
* In HDMI/Component (over 720p), DTV(over HD TV)mode, JJuusstt SSccaann is available.
[c][ ][Set ID][ ][OK/NG][Data][x]
0033.. SSccrreeeenn MMuuttee ((CCoommmmaanndd:: kk dd))
G To select screen mute on/off.
Transmission
Data 00 : Screen mute off (Picture on)01 : Screen mute on (Picture off)
[k][d][ ][Set ID][ ][Data][Cr]
Ack
[d][ ][Set ID][ ][OK/NG][Data][x]
0055.. VVoolluummee CCoonnttrrooll ((CCoommmmaanndd:: kk ff))
G To adjust volume.You can also adjust volume with the VOLUME buttons onremote control.
Transmission
Data Min : 00 ~ Max : 64
* Refer to ‘Real data mapping 1’. See page 110.
[k][f][ ][Set ID][ ][Data][Cr]
Ack
[f][ ][Set ID][ ][OK/NG][Data][x]
0066.. CCoonnttrraasstt ((CCoommmmaanndd:: kk gg))
G To adjust screen contrast. You can also adjust contrast in the PICTURE menu.
Transmission
Data Min : 00 ~ Max : 64
* Refer to ‘Real data mapping 1’. See page 110.
[k][g][ ][Set ID][ ][Data][Cr]
Ack
[g][ ][Set ID][ ][OK/NG][Data][x]
0077.. BBrriigghhttnneessss ((CCoommmmaanndd:: kk hh))
G To adjust screen brightness.You can also adjust brightness in the PICTURE menu.
Transmission
Data Min : 00 ~ Max : 64
* Refer to ‘Real data mapping 1’. See page 110.
[k][h][ ][Set ID][ ][Data][Cr]
Ack
[h][ ][Set ID][ ][OK/NG][Data][x]
0011.. PPoowweerr ((CCoommmmaanndd:: kk aa))
G To control Power On/Off of the set.
Transmission
Data 00 : Power Off 01 : Power On
[k][a][ ][Set ID][ ][Data][Cr]
Ack
[a][ ][Set ID][ ][OK][Data][x]
G To show Power On/Off.
Transmission
[k][a][ ][Set ID][ ][FF][Cr]
Ack
* Similarly, if other functions transmit ‘0xFF’ data basedon this format, Acknowledgement data feed backpresents status about each function.
* OK Ack. ,Error Ack. and other message may display onthe screen when TV is power On.
[a][ ][Set ID][ ][OK/NG][Data][x]

109
AP
PE
ND
IX
1122.. RReemmoottee ccoonnttrrooll lloocckk mmooddee ((CCoommmmaanndd:: kk mm))
G To lock the front panel controls on the monitor andremote control.
Transmission
[k][m][ ][Set ID][ ][Data][Cr]
Ack
Data 00 : Lock off 01 : Lock on
* If you are not using the remote control, use this mode.When main power is on/off, external control lock isreleased.
[m][ ][Set ID][ ][OK/NG][Data][x]
1111.. OOSSDD SSeelleecctt ((CCoommmmaanndd:: kk ll))
G To select OSD (On Screen Display) on/off whencontrolling remotely.
Transmission
[k][l][ ][Set ID][ ][Data][Cr]
Ack
Data 00 : OSD off 01 : OSD on
[l][ ][Set ID][ ][OK/NG][Data][x]
0099.. TTiinntt ((CCoommmmaanndd:: kk jj))
G To adjust the screen tint.You can also adjust tint in the PICTURE menu.
Transmission
Data Red : 00 ~ Green : 64
* Refer to ‘Real data mapping 1’. See page 110.
[k][j][ ][Set ID][ ][Data][Cr]
Ack
[j][ ][Set ID][ ][OK/NG][Data][x]
G To adjust the screen sharpness.You can also adjust sharpness in the PICTURE menu.
Transmission
1100.. SShhaarrppnneessss ((CCoommmmaanndd:: kk kk))
Data Min : 00 ~ Max : 64
* Refer to ‘Real data mapping 1’. See page 110.
[k][k][ ][Set ID][ ][Data][Cr]
Ack
[k][ ][Set ID][ ][OK/NG][Data][x]
1133.. BBaallaannccee ((CCoommmmaanndd:: kk tt))
G To adjust balance.You can also adjust balance in the AUDIO menu.
Transmission
Data Min : 00 ~ Max : 64
* Refer to ‘Real data mapping 1’. See page 110.
[k][t][ ][Set ID][ ][Data][Cr]
Ack
[t][ ][Set ID][ ][OK/NG][Data][x]
1144.. CCoolloouurr TTeemmppeerraattuurree ((CCoommmmaanndd:: kk uu))
G To adjust colour temperature. You can also adjust ColourTemperature in the PICTURE menu.
Transmission
Data 00: Medium 01:Cool 02: Warm
[k][u][ ][Set ID][ ][Data][Cr]
Ack
[u][ ][Set ID][ ][OK/NG][Data][x]
1155.. AAbbnnoorrmmaall SSttaattee ((CCoommmmaanndd:: kk zz))
G To recognize an abnormal state.
Transmission
Data FF : Read
Data 00: Normal (Power on and signal exist)01: No signal (Power on)02: Turn the TV off by remote control03: Turn the TV off by sleep time function04: Turn the TV off by RS-232C function05: 5V down06: AC down07: Turn the TV off by Fan Alarm function08: Turn the TV off by Off time function09: Turn the TV off by Auto sleep functiona: Turn the TV off by AV board detection.
* This function is “read only”.
[k][z][ ][Set ID][ ][FF][ ][Cr]
Ack
[z][ ][Set ID][ ][OK/NG][Data][x]
1166.. IISSMM MMeetthhoodd ((CCoommmmaanndd:: jj pp))
G To control the ISM method. You can also adjust ISMMethod in OPTION menu.
Transmission
[j][p][ ][Set ID][ ][Data][Cr]
Ack
[p][ ][Set ID][ ][OK/NG][Data][x]
Data 01: Inversion02: Orbiter04: White wash08: Normal

110
APPENDIX
AP
PE
ND
IX** RReeaall ddaattaa mmaappppiinngg 11
00 : Step 0
A : Step 10 (Set ID 10)
F : Step 15 (Set ID 15)10 : Step 16 (Set ID 16)
64: Step 100
6E : Step 110
73 : Step 11574 : Step 116
C7: Step 199
FE : Step 254FF : Step 255
** RReeaall ddaattaa mmaappppiinngg 22
00 :-4001 :-3902 :-38
28 :0
4E : +384F : +3950 : +40
2200..TTuunnee CCoommmmaanndd ((CCoommmmaanndd:: mm aa))
G Select channel to following physical number.
Transmission
Data00 : High channel dataData01 : Low channel data
ex. No. 47 -> 00 2F (2FH)No. 394 -> 01 88 (188H), DTV No. 0 -> Don’t care
Data020x00 : ATV Main0x10 : DTV Main
Channel data rangeAnalogue - Min: 00 ~ Max: 63 (0~99)Digital - Min: 00 ~ Max: 3E7 (0~999)
[m][a][ ][Set ID][ ][Data0][ ][Data1][ ][Data2][Cr]
Ack
[a][ ][Set ID][ ][OK/NG][Data][x]
Data Min: 00 ~ Max: FF
2211.. CChhaannnneell AAdddd//SSkkiipp((CCoommmmaanndd:: mm bb))
G To set skip status for the current Programme.
Transmission
Data 00 : Skip 01 : Add
[m][b][ ][Set ID][ ][Data][Cr]
Ack
[b][ ][Set ID][ ][OK/NG][Data][x]
1177.. PPoowweerr SSaavviinngg ((CCoommmmaanndd:: jj qq))
G To reduce the power consumption of the TV. You can alsoadjust Low Power in OPTION menu.
Transmission
Data Min :00 ~ Max :04 (*transmit by hexadecimal code)
[j][q][ ][Set ID][ ][Data][Cr]
Ack
[q][ ][Set ID][ ][OK/NG][Data][x]
1188.. AAuuttoo CCoonnff iigguurree((CCoommmmaanndd:: jj uu))
G To adjust picture position and minimize image shakingautomatically. It works only in RGB (PC) mode.
Transmission
Data 01: To set
[j][u][ ][Set ID][ ][Data][Cr]
Ack
[u][ ][Set ID][ ][OK/NG][Data][x]
1199.. EEqquuaall iizzee((CCoommmmaanndd:: jj vv ))
G To adjust equalize.
Transmission
MSB LSB
0
[j][v][ ][Set ID][ ][Data][Cr]
0 0 0 0 0 0 0
Frequency Data
Ack
[v][ ][Set ID][ ][OK/NG][Data][x]
Frequency
80Hz
00000 ~10010
220Hz
470Hz
1KHz
2.2KHz
4.7KHz
12KHz
7 6 5
0 0 0
0 0 1
0 1 0
0 1 1
1 0 0
1 0 1
1 1 0
4 3 2 1 0

111
AP
PE
ND
IX
2233.. IInnppuutt sseelleecctt ((CCoommmmaanndd:: xx bb ))((MMaaiinn PPiiccttuurree IInnppuutt))
G To select input source for main picture.
Transmission
Data Structure
MSB LSB
0
[x][b][ ][Set ID][ ][Data][Cr]
0 0 0 0 0 0 0
External Input Input Number
Ack
[b][ ][Set ID][ ][OK/NG][Data][x]
External Input Data
0 0 0 1 Analogue
0 0 0 0 DTV
0 0 1 0 AV
0 1 0 0 Component
0 1 0 1 RGB-PC
1 0 0 1 HDMI/DTV-PC
Input Number Data
0 0 0 0 Input1
0 0 1 1 Input4
0 0 1 0 Input3
0 0 0 1 Input2
2222.. KKeeyy((CCoommmmaanndd:: mm cc))
G To send IR remote key code.
Transmission
Data Key code - Refer to page 104.
[m][c][ ][Set ID][ ][Data][Cr]
Ack
[c][ ][Set ID][ ][OK/NG][Data][x]

112
APPENDIX
AP
PE
ND
IX
Open source software notice
The following GPL executables and LGPL/MPL libraries used in this product are subject to theGPL2.0/LGPL2.1/MPL1.1 License Agreements:
GGPPLL EEXXEECCUUTTAABBLLEESS::• Linux kernel 2.6
• busybox
LLGGPPLL LLIIBBRRAARRIIEESS::• glibc
MMPPLL LLIIBBRRAARRIIEESS::• Nanox
LG Electronics offers to provide source code to you on CD-ROM for a charge covering the cost of performingsuch distribution, such as the cost of media, shipping and handling upon e-mail request to LG Electronics at:[email protected] This offer is valid for a period of three(3) years from the date of the distribution of this product by LGElectronics.You can obtain a copy of the GPL, LGPL and MPL licenses at next pages. Also you can obtain the translation of GPL, LGPL licenses from http://www.gnu.org/licenses/old-licenses/gpl-2.0-translations.html, http://www.gnu.org/licenses/old-licenses/lgpl-2.1-translations.html.
• This software is based in part on the work of the Independent JPEG Group.
• This software includes the libpng, PNG reference library.
• This software includes the Zlib compression library, developed by Jean-loup Gailly and Mark Adler. Copyright(C) 1995-2005 Jean-loup Gailly and Mark Adler
113
AP
PE
ND
IX
OPEN SOURCE LICENSE
GNU GENERAL PUBLIC LICENSEVersion 2, June 1991
Copyright (C) 1989, 1991 Free Software Foundation, Inc., 51 Franklin Street, Fifth Floor, Boston, MA 02110-1301 USAEveryone is permitted to copy and distribute verbatim copies of this license document, but changing it is not allowed.
Preamble
The licenses for most software are designed to take away your freedom to share and change it. By contrast, the GNUGeneral Public License is intended to guarantee your freedom to share and change freesoftware--to make sure the software is free for all its users. This General Public License applies to most of the FreeSoftware Foundation's software and to any other program whose authors commit tousing it. (Some other Free Software Foundation software is covered by the GNU Lesser General Public Licenseinstead.) You can apply it to your programs, too.
When we speak of free software, we are referring to freedom, not price. Our General Public Licenses are designed tomake sure that you have the freedom to distribute copies of free software (and charge forthis service if you wish), that you receive source code or can get it if you want it, that you can change the software oruse pieces of it in new free programs; and that you know you can do these things.
To protect your rights, we need to make restrictions that forbid anyone to deny you these rights or to ask you to sur-render the rights. These restrictions translate to certain responsibilities for you if you distribute copies of the software,or if you modify it.
For example, if you distribute copies of such a program, whether gratis or for a fee, you must give the recipients allthe rights that you have. You must make sure that they, too, receive or can get the source code. And you must showthem these terms so they know their rights.
We protect your rights with two steps: (1) copyright the software, and (2) offer you this license which gives you legalpermission to copy, distribute and/or modify the software.
Also, for each author's protection and ours, we want to make certain that everyone understands that there is no war-ranty for this free software. If the software is modified by someone else and passed on, wewant its recipients to know that what they have is not the original, so that any problems introduced by others will notreflect on the original authors' reputations.
Finally, any free program is threatened constantly by software patents. We wish to avoid the danger that redistributorsof a free program will individually obtain patent licenses, in effect making the program proprietary. To prevent this, wehave made it clear that any patent must be licensed for everyone's free use or not licensed at all.
The precise terms and conditions for copying, distribution and modification follow.
GNU GENERAL PUBLIC LICENSETERMS AND CONDITIONS FOR COPYING, DISTRIBUTION AND MODIFICATION
0. This License applies to any program or other work which contains a notice placed by the copyright holder saying itmay be distributed under the terms of this General Public License. The "Program", below, refers to any such programor work, and a "work based on the Program" means either the Program or any derivative work under copyright law: thatis to say, a work containing the Program or a portion of it, either verbatim or with modifications and/or translated intoanother language. (Hereinafter, translation is included without limitation in the term "modification".) Each licensee isaddressed as "you".
Activities other than copying, distribution and modification are not covered by this License; they are outside its scope.The act of running the Program is not restricted, and the output from the Programis covered only if its contents constitute a work based on the Program (independent of having been made by runningthe Program). Whether that is true depends on what the Program does.

114
APPENDIX
AP
PE
ND
IX
1. You may copy and distribute verbatim copies of the Program's source code as you receive it, in any medium, pro-vided that you conspicuously and appropriately publish on each copy an appropriatecopyright notice and disclaimer of warranty; keep intact all the notices that refer to this License and to the absence ofany warranty; and give any other recipients of the Program a copy of this Licensealong with the Program.
You may charge a fee for the physical act of transferring a copy, and you may at your option offer warranty protection inexchange for a fee.
2. You may modify your copy or copies of the Program or any portion of it, thus forming a work based on theProgram, and copy and distribute such modifications or work under the terms of Section 1 above, provided that youalso meet all of these conditions:
a) You must cause the modified files to carry prominent notices stating that you changed the files and the date of anychange.
b) You must cause any work that you distribute or publish, that in whole or in part contains or is derived from theProgram or any part thereof, to be licensed as a whole at no charge to all third parties under the terms of thisLicense.
c) If the modified program normally reads commands interactively when run, you must cause it, when started runningfor such interactive use in the most ordinary way, to print or display an announcement including an appropriate copy-right notice and a notice that there is no warranty (or else, saying that you provide a warranty) and that users mayredistribute the program under these conditions, and telling the user how to view a copy of this License. (Exception:if the Program itself is interactive but does not normally print such an announcement, your work based on theProgram is not required to print an announcement.)
These requirements apply to the modified work as a whole. If identifiable sections of that work are not derived from theProgram, and can be reasonably considered independent and separate works in themselves, then this License, and itsterms, do not apply to those sections when you distribute them as separate works. But when you distribute the samesections as part of a whole which is a work based on the Program, the distribution of the whole must be on the terms ofthis License, whose permissions for other licensees extend to the entire whole, and thus to each and every part regard-less of who wrote it.
Thus, it is not the intent of this section to claim rights or contest your rights to work written entirely by you; rather, theintent is to exercise the right to control the distribution of derivative or collective works based on the Program.
In addition, mere aggregation of another work not based on the Program with the Program (or with a work based onthe Program) on a volume of a storage or distribution medium does not bring the other work under the scope of thisLicense.
3. You may copy and distribute the Program (or a work based on it, under Section 2) in object code or executableform under the terms of Sections 1 and 2 above provided that you also do one of the following:
a) Accompany it with the complete corresponding machine-readable source code, which must be distributed underthe terms of Sections 1 and 2 above on a medium customarily used for software interchange; or,
b) Accompany it with a written offer, valid for at least three years, to give any third party, for a charge no more thanyour cost of physically performing source distribution, a complete machine-readable copy of the correspondingsource code, to be distributed under the terms of Sections 1 and 2 above on a medium customarily used for softwareinterchange; or,
c) Accompany it with the information you received as to the offer to distribute corresponding source code. (Thisalternative is allowed only for non-commercial distribution and only if you received the program in object code or exe-cutable form with such an offer, in accord with Subsection b above.)
The source code for a work means the preferred form of the work for making modifications to it. For an executablework, complete source code means all the source code for all modules it contains, plus any associated interface defini-tion files, plus the scripts used to control compilation and installation of the executable. However, as a special excep-tion, the source code distributed need not include anything that is normally distributed (in either source or binaryform) with the major components (compiler, kernel, and so on) of the operating system on which the executable runs,unless that component itself accompanies the executable.
115
AP
PE
ND
IX
If distribution of executable or object code is made by offering access to copy from a designated place, then offeringequivalent access to copy the source code from the same place counts as distribution of the source code, even thoughthird parties are not compelled to copy the source along with the object code.
4. You may not copy, modify, sublicense, or distribute the Program except as expressly provided under this License.Any attempt otherwise to copy, modify, sublicense or distribute the Program is void, and will automatically terminateyour rights under this License. However, parties who have received copies, or rights, from you under this License willnot have their licenses terminated so long as such parties remain in full compliance.
5. You are not required to accept this License, since you have not signed it. However, nothing else grants you permis-sion to modify or distribute the Program or its derivative works. These actions are prohibited by law if you do notaccept this License. Therefore, by modifying or distributing the Program (or any work based on the Program), you indi-cate your acceptance of this License to do so, and all its terms and conditions for copying, distributing or modifying theProgram or works based on it.
6. Each time you redistribute the Program (or any work based on the Program), the recipient automatically receives alicense from the original licensor to copy, distribute or modify the Program subject to these terms and conditions. Youmay not impose any further restrictions on the recipients' exercise of the rights granted herein. You are not responsiblefor enforcing compliance by third parties to this License.
7. If, as a consequence of a court judgment or allegation of patent infringement or for any other reason (not limited topatent issues), conditions are imposed on you (whether by court order, agreement or otherwise) that contradict the con-ditions of this License, they do not excuse you from the conditions of this License. If you cannot distribute so as to sat-isfy simultaneously your obligations under this License and any other pertinent obligations, then as a consequence youmay not distribute the Program at all. For example, if a patent license would not permit royalty-free redistribution of theProgram by all those who receive copies directly or indirectly through you, then the only way you could satisfy both itand this License would be to refrain entirely from distribution of the Program.
If any portion of this section is held invalid or unenforceable under any particular circumstance, the balance of the sec-tion is intended to apply and the section as a whole is intended to apply in other circumstances.
It is not the purpose of this section to induce you to infringe any patents or other property right claims or to contestvalidity of any such claims; this section has the sole purpose of protecting the integrity of the free software distributionsystem, which is implemented by public license practices. Many people have made generous contributions to the widerange of software distributed through that system in reliance on consistent application of that system; it is up to theauthor/donor to decide if he or she is willing to distribute software through any other system and a licensee cannotimpose that choice.
This section is intended to make thoroughly clear what is believed to be a consequence of the rest of this License.
8. If the distribution and/or use of the Program is restricted in certain countries either by patents or by copyrightedinterfaces, the original copyright holder who places the Program under this License may add an explicit geographicaldistribution limitation excluding those countries, so that distribution is permitted only in or among countries not thusexcluded. In such case, this License incorporates the limitation as if written in the body of this License.
9. The Free Software Foundation may publish revised and/or new versions of the General Public License from time totime. Such new versions will be similar in spirit to the present version, but may differ in detail to address new problemsor concerns.
Each version is given a distinguishing version number. If the Program specifies a version number of this License whichapplies to it and "any later version", you have the option of following the terms and conditions either of that version or ofany later version published by the Free Software Foundation. If the Program does not specify a version number ofthis License, you may choose any version ever published by the Free Software Foundation.
10. If you wish to incorporate parts of the Program into other free programs whose distribution conditions are different,write to the author to ask for permission. For software which is copyrighted by the Free Software Foundation, write tothe Free Software Foundation; we sometimes make exceptions for this. Our decision will be guided by the two goalsof preserving the free status of all derivatives of our free software and of promoting the sharing and reuse of softwaregenerally.

116
APPENDIX
AP
PE
ND
IX
NO WARRANTY
11. BECAUSE THE PROGRAM IS LICENSED FREE OF CHARGE, THERE IS NO WARRANTY FOR THE PRO-GRAM, TO THE EXTENT PERMITTED BY APPLICABLE LAW. EXCEPT WHEN OTHERWISE STATED IN WRITINGTHE COPYRIGHT HOLDERS AND/OR OTHER PARTIES PROVIDE THE PROGRAM "AS IS" WITHOUT WARRANTYOF ANY KIND, EITHER EXPRESSED OR IMPLIED, INCLUDING, BUT NOT LIMITED TO, THE IMPLIED WAR-RANTIES OF MERCHANTABILITY AND FITNESS FOR A PARTICULAR PURPOSE. THE ENTIRE RISK AS TO THEQUALITY AND PERFORMANCE OF THE PROGRAM IS WITH YOU. SHOULD THE PROGRAM PROVE DEFEC-TIVE, YOU ASSUME THE COST OF ALL NECESSARY SERVICING, REPAIR OR CORRECTION.
12. IN NO EVENT UNLESS REQUIRED BY APPLICABLE LAW OR AGREED TO IN WRITING WILL ANY COPY-RIGHT HOLDER, OR ANY OTHER PARTY WHO MAY MODIFY AND/OR REDISTRIBUTE THE PROGRAM AS PER-MITTED ABOVE, BE LIABLE TO YOU FOR DAMAGES, INCLUDING ANY GENERAL, SPECIAL, INCIDENTAL ORCONSEQUENTIAL DAMAGES ARISING OUT OF THE USE OR INABILITY TO USE THE PROGRAM (INCLUDINGBUT NOT LIMITED TO LOSS OF DATA OR DATA BEING RENDERED INACCURATE OR LOSSES SUSTAINED BYYOU OR THIRD PARTIES OR A FAILURE OF THE PROGRAM TO OPERATE WITH ANY OTHER PROGRAMS),EVEN IF SUCH HOLDER OR OTHER PARTY HAS BEEN ADVISED OF THE POSSIBILITY OF SUCH DAMAGES.
END OF TERMS AND CONDITIONS
How to Apply These Terms to Your New Programs
If you develop a new program, and you want it to be of the greatest possible use to the public, the best way toachieve this is to make it free software which everyone can redistribute and change under these terms.
To do so, attach the following notices to the program. It is safest to attach them to the start of each source file to mosteffectively convey the exclusion of warranty; and each file should have at least the "copyright" line and a pointer towhere the full notice is found.
<one line to give the program's name and a brief idea of what it does.>Copyright (C) <year> <name of author>
This program is free software; you can redistribute it and/or modify it under the terms of the GNU General PublicLicense as published by the Free Software Foundation; either version 2 of the License, or (at your option) any laterversion.
This program is distributed in the hope that it will be useful, but WITHOUT ANY WARRANTY; without even theimplied warranty of MERCHANTABILITY or FITNESS FOR A PARTICULAR PURPOSE. See the GNU GeneralPublic License for more details.
You should have received a copy of the GNU General Public License along with this program; if not, write to theFree Software Foundation, Inc., 51 Franklin Street, Fifth Floor, Boston, MA 02110-1301 USA.
Also add information on how to contact you by electronic and paper mail.
If the program is interactive, make it output a short notice like this when it starts in an interactive mode:
Gnomovision version 69, Copyright (C) year name of author Gnomovision comes with ABSOLUTELY NO WARRAN-TY; for details type `show w'. This is free software, and you are welcome to redistribute it under certain conditions;type `show c' for details.
The hypothetical commands `show w' and `show c' should show the appropriate parts of the General Public License.Of course, the commands you use may be called something other than `show w' and `show c'; they could even bemouse-clicks or menu items--whatever suits your program.
You should also get your employer (if you work as a programmer) or your school, if any, to sign a "copyright disclaimer"for the program, if necessary. Here is a sample; alter the names:
Yoyodyne, Inc., hereby disclaims all copyright interest in the program `Gnomovision' (which makes passes at compil-ers) written by James Hacker.
<signature of Ty Coon>, 1 April 1989Ty Coon, President of Vice
This General Public License does not permit incorporating your program into proprietary programs. If your program is asubroutine library, you may consider it more useful to permit linking proprietary applications with the library. If this iswhat you want to do, use the GNU Lesser General Public License instead of this License.
117
AP
PE
ND
IX
GNU LESSER GENERAL PUBLIC LICENSEVersion 2.1, February 1999
Copyright (C) 1991, 1999 Free Software Foundation, Inc. 51 Franklin Street, Fifth Floor, Boston, MA 02110-1301USA Everyone is permitted to copy and distribute verbatim copies of this license document, but changing it is notallowed.
[This is the first released version of the Lesser GPL. It also counts as the successor of the GNU Library PublicLicense, version 2, hence the version number 2.1.]
Preamble
The licenses for most software are designed to take away your freedom to share and change it. By contrast, the GNUGeneral Public Licenses are intended to guarantee your freedom to share and change free software--to make sure thesoftware is free for all its users.
This license, the Lesser General Public License, applies to some specially designated software packages--typicallylibraries--of the Free Software Foundation and other authors who decide to use it. You can use it too, but we suggestyou first think carefully about whether this license or the ordinary General Public License is the better strategy to use inany particular case, based on the explanations below.
When we speak of free software, we are referring to freedom of use, not price. Our General Public Licenses aredesigned to make sure that you have the freedom to distribute copies of free software (and charge for this service if youwish); that you receive source code or can get it if you want it; that you can change the software and use pieces ofit in new free programs; and that you are informed that you can do these things.
To protect your rights, we need to make restrictions that forbid distributors to deny you these rights or to ask you tosurrender these rights. These restrictions translate to certain responsibilities for you if you distribute copies of thelibrary or if you modify it.
For example, if you distribute copies of the library, whether gratis or for a fee, you must give the recipients all therights that we gave you. You must make sure that they, too, receive or can get the source code. If you link other codewith the library, you must provide complete object files to the recipients, so that they can relink them with the libraryafter making changes to the library and recompiling it. And you must show them these terms so they know their rights.
We protect your rights with a two-step method: (1) we copyright the library, and (2) we offer you this license, whichgives you legal permission to copy, distribute and/or modify the library.
To protect each distributor, we want to make it very clear that there is no warranty for the free library. Also, if thelibrary is modified by someone else and passed on, the recipients should know that what they have is not the originalversion, so that the original author's reputation will not be affected by problems that might be introduced by others.
Finally, software patents pose a constant threat to the existence of any free program. We wish to make sure that acompany cannot effectively restrict the users of a free program by obtaining a restrictive license from a patent holder.Therefore, we insist that any patent license obtained for a version of the library must be consistent with the full freedomof use specified in this license.
Most GNU software, including some libraries, is covered by the ordinary GNU General Public License. This license,the GNU Lesser General Public License, applies to certain designated libraries, and is quite different from the ordinaryGeneral Public License. We use this license for certain libraries in order to permit linking those libraries into non-freeprograms.
When a program is linked with a library, whether statically or using a shared library, the combination of the two is legal-ly speaking a combined work, a derivative of the original library. The ordinary General Public License therefore permitssuch linking only if the entire combination fits its criteria of freedom. The Lesser General Public License permits morelax criteria for linking other code with the library.
We call this license the "Lesser" General Public License because it does Less to protect the user's freedom than theordinary General Public License. It also provides other free software developers Less of an advantage over competingnon-free programs. These disadvantages are the reason we use the ordinary General Public License for manylibraries. However, the Lesser license provides advantages in certain special circumstances.
For example, on rare occasions, there may be a special need to encourage the widest possible use of a certain library,so that it becomes a de-facto standard. To achieve this, non-free programs must be allowed to use the library. A morefrequent case is that a free library does the same job as widely used non-free libraries. In this case, there is little togain by limiting the free library to free software only, so we use the Lesser General Public License.
In other cases, permission to use a particular library in non-free programs enables a greater number of people to usea large body of free software. For example, permission to use the GNU C Library in non-free programs enables manymore people to use the whole GNU operating system, as well as its variant, the GNU/Linux operating system.

118
APPENDIX
AP
PE
ND
IX
Although the Lesser General Public License is Less protective of the users' freedom, it does ensure that the user of aprogram that is linked with the Library has the freedom and the wherewithal to run that program using a modified ver-sion of the Library.
The precise terms and conditions for copying, distribution and modification follow. Pay close attention to the differ-ence between a "work based on the library" and a "work that uses the library". The former contains code derived fromthe library, whereas the latter must be combined with the library in order to run.
GNU LESSER GENERAL PUBLIC LICENSETERMS AND CONDITIONS FOR COPYING, DISTRIBUTION AND MODIFICATION
0. This License Agreement applies to any software library or other program which contains a notice placed by thecopyright holder or other authorized party saying it may be distributed under the terms of this Lesser General PublicLicense (also called "this License"). Each licensee is addressed as "you".
A "library" means a collection of software functions and/or data prepared so as to be conveniently linked with applica-tion programs (which use some of those functions and data) to form executables.
The "Library", below, refers to any such software library or work which has been distributed under these terms. A"work based on the Library" means either the Library or any derivative work under copyright law: that is to say, a workcontaining the Library or a portion of it, either verbatim or with modifications and/or translated straightforwardly intoanother language. (Hereinafter, translation is included without limitation in the term "modification".)
"Source code" for a work means the preferred form of the work for making modifications to it. For a library, completesource code means all the source code for all modules it contains, plus any associated interface definition files, plusthe scripts used to control compilation and installation of the library.
Activities other than copying, distribution and modification are not covered by this License; they are outside its scope.The act of running a program using the Library is not restricted, and output from such a program is covered only if itscontents constitute a work based on the Library (independent of the use of the Library in a tool for writing it). Whetherthat is true depends on what the Library does and what the program that uses the Library does.
1. You may copy and distribute verbatim copies of the Library's complete source code as you receive it, in any medi-um, provided that you conspicuously and appropriately publish on each copy an appropriate copyright notice and dis-claimer of warranty; keep intact all the notices that refer to this License and to the absence of any warranty; and distrib-ute a copy of this License along with the Library.
You may charge a fee for the physical act of transferring a copy, and you may at your option offer warranty protectionin exchange for a fee.
2. You may modify your copy or copies of the Library or any portion of it, thus forming a work based on the Library,and copy and distribute such modifications or work under the terms of Section 1 above, provided that you also meet allof these conditions:
a) The modified work must itself be a software library.
b) You must cause the files modified to carry prominent notices stating that you changed the files and the date ofany change.
c) You must cause the whole of the work to be licensed at no charge to all third parties under the terms of thisLicense.
d) If a facility in the modified Library refers to a function or a table of data to be supplied by an application programthat uses the facility, other than as an argument passed when the facility is invoked, then you must make a goodfaith effort to ensure that, in the event an application does not supply such function or table, the facility still operates,and performs whatever part of its purpose remains meaningful.
(For example, a function in a library to compute square roots has a purpose that is entirely well-defined independent ofthe application. Therefore, Subsection 2d requires that any application-supplied function or table used by this functionmust be optional: if the application does not supply it, the square root function must still compute square roots.)
These requirements apply to the modified work as a whole. If identifiable sections of that work are not derived from theLibrary, and can be reasonably considered independent and separate works in themselves, then this License, and itsterms, do not apply to those sections when you distribute them as separate works. But when you distribute the samesections as part of a whole which is a work based on the Library, the distribution of the whole must be on the terms ofthis License, whose permissions for other licensees extend to the entire whole, and thus to each and every part regard-less of who wrote it.

119
AP
PE
ND
IX
Thus, it is not the intent of this section to claim rights or contest your rights to work written entirely by you; rather, theintent is to exercise the right to control the distribution of derivative or collective works based on the Library.
In addition, mere aggregation of another work not based on the Library with the Library (or with a work based on theLibrary) on a volume of a storage or distribution medium does not bring the other work under the scope of this License.
3. You may opt to apply the terms of the ordinary GNU General Public License instead of this License to a given copyof the Library. To do this, you must alter all the notices that refer to this License, so that they refer to the ordinary GNUGeneral Public License, version 2, instead of to this License. (If a newer version than version 2 of the ordinary GNUGeneral Public License has appeared, then you can specify that version instead if you wish.) Do not make any otherchange in these notices.
Once this change is made in a given copy, it is irreversible for that copy, so the ordinary GNU General Public Licenseapplies to all subsequent copies and derivative works made from that copy.
This option is useful when you wish to copy part of the code of the Library into a program that is not a library.
4. You may copy and distribute the Library (or a portion or derivative of it, under Section 2) in object code or exe-cutable form under the terms of Sections 1 and 2 above provided that you accompany it with the complete correspond-ing machine-readable source code, which must be distributed under the terms of Sections 1 and 2 above on amedium customarily used for software interchange.
If distribution of object code is made by offering access to copy from a designated place, then offering equivalentaccess to copy the source code from the same place satisfies the requirement to distribute the source code, eventhough third parties are not compelled to copy the source along with the object code.
5. A program that contains no derivative of any portion of the Library, but is designed to work with the Library by beingcompiled or linked with it, is called a "work that uses the Library". Such a work, in isolation, is not a derivative work ofthe Library, and therefore falls outside the scope of this License.
However, linking a "work that uses the Library" with the Library creates an executable that is a derivative of the Library(because it contains portions of the Library), rather than a "work that uses the library". The executable is therefore cov-ered by this License. Section 6 states terms for distribution of such executables.
When a "work that uses the Library" uses material from a header file that is part of the Library, the object code for thework may be a derivative work of the Library even though the source code is not.Whether this is true is especially significant if the work can be linked without the Library, or if the work is itself a library.The threshold for this to be true is not precisely defined by law.
If such an object file uses only numerical parameters, data structure layouts and accessors, and small macros andsmall inline functions (ten lines or less in length), then the use of the object file is unrestricted, regardless of whether itis legally a derivative work. (Executables containing this object code plus portions of the Library will still fall underSection 6.)
Otherwise, if the work is a derivative of the Library, you may distribute the object code for the work under the terms ofSection 6. Any executables containing that work also fall under Section 6, whether or not they are linked directly withthe Library itself.
6. As an exception to the Sections above, you may also combine or link a "work that uses the Library" with the Libraryto produce a work containing portions of the Library, and distribute that work under terms of your choice, provided thatthe terms permit modification of the work for the customer's own use and reverse engineering for debugging such modi-fications.
You must give prominent notice with each copy of the work that the Library is used in it and that the Library and itsuse are covered by this License. You must supply a copy of this License. If the work during execution displays copy-right notices, you must include the copyright notice for the Library among them, as well as a reference directing theuser to the copy of this License. Also, you must do one of these things:
a) Accompany the work with the complete corresponding machine-readable source code for the Library includingwhatever changes were used in the work (which must be distributed under Sections 1 and 2 above); and, if the workis an executable linked with the Library, with the complete machine-readable "work that uses the Library", as objectcode and/or source code, so that the user can modify the Library and then relink to produce a modified executablecontaining the modified Library. (It is understood that the user who changes the contents of definitions files in theLibrary will not necessarily be able to recompile the application to use the modified definitions.)
b) Use a suitable shared library mechanism for linking with the Library. A suitable mechanism is one that (1) uses atrun time a copy of the library already present on the user's computer system, rather than copying library functionsinto the executable, and (2) will operate properly with a modified version of the library, if the user installs one, aslong as the modified version is interface-compatible with the version that the work was made with.

120
APPENDIX
AP
PE
ND
IX
c) Accompany the work with a written offer, valid for at least three years, to give the same user the materialsspecified in Subsection 6a, above, for a charge no more than the cost of performing this distribution.
d) If distribution of the work is made by offering access to copy from a designated place, offer equivalent access tocopy the above specified materials from the same place.
e) Verify that the user has already received a copy of these materials or that you have already sent this user a copy.
For an executable, the required form of the "work that uses the Library" must include any data and utility programsneeded for reproducing the executable from it. However, as a special exception, the materials to be distributed neednot include anything that is normally distributed (in either source or binary form) with the major components (compiler,kernel, and so on) of the operating system on which the executable runs, unless that component itself accompaniesthe executable.
It may happen that this requirement contradicts the license restrictions of other proprietary libraries that do not normal-ly accompany the operating system. Such a contradiction means you cannot use both them and the Library together inan executable that you distribute.
7. You may place library facilities that are a work based on the Library side-by-side in a single library together withother library facilities not covered by this License, and distribute such a combined library, provided that the separatedistribution of the work based on the Library and of the other library facilities is otherwise permitted, and provided thatyou do these two things:
a) Accompany the combined library with a copy of the same work based on the Library, uncombined with any otherlibrary facilities. This must be distributed under the terms of the Sections above.
b) Give prominent notice with the combined library of the fact that part of it is a work based on the Library, andexplaining where to find the accompanying uncombined form of the same work.
8. You may not copy, modify, sublicense, link with, or distribute the Library except as expressly provided under thisLicense. Any attempt otherwise to copy, modify, sublicense, link with, or distribute the Library is void, and will automati-cally terminate your rights under this License. However, parties who have received copies, or rights, from you underthis License will not have their licenses terminated so long as such parties remain in full compliance.
9. You are not required to accept this License, since you have not signed it. However, nothing else grants you permis-sion to modify or distribute the Library or its derivative works. These actions are prohibited by law if you do not acceptthis License. Therefore, by modifying or distributing the Library (or any work based on the Library), you indicate youracceptance of this License to do so, and all its terms and conditions for copying, distributing or modifying the Library orworks based on it.
10. Each time you redistribute the Library (or any work based on the Library), the recipient automatically receives alicense from the original licensor to copy, distribute, link with or modify the Library subject to these terms and condi-tions. You may not impose any further restrictions on the recipients' exercise of the rights granted herein.You are not responsible for enforcing compliance by third parties with this License.
11. If, as a consequence of a court judgment or allegation of patent infringement or for any other reason (not limited topatent issues), conditions are imposed on you (whether by court order, agreement or otherwise) that contradict the con-ditions of this License, they do not excuse you from the conditions of this License. If you cannot distribute so as to sat-isfy simultaneously your obligations under this License and any other pertinent obligations, then as a consequence youmay not distribute the Library at all. For example, if a patent license would not permit royalty-free redistribution of theLibrary by all those who receive copies directly or indirectly through you, then the only way you could satisfy both it andthis License would be to refrain entirely from distribution of the Library.
If any portion of this section is held invalid or unenforceable under any particular circumstance, the balance of the sec-tion is intended to apply, and the section as a whole is intended to apply in other circumstances.
It is not the purpose of this section to induce you to infringe any patents or other property right claims or to contestvalidity of any such claims; this section has the sole purpose of protecting the integrity of the free software distributionsystem which is implemented by public license practices. Many people have made generous contributions to the widerange of software distributed through that system in reliance on consistent application of that system; it is up to theauthor/donor to decide if he or she is willing to distribute software through any other system and a licensee cannotimpose that choice.
This section is intended to make thoroughly clear what is believed to be a consequence of the rest of this License.
12. If the distribution and/or use of the Library is restricted in certain countries either by patents or by copyrightedinterfaces, the original copyright holder who places the Library under this License may add an explicit geographical dis-tribution limitation excluding those countries, so that distribution is permitted only in or among countries not thusexcluded. In such case, this License incorporates the limitation as if written in the body of this License.
121
AP
PE
ND
IX
13. The Free Software Foundation may publish revised and/or new versions of the Lesser General Public Licensefrom time to time. Such new versions will be similar in spirit to the present version, but may differ in detail to addressnew problems or concerns.
Each version is given a distinguishing version number. If the Library specifies a version number of this License whichapplies to it and "any later version", you have the option of following the terms and conditions either of that version or ofany later version published by the Free Software Foundation. If the Library does not specify a license version number,you may choose any version ever published by the Free Software Foundation.
14. If you wish to incorporate parts of the Library into other free programs whose distribution conditions are incompati-ble with these, write to the author to ask for permission. For software which is copyrighted by the Free SoftwareFoundation, write to the Free Software Foundation; we sometimes make exceptions for this. Our decision will be guid-ed by the two goals of preserving the free status of all derivatives of our free software and of promoting the sharingand reuse of software generally.
NO WARRANTY
15. BECAUSE THE LIBRARY IS LICENSED FREE OF CHARGE, THERE IS NO WARRANTY FOR THE LIBRARY,TO THE EXTENT PERMITTED BY APPLICABLE LAW. EXCEPT WHEN OTHERWISE STATED IN WRITING THECOPYRIGHT HOLDERS AND/OR OTHER PARTIES PROVIDE THE LIBRARY "AS IS" WITHOUT WARRANTY OFANY KIND, EITHER EXPRESSED OR IMPLIED, INCLUDING, BUT NOT LIMITED TO, THE IMPLIED WARRANTIESOF MERCHANTABILITY AND FITNESS FOR A PARTICULAR PURPOSE. THE ENTIRE RISK AS TO THE QUALITYAND PERFORMANCE OF THE LIBRARY IS WITH YOU. SHOULD THE LIBRARY PROVE DEFECTIVE, YOUASSUME THE COST OF ALL NECESSARY SERVICING, REPAIR OR CORRECTION.
16. IN NO EVENT UNLESS REQUIRED BY APPLICABLE LAW OR AGREED TO IN WRITING WILL ANY COPY-RIGHT HOLDER, OR ANY OTHER PARTY WHO MAY MODIFY AND/OR REDISTRIBUTE THE LIBRARY AS PERMIT-TED ABOVE, BE LIABLE TO YOU FOR DAMAGES, INCLUDING ANY GENERAL, SPECIAL, INCIDENTAL ORCONSEQUENTIAL DAMAGES ARISING OUT OF THE USE OR INABILITY TO USE THE LIBRARY (INCLUDING BUTNOT LIMITED TO LOSS OF DATA OR DATA BEING RENDERED INACCURATE OR LOSSES SUSTAINED BY YOUOR THIRD PARTIES OR A FAILURE OF THE LIBRARY TO OPERATE WITH ANY OTHER SOFTWARE), EVEN IFSUCH HOLDER OR OTHER PARTY HAS BEEN ADVISED OF THE POSSIBILITY OF SUCH DAMAGES.
END OF TERMS AND CONDITIONS
How to Apply These Terms to Your New Libraries
If you develop a new library, and you want it to be of the greatest possible use to the public, we recommend making itfree software that everyone can redistribute and change. You can do so by permitting redistribution under these terms(or, alternatively, under the terms of the ordinary General Public License).
To apply these terms, attach the following notices to the library. It is safest to attach them to the start of each sourcefile to most effectively convey the exclusion of warranty; and each file should have at least the "copyright" line and apointer to where the full notice is found.
<one line to give the library's name and a brief idea of what it does.>Copyright (C) <year> <name of author>
This library is free software; you can redistribute it and/or modify it under the terms of the GNU Lesser GeneralPublic License as published by the Free Software Foundation; either version 2.1 of the License, or (at your option)any later version.
This library is distributed in the hope that it will be useful, but WITHOUT ANY WARRANTY; without even the impliedwarranty of MERCHANTABILITY or FITNESS FOR A PARTICULAR PURPOSE. See the GNU Lesser GeneralPublic License for more details.
You should have received a copy of the GNU Lesser General Public License along with this library; if not, write tothe Free Software Foundation, Inc., 51 Franklin Street, Fifth Floor, Boston, MA 02110-1301 USA
Also add information on how to contact you by electronic and paper mail.
You should also get your employer (if you work as a programmer) or your school, if any, to sign a "copyright disclaimer"for the library, if necessary. Here is a sample; alter the names:
Yoyodyne, Inc., hereby disclaims all copyright interest in the library `Frob' (a library for tweaking knobs) written byJames Random Hacker.
<signature of Ty Coon>, 1 April 1990Ty Coon, President of Vice

122
APPENDIX
AP
PE
ND
IX
MOZILLA PUBLIC LICENSEVersion 1.1
---------------
1. Definitions.
1.0.1. "Commercial Use" means distribution or otherwise making the Covered Code available to a third party.
1.1. "Contributor" means each entity that creates or contributes to the creation of Modifications.
1.2. "Contributor Version" means the combination of the Original Code, prior Modifications used by a Contributor,and the Modifications made by that particular Contributor.
1.3. "Covered Code" means the Original Code or Modifications or the combination of the Original Code andModifications, in each case including portions thereof.
1.4. "Electronic Distribution Mechanism" means a mechanism generally accepted in the software development com-munity for the electronic transfer of data.
1.5. "Executable" means Covered Code in any form other than Source Code.
1.6. "Initial Developer" means the individual or entity identified as the Initial Developer in the Source Code noticerequired by Exhibit A.
1.7. "Larger Work" means a work which combines Covered Code or portions thereof with code not governed by theterms of this License.
1.8. "License" means this document.
1.8.1. "Licensable" means having the right to grant, to the maximum extent possible, whether at the time of the ini-tial grant or subsequently acquired, any and all of the rights conveyed herein.
1.9. "Modifications" means any addition to or deletion from the substance or structure of either the Original Code orany previous Modifications. When Covered Code is released as a series of files, a Modification is:
A. Any addition to or deletion from the contents of a file containing Original Code or previous Modifications.
B. Any new file that contains any part of the Original Code or previous Modifications.
1.10. "Original Code" means Source Code of computer software code which is described in the Source Code noticerequired by Exhibit A as Original Code, and which, at the time of its release under this License is not alreadyCovered Code governed by this License.
1.10.1. "Patent Claims" means any patent claim(s), now owned or hereafter acquired, including without limitation,method, process, and apparatus claims, in any patent Licensable by grantor.
1.11. "Source Code" means the preferred form of the Covered Code for making modifications to it, including allmodules it contains, plus any associated interface definition files, scripts used to control compilation and installationof an Executable, or source code differential comparisons against either the Original Code or another well known,available Covered Code of the Contributor's choice. The Source Code can be in a compressed or archival form,provided the appropriate decompression or de-archiving software is widely available for no charge.
1.12. "You" (or "Your") means an individual or a legal entity exercising rights under, and complying with all of theterms of, this License or a future version of this License issued under Section 6.1.For legal entities, "You" includes any entity which controls, is controlled by, or is under common control with You.For purposes of this definition, "control" means (a) the power, direct or indirect, to cause the direction or manage-ment of such entity, whether by contract or otherwise, or (b) ownership of more than fifty percent (50%) of the out-standing shares or beneficial ownership of such entity.
2. Source Code License.
2.1. The Initial Developer Grant.The Initial Developer hereby grants You a world-wide, royalty-free, non-exclusive license, subject to third party intel-lectual property claims:
(a) under intellectual property rights (other than patent or trademark) Licensable by Initial Developer to use,reproduce, modify, display, perform, sublicense and distribute the Original Code (or portions thereof) with orwithout Modifications, and/or as part of a Larger Work; and
123
AP
PE
ND
IX
(b) under Patents Claims infringed by the making, using or selling of Original Code, to make, have made, use,practice, sell, and offer for sale, and/or otherwise dispose of the Original Code (or portions thereof).
(c) the licenses granted in this Section 2.1(a) and (b) are effective on the date Initial Developer first distributesOriginal Code under the terms of this License.
(d) Notwithstanding Section 2.1(b) above, no patent license is granted: 1) for code that You delete from theOriginal Code; 2) separate from the Original Code; or 3) for infringements caused by: i) the modification of theOriginal Code or ii) the combination of the Original Code with other software or devices.
2.2. Contributor Grant.Subject to third party intellectual property claims, each Contributor hereby grants You a world-wide, royalty-free,non-exclusive license
(a) under intellectual property rights (other than patent or trademark) Licensable by Contributor, to use, repro-duce, modify, display, perform, sublicense and distribute the Modifications created by such Contributor (or por-tions thereof) either on an unmodified basis, with other Modifications, as Covered Code and/or as part of aLarger Work; and
(b) under Patent Claims infringed by the making, using, or selling of Modifications made by that Contributoreither alone and/or in combination with its Contributor Version (or portions of such combination), to make, use,sell, offer for sale, have made, and/or otherwise dispose of: 1) Modifications made by that Contributor (or portionsthereof); and 2) the combination of Modifications made by that Contributor with its Contributor Version (or por-tions of such combination).
(c) the licenses granted in Sections 2.2(a) and 2.2(b) are effective on the date Contributor first makesCommercial Use of the Covered Code.
(d) Notwithstanding Section 2.2(b) above, no patent license is granted: 1) for any code that Contributor has delet-ed from the Contributor Version; 2) separate from the Contributor Version; 3) for infringements caused by: i)third party modifications of Contributor Version or ii) the combination of Modifications made by that Contributorwith other software (except as part of the Contributor Version) or other devices; or 4) under Patent Claimsinfringed by Covered Code in the absence of Modifications made by that Contributor.
3. Distribution Obligations.
3.1. Application of License.The Modifications which You create or to which You contribute are governed by the terms of this License, including
without limitation Section 2.2. The Source Code version of Covered Code may be distributed only under the terms ofthis License or a future version of this License released under Section 6.1, and You must include a copy of thisLicense with every copy of the Source Code You distribute. You may not offer or impose any terms on any SourceCode version that alters or restricts the applicable version of this License or the recipients' rights hereunder.However, You may include an additional document offering the additional rights described in Section 3.5.
3.2. Availability of Source Code.Any Modification which You create or to which You contribute must be made available in Source Code form underthe terms of this License either on the same media as an Executable version or via an accepted ElectronicDistribution Mechanism to anyone to whom you made an Executable version available; and if made available viaElectronic Distribution Mechanism, must remain available for at least twelve (12) months after the date it initiallybecame available, or at least six (6) months after a subsequent version of that particular Modification has beenmade available to such recipients. You are responsible for ensuring that the Source Code version remains availableeven if theElectronic Distribution Mechanism is maintained by a third party.
3.3. Description of Modifications.You must cause all Covered Code to which You contribute to contain a file documenting the changes You made to
create that Covered Code and the date of any change. You must include a prominent statement that the Modificationis derived, directly or indirectly, from Original Code provided by the Initial Developer and including the name of theInitial Developer in (a) the Source Code, and (b) in any notice in an Executable version or related documentation inwhich You describe the origin or ownership of the Covered Code.
3.4. Intellectual Property Matters(a) Third Party Claims.If Contributor has knowledge that a license under a third party's intellectual property rights is required to exercisethe rights granted by such Contributor under Sections 2.1 or 2.2, Contributor must include a text file with theSource Code distribution titled "LEGAL" which describes the claim and the party making the claim in sufficientdetail that a recipient will know whom to contact. If Contributor obtains such knowledge after the Modification ismade available as described in Section 3.2, Contributor shall promptly modify the LEGAL file in all copiesContributor makes available thereafter and shall take other steps (such as notifying appropriate mailing lists ornewsgroups) reasonably calculated to inform those who received the Covered Code that new knowledge hasbeen obtained.

124
APPENDIX
AP
PE
ND
IX
(b) Contributor APIs.If Contributor's Modifications include an application programming interface and Contributor has knowledge of
patent licenses which are reasonably necessary to implement that API, Contributor must also include this infor-mation in the LEGAL file.
(c) Representations.Contributor represents that, except as disclosed pursuant to Section 3.4(a) above, Contributor believes thatContributor's Modifications are Contributor's original creation(s) and/or Contributor has sufficient rights to grantthe rights conveyed by this License.
3.5. Required Notices.You must duplicate the notice in Exhibit A in each file of the Source Code. If it is not possible to put such notice in aparticular Source Code file due to its structure, then You must include such notice in a location (such as a relevantdirectory) where a user would be likely to look for such a notice. If You created one or more Modification(s)You may add your name as a Contributor to the notice described in Exhibit A. You must also duplicate this Licensein any documentation for the Source Code where You describe recipients' rights or ownership rights relating toCovered Code. You may choose to offer, and to charge a fee for, warranty, support, indemnity or liability obligationsto one or more recipients of Covered Code. However, You may do so only on Your own behalf, and not on behalf ofthe InitialDeveloper or any Contributor. You must make it absolutely clear than any such warranty, support, indemnity or liabil-ity obligation is offered by You alone, and You hereby agree to indemnify the Initial Developer and every Contributorfor any liability incurred by the Initial Developer or such Contributor as a result of warranty, support, indemnity or lia-bility terms You offer.
3.6. Distribution of Executable Versions.You may distribute Covered Code in Executable form only if the requirements of Section 3.1-3.5 have been met forthat Covered Code, and if You include a notice stating that the Source Code version of the Covered Code is avail-able under the terms of this License, including a description of how and where You have fulfilled the obligations ofSection 3.2. The notice must be conspicuously included in any notice in an Executable version, related documenta-tion or collateral in which You describe recipients' rights relating to the Covered Code. You may distribute theExecutable version of Covered Code or ownership rights under a license of Your choice, which may contain termsdifferent from this License, provided that You are in compliance with the terms of this License and that the licensefor the Executable version does not attempt to limit or alter the recipient's rights in the Source Code version fromthe rights set forth in thisLicense. If You distribute the Executable version under a different license You must make it absolutely clear that anyterms which differ from this License are offered by You alone, not by the Initial Developer or any Contributor. Youhereby agree to indemnify the Initial Developer and every Contributor for any liability incurred by the InitialDeveloper or such Contributor as a result of any such terms You offer.
3.7. Larger Works.You may create a Larger Work by combining Covered Code with other code not governed by the terms of thisLicense and distribute the Larger Work as a single product. In such a case, You must make sure the requirementsof this License are fulfilled for the Covered Code.
4. Inability to Comply Due to Statute or Regulation.
If it is impossible for You to comply with any of the terms of this License with respect to some or all of the CoveredCode due to statute, judicial order, or regulation then You must: (a) comply with the terms of this License to the max-imum extent possible; and (b) describe the limitations and the code they affect. Such description must be included inthe LEGAL file described in Section 3.4 and must be included with all distributions of the Source Code. Except totheextent prohibited by statute or regulation, such description must be sufficiently detailed for a recipient of ordinaryskill to be able to understand it.
5. Application of this License.
This License applies to code to which the Initial Developer has attached the notice in Exhibit A and to relatedCovered Code.
6. Versions of the License.
6.1. New Versions.Netscape Communications Corporation ("Netscape") may publish revised and/or new versions of the License fromtime to time. Each version will be given a distinguishing version number.
6.2. Effect of New Versions.Once Covered Code has been published under a particular version of the License, You may always continue to useit under the terms of that version. You may also choose to use such Covered Code under the terms of any subse-quent version of the License published by Netscape. No one other than Netscape has the right to modify the termsapplicable to Covered Code created under this License.

125
AP
PE
ND
IX
6.3. Derivative Works.If You create or use a modified version of this License (which you may only do in order to apply it to code which isnot already Covered Code governed by this License), You must (a) rename Your license so that the phrases"Mozilla", "MOZILLAPL", "MOZPL", "Netscape", "MPL", "NPL" or any confusingly similar phrase do not appear inyour license (except to note that your license differs from this License) and (b) otherwise make it clear that Your ver-sion of the license contains terms which differ from the Mozilla Public License and Netscape Public License. (Fillingin the name of the Initial Developer, Original Code or Contributor in the notice described in Exhibit A shall not ofthemselves be deemed to be modifications of this License.)
7. DISCLAIMER OF WARRANTY.
COVERED CODE IS PROVIDED UNDER THIS LICENSE ON AN "AS IS" BASIS, WITHOUT WARRANTY OF ANYKIND, EITHER EXPRESSED OR IMPLIED, INCLUDING, WITHOUT LIMITATION, WARRANTIES THAT THE COV-ERED CODE IS FREE OF DEFECTS, MERCHANTABLE, FIT FOR A PARTICULAR PURPOSE OR NON-INFRING-ING. THE ENTIRE RISK AS TO THE QUALITY AND PERFORMANCE OF THE COVERED CODE IS WITH YOU.SHOULD ANY COVERED CODE PROVE DEFECTIVE IN ANY RESPECT, YOU (NOT THE INITIAL DEVELOPER ORANY OTHER CONTRIBUTOR) ASSUME THE COST OF ANY NECESSARY SERVICING, REPAIR OR CORRECTION.THIS DISCLAIMER OF WARRANTY CONSTITUTES AN ESSENTIAL PART OF THIS LICENSE. NO USE OF ANYCOVERED CODE IS AUTHORIZED HEREUNDER EXCEPT UNDER THIS DISCLAIMER.
8. TERMINATION.
8.1. This License and the rights granted hereunder will terminate automatically if You fail to comply with terms here-in and fail to cure such breach within 30 days of becoming aware of the breach. All sublicenses to the CoveredCode which are properly granted shall survive any termination of this License. Provisions which, by their nature,must remain in effect beyond the termination of this License shall survive.
8.2. If You initiate litigation by asserting a patent infringement claim (excluding declatory judgment actions) againstInitial Developer or a Contributor (the Initial Developer or Contributor against whom You file such action is referredto as "Participant") alleging that:
(a) such Participant's Contributor Version directly or indirectly infringes any patent, then any and all rights grantedby such Participant to You under Sections 2.1 and/or 2.2 of this License shall, upon 60 days notice from Participantterminate prospectively, unless if within 60 days after receipt of notice You either: (i) agree in writing to payParticipant a mutually agreeable reasonable royalty for Your past and future use of Modifications made by suchParticipant, or (ii) withdraw Your litigation claim with respect to the Contributor Version against such Participant. Ifwithin 60 days of notice, a reasonable royalty and payment arrangement are not mutually agreed upon in writing bythe parties or the litigation claim is not withdrawn, the rights granted by Participant to You under Sections 2.1 and/or2.2 automatically terminate at the expiration of the 60 day notice period specified above.
(b) any software, hardware, or device, other than such Participant's Contributor Version, directly or indirectlyinfringes any patent, then any rights granted to You by such Participant under Sections 2.1(b) and 2.2(b) arerevoked effective as of the date You first made, used, sold, distributed, or had made, Modifications made by thatParticipant.
8.3. If You assert a patent infringement claim against Participant alleging that such Participant's Contributor Versiondirectly or indirectly infringes any patent where such claim is resolved (such as by license or settlement) prior to theinitiation of patent infringement litigation, then the reasonable value of the licenses granted by such Participantunder Sections 2.1 or 2.2 shall be taken into account in determining the amount or value of any payment or license.
8.4. In the event of termination under Sections 8.1 or 8.2 above, all end user license agreements (excluding distrib-utors and resellers) which have been validly granted by You or any distributor hereunder prior to termination shallsurvive termination.
9. LIMITATION OF LIABILITY.
UNDER NO CIRCUMSTANCES AND UNDER NO LEGAL THEORY, WHETHER TORT (INCLUDING NEGLI-GENCE), CONTRACT, OR OTHERWISE, SHALL YOU, THE INITIAL DEVELOPER, ANY OTHER CONTRIBUTOR, ORANY DISTRIBUTOR OF COVERED CODE,OR ANY SUPPLIER OF ANY OF SUCH PARTIES, BE LIABLE TO ANYPERSON FOR ANY INDIRECT, SPECIAL, INCIDENTAL, OR CONSEQUENTIAL DAMAGES OF ANY CHARACTERINCLUDING, WITHOUT LIMITATION, DAMAGES FOR LOSS OF GOODWILL, WORK STOPPAGE, COMPUTERFAILURE OR MALFUNCTION, OR ANY AND ALL OTHER COMMERCIAL DAMAGES OR LOSSES, EVEN IF SUCHPARTY SHALL HAVE BEEN INFORMED OF THE POSSIBILITY OF SUCH DAMAGES. THIS LIMITATION OF LIABILI-TY SHALL NOT APPLY TO LIABILITY FOR DEATH OR PERSONAL INJURY RESULTING FROM SUCH PARTY'SNEGLIGENCE TO THE EXTENT APPLICABLE LAW PROHIBITS SUCH LIMITATION. SOME JURISDICTIONS DONOT ALLOW THE EXCLUSION OR LIMITATION OF INCIDENTAL OR CONSEQUENTIAL DAMAGES, SO THISEXCLUSION AND LIMITATION MAY NOT APPLY TO YOU.

126
APPENDIX
AP
PE
ND
IX
10. U.S. GOVERNMENT END USERS.
The Covered Code is a "commercial item," as that term is defined in 48 C.F.R. 2.101 (Oct. 1995), consisting of"commercial computer software" and "commercial computer software documentation," as such terms are used in 48C.F.R. 12.212 (Sept. 1995). Consistent with 48 C.F.R. 12.212 and 48 C.F.R. 227.7202-1 through 227.7202-4 (June1995), all U.S. Government End Users acquire Covered Code with only those rights set forth herein.
11. MISCELLANEOUS.
This License represents the complete agreement concerning subject matter hereof. If any provision of this Licenseis held to be unenforceable, such provision shall be reformed only to the extent necessary to make it enforceable. ThisLicense shall be governed by California law provisions (except to the extent applicable law, if any, provides otherwise),excluding its conflict-of-law provisions. With respect to disputes in which at least one party is a citizen of, or an entitychartered or registered to do business in the United States of America, any litigation relating to this License shall besubject to the jurisdiction of the Federal Courts of the Northern District of California, with venue lying in Santa ClaraCounty, California, with the losing party responsible for costs, including without limitation, court costs and reasonableattorneys' fees and expenses. The application of the United Nations Convention on Contracts for the International Saleof Goods is expressly excluded. Any law or regulation which provides that the language of a contract shall be construedagainst the drafter shall not apply to this License.
12. RESPONSIBILITY FOR CLAIMS.
As between Initial Developer and the Contributors, each party is responsible for claims and damages arising, direct-ly or indirectly, out of its utilization of rights under this License and You agree to work with Initial Developer andContributors to distribute such responsibility on an equitable basis. Nothing herein is intended or shall be deemed toconstitute any admission of liability.
13. MULTIPLE-LICENSED CODE.
Initial Developer may designate portions of the Covered Code as "Multiple-Licensed". "Multiple-Licensed" meansthat the Initial Developer permits you to utilize portions of the Covered Code under Your choice of the NPL or the alter-native licenses, if any, specified by the Initial Developer in the file described in Exhibit A.
EXHIBIT A -Mozilla Public License.
``The contents of this file are subject to the Mozilla Public License Version 1.1 (the "License"); you may not use thisfile except in compliance with the License. You may obtain a copy of the License at http://www.mozilla.org/MPL/
Software distributed under the License is distributed on an "AS IS" basis, WITHOUT WARRANTY OF ANY KIND,either express or implied. See the License for the specific language governing rights and limitations under the License.
The Original Code is ______________________________________.
The Initial Developer of the Original Code is ________________________.Portions created by ______________________ are Copyright (C) _____________________________. All Rights Reserved.
Contributor(s): ______________________________________.
Alternatively, the contents of this file may be used under the terms of the _____ license (the "[___] License"), inwhich case the provisions of [______] License are applicable instead of those above. If you wish to allow use of yourversion of this file only under the terms of the [____] License and not to allow others to use your version of this fileunder the MPL, indicate your decision by deleting the provisions above and replace them with the notice and otherprovisions required by the [___] License. If you do not delete the provisions above, a recipient may use your version ofthis file under either the MPL or the [___] License."
[NOTE: The text of this Exhibit A may differ slightly from the text of the notices in the Source Code files of theOriginal Code. You should use the text of this Exhibit A rather than the text found in the Original Code Source Code forYour Modifications.]

