plasma panel monitors triage & troubleshooting …diagramasde.com/diagramas/otros/sony plasma...
TRANSCRIPT
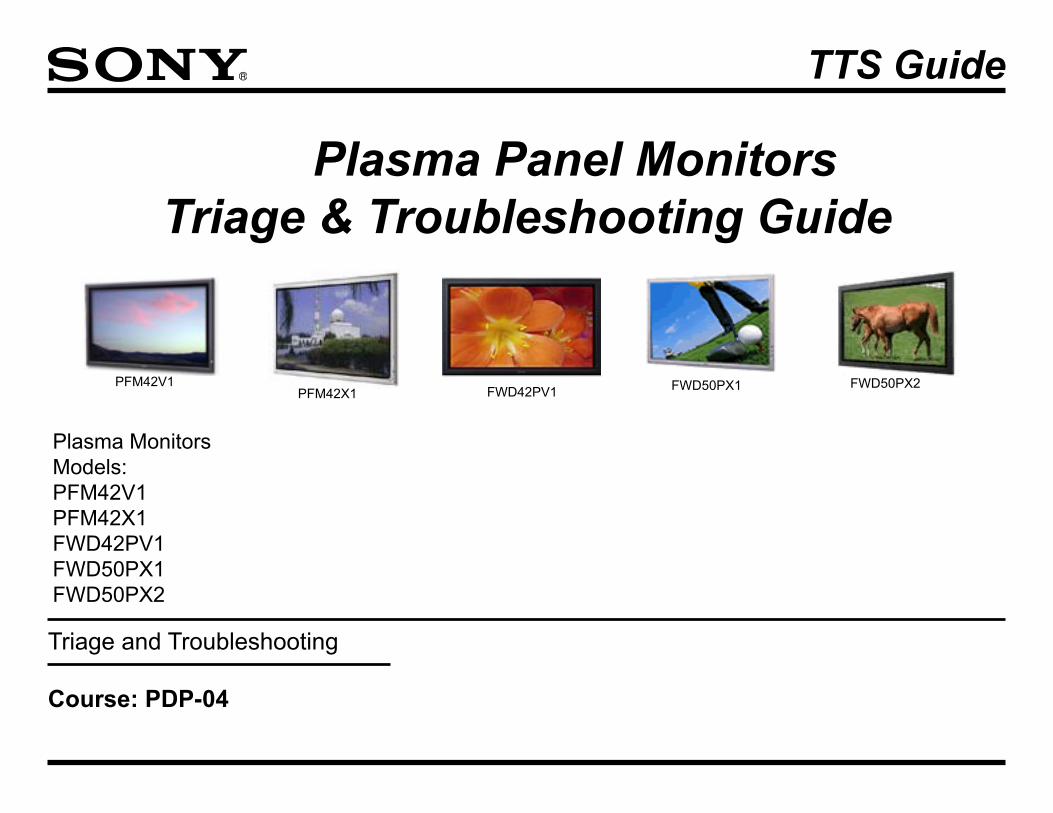
Plasma Monitors Models:PFM42V1PFM42X1FWD42PV1FWD50PX1FWD50PX2
Triage and Troubleshooting
Course: PDP-04
TTS Guide
Plasma Panel MonitorsTriage & Troubleshooting Guide
PFM42V1PFM42X1 FWD42PV1 FWD50PX1 FWD50PX2
PDP-04 i
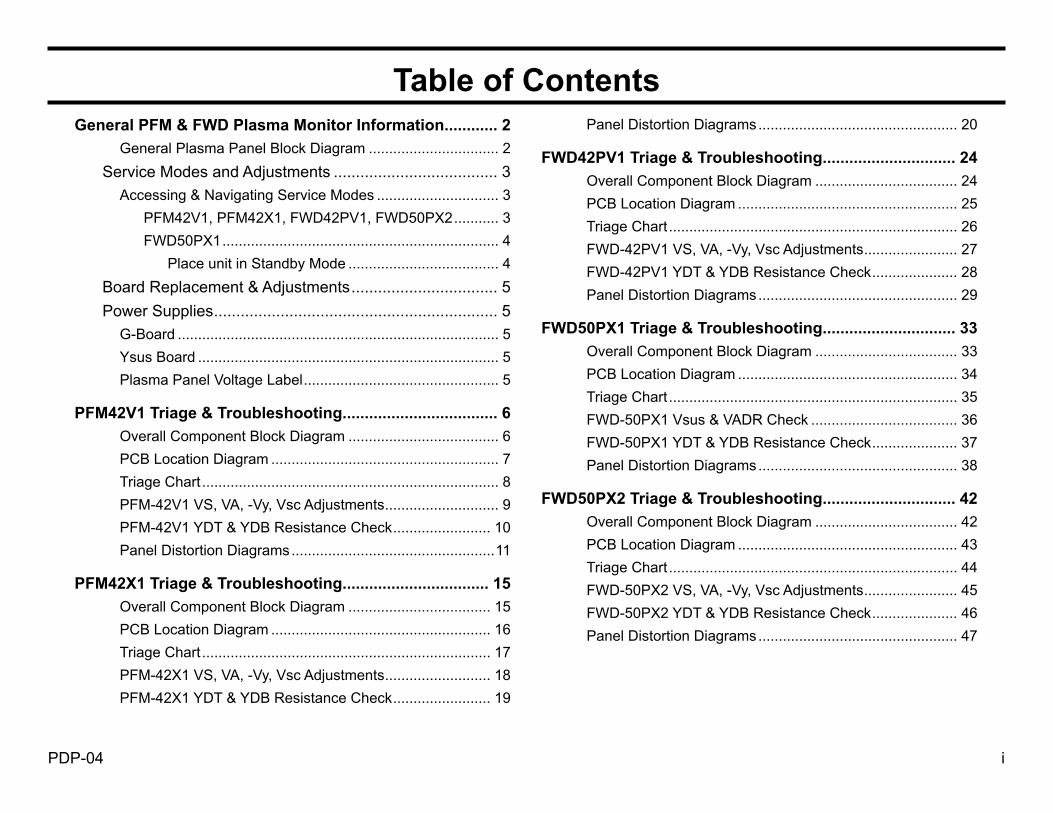
Panel Distortion Diagrams ................................................. 20
FWD42PV1 Triage & Troubleshooting .............................. 24Overall Component Block Diagram ................................... 24PCB Location Diagram ...................................................... 25Triage Chart ....................................................................... 26FWD-42PV1 VS, VA, -Vy, Vsc Adjustments ....................... 27FWD-42PV1 YDT & YDB Resistance Check ..................... 28Panel Distortion Diagrams ................................................. 29
FWD50PX1 Triage & Troubleshooting .............................. 33Overall Component Block Diagram ................................... 33PCB Location Diagram ...................................................... 34Triage Chart ....................................................................... 35FWD-50PX1 Vsus & VADR Check .................................... 36FWD-50PX1 YDT & YDB Resistance Check ..................... 37Panel Distortion Diagrams ................................................. 38
FWD50PX2 Triage & Troubleshooting .............................. 42Overall Component Block Diagram ................................... 42PCB Location Diagram ...................................................... 43Triage Chart ....................................................................... 44FWD-50PX2 VS, VA, -Vy, Vsc Adjustments ....................... 45FWD-50PX2 YDT & YDB Resistance Check ..................... 46Panel Distortion Diagrams ................................................. 47
General PFM & FWD Plasma Monitor Information ............ 2General Plasma Panel Block Diagram ................................ 2
Service Modes and Adjustments ..................................... 3Accessing & Navigating Service Modes .............................. 3
PFM42V1, PFM42X1, FWD42PV1, FWD50PX2 ........... 3FWD50PX1 .................................................................... 4 Place unit in Standby Mode ..................................... 4
Board Replacement & Adjustments ................................. 5Power Supplies ................................................................ 5
G-Board ............................................................................... 5Ysus Board .......................................................................... 5Plasma Panel Voltage Label ................................................ 5
PFM42V1 Triage & Troubleshooting ................................... 6Overall Component Block Diagram ..................................... 6PCB Location Diagram ........................................................ 7Triage Chart ......................................................................... 8PFM-42V1 VS, VA, -Vy, Vsc Adjustments ............................ 9PFM-42V1 YDT & YDB Resistance Check ........................ 10Panel Distortion Diagrams ..................................................11
PFM42X1 Triage & Troubleshooting ................................. 15Overall Component Block Diagram ................................... 15PCB Location Diagram ...................................................... 16Triage Chart ....................................................................... 17PFM-42X1 VS, VA, -Vy, Vsc Adjustments .......................... 18PFM-42X1 YDT & YDB Resistance Check ........................ 19
Table of Contents

PDP-04 2
General PFM & FWD Plasma Monitor Information
Control Board
X-Board X-Board
Ysus-Board Zsus-Board
(Address Board)
(Scan Board)
RGB/YUV Input
DVI Input
Audio Input
(Address Board)
X-Board X-Board(Address Board) (Address Board)
COF (Chip On Film)
FPC (Flexible Printed Circuit)
FFC (Flat Flexible Cable)
IC IC IC
IC
IC
IC
IC
FFCFFC
Audio Input
Plasma Panel
Address boards for Dual Scan Models
No ConnectionFWD50PX2
Model
FWD50PX2 Model Only
PFM 4 ICsFWD 1 IC
A-Board
IC
Points for Disconnection
FWD Only
PFM Only
General Plasma Panel Block Diagram
PDP-04 3
General Information
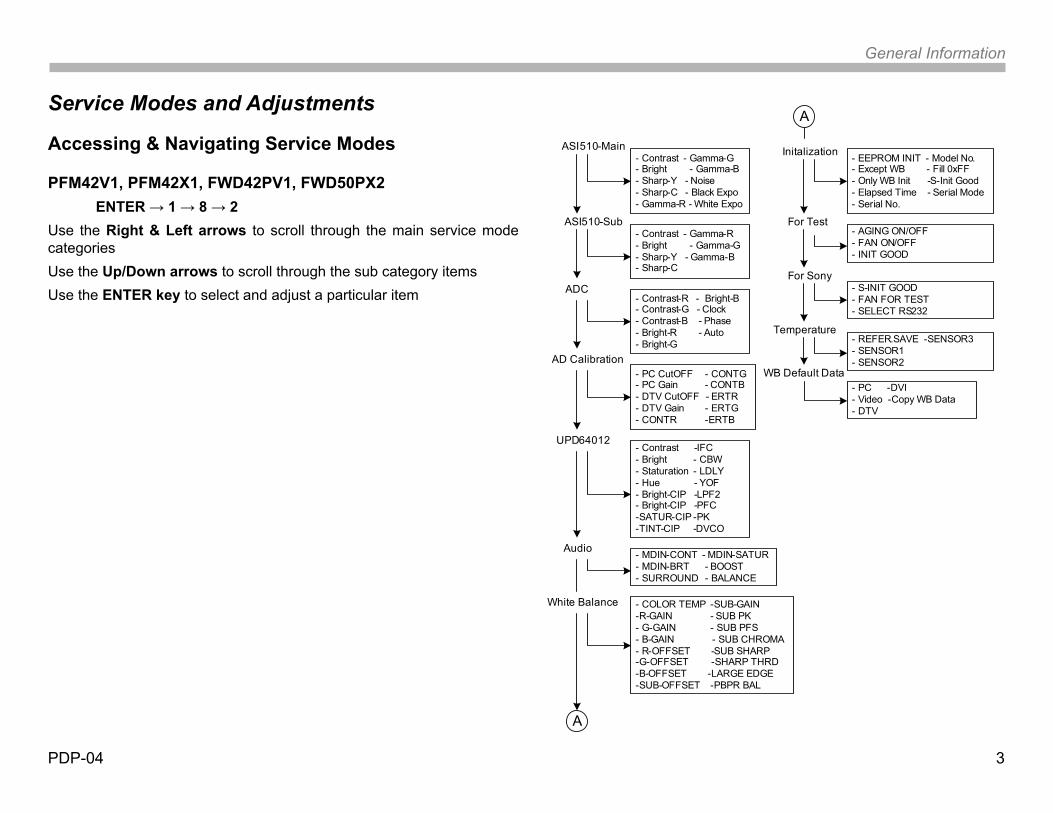
Service Modes and Adjustments
Accessing & Navigating Service Modes
PFM42V1, PFM42X1, FWD42PV1, FWD50PX2 ENTER → 1 → 8 → 2Use the Right & Left arrows to scroll through the main service mode categoriesUse the Up/Down arrows to scroll through the sub category itemsUse the ENTER key to select and adjust a particular item
ASI510-Main- Contrast - Gamma-G- Bright - Gamma-B- Sharp-Y - Noise- Sharp-C - Black Expo- Gamma-R - White Expo
- Contrast - Gamma-R- Bright - Gamma-G- Sharp-Y - Gamma-B - Sharp-C
ASI510-Sub
- Contrast-R - Bright-B- Contrast-G - Clock- Contrast-B - Phase - Bright-R - Auto- Bright-G
ADC
- PC CutOFF - CONTG- PC Gain - CONTB- DTV CutOFF - ERTR - DTV Gain - ERTG- CONTR -ERTB
AD Calibration
- Contrast -IFC- Bright - CBW- Staturation - LDLY - Hue - YOF- Bright-CIP -LPF2- Bright-CIP -PFC-SATUR-CIP -PK-TINT-CIP -DVCO
UPD64012
- MDIN-CONT - MDIN-SATUR- MDIN-BRT - BOOST- SURROUND - BALANCE
Audio
- COLOR TEMP -SUB-GAIN-R-GAIN - SUB PK- G-GAIN - SUB PFS - B-GAIN - SUB CHROMA- R-OFFSET -SUB SHARP-G-OFFSET -SHARP THRD-B-OFFSET -LARGE EDGE-SUB-OFFSET -PBPR BAL
White Balance
- EEPROM INIT - Model No.- Except WB - Fill 0xFF- Only WB Init -S-Init Good- Elapsed Time - Serial Mode- Serial No.
Initalization
- AGING ON/OFF - FAN ON/OFF- INIT GOOD
For Test
- S-INIT GOOD- FAN FOR TEST- SELECT RS232
For Sony
- REFER.SAVE -SENSOR3- SENSOR1- SENSOR2
Temperature
- PC -DVI- Video -Copy WB Data- DTV
WB Default Data
A
A

PDP-04 4
General Information
FWD50PX1
Place unit in Standby Mode Press DISPLAY → 5 → VOL + → POWERUse the Right & Left arrows to scroll through the main service mode categories
- EEPROM Initialize- Chroma Decider- AD Converter- White Balance- General- Manual Control - Preset Edit- Service Staus
Service Mode
A/ D Converter AdjustmentWhite Balance Adjustment
Adjustments per Repair & Board Replacement
When any repair related to picture quality is perfromed - White Balance
When B board and/ or it’s peripheral is replaced - AD Converter
When PDP is replaced - White Balance
When Q board and/ or it’s peripheral is replaced - AD Converter

PDP-04 5
General Information
Use the Up/Down arrows to scroll through the sub category itemsUse the ENTER key to select and adjust a particular item
Board Replacement & Adjustments
G-Board – Adjustment VA, VS per the levels indicated on the label located on the rear of the Plasma panel. Input and display a Full White raster for adjustment.Ysus Board – Adjustment VA, VS, Vsc, -Vy per the levels indicated on the label located on the rear of the Plasma panel. Input and display a Full White raster for adjustment.Zsus Board – Adjustment VA, VS per the levels indicated on the label located on the rear of the Plasma panel. Input and display a Full White raster for adjustment.Address Board – Adjustment VA, VS per the levels indicated on the label located on the rear of the Plasma panel. Input and display a Full White
-Vy Vsc
VA VS
Label located on the back of the PDPraster for adjustment.Control Board - Adjustment VA, VS, Vsc, -Vy per the levels indicated on the label located on the rear of the Plasma panel. Input and display a Full White raster for adjustment.Plasma Panel – Adjustment VA, VS per the levels indicated on the label located on the rear of the Plasma panel. Adjust White Balance and AD Calibration per the procedure found in the unit Service Manual. Input and display a Full White raster for adjustment.A or B Board – Adjust White Balance and AD Calibration per the procedure found in the unit Service Manual.Voltage Checks
Power Supplies
G-BoardVA – Reference label on the rear of Plasma Panel for correct voltage level (Input and display a Full White raster for adjustment)VS – Reference label on the rear of Plasma Panel for correct voltage level (Input and display a Full White raster for adjustment)Standby 5V Operating 5V
Ysus BoardVsc – reference label on the rear of Plasma Panel for correct voltage level-Vy – reference label on the rear of Plasma Panel for correct voltage level
Plasma Panel Voltage Label

PDP-04 6
PFM42V1 Triage & Troubleshooting
Display Panel Assembly
Power to all Panel Assb. PCBs
PowerAudio
Video
A-BoardG-Board
Power Supplies
Video Processing Audio Processing Main Microprocessor Fan Control AV Switching
Video Input 1 (DVI)
Video Input 2 (HD15)
L-Board
Audio Amplifier
Control
AC Input
Panel Pixel Control
Power Sw. IR Sensor LEDS
H2-BoardSwitches
H1-Board
YDTBoard
& Drive ICs
YDTBoard
& Drive ICs Zsus
ScanBoard
XR address Board
Composite InputBKM-V10
Component InputBKM-V11
Optional Video Input Boards
Single Address Scan
Fan 1
Fan 2
Fan 3
Temp. Sensor 1
Temp. Sensor 2
Temp. Sensor 3
Control
Control
Data
Data
Data
Control
PFM42V1YsusScanBoard
TR-Board
TL-Board
Control-Board & XL address Board
XL address Brd Section
Plasma Panel
ACD
RELAY
VS ONKey Control LinesACD – Detects the presence of AC input. No Red STBY LED if missing.Relay – Turns ON AC input relay. No Relay click if missing.VS ON – Turns ON the VS power supply. No VS voltage if missing.
1
2STBY 5V3
CN801
5
Overall Component Block Diagram

PDP-04 7
PFM42V1 Troubleshooting
Zsus
YDT
YDB
L-Brd
Ysus
XR -Board
FAN #3
Fan #1
Fan #2
Top of TVRear View
Temp
Temp
A-Board
G-Board
Temp
H2-Brd
H1-B
rd
PFM-42V1
Control-Board & XL-Board
PCB Location Diagram

PDP-04 8
PFM42V1 Troubleshooting
Board Reference
PFM42V1
Amber LED ON Red LED ONNo Green LED
No Red LEDNo Green LED
Stationary V or H Line Failure
No Video (Green LED) (No Primer)
No Video (Green LED) (Primer OK) No Audio Part #
A � � � � 1-761-811-11
G � � � � 1-761-810-11
Control Brd � 1-761-875-11
Ysus Brd � 1-761871-11
AC Input � Check Condition
Plasma Panel *� 1-805-424-11
L � 1-761-812-11
*NOTE: Check the Panel Distortion diagrams on the following pages for further failure symptoms and component
replacement recommendations.
��Primary Defective Part� Secondary Defective Part
Triage Chart

PDP-04 9
PFM42V1 Troubleshooting
-Vy Adj.VR6
Vsc Adj.VR5
-Vy TP R8Vsc TP R60
VS Adj.RV203
VA Adj.RV204
VA TP CN806 pins 1 & 2
VS TP CN806 pins 8,9,10
CN806
NOTE: Measure -Vy & Vsc across resistors
GRND Side
VS & VA GRND
Ysus Board G Board
GRND Side
PFM-42V1 VS, VA, -Vy, Vsc Adjustments

PDP-04 10
PFM42V1 Troubleshooting
Ohms
~3MΩ
COM VΩ
Ohms
~3MΩ
COM VΩ
CAUTION: Remove power from unit before making the resistance measurementNOTE: The resistance measurement between the com and VS voltage pads should read approximately 3M ohms with voltmeter leads oriented as shown in the diagram. If the voltmeter leads are reverse the reading will be infinite.A typical faulty reading is 500 ohms. Replace the YDT or YDB if a low resistance is measured.
YDT
YDB
VOM
VOM
PFM-42V1 YDT & YDB Resistance Check
PDP-04 11
PFM42V1 Troubleshooting
YDBBoard
& Drive ICs
YDTBoard
& Drive ICs
XR address Board
ZsusScanBoard
YDBBoard
& Drive ICs
YDTBoard
& Drive ICs
XR address Board
ZsusScanBoard
YDBBoard
& Drive ICs
YDTBoard
& Drive ICs
XR address Board
ZsusScanBoard
YsusScanBoard
YsusScanBoard
YsusScanBoard
Control Board & XL address Board
Control Board & XL address Board
Control Board & XL address Board
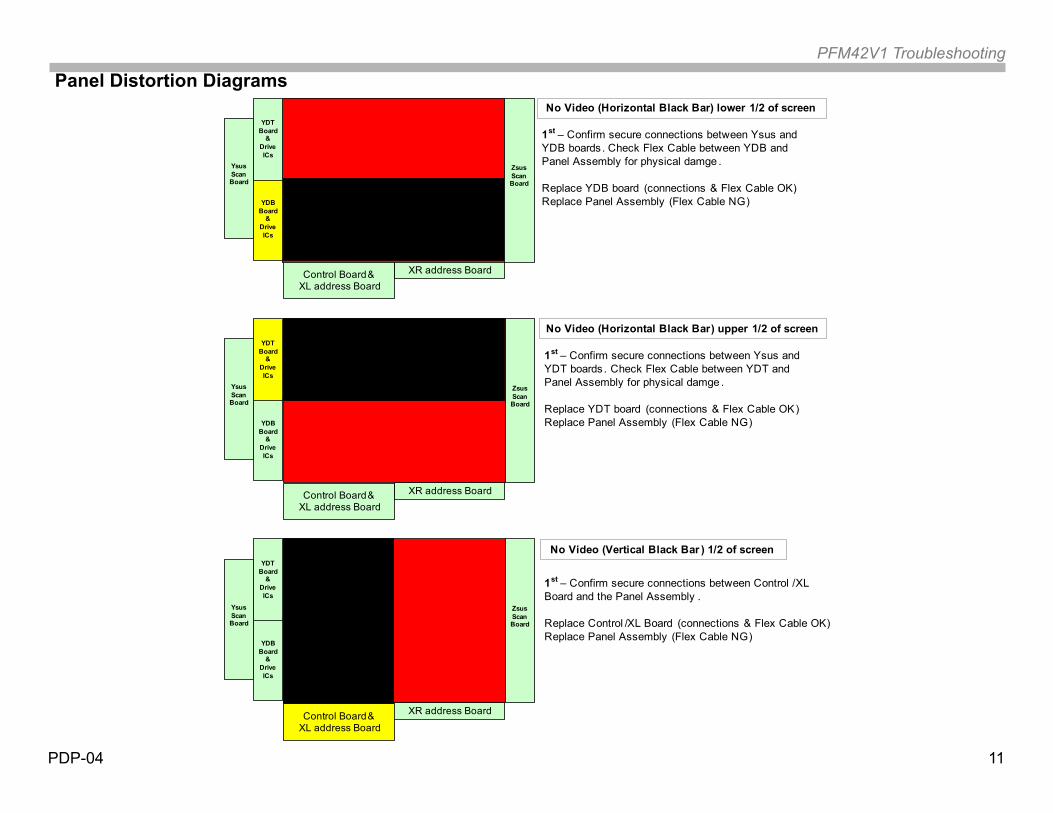
No Video (Horizontal Black Bar) lower 1/2 of screen
1st – Confirm secure connections between Ysus and YDB boards . Check Flex Cable between YDB and Panel Assembly for physical damge .
Replace YDB board (connections & Flex Cable OK)Replace Panel Assembly (Flex Cable NG)
No Video (Horizontal Black Bar) upper 1/2 of screen
1st – Confirm secure connections between Ysus and YDT boards . Check Flex Cable between YDT and Panel Assembly for physical damge .
Replace YDT board (connections & Flex Cable OK)Replace Panel Assembly (Flex Cable NG)
No Video (Vertical Black Bar ) 1/2 of screen
1st – Confirm secure connections between Control /XL Board and the Panel Assembly .
Replace Control /XL Board (connections & Flex Cable OK)Replace Panel Assembly (Flex Cable NG)
Panel Distortion Diagrams

PDP-04 12
PFM42V1 Troubleshooting
YDBBoard
& Drive ICs
YDTBoard
& Drive ICs
XR address Board
ZsusScanBoard
YDBBoard
& Drive ICs
YDTBoard
& Drive ICs
XR address Board
ZsusScanBoard
YDBBoard
& Drive ICs
YDTBoard
& Drive ICs
XR address Board
ZsusScanBoard
YsusScanBoard
YsusScanBoard
YsusScanBoard
Control Board & XL address Board
Control Board & XL address Board
Control Board & XL address Board
No Video (Vertical Black Bar ) 1/2 of screen
Single Vertical Black Line (right side of screen )
1st – Confirm secure connections between XR and Control/XL Board.
1st – Confirm secure connections between XR and Control /XL Boards .
2nd – Confirm 5V and VA voltages to XR board .
3rd – Replace boards in the following order .
A) Replace XR-BoardB) Replace Control Board
Single Vertical Black Line (left side of screen )
2nd – Check the drive ICs on the flex cables between the XR and Panel for physical damage .
Replace Panel Assembly for defective flex cable ICs
3rd – Replace XR board
1st – Confirm secure connections between Control /XL Board and the Panel Assembly.
2nd – Check the drive ICs on the flex cables between the Control/XL board and Panel for physical damage .
Replace Panel Assembly for defective flex cable ICs
3rd – Replace Control/XL board (Flex ICs OK)
PDP-04 13
PFM42V1 Troubleshooting
YDBBoard
& Drive ICs
YDTBoard
& Drive ICs
XR address Board
ZsusScanBoard
YDBBoard
& Drive ICs
YDTBoard
& Drive ICs
XR address Board
ZsusScanBoard
YsusScanBoard
YsusScanBoard
Control Board & XL address Board
Control Board & XL address Board
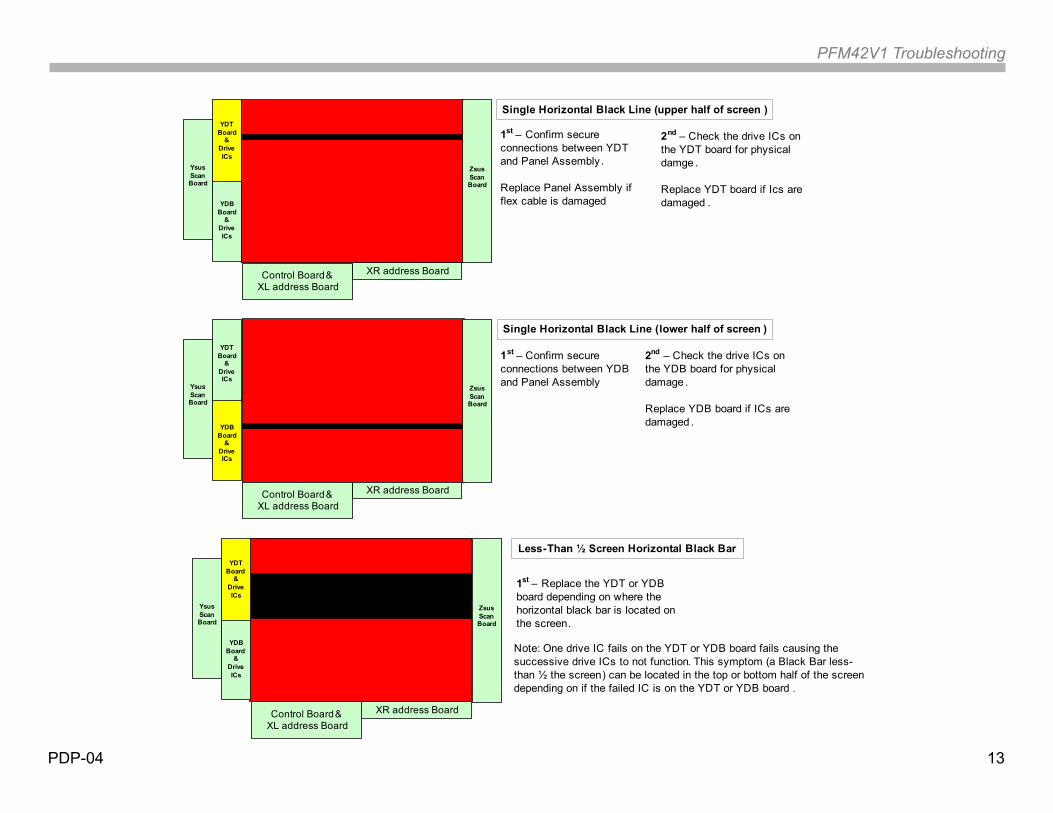
Single Horizontal Black Line (upper half of screen )
1st – Confirm secure connections between YDT and Panel Assembly .
Replace Panel Assembly if flex cable is damaged
2nd – Check the drive ICs on the YDT board for physical damge .
Replace YDT board if Ics are damaged .
Single Horizontal Black Line (lower half of screen )
1st – Confirm secure connections between YDB and Panel Assembly
2nd – Check the drive ICs on the YDB board for physical damage .
Replace YDB board if ICs are damaged .
YDBBoard
& Drive ICs
YDTBoard
& Drive ICs
Control Board & XL address Board
XR address Board
ZsusScanBoard
YsusScanBoard
Note: One drive IC fails on the YDT or YDB board fails causing the successive drive ICs to not function. This symptom (a Black Bar less-than ½ the screen) can be located in the top or bottom half of the screen depending on if the failed IC is on the YDT or YDB board .
Less-Than ½ Screen Horizontal Black Bar
1st – Replace the YDT or YDB board depending on where the horizontal black bar is located on the screen.

PDP-04 14
PFM42V1 Troubleshooting
YDBBoard
& Drive ICs
YDTBoard
& Drive ICs
XR address Board
ZsusScanBoard
YsusScanBoard
Control Board & XL address Board
No Video – Black Raster
1st – Check Flex cable connections between Ysus & YDT/YDB boards .Check VS and 5V power supplies to Ysus board . Check for screen Priming
Replace G-board (Volatge(s) NG)Replace Ysus (Priming NG)Replace Control /XL Board (Priming OK)
2nd – Check connections between Ysus and Control boards are secure .Connections & Voltages OKA) Replace YsusB) Replace Control board
3rd – Check all voltages and connections to Zsus board .
Replace Zsus (connections & voltages OK)
ZsusScanBoard
YDBBoard
& Drive ICs
YDTBoard
& Drive ICs
XR address Board
YsusScanBoard
Control Board & XL address Board
Pixelization & Black Areas In Video
1st – Confirm connections and power supply voltages (VS & 5V) to Zsus board are secure .Confirm Flex cable connections between Zsus board and Panel .
2nd –A) Replace Zsus board (all connections and voltages OK ) B) Replace G-board (voltages NG)C) Replace Plasma Panel (Flex cable NG)

PDP-04 15
PFM42X1 Triage & Troubleshooting
Display Panel Assembly
Power to all Panel Assb. PCBs
Power Audio
Video
A-BoardG-Board
Control-Board
Video Processing Audio Processing Main Microprocessor Fan Control AV Switching
Video Input 2 (HD15)
L-Board
Audio Amplifier
Control
AC Input
Panel Pixel Control
Power Sw. IR Sensor LEDS
H2-BoardSwitches
H1-Board
YDBBoard
& Drive ICs
YDTBoard
& Drive ICs Zsus
ScanBoard
XLB address Board XRB address Board
Composite InputBKM-V10
Optional Video Input Board
Dual Address Scan
XLT address Board XRT address Board
LRLR
Fan 1
Fan 2
Fan 3
Temp. Sensor 1
Temp. Sensor 2
Temp. Sensor 3
Control
Control
Data
Data
Data
Fan 4
Control
Control
PFM42X1
YsusScanBoard
PlasmaPanel
Power Supplies
Video Input 1 (DVI)
Key Control LinesACD – Detects the presence of AC input. No Red STBY LED if missing.Relay – Turns ON AC input relay. No Relay click if missing.VS ON – Turns ON the VS power supply. No VS voltage if missing.
ACD
RELAY
VS ON
1
2STBY 5V
3
CN801
5
Overall Component Block Diagram

PDP-04 16
PFM42X1 Troubleshooting
Zsus
YDT
YDB
L-Brd
Ysus
XRB -Board
Top of TVRear View
Temp
Temp
A-Board
XLB-Board
G-Board
XLT-Board
XRT-Board
Temp
Control-Board
Fan #4
Fan #2 Fan #3
Fan #1
H2-Brd
H1-B
rd
PFM-42X1
PCB Location Diagram
PDP-04 17
PFM42X1 Troubleshooting
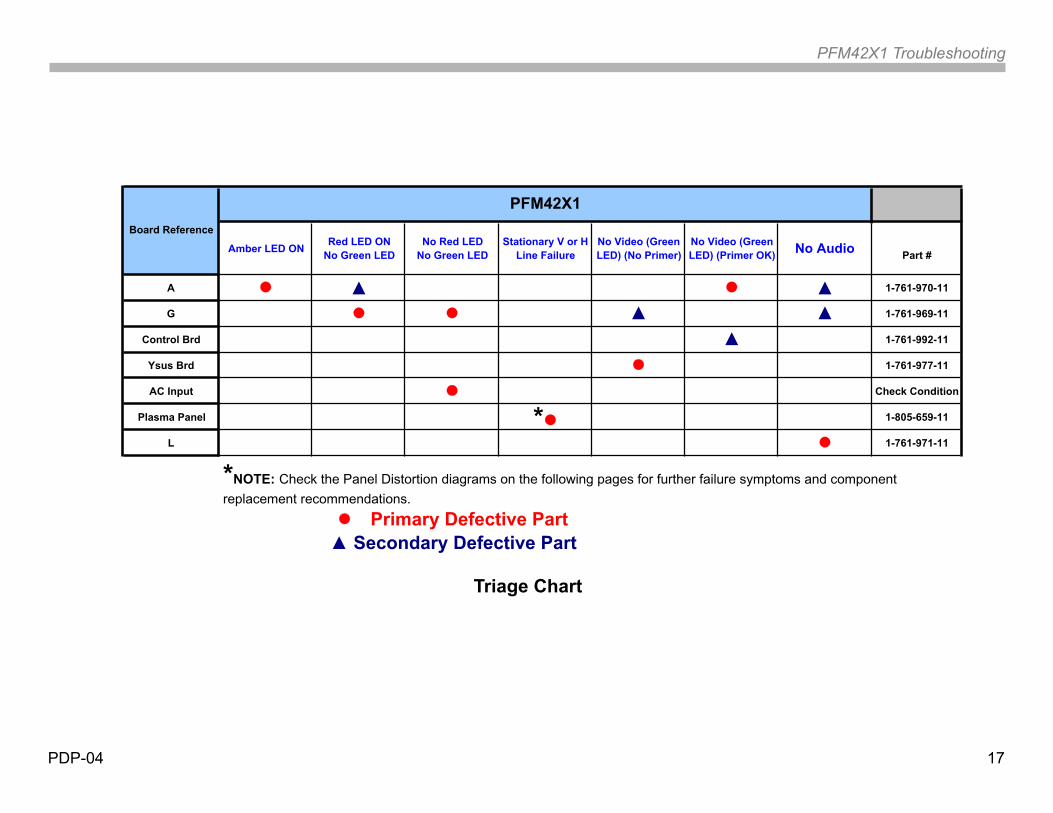
Board Reference
PFM42X1
Amber LED ON Red LED ONNo Green LED
No Red LEDNo Green LED
Stationary V or H Line Failure
No Video (Green LED) (No Primer)
No Video (Green LED) (Primer OK) No Audio Part #
A � � � � 1-761-970-11
G � � � � 1-761-969-11
Control Brd � 1-761-992-11
Ysus Brd � 1-761-977-11
AC Input � Check Condition
Plasma Panel *� 1-805-659-11
L � 1-761-971-11
*NOTE: Check the Panel Distortion diagrams on the following pages for further failure symptoms and component
replacement recommendations.
��Primary Defective Part� Secondary Defective Part
Triage Chart

PDP-04 18
PFM42X1 Troubleshooting
PFM-42X1 VS, VA, -Vy, Vsc Adjustments
PDP-04 19
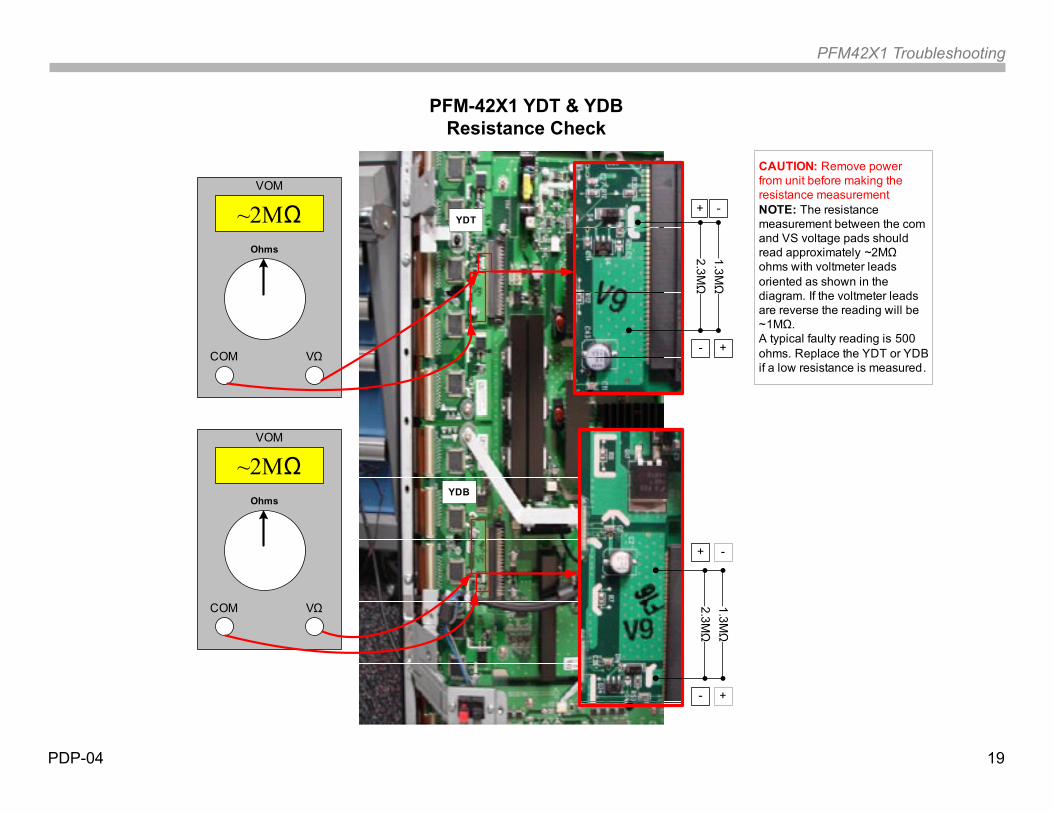
PFM42X1 Troubleshooting
Ohms
~2MΩ
COM VΩ
Ohms
~2MΩ
COM VΩ
CAUTION: Remove power from unit before making the resistance measurementNOTE: The resistance measurement between the com and VS voltage pads should read approximately ~2MΩohms with voltmeter leads oriented as shown in the diagram. If the voltmeter leads are reverse the reading will be ~1MΩ.A typical faulty reading is 500 ohms. Replace the YDT or YDB if a low resistance is measured.
YDT
YDB
VOM
VOM
+ -
- +
+
-
-
+
1.3MΩ
2.3MΩ
1.3MΩ
2.3MΩ
PFM-42X1 YDT & YDB Resistance Check

PDP-04 20
PFM42X1 Troubleshooting
YDBBoard
& Drive ICs
YDTBoard
& Drive ICs
XLB address Board XRB address Board
ZsusScanBoard
YDBBoard
& Drive ICs
YDTBoard
& Drive ICs
XLB address Board XRB address Board
ZsusScanBoard
YDBBoard
& Drive ICs
YDTBoard
& Drive ICs
XLB address Board XRB address Board
ZsusScanBoard
XLT address Board XRT address Board
XLT address Board XRT address Board
XLT address Board XRT address Board
YsusScanBoard
YsusScanBoard
YsusScanBoard
No Video (Horizontal Black Bar) lower 1/2 of screen
1st – Confirm secure connections between Ysus and YDB boards . Check Flex Cable between YDB and Panel Assembly for physical damge .
Replace YDB board (connections & Flex Cable OK)Replace Panel Assembly (Flex Cable NG)
No Video (Horizontal Black Bar) upper 1/2 of screen
1st – Confirm secure connections between Ysus and YDT boards . Check Flex Cable between YDT and Panel Assembly for physical damge .
Replace YDT board (connections & Flex Cable OK)Replace Panel Assembly (Flex Cable NG)
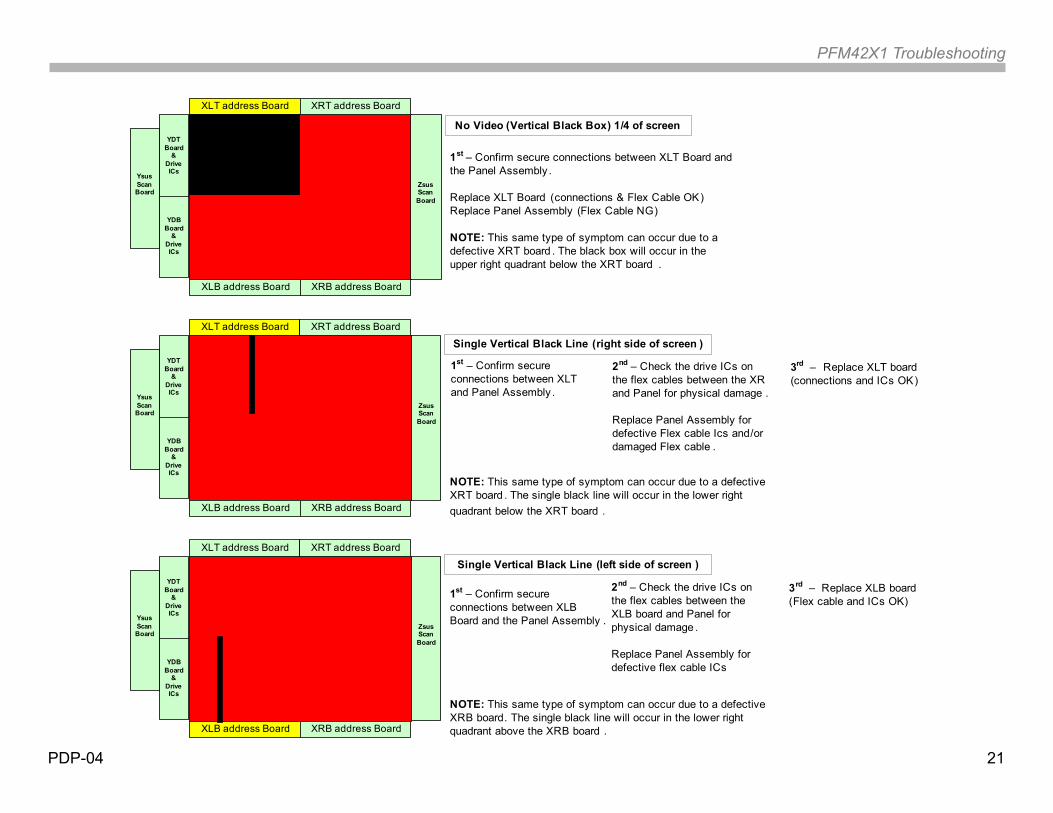
No Video (Vertical Black Box) 1/4 of screen
1st – Confirm secure connections between XLB Board and the Panel Assembly .
Replace XLB Board (connections & Flex Cable OK)Replace Panel Assembly (Flex Cable NG)
NOTE: This same type of symptom can occur due to a defective XRB board. The black box will occur in the lower right quadrant above the XRB board .
Panel Distortion Diagrams
PDP-04 21
PFM42X1 Troubleshooting
YDBBoard
& Drive ICs
YDTBoard
& Drive ICs
XLB address Board XRB address Board
ZsusScanBoard
YDBBoard
& Drive ICs
YDTBoard
& Drive ICs
XLB address Board XRB address Board
ZsusScanBoard
YDBBoard
& Drive ICs
YDTBoard
& Drive ICs
XLB address Board XRB address Board
ZsusScanBoard
XLT address Board XRT address Board
XLT address Board XRT address Board
XLT address Board XRT address Board
YsusScanBoard
YsusScanBoard
YsusScanBoard
No Video (Vertical Black Box) 1/4 of screen
1st – Confirm secure connections between XLT Board and the Panel Assembly .
Replace XLT Board (connections & Flex Cable OK)Replace Panel Assembly (Flex Cable NG)
NOTE: This same type of symptom can occur due to a defective XRT board . The black box will occur in the upper right quadrant below the XRT board .
Single Vertical Black Line (right side of screen )
1st – Confirm secure connections between XLT and Panel Assembly .
Single Vertical Black Line (left side of screen )
2nd – Check the drive ICs on the flex cables between the XR and Panel for physical damage .
Replace Panel Assembly for defective Flex cable Ics and/or damaged Flex cable .
3rd – Replace XLT board (connections and ICs OK)
1st – Confirm secure connections between XLB Board and the Panel Assembly .
2nd – Check the drive ICs on the flex cables between the XLB board and Panel for physical damage .
Replace Panel Assembly for defective flex cable ICs
3rd – Replace XLB board (Flex cable and ICs OK)
NOTE: This same type of symptom can occur due to a defective XRT board . The single black line will occur in the lower right quadrant below the XRT board .
NOTE: This same type of symptom can occur due to a defective XRB board. The single black line will occur in the lower right quadrant above the XRB board .

PDP-04 22
PFM42X1 Troubleshooting
YDBBoard
& Drive ICs
YDTBoard
& Drive ICs
XLB address Board XRB address Board
ZsusScanBoard
YDBBoard
& Drive ICs
YDTBoard
& Drive ICs
XLB address Board XRB address Board
ZsusScanBoard
XLT address Board XRT address Board
XLT address Board XRT address Board
YsusScanBoard
YsusScanBoard
Single Horizontal Black Line (upper half of screen )
1st – Confirm secure connections between YDT and Panel Assembly .
Replace Panel Assembly if flex cable is damaged
2nd – Check the drive ICs on the YDT board for physical damge .
Replace YDT board if Ics are damaged .
Single Horizontal Black Line (lower half of screen )
1st – Confirm secure connections between YDB and Panel Assembly
2nd – Check the drive ICs on the YDB board for physical damage .
Replace YDB board if ICs are damaged .
YDBBoard
& Drive ICs
YDTBoard
& Drive ICs
XLB address Board XRB address Board
ZsusScanBoard
YsusScanBoard
XLT address Board XRT address Board
Note: One drive IC fails on the YDT or YDB board fails causing the successive drive ICs to not function. This symptom (a Black Bar less-than ½ the screen ) can be located in the top or bottom half of the screen depending on if the failed IC is on the YDT or YDB board .
Less-Than ½ Screen Horizontal Black Bar
1st – Replace the YDT or YDB board depending on where the horizontal black bar is located on the screen .

PDP-04 23
PFM42X1 Troubleshooting
YDBBoard
& Drive ICs
YDTBoard
& Drive ICs
XLB address Board XRB address Board
ZsusScanBoard
XLT address Board XRT address Board
YsusScanBoard
No Video – Black Raster
1st – Check Flex cable connections between Ysus & YDT/YDB boards .Check VS and 5V power supplies to Ysus board . Check for screen Priming
Replace G-board (Volatge(s) NG)Replace Ysus (Priming NG)Replace Control /XL Board (Priming OK)
2nd – Check connections between Ysus and Control boards are secure .Connections & Voltages OKA) Replace YsusB) Replace Control board
3rd – Check all voltages and connections to Zsus board .
Replace Zsus (connections & voltages OK)
Control Board
ZsusScanBoard
YDBBoard
& Drive ICs
YDTBoard
& Drive ICs
XLB address Board XRB address Board
XLT address Board XRT address Board
YsusScanBoard
Pixelization & Black Areas In Video
1st – Confirm connections and power supply voltages (VS & 5V) to Zsus board are secure .Confirm Flex cable connections between Zsus board and Panel .
2nd –A) Replace Zsus board (all connections and voltages OK) B) Replace G-board (voltages NG)C) Replace Plasma Panel (Flex cable NG)

PDP-04 24
FWD42PV1 Triage & Troubleshooting
Display Panel Assembly
Power to all Panel Assb. PCBsPower Audio
Video
A-BoardG-Board
Control-Board
Power Supplies
Video Processing Audio Processing Main Microprocessor Fan Control AV Switching
Video Input 1 (DVI)
Video Input 2 (HD15)
L-Board
Audio Amplifier
Control
AC Input
Panel Pixel Control
Power Sw. IR Sensor LEDS
H2-BoardSwitchesH1-Board
YDBBoard
& Drive ICs
YDTBoard
& Drive ICs Zsus
ScanBoard
XLB address Board XRB address Board
Composite InputBKM-V10
Optional Video Input Board
Single Address Scan
Fan 1
Fan 2
Fan 3
Temp. Sensor 1
Temp. Sensor 2
Temp. Sensor 3
Control
Control
Data
Data
Data
Fan 4
Control
Control
Fan 5Control
FWD42PV1
YsusScanBoard
LRLR
PlasmaPanel
Key Control LinesACD – Detects the presence of AC input. No Red STBY LED if missing.Relay – Turns ON AC input relay. No Relay click if missing.VS ON – Turns ON the VS power supply. No VS voltage if missing.
ACD
RELAY
VS ON
1
2STBY 5V
3
CN801
7
Overall Component Block Diagram

PDP-04 25
FWD42PV1 Troubleshooting
Zsus-Board
YDT
YDB
L-Brd
Ysus-Board
XR -Board
Fan #1
Fan #4
Top of TVRear View
Temp
Temp
XL-Board
G-Board
Temp
Control-Board
Fan #3Fan #2
Fan #5
A-Board
H2-Brd
FWD-42V1
PCB Location Diagram
PDP-04 26
FWD42PV1 Troubleshooting
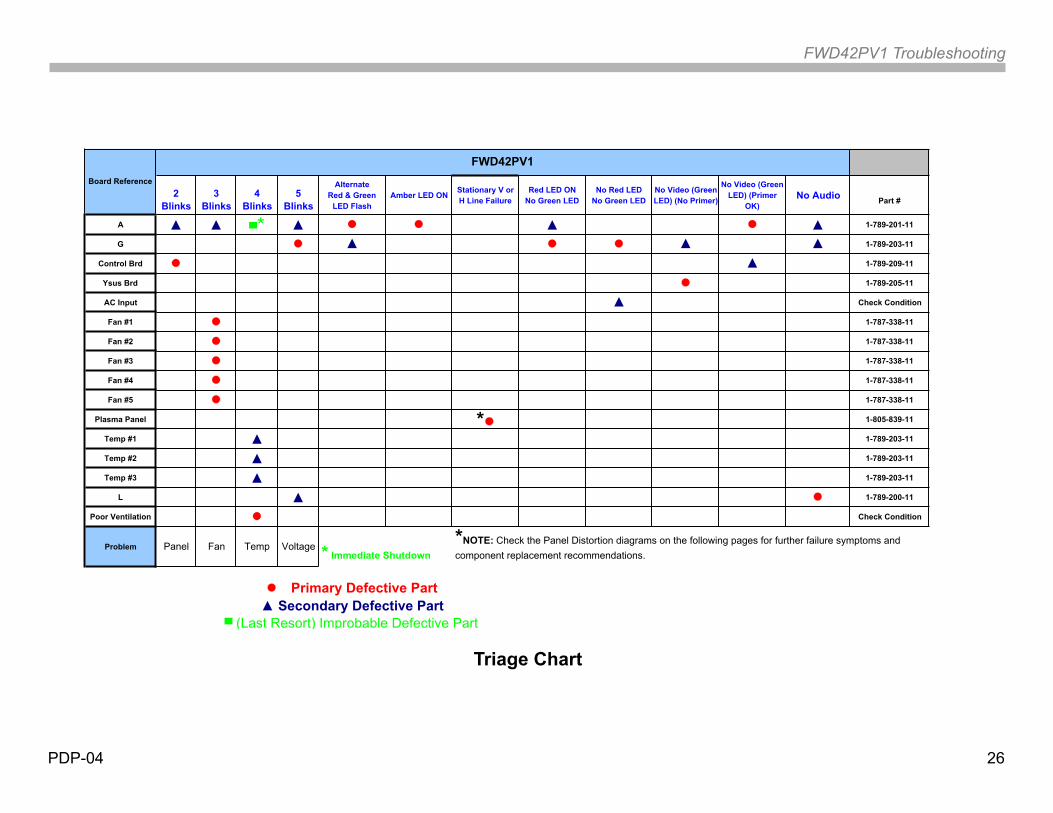
Board Reference
FWD42PV1
2Blinks
3Blinks
4Blinks
5Blinks
AlternateRed & Green
LED FlashAmber LED ON Stationary V or
H Line FailureRed LED ON
No Green LED No Red LED
No Green LED No Video (Green LED) (No Primer)
No Video (Green LED) (Primer
OK)No Audio Part #
A � � �* � � � � � � 1-789-201-11
G � � � � � � 1-789-203-11
Control Brd � � 1-789-209-11
Ysus Brd � 1-789-205-11
AC Input � Check Condition
Fan #1 � 1-787-338-11
Fan #2 � 1-787-338-11
Fan #3 � 1-787-338-11
Fan #4 � 1-787-338-11
Fan #5 � 1-787-338-11
Plasma Panel *� 1-805-839-11
Temp #1 � 1-789-203-11
Temp #2 � 1-789-203-11
Temp #3 � 1-789-203-11
L � � 1-789-200-11
Poor Ventilation � Check Condition
Problem Panel Fan Temp Voltage * Immediate Shutdown *NOTE: Check the Panel Distortion diagrams on the following pages for further failure symptoms and component replacement recommendations.
��Primary Defective Part� Secondary Defective Part
� (Last Resort) Improbable Defective Part
Triage Chart

PDP-04 27
FWD42PV1 Troubleshooting
FWD-42PV1 VS, VA, -Vy, Vsc Adjustments
-Vy Adj.Vsc Adj.
VS Adj.VR600
VA Adj.VR700
CN807
Ysus Board
G Board
-Vy TP R8
Vsc TP R60
GRND Side
GRND Side
VS TP CN807 pins 1, 2
VS & VA GRND
VA TP CN806 pin 6

PDP-04 28
FWD42PV1 Troubleshooting
FWD-42PV1 YDT & YDB Resistance Check
Ohms
~3MΩ
COM VΩ
Ohms
~3MΩ
COM VΩ
YDT
YDB
VOM
VOM
CAUTION: Remove power from unit before making the resistance measurementNOTE: The resistance measurement between the com and VS voltage pads should read approximately 3M ohms with voltmeter leads oriented as shown in the diagram. If the voltmeter leads are reverse the reading will be infinite.A typical faulty reading is 500 ohms. Replace the YDT or YDB if a low resistance is measured.

PDP-04 29
FWD42PV1 Troubleshooting
YDBBoard
& Drive ICs
YDTBoard
& Drive ICs
XL address Board XR address Board
ZsusScanBoard
YDBBoard
& Drive ICs
YDTBoard
& Drive ICs
XL address Board XR address Board
ZsusScanBoard
YDBBoard
& Drive ICs
YDTBoard
& Drive ICs
XL address Board XR address Board
ZsusScanBoard
YsusScanBoard
YsusScanBoard
YsusScanBoard
No Video (Horizontal Black Bar) lower 1/2 of screen
1st – Confirm secure connections between Ysus and YDB boards . Check Flex Cable between YDB and Panel Assembly for physical damge .
Replace YDB board (connections & Flex Cable OK)Replace Panel Assembly (Flex Cable NG)
No Video (Horizontal Black Bar) upper 1/2 of screen
1st – Confirm secure connections between Ysus and YDT boards . Check Flex Cable between YDT and Panel Assembly for physical damge .
Replace YDT board (connections & Flex Cable OK)Replace Panel Assembly (Flex Cable NG)
No Video (Vertical Black Bar ) 1/2 of screen
1st – Confirm secure connections between XL Board and the Panel Assembly .
Replace XL Board (connections & Flex Cable OK)Replace Panel Assembly (Flex Cable NG)
Panel Distortion Diagrams

PDP-04 30
FWD42PV1 Troubleshooting
YDBBoard
& Drive ICs
YDTBoard
& Drive ICs
XL address Board XR address Board
ZsusScanBoard
YDBBoard
& Drive ICs
YDTBoard
& Drive ICs
XL address Board XR address Board
ZsusScanBoard
YDBBoard
& Drive ICs
YDTBoard
& Drive ICs
XL address Board XR address Board
ZsusScanBoard
YsusScanBoard
YsusScanBoard
YsusScanBoard
No Video (Vertical Black Bar ) 1/2 of screen
Single Vertical Black Line (right side of screen )
1st – Confirm secure connections between XR, XL, and Control Boards .
1st – Confirm secure connections between XR, XL, and Control Boards .
2nd – Confirm 5V and VA voltages to XR board .
3rd – Replace boards in the following order .
A) Replace XR-BoardB) Replace Control Board
Single Vertical Black Line (left side of screen )
2nd – Check the drive ICs on the flex cables between the XR and Panel for physical damage .
Replace Panel Assembly for defective flex cable ICs
3rd – Replace XR board
1st – Confirm secure connections between XL Board and the Panel Assembly .
2nd – Check the drive ICs on the flex cables between the XL board and Panel for physical damage .
Replace Panel Assembly for defective flex cable ICs
3rd – Replace XL board (Flex ICs OK)

PDP-04 31
FWD42PV1 Troubleshooting
YDBBoard
& Drive ICs
YDTBoard
& Drive ICs
XL address Board XR address Board
ZsusScanBoard
YDBBoard
& Drive ICs
YDTBoard
& Drive ICs
XL address Board XR address Board
ZsusScanBoard
YsusScanBoard
YsusScanBoard
Single Horizontal Black Line (upper half of screen )
1st – Confirm secure connections between YDT and Panel Assembly .
Replace Panel Assembly if flex cable is damaged
2nd – Check the drive ICs on the YDT board for physical damge .
Replace YDT board if Ics are damaged .
Single Horizontal Black Line (lower half of screen )
1st – Confirm secure connections between YDB and Panel Assembly
Replace Panel Assembly if flex cable is damaged
2nd – Check the drive ICs on the YDB board for physical damage .
Replace YDB board if ICs are damaged .
YDBBoard
& Drive ICs
YDTBoard
& Drive ICs
XL address Board XR address Board
ZsusScanBoard
YsusScanBoard
Note: One drive IC fails on the YDT or YDB board fails causing the successive drive ICs to not function. This symptom (a Black Bar less-than ½ the screen ) can be located in the top or bottom half of the screen depending on if the failed IC is on the YDT or YDB board .
Less-Than ½ Screen Horizontal Black Bar
1st – Replace the YDT or YDB board depending on where the horizontal black bar is located on the screen .

PDP-04 32
FWD42PV1 Troubleshooting
YDBBoard
& Drive ICs
YDTBoard
& Drive ICs
XL address Board XR address Board
ZsusScanBoard
YsusScanBoard
No Video – Black Raster
1st – Check Flex cable connections between Ysus & YDT/YDB boards .Check VS and 5V power supplies to Ysus board. Check for screen Priming
Replace G-board (Volatge (s) NG)Replace Ysus (Priming NG)Replace Control Board (Priming OK)
2nd – Check connections between Ysus and Control boards are secure .Connections & Voltages OKA) Replace YsusB) Replace Control board
3rd – Check all voltages and connections to Zsus board .
Replace Zsus (connections & voltages OK)
Control Board
ZsusScanBoar
d
YDBBoard
& Drive ICs
YDTBoard
& Drive ICs
XL address Board XR address Board
YsusScanBoard
Pixelization & Black Areas In Video
1st – Confirm connections and power supply voltages (VS & 5V) to Zsus board are secure .Confirm Flex cable connections between Zsus board and Panel .
2nd –A) Replace Zsus board (all connections and voltages OK) B) Replace G-board (voltages NG)C) Replace Plasma Panel (Flex cable NG)
PDP-04 33
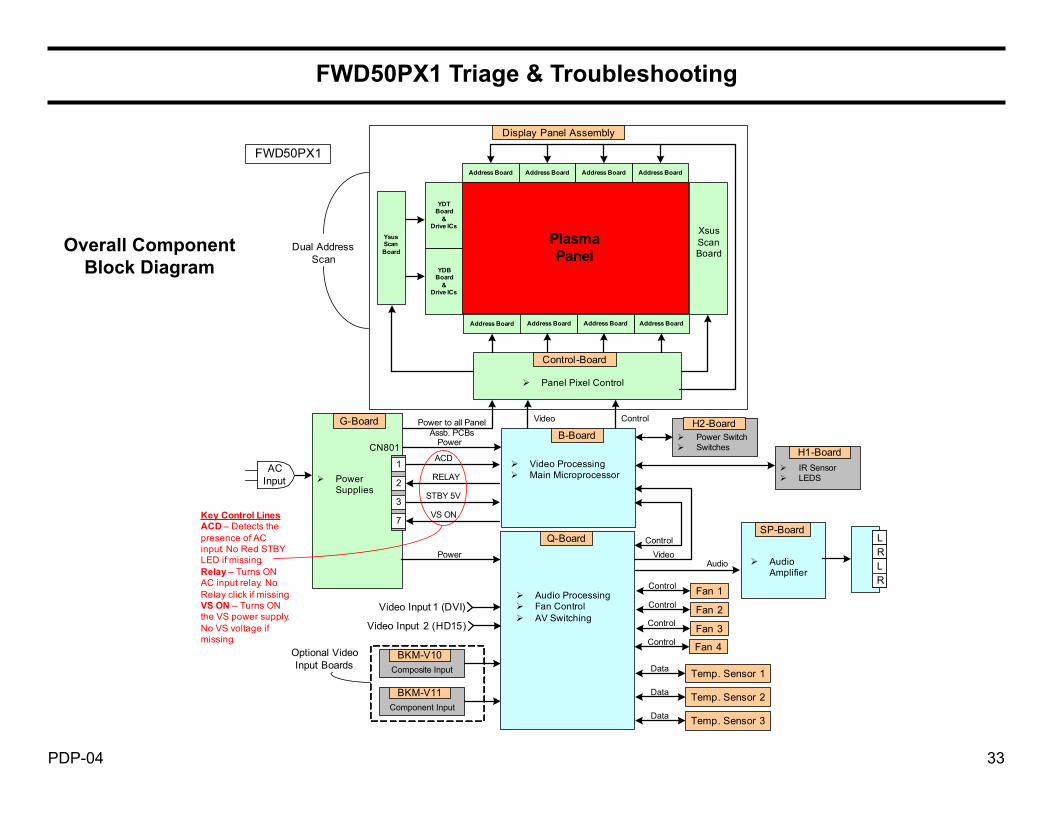
FWD50PX1 Triage & Troubleshooting
Display Panel Assembly
Power to all Panel Assb. PCBs
Power
Audio
Video
B-BoardG-Board
Control-Board
Power Supplies
Video Processing Main Microprocessor
Video Input 1 (DVI)
Video Input 2 (HD15)
SP-Board
Audio Amplifier
Control
AC Input
Panel Pixel Control
Fan 1
Fan 2
Fan 3
Temp. Sensor 1
Temp. Sensor 2
Temp. Sensor 3
Control
Control
Data
Data
Data
IR Sensor LEDS
Power Switch Switches H1-Board
YDBBoard
& Drive ICs
YDTBoard
& Drive ICs Xsus
ScanBoard
Address Board
Composite InputBKM-V10
Component InputBKM-V11
Optional Video Input Boards
Dual Address Scan
Fan 4
Control
Control
Q-Board
Audio Processing Fan Control AV Switching
ControlVideoPower
H2-Board
FWD50PX1
Address Board Address BoardAddress Board
Address Board Address Board Address BoardAddress Board
YsusScanBoard
LRLR
PlasmaPanel
Key Control LinesACD – Detects the presence of AC input. No Red STBY LED if missing.Relay – Turns ON AC input relay. No Relay click if missing.VS ON – Turns ON the VS power supply. No VS voltage if missing.
ACD
RELAY
VS ON
1
2STBY 5V3
CN801
7
Overall Component Block Diagram

PDP-04 34
FWD50PX1 Troubleshooting
X Drive
YDT
YDB
Address Board
Top of TVRear View
S-Brd
S-Brd
Address Board
Fan #1
Fan #4Fan #3
H2-Brd
H1-Brd
FWD-50PX1
Interface-BoardY Drive
U1-Brd
Q-Board Power Unit Board
Address BoardAddress Board
Address BoardAddress Board Address BoardAddress Board
SP-Board
Digital Video Board
S-Brd
B-Board
Fan #2
PCB Location Diagram

PDP-04 35
FWD50PX1 Troubleshooting
Board Reference
FWD50PX1
2Blinks
3Blinks
4Blinks
5Blinks
6Blinks
AlternateRed & Green
LED FlashAmber LED ON Red LED ON
No Green LED Stationary V or H
Line Failure No Red LED
No Green LED
No Video(Green LED) (No
Primer)
No Video(Green LED) (Primer OK)
No Audio Part #
B � � � � � � � � � � A-1070-525-A
Q � � � A-1062-627-A
G � � � � � 1-468-872-11
Interface Brd � � 9-885-061-46
Digital Video Brd � � 9-885-061-45
Ysus Brd � 9-885-061-44
AC Input � Check Condition
Fan #1 � 1-787-088-11
Fan #2 � 1-787-088-11
Fan #3 � 1-787-243-11
Fan #4 � 1-787-243-11
Plasma Panel *� � 1-805-676-11
Temp. #1 *� A-1068-935-A
Temp. #2 *� A-1068-935-A
Temp. #3 *� A-1068-935-A
L � A-1068-935-A
Poor Ventilation � Check Condition
Problem Panel Temp Fan 3.3V5V 6V *Immediate Shutdown
*NOTE: Check the Panel Distortion diagrams on the following pages for further failure symptoms and component replacement recommendations.
��Primary Defective Part� Secondary Defective Part
� (Last Resort) Improbable Defective Part
Triage Chart

PDP-04 36
FWD50PX1 Troubleshooting
FWD-50PX1 Vsus & VADR Check

PDP-04 37
FWD50PX1 Troubleshooting
FWD-50PX1 YDT & YDB Resistance Check

PDP-04 38
FWD50PX1 Troubleshooting
YDBBoard
& Drive ICs
YDTBoard
& Drive ICs
XsusScanBoard
YDBBoard
& Drive ICs
YDTBoard
& Drive ICs
XsusScanBoard
YDBBoard
& Drive ICs
YDTBoard
& Drive ICs
XsusScanBoard
Address Board
Address Board
Address Board
Address Board
Address Board
Address Board
Address Board
Address Board
Address Board
Address Board
Address Board
Address Board
Address Board
Address Board
Address Board
Address Board
Address Board
Address Board
Address Board
Address Board
Address Board
Address Board
Address Board
Address Board
YsusScanBoard
YsusScanBoard
YsusScanBoard
No Video (Horizontal Black Bar) lower 1/2 of screen
1st – Confirm secure connections between Ysus and YDB boards . Check Flex Cable between YDB and Panel Assembly for physical damge .
Replace YDB board (connections & Flex Cable OK)Replace Panel Assembly (Flex Cable NG)
No Video (Horizontal Black Bar) upper 1/2 of screen
1st – Confirm secure connections between Ysus and YDT boards . Check Flex Cable between YDT and Panel Assembly for physical damge .
Replace YDT board (connections & Flex Cable OK)Replace Panel Assembly (Flex Cable NG)
No Video (Vertical Black Box) 1/8 of screen
1st – Confirm secure connections between associated address board and the Panel Assembly . Check driver ICs for physical damage .
Replace Address Board (connections & Flex Cable OK)Replace Panel Assembly (Flex Cable or Driver ICs NG)
NOTE: This same type of symptom can occur due to any defective address boards . The black box will occur in the lower or upper part of the screen below or above a particular address board .
Panel Distortion Diagrams
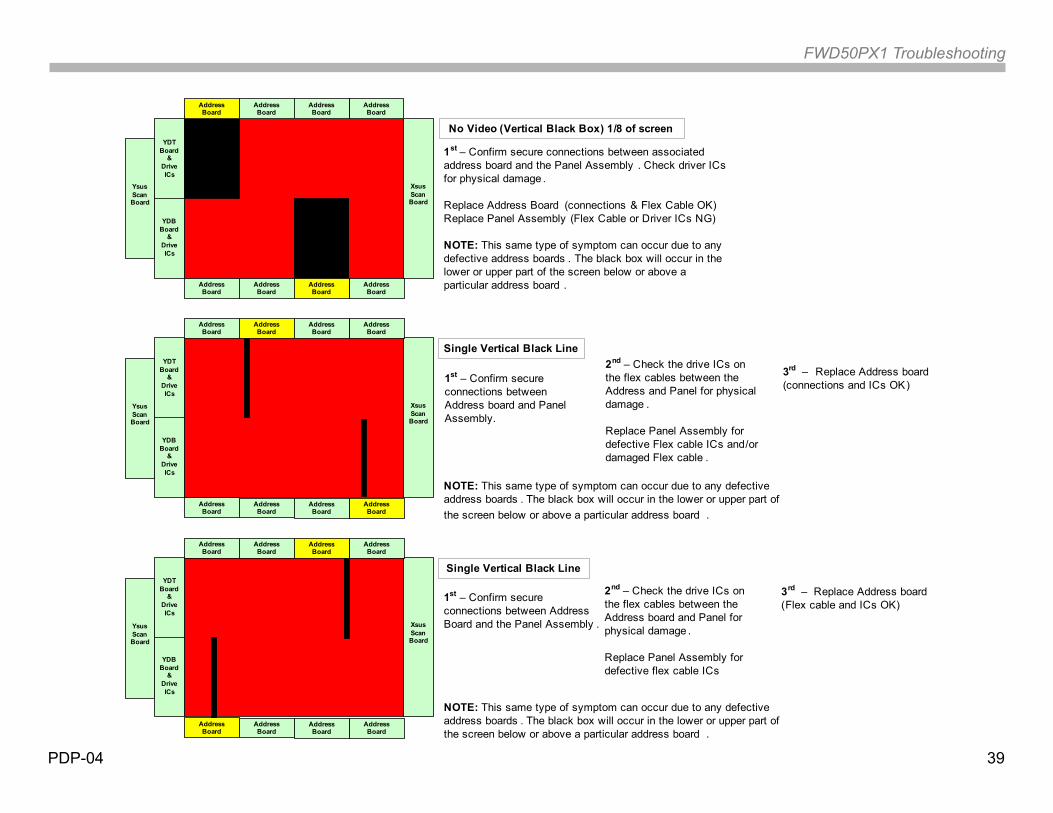
PDP-04 39
FWD50PX1 Troubleshooting
YDBBoard
& Drive ICs
YDTBoard
& Drive ICs
XsusScanBoard
YDBBoard
& Drive ICs
YDTBoard
& Drive ICs
XsusScanBoard
YDBBoard
& Drive ICs
YDTBoard
& Drive ICs
XsusScanBoard
Address Board
Address Board
Address Board
Address Board
Address Board
Address Board
Address Board
Address Board
Address Board
Address Board
Address Board
Address Board
Address Board
Address Board
Address Board
Address Board
Address Board
Address Board
Address Board
Address Board
Address Board
Address Board
Address Board
Address Board
YsusScanBoard
YsusScanBoard
YsusScanBoard
No Video (Vertical Black Box) 1/8 of screen
1st – Confirm secure connections between associated address board and the Panel Assembly . Check driver ICs for physical damage .
Replace Address Board (connections & Flex Cable OK)Replace Panel Assembly (Flex Cable or Driver ICs NG)
NOTE: This same type of symptom can occur due to any defective address boards . The black box will occur in the lower or upper part of the screen below or above a particular address board .
Single Vertical Black Line
1st – Confirm secure connections between Address board and Panel Assembly.
Single Vertical Black Line
2nd – Check the drive ICs on the flex cables between the Address and Panel for physical damage .
Replace Panel Assembly for defective Flex cable ICs and/or damaged Flex cable .
3rd – Replace Address board (connections and ICs OK)
1st – Confirm secure connections between Address Board and the Panel Assembly .
2nd – Check the drive ICs on the flex cables between the Address board and Panel for physical damage .
Replace Panel Assembly for defective flex cable ICs
3rd – Replace Address board (Flex cable and ICs OK)
NOTE: This same type of symptom can occur due to any defective address boards . The black box will occur in the lower or upper part of the screen below or above a particular address board .
NOTE: This same type of symptom can occur due to any defective address boards . The black box will occur in the lower or upper part of the screen below or above a particular address board .

PDP-04 40
FWD50PX1 Troubleshooting
YDBBoard
& Drive ICs
YDTBoard
& Drive ICs
XsusScanBoard
YDBBoard
& Drive ICs
YDTBoard
& Drive ICs
XsusScanBoard
Address Board
Address Board
Address Board
Address Board
Address Board
Address Board
Address Board
Address Board
Address Board
Address Board
Address Board
Address Board
Address Board
Address Board
Address Board
Address Board
YsusScanBoard
YsusScanBoard
Single Horizontal Black Line (upper half of screen )
1st – Confirm secure connections between YDT and Panel Assembly .
Replace Panel Assembly if flex cable is damaged
2nd – Check the drive ICs on the YDT board for physical damge .
Replace YDT board if Ics are damaged .
Single Horizontal Black Line (lower half of screen )
1st – Confirm secure connections between YDB and Panel Assembly
2nd – Check the drive ICs on the YDB board for physical damage .
Replace YDB board if ICs are damaged .
YDBBoard
& Drive ICs
YDTBoard
& Drive ICs
ZsusScanBoard
YsusScanBoard
Address Board
Address Board
Address Board
Address Board
Note: One drive IC fails on the YDT or YDB board fails causing the successive drive ICs to not function. This symptom (a Black Bar less-than ½ the screen ) can be located in the top or bottom half of the screen depending on if the failed IC is on the YDT or YDB board .
Less -Than ½ Screen Horizontal Black Bar
1st – Replace the YDT or YDB board depending on where the horizontal black bar is located on the screen.
Address Board
Address Board
Address Board
Address Board

PDP-04 41
FWD50PX1 Troubleshooting
YDBBoard
& Drive ICs
YDTBoard
& Drive ICs
XsusScanBoard
Address Board
Address Board
Address Board
Address Board
Address Board
Address Board
Address Board
Address Board
YsusScanBoard
No Video – Black Raster
1st – Check Flex cable connections between Ysus & YDT/YDB boards .Check VS and 5V power supplies to Ysus board . Check for screen Priming
Replace G-board (Volatge(s) NG)Replace Ysus (Priming NG)Replace Control /XL Board (Priming OK)
2nd – Check connections between Ysus and Control boards are secure .Connections & Voltages OKA) Replace YsusB) Replace Control board
3rd – Check all voltages and connections to Xsus board .
Replace Xsus (connections & voltages OK)
Control Board
XsusScanBoard
YDBBoard
& Drive ICs
YDTBoard
& Drive ICs
Address Board
Address Board
Address Board
Address Board
Address Board
Address Board
Address Board
Address Board
YsusScanBoard
Pixelization & Black Areas In Video
1st – Confirm connections and power supply voltages (VS & 5V) to Zsus board are secure .Confirm Flex cable connections between Zsus board and Panel .
2nd –A) Replace Zsus board (all connections and voltages OK ) B) Replace G-board (voltages NG)C) Replace Plasma Panel (Flex cable NG)

PDP-04 42
FWD50PX2 Triage & Troubleshooting
Display Panel Assembly
Power to all Panel Assb. PCBs
Power Audio
Video
A-BoardG-Board
Control-Board
Power Supplies
Video Processing Audio Processing Main Microprocessor Fan Control AV Switching
Video Input 1 (DVI)
Video Input 2 (HD15)
L-Board
Audio Amplifier
Control
AC Input
Panel Pixel Control
Power Sw. IR Sensor LEDS
H2-Board
SwitchesH1-Board
YsusScan(YDT)Board
& Drive ICs
YsusScan(YDT)Board
& Drive ICs Zsus
ScanBoard
XL address Brd XR address Brd
Composite InputBKM-V10
Component InputBKM-V11
Optional Video Input Boards
Single Address Scan
Fan 1
Fan 2
Fan 3
Temp. Sensor 1
Temp. Sensor 2
Temp. Sensor 3
Control
Control
Data
Data
Data
Control
Fan 4
Fan 5
Fan 6
Control
Control
Control
XC address Brd
FWD50PX2
YsusScanBoard
LRLR
PlasmaPanel
Key Control LinesACD – Detects the presence of AC input. No Red STBY LED if missing.Relay – Turns ON AC input relay. No Relay click if missing.VS ON – Turns ON the VS power supply. No VS voltage if missing.
ACD
RELAY
VS ON
1
2STBY 5V
3
CN801
7
Overall Component Block Diagram

PDP-04 43
FWD50PX2 Troubleshooting
YDT
YDBL-Brd
Ysus-Board
XR -Board
Fan #1
Fan #4
Top of TVRear View
TempTemp
XL-Board
G-Board
Temp
Control-Board
Fan #3Fan #2
H2-Brd
H1-Brd
XC -Board
Zsus-Board
FWD-50PX2
Fan #6
A-Board
I-Brd
Fan #5
PCB Location Diagram

PDP-04 44
FWD50PX2 Troubleshooting
Board Reference
FWD50PX2
2Blinks
3Blinks
4Blinks
5Blinks
AlternateRed & Green
LED FlashAmber LED ON Red LED ON
No Green LED No Red LED
No Green LED Stationary V or H Line Failure
No Video (Green LED) (No Primer)
No Video (Green LED) (Primer
OK)No Audio Part #
A � � �* � � � � � � 1-789-374-11
G � � � � � � 1-789-375-11
Control Brd � � 1-789-380-11
Ysus Brd � 1-789-386-11
AC Input � Check Condition
Fan #1 � 1-787-434-11
Fan #2 � 1-787-434-11
Fan #3 � 1-787-434-11
Fan #4 � 1-787-437-11
Fan #5 � 1-787-434-11
Fan #6 � 1-787-437-11
Plasma Panel *� 1-802-006-11
Temp #1 � 1-789-203-11
Temp #2 � 1-789-203-11
Temp #3 � 1-789-203-11
L � � 1-789-376-11
Poor Ventilation � Check Condition
Problem Panel Fan Temp Voltage * Immediate Shutdown *NOTE: Check the Panel Distortion diagrams on the following pages for further failure symptoms and component replacement recommendations.
��Primary Defective Part� Secondary Defective Part
� (Last Resort) Improbable Defective Part
Triage Chart

PDP-04 45
FWD50PX2 Troubleshooting
-Vy Adj.
Vsc Adj.
-Vy TP
Vsc TP
Two Vertically mounted boards on the Ysus Board
VS Adj.VR600
VA Adj.VR700
VS TP CN806 pins 1, 2, 3
VA TP CN806 pins 9 & 10
CN806
-Vy GRND
Vsc GRND
VS & VA GRND
Ysus Board G BoardFWD-50PX2 VS, VA, -Vy, Vsc Adjustments
PDP-04 46
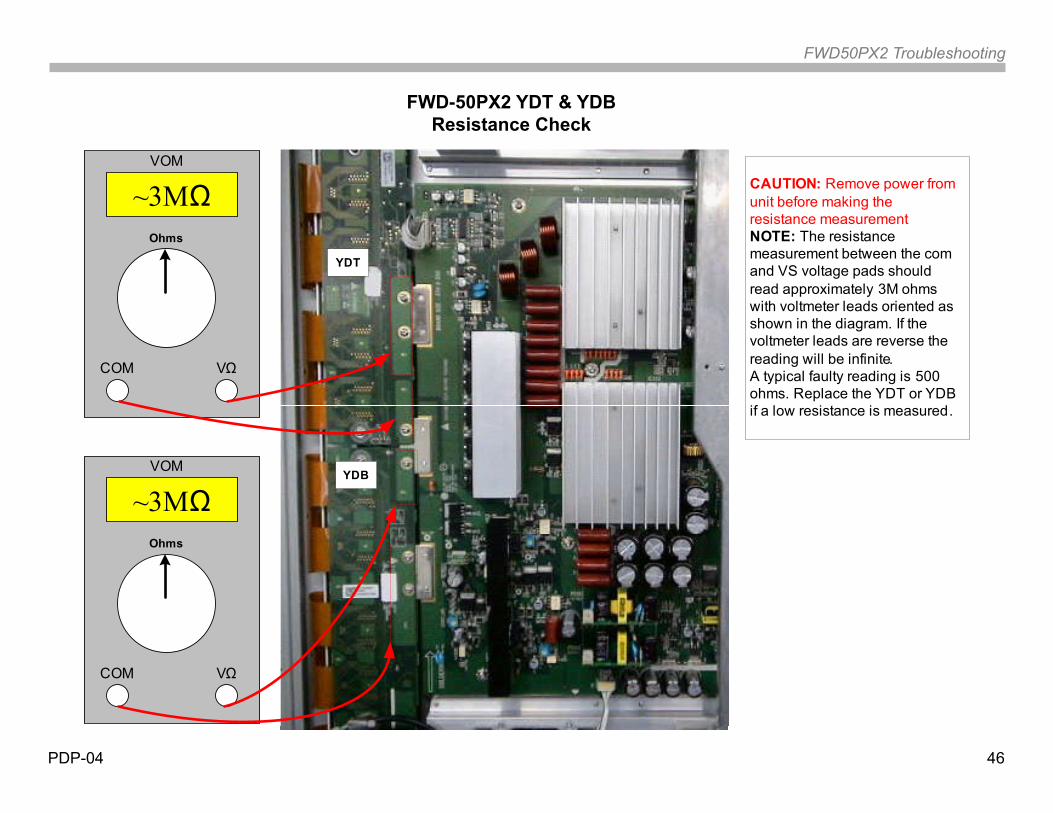
FWD50PX2 Troubleshooting
Ohms
~3MΩ
COM VΩ
Ohms
~3MΩ
COM VΩ
CAUTION: Remove power from unit before making the resistance measurementNOTE: The resistance measurement between the com and VS voltage pads should read approximately 3M ohms with voltmeter leads oriented as shown in the diagram. If the voltmeter leads are reverse the reading will be infinite.A typical faulty reading is 500 ohms. Replace the YDT or YDB if a low resistance is measured.
YDT
YDB
VOM
VOM
FWD-50PX2 YDT & YDB Resistance Check

PDP-04 47
FWD50PX2 Troubleshooting
YDBBoard
& Drive ICs
YDTBoard
& Drive ICs
ZsusScanBoard
YDBBoard
& Drive ICs
YDTBoard
& Drive ICs
ZsusScanBoard
YDBBoard
& Drive ICs
YDTBoard
& Drive ICs
ZsusScanBoard
XL address Brd XR address BrdXC address Brd
XL address Brd XR address BrdXC address Brd
XL address Brd XR address BrdXC address Brd
YsusScanBoard
YsusScanBoard
YsusScanBoard
No Video (Horizontal Black Bar) lower ½ of screen
1st – Confirm secure connections between YDT and YDB boards . Check Flex Cable between YDB and Panel Assembly for physical damge .
Replace YDB board (connections & Flex Cable OK)Replace Panel Assembly (Flex Cable NG)
No Video (Horizontal Black Bar) upper ½ of screen
1st – Confirm secure connections between Ysus and YDT boards . Check Flex Cable between YDT and Panel Assembly for physical damge .
Replace YDT board (connections & Flex Cable OK)Replace Panel Assembly (Flex Cable NG)
No Video (Vertical Black Bar ) 1/3 of screen
1st – Confirm secure connections between XL and Control Boards .
2nd – Confirm 5V and VA voltages to XL board .
3rd – Replace boards in the following order .
A) Replace XL-BoardB) Replace Control Board
Panel Distortion Diagrams

PDP-04 48
FWD50PX2 Troubleshooting
YDBBoard
& Drive ICs
YDTBoard
& Drive ICs
YDBBoard
& Drive ICs
YDTBoard
& Drive ICs
YDBBoard
& Drive ICs
YDTBoard
& Drive ICs
XL address Brd XR address BrdXC address Brd
XL address Brd XR address BrdXC address Brd
XL address Brd XR address BrdXC address Brd
YsusScanBoard
YsusScanBoard
YsusScanBoard
Note: This same symptom can occur due to a defective XC board . Follow the same step listed above for the XL -board to troubleshoot a possible defective XC board .
No Video (Vertical Black Bar) 1/3 of screen
Single Vertical Black Line (right side of screen )
1st – Confirm secure connections between XR and Control Board .
1st – Confirm secure connections between XR and Control Boards .
2nd – Confirm 5V and VA voltages to XR board.
3rd – Replace boards in the following order .
A) Replace XR-BoardB) Replace Control Board
Single Vertical Black Line (left side of screen )
2nd – Check the drive ICs on the flex cables between the XR and Panel for physical damage .
Replace Panel Assembly for defective flex cable ICs
3rd – Replace XR board
1st – Confirm secure connections between XL and Control Board .
2nd – Check the drive ICs on the flex cables between the XL and Panel for physical damage .
Replace Panel Assembly for defective flex cable ICs
3rd – Replace XL board
ZsusScanBoard
ZsusScanBoard
ZsusScanBoard
NOTE: This same type of symptom can occur due to a defective XC board . The single black line will occur in the center of the screen above the XC board .

PDP-04 49
FWD50PX2 Troubleshooting
YDBBoard
& Drive ICs
YDTBoard
& Drive ICs
ZsusScanBoard
YDBBoard
& Drive ICs
YDTBoard
& Drive ICs
ZsusScanBoard
XL address Brd XR address BrdXC address Brd
XL address Brd XR address BrdXC address Brd
YsusScanBoard
YsusScanBoard
Single Horizontal Black Line (upper half of screen )
1st – Confirm secure connections between YDT and Panel Assembly .
Replace Panel Assembly if flex cable is damaged
2nd – Check the drive ICs on the YDT board for physical damge .
Replace YDT board if Ics are damaged .
Single Horizontal Black Line (lower half of screen )
1st – Confirm secure connections between YDB and Panel Assembly
2nd – Check the drive ICs on the YDB board for physical damage .
Replace YDB board if ICs are damaged .
YDBBoard
& Drive ICs
YDTBoard
& Drive ICs
XL address Board XR address Board
ZsusScanBoard
YsusScanBoard
Note: One drive IC fails on the YDT or YDB board fails causing the successive drive ICs to not function. This symptom (a Black Bar less-than ½ the screen ) can be located in the top or bottom half of the screen depending on if the failed IC is on the YDT or YDB board .
Single Defective Driver Board Buffer IC on YDT or YDB Board
1st – Replace the YDT or YDB board depending on where the horizontal black bar is located on the screen .
YDBBrd
YDTBrd
XL address Board XR address Board
ZsusYsus

PDP-04 50
FWD50PX2 Troubleshooting
YDBBoard
& Drive ICs
YDTBoard
& Drive ICs
ZsusScanBoard
XL address Brd XR address BrdXC address Brd
YsusScanBoard
ZsusScanBoard
YDBBoard
& Drive ICs
YDTBoard
& Drive ICs
XL address Brd XR address BrdXC address Brd
YsusScanBoard
No Video – Black Raster
1st – Check flex cable connections between Ysus & YDT/YDB boards .Check VS and 5V power supplies to Ysus board .
Replace G-board (Volatge(s) NG)Replace Ysus (Priming NG)Replace Control Board (Priming OK)
2nd – Check connections between Ysus and Control boards are secure .Connections & Voltages OKA) Replace YsusB) Replace Control board
3rd – Check all voltages and connections to Zsus board .
Replace Zsus (connections & voltages OK)
Pixelization & Black Areas In Video
1st – Confirm connections and power supply voltages (VS & 5V) to Zsus board are secure .Confirm Flex cable connections between Zsus board and Panel .
2nd –A) Replace Zsus board (all connections and voltages OK) B) Replace G-board (voltages NG)C) Replace Plasma Panel (Flex cable NG)
Control Board

and i.Link are trademarks of Sony Electronics
2007 Sony Electronics, Inc.EMCSA - A Service Company
16530 Via EsprilloSan Diego, CA 92127
Reproduction in whole or part without written permission is prohibited. All rights reservedPDP040607 06/08/07