planning a healthy garden
TRANSCRIPT

LESSON PLANS FOR 2011-12 SCHOOL YEAR Grade 2
Planning a Healthy Garden
Lesson three: How do we make a garden plan?
“Our Food Garden Plan” from GROWING IN THE GARDEN: LOCAL FOODS AND HEALTHY LIVING, Iowa State University Extension and Outreach
Students draw their favorite foods from plants on paper plates that they “plant” in a garden taped out on the floor. When they discover the challenge of making all the plants fit, they go through a series of tasting, math, and science activities until they come up with the crops they will actually plant in their cool season and fall harvest gardens. _____________________________________________________________________________
Content objectives: Identify and select locally grown fruits and vegetables to plant, grow, harvest and eat; Use a variety of mathematic and science concepts and skills to create local garden plans and calendars.
Life skill objectives: Critical thinking, Problem solving, Decision making, Healthy living, Communication (listening, asking and responding to questions), Citizenship (sharing an idea to improve something), Leadership (working together in a team) Core and STEM concepts and skills: Math Operations and algebraic thinking, Number and operations, Measurement and data, Geometry, Mathematical practices Science Science as inquiry, Earth and space, Life science Language Arts Reading, Speaking, Listening, Viewing Social Studies Economics, Geography Healthy snack: Vegetables students can choose from to plant in their garden Additional and supporting resources: “How do you plan a garden?” General Information for planning unit in GROWING IN THE GARDEN: LOCAL FOODS AND HEALTHY LIVING, The Vegetables We Eat by Gail Gibbons (check in library or purchase online)

LESSON PLANS FOR 2011-12 SCHOOL YEAR Grade 2
BEFORE THE LESSON
1. Grade 2, Lesson 3: This document contains all the curriculum items and resources you need for this lesson. All lesson downloads are located on the www.peoplesgarden.wsu.edu Educational Toolkit.
2. Check materials list for complete description of items needed. 3. Review “Gardening Tips for Working with Kids.” 4. Have a planning meeting. A few weeks before doing the planning lesson, have a meeting with the all the adults that want to be involved in the second grade gardens. Make copies of the “Gardening Tips for Working with Kids” to distribute at the meeting The students will taste fruits or vegetables that they could plant as cool
season and warm season crops. Are there any suggestions on fruits or vegetables that the adults would like to plant with the students? Come up with three or four options for each of the cool and warm season crops so the students have an opportunity to make choices on what they would like to plant. Are there any recommendations regarding purchasing and preparing the samples for this lesson and others?
The students will be planning their garden first on a floor garden plan and then on a garden grid. They have charts to know how much space certain crops take. It would be helpful if a Master Gardener or a garden expert could help with the planning lesson so that the students can eventually come up with the garden plan that they will actually use. The students also need help to start a garden calendar that they can follow in your region. Make a plan for a garden expert to work with the teacher and the students during the planning lesson. Share a copy of the lesson and The Lesson section below so that everyone can be ready.
We highly suggest trying the square foot gardening method to get the most out of small garden spaces as possible, to make it easier to plant the garden, and to eventually make it harder for weeds to grow. Refer to the lesson to learn more about this method and assign people the task of making square foot garden templates 1 and 2 from the patterns at the end

LESSON PLANS FOR 2011-12 SCHOOL YEAR Grade 2
of the lesson. Poster board works the best. It is nice to have at least two of each size. They will be used in the planning lesson.
5. Assemble necessary fruits and vegetables for “Where We Live Fruits and Vegetables Sampler.”
6. This is a good time for each student to start his or her own Garden Journal. Each time you do a lesson or go out in the garden there is an opportunity to add something new to the Garden Journal. A 1” vinyl binders or sturdy plastic folders with 3‐ring binders works well; students can take their journals to the garden and add pages, activity sheets, charts, recipes, etc. The binders with a window on the front are nice because students can design their front cover on a heavy piece of paper and slip it into the sleeve. The students can also design their own inside cover page. Provide permanent markers so they can at least creatively write the title, using their first and last name such as “Charlie Smith’s Garden Journal”, on the front of the binder or folder. We have found that it works best to collect the journals after each use. THE LESSON 1. Our Food Garden Plan is meant to be taught over two or more days. AFTER THE LESSON Add a copy of the class’s Our Food Garden Plan to the Garden Journal. On the back of the page, have the students copy the list of crops that the class chose to grow. If one of their crops did not survive the vote, have them list that crop. If the class discovered that all the crops would not fit in their garden space, have them note that as well. Make a copy of the Garden Calendar so that the students can add information about their garden. Hopefully, they can write “Plant cool season crops” on one of the days. RECIPE “Where We Live Fruits and Vegetables Sampler” Select at least three to five fresh fruits and/or vegetables that students can taste and that could be grown in their gardens. Refer to the lesson to include both cool season and warm season crops.

USDA FNS People’s Garden School Garden Pilot Project: Healthy Gardens, Healthy Youth
Tips for Working with Kids and the Garden
The following tips are from HGHY Master Gardeners and site leaders and are based on their experiences gardening with kids. These are tips for both school and the summer programs. A sample in‐garden lesson outline can be found at the end of this document.
Be Prepared Send home information about the garden program including the details about who isleading the program, what the kids will be doing, where the gardens are located, whenthe kids will be gardening, what is happening with the garden produce, and expectationsof the young gardeners. All gardeners should be wearing close‐toed shoes and have sunprotection. They will not be allowed to work in the garden or with food if they are sickor have been sick within the last 24 hours.
Every time you go to the garden, take supplies such as a first aid kit, wet wipes, waterjug with cups (or have kids bring their own water) and water for washing the produce.
Use lesson plans and educational resources to prepare for each session. Play a game,sing a song, act out a play, read a book, or make a garden‐based craft each session.Remember to have fun! See the Sample Garden Session outline at the end of these tips.
Working With the Kids Make sure the young gardeners know the 3 R’s garden rules: Respect, Responsibility,Readiness.
Be fully prepared before heading to the garden so there will be little down time for thekids. The tools and any supplies should be easy to access and ready to go. Break largegroups into manageable sizes. Have more than one activity and rotate them. Keep everychild busy and on task or their attention will shift and they will drift. Have enough adultsupervision to make this happen.
Always demonstrate before letting the kids work on their own. The more adult helpersyou have to float around and guide the kids, the better. Do not do things for the kids,show them how and have them show you how back.
Check their work. Don’t take their word for it when they say they have completed atask. You might find that things were missed.
Take frequent shade and water breaks. Break times are good times to introduce healthysnacks, books, garden journals, or other hands‐on activities.
Every child will appreciate some one‐on‐one time with instructors while working in thegarden. Let them tell their stories and show you the weeds they found and pulled, etc.
Printed with Permission , February 2012

Planning the Garden Use the hands‐on, deeply aligned classroom lessons to help the students plan theirgardens. The kids will have fun learning and taking ownership of the garden. They willget excited about choosing what to plant and how much they need to plant by doingthese lessons. A Master Gardener or an experienced gardener is a valuable resource tohelp kids discover what crops can be grown in the climate and in the amount of spacethey will have to garden. Start a Garden Journal or Garden Records right away.
Young students are not able to prepare the site for gardening. Master Gardeners andothers can provide leadership for that. FFA students, parents, Ameri‐Corps, Food Corps,garden clubs, retired teachers, neighbors and others have been instrumental inpreparing the gardens and helping the youth in the planning stages.
For the young children, have the sections of the garden already measured out andmarked according to the garden plan. For the older youth, help them measure and markthe garden sections.
Kids like to use garden tools, but they LOVE to use child‐sized tools such as kid‐sizedrakes, hoes, shovels, watering cans, and gloves. The type of garden tools they needdepend on the type of garden they will be working with and how it is planted – squarefoot vs. rows. They can share tools. Older students have been using adult‐sized tools andeven tools that have been loaned by Master Gardener groups.
Master Gardeners and FFA members are using their green houses to start seeds andgrow transplants for the school gardens.
Help the students start a compost bin and get the whole school involved.
Planting Go over tool safety rules for hoes, trowels, and rakes. A tool safety game is part of thegardening curriculum.
Go over ways the plants in your garden are going to be planted: seeds, sets, transplants,seed pieces.
Plant fast growing (cool season) crops like radishes and spinach for early satisfaction. Tryto stagger your crops for constant harvest opportunities. Make sure the students willhave something to harvest when they return to school in the fall.
Maintaining Watering
Watering is extremely important, especially in raised bed gardens. If you aremeeting just once a week, you may have to make plans for additional watering.Families, youth groups, organizations, neighbors can sign up for times. Someone willneed to be responsible to make sure the watering plans are carried out.
Using a watering wand is a good way to water the garden. Show how to water at thebase of the plant. Teach the kids to count how long it takes to water a plant.
Printed with Permission , February 2012

Weeding Help the kids distinguish the difference between weeds and garden plants. Show themhow to pull weeds so that the garden plants are not disturbed. Tell them where youwant them to put the weeds. Have challenges such as finding the biggest weed, mostunusual weed, most weeds, etc. Talk about why some parts of the gardens have moreweeds than other parts, etc.
Insects and pests Insects intrigue and scare children. They enjoy doing the lessons about pests and goingon hunting missions to find and eradicate them. Getting to show everyone the squashbug they found – and sometimes their eggs – is a joy in and of itself!
Use the lessons from Grades 2 and 4 to identify “good guys” and “bad guys” in thegarden and to figure out what to do about them. Then help the kids take the next stepsto protect their garden from unwanted pests.
Harvesting, Preparing and Eating the Produce! Kids get excited when they see fruits/vegetables growing on the plants. Make sure thatthey show everyone by pointing and not picking! Describe what to look for to determinewhen the fruits/vegetables are ready to harvest.
Show kids HOW to harvest produce gently. For example, gently hold a bean plant beforepulling off the bean, cut the lettuce with scissors, etc.
Kids love to harvest and taste the bounty. Try to include this in every lesson.
Include in the lesson, ideas for how the food can be eaten. Simple recipes such ascucumber‐flavored water, radish or veggie sandwiches, veggies with dip, cucumbers andonions in vinegar, etc. are the best. Get a large bottle of Ranch dressing because the kidswill try anything they can dip! There are several ideas in the lessons.
Show the whole vegetable before cutting it open. Have them find the seeds.
Plastic plates and knives can be used for cutting and preparing produce.
Help the kids put their gardens to bed.
Printed with Permission , February 2012
Our Food Garden Plan
Content objeCtiveS
Life SkiLL objeCtiveS
indiCatorSevaLuationS
SubjeCt StandardSCore ConCeptS and SkiLLS
Learner typeS
MateriaLS
Identify and select locally grown fruits and vegetables to plant, grow, harvest and eat.Use a variety of mathematic and science concepts and skills to create local garden plans and calendars.
Critical thinking, Problem solving, Decision making, Healthy living, Communicating (listening, asking and responding to questions), Citizenship (teamwork), Leadership (sharing an idea to improve something)
Students will develop a productive garden plan that will demonstrate how much healthy food can be grown in a limited amount of space.
21st Century Skills: Employability skills, Health literacyScience: Science as inquiry, Earth and space, Life scienceMathematics: Operations and algebraic thinking, Numbers and operations, Measurement and data, Geometry, Mathematical practicesSocial Studies: Economics, GeographyLiteracy: Reading, Speaking, Listening, Viewing
Linguistic-words, Logical-mathematical, Spatial-visual, Bodily-kinesthetic, Interpersonal, Intrapersonal, Natural
See TEACHER’S NOTES following this list to find help with these materials and to deliver this lesson. Working with local partners grows community capacity and sustainability.
White paper (two sheets per student)Crayons or colored pencils2 to 4 long tape measuresMasking tape White or black interactive board, or large sheet of paper and markers or chalk (see chart in Introduction section)Where We Live Fruits and Vegetables Sampler (see the TEACHER’S NOTES following this Materials list)Small paper plates (one per student)Napkins (one per student)Food handling gloves (optional, wash hands thoroughly)Garden Grid (There are two pages of garden grids. Choose the page that fits your garden space. Make a copy to show the class. The grids are found at the end of this lesson)3 sheets of plain paper (write Small, Medium, and Large on them)Fruit and vegetable squares (copy and cut, one square per person, found at the end of this lesson)
1
Unit 4Lesson 4a
E
GrowinG in the Garden: LocaL Foods and heaLthy LivinG
4-H Youth Development4H-905LFHL | August 2011
Materials continued on the next page.
Grade 2 Lesson 3
Printed with Permssion , February 2012
raise your hand if you have ever planted a garden.
What did you grow in your garden and why?Have a few students share their experiences.
Hand out white paper and ask the students to use their crayons or colored pencils to draw a picture of one fruit or vegetable they might like to grow and eat. Tell them that they will have five minutes to draw and color their fruit or vegetable. Remind them to choose their own fruit or vegetable and not copy others.
While they are drawing, use tape measures and masking tape to create the outside edges of a floor garden in your classroom. The garden should be almost large enough for the students to “plant” their drawings. A 4' x 8' garden is an example of a raised bed garden. Draw and color your own fruit or vegetable.
Have the students bring their drawings and sit around the floor garden space.
The masking tape marks the outside of what we are going to call “Our Floor Garden.” One by one, please stand up and tell us what fruit or vegetable you drew and why you chose it. Then you can plant your picture somewhere in “Our Floor Garden” space. I will start.
2
engageset the stage
15 to 20 minutes
IntroductIon
| GrowinG in the Garden: LocaL Foods and heaLthy LivinG
Lesson 4a | introdUction to LocaL Foods and heaLthy LivinG
Plant Sizes chart (copy so everyone can see, found at the end of this lesson)Rulers (one per student, or share)PencilsScissors (one per student, or share)Newspapers (Enough to cut out several 12 inch squares or larger, see the Reflect section)Square foot garden templates (make examples, see Reflect section found at end of lesson)Planting Guide chart (found at the end of this lesson)Monthly calendar (to count days from planting to harvest)Raised Bed Garden Plan (found at the end of this lesson)Tilled Garden Plan (found at the end of the lesson)Family Letter (copy one per student, found at the end of the lesson)
TEACHER’S NOTES: Local partners can provide expertise, time, energy, supplies, and/or funding. Potential partners include: School staff, volunteers, and older students (from classrooms, food-service, maintenance, administration, high school, and parent-teacher groups); Extension staff, volunteers, and participants (such as Master Gardeners, 4-H Club members, nutrition programs such as EFNEP, specialists or agents); local foods producers; gardeners; farmer’s market venders; local foods restaurants; grocery store produce managers; senior centers; local organizations and businesses; and interested and knowledgeable individuals of all ages and cultures. These people can help you use this lesson and apply the activities to where you live and your garden program.
The Do/Explore section starts with a “Where We Live Fruits and Vegetables Sampler.” It should include at least three to five fresh fruits and/or vegetables that students can taste and that could be grown in their gardens. Introduce other options by showing pictures on food packages or from magazines. Make sure you are including cool season crops such as lettuce, spinach, radishes, and onions that can be planted and harvested in the spring before school is out. Also include fall harvest crops such as tomatoes, peppers, potatoes, squash, muskmelon, watermelon, and pumpkin that can planted in late spring and harvested late in the summer when school resumes. See the TEACHER’S NOTES at the beginning of the Do/Explore section.
MateriaLSCONTINUED
Grade 2 Lesson 3
Printed with Permssion , February 2012
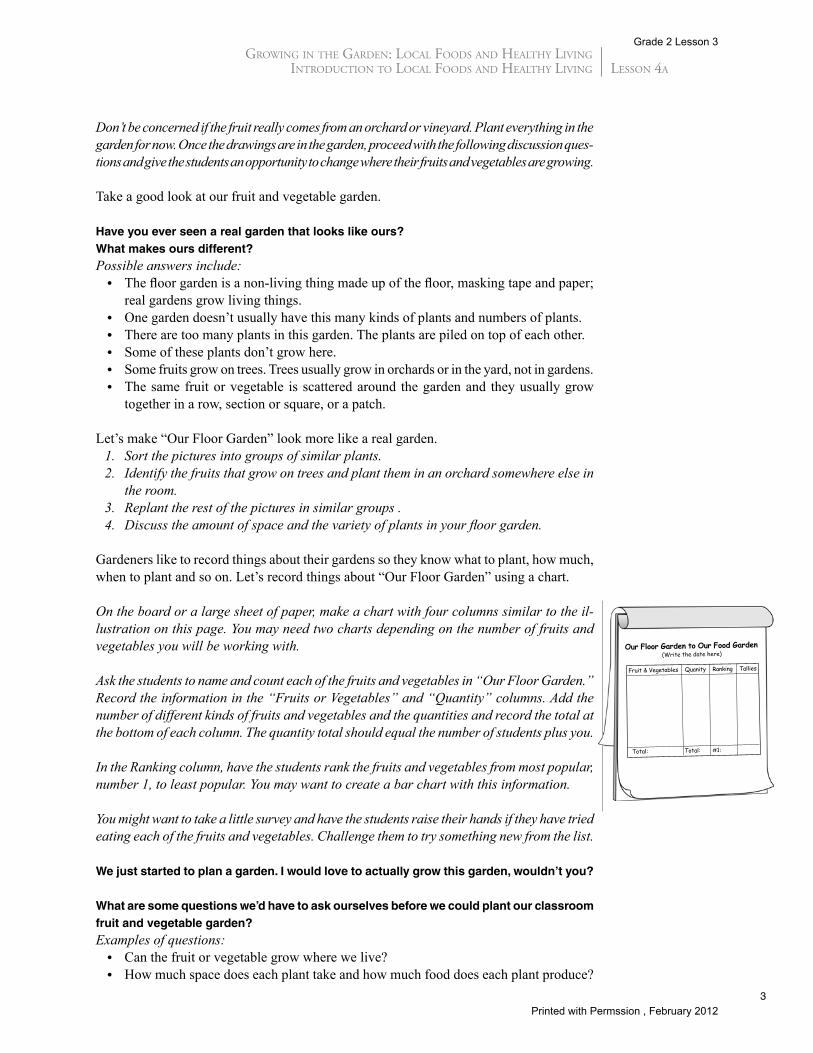
Our Floor Garden to Our Food Garden(Write the date here)
Fruit & Vegetables Quanity Ranking Tallies
Total: Total: #1:
3
GrowinG in the Garden: LocaL Foods and heaLthy LivinG |introdUction to LocaL Foods and heaLthy LivinG | Lesson 4a
Don’t be concerned if the fruit really comes from an orchard or vineyard. Plant everything in the garden for now. Once the drawings are in the garden, proceed with the following discussion ques-tions and give the students an opportunity to change where their fruits and vegetables are growing. Take a good look at our fruit and vegetable garden.
Have you ever seen a real garden that looks like ours?What makes ours different?Possible answers include: • The floor garden is a non-living thing made up of the floor, masking tape and paper;
real gardens grow living things. • One garden doesn’t usually have this many kinds of plants and numbers of plants. • There are too many plants in this garden. The plants are piled on top of each other. • Some of these plants don’t grow here. • Some fruits grow on trees. Trees usually grow in orchards or in the yard, not in gardens. • The same fruit or vegetable is scattered around the garden and they usually grow
together in a row, section or square, or a patch.
Let’s make “Our Floor Garden” look more like a real garden. 1. Sort the pictures into groups of similar plants. 2. Identify the fruits that grow on trees and plant them in an orchard somewhere else in
the room. 3. Replant the rest of the pictures in similar groups . 4. Discuss the amount of space and the variety of plants in your floor garden.
Gardeners like to record things about their gardens so they know what to plant, how much, when to plant and so on. Let’s record things about “Our Floor Garden” using a chart.
On the board or a large sheet of paper, make a chart with four columns similar to the il-lustration on this page. You may need two charts depending on the number of fruits and vegetables you will be working with.
Ask the students to name and count each of the fruits and vegetables in “Our Floor Garden.” Record the information in the “Fruits or Vegetables” and “Quantity” columns. Add the number of different kinds of fruits and vegetables and the quantities and record the total at the bottom of each column. The quantity total should equal the number of students plus you.
In the Ranking column, have the students rank the fruits and vegetables from most popular, number 1, to least popular. You may want to create a bar chart with this information.
You might want to take a little survey and have the students raise their hands if they have tried eating each of the fruits and vegetables. Challenge them to try something new from the list.
We just started to plan a garden. i would love to actually grow this garden, wouldn’t you?
What are some questions we’d have to ask ourselves before we could plant our classroom fruit and vegetable garden?Examples of questions: • Can the fruit or vegetable grow where we live? • How much space does each plant take and how much food does each plant produce?
Grade 2 Lesson 3
Printed with Permssion , February 2012

4
| GrowinG in the Garden: LocaL Foods and heaLthy LivinG
Lesson 4a | introdUction to LocaL Foods and heaLthy LivinG
doexplore
investigate concepts
10 minutes
• Is there enough space to grow all the plants? • When can we plant it and when can we harvest it?
Now you can go harvest your fruit and vegetable pictures out of the garden and take them back to your seats. We will reuse the pictures. We are going to take what we learned and plan “Our Food Garden.”
TEACHER’S NOTES: See the “Where We Live” Fruits and Vegetables Sampler described in the TEACHER’S NOTES at the end of the Materials list. Wash and precut samples and store them in bags. Save a whole one to show the students and to demonstrate how to prepare or cut it. Invite a few students to help distribute the samples. You may want them to wear gloves or use tongs to put the samples on one paper plate per student. Students are more likely to try new fruits and vegetables if you add some ranch dressing or a dip on their plates. Additional local fruits and vegetables could be discussed by showing pictures from food packages, cans, models, internet sources, magazines, or food advertisements. Explain that most of the frozen and canned fruits and vegetables they eat are not grown locally. Often times fresh fruits and vegetables come from hundreds or thousands of miles away.
Have the student helpers wash their hands first and then have the rest of the students wash their hands. Clean the serving table and your hands. Then set up the table with the fruits and vegetables, cutting boards, knives, gloves, paper towels, paper plates, and napkins. Have the student helpers put the paper plates out on the table so that they can place one sample of each fruit or vegetable on each plate. When the other students are done wash-ing their hands, have them pick up their sample plates and take them back to their seats. Instruct them not to eat anything on their plates until they are told.
We make a lot of our food choices based on how things taste. Fruits and vegetables are healthy food choices. They are called “GLOW” foods because the vitamins and minerals in them can make shiny hair, sparkling eyes, glowing skin, and healthy or glowing bodies.
We are going to taste fruits and vegetables that can grow near where we live and that we might be able to grow in our garden. I grew/bought these at ______________________. I kept most of these in the refrigerator to keep them fresh until we needed them. Then I washed and cut them into sample sizes. Please don’t eat them until we can talk about each one. Let’s see if you can identify them and then we’ll taste them one by one.
Show one whole fruit or vegetable at a time. Have the students tell what it is. Then have them describe the outside, slice it open and have them describe the inside. Have the students find and try that fruit or vegetable from their plate. Have them describe the taste, texture, and smell. Then use the same procedure to move on to the next fruit or vegetable. If you want to introduce more locally-grown fruits and vegetables, show pictures of them.
Have the students find the fruits and vegetables they just ate or learned about in the first column of the “Our Floor Garden” chart. Circle the fruits or vegetables as the students identify them and add new ones to the bottom of the list.
Think about each of the vegetables you just ate and which ones would be your first and second choices to plant in our garden. We will take a hand vote and make a tally mark for
Grade 2 Lesson 3
Printed with Permssion , February 2012

5
GrowinG in the Garden: LocaL Foods and heaLthy LivinG |introdUction to LocaL Foods and heaLthy LivinG | Lesson 4a
each vote beside the vegetables on our chart. You will get two votes – one for your first choice and one for your second choice. When we are done, we will count the number of tally marks and determine what we will be growing in our garden. (Ask if there are any questions. You may want to ask students to help count and to make the tally marks. Remind them that they can vote twice. Proceed with the vote.)
As a class, count up the number of tallies for each fruit or vegetable and record the number next to the tally marks. Compare the quantity, ranking, and tally columns and discuss the most popular fruits and vegetables on the chart. Put a star next to the top four to six choices. Make sure that there are two or three cool season crops such as lettuce, spinach, radishes, and green onions. You may be able to plant and harvest those before you plant the warm season crops.
We are getting closer to deciding what we will plant in our garden. What do we need to know about these plants before we include them in our garden?Examples of questions: • How many fruits or vegetables does one plant grow? • How many plants do we need to grow and is there enough space in our garden? • When will we get to eat the fruits and vegetables that we plant? There are many decisions to make when you are planning a garden. In order to find the answers to our questions, we will need to gather more information.
TEACHER’S NOTES: Start this section on another day or after students have had a brain break. This section relates to decisions regarding space in the garden. If you haven’t had a lot of gardening experience, you may want to find expert help from the list of partners in the TEACHER’S NOTES following the Materials list. Here are some things you will need to prepare ahead of time.
1. Choose the Garden Grid page that best fits your garden space and make at least two copies. One should be the grid that you work on with the students, the other will be the final garden plan. Once the final plan is completed, make back-up copies. If you are using the 10' x 15' grid, make an outline the size or your actual garden space before you share it with the students.
2. Make a list of the crops that you will probably end up planting from the students choices and be sure to include spring and fall harvest crops. We suggest starting a new garden with just vegetable crops, unless you want to try melons. Fruits either grow on trees or take a few years to produce a good crop. You can add those fruits another year.
3. Copy the vegetables and fruits picture squares at the end of this lesson. Cut apart each square so everyone receives on picture. If the vegetables or fruits you are planting are not pictured, use the blank square to draw and label your own picture. Write “Small”, “Medium”, “Large” on separate pieces of paper to use as headers for three columns. Project or make a copy of the Planting Guide chart found at the end of the lesson so that everyone can refer to it. You may want to use poster board to make a sample of Square Foot Garden Templates 1 and 2 found at the end of this lesson.
4. If possible, go outside where you can look at your garden spaces. Otherwise, mark out your garden spaces on the floor. You may want to show pictures of the type of garden you will be planting from the Internet.
5. Continue to use “Our Floor Garden to Our Food Garden” chart.
rEflEctexplaindevelop concepts
30 minutes, on another day
Grade 2 Lesson 3
Printed with Permssion , February 2012

6
| GrowinG in the Garden: LocaL Foods and heaLthy LivinG
Lesson 4a | introdUction to LocaL Foods and heaLthy LivinG
aCtion StepS to explore the relationship betweenthe space in the garden and the food plants you want to grow
1. Work together to find out how much space you will have to grow food in your actual garden. Display the “Garden Grid” where everyone can see it.
I have started a plan on this Garden Grid that will become “Our Food Garden Plan”. We will use it to plan the garden(s) that we will grow. This will help us to grow the kinds and amounts of fruits and vegetables that we want to eat.
What is/are the basic shape(s) of our garden spaces? You may have different shapes depending on the use of containers. Most raised bed
and tilled food gardens are rectangle, but they don’t have to be.
We will be planting gardens in (container/raised bed/or tilled) gardens. (Explain the differences by showing them the actual garden spaces or showing pictures of each kind of garden space.)
Go outside or somewhere that you can view and measure the garden(s) you will be planting. If that is not possible, use your floor to work with the students and tape out the sizes and shapes of your containers, raised beds or tilled gardens.
Have the students count off by four vegetables that you are planning to plant in your garden, for example, radishes, lettuce, sweet potatoes and pumpkins. Then have all the radish students stand on one side of the garden space, the lettuce students stand on another side and so on.
Show them the tape measure and talk about how it works. Give a tape measure to a student at one corner of the garden. Have them hold the end of the tape to the corner of the garden and pass it down his or her side of the garden until it reaches the other end. Show the last person how to lock the tape measure. Have everyone on the same side lay the tape measure along the edge of the garden to make sure it is flat. Have them read the tape measure and record the measurement on the outside edges of the garden on “Our Food Garden Plan.” If you have four tape measures, it would be good to leave them around the edges of the garden to show everyone how that looks. You may want to introduce the concepts of perimeter and area.
Now that we know how much garden space we have to work with, let’s see how many plants we can grow in “Our Food Garden.”
2. Work together to find out how big the plants will grow. Write “Small,” “Medium,” and “Large” on three pieces of paper and place them
like column headers on top of a large table or on the floor.
Distribute the vegetable and fruit pictures, at least one per student.
Display the “Plant Sizes” chart where everyone can see it.
Invite the students to bring their squares with vegetable or fruit pictures to come and sit or stand around the small, medium, and large column headers. Have someone read
Grade 2 Lesson 3
Printed with Permssion , February 2012

7
GrowinG in the Garden: LocaL Foods and heaLthy LivinG |introdUction to LocaL Foods and heaLthy LivinG | Lesson 4a
the title of the “Plant Sizes” chart and another student read the column headers. Talk about the measurements that determine whether a plant is small, medium, or large. Show what 3 inches, 6 inches, and 12 inches looks like on a ruler. Explain that some plants grow even bigger than that.
Why do we need to know how big our vegetable and fruit plants are going to grow?
It helps us to find out what plants and how many of them can fit into our container, raised bed, or traditional tilled (in the ground) gardens. It also tells us how far apart to plant our seeds or young plants.
You each have a small square with a picture on it. do you think the vegetable or fruit on your square comes from a small, medium or
large plant? Let’s find out.
We have “Small,” “Medium,” and “Large” column headers on the table/floor just like you see on the “Plant Sizes” chart. One person at a time, please tell us what vegetable or fruit you have and if you have ever seen it or eaten it before. Then guess if your vegetable or fruit comes from a small, medium, or large plant and put your picture square in the right column. We will use the chart to see if you guessed correctly. (Ev-eryone can help each other through this activity. Many students may not have heard of their vegetable or fruit.)
Let’s use “Our Floor Garden to Our Food Garden” chart and compare our pictures to the circled fruits and vegetables on the chart. Remove the vegetable and fruit squares that we didn’t eat or learn about. Those vegetables and fruits may not grow well here and we will most likely not be planting them in our garden.
Look at the remaining vegetables and fruits in our columns. We could grow these plants here, but we want to take a closer look at just the plants we want to plant in our garden. Look at the fruits and vegetables on the chart that have stars in front of them. Remove all the other vegetable and fruit pictures until all that is left in the “Small,” “Medium,” and “Large” columns are the plants that we want to grow in our garden.
Focus on the characteristics of the plants that remain in the columns. Medium sized plants start to look like small shrubs with branches. Large sized plants may grow tall or like vines or tall plants that spread out. Discuss how many fruits or vegetables come from each of the plants and how many plants you would need to grow to produce a sample for everyone to eat. For example, you may want to grow one radish per person, one lettuce plant for two or three people, one cherry tomato plant, two hills of sweet potatoes and so on. Record the number of plants you think you need in the margin next to the fruit or vegetable on the “Our Floor Garden to Our Food Garden” chart. Have the students return to their seats.
3. Work together to see if the plants fit into our garden. Let’s see how our plant choices from “Our Food Garden” chart will fit in the gardens
we are going to plant. Take out your rulers, markers or crayons, scissors, and the fruit or vegetable pictures you drew. (Have your own supplies, plus newspapers.)
Grade 2 Lesson 3
Printed with Permssion , February 2012

8
| GrowinG in the Garden: LocaL Foods and heaLthy LivinG
Lesson 4a | introdUction to LocaL Foods and heaLthy LivinG
What large plants do we want to plant in our garden and how many did we think we needed?
(You should have at least one of these plants because they will provide your students with something to harvest in the fall when they return to school.)
Distribute individual pages of the newspaper and have students work together to measure and cut 12 inch to 15 inch squares that will represent the large plants in the garden. Have them write the name of the vegetable or fruit and draw a picture of it, on top of the square.
Have the students take the large squares and place them on your actual container, raised bed, or tilled garden spaces or on the floor gardens taped on the floor. You may need to hold the papers down with a rock or stake them down with a small stick.
Repeat this process with the medium and small plants by making 6 to 10 inch squares and 3 or 4 inch squares. Use the paper from their fruit and vegetable pictures espe-cially for the small plants.
Give the students five minutes to work together to fit all the crops into the actual container, raised bed, or tilled garden spaces or the taped spaces on the floor. If you are outside, use coins, erasers, or rocks to hold the papers in place.
Discuss how the garden turned out.
There is one more thing we need to explore about plants in the garden that may help us grow everything we want to grow. Let’s see if a planting guide will help us grow more things in our garden.
4. explore the possibilities of using a planting guide to grow more crops in your garden space.
Display the “Planting Guide” chart where everyone can see it. Have a calendar handy to count the days from planting to eating.
This is a “Planting Guide” chart. It shows how many days it takes from the time you plant a seed or young plant to the day you can harvest and eat it. It is arranged in small, medium and large crops so we can easily use it to think about how we might be able to rearrange the plants in our garden or grow them at different times.
Go through the chart and highlight or circle your garden choices and the days until the vegetable or fruit is most likely to be ready to eat.
Most of the small vegetables can be planted inside in late winter or outside in a raised bed when the ground is workable. Refer to the chart and a calendar to show students when you may be able to plant the small crops and then count the number of days until harvest. Mark the beginning and end dates on the calendar.
is it possible that we could plant the small plants or crops and be able to eat them before school is out in the summer?
Yes
Grade 2 Lesson 3
Printed with Permssion , February 2012

9
GrowinG in the Garden: LocaL Foods and heaLthy LivinG |introdUction to LocaL Foods and heaLthy LivinG | Lesson 4a
if we harvested the small plants, what could we make with them? Possible answers include: Veggies and dip, salads, wraps, sandwiches, egg rolls
Some of the medium and large plants, such as tomatoes, broccoli, eggplant and pep-pers can be started from seed in containers in the classroom and they can be planted outside once the chance of frost has passed. Use a calendar and show the students when you may be able to plant the medium and large crops. Then have them use the chart and calendar to count the number of days it will take for the fruit or vegetable to grow and be ready to eat.
is it possible that we could plant the medium and large plants before the end of the school year and come back at the beginning of the next school year to harvest and eat them?
Yes
What can we do with this information to help us plant and harvest all the fruits and vegetables we want to plant?
We could plant the small plants and harvest them. That would leave a space in the garden to plant the medium and large plants. If we started some of the medium and large plants in our classrooms, we could give them a head start and move them outside when there is space.
5. plan the garden to make everything work. An efficient use of garden space that incorporates ease of planting in container and
raised bed gardens is Mel Bartholemew’s Square Foot Gardening method. You can combine the square foot method and try row gardening in a tilled garden (traditional, in the ground). The students will be using square foot templates to plant the garden. Therefore, when the students rearrange their plant squares, have them try to work in square plots instead of rows.
One more thing we can do to get the most food from our garden is to use a planting method called square foot gardening. This time when we arrange our small and me-dium plants in the garden, we can group them in squares of plots instead of rows.
Let’s go back to the garden and put the puzzle together using our plant squares as the puzzle pieces.
Use the raised bed and tilled garden plans found at the end of this lesson and the container garden illustrations on this page as examples for the students. Have the stu-dents compare the illustrations with their garden plans made by squares in the garden. Remind the students that they can use double cropping or use the space to grow spring harvest crops and then replant the garden with late summer and fall harvest crops.
Other adults or high school volunteers and mentors can work with the students to rearrange the plant squares into a spring harvest garden and then a late summer and fall harvest garden. You may need to add or subtract plant squares.
E
Special note: You may want to tape the squares together and display your garden plan like a mural or quilt on the wall.
Grade 2 Lesson 3
Printed with Permssion , February 2012

10
| GrowinG in the Garden: LocaL Foods and heaLthy LivinG
Lesson 4a | introdUction to LocaL Foods and heaLthy LivinG
IMPORTANT: Draw the spring harvest and late summer or fall harvest garden plans on the “Our Food Garden Plan” worksheets. Write the name of the plants and the number of plants in each of the sections. Record any other notes on the Plan.
We now have “Our Food Garden Plan” to help us move closer to planting.
What can we do to have more fruits and vegetables for our school?Possible answers include: • Work with local food producers, gardeners and farmers to share what they grow. • Work with the community and neighborhood garden site to grow more food. • Partner with high school students and teachers in horticulture, FFA, or 4-H. • Expand your gardens to nearby empty lots, public spaces, senior centers, health and
wellness centers, after-school program sites, etc. • Explore the possibilities of adding different types of containers to grow food such as
kid’s swimming pools to grow melons or pumpkins, or using wagons or wheelbarrows or decorated oil drums on wheels.
You may choose to actually expand your garden or access to healthy foods in one or more of the ways mentioned above. If so, have the students use what they have learned to plan another garden. If you are new to gardening, starting small is a good idea.
My HoMe food Garden pLan
Distribute plain sheets of paper or blank copies of one of the Garden Grids found at the end of the lessons. The students will need their pencils and rulers.
At the top of your paper write “My Home Food Garden Plan” and put your name below the title. This is an opportunity for you to draw a food garden plan that you can share and do at home. If you don’t have a yard, you can plant some plants in different containers or in a windowsill garden. Or, you can have a space in a community or neighborhood garden. Think of the type of garden spaces you can create at home and the plants that you might be able to help your family grow. Use “Our Food Garden Plan” and the charts as a guide. Start small to keep things manageable, you won’t have all your classmates to help you. If you already have a garden, draw a section of it where you might be able to make your own plans.
Ask some of the students to share their plans with the rest of the class. Have them stand where everyone can see their plan and speak loudly so everyone can hear.
Collect their garden plans and see what they learned. Give them suggestions so that they can actually use the plan or part of the plan at their homes. Make copies of the family letter found at the end of this lesson on the back of the students’ “Home Food Garden Plans.” Have the students write the date at the top and sign their own names after “Thanks!” Send the students home with their letters and their garden plans. Have them describe their garden plans to their families. A few days later, give them an opportunity to share their families’ reactions to their plans.
E
expandelaborate in a new way
20 minutes
plus home assignment
Apply
Grade 2 Lesson 3
Printed with Permssion , February 2012

11
GrowinG in the Garden: LocaL Foods and heaLthy LivinG |introdUction to LocaL Foods and heaLthy LivinG | Lesson 4a
Garden Grid
Name
our Food
garden plan
4-H Youth Development4H-905LFHL | August 2011
= 1 square foot
15
14
13
12
11
10
9
8
7
6
5
4
3
2
1
01 2 3 4 5 6 7 8 9 10
Grade 2 Lesson 3
Printed with Permssion , February 2012

12
| GrowinG in the Garden: LocaL Foods and heaLthy LivinG
Lesson 4a | introdUction to LocaL Foods and heaLthy LivinG
Garden Grid
Name
our Food
garden plan
4-H Youth Development4H-905LFHL | August 2011
1 2 3 4 5 6 7 8 1 square foot
4
3
2
1
0
4’ x 8’ raiSed Garden
29"
14"
15” x 30” eartHbox™ Container GardenS
Grade 2 Lesson 3
Printed with Permssion , February 2012

carrot potato onion sweet potato
radish green beans pea pod corn
tomato pepper okra leaf lettuce
cabbage eggplant spinach pumpkin
cucumber broccoli cauliflower13
Grade 2 Lesson 3
Printed with Permssion , February 2012

14
| GrowinG in the Garden: LocaL Foods and heaLthy LivinG
Lesson 4a | introdUction to LocaL Foods and heaLthy LivinG
MediuM6 to 24 inches
veGetabLeS
Asparagus
Beans
Broccoli
Cabbage
Cauliflower
Collards
Eggplant
Peas
Peppers
fruit
Strawberries
LarGe24 inches or more tall or long
veGetabLeS
Brussel sprouts
Cucumbers
Okra
Potatoes
Pumpkins
Summer squash
Sweet corn
Sweet potatoes
Tomatoes
Tomatillos
Winter squash
Zucchini
fruit
Blueberries
Grapes
Muskmelon (cantaloupe)
Watermelon
pLant SizeS
How big will plants grow?
© Copyright 2011 Iowa State University
4-H Youth Development4H-905LFHL | August 2011
SMaLL3 to 5 inches
veGetabLeS
Beets
Carrots
Kohlrabi
Onions
Radishes
Garlic
Kale
Lettuce
Mustard greens
Spinach
fruit
Grade 2 Lesson 3
Printed with Permssion , February 2012

GrowinG in the Garden: LocaL Foods and heaLthy LivinG |introdUction to LocaL Foods and heaLthy LivinG | Lesson 4a
15
4-H Youth Development4H-905LFHL | August 2011
Square-foot GardeninG
teMpLate 1onions, carrots, radishes,
beets, lettuce, spinach
1. Make a copy of this page. 2. Cut around the 4 inch squares and cut out the circles. 3. Place one template on one corner of a poster board. Draw around the outside of the square and around the circles. 4. Use the same template four times to make a square foot gardening guide. 5. Cut around the square foot and cut out the circles. 6. Write the names of the crops in the center of the guide. 7. It is best to laminate these guides to keep them in good shape from year to year.
Square-foot GardeninG
teMpLate 1onions, carrots, radishes,
beets, lettuce, spinach
Square-foot GardeninG
teMpLate 1onions, carrots, radishes,
beets, lettuce, spinach
Square-foot GardeninG
teMpLate 1onions, carrots, radishes,
beets, lettuce, spinach
Square-foot GardeninG
teMpLate 1onions, carrots, radishes,
beets, lettuce, spinach
SquARE-fOOT GARdENING TEMPlATE 1
Grade 2 Lesson 3
Printed with Permssion , February 2012

16
| GrowinG in the Garden: LocaL Foods and heaLthy LivinG
Lesson 4a | introdUction to LocaL Foods and heaLthy LivinG
SquARE-fOOT GARdENING TEMPlATE 2
4-H Youth Development4H-905LFHL | August 2011
Square-foot GardeninG
teMpLate 2 peas, bush beans
Grade 2 Lesson 3
Printed with Permssion , February 2012

© C
opyr
ight
201
1 Io
wa
Sta
te U
nive
rsity
4-H Youth Development4H-905LFHL | August 2011
pLantinG Guide
veGetabLeS dayS untiL pLantinG HarveStinG or fruit HarveSt* date date
SMaLL pLantS
Beets 60 - 80
Carrots 60 - 80
Kohlrabi 50 - 60
Onions 90
Radishes 30 - 35
Kale 60 - 70
Lettuce 30 - 40
Mustard greens 40 - 60
Spinach 35 - 40
MediuM pLantS
Asparagus 3 yrs after first planting
Beans 50 - 60
Broccoli 60 - 80
Cabbage 60 - 80
Cauliflower 60 - 80
Collards 50 - 55
Eggplant 75 - 80
Okra 70 - 90
Peas 50 - 75
Peppers 70 - 75
Strawberries 1 yr after first planting
LarGe pLantS
Brussel sprouts 90
Cucumbers 50 - 70
Potatoes 70 - 110
Pumpkins 90 - 120
Summer squash 60 - 75
Sweet corn 65 - 90
Sweet potatoes 100 - 110
Tomatoes 70 - 80
Tomatillos 70 - 80
Winter squash 90 - 120
Zucchini 60 – 75
Muskmelon (cantaloupe) 70 – 85
* varies with variety
GrowinG in the Garden: LocaL Foods and heaLthy LivinG |introdUction to LocaL Foods and heaLthy LivinG | Lesson 4a
17
Grade 2 Lesson 3
Printed with Permssion , February 2012

Garden Calendar Name
Sun Mon tue Wed tHu fri Sat
jan
ua
ry
Sun Mon tue Wed tHu fri Sat
Ma
rC
H
Sun Mon tue Wed tHu fri Sat
Ma
y
Sun Mon tue Wed tHu fri Sat
Sun Mon tue Wed tHu fri Sat
Sun Mon tue Wed tHu fri Satf
eb
ru
ar
ya
pr
iLj
un
e
4-H Youth Development4H-905LFHL | August 2011
Grade 2 Lesson 3
Printed with Permssion , February 2012

Garden CalendarSun Mon tue Wed tHu fri Sat
ju
Ly
Sun Mon tue Wed tHu fri Sat
Se
pt
eM
be
r
Sun Mon tue Wed tHu fri Sat
no
ve
Mb
er
Sun Mon tue Wed tHu fri Sat
Sun Mon tue Wed tHu fri Sat
Sun Mon tue Wed tHu fri Sat
au
Gu
St
oC
to
be
rd
eC
eM
be
r
4-H Youth Development4H-905LFHL | August 2011
Grade 2 Lesson 3
Printed with Permssion , February 2012

20
| GrowinG in the Garden: LocaL Foods and heaLthy LivinG
Lesson 4a | introdUction to LocaL Foods and heaLthy LivinG
radishes
© Copyright 2011 Iowa State University
4-H Youth Development4H-905LFHL | August 2011
raiSed bed Garden pLan
Square-foot MetHod for 4' x 8' raiSed bed
Plant as soon as soil can be worked.
SprinG faLL
leaflettuce
onions
beets
broccoli
spinach
snap peas
trellis
butternutsquash
potatoes
grape orcherrytomatoes
peppers
sweetpotatoes
Plant near the end of May.
Grade 2 Lesson 3
Printed with Permssion , February 2012

4-H Youth Development4H-905LFHL | August 2011
tiLLed Garden pLan
Square-foot MetHod for 10’ x 15’ Garden
tomato
tomato
pepper pepper pepper
© C
opyr
ight
201
1 Io
wa
Sta
te U
nive
rsity
WaLkWay
GrowinG in the Garden: LocaL Foods and heaLthy LivinG |introdUction to LocaL Foods and heaLthy LivinG | Lesson 4a
21
cucumber cucumber
beans
broccoli broccoli cabbage
broccoli broccoli cabbage
flowers
trellis
carrots onions
lettuce
zucchini
peas
Grade 2 Lesson 3
Printed with Permssion , February 2012

22
| GrowinG in the Garden: LocaL Foods and heaLthy LivinG
Lesson 4a | introdUction to LocaL Foods and heaLthy LivinG
Dear Family,
Our class is planting a garden. We are excited to grow food to eat at school. Did you know that I tried some new fruits and vegetables today?
We made up plans for home food gardens. Do you think my garden plan would work in our yard or in some containers? Please help me make changes.
My teacher would like me to bring my plan back to school so I can share it with the class.
Thanks!
MYGARDEN
PLAN
4-H Youth Development4H-905LFHL | August 2011
Grade 2 Lesson 3
Printed with Permssion , February 2012