placing trusses using exterior bracket platform
TRANSCRIPT

ihsa.ca
Residential Roof TrussInstallation Procedures

Residential Roof Truss Installation Procedures
Work Safe for Life i
Residential Roof Truss
Installation Procedures
Infrastructure Health & Safety Association
5110 Creekbank Road, Suite 400
Mississauga, Ontario L4W 0A1 Canada
1-800-263-5024
ihsa.ca
Work Safe for Life

Residential Roof Truss Installation Procedures
Work Safe for Lifeii
IHSA has additional information on this and other topics.
Visit ihsa.ca or call Customer Service at 1-800-263-5024
The contents of this publication are for general information only. This publication should not be
regarded or relied upon as a definitive guide to government regulations or to safety practices and
procedures. The contents of this publication were, to the best of our knowledge, current at the
time of printing. However, no representations of any kind are made with regard to the accuracy,
completeness, or sufficiency of the contents. The appropriate regulations and statutes should be
consulted. Readers should not act on the information contained herein without seeking specific
independent legal advice on their specific circumstance. The Infrastructure Health & Safety
Association is pleased to answer individual requests for counselling and advice.
This manual was developed, reviewed, and endorsed by the Residential Sector Labour-
Management Health and Safety Committee in association with IHSA.
© Infrastructure Health and Safety Association, 2012
All rights reserved. This publication may not be reproduced, in whole or in part, or stored in any
material form, without the express written permission of the copyright owner.
Revised, November 2013

Residential Roof Truss Installation Procedures
Work Safe for Lifeiii
Table of Contents
Introduction 1
Terminology 2
Method 1:
Installing Trusses Using an Exterior Bracket Platform Scaffold 3
Method 2:
Installing Trusses Using an Interior Bracket Platform Scaffold 9
Method 3:
Assembling the Roof on the Ground and Hoisting into Place 14
Appendix A: Constructing an Interior Walking Platform 18
Residential Roof Truss Installation Procedures
Work Safe for Lifeiv

Residential Roof Truss Installation Procedures
Work Safe for Lifev

Residential Roof Truss Installation Procedures
Work Safe for Life 1
Introduction
The following procedures have been developed to provide information on fall protection
to workers during the placing and installation of roof trusses. These procedures are based
on research, field tests, and accepted industry practices, and are intended to provide
workers and employers with safe and productive means of performing this challenging
phase of construction.
Fall hazard awareness and the proper use of fall protection are critical to worker safety
during the installation, use, and removal of the systems described in this document. It is
also necessary to clearly understand and follow the manufacturer’s instructions, the
Occupational Health and Safety Act, and the Regulations for Construction Projects.
The use of this document or any procedure developed from this document does not
exempt employers and workers from compliance with the Occupational Health and
Safety Act or the Regulations for Construction Projects.

Residential Roof Truss Installation Procedures
Work Safe for Life2
Terminology
Three types of scaffold are described below. Procedures for using these types of scaffold
to install roof trusses are explained in this document.
Exterior Bracket Platform Scaffold
An exterior bracket platform scaffold is a scaffold that consists of engineered and
manufactured brackets which are hung or otherwise suspended from the wall framing to
the outside of the perimeter of the house. These brackets are used to support planks and
guardrails in order to create a work platform in compliance with the Occupational Health
and Safety Act and Regulations for Construction Projects. An exterior bracket platform
scaffold is to be used in conjunction with an interior walking platform scaffold when
installing roof trusses.
Interior Bracket Platform Scaffold
An interior bracket platform scaffold is a scaffold that consists of engineered and
manufactured brackets which are hung or otherwise suspended from the wall framing to
the inside of the perimeter of the house. These brackets are used to support planks and
guardrails in order to create a work platform in compliance with the Occupational Health
and Safety Act and Regulations for Construction Projects. An interior bracket platform
scaffold is to be used in conjunction with an interior walking platform scaffold when
installing roof trusses.
Interior Walking Platform Scaffold
An interior walking platform scaffold is a scaffold that consists of engineered and
manufactured OR engineered and job-built frames placed along the interior of the
building, parallel to and directly under the ridge line. These frames are used to support
planks in order to create a work platform in compliance with the Occupational Health
and Safety Act and Regulations for Construction Projects. An interior walking platform
scaffold is to be used in conjunction with either the exterior or interior bracket platform
scaffold when installing roof trusses.

Residential Roof Truss Installation Procedures
Work Safe for Life3
Method 1:
Installing Trusses Using an Exterior Bracket
Platform Scaffold
The use of an exterior bracket platform scaffold hanging from the top plate of an
adequately braced and supported wall can facilitate the installation of trusses in low-rise
residential construction. A competent worker shall oversee the installation of a scaffold
system. Employers must ensure that all workers are trained in how to properly install
scaffold systems.
The manufacturer’s instructions, Occupational Health and Safety Act and Regulations for
Construction Projects must be followed. The procedures outlined in this document do not
supersede manufacturer’s instructions or legislative requirements. The
manufacturer’s/fabricator’s instructions for the device must be supplemented with
engineering documentation that addresses the stability requirements of the wall for
attachment, as well as the connection methods of the work platform. If field conditions
vary and create situations beyond the scope of the manufacturer’s instructions, additional
engineering may be required.
Below are some of the benefits of using an exterior bracket platform scaffold system to
erect trusses.
Workers have a wide, guardrailed work platform.
Work is situated at a comfortable and ergonomically correct height.
The height of the top plate above the platform allows the wall to act as a barrier
from falling to the inside of the house. (If not, fall protection must be used.)
Aligning and squaring trusses, toe-nailing and securing, installing fascia board,
and installing the first row of roof sheathing can be done from the platform.
The platform can be left in place for other trades following the framing of the
roof.

Residential Roof Truss Installation Procedures
Work Safe for Life4
The main challenge of using an exterior bracket platform scaffold system to erect trusses
is that fall protection may be required when installing and removing the system.
Procedure
The steps below explain how to use an exterior bracket platform scaffold to install trusses
in low-rise residential construction projects. The procedure is divided into five main
steps, and each step is further broken down.
Step 1—Walls
(a) Prior to installing the platform, a competent worker must ensure that the
walls are built and braced as required by the platform manufacturer’s
instructions.
(b) Measure and mark the location of the brackets on walls as per manufacturer’s
instructions.
(c) Arrange with the truss manufacturer to have trusses stacked and delivered in
the order they will be installed.
(d) Receive/place trusses on top of the wall, ensuring manufacturer’s instructions
are followed for truss rigging and hoisting. It is advisable to place the trusses
on the walls before installing the exterior bracket platform scaffold to avoid
any obstruction caused by bracket locations.
(e) Ensure that brackets do not exceed the maximum allowable distance.
Supports for wood planks can not be more than 2.1m apart.
(f) Assemble all the components needed to completely surround the perimeter of
the house.
(g) A competent worker must inspect all components before installation.
Step 2—Installing exterior bracket components
(a) Prior to placing brackets on the exterior of the house, ensure that the area
below is clear of all workers. Post warning signs at ground level and at access
points of the house.
Residential Roof Truss Installation Procedures
Work Safe for Life5
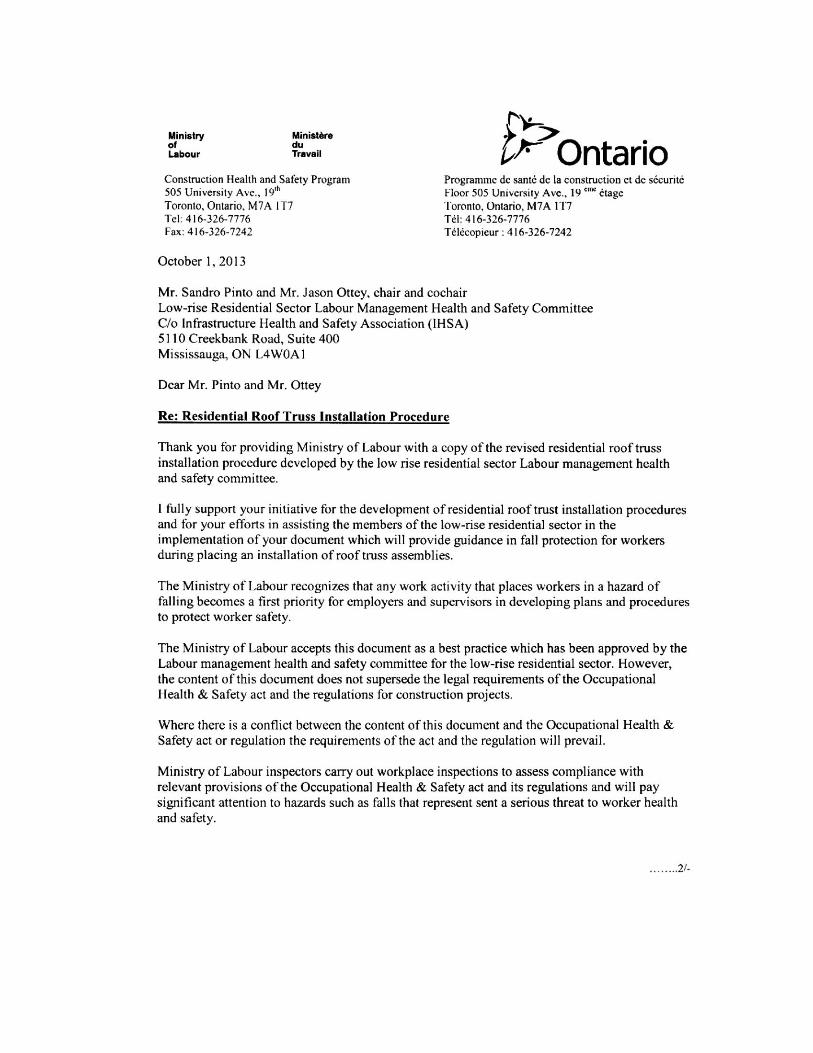
(b) Ensure that a competent worker supervises the installation of the scaffold.
(c) If required, use a portable ladder from the inside of the house to place and
secure brackets over the top plate according to manufacturer’s instructions.
When using a ladder supported against the top plate, always keep your feet at
least 0.9m (3ft.) below the top plate so it can guard against a fall to the
outside.
(d) If a worker installing components is exposed to a fall greater than 3 metres*,
the worker must be trained in fall protection and a fall protection system must
be used.
Remember always to use manufacturer’s original parts or approved
replacements. Do not replace damaged or missing parts with non-approved
materials.
Step 3—Placing planks and guardrails
(a) Always follow manufacturer’s instructions when installing planks and
guardrails.
(b) Ensure that all components of the system—including platform members—are
cleated or otherwise secured against slipping.†
*For a complete list of conditions requiring workers to use fall protection, see O.Reg. 213/91, Section 26.
† For a complete list of conditions relating to scaffold platforms, see O.Reg. 213/91, Section 135.
Residential Roof Truss Installation Procedures
Work Safe for Life6
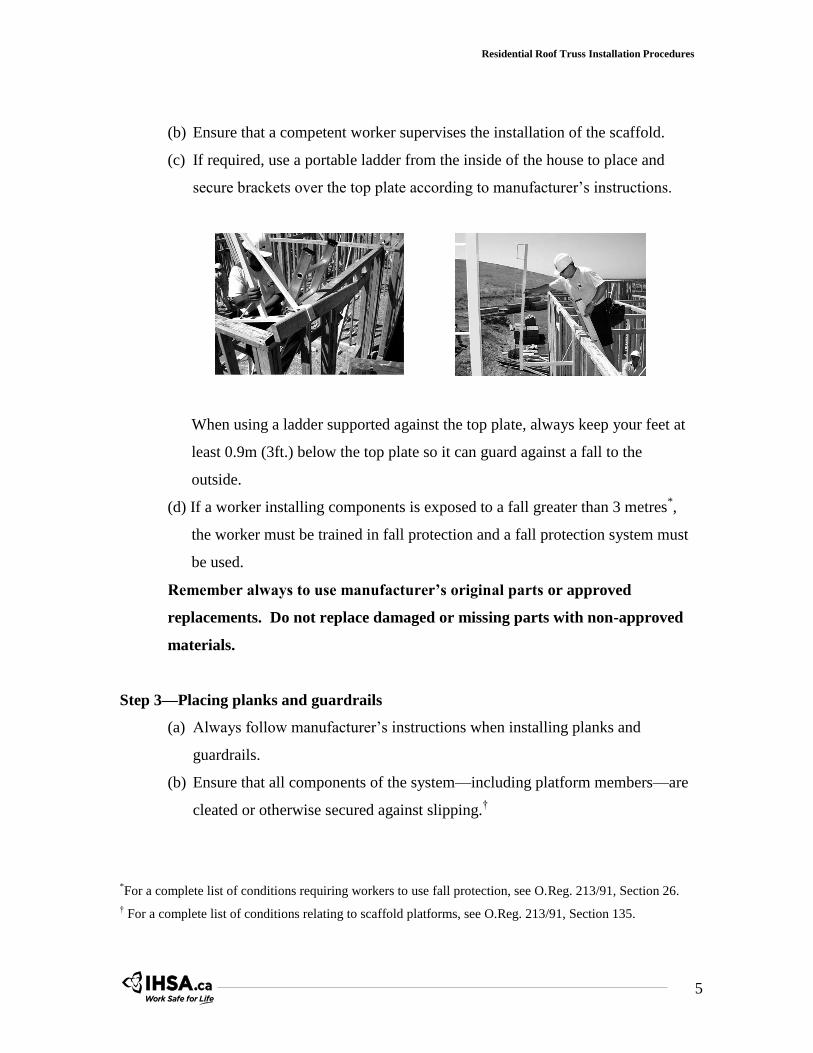
(c) The first bay installed will be the last bay removed. To make removal safer
and easier, begin installation at a door or window opening. You will be able to
pass components through the opening during the dismantling phase.
(d) From the inside of the building, use a ladder to place the first bay of planks on
the brackets. This is best done as a two-person operation: one worker on the
floor passes planks up to the other worker on the ladder. Then the worker on
the ladder lifts the plank over the top plate and places it on the bracket.
When possible, use a lift truck or other mechanical hoisting or lifting device to
place planks directly on the brackets. This eliminates the need for a worker to
reach over the top plate from a ladder and install planks.
(e) If the system requires, and if the worker can reach from a safe position on the
ladder, install the guardrail posts and guardrails. If these components can’t be
installed from the ladder, they can be installed from the platform. Installation
from the platform requires a complete fall protection system (commonly a
full-body harness, double lanyard, and adequate means of attachment to the
top plate).

Residential Roof Truss Installation Procedures
Work Safe for Life7
(f) To allow for fall protection and to prevent overexertion, it is important to
install the exterior bracket platform in sequence, one bay after another, until
the perimeter of the building is completely surrounded.*
(g) Provide a ladder for access to the platform from the inside of the building in
accordance to the Regulations for Construction Projects (i.e., extending
900 mm above the platform and tied off since it is the regular means of
access).
Remember always to use proper fall protection when exposed to a fall
hazard. Reaching over the top plate to install components may create a fall
hazard—be aware and tie off.
Step 4—Spreading Trusses
(a) To facilitate the placement of trusses, install an interior walking platform
scaffold along the centre of the house and parallel to the roof peak.
(See Appendix A.)
(b) While working from the platform, spread and stand trusses. To brace the
trusses, follow the manufacturer’s instructions.
(d) The workers on the exterior bracket platform scaffold align and toe-nail the
trusses, place the fascia board, and place the first row of sheathing.
(e) Ensure that all workers use a fall protection system when placing sheathing
beyond the first row.
Fall protection must be worn whenever a worker leaves the platform and is
exposed to a fall hazard.
*Brackets are placed all the way around the top plate on buildings with full hip roofs.

Residential Roof Truss Installation Procedures
Work Safe for Life8
Step 5—Dismantling
(a) The dismantling of the scaffold system must be supervised by a competent
worker.
(b) Workers must be tied off to an adequate anchor point (e.g., the roof) prior to
removing any component of the scaffold.
(c) Starting from the last section that was installed, begin removing components
in accordance with the manufacturer’s instructions.
(d) If a lift truck or other suitable lifting or hoisting device is available, place
components on a properly secured pallet on the roof of the building for
removal.
If a lift truck or other suitable lifting or hoisting device is not available, pass
components through window or door openings to workers on the inside of the
house.
(e) If construction of the exterior bracket platform was started near a window or
door opening as described in Step 3, the last two planks to be removed should
be adjacent to a window or door opening. Workers on the floor inside the
building can reach out and remove the last two planks through the opening.
Fall protection must be used as required.
(d) From the inside of the house, dismantle the brackets and lower them to the
ground by appropriate means or bring them into the house, depending on the
manufacturer’s instructions and construction conditions.
If a worker is exposed to a fall greater than 3 metres* while dismantling
components, fall protection must be used.
Never drop any material or components from heights.
*For a complete list of conditions requiring workers to use fall protection, see O.Reg. 213/91, Section 26.

Residential Roof Truss Installation Procedures
Work Safe for Life9
Method 2:
Installing Trusses Using an Interior Bracket
Platform Scaffold
The use of an interior bracket platform scaffold hanging from the top plate of an
adequately braced and supported wall can facilitate the installation of trusses in low-rise
residential construction. A competent worker shall oversee the installation of a scaffold
system. Employers must ensure that all workers are trained in how to properly install
scaffold systems.
The manufacturer’s instructions, Occupational Health and Safety Act and Regulations for
Construction Projects must be followed. The procedures outlined in this document do not
supersede manufacturer’s instructions or legislative requirements. The
manufacturer’s/fabricator’s instructions for the device must be supplemented with
engineering documentation that addresses the stability requirements of the wall for
attachment, as well as the connection methods of the work platform. If field conditions
vary and create situations beyond the scope of the manufacturer’s instructions, additional
engineering may be required.
Below are some of the benefits of using an interior bracket platform scaffold system to
erect trusses.
Workers have a work platform and walkway.
Work is situated at a comfortable and ergonomically correct height.
It is a cost-efficient and time-efficient method.
Provided the platform is between 0.9m and 1.1m below the top plate, there is no
requirement for a guardrail to be installed to the outside of the house, since the
framing itself will prevent workers from falling.

Residential Roof Truss Installation Procedures
Work Safe for Life10
The height of the platform from floor level inside the house may not require the
use of a guardrail (as long as all floor openings are adequately covered, and other
regulation requirements are met).
Aligning and squaring trusses, toe-nailing and securing, and installing fascia
board* can be done from the platform.
Below are some of the challenges of using an interior bracket platform scaffold system to
erect trusses.
When installing the fascia board, workers may require additional fall protection
measures if it is done from the platform.*
The first full row of sheathing cannot be installed from the platform.
Mid-rails and toeboards may be required at widow and door openings.
Interior structures, such as walls, prevent a continuous platform.
Workers have to repeatedly bend down under trusses to walk across the work
platform. Alternatively, workers must climb down a ladder to the floor, walk
across the house and access another part of the platform using another ladder.
Procedure
The steps below explain how to use an interior bracket platform scaffold to install trusses
in low-rise residential construction projects. The procedure is divided into five main
steps, and each step is further broken down.
Step 1—Walls
(a) Prior to installing the platform, a competent worker must ensure that the walls
are built and braced as required by the platform manufacturer’s instructions.
(b) Measure and mark the location of the brackets on walls as per manufacturer’s
instructions.
(c) Ensure that brackets do not exceed the maximum allowable distance. Supports
for wood planks should not be more than 2.1m apart.
*The ability of the worker to safely install fascia from an interior bracket platform can be affected by the
worker’s height and reach, slope of roof, overhang distance, etc.

Residential Roof Truss Installation Procedures
Work Safe for Life11
(d) Assemble all the components needed to completely surround the perimeter of
the house.
(e) A competent worker must inspect all components before installation.
Step 2—Installing interior bracket components
(a) Ensure that a competent worker supervises the installation of the system.
(b) If required, use a portable ladder inside of the house to place brackets over the
top plate and secure according to manufacturer’s instructions.
When using a ladder supported against the top plate, always keep your feet at
least 0.9m (3ft.) below the top plate to prevent a fall to the outside.
(c) Continue placing and securing brackets until they are all in place and secure.
Step 3—Placing planks and guardrails
(a) Always follow manufacturer’s instructions when installing planks and
guardrails (if guardrails are required, e.g., open to area below).
(b) Ensure that all components of the system—including platform members—are
cleated or otherwise secured against slipping.*
* For a complete list of conditions relating to scaffold platforms, see O.Reg. 213/91, Section 135.

Residential Roof Truss Installation Procedures
Work Safe for Life12
(c) Most planks and guardrail components can be installed from the floor level of
the house. If a worker installing components is exposed to a fall greater than 3
metres*, the worker must be trained in fall protection and a fall protection
system must be used.
Remember always to use manufacturer’s original parts or approved
replacements. Do not replace damaged or missing parts with non-approved
materials.
Step 4—Spreading Trusses
(a) Arrange with the truss manufacturer to have trusses stacked and delivered in
the order that they will be installed.
(b) Receive/place trusses on top of the completed walls, ensuring manufacturer’s
instructions are followed for truss rigging and hoisting.
(c) To facilitate the placement of trusses, install an interior walking platform
along the centre of the house and parallel to the roof peak
(see Appendix A).
(d) While working from the platform, spread and stand the trusses. To brace the
trusses, follow the manufacturer’s instructions.
(e) As the trusses are put in place, workers will have to bend down to walk under
them, or climb down from the platform and walk across the floor. Climbing
up and walking on the top plate or on the trusses is not a safe option.
(f) Align and toe-nail the trusses from the platform.
*For a complete list of conditions requiring workers to use fall protection, see O.Reg. 213/91, Section 26

Residential Roof Truss Installation Procedures
Work Safe for Life13
(g) Install fascia board from the platform. Whether or not this can be done safely
depends on the height of the worker, pitch of the roof, width of the overhang,
and type of roof. Never reach too far over or climb over the top plate and
expose yourself to a fall greater than 3 metres* without a full fall protection
system. The same is true when installing sheathing.
(h) Install partial width sheathing from the interior platform.
Step 5—Dismantling
(a) The dismantling of the scaffold system must be supervised by a competent
worker.
(b) If required, use a portable ladder from the inside of the house to remove
components according to manufacturer’s instructions. Always follow
manufacturer’s instructions when removing planks and guardrail systems (if
guardrails are required, e.g., open to area below).
(c) Most planks and guardrail components can be dismantled from the floor level
of the house. If a worker dismantling components is exposed to a fall greater
than 3 metres*, fall protection must be used.
Never drop any material or components from heights.
*For a complete list of conditions requiring workers to use fall protection, see O.Reg. 213/91, Section 26.

Residential Roof Truss Installation Procedures
Work Safe for Life14
Method 3:
Assembling the Roof on the Ground and
Hoisting into Place
A third option when constructing a roof for low-rise residential projects is to assemble it
at ground level and hoist it into place.
The manufacturer’s instructions, Occupational Health and Safety Act and Regulations for
Construction Projects must be followed. The procedures outlined in this document do not
supersede manufacturer’s instructions or legislative requirements. The
manufacturer’s/fabricator’s instructions for the device must be supplemented with
engineering documentation that addresses the stability requirements of the wall for
attachment, as well as the connection methods of the work platform. If field conditions
vary and create situations beyond the scope of the manufacturer’s instructions, additional
engineering may be required.
Below are some of the benefits of assembling the roof on the ground and hoisting it into
place.
The risk of working at heights is minimized
Work is situated a few feet above the ground, which is a more comfortable and
ergonomically correct work height.
Most of the sheathing and shingling can be completed while roof is at ground
level.
Fall protection anchor points can be installed on the roof for use after it is hoisted
into place.
Below are some of the challenges of using this method of roof assembly:
Additional adequate hoisting equipment is required.
The hoisting area must be free from overhead obstructions.

Residential Roof Truss Installation Procedures
Work Safe for Life15
There must be sufficient space on site to build the roof on the ground and hoist it
into place without blocking access for emergency vehicles.
Fall protection may be required to complete certain phases of assembly.
Written procedures are required for building, hoisting, and placing the roof. Workers
who are involved at any stage of the procedure must be instructed on the procedures and
must follow them.
Procedure
Step 1—Assembly on the Ground
(a) Consult with the truss manufacturer to identify a method of hoisting the roof
once it is assembled. This includes identifying the engineered lifting points.
The truss manufacturer should provide the design assumptions (load)
with their systems.
(b) Locate an area in which assembly of the roof structure can take place. Ensure
that there is enough space to set up adequate hoisting equipment. This area
should be firm and level to facilitate the work. An area free from mud, ice,
snow etc. is recommended.
(c) Construct a template structure to assemble the roof on.
(d) Assemble the roof trusses according to the design layout. If there is a risk of
falling more than 3 metres* (10 ft), the worker must be trained in fall
protection and must use a fall protection system.
*For a complete list of conditions requiring workers to use fall protection, see O.Reg. 213/91, Section 26.

Residential Roof Truss Installation Procedures
Work Safe for Life16
(e) Ensure that the roof assembly will fit onto the constructed walls of the
building. The safest place to make changes to the assembly is when it is still
at ground level.
(f) Install fall protection anchors on the roof before the roof is raised into position.
The anchors points should be easy to reach and tie off to. These anchors are
needed for fall protection systems when workers are disconnecting hoist lines
and finishing the roof. Follow manufacturer’s instructions when installing
anchors. If it is necessary for workers to access the roof to unhook the rigging
system, they must connect to a fall protection system before getting up onto
the roof.
(g) Install sheathing. Use edge protection/support brackets on the roof to help
worker positioning.
(h) Ensure housekeeping around the roof area is maintained.
(i) If shingling is required, proceed using required methods of fall protection.
Step 2—Hoisting the Roof
(a) Define the weight of the roof, the distance to where it will be placed, rigging
requirements, tag lines, etc.
(b) Consult with the hoisting company/operator and select the appropriate size
and type of equipment.
(c) Ensure that there is an adequate area to set up for the hoisting operation.
(d) Make sure there is a competent signal person available.

Residential Roof Truss Installation Procedures
Work Safe for Life17
(e) Securely cover all floor openings in the house.
(f) Limit the number of workers in the house and in the hoisting area to only
those needed to perform the required work. All other workers MUST be out
of the structure and in an area where the load will not pass over them.
(g) Hoist the roof into position. Workers in the house must use tag lines to help
land the roof on the walls.
(h) If minor repositioning is required, only use proper pry bars
(i) Unhook the rigging system from the landed roof. Workers performing this
task must be protected with a fall protection system prior to getting up onto
the roof.
(j) Finish the roof (sheathing, shingling, miscellaneous work) using complete fall
protection at all times).
Workers should never position any part of their body between the top of a
wall and the roof as it is descending.

Residential Roof Truss Installation Procedures
Work Safe for Life18
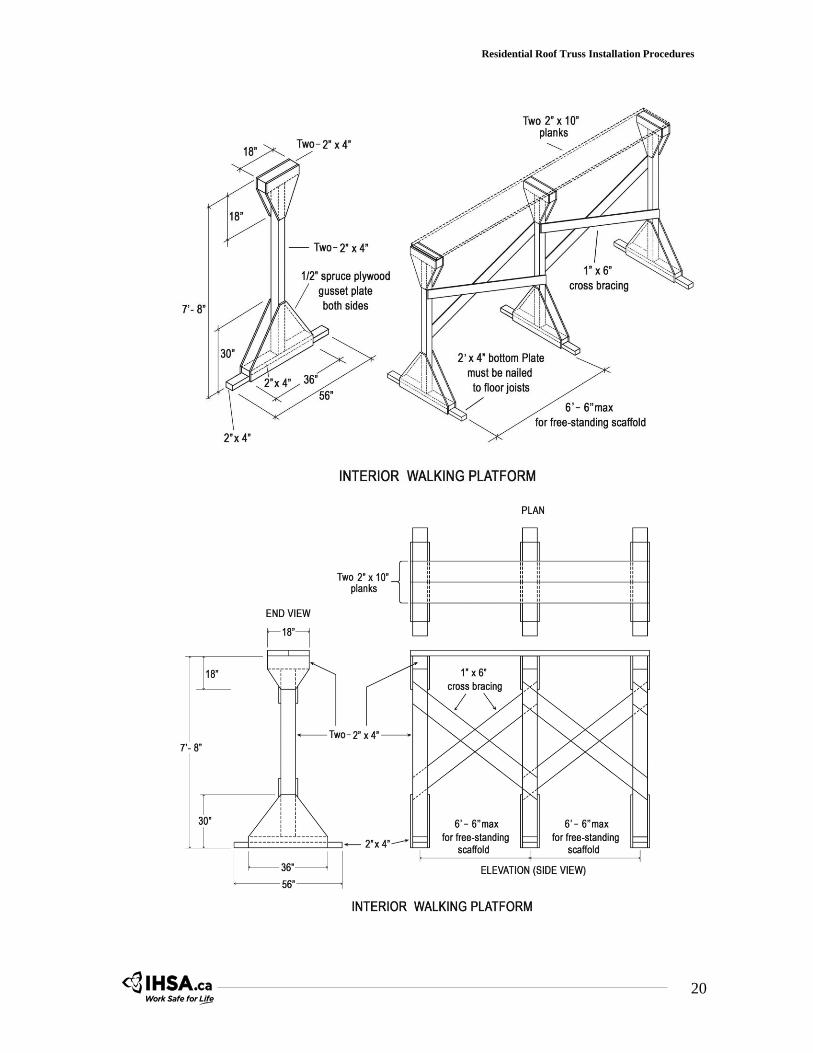
Appendix A
Constructing an Interior Walking Platform
The following procedure details the installation of a free-standing platform in the
interior of the house. This platform provides workers a safe position from which to
install roof trusses. This procedure is based on accepted industry practices and is to
be considered as one part of the solution for regulation compliance. This interior
walking platform is to be used in conjunction with a perimeter scaffold system (i.e.,
an interior or exterior bracket platform scaffold) to provide workers with fall
protection during the truss installation phase.
Procedure
Step 1—Install Platform
(a) If using a job-built wood platform, fabricate and install posts, braces, and
platform deck according to engineered details (see sample at the end of
appendix).
OR
If using masonry scaffold frames (30″ or 5ʹ width), install frames, braces, and
platform deck in accordance with the Occupational Health and Safety Act and
the Regulations for Construction Projects.
Residential Roof Truss Installation Procedures
Work Safe for Life19
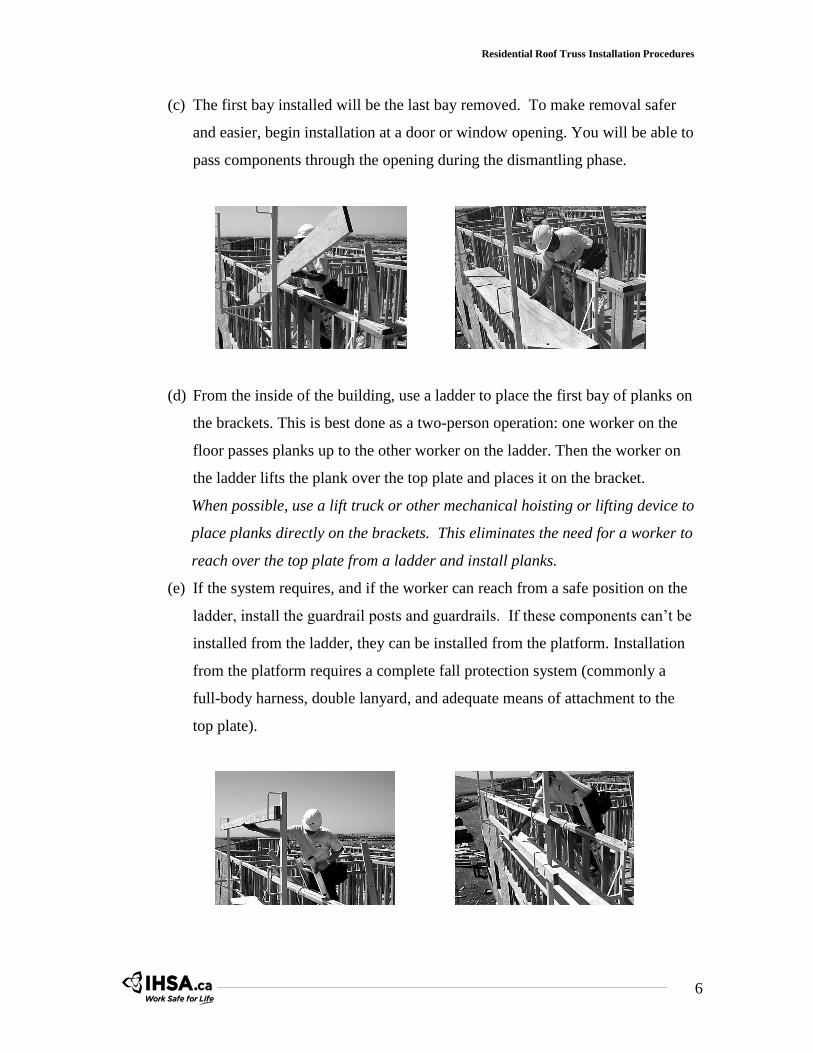
(b) Install the platform along the centre of the structure, parallel to the roof peak.
Make sure that all openings on the floor beneath the platform are completely
and securely covered.
(c) Construct guardrails for door, window, and other openings in the exterior
framing. Provide ladder access to the interior platform.
Step 2—Position, Erect, and Brace Trusses
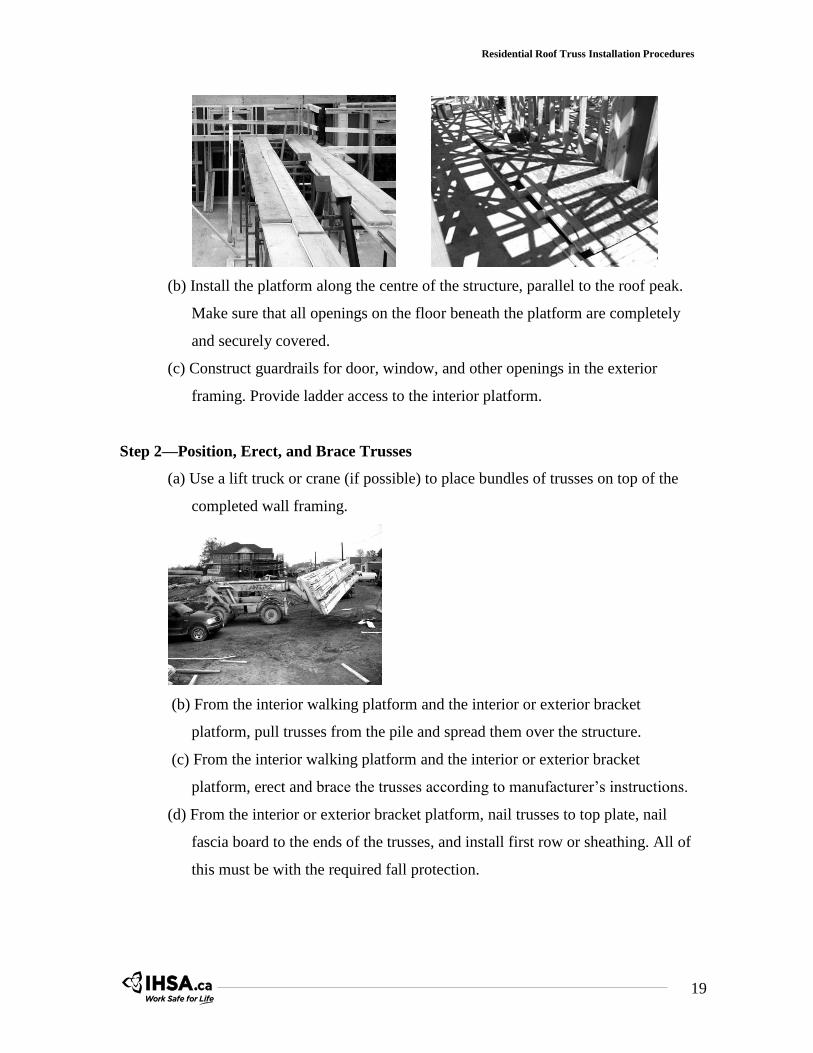
(a) Use a lift truck or crane (if possible) to place bundles of trusses on top of the
completed wall framing.
(b) From the interior walking platform and the interior or exterior bracket
platform, pull trusses from the pile and spread them over the structure.
(c) From the interior walking platform and the interior or exterior bracket
platform, erect and brace the trusses according to manufacturer’s instructions.
(d) From the interior or exterior bracket platform, nail trusses to top plate, nail
fascia board to the ends of the trusses, and install first row or sheathing. All of
this must be with the required fall protection.
Residential Roof Truss Installation Procedures
Work Safe for Life20

Find out what we can do for you at ihsa.ca
About IHSA
IHSA’s vision is workplaces without injuries, illnesses, or fatalities.
We engage with our member firms, workers, and other stakeholders to help them continuously improve their health and safety performance. We do this by providing effective and innovative sector-specific programs, products, and services.
We offer
• Training programs • Consulting services • Health and safety audits • Publications and e-news • Posters and stickers • Reference material • A resource-rich website • Solutions to high-risk activities • Due diligence solutions.
W210
Infrastructure Health & Safety Association (IHSA)5110 Creekbank Road, Suite 400
Mississauga, Ontario L4W 0A1 CanadaTel: 1-800-263-5024 • Fax: 905-625-8998
ihsa.ca