place-based geospatial learning and applications in … · place-based geospatial learning and...
TRANSCRIPT

MapTEACHPLACE-BASED GEOSPATIAL LEARNING
AND APPLICATIONS IN ALASKA
Mapping Technology Experiences with Alaska's Cultural Heritage
www.mapteach.org
Place-Based Geospatial Education for AlaskaTeacher and Student GuideGrades 6-12

MapTEACH: PLACE-BASED GEOSPATIAL LEARNING AND APPLICATIONS IN ALASKA Place Based Geospatial Education for Alaska Teacher and Student Guide Grades 6-12 De Anne Stevens Alaska Division of Geological & Geophysical Surveys Alaska Department of Natural Resources Sidney Stephens UA Geography Program School of Natural Resources and Agricultural Sciences University of Alaska-Fairbanks Patty Burns GeoData Center, Geophysical Institute University of Alaska-Fairbanks Sam Batzli Space Science and Engineering Center University of Wisconsin-Madison Timothy Olsen Space Science and Engineering Center University of Wisconsin-Madison
2008
With assistance from: Emma Walton - project evaluator
Kim Streeter and Bil Aldrich - MapTEACH interns Jackie Fenno - PI Emeritus
MapTEACH Advisory Board:
Andy Angaiak, Ray Barnhardt, Neal Brown, Shirley Holloway, Martin Jeffries, June McAtee and Elena Sparrow
Funding by: The National Science Foundation ITEST Program
(Grant Numbers ESI-0322980, ESI-0322958 and ESI-0323191) and
UA Geography Program, University of Alaska-Fairbanks GeoData Center, Geophysical Institute, University of Alaska-Fairbanks
MapTEACH thanks the following teachers for their piloting, review, and feedback:
Bonnie Hauschka, Cantwell School, Cantwell Chuck Hugny, Nenana High School and Living Center, Nenana Debbie Chalmers, Mendenhall River Community School, Juneau Denis Gardella, Top of the Kuskoswim School, Nicholai Diane "Molly" Hale, Hooper Bay School, Hooper Bay Frida Shroyer, Hutchison High School, Fairbanks Geoff Buerger, Anderson School, Anderson Gladys Abraham, Hooper Bay School, Hooper Bay John Carlson, Fairbanks North Star Borough School District Katie Kennedy, University of Alaska, Geography Program, Fairbanks Michael Warren, Central Middle School, Anchorage Olga Skinner, Effie Kokrine Charter School, Fairbanks Sheryl Meierotto, Effie Kokrine Charter School, Fairbanks
MapTEACH also thanks the following for their involvement and cooperation:
Albert Kowchee Alaska Humanities Forum Barb Pungowiyi Alaska Native Science and Engineering Program (ANSEP) Bergman Silas Barnette Magnet School Carl Aschenfelter Bering Strait Native Association Eleanor Laughlin Bering Strait School District Elizabeth Marino Cultural Heritage Education Center Elsie Titus Effie Kokrine Charter School Geraldine Charlie Eskimo Heritage Program Gilbert Ketzler Gaalee’ya Spirit Camp Howard Luke Geographic Information Network of Alaska (GINA) Hugo Lindfors Kawerak Elders Advisory Committee Irene Anderson Kawerak, Inc. Jacob Ahwinona Lighthouse Community Christian School Jason Mayrand Minto School Jeff Selvey Native Knowledge Network John Wehde Nenana Living Center Josephine Riley Nenana Public Schools Josh Wisniewski Nenana Senior Center Ken Charlie Nenana Tribal Council Lige Charlie Nenana Wellness Coalition Lincoln Trigg Nome-Beltz High School Mamie Maloney Northwest Alaska Career and Technical Center (NACTEC) Margaret Saunders Northwest Arctic Borough School District Mark Ebels Old Minto Culture Camp Mary Alexander Sitnasuak Native Corporation Matt Ganley XYZ Club Senior Center Matt Gilbert The communities of Fairbanks, Nome, Nenana, and Minto Moses Paul And many others… Neal Charlie Phoebe Omilak Robert Charlie Ruth Emmons Sam Demientieff Tom Heinrichs Vernel Titus Wes Alexander
Very special thanks to all the wonderful students we have worked with in
developing MapTEACH!

TABLE OF CONTENTS
MapTEACH Curriculum Overview. ........................................................... i
Lesson Summaries by Module.. .............................................................. iii
Sample Lesson Groupings...................................................................... vii
Place Names and Landmarks (PNL)
PNL 1 Introducing the Unit and Mental Maps ..................................... 1
PNL 2 Simon Paneak's Sketch Maps .................................................. 5
PNL 3 Working with Local Experts – Mental Maps............................... 21
PNL 4 What's in a Name? ................................................................. 25
PNL 5 Picking Points off a Paper Map ................................................ 39
PNL 6 Field Trip Guide ..................................................................... 51
Remote Sensing/Geology (RSG)
RSG 1 Air Photo Interpretation.......................................................... 57
RSG 2 Seeing in Stereo and Route Finding ......................................... 65
RSG 3 Evaluating Erosion.................................................................. 109
RSG 4 Change Over Time ................................................................. 115
Global Positioning System (GPS)
GPS 1 Introduction to GPS with Geocaching....................................... 125
GPS 2 Field Data Collection for GPS Data and Digital Photo Documentation ............................................................. 137
GPS 3 Using Your Own Field Trip Data............................................... 145
GPS 4 Hotlinking to a Field Trip Data Document ................................. 173
GPS 5 Using a GPS to Collect Track Logs ........................................... 187
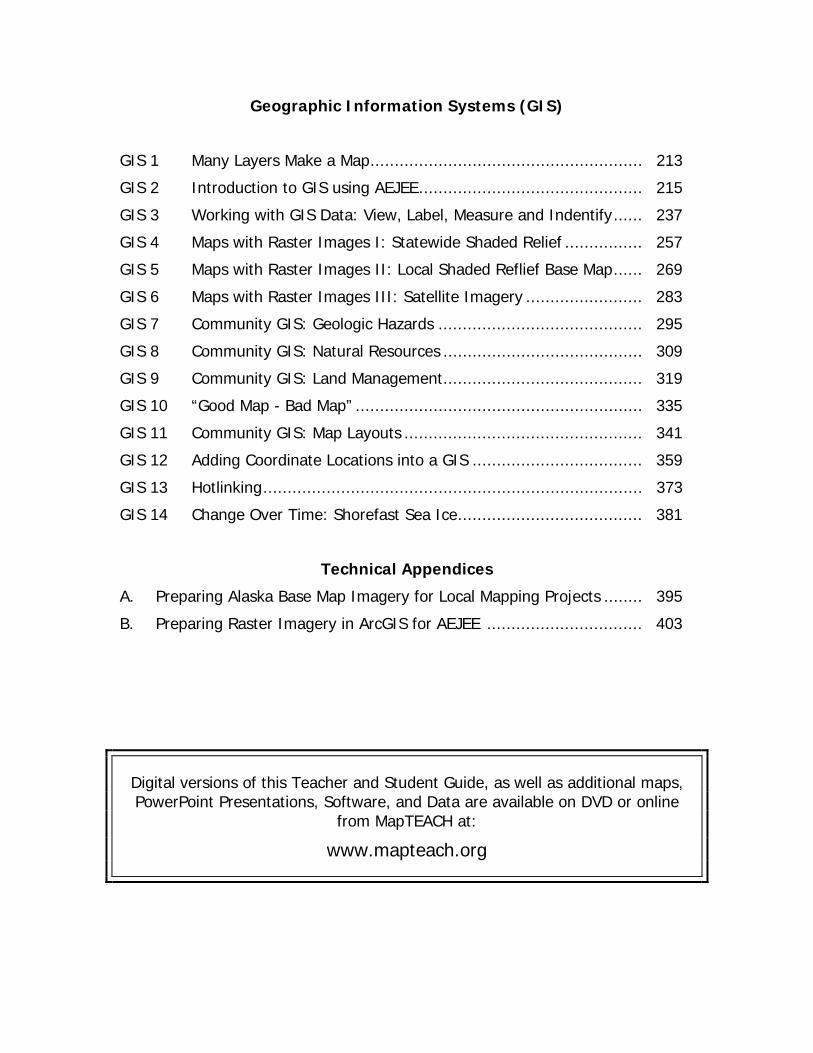
Geographic Information Systems (GIS)
GIS 1 Many Layers Make a Map........................................................ 213
GIS 2 Introduction to GIS using AEJEE.............................................. 215
GIS 3 Working with GIS Data: View, Label, Measure and Indentify...... 237
GIS 4 Maps with Raster Images I: Statewide Shaded Relief ................ 257
GIS 5 Maps with Raster Images II: Local Shaded Reflief Base Map...... 269
GIS 6 Maps with Raster Images III: Satellite Imagery ........................ 283
GIS 7 Community GIS: Geologic Hazards .......................................... 295
GIS 8 Community GIS: Natural Resources ......................................... 309
GIS 9 Community GIS: Land Management......................................... 319
GIS 10 “Good Map - Bad Map” ........................................................... 335
GIS 11 Community GIS: Map Layouts ................................................. 341
GIS 12 Adding Coordinate Locations into a GIS ................................... 359
GIS 13 Hotlinking.............................................................................. 373
GIS 14 Change Over Time: Shorefast Sea Ice...................................... 381
Technical Appendices
A. Preparing Alaska Base Map Imagery for Local Mapping Projects ........ 395
B. Preparing Raster Imagery in ArcGIS for AEJEE ................................ 403
Digital versions of this Teacher and Student Guide, as well as additional maps, PowerPoint Presentations, Software, and Data are available on DVD or online
from MapTEACH at:
www.mapteach.org

i
MapTEACH: PLACE-BASED GEOSPATIAL LEARNING AND APPLICATIONS IN ALASKA
MapTEACH (Mapping Technology Experiences with Alaska’s Cultural Heritage) is an educational curriculum for middle and high school students designed to help them both (1) understand the physical and cultural features of their environment, and (2) use mapping technologies to enhance and portray that new understanding. As such, it emphasizes the integration of three focus areas: geoscience, local landscape knowledge, and geographic information science (GPS, GIS and remotely sensed imagery). MapTEACH gives Alaskan students the opportunity to make a connection between traditional ways of viewing the landscape, scientific ways of making observations about the landscape, and the process of using cutting-edge information technologies to gather and disseminate information about the landscape. At its core, this curriculum is place-based and interdisciplinary in nature, and seeks to connect students, teachers, community members and scientists in an exploration of the local landscape from multiple perspectives. Lessons are organized into the following sections for ease of use: Section 1: Place Names and Landmarks These lessons seek to answer the question “How do you know where you are?” by grounding students in an appreciation of their own mental maps and then expanding this to include understanding and documentation of the place names and landscape knowledge of local experts. This work is based on the belief that there are many ways to “know” where you are and that each way of knowing contributes to our overall understanding of the landscape. Section 2: Remote Sensing and Geology These hands-on lessons introduce students to remotely sensed imagery by exploring local air photo imagery, stereo pair photographs and topographic maps and by using these maps and imagery to evaluate river erosion and change over time. These lessons are not only interesting and relevant in their own right, but provide a solid introduction to the imagery used in several of the GIS lessons. Section 3: Global Positioning System These lessons guide students through the basic uses of handheld Global Positioning System (GPS) units by finding and placing geocaches, documenting waypoints, and downloading location information into a computer in order to create a map of a place or a journey. Section 4: Geographic Information Systems These lessons enable students to use GIS mapping technology to enhance and portray their understanding of the world around them by: (1) exploring the fundamental concept that maps are made of layers of data and a computer

ii
allows us to stack these layers in many different ways; and (2) manipulating existing data layers and adding their own data to generate original maps of personal, cultural or scientific interest. As can be seen in Tables 1 – 4 below, each section has a coherent set of goals and, with a few exceptions, lessons in each section are sequential so that they can be worked through in part or in whole in the order presented. In practice, however, the lessons are intended to be used in a variety of combinations, mixing and matching lessons from several sections to achieve desired learning outcomes and timeframes. Table 5 demonstrates how different elements of this curriculum might be adapted to suit unique classroom needs by describing several potential lesson sequences. Several of the lessons included in the MapTEACH curriculum involve making digital maps using GPS and other data collected locally by students. Satellite imagery can be a useful and informative base map layer upon which students can display their own data. It is not feasible for MapTEACH to be able to anticipate every possible area that any given student project would need satellite base map data for, therefore we have developed two procedures so teachers (or advanced students) can generate their own image layers for use in their local-area digital mapping projects. These procedures can be found in the Appendix. We expect and hope that as you become more familiar with this curriculum, you will find new ways to use and adapt these lessons and make them your own. We hope you will share these adaptations with us and also let us know what we might do next to make this curriculum more responsive to your needs.
iii
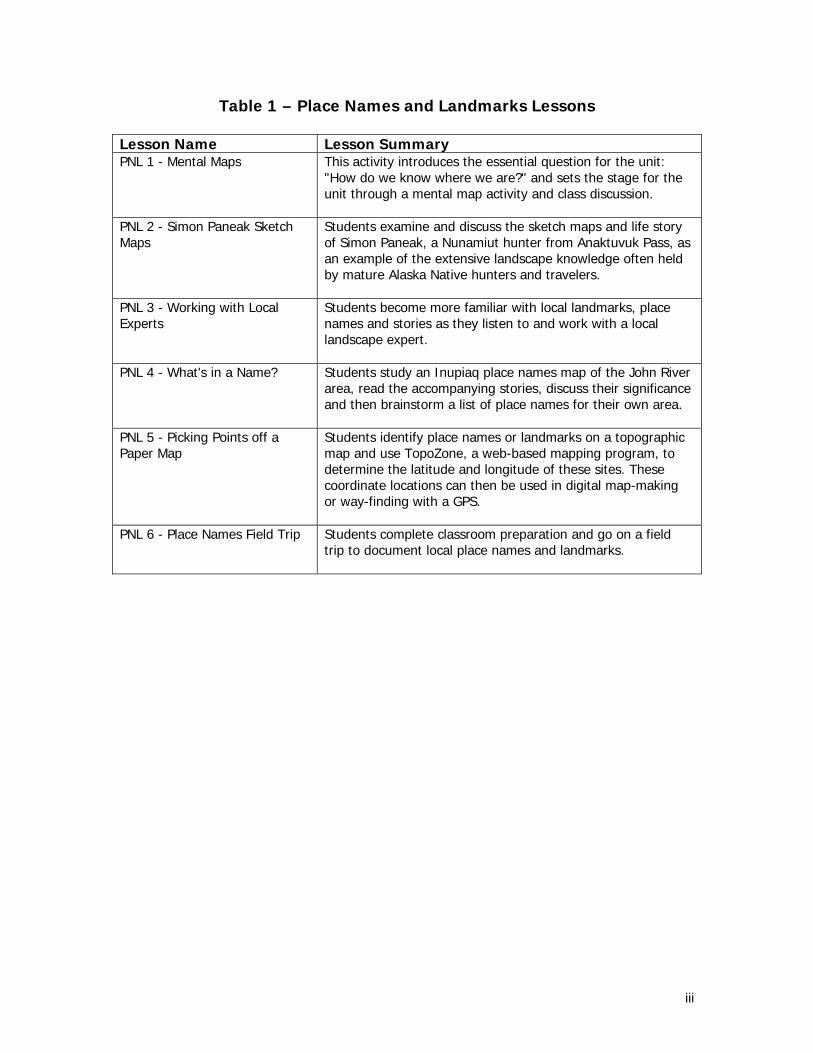
Table 1 – Place Names and Landmarks Lessons
Lesson Name Lesson Summary PNL 1 - Mental Maps
This activity introduces the essential question for the unit: "How do we know where we are?" and sets the stage for the unit through a mental map activity and class discussion.
PNL 2 - Simon Paneak Sketch Maps
Students examine and discuss the sketch maps and life story of Simon Paneak, a Nunamiut hunter from Anaktuvuk Pass, as an example of the extensive landscape knowledge often held by mature Alaska Native hunters and travelers.
PNL 3 - Working with Local Experts
Students become more familiar with local landmarks, place names and stories as they listen to and work with a local landscape expert.
PNL 4 - What's in a Name?
Students study an Inupiaq place names map of the John River area, read the accompanying stories, discuss their significance and then brainstorm a list of place names for their own area.
PNL 5 - Picking Points off a Paper Map
Students identify place names or landmarks on a topographic map and use TopoZone, a web-based mapping program, to determine the latitude and longitude of these sites. These coordinate locations can then be used in digital map-making or way-finding with a GPS.
PNL 6 - Place Names Field Trip
Students complete classroom preparation and go on a field trip to document local place names and landmarks.

iv
Table 2 – Remote Sensing/Geology Lessons
Lesson Name Lesson Summary RSG 1 – Air Photo Interpretation
This activity introduces students to color infrared (CIR) air photo interpretation. Students examine a CIR air photo of their community, identify prominent features and interpret what those features might be through use of an air photo key.
RSG 2 - Seeing in Stereo and Route Finding
At stations set up around the room, students view and interpret stereo pair air photos in three dimensions (3-D), compare them with topographic maps of the same area and determine which route is "best." Students also discuss the advantages and disadvantages of each image with regard to finding your way.
RSG 3 – Evaluating Erosion
Students examine several air photos of Alaskan rivers and identify areas of erosion and deposition.
RSG 4 – Change Over Time
Students study a chronological series of images and maps of Fairbanks or Nenana, looking for evidence of changes over time
Table 3 – Global Positioning System Lessons
Lesson Name Lesson Summary GPS 1 – Introduction to GIS with Geocaching
Students learn how to use GPS units to perform a variety of tasks. They learn how to: adjust the settings of the units; enter and mark waypoint information; find geocaches; and place a geocache.
GPS 2 – Field Data Collection for GPS Data and Digital Photo Documentation
Students go on a field trip to collect geospatial data and other useful information to document sites of interest they encounter.
GPS 3 – Using Your Own Field Trip Data
Students make GIS maps using data they have collected on a local field trip with their GPS units and digital cameras. They download their photos and GPS waypoints into a CSV file and then make a map of their sites that includes photos they took on their field trip.
GPS 4 – Hotlinking to a Field Trip Data Document
Students create Word documents describing their field trip sites and then learn how to hotlink the points in a GIS project to these Word documents thus creating an interactive map.
GPS 5 – Using Track Log Data Students make GIS maps using track log /trail data they have collected on a local field trip with their GPS units and digital cameras.

v
Table 4 – Geographic Information Systems Lessons
Lesson Name Lesson Summary GIS 1 – Many Layers Make a Map
Students brainstorm a list of information portrayed on topographic maps sort that information into categories or themes and then trace a few layers onto mylar in imitation of GIS layers/themes.
GIS 2 – Introduction to GIS Using AEJEE
Students are introduced to the use of GIS as a way to make customized maps. Students learn to: add layers, set projection, modify the appearance of the map and label features on it.
GIS 3 – Working with GIS Data: View, Label, Measure and Identify
Students learn some of the key qualities of GIS that make it more dynamic and powerful than paper maps. They learn new ways to view the information held in a GIS, and begin asking questions and solving problems.
GIS 4 – Maps with Raster Images I: Statewide Shaded Relief
Students work with a shaded relief image of Alaska and answer questions about what they can observe.
GIS 5 – Maps with Raster Images II: Local Shaded Relief Base Map
Students use a shaded relief raster layer and several vector layers to make a base map, centered on their community. The base map they construct during this exercise will be used as a starting point for several future GIS lessons.
GIS 6 – Maps with Raster Images III: Satellite Imagery
Students use GIS to load and view true-color and enhanced satellite images of Alaska. Based on their knowledge of Alaskan geography and recent image interpretation experiences, they interpret features found in the satellite images.
GIS 7 – Community GIS: Geologic Hazards
By choosing an Alaskan community as a starting point, students investigate and map geologic hazards that may affect that community directly. In turn, students begin to see how the geology and climate of a place sets the stage for specific hazardous events.
GIS 8 – Community GIS: Natural Resources
Geological resources often play a critical role in the economies of Alaskan communities. During this lesson, students investigate the distribution of resources regionally and locally. The maps students make can help them explore current and potential resource use by their project communities.
GIS 9 – Community GIS: Land Management
Who decides what is done with land in Alaska? Using GIS tools and information, the students investigate land ownership and management units and the distribution of resources beginning with their project community and expanding outward. The maps students make can help them explore current and potential resource use by their project communities.

vi
GIS 10 – Good Map – Bad Map The teacher reviews basic cartographic guidelines, and then shows an example AEJEE map that is cartographically incorrect, incomplete, and poorly designed. Students critique the map. A correct, complete, and attractively designed map is then reviewed for comparison.
GIS 11 – Community GIS: Map Layouts
Beginning with the base map created in GIS 7 -Community GIS: Geologic Hazards, students make map layouts that can be saved and printed as paper maps and used for reports or presentations.
GIS 12 – Adding Coordinate Locations into a GIS
Students use Serpentine Hot Springs on the Seward Peninsula as an example site to learn how to manually add coordinate data into a GIS project by creating a comma separated values file (.csv) and importing it into an AEJEE project
GIS 13 - Hotlinking Students modify the Serpentine Hot Springs csv file created in GIS 12 as an example site to learn how to hotlink data in a GIS project to a website about the hot springs, thus creating an interactive map.
GIS 14 – Change Over Time – Shorefast Sea Ice
Students use GIS to analyze changes in the extent of shorefast sea ice. They extract information from multi-year and single year data and look for trends over time.
vii
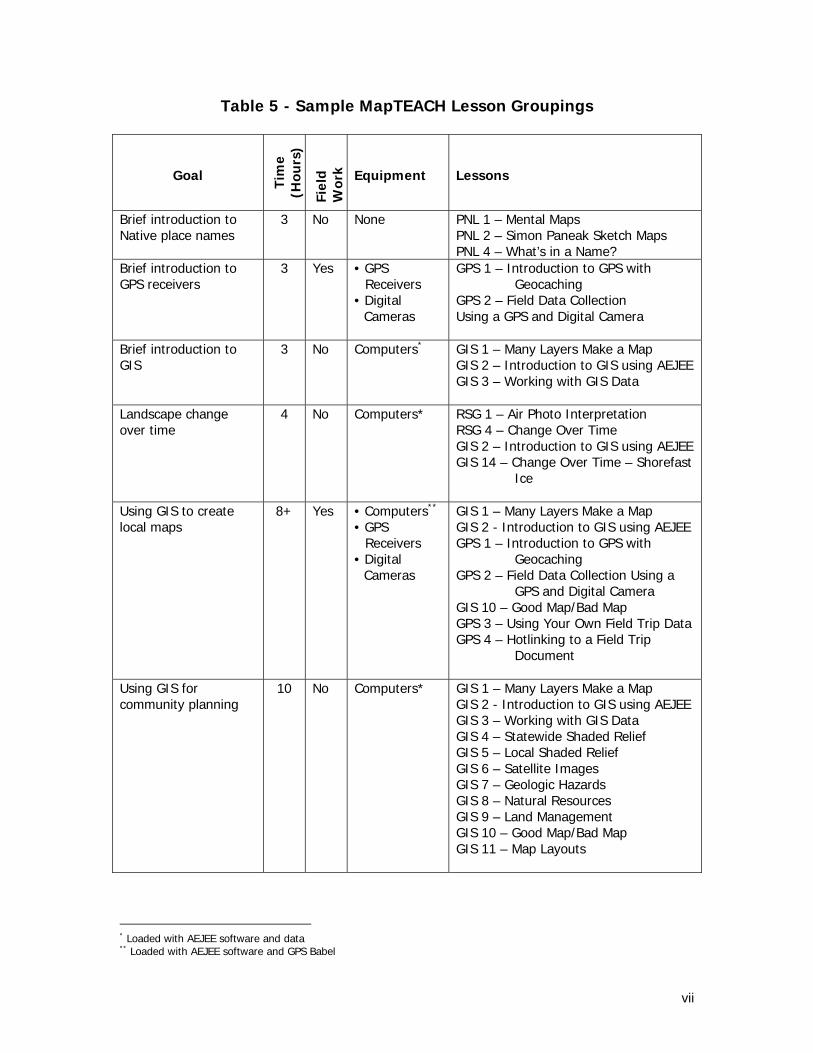
Table 5 - Sample MapTEACH Lesson Groupings
Goal
Tim
e (H
ours
)
Fiel
d W
ork
Equipment
Lessons
Brief introduction to Native place names
3 No None PNL 1 – Mental Maps PNL 2 – Simon Paneak Sketch Maps PNL 4 – What’s in a Name?
Brief introduction to GPS receivers
3 Yes • GPS Receivers
• Digital Cameras
GPS 1 – Introduction to GPS with Geocaching
GPS 2 – Field Data Collection Using a GPS and Digital Camera
Brief introduction to GIS
3 No Computers* GIS 1 – Many Layers Make a Map GIS 2 – Introduction to GIS using AEJEE GIS 3 – Working with GIS Data
Landscape change over time
4 No Computers* RSG 1 – Air Photo Interpretation RSG 4 – Change Over Time GIS 2 – Introduction to GIS using AEJEE GIS 14 – Change Over Time – Shorefast
Ice
Using GIS to create local maps
8+ Yes • Computers** • GPS
Receivers • Digital
Cameras
GIS 1 – Many Layers Make a Map GIS 2 - Introduction to GIS using AEJEE GPS 1 – Introduction to GPS with
Geocaching GPS 2 – Field Data Collection Using a
GPS and Digital Camera GIS 10 – Good Map/Bad Map GPS 3 – Using Your Own Field Trip Data GPS 4 – Hotlinking to a Field Trip
Document
Using GIS for community planning
10 No Computers* GIS 1 – Many Layers Make a Map GIS 2 - Introduction to GIS using AEJEE GIS 3 – Working with GIS Data GIS 4 – Statewide Shaded Relief GIS 5 – Local Shaded Relief GIS 6 – Satellite Images GIS 7 – Geologic Hazards GIS 8 – Natural Resources GIS 9 – Land Management GIS 10 – Good Map/Bad Map GIS 11 – Map Layouts
* Loaded with AEJEE software and data ** Loaded with AEJEE software and GPS Babel

viii
Goal
Tim
e (H
ours
)
Fiel
d W
ork
Equipment
Lessons
Using GIS to create local place names maps
15 Yes •Computers** • GPS
Receivers • Digital
Cameras
PNL 1 – Mental Maps PNL 2 – Simon Paneak Sketch Maps PNL 3 – Working with Local Experts PNL 4 – What’s in a Name? GPS 1 – Introduction to GPS with
Geocaching GPS 2 – Field Data Collection Using a
GPS and Digital Camera GIS 1 – Many Layers Make a Map GIS 2 – Introduction to GIS using AEJEE PNL 6 – Field Trip Guide GIS 10 – Good Map, Bad Map GPS 3 – Using Your Own Field Trip Data GPS 4 – Hotlinking to a Field Trip
Document

MapTEACH:
Global Positioning System (GPS)


www.mapteach.org Global Positioning System Lesson 1 Introduction to GPS with Geocaching
Page 125
GPS Lesson 1 INTRODUCTION TO GPS WITH GEOCACHING
TEACHER INFORMATION
Lesson Summary: During this lesson students will learn how to use GPS units
to perform a variety of tasks. They will: become familiar with GPS and handheld GPS units; learn how to adjust the settings of the units; learn how to enter waypoint information; learn how to find a geocache; and learn how to place a geocache.
Objectives: Students will learn how to operate a GPS unit to collect
and modify waypoint information. Estimated Time: 1 hour Correlation to Alaska Standards: Geography A-6 Use spatial (geographic) tools and technologies to analyze
and develop explanations and solutions to geographic problems.
Technology A Operate technology-based tools.
BACKGROUND FOR THE TEACHER The following explanation of GPS is courtesy of Garmin, one of the world’s leading GPS manufacturers. “The Global Positioning System (GPS) is a satellite-based navigation system made up of a network of 24 satellites placed into orbit by the U.S. Department of Defense. GPS was originally intended for military applications, but in the 1980s, the government made the system available for civilian use. GPS works in any weather conditions, anywhere in the world, 24 hours a day.
GPS satellites circle the earth twice a day in a very precise orbit and transmit signal information to earth. GPS receivers take this information and use triangulation to calculate the user's exact location. Essentially, the GPS receiver compares the time a signal was transmitted by a satellite with the time it was received. The time difference tells the GPS receiver how far away the satellite is.
Global Positioning System Lesson 1 www.mapteach.org Introduction to GPS with Geocaching
Page 126
Now, with distance measurements from a few more satellites, the receiver can determine the user's position and display it on the unit's electronic map.
A GPS receiver must be locked on to the signal of at least three satellites to calculate a 2D position (latitude and longitude) and track movement. With four or more satellites in view, the receiver can determine the user's 3D position (latitude, longitude and altitude). Once the user's position has been determined, the GPS unit can calculate other information, such as speed, bearing, track, trip distance, distance to destination, sunrise and sunset time and more.”
Geocaching is an entertaining treasure-hunting game for GPS users. Participating in geocaching is a good way to learn about the wonderful features and capabilities of a GPS unit. The basic idea is to set up caches of interesting items and to share the locations of these caches with others, who can then use the location coordinates and their GPS units to find them. Some important concepts and tips for success when setting up and using GPS units: • Check batteries before using the GPS unit. Batteries run down quickly in cold
temperatures. • GPS Units set their clocks and calendars from the satellite signal. Time
settings selected in the GPS menus only affect the format that the time is displayed in.
MATERIALS • GPS units – one for each student group • Geocaches – one for each student group • Copies of student directions for the lesson INSTRUCTIONAL PROCEDURES
Getting Ready Before starting this lesson with the students, you will need to create one geocache for each group of students. Three students per group is a good number, but this activity can be done with larger or smaller groups if necessary. If you are new to GPS or rusty, it is important to run through the lesson that follows before placing the caches so that at least one of your GPS units has the correct settings and you know how to mark a waypoint.
• For each cache, acquire a large resealable plastic bag (e.g., Ziploc-type)
or plastic tub. • Put objects of interest in the bag (equal to the number of students
participating in the exercise). Be creative here. Objects can be educational
www.mapteach.org Global Positioning System Lesson 1 Introduction to GPS with Geocaching
Page 127
or functional items like mini rulers or pencils, or simply fun like stickers or mini globes. For long-term caches, DO NOT use food (may attract unwanted wild geocachers). Use your judgment as a teacher. Do you really want to pass out noise-makers or yo-yos? Probably not.
• Label the bag or tub “MapTEACH” and the Cache # (1, 2, 3…). • Without the students noticing, find a hiding place for the caches. Bring all
of your GPS units with you. • Select a hiding place that is more than 25 but less than 100 yards from
where the class will start their searching. Avoid covered or heavily forested area (GPS signal will fade). Hide the cache from plain site, but don’t make this too hard. In the past we have hidden caches in tall grass, or behind a tree, or in the end of a hollow log, and that has proven sufficiently challenging.
• Write down the cache # and corresponding coordinates for each geocache. Coordinates should be noted in degrees, minutes and decimal seconds (See Explore 2: Checking and adjusting the unit settings if needed).
Gear-up • Ask students if they have ever used GPS units, or know somebody who
uses one. What are they used for? • Ask students if they know how a GPS unit works. Follow this up with a
level-appropriate explanation of how GPS units use satellites to triangulate locations.
• Tell your students that they will be using GPS units to find hidden treasure! Explain geocaching.
• Assign Student groups. • Post Student group name, assigned GPS #, geocache name, and
corresponding coordinates in the classroom. Student groups will enter coordinates for their assigned geocaches into the GPS during Activity 3.
• At the end of the activities, ask students to share their experiences working with GPS units and geocaches. What makes a good or a bad geocache? How well did the GPS units lead them to the hidden treasures? Were they able to make any connections between the number of satellites, the accuracy of the GPS location and how well it worked to find the geocache? What does this say about the limitations of GPS units? Can they think of any other ways to navigate besides using GPS units (maps, verbal instructions, landmarks, etc.)? What are the pros and cons of each method?
That’s it. There are many possible variations on this lesson. “Virtual” caches can be made in which the cache is a historical marker or a natural feature. The student must answer a question about the information in the marker or about the natural feature to get credit for the find.

Global Positioning System Lesson 1 www.mapteach.org Introduction to GPS with Geocaching
Page 128
TEACHER RESOURCES The deviation or variance from true-north to magnetic north is significant at higher latitudes (such as places in Alaska) and changes every year. GPS units will correct for this if you set them to use “true” north (Explore 2, Step 3e). If you want to discuss the difference between magnetic north and true north and its effect on traditional magnetic compasses, the following website and its associated links provide a good explanation: http://gsc.nrcan.gc.ca/geomag/field/magdec_e.php You can use this website to determine the correct current adjustment for your location (to manually enter in the settings with “user” and then “mag”): http://www.ngdc.noaa.gov/geomagmodels/Declination.jsp Converting between Decimal Degrees and Degrees/Min/Sec can be done online here: http://www.fcc.gov/mb/audio/bickel/DDDMMSS-decimal.html If you want the students to learn to make the conversion using their own math skills, a simple how-to is here: http://www.mass.gov/mgis/llcoord.htm Learn more about how GPS units work at: http://www8.garmin.com/aboutGPS/ Official “Geocaching” is a global hobby with a well established website and set of rules. You can read about it here: http://www.geocaching.com/
www.mapteach.org Global Positioning System Lesson 1 Introduction to GPS with Geocaching
Page 129
Group Name: Group GIS Number: Group Members
GPS Lesson 1
INTRODUCTION TO GPS WITH GEOCACHING STUDENT EXERCISE
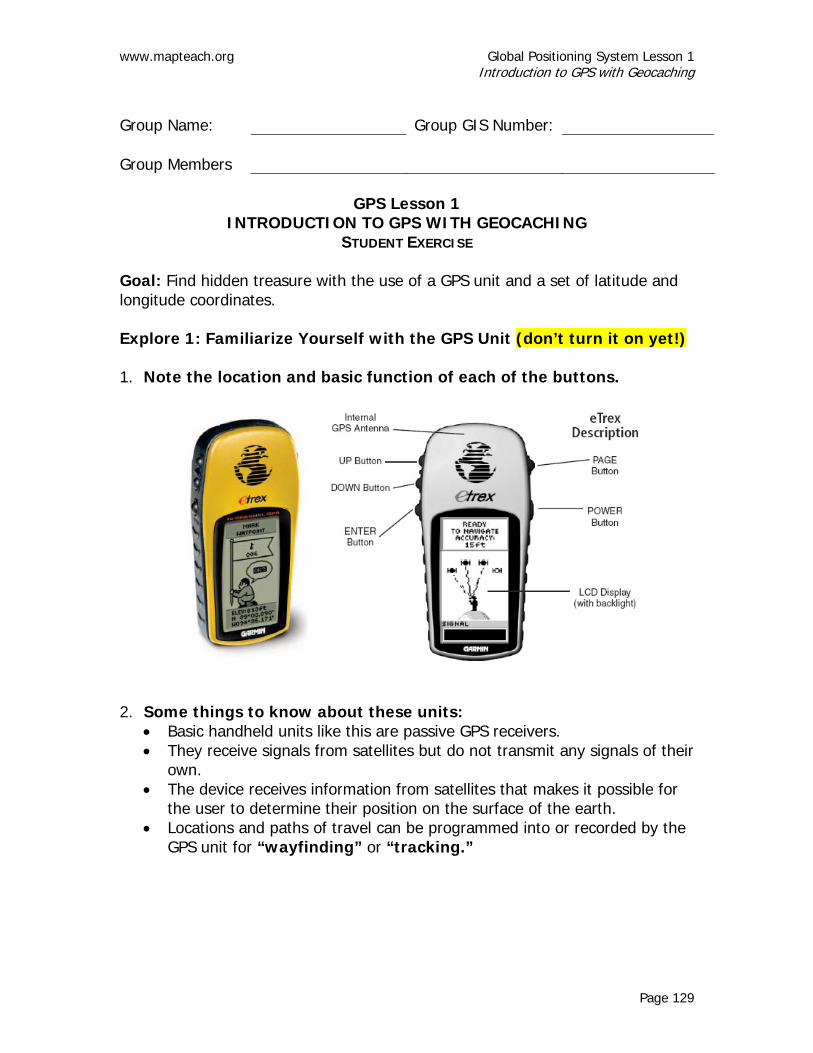
Goal: Find hidden treasure with the use of a GPS unit and a set of latitude and longitude coordinates. Explore 1: Familiarize Yourself with the GPS Unit (don’t turn it on yet!) 1. Note the location and basic function of each of the buttons.
2. Some things to know about these units:
• Basic handheld units like this are passive GPS receivers. • They receive signals from satellites but do not transmit any signals of their
own. • The device receives information from satellites that makes it possible for
the user to determine their position on the surface of the earth. • Locations and paths of travel can be programmed into or recorded by the
GPS unit for “wayfinding” or “tracking.”
Global Positioning System Lesson 1 www.mapteach.org Introduction to GPS with Geocaching
Page 130
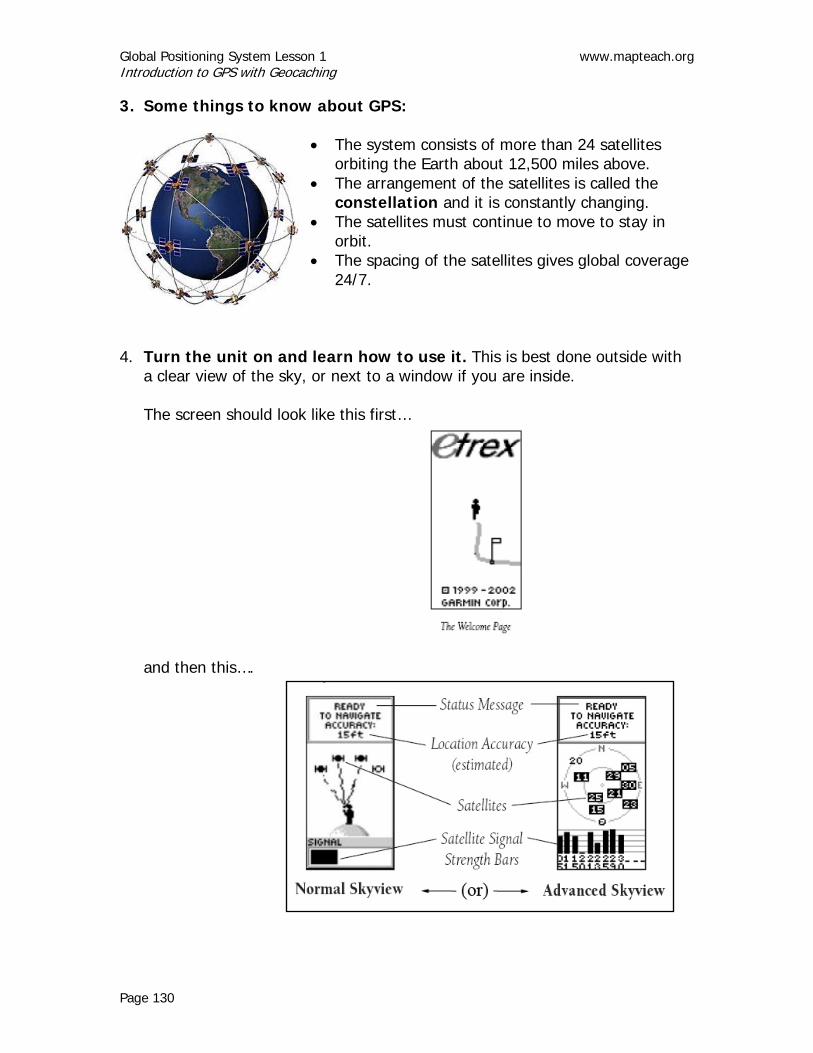
3. Some things to know about GPS: • The system consists of more than 24 satellites
orbiting the Earth about 12,500 miles above. • The arrangement of the satellites is called the
constellation and it is constantly changing. • The satellites must continue to move to stay in
orbit. • The spacing of the satellites gives global coverage
24/7.
4. Turn the unit on and learn how to use it. This is best done outside with
a clear view of the sky, or next to a window if you are inside. The screen should look like this first…
and then this….
www.mapteach.org Global Positioning System Lesson 1 Introduction to GPS with Geocaching
Page 131
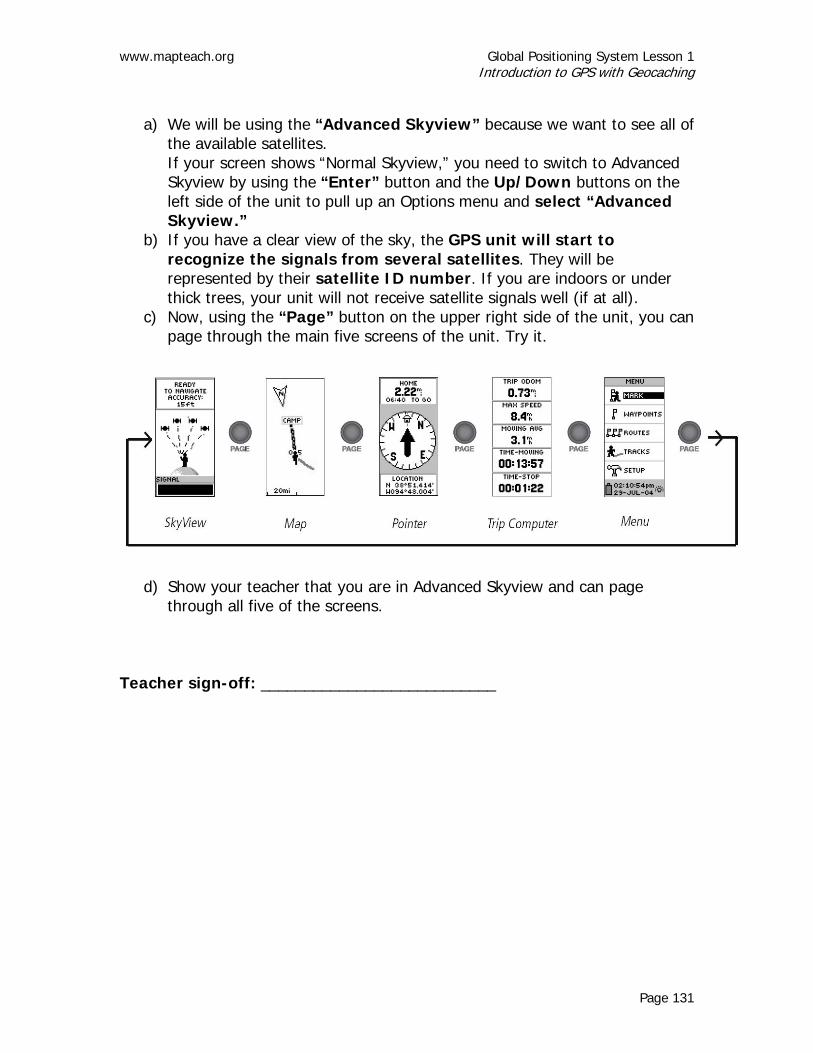
a) We will be using the “Advanced Skyview” because we want to see all of
the available satellites. If your screen shows “Normal Skyview,” you need to switch to Advanced Skyview by using the “Enter” button and the Up/Down buttons on the left side of the unit to pull up an Options menu and select “Advanced Skyview.”
b) If you have a clear view of the sky, the GPS unit will start to recognize the signals from several satellites. They will be represented by their satellite ID number. If you are indoors or under thick trees, your unit will not receive satellite signals well (if at all).
c) Now, using the “Page” button on the upper right side of the unit, you can page through the main five screens of the unit. Try it.
d) Show your teacher that you are in Advanced Skyview and can page
through all five of the screens.
Teacher sign-off: ___________________________
Global Positioning System Lesson 1 www.mapteach.org Introduction to GPS with Geocaching
Page 132
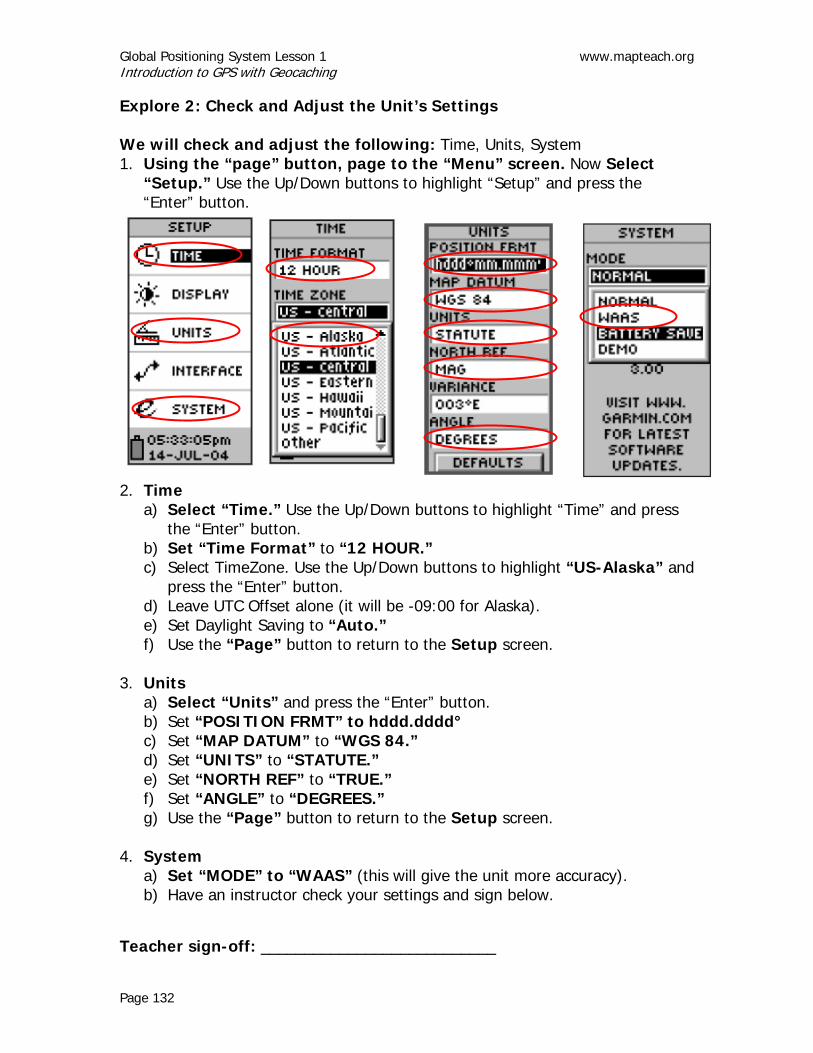
Explore 2: Check and Adjust the Unit’s Settings We will check and adjust the following: Time, Units, System 1. Using the “page” button, page to the “Menu” screen. Now Select
“Setup.” Use the Up/Down buttons to highlight “Setup” and press the “Enter” button.
2. Time
a) Select “Time.” Use the Up/Down buttons to highlight “Time” and press the “Enter” button.
b) Set “Time Format” to “12 HOUR.” c) Select TimeZone. Use the Up/Down buttons to highlight “US-Alaska” and
press the “Enter” button. d) Leave UTC Offset alone (it will be -09:00 for Alaska). e) Set Daylight Saving to “Auto.” f) Use the “Page” button to return to the Setup screen.
3. Units
a) Select “Units” and press the “Enter” button. b) Set “POSITION FRMT” to hddd.dddd° c) Set “MAP DATUM” to “WGS 84.” d) Set “UNITS” to “STATUTE.” e) Set “NORTH REF” to “TRUE.” f) Set “ANGLE” to “DEGREES.” g) Use the “Page” button to return to the Setup screen.
4. System
a) Set “MODE” to “WAAS” (this will give the unit more accuracy). b) Have an instructor check your settings and sign below.
Teacher sign-off: ___________________________
www.mapteach.org Global Positioning System Lesson 1 Introduction to GPS with Geocaching
Page 133
Explore 3: Enter a Waypoint (the geocache location)
Assigned coordinates: Waypoint name: ______________________________________
Latitude: N ______________________________________
Longitude: W ______________________________________
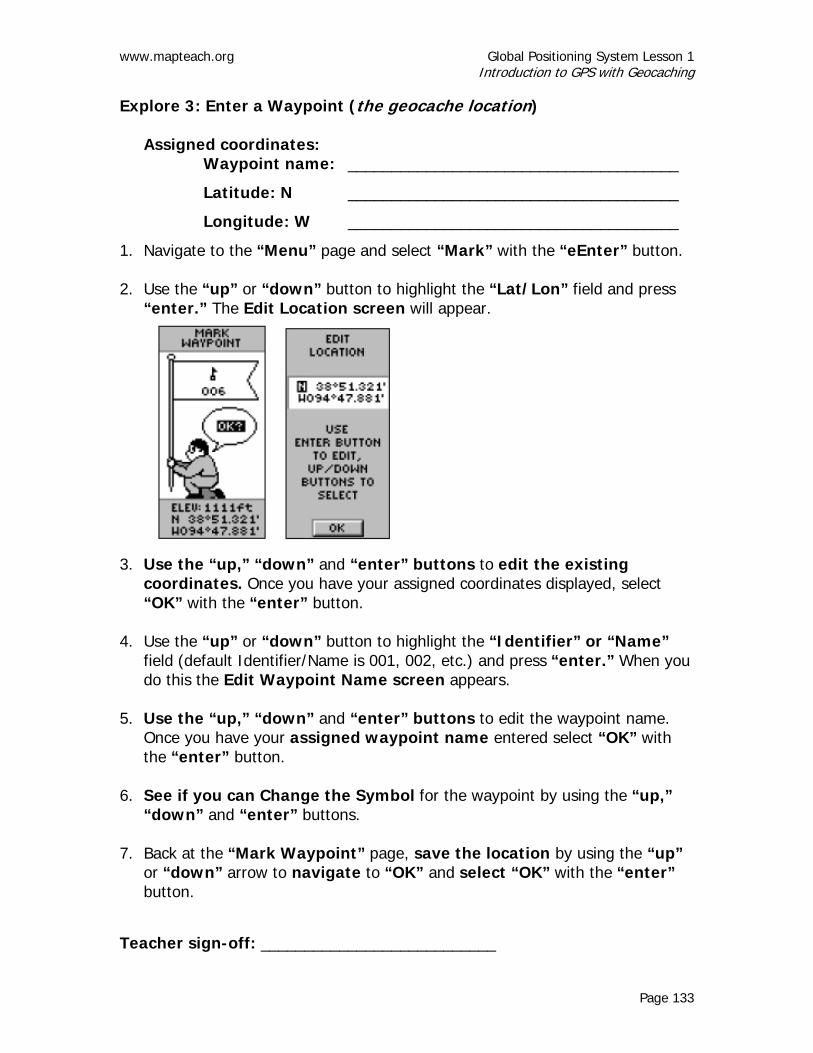
1. Navigate to the “Menu” page and select “Mark” with the “eEnter” button.
2. Use the “up” or “down” button to highlight the “Lat/Lon” field and press “enter.” The Edit Location screen will appear.
3. Use the “up,” “down” and “enter” buttons to edit the existing
coordinates. Once you have your assigned coordinates displayed, select “OK” with the “enter” button.
4. Use the “up” or “down” button to highlight the “Identifier” or “Name” field (default Identifier/Name is 001, 002, etc.) and press “enter.” When you do this the Edit Waypoint Name screen appears.
5. Use the “up,” “down” and “enter” buttons to edit the waypoint name. Once you have your assigned waypoint name entered select “OK” with the “enter” button.
6. See if you can Change the Symbol for the waypoint by using the “up,” “down” and “enter” buttons.
7. Back at the “Mark Waypoint” page, save the location by using the “up” or “down” arrow to navigate to “OK” and select “OK” with the “enter” button.
Teacher sign-off: ___________________________
Global Positioning System Lesson 1 www.mapteach.org Introduction to GPS with Geocaching
Page 134
Explore 4: Finding a Geocache (Outside Activity) 1. Getting Started
a) On the teacher’s instructions, go outside and turn on the GPS unit. b) Make sure you have a clear view of the sky. c) Wait for the GPS unit to acquire enough satellite signals (3-4) to
establish a location. On the “Skyview” page, the unit will note “Ready to Navigate” (this may take a few minutes).
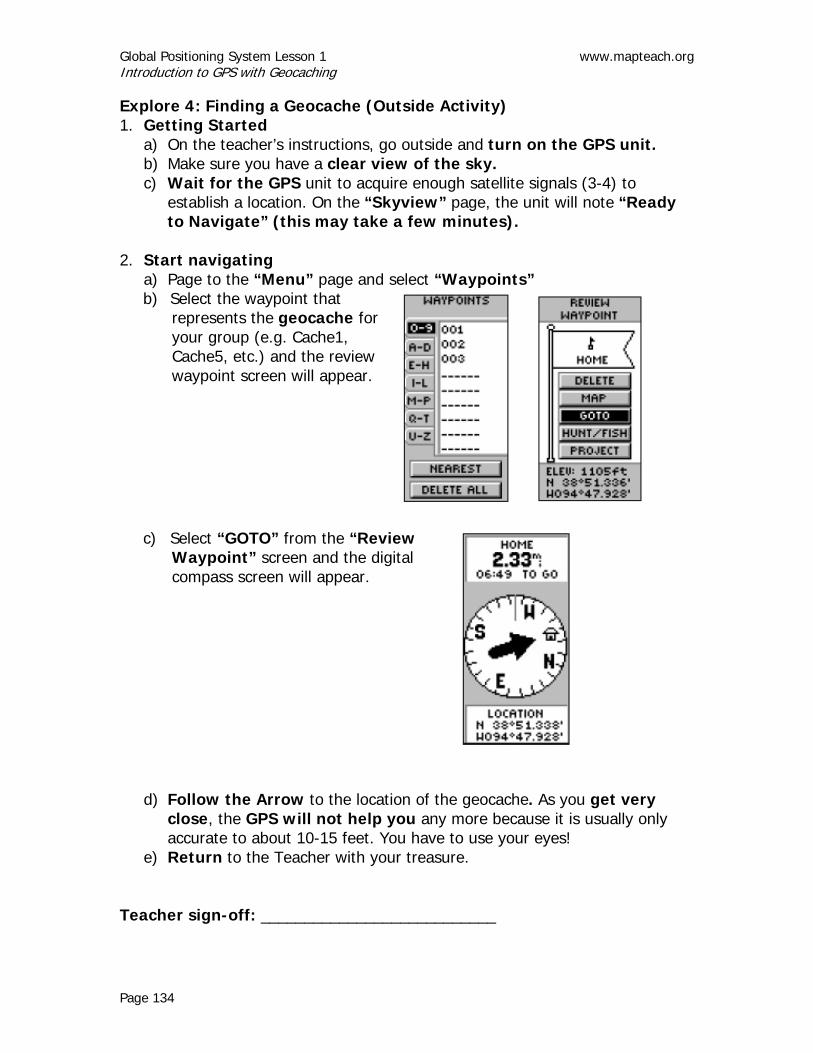
2. Start navigating a) Page to the “Menu” page and select “Waypoints” b) Select the waypoint that
represents the geocache for your group (e.g. Cache1, Cache5, etc.) and the review waypoint screen will appear.
c) Select “GOTO” from the “Review Waypoint” screen and the digital compass screen will appear.
d) Follow the Arrow to the location of the geocache. As you get very
close, the GPS will not help you any more because it is usually only accurate to about 10-15 feet. You have to use your eyes!
e) Return to the Teacher with your treasure. Teacher sign-off: ___________________________
www.mapteach.org Global Positioning System Lesson 1 Introduction to GPS with Geocaching
Page 135
Explore 5: (Optional) Make a Geocache Using your new GPS skills, plan and hide a geocache of your own! 1. Name the geocache (6 characters maximum)
Geocache Name:_____________________________________________ 2. Choose items to hide 3. Put items and an identifying label in the container (include the name
of the cache) 4. Choose a place to hide the cache
a) don’t make it too hard or it takes too long to find b) a portion of the container must be visible c) the cache cannot be buried
5. Mark the location of the geocache and enter the geocache name in
the GPS 6. Go to the classroom 7. Give the GPS unit to the teacher
Teacher sign-off: ___________________________ (make sure there is a valid waypoint for the geocache) 8. The instructor will give your group a GPS unit prepared by another group of
students and the name of the Geocache that you will look for. Geocache Name:_____________________________________________ 9. Using the skills you learned during Activity 4, see if your group can find
the geocache. Take your “treasure” to the classroom.
10. Return the GPS to the instructor.
Teacher sign-off: ___________________________


www.mapteach.org Global Positioning System Lesson 2 Field Data Collection for GPS Data and Digital Photo Documentation
Page 137
GPS Lesson 2 FIELD DATA COLLECTION FOR GPS DATA AND
DIGITAL PHOTO DOCUMENTATION TEACHER INFORMATION
Lesson Summary: During this lesson students will go on a field trip to collect geospatial data and other useful information to document sites of interest they encounter.
Objectives: In this lesson students learn to take field notes, take digital
photos, and mark the location of their photos with GPS waypoints
Estimated Time: 1 hour or more Correlation to Alaska Standards: Geography A-6 Use spatial (geographic) tools and technologies to analyze
and develop explanations and solutions to geographic problems.
Technology A Operate technology-based tools. INSTRUCTIONS FOR THE TEACHER Choose a field trip location or route that is of interest to your students and includes several notable features to document. These features or sites should be at least a few hundred feet away from each other so the GPS points the students collect have good geospatial separation if they are going to use the data to make AEJEE maps. If the sites are too close together the points will clump up in a very small area and the resulting maps will not be as rewarding. Before starting this lesson, students must have completed the “Introduction to GPS with Geocaching” lesson or equivalent.

Global Positioning System Lesson 2 www.mapteach.org Field Data Collection for GPS Data and Digital Photo Documentation
Page 138
Getting Ready Make sure the GPS units and cameras are ready by: • Checking batteries on both GPS Units and Cameras • Clearing memory cards (of the cameras) • Clearing waypoints and track logs from the GPS units • Checking time/date setting on the cameras • Making sure the cameras and GPS units are labeled
Gear-up • Give the students a sense of what their objective is in terms of the
photography. Are they looking for physical landscape features? Cultural landscape features? Landmarks? Points of interest?
• Make sure the students pass the worksheet, camera, and GPS unit around in their group so that each has an opportunity to work with the technology and the note taking.
www.mapteach.org Global Positioning System Lesson 2 Field Data Collection for GPS Data and Digital Photo Documentation
Page 139
Group Name: Group GIS Number: Group Members
Date:
Camera Number:
Observation Sheet
Field Data Collection Sheet for GPS Data and Digital Photo Documentation Student expectations: Your work will be graded based on attitude, neatness, completeness, photo quality, and description quality. Data collection procedure: Select one group member to do each of the following tasks (members will switch tasks for each site visited): Recorder, GPS Operator, Photographer. When we arrive at each field site: 1. The Group assigns a one or two word site name that will be used to label
the site on maps.
2. The Recorder writes down the site name.
3. The Group decides how they want to describe the site.
4. The Recorder writes the description on the Observation Sheet.
5. The GPS Operator makes sure that they are getting a good GPS reading (at least 60 ft. GPS accuracy).
6. The GPS Operator marks a waypoint and relays GPS information to the recorder.
7. The Recorder writes the waypoint number and GPS accuracy on the Observation Sheet.
8. The Photographer takes one photo and the Recorder writes the Photographer’s name on the Observation Sheet.
9. Group members switch data collection tools and tasks.


www.mapteach.org Global Positioning System Lesson 2 Field Data Collection for GPS Data and Digital Photo Documentation
Page 141
Photo 1 Photographer:
GPS Operator: GPS accuracy: feet Waypoint: Site Name: Description:
Photo 2 Photographer:
GPS Operator: GPS accuracy: feet Waypoint: Site Name: Description:
Photo 3 Photographer:
GPS Operator: GPS accuracy: feet Waypoint: Site Name: Description:

Global Positioning System Lesson 2 www.mapteach.org Field Data Collection for GPS Data and Digital Photo Documentation
Page 142
Photo 4 Photographer:
GPS Operator: GPS accuracy: feet Waypoint: Site Name: Description:
Photo 5 Photographer:
GPS Operator: GPS accuracy: feet Waypoint: Site Name: Description:
Photo 6 Photographer:
GPS Operator: GPS accuracy: feet Waypoint: Site Name: Description:

www.mapteach.org Global Positioning System Lesson 2 Field Data Collection for GPS Data and Digital Photo Documentation
Page 143
Photo 7 Photographer:
GPS Operator: GPS accuracy: feet Waypoint: Site Name: Description:
Photo 8 Photographer:
GPS Operator: GPS accuracy: feet Waypoint: Site Name: Description:
Photo 9 Photographer:
GPS Operator: GPS accuracy: feet Waypoint: Site Name: Description:
Global Positioning System Lesson 2 www.mapteach.org Field Data Collection for GPS Data and Digital Photo Documentation
Page 144
Photo 10 Photographer:
GPS Operator: GPS accuracy: feet Waypoint: Site Name: Description:
Photo 11 Photographer:
GPS Operator: GPS accuracy: feet Waypoint: Site Name: Description:
Photo 12 Photographer:
GPS Operator: GPS accuracy: feet Waypoint: Site Name: Description:

www.mapteach.org Global Positioning System Lesson 3 Using Your Own Field Trip Data
Page 145
GPS Lesson 3 USING YOUR OWN FIELD TRIP DATA
TEACHER INFORMATION
Lesson Summary: During this lesson students will make GIS maps using data
they have collected on a local field trip with their GPS units and digital cameras. They will download photos they took with their cameras, and will use the computer program GPSBabel to download their GPS waypoints into a CSV file. They will modify their CSV files to include an informative name for the sites they documented with their waypoints. Students will then generate points from this CSV file in AEJEE and make a map of their sites that includes photos they took on their field trip.
Objectives: Students will learn to download photos from their digital
cameras and waypoint data from their GPS units and to make a map using these data in AEJEE. (It is assumed that students have completed GIS lesson 1 "Many Layers Make a Map," GIS lesson 2 "Introduction to GIS using AEJEE" and, optionally, GIS lesson 10 "Good Map, Bad Map.")
Estimated Time: 1 hour Correlation to Alaska Standards: Geography A-6 Use spatial (geographic) tools and technologies to analyze
and develop explanations and solutions to geographic problems.
Technology A-1 Use a computer to enter and retrieve information. BACKGROUND FOR THE TEACHER This lesson teaches students how to prepare site observations from an earlier field trip for inclusion in an AEJEE GIS map. For each site on the field trip, the student(s) need to have marked a GPS waypoint, taken a digital picture, and written down notes that will help label and explain what they observed. A GPS field trip lesson with field data sheets is also included in the MapTEACH curriculum.
Global Positioning System Lesson 3 www.mapteach.org Using Your Own Field Trip Data
Page 146
The best data is the students’ own data, and students are very excited to see their own observations and pictures attached to an AEJEE map. If time or weather issues preclude students being able to make their own field trip observations, you may opt to go out yourself and make observations at a handful of sites along a road, trail or near the school, and then share the pictures and GPS unit with students so they can download and prepare the data. At the end of the lesson, you might ask the students for ideas about other field trips that could be documented this way and shared on maps that would be interesting to the local community. Some important concepts and tips for success: • Please review the information provided on CSV files and layouts that appears
in previous lessons. • Make sure the GPS unit is plugged into the computer and turned on before
opening GPSBabel, or the proper port won’t show up in the drop-down menu. • Photos placed in an AEJEE layout will default to a square shape. Resizing the
photo using the corners of the square will stretch or squash the image, so students should be observant of what their photos look like in their final layouts.
• This is a long lesson with multiple steps. Consider splitting it into two or more sessions if you have limited computer time. A good way to split this lesson is to have students work through Explore 3 (Add Waypoints to Your AEJEE Map), then do the Field Trip layout as a separate session.
• Layouts in AEJEE must be done in a single session! Do not let students begin working on a layout if they do not have enough time to finish it to your satisfaction, or their work will be lost.
• Symbology and labels should be exactly the way the student wants them before switching to Layout View in AEJEE. Changing the symbology and labels after entering layout view can cause problems.
• Do not switch back and forth between Layout View and Map View. Once you are in Layout View, stay there.
• Students should not change the scale of their map document after they enter Layout View in AEJEE. Redraw times are very long if the scale is changed, and it is much better to leave the document at the default scale.
• If the student is having trouble selecting a map element (scale bar, north arrow, text, etc.) that is on top of the map data frame, have them click on the white space around the map, then click on the map data frame, and then move the data frame out of the way. The map element can then be selected and moved off to the side. The map data frame can then be selected and moved back into place, and the map element can be selected and placed where the student wants it to be.

www.mapteach.org Global Positioning System Lesson 3 Using Your Own Field Trip Data
Page 147
• If the student moves a map element too far off to the side of the layout page, AEJEE may not be able to select the element. If the map element is far off to the side and the student is unable to select it, use the “Fixed zoom out” tool to expand the view of the layout page. You can then select the out-of-bounds map element and move it back into the work area. Then use the “Fixed zoom in” tool to return to the original view of the page.
• Keep in mind the general guidelines for cartography and working with map
layouts in AEJEE: o Map should have a clearly defined subject, ortheme – a purpose for the
map, or the story that the map is meant to tell o Map should include data points that are symbolized and labeled so they
are legible and informative Symbol sizes and colors should show up well on the base layer and
shouldn’t interfere with each other Label text should be a legible font style, color, and size, and show up
well on the base layer Important Tip: When working in AEJEE layouts, make text and
symbols for points much bigger than you think they should be; they end up looking smaller in the final printed map
o Map area should be zoomed in on the selected data points and whatever other features that should be included on the map
o Map balance o Elements should be placed on the page so there is an even distribution of
elements covering the page and there isn’t a lot of white space o Fonts for text and titles should be carefully selected
Fonts should be chosen that are easy-to-read, attractive, and fit the theme of the map
Try to limit font selection to no more than two fonts; this helps the map look more uniform and professional
The title is usually the largest font size on the map MATERIALS • Computers - one for each student is best or two students can share. The
computers must meet the following specifications to run AEJEE: o Macintosh: MacOS 10.3 or above, 100 MB hard drive space, Internet
connection; recommend G4 or faster processor and more than 64 MB RAM
Then use “Fixed zoom in” to return the layout page to the original view
First, use “Fixed zoom out” to expand the view, then select the map element and move it
Global Positioning System Lesson 3 www.mapteach.org Using Your Own Field Trip Data
Page 148
o Windows: Win2000 or WinXP, 100 MB hard drive space, Internet connection; recommend Pentium III or faster processor and more than 64 MB RAM
• AEJEE software can be provided by MapTEACH on a CD delivered to you, or you can download the correct version from our website at http://www.mapteach.org• MapTEACH GIS data also can be sent on a CD or downloaded from our website at http://www.mapteach.org • GPSBabel software to download and convert the GPS waypoint data can be provided on a CD or downloaded from our website at http://www.mapteach.org or downloaded at http://www.gpsbabel.org• Digital cameras containing photos of the field trip sites, and camera download
cables • GPS units with waypoints of the field trip sites, and GPS download cables
(with USB serial adaptors, if needed) • Field trip data sheets with information about the sites and photos. • Copies of student directions for the lesson INSTRUCTIONAL PROCEDURES
Before Class • At the minimum, have a single GPS unit prepared with a handful of
waypoints, so that each waypoint matches the location of a single site, a digital photo, and a record of observation(s) for the site. All students can then download data from this one shared GPS unit.
• Ideally, students have records from a recent field trip where groups of students were able to visit sites of interest, and at each site collect their own digital photo, GPS waypoint, and observation notes. In this case, students also need to keep careful track of which camera and which GPS unit they used.
• Check, update and/or maintain all student equipment including computers so everything works as smoothly as possible.
• Prepare materials for the lesson and try out all the activities well in advance before the students work through them.
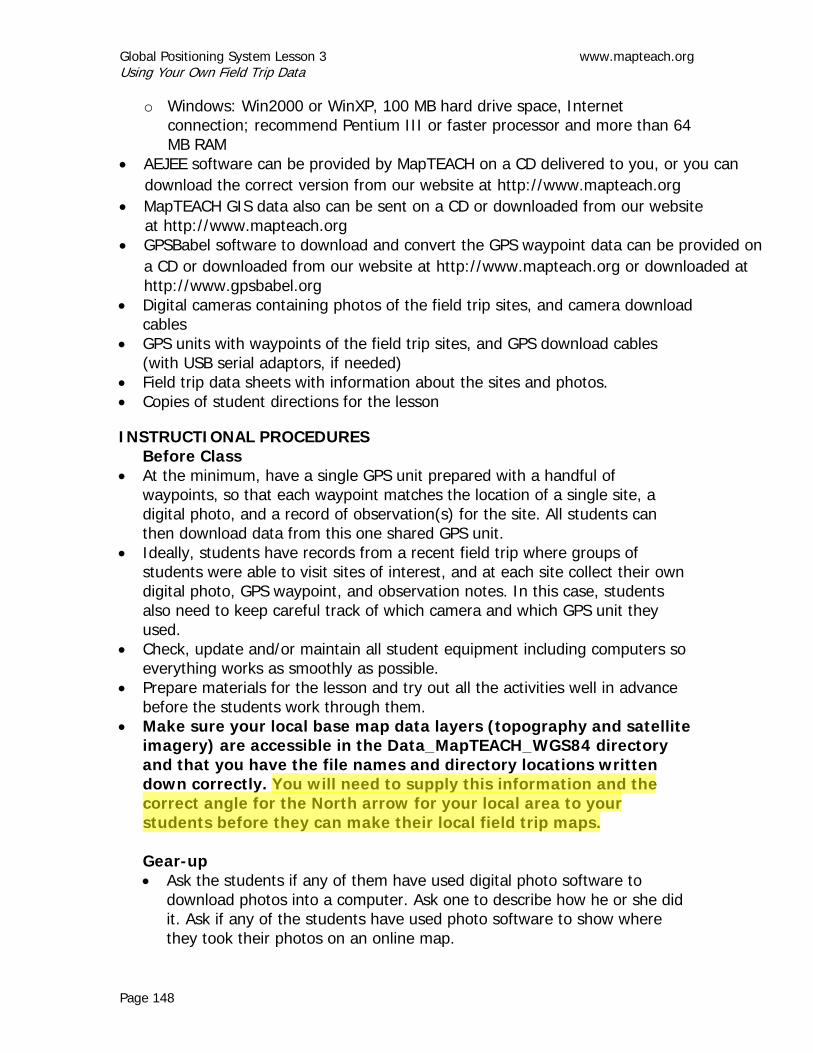
• Make sure your local base map data layers (topography and satellite imagery) are accessible in the Data_MapTEACH_WGS84 directory and that you have the file names and directory locations written down correctly. You will need to supply this information and the correct angle for the North arrow for your local area to your students before they can make their local field trip maps. Gear-up • Ask the students if any of them have used digital photo software to
download photos into a computer. Ask one to describe how he or she did it. Ask if any of the students have used photo software to show where they took their photos on an online map.
www.mapteach.org Global Positioning System Lesson 3 Using Your Own Field Trip Data
Page 149
• Explain that in this lesson they will download photos, locate the sites where the photos were taken using GPS waypoints, and then add information to each record so this can all be included in a GIS map they will make using AEJEE.
• Write on the board or pass out as handouts the angle for the North arrow, the names of the image files for your local topography and satellite imagery, and which data folder(s) those image files are located in. Your students will need this information to load the base map data for their local field trip maps.
• If students are going to work on layouts in the current session, emphasize to them that they should keep in mind the general guidelines for cartography and working with map layouts in AEJEE. These guidelines are listed in the student lesson. Make sure they know that layouts need to be completed in a single computer session because they can not be reliably saved and reopened later. The only permanent record of their final map will be the JPG file they generate from their layout.
MORE EXPLORATION Look up geotagged photos on Flickr at http://www.flickr.com/ What might be the advantages and disadvantages of using a mapping service like this as compared to how you might use AEJEE GIS maps? TEACHER RESOURCES Specific instructions on creating CSV files with Macs and PCs to make point shapefiles and hotlinks can be found in ESRI’s “Introduction to ArcExplorer—Java Edition for Education” for AEJEE 2.3 available as an Adobe Acrobat PDF: http://www.esri.com/software/arcexplorer/download.html Wikipedia provides information about Comma-Separated Values (CSV) files at: http://en.wikipedia.org/wiki/Comma-separated_values Cooke, Donald (2005). Fun with GPS, ESRI Press, Redlands, CA TEACHER REFERENCES ESRI’s “Introduction to ArcExplorer—Java Edition for Education” available as an Adobe Acrobat PDF: http://www.esri.com/software/arcexplorer/download.html GPSBabel converts waypoints, tracks, and routes collected using GPS from one format to another (including CSV files) and runs on multiple computer platforms http://www.gpsbabel.org/


www.mapteach.org Global Positioning System Lesson 3 Using Your Own Field Trip Data
Page 151
Name: ____________________
GPS Lesson 3 USING YOUR OWN FIELD TRIP DATA
STUDENT EXERCISE
Objectives: Students will learn to download photos from their digital cameras and waypoint data from their GPS units and to make a map using these data in AEJEE.
Estimated Time: 1 hour Explore 1: Downloading Trip Data on a Macintosh First, download your field trip photos from your camera into your MapTEACH_Work directory. 1. Connect your camera to your computer using the cable provided.
2. If the camera does not start communicating with the computer on its own,
press the “OK” button on the camera.
3. Close iPhoto if it automatically pops up.
4. Open the camera folder that is now on your desktop and navigate through the DCIM folder until you get down to the photos (.jpg extension).
5. Drag and drop the photos into your MapTEACH_Work folder.
6. When you are finished copying your photos, drag and drop the icon for the camera into the Trash/Eject area of your screen, disconnect the camera, and pass it and the cable to the next person in your group.

Global Positioning System Lesson 3 www.mapteach.org Using Your Own Field Trip Data
Page 152
Now, download your GPS waypoints from your GPS into your MapTEACH_Work directory. 1. Connect the cable to your GPS unit and plug it into a USB port on
your Macintosh.
2. Turn on the GPS unit, then Start GPSBabel. You can launch it from the dock on your computer or from its icon on the desktop.

www.mapteach.org Global Positioning System Lesson 3 Using Your Own Field Trip Data
Page 153
3. In the Quick GPSBabel window:
• For the Operating Mode: Check “Waypoints.” • For the Input Options: Check “Use GPS receiver” and select
“Garmin” from the “Type” drop-down menu and the item beginning with “USA” from the “Port” drop-down menu.
• For the Output Options: Check “Use file” and select “Universal csv with field structure in first line” for the Type drop-down menu.
Global Positioning System Lesson 3 www.mapteach.org Using Your Own Field Trip Data
Page 154
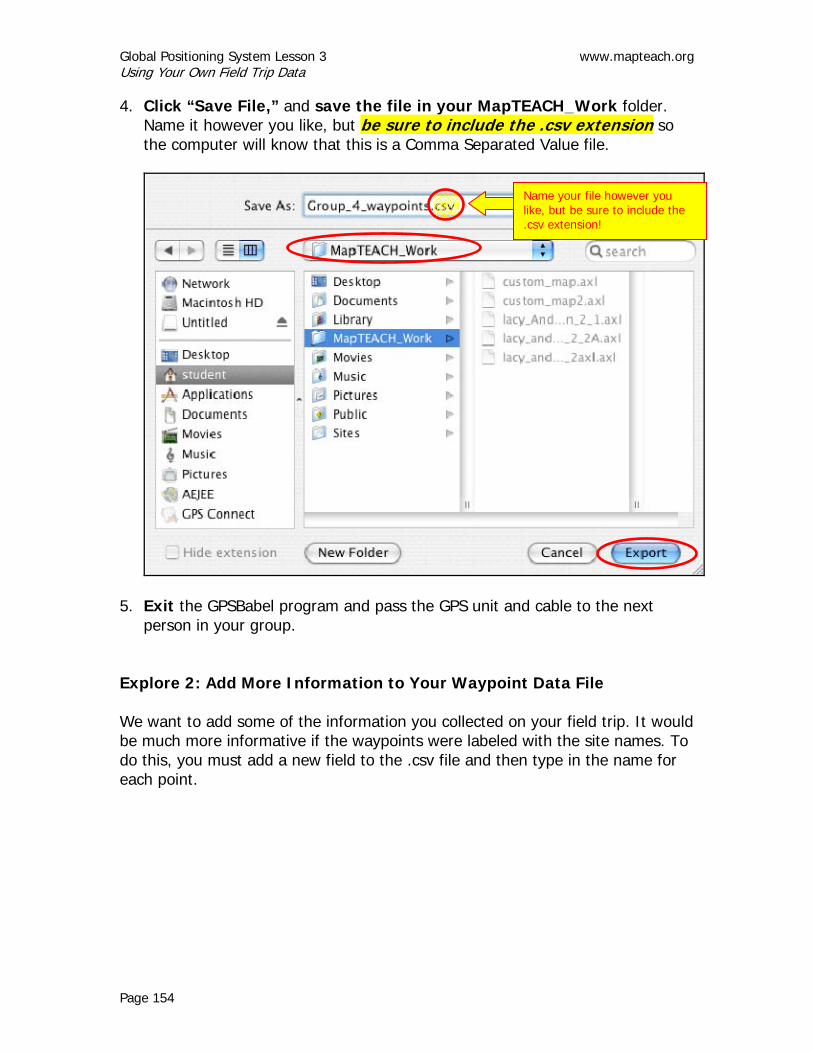
4. Click “Save File,” and save the file in your MapTEACH_Work folder. Name it however you like, but be sure to include the .csv extension so the computer will know that this is a Comma Separated Value file.
5. Exit the GPSBabel program and pass the GPS unit and cable to the next
person in your group. Explore 2: Add More Information to Your Waypoint Data File We want to add some of the information you collected on your field trip. It would be much more informative if the waypoints were labeled with the site names. To do this, you must add a new field to the .csv file and then type in the name for each point.
Name your file however you like, but be sure to include the .csv extension!
www.mapteach.org Global Positioning System Lesson 3 Using Your Own Field Trip Data
Page 155
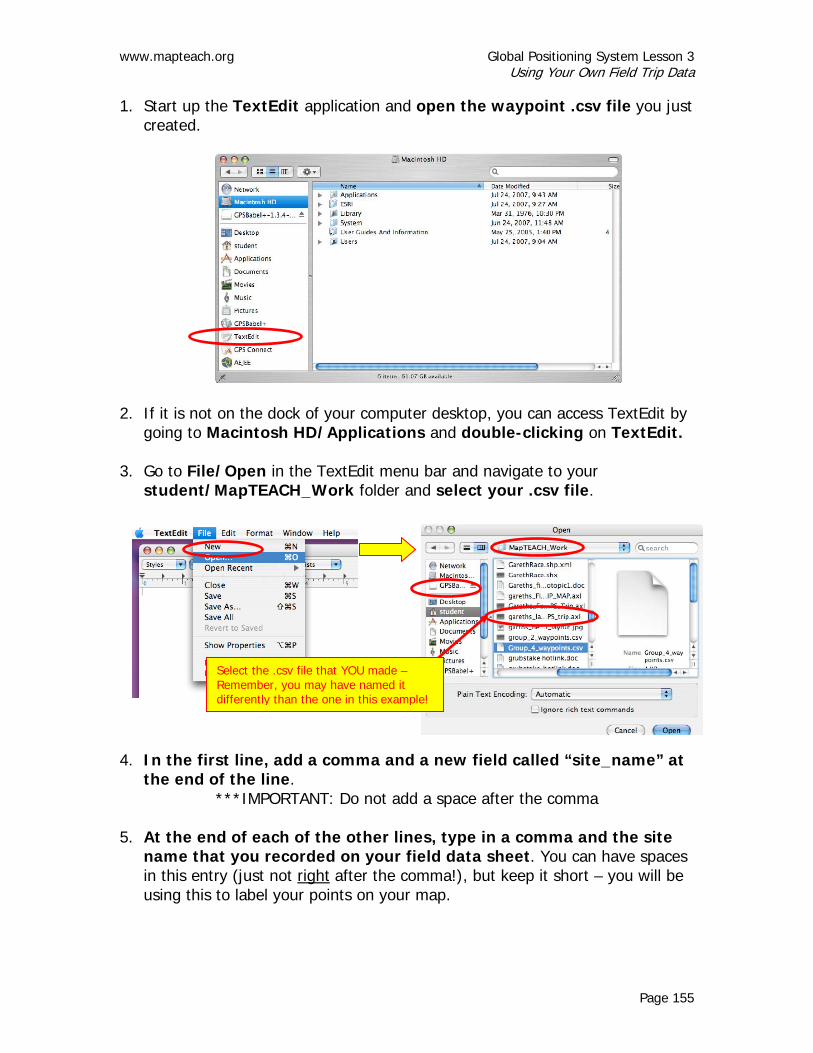
1. Start up the TextEdit application and open the waypoint .csv file you just created.
2. If it is not on the dock of your computer desktop, you can access TextEdit by going to Macintosh HD/Applications and double-clicking on TextEdit.
3. Go to File/Open in the TextEdit menu bar and navigate to your student/MapTEACH_Work folder and select your .csv file.
4. In the first line, add a comma and a new field called “site_name” at
the end of the line. ***IMPORTANT: Do not add a space after the comma
5. At the end of each of the other lines, type in a comma and the site
name that you recorded on your field data sheet. You can have spaces in this entry (just not right after the comma!), but keep it short – you will be using this to label your points on your map.
Select the .csv file that YOU made – Remember, you may have named it differently than the one in this example!

Global Positioning System Lesson 3 www.mapteach.org Using Your Own Field Trip Data
Page 156
Your file may look something like this:
6. Use Save As and save this file in your MapTEACH_Work folder. Name it however you like, but be sure to include the .csv extension so the computer will know that this is a Comma Separated Values file.
Show your .csv file to your teacher. Teacher sign-off: ___________________________ (Check for errors and confirm that the student’s site names are included)
Add a comma and site_name to the end of the first line
At the end of each line, add a comma and the name you gave each of your waypoints
Name your file however you like, but be sure to include the .csv extension!

www.mapteach.org Global Positioning System Lesson 3 Using Your Own Field Trip Data
Page 157
Explore 3: Add Waypoints to Your AEJEE Map 1. Open AEJEE and start a new map. 2. Navigate to the folder /ESRI/AEJEE/Data_MapTEACH_WGS84. 3. Add Coastline_Simple from the Base_Data folder. 4. Set your projection to Regional Projections/Albers Equal Area
(Ellipsoid) and select Alaska. Set your datum to WGS84 (World Geod. Sys. 1984).
5. Add Towns from the Infrastructure folder. 6. Label the Towns using Name. 7. Zoom in on your town so it is in the middle of the screen. Use the Zoom to
Scale tool to zoom-in to a scale of 1:100000.

Global Positioning System Lesson 3 www.mapteach.org Using Your Own Field Trip Data
Page 158
Your map might look something like this:
8. Save your map project:
• Click on “File” in the Menu Bar • Select “Save As” • Navigate to the student/MapTEACH_Work folder • Name the project using your name followed by “FieldTrip”:
firstname_FieldTrip
Use your own name
www.mapteach.org Global Positioning System Lesson 3 Using Your Own Field Trip Data
Page 159
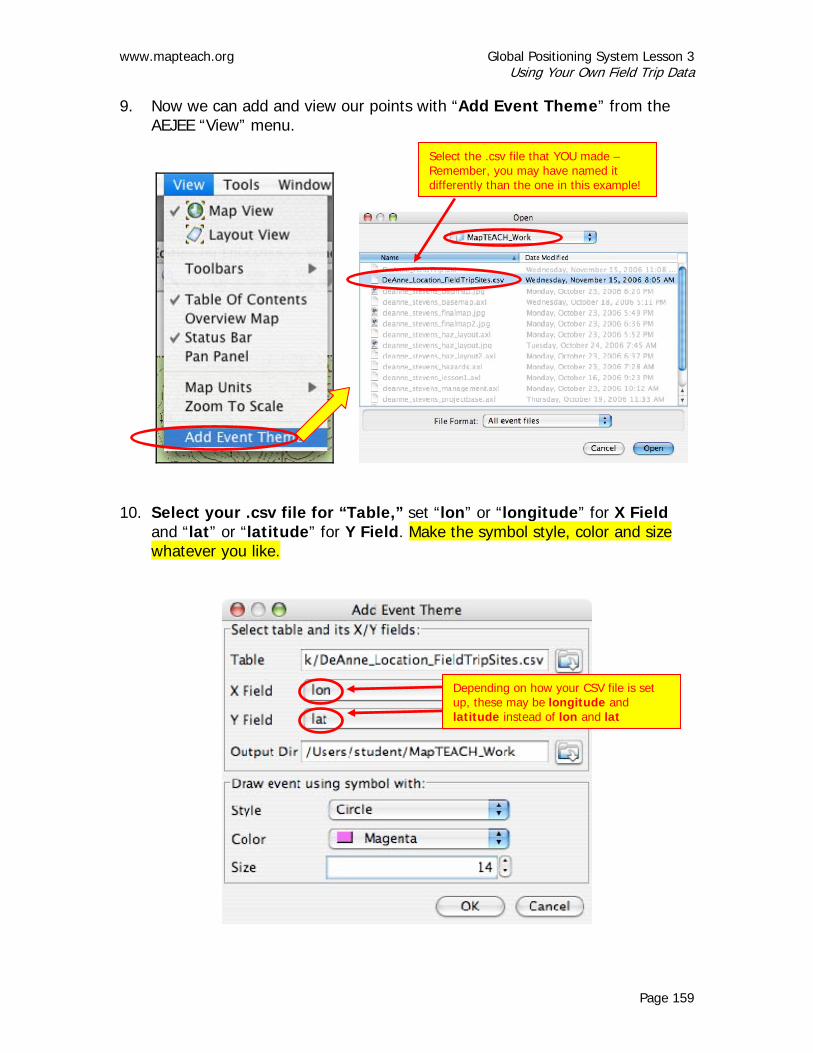
9. Now we can add and view our points with “Add Event Theme” from the AEJEE “View” menu.
10. Select your .csv file for “Table,” set “lon” or “longitude” for X Field
and “lat” or “latitude” for Y Field. Make the symbol style, color and size whatever you like.
Select the .csv file that YOU made – Remember, you may have named it differently than the one in this example!
Depending on how your CSV file is set up, these may be longitude and latitude instead of lon and lat

Global Positioning System Lesson 3 www.mapteach.org Using Your Own Field Trip Data
Page 160
11. You can now label your points with their “site_name” by using the
layer properties (Control-Click layer name). Make the labels look the way you want.
Your result might look something like this:
12. Turn off Coastline_Simple. 13. Add layers for your local topography and satellite imagery. Your
teacher will provide the file names and directory locations for these data layers. See how your map looks with different satellite imagery as a background and how it looks with the topographic map as a background by checking and unchecking the boxes next to the names of the raster data layers.
14. Pick the base layer (topographic map or a satellite image) you like
best and leave it turned on. Turn off or remove the raster data layers you are not using.
15. Zoom in and out to see what view looks best.

www.mapteach.org Global Positioning System Lesson 3 Using Your Own Field Trip Data
Page 161
16. Symbolize your points and text the way you like them. Make sure that your points and text are large enough so you are able to read them easily.
Your map might look something like this: Save your project and have a teacher sign off. Teacher sign-off: ___________________________ (Check that student has selected appropriate base map and symbology) If your lab session is almost over, you may need to complete the next section in
another lab session.
***ASK YOUR TEACHER IF YOU SHOULD CONTINUE***
Remember that you cannot save layouts, so make sure you have enough time to do a complete layout before you begin.
Global Positioning System Lesson 3 www.mapteach.org Using Your Own Field Trip Data
Page 162
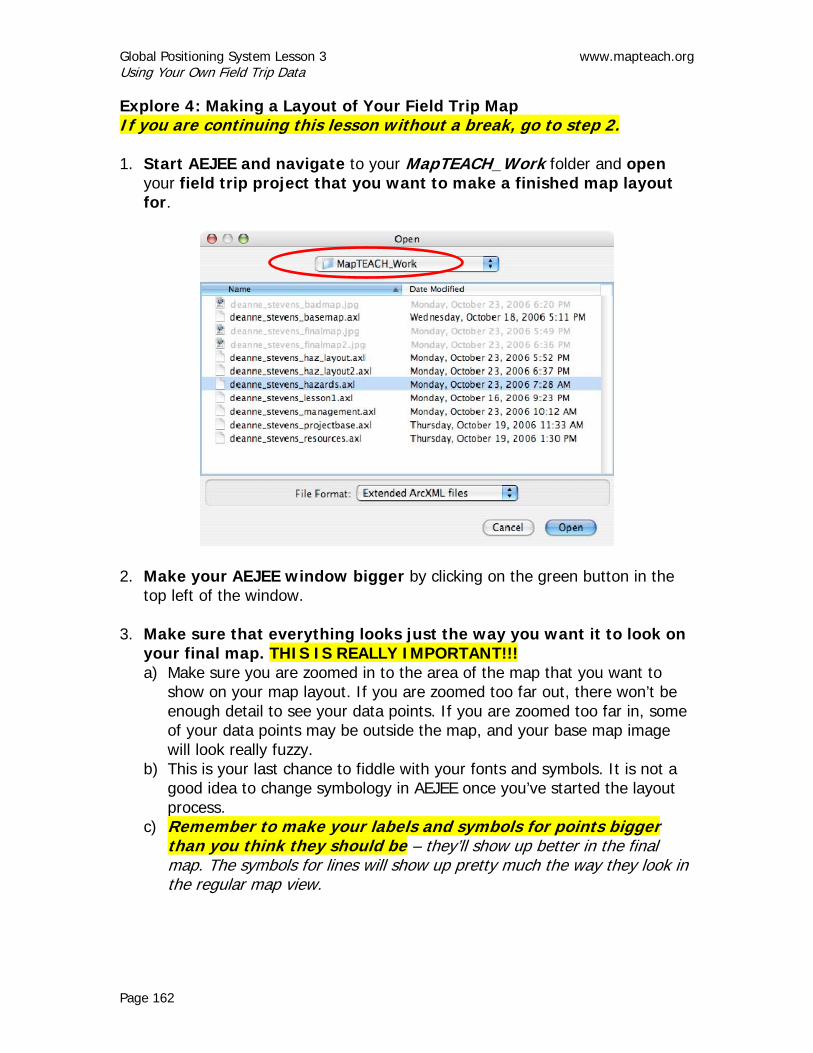
Explore 4: Making a Layout of Your Field Trip Map If you are continuing this lesson without a break, go to step 2. 1. Start AEJEE and navigate to your MapTEACH_Work folder and open
your field trip project that you want to make a finished map layout for.
2. Make your AEJEE window bigger by clicking on the green button in the
top left of the window. 3. Make sure that everything looks just the way you want it to look on
your final map. THIS IS REALLY IMPORTANT!!! a) Make sure you are zoomed in to the area of the map that you want to
show on your map layout. If you are zoomed too far out, there won’t be enough detail to see your data points. If you are zoomed too far in, some of your data points may be outside the map, and your base map image will look really fuzzy.
b) This is your last chance to fiddle with your fonts and symbols. It is not a good idea to change symbology in AEJEE once you’ve started the layout process.
c) Remember to make your labels and symbols for points bigger than you think they should be – they’ll show up better in the final map. The symbols for lines will show up pretty much the way they look in the regular map view.

www.mapteach.org Global Positioning System Lesson 3 Using Your Own Field Trip Data
Page 163
Your map might look something like this:
4. Start the layout process by selecting View from the main menu, and
selecting “Layout View.”
Global Positioning System Lesson 3 www.mapteach.org Using Your Own Field Trip Data
Page 164
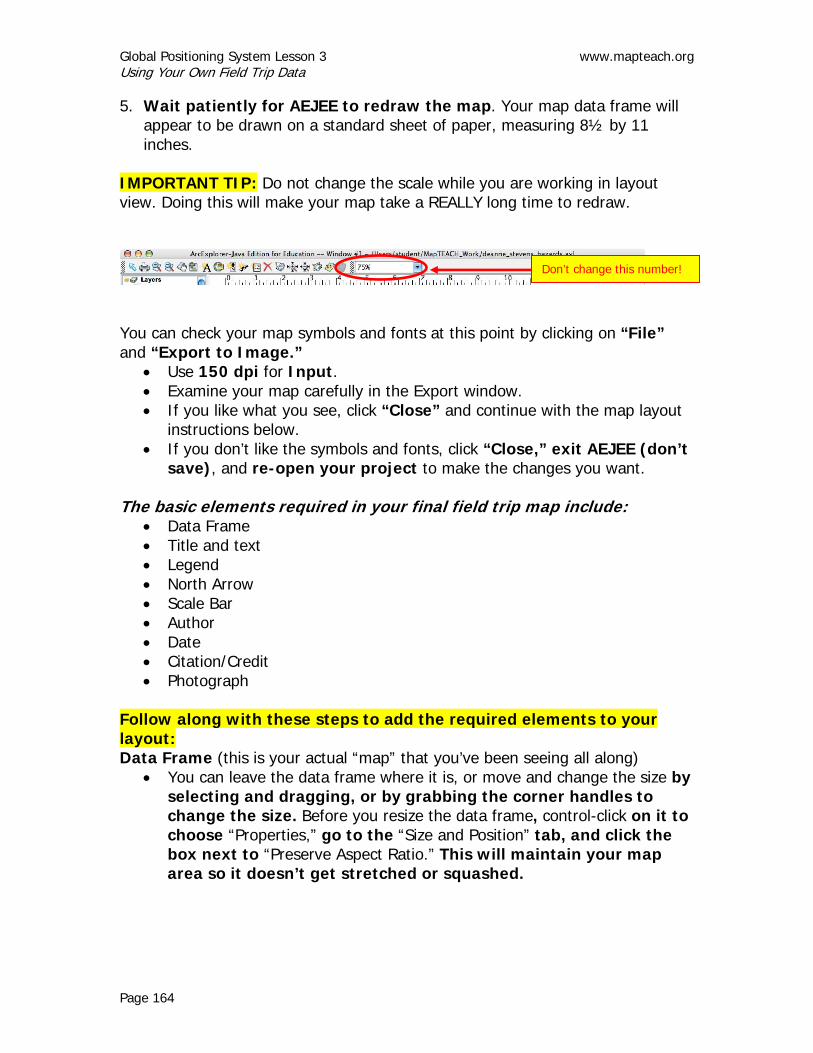
5. Wait patiently for AEJEE to redraw the map. Your map data frame will appear to be drawn on a standard sheet of paper, measuring 8½ by 11 inches.
IMPORTANT TIP: Do not change the scale while you are working in layout view. Doing this will make your map take a REALLY long time to redraw.
You can check your map symbols and fonts at this point by clicking on “File” and “Export to Image.”
• Use 150 dpi for Input. • Examine your map carefully in the Export window. • If you like what you see, click “Close” and continue with the map layout
instructions below. • If you don’t like the symbols and fonts, click “Close,” exit AEJEE (don’t
save), and re-open your project to make the changes you want. The basic elements required in your final field trip map include:
• Data Frame • Title and text • Legend • North Arrow • Scale Bar • Author • Date • Citation/Credit • Photograph
Follow along with these steps to add the required elements to your layout: Data Frame (this is your actual “map” that you’ve been seeing all along)
• You can leave the data frame where it is, or move and change the size by selecting and dragging, or by grabbing the corner handles to change the size. Before you resize the data frame, control-click on it to choose “Properties,” go to the “Size and Position” tab, and click the box next to “Preserve Aspect Ratio.” This will maintain your map area so it doesn’t get stretched or squashed.
Don’t change this number!
www.mapteach.org Global Positioning System Lesson 3 Using Your Own Field Trip Data
Page 165
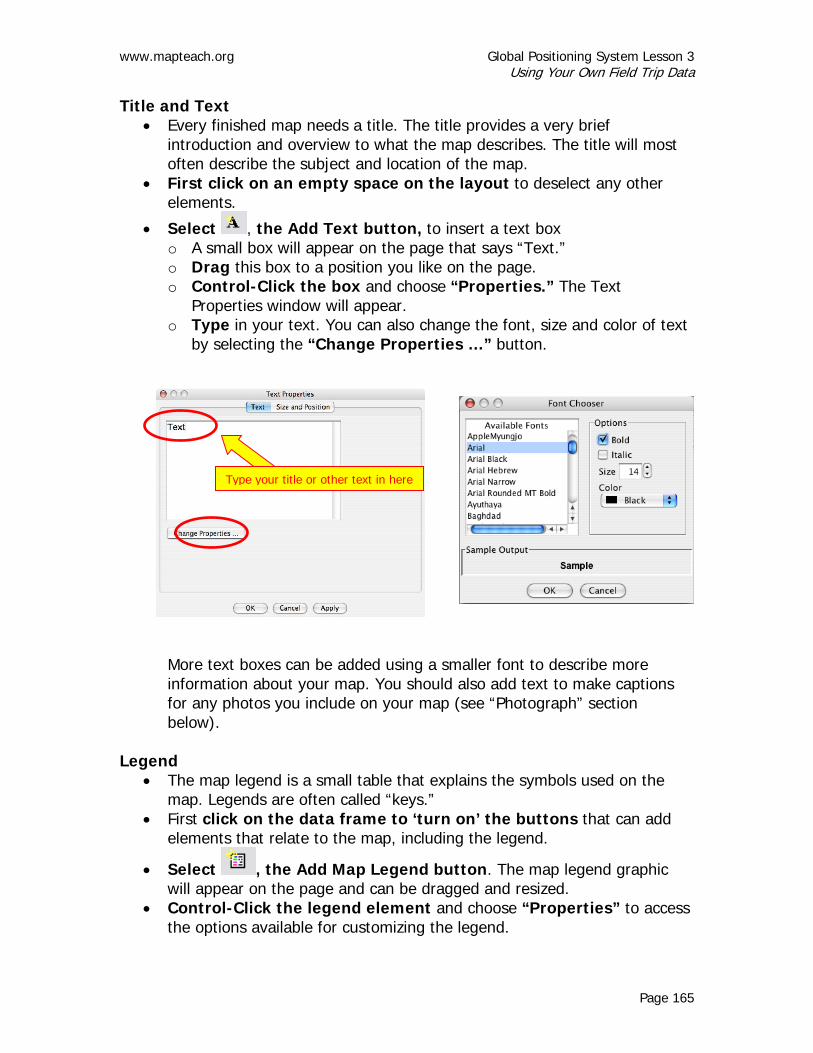
Title and Text • Every finished map needs a title. The title provides a very brief
introduction and overview to what the map describes. The title will most often describe the subject and location of the map.
• First click on an empty space on the layout to deselect any other elements.
• Select , the Add Text button, to insert a text box o A small box will appear on the page that says “Text.” o Drag this box to a position you like on the page. o Control-Click the box and choose “Properties.” The Text
Properties window will appear. o Type in your text. You can also change the font, size and color of text
by selecting the “Change Properties …” button.
More text boxes can be added using a smaller font to describe more information about your map. You should also add text to make captions for any photos you include on your map (see “Photograph” section below).
Legend • The map legend is a small table that explains the symbols used on the
map. Legends are often called “keys.” • First click on the data frame to ‘turn on’ the buttons that can add
elements that relate to the map, including the legend.
• Select , the Add Map Legend button. The map legend graphic will appear on the page and can be dragged and resized.
• Control-Click the legend element and choose “Properties” to access the options available for customizing the legend.
Type your title or other text in here
Global Positioning System Lesson 3 www.mapteach.org Using Your Own Field Trip Data
Page 166
North Arrow • The North Arrow orients the viewer to determine the direction of North on
the map. • First click on the data frame to ‘turn on’ the buttons that can add
elements that relate to the map, including the north arrow.
• Select , the Add north arrow button. The North arrow selector window opens and presents many different styles to choose from. Choose one, drag, drop and alter the size and color so that it looks good on the layout. Make sure you change the angle of the North arrow so it points towards north for your map area. Your teacher will provide this angle.
Scale Bar
• First click on the data frame to ‘turn on’ the buttons that can add elements that relate to the map, including the scale bar.
• Select , the Add map scale bar button. Choose the bar you like and place it on the map. Control-Click on the scale bar element, use “Properties” to select miles or kilometers for the units shown.
Author
• Make a text box and add the author’s name. This entry may also include where the author works or goes to school.
Date
• Make a text box and add the date when the map was completed. This may be appended to the author.
Citation/Credit
• The citation tells the viewer where data for the map came from. The citation includes any necessary or important information about sources of data for the map, when data was gathered, projection information and any thing else that seems important for a person reading the map.
• Make a text box to add a citation. Some citations are brief. Photograph
• A photograph or other picture can be added when you select , the Add image button. o Use at least one of the photographs you downloaded from the digital
camera: navigate to the MapTEACH_Work folder and select your image.

www.mapteach.org Global Positioning System Lesson 3 Using Your Own Field Trip Data
Page 167
o You can resize your photo image by grabbing and using the corner handles. Pay attention to what you’re doing, since you can stretch or squash your picture this way.
o Make sure to use the Text tool to add a caption describing the photograph and giving credit for the photographer.
When your map layout is complete, it might look something like this:
Show your map layout to a teacher. Teacher sign-off: ___________________________ Save your map project: • Click on “File” in the Menu Bar • Select “Save As” • Navigate to the student/MapTEACH_Work folder • Name the project using an appropriate name that includes your own name
(for instance, yourname_FieldTripLayout)

Global Positioning System Lesson 3 www.mapteach.org Using Your Own Field Trip Data
Page 168
Explore 5: Export Your Map Layout Because AEJEE does not reliably save map layouts, the only way to preserve your final map is to convert it into a graphics file. We will use a JPG format. Your map can then be printed, added as a picture into a word processing document, or used as a graphic image in presentation software like MS PowerPoint. 1. Choose File/Export to image from the AEJEE menu.
2. Choose File/Export to image from the AEJEE menu. A dialogue box will
appear and require a number for dots per inch (dpi) to specify the resolution of the output file. Use 150 dpi.
3. Wait patiently until a new window appears. It can take a couple minutes. In the Export window, click “Export.”

www.mapteach.org Global Positioning System Lesson 3 Using Your Own Field Trip Data
Page 169
4. Save the image into your MapTEACH_Work folder as a JPG. Name the
file to include the extension “.jpg”. Otherwise it will not save. Wait a minute or two while the computer exports your map.
5. Wait a moment to allow AEJEE to complete the export process, then
close the Export window and exit AEJEE. Print Your Map Layout Once the map image is saved, it can be imported to word processing documents (MS Word), graphics presentations (MS PowerPoint) or any image processing application. The exported map can also be emailed anywhere as an attachment. You may be able to just open your JPG map directly by double-clicking on the file, and then print it from your computer’s picture viewer.
EXAMPLE MAP

Global Positioning System Lesson 3 www.mapteach.org Using Your Own Field Trip Data
Page 170
1. Start up MS Word. 2. Select Page Setup from the
File pull-down menu.
3. Change the Orientation of
the page by selecting the middle icon.
4. Click “OK.”
5. Select Insert/Picture/From File from the pull down menu.

www.mapteach.org Global Positioning System Lesson 3 Using Your Own Field Trip Data
Page 171
6. Navigate to your JPG file in MapTEACH_Work and click the Insert button.
7. The image appears in the document. You can re-size the picture if you wish.
8. Save your Word document map to your MapTEACH_Work directory, using
any name you would like.
9. Print your map, or have the Word document transferred to your teacher’s thumb drive for printing.
Show your printed map to a teacher. Teacher sign-off: ___________________________

www.mapteach.org Global Positioning System Lesson 4 Hotlinking to a Field Trip Data Document
Page 173
GPS Lesson 4 HOTLINKING TO A FIELD TRIP DATA DOCUMENT
TEACHER INFORMATION
Lesson Summary: During this lesson students use data they collected on a
field trip to learn how to hotlink to Word documents in a GIS project. They will make one or more Word documents in which they describe their field trip sites and embed the digital photographs they took during the trip. The CSV file created in GPS Lesson 3 “Using Your Own Field Trip Data,” is modified to include the pathname and document names for the sites they are linking. The revised CSV file is loaded into their existing AEJEE field trip project and the hotlink is activated, allowing the user to click on the point representing the site and connect to the informative Word document.
Objectives: Students will learn to hotlink a document to a point in their
AEJEE map. Estimated Time: 1 hour Correlation to Alaska Standards: Geography A-6 Use spatial (geographic) tools and technologies to analyze
and develop explanations and solutions to geographic problems.
Technology A-1 Use a computer to enter and retrieve information. BACKGROUND FOR THE TEACHER This lesson teaches students how to work with site observations from an earlier field trip for inclusion in an interactive AEJEE GIS map. For each site on the field trip, the student(s) need to have marked a GPS waypoint, taken a digital picture, and written down notes that will help label and explain what they observed. A GPS field trip lesson with field data sheets is also included in the MapTEACH curriculum.

Global Positioning System Lesson 4 www.mapteach.org Hotlinking to a Field Trip Data Document
Page 174
Students should complete GPS Lesson 3 Using Your Own Field Trip Data prior to starting this lesson; the layout portion of that lesson is not a prerequisite for this lesson. GIS Lesson 13 Hotlinking introduces the concept of hotlinking by connecting a single point to a web site. Some important concepts and tips for success: • AEJEE uses comma separated values files (.csv, or CSV) to generate
shapefiles of points that can be hotlinked. • The attribute name in the first line of the CSV file that equates to the hotlink
must be HOTLINK, all in capital letters. See example:
• This lesson constructs a hotlink to connect to a document file. Hotlinks can
connect to any kind of file your computer can open, including pictures, text documents, video clips, sound files, web sites, etc. o The syntax to connect to a file on your computer is file:/// followed by
the pathname and document name. Example: File:///Users/student/MapTEACH_Work/FieldTripSite1.doc (This connects to a Word document named FieldTripSite1.doc that is located in the MapTEACH_Work folder in the Users/student directory of a Mac computer; if you want to hotlink to a file or document that is saved somewhere else, remember that the syntax must exactly match the pathname so AEJEE can find your file)
o The syntax to connect a point to a web site is http:// followed by the web site pathname.
Example: http://www.nps.gov/bela/html/serpent.htm
• When hotlinking to files or documents, AEJEE will not accept a document name that has spaces. Instead of using a name like “my field trip.doc”, you should use alternatives like “my_field_trip.doc”, “MyFieldTrip.doc” or “myfieldtrip.doc”. It is also a good idea to avoid special characters when naming a file: #, $, /,*, or others like this can cause problems. Stick with letters, numbers, underscores, and dashes.
• Older versions of AEJEE did not allow spaces on either side of the commas in the CSV files, although the newest version seems more tolerant. To avoid possible confusion, the lesson retains instructions for the older versions of AEJEE.
Must be HOTLINK, all capitals!
www.mapteach.org Global Positioning System Lesson 4 Hotlinking to a Field Trip Data Document
Page 175
• There can be no “empty returns” at the end of the CSV document. If you click your pointer in the blank white area below your last line of data and a cursor appears below your last line of data, you must backspace or delete until the cursor is exactly after (to the right of) your last piece of data.
• Working with CSV files and hotlinks can be very frustrating for students, who
are often rushing and not paying close attention to what they are typing. Any typographical error, extra space or misplaced comma will cause the process to malfunction. If the hotlink is not working, work patiently with the student to very carefully check their file for errors.
• When activating hotlinks, there are some critical items that must be kept in mind: o MapTips must be set to reference HOTLINK in the point shapefile that the
hotlink is generated from o The shapefile containing the hotlink(s) must be selected (highlighted) in
the Table of Contents on the left side of the AEJEE window o The Hotlink lightning bolt tool must be used to select the point in the map
project o Hover the Hotlink lightning bolt tool over the point until the MapTip info
appears next to point (either the url if linking to a web site, or the pathname and file name if linking to a file or document); do not click until you can see this information
o If you can see the MapTip info next to the point but are having trouble clicking on it, try zooming in a little so you can better target the point
o If you can see the MapTip info and can successfully click the point, but nothing happens, it probably means that you have set up everything correctly but there is either: 1) a typographical error in the url, pathname, or file name in your CSV file and AEJEE can not find your hotlinked web site or file - check for typos!; or 2) there is a space or a special character in the file name you are trying to link to – check the file name!
2: Cursor should be here
1: When you click here…
If it isn’t, backspace until it is!

Global Positioning System Lesson 4 www.mapteach.org Hotlinking to a Field Trip Data Document
Page 176
MATERIALS • Computers - one for each student is best or two students can share. The
computers must meet the following specifications to run AEJEE: o Macintosh: MacOS 10.3 or above, 100 MB hard drive space, Internet
connection; recommend G4 or faster processor and more than 64 MB RAM o Windows: Win2000 or WinXP, 100 MB hard drive space, Internet
connection; recommend Pentium III or faster processor and more than 64 MB RAM
• AEJEE software can be provided by MapTEACH on a CD delivered to you, or you can download the correct version from our website at http://www.mapteach.org• MapTEACH GIS data also can be sent on a CD or downloaded from our website at http://www.mapteach.org • GPSBabel software to download and convert the GPS waypoint data can be provided on a CD or downloaded from our website at http://www.mapteach.org or downloaded at http://www.gpsbabel.org• Microsoft Word software. If Word is not available on your class computers,
any other word-processing program will work. If substituting a different word-processing program, you will need to revise the student instructions accordingly.
• Field trip data sheets with information about the sites and photos. • Copies of student directions for the lesson. INSTRUCTIONAL PROCEDURES:
Before Class • Make sure that the students have downloaded the digital photos from the
field trip into their MapTEACH_Work directories. This was part the GIS lesson “Using Your Own Field Trip Data.”
• Make sure that the students have CSV files of their GPS waypoints in their MapTEACH_Work directories. This was part of GPS Lesson 3 “Using Your Own Field Trip Data.”
• Check, update and/or maintain all student equipment including computers so everything works as smoothly as possible.
• Prepare materials for the lesson and try out all the activities well in advance before the students work through them.
Gear-up Have the students recall their experiences on the field trip. Ask them about what kinds of things would they like to share with someone else about what they saw on the trip. They have already made a layout of their field trip, with one or more photos. Can they think of a different way to use AEJEE to show this information to someone? Remind them about the GIS lesson “Hotlinking.” Explain that in this lesson students will be making an interactive map that will allow others to click on the points representing the sites they visited to connect to Word documents describing those sites and showing pictures that
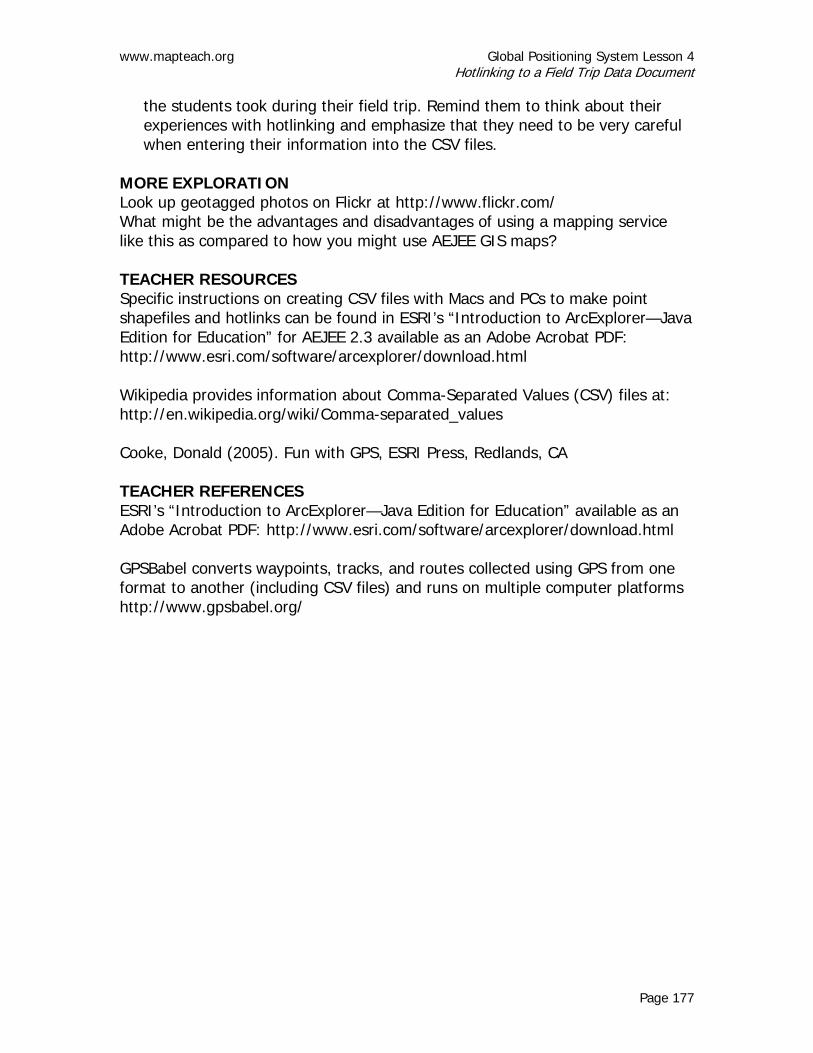
www.mapteach.org Global Positioning System Lesson 4 Hotlinking to a Field Trip Data Document
Page 177
the students took during their field trip. Remind them to think about their experiences with hotlinking and emphasize that they need to be very careful when entering their information into the CSV files.
MORE EXPLORATION Look up geotagged photos on Flickr at http://www.flickr.com/ What might be the advantages and disadvantages of using a mapping service like this as compared to how you might use AEJEE GIS maps? TEACHER RESOURCES Specific instructions on creating CSV files with Macs and PCs to make point shapefiles and hotlinks can be found in ESRI’s “Introduction to ArcExplorer—Java Edition for Education” for AEJEE 2.3 available as an Adobe Acrobat PDF: http://www.esri.com/software/arcexplorer/download.html Wikipedia provides information about Comma-Separated Values (CSV) files at: http://en.wikipedia.org/wiki/Comma-separated_values Cooke, Donald (2005). Fun with GPS, ESRI Press, Redlands, CA TEACHER REFERENCES ESRI’s “Introduction to ArcExplorer—Java Edition for Education” available as an Adobe Acrobat PDF: http://www.esri.com/software/arcexplorer/download.html GPSBabel converts waypoints, tracks, and routes collected using GPS from one format to another (including CSV files) and runs on multiple computer platforms http://www.gpsbabel.org/


www.mapteach.org Global Positioning System Lesson 4 Hotlinking to a Field Trip Data Document
Page 179
Name: ____________________
GPS Lesson 4 HOTLINKING TO A FIELD TRIP DATA DOCUMENT
STUDENT EXERCISE
Objectives: Students will learn to hotlink a document to a point on their
AEJEE map. Estimated Time: 1 hour In this lesson you will make an interactive map that will allow someone to click on sites in your AEJEE map project to open informative documents that you have written that describe the site and why it is important or interesting. You will write the document using a word-processing program, and you will include photos that you took on your field trip. You will then hotlink your GPS points on your AEJEE map to connect to your descriptions. Explore 1: Making a Photo Data Document The first thing you need to do is pick a site from the field trip you want to describe. Site I am using for this exercise: ______________________________________ Decide which photo of this site you would like to link to and write down the file name. You can look at your photos by double-clicking on their file names in the Mac Finder window for MapTEACH_Work. File name of photo to use in hotlinked document:_________________________ (Remember: This photo should relate to the site you are hotlinking to!)

Global Positioning System Lesson 4 www.mapteach.org Hotlinking to a Field Trip Data Document
Page 180
We need to make a document to link to that has the photo and information about why the site is important. We will make this document in Microsoft Word.
1. Start up MS Word and select Insert/Picture/From File from the pull
down menu.
2. Find the photo you want to use in your MapTEACH_Work folder and click
“insert.”
3. Now you can add information about the photo to the document. Refer to your field data sheet for the information you recorded about the photo and the site it documents. This information should include: a) Date b) Photographer c) Waypoint number d) GPS accuracy e) Site name f) Description – describe this photo and this site in complete
sentences. Why is this site important or interesting? What are we seeing in the photo?
g) Anything else your teacher suggests you should include

www.mapteach.org Global Positioning System Lesson 4 Hotlinking to a Field Trip Data Document
Page 181
Here is an example of a Field Trip Data Document:

Global Positioning System Lesson 4 www.mapteach.org Hotlinking to a Field Trip Data Document
Page 182
4. Save your Word document to your MapTEACH_Work directory, giving it a name like “yourname_FieldTripPhoto1.doc”. Do not include any spaces or special characters (like # or @ or /) in this name, or the hotlink will not work!
What did you name your Word document? ______________________________
Show your Word document to a teacher. Teacher sign-off: ___________________________

www.mapteach.org Global Positioning System Lesson 4 Hotlinking to a Field Trip Data Document
Page 183
Explore 2: Making the Hotlink CSV File 1. Now we are going to make the hotlink to the file you created. To do this, we
are going to make a new .csv file using the one you already made as a starting point so you don’t have to re-type as much.
2. Start up the TextEdit application and open the waypoint file you made earlier and saved in MapTEACH_Work folder. It should be called something like yourname_Location_FieldTripSites.csv
3. Now, do a “Save As” and give it a name something like yourname_FieldTrip_PhotoLocation_Hotlink.csv
Make sure you put the .csv extension after the file name!
Make sure you include the .csv extension!!

Global Positioning System Lesson 4 www.mapteach.org Hotlinking to a Field Trip Data Document
Page 184
Now you need to edit this file to make a hotlink of only the site you want to document.
4. Delete all the lines except the first line and the line with the data
about the point you picked the photo for. Refer to page 1 of this lesson to see which site you are working with.
5. Just after “site_name.” add a comma and the new field called “HOTLINK” all in capital letters. Remember: do not include any extra spaces immediately before or after the commas in this file.
Then, just after the site name of the location you picked the photo for, add a comma and type file:///Users/student/MapTEACH_Work/ followed by the name of the document you created. Refer to page 5 of this lesson to see what you named the document.
6. Check the file carefully for typographical errors and save it. It should look something like this:
Explore 3: Adding the Hotlink to Your AEJEE Field Trip Map 1. Open your AEJEE field trip project and use the Add Event Theme
process to make a new shapefile, which will automatically be named the same as your CSV file, but without the .csv extension.
2. Make the symbol anything you would like, but make sure you can see it on top of the points you already have on your map.
3. On the AEJEE menu, use Tools/Map tips to open the MapTips dialogue box. This will help AEJEE to find the hot spot for the link on the map.
4. In the MapTips box, select “yourname_FieldTrip_PhotoLocation_Hotlink” for the layer and HOTLINK as the field. Click Set MapTips and then click “OK.”
Your file name here

www.mapteach.org Global Positioning System Lesson 4 Hotlinking to a Field Trip Data Document
Page 185
Make your hotlinked layer the active layer by clicking on it in the Table of Contents window. Select the “Hot Link” lightening bolt from the tool bar.
5. Hover the cursor right over the dot at your point until the Map Tip info pops
up and shows the path and file name you have linked to the point. It might take a few seconds for the information to show up, so be patient. When the information shows up, click and your browser will open the Word document describing the site you have documented.
Global Positioning System Lesson 4 www.mapteach.org Hotlinking to a Field Trip Data Document
Page 186
Show your hyperlink to a teacher and demonstrate that it works. Teacher sign-off: ___________________________ Extra Credit: Make linked documents for one or more of your other Field Trip sites. Show your additional hyperlink(s) to a teacher and demonstrate that they work. Teacher sign-off: ___________________________

www.mapteach.org Global Positioning System Lesson 5 Using Track Log Data
Page 187
GPS Lesson 5 USING TRACK LOG DATA
TEACHER INFORMATION
Lesson Summary: During this lesson students will make GIS maps using trail
data they have collected on a local field trip with their GPS units and digital cameras. They will download their GPS track logs into a CSV file. Students will then generate points from this CSV file in AEJEE and make a map of their journey that includes photos they took on their field trip.
Objectives: Students will learn to download photos from their digital
cameras and track log data from their GPS units and to make a map using these data in AEJEE.
Estimated Time: 1 hour Correlation to Alaska Standards: Geography A-6 Use spatial (geographic) tools and technologies to analyze
and develop explanations and solutions to geographic problems.
Technology A-1 Use a computer to enter and retrieve information.
BACKGROUND FOR THE TEACHER This lesson teaches students how to prepare GPS track log data from an earlier field trip for inclusion in an AEJEE GIS map. A GPS field trip lesson with field data sheets is included in the MapTEACH curriculum. This lesson can be modified to include collecting a track log as part of the trip. The best data is the students’ own data, and students are very excited to see their own observations and pictures attached to an AEJEE map. If time or weather issues preclude students being able to make their own field trip observations, you may opt to go out yourself and make observations and collect a GPS track log along a road, trail or near the school, and then share the pictures and GPS unit with students so they can download and prepare the data.

Global Positioning System Lesson 5 www.mapteach.org Using Track Log Data
Page 188
At the end of the lesson, you might ask the students for ideas about other field trips that could be documented this way and shared on maps that would be interesting to the local community. Some important concepts and tips for success: • Please review the information provided on CSV files and layouts that appears
in previous lessons. • Make sure the GPS unit is plugged into the computer and turned on before
opening GPSBabel, or the proper port won’t show up in the drop-down menu. • Photos placed in an AEJEE layout will default to a square shape. Resizing the
photo using the corners of the square will stretch or squash the image, so students should be observant of what their photos look like in their final layouts.
• This is a long lesson with multiple steps. Consider splitting it into two or more sessions if you have limited computer time. A good way to split this lesson is to have students work through Explore 3 (Add Track Log to Your AEJEE Map), then do the Trail Trip layout as a separate session.
• Layouts in AEJEE must be done in a single session! Do not let students begin working on a layout if they do not have enough time to finish it to your satisfaction, or their work will be lost.
• Symbology and labels should be exactly the way the student wants them before switching to Layout View in AEJEE. Changing the symbology and labels after entering layout view can cause problems.
• Do not switch back and forth between Layout View and Map View. Once you are in Layout View, stay there.
• Students should not change the scale of their map document after they enter Layout View in AEJEE. Redraw times are very long if the scale is changed, and it is much better to leave the document at the default scale.
• If the student is having trouble selecting a map element (scale bar, north arrow, text, etc.) that is on top of the map data frame, have them click on the white space around the map, then click on the map data frame, and then move the data frame out of the way. The map element can then be selected and moved off to the side. The map data frame can then be selected and moved back into place, and the map element can be selected and placed where the student wants it to be.
• If the student moves a map element too far off to the side of the layout page, AEJEE may not be able to select the element. If the map element is far off to the side and the student is unable to select it, use the “Fixed zoom out” tool to expand the view of the layout page. You can then select the out-of-bounds map element and move it back into the work area. Then use the “Fixed zoom in” tool to return to the original view of the page.

www.mapteach.org Global Positioning System Lesson 5 Using Track Log Data
Page 189
• Keep in mind the general guidelines for cartography and working with map
layouts in AEJEE: o Map should have a clearly defined subject, ortheme – a purpose for the
map, or the story that the map is meant to tell o Map should include data points that are symbolized and labeled so they
are legible and informative Symbol sizes and colors should show up well on the base layer and
shouldn’t interfere with each other Label text should be a legible font style, color, and size, and show up
well on the base layer Important Tip: When working in AEJEE layouts, make text and
symbols for points much bigger than you think they should be; they end up looking smaller in the final printed map
o Map area should be zoomed in on the selected data points and whatever other features that should be included on the map
o Map balance Elements should be placed on the page so there is an even distribution
of elements covering the page and there isn’t a lot of white space o Fonts for text and titles should be carefully selected
Fonts should be chosen that are easy-to-read, attractive, and fit the theme of the map
Try to limit choices to no more than two fonts; this helps the map look more uniform and professional
The title is usually the largest font size on the map MATERIALS • Computers - one for each student is best or two students can share. The
computers must meet the following specifications to run AEJEE: o Macintosh: MacOS 10.3 or above, 100 MB hard drive space, Internet
connection; recommend G4 or faster processor and more than 64 MB RAM o Windows: Win2000 or WinXP, 100 MB hard drive space, Internet
connection; recommend Pentium III or faster processor and more than 64 MB RAM
First, use “Fixed zoom out” to expand the view, then select the map element and move it
Then use “Fixed zoom in” to return the layout page to the original view
Global Positioning System Lesson 5 www.mapteach.org Using Track Log Data
Page 190
• AEJEE software can be provided by MapTEACH on a CD delivered to you, or you can download the correct version from our website at http://www.mapteach.org• MapTEACH GIS data also can be sent on a CD or downloaded from our website at http://www.mapteach.org • GPSBabel software to download and convert the GPS waypoint data can be provided on a CD or downloaded from our website at http://www.mapteach.org or downloaded at http://www.gpsbabel.org• Digital cameras containing photos of the field trip, and camera download
cables. • GPS units with track logs of the field trip sites, and GPS download cables
(with USB serial adaptors, if needed). • Copies of the GPS Track Log Setup sheet. • Field trip data sheets with information about the photos. • Copies of student directions for the lesson. INSTRUCTIONAL PROCEDURES
Getting Ready • At the minimum, have a single GPS unit prepared with a track log, so that
the track log includes the locations of sites of interest and digital photos. Students can then all download data from this one shared GPS unit.
• Ideally, students will use records from a field trip where groups of students were able to travel a trail or route and collect their own: digital photo, GPS track logs, and observation notes. Students will need to keep careful track of which camera and which GPS unit they used. They may also have collected waypoints for sites of interest along the trail, which can be added to their AEJEE project as an optional extra step.
• Check, update and/or maintain all student equipment including computers so everything works as smoothly as possible.
• Prepare materials for the lesson and try out all the activities well in advance before the students work through them.
• Make sure your local base map data layers (topography and satellite imagery) are accessible in the Data_MapTEACH_WGS84 directory and that you have the file names and directory locations written down correctly. You will need to supply this information and the correct angle for the North arrow for your local area to your students before they can make their local field trip maps.
Gear-up • Ask the students if any of them have used a GPS unit to map a trail or
route. Ask one to describe how he or she did it. • Explain that a track log is a series of coordinates of points along the way
that the GPS can automatically collect if you set it up to do that. This is like a breadcrumb trail, where each breadcrumb is a point that the GPS

www.mapteach.org Global Positioning System Lesson 5 Using Track Log Data
Page 191
locates and records the location of. This sprinkling of points shows where you have traveled with your GPS unit.
• If a field trip is to be part of this lesson, pass out copies of the GPS Track Log Setup sheet and work through the process with students prior to going on the field trip. Have the students collect track logs, take digital photos, and record observations about interesting sites.
• Back in the classroom, explain that in this lesson they will download track logs collected by the GPS units and then make an AEJEE map of their trail that includes photos.
• Write on the board or pass out as handouts the angle for the North arrow, the names of the image files for your local topography and satellite imagery, and which data folder(s) those image files are located in. Your students will need this information to load the base map data for their local field trip maps.
• If students are going to work on layouts in the current session, emphasize to them that they should keep in mind the general guidelines for cartography and working with map layouts in AEJEE. These guidelines are listed in the student lesson. Make sure they know that layouts need to be completed in a single computer session because they can not be reliably saved and reopened later. The only permanent record of their final map will be the JPG file they generate from their layout.
TEACHER RESOURCES Specific instructions for creating CSV files with Macs and PCs to make point shapefiles and hotlinks can be found in ESRI’s “Introduction to ArcExplorer—Java Edition for Education” for AEJEE 2.3 available as an Adobe Acrobat PDF: http://www.esri.com/software/arcexplorer/download.html Wikipedia provides information about Comma-Separated Values (CSV) files at: http://en.wikipedia.org/wiki/Comma-separated_values Cooke, Donald (2005). Fun with GPS, ESRI Press, Redlands, CA TEACHER REFERENCES ESRI’s “Introduction to ArcExplorer—Java Edition for Education” available as an Adobe Acrobat PDF: http://www.esri.com/software/arcexplorer/download.html GPSBabel converts waypoints, tracks, and routes collected using GPS from one format to another (including CSV files) and runs on multiple computer platforms http://www.gpsbabel.org/


www.mapteach.org Global Positioning System Lesson 5 Using Track Log Data
Page 193
Name: ____________________
GPS Lesson 5 USING TRACK LOG DATA
STUDENT EXERCISE
Objectives: Students will learn to download photos from their digital cameras and track log data from their GPS units and to make a map using these data in AEJEE.
Estimated Time: 1 hour Explore 1: Downloading Trip Data on a Macintosh First, download your field trip photos from your camera into your MapTEACH_Work directory. 1. Connect your camera to your computer using the cable provided.
2. If the camera does not start communicating with the computer on its own,
press the “OK” button on the camera.
3. Close out of iPhoto if it automatically pops up.
4. Open the camera folder that is now on your desktop and navigate through the DCIM folder until you get down to the photos (.jpg extension).
5. Drag and drop the photos into your MapTEACH_Work folder.
6. When you are finished copying your photos, drag and drop the icon for the camera into the Trash/Eject area of your screen, disconnect the camera, and pass it and the cable to the next person in your group.
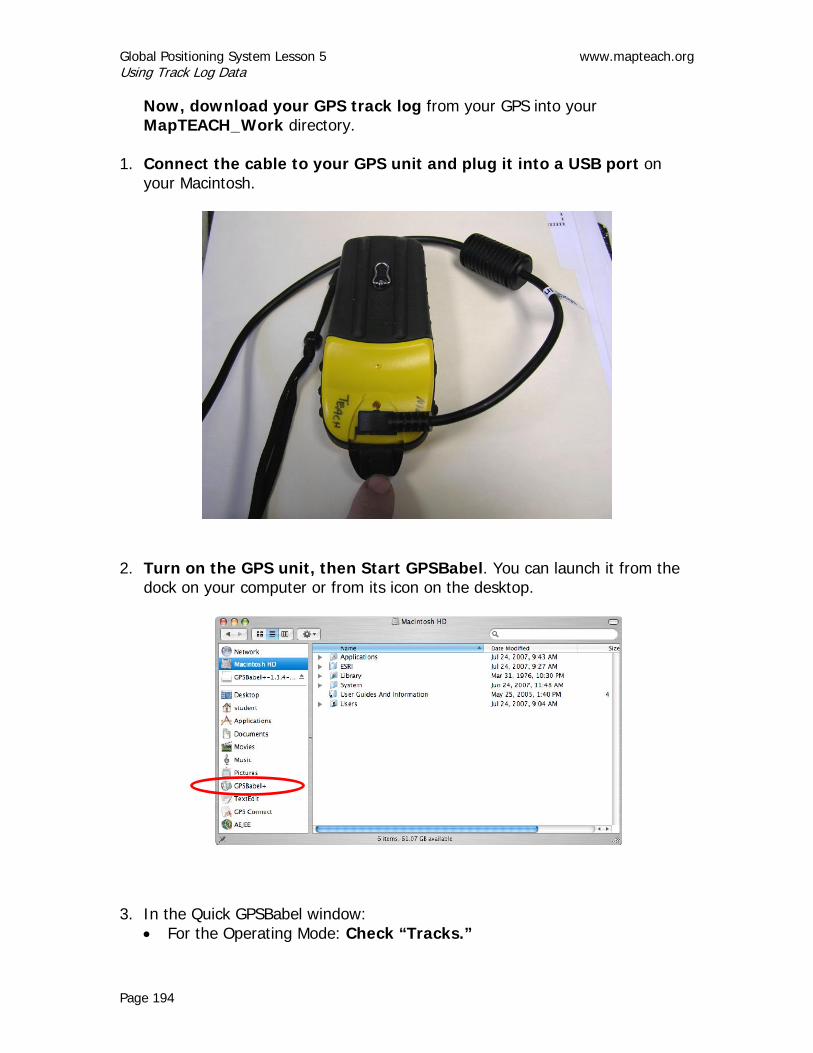
Global Positioning System Lesson 5 www.mapteach.org Using Track Log Data
Page 194
Now, download your GPS track log from your GPS into your MapTEACH_Work directory.
1. Connect the cable to your GPS unit and plug it into a USB port on
your Macintosh.
2. Turn on the GPS unit, then Start GPSBabel. You can launch it from the
dock on your computer or from its icon on the desktop.
3. In the Quick GPSBabel window:
• For the Operating Mode: Check “Tracks.”

www.mapteach.org Global Positioning System Lesson 5 Using Track Log Data
Page 195
• For the Input Options: Check “Use GPS receiver” and select “Garmin” from the “Type” drop-down menu and the item beginning with “USA” from the “Port” drop-down menu.
• For the Output Options: Check “Use file” and select “Universal csv with field structure in first line” for the Type drop-down menu. If this option is not available use “Comma separated values.”
4. Click “Save File,” and save the file in your MapTEACH_Work folder.
Name it however you like, but be sure to include the .csv extension so the computer will know that this is a Comma Separated Value file.
Use “Universal csv with field structure in first line” if this option is available. Otherwise, use “Comma separated values”.
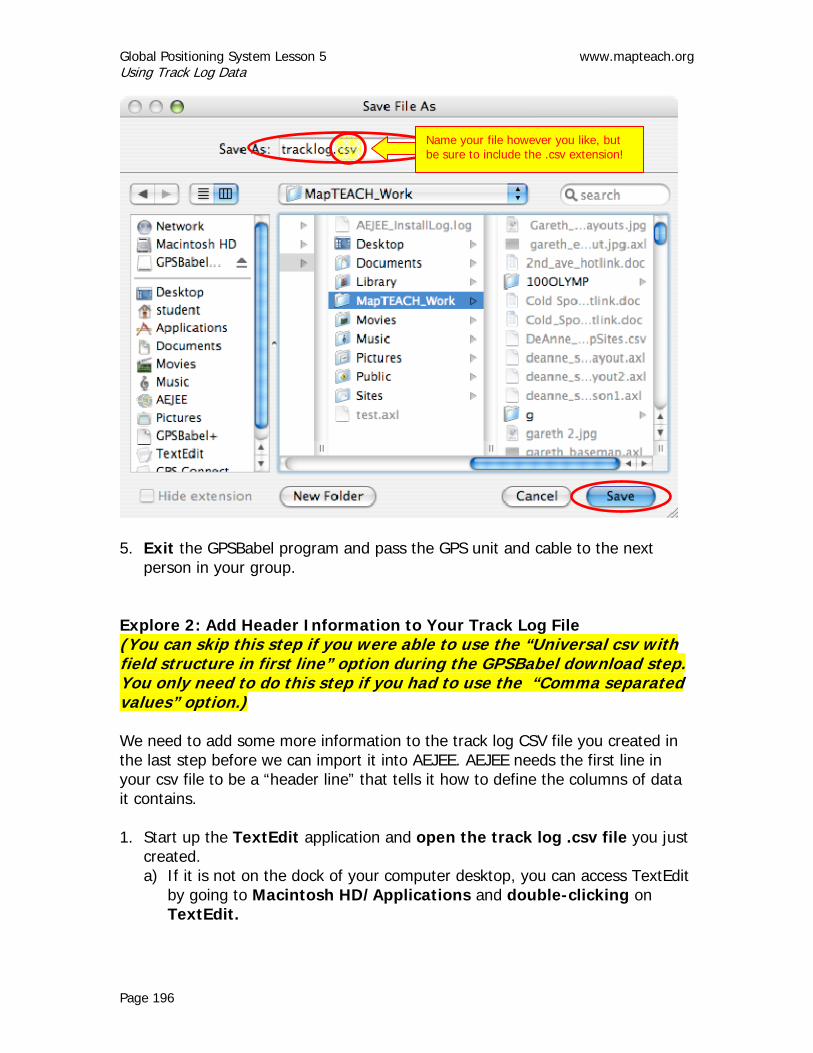
Global Positioning System Lesson 5 www.mapteach.org Using Track Log Data
Page 196
5. Exit the GPSBabel program and pass the GPS unit and cable to the next
person in your group. Explore 2: Add Header Information to Your Track Log File (You can skip this step if you were able to use the “Universal csv with field structure in first line” option during the GPSBabel download step. You only need to do this step if you had to use the “Comma separated values” option.) We need to add some more information to the track log CSV file you created in the last step before we can import it into AEJEE. AEJEE needs the first line in your csv file to be a “header line” that tells it how to define the columns of data it contains. 1. Start up the TextEdit application and open the track log .csv file you just
created. a) If it is not on the dock of your computer desktop, you can access TextEdit
by going to Macintosh HD/Applications and double-clicking on TextEdit.
Name your file however you like, but be sure to include the .csv extension!
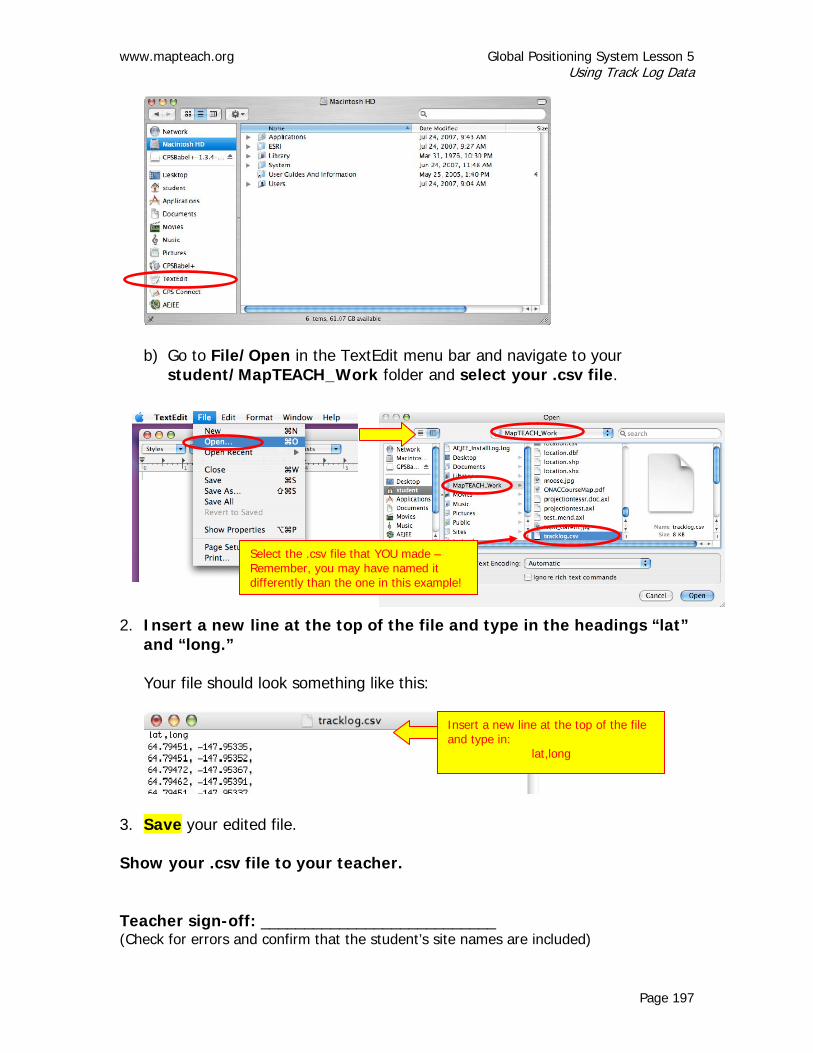
www.mapteach.org Global Positioning System Lesson 5 Using Track Log Data
Page 197
b) Go to File/Open in the TextEdit menu bar and navigate to your
student/MapTEACH_Work folder and select your .csv file.
2. Insert a new line at the top of the file and type in the headings “lat”
and “long.” Your file should look something like this:
3. Save your edited file. Show your .csv file to your teacher. Teacher sign-off: ___________________________ (Check for errors and confirm that the student’s site names are included)
Insert a new line at the top of the file and type in:
lat,long
Select the .csv file that YOU made – Remember, you may have named it differently than the one in this example!

Global Positioning System Lesson 5 www.mapteach.org Using Track Log Data
Page 198
Explore 3: Add a Track Log to Your AEJEE Map 1. Open AEJEE and start a new map. 2. Navigate to the folder /ESRI/AEJEE/Data/Data_MapTEACH_WGS84. 3. Add Coastline_Simple from the Base_Data folder 4. Set your projection to Regional Projections/Albers Equal Area
(Ellipsoid) and select Alaska. Set your datum to WGS84 (World Geod. Sys. 1984)
5. Add Towns from the Infrastructure folder. 6. Label the Towns using Name. 7. Zoom in on your general field trip location so it is in the middle of the
screen. Use the Zoom to Scale tool to zoom-in to a scale of 1:100,000.

www.mapteach.org Global Positioning System Lesson 5 Using Track Log Data
Page 199
Your map might look something like this:
8. Save your map project:
• Click on “File” in the Menu Bar • Select “Save As” • Navigate to the student/MapTEACH_Work folder • Name the project using your name followed by “TrailMap”:
firstname_TrailMap

Global Positioning System Lesson 5 www.mapteach.org Using Track Log Data
Page 200
9. Now we can add and view our points with “Add Event Theme” from the AEJEE “View” menu.
Use your own name
Select the .csv file that YOU made – Remember, you may have named it differently than the one in this example!
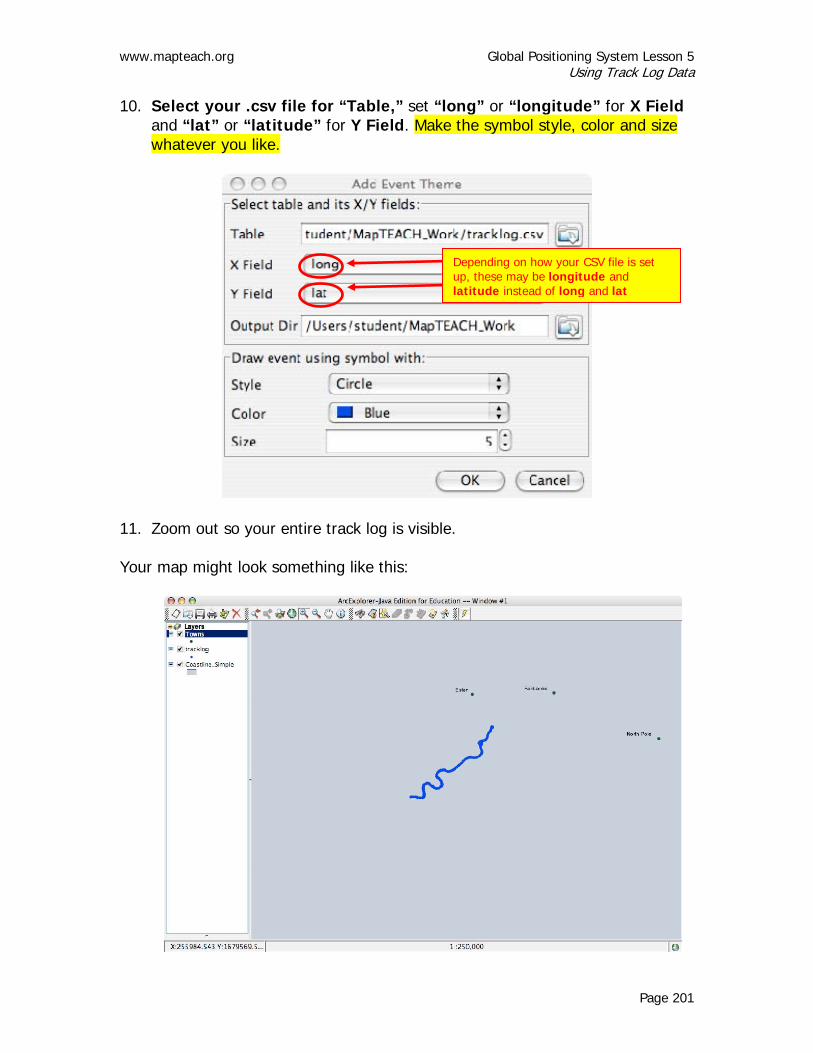
www.mapteach.org Global Positioning System Lesson 5 Using Track Log Data
Page 201
10. Select your .csv file for “Table,” set “long” or “longitude” for X Field and “lat” or “latitude” for Y Field. Make the symbol style, color and size whatever you like.
11. Zoom out so your entire track log is visible. Your map might look something like this:
Depending on how your CSV file is set up, these may be longitude and latitude instead of long and lat

Global Positioning System Lesson 5 www.mapteach.org Using Track Log Data
Page 202
12. Turn off Coastline_Simple.
13. Add layers for your local topography and satellite imagery. Your
teacher will provide the file names and directory locations for these data layers. See how your map looks with different satellite imagery as a background and how it looks with the topographic map as a background by checking and unchecking the boxes next to the names of the raster data layers.
14. Pick the base layer (topographic map or a satellite image) you like
best and leave it turned on. Turn off or remove the raster data layers you are not using.
15. Zoom in and out to see what view looks best. 16. If you have other data you would like to add to your map, do so. This might
include sites that you have visited and collected GPS points for during a class field trip, or it might be other data layers from the Data_MapTEACH_WGS84 folder.
17. Symbolize your points and text the way you like them. Make sure that your
points and text are large enough so you are able to read them easily. Your map might look something like this:

www.mapteach.org Global Positioning System Lesson 5 Using Track Log Data
Page 203
Save your project and have a teacher sign off. Teacher sign-off: ___________________________ (Check that student has selected appropriate base map and symbology) If your lab session is almost over, you may need to complete the next section in
another lab session.
***ASK YOUR TEACHER IF YOU SHOULD CONTINUE***
Remember that you cannot save layouts, so make sure you have enough time to do a complete layout before you begin.
Explore 4: Making a Layout of Your Trail Map If you are continuing this lesson without a break, go to step 2. 1. Start AEJEE and navigate to your MapTEACH_Work folder and open
your field trip project that you want to make a finished map layout for.
2. Make your AEJEE window bigger by clicking on the green button in the
top left of the window. 3. Make sure that everything looks just the way you want it to look on
your final map. THIS IS REALLY IMPORTANT!!!

Global Positioning System Lesson 5 www.mapteach.org Using Track Log Data
Page 204
a) Make sure you are zoomed in to the area of the map that you want to
show on your map layout. If you are zoomed too far out, there won’t be enough detail to see your data points. If you are zoomed too far in, some of your data points may be outside the map, and your base map image will look really fuzzy.
b) This is your last chance to fiddle with your fonts and symbols. It is not a good idea to change symbology in AEJEE once you’ve started the layout process.
c) Remember to make your labels and symbols for points bigger than you think they should be – they’ll show up better in the final map. The symbols for lines will show up pretty much the way they look in the regular map view.
4. Start the layout process by selecting View from the main menu, and
selecting “Layout View.”
5. Wait patiently for AEJEE to redraw the map. Your map data frame will
appear to be drawn on a standard sheet of paper, measuring 8 ½ by 11 inches.
IMPORTANT TIP: Do not change the scale while you are working in layout view. Doing this will make your map take a REALLY long time to redraw.
Don’t change this number!
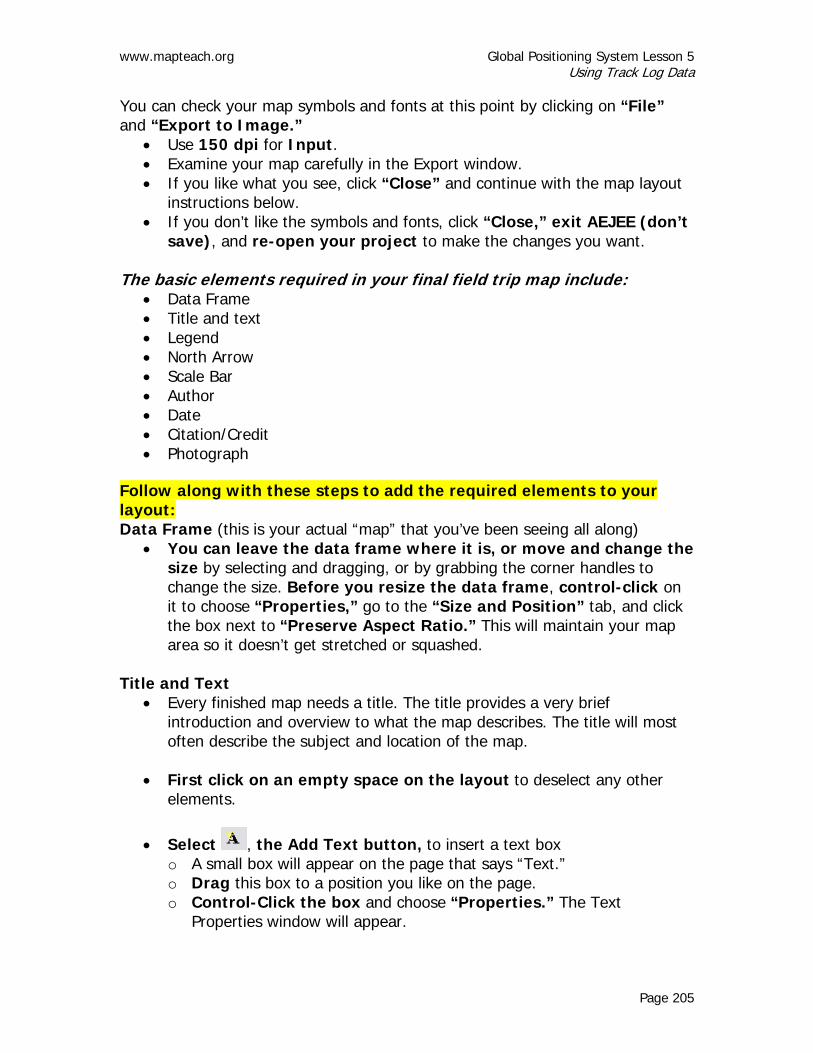
www.mapteach.org Global Positioning System Lesson 5 Using Track Log Data
Page 205
You can check your map symbols and fonts at this point by clicking on “File” and “Export to Image.”
• Use 150 dpi for Input. • Examine your map carefully in the Export window. • If you like what you see, click “Close” and continue with the map layout
instructions below. • If you don’t like the symbols and fonts, click “Close,” exit AEJEE (don’t
save), and re-open your project to make the changes you want. The basic elements required in your final field trip map include:
• Data Frame • Title and text • Legend • North Arrow • Scale Bar • Author • Date • Citation/Credit • Photograph
Follow along with these steps to add the required elements to your layout: Data Frame (this is your actual “map” that you’ve been seeing all along)
• You can leave the data frame where it is, or move and change the size by selecting and dragging, or by grabbing the corner handles to change the size. Before you resize the data frame, control-click on it to choose “Properties,” go to the “Size and Position” tab, and click the box next to “Preserve Aspect Ratio.” This will maintain your map area so it doesn’t get stretched or squashed.
Title and Text • Every finished map needs a title. The title provides a very brief
introduction and overview to what the map describes. The title will most often describe the subject and location of the map.
• First click on an empty space on the layout to deselect any other elements.
• Select , the Add Text button, to insert a text box o A small box will appear on the page that says “Text.” o Drag this box to a position you like on the page. o Control-Click the box and choose “Properties.” The Text
Properties window will appear.
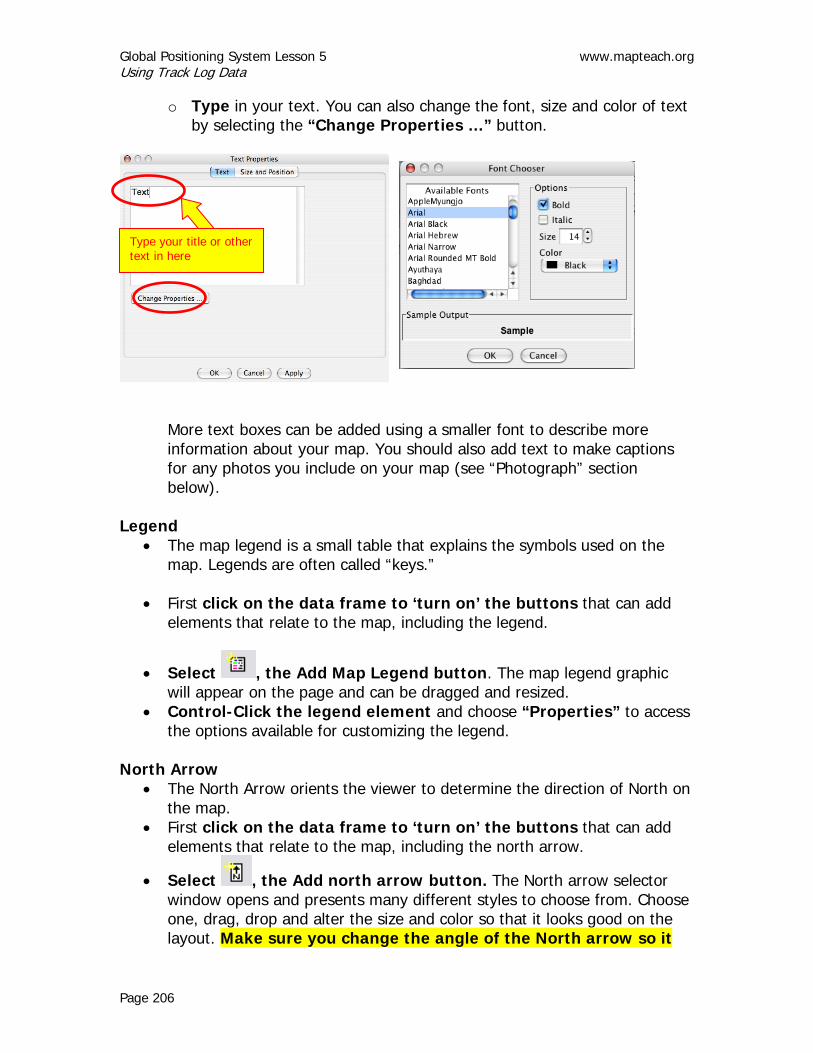
Global Positioning System Lesson 5 www.mapteach.org Using Track Log Data
Page 206
o Type in your text. You can also change the font, size and color of text by selecting the “Change Properties …” button.
More text boxes can be added using a smaller font to describe more information about your map. You should also add text to make captions for any photos you include on your map (see “Photograph” section below).
Legend • The map legend is a small table that explains the symbols used on the
map. Legends are often called “keys.”
• First click on the data frame to ‘turn on’ the buttons that can add elements that relate to the map, including the legend.
• Select , the Add Map Legend button. The map legend graphic will appear on the page and can be dragged and resized.
• Control-Click the legend element and choose “Properties” to access the options available for customizing the legend.
North Arrow • The North Arrow orients the viewer to determine the direction of North on
the map. • First click on the data frame to ‘turn on’ the buttons that can add
elements that relate to the map, including the north arrow.
• Select , the Add north arrow button. The North arrow selector window opens and presents many different styles to choose from. Choose one, drag, drop and alter the size and color so that it looks good on the layout. Make sure you change the angle of the North arrow so it
Type your title or other text in here

www.mapteach.org Global Positioning System Lesson 5 Using Track Log Data
Page 207
points towards north for your map area. Your teacher will provide this angle.
Scale Bar
• First click on the data frame to ‘turn on’ the buttons that can add elements that relate to the map, including the scale bar.
• Select , the Add map scale bar button. Choose the bar you like and place it on the map. Control-Click on the scale bar element, use “Properties” to select miles or kilometers for the units shown.
Author • Make a text box and add the author’s name. This entry may also
include where the author works or goes to school. Date
• Make a text box and add the date when the map was completed. This may be appended to the author.
Citation/Credit
• The citation tells the viewer where data for the map came from. The citation includes any necessary or important information about sources of data for the map, when data was gathered, projection information and any thing else that seems important for a person reading the map.
• Make a text box to add a citation. Some citations are brief. Photograph
• A photograph or other picture can be added when you select , the Add image button. o Use at least one of the photographs you downloaded from the digital
camera: navigate to the MapTEACH_Work folder and select your image.
o You can resize your photo image by grabbing and using the corner handles. Pay attention to what you’re doing, since you can stretch or squash your picture this way.
o Make sure to use the Text tool to add a caption describing the photograph and giving credit for the photographer.
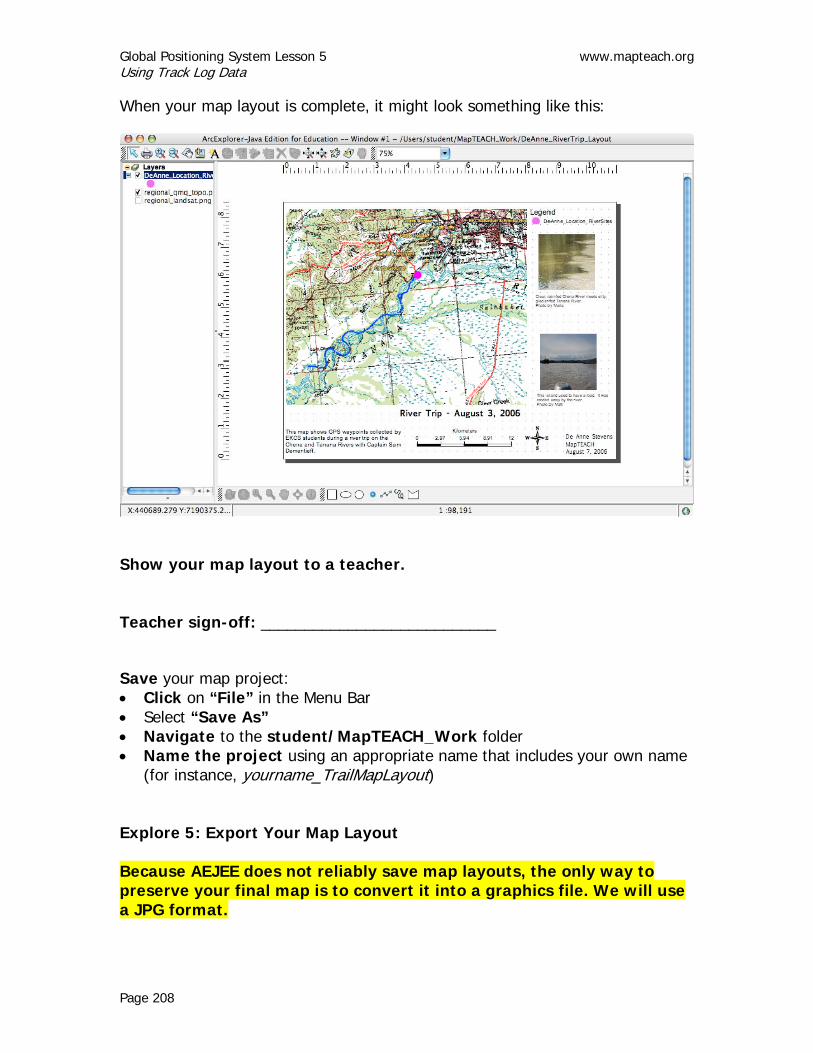
Global Positioning System Lesson 5 www.mapteach.org Using Track Log Data
Page 208
When your map layout is complete, it might look something like this:
Show your map layout to a teacher. Teacher sign-off: ___________________________ Save your map project: • Click on “File” in the Menu Bar • Select “Save As” • Navigate to the student/MapTEACH_Work folder • Name the project using an appropriate name that includes your own name
(for instance, yourname_TrailMapLayout) Explore 5: Export Your Map Layout Because AEJEE does not reliably save map layouts, the only way to preserve your final map is to convert it into a graphics file. We will use a JPG format.

www.mapteach.org Global Positioning System Lesson 5 Using Track Log Data
Page 209
Your map can then be printed, added as a picture into a word processing document, or used as a graphic image in presentation software like MS PowerPoint. 1. Choose File/Export to image from the AEJEE menu.
2. Choose File/Export to image from the AEJEE menu. A dialogue box will
appear and require a number for dots per inch (dpi) to specify the resolution of the output file. Use 150 dpi.
3. Wait patiently until a new window appears. It can take a couple of minutes. In the Export window, click “Export.”

Global Positioning System Lesson 5 www.mapteach.org Using Track Log Data
Page 210
4. Save the image into your MapTEACH_Work folder as a JPG. Name the
file to include the extension “.jpg”. Otherwise it will not save. Wait a minute or two while the computer exports your map.
5. Wait a moment to allow AEJEE to complete the export process, then
close the Export window and exit AEJEE. Print Your Map Layout Once the map image is saved, it can be imported to word processing documents (MS Word), graphics presentations (MS PowerPoint) or any image processing application. The exported map can also be emailed anywhere as an attachment. You may be able to just open your JPG map directly by double-clicking on the file, and then print it from your computer’s picture viewer. Show your printed map to a teacher. Teacher sign-off: ___________________________
EXAMPLE MAP

www.mapteach.org Global Positioning System Lesson 5 Using Track Log Data
Page 211
