pixar renderman2.0 partii
DESCRIPTION
Pixar RenderMan2.0 partIITRANSCRIPT

RenderMan PartII
Aj.Pruet Putjorn 1
Pixar RenderMan 2.0
PartII
RenderMan with Shadow’s Paint Effects
1. Select ground terrain 2. On menuset of Rendering, Go to menu Paint effects> Make Paintable
3. Go to menu Window> General Editors> Visor

RenderMan PartII
Aj.Pruet Putjorn 2
4. Select PlantsMesh category on the left 5. Select cortinarius.mel
6. Hold “b” on keyboard to make brush bigger 7. Paints on the ground as picture

RenderMan PartII
Aj.Pruet Putjorn 3
8. Render it with no shadow
9. Select key_lightShape, turn on Use Depth Map Shadows 10. Increase Resolution to 1024
RenderMan PartII
Aj.Pruet Putjorn 4
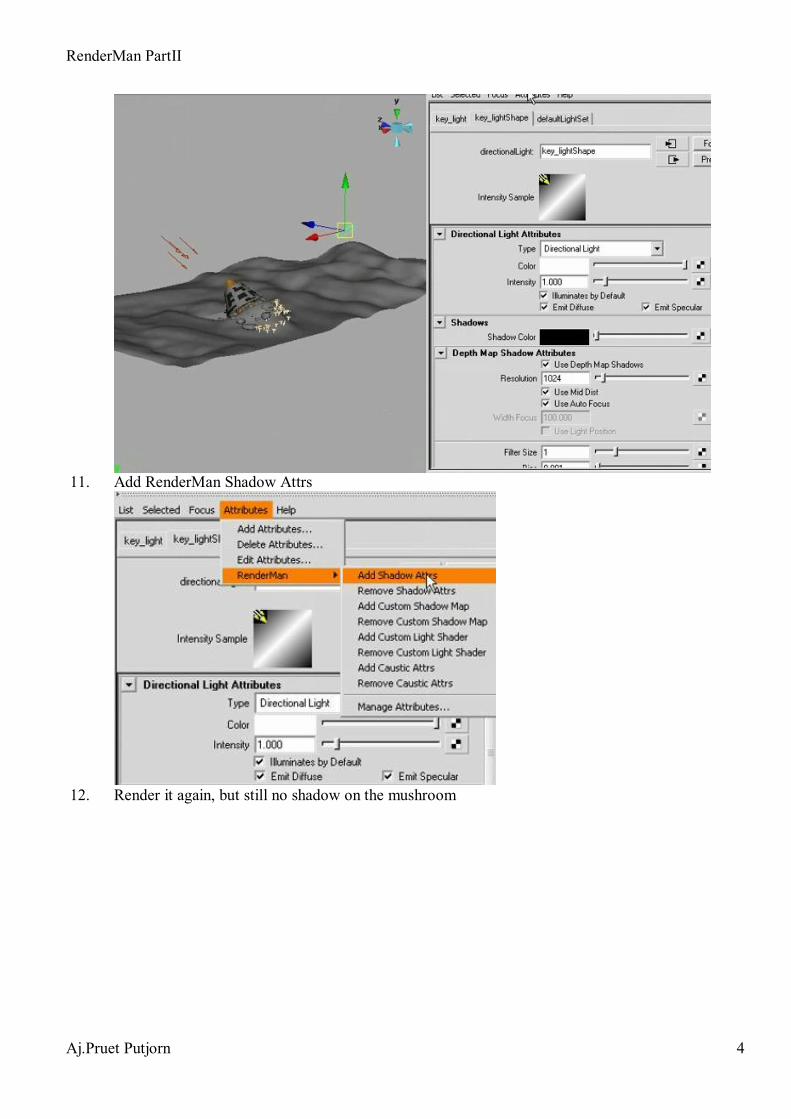
11. Add RenderMan Shadow Attrs
12. Render it again, but still no shadow on the mushroom

RenderMan PartII
Aj.Pruet Putjorn 5
13. Select mushroom 14. On the cortinarius1 Tab, turn on Cast Shadows on Shadow Effects
15. Render it again
RenderMan PartII
Aj.Pruet Putjorn 6
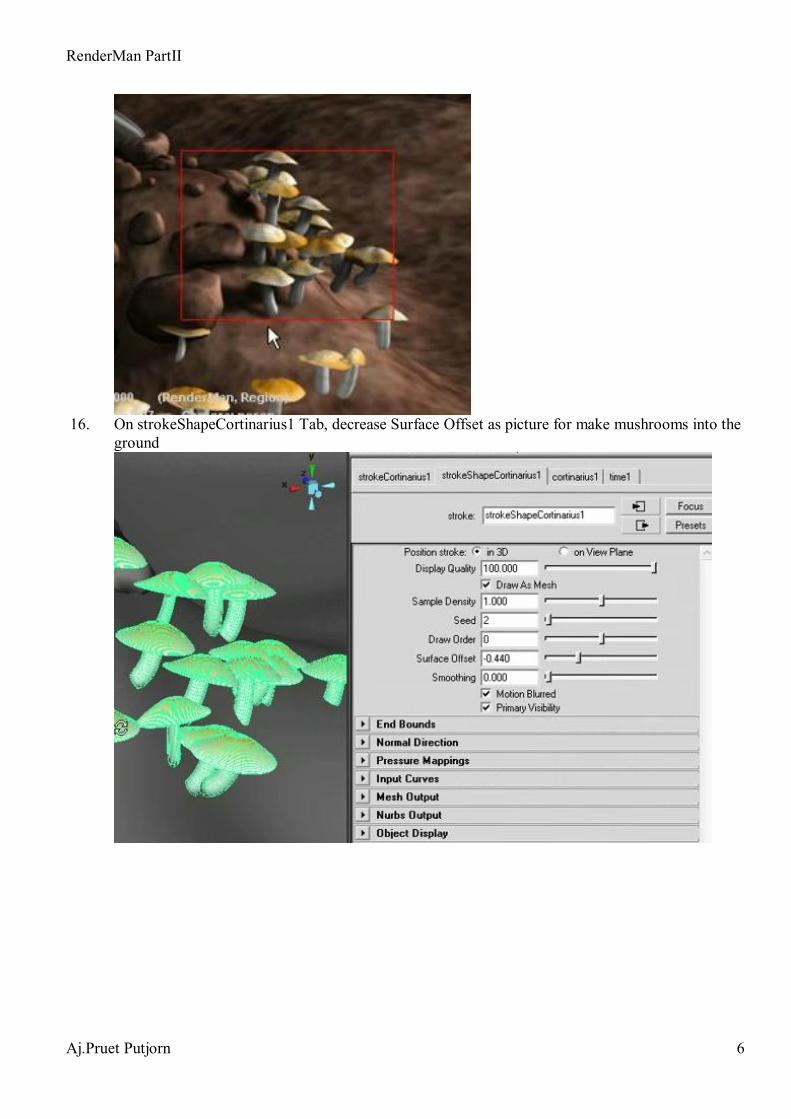
16. On strokeShapeCortinarius1 Tab, decrease Surface Offset as picture for make mushrooms into the ground

RenderMan PartII
Aj.Pruet Putjorn 7

RenderMan PartII
Aj.Pruet Putjorn 8
RenderMan with fur render 17. When you render scene will have bad result
18. On the hero Tab 19. Increase Density to 200000 hair

RenderMan PartII
Aj.Pruet Putjorn 9
20. Select spotLightShape2 and turn on Use Depth Map Shadows
21. To improve the hair render, add RenderMan Shadow Attributes

RenderMan PartII
Aj.Pruet Putjorn 10
22. Render it, will get better
23. Increase Depth Map Resolution to 1024
24. Increase quality on Render Setting

RenderMan PartII
Aj.Pruet Putjorn 11
25. Activate Sigma Hiding (very good on thin object) on Advanced Tab

RenderMan PartII
Aj.Pruet Putjorn 12
RenderMan with Curve Render 26. Go to menu Create> Pencil Curve Tool
27. Draw some curve shape
28. If you render, will get nothing 29. Select curve, go to menu Attributes> RenderMan> Add Rendering Attrs

RenderMan PartII
Aj.Pruet Putjorn 13
30. You will see the curve after Render
31. You can play around with this attribute
32. You can assign material and making color in the Custom ShadingGroup 33. Choose Create shadingEngine
RenderMan PartII
Aj.Pruet Putjorn 14
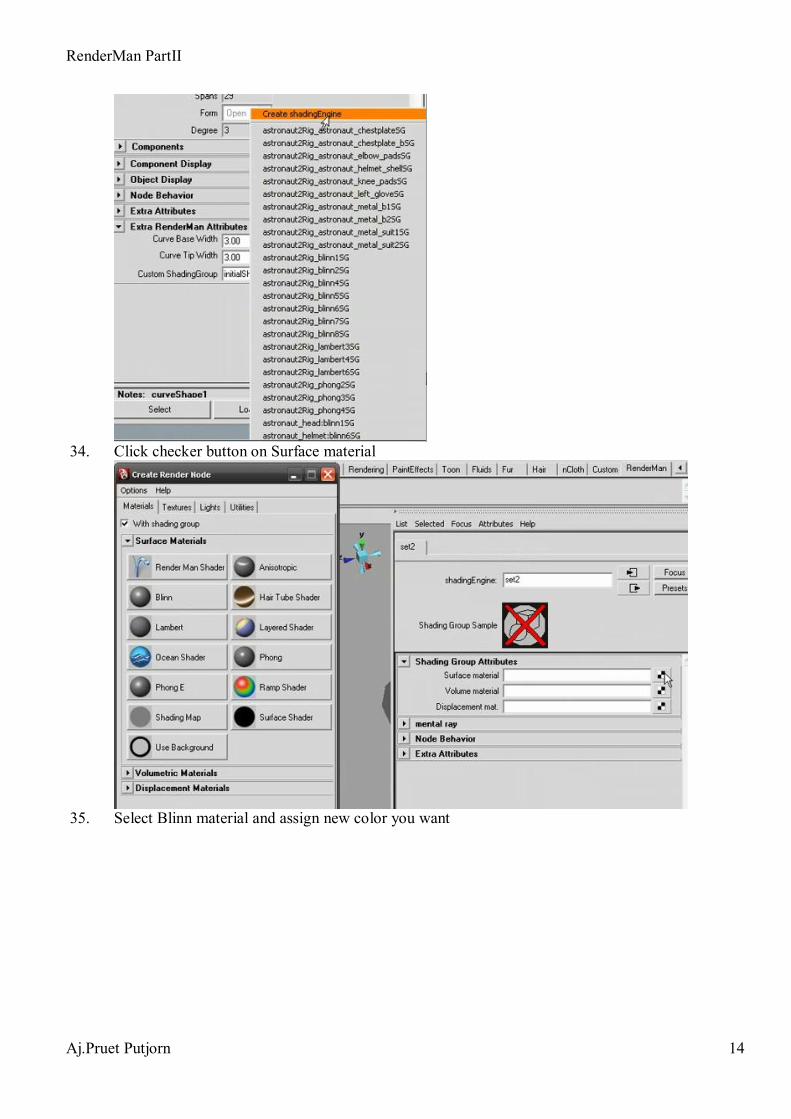
34. Click checker button on Surface material
35. Select Blinn material and assign new color you want

RenderMan PartII
Aj.Pruet Putjorn 15

RenderMan PartII
Aj.Pruet Putjorn 16
RenderMan with Subsurface Scattering
36. When you open the scene and render, will see normal shading from his face.
37. Create Spotlight for the scene
38. Select Spotlight and Look though Spotlight in perspective view

RenderMan PartII
Aj.Pruet Putjorn 17
39. Making angle behind of his head as picture
40. Increase Light Intensity to 2.000

RenderMan PartII
Aj.Pruet Putjorn 18
41. Create one more spotlight from the front of head (fill light) 42. Decrease light intensity to 0.400

RenderMan PartII
Aj.Pruet Putjorn 19
43. Select his face 44. Go to menu Attributes> RenderMan> Add Subsurface Scattering
45. You will get new list as picture

RenderMan PartII
Aj.Pruet Putjorn 20
46. When you render it, will get more lighter on face
47. If you change Scattering Strength to 3.00, get more effect, brighter
RenderMan PartII
Aj.Pruet Putjorn 21
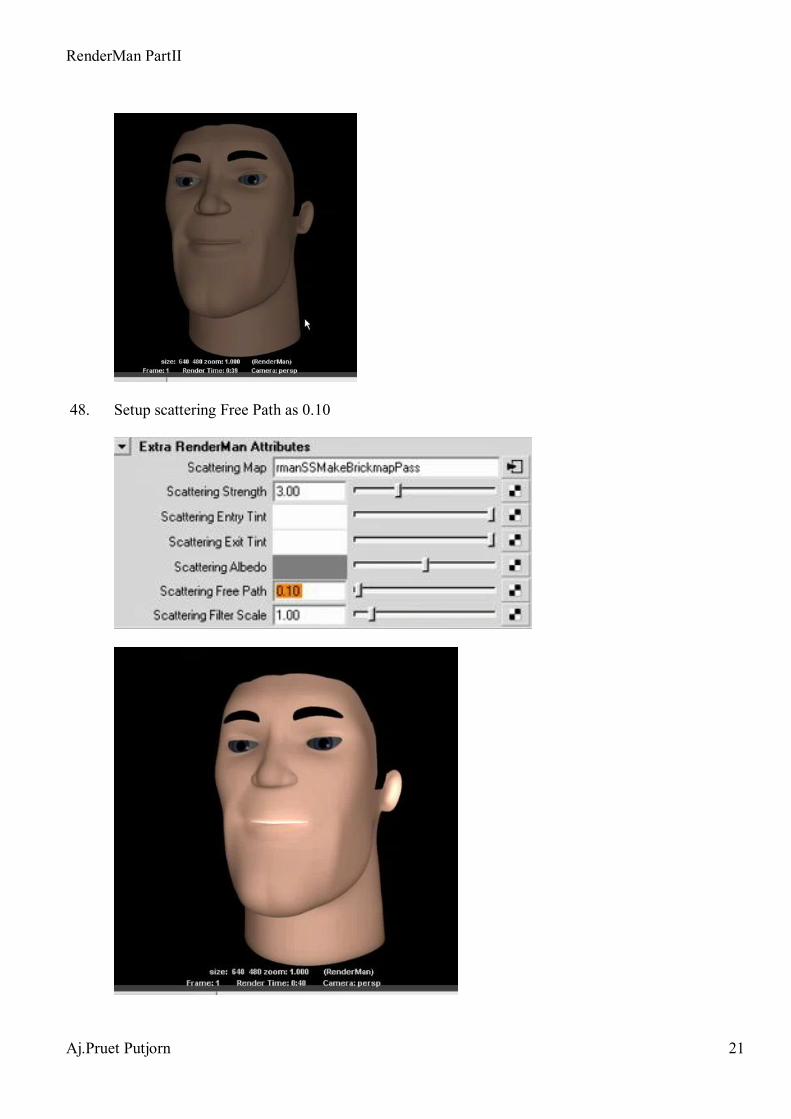
48. Setup scattering Free Path as 0.10

RenderMan PartII
Aj.Pruet Putjorn 22
49. Assign pink color to Scattering Exit Tint and decrease Scattering Strength to 2.00

RenderMan PartII
Aj.Pruet Putjorn 23
RenderMan with Subsurface Scattering (Continue)
50. Open scene and add RenderMan Subsurface Scattering to his face
51. Click the connect button on Scattering Map
52. On rmanSSDiffusePass Tab 53. Copy Command in a filed, put in the Notepad
54. Replace –albedo fromfile with material skin1
55. Replace –diffusemeanfreepath fromfile with –unitlength 0.01

RenderMan PartII
Aj.Pruet Putjorn 24
56. Make them back to the original position and copy it
57. Put it back to the Command filed
58. Render it
59. Create Spotlight behind his head and make it brighter as picture

RenderMan PartII
Aj.Pruet Putjorn 25
60. Duplicate the light as fill light and decrease intensity to 0.4
61. Render one more time

RenderMan PartII
Aj.Pruet Putjorn 26

RenderMan PartII
Aj.Pruet Putjorn 27
RenderMan with Caustic Effects 62. Render scene to see normal result
63. Create area light
64. Make angle as picture
65. Increase Penumbra angle to 10.000
RenderMan PartII
Aj.Pruet Putjorn 28
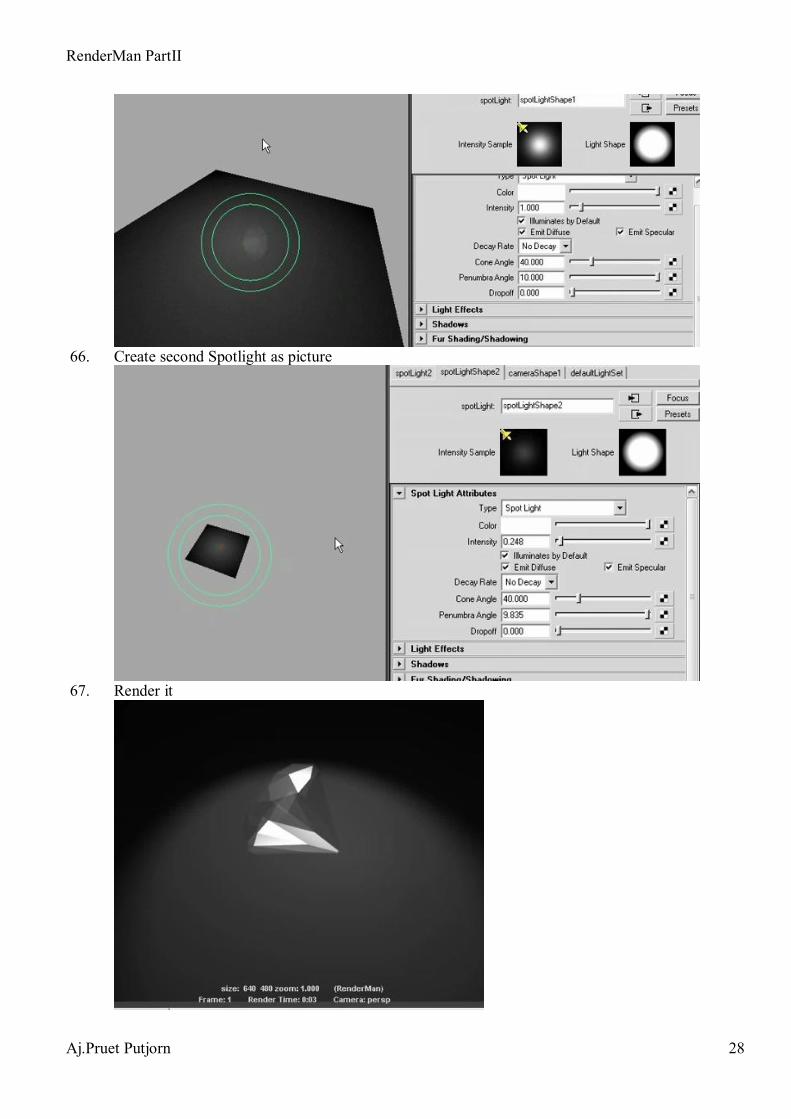
66. Create second Spotlight as picture
67. Render it

RenderMan PartII
Aj.Pruet Putjorn 29
68. Increase Intensity on light2 a bit
69. Select Diamond object 70. Go to Blinn material attribute 71. Add RenderMan “Caustic Controls”

RenderMan PartII
Aj.Pruet Putjorn 30
72. Select Glass on Shading Model
73. Activate Refractions and increase Refractive Index to 2.714 (Diamond)

RenderMan PartII
Aj.Pruet Putjorn 31
74. Still no caustics, have not add attribute on light yet 75. Select light1, add RenderMan Attributes “ Caustic Attrs”
76. Select the floor, add RenderMan Attributes “ Caustic Controls”
77. Select light1, turn on Decay Rate to be “Quadratic”

RenderMan PartII
Aj.Pruet Putjorn 32
78. Increase light intensity to 500 79. Render it
80. Change light intensity to 250

RenderMan PartII
Aj.Pruet Putjorn 33
81. On the light1, RenderMan Caustics Attribute 82. Try to setup as picture, change color of caustic filter, and strength
83. If you change Caustic Estimator to 25 (get shaper) or 500 (get more blur)
84. Go to Caustic Map link
85. If you change Emit to 10,000 (much more accurate)

RenderMan PartII
Aj.Pruet Putjorn 34

RenderMan PartII
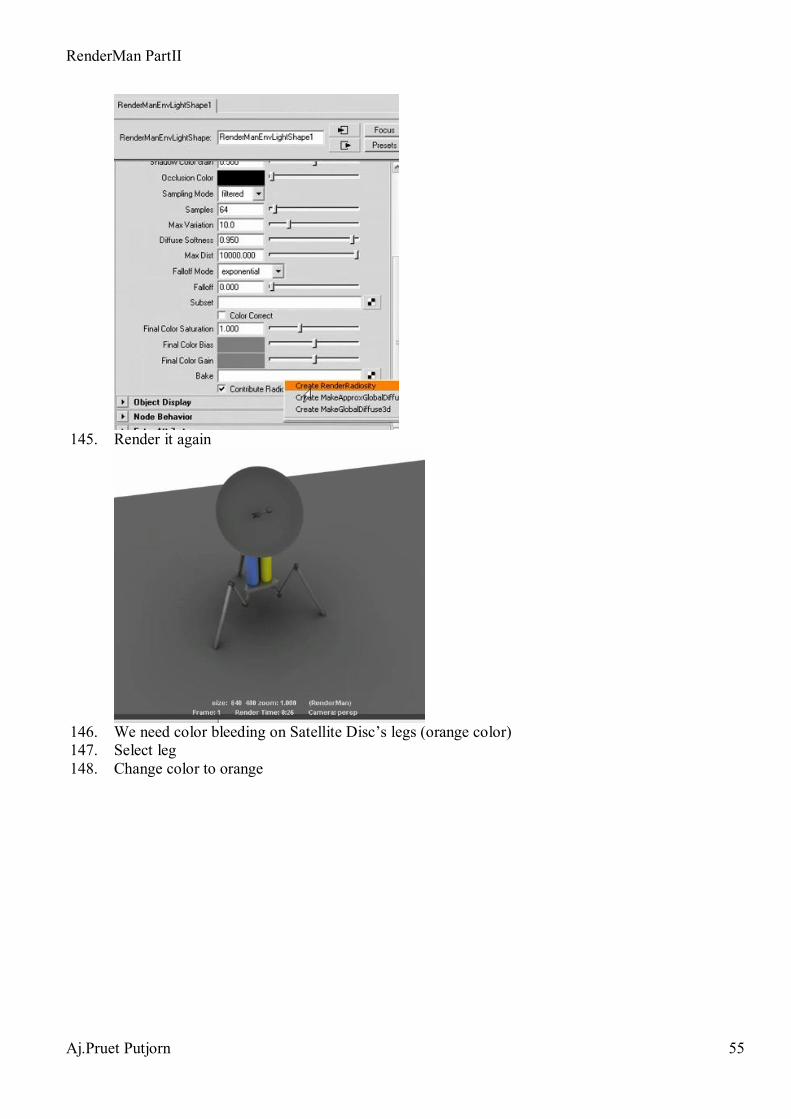
Aj.Pruet Putjorn 35
RenderMan with Global Illumination 86. Click ENV Light button on RenderMan self to create environment sphere
87. Render it
88. Select the env sphere and open attribute editor, will see RenderMan ENV light window 89. Create Spotlight for scene

RenderMan PartII
Aj.Pruet Putjorn 36
90. Make angle as picture and increase Penumbra Angle to 10
91. Now, get brighter, get information shaded on objects
92. Drops intensity to 0.7

RenderMan PartII
Aj.Pruet Putjorn 37
93. Activate Use Depth Map Shadows
94. Select the ENV sphere 95. On Environment Image, click folder button to add IBL

RenderMan PartII
Aj.Pruet Putjorn 38
96. Select N005_1500
97. You will get image on your sphere

RenderMan PartII
Aj.Pruet Putjorn 39
98. Render it, get high light on surfaces
99. But if you want to see only IBL, have to turn light off 100. Select Spotlight, turn off shadows, off illuminates by Default

RenderMan PartII
Aj.Pruet Putjorn 40

RenderMan PartII
Aj.Pruet Putjorn 41
RenderMan with Occlusion 101. Open Scene 102. Activate Ray tracing on Render Setting
103. Render it
104. Set Sampling Mode to Sampled (more Quality)

RenderMan PartII
Aj.Pruet Putjorn 42
105. Change Samples to 512 (more accurate) and Max Variation to 1.5 (how fast render it)
106. Render it, get much smooth quality, very long time to render, get some mistake on disc

RenderMan PartII
Aj.Pruet Putjorn 43
107. Select the disc, add RenderMan Attributes
108. Add “Trace Bias”
109. Set to about 0.01

RenderMan PartII
Aj.Pruet Putjorn 44
110. Rotate ENV sphere to move light source to the front of character
111. Render it, will take about 10 minus, not a good solution for time saving, we will using Bake on next the lesson

RenderMan PartII
Aj.Pruet Putjorn 45
RenderMan with Bake Occlusion 112. When you open scene, it already setup as very high quality values, it will take 30 minus to render
these
113. The file is already create Bake pass as you can see on Bake field
114. If you render this, will take about 33 minus
115. If you would like to Create Bake set, right click on Bake field, will get 3 options

RenderMan PartII
Aj.Pruet Putjorn 46
116. Select rmanMakeGlobalDiffuse3dPass(already created)
117. When you render, files will save to Bake_gi folder
118. Change Caching Behavior to “Reuse” for save render time (using cache data from computer)

RenderMan PartII
Aj.Pruet Putjorn 47
119. When you render it again, will using render time just 30 second
120. But if you turn camera from different angle, will get black spot (missing data), cause of system does not know from the new angle data

RenderMan PartII
Aj.Pruet Putjorn 48
RenderMan with point cloud occlusion 121. Open scene, decrease Max Dist to 1000
122. Turn on Ray Tracing on Render Setting and render it, will very slow render

RenderMan PartII
Aj.Pruet Putjorn 49
123. Turn off Ray Tracing on Render Setting
124. Create Bake for ENV light 125. On Bake field, right click, select “Create Render Radiosity”
126. Render it, faster, nice and clean than previous technique
RenderMan PartII
Aj.Pruet Putjorn 50
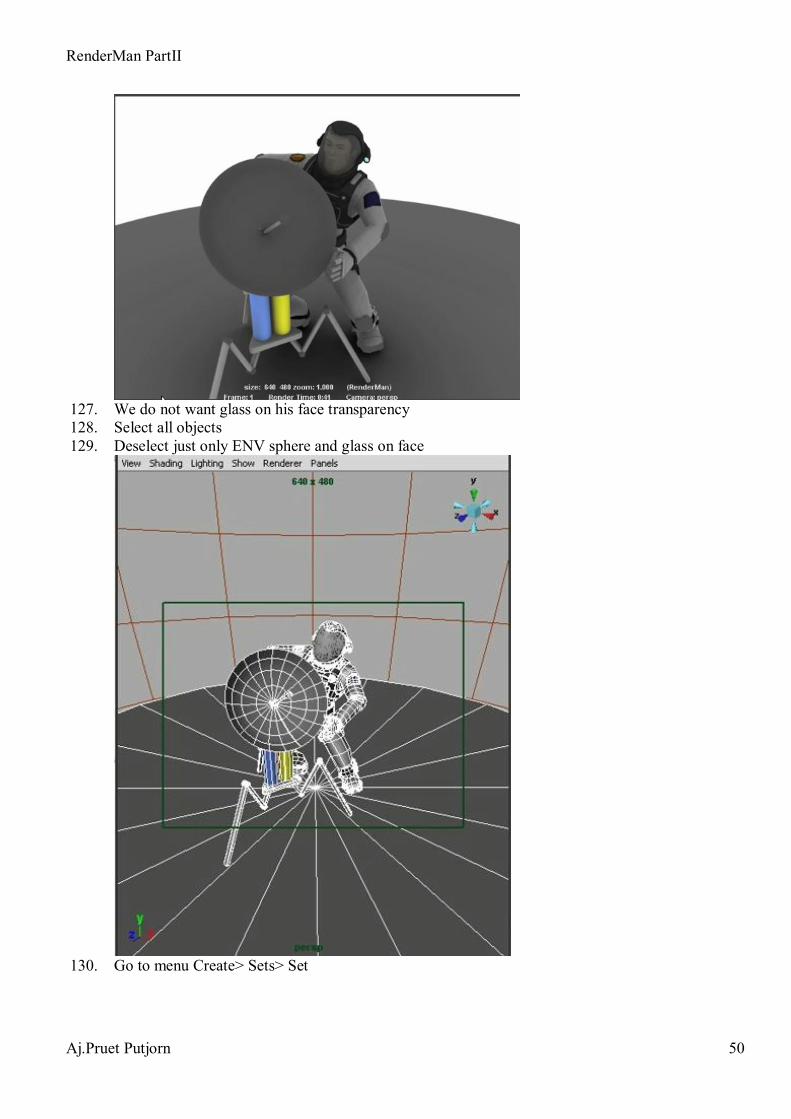
127. We do not want glass on his face transparency 128. Select all objects 129. Deselect just only ENV sphere and glass on face
130. Go to menu Create> Sets> Set

RenderMan PartII
Aj.Pruet Putjorn 51
131. You will get Set1
132. Rename to “a_occ_set”
133. Select on ENV sphere and click on Bake link button

RenderMan PartII
Aj.Pruet Putjorn 52
134. Right click on Object Set filed and select a_occ_set
135. Render to see what happened 136. We will separate body out of the set 137. Select satellite disc and floor 138. Go to menu Create> Sets> Set option
139. Rename to ab_occ_set

RenderMan PartII
Aj.Pruet Putjorn 53
140. On Object Set, right click, select ab_ooc_set
141. Render it, will see just only satellite disc have occlusion, human have just only normal shade

RenderMan PartII
Aj.Pruet Putjorn 54
RenderMan with Color Bleeding 142. First, create ENV light
143. Turn on Ray Tracing in Render Setting
144. Right click on Bake and select Create RenderRadiosity
RenderMan PartII
Aj.Pruet Putjorn 55
145. Render it again
146. We need color bleeding on Satellite Disc’s legs (orange color) 147. Select leg 148. Change color to orange

RenderMan PartII
Aj.Pruet Putjorn 56
149. Quick render it (no color bleeding yet)
150. Select on ENV light 151. Change Shadowing from Occlusion to Colorbleeding

RenderMan PartII
Aj.Pruet Putjorn 57
152. We need more bleeding 153. Select leg and increase Ambient Color to Maximum

RenderMan PartII
Aj.Pruet Putjorn 58
154. But, we need normal shader at satellite’ legs (not likes lava on legs) 155. Select ENV light 156. On Bake, click go to button
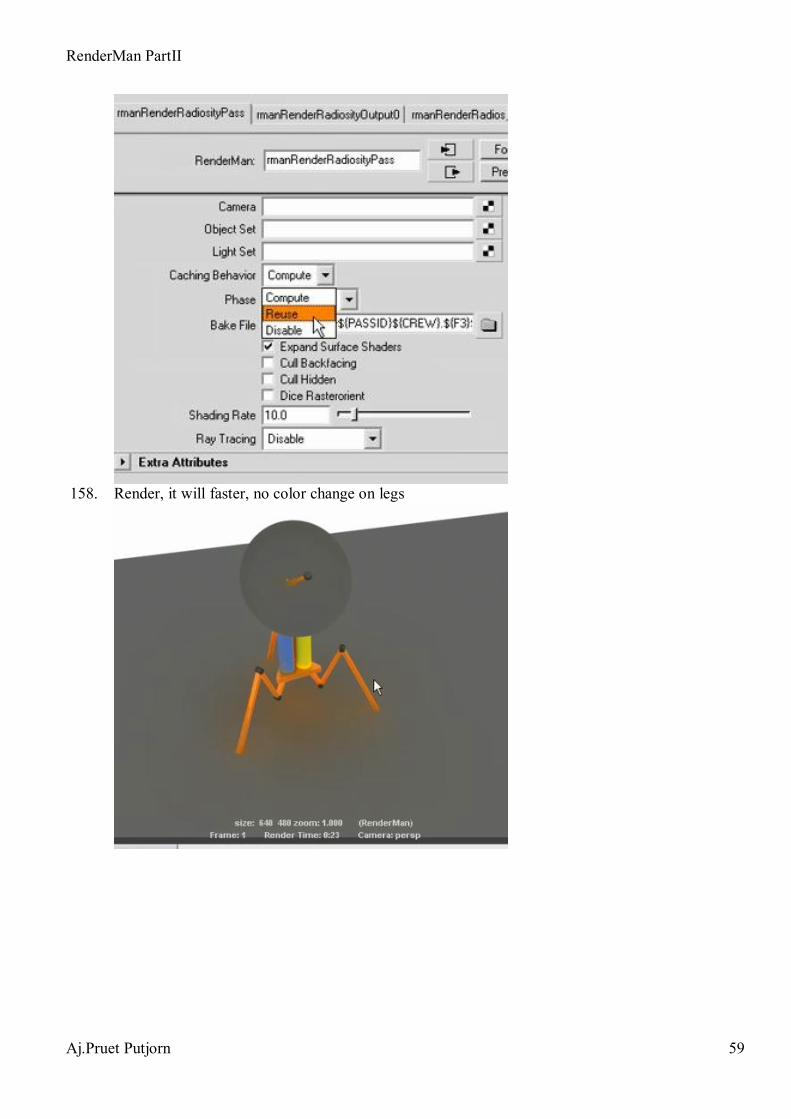
157. On Caching Behavior choose “Reuse”, because we rendered it and want to reuse again
RenderMan PartII
Aj.Pruet Putjorn 59
158. Render, it will faster, no color change on legs

RenderMan PartII
Aj.Pruet Putjorn 60
RenderMan with Occlusion and Color bleeding 159. Open scene, render it
160. Select all objects on disc and floor
161. Go to menuset of Rendering 162. Go to menu Lighting/Shading> Bake(RenderMan) option

RenderMan PartII
Aj.Pruet Putjorn 61
163. Set Objects to Selected, then click Bake and Close button
164. Press 6, show texture

RenderMan PartII
Aj.Pruet Putjorn 62
165. Select ENV light 166. Click go to button on Bake
167. Disable on Caching Behavior

RenderMan PartII
Aj.Pruet Putjorn 63

RenderMan PartII
Aj.Pruet Putjorn 64
RenderMan with Render Passes 168. Open render settings, see in Passes Tab
169. Create a Custom Output pass as picture
170. Right click and select DiffuseColor, Normal(N), OcclusionIndirect, Normal Geometry(Ng)

RenderMan PartII
Aj.Pruet Putjorn 65
171. Change Image Format to OpenEXR

RenderMan PartII
Aj.Pruet Putjorn 66
172. Click on batch icon
173. You can use compositing program to composite EXR file(include all passes)

RenderMan PartII
Aj.Pruet Putjorn 67

RenderMan PartII
Aj.Pruet Putjorn 68
RenderMan with Render’s Statistics 174. Open Render Settings, Advanced Tab 175. Turn on Output Statistics
176. Click folder on Statistics XML File
177. Rename file “render_stats” with “render_stats.xml”

RenderMan PartII
Aj.Pruet Putjorn 69
178. Click Batch icon
179. Open the data folder
180. Open file with Internet Explorer

RenderMan PartII
Aj.Pruet Putjorn 70
181. We will get file information likes picture below

RenderMan PartII
Aj.Pruet Putjorn 71
RenderMan with Create own shading language 182. Open file
183. Open Notepad and Create folder in c: drive names “shaders” 184. Save file as “myFirstShader.sl”
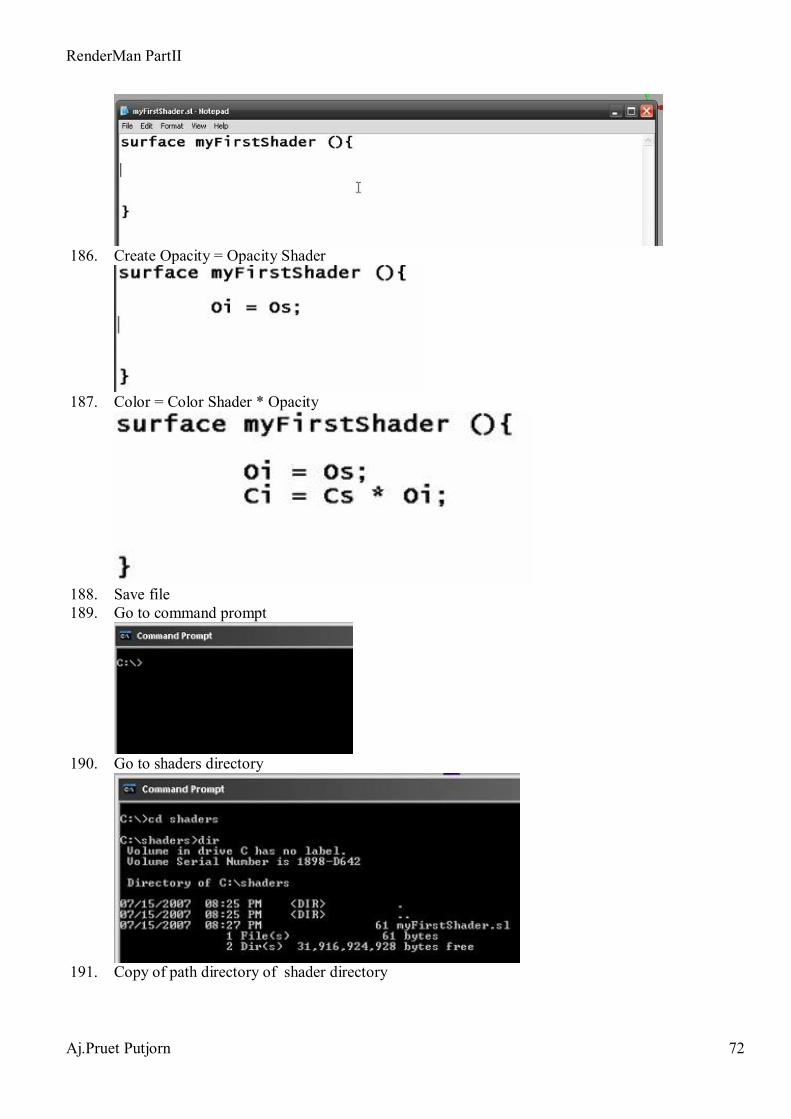
185. Type code as picture for the first step
RenderMan PartII
Aj.Pruet Putjorn 72
186. Create Opacity = Opacity Shader
187. Color = Color Shader * Opacity
188. Save file 189. Go to command prompt
190. Go to shaders directory
191. Copy of path directory of shader directory

RenderMan PartII
Aj.Pruet Putjorn 73
192. Open system properties 193. On Advanced Tab, click on Environment Variables
194. Double click on path variable 195. Paste copied path following in the filed (start with ;)

RenderMan PartII
Aj.Pruet Putjorn 74
196. Put ; at the end
197. Better way to using command 198. Create shortcut of Command Prompt in Shaders folder
199. Right click on shortcut, select properties

RenderMan PartII
Aj.Pruet Putjorn 75
200. Delete text in “Start in” filed
201. Now, when you double click on Command Prompt shortcut, it will popup command prompt window automatically
202. Typing shader myFirstShader.sl, system will compiled file

RenderMan PartII
Aj.Pruet Putjorn 76
203. After compiled, you will get .slo file
204. Create RenderMan Maya Shader Node
205. Add this shader to object

RenderMan PartII
Aj.Pruet Putjorn 77
206. Double click on shader 207. Click folder button on Shader filed
208. Open .slo file
209. Go to menu Attributes> RenderMan > Manage Attributes…
210. Add Color and Opacity Attributes then close

RenderMan PartII
Aj.Pruet Putjorn 78
211. Try to change color then render

RenderMan PartII
Aj.Pruet Putjorn 79
RenderMan with Create own shading language (Continuous) 212. Rename myFirstShader.sl to myNoiseShader.sl 213. Edit file as picture
214. Open UV Texture Editor
215. Edit text file as picture then save

RenderMan PartII
Aj.Pruet Putjorn 80
216. Compile myNoiseShader.sl
217. Load myNoiseShader.slo
218. Render it

RenderMan PartII
Aj.Pruet Putjorn 81
219. Edit file as picture, then save it
220. Compile, reload 221. Render it again 222. Change color to white

RenderMan PartII
Aj.Pruet Putjorn 82
223. Render it
224. Edit text file as picture, save it
225. Compile and Reload 226. You will get myFq parameters
227. Now, you can change parameter as you need 228. Edit text file as picture

RenderMan PartII
Aj.Pruet Putjorn 83
229. Now, you will get new blender slider
RenderMan with Create own shading language (Continuous)

RenderMan PartII
Aj.Pruet Putjorn 84
230. Create directional light
231. Move the light in the front of object
232. Turn on face normals

RenderMan PartII
Aj.Pruet Putjorn 85
233. Save new file as myNoiseDiffuseShader.sl
234. Edit file as picture

RenderMan PartII
Aj.Pruet Putjorn 86
235. Save file and Compile
236. Load file

RenderMan PartII
Aj.Pruet Putjorn 87
237. Render it

RenderMan PartII
Aj.Pruet Putjorn 88
RenderMan with Create own shading language (Continuous) 238. Save file as myFirstDisp.sl
239. Type code as picture
240. Save it 241. Compile it
242. Go to shading group 243. Load Displacement mat.
244. Select RenderMan Displacement Materials for this

RenderMan PartII
Aj.Pruet Putjorn 89
245. Load myFirstDisp.slo to Shader field
246. When you render it, will get something look bad
RenderMan PartII
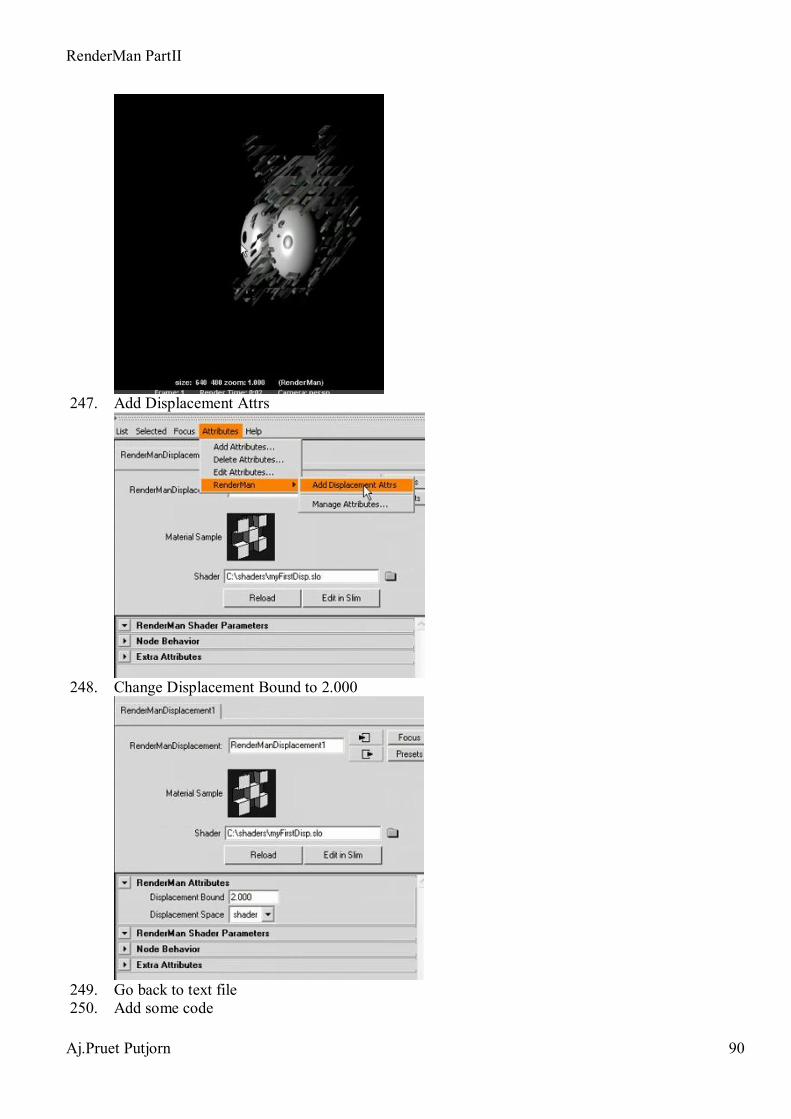
Aj.Pruet Putjorn 90
247. Add Displacement Attrs
248. Change Displacement Bound to 2.000
249. Go back to text file 250. Add some code

RenderMan PartII
Aj.Pruet Putjorn 91
251. Save and compile 252. Render it again
253. Go back to text file 254. Add some code
255. Save and compile 256. Click reload button
RenderMan PartII
Aj.Pruet Putjorn 92
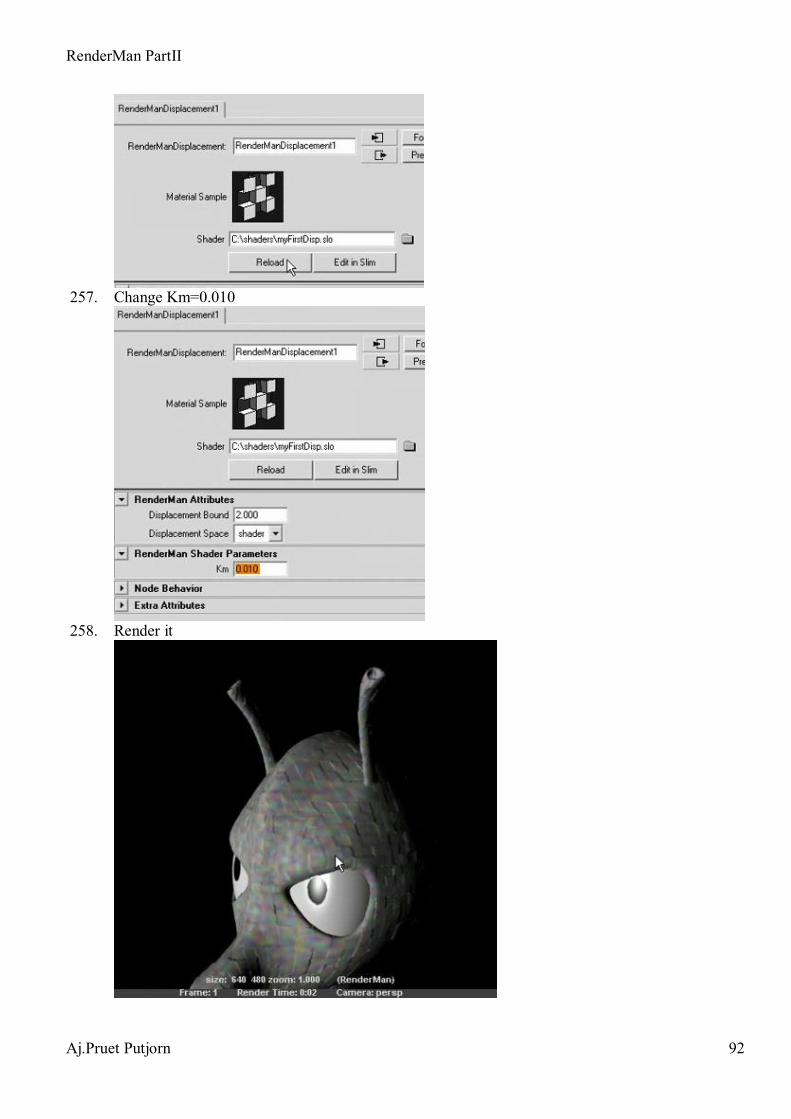
257. Change Km=0.010
258. Render it

RenderMan PartII
Aj.Pruet Putjorn 93
RenderMan with Create own custom light shader 259. Create point light
260. Move it likes picture
261. Create NURBS Plane
262. Scale it

RenderMan PartII
Aj.Pruet Putjorn 94
263. Render it
264. Open Note Pad and save it as myFirstLight.sl
265. Write code as picture

RenderMan PartII
Aj.Pruet Putjorn 95
266. Save and Compile
267. Add custom light shader
268. Click create icon

RenderMan PartII
Aj.Pruet Putjorn 96
269. Load myFirstLight.slo to shader
270. Change color to orange
271. Render it
272. If we want to add occlusion 273. Go back to Note Pad 274. Add more code

RenderMan PartII
Aj.Pruet Putjorn 97
275. Save and Compile 276. Move light near head
277. Activate Raytracing
278. Render it

RenderMan PartII
Aj.Pruet Putjorn 98