pir moisture poof lamp - lexing · pir moisture poof lamp ... please check if there is any hinder...
TRANSCRIPT

PIR MOISTURE POOF LAMP
This product is a kind of energy-saving automatic lamp ,it can turn on when one comes and turn off when he leaves, It can identify day and night automatically. It adopts infrared energy discharge detector and integrated circuit. its performance is stable. The lamp will be on when one enters the detection field and trigger it, and it will be off when one leaves.
1.Can identify day and night automatically, the working light-control can be adjusted freely, it can work automatically at night and stop in the daytime.2.The illuminated time can be delayed automatically and adjusted according to the customer’s desire.
100.8mm264mm
LX-PR-83 Infrared Sensor Lamp Instruction
Correct moving orientation Detection angle
Specifications
Sensor information
140°/180°/200°9m (Max)
Summary
Function
Power source: 220-240V/AC
110-130V/AC
Power frequency: 50/60Hz
Rated load: 60W Max.(incandescent lamp)
Detection angle: 140° 180° 200°
Detection range: 9m(Max)(24°C)
Time setting: min:8sec±3sec
max: 7min±2min
Light-control: 10LUX~sunshine
Installation height: 1.5m~3m
Working temperature: -10°C~+40°C
Working humidity: ≤93%RH IP 44
Infrared Sensor Lamp 1X
2X
2X
2X
QuantityPacking list in
Φ6 Plastic expansion
Φ4 Sealing ring
3x30 Screw
184mm144mm
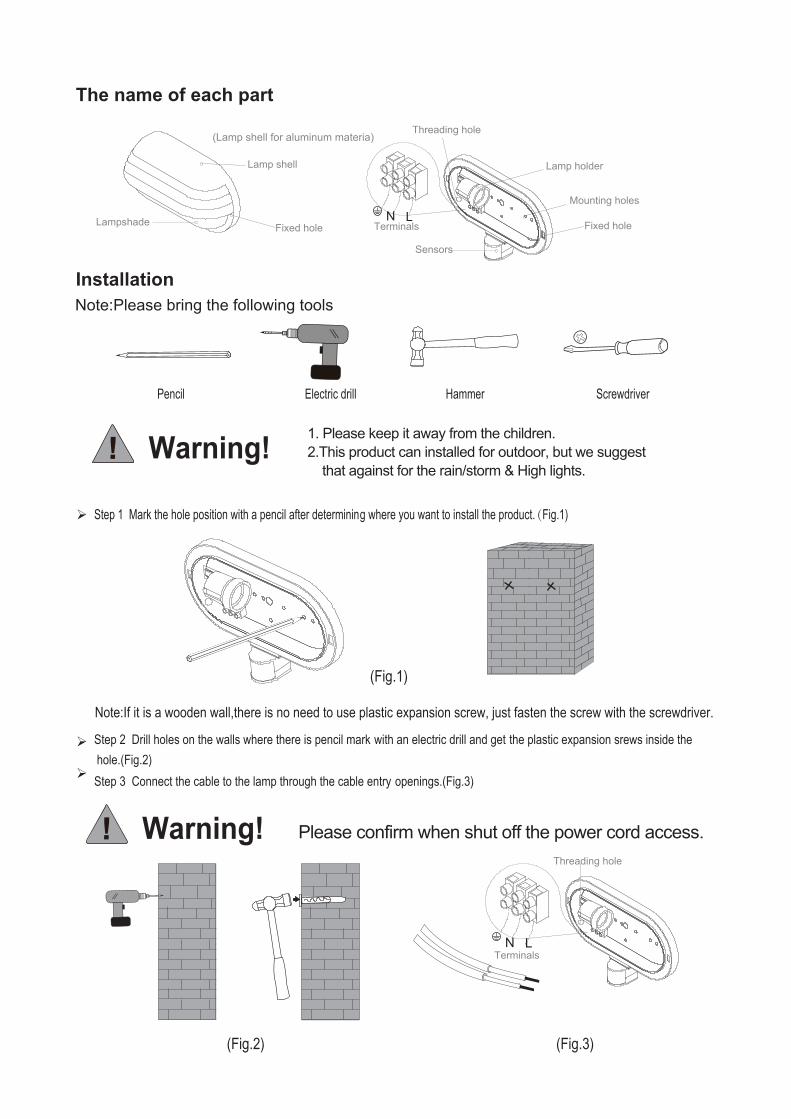
Step 1 Mark the hole position with a pencil after determining where you want to install the product.(Fig.1)
Threading hole
Threading hole
Lamp holder
Fixed hole Fixed hole
Mounting holes
Terminals
Terminals
Lamp shell
Lampshade
Sensors
N
The name of each part
Installation
Pencil Electric drill Hammer Screwdriver
Note:Please bring the following tools
Warning! 1. Please keep it away from the children.2.This product can installed for outdoor, but we suggest that against for the rain/storm & High lights.
(Lamp shell for aluminum materia)
N L
Note:If it is a wooden wall,there is no need to use plastic expansion screw, just fasten the screw with the screwdriver.
Step 2 Drill holes on the walls where there is pencil mark with an electric drill and get the plastic expansion srews inside the
Step 3 Connect the cable to the lamp through the cable entry openings.(Fig.3)hole.(Fig.2)
Please confirm when shut off the power cord access.Warning!
(Fig.1)
(Fig.2) (Fig.3)
L

PIR MOISTURE POOF LAMP
L
Step 5 Fasten the cover to the lamp base which has been installed on the wall.(Fig.5)
Step 6 Open the cover of the control panel downwards, and set the control knobs,and then cover the control panel upwards.(Fig.6)
Step 4 If it is a wooden wall,there is no need to use plastic expansion,just drive the screw with the screwdriver.(Fig.4a) If it is not a wooden wall ,please refer to step 2.(Fig.4b)
Suggest using the load below 40W, if it is beyond 40W, please add heat shield on the sensor.
(Fig.4a) (Fig.4b)
(Fig.5) (Fig.6)
Heat shield
After installing, turn the time knob anticlockwise to minimum before electrifying, turn light-control knob to minimum (daytime) anticlockwise.The load should work after the first electrifying for 5S, then it stops , make it induct again within 30s, the load should work again. If all are regular, adjust the time knob to set the light time according to your desire; you can set the working ambient light by adjusting the light-control knob.Attention: during the using course,it can induct continually if the load doesn’t stop working after the last indication , otherwise it will make the next induction after 5s interval.
1. Electrician and experienced human can install it.2. The unrest objects can’t be regarded as the installation basis-face.3. There is no hinder or unrest objects effecting detection in front of the detection window.4. Avoid installing it near temperature alteration zone, for example, air condition, central heater etc.5. Please do not open the case for your safety if you find the hitch after installation, you should contact the provider in time.6. If there are some difference between instruction and the function the product has, please give priority to product and sorry not to inform you additionally.
Test
Note

Some problem and solved way
Warning!
The load can not work1. Check if the connection of power and load is correct;2. If the lamp is good;3. If the set work light correspond to ambient luminance.
The sensitivity is poor1. Please check if there is any hinder in front of the detection window that effect to receiving the signals;2. Please check the ambient temperature;3. Please check if the signal source is in the detection field;4. Please check the installation height;5. If the moving orientation is right.
The sensor can not shut off the load automatically1. If there is continual induction signal in the detection field;2. If the time setting is set to the largest;3. If the power correspond to the instruction required;4. If the temperature change near the sensor (air conditioner, central heater etc).
Please confirm with profession installation.
Please cut off power supply before installation and removal operations.
Make sure that you have cut off the power for safety purposes.
Improper operation caused losses, the manufacturer does not undertake any responsibility.