pipelines welding handbook
TRANSCRIPT
8/2/2019 Pipelines Welding Handbook
http://slidepdf.com/reader/full/pipelines-welding-handbook 1/64
Pipelines Welding Handbook
• Welding techniques • Welding consumables • Defects and remedies
XA00105920

8/2/2019 Pipelines Welding Handbook
http://slidepdf.com/reader/full/pipelines-welding-handbook 2/64
INTRODUCTION .............................................. 3
Joint details ............................................................. 4Joint types ............................................................... 5
Electrode positioning angles ................................... 6
Pipe classification ................................................... 7
Consumption of electrodes ..................................... 11
ASME / EN positions .............................................. 13
THE MANUAL METAL ARC
PROCESS ........................................................... 15
General information .............................................. 16
Filler materials ........................................................ 17
Pipeweld cellulosic electrodes ................................ 17
Basic electrodes ...................................................... 19
Basic electrodes - Technical data ............................ 20
Cellulosic electrodes - Technical data..................... 22
WELDING TECHNIQUES
AND OPERATIVE PRACTICES ................. 25
General information .............................................. 26
Pipe welding in vertical down (downhill)
with cellulosic electrodes
1 - Preparation and tacking ..................................... 272 - Joint in 5G/PG position ...................................... 29
3 - Joint in 6G/H-L045 position ............................... 35
Welding of pipes in vertical up (uphill)
with mixed cellulosic/basic technique
1 - Preparation and tacking ..................................... 38
2 - Joint in 5G/PF position ...................................... 40
3 - Joint in 2G/PC position ...................................... 44
4 - Joint in 6G/H-L045 position .............................. 47
DEFECTS: CAUSES AND REMEDIES ...... 49
AUTOMATIC PIPE WELDING .................... 53
General information .............................................. 54
Filler materials ........................................................ 55
Welding techniques and operational practices ....... 57
Examples of WPS ................................................... 58
Comparison between three welding methods.......... 62
Defects and remedies ............................................. 63
List of contents
1

8/2/2019 Pipelines Welding Handbook
http://slidepdf.com/reader/full/pipelines-welding-handbook 3/64
INTRODUCTION

8/2/2019 Pipelines Welding Handbook
http://slidepdf.com/reader/full/pipelines-welding-handbook 4/64
Butt Joint
1. Root gap: separation between the edges to be weldedat the root of the joint
2. Root face: surface of the joint preparationperpendicular to the surface of the plate
3. Bevel surface: oblique surface of the joint preparation4. Bevel angle: angle between the bevelled surface and
a plane perpendicular to the plate5. Included angle: total angle between the two bevelsurfaces
6. Seam width: effective width of the joint (distancebetween the bevels plus depth of penetration). Thewidth of the calking iron seam and groove iron are thesame thing
7. Thickness of the plate
Fillet Joint
1. Throat thickness: distance between seam root andsurface measured on the bisector of the angle
2. Leg lenght: distance between seam root and edge3. Joint root: point in which the bottom of the seam
intersects the surface of the base metal4. Joint edge: junction point between seam surface and
base metal surface5. Joint surface: external surface of the seam6. Fusion depth: depth reached by the fusion bath from
the surface of the base metal7. Seam width: distance between the joint edges
Joint details
4
8/2/2019 Pipelines Welding Handbook
http://slidepdf.com/reader/full/pipelines-welding-handbook 5/64
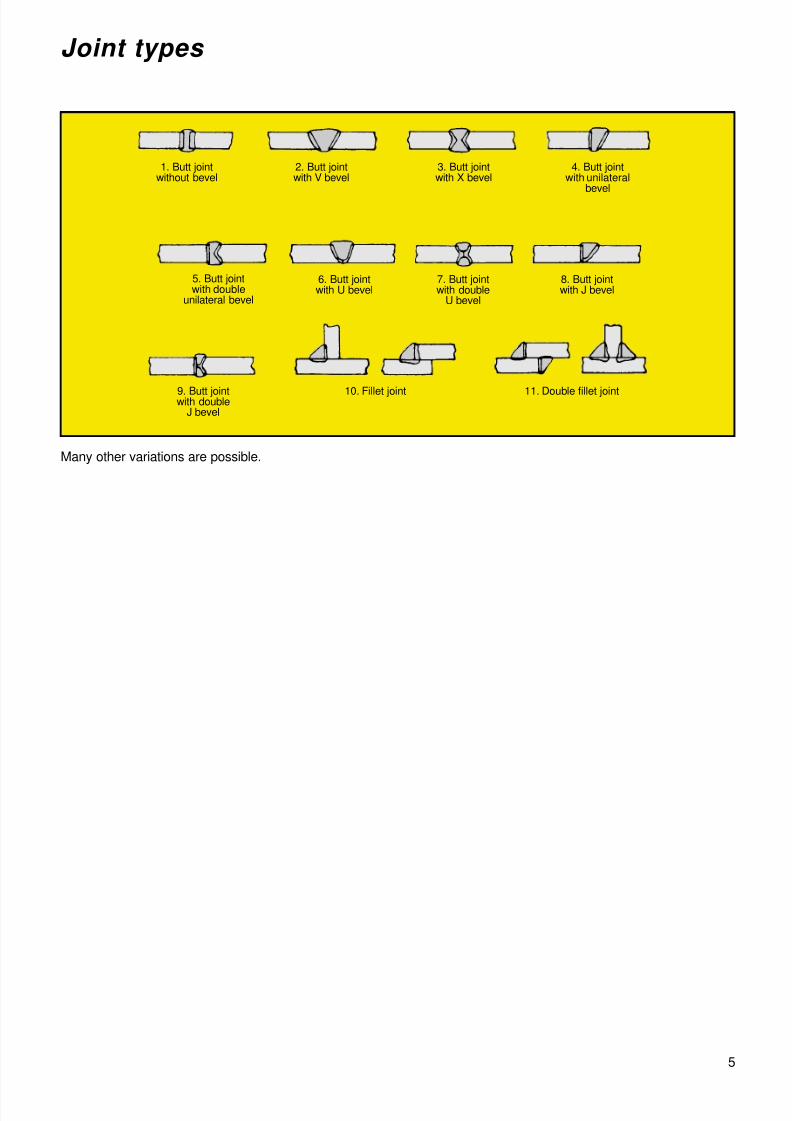
Many other variations are possible.
5
1. Butt jointwithout bevel
2. Butt jointwith V bevel
3. Butt jointwith X bevel
4. Butt jointwith unilateral
bevel
5. Butt jointwith double
unilateral bevel
6. Butt jointwith U bevel
7. Butt jointwith double
U bevel
8. Butt jointwith J bevel
9. Butt jointwith doubleJ bevel
10. Fillet joint 11. Double fillet joint
Joint types

8/2/2019 Pipelines Welding Handbook
http://slidepdf.com/reader/full/pipelines-welding-handbook 6/64
In this handbook the official AWS method is used todefine the positioning angles of the electrodes(EN added).Two angles are indicated: the feed angle and the workangle.
The feed angle is called “TO BE PUSHED” when theelectrode points in the feed direction.The feed angle is called “TO BE PULLED” when theelectrode points in opposite direction to the feed.The work angle is given in relation to a reference planeor work plane.The figures illustrate the definition method of the angles.Taking the clock face as reference, 1 minute correspondsto 6°.
WORK PLANE
F E E D
WELDING AXIS
F E E D P L
A N E
A N G L E T
O B E P U L
L E D
A N G L E T
O B E P U S
H E D
WORK PLANE
F E E D P L
A N E
A N G L E T
O B E P U S
H E D A N G L E T
O B E P U L
L E D
F E E D
WELDING AXIS
W O R K P L
A N E
S Y M M E T
R Y A X I S
M E T R Y A
X I S
F E E D P LAN E F E E D
ANGLE TO BE PUSHEDANGLE TO BE PULLED
Electrode positioning angles
6
Vertical
Horizonal

8/2/2019 Pipelines Welding Handbook
http://slidepdf.com/reader/full/pipelines-welding-handbook 7/64
Pipe classification Non-welded and welded pipes sized in accordance with ANSI B 36.10 and API standards
7

8/2/2019 Pipelines Welding Handbook
http://slidepdf.com/reader/full/pipelines-welding-handbook 8/64
Prescriptions concerning the results of the traction and bending test for thicknesses ≤
25mm1, and for the hydrostatic test
8
Designation of the steels Pipe body Welding seam Pipe(unwelded and welded pipes)
HFW, SAW, SAW, COWCOW
Alphanumeric Numeric Unitary yielding Tensile Elongation3 Tensile Diameter of Hydrostaticpoint strength (L0 = 5,65√S 0 strength the spindle test
for bendingR 10,5 R m R 10,5 / R m
2 A R m test4
(see 8.2.3.5) (see 8.2.3.8)MPa MPa % MPa
min. max. min. min.
L245NB 1.0457from 245 to 440 415
0,8022 3 T
L245MB 1.0418 0,85
L290NB 1.0484from 290 to 440 415
0,8021 3 T
L290MB 1.0429 0,85
L360NB 1.0582 0,85L360QB 1.8948 from 360 to 510 415 0,88 20 4 T
L360MB 1.0578 0,85
L415NB 1.8972 0,85L415QB 1.8947 from 415 to 565 420 0,88 18 5 T
L415MB 1.8973 0,85
L450QB 1.8952from 450 to 570 535
0,9018 6 T
L450MB 1.8975 0,87
L485QB 1.8955from 485 to 605 570
0,9018 6 T
L485MB 1.8977 0,90
L555QB 1.8957from 555 to 675 625
0,9018 6 T
L555MB 1.8978 0,90
1 The mechanical features of pipes with greater thickness values of up to 40mm must be agreed.2 The values of the ratio between the unitary yield point and the tensile strength are applied for the “pipe”product.They cannot be requested for thestarting material.
3 These values are applied for transversal samples withdrawn from the body of the pipe. If longitudinal samples are tested, the elongation valuesmust be increased by 2 units.
4 T = prescribed pipe thickness.
The same va-lues as the pipebody are ap-plied.
Each pipe musttake the testwithout showinglosses or visibledeformations

8/2/2019 Pipelines Welding Handbook
http://slidepdf.com/reader/full/pipelines-welding-handbook 9/64
Outside diameters and preferential thicknesses (indicated in the framed zone of the table,including the frame itself)
Outside Thicknessdiameter mm
mm 2,3 2,6 2,9 3,2 3,6 4 4,35 5 5,6 6,3 7,1 8 8,8 10 11 12,5 14,2 16 17,5 20 22,2 25 28 30 32 36 40
33,7
42,4
48,3
60,3
88,9
114,3
168,3
219,1
273
323,9
355,6
406,4
457
508
559
610
660
711
762
813
864
914
1 016
1 067
1 118
1 168
1 219
1 321
1 422
1 524
1 626
9

8/2/2019 Pipelines Welding Handbook
http://slidepdf.com/reader/full/pipelines-welding-handbook 10/64
10
Mechanical features / Chemical compositions (A.P.I. steels)
A.P.I.Mechanical prop. MPa Chemical composition %
Carbonium
specification Quality Yielding Tensile Carbon Manganese (max)
point strength (max) (max) equivalent

8/2/2019 Pipelines Welding Handbook
http://slidepdf.com/reader/full/pipelines-welding-handbook 11/64
11
Consumption of electrodes Pipeweld electrodes consumption (kg) in downhill vertical

8/2/2019 Pipelines Welding Handbook
http://slidepdf.com/reader/full/pipelines-welding-handbook 12/64
12
Pipeweld electrodes consumption (kg) in uphill vertical
N o t e : f o r p i p e s o f l e s s t h a n 1 5 2 m m (
6 ” ) d i a m e t e r , w i t h w a l l t h i c k n e s s u p t o 6 . 4 m m , P i p e w e l d 6 0 1 0 , d i a m e t
e r 2 . 5 m m , m a y b e u s e d f o r t h e f i r s t b e a d .
A p p r o x i m a t e w e i g h t o f P i p e w e l d e l e c
t r o d e s
Ø 3 . 2
5 a p p r o x .
2 8 g r a m s
Ø 4 . 2
5 a p p r o x .
4 0 g r a m s
Ø 5 . 2
5 a p p r o x .
6 2 g r a m s

8/2/2019 Pipelines Welding Handbook
http://slidepdf.com/reader/full/pipelines-welding-handbook 13/64
13
1G/1F (PA) 2G (PC)
3G/3F
1F (PA)2F (PB) 3G/3F
4G
(PE) 5G
6G
PG - DOWNHILLPF - UPHILL
PG - DOWNHILLPF - UPHILL
PG - DOWNHILLPF - UPHILL
(H-LO45)
ASME/EN positions

8/2/2019 Pipelines Welding Handbook
http://slidepdf.com/reader/full/pipelines-welding-handbook 14/64

8/2/2019 Pipelines Welding Handbook
http://slidepdf.com/reader/full/pipelines-welding-handbook 15/64
THE MANUAL METAL ARC
PROCESS

8/2/2019 Pipelines Welding Handbook
http://slidepdf.com/reader/full/pipelines-welding-handbook 16/64
16
General information
The main welding process used to weld pipelines is theMMA method, manual welding with coated electrodes.There are many reasons for this choice. The first is themost obvious: the manual electrode is the first productinvented that is suitable for arc welding.
However, still today, when more sophisticated materialsand more productive and less expensive techniques areat the users’ disposal, MMA welding remains a favouredprocess to weld pipes. Its easy use, capacity to reachpositions of difficult accessibility, the simplicity of thenecessary generators (or the fact of being able to usemotor generators; network power is not always availableon installation sites), the fact that protective gases(difficult to find in certain countries, in particular thirdworld countries), necessary in welding with solid or coredwires, are not required, all these and others are thereasons for this choice.Some classes of cellulosic and basic electrodes havebeen specially designed to meet the requirements of the
grade of steel used to manufacture the pipeline and thesafety specifications laid down by standards, but also toequip the user i.e. welders with versatile products createdfor this specific purpose.

8/2/2019 Pipelines Welding Handbook
http://slidepdf.com/reader/full/pipelines-welding-handbook 17/64
Care and storage of cellulosic electrodesCellulosic electrodes need a definite amount of moisture,normally between 3% and 9%, to give satisfactoryoperation. Over drying this type of electrode will lead tocharring of the organic material within the coating.This
can give un-satisfactory welding performance, loss of arcvoltage and weld metal porosity. These types ofelectrodes should NOT be re-dried.
Cans for transport and stockage in heavy
environments
The ESAB range of consumables for pipeline weldinghas been developed to match the steel qualities and thedemands from the pipeline industry for reliable, easy to
17
OK PIPEWELD CELLULOSICELECTRODES
OK Pipeweld electrodes have always been a safe andproductive solution in the welding of pipelines.
Features• High Cellulose content in the electrode provides an
intense arc good penetration in all positions.
• High Cellulose content gives small slag covering of theweld bead, although it is easily re-melted it is advisableto remove before welding the next bead.
• The thin coating combined with the penetrating arcenables a smaller root gap to be utilised and thecomplete joint requires less weld metal to bedeposited.
• The rapid solidification of the weld metal allows truly all
positional welding
Recommended current ranges for the different
welding positions.
Welding equipment
The welding generators that can be used with OKPipeweld need to have a relatively high open circuitvoltage (OCV > 65V) and good dynamic characteristics.This prevents the arc snapping out during the weldingoperation.
Filler materials
8/2/2019 Pipelines Welding Handbook
http://slidepdf.com/reader/full/pipelines-welding-handbook 18/64
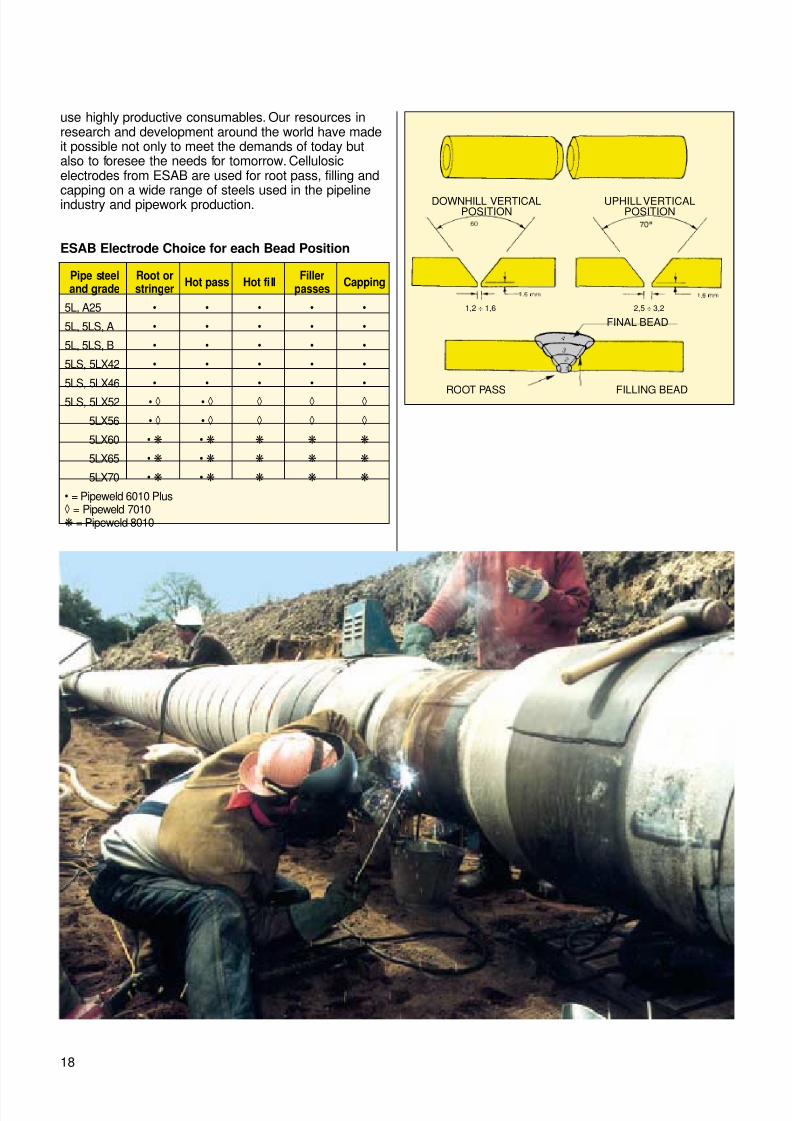
use highly productive consumables. Our resources inresearch and development around the world have madeit possible not only to meet the demands of today butalso to foresee the needs for tomorrow. Cellulosicelectrodes from ESAB are used for root pass, filling and
capping on a wide range of steels used in the pipelineindustry and pipework production.
ESAB Electrode Choice for each Bead Position
18
Pipe steel Root orHot pass Hot fill
FillerCapping
and grade stringer passes
5L, A25 • • • • •
5L, 5LS, A • • • • •
5L, 5LS, B • • • • •
5LS, 5LX42 • • • • •
5LS, 5LX46 • • • • •
5LS, 5LX52 • ◊ • ◊ ◊ ◊ ◊
5LX56 • ◊ • ◊ ◊ ◊ ◊
5LX60 • ❋ • ❋ ❋ ❋ ❋
5LX65 • ❋ • ❋ ❋ ❋ ❋
5LX70 • ❋ • ❋ ❋ ❋ ❋
• = Pipeweld 6010 Plus◊ = Pipeweld 7010❋ = Pipeweld 8010
DOWNHILL VERTICALPOSITION
UPHILL VERTICALPOSITION
FINAL BEAD
ROOT PASS FILLING BEAD
1,2 ÷ 1,6 2,5 ÷ 3,2

8/2/2019 Pipelines Welding Handbook
http://slidepdf.com/reader/full/pipelines-welding-handbook 19/64
19
BASIC ELECTRODES
When the pipeline steel has a strength higher than X70the need of preheat and post weld heat treatmentbecomes more stringent and the choice of using basic
electrodes offers advantages.The reason is, of coursethe high amount of hydrogen in the weld metal fromcellulosic electrodes. The hydrogen is a greater risk forcracks in high strength material, because of theincreased sensitivity to hardening in these steels.The properties of the basic electrodes also mean muchbetter impact properties at low temperatures.The disadvantage with basic electrodes welded verticallyup is the low current that has to be used resulting in lowproductivity.This can be avoided by using basic electrodes developedspecially for welding of pipelines in the vertical-downposition. These electrodes contain iron powder in thecoating and therefore have higher productivity than
cellulose electrodes since they also can be welded athigher currents than cellulose electrodes.Productivity is 25-30% higher than for celluloseelectrodes and 40-50% higher than for basic electrodesin vertically up welding.In the root, the penetration and force from a celluloseelectrode is however the most productive process sincethey can manage a small root-opening with high currentresulting in fast progression. A basic electrode can beused also for the root but requirements on alignment willbe higher because of the less forceful arc.The best procedure for welding high strength pipelines istherefore to use cellulose electrodes for the root pass and
basic vertical down electrodes for filling and capping passes.The higher quality of the basic weld metal isadvantageous when a pipeline is exposed to stress.When, during its route, an underground pipe (mediumand large diameters) crosses roads and railways, whengreater static and dynamic stress exists for externalreasons or when the pipes of medium and smalldiameter are submitted to high temperatures, strongpressure and vibration (heating plants, refineries etc.), itis normally preferred to carry out the first bead withPipeweld and the filling with a basic electrode.
With this, the complete penetration that only Pipeweldcan guarantee and the maximum tenacity of the joint dueto the electrode with basic coating are obtained.Some mechanical characteristics, in particular the valuesof toughness and strength, were improved.OK 48.00 is classified E 7018-1; this means that itsupplies resiliency values of over 27j at – 46°C, thanks tothe purity of its components, in an even better developedformula.It can be used to weld steels with high values ofequivalent carbon and/or high elastic limit thanks to thelaying which guarantees values of diffusible hydrogen of≤ 5 ml/100 gr. and consequently makes the risk of coldcracks practically non-existent, also permitting areduction of the pre-heating temperature required for thebasic electrodes. In addition to these metallurgical andproductive aspects that are important for the constructor,there is improved welding capacity. The excellent startingand restarting, the constant and regular fusion and thefine aspect of the weld seam in all positions arecharacteristics of fundamental importance for the welderand guarantee a high productivity.The VacPac boxing (plastic inner box with Vac Packedaluminium foil hermetically sealed) ensures thesecharacteristics, over a long time and allows the productto be used without redrying.
A.P.I. Quality Suggested ElectrodeSpecification First root Filling
5L A 25 Pipeweld 6010 OK 48.00
5L – 5LS A Pipeweld 6010 OK 48.00
5L – 5LS B Pipeweld 6010 OK 48.00
5LX X42 Pipeweld 6010 OK 48.00
5LX X46 Pipeweld 6010 OK 48.00
5LX X52 Pipeweld 6010 OK 48.00
5LX X56 Pipeweld 6010 OK 48.00
5LX X60 Pipeweld 6010 OK 48.00
5LX X65 Pipeweld 6010 OK 74.70
5LX X70 Pipeweld 6010 OK 74.70

8/2/2019 Pipelines Welding Handbook
http://slidepdf.com/reader/full/pipelines-welding-handbook 20/64
20
Basic electrodes for steels with mediumand high yield strength
Electrode type OK 48.00 OK 53.70 OK 74.70
Coating Basic Basic Basic
Classifications
Recovery 115 115 115
Mechanical properties
All weld metalanalysis wt %
Applications
Welding Current DC+ AC, DC+(–) DC+
Welding parameters Ø Amp2.5 60 ÷ 903.2 90 ÷ 1304 140 ÷ 1805 190 ÷ 220
Ø Amp2.5 60 ÷ 903.2 80 ÷ 1304 115 ÷ 1905 180 ÷ 290
Ø Amp2 50 ÷ 802.5 70 ÷ 1003.2 90 ÷ 1404 120 ÷ 1805 180 ÷ 230
Electrode used for weldinghigh tensile low alloyedsteels API 5L X60, X65, X70
A low hydrogen AC/DCelectrode for one sidewelding of pipes and gen-eral structure. The rootpenetration is good, leav-ing a flat bead with easyremovable slag. Suitablefor welding of pipeline up toAPI 5L X56 it is aiso suit-
able for root pass weldingup to API 5L X80
Electrode suitable for weld-ing in all positions of carbonsteels with medium andhigh yeld strength. The lowhydrogen content in thedeposited metal minimisesthe risk of cracks. Excellentradiographic qualities. Fornaval constructions, struc-tural fabrication, boilers, etc.Excellent welding aspectalso in a vertical position.
R ≥ 510 MPaS ≥ 420 MPaA ≥ 26%KV ≥ 48J at – 40°CKV ≥ 27J at – 46°C
C ≤ 0.06 ÷ 0.1Mn ≤ 1.3 ÷ 1.6Si ≤ 0.25 ÷ 0.50Mo 0.3 ÷ 0.5
R ≥ 550 MPaS ≥ 430 MPaA ≥ 26%KV ≥ 150J at – 20°CKV ≥ 100J at – 46°C
C ≤ 0.04 ÷ 0.08Mn ≤ 0.95 ÷ 1.35Si ≤ 0.3 ÷ 0.6Ni < 0.1
R ≥ 510 MPaS ≥ 420 MPaA ≥ 26%KV ≥ 48J at – 40°CKV ≥ 27J at – 46°C
C ≤ 0,10Mn ≤ 1,60Si ≤ 0,60
AWS A/SFA 5.5:E8018-G
EN 499:E46 Mu Mo B 32
AWS A/SFA 5.1:E7016-1
EN 499:E42 5 B 12 H5
ISO 2560:E51 5 B 24 H
AWS A/SFA 5.1:E7018
EN 499:E42/46 4 B 42 H5
ISO 2560:E51 5 B 120 20 H

8/2/2019 Pipelines Welding Handbook
http://slidepdf.com/reader/full/pipelines-welding-handbook 21/64
21
Basic electrodes for vertical-downwelding
Electrode type Filarc 27P Filarc 37P Filarc 108MP
Coating Basic Basic Basic
Classifications
Recovery 120 120 120
Mechanical properties
All weld metalanalysis wt %
Applications
Welding Current DC+ DC+ DC+
Welding parameters Ø Amp3.2 110 ÷ 1504 180 ÷ 2204,5 230 ÷ 270
Ø Amp3.2 110 ÷ 1504 180 ÷ 2204,5 230 ÷ 270
Ø Amp2.5 80 ÷ 1003.2 110 ÷ 1504 180 ÷ 2204,5 230 ÷ 270
Suitable for welding highstrength pipe steels suchas API 5LX80.Performance and produc-tivity is similar to Filarc27P.
Suitable for welding highstrength pipe steels suchas API 5LX75.Performance and produc-tivity is similar to Filarc27P.
Filarc 27P is specially desi-gned for downhill welding ofcircumferential welds jointsin pipes. Suitable for pipesteels API 5LX52 – X70
TS > 690 MPaYS > 620 MPaA5 ≥ 22%
C: 0,06-0,09Si: 0,30-0,70Mn:1,6-2,0Ni: 1,30-1,60
TS > 620 MPaYS > 550 MPaA5 ≥ 24%
C: 0,06-0,09Si: 0,30-0,70Mn:1,0-1,4Ni: 0,6-0,99 1,0Mo:0,3-0,6
TS > 550 MPaYS > 460 MPaA5 ≥ 25%
C: 0,06-0,09Si: 0,30-0,70Mn:1,0-1,4
AWS A/SFA 5.5:E10018-G
EN 757:E55 4 Z B 41 H5
AWS A/SFA 5.5:E9018-G
EN 499:E55 5 1NiMo B 41 H5
AWS A/SFA 5.5:E8018-G
EN 499:E46 5 B 41 H5

8/2/2019 Pipelines Welding Handbook
http://slidepdf.com/reader/full/pipelines-welding-handbook 22/64
22
Cellulosic electrodes for pipes
Electrode type Pipewe ld 6010 PLUS Pipeweld 7010
Coating Cellulosic Cellulosic
Classifications
Recovery 90 90
Mechanical properties
All weld metal analysis wt %
Applications
Welding Current DC+(-) DC+
Welding parameters Ø Amp3.2 60 ÷ 1104 90 ÷ 1405 110 ÷ 170
Ø Amp2.5 60 ÷ 803.2 80 ÷ 1404 100 ÷ 1805 150 ÷ 250
Electrode suitable for welding in allpositions of pipes in steel type API5LX – X63 – X65 – X70. Easy touse, smooth running and penetrat-ing. Particularly suitable for weldingon site, in downhill and overhead.Excellent radiographic qualities.
Electrode suitable for welding of rootpass on every API 5L grade pipe,designed for vertical down DC – (main line welding)
R ≥ 560 MPaS ≥ 480 MPaA ≥ 20%KV ≥ 27J at – 30°C
C 0,12Mn 0,30 ÷ 0,60Si 0,30Ni 0,50 ÷ 0,80Mo 0,10 ÷ 0,25
R ≥ 420 MPaS ≥ 350 MPaA ≥ 22%
C 0,13Mn 0,4Si 0,25
AWS A/SFA 5.5:E7010-G (P1)
EN 499:E42/3 Z C 21
ISO 2560:E51 4 C 10
AWS/SFA 5.1:E6010
EN 499:E 38/3 C 21
8/2/2019 Pipelines Welding Handbook
http://slidepdf.com/reader/full/pipelines-welding-handbook 23/64
23
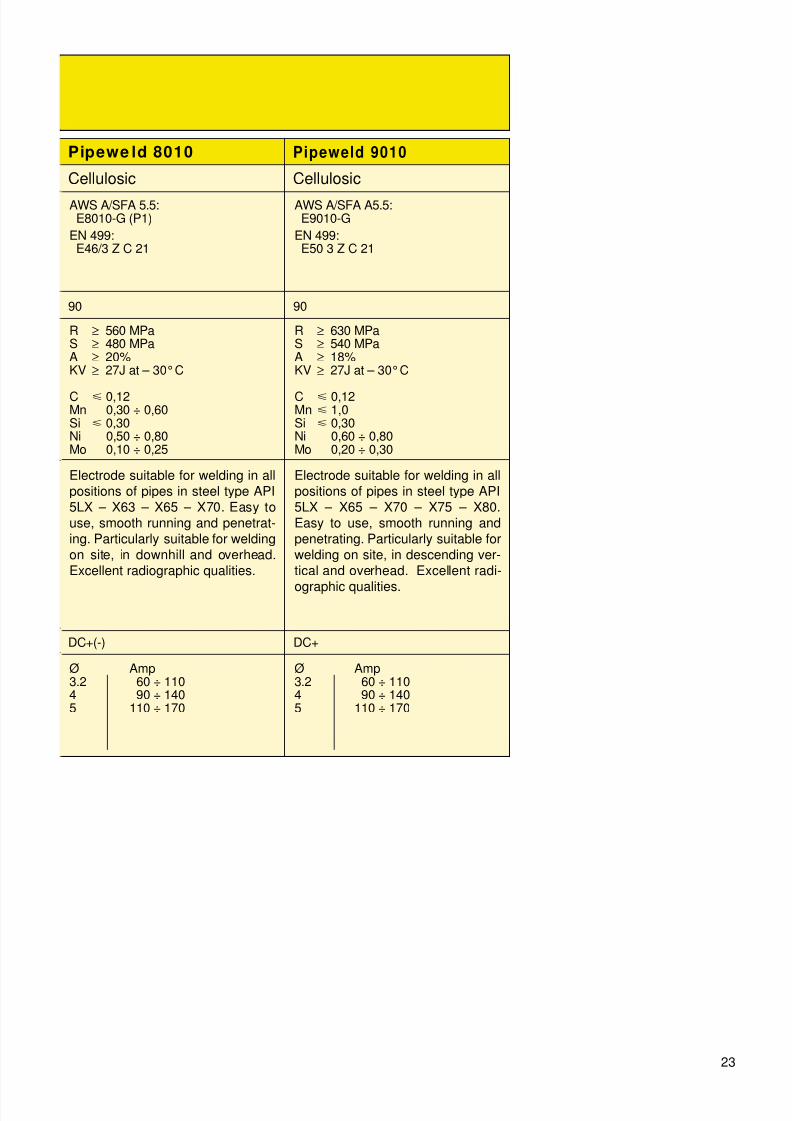
Pipewe ld 8010 Pipeweld 9010
Cellulosic Cellulosic
90 90
DC+(-) DC+
Ø Amp3.2 60 ÷ 1104 90 ÷ 1405 110 ÷ 170
Ø Amp3.2 60 ÷ 1104 90 ÷ 1405 110 ÷ 170
Electrode suitable for welding in allpositions of pipes in steel type API5LX – X65 – X70 – X75 – X80.Easy to use, smooth running andpenetrating. Particularly suitable forwelding on site, in descending ver-tical and overhead. Excellent radi-
ographic qualities.
Electrode suitable for welding in allpositions of pipes in steel type API5LX – X63 – X65 – X70. Easy touse, smooth running and penetrat-ing. Particularly suitable for weldingon site, in downhill and overhead.Excellent radiographic qualities.
R ≥ 630 MPaS ≥ 540 MPaA ≥ 18%KV ≥ 27J at – 30°C
C 0,12Mn 1,0Si 0,30Ni 0,60 ÷ 0,80Mo 0,20 ÷ 0,30
R ≥ 560 MPaS ≥ 480 MPaA ≥ 20%KV ≥ 27J at – 30°C
C 0,12Mn 0,30 ÷ 0,60Si 0,30Ni 0,50 ÷ 0,80Mo 0,10 ÷ 0,25
AWS A/SFA A5.5:E9010-G
EN 499:E50 3 Z C 21
AWS A/SFA 5.5:E8010-G (P1)
EN 499:E46/3 Z C 21

8/2/2019 Pipelines Welding Handbook
http://slidepdf.com/reader/full/pipelines-welding-handbook 24/64

8/2/2019 Pipelines Welding Handbook
http://slidepdf.com/reader/full/pipelines-welding-handbook 25/64
WELDING TECHNIQUES AND
OPERATIVE PRACTICES

8/2/2019 Pipelines Welding Handbook
http://slidepdf.com/reader/full/pipelines-welding-handbook 26/64
26
Cellulosic electrodes, suitable for use in vertical up andvertical down directions, are normally chosen to weldsteel pipes. The fastest and therefore most productivemethod is welding downhill with cellulosic electrodes.However, when it is necessary to guarantee particularly
high integrity for pipes submitted to high static ordynamic stress (for example, underground pipes ofmedium or large diameter in the crossing of roads orrailways, or small or medium pipes subject to vibrations,temperature, pressure), the technique of mixed welding,cellulosic plus basic in vertical up, is sometimespreferred. The following chapters illustrate the mostfrequent operating practices used in manual pipe weldingand the different techniques adopted, starting frompreparation and closing with a thorough examination ofthe potential defects, their causes and the necessaryremedies.
General information

8/2/2019 Pipelines Welding Handbook
http://slidepdf.com/reader/full/pipelines-welding-handbook 27/64
27
Preparation and tackingThe scope of this chapter is to suggest a preparation andtacking procedure for the construction of a standard jointon sections of mild steel pipe, for the purposes ofdeveloping welding procedures or welder training. Note
that for welding procedure qualification, EN 288-9requires that tests be made between full pipe lengthsunless otherwise agreed between the contracting parties.
Eliminate burrs caused by the grinding operation.
Welding parameters for tackingElectrode E6010 Ø 2.5 mm, Current 70 ÷ 100AorElectrode E6010 Ø 3.2 mm, Current 100 ÷ 120A
Operations
Rest one of the pipe sections on the worktop with thebevelled edge facing upwards.
SPACING WIRE
INCLUDED ANGLE
ROOT GAP
EVEL ANGLE
ROOT FACE
STANDARD JOINT
1,2 1,6 mm
Place a spacing wire of 1.6 mm diameter on the bevellededge then rest the second pipe section on the spacingwire with the bevelled edge facing downwards. Align thetwo sections to form the desired bevelling.In accordance with the API code the misalignment mustnot exceed 1.6 mm.
At this point start the tacking operation, laying a 12 to22mm long seam.
The tack bead should penetrate the root in order to forman internal projection of 1.6 mm and both edges of thebevel must be fused.
READ TACK
PENETRATION
1.6 mmEXCESS WELD METAL AT THE ROOT
CORRECT ALIGNMENT MAXIMUM MISALIGNMENT
Pipe welding in vertical down (downhill) with cellulosic electrodes

8/2/2019 Pipelines Welding Handbook
http://slidepdf.com/reader/full/pipelines-welding-handbook 28/64
28
Then reposition the spacing wire and deposit asecond tack.
Remove the spacing wire. If in root gap is uneven, makea third tack where the gap is greatest, in such a way that
weld shrinkage will close it up. If the distance betweenthe edges on the most open side is too great to permitthe third tack, first correct the distances compressing themost open side.
Place the third and fourth tacks at right angles to the firstand second.
GAP TOONARROW
GAP TOO WIDE
ONE OF THETACKS
SECOND TACK
FIRST TACK
Grind the external surface of the tacks in such a way thattheir thickness is approximately 1.6 mm, to facilitate thestart of the first bead.
To obtain a quality weld, correct joint preparation andaccurate tacking are necessary. Faulty tacking will causedefects in the final welding.
PART TO BE REMOVED
APPROXIMATELY 1.6 mm
ROUND THE CONNECTINGEDGES BETWEEN THE TACKAND THE ROOT FACEOF THE BEVEL
CONNECT THE ENDSOF THE TACK

8/2/2019 Pipelines Welding Handbook
http://slidepdf.com/reader/full/pipelines-welding-handbook 29/64
29
2 - Joint in 5G / PGThis type of joint and position is commonly used to welda line of steel tubes of medium-large diameters, of 8” andmore.
Welding parametersElectrode E6010 Ø 4.0 mm, DC+, Current 120 ÷ 160A(root)Electrode E7010-G-(P1)* Ø 4.0 mm, DC+, Current150 ÷ 1 60A (hot pass)Electrode E7010~G~(P1)* Ø 5.0 mm, DC+, Current150 ÷ 160A (fill and cap)* or alternatively, according to the type of base steel tobe welded, substitute with electrode E8010-G-(P1) orE9010-G.
It is important that the generator has a minimum opencircuit voltage of 70V.
OperationsAfter having carried out the preparation and tacking asdescribed in chapter 1, use pliers and clamps to fix thepiece in a horizontal position with the tacks placed at 3,6, 9 and 12 o’clock. It is recommended to place the tackwith the smallest root gap at 12 o’clock.
Make the root (stringer) bead with a 4.0 mm diameterelectrode. The current must be set at 120 ÷ 160A.
Start with the electrode at 12 o’clock, with a trailingelectrode angle of 10 ÷ 15°and the electrode in theplane of the joint.
FEED
VERTICAL AXIS
10° - 15°
PLIERSTACKS
POSITIONSOF TACKS
Start the arc at the root of the joint (never on the edge ofthe tack towards the external surtace of the pipe), pushthe electrode into the joint and advance in a regularmanner.
To better check the weld pool, it may be necessary tovary the trail angle from 10 ÷ 15°to 0 ÷ 30°. Use the
dragging or “hidden arc” technique, always keeping theelectrode at the bottom of the joint. A “keyhole” groove,which follows the top of the electrode in its movement, isthus formed.
SEAM
MELTED METAL WHICH FLOWS UPWARDS
“KEYHOLE” GROOVE
ELECTRODE TIP
PUSH THE ELECTRODEINTO THE JOINT
VERTICAL AXIS

8/2/2019 Pipelines Welding Handbook
http://slidepdf.com/reader/full/pipelines-welding-handbook 30/64
30
If blowholes form, slightly swing the electrode from oneside to the other as shown in the figure.
If it is necessary to interrupt the arc before the run isended, the tip of the electrode must be rapidly snappeddown.
This prevents slag inclusion in the weld pool. Removethe slag from the crater and from the last 50 mm of theweld.The restart should be made starting on the weldmetal approximately 12 mm before the crater andmoving towards it with an arc length slightly abovenormal. Then push the electrode to the bottom of the joint to fill the crater and continue welding in the normal
manner.
RESTARTING PROCEDURE
START HERE
SEAM
ELECTRODE
ELECTRODE
The finished bead must form a 1.6 mm thick weldreinforcement at the root.
When the first half of the bottom bead is completed,remove the slag then repeat the process on the secondhalf of the joint.
LEVELED TO 1.6mm
ROOT PENETRATION
UNDERCUTS

8/2/2019 Pipelines Welding Handbook
http://slidepdf.com/reader/full/pipelines-welding-handbook 31/64
31
For the hot pass use E7010-G(P1), E8010-G(P1) orE9010-G electrodes, depending on the class of the steelto be welded, in 4.0 mm diameterStart with the electrode at 12 o’clock, maintaining thesame angles indicated for the bottom bead, towards 6
o’clock. Use a light up and down movement to check theweld pool. Move the tip in the forward direction for alength equal to the diameter of the electrode to allow thepool to solidify slightly then move the tip back for a lengthequal to half of the diameter. At this point wait until thecrater is full before moving onwards.
Maintain an arc length equal to the electrode diameter.Do not increase the arc length during movement. If thearc is interrupted before the bead is complete, removethe slag from the crater, restart the arc starting on the
bottom bead, approximately 12 mm in front of the secondbead and move back up to the crater.
START HERE
12 mm
CRATER
DWELL POINTS
DOWN FOR1 ELECTRODEDIAMETER
UP FOR 1 / 2ELECTRODE DIAMETER
ELECTRODE
ARC LENGTH EQUALTO ELECTRODEDIAMETER
WELDINGDIRECTION
Make sure that you have filled the crater then restartwelding as indicated previously. Carry out the second halfof the run with the same procedure.
It should be noted that the “pulling” technique with whichthe root bead is laid causes an incomplete fusion and
slag inclusion (“tramlines”) at the seam edges.
Due to the higher current used, the second or “hot” passdoes not transfer much metal to the joint, but its greaterheat frees the slag and completes the fusion betweenthe weld edges and the base metal.

8/2/2019 Pipelines Welding Handbook
http://slidepdf.com/reader/full/pipelines-welding-handbook 32/64
32
To carry out the filling pass (third pass), the startingposition and trailing angles of the electrode are the sameas indicated for the root and hot passes, but electrodesof 5.0 mm diameter with current set at 150-1 80A mustbe used. Use a swinging movement, maintaining an arc
length equal to the electrode diameter. Pause with the tipof the electrode on the edge of the previous bead. Movetowards the opposite edge with descending by half theelectrode diameter.
If it is necessary to restart the arc use the sameprocedure as indicated for the second pass. After havingwelded the second half of the joint, completely removethe slag.
PENULTIMATEBEAD
0.8 mm
To fill the joint up to 0.8 mm from the external pipesurface it may be necessary to deposit additionalpasses on the whole circumference.
These beads should generally add a 1.6 mm thick layer.Use the same techniques indicated for the previous
passes. Often, after having made all these layers, the joint is thicker in the upper and lower zone than in theside zones of the pipe, making it necessary to fill itevenly before making the cap. In this case stripperbeads are laid with the same techniques illustratedpreviously.
12:00
ZONES WHICHMAY NEEDLEVELLING BEADS

8/2/2019 Pipelines Welding Handbook
http://slidepdf.com/reader/full/pipelines-welding-handbook 33/64
33
The technique used for the cap pass is the same asindicated for the penultimate bead, but the swingingmovement must be wider. Dwell with the tip of theelectrode on the edges of the previous bead.
Use a Z or half-moon oscillation with adequate arclength, travel speed and electrode slope.
HALF-MOONOSCILLATION
Z - OSCILLATION
STOP HERE
ELECTRODE
LAST BEAD
Advance at a speed that makes it possible to obtain a0.8 to 1.6 mm thick reinforcement and an overlap ofapproximately 1.6mm at the edges.
1.6 mm
WELD METAL 1.6 mmOVERLAP
1.6 mmROOT WELD METAL

8/2/2019 Pipelines Welding Handbook
http://slidepdf.com/reader/full/pipelines-welding-handbook 34/64
34
API standards provide visual analysis and relevantquality assessment of the weld sample. After havingcarried out the preparation and tacking, the piece ismarked for identification then welded in the 5G positionas previously indicated. A visual analysis of the weld is
then carried out.
Acceptability criteria are as follows:• Cracks: the weld must not present cracks.• Penetration: the joint root must show complete
penetration.• Fusion: fusion between the base metal and filler metal
must appear complete.• Slag inclusion: the hollow in the melted zone containingslag must not exceed 3.2 mm for each 152 mm of weld.
• Gaseous inclusion: a section affected by porositycannot be longer than 1.6mm and their total must notexceed the length of 3.2mm each 6.5 cm2 of weldsurface.
• Undercuts: they must not exceed a width of 0.8mm, adepth of 0.8 mm and their total length must not exceed50.8mm in each 152mm of weld or 5% of the wallthickness, if the weld is shorter.
• Weld metal: the surface and root reinforcements mustnot exceed the indicated dimensions, must be evenlyconnected with the surfaces of the base metal and their
edges must be free from undercuts.

8/2/2019 Pipelines Welding Handbook
http://slidepdf.com/reader/full/pipelines-welding-handbook 35/64
35
3 - Joint in 6G / H-L045Use: welding all mild steel pipes of 8” (203 mm) diameterand wall thickness of 8.2mm.
Welding parameters
Electrode E6010 Ø 2.5mm, Current 70 ÷ 100AElectrode E6010 Ø 3.25mm, Current 100 ÷ 120AThe generator must have an open circuit voltage of 70V
OperationsAfter having carried out the preparation and tackingoperation as described in chapter 1, fix the piece usingpliers and/or clamps with its axis at 45°to the horizontalplane and with tacks placed at 3, 6, 9 and 12 o ’clock.Place the tack where there is the smallest root gap at12 o’clock.
6G POSITION
Carry out the root bead with the same technique used inchapter 2, page 29.
Keep the electrode parallel to the plane of the joint anduse a trailing angle of 10÷15°. It the electrode coatingmelts in an irregular manner, slightly move the tip from
one edge to the other. Weld both halves of the joint withthe same technique.The bottom bead should penetrateinside the pipe not more than 1.6 mm.
FEED
SIDE VIEW
DIRECTION
10° - 15°

8/2/2019 Pipelines Welding Handbook
http://slidepdf.com/reader/full/pipelines-welding-handbook 36/64
36
For the hot pass use E6010 electrodes of 3.25 mmdiameter. Start the arc at 12 o’clock with the sameelectrode angles used for the bottom bead.Use a similar movement to that described for the secondbead in chapter 2, page 29.
For the filling passes start from 12 o’clock with a workangle of 80-90°to the pipe axis supported at the sides atthe top of the seam.
FEED
DWELLPOINTS
DIRECTION
90°
10°-15°
25°-30°
Advance from 12 o’clock to 6 o’clock using an elongatedoscillating movement, then, if necessary, execute levelingbeads.
Execute the capping pass using the same electrodeangles and technique as the filling technique. Theexternal bead should create a 1.6 mm thickreinforcement and penetrate the beveled edge up to 1.6mm. Weld both halves of the joint then remove the slag.
SURFACE WELDMETAL1.6mm
SEQUENCE OF THE BEADS
EDGE FUSION1.6mm

8/2/2019 Pipelines Welding Handbook
http://slidepdf.com/reader/full/pipelines-welding-handbook 37/64
37
To pass the qualification test in a welding process inthe 6G position — which covers all the others – somemechanical tests must be performed on a sample. Forthis purpose prepare and tack a piece as described inchapter 1.
Carry out the welding as described in this chapter. Takecare to remove the largest irregularities using a grinder withflexible disk and fine grain before laying the second bead.Make a visual check as indicated in chapter 2, page 29.From the welded piece will be obtained six sectionswhich must be previously marked for identification by theoperator. Proceed with pipe cutting to obtain six strips ofa width of 25mm, as illustrated below.
REVERSE BEND
NICK BREAK
NICK BREAK
FACE BEND
ROUND THE CONNECTINGEDGES BETWEENTHE TACK AND THE SHOULDERSOF THE BEVEL
SHARPEN THE ENDSOF THE TACK
The coupons for the bend tests must be ground onboth surfaces of the weld up to the thickness of the pipewall, but without notching the base metal.Using a jig, bend the strips over a mandrel 3 times thepipe thickness, one with the root on the outside and
one the opposite way.
The acceptability standard is satisfied if no cracks orother defects of over 3.2 mm or half the wall thickness, ifthis is lower, appear after bending in the weld seam orfusion zone in each direction. No cracks starting from theedge of the samples, if smaller than 6.4 mm measured ineach direction, should be taken into consideration, unlessaccompanied by other defects.To carry out the nick break tests, a notch is made in thecentre of the weld with the 3.2 mm deep saw cut on allsides of the sample.The internal and externalreinforcement must not be removed.
The samples may be broken under tension with aspecial machine, or by striking their centre with ahammer after having supported their ends, or strikingone end of them after having fixed the other. Theacceptability standard is satisfied when the exposedsurfaces of each sample show complete penetrationand fusion. The maximum size of porosity must notexceed 1.6mm and the total porosity areas must notexceed 2% of the examined surfaces. Slag inclusionmust not exceed 0.8mm in depth, 3.2mm in length, orhalf the wall surface if this is smaller. Furthermore,there must be at least 12mm of sound metal betweenone inclusion and the other.
THE EDGES MUST BEREGULAR AND PARALLEL
DO NOT REMOVE THE WELD METAL
19,1 mm
APPROXIMATELY3.2mm

8/2/2019 Pipelines Welding Handbook
http://slidepdf.com/reader/full/pipelines-welding-handbook 38/64
38
1 - Preparation and tackingThe scope of this chapter is to provide correctpreparation and tacking procedure for a standard joint onpipe sections with 8” diameter (203 mm). The joint isprepared by making a bevel as indicated in the figures.
Remove burrs caused by the grinding operation.
Welding parameters for tackingElectrode E6010 Ø 3.2mm, DC+, Current 85 ÷ 110A
If the power source has no ammeter, the current may beempirically set by proceeding as follows: place a 6mmthick strip of mild steel in horizontal position, start the arcand lay down a straight seam, which must be even, with
a regular ripple and 1.6 mm thick. If the seam is unevenand strongly convex, the current must be increased. If itis flat and there is excessive spatter, the current must bereduced.
INCLUDED ANGLE
ROOT GAP
BEVELANGLE
ROOT FACE
STANDARD JOINT DIMENSIONS
CHARACTERISTICS OF THE BEVEL
75°
37 1/2°
2,0 - 2,5 mm2,4 - 3,2 mm
OperationsRest one of the pipe sections on the worktop with thebevelled edge facing downwards.
Place a spacing wire of 3.2mm diameter on the
bevelled edge then rest the second pipe section on thespacing wire with the bevelled edge facing downwards.Align the two sections to form the desired jointpreparation. In accordance with the ASME code,misalignment must not exceed 1.6mm.
CORRECT ALIGNMENT MAXIMUM MISALIGNMENT
SPACING WIRE
Welding of pipes in vertical up (uphill) with mixed cellulosic/basic technique
Lowcurrent Highcurrent OK

8/2/2019 Pipelines Welding Handbook
http://slidepdf.com/reader/full/pipelines-welding-handbook 39/64
39
At this point the tacking operation starts, laying a 12 to20mm long bead.
The tack must penetrate the root so as to form a bead1.6mm high inside the pipe and both sides of the
preparation must be fused. Then reposition the spacingwire and deposit a second tack.
FIRSTTACK SEAM
SECONDTACK SEAM
TACK
PENETRATION
WELD METAL AT THE ROOT1.6mm
Remove the spacing wire. If in one of the spans the rootgap is greater than on the opposite side, place a thirdtack where the gap is widest, so that weld shrinkage willeven the difference. If the gap at its widest point is toogreat to permit a third tack, first correct the gap by
compressing the most open side. Make the third andfourth tacks at right angles to the first and second.
To obtain a quality weld, correct joint preparation and
accurate tacking are necessary. Faulty tacking will
cause defects in the final welding.
TOO TIGHT
TOOOPEN SPACE
ONE OF THEFIRST TACKS

8/2/2019 Pipelines Welding Handbook
http://slidepdf.com/reader/full/pipelines-welding-handbook 40/64

8/2/2019 Pipelines Welding Handbook
http://slidepdf.com/reader/full/pipelines-welding-handbook 41/64
41
When approaching a tack, reduce travel speed andslightly increase arc length. If the crater tends to close,use a trailing angle (pulling) of 5 ÷ 10°and/or reducefeed speed. If instead it tends to widen, use a leadingangle (pushing) of 5 ÷ 10°and/or increase feed speed.
If necessary interrupt the arc before the seam is finished,form a “keyhole” crater of approximately 5 mm diameterby rapidly pushing the electrode point through the jointfor approximately 13 mm, then completely withdraw theelectrode. In this way complete penetration is assured atrestart.
ELECTRODE
CRATER WIDENING
5-10° TO BE PULLED
5-10° TO BE PUSHED
4:00
Remove the slag from the crater and from the last 25mm of seam. Restart should be carried out starting onthe weld approximately 20 mm before the crater andmoving towards it with a slightly higher than normal arclength. Move back and forth on the crater to preheat the
edges then reset the normal arc length.
When the first half of the bottom bead has ended,remove the slag then repeat the operation on the secondhalf of the joint.The finished bead should have a slightly convex surfaceand be up to 1.6mm high.
At this point, the filling and capping passes may beexecuted either continuing with cellulosic electrodes orusing the mixed cellulosic/basic technique.
WELD METAL AT ROOT
SLIGHTLY CONVEX
START HERE
RESTARTING PROCEDURE
25mmSLAG REMOVED
APPROXIMATELY5mm DIAMETER
“KEYHOLE” CRATER
8/2/2019 Pipelines Welding Handbook
http://slidepdf.com/reader/full/pipelines-welding-handbook 42/64
42
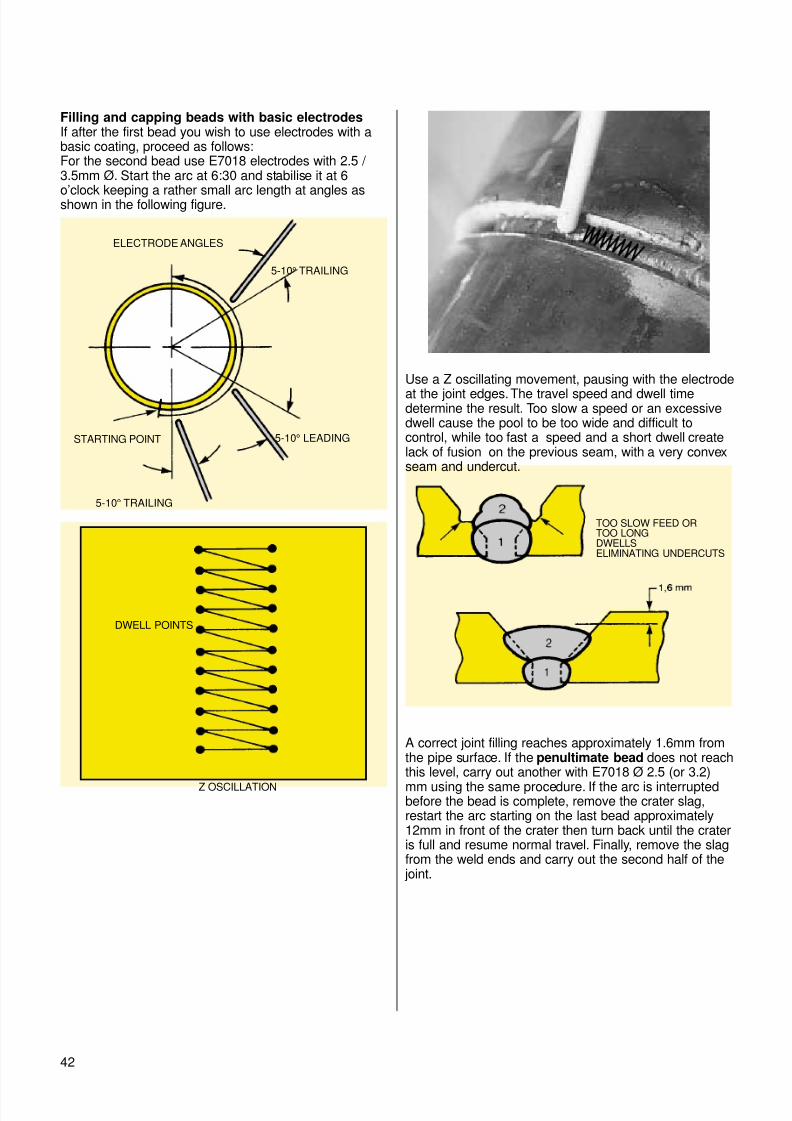
Filling and capping beads with basic electrodesIf after the first bead you wish to use electrodes with abasic coating, proceed as follows:For the second bead use E7018 electrodes with 2.5 / 3.5mm Ø. Start the arc at 6:30 and stabilise it at 6
o’clock keeping a rather small arc length at angles asshown in the following figure.
DWELL POINTS
Z OSCILLATION
ELECTRODE ANGLES
STARTING POINT
5-10° TRAILING
5-10° LEADING
5-10° TRAILING
Use a Z oscillating movement, pausing with the electrode
at the joint edges.The travel speed and dwell timedetermine the result. Too slow a speed or an excessivedwell cause the pool to be too wide and difficult tocontrol, while too fast a speed and a short dwell createlack of fusion on the previous seam, with a very convexseam and undercut.
A correct joint filling reaches approximately 1.6mm fromthe pipe surface. If the penultimate bead does not reachthis level, carry out another with E7018 Ø 2.5 (or 3.2)
mm using the same procedure. If the arc is interruptedbefore the bead is complete, remove the crater slag,restart the arc starting on the last bead approximately12mm in front of the crater then turn back until the crateris full and resume normal travel. Finally, remove the slagfrom the weld ends and carry out the second half of the joint.
TOO SLOW FEED ORTOO LONGDWELLSELIMINATING UNDERCUTS
8/2/2019 Pipelines Welding Handbook
http://slidepdf.com/reader/full/pipelines-welding-handbook 43/64
43
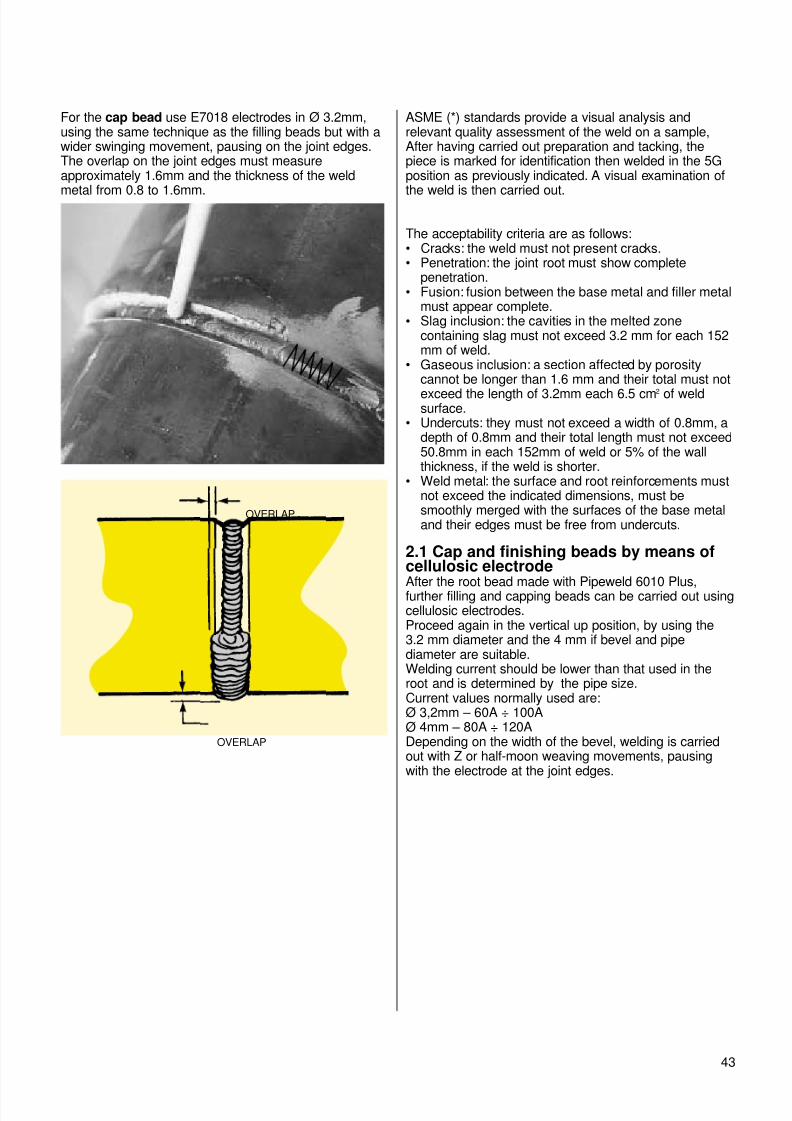
For the cap bead use E7018 electrodes in Ø 3.2mm,using the same technique as the filling beads but with awider swinging movement, pausing on the joint edges.The overlap on the joint edges must measureapproximately 1.6mm and the thickness of the weld
metal from 0.8 to 1.6mm.
OVERLAP
OVERLAP
ASME (*) standards provide a visual analysis andrelevant quality assessment of the weld on a sample,After having carried out preparation and tacking, thepiece is marked for identification then welded in the 5Gposition as previously indicated. A visual examination of
the weld is then carried out.
The acceptability criteria are as follows:• Cracks: the weld must not present cracks.• Penetration: the joint root must show complete
penetration.• Fusion: fusion between the base metal and filler metal
must appear complete.• Slag inclusion: the cavities in the melted zone
containing slag must not exceed 3.2 mm for each 152mm of weld.
• Gaseous inclusion: a section affected by porositycannot be longer than 1.6 mm and their total must not
exceed the length of 3.2mm each 6.5 cm2 of weldsurface.
• Undercuts: they must not exceed a width of 0.8mm, adepth of 0.8mm and their total length must not exceed50.8mm in each 152mm of weld or 5% of the wallthickness, if the weld is shorter.
• Weld metal: the surface and root reinforcements mustnot exceed the indicated dimensions, must besmoothly merged with the surfaces of the base metaland their edges must be free from undercuts.
2.1 Cap and finishing beads by means ofcellulosic electrodeAfter the root bead made with Pipeweld 6010 Plus,further filling and capping beads can be carried out usingcellulosic electrodes.Proceed again in the vertical up position, by using the3.2 mm diameter and the 4 mm if bevel and pipediameter are suitable.Welding current should be lower than that used in theroot and is determined by the pipe size.Current values normally used are:Ø 3,2mm – 60A ÷ 100AØ 4mm – 80A ÷ 120ADepending on the width of the bevel, welding is carriedout with Z or half-moon weaving movements, pausingwith the electrode at the joint edges.

8/2/2019 Pipelines Welding Handbook
http://slidepdf.com/reader/full/pipelines-welding-handbook 44/64
44
3 - Joint in 2G / PCThis type of joint and position is used on pipes, piles,small vessels.The following example relates to thewelding of pipe with 8” (203 mm) diameter.
Welding parameters (*)Electrode E6010 Ø 3.2mm, DC+, Current 85 ÷ 110A rootElectrode E7018 Ø 2.5mm, DC+, Current 85 ÷ 110AfillingElectrode E7018 Ø 3.2mm, DC÷, Current 110 ÷ 140Acap
The power source must have an OCV of at least 70 V
(*) For process with mixed cellulosic/basic technique
OperationsAfter having carried out the preparation and tacking, fixthe piece in the 2G position (vertical axis).
Then make the root bead with E6010 electrodes of 3.2mm diameter.
ELECTRODE
WORK ANGLE
The electrode must be held horizontally with a trailing
angle of 5 ÷ 10°. Start the bead 50 mm from the tack,form the “keyhole” crater and advance with a slightlyswinging movement similar to that used for the 5Gposition. Keep the electrode on the edges of theshoulder.
ROOT FACE
5mm “KEYHOLE”CRATER
STOP POINTS
1 ELECTRODE DIAMETER
1/2 ELECTRODE DIAMETER
DIRECTION OF TRAVEL
ELECTRODE ANGLE

8/2/2019 Pipelines Welding Handbook
http://slidepdf.com/reader/full/pipelines-welding-handbook 45/64
45
If the crater tends to widen, increase the trailing angle
from 5 to 10°. If the electrode tip is pushed too far intothe joint, undercuts form along the root and excessivepenetration and defects occur. If the electrode is notpushed deep enough into the joint, insufficientpenetration and undercuts on the beveled surfaces of thepreparation are obtained.
If the arc is interrupted before the bead is complete,clean the crater and restart as described in the previousparagraph, not forgetting to fill the crater.
ALWAYS FILL THE CRATER
CRATER
ELECTRODE PUSHEDTOO FAR INTO THE JOINT
UNDERCUTS
DIRECTION
5°-10°
The second or filling bead pass be carried out withan E7018 electrode in 2.5 mm diameter.
The electrode must be held horizontally with a trailingangle of 5 ÷ 10°.
Use a perpendicular W motion, with pauses at the pointsindicated in the figure to correctly fill the welding crater.Keep the arc as short as possible. The bead must be flator slightly convex with good fusion on the edges.
8/2/2019 Pipelines Welding Handbook
http://slidepdf.com/reader/full/pipelines-welding-handbook 46/64
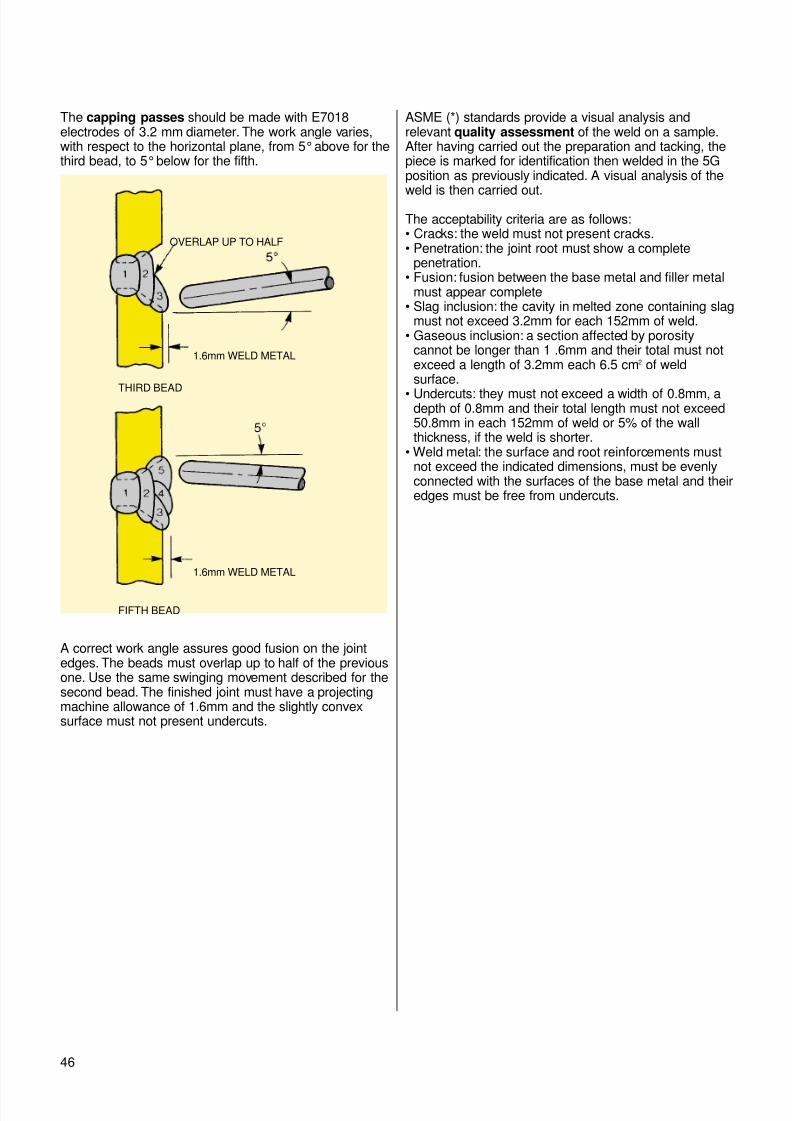
46
The capping passes should be made with E7018electrodes of 3.2 mm diameter. The work angle varies,with respect to the horizontal plane, from 5°above for thethird bead, to 5°below for the fifth.
A correct work angle assures good fusion on the jointedges. The beads must overlap up to half of the previousone. Use the same swinging movement described for thesecond bead. The finished joint must have a projectingmachine allowance of 1.6mm and the slightly convexsurface must not present undercuts.
OVERLAP UP TO HALF
THIRD BEAD
1.6mm WELD METAL
1.6mm WELD METAL
FIFTH BEAD
ASME (*) standards provide a visual analysis andrelevant quality assessment of the weld on a sample.After having carried out the preparation and tacking, thepiece is marked for identification then welded in the 5Gposition as previously indicated. A visual analysis of the
weld is then carried out.
The acceptability criteria are as follows:• Cracks: the weld must not present cracks.• Penetration: the joint root must show a complete
penetration.• Fusion: fusion between the base metal and filler metal
must appear complete• Slag inclusion: the cavity in melted zone containing slag
must not exceed 3.2mm for each 152mm of weld.• Gaseous inclusion: a section affected by porosity
cannot be longer than 1 .6mm and their total must notexceed a length of 3.2mm each 6.5 cm2 of weldsurface.
• Undercuts: they must not exceed a width of 0.8mm, adepth of 0.8mm and their total length must not exceed50.8mm in each 152mm of weld or 5% of the wallthickness, if the weld is shorter.
• Weld metal: the surface and root reinforcements mustnot exceed the indicated dimensions, must be evenlyconnected with the surfaces of the base metal and theiredges must be free from undercuts.

8/2/2019 Pipelines Welding Handbook
http://slidepdf.com/reader/full/pipelines-welding-handbook 47/64
47
4 - Joint in 6G / H-LO45This type of joint and position is used to weld bends,flanges, fittings. The following example shows the weldingof pipes of 8” (203mm) diameter. The 6G welding positionqualifies all the others.
Welding parameters (*)Electrode E6010 Ø 3.2mm, DC÷, Current 85 ÷ 110A rootbeadElectrode E7018 Ø 2.5mm, DC+, Current 85 ÷ 110AfillingElectrode E7018 Ø 3.2mm, DC+, Current 110 140A cap
The power source must have an OCV of at least 70 V
(*) For process with mixed cellulosic/basic technique
Operations
After having carried out the preparation and tacking, fixthe piece in the 6G position (axis 45°to the horizontalplane) The tack must be placed at 2, 5, 8 and 11 o ’clock.
Then carry out the root bead with E6010 electrodes of3.2 mm diameter. Start with the electrode at 6:30, withthe electrode in the plane of the joint and at right angles
to the direction of travel.
FEED ANGLE WORKING ANGLE
6G POSITION
Use a light swinging movement. The tip of the electrodeshould be kept on the edges of the shoulder but withoutexerting pressure on them. If the crater tends to close,use a slight trailing angle and/or reduce travel speed. Ifthe crater tends to widen, use a slight leading angle
and/or increase travel speed.
The arc interruption and reinsertion procedures aresimilar to those described in chapter 2, page 40.Execute both halves of the bead and remove the slagbefore laying the second bead.
LIGHT CONVEXITY
ROOT REINFORCEMENT
HIGH DISTANCEBETWEEN THE EDGES
NARROW CRATER
5-10° LEADING
5-10° TRAILING
FEED
WIDE CRATER
REDUCED DISTANCEBETWEEN THE EDGES
8/2/2019 Pipelines Welding Handbook
http://slidepdf.com/reader/full/pipelines-welding-handbook 48/64
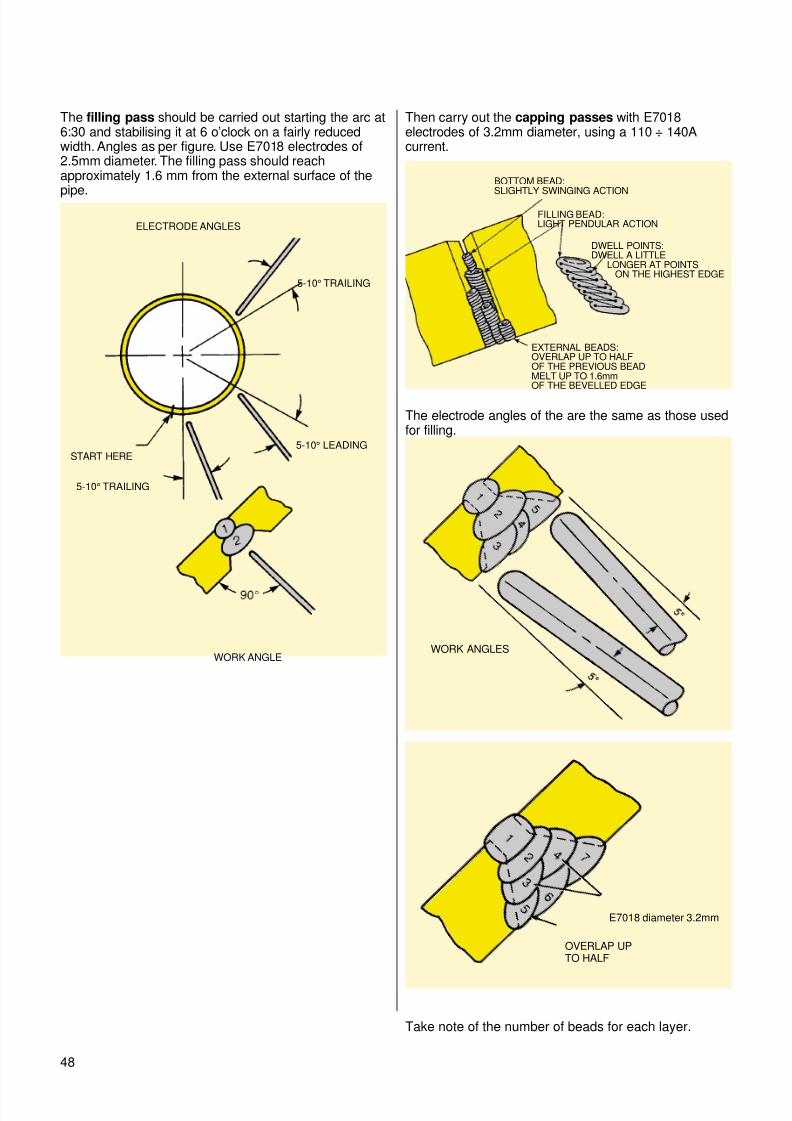
48
The filling pass should be carried out starting the arc at6:30 and stabilising it at 6 o’clock on a fairly reducedwidth. Angles as per figure. Use E7018 electrodes of2.5mm diameter. The filling pass should reachapproximately 1.6 mm from the external surface of the
pipe.
ELECTRODE ANGLES
5-10° TRAILING
5-10° LEADING
5-10° TRAILING
START HERE
WORK ANGLE
Then carry out the capping passes with E7018electrodes of 3.2mm diameter, using a 110 ÷ 140Acurrent.
The electrode angles of the are the same as those usedfor filling.
Take note of the number of beads for each layer.
OVERLAP UPTO HALF
E7018 diameter 3.2mm
WORK ANGLES
BOTTOM BEAD:SLIGHTLY SWINGING ACTION
FILLING BEAD:LIGHT PENDULAR ACTION
DWELL POINTS:DWELL A LITTLE
LONGER AT POINTSON THE HIGHEST EDGE
EXTERNAL BEADS:OVERLAP UP TO HALFOF THE PREVIOUS BEADMELT UP TO 1.6mmOF THE BEVELLED EDGE

8/2/2019 Pipelines Welding Handbook
http://slidepdf.com/reader/full/pipelines-welding-handbook 49/64
DEFECTS : CAUSES AND
REMEDIES

8/2/2019 Pipelines Welding Handbook
http://slidepdf.com/reader/full/pipelines-welding-handbook 50/64
50
To find and possibly prevent welding defects, theoperator must acquire familiarity with the form anddimension of the weld pool and its relation to the formand appearance of the finished weld seam.The filler metal is generated by the electrode, which
through the arc starts mixing with the melted basemetal. In vertical down welding, the arc force tends tomake the melted metal flow towards the rear part of thecrater to form the seam, while the force of gravity tendsto counterbalance that of the arc, making the fusionpool flow in feed direction.On the contrary, in vertical up welding, the force of thearc and that of gravity push the melted metal back inthe crater to form the seam.The movement of the melted metal towards the back ofthe crater and its form provide the operator with ameans of continuous quality control, without interruptingthe arc. The essential variables by which the operatorinterprets the fusion bath on which he must intervene to
prevent welding defects are: electrode diameter,current, arc length, feed speed and electrodepositioning angles.
One of the most important factors is penetration.There is correct penetration when the weld completelycrosses the joint thickness, leaving a small seam ofcontinuous penetration well-fused at the back. One ofthe commonest defects in pipe welding is insufficientpenetration, which consists in discontinuity betweenthe two edges of the bevel due to the fact that the fillermetal has not completely penetrated the joint. Thistakes place as, during welding, the groove starts to
close, the seam becomes narrow and the welding bathstagnant. To prevent this problem, a possible remedy isto decrease feed speed or reduce the electrode driveangle to increase the temperature of the bath andtherefore the penetration. If this is not sufficient,interrupt welding and increase the current or use thegrinder to redece the root face.
The opposite defect is excessive penetration, which ismarked by an excessive reinforcement on the back ofthe joint, higher than required.
In this case, during welding the groove becomes too
wide and the weld pool control is difficult due to its sizeand fluidity. To reduce penetration and eliminate thisproblem feed speed may be increased, possibly alsoincreasing the electrode drive angle. If this is notsufficient, interrupt welding and reduce the current.
An excessive heat supply may cause shrinkage Thismakes the internal surface of the joint concave. It is acommon defect when welding overhead: the force ofgravity causes the internal surface of the seam tobecome concave and the external surface convex.
In both cases it is necessary to reduce the heat supplyto the melted bath, the methods are the same as those
described in the previous case.

8/2/2019 Pipelines Welding Handbook
http://slidepdf.com/reader/full/pipelines-welding-handbook 51/64
51
Vertical welding, too high a heat input causes burnthrough and fall of melted metal.
Another cause of defects is often linked to an imperfectrestart of the arc, generally due to too low current or
insufficient pre-heating; the start of the connectingseam is too wide and the end has a contour degradingtowards the crater.
To prevent this type of defect, the electrode must beremoved towards the end of the crater, keeping the archslightly long for pre-heating. At the end reduce the arclength to melt the thin bridge of metal, waiting until theseam is of equal length to the existing one, then restartfeed. When the arc is correctly started, the electrodemust be turned towards the end of the crater.Also in the case of ascending restart with electrodeswith low alloy and/or low carbon contents (basic),the arc must be restarted upstream of the crater then
moving towards the other end and should be keptslightly longer than normal. To restart on the filling orexternal beads, with cellulosic or basic electrodes,switch on the arc approximately 13mm in front of thecrater then move back until it is filled. In this way theprevious seam is correctly pre-heated.
Another typical welding defect consists of undercuts.These are furrows displayed at the seam edges at theconnection with the surface of the base metal. Theyreduce thickness and cause burn through. This defect isdue to the excessive length of the arc. The larger thearc cone, the wider the cuts will be, and the filler metal
is laid in drops and there is excessive spatter withconsequent loss of filler material.Also the vertical down root often causes smallundercuts at the edges of the external surface of theseam, but this is mainly due to an over-high travelspeed. The second bead usually fills the cuts at theedges and prevents the lack of fusion and slaginclusion.The undercuts at the root inside the pipe are caused byan over-short arc. The tip of the electrode is pushedtoo far into the joint and the filler material which ispushed through the joint is laid at the root.
Finally, we must draw your attention to a series ofwelding defects caused by incorrect joint preparation.The root gap, the root face and cleaning of the joint areall factors directly related to the future quality of thefinished weld.An excessive distance between the edges or a toosmall may cause excessive penetration, shrinkingeffect, breakage or undercuts. An excessive root gapmakes it necessary to increase travel speed otherwisethere would be an excessive heat supply with excessive
penetration or burn through. Similarly, if the shouldersurface is too small, the arc heat makes the edges meltat the root and this leads to the previous situation inwhich the distance between the edges is excessive.On the contrary, too small a root gap or too large a rootface may cause insufficient penetration, lack of fusionand convexity of the seam surface with possible slaginclusion. If the root face is too high, the arc cannot meltthe joint edges to create the groove and the metal islaid between the edges with insufficient penetration.Insufficient or inadequate cleaning of the joint and basematerial before welding may cause further defects,generally gaseous inclusion (porosity if ≤ 1mm,
blowholes if≥
1mm). The presence of oil or dirt on thesurfaces to be welded causes spherical porosity. Othercauses of porosity may be the presence of humidity onthe base metal, excessive feed speed or excessiveundulation of the electrode.Finally, it is important to mention the effect of theelectrode angle as a means of temperature control.The feed angles, “to be pushed” or “to be pulled”,influence heat supply, arc force and the quantity ofmaterial laid. Since the arc force is always exerted inthe same direction as the electrode, if this is notcentred on the joint the arc causes undercuts along theedges. Welding in upwards, gravity moves the meltedmetal towards the lowest point of the crater in which
large undercuts have not been filled. Undercuts, whichmay however be caused by excessive arc length, mayalso occur along the edges of the joint root.
To sum up, the quality of the weld depends on theoperator’s ability, on his knowledge of the appropriatetechniques and on his capacity to control the fiveessential variables mentioned at the start. Jointpreparation, and its cleaning before welding, must beaccurate.
GOOD FUSION
LIGHTCONVEXITY

8/2/2019 Pipelines Welding Handbook
http://slidepdf.com/reader/full/pipelines-welding-handbook 52/64

8/2/2019 Pipelines Welding Handbook
http://slidepdf.com/reader/full/pipelines-welding-handbook 53/64
AUTOMATIC PIPE WELDING

8/2/2019 Pipelines Welding Handbook
http://slidepdf.com/reader/full/pipelines-welding-handbook 54/64
54
General information
For decades the largest companies specialising in pipeconstruction at world level have adopted automaticwelding systems, immediately finding their choicerewarded.The main reasons for the conversion are:
• Increased productivity• Lower welding costs• Use of fewer staff• Operators (welders) are trained in a few weeks• Lower repair percentage• Perfect repeteability of a test joint
Different alternatives can be chosen when the conversionhas to take place:
• One side welding with internal line-up clamp usingcopper backing• Performing of internal root pass with a “welding internal
line-up clamp”
Both of those give good productivity and low repairingrate, but their respective advantages are:
One side welding• Low cost equipment• Higher speed on root pass (the first pass gives theproduction speed to the main line welding phase)
Internal pass• Can be used when copper backings are not allowed• Can ensure better penetration on high-low conditions

8/2/2019 Pipelines Welding Handbook
http://slidepdf.com/reader/full/pipelines-welding-handbook 55/64
55
Filler materials
SOLID WIRES
ESAB, which follows the natural development of thesector, has set up and has now sold for years to allcompanies in the sector a complete range of solid
wires for pipe welding which covers the entire range ofsteels.
OK Autrod 12.66
Classification SFA/AWS A5.18-93 : ER 70S-6EN 440 : G 42 2 C G4Si1EN 440 : G 46 3 M G4Si1
OK Autrod 12.66 is a copper-coated solid wire withlow content of impurity elements for downhillcircumferential GMAW welding on pipe qualities such
as API 5L, grade X52 to grade X70. The wire permitswelding with high current (spray-arc) and also withshort-circuiting transfer in all positions. Shielding gasAr/CO2.
Typical all-weld metal composition - % C = 0.07Si = 0.8Mn = 1.4
Typical properties all-weld metal Yield stress : 535 MpaTensile strength : 600 Mpa
Elongation : 26%Charpy V : 100J at – 20°C
OK Autrod 13.13
Classification SFA/AWS A5.28 : ER 100S-GEN 12534 : GMn3NiCrMo
A copper-coated, low-alloy, chromium-nickel-molybdenum (0.5% Cr, 0.5% Ni, 0.2% Mo), solid wire forthe GMAW of high tensile strength steels with a minimumyield strength (0.2% offset) of less than 610 MPa and aminimum tensile strength exceeding 710 Mpa. Alsosuitable when welding steels where good impact strengthat lower temperatures is required.OK Autrod 13.13 is usually welded with Ar/CO2
as theshielding gas. The mechanical properties are given in theas-welded condition. After stress relieving, themechanical properties decrease by about 30 Mpa in thecase of yield and tensile strength.
Typical all-weld metal composition - % C = 0.1Si = 0.7Mn = 1.4Cr = 0.6Ni = 0.6Mo = 0.2
Typical properties all-weld metal Yield stress : 690 MPaTensile strength : 770 MPaElongation : 20%Charpy V :
80J at 0°C50J at – 60°C

8/2/2019 Pipelines Welding Handbook
http://slidepdf.com/reader/full/pipelines-welding-handbook 56/64
56
CORED WIRES
For even more extreme applications, where productivity,quality and mechanical features must be guaranteed,ESAB, thanks to its preferred partner relationship with
large contractors specialised in the offshore sector, hasprepared a series of cored wires which permit aconsiderable increase in productivity.
FILARC PZ6104
Classification SFA/AWS A5.18 : E70C-GM H4EN 758-1997 : T42 5 Z MM 2 H5
Metal-cored wire providing a ductile weld metal alloyedwith 1% Ni for good CVN toughness down to – 50°C.Developed for applications involving thick plates, highrestraint and/or low-temperature toughnessrequirements, as in offshore construction. Primary usecomprises multi-layer butt and fillet welds in the downhilland horizontal/vertical positions. Root passes withoutbacking are welded in the short-arc mode. Pulsed MIGoperation is applied to optimise the filling of positional joints, using Ar/8%CO2 shielding gas. Suitable forsemiautomatic and fully automatic orbital weldingmachines.
Typical all-weld metal composition - % C = 0.03 – 0.07Si = 0.4 – 0.7Mn = 1.2 – 1.6Ni = 0.7 – 0.95
Typical properties all-weld metal Yield stress : 420 MPaTensile strength : 520 - 620 MPaElongation : 22%Charpy V :54J at -40°C47J at – 50°C

8/2/2019 Pipelines Welding Handbook
http://slidepdf.com/reader/full/pipelines-welding-handbook 57/64
57
Welding with mixed technique
Electrode+wire welding may be considered the first steptowards complete automation of the welding process;although large companies adopted this solution in theearly Eighties to limit investments in the first phase.
It could work on a standard API bevel (30°+30°) withoutusing bevelling machine (very expensive device),performing root and hot passes by cellulosic electrodesand filling and cap by solid or cored wires.Very commonusing of self-shielded cored wire where good quality ofgas is not easy to find.
Wire welding
Wire welding, with reduced bevel and use of an internalclamp with copper supports is definitely the cheapest,safest and most productive solution to adopt and hasbeen used for years to construct sea and land pipes bynumerous companies in the sector.
How automatic equipment works
The welding torch moves downhill at a speedprogrammed by a selector. The speed is determined foreach pass, on the half circumference. At the end of eachpass the torch moves back to the starting position andrestarts, after the welding parameters have beenregulated or automatically set.The operation is carriedout by means of two carriages on the same weld, toincrease productivity.
Advantages
Operators, even if recruited among generic personnel,
can be trained in two-weeks time.Number of personnel dedicated to the welding phase canbe reduced by 30% (it’s not necessary to grind and brush joints – welding wire does not produce slag).Working time is completely productive. Dead timesbetween each pass are reduced to a minimum.
Welding techniques and operational practices for automatic orbital welding
DEPOSITION RATEWeld metal deposition per hour
Electrode Cored Automatic
wire-manual welding
DEPOSITION EFFICIENCYRatio of weight of weld metal deposited to the weight used
Electrode Cored Automatic
wire-manual welding
DUTY CYCLE FACTORS
Ratio of arc time to working time
Electrode Cored Automatic
wire-manual welding
1,36 kg/hr 1,8 kg/hr 3,6 kg/hr
35% 35% 80%
65% 85% 90%

8/2/2019 Pipelines Welding Handbook
http://slidepdf.com/reader/full/pipelines-welding-handbook 58/64
58
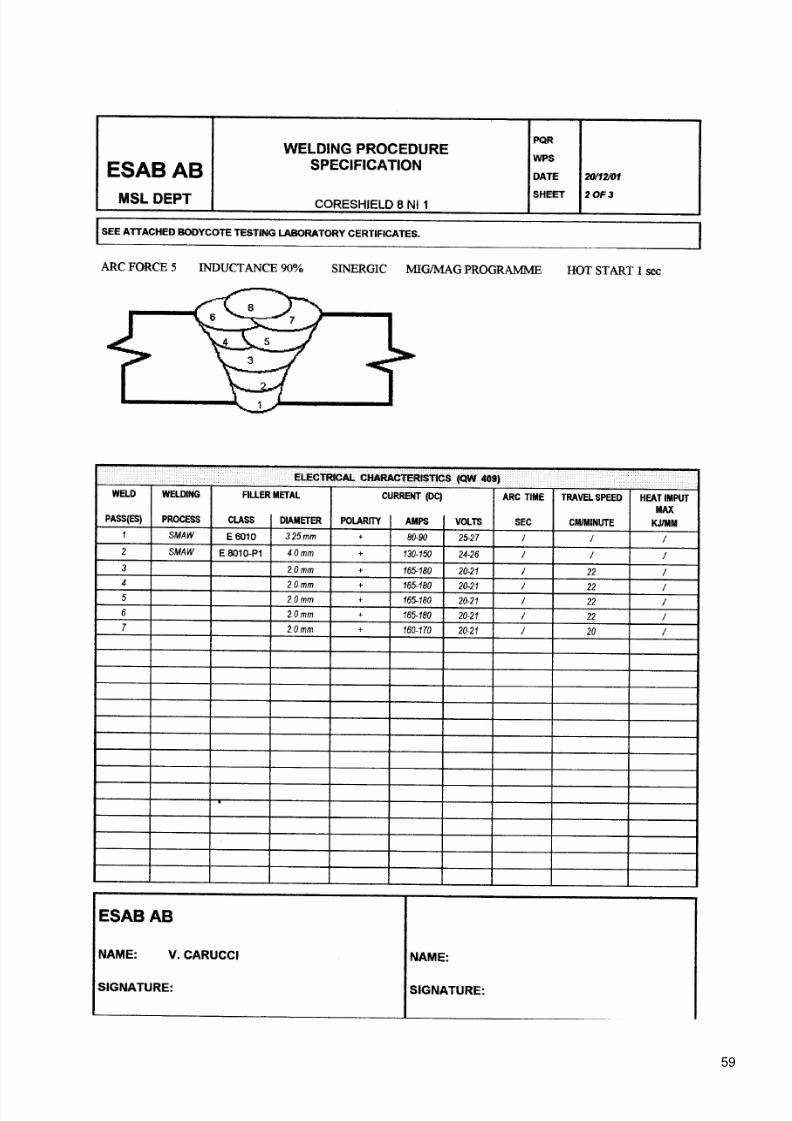
Examples of WPS - Welding Procedure Specifications
8/2/2019 Pipelines Welding Handbook
http://slidepdf.com/reader/full/pipelines-welding-handbook 59/64
59

8/2/2019 Pipelines Welding Handbook
http://slidepdf.com/reader/full/pipelines-welding-handbook 60/64
60
Examples of WPS - Welding Procedure Specifications

8/2/2019 Pipelines Welding Handbook
http://slidepdf.com/reader/full/pipelines-welding-handbook 61/64
61

8/2/2019 Pipelines Welding Handbook
http://slidepdf.com/reader/full/pipelines-welding-handbook 62/64
62
Comparison between three welding methods 36” pipe, 14 mm thickness
Electrode Electrode + wire Wire + copper backingType of bevel
Welding ProcedureSpecification
I°pass Pipeweld 6010 Plus ∅ 4 mm Pipeweld 6010 Plus ∅ 4 mm OK Autrod 12.66 ∅ 1 mm
II°pass Pipeweld 7010/8010 ∅ 4 mm Pipeweld 7010/8010 ∅ 4 mm OK Autrod 12.66 ∅ 1 mm
Filling Pipeweld 7010/8010 ∅ 5 mm OK Autrod 12.66 ∅ 1 mm OK Autrod 12.66 ∅ 1 mm
Capping Pipeweld 7010/8010 ∅ 5 mm OK Autrod 12.66 ∅ 1 mm OK Autrod 12.66 ∅ 1 mmThe joint could be also filledwith self shielded cored wire(Coreshield 8NiA)or OK Tubrod 15.17 insemiautomatic technique
TimesArc time 64 minutes 41 minutes 25 minutes
Efficiency 35% 35% + 80% 80%
Total time 182 minutes 68 minutes 31 minutes
Costs (only an example)
Manpower 34 Euro/hourElectrodes 5 Euro/kg
Wire 3 Euro/kg + 0,5 Euro/kg gas
Manpower cost 102 Euro 38 Euro 17 euro
Welding weight 2 kg 1,6 kg 1,2 kg
Consumables cost 11 Euro 6 Euro 4 Euro
Total weld cost 113 Euro 44 Euro 21 Euro
12°
R: 3,2 mm
1 mm
1,5 mm
12°
30°
1,5 mm~ 5 mm
30°
1,5 mm
The bevel = volume reduction
The finished weld

8/2/2019 Pipelines Welding Handbook
http://slidepdf.com/reader/full/pipelines-welding-handbook 63/64
63
Hollow beadThe x-ray shows how a hollow channel inside the firstbead may be caused by the presence of dirt inside thepipe, by inaccurate grinding of the internal wall of thepipe near the bevel, by bad weather conditions which
make water or steam reach the weld while the firstbead is being carried out or by incorrect weldingparameters (too much current, too much gas).
RemediesCheck internal cleaning of the pipe, all the circumference,by means of manual grinding (brushing is not sufficient)for a section of at least 2 cm from the bevel.
In bad weather conditions, manual cleaning with clothsof the internal wall of both the pipes to be joined evenbefore carrying out the first bead and before theoverhead section (6:00) as it is that most likely toconvey water or steam.
Periodic check of welding parameters
Lack of penetrationThis presents itself as an interruption, perhaps ofconsiderable length or with sections of the inside weldseam, which should instead be uniform after the firstbead. In pipes with a sufficiently large diameter topermit internal accessibility it is visible to the naked eyeand, in some cases, the intact bevel is visible (awelding process for instantaneous repair of the faultfrom the inside) is recommended. It may be caused byincorrect geometrical dimensions of the bevel, incorrect
welding parameters, bad fit up (excessivemisalignments) or poor operator skill.
RemediesCheck bevel, check welding parameters, pipe rotation(always compatible with the position of the longitudinalwelds which must be spaced a certain length) orapplication of shims on the internal clamp expanders toreduce misalignments.We will not dwell on the skill of the operators; the mostexpert should be chosen and reserved for the first bead(a delay in execution stops the whole “welding train”).
Lack of fusionThe main defect of wire processes. In x-ray it appearsas a continuous or short dashed line on one or bothsides of the joint; by assessing its position as regardsthe first bead (whiter seam at the centre of the film),you can assume its depth.The main causes are: incorrect bevel dimensions,incorrect welding parameters or operator negligence.
RemediesConstant check of all process geometrical andfunctional parameters and informed operators.A second case exists. Less common than the lack offusion called INTERPASS, caused by the dropping of the
weld pool in the vertical section of the pipe (2:00-5:00)due to incorrect welding parameters; it appears in the x-ray as a darker veil between two successive beads.
PorosityIn a coated electrode process, the weld pool isprotected from external oxidation by combustion of thecoating, but in a wire process it is protected by aprotective gas, introduced into the arc zone by a torch;
the lack of gas causes porosity.RemediesCheck the good state of maintenance of coverages forprotection from the wind, check the good state ofmaintenance of sleeves, connections, gas diffusers and,more as recommendation than a technical remedy,substitute gas cylinders before they finish completely.
Slag inclusionDefect found only in the mixed (electrode+wire) technique,it presents itself in the slab as an elongated, crackedinclusion of a certain thickness, usually positioned on oneside of the bevel. It is caused by bad slag cleaning in thesecond bead, which remains imprisoned and does notmelt in the successive wire bead.A sporadic case, mentioned for comprehensiveness, isslag inclusion due to its entrapment in the hollowcreated between the second bead and the bevel wall ifthis, in the section at 30°, has not been completely filled.To be more clear, if you start to weld with wire beforefilling the bevel section at 30°with the electrode, thiscould cause defects (even lack of fusion).
RemediesThorough cleaning of the second bead
External defects (undercuts and excessweld metal)These cannot be considered real welding defects whichcause joint seal problems, but are “to be repaired” dueto the possibility of the start of corrosion or fatiguefailure (cuts) or to facilitate subsequent operations ofcoating and installation (excess weld material)
RemediesGood preparation of the joint before executing thefinishing bead: the underlying bead must be uniform,perfectly clean and leave 1mm from the pipe surface topermit the voluminous pool of the last bead to restsmoothly and create a 1-1.5mm seam for the widest part
of the joint.
At the end of the “welding train”, it is advisable toprovide a tractor, even of small size for the manualrepair of defects on the external bead.
Defects and remedies

8/2/2019 Pipelines Welding Handbook
http://slidepdf.com/reader/full/pipelines-welding-handbook 64/64
Per saldature di qualità,usate il telefono!