pioneer pro djs manual
TRANSCRIPT

8/8/2019 Pioneer Pro DJS Manual
http://slidepdf.com/reader/full/pioneer-pro-djs-manual 1/155

8/8/2019 Pioneer Pro DJS Manual
http://slidepdf.com/reader/full/pioneer-pro-djs-manual 2/155
2 ContentsIndexDJS Ver. 1.002
Pioneer is a registered trademark of the Pioneer Corporation. Copyright © 2005 Pioneer Corporation.
All rights reserved.
Microsoft and Windows are registered trademarks of the Microsoft Corporation of the United States
and other countries. Copyright © 2005 Microsoft Corporation. All rights reserved.
Pentium is a registered trademark of the Intel Corporation of the United States.
Adobe and Reader are either registered trademarks or trademarks of Adobe Systems Incorporated in
the United States and/or other countries.
All other company names and names of products are either the trademarks or registered trademarks of
their respective company(ies).
DisclaimersThis software is not compatible with music CDs that do nothave the either of following symbols printed on the label of the
disc.
This software restricts the playback and reproduction of music content subject to copyright protection.* When encoded data is included in order to protect the copyrights of music content, the program may not operate
correctly.
* When encoded data included in order to protect the copyrights of music content is detected, it may cancel the
ripping, playback and/or other processes.
* In oder to protect the copyrights of music content, transferring (checking out) music to SD memory cards is
limited to a maximum of 3 per music content.
* A reader compatible with the copyright protection function of SD memory cards is needed in order to transfer
(check out) music content to an SD memory card. For more detailed information, refer to the user’s manual of
the various readers/writers.
* Music transferred (checked out) to an SD memory card can only be played back on SD Audio Compatible
players. For more detailed information, refer to the user’s manual of the various players.
Please make a note of your registration information and keep it in a safe location.* Please be advised that in the unlikely event that the information created/registered with this software is lost,
Pioneer shall bear no responsibility for it.
About CopyrightsCopying of copyrighted materials such as music is unlawful unless permitted by a legal exception or
consented to by the rightowners.

8/8/2019 Pioneer Pro DJS Manual
http://slidepdf.com/reader/full/pioneer-pro-djs-manual 3/155
DJS Ver. 1.002 3
Reading this Manual
ContentsIndex
Reading this ManualThis User’s Manual uses the following writing conventions in its explanations.
You can get the most out of this manual with a full understanding of each.
• The names of pop-up screens and function screens (DJ Play, Music Management, Ripping, Create
and Transfer) are enclosed in bold brackets, [ ]. (Ex. [DJ Play] screen)
• Menus and icons that are displayed on the screens are enclosed in brackets, [ ].
(For example: [ A /4 ] button)
* The sample screen shots were taken with Windows XP as the OS and the screen settings set to the XGA (1024 ×
768 Pixels) size.The DJ Play sample screen shots were taken with it set to side by side positions.
* For information about SXGA (1280 × 1024 Pixels) images, refer to ‘Starting Up DJS’ P.12 .
Basic Descriptionof an Operation
A fuller explanation of theoperation
The DJS screenthat is displayedwhile performing astep
Things to becareful of while
performing a step
Helpfulinformation andwhere to findrelated information
Chapter number and title
Steps on the page
Goes to the Tableof Contents
Goes to the Index
Section title
Indicates thecontent continueson the next page
Software nameand its versionnumber
Page number

8/8/2019 Pioneer Pro DJS Manual
http://slidepdf.com/reader/full/pioneer-pro-djs-manual 4/155
4 DJS Ver. 1.002
Table of Contents
ContentsIndex
Table of ContentsAbout DJS ................................................................................................................................ 6
Getting Ready .......................................................................................................................... 61. Checking the Packaging .................................................................................................................................62. Installing DJS ...................................................................................................................................................73. Starting Up DJS .............................................................................................................................................12
Names of Each Screen.......................................................................................................... 14Chapter 1 Getting the Most out of DJS............................................................................. 16
1-1 DJ System..................................................................................................................................... 16Chapter 2 Mixing Songs..................................................................................................... 18
2-1 Using the Auto Function to Mix Songs.......................................................................................... 182-2 Mixing Songs Manually ................................................................................................................. 29
Chapter 3 Playing Sound ................................................................................................... 343-1 Adjusting the Sound Quality.......................................................................................................... 34
3-1-1 Making Changes3-1-2 Cutting a Specific Range3-2 Adding Effects ............................................................................................................................... 37
3-2-1 Effector Types and their Features3-2-2 Adding Effects3-2-3 Adjusting Effects3-2-4 Turning Effects ON/OFF
3-3 Playing a Part of a Song Repeatedly ............................................................................................ 443-3-1 Setting up Loops (Play)3-3-2 Getting out of a Loop3-3-3 Playing a Loop you Set up Previously
3-4 Setting up to 8 Points to Start Playing (List Hot Cue) ...................................................................473-4-1 Determining List Hot Cue Points
3-4-2 Playing from a List Hot Cue Point3-5 Arranging Mixes of Songs.............................................................................................................513-5-1 Types of Mix Modes & Fader Curves and their Features3-5-2 Selecting a Mix Mode or Fader Curve3-5-3 Setting the Mixing Time (Beat)3-5-4 Mixing Songs
3-6 Using the Fader Start Functions ................................................................................................... 543-6-1 Channel Fader Start3-6-2 Cross Fader Start
Chapter 4 Useful Functions............................................................................................... 574-1 Setting up to 4 Points to Start Playing (Track Hot Cue) ................................................................ 57
4-1-1 Determining Track Hot Cue Points
4-1-2 Calling Out Track Hot Cues4-1-3 Changing a Track Hot Cue into an Auto Setup Cue4-2 Using Play Lists............................................................................................................................. 61
4-2-1 Auto-Playing a Play List4-2-2 Changing the Order of Songs During Auto-Play
4-3 Checking Songs ............................................................................................................................ 634-4 Using the Auto Mix Function for Mixing Songs ............................................................................. 654-5 Key Operations ............................................................................................................................. 674-6 Operations used with DMP-555 .................................................................................................... 68
4-6-1 Connecting4-6-2 Allocating the DMP-555 to a Player
Chapter 5 Creating Loops Made Easy.............................................................................. 705-1 Making a Loop............................................................................................................................... 705-2 Adjusting the Loop Range............................................................................................................. 725-3 Saving the Length of a Loop as a Track .......................................................................................735-4 Other Useful Functions (Create) ................................................................................................... 74

8/8/2019 Pioneer Pro DJS Manual
http://slidepdf.com/reader/full/pioneer-pro-djs-manual 5/155
DJS Ver. 1.002 5
Table of Contents
ContentsIndex
Chapter 6 Play Lists & Classifying Songs ....................................................................... 766-1 Editing Song Information............................................................................................................... 766-2 Classifying Songs into Categories ................................................................................................786-3 Creating a New Play List............................................................................................................... 796-4 Editing a Playlist............................................................................................................................ 80
Chapter 7 Importing Songs ............................................................................................... 827-1 Importing an MP3.......................................................................................................................... 827-2 Importing Songs from Music CDs ................................................................................................. 837-3 Importing WAV Files ..................................................................................................................... 867-4 Recording Sound from Microphone or Line Input ......................................................................... 89
Chapter 8 Using SD Cards................................................................................................. 918-1 Transferring DJS Music to SD Cards............................................................................................ 918-2 Returning Music from an SD Card to DJS .................................................................................... 93
Chapter 9 Changing the Settings to Make DJS More Convenient ................................. 959-1 Opening and Closing Preferences ................................................................................................ 95
9-1-1 Opening Preferences9-1-2 Closing Preferences
9-2 Setting the Size of Text Displayed in Lists ....................................................................................979-3 Setting the Layout of DJ Play Functions ....................................................................................... 989-4 Mixer and Sound Card Settings .................................................................................................. 100
9-4-1 Switching between Internal & External Mixers9-4-2 Selecting a Sound Card9-4-3 Adjusting Delay Time9-4-4 Adjusting the Size of Buffers
9-5 Key Assignment Settings ............................................................................................................ 1049-6 Ripping Settings ..........................................................................................................................105
9-6-1 Setting the Bit Rate9-6-2 ID3 Tag Settings9-6-3 Dead Air Cut Settings9-6-4 Settings for Selecting the DVD/CD Drive & Acquiring Song Information9-6-5 Line In Settings
9-7 Category Settings........................................................................................................................1089-7-1 Selecting Categories for Top & Other 9-7-2 Creating Categories & Play Lists, Changing their Names and Deleting them
Chapter 10 Other Functions .............................................................................................. 11110-1 Connecting to the Internet........................................................................................................... 11110-2 Table of Functions....................................................................................................................... 11210-3 Tables of Menus.......................................................................................................................... 123
10-3-1 Names of Each Function & What they Do10-3-2 Menus Displayed in DJ Play Functions10-3-3 Menus Displayed in Track List/Play List
Chapter 11 User Registration ............................................................................................ 13111-1 Registering Online....................................................................................................................... 13111-2 Registering Offline....................................................................................................................... 136
Chapter 12 Uninstalling DJS ............................................................................................. 139
Chapter 13 Version Updates.............................................................................................. 14213-1 Updating the Version of the DJS Software............... .............. ................. ................. ................. .. 14213-2 Updating the Version of the DJS Manual .................................................................................... 14413-3 Updating the Version of the DMP-555 Firmware ........................................................................ 146
Troubleshooting .................................................................................................................. 148Index ..................................................................................................................................... 151

8/8/2019 Pioneer Pro DJS Manual
http://slidepdf.com/reader/full/pioneer-pro-djs-manual 6/155
6 DJS Ver. 1.002
About DJS
ContentsIndex
About this Manual
About DJS
Thank you very much for your purchase of DJS . DJS is a software that allows you to enjoy DJing with MP3 files. You can enjoy all the things involved
in being the DJ with just DJS , as it incorporates the functions of MP3 players and those of a DJ’s mixer. Not only can you achieve a high level of DJ play with its rich variety of functions, like its equalizer,
effector and hot cueing, but even a beginner to DJ mixers has easy access to the pleasure of DJing via its
auto tempo synching function, beat display function, etc.
First off, in order to get to know DJS ’s functions, please read the Quick Start Guide (pamphlet) and the
User’s Manual (PDF), and then get right to using DJS for real.
Getting Ready1. Checking the PackagingCheck that the following attachments are enclosed with DJS .
If this is your first time using DJ equipment or DJS , please read the Quick Start Guide and then start
enjoying DJS .
Quick Start Guide:Written to make it easy to start using DJS right away.
User’s Manual:Written so you can use the full complement of DJS functions.
CD-ROM × 1
Quick Start Guide × 1
Installation Key Sticker × 1
Keyboard Stickers × 4
User Registration Card × 1
Notices about DJS × 1

8/8/2019 Pioneer Pro DJS Manual
http://slidepdf.com/reader/full/pioneer-pro-djs-manual 7/155
(Contd. on the next page)
DJS Ver. 1.002 7
Getting Ready
ContentsIndex
2. Installing DJS
Before you install DJS , please read the Software Usage Agreement, and if you agree to the content, take
the software out of its package. Also before installing, check and make sure that your computer meets the
following requirements.
Warning: Please note that other software, when used with this software, may cause incompatibilities thatcould render this software inoperable.
Warning: Prior to initiating installation of DJS, use the Windows update function to install the newestService Pack on your computer.
Recommended Operating EnvironmentCPU: IBM PC/AT compatible computer with 1.5 GHz or faster Intel ® Pentium ® M
or compatible processor
Required Memory: 512 MB
Hard Disk: 250 MB(Not including the space required for saving files, such as MP3, etc.)
Optical Disk Drive: DVD/CD Drive
Display: 1024 × 768 Pixels (XGA), High Color (16 bit) or better display capabilitySound: Internal or External Audio Output Board or Device
(If sound will be output to both speakers and headphones, 2 systems arerequired.)
OS: Microsoft ® Windows ® XP Home Edition/ProfessionalMicrosoft ® Windows ® 2000 Professional
External Ports: USB 1.1
Input Devices: Keyboard, Mouse (or equivalent pointing device)
Internet Connection Environment: Connection speed of 56 kbps or faster. To be used with Internet Explorer 5.5or later, or a 128-bit SSL enabled Web browser.

8/8/2019 Pioneer Pro DJS Manual
http://slidepdf.com/reader/full/pioneer-pro-djs-manual 8/155
8
(Contd. on the next page)
DJS Ver. 1.002
Getting Ready
ContentsIndex
1 Place the DJS CD-ROM in the DVD/CD drive.• After a few moments, the [DJS Installation] screen will
open.
2 Click the [Install DJS] button.
• Once you click on the [Install DJS] button, the screen for selecting the language is displayed.
3 Select [English] and click the [OK] button.
• Depending on the user’s Windows environment, you may be able to select from a number of languages.• The [Preparing to install DJS.] screen opens.• Once the preparation is complete, the [Commencing
installation of DJS...] screen opens.
Step 1 2 3 4 5 6 7 8 9 Warning!
Installing and uninstalling DJS requires administrator authority for
the computer. Log in as a user whohas been set up as a computer administrator and then install thesoftware.
If the [DJS Installation] screen fails toopen after you place the CD-ROM in thedrive, open the [CD Drive] from MyComputer on the [Start] menu anddouble-click the [Autorun] icon.
Warning!When the trial version of DJS has been installedOn the [ DJS Installation ] screen, the[The trial version of DJS has beendetected on this computer.] messageis displayed. Install this software after removing the trial version of DJS .1. Click the [Uninstall the trial version
of DJS] button to uninstall the trialversion of DJS .
‘Chapter 12 Uninstalling DJS’ P.1392. After removal of the trial version,
click the [Install DJS] button toinstall DJS (this software).
To cancel the installation…Click the [Cancel] button.
If you are using AdobeReader Version 3.0 or earlier...A message will be displayed. Followthe instructions in the message touninstall it and then to reinstall.

8/8/2019 Pioneer Pro DJS Manual
http://slidepdf.com/reader/full/pioneer-pro-djs-manual 9/155
(Contd. on the next page)
DJS Ver. 1.002 9
Getting Ready
ContentsIndex
4 Click the [Next] button.
• The [Usage Agreement] screen opens.
5 After reading the End User License Agreement,select [Agree] and then click the [Next] button.
• The [Inputting the Installation Key] screen opens.
Step 1 2 3 4 5 6 7 8 9
If you do not agree…Click the [Cancel] button.
• The installation will be terminated.• In such case, you will not be able
to use DJS .

8/8/2019 Pioneer Pro DJS Manual
http://slidepdf.com/reader/full/pioneer-pro-djs-manual 10/155
10
(Contd. on the next page)
DJS Ver. 1.002
Getting Ready
ContentsIndex
6 Enter the installation key and then click the [Next]button.
• The installation key is printed on the Installation KeySticker that comes in the package.• The installation key will be printed in green. Be careful to
input all numerals and letters correctly.
• The [Installation Destination Folder] screen opens.
7 Click the [Next] button after you check thedestination folder for the installation.
• The [Confirming Installation Information] screenopens.
Step 1 2 3 4 5 6 7 8 9 Warning!
You will need your installation keywhen making inquiries, so please
write it down and keep it in a safe place after finishing all installation procedures.
If the [Insufficient DiskCapacity] screen opens...There isn’t enough free space on thehard disk to which it will be installed.Perform either operation (a) or (b).(a) Click the [OK] button and specify a
different drive.(b) Click the [Cancel] button and
suspend installation. Delete
unneeded files and programs toensure there is enough hard disk capacity and then restart theinstallation.

8/8/2019 Pioneer Pro DJS Manual
http://slidepdf.com/reader/full/pioneer-pro-djs-manual 11/155
DJS Ver. 1.002 11
Getting Ready
ContentsIndex
8 Click the [Next] button after checking the[Installation Information].
• The installation begins and the [DJS is being installed.] screen opens.
• Once the installation is complete, the [Installation of DJSis now complete.] screen opens.
9 After clicking the [Yes, I want to restart mycomputer now.] button, read the message that isdisplayed and click the [Finish] button.
• The [Installation of DJS is now complete.] closes andyour computer restarts.
Step 1 2 3 4 5 6 7 8 9
Changing the [InstallationInformation]You can go back to the previous settingsscreen by clicking the [Back] button.
After making changes...Check the places that you have changedthen click the [Next] button andcontinue with the installation process.
Warning!If you select [No, I will restartmy computer later.]…It is necessary to restart your computer.If you select [No, I will restart mycomputer later.] and finish theinstallation, be absolutely sure that youdo restart your computer before youstart up DJS .
If you can’t successfullyinstall DJS ...Inquiries Regarding Installation andUser Registration (URL)
‘Troubleshooting’ P.148

8/8/2019 Pioneer Pro DJS Manual
http://slidepdf.com/reader/full/pioneer-pro-djs-manual 12/155
12
(Contd. on the next page)
DJS Ver. 1.002
Getting Ready
ContentsIndex
3. Starting Up DJS
There are two ways to start up DJS , (a) and (b).
1 Start up DJS with either method (a) or (b).
When you start up DJS after registeringas a user, the [Update Available] screenmay appear. Download the update
package and use it to conduct a versionupdate.
‘Chapter 13 Version Updates’P.142
• If you don't want to download theupdate the package right away,click on the [No] button.
Warning!About the computer power settingsIf the computer enters power savingsmode (such as system standby) whileyou are using DJS , DJS may not beable to return to its original status.When you are going to use DJS , it isrecommended that you change thetimer settings on the [Power Schemes]
tab of the [Power Options Properties] screen to [None].
About peripheralconnectionsPlease quit DJS prior to turning on or off peripheral equipment or removingor adding hardware such as sounddevices, CD drives, or SD memorycard readers/writers.
(a) Double-click the [DJS] shortcut icon on the desktop.
(b) Click the [Start] button, then select [All Programs],(Windows XP) or [Programs] (Windows 2000) and[DJS] in that order.
In Windows XP
In Windows 2000

8/8/2019 Pioneer Pro DJS Manual
http://slidepdf.com/reader/full/pioneer-pro-djs-manual 13/155
DJS Ver. 1.002 13
Getting Ready
ContentsIndex
2 If you haven’t completed the user registration, adialog box prompting user registration will appear when you start DJS . Please register as indicated.
‘Chapter 11 User Registration’ P.131
• If you do not wish to register right away, click [No] buttonin the dialog box.
3 Follow the instructions in the [Folder Settings] screen, selecting destination folders for musiclibrary creation, and then click the [OK] button.
(Only the 1st time it is started)• The following screen is displayed.
About registrationIf you do not register the software, the DJS software will operate with thefollowing conditions:(a) You can use DJS for a period of 60
days without registering the user.(b) A dialog box prompting you to
register a user will be displayedevery time you launch the program.
‘Chapter 11 User Registration’P.131
DJS Screen SizeThe screen is displayed in line with thecomputer’s screen settings (SXGA 1280× 1024 or XGA 1024 × 768).
The Music Library CreationFolder Music files created by ripping are savedin this folder.The save destination folder specifiedhere can be modified late r.
‘[Help] Menu’ P.126
[DJ Play] Screen
XGA SXGA

8/8/2019 Pioneer Pro DJS Manual
http://slidepdf.com/reader/full/pioneer-pro-djs-manual 14/155
14
(Contd. on the next page)
DJS Ver. 1.002
Names of Each Screen
ContentsIndex
Names of Each Screen DJS has 5 functions in addition to the DJ Play function that opens
when DJS starts up. To switch between functions, click the [Function]
icon at the top of the screen.
Internet FunctionGives you access to our user support pagesand to a web page that introduces web sitesthat distribute music.
Music Management FunctionsAllows you to edit the information on songs in a track list. Allows you to classify each of your songs intotheir respective categories.
Ripping FunctionConverts music CDs, WAV filesand the sound from line inputsinto MP3 files and then importsthem.

8/8/2019 Pioneer Pro DJS Manual
http://slidepdf.com/reader/full/pioneer-pro-djs-manual 15/155
DJS Ver. 1.002 15
Names of Each Screen
ContentsIndex
Create FunctionAllows you to create loops andsave them as separate tracks.
DJ Play Function
[Function] Icon
Transfer FunctionAllows you to transfer songs inthe MP3 format to a SD memorycard.

8/8/2019 Pioneer Pro DJS Manual
http://slidepdf.com/reader/full/pioneer-pro-djs-manual 16/155
16 DJS Ver. 1.002
1 Getting the Most out of DJS DJ System
ContentsIndex
(Contd. on the next page)
Chapter 1Getting the Most out of DJS
Explains the system structure that needs to be in place to DJwith DJS .
1-1 DJ SystemWhen Using the DJS Mixer Function
Outputs the audio for speakers and monitor separately. Doing sorequires a computer equipped with at least 2 audio outputsystems, either internal or external. If your computer only has 1audio output system, you will have to install additional audiodevices, such as a sound card. Then connect your speakers or headphones to the computer’s audio output (for speakers,monitor) respectively.
Example of connections in a 2 audio output (sound card)system
Warning!If you increase the number of sound cardsMake the settings appropriate for theaudio output to the audio device, suchas a sound card, on the [Preference] screen.
‘9-4-2 Selecting a Sound Card’P.101
Sound Card
Speaker (Left) Computer
Headphones
Speaker (Right)

8/8/2019 Pioneer Pro DJS Manual
http://slidepdf.com/reader/full/pioneer-pro-djs-manual 17/155
DJS Ver. 1.002 17
1 Getting the Most out of DJS DJ System
ContentsIndex
When Using an External Mixer You can use just DJS ’s player functions (Player A, Player B, ListPlayer) without using the DJS mixer functions. When doing so,you can output the audio of the 3 players to an external mixer. Todo this, your computer needs to have a minimum of 2 or 3+
internal or external audio output systems. If the computer you areusing only has 1 audio output system, you will have to installadditional audio devices, such as sound cards.Then connect each of the audio outputs (for Player A, Player B&/or List Player) from your computer to the external mixer andconnect the external mixer to the speakers and headphones.
Example of connections in a 3 audio output (sound card)system
Switching to an ExternalMixer When DJS is initially installed, it is setup for using the DJS mixer functions.Consequently, if you do not wish to use DJS ’s mixer functions, use the
[Preference] screen to switch thesettings to using an external mixer.
‘9-4-1 Switching between Internal& External Mixers’ P.100
Warning!If you increase the number of sound cardsMake the settings appropriate for theaudio output to the audio device, such
as a sound card, on the [Preference] screen.
‘9-4-2 Selecting a Sound Card’P.101
Sound Card
Speaker (Left)Headphones
Computer Speaker (Right)
External Mixer

8/8/2019 Pioneer Pro DJS Manual
http://slidepdf.com/reader/full/pioneer-pro-djs-manual 18/155
18
(Contd. on the next page)
DJS Ver. 1.002
Mixing Songs Using the Auto Function to Mix Songs2
ContentsIndex
Chapter 2Mixing SongsWhen you use the Quick Start Guide, everything is doneautomatically, except for selecting songs. Follow the belowexplanation on how to mix songs in a semi-automatic way (autofunctions) and how to do everything yourself (manual).
2-1 Using the Auto Function to MixSongs
Auto function automate parts of the operation involved with mixing
songs. If you use the convenient functions explained here, you canmake light work of DJing.The actual work flow is as follows.
• Start up DJS before doing any of the operations.• Switch the [AUTO MIX] button on the Mixer to the [MIX] button.
Warning!Sound Output to HeadphonesGet a sound card that is for headphones. If there is no sound card,the headphones will not work.
‘1-1 DJ System’ P.16
Changing the [AUTO MIX]button to the [MIX] button1. Right click the [AUTO MIX] button.2. Click [MIX].
Select an MP3 Song Steps 1–3
*Get two MP3 songs ready.
Assign songs to players A and B Steps 4–6
Decide on the play start position for player B
Steps 7–10
Automatically synchronize the Tempo(speed)
Step 11
Decide the Timing for Mixing the Songs Step 12
Play Player B Step 13
Switch the Song to Play Step 14

8/8/2019 Pioneer Pro DJS Manual
http://slidepdf.com/reader/full/pioneer-pro-djs-manual 19/155
(Contd. on the next page)
DJS Ver. 1.002 19
Mixing Songs Using the Auto Function to Mix Songs2
ContentsIndex
Layout of the Information Display
1 Title DisplayDisplays song titles.
2 Album DisplayDisplays the name of the album.
3 Artist DisplayDisplays the name of the artist.
4 Playing AddressThe width indicates the length of the whole song. The yellow indicates the
playback position. The solid line in the color of the player indicates the rangethat is being displayed in the waveform display. If you drag the solid line, youcan move the range of the waveform display. (After it has been displayed for about 2seconds, it returns to the playback position.)
5 Zoom Out ButtonShrinks the range of the waveform that is displayed.
6 Zoom In ButtonExpands the range of the waveform that is displayed.
7 Zoom ButtonExpands the display of the area around the playback position in the waveformdisplay.
8 FULL ButtonThe entire song is displayed in the waveform display.
9 Master Tempo DisplayLights up when the Master Tempo function is ON.
0 Time Display SettingDisplays the settings for the time display (Elapsed time display: Normal; Timeremaining display: Remain). If you click the display, it toggles to the other setting.
- Time DisplayDisplays the time (time remaining or elapsed time).
= Tempo DisplayDisplays the tempo setting.
~ BPM DisplayDisplays the BPM, which is automatically detected during playback. It updatesitself every time it is detected.
! Waveform DisplayThe dynamics of the music are displayed as a waveform.
A Loop Display ‘3-3-1 Setting up Loops (Play)’ P.44
B Reloop Display ‘3-3-3 Playing a Loop you Set up
Previously’ P.46
C AUTO CUE Display ‘When the Auto Cue function is ON’
P.22
D BPM SYNC Button ‘2-1 Using the Auto Function to Mix
Songs’ P.18
E TAP Button ‘Using the [TAP] button to Re-detect
the BPM’ P.33
Master Tempo FunctionWhen the master tempo is OFF, changingthe tempo causes the key to be altered(faster: higher pitch, slower: lower pitch),
but if you turn the master tempo ON, it prevents changes to the tempo from
resulting in changes to the key.
Expanding the WaveformDisplayCan be expanded to a maximum of 4
beats.
Meaning of Colors in theWaveform DisplayWhile a Loop is Playing
Light Blue: In the range of the loop being played
Indigo: Outside the range of theloop being played
123
!
45
=
6A
-0B
D
E
9
~
87
C

8/8/2019 Pioneer Pro DJS Manual
http://slidepdf.com/reader/full/pioneer-pro-djs-manual 20/155
20
(Contd. on the next page)
DJS Ver. 1.002
Mixing Songs Using the Auto Function to Mix Songs2
ContentsIndex
Layout of the Mixer
1 Headphone Monitor ControlDisplays the [HEADPHONES] screen. ‘[Headphone Monitor
Control]’ P.272 Headphone Volume LevelAdjusts the volume for the headphones.
3~ Peak Level Meter (for both Players A & B)Displays the volume of each player.
4- Channel Fader (for both Players A & B)Adjusts the volume of each player.
50 Auto Fader (for both Players A & B)Adjusts the volume of each player.
6= Headphone Cue (for both Players A & B)Select the source to monitor on your headphones.
7 Beat Indicator Displays the beat of each player.
8 Cross Fader Switches the sound that is output from the speakers.
9 AUTO MIX/MIX ButtonMoves the position of the Cross Fader to the opposite side.
! Headphone Cue (Master)Switches the sound output from the headphones to that of the master.
@ Peak Level Meter (Master)Displays the volume of the master sound.
# Master Fader Adjusts the volume of the master.
A J AUTO Button ‘Adjusting all of the Sound’ P.36
B K
Trim ‘Adjusting all of the Sound’ P.36
C I Equalizer ‘3-1 Adjusting the Sound Quality’
P.34
D H Fader Start Button ‘3-6 Using the Fader Start Functions’
P.54
E Mix Mode Button ‘3-5-1 Types of Mix Modes & Fader
Curves and their Features’ P.51
F Fader Curve Button ‘3-5-1 Types of Mix Modes & Fader
Curves and their Features’ P.51
G Effector ‘3-2 Adding Effects’ P.37
[Beat Adjust] ButtonThe circle on the left side of the [BeatIndicator] serves as the [Beat Adjust]
but tons as well.) ‘Operating the [Beat Adjust] Button’
P.27
1
6
9
8
43
2
5
A
B
C
D
=
-~
0
J
K
I
EF
H
7 @ #
!
@

8/8/2019 Pioneer Pro DJS Manual
http://slidepdf.com/reader/full/pioneer-pro-djs-manual 21/155
(Contd. on the next page)
DJS Ver. 1.002 21
Mixing Songs Using the Auto Function to Mix Songs2
ContentsIndex
1 Click [File] and select [Import] then [MP3 AudioFile] in order.• The [Importing MP3 Audio Files] screen opens.
2 Click the first song you want to play and then clickthe [Open] button.
• When you start importing, the [Import] screen opens upso you can check the status of progress.
• Once you have finished importing, click the [OK] button
to close the [Import] screen. The songs you imported will be displayed in the track list.
Step1 2 3 4 5 6 7 8 9 10 11 12 13 14
Warning!If you click on the [Open] buttonafter clicking on and selecting afolder, all of the MP3 files containedwithin the folder and sub-folder will
be imported. ‘7-1 Importing an MP3’ P.82
If you want to change thefolder...Click the name of the folder displayed
in the [Location of File(s)] and click thefolder you wish to change to.
When opening foldersDouble click on the folder name or folder icon to open the folder toreference the sub-folders and MP3 filescontained within.
Listing songs in the order you wish to play them.
‘6-3 Creating a New Play List’ P.79
Displaying the play list whenDJS starts up
‘9-3 Setting the Layout of DJ PlayFunctions’ P.98
Meanings of Colors for Categories/Tracks/Play ListDJ Play Function:
Slate Blue: While Not PlayingGreen: During Playback on
Player ABlue: During Playback on
Player BOrange: During Playback of the
List Player Gray: Cannot be Played
Functions other than DJ Play:Slate Blue: While Not PlayingOrange: During Playback Gray: Cannot be Played
The import process cannotbe done
‘Troubleshooting’ P.148

8/8/2019 Pioneer Pro DJS Manual
http://slidepdf.com/reader/full/pioneer-pro-djs-manual 22/155
22
(Contd. on the next page)
DJS Ver. 1.002
Mixing Songs Using the Auto Function to Mix Songs2
ContentsIndex
3 After doing step 1, click the song that will bemixed next and click the [Open] button.• The [Import] screen closes and the selected song(s) are
added to the track list.
4 Drag the slider of the [Cross Fader] to the player A side (left edge).• Music will be output only from player A.
5 Select the first song to play and drag & drop itfrom the track list to player A.• The song will start to play on player A.
6 Select the next song to play and drag & drop itfrom the track list to player B.• The song will start to play on player B.
Step1 2 3 4 5 6 7 8 9 10 11 12 13 14
Before mixing…This chapter explains how to mix songswhile 2 songs are playing at the sametime, so conduct the operations with themix mode at [Cross Fader] as is.
‘3-5-1 Types of Mix Modes & Fader Curves and their Features’ P.51
When the Auto Cue functionis ONWhen the Auto Cue is working, itautomatically detects where the musicstarts (starting point of the song), cues itup and stands by.
Status DisplayWhen a song is put on Player A, B or alist player, a musical note symbol will
be displayed on the left side of the titledisplay.
Play/Pause Button [ A /4 ]In DJS a song starts to play as soon asyou put it on a player.
In addition, if you press the [ A /4 ] button during playback, it pauses withthe sound being output. (Sound ONPause)
When a song finishes playingTrack List:
Returns to the beginning of thesong and continues to play.
Play List:The next song is put on.
Track Search Buttons on theTrack ListRegardless of which track search buttonyou click [ 6 ] [7 ], it jumps to the
beginning of the song.
Title Display of a ListIf the latter part of a title is hidden
because the list is too narrow, put thecursor on it and the entire title will bedisplayed as a pop-up. Double-bytecharacters for languages like Chineseand Japanese cannot be displayed.

8/8/2019 Pioneer Pro DJS Manual
http://slidepdf.com/reader/full/pioneer-pro-djs-manual 23/155
(Contd. on the next page)
DJS Ver. 1.002 23
Mixing Songs Using the Auto Function to Mix Songs2
ContentsIndex
7 Click the headphone cue for player B.• The headphone cue will light up.
About the Headphone CueWhen you click a headphone cue, you can output the soundfrom that headphone.
Functions that have a headphone cue:Player A, Player B, List Player, Master, Effector
8 Listen to the song over your headphones andsearch for the playback start position.
9 Clicking the [ A /F ] button of player B at theplayback start position pauses it.
Step1 2 3 4 5 6 7 8 9 10 11 12 13 14
Warning!
Sound Output to HeadphonesGet a sound card that is for headphones. If there is no sound card,the headphones will not work.
‘1-1 DJ System’ P.16
Adjusting your headphonesYou can make adjustments for thevolume of your headphones, mixinglevels, and switching between stereoand mono split.
‘[Headphone Monitor Control]’ P.27
Rewind & Fast ForwardIf you click the search buttons, [ 8 ][9 ] you can move the playback
position to the vicinity where you want it.
Changing the PlaybackPositionYou can move the playback position tothe point you click in the waveformdisplay or the [Playing Address].
Fine Tuning the PausePositionIf you turn the [Jog Dial] while the songis paused, you can make fine
adjustments in frame units to the paused position. (1 Frame 1/75 Sec.)In addition, you can also click thesearch buttons [8 ] [9 ] to make fineadjustments.

8/8/2019 Pioneer Pro DJS Manual
http://slidepdf.com/reader/full/pioneer-pro-djs-manual 24/155
24
(Contd. on the next page)
DJS Ver. 1.002
Mixing Songs Using the Auto Function to Mix Songs2
ContentsIndex
10 Click player B’s [CUE] button and to set up theplace where playback is to start.
11 Click player B’s [BPM SYNC] button and it willmatch the speed of player A’s song.
12 Using the [Beat Indicator] of Player A as a guide,gauge when playback is to start for Player B.
About the Beat IndicatorsThe [Beat Indicator] is composed of one large, circular indicator on the left and 3 smaller circular indicators to itsright. Usually, the largest waveform is shown in the large,round indicator as the beginning of the beat.
Step1 2 3 4 5 6 7 8 9 10 11 12 13 14
Using the [CUE] button ‘Using the [CUE] button’ P.28
Recording Cues(Track Hot Cues / List Hot Cues)
‘4-1 Setting up to 4 Points to StartPlaying (Track Hot Cue)’ P.57
‘3-4 Setting up to 8 Points to StartPlaying (List Hot Cue)’ P.47
[BPM SYNC] ButtonThis button automatically adjusts thespeed of the next song to synchronizewith the speed of the song being played.The speed of a song is called its BPM(Beats Per Minute). The button is called[BPM SYNC] as it automaticallysynchronizes the BPM of the two songs.
[Beat Indicators]The indicators display the beats of
players A & B. In order to mix thesongs cleanly, it is essential tosynchronize the 2 beats perfectly.
Adjusting Disparities in theBeat Displays
‘Adjusting discrepancies in the [BeatIndicator]’ P.27

8/8/2019 Pioneer Pro DJS Manual
http://slidepdf.com/reader/full/pioneer-pro-djs-manual 25/155
(Contd. on the next page)
DJS Ver. 1.002 25
Mixing Songs Using the Auto Function to Mix Songs2
ContentsIndex
13 Click on the [ A /4 ] button of Player B to initiateplayback for player B.• This enables you to monitor the sound from player B on
your headphones.
14 Click the [MIX] button to move the slider of the[Cross Fader] to player B.
• As the [Cross Fader] moves, the volume from player Agets quieter while that of player B gets louder.
• When the [Cross Fader] reaches the right side and stops,the volume from player A goes completely off.
Step1 2 3 4 5 6 7 8 9 10 11 12 13 14
[MIX] ButtonThis button automatically moves thecross fader position from the song being
played to the next song to be played.
Setting the Timing (beats) of the [Cross Fader]
‘3-5-3 Setting the Mixing Time(Beat)’ P.53
Direction the [Cross Fader]MovesThe [Cross Fader] moves to theopposite side. If you press the [MIX]
button again while it is moving, the[Cross Fader] will stop moving.
If the BPM Isn’t DetectedSongs are mixed at 120 BPM.

8/8/2019 Pioneer Pro DJS Manual
http://slidepdf.com/reader/full/pioneer-pro-djs-manual 26/155
26
(Contd. on the next page)
DJS Ver. 1.002
Mixing Songs Using the Auto Function to Mix Songs2
ContentsIndex
When the Beat is not Synchronized…If the beat is not synchronized, the drums make an out of sync“bam-bam” sound and it all sounds fast and garbled. The timingof the mixing of the songs is either too slow or too fast.Conduct one of the following, ‘Adjusting with the [Jog Dial]
before Mixing’ P.26 or ‘Adjusting discrepancies in the [BeatIndicator]’ P.27 .
Adjusting with the [Jog Dial] before Mixing
If you check your headphones before mixing the songs, you willnotice if the beats are not aligned. If you use the jog dial, you canmake adjustments, like speeding the beat up or altering the
playback position.
Switching Jog Dial ModesClick the [Scratch] button above and to the right of the Jog Dialto switch between the Normal and Scratch modes.
Operating in the Normal Mode
Operating in the Scratch Mode
When Off: Normal ModeWhen Lit: Scratch Mode
Clockwise: The song plays faster the further you turnthe dial.
Counter Clockwise: The song plays slower the further youturn the dial.
Rotate: The more you move the dial, the more the playback position moves while sound continues to be output.
Stop: When you stop turning the jog dial, playback returns to normal.
Norma Mo e Scratc Mo e

8/8/2019 Pioneer Pro DJS Manual
http://slidepdf.com/reader/full/pioneer-pro-djs-manual 27/155
(Contd. on the next page)
DJS Ver. 1.002 27
Mixing Songs Using the Auto Function to Mix Songs2
ContentsIndex
When the BPM (speed) is not Synchronized … ‘Using the [TAP] button to Re-detect the BPM’ P.33
Adjusting discrepancies in the [Beat Indicator]If the display of the [Beat Indicator] gets out of sync with the
actual beat, use the [Beat Adjust] button to redisplay it.The circle on the left side of the [Beat Indicator] has the functionof displaying the starting beat and acts as the [Beat Adjust]
button.
Operating the [Beat Adjust] ButtonIf you click the [Beat Adjust] button, the timing with which youclick it is re-displayed in the [Beat Indicator] as the starting beat.
[Headphone Monitor Control]Make headphone settings on the Mixer and [HEADPHONES] screens.
The [HEADPHONES] screen is displayed by right clicking the[Headphone Monitor Control] on the upper edge of the Mixer.
The Mixer Selecting the Source to Monitor on your Headphones:
Click the headphone cue on each of the sources, players,master, or effector and it will light up.
Adjusting the Volume:Drag the slider of the [Headphone Volume Level] to adjust thevolume. Turn the dial to the left [-] to decrease the volume andturn it to the right [+] to increase the volume.

8/8/2019 Pioneer Pro DJS Manual
http://slidepdf.com/reader/full/pioneer-pro-djs-manual 28/155
Mixing Songs Using the Auto Function to Mix Songs
28 DJS Ver. 1.002
2
ContentsIndex
[HEADPHONES]Screen
Using the [CUE] buttonIf you click the [CUE] button, it will work as follows, dependingon the circumstances when you clicked it.
With [STEREO] SelectedIf you click [STEREO], the sourceselected with [Headphone Cue] can bemonitored in stereo.
With [MONO SPLIT] SelectedIf you click [MONO SPLIT], the outputto the headphones becomes monauraland you can monitor the audio of thesource selected with [Headphone Cue](not master) on the left and the master audio on the right.
Switching between Stereo & Mono Split:Click either the [STEREO] or [MONO SPLIT] button andselect the ‘monitoring by headphones’ method.
Mixing Adjustment:If you turn the dial to the left to [CUE], the volume of sourcesselected with headphone cue, other than master, increases,whereas if you turn it to the right to [MASTER], the volume of the Master output increases.If you right click on the dial, it returns to the middle position
between [CUE] and [MASTER].
When Cues have been SetThe Loop In button blinks 3 times andthen stays lit. (A cue point and a loop in
point are the same)
A Cue is overwritten when…(a) When a new cue is set(b) When Auto Cue is ON and you put
on another song(c) When Auto Cue is on and you return
to the beginning of a song with track search
(d) When a new loop is set up(e) When a One Track Loop is set up(f) When you move to any function
other than DJ Play(g) When a track is put on that has an
Auto Setup Cue set to it or when it jumps to the beginning of the songvia track searching of a track thathas an Auto Setup Cue set
Saving Set CuesThe Track Hot Cue function allows you toregister up to 4 cues per song.
‘4-1 Setting up to 4 Points to StartPlaying (Track Hot Cue)’ P.57
When Paused:
That position is registered for the [CUE] button and it changesto Cue Standby.When in Cue Standby:
As long as you push and hold the button, it continues to playfrom the cue position. Once you release the button, it returns tothe cue position and goes to cue standby.
During Playback:It returns to the cue position and stands by.
* Registered cue position information is retained until either anew cue position is set, or the [DJ Play] screen is closed.

8/8/2019 Pioneer Pro DJS Manual
http://slidepdf.com/reader/full/pioneer-pro-djs-manual 29/155
(Contd. on the next page)
DJS Ver. 1.002 29
Mixing Songs Mixing Songs Manually2
ContentsIndex
2-2 Mixing Songs ManuallyThe procedures explained here are aimed at users who are alreadyaccustomed to using DJ equipment. For beginners these methods callfor a great deal of practice, but this is the only way to develop so you
can use the methods freely.
The actual work flow is as follows.
• Start up DJS before doing any of the operations.
Select an MP3 Song
*Get two MP3 songs ready.
Assign songs to players A and B Steps 1–3
Synchronize the tempo (speed) whilelistening to the music
Steps 4–6
Decide on the play start position for player B Steps 7–9
Decide the Timing for Mixing the Songs Step 10
Play Player B Step 11
Switch the Song to Play Step 12
( )

8/8/2019 Pioneer Pro DJS Manual
http://slidepdf.com/reader/full/pioneer-pro-djs-manual 30/155
30
(Contd. on the next page)
DJS Ver. 1.002
Mixing Songs Mixing Songs Manually2
ContentsIndex
1 Drag the slider of the [Cross Fader] to the player A side (left edge).
2 Select the first song to play and drag & drop itfrom the track list to player A.• The song starts to play.
3 Select the next song to play and drag & drop itfrom the track list to player B.• The song starts to play.
4 Click the headphone cue for player B.• The headphone cue will light up.
5 Listen to the music on player B over theheadphones and gauge the difference in tempos.
Step1 2 3 4 5 6 7 8 9 10 11 12
Warning!
Sound Output to HeadphonesGet a sound card that is for headphones. If there is no sound card,the headphones will not work.
‘1-1 DJ System’ P.16
Before Mixing SongsImport 2 or more songs into the track list.
BPM DisplayThe automatically detected BPM isdisplayed in the information display for each player.
8/8/2019 Pioneer Pro DJS Manual
http://slidepdf.com/reader/full/pioneer-pro-djs-manual 31/155
(Contd. on the next page)
DJS Ver. 1.002 31
Mixing Songs Mixing Songs Manually2
ContentsIndex
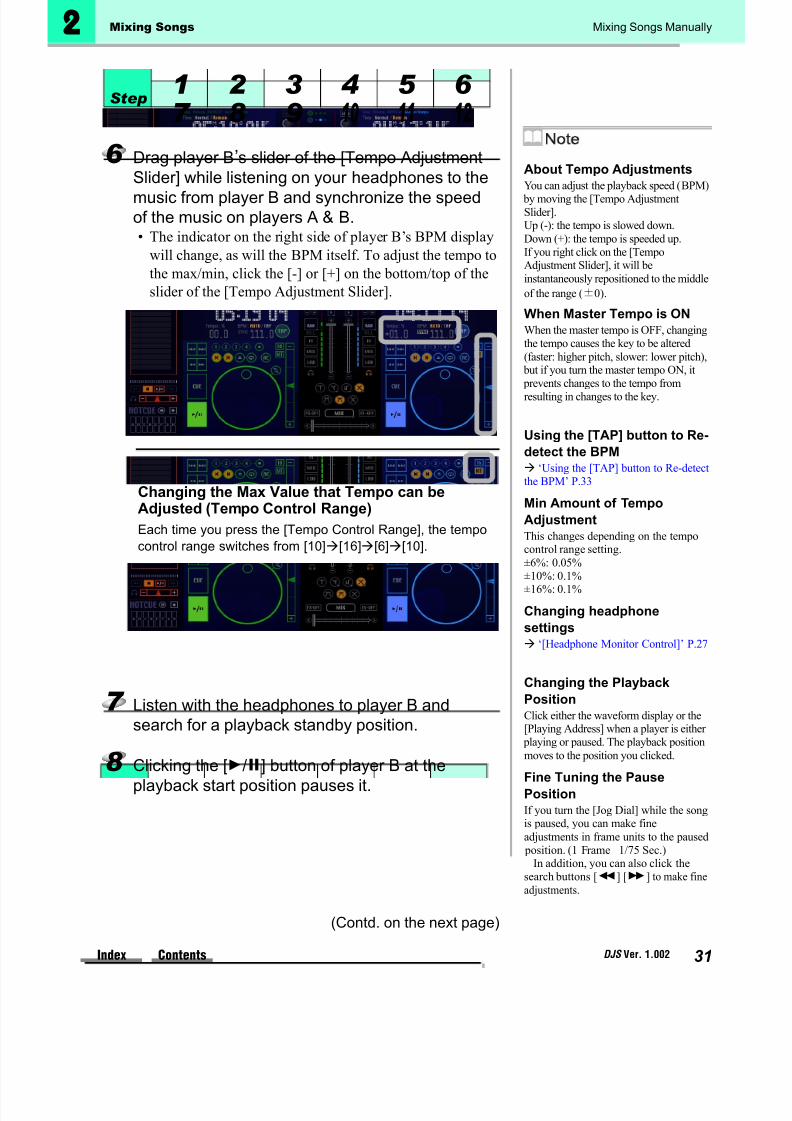
6 Drag player B ’s slider of the [Tempo AdjustmentSlider] while listening on your headphones to themusic from player B and synchronize the speedof the music on players A & B.• The indicator on the right side of player B’s BPM display
will change, as will the BPM itself. To adjust the tempo tothe max/min, click the [-] or [+] on the bottom/top of theslider of the [Tempo Adjustment Slider].
Changing the Max Value that Tempo can beAdjusted (Tempo Control Range)Each time you press the [Tempo Control Range], the tempocontrol range switches from [10] [16] [6] [10].
7 Listen with the headphones to player B andsearch for a playback standby position.
8 Clicking the [ A /F ] button of player B at theplayback start position pauses it.
Step1 2 3 4 5 6 7 8 9 10 11 12
About Tempo AdjustmentsYou can adjust the playback speed (BPM) by moving the [Tempo AdjustmentSlider].Up (-): the tempo is slowed down.Down (+): the tempo is speeded up.If you right click on the [TempoAdjustment Slider], it will beinstantaneously repositioned to the middleof the range ( ± 0).
When Master Tempo is ONWhen the master tempo is OFF, changing
the tempo causes the key to be altered(faster: higher pitch, slower: lower pitch), but if you turn the master tempo ON, it prevents changes to the tempo fromresulting in changes to the key.
Using the [TAP] button to Re-detect the BPM
‘Using the [TAP] button to Re-detectthe BPM’ P.33
Min Amount of Tempo
AdjustmentThis changes depending on the tempocontrol range setting.±6%: 0.05%±10%: 0.1%±16%: 0.1%
Changing headphonesettings
‘[Headphone Monitor Control]’ P.27
Changing the PlaybackPositionClick either the waveform display or the[Playing Address] when a player is either
playing or paused. The playback positionmoves to the position you clicked.
Fine Tuning the PausePositionIf you turn the [Jog Dial] while the songis paused, you can make fineadjustments in frame units to the paused
position. (1 Frame 1/75 Sec.)In addition, you can also click the
search buttons [8 ] [9 ] to make fineadjustments.

8/8/2019 Pioneer Pro DJS Manual
http://slidepdf.com/reader/full/pioneer-pro-djs-manual 32/155
32
(Contd. on the next page)
DJS Ver. 1.002
Mixing Songs Mixing Songs Manually2
ContentsIndex
9 Click player B’s [CUE] button to set up the placewhere playback is to start.
10 Using the [Beat Indicator] of Player A as a guide,gauge when playback is to start for Player B.
11 Click the [ A /F ] button of Player B to initiateplayback for player B.• This enables you to monitor Player B’s sound on your
headphones.
12 Drag the slider of the [Cross Fader] and move itto the player B side at whatever speed you wish.
• As the [Cross Fader] moves, the volume from player Agets quieter while that of player B gets louder.
• When the [Cross Fader] reaches the right side, the volumefrom player A goes completely off.
Step1 2 3 4 5 6 7 8 9 10 11 12
Using the [CUE] button ‘Using the [CUE] button’ P.28
Auto Cue Function ‘When the Auto Cue function is ON’
P.22
Recording cues(Track Hot Cues/List Hot Cues)
‘4-1 Setting up to 4 Points to StartPlaying (Track Hot Cue)’ P.57
‘3-4 Setting up to 8 Points to StartPlaying (List Hot Cue)’ P.47
Using the Channel Fader ‘Using the Channel Fader to Mix
Songs’ P.33
Correcting Discrepancies inthe Beat Displays
‘Adjusting discrepancies in the [BeatIndicator]’ P.27
About the Cross Fader The output sound can be switched back and forth by changing the position of thecross fader.
Far left:only player A can be heard.Far right:only player B can be heard.Other positions:some combination of player A and player B can be heard.
If you right click on the [Cross Fader], itwill be instantaneously repositioned in themiddle of the range.

8/8/2019 Pioneer Pro DJS Manual
http://slidepdf.com/reader/full/pioneer-pro-djs-manual 33/155
DJS Ver. 1.002 33
Mixing Songs Mixing Songs Manually2
ContentsIndex
When the BPM (speed) is not Synchronized …When it is difficult to synchronize the beats with the auto-detected BPM, use the [TAP] button to find the BPM.
Using the [TAP ] button to Re-detect the BPM
It takes practice to get good at mixing songs smoothly. At first,mix songs by using the [AUTO MIX] button and auto functions,so you can gradually learn while enjoying DJing.
Using the Channel Fader to Mix SongsLeaving the [Cross Fader] in its central position, adjust the
volume of each player’s [Channel Fader] and change the songthat outputs sound.
1. Put the song you want to find the BPM of on a player and playit.
2. While listening to the song, click the [TAP] button tosynchronize the beat.
3. The BPM is found by using the interval between clicks as a basis and then displayed.
Repositioning the [Cross
Fader] to the Middle of theRangeIf you right click on the [Cross Fader],it will be instantaneously repositionedin the middle of the range.
Having the [Channel Fader]move automaticallyClick the [Auto Fader] button on theright side of the [Channel Fader].
Adjusting the [Auto Fader]button.Sets the amount of time (beats) it takesthe [Channel Fader] to move when the[Auto Fader] button is pressed.1. Right click the [Auto Fader] button.2. Click the time (beats) to set it.
[Auto Fader]
[Channel Fader]

8/8/2019 Pioneer Pro DJS Manual
http://slidepdf.com/reader/full/pioneer-pro-djs-manual 34/155
34 DJS Ver. 1.002
3 Playing Sound Adjusting the Sound Quality
ContentsIndex
Chapter 3Playing SoundDJS enables you to change the way your music sounds, addaudio effects and create a new and different atmosphere. If youperform effectively, you’ll match the mood in the room andcreate an excitement and feeling the original song couldn’t get.
3-1 Adjusting the Sound QualityWith DJS you can adjust the quality of the sound by utilizing theequalizer function to extract any range of music (i.e. low, mediumand high ranges) and making the sound of that frequency band louder
or quieter.Furthermore, by using the Kill Function, you can change sound quality
by cutting out any frequency band (i.e. low, medium and high ranges).
Image of sound when the low range has been toneddown (Equalizer Function)
Image of sound when the low range has been cut out(Kill Function)
* When the Kill function is put into effect, the sound in the selected rangeis cut completely. (The figure is an image depicting what happens whenthe Kill function is activated for the low range).
Equalizer FunctionDivides one sound into the [HI], [MID]and [LOW] ranges and adjusts them.
Each range of sound can be adjustedin a band of –26 dB – +12 dB.
o ume
+12dB
-26dB
LOW MID HIFrequency
0dB
Functional Range of the Equalizer Function
Volume
LOW MID HIFrequency
KILL

8/8/2019 Pioneer Pro DJS Manual
http://slidepdf.com/reader/full/pioneer-pro-djs-manual 35/155
(Contd. on the next page)
DJS Ver. 1.002 35
3 Playing Sound Adjusting the Sound Quality
ContentsIndex
3-1-1 Making ChangesTo make it easier to listen to when playing music at high volumes, itis important to adjust the balance of the low, mid and high ranges.
Following is an explanation by way of an example of adjusting asong on player A with the equalizer.
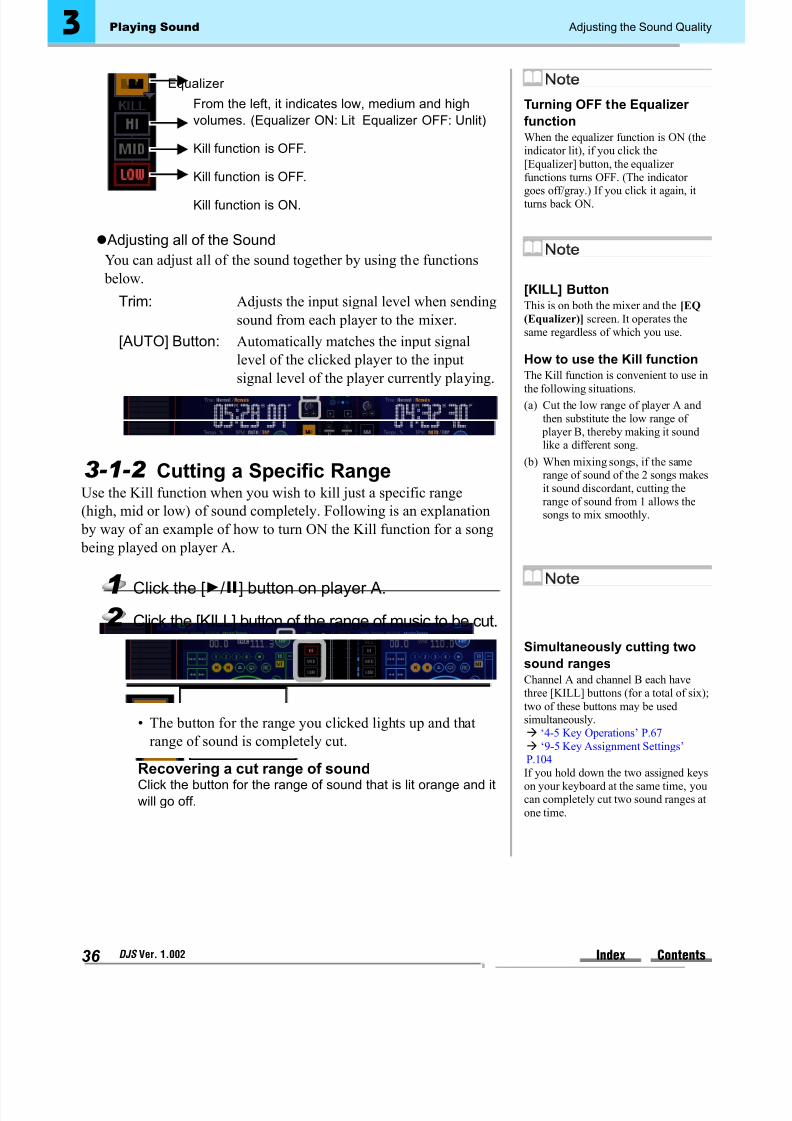
1 Click the [ A /F ] button on player A.
2 Click the [Equalizer] button on player A.• The [Equalizer] button on player A lights up.
Indicator FunctionsThe [Equalizer] button does not just start up the [EQ(Equalizer)] screen, but plays the role of an indicator as well.
3 Right click the [Equalizer] button on player A.• The [EQ (Equalizer)] screen opens.
4 Dragging the [Channel Equalizer] of the range(HI, MID, LOW) you wish to adjust and adjust it.
• If you rotate it to the left (-), it gets quieter, to the right (+)and it gets louder (Min -26 dB, Max +12 dB).
• If you right click on the [Channel Equalizer], you canreturn its setting to the middle position ( ± 0dB).
• If you click the [+] or the [-], you can adjust them little bylittle.
Completely cutting soundfrom a given bandClick the [KILL] button.
‘3-1-2 Cutting a Specific Range’P.36
Warning!When the Kill function is ONAdjustments cannot be made with the[Channel Equalizer]. Once you turn theKill function OFF, they can be usedagain.
‘3-1-2 Cutting a Specific Range’P.36
[EQ (Equalizer)] Screen
[KILL] Button
[-] Button
[Channel Equalizer HI]
[Channel Equalizer MID]
[Channel Equalizer LOW]
[+] Button
8/8/2019 Pioneer Pro DJS Manual
http://slidepdf.com/reader/full/pioneer-pro-djs-manual 36/155
36 DJS Ver. 1.002
3 Playing Sound Adjusting the Sound Quality
ContentsIndex
Adjusting all of the SoundYou can adjust all of the sound together by using the functions
below.
3-1-2 Cutting a Specific RangeUse the Kill function when you wish to kill just a specific range(high, mid or low) of sound completely. Following is an explanation
by way of an example of how to turn ON the Kill function for a song being played on player A.
1 Click the [ A /F ] button on player A.
2 Click the [KILL] button of the range of music to be cut.
• The button for the range you clicked lights up and thatrange of sound is completely cut.
Recovering a cut range of soundClick the button for the range of sound that is lit orange and itwill go off.
Turning OFF the Equalizer functionWhen the equalizer function is ON (theindicator lit), if you click the[Equalizer] button, the equalizer functions turns OFF. (The indicator goes off/gray.) If you click it again, itturns back ON.Kill function is ON.
Equalizer
From the left, it indicates low, medium and highvolumes. (Equalizer ON: Lit Equalizer OFF: Unlit)
Kill function is OFF.
Kill function is OFF.
[KILL] ButtonThis is on both the mixer and the [EQ(Equalizer)] screen. It operates thesame regardless of which you use.
How to use the Kill functionThe Kill function is convenient to use inthe following situations.(a) Cut the low range of player A and
then substitute the low range of player B, thereby making it soundlike a different song.
(b) When mixing songs, if the samerange of sound of the 2 songs makesit sound discordant, cutting therange of sound from 1 allows thesongs to mix smoothly.
Trim: Adjusts the input signal level when sendingsound from each player to the mixer.
[AUTO] Button: Automatically matches the input signallevel of the clicked player to the inputsignal level of the player currently playing.
Simultaneously cutting twosound rangesChannel A and channel B each have
three [KILL] buttons (for a total of six);two of these buttons may be usedsimultaneously.
‘4-5 Key Operations’ P.67 ‘9-5 Key Assignment Settings’
P.104If you hold down the two assigned keyson your keyboard at the same time, youcan completely cut two sound ranges atone time.
8/8/2019 Pioneer Pro DJS Manual
http://slidepdf.com/reader/full/pioneer-pro-djs-manual 37/155
DJS Ver. 1.002 37
3 Playing Sound Adding Effects
ContentsIndex
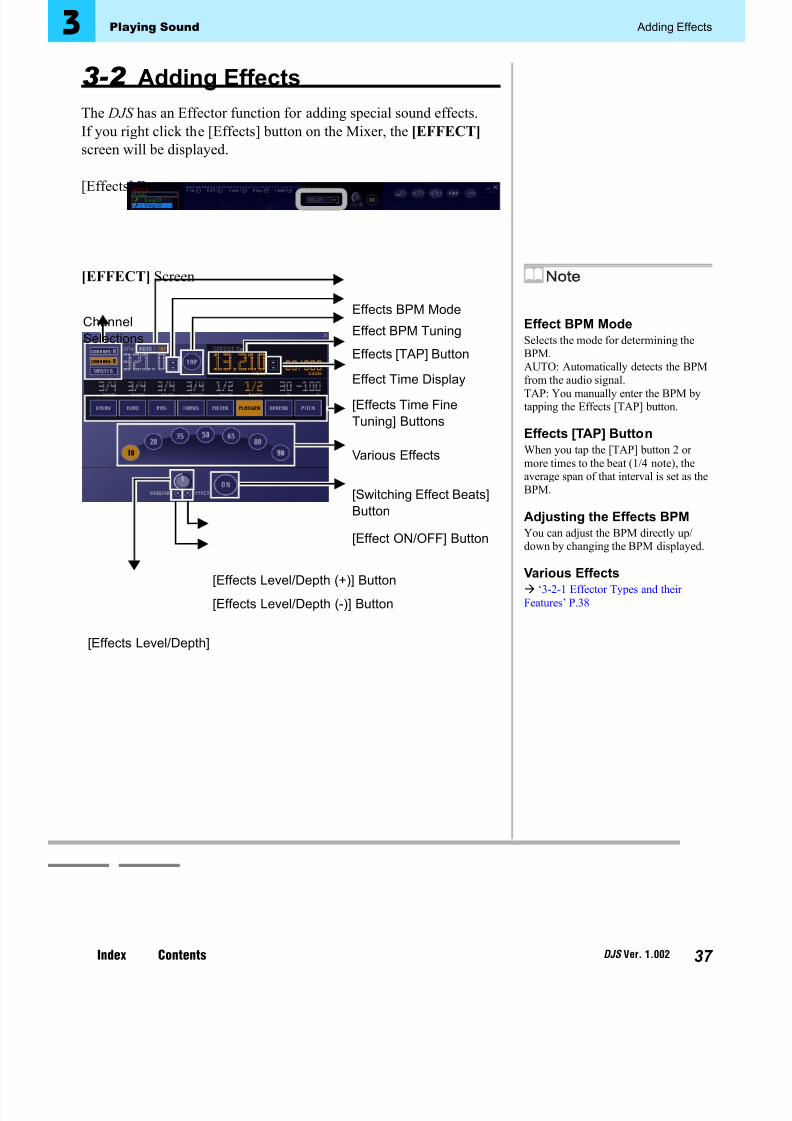
3-2 Adding EffectsThe DJS has an Effector function for adding special sound effects.If you right click the [Effects] button on the Mixer, the [EFFECT] screen will be displayed.
[Effects] Button
[EFFECT] Screen
Effect BPM ModeSelects the mode for determining theBPM.AUTO: Automatically detects the BPMfrom the audio signal.TAP: You manually enter the BPM bytapping the Effects [TAP] button.
Effects [TAP] ButtonWhen you tap the [TAP] button 2 or more times to the beat (1/4 note), theaverage span of that interval is set as theBPM.
Adjusting the Effects BPMYou can adjust the BPM directly up/down by changing the BPM displayed.
Various Effects ‘3-2-1 Effector Types and their
Features’ P.38
[Effects Time FineTuning] Buttons
Various Effects
[Switching Effect Beats]Button
[Effect ON/OFF] Button
[Effects Level/Depth]
[Effects Level/Depth (+)] Button
[Effects Level/Depth (-)] Button
ChannelSelections
Effects [TAP] Button
Effect Time Display
Effect BPM Tuning
Effects BPM Mode

8/8/2019 Pioneer Pro DJS Manual
http://slidepdf.com/reader/full/pioneer-pro-djs-manual 38/155
38
(Contd. on the next page)
DJS Ver. 1.002
3 Playing Sound Adding Effects
ContentsIndex
3-2-1 Effector Types and their Features DJS has the following Effector functions. Each kind of effect links upwith the automatically detected BPM and plays the sound.
DELAYDelays the music and repeats it once. This makes the music soundlike it was reflected, giving it the feel of being live or indoors.
Effect Times: 1/4, 2/4, 3/4, 1, 2, 4 or 8 beatsFine Tuning Units: Time delay of 1 to 3,500 msec (1 msecSteps)
Ex.If set to delay for a 1/2 beat, a quarter note becomes an eighthnote. Further, if matched to the delay of a 3/4 beat, it makes ita jumpy rhythm.
ECHOThe music is delayed and repeated a number of times, making itecho. If a vocal is given a 1 beat echo, it gives it the effect of
being sung in round.
Effect Times: 1/4, 2/4, 3/4, 1, 2, 4 or 8 beatsFine Tuning Units: Time delay of 1 to 3,500 msec (1 msecSteps)
Ex.If during a 1 beat echo you suddenly move the channel fader
to a volume of 0 and cut the input sound, the music repeats tothe beat and fades out.
Original(4 Beats)
1/2 Delay(8 Beats)
Beat1 Beat1 Beat
Cut the Input Sound
Fade Out

8/8/2019 Pioneer Pro DJS Manual
http://slidepdf.com/reader/full/pioneer-pro-djs-manual 39/155
(Contd. on the next page)
DJS Ver. 1.002 39
3 Playing Sound Adding Effects
ContentsIndex
PAN (Auto PAN)Pans the sound right and left. In addition, it is also possible to doa short auto-pan at shorter intervals than is possible by operatingthe cross fader on the screen.
Effect Times: 1/4, 2/4, 3/4, 1, 2, 4 or 8 beatsFine Tuning Units: Switching Time 10 to 16,000 msec (from 1to 1,000 in 5 msec steps; from 1,000 to16,000 in 10 msec steps)
Ex.
TRANS (Auto TRANS)Synchronizes the sound to the rhythm and cuts it off automatically.
Effect Times: 1/4, 2/4, 3/4, 1, 2, 4 or 8 beatsFine Tuning Units: Switching Time 10 to 16,000 msec (from 1
to 1,000 in 5 msec steps; from 1,000 to16,000 in 10 msec steps)
Ex.
L
R
L
R
Center (Stereo)
Center (Stereo)
Auto Beat Pan
Short Auto Pan
1 Cycle 1/4, 1/2, 3/4, 1/1, 2/1,4/1, 8/1 beats
Cut Cut
Time
1 Cycle 1/4, 1/2, 3/4, 1/1, 2/1,4/1, 8/1 beats
8/8/2019 Pioneer Pro DJS Manual
http://slidepdf.com/reader/full/pioneer-pro-djs-manual 40/155
40 DJS Ver. 1.002
3 Playing Sound Adding Effects
ContentsIndex
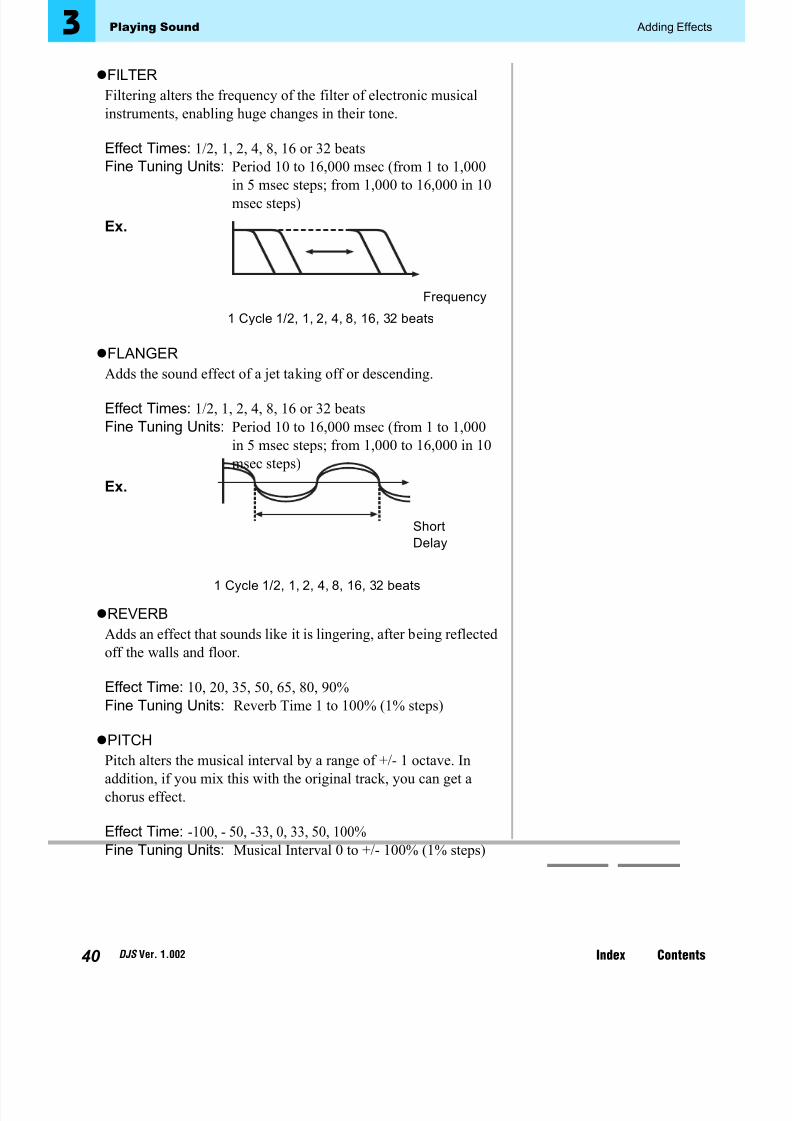
FILTERFiltering alters the frequency of the filter of electronic musicalinstruments, enabling huge changes in their tone.
Effect Times: 1/2, 1, 2, 4, 8, 16 or 32 beats
Fine Tuning Units: Period 10 to 16,000 msec (from 1 to 1,000in 5 msec steps; from 1,000 to 16,000 in 10msec steps)
Ex.
FLANGERAdds the sound effect of a jet taking off or descending.
Effect Times: 1/2, 1, 2, 4, 8, 16 or 32 beatsFine Tuning Units: Period 10 to 16,000 msec (from 1 to 1,000
in 5 msec steps; from 1,000 to 16,000 in 10msec steps)
Ex.
REVERBAdds an effect that sounds like it is lingering, after being reflectedoff the walls and floor.
Effect Time: 10, 20, 35, 50, 65, 80, 90%Fine Tuning Units: Reverb Time 1 to 100% (1% steps)
PITCHPitch alters the musical interval by a range of +/- 1 octave. Inaddition, if you mix this with the original track, you can get achorus effect.
Effect Time: -100, - 50, -33, 0, 33, 50, 100%Fine Tuning Units: Musical Interval 0 to +/- 100% (1% steps)
1 Cycle 1/2, 1, 2, 4, 8, 16, 32 beats
Frequency
1 Cycle 1/2, 1, 2, 4, 8, 16, 32 beats
ShortDelay
8/8/2019 Pioneer Pro DJS Manual
http://slidepdf.com/reader/full/pioneer-pro-djs-manual 41/155
(Contd. on the next page)
DJS Ver. 1.002 41
3 Playing Sound Adding Effects
ContentsIndex
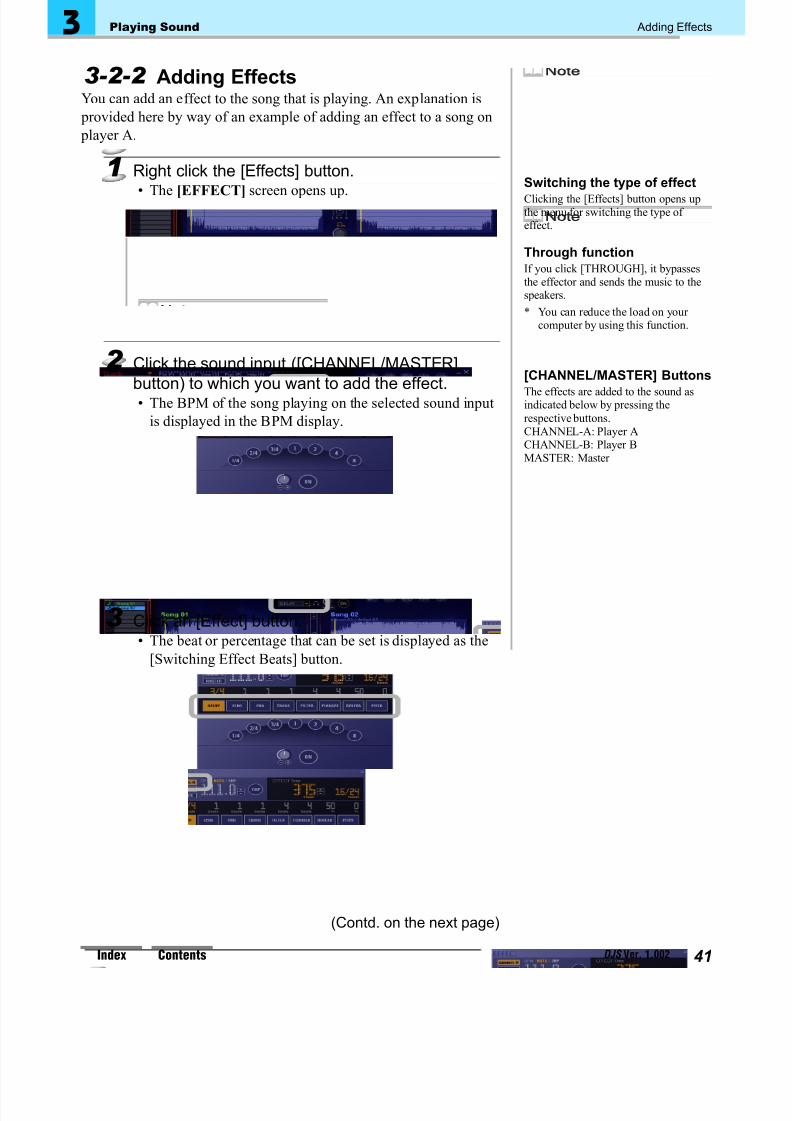
3-2-2 Adding EffectsYou can add an effect to the song that is playing. An explanation is
provided here by way of an example of adding an effect to a song on player A.
1 Right click the [Effects] button.• The [EFFECT] screen opens up.
2 Click the sound input ([CHANNEL/MASTER]button) to which you want to add the effect.• The BPM of the song playing on the selected sound input
is displayed in the BPM display.
3 Click an [Effect] button.• The beat or percentage that can be set is displayed as the
[Switching Effect Beats] button.
Switching the type of effectClicking the [Effects] button opens upthe menu for switching the type of effect.
Through functionIf you click [THROUGH], it bypassesthe effector and sends the music to thespeakers.* You can reduce the load on your
computer by using this function.
[CHANNEL/MASTER] ButtonsThe effects are added to the sound asindicated below by pressing therespective buttons.CHANNEL-A: Player ACHANNEL-B: Player BMASTER: Master

8/8/2019 Pioneer Pro DJS Manual
http://slidepdf.com/reader/full/pioneer-pro-djs-manual 42/155
42 DJS Ver. 1.002
3 Playing Sound Adding Effects
ContentsIndex
4 Click the [Switching Effect Beats] button.
• The Effect Time value that corresponds to the contents of the selected [Switching Effect Beats] button is displayedin the [EFFECT Time] of the [EFFECT] screen.
Fine Tuning the Effect TimeYou can fine tune the time manually by pressing the EffectTime Fine Tuning buttons.
Refer to ‘3-2-1 Effector Types and their Features’ P.38 for information on the units and effects that can be realized withfine tuning.
5 Click the [Headphone Cue (Effects)] button andcheck it on your headphones.• The button will light up and the effect is output from your
headphone output.
[Switching Effect Beats]ButtonThe value to be changed on the[Switching Effect Beats] button differsdepending on the kind of effect.
‘3-2-1 Effector Types and their Features’ P.38

8/8/2019 Pioneer Pro DJS Manual
http://slidepdf.com/reader/full/pioneer-pro-djs-manual 43/155
DJS Ver. 1.002 43
3 Playing Sound Adding Effects
ContentsIndex
3-2-3 Adjusting Effects
1 Dragging the [Effects Level/Depth] adjusts thebalance of the levels between the source andthe effect.• Rotating the [Effects Level/Depth] to the left (-) makes it
smaller, while rotating it to the right (+) makes it larger.• If you right click on [Effects Level/Depth], you can return
this setting to the middle position.• If you click the [Effects Level/Depth (+)] or the [Effects
Level/Depth (-)], you can adjust them little by little.
3-2-4 Turning Effects ON/OFF
1 Click the [Effect ON/OFF] button.• The button lights up and the effect selected for master
output is applied.
2 Click the button again.• The button goes off and the effect turns OFF.
[Effects Level/Depth]This is on both the mixer and the[EFFECT] screen. It operates the same
regardless of which you use.
[Headphone Cue (Effects)]buttonIf you toggle the button from OFF toON, the effect sound is output fromyour speakers.
[Effect ON/OFF] ButtonThis is on both the mixer and the[EFFECT] screen. It operates the sameregardless of which you use.

8/8/2019 Pioneer Pro DJS Manual
http://slidepdf.com/reader/full/pioneer-pro-djs-manual 44/155
44
(Contd. on the next page)
DJS Ver. 1.002
3 Playing Sound Playing a Part of a Song Repeatedly
ContentsIndex
3-3 Playing a Part of a SongRepeatedly
One of the things DJs do is play loops.By playing just one part of a song over and over again, you can get
various effects.
With the sound of how pro DJs perform in mind, try out all kinds of different things.
3-3-1 Setting up Loops (Play)While listening to a song, set the range of the loop. As soon as youfinish setting it, the loop immediately starts playing.
1 Click the [ A /F ] button and it plays the song.
Saving a loop ‘4-1 Setting up to 4 Points to StartPlaying (Track Hot Cue)’ P.57
Saving a Loop as a SeparateTrack
‘5-3 Saving the Length of a Loop asa Track’ P.73
(Ex. 1) Playing one part of a song over and over again gives it thefeeling of being stuck in the groove.
(Ex. 2) With a loop playing as a base, lay the melody of another song on top.
A Loop is overwritten…(a) When Cues have been Set(b) When Auto Cue is ON and you put
on another song(c) When Auto Cue is on and you return
to the beginning of a song with track search
(d) When a new loop is set up(e) When a One Track Loop is set up(f) When you move to any function
other than DJ Play(g) When a track is put on that has an
Auto Setup Cue set to it or when it jumps to the beginning of the songvia track search of a track that hasan Auto Setup Cue set
Dead Air
Loop Loop Loop Loop LoopLoop In Loop Out
Loop Playing

8/8/2019 Pioneer Pro DJS Manual
http://slidepdf.com/reader/full/pioneer-pro-djs-manual 45/155
DJS Ver. 1.002 45
3 Playing Sound Playing a Part of a Song Repeatedly
ContentsIndex
2 While paused, click the [Loop In] button at thepoint where the loop is to start playing.• The point specified in this operation is called the loop in
point.
3 While paused, click the [Loop Out] button at thepoint to end playing the loop.
• The point specified in this step is called the loop out point.• In a moment, the loop starts playing. (While the loop is playing, the [Loop In] [Loop Out] buttons blink on andoff.)
• The Loop display on the information display comes on.
Playing an entire song as a loop (One Track Loop)To play an entire song (track) as a loop, click the [One Track Loop] button.
It is effective when a song is for playing a loop.
When Cues are SetThe point specified to the [CUE] button
becomes the loop in point.
Out Adjust FunctionIf you follow the procedures below, you
can adjust the loop out point youspecified previously.1. While the loop is playing, click the
[Loop Out] button.2. Use [ 8 ] [9 ] or [Jog Dial] to find
the desired loop out point. (Whileyou are making adjustments, the[Loop Out] button blinks off and onmore quickly than during playback)
3. Click the [Loop Out] button.* It stays in the loop-out adjust status
until you press the [Loop Out] button.
* The [Loop In] point cannot beadjusted.
When Auto Cue is ONEven if an auto-cue has been set, the
beginning of the track will be the loopin point.

8/8/2019 Pioneer Pro DJS Manual
http://slidepdf.com/reader/full/pioneer-pro-djs-manual 46/155
46 DJS Ver. 1.002
3 Playing Sound Playing a Part of a Song Repeatedly
ContentsIndex
3-3-2 Getting out of a LoopA loop will continue to play until you stop the loop. To stop the loop,follow the steps below.
1 While the loop is playing, click the [Exit/Reloop]button.• This returns the player to normal playback mode.• The Loop display goes out and the Reloop display comes
on. ‘Layout of the Information Display’ P.19
3-3-3 Playing a Loop you Set upPreviously
After finishing the playback of a loop, to restart a loop playing in thespecified range, follow the procedures below.
1 While paused, click the [Exit/Reloop] button.• It jumps to the loop in point and starts playing the loop
seamlessly.• The Reloop display goes out and the Loop display comes
on. ‘Layout of the Information Display’ P.19
After Exiting Loop PlaybackEven when the playback positionreaches the loop out point, it will notreturn to the loop in point.
When relooping is possibleWhen relooping is possible, [Reloop] isdisplayed in the information display.

8/8/2019 Pioneer Pro DJS Manual
http://slidepdf.com/reader/full/pioneer-pro-djs-manual 47/155
(Contd. on the next page)
DJS Ver. 1.002 47
3 Playing Sound Setting up to 8 Points to Start Playing (List Hot Cue)
ContentsIndex
3-4 Setting up to 8 Points to StartPlaying (List Hot Cue)
List hot cue starts playback at the same time as when a cue point iscalled out. Further, you can set up to 8 cues for the whole track list.(You can set up to 8 cues for the whole play list.)Even if you do not set any list hot cues for songs on a player, if you
just click list hot cue, it calls out a cue point. It is better to set pointsthat are used more frequently than track hot cues.
3-4-1 Determining List Hot Cue PointsList hot cue points can record cues or loops with the [List Hot CUE] buttons on the lower part of the play list, from [A] to [H].
1 Specify a song on player A or B and determinethe point to record.• When you record a loop, start the loop playing.
2 Clicking the [Record] button makes the [List HotCUE] buttons (A to H) light up red.• This state is the List Hot Cue record mode.
Track Hot Cue ‘4-1 Setting up to 4 Points to StartPlaying (Track Hot Cue)’ P.57
Stopping recordingClick the [Record] button again.

8/8/2019 Pioneer Pro DJS Manual
http://slidepdf.com/reader/full/pioneer-pro-djs-manual 48/155

8/8/2019 Pioneer Pro DJS Manual
http://slidepdf.com/reader/full/pioneer-pro-djs-manual 49/155
(Contd. on the next page)
DJS Ver. 1.002 49
3 Playing Sound Setting up to 8 Points to Start Playing (List Hot Cue)
ContentsIndex
3-4-2 Playing from a List Hot Cue PointClick a recorded [List Hot CUE] button and the List Hot Cue point iscalled out. Moments later it starts playing from the List Hot Cue
point.
1 Playing back on Player A:Click the upper half of a [List Hot CUE] button.Playing back on Player B:
Click the lower half of a [List Hot CUE] button.
Display of Cues and Loops
If a List Hot Cue is called outduring a pause in the ScratchModePauses at the List Hot Cue point (or if aloop, at the Loop In point).
Loop In/Loop Out ButtonsWhen a List Hot Cue you set for a loopis called out, loop in/loop out points areset for the loop in/loop out buttons.Once a List hot cue finishes being
played, it returns to its original setting.
Getting out of a LoopClick the [Exit/Reloop] button.
When a button is completely filled in (A, E, H in diagrambelow):
A cue point has been set.When a frame inside the button is displayed (C, F below):
A loop has been set.Meaning of Colors:
Player A: Green
Player B: BlueIf no song is set on a player: Purple
* In the screen shot, nothing is set for B, D or G.

8/8/2019 Pioneer Pro DJS Manual
http://slidepdf.com/reader/full/pioneer-pro-djs-manual 50/155
50 DJS Ver. 1.002
3 Playing Sound Setting up to 8 Points to Start Playing (List Hot Cue)
ContentsIndex
Hot Cue ListClicking on [Pop Hot CUE List] opens the hot cue list.
The following information is displayed in the hot cue list.
TitleDisplays the name of the song for which a list hot cue is recorded.
List Hot Cue/Loop In PointDisplays the cue point or the loop in point. You can change this
by entering a number.
Loop Out PointDisplays the loop out point if a loop has been set up. You canchange this by entering a number. If the loop out point is blank, it
becomes a cue point.Track Hot Cue Number DisplayDisplays the Track Hot Cue or loop number if the setting is thesame as the Track Hot Cue or loop (1 to 4).
Closing the Hot Cue ListClick the [Close] button on the upper right of the screen.
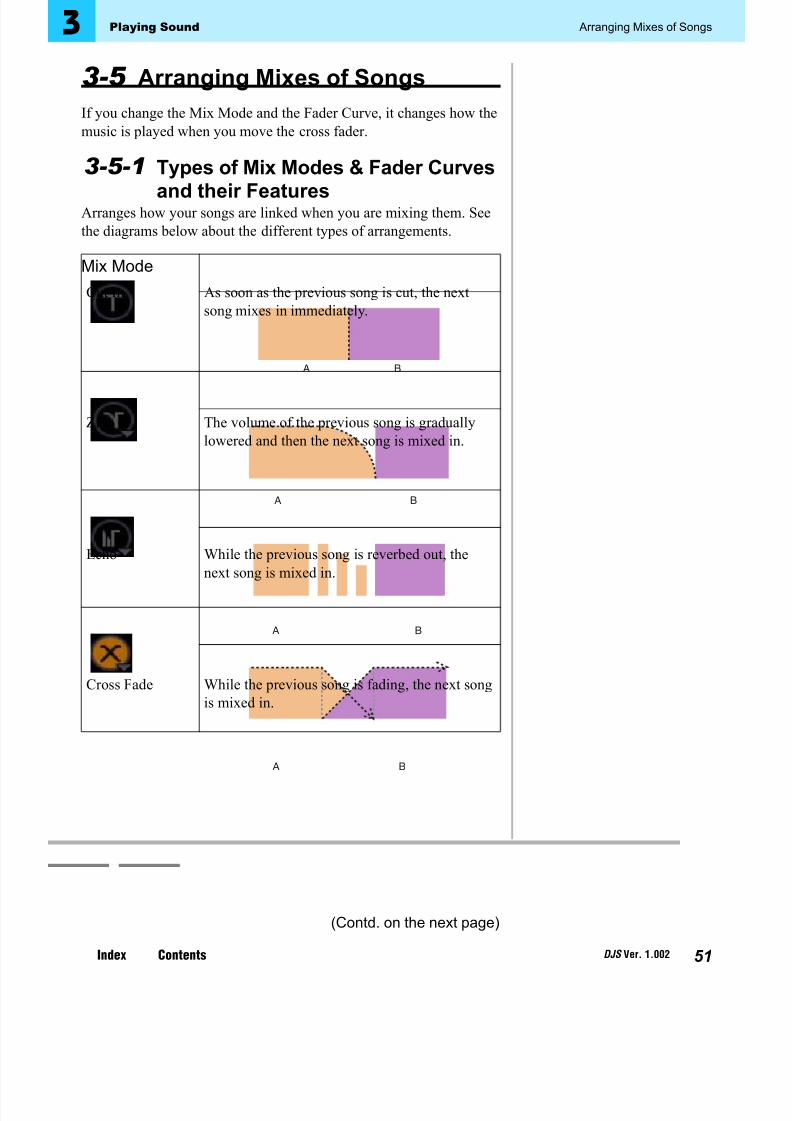
8/8/2019 Pioneer Pro DJS Manual
http://slidepdf.com/reader/full/pioneer-pro-djs-manual 51/155
(Contd. on the next page)
DJS Ver. 1.002 51
3 Playing Sound Arranging Mixes of Songs
ContentsIndex
3-5 Arranging Mixes of SongsIf you change the Mix Mode and the Fader Curve, it changes how themusic is played when you move the cross fader.
3-5-1 Types of Mix Modes & Fader Curvesand their FeaturesArranges how your songs are linked when you are mixing them. Seethe diagrams below about the different types of arrangements.
Mix Mode
Cut In As soon as the previous song is cut, the nextsong mixes in immediately.
Zip The volume of the previous song is graduallylowered and then the next song is mixed in.
Echo While the previous song is reverbed out, thenext song is mixed in.
Cross Fade While the previous song is fading, the next songis mixed in.
A B
A B
A B
A B

8/8/2019 Pioneer Pro DJS Manual
http://slidepdf.com/reader/full/pioneer-pro-djs-manual 52/155
52 DJS Ver. 1.002
3 Playing Sound Arranging Mixes of Songs
ContentsIndex
Fader Curves
How to Use the Mix Modes and Fader CurvesMix Modes:The settings you selected with the [Mix Mode] button becomeeffective when the [AUTO MIX] or [MIX] buttons are used.
Fader Curves:The settings you selected with the [Fader Curve] button becomeeffective when the [AUTO MIX], [MIX] buttons or the [CrossFader] are used.
Curve-A The point where the volume of the previous songstarts to fade meets at the point where the volume of the next song comes up full.
Curve-B The volume of the previous and next songs start tofade out and in, respectively, at the same time andthey cross at the point of -3dB.
Curve-C The volume of the previous and next songs start tofade out and in at the same time and they crossmidway.
A B
A B
A B

8/8/2019 Pioneer Pro DJS Manual
http://slidepdf.com/reader/full/pioneer-pro-djs-manual 53/155

8/8/2019 Pioneer Pro DJS Manual
http://slidepdf.com/reader/full/pioneer-pro-djs-manual 54/155
54
(Contd. on the next page)
DJS Ver. 1.002
3 Playing Sound Using the Fader Start Functions
ContentsIndex
3-6 Using the Fader Start FunctionsIf you use the Fader Start function, you can start a song playingthrough either the operation of the cross fader or a channel fader. Inaddition, if you set up a cue, you can also back cue.
You can do various things like starting players, cueing back, etcsimply via the fader, so you can make it perform like a sampler.
3-6-1 Channel Fader StartHow to use the Channel Fader Start function is explained here for Player A. Before conducting the operations below, set a song for Player A and put it into Cue Standby mode. Set the Channel Fader toits minimum setting (Volume 0).
1 Click Player A’s [Fader Start] button to display[FS-CH].• Every time you click the [Fader Start] button, it switches
between the modes as follows.[FS-OFF] [FS-CH] [FS-CR] [FS-OFF]
Back CueMoves the playback position to the cue
point and goes to standby at that point.
Setting a [CUE] ‘Using the [CUE] button’ P.28
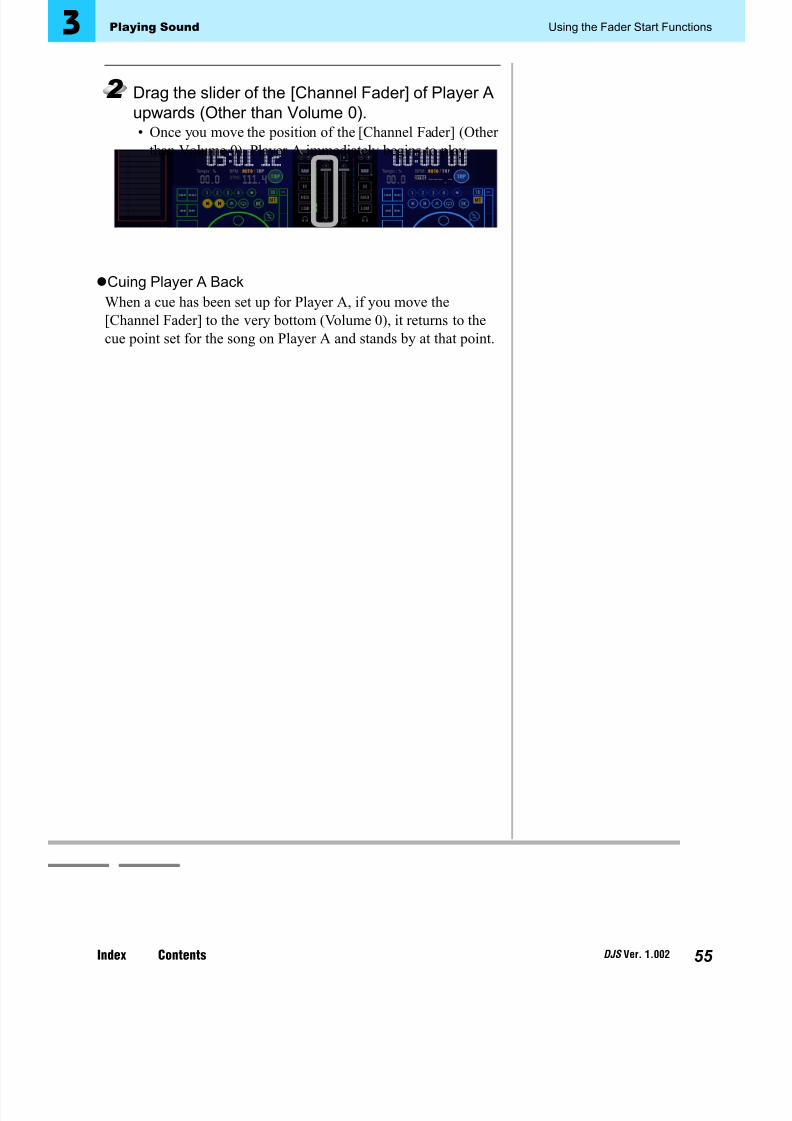
8/8/2019 Pioneer Pro DJS Manual
http://slidepdf.com/reader/full/pioneer-pro-djs-manual 55/155
DJS Ver. 1.002 55
3 Playing Sound Using the Fader Start Functions
ContentsIndex
2 Drag the slider of the [Channel Fader] of Player Aupwards (Other than Volume 0).• Once you move the position of the [Channel Fader] (Other
than Volume 0), Player A immediately begins to play.
Cuing Player A BackWhen a cue has been set up for Player A, if you move the[Channel Fader] to the very bottom (Volume 0), it returns to thecue point set for the song on Player A and stands by at that point.

8/8/2019 Pioneer Pro DJS Manual
http://slidepdf.com/reader/full/pioneer-pro-djs-manual 56/155
56 DJS Ver. 1.002
3 Playing Sound Using the Fader Start Functions
ContentsIndex
3-6-2 Cross Fader StartHow to use the Cross Fader Start function is explained here for Player A. Before conducting the operations below, set a song for Player Aand put it into Pause (Delay) or Cue Standby mode. Move the CrossFader to the Player B side (i.e., to the right side).
1 Click Player A’s [Fader Start] button to display[FS-CR].• Every time you click the [Fader Start] button, it switches
between the modes as follows.[FS-OFF] [FS-CH] [FS-CR] [FS-OFF]
2 Drag the slider of the [Cross Fader] toward thePlayer A side (any position except the right edge).
• Once you start moving the [Cross Fader] toward thePlayer A side (any position except the right edge), Player A immediately starts playing.
Cuing Player A BackWhen a cue has been set up for Player A, if you move the [CrossFader] to the very bottom (right edge), it returns to the cue pointset for the song on Player A and stands by at that point.
Setting a [CUE] ‘Using the [CUE] button’ P.28

8/8/2019 Pioneer Pro DJS Manual
http://slidepdf.com/reader/full/pioneer-pro-djs-manual 57/155
(Contd. on the next page)
DJS Ver. 1.002 57
4 Useful Functions Setting up to 4 Points to Start Playing (Track Hot Cue)
ContentsIndex
Chapter 4Useful FunctionsThis chapter will introduce you to functions in DJS that areuseful and convenient for DJing.
4-1 Setting up to 4 Points to StartPlaying (Track Hot Cue)
You can record up to 4 cues or loops per song with DJS . Thisfunction is called Track Hot Cue.
Once you record your Track Hot Cues, you can call those points out
instantaneously. In addition, if you record various points, you can usethem to suit the mood.
[Track Hot CUE] Buttons
4-1-1 Determining Track Hot Cue PointsRecord a cue or loop to the [Track Hot CUE] buttons, from [1] to [4]on either player. You can set up 4 Track Hot Cues per song.
Track Hot Cues that you record are recorded in the song’sinformation.
Standby Cueing ‘Using the [CUE] button’ P.28
Setting up a loop ‘3-3-1 Setting up Loops (Play)’ P.44
Warning!When you change songs, the contentof the [Track Hot CUE] buttons alsochanges.

8/8/2019 Pioneer Pro DJS Manual
http://slidepdf.com/reader/full/pioneer-pro-djs-manual 58/155
58
(Contd. on the next page)
DJS Ver. 1.002
4 Useful Functions Setting up to 4 Points to Start Playing (Track Hot Cue)
ContentsIndex
1 Put a song on player A or B and determine thepoint(s) to record.
2 Click the [Record Track Hot CUE] button and itmakes the [Track Hot CUE] button light up red.
• The background of [Track Hot CUE] buttons that arealready being used light up.
3 Setting a Cue Point:During playback or during a silent pause, click the
[Track Hot CUE] button at the point you wish to set acue.Setting up a loop:
While the loop is playing, click the [Track Hot CUE]button.
• The number of the [Track Hot CUE] button you click willflash red for about 3 seconds.
4 Click the [Record Track Hot CUE] button.• The Track Hot Cue settings are complete and it returns to
the Call Out mode.
Overwriting a Track Hot Cuethat is being UsedClick a [Track Hot CUE] button that isalready being used and conduct thefollowing operations.
Cancel the SettingClick the [Record Track Hot CUE]
button again.
Playing a Loop ‘3-3-1 Setting up Loops (Play)’ P.44
Track Hot Cue Display ‘Waveform Display Symbols (Track
Hot Cue Tags)’ P.59

8/8/2019 Pioneer Pro DJS Manual
http://slidepdf.com/reader/full/pioneer-pro-djs-manual 59/155
DJS Ver. 1.002 59
4 Useful Functions Setting up to 4 Points to Start Playing (Track Hot Cue)
ContentsIndex
Deleting Track Hot Cues
Display of Cues and Loops
Waveform Display Symbols (Track Hot Cue Tags)
When you set a Track Hot Cue, a Track Hot Cue tag is displayedin the waveform display.
Fine Tuning the Stop Position
1. Display a [Cue Mark] in either the track list or the play list.
2. Right click above the [Cue Mark] and click [Clear TrackHot CUE].
[● ] (Filled in):A cue point has been set.
[ ] (Only the outer ring is colored):A loop has been set.
1. Indicates the cue point for Track Hot CUE 1.2. Indicates the loop in point for Track Hot CUE 2.3. Indicates the loop out point for Track Hot CUE 2.
2 1 3
Copying Information of a[Track Hot CUE] button to aList Hot Cue
‘3-4-1 Determining List Hot CuePoints’ P.47
1. Play a song and pause it approximately where sound
starts to play.2. Use the [ 8 ] / [9 ] buttons or the jog dial to fine tune the
position. You can make adjustments in increments of 1frame (1/75 of a second).

8/8/2019 Pioneer Pro DJS Manual
http://slidepdf.com/reader/full/pioneer-pro-djs-manual 60/155
60 DJS Ver. 1.002
4 Useful Functions Setting up to 4 Points to Start Playing (Track Hot Cue)
ContentsIndex
4-1-2 Calling Out Track Hot CuesIf you click a [Track Hot CUE] button that has a cue or loop set up, itcalls out the Track Hot Cue and starts playing.
1 Click a [Track Hot CUE] button that has a cue or loop recorded.• The Track Hot Cue point is called out and it starts playing.
4-1-3 Changing a Track Hot Cue into anAuto Setup Cue
One Track Hot Cue can be changed to an [Auto Setup CUE].If you change one to an [Auto Setup CUE], when a song is put oneither player, it cues it up to the [Auto Setup CUE] position andstands by.
The following is an explanation of how to change a Track Hot Cuethat was set up previously into an Auto Setup Cue.
1Open a track list or a play list, right click on theicon indicating Track Hot Cue settings and click[Auto Setup CUE ON].
Clearing the Auto Setup CueRight click on a [Cue Mark] in a list and then click [Auto Setup
CUE OFF].
When a Track Hot Cue isCalled OutIt is recorded to a [CUE] button. If you
click a [CUE] button during playback, itreturns to the Track Hot Cue.
When in a Pause in theScratch ModeIt calls out a Track Hot Cue and cues itup and stands by.
Getting out of a LoopClick the [Exit/Reloop] button.
When an Auto Setup Cue isCalled OutIt is recorded to a [CUE] button. If youclick a [CUE] button during playback, itreturns to the Auto Setup Cue.
Auto Setup Cues and AutoCuesWhen both have been set up, the AutoSetup Cue is given priority and is cuedup.

8/8/2019 Pioneer Pro DJS Manual
http://slidepdf.com/reader/full/pioneer-pro-djs-manual 61/155
DJS Ver. 1.002 61
4 Useful Functions Using Play Lists
ContentsIndex
4-2 Using Play ListsIf you use a play list, you can play songs automatically in the order of the list. Using a play list is convenient when you have alreadydecided the order you want to play songs in.
• To use a play list, use the Preference to make settings so the list thatis displayed when DJS starts up will be a play list. ‘9-3 Setting the Layout of DJ Play Functions’ P.98
• Before you can use a play list, you have to create one. ‘6-3 Creating a New Play List’ P.79
4-2-1 Auto-Playing a Play ListThe songs recorded in the play list are played automatically.
1Click the [ A /F ] button on player A.Songs play alternately as below.• If you display a play list on the [DJ Play] screen, the 1st
song is allocated to player A and the 2nd song isautomatically allocated to player B.
• Once playing starts, songs are played in turn, starting with player A, then B, then from player B to player A.
• When the song being played comes to the [Mix Out] position, the next song starts playing from its [Mix In] position.
• It switches to the next player according to the mix mode,fader curve, and mix beats that were set up.
• If a [Mix Out] point has not been set up, the song will play all the way to the end (including dead air parts).
• If a [Mix In] point has not been set up, the song will playfrom the beginning (including dead air parts).
• When a song ends on a player, its next song isautomatically set up (standby mode).
Deleting a Song from a Play ListRight click the song to be deleted and click [Remove].
Displaying Play Lists on theRight Side of the Screen
‘9-3 Setting the Layout of DJ Play
Functions’ P.98
Switching the Width of a ListClick the icon on the upper right of the
play list display. When the [DJ Play] screen is opened, it is displayed at thenarrowest list width. In addition, if youclick the player or the mixer, the playlist is displayed at its narrowest width.
Auto Level AdjustmentWhile playing a play list, when itswitches from one player to another,
this automatically adjusts the levels sothey are the same.
Changing the Song Order The song order of a play list can bechanged by dragging and dropping thesongs.
Changing Song Order duringAuto Play
‘4-2-2 Changing the Order of SongsDuring Auto-Play’ P.62
Saving Changes to a PlayListAfter you edit a play list and go to closeit, a message will be displayed to check if you wish to save it. If you wish tosave it, click the [Yes] button.
Order of Priority for Mix StartPositions1. Auto Setup Cue2. Mix In Start
3. Auto Cue4. Beginning of Track
Order of Priority for Mix EndPositions1. Mix Out Start2. End of Track
Changing the mix mode/fader curve from the play listWhen you right click an icon indicatingthe settings for each, a menu thatenables you to make selections opens.

8/8/2019 Pioneer Pro DJS Manual
http://slidepdf.com/reader/full/pioneer-pro-djs-manual 62/155
62 DJS Ver. 1.002
4 Useful Functions Using Play Lists
ContentsIndex
4-2-2 Changing the Order of SongsDuring Auto-Play
You can change the order of songs during Auto Play of a play list.
1 Drag the song you wish to change from the playlist and drop it in the place you want to change to.• This will result in the following, depending on the status
of the selected song and the position in the play list whereit is dropped.
Adding Song(s)You can add songs while a play list is
playing by dragging songs from thetrack list and dropping them on the playlist.
Deleting SongsRight click the song to be deleted andclick [Remove].
Operation of the [CUE], the[Exit/Reloop] and the [ListHot CUE] buttonsIf you use one of the buttons above tochange to another song from the onethat was set on a player, the song
becomes a played song.
Using the [ 8 ] [9 ] ButtonsFast forwarding the song being playedto the end of the song: ends the song
being played.Starts playing the cued upsong
Fast forwarding the cued up song to theend of the song: moves the cued upsong to the played area.
Rewinding the song being played to the beginning of the song: starts playingfrom the beginning of the song that was
being played.
Rewinding the cued up song to the beginning: starts playing from the beginning of the cued up song.
Using the [ 6 ] [7 ] ButtonsSkipping the song being played or the
cued up song (7
):For each click, it skips that number of songs. The skipped songs are moved tothe played area.
Skipping the song being played or thecued up song ( 6 ):Skips as many songs as consecutiveclicks minus 1. The skipped songs aremoved to the unplayed area.
Drag From Drag To Action
UnplayedSong
UnplayedArea
Changes the song order of the list.
UnplayedSong
Played Area Changes the song order of the list.
UnplayedSong
Song Playing Finishes the song being played and puts thedragged song on the player. The song that was
playing becomes a played song.
UnplayedSong
Cued UpSong
The song order of the list is changed and thesong that had been cued up is treated as already
played.
Played Song UnplayedArea
The song is added to the list.
Played Song Song Playing Finishes the song being played and puts thedragged song on the player. The song that was
playing becomes a played song.
Played Song Cued UpSong
The song order of the list is changed and thesong that had been cued up is treated as already
played.
Song Playing UnplayedArea
The song is added to the list.
Song Playing Played Area The next song starts to play and the song that had been playing is moved to the end of the playedsong area.
Song Playing Cued UpSong
The song is added to the list and the song thathad been cued up is treated as already played.
Cued UpSong
Song Playing Finishes the song being played and puts thedragged song on the player. The song that was
playing becomes a played song.
Played Area
Title of Song PlayingTitle of Cued Up Song
Unplayed Area

8/8/2019 Pioneer Pro DJS Manual
http://slidepdf.com/reader/full/pioneer-pro-djs-manual 63/155
(Contd. on the next page)
DJS Ver. 1.002 63
4 Useful Functions Checking Songs
ContentsIndex
4-3 Checking SongsIn addition to the A & B players, the DJ Play function comes withanother player (list player), which is for sampling songs. The list
player is below the track list or the play list. If you use the list player,you can give a trial listen to a song in the track list or the play list.
It works as follows if you set it to [Internal Mixer] and use the list
player.• When you start listening to the list player, the output signal of the
headphone cue to the mixer ceases to be sent to the headphones andonly the sound of the list player can be heard.
Warning!Before Using the List Player If your computer does not have thenecessary sound card installed and isnot set up to enable checking the soundover the headphones, the list player cannot be used.
‘1-1 DJ System’ P.16
List Player SettingsMake the [DJ Play] – [Mixer/SoundCard] settings on the [Preference] screen in line with your operatingenvironment.
‘9-4 Mixer and Sound Card
Settings’ P.100
Listening to List Player Sound on your HeadphonesSet it to [Internal Mixer].
‘9-4 Mixer and Sound CardSettings’ P.100
When using the DJS Mixer function, [Internal Mixer]You need to have at least 2 sound cardsin order to output the sound of the list
player from your headphones.
When you are using theExternal Mixer Function[External Mixer]A sound card is required to output thelist player sound.
In addition, set it to [External Mixer],allocate the sound card to the list player and you can use it as an independent
player.

8/8/2019 Pioneer Pro DJS Manual
http://slidepdf.com/reader/full/pioneer-pro-djs-manual 64/155
64 DJS Ver. 1.002
4 Useful Functions Checking Songs
ContentsIndex
Functions of the Various Buttons
Sample Song Playing AddressThe playback position of the song you are giving a trial listen tois indicated by yellow.In addition, if you click any position on the bar, playback jumpsto that position.Once the song plays to the end position, it stops.
Sample Song Stop Button ( 3 )
This stops the playback.Sample Song Play/Pause Button ( A /4 )
While stopped or paused: starts playback.
While playing: pauses playback.
Sample Song Search Button ( 8 )This function is only available during playback and rewinds atabout 10 times normal speed as long as the button is pushed.If you continue to hold the button after reaching the start of thesong, it simply rewinds to the starting position and maintains itsstatus. (Does not return to the previous song.)
Sample Song Search Button ( 9 )This function is only available during playback and fast forwardsat about 10 times normal speed as long as the button is pushed.If you continue to hold the button after reaching the end of thesong, it simply fast forwards to the end position and stops.
Sample Song Headphone CueOnce playing starts on the list player, the sample song headphone
cue lights up. If you make the headphone cue on the mixer lightup, it goes out and sample listening stops. In addition, it goes outwhen playback is stopped or paused.
Sample Song Monitor Output LevelClicking the +/- buttons adjusts the volume of the song beingsampled.
30 Seconds before PlaybackEndsWhen playback reaches 30 seconds
before the end, the area to be played(gray) and the area already played(indigo) start flashing alternately. Whenit reaches 15 seconds to the end, theyflash more quickly.
When Headphone Cue is lit
(While List Player is Playing)If you click the mixer’s headphone cue(Players A/B, Master Effector), itswitches to the sound of the clickedheadphone cue and the list player headphone cue goes OFF.

8/8/2019 Pioneer Pro DJS Manual
http://slidepdf.com/reader/full/pioneer-pro-djs-manual 65/155
(Contd. on the next page)
DJS Ver. 1.002 65
4 Useful Functions Using the Auto Mix Function for Mixing Songs
ContentsIndex
4-4 Using the Auto Mix Function for Mixing Songs
If you use the Auto Mix function, you can automatically synchronizethe beat with the BPM and mix the songs using just 1 button.
Following is an explanation of how to use the Auto Mix function tomix songs from player A with those of player B.
1 Select the songs you wish to mix from the tracklist and drag and drop them on players A & B.• The songs will start playing on their respective players.• The songs in the track list will change to the color of their
player (A: Green, B: Blue).• Song information is displayed in the information display.
2 Drag the slider of the [Cross Fader] all the way tothe left.
• Only the sound from player A is output from the speakers.
About the Cross Fader The output sound can be switched back and forth by changing the position of the
cross fader.
Far left:only player A can be heard.Far right:only player B can be heard.Other positions:some combination of player A and player B can be heard.
If you right click on the [Cross Fader], itwill be instantaneously repositioned in themiddle of the range.

8/8/2019 Pioneer Pro DJS Manual
http://slidepdf.com/reader/full/pioneer-pro-djs-manual 66/155
66 DJS Ver. 1.002
4 Useful Functions Using the Auto Mix Function for Mixing Songs
ContentsIndex
3 Click the headphone cue for player B.• This enables you to check the sound from player B on
your headphones.
4 After pressing the [ A /4 ] button at the position youwant to cue up player B, click the [CUE] button.• This cues up the song at the position you pressed [ A /4 ].
5 Click the [AUTO MIX] button at the place youwish to start mixing.• Once auto mixing begins, the following operations are
conducted simultaneously.
• As the [Cross Fader] moves, the volume from player Agets quieter while that of player B gets louder.
• When the [Cross Fader] reaches the right side and stops,the volume from player A goes completely off.
Changing the PlaybackPositionClick either the waveform display or the[Playing Address] when a player iseither playing or paused. The playback
position moves to the position youclicked.
Fine Tuning the PausePositionWhile a player is paused, you can make
minute adjustments to the pause position by turning the [Jog Dial].
Using the [CUE] button ‘Using the [CUE] button’ P.28
When the Beat and BPMwon’t Synchronize (Worksthe same as MIX)The beat will not synchronize with theBPM in the following circumstances.(a) During Auto Mix if either the
[Tempo Adjustment Slider] or [Tempo Control Range] has beenoperated.
(b) When either the beat or the BPM isnot detected.
Auto Mix is Cancelled…Whenever any of the following areoperated: Cross Fader, Fader Curve,Mix Mode, Mix Beat.
(a) Player B starts playing.(b) The speed (BPM) and beat of Player B are aligned with
those of Player A.(c) The [Cross Fader] moves from left to right.

8/8/2019 Pioneer Pro DJS Manual
http://slidepdf.com/reader/full/pioneer-pro-djs-manual 67/155
DJS Ver. 1.002 67
4 Useful Functions Key Operations
ContentsIndex
4-5 Key OperationsYou can operate DJ Play functions from your computer’s keyboard.Right after installation, the functions are allocated to keys as follows.
Changing Key Assignments ‘9-5 Key Assignment Settings’
P.104
Warning!When using DJS on aLaptop Computer If you set the NumLock key on your keyboard, the keys replaced by the ten-key (J, K, L, …) cannot be usedeffectively. Make sure and release the
NumLock key before beginning use.When using DJS with theChinese or Japaneselanguage versions of WindowsWhen the input mode is set to Chinesecharacters (kanji), the keyboard cannot
be used effectively. Set the input modeto direct input before use.
* In the diagram, the colors indicate functions as follows: indigo, the Mixer, green,Player A, blue, Player B.
* M = Mixer, A = Player A, B = Player B.
F1: Mix Mode Cut In (M) I: Loop In Adjust (B)
F2: Mix Mode Zip (M) O: Loop Out Adjust (B)
F3: Mix Mode Echo (M) P: Loop Exit/Reloop (B)
F4: Mix Mode Cross Fade (M) [: One Track Loop (B)
F5: Beat Adjuster (A) ]: (Not Assigned)
F6: Headphone Cue (A) A: Auto Cue (A)
F7: Headphone Cue (B) S: Track Search REW (A)
F8: Beat Adjuster (B) D: Track Search FWD (A)
F9: MIX (M) F: (Not Assigned)
F10: Fader Curve Curve-A (M) G: (Not Assigned)
F11: Fader Curve Curve-B (M) H: Auto Fader B (M)
F12: Fader Curve Curve-C (M) J: Auto Cue (B)
1: Jog Dial REW (A) K: Track Search REW (B)
2: Jog Dial FWD (A) L: Track Search FWD (B)
3: Tempo Control Range (A) ;: (Not Assigned)
4: Tempo Adjust - (A) “: (Not Assigned)
5: (Not Assigned) Z: Master Tempo (A)
6: Tempo Adjust + (A) X: CUE (A)
7: Jog Dial REW (B) C: Play/Pause (A)
8: Jog Dial FWD (B) V: Search REW (A)
9: Tempo Control Range (B) B: Search FWD (A)
0: Tempo Adjust - (B) N: Master Tempo (B)
-: (Not Assigned) M: CUE (B)
=: Tempo Adjust + (B) ,: Play/Pause (B)
Q: Scratch Mode Select (A) .: Search REW (B)
W: Loop In Adjust (A) /: Search FWD (B)
E: Loop Out Adjust (A) ↑ : Master Volume + (M)
R: Loop Exit/Reloop (A) ↓ : Master Volume - (M)
T: One Track Loop (A) ← : Cross Fader Left (M)
Y: Auto Fader A (M) → : Cross Fader Right (M)
U: Scratch Mode Select (B)
F1
1
F2
2 3 4 5 6
Q W E R T Y
7 8 9 0
U I O P
- =
[ ]
A S D F
Z X C V
G H J K
B N M ,
L ; "
. /
F3
Space
F4 F5 F6 F7 F8 F9 F10 F11 F12
Ins
Del
Home Pg Up
Pg DnEnd
AC AC
CROSSFADE
CUTIN
ZIPACURVE
CCURVE
BCURVE
MT
TCR TCR
CUE MT
MIX
CUE
TP TPTP TP
CFB
CFA
CFA
CFBECHO

8/8/2019 Pioneer Pro DJS Manual
http://slidepdf.com/reader/full/pioneer-pro-djs-manual 68/155
68 DJS Ver. 1.002
4 Useful Functions Operations used with DMP-555
ContentsIndex
4-6 Operations used with DMP-555If you connect the Pioneer digital media player DMP-555 with a USBcable, you can operate DJS with the DMP-555’s operation keys.
Functions you can Perform from the DMP-555DJ Play FunctionCreate Function (Starts & Stops Playback, Sets Loops, etc.)Transfer Function (SD Memory Card Reader and Writer)
4-6-1 ConnectingYou can connect the DMP-555 to your computer with a USB cable.You will need to install the driver software in order to use the DMP-555.
1 Connect the USB cable to the USB ports of thecomputer and of the DMP-555.• You can also start up the computer, turn the DMP ON and
then connect them.
Connecting a 2nd DMP-555If you connect a second DMP-555 via USB cables, you canoperate Players A & B from their respective DMP-555s.
‘4-6-2 Allocating the DMP-555 to a Player’ P.69
DMP-555The DMP-555 is not sold in somecountries and/or regions, such as inJapan.
When using the Transfer function
you can use a reader/writer compliantwith SD memory cards’ CopyrightProtection Function in place of theDMP-555.
‘Chapter 8 Using SD Cards’ P.91
Warning!SD Card Reader/Writer Please use devices that are compatiblewith copyright protection functions.(Check the specs of your SD card
reader/writer before connecting it.)
Warning!Installing DriversSee “Read me” on the Installation DJS CD-ROM.
Supplied USB cable
DMP-555
Computer
After Drivers are InstalledYou do not need to install drivers againeven if you make changes, such as toyour USB port connections, connectinga 2nd DMP-555, etc.

8/8/2019 Pioneer Pro DJS Manual
http://slidepdf.com/reader/full/pioneer-pro-djs-manual 69/155
DJS Ver. 1.002 69
4 Useful Functions Operations used with DMP-555
ContentsIndex
4-6-2 Allocating the DMP-555 to a Player You can assign a DMP-555 in place of a Player, A or B, of the DJPlay function.
Use the DMP-555’s Source Select Button ([CD] or [Card]) toassign the player.
1 Press the DMP-555’s Source Select button ([CD]or [Card]).• To assign it to Player A: Press [CD].• To assign it to Player B: Press [Card].
When 2 DMP-555s are ConnectedWhen two DMP-555s are connected, they are automatically
assigned to Player A and Player B.
* If you wish to reverse the settings, press on one of theDMP-555’s Source Select button ([CD] or [Card]). Theother DMP-555 will change automatically.
2 Working with DMP-555s.• When you operate the DMP-555 via controls such as the
jog dial, the tempo adjustment slider, the play/pause button, etc., the corresponding Player will respond.
When a 2nd DMP-555 isconnected using the Createor Transfer functionThe first DMP-555 detected becomesthe controller and the Source SelectButton ([CD] or [Card]) goes off.The other DMP-555 can be used as astand alone digital media player.
Player A:
The DMP-555 whose Source Select button [CD] is lit.
Player B:
The DMP-555 whose Source Select button [Card] is lit.

8/8/2019 Pioneer Pro DJS Manual
http://slidepdf.com/reader/full/pioneer-pro-djs-manual 70/155

8/8/2019 Pioneer Pro DJS Manual
http://slidepdf.com/reader/full/pioneer-pro-djs-manual 71/155
DJS Ver. 1.002 71
5 Creating Loops Made Easy Making a Loop
ContentsIndex
3 Click the point to set as the cue or the loop in/outpoint on the waveform display (entire/enlarged).(If setting up a loop, then go ahead and click theloop out point.)
• The track hot cue tags are displayed in the waveform
display and it starts to play from the point you clicked. (If a loop was set up, it plays the loop.)
• You can set up a max of 4 cues or loops.
4 Click the [Save] button.• The [SAVE] screen opens.
5 Click [Save] and then click the [Save] button.• After saving the settings, close the [SAVE] screen.
Warning!When you Click a PointBe sure to click in the vicinity of thecenter line of the waveform. Clickinganywhere other than near the center
line makes it jump to the clicked position and start playing.
Player Functions[A /4 ]: Play or Pause[3 ]: Stop[Volume Adjuster]: Adjusts the Volume
Stop Position of the [ 3 ]ButtonMoves to the beginning of the track or to the loop in point.
Blue Part of the WaveformDisplayIndicates the range to be played.
Selecting a Track Hot CueNumber that has not been SetUpAfter clicking the track hot cue number at the bottom left of the entirewaveform display if you create a cue or loop, the selected number is assigned tothat cue/loop.
Selecting a Track Hot CueNumber that has been Set UpIf you click the track hot cue number of a cue or loop that has already been setup, the replay point moves to the cue or loop in point.
Using the Beat Guide &Snapping FunctionsIf you specify the beat interval anddisplay the guide on the top of thewaveform, you can set the positions of cues or loops.
‘5-4 Other Useful Functions(Create)’ P.74
Track Hot Cue Tag ‘5-2 Adjusting the Loop Range’ P.72
Saving a Loop you Createdas a Track
‘5-3 Saving the Length of a Loop asa Track’ P.73
Setting a Cue Setting a Loop Out

8/8/2019 Pioneer Pro DJS Manual
http://slidepdf.com/reader/full/pioneer-pro-djs-manual 72/155
72 DJS Ver. 1.002
5 Creating Loops Made Easy Adjusting the Loop Range
ContentsIndex
5-2 Adjusting the Loop RangeAdjust the positions of saved cues and loops.
1 Click the round part of the [Track Hot CUE] tag on
the bottom of the waveform display and thenselect the point to change it to.• The song starts to play from the point you clicked.
Track Hot CUE tag
2 Drag the round part of the [Track Hot CUE] tagand drop it at the point you wish to change it to.
Making a cue point into a loop in or loop out point.Drag & drop the triangle symbol on either side of the cue tag.
Making a loop in or loop out point into a cue point.If the loop out is to be deleted:
Drag & drop the loop out point before (to the left) of the loopin point.
If the loop in point is to be deleted:Drag & drop the loop in point after (to the right) of the loopout point.
3 Click the [Save] button.• The [SAVE] screen opens.
4 Click [Save] and then click the [Save] button.• After saving the settings, close the [SAVE] screen.
Short Cut KeysMoves the loop in/out points by a frameat a time. (1 Frame 1/75 sec.): [ ] [ ]
Undoing OperationsYou can undo the last thing you did byexecuting [Edit] [Undo].
If a DMP-555 is connected toyour computer You can set up loops with the DMP-555’s operating keys while a song is
playing. ‘4-6 Operations used with DMP-
555’ P.68
Clear Button ‘Clear Function’ P.75
Using the Beat Guide &Snapping FunctionsYou can specify the beat interval,display the guide on top of thewaveform and set the positions of cues
or loops. ‘5-4 Other Useful Functions
(Create)’ P.74
Loop Out PointLoop In PointCue Point
Saving a Loop you Createdas a Track
‘5-3 Saving the Length of a Loop as
a Track’ P.73

8/8/2019 Pioneer Pro DJS Manual
http://slidepdf.com/reader/full/pioneer-pro-djs-manual 73/155
DJS Ver. 1.002 73
5 Creating Loops Made Easy Saving the Length of a Loop as a Track
ContentsIndex
5-3 Saving the Length of a Loop asa Track
This saves the range of a loop you have created as an MP3 file.
1 Click the [Save] button.
• The [SAVE] screen opens.
2 Click the [Save as] check box and then click the[Select Loop] button.
• The loop selection screen opens.
3 Click the check box of the loop you wish to saveand then click the [OK] button.
4 Click the [Save] button.• The progression bar indicates the status of progress in
saving the loop.• Once saving finishes, the progression bar closes.
Making a Loop ‘5-1 Making a Loop’ P.70
When music is transferredfrom Ripping (CD-DA, WAV)You can only select [Save as]. (It cannot
be saved as a track hot cue.)
Song titles when saving as anew trackA title composed of the original songtitle + a space + #LOOP + the track hotcue number is assigned automatically.

8/8/2019 Pioneer Pro DJS Manual
http://slidepdf.com/reader/full/pioneer-pro-djs-manual 74/155
74
(Contd. on the next page)
DJS Ver. 1.002
5 Creating Loops Made Easy Other Useful Functions (Create)
ContentsIndex
5-4 Other Useful Functions (Create)Renumbering Function
When you click the [Renum] button, the memory of cues and/or loops you have set up is renumbered in order from the beginningof the song.Once you click the [Save] button, it is saved with the newnumbers.
Beat Guide and Snapping Function
After clicking the [Snap] function, when you click in the vicinityof the desired point, it sets a point much closer in the beat guidein the expanded waveform display.
• If you click the [Guide ADJ] slider, you can select a beat guideinterval in the expanded waveform display from among those
below.Beats: 1/16, 1/8, 1/4, 1/2, 1, 2, 4, 8, 16, 32
• The selected beat guide interval is displayed on the right side of the bar. (In the example screen, it is a [1/16 beat])
Canceling the SnappingFunctionWhen you wish to set a cue/loopwithout using the snapping function, if you click the [Snap] button you cancancel the snapping function.
The point selected by the cursor Beat guide
A selection with thesnapping function

8/8/2019 Pioneer Pro DJS Manual
http://slidepdf.com/reader/full/pioneer-pro-djs-manual 75/155
DJS Ver. 1.002 75
5 Creating Loops Made Easy Other Useful Functions (Create)
ContentsIndex
Clear Function
When you click the [Clear] button, the selected track hot cue isdeleted.
Halving & Doubling the Length of a Loop
Click the [Track Hot CUE] button to be changed and then click either [×1/2] (half) or [×2] (double).
When a loop in or out point isselectedThe selected loop in or out point isdeleted and the point left behind
becomes a cue point.
Short Cut Keys[×1/2]: [Ctrl] + [h][×2]: [Ctrl] + [w]

8/8/2019 Pioneer Pro DJS Manual
http://slidepdf.com/reader/full/pioneer-pro-djs-manual 76/155
76
(Contd. on the next page)
DJS Ver. 1.002
6 Play Lists & Classifying Songs Editing Song Information
Index Contents
Chapter 6Play Lists & Classifying SongsYou can edit the information on songs you wish to use and classifyeach into a category. In addition, you can create a play list andsave it in a category.
6-1 Editing Song InformationThis changes the song information below for a displayed track list or
play list.
1 Click [File] and then [Music Management].• The [Music Management] screen opens.
• The category list is displayed on the left, while the track list is on the right.
2 Click the song (line) of the song you wish to editfrom the items displayed in the track list.
Song Information Displayedin ListsTR.: Play Number within an AlbumNo.: Play Number in a Play ListStatus: Displays the play or standby
status of a player with a note mark Title: Name of a SongArtist: Name of the ArtistAlbum: Title of the AlbumTime: Running Time (Length of Song)Size: Size of the MP3 FileGenre: The style of musicTrack Hot CUE: Track Hot CueHOT: List Hot CueMix In Start: Time Mix Starts (Start of Song)Mix Out Start: Time Mix Starts (End of Song)Mode: Mix ModeBeats: Beats for MixingFader: Fader CurveBPM: BPMEntry: Date/Time Registered inDatabaseBit Rate: Bit RateCopy: Number Remaining that can beCopiedLocation: Location a File is Saved
Toggling between Ascendingor Descending Sort Order Click the name of the item you wish tochange.
Priority Ranking of Notes Numbers Alphabet SelectedLanguage (The opposite whendescending order)* Only when it is a number, if it is too
short, modify the number to therequired length by adding a 0 andthen sort.
Narrowing a SearchIf you enter the first letter(s) of a title tothe right of the item’s name, Title, Artist,
Album, Genre, Location, thecorresponding song will be displayed. If you click a displayed song, the displaytoggles back as it was before.
Changing the Width of an ItemDrag the border of any item.
Keyboard Jump FunctionIf you select the header on top of a listand then type in a letter on thekeyboard, it will jump to the first linecorresponding to the letter.
Changing the Order of ItemsIf you drag and drop the item you wish tochange, it changes where it is displayed.
• Song Name (Title) • Genre
• Name of the Artist • Tempo of the Song (BPM)• Title of the Album (Album)

8/8/2019 Pioneer Pro DJS Manual
http://slidepdf.com/reader/full/pioneer-pro-djs-manual 77/155
DJS Ver. 1.002 77
6 Play Lists & Classifying Songs Editing Song Information
ContentsIndex
3 Click [Edit] and then click [Edit].• The [EDIT] screen opens.
Deleting Songs
4 Click the item you wish to change and then either enter information or select a menu.• You can enter text to a length of 128 single-byte, English
characters for the Title, Artist, Album and Genre. Double- byte characters for languages like Chinese and Japanesecannot be displayed.
5 Once you finish making changes, click the [OK]button.• Depending on the content of your editing, the edited
song(s) may be moved to another category or it may cease
to be displayed. (In cases such as when a song registeredin a category is being displayed and the genre or BPM isedited.)
Editing Directly1. Click a song.2. Click the item you wish to change.3. Once it changes so you can edit the
info, enter the desired text or
numbers.
Name of GenreIf an applicable genre has not been setup, an error message will be given.(Genre names that have not beencreated cannot be input.)
Editing Identical Informationfor Multiple Songs at theSame TimeThe album, artist, BPM and genre
information for multiple songs can beedited all together.1. Click a song.* If you click songs while holding the
Shift or Ctrl key down, you can selectmultiple songs.
2. Right click and then click [Edit theAlbum, Artist, Genre, BPM].
3. Enter the information you wish toedit on the screen that opens and thenclick the [OK] button.
Characters that Cannot beEntered
‘Characters that Cannot be Entered(Symbols)’ P.79
When Auto Set Up Cues areSetIt is not possible to edit the Mix Instarting point.
BPM ValuesYou can enter values from 40.00 to399.99 up to the 2nd digit after the
decimal.* The 1st and 2nd digits after the
decimal point may be omitted for display in lists.
Mix In Start ValuesThe values cannot be after the Mix OutStart.
Mix Out Start ValuesThe values cannot be before the Mix InStart.
Time (Frames) ValuesYou can enter frame values from 0 to74. (1 Frame 1/75 Sec.)
Perform either (a) or (b).
(a) Press the Delete key.(b) Click [Edit] and then click [Delete].
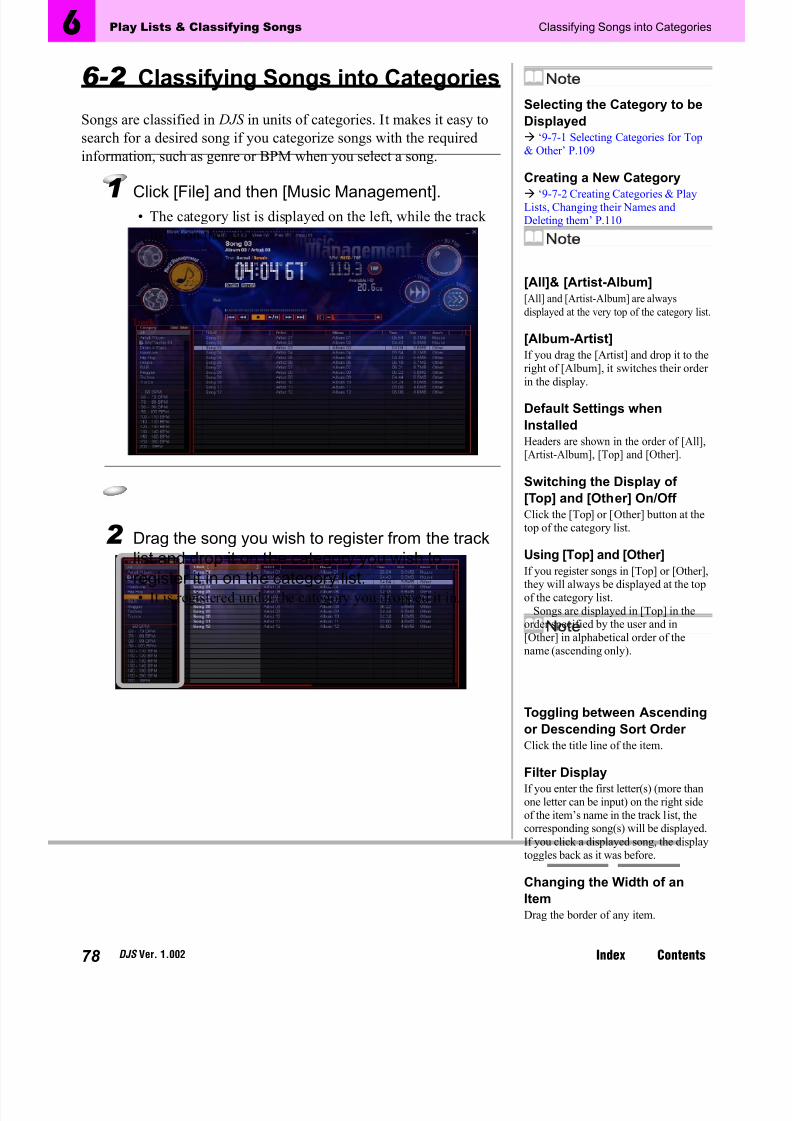
8/8/2019 Pioneer Pro DJS Manual
http://slidepdf.com/reader/full/pioneer-pro-djs-manual 78/155
78 DJS Ver. 1.002
6 Play Lists & Classifying Songs Classifying Songs into Categories
Index Contents
6-2 Classifying Songs into Categories
Songs are classified in DJS in units of categories. It makes it easy tosearch for a desired song if you categorize songs with the requiredinformation, such as genre or BPM when you select a song.
1 Click [File] and then [Music Management].• The category list is displayed on the left, while the track
list is on the right.
2 Drag the song you wish to register from the tracklist and drop it on the category you wish toregister it in on the category list.• It is registered under the category you dropped it in.
Selecting the Category to beDisplayed
‘9-7-1 Selecting Categories for Top& Other’ P.109
Creating a New Category ‘9-7-2 Creating Categories & Play
Lists, Changing their Names andDeleting them’ P.110
[All]& [Artist-Album][All] and [Artist-Album] are alwaysdisplayed at the very top of the category list.
[Album-Artist]If you drag the [Artist] and drop it to theright of [Album], it switches their order in the display.
Default Settings whenInstalledHeaders are shown in the order of [All],[Artist-Album], [Top] and [Other].
Switching the Display of [Top] and [Other] On/Off Click the [Top] or [Other] button at thetop of the category list.
Using [Top] and [Other]If you register songs in [Top] or [Other],they will always be displayed at the topof the category list.
Songs are displayed in [Top] in theorder specified by the user and in[Other] in alphabetical order of thename (ascending only).
Toggling between Ascendingor Descending Sort Order Click the title line of the item.
Filter DisplayIf you enter the first letter(s) (more thanone letter can be input) on the right sideof the item’s name in the track list, thecorresponding song(s) will be displayed.If you click a displayed song, the displaytoggles back as it was before.
Changing the Width of anItemDrag the border of any item.

8/8/2019 Pioneer Pro DJS Manual
http://slidepdf.com/reader/full/pioneer-pro-djs-manual 79/155
DJS Ver. 1.002 79
6 Play Lists & Classifying Songs Creating a New Play List
ContentsIndex
6-3 Creating a New Play ListDecide on the order in which to play songs and then add them to the
play list.
1 Right click on the [Top] category list.
2 Click [Make Playlist].
• A new play list is displayed at the bottom of the selectedcategory list.
• The title “My Play List + a 2 digit number” isautomatically assigned to it. To change it, enter a name.(up to 128 characters) Double-byte characters for languages like Chinese and Japanese cannot be displayed.
Characters that Cannot be Entered (Symbols)The following characters (symbols) cannot be entered in DJS .
3 Click any song from any category and drag and
drop it into the play list.
• Songs are added to the play list in the order in which youdrag and drop them.
Creating a new play list in[Other]Right click on the [Other] category listand then click [Make Playlist].
Creating a new play list fromthe [File] menu1. Click [File] – [New] – [Make
Playlist].2. Enter a name for the play list and
click the category for it to be saved to
(Top or Other).3. Click the [OK] button.
Track List Display SizeOpens the display at its previous size
and position.Auto-Playing a Play List
‘4-2-1 Auto-Playing a Play List’ P.61
Changing the Song Order in aPlay List
‘4-2-2 Changing the Order of SongsDuring Auto-Play’ P.62
Deleting a Song from a PlayList1. Right click the song you wish to delete
(more than one can be selected).2. Click [MIX].* The song is removed from the play
list, but it is not deleted from thedatabase.
When many songs areregistered in the track listIt makes it easier to search if youspecify a category and limit the range.
When multiple songs weredragged and dropped at thesame timeThey are added in the order they wereselected.
€ ‚ ƒ „ … † ‡ ˆ ‰Š ‹ Œ ‘ ’ “ ”
ž•
– — ˜ ™Ž
š › œ Ÿ

8/8/2019 Pioneer Pro DJS Manual
http://slidepdf.com/reader/full/pioneer-pro-djs-manual 80/155
80
(Contd. on the next page)
DJS Ver. 1.002
6 Play Lists & Classifying Songs Editing a Playlist
Index Contents
6-4 Editing a PlaylistThis sets how each track in the play list will be played.
The following items can be changed.
• Track Hot CUE (1 –
4): Settings for track hot cues and loops• Mix Out: Sets how the song being played is to end.• Mix In: Sets how the next song is to start playing.
To make the settings, click the [Toggle Display] at the top, right of the play list, widening it, and display the item(s) to be edited.
See ‘4-2-2 Changing the Order of Songs During Auto-Play’ P.62 for more information about changing song order and adding/removing songs.
Following is a detailed explanation of how to make the settings for each item.
Track Hot CueSpecify a track hot cue as an auto setup cue.Right click the icon of a cue mark and then click [Auto Setup
CUE ON].
• To cancel Auto Setup Cue settings, click [Auto Setup CUE OFF].
Mix InSpecify the point where the song will start playing.You can also specify the same position as the track hot cue byright clicking.
Switching the Width of a ListClick the [Toggle Display] button on theupper right of the play list display.
When the [DJ Play] screen is opened,it is displayed at the narrowest listwidth.In addition, if you click the player or themixer, the play list is displayed at itsnarrowest width.
Items that cannot be Edited(Play List)
No items other than [Track Hot CUE][Mix In] [Mix Out] can be edited(display only).
Cue Mark
[Cue Mark]The following symbols are used.● : Cue
: LoopHighrighted: Auto Setup CUE ON
Registeing Track Hot Cueinto List Hot CuesDrag a [Cue Mark] and drop it in thehot cue list.
Clearing Track Hot CueRight click the icon of a cue or loop andthen click [Clear Track Hot CUE].
Warning!When the Track Hot Cue isset to Auto Setup CueIt automatically sets that cue point to[Mix In]. This value cannot bechanged.
When no Value has been setfor [Mix In]The starting point of the song acts as the beginning of the song. (In line with autocue settings)

8/8/2019 Pioneer Pro DJS Manual
http://slidepdf.com/reader/full/pioneer-pro-djs-manual 81/155
DJS Ver. 1.002 81
6 Play Lists & Classifying Songs Editing a Playlist
ContentsIndex
Mix OutChanges how playback ends (Start/Mode/Beats/Fader).If you right click each item, its menu will open.
Start:Sets the position of the ending time.
You can also specify the same position as the track hot cue byright clicking.
Mode:Selects the mix mode.
Beats:Selects the mix beats.Settings can be changed even while selecting mix mode [Cut In],however the status of the [Cut In] does not change.
Fader:Selects the fader curve.
Settings can be changed even while selecting mix mode [Cut In],however the status of the [Cut In] does not change.
Mix Mode‘3-5-1 Types of Mix Modes & Fader
Curves and their Features’ P.51
Fader Curve‘3-5-1 Types of Mix Modes & Fader
Curves and their Features’ P.51

8/8/2019 Pioneer Pro DJS Manual
http://slidepdf.com/reader/full/pioneer-pro-djs-manual 82/155
82 DJS Ver. 1.002
7 Importing Songs Importing an MP3
ContentsIndex
Chapter 7Importing SongsYou can convert and import music CDs, WAV files, soundsources from a microphone or other external devices, etc., intoMP3 files, which can be used by DJS .
7-1 Importing an MP3Imports MP3 files on your computer into DJS .(DJ Play, Music Management, Transfer Functions only)
1 Click [File] and then click [Import] – [MP3 AudioFile].• The [Importing MP3 Audio Files] screen opens.
2 After clicking the MP3 file(s) to be imported, click
the [Open] button.• If you click on the [Open] button after clicking on andselecting a folder, all of the MP3 files contained within thefolder and sub-folder will be imported.
MP3A digital compression technology for music data. DJS is compatible witheither file format (a) or (b).(a) MPEG-1 Audio Layer-3(b) MPEG-2 Audio Layer-3 LSF
Folder displayed in the[Importing MP3 Audio Files]screenThe first time the program is started up,the folder set up as the music library isopened. If you change the folder, thatfolder will open thereafter.
If you want to change thefolder Click the name of the folder displayedin the [Location of File(s)] and click thefolder you wish to change to.
When opening foldersDouble click on the folder name or
folder icon to open the folder toreference the sub-folders and MP3 filescontained within.
Tag Information of MP3 FilesTag information like titles, genres,artists, etc. is imported from MP3 filesand displayed in categories.Double-byte characters, like those usedfor Chinese and Japanese, cannot bedisplayed.
MP3 File Tag InformationCompatible with ID3v1 & ID3v2formats.
Editing Song Information ‘6-1 Editing Song Information’ P.76
When importing a play listPlay lists created with other softwarecan be imported.* If compatible with M3U files.1. Click [File] – [Import] – [M3U
Playlist].2. Click the M3U file you wish to
import and then click the [Open]
button.The import process cannotbe done
‘Troubleshooting’ P.148

8/8/2019 Pioneer Pro DJS Manual
http://slidepdf.com/reader/full/pioneer-pro-djs-manual 83/155
(Contd. on the next page)
DJS Ver. 1.002 83
7 Importing Songs Importing Songs from Music CDs
ContentsIndex
7-2 Importing Songs from Music CDsImports songs from music CDs as MP3 files.
1 Put a Music CD (CD-DA) in the DVD/CD drive.
2 Click [File] and then click [Ripping] – [CD-DA].• The [Ripping] screen opens.• The songs on the music CD are displayed in the upper list
(CD List). The disc title of compatible CDs is limited inEnglish to a maximum of 128 characters.
3 Click the check boxes of songs you wish toimport.
• Once you click a box, a check mark is displayed in it.• The lower list (track list) switches to the Artist-Album(Album-Artist) display and the songs you clicked on areshown.
Step 1 2 3 4 5 6 7
[Ripping] IconIf you click the [Ripping] icon, which isdisplayed in each function, it shifts tothe Ripping Function.
Input MediaThe [CD], [LINE], and [WAV] buttonson the left edge of the list aboveindicate the media for importing. The
button of the selected source will be litred.
If [CD] is not lit redClick the [CD] button.
Changing the composition of the listA [Spread List] button is located to theright of the [CD] button.
Importing Music Info via theInternet1. [CD Information] button.2. The information of the CD list is
updated, and at the same time theinformation displayed in the track listestimated from Ripping is alsoupdated.

8/8/2019 Pioneer Pro DJS Manual
http://slidepdf.com/reader/full/pioneer-pro-djs-manual 84/155
84
(Contd. on the next page)
DJS Ver. 1.002
7 Importing Songs Importing Songs from Music CDs
ContentsIndex
• Depending on the total number of songs selected, the harddisk space that is required is calculated and the [RequiredHD] is displayed. (The [Available HD] shows how much
hard disk space is free.)
Selecting or Clearing All SongsSelect All Songs: Click [Select All].Clear All Songs: Click [Clear All].
4 Changing the Bit Rate:Click the bit rate to set it.
• [Rate] indicates the bit rates.Cutting Dead Air:
After clicking [Dead Air Cut], click the desired timesetting.
• Dead Air Cut is displayed in [Mode].
Step 1 2 3 4 5 6 7
[Refresh] ButtonReads the CD and updates the list.
Default Settings whenInstalledThe bit rate is set to [128 kbps].
The dead air cut is set to [Normal](dead air is not cut).
Changing the bit rate settingsthat can be selected
‘9-6-1 Setting the Bit Rate’ P.105
Changing the dead air detection times that can beselected
‘9-6-3 Dead Air Cut Settings’ P.106
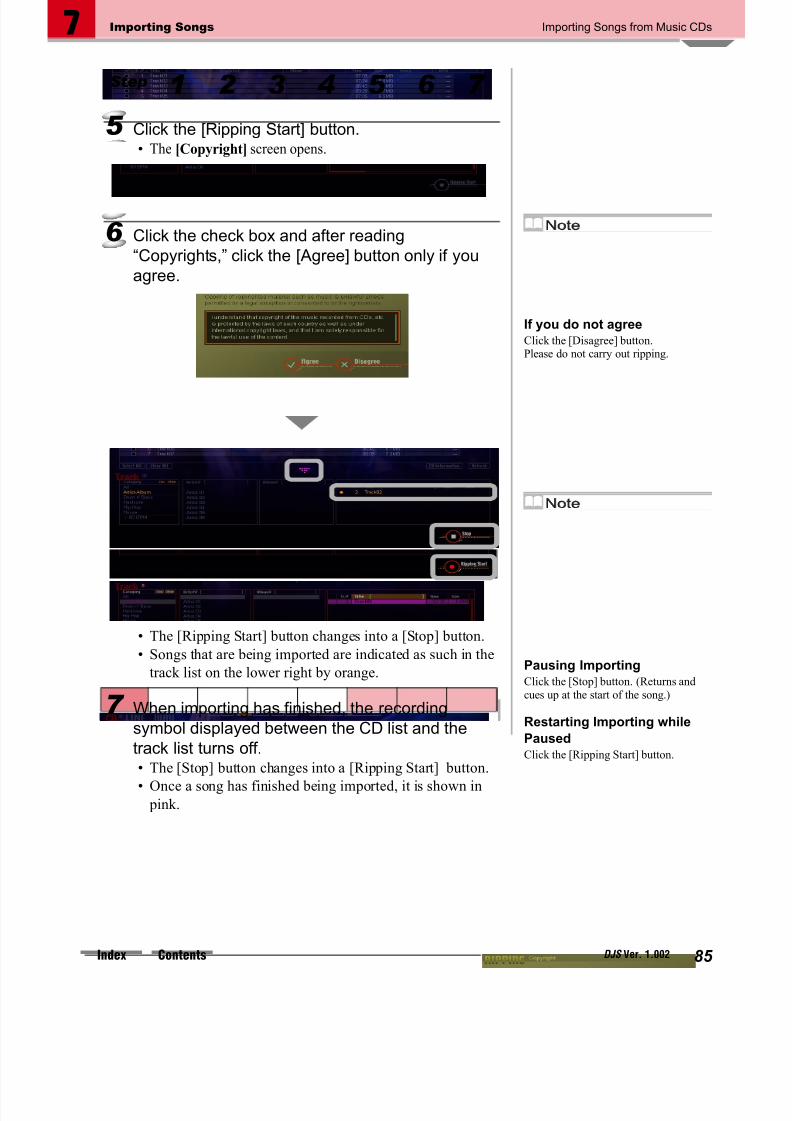
8/8/2019 Pioneer Pro DJS Manual
http://slidepdf.com/reader/full/pioneer-pro-djs-manual 85/155

8/8/2019 Pioneer Pro DJS Manual
http://slidepdf.com/reader/full/pioneer-pro-djs-manual 86/155
86
(Contd. on the next page)
DJS Ver. 1.002
7 Importing Songs Importing WAV Files
ContentsIndex
7-3 Importing WAV FilesCompresses WAV (.wav) files on your computer into MP3 files andimports them.
1 Click [File] and then click [Ripping] – [Wave].• The [Ripping] screen opens.• In the upper list (WAV List), a list of folders is displayed
on the left, while on the right the songs inside a folder areshown.
2 Click the [WAV] button and the songs to beimported are shown in the upper list.• The folders are displayed on the left side of the list, while
the songs inside the selected folder are displayed on theright.
Step 1 2 3 4 5 6 7
[Ripping] IconIf you click the [Ripping] icon, which isdisplayed in each function, it shifts tothe Ripping Function.
Input MediaThe [CD], [LINE], and [WAV] buttonson the left edge of the list above
indicate the media for importing. The button of the selected source will be litred.
Changing FoldersClick the folder you wish to displayfrom the list shown on the left.
Changing the composition of the listA [Spread List] button is located to theright of the [WAV] button.

8/8/2019 Pioneer Pro DJS Manual
http://slidepdf.com/reader/full/pioneer-pro-djs-manual 87/155
(Contd. on the next page)
DJS Ver. 1.002 87
7 Importing Songs Importing WAV Files
ContentsIndex
3 Click the check boxes of songs you wish toimport.
• Once you click a box, a check mark is displayed in it.• Depending on the total number of songs selected, the hard
disk space that is required is calculated and the [RequiredHD] is displayed.
Selecting or Clearing All SongsSelect All Songs: Click [Select All].Clear All Songs: Click [Clear All].
4 Click the bit rate to set it.• [Rate] indicates the bit rates.
Step 1 2 3 4 5 6 7 Warning!
If there is Insufficient HardDisk SpaceSongs cannot be imported. Cancelwhat you are doing and check howmuch hard disk space is needed inorder to save.
Default Settings when
InstalledThe bit rate is set to [128 kbps].The dead air cut is set to [Normal] (deadair is not cut).
Changing the bit rate settingsthat can be selected
‘9-6-1 Setting the Bit Rate’ P.105

8/8/2019 Pioneer Pro DJS Manual
http://slidepdf.com/reader/full/pioneer-pro-djs-manual 88/155
88 DJS Ver. 1.002
7 Importing Songs Importing WAV Files
ContentsIndex
5 Click the [Ripping Start] button.• The [Copyright] screen opens.
6 Click the check box and after reading“Copyrights,” click the [Agree] button only if youagree.
• The [Ripping Start] button changes into a [Stop] button.• Songs that are being imported are indicated as such in the
track list on the lower right by orange.
7 When importing has finished, the recording
symbol displayed between the WAV list and thetrack list goes off.• The [Stop] button changes into a [Ripping Start] button.• Once a song has finished being imported, it is shown in
pink.
Step 1 2 3 4 5 6 7
If you do not agreeClick the [Disagree] button.Please do not carry out ripping.
Pausing ImportingClick the [Stop] button.Returns and cues up at the start of thesong.
Restarting Importing whilePausedClick the [Ripping Start] button.

8/8/2019 Pioneer Pro DJS Manual
http://slidepdf.com/reader/full/pioneer-pro-djs-manual 89/155
(Contd. on the next page)
DJS Ver. 1.002 89
7 Importing Songs Recording Sound from Microphone or Line Input
ContentsIndex
7-4 Recording Sound fromMicrophone or Line Input
Records audio from a microphone or external device (Line In) as anMP3 file.
1 Click [File] and then click [Ripping] – [Line In].• The [Ripping] screen opens.
2 Click the [Time Set] button, adjust the minuteswith [ C ] [D ] and then click the [Set] button.• The Minutes display flashes.
Canceling the Recording Time SettingClick [Cancel]. The recording time you set is returned to whatit was before (before changes), so redo the settings from thebeginning.
3 Adjust the seconds with [ C ] [D ] and then click[Set].• The Seconds display flashes.
4 Click the input column of the line input list andenter the necessary information.• Items to Enter:
[Title] [Album] [BPM] [Artist] [Genre]
Warning!After the [Ripping] screen opens,line input is automatically set. Whenrecording from the microphone,change the setting from [Line Input]to [Microphone].
[Ripping] IconIf you click the [Ripping] icon, which isdisplayed in each function, it shifts tothe Ripping Function.
Input MediaThe [CD], [LINE], and [WAV] buttonson the left edge of the list above indicatethe media for importing. The button of the selected source will be lit red.
Converting the Microphoneand Input SettingsThese settings can be changed on the[Audio] tab of the Windows [Soundsand Audio Devices Properties] screen.1. Click on and select the device name
displayed in the [Default device] areaof [Sound recording] on the [Audio]tab.
2. Click on the [Volume …] button of [Sound recording] on the [Audio] tab,and then select either [Microphone]or [Line Input].
MP3 SettingsThe valid settings are lit. If you wish tochange them, click the desired settings.Rate: Bit Rate.REC Mode: Toggles between Stereoand Mono.Sampling Rate: Sampling Frequency.Track Divide: When set to Multi, if three or more seconds elapse with nosound (dead air), the track isautomatically split up and a MP3 audiofile is created.
Recommended SamplingFrequencyThis software features 48kHz internalaudio processing. When recording frommicrophone or line input, it is possibleto choose from any of the availableselections, but the [48kHz] setting isrecommended.
Using the [List] Button1. Click the [List] button and display
the genre table.2. Select a genre name and click the
[OK] button.

8/8/2019 Pioneer Pro DJS Manual
http://slidepdf.com/reader/full/pioneer-pro-djs-manual 90/155
90 DJS Ver. 1.002
7 Importing Songs Recording Sound from Microphone or Line Input
ContentsIndex
5 Click the [Ripping Start] button.
6 Click the check box and after reading“Copyrights,” click the [Agree] button only if youagree.
• The [Ripping Start] button changes into a [Stop] button.• Songs that are being imported are indicated as such in the
track list on the lower right by orange.
7 The [Time Set] value counts down and when itreaches [0:00], recording finishes.• The [Stop] button changes into a [Ripping Start] button.• Once a song has finished being imported, it is shown in
pink.• The changed recording time returns to what it was before
(before changes).
If you do not agreeClick the [Disagree] button.Please do not carry out ripping.
Stopping recordingClick the [Stop] button.It saves the recording up to the pointwhere you clicked the [Stop] button.

8/8/2019 Pioneer Pro DJS Manual
http://slidepdf.com/reader/full/pioneer-pro-djs-manual 91/155
(Contd. on the next page)
DJS Ver. 1.002 91
8 Using SD Cards Transferring DJS Music to SD Cards
ContentsIndex
Chapter 8Using SD CardsYou can use DJS to manage your songs—transferring them toan SD card loaded in a DMP-555 or an SD card reader/writer attached to your computer, as well as returning them from theSD card to DJS .
8-1 Transferring DJS Music to SDCards
You can transfer music managed by DJS to an SD card loaded in your
SD reader/writer. (Check Out)
1 Connect the card reader/writer to your computer and load an SD card (in the unlocked position).
2 Click [File] and then [Transfer].• The [Transfer] screen opens.• The songs in DJS (computer) are shown in the upper track
list and the songs on the SD memory card are shown onthe lower track list.
Warning!SD Card Reader/Writer Please use devices that are compatiblewith copyright protection functions.(Check the specs of your SD cardreader/writer before connecting it.)
Administrator authority for thecomputer being used is required inorder to use SD Memory Cards. So,log in as the user designated as theComputer Administrator before tryingto use them.
SD Card Unlock Status
[Transfer] IconIf you click the [Transfer] icon, which isdisplayed in each function, it shifts tothe Transfer Function.
Adding a Play List1. Click [File] and then click [SD
Memory Card] – [Make Playlist].2. Enter the name of the play list.3. Click the [OK] button.4. Drag & drop the songs inside the SD
card to the card play list.
UNLOCK
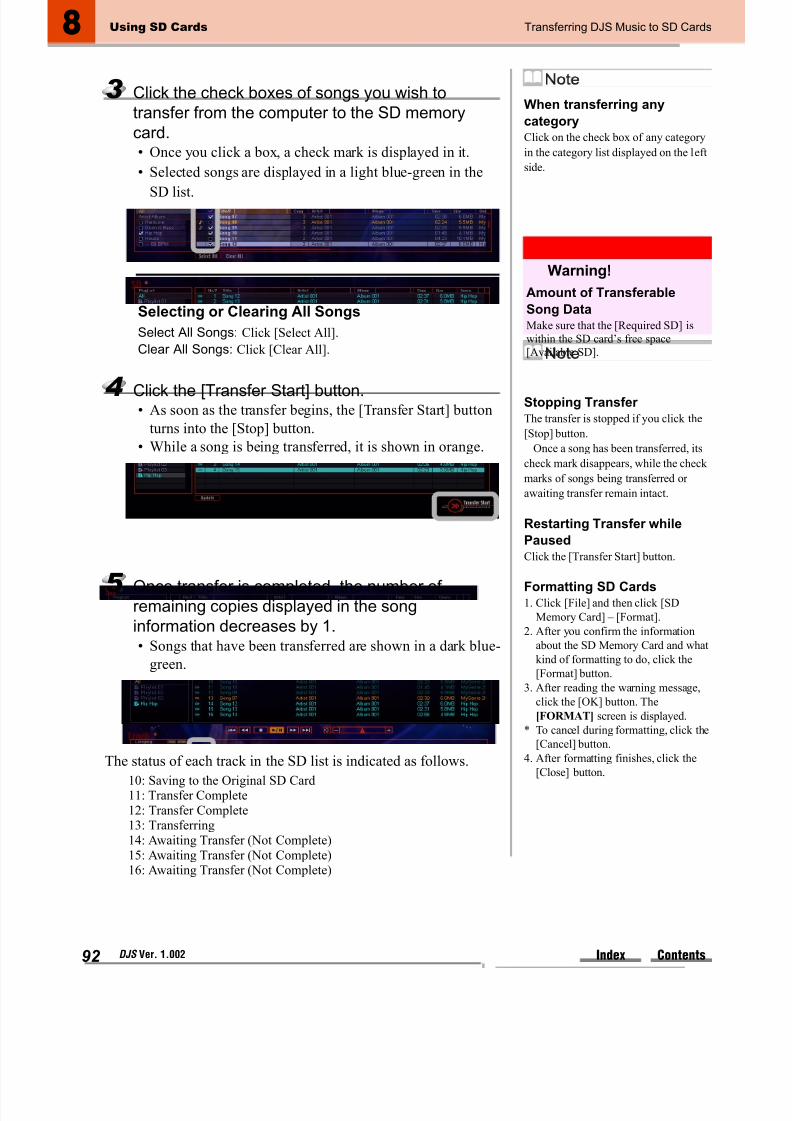
8/8/2019 Pioneer Pro DJS Manual
http://slidepdf.com/reader/full/pioneer-pro-djs-manual 92/155

8/8/2019 Pioneer Pro DJS Manual
http://slidepdf.com/reader/full/pioneer-pro-djs-manual 93/155
(Contd. on the next page)
DJS Ver. 1.002 93
8 Using SD Cards Returning Music from an SD Card to DJS
ContentsIndex
8-2 Returning Music from an SDCard to DJS
Returns the song copied to the SD card to the computer from which itwas copied.
You can restore the number of remaining copies, which decreasedduring copying, by conducting the following process. (Check In)
1 Connect the card reader to your computer andload an SD card (in the UNLOCK position).
2 Click [File] and then [Transfer].• The songs in DJS (computer) are shown in the upper track
list and the songs on the SD memory card are shown on
the lower SD list.
3 Click [All] in the lower SD list.• After switching the SD list to so that All is displayed,
carry out Check In.
[Transfer] IconIf you click the [Transfer] icon, which isdisplayed in each function, it shifts to
the Transfer Function.

8/8/2019 Pioneer Pro DJS Manual
http://slidepdf.com/reader/full/pioneer-pro-djs-manual 94/155
94 DJS Ver. 1.002
8 Using SD Cards Returning Music from an SD Card to DJS
ContentsIndex
4 Drag the songs to be checked into the computer from the lower SD list and drop them into theupper track list.• The [Confirm Check In] screen displays.
5 Click the [OK] button in the [Confirm Check In] screen.
• The songs are removed from the lower SD list and theremaining copies in the upper track list increase by 1.
If a Copied File is MissingIf the original of a copied song is deleted from your computer, itwill become impossible to return the song to your computer. If you try to check a song in, it will simply be deleted from the SDmemory card as well.
Similarly, it is not possible to check in a song from an SDmemory card onto a computer other than the one from which itwas checked out. If you try to check a song in to a computer other than where it was checked out, it will simply delete the songfrom your SD memory card.

8/8/2019 Pioneer Pro DJS Manual
http://slidepdf.com/reader/full/pioneer-pro-djs-manual 95/155
(Contd. on the next page)
DJS Ver. 1.002 95
9 Changing the Settings to Make DJS More Convenient Opening and Closing Preferences
ContentsIndex
Chapter 9Changing the Settings toMake DJS MoreConvenientYou can make various settings in Preferences to customize thevarious functions so they are easier for you to use.
9-1 Opening and ClosingPreferences
9-1-1 Opening PreferencesOpens the [Preference] screen so you can change your settings.
1 Click [File] and then [Preference].• The [Preference] screen opens.
2 Click the menu to use from among the items onthe left.
3 Operating the buttons below executes thechanges to settings.Sample Screen
PreferencesCan be opened from any of thefunctions except Internet.

8/8/2019 Pioneer Pro DJS Manual
http://slidepdf.com/reader/full/pioneer-pro-djs-manual 96/155
96 DJS Ver. 1.002
9 Changing the Settings to Make DJS More Convenient Opening and Closing Preferences
ContentsIndex
Check BoxSelect (checks the box):
Click.Deselect (remove check mark):
Click a check mark.
• You can check more than one check box.
Radio ButtonSelect (lights up):
Click.Deselect (goes off):
Click a different radio button.• One of the options is always selected.• If you click on a lighted radio button, it does not change the setting.
[J ] Button/[ D ] ButtonChanging the Number:
Enter a number directly. Click the [C ] button or the [D ] button.
9-1-2 Closing PreferencesAfter saving the settings, closes the [Preference] screen.
1 Make the different kinds of settings to thePreferences (For information on how to makesettings, refer to P.97–110.)
2 Saving the changes:Click the [OK] button.
To not save the changes:Click the [Cancel] button.
• The [Preference] screen closes.

8/8/2019 Pioneer Pro DJS Manual
http://slidepdf.com/reader/full/pioneer-pro-djs-manual 97/155
DJS Ver. 1.002 97
9 Changing the Settings to Make DJS More Convenient Setting the Size of Text Displayed in Lists
ContentsIndex
9-2 Setting the Size of TextDisplayed in Lists
This changes the size of text displayed in track lists & play lists.
1 Click [General].
2 Click the radio button of the font size you wish touse.• You can choose from among the 3 font sizes (Units: Pixel)
below.[Small (11 px)], [Medium (14 px)] and [Large (18 px)]
• When you pass the mouse cursor over the options,examples appear on the right-hand side.
Default Settings whenInstalledSet to [Medium (14 px)].

8/8/2019 Pioneer Pro DJS Manual
http://slidepdf.com/reader/full/pioneer-pro-djs-manual 98/155
98
(Contd. on the next page)
DJS Ver. 1.002
9 Changing the Settings to Make DJS More Convenient Setting the Layout of DJ Play Functions
ContentsIndex
9-3 Setting the Layout of DJ PlayFunctions
Changes the display and/or layout settings of the DJ Play Functions.
1 Click [Play Style].
2 Select the changes to settings from the changeitems (play list format, play list position, player positioning, type of volume controls, waveformdisplay) by clicking its radio button.
Default Settings whenInstalledAt installation the following settings aremade.
Music List Style:
Music List Layout:Player Layout:Volume Type:Waveform Display:
Track List
LeftHorizontalRotaryDisplay
* Settings displayed in orange are the default settings atinstallation.
Music List Style
Track List Playlist
Music List Layout
Left Right

8/8/2019 Pioneer Pro DJS Manual
http://slidepdf.com/reader/full/pioneer-pro-djs-manual 99/155
DJS Ver. 1.002 99
9 Changing the Settings to Make DJS More Convenient Setting the Layout of DJ Play Functions
ContentsIndex
Player Layout
Diagonal Horizontal
Volume Type
Rotary Slide
Waveform Display
ON OFF

8/8/2019 Pioneer Pro DJS Manual
http://slidepdf.com/reader/full/pioneer-pro-djs-manual 100/155
100 DJS Ver. 1.002
9 Changing the Settings to Make DJS More Convenient Mixer and Sound Card Settings
ContentsIndex
9-4 Mixer and Sound Card SettingsFor switching the mixer, selecting the sound card, adjusting the delaytime and adjusting the size of buffers.Here you will display the [Mixer/Sound Card] settings screen.
1 Click [Mixer/Sound Card].• The [Mixer/Sound Card] settings screen opens.
9-4-1 Switching between Internal &External Mixers
Switch between the [Internal Mixer] and the [External Mixer].
[Internal Mixer]:When you want to use the DJS mixer functions.
[External Mixer]:When you want to connect to the mixer with sound output from thesound card.
1 Click either [Internal Mixer] or [External Mixer].• The right portion of the screen shot shows the connection
diagram after changes.
Delay Time ‘9-4-3 Adjusting Delay Time’ P.102
Buffer Size ‘9-4-4 Adjusting the Size of Buffers’
P.103
Default Settings whenInstalledAt installation it is set to [InternalMixer].

8/8/2019 Pioneer Pro DJS Manual
http://slidepdf.com/reader/full/pioneer-pro-djs-manual 101/155

8/8/2019 Pioneer Pro DJS Manual
http://slidepdf.com/reader/full/pioneer-pro-djs-manual 102/155

8/8/2019 Pioneer Pro DJS Manual
http://slidepdf.com/reader/full/pioneer-pro-djs-manual 103/155
DJS Ver. 1.002 103
9 Changing the Settings to Make DJS More Convenient Mixer and Sound Card Settings
ContentsIndex
9-4-4 Adjusting the Size of BuffersBuffer size is a setting that is made to prevent any interruption to theaudio stream.If you experience an interruption to the audio, follow the steps belowto increase the size of the buffer.
Buffer SizeIn the interest of preventing the audio from being interrupted,especially when your computer is doing a lot of processing, DJS gathers together the audio data and sends it to a place called a
buffer, where it is saved. While this audio data is being saved tothe buffer, there will be a lag in the audio.If you are not experiencing any interruptions to the audio stream,can you can reduce the size of the buffer, which will reduce thelag in the audio.
1 Click either [ C ] or [ D ] for the [Buffer Size].
If the audio is interruptedYou can eliminate interruptions to theaudio by reducing the load on your computer. You can reduce the load onyour computer in the following ways.
(a) Tu rn OFF the waveform display. ‘9-3 Setting the Layout of DJ
Play Functions’ P.98(b) Bypass the equalizer & effector.
‘3-1-1 Making Changes’ P.3 5 ‘3-2-2 Adding Effects’ P.41
Adjustable RangeCan be adjusted from between 2 to 20frames. (1 frame = 512 samples)
Default Settings whenInstalledIt is set to 4 frames.

8/8/2019 Pioneer Pro DJS Manual
http://slidepdf.com/reader/full/pioneer-pro-djs-manual 104/155
104 DJS Ver. 1.002
9 Changing the Settings to Make DJS More Convenient Key Assignment Settings
ContentsIndex
9-5 Key Assignment SettingsCustomizes the assignment of key for operation the DJ Play functionsfrom your computer’s keyboard.
1 Click [Keyboard Assign].
• The [Keyboard Assign] settings screen opens.
2 Click the name of the area(s) that has the functionyou wish to assign.• The areas (5) are shown as the following.
[Player A] [Player B] [Mixer] [Effector] [HeadphonesOut]• The name of the area you click lights up and its function
layout is shown.
3 Click a function assigned to the keyboard.• The function you clicked lights up on the function chart.
4 Click the key on the keyboard layout that isassigned the function.• The key you clicked will show the same symbol as the
selected function.
Functions for which keyassignments can be madeOnly for DJ Play functions.
One Touch Key Assignment
Drag a button from the functions chartand drop it on a key in the keyboardlayout.
Alternatively, you can also drag fromthe keyboard layout and drop on thefunctions chart.
Returning to the InstallationDefault Key AssingmentsClick the [Reset Default] button.
Clearing the Key Assignmentof Selected Button(s)Click the [Clear] button.
The selected key(s) will lose all of itsassigned functions.
Clear All Key AssignmentsClick the [Clear All] button.
All the key(s) will lose their assignedfunctions.

8/8/2019 Pioneer Pro DJS Manual
http://slidepdf.com/reader/full/pioneer-pro-djs-manual 105/155
DJS Ver. 1.002 105
9 Changing the Settings to Make DJS More Convenient Ripping Settings
ContentsIndex
9-6 Ripping SettingsChanges the settings for importing music to DJS .
1 Click [Encoding].
• The screen for setting the [Recording Rate] , [ID3 TagSetting] , and [Dead Air Cut] opens.
9-6-1 Setting the Bit RateSelect the bit rate to be shown in the Ripping function.
1 Select from between [CBR] and [VBR] for the[Recording Rate] and click it.
CBR: Select 3 form the range of 80 -320 kbps (9 steps).VBR: Select one of the three types.
9-6-2 ID3 Tag SettingsSelects the type of ID3 tag (song information) to be recorded in theMP3 file.
1 Select a setting from the [ID3 Tag Setting] and clickit.
The Ripping FunctionThe settings changed here are displayed.
✐ ExplanationsCBR (Constant Bit Rate)An abbreviation for Constant Bit Rate.An allocation format in which theamount of bit traffic is always constant.
VBR (Variable Bit Rate)An abbreviation for Variable Bit Rate.An allocation format in which most bittraffic is in bursts of packetized sound.
[CBR] ValuesThe larger the value, the better thequality, but the volume of data is alsogreater.
Default Settings whenInstalledAt installation the following settings aremade.CBR (Units of kbps):
[128] [160] [192]VBR: Normal
Default Settings whenInstalledv2.2.0
Versions that may beSelectedv1, v1.1, v2.2.0, v2.3.0, v2.4.0, None

8/8/2019 Pioneer Pro DJS Manual
http://slidepdf.com/reader/full/pioneer-pro-djs-manual 106/155
106
(Contd. on the next page)
DJS Ver. 1.002
9 Changing the Settings to Make DJS More Convenient Ripping Settings
ContentsIndex
9-6-3 Dead Air Cut SettingsSelect the settings (3) shown in the Ripping function.
1 Set the number of seconds for the [Dead Air Cut]by clicking [ C ] or [ D ].• Set how far (1 -99 seconds) before the point detected as
dead air at the end of a song to start.
9-6-4 Settings for Selecting the DVD/CDDrive & Acquiring Song Information
This changes the CD drive to be used when importing songs from amusic CD. In addition, this changes the settings for importing songinformation via the Internet (Auto Access ON/OFF, Site(s) to Access,Proxy Servers).
1 Click [About CD-DA].• The [DVD/CD Drive] and [CD Information] setting
screens open.
2 Click the DVD/ or CD drive you wish to use.• The [DVD/CD Drives] that can be used are displayed in a
list.• The currently selected DVD/CD drive is displayed in
orange.
Default Settings whenInstalledAt installation the following settings aremade.(Units: Sec.) [10] [30] [60]

8/8/2019 Pioneer Pro DJS Manual
http://slidepdf.com/reader/full/pioneer-pro-djs-manual 107/155
(Contd. on the next page)
DJS Ver. 1.002 107
9 Changing the Settings to Make DJS More Convenient Ripping Settings
ContentsIndex
3 To acquire song information automatically:
To acquire song information manually:
4 Do not use a proxy server:Click [Don’t use Proxy Server].
To use a proxy server:Click [Use Proxy Server] and then set the [IPAddress] and the [Port].
9-6-5 Line In SettingsChanges the settings for recording music from Line In.
1 Click [Line Recording].• Connected devices are shown in a list.
2 Select the device from which external sound willbe imported (the sound device) from [InputDevice].• The currently selected device is displayed in orange.• Settings that are changed here are used on the [Ripping]
screen, [Line In].
Default Settings whenInstalledAt installation it is set to [Don’t get itautomatically].
1. Enter the [URL of The Server].2. Click [Get it automatically].
1. Enter the [URL of The Server].2. Click [Don’t get it automatically].
Proxy Server SettingsYou can get CD information withoutusing a proxy server.
[IP Address] and [Port]SettingsAny information previously created inOS (Windows) will be automaticallydisplayed.
Default Settings whenInstalledAccording to the Windows recordingsettings.

8/8/2019 Pioneer Pro DJS Manual
http://slidepdf.com/reader/full/pioneer-pro-djs-manual 108/155
108 DJS Ver. 1.002
9 Changing the Settings to Make DJS More Convenient Category Settings
ContentsIndex
3 Click a column for entering the [Recording Time](minutes and/or seconds) and enter a time.• You can set it from [00:01] to [99:59].• Settings that are changed here are displayed every time
the [Ripping] screen, [Line In] is launched.
4 Select the frequency you wish to set from the[Sampling Frequency] and click it.• Make sure it matches the device being used.• Select 3 from the 6 following rates.
(Unit/kHz) [16] [22] [24] [32] [44] [48]• The sampling frequencies are displayed as choices on the
[Ripping] screen, [Line In].
9-7 Category SettingsSets the categories that are displayed in [Top] or [Other] in the list of categories in track lists. In addition, it adds Genres and Play Lists tocategories.
1 Click on [Category].
• The [Category] settings screen opens.
✐ ExplanationsSampling FrequencyWhen analog data from music isdigitized, the standard frequency atwhich it is done is called the sampling
rate. The higher the sampling rate, themore faithfully the original music can be reproduced, but it also increases thevolume of data.Digital audio devicesgenerally have their own, fixedsampling frequency. (For CDs, MDs,etc., 44.1kHz)
Default Settings whenInstalledAt instllation it is set to [05:00].
Default Settings whenInstalledAt installation it is set to [32], [44] and[48] kHz.* [22]: 22.05KHz
[44]: 44.1KHz

8/8/2019 Pioneer Pro DJS Manual
http://slidepdf.com/reader/full/pioneer-pro-djs-manual 109/155
DJS Ver. 1.002 109
9 Changing the Settings to Make DJS More Convenient Category Settings
ContentsIndex
9-7-1 Selecting Categories for Top &Other
Selects the categories for display in [Top] & [Other].
1 In the [Category] settings screen, click oncategories for [Top] or for [Other].
2 To put in [Top]:Click on [ ] on the right side of the [Top] list.
To put in [Other]:Click on [ ] on the right side of the [Other] list.
• A [T] is displayed to the left of category names that are in[Top].
• An [O] is displayed to the left of category names that are
in [Other].
To select items for display in [Genre] – [Default]…Do the following:
[Top]Immediately after installation thefollowing categories are selected.[Drum n’Bass][Hardcore][Hip Hop][House][R&B][Reggae][Techno][Trans]
[Other]Immediately after installation thefollowing categories are selected.[Club] [Dance] [Disco] [Electronic][Jazz] [Jungle] [Latin] [Metal][NewAge] [Oldies] [Samba] [Vocal]
Switching between [Top] &[Other]Do the following:1. Click the category you wish to move.2. Click on [ ] or [ ] between [Top]
and [Other].
1. Click [List] and display the Genre list.2. Click the Genre check boxes, either checking them (show) or
unchecking them (don’t show).3. Click [OK].

8/8/2019 Pioneer Pro DJS Manual
http://slidepdf.com/reader/full/pioneer-pro-djs-manual 110/155
110 DJS Ver. 1.002
9 Changing the Settings to Make DJS More Convenient Category Settings
ContentsIndex
9-7-2 Creating Categories & Play Lists,Changing their Names and Deletingthem
This creates new categories and/or play lists.Here you can also change the names of and/or delete categories and
play lists.
1 Click the item ([Genre] or [Playlist]) you wish toadd or change.
2 To add: Click [Add].To change a name: Click [Edit].To delete: Click [Delete].• Displayed at the bottom when a name can be entered.
3 You can use letters and numbers to enter category names.• Only single byte letters/numbers can be entered.
‘Characters that Cannot be Entered (Symbols)’ P.79
Changing the [BPM] CategoryTo prevent an omission of BPM values, you do not enter thevalue that is displayed, but the values that comprise the limits of each category. (The Min [40] and Max [400] cannot be altered.)* Immediately after installation there are 12 categories. This number
cannot be increased or decreased.
Warning!You cannot add, change the name of,or delete [BPM].
You cannot change the name of or delete the [Genre] – [Default]
category.

8/8/2019 Pioneer Pro DJS Manual
http://slidepdf.com/reader/full/pioneer-pro-djs-manual 111/155
DJS Ver. 1.002 111
0 Other Functions Connecting to the Internet
ContentsIndex
Chapter 10Other FunctionsThis section provides a list of the functions you can use in DJS as well as an explanation of each pull-down menu.
10-1 Connecting to the InternetYou can receive user support via the Internet.
1 Click the [Internet] icon and connect to theInternet.• Your web browser will launch and open the DJS
[Download] page.• You can access the DJS website only via the [Internet]
icon.
2 Click [Support Top].
[Download] PageLinks to sites where you can downloadMP3 files.
Web Browser to be UsedLaunches the browser set as thedesignated browser.
Changing Web Browser to beUsedLaunch the browser you wish to use andchange the setting to designated
browser.
Warning!When Downloading SongsFollow the instructions provided oneach site.
If you have not Registeredas a User The user registration dialog([Welcome] Screen) will open.
‘Chapter 11 User Registration’P.131
If you enter the URL of thesupport site into your browser You will not be able to connect to thesupport site. It only works by click the DJS [Internet] icon.

8/8/2019 Pioneer Pro DJS Manual
http://slidepdf.com/reader/full/pioneer-pro-djs-manual 112/155
112
(Contd. on the next page)
DJS Ver. 1.002
0 Other Functions Table of Functions
ContentsIndex
10-2 Table of Functions● Names of Each Function & What it Does
● Function
● DJ Play FunctionsPlayer
Minimize Button Minimizes the DJS window.
Close Button Closes DJS .
Music ManagementIcon
Switches to the [Music Management] screen.
Internet Icon Starts up your Internet browser and connects to the site.
Ripping Icon Switches to the [Ripping] screen. Opens last screen that was displayed (CD-DA,WAV, Line In)
Create Icon Switches to the [Create] screen.
Transfer Icon Switches to the [Transfer] screen.
Track Search Button(6 /7 )
7 : For each click, it skips that number of songs.6 : Skips as many songs as consecutive clicks minus 1.
Search Buttons(8 /9 )
Operates as follows during play, pause and when cued up.Rewinds or fast forwards as long as you click or operate the key. Once you releasethe click or the key, it returns to what it had been doing (play, pause or cued up.)
It works as follows during loop out adjustments.As long as you are clicking or operating a key, it moves the loop out position
backward/forwards. Once you release the click or the key, it stops moving the position.
If you just do a short click or press the key, it moves the loop out position 1 frame backwards/forwards.
CUE Button Operates as follows during play, pause and when cued up.During playback after the set cue point: Cues up at the cue point.While Paused: Sets the cue point.While Cued Up: Samples the sound from the cue point. (Cue Point Sampler)
Play/Pause Button(A /4 ) Standby/Paused/Cued Up: Starts Playing.While Playing: Pauses.
Loop In Button While Playing, Paused, Cued Up: Sets the loop in point.
Loop Out/Out Adjust Button
After setting the loop in, while playing/paused after the loop in: After setting theloop out point, starts playing the loop.
While Playing the Loop: Starts the out adjust.Playing during the Out Adjust: After setting the loop out point, starts playing the
loop.
One Track Loop Button Sets the beginning of the track as the loop in point and the end of the track as the loopout point, and then starts playing the loop.

8/8/2019 Pioneer Pro DJS Manual
http://slidepdf.com/reader/full/pioneer-pro-djs-manual 113/155
(Contd. on the next page)
DJS Ver. 1.002 113
0 Other Functions Table of Functions
ContentsIndex
Exit/Reloop Button After exiting a loop that is not being played: Resets the loop settings frommemory.While Playing a Loop: Returns to playing normally.
AUTO CUE Button Toggles the Auto Cue function ON or OFF.
Track Hot CUE Memory
Button
Toggles the Track Hot Cue Recording Mode ON or OFF.
Track Hot CUE Button During Playback Mode (while the track hot cue memory button is not lit):1. With track hot cue settings made and player paused silently
Calls out the registered track hot cue and pauses.2. With the track hot cue settings made and the player playing
Calls out the registered track hot cue and starts playing.During Recording Mode (while the track hot cue memory button is lit):1. While a Loop is Playing
Records the loop that is playing.2. Other than while a Loop is Playing
Saves that position as a cue point.
Tempo Control RangeButton
Switches the maximum controllable tempo (BPM).(10 16 6)
Master Tempo Button Toggles the Master Tempo function ON or OFF.
Tempo Adjustment Slider Adjusts the tempo (BPM) of each player. If you right click, the position becomescentered ( ± 0).
Scratch Button Toggles the Scratch Mode ON or OFF.
Jog Dial While Playing: Makes fine adjustments to the tempo.While Paused: Makes fine adjustments to the pause position.Scratch Mode: Plays backwards & forwards while outputting the sound.
While Adjusting the Out Adjust: Makes fine adjustments to the loop out point.Loop/Reloop/AUTO CUE/Master Tempo Display
Lights up while playing a loop, when a reloop is possible, when setting an auto cue,while setting the master tempo.
Time Normal Button Switches to elapsed time in the time display. (Lights up orange during settings.)
Time Remain Button Switches to time remaining in the time display. (Lights up orange during settings.)
Time Display Displays the time of the song on the player.
Tempo Display Displays the value set by the tempo adjustment slider.
BPM Display Displays either the BPM value detected automatically from the song on the player or the BPM value detected based on the interval tapped in with the [TAP ] button.
BPM SYNC Button Toggles the BPM Synchro ON or OFF when in the slave mode.Cannot be used when in the master mode.
TAP Button The interval resulting from pressing the [TAP ] button is reflected in measurement of the BPM.
Waveform Display During Play: Moves the playback point to the selected point.During Standby: Starts playing from the selected point.While Paused: Moves the paused point to the selected point.While Cued Up: Moves to the selected point and pauses.
Track Hot CUE Tag Normally: Displays the registered cues, loop in and loop out points.
Zoom In/Out ButtonExpands or shrinks the waveform display by one increment.
ZOOM Button [ZOOM]: Displays Part of the Waveform / [FULL]: Displays the Entire Waveform

8/8/2019 Pioneer Pro DJS Manual
http://slidepdf.com/reader/full/pioneer-pro-djs-manual 114/155

8/8/2019 Pioneer Pro DJS Manual
http://slidepdf.com/reader/full/pioneer-pro-djs-manual 115/155
(Contd. on the next page)
DJS Ver. 1.002 115
0 Other Functions Table of Functions
ContentsIndex
Track List
• The track list has Music Management, Ripping, and Transfer functions.
Master Fader +/- Buttons Increases & decreases the volume of the master.
AUTO MIX / MIX Button Starts Auto Mixing. Clicking it while the Auto Mix is operating stops Auto Mixing. If you right click, the menu screen for changing [AUTO MIX]/[MIX] opens.
Cross Fader Adjusts the mixing balance (Left/Right Volume). If you right click, the position becomes centered.
Cross Fader Adjust</> Buttons
Adjust the mixing balance (L/R).
*The same function exists for each player (A/B).
All Displays the entire track list.
Artist-Album Displays the track list by Artist-Album.
Top Button Toggles between Display & Do Not Display the Top category.
Other Button Toggles between Display & Do Not Display the Other category.Title Display *1 If you enter text inside the brackets of the Title column, it restricts display to those
titles with that text. *3
Artist Display *1 If you enter text inside the brackets of the Artist column, it restricts display to thoseartists with that text. *3
Album Display *1 If you enter text inside the brackets of the Album column, it restricts display to thosealbums with that text. *3
Time Display *1 Displays the length of the song (time).
Size Display *1 Displays the size of the MP3 file.
Genre Display *1 Displays the Genre.
BPM Display *1 Displays the BPM.
Track Hot CUE Display *1 Displays whether there are any track hot cues or not. *2
List Hot CUE Display *1 Displays whether there are any list hot cues or not. *2
Mix In Start Display *1 Displays the time that mixing will start. *2
Mix Out Start Display *1 Displays the time that mixing will end. *2
Mix Out Mode Display *1 Displays the selected mix mode. *2
Mix Out Beats Display *1 Displays the selected mix beat. *2
Mix Out Fader Display*1
Displays the selected fader curve.*2
Status Display *1 Displays the status of a song.
*1 The play list has the same functions.*2 If you right click, it shows the menu.*3 If you click the results displayed, it returns to the display before it was restricted.

8/8/2019 Pioneer Pro DJS Manual
http://slidepdf.com/reader/full/pioneer-pro-djs-manual 116/155
116
(Contd. on the next page)
DJS Ver. 1.002
0 Other Functions Table of Functions
ContentsIndex
Play List
• The display of song information is the same as the track list.
List Player
Information Display of Players in the List
List Hot Cue
Track List Pop-up Button Toggles between Display & Do Not Display the track list.
Switch Play List Display</> Buttons
Enlarges or shrinks the width of the play list display.
Clear All Button Clears all the songs recorded in the play list.
Display Play ListNumbers
Displays numbers for the order of songs in the play list.
Sample Playing Address During Sample Playing: Moves the playback point to the selected point.While Sample Song is Paused: Moves the paused point to the selected point.
Sample Song Play/Pause Button ( A /4 )
With Sample Stopped/Paused: Starts playing.While Playing Sample: Pauses
Sample Song StopButton ( 3 )
With Sample Song Playing/Paused: Ends sampling and removes song from player.
Sample Song SearchButton ( 8 /9 )
Rewinds or fast forwards as long as you click or operate the key. Once you release theclick or the key, it returns to what it had been doing (play, paused).
Sample SongHeadphone Cue Button
Toggles the list player’s headphone volume ON or OFF.
Sample Song Monitor Output Level
Adjust the monitor output level to the position it is dragged to. If you right click, it becomes positioned in the middle of its range.
Sample Song Monitor Output Level +/- Button
Increases & decreases the monitor output level.
Display Loop Lights up the loop being played.
Display Reloop This indicator flashes during loop playback and when in re-loop standby mode.
Time Normal Button Switches to elapsed time in the time display. (Lights up orange during settings)
Time Remain Button Switches to time remaining in the time display. (Lights up orange during settings)
Time Display Displays the time of the song registered on the player.
Master Tempo Display Displays the status of the Master Tempo function.
Display Hot CUE ListButton
Displays the hot cue list.

8/8/2019 Pioneer Pro DJS Manual
http://slidepdf.com/reader/full/pioneer-pro-djs-manual 117/155
(Contd. on the next page)
DJS Ver. 1.002 117
0 Other Functions Table of Functions
ContentsIndex
HEADPHONES Screen
EQ (Equalizer) Screen
EFFECT Screen
Hot CUE Button (A-H) The upper half operates player A while the lower half operates player B.It works as follows during the play mode.During Playback Mode (while the list hot cue memory button is not lit):1. With list hot cue settings made and player paused silently
Calls out the registered list hot cue and pauses.2. With the list hot cue settings made and the player playing
Calls out the registered list hot cue and starts playing.During Recording Mode (while the list hot cue memory button is lit):1. While a Loop is Playing
Records the loop that is playing.2. Other than while a Loop is Playing
Saves that position as a cue point.Record Button Toggles the List Hot Cue Recording Mode ON or OFF.
STEREO Button Toggles the stereo mode.
MONO SPLIT Button Toggles the mono split mode.
Mixing Adjustments Adjusts mixing (Master & non-master) of the master volume. If you right click, it becomes positioned in the middle of its range.
MASTER Level Button Increases the volume of the Master monitor.
CUE Level Button Increases the volume of monitor other than master.
HI Adjusts the output level in the high range. If you right click, it becomes positioned inthe middle of its range.
MID Adjusts the output level in the mid range. If you right click, it becomes positioned inthe middle of its range.
LOW Adjusts the output level in the low range. If you right click, it becomes positioned inthe middle of its range.
+/- Buttons * Increases & decreases the output level of the selected range.
KILL Button * Cuts output of the selected range.
* The same button is for each range (HI, MID, LOW).
CHANNEL-A Button Applies the results of an effect to Channel A.
CHANNEL-B Button Applies the results of an effect to Channel B.
MASTER Button Applies the results of an effect to the master.
BPM Display Displays the BPM.
The Effects TAP Button Measures the BPM when applying an effect.
Display Effect Timer Displays the time of set up effects.
Effect Time Fine TuningButtons
Makes the time setting of an effect longer or shorter.

8/8/2019 Pioneer Pro DJS Manual
http://slidepdf.com/reader/full/pioneer-pro-djs-manual 118/155
118
(Contd. on the next page)
DJS Ver. 1.002
0 Other Functions Table of Functions
ContentsIndex
Display Hot Cue List
● Music Management Functions
• The track list is the same as the track list of the DJ Play functions.
Display Last Effect Beat Displays the last beat used.
Delay Button Toggles the Effects result to Delay.
Echo Button Toggles the Effects result to ECHO.
Pan Button Toggles the Effects result to Pan.
Trans Button Toggles the Effects result to Trans.Filter Button Toggles the Effects result to Filter.
Flanger Button Toggles the Effects result to Flanger.
Reverb Button Toggles the Effects result to Reverb.
Pitch Button Toggles the Effects result to Pitch.
Switching Effect BeatsButton
Switches the effect of the selected beat (or %).
Effects Level/Depth Adjusts the effect level. If you right click, it becomes positioned in the middle of itsrange.
Effects Level/Depth +/-Button
Raises and lowers the effect level.
Effect ON/OFF Button Toggles the Effects function ON or OFF.
Display Hot CUE Number Displays the list hot cue number (A -H).
Display Title Displays the title.
Display CUE/Loop In Displays the cue/loop in point in time.
Display Loop Out Displays the loop out point in time.
Display CUE Number Displays the track hot cue number (1 -4).
Display My Songs Displays the title and the name of the album and artist of My Songs.
Display Next Song Displays the title and the name of the album and artist of the next song.
Time Normal Button Switches to elapsed time in the time display. (Lights up orange during settings)
Time Remain Button Switches to time remaining in the time display. (Lights up orange during settings)
Shuffle Button Switches the play mode to genre.
Repeat Button Switches the play mode to repeat.
Time Display Displays the time of the song registered on the player.
BPM Display Displays the BPM.
TAP Button The interval resulting from clicking the [TAP] button is reflected in measurement of the BPM.
Display Available HD Displays the free hard disk space.
Mute Button Toggles the mute function ON or OFF.
Volume Fader Adjusts the volume. If you right click, it becomes positioned in the middle of its range.
Volume +/- Buttons Turns the volume up or down.

8/8/2019 Pioneer Pro DJS Manual
http://slidepdf.com/reader/full/pioneer-pro-djs-manual 119/155

8/8/2019 Pioneer Pro DJS Manual
http://slidepdf.com/reader/full/pioneer-pro-djs-manual 120/155
120
(Contd. on the next page)
DJS Ver. 1.002
0 Other Functions Table of Functions
ContentsIndex
Time Set Button Displays the button for changing the recording time.
STEREO/MONO Toggle Line Input mode only: Toggles between stereo and mono for the recording time.
Select Sampling RateButton
Line Input mode only: Switches the sampling rate for the recording time.
Input Level Adjusts the input level. If you right click, it becomes positioned in the middle of its
range.Input Level +/- Button Raises and lowers the input level.
Input Level Meter Displays the input level of the sound being imported from the line input.
List Button Selects a genre from the list.
Display Imported SongTitle
Makes the selected item active and opens the editing window.
Display Imported SongArtist
Makes the selected item active and opens the editing window.
Display Imported Song
Album
Makes the selected item active and opens the editing window.
Display Imported SongGenre
Makes the selected item active and opens the editing window.
Display Imported SongBPM
Makes the selected item active and opens the editing window.
Folder Up Button Displays the list of MP3 files in the folder one level higher.
Desktop Button Displays a list of MP3 files on the desktop.
v/> Buttons v Button: Closes the folder.> Button: Opens the folder.
Open/Close Folder When a closed folder is selected: Opens the folder.When an open folder is selected: Closes the folder.
Display File Name If you enter text inside the brackets of the file name, it restricts display to files withthat text.*
Display Date Displays the date the file was saved.
Display SamplingFrequency
Displays the sampling rate of the file(s).
Display Bit Size Displays the size of the file in bits.
CD Button Switches to the Import CD screen.
Line In Button Switches to the Import Line Input screen.
WAV Button Switches to the Import WAV Files screen.
Ripping Start Button Starts ripping.
Stop Button Stops ripping.
* If you click the results displayed, it returns to the display before it was restricted.
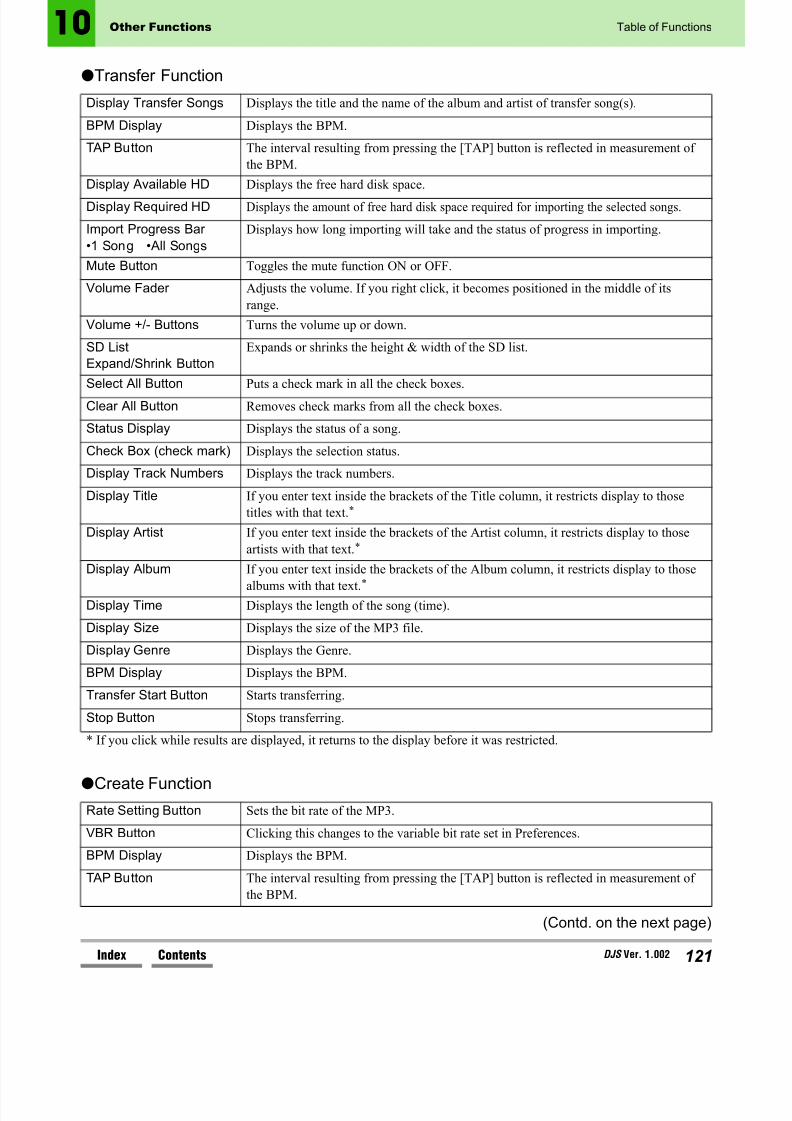
8/8/2019 Pioneer Pro DJS Manual
http://slidepdf.com/reader/full/pioneer-pro-djs-manual 121/155
(Contd. on the next page)
DJS Ver. 1.002 121
0 Other Functions Table of Functions
ContentsIndex
● Transfer Function
● Create Function
Display Transfer Songs Displays the title and the name of the album and artist of transfer song(s).
BPM Display Displays the BPM.
TAP Button The interval resulting from pressing the [TAP] button is reflected in measurement of the BPM.
Display Available HD Displays the free hard disk space.
Display Required HD Displays the amount of free hard disk space required for importing the selected songs.
Import Progress Bar •1 Song •All Songs
Displays how long importing will take and the status of progress in importing.
Mute Button Toggles the mute function ON or OFF.
Volume Fader Adjusts the volume. If you right click, it becomes positioned in the middle of itsrange.
Volume +/- Buttons Turns the volume up or down.
SD ListExpand/Shrink Button
Expands or shrinks the height & width of the SD list.
Select All Button Puts a check mark in all the check boxes.
Clear All Button Removes check marks from all the check boxes.
Status Display Displays the status of a song.
Check Box (check mark) Displays the selection status.
Display Track Numbers Displays the track numbers.
Display Title If you enter text inside the brackets of the Title column, it restricts display to thosetitles with that text. *
Display Artist If you enter text inside the brackets of the Artist column, it restricts display to thoseartists with that text. *
Display Album If you enter text inside the brackets of the Album column, it restricts display to thosealbums with that text. *
Display Time Displays the length of the song (time).
Display Size Displays the size of the MP3 file.
Display Genre Displays the Genre.
BPM Display Displays the BPM.
Transfer Start Button Starts transferring.Stop Button Stops transferring.
* If you click while results are displayed, it returns to the display before it was restricted.
Rate Setting Button Sets the bit rate of the MP3.
VBR Button Clicking this changes to the variable bit rate set in Preferences.
BPM Display Displays the BPM.
TAP Button The interval resulting from pressing the [TAP] button is reflected in measurement of the BPM.

8/8/2019 Pioneer Pro DJS Manual
http://slidepdf.com/reader/full/pioneer-pro-djs-manual 122/155
122 DJS Ver. 1.002
0 Other Functions Table of Functions
ContentsIndex
Display Available HD Displays the free hard disk space.
Mute Button Toggles the mute function ON or OFF.
Volume Fader Adjusts the volume. If you right click, it becomes positioned in the middle of itsrange.
Volume +/- Buttons Turns the volume up or down.
Entire Waveform Display Moves the playback position (replay bar) to the point clicked.
Expanded Range Frame Displayed in the entire waveform display and indicates the position of the expandedwaveform display.
Beat Guideline Displays the unit of the beat.
Track Hot CUE Tag If you drag further left than the tag, it changes the loop in setting and the expandedwaveform frame, & it changes the expanded waveform. If you drag further right thanthe tag, it changes the loop in setting and the expanded waveform frame, & it changesthe expanded waveform.
Track Hot CUE/
Loop In (1-4)
Dragging this sets the loop in point.
Loop Out (1-4) Dragging this sets the loop out point.
Track Hot CUE Button Settings Made: Click and the playback position jumps to the track hot cue.Not Set: Drag and drop onto the waveform to set the track hot cue and stop the
automatic scrolling of the expanded waveform.
Renum Button When Loop is Selected: Renumbers the loop in numbers from the selected song.
×1/2 Button When a Loop is Selected: Cuts the selected loop in half.
×2 Button When a Loop is Selected: Doubles the selected loop.
Clear Button When a Loop is Selected: Clears the selected loop.When a Cue is Selected: Clears the selected cue.
Guide Adjust Slider Sets how often the beat line is drawn in the expanded waveform. If you right click, it becomes positioned in the middle of its range (1-bit).
Guide ADJ +/- Button Increases or decreases the time between drawing the beat line in the expandedwaveform.
Snap Button Toggles the Snap mode ON or OFF.
Display ExpandedWaveform
Zooms in on a part of the entire waveform display.Moves the playback position (replay bar) to the point clicked.
Wave Zoom +/- Buttons Expands or shrinks the expanded waveform frame.
Save Button Overwrites track hot cues and Saves/Saves as MP3 files.* If the remaining copies is 0, it cannot be saved as MP3 files.* Saves it as an MP3 file when a song is displayed in the Ripping function. (Track hot
cues cannot be overwritten.)

8/8/2019 Pioneer Pro DJS Manual
http://slidepdf.com/reader/full/pioneer-pro-djs-manual 123/155
(Contd. on the next page)
DJS Ver. 1.002 123
0 Other Functions Tables of Menus
ContentsIndex
10-3 Tables of MenusExplanations of the menu bars and the menus that open when you right-click are provided here.
10-3-1 Names of Each Function & What they DoThe menus open if you click the headers [File], [Edit], [View], [Play] or [Help] at the top of the DJ Play,Music Management, Ripping, Create, and Transfer function screens.
For information on how to operate the items, see the reference page in the right column of the table. Thekey column in the table lists the short-cut keys that correspond to functions that can be executed when itsmenu has been opened.
● [File] Menu
• [Import] can be used in the DJ Play, Music Management, and Transfer functions.
[Import] Submenu
[New] Submenu
Display Title *The letter in parentheses ( ) indicates a short-cut key for the corresponding menu.
File [File] Menu (Alt+F)Edit [Edit] Menu (Alt+E)View [View] Menu (Alt+V)Play [Play] Menu (Alt+P)Help [Help] Menu (Alt+H)
Display Action Key SeeNew Displays the submenu of [New]. N P.123Import Displays the submenu of [Import]. O P.82Save Overwrites and saves changed play lists and genres. S – Save As... Renames and saves changed play lists and genres. A –
Preference Displays the [Preference] screen. P P.95SD Memory Card Displays the submenu of [SD Memory Card]. E P.124DJ Play Moves to the DJ Play functions. D P.15Music Management Moves to the Music Management functions. M P.14Internet Moves to the Internet functions. I P.14Ripping Displays the submenu of [Ripping]. R P.124Create Moves to the Create functions. C P.15Transfer Moves to the Transfer functions. T P.15Exit Closes DJS . (Alt+F4 also works) X –
Display Action Key SeeMP3 Audio File Registers MP3 files to a track list. A P.82M3U Playlist Registers play list (M3U) files in a category list. P P.82
Display Action Key See
Make Playlist Creates a new play list. P P.79Make Genre Creates a new genre. G P.110

8/8/2019 Pioneer Pro DJS Manual
http://slidepdf.com/reader/full/pioneer-pro-djs-manual 124/155
124
(Contd. on the next page)
DJS Ver. 1.002
0 Other Functions Tables of Menus
ContentsIndex
[SD Memory Card] Submenu (Transfer Function Only)
[Ripping] Submenu
● [Edit] Menu
• [Undo] and [Redo] can be selected in the Create function. (Valid just once)• [Edit] displays the [EDIT] screen.
[Show] Submenu
Display Action Key See
Format Formats your SD memory card. F P.92
Make Playlist Creates a play list on your SD memory card. P P.91
Display Action Key See
CD-DA Converts songs from music CDs to MP3 files and imports them. C P.83
Line In Converts sound from the Line IN to MP3 files and imports them. L P.89
Wave Converts WAV files to MP3 files and imports them. W P.86
Display Action Key See
Undo Undoes the last operation to a loop. U –
Redo Redoes the last operation to the loop. R –
Cut Cuts the selected range. T –
Copy Copies the selected range. C –
Paste Pastes information that has been copied or cut. P –
Show Displays the submenu of [Show]. S P.124
Edit Edits song information. E –
Remove Removes songs from a list. M –
Delete Deletes song(s) from the database. D –
Select All Selects all. L –
Display Action SeeArtist: Displays the name of the artist. P.76
Album: Displays the title of the album. P.76
Track No.: Displays the track numbers. P.76Title: Displays the title. P.76
Genre: Displays the genre. P.76
BPM: Displays the BPM. P.76
Track Hot CUE 1: Displays the status of track hot cue 1. P.76
Track Hot CUE 2: Displays the status of track hot cue 2. P.76
Track Hot CUE 3: Displays the status of track hot cue 3. P.76
Track Hot CUE 4: Displays the status of track hot cue 4. P.76
Mix In Starting Point: Displays the time of the mix in starting point. P.76
Mix Out Starting Point: Displays the time of the mix out starting point. P.76Mix Out Mixing Mode: Displays the mix mode. P.76
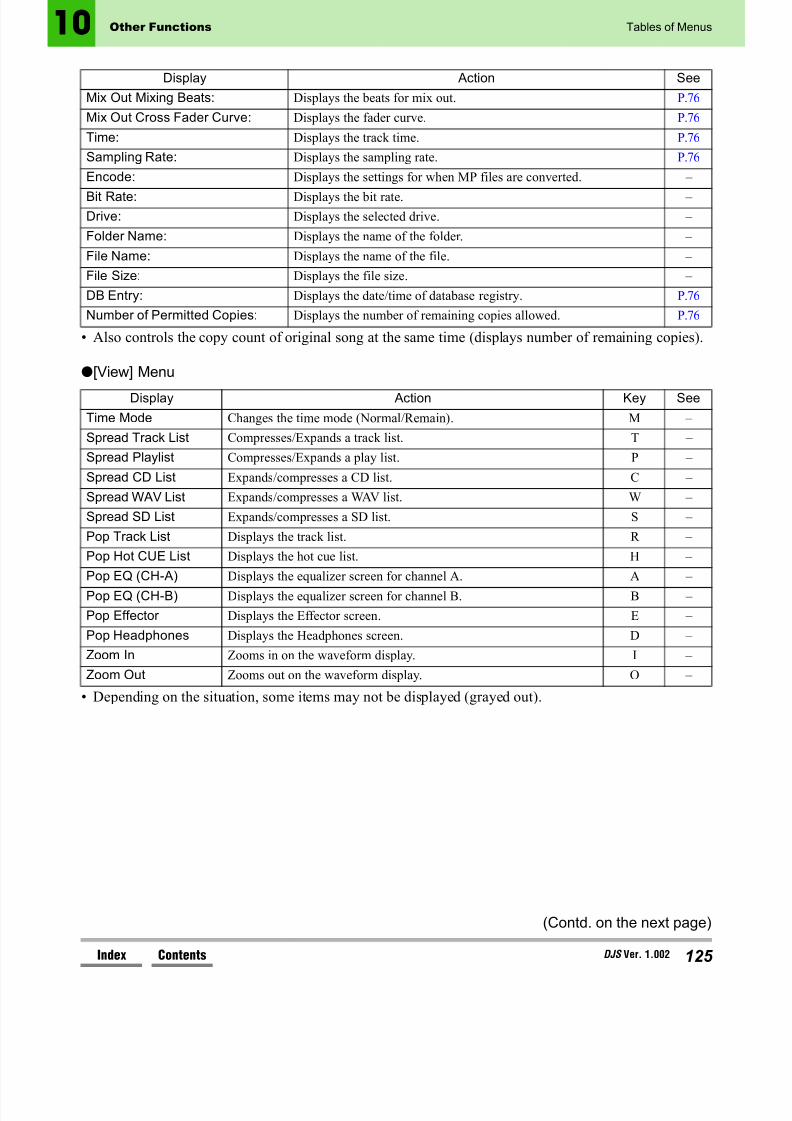
8/8/2019 Pioneer Pro DJS Manual
http://slidepdf.com/reader/full/pioneer-pro-djs-manual 125/155
(Contd. on the next page)
DJS Ver. 1.002 125
0 Other Functions Tables of Menus
ContentsIndex
• Also controls the copy count of original song at the same time (displays number of remaining copies).
● [View] Menu
• Depending on the situation, some items may not be displayed (grayed out).
Mix Out Mixing Beats: Displays the beats for mix out. P.76
Mix Out Cross Fader Curve: Displays the fader curve. P.76
Time: Displays the track time. P.76
Sampling Rate: Displays the sampling rate. P.76
Encode: Displays the settings for when MP files are converted. – Bit Rate: Displays the bit rate. –
Drive: Displays the selected drive. –
Folder Name: Displays the name of the folder. –
File Name: Displays the name of the file. –
File Size: Displays the file size. –
DB Entry: Displays the date/time of database registry. P.76
Number of Permitted Copies: Displays the number of remaining copies allowed. P.76
Display Action See
Display Action Key SeeTime Mode Changes the time mode (Normal/Remain). M –
Spread Track List Compresses/Expands a track list. T –
Spread Playlist Compresses/Expands a play list. P –
Spread CD List Expands/compresses a CD list. C –
Spread WAV List Expands/compresses a WAV list. W –
Spread SD List Expands/compresses a SD list. S – Pop Track List Displays the track list. R –
Pop Hot CUE List Displays the hot cue list. H –
Pop EQ (CH-A) Displays the equalizer screen for channel A. A –
Pop EQ (CH-B) Displays the equalizer screen for channel B. B –
Pop Effector Displays the Effector screen. E –
Pop Headphones Displays the Headphones screen. D –
Zoom In Zooms in on the waveform display. I –
Zoom Out Zooms out on the waveform display. O –

8/8/2019 Pioneer Pro DJS Manual
http://slidepdf.com/reader/full/pioneer-pro-djs-manual 126/155
126 DJS Ver. 1.002
0 Other Functions Tables of Menus
ContentsIndex
● [Play] Menu
• The list player can be operated from the DJ Play functions.• The different functions are assigned to the F1–F12 keys in the DJ Play functions. (You can make the
changes to settings with Preferences.)
● [Help] Menu
[Version UP] Submenu
Display Action Key See
Previous Back. V –
Rewind Rewinds. R –
Stop Stops. S –
Play/Pause Plays/pauses. P –
Fast Forward Fast forwards. F –
Next Next. N –
Mute Mutes. M –
Volume Down Decreases the volume. D –
Volume Up Increases the volume. U –
Shuffle Shuffles. H –
Repeat Repeats. T –
Sound Card Opens the sound card settings screen. C –
Display Action Key See
Quick Start Guide Displays the Quick Start Guide. Q –
User’s Manual Displays the User’s Manual. M –
Pop Hints Displays hints. P – User Registration Displays the [User Registration] screen. When user registration
is completed the menu will switch to [Show Key Code].R –
Version UP If you select this, it displays the [Version UP] submenu. U –
Change Music LibraryFolder
Displays the folder that the music files created by Ripping andCreate are saved to.
F P.13
Version Information Displays version information. I –
Display Action Key SeeDJS Software Updates the DJS software to the latest version. S –
DJS Manual Updates the DJS manual to the latest version. M –
DMP-555 Firmware Updates the DMP-555 firmware to the latest version. F –

8/8/2019 Pioneer Pro DJS Manual
http://slidepdf.com/reader/full/pioneer-pro-djs-manual 127/155
DJS Ver. 1.002 127
0 Other Functions Tables of Menus
ContentsIndex
10-3-2 Menus Displayed in DJ Play FunctionsThe following menus are displayed if you right click on the [Auto Fader], [Mix Mode], [AUTO MIX], or [MIX] buttons, or the Hot Cue, Track or Play lists that are displayed in [DJ Play] screens.The key column in the table lists short-cut keys that can execute functions for each of the items.
• If you select more than one List Hot Cue, only [Clear List Hot CUE] can be selected.• [Cut], [Copy] and [Paste] can only be selected when editing times (Start/End).
●If you right click the [Auto Fader] (CH-A / CH-B) button:
Display Action
0 Operates the channel fader at 0 beats.
1 Operates the channel fader at 1 beat.
2 Operates the channel fader at 2 beats.
4 Operates the channel fader at 4 beats.
8 Operates the channel fader at 8 beats.
16 Operates the channel fader at 16 beats.
32 Operates the channel fader at 32 beats.
64 Operates the channel fader at 64 beats.
● If you right click the [Mix Mode] (Zip/Echo/Cross Fade) button:Display Action
0 Mixes (operates the cross fader) at 0 beats.
1 Mixes (operates the cross fader) at 1 beat.
2 Mixes (operates the cross fader) at 2 beats.
4 Mixes (operates the cross fader) at 4 beats.
8 Mixes (operates the cross fader) at 8 beats.
16 Mixes (operates the cross fader) at 16 beats.
32 Mixes (operates the cross fader) at 32 beats.
64 Mixes (operates the cross fader) at 64 beats.
● If you right click the [AUTO MIX] or [MIX] buttons:Display Action
AUTO MIX Switches to the [AUTO MIX] button.
MIX Switches to the [MIX] button.
● If you right click the Hot Cue List:Display Action Key
Cut Cuts the selected range. Ctrl+X
Copy Copies the selected range. Ctrl+C
Paste Pastes information that has been copied or cut. Ctrl+V
Clear List Hot CUE Deletes list hot cues. –

8/8/2019 Pioneer Pro DJS Manual
http://slidepdf.com/reader/full/pioneer-pro-djs-manual 128/155
128
(Contd. on the next page)
DJS Ver. 1.002
0 Other Functions Tables of Menus
ContentsIndex
10-3-3 Menus Displayed in Track List/Play ListThe menus displayed for each item in the track list/play lists are different.The key column in the table lists short-cut keys that can execute functions for each of the items.
• [Cut], [Copy] and [Paste] cannot be selected when in a play list (cannot be edited).
• If you select [Edit], a dialog box that allows editing of all items is displayed.
● If you right click on [Title], [Album], [Artist], [Genre], or [BPM]:Display Action Key
Cut Cuts the selected range. Ctrl+X
Copy Copies the selected range. Ctrl+C
Paste Pastes information that has been copied or cut. Ctrl+V
Show Displays song information. –
Edit Edits song information. –
Remove Removes song(s) from the play list. –
Delete Deletes song(s) from the database. –
● If you right click on [Track Hot CUE] 1, 2, 3, 4:Display Action
Auto Setup CUE ON Turns the Auto Setup Cue ON.
Auto Setup CUE OFF Turns the Auto Setup Cue OFF.
Clear Track Hot CUE Deletes the selected track hot cue(s).
Show Displays song information.
Edit Edits song information.
Remove Removes song(s) from the play list.Delete Deletes song(s) from the database.
● If you right click on [Mix In Start] or [Mix Out Start]:Display Action Key
Cut Cuts the selected range. Ctrl+X
Copy Copies the selected range. Ctrl+C
Paste Pastes information that has been copied or cut. Ctrl+V
Paste Track Hot CUE 1 Pastes track hot cue 1. –
Paste Track Hot CUE 2 Pastes track hot cue 2. – Paste Track Hot CUE 3 Pastes track hot cue 3. –
Paste Track Hot CUE 4 Pastes track hot cue 4. –
Show Displays song information. –
Edit Edits song information. –
Remove Removes song(s) from the play list. –
Delete Deletes song(s) from the database. –

8/8/2019 Pioneer Pro DJS Manual
http://slidepdf.com/reader/full/pioneer-pro-djs-manual 129/155
(Contd. on the next page)
DJS Ver. 1.002 129
0 Other Functions Tables of Menus
ContentsIndex
● If you right click on [Mix Out], [Mode]:
Display Action
Cut In Changes to [Cut In].
Zip Changes to [Zip].
Echo Changes to [Echo].
Cross Fade Changes to [Cross Fade].
Show Displays song information.
Edit Edits song information.
Remove Removes song(s) from the play list.
Delete Deletes song(s) from the database.
● If you right click on [Mix Out], [Beats]:Display Action
0 Mixes (operates the cross fader) at 0 beats.
1 Mixes (operates the cross fader) at 1 beat.
2 Mixes (operates the cross fader) at 2 beats.
4 Mixes (operates the cross fader) at 4 beats.
8 Mixes (operates the cross fader) at 8 beats.
16 Mixes (operates the cross fader) at 16 beats.
32 Mixes (operates the cross fader) at 32 beats.
64 Mixes (operates the cross fader) at 64 beats.
Show Displays song information.
Edit Edits song information.Remove Removes song(s) from the play list.
Delete Deletes song(s) from the database.
● If you right click on [Mix Out], [Fader]:Display Action
Curve-A Changes to the Curve-A.
Curve-B Changes to the Curve-B.
Curve-C Changes to the Curve-C.
Show Displays song information.Edit Edits song information.
Remove Removes song(s) from the play list.
Delete Deletes song(s) from the database.
● If you right click on any other item:Display Action
Show Displays song information.
Edit Edits song information.
Remove Removes song(s) from the play list.
Delete Deletes song(s) from the database.

8/8/2019 Pioneer Pro DJS Manual
http://slidepdf.com/reader/full/pioneer-pro-djs-manual 130/155
130 DJS Ver. 1.002
0 Other Functions Tables of Menus
ContentsIndex
• [Edit Album], [Edit Artist], [Edit Genre], and [Edit BPM] open a dialog box for changing all together.• [Edit Album], [Edit Artist], [Edit Genre], and [Edit BPM] cannot be selected from a play list (cannot
be edited).• [Remove] can be selected in Play List, and [Delete] can be selected at any other time.
• When either [Make Playlist] or [Make Genre] is selected, 1 line is added to the last line of the Topcategory or the Other category and you can enter a name for the play list or for the genre. In addition,
you can [Cut], [Copy], [Paste], and [Delete] play lists and genres that you have created yourself.• With [ALL] or [Artist-Album] (Album-Artist), neither [Delete] nor [Remove] may be selected.
● If you right click on more than one songs on a track list:Display Action
Edit Album Edits the title of the album.
Edit Artist Edits the name of the artist.
Edit Genre Edits the name of the genre.
Edit BPM Edits the BPM.
Remove Removes song(s) from the play list.
Delete Deletes song(s) from the database.
● If you right click under the following conditions:• If one is selected (highlighted) from either the [Album] or the [Artist] column and right clicked.
Display Action Key
Cut Cuts the selected range. Ctrl+X
Copy Copies the selected range. Ctrl+C
Paste Pastes information that has been copied or cut. Ctrl+V
● If 1 is selected from the [Category] column and right clicked:Display Action Key
Make Playlist Creates a new play list. –
Make Genre Creates a new genre. –
Cut Cuts the selected range. Ctrl+X
Copy Copies the selected range. Ctrl+C
Paste Pastes information that has been copied or cut. Ctrl+V
Remove Removes category(es) from the play list. –
Delete Deletes category(es) from the database. –

8/8/2019 Pioneer Pro DJS Manual
http://slidepdf.com/reader/full/pioneer-pro-djs-manual 131/155
(Contd. on the next page)
DJS Ver. 1.002 131
1 User Registration Registering Online
ContentsIndex
Chapter 11User RegistrationPlease register the software so you can use DJS . Use of DJS is in the trial period until you enter the registration ID issued toyou when you register the user. If the 60 -day trial periodelapses and you have not yet entered a registration ID, you willnot be able to use DJS any further.
11-1 Registering Online
1 Start up DJS .• Until registration is completed, a message indicating the
number of days remaining in the trial period is displayed.
2 Click the [Yes] button.• The [Welcome] screen opens up.
Step
1 2 3 4 5 6 7 Warning!Before Registering OnlineConnect your computer to the Internet.
Before the Trial Period EndsYou can call out the [UserRegistration] screen from DJS ’s [Help]menu.
After the Trial Period EndsIf you double-click the DJS short-cuticon, a message prompting you toregister a user will be displayed.

8/8/2019 Pioneer Pro DJS Manual
http://slidepdf.com/reader/full/pioneer-pro-djs-manual 132/155
132
(Contd. on the next page)
DJS Ver. 1.002
1 User Registration Registering Online
ContentsIndex
3 After clicking [Online Registration], click the [Next]button.
• The [User Information Entry 1/2] screen opens.
Step 1 2 3 4 5 6 7

8/8/2019 Pioneer Pro DJS Manual
http://slidepdf.com/reader/full/pioneer-pro-djs-manual 133/155

8/8/2019 Pioneer Pro DJS Manual
http://slidepdf.com/reader/full/pioneer-pro-djs-manual 134/155
134
(Contd. on the next page)
DJS Ver. 1.002
1 User Registration Registering Online
ContentsIndex
5 After entering the required information, click the[Next] button.• * indicates item that must be entered.
• The [Confirm your entries] screen opens.
Step 1 2 3 4 5 6 7

8/8/2019 Pioneer Pro DJS Manual
http://slidepdf.com/reader/full/pioneer-pro-djs-manual 135/155
DJS Ver. 1.002 135
1 User Registration Registering Online
ContentsIndex
6 After checking the content of the information youentered, click the [Submit] button.
• Once you click the [Submit] button, your computer connects to the Internet and registers your information onthe server.
• After sending, once you complete registration, the [IDRegistration Complete] message is displayed.
7 Click the [OK] button.
• The [Display of Registration ID] screen appears.• If you click the [OK] button, the [Display of RegistrationID] screen closes and it launches DJS.
Step 1 2 3 4 5 6 7

8/8/2019 Pioneer Pro DJS Manual
http://slidepdf.com/reader/full/pioneer-pro-djs-manual 136/155
136
(Contd. on the next page)
DJS Ver. 1.002
1 User Registration Registering Offline
ContentsIndex
11-2 Registering OfflineFill out the enclosed User Registration Card with the requiredinformation and mail it in. Be sure to write in the key code obtainedin the following steps on the User Registration Card.
1 Start up DJS .• The message indicating the number of days remaining in
the trial period is displayed.
2 Click [Yes].• The [Welcome] screen opens up.
3 After clicking [Offline Registration] and [Show KeyCode], click the [Next] button.
• The [Key Code] screen comes out.
Step 1 2 3 4 5 6 7
Before the Trial Period EndsYou can call out the [UserRegistration] screen from DJS ’s [Help]menu.
After the Trial Period EndsIf you double-click the DJS short-cuticon, a message prompting you toregister a user will be displayed.

8/8/2019 Pioneer Pro DJS Manual
http://slidepdf.com/reader/full/pioneer-pro-djs-manual 137/155
(Contd. on the next page)
DJS Ver. 1.002 137
1 User Registration Registering Offline
ContentsIndex
4 After writing in the [Key Code] displayed onto theUser Registration Card, click [Finish].
• Write the address from the User Registration CardAddress Table onto your User Registration Card and sendit in.
• After we receive your User Registration Card, we willreply with your Registration ID.
[The User Registration Card Address Table]1: North America
PIONEER ELECTRONICS (USA) INC.BUSINESS SOLUTIONS DIVISION, PRO AUDIO MARKETING
2265 East 220th Street, Long Beach, CA 90810, U.S.A
2: EuropePIONEER ELECTRONICS NVMULTIMEDIA DIVISION
Pioneer House, Hollybush Hill, Stoke Poges, Slough SL2 4QP U.K.
3: South Asia, Southeast AsiaPIONEER ELECTRONICS ASIACENTRE PTE. LTD.
253 Alexandra Road, #04-01, Singapore 1599364: Hong Kong
PIONEER (HK) LIMITEDSuite 901-906, 9th Floor World Commerce Centre, Harbour City 11Canton Road, Tsim Sha Tsui Kowloon, Hong Kong
5: OceaniaPIONEER ELECTRONICS AUSTRALIA PTY. LTD.
178-184 Boundary Road, Braeside, Victoria 3195, Australia
6: Middle East, AfricaPIONEER GULF, FZE.
Lob 11-017, Jabel Ali Free Zone, P.O.Box 61226, Jabel Ali, Dubai, U.A.E.
7: Central & South America
PIONEER INTERNATIONAL (MIAMI) INC.5200 Blue Lagoon Drive, Suite 850, Miami FL 33126, USA
Step 1 2 3 4 5 6 7
Warning!Once your Registration ID arrives,follow steps 5 and 6 and enter theRegistration ID. (Registration is notcomplete until you enter your Registration ID. It can be used untilthe end of the trial period.)
The address differs depending on theregion in which you reside. Pleasecheck the address and send it in.

8/8/2019 Pioneer Pro DJS Manual
http://slidepdf.com/reader/full/pioneer-pro-djs-manual 138/155
138 DJS Ver. 1.002
1 User Registration Registering Offline
ContentsIndex
5 Once your Registration ID arrives, carry out steps1 and 2 and the [Welcome] screen will open.• Have the Registration ID you received in the mail ready.
6 After clicking [Offline Registration] and [Enter your Registration ID], click the [Next] button.
• The [Registration ID Entry] screen opens.
7 After entering the Registration ID, click the [OK]button.
• Once you complete the registration, the message [IDRegistration Complete] is displayed and DJS starts up.
Step 1 2 3 4 5 6 7 Warning!
Take good care of your registrationID that arrived by mail as even after you register as a user, you may needit to consult about any problems youmight have.

8/8/2019 Pioneer Pro DJS Manual
http://slidepdf.com/reader/full/pioneer-pro-djs-manual 139/155
(Contd. on the next page)
DJS Ver. 1.002 139
2 Uninstalling DJS
ContentsIndex
Chapter 12Uninstalling DJS
Uninstalls DJS .If the trial version of DJS is installed, you can use the same
procedures to uninstall it.
1 Open the control panel.First click the [Start] button and then [Control Panel] toopen the [Control Panel].• If you are using Windows 2000, click the [Start] button,
then [Settings] and then the [Control Panel] in that order,and the [Control Panel] window will open.
2 Click [Add or Remove Programs].• If you are using Windows 2000, click [Add or Remove
Applications].
• The [Add or Remove Programs] screen will open.
Using the CD-ROM toUninstall DJS
1. Place the DJS CD-ROM in a DVD/CD drive.
2. Click the [Uninstall DJS] on the[DJS Installation] screen.
* Check to make sure of the version of the DJS program shown.
Switching the Display of theControl PanelIf you are using Windows XP with thecontrol panel set to [Classic Display],you can return to the category displayon the left of the screen if you click [Switch to Category View].

8/8/2019 Pioneer Pro DJS Manual
http://slidepdf.com/reader/full/pioneer-pro-djs-manual 140/155

8/8/2019 Pioneer Pro DJS Manual
http://slidepdf.com/reader/full/pioneer-pro-djs-manual 141/155
DJS Ver. 1.002 141
2 Uninstalling DJS
ContentsIndex
• The uninstall process begins and the [DJS is beinguninstalled.] screen opens.
• Once the uninstall process finishes, the [Uninstallation of DJS is now complete.] screen opens.
5 Click the [Finish] button.
• Closing the [Uninstallation of DJS is now complete.] screen completes the uninstall process.

8/8/2019 Pioneer Pro DJS Manual
http://slidepdf.com/reader/full/pioneer-pro-djs-manual 142/155
142
(Contd. on the next page)
DJS Ver. 1.002
3 Version Updates Updating the Version of the DJS Software
ContentsIndex
Chapter 13Version UpdatesYou can update your DJS software, DJS manual and DMP-555firmware by getting update packages from Pioneer’s dedicatedsupport site.
13-1 Updating the Version of theDJS Software
Update the version of the DJS software.
1 Click [Help] and then click [Version UP] – [DJSSoftware].• The [Update Available] screen opens.
2 Click the [Yes] button.
• The download of the update package begins.• While the Update Package is downloading, the
[Currently downloading the update package.] screen isdisplayed.
Warning!Before Updating VersionsConnect your computer to the Internet.
Updating the version requiresadministrator authority for thecomputer. Log in as a user who was
been set up as a computer administrator and then update thecomputer.
You cannot update the version unlessuser registration has been completed.
If there is not a newer versionof DJS than the one you arecurrently usingDo not try to update the version.

8/8/2019 Pioneer Pro DJS Manual
http://slidepdf.com/reader/full/pioneer-pro-djs-manual 143/155
DJS Ver. 1.002 143
3 Version Updates Updating the Version of the DJS Software
ContentsIndex
• Once the download finishes, DJS closes and the update of DJS software starts.
• The [Executing the update.] screen is displayed whilethe software is being updated.
• Once the update finishes, a message indicating the versionhas been updated is shown.
3 Click the [OK] button.
• The message indicating the version has been updatedcloses and DJS starts up.

8/8/2019 Pioneer Pro DJS Manual
http://slidepdf.com/reader/full/pioneer-pro-djs-manual 144/155
144
(Contd. on the next page)
DJS Ver. 1.002
3 Version Updates Updating the Version of the DJS Manual
ContentsIndex
13-2 Updating the Version of theDJS Manual
Updates the version of the DJS software.
1 Click [Help] and then click [Version UP] – [DJSManual].• The [Update Available] screen opens.
2 Click the [Yes] button.
• The download of the update package begins.• While the Update Package is downloading, the
[Currently downloading the update package.] screen isdisplayed.
• Once the download finishes, DJS closes and the update of DJS software starts.
• The [Executing the update.] screen is displayed whilethe manual is being updated.
Warning!Before Updating VersionsConnect your computer to the Internet.
Close all DJS manuals.
Updating the version requiresadministrator authority for thecomputer. Log in as a user who was
been set up as a computer administrator and then update the computer.
You cannot update the version unlessuser registration has been completed.
If there is not a newer version
of manual than the one youare currently usingDo not try to update the version.

8/8/2019 Pioneer Pro DJS Manual
http://slidepdf.com/reader/full/pioneer-pro-djs-manual 145/155
DJS Ver. 1.002 145
3 Version Updates Updating the Version of the DJS Manual
ContentsIndex
• Once the update finishes, a message indicating the versionhas been updated is shown.
3 Click the [OK] button.
• This completes the update of the version of the DJS manual.
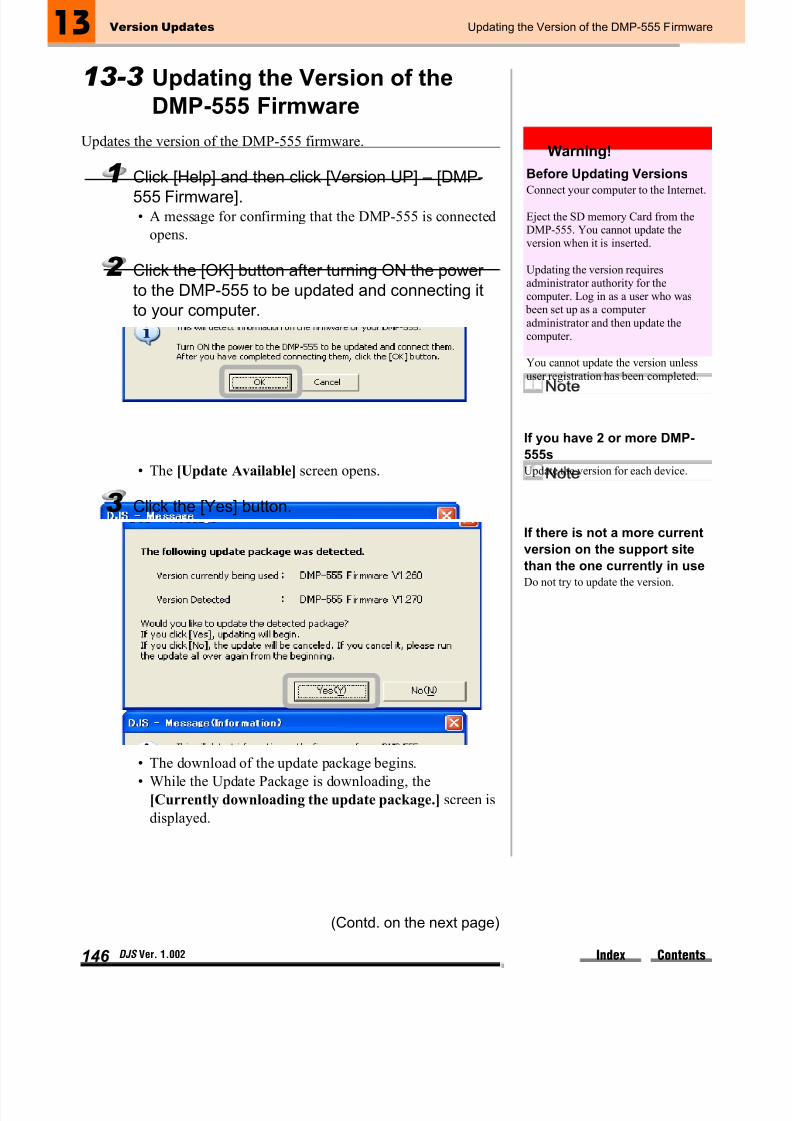
8/8/2019 Pioneer Pro DJS Manual
http://slidepdf.com/reader/full/pioneer-pro-djs-manual 146/155
146
(Contd. on the next page)
DJS Ver. 1.002
3 Version Updates Updating the Version of the DMP-555 Firmware
ContentsIndex
13-3 Updating the Version of theDMP-555 Firmware
Updates the version of the DMP-555 firmware.
1 Click [Help] and then click [Version UP] – [DMP-555 Firmware].• A message for confirming that the DMP-555 is connected
opens.
2 Click the [OK] button after turning ON the power to the DMP-555 to be updated and connecting itto your computer.
• The [Update Available] screen opens.
3 Click the [Yes] button.
• The download of the update package begins.• While the Update Package is downloading, the
[Currently downloading the update package.] screen isdisplayed.
Warning!
Before Updating VersionsConnect your computer to the Internet.
Eject the SD memory Card from theDMP-555. You cannot update theversion when it is inserted.
Updating the version requiresadministrator authority for thecomputer. Log in as a user who was
been set up as a computer administrator and then update thecomputer.
You cannot update the version unlessuser registration has been completed.
If you have 2 or more DMP-555sUpdate the version for each device.
If there is not a more currentversion on the support sitethan the one currently in useDo not try to update the version.

8/8/2019 Pioneer Pro DJS Manual
http://slidepdf.com/reader/full/pioneer-pro-djs-manual 147/155
DJS Ver. 1.002 147
3 Version Updates Updating the Version of the DMP-555 Firmware
ContentsIndex
• Once the download finishes, updating of the DMP-555firmware begins.
• The [Executing the update.] screen is displayed whilethe firmware is being updated.
• Once the update finishes, a message indicating the versionhas been updated is shown.
4 Click the [OK] button.• This completes the updating of the version of the DMP-
555 firmware.
5 Turn OFF the power to the DMP-555.
6 Turn ON the power to the DMP-555.

8/8/2019 Pioneer Pro DJS Manual
http://slidepdf.com/reader/full/pioneer-pro-djs-manual 148/155
148
(Contd. on the next page)
DJS Ver. 1.002
Appendix Troubleshooting
ContentsIndex
Appendix
Troubleshooting
Before contacting us with inquires regarding operation of the software or technical questions,please check to see if the answers to your questions can be found on either this User’s Manual,
which is located on this product’s CD-ROM, or in the FAQ appearing on the support site for thisproduct.For more information about the process of connecting to our support site, please see page 111 of this User’s Manual ( 10-1 Connecting to the Internet ).
In order to connect to the support site, it is necessary to be a registered user. Customers withaccess to the Internet are able to register online. For information about how to register as a user using this method, please see page 131 of this User’s Manual ( 11-1 Registering Online ).
Customers without access to the Internet may record the required information on the User
Registration Card and mail it to us. Upon receipt, we will register these individuals. For informationabout the procedures for registering as a user, as well as where to send the User RegistrationCard, please see page 136 of this User’s Manual ( 11-2 Registering Offline ). (Note: please do notsend the User Registration Card to the customer support offices noted on the next page.)
If you utilize our Support Service, please be prepared to provide the customer name, productname, installation key, brand and make of computer, detailed spec information (CPU, amount of available memory and connected peripherals), version of operating system and a detailedexplanation of the problem(s) you are experiencing.
Under no circumstances will our support personnel be able to assist users who have notcompleted the user registration process.If you run into difficulties in the installation process or during user registration, please visit our home page.
Information about installation and user registration can be found athttp://www.prodjnet.com/djs/support/
Please keep in mind that we are only able to answer questions regarding our products; inquiriesconcerning the operation of, and technical questions regarding computers, peripherals, etc. shouldbe directed to the appropriate product maker or the shop where the product in question was
purchased.

8/8/2019 Pioneer Pro DJS Manual
http://slidepdf.com/reader/full/pioneer-pro-djs-manual 149/155
(Contd. on the next page)
DJS Ver. 1.002 149
Appendix Troubleshooting
ContentsIndex
List of Customer Support
Country of Europe Contacts
Andorra R.AC.EL (Pioneer distributor)Tel: (+376) 822 651
E-mail: [email protected] Hans Lurf GMBH
(Pioneer distributor)Tel: (+43) 161 645 800E-mail: [email protected]
Belgium Pioneer Belgium, a branch of Pioneer Benelux B.V.Tel: +32 (0)3.570.05.70E-mail: [email protected]
Bosnia &Herzegovina
MEDIA FORUM D.O.O. (Pioneer distributor)Tel: (+387) 36 650 488E-mail: [email protected]
Bulgaria Global Electronics PLC (Pioneer distributor)Tel: (+359) 32 622 498E-mail: [email protected]
Croatia Helikop (Pioneer distributor)Tel: (+385) 1 2314-555
E-mail: [email protected] Cyprus(Greek part)
KH. Papasian (Distributors) LTD (Pioneer distributor)Tel: (+357) 22 486 565E-mail: [email protected]
Cyprus(TurkishPart)
Gayem Electronics LTD.(Pioneer distributor)Tel: +(90) 392 225 6555E-mail: [email protected]
CzechRepublic
Basys CS Praha s.r.o. (Pioneer distributor)Tel: (+420) 234 706 700E-mail: [email protected]
Denmark Pioneer Denmark A.S.Tel: +(45) 43 55 54 00E-mail: [email protected]
Estonia Digisound OÜ(Pioneer distributor)Tel: (+372) 60 33 990E-mail: [email protected]
Finland Pioneer Finland (Pioneer distributor)Tel: (+358) 207 74 97 80
France Pioneer France S.A.Tel: +(33) (0) 810 786 400E-mail: [email protected]
FYROM
(Macedonia)
Makpetrol AD (Pioneer distributor)
Tel: +(389) 2 112 144E-mail:[email protected]
Germany Pioneer ElectronicsDeutschland GmbHTel: (+49) 603 980 099 99E-mail: [email protected]
Gibraltar Liberty Ltd.Tel: +34 956 776 912
Greece INTERSYS S.A.(Pioneer Hi-Fi distributor)Tel: (+30) 10 95 54 000E-mail: [email protected]
Hungary Basys Multimedia Kft. (Pioneer distributor)Tel: +(36) 23 415 541E-mail: [email protected]
Iceland Braedurnir Ormsson ehf Tel: 354 530 2800
E-mail: [email protected] Audio Vision Import LTD.
(Pioneer distributor)Tel: (+353) 1 240 5643E-mail: [email protected]
Israël UDT Electronics Corporation LTD(Pioneer Multimedia Productsdistributor)Tel: (+972) 3 522 01 35E-mail: [email protected]
Italy Pioneer Italy S.P.A.Tel: +(39) 02 939 11E-mail:[email protected]
Latvia Baltic Multimedia SIA(Pioneer distributor)Tel: +(371) 761 01 11E-mail: [email protected]
Lituania Digisound OÜ(Pioneer distributor)
Tel: (+372) 60 33 990E-mail: [email protected]

8/8/2019 Pioneer Pro DJS Manual
http://slidepdf.com/reader/full/pioneer-pro-djs-manual 150/155
150 DJS Ver. 1.002
Appendix Troubleshooting
ContentsIndex
Luxemburg Pioneer BelgiumTel: +(32) 3 570 05 25E-mail: [email protected]
Malta Dorell Trading Ltd.(Pioneer Service & Repair Centre)Tel: (+356) 21314003E-mail: [email protected]
Maroc Skytek S.A.R.LTel: +212 22 321 312E-mail: [email protected]
TheNetherlands
Pioneer Benelux B.V.tel: 0900-PIONEER (0900-7466337)E-mail: [email protected]
Norway Pioneer Norge A/STel: +47 22 09 3050E-mail: [email protected]
Poland DSV Trading S.A.(Pioneer distributor)Tel: (+48) 58 661 28 00E-mail: [email protected]
Piotech s.c. (After-sales service)Tel: +48 (0)58 624 5009E-mail: [email protected]
Portugal Pioneer Electronics Iberica S.A.Tel: (+351) 21 861 03 40E-mail: [email protected]
Romania Sun Audio Electronics S.R.L. (Pioneer distributor)Tel: (+40) 21 222 14 28E-mail: [email protected]
Russia Pioneer Europe NV - MoscowRepresentative OfficeE-mail: [email protected]
Serbia &Montenegro
ITM(Pioneer distributor)Tel: +(381) 11 31 07 400E-mail: [email protected]
Slovakia BASYS CZECH+SLOVAK s.R.O. (Pioneer distributor)Tel: +(421) 2 49 10 66 11E-mail: [email protected]
AUDIO URI BaSys (Service channel)Tel: +421 7 5477 5527
Slovenia Primaline DOO(Pioneer distributor)Tel: (+386) 1 510 31 40E-mail: [email protected]
Spain Pioneer Electronics Iberica S.A.Tel: +(34) 937 18 26 42E-mail: [email protected]
Sweden Pioneer Scandinavia A.BTel: (+46) 8 609 91 00URL;http://www.pioneer.se/se/content/company/company/locations.html
Switzerland Sacom S.A. (Pioneer distributor)Tel: (+41) 32 366 85 85E-mail: [email protected]
Turkey Digi-Com Elektronic(Pioneer distributor)Tel: +(90) 212 470 0600E-mail: [email protected]
Tunisia World Technology Access (Pioneer distributor)Tel: +(216) 71 894 770E-mail: [email protected]
UnitedKingdom
Pioneer GB LTD.Tel: +(44) 17 537 895 00URL;http://pioneer-customerrelations.custhelp.com/cgi-bin/pioneer.cfg/php/enduser/home.php
Country of America Contacts
Canada Pioneer Electronics of Canada(Customer Satisfaction Group)Tel: Long distance (877) 283-5901
Tel: Local (905) 479-4411E-mail: [email protected]
UnitedStates
PIONEER USA(Customer Service Department)Tel: (800) 421-1404URL;http://www.pioneerelectronics.com/pna/contact/us/0,,2076_ 138787615,00.html

8/8/2019 Pioneer Pro DJS Manual
http://slidepdf.com/reader/full/pioneer-pro-djs-manual 151/155
DJS Ver. 1.002 151
Index
ContentsIndex
IndexInstruction for symbolsIf marked with a symbol, the term is a name of a buttonor icon. The symbols indicate usable functions of buttonsand icons.1 : DJ Play Function1 ✩ : Pop Up Screen of DJ Play Function2 : MusicManagement Function3 : Ripping Function4 : Transfer Function5 : Create Function6 : Track List
Symbols×1/2 5 .................................................................. 75×2 5 ..................................................................... 75v/> Buttons 3 ..................................................... 120
AA Cue is overwritten when… ............................... 28A Loop is overwritten… ....................................... 44About DJS ............................................................. 6About the Beat Indicators .................................... 24Adding Effects ..................................................... 37
Adjusting Delay Time ......................................... 102Adjusting discrepancies in the Beat Indicator ...... 27Adjusting Effects .................................................. 43Adjusting the Effects BPM 1 ✩ ............................. 37Adjusting the Loop Range ................................... 72Adjusting the Size of Buffers ............................. 103Adjusting the Sound Quality ................................ 34Adjusting with the Jog Dial before Mixing ............ 26Album Display ...................................................... 19Album Display 6 ................................................ 115Album-Artist 6 ...................................................... 78All6 ................................................................... 115Allocating the DMP-555 to a Player ..................... 69Artist Display ........................................................ 19Artist Display 6 .................................................. 115Artist-Album 6 ...................................................... 78ASIO .................................................................. 101AUTO Button 1 .............................................. 20, 36AUTO CUE Button 1 ......................................... 113AUTO CUE Display ............................................. 19Auto Cue 1 .......................................................... 22
Auto Fader 1 ....................................................... 20Auto Level Adjustment ......................................... 61AUTO MIX Button 1 ............................................ 20Auto Setup Cue ................................................... 60
Auto-Playing a Play List ....................................... 61Available HD 345 .............................................. 84
BBack Cue ............................................................. 54Beat Adjust Button 1 ........................................... 20Beat Guideline 5 ................................................ 122Beat Indicator 1 ................................................... 20Best Guide and Snapping Function ..................... 74BPM Display ........................................................ 19BPM SYNC Button .............................................. 19BPM SYNC 1 ...................................................... 24Buffer Size ......................................................... 103
CCalling Out Track Hot Cues ................................. 60Category Settings .............................................. 108CBR ................................................................... 105CD Button 3 ....................................................... 120CD Information .................................................... 83Changing a Track Hot Cue into an AutoSetup Cue ............................................................ 60Changing the Order of Songs DuringAuto-Play ............................................................. 62Channel Equalizer 1 ✩ ......................................... 35Channel Fader Start ............................................ 54
Channel Fader 1
........................................... 20, 33CHANNEL-A 1 ✩ ................................................. 41CHANNEL-B 1 ✩ ................................................. 41Characters that Cannot be Entered (Symbols) .... 79Check In .............................................................. 93Checking Songs .................................................. 63Classifying Songs into Categories ....................... 78Clear All Button 346 ....................... 116, 119, 121Clear button 5 ...................................................... 75Clear Function ..................................................... 75Clearing the Auto Setup Cue ............................... 60Closing Preferences ............................................ 96Connecting .......................................................... 68Connecting a 2nd DMP-555 ................................ 68Connecting to the Internet ................................. 111CPU ....................................................................... 7Create Function ................................................... 15Create Icon 12345 ....................................... 112Creating a New Play List ..................................... 79Creating Categories & Play Lists, Changingtheir Names and Deleting them ......................... 110
Cross Fade .......................................................... 51Cross Fader Start ................................................ 56Cross Fader 1 ..................................................... 20CUE button 1 ....................................................... 28

8/8/2019 Pioneer Pro DJS Manual
http://slidepdf.com/reader/full/pioneer-pro-djs-manual 152/155
152 DJS Ver. 1.002
Index
ContentsIndex
Cue Mark ............................................................. 80Curve-A ............................................................... 52Curve-B ............................................................... 52Curve-C ............................................................... 52Cut In ................................................................... 51Cutting a Specific Rang ....................................... 36
DDead Air Cut Settings ........................................ 106Dead Air Cut 3 ..................................................... 84Delay Time ........................................................ 102DELAY 1 ............................................................. 38Deleting Track Hot Cues ..................................... 59Desktop Button 3 ............................................... 120Determining List Hot Cue Points ......................... 47Determining Track Hot Cue Points ...................... 57
Diagonal .............................................................. 99DirectX / MCI ..................................................... 101Display ................................................................... 7Display Bit Size 3 .............................................. 120Display Date 3 ................................................... 120Display File Name 3 .......................................... 120Display Imported Song Album 3 ........................ 120Display Imported Song Artist 3 .......................... 120Display Imported Song BPM 3 .......................... 120Display Imported Song Genre 3 ........................ 120Display Imported Song Title 3 ........................... 120Display My Songs 23 ....................................... 118Display Next Song 23 ...................................... 118Display of Cues and Loops ............................ 49, 59Display Sampling Frequency 3 ......................... 120Display Transfer Songs 4 .................................. 121DJ Play Function ................................................. 15DJ System ........................................................... 16DJS Screen Size ................................................. 13Download Page ................................................. 111DVD/CD drive ........................................................ 8
EEcho .................................................................... 51ECHO 1 ............................................................... 38Edit Menu .......................................................... 124Editing a Playlist .................................................. 80Editing Song Information ..................................... 76Effect BPM Mode 1 ✩ .......................................... 37Effect ON/OFF Button 1 ✩ ................................... 37Effect Time Display 1 ✩ ....................................... 37
Effector Types and their Features ....................... 38Effector 1 ............................................................. 20Effects Level/Depth (-) Button 1 ✩ ....................... 37Effects Level/Depth (+) Button 1 ✩ ...................... 37
Effects Level/Depth 1 ✩ ...................................... 37Effects TAP Button 1 ✩ ........................................ 37Effects Time Fine Tuning Buttons 1 ✩ ................. 37Entire Waveform Display 5 ................................ 122Equalizer 1 .......................................................... 20Erasing a recorded List Hot Cue ......................... 48
Exit/Reloop Button 1 ......................................... 113Expanded Range Frame 5 ................................ 122Expanding the Waveform Display ....................... 19External Ports ........................................................ 7
FFader Curve Button 1 .......................................... 20Fader Start Button 1 ............................................ 20Fader Start Functions 1 ....................................... 54File Menu ........................................................... 123
FILTER 1 ............................................................. 40Fine Tuning the Effect Time ................................ 42FLANGER 1 ........................................................ 40Folder Up Button 3 ............................................ 120FULL Button ........................................................ 19Functions you can Perform from the DMP-555 ... 68
GGenre Display 6 ................................................ 115Getting out of a Loop ........................................... 46
Guide ADJ +/- Button5
..................................... 122Guide ADJ slider 5 .............................................. 74Guide Adjust Slider 5 ........................................ 122
HHard Disk ............................................................... 7Headphone Cue .................................................. 20Headphone Monitor Control .......................... 20, 27Headphone Volume Level ................................... 20HEADPHONES Screen ....................................... 28Help Menu ......................................................... 126HI1 ✩ ................................................................. 117Horizontal ............................................................ 99Hot Cue List 1 ..................................................... 50How to use the Kill function ................................. 36How to Use the Mix Modes and Fader Curves .... 52
IID3 Tag Settings ................................................ 105If the audio is interrupted ................................... 103Import Progress Bar 34 ............................ 119, 121Import Submenu ................................................ 123Importing an MP3 ................................................ 82Importing Songs from Music CDs ........................ 83

8/8/2019 Pioneer Pro DJS Manual
http://slidepdf.com/reader/full/pioneer-pro-djs-manual 153/155

8/8/2019 Pioneer Pro DJS Manual
http://slidepdf.com/reader/full/pioneer-pro-djs-manual 154/155
154 DJS Ver. 1.002
Index
ContentsIndex
QQuick Start Guide .................................................. 6
RRate Setting Button 35 ..................................... 119
Reading this Manual .............................................. 3Recommended Operating Environment ................ 7Record button ...................................................... 47Record Track Hot Cue button .............................. 58Recording Sound from Microphone or Line Input ............................................................. 89Registering Offline ............................................. 136Registering Online ............................................. 131Reloop Display .................................................... 19Renum button 5 ................................................... 74Renumbering Function ........................................ 74Repeat Button 2 ................................................ 118Required HD 345 .............................................. 84Required Memory .................................................. 7Returning Music from an SD Card to DJS ........... 93REVERB 1 .......................................................... 40Ripping Function .................................................. 14Ripping Icon 12345 ...................................... 112Ripping Settings ................................................ 105Ripping Start Button 3 ....................................... 120Ripping Submenu .............................................. 124
Rotary .................................................................. 99
SSample Song Headphone Cue ............................ 64Sample Song Monitor Output Level ..................... 64Sample Song Play/Pause Button ........................ 64Sample Song Playing Address ............................ 64Sample Song Search Button ............................... 64Sample Song Stop Button ................................... 64Sampling Frequency .......................................... 108
Saving the Length of a Loop as a Track .............. 73Scratch Mode 1 ................................................... 26SD Card Reader/Writer ....................................... 91SD List Expand/Shrink Button 4 ........................ 121SD Memory Card Submenu .............................. 124Search Buttons .................................................. 112Select All Button 34 ................................. 119, 121Select Sampling Rate Button 3 ......................... 120Selecting a Mix Mode or Fader Curve ................. 53Selecting a Sound Card ..................................... 101Selecting Categories for Top & Other ................ 109Setting the Bit Rate ............................................ 105Setting the Layout of DJ Play Functions .............. 98Setting the Mixing Time (Beat) ............................ 53
Setting the Size of Text Displayed in Lists .......... 97Setting up Loops (Play) ....................................... 44Settings for Selecting the DVD/CD Drive &Acquiring Song Information ............................... 106Show Submenu ................................................. 124Shuffle Button 2 ................................................. 118
S ize Display 6 ................................................... 115Slide ..................................................................... 99Sound .................................................................... 7Status Display ...................................................... 22STEREO/MONO Toggle 3 ................................ 120STEREO 1 ✩ ....................................................... 28Stop Button 34 ......................................... 120, 121Switching between Internal &External Mixers .................................................. 100Switching Effect Beats Button 1 ✩ ....................... 37Switching Jog Dial Modes ................................... 26Switching the Display of Top and Other On/Off ... 78SXGA ................................................................... 13
TTAP Button .......................................................... 19Tempo Control Range ......................................... 31Tempo Display ..................................................... 19Through function .................................................. 41Time Display ........................................................ 19Time Display Setting ............................................ 19Time Display 6 .................................................. 115Time Normal Button ........................................... 113Time Remain Button .......................................... 113Time Set Button 3 ............................................. 120Title Display ......................................................... 19Title Display 6 .................................................... 115Top 6 ........................................................... 78, 109Track Hot Cue ..................................................... 57Track Hot Cue Buttons ........................................ 57Track Hot CUE Display 6 .................................. 115
Track Hot Cue Tags ............................................ 59Track Search Button .......................................... 112TRANS 1 ............................................................. 39Transfer Function ................................................ 15Transfer Icon 12345 .................................... 112Transfer Start Button 4 ...................................... 121Transferring DJS Music to SD Cards .................. 91Trim 1 ............................................................ 20, 36Troubleshooting ................................................. 148Turning Effects ON/OFF ...................................... 43Types of Mix Modes & Fader Curves and their Features .............................................................. 51

8/8/2019 Pioneer Pro DJS Manual
http://slidepdf.com/reader/full/pioneer-pro-djs-manual 155/155
Index
UUninstalling DJS ................................................ 139Updating the Version of the DJS Manual .......... 144Updating the Version of the DJS Software ........ 142Updating the Version of the DMP-555Firmware ............................................................ 146User Registration Card .......................................... 6User Registration Card Address Table .............. 137User’s Manual ........................................................ 6Using Play Lists ................................................... 61Using the Auto Function to Mix Songs ................ 18Using the Auto Mix Function for Mixing Songs .... 65Using the TAP button to Re-detect the BPM ....... 33
VVBR ................................................................... 105VBR Button 35 ................................................. 119Version UP Submenu ........................................ 126View Menu ......................................................... 125Volume Type ....................................................... 99
WWAV Button 3 .................................................... 120Waveform Display ......................................... 19, 99Web Browser to be Used ................................... 111When importing a play list ................................... 82