pin functions - farnell · pdf fileon the pi for screenless status updates. gpio seven of the...
TRANSCRIPT

ELECTRODES These twelve capacitive sensing electrodes can detect touch and proximity. With gold edge plating and 3.2mm holes they are easy to clip to, paint onto with Electric Paint or solder to.
CONNECTOR HEADERThis connects to any Raspberry Pi with a 40-pin GPIO connector (all of the modern models).
RGB LEDActive low, red connected to J8.31, green to J8.29, blue to J8.37. Beautifully colour balanced and shines through a mounting hole on the Pi for screenless status updates.
GPIOSeven of the pins that we don’t use are taken from the GPIO header and broken out for you to connect to.
PROTOTYPING AREA84 pads (7 x 12) with 1mm diameter drills spaced 2.54mm apart for you to use as you wish.
AUDIO OUT15.5-bit stereo line out on a 3.5mm socket with a dedicated low-noise power supply. Will drive most headphones too.
GROUNDGreat for grounding shielded cable and for clipping oscilloscope probes or multimeter leads to when debugging your project.
PUSH SWITCHActive low, connected to J8.7. Requires the Pi’s onboard pullup resistor to be enabled in software. Useful for shutting down or restarting the Pi properly.
bareconductive.com @BareConductive #PiCap
High resolution, tuneable touch and distance sensors for your Raspberry Pi
PROTOTYPING AREA
E0 to E11 12 CAPACITIVE SENSING ELECTRODES
RGB LED
AUDIO OUTGND
PUSH SWITCH
CONNECT RASPBERRY Pi A+, B+, ZERO AND LATER
7 GPIO FROM MAIN HEADER
PINFUNCTIONS
PROTOTYPING AREA
E0 to E11 12 CAPACITIVE SENSING ELECTRODES
RGB LED
AUDIO OUTGND
PUSH SWITCH
CONNECT RASPBERRY Pi A+, B+, ZERO AND LATER
7 GPIO FROM MAIN HEADER
PINFUNCTIONS
The Pi Cap works with Raspberry Pi A+, B+, Zero and later.
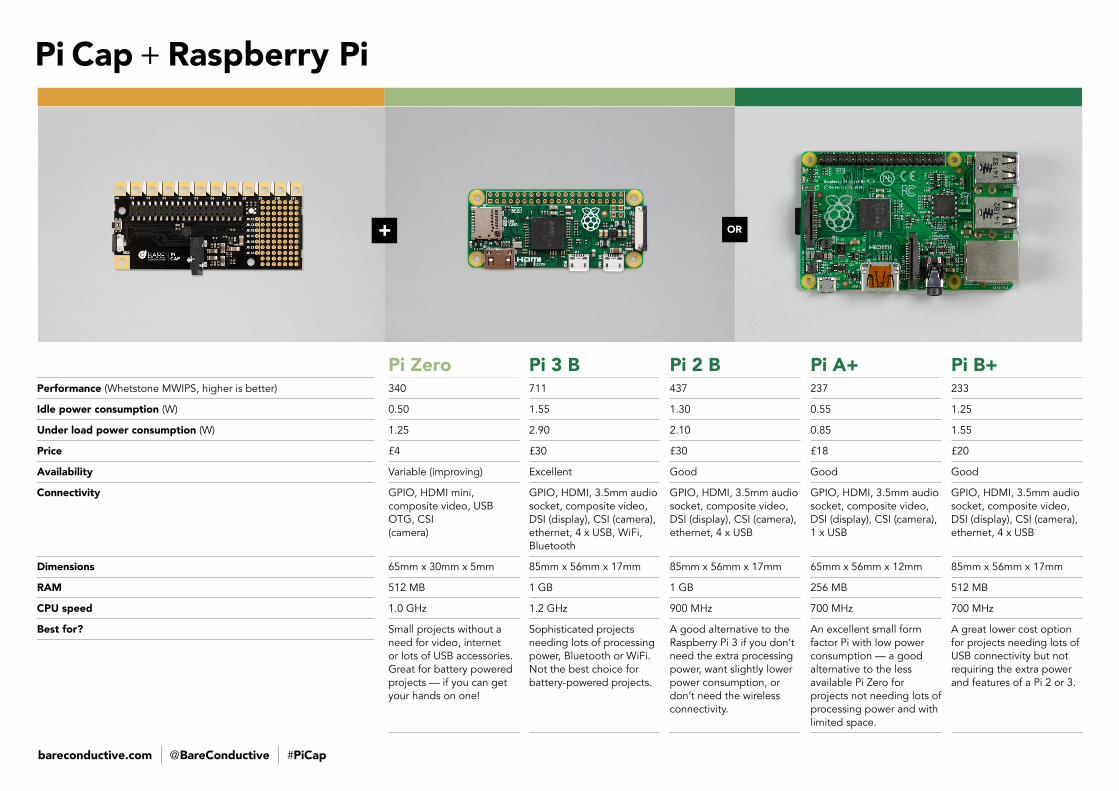
Performance (Whetstone MWIPS, higher is better)
Idle power consumption (W)
Under load power consumption (W)
Price
Availability
Connectivity
Dimensions
RAM
CPU speed
Best for?
Pi Zero340
0.50
1.25
£4
Variable (improving)
GPIO, HDMI mini, composite video, USB OTG, CSI (camera)
65mm x 30mm x 5mm
512 MB
1.0 GHz
Small projects without a need for video, internet or lots of USB accessories. Great for battery powered projects — if you can get your hands on one!
Pi 3 B711
1.55
2.90
£30
Excellent
GPIO, HDMI, 3.5mm audio socket, composite video, DSI (display), CSI (camera), ethernet, 4 x USB, WiFi, Bluetooth
85mm x 56mm x 17mm
1 GB
1.2 GHz
Sophisticated projects needing lots of processing power, Bluetooth or WiFi. Not the best choice for battery-powered projects.
Pi 2 B437
1.30
2.10
£30
Good
GPIO, HDMI, 3.5mm audio socket, composite video, DSI (display), CSI (camera), ethernet, 4 x USB
85mm x 56mm x 17mm
1 GB
900 MHz
A good alternative to the Raspberry Pi 3 if you don’t need the extra processing power, want slightly lower power consumption, or don’t need the wireless connectivity.
Pi A+237
0.55
0.85
£18
Good
GPIO, HDMI, 3.5mm audio socket, composite video, DSI (display), CSI (camera), 1 x USB
65mm x 56mm x 12mm
256 MB
700 MHz
An excellent small form factor Pi with low power consumption — a good alternative to the less available Pi Zero for projects not needing lots of processing power and with limited space.
Pi B+233
1.25
1.55
£20
Good
GPIO, HDMI, 3.5mm audio socket, composite video, DSI (display), CSI (camera), ethernet, 4 x USB
85mm x 56mm x 17mm
512 MB
700 MHz
A great lower cost option for projects needing lots of USB connectivity but not requiring the extra power and features of a Pi 2 or 3.
Pi Cap + Raspberry Pi
bareconductive.com @BareConductive #PiCap
+ OR

Touch Board vs Pi Cap What is the difference?
Plug and play out of the box No computer needed to start Programmable via Arduino IDE Uses capacitive sensing Can detect touch and proximity On board MP3 playback from Micro SD card Installer works for every operating system
+ Raspberry Pi add-on (A+, B+, Zero or later)+ Simple Raspbian package setup+ Programmable via C++ and Python+ Uses capacitive sensing+ Can detect touch and proximity+ High quality audio output+ Includes a push-button, RGB LED, prototyping
area, GPIO breakout and 3.5mm audio line out
OUT OF THE BOXStraight out of the box, the Touch Board acts a touch-triggered MP3 player. It doesn’t need to be connected to a computer to play sounds, when it arrives there is already an audio guide on the SD card that plays when you touch the electrodes. You don’t need an internet connection or computer to get started.
OUT OF THE BOXOur tutorials take you through the complete process of installing the Raspbian operating system, attaching the Pi Cap to the Raspberry Pi, installing our software examples and guiding you through an introduction of what you can do.
HOW IT WORKSThe Touch Board uses capacitive sensing. This means you don’t have to actually touch a sensor to send a signal to the board as it is detecting the change in the electrical field rather than connecting a circuit. The Touch Board requires no second connection this means you can use one hand to interact with the sensor while the other remains completely free! You can also trigger the Touch Board through other resistive materials such as glass and wood.
HOW IT WORKSThe Pi Cap benefits from the same capacitive sensing platform that the Touch Board uses. This means you can use the sensors to detect touch, distance or proximity, and you can access all the same data on the Raspberry Pi using the Pi Cap.
CODINGThe Touch Board is compatible with the Arduino platform and you can program the chip on the board to do pretty much anything you want, whether it’s touch, proximity, HID (mouse and keyboard), MIDI and much more. The Touch Board has been designed to work with a range of shields so you can add extra functions. Check out the Touch Board Shield Guide to learn more.
CODINGThe Pi Cap comes with example code and libraries for C++ and Python. Similarly to the Touch Board, you can use the Pi Cap to trigger MP3s, but unlike the Touch Board you can trigger multiple sounds at the same time (polyphonically). You can also take advantage of the more sophisticated features that the Raspberry Pi offers — internet connectivity, video playback, OSC, Bluetooth — and interface with the wealth of software already written for the Pi.
POWERYou can use a USB cable to power the Touch Board, or just plug in a LiPo battery. Your Touch Board can stand completely alone, or concealed in a project. The LiPo battery will charge when the board is plugged in via USB.
POWERThe Pi Cap is powered by the Raspberry Pi that it is attached to, which is in turn powered via a USB power supply. You’ll need a supply capable of at least 1.5A (although we recommend a 2.5A supply) — the Pi is a lot more power hungry than the Touch Board. If you need portable power, a USB power pack is the best solution.
bareconductive.com @BareConductive #PiCap
TOUCH BOARD Pi CAP
Arduino-Compatible Raspberry Pi add-on