pilotaware operating instructions for pilotaware software version (20160708) · pdf...
TRANSCRIPT

Page 1
PilotAware Operating Instructions for PilotAware Software Version (20160708)
Introduction Thank you for joining the PilotAware Team and helping to make conspicuity (See and be Seen) a reality for all. These operating instructions have been written to help you make the most of your PilotAware software whether you have built the hardware yourselves or purchased a complete PilotAware Classic kit from Aviation Technology and Hardware at the website pilotawarehardware.com. These operating instructions are available on line and printed copies are not therefore issue controlled. The latest copy will be found on the pilotaware.com, pilotawarehardware.com and the PilotAware Forum (forum.pilotaware.com) websites. These PilotAware Operating Instructions are a living document and corrections will be made when identified or software
updated. Any feedback on content and presentation will be welcomed via the Operating Instructions thread on the PilotAware Forum.
These Operating Instructions make reference to PilotAware Classic which is the latest hardware available. However, the operation of the software will be the same if you have built the hardware yourself and you have the appropriate hardware and license.
Warning
The software provided by PilotAware. Com is uncertificated software provided to work with hardware to provide a unit for use AS A SECONDARY POSITIONAL AWARENESS AID ONLY.
PilotAware is a secondary positional awareness aid, it is not a collision avoidance device.
PilotAware contains NO collision avoidance algorithms and will NOT give you any advice on how to avoid traffic or any advice to other traffic on how to avoid you.
As Pilot in Command it is your responsibility to take all necessary actions to maintain safe flight, including collision avoidance and the safe use of this software.
PilotAware software is provided for use under Visual Flight Rules in Visual Meteorological Conditions only and is not certified to any standard.
It is a mandatory pre-requisite to using this PilotAware Software, that you have read, understand, agree and comply with the latest installation and operating instructions and
have read and agree with the PilotAware Limited PILOTAWARE END USER LICENCE AGREEMENT. This is available from PilotAware.com. This will have been done when you
accepted your PilotAware License.

Page 2
Using Electronic Conspicuity Devices
Pilots flying under VFR should spend most of their time looking out of the aircraft and scanning the local airspace. It is often observed however, that pilots do not spend sufficient
time on their visual scan and their scan may not be optimal. PilotAware comes under the genre of equipment called Electronic Conspicuity (EC). When used as a secondary positional awareness device PilotAware can enhance your situational awareness but only by augmenting your visual scan nor replacing it. It is vitally important that you understand and acknowledge that there are concerns, that a reliance on a prompted lookout from any EC device including PilotAware could reduce the effectiveness of the visual scan.
For instance, there may be a danger that your attention will be focused on the one area
prompted and therefore, you maybe spotting the wrong aircraft, or missing other aircraft that are outside the area prompted by the EC device.
Some pilots may become intrigued by the information provided on local aircraft, or fixated
on the display, at the expense of maintaining their necessary visual scan. Pilots may also incorrectly assume that all aircraft can be seen on their EC device, which is
NOT the case.
It must therefore be stressed that PilotAware does not replace the need for an effective visual scan which is your primary responsibility and primary method of seeing other
aircraft.
It is also imperative that you fully familiarise yourself with the set-up, configuration and operation of your PilotAware unit before you use it in your aircraft. The in-flight cockpit is not the place to become familiar with any new piece of equipment. If you are in doubt of any part of the operation in flight, ignore it until you can study its operation whilst safely on the ground. It is also recommended that in the early days of using any EC device a second pilot or observer is present in the aircraft to get used to the new equipment. This can be done by buddying up with another pilot or competent passenger in the early flights. If at any time you feel that you are distracted by PilotAware turn it off until you are more familiar with its operation. PilotAware is used entirely at the risk of the user. Great care has been taken to eliminate
defects during its development however it is not claimed to be fault-free. No claims are made regarding its correctness, reliability or fitness for any particular purpose. The
PilotAware project developers and other contributors shall not be liable for errors contained herein or for incidental or consequential damages, loss of data or personal injury in
connection with the fidelity, performance, or use of this software.

Page 3
Contents
PilotAware Operating Instructions for PilotAware Software Version (20160708) .................. 1
Introduction................................ ................................ ................................ ...... 1 Warning ....................................................................................................................................... 1 Using Electronic Conspicuity Devices ............................................................................................. 2
Contents ................................ ................................ ................................ .......... 3
PilotAware Hardware................................ ................................ ........................... 5 Raspberry Pi Micro-computer. ....................................................................................................... 5 Power lead ................................................................................................................................... 5 The Radio Bridge .......................................................................................................................... 5 Wi-Fi USB Connector (dongle) ....................................................................................................... 6 ADSB receiver (dongle) and Antenna.............................................................................................. 6 GPS (dongle) ................................................................................................................................ 6 Power Supply ............................................................................................................................... 6
PilotAWare Unit ................................ ................................ ................................ . 7
PilotAware Software. ................................ ................................ ........................... 7
Powering up and Connecting your Tablet of Choice. ................................ ..................... 7
PilotAWare System Interface ................................ ................................ ................. 9
Connecting to your chosen Navigational Package ................................ ........................ 9 Connecting to Individual Packages ................................................................................................. 9
SkyDemon ................................................................................................................................ 9 Easy VFR (updated July 2016) .................................................................................................. 12 RunwayHD ............................................................................................................................. 20 Air Navigation Pro .................................................................................................................. 24 XC-Soar TE (v6.8) .................................................................................................................... 26
Now that you have PilotAware working ................................ ................................ .. 27
So what do the lights indicate? ................................ ................................ ............. 28 Fault Scenarios ........................................................................................................................... 28
License, Setup, Configuration and Information Pages................................. ................. 29 Home Page................................................................................................................................. 29
Software Version .................................................................................................................... 29 License ................................................................................................................................... 30 PilotAware Interface and Status Information. ........................................................................... 30
Configuration Page ..................................................................................................................... 31 Logging ...................................................................................................................................... 33 Updates ..................................................................................................................................... 35 List Track.................................................................................................................................... 35 Save Track .................................................................................................................................. 36
Automatic Software Upgrade. ................................ ................................ .............. 36
Manual Software Upgrade ................................ ................................ .................. 37

Page 4
SD Card Formatting..................................................................................................................... 37 Download The PilotAware Software............................................................................................. 38 Copying The Files to The Micro SD Card ....................................................................................... 38
Mode S Detection (only available when using Pi2B)................................ .................... 40 Warning ..................................................................................................................................... 40 How Mode S Detection Works ..................................................................................................... 40 Visual Alert................................................................................................................................. 41
Mode S Separation ................................................................................................................. 42 Mode S Detection range .......................................................................................................... 43
Voice Alerts (only Available when using Pi2B) ................................ ........................... 43 Introduction ............................................................................................................................... 43 Warning ..................................................................................................................................... 43 Voice Alert Output ...................................................................................................................... 44 Adjusting the Output Volume ...................................................................................................... 44 Type of Audio Alert. .................................................................................................................... 45
P3I and ADSB.......................................................................................................................... 45
Installing the PilotAware unit in your Aircraft................................. ........................... 47
ADSB Out. ................................ ................................ ................................ ...... 48 Connecting to a Mode S transponder. .......................................................................................... 48
FAQ ................................ ................................ ................................ .............. 48 I have a question that these operating instructions doesn’t address what should I do?................ 48 How do I get my MAC address? ............................................................................................... 48 I Can’t access http://pilotaware.lode.co.uk/ Whilst Connected to the PilotAware Hotspot. .......... 49 My PilotAware seems to be working intermittently and keeps resetting what should I do? .......... 49 Why can’t I get Voice Alerts and Mode S detection when using a Raspberry Pi B+? ..................... 49 Can I have an ADSB only version of PilotAWare? ....................................................................... 49 My PilotAware Classic GPS isn’t working out of the Box............................................................. 50 I have put together my PilotAware Classic and it won’t work in the conservatory/kitchen/bedroom/1959 split-screen Volkswagen. Why is this? .............................. 50 Do I need to connect PilotAware classic to a transponder for it to work? .................................... 50 Where can I get more information. .......................................................................................... 50 Does PilotAware detect FLARM................................................................................................ 51
Addendum ................................ ................................ ................................ ..... 51 ETSI Standard ............................................................................................................................. 51 LAA ............................................................................................................................................ 51 BMAA ........................................................................................................................................ 51 Other Useful Websites ................................................................................................................ 51
Acknowledgements................................ ................................ ........................... 52
Changes in Latest Software Version 20160708................................ .......................... 52

Page 5
PilotAware Hardware
PilotAware Units are available from Aviation Technology and Hardware Ltd at pilotawarehardware.com. For the technically minded enthusiast who likes to self-build, units can be built using the known good hardware recommended on the PilotAware Forum website and purchasing the bits from the internet. Individual parts are not available from PilotAware or Aviation Technology and Hardware. To allow all users to be familiar with their PilotAware the main hardware components are as follows:-
Raspberry Pi Micro-computer. PilotAware software has been developed to run either on the ubiquitous Raspberry Pi B+ or a Raspberry Pi 2B Microcomputer. Due to the differing computing power available on these 2 units, the functionality available differs depending on which vers ion of Raspberry Pi used. The Raspberry PiB+ originally used is less powerful than the Raspberry Pi2B and whilst it is very capable of providing all of the original functionality of PilotAware and the latest
automatic software download, it is not powerful enough to implement the new Voice Alerts and Mode S detection. To enjoy these new functions, you will need the Raspberry Pi2B
microcomputer and a new software license for the added functionality. New licenses can be bought with the PilotAware Bridge at pilotawarehardware.com.
Complete PilotAware Classic units come with the Raspberry Pi2B micro-computer and an
upgraded license enabling all the latest functionality.
Software later than version 20160511, will detect which version of Raspberry Pi is being used and the license held and adjusts the functionality accordingly.
Power lead The power lead is a small but very important component in the operation of PilotAware units. The Raspberry Pi unit runs from a USB power source of between 4.75-5.25 volts, and requires a minimum of 4.75 volts for correct operation. To ensure that the correct voltage is provided to the Raspberry Pi unit the power lead should be a good quality stranded copper
lead with a minimum size of 20 AWG (American Wire Gauge). Maximum recommended length is 1 metre unless an input voltage of 5.25 volts can be guaranteed. Note if the
voltage at the input of the Raspberry Pi becomes lower than 4.75 volts then the unit will reset (brown out) and be unreliable. PilotAware Classic units are supplied with a suitable 1
metre 20AWG lead to prevent this happening providing a suitable power supply is used.
The Radio Bridge The PilotAware Radio Bridge provides the 869MHz band Transmit and Receive, barometer, voltage regulation and interconnect to the Raspberry Pi unit. It will work with both
Raspberry Pi B+ and raspberry Pi 2B units. The Radio Bridge has been designed to connect to the Raspberry Pi through the PIO connectors as a plug on shield. The Radio Bridge gets its
power from the Raspberry Pi and has an SMA connector for the attachment of the P3I antenna which can be mounted directly to the bridge or via a coaxial extension cable.

Page 6
Wi-Fi USB Connector (dongle) The USB Wi-Fi dongle is connected to the bottom right hand USB connector. This must be an
RT5370 type as supplied with the PilotAware Classic unit.
ADSB receiver (dongle) and Antenna. The ADSB receiver uses a Mini USB DVB-T RTL-SDR Receiver which is connected to the bottom left USB connector. This is a receive only unit that is used to receive the ADSB and
where appropriate Mode S transmissions. The receiver will get warm in normal operation.
GPS (dongle) The GPS used is a U-Blox (G-7020). This can be either plugged directly into the Raspberry Pi or extended on a USB lead or replaced with a GPS on an extension lead. Whichever version is used the GPS should be positioned with a clear view of the upper atmosphere.
Power Supply It is very important that the supply used to power the Raspberry pi is stable, capable of
providing 2 Amps and does not create a significant amount of radiated noise either through radio interference or induced noise into the primary power source. This can affect other electronic equipment in your aircraft particularly noticeable in the radio reception.
For this reason, it is recommended that the PilotAware Unit is powered from a good quality portable USB power supply such as the Anker PowerCore 20100 or the smaller Anker Power Core 10000 unit which is the same size as the PilotAware unit. Cigarette lighter voltage converters can be used but they must be of good quality and capable of delivering a constant 2 Amp supply. The Anker Power Drive 2 Model 2310 has been shown to be very good product in this respect. Beware of running additional consumer items from the cigarette lighter voltage converter as this may reduce the power available for PilotAware
and cause the Raspberry pi to reset. If there are any problems with your PilotAware unit then first check that you are using a reliable power supply and a good quality 20AWG cable. This is by far, the most common reason for failure of the unit experienced to date. If you are operating an EASA aircraft or you want an EASA approved power supply for
PilotAware certified units can be bought from www.charge4.co.uk.

Page 7
PilotAWare Unit The PilotAware unit looks like this when assembled.
PilotAware Software. PilotAware software is provided on a yearly license basis and can be purchased with a PilotAware Bridge or with the Complete PilotAware Classic. The licence includes regular
software upgrades and maintenance releases. The software is revision controlled with the following naming convention. PilotAware Version (YYYYMMDD). In this way it is easy to see if there is a later version than the one that you are using. The PilotAWare unit will automatically check this if you request a software update as described in the Automatic Software Update Section of these Operating instructions.
The software resides on a 4Gigabyte Micro SD card and new releases are automatically downloaded by connecting your PilotAware unit to the internet through an RJ45 Ethernet
cable connected to a free port on your broadband router. Instructions on how to do this can be found later in these operating instructions. PilotAware software is protected by the
conditions of the license agreement that you have signed. Please make sure that you are familiar with these and abide by the conditions.
Powering up and Connecting your Tablet of Choice. It is assumed that you have downloaded your license from the website
http://pilotaware.lode.co.uk as described in the quick start guide provided with your PilotAware Classic kit or Bridge if you have self-built, and you have powered it up successfully for the first time.
The powering up sequence will be the same every time. Apply power to your PilotAware unit. This will boot the system and after about 60-90
seconds a Wi-Fi hotspot will be set up from the PilotAware unit.
Page 8
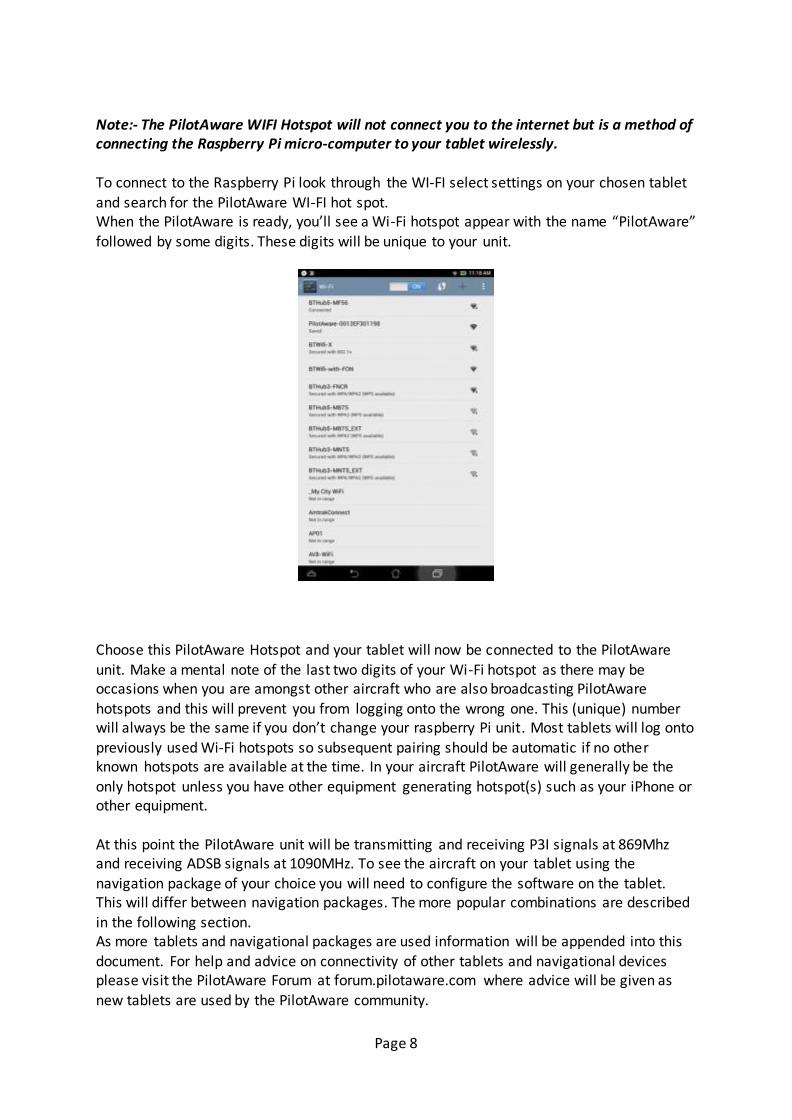
Note:- The PilotAware WIFI Hotspot will not connect you to the internet but is a method of connecting the Raspberry Pi micro-computer to your tablet wirelessly. To connect to the Raspberry Pi look through the WI-FI select settings on your chosen tablet and search for the PilotAware WI-FI hot spot. When the PilotAware is ready, you’ll see a Wi-Fi hotspot appear with the name “PilotAware”
followed by some digits. These digits will be unique to your unit.
Choose this PilotAware Hotspot and your tablet will now be connected to the PilotAware
unit. Make a mental note of the last two digits of your Wi-Fi hotspot as there may be occasions when you are amongst other aircraft who are also broadcasting PilotAware
hotspots and this will prevent you from logging onto the wrong one. This (unique) number will always be the same if you don’t change your raspberry Pi unit. Most tablets will log onto
previously used Wi-Fi hotspots so subsequent pairing should be automatic if no other known hotspots are available at the time. In your aircraft PilotAware will generally be the
only hotspot unless you have other equipment generating hotspot(s) such as your iPhone or other equipment.
At this point the PilotAware unit will be transmitting and receiving P3I signals at 869Mhz and receiving ADSB signals at 1090MHz. To see the aircraft on your tablet using the navigation package of your choice you will need to configure the software on the tablet. This will differ between navigation packages. The more popular combinations are described in the following section. As more tablets and navigational packages are used information will be appended into this
document. For help and advice on connectivity of other tablets and navigational devices please visit the PilotAware Forum at forum.pilotaware.com where advice will be given as
new tablets are used by the PilotAware community.

Page 9
PilotAWare System Interface
Connecting to your chosen Navigational Package
There are several supported navigation systems you can use to display the traffic from the PilotAware unit. To date these are:
SkyDemon RunwayHD
EasyVFR Air Navigation Pro
Sky-Map XC Soar
With open interfaces PilotAware is admirably positioned to interface with many other systems as its use becomes more widespread.
Connecting to Individual Packages
SkyDemon Start SkyDemon and tap the “...” button at the top (or on iOS, the “More” button) Select “Setup”

Page 10
Select “Connectivity Options”
Check “Live Data when Planning” √Check “FLARM”Tap “Air Connect Key” and set it to
6000.Go back to the Setup menu and select “Navigation Options”
Scroll to the bottom of the list and change the “Show Within Vertically” setting to a high number of feet. E.g. “40000ft”. This allows us to see commercia l airliners at high altitude for
testing.

Page 11
Later, when actually flying with the PilotAware you can reduce this value to de-clutter the display removing very high (or very low!) level traffic that you’re not interested in. Return to the main SkyDemon screen and select “Go Flying”, then select “Use FLARM”
Briefly you will see “Seeking GPS Satellites”:
If things stop at this point, it’s likely you have poor GPS reception. If all is good you should see (likely ADS-B) traffic like this as smaller aircraft on the display:

Page 12
Traffic are annotated with either their Flight ID or if not available, their hex code. Also
shown is their relative altitude in thousands of feet. In the image above you can see one of the Oxford Seneca’s at low level as well as 2 commercial flights EZY24KE and BAW288 higher
up.
Easy VFR (updated July 2016) This guidance covers tablets running EasyVFR with or without a built-in GPS.
It assumes that you have a PilotAware Classic device fitted with a GLONASS or similar USB GPS.
1. Power up the PilotAware unit and connect your tablet to it via WiFi.
Ensure that you are in a position where a good GPS signal is available. If testing at home,
please note that K Glass appears to act as a shield and blocks a good signal, as can the house itself. You will also find that the same window sill does not detect the same number of satellites at night as it does during the day.
2. Load EasyVFR and from the Moving Map screen, select MENU.

Page 13

Page 14
Select Nav Tools…
Select Settings…

Page 15
Select FLARM Settings

Page 16
Configure the settings as follows: Use FLARM = On (Green bar lit) WiFly IP Address: 192.168.1.1 WiFly Port: 2000 WiFly Pin-Code: 6002 Planes Symbol Magnification Level: Select to provide the desired size of Planes Symbol, other than your own Plot Plane
Use Flarm GPS as EasyVFR GPS: On or Off, as required On – To use the PilotAware GPS to provide GPS feed to EasyVFR. *
Off – To use the inbuilt tablet GPS to feed EasyVFR. Used protocol: TCP
Vertical proximity: As desired in order to filter out unwanted traffic. This f ilter will be dependent on the filtering you have configured in PilotAware.
* See section below regarding tablets without a GPS
Select OK
Select Back

Page 17
Select MENU
Assuming that your PilotAware unit is fully functioning and with a valid GPS signal, after a few seconds, the GPS Fix status at the top of the screen will change to display:
GPS FLARM

Page 18
PilotAware outputs the Flight Number/Aircraft Registration alternately every 5 seconds (by
default) or it can be hard set to display either. This applies to traffic detected via ADS-B or P3i.

Page 19
Mode S detection Aircraft which are transmitting Mode S will display on your moving map detailing the transmitted code, the relative altitude to your altitude and a colour coding based on signal strength using RAG (Red – Amber-Green) colour banding.
Examples of Red, Green and Red and Amber Mode S traffic are shown below.

PilotAware Operating Instructions Issue 01c July 2016 Software Version 20160708
20
EasyVFR devices without an inbuilt GPS If your tablet is not equipped with an inbuilt GPS and you have a GLONASS USB module or similar in your PilotAware unit, then you can use that device to provide GPS signals to
EasyVFR by selecting: Use Flarm GPS as EasyVFR GPS: On in the FLARM Settings configuration. This negates having to have a Bluetooth GPS.
RunwayHD Start Runway HD.
Select the cog icon at the top to show the Settings menu:

PilotAware Operating Instructions Issue 01c July 2016 Software Version 20160708
21
Select FLARM
Select Enable FLARM to enable it.
Select Altitude Filter’s box and enter 40000 (for testing). This can be changed later to decrease traffic at levels you’re not interested in).
Select Use FLARM for GPS to enable it. Select PilotAware to select it. Scroll the page down past “PilotAware”

PilotAware Operating Instructions Issue 01c July 2016 Software Version 20160708
22
Select the IP Address box and enter: 192.168.1.1Tap the Port box and enter: 2000Tap the
Passcode box and enter: 6001Return to the main display and you should see traffic shown
like this:
If you have poor GPS reception you will see this:

PilotAware Operating Instructions Issue 01c July 2016 Software Version 20160708
23
If you lose connection to the PilotAware Wi-Fi hotspot you will see this:

PilotAware Operating Instructions Issue 01c July 2016 Software Version 20160708
24
Air Navigation Pro
Open the AirNav Pro app.
Select Map options then select Traffic awareness.
Select Nearby mode and Show traffics on map options.
Select the Tools menu then select Sensors.

PilotAware Operating Instructions Issue 01c July 2016 Software Version 20160708
25
From the Sensors menu select FLARM / AirAvionics Airconn.
With the Sensor selected OFF input:
Pin code 6003
P Address 192.168.1.1
Port number 2000. Then select Sensor ON.
You should now see traffic. Targets nearby are labelled, here passing overhead.

PilotAware Operating Instructions Issue 01c July 2016 Software Version 20160708
26
XC-Soar TE (v6.8) Open XC Soar TE:
Select ‘Fly’
Double tap the display. Select ‘Config’ Select ‘Devices’ Choose a position from A to F by tapping and then
Select ‘Edit’. Select the box to the right of "Port".
Select ‘TCP Client’ ‘Select’ on the left.
In the ‘IP Address’ box enter 192.168.1.1 In the box to the right of ‘Port’ select ‘2000’
In the box to the right of ‘Driver’ select ‘FLARM’
Select ‘OK’ Select ‘New profile’ Select ‘Enable’ With a GPS connected to PilotAware It should connect and say "GPS fix; FLARM" If to download a map and airspace. You will need to switch your Wi-Fi connection to your internet connection from your PilotAware Wi-Fi connection.
Return to XC Soar TE and continue as follows: Double tap the main display again
Select ‘Config Select ‘System’
Select ‘Site Files" --> "Site Files" Select ‘Map database’
Select ‘Download’ and choose the desired map
Next, choose your airspace info by tapping the box to the right of “Airspaces” Select the airspace and tap “Download” Switch your Wi-Fi connection back to the PilotAware Wi-Fi, rather than your internet
connection in the Wi-Fi settings. Return to XC Soar.
Traffic appears on the map when you are zoomed in to a certain level - if you zoom out, it disappears. You can see traffic as a blue triangle.
The software should as default display a "FLARM radar" display on the main display at the
bottom right, when there's traffic. If you double tap it you can get just the radar display on which you can select North Up or Track Up under the various menus, and zoom in or out, up
to 10km.

PilotAware Operating Instructions Issue 01c July 2016 Software Version 20160708
27
If more than one bit of traffic is displayed, you can select it and it'll tell you the relative altitude and the distance. If you want height in feet, you can select "Config" --> "System" --> "Setup" --> "Units" and select Preset: British or American.
Now that you have PilotAware working It’s always exciting when you get something as innovative as PilotAware working and you will want to explore its features and functions. Therefore, we encourage you to do this at
home before you go flying as this will increase your familiarity and reduce the initial workload when you use it for real in your aircraft.
However, there are some things that you should bear in mind to get you up the learning
curve more quickly. It is very important that you use the power lead supplied with the PilotAware
Classic at all times. This is because it is a high specification cable (AWG20) that will ensure that there is minimal voltage drop between the supply and the PilotAware
Classic Unit. It is also very important that you use a power supply that will give 5.2V with a
minimum of 2A supply. Not doing this is the single most common source of problems because the Raspberry pi and the peripherals will not work properly without the
correct robust power supply. ANKER products are very good to power PilotAware. Use either the ANKER Power Drive 2 adapter, the ANKER PowerCore 20100 or
PowerCore 10000 power block(s). If you prefer an EASA approved unit, the Charge 2 or Charge 4 from Jeremy Curtis are also very good. www.charge4.co.uk.
The PilotAware Classic will have been tested on assembly and works. However, it will take some time for the GPS to recognize its new position and capture the required
number of satellites. It will not do this without a clear view of the sky, so don’t expect this to happen indoors, even if you put it by the window or can see the sky
through the conservatory. After the first fix has been achieved, it will possibly work from a south facing window unless the glass is high specification as this glass will
block the GPS signals. So do not expect it to work 100% reliably indoors.
Connecting to the PilotAware Configuration Pages is done through your tablet, connected to the PilotAware Wi-Fi Hotspot. With this done, type in http://192.168.1.1 on the browser on your tablet and not on your home computer connected to the internet.
For PilotAware to ‘see’ other PilotAware units , the unit needs to have line of sight. So if you do have two units and leave one in the window and drive off in your car to see if you can pick it up you will, but only for about 600 metres depending on the
density of the urban environment. 869.5 MHz radio waves will penetrate some walls but not many of them so the signal will be greatly reduced. It will be fine when you are in the air, with 20Kms range being achieved with correctly installed units.
Initially set your navigation software to see traffic detected by PilotAware with a 30,000 ft. separation. It’s fun and confidence building but when in flight set a realistic separation to suit yourself. This is done on your navigation software ie EasyVFR Sky, Demon etc.

PilotAware Operating Instructions Issue 01c July 2016 Software Version 20160708
28
Don’t expect to see lots and lots of PilotAware equipped aircraft from day 1. Even with 1000 units flying, the UK is a very large air space.
Read these Operating Instructions and experiment with the configuration of PilotAware and the configuration available on your chosen navigation package.
Forum.PilotAware.com is a great place to share information and get other ideas from other aware pilots.
So what do the lights indicate? On the PilotAware Classic there are several LED’s. These can be seen from the end of the PilotAware Classic enclosure and the Green LED’s on the GLONASS GPS Dongle. So when should they be illuminated and of what use are they. Firstly, there are two lights on the Raspberry Pi computer which is the lower board as you
look into the end of the unit. One is Red and one is Green. The red one indicates that power has been applied to the Raspberry Pi if this is not on then it’s not getting any power.
The second green light indicates when there is a disc access from the Raspberry Pi to the SD
card and vice versa. So this will flash when data is being transferred between the two.
Secondly there are four LED’s on the Radio Bridge, 2 groups of two on the left and right hand side of the board as viewed from the end. The Radio Bridge is the higher of the two
boards as viewed with the thicker antenna on the right hand side.
When you power up the red light on the Raspberry Pi board will light up followed by the green light which will flash as the system boots up. The red Led on the right hand side of the
Radio bridge will also flash.
When the unit has loaded the software and booted up the normal state is for the Red LED on the Raspberry Pi to be permanently on and the on the Radio Bridge the red light will give
single flashes and the Green LED will pulse in groups of 4 flashes.
When the GLONASS GPS has achieved a satellite group fix it will flash green with a period of
about 1 second. Also if you look at the home page on http://192.168.1.1 you will get an indication of how many satellites have been captured. This should normally be above 5 but ideally 7 and above when outside.
Fault Scenarios If the Raspberry Pi is showing a permanent red and a permanent green light, this may be an indication that the SD card (mounted at the front of the unit to the left and below the thick antenna) is not seated properly. Turn the unit off and check that the SD card is seated properly by pushing it in and feeling for a mechanical lock.
If the GLONASS GPS is not flashing green this means that you have not captured any satellites. Position the unit so that it can see the sky preferably outside. It may take some time to gather the data especially if this is the first fix in a new location.

PilotAware Operating Instructions Issue 01c July 2016 Software Version 20160708
29
License, Setup, Configuration and Information Pages. PilotAware allows you to use its Wi-Fi interface to gain access to system information and to configure your unit to meet your specific requirements. To gain access to the information available from PilotAware connect to the PilotAware Wi-Fi hotspot and open a browser on your tablet or phone and in the address bar type:
192.168.1.1 and press go. This will bring you to the….
Home Page You will see a page similar to the following screenshot which is the ‘Home’ page. If it doesn’t look like this, then select the ‘Home’ tab from the selection bar to select the ‘Home’ page from any of the screens. When working properly the illuminated cells, column 1, rows 6-10 should all be green as shown.
Software Version Firstly, the home page will tell you which version of software you are using and when it expires. When the software expires PilotAware will sleep and a new license will need to be bought. You will receive an email in advance of this date so that you can renew the licence to maintain continuity of use. For example, the screenshot above shows the version of software as 20160708. The nomenclature convention used is YYYYMMDD, therefore this shows that the software running is the version released on 8th July 2016. Planned software updates will generally be every 3 months. If there is an intermediate maintenance release you will be notified by email or notification on the Forum so that you can keep your software up to date. Software updates have been automated and can be achieved by connecting your PilotAware unit to your broadband router via an RJ45 Ethernet cable. To do this select the ‘Updates’ tab from the banner at the top of any information page. Please see the section on Software Upgrades on how to do this.

PilotAware Operating Instructions Issue 01c July 2016 Software Version 20160708
30
License Similarly, the licence expiry date also uses the nomenclature YYYYMMDD, therefore the above example shows the licence expiry date to be 1st January 2017.
PilotAware Interface and Status Information.
The information available from the home page gives the following information. Please don’t be alarmed at this, it’s not necessary that you know or understand all or any of this and there isn’t going to be a test. However, at PilotAware we are aware that lots of customers like this technical stuff and we don’t need to keep it secret. So, reading from the top to the bottom of the table:-
HOSTID This shows the MAC address of the Raspberry Pi computer. This is l inked to your l icense which will only work on that Raspberry Pi and only when its connected to a PilotAware Bridge.
PLATFORM This shows what model of Raspberry Pi computer is being used. The software will auto detect which Raspberry Pi is being used and enable the correct functions.
ETHO-IP This is the IP address of the wired Ethernet l ink if it is being used.
DATE This shows the current date and time
UPTIME This shows the amount of time that the unit has been running since reboot or
power down. It also shows the CPU core temperature. The absolute maximum core temperature should be no greater than 85 degrees Centigrade. This is useful if you suspect that the unit is overheating due to being positioned in a very hot location like the coaming in full sunlight for a long time.
NAVIGATION This shows the number of tablets connected to PilotAware (max 4) and running
navigation software. Up to 4 tablets or smart phones can be connected simultaneously each running different navigation packages if you want.
ADS-B (DVB-T) Number of ADSB messages received since last power up. (+ the number of packets in the last 5 seconds)
TRX (RXTX) Number of P3I TX RX (The PilotAware Radio) and CRCFAIL messages since last reboot. CRCFAIL = received packets fail ing the checksum
PRESSURE ALTITUDE This gives the various outputs from the barometer working to local pressures.
GPS GPS information mode and satell ites connected normally between 5 and 8 but could be more. Whether you have a good or invalid fix and whether the mode is 2D
or 3D.
USB 1d6b:0002 What is connected to the USB input
USB 20bda:2838 What is connected to the USB input
USB 1546:01a7 What is connected to the USB input
USB 148f:5370 What is connected to the USB input

PilotAware Operating Instructions Issue 01c July 2016 Software Version 20160708
31
Interface Status Column 1, lines 6 to 10 shows the status of the individual interface. All greens are good with either red or amber being used to aid system fault diagnosis as the following table shows.
NAVIGATION Red ADS-B (DVB-T) Red No ADSB Messages are being received. Check that the ADSB
dongle is connected. The messages count should be incrementing as new traffic is recorded.
TRX (RXTX) Red 3PI radio is not working. One of the reasons that this will show red is that there is not a good GPS fix. Check how many satellites are being received minimum 5. Also check how many messages have been sent (Tx) or received (Rx) as to a clue to any miss-operation. Normally there will be considerably more (Tx) than (Rx).
PRESSURE ALTITUDE Red This will show that the barometer is not functioning correctly. Check that power lead and power supply. Reboot and try again.
GPS Red Shows GPS inoperable usually due to not having a good view of the sky. Do not expect the GPS to work indoors. Also check that the GPS has a good mechanical and therefore electrical connection by removing and inserting the dongle into the USB socket a few times. Also if there is not a good GPS signal then lines 7 and 8 will probably be red as well as PilotAware will not be able to determine the location of traffic.
Configuration Page The configuration page is reached by selecting the Configure tab on the top banner of any
page. The configuration page will look like the following screenshot.

PilotAware Operating Instructions Issue 01c July 2016 Software Version 20160708
32
The configuration page allows you to change many of the setting in PilotAware to suit your requirements. The configurable items are from the top down as follows. Hex-ID (Manual) If you have a transponder in your aircraft, you must input your ICAO number in
here so that PilotAware ignores your own 1090 transmissions. This is a Hex code is 0-9, A-F. No other letters. Please make sure you do this carefully and correctly. Even if you don’t have a transponder in your aircraft please put the unique Hex -ID for your aircraft so this can be displayed if chosen. If you don’t know the Hex -ID, it
can be found in the UK by searching your aircraft registration in the G-INFO database. WWW. publicapps.caa.co.uk/modalapplication.aspx?appid=1
Flight-ID This is how your fl ight identification will be displayed to other aircraft navigational software when your position is received. Usually the aircraft registration is put in here but it can be FRED if you want. PilotAware will not save il legal entries
Group-ID This is so that you can associate yourself with a group of aircraft on a fly out or a
club event. All aircraft in the same group as you will be bracketed with the ‘#’ character, so will appear as #Group-ID#. This is set to PAW-Group by default. Change it as required or leave blank.
Aircraft Type Insert your Aircraft Type so that its type can be shown on the navigational software if it has the capability so to do.
Display Traffic Info This gives you the option of how traffic is identified on your navigational
software. Either showing the REG-ID or the Flight-ID or alternating the two.
Modes S separation This gives you the option to set the threshold for Mode S alerts or disable as required. See section on Mode S for best option for you. This is only present in the Pi2B version.
Mode S Detect This gives you the option to set the Mode S sensitivity i.e. at what signal strength the detection is triggered. See section on Mode S for best option for you. This is
only present in the Pi2B version.
Mode S Select This enables the Mode S functionality. Select Modes S to enable. The default condition is disabled ie None. Please read the section on Mode S to ensure that you understand its operation before enabling. Only present in the Pi2B version.
License Key This is your 16 digit l icence key specific to you and the Raspberry pi you have registered. Please note that the numbers are HEX characters that is 0-9 plus
ABCDEF. There are no other letters permitted such as “O”. Be careful not to mix up ‘B’ and ‘8’, 0 (zero) and O.
Volume control This allows you to adjust the output volume from the Pi to help you interface into your audio system. On each change of the setting the words “PILOT AWARE” are output from the 3.5mm audio out socket of the Raspberry Pi so you can check the
volume as it changes. Also outputs “PILOT AWARE” during boot up. This is only present in the Pi2B version.
USB Settings These should normally be left at the default settings, but allow you to set the interface including the baud rate individually for each port if required.
Port 1 Top left USB port (with the Ethernet port to the left).
Port 2 Bottom left USB port (with the Ethernet port to the left).
Port 3 Top right USB port (with the Ethernet port to the left).
Port 4 Bottom right USB port (with the Ethernet port to the left).
Log interface message This allows certain debug messages to be sent to the logging screen, this is useful if you experience an issue, and need to l ia ise with Technical Support
Save Use this button to save the configuration changes you have selected. Wait until the page refreshes to ensure that this has been accepted and stored in your
Raspberry Pi . If you don’t do this your changes will not be saved.
When making a change you must select save and get a refresh for the changes to be saved.

PilotAware Operating Instructions Issue 01c July 2016 Software Version 20160708
33
Logging System logging data can be seen by selecting the logging page from the selection bar on any
page.
This information is only really intended to be used if you experience an issue, Technical Support may ask you to send a copy of this logging screen, after enabling some of the flags to control the output messages.

PilotAware Operating Instructions Issue 01c July 2016 Software Version 20160708
34
Traffic Traffic being received by PilotAware can be seen in real time by accessing the Traffic page from the selection bar on any page. The traffic Page will look something like this.
The traffic page gives information on both P3I 869MHz and ADSB 1090MHz reception and the data can be interpreted as follows. HEX(7) This is the 6 Digit ICAO Hex code of the transmitting aircraft.
REG This shows the registration of the aircraft transmitting the signal.
SQ This shows the aircraft squawk code, if the transmitting aircraft is squawking. If the PilotAware has been associated with a Group-ID on the configuration page then this Group-ID will appear in the SQ column.
Distance-KM This shows the distance in Kilometres between you and the transmitting aircraft. If there is no distance in here this is because no GPS positional data is being
received. This will be a bearing less mode S transmission.
ALT-FT This shows the relative alti tude in feet between you and the transmitting aircraft. For aircraft transmitting ADSB or P3I this will be calculated from the GPS data received. For Mode S transmissions, this will be the transmitted altitude.
BR This is the bearing of the target relative to you in analogue 12hour clock format. This will obviously contain no information for bearing less targets such as Mode S.
This bearing will be relative to North if you are not moving.
SIG
This is a number analogous with the ADSB or Mode S signal received. This non absolute number is used to determine the threat from bearing less targets and the background of the cell will transit through white green amber red amber green white, Mode S traffic approaches to and retreats from your aircraft. A
signal strength of 0 (zero) indicates that it is a PilotAware P3I transmission.
Vers Vers field of ADS-B DF17 packet
NACp NACp field of ADS-B DF17 packet
SDA SDA field of ADS-B DF17 packet
NICa NICa field of ADS-B DF17 packet

PilotAware Operating Instructions Issue 01c July 2016 Software Version 20160708
35
SIL SIL field of ADS-B DF17 packet.
SILs SILs field of ADS-B DF17 packet
Aircraft Owner This shows the aircraft type and owner. Private in the case of most GA aircraft.
Updates The updates page shows if there are any software updates applicable to your unit. The updates page can be accessed by selecting the Updates tab from the selection bar on any page. The updates page will look something like the following screen shot.
Using this page, the system will check for any software updates. To activate this page, you will need to be connected to a broadband router via an Ethernet cable. Please see the section on software updates which will guide you how to do this.
List Track The list track page gives a list of the information collected on your latest flights. The list track page can be accessed by selecting List Track from the selection bar on any page. The page will look something like this

PilotAware Operating Instructions Issue 01c July 2016 Software Version 20160708
36
A software tool is available on the PilotAware forum that can analyze this data if required. In essence it contains a complete record of your flight, including all traffic information received by PilotAware. A little geeky but of interest to some.
Save Track This button allows you to save a track manually, although the data is also automatically
saved every minute whilst the power is on.
Automatic Software Upgrade. PilotAware users will be informed via the forum, forum.pilotaware.com, of new software updates for maintenance releases, improvements or new functionality. In software versions of 20160511 or later it is possible to detect whether you are running the latest software and upgrade to the latest software if you wish. To do this you will need to first connect your PilotAware raspberry Pi unit to your Broadband router via an Ethernet cable before powering up the PilotAware. If you are unsure an RJ45 Ethernet cable looks like this.
When powered up, log onto your PilotAware Wi-Fi from your PC, tablet or IPhone and type in the web access code 192.168.1.1. Select Updates from the options menu
Select Check for Updates Wait for a while
Response ‘Checking for updates’
You will be informed if there is a more recent software update than the one you are using. If there is then the install box will be highlighted and PilotAware New Version will be shown.
Select Install and the new revision of software will be installed. This will take some time so have a cup of tea or leave it and do something else.
Please note that during this operation there is no visual indication that the software is being downloaded other than that the page is being refreshed. When the software has been downloaded you will lose the Wi-Fi connection from the PilotAware unit to the tablet as the
PilotAware unit reboots. When this happens re- search for the WI-FI as it boots up and log onto the PilotAware Wi-Fi as normal. Open a browser on your tablet or phone and in the address bar type: 192.168.1.1 and press go. This will bring you to the Home Page where
you will see confirmation that the new software the new version of software has been downloaded through its Version being displayed at the top of the page.

PilotAware Operating Instructions Issue 01c July 2016 Software Version 20160708
37
Please Note. If your home router uses the subnet 192.168.1.xxx Then you will not be able to connect from your wireless tablet, whilst it is connected to your home router. This is because the Wired and Wireless networks cannot use the same subnet. There are 2 ways to overcome this.
Option 1 connect to your home network, and leave for 20 mins
turn off disconnect from home network
turn on
connect from tablet
Option 2
connect to your home network,
access your router connected client page, to discover the IP address allocated
from another machine connected to your home network, connect to the address indicated on your router
Note if you are having difficulty then remove the WI-FI dongle to ensure forced use of the wired interface.
Option 1 is probably easier, connect, leave for 20 mins and come back later. Log onto the
PilotAware Wi-Fi and open a browser on your tablet or phone and in the address bar type: 192.168.1.1 and press go. This will bring you to the Home Page where you will see
confirmation that the new software the new version of software has been downloaded through its Version being displayed at the top of the page
Manual Software Upgrade
If the software that you are running is earlier than Version 20160511 or if you need to revert to a manual software upgrade this can be achieved as follows.
SD Card Formatting Firstly, you will need to download the SD Card Formatter. On your PC browser go to the
following website:
https://www.sdcard.org/downloads/formatter_4/
Download the appropriate Windows or Mac version of the SD card formatter. Click “SD
Formatter for Windows Download” or “SD Formatter for Mac Download” from the menu on the left.

PilotAware Operating Instructions Issue 01c July 2016 Software Version 20160708
38
Next select the blue “Accept” button to download the software (SDFormatter4.zip). Double
click the ZIP file to open it and run “setup.exe” (Windows)Click “Run” if you get a security warning at this point and follow the instructions on-screen. Start the SD Formatter program.
Insert your micro SD card into your PC or MAC (normally using an SD Card adapter) Select the drive letter representing the Micro SD card, usually this is E: or F: but do check,
especially if you have other drives or USB sticks attached to your computer! Click the “Option” button:
Select the FORMAT TYPE dropdown and choose “FULL (Overwrite)”: Select the “FORMAT SIZE ADJUSTMENT” option and choose “ON”: Click “OK” Double check you have the correct drive letter for the Micro SD card and click “Format”
Click “OK” – it will usually take several minutes to format the card and once started you must not stop the process until you are informed that it is complete. If the format appears to be complete in a few seconds or a couple of minutes, you probably have not selected “FULL (Overwrite)” which is necessary for the format to work correctly. Exit the formatter when the format has finished, you do not need it once the formatting is
complete.
Download The PilotAware Software From the PilotAware forum downloads section here: http://pilotaware.lode.co.uk
Selecting download the software which will download the latest version of the PilotAware
software. The releases are named by year, month and date e.g.:
“PilotAware Release 20151030” is the version released on 30th
October 2015. This will be a ZIP file named similarly to the release. E.g. PilotAware.20151030.zip
Copying The Files to The Micro SD Card The PilotAware ZIP file should now be in your Downloads folder:

PilotAware Operating Instructions Issue 01c July 2016 Software Version 20160708
39
Double click it to open the ZIP file:
Double click the folder inside the ZIP file to show the contents:
Select ALL the files and subfolders in the folder NOT THE FOLDER ITSELF. You can do this by either clicking the first file, press and hold shift and click the last file, this
will select all the files, let go of the shift key. Alternatively click one of the files, then hold CTRL and press A to select them all.

PilotAware Operating Instructions Issue 01c July 2016 Software Version 20160708
40
Drag all these files onto your Micro SD card’s drive letter to copy them to your Micro SD card. Alternatively, right click on the highlighted files and select Copy, then left click on your Micro SD card Removable Disk icon and right click then select Paste.
The copy will take a couple of minutes.When it has finished, right click on the Removable Disk icon for your card and select “Eject”. Physically remove the Micro SD card from your PC.
The MicroSD card can then be put back into your PilotAware, which can then be powered up
again and will automatically run the new software. Note: After performing a manual software update you will have to go to the Configure screen and re-enter your original License Key as this will have been deleted during the card formatting process.
Mode S Detection (only available when using Pi2B)
Warning If you are not absolutely sure on the information that this facility gives you and what you
should do with it, we recommend that you disable Mode S detection before you fly so that it is not a distraction to you until you become familiar with its operation. Note. The
default condition is that Mode S is disabled until you enable it on the Configuration Page under Mode S Select.
Software release(s) 20160511 and later contains the ability to detect and display
information on transmissions from Mode S transponders.
How Mode S Detection Works Unlike ADSB Out or P3I equipped aircraft, Mode S transponders are devices which only
transmit (using 1090MHz) when interrogated by a ground radar signal or an aircraft TCAS System. Unlike ADSB, raw Mode S transponder signals give no GPS based positional data
and so their position bearing and distance cannot be accurately determined by PilotAware.

PilotAware Operating Instructions Issue 01c July 2016 Software Version 20160708
41
PilotAware will, however, detect the altitude of the transmitting mode S transponder, what code it is squawking, the aircraft’s registration and ICAO number, thus allowing each transmission to be individually identified and processed. So mode S detection has deficiencies from both P3I and ADSB transmission detection as you will never know exactly where the Mode S transmitting aircraft is, only its height and whether the received signal is getting stronger or weaker.
However, many experienced pilots have requested that we include the detection and
warning of the presence of Mode S equipped aircraft in the latest software release so that they can use the information presented to enhance their primary scan and hence, inform
their operational decisions.
Mode S signals are captured and used to drive both geographic and voice alerts at pre-determined levels.
The signal from an approaching mode S transponder will increase non linearly as it gets close to, and diminish non linearly as it retreats from your aircraft. As it gets closer, the strength of the signal received increases non linearly. The absolute signal strength at any particular distance is not a constant for all installations so we can only work with changes in relative strengths. To add to this, Commercial Air Traffic (CAT) transponders transmit Mode S at far higher power levels than used by GA traffic. PilotAware takes this into account by the provision of user selectable ‘Mode S detector range’ options. (see below) When a mode S transmission is detected and it is above any one of a group of pre-set strengths (selectable bu the user in the PilotAware CONFIGURE page) it will trigger a voice alert direct from the PilotAware audio output and send a message to your chosen navigation software package.
Received mode S signal strength increases non linearly as target gets closer
Absolute transmitted mode S signal strength varies from
aircraft to aircraft
Visual Alert
In addition to the voice command from the PilotAware unit, a visual alert including the relative height will appear on your Tablet as defined by your navigation software supplier.
On SkyDemon this will be by a series of rings around your aircraft getting smaller and

PilotAware Operating Instructions Issue 01c July 2016 Software Version 20160708
42
changing through Green Amber Red as the aircraft get closer. On EasyVFR this is done by the appearance of a banner alerting you to the danger and its status. The display of Mode S alerts in other navigation systems will vary. Please note How this is shown on the navigational tablet is not determined by PilotAware Ltd but by the navigational software manufacturer.
It is important to be clear in your own mind that a mode S signal will not give you an accurate horizontal separation only a vertical one. So you will know the relative height
compared to your aircraft height but not the distance or bearing. Therefore, effective action can only be taken as a result of your own observation, supported by prompts from
PilotAware. The relative vertical separation will help in this regard as it dictates whether you need to look for the target above, below or at a similar altitude to your own, but remember
you will still need to carry out a full 3600 scan and you are Pilot in Command.
Please note if the contact is from the high power output of Commercial Aircraft Mode S transponders, it is possible that you will not be able to see the contact as it will be too far away. (See Mode S Detection Range – below)
Mode S Separation
PilotAware allows you to set the vertical separation for the Mode S Alerts relative to your own aircraft. This is done by logging onto your PilotAware WiFi hotspot and typing in
192.168.1.1 and selecting Configure from the Options Menu.
Select Mode-S Separation
This will give you the following options +/- 500 ft This will detect and display Mode S traffic up to +\- 500ft vertical separation from your
own position and ignore others
+/-1000ft This will detect and display Mode S traffic up to +\- 1,000ft vertical separation from your own position and ignore others
+/- 2000ft This will detect and display Mode S traffic up to +\- 2,000 ft vertical separation from your own position and ignore others Start with this one
+/- 4000ft This will detect and display Mode S traffic up to +\- 4,000 ft vertical separation from your own position and ignore others
+/- 50000ft This will detect and display Mode S traffic up to +\- 50,000 ft vertical separation from your own position and ignore others. Not Recommended
In the above menu the 50,000 ft separation will give a significant amount of data and is only used for testing purposes.
Selecting +/-500ft will minimize the number of alerts but will only warn you of Mode S transmitting aircraft within this separation from your aircraft. The other settings wil l get an increasing amount of alerts from a greater separation range. It is for you to decide the separation range that you are personally comfortable flying with.

PilotAware Operating Instructions Issue 01c July 2016 Software Version 20160708
43
Choose which is best for you by experimentation or better still discuss this with more experienced pilots or your club CFI. So that you got get inundated with information it may be best to choose a closer separation and a lower sensitivity as described below until you are familiar with the information that PilotAware gives.
Mode S Detection range In addition to Altitude Separation, PilotAware allows you to set your preferred Mode S Detection Range which varies the sensitivity of the Mode S Alerts to match the environment in which you will be flying. This is done by logging onto your PilotAware WIFI hotspot and
typing in 192.168.1.1 and selecting Configure from the Options Menu. Select Mode-S Detect
This will give you the following options
Ultra-Short Range
This will give you the lowest sensitivity and is intended to minimize alerts when operating in high Mode S strength environments such as being adjacent to or when transiting through the overhead of major airports.
Short Range This is a low alert setting for GA use in busier environments. Start with this one.
Medium Range This is the default setting a higher alert for General aviation use.
Long Range This setting will bring in alerts from a greater range, e.g., when operating in low occupancy (in aviation terms) rural environments with few aircraft.
Testing (noisy) This is an extremely high sensitivity range intended to allow maximum alerts for test purposes only. It is recommended that this is not used in normal use
Voice Alerts (only Available when using Pi2B)
Introduction Software release(s) 20160511 and later contains the ability to issue voice alerts. These are alerts, not commands. They are a verbal indication of local traffic and contain no advice on
the action to be taken once issued.
As PIC it is your responsibility to take the necessary action. Please be aware that the issue of a voice alert does not give information on all traffic in the vicinity, only those that can be
seen by PilotAware and from which only information has been received. There will be other traffic that is not being picked up so maintain your preferred visual scan.
Warning It is vitally important that you understand and acknowledge that there are concerns that a
reliance on a prompted lookout from any EC device including PilotAware could reduce the effectiveness of the visual scan.

PilotAware Operating Instructions Issue 01c July 2016 Software Version 20160708
44
For instance, there may be a danger that your attention will be focused on the one area prompted whether this be by voice or visually and therefore, you maybe spotting the wrong aircraft, or missing other aircraft that are outside the area prompted by PilotAware. Some pilots may become intrigued by the information provided on local aircraft, or fixated on the display or voice commands, at the expense of maintaining their necessary visual scan.
Pilots may also incorrectly assume that all aircraft can be seen on their EC device. This is not
the case.
It must therefore be stressed that PilotAware does not replace the need for an effective visual scan which is your primary responsibility.
If at any time you feel that you are distracted by PilotAware turn it off until you are more
familiar with its operation.
Voice Alert Output The voice alert output is available from the 3.5mm jack on the PilotAware unit. It does not
come from your tablet or iPhone, although some navigational systems do incorporate their own audio alerts. The output volume is adjustable and the output can be fed into your headset, intercom or other communication device as you wish using a 3.5mm male to male
connecting lead. Please note that the interface to your communications equipment will be bespoke to your requirements and to your design. Information on connecting to the more
common units will no doubt be available as more installations are completed.
A direct connection to noise canceling headsets such as Bose or Light Speed Zulu has proven most effective.
Adjusting the Output Volume
The voice alert subroutine is always on. However, the volume can be raised or lowered as required to the maximum and minimum available. This is done by logging onto your
PilotAware WIFI hotspot and typing in 192.168.1.1 and selecting Configure from the Options Menu.
Midway through the table you will see the volume control.
Selecting ‘+’will increase the volume Selecting ‘-’will decrease the volume.
There is an upper limit to which the output volume can be raised. Above this further
amplification will be needed if a higher output is required. The output impedance and other electrical characteristics can be found in the on line Raspberry Pi literature. Modifications
to the audio output of PilotAware Classics are not covered by the Warranty. As the volume is increased or decreased an announcement of “PILOTAWARE” will be made so that you can
vary the output for your needs.

PilotAware Operating Instructions Issue 01c July 2016 Software Version 20160708
45
Type of Audio Alert.
There are two type of Audi Alert given by PilotAware.
P3I and ADSB Both P3I and ADSB signals give GPS positional data so they are able to accurately position in 3 dimensions, aircraft nearby to your own aircraft. This allows PilotAware to give an audio alert very similar to that which you would get from an ATC service. This is in the format “Traffic, One O’clock, two hundred feet, level, 9 kilometers”
PilotAware will always call out vertical separation in feet and distances in whole kilometers rounded down to the nearest kilometer.
PilotAware ADS-B and P3I Audio Alerts.
ADSB and PilotAware P3I Audio Alerts are generated when aircraft transit between 3 zones around the host aircraft.
These Zones are Pre set and are not configurable
Zone 3 +/-2000ft <= 10Km Zone 2 +/-1000ft <= 5Km
Zone 1 +/- 500ft <= 3Km
10km +/- 2,000ft
5 km +/- 1,000ft
Zone 1
3 km +/- 500ft “Traffic, 10 O’clock, 500 feet, level, 3 kilometers”
PilotAware ADS-B and P3I Audio Alerts.Audio alerts are given by PilotAware as approaching aircraft enter or leave specific pre set zones. As we have positional data from ADS-B and P3I we can be very specific about height distance and
bearing.
Please note Audio Alerts are onlygenerated as approaching aircraft
transit into closer zones. If they don’t then no further alert is given.
In the phrase “Traffic, One O’clock, two hundred feet, level, 9 kilometers”, the reference to level is where to direct your scan, not that the aircraft is at the same altitude as you. In this example an aircraft at 200 ft 9 kilometres away will appear as level although at that point it
will be 200 ft above you.

PilotAware Operating Instructions Issue 01c July 2016 Software Version 20160708
46
Mode S Mode S is considerably less accurate in its positioning information in that it gives no GPS co-ordinates. See section on Mode S detection. From the signal that we receive we can only detect its height relative to 1013.2Mb and the signal strength of the received transmission. So the voice commands have to be in a different format.
The signal from an approaching Mode S transponder will increase non linearly as it gets close to, and diminish non linearly as it retreats from your aircraft. As it gets closer, the
strength of the signal received increases exponentially. The absolute signal strength at any particular distance is not a constant for all installations so we can only work with relative
strengths. A voice alert is generated as the signal strength changes from one strength band to another. This is manifested in the following voice alerts.
“TRAFFIC NOTICE” – Advises you of the presence of a Mode S contact at the maximum range
for your selected detection setting. “TRAFFIC ALERT” – Advises that the aircraft is continuing towards you. You should now be maximizing your visual scan guided by the relative height and also planning and possibly implementing avoiding action. E.g. climbing or descending to increase separation. “TRAFFIC DANGER”- The aircraft is now in relative close proximity and all efforts should be concentrated on a visual scan to locate it, together with any and all appropriate action to maximize separation. Please remember that because of the significantly higher output of CAT transponders, it is possible that you will not be able to visually see the contact for which you have received a voice alert for because it will be too far away.
PilotAware Mode S Detection still maintains 3 zones around the aircraft but the separation and sensitivity values are determined by the user.
Separation Sensitivity
Detection Sensitivity

PilotAware Operating Instructions Issue 01c July 2016 Software Version 20160708
47
Installing the PilotAware unit in your Aircraft. The installation of PilotAware will differ from aircraft to aircraft, depending on the design,
class and licensing authority of the aircraft. In its simplest form PilotAware has been designed as ‘carry on equipment’ that is classified as a temporary installation and therefore
does not need installation approval. This is similar to the fitting and using of a hand held radio in the aircraft.
The golden rule is that the antennas and the GPS must be able to ‘see’ out of the aircraft
and the unit itself must be securely fastened within the aircraft. On conventional aircraft this will usually be in front of the Pilot and passenger(s), however this will differ from
aircraft to aircraft. Experimentation and sharing best practice through the PilotAware forum will identify the best location for each aircraft type and combination. Like all radio signals,
those used by PilotAware get attenuated (weakened) if they transit metal or water (the engine and possibly the skin of the aircraft is metal and you and your passenger are for
practical purposes water. So position the antennas such that they have the best chance of avoiding these. External antennas are by far the best solution.
Some operators will want to make the installation more permanent. This can be done by distributing the PilotAware hardware throughout your aircraft and then connecting the
radio antennas, power, GPS and even the Wi-Fi via extension leads.
If this is to be done, then there are some things that you need to consider. For example, If, you do wish to install an external antenna(s), the manufacturer of your aircraft or importer,
should be consulted as to the best practice used for the installation. Also your licensing authority such as the CAA, LAA, BGA, BHGA or BMAA in the UK, will need to be consulted for
the relevant approval. This may require the granting of permission so to do, a fee and an inspection by an authorized inspector following the installation. As owner of the aircraft it is
your responsibility to ensure that this is done correctly and in order. In other European countries the regulation process may differ and it is your responsibility to ensure that local
regulations are adhered to. PilotAware Ltd will advise but take no responsibility for individual installations in aircraft.
Placing the PilotAware on the dashboard coaming is a popular initial position. However, ensure that the coaming does not get too hot, it can get very hot if its black and there is no
cloud cover in the summer. PilotAware will malfunction if the core temperature exceeds 85% centigrade. This temperature can be monitored on the PilotAware Home page. For more information on antenna location and types please see the article on Antenna
Location on the PilotAware.Com website.

PilotAware Operating Instructions Issue 01c July 2016 Software Version 20160708
48
ADSB Out.
Connecting to a Mode S transponder. One of the very useful features of PilotAware is the ability to share its information with third party equipment. This is particularly useful when you want to use the GPS in PilotAware as the uncertified GPS source to convert your Mode S transponder with extended squitter (ES)
to transmit ADSB-out. To do this you need to obtain a USB-RS232 converter in order to connect to your transponder, each model/type will likely be different. Once connected to
PilotAware you will need to manually configure the USB port for Baud Rate and Transponder type, each type requires differing NMEA messages and rates.
For example, to connect PilotAware to your Funke transponder to give ADS-B Out. You will
need to use a USB -RS232 converter cable. This must be "true" RS232, +/- 12V, and NOT the "TTL" cable variant which is provides only 0-5V signaling.
For the correct pins out see http://docs.fasvig.info/ADS-B/Funke_TRT800A-
H_connection_uncertified_GPS.pdf
Also see later posts on the PilotAware Forum under General Discussion, forum thread, entitled "ADSB out from Funke TRT 800H (when should my plane "show on another?")".
FAQ
I have a question that these operating instructions doesn’t address what should I do? There is a PilotAware Forum that you can join and share your questions and ideas with other PilotAware users. This forum can be found at forum.pilotaware.com. Here you will find a lot of information on installation, operation, enhancements and add-ons that others have done to their PilotAware units. If you find something wrong with these instructions or don’t understand then there is a section here on the documentation. You can help us improve by
posting here.
How do I get my MAC address? You can see your MAC address from two locations
Firstly, from your PilotAware Hotspot name which will appear in the settings on your tablet. The hotspot will be called something like PilotAware-xxxxxxxxxxxx
the xxxxxxxxxxxx - will be the MAC address / HOSTID
Secondly from PilotAware Webserver
if you connect your tablet / PC / mac to the PilotAware Wi-Fi hotspot, then browse to the status web page
http://192.168.1.1

PilotAware Operating Instructions Issue 01c July 2016 Software Version 20160708
49
Go to the HOME page you will see an entry for HOSTID, the number above will be present. This is your MAC address.
I Can’t access http://pilotaware.lode.co.uk/ Whilst Connected to the PilotAware Hotspot. This is correct you will not be able to this from the PilotAware Hotspot as this is merely a clever and convenient way to connect to your tablet without using a cable. It is not an internet connection. To get to access http://pilotaware.lode.co.uk/ you will need to log onto a Wi-Fi connection that does have access to your internet provider such as the Wi-Fi from your broadband router.
My PilotAware seems to be working intermittently and keeps resetting what should I do? IMPORTANT. If you are having any difficulties with the operation of your PilotAware Classic or home built unit then before doing anything else, you should check the power supply and the power lead. This is because the Raspberry Pi needs to be powered by 5.25V and will draw up to 2.0 amps when transmitting over P3I. The conductors in the power lead should have a thickness of 20 AWG or thicker and not cause a voltage drop of greater than 0.25V when presented to the Raspberry Pi. Voltages below 4.75V will cause the Raspberry Pi to reset and the peripheral devices such as the GPS and WIFI to be unreliable. The power supply should be a good quality power pack or a good quality DC/DC converter. Cheap cigarette lighter converters will just not do and may induce noise into the aircraft DC power buss which may cause radio and other interference.
Why can’t I get Voice Alerts and Mode S detection when using a Raspberry Pi B+? The Raspberry Pi B+ is an excellent processor but it does not have the processing power to consistently and accurately do all the things that we want it to do when including Voice Alerts and Mode S detection. Consequently, the decision was made that these functions would only be supported on a Raspberry Pi 2B. The PilotAware Classic has a Pi2B and runs all the functionality out of the box. If you want to upgrade your homebuilt unit to a Pi2B
then you will need to purchase a new License to gain access to the new functionality. PilotAware software will automatically detect which version of Pi is being used.
Can I have an ADSB only version of PilotAWare?
No, we do not encourage this as the whole ethos of PilotAware is to get the maximum
number of people to be able to see and be seen by the majority. Therefore, the inclusion of the P3I Tx/Rx in the 869MHz band is very important for those that cannot afford or don’t
have ADSB equipment. By using PilotAware you are helping to expand electronic conspicuity to the maximum number of people. Also the Bridge is required to feed local barometric
pressure to the processor so that accurate height and separation between the various systems is maintained. PilotAWare software will not run without the presence of a Bridge.

PilotAware Operating Instructions Issue 01c July 2016 Software Version 20160708
50
My PilotAware Classic GPS isn’t working out of the Box. All hardware is tested by Aviation Technology and Hardware before it is dispatched and the GPS will have been working before it left the production facility. When the GPS moves to a new location it will need to collect data (get a Fix) from the satellites. The Time-To-First-Fix (TTFF) depends on the startup mode, with cold starts giving the longest TTFF. Factors affecting boot mode and how long this will take include:
1. Whether or not the GPS has valid almanac and ephemeris data. 2. Incoming signal levels.
3. Whether the unit is within 60 Miles / 100 KM of location of its previous fix. 4. Length of time since previous fix.
So the further away you are from where and when the GPS was last used the longer it will
take to re boot. If the GPS isn’t working then neither ADSB nor P3I detection will work.
I have put together my PilotAware Classic and it won’t work in the conservatory/kitchen/bedroom/1959 split-screen Volkswagen. Why is this? PilotAware is designed to work in an aircraft with the correct antenna and a GPS that can see the satellites in the upper atmosphere. Trying to operate this inside will not always work. You may think that you can see the upper atmosphere from your conservatory but
there is usually lead and other chemicals in the glass that will attenuate the weak GPS signal. Also if the GPS has been moved over a significant distance or not been used for a
while it will need to capture its almanac and ephemeris data and will require a strong signal to do this. Take the whole unit outside ensure the power supply and cable are good quality
and it should work. A minimum of 5 satellites are required.
Do I need to connect PilotAware classic to a transponder for it to work? You do not need to connect your PilotAware classic to a transponder for it to work. However
for technically aware users, we have provided the ability to interface it to third party equipment if they so desire. Caveat emptor. This is usually done so that the GPS available in PilotAware can be used as a positional source to convert a Mode S transponder with ES (Extended Squitter) to one capable of outputting ADSB signals. If this sounds like too much technical jargon don’t worry you don’t need it now, but it may be useful later if the take up of ADSB becomes anything more than an expensive dream or expensive mandate. However, if you have a Trig or Funke transponder or other suitable transponder then this is a real advantage that Pi lotAware gives you at no extra cost.
Where can I get more information.
To read more on Installation, Antennas, Power supplies Pilotawarehardware.com For Technical information and further information on Installation, Antennas, Power Supplies Pilotaware.com

PilotAware Operating Instructions Issue 01c July 2016 Software Version 20160708
51
For technical discussion and to share hints and tips on installation, operation, further developments Forum.pilotaware.com
Does PilotAware detect FLARM. Unfortunately, it’s not possible at the moment to see aircraft equipped with FLARM. FLARM is a proprietary system which is encrypted because that’s the way the company that produces FLARM wants it to be. PilotAware is an open interface system so we are happy for others to detect us. However, we do not intend to decrypt FLARM. There are legal ways of detecting FLARM which we may investigate as an enhancement to PilotAware in later releases if there is sufficient demand.
Addendum
ETSI Standard
The Radio Bridge on PilotAware has been specifically designed and developed for use with PilotAware. It operates in the open 869.5MHz band which is license free in Europe.
However, this frequency is not open in all countries around the world. If you want to use PilotAware outside the European Union, please check that it is legal so to do.
The Radio Bridge has been designed and tested compliant to ETSI (European Standards
Institute) EN 300-220-2 Electromagnetic compatibility and Radio Spectrum Matters (ERM); Short Range Devices (SRD); Radio equipment to be used in the 25 MHz to 1 000 MHz
frequency range with power levels ranging up to 500 mW; Part 2: Harmonized EN covering essential requirements under article 3.2 of the R&TTE Directive.
LAA If your aircraft is administered by the Light Aircraft Association and you need information on minor mods to your aircraft with regards to PilotAware. See the website here LAA
BMAA If your aircraft is administered by the British Microlight association and you need
information on minor mods to your aircraft with regards to PilotAware. See the website see here BMAA
Other Useful Websites Sky Demon
Runway HD Easy VFR
Air Navigation Pro Sky-Map XC Soar
PilotAware Aviation Technology and Hardware PilotAware Forum

PilotAware Operating Instructions Issue 01c July 2016 Software Version 20160708
52
Acknowledgements This documentation has been produced using input from various sources amongst the PilotAware Team and Testers. We would like to acknowledge their continuing help and
support in providing their time and effort in its compilation.
Changes in Latest Software Version 20160708 Fixes and enhancements
- Fixed bugs associated with lockups caused by audio messages
- Fixed bugs causing 'lost GPS' and 'Wi-Fi disconnect'
- Add specific messages for different systems, based upon supplied PIN Code:
NAV_SKYDEMON = 6000
NAV_RUNWAYHD = 6001 NAV_EASYVFR = 6002
NAV_AIRNAVPRO = 6003
- Added relative bearing into traffic display - Added Core CPU Temperature display to web page
End of documentation