pilot course photoshop part 2: intermediate · photoshop part 2: intermediate prefa c e preface ....
TRANSCRIPT

Pilot Course Photoshop Part 2: Intermediate
Workbook
Edition 1 June 2010


iii
Photoshop Part 2: Intermediate
Edition 11, June 2010 Document number: 3707-2010
Photoshop Part 2: Intermediate

iv
Photoshop Part 2: Intermediate
Pref
ace
Preface This pilot course provides demonstrations and hands on exercises using Photoshop. It includes transforming images, making selections, colour and tone adjustments, some basic layers work, adding text and text effects to images. Level: Intermediate. You would be expected to have a basic understanding of Photoshop’s user interface and how the Toolbox, Palette and Menu functions work before attempting the exercises in this course workbook. An extended workbook which covers exercises in this and the Introductory course can be downloaded from: http://www.ed.ac.uk/is-skills/documents-catalogue
Lesley PearsonJune 2010
If you require this document in an alternative format, such as large print, please leave a message on 0131 650 3350 or email [email protected]. Copyright © IS 2010 Permission is granted to any individual or institution to use, copy or redistribute this document whole or in part, so long as it is not sold for profit and provided that the above copyright notice and this permission notice appear in all copies. Where any part of this document is included in another document, due acknowledgement is required.

v C
ontents
Contents Section 1: Transforming images ..................................................... 1
Exercise 1 - Rotating and flipping images ................................................ 1 Exercise 2 – Straightening images........................................................... 2 Exercise 3 – Scaling and Skewing ........................................................... 3 Exercise 4 – Warping ............................................................................... 4
Section 2: Making selections .......................................................... 5 Exercise 1 - Marquee Tools ..................................................................... 5 Exercise 2 – Altering selections ............................................................... 6 Exercise 3 – Lasso Tools ......................................................................... 7 Exercise 4 – Magic Wand ........................................................................ 8 Exercise 5 – Magnetic Lasso ................................................................... 9 Exercise 6 – Quick Mask Mode.............................................................. 10 Exercise 7 – Extracting a selection ........................................................ 11
Section 3: Basic Tonal and Colour Corrections .......................... 12 Introduction ............................................................................................ 12 Exercise 1 - Improve contrast using Levels ........................................... 13 Exercise 2 – Improve contrast using Curves.......................................... 14 Exercise 3 – Opening shadows ............................................................. 15 Exercise 4 – Colour Balance .................................................................. 16 Exercise 5 – Changing Hues ................................................................. 17
Section 4: Layer Basics ................................................................. 18 Introduction ............................................................................................ 18 Exercise 1 – New Layers ....................................................................... 19 Exercise 2 – Working with Layers .......................................................... 20 Exercise 3 – Change Layer opacity ....................................................... 21
Section 5: Text ................................................................................ 22 Exercise 1 – Point type .......................................................................... 22 Exercise 2 – Text Colour ........................................................................ 23 Exercise 3 - Text size and text editing ................................................... 24 Exercise 4 – Paragraph type .................................................................. 25 Exercise 5 – Part 1 - Special text effects using Layer Styles ................. 26 Exercise 5 – Part 2 – More special text effects using Layer Styles ........ 27
Photoshop Part 2: Intermediate


1 PhotoshSection 1: Transforming images o
p Part 2: Intermediate
Exercise 1 - Rotating and flipping images 1 With Photoshop launched, open the image file named
informatics_reverse: File > Open [Ctrl+O], navigate to the image file and click Open.
Note - There are two other ways of opening files in Photoshop:
a. Open a Windows Explorer window, navigate to the image then drag and drop the image icon into Photoshop’s workspace.
b. If Photoshop is not already launched, you can open a file and the application at the same time by navigating to the file in Windows Explorer, right-clicking it, selecting Open with from the drop-down menu and then selecting Photoshop from the list of applications offered.
2 Rotation. The image you have opened needs to be turned the right
way up, so select Image > Rotate Canvas > 90° CW
Note that there are other rotation options in the Rotate Canvas menu.
3 Flipping. There is one more action to be carried out on the image. The image has been reversed and so the lettering is back to front (this can happen when a film transparency has been digitally scanned wrong side up, for example). The image needs to be flipped about its vertical axis. To do this, select: Image > Rotate Canvas > Flip canvas Horizontal The image should now be both the right way up and the right way round.
Note about keyboard shortcuts – The underlined letters in steps 2 and 3 above represent keyboard shortcuts used to quickly access the menu and sub-menus. To see which letters represent shortcuts in the top level of the menu, press Alt now. The underlined letters are the shortcut keys. Hold the Alt key when selecting from the top level of the menu. In the sub-menus, you need only use the shortcut key without using Alt. If you use only the mouse to select from menus, the shortcut underlining is not visible. Using the keyboard shortcut to access a top-level menu reveals the underlining in the sub-menus. Practice using the shortcuts for a few minutes, starting with the two above. You will find examples of such shortcuts (and Toolbox button shortcuts) throughout this workbook. You don’t have to use them now, but if are going to work with Photoshop regularly, it will ultimately save you a lot of time and effort if you practise and learn to use them. 4 Close the image without saving. Be careful to close just the image and
not Photoshop.
Photoshop Part 2: Intermediate
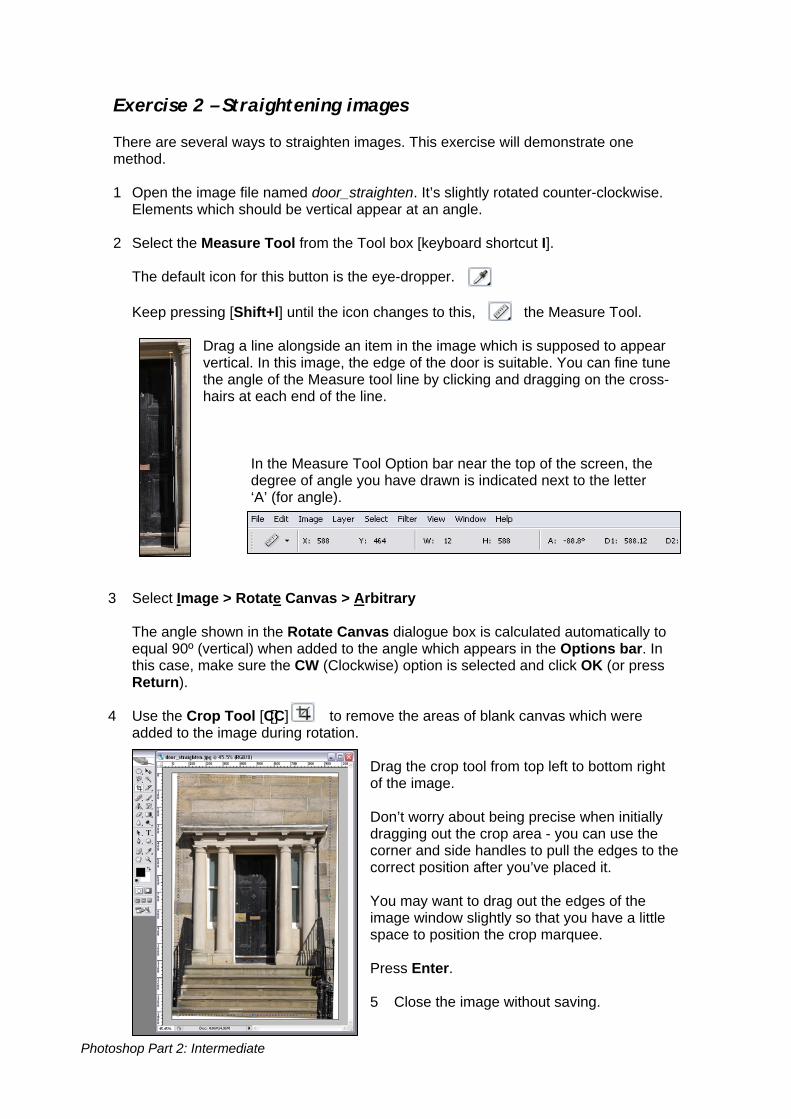
Exercise 2 – Straightening images There are several ways to straighten images. This exercise will demonstrate one method. 1 Open the image file named door_straighten. It’s slightly rotated counter-clockwise.
Elements which should be vertical appear at an angle. 2 Select the Measure Tool from the Tool box [keyboard shortcut I].
The default icon for this button is the eye-dropper. Keep pressing [Shift+l] until the icon changes to this, the Measure Tool.
Drag a line alongside an item in the image which is supposed to appearvertical. In this image, the edge of the door is suitable. You can fine tunethe angle of the Measure tool line by clicking and dragging on the crosshairs at each end of the line.
-
In the Measure Tool Option bar near the top of the screen, thedegree of angle you have drawn is indicated next to the letter‘A’ (for angle).
3 Select Image > Rotate Canvas > Arbitrary
The angle shown in the Rotate Canvas dialogue box is calculated automatically to equal 90º (vertical) when added to the angle which appears in the Options bar. In this case, make sure the CW (Clockwise) option is selected and click OK (or press Return).
4 Use the Crop Tool [C] [C] to remove the areas of blank canvas which were added to the image during rotation.
Drag the crop tool from top left to bottom right of the image. Don’t worry about being precise when initially dragging out the crop area - you can use the corner and side handles to pull the edges to the correct position after you’ve placed it. You may want to drag out the edges of the image window slightly so that you have a little space to position the crop marquee. Press Enter. 5 Close the image without saving.
Photoshop Part 2: Intermediate

3 PhotoshExercise 3 – Scaling and Skewing
op
1 Open the image file named neuroscience.
Part 2: Intermediate
2 In this exercise, you’ll use the Free Transform option from the Edit
menu to perform several types of transformation to the image before applying them all in the final step.
Before doing so, look at the Layers pallet (if it isn’t visible in the palettes on the right, use Window > Layers to open it). The current image layer is named Background and displays a little padlock symbol.
While a layer is in Background mode, you can’t apply transformations to it. To unlock the layer, double click it to open a New Layer dialogue box. Click OK. It’s now an unlocked layer.
3 Press F to change the view to full screen mode then select Edit > Free
Transform [Ctrl+T]. A bounding box with corner and edge handles will appear around the image.
4 Scale. Drag the top left corner up and to the left to freely scale the
image up to a larger size.
Scale proportionally. Hold Shift and drag the bottom right handle down and to the right to scale the image up while maintaining its proportions.
5 Stretch. Drag one of the handles on the edge of the image to stretch it. 6 Rotate. Hover near the one of the corners until the rotate cursor
appears and drag it round to rotate the image a few degrees.
7 Perspective. Right click on the image. The revealed menu contains types of transformation you have already made plus a few others. Select Perspective and drag the corner handles to change the image perspective.
8 Click on the centre of the image and move it so that any visible blank
canvas areas are filled as far as possible. Now press enter to apply all your transformations.
9 Press F until the default image window is visible and close the image
without saving.
Photoshop Part 2: Intermediate

Exercise 4 – Warping
1 Open the image named black_annexe.
2 Unlock the image by double clicking the Background layer, as in Exercise 3.
3 Change to full screen mode (F) then select the Warp function [Edit > Transform > Warp or Ctrl+T > right click in the bounding box > Warp]. The Warp mesh, a grid with control points, will appear over the image.
4 To warp the image, drag the control points which are around the edge of the Warp
Mesh in different directions. You can also warp the image by clicking and moving the lines inside the mesh.
5 Press Enter to apply the warp transformation. Now undo the transformation [Edit >
Undo Warp or Ctrl+Z or step back through the History states].
6 Warp transformations can also be made using preset shapes. Apply the Warp Mesh grid to the image again. The drop down menu in the Options bar at the top of the window provides a variety of preset warp shapes. Try some of them out.
You’ll notice that each preset has a little square handle which you can drag to exaggerate or change the direction of the warp shape.
Image warped using the Twist preset. 7 Press F until the image window controls are visible then close without saving.
Photoshop Part 2: Intermediate
5 PhotoshSection 2: Making selections
You may want to cut out a section of an image to use in another, or change a part of an image without affecting the whole. To do this, you need to use the tools in the Toolbox which allow you to make selections. Exercise 1 - Marquee Tools
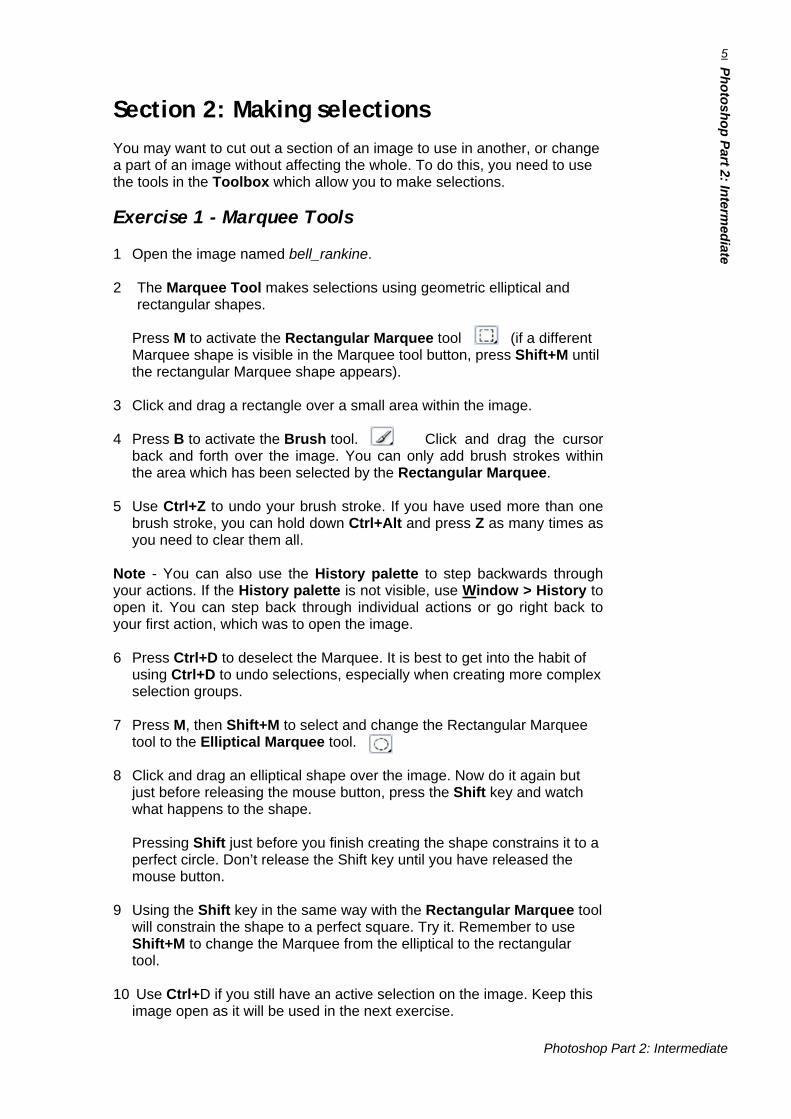
op Part 2: Intermediate 1 Open the image named bell_rankine.
2 The Marquee Tool makes selections using geometric elliptical and
rectangular shapes.
Press M to activate the Rectangular Marquee tool (if a different Marquee shape is visible in the Marquee tool button, press Shift+M until the rectangular Marquee shape appears).
3 Click and drag a rectangle over a small area within the image.
4 Press B to activate the Brush tool. Click and drag the cursor
back and forth over the image. You can only add brush strokes within the area which has been selected by the Rectangular Marquee.
5 Use Ctrl+Z to undo your brush stroke. If you have used more than one
brush stroke, you can hold down Ctrl+Alt and press Z as many times as you need to clear them all.
Note - You can also use the History palette to step backwards through
your actions. If the History palette is not visible, use Window > History to open it. You can step back through individual actions or go right back to your first action, which was to open the image.
6 Press Ctrl+D to deselect the Marquee. It is best to get into the habit of
using Ctrl+D to undo selections, especially when creating more complex selection groups.
7 Press M, then Shift+M to select and change the Rectangular Marquee
tool to the Elliptical Marquee tool.
8 Click and drag an elliptical shape over the image. Now do it again but just before releasing the mouse button, press the Shift key and watch what happens to the shape.
Pressing Shift just before you finish creating the shape constrains it to a perfect circle. Don’t release the Shift key until you have released the mouse button.
9 Using the Shift key in the same way with the Rectangular Marquee tool
will constrain the shape to a perfect square. Try it. Remember to use Shift+M to change the Marquee from the elliptical to the rectangular tool.
10 Use Ctrl+D if you still have an active selection on the image. Keep this
image open as it will be used in the next exercise.
Photoshop Part 2: Intermediate

Exercise 2 – Altering selections
1 Use the image from the previous exercise.
Move a selection. Activate the Rectangular Marquee Tool and drag a rectangular selection. Click the centre of the selection and drag it around the image. It won’t affect the image pixels beneath.
2 Add to / Subtract from a selection. You can add to and subtract from a Marquee
selection in two ways. There are buttons in the Marquee tool options bar:
Or you can hold down the shortcut keys Shift to add to or Alt to subtract from a selection.
The New selection button is the Marquee default setting. With the New selection button activated, draw a second Marquee selection in another area of the image. Don’t use Shift or Alt yet. Your first Marquee selection disappeared because the New selection option overrides all previous selections made.
Using the Shift and Alt keys, practise adding and subtracting rectangular and elliptical marquees. You can select separate areas of the image but you can also intersect selections with one another other. Watch what happens when you intersect selections. You should end up with a selection or selections with some curved and some straight edges.
3 Transform a selection. You can further change the shape and orientation of a
selection by using the Transform Selection option. From the Menu bar at the top of the window, choose Select >Transform Selection. This places all your selections inside a bounding box which has transformation handles around its edge and corners which will allow you to scale, stretch and rotate the selection group.
To rotate the selection, hover just outside one of the corner handles. When the cursor changes to the rotate cursor, click and rotate the selection.
To accept the transformations you have made to a selection, either double click inside it, or press Enter. If you don’t want to accept the transformations, press Esc to exit the Transform Selection option.
4 Close the image without saving.
Photoshop Part 2: Intermediate

7 PhotoshExercise 3 – Lasso Tools
The Lasso tools can be used to make more randomly shaped selections.
op Part 2: Intermediate
1 Open the image file named campus_sculpture. 2 Press L to select the Lasso Tool (or Shift+L to toggle to the
Lasso Tool if is not visible).
3 Click and drag a free-hand selection around the sculpture making sure you finish at the point you began in order to close the selection. As you can see, this makes a very roughly shaped selection.
4 Deselect the selection (Ctrl+D).
5 Open the image file named vistor_centre (you don’t have to close
campus_sculpture first). Select the Polygonal Lasso Tool (Shift+L).
6 You will be selecting the printed red area of the sign board. Click just inside the top left corner of the sign and release the mouse button. Move to the top right hand corner of the sign and click there.
Each time you click, you create an anchor point from which you can continue making the selection in any direction using straight lines.
If you are not satisfied with the placing of an anchor point, you can step back to the previous point by pressing the Backspace or Delete key.
Continue the selection by clicking on the
bottom right and bottom left corners of the sign. In the final part of the selection, you will notice that a tiny circle appears within the Polygon Lasso cursor as you get close to your starting point.
This tells you that you can now join the start and finish points of your selection cleanly. When you see the circle appear, click once more to complete the selection.
The Polygon Lasso Tool is useful when curved sections are not required in a selection or there are perspective angles present, as in this image.
Note - If you don’t want to finish a marquee at the same point you started, just double click on the last anchor point you want to make and a straight line will complete it from there back to the starting point.
7 Close both images without saving.
Photoshop Part 2: Intermediate

Exercise 4 – Magic Wand
The Magic Wand selection tool creates a marquee based upon the colour or tonal value of the first pixel you click. The range of colours included in a selection is determined by the Tolerance Value you enter in the Options bar; the lower the Tolerance, the fewer shades of colour will be included in your selection.
1 Open the image file named dht.
2 Activate the Magic Wand Tool [W] and set the Tolerance to 58.
3 Click on an area of sky. The Magic Wand will select
a large area but there will be some parts which have not been selected.
If you clicked on the clouds, then the blue pixels of the sky will not have been selected. If you clicked on the blue sky, then the white clouds will not have been selected.
4 To add to the selection so that the whole sky is included, hold the Shift key and click on the areas which have not yet been selected. This will pick up the tones and shades which are different from those associated with the first pixel you clicked.
It may take three or four more Shift + clicks to select the whole sky area.
Note – you can change the Tolerance level while adding selections to reduce or add to the range of shades and tones which are picked up by the Magic Wand Tool. You can use the Alt key while clicking to step back to the previous selection made if you find that the Tolerance requires adjustment.
Notice that the buttons for adding to and subtracting from selections in the Magic Wand Tool Options bar are the same as those seen in the Marquee Tools Options bar. 5 Close the image without saving.
Photoshop Part 2: Intermediate
9 PhotoshExercise 5 – Magnetic Lasso
The Magnetic Lasso tool allows you to select parts of an image which have defined edges. You could try using the Magic Wand Tool to make the selection but there is a simple test to determine which of the tools to use. When using the Magic Wand Tool, if you can’t make the selection within a few clicks using the default settings, then the Magic Wand is probably not the tool for that task.
op Part 2: Intermediate
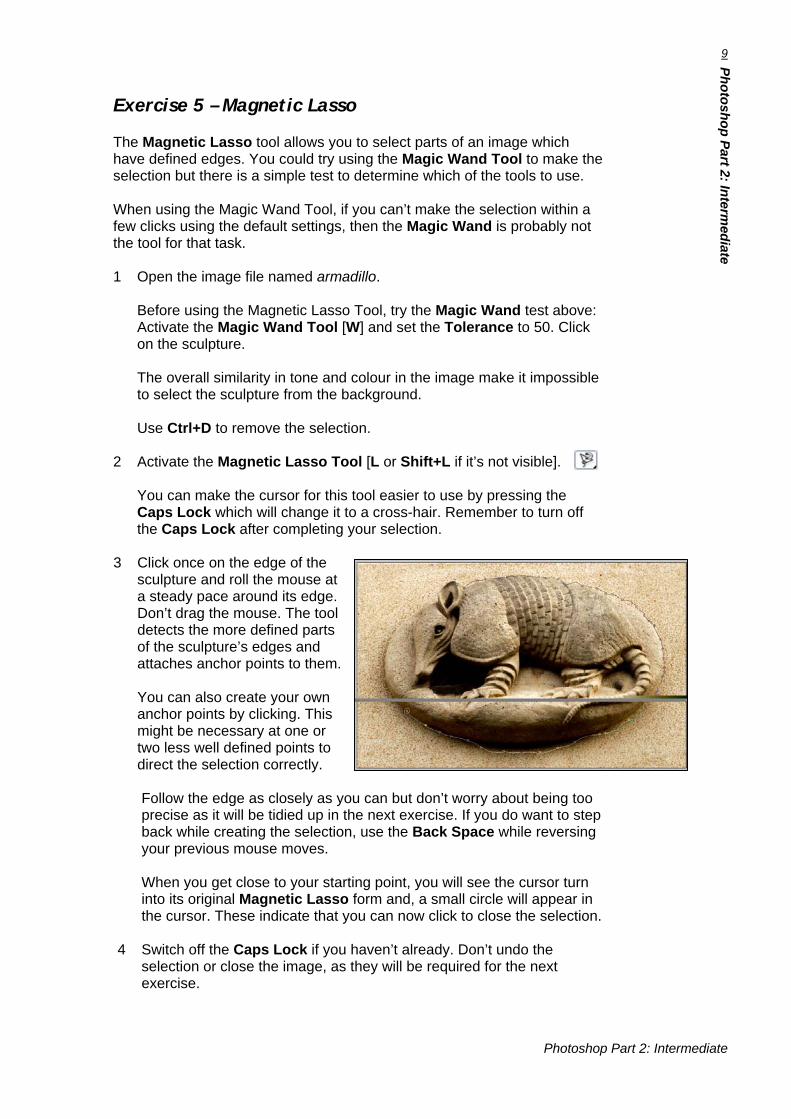
1 Open the image file named armadillo. Before using the Magnetic Lasso Tool, try the Magic Wand test above: Activate the Magic Wand Tool [W] and set the Tolerance to 50. Click on the sculpture. The overall similarity in tone and colour in the image make it impossible to select the sculpture from the background. Use Ctrl+D to remove the selection.
2 Activate the Magnetic Lasso Tool [L or Shift+L if it’s not visible].
You can make the cursor for this tool easier to use by pressing the Caps Lock which will change it to a cross-hair. Remember to turn off the Caps Lock after completing your selection.
3 Click once on the edge of the
sculpture and roll the mouse at a steady pace around its edge. Don’t drag the mouse. The tool detects the more defined parts of the sculpture’s edges and attaches anchor points to them. You can also create your own anchor points by clicking. This might be necessary at one or two less well defined points to direct the selection correctly.
Follow the edge as closely as you can but don’t worry about being too precise as it will be tidied up in the next exercise. If you do want to step back while creating the selection, use the Back Space while reversing your previous mouse moves. When you get close to your starting point, you will see the cursor turn into its original Magnetic Lasso form and, a small circle will appear in the cursor. These indicate that you can now click to close the selection.
4 Switch off the Caps Lock if you haven’t already. Don’t undo the selection or close the image, as they will be required for the next exercise.
Photoshop Part 2: Intermediate

Exercise 6 – Quick Mask Mode The Quick Mask Mode is a painting mode which, in conjunction with the Brush Tool, allows you to further modify selections. The Brush Tool is ideal for this task as its diameter, softness and opacity can be controlled. The Quick Mask Mode will be used here to tidy up the edges of the selection made in the previous exercise.
1 Continue using the armadillo image from the previous exercise with its Magnetic
Lasso selection. Activate the Quick Mask Mode [Q]. The temporary red overlay mask will allow you paint in new areas and paint out unwanted areas of your selection.
2 Look at the foreground / background colour selection box in the Toolbox. The default colour setting is black foreground and white background. The small version in the bottom left corner of the box is the foreground / background default reset button [D]. The two headed arrow in the top right corner swaps the foreground / background colours [X].
3 Ensure the Set foreground colour box is set to default. Select the Brush Tool
[B]. In the Options bar, select a brush diameter of around 18 pixels from the drop-down menu.
You can change the Brush Tool diameter size as you work if you require more precision. You can also use the Zoom function to work closely on complex areas [Z then click or Alt + mouse roller to zoom only, or Ctrl+Alt+= to zoom and expand the window at the same time].
The red overlay of the Quick Mask becomes the selection. Brushing when black is the foreground colour adds pixels to the selection and brushing when white is the foreground colour removes pixels from the selection. There are no black or white pixels added to the image.
4 With black as the foreground colour, use the Brush Tool to paint over areas where
the Magnetic Lasso selection strayed outside the edges of the armadillo sculpture.
5 Press X to swap the foreground / background colours so that white is the foreground colour. Use the Brush Tool to go over areas where the Magnetic Lasso selection strayed inside the edges of the sculpture.
6 Press Q to return to Standard Mode but don’t close the image or deselect the
sculpture as they will be required for the next exercise.
Photoshop Part 2: Intermediate

11 PhotoshExercise 7 – Extracting a selection
When you have selected an object within an image, it is probably because you want to use that selection elsewhere. To do that, you need to extract the object from the original image.
op Part 2: Intermediate
1 Continue using the armadillo image with its selection from the previous exercise. Press Ctrl+J to automatically copy and paste a copy of the selection to a new layer. The copy is in exactly the same position as the original so it looks as though nothing has changed. Look at the Layers palette to see the new layer (if the Layers palette is not visible, select Window > Layers to make it visible – there will be more about Layers later).
Switch off the Visibility button which is on the left side of the Background layer. The Background layer should be no longer visible in the image window and you should see the copied selection layer only.
2 The selection, which should still be in the clipboard, can now be copied to a New document. To create a new document, select File > New [Ctrl+N]. Click OK in the New dialogue box.
By default, the new document will be sized according to the size of the document on the clipboard. In this case, it should be the same size as the selection it was copied from, though not the same dimensions as the original document due to the pixels surrounding the sculpture being removed by the selection.
3 Paste the selection into the new document Edit > Paste [Ctrl+V]. 4 Sometimes even the most careful selections can leave a few unwanted
background pixels around the edges. You can try using the Defringe function [Layers > Matting > Defringe] if you need to remove any remaining background pixels which are still visible at the edges of your selection.
If you do use Defringe, start with the default setting of 1 pixel and increase the number of pixels if required.
5 Close both documents without saving, unless you wish to save them to
your own storage device.
Photoshop Part 2: Intermediate

Section 3: Basic Tonal and Colour Corrections Introduction
Linear and non-linear corrections If you have a photo which looks flat and lacks contrast, you may be tempted to use Image > Adjustments > Brightness/Contrast. However, there are few instances in which using the limited controls of this function will be adequate. Better results will be obtained by using one of the more sophisticated correction methods: Levels, Curves and Shadows/Highlights. The Brightness/Contrast function is limited because it affects the image as a whole in a linear fashion: the Brightness control makes all the pixels in the image brighter and the Contrast control makes all the pixels in the image darker. No distinction is made between highlight and shadow pixels. The non-linear correction controls in Levels, Curves and Shadows/Highlights allow you to correct highlights and shadows independently and will also allow adjustments to more tonal ranges. The Histogram Palette
The Histogram Palette is a graph which displays the number of pixels in an image which fall within the shadow, highlight and midtone grey tonal values. Tonal values range from 0 to 255, 0 being black and 255 being white. The darker (shadow) pixels are on the left and the lighter (highlight) pixels are on the right. The left histogram above shows the tonal values bunched mostly in the centre, in the midtone area, with a peak on the right representing the washed-out white of the sky and the over-highlighted elements of the building. This indicates a lack of contrast. The histogram on the right shows peaks across all tonal values because it has better overall contrast.
Photoshop Part 2: Intermediate

13 PhotoshExercise 1 - Improve contrast using Levels
op
1 Open the image file named library_incorrect.
Part 2: Intermediate
2 Open the Histogram palette. It should be one of the tabs in the
topmost palette. If it is not visible, select Window > Histogram.
3 Select Image > Adjustments > Levels to open the Levels dialogue box. The histogram in the dialogue box will match the one shown in the Histogram palette.
4 There are no pixels representing shadow tones in the left side of the
histogram. To alter the tonal values so that the shadow areas are made darker, click on the black triangle to the left, immediately beneath the histogram, and drag it to the right until the value displayed in the left Input Levels box reads 50. Notice that the graph in the Histogram palette moves to the left as you move the slider. The original histogram graph shape appears as a grey shadow behind the new shape. By setting the dark tones to 50, pixels with that value or less will appear black (value 0).
5 To apply a little more mid-range contrast, move the Midtone grey point (the central slider under the histogram) to an Input Level of 0.94 (middle Input Level box).
You can input the values manually, but it is often better to play with the level sliders so that you can see the effect on the image as you move them.
6 Un-tick the Preview box in the lower right of the dialogue box to see
the difference your adjustments make to the image.
The original image was overexposed. Adjusting the levels won’t make it perfect, but it can do much to improve the contrast.
7 Click OK and close the image without saving.
Photoshop Part 2: Intermediate

Exercise 2 – Improve contrast using Curves The Curves function displays the tonal levels on an angled line, the dark pixels at the bottom left and the light pixels at the top right. Rather than just the three control points you find in the Levels function, the Curves function allows you to add up to 16 points which you can drag to alter the image. 1 Open the image file named bristo_square. 2 Open the Curves dialogue box [Image > Adjustments >
Curves].
3 To anchor the Midtones so that they remain as they are, click a
point precisely where the line intersects with the centre of the grid.
The Input and Output boxes should both read 128. If you haven’t quite hit the centre, you can adjust the numbers manually.
4 Place another anchor point where the line intersects the centre
of the lower left section (dark tones).
The Input and Output boxes should both read 64.
5 Place one more anchor point where the line intersects the centre of the upper right section (light tones).
The Input and Output boxes should both read 191.
6 Select the light tones anchor point. Change the light tones Input to 188 and the Output to 199.
7 Select the dark tones anchor point. Change the dark tones Input to 72 and the
Output to 53.
Notice that the alterations change the line to an S-curve. Un-tick the Preview box to view the subtle increase in brightness and contrast that the alterations make.
8 Cancel the Curves dialogue box and close the image without saving.
Photoshop Part 2: Intermediate

15 PhotoshExercise 3 – Opening shadows
op
If you have an image with neutral exposure but which has dense shadows (for example, a photograph taken when the sun is low in the sky), you can use the Shadow/Highlight function to lighten the shadows and reveal more detail.
Part 2: Intermediate
1 Open the image file named black_shadows. 2 Open the Shadow/Highlight function [Image > Adjustments >
Shadow/Highlight.
The Shadow/Highlight dialogue box opens with default settings of Shadows Amount at 50% and Highlights Amount at 0%. Because the Preview is turned on by default, you can see an immediate and quite dramatic difference in the image. The default setting for the Shadow Amount is usually too high, as in this case.
3 Before making adjustments to the shadows and highlights, tick the Show More Options box [Alt+O] at the bottom left of the dialogue box. The expanded box contains extra options with which you can make more subtle adjustments.
4 Make the following adjustments: Shadows: Amount – 16% Tonal Width – 49% Radius – 69 px Highlights: Amount – 21% Tonal Width – 61% Radius – 28 px The Shadows Tonal Width is the range of tones which will be brightened in the image shadows. The Highlights Tonal Width is the range of tones which will be darkened in the image highlights. When using the Highlight Tonal Width, be careful that you don’t go too far and end up with a ‘posterized’ effect (glowing edges).
5 Un-tick the Preview box to see how the alterations you have made
have changed the image. 6 Close the image without saving.
Photoshop Part 2: Intermediate

Exercise 4 – Colour Balance When you adjust the colour balance in an image, you are altering its ‘temperature’. Images which have a blue cast can appear cold, and images with too much yellow or red can seem too warm. You increase or decrease the reds and blues to change the temperature of an image or give it a different coloured tint using Colour Balance. 1 Open the image named library_foyer.
2 Select Image > Adjustments > Colour Balance to open the Colour Balance
dialogue box. This image is a little cool, so we are going to warm it up by altering the red and yellow tones.
3 Drag the top slider towards Red until the left Colour Levels box reads +10
4 Drag the bottom slider towards Yellow until the right Colour Levels box reads -10.
Note - If you find it difficult to hit just the right number using the sliders, you can use the Up and Down arrow keys to reach the number you need or enter it manually. You can also use the Tab key to move to the next Colour Level box. This is something you can do in all fields with adjustable values.
5 In the Tone Balance section of the dialogue box, select the Shadows button (the
Midtones button is always selected by default when the dialogue box opens) and repeat steps 3 and 4. Click on the Highlights button and repeat steps 3 and 4 once more.
6 Untick and tick the Preview button a few times to observe the subtle difference
that these slight adjustments to the red and yellow tones make. Click OK. Cooler blues and greens
Warmer reds and yellows 7 Close the image without saving.
Photoshop Part 2: Intermediate
17 PhotoshExercise 5 – Changing Hues
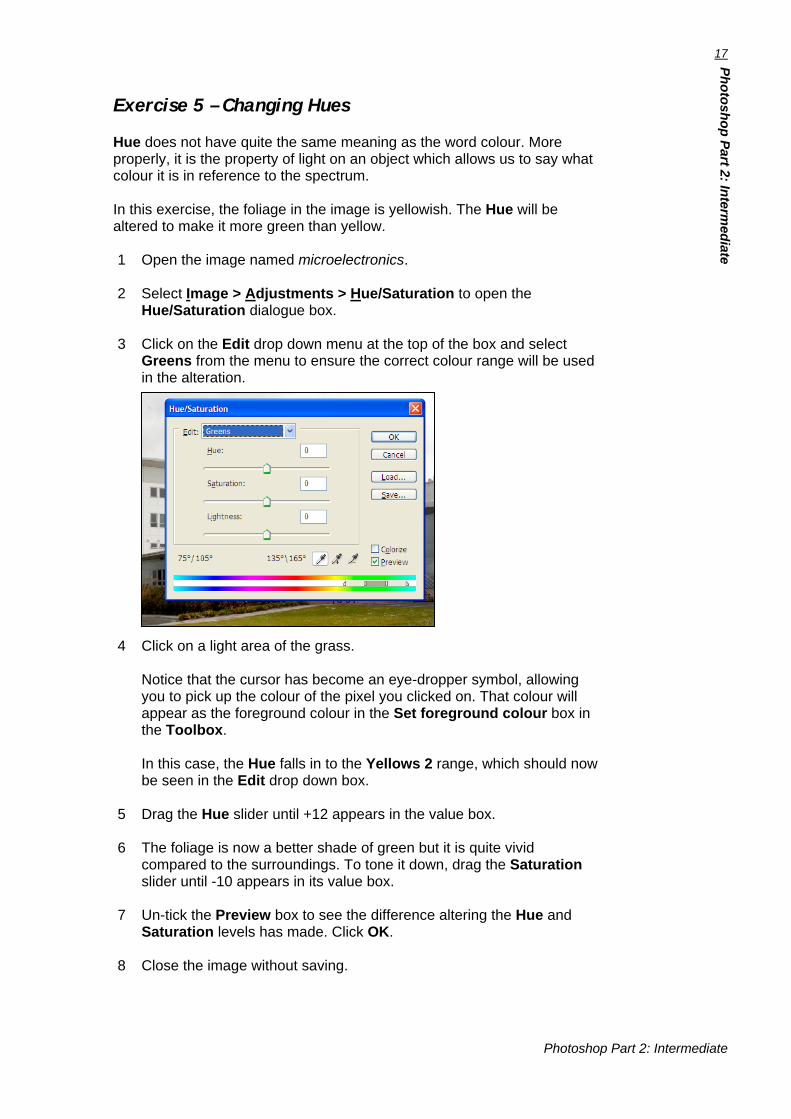
Hue does not have quite the same meaning as the word colour. More properly, it is the property of light on an object which allows us to say what colour it is in reference to the spectrum. In this exercise, the foliage in the image is yellowish. The Hue will be altered to make it more green than yellow.
op Part 2: Intermediate 1 Open the image named microelectronics.
2 Select Image > Adjustments > Hue/Saturation to open the
Hue/Saturation dialogue box.
3 Click on the Edit drop down menu at the top of the box and select Greens from the menu to ensure the correct colour range will be used in the alteration.
4 Click on a light area of the grass.
Notice that the cursor has become an eye-dropper symbol, allowing you to pick up the colour of the pixel you clicked on. That colour will appear as the foreground colour in the Set foreground colour box in the Toolbox. In this case, the Hue falls in to the Yellows 2 range, which should now be seen in the Edit drop down box.
5 Drag the Hue slider until +12 appears in the value box. 6 The foliage is now a better shade of green but it is quite vivid
compared to the surroundings. To tone it down, drag the Saturation slider until -10 appears in its value box.
7 Un-tick the Preview box to see the difference altering the Hue and
Saturation levels has made. Click OK.
8 Close the image without saving.
Photoshop Part 2: Intermediate
Section 4: Layer Basics
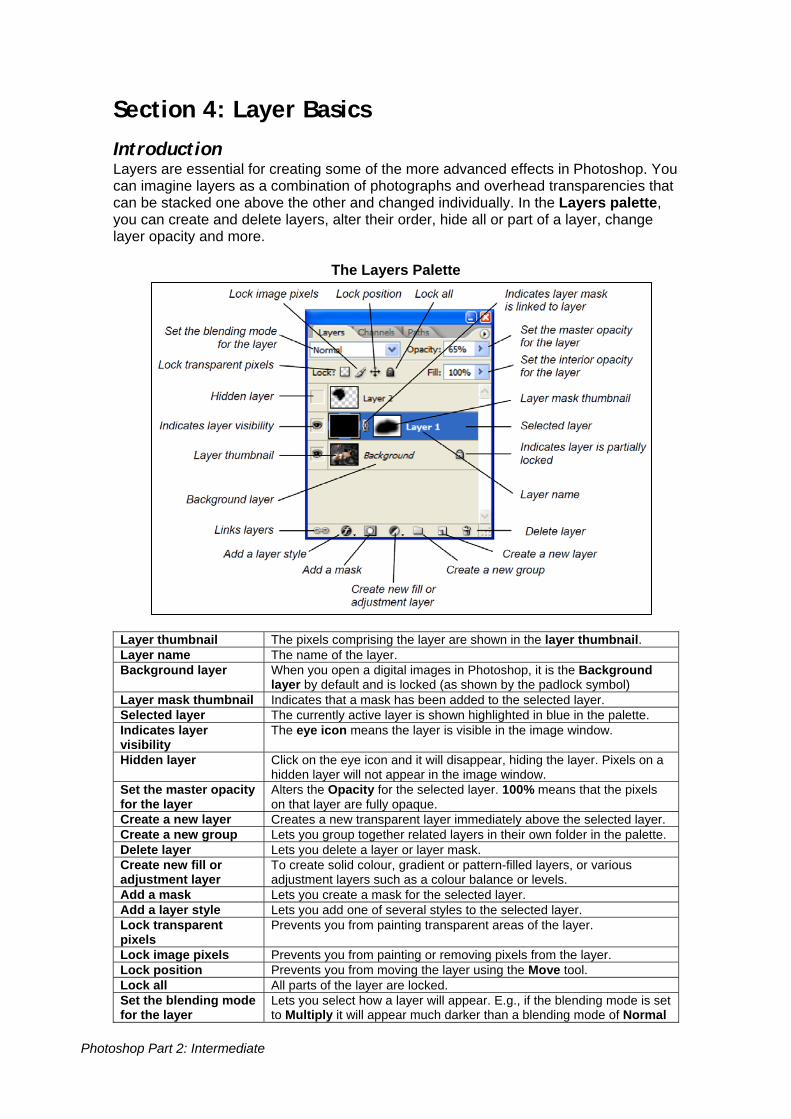
Introduction Layers are essential for creating some of the more advanced effects in Photoshop. You can imagine layers as a combination of photographs and overhead transparencies that can be stacked one above the other and changed individually. In the Layers palette, you can create and delete layers, alter their order, hide all or part of a layer, change layer opacity and more.
The Layers Palette
Layer thumbnail The pixels comprising the layer are shown in the layer thumbnail. Layer name The name of the layer. Background layer When you open a digital images in Photoshop, it is the Background
layer by default and is locked (as shown by the padlock symbol) Layer mask thumbnail Indicates that a mask has been added to the selected layer. Selected layer The currently active layer is shown highlighted in blue in the palette. Indicates layer visibility
The eye icon means the layer is visible in the image window.
Hidden layer Click on the eye icon and it will disappear, hiding the layer. Pixels on a hidden layer will not appear in the image window.
Set the master opacity for the layer
Alters the Opacity for the selected layer. 100% means that the pixels on that layer are fully opaque.
Create a new layer Creates a new transparent layer immediately above the selected layer. Create a new group Lets you group together related layers in their own folder in the palette. Delete layer Lets you delete a layer or layer mask. Create new fill or adjustment layer
To create solid colour, gradient or pattern-filled layers, or various adjustment layers such as a colour balance or levels.
Add a mask Lets you create a mask for the selected layer. Add a layer style Lets you add one of several styles to the selected layer. Lock transparent pixels
Prevents you from painting transparent areas of the layer.
Lock image pixels Prevents you from painting or removing pixels from the layer. Lock position Prevents you from moving the layer using the Move tool. Lock all All parts of the layer are locked. Set the blending mode for the layer
Lets you select how a layer will appear. E.g., if the blending mode is set to Multiply it will appear much darker than a blending mode of Normal
Photoshop Part 2: Intermediate

19 PhotoshExercise 1 – New Layers
op
There are several ways to create new layers. For instance, you can create new empty layers, or you can copy whole or part of an existing layer.
Part 2: Intermediate
1 Open the image file named tiger
2 Make sure the Layers palette is open [Alt+W].
There is one locked image layer in the palette.
3 Click the Create a new layer button at the bottom of the
Layers palette.
This will create a new layer above the Background layer called Layer 1. The checked pattern in the layer thumbnail indicates that the layer is transparent and empty of pixels.
4 Double click on the words ‘Layer 1’ in the new layer. This will turn the name into a text box and you can rename the layer. Rename it Empty.
5 Now you will create another new layer by copying the Background
layer. Click on the Background layer and drag it down to the Create a new layer tool. You will be correctly positioned over the button when the cursor changes to a hand.
When you release the mouse button, a new layer called Background copy will appear, which is an exact copy of the original Background layer.
6 Finally, you will create a new layer from a selection. Ensure the Background copy layer is still selected.
Activate the Lasso tool and set the Feather value in the Options bar to 20 px (pixels). Use the Lasso tool to roughly select the tiger sculpture then use Layer > New > Layer via Copy [Ctrl+J] to copy the selection to a new layer.
Note – When you copy an image or selection from one open document to another, it will also appear as a new layer.
Don’t close the image as it will be required for the next exercise.
Photoshop Part 2: Intermediate

Exercise 2 – Working with Layers
A new layer is always visible by default. If you want to view the pixels on a specific layer, you can hide the other layers by clicking the Layer visibility button off. When you want to work on a particular layer, it is important to ensure that its Layer visibility button is on and that it is activated in the Layers palette. The active layer is always highlighted, usually in blue. 1 Working on the same image and its four layers from the previous exercise, switch
off the Layer visibility in both the Background and Background copy layers.
2 Activate the layer named Empty. 3 Click on the Set foreground colour tool in the Toolbox to open the Colour
Picker dialogue box.
Click on a colour from the spectrum bar and then a shade of that colour from the large box.
4 Select the Paint Bucket Tool [G or Shift+G if it’s not visible]. 5 Click on the image. The layer named Empty should now be the filled with the
colour you selected. If you imagine the layers as transparent sheets stacked one above the other, all the pixels in the topmost layer (in this case, the Empty layer) should be visible. As you have filled this layer with solid colour pixels, you can’t see anything of Layer 1 below it.
6 Click on the layer named Empty and drag it to just below the layer named Layer 1. Now that Layer 1 (the selection you made in the previous exercise) is at the top of the stack, its pixels are visible but its transparent edges allow the colour from the layer below to show through.
Using a value of 20 px in the Feather option when selecting the tiger with the Lasso Tool gave the edges a soft and diffuse effect, which is why the colour appears to fade rather than stop abruptly near the tiger. Don’t close the image as it will be used in the next exercise.
Photoshop Part 2: Intermediate

21 PhotoshExercise 3 – Change Layer opacity
Continue working on the image from the previous exercise.
op Part 2: Intermediate
1 Switch off the Visibility button of Layer 1 (the selection copy layer).
2 Switch on the Visibility button of the Background layer.
3 Select the layer named Empty. All you should see in the
image window is the colour you filled the layer with in the previous exercise.
4 At the top of the Layers palette there is an opacity levels
box. Click on the little black arrow next to the box. A slider will appear which you can use to change the opacity of the activated Empty layer.
Move the slider until the value reads 50%. The coloured pixels of the Empty layer have been blended with the Layer 1 pixels, allowing you to see 50% of both layers. As well as the using the slider, you can change the opacity level by clicking inside the Opacity value box and using the up and down arrow keys or typing in the value. Do this and change the opacity to 70%. Now only 30% of the Background layer is visible.
5 You can also change the opacity of selections. Switch off the Visibility button of the Empty layer. Select the Background layer and create a new empty layer above it by clicking on the New layer button.
6 The new layer should be activated by default. Select the Elliptical
Marquee Tool [M or Shift+M if it’s not visible]. Ensure that the Feather value in the Options bar is set to 0 and drag out an elliptical shape around the tiger sculpture.
7 Select another colour from the foreground colour Colour picker (or
select the colour from the Swatches palette which is quicker to use but has fewer colours to choose from).
8 Activate the Paint Bucket Tool [G] and fill the Marquee selection with
colour.
9 Change the layer opacity to 35%. You can now see 65% of the Background layer through the coloured selection.
10 Close the image without saving, or save it to your own storage device if
you wish.
Note – when you save a document with layers for the first time, it will automatically try to save as a PSD (Photoshop Document) so that you have the option of preserving the layers in the saved file.
n you save a document with layers for the first time, it will automatically try to save as a PSD (Photoshop Document) so that you have the option of preserving the layers in the saved file.
Photoshop Part 2: Intermediate

Section 5: Text Exercise 1 – Point type
1 Open the image named old_college.
2 Press D to return the Set foreground colour to the default setting (black foreground, white background).
3 Select the Horizontal Type Tool [T or Shift+T if it’s not visible].
4 In the Options bar, leave the font as Times New Roman Regular but change the font Point size from the default 12 pt to 30 pt (use the drop-down options to change the font point size – you can also enter your own point size if you don’t want to use the options presented in the drop-down menu) .
The colour picker in the Options bar should be black as the colour has been taken from that which appears in the Set foreground colour box.
5 Click the image on the light area of stones above the arches. A flashing cursor will appear and you will notice that a new layer appears above the Background layer in the Layers palette. The letter T in the layer thumbnail indicates that it is a Text layer.
6 Type the words ‘Old College Quad’.
Click the Commit any current edits tool in the Options bar.
If you change your mind, you can use the Cancel current edits tool (left of the Commit tool) or press Esc to remove the layer.
If you have already committed an edit, you can delete the layer by clicking on the Delete layer button or dragging the layer on top of the Delete layer button. Notice that the Text layer has named itself using the text you typed on the image.
7 With the Text Tool still selected, click on the image again just below the ‘Old College Quad’ text. Using the Change the font style drop down menu in the Options bar, change the font style from Regular to Bold Italic and type the word ‘Edinburgh’. Click the Commit any current edits tool.
Note - When you add type to an image, it will appear as a continuous text box without wrapping. To insert a line break, press Enter to continue adding text on the next line. Don’t close the image as it will be used in the next exercise.
Photoshop Part 2: Intermediate

23 PhotoshExercise 2 – Text Colour
Although the colour of the text has been determined by the colour which was in the Set foreground colour box, it can easily be changed even after the text has been committed.
op Part 2: Intermediate
1 Continue using the image from the previous exercise. Ensure the Horizontal Type Tool [T] is selected and that the layer named Edinburgh is activated.
2 Click in the Colour Picker in the Options bar to open the Colour Picker dialogue box.
3 Select a colour from the Colour Picker. You will see that the selected
text changes to the colour you have chosen. Click OK.
Note - While the Colour Picker dialogue box is open, you can also use the cursor (which changes to an eye-dropper when moved over the image) to pick up a colour from the image, such as the blue sign-board, to match the text colour with areas of the image.
4 When a tool other than the Text Tool is activated, it is still possible to
change the colour of an active Text Layer by accessing the Colour Picker dialogue box in a different way.
Activate the layer named Old College Quad and select the Move Tool [V].
5 Click on the Set foreground colour tool in the Toolbox to open the
Colour Picker dialogue box. Select a new colour and click OK. Press Alt+Back Space to change the colour of the text.
With this method of changing text colour, you won’t see a preview of how the colour will affect the text as you can when using the text colour picker.
Don’t close the image as it will be used in the next exercise.
Photoshop Part 2: Intermediate

Exercise 3 - Text size and text editing
Text size can be altered by changing the font size or by scaling the text up or down. 1 Changing text size. Ensure the Text Tool [T] is selected and the Edinburgh layer
is activated.
2 In the Options bar, select Castellar from the Font Family drop-down menu. Change the font size to 24 pt. This has changed both the Font Family and Font size.
3 Now you will change text size in a different way. Activate the layer named Old
College Quad.
4 Select the Move Tool [V] and tick the Show Transformation Controls in the Options bar. A bounding box with transformation handles will appear around the active text.
5 Hold down the Shift key (to maintain aspect ratio) while scaling the text box down
by pulling the top corner transformation handles in until the text is the same width as the word ‘Edinburgh’ below it.
6 Press Enter to accept the transformation and un-tick the Show Transform
Controls box in the Options bar.
7 With the Move tool still activated, use the arrow keys to nudge the text into a perfect position above the word ‘Edinburgh’.
8 Press Shift and activate the layer named Edinburgh. Both text layers should now
be activated. Use the arrow keys to nudge both text layers so that all the text fits into a light area of the stonework in the image.
As long as the Move Tool and layer (or layers) you wish to move are selected, you can either click and drag the text or use the arrow keys to precisely place the text.
9 Text editing. Double click the Thumbnail image in the Old College Quad layer.
This action automatically switches on the Text Tool and the text will be highlighted ready for editing.
10 Click inside the highlighted text, just in front of the word ‘College’. Drag the mouse
to the right to highlight only the word ‘College’. Overtype it with the word ‘University’. Click the Commit any current edits tool.
11 Using what you have learned in this exercise:
• Move the word ‘Edinburgh’ so that it is centred under the words ‘Old University Quad’.
• Move the two layers of text together to the best position on the image. Don’t close the image as it will be used in the next exercise.
Photoshop Part 2: Intermediate

25 PhotoshExercise 4 – Paragraph type
To add paragraphs of flowing text instead of non-wrapping headings, you can create a bounding text box to contain Paragraph type.
op Part 2: Intermediate
1 In the Layers palette, activate the Background layer to prevent making any accidental changes to the text layers. Activate the Type Tool [T]. Make sure the font is Times New Roman.
Note - There is a shortcut for selecting fonts: Click once inside the Font Family drop down box. This should highlight the currently selected font name. Type the first two letters of Times. The box will automatically navigate to the Times New Roman font and you can continue.
2 Change the Font point size to 20 pt (you will have to enter the number
manually as 20 pt is not one of the options in the drop-down menu). 3 In the lower right hand area of the image, drag out a rectangular Text
box with the Type Tool. Don’t worry about its size or shape for now. 4 Type the following text into the Text box:
Old College Quad was completed in 1827 and was designed by William Henry Playfair.
Double click on the new Text layer name and change it to ‘Text box’.
5 If the text colour has not been altered since you created the first two text layers, the text will probably be too dark to see against the background image.
To change this, firstly make sure that the Text box layer is activated and the Move Tool [V] is selected.
6 Press D to set the Foreground colour to default,
then press X so that white becomes the Foreground colour. Press Alt+Back space to change the Paragraph type colour to white.
7 Double click the Text box layer thumbnail to activate the text bounding box. Use the transformation handles to resize the box so that it fits neatly around the text.
Watch how the text wraps according to the size of the box. Avoid splitting words over two lines. Click the Commit any current edits tool in the Options bar when you are satisfied with the shape and size of the text box.
8 Drag the text box down to the lower right corner of the image, where
the contrast between the white text and darker area in the background image is best. Use the arrow keys to fine tune the text box position.
Don’t close the image as it will be used in the final exercise.
Photoshop Part 2: Intermediate

Exercise 5 – Part 1 - Special text effects using Layer Styles
1 Continue using the image from the previous exercise. Activate the Old University Quad text layer in the Layers palette. Double click the layer’s thumbnail to highlight the text. Change the word ‘University’ back to ‘College’. Commit the change by clicking the Commit any current edits tool.
2 Select the Move Tool [V] and drag the text nearer to the top and centre of the
image. Tick the Show Transform Controls in the Options bar.
3 Hover over any of the text box transform handles until the cursor changes to a double-headed arrow. When it changes, click once but don’t drag the handle.
4 When you click the transform handles, notice that there are no active tools in the
Toolbox and that the Options bar now contains transformation options.
In the Options bar, activate the Maintain aspect ratio button between the W (Width) and H (Height) option boxes.
5 Change the Width option to 300%. Because Maintain aspect ratio has been activated, the Height option will change to 300% automatically.
Commit the alteration by clicking the Commit any current edits tool and un-tick Show Transform Controls.
6 Double click the layer thumbnail once more, change the Font family to Impact and commit the edit.
7 Applying Layer Styles. There are several ways to access Layer Styles tools. To
instantly see all the available styles in one dialogue box, double click on the right side of the Old College Quad layer to open it.
8 Select the Drop Shadow effect in the menu on the left side of the dialogue box,
making sure it is highlighted.
In the Drop Shadow settings, set the Blend Mode to Normal, Opacity to 70% and the Angle to 120 degrees. Leave the rest of the settings as they are.
Click OK. Note – Layer styles can be added to selections and graphic objects too, not just text. Leave the image open as it will be used in the second part of the exercise.
Photoshop Part 2: Intermediate

27
Photoshop Part 2: Intermediate
PhotoshoExercise 5 – Part 2 – More special text effects using Layer Styles p Part 2: Interm
ediate
Now that you have added a Layer Styles effect to the Old College Quad layer, you will see that a Layer Styles symbol and a drop-down menu arrow have appeared on the right side of the layer. 1 Click on the layer drop-down menu. It tells you which
Layer Styles effects have been added to the layer. Layer Styles effects also have Visibility off / on buttons which allow you to view combinations of effects or an effect in isolation.
2 Now to add a new effect. Double click the Layer Styles symbol on the right side of the Old College Quad layer to open the dialogue box again.
3 Highlight Gradient Overlay in the Layer Styles menu and enter the
following settings: Blend Mode: Lighten Opacity: 50% Style: Linear Angle: 90 degrees Scale: 100%
Click OK. The text now has both shadow and gradient effects.
4 Switch off the Visibility button for the Gradient Overlay effect in the
layer drop-down menu. Drop Shadow should now be the only visible effect.
5 Double-click the Layer Styles symbol to open the dialogue box once
more. Highlight Bevel and Emboss in the Styles menu. Enter the following settings: Style: Inner Bevel
Technique: Smooth Depth: 60% Direction: Up Size: 4 px Soften: 2 px Angle: 120 degrees Altitude: 30 degrees Highlight Mode: Normal Opacity: 60%
Click OK.
Try different combinations of the effects which have been applied to the layer by switching the Visibility buttons off and on. Note – If you want to make further changes to an effect you’ve already applied, you can open the Layer Styles dialogue box at the specific menu required by double clicking the required effect in the Layer Styles drop-down menu.

Photoshop Part 2: Intermediate