piko smartcontrol system - gaugemaster.com control.pdfdqg dydlodeoh ixqfwlrqv $ vhshudwh surjudpplqj...
TRANSCRIPT
3
PIKO SmartControl® System
User Manual

System
4
Directory
1. Introduction .............................................................................................................................. 6
2. System description .................................................................................................................. 7
2.1. The new system’s brain: the PIKO SmartBox® ...................................................................... 8
2.2. PIKO SmartController® .......................................................................................................... 10
2.3 PIKO SmartBox® ..................................................................................................................... 12
3. Getting started ....................................................................................................................... 15
3.1 Installing the PIKO SmartBox® .............................................................................................. 16
3.2 First Start of the PIKO SmartControl® System .................................................................... 19
4. PIKO SmartControl® App ....................................................................................................... 24
4.1. Overview of features .............................................................................................................. 25
4.1.1 Settings ................................................................................................................................... 25
4.1.2 Main-pages of the PIKO SmartControl® app ........................................................................ 27
4.1.3 Overview of features .............................................................................................................. 28
4.2 The control panel ................................................................................................................... 29
4.2.1 Edit locomotive ...................................................................................................................... 30
4.2.2 Create new locomotive .......................................................................................................... 32
4.2.3 “create consist” ..................................................................................................................... 34
4.2.4 Controlling a locomotive ....................................................................................................... 34
4.2.5 Switching between locos ....................................................................................................... 35
4.3 The switch panel .................................................................................................................... 37
4.3.1 Create new switch panel ....................................................................................................... 37
4.3.2 Control the switch panel ....................................................................................................... 42
4.4 Programming .......................................................................................................................... 43
4.4.1 Read and write CV’s ............................................................................................................... 43
4.4.2 CV Write CV’s .......................................................................................................................... 43
4.4.3 DCC-Address .......................................................................................................................... 44
5. Options and settings of the PIKO SmartControl® System ................................................. 45
5.1 Link the PIKO SmartBox® into a local network ................................................................... 45
5.2 Link the PIKO SmartController® into a local network ......................................................... 46
5.3 Additional settings of the PIKO SmartBox® via the settings app ..................................... 46
5.4 Update and Reset of the PIKO SmartBox® ........................................................................... 51

5
® ® ® ®
®
5.4.1 Reset of the PIKO SmartBox® ............................................................................................... 51
5.4.2 Update of the PIKO SmartBox® ............................................................................................ 51
5.4.3 BackUp and Restore / Rescue of the PIKO SmartBox® ...................................................... 52
5.5 Updating the PIKO SmartController® with a computer ....................................................... 53
6. Overview of the Android operating system ......................................................................... 55
6.1 Downloading and installing apps from the Google® PlayStore ......................................... 56
6.2 Changing the background picture........................................................................................ 56
6.3 Personalize your devices ...................................................................................................... 57
6.4 Changing the system language ............................................................................................ 57
7. Android-Tips ........................................................................................................................... 58
7.1 Display settings: Brightness and timeout ........................................................................... 58
7.2 Font size ................................................................................................................................. 59
7.3 Manage installed apps ........................................................................................................... 60
7.4 Checking battery usage ........................................................................................................ 61
8. Detailed instructions for the PIKO SmartControl® App ...................................................... 62
8.1 PIKO SmartControl® App ....................................................................................................... 62
8.2 Android menus and features ................................................................................................ 65
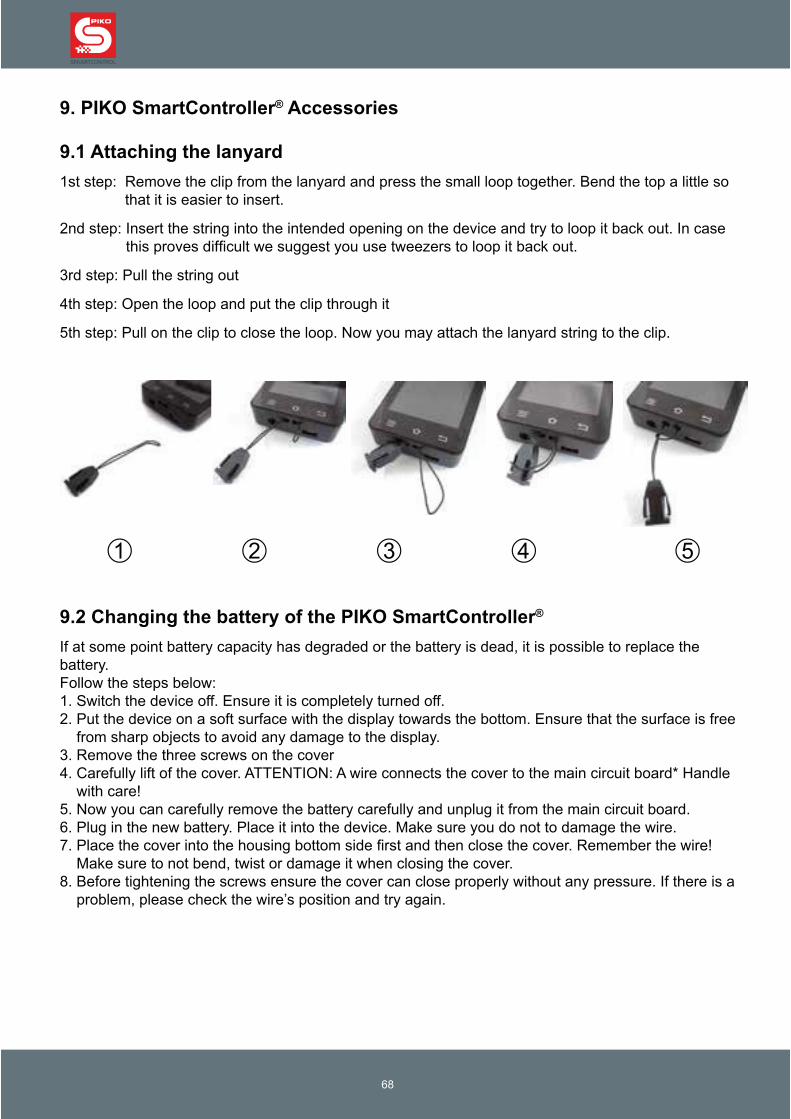
9. PIKO SmartController® Accessories .................................................................................... 68
9.1 Attaching the lanyard ............................................................................................................ 68
9.2 Changing the battery of the PIKO SmartController® ........................................................... 68
10. Glossary .................................................................................................................................. 70
10.1 Digital glossary ...................................................................................................................... 70
10.2 Android glossary ................................................................................................................... 72
11. Function symbols .................................................................................................................. 73
12. Safety notice ........................................................................................................................... 74
13. FAQ .......................................................................................................................................... 74
Notes ....................................................................................................................................... 80

System
6
1. Introduction
®
®
PIKO SmartControl® – the digital future of model train controlSimply brilliant – brilliantly simple
®
H0, TT N-scale track systems
7
2. System description
The mobile controller – PIKO SmartControl®
®
Notice: ® ®
® ®
PIKO SmartController®
Features:
Controlling locos
•
Switches and accessories
Consisting

System
2.1. The new system’s brain: the PIKO SmartBox®
® ®
®
®
®
®
®
®
®
®
® ®
Attention:
Due to technical reasons only one PIKO SmartBox® can be used within a WiFi range. It is not
possible to use two PIKO SmartBoxes® within one room.
For using two PIKO SmartBoxes® within one WiFi range please see chapter „5.3 / additonal
settings of the PIKO SmartBox® via the settings app”.
9
PIKO SmartBox®
DCC central station with RailComPlus*
Wireless LAN receiver for the PIKO SmartController® *®
®
®
Ethernet-Port*
Integrated main track booster, up to 5 A output (adjustable)
Integrated programming track output for decoder programming
Loconet-T extension port**
Power supply
* a detailed explanation of the terms used above can be found at the end of the manual

System
10
2.2. PIKO SmartController®
Hardware
The four function buttons on the sides
The motorized analog dial
„Stop / II“-button ®
®
® ®
1
2
3
4
5
6
7
8
9

11
The status-LED ®
Hardware-buttons
6
1
5

System
12
Attaching the Lanyard®
® ®
Information about the Android operating system
®
2.3 PIKO SmartBox®

13
Hardware
top:
®
Backside:
1 2 3 4 5 6 7 8
111091 2 3 4 5 6 7 8
System
14
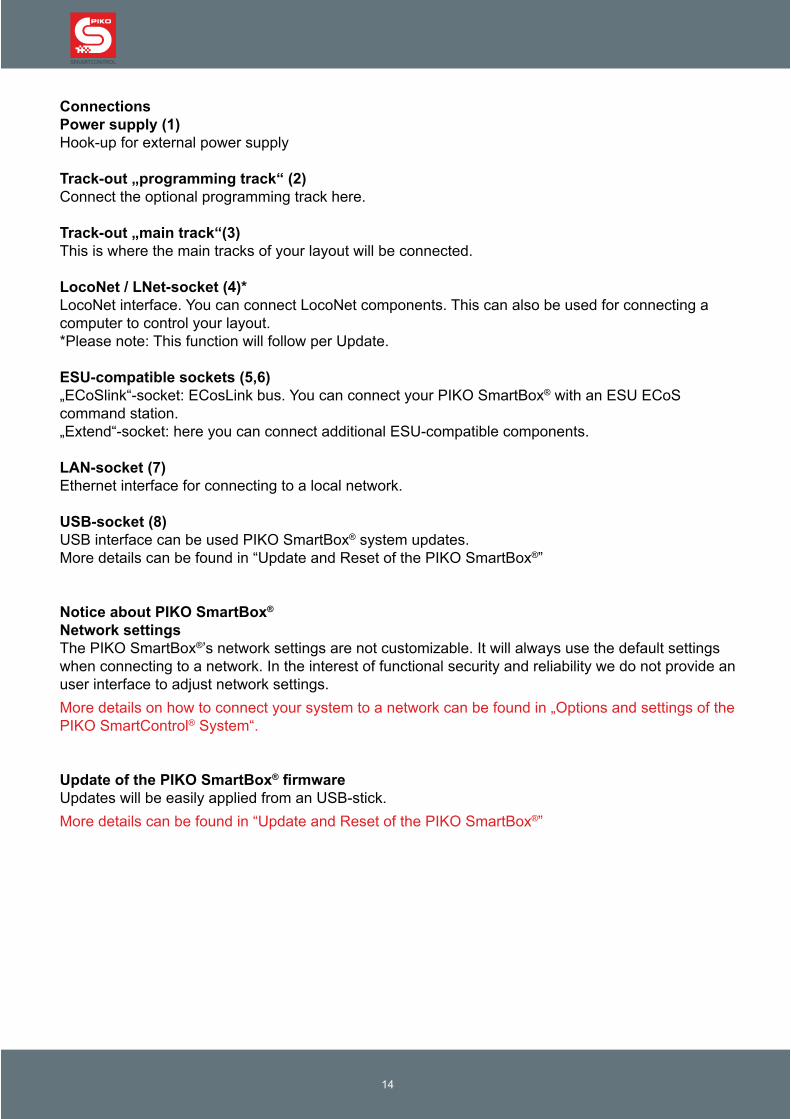
Connections
Power supply (1)
Track-out „programming track“ (2)
Track-out „main track“(3)
LocoNet / LNet-socket (4)*
ESU-compatible sockets (5,6)®
LAN-socket (7)
USB-socket (8)®
®
Notice about PIKO SmartBox®
Network settings®
®
Update of the PIKO SmartBox®
®
15
3. Getting started
System setup
®
®
®
®
®
®

System
16
3.1 Installing the PIKO SmartBox®
®
®
®
Attention!

17
Connecting your PIKO SmartBox® to the track
®
Terminal / Socket Connector
System
®
®
Notice:
Connecting additional components to the PIKO SmartBox®
®
®
Connecting the PIKO SmartBox® to the power supply®
® ®
®
Notice: ®
®

19
3.2 First Start of the PIKO SmartControl® System
Activating the PIKO SmartController®

System
20
Setting up the device
(Android-setup) Setup Date and time
21
Wi-Fi-settings® ®
®
®
More settings / options:
®
®
System
22
Please note: ® ®
®
®
®
®
Setting up a Google®-Account erstellen (internet connection necessary)®
®

23
®
Security notice: Android with internet connection
Battery charging®
®
®
Notice: ®
System
24
4. PIKO SmartControl® App
®
Starting the PIKO SmartControl® App ®
®
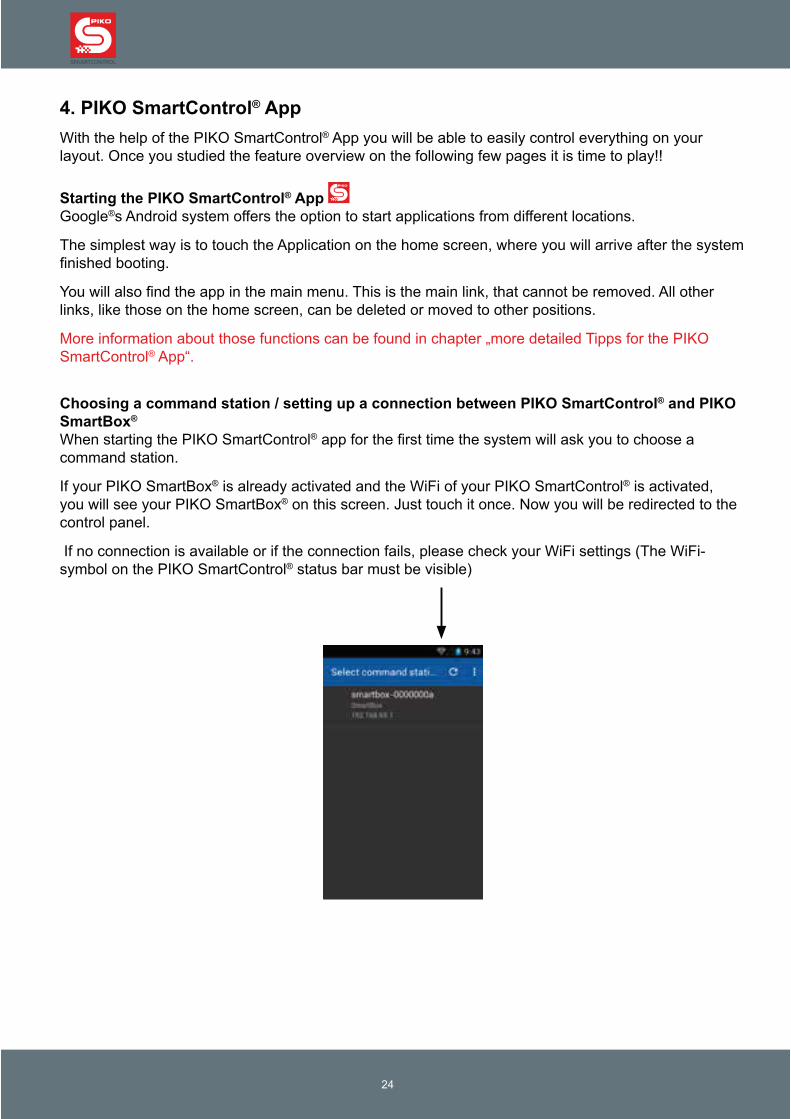
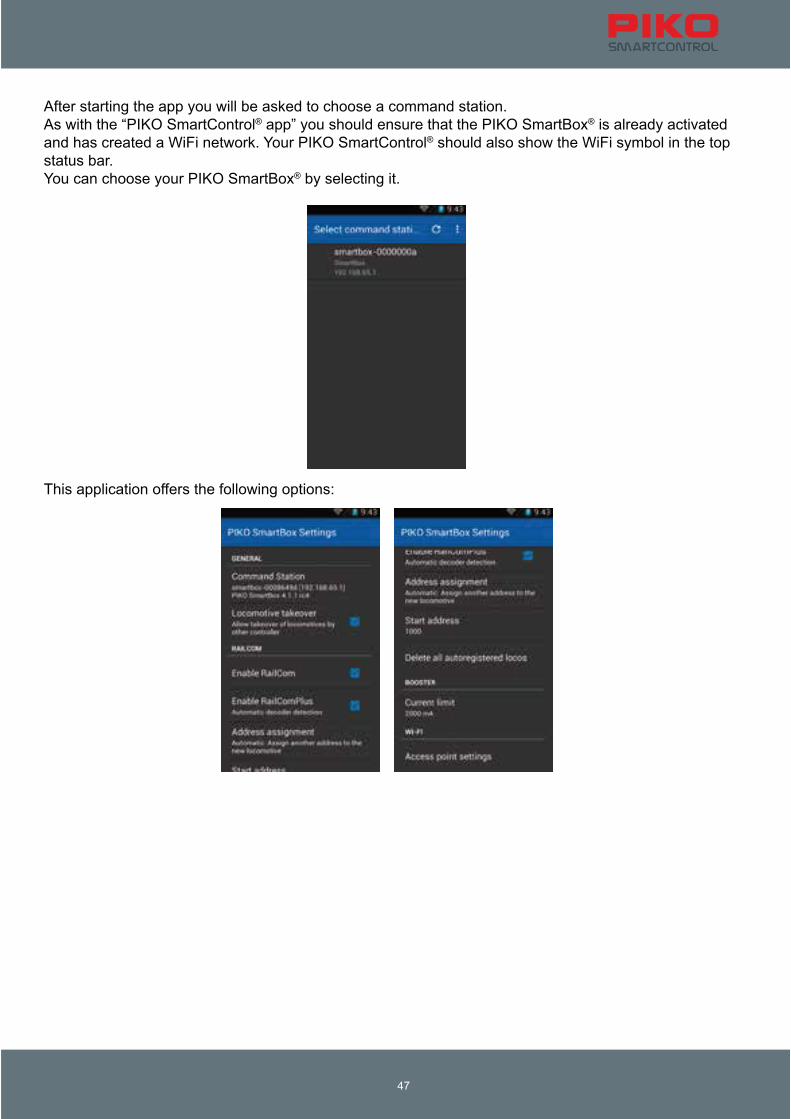
Choosing a command station / setting up a connection between PIKO SmartControl® and PIKO
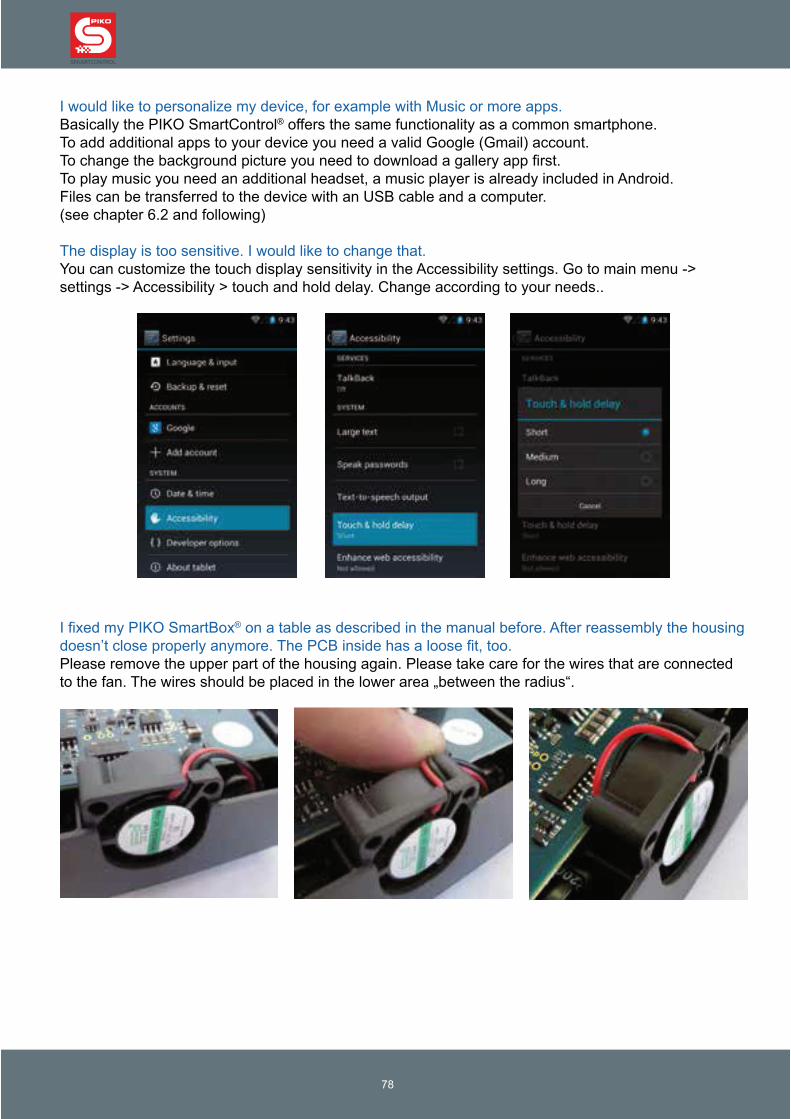
SmartBox®
®
® ®
®
®

25
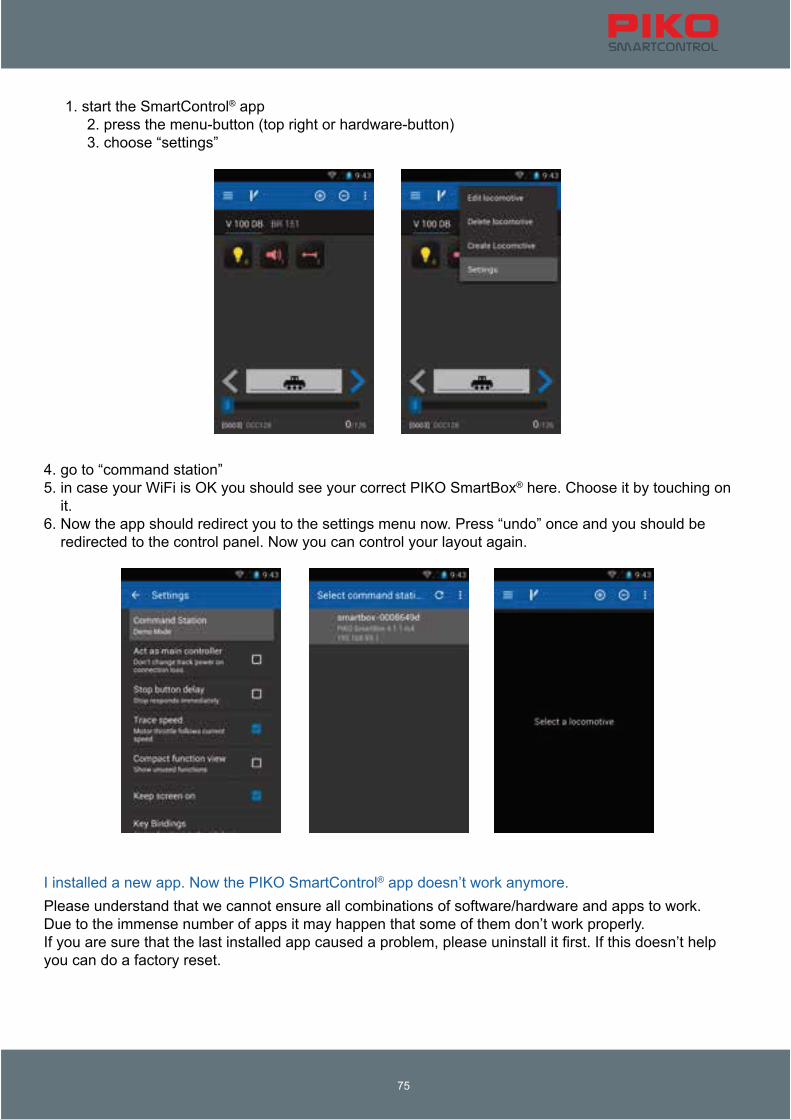
4.1. Overview of features
4.1.1 Settings
* Please note the change of the text when activating / deactivating any
function.

System
26
Select command station
Act as main controller
® ®
®
®
®
®
Stop button delay
Trace speed
Compact function view
Don’t lock screen
®
27
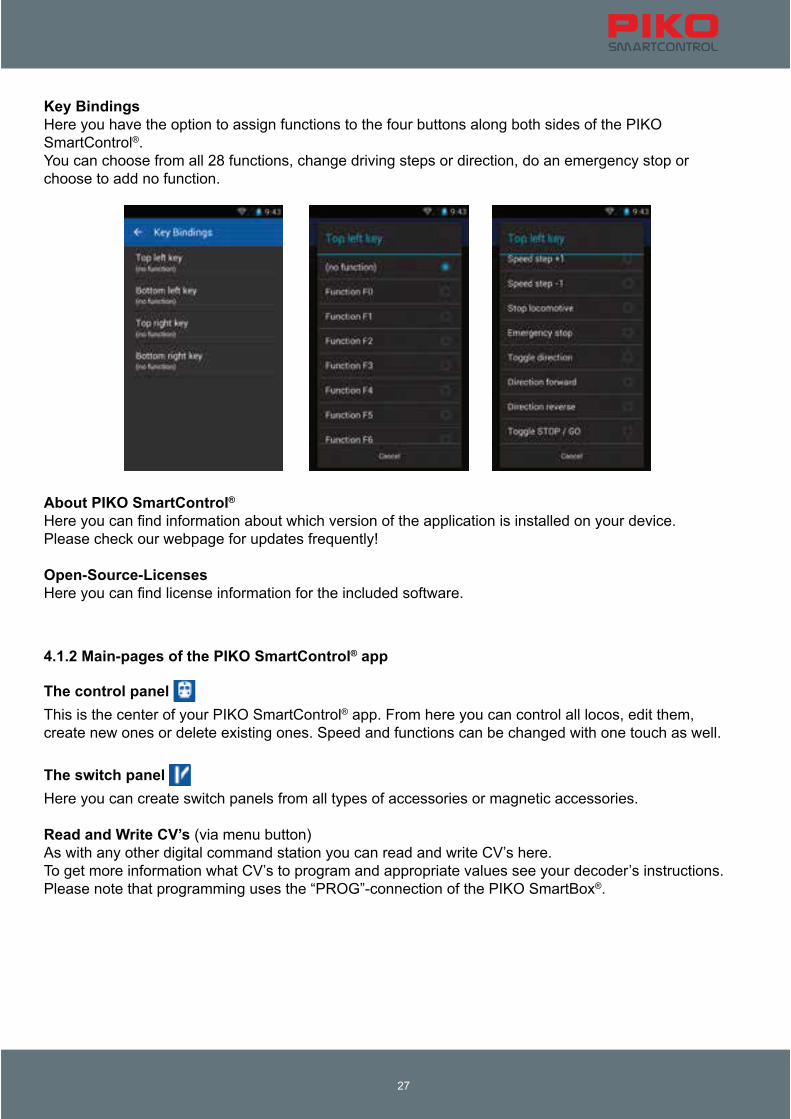
Key Bindings
®
About PIKO SmartControl®
Open-Source-Licenses
4.1.2 Main-pages of the PIKO SmartControl® app
The control panel ®
The switch panel
Read and Write CV’s
®
System
4.1.3 Overview of features
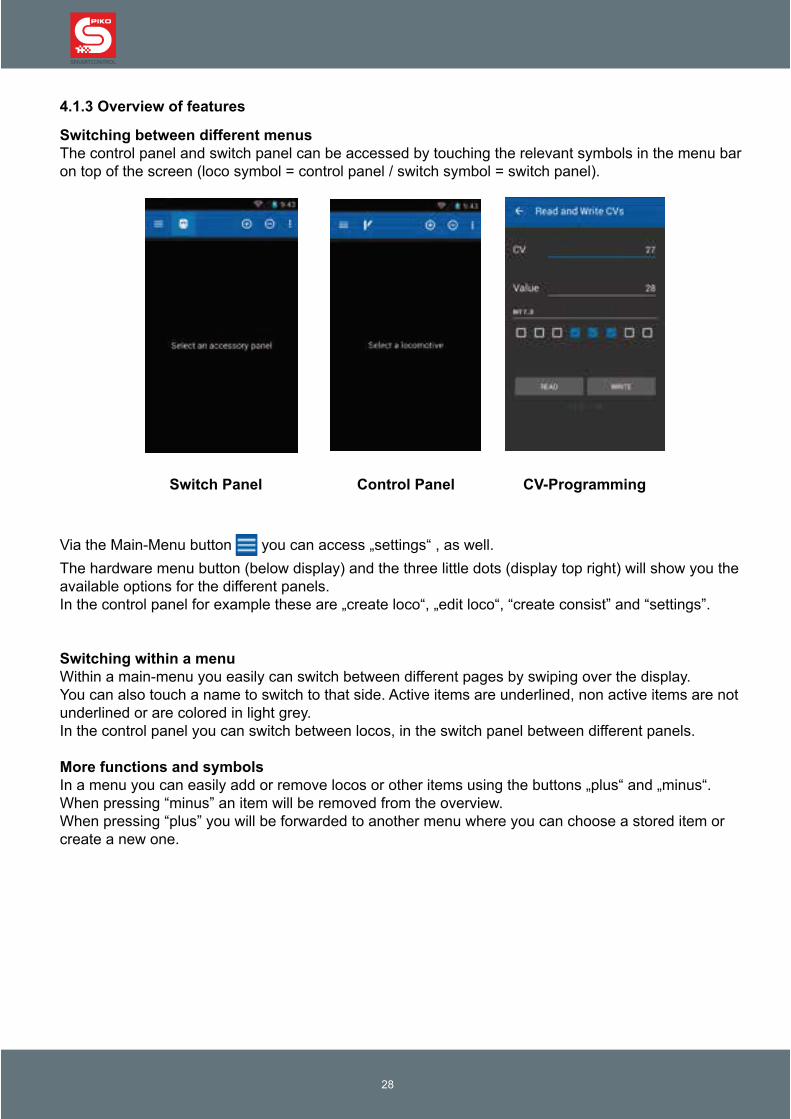
Switching between different menus
Switch Panel Control Panel CV-Programming
Switching within a menu
More functions and symbols
29
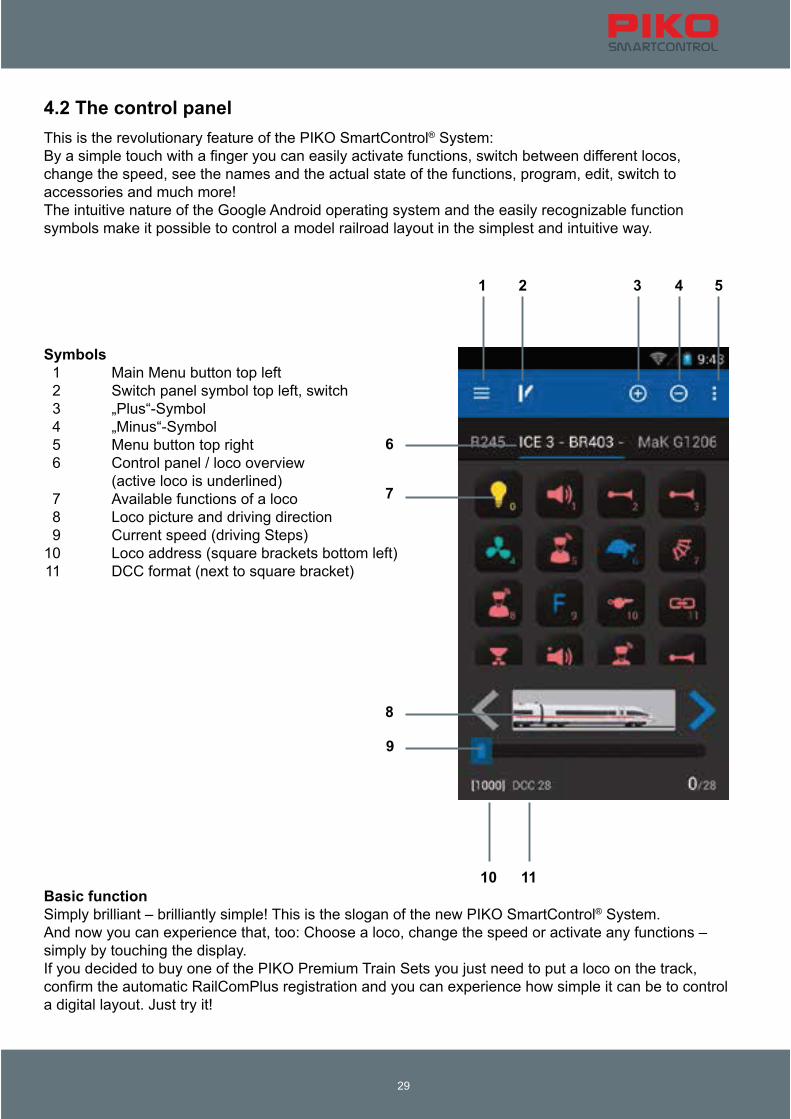
4.2 The control panel
®
Symbols
Basic function®
1 2 3 4 5
6
7
8
10 11
9
System
30
Additional menus in the control panel
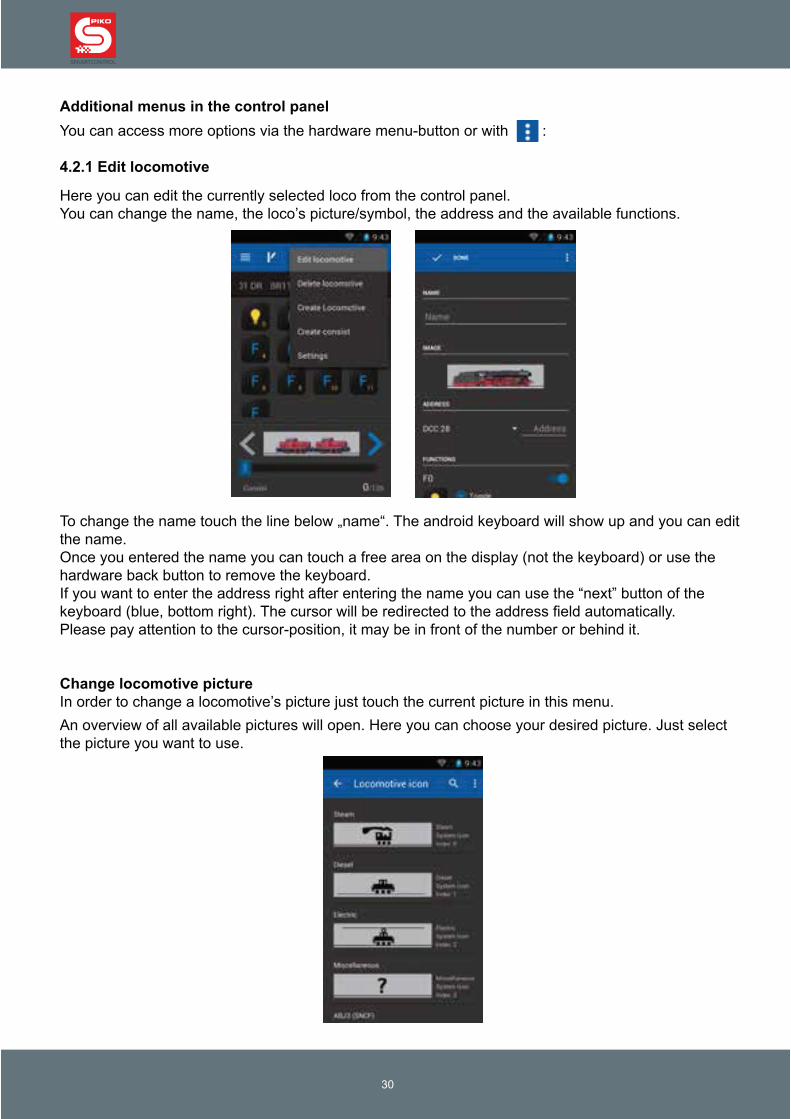
4.2.1 Edit locomotive
Change locomotive picture
31
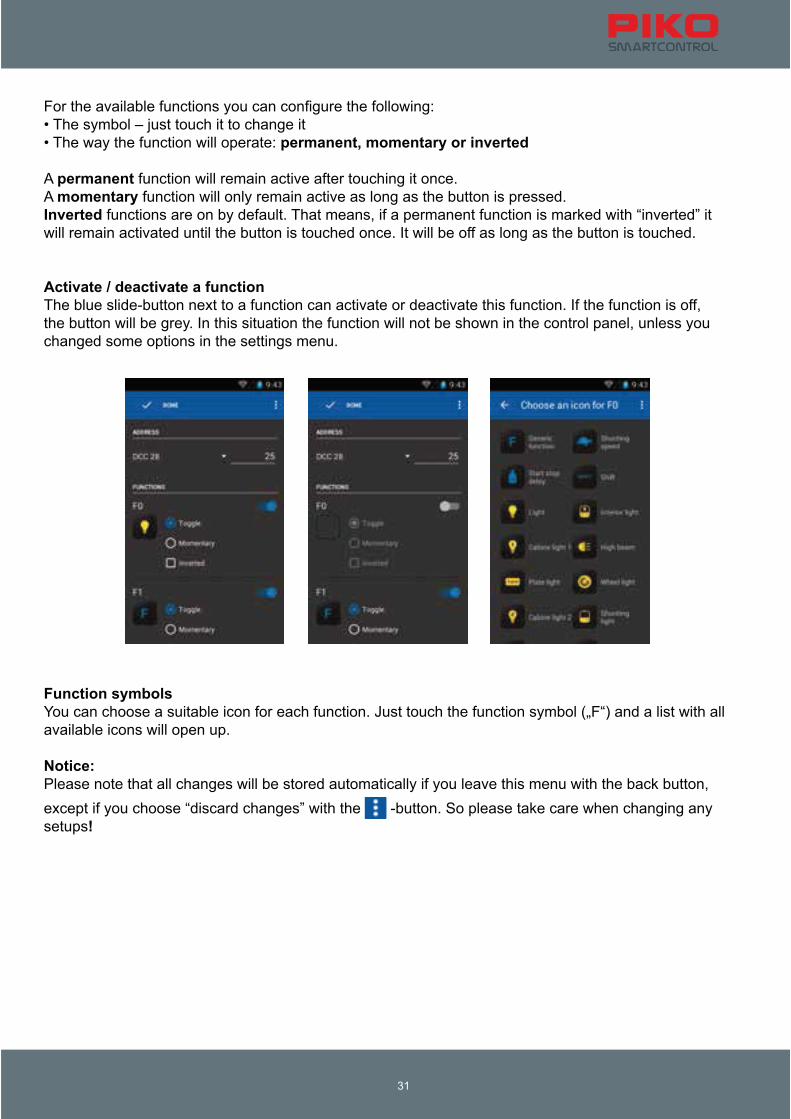
permanent, momentary or inverted
permanent
momentary
Inverted
Activate / deactivate a function
Function symbols
Notice:
setups!

System
32
4.2.2 Create new locomotive
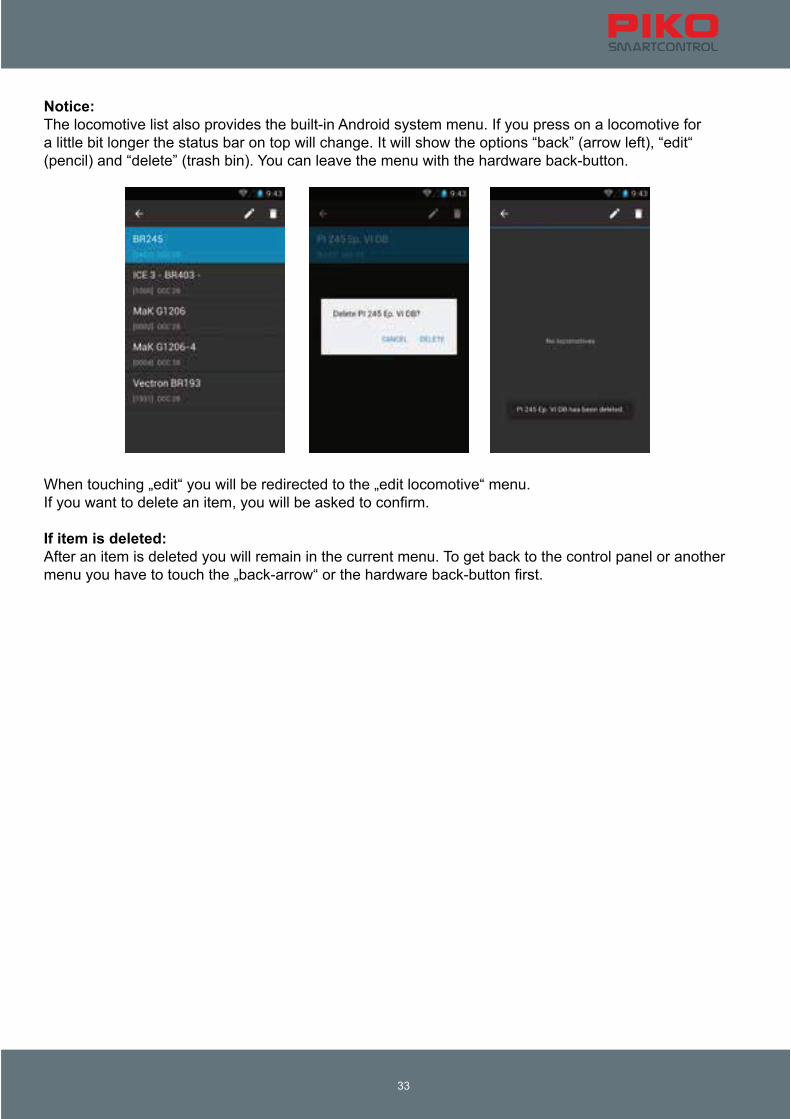
Notice:
Control panel – „plus“ and „minus“ symbols
33
Notice:
If item is deleted:
System
34
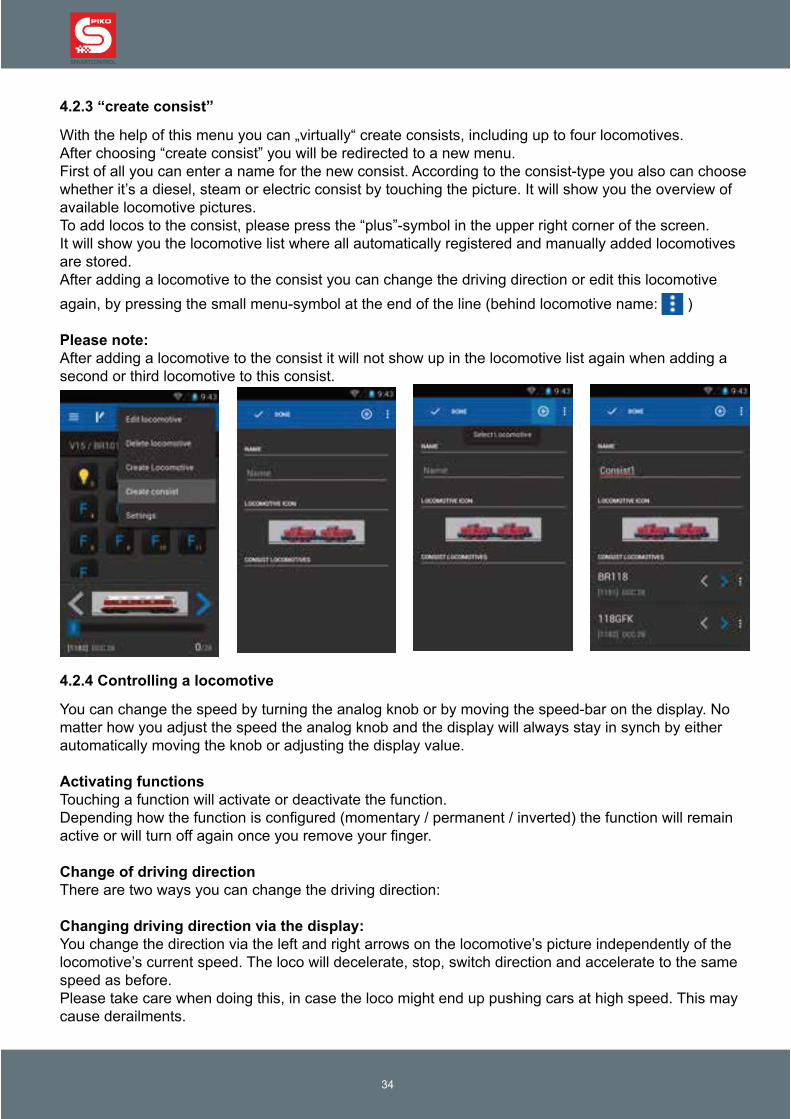
4.2.3 “create consist”
Please note:
4.2.4 Controlling a locomotive
Activating functions
Change of driving direction
Changing driving direction via the display:
35
Changing driving direction via the analog knob:
4.2.5 Switching between locos
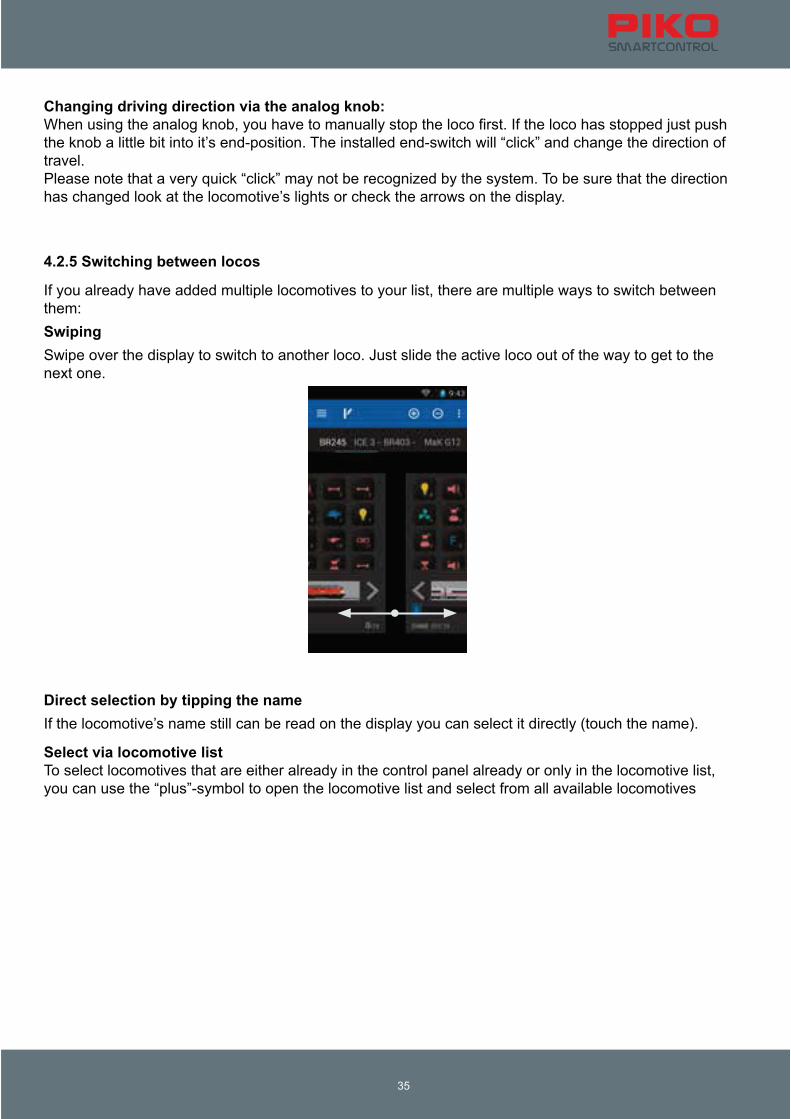
Swiping
Direct selection by tipping the name
Select via locomotive list

System
36
Information about automatic registration via RailComPlus®:
®

37
4.3 The switch panel
Other menus in the switch panel
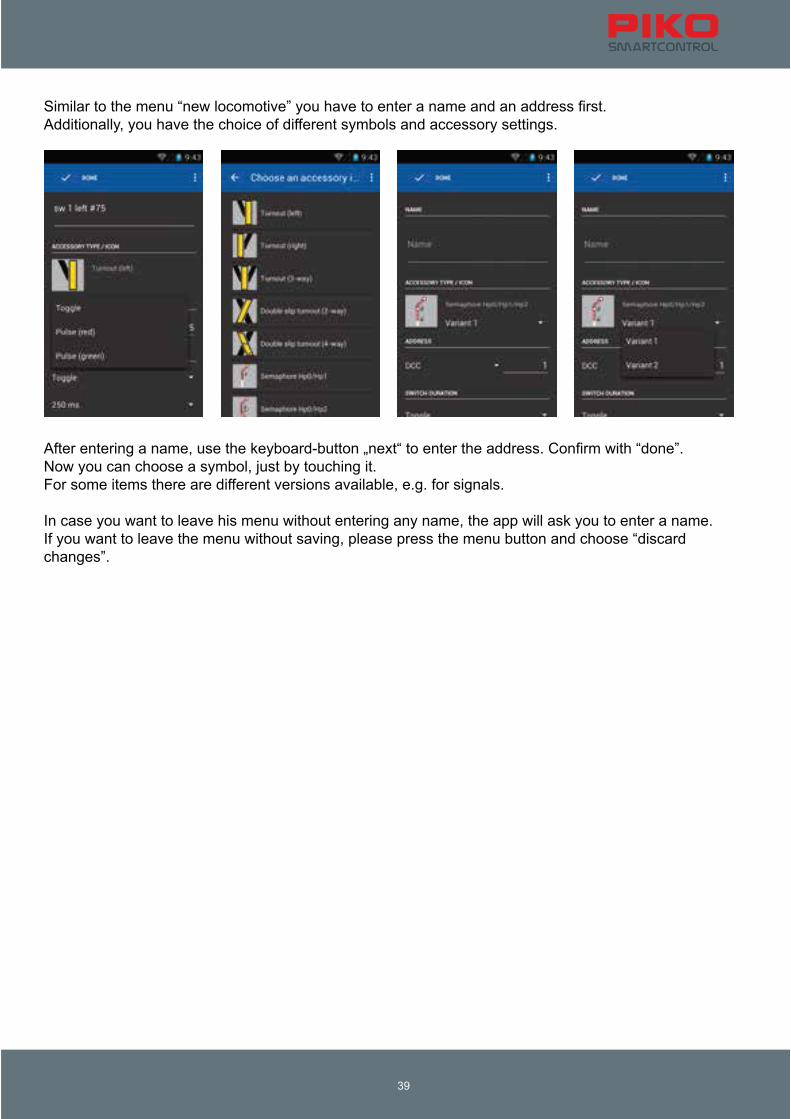
4.3.1 Create new switch panel
create new panel

System
”items list“®
“create new item”
39
System
40
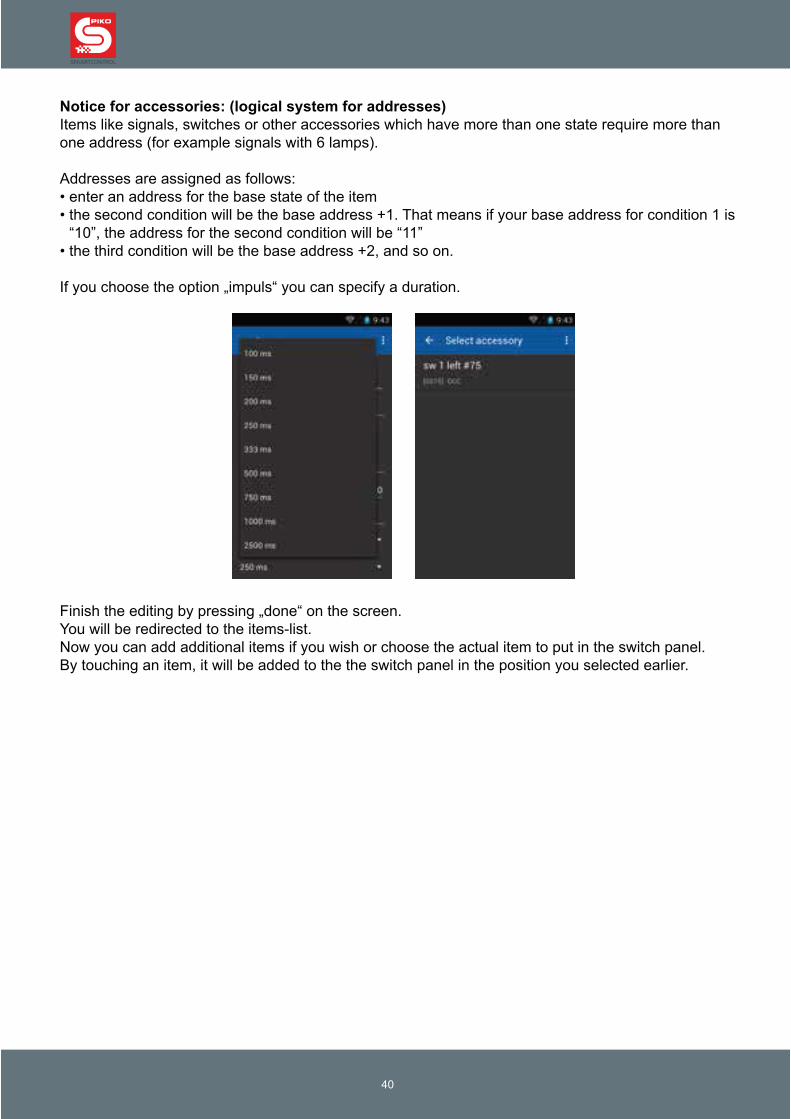
Notice for accessories: (logical system for addresses)
41
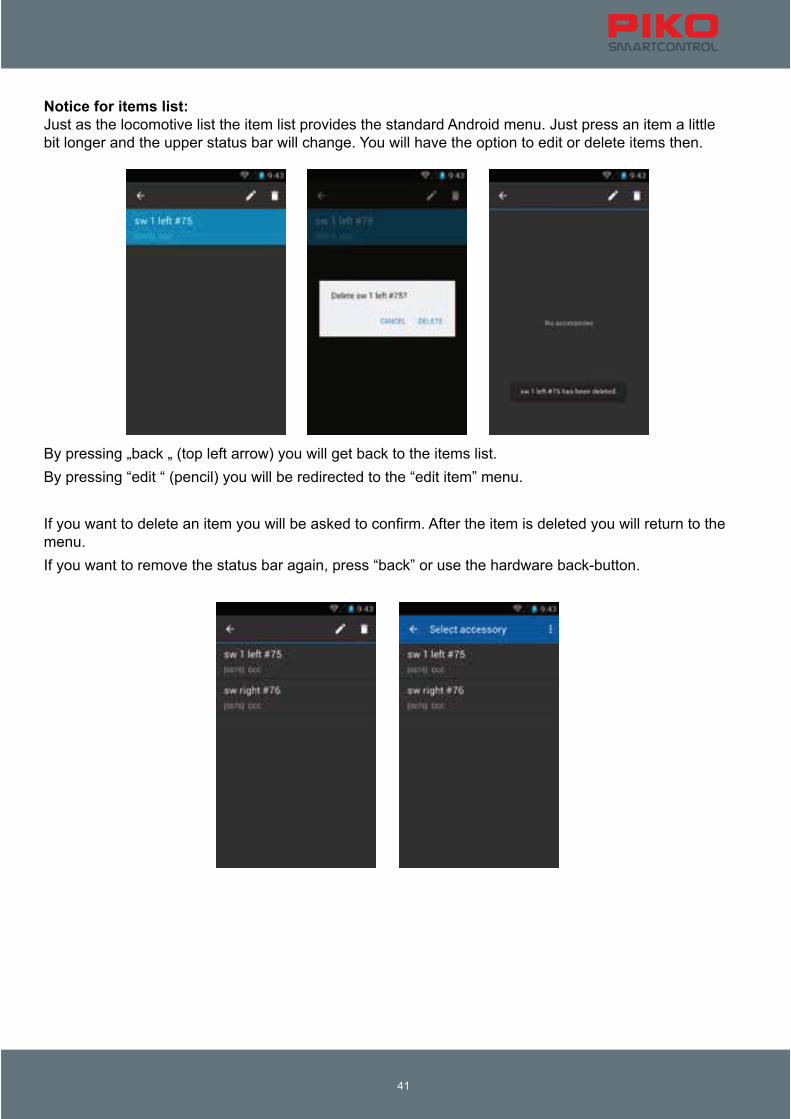
Notice for items list:

System
42
4.3.2 Control the switch panel
43
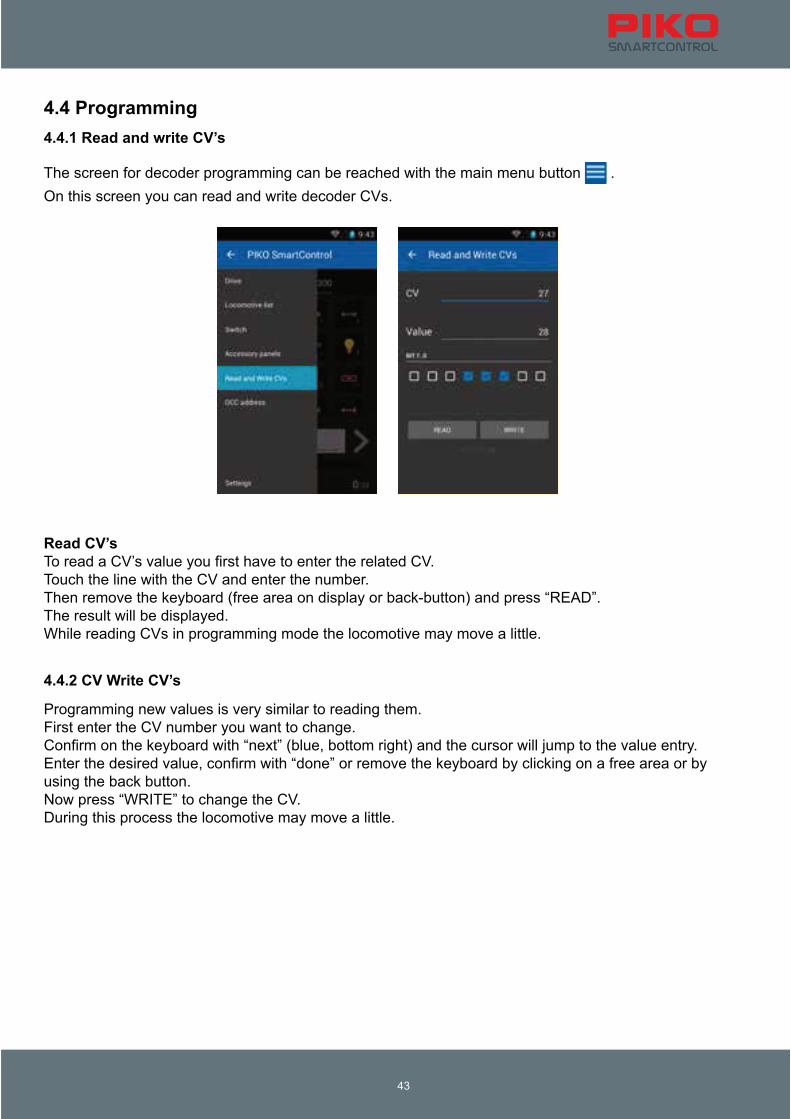
4.4 Programming
4.4.1 Read and write CV’s
Read CV’s
4.4.2 CV Write CV’s

System
44
4.4.3 DCC-Address

45
5. Options and settings of the PIKO SmartControl® System
5.1 Link the PIKO SmartBox® into a local network
®
Connection via LAN®
®
Connection via WiFi
®
®
®
®
®
The basic settings in this mode are as following:
®
®
Network settings of the PIKO SmartBox®
Attention:
Due to technical reasons only one PIKO SmartBox® can be used within a WiFi range. It is not
possible to use two PIKO SmartBoxes® within one room.
For using two PIKO SmartBoxes® within one WiFi range please see chapter „5.3 / additonal
settings of the PIKO SmartBox® via the settings app”.

System
46
5.2 Link the PIKO SmartController® into a local network
Connecting with a local network via WiFi
®
®
Note:
5.3 Additional settings of the PIKO SmartBox® via the settings app
® ®
®
47
® ®
®
®
System
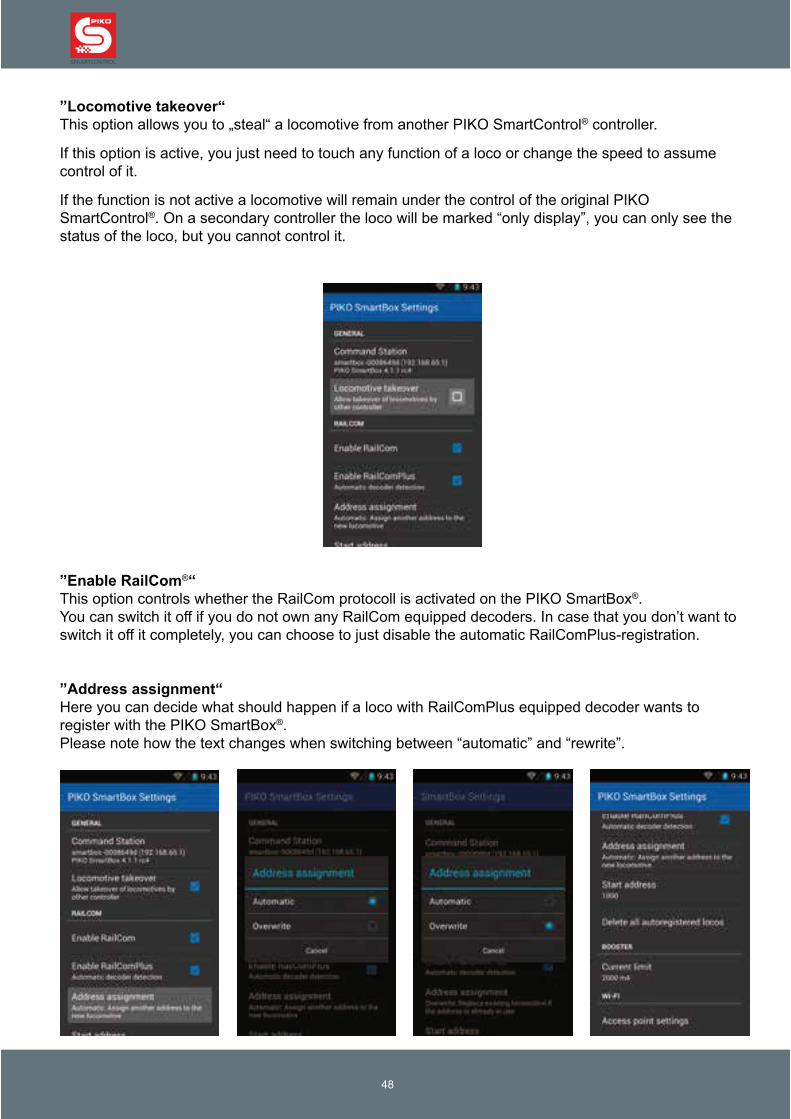
”Locomotive takeover“®
®
”Enable RailCom®“®
”Address assignment“
®
49
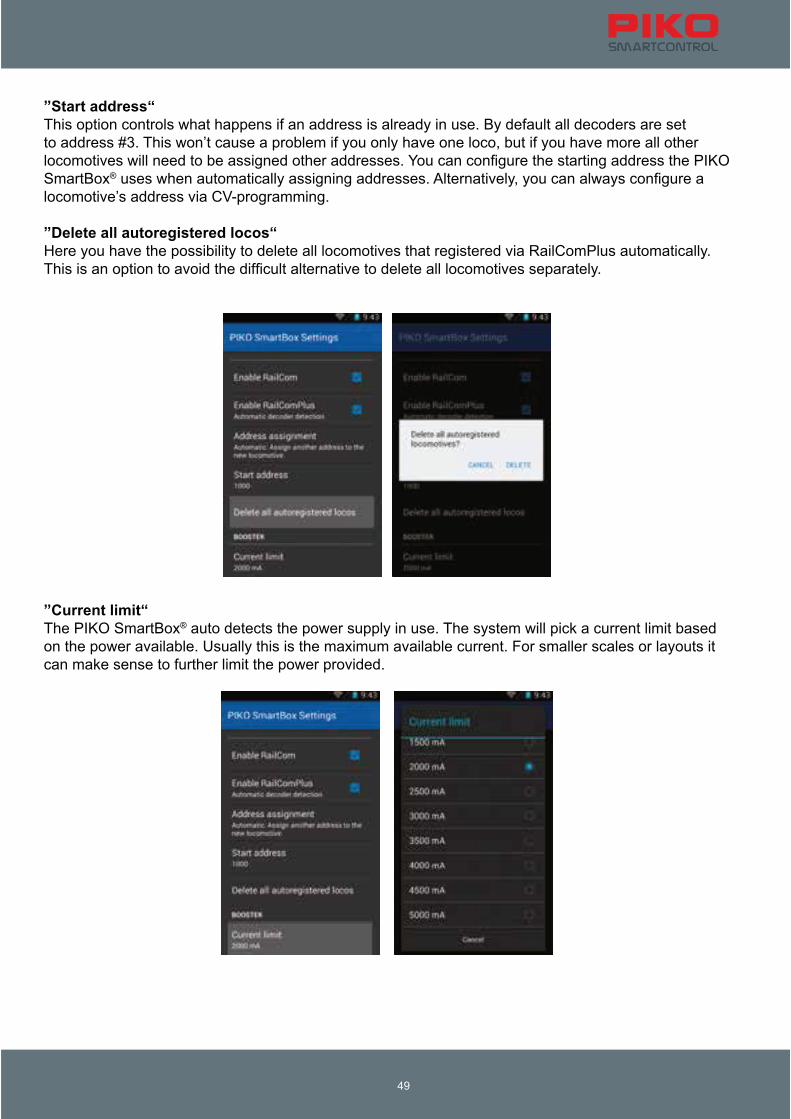
”Start address“
®
”Delete all autoregistered locos“
”Current limit“®

System
50
„Access point settings“
®

51
® ®
®
5.4 Update and Reset of the PIKO SmartBox®
5.4.1 Reset of the PIKO SmartBox®
®
5.4.2 Update of the PIKO SmartBox®
®
®
®
®
®

System
52
Preparing the USB-stick for the Update
®
Note: ®
®
5.4.3 BackUp and Restore / Rescue of the PIKO SmartBox®
®
®
®
Please note:
®
®
®
® ®
Attention:®
53
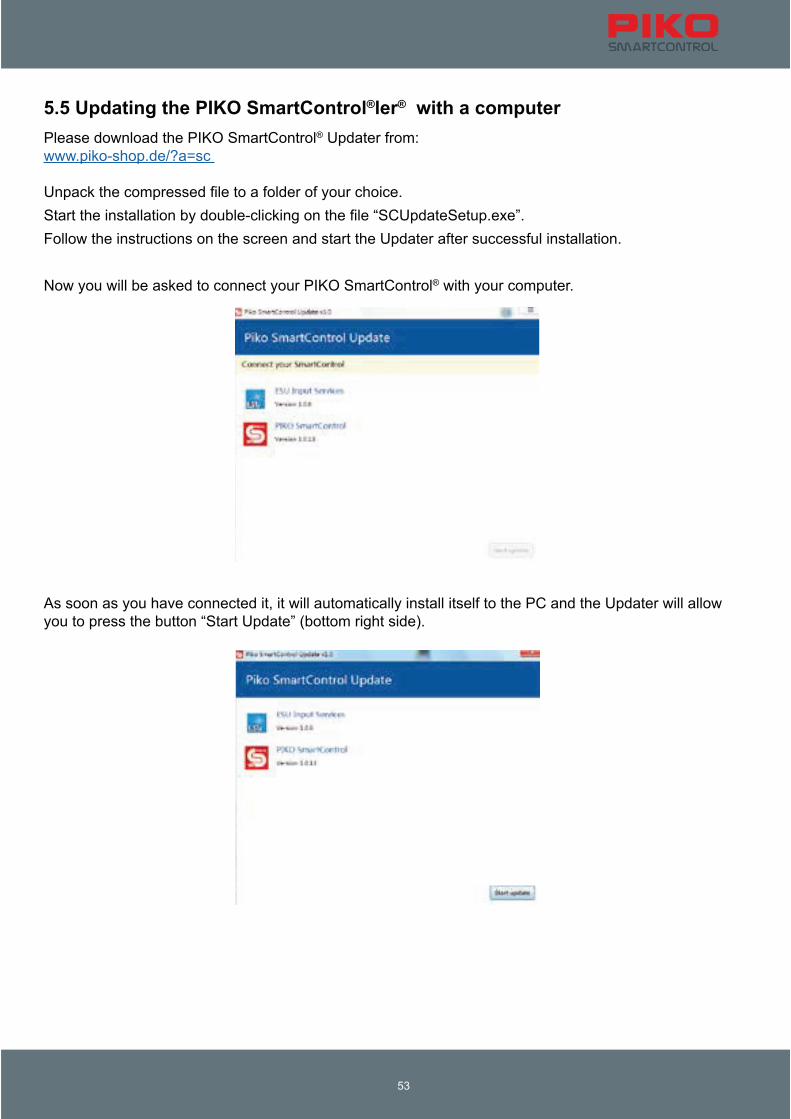
5.5 Updating the PIKO SmartControl®ler® with a computer
®
®
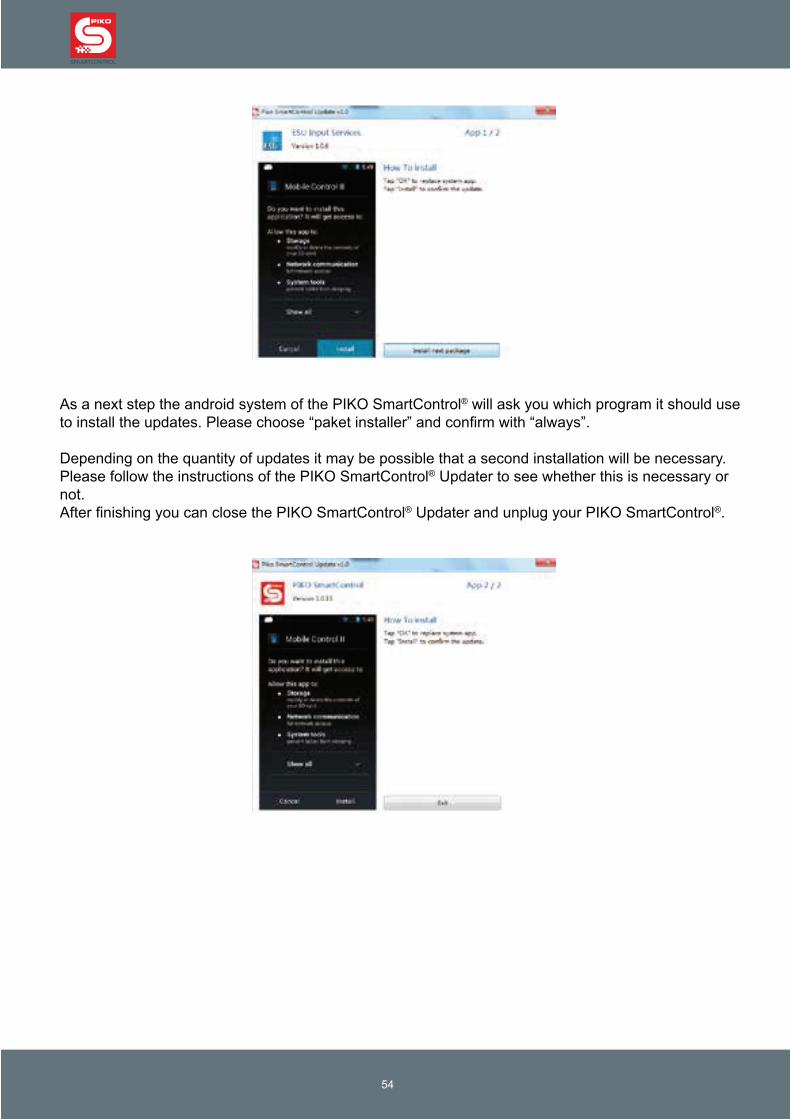
System
54
®
®
® ®
55
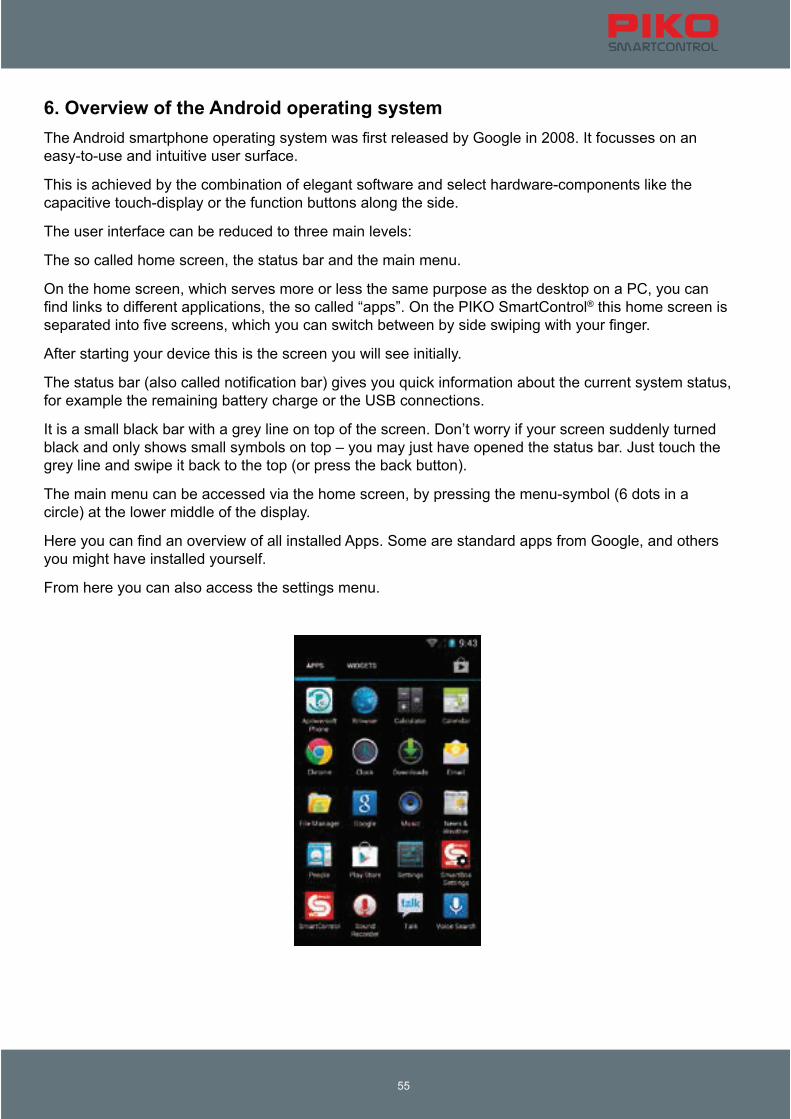
6. Overview of the Android operating system
®
System
56
You will quickly realize that Google’s Android operating system contains a lot of smart hidden
shortcuts and features.
6.1 Downloading and installing apps from the Google® PlayStore
Please remember that the PIKO SmartControl® is not a full featured smartphone. Depending on
understand that due to the large number of available apps and the customized hardware of the
PIKO SmartControl® it is not possible to guarantee that all apps will work.
Please note:
6.2 Changing the background picture
®
57
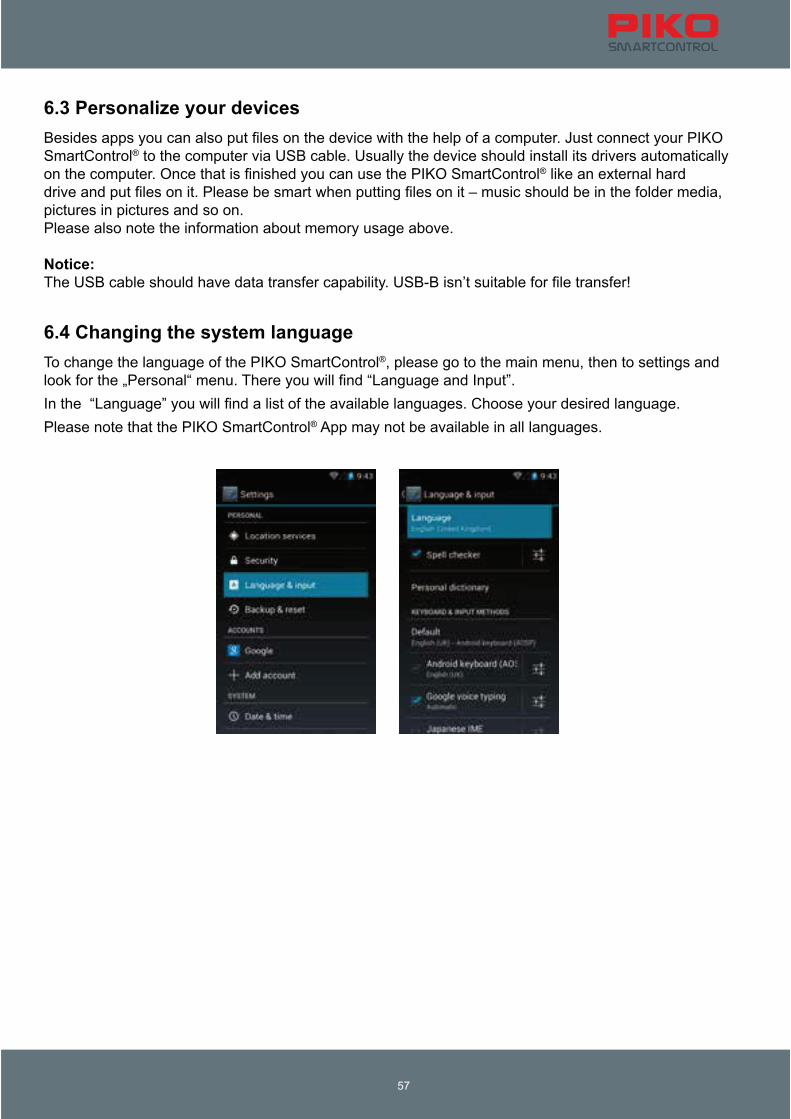
6.3 Personalize your devices
®
®
Notice:
6.4 Changing the system language
®
®
System
7. Android-Tips
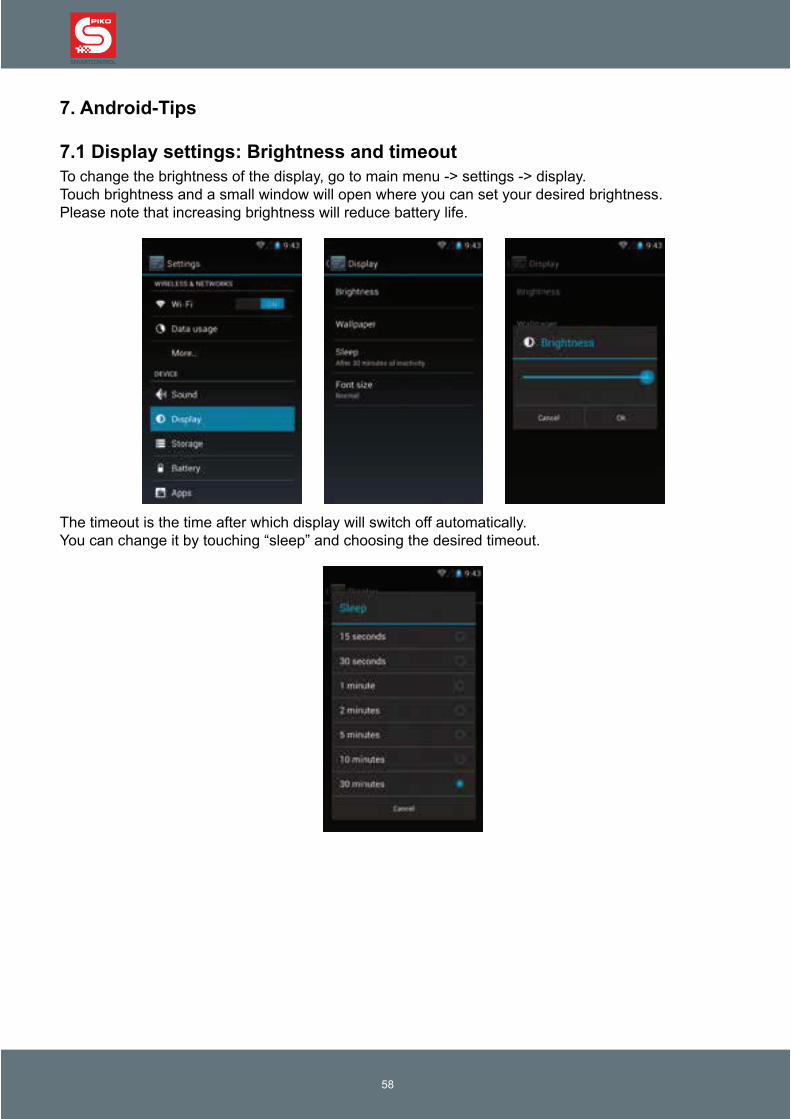
7.1 Display settings: Brightness and timeout
59
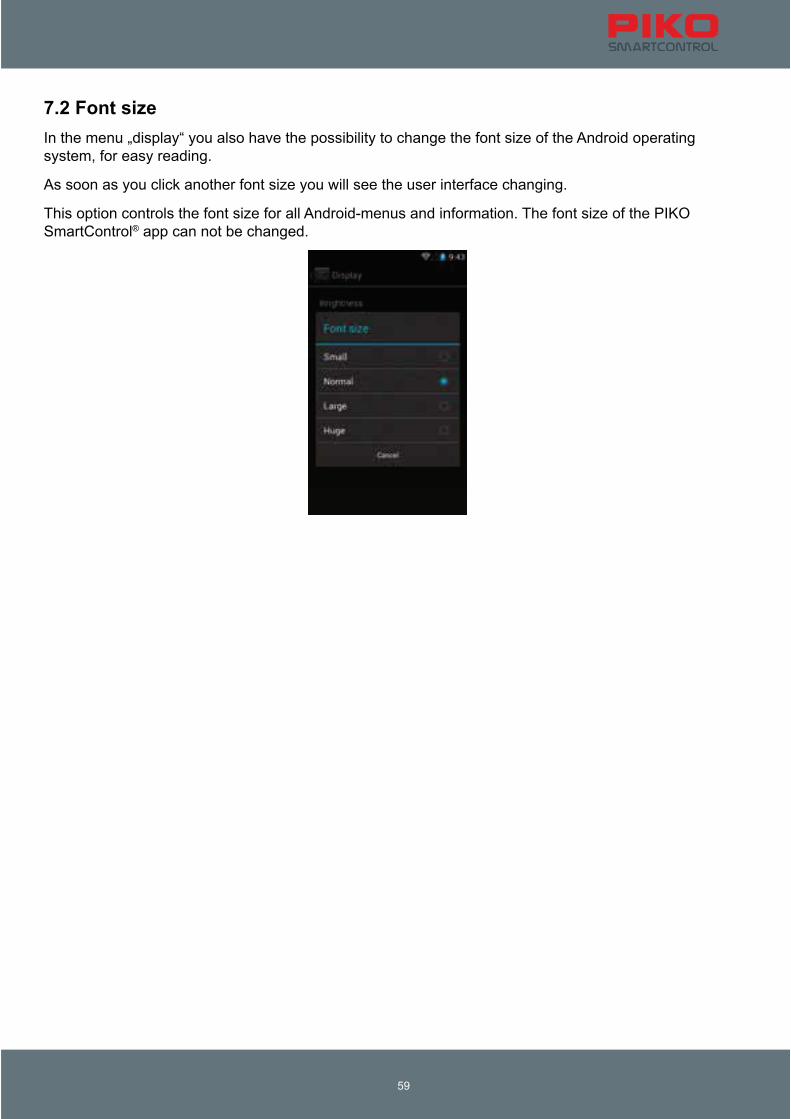
7.2 Font size
®
System
60
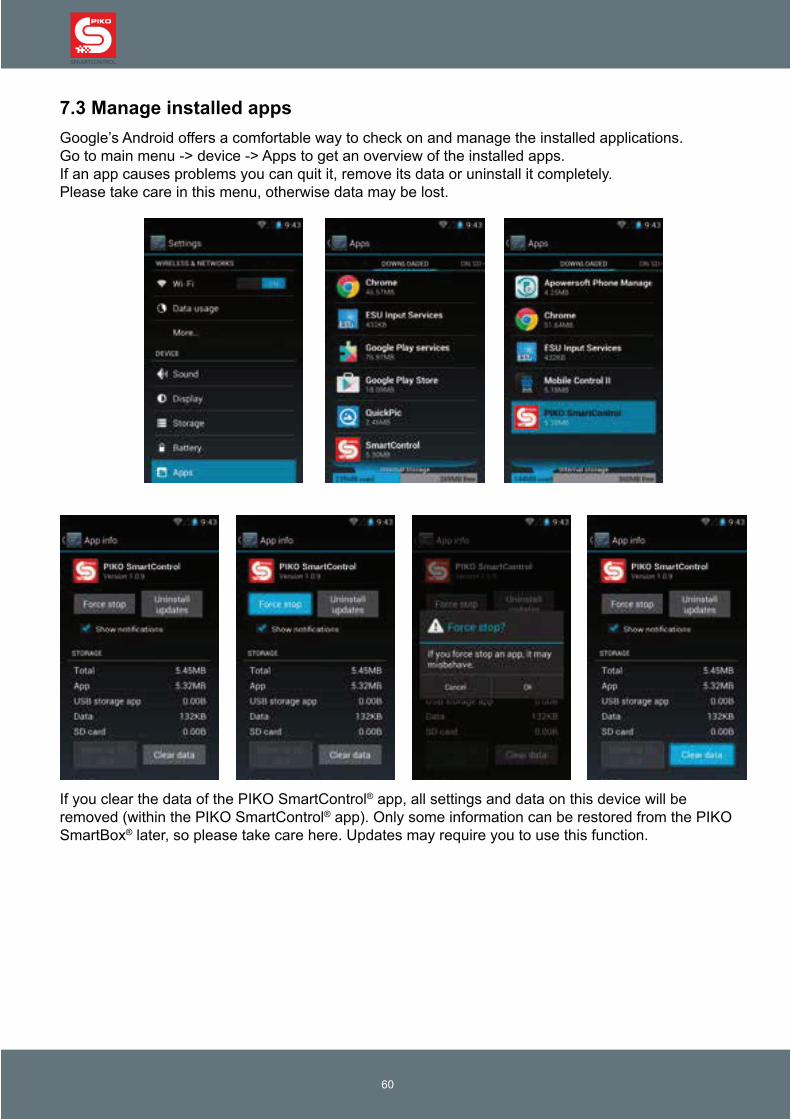
7.3 Manage installed apps
®
®
®
61
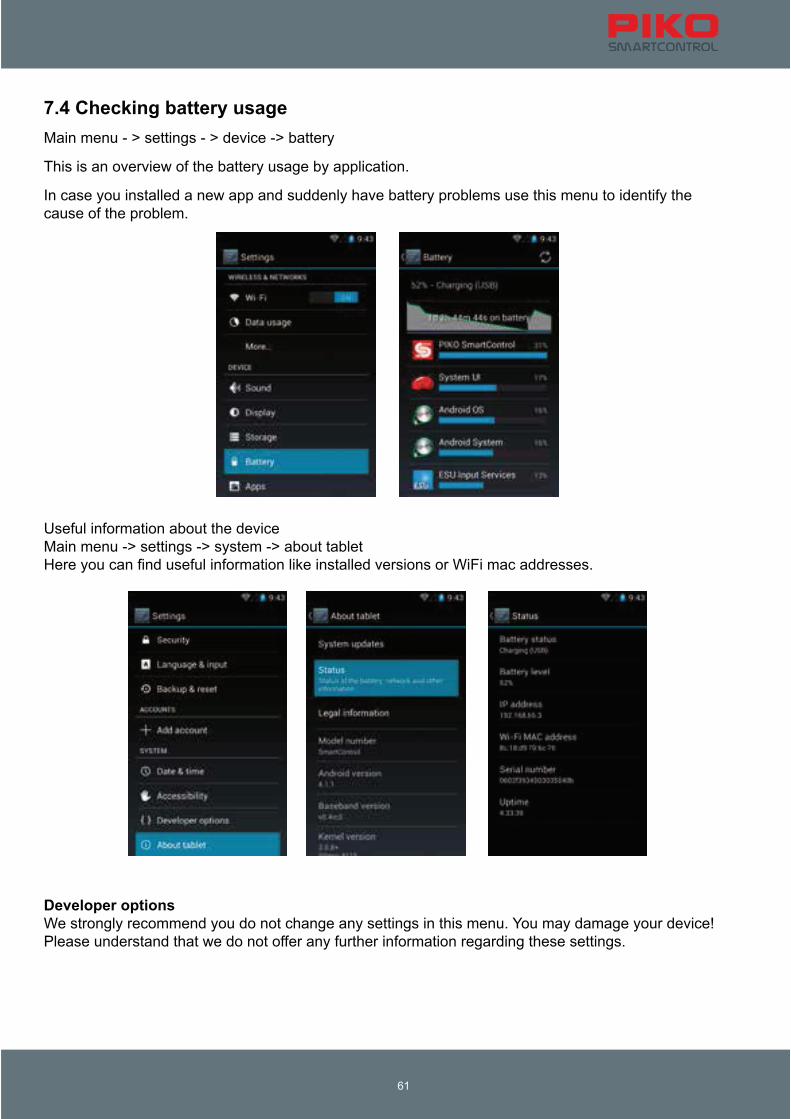
7.4 Checking battery usage
Developer options

System
62
8. Detailed instructions for the PIKO SmartControl® App
®
8.1 PIKO SmartControl® App
Menus will appear close to the menu button you pressed.

63
Long pressing the locomotive name in the control panel will open a list of locomotives.
System
64
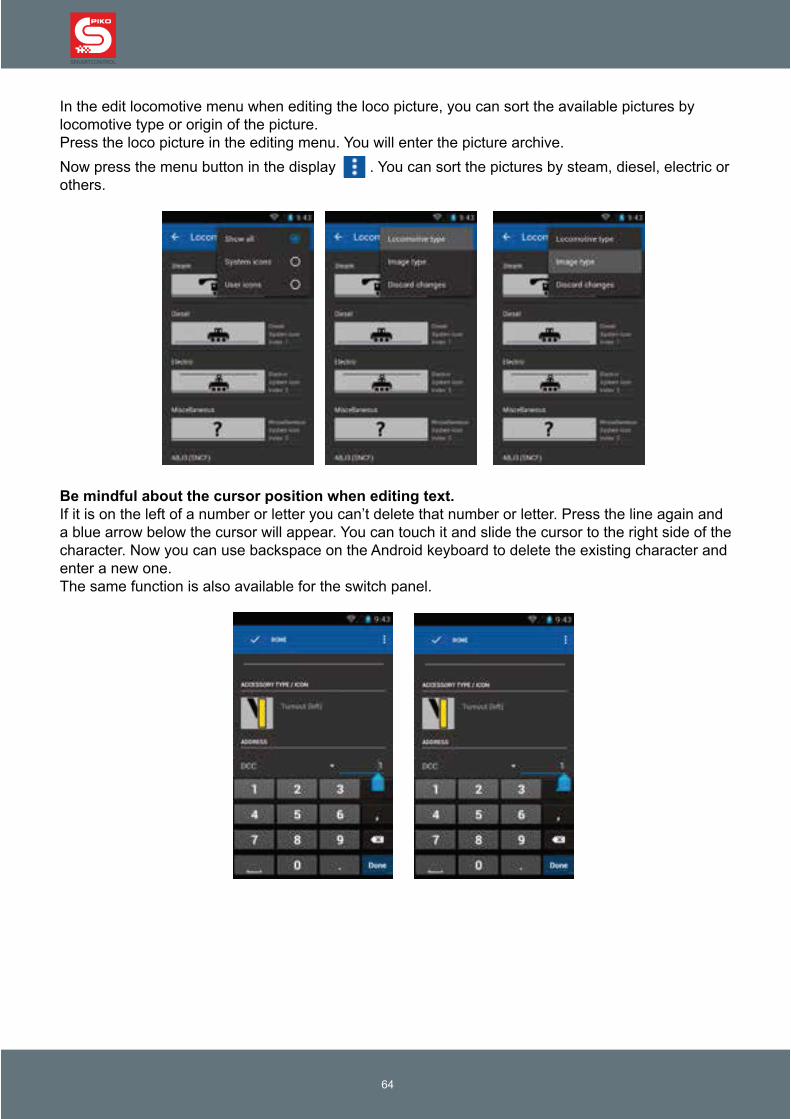
Be mindful about the cursor position when editing text.

65
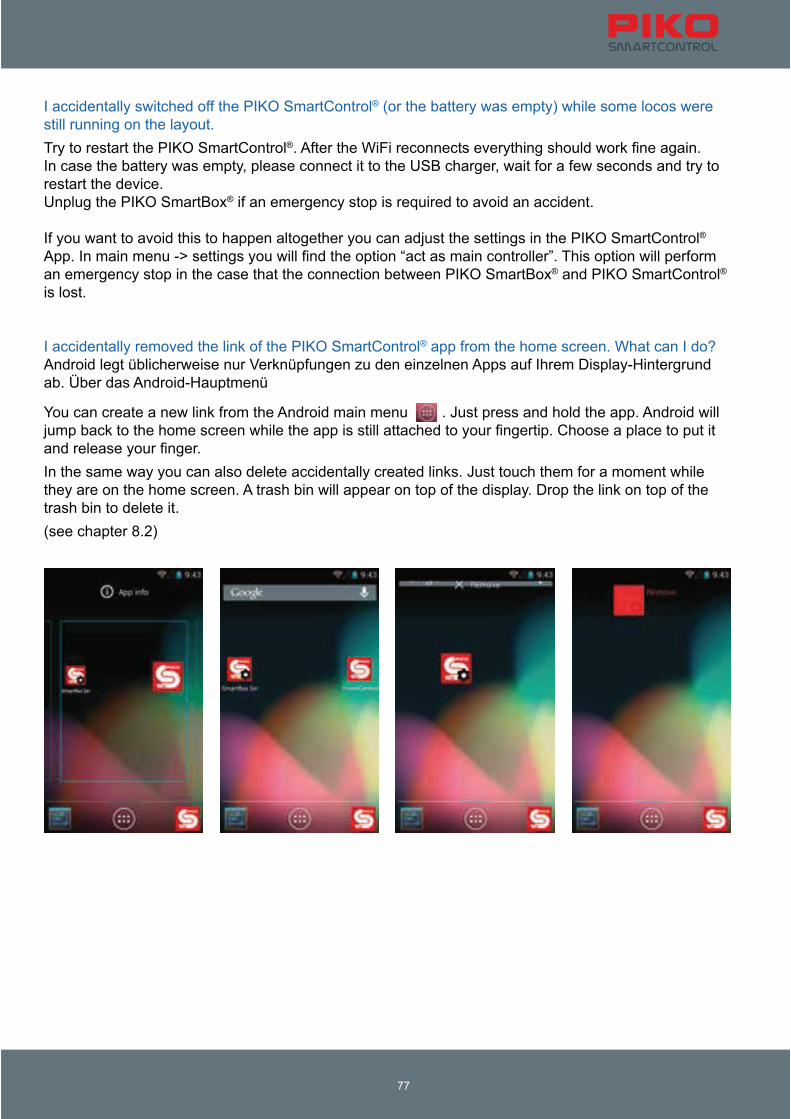
8.2 Android menus and features
You can create links on the home screen for all installed apps.
Deleting a link works similarly.
System
66
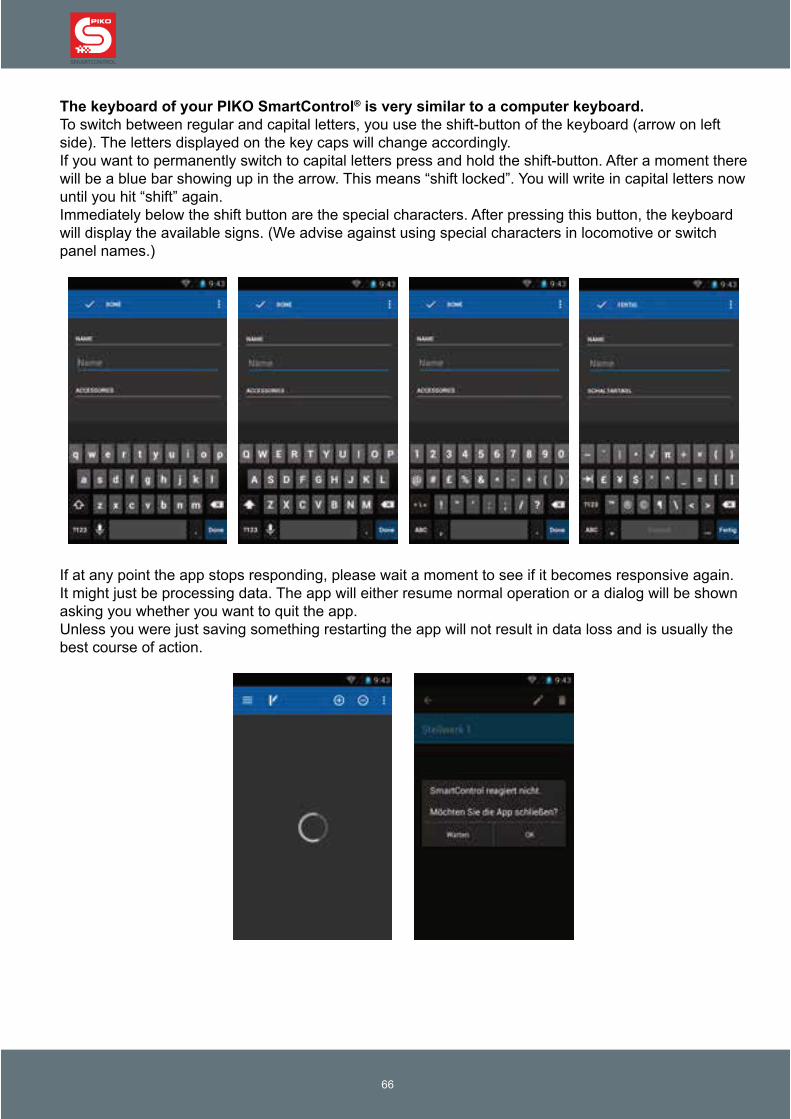
The keyboard of your PIKO SmartControl® is very similar to a computer keyboard.
67
®
System
9. PIKO SmartController® Accessories
9.1 Attaching the lanyard
9.2 Changing the battery of the PIKO SmartController®

69
Warranty
All manipulations of the system will void the warranty, such as:
System
70
10. Glossary
10.1 Digital glossary
AnDi
Bit
Booster
BUS / BUS-System
Byte
Consisting
CV
CV-Programming
DCC
Decoder
Digital address / DCC-Address
ESU
Driving steps
Track occupancy detector
LNET / LocoNet
Magnetic accessories
MOROP
NEM
NMRA
71
Protocol –
RailComPlus® –
Command station –

System
72
10.2 Android glossary
Access point
App (Application)
Booting
Default value
Display-Timeout
Factory reset
Home screen
IP-Address
LAN
Open Source License
Router
SSID
Update
WLAN
WPS - WiFi Protected Setup

73
11. Function symbols

System
74
12. Safety notice
®
13. FAQ
®
® ®
®
®
75
®
®
®
System
76
®
®
®
®
®
®
® ®
®
®
®
®
77
®
®
®
®
® ®
®
System
®
®

79
Note

System
Note

Note

System
Note