p.i.g.i. users manual - saber astro · pdf filepigi users manual 4 startup make sure to have...
TRANSCRIPT
PIGI USERS MANUAL
P . I .G . I . US ERS MA NU A L
THE PREDICT IVE GRO U N D STATION PROJECT VER 0 . 8 .6 ALPH A RELE ASE
Jason Held and Tim Smith
6/19/2017
This document contains information proprietary to Saber Astronautics LLC and Saber Astronautics Australia. The information may not be used, disclosed or reproduced without the prior written authorization of Saber Astronautics; and those so authorized may only use the information for the purpose of evaluation consistent with authorization. Reproduction of any section of this document must include this legend

PIGI USERS MANUAL
2
TABLE OF CONTENTS
Summary ....................................................................................................................................................... 3
Startup .......................................................................................................................................................... 4
Solar System View ......................................................................................................................................... 5
User Controls ................................................................................................................................................ 6
Main Menu Bar ............................................................................................................................................. 6
Adding a new Satellite .................................................................................................................................. 7
Adding a new Groundstation ........................................................................................................................ 7
Scene Files ..................................................................................................................................................... 8
Selected Objects Menu ................................................................................................................................. 9
Time Bar and Overpasses .............................................................................................................................. 9
Satellite Transfers ....................................................................................................................................... 11
Viewing Telemetry Data (Team License) .................................................................................................... 12
Running the Data ........................................................................................................................................ 12
Injecting Your Own Assets .......................................................................................................................... 13
Science Tab ................................................................................................................................................. 14
Track Mode (Testing) .................................................................................................................................. 16
Thank You! .................................................................................................................................................. 16

PIGI USERS MANUAL
3
SUMMARY
This is a quick start instruction manual for PIGI. Version 0.8.6 is designed for situational awareness,
constellation mission planning and a basic dish controller. The Casual License is useful for students of all
ages, entrepreneurs, and hobbyists/enthusiasts who wish to get quick solutions.
PIGI includes the following features:
- Orbital Mechanics Propagator (SGP4)
- Overpass Calculation
- Addition of Satellites and Ground Stations
- Data API (“PIGIBack”) to connect with any data streams needed, or drive the simulation via
MATLAB/R/etc
- Spacecraft ‘Exploded View’
- JPL Asteroid Database and Hipparcos Star Chart
- Satellite Interplanetary Transfers
A Team License (demo), is available which includes health and welfare telemetry management and alert
system. Commercial satellites needing that extra level of detail can contact us for our full machine
learning driven diagnostics services.
This is an Alpha release, and while it is stable defects may still exist. As part of the license any user is
entitled to upgrades and any feedback is welcome. PIGI is a working application, with that we plan a new
release every month so if there are features you want added don’t hesitate to contact us!
PIGI ver 0.8.6 is primarily tested for Windows 10, 8, 7, and Mac ver 10.11.
THANK YOU to the brave souls who joined us in private demo trials! A quick shout out to our friends at:
- International Space University (Strasbourg)
- University of New South Wales
- Australian Defence Force Academy
- Embry Riddle Aeronautical University
- Utah State
- University of Sydney
- OrbitOz
- Melbourne University
- Delta-V SpaceHub

PIGI USERS MANUAL
4
STARTUP
Make sure to have an installer and a separate data demo folder.
For Windows, double click the PIGI installer and follow the instructions given.
For Mac, unzip the package and double click the app as normal.
Run PIGI. PIGI will require a license key; cut and paste the license key provided in the original email into
the entry box. A brief loading screen will then show. When finished loading a screen similar to the image
found below will appear. As stated, press the badge to continue:
PIGI STARTUP SCREEN

PIGI USERS MANUAL
5
SOLAR SYSTEM VIEW
The main screen is a view of the Solar System. Key information found on-screen:
- Sim Status (Live, Paused, Simulated)
- Time Bar (Scroll bar to manipulate and simulate time)
- Main Menu
- Planet Navigation (Scroll over to expand, click on a planet to jump the camera to that planet)
DESCRIPTION OF PIGI HUD COMPONENTS
Main Menu
Planet Navigation
Time Bar Sim Status
PIGI USERS MANUAL
6
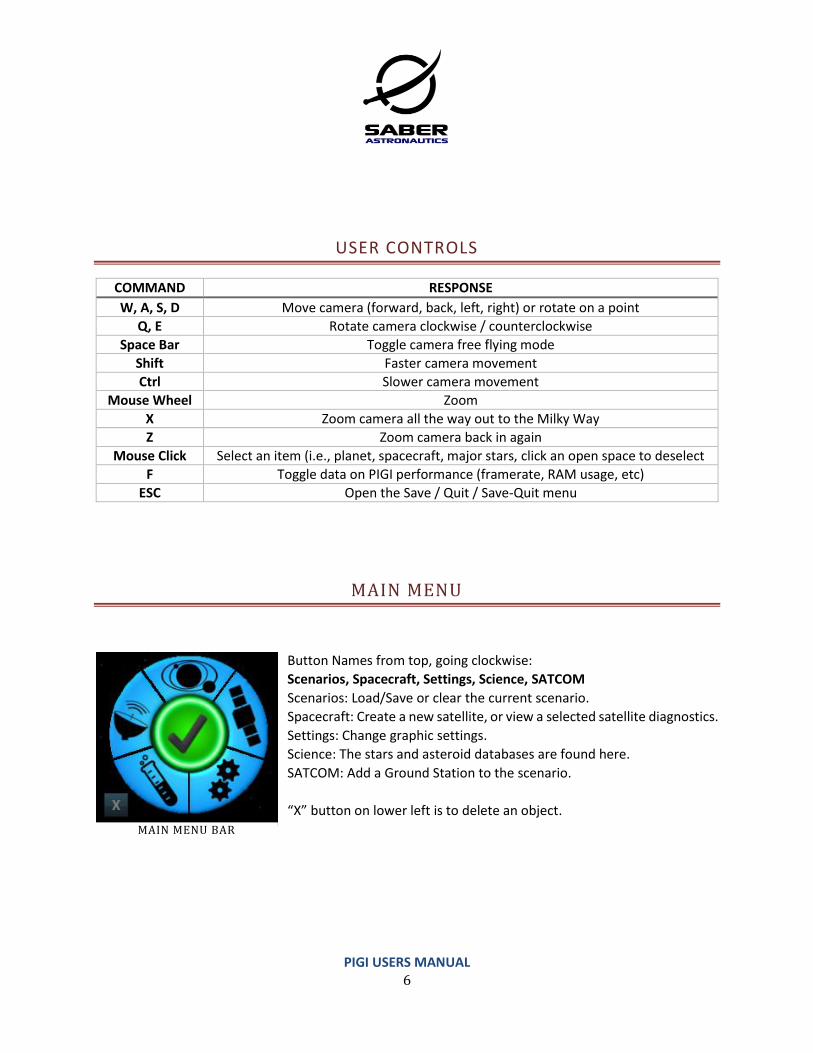
USER CONTROLS
COMMAND RESPONSE
W, A, S, D Move camera (forward, back, left, right) or rotate on a point
Q, E Rotate camera clockwise / counterclockwise
Space Bar Toggle camera free flying mode
Shift Faster camera movement
Ctrl Slower camera movement
Mouse Wheel Zoom
X Zoom camera all the way out to the Milky Way
Z Zoom camera back in again
Mouse Click Select an item (i.e., planet, spacecraft, major stars, click an open space to deselect
F Toggle data on PIGI performance (framerate, RAM usage, etc)
ESC Open the Save / Quit / Save-Quit menu
MAIN MENU
Button Names from top, going clockwise:
Scenarios, Spacecraft, Settings, Science, SATCOM
Scenarios: Load/Save or clear the current scenario.
Spacecraft: Create a new satellite, or view a selected satellite diagnostics.
Settings: Change graphic settings.
Science: The stars and asteroid databases are found here.
SATCOM: Add a Ground Station to the scenario.
“X” button on lower left is to delete an object.
MAIN MENU BAR

PIGI USERS MANUAL
7
SATELLITE PARAMETER ENTRY TABLE
ADDING A NEW SATELLITE
Click the “Satellite” button on the main menu bar to add a satellite. Satellites are added directly from the
Satellite Catalogue, from a TLE (Text based), or manually via input of six orbital elements. Enter the
elements, then choose a media set and hit “Add” to add the new satellite.
All media sets are located here: C:\Program Files\Pigi 0.8.6.0\media
ADDING A NEW GROUNDSTATION
Similarly, adding a new ground station is very easy. Click the SATCOM icon located on the main menu bar,
enter the proper parameters for latitude, longitude, elevation, station name, and beam width. Click
“Add”.
ADD SATELLITE PANEL
ADD GROUND STATION PANEL
GROUND STATION INFORMATION

PIGI USERS MANUAL
8
SCENE FILES
PIGI can load in prebuilt scenarios, called a “scene”. You can design your own constellations and save the
scene via the main menu tab. Scenes use an easy to read and generate .xml format. Saber provides a
sample MATLAB / Octave generator so you can set up your own constellations of satellites and ground
stations. Running the script will prompt the user to enter parameters for each constellation. Following
the instructions in the script produces the scene file. Below is an example scenario.
NOTE: PIGI can handle hundreds of satellites without too much stress. Many satellites and many ground stations may cause
reduced frame rates, especially when propagating forward in time.
SAMPLE CONSTELLATION

PIGI USERS MANUAL
9
SELECTED OBJECTS MENU
Every spacecraft has its own info panel.
Fov (Field of View): Locks the field of view, useful if comparing overpasses
Rot (Rotate): Changes the satellite rotation
Refresh: Update the statistics with the most current information
Favourite: Adds the item to the favourites menu for easy viewing
Lock/Unlock: Unlocking allows a user to change orbital elements and other critical data
TIME BAR AND OVERPASSES
The Time bar shows overpass information, color-coded by satellite. The scroll bars allows propagation
forward or backwards in the simulation. Click on the button label “[…]” to show a list of overpasses for
that site.
Field of View
SATELLITE DETAILS
OVERPASS DATA
PIGI USERS MANUAL
10
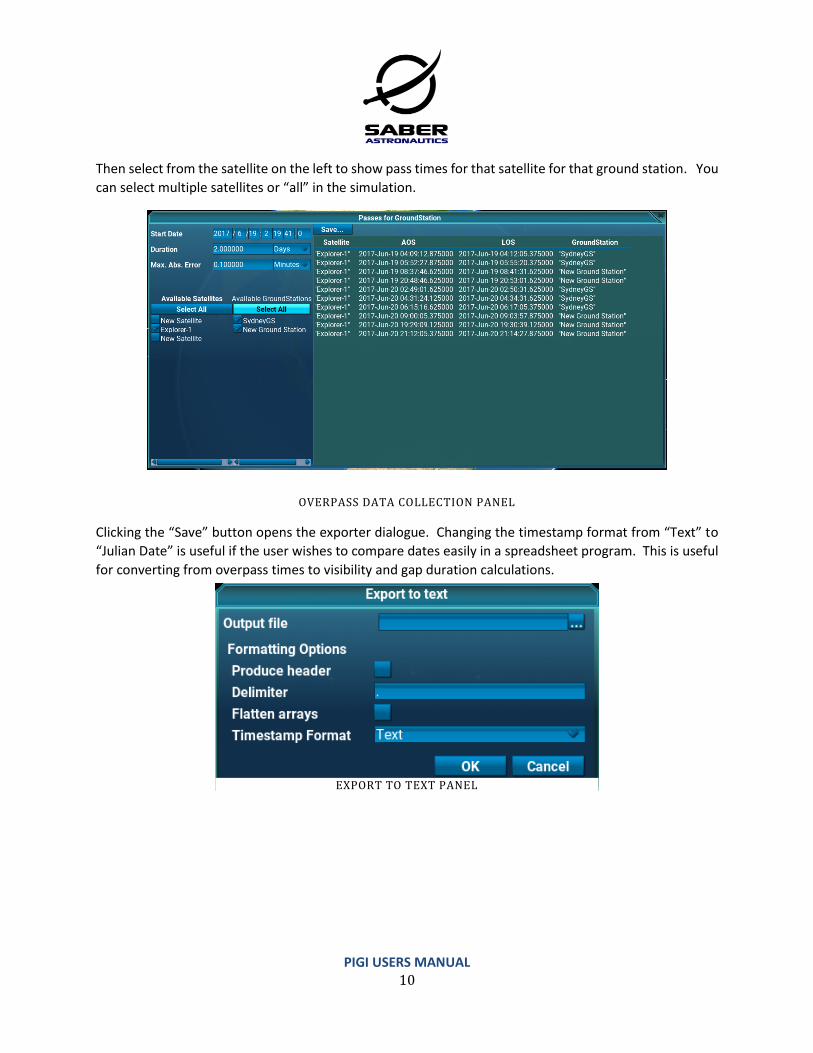
Then select from the satellite on the left to show pass times for that satellite for that ground station. You
can select multiple satellites or “all” in the simulation.
Clicking the “Save” button opens the exporter dialogue. Changing the timestamp format from “Text” to
“Julian Date” is useful if the user wishes to compare dates easily in a spreadsheet program. This is useful
for converting from overpass times to visibility and gap duration calculations.
EXPORT TO TEXT PANEL
OVERPASS DATA COLLECTION PANEL

PIGI USERS MANUAL
11
SATELLITE TRANSFERS
In PIGI, there exists the ability to perform satellite manoeuvres on the same planet or transfers to other
planets. Click on a satellite than from within the satellites information tab locate and click on the symbol
for satellite transfer. This will pull up the transfer panel. From there the user can select “Same Planet”
manoeuvres or “Interplanetary” transfers. Each panel is self-explanatory. Fill in the necessary information
and follow the directions.
Above are some examples of the information that the user will have to fill out as well, as what will be
shown by PIGI for the user. Transfers can be made to any planet or asteroid tracked in the simulation.
TRANSFER PANEL
INTERPLANETARY TRANSFER PANEL TRANSFER DETAILS PANEL

PIGI USERS MANUAL
12
VIEWING TELEMETRY DATA (TEAM AND ENTERPRISE LICENSES)
With a satellite selected, click again on the satellite icon in the main menu to enter diagnostics.
This places the camera in the Satellite diagnostic view. The mouse wheel will increase exploded view
level. Components are highlighted red based on alert level from the telemetry database. This is visible
only if the data demo is also running—see below.
Click on a telemetry item to show a plot of values. When a telemetry item goes outside its bounds, a
notice is posted on the bottom of the screen as an alert.
RUNNING THE DATA
We have a simple version of the PIGI data API to pipe data from a satellite to the simulation. The
enterprise demo also includes a sample regression matrix which is output from a System Map model
trained at our lab. Take a look at the “Sample Source” folder for the following files:
metrics_and_telem Config file which sets the data rate and data sources
playback-source A simple executable (made from our PIGI API)
telem_and_mets.csv Raw data from telemetry and/or System Map metrics in time series
format
MySatName.xml Metadata file
To run the demo, click and drag the “metrics_and_telem” file into the “playback_source”. The playback
source will run in the background. PIGI will update the simulation from data sent from the executable.
EXPANDED VIEW OF A SATELLITE
SATELLITE BUTTON ON HUD

PIGI USERS MANUAL
13
**Note: large raw data files take some time to load, as the playback-source is a very simple
implementation of our data API.
The telemetry will then populate and any conditions causing an alert will appear as shown above.
Those with an Enterprise license will also see the cause-effect screen (System Map) update in the
simulation. Circles are performance metrics calcuated as a function of telemetry. Arrows are
relationships. Red arrows are negative relationships. Faded arrows represent uncertain relationships,
which should be taken with a grain of salt. Solid arrows have high certainty and can guide diagnostic
actions.
INJECTING YOUR OWN ASSETS
0.8.6 allows a user to inject their own spacecraft into PIGI with a bit of hacking. Needed will be .mesh and
.material files of the spacecraft, which are read by the graphics program. To do the exploded view PIGI
will also require .mesh and .material files for all of the components, as well as a .scene file. Several
software programs allow a user to convert from common CAD formats. For example, Solidworks .stl files
can be loaded into Blender or Maya and converted using the Ogre3D plugin.
Naming convention is important. Some general rules:
- All of the assets for a spacecraft must be in the same folder. The spacecraft name should be
identical to the folder name. For example “CubeSat” folder should have “CubeSat.mesh” etc
- Names for each part, for doing an exploded view, must be the same as named in the .scene
- PIGI only loads a part once, repeats are not re-loaded. This can be very useful if when multiple
spacecraft use common parts.
Pressing F12 brings the debug menu, which shows all of the graphical assets. Click on the “Resources” tab
to bring up the Resources menu. (Note: ignore the entities tab).
Click on the “Add” Button to add a resource path to PIGI. The new spacecraft will be available as an option
when createing a new spacecraft in the Solar System Viewer.

PIGI USERS MANUAL
14
DEBUG PANEL
Python scripts are available to help automate this process of converting from CAD to PIGI, from the
Downloads page.
SCIENCE TAB
The Science tab has several fun features used to explore the Hipparcos star catalogue. The catalogue has
roughly ~118k stars. PIGI allows the major (brightest) stars to be clickable for reference, and trackable if
connected to a ground station or telescope.
The star chart control panel allows the user to activate/deactivate constellations and other information
for educational purposes, or simply for to control the aesthetics.

PIGI USERS MANUAL
15
BIG DIPPER STARFIELD PANEL
For more information on Hipparcos see http://www.cosmos.esa.int/web/hipparcos
The Science tab also allows selecting known asteroids.
ASTEROID PANEL

PIGI USERS MANUAL
16
TRACK MODE (TESTING)
Satellites, stars, and other objects can be tracked if using a telescope or a SATCOM station. This requires
using a “PigiBack” client loaded on the satellite dish or telescope. The track mode is activated by clicking
on a ground station and selecting the track object from the “Track Satellite” or “Track Star” tab.
Azimuth and Elevation commands will be sent to the client controller.
Feel free to contact us if you want to try this with your own station.
TRACK MODE
THANK YOU!
Thanks for trying the PIGI Alpha release ver 0.8.6. We are actively improving PIGI based on feedback and
wish to make it useful to all operations. Feel free to reach out to us at [email protected].