photo sweet 1 - voloper creations 2 photo sweet 1.1 user guide ... whether through advertising, ......
TRANSCRIPT
Page 2 Photo Sweet 1.1 User Guide
This document was produced by Voloper Creations Inc.
© 2000 – 2010 Voloper Creations Inc. All Rights Reserved
Brands or product names are trademarks or registered trademarks of their respective holders.
The information contained herein is the property of Voloper Creations Inc. Except as specifically authorized in writing by Voloper Creations Inc. , the holder of this document shall: i) keep all information contained herein confidential, and ii) protect the information, in whole or in part, from disclosure and dissemination to all third parties except where otherwise authorized.
This document, as well as the software described in it, is furnished under license and may only be used or copied in accordance with the terms of such license. The information in this document is provided for informational purposes only, is subject to change without notice, and should not be construed as a commitment by Voloper Creations Inc.

© 2010 Voloper Creations Inc. Page 3
Table of Contents Thank you for choosing the Photo Sweet v1.1! ................................................... 5 What’s new in Photo Sweet v1.1?..................................................................... 6
Social Media Push: Flickr Ready ............................................................................... 6 Section 1: The Photo Sweet Picture Gallery Front-end Interface............................ 7
The Main Page ......................................................................................................... 7 The Galleries ........................................................................................................... 8 Gallery Popup Windows............................................................................................. 9 The Search Page ...................................................................................................... 9
Section 2: The Postcard Mailer Front-end Interface ............................................11 The Main Page ........................................................................................................11 The Galleries ..........................................................................................................12 Gallery Pop-up Windows...........................................................................................13 The Search Page .....................................................................................................14 The Message Detail Page..........................................................................................15 The Message Preview Page .......................................................................................16 The Sent Postcard Confirmation Page.........................................................................16
Section 3: Vertical and Horizontal Scrollers Front-end ........................................18 The Vertical Image Scroller.......................................................................................18 The Horizontal Image Scroller ...................................................................................18
Section 4: Picture Gallery Configuration ...........................................................19 Setting the Gallery Layout .....................................................................................19 Displaying Picture Borders .....................................................................................19 Specifying a Border Color ......................................................................................19 Show Picture on Separate Popups ...........................................................................20 Configuring Popup Width and HeightSize..................................................................20 Specifying Popup Background and Font Colors ..........................................................20 Allowing Previous-Next Navigation ..........................................................................20 Setting Picture and Thumbnail Heights.....................................................................20 Show Picture on Mouse Over ..................................................................................20
Section 5: Postcard Mailer Configuration ..........................................................21 Website and E-mail Set-up.....................................................................................21 End Message .......................................................................................................21 E-mail Message ....................................................................................................21 Displaying Stamps................................................................................................22
Section 6: Image Scrolling .............................................................................23 Setting Scroller Width ...........................................................................................23 Setting Scroller Height ..........................................................................................23 Setting Scroller Speed...........................................................................................23 Default Category ..................................................................................................23 Show Large Image in Scroll....................................................................................23 Enabling Scroller Stopping the Scroller ....................................................................23
Section 7: Managing Galleries.........................................................................24 Adding a New Gallery............................................................................................24 Editing a Gallery...................................................................................................26 Deleting a Gallery.................................................................................................26 Changing the Gallery Sort Order .............................................................................26 Viewing Pictures ...................................................................................................26 Viewing Sub-galleries............................................................................................27 Adding a Sub-gallery.............................................................................................27 Editing a Sub-gallery.............................................................................................27 Deleting a Sub-gallery...........................................................................................27
List All Categories ...................................................................................................27

Page 4 Photo Sweet 1.1 User Guide
Section 8: Managing Pictures..........................................................................28 Adding New Pictures............................................................................................. 28 Editing Picture Details........................................................................................... 31 Adding/Dropping Galleries..................................................................................... 31 Deleting a Picture ................................................................................................ 31 Changing the Picture Sort Order............................................................................. 31
Section 9: Export and Import .........................................................................32 Exporting Pictures and Galleries................................................................................ 32 Importing Pictures and Galleries ............................................................................... 32 Table Details List .................................................................................................... 33
Galleries............................................................................................................. 33 Gallery Details..................................................................................................... 34 Pictures.............................................................................................................. 35 Picture Details ..................................................................................................... 36 Gallery and Picture Links....................................................................................... 37
Section 10: Managing Stamps ........................................................................38 Adding a Stamp................................................................................................... 38 Editing Stamp Details ........................................................................................... 39 Deleting Stamps .................................................................................................. 39 Changing the Stamp Sort Order ............................................................................. 39
Section 11: Tracking Senders and Recipients ....................................................41 The Senders page ................................................................................................ 41 Deleting a Sender ................................................................................................ 41 The Recipients page ............................................................................................. 41 Deleting a Recipient ............................................................................................. 42
Section 12: Managing Front-end Pages ............................................................43 Configuring a Front-end Page ................................................................................... 43
Editing a Front-end Page....................................................................................... 43 Section 13: Integration..................................................................................45
Integrating the Photo Sweet Application .................................................................. 45 Integrating a Photo Sweet Sub-module to a page ..................................................... 45 Integrating Individual Galleries .............................................................................. 46
Section 14: Internet Marketing Toolkit Integration.............................................47 Adding the Internet Marketing Module .................................................................... 47
Section 15: Talk to Us ...................................................................................48 Section 16: The Web Content Editor Toolbar Page .............................................49 Section 17: Glossary .....................................................................................50
Border................................................................................................................ 50 Em .................................................................................................................... 50 Graphical User Interface (GUI)............................................................................... 50 Hexadecimal ....................................................................................................... 50 Link ................................................................................................................... 50 Navigation Menu.................................................................................................. 50 Radio Button ....................................................................................................... 50 Rollover.............................................................................................................. 50 TPCCP................................................................................................................ 50 URL ................................................................................................................... 50 World Wide Web Consortium (W3C)........................................................................ 50 Worldwide Accessibility Initiative (WAI)................................................................... 50
Index ..........................................................................................................51
© 2010 Voloper Creations Inc. Page 5
Thank you for choosing the Photo Sweet v1.1!
Attract more visitors, add more value to your site and give your website visitors a reason to keep coming back with the next generation of the Photo Sweet! Version 1.1 lets you create a full-powered image management service that features a familiar and consistent user interface, an easy-to-use Administration Panel that uses the best elements of our suite of products, and a scalable platform that allows you to maintain an unlimited number of galleries and sub-galleries.
Created in ASP.NET and built on the Microsoft SQL Server Platform, the Photo Sweet v1.1 is a powerful image management solution that offers a wide range of out-of-the-box features, and is nimble and flexible enough to be up and running in no time, avoiding the costly development process.
Provide your site visitors and customers with an online gallery that allows them to choose from unlimited galleries, send images to multiple recipients, and customize their greeting card messages. As a Site Administrator, you can easily manage the Photo Sweet’s gallery, picture and module settings through the Administration Panel, which has an integrated Web Content Editor (WCE), a powerful web-authoring tool that lets you manage the content of your web pages in a dynamic, WYSIWYG method.
What can the Photo Sweet v1.1 do for your site? It contributes to your website’s stickiness factor, encouraging your visitors to stay longer and revisit your site multiple times, leading to increased revenues, whether through advertising, product sales, or increased usage of your site’s services.
How is the Photo Sweet v1.1 different from other online display solutions? Managing an online gallery can be time-consuming. To minimize your time spent on administrative and system maintenance tasks, Photo Sweet v1.1 comes with full system maintenance, is easy to configure, and is equipped with export and import functions that can handle large file uploads and downloads smoothly and seamlessly.

Page 6 Photo Sweet 1.1 User Guide
What’s new in Photo Sweet v1.1?
Social Media Push: Flickr Ready
Photo Sweet has added "push" technology. Images uploaded by the Pictures option can be pushed out to the Flickr social media site along with its accompanying description and tags. An Upload to Flickr option has been added to the Pictures page. As well, a new Tags field has been added to the Pictures page. Tags added in the Tags field will be uploaded to Flickr and used within the Flickr system.
Note: Before you can use the push options you need to set up your developer keys in the Social Media ToolKit.
© 2010 Voloper Creations Inc. Page 7
Section 1: The Photo Sweet Picture Gallery Front-end Interface
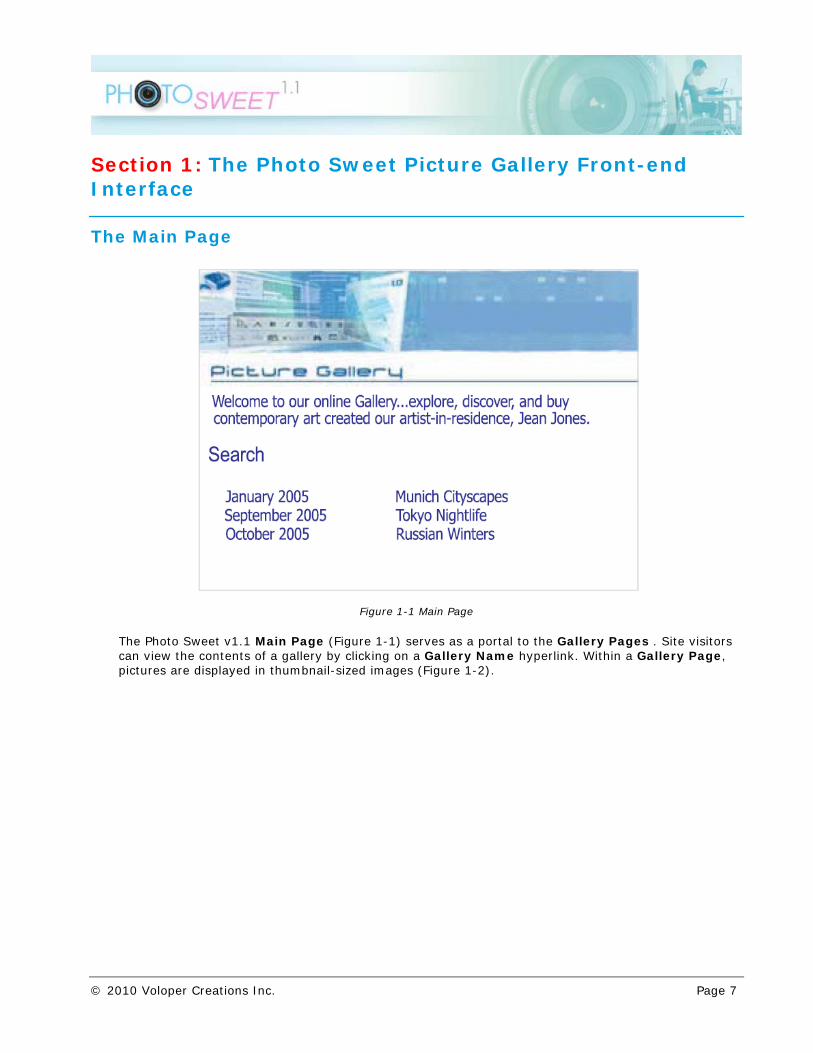
The Main Page
Figure 1-1 Main Page
The Photo Sweet v1.1 Main Page (Figure 1-1) serves as a portal to the Gallery Pages . Site visitors can view the contents of a gallery by clicking on a Gallery Name hyperlink. Within a Gallery Page, pictures are displayed in thumbnail-sized images (Figure 1-2).

Page 8 Photo Sweet 1.1 User Guide
The Galleries
Figure 1-2 Thumbnail Galleries
The Thumbnail Galleries (Figure 1-2) contain thumbnails that can easily be viewed as a larger picture with one click. A popup window will open (Figure 1-3). Site visitors can zoom in on an image by clicking on it.

© 2010 Voloper Creations Inc. Page 9
Gallery Popup Windows
Figure 1-3 Popup Window
Site visitors can click a thumbnail image to view a larger picture within a popup window (Figure 1-3). Alternatively, the image can be set to display as a "light box": the rest of the screen darkens and the selected image expands. As a Site Administrator, you can configure popups to be navigable by enabling Previous and Next Navigation in the Administration Panel’s Gallery Configuration page.
The Search Page
Figure 1-4 Search Page

Page 10 Photo Sweet 1.1 User Guide
Site visitors who already know what they are looking for can use the Photo Sweet’s Search Page (Figure 1-4) to find the products they want by entering one or more search terms into the following product search boxes: Picture Name, Description, and Galleries. Using basic Boolean search operators such as AND, OR, or NOT, site visitors can refine their queries to produce relevant search results.

© 2010 Voloper Creations Inc. Page 11
Section 2: The Postcard Mailer Front-end Interface
The Main Page
Figure 2-1 Postcard Mailer Main Page
The Postcard Mailer v4.0 Main Page serves as a portal to the e-Card Galleries (Figure 2-1). Site visitors can view the contents of a gallery by clicking on a Gallery Name hyperlink. Within a Gallery Page, postcard pictures are displayed in thumbnail-sized images (Figure 2-1).
Page 12 Photo Sweet 1.1 User Guide
The Galleries
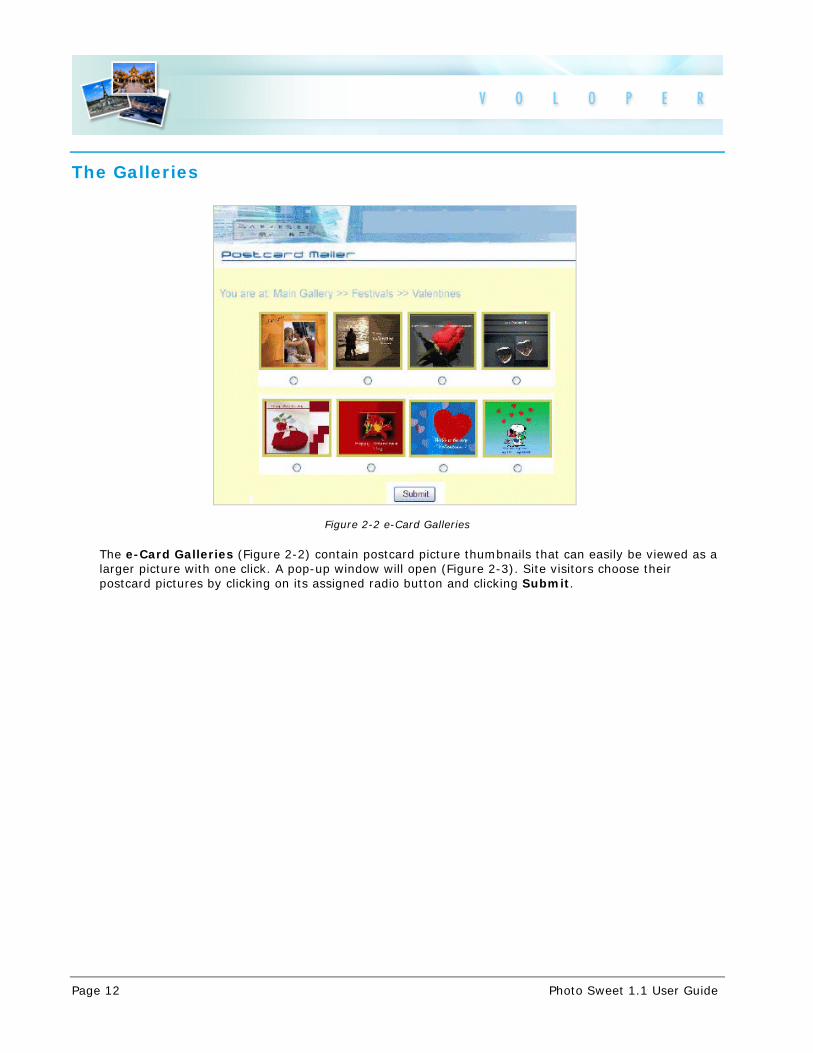
Figure 2-2 e-Card Galleries
The e-Card Galleries (Figure 2-2) contain postcard picture thumbnails that can easily be viewed as a larger picture with one click. A pop-up window will open (Figure 2-3). Site visitors choose their postcard pictures by clicking on its assigned radio button and clicking Submit.

© 2010 Voloper Creations Inc. Page 13
Gallery Pop-up Windows
Figure 2-3 Pop-Up Window
Site visitors can click a thumbnail image to view a larger postcard picture within a pop-up window (Figure 2-3). As a Site Administrator, you can configure pop-ups to be navigable by enabling Previous and Next Navigation in the Administration Panel’s Gallery Configuration page.
Page 14 Photo Sweet 1.1 User Guide
The Search Page
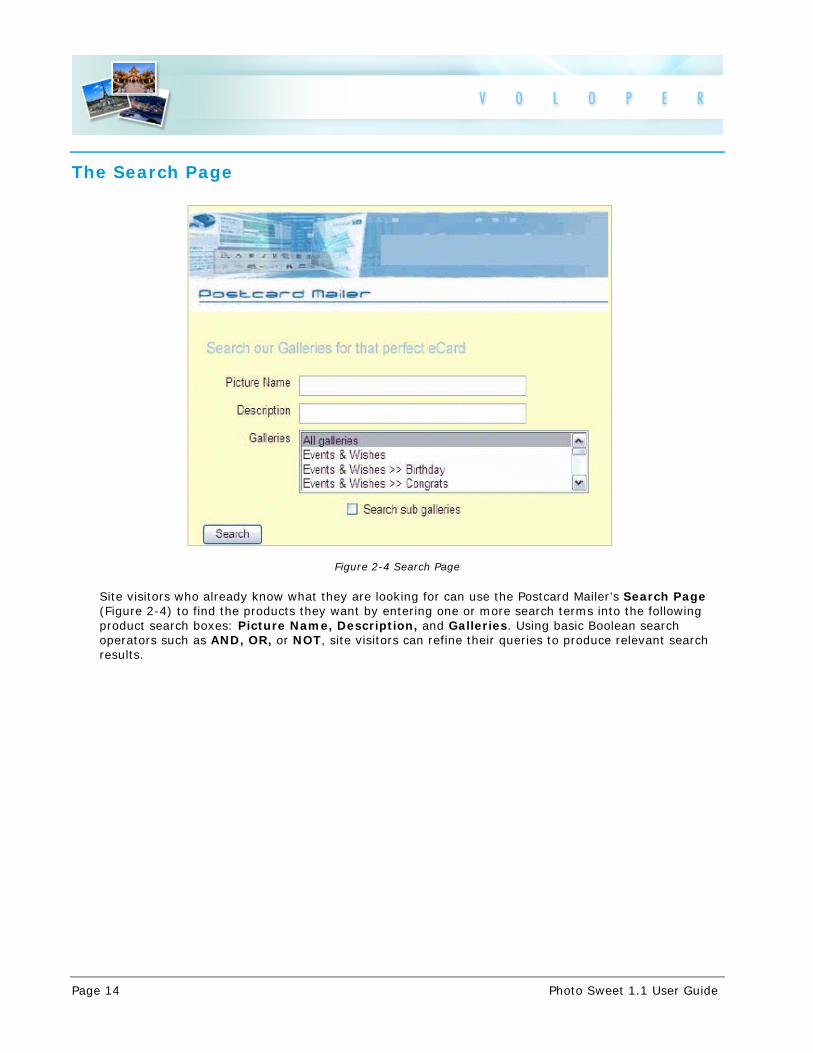
Figure 2-4 Search Page
Site visitors who already know what they are looking for can use the Postcard Mailer’s Search Page (Figure 2-4) to find the products they want by entering one or more search terms into the following product search boxes: Picture Name, Description, and Galleries. Using basic Boolean search operators such as AND, OR, or NOT, site visitors can refine their queries to produce relevant search results.

© 2010 Voloper Creations Inc. Page 15
The Message Detail Page
Figure 2-5 Message Detail Page
After a site visitor has chosen a picture for their postcard, the Message Detail Page will be displayed (Figure 2-5). Within this page, they can personalize their e-Card by adding a message to the postcard, specify recipient information, enable Sent Postcard Confirmation, and customize their e-Card by adding a postage stamp. Once they have entered the needed information, they can press the Submit button to send the card, or click the Preview button to view how postcard will look like.

Page 16 Photo Sweet 1.1 User Guide
The Message Preview Page
Figure 2-6 Message Preview Page
After clicking the Preview button, the Message Preview Page (Figure 2-6) will be displayed, providing the sender with a view of the final postcard before it is sent to the recipient. To edit the existing postcard, the sender can click on Back to Send Postcard. To send the postcard, the sender clicks the Submit button.
The Sent Postcard Confirmation Page
Figure 2-7 Sent Postcard Confirmation Page

© 2010 Voloper Creations Inc. Page 17
Once the postcard is sent, the Postcard Mailer displays a Sent Postcard Confirmation Page (Figure 2-7), confirming that the postcard has been sent to the recipient.
Page 18 Photo Sweet 1.1 User Guide
Section 3: Vertical and Horizontal Scrollers Front-end
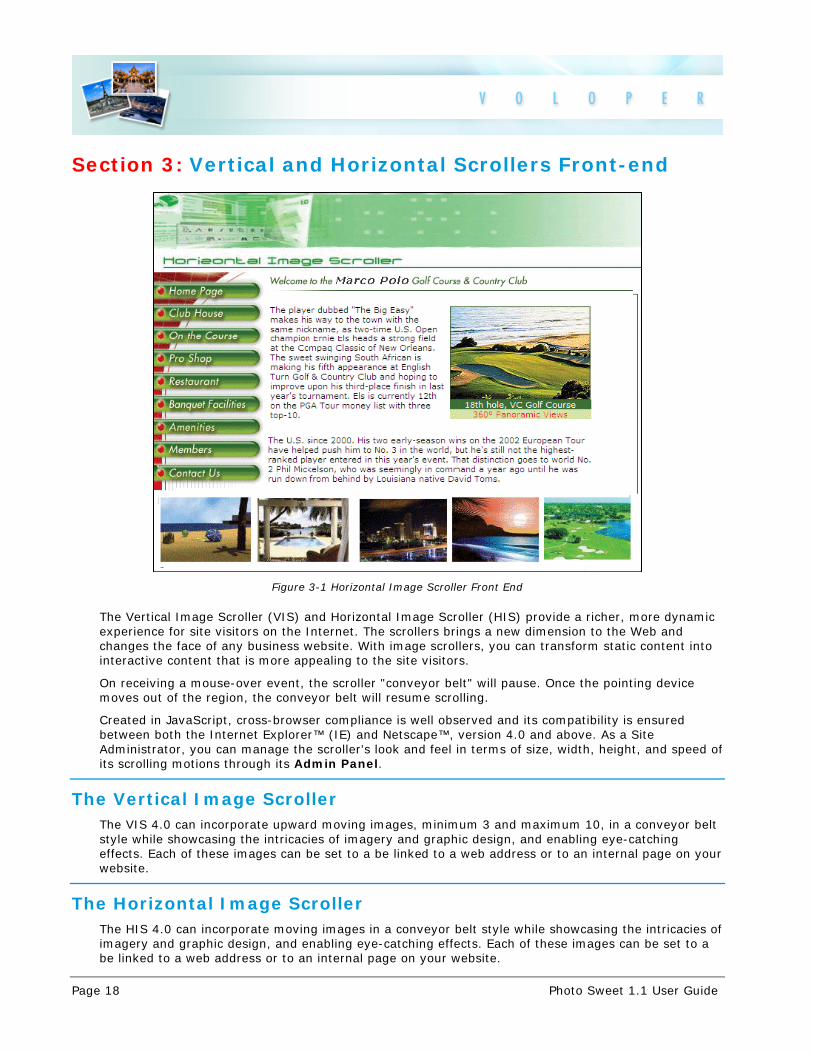
Figure 3-1 Horizontal Image Scroller Front End
The Vertical Image Scroller (VIS) and Horizontal Image Scroller (HIS) provide a richer, more dynamic experience for site visitors on the Internet. The scrollers brings a new dimension to the Web and changes the face of any business website. With image scrollers, you can transform static content into interactive content that is more appealing to the site visitors.
On receiving a mouse-over event, the scroller "conveyor belt" will pause. Once the pointing device moves out of the region, the conveyor belt will resume scrolling.
Created in JavaScript, cross-browser compliance is well observed and its compatibility is ensured between both the Internet Explorer™ (IE) and Netscape™, version 4.0 and above. As a Site Administrator, you can manage the scroller's look and feel in terms of size, width, height, and speed of its scrolling motions through its Admin Panel.
The Vertical Image Scroller The VIS 4.0 can incorporate upward moving images, minimum 3 and maximum 10, in a conveyor belt style while showcasing the intricacies of imagery and graphic design, and enabling eye-catching effects. Each of these images can be set to a be linked to a web address or to an internal page on your website.
The Horizontal Image Scroller The HIS 4.0 can incorporate moving images in a conveyor belt style while showcasing the intricacies of imagery and graphic design, and enabling eye-catching effects. Each of these images can be set to a be linked to a web address or to an internal page on your website.
© 2010 Voloper Creations Inc. Page 19
Section 4: Picture Gallery Configuration
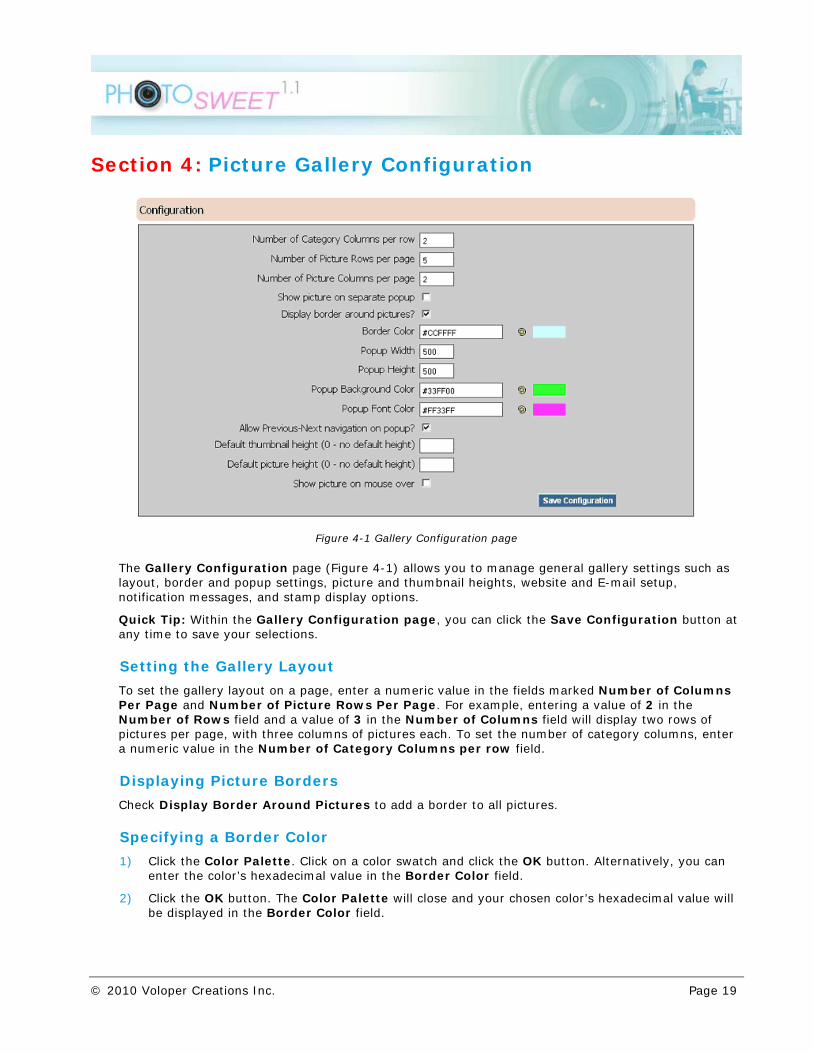
Figure 4-1 Gallery Configuration page
The Gallery Configuration page (Figure 4-1) allows you to manage general gallery settings such as layout, border and popup settings, picture and thumbnail heights, website and E-mail setup, notification messages, and stamp display options.
Quick Tip: Within the Gallery Configuration page, you can click the Save Configuration button at any time to save your selections.
Setting the Gallery Layout
To set the gallery layout on a page, enter a numeric value in the fields marked Number of Columns Per Page and Number of Picture Rows Per Page. For example, entering a value of 2 in the Number of Rows field and a value of 3 in the Number of Columns field will display two rows of pictures per page, with three columns of pictures each. To set the number of category columns, enter a numeric value in the Number of Category Columns per row field.
Displaying Picture Borders
Check Display Border Around Pictures to add a border to all pictures.
Specifying a Border Color
1) Click the Color Palette. Click on a color swatch and click the OK button. Alternatively, you can enter the color’s hexadecimal value in the Border Color field.
2) Click the OK button. The Color Palette will close and your chosen color’s hexadecimal value will be displayed in the Border Color field.

Page 20 Photo Sweet 1.1 User Guide
Show Picture on Separate Popups
If you wish display zoomed in pictures in a popup window, enable this checkbox. You should define the popup window using the options below. If you leave the checkbox unchecked the image will display in a "lightbox".
Configuring Popup Width and HeightSize
Enter the number of pixels in Popup Width and Popup Height to customize the size of the picture popup screen.
Specifying Popup Background and Font Colors
Choose a background and font color for your popups by choosing a color from the Color Palette.
1) Click the Color Palette. Click on a color swatch and click the OK button. Alternatively, you can enter the color’s hexadecimal value in the Border Color field.
2) Click the OK button. The Color Palette will close and your chosen color’s hexadecimal value will be displayed in the Border Color field.
Allowing Previous-Next Navigation
Check Allow Previous-Next Navigation on Popup to enable Previous and Next arrows within the popup screen.
Setting Picture and Thumbnail Heights
Enter the number of pixels in Default Thumbnail Height and Default Picture Height to display pictures and thumbnails in a pre-set size. Entering 0 disables the default height settings and displays pictures and thumbnails in their actual sizes.
Show Picture on Mouse Over
Check this box if you want the thumbnail to automatically zoom if you mouse over the image.
© 2010 Voloper Creations Inc. Page 21
Section 5: Postcard Mailer Configuration
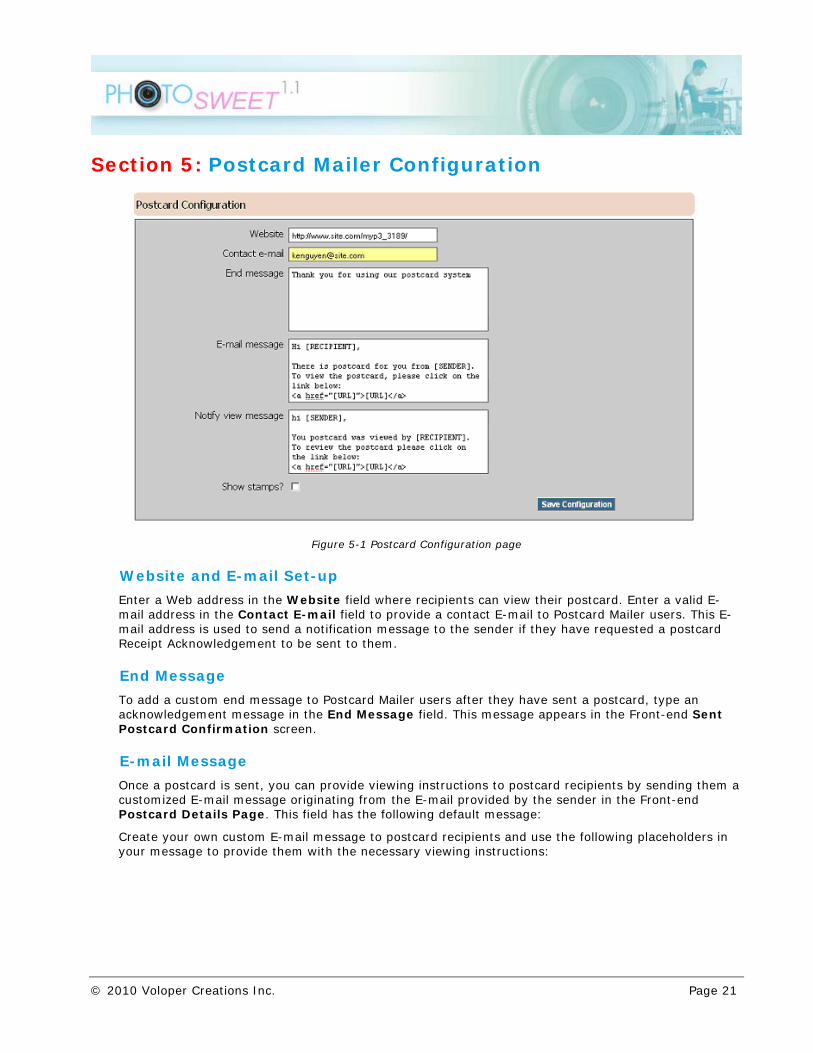
Figure 5-1 Postcard Configuration page
Website and E-mail Set-up
Enter a Web address in the Website field where recipients can view their postcard. Enter a valid E-mail address in the Contact E-mail field to provide a contact E-mail to Postcard Mailer users. This E-mail address is used to send a notification message to the sender if they have requested a postcard Receipt Acknowledgement to be sent to them.
End Message
To add a custom end message to Postcard Mailer users after they have sent a postcard, type an acknowledgement message in the End Message field. This message appears in the Front-end Sent Postcard Confirmation screen.
E-mail Message
Once a postcard is sent, you can provide viewing instructions to postcard recipients by sending them a customized E-mail message originating from the E-mail provided by the sender in the Front-end Postcard Details Page. This field has the following default message:
Create your own custom E-mail message to postcard recipients and use the following placeholders in your message to provide them with the necessary viewing instructions:

Page 22 Photo Sweet 1.1 User Guide
Placeholder Description
[URL] This placeholder inserts a valid Web address in the E-mail message and uses the Web address in the Website field.
[RECIPIENT] This placeholder inserts the recipient’s name in the E-mail message, derived from the information provided by the postcard sender in the Front-end Postcard Details Page.
[SENDER] This placeholder inserts the sender’s name in the E-mail message, derived from the information provided by the postcard sender in the Front-end Postcard Details Page.
<A>and </A> Tags These tags create a clickable hyperlink within the E-mail message that opens a browser window displaying the postcard and message sent by the Postcard Mailer user.
Displaying Stamps
Check Show Stamps to allow the postcard sender to add stamps to the postcard in the Front-end Postcard Details Page.
After you have configured general Postcard Mailer settings, click the Save Configuration button to save your changes. The confirmation message Configuration Updated Successfully will be displayed.
© 2010 Voloper Creations Inc. Page 23
Section 6: Image Scrolling
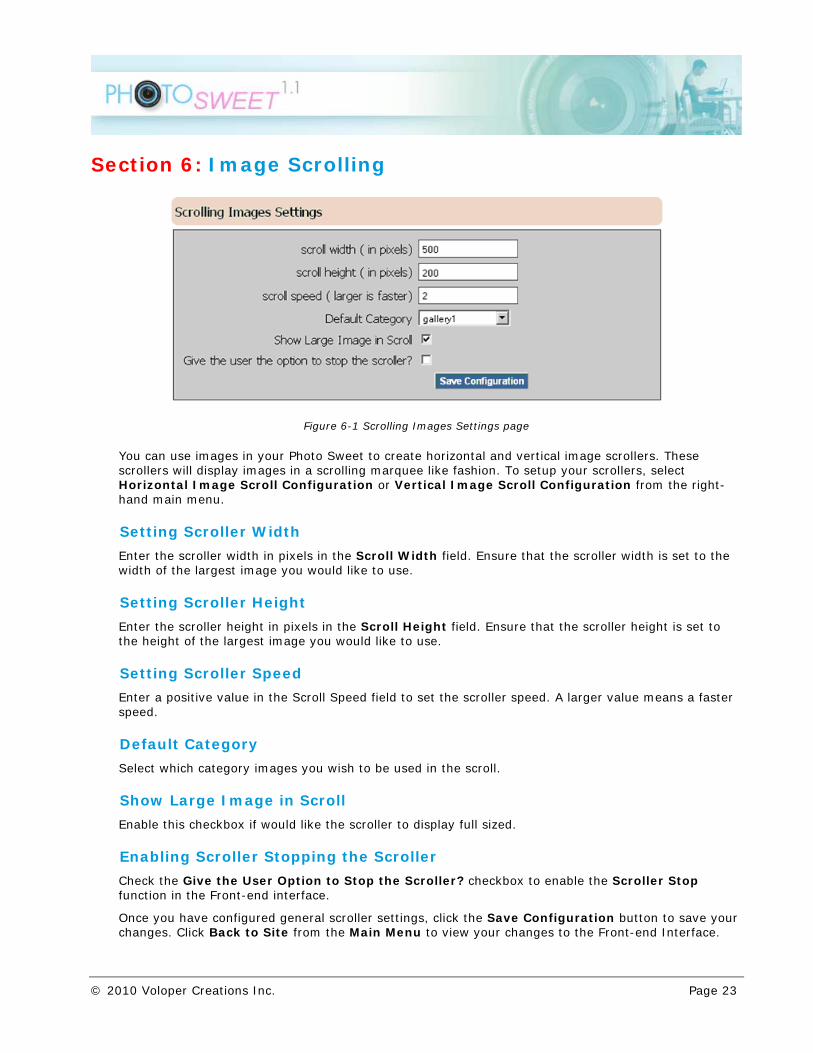
Figure 6-1 Scrolling Images Settings page
You can use images in your Photo Sweet to create horizontal and vertical image scrollers. These scrollers will display images in a scrolling marquee like fashion. To setup your scrollers, select Horizontal Image Scroll Configuration or Vertical Image Scroll Configuration from the right-hand main menu.
Setting Scroller Width
Enter the scroller width in pixels in the Scroll Width field. Ensure that the scroller width is set to the width of the largest image you would like to use.
Setting Scroller Height
Enter the scroller height in pixels in the Scroll Height field. Ensure that the scroller height is set to the height of the largest image you would like to use.
Setting Scroller Speed
Enter a positive value in the Scroll Speed field to set the scroller speed. A larger value means a faster speed.
Default Category
Select which category images you wish to be used in the scroll.
Show Large Image in Scroll
Enable this checkbox if would like the scroller to display full sized.
Enabling Scroller Stopping the Scroller
Check the Give the User Option to Stop the Scroller? checkbox to enable the Scroller Stop function in the Front-end interface.
Once you have configured general scroller settings, click the Save Configuration button to save your changes. Click Back to Site from the Main Menu to view your changes to the Front-end Interface.
Page 24 Photo Sweet 1.1 User Guide
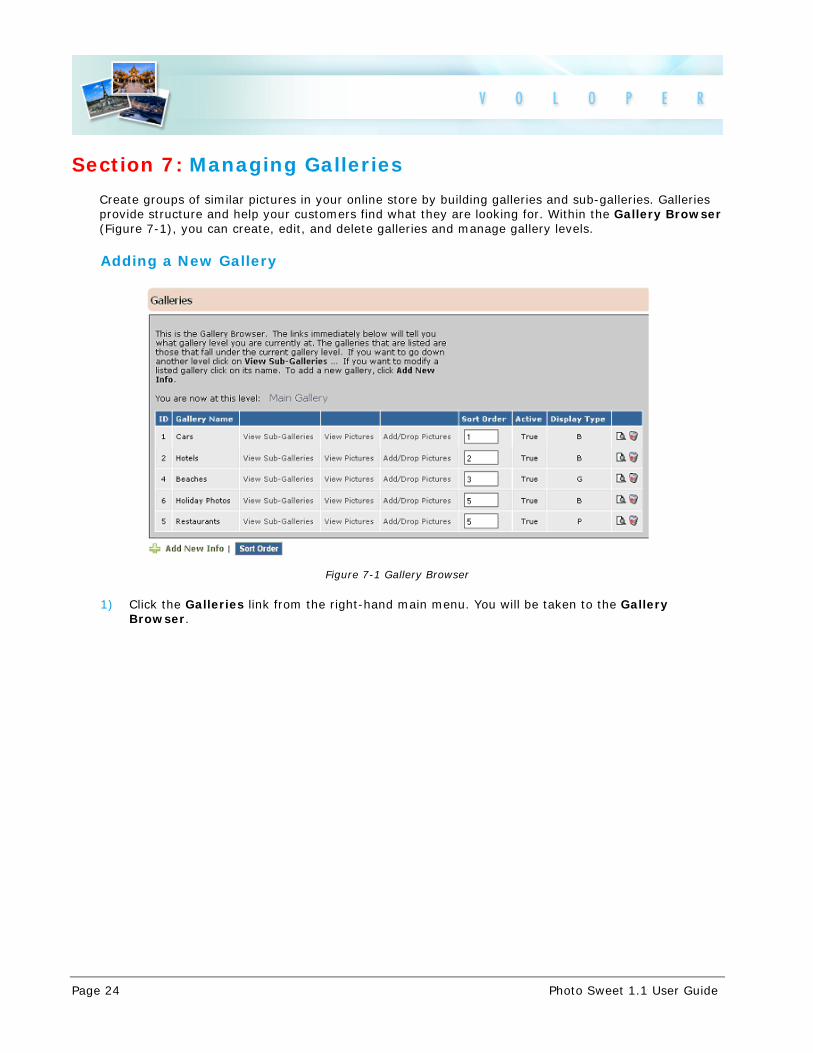
Section 7: Managing Galleries
Create groups of similar pictures in your online store by building galleries and sub-galleries. Galleries provide structure and help your customers find what they are looking for. Within the Gallery Browser (Figure 7-1), you can create, edit, and delete galleries and manage gallery levels.
Adding a New Gallery
Figure 7-1 Gallery Browser
1) Click the Galleries link from the right-hand main menu. You will be taken to the Gallery Browser.
© 2010 Voloper Creations Inc. Page 25
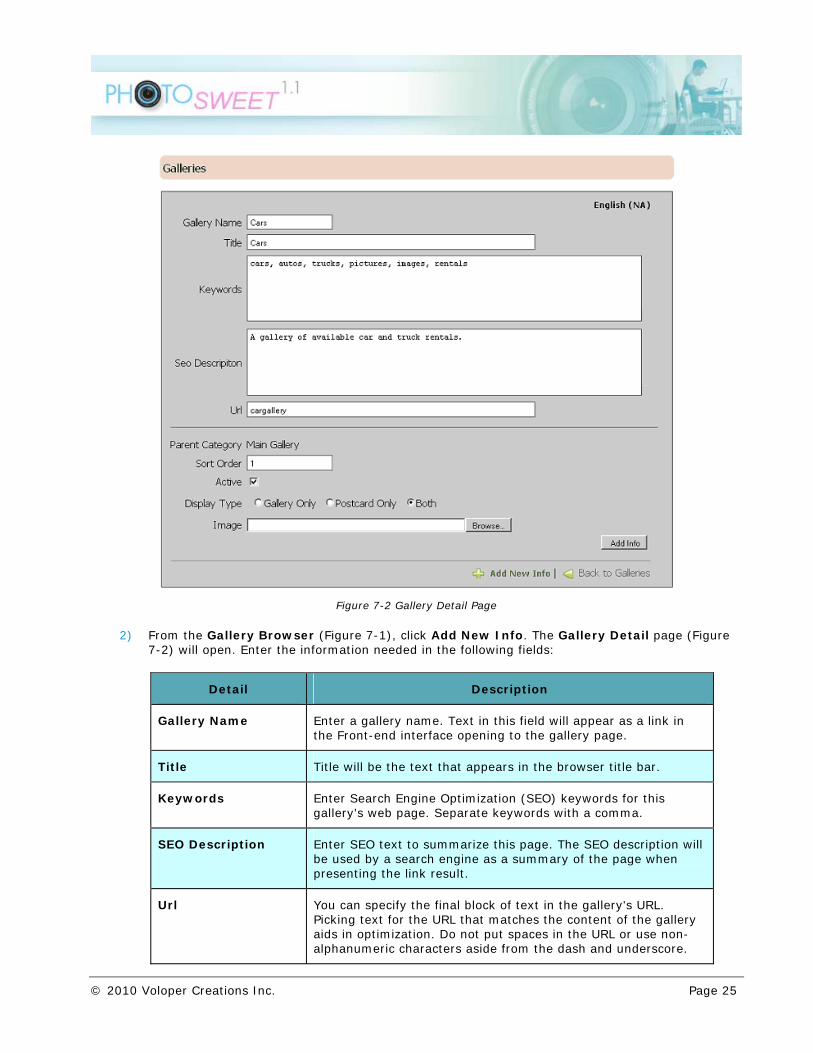
Figure 7-2 Gallery Detail Page
2) From the Gallery Browser (Figure 7-1), click Add New Info. The Gallery Detail page (Figure 7-2) will open. Enter the information needed in the following fields:
Detail Description
Gallery Name Enter a gallery name. Text in this field will appear as a link in the Front-end interface opening to the gallery page.
Title Title will be the text that appears in the browser title bar.
Keywords Enter Search Engine Optimization (SEO) keywords for this gallery's web page. Separate keywords with a comma.
SEO Description Enter SEO text to summarize this page. The SEO description will be used by a search engine as a summary of the page when presenting the link result.
Url You can specify the final block of text in the gallery's URL. Picking text for the URL that matches the content of the gallery aids in optimization. Do not put spaces in the URL or use non-alphanumeric characters aside from the dash and underscore.

Page 26 Photo Sweet 1.1 User Guide
Detail Description
Sort Order Establish a sort order for a gallery by entering a numeric value in this field. A sort order value of 1 will place the gallery as first in the list; a sort order value of 2 will place that gallery second, and so on.
Active Check this box to indicate an active gallery. Active refers to galleries that are available for viewing from the Front-end interface. An unchecked Active box means that the gallery is unavailable.
Display Type Select where you would like the Gallery to be displayed - Gallery Only, Postcard Only, or Both.
Image Upload an image for the gallery by browsing to the folder where the image file is located. Select the file and click the Open button. This image will be displayed with the gallery name link on the Front-end interface.
3) Click Add Info.
Note: If you have configured your website to display in multiple languages in OpenSites (OpenSites>Website Setup) or in your OBS project, the Gallery Detail Page will display the Gallery Name field in each language.
Editing a Gallery
To edit a gallery, click on the edit icon assigned to the Gallery Name in the Gallery Browser (Figure 7-1) to open the Gallery Detail Page (Figure 7-2). Edit the necessary fields, and click the Update Info button.
Deleting a Gallery
1) From the right-hand Main Menu, click Galleries.
2) Find the gallery name in the Gallery Browser and click the Delete icon assigned to it. A confirmation window will appear.
3) Click the OK button. The selected gallery will be deleted from the list.
Changing the Gallery Sort Order
Within the Category Browser (Figure 7-1), you can establish a sort order for all the sub-galleries by entering a numeric value in the Sort Order field. A sort order value of 1 will place the sub-gallery as first in the list; a sort order value of 2 will place the sub-gallery second, and so on. Click the Sort Order button to save your settings.
Viewing Pictures
You can view pictures within a gallery or sub-gallery by clicking the View Pictures hyperlink assigned to it. The gallery or sub-gallery’s Pictures List will open, displaying the picture’s Name, Description, Thumbnail, Sort Order, Status (Active or Inactive), and Display Type (Gallery, Postcard, or Both). Within the gallery’s Pictures List, you can edit, delete or perform Add/Drop Gallery functions. Please see "Managing Pictures" on page 28 for detailed information on managing pictures.

© 2010 Voloper Creations Inc. Page 27
Viewing Sub-galleries
To view, edit, or delete a sub-gallery:
1) From the right-hand Main Menu, click Galleries.
2) Find the parent gallery name in the Gallery Browser and click the View Sub-Galleries.
Adding a Sub-gallery
1) To create a new sub-gallery, find the gallery name you would like the sub-gallery to belong from the Gallery Browser. Click View Sub-galleries. The contents of the gallery will be displayed in a Sub-gallery List Menu.
2) Click Add New Info. The Sub-gallery Details Menu will be displayed, with fields identical to the Gallery Detail Page (Figure 7-2). Enter the information as above.
3) Click Add Info.
Editing a Sub-gallery
To edit a Sub-gallery, find the sub-gallery's parent gallery name in the Gallery Browser. Click View Sub-galleries. The contents of the gallery will be displayed in a Sub-gallery List Menu.
To edit the sub-gallery, click on the Edit icon assigned to the Gallery Name in the Gallery Browser (Figure 7-1). This will open the Gallery Detail Page (Figure 7-2). Edit the necessary fields, and click the Update Info button.
Deleting a Sub-gallery
1) From the right-hand Main Menu, click Galleries.
2) Find the sub-gallery name and click the Delete icon assigned to it. A confirmation window will appear.
3) Click the OK button. The selected sub-gallery will be deleted from the list.
List All Categories If you prefer to see all your galleries, including sub-galleries, in a tree like view, click List All Categories from the right-hand Main Menu.
Page 28 Photo Sweet 1.1 User Guide
Section 8: Managing Pictures
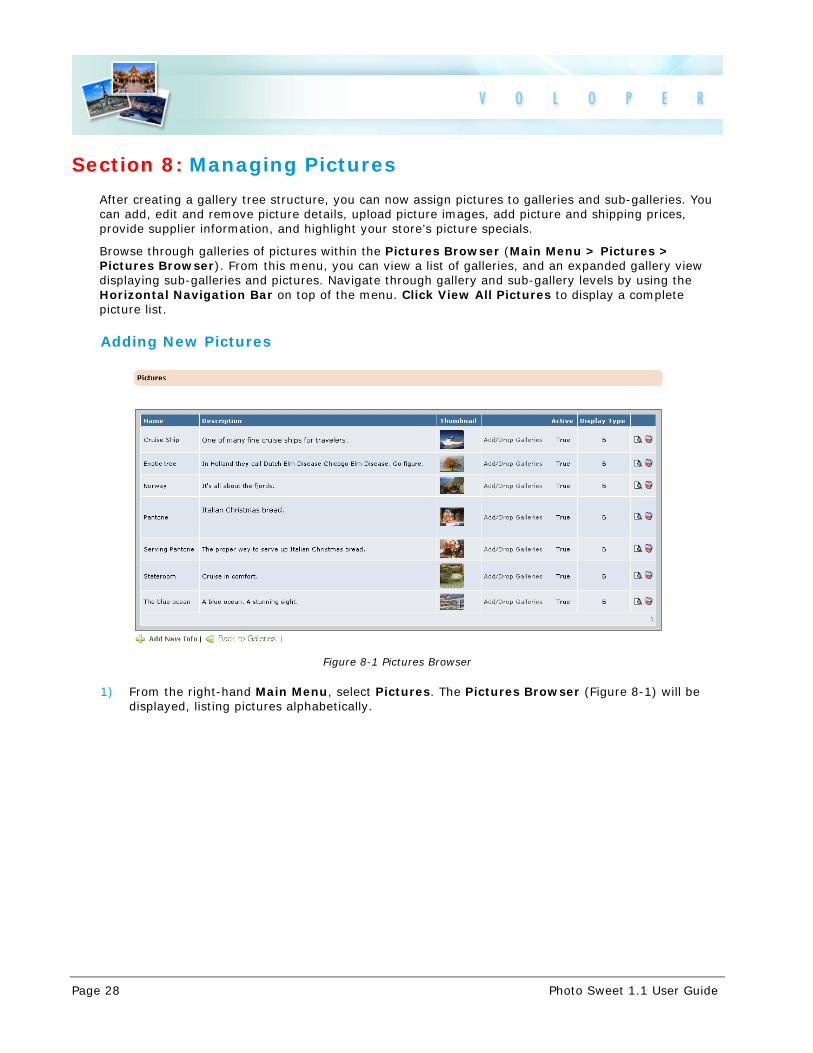
After creating a gallery tree structure, you can now assign pictures to galleries and sub-galleries. You can add, edit and remove picture details, upload picture images, add picture and shipping prices, provide supplier information, and highlight your store’s picture specials.
Browse through galleries of pictures within the Pictures Browser (Main Menu > Pictures > Pictures Browser). From this menu, you can view a list of galleries, and an expanded gallery view displaying sub-galleries and pictures. Navigate through gallery and sub-gallery levels by using the Horizontal Navigation Bar on top of the menu. Click View All Pictures to display a complete picture list.
Adding New Pictures
Figure 8-1 Pictures Browser
1) From the right-hand Main Menu, select Pictures. The Pictures Browser (Figure 8-1) will be displayed, listing pictures alphabetically.

© 2010 Voloper Creations Inc. Page 29
Figure 8-2 Picture Details Page
2) Click the Add New Info button. The Picture Details Page (Figure 8-2) will be displayed.
3) Enter the information needed in the following fields:
Details Description
Gallery Select picture’s gallery from the gallery list. To select more than one gallery, hold the CTRL key and click to highlight and select the gallery name(s).
Page 30 Photo Sweet 1.1 User Guide
Details Description
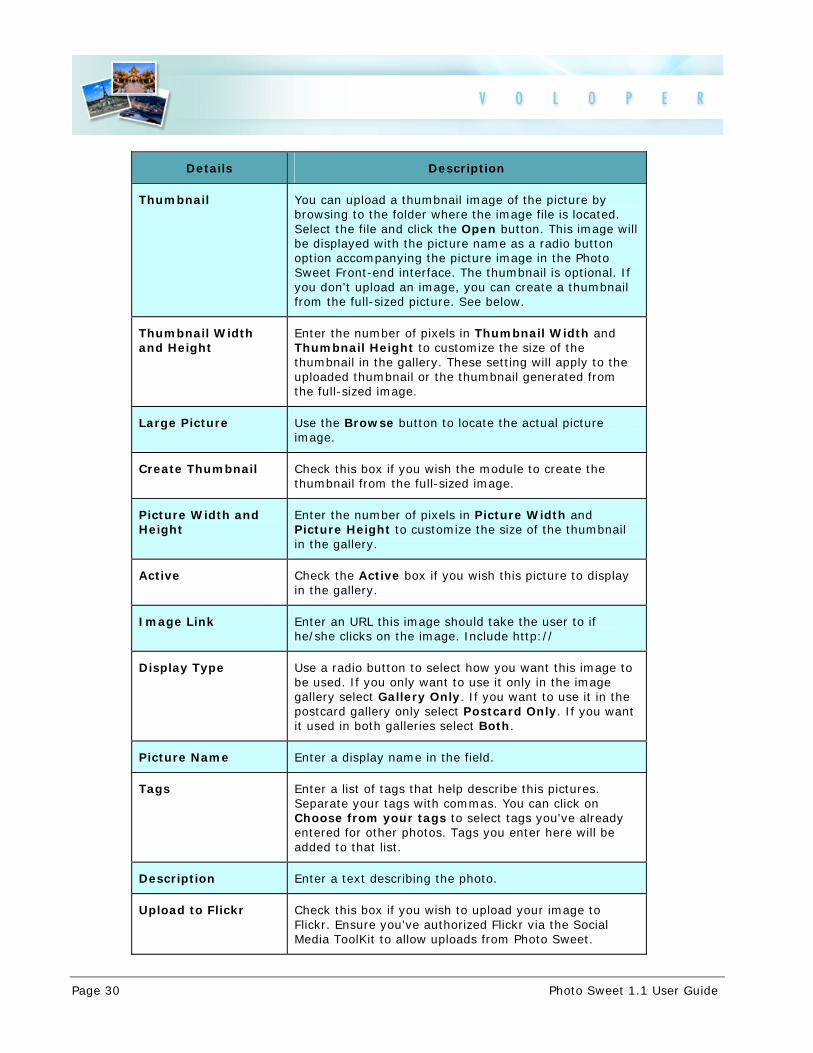
Thumbnail You can upload a thumbnail image of the picture by browsing to the folder where the image file is located. Select the file and click the Open button. This image will be displayed with the picture name as a radio button option accompanying the picture image in the Photo Sweet Front-end interface. The thumbnail is optional. If you don't upload an image, you can create a thumbnail from the full-sized picture. See below.
Thumbnail Width and Height
Enter the number of pixels in Thumbnail Width and Thumbnail Height to customize the size of the thumbnail in the gallery. These setting will apply to the uploaded thumbnail or the thumbnail generated from the full-sized image.
Large Picture Use the Browse button to locate the actual picture image.
Create Thumbnail Check this box if you wish the module to create the thumbnail from the full-sized image.
Picture Width and Height
Enter the number of pixels in Picture Width and Picture Height to customize the size of the thumbnail in the gallery.
Active Check the Active box if you wish this picture to display in the gallery.
Image Link Enter an URL this image should take the user to if he/she clicks on the image. Include http://
Display Type Use a radio button to select how you want this image to be used. If you only want to use it only in the image gallery select Gallery Only. If you want to use it in the postcard gallery only select Postcard Only. If you want it used in both galleries select Both.
Picture Name Enter a display name in the field.
Tags Enter a list of tags that help describe this pictures. Separate your tags with commas. You can click on Choose from your tags to select tags you've already entered for other photos. Tags you enter here will be added to that list.
Description Enter a text describing the photo.
Upload to Flickr Check this box if you wish to upload your image to Flickr. Ensure you've authorized Flickr via the Social Media ToolKit to allow uploads from Photo Sweet.

© 2010 Voloper Creations Inc. Page 31
4) Click the Update Info button. The message New Info Updated Successfully will appear on top of the page and the newly-created picture will be displayed within the gallery’s Pictures Menu.
If you have configured your website to display in multiple languages in OpenSites (OpenSites>Website Setup) or in your OBS project, the Picture Details Page will display the Name and Description fields in each language.
Editing Picture Details
To edit picture details, click on the Edit icon assigned to the picture name in the Pictures Browser to open the Picture Details Page (Figure 8-2). Edit the necessary fields, and click the Update Info button.
Adding/Dropping Galleries
Pictures can belong to more than one gallery. Select the galleries a picture belongs to by accessing Add/Drop Galleries in the Pictures Menu.
1) To select the galleries where a picture belongs, find the picture from the Pictures Browser (Figure 8-1) and click Add/Drop Galleries. A list of all galleries will be displayed.
2) Check the galleries the picture belongs to in the list. To select all galleries, select the top checkbox named Galleries. Alternatively, to remove the picture from galleries it does not belong to, uncheck the assigned gallery checkbox.
3) Click the Submit button. The specified changes will have taken effect.
Deleting a Picture
1) From the Main Menu, click Pictures.
2) Find the picture name in the Pictures Browser (Figure 8-1) and click the Delete iconassigned to it. A confirmation window will appear.
3) Click the OK button. The selected picture will be deleted from the list.
Note: If you've enabled Flickr access, deleting a photo might also delete it from your Flickr account, depending on your delete option set in the Social Media Toolkit's Flickr Posting Configurations option.
Changing the Picture Sort Order
Within the Pictures Browser (Figure 8-1), you can establish a sort order for all pictures by entering a numeric value in the Sort Order field. A sort order value of 1 will place the sub-gallery as first in the list; a sort order value of 2 will place the sub-gallery second, and so on. Click the Sort Order button to save your settings.
Page 32 Photo Sweet 1.1 User Guide
Section 9: Export and Import
The Photo Sweet allows you to import and export the pictures and gallery databases into and from a Microsoft Excel spreadsheet. This is helpful if you have an extensive picture list, and if you want to keep an offline copy of the store’s list of pictures and galleries for backup purposes.
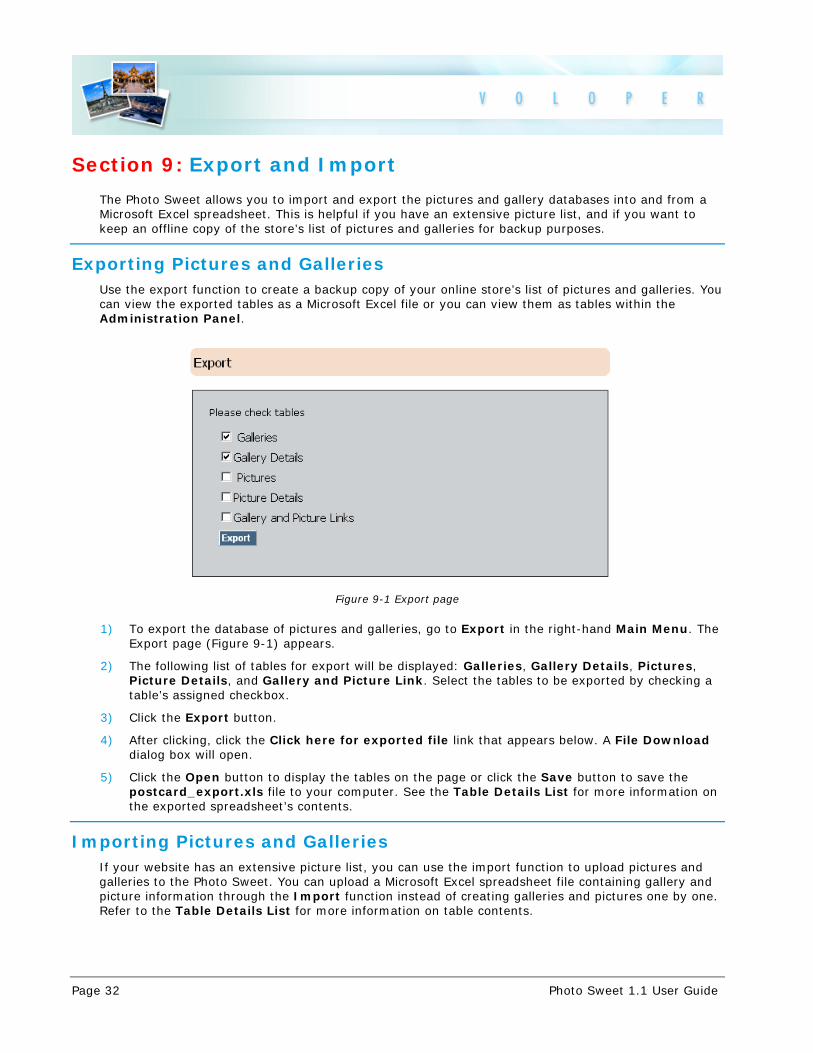
Exporting Pictures and Galleries Use the export function to create a backup copy of your online store’s list of pictures and galleries. You can view the exported tables as a Microsoft Excel file or you can view them as tables within the Administration Panel.
Figure 9-1 Export page
1) To export the database of pictures and galleries, go to Export in the right-hand Main Menu. The Export page (Figure 9-1) appears.
2) The following list of tables for export will be displayed: Galleries, Gallery Details, Pictures, Picture Details, and Gallery and Picture Link. Select the tables to be exported by checking a table’s assigned checkbox.
3) Click the Export button.
4) After clicking, click the Click here for exported file link that appears below. A File Download dialog box will open.
5) Click the Open button to display the tables on the page or click the Save button to save the postcard_export.xls file to your computer. See the Table Details List for more information on the exported spreadsheet’s contents.
Importing Pictures and Galleries If your website has an extensive picture list, you can use the import function to upload pictures and galleries to the Photo Sweet. You can upload a Microsoft Excel spreadsheet file containing gallery and picture information through the Import function instead of creating galleries and pictures one by one. Refer to the Table Details List for more information on table contents.

© 2010 Voloper Creations Inc. Page 33
Figure 9-2 Import page
1) Export all of the tables in the Export List. (See Exporting Pictures and Galleries above). Save the postcard_export.xls file to your computer. Locate and open the postcard_export.xls file. This is an empty Microsoft Excel file that contains all the spreadsheet table headings.
2) Enter the necessary table information for each table heading. Refer to the Table Details List for more information on table contents. After completing the all required fields in the Excel file, go to Import in the Main Menu (Figure 9-2). Select the tables to be imported by checking a table’s assigned checkbox.
3) Click the Import button. Once the import process is finished, the message Process Completed will be displayed on top of the page.
Quick Tip: When importing from Microsoft Excel into the Photo Sweet, import each main table with its associated detail table, For example, the Picture Table should be imported along with the Picture Details Table.
Table Details List The following tables provide information on each of the headings in the shop_export.xls file.
Galleries
The Galleries Table corresponds to the Postcard_Category sheet in the postcard_export.xls file. This sheet specifies category details and image information.
Detail Description
Category (cat_id) A unique number automatically generated and assigned to a gallery. On import: Required field. Assign a unique number for each gallery.
Category Name (c_name)
This field is not in use. On import: Leave blank.

Page 34 Photo Sweet 1.1 User Guide
Detail Description
Parent (parent_id) A gallery can have a parent gallery. This field refers to the parent gallery’s unique ID. If the parent number is 0, it is classified as a main gallery. On Import: Required field. Enter a valid parent number (positive integer).
Category Image (cat_image)
This field is not in use. On import: Leave blank.
Sort Order (sort_order)
A sort order value of 1 will place the gallery first in the list; a sort order value of 2 will place the gallery second, and so on. On Import: Required field. Enter a positive integer.
Active (active) This field specifies active and inactive galleries. On Import: Required field. Enter TRUE if the gallery is active and available for viewing. Galleries marked FALSE are inactive and are unavailable from the Front-end interface.
Gallery Details
The Gallery Details Table corresponds to the Postcard_Category_Detail sheet in the postcard_export.xls file. It specifies gallery names in the language(s) used in your site. Contact us if you would like to have your site displayed in multiple languages.
Detail Description
Category Detail ID (cat_detail_id)
A unique number automatically generated and assigned to a gallery. On import: Required field. Assign a unique number for each gallery.
Category Detail ID (cat_detail_id)
A unique number automatically generated and assigned to a Gallery Detail Page. On import: Required field. Enter a unique number for each page (positive integer).
Category ID (catid)
A unique number automatically generated and assigned to a gallery. On import: Required field. Assign a unique number for each gallery. Ensure that these correspond to the numbers assigned in the Galleries Table cat_id.
Language ID (lang_id)
A number automatically generated and assigned to the language(s) used in the Gallery Detail Page. 1= site first language, 2= site second language, etc. Please contact us if you would like your site to be displayed in multiple languages. On Import: Required. Enter a positive integer.
Category Name (cat_name)
Enter a gallery name. Text in this field will be displayed as a link in the Front-end interface opening to the Gallery Main Page. On Import: Required field.

© 2010 Voloper Creations Inc. Page 35
Pictures
The Pictures Table corresponds to the Postcard_Pictures sheet in the postcard_export.xls file. It specifies postcard picture and thumbnail sizes and picture sort order information.
Detail Description
Picture ID (pic_id) A unique number automatically generated and assigned to a postcard picture. Assign a unique number for each picture.
Category ID (catid)
A unique number automatically generated and assigned to a gallery. On import: Required field. Enter the cat_id of the gallery the picture belongs to in this field. Choose from the cat_ids in the Galleries Table cat_id column.
Thumbnail Picture (pic_thumb)
Postcard thumbnail picture. Enter an image file name, e.g., book.jpg. On import: Optional field.
Large Picture (pic_large)
Postcard picture. Enter an image file name, e.g., book.jpg. On import: Required field.
Thumbnail Picture Width (pic_twidth)
Thumbnail width. On import: Optional field. Enter a value in pixels to set the thumbnail picture width. Otherwise, enter 0.
Thumbnail Picture Height (pic_theight)
Thumbnail height. On import: Optional field. Enter a positive value in pixels to set the thumbnail picture height. Otherwise, enter 0.
Large Picture Width (pic_lwidth)
Postcard Picture width. On import: Required field. Enter a positive value in pixels to set the large picture width.
Large Picture Height (pic_lheight)
Postcard Picture height. On import: Required field. Enter a positive value in pixels to set the large picture height.
Picture Sort Order (pic_sortorder)
A sort order value of 1 will place the gallery as first in the list; a sort order value of 2 will place the gallery second, and so on. On import: Required field. Enter a positive integer
Active (active) This field specifies active and inactive pictures. On Import: Required field. Enter TRUE if the picture is active and available for viewing. Pictures marked FALSE are inactive and are unavailable from the Front-end interface.

Page 36 Photo Sweet 1.1 User Guide
Picture Details
The Picture Details Table corresponds to the Postcard_Pictures_Details sheet in postcard_export.xls file. It specifies product names and descriptions in the language(s) used in your site. Contact us if you would like to have your site displayed in multiple languages.
Detail Description
Postcard Picture Detail ID(postcard_pictures_ detail_id)
A unique number automatically generated and assigned to a Picture Detail Page. On import: Required field. Assign a unique number for each page.
Active (active) This field specifies active and inactive pictures. On Import: Required field. Enter TRUE if the picture is active and available for viewing. Pictures marked FALSE are inactive and are unavailable from the Front-end interface.
Language ID (lang_id)
A number automatically generated and assigned to the language(s) used in the Picture Detail Page. 1 = site first language, 2 = site second language, etc. Please contact us if you would like your site to be displayed in multiple languages. On Import: Required field. Enter a positive integer.
Picture Name (pic_name)
Enter a picture name. Text in this field will be displayed as a radio button option accompanying the picture image in the Photo Sweet Front-end interface. On Import: Required field.
Picture Description (pic_desc)
Enter a product description to appear within the Picture Detail popup window. On Import: Optional field.
© 2010 Voloper Creations Inc. Page 37
Gallery and Picture Links
The Gallery and Picture Links Table corresponds to the Postcard_links sheet in postcard_export.xls file. It links categories to products.
Detail Description
Link ID (link_id) A unique number automatically generated and assigned to a Gallery-Picture link. On import: Required field. Assign a unique number for each Gallery-Picture link.
Category ID (cat_id)
A unique number automatically generated and assigned to a category. On import: Required field. Assign a unique number for each category. Ensure that these correspond to the numbers assigned in the Category Table cat_id.
Picture ID (pic_id) A unique number automatically generated and assigned to a picture. On import: Required field. Assign a unique number for each product. Ensure that these correspond to the numbers assigned in the Picture Table pic_id.
Sort Order (sort_order)
A sort order value of 1 will place the category as first in the list; a sort order value of 2 will place that category second, and so on. On import: Required. Enter a positive integer.

Page 38 Photo Sweet 1.1 User Guide
Section 10: Managing Stamps
Figure 10-1 Stamps page
The Stamps page (Figure 10-1) allows the Site Administrator to configure stamps and sending options. Add, edit, delete and configure stamp settings within this menu.
Adding a Stamp
1) From the right hand Main Menu, select Stamps. The Stamp List page (Figure 10-1) will be displayed.
Figure 10-2 Stamps Detail page
2) Click Add New Info. The Stamps Detail page (Figure 10-2) will be displayed.

© 2010 Voloper Creations Inc. Page 39
3) Enter the information needed in the following fields:
Detail Description
Stamp with Postmark (optional)
Upload an image for a postmarked stamp by browsing to the folder where the image file is located. Select the file and click the Open button. The path to the image file will be displayed in the Stamp with Postmark field.
Width Enter a width in pixels for a Stamp with Postmark image in the Width field.
Height Enter a height in pixels for a Stamp with Postmark image in the Height field.
Stamp without Postmark (required)
Upload an image for a stamp with no postmark by browsing to the folder where the image file is located. Select the file and click the Open button. The path to the image file will be displayed in the Stamp without Postmark field.
Stamp Width Enter a width in pixels for a Stamp without Postmark image in the Stamp Width field.
Stamp Height Enter a height in pixels for a Stamp without Postmark image in the Stamp Height field
Sort Order Establish a sort order for the stamps by entering a numeric value in this field. A sort order value of 1 will place the stamp first in the list; a sort order value of 2 will place that stamp second, and so on.
Stamp Enter a stamp name. Text in this field will be displayed as a radio button option accompanying the stamp image in the Postcard Mailer Front-End interface.
4) Click the Add Info button.
Editing Stamp Details
To edit stamp details, click on the edit icon assigned to the stamp name in the Stamp List to open the Stamps Detail Page (Figure 10-2). Edit the necessary fields, and click the Update Info button.
Deleting Stamps
1) From the right-hand Main Menu, click Stamps.
2) Find the stamp name in the Stamps page List and click the Delete icon assigned to it. A confirmation window will appear.
3) Click the OK button. The selected stamp will be deleted from the list.
Changing the Stamp Sort Order
Within the Stamp Menu (Figure 5-1), you can establish a sort order for all stamps by entering a numeric value in the Sort Order field. A sort order value of 1 will place the sub-gallery as first in the

Page 40 Photo Sweet 1.1 User Guide
list; a sort order value of 2 will place the sub-gallery second, and so on. Click the Sort Order button to save your settings.
© 2010 Voloper Creations Inc. Page 41
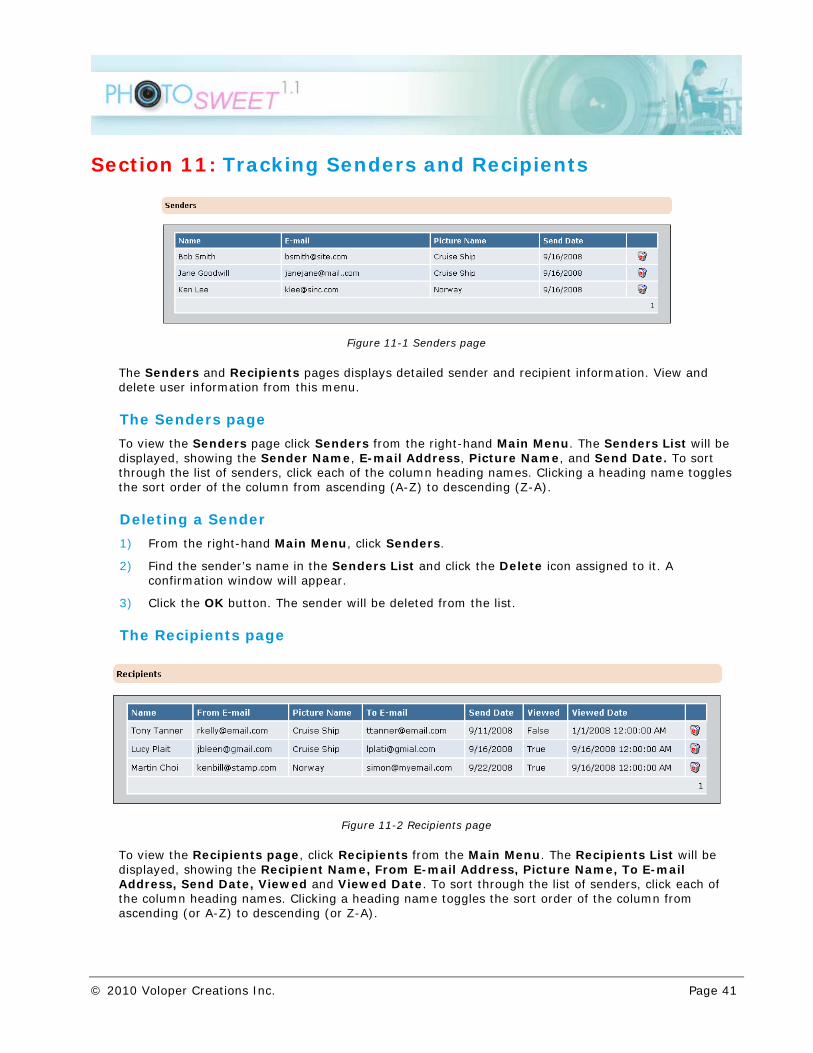
Section 11: Tracking Senders and Recipients
Figure 11-1 Senders page
The Senders and Recipients pages displays detailed sender and recipient information. View and delete user information from this menu.
The Senders page
To view the Senders page click Senders from the right-hand Main Menu. The Senders List will be displayed, showing the Sender Name, E-mail Address, Picture Name, and Send Date. To sort through the list of senders, click each of the column heading names. Clicking a heading name toggles the sort order of the column from ascending (A-Z) to descending (Z-A).
Deleting a Sender
1) From the right-hand Main Menu, click Senders.
2) Find the sender’s name in the Senders List and click the Delete icon assigned to it. A confirmation window will appear.
3) Click the OK button. The sender will be deleted from the list.
The Recipients page
Figure 11-2 Recipients page
To view the Recipients page, click Recipients from the Main Menu. The Recipients List will be displayed, showing the Recipient Name, From E-mail Address, Picture Name, To E-mail Address, Send Date, Viewed and Viewed Date. To sort through the list of senders, click each of the column heading names. Clicking a heading name toggles the sort order of the column from ascending (or A-Z) to descending (or Z-A).

Page 42 Photo Sweet 1.1 User Guide
Deleting a Recipient
1) From the right-hand Main Menu, click Recipients.
2) Find the sender’s name in the Recipients List and click the Delete icon assigned to it. A confirmation window will appear.
3) Click the OK button. The recipient will be deleted from the list.

© 2010 Voloper Creations Inc. Page 43
Section 12: Managing Front-end Pages
The Photo Sweet Pages Menu lists all the Web pages within the Photo Sweet Manager This menu allows you to configure each page using the WCE tool and include SEO information for each page.
Configuring a Front-end Page
Figure 12-1 Postcard Mailer Category page
Editing a Front-end Page
1) From the right-hand Main Menu, click the Category (postcard or Photo Sweet), Search (postcard or Photo Sweet), Send, Preview, or Popup Page.
2) he appropriate page will appear. In the figure above we are making changes to the Postcard Mailer Category Page (Figure 12-1).
3) Enter a page title in the Title field. The title appears on a browser title line, usually at the top of the window, and is the part of the page displayed on search engines as a link. It also appears in browser Forward/Backward lists, as well as in browser Bookmarks and Favorites.
4) Enter keywords for the front-end page in the Keywords field. Keywords are words used to search for a topic. Use keywords that best describe your website, its contents, and the products and services offered. Separate each keyword using a comma.
5) Enter a description for the front-end page in the SEO Description field. The page description is used by search engines to summarize the contents of a webpage and is displayed with the Page Title and the Web address as part of a search result.
6) Select a template from the Template drop-down menu.

Page 44 Photo Sweet 1.1 User Guide
7) Enter text in the Description field. Use the WCE tools to customize the front-end page formatting and layout. (Please refer to the WCE Toolbar Page on page for a description of each WCE button).
8) When you are finished, click the Update Info button. The changes you have made will be displayed in the front-end page.
See the table below for a list of pages you can configure and important placeholders for each page.
Menu Item Front End Page Placeholder Details
[P:postcard_category] Displays a list of sub-categories for this category.
[P:postcard_picture] Displays a list of picture for this category.
Category (Postcard Mailer)
The category page.
[P:postcard_footer] Displays navigation links in the footer.
Search (Postcard Mailer)
The search page. [P:postcard_search] Displays the gallery search dialog.
[P:postcard_send] Displays the message composition page.
Send The send page.
[P:postcard_footer] Displays navigation links in the footer.
[P:postcard_view] Displays the preview dialog. Preview The preview page
[P:postcard_footer] Displays navigation links in the footer.
[P:gallery_category] Displays a list of sub-categories for this category.
[P:gallery_picture] Displays a list of picture for this category.
Category (Photo Sweet)
The category page.
[P:gallery_footer] Displays navigation links in the footer.
Search (Photo Sweet)
The search page. [P:gallery_search] Displays the gallery search dialog.
Popup Page The image popup page
[P:gallery_popup] Gallery Image popup
© 2010 Voloper Creations Inc. Page 45
Section 13: Integration
Photo Sweet is fully modular and is easily integrated within your Web project in OpenSites. Version 6.0 allows you to choose between integrating the full Photo Sweet application or integrating sub-modules across multiple pages.
Integrating the Photo Sweet Application
1) From the OpenSites Work Area, drag the Photo Sweet to the page you would like to host the
Photo Sweet application. The tool icon will appear within the Page icon.
2) Double-click the page icon. The Page Details View will be displayed. Click the Contents tab.
3) Within the WCE window, position your cursor where you would like the Photo Sweet application to be placed.
4) Click the Insert/Edit Placeholder icon. The Placeholder Properties dialog will be displayed.
5) Select Photo Sweet from the Placeholder Name dropdown list and click OK. The Photo Sweet placeholder will be displayed in the WCE window. You have now successfully added the Photo Sweet application to your Web project.
Integrating a Photo Sweet Sub-module to a page
You can choose to integrate Photo Sweet sub-modules across multiple pages.
1) From the OpenSites Work Area, drag the Photo Sweet to the page you would like to host the
Photo Sweet application. The tool icon will appear within the Page icon.
2) Double-click the page icon. The Page Details View will be displayed. Click the Contents tab.
3) Within the WCE window, position your cursor where you would like the Photo Sweet application to be placed.
4) Click the Insert/Edit Placeholder icon. The Placeholder Properties dialog will be displayed.
5) Select the submodule you would like to add from the Placeholder Name dropdown list and click OK. The sub-module placeholder will be displayed in the WCE window. You have now successfully added the Photo Sweet application to your Web project.

Page 46 Photo Sweet 1.1 User Guide
Integrating Individual Galleries
Photo Sweet's sub-modules (Postcard Mailer and Picture Gallery) allow you to place individual sub-galleries on a page. For example, if you only wanted to make available the Cars image gallery for the postcard mailer on one particular page, first note the ID number of the gallery in the Galleries page (Figure 13-1). From OpenSites, click the Page Details Content tab.
Figure 13-1 Galleries Page
Click the Insert/Edit Placeholder icon. The Placeholder Properties dialog will be displayed (Figure 13-2). Select the Postcard Mailer Category Picture or the Picture Gallery Category Picture submodule you would like to add from the Placeholder Name dropdown list and click OK. The sub-module placeholder will be displayed in the WCE window.
Figure 13-2 Placeholder Properties dialog box
Finally, edit the placeholder and enter the gallery ID number after the CATID= portion of the placeholder.

© 2010 Voloper Creations Inc. Page 47
Section 14: Internet Marketing Toolkit Integration
Voloper's Internet Marketing Toolkit (Customer Manager, Campaign Manager, and Dashboard) integrates with the Photo Sweet module and captures user activity. The following Photo Sweet module activities are captured:
Send a Card: The toolkit captures which postcards are sent and how often.
View Postcard: The toolkit captures which postcards are viewed and how often.
Adding the Internet Marketing Module
If you do not have the Internet Marketing Toolkit please contact Voloper Creations directly. See our web site at http://www.voloper.com for contact information.

Page 48 Photo Sweet 1.1 User Guide
Section 15: Talk to Us
Your feedback is important to us. Whether you'd like to share your opinion about a product, ask a question about one of our services, or comment on our website, we want to hear from you. Send your feedback and valuable suggestions to us. We look forward to hearing from you.
© 2010 Voloper Creations Inc. Page 49
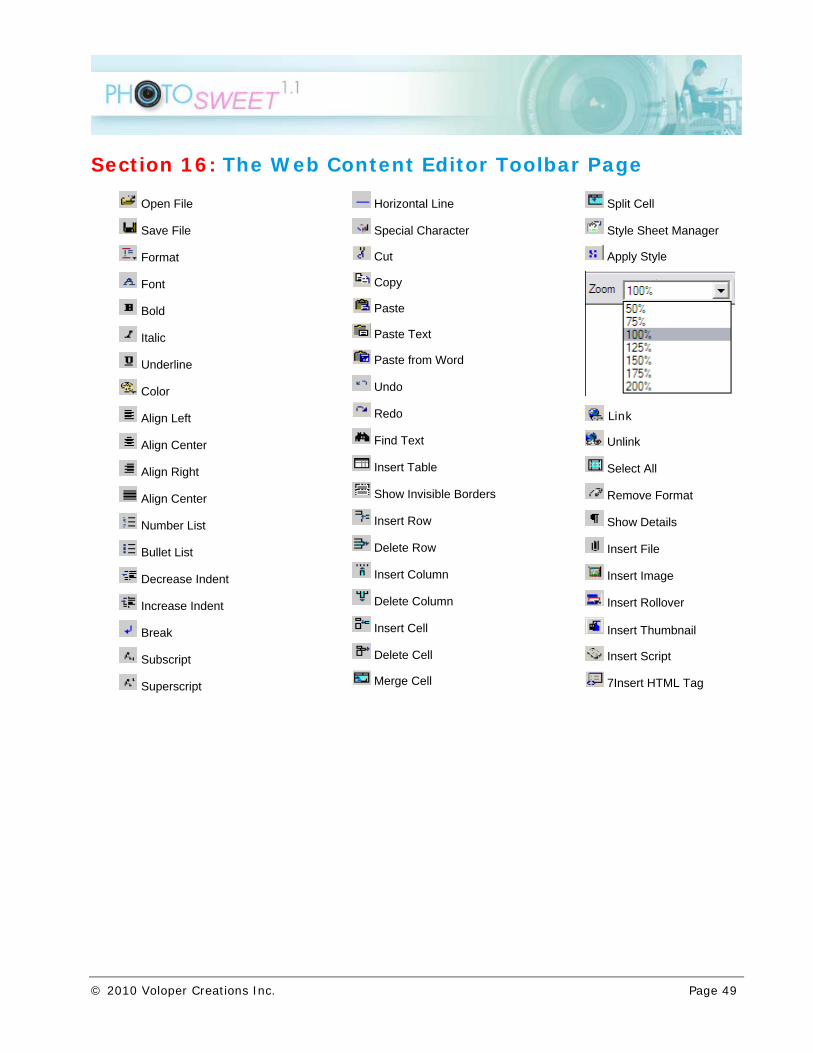
Section 16: The Web Content Editor Toolbar Page
Open File
Save File
Format
Font
Bold
Italic
Underline
Color
Align Left
Align Center
Align Right
Align Center
Number List
Bullet List
Decrease Indent
Increase Indent
Break
Subscript
Superscript
Horizontal Line
Special Character
Cut
Copy
Paste
Paste Text
Paste from Word
Undo
Redo
Find Text
Insert Table
Show Invisible Borders
Insert Row
Delete Row
Insert Column
Delete Column
Insert Cell
Delete Cell
Merge Cell
Split Cell
Style Sheet Manager
Apply Style
Link
Unlink
Select All
Remove Format
Show Details
Insert File
Insert Image
Insert Rollover
Insert Thumbnail
Insert Script
7Insert HTML Tag
Page 50 Photo Sweet 1.1 User Guide
Section 17: Glossary
Border
Border refers to the boundary line at the edge of the Web page or module
Em
An em is a unit of measurement that refers to the font size of the parent element in a Web page2.
Graphical User Interface (GUI)
A computer interface that uses pictures and icons instead of text. Pronounced “gooey”.
Hexadecimal
A numbering system which uses a base of 16. The first ten digits are 0-9 and the next six are AF. Hexadecimal numbers are used to color Web pages. For example, the hexadecimal equivalent for the color white is #FFFFFF1.
Link
Highlighted graphics or text in a Web page which jumps to a new page or location in the page when clicked. Links can also be used to download files.
Navigation Menu
A list of links found at the top, bottom, or left of a Web page that allow users to view the major topic pages of a Web site.
Radio Button
An element in the user interface that allows a user to select an option. Each button represents a mutually exclusive selection.
Rollover
A rollover occurs when the mouse pointer moves over a graphical element and displays a change in appearance.
TPCCP
Third-party Credit Card Processor. A company that accepts credit card transactions for other online businesses who usually charge a small fee for the service.
URL
Uniform Resource Locator. A Web address, such as http://www. google. com.
World Wide Web Consortium (W3C)
The World Wide Web Consortium (W3C) is an international consortium where Member organizations, a full-time staff, and the public work together to develop Web standards.
Worldwide Accessibility Initiative (WAI)
The Web Accessibility Initiative (WAI) works with organizations around the world to develop strategies, guidelines, and resources to help make the Web accessible to people with disabilities.
© 2010 Voloper Creations Inc. Page 51
Index
Adding a New Gallery .................................. 24 Adding a Stamp.......................................... 38 Adding a Sub-gallery ................................... 27 Adding New Pictures.................................... 28 Adding/Dropping Galleries............................ 31 Borders ..................................................... 19 Borders Color ............................................. 19 Changing the Stamp Sort Order .................... 39 Color......................................................... 19 Configuring a Front-end Page ....................... 43 Confirmation Page....................................... 16 Default Category......................................... 23 Deleting a Gallery ....................................... 26 Deleting a Picture ....................................... 31 Deleting a Recipient .................................... 42 Deleting a Sender ....................................... 41 Deleting a Sub-gallery ................................. 27 Deleting Stamps ......................................... 39 Editing a Front-end Page.............................. 43 Editing a Gallery ......................................... 26 Editing a Sub-gallery ................................... 27 Editing Picture Details.................................. 31 Editing Stamp Details .................................. 39 E-mail Message .......................................... 21 E-mail Set-up............................................. 21 End Message .............................................. 21 Exporting Pictures and Galleries .................... 32 Font Colors ................................................ 20 Front-end Interface ....................................... 7 Front-end Pages, Managing .......................... 43 Galleries .................................................... 12 Gallery Layout ............................................ 19 Gallery Pop-up Windows .............................. 13 Horizontal Image Scroller............................. 18 Horizontal Scroller Front-end ........................ 18 Image Scrolling .......................................... 23 Importing Pictures and Galleries.................... 32 Integration................................................. 45 Large Image in Scroll .................................. 23
List All Categories........................................ 27 Main Page .................................................. 11 Managing Front-end Pages............................ 43 Managing Galleries ...................................... 24 Managing Pictures ....................................... 28 Managing Stamps........................................ 38 Message Detail Page .................................... 15 Message Preview Page ................................. 16 Mouse Over ................................................ 20 Navigation.................................................. 20 Picture Gallery Configuration......................... 19 Picture Sort Order ....................................... 31 Popup Background....................................... 20 Popup Font Colors ....................................... 20 Popup Size ................................................. 20 Popup Windows.............................................9 Popups ...................................................... 20 Postcard Mailer Configuration........................ 21 Postcard Mailer Front-end Interface ............... 11 Radio Button .............................................. 50 Recipients .................................................. 41 Scroller Height ............................................ 23 Scroller Speed ............................................ 23 Scroller Width............................................. 23 Scrollers Front-end...................................... 18 Search Page ........................................... 9, 14 Senders ..................................................... 41 Sent Postcard Confirmation Page ................... 16 Stamps.................................................22, 38 Stopping the Scroller ................................... 23 Thumbnail Galleries .......................................8 Thumbnail Heights....................................... 20 Tracking Senders and Recipients ................... 41 Vertical Image Scroller................................. 18 Vertical Scroller Front-end ............................ 18 Viewing Pictures.......................................... 26 Viewing Sub-galleries................................... 27 Worldwide Accessibility Initiative ................... 50