photo editing software for snap lab - abs imaging systems
TRANSCRIPT
Photo Editing Software
For Snap Lab
User Manual — Exclusively for DNP Printers
June 2017
Version 3.1
Photo Editing Software User Manual
2
1. Contents 1. Contents ............................................................................................................................................. 2
2. License Agreements ............................................................................................................................. 5 Snap Lab Software Licensing Agreement ........................................................................................................... 5
Ownership Retained By Licensor ................................................................................................................................... 5
Disclaimer of Warranties................................................................................................................................................ 5
Limitation of Liability ...................................................................................................................................................... 5
Governing Law ............................................................................................................................................................... 6
Term ............................................................................................................................................................................... 6
Acknowledgments .............................................................................................................................................. 6
ICC Profiles.......................................................................................................................................................... 6
3. Introduction ........................................................................................................................................ 7 Quick Start .......................................................................................................................................................... 8
Snap Lab System Setup .................................................................................................................................................. 8
Supported Printers ......................................................................................................................................................... 9
Main panel and Software Management ........................................................................................................................ 9
Language ............................................................................................................................................................ 9
Terms and Conditions....................................................................................................................................... 10
About Print Finishes ......................................................................................................................................... 11
4. Loading Images.................................................................................................................................. 12 How to Load Images? ....................................................................................................................................... 12
Memory Card ............................................................................................................................................................... 13
USB Device ................................................................................................................................................................... 13
iPhone and iPad ........................................................................................................................................................... 14
Android ........................................................................................................................................................................ 16
Windows Phone 8 ........................................................................................................................................................ 17
5. Event Mode ....................................................................................................................................... 19 How to Print in Event Mode ............................................................................................................................. 19
6. Ordering Products ............................................................................................................................. 22 Prints: DS620 .................................................................................................................................................... 22
Passport: DS620................................................................................................................................................ 24
Biometric Product Information .................................................................................................................................... 27
Passport All Countries: DS620 .......................................................................................................................... 27
Frames: DS620 .................................................................................................................................................. 28
Panoramic Prints Product ................................................................................................................................. 31
Panoramic Print Sizes ................................................................................................................................................... 32
Panoramic Print Workflow: .......................................................................................................................................... 33
Calendars .......................................................................................................................................................... 36
Single Page Calendars .................................................................................................................................................. 36
Multi-Page Calendars (13 Pages Simplex) .................................................................................................................... 40
Collage Product ................................................................................................................................................ 44
Printing Collages ........................................................................................................................................................... 45
Duplex Print Products ....................................................................................................................................... 47
Double Sided Prints ...................................................................................................................................................... 47
Printing Greeting Cards with the DS80DX .................................................................................................................... 48
Photobook .................................................................................................................................................................... 51
7. Editing Images in Kiosk Mode ............................................................................................................ 56 Editing Simplex Products .................................................................................................................................. 56
Photo Editing Software User Manual
3
Edit ............................................................................................................................................................................... 56
Crop .............................................................................................................................................................................. 56
Effects .......................................................................................................................................................................... 57
Fine Rotation ................................................................................................................................................................ 57
Red Eye......................................................................................................................................................................... 57
Text .............................................................................................................................................................................. 58
Editing Multi-Page Products ............................................................................................................................ 58
Page commands ........................................................................................................................................................... 58
To Add ClipArt: ............................................................................................................................................................. 59
Image Editing ............................................................................................................................................................... 60
Using Photo Filters ........................................................................................................................................... 61
8. Understanding Order History ............................................................................................................. 62 Event Mode Set Up .......................................................................................................................................... 62
9. HOT FOLDER PRINT ........................................................................................................................... 63
10. Admin Settings – General .................................................................................................................. 65 Initial parameters ............................................................................................................................................ 65
Set Up Event Mode ...................................................................................................................................................... 67
Print Finish Mode ............................................................................................................................................ 72
Setting the Partial Matte Area ..................................................................................................................................... 74
Screen Saver .................................................................................................................................................... 77
Navigating the Screen Saver Screen............................................................................................................................. 77
Creating a New Screen Saver ....................................................................................................................................... 77
Language .......................................................................................................................................................... 79
Changing the Language Settings. ................................................................................................................................. 79
Photo Sources .................................................................................................................................................. 80
Image Editing ................................................................................................................................................... 81
End User Information ...................................................................................................................................... 82
Process Order Confirmation ............................................................................................................................ 82
Import/Export Settings .................................................................................................................................... 83
Exporting a Configuration File ...................................................................................................................................... 83
Importing a Configuration File ..................................................................................................................................... 84
Receipt ............................................................................................................................................................. 85
Supported Receipt Printers .......................................................................................................................................... 85
Configuring the Receipt Printer ................................................................................................................................... 86
Barcode and QR Code Settings .................................................................................................................................... 86
Order Management System ............................................................................................................................ 91
Enabling the Order Management System .................................................................................................................... 91
Releasing an Order ....................................................................................................................................................... 92
Screen-Shots: ............................................................................................................................................................... 92
Printer Parameters .......................................................................................................................................... 96
Printer Color Adjustments ........................................................................................................................................... 96
Panoramic Printer: ....................................................................................................................................................... 98
Products ......................................................................................................................................................... 100
Print & Print with Frame ............................................................................................................................................ 100
Single Sided Greeting Cards ....................................................................................................................................... 100
Double Sided Greeting Cards ..................................................................................................................................... 100
Calendar ..................................................................................................................................................................... 101
Photobook .................................................................................................................................................................. 101
Passport ..................................................................................................................................................................... 101
Photo Editing Software User Manual
4
Prices .............................................................................................................................................................. 104
Frames ............................................................................................................................................................ 105
Creating New Frames ................................................................................................................................................. 106
Example of Importing a Frame ................................................................................................................................... 108
Themes ........................................................................................................................................................... 109
Adding New Themes from Images ............................................................................................................................. 109
11. Diagnostics ...................................................................................................................................... 112 Team Viewer................................................................................................................................................... 112
Printer Status .................................................................................................................................................. 112
Orders in Process ............................................................................................................................................ 113
Receipt Printer Test ........................................................................................................................................ 113
Export Logs ..................................................................................................................................................... 113
Software Update ............................................................................................................................................ 113
Updating the Software without an Internect Connection ......................................................................................... 114
12. Statistics ......................................................................................................................................... 115
13. Change Mode: Photo Editing Software vs Party Print ........................................................................ 116 Change to Party Print Mode ........................................................................................................................... 116
Launching the Same Mode Again ................................................................................................................... 119
Change to Photo Editing Software Mode ....................................................................................................... 119
14. Printers configuration support ......................................................................................................... 122 System Configurations.................................................................................................................................... 122
Printer Matrix ................................................................................................................................................. 123
DS820 Printer Support .................................................................................................................................... 125
Some Key Features: .................................................................................................................................................... 125
DS820 High Quality Media Support ........................................................................................................................... 125
RX1HS printer support .................................................................................................................................... 126
15. DNP DS-Printer Firmware Upgrade ................................................................................................... 127 Firmware Upgrade Process - Automatic: ....................................................................................................... 127
Firmware Upgrade Process - Manual: ............................................................................................................ 127
16. DS620 Printer 6x9 Firmware Update ................................................................................................ 129
17. Troubleshooting .............................................................................................................................. 131 Contacting Technical Support ........................................................................................................................ 131
Issue with Wireless Transfer via ‘PhotoPrints’ App........................................................................................ 131
Local Immediate Print Product is No Longer Available .................................................................................. 131
Photo Editing Software User Manual
5
2. License Agreements
Snap Lab Software Licensing Agreement PLEASE READ THE FOLLOWING TERMS AND CONDITIONS CAREFULLY BEFORE USING THIS SOFTWARE.
USING THIS SOFTWARE INDICATES YOUR ACCEPTANCE OF THESE TERMS AND CONDITIONS. IF YOU DO NOT
AGREE WITH THESE TERMS AND CONDITIONS, PROMPTLY RETURN THIS SOFTWARE TO YOUR SUPPLIER.
This Software License Agreement is a legal document between you (a single entity) and FIT Engineering S.r.l.
(the “Licensor”) for the Photo Editing Software (the “Software”).
The Software includes the installed software, the associated media, any printed materials, and any electronic
documentation. By using the Software, you agree to the terms of this Software License Agreement. The
Licensor grants you a non-exclusive, non-transferable license to use one copy of the Software in object code
only.
Ownership Retained By Licensor
FIT Engineering S.r.l. owns all title and copyrights in and to the Software and the Licensor has the full right and
authority to grant the license granted herein. Your license does not give you any title or ownership in the
Software, nor is it a sale of any rights in the Software. The only right granted to you is the right to use the
Software in accordance with the terms of this Software License Agreement. All rights not specifically granted
to you under this Software License Agreement are reserved by the Licensor.
You may make only a single copy of Software as a backup copy, provided that it includes all notices and
markings, including copyright, trademark and other proprietary notices as on the original. Such backup copy
of the Software may not be in use at any time unless the original Software is damaged beyond use, and it
must remain in your possession and control.
You may not copy the software onto any public network. You may not, and you may not allow others to
modify, disassemble, decompile, translate, reverse engineer, reproduce, make derivative works of or enhance
the Software. You may not, and you may not allow others to rent, lease, sell, and sublicense or otherwise
transfer the Software to any other person.
In addition to any other rights it may have, the Licensor may terminate this Software License Agreement if
you fail to comply with the terms and conditions hereof. In such event, you must cease all use of the Software
and destroy all copies of the Software and all of its component parts.
At the Licensor’s sole discretion, the Licensor may from time to time provide you with updates to the
Software. Any such updates shall become part of the Software licensed to you hereunder and subject to all of
the terms and conditions of this Software License Agreement.
Disclaimer of Warranties
The Licensor expressly disclaims any and all warranties relative to the Software. THE SOFTWARE IS PROVIDED
“AS IS,” WITH- OUT WARRANTY OF ANY KIND, EXPRESS OR IMPLIED, INCLUDING, WITHOUT LIMITATION, THE
IMPLIED WARRANTIES OF MERCHANTABILITY AND FITNESS FOR OF PARTICULAR PURPOSE AND NON-
INFRINGEMENT AND THE ENTIRE RISK AS TO THE QUALITY AND PERFORMANCE OF THE LICENSED PRODUCT IS
WITH YOU.
Limitation of Liability
In no event shall the Licensor be liable for any direct, special, incidental, indirect or consequential damages
whatsoever to you including, without limitation, damages for loss of profits, sales or data or for business
interruption) arising out of the use of or inability to use the Software, even if the Licensor has been advised of
the possibility of such damages. In any event, the Licensor’s entire liability under any provision shall be limited
Photo Editing Software User Manual
6
to the amount actually paid by you for the Software. Because some states and jurisdictions do not allow the
exclusion or limitation of liability, the above limitation may not apply to you.
If any provision of the Software License Agreement is declared by a court of competent jurisdiction to be
invalid for any reason, such invalidity shall not affect the remaining provisions hereof.
Governing Law
This Software License Agreement shall be governed by the laws of Italy without regard to conflict of laws
principles.
Term
This License Agreement is effective until terminated. You may terminate this License Agreement by returning
the Licensed Product to Licensor. Licensor may terminate this License Agreement if you breach any of the
terms and conditions. Upon termination of this License Agreement for any reason, you shall return the
Licensed Product to Licensor. All provisions of this Agreement relating to disclaimers of warranties, limitation
of liability, remedies, or damages, and Licensor’s proprietary rights shall survive termination.
YOU ACKNOWLEDGE YOU HAVE READ AND UNDERSTAND THIS AGREEMENT AND AGREE TO BE BOUND BY ITS
TERMS. YOU FURTHER AGREE THAT THIS AGREEMENT IS THE COMPLETE AND EXCLUSIVE STATEMENT OF THE
AGREEMENT BETWEEN YOU AND LICENSOR, AND SUPERSEDES ANY PROPOSAL OR PRIOR AGREEMENT, ORAL
OR WRITTEN, AND ANY OTHER COMMUNICATIONS RELATING TO THE SOFTWARE ADDRESSED IN THIS
AGREEMENT.
Acknowledgments This document is for informational purposes only. FIT Engineering S.r.l. makes no warranties, expressed or
implied, as to the information in this document.
ICC Profiles Dai Nippon Printing Co., Ltd. (DNP) provided ICC profiles implemented into Photo Editing software.
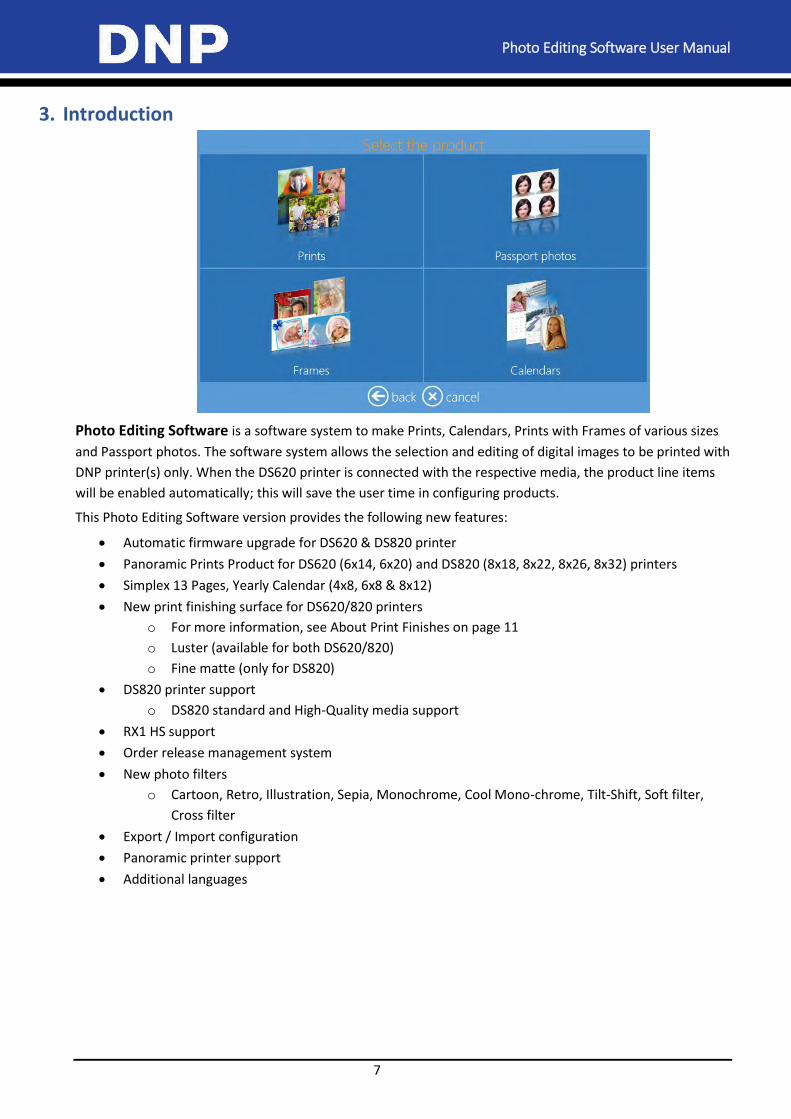
Photo Editing Software User Manual
7
3. Introduction
Photo Editing Software is a software system to make Prints, Calendars, Prints with Frames of various sizes
and Passport photos. The software system allows the selection and editing of digital images to be printed with
DNP printer(s) only. When the DS620 printer is connected with the respective media, the product line items
will be enabled automatically; this will save the user time in configuring products.
This Photo Editing Software version provides the following new features:
Automatic firmware upgrade for DS620 & DS820 printer
Panoramic Prints Product for DS620 (6x14, 6x20) and DS820 (8x18, 8x22, 8x26, 8x32) printers
Simplex 13 Pages, Yearly Calendar (4x8, 6x8 & 8x12)
New print finishing surface for DS620/820 printers
o For more information, see About Print Finishes on page 11
o Luster (available for both DS620/820)
o Fine matte (only for DS820)
DS820 printer support
o DS820 standard and High-Quality media support
RX1 HS support
Order release management system
New photo filters
o Cartoon, Retro, Illustration, Sepia, Monochrome, Cool Mono-chrome, Tilt-Shift, Soft filter,
Cross filter
Export / Import configuration
Panoramic printer support
Additional languages

Photo Editing Software User Manual
8
New themes for Calendar/Greeting Card/Photobook products
Under the Prints with Frames product selection, there are New Frames for the following square sizes:
4x4, 5x5, 6x6, and 8x8.
Other improvement items
For assistance or support, contact DNP technical support at [email protected]
Quick Start
Snap Lab System Setup
Before you start working with the Photo Editing Software, connect and switch on the DS620 printer and the
Wi-Fi router (PhotoPrints.) Then, turn on the Snap Lab (push the button rear side of the terminal). The Photo
Editing Software will automatically display only products that can be printed with connected printers and
loaded media when DS620 printer is connected (please, refer to the installation guide).
If the DS620 printer is not connected, the software will display the following message:
When the printer is connected to the system, the above message will disappear automatically within a few
seconds, and the software will display the available products as per the connected printer.
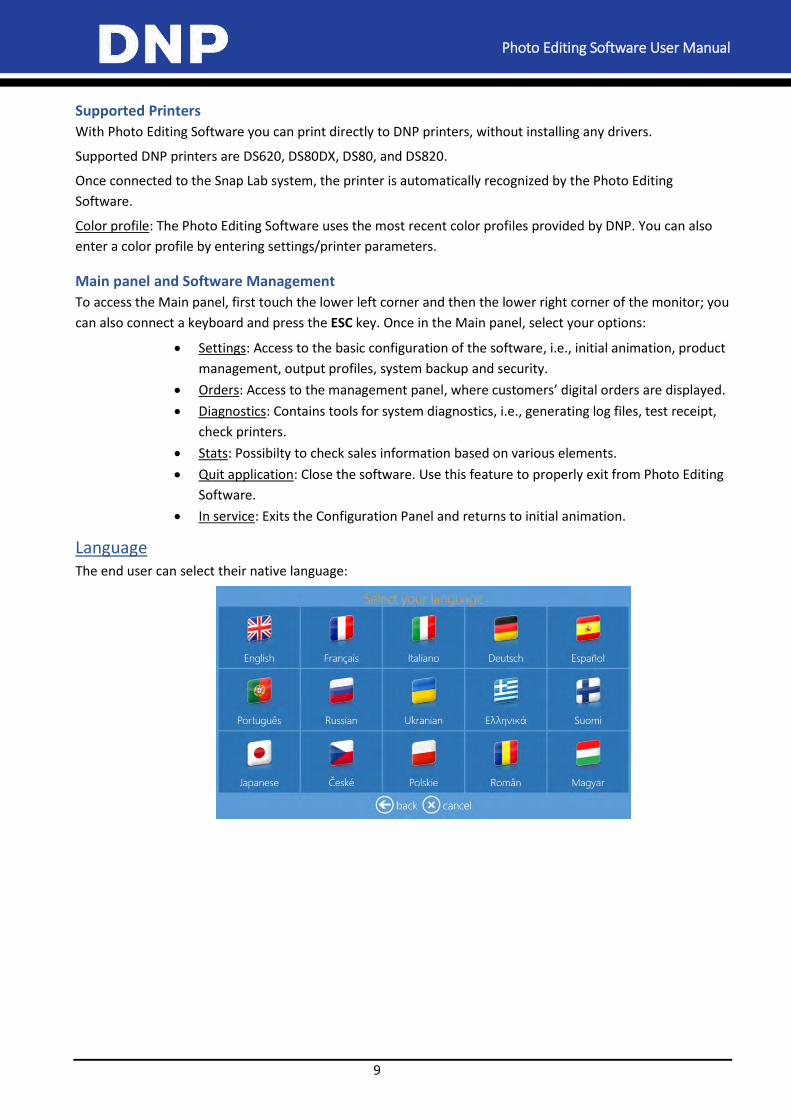
Photo Editing Software User Manual
9
Supported Printers
With Photo Editing Software you can print directly to DNP printers, without installing any drivers.
Supported DNP printers are DS620, DS80DX, DS80, and DS820.
Once connected to the Snap Lab system, the printer is automatically recognized by the Photo Editing
Software.
Color profile: The Photo Editing Software uses the most recent color profiles provided by DNP. You can also
enter a color profile by entering settings/printer parameters.
Main panel and Software Management
To access the Main panel, first touch the lower left corner and then the lower right corner of the monitor; you
can also connect a keyboard and press the ESC key. Once in the Main panel, select your options:
Settings: Access to the basic configuration of the software, i.e., initial animation, product
management, output profiles, system backup and security.
Orders: Access to the management panel, where customers’ digital orders are displayed.
Diagnostics: Contains tools for system diagnostics, i.e., generating log files, test receipt,
check printers.
Stats: Possibilty to check sales information based on various elements.
Quit application: Close the software. Use this feature to properly exit from Photo Editing
Software.
In service: Exits the Configuration Panel and returns to initial animation.
Language The end user can select their native language:
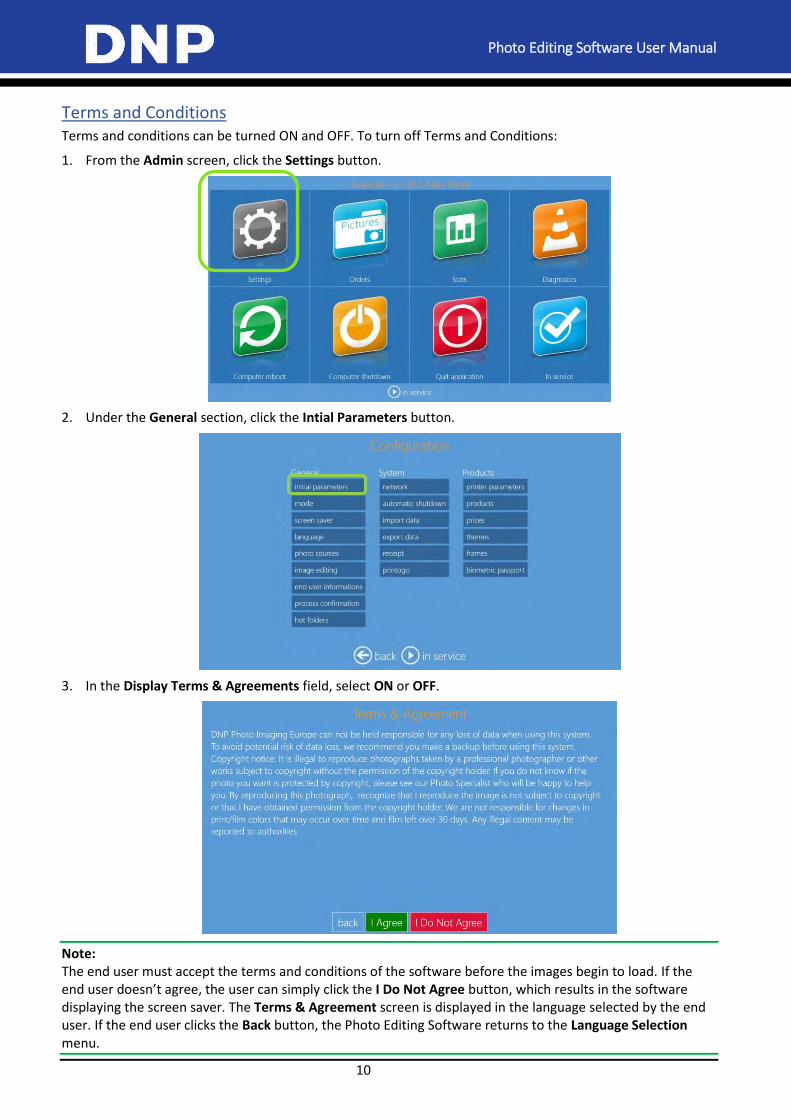
Photo Editing Software User Manual
10
Terms and Conditions Terms and conditions can be turned ON and OFF. To turn off Terms and Conditions:
1. From the Admin screen, click the Settings button.
2. Under the General section, click the Intial Parameters button.
3. In the Display Terms & Agreements field, select ON or OFF.
Note: The end user must accept the terms and conditions of the software before the images begin to load. If the end user doesn’t agree, the user can simply click the I Do Not Agree button, which results in the software displaying the screen saver. The Terms & Agreement screen is displayed in the language selected by the end user. If the end user clicks the Back button, the Photo Editing Software returns to the Language Selection menu.
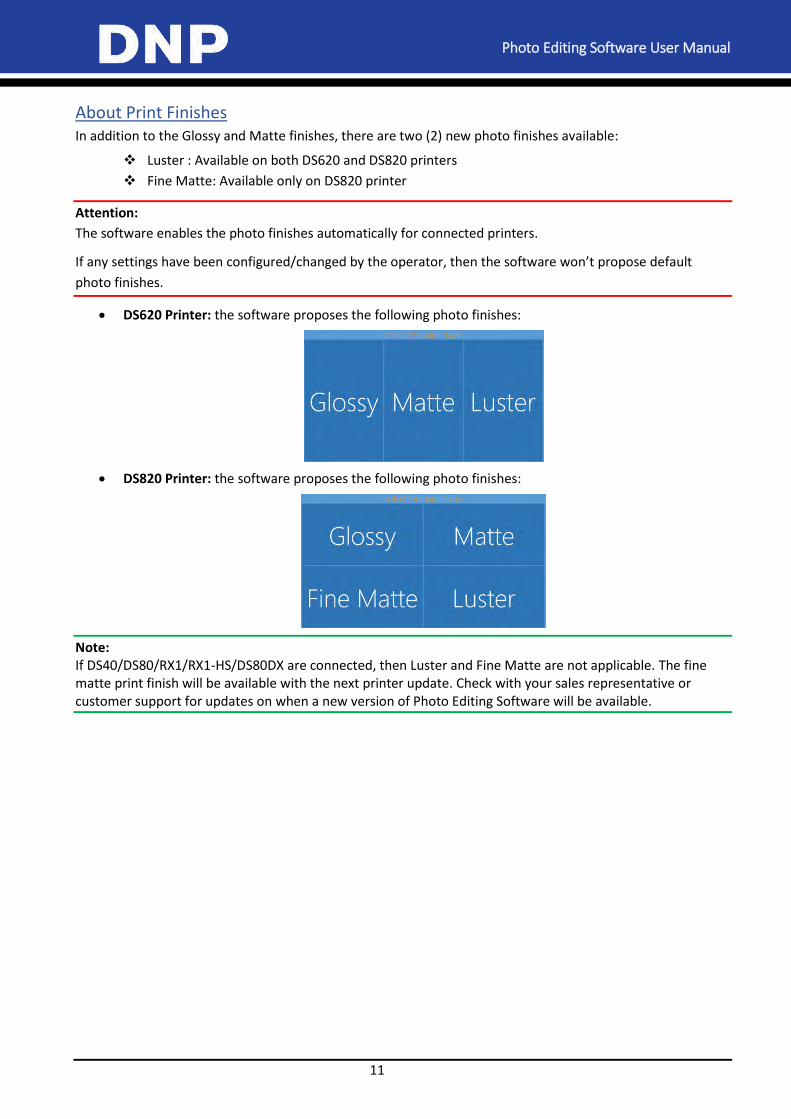
Photo Editing Software User Manual
11
About Print Finishes
In addition to the Glossy and Matte finishes, there are two (2) new photo finishes available:
Luster : Available on both DS620 and DS820 printers
Fine Matte: Available only on DS820 printer
Attention:
The software enables the photo finishes automatically for connected printers.
If any settings have been configured/changed by the operator, then the software won’t propose default
photo finishes.
DS620 Printer: the software proposes the following photo finishes:
DS820 Printer: the software proposes the following photo finishes:
Note: If DS40/DS80/RX1/RX1-HS/DS80DX are connected, then Luster and Fine Matte are not applicable. The fine matte print finish will be available with the next printer update. Check with your sales representative or customer support for updates on when a new version of Photo Editing Software will be available.
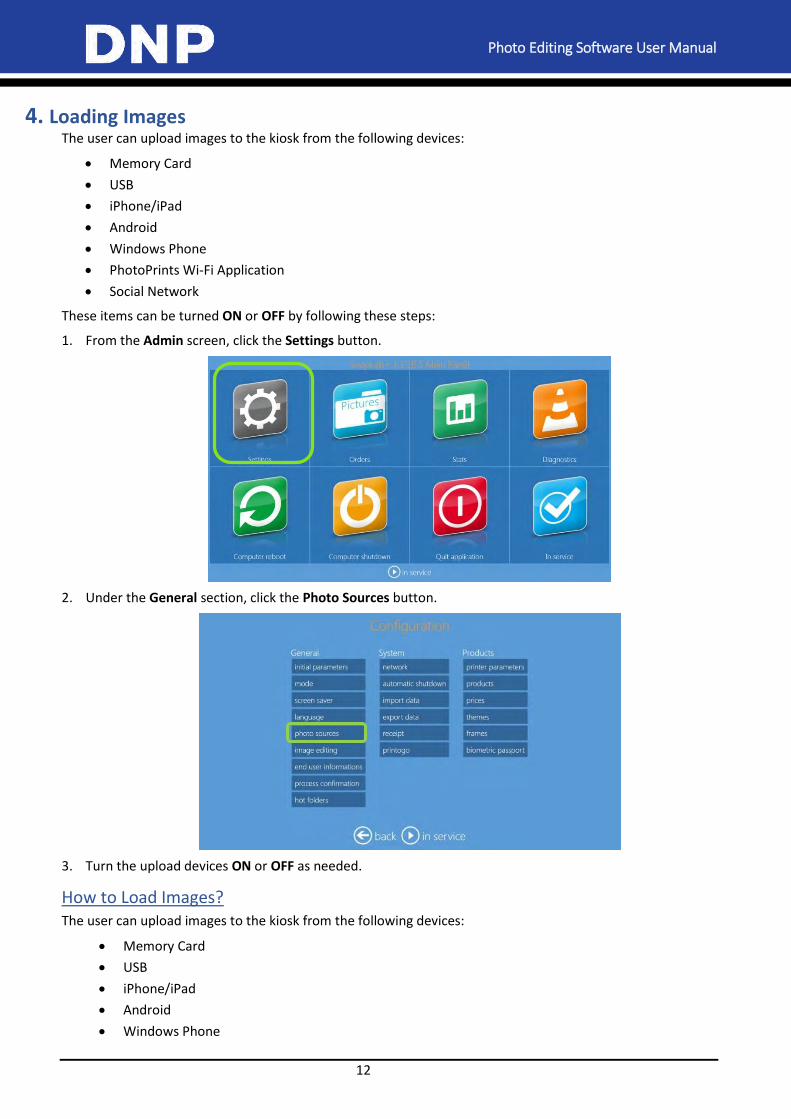
Photo Editing Software User Manual
12
4. Loading Images The user can upload images to the kiosk from the following devices:
Memory Card
USB
iPhone/iPad
Android
Windows Phone
PhotoPrints Wi-Fi Application
Social Network
These items can be turned ON or OFF by following these steps:
1. From the Admin screen, click the Settings button.
2. Under the General section, click the Photo Sources button.
3. Turn the upload devices ON or OFF as needed.
How to Load Images? The user can upload images to the kiosk from the following devices:
Memory Card
USB
iPhone/iPad
Android
Windows Phone
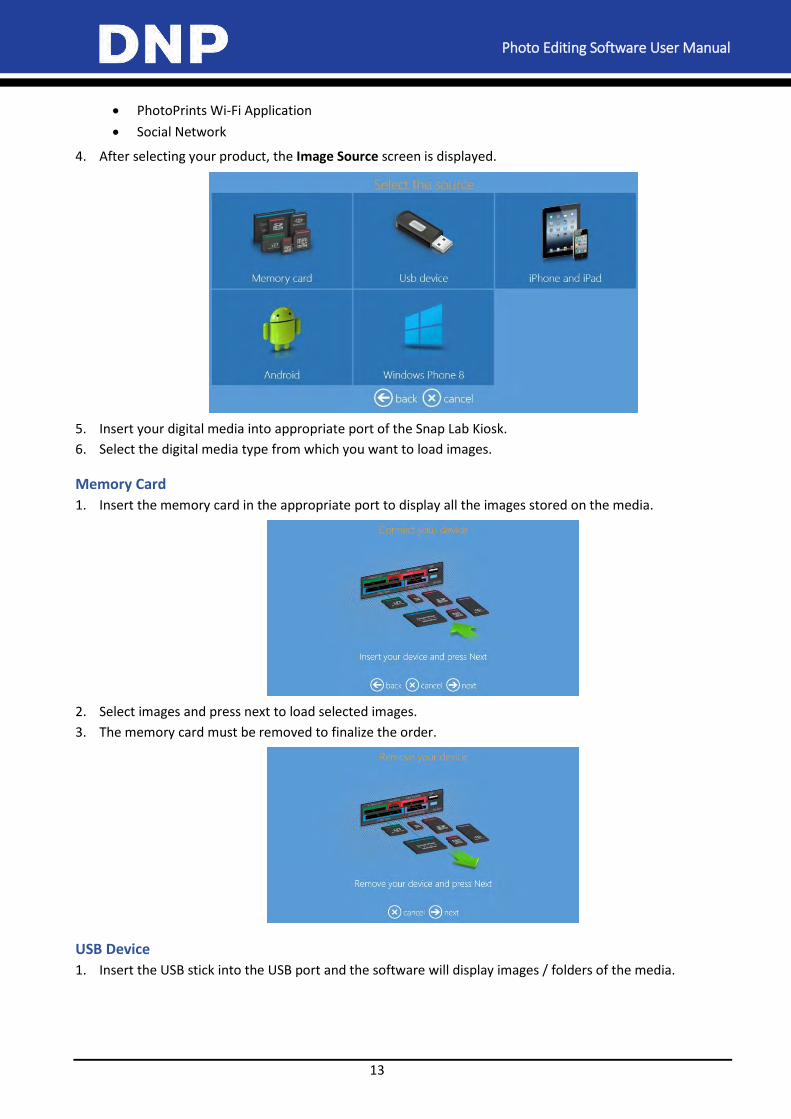
Photo Editing Software User Manual
13
PhotoPrints Wi-Fi Application
Social Network
4. After selecting your product, the Image Source screen is displayed.
5. Insert your digital media into appropriate port of the Snap Lab Kiosk.
6. Select the digital media type from which you want to load images.
Memory Card
1. Insert the memory card in the appropriate port to display all the images stored on the media.
2. Select images and press next to load selected images.
3. The memory card must be removed to finalize the order.
USB Device
1. Insert the USB stick into the USB port and the software will display images / folders of the media.
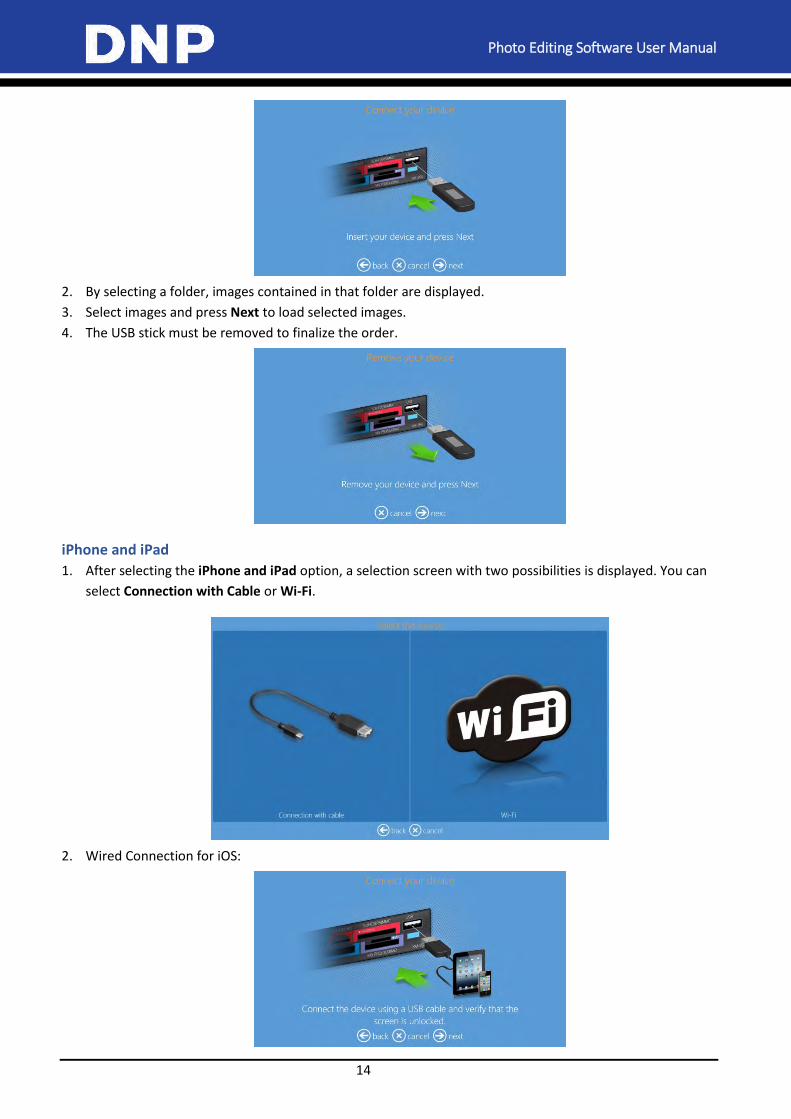
Photo Editing Software User Manual
14
2. By selecting a folder, images contained in that folder are displayed.
3. Select images and press Next to load selected images.
4. The USB stick must be removed to finalize the order.
iPhone and iPad
1. After selecting the iPhone and iPad option, a selection screen with two possibilities is displayed. You can
select Connection with Cable or Wi-Fi.
2. Wired Connection for iOS:
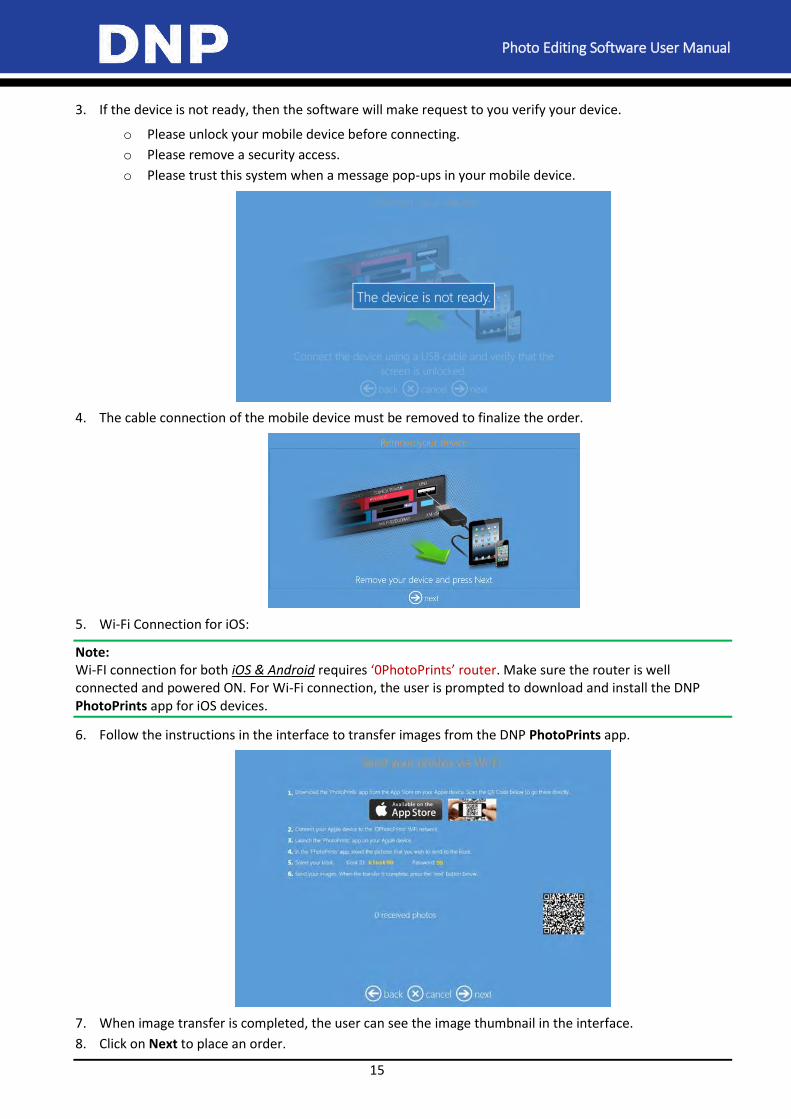
Photo Editing Software User Manual
15
3. If the device is not ready, then the software will make request to you verify your device.
o Please unlock your mobile device before connecting.
o Please remove a security access.
o Please trust this system when a message pop-ups in your mobile device.
4. The cable connection of the mobile device must be removed to finalize the order.
5. Wi-Fi Connection for iOS:
Note: Wi-FI connection for both iOS & Android requires ‘0PhotoPrints’ router. Make sure the router is well connected and powered ON. For Wi-Fi connection, the user is prompted to download and install the DNP PhotoPrints app for iOS devices.
6. Follow the instructions in the interface to transfer images from the DNP PhotoPrints app.
7. When image transfer is completed, the user can see the image thumbnail in the interface.
8. Click on Next to place an order.
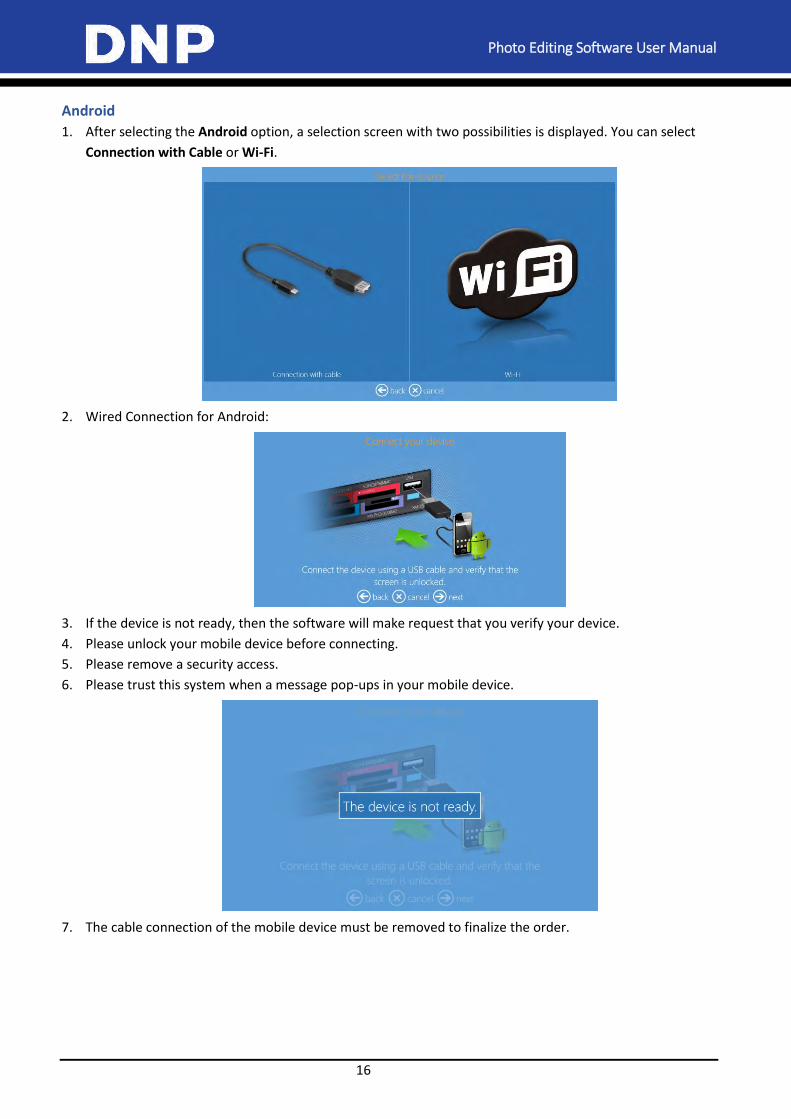
Photo Editing Software User Manual
16
Android
1. After selecting the Android option, a selection screen with two possibilities is displayed. You can select
Connection with Cable or Wi-Fi.
2. Wired Connection for Android:
3. If the device is not ready, then the software will make request that you verify your device.
4. Please unlock your mobile device before connecting.
5. Please remove a security access.
6. Please trust this system when a message pop-ups in your mobile device.
7. The cable connection of the mobile device must be removed to finalize the order.
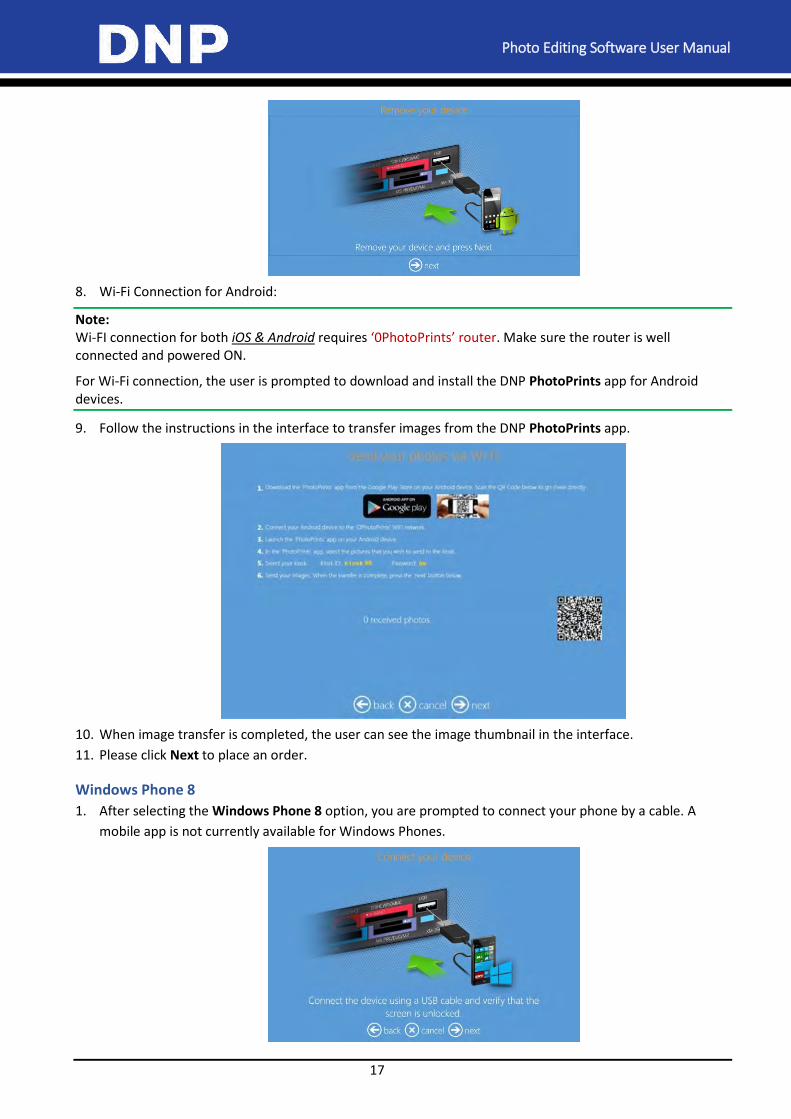
Photo Editing Software User Manual
17
8. Wi-Fi Connection for Android:
Note: Wi-FI connection for both iOS & Android requires ‘0PhotoPrints’ router. Make sure the router is well connected and powered ON.
For Wi-Fi connection, the user is prompted to download and install the DNP PhotoPrints app for Android devices.
9. Follow the instructions in the interface to transfer images from the DNP PhotoPrints app.
10. When image transfer is completed, the user can see the image thumbnail in the interface.
11. Please click Next to place an order.
Windows Phone 8
1. After selecting the Windows Phone 8 option, you are prompted to connect your phone by a cable. A
mobile app is not currently available for Windows Phones.
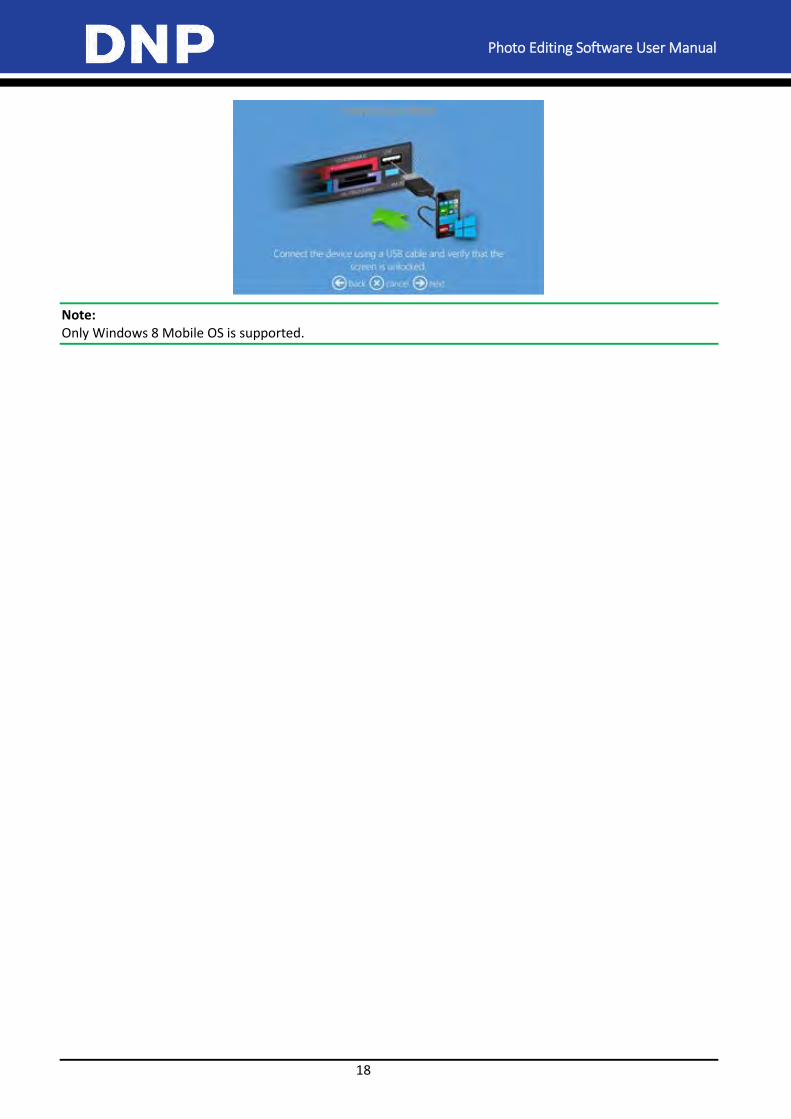
Photo Editing Software User Manual
18
Note: Only Windows 8 Mobile OS is supported.
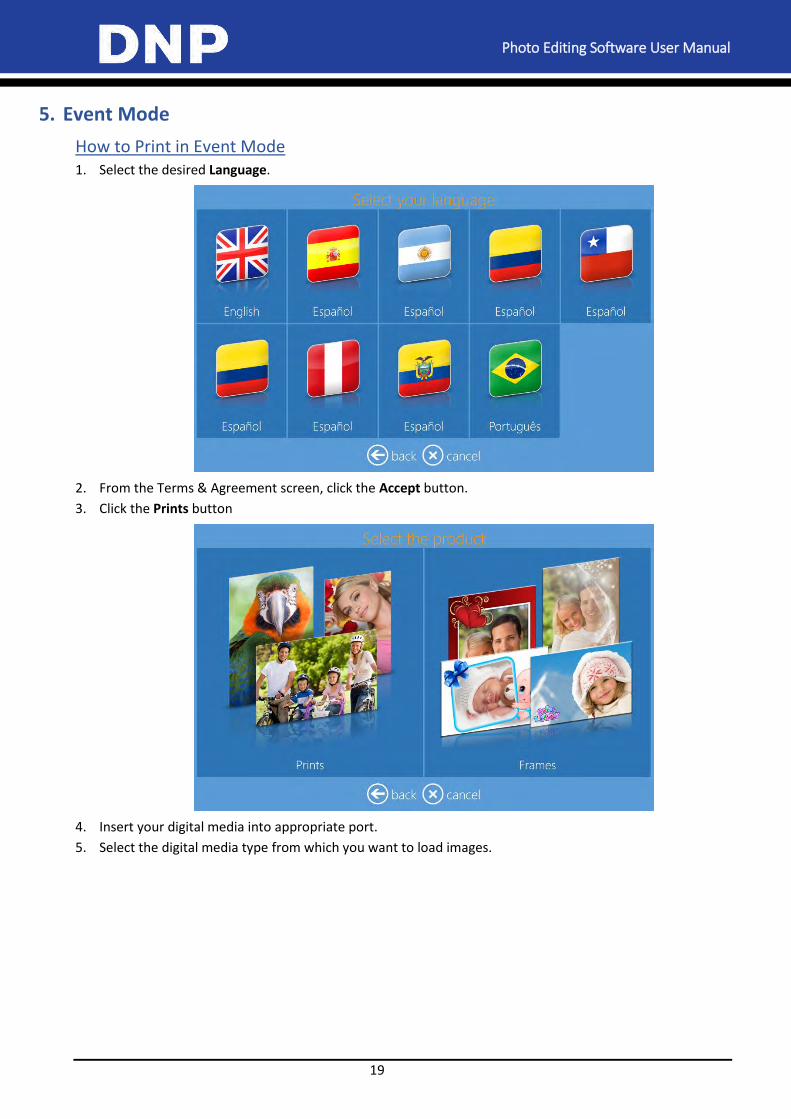
Photo Editing Software User Manual
19
5. Event Mode
How to Print in Event Mode 1. Select the desired Language.
2. From the Terms & Agreement screen, click the Accept button.
3. Click the Prints button
4. Insert your digital media into appropriate port.
5. Select the digital media type from which you want to load images.
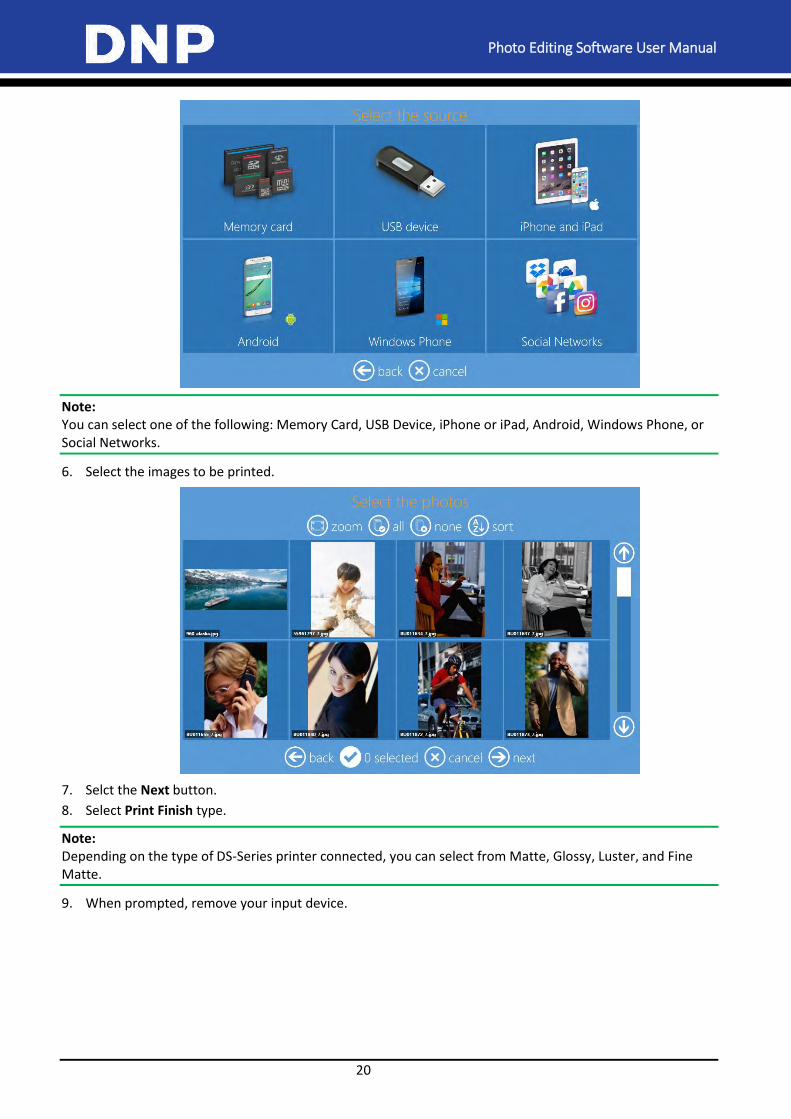
Photo Editing Software User Manual
20
Note: You can select one of the following: Memory Card, USB Device, iPhone or iPad, Android, Windows Phone, or Social Networks.
6. Select the images to be printed.
7. Selct the Next button.
8. Select Print Finish type.
Note: Depending on the type of DS-Series printer connected, you can select from Matte, Glossy, Luster, and Fine Matte.
9. When prompted, remove your input device.
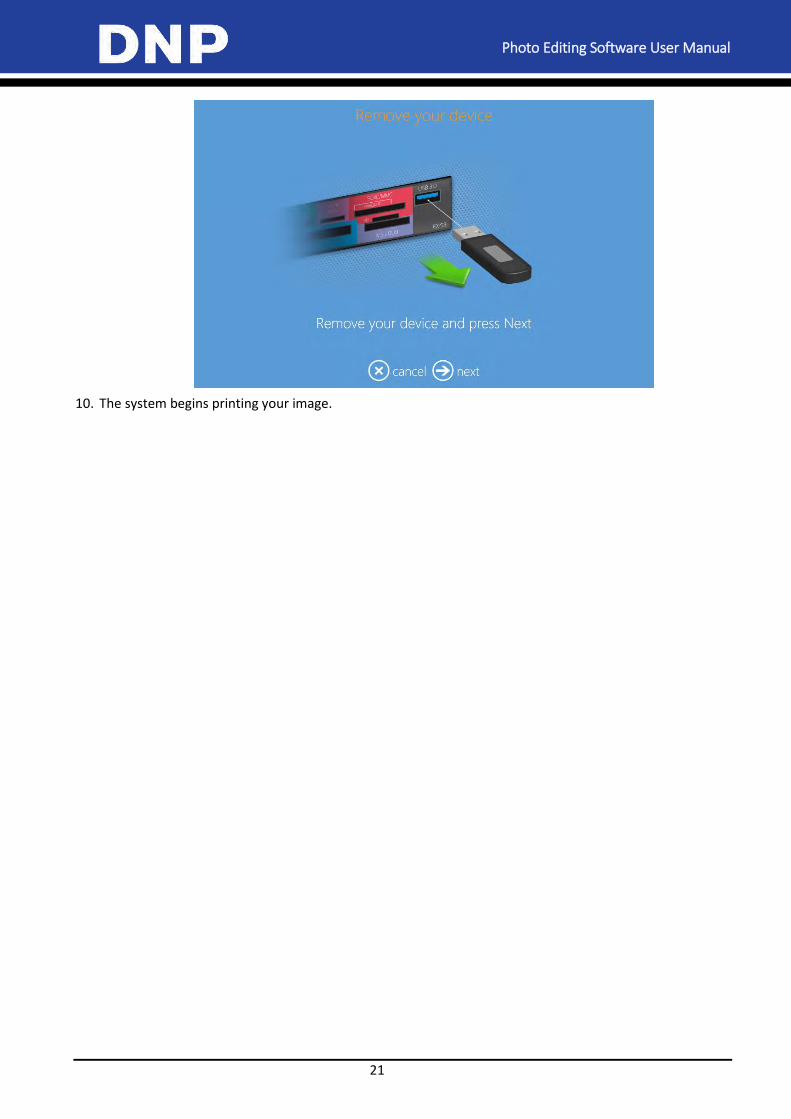
Photo Editing Software User Manual
21
10. The system begins printing your image.
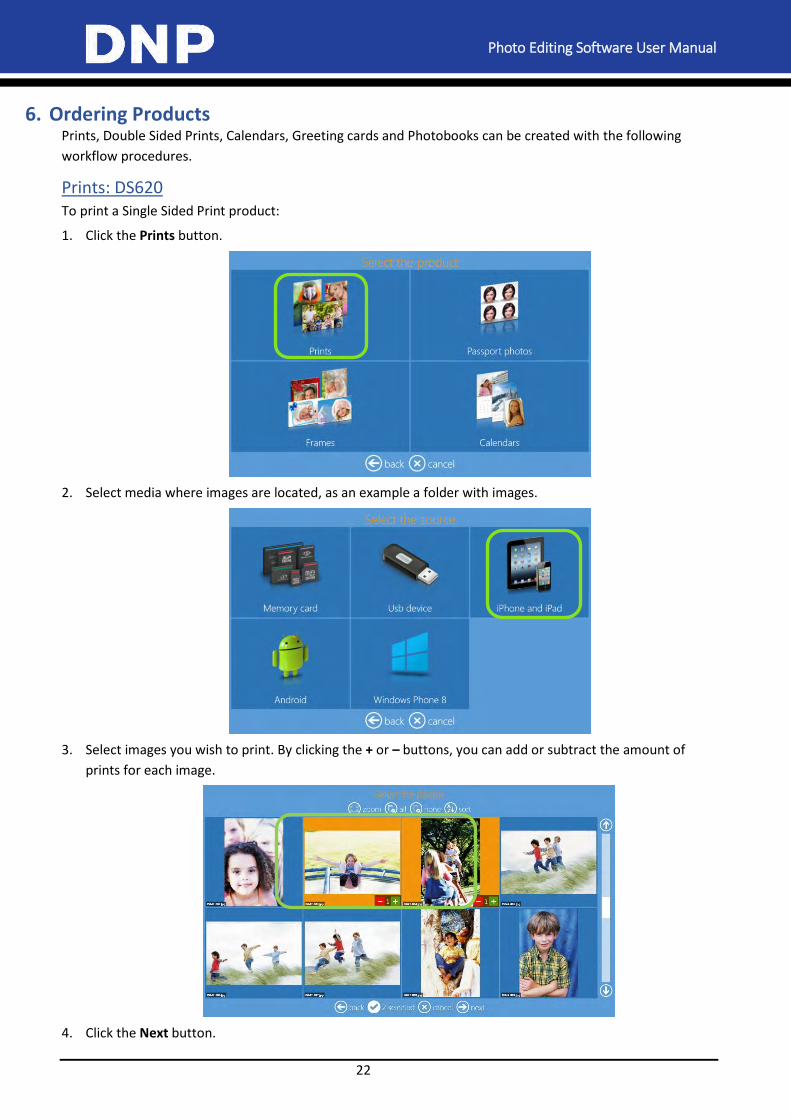
Photo Editing Software User Manual
22
6. Ordering Products Prints, Double Sided Prints, Calendars, Greeting cards and Photobooks can be created with the following
workflow procedures.
Prints: DS620 To print a Single Sided Print product:
1. Click the Prints button.
2. Select media where images are located, as an example a folder with images.
3. Select images you wish to print. By clicking the + or – buttons, you can add or subtract the amount of
prints for each image.
4. Click the Next button.
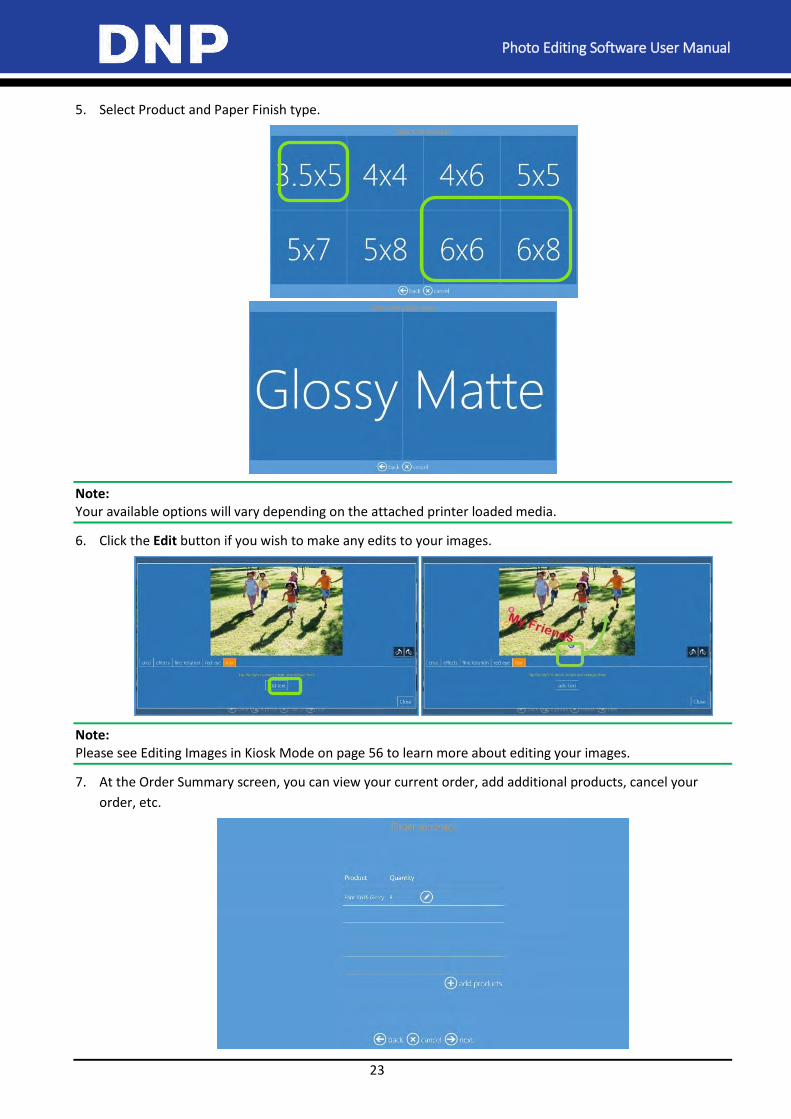
Photo Editing Software User Manual
23
5. Select Product and Paper Finish type.
Note: Your available options will vary depending on the attached printer loaded media.
6. Click the Edit button if you wish to make any edits to your images.
Note: Please see Editing Images in Kiosk Mode on page 56 to learn more about editing your images.
7. At the Order Summary screen, you can view your current order, add additional products, cancel your
order, etc.
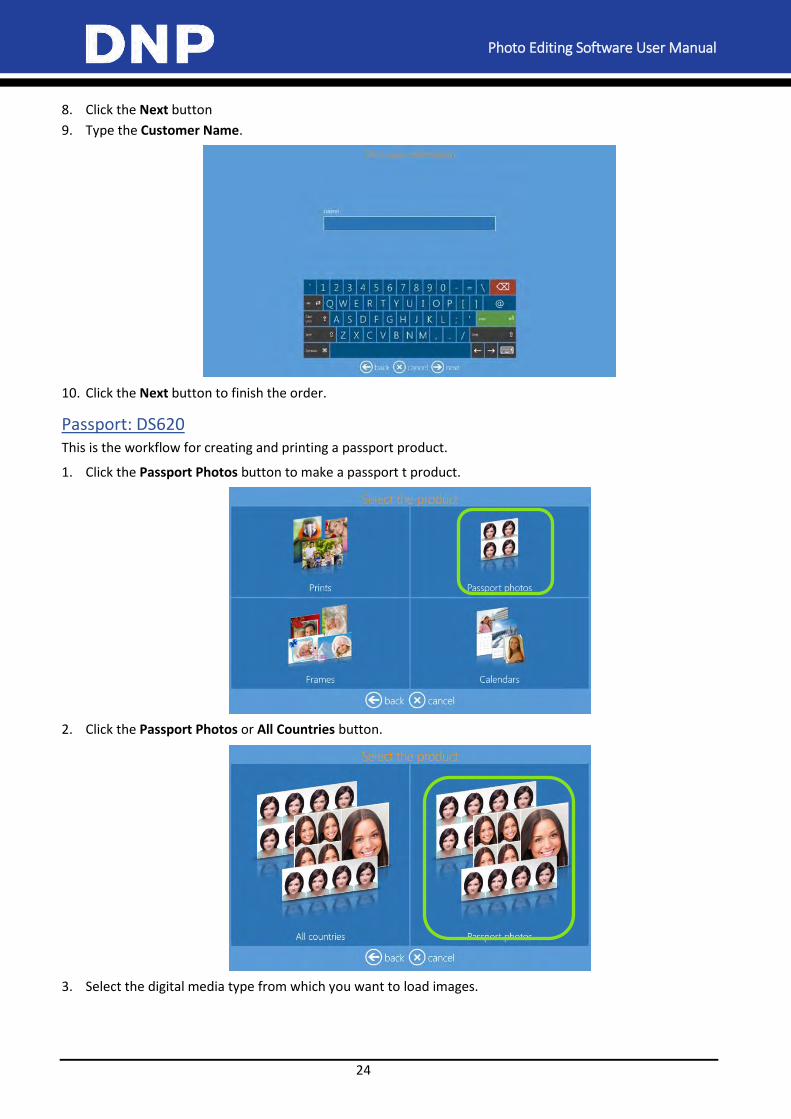
Photo Editing Software User Manual
24
8. Click the Next button
9. Type the Customer Name.
10. Click the Next button to finish the order.
Passport: DS620 This is the workflow for creating and printing a passport product.
1. Click the Passport Photos button to make a passport t product.
2. Click the Passport Photos or All Countries button.
3. Select the digital media type from which you want to load images.

Photo Editing Software User Manual
25
4. Select images.
5. Select paper finish type.
6. Please wait awhile the system generates the passport product.
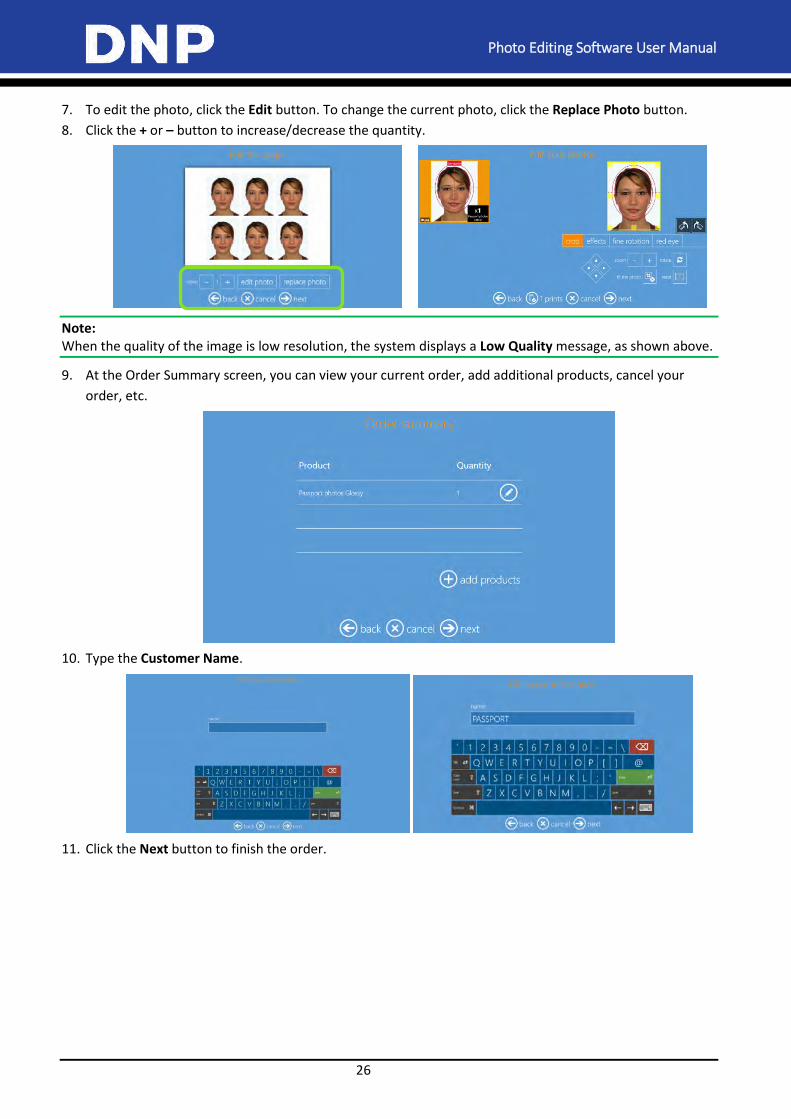
Photo Editing Software User Manual
26
7. To edit the photo, click the Edit button. To change the current photo, click the Replace Photo button.
8. Click the + or – button to increase/decrease the quantity.
Note: When the quality of the image is low resolution, the system displays a Low Quality message, as shown above.
9. At the Order Summary screen, you can view your current order, add additional products, cancel your
order, etc.
10. Type the Customer Name.
11. Click the Next button to finish the order.
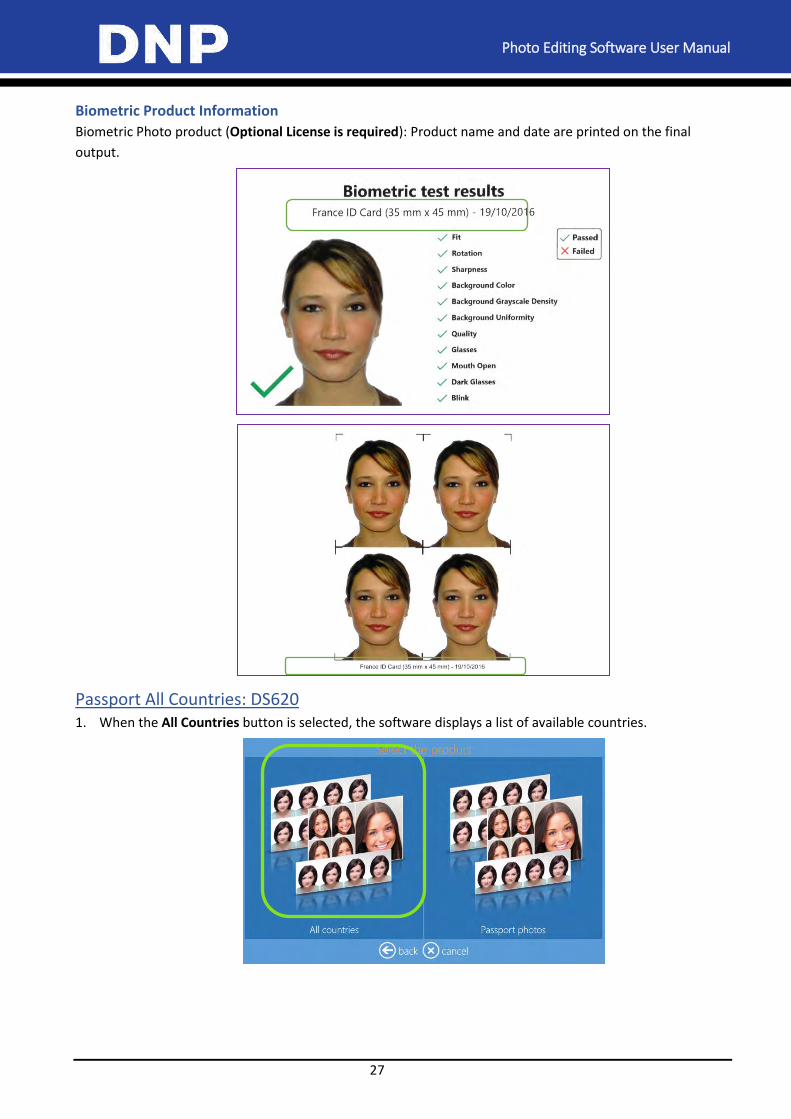
Photo Editing Software User Manual
27
Biometric Product Information
Biometric Photo product (Optional License is required): Product name and date are printed on the final
output.
Passport All Countries: DS620 1. When the All Countries button is selected, the software displays a list of available countries.
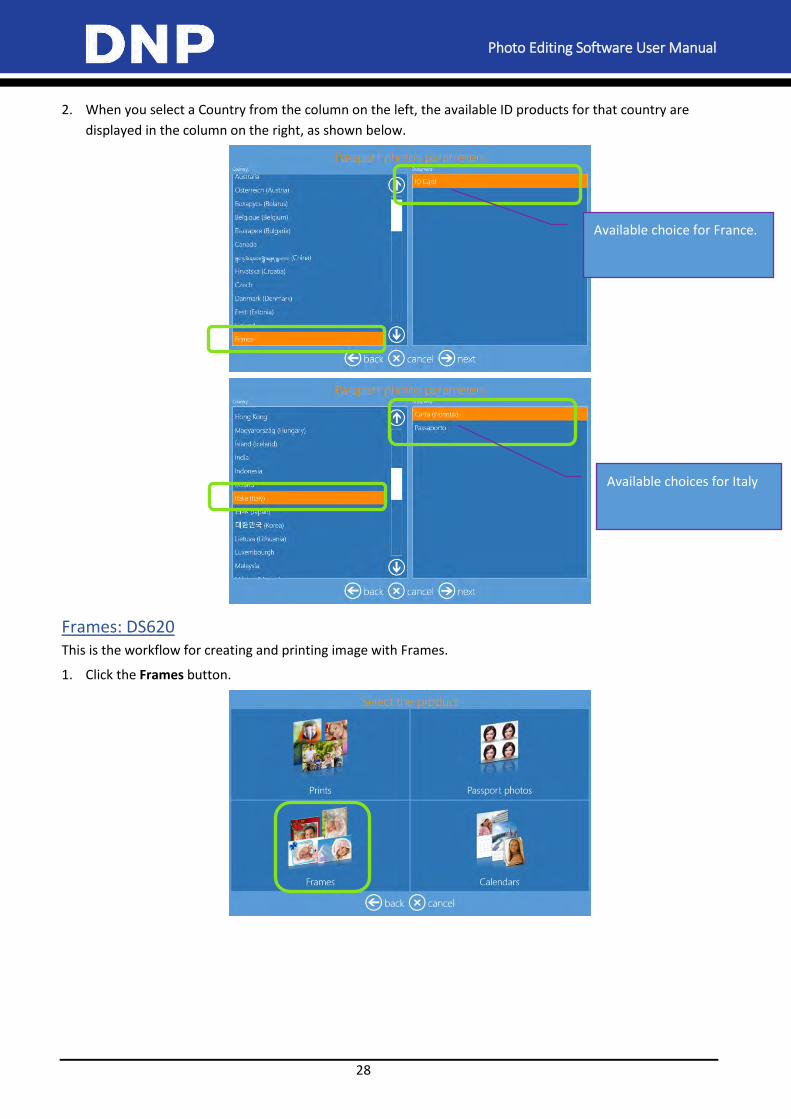
Photo Editing Software User Manual
28
2. When you select a Country from the column on the left, the available ID products for that country are
displayed in the column on the right, as shown below.
Frames: DS620 This is the workflow for creating and printing image with Frames.
1. Click the Frames button.
Available choice for France.
Available choices for Italy
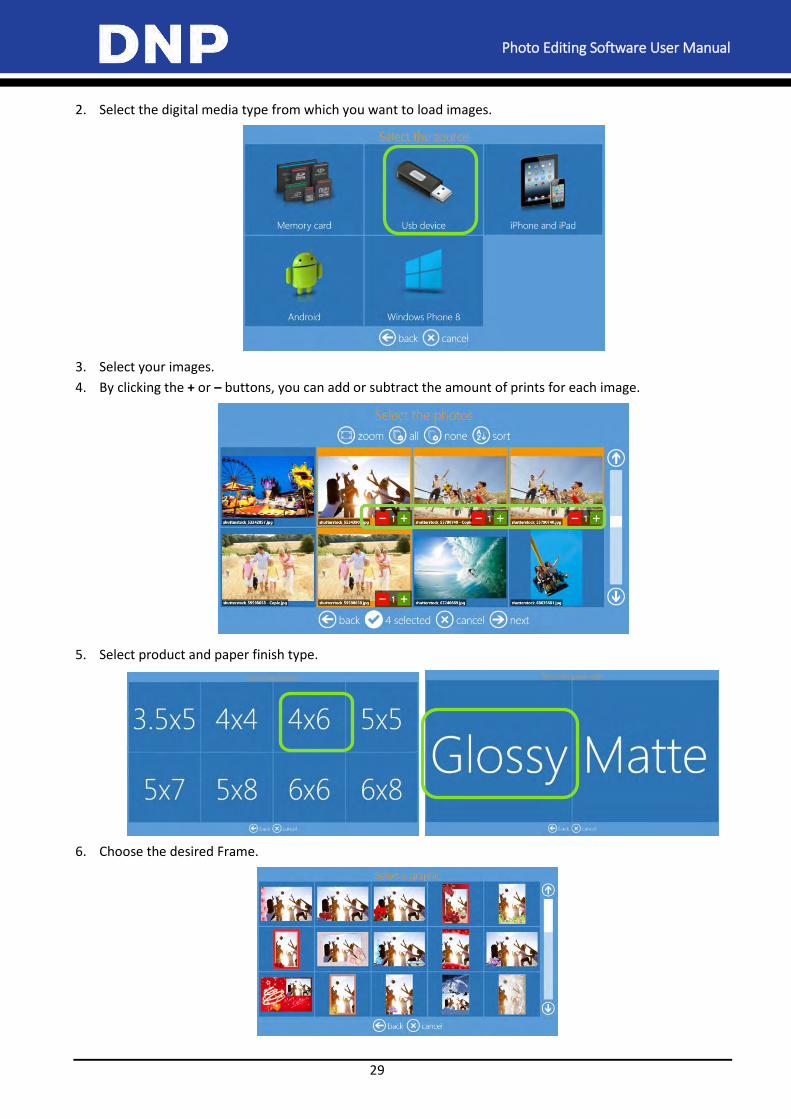
Photo Editing Software User Manual
29
2. Select the digital media type from which you want to load images.
3. Select your images.
4. By clicking the + or – buttons, you can add or subtract the amount of prints for each image.
5. Select product and paper finish type.
6. Choose the desired Frame.
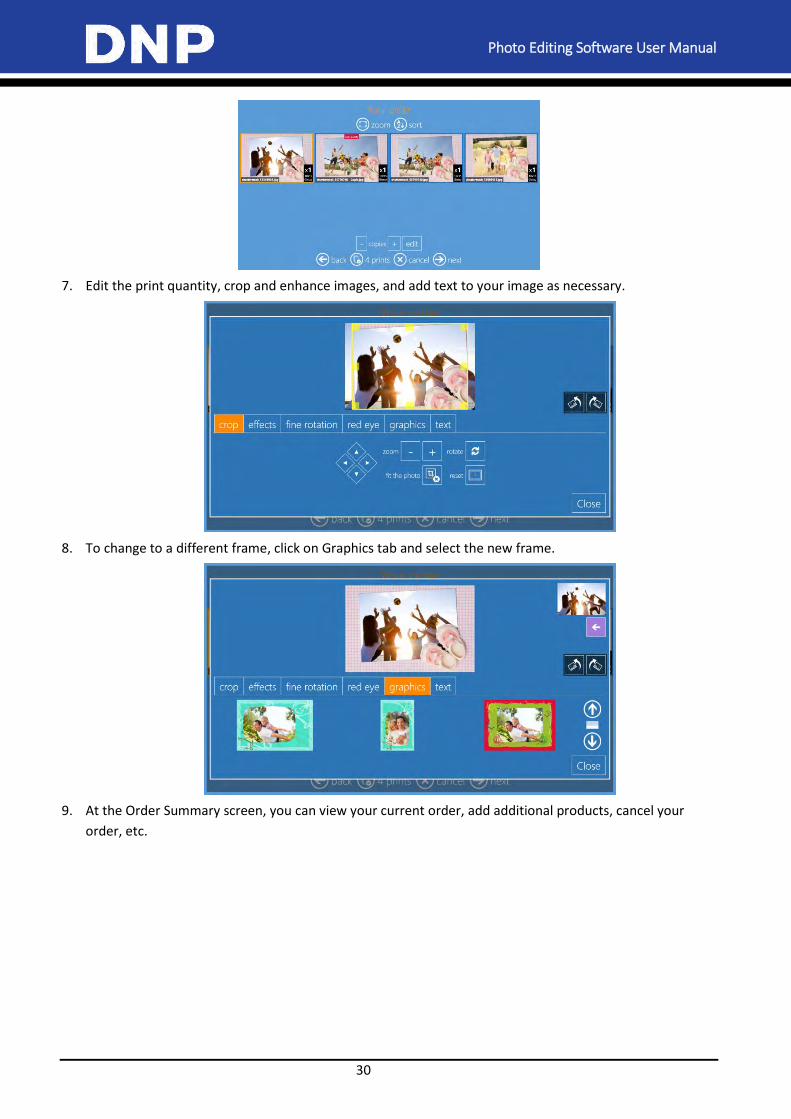
Photo Editing Software User Manual
30
7. Edit the print quantity, crop and enhance images, and add text to your image as necessary.
8. To change to a different frame, click on Graphics tab and select the new frame.
9. At the Order Summary screen, you can view your current order, add additional products, cancel your
order, etc.
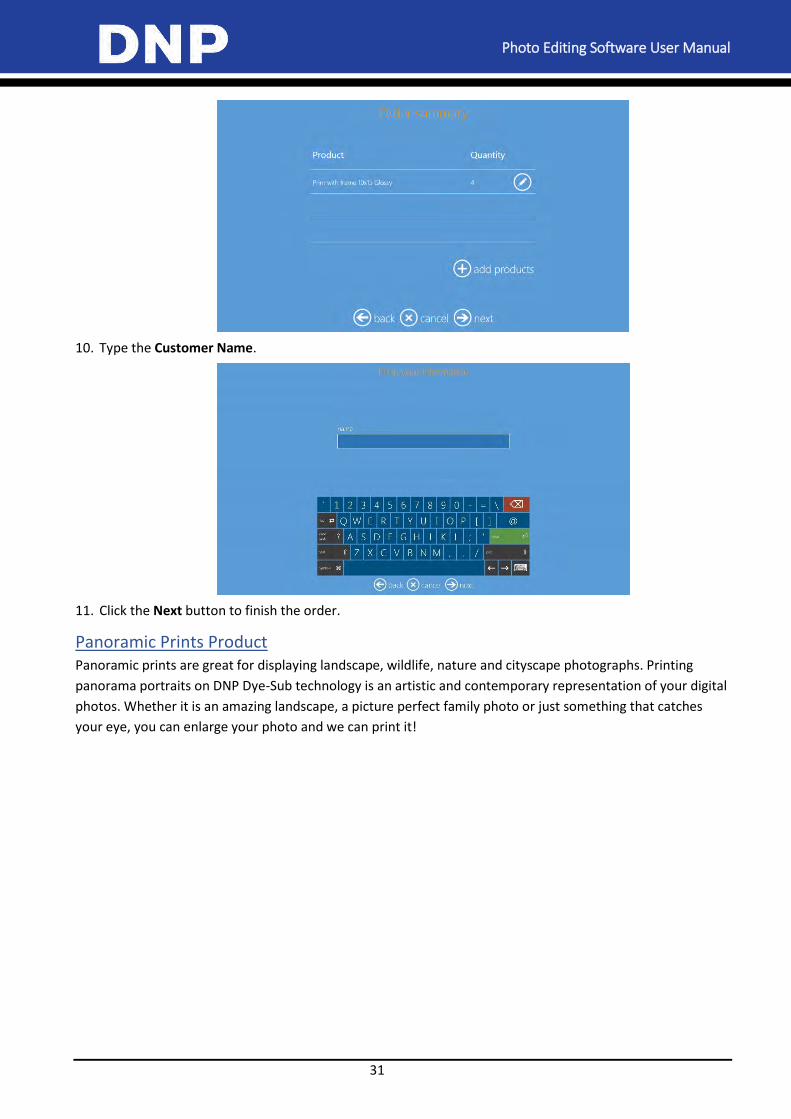
Photo Editing Software User Manual
31
10. Type the Customer Name.
11. Click the Next button to finish the order.
Panoramic Prints Product Panoramic prints are great for displaying landscape, wildlife, nature and cityscape photographs. Printing
panorama portraits on DNP Dye-Sub technology is an artistic and contemporary representation of your digital
photos. Whether it is an amazing landscape, a picture perfect family photo or just something that catches
your eye, you can enlarge your photo and we can print it!
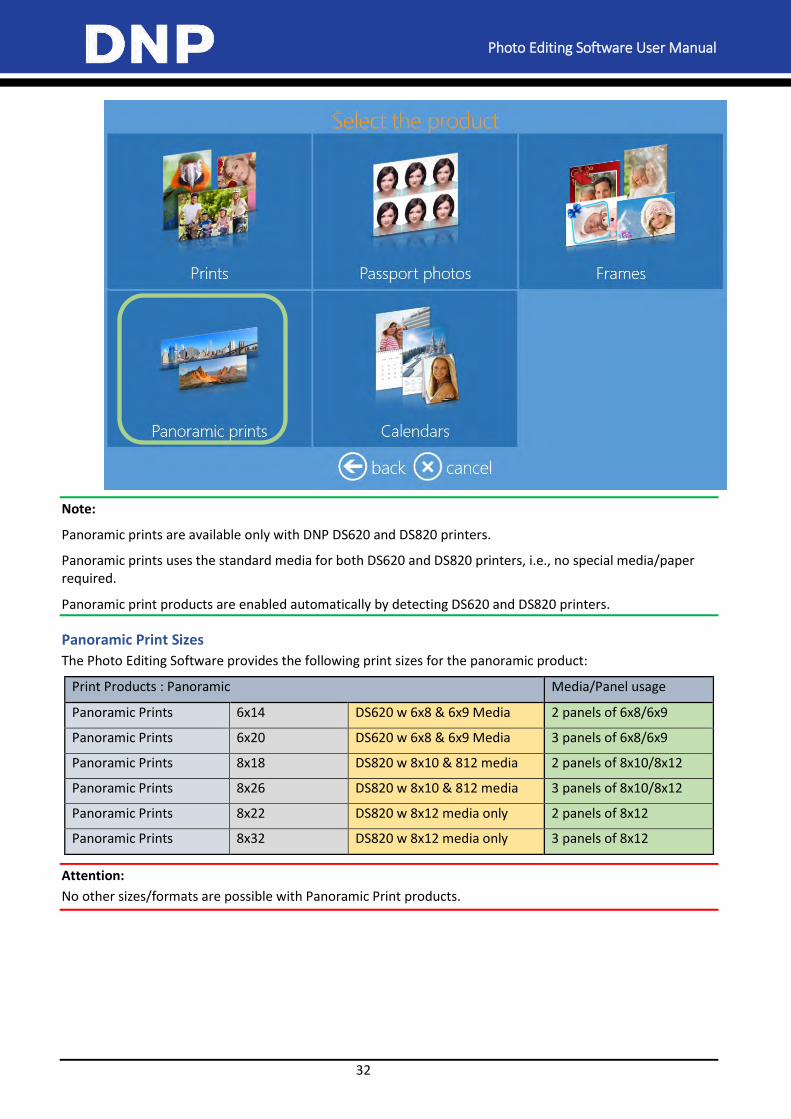
Photo Editing Software User Manual
32
Note:
Panoramic prints are available only with DNP DS620 and DS820 printers.
Panoramic prints uses the standard media for both DS620 and DS820 printers, i.e., no special media/paper required.
Panoramic print products are enabled automatically by detecting DS620 and DS820 printers.
Panoramic Print Sizes
The Photo Editing Software provides the following print sizes for the panoramic product:
Print Products : Panoramic Media/Panel usage
Panoramic Prints 6x14 DS620 w 6x8 & 6x9 Media 2 panels of 6x8/6x9
Panoramic Prints 6x20 DS620 w 6x8 & 6x9 Media 3 panels of 6x8/6x9
Panoramic Prints 8x18 DS820 w 8x10 & 812 media 2 panels of 8x10/8x12
Panoramic Prints 8x26 DS820 w 8x10 & 812 media 3 panels of 8x10/8x12
Panoramic Prints 8x22 DS820 w 8x12 media only 2 panels of 8x12
Panoramic Prints 8x32 DS820 w 8x12 media only 3 panels of 8x12
Attention:
No other sizes/formats are possible with Panoramic Print products.
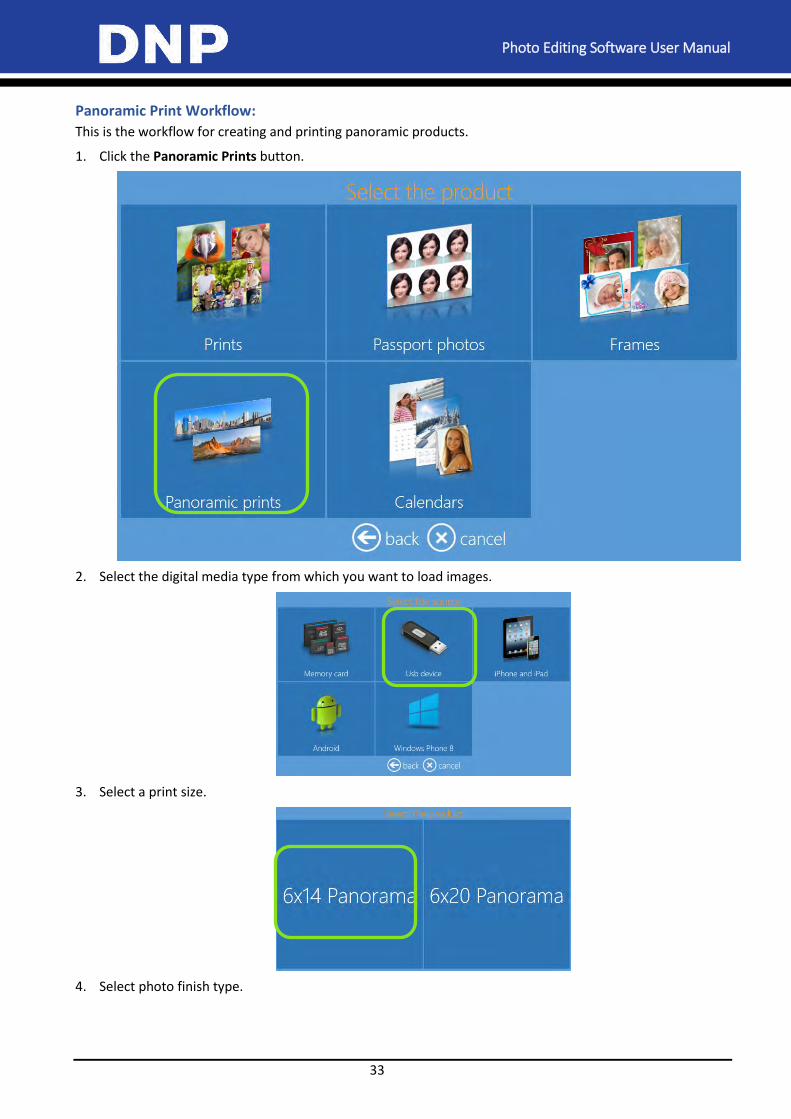
Photo Editing Software User Manual
33
Panoramic Print Workflow:
This is the workflow for creating and printing panoramic products.
1. Click the Panoramic Prints button.
2. Select the digital media type from which you want to load images.
3. Select a print size.
4. Select photo finish type.
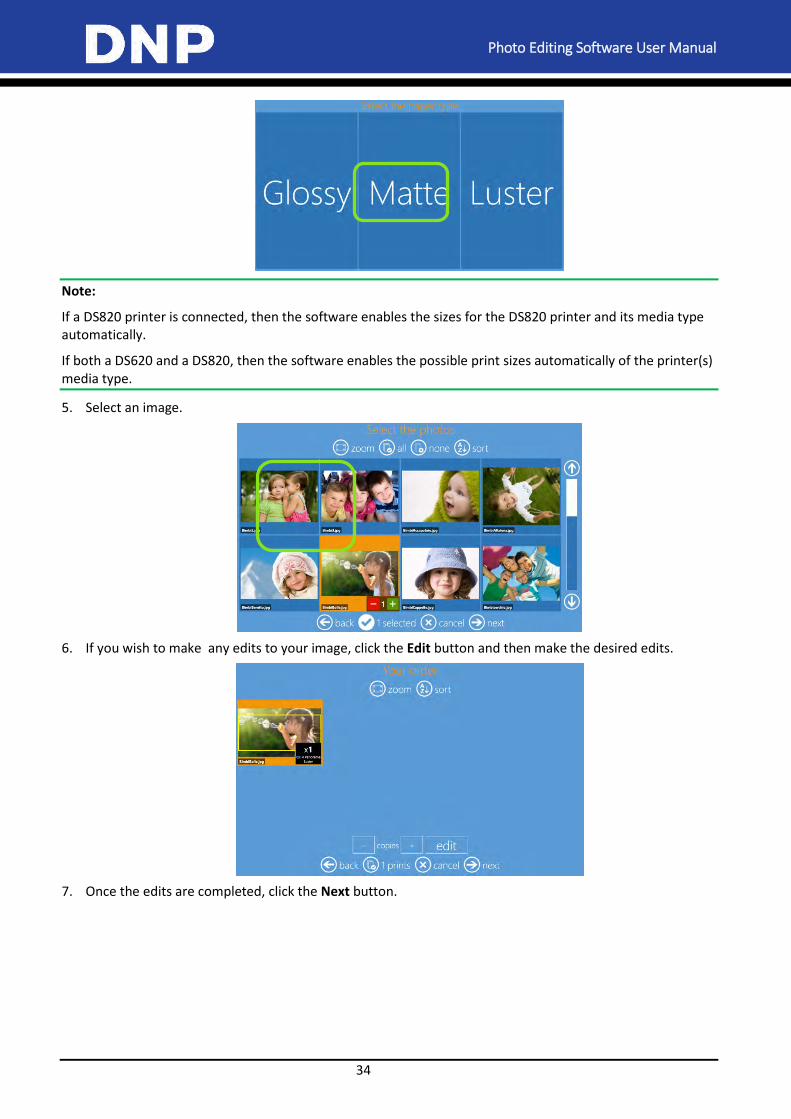
Photo Editing Software User Manual
34
Note:
If a DS820 printer is connected, then the software enables the sizes for the DS820 printer and its media type automatically.
If both a DS620 and a DS820, then the software enables the possible print sizes automatically of the printer(s) media type.
5. Select an image.
6. If you wish to make any edits to your image, click the Edit button and then make the desired edits.
7. Once the edits are completed, click the Next button.
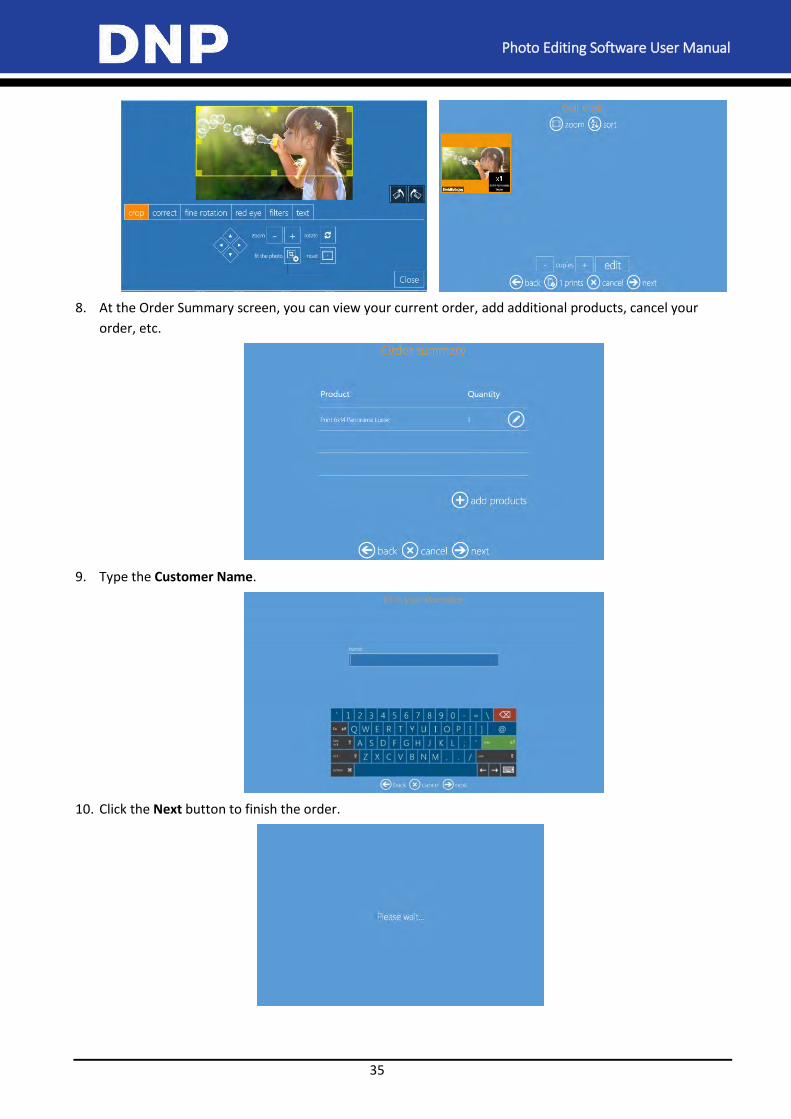
Photo Editing Software User Manual
35
8. At the Order Summary screen, you can view your current order, add additional products, cancel your
order, etc.
9. Type the Customer Name.
10. Click the Next button to finish the order.
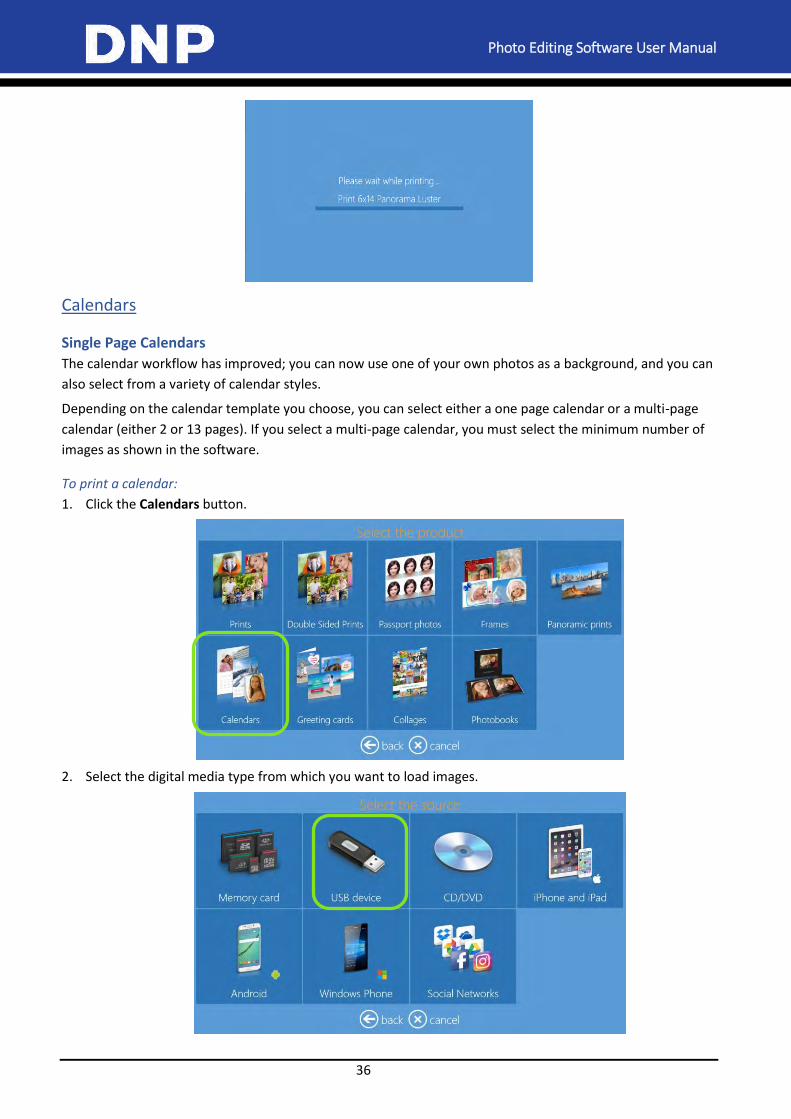
Photo Editing Software User Manual
36
Calendars
Single Page Calendars
The calendar workflow has improved; you can now use one of your own photos as a background, and you can
also select from a variety of calendar styles.
Depending on the calendar template you choose, you can select either a one page calendar or a multi-page
calendar (either 2 or 13 pages). If you select a multi-page calendar, you must select the minimum number of
images as shown in the software.
To print a calendar:
1. Click the Calendars button.
2. Select the digital media type from which you want to load images.
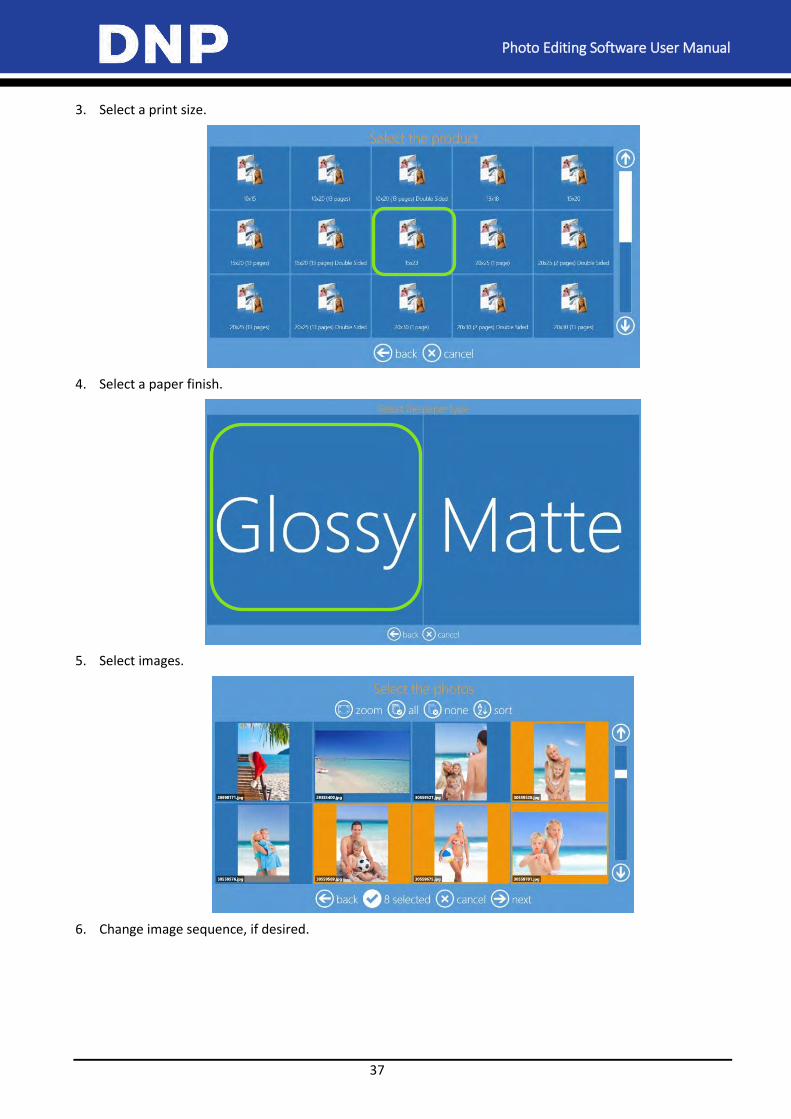
Photo Editing Software User Manual
37
3. Select a print size.
4. Select a paper finish.
5. Select images.
6. Change image sequence, if desired.
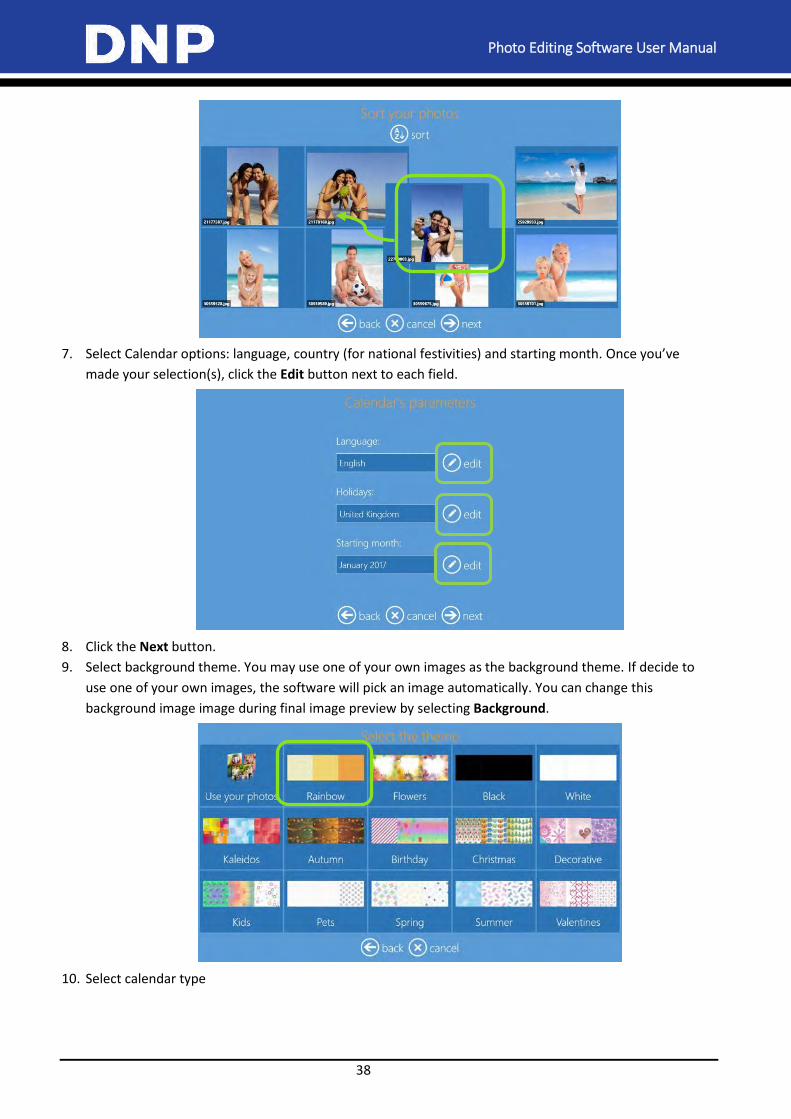
Photo Editing Software User Manual
38
7. Select Calendar options: language, country (for national festivities) and starting month. Once you’ve
made your selection(s), click the Edit button next to each field.
8. Click the Next button.
9. Select background theme. You may use one of your own images as the background theme. If decide to
use one of your own images, the software will pick an image automatically. You can change this
background image image during final image preview by selecting Background.
10. Select calendar type
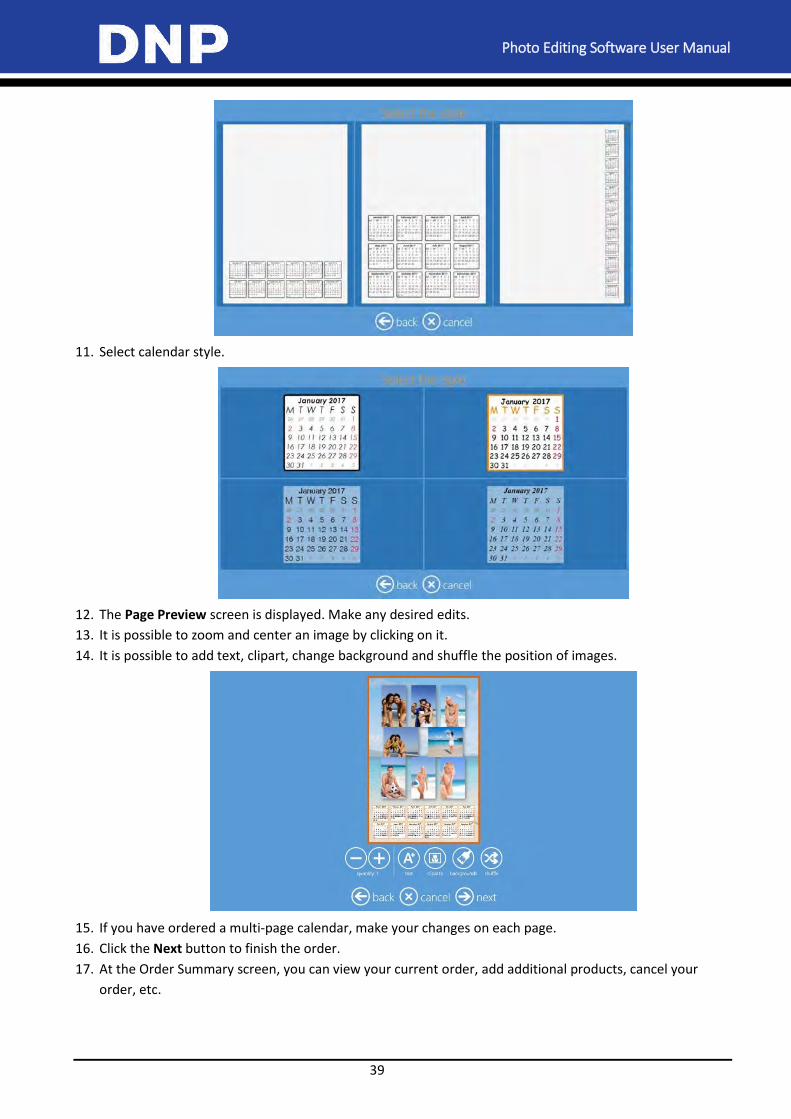
Photo Editing Software User Manual
39
11. Select calendar style.
12. The Page Preview screen is displayed. Make any desired edits.
13. It is possible to zoom and center an image by clicking on it.
14. It is possible to add text, clipart, change background and shuffle the position of images.
15. If you have ordered a multi-page calendar, make your changes on each page.
16. Click the Next button to finish the order.
17. At the Order Summary screen, you can view your current order, add additional products, cancel your
order, etc.
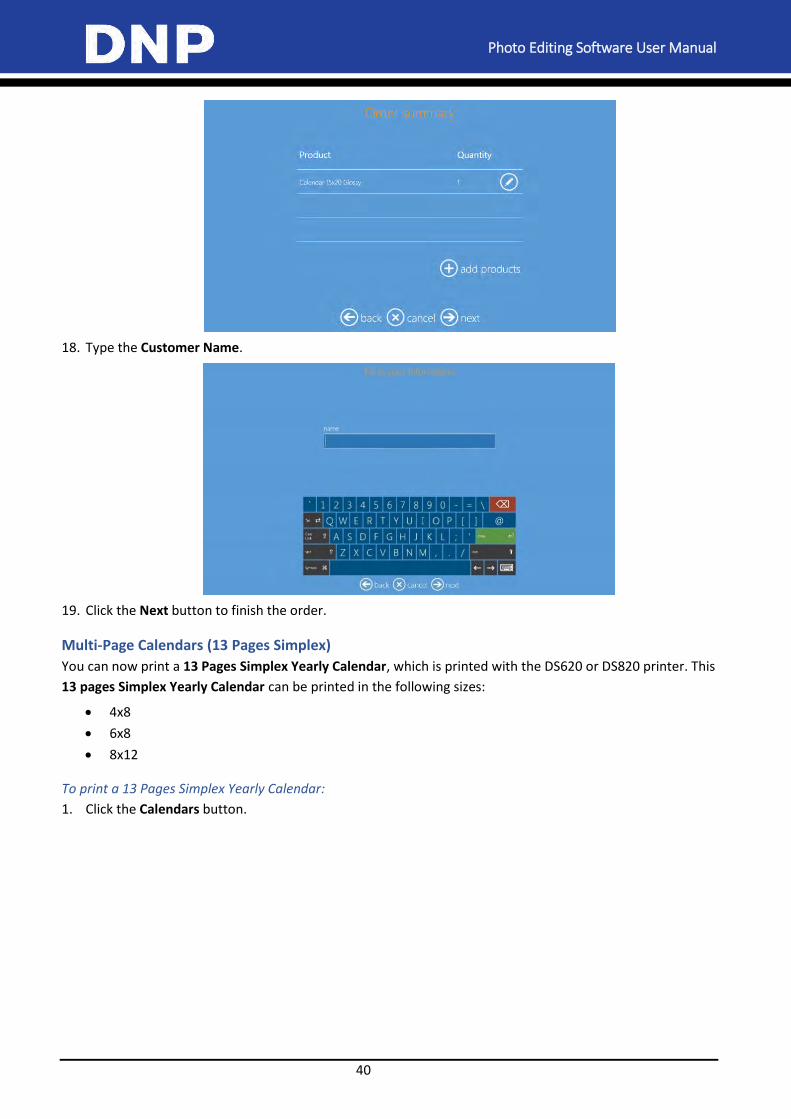
Photo Editing Software User Manual
40
18. Type the Customer Name.
19. Click the Next button to finish the order.
Multi-Page Calendars (13 Pages Simplex)
You can now print a 13 Pages Simplex Yearly Calendar, which is printed with the DS620 or DS820 printer. This
13 pages Simplex Yearly Calendar can be printed in the following sizes:
4x8
6x8
8x12
To print a 13 Pages Simplex Yearly Calendar:
1. Click the Calendars button.
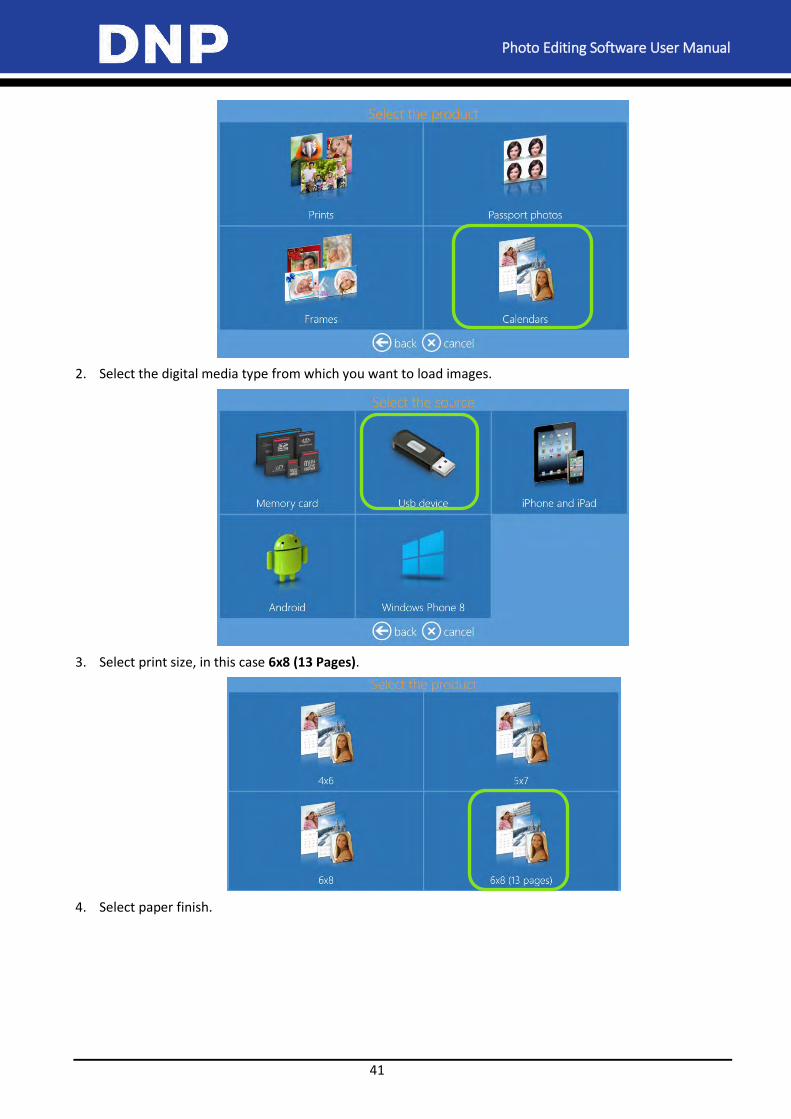
Photo Editing Software User Manual
41
2. Select the digital media type from which you want to load images.
3. Select print size, in this case 6x8 (13 Pages).
4. Select paper finish.

Photo Editing Software User Manual
42
5. Select images.
6. Select a background theme.
7. Change the image sequence, if necessary.
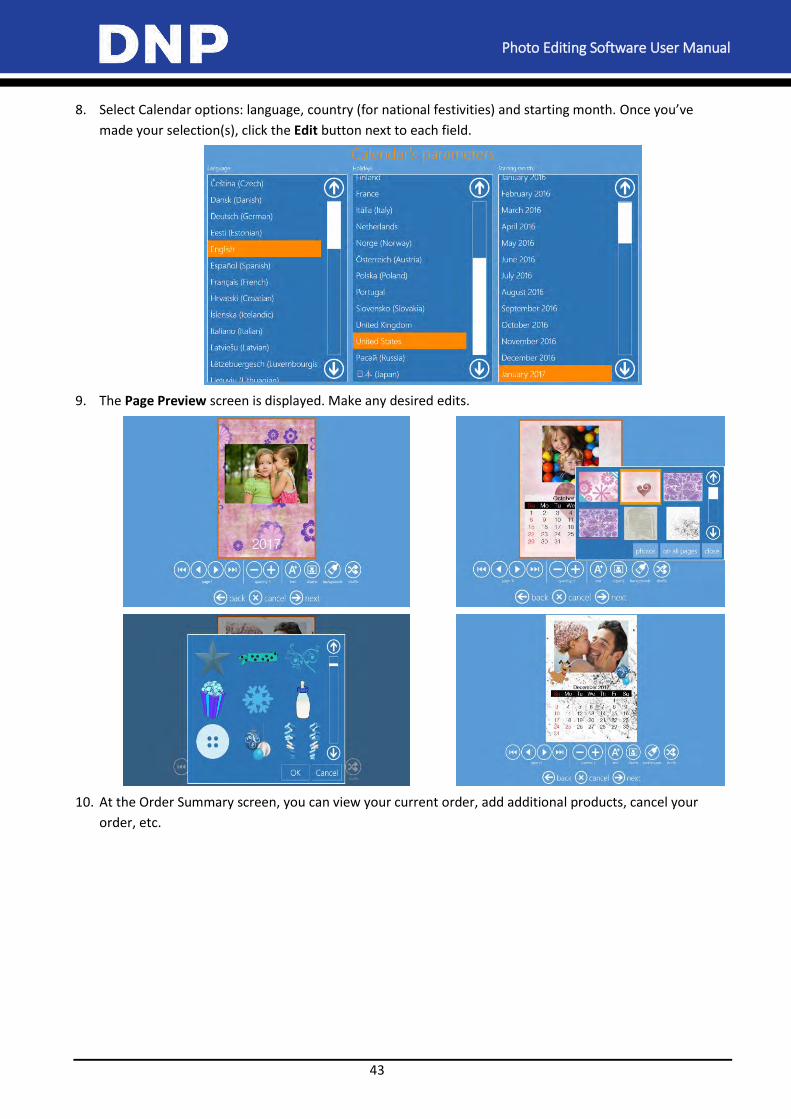
Photo Editing Software User Manual
43
8. Select Calendar options: language, country (for national festivities) and starting month. Once you’ve
made your selection(s), click the Edit button next to each field.
9. The Page Preview screen is displayed. Make any desired edits.
10. At the Order Summary screen, you can view your current order, add additional products, cancel your
order, etc.
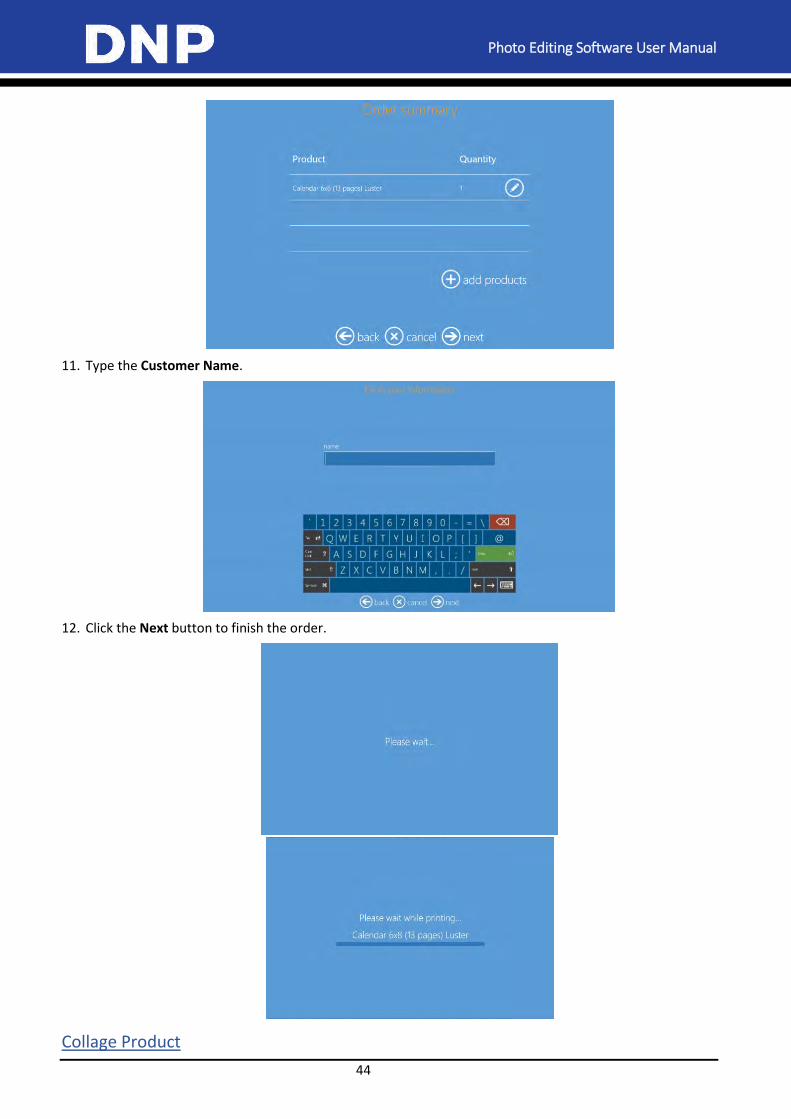
Photo Editing Software User Manual
44
11. Type the Customer Name.
12. Click the Next button to finish the order.
Collage Product
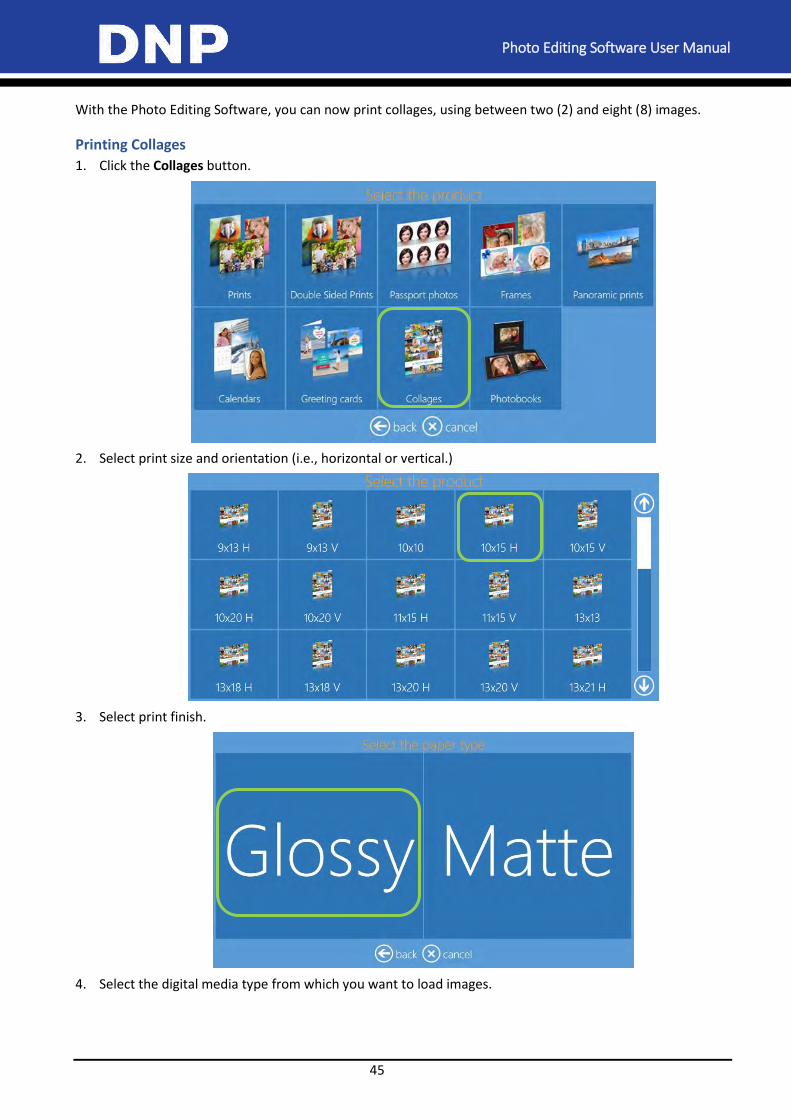
Photo Editing Software User Manual
45
With the Photo Editing Software, you can now print collages, using between two (2) and eight (8) images.
Printing Collages
1. Click the Collages button.
2. Select print size and orientation (i.e., horizontal or vertical.)
3. Select print finish.
4. Select the digital media type from which you want to load images.
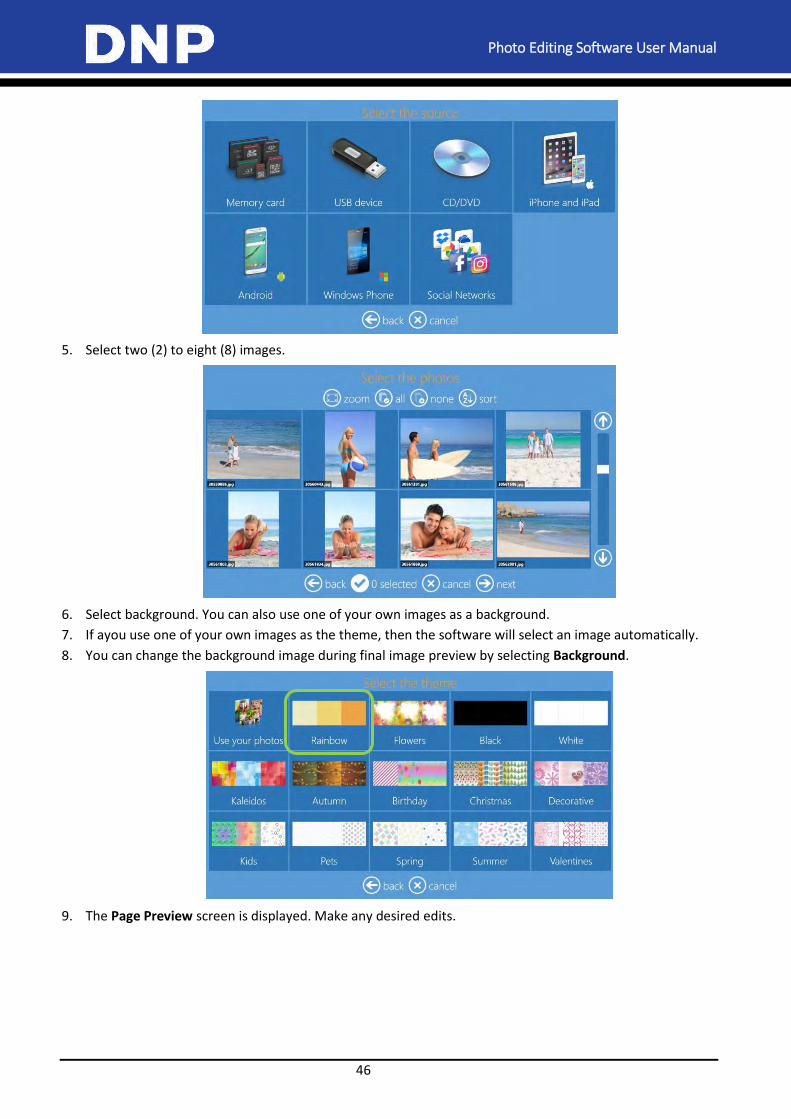
Photo Editing Software User Manual
46
5. Select two (2) to eight (8) images.
6. Select background. You can also use one of your own images as a background.
7. If ayou use one of your own images as the theme, then the software will select an image automatically.
8. You can change the background image during final image preview by selecting Background.
9. The Page Preview screen is displayed. Make any desired edits.
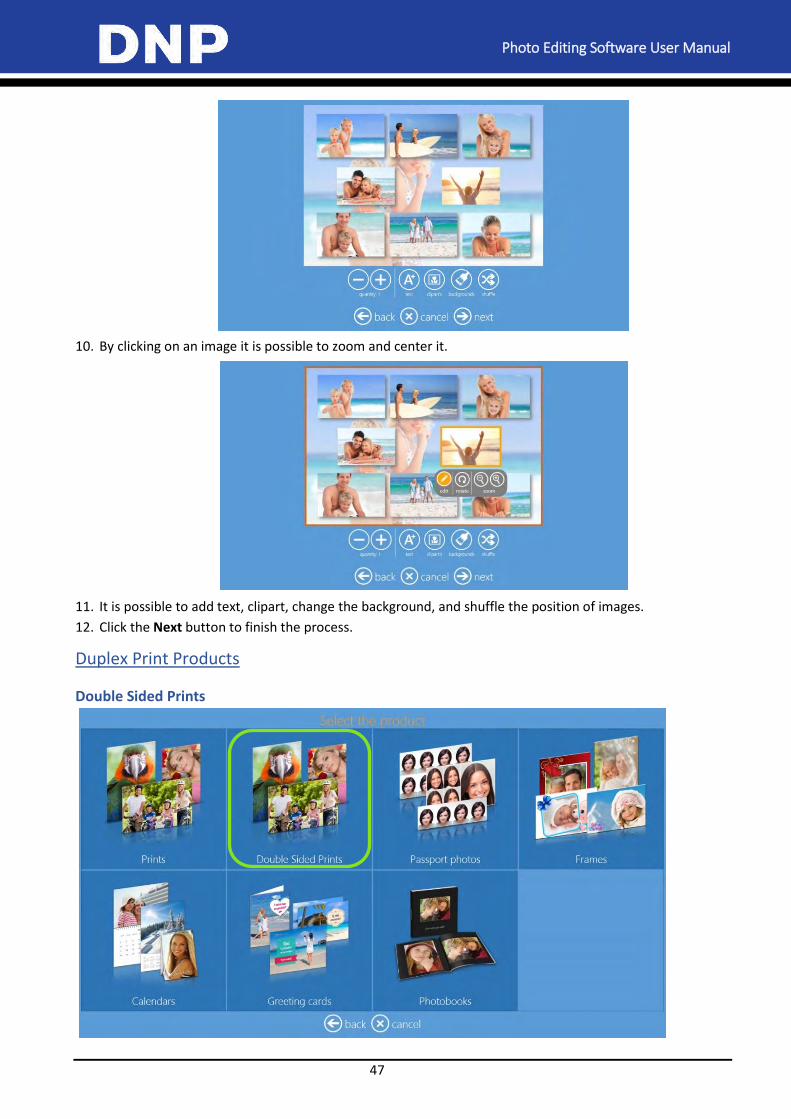
Photo Editing Software User Manual
47
10. By clicking on an image it is possible to zoom and center it.
11. It is possible to add text, clipart, change the background, and shuffle the position of images.
12. Click the Next button to finish the process.
Duplex Print Products
Double Sided Prints
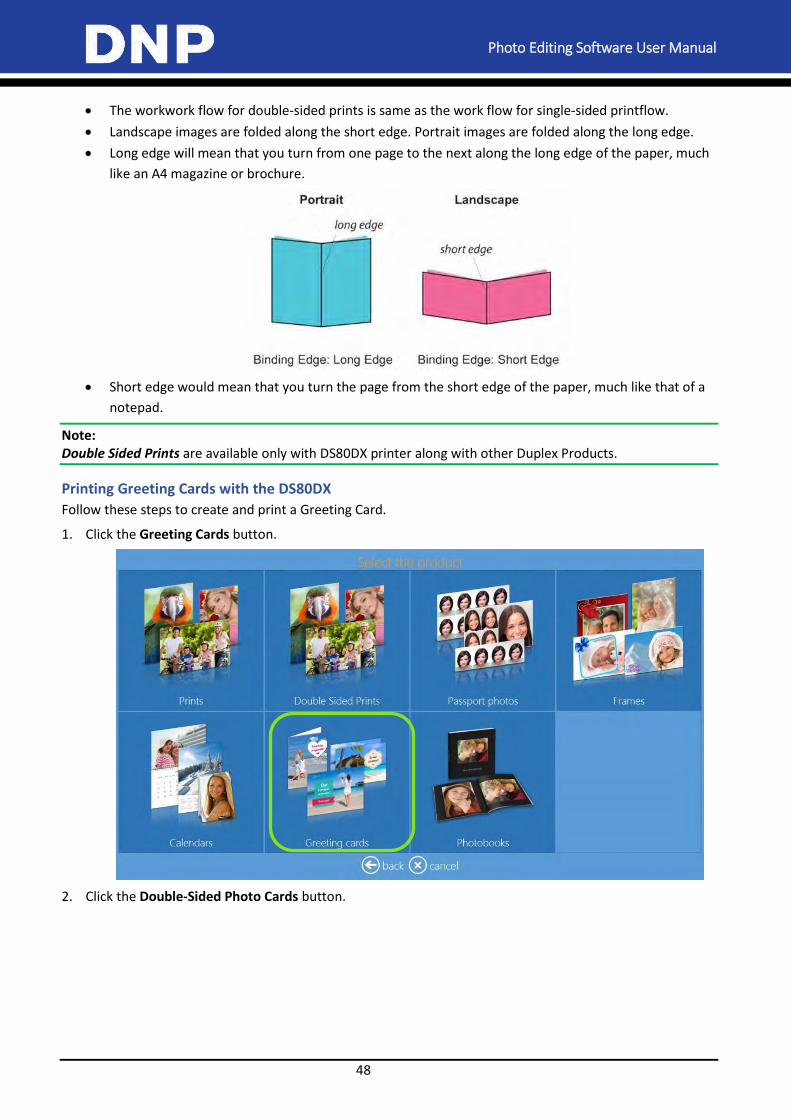
Photo Editing Software User Manual
48
The workwork flow for double-sided prints is same as the work flow for single-sided printflow.
Landscape images are folded along the short edge. Portrait images are folded along the long edge.
Long edge will mean that you turn from one page to the next along the long edge of the paper, much
like an A4 magazine or brochure.
Short edge would mean that you turn the page from the short edge of the paper, much like that of a
notepad.
Note: Double Sided Prints are available only with DS80DX printer along with other Duplex Products.
Printing Greeting Cards with the DS80DX
Follow these steps to create and print a Greeting Card.
1. Click the Greeting Cards button.
2. Click the Double-Sided Photo Cards button.
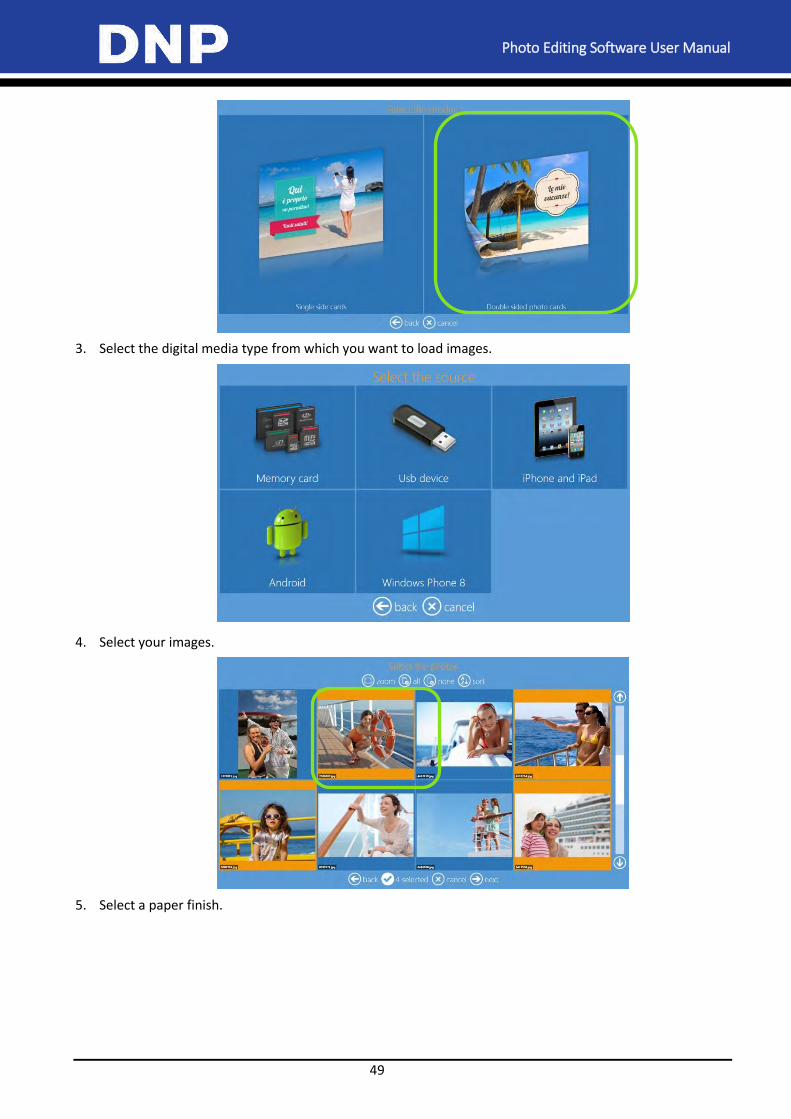
Photo Editing Software User Manual
49
3. Select the digital media type from which you want to load images.
4. Select your images.
5. Select a paper finish.
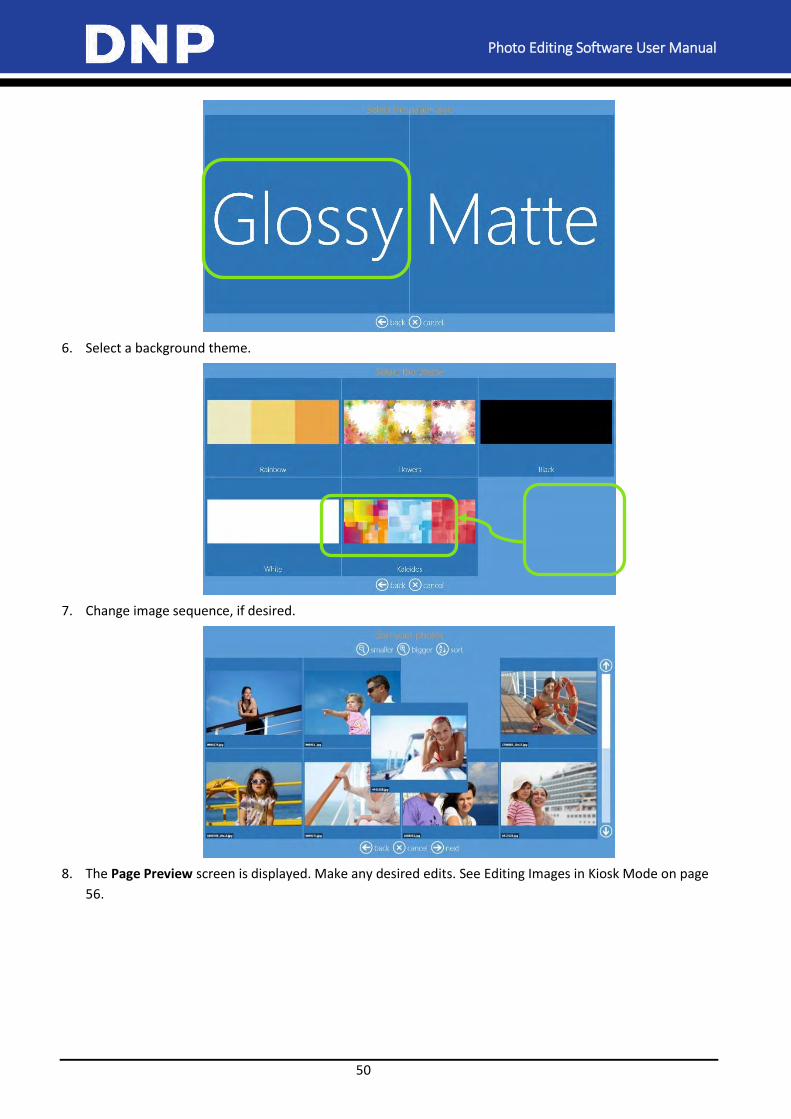
Photo Editing Software User Manual
50
6. Select a background theme.
7. Change image sequence, if desired.
8. The Page Preview screen is displayed. Make any desired edits. See Editing Images in Kiosk Mode on page
56.
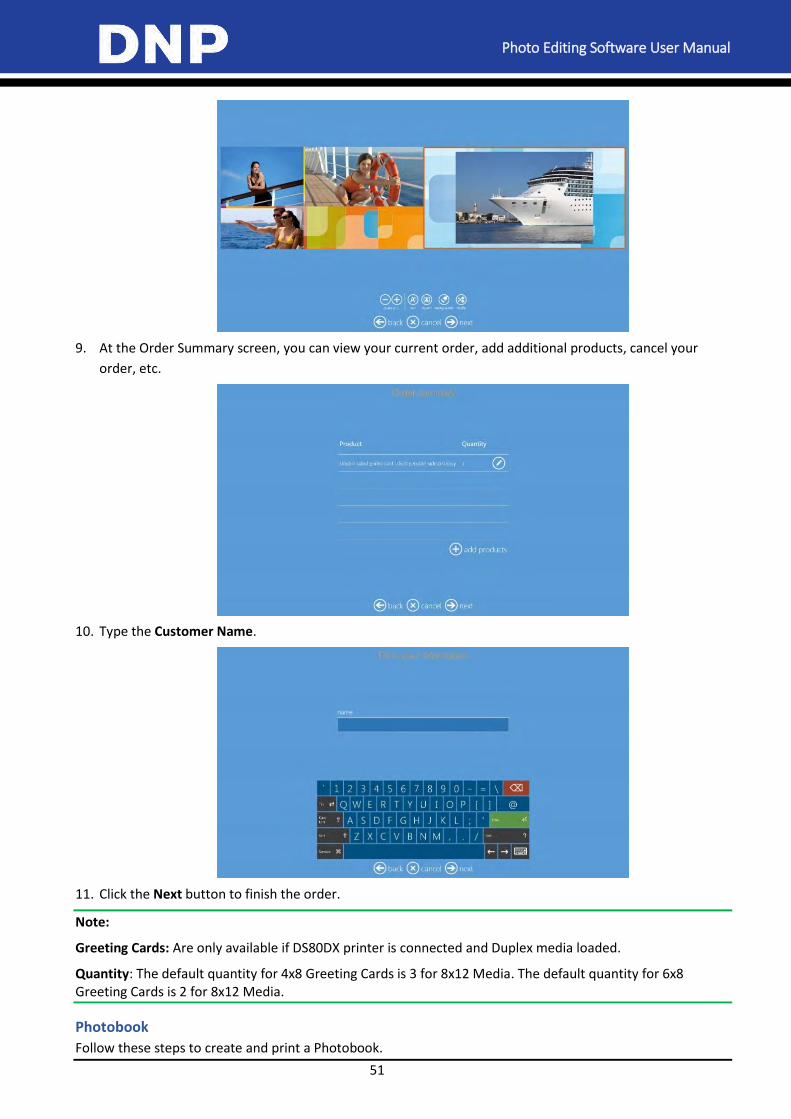
Photo Editing Software User Manual
51
9. At the Order Summary screen, you can view your current order, add additional products, cancel your
order, etc.
10. Type the Customer Name.
11. Click the Next button to finish the order.
Note:
Greeting Cards: Are only available if DS80DX printer is connected and Duplex media loaded.
Quantity: The default quantity for 4x8 Greeting Cards is 3 for 8x12 Media. The default quantity for 6x8 Greeting Cards is 2 for 8x12 Media.
Photobook
Follow these steps to create and print a Photobook.
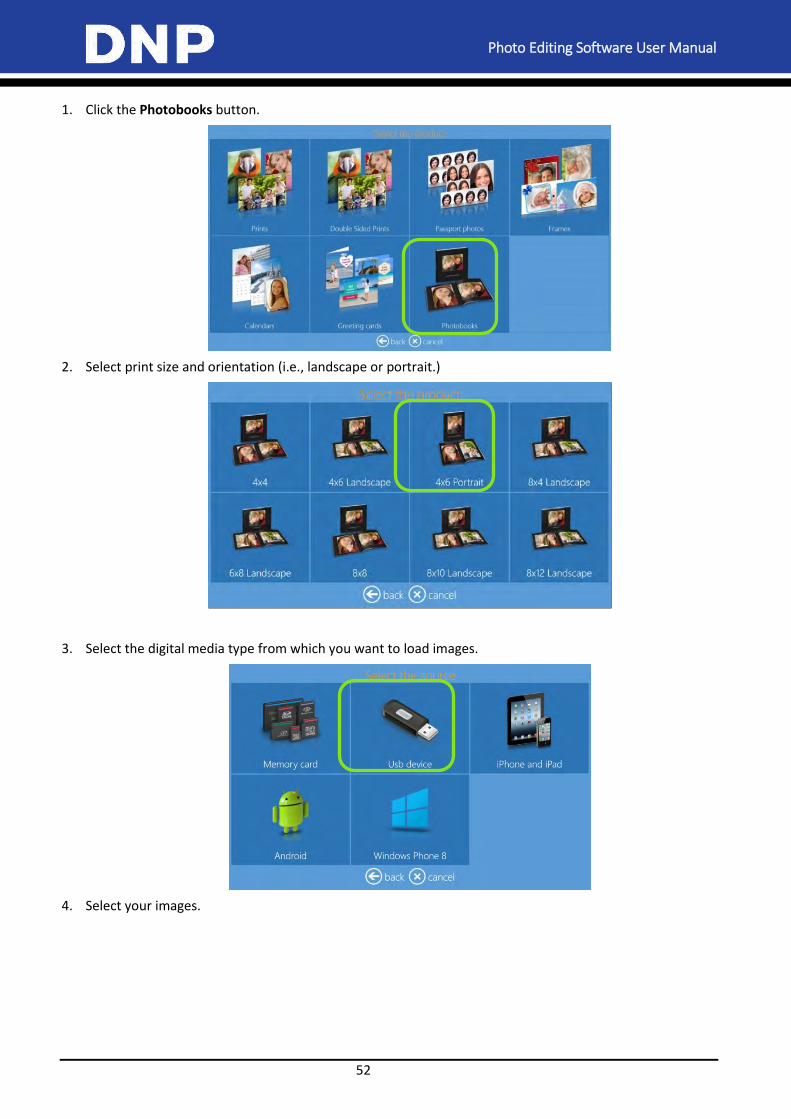
Photo Editing Software User Manual
52
1. Click the Photobooks button.
2. Select print size and orientation (i.e., landscape or portrait.)
3. Select the digital media type from which you want to load images.
4. Select your images.
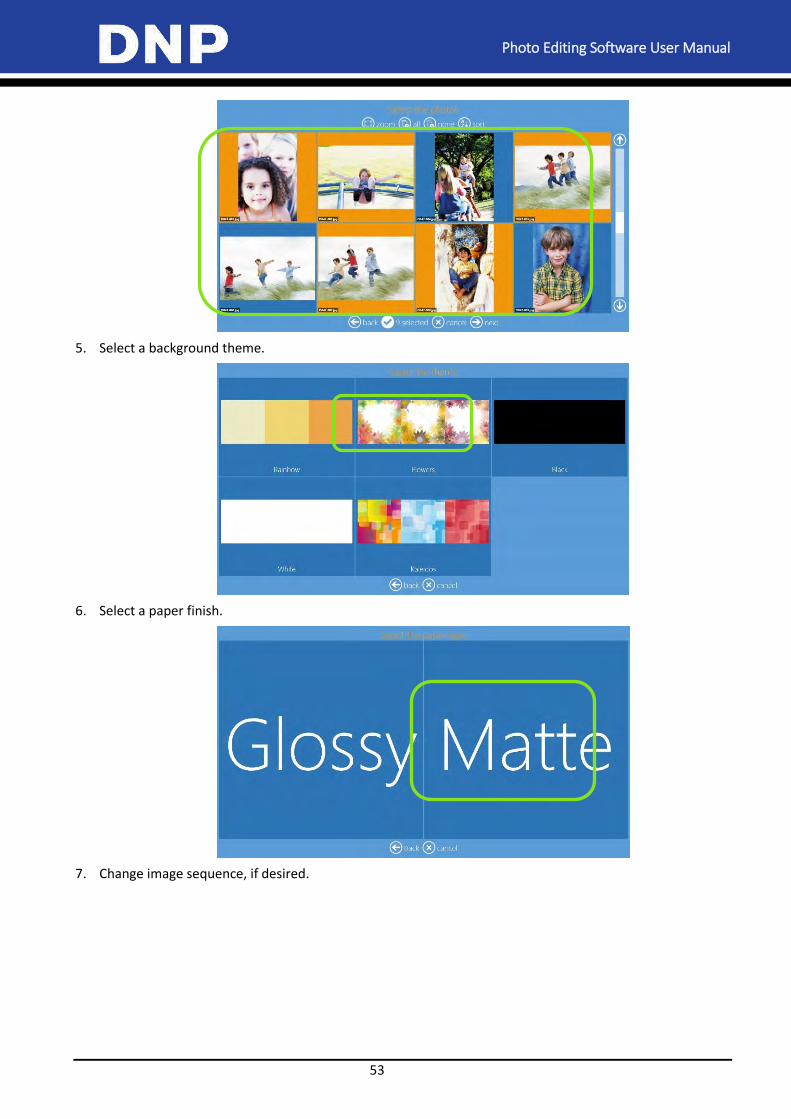
Photo Editing Software User Manual
53
5. Select a background theme.
6. Select a paper finish.
7. Change image sequence, if desired.
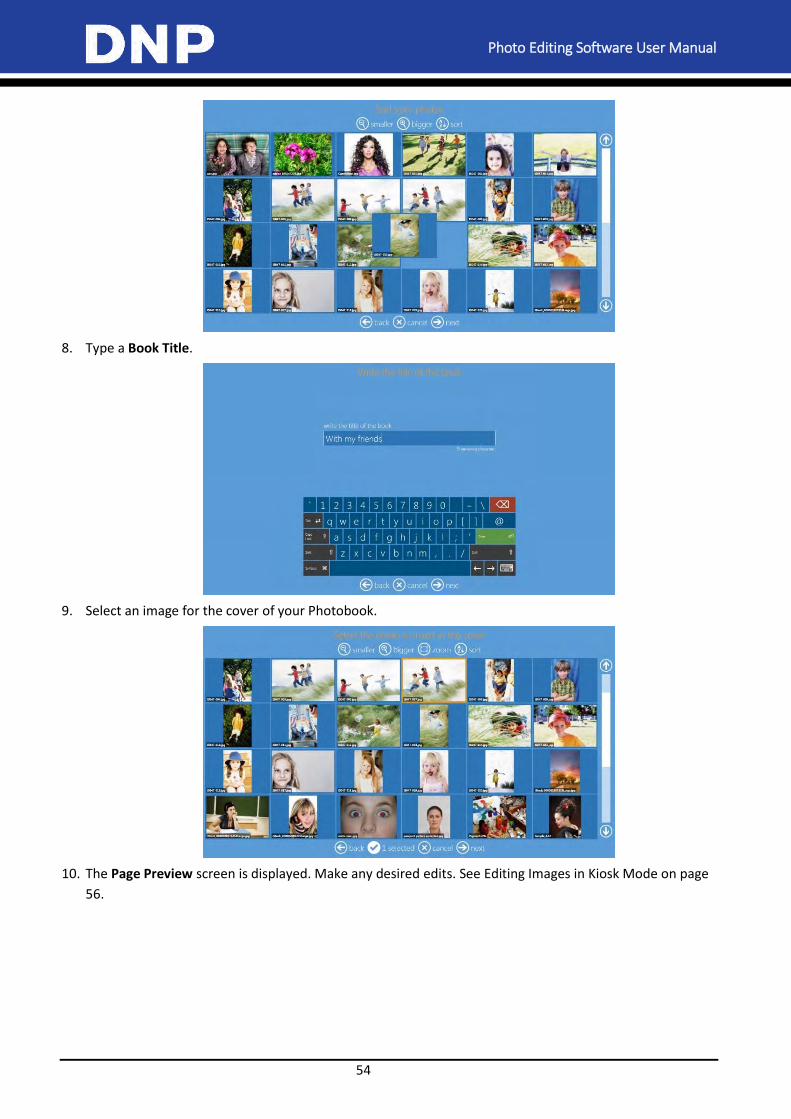
Photo Editing Software User Manual
54
8. Type a Book Title.
9. Select an image for the cover of your Photobook.
10. The Page Preview screen is displayed. Make any desired edits. See Editing Images in Kiosk Mode on page
56.
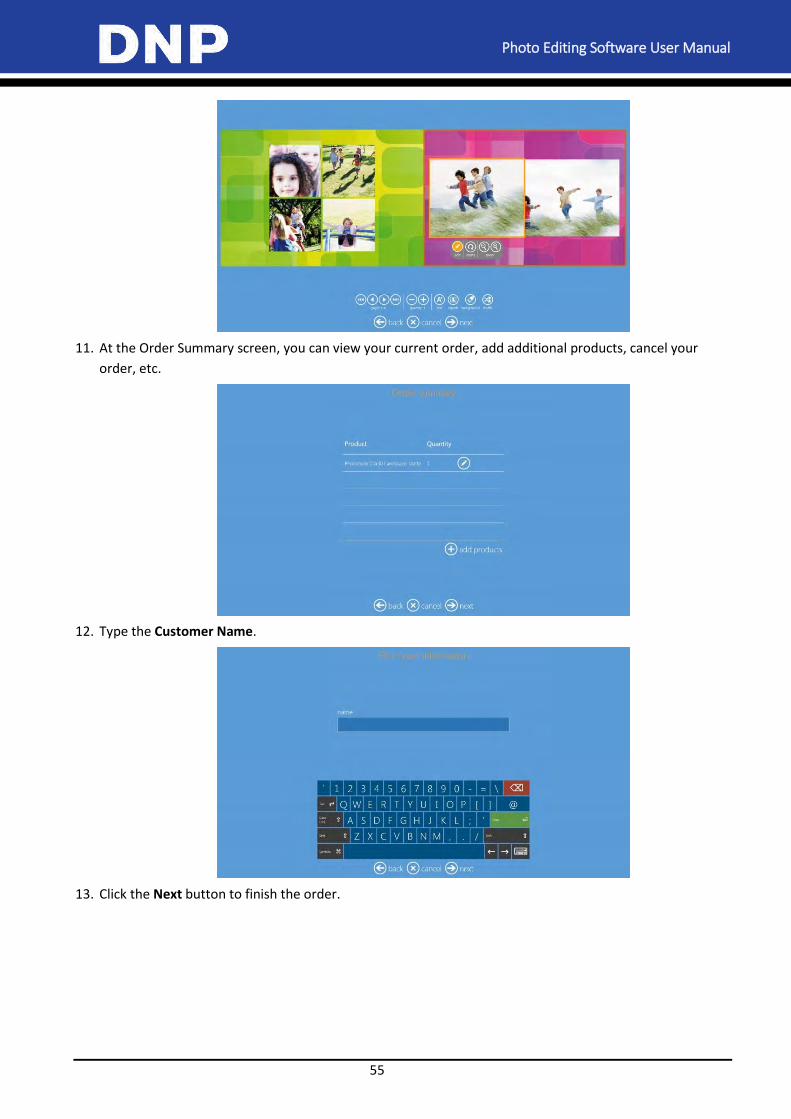
Photo Editing Software User Manual
55
11. At the Order Summary screen, you can view your current order, add additional products, cancel your
order, etc.
12. Type the Customer Name.
13. Click the Next button to finish the order.
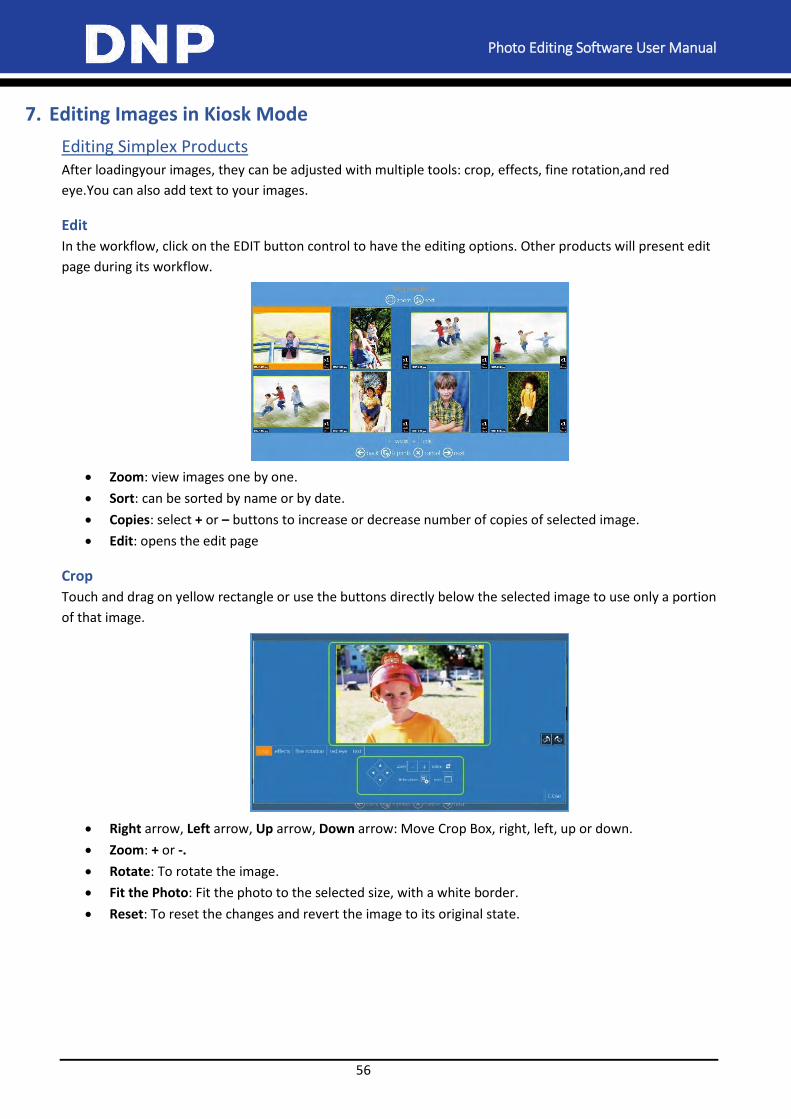
Photo Editing Software User Manual
56
7. Editing Images in Kiosk Mode
Editing Simplex Products After loadingyour images, they can be adjusted with multiple tools: crop, effects, fine rotation,and red
eye.You can also add text to your images.
Edit
In the workflow, click on the EDIT button control to have the editing options. Other products will present edit
page during its workflow.
Zoom: view images one by one.
Sort: can be sorted by name or by date.
Copies: select + or – buttons to increase or decrease number of copies of selected image.
Edit: opens the edit page
Crop
Touch and drag on yellow rectangle or use the buttons directly below the selected image to use only a portion
of that image.
Right arrow, Left arrow, Up arrow, Down arrow: Move Crop Box, right, left, up or down.
Zoom: + or -.
Rotate: To rotate the image.
Fit the Photo: Fit the photo to the selected size, with a white border.
Reset: To reset the changes and revert the image to its original state.
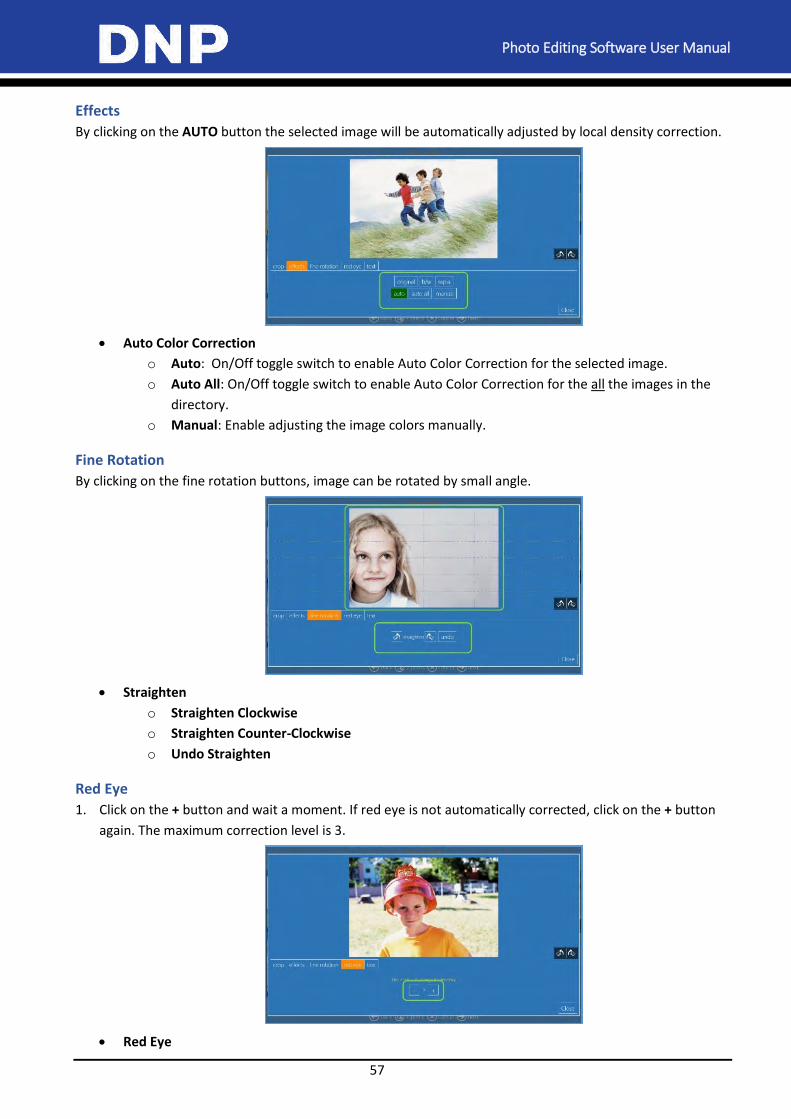
Photo Editing Software User Manual
57
Effects
By clicking on the AUTO button the selected image will be automatically adjusted by local density correction.
Auto Color Correction
o Auto: On/Off toggle switch to enable Auto Color Correction for the selected image.
o Auto All: On/Off toggle switch to enable Auto Color Correction for the all the images in the
directory.
o Manual: Enable adjusting the image colors manually.
Fine Rotation
By clicking on the fine rotation buttons, image can be rotated by small angle.
Straighten
o Straighten Clockwise
o Straighten Counter-Clockwise
o Undo Straighten
Red Eye
1. Click on the + button and wait a moment. If red eye is not automatically corrected, click on the + button
again. The maximum correction level is 3.
Red Eye
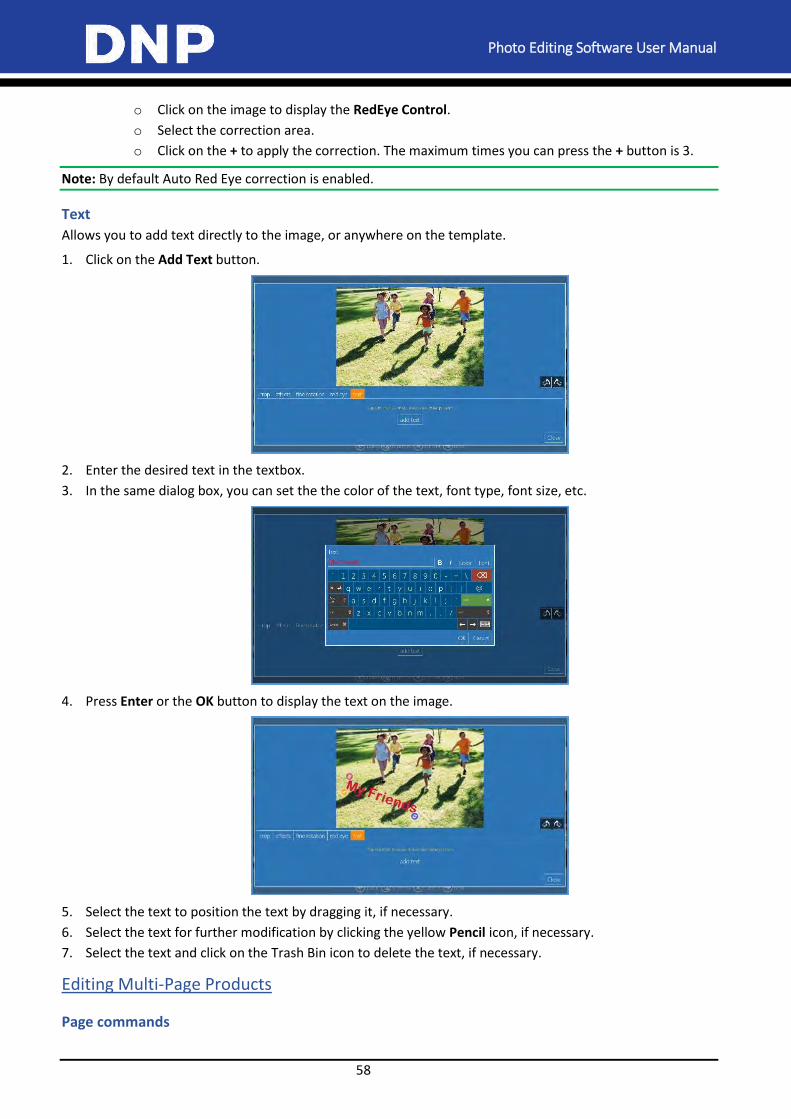
Photo Editing Software User Manual
58
o Click on the image to display the RedEye Control.
o Select the correction area.
o Click on the + to apply the correction. The maximum times you can press the + button is 3.
Note: By default Auto Red Eye correction is enabled.
Text
Allows you to add text directly to the image, or anywhere on the template.
1. Click on the Add Text button.
2. Enter the desired text in the textbox.
3. In the same dialog box, you can set the the color of the text, font type, font size, etc.
4. Press Enter or the OK button to display the text on the image.
5. Select the text to position the text by dragging it, if necessary.
6. Select the text for further modification by clicking the yellow Pencil icon, if necessary.
7. Select the text and click on the Trash Bin icon to delete the text, if necessary.
Editing Multi-Page Products
Page commands
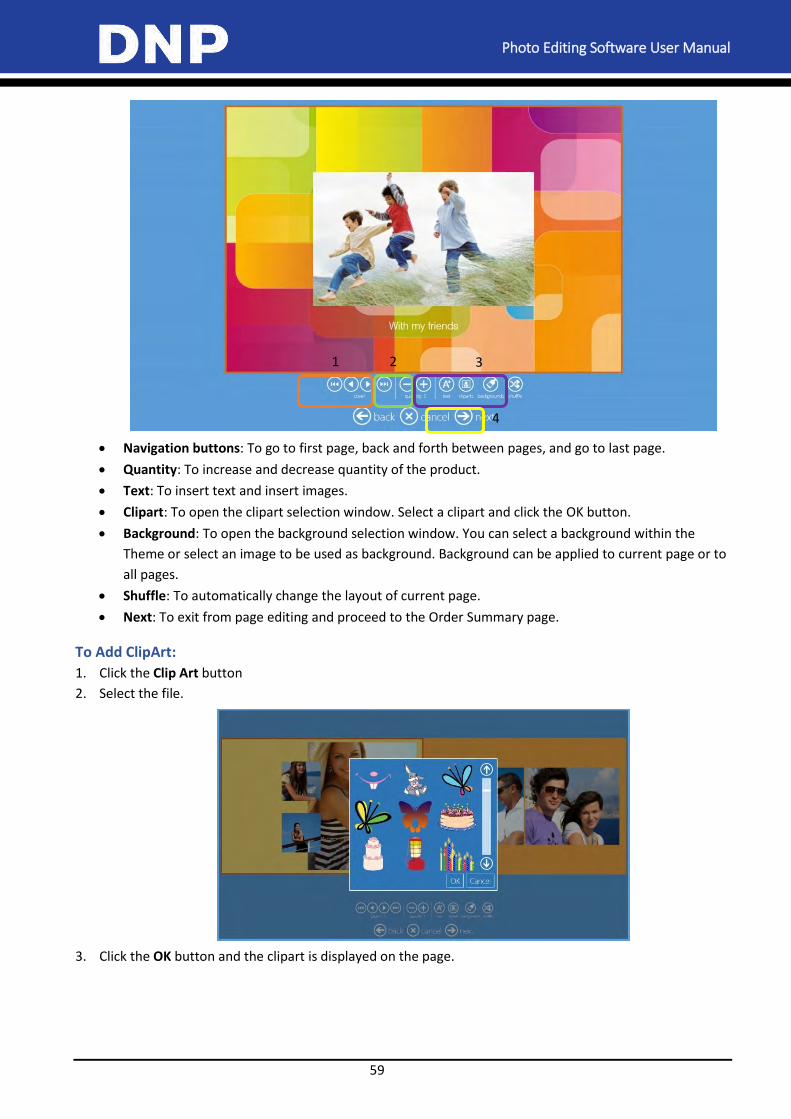
Photo Editing Software User Manual
59
Navigation buttons: To go to first page, back and forth between pages, and go to last page.
Quantity: To increase and decrease quantity of the product.
Text: To insert text and insert images.
Clipart: To open the clipart selection window. Select a clipart and click the OK button.
Background: To open the background selection window. You can select a background within the
Theme or select an image to be used as background. Background can be applied to current page or to
all pages.
Shuffle: To automatically change the layout of current page.
Next: To exit from page editing and proceed to the Order Summary page.
To Add ClipArt:
1. Click the Clip Art button
2. Select the file.
3. Click the OK button and the clipart is displayed on the page.
1 2 3
2
4
2

Photo Editing Software User Manual
60
Image Editing
Edit: Opens the editing window.
Rotate: To rotate the image inside the box. The image is rotated 90°.
Zoom: To enlarge and decrease image. Change position of image within the layout box.
2 3
2
1

Photo Editing Software User Manual
61
Using Photo Filters
You can add filters to your images. The following filters are available:
Monochrome
Retro
Sepia
Tilt-Shift
Soft-Filter
Original
Cool-Monochrome
Cross-Filter
Illustration
Mirror
To access filters, click on the Edit button of any product workflow, and then click on the Filters tab.
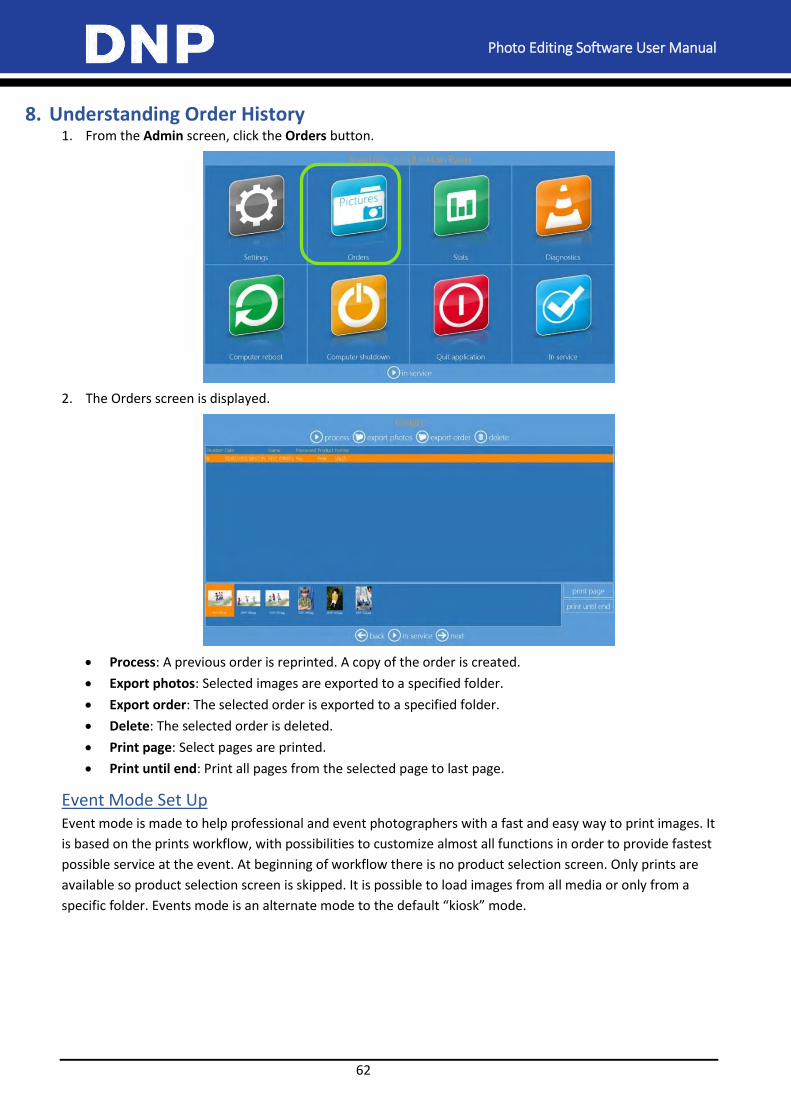
Photo Editing Software User Manual
62
8. Understanding Order History 1. From the Admin screen, click the Orders button.
2. The Orders screen is displayed.
Process: A previous order is reprinted. A copy of the order is created.
Export photos: Selected images are exported to a specified folder.
Export order: The selected order is exported to a specified folder.
Delete: The selected order is deleted.
Print page: Select pages are printed.
Print until end: Print all pages from the selected page to last page.
Event Mode Set Up Event mode is made to help professional and event photographers with a fast and easy way to print images. It
is based on the prints workflow, with possibilities to customize almost all functions in order to provide fastest
possible service at the event. At beginning of workflow there is no product selection screen. Only prints are
available so product selection screen is skipped. It is possible to load images from all media or only from a
specific folder. Events mode is an alternate mode to the default “kiosk” mode.
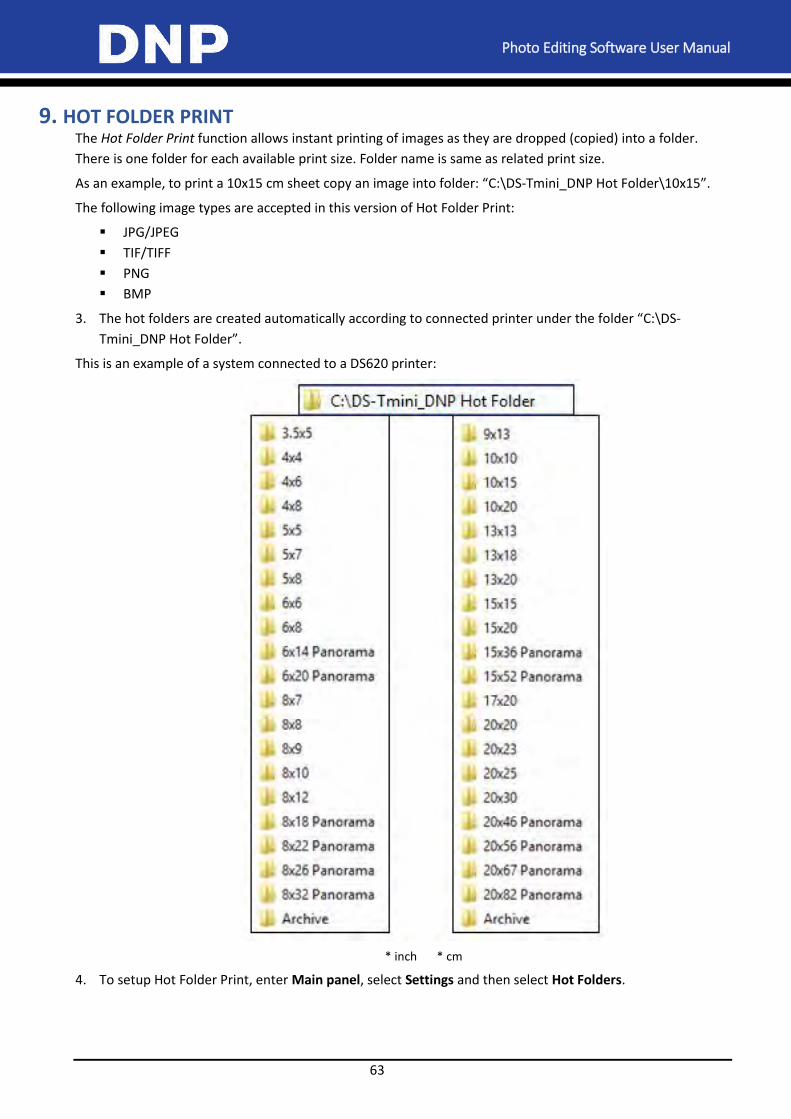
Photo Editing Software User Manual
63
9. HOT FOLDER PRINT The Hot Folder Print function allows instant printing of images as they are dropped (copied) into a folder.
There is one folder for each available print size. Folder name is same as related print size.
As an example, to print a 10x15 cm sheet copy an image into folder: “C:\DS-Tmini_DNP Hot Folder\10x15”.
The following image types are accepted in this version of Hot Folder Print:
JPG/JPEG
TIF/TIFF
PNG
BMP
3. The hot folders are created automatically according to connected printer under the folder “C:\DS-
Tmini_DNP Hot Folder”.
This is an example of a system connected to a DS620 printer:
* inch * cm
4. To setup Hot Folder Print, enter Main panel, select Settings and then select Hot Folders.
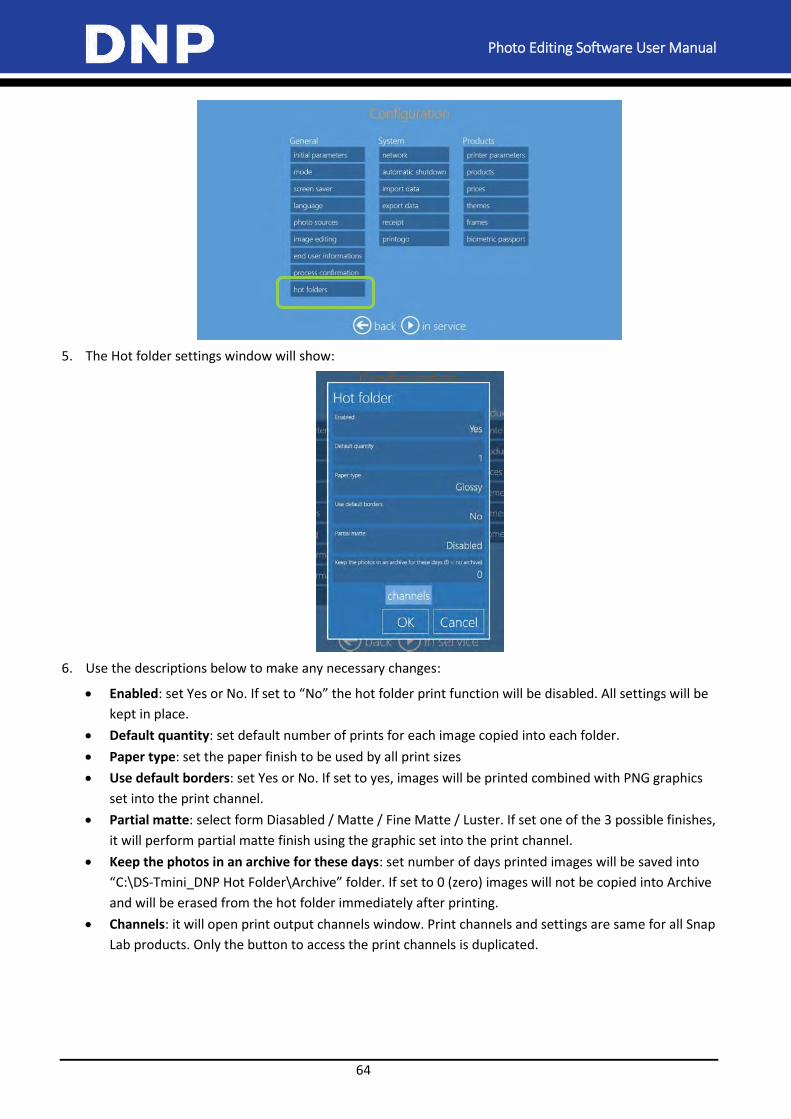
Photo Editing Software User Manual
64
5. The Hot folder settings window will show:
6. Use the descriptions below to make any necessary changes:
Enabled: set Yes or No. If set to “No” the hot folder print function will be disabled. All settings will be
kept in place.
Default quantity: set default number of prints for each image copied into each folder.
Paper type: set the paper finish to be used by all print sizes
Use default borders: set Yes or No. If set to yes, images will be printed combined with PNG graphics
set into the print channel.
Partial matte: select form Diasabled / Matte / Fine Matte / Luster. If set one of the 3 possible finishes,
it will perform partial matte finish using the graphic set into the print channel.
Keep the photos in an archive for these days: set number of days printed images will be saved into
“C:\DS-Tmini_DNP Hot Folder\Archive” folder. If set to 0 (zero) images will not be copied into Archive
and will be erased from the hot folder immediately after printing.
Channels: it will open print output channels window. Print channels and settings are same for all Snap
Lab products. Only the button to access the print channels is duplicated.
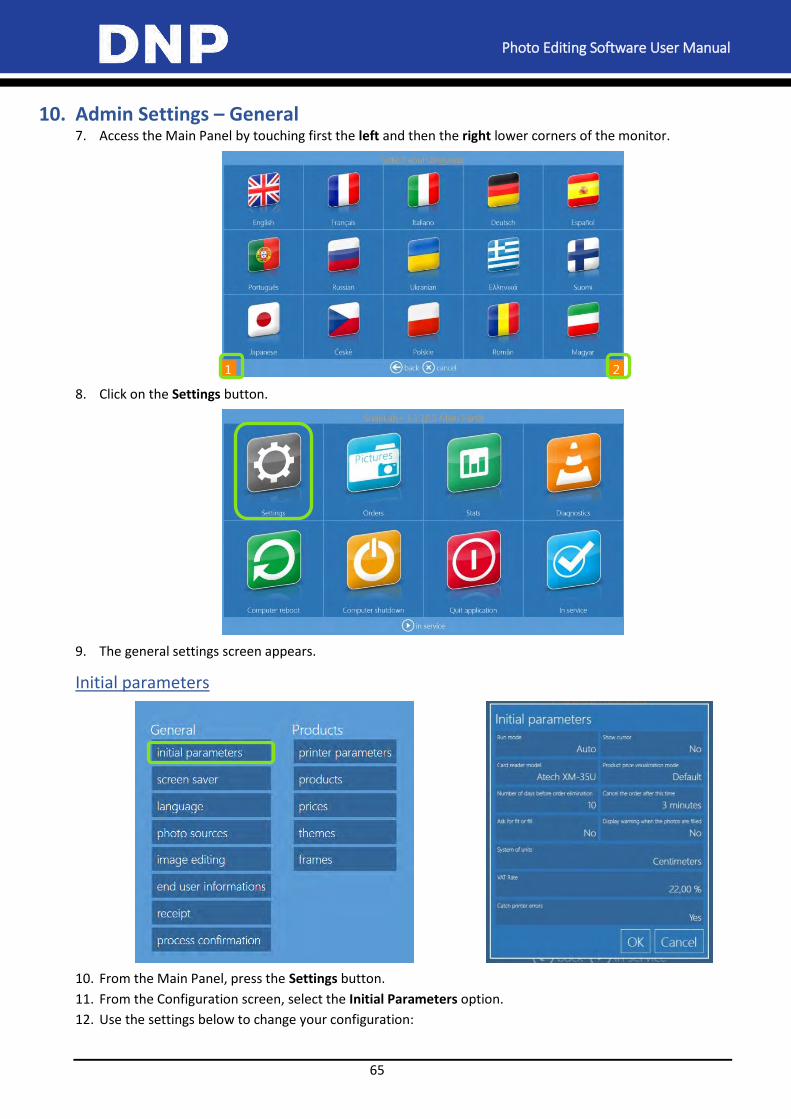
Photo Editing Software User Manual
65
10. Admin Settings – General 7. Access the Main Panel by touching first the left and then the right lower corners of the monitor.
8. Click on the Settings button.
9. The general settings screen appears.
Initial parameters
10. From the Main Panel, press the Settings button.
11. From the Configuration screen, select the Initial Parameters option.
12. Use the settings below to change your configuration:
Photo Editing Software User Manual
66
Run Mode – Set to Auto to run the Snap Lab software automatically when you start the console.
Manual mode requires operator interaction to start the software (double clicking the software icon).
Show Cursor – Set to No to hide the system cursor (useful for touch screen devices). Set to Yes to
show system pointer on the screen (useful for operation with a mouse).
Card Reader – Select the appropriate card reader model from the available list.
Price Visualization Mode – Change the price display method as needed. Available options are: no
price, maximum price, minimum price, all prices (default option), and first price (price for quantity
equal to one).
Number of Days Before Order Elimination – Specifies the number of days until processed orders are
deleted from the system.
Cancel the Order after this Time – Number of days until cancelled orders are deleted from the
system.
Fit or Fill – Only used for the prints product. If set to Yes, the customer is asked whether they want to
have their image cropped to the print size aspect ratio (fill mode) or shrunk to fit the full image on
the print area (fit mode). No disables this option.
Display Warning after Photos are “Filled” – When set to Yes, displays a warning when images are
cropped using the Fit or Fill setting explained above.
Units – Set the unit of measure for the system – metric or inches.
VAT Rate – Enter the VAT tax rate for the country if applicable. If the country has no VAT tax, enter a
value of 0.
Catch Printer Errors – When set to Yes, a pop up screen appears if any printer errors occur while the
system is in use. If you want to hide any printer errors from the interface, set the value to No.
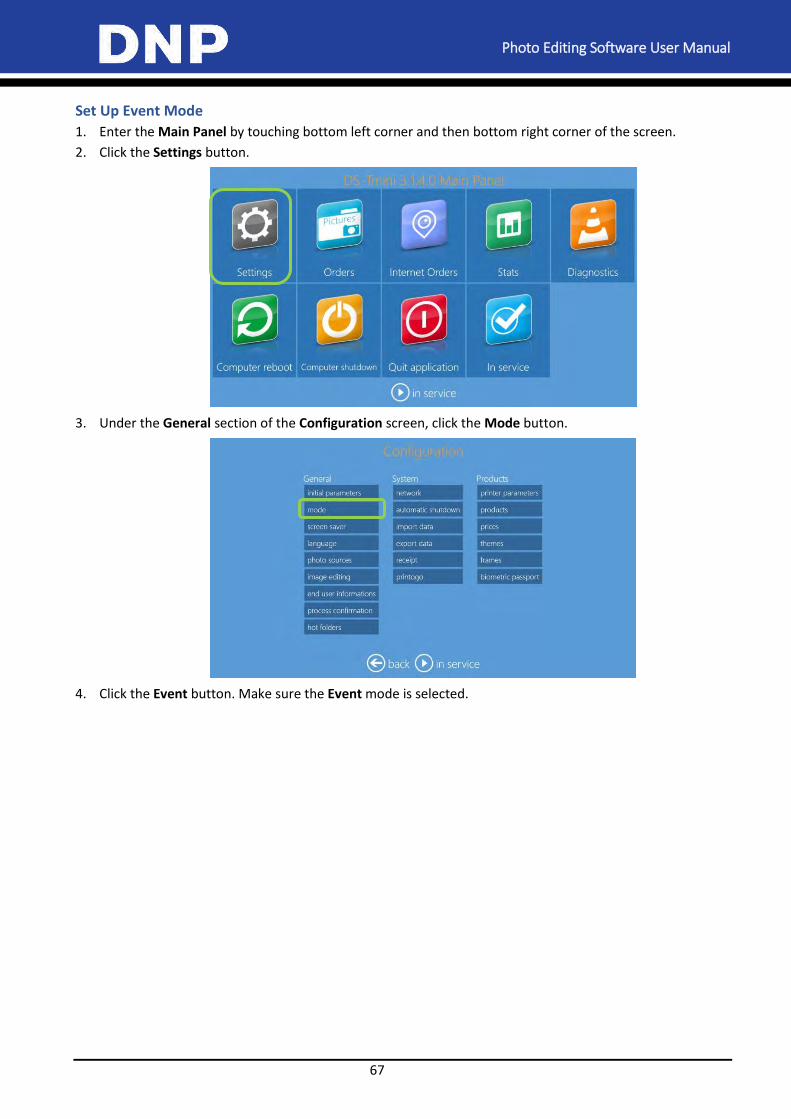
Photo Editing Software User Manual
67
Set Up Event Mode
1. Enter the Main Panel by touching bottom left corner and then bottom right corner of the screen.
2. Click the Settings button.
3. Under the General section of the Configuration screen, click the Mode button.
4. Click the Event button. Make sure the Event mode is selected.
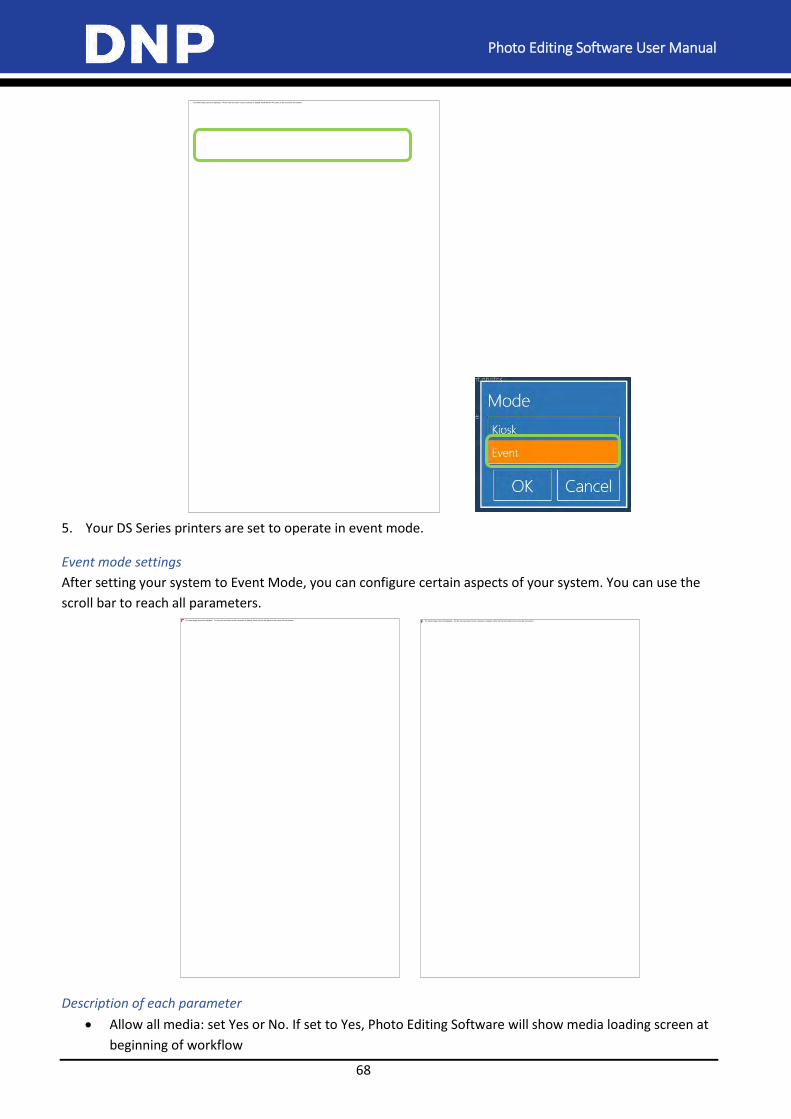
Photo Editing Software User Manual
68
5. Your DS Series printers are set to operate in event mode.
Event mode settings
After setting your system to Event Mode, you can configure certain aspects of your system. You can use the
scroll bar to reach all parameters.
Description of each parameter
Allow all media: set Yes or No. If set to Yes, Photo Editing Software will show media loading screen at
beginning of workflow
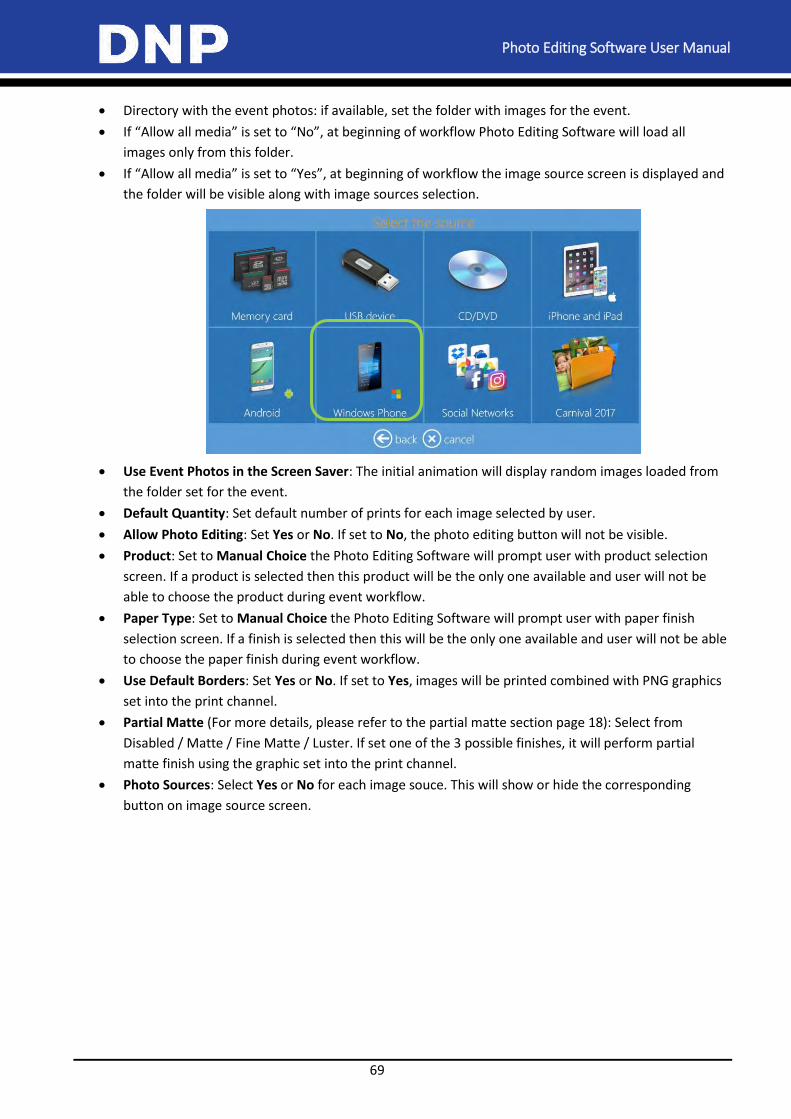
Photo Editing Software User Manual
69
Directory with the event photos: if available, set the folder with images for the event.
If “Allow all media” is set to “No”, at beginning of workflow Photo Editing Software will load all
images only from this folder.
If “Allow all media” is set to “Yes”, at beginning of workflow the image source screen is displayed and
the folder will be visible along with image sources selection.
Use Event Photos in the Screen Saver: The initial animation will display random images loaded from
the folder set for the event.
Default Quantity: Set default number of prints for each image selected by user.
Allow Photo Editing: Set Yes or No. If set to No, the photo editing button will not be visible.
Product: Set to Manual Choice the Photo Editing Software will prompt user with product selection
screen. If a product is selected then this product will be the only one available and user will not be
able to choose the product during event workflow.
Paper Type: Set to Manual Choice the Photo Editing Software will prompt user with paper finish
selection screen. If a finish is selected then this will be the only one available and user will not be able
to choose the paper finish during event workflow.
Use Default Borders: Set Yes or No. If set to Yes, images will be printed combined with PNG graphics
set into the print channel.
Partial Matte (For more details, please refer to the partial matte section page 18): Select from
Disabled / Matte / Fine Matte / Luster. If set one of the 3 possible finishes, it will perform partial
matte finish using the graphic set into the print channel.
Photo Sources: Select Yes or No for each image souce. This will show or hide the corresponding
button on image source screen.
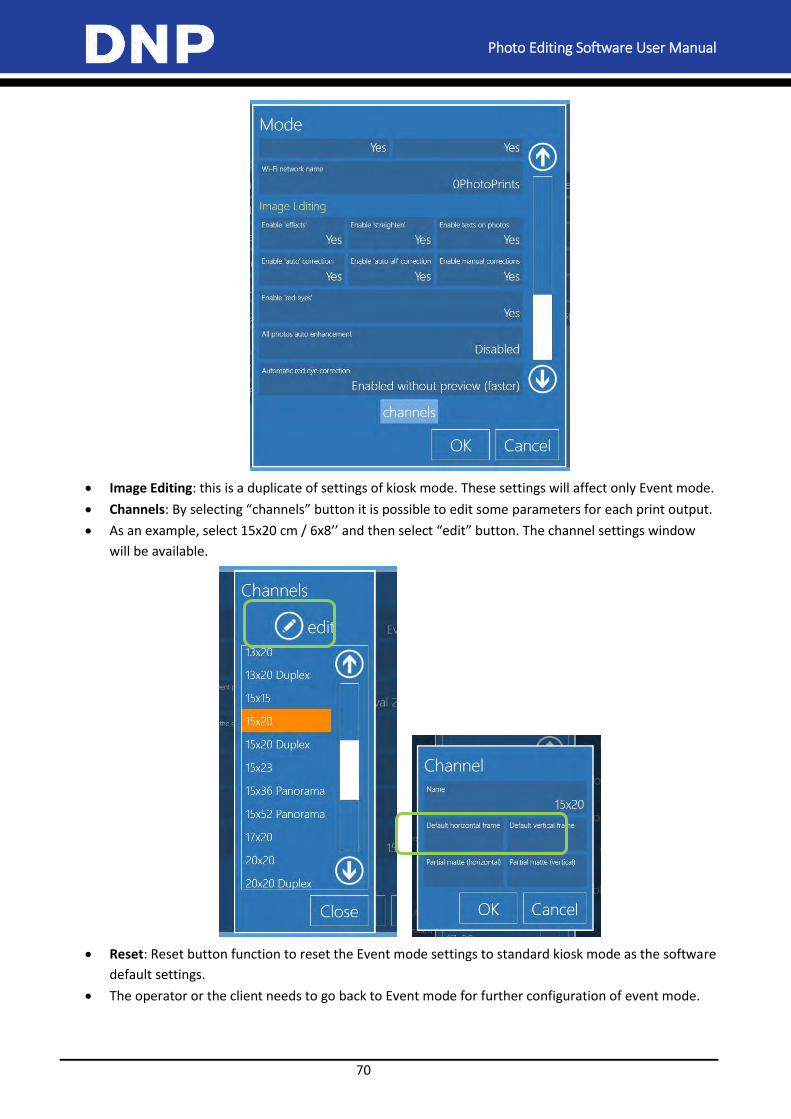
Photo Editing Software User Manual
70
Image Editing: this is a duplicate of settings of kiosk mode. These settings will affect only Event mode.
Channels: By selecting “channels” button it is possible to edit some parameters for each print output.
As an example, select 15x20 cm / 6x8’’ and then select “edit” button. The channel settings window
will be available.
Reset: Reset button function to reset the Event mode settings to standard kiosk mode as the software
default settings.
The operator or the client needs to go back to Event mode for further configuration of event mode.
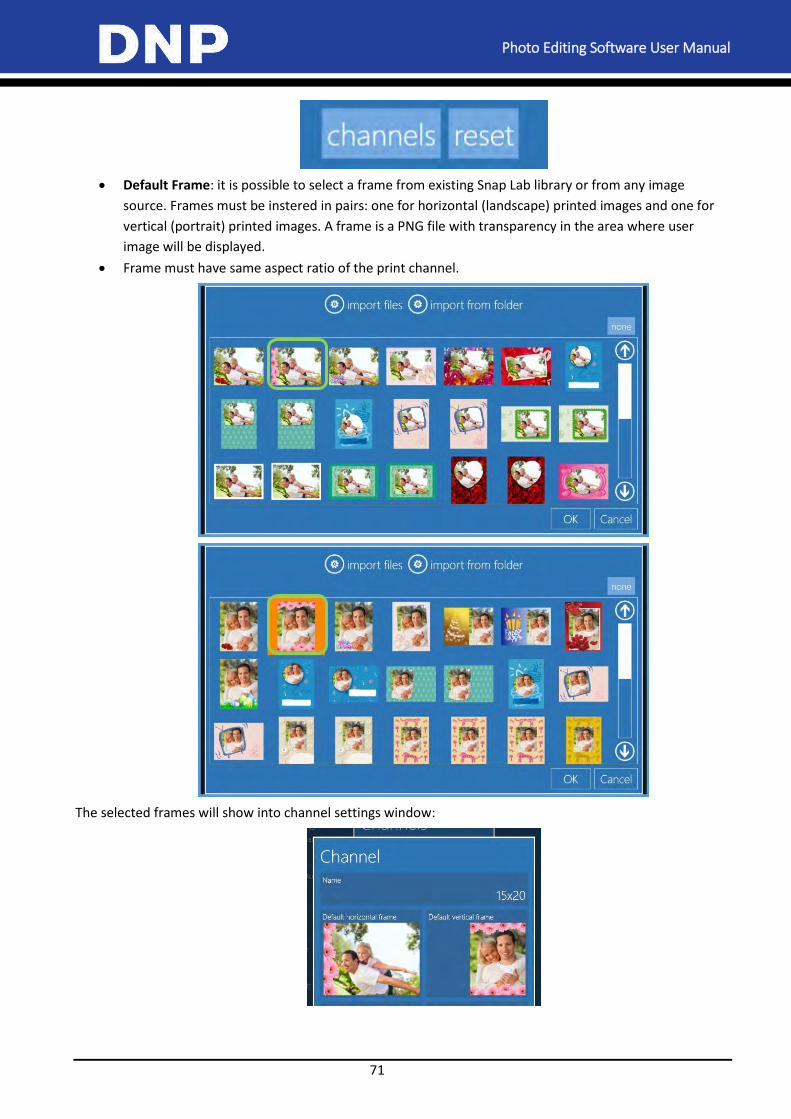
Photo Editing Software User Manual
71
Default Frame: it is possible to select a frame from existing Snap Lab library or from any image
source. Frames must be instered in pairs: one for horizontal (landscape) printed images and one for
vertical (portrait) printed images. A frame is a PNG file with transparency in the area where user
image will be displayed.
Frame must have same aspect ratio of the print channel.
The selected frames will show into channel settings window:
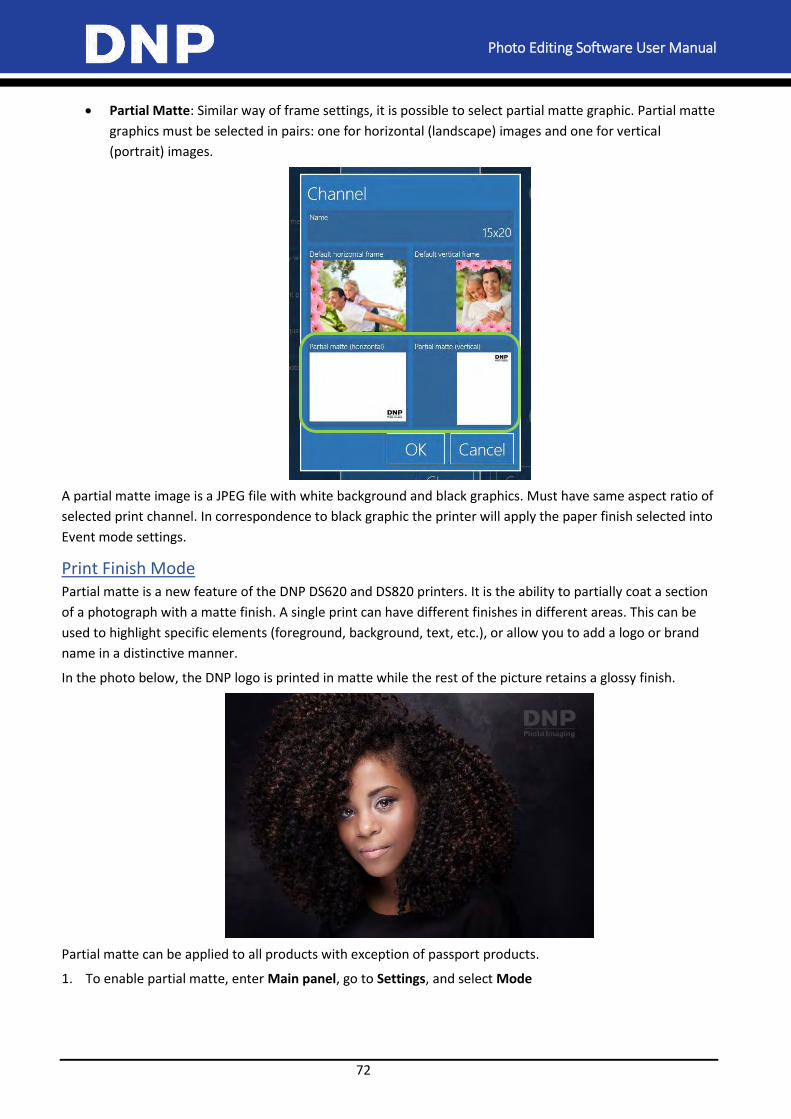
Photo Editing Software User Manual
72
Partial Matte: Similar way of frame settings, it is possible to select partial matte graphic. Partial matte
graphics must be selected in pairs: one for horizontal (landscape) images and one for vertical
(portrait) images.
A partial matte image is a JPEG file with white background and black graphics. Must have same aspect ratio of
selected print channel. In correspondence to black graphic the printer will apply the paper finish selected into
Event mode settings.
Print Finish Mode Partial matte is a new feature of the DNP DS620 and DS820 printers. It is the ability to partially coat a section
of a photograph with a matte finish. A single print can have different finishes in different areas. This can be
used to highlight specific elements (foreground, background, text, etc.), or allow you to add a logo or brand
name in a distinctive manner.
In the photo below, the DNP logo is printed in matte while the rest of the picture retains a glossy finish.
Partial matte can be applied to all products with exception of passport products.
1. To enable partial matte, enter Main panel, go to Settings, and select Mode
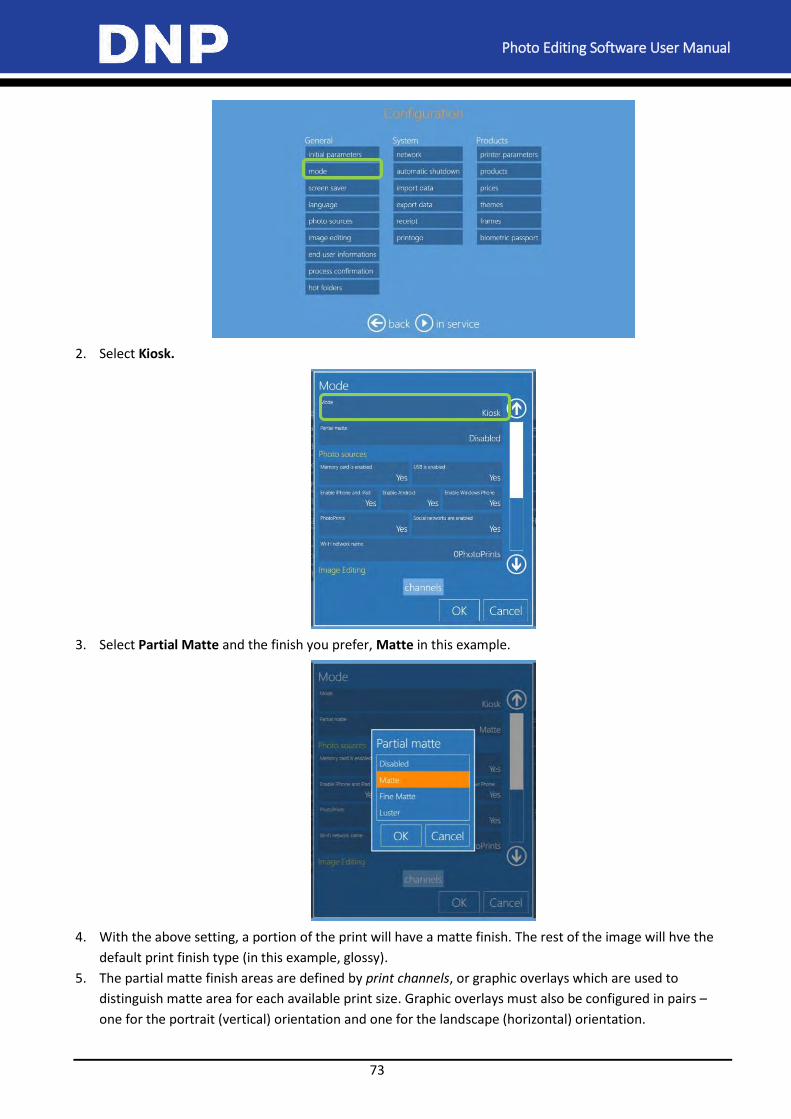
Photo Editing Software User Manual
73
2. Select Kiosk.
3. Select Partial Matte and the finish you prefer, Matte in this example.
4. With the above setting, a portion of the print will have a matte finish. The rest of the image will hve the
default print finish type (in this example, glossy).
5. The partial matte finish areas are defined by print channels, or graphic overlays which are used to
distinguish matte area for each available print size. Graphic overlays must also be configured in pairs –
one for the portrait (vertical) orientation and one for the landscape (horizontal) orientation.
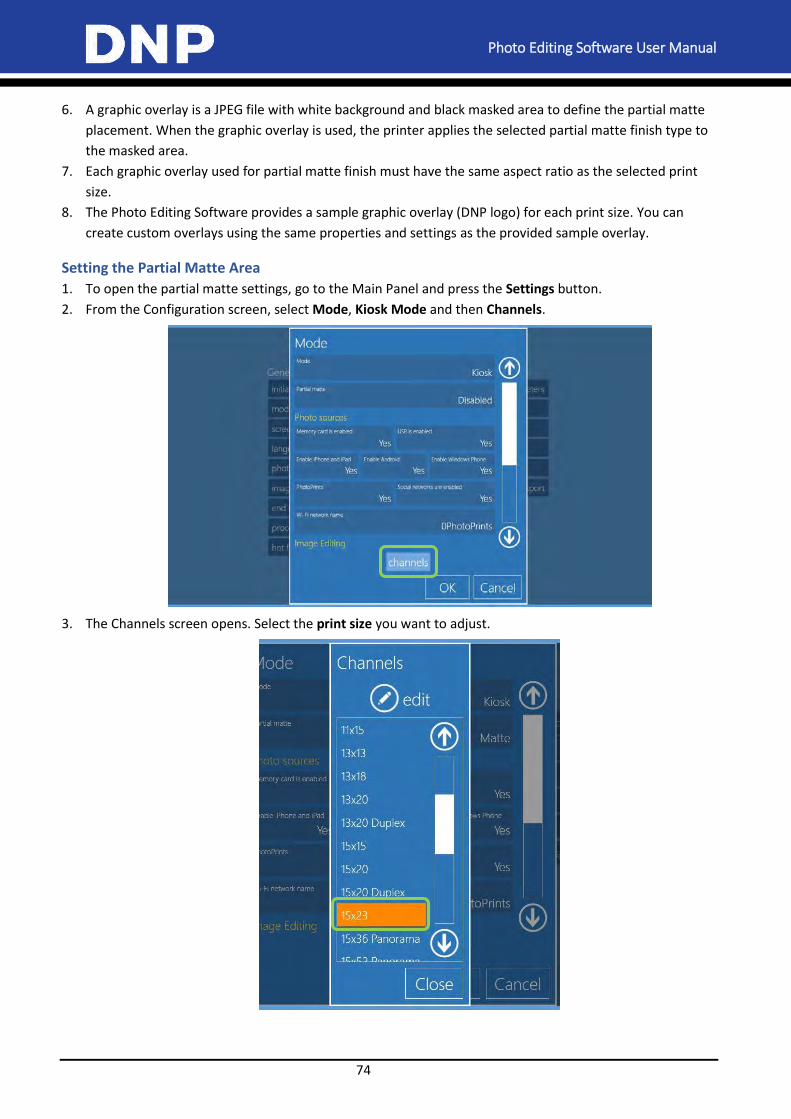
Photo Editing Software User Manual
74
6. A graphic overlay is a JPEG file with white background and black masked area to define the partial matte
placement. When the graphic overlay is used, the printer applies the selected partial matte finish type to
the masked area.
7. Each graphic overlay used for partial matte finish must have the same aspect ratio as the selected print
size.
8. The Photo Editing Software provides a sample graphic overlay (DNP logo) for each print size. You can
create custom overlays using the same properties and settings as the provided sample overlay.
Setting the Partial Matte Area
1. To open the partial matte settings, go to the Main Panel and press the Settings button.
2. From the Configuration screen, select Mode, Kiosk Mode and then Channels.
3. The Channels screen opens. Select the print size you want to adjust.
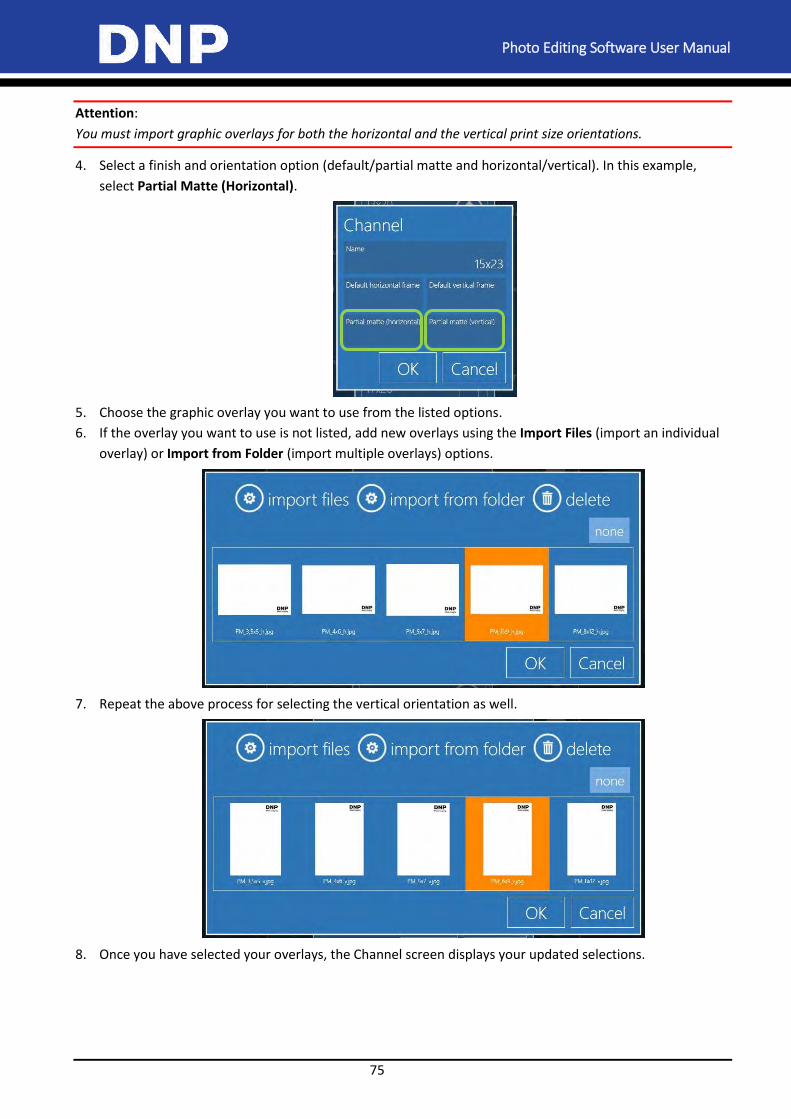
Photo Editing Software User Manual
75
Attention:
You must import graphic overlays for both the horizontal and the vertical print size orientations.
4. Select a finish and orientation option (default/partial matte and horizontal/vertical). In this example,
select Partial Matte (Horizontal).
5. Choose the graphic overlay you want to use from the listed options.
6. If the overlay you want to use is not listed, add new overlays using the Import Files (import an individual
overlay) or Import from Folder (import multiple overlays) options.
7. Repeat the above process for selecting the vertical orientation as well.
8. Once you have selected your overlays, the Channel screen displays your updated selections.
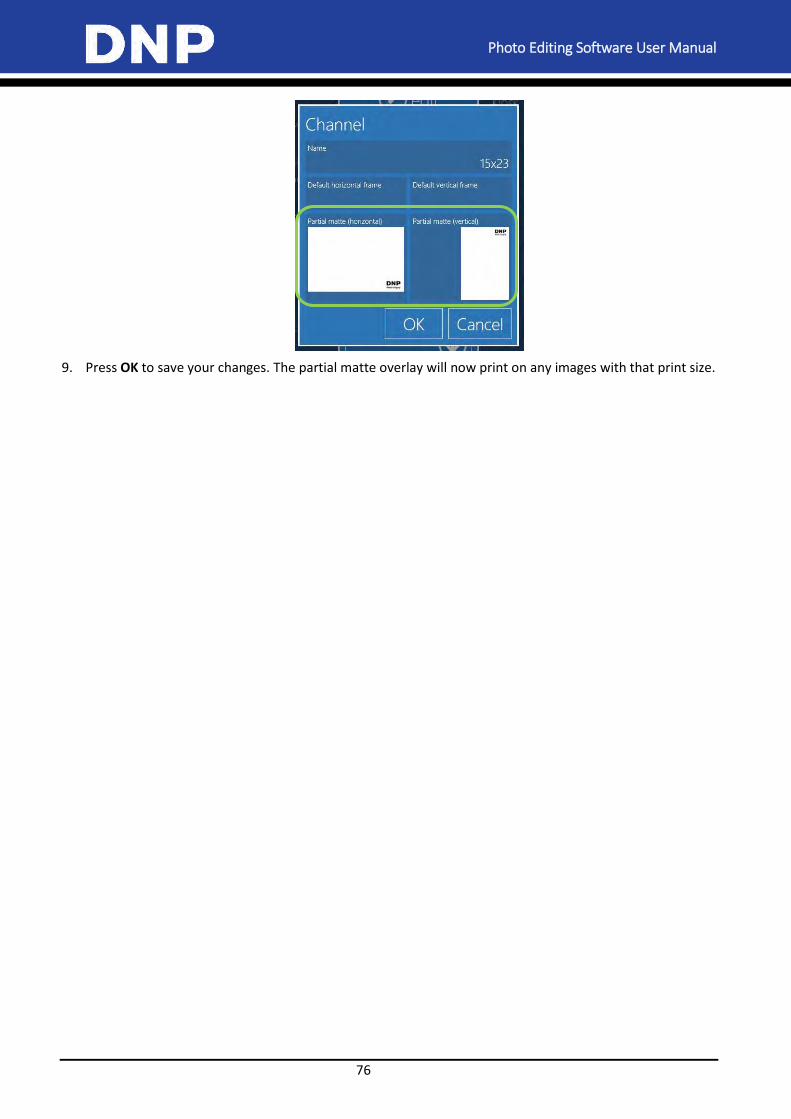
Photo Editing Software User Manual
76
9. Press OK to save your changes. The partial matte overlay will now print on any images with that print size.
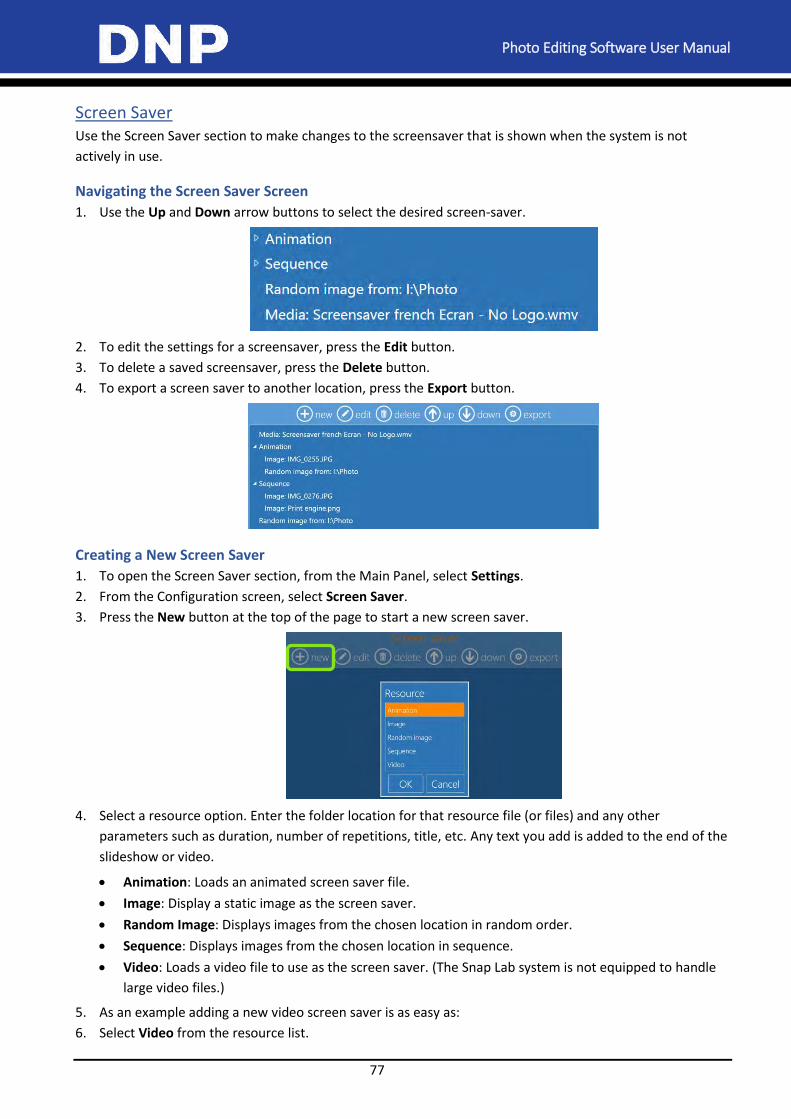
Photo Editing Software User Manual
77
Screen Saver Use the Screen Saver section to make changes to the screensaver that is shown when the system is not
actively in use.
Navigating the Screen Saver Screen
1. Use the Up and Down arrow buttons to select the desired screen-saver.
2. To edit the settings for a screensaver, press the Edit button.
3. To delete a saved screensaver, press the Delete button.
4. To export a screen saver to another location, press the Export button.
Creating a New Screen Saver
1. To open the Screen Saver section, from the Main Panel, select Settings.
2. From the Configuration screen, select Screen Saver.
3. Press the New button at the top of the page to start a new screen saver.
4. Select a resource option. Enter the folder location for that resource file (or files) and any other
parameters such as duration, number of repetitions, title, etc. Any text you add is added to the end of the
slideshow or video.
Animation: Loads an animated screen saver file.
Image: Display a static image as the screen saver.
Random Image: Displays images from the chosen location in random order.
Sequence: Displays images from the chosen location in sequence.
Video: Loads a video file to use as the screen saver. (The Snap Lab system is not equipped to handle
large video files.)
5. As an example adding a new video screen saver is as easy as:
6. Select Video from the resource list.
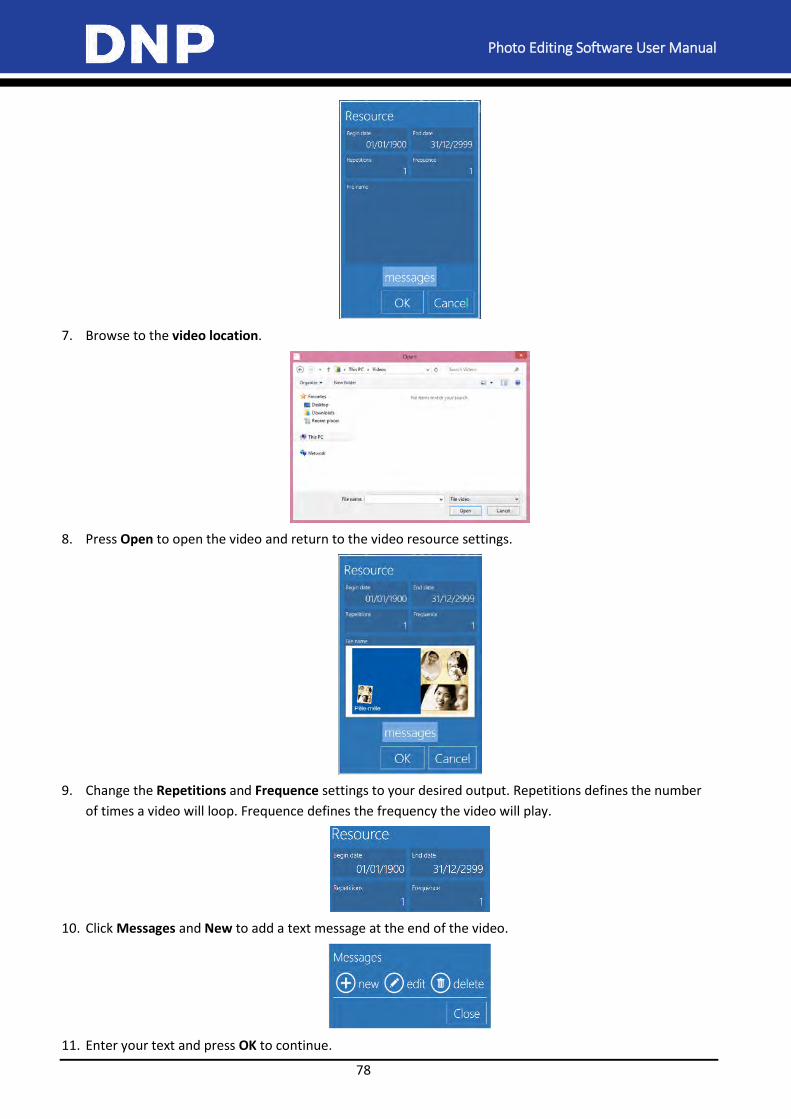
Photo Editing Software User Manual
78
7. Browse to the video location.
8. Press Open to open the video and return to the video resource settings.
9. Change the Repetitions and Frequence settings to your desired output. Repetitions defines the number
of times a video will loop. Frequence defines the frequency the video will play.
10. Click Messages and New to add a text message at the end of the video.
11. Enter your text and press OK to continue.
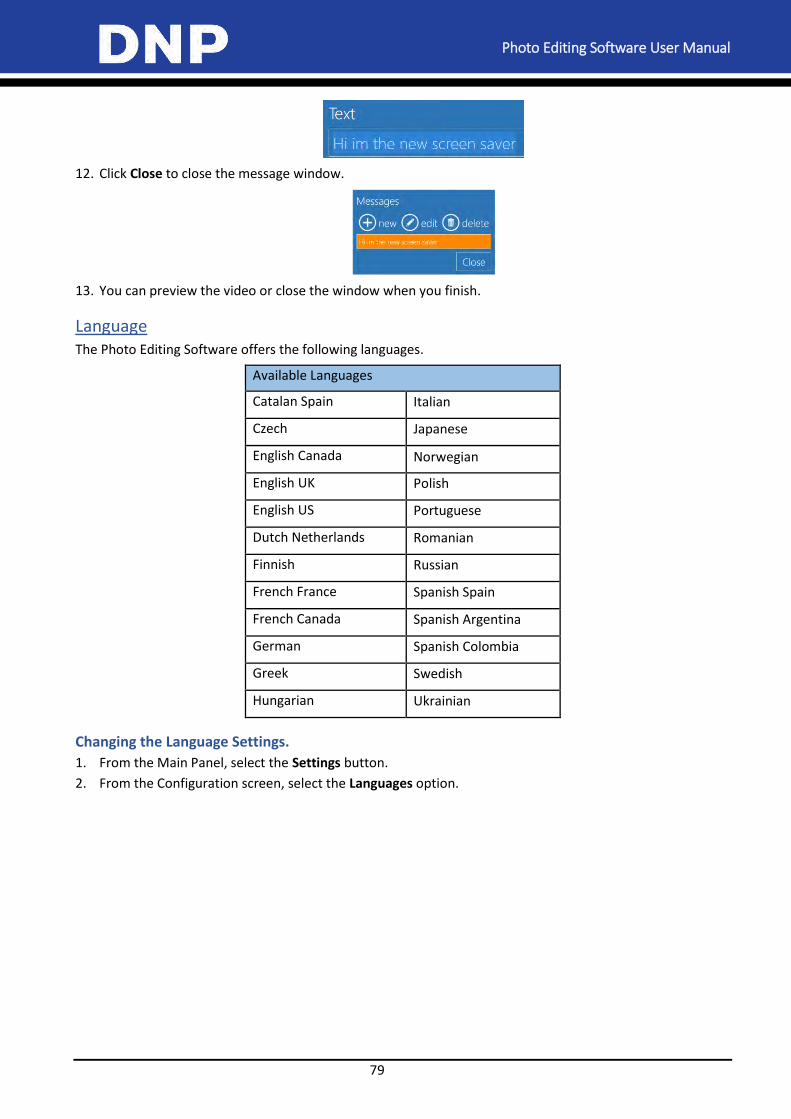
Photo Editing Software User Manual
79
12. Click Close to close the message window.
13. You can preview the video or close the window when you finish.
Language The Photo Editing Software offers the following languages.
Available Languages
Catalan Spain Italian
Czech Japanese
English Canada Norwegian
English UK Polish
English US Portuguese
Dutch Netherlands Romanian
Finnish Russian
French France Spanish Spain
French Canada Spanish Argentina
German Spanish Colombia
Greek Swedish
Hungarian Ukrainian
Changing the Language Settings.
1. From the Main Panel, select the Settings button.
2. From the Configuration screen, select the Languages option.
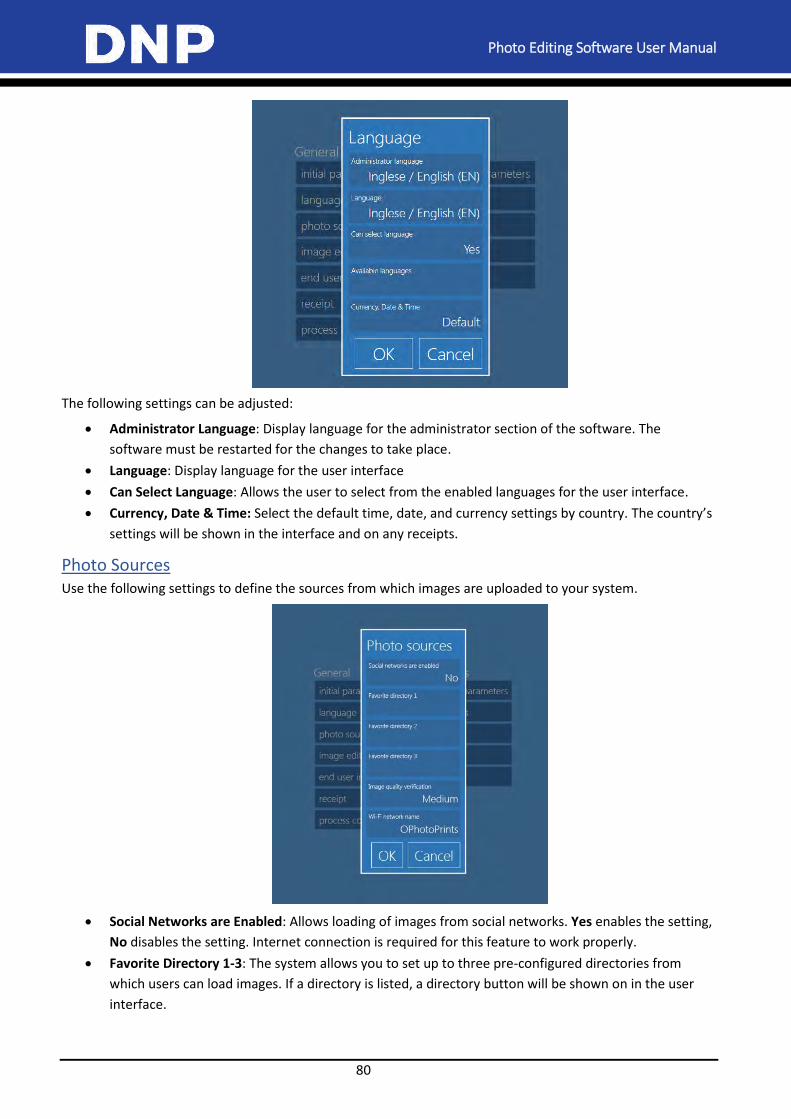
Photo Editing Software User Manual
80
The following settings can be adjusted:
Administrator Language: Display language for the administrator section of the software. The
software must be restarted for the changes to take place.
Language: Display language for the user interface
Can Select Language: Allows the user to select from the enabled languages for the user interface.
Currency, Date & Time: Select the default time, date, and currency settings by country. The country’s
settings will be shown in the interface and on any receipts.
Photo Sources Use the following settings to define the sources from which images are uploaded to your system.
Social Networks are Enabled: Allows loading of images from social networks. Yes enables the setting,
No disables the setting. Internet connection is required for this feature to work properly.
Favorite Directory 1-3: The system allows you to set up to three pre-configured directories from
which users can load images. If a directory is listed, a directory button will be shown on in the user
interface.
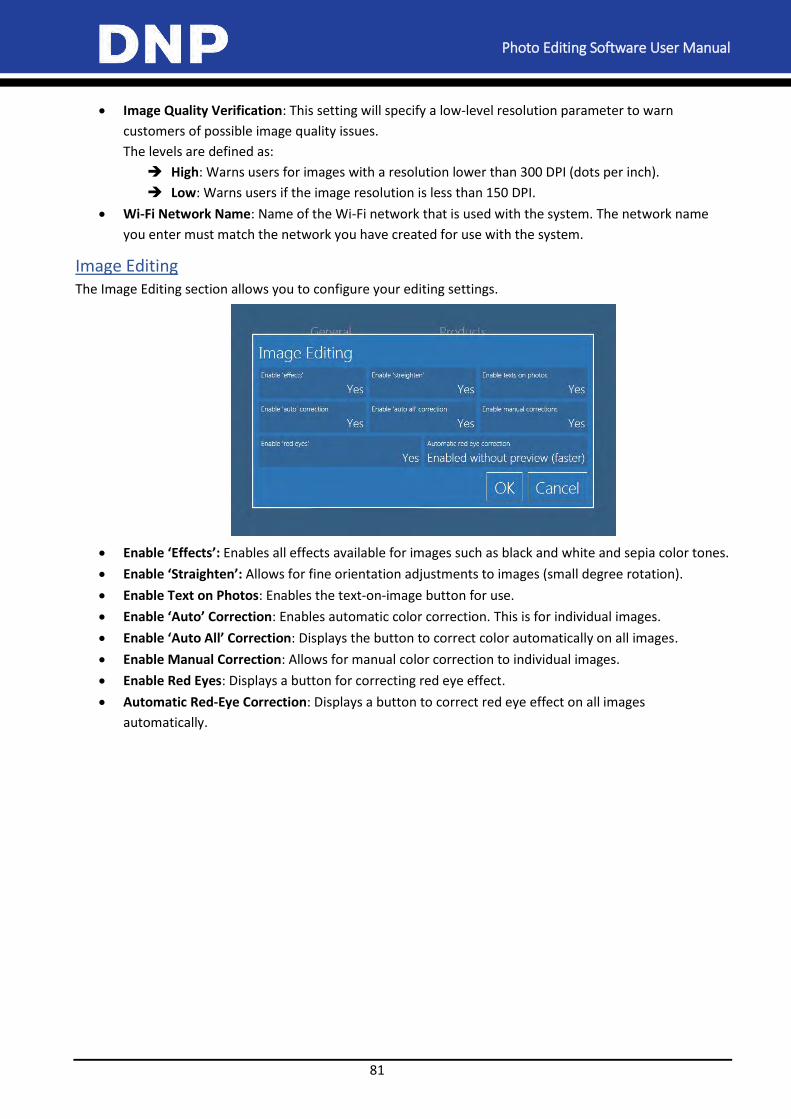
Photo Editing Software User Manual
81
Image Quality Verification: This setting will specify a low-level resolution parameter to warn
customers of possible image quality issues.
The levels are defined as:
High: Warns users for images with a resolution lower than 300 DPI (dots per inch).
Low: Warns users if the image resolution is less than 150 DPI.
Wi-Fi Network Name: Name of the Wi-Fi network that is used with the system. The network name
you enter must match the network you have created for use with the system.
Image Editing The Image Editing section allows you to configure your editing settings.
Enable ‘Effects’: Enables all effects available for images such as black and white and sepia color tones.
Enable ‘Straighten’: Allows for fine orientation adjustments to images (small degree rotation).
Enable Text on Photos: Enables the text-on-image button for use.
Enable ‘Auto’ Correction: Enables automatic color correction. This is for individual images.
Enable ‘Auto All’ Correction: Displays the button to correct color automatically on all images.
Enable Manual Correction: Allows for manual color correction to individual images.
Enable Red Eyes: Displays a button for correcting red eye effect.
Automatic Red-Eye Correction: Displays a button to correct red eye effect on all images
automatically.
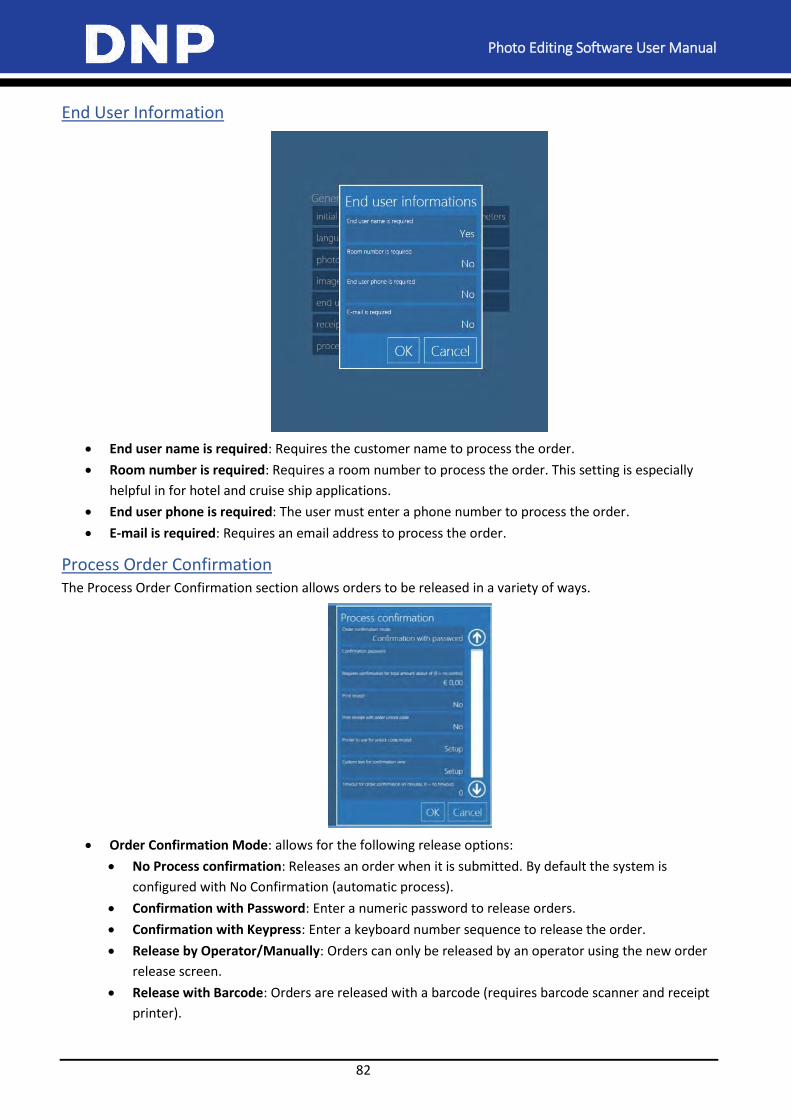
Photo Editing Software User Manual
82
End User Information
End user name is required: Requires the customer name to process the order.
Room number is required: Requires a room number to process the order. This setting is especially
helpful in for hotel and cruise ship applications.
End user phone is required: The user must enter a phone number to process the order.
E-mail is required: Requires an email address to process the order.
Process Order Confirmation The Process Order Confirmation section allows orders to be released in a variety of ways.
Order Confirmation Mode: allows for the following release options:
No Process confirmation: Releases an order when it is submitted. By default the system is
configured with No Confirmation (automatic process).
Confirmation with Password: Enter a numeric password to release orders.
Confirmation with Keypress: Enter a keyboard number sequence to release the order.
Release by Operator/Manually: Orders can only be released by an operator using the new order
release screen.
Release with Barcode: Orders are released with a barcode (requires barcode scanner and receipt
printer).
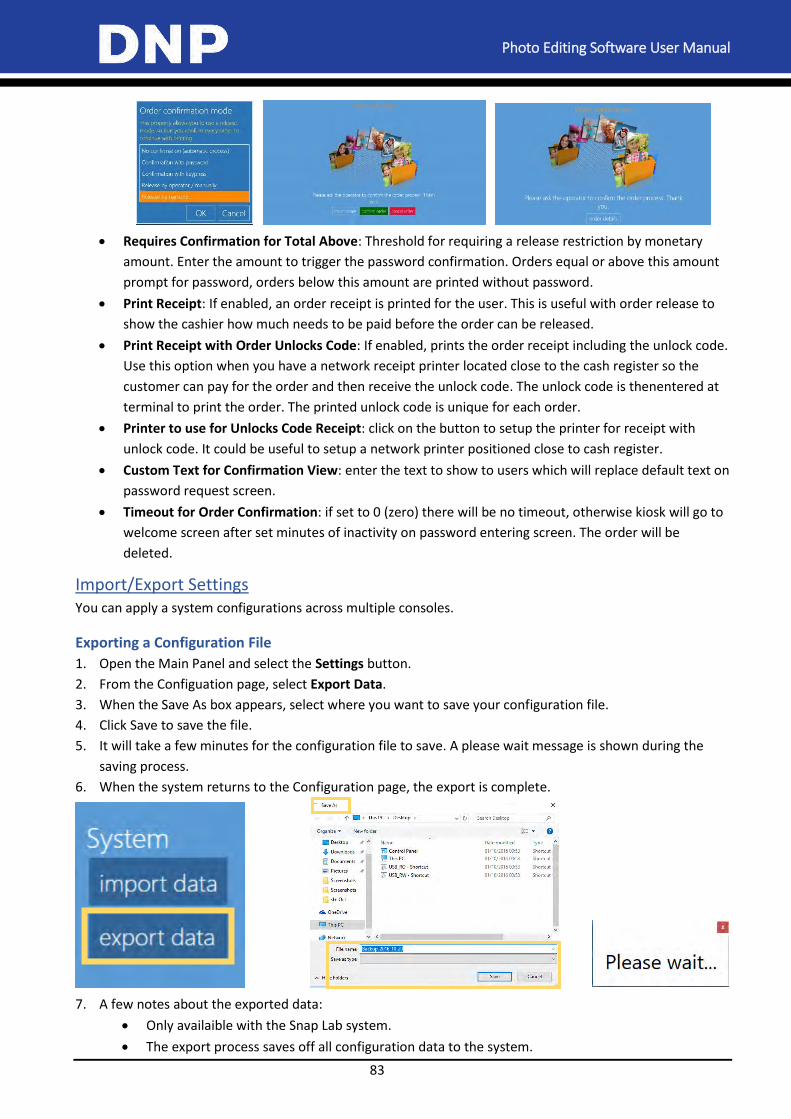
Photo Editing Software User Manual
83
Requires Confirmation for Total Above: Threshold for requiring a release restriction by monetary
amount. Enter the amount to trigger the password confirmation. Orders equal or above this amount
prompt for password, orders below this amount are printed without password.
Print Receipt: If enabled, an order receipt is printed for the user. This is useful with order release to
show the cashier how much needs to be paid before the order can be released.
Print Receipt with Order Unlocks Code: If enabled, prints the order receipt including the unlock code.
Use this option when you have a network receipt printer located close to the cash register so the
customer can pay for the order and then receive the unlock code. The unlock code is thenentered at
terminal to print the order. The printed unlock code is unique for each order.
Printer to use for Unlocks Code Receipt: click on the button to setup the printer for receipt with
unlock code. It could be useful to setup a network printer positioned close to cash register.
Custom Text for Confirmation View: enter the text to show to users which will replace default text on
password request screen.
Timeout for Order Confirmation: if set to 0 (zero) there will be no timeout, otherwise kiosk will go to
welcome screen after set minutes of inactivity on password entering screen. The order will be
deleted.
Import/Export Settings You can apply a system configurations across multiple consoles.
Exporting a Configuration File
1. Open the Main Panel and select the Settings button.
2. From the Configuation page, select Export Data.
3. When the Save As box appears, select where you want to save your configuration file.
4. Click Save to save the file.
5. It will take a few minutes for the configuration file to save. A please wait message is shown during the
saving process.
6. When the system returns to the Configuration page, the export is complete.
7. A few notes about the exported data:
Only availaible with the Snap Lab system.
The export process saves off all configuration data to the system.
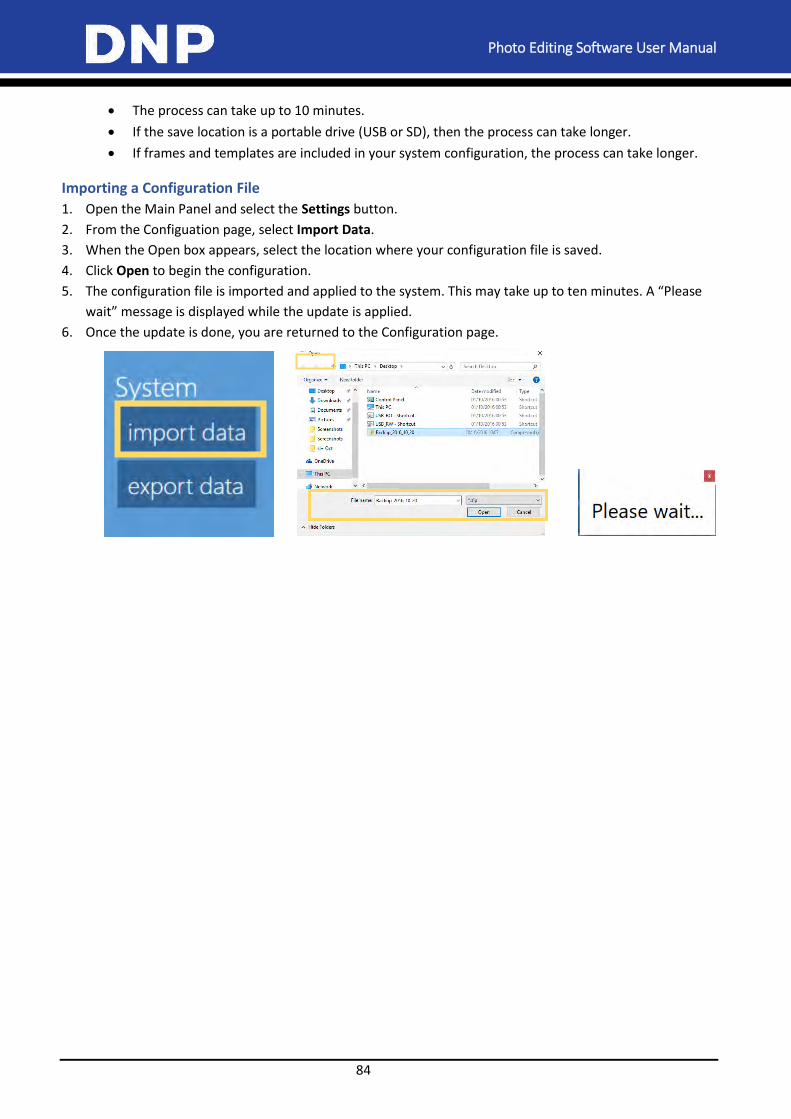
Photo Editing Software User Manual
84
The process can take up to 10 minutes.
If the save location is a portable drive (USB or SD), then the process can take longer.
If frames and templates are included in your system configuration, the process can take longer.
Importing a Configuration File
1. Open the Main Panel and select the Settings button.
2. From the Configuation page, select Import Data.
3. When the Open box appears, select the location where your configuration file is saved.
4. Click Open to begin the configuration.
5. The configuration file is imported and applied to the system. This may take up to ten minutes. A “Please
wait” message is displayed while the update is applied.
6. Once the update is done, you are returned to the Configuration page.
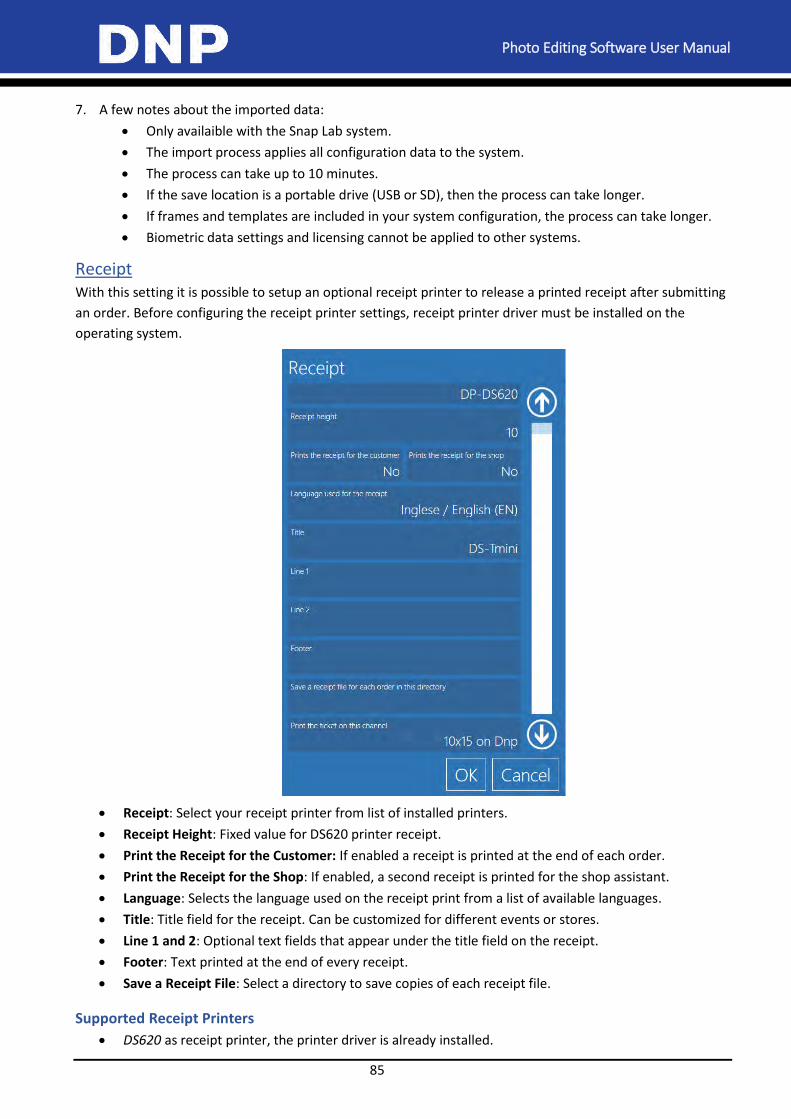
Photo Editing Software User Manual
85
7. A few notes about the imported data:
Only availaible with the Snap Lab system.
The import process applies all configuration data to the system.
The process can take up to 10 minutes.
If the save location is a portable drive (USB or SD), then the process can take longer.
If frames and templates are included in your system configuration, the process can take longer.
Biometric data settings and licensing cannot be applied to other systems.
Receipt With this setting it is possible to setup an optional receipt printer to release a printed receipt after submitting
an order. Before configuring the receipt printer settings, receipt printer driver must be installed on the
operating system.
Receipt: Select your receipt printer from list of installed printers.
Receipt Height: Fixed value for DS620 printer receipt.
Print the Receipt for the Customer: If enabled a receipt is printed at the end of each order.
Print the Receipt for the Shop: If enabled, a second receipt is printed for the shop assistant.
Language: Selects the language used on the receipt print from a list of available languages.
Title: Title field for the receipt. Can be customized for different events or stores.
Line 1 and 2: Optional text fields that appear under the title field on the receipt.
Footer: Text printed at the end of every receipt.
Save a Receipt File: Select a directory to save copies of each receipt file.
Supported Receipt Printers
DS620 as receipt printer, the printer driver is already installed.
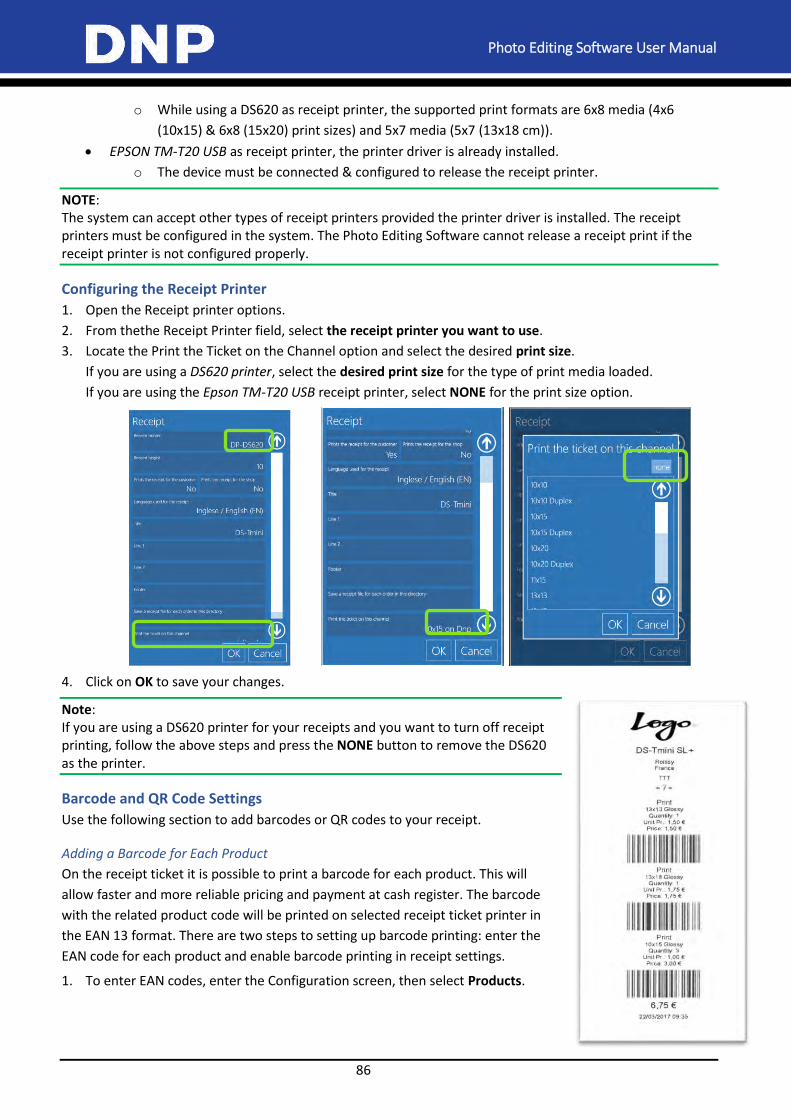
Photo Editing Software User Manual
86
o While using a DS620 as receipt printer, the supported print formats are 6x8 media (4x6
(10x15) & 6x8 (15x20) print sizes) and 5x7 media (5x7 (13x18 cm)).
EPSON TM-T20 USB as receipt printer, the printer driver is already installed.
o The device must be connected & configured to release the receipt printer.
NOTE: The system can accept other types of receipt printers provided the printer driver is installed. The receipt printers must be configured in the system. The Photo Editing Software cannot release a receipt print if the receipt printer is not configured properly.
Configuring the Receipt Printer
1. Open the Receipt printer options.
2. From thethe Receipt Printer field, select the receipt printer you want to use.
3. Locate the Print the Ticket on the Channel option and select the desired print size.
If you are using a DS620 printer, select the desired print size for the type of print media loaded.
If you are using the Epson TM-T20 USB receipt printer, select NONE for the print size option.
4. Click on OK to save your changes.
Note: If you are using a DS620 printer for your receipts and you want to turn off receipt printing, follow the above steps and press the NONE button to remove the DS620 as the printer.
Barcode and QR Code Settings
Use the following section to add barcodes or QR codes to your receipt.
Adding a Barcode for Each Product
On the receipt ticket it is possible to print a barcode for each product. This will
allow faster and more reliable pricing and payment at cash register. The barcode
with the related product code will be printed on selected receipt ticket printer in
the EAN 13 format. There are two steps to setting up barcode printing: enter the
EAN code for each product and enable barcode printing in receipt settings.
1. To enter EAN codes, enter the Configuration screen, then select Products.
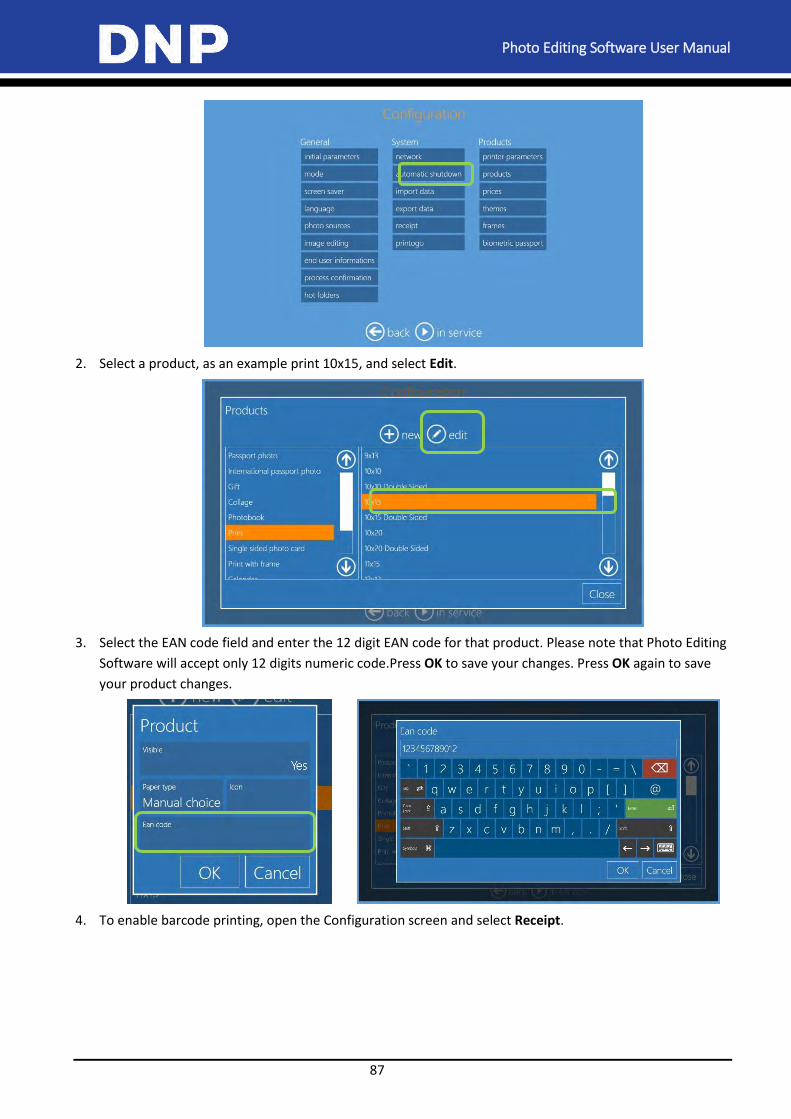
Photo Editing Software User Manual
87
2. Select a product, as an example print 10x15, and select Edit.
3. Select the EAN code field and enter the 12 digit EAN code for that product. Please note that Photo Editing
Software will accept only 12 digits numeric code.Press OK to save your changes. Press OK again to save
your product changes.
4. To enable barcode printing, open the Configuration screen and select Receipt.
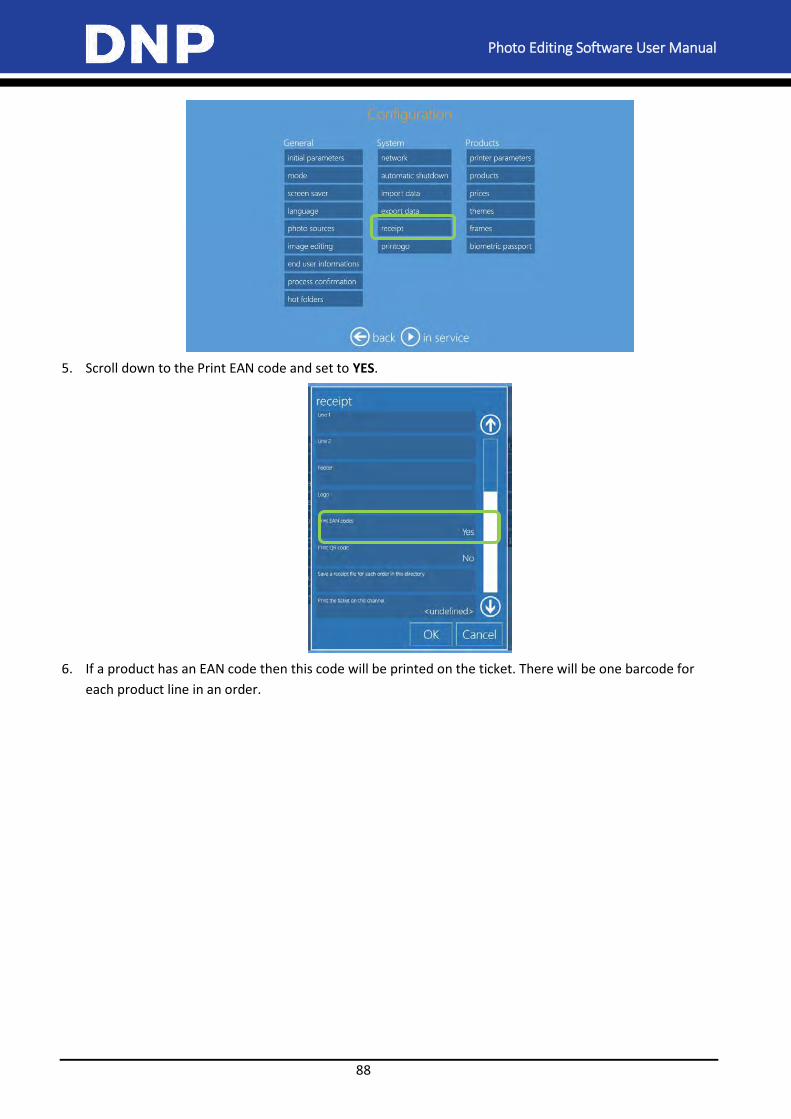
Photo Editing Software User Manual
88
5. Scroll down to the Print EAN code and set to YES.
6. If a product has an EAN code then this code will be printed on the ticket. There will be one barcode for
each product line in an order.
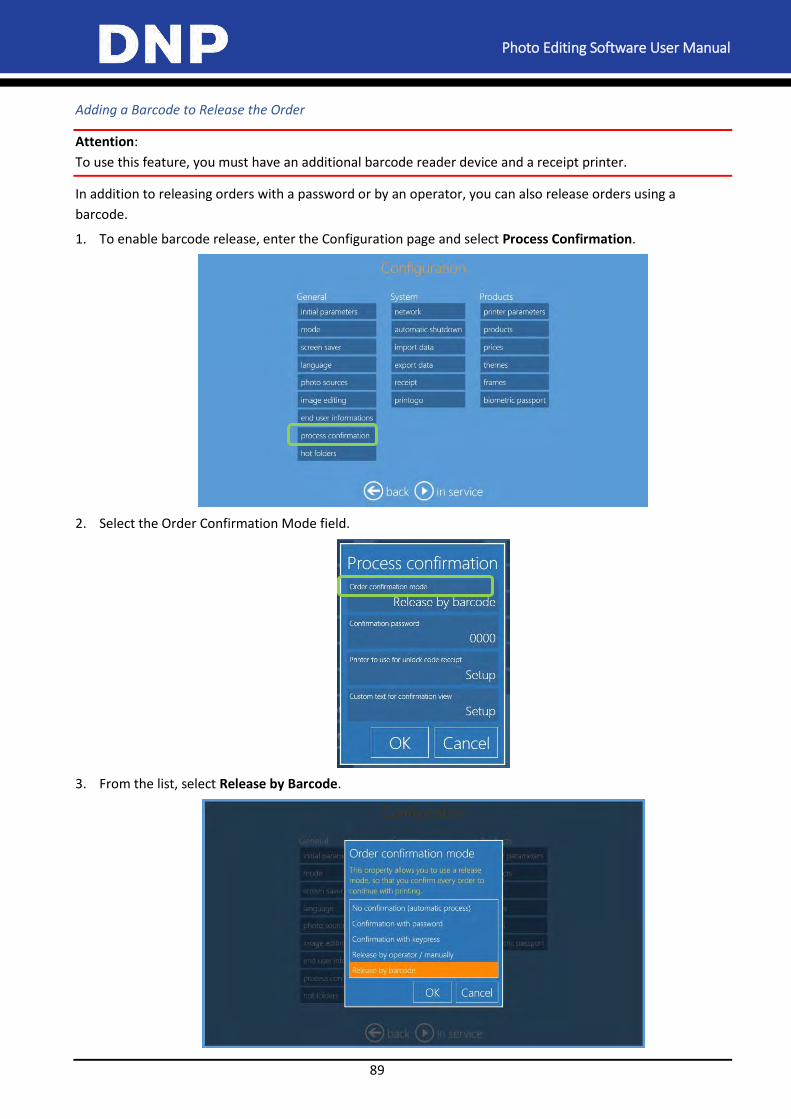
Photo Editing Software User Manual
89
Adding a Barcode to Release the Order
Attention:
To use this feature, you must have an additional barcode reader device and a receipt printer.
In addition to releasing orders with a password or by an operator, you can also release orders using a
barcode.
1. To enable barcode release, enter the Configuration page and select Process Confirmation.
2. Select the Order Confirmation Mode field.
3. From the list, select Release by Barcode.
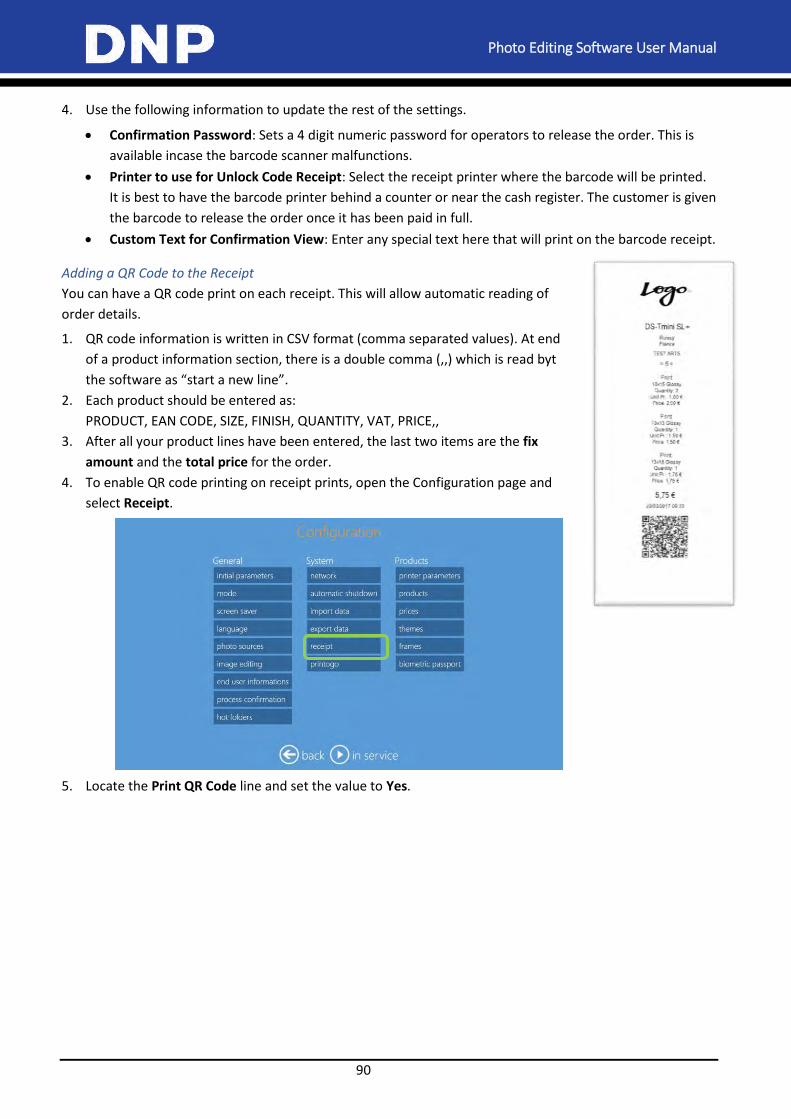
Photo Editing Software User Manual
90
4. Use the following information to update the rest of the settings.
Confirmation Password: Sets a 4 digit numeric password for operators to release the order. This is
available incase the barcode scanner malfunctions.
Printer to use for Unlock Code Receipt: Select the receipt printer where the barcode will be printed.
It is best to have the barcode printer behind a counter or near the cash register. The customer is given
the barcode to release the order once it has been paid in full.
Custom Text for Confirmation View: Enter any special text here that will print on the barcode receipt.
Adding a QR Code to the Receipt
You can have a QR code print on each receipt. This will allow automatic reading of
order details.
1. QR code information is written in CSV format (comma separated values). At end
of a product information section, there is a double comma (,,) which is read byt
the software as “start a new line”.
2. Each product should be entered as:
PRODUCT, EAN CODE, SIZE, FINISH, QUANTITY, VAT, PRICE,,
3. After all your product lines have been entered, the last two items are the fix
amount and the total price for the order.
4. To enable QR code printing on receipt prints, open the Configuration page and
select Receipt.
5. Locate the Print QR Code line and set the value to Yes.

Photo Editing Software User Manual
91
Order Management System The PES system now offers an order management system to manage several orders simultaneously. By
enabling this feature, the software can stack multiple orders and allow the operator to decide when an order
should be processed using a print processing screen.
Enabling the Order Management System
1. Go to the Main Panel and press the Settings button.
2. From the Configuration screen, select the Process Confirmation option.
3. Click the Order Confirmation Mode field.
4. Select the Release by Operator / manually option. Press OK.
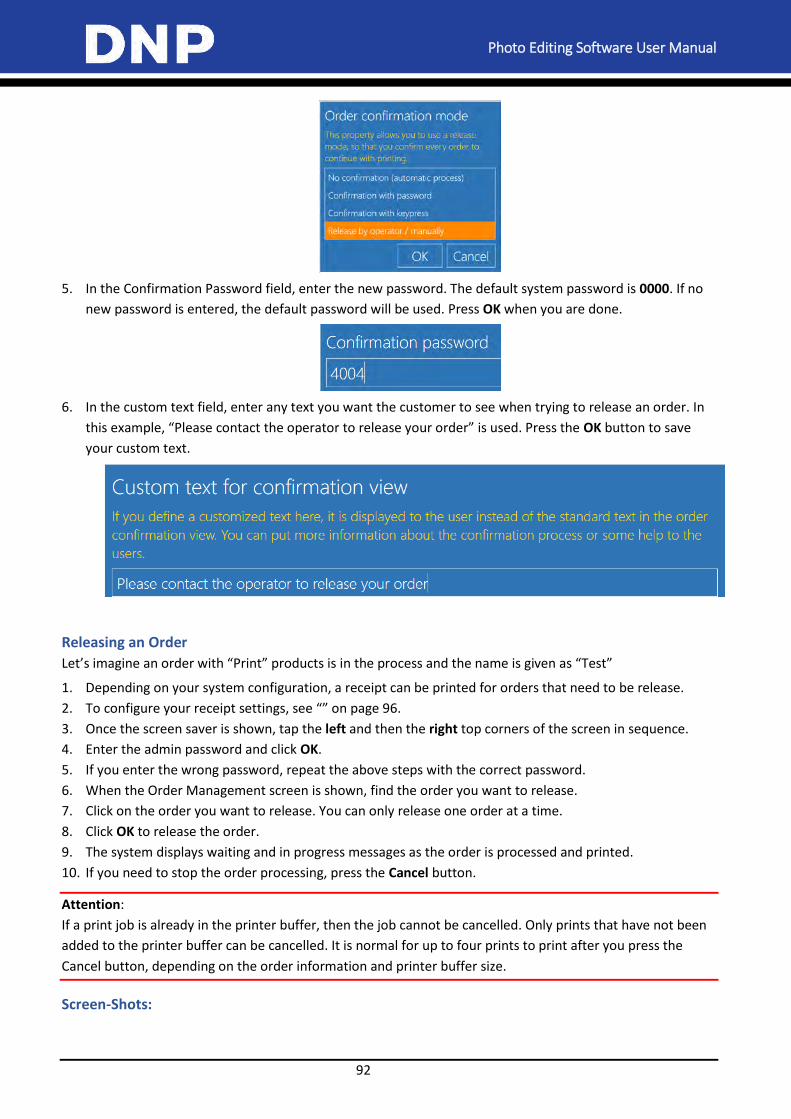
Photo Editing Software User Manual
92
5. In the Confirmation Password field, enter the new password. The default system password is 0000. If no
new password is entered, the default password will be used. Press OK when you are done.
6. In the custom text field, enter any text you want the customer to see when trying to release an order. In
this example, “Please contact the operator to release your order” is used. Press the OK button to save
your custom text.
Releasing an Order
Let’s imagine an order with “Print” products is in the process and the name is given as “Test”
1. Depending on your system configuration, a receipt can be printed for orders that need to be release.
2. To configure your receipt settings, see “” on page 96.
3. Once the screen saver is shown, tap the left and then the right top corners of the screen in sequence.
4. Enter the admin password and click OK.
5. If you enter the wrong password, repeat the above steps with the correct password.
6. When the Order Management screen is shown, find the order you want to release.
7. Click on the order you want to release. You can only release one order at a time.
8. Click OK to release the order.
9. The system displays waiting and in progress messages as the order is processed and printed.
10. If you need to stop the order processing, press the Cancel button.
Attention:
If a print job is already in the printer buffer, then the job cannot be cancelled. Only prints that have not been
added to the printer buffer can be cancelled. It is normal for up to four prints to print after you press the
Cancel button, depending on the order information and printer buffer size.
Screen-Shots:
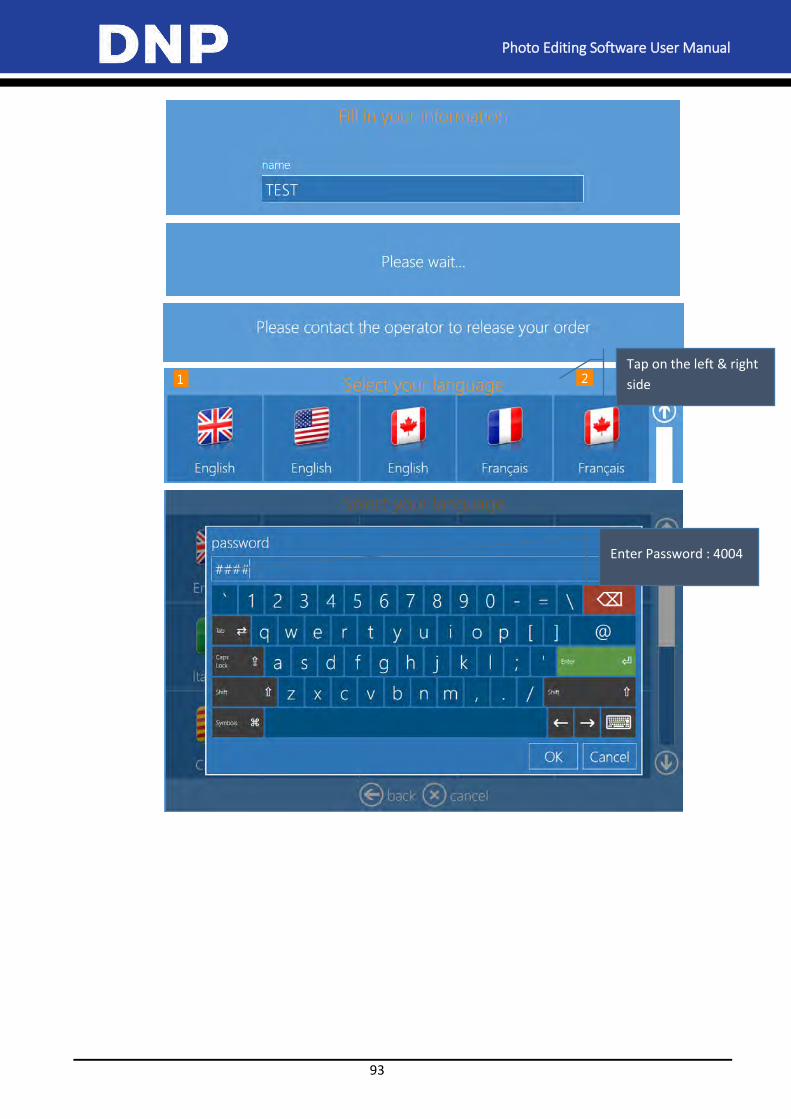
Photo Editing Software User Manual
93
Tap on the left & right
side
Enter Password : 4004
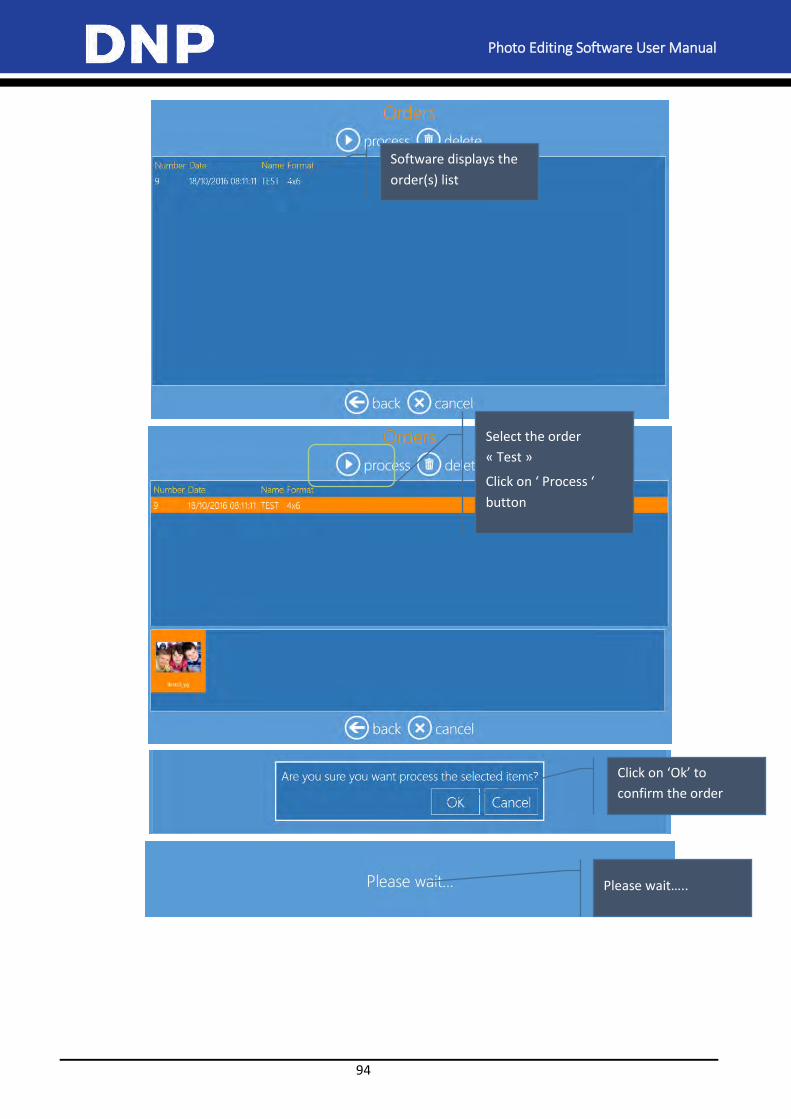
Photo Editing Software User Manual
94
Software displays the
order(s) list
Select the order
« Test »
Click on ‘ Process ‘
button
Click on ‘Ok’ to
confirm the order
Please wait…..
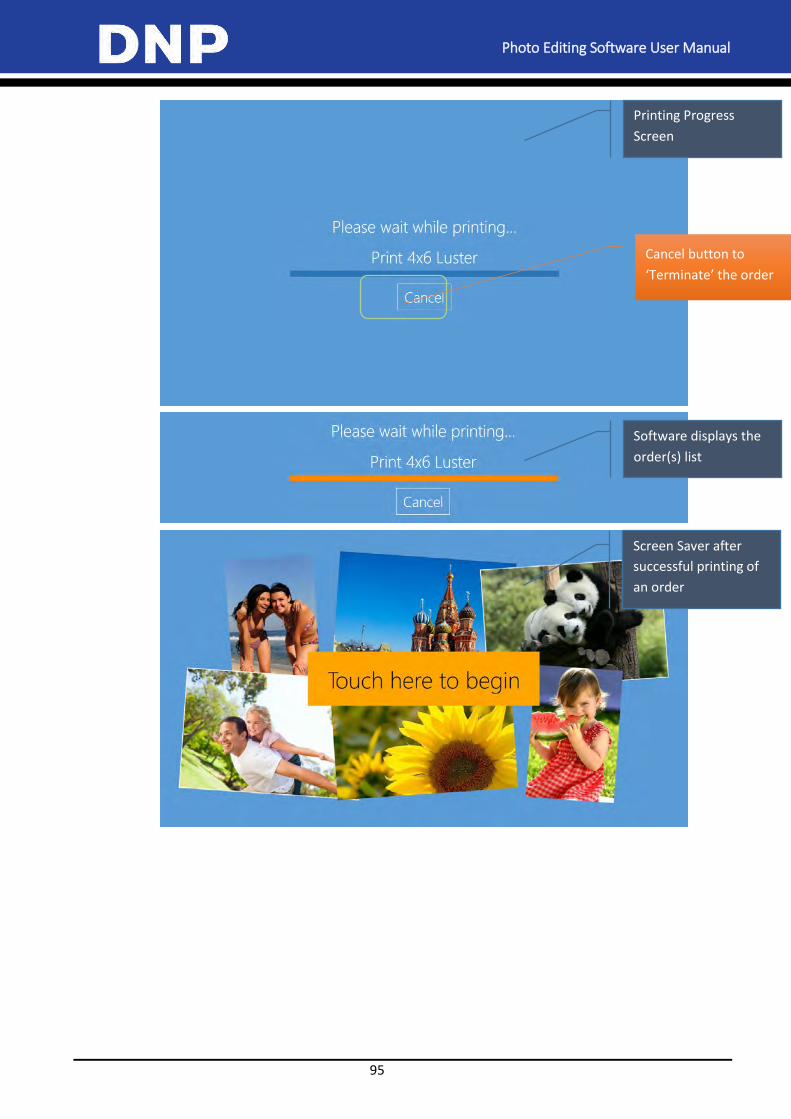
Photo Editing Software User Manual
95
Software displays the
order(s) list
Printing Progress
Screen
Cancel button to
‘Terminate’ the order
Screen Saver after
successful printing of
an order
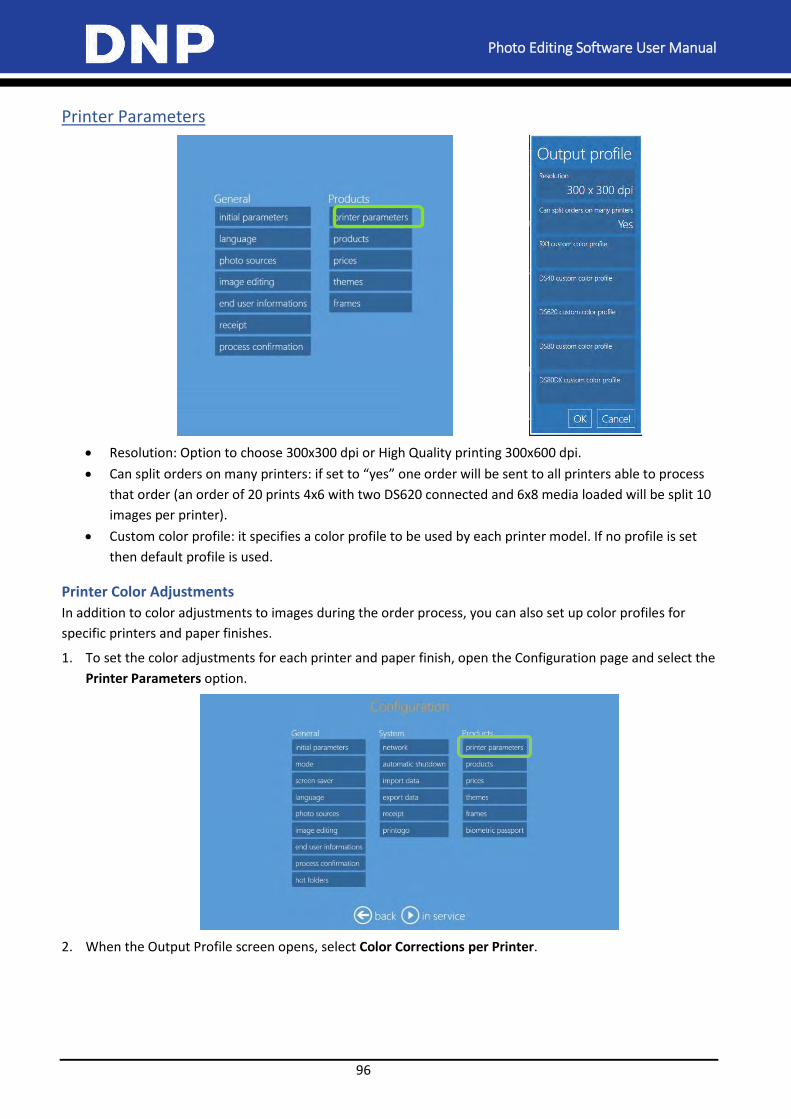
Photo Editing Software User Manual
96
Printer Parameters
Resolution: Option to choose 300x300 dpi or High Quality printing 300x600 dpi.
Can split orders on many printers: if set to “yes” one order will be sent to all printers able to process
that order (an order of 20 prints 4x6 with two DS620 connected and 6x8 media loaded will be split 10
images per printer).
Custom color profile: it specifies a color profile to be used by each printer model. If no profile is set
then default profile is used.
Printer Color Adjustments
In addition to color adjustments to images during the order process, you can also set up color profiles for
specific printers and paper finishes.
1. To set the color adjustments for each printer and paper finish, open the Configuration page and select the
Printer Parameters option.
2. When the Output Profile screen opens, select Color Corrections per Printer.
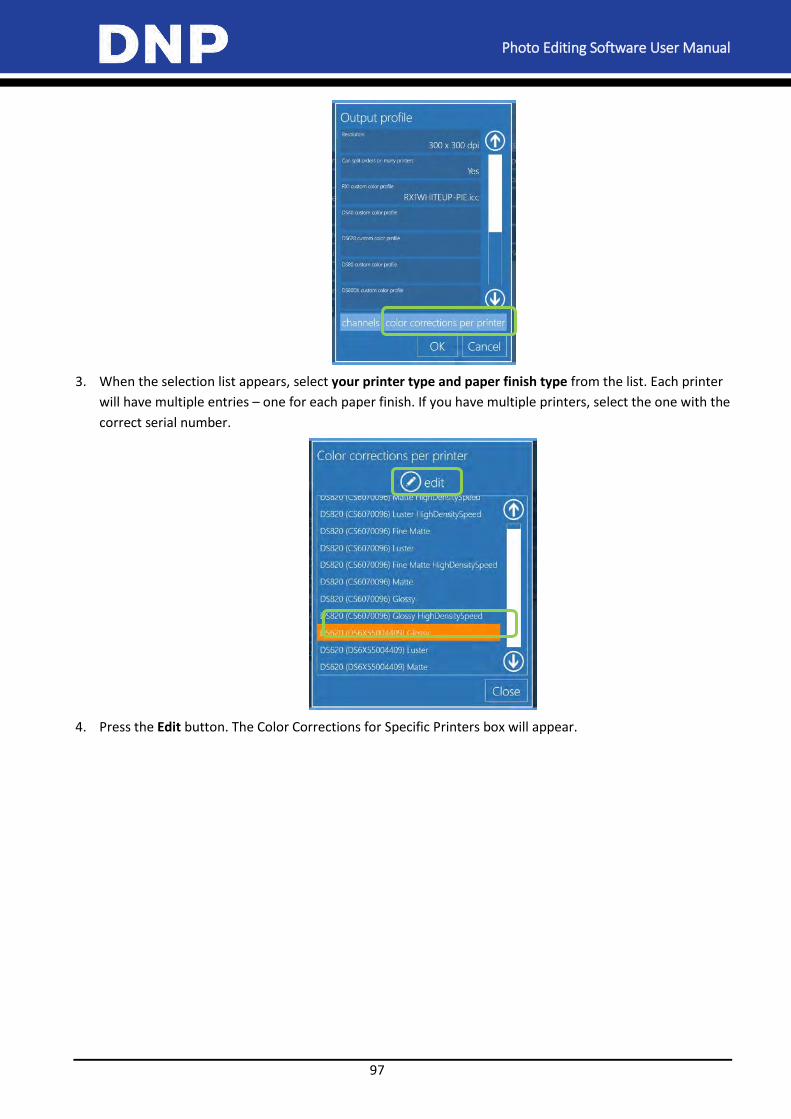
Photo Editing Software User Manual
97
3. When the selection list appears, select your printer type and paper finish type from the list. Each printer
will have multiple entries – one for each paper finish. If you have multiple printers, select the one with the
correct serial number.
4. Press the Edit button. The Color Corrections for Specific Printers box will appear.
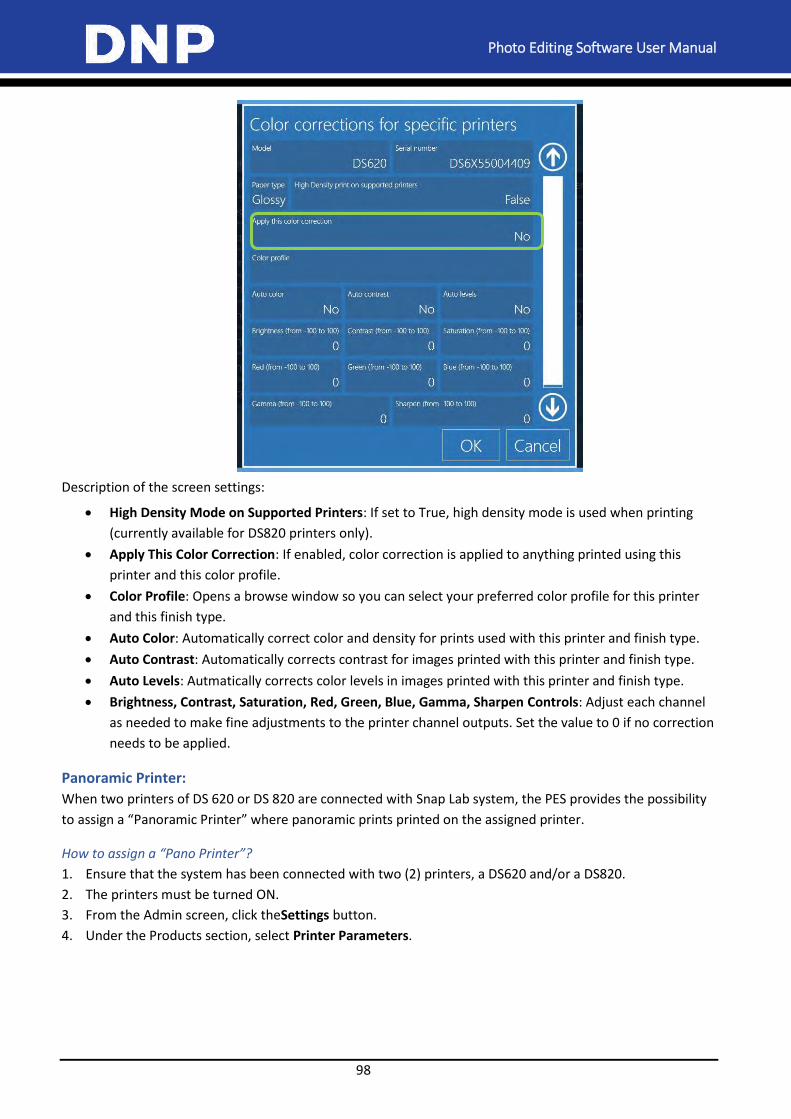
Photo Editing Software User Manual
98
Description of the screen settings:
High Density Mode on Supported Printers: If set to True, high density mode is used when printing
(currently available for DS820 printers only).
Apply This Color Correction: If enabled, color correction is applied to anything printed using this
printer and this color profile.
Color Profile: Opens a browse window so you can select your preferred color profile for this printer
and this finish type.
Auto Color: Automatically correct color and density for prints used with this printer and finish type.
Auto Contrast: Automatically corrects contrast for images printed with this printer and finish type.
Auto Levels: Autmatically corrects color levels in images printed with this printer and finish type.
Brightness, Contrast, Saturation, Red, Green, Blue, Gamma, Sharpen Controls: Adjust each channel
as needed to make fine adjustments to the printer channel outputs. Set the value to 0 if no correction
needs to be applied.
Panoramic Printer:
When two printers of DS 620 or DS 820 are connected with Snap Lab system, the PES provides the possibility
to assign a “Panoramic Printer” where panoramic prints printed on the assigned printer.
How to assign a “Pano Printer”?
1. Ensure that the system has been connected with two (2) printers, a DS620 and/or a DS820.
2. The printers must be turned ON.
3. From the Admin screen, click theSettings button.
4. Under the Products section, select Printer Parameters.
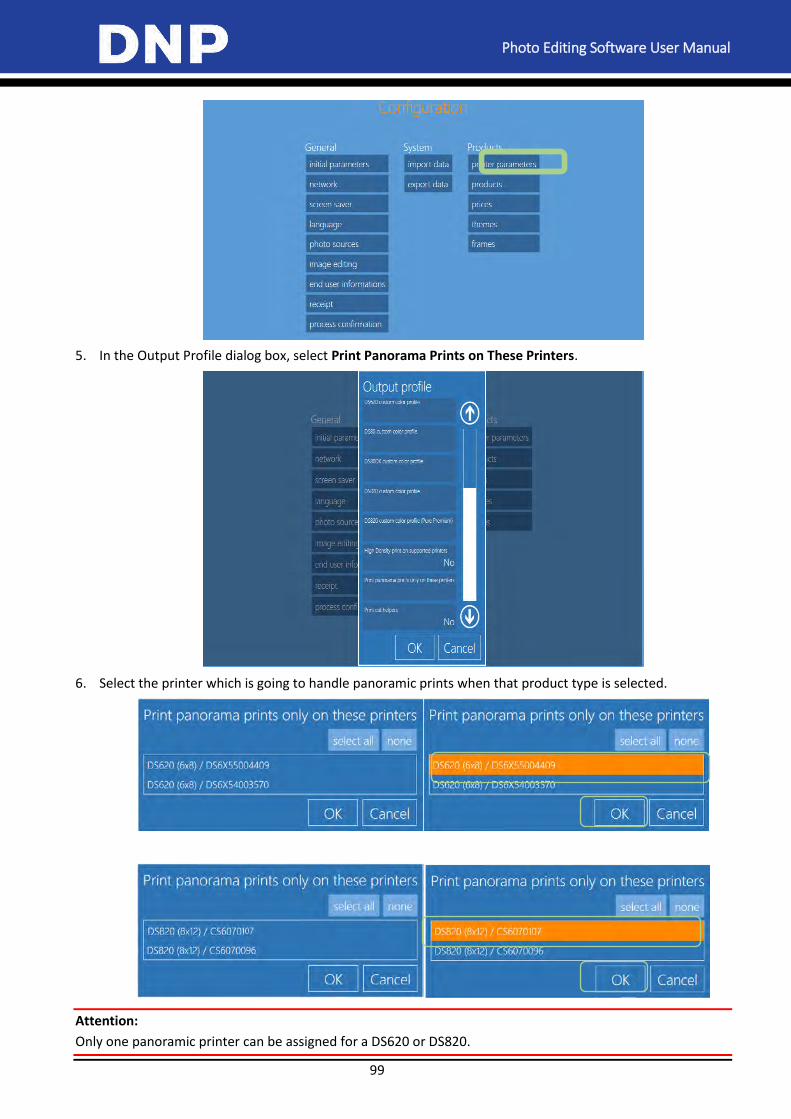
Photo Editing Software User Manual
99
5. In the Output Profile dialog box, select Print Panorama Prints on These Printers.
6. Select the printer which is going to handle panoramic prints when that product type is selected.
Attention:
Only one panoramic printer can be assigned for a DS620 or DS820.
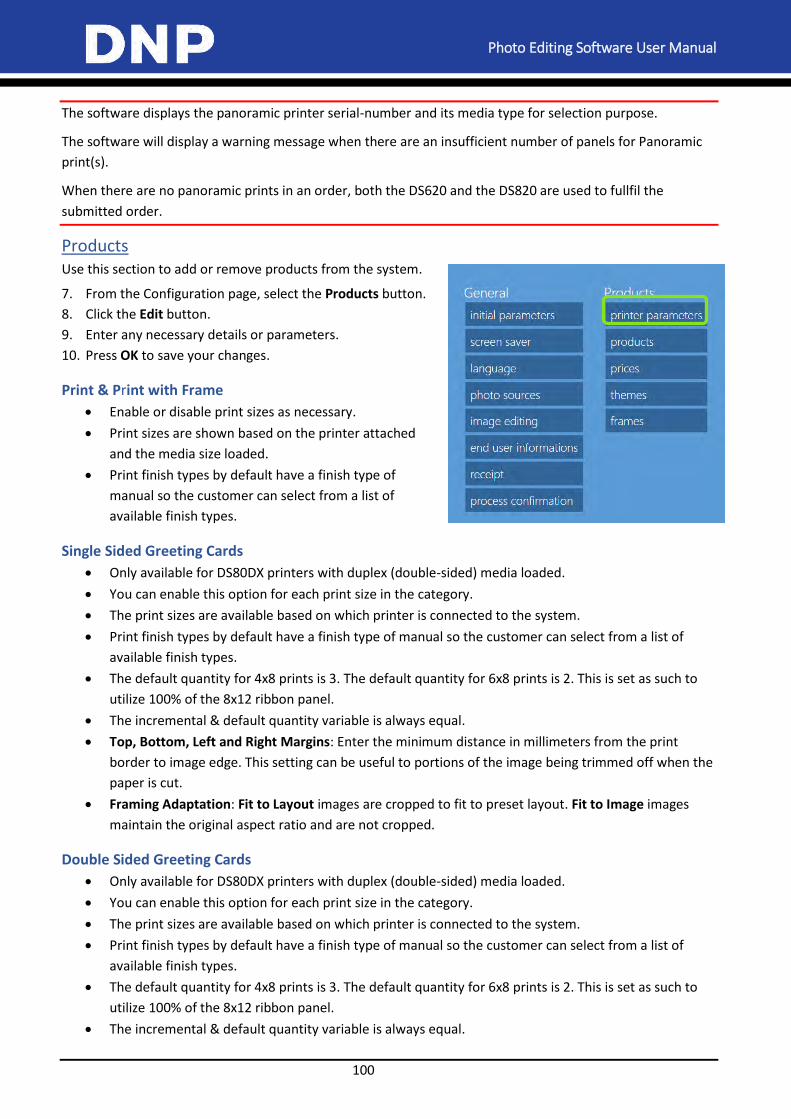
Photo Editing Software User Manual
100
The software displays the panoramic printer serial-number and its media type for selection purpose.
The software will display a warning message when there are an insufficient number of panels for Panoramic
print(s).
When there are no panoramic prints in an order, both the DS620 and the DS820 are used to fullfil the
submitted order.
Products Use this section to add or remove products from the system.
7. From the Configuration page, select the Products button.
8. Click the Edit button.
9. Enter any necessary details or parameters.
10. Press OK to save your changes.
Print & Print with Frame
Enable or disable print sizes as necessary.
Print sizes are shown based on the printer attached
and the media size loaded.
Print finish types by default have a finish type of
manual so the customer can select from a list of
available finish types.
Single Sided Greeting Cards
Only available for DS80DX printers with duplex (double-sided) media loaded.
You can enable this option for each print size in the category.
The print sizes are available based on which printer is connected to the system.
Print finish types by default have a finish type of manual so the customer can select from a list of
available finish types.
The default quantity for 4x8 prints is 3. The default quantity for 6x8 prints is 2. This is set as such to
utilize 100% of the 8x12 ribbon panel.
The incremental & default quantity variable is always equal.
Top, Bottom, Left and Right Margins: Enter the minimum distance in millimeters from the print
border to image edge. This setting can be useful to portions of the image being trimmed off when the
paper is cut.
Framing Adaptation: Fit to Layout images are cropped to fit to preset layout. Fit to Image images
maintain the original aspect ratio and are not cropped.
Double Sided Greeting Cards
Only available for DS80DX printers with duplex (double-sided) media loaded.
You can enable this option for each print size in the category.
The print sizes are available based on which printer is connected to the system.
Print finish types by default have a finish type of manual so the customer can select from a list of
available finish types.
The default quantity for 4x8 prints is 3. The default quantity for 6x8 prints is 2. This is set as such to
utilize 100% of the 8x12 ribbon panel.
The incremental & default quantity variable is always equal.
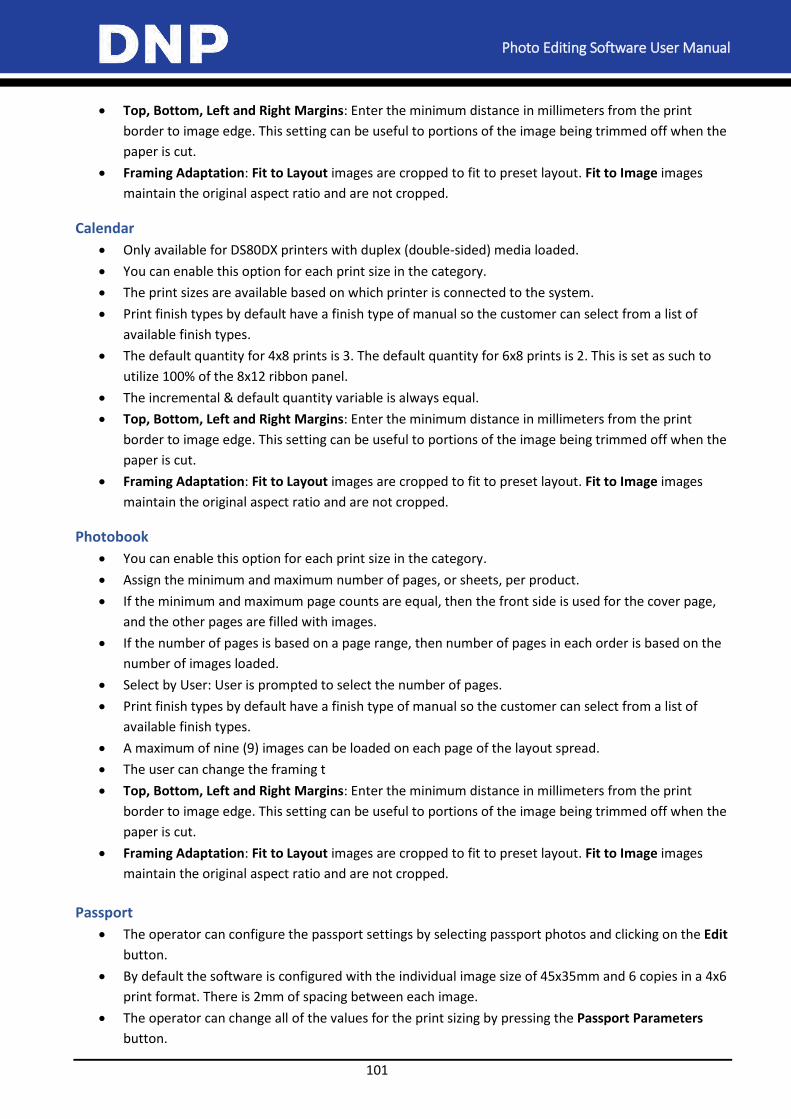
Photo Editing Software User Manual
101
Top, Bottom, Left and Right Margins: Enter the minimum distance in millimeters from the print
border to image edge. This setting can be useful to portions of the image being trimmed off when the
paper is cut.
Framing Adaptation: Fit to Layout images are cropped to fit to preset layout. Fit to Image images
maintain the original aspect ratio and are not cropped.
Calendar
Only available for DS80DX printers with duplex (double-sided) media loaded.
You can enable this option for each print size in the category.
The print sizes are available based on which printer is connected to the system.
Print finish types by default have a finish type of manual so the customer can select from a list of
available finish types.
The default quantity for 4x8 prints is 3. The default quantity for 6x8 prints is 2. This is set as such to
utilize 100% of the 8x12 ribbon panel.
The incremental & default quantity variable is always equal.
Top, Bottom, Left and Right Margins: Enter the minimum distance in millimeters from the print
border to image edge. This setting can be useful to portions of the image being trimmed off when the
paper is cut.
Framing Adaptation: Fit to Layout images are cropped to fit to preset layout. Fit to Image images
maintain the original aspect ratio and are not cropped.
Photobook
You can enable this option for each print size in the category.
Assign the minimum and maximum number of pages, or sheets, per product.
If the minimum and maximum page counts are equal, then the front side is used for the cover page,
and the other pages are filled with images.
If the number of pages is based on a page range, then number of pages in each order is based on the
number of images loaded.
Select by User: User is prompted to select the number of pages.
Print finish types by default have a finish type of manual so the customer can select from a list of
available finish types.
A maximum of nine (9) images can be loaded on each page of the layout spread.
The user can change the framing t
Top, Bottom, Left and Right Margins: Enter the minimum distance in millimeters from the print
border to image edge. This setting can be useful to portions of the image being trimmed off when the
paper is cut.
Framing Adaptation: Fit to Layout images are cropped to fit to preset layout. Fit to Image images
maintain the original aspect ratio and are not cropped.
Passport
The operator can configure the passport settings by selecting passport photos and clicking on the Edit
button.
By default the software is configured with the individual image size of 45x35mm and 6 copies in a 4x6
print format. There is 2mm of spacing between each image.
The operator can change all of the values for the print sizing by pressing the Passport Parameters
button.
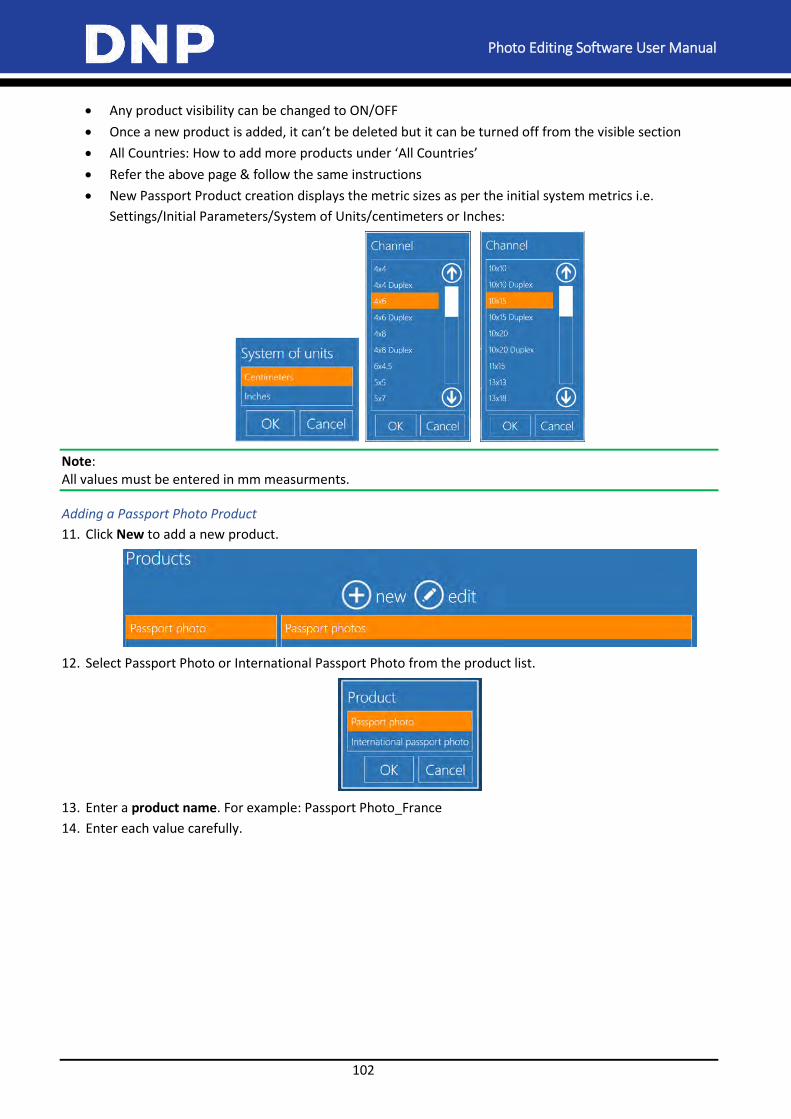
Photo Editing Software User Manual
102
Any product visibility can be changed to ON/OFF
Once a new product is added, it can’t be deleted but it can be turned off from the visible section
All Countries: How to add more products under ‘All Countries’
Refer the above page & follow the same instructions
New Passport Product creation displays the metric sizes as per the initial system metrics i.e.
Settings/Initial Parameters/System of Units/centimeters or Inches:
Note: All values must be entered in mm measurments.
Adding a Passport Photo Product
11. Click New to add a new product.
12. Select Passport Photo or International Passport Photo from the product list.
13. Enter a product name. For example: Passport Photo_France
14. Enter each value carefully.
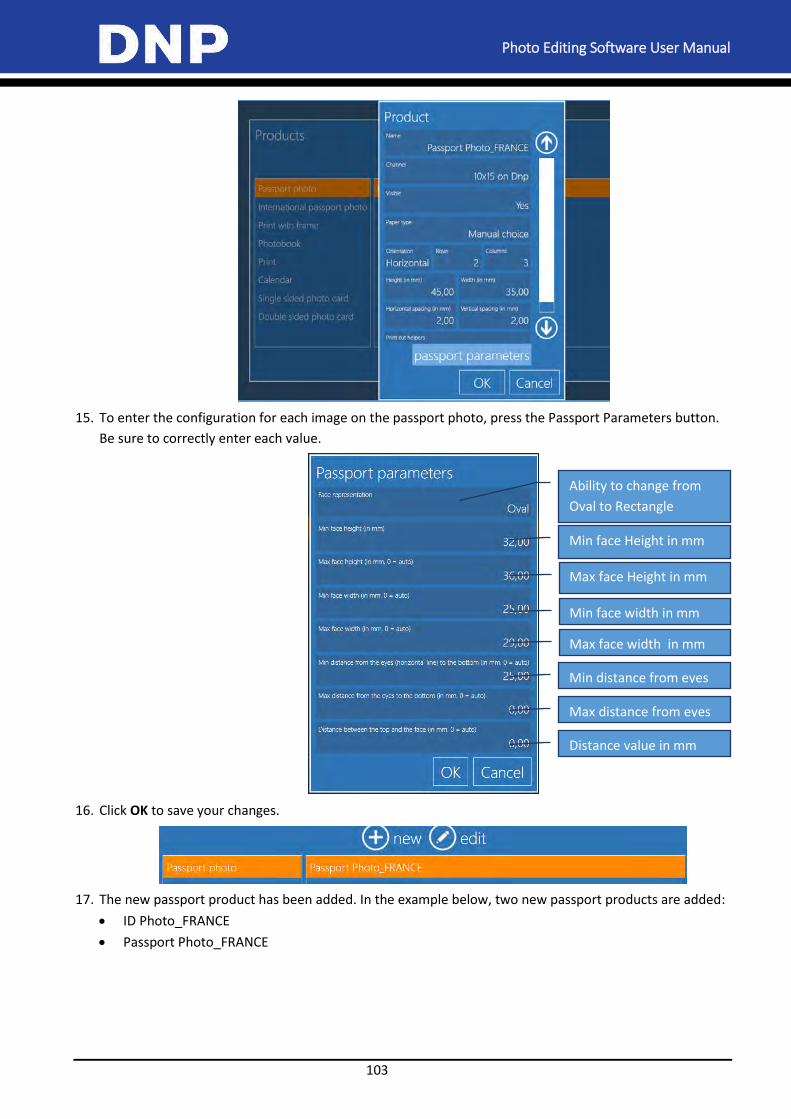
Photo Editing Software User Manual
103
15. To enter the configuration for each image on the passport photo, press the Passport Parameters button.
Be sure to correctly enter each value.
16. Click OK to save your changes.
17. The new passport product has been added. In the example below, two new passport products are added:
ID Photo_FRANCE
Passport Photo_FRANCE
Ability to change from
Oval to Rectangle
Min face Height in mm
Max face Height in mm
Min face width in mm
Max face width in mm
Min distance from eyes
m Max distance from eyes
Distance value in mm
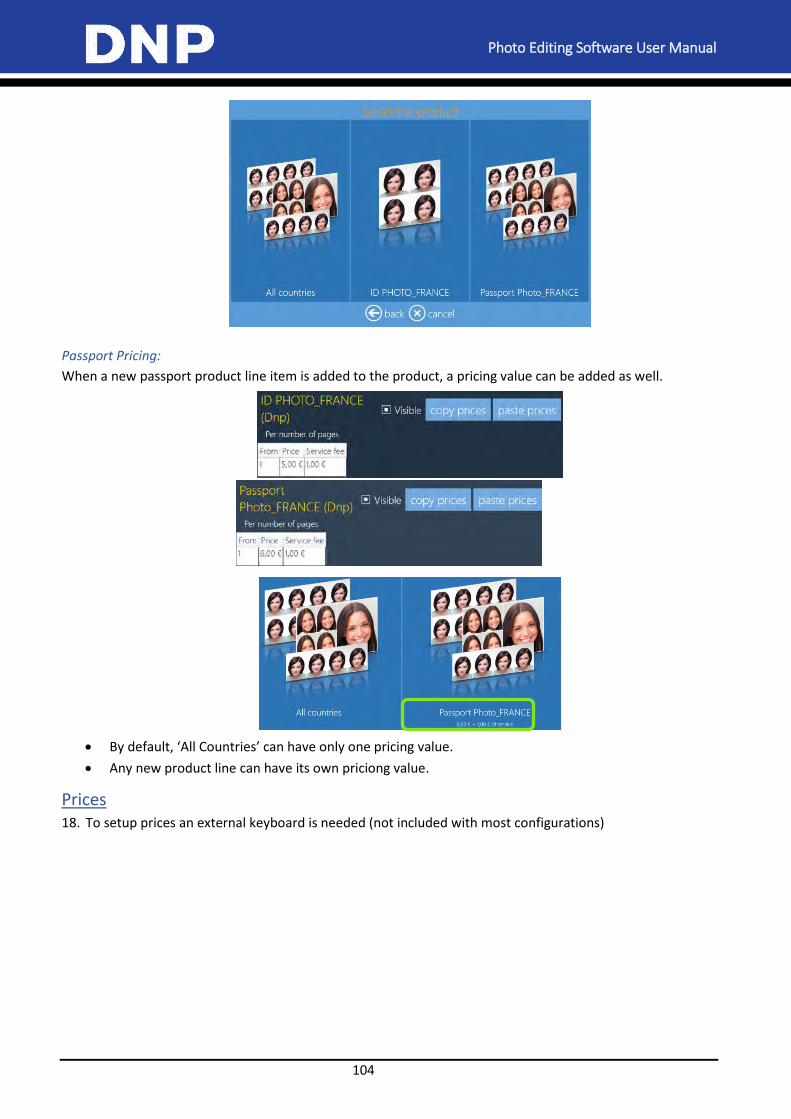
Photo Editing Software User Manual
104
Passport Pricing:
When a new passport product line item is added to the product, a pricing value can be added as well.
By default, ‘All Countries’ can have only one pricing value.
Any new product line can have its own priciong value.
Prices 18. To setup prices an external keyboard is needed (not included with most configurations)
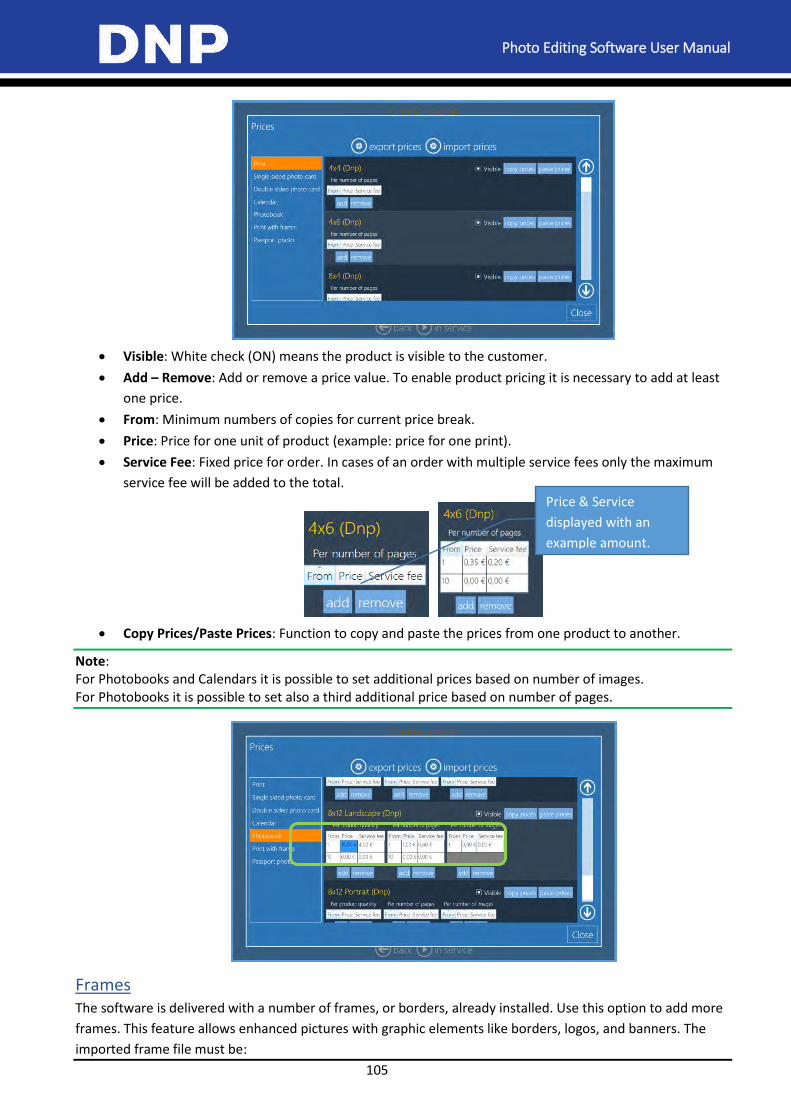
Photo Editing Software User Manual
105
Visible: White check (ON) means the product is visible to the customer.
Add – Remove: Add or remove a price value. To enable product pricing it is necessary to add at least
one price.
From: Minimum numbers of copies for current price break.
Price: Price for one unit of product (example: price for one print).
Service Fee: Fixed price for order. In cases of an order with multiple service fees only the maximum
service fee will be added to the total.
Copy Prices/Paste Prices: Function to copy and paste the prices from one product to another.
Note: For Photobooks and Calendars it is possible to set additional prices based on number of images. For Photobooks it is possible to set also a third additional price based on number of pages.
Frames The software is delivered with a number of frames, or borders, already installed. Use this option to add more
frames. This feature allows enhanced pictures with graphic elements like borders, logos, and banners. The
imported frame file must be:
Price & Service
displayed with an
example amount.
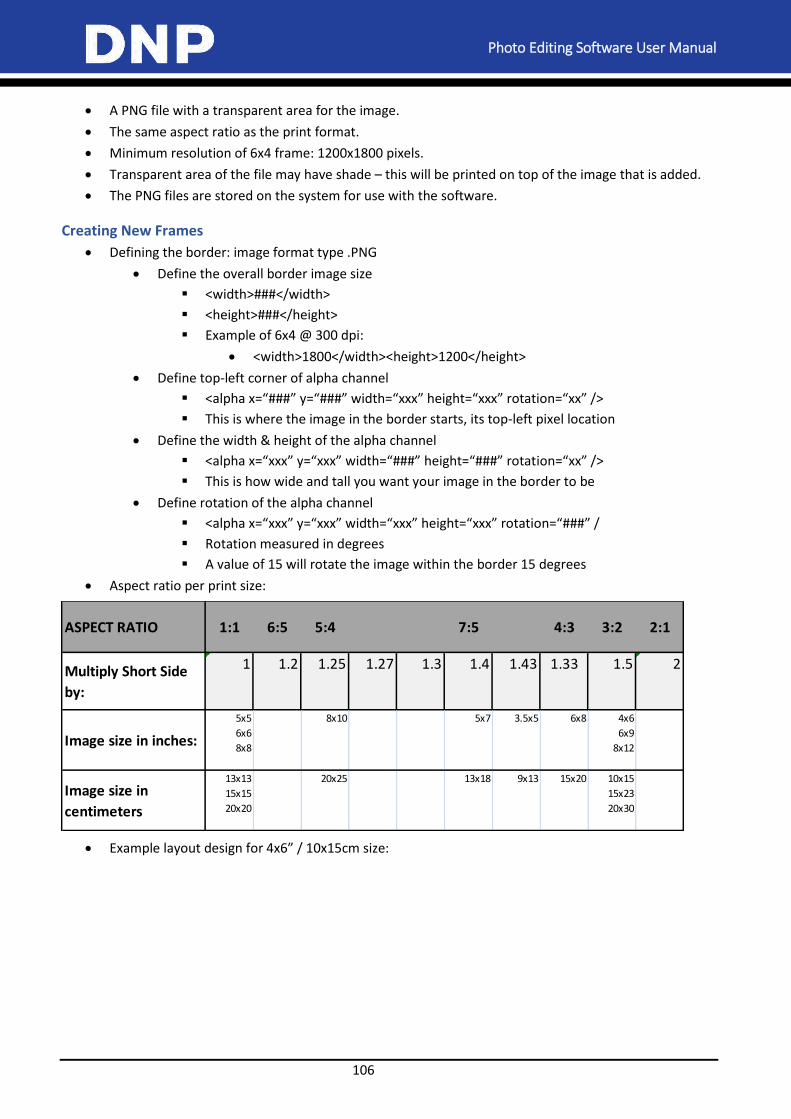
Photo Editing Software User Manual
106
A PNG file with a transparent area for the image.
The same aspect ratio as the print format.
Minimum resolution of 6x4 frame: 1200x1800 pixels.
Transparent area of the file may have shade – this will be printed on top of the image that is added.
The PNG files are stored on the system for use with the software.
Creating New Frames
Defining the border: image format type .PNG
Define the overall border image size
<width>###</width>
<height>###</height>
Example of 6x4 @ 300 dpi:
<width>1800</width><height>1200</height>
Define top-left corner of alpha channel
<alpha x=“###” y=“###” width=“xxx” height=“xxx” rotation=“xx” />
This is where the image in the border starts, its top-left pixel location
Define the width & height of the alpha channel
<alpha x=“xxx” y=“xxx” width=“###” height=“###” rotation=“xx” />
This is how wide and tall you want your image in the border to be
Define rotation of the alpha channel
<alpha x=“xxx” y=“xxx” width=“xxx” height=“xxx” rotation=“###” /
Rotation measured in degrees
A value of 15 will rotate the image within the border 15 degrees
Aspect ratio per print size:
Example layout design for 4x6” / 10x15cm size:
5x5 8x10 5x7 3.5x5 6x8 4x6
6x6 6x9
8x8 8x12
13x13 20x25 13x18 9x13 15x20 10x15
15x15 15x23
20x20 20x30
Image size in inches:
Image size in
centimeters
1.43 1.5 2Multiply Short Side
by:
4:3
1.33
7:5 3:2 2:1
1 1.2 1.25 1.27 1.3 1.4
ASPECT RATIO 1:1 6:5 5:4
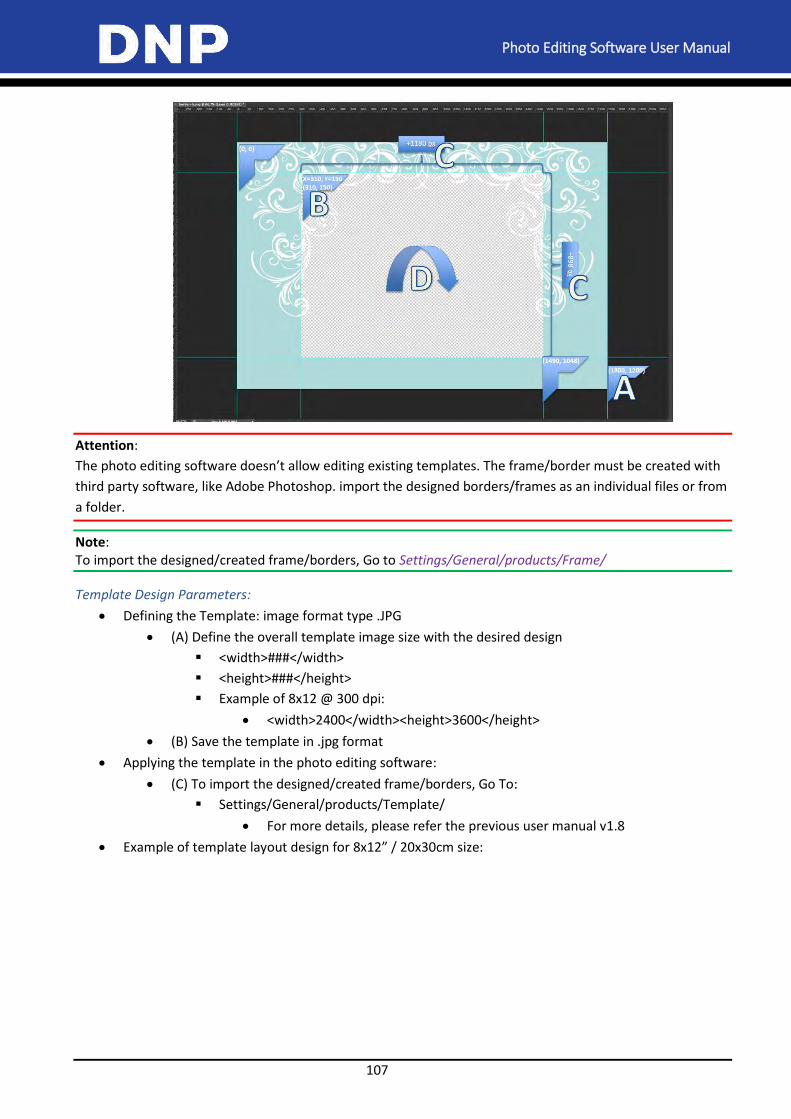
Photo Editing Software User Manual
107
Attention:
The photo editing software doesn’t allow editing existing templates. The frame/border must be created with
third party software, like Adobe Photoshop. import the designed borders/frames as an individual files or from
a folder.
Note: To import the designed/created frame/borders, Go to Settings/General/products/Frame/
Template Design Parameters:
Defining the Template: image format type .JPG
(A) Define the overall template image size with the desired design
<width>###</width>
<height>###</height>
Example of 8x12 @ 300 dpi:
<width>2400</width><height>3600</height>
(B) Save the template in .jpg format
Applying the template in the photo editing software:
(C) To import the designed/created frame/borders, Go To:
Settings/General/products/Template/
For more details, please refer the previous user manual v1.8
Example of template layout design for 8x12” / 20x30cm size:
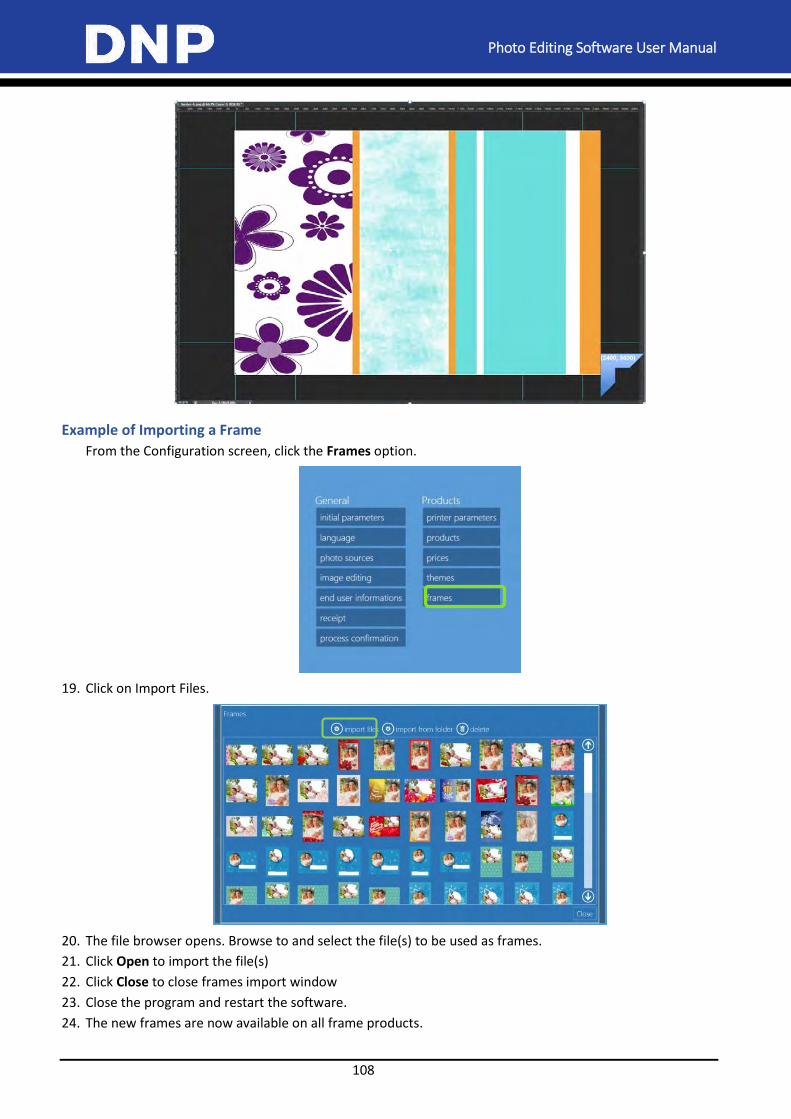
Photo Editing Software User Manual
108
Example of Importing a Frame
From the Configuration screen, click the Frames option.
19. Click on Import Files.
20. The file browser opens. Browse to and select the file(s) to be used as frames.
21. Click Open to import the file(s)
22. Click Close to close frames import window
23. Close the program and restart the software.
24. The new frames are now available on all frame products.
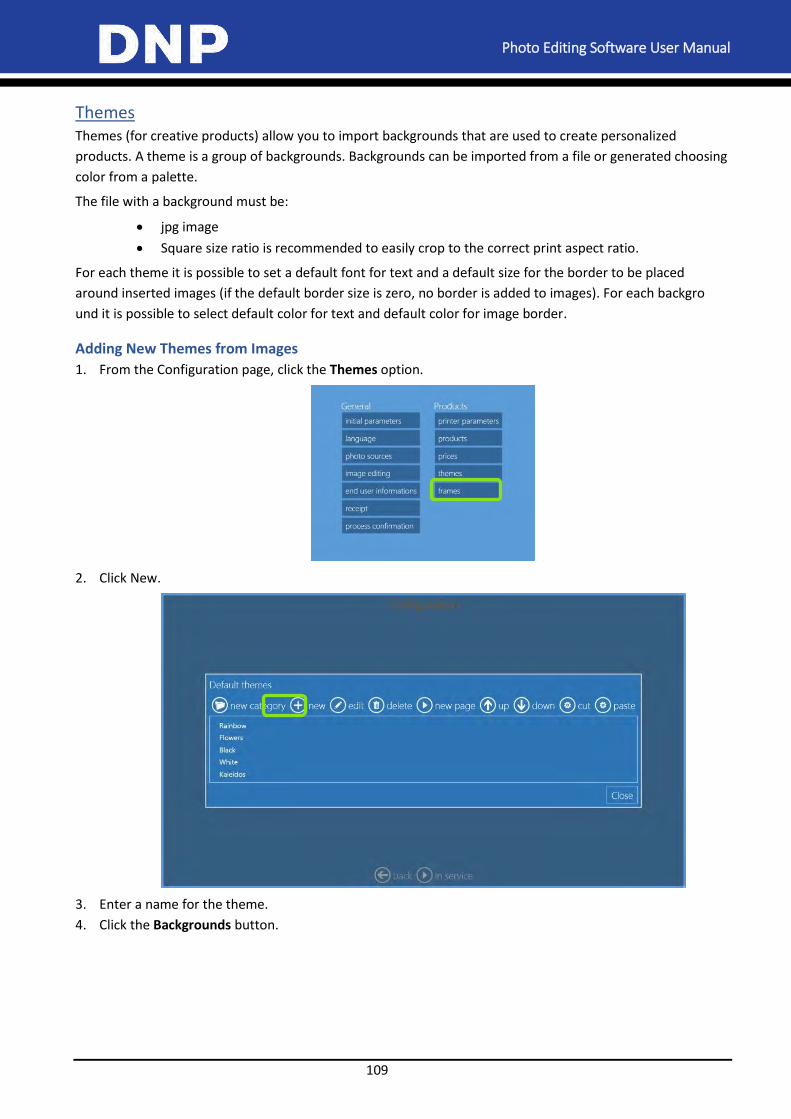
Photo Editing Software User Manual
109
Themes Themes (for creative products) allow you to import backgrounds that are used to create personalized
products. A theme is a group of backgrounds. Backgrounds can be imported from a file or generated choosing
color from a palette.
The file with a background must be:
jpg image
Square size ratio is recommended to easily crop to the correct print aspect ratio.
For each theme it is possible to set a default font for text and a default size for the border to be placed
around inserted images (if the default border size is zero, no border is added to images). For each backgro
und it is possible to select default color for text and default color for image border.
Adding New Themes from Images
1. From the Configuration page, click the Themes option.
2. Click New.
3. Enter a name for the theme.
4. Click the Backgrounds button.
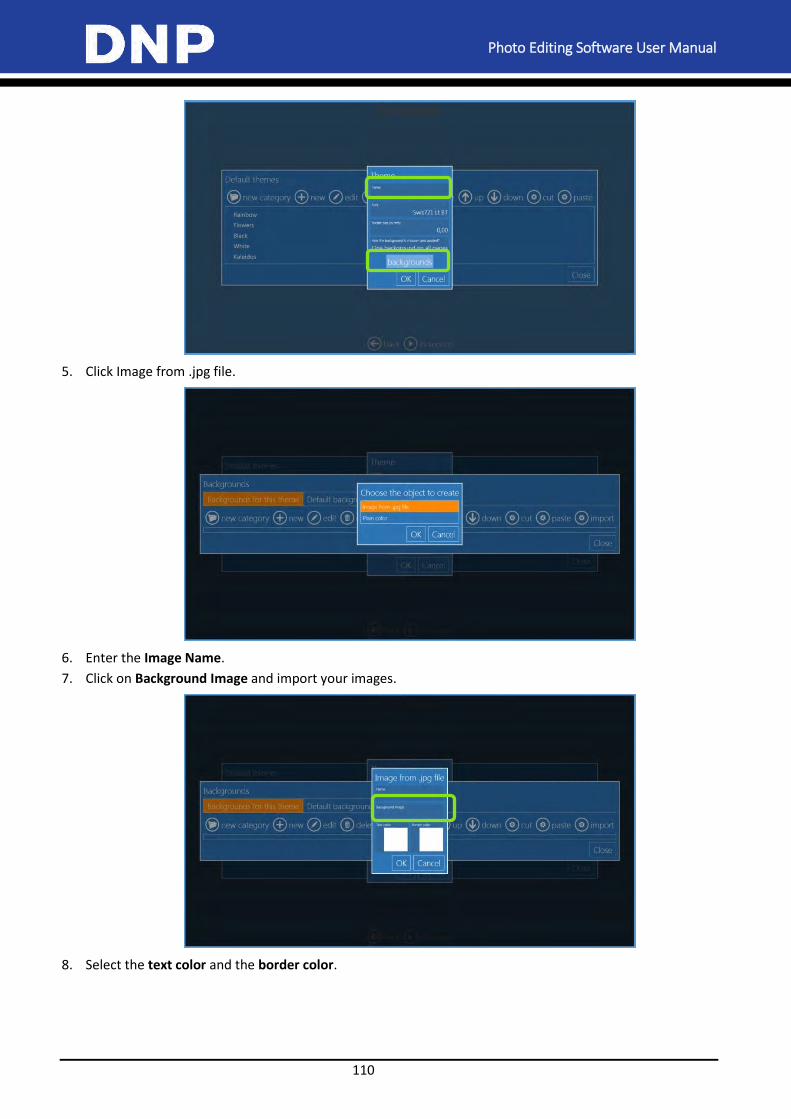
Photo Editing Software User Manual
110
5. Click Image from .jpg file.
6. Enter the Image Name.
7. Click on Background Image and import your images.
8. Select the text color and the border color.
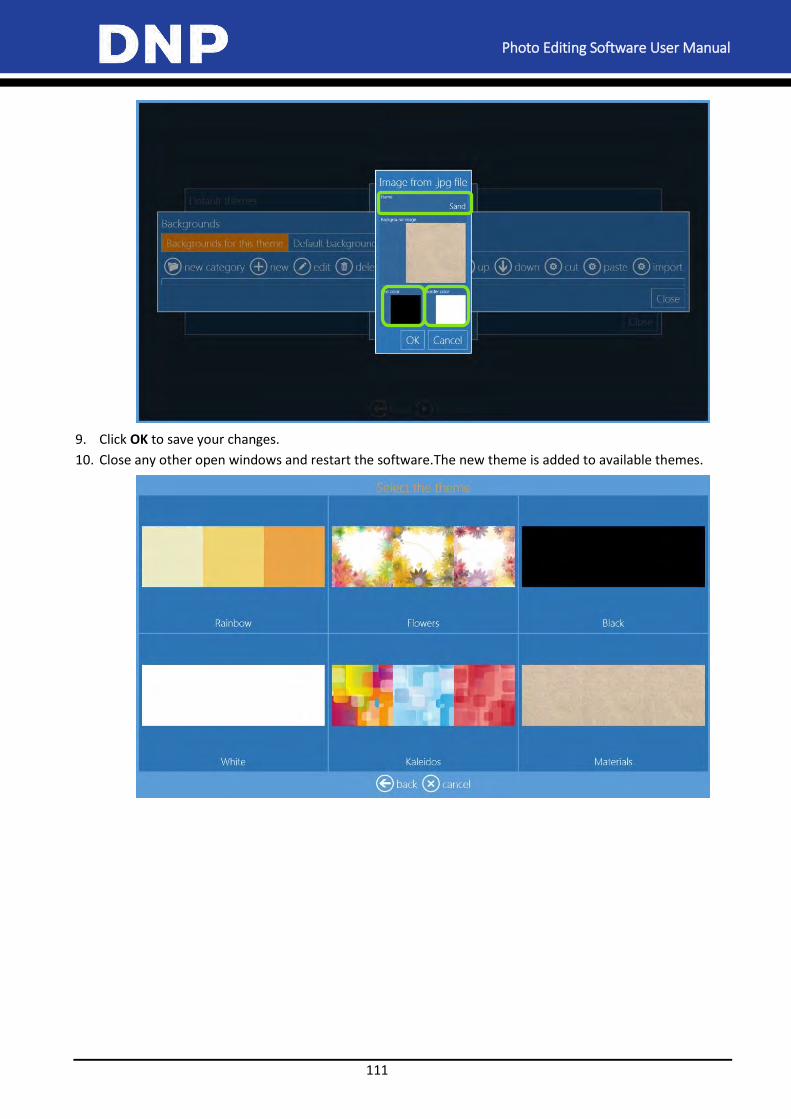
Photo Editing Software User Manual
111
9. Click OK to save your changes.
10. Close any other open windows and restart the software.The new theme is added to available themes.

Photo Editing Software User Manual
112
11. Diagnostics
Team Viewer When the system requires remote support, connect with an internet connection and provide the Team
Viewer ID to the support person as needed.
1. From the Main Panel, select the Diagnostics button.
2. Select the Teamviewer option.
3. When prompted, enter the password: dnppiesupport (in small letters with no space)
4. Wait for the DNP-PIE Remote Support window to appear.
Printer Status 1. From the Main Panel, select the Diagnostics button.
2. Select the Printer Status option.
3. Use the information on this screen to identify your printers and the current status of each printer.
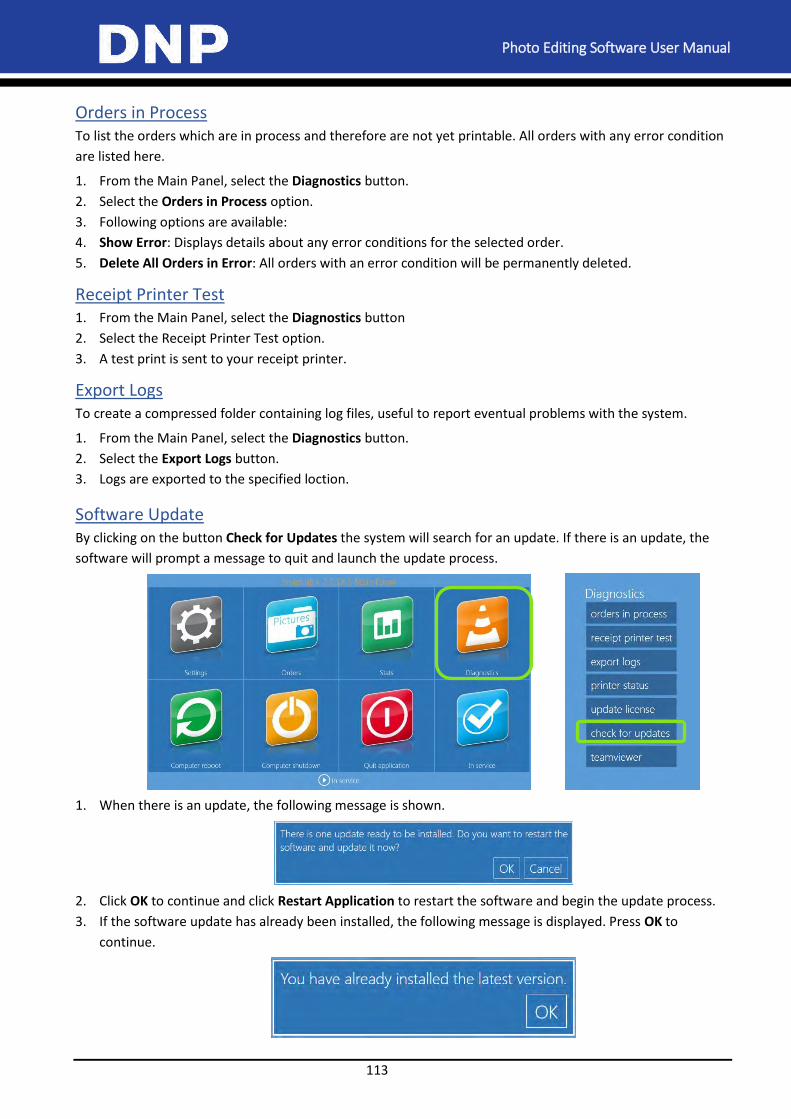
Photo Editing Software User Manual
113
Orders in Process To list the orders which are in process and therefore are not yet printable. All orders with any error condition
are listed here.
1. From the Main Panel, select the Diagnostics button.
2. Select the Orders in Process option.
3. Following options are available:
4. Show Error: Displays details about any error conditions for the selected order.
5. Delete All Orders in Error: All orders with an error condition will be permanently deleted.
Receipt Printer Test 1. From the Main Panel, select the Diagnostics button
2. Select the Receipt Printer Test option.
3. A test print is sent to your receipt printer.
Export Logs To create a compressed folder containing log files, useful to report eventual problems with the system.
1. From the Main Panel, select the Diagnostics button.
2. Select the Export Logs button.
3. Logs are exported to the specified loction.
Software Update By clicking on the button Check for Updates the system will search for an update. If there is an update, the
software will prompt a message to quit and launch the update process.
1. When there is an update, the following message is shown.
2. Click OK to continue and click Restart Application to restart the software and begin the update process.
3. If the software update has already been installed, the following message is displayed. Press OK to
continue.

Photo Editing Software User Manual
114
4. If there is no internet connection, the following message appears. Press OK to continue.
Updating the Software without an Internect Connection
It is possible to use another way to update the software; by downloading the installer from:
http://www.dnpphoto.com/downloads/ and selecting the product name.
Attention:
The instruction below is only for the Snap Lab system.
5. Exit all applications.
6. After downloading the software, copy and extract the zip file on the desktop of the system.
7. Open the folder and access the installer file. Double-click on the installer and follow the
installation instructions.
8. Click Finish (see image number above 4) and restart the system.
Attention:
Do not interrupt the installation process during the installation!
1
2
3
4
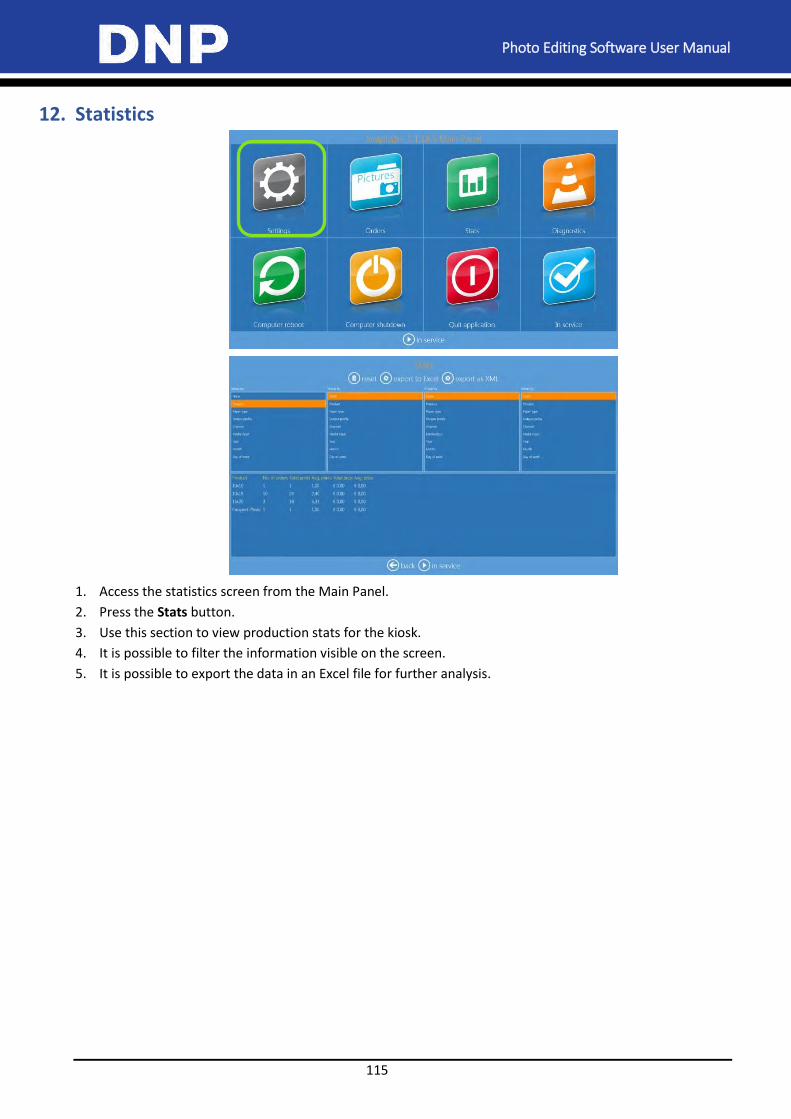
Photo Editing Software User Manual
115
12. Statistics
1. Access the statistics screen from the Main Panel.
2. Press the Stats button.
3. Use this section to view production stats for the kiosk.
4. It is possible to filter the information visible on the screen.
5. It is possible to export the data in an Excel file for further analysis.
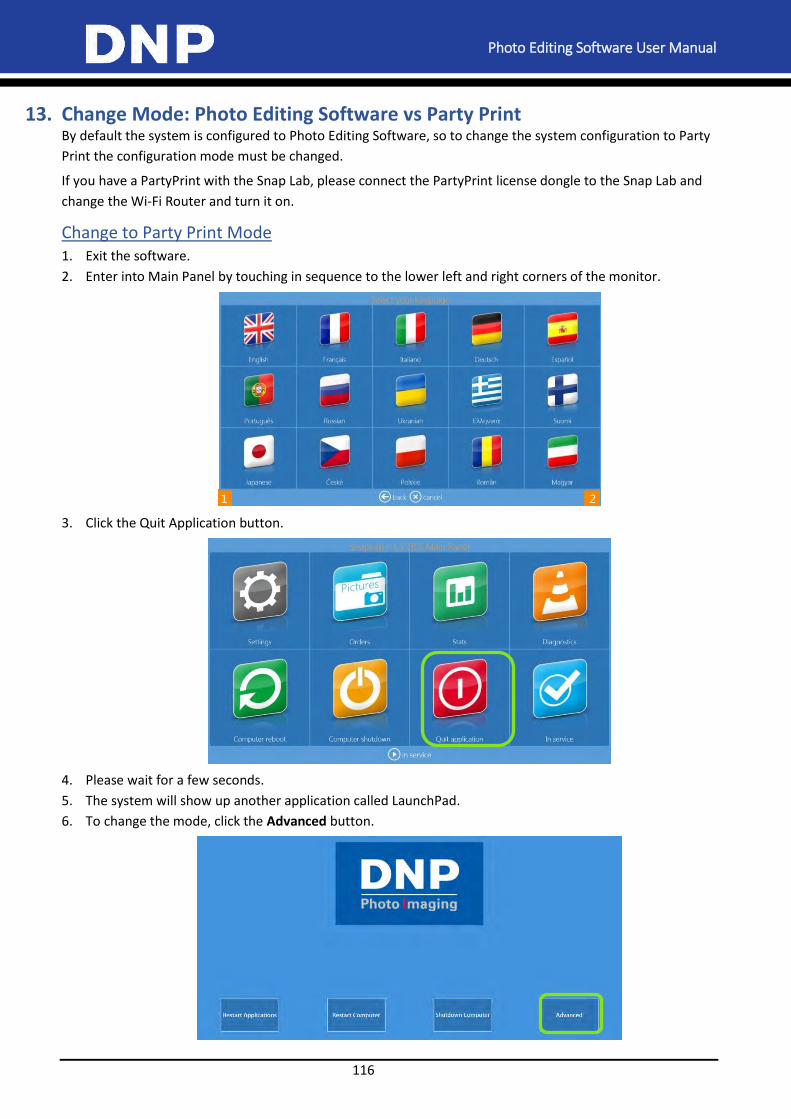
Photo Editing Software User Manual
116
13. Change Mode: Photo Editing Software vs Party Print By default the system is configured to Photo Editing Software, so to change the system configuration to Party
Print the configuration mode must be changed.
If you have a PartyPrint with the Snap Lab, please connect the PartyPrint license dongle to the Snap Lab and
change the Wi-Fi Router and turn it on.
Change to Party Print Mode 1. Exit the software.
2. Enter into Main Panel by touching in sequence to the lower left and right corners of the monitor.
3. Click the Quit Application button.
4. Please wait for a few seconds.
5. The system will show up another application called LaunchPad.
6. To change the mode, click the Advanced button.

Photo Editing Software User Manual
117
7. Type the password 1600.
8. Click the Mode button quickly.
9. The advance control will disapper in 3-5 seconds.
10. By clicking on the Mode button the software will display 2 options:
Current Configuration: Photo Editing Software (Snap Lab);
Available Configuration: Party Print.
Note: The current configuration won’t be accessible; as it’s the actual confuguration. This will be respected in any mode (Photo Editing Software vs Party Print).
11. Click on Available Configuration then Party Print and follow the instructions.
12. Please follow the instruction carefully before clicking on the OK button.
Password : 1600
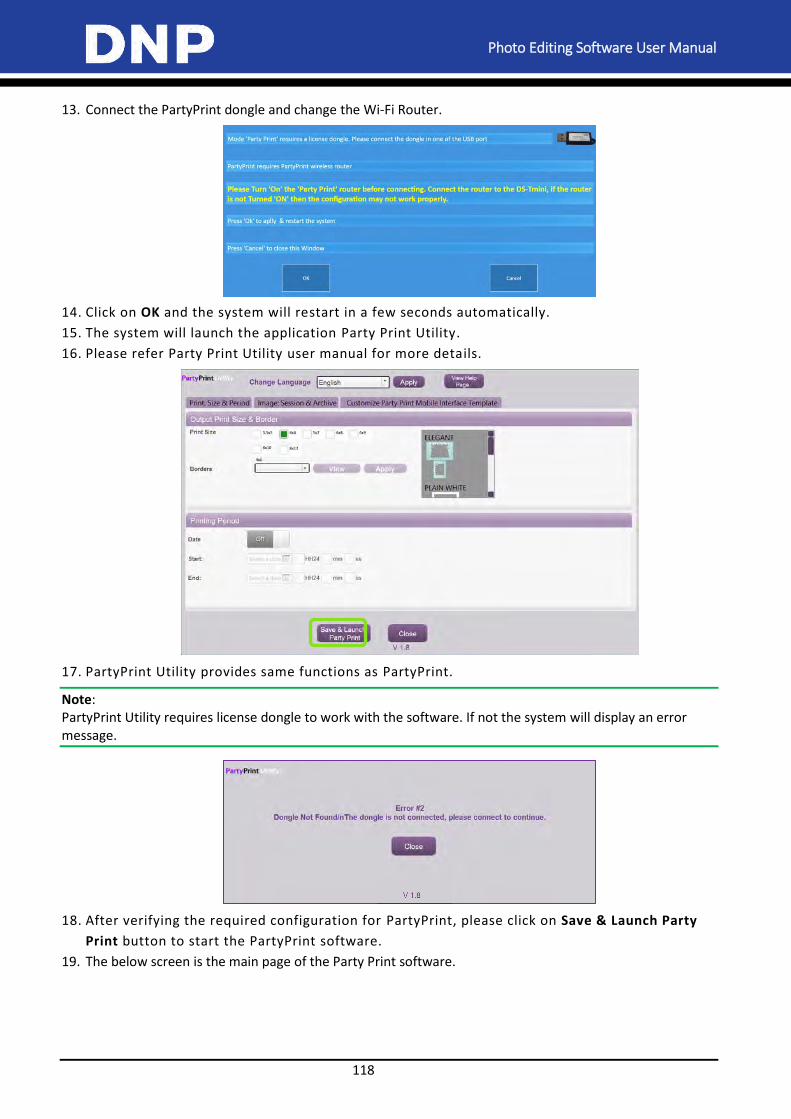
Photo Editing Software User Manual
118
13. Connect the PartyPrint dongle and change the Wi-Fi Router.
14. Click on OK and the system will restart in a few seconds automatically.
15. The system will launch the application Party Print Utility.
16. Please refer Party Print Utility user manual for more details.
17. PartyPrint Utility provides same functions as PartyPrint.
Note: PartyPrint Utility requires license dongle to work with the software. If not the system will display an error message.
18. After verifying the required configuration for PartyPrint, please click on Save & Launch Party
Print button to start the PartyPrint software.
19. The below screen is the main page of the Party Print software.
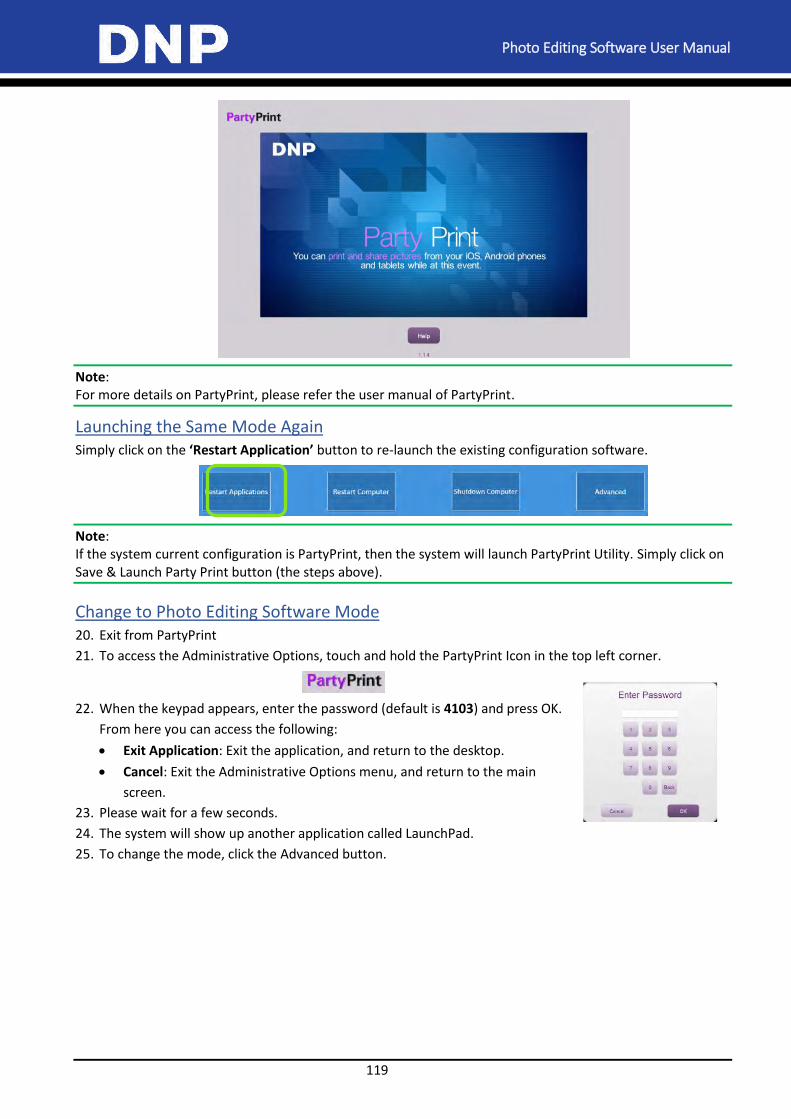
Photo Editing Software User Manual
119
Note: For more details on PartyPrint, please refer the user manual of PartyPrint.
Launching the Same Mode Again Simply click on the ‘Restart Application’ button to re-launch the existing configuration software.
Note: If the system current configuration is PartyPrint, then the system will launch PartyPrint Utility. Simply click on Save & Launch Party Print button (the steps above).
Change to Photo Editing Software Mode 20. Exit from PartyPrint
21. To access the Administrative Options, touch and hold the PartyPrint Icon in the top left corner.
22. When the keypad appears, enter the password (default is 4103) and press OK.
From here you can access the following:
Exit Application: Exit the application, and return to the desktop.
Cancel: Exit the Administrative Options menu, and return to the main
screen.
23. Please wait for a few seconds.
24. The system will show up another application called LaunchPad.
25. To change the mode, click the Advanced button.
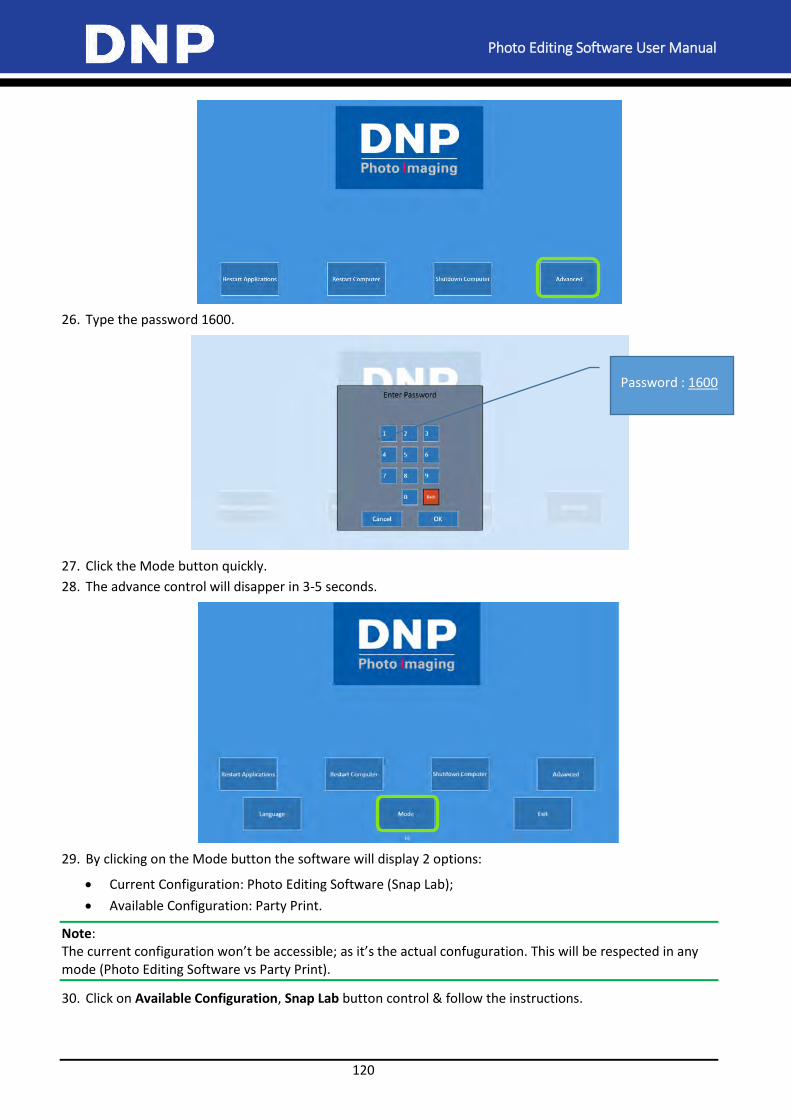
Photo Editing Software User Manual
120
26. Type the password 1600.
27. Click the Mode button quickly.
28. The advance control will disapper in 3-5 seconds.
29. By clicking on the Mode button the software will display 2 options:
Current Configuration: Photo Editing Software (Snap Lab);
Available Configuration: Party Print.
Note: The current configuration won’t be accessible; as it’s the actual confuguration. This will be respected in any mode (Photo Editing Software vs Party Print).
30. Click on Available Configuration, Snap Lab button control & follow the instructions.
Password : 1600
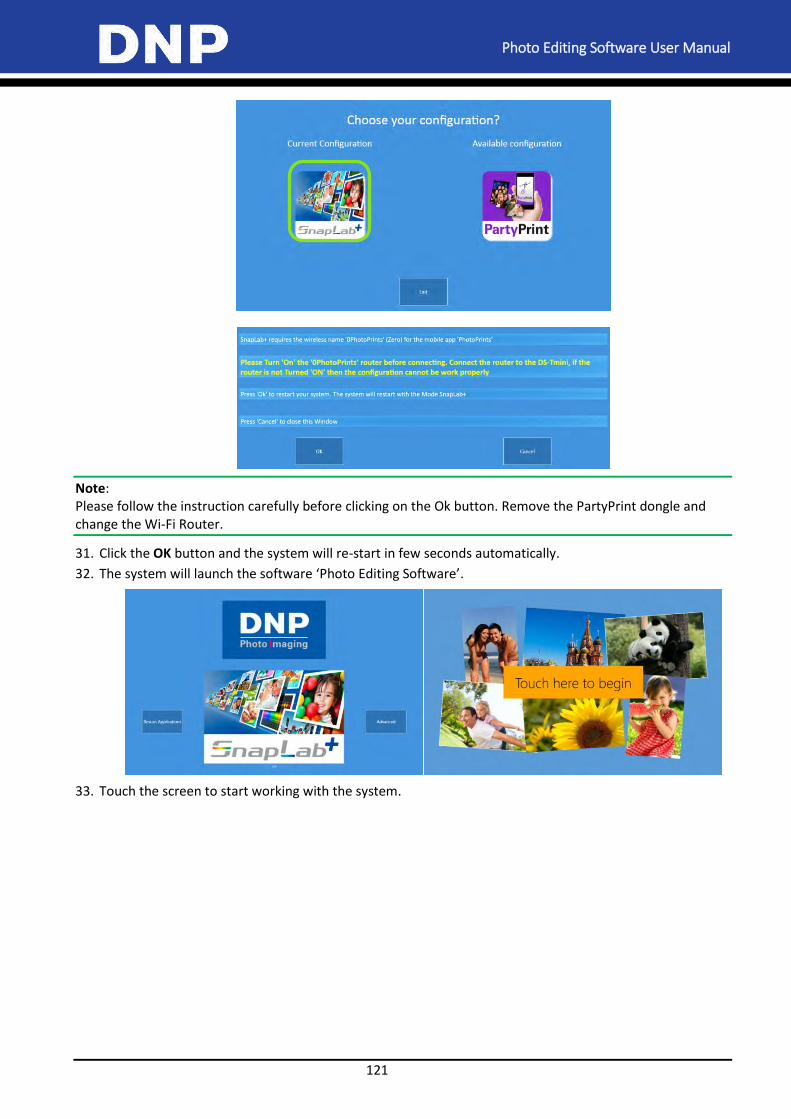
Photo Editing Software User Manual
121
Note: Please follow the instruction carefully before clicking on the Ok button. Remove the PartyPrint dongle and change the Wi-Fi Router.
31. Click the OK button and the system will re-start in few seconds automatically.
32. The system will launch the software ‘Photo Editing Software’.
33. Touch the screen to start working with the system.
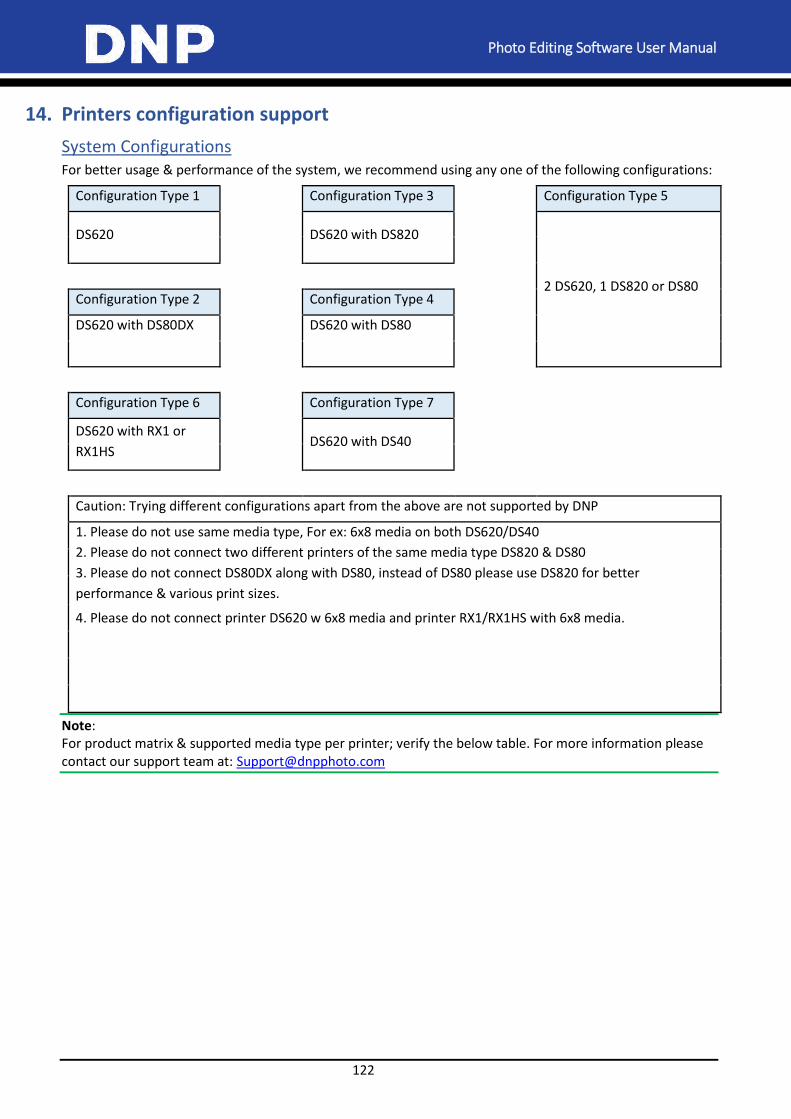
Photo Editing Software User Manual
122
14. Printers configuration support
System Configurations For better usage & performance of the system, we recommend using any one of the following configurations:
Configuration Type 1 Configuration Type 3 Configuration Type 5
DS620
DS620 with DS820
2 DS620, 1 DS820 or DS80
Configuration Type 2 Configuration Type 4
DS620 with DS80DX DS620 with DS80
Configuration Type 6 Configuration Type 7
DS620 with RX1 or
RX1HS
DS620 with DS40
Caution: Trying different configurations apart from the above are not supported by DNP
1. Please do not use same media type, For ex: 6x8 media on both DS620/DS40
2. Please do not connect two different printers of the same media type DS820 & DS80
3. Please do not connect DS80DX along with DS80, instead of DS80 please use DS820 for better
performance & various print sizes.
4. Please do not connect printer DS620 w 6x8 media and printer RX1/RX1HS with 6x8 media.
Note: For product matrix & supported media type per printer; verify the below table. For more information please contact our support team at: [email protected]

Photo Editing Software User Manual
123
Printer Matrix SL+ Product Matrix in Centimeter:
Product Size Printer W Media Product Size Printer W Media
Print Products: Simplex Print Products : Calendars
Simple Prints 9 x 13 DS 620 / RX1 Calendar 1 Page Simplex 20 x 25 DS80 DX / DS 80 / DS 820
Simple Prints 10 x 10 (Trim) DS 620 / RX1 Calendar 2 Pages Duplex 20 x 25 DS80 DX
Simple Prints 10 x 15 DS 620 / RX1 Calendar 13 Pages Duplex 20 x 25 DS80 DX
Simple Prints (10 x 15)2 DS 620 / RX1 w 15x20 Media Calendar 13 Pages Simplex 20 x 25 DS80 DX / DS 80 / DS 820
Simple Prints (11 x 15)2 DS 620 w 6x9 Media Calendar 1 Page Simplex 20 x 30 DS80 DX / DS 80 / DS 820
Simple Prints 13 x 13 DS 620 /RX1 Calendar 2 Pages Duplex 20 x 30 DS80 DX
Simple Prints 13 x 18 DS 620 /RX1/DS 820* Calendar 13 Pages Duplex 20 x 30 DS80 DX
Simple Prints 15 x 15 DS 620 /RX1 Calendar 13 Pages Simplex 20 x 30 DS80 DX / DS 80 / DS 820
Simple Prints 15 x 20 DS 620 /RX1/ DS 820 Calendar Single Page 15 x 20 DS 620 /RX1/ DS 820
Simple Prints 15 x 23 DS 620 / DS 820* Calendar 13 Pages Simplex 15 x 20 DS 820 / DS 620
Simple Prints 20 x 20 DS80 / DS 80 DX / DS 820 Calendar 13 Pages Simplex 10x20 DS 80 / DS 820
Simple Prints 20 x 25 DS80 / DS 80 DX / DS 820 Calendar Single Page 13 x 18 DS 620 /RX1/ DS 820*
Simple Prints 20 x 30 DS80 / DS 80 DX / DS 820 Calendar Single Page 15 x 20 DS 620 /RX1/ DS 820
Panoramic Prints 15x35 DS 620 w 15x20 Media Double Sided Prints 10 x 20 DS80 DX
Panoramic Prints 15x50 DS 620 w 15x20 Media Double Sided Prints 15 x 20 DS80 DX
Panoramic Prints 20x45 DS 820 w 20x25 Double Sided Prints 20 x 20 DS80 DX
Panoramic Prints 20x65 DS 820 w 20x25 Double Sided Prints 20 x 25 DS80 DX
Panoramic Prints 20x55 DS 820 w 20x30 Double Sided Prints 20 x 30 DS80 DX
Panoramic Prints 20x80 DS 820 w 20x30
Print Products : PhotoBooks
Simple Prints with Frame 9 x 13 DS 620 / RX1 Photo Book 10 x 10 DS80 DX (White Trim)
Simple Prints with Frame 10 x 10 (Trim) DS 620 / RX1 Photo Book H/V 10 x 15 DS80 DX (White Trim)
Simple Prints with Frame 10 x 15 DS 620 / RX1 Photo Book H/V 10 x 20 DS80 DX (White Trim)
Simple Prints with Frame 13 x 13 DS 620 Photo Book H/V 15 x 20 DS80 DX
Simple Prints with Frame 13 x 18 DS 620 / RX1 Photo Book 20 x 20 DS80 DX
Simple Prints with Frame 15 x 15 DS 620 /RX1/ DS 820 Photo Book H/V 20 x 25 DS80 DX
Simple Prints with Frame 15 x 20 DS 620 /RX1/ DS 820 Photo Book H/V 20 x 30 DS80 DX
Simple Prints with Frame 15 x 23 DS 620 w 15x23 Media
Simple Prints with Frame 20 x 20 DS80 / DS 80 DX / DS 820
Simple Prints with Frame 20 x 25 DS80 / DS 80 DX / DS 820
Simple Prints with Frame 20 x 30 DS80 / DS 80 DX / DS 820
Greeting Card Simplex 10 x 20 DS80 / DS 80 DX / DS 820 ID Photo 10 x 15 DS 620 / RX1
Greeting Card Simplex 15 x 20 DS80 / DS 80 DX / DS 820
Greeting Card Double Side 10 x 20 DS80 DX
Greeting Card Double Side 15 x 20 DS80 DX
DS 620 10x15, 13 x 18 9x13
15 x 20 10x15
15 x 23 13x18
DS 820 20 x 25(Standard, Premium) 15x20
20 x 30(Standard, Premium) 20 x 25
RX1 HS 9x13 20 x 30
10x15 20 x 25 Duplex Media
13x18 20 x 30 Duplex Media
15x20
Note: 15x23 simplex calendar with 15x23 media only
Caution: Please do not mix DS 820 media with DS 80 vice versa; RX1 HS printer detects HS media only where RX1 can detect both HS/Standard
Print Products : ID Photo / PassportPrint Products : Greeting Cards
Print Products : Frames / Borders
Print Products : Panoramic Print Products: Double Sided
* : White space on the right side of the print
DS 80 DX
DS 80
Printer with supported Media
RX1
Printer with supported Media
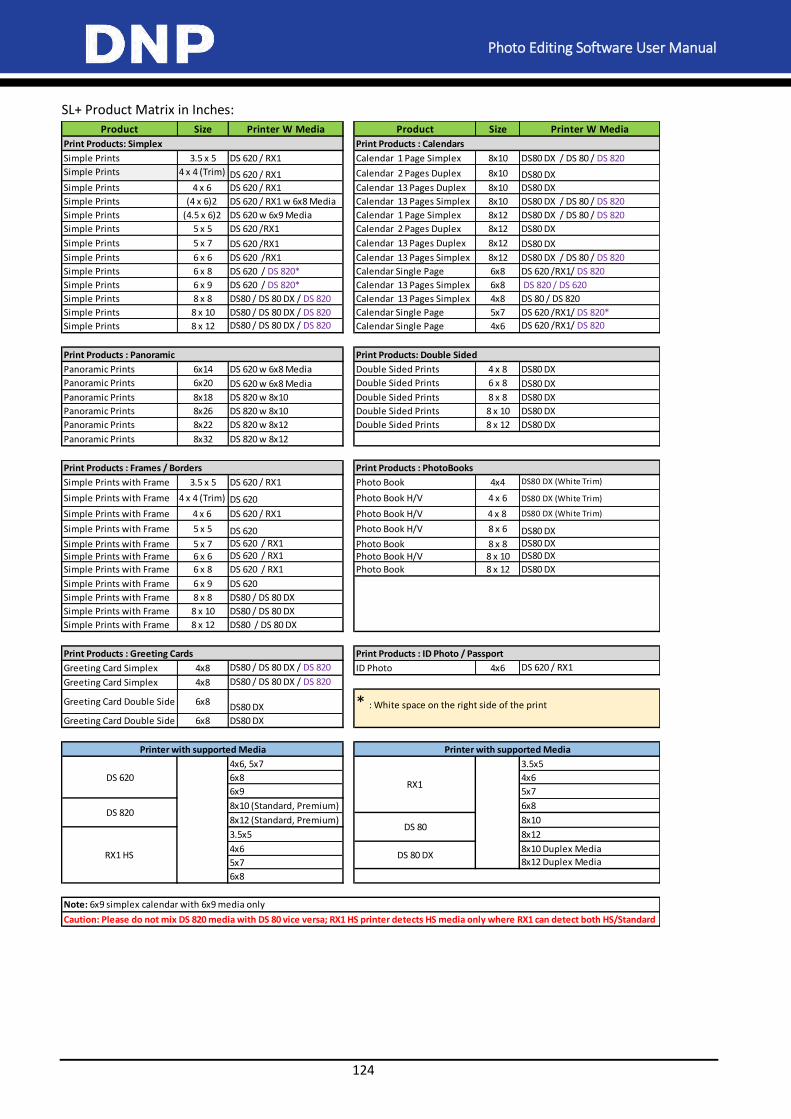
Photo Editing Software User Manual
124
SL+ Product Matrix in Inches:
Product Size Printer W Media Product Size Printer W Media
Print Products: Simplex Print Products : Calendars
Simple Prints 3.5 x 5 DS 620 / RX1 Calendar 1 Page Simplex 8x10 DS80 DX / DS 80 / DS 820
Simple Prints 4 x 4 (Trim) DS 620 / RX1 Calendar 2 Pages Duplex 8x10 DS80 DX
Simple Prints 4 x 6 DS 620 / RX1 Calendar 13 Pages Duplex 8x10 DS80 DX
Simple Prints (4 x 6)2 DS 620 / RX1 w 6x8 Media Calendar 13 Pages Simplex 8x10 DS80 DX / DS 80 / DS 820
Simple Prints (4.5 x 6)2 DS 620 w 6x9 Media Calendar 1 Page Simplex 8x12 DS80 DX / DS 80 / DS 820
Simple Prints 5 x 5 DS 620 /RX1 Calendar 2 Pages Duplex 8x12 DS80 DX
Simple Prints 5 x 7 DS 620 /RX1 Calendar 13 Pages Duplex 8x12 DS80 DX
Simple Prints 6 x 6 DS 620 /RX1 Calendar 13 Pages Simplex 8x12 DS80 DX / DS 80 / DS 820
Simple Prints 6 x 8 DS 620 / DS 820* Calendar Single Page 6x8 DS 620 /RX1/ DS 820
Simple Prints 6 x 9 DS 620 / DS 820* Calendar 13 Pages Simplex 6x8 DS 820 / DS 620
Simple Prints 8 x 8 DS80 / DS 80 DX / DS 820 Calendar 13 Pages Simplex 4x8 DS 80 / DS 820
Simple Prints 8 x 10 DS80 / DS 80 DX / DS 820 Calendar Single Page 5x7 DS 620 /RX1/ DS 820*
Simple Prints 8 x 12 DS80 / DS 80 DX / DS 820 Calendar Single Page 4x6 DS 620 /RX1/ DS 820
Panoramic Prints 6x14 DS 620 w 6x8 Media Double Sided Prints 4 x 8 DS80 DX
Panoramic Prints 6x20 DS 620 w 6x8 Media Double Sided Prints 6 x 8 DS80 DX
Panoramic Prints 8x18 DS 820 w 8x10 Double Sided Prints 8 x 8 DS80 DX
Panoramic Prints 8x26 DS 820 w 8x10 Double Sided Prints 8 x 10 DS80 DX
Panoramic Prints 8x22 DS 820 w 8x12 Double Sided Prints 8 x 12 DS80 DX
Panoramic Prints 8x32 DS 820 w 8x12
Print Products : PhotoBooks
Simple Prints with Frame 3.5 x 5 DS 620 / RX1 Photo Book 4x4 DS80 DX (White Trim)
Simple Prints with Frame 4 x 4 (Trim) DS 620 Photo Book H/V 4 x 6 DS80 DX (White Trim)
Simple Prints with Frame 4 x 6 DS 620 / RX1 Photo Book H/V 4 x 8 DS80 DX (White Trim)
Simple Prints with Frame 5 x 5 DS 620 Photo Book H/V 8 x 6 DS80 DX
Simple Prints with Frame 5 x 7 DS 620 / RX1 Photo Book 8 x 8 DS80 DX
Simple Prints with Frame 6 x 6 DS 620 / RX1 Photo Book H/V 8 x 10 DS80 DX
Simple Prints with Frame 6 x 8 DS 620 / RX1 Photo Book 8 x 12 DS80 DX
Simple Prints with Frame 6 x 9 DS 620
Simple Prints with Frame 8 x 8 DS80 / DS 80 DX
Simple Prints with Frame 8 x 10 DS80 / DS 80 DX
Simple Prints with Frame 8 x 12 DS80 / DS 80 DX
Greeting Card Simplex 4x8 DS80 / DS 80 DX / DS 820 ID Photo 4x6 DS 620 / RX1
Greeting Card Simplex 4x8 DS80 / DS 80 DX / DS 820
Greeting Card Double Side 6x8DS80 DX * : White space on the right side of the print
Greeting Card Double Side 6x8 DS80 DX
4x6, 5x7 3.5x5
6x8 4x6
6x9 5x7
8x10 (Standard, Premium) 6x8
8x12 (Standard, Premium) 8x10
3.5x5 8x12
4x6 8x10 Duplex Media
5x7 8x12 Duplex Media
6x8
Note: 6x9 simplex calendar with 6x9 media only
Print Products: Double Sided
Printer with supported Media Printer with supported Media
Caution: Please do not mix DS 820 media with DS 80 vice versa; RX1 HS printer detects HS media only where RX1 can detect both HS/Standard
Print Products : ID Photo / PassportPrint Products : Greeting Cards
Print Products : Frames / Borders
Print Products : Panoramic
DS 620RX1
DS 820
DS 80
RX1 HS DS 80 DX
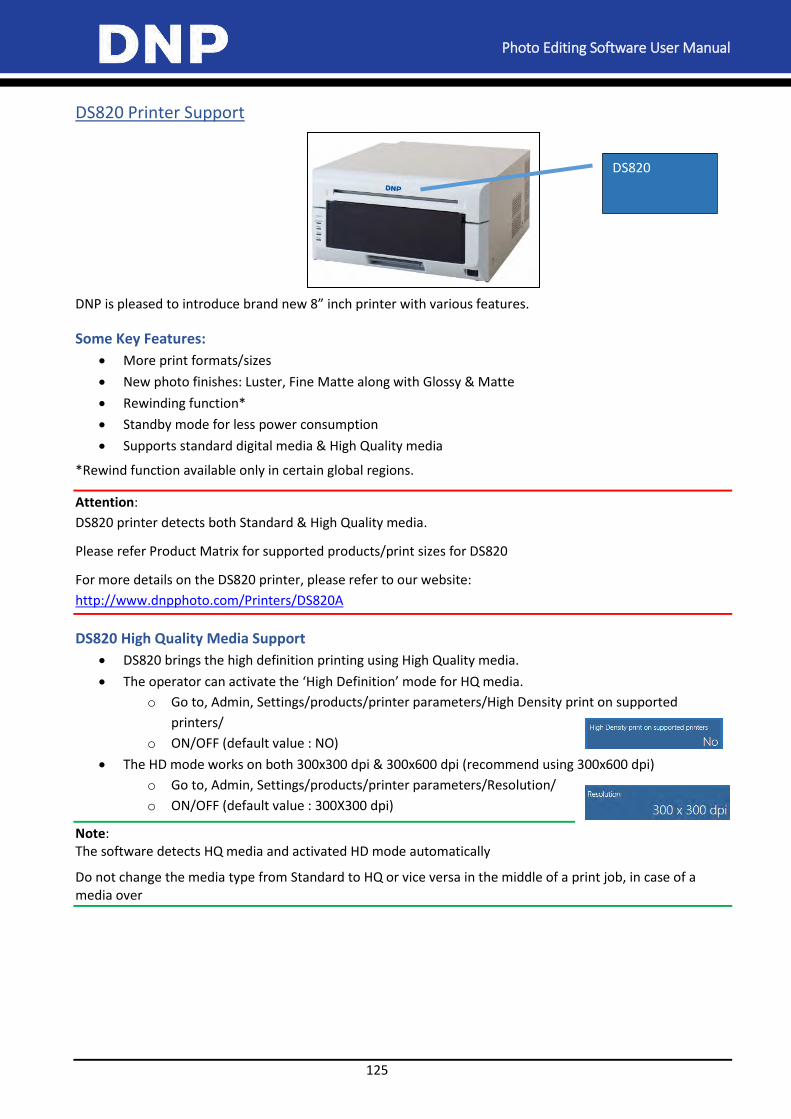
Photo Editing Software User Manual
125
DS820 Printer Support
DNP is pleased to introduce brand new 8” inch printer with various features.
Some Key Features:
More print formats/sizes
New photo finishes: Luster, Fine Matte along with Glossy & Matte
Rewinding function*
Standby mode for less power consumption
Supports standard digital media & High Quality media
*Rewind function available only in certain global regions.
Attention:
DS820 printer detects both Standard & High Quality media.
Please refer Product Matrix for supported products/print sizes for DS820
For more details on the DS820 printer, please refer to our website:
http://www.dnpphoto.com/Printers/DS820A
DS820 High Quality Media Support
DS820 brings the high definition printing using High Quality media.
The operator can activate the ‘High Definition’ mode for HQ media.
o Go to, Admin, Settings/products/printer parameters/High Density print on supported
printers/
o ON/OFF (default value : NO)
The HD mode works on both 300x300 dpi & 300x600 dpi (recommend using 300x600 dpi)
o Go to, Admin, Settings/products/printer parameters/Resolution/
o ON/OFF (default value : 300X300 dpi)
Note: The software detects HQ media and activated HD mode automatically
Do not change the media type from Standard to HQ or vice versa in the middle of a print job, in case of a media over
DS820
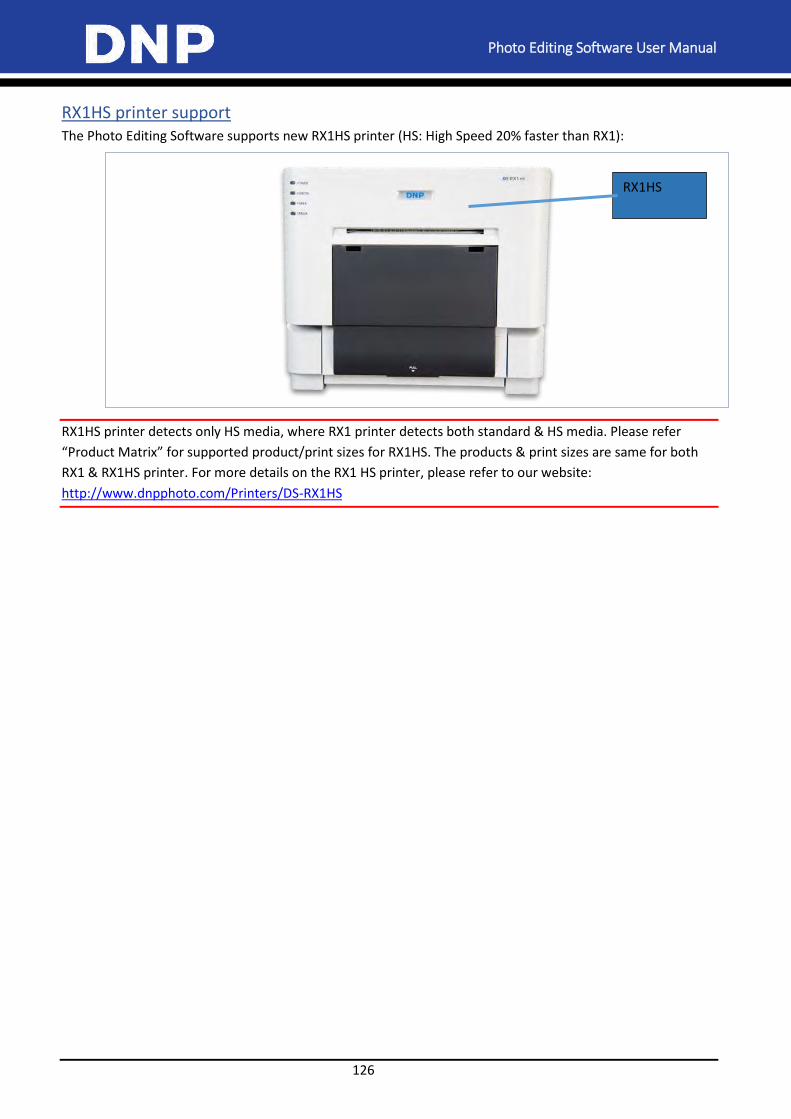
Photo Editing Software User Manual
126
RX1HS printer support The Photo Editing Software supports new RX1HS printer (HS: High Speed 20% faster than RX1):
RX1HS printer detects only HS media, where RX1 printer detects both standard & HS media. Please refer
“Product Matrix” for supported product/print sizes for RX1HS. The products & print sizes are same for both
RX1 & RX1HS printer. For more details on the RX1 HS printer, please refer to our website:
http://www.dnpphoto.com/Printers/DS-RX1HS
RX1HS
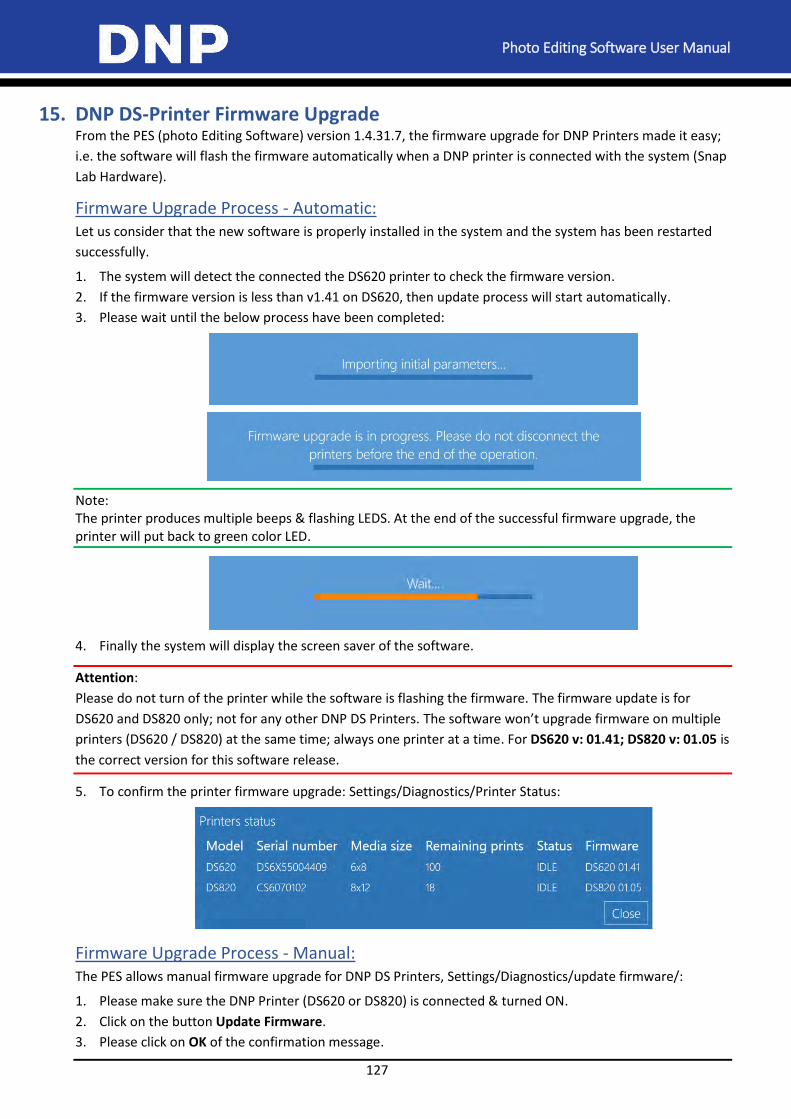
Photo Editing Software User Manual
127
15. DNP DS-Printer Firmware Upgrade From the PES (photo Editing Software) version 1.4.31.7, the firmware upgrade for DNP Printers made it easy;
i.e. the software will flash the firmware automatically when a DNP printer is connected with the system (Snap
Lab Hardware).
Firmware Upgrade Process - Automatic: Let us consider that the new software is properly installed in the system and the system has been restarted
successfully.
1. The system will detect the connected the DS620 printer to check the firmware version.
2. If the firmware version is less than v1.41 on DS620, then update process will start automatically.
3. Please wait until the below process have been completed:
Note: The printer produces multiple beeps & flashing LEDS. At the end of the successful firmware upgrade, the printer will put back to green color LED.
4. Finally the system will display the screen saver of the software.
Attention:
Please do not turn of the printer while the software is flashing the firmware. The firmware update is for
DS620 and DS820 only; not for any other DNP DS Printers. The software won’t upgrade firmware on multiple
printers (DS620 / DS820) at the same time; always one printer at a time. For DS620 v: 01.41; DS820 v: 01.05 is
the correct version for this software release.
5. To confirm the printer firmware upgrade: Settings/Diagnostics/Printer Status:
Firmware Upgrade Process - Manual: The PES allows manual firmware upgrade for DNP DS Printers, Settings/Diagnostics/update firmware/:
1. Please make sure the DNP Printer (DS620 or DS820) is connected & turned ON.
2. Click on the button Update Firmware.
3. Please click on OK of the confirmation message.
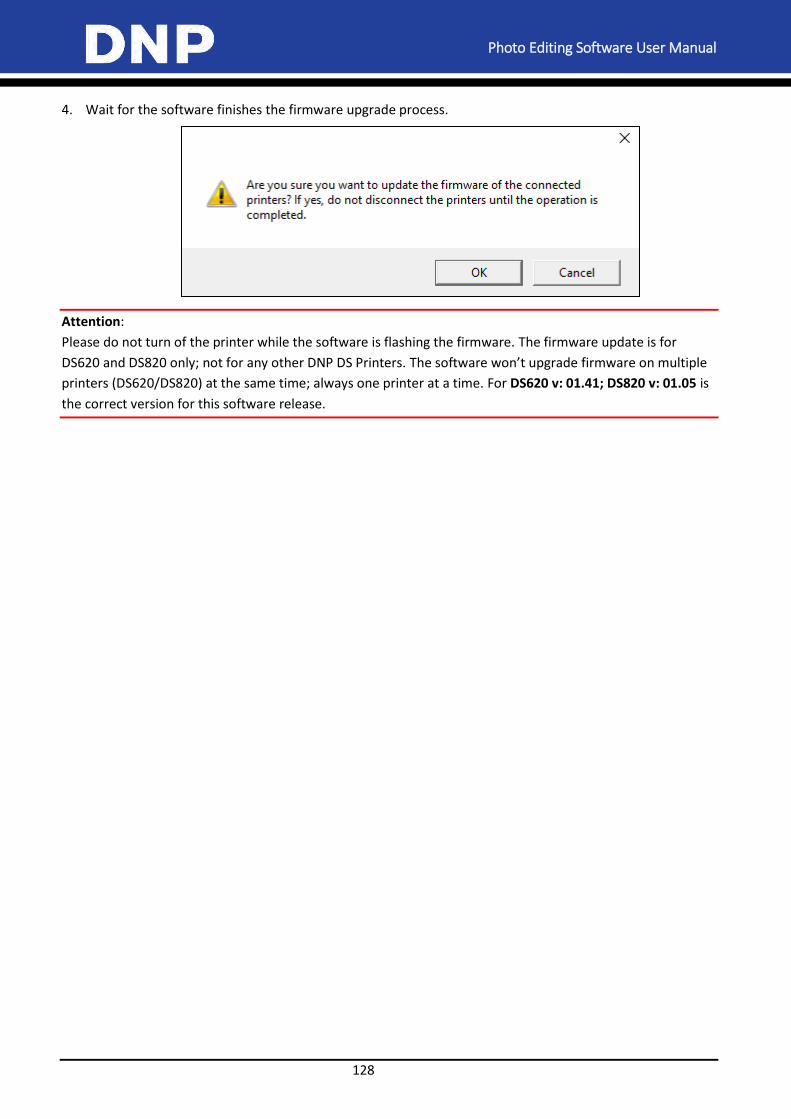
Photo Editing Software User Manual
128
4. Wait for the software finishes the firmware upgrade process.
Attention:
Please do not turn of the printer while the software is flashing the firmware. The firmware update is for
DS620 and DS820 only; not for any other DNP DS Printers. The software won’t upgrade firmware on multiple
printers (DS620/DS820) at the same time; always one printer at a time. For DS620 v: 01.41; DS820 v: 01.05 is
the correct version for this software release.
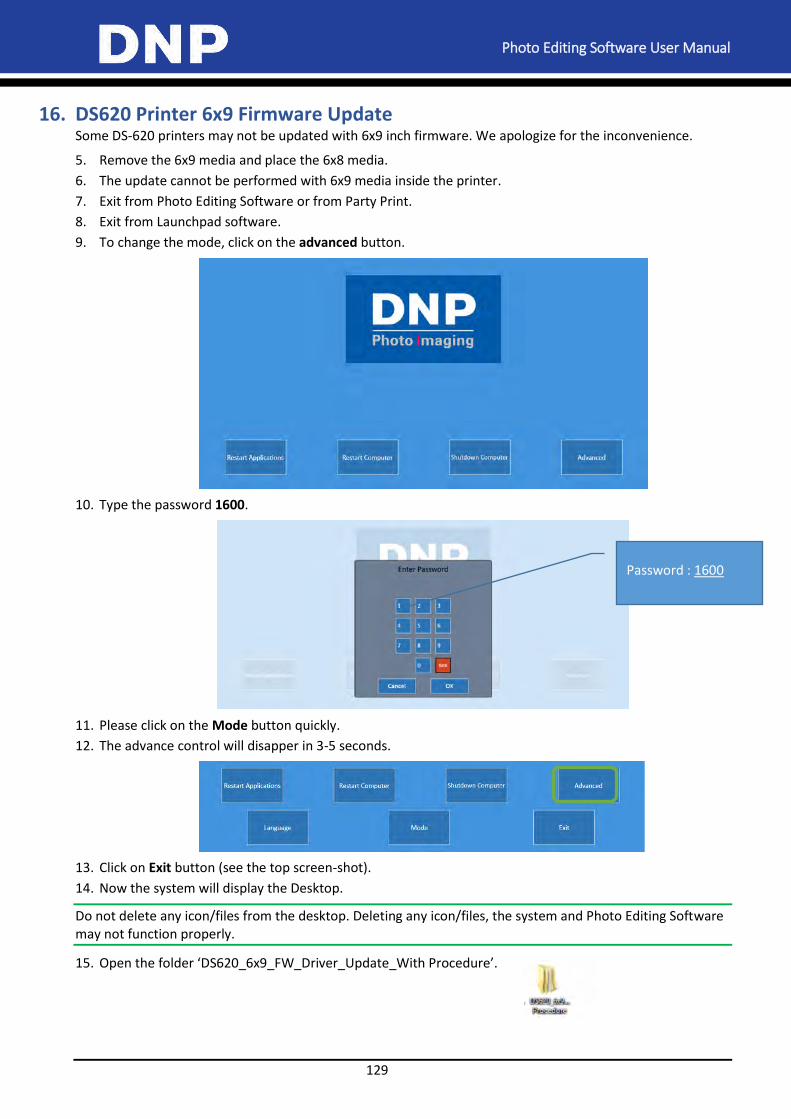
Photo Editing Software User Manual
129
16. DS620 Printer 6x9 Firmware Update Some DS-620 printers may not be updated with 6x9 inch firmware. We apologize for the inconvenience.
5. Remove the 6x9 media and place the 6x8 media.
6. The update cannot be performed with 6x9 media inside the printer.
7. Exit from Photo Editing Software or from Party Print.
8. Exit from Launchpad software.
9. To change the mode, click on the advanced button.
10. Type the password 1600.
11. Please click on the Mode button quickly.
12. The advance control will disapper in 3-5 seconds.
13. Click on Exit button (see the top screen-shot).
14. Now the system will display the Desktop.
Do not delete any icon/files from the desktop. Deleting any icon/files, the system and Photo Editing Software may not function properly.
15. Open the folder ‘DS620_6x9_FW_Driver_Update_With Procedure’.
Password : 1600

Photo Editing Software User Manual
130
16. Go to the folder VersionUpTool.
17. Double click on the file DP-DS620_0110_Win64.
18. Select Printer DP-DS620
19. Click on Start then click the End button when it is prompted.
20. If the printer is not connected then the software will display the below message.
21. Please check the printer USB is properly connected with the Snap Lab system.
22. For more details on 6x9 FW update please refer to VersionUpTool_DP-DS620_0110_ENG.pdf.
23. By default the system has 64 bit FW ugrade executable file because the windows OS is 64 bit.
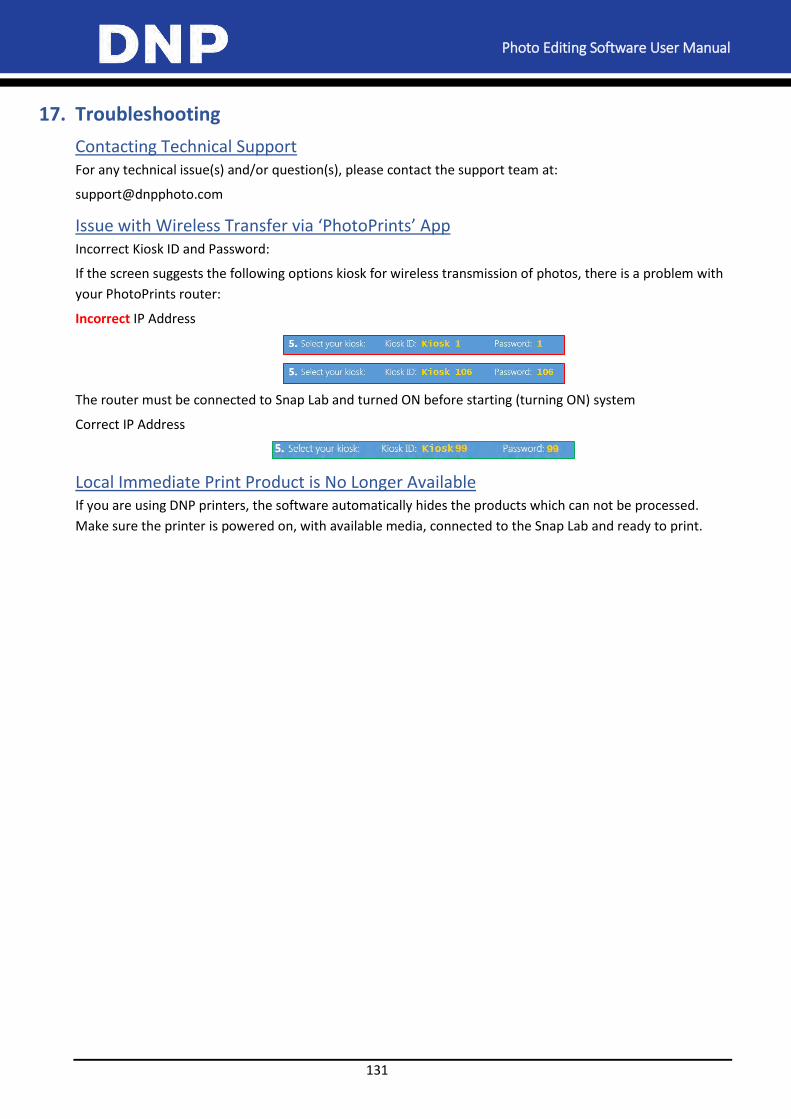
Photo Editing Software User Manual
131
17. Troubleshooting
Contacting Technical Support For any technical issue(s) and/or question(s), please contact the support team at:
Issue with Wireless Transfer via ‘PhotoPrints’ App Incorrect Kiosk ID and Password:
If the screen suggests the following options kiosk for wireless transmission of photos, there is a problem with
your PhotoPrints router:
Incorrect IP Address
The router must be connected to Snap Lab and turned ON before starting (turning ON) system
Correct IP Address
Local Immediate Print Product is No Longer Available If you are using DNP printers, the software automatically hides the products which can not be processed.
Make sure the printer is powered on, with available media, connected to the Snap Lab and ready to print.