photo by scott kelby exposure: 0.8s focal length: 40mm ... · chapter 3 mastering camera raw this...
TRANSCRIPT

Photo by Scott Kelby Exposure: 0.8s Focal Length: 40mm Aperture Value: ƒ/4.3

Chapter 3 Mastering Camera Raw
This is the first version of this book to have
an entire chapter devoted to Camera Raw.
So why a whole chapter? Three reasons:
(1) Camera Raw is that important, has that
many new features in CS2, and I felt I needed
to cover them all; (2) I needed the extra pages
to get my page count up; (3) I really didn’t
need the page count, but you can’t be sure of
that. Now, is this chapter for everybody? No.
It’s really only for people who shoot in RAW
format (you’ll know if your digital camera can
shoot in RAW, because the salesman who sold
you the camera would’ve been totally naked at
the time of your purchase). Okay, I’m going to
get serious for just a moment (and for only a
moment, so don’t get excited—especially
with that naked salesman around). Camera
Raw isn’t for everybody. For example, if you’re
a seasoned pro that gets his/her exposure
dead-on every time and never have white
balance issues, go ahead and shoot in a
high-quality JPEG format. But for everyone
else, RAW lets us fix all sorts of things after
the fact, in Photoshop, and because it’s all
happening within the data from the camera,
we can tweak the exposure, white balance,
and a dozen other settings to create a new,
perfectly balanced “original” from our digital
negative. This is very powerful stuff. Now, back
to the crazy crap. See the title for this chapter,
“Raw Hide”? You’re thinking it’s that old
western TV show, right? Well, I’m thinkin’ it’s
the theme song from that old western TV
show. Come on, sing with me: “Head ’em up,
move ’em out, Rawwwww Hidddeeeeeeee!”
(Note to editors: Insert whip sound effect here.)
Raw Hidemastering camera raw
53Chapter 3Mastering Camera Raw

54 Chapter 3 Mastering Camera Raw
The Photoshop CS2 Book for Digital Photographers
55Chapter 3Mastering Camera Raw
Continued
The Photoshop CS2 Book for Digital Photographers
Camera Raw
Essentials
If you take a photo with a traditional film camera and send the film to a lab for processing, they produce an original print from the negative you gave them (and the negative remains intact). Well, Photoshop’s Camera Raw lets you be the lab, by letting you import an unprocessed RAW original (your “digital negative”) and process it yourself, just like the lab. You can adjust everything—from exposure to white balance and more—to create your own original print to open in Photoshop, while the RAW file remains intact. Of course, the first step is shooting in RAW mode (luckily almost all of today’s digital cameras can shoot in RAW mode).
Step One: You can open a Camera Raw image in several ways—right from within the Adobe Bridge by either double-clicking on a RAW image or pressing Command-R (PC: Control-R) with the image selected, or you can also open it using the stan-dard Open command from Photoshop CS2’s File menu. Regardless, a RAW image automatically opens in the Camera Raw interface (shown in the next step).
Step Two: If you want to open multiple RAW photos from the Bridge, Command-click (PC: Control-click) on all the images you want to open in Camera Raw; then, once they’re selected, double-click on any one of the selected photos. The photo you double-clicked on will appear in the pre-view window ready for editing, and the other photos you selected will appear along the left side of the Camera Raw dialog. To edit one of the images listed on the side, just click once on the one you want to edit.
Step Three:To take advantage of that large preview area, here are some quick preview short-cuts: There’s a Zoom tool that works just like the one in Photoshop. If you double-click on it (in the top-left corner above the preview), it zooms up to a 100% view. When you’re zoomed in tight, press-and-hold the Spacebar on your keyboard to get the Hand tool, then just click-and-drag in the preview window to move around the image. To quickly fit your entire photo in the preview area, double-click on the Hand tool above the preview or press Command-0 (zero) [PC: Control-0]). You can also press Command–+ (Plus key) (PC: Control–+) to zoom in and Command–- (Minus key) (PC: Control–-) to zoom out. Also, you can rotate a photo left or right by press-ing L or R, respectively.
Step Four: You do your photo processing in the right column of the Camera Raw inter-face. There are five “tabs” with different sets of controls under each, but all the basic essential adjustments are found under the Adjust tab (make sure it’s visible by clicking on its tab).
TIP: I’m sure you’ve noticed that the Auto checkboxes are “on” by default, but if you really want to turn them off for good, here’s what you do: Open a RAW file, turn off all the Auto checkboxes, and then go to the Settings flyout menu (it’s the right-facing arrow to the right of the Settings pop-up menu) and choose Save New Camera Raw Defaults. Now, when you open a RAW image, all the Auto checkboxes will be off by default.
©SCO
TT K
ELBY
©SCO
TT K
ELBY

56 Chapter 3 Mastering Camera Raw
The Photoshop CS2 Book for Digital Photographers
57Chapter 3Mastering Camera Raw
Continued
The Photoshop CS2 Book for Digital Photographers
Step Five: We’ll start by looking at the White Balance setting. When you open a photo in Camera Raw, Photoshop looks at the White Balance setting that was used when the photo was taken, and it dis-plays that setting in the White Balance pop-up menu. If the white balance looks good to you, you can leave it set as-is. If the white balance was set correctly (or if you just want to see if you can come up with a setting that looks better to you), you can apply a preset setting by choosing one from the White Balance pop-up menu. When you choose a new white balance, the preview updates so you can see how this new setting will affect your photo.
Step Six: Besides using these default White Balance settings, you can tweak them manually to create your own custom white balance. You do this using the Temperature and Tint sliders. To make your white balance more blue, drag the Temperature slider to the left. To add more yellow, drag it to the right. The Tint slider basically does the same thing, just with different colors: dragging to the left brings more green into your photo and dragging to the right brings in more red. By using these two sliders, you can pretty much create whatever white bal-ance situation you prefer (this is totally a personal preference thing).
Step Seven: There’s another way to set your white balance: use the White Balance tool (found at the top of the Camera Raw dialog—it looks like the regular Eyedropper tool). You just press the letter I to get that tool, then click it once in a neutral area of your photo (you don’t want to click in a perfectly white area with no detail; you want an area that’s off-white or light gray with some detail).
TIP: To help you find this neutral color in your images, I’ve included a black/gray/white swatch card for you in the back of this book (it’s perforated so you can tear it out). Just put this card into your RAW shot, take the shot, and when you open the RAW file in Camera Raw, you can then click the White Balance tool on the neutral gray swatch on the swatch card. When you’re done, just crop the card out of the image. (See Chapter 6 for more information on how to use this handy card.)
Step Eight: Now let’s move on to your tonal adjust-ments (which are located just below the White Balance section). The top slider (and probably the most widely used slider in all of Camera Raw) is for adjust-ing the exposure of your photo (you can increase the exposure up to four f-stops and decrease it up to two f-stops. So, an Exposure slider setting of +1.50 would be an increase of a stop and a half). One way to make this adjustment is to “eye” it: Just drag the slider, then look at the preview to see how your image looks. But there are some other features to help you make more informed exposure decisions.

58 Chapter 3 Mastering Camera Raw
The Photoshop CS2 Book for Digital Photographers
59Chapter 3Mastering Camera Raw
Continued
The Photoshop CS2 Book for Digital Photographers
Step Nine: To get some help with setting your exposure, there’s now an Auto checkbox in CS2 that will attempt to automatically set the exposure for you. It often does a pretty darn good job, so it’s worth see-ing how it looks (you can see an instant preview as soon as you click the check-box on/off). Leaving the Auto Exposure checkbox on increased the Exposure to +1.40 for this image. If that doesn’t look good to you, there’s another popular way to set the right exposure…
Step Ten (Exposure): The method I use to set the exposure is to have Camera Raw tell me how far I can go (either increasing or decreasing the Exposure setting), so I get the best possible exposure, without clipping off any highlights or shadows. To do this, press-and-hold the Option (PC: Alt) key and click on the Exposure slider (by the way, moving a slider automatically turns off the Auto checkbox for that slider). When you do this, the screen will turn black. If anything shows up in white (or red, green, or blue), that’s a warning that the highlights are clipping (basically, that means there will be no detail in that area, which may actually be okay—clip-ping areas like a bright reflection on a car’s bumper or the center of the sun isn’t a problem). So, as long as important areas aren’t clipped off, I keep clicking-and-dragging to the right (with Option/Alt held down) until some real clipping starts to appear. In this case, I pushed it to +1.50, whereas Auto only went to +1.40. I can go with that or something less, but if I push it any further, I’m going to lose important detail.
Step Eleven (Shadows): Now that your Exposure is set (and you protected your highlights from clipping), what about the shadows? Well, there’s a slider for that too—it’s called (surpris-ingly enough) the Shadows slider. Sliding it to the right increases the shadows in your photo. Again, there’s an Auto checkbox (and you should give that a try), but you can also use the Option-drag (PC: Alt-drag) trick on the Shadows slider. This time, the preview will show shadow areas (with no detail) in pure black (meaning these areas are getting clipped—white areas are not clipped). If you see other colors (like red, green, or blue), they’re getting clipped a bit too, but not as significantly as the overall shadows, so I’m not as concerned about a little bit of clipping in color). If there’s significant clipping, drag to the left to reduce the amount of shadows. If not, drag to the right until you start getting some clipping.
TIP: In CS2, Adobe added a very helpful feature to keep you from clipping either your highlights or shadows. At the top of the Camera Raw dialog, there are two checkboxes: one for highlights, one for shadows. When you turn them on, any-time highlight areas start getting clipped (regardless of which slider you’re using), the clipped areas will appear in solid red, while clipped shadow areas will appear in blue, giving you an instant visual warning exactly where clipping is occurring. Not bad, eh?

60 Chapter 3 Mastering Camera Raw
The Photoshop CS2 Book for Digital Photographers
61Chapter 3Mastering Camera Raw
The Photoshop CS2 Book for Digital Photographers
Step Twelve (Brightness):The next adjustment slider down is Brightness. Since you’ve already adjusted the highlights (with Exposure) and shadows (with the Shadow slider), the Brightness slider adjusts everything else (I always relate this slider to the midtones slider in the Levels dialog, so that might help in understanding how this slider differs from Exposure or Shadows). There is an Auto checkbox for Brightness, but I’m not too crazy about this particular Auto setting, as it seems (to me anyway) to give the photo a flat look, but hey—that’s just me. Turn Auto on/off and see if you agree—or just drag the slider to the right (above 50) to lighten the midtones or to the left (below 50) to darken them.
Step Thirteen (Contrast): The Contrast slider does pretty much what you’d expect it to—adds or reduces contrast (depending on which way you drag it). If you drag to the right, it increases the contrast in the image (so you can imagine you’ll probably be dragging right most of the time), or if you want to reduce the contrast in your image (making it look flat), drag to the left. There’s also an Auto checkbox here, but to me it never seems to add enough contrast, so I usually wind up adjusting this one myself while looking at the pre-view (and the histogram) as a guide.
Step Fourteen (Saturation):The Saturation slider makes the colors in your RAW photo either more saturated and colorful (by dragging to the right) or less saturated and flat (by dragging to the left). This is my least-used slider in Camera Raw, as I normally wait until I’m in Photoshop, because I view adding sat-uration as a special effect, and not gener-ally something I do when I’m just trying to create a nicely exposed, well-balanced image. In fact, I only adjust this setting if some of the other changes I made in Camera Raw make my colors look flat. Otherwise, I ignore that slider, but that’s just me; if you want more saturated photos, go for it (I won’t tell anybody). By the way, there’s no Auto checkbox for Saturation. I call that an act of mercy.
Step Fifteen: Let’s say that you’ve got a studio set up, so you have pretty controlled lighting. If that’s the case, you might want to save these correction settings (for this particular camera, used in this particular lighting situation). That way, the next time you’re processing images taken with this camera in your studio, you can quickly call up these same settings. To do this, just click on the right-facing arrow to the right of the Settings pop-up menu and choose Save Settings from the flyout menu that appears. Give your settings a descriptive name, and then click Save. Now this group of settings will appear in the Settings pop-up menu.

62 Chapter 3 Mastering Camera Raw
The Photoshop CS2 Book for Digital Photographers
63Chapter 3Mastering Camera Raw
Continued
The Photoshop CS2 Book for Digital Photographers
Step One: Once you’ve made all your exposure and tonal settings, fixed any lens-related problems, and generally have the photo looking the way you want it to in the Camera Raw dialog, it’s time to fine-tune your resolution, size, etc. (In the bottom left of the dialog, make sure the Show Workflow Options checkbox is turned on.) First we’ll start with choosing your size. By default, the size that appears in the Size pop-up menu is the original size dictated by your digital camera’s mega-pixel capacity (in this case it’s 2560x1980 pixels, the size generated by a 5-mega-pixel camera).
Step Two (Size): If you click-and-hold on the Size pop-up menu, you’ll see a list of image sizes that Camera Raw can generate from your RAW original. The ones with a plus sign (+) by them indicate that you’re scaling the image up in size. The minus sign (-) means the image will be smaller than the original size taken by the camera, which quality-wise isn’t a problem. The number in parentheses shows the equivalent megapixels that size represents. Usually, it’s fairly safe to increase the size to the next largest choice—anything above that and you risk having the image look soft or pixelated.
Since you’re creating and processing your own images, it only makes sense that you get to choose what resolution, what size, which color space, and how many bits per channel your photo will be, right? Adobe calls these “workflow” decisions, which is why in order to make these decisions you have to turn on the checkbox for Show Workflow Options. Once you do that, the workflow options are revealed. Here’s how to know what to put where:
Sizing and Resolution in Camera Raw
Step Three (Resolution): Just under the Size pop-up menu, you’ll see the Resolution field. The topic of reso-lution is something entire training DVDs are dedicated to, so we won’t go in-depth about it here, but I’ll give you some quick guidelines. If your photo will wind up on a printing press, use 300 ppi (you don’t really need that much, but many print shops still think you do, so just play it safe at 300 ppi). If you’re printing 8x10" or smaller to an inkjet printer, you can also use 300 ppi (or even 360 if you’re really picky). For larger prints (like 13x19"), you can get away with 240 ppi or less (I’ve used as little as 180). Either way, you’re not locked in because you can always change the size and resolution in Photoshop.
Step Four (Space and Depth): The color space choice is easy: Choose Adobe RGB 1998. It’s the most popular choice with photographers because the range (gamut) of colors it supports is greater than sRGB (giving you more color), and it’s big enough to get the most out of your inkjet prints (unlike ProPhoto RGB, which lets you add col-ors your printer can’t reproduce). As for the Depth pop-up menu, generally choose 8 Bits/Channel. Although some high-end photographers insist on 16-bit, you don’t get the full use of Photoshop’s tools and features, plus the file sizes are approximately double in size (which makes Photoshop run a lot slower), not to mention they take up more room on your hard disk.

64 Chapter 3 Mastering Camera Raw
The Photoshop CS2 Book for Digital Photographers
65Chapter 3Mastering Camera Raw
Continued
The Photoshop CS2 Book for Digital Photographers
Cropping within
Camera Raw
Step One: Once your image is open in Camera Raw, you use the Crop tool to crop the image (no big shock there), but it works differently than the regular Crop tool. First, click-and-hold on the Crop tool in the Toolbox (along the top of the preview area) and a pop-up menu will appear. If you choose Normal, you’ll get the standard “drag-it-where-you-want-it” cropping, or you can use one of the cropping presets. When you drag out any cropping border, the Size pop-up menu (in the Show Workflow Options section in the bottom of Camera Raw) changes into a Crop Size pop-up menu, which displays the pixel dimensions of the currently selected crop and gives you the equivalent megapixels.
Step Two: If you want an exact size for your cropped image (like 6x4", 8x10", etc.), you can click-and-hold on the Crop tool in the Toolbox, and then choose Custom from the pop-up menu. When the Custom Crop dialog appears, change the Crop pop-up menu to Inches, then type in the size you want in the fields. You can enter exact pixel sizes, centimeters, or a custom ratio.
Photoshop CS2 is the first version to enable you to crop your images right within Camera Raw, but it does it a little differently than the regular cropping in Photoshop CS2, so here’s a quick look at how it works.
Step Three: If you go with one of the preset ratio crops, you can drag either horizontally or vertically and the border will main-tain that ratio. However, if you drag out a cropping ratio vertically, and then instead want that crop ratio to be hori-zontal, just grab a corner point and drag up (or down, depending on which corner point you select) and the cropping bor-der will flip horizontally. Also, you can change to any other ratio by Control-clicking (PC: Right-clicking) within the cropping border and choosing a new ratio from the contextual menu. You can also clear the current crop by pressing the Escape key on your keyboard or by pressing Delete (PC: Backspace).
Step Four: Once you click on the Open button in Camera Raw, the image is cropped to your specs and opened in Photoshop. If you click on the Done button in Camera Raw, the cropping border remains with the file, but the image itself isn’t cropped—if you reopen the RAW file, you’ll see the cropping border still in place.
©SCO
TT K
ELBY

66 Chapter 3 Mastering Camera Raw
The Photoshop CS2 Book for Digital Photographers
67Chapter 3Mastering Camera Raw
The Photoshop CS2 Book for Digital Photographers
Step One: Start by opening the RAW photo that needs to be straightened in Camera Raw (needless to say, it must be a photo taken in RAW format. So, if it was need-less to say, why did I say it? I have issues). In the Camera Raw Toolbox, choose the Straightening tool (it’s immediately to the right of the Crop tool). Now, click-and-drag it along the horizon line in your photo.
Step Two: When you release your mouse button, the preview shows you how the photo will be rotated and straightened. It doesn’t actually rotate the photo at this point—that doesn’t happen until you open the file in Photoshop itself. For now, you just get a border that shows you how it will be rotated. Now, if you click Save or Done, the straightening information is saved along with the file, so if you open this file again in Camera Raw, that straightening crop border will still be in place.
TIP: If you want to cancel your straight-ening, click on the Crop tool in Camera Raw’s Toolbox. Then, press the Escape key on your keyboard, and the straightening border will go away. However, if you want to keep your straightening, click the Open button, and the photo will be straightened and cropped perfectly to size, ready for editing in Photoshop.
Straightening Photos within Camera Raw
Adobe added a timesaving method for straightening photos within Camera Raw (in fact, in CS2 it’s now easier to straighten RAW photos
than it is to straighten simple 8-bit images). What I like best about this technique is that it’s pretty much a one-click trick. What’s really weird,
though, is that the hardest part is learning how to cancel a straightening (especially because once you use the Straightening tool, that straightening
info stays with the RAW file, even if you just click Done).
CROPPING TIP 1: If you have a crop border in place and click Save in the Camera Raw dialog, a Save Options dialog will appear. If you choose Photoshop in the Format pop-up menu, a new option will appear called Preserve Cropped Pixels. Select that option and click Save. When you later open this cropped image, it will appear cropped, but the image will be on an editable layer (not the Background layer), and the rest of the original image is still available. Just press V to get the Move tool and drag it into view within the document window.
CROPPING TIP 2: If you have multiple photos open in Camera Raw, you can crop them all at one time. Here’s how: Click on the Select All button above the row of thumbnails along the left side of the Camera Raw dialog, and then use the Crop tool to create your cropping bor-der on your image in the preview area. If you look at the other images along the side, you’ll see they all have a tiny Crop icon in the bottom-left corner of their thumbnail, indicating that they’ll all be cropped to match (when they’re opened or saved).
CROPPING TIP 3: If you have a crop-ping border in place, you can zoom your cropped area to fit within the entire pre-view window by simply double-clicking on the Crop tool.
©SCO
TT K
ELBY

68 Chapter 3 Mastering Camera Raw
The Photoshop CS2 Book for Digital Photographers
69Chapter 3Mastering Camera Raw
Continued
The Photoshop CS2 Book for Digital Photographers
Method One: This first one might really surprise you: You can edit multiple RAW images and apply settings to all of them at once, without ever having Photoshop open. That’s right, you can do it all from the Adobe Bridge. Just Command-click (PC: Control-click) on the thumbnails you want to edit, press Command-R (PC: Control-R), and those photos will open in Camera Raw (right from the Bridge, without even launching Photoshop). Click on the Select All button in the top-left corner of the Camera Raw dialog to select all your open photos. Now, any changes you make to your main image will be applied to all open images.
TIP: When you click the Save Images button (and choose your settings in the resulting Save Options dialog), Camera Raw will batch process the files while you’re correcting your images. A status link will appear above the Save Images button. Click on the link to see the sta-tus of your processed images.
Automating Your Camera
Raw Processing
One of the coolest things about Camera Raw in Photoshop CS2 is the level of automation. By that I mean that when you apply changes to one image, you can easily and quickly apply those same set of changes to a host of other images—even while you’re working on other things, it’s still processing in the background. Sweeeet!
Method Two: If you’ve made an adjustment to one photo that was taken using a particular camera under a particular lighting situa-tion (like a Nikon D70 in direct sunlight), you can save those changes and apply them in one click to other RAW images from right within the Bridge. First, save your settings by going under the Settings flyout menu (it’s the little right-facing arrow to the right of the Settings pop-up menu) and choosing Save Settings. To apply those settings to another image(s), click on that photo in the Bridge, go under the Edit menu, under Apply Camera Raw Settings, and choose your saved setting.
Method Three: If you’ve made changes to a RAW file, you can instantly return to your camera’s original default settings by clicking on the photo in the Bridge, going under the Edit menu, under Apply Camera Raw Settings, and choosing Clear Camera Raw Settings. This removes your edits (or the default Camera Raw settings) and replaces the original default settings from your camera.
©SCO
TT K
ELBY
©SCO
TT K
ELBY

70 Chapter 3 Mastering Camera Raw
The Photoshop CS2 Book for Digital Photographers
71Chapter 3Mastering Camera Raw
The Photoshop CS2 Book for Digital Photographers
Method Four: If you’ve applied some Camera Raw adjustments to a file, you can copy-and-paste those adjustments to any other files in the Bridge you like. Start by click-ing on the thumbnail of an adjusted RAW photo. Then, go under the Bridge’s Edit menu, under Apply Camera Raw Settings, and choose Copy Camera Raw Settings. Now Command-click (PC: Control-click) on the thumbnails of any other RAW photos that you want to have those same settings, and then go back under the Edit menu, under Apply Camera Raw Settings, and choose Paste Camera Raw Settings. This brings up a dialog asking which of those copied set-tings you want applied: everything or just certain settings. Choose what you want from the Subset pop-up menu or click on the checkboxes to turn on/off the items you want, and then click OK. Those checked settings will be applied to your selected images. How cool is that?
Sharpening within Camera Raw
Step One: When you open an image in Camera Raw, by default it applies a small amount of sharpening to your photo. You can see how much by going to the Detail tab (along the right side of the dialog) and looking at the Sharpness slider. To add additional sharpness, drag the slider to the right (if you do this, first make sure to set your view to 100% in the bottom left of the preview so you can see the effect of sharpening).
Step Two: Now that you know how to apply more sharpness (I hate to tell you this), I recom-mend setting the Sharpness at 0% (essen-tially turning it off). I recommend this for two reasons: First, because there’s just one slider, so you basically have to take what it gives you. Second, I feel sharpening should be done right before you save the file, not when you’re initially creating it, so it does the minimum amount of damage to the image. However, if you’d like to see what the “sharpened” image would look like, you can sharpen just the preview, not the actual file. Just press Command-K (PC: Control-K) while the Camera Raw dialog is open, and in the Camera Raw Preferences dialog, choose Preview Images Only in the Apply Sharpening To pop-up menu.
Although Camera Raw enables you to sharpen your image at this early stage in the correction process, you have to decide if this is something
you really want to do. I’ve heard arguments for sharpening at this stage, but many more against it, so like most corrections, it’ll come down to
your own personal preference. If you do decide to sharpen now (or if you want to turn off the sharpening that’s on by default), here’s how:
72 Chapter 3 Mastering Camera Raw
The Photoshop CS2 Book for Digital Photographers
73Chapter 3Mastering Camera Raw
The Photoshop CS2 Book for Digital Photographers
Adjusting Color
(Calibrating)
Step One: Let’s say after setting the exposure, brightness, etc., there’s a part of your image that has too much red. To remove that red, go to the Calibrate tab (along the right side of the Camera Raw dialog) and drag the Red Saturation slider to the left, lowering the amount of red in the entire photo. If the red simply isn’t the right shade of red (maybe it’s too hot and you just want to tone it down a bit), drag the Red Hue slider until the red color looks better to you (dragging to the right makes the reds more orange).
Step Two: If all the images from your digital camera have this problem with red, you may want to save these calibration set-tings by choosing Save Settings Subset from the Settings flyout menu (it’s the right-facing arrow to the right of the Settings pop-up menu). When the Save Settings Subset dialog appears, uncheck everything but Calibration (or choose it from the Subset pop-up menu), and then click Save. Now you can apply these settings to other images shot with that digital camera by choosing your saved subset from the Settings pop-up menu. Note: You can adjust your blues and greens in the same way.
So far, everything in Camera Raw has been about adjusting the exposure, or the brightness, or the sharpness, or the white balance…and that’s all well and good, but what if your photo is too red, or what if the white balance looks right, but something in the photo is still too blue? Here’s what to do:
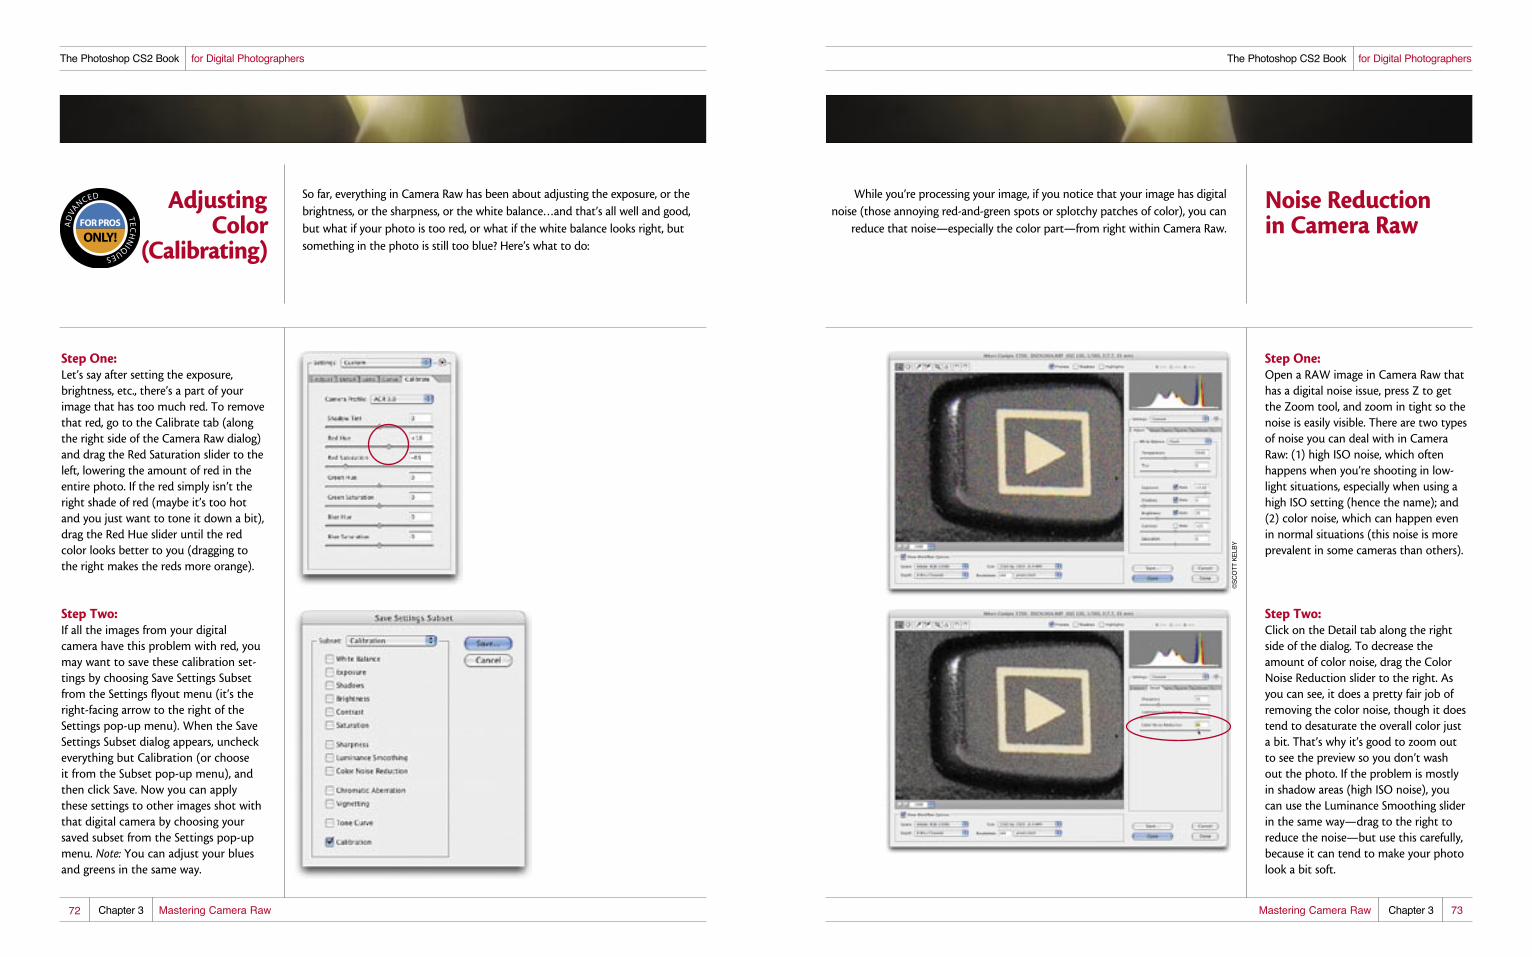
While you’re processing your image, if you notice that your image has digital noise (those annoying red-and-green spots or splotchy patches of color), you can
reduce that noise—especially the color part—from right within Camera Raw.
Noise Reduction in Camera Raw
Step One: Open a RAW image in Camera Raw that has a digital noise issue, press Z to get the Zoom tool, and zoom in tight so the noise is easily visible. There are two types of noise you can deal with in Camera Raw: (1) high ISO noise, which often happens when you’re shooting in low-light situations, especially when using a high ISO setting (hence the name); and (2) color noise, which can happen even in normal situations (this noise is more prevalent in some cameras than others).
Step Two: Click on the Detail tab along the right side of the dialog. To decrease the amount of color noise, drag the Color Noise Reduction slider to the right. As you can see, it does a pretty fair job of removing the color noise, though it does tend to desaturate the overall color just a bit. That’s why it’s good to zoom out to see the preview so you don’t wash out the photo. If the problem is mostly in shadow areas (high ISO noise), you can use the Luminance Smoothing slider in the same way—drag to the right to reduce the noise—but use this carefully, because it can tend to make your photo look a bit soft.
©SCO
TT K
ELBY

74 Chapter 3 Mastering Camera Raw
The Photoshop CS2 Book for Digital Photographers
75Chapter 3Mastering Camera Raw
Continued
The Photoshop CS2 Book for Digital Photographers
Bracketing with Camera Raw
If you forgot to bracket in the camera itself, you can use Camera Raw to create multiple exposures, and then open those images in Photoshop, where you can composite them together to create an image that one exposure alone couldn’t capture. Here’s how it’s done:
Step One: Open the RAW image you want to apply a bracketing technique to. In this exam-ple, the kettle is too dark, but the back-ground the kettle was shot on looks fairly good, so we’re going to expose this first image for the highlights. Start by increas-ing the Exposure and Brightness settings by dragging the sliders to the right, and then lower the Shadows by dragging its slider to the left (the Auto checkboxes will be deselected automatically). Now the kettle, which was quite dark in the original RAW file, is fairly well exposed, so it’s time to click on the Open button at the bottom of the Camera Raw dialog to open this version in Photoshop.
Step Two: Now go back to the Adobe Bridge (or wherever the original image is), and reopen the same RAW file in Camera Raw. This time, we’re going to expose it for the shadows, so reduce the Exposure setting, increase the Shadows, decrease the Brightness, and decrease the Contrast to create an image with deep, rich shadow areas that still have some detail and the nice gray background. Once it looks good in the preview, click on the Open button to open this shad-ow-heavy version in Photoshop.
Step Three: Now you should have both versions open in Photoshop: the brighter one exposed for the highlights (to bring out the kettle) and the darker one exposed for the shadows (to bring out the gray background and the shadows below the kettle). Arrange the windows so you can see both onscreen at the same time.
Step Four: Press V to get the Move tool, press-and-hold the Shift key, and drag-and-drop the darker version on top of the lighter version. The key to this part is holding down the Shift key while you drag, which perfectly aligns the dark copy (that now appears on its own layer in the Layers palette) with the lighter version on the Background layer. (This exact alignment of one identical photo over another is referred to as being “pin registered.”) You can now close the shadow docu-ment without saving, as both versions of the image are contained within the lighter version.
©SCO
TT K
ELBY

76 Chapter 3 Mastering Camera Raw
The Photoshop CS2 Book for Digital Photographers
77Chapter 3Mastering Camera Raw
The Photoshop CS2 Book for Digital Photographers
Step Five: Go to the Layers palette, hold down the Option (PC: Alt) key, and click on the Add Layer Mask icon at the bottom of the Layers palette. This puts a black mask over your darker image, covering it so you only see the lighter image on the Background layer.
Step Six: Now you get to “reveal” the darker parts, but only where you want them. Here’s how: Press the letter B to get the Brush tool, and then click on the down-facing arrow next to the word “Brush” in the Options Bar and choose a medium-size, soft-edged brush from the Brush Picker. Now, press the letter D to set your Foreground color to white, and start painting over the areas of the photo that you want to be darker (in this case, the base of the kettle). As you paint with white directly on that black mask, the white reveals the dark version beneath the mask.
Step Seven: Keep going until you’ve painted the dark areas that you want back in (in this case, you get a composite where the kettle is from the darker bracketed version, while the background and shadows beneath the kettle are from the lighter bracket). If the dark areas seem too intense, slightly lower the Opacity in the Layers palette. So what you wind up with is an image like the one shown here—one where the object and background are perfectly exposed—it’s the best of two photos combined.

78 Chapter 3 Mastering Camera Raw
The Photoshop CS2 Book for Digital Photographers
79Chapter 3Mastering Camera Raw
The Photoshop CS2 Book for Digital Photographers
Fixing Chromatic
Aberrations (That Colored-
Edge Fringe)
Chromatic aberrations is a fancy name for that thin line of colored fringe that sometimes appears around the edges in photos. Sometimes the fringe is red, sometimes green, sometimes blue, but all the time it’s bad, so we might as well get rid of it. Luckily, Camera Raw has a built-in fix that does a pretty good job.
Step One: Open the RAW photo that has signs of chromatic aberrations (colored-edge fringe), and then press Z to get the Zoom tool in the Camera Raw dialog. Zoom in on an area where the fringe is fairly obvious. In the example shown here, I zoomed directly in on a newspa-per in the photo that had a red-edge fringe along one side.
Step Two: To remove this fringe, click on the Lens tab along the right side of the Camera Raw dialog to bring up the Chromatic Aberration sliders. They’re pretty self-explanatory: The top one fixes red or cyan fringe; the bottom fixes blue or yellow fringe.
TIP: Before you begin fixing any chro-matic aberrations, you may want to click on the Detail tab and lower the Sharpness amount to 0%, because sharpening can also cause color fringes to appear (and you want to make sure you’re curing the right problem).
Step Three: Since the fringe in this particular case is red, move the top Chromatic Aberration slider to the right (toward Cyan), which removes the red fringe.
TIP: Here’s a tip to help you more eas-ily see where the fringe is (and if your corrections are really working). If you Option-click (PC: Alt-click) on one of the sliders, the preview will change to dis-play just those two colors (Red/Cyan or Blue/Yellow) in your image. For example, this photo has a purple fringe around the base of the wheel, but by Option/Alt-clicking on the Blue/Yellow slider, it’s easier to isolate the fringe, so I can now drag to the left (away from Yellow) to neutralize the purple fringe. The preview helps you see if the fringe is really going away while you’re correcting it.
©DAV
E M
OSE
R
©DAV
E M
OSE
R

80 Chapter 3 Mastering Camera Raw
The Photoshop CS2 Book for Digital Photographers
81Chapter 3Mastering Camera Raw
The Photoshop CS2 Book for Digital Photographers
Okay, besides the Contrast slider we talked about earlier (which is rather limited), in Photoshop CS2 you can actually create your own custom contrast curves. This gives you a much larger level of control over the contrast in your image, and you can use the built-in presets or create (and save) your own curve settings manually.
Step One: Open the image in Camera Raw whose contrast you want to adjust using curves. Then click on the Curve tab along the right side of the Camera Raw dialog to make the curves visible. The default Tone Curve is set to Medium Contrast, which provides a medium amount of contrast (you can see only a slight angle in the curve).
Step Two: If you want to create much more dramatic contrast within your image, choose Strong Contrast from the Tone Curve pop-up menu, which creates a much steeper curve.
Adjusting Contrast
Using Curves
Step Three: If you’re familiar with curves and want to create your own custom curve, start by editing any one of the preset curves by simply clicking-and-dragging any adjustment points. Doing this immedi-ately changes the Tone Curve pop-up menu to Custom, meaning you’re free to adjust the curve any way you’d like. If you’d prefer to start from scratch, choose Linear from the Tone Curve pop-up menu, which gives you a flat curve. To add adjustment points, just click along the curve. To remove a point, just click-and-drag it right off the curve (drag it off quickly, like you’re pulling off a Band-Aid).
Step Four: If you create a contrast curve that you’d like to be able to apply again, unfortu-nately you’re not able to add it to the Tone Curve pop-up menu; however, you can save that setting by going up to the Settings flyout menu (it’s the right-facing arrow to the right of the Settings pop-up menu) and choosing Save Settings Subset. This brings up a dialog that lets you choose which controls you want to save. In this case, from the Subset pop-up menu choose Tone Curve. Click Save, name your file, and from now on you can choose to load your custom curve from the Settings pop-up menu.

82 Chapter 3 Mastering Camera Raw
The Photoshop CS2 Book for Digital Photographers
83Chapter 3Mastering Camera Raw
The Photoshop CS2 Book for Digital Photographers
Fixing (or Creating)
Edge Vignetting
If you’re looking at a photo and the corners of the photo appear darker, that’s lens vignetting. This is either a problem or a cool effect, depending on how you view it. Generally, I look at it this way—if it’s just the corners, and they’re just a little bit dark, that’s a problem and I fix it. However, sometimes I want to focus the viewer’s attention on a particular area, so I create a vignette, but I expand it significantly beyond the corners so it looks like an intentional effect, not a lens problem. Here’s how to fix (or create) vignettes:
Step One: In the RAW photo shown here, you can see the hard areas in the corners (the vignetting I was talking about). This vignetting is normally caused by the camera’s lens, so don’t blame yourself (unless you bought a really cheap lens—then feel free to give yourself as much grief as you can bear).
Step Two: To remove this vignetting from the corners, click on the Lens tab (along the right of the Camera Raw dialog) to bring up the Vignetting options. Click on the Amount slider and drag it to the right until the vignetting disappears (dragging to the right essentially brightens the cor-ners, which hides the vignetting). Once you begin moving the Amount slider, the Midpoint slider beneath it becomes avail-able. That slider determines how wide the vignetting repair extends into your photo (in other words, how far out from the corners your repair extends), so drag it to the right for even more lightening.
Step Three: Now for the opposite: adding vignetting to focus attention (by the way, in the Photographic Special Effects chapter, I also show you how to get the same effect outside of Camera Raw). This time, in the Vignetting section, drag the Amount slider to the left, and as you drag you’ll start to see vignetting appear in the cor-ners of your photo. But since it’s just in the corners, it looks like the bad kind of vignetting, not the good kind, so you’ll need to go on to the next step.
Step Four: To make the vignetting look more like a soft spotlight falling on your subject, drag the Midpoint slider to the left, which increases the size of the vignetting and creates a soft, pleasing effect. That’s it—how to get rid of ’em and how to add ’em. Two for the price of one!
©SCO
TT K
ELBY
©SCO
TT K
ELBY

84 Chapter 3 Mastering Camera Raw
The Photoshop CS2 Book for Digital Photographers
85Chapter 3Mastering Camera Raw
The Photoshop CS2 Book for Digital Photographers
Saving RAW Files in Adobe’s Digital Negative
(DNG) Format
At this point in time, there’s a concern with the RAW file format because there’s not a single, universal format for RAW images—every digital camera manufac-turer has its own. That may not seem like a problem, but what happens if one of these camera companies stops developing or supporting a format and switches to something else? Seriously, what if in a few years from now there was no easy way to open your saved RAW files? Adobe recognized this problem and created the Digital Negative (DNG) format for long-term archival of RAW images.
Step One: As of the writing of this book, no major digital camera manufacturer has built in the ability to save RAW files in Adobe’s DNG format (although we believe it’s only a matter of time before they do); so for now what you can do is save your RAW file to Adobe DNG from right within the Camera Raw dialog, which you do by hitting the Save button. This brings up the Save Options dialog, and at the bottom of the dialog is where you choose your file format. To save in DNG, choose Digital Negative from the Format pop-up menu.
Step Two: You have some additional options: You can choose to embed the original RAW file into your DNG (making the file larger, but your original is embedded for safekeeping in case you ever need to extract it—and if you have the hard disk [or CD space]—go for it!). There’s a compression option (and it’s “lossless,” meaning you don’t lose quality like you do with JPEG compression). You can also choose to include a JPEG preview with your DNG file. That’s it—click Save and you’ve got a DNG archival-quality file that can be opened by Photoshop (or the free DNG utility from Adobe).
HDR and Exposure Merge
While Photoshop CS2 is the first version to compile High Dynamic Range (HDR) 32-bit images, you kind of have to think of this as more of a “technology preview”
than a tool that will get a lot of use (at this point anyway), because thus far there are no monitors that can truly display HDR images or printers
that can print the range of colors they possess. But there will be one day (and we’ll all fly around with jet packs, too). Here’s how to mess around with
HDR and impress your photographer friends:
Step One: The magic of HDR is that it lets you merge multiple shots of the same scene (using a tripod), but you vary the exposure time for each shot (not the f-stops—the exposure time). Then these are merged together to create one “megaphoto” with a dynamic range far exceeding what humans, printers, or displays can reproduce. However, dogs can see HDR and they love it! (Kidding.) So that’s step one: Shoot multiple shots of the same scene and vary the expo-sure value (Adobe recommends two exposure-time value settings between shots, like 1/100, 1/250, 1/500, etc.). Once you’ve taken your shots, you can open them from the Adobe Bridge by navigating to them on your hard disk, then going under the Tools menu, under Photoshop, and choosing Merge to HDR.
Step Two: When the Merge to HDR dialog appears, you’ll see the results of the merge (and the photos used are displayed on the left side of the dialog). At this point, there’s only one slider, which you can move to adjust the white point. You also get to choose the bit-depth, but if you leave it at the default 32-bit and open it in Photoshop CS2, there’s a very limited number of tools or features that work on 32-bit images.
©SCO
TT K
ELBY