photo 1 unit plan
TRANSCRIPT

Photo 1 Unit Plan Architecture Angle Views and Framing
Author: Shea Brook Adapted from a lesson plan by Elise Pelletier
Grade Level: 912 Time Span: 45 Classes 67 minute sessions
Essential Question: “How do images influence our view of the world?”
Provoking Questions: 1. What architectural subjects will you use to shoot for your project? 2. How many angle views can you utilize? 3. What kind of filters and tools will you use in photoshop on your final work?
Learning Objectives:
1. Students will demonstrate different angles of view when photographing architecture.
2. Students will focus their attention and subject matter on architectural structures and their details, and will take multiple photos for their final project.
3. Students will develop their photographic eye as well as learn various techniques on photo manipulation using Photoshop.
Maine Learning Results:
A1 Artist’s Purpose
A2 Elements of Art and Principles of Design A3 Media, Tools, Techniques, and Processes B1 Media Skills B2 Composition Skills B3 Making Meaning B4 Exhibition C1 Application of Creative Process D1 Aesthetics and Criticism E1 The Arts and History and World Cultures E2 The Arts and Other Disciplines E3 GoalSetting E5 Interpersonal Skills
1
Vocabulary & Visual Provocation:
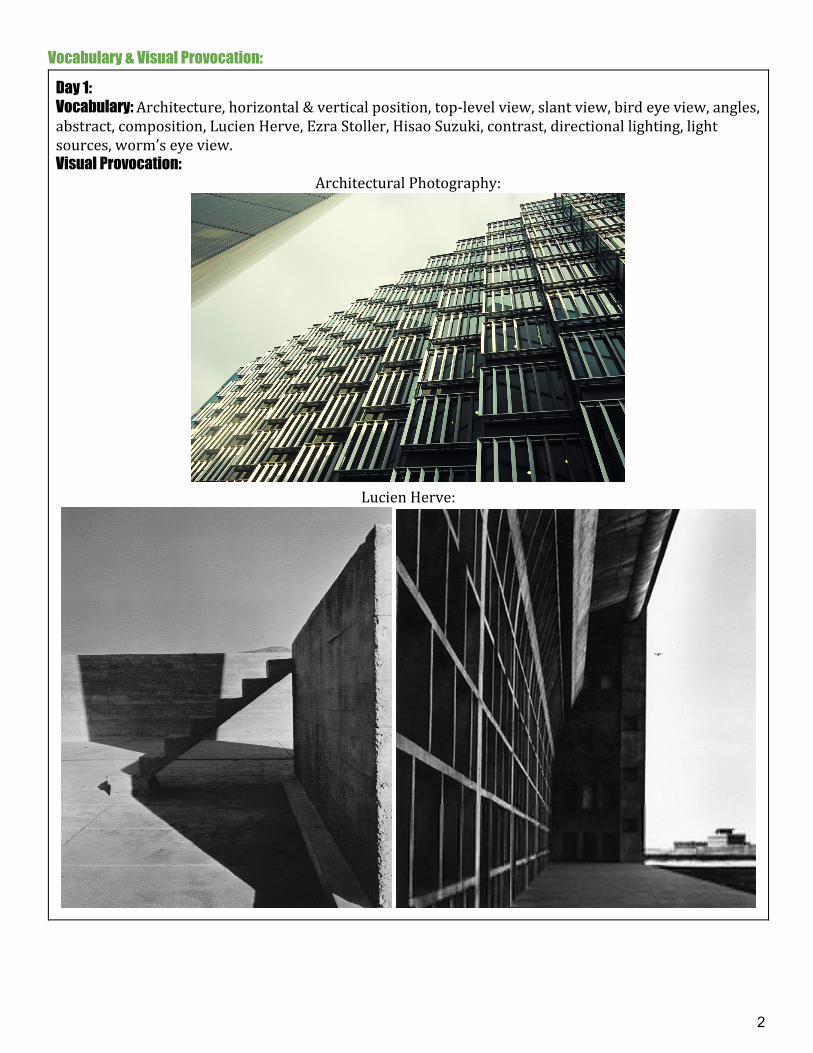
Day 1: Vocabulary: Architecture, horizontal & vertical position, toplevel view, slant view, bird eye view, angles, abstract, composition, Lucien Herve, Ezra Stoller, Hisao Suzuki, contrast, directional lighting, light sources, worm’s eye view. Visual Provocation:
Architectural Photography:
Lucien Herve:
2

Ezra Stoller:
3
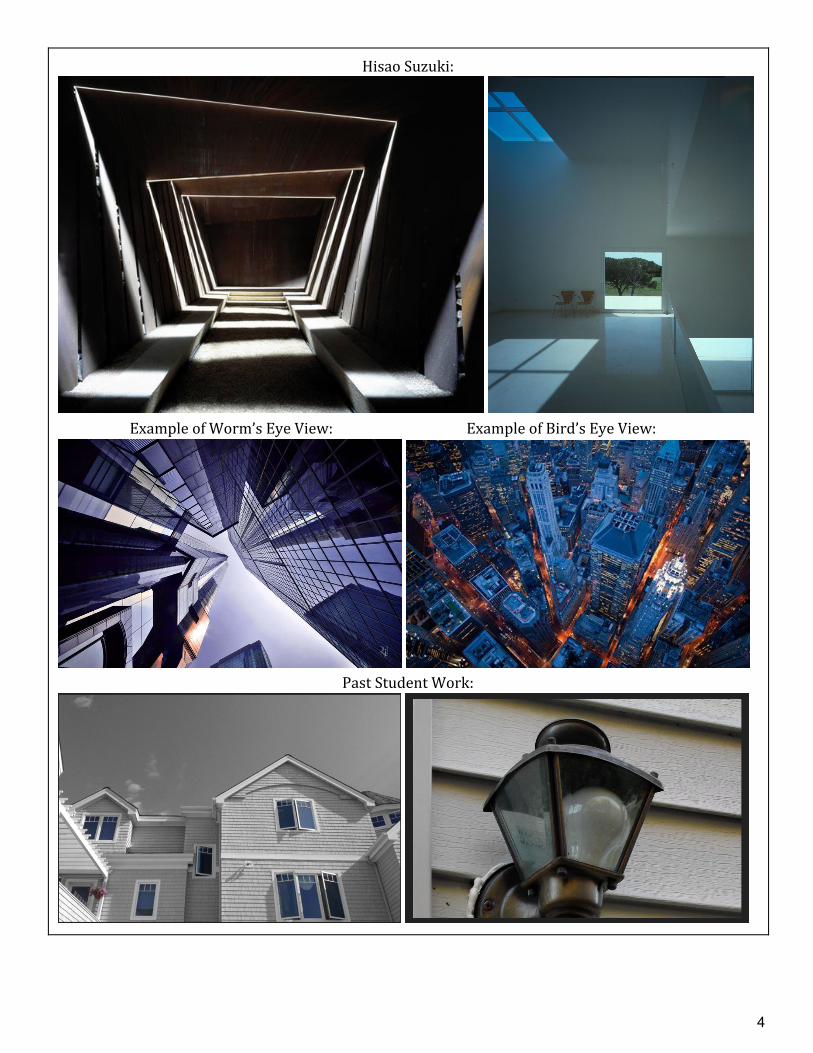
Hisao Suzuki:
Example of Worm’s Eye View: Example of Bird’s Eye View:
Past Student Work:
4
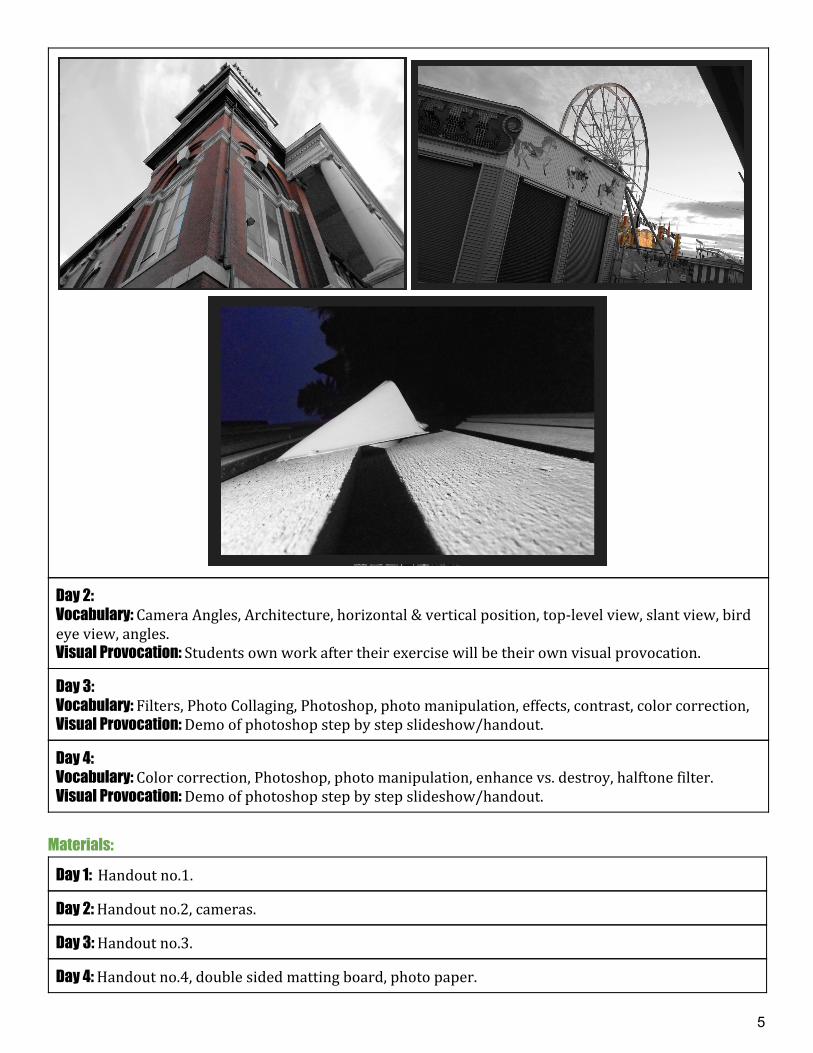
Day 2: Vocabulary: Camera Angles, Architecture, horizontal & vertical position, toplevel view, slant view, bird eye view, angles. Visual Provocation: Students own work after their exercise will be their own visual provocation.
Day 3: Vocabulary: Filters, Photo Collaging, Photoshop, photo manipulation, effects, contrast, color correction, Visual Provocation: Demo of photoshop step by step slideshow/handout.
Day 4: Vocabulary: Color correction, Photoshop, photo manipulation, enhance vs. destroy, halftone filter. Visual Provocation: Demo of photoshop step by step slideshow/handout.
Materials:
Day 1: Handout no.1.
Day 2: Handout no.2, cameras.
Day 3: Handout no.3.
Day 4: Handout no.4, double sided matting board, photo paper.
5
Direct Instruction:
Day 1: ● Day one of this unit will be for the introduction of the project, and an overview of different
architecture angle views and framing. The teacher will have a slide presentation with examples of views along with descriptions, and architecture photographers. The teacher will ask students what they notice in the photos of architectures such as for lighting, angles, perspective, and angle views they believe some past student work to be.
● The first handout will be given for the final project outline/expectations, and the teacher will describe that photos taken must be of architecture; “A man made structure that you can walk through, around, and interact with.” The teacher will go over the handout with the students, and will clarify any questions that may arise. The teacher will ask that students for the next class bring in cameras for an inclass activity/exercise.
Day 2: ● Students will arrive to class with their cameras from home. The teacher will ask what students
remember from the previous class as a formative assessment. Angle views, as well as the meaning/definition of architecture will be gone over as well.
● The teacher will then pass the second handout around to the students and will go over what will be expected of the day's activity. Angles will be gone over, how to stand and shoot a photo will be demonstrated, as well as a quick discussion how different angles and framing can alter the meaning of an object. Example: If you were to focus on detail of an object, it will distort your idea on what you’re looking at since it may be a detail that goes unnoticed.
● The teacher will ask students to be thoughtful in their consideration of the subjects they choose to photograph around the school since they will be uploading these images to flickr to work on in their next class, as well as have a discussion on their findings.
● Students will have half of class time to locate three different subjects to photograph, then the second half uploading their images to flickr, then a discussion, finishing up with an exit ticket on reflection upon the day’s activity.
Day 3: ● Students will arrive to class and will watch a demonstration on a few filters the teacher chooses
to explain. Before the slide presentation the teacher will have passed out handouts showing each step the teacher will go through for reference, along with the name of the filters and the expectations of the day’s project.
● During the slide presentation the teacher will answer questions as they arise, and will ask that students experiment with several filters using their photographs from the previous class's activity. They will be expected to save and upload to a subfolder three of the filters from the teacher’s demonstration along with any filters they experimented with that they were particularly drawn to.
● The teacher will ask that students upload their final architectural photos at home to their desktops as homework the night before the next class, this is so class time won’t be wasted on this process.
Day 4: ● Create contact sheet to google classroom, editing, demo on collaging, how to edit photos,
superimpose photos, use previous filter knowledge etc. Day 7 upload to flickr, website, and reflection.
Technology: Cameras, Flickr, Photoshop CS2015, Slide Presentations.
6
Modifications for Students with Exceptionalities: 1. Concepts will be gone over several times with visual examples as well as written examples for
both types of learners. 2. Students have preferential seating. 3. Students have the freedom to photograph any three architectural structures.
Instructional Resources: Architectural Photography: http://static1.squarespace.com/static/55c8f6e0e4b02695d6be3666/55ccf693e4b0fe0a5d6d7864/55ce419fe4b07630b3dd9032/1439580578303/IdenticoArchitecturalPhotographyMoreLondon1.png?format=1500w Lucien Herve: http://www.hotelswelove.com/wpcontent/uploads/2013/03/tumblr_lavqejqCB21qz8vmx.jpg http://www.tomorrowstarted.com/wpcontent/uploads/2013/05/lecorbusierindialucienherve06.jpg https://p2.liveauctioneers.com/131/22961/8141404_1_l.jpg http://www.mumalehavre.fr/sites/default/files/thumbnails/image/bdm_herve_tour_hotel_ville.jpg Ezra Stoller: http://graphics8.nytimes.com/newsgraphics/2015/03/20/whitneysketch/assets/slides/breuer/2.jpg http://savcdn.com/sites/default/files/imagecache/superphoto/7538132.jpg Hisao Suzuki: https://smediacacheak0.pinimg.com/736x/62/9d/75/629d757a3951c2286a858c925b4c6271.jpg http://a1.images.divisare.com/image/upload/c_fit,w_1440/f_auto,q_80/v1/project_images/1701419/CasaAsencio_02_HisaoSuzuki.jpg Example of Worm’s Eye View: https://acdn.architizer.com/thumbnailsPRODUCTION/8a/e8/8ae810fdacdf2f8631d6870144101046.jpg Example of Bird’s Eye View: http://entertainmentmesh.com/wpcontent/uploads/2012/07/87wallpapers.jpg
7

Day 1 Handout: Project Due Date:
Architectural Photography is the photographing of buildings and similar man made structures to show either accurate representations of the subject or focus on specific details of that structure. Architecture is something you can walk through and interact with. Objective: Demonstrate your point of view by photographing architecture at different angle of views. The purpose of this assignment is to focus your attention on architectural structures and their details. This assignment encourages you to continue to develop your photographic eye. Further this process by capturing photos that are taken from different angles, framing your photos so that we don’t just “see” a building.
*We will view the photography of Lucien Herve, Ezra Stoller, and Hisao Suzuki* In Photographs our vision is limited by the edges of the frame, helping the photographer to focus attention on the intended subject by limiting the field of vision. Where the camera is placed in relation to the subject can affect the way the viewer perceives the subject.
For final project: Shoot photos of 3 different architectural structures. For each structure, be sure to do all of the following:
● Take 1015 photos of each architectural structure. (The more you have available the better your options will be) (3045 photos total).
● Vary the angles of your shots, distance from the subjects (both physical and with your zoom) Bird’s Eye, worm’s eye, slant view, etc. Why? Because the composition of the photo changes as you vary the angles to shoot at the subject.
● Take detail shots of parts of the buildings (doors, ceilings, structural elements, etc.) ● Take into account lighting, cast shadows, reflections of windows, and time of day. ● When taking photos of your subject matter find different areas of geometric shapes.
8

Vocab: Bird’s Eye: A bird'seye view is an elevated view of an object from above, with a perspective as though the observer were a bird. Worm's Eye: A worm’s eye view is a view of an object from below, as though the observer were a worm; the opposite of a bird'seye view. Slant View: This is where the camera is purposely tilted to one side so the horizon is on an angle. This creates an interesting and dramatic effect. Low Angle: This shows the subject from below, giving them the impression of being more powerful or dominant. High Angle: A high angle shows the subject from above, i.e. the camera is angled down towards the subject. This has the effect of diminishing the subject, making them appear less powerful, less significant or even submissive. Eye Level: This is the most common view, being the realworld angle that we are all used to. It shows subjects as we would expect to see them in real life. It is a fairly neutral shot.
9

Day 2 Handout: Class Exercise/Activity Criteria:
● Go around the school and find 3 subjects to photograph using different angle views. Each subject must has the following angle views: (Bird’s Eye, Worm’s Eye, Slant View, Eye Level). Make sure to take close up clear photos along with photos taken standing further away from your subject.
● Upload your photos to your desktops so we may utilize these for the next class. ● Write a reflection on activity.
10
Reflection of Day 2 Activity: In Photographs our vision is limited by the edges of the frame, helping the photographer to focus attention on the intended subject by limiting the field of vision. Where the camera is placed in relation to the subject can affect the way the viewer perceives the subject. For each of your subjects choose one angle view you shot (must be a different angle view for each), and write a quick reflection on how the angle affected your chosen subjects appearance or meaning. Label your subject (what was the subject you shot?) as well as the angle view. STUDENT NAME:_________________________________________________________
Subject 1:______________________________________ Angle View:________________________________________________ Reflection: Subject 2:______________________________________ Angle View:________________________________________________ Reflection: Subject 3:______________________________________ Angle View:________________________________________________ Reflection:
11
Project 3 Editing Smart Object Filters: What enhances and what destroys? Smart Objects: Smart objects preserve an image’s source content with all its original characteristics, enabling you to perform nondestructive editing to the layer. Criteria:
1. Create a folder that you will drop 6 photos within to edit; these six photos will be the best examples you have of each angle view.
2. Once you have done that rename each photo the angle view they are demonstrating. 3. You will then choose one of these photos to edit as the Halftone filter being demonstrated today by the
teacher, the rest of the five you will edit using Smart Object Filters deciding upon which filter you’d like to experiment with. Some you will enhance in your opinion, and some you will destroy.
4. Save all the originals, and save all your edited versions so we have a “before & after.”
Halftone Filter: Step 1: Before you begin your filters resize your photo(s) in Photoshop by using the following steps:
To resize, choose the Crop Tool on the Toolbar. 1. A new toolbar will appear below the top toolbar. Says “Aspect Ratio…”
a. Change top toolbar drop down menu to Wx H x resolution b. W: 4 inches (Vertical) or 6 inches (Horizontal)
H: 6 inches (Vertical) or 4 inches (Horizontal) or viceversa for different orientation
c. Resolution: 300 2. While still on the crop tool, drag the mouse over the photo, to select the area you would like
to resize. 3. Press Enter
Step 2: Duplicate your original layer by going to your toolbar and selecting “Layer.” (MAKE SURE TO HAVE AN ORIGINAL COPY OF THIS PHOTO AS WELL FOR THE FINAL PROJECT)
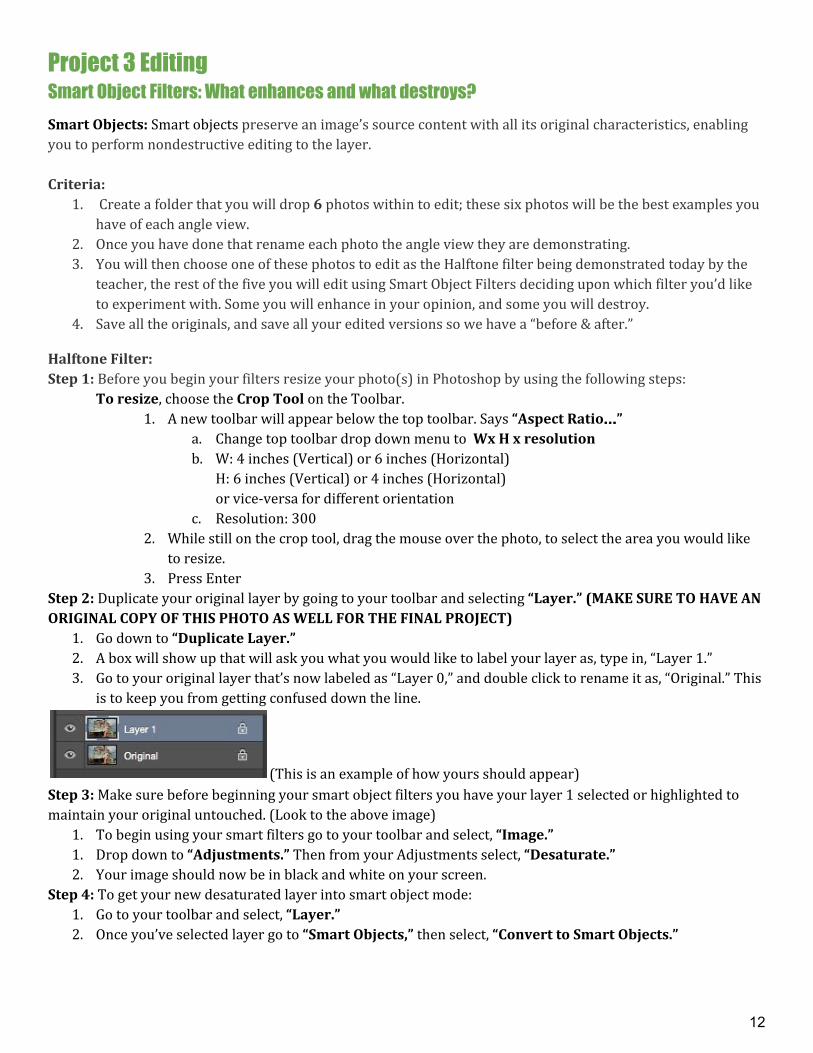
1. Go down to “Duplicate Layer.” 2. A box will show up that will ask you what you would like to label your layer as, type in, “Layer 1.” 3. Go to your original layer that’s now labeled as “Layer 0,” and double click to rename it as, “Original.” This
is to keep you from getting confused down the line.
(This is an example of how yours should appear)
Step 3: Make sure before beginning your smart object filters you have your layer 1 selected or highlighted to maintain your original untouched. (Look to the above image)
1. To begin using your smart filters go to your toolbar and select, “Image.” 1. Drop down to “Adjustments.” Then from your Adjustments select, “Desaturate.” 2. Your image should now be in black and white on your screen.
Step 4: To get your new desaturated layer into smart object mode: 1. Go to your toolbar and select, “Layer.” 2. Once you’ve selected layer go to “Smart Objects,” then select, “Convert to Smart Objects.”
12

(This is how your layers should appear after step 4)
Step 5: To get to your filter options go to your toolbar and select “Filter.” 1. Then select, “Filter Gallery.” 2. Your screen should completely change once you’ve selected filter gallery.
As you can see above your image has been zoomed in so you may see detail for your next smart object filter selections. Step 6: To get to your halftone filter:
1. Go to the folder labeled, “Sketch.” Press on the arrow pointing toward Sketch and you will get a drop down selection of filters:
2. Select “Halftone Pattern.” 3. Once you’ve selected halftone pattern your right box will change to reveal options for size and
contrast. Decide what you’d like your “Dot” size and contrast to be...you’ll see how the scales change your image before pressing, “OK.” (The higher your dot size number the blurrier it appears, the higher your contrast number the less gray tones you have going towards the black and white scale. Step 7: Go to your toolbar and select your Gradient Tool, at the top of the screen you will get your Gradient toolbar where you can select from various colored gradients:
13

⟶
2. Choose one of the gradient colors from above. 3. Go back to your toolbar to, “Layer.” And then, “Duplicate Layer.” Rename to “Gradient Layer.”
Step 8: Once you’ve duplicated your layer and have renamed it gradient layer: 1. Drag your mouse from the top left corner to the bottom right corner to get your chosen color gradient
applied to your layer.
This is how your layers should look.
2. Go above your layers to select the option from “Normal,” to “Soft Light.” (You can experiment with other options if you’d like.) Step 9: Final Step! Save your file as a JPEG, and give your file a name! Make sure to Flatten your file.
14
Project 3: Finished editing?
1. Upload 6 edited photos to Flickr Title each photo the angle and filter used.
2. Share photos with Flickr class group
3. Create new page on website titled Project 3 Architecture
4. Create table on new page with the dimensions 2 (across) x6 (down).
5. Insert each before and after (edited) photo next to each other in table.
6. Below “Before” photo type angle present in photograph.
7. Below “After” photo, type filter used in Photoshop.
Reflection
Looking back on project three, we discussed what enhances and what destroys a photograph within
Photoshop. When you alter an image using filters you destroy the original, and in doing so you enhance the photo
based on your selection. Using Smart Object filters you had the choice of any filter, so long as your architecture
would still be recognizable. Each filter varied in texture, distortion, color, etc.
Write your reflection within your website, and share with Ms. Pelletier, and your class.
1. For your reflection look at each “before & after” architectural photo, and reflect upon your choice of
filter. Name the filter, and describe why you chose the filter you did, and how it enhances as well as
destroys the original image. This is your chance to describe the angle you used and whether or not the
filter changed the composition for the better.
________________________________________________________________________________________________________________________
Printing Photos:
1. Select one “before & after,” photographs that presents the most change and alteration. 2. Upload the “before & after” photos to your Google Drive. 3. Log in to computer in Art Lab, and Google account. 4. Download both photos, open in Photo Gallery. 5. Go to File > Print > Print, change following settings on Print window:
i. Printer: Art Canon ii. Paper size: 4 x 6 iii. Paper Type: Photo paper Glossy II > Print
6. Mount photos on same matte board.
15
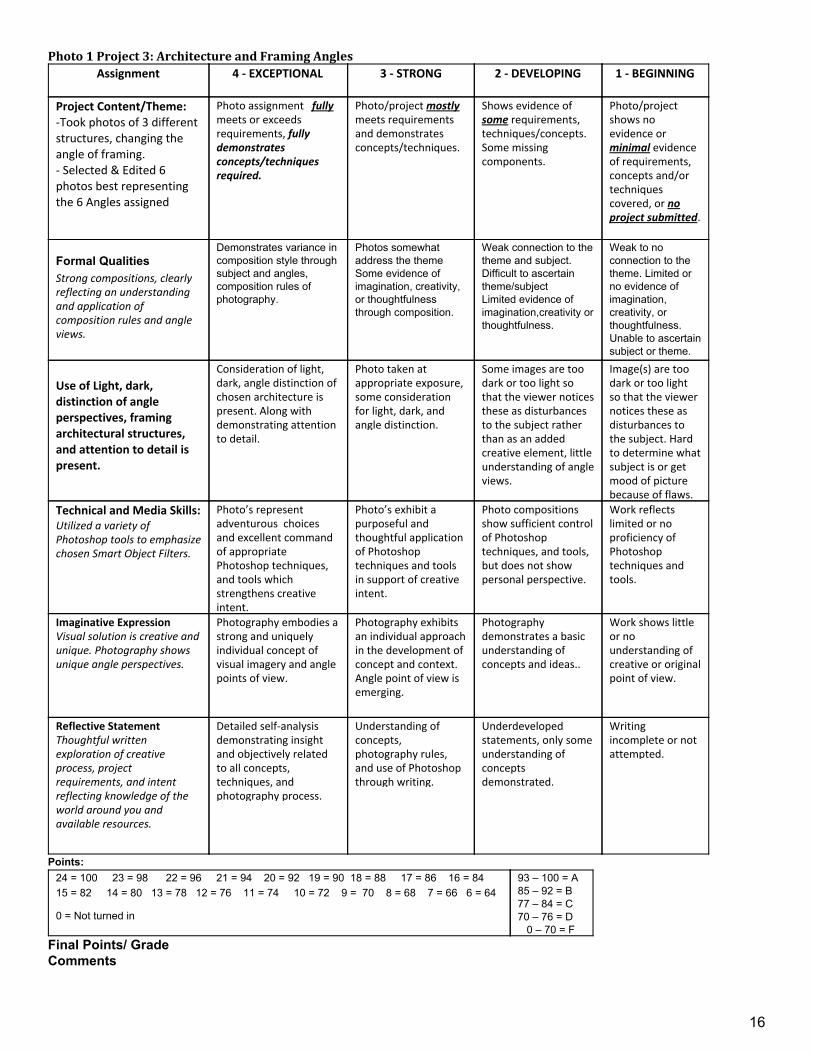
Photo 1 Project 3: Architecture and Framing Angles Assignment
4 EXCEPTIONAL 3 STRONG 2 DEVELOPING 1 BEGINNING
Project Content/Theme: Took photos of 3 different structures, changing the angle of framing. Selected & Edited 6 photos best representing the 6 Angles assigned
Photo assignment fully meets or exceeds requirements, fully demonstrates concepts/techniques required.
Photo/project mostly meets requirements and demonstrates concepts/techniques.
Shows evidence of some requirements, techniques/concepts. Some missing components.
Photo/project shows no evidence or minimal evidence of requirements, concepts and/or techniques covered, or no project submitted.
Formal Qualities Strong compositions, clearly reflecting an understanding and application of composition rules and angle views.
Demonstrates variance in composition style through subject and angles, composition rules of photography.
Photos somewhat address the theme Some evidence of imagination, creativity, or thoughtfulness through composition.
Weak connection to the theme and subject. Difficult to ascertain theme/subject Limited evidence of imagination,creativity or thoughtfulness.
Weak to no connection to the theme. Limited or no evidence of imagination, creativity, or thoughtfulness. Unable to ascertain subject or theme.
Use of Light, dark, distinction of angle perspectives, framing architectural structures, and attention to detail is present.
Consideration of light, dark, angle distinction of chosen architecture is present. Along with demonstrating attention to detail.
Photo taken at appropriate exposure, some consideration for light, dark, and angle distinction.
Some images are too dark or too light so that the viewer notices these as disturbances to the subject rather than as an added creative element, little understanding of angle views.
Image(s) are too dark or too light so that the viewer notices these as disturbances to the subject. Hard to determine what subject is or get mood of picture because of flaws.
Technical and Media Skills: Utilized a variety of Photoshop tools to emphasize chosen Smart Object Filters.
Photo’s represent adventurous choices and excellent command of appropriate Photoshop techniques, and tools which strengthens creative intent.
Photo’s exhibit a purposeful and thoughtful application of Photoshop techniques and tools in support of creative intent.
Photo compositions show sufficient control of Photoshop techniques, and tools, but does not show personal perspective.
Work reflects limited or no proficiency of Photoshop techniques and tools.
Imaginative Expression Visual solution is creative and unique. Photography shows unique angle perspectives.
Photography embodies a strong and uniquely individual concept of visual imagery and angle points of view.
Photography exhibits an individual approach in the development of concept and context. Angle point of view is emerging.
Photography demonstrates a basic understanding of concepts and ideas..
Work shows little or no understanding of creative or original point of view.
Reflective Statement Thoughtful written exploration of creative process, project requirements, and intent reflecting knowledge of the world around you and available resources.
Detailed selfanalysis demonstrating insight and objectively related to all concepts, techniques, and photography process.
Understanding of concepts, photography rules, and use of Photoshop through writing.
Underdeveloped statements, only some understanding of concepts demonstrated.
Writing incomplete or not attempted.
Points: 24 = 100 23 = 98 22 = 96 21 = 94 20 = 92 19 = 90 18 = 88 17 = 86 16 = 84 15 = 82 14 = 80 13 = 78 12 = 76 11 = 74 10 = 72 9 = 70 8 = 68 7 = 66 6 = 64
0 = Not turned in
93 – 100 = A 85 – 92 = B 77 – 84 = C 70 – 76 = D 0 – 70 = F
Final Points/ Grade Comments
16