phase intermediate teacher’s guide...the teacher’s guide • the teacher’s guide elaborates...
TRANSCRIPT
Inte
rmed
iate
Pha
se
Teac
her’s
Gui
de
Grade
6
Natural Sciences
Natural Sciences Intermediate Phase
Work Schedule and Teacher’s Guide
The Natural Sciences Work Schedule and the Teachers’ Guide provide support to teachers to implement the NCS. This is not a policy document but is a resource for teachers. The Work Schedule and the Teachers’ Guide follow the same weekly plan for each grade. The Work Schedule
• This is a broad framework that offers a selection of content (Learning Outcomes and Core Knowledge and Concepts) for each grade 4 -6.
• The Work Schedule gives a week by week outline of the content, and the assessment focus.
• It works towards all three NS Learning Outcomes. • It covers all the Core Knowledge and Concepts in the four strands of the Natural
Sciences. The Teacher’s Guide
• The teacher’s guide elaborates and elucidates the outline given in the Work Schedule week by week in each grade.
• It gives a wide variety of lessons which build up to various assessment tasks related to the NS Learning Outcomes.
• It gives further detail of the concepts to be taught and methods to be used. • It also details the integration possibilities between the NS strands as well as
between the different Learning Areas. How to use the Work Schedule and Teacher’s Guide We recommend that:
• Teachers use these documents to support their own plans and incorporate what they find useful.
• Teachers adapt the programme to the pace of their learners. • Teachers choose what is suitable to their context and what is manageable in their
classroom. • Teachers should plan their assessment programme in advance for each term
according to their own teaching pace. • Teachers should integrate content wherever it is appropriate. • Teachers should consult the National Curriculum Statement Policy - Document as a
reference to the learning outcomes, assessment standards and prescribed content knowledge.
ACKNOWLEDGEMENTS
Sincere thanks to the teachers and curriculum advisers who have developed the work schedule for the Intermediate Phase. Directorate Curriculum : GET
TEACHER’S GUIDE : GRADE 6
NATURAL SCIENCES
CONTENTS
PART ONE: INFORMATION NATIONAL POLICY DOCUMENTS
INFORMATION FOR TEACHERS
GENERAL INFORMATION
PART TWO: SUGGESTIONS FOR IMPLEMENTING THE WORK SCHEDULE FOR NATURAL SCIENCES IN THE CLASSROOM
Grade 6 Assessment Program Learning Outcomes and Assessment Standards Strand 1: Energy and Change Strand 2: Matter and Materials Strand 3: Life and Living Strand 4: Planet Earth and Beyond PART THREE: APPENDIX Grade 6 Template for scientific investigation
PART FOUR: SCIENTIFIC LITERACY
Glossary
- 1 -
PART ONE: INFORMATION
NATIONAL POLICY DOCUMENTS
National Curriculum Statement Grades R-9 - POLICY National Curriculum Statement Grades R-9 - Teacher’s Guide National Policy on Assessment and Qualifications for schools in the GET band National Curriculum Statement – GET - Assessment Guidelines
GENERAL INFORMATION:
Teaching starts from what the learners already know. The Natural Sciences curriculum consists of 70% prescribed curriculum, as stipulated in
the Work Schedule and 30% from extended and local content. Safety in the Natural Sciences classroom / laboratory is important. Learners should be
constantly warned of any possible dangers and work safely. Accuracy in Science should be emphasised. There are examples of Scientific Investigations for each grade. These can be used as
complete activities for assessment purposes. The assessment instruments can be adjusted where appropriate.
INFORMATION FOR TEACHERS
Scientific Literacy: Teachers should have an understanding of these concepts prior to each week’s lessons. It is important to build up scientific concepts and language. ‘Briefly defined concepts’ are the words and concepts teachers use during the lesson. Teachers must make sure learners understand their meaning. These words must not, however, develop into learned vocabulary words without understanding the concepts. Learners must be allowed to revisit the concepts and meanings.
Suggestions for Implementing: These suggestions should help teachers on HOW to set up their own activities. Use your own experience and creativity in your planning according to your own school’s needs. Also build in ways to help learners with barriers. Provide for extended learning and diversity – see policy documents. Integrate Literacy and Numeracy where applicable throughout the year while teaching, learning and assessing.
Resources: Use resources available in your school/community.
Integration: Address integration and make links where they naturally occur in the
curriculum. Integration is possible within the knowledge strands of Natural Sciences, and across the different Learning Areas. Although the four knowledge strands are set out separately per term in the Intermediate Phase, you can still integrate the strands where appropriate to ensure that Natural Sciences is not taught in compartments. The links between the strands can be incorporated into the activities.
Assessment: Assess a learner’s performance using appropriate assessment formats
guided by the assessment standards. Informal assessment is part of the monitoring process to help learners before the formal assessment tasks. Use different and appropriate forms of assessment spread out over the year. Remember to record formal assessment tasks. Examples of formal assessment tasks are given.
- 2 -
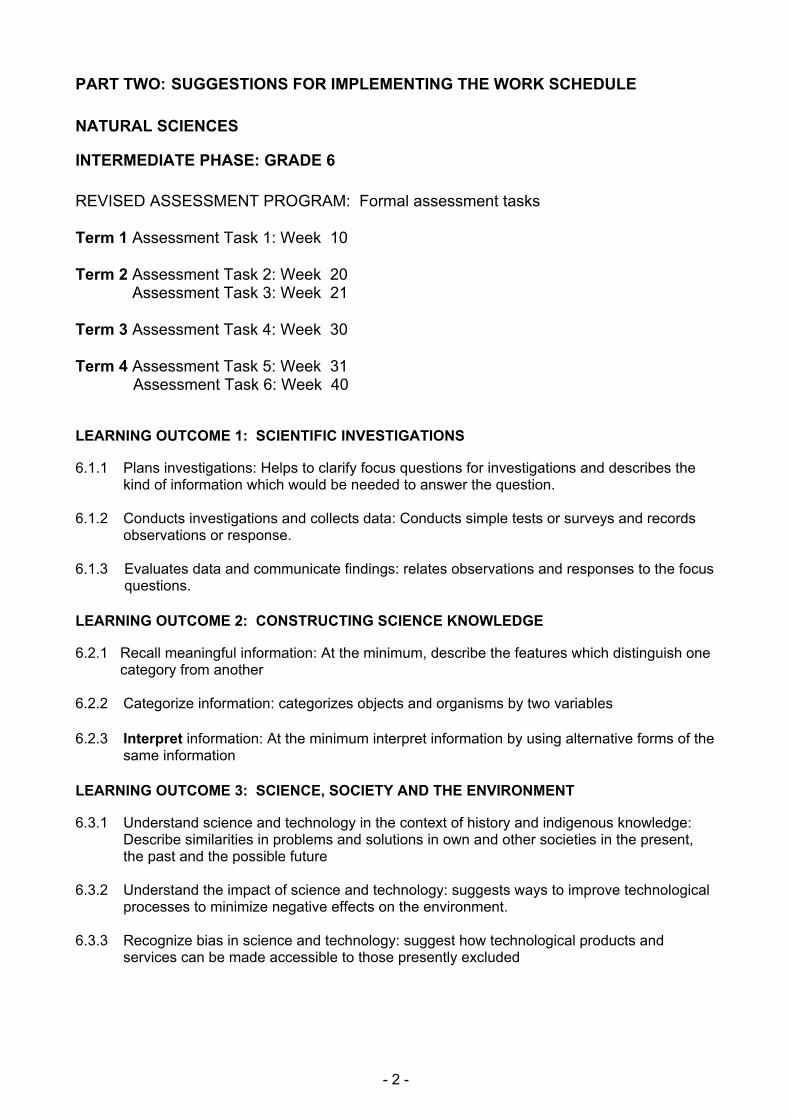
PART TWO: SUGGESTIONS FOR IMPLEMENTING THE WORK SCHEDULE
NATURAL SCIENCES
INTERMEDIATE PHASE: GRADE 6 REVISED ASSESSMENT PROGRAM: Formal assessment tasks Term 1 Assessment Task 1: Week 10 Term 2 Assessment Task 2: Week 20
Assessment Task 3: Week 21
Term 3 Assessment Task 4: Week 30 Term 4 Assessment Task 5: Week 31 Assessment Task 6: Week 40
LEARNING OUTCOME 1: SCIENTIFIC INVESTIGATIONS 6.1.1 Plans investigations: Helps to clarify focus questions for investigations and describes the
kind of information which would be needed to answer the question.
6.1.2 Conducts investigations and collects data: Conducts simple tests or surveys and records observations or response.
6.1.3 Evaluates data and communicate findings: relates observations and responses to the focus questions. LEARNING OUTCOME 2: CONSTRUCTING SCIENCE KNOWLEDGE 6.2.1 Recall meaningful information: At the minimum, describe the features which distinguish one category from another 6.2.2 Categorize information: categorizes objects and organisms by two variables 6.2.3 Interpret information: At the minimum interpret information by using alternative forms of the
same information LEARNING OUTCOME 3: SCIENCE, SOCIETY AND THE ENVIRONMENT 6.3.1 Understand science and technology in the context of history and indigenous knowledge:
Describe similarities in problems and solutions in own and other societies in the present, the past and the possible future
6.3.2 Understand the impact of science and technology: suggests ways to improve technological processes to minimize negative effects on the environment. 6.3.3 Recognize bias in science and technology: suggest how technological products and
services can be made accessible to those presently excluded
- 3 -
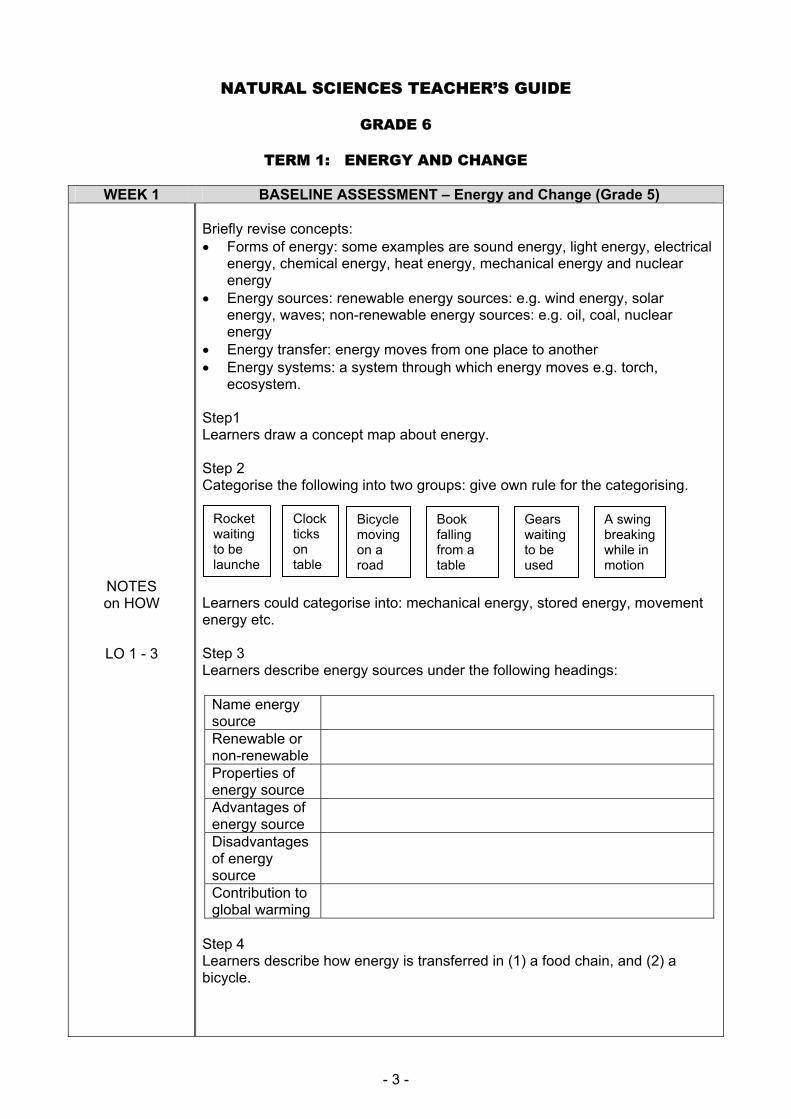
NATURAL SCIENCES TEACHER’S GUIDE
GRADE 6
TERM 1: ENERGY AND CHANGE
WEEK 1 BASELINE ASSESSMENT – Energy and Change (Grade 5)
NOTES on HOW
LO 1 - 3
Briefly revise concepts: • Forms of energy: some examples are sound energy, light energy, electrical
energy, chemical energy, heat energy, mechanical energy and nuclear energy
• Energy sources: renewable energy sources: e.g. wind energy, solar energy, waves; non-renewable energy sources: e.g. oil, coal, nuclear energy
• Energy transfer: energy moves from one place to another • Energy systems: a system through which energy moves e.g. torch,
ecosystem. Step1 Learners draw a concept map about energy. Step 2 Categorise the following into two groups: give own rule for the categorising. Learners could categorise into: mechanical energy, stored energy, movement energy etc. Step 3 Learners describe energy sources under the following headings:
Name energy source
Renewable or non-renewable
Properties of energy source
Advantages of energy source
Disadvantages of energy source
Contribution to global warming
Step 4 Learners describe how energy is transferred in (1) a food chain, and (2) a bicycle.
Rocket waiting to be launche
Bicycle moving on a road
A swing breaking while in motion
Book falling from a table
Clock ticks on table
Gears waiting to be used
- 4 -
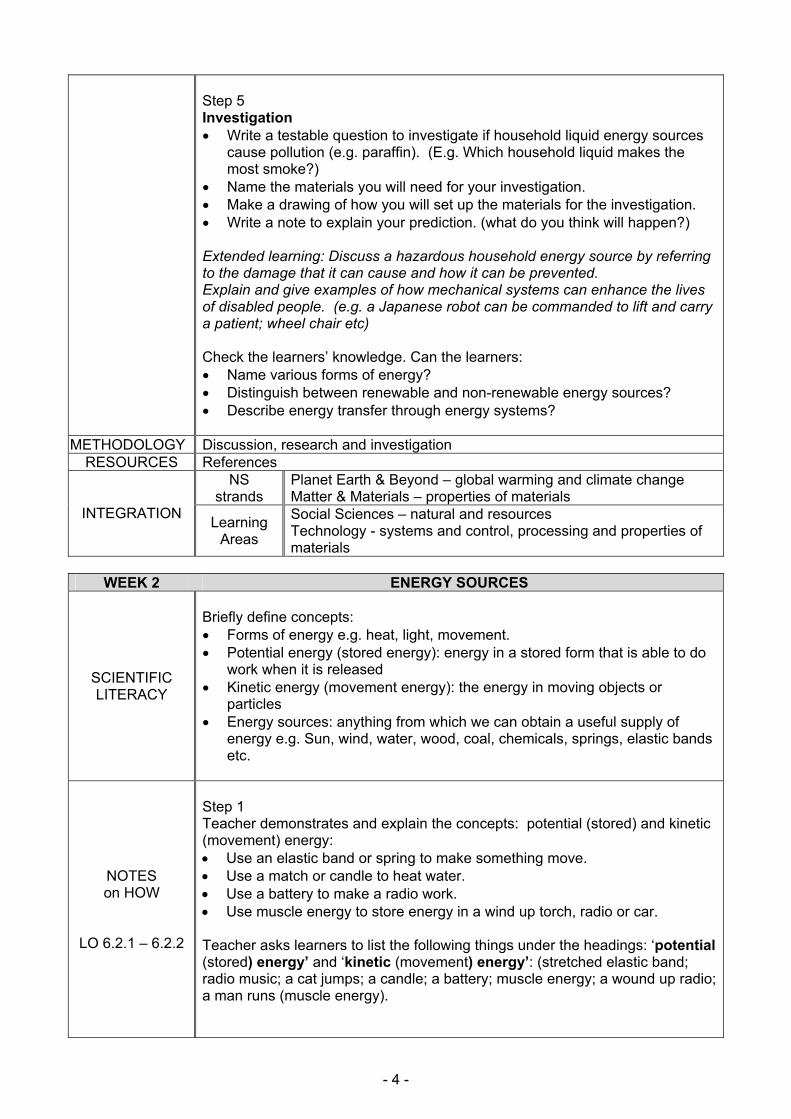
Step 5 Investigation • Write a testable question to investigate if household liquid energy sources
cause pollution (e.g. paraffin). (E.g. Which household liquid makes the most smoke?)
• Name the materials you will need for your investigation. • Make a drawing of how you will set up the materials for the investigation. • Write a note to explain your prediction. (what do you think will happen?) Extended learning: Discuss a hazardous household energy source by referring to the damage that it can cause and how it can be prevented. Explain and give examples of how mechanical systems can enhance the lives of disabled people. (e.g. a Japanese robot can be commanded to lift and carry a patient; wheel chair etc) Check the learners’ knowledge. Can the learners: • Name various forms of energy? • Distinguish between renewable and non-renewable energy sources? • Describe energy transfer through energy systems?
METHODOLOGY Discussion, research and investigation RESOURCES References
NS strands
Planet Earth & Beyond – global warming and climate change Matter & Materials – properties of materials
INTEGRATION Learning Areas
Social Sciences – natural and resources Technology - systems and control, processing and properties of materials
WEEK 2 ENERGY SOURCES
SCIENTIFIC LITERACY
Briefly define concepts: • Forms of energy e.g. heat, light, movement. • Potential energy (stored energy): energy in a stored form that is able to do
work when it is released • Kinetic energy (movement energy): the energy in moving objects or
particles • Energy sources: anything from which we can obtain a useful supply of
energy e.g. Sun, wind, water, wood, coal, chemicals, springs, elastic bands etc.
NOTES on HOW
LO 6.2.1 – 6.2.2
Step 1 Teacher demonstrates and explain the concepts: potential (stored) and kinetic (movement) energy: • Use an elastic band or spring to make something move. • Use a match or candle to heat water. • Use a battery to make a radio work. • Use muscle energy to store energy in a wind up torch, radio or car. Teacher asks learners to list the following things under the headings: ‘potential (stored) energy’ and ‘kinetic (movement) energy’: (stretched elastic band; radio music; a cat jumps; a candle; a battery; muscle energy; a wound up radio; a man runs (muscle energy).
- 5 -
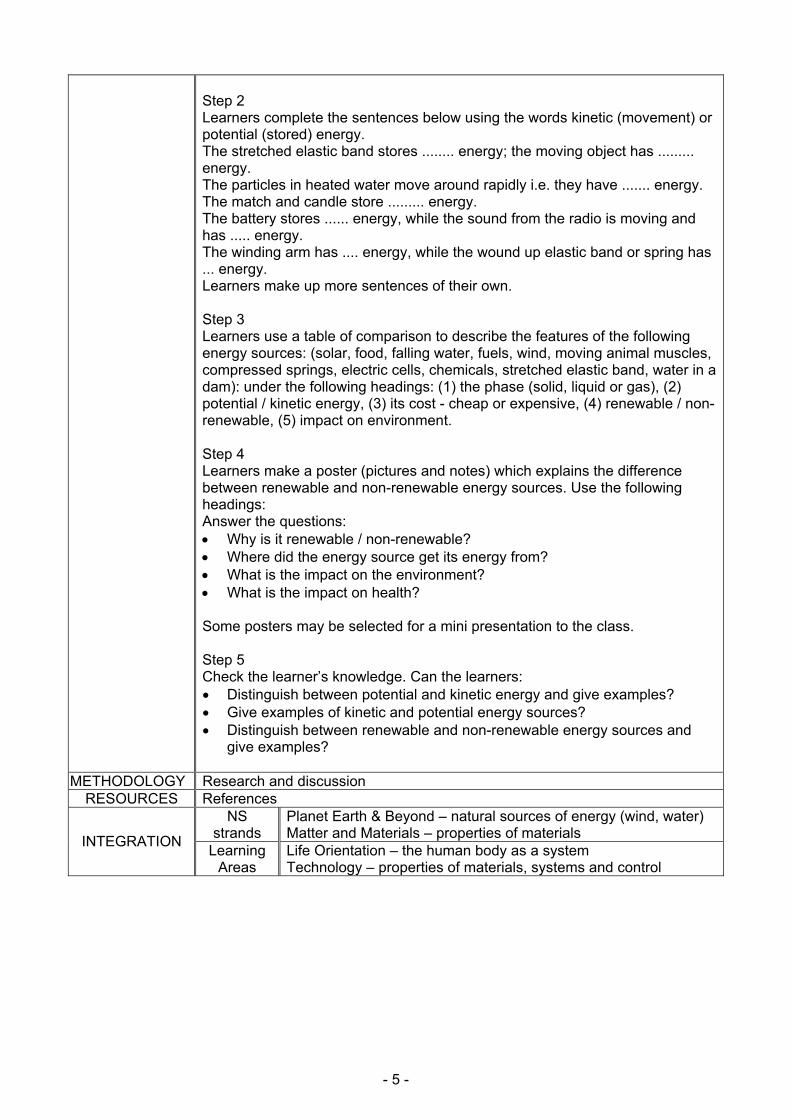
Step 2 Learners complete the sentences below using the words kinetic (movement) or potential (stored) energy. The stretched elastic band stores ........ energy; the moving object has ......... energy. The particles in heated water move around rapidly i.e. they have ....... energy. The match and candle store ......... energy. The battery stores ...... energy, while the sound from the radio is moving and has ..... energy. The winding arm has .... energy, while the wound up elastic band or spring has ... energy. Learners make up more sentences of their own. Step 3 Learners use a table of comparison to describe the features of the following energy sources: (solar, food, falling water, fuels, wind, moving animal muscles, compressed springs, electric cells, chemicals, stretched elastic band, water in a dam): under the following headings: (1) the phase (solid, liquid or gas), (2) potential / kinetic energy, (3) its cost - cheap or expensive, (4) renewable / non-renewable, (5) impact on environment. Step 4 Learners make a poster (pictures and notes) which explains the difference between renewable and non-renewable energy sources. Use the following headings: Answer the questions: • Why is it renewable / non-renewable? • Where did the energy source get its energy from? • What is the impact on the environment? • What is the impact on health? Some posters may be selected for a mini presentation to the class. Step 5 Check the learner’s knowledge. Can the learners: • Distinguish between potential and kinetic energy and give examples? • Give examples of kinetic and potential energy sources? • Distinguish between renewable and non-renewable energy sources and
give examples?
METHODOLOGY Research and discussion RESOURCES References
NS strands
Planet Earth & Beyond – natural sources of energy (wind, water) Matter and Materials – properties of materials INTEGRATION Learning
Areas Life Orientation – the human body as a system Technology – properties of materials, systems and control
- 6 -
Self assessment □ Peer assessment □ Group assessment □
Teacher assessment □ Investigation activities □
Case studies □
Mind mapping □
Projects □
Simulations □
Concept mapping □
Research √
Role-play □
Brainstorming tasks □
Assignment □
Translation task □
Functional writing √
Performance based assess. □
Interviews □
Presentations √
Practical demonstration □
Questionnaires □ Other:
ASSESSMENT Reminder :
Record learner performance on
Formal Assessment Tasks
Test □
Structured questions □ Other:
WEEK 3 ENERGY TRANSFERS AND CONVERSIONS l
SCIENTIFIC LITERACY
Briefly define concepts: • Potential energy sources: energy sources that store energy e.g. battery,
cell, elastic band, chemicals, fuel etc. • Kinetic energy sources: energy sources that move e.g. electricity, falling
water, wind • Energy transfer: when energy moves from one object, or part of a system,
to another • Energy conversion: when energy changes from one form to another.
NOTES on HOW
LO 6.3.2
Step 1 • Explain the concepts ‘energy transfer’ and ‘energy conversion’ by using the
torch: • Learners construct a simple circuit with a battery, wire and a globe. • Use words such as: battery, stored / potential energy, chemical energy,
electric wires, light bulb, electric current, movement / kinetic energy, heat energy, light energy.
• First deal with energy transfer from battery to wires to light bulb, and then with energy conversion from stored chemical energy to moving electric energy, to light and heat energy.
• Learners draw and write notes to show (1) how energy is transferred from one part of the circuit to another and (2) converted from one form of energy to another.
Step 2: Group Activity or demonstration lesson Teacher supplies learners with elastic bands and / or springs and / or balloons; also batteries, light bulbs, speakers (if available); bottles filled with water and containers to pour them into etc. • Learners devise their own way of releasing the energy from an energy
source they are given. The energy released must be transferred to something else, which must cause part of the system to move.(e.g. catapult, water mill, electric fan etc.)
• Learners must demonstrate their ‘inventions’ and describe both the transfer of energy and the conversion of energy in their systems. Learners then write about the energy transfers and conversions in two of the ‘inventions’ selected by the teacher.

- 7 -
Step 3 Describe energy transfers and conversions in a more complex energy system such as a motor car or a cell phone and from the power station to our home. • In a motor car system (highly simplified) one could consider different sub-
systems separately e.g. the battery works the window wipers, the hooter and the headlamps; the fuel, moves the engine, which turns the shaft and axle, which turns the wheels etc.
• In a cell phone the battery works the light, produces sound etc. Learners draw their energy system indicating the energy transfers and energy conversions on the drawing, with labels and short notes. Extended learning: Using any of the materials in the list below, learners describe (write and draw) and demonstrate a simple system to produce 1) a sound, 2) a small amount of heat, 3) movement, 4) light. List: stones, cup, batteries, small light bulbs, connecting wires, metal spoons (teacher can add to this list). Check the learner’s knowledge. Can the learners: • Distinguish between energy transfer and energy conversion? • Describe the transfer and conversion of energy in a system?
METHODOLOGY Research, practical demonstration, discussion RESOURCES Text books, pictures
NS strands
Life & Living – food chains and ecosystems Matter and Material – properties of materials INTEGRATION Learning
Areas Life Orientation – the human body as a system Technology – properties of materials, systems and control
Self assessment □ Peer assessment □ Group assessment □ Teacher assessment □
Investigation activities □
Case studies □
Mind mapping □
Projects □
Simulations □
Concept mapping □
Research √
Role-play □
Brainstorming tasks □
Assignment □
Translation task □
Functional writing √
Performance based assess. □
Interviews □
Presentations √
Practical demonstration □
Questionnaires □ Other:
ASSESSMENT Reminder :
Record learner performance on
Formal Assessment Tasks
Test □
Structured questions □ Other:
WEEK 4 ENERGY TRANSFER AND CONVERSIONS II
SCIENTIFIC LITERACY
Briefly define concepts: • Potential energy (stored energy) • Kinetic energy (energy of motion / movement energy) • Energy conversions:
o From potential energy to kinetic energy e.g. a battery turns a motor o From kinetic energy to potential energy e.g. compressing a spring,
stretching an elastic band.
- 8 -
NOTES on HOW
LO 6.1 – 6.3
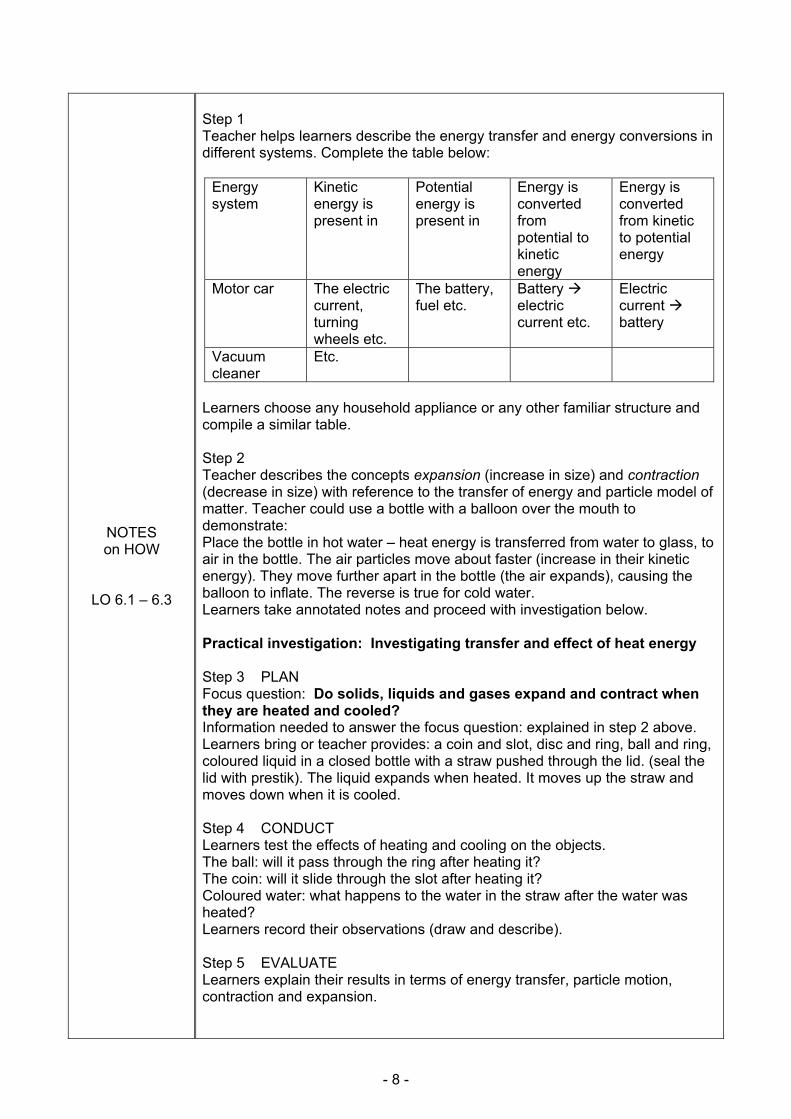
Step 1 Teacher helps learners describe the energy transfer and energy conversions in different systems. Complete the table below:
Energy system
Kinetic energy is present in
Potential energy is present in
Energy is converted from potential to kinetic energy
Energy is converted from kinetic to potential energy
Motor car The electric current, turning wheels etc.
The battery, fuel etc.
Battery electric current etc.
Electric current battery
Vacuum cleaner
Etc.
Learners choose any household appliance or any other familiar structure and compile a similar table. Step 2 Teacher describes the concepts expansion (increase in size) and contraction (decrease in size) with reference to the transfer of energy and particle model of matter. Teacher could use a bottle with a balloon over the mouth to demonstrate: Place the bottle in hot water – heat energy is transferred from water to glass, to air in the bottle. The air particles move about faster (increase in their kinetic energy). They move further apart in the bottle (the air expands), causing the balloon to inflate. The reverse is true for cold water. Learners take annotated notes and proceed with investigation below. Practical investigation: Investigating transfer and effect of heat energy Step 3 PLAN Focus question: Do solids, liquids and gases expand and contract when they are heated and cooled? Information needed to answer the focus question: explained in step 2 above. Learners bring or teacher provides: a coin and slot, disc and ring, ball and ring, coloured liquid in a closed bottle with a straw pushed through the lid. (seal the lid with prestik). The liquid expands when heated. It moves up the straw and moves down when it is cooled. Step 4 CONDUCT Learners test the effects of heating and cooling on the objects. The ball: will it pass through the ring after heating it? The coin: will it slide through the slot after heating it? Coloured water: what happens to the water in the straw after the water was heated? Learners record their observations (draw and describe). Step 5 EVALUATE Learners explain their results in terms of energy transfer, particle motion, contraction and expansion.
- 9 -
Step 6 Learners research how the contraction and expansion of materials are taken into account in construction e.g. expansion joints in railway tracks, concrete slabs, bridges etc. Report (write and draw) to describe what they have learnt. Step 7 Check the learner’s knowledge. Can the learners: • Describe kinetic and potential energy? • Identify parts of a system where energy is converted from kinetic to
potential energy and vice versa? • Describe expansion and contraction and its importance when constructing
things?
METHODOLOGY Practical demonstration, discussion and research RESOURCES Reference material, equipment for experiments
NS strands Matter and Materials – properties of materials
INTEGRATION Learning Areas Technology – systems and control
Self assessment □ Peer assessment □ Group assessment □ Teacher assessment □
Investigation activities □
Case studies □
Mind mapping □
Projects □
Simulations □
Concept mapping □
Research √
Role-play □
Brainstorming tasks □
Assignment □
Translation task □
Functional writing √
Performance based assess. □
Interviews □
Presentations √
Practical demonstration √
Questionnaires □ Other:
ASSESSMENT Reminder :
Record learner performance on
Formal Assessment Tasks
Test □
Structured questions □ Other:
WEEK 5 SAFETY RULES ASSOCIATED WITH ENERGY SOURCES
SCIENTIFIC LITERACY
Briefly define concepts: • Fossil fuels: fuels that are formed from the remains of organisms that lived
very long ago • Circuit: a system of electrical wires and components through which a
current flows • Unsafe practices: harmful or dangerous things to do.
NOTES on HOW
LO 6.3.1 – 6.3.3
Step 1 Introduce learners to the different ways in which electricity is generated e.g. by providing diagrams which show how fossil fuels, nuclear energy and various renewable energy sources are used to produce electricity. Give learners a pie chart showing all the different kinds of fuels used in South Africa. Ask questions about the pie chart: • Which energy source is used most commonly? Why do you think so? • Which energy source is the least commonly used? Why do you think so?
- 10 -
• Calculate (or estimate) the total percentage of renewable energy sources
from the pie chart. • What do you think about this? Step 2 Learners research about the advantages and disadvantages of each of the ways to generate electricity. The class is divided into three groups: fossil fuels, nuclear energy and renewable energy. Each group must (1) promote their method as the best way to generate electricity, and (2) find fault with the other ways. Points are scored for clear reasons that can be defended. Step 3 Learners write down advantages and disadvantages of each of the energy sources. Step 4 Learners learn how to wire a three pin plug, draw and label. Teacher tells learners about the functions of each of the wires and the importance of wiring in the correct order. (live, neutral & earth wire) Teacher provides learners with a diagram to show how the circuit of the plug forms a complete circuit with the power station when the switch is closed. Step 5 Check the learner’s knowledge. Can the learners: • Describe how electricity is generated by a renewable and non-renewable
source? • List advantages and disadvantages of a renewable and non-renewable
energy source? • Wire a three pin plug and describe the function of each of the wires?
METHODOLOGY Demonstration and research RESOURCES References, equipment for wiring a plug
NS strands
Planet Earth and Beyond - electricity in nature; Life and Living - electricity and its negative effect on the human body Matter & Materials – properties of materials INTEGRATION
Learning Areas
Social Sciences – environmental impact, generation of electricity Life Orientation – safety precautions Technology – systems and control
Self assessment □ Peer assessment □ Group assessment □ Teacher assessment □
Investigation activities □
Case studies □
Mind mapping □
Projects □
Simulations □
Concept mapping □
Research √
Role-play □
Brainstorming tasks □
Assignment □
Translation task □
Functional writing √
Performance based assess. □
Interviews □
Presentations √
Practical demonstration √
Questionnaires □ Other:
ASSESSMENT Reminder :
Record learner performance on
Formal Assessment Tasks
Test □
Structured questions □ Other:
- 11 -
WEEK 6 ELECTRICAL CIRCUITS
SCIENTIFIC LITERACY
Briefly define concepts: • Electrical circuits: the path along which electricity moves to make
appliances work • Electrical components: the parts that make up an electric circuit • Light bulbs (globes): an electrical component that converts electrical energy
to light and heat energy • Motors: an electrical component that spins when connected into a circuit • Heating wires: special wires that heat up when an electric current passes
through it e.g. found in irons, heaters, geysers, kettles • Conducting wires: wires which allow electricity to pass through • Switches: the components that either open (break) or close (complete) a
circuit • Battery (electrical cell).
NOTES on HOW
LO 6.2.1
Step 1 Describe the features of the electrical components. Learners record and describe: • The appearance (how it looks) • Its symbol in a circuit diagram • What it is made of • What it can do • Reason it is used • Dangers of the components (e.g. it gets hot etc.) Step 2 Set up a few work stations with different circuits. Get learners to make their own circuits using all of the components. By the end of the activity, learners should have seen all the components in action. Learners move around in groups to visit each work station. They draw each circuit and record their observations about the functions of the various components. They draw arrows in each circuit to show the flow of electricity. Step 3 Each group drafts a test, which is checked by the teacher. They peer assess the test to ensure learners know the components and their functions. Extended learning: learn to identify the materials used in the making of components e.g. copper metal in wires and research the properties of materials. Step 4 Check the learner’s knowledge. Can the learners: • Identify various electrical components, draw their symbols and state their
function? • Draw simple circuit diagrams with labels? • Show the flow of electricity correctly in each circuit?
METHODOLOGY Practical work with support RESOURCES References and electrical materials
- 12 -
NS
strands Matter and Materials – properties of materials INTEGRATION Learning
Areas Technology - electrical systems
Self assessment □ Peer assessment □ Group assessment □ Teacher assessment □
Investigation activities □
Case studies □
Mind mapping □
Projects □
Simulations □
Concept mapping □
Research √
Role-play □
Brainstorming tasks □
Assignment □
Translation task □
Functional writing √
Performance based assess. □
Interviews □
Presentations √
Practical demonstration √
Questionnaires □ Other:
ASSESSMENT Reminder :
Record learner performance on
Formal Assessment Tasks
Test □
Structured questions □ Other:
WEEK 7 BUILD AN ELECTRICAL CIRCUIT
SCIENTIFIC LITERACY
Briefly define concepts: • Electrical circuits: the path along which electricity moves to make
appliances work • Electrical components: the parts that make up an electric circuit • Light bulbs (globes): an electrical component that converts electrical energy
to light and heat energy • Motors: an electrical component that spins when connected into a circuit • Heating wires: special wires that heat up when an electric current passes
through it e.g. found in irons, heaters, geysers, kettles • Conducting wires: wires which allow electricity to pass through • Switches: the components that either open (break) or close (complete) a
circuit • Battery (electrical cell)
NOTES on HOW
LO 6.1.1 – 6.1.3 6.2.3
Investigation: Build an electric circuit that includes components that will produce heat, light and sound energy and makes an object move Step 1 PLAN Clarify a focus question to investigate the components in an electrical circuit e.g. What is the best way to arrange the components so that they perform optimally (work at their best)? Describe information needed to answer the focus question.
Step 2 CONDUCT Gather all equipment you will need. Conduct simple tests: Build the circuits with the components in different positions and record your observations: when are the lights brightest, the buzzes loudest etc? Your electrical circuits should include heating wires, light bulbs, buzzers (if available).
- 13 -
Step 3 EVALUATE Evaluate data. Relate observations to focus question. Communicate findings: Draw two of your electrical circuits (1) as you see it and (2) as circuit diagrams. Show arrows indicating the flow of electricity around each circuit. Step 4 Learners could do a further investigation which determines what will happen if more cells were added to the circuit above. Step 5 Construct a short description of an electrical circuit: Learners draw the circuit diagram based on the description. Show and describe the energy transfers and the energy conversions that take place in the circuit. Step 6 Check the learner’s knowledge. Can the learners: • Build a working electrical circuit, draw the circuit diagram, and describe the
energy transfers and conversions in the circuit? • Draw a circuit diagram from a description? • Show the flow of electricity correctly in each circuit?
METHODOLOGY Investigation, discussion RESOURCES References, electrical components
NS strands Matter and Materials – properties of materials
INTEGRATION Learning Areas
Social Sciences – natural resources and economic activities Technology - electrical systems
Self assessment □ Peer assessment □ Group assessment □ Teacher assessment □
Investigation activities √
Case studies □
Mind mapping □
Projects □
Simulations □
Concept mapping □
Research □
Role-play □
Brainstorming tasks □
Assignment □
Translation task □
Functional writing √
Performance based assess. □
Interviews □
Presentations √
Practical demonstration √
Questionnaires □ Other:
ASSESSMENT Reminder :
Record learner performance on
Formal Assessment Tasks
Test □
Structured questions □ Other:
WEEK 8 SOUND ENERGY
SCIENTIFIC LITERACY
Briefly define concepts: • Sound is made by a vibrating object • Sources of sound: sound travels away from sources (e.g. radio, clapping
hands, shouting etc). Sound gets fainter as it moves away. • Sound can only travel through a medium (liquid, solid, gas). Sound cannot
travel through a vacuum (i.e. no air). • Vibrations: rapid movements made by an object (e.g. feel the vibrations
coming from a speaker)
- 14 -
• Pitch: high or low sounds. Notes have a high pitch (high sound) or a low
pitch (low sound). • Volume: how soft or loud a sound is.
NOTES on HOW
LO 6.1
LO 6.3.1 – 6.3.3
Investigation: How are sounds made? Step 1 PLAN Learners suggest different ways in which sounds can be made using a variety of materials. Step 2 CONDUCT Carry out instructions to make sounds in different ways. • Hold the one end of a ruler down on top of a table with some length of the
ruler protruding over the edge. Flick (twang) the protruding end and listen to the sound.
• Pluck an elastic band that is pulled tight. • Hold fingers against your voice box while humming. • Pull the mouth of a balloon tight while air is rushing out of it. • Bang on a coffee can drum. Etc. Learners answer questions: How was the sound made? What did you see? What did you hear? What is the source of the vibration? Step 3 EVALUATE Learners tell what they have learnt about how sounds are made. Teacher explains that sounds are made when things vibrate. The vibration of the object causes air molecules to move and this makes a wave motion (movement) in the air. When these waves reach our ears we hear them as sound. The air molecules themselves do not move across the room, they just vibrate back and forth, passing the vibration on to the next particle and so on. NOTE: The investigation below will show the wave effect. Step 4 Further investigations
Can sounds travel through liquids, solids or gases? (Sounds need to travel through a medium)
Teacher explains that sounds need a medium (solid, liquid or gas) to travel through. Learners do the following activities: a) Sound travels through liquids Pour some water into a plastic lunch box so that it is about a quarter full. Tap the side of the lunch box with a metal spoon. Keep tapping it evenly. Observe the surface of the water and describe what you saw. b) Sound travels through solids Close your one ear and put your other ear to the table on one end and let someone tap the table on the other end. Can you hear the sound?
- 15 -
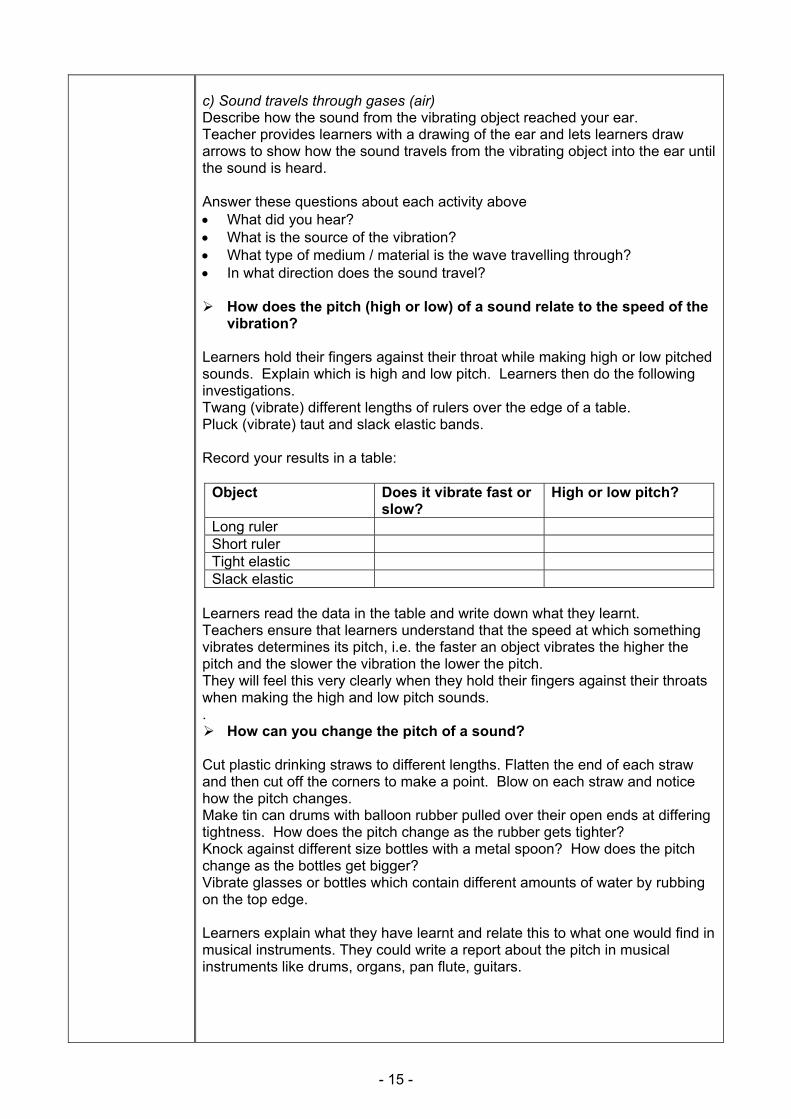
c) Sound travels through gases (air) Describe how the sound from the vibrating object reached your ear. Teacher provides learners with a drawing of the ear and lets learners draw arrows to show how the sound travels from the vibrating object into the ear until the sound is heard. Answer these questions about each activity above • What did you hear? • What is the source of the vibration? • What type of medium / material is the wave travelling through? • In what direction does the sound travel?
How does the pitch (high or low) of a sound relate to the speed of the vibration?
Learners hold their fingers against their throat while making high or low pitched sounds. Explain which is high and low pitch. Learners then do the following investigations. Twang (vibrate) different lengths of rulers over the edge of a table. Pluck (vibrate) taut and slack elastic bands. Record your results in a table:
Object Does it vibrate fast or slow?
High or low pitch?
Long ruler Short ruler Tight elastic Slack elastic
Learners read the data in the table and write down what they learnt. Teachers ensure that learners understand that the speed at which something vibrates determines its pitch, i.e. the faster an object vibrates the higher the pitch and the slower the vibration the lower the pitch. They will feel this very clearly when they hold their fingers against their throats when making the high and low pitch sounds. .
How can you change the pitch of a sound? Cut plastic drinking straws to different lengths. Flatten the end of each straw and then cut off the corners to make a point. Blow on each straw and notice how the pitch changes. Make tin can drums with balloon rubber pulled over their open ends at differing tightness. How does the pitch change as the rubber gets tighter? Knock against different size bottles with a metal spoon? How does the pitch change as the bottles get bigger? Vibrate glasses or bottles which contain different amounts of water by rubbing on the top edge. Learners explain what they have learnt and relate this to what one would find in musical instruments. They could write a report about the pitch in musical instruments like drums, organs, pan flute, guitars.
- 16 -
Teachers note: The shorter the pipe in a musical instrument, the higher the pitch. (straws) The larger the resonating chamber (filled with air), the lower the pitch. (as in big drums) The tighter the skin on the drum, the higher the pitch. On a stringed instrument the shorter or tighter the string the higher the pitch.
How are loud and soft sounds (volume) made? Learners clap their hands softly and then loudly. Learners make sound with their voices and then blow through a cardboard tube (of toilet roll or paper towel). What happens to the sound? Can the learners suggest why? Teacher explains that the volume depends on the amount of energy in the sound. If the vibration has lots of energy it makes a large sound wave which gives a loud sound (e.g. loud clapping). If an object is vibrated in a cavity, as in a guitar or a bell, the sound is amplified (concentrated and made louder) and can last longer. The volume of sound is measured in decibel (dB). The unit is named after Alexander Graham Bell who invented the telephone. Teacher ensures learners understand the effects of very loud noise and how to care for their ears. This could be a ‘reading for understanding’ task. Extended learning: Learners make own simple musical instruments and demonstrate how they can change the pitch of their instrument. Step 5 Check the learner’s knowledge: Can the learner: • Describe how sound is made? • Describe the difference between pitch and volume? • Tell a high pitch from a low pitch and explain the difference? • Describe how sound travels from the source to the ear?
METHODOLOGY Practical investigations with support, discussion RESOUCES Text books, references, equipment for investigation
NS strands Matter and Materials – properties of materials
INTEGRATION Learning Areas
Technology – producing sound Arts & Culture – musical instruments
Self assessment □ Peer assessment □ Group assessment □ Teacher assessment □
Investigation activities √
Case studies □
Mind mapping □
Projects □
Simulations □
Concept mapping □
Research □
Role-play □
Brainstorming tasks □
Assignment □
Translation task □
Functional writing √
Performance based assess. √
Interviews □
Presentations √
Practical demonstration □
Questionnaires □ Other:
ASSESSMENT Reminder :
Record learner performance on
Formal Assessment Tasks
Test □
Structured questions □ Other:
- 17 -
WEEK 9 SUGGESTIONS FOR CONSOLIDATION
SCIENTIFIC LITERACY
NOTES on HOW
LO 6.1.1 – 6.1.3
• Sources of energy: make posters with headings, labels and notes to show
e.g. renewable and non-renewable energy sources; potential and kinetic energy sources.
• Forms of energy: make posters with headings, labels and notes to show different forms of kinetic and potential energy.
• Energy changes: collect machines and objects that bring about energy changes. Describe the energy transfers and conversions (changes) that take place in each machine.
• Energy Safety: do a survey at home to find where electrical energy is used safely and unsafely in your home. Write a report and suggest ways to improve the safety at home.
• Conserving energy and the environment: list advantages and disadvantages of a renewable and non-renewable energy source.
• Electric circuits: find out how electricity comes from the power station to our homes and back to the power station. Draw and write to explain.
• Learners draw any musical instrument and label the main parts. Explain how sounds are made by the instrument and how the pitch and volume of the sound can be changed.
METHODOLOGY Investigation and research
RESOURCES Reference material NS
strands Matter and Material – properties of matter and materials INTEGRATION Learning
Areas Social Sciences – equal access to resources and services Technology – properties of materials and systems
Self assessment □ Peer assessment □ Group assessment □ Teacher assessment □
Investigation activities □
Case studies □
Mind mapping □
Projects □
Simulations □
Concept mapping □
Research √
Role-play □
Brainstorming tasks □
Assignment □
Translation task □
Functional writing √
Performance based assess. □
Interviews □
Presentations √
Practical demonstration □
Questionnaires □ Other:
ASSESSMENT Reminder :
Record learner performance on
Formal Assessment Tasks
Test □
Structured questions □ Other:
WEEK 10 FORMAL ASSESSMENT TASK 1
FORMAL ASSESSMENT TASK
LO 2 AS 1 Draw a concept chart on energy.
- 18 -
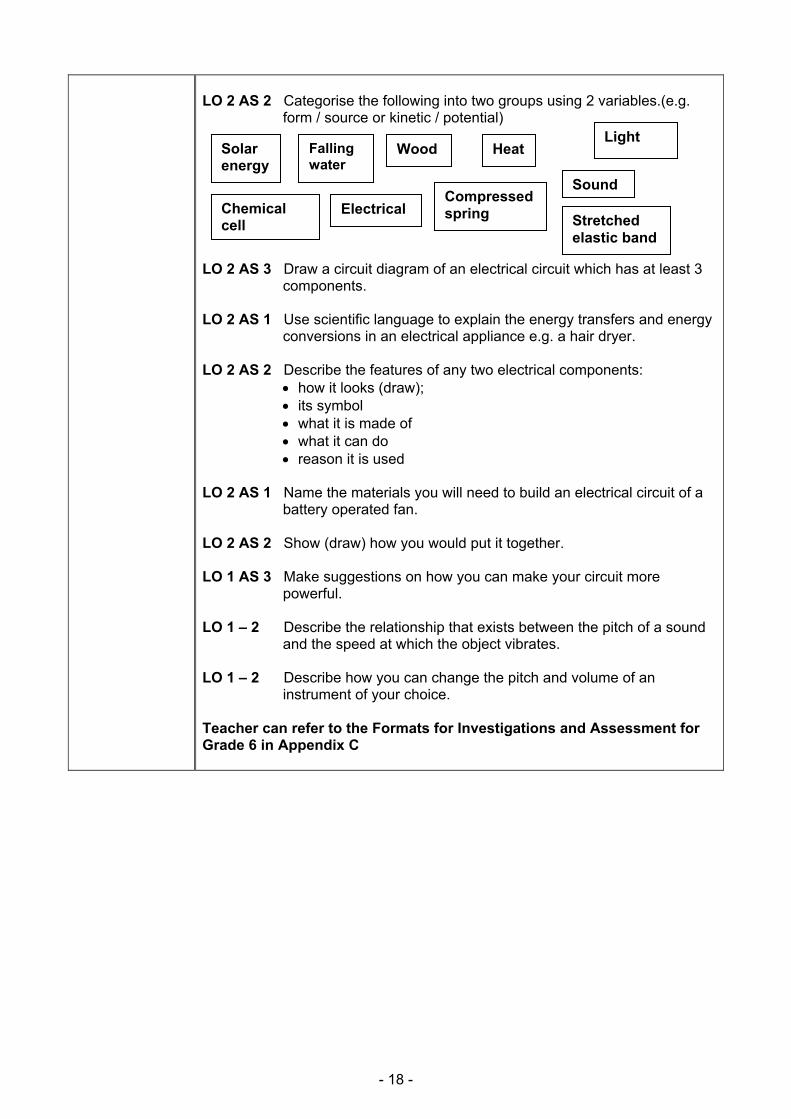
LO 2 AS 2 Categorise the following into two groups using 2 variables.(e.g. form / source or kinetic / potential) LO 2 AS 3 Draw a circuit diagram of an electrical circuit which has at least 3 components. LO 2 AS 1 Use scientific language to explain the energy transfers and energy conversions in an electrical appliance e.g. a hair dryer. LO 2 AS 2 Describe the features of any two electrical components:
• how it looks (draw); • its symbol • what it is made of • what it can do • reason it is used
LO 2 AS 1 Name the materials you will need to build an electrical circuit of a battery operated fan. LO 2 AS 2 Show (draw) how you would put it together. LO 1 AS 3 Make suggestions on how you can make your circuit more powerful. LO 1 – 2 Describe the relationship that exists between the pitch of a sound and the speed at which the object vibrates. LO 1 – 2 Describe how you can change the pitch and volume of an instrument of your choice. Teacher can refer to the Formats for Investigations and Assessment for Grade 6 in Appendix C
Solar energy
Electrical
Light Wood Falling
water Heat
Sound Compressed spring Stretched
elastic band
Chemical cell
- 19 -
TERM 2: MATTER AND MATERIALS
WEEK 11 BASELINE ASSESSMENT – MATTER AND MATERIALS (GRADE 5)
NOTES on HOW
LO 1-3
Do baseline assessment of Grade 5 Matter and Materials to find out what prior knowledge has been gained. Ask questions on: • Matter: anything which has mass and occupies space • Materials: solid matter e.g. metals, ceramics and polymers that are useful to us • Phases of matter • Classes of materials • Substances: can exist naturally or can be made • Solvents: solutions and solubility • Boiling and melting points.
WEEK 12 + 13 PROPERTIES OF MATERIALS
SCIENTIFIC LITERACY
Briefly define concepts : Materials • Materials: anything made out of solid matter • Metals: iron, chrome, aluminium, copper, etc. • Ceramics: pottery, porcelain, tiles, glass • Polymers: plastics and fibres (man made plastic fibres and natural fibres
such as wool and cotton) Compounds • Compound: substance formed by a combination of atoms (elements). (E.g.
water is a compound formed from oxygen and hydrogen (H2O)) • Oxygen: (O2) the gas that we breathe in order to survive • Rust: a compound formed from the reaction of iron (where ever it is) and
oxygen from the air. Properties of materials • Insulation : the ability to prevent energy from escaping or entering • Flexibility: the ability to bend or stretch and return to its original state • Hardness: the ability to withstand forces • Magnetism: the ability to be attracted to magnetic forces • Electrical conduction: the ability to let electric energy flow • Heat conduction: the ability to let heat energy flow through it • Solubility: the ability of solids to be dissolved in a liquid.
NOTES on HOW
LO 6.2.1 - 6.2.2
Step 1 Teacher provides a few materials which include: metals, polymers and ceramics. Step 2 Learners describe the features of the selected materials. Step 3 Learners can group the materials according to their features.

- 20 -
LO 6.1.1 – 6.1.3
Step 4 Organise work stations Investigate the properties of different materials
Can metals, ceramics and plastics rust when placed in water? Do all metals rust? Do metals, ceramics and plastics respond to magnets? Do metals, ceramics and plastics conduct electricity or not? Do metals, ceramics and plastics conduct heat or not? Do metals, ceramics and plastics dissolve in water or other solvents
(such as vinegar)? Station 1: Rusting Learners can place a sample of each of the materials (different metals (NB: include an iron nail), plastics and ceramics) in a bottle with a small amount of water and a teaspoon of salt. Place it in the sun to test if the metal rusts. Allow to stand over a period of ten days with a lid on the bottle. They write down their observations. Station 2: Flexibility Stretch and bend different materials and test to see if / how it returns to the original state. Station 3: Hardness Hit materials (use stones) to see its ability to withstand forces. Station 4: Magnetism Use a magnet to test the materials’ ability to be attracted by magnetic forces. Station 5: Electrical conductors Connect materials into electrical circuits to test the materials’ ability to let electric energy flow. Station 6: Heat insulation Use materials to test their ability to let heat energy in or out. Make box houses with different materials for roofs (e.g. aluminium foils, cardboard, wood, plastic, tiles, etc). Seal the boxes and insert thermometers into a tiny hole in the side and place in the sun for two hours. Ask learners to measure the temperature inside the boxes at the exact same time after two hours. Ask learners to make a note of their readings. Station 7: Heat conduction Learners put teaspoons made of different materials into a container of boiling water. (Use plastic and metal teaspoons, small wooden spoons and also metal teaspoons with plastic or wooden handles). Learners feel the handle of the teaspoon after 5 min to test how they conduct heat. Step 5 Learners draw and write to record their observations and include any temperature measurements. They show and tell about their investigation to the rest of the class. Step 6 Ask learners to categorize the materials according to the above properties. They must make a chart to show you they have categorised the materials. Step7 Explain the following: materials like plastics can be divided into two main categories. • Natural polymers: Plants make starch during photosynthesis. Starch is a
polymer. Plants and animals also make fibres such as cotton, grass fibres (for making baskets), linen, and wool and hair.
• Synthetic polymers: plastics (man-made fibres) like nylon, polythene, polyester. Plastics are made from coal and oil.
- 21 -
Step 8 Bring examples of many kinds of plastics and fibres. Ask learners to categorize the materials into two main categories – synthetic and natural polymers. Step 9 Check the learners’ knowledge. Can learners: • Describe different materials using suitable vocabulary (referring to their
properties)? • Set up activities to investigate the properties of materials and make
appropriate and accurate observations and measurements? • Draw and write to record their observations accurately? • Correctly sort materials according to their properties? • Correctly tell the difference between man made and natural polymers?
METHODOLOGY Class discussion, practical work, categorise
RESOURCES Materials (plastic, metal, ceramic), boxes, thermometers, work sheets, containers , water etc.
NS strands Planet Earth & Beyond – natural & synthetic materials
INTEGRATION Learning Areas
Technology – properties of materials EMS – processing of raw materials
Self assessment □ Peer assessment □ Group assessment □ Teacher assessment □
Investigation activities √
Case studies □
Mind mapping □
Projects □
Simulations □
Concept mapping □
Research □
Role-play □
Brainstorming tasks □
Assignment □
Translation task □
Functional writing √
Performance based assess. √
Interviews □
Presentations √
Practical demonstration □
Questionnaires □ Other:
ASSESSMENT Reminder :
Record learner performance on
Formal Assessment
Tasks
Test □
Structured questions □ Other:
WEEK 14 PHASES OF MATTER
SCIENTIFIC LITERACY
Briefly define concepts : • Substances: can exist naturally or can be made • Phases of matter: solids, liquids and gasses • Solid: matter with a fixed form • Liquid: matter with irregular form • Gas : matter with no structure • Absorbed energy: when energy is gained / absorbed or been added • Released energy: when energy is lost or released • Evaporation: when water changes from liquid to vapour (gas).
- 22 -
NOTES on HOW
LO 6.2.1 - 6.3.1
Step 1 Learners bring (or identify) a variety of materials to class. (solids; liquids; gases) Solids - sugar particles, ice cube Liquids - water, soft drinks, blood, oil, milk Gases - blown up a balloon, a pumped tube of bicycle, bottles of air. Step 2 Explain that all solids, liquids and gases are made of particles which are so small they cannot be seen. The particles can gain or lose energy, when they are heated or cooled. In solids the particles: • are closely packed, touching each other • they are held together by strong forces • they are moving (vibrating) slightly In liquids the particles: • have spaces between them • they are held together by weaker forces than in solids • they are moving around In gases the particles: • have huge spaces between them • they are held together by very weak forces • they move around with a lot of energy Step 3 Explain how phase change takes place, using the particle model of matter like this: • When a solid is heated it melts. This is because the particles absorb the
energy and start to move around more, they get bigger spaces between them and the forces between them get weaker. In this way the solid becomes a liquid.
• When the liquid is heated the particles absorb even more energy and become very energetic. They have weak forces holding them together. They have huge spaces between them. In this way the liquid becomes a gas.
Step 4 Ask learners to draw and write to describe the features of a solid, liquid and a gas, using the particle model of matter. Learners write short paragraphs with everyday examples to explain the meaning of the following concepts: • melting • freezing (solidifying) • boiling(evaporating) • condensing Step 5 Teacher explains that industries use the phases of matter to shape different products. Solids like metals (gold), polymers (plastics) and ceramics (glass) are used to produce useful products.
- 23 -
Step 6 Ask learners to research information about industrial processes. They make a poster (with pictures, drawings, labels, notes and heading) to describe the processes in which industries use the phases of matter to shape articles into usable products. Step 7 Check the learners’ knowledge. Can learners: • Describe solids, liquids and gases in terms of the particle model of matter
showing correct understanding? • Write paragraphs that show that they understand freezing, melting, boiling
(evaporating), and condensing and be able to give everyday examples? • Find accurate information about how industry uses the three phases of
matter in their manufacturing processes?
METHODOLOGY Discussion, explanation, research RESOURCES Different kinds of materials, reference books
NS strands Energy and Change – the role of energy in processes
INTEGRATION Learning Areas Technology and EMS – properties and processing of materials
Self assessment □ Peer assessment □ Group assessment □ Teacher assessment □
Investigation activities □
Case studies □
Mind mapping □
Projects □
Simulations □
Concept mapping □
Research √
Role-play □
Brainstorming tasks □
Assignment □
Translation task √
Functional writing √
Performance based assess. □
Interviews □
Presentations □
Practical demonstration □
Questionnaires □ Other:
ASSESSMENT Reminder :
Record learner performance on
Formal Assessment Tasks
Test □
Structured questions □ Other:
WEEK 15 PERMANENT OR TEMPORARY PHASE CHANGES
SCIENTIFIC LITERACY
Briefly define concepts: • Solid: particles very close together in a fixed form • Liquid: particles tend to roll over one another and has irregular form • Gas: particles very far apart and has no form • Melting: change of state from a solid to a liquid, usually caused by heat
energy • Energy absorbed: when energy is gained or been added • Energy released: when energy is lost • Permanent change: cannot change back to its original form • Temporary change: change is not permanent - can change back again • Phase change: to change from one state to the other (solids, liquids,
gases)
- 24 -
NOTES on HOW
LO 6.1.1 - 6.1.3
Scientific investigation - Phase changes in matter Scenario There is going to be a market day in your school. You have to make different cartoon characters out of chocolate, jelly or frozen juice using moulds. Your friend has to boil eggs. Others have to make vetkoek, or pancakes. Everything can be displayed in an interesting way. Step 1 PLAN Learners describe information needed to answer the focus question. Learners ask questions about chocolate, jelly and ice cream (frozen juice) and eggs, pancakes and vetkoek etc. such as: Can chocolate be changed more than once to be moulded into different shapes? Can eggs be changed more than once to have different shapes? Do eggs go solid if we freeze them? etc. Step 2 Learners clarify a focus question to investigate which forms of matter change permanently or temporarily. Step 3 Explain that some matter changes permanently while other changes in matter might be temporary, depending on the properties. In chocolate, jelly and ice cream suckers the changes are temporary. In eggs, vetkoek, and pancakes the changes will be permanent. Step 4 CONDUCT Teacher has to make sure that all the needed equipment is available. Step 5 Learners gather all the equipment to investigate the properties of chocolates and eggs. Step 6 Ask learners to conduct simple tests on permanent and temporary changes. • Learners melt and cool down chocolate. Repeat process a few times to
investigate if the change is permanent or temporary. • Learners boil and cool down an egg. Repeat process a few times to
investigate if the change is permanent or temporary. Etc. Step 7 Learners record their observations by writing short notes. Step 8 EVALUATE • Learners share their experiences with the rest of the class. • Learners make a table, listing the substances that undergo permanent
changes and those that undergo temporary changes. • They write to explain the difference between a permanent change and a
temporary change.
- 25 -
Step9 Check the learners’ knowledge. Can learners: • Formulate appropriate questions for investigating particular foods? • Describe different foods using suitable vocabulary (referring to their
properties)? • Set up activities to investigate whether various foods undergo a permanent
or temporary change after heating or cooling? • Make appropriate and accurate observations? • Draw and write to record their observations accurately? • Correctly sort foods according to the changes they undergo (tabulate
results)? • Correctly tell the difference between a temporary and permanent change?
METHODOLOGY Do experiments ; discussions ; investigations RESOURCES Equipments needed for different experiments ; work sheet
NS strands Energy and Change – the role of energy in processes
INTEGRATION Learning Areas EMS and Technology – processes and products
Self assessment □ Peer assessment □ Group assessment □ Teacher assessment □
Investigation activities √
Case studies □
Mind mapping □
Projects □
Simulations □
Concept mapping □
Research □
Role-play □
Brainstorming tasks □
Assignment □
Translation task √
Functional writing √
Performance based assess. □
Interviews □
Presentations √
Practical demonstration □
Questionnaires □ Other:
ASSESSMENT Reminder :
Record learner performance on
Formal Assessment Tasks
Test □
Structured questions □ Other:
WEEK 16 CRYSTALLISATION: HOW DO WE GET SALT BACK FROM A SALT WATER SOLUTION?
SCIENTIFIC LITERACY
Briefly define concepts • Condensation: a process in which a water vapour (gas) is cooled down and
it turns to a liquid • Evaporation: a process in which liquid is heated to change into water
vapour (gas) • Separation: a process where solid substances are separated • Solidification: when a substance, like water, becomes solid • Crystallisation: a process of forming crystals by heating a solution to
evaporate the solvent • Distillation: a process where a liquid is heated to produce vapour. The
vapour is then condensed by cooling to form a pure liquid.
- 26 -
NOTES on HOW
LO 6.1.1 - 6.1.3
Scientific investigation: Crystallisation Step 1 Teacher explains which substances can be crystallised through certain processes. Scenario: We are stuck on an island. We want to have salt for various reasons. With the understanding of the above concepts, investigate a method to make salt from sea water to solve this problem. Step 2 PLAN Learners clarify a focus question to start an investigation on crystallisation. E.g. How do we get salt back from a salt water solution? Step 3 Based on the teacher’s explanation, learners have to describe the information needed to answer the focus question. Step 4 CONDUCT Ask learners to give ideas on possibilities of how the investigation could be conducted. They must try decanting, filtering, and boiling (or leaving the solution in the sun) to evaporate the water and crystallize the salt. Step 5 Ask learners to gather all the equipment needed to investigate how to crystallize the salt. Step 6 • Learners try out decanting, filtering, and boiling the solution. • Learners can leave the solution on a place where it is exposed to direct
heat from the sun (to speed up the process), with lots of wind and away from the possibility of frequent movement.
Step 7 Ask learners to record their observations over a period of at least two weeks by making drawings and short notes. Step 8 EVALUATE Learners answer questions: 1. Can the salt be separated from the water by decanting? Why or why not? 2. Can the salt be separated from the water by filtering? Why or why not? 3. Can the salt be separated from the water by boiling the solution? Why or why not? 4. Can the salt be separated from the water by leaving it in the sun? Why or why not? 5. What has happened to the water during the process of crystallisation? 6. Does the salt look different when it has been reclaimed by boiling compared to when it has been left in the sun? 7. Describe some properties of crystals. Step 9 Learners research how salt is separated commercially from sea water in salt pans. They present their information to the class.
- 27 -
Step 10 Check the learners’ knowledge. Can learners: • Formulate appropriate questions for investigating how to separate salt from
a salt solution? • Set up activities to investigate different ways of reclaiming salt from a
solution? • Make appropriate and accurate observations? • Draw and write to record their observations accurately? • Answer the questions correctly? • Describe the properties of salt crystals? • Research and find correct information about how salt is reclaimed from the
sea? • Correctly tell how salt is reclaimed commercially?
METHODOLOGY Experimentation RESOURCES Equipment needed for experiment
NS strands
Planet Earth & Beyond – natural resources, (water) pollution, purification of water INTEGRATION Learning
Areas Social Sciences – people, resources and the environment, water purification systems
Self assessment □ Peer assessment □ Group assessment □ Teacher assessment □
Investigation activities √
Case studies □
Mind mapping □
Projects √
Simulations □
Concept mapping □
Research □
Role-play □
Brainstorming tasks □
Assignment □
Translation task □
Functional writing √
Performance based assess. □
Interviews □
Presentations √
Practical demonstration □
Questionnaires □ Other:
ASSESSMENT Reminder :
Record learner performance on
Formal Assessment Tasks
Test □
Structured questions √ Other:
WEEK 17 - 18 BOILING POINTS OF DIFFERENT LIQUIDS
SCIENTIFIC LITERACY
Briefly define concepts: • Boiling point: the temperature at which a liquid turns into a gas • Melting point: the temperature when a solid turns into a liquid • Thermometer: an instrument to measure the amount of heat energy • Degree Celsius (ºC ): the unit to measure heat energy
NOTES on HOW
LO 6.1.1 - 6.1.3
LO 6.2.1
Investigation on Boiling Points Step 1 PLAN Learners help to clarify a focus question to start investigations on the boiling points of different liquids (e.g. coke, orange juice, energade, sugar water, salt water etc). They must compare the boiling points of at least two different liquids and water.
- 28 -
LO 6.2
LO 6.3
Examples of questions;
How long does it take for the liquids to reach boiling point? (measure time )
Do the different liquids have different boiling points? (measure temperature every five minutes for each liquid and compare)
Do the different liquids boil at a higher or lower temperature than water? (measure temperature every five minutes of each liquid and the water and compare them)
Explain to learners how to read the thermometers at eye level for accuracy. Learners describe information needed to answer the focus question. Step 2 CONDUCT • Learners heat the liquids while taking the temperature and making
observations every five minutes until boiling point is reached. (The temperature does not rise any further after boiling - take two or three more measurements to verify this).
• Record observations by making notes and recording the temperature at five minute intervals.
Step 3 EVALUATE • Learners draw line graphs of their results (Plot time in 5min intervals on
horizontal X-axis . Plot temperature in °C on the vertical Y-axis) • Relate observations to focus questions: did the results (observations and
temperature readings) provide answers to the focus question? Discuss what was learnt from the investigation.
Investigation on Melting Points Step 4 PLAN Design an investigation to compare what happens when two different solids melt (e.g. ice, frozen juice, frozen coke, ice cream, butter or margarine, melting chocolate etc.). Step 5 CONDUCT • Make observations and temperature measurements at regular time
intervals (e.g. place margarine in the sun and measure temperature every five minutes and do the same with another solid and compare).
• Draw line graphs. (Plot time in 5min intervals on horizontal X-axis. Plot temperature in °C on the vertical Y-axis)
Step 6 EVALUATE Write a report which contains the following:
Focus question Method Results (observations and measurements) Graphs What have you learnt about melting points of different substances?
Step 7 Questions • What happens to the temperature of a liquid as it reaches boiling point? • What happens to the temperature of a solid as it reaches melting point? • Can we tell when the boiling point and melting point has been reached just
by observation alone? Why or why not?
- 29 -
Step 8 Research to find information about the boiling and melting points of different substances (e.g. salt, sugar, copper, gold, lead, dry ice (nitrogen), water, mercury, etc.). Step 9 Find out, report and present information about how refrigeration helps people. (E.g. What are some of the problems (health and food costs, etc.) that people experience if they do not have fridges? What other methods do people use to keep food cool?). Step 10 Check the learners’ knowledge. Can learners: • Formulate appropriate questions for investigating boiling and melting
points? • Understand correctly that at boiling point the temperature of the liquid stays
constant until all the liquid has changed to a gas? • Understand correctly that at the melting point of a solid the temperature
remains constant until all the solid has changed to liquid? • Correctly set up activities to investigate the boiling and melting points of
different liquids and solids? • Make appropriate and accurate observations and measurements? • Draw and write to record their observations and measurements accurately? • Draw graphs (correct heading, scale, labelled axes, points correctly
plotted)? • Research and find correct information about how refrigeration benefits
people and the consequences of not having refrigeration?
METHODOLOGY Discuss, practical work, observe, make notes RESOURCES Work sheets, flame burners, containers
NS strands Energy and Change – reaction to energy loss and energy gain
INTEGRATION Learning Areas Mathematics – measurement and graphs
Self assessment □ Peer assessment □ Group assessment □ Teacher assessment □
Investigation activities √
Case studies □
Mind mapping □
Projects √
Simulations □
Concept mapping □
Research √
Role-play □
Brainstorming tasks □
Assignment □
Translation task √
Functional writing √
Performance based assess. □
Interviews □
Presentations √
Practical demonstration □
Questionnaires □ Other:
ASSESSMENT Reminder :
Record learner performance on
Formal Assessment Tasks
Test □
Structured questions √ Other:
WEEK 19 REVISION AND EXTENDED LEARNING
SCIENTIFIC LITERACY
Briefly define all previous concepts
- 30 -
Suggestions for Consolidation • Properties: find out (write and present) how people prevent rusting and why
it is important. • Phases of matter: Safety concerns when using cooking gas in the home.
Write safety rules. • Permanent and temporary changes: demonstrate (show and tell) how to
make a permanent or temporary change to substances used in every day life by heating or cooling.
• Crystallisation: grow sugar or alum crystals from saturated solutions. • Boiling points: research (write and draw) how the melting point of gold is
important to the gold industry.
METHODOLOGY RESOURCES Equipment needed for experiment
NS strands Energy & Change – role of energy in processes
INTEGRATION Learning Areas Technology and EMS – properties of materials and processes
Self assessment □ Peer assessment □ Group assessment □ Teacher assessment □
Investigation activities □
Case studies □
Mind mapping □
Projects □
Simulations □
Concept mapping □
Research □
Role-play □
Brainstorming tasks □
Assignment □
Translation task √
Functional writing √
Performance based assess. □
Interviews □
Presentations □
Practical demonstration □
Questionnaires □ Other:
ASSESSMENT Reminder :
Record learner performance on
Formal Assessment
Tasks
Test □
Structured questions √ Other:
WEEK 20 FORMAL ASSESSMENT TASK 2 – Factors that affect the boiling point of
water
SCIENTIFIC LITERACY
Briefly define concepts : • Mixtures: a combination of two or more substances which can be separated
again • Dissolve: when a substance mixes with a liquid and seems to disappear
inside the liquid, so cannot be seen • Solutions: a special mixture in which a solid, liquid or gas is dissolved in a
liquid • Soluble substances: substances which dissolve (seem to disappear) when
mixed with a liquid (e.g. sugar mixed into water) • Insoluble substances: substances which cannot dissolve in a liquid (e.g. tea
leaves in water) • Solute: a substance which can dissolve in another substance, forming a
solution • Solvent: a substance which can dissolve another substance, or in which
another substance is dissolved, forming a solution • Concentrated: a large amount of solute dissolved in a solution
- 31 -
• Temperature: a numerical measure of hotness or coldness on a standard
scale (Degrees Celsius - °C) • Factors affecting solubility: things that speed up or slow down dissolving
e.g. number of stirs; temperature of liquid; size of the grain • Boiling point: the temperature at which a liquid turns to a gas.
NOTES on HOW
LO 6.1
Investigation: Does the concentration of solute in water affect the boiling point of the water? Step 1 PLAN Teacher reminds learners that the boiling point of water is100°C at sea level. Teacher explains that you can change the boiling point of water by adding dissolved substances to the water. The more solute you add to the water the more the boiling point changes (increases). Step 2 Learners help to formulate a few questions which could lead to an investigation. Step3 Ask learners to clarify a focus question to start an investigation on the boiling point of the amount of solute in a solvent. Step 4 Ask learners to describe information needed to answer the focus question. Step 5 CONDUCT Teacher allows learners to develop their own suggestions on how the investigation could be conducted. Teacher guides learners to set up apparatus correctly. Learners measure water into a pyrex beaker (which will not break when heated). They heat the water until it boils vigorously. They record the temperature of the boiling water. Then they add a teaspoon of sugar / salt and bring to the boil again. Take the temperature and record it in a table. Learners add another teaspoon of sugar / salt to the boiling solution, Bring it to the boil and take the temperature again. Record it. Safety warning: Be careful not to burn yourself when working with flames Step 6 Repeat the procedure 3-4 times. Keep recording and draw a line graph to present the data. (Plot the number of teaspoons of sugar / salt added on the horizontal X-axis. Plot the temperature on the vertical Y-axis in °C) Step 7 EVALUATE Questions: • What was the temperature of the water when it boiled? • What happened to the boiling temperature as you added more and more
sugar / salt? • What was the highest temperature recorded? Step 8 Write a report which contains the following:
Focus question Method
- 32 -
Results (observations and measurements) Graphs What have you learnt about the effect on the boiling point of water when
you add more and more sugar / salt? Step 9 Check the learners’ knowledge. Can learners: • Formulate appropriate questions for investigating the effect of solutes on
the boiling point of water? • Understand correctly that the boiling point of water is raised when solutes
are added to the water? • Correctly set up activities and carry out the investigation? • Make appropriate and accurate observations and measurements? • Draw and write to record their observations and measurements accurately? • Draw graphs (correct heading, scale, labelled axes, points correctly
plotted)? • Answer questions correctly about their results and reach a reasonable
conclusion?
METHODOLOGY Experimentation RESOURCES Equipment needed for experiment
NS strands Energy & Change – role of energy in processes
INTEGRATION Learning Areas Mathematics – measurement and graphic representation of data
Self assessment □ Peer assessment □ Group assessment □ Teacher assessment □
Investigation activities √
Case studies □
Mind mapping □
Projects □
Simulations □
Concept mapping □
Research □
Role-play □
Brainstorming tasks □
Assignment □
Translation task √
Functional writing √
Performance based assess. □
Interviews □
Presentations □
Practical demonstration □
Questionnaires □ Other:
ASSESSMENT Reminder :
Record learner performance on
Formal Assessment
Tasks
Test □
Structured questions √ Other:

- 33 -
WEEK 21 FORMAL ASSESSMENT TASK 3
LO 2 - 3
Teacher will set up the Formal Assessment Task according to the activities that have been done during this term.
LO 2 AS 1 Prepare an assessment task in which the learners should be able to recall scientific knowledge based on the following: • Properties of metals, ceramics and plastics (polymers), (rusting,
magnetism, electrical and heat conduction and insulation, solubility.) • The phases of matter (based on the particle model of matter) • Permanent and temporary changes brought about by heating (and cooling) • Crystallisation • Melting and boiling points. LO 2 AS 1 Learners must describe: • classes of materials • the properties of materials • the phases of matter. LO 2 AS 1 Learners must explain: • How to separate solutes from a solvent • How crystallisation takes place.
LO 2 AS 2 Learners must categorise materials based on their properties. LO 2 AS 2 Learners must explain their own rule for categorising materials. LO 3 AS 2 Learners explain technological products and processes by referring to mixtures and solutions, and phase changes, and temporary and permanent changes to materials.
- 34 -
TERM 3: LIFE AND LIVING
WEEK 21 continued BASELINE ASSESSMENT - Life and Living (Grade 5)
SCIENTIFIC LITERACY
• Life Processes: all living things carry out these processes: move,
reproduce, grow, respond to stimuli, exchange gases, feed, excrete • Biodiversity: “bio” meaning life / living organisms; “diversity” meaning
variety, i.e. the many different kinds of living organisms found within an area
• Interaction in environment: the effect that living and non-living things have on one another
• Photosynthesis: the process by which green plants use sunlight to make starch from carbon dioxide and water
• Ecosystems: the plants and animals and micro organisms which live in an environment and interact with each other and their environment
• Habitat: a specific place, within an ecosystem, where plants and animals live and reproduce
• Organisms: all living things; animals, plants and micro organisms.
NOTES on HOW
LO 1 - 3
Step 1 Learners write down the characteristics of living things. Learners sort a list of things (living and non-living) into a table with those headings. Step 2 Learners tell teacher what they understand by biodiversity. Teacher gives learners pictures of two ecosystems. One has a greater diversity of plants while the other has a greater diversity of animals and an overall greater biodiversity. Learners answer questions in full sentences: • What is an ecosystem? • Name non-living things in the ecosystem e.g. air, water, soil etc. • Name each ecosystem above. • List two habitats in each ecosystem e.g. under rocks; in trees; in water etc. • Which ecosystem has a greater diversity of plants? Explain your answer. • Which ecosystem has a greater diversity of animals? Explain your answer. • Which ecosystem has a greater biodiversity? Explain your answer. • Learners write down a food chain found in each ecosystem. Step 3 Learners draw and label a picture of a plant. They add words and short notes to show the process of photosynthesis in the plant. Learners answer questions: • What do we call the process in which plants make their own food? • Name the gas which plants need for this process and which gas is given off
by the plant during this process? • Name the green substance (pigment) that the plant needs for this process. • Write down two other things needed by the plant for this process to happen.• What food substance does the plant produce as an end product of this
process? • Why is photosynthesis such an important process in every ecosystem?
- 35 -
Extended learning: Learners compare two different ecosystems and write a paragraph (in their own words) about the diversity of living organisms (biodiversity) in each. Step 4 Check the learner’s knowledge. Can learners: • Separate things into living and non-living? • Describe the characteristics of living things? • Describe an ecosystem, habitat, food chain? • Describe the biodiversity in an ecosystem? • Describe the process of photosynthesis? • Explain the importance of photosynthesis?
METHODOLOGY Class discussion refers to previous knowledge and experiences RESOURCES Worksheets on prior knowledge, reference material
NS strands
Life & Living – inter-dependence of plants and animals Planet Earth & Beyond – importance of Earth materials (soil, air, water) Energy & Change – transfer of food energy INTEGRATION
Learning Areas
Social Sciences – people, resources and the environment, extinction of plants and animals, environmental degradation
WEEK 22 FOOD GROUPS THAT ENHANCE HEALTHY LIVING
SCIENTIFIC LITERACY
Briefly define concepts : • Food pyramid: a pyramid-shaped diagram to show the main food groups • Supplements: vitamins or mineral added to a food or a person’s diet to
improve it • Services: e.g. clinic, community, vegetable gardens.
NOTES on HOW
LO 6.2.2 - 6.2.3
6.3.3
Food groups that enhance healthy living Step 1 • Learners research nutritional values of different foods by looking at the
nutrient information on the food labels. Learners collect empty food containers (e.g. cereal boxes, food cans, etc.) and answer questions or they could do a comparison of food types (e.g. compare nutritional values of breakfast cereals).
• Make a list of the breakfast cereals eaten by all the learners in class. Learners draw a bar graph and then do a comparative nutrient table of 5 of the most popular cereals and answer questions.
Breakfast cereal
Energy value in kilojoules (kJ)
Protein per 100 grams serving
Carbo-hydrates per 100 gram serving
Fat per 100 gram serving
Fibre per 100 gram serving
Number of different vitamins and minerals
Cornflakes Rice Crispies
Maize (Mielie-pap)
Etc.
- 36 -
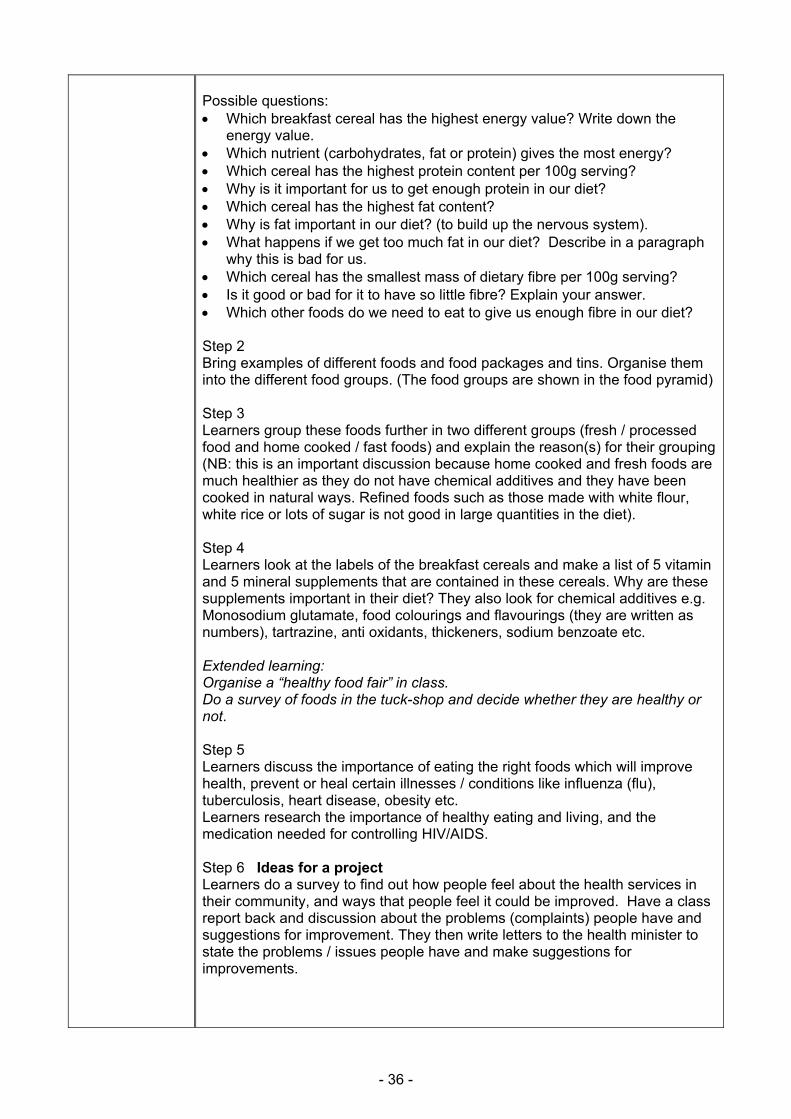
Possible questions: • Which breakfast cereal has the highest energy value? Write down the
energy value. • Which nutrient (carbohydrates, fat or protein) gives the most energy? • Which cereal has the highest protein content per 100g serving? • Why is it important for us to get enough protein in our diet? • Which cereal has the highest fat content? • Why is fat important in our diet? (to build up the nervous system). • What happens if we get too much fat in our diet? Describe in a paragraph
why this is bad for us. • Which cereal has the smallest mass of dietary fibre per 100g serving? • Is it good or bad for it to have so little fibre? Explain your answer. • Which other foods do we need to eat to give us enough fibre in our diet? Step 2 Bring examples of different foods and food packages and tins. Organise them into the different food groups. (The food groups are shown in the food pyramid) Step 3 Learners group these foods further in two different groups (fresh / processed food and home cooked / fast foods) and explain the reason(s) for their grouping (NB: this is an important discussion because home cooked and fresh foods are much healthier as they do not have chemical additives and they have been cooked in natural ways. Refined foods such as those made with white flour, white rice or lots of sugar is not good in large quantities in the diet). Step 4 Learners look at the labels of the breakfast cereals and make a list of 5 vitamin and 5 mineral supplements that are contained in these cereals. Why are these supplements important in their diet? They also look for chemical additives e.g. Monosodium glutamate, food colourings and flavourings (they are written as numbers), tartrazine, anti oxidants, thickeners, sodium benzoate etc. Extended learning: Organise a “healthy food fair” in class. Do a survey of foods in the tuck-shop and decide whether they are healthy or not. Step 5 Learners discuss the importance of eating the right foods which will improve health, prevent or heal certain illnesses / conditions like influenza (flu), tuberculosis, heart disease, obesity etc. Learners research the importance of healthy eating and living, and the medication needed for controlling HIV/AIDS. Step 6 Ideas for a project Learners do a survey to find out how people feel about the health services in their community, and ways that people feel it could be improved. Have a class report back and discussion about the problems (complaints) people have and suggestions for improvement. They then write letters to the health minister to state the problems / issues people have and make suggestions for improvements.
- 37 -
Learners research how they can help to relieve their communities’ lack of resources (work at clinics to improve services, grow vegetable gardens to feed the sickly and poor etc.). Step 7 Check the learner’s knowledge. Can learners: • Sort foods into the different food groups and describe the purpose
(function) of each food group in the body? • Describe a balanced diet? • Recognise foods that are not good to eat in large quantities (e.g. refined
foods) and explain the reasons why they are unhealthy? • Read food labels to get a basic understanding of nutrient values?
METHODOLOGY Discussion and research RESOURCES Reference material, posters, pictures, cereal boxes and other foods, internet.
NS strands Energy & Change – energy provided in different foods
INTEGRATION Learning Areas
Mathematics – using graphs for data representation Life Orientation – social development and healthy living
Self assessment □ Peer assessment □ Group assessment □ Teacher assessment □
Investigation activities □
Case studies □
Mind mapping □
Projects √
Simulations □
Concept mapping □
Research √
Role-play □
Brainstorming tasks □
Assignment □
Translation task □
Functional writing √
Performance based assess. □
Interviews √
Presentations √
Practical demonstration □
Questionnaires □ Other:
ASSESSMENT Reminder :
Record learner performance on
Formal Assessment Tasks
Test □
Structured questions √ Other:
WEEK 23 SKELETONS MUSCLES AND MOVEMENT
SCIENTIFIC LITERACY
Briefly define concepts: • Muscles: body tissue that contracts to cause movement • Types of muscles e.g. biceps, triceps • Attachments: e.g. ligaments, tendons • Joints: the place on a skeleton where two bones meet. Joints allow
movement. • Invertebrates: (insects, worms, molluscs, crustaceans) have an external
skeleton (exoskeleton) • Vertebrates: (Fish, Amphibians, Reptiles, Birds, Mammals) have an internal
skeleton (endoskeleton) • Skeleton parts – skull, jaw, backbone (vertebrae), rib cage, front leg or arm
(humerus, radius and ulna), back leg or legs (femur, tibia, fibula), shoulder (shoulder blade, collar bone) and hip girdle, feet and hands.
- 38 -
NOTES on HOW
LO 6.2.1 – 6.2.3
Skeletons Step 1 Teacher explains that vertebrate animals have a skeleton on the inside of their bodies (endoskeleton), which supports and protects their bodies from the inside. Vertebrates are generally larger animals because their endoskeletons are stronger and are therefore able to support much larger masses. Most invertebrates have a skeleton on the outside of their body (exoskeleton) that supports and protects their bodies from the outside. Invertebrate animals are therefore smaller animals because exoskeletons are not as strong and can only support smaller masses. Both vertebrate and invertebrate skeletons have joints. Step 2 Learners do a survey of the school ground to make a list of all the animals they can observe, hear or see signs of (e.g. spider web, animal droppings, footprints, shells etc.). Learners now sort the animals from their survey into vertebrates and invertebrates. They record their sorting in a table. Step 3: Vertebrates Making a skeleton Learners draw the outline of an animal onto a piece of paper folded at the animal’s back- bone e g an elephant or giraffe. They try to make the cut out animal stand up. It falls over easily. Then they must use plastic drinking straws (cellotaped to the underside) to make a skeleton for it. Step 4 The human skeleton Give learners a picture of the human skeleton. They must label the parts: skull, jaw, backbone (vertebrae), rib cage, front leg or arm (humerus, radius and ulna), legs (femur, tibia, fibula), shoulder (shoulder blade, collar bone) and hip girdle, feet and hands. They must write notes on the function of each part: • Skull and ribs: protect the brain, heart and lungs • Legs and arms: movement • Backbone: protects the spinal cord and allows flexible movement • Joints: connect the bones and allow movement • Jaw: strong bone for the teeth sockets.
Step 5 Skeletons of other vertebrates Teacher supplies pictures of skeletons of the different vertebrate groups. Learners sort the pictures of the skeletons into the different vertebrate groups. (e.g. mammals, birds etc.) Step 6 Comparing skeletons Learners look at the pictures of the skeletons of two animals (e.g. a bird and a mammal) and answer questions. • Label the main parts of the skeleton of each animal (skull, ribs, backbone,
vertebrae, fore limbs, hind limbs, hip girdle, shoulder girdle, tail, shoulder joint, hip joint, elbow joint, knee joint etc.).
- 39 -
• How is the skull of the bird different from that of the mammal? • How are the limbs of the bird different from that of the mammal? • What job do the ribs perform in each animal? • How are the skeletons similar? • Why are most bird skeletons lighter than mammal skeletons? Step 7 Joints, muscles and movement • Teacher explains that: the muscles bring about extension (straightening)
and flexing (bending) of our limbs. Muscles are attached to the bones across the joints; pairs of muscles contract and relax antagonistically (counteracting each other) to bring about movement; bones are rigid whilst muscles are flexible.
• Learners are given diagrams showing how the human fore arm is moved up and down, and key words which describe how it works (e.g. one muscle contracts while the other relaxes, the forearm moves upwards etc.).
• Use this information to write a paragraph on how muscles move the fore-arm up and down.
Step 8 Fossil skeletons Teacher provides learners with information about fossils. Learners read information about fossil skeletons. Learners draw a skeleton of an animal that we know about from its fossil remains e.g. a dinosaur. Learners write notes about it. Extended learning Learners collect bones of animals and work out which part of the skeleton they come from. Learners use wire, wood, hard cardboard, elastic, split pins etc. to make a model of an arm and its muscles. They demonstrate how it works. Step 9 Check the learner’s knowledge. Can learners: • Sort animals into vertebrate and invertebrate groups by looking at their
skeletons? • Name the parts of vertebrate skeletons and describe their functions? • Describe how muscles move the human fore-arm?
METHODOLOGY Class discussion, research
RESOURCES Text books, pictures or photos, flip charts, worksheets, models, bones, paper, straws , scissors, reference material
NS strands Planet Earth & Beyond – fossils and evolution
INTEGRATION Learning Areas
Life Orientation – the importance of a balanced diet and exercise lifestyle choices that promote healthy living
- 40 -
Self assessment □ Peer assessment □ Group assessment □
Teacher assessment □ Investigation activities □
Case studies □
Mind mapping □
Projects □
Simulations □
Concept mapping □
Research √
Role-play □
Brainstorming tasks □
Assignment □
Translation task □
Functional writing √
Performance based assess. □
Interviews □
Presentations √
Practical demonstration √
Questionnaires □ Other:
ASSESSMENT Reminder :
Record learner performance on
Formal Assessment Tasks
Test □
Structured questions √ Other:
WEEK 24 PHOTOSYNTHESIS
SCIENTIFIC LITERACY
Briefly define concepts: • Photosynthesis: the process by which green plants use sunlight, carbon
dioxide and water, to form carbohydrates and oxygen • Almost all ecosystems are dependent on the Sun as a source of energy
(needed by plants for photosynthesis). • Interaction in the environment: in every ecosystem plants and animals
interact with each other; feed, mate, bring up babies, compete for habitats and resources
• Habitat: places in and ecosystem where animals live • Survival: all animals are dependent on plants for their survival • Diversity: the many different plants and animals.
NOTES on HOW
LO 6.1.1 – 6.1.3
LO 6.2.1 – 6.2.2
Photosynthesis Step 1 Teacher explains that chlorophyll in the green leaves absorbs sunlight, water is absorbed through the roots and carbon dioxide is absorbed through tiny holes (stomata) in the leaves. Teacher explains that the energy from the sun is used to combine carbon dioxide with water to form carbohydrates (stored as starch). Oxygen is released as a by-product of the process. Learners describe (make an annotated drawing) (1) the importance of sunlight, water and carbon dioxide for photosynthesis (2) how each one is absorbed by the plant and (3) the products of photosynthesis. Step 2 Teacher explains that we use iodine to test for starch. It turns from brown to blue-black when dropped onto starch. Teacher demonstrates the starch test on maizena or flour. Step 3 Testing a green leaf for starch Learners test a green leaf for starch (use soft leaves that have been in the sun for at least an hour and just picked). Soak the leaf in boiling water in a foam cup for two minutes to soften it.
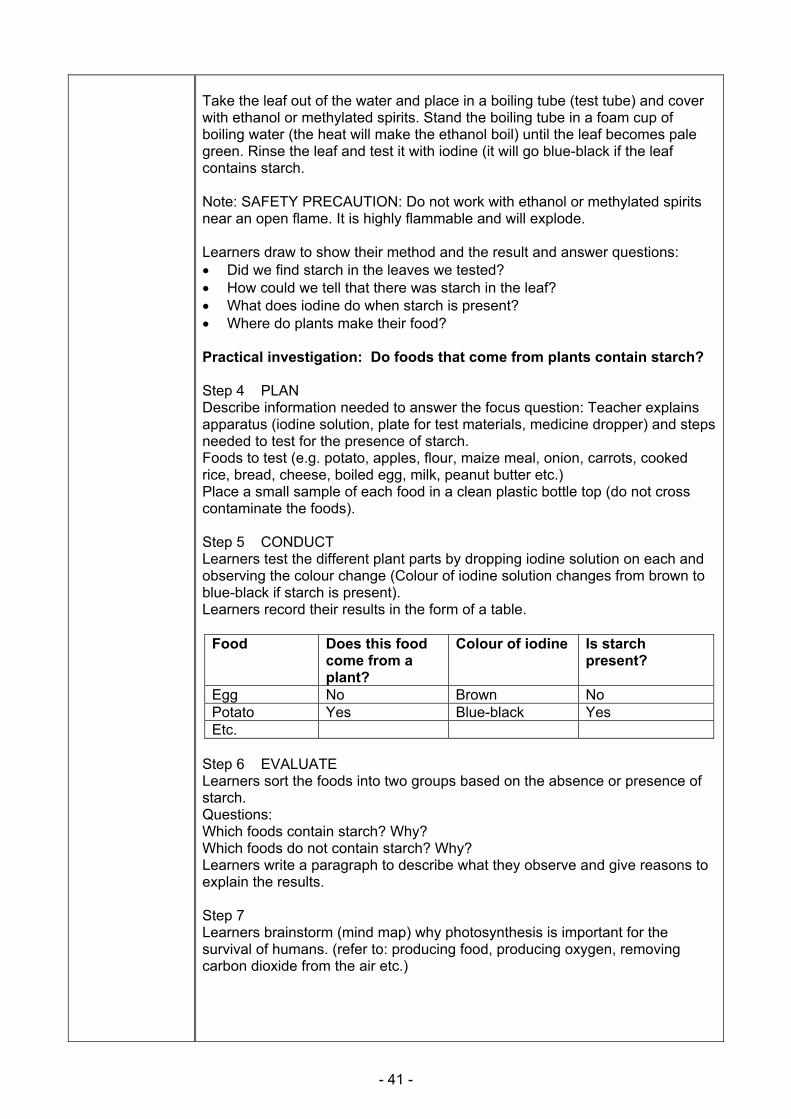
- 41 -
Take the leaf out of the water and place in a boiling tube (test tube) and cover with ethanol or methylated spirits. Stand the boiling tube in a foam cup of boiling water (the heat will make the ethanol boil) until the leaf becomes pale green. Rinse the leaf and test it with iodine (it will go blue-black if the leaf contains starch. Note: SAFETY PRECAUTION: Do not work with ethanol or methylated spirits near an open flame. It is highly flammable and will explode. Learners draw to show their method and the result and answer questions: • Did we find starch in the leaves we tested? • How could we tell that there was starch in the leaf? • What does iodine do when starch is present? • Where do plants make their food? Practical investigation: Do foods that come from plants contain starch? Step 4 PLAN Describe information needed to answer the focus question: Teacher explains apparatus (iodine solution, plate for test materials, medicine dropper) and steps needed to test for the presence of starch. Foods to test (e.g. potato, apples, flour, maize meal, onion, carrots, cooked rice, bread, cheese, boiled egg, milk, peanut butter etc.) Place a small sample of each food in a clean plastic bottle top (do not cross contaminate the foods). Step 5 CONDUCT Learners test the different plant parts by dropping iodine solution on each and observing the colour change (Colour of iodine solution changes from brown to blue-black if starch is present). Learners record their results in the form of a table.
Food Does this food come from a plant?
Colour of iodine Is starch present?
Egg No Brown No Potato Yes Blue-black Yes Etc.
Step 6 EVALUATE Learners sort the foods into two groups based on the absence or presence of starch. Questions: Which foods contain starch? Why? Which foods do not contain starch? Why? Learners write a paragraph to describe what they observe and give reasons to explain the results. Step 7 Learners brainstorm (mind map) why photosynthesis is important for the survival of humans. (refer to: producing food, producing oxygen, removing carbon dioxide from the air etc.)
- 42 -
Step 8 Check the learner’s knowledge. Can learners: • Describe photosynthesis, listing the things needed and produced during the
process? • Describe the Iodine test for starch and predict which substances would
contain starch? • Carry out the starch test on green leaves? • Carry out the starch test on different foods? • Understand the importance of photosynthesis to living things?
METHODOLOGY Practical investigation, class discussion, research RESOURCES Apparatus for practical investigations, plants, worksheets, reference material
NS strands
Matter and Materials - properties of matter Energy & Change – photosynthesis is a process in which plants make food using the energy from the Sun INTEGRATION
Learning Areas Life Orientation – knowledge of food content
Self assessment □ Peer assessment □ Group assessment □ Teacher assessment □
Investigation activities √
Case studies □
Mind mapping □
Projects □
Simulations □
Concept mapping □
Research □
Role-play □
Brainstorming tasks √
Assignment □
Translation task □
Functional writing √
Performance based assess. □
Interviews □
Presentations □
Practical demonstration □
Questionnaires □ Other:
ASSESSMENT Reminder :
Record learner performance on
Formal Assessment Tasks
Test □
Structured questions √ Other:
WEEK 25 + 26 ECOSYSTEMS - predator prey relations
SCIENTIFIC LITERACY
Briefly define concepts: • Fertile soil: soil that is rich in nutrients to ensure optimum growth of plants • Sustainability: a way of using natural resources efficiently so that there is
enough for future use • Interaction in the environment: organisms affect each other in different
ways e.g. predators and prey • Habitat: a specific place, within an ecosystem, where plants and animals
live and reproduce. • Survival: living long enough to reproduce, so that the organism (species)
will not die out (become extinct) • Diversity: the many different kinds of living organisms in an area.
NOTES on HOW
LO 6.2.1
Step 1 Teacher informs learners that certain organisms in an ecosystem interact in specific ways e.g. predation. Teacher defines predation by giving examples e.g. a chameleon catching a fly. Predation is when a predator captures and kills its prey for food; a predator is an organism that kills other organisms for food; a prey is an organism that is eaten by a predator.
- 43 -
Learners contribute further examples of predator-prey interactions; they write down the definitions and record the predators and their prey in a table: Predator Prey Chameleon fly Etc.
Step 2 Learners research reference books or the internet to find if any plant predators exist (e.g. Venus Fly Trap). They make a labelled diagram and write brief notes to describe their plant predator. Step 3 Teacher chooses a predator e.g. an eagle to show learners how predators are adapted for catching their prey. Learners are given a diagram and write annotated notes on the diagram. Learners could do the same for another predator e.g. a crocodile. Step 4 • Show learners pictures or a DVD about how prey animals are adapted to
avoid being eaten, by referring to camouflage (animals that have body colours and / or patterns that blend in with their environment so that predators cannot easily find them).
• Give learners pictures of prey animals e.g. buck, butterfly. Learners design and colour an environment (background) against which it is not easy to see the prey. Attach the prey animal to its environment and ask the class to try and see the animal against its background.
Step 5 Sustainability of an environment Teacher explains what a sustainable environment is. One in which the plants and animals of that environment can survive successfully over long periods of time because the environment provides everything they need; food, habitat, places to breed, etc. teacher explains that human development in an area can make an environment unsustainable for certain species of animals. For example the habitat of a leopard becomes much smaller when farms are built close by and fenced. The leopard cannot find enough animals to hunt in the remaining natural environment. Step 6 Research task: Learners watch a DVD or TV programme about an animal that is in danger of dying out because its environment cannot sustain it any longer. (Albatrosses, polar bears, leopards, etc.) They write about it with their group. Step 7 Check the learner’s knowledge. Can learners: • Describe predation, predators and prey? • Describe the adaptations of a typical predator? • Understand how camouflage helps a prey animal to survive? • Describe what happens to an animal when its environment cannot sustain
it?
METHODOLOGY Class discussion, research RESOURCES Pictures, reference material such as encyclopaedia, tables etc.
- 44 -
NS strands
Planet Earth & Beyond – Global warming and climate change, changing environments and its impact on plants INTEGRATION Learning
Areas Social Sciences – people, resources and the environment, plant and animal extinctions, environmental degradation
Self assessment □ Peer assessment □ Group assessment □ Teacher assessment □
Investigation activities □
Case studies □
Mind mapping □
Projects □
Simulations □
Concept mapping □
Research □
Role-play □
Brainstorming tasks □
Assignment □
Translation task □
Functional writing √
Performance based assess. □
Interviews □
Presentations □
Practical demonstration √
Questionnaires □ Other:
ASSESSMENT Reminder :
Record learner performance on
Formal Assessment Tasks
Test □
Structured questions □ Other:
WEEK 27 HABITATS – SOCIAL PATTERNS
SCIENTIFIC LITERACY
Briefly define concepts: • Habitat: a specific place, within an ecosystem, where plants and animals
live and reproduce • Social patterns: solitary, animal pairs, packs, prides, herds, troops, colonies Species: organisms with the same visible characteristics that can only
reproduce with their own kind.
NOTES on HOW
LO 6.2.2
Step 1 Teacher defines each of the social patterns. (e.g. pack, pride, pair, troop, family, solitary animals, colony etc.) Teacher chooses a social pattern (or patterns) and an example of an animal (or animals) and provides the necessary information about that animal to do a class study. (OR if possible let the learners do the research themselves) Give each group a part of the information to contribute to a class poster. They read and summarise and make drawings and labels with headings etc.) The following headings can help to divide up the information: (1) Describe the social pattern (e.g. pack) (2) Pictures of different animals that have this social pattern (wolves, wild dogs etc.) (3) Mark on the world map where these animals occur in the world. (4) The type of natural environment (ecosystem) the chosen animal is found in. (5) The habitat in which it lives within that ecosystem. (6) Describe the social structure (e.g. who leads the pack, the role that males and females play etc.) and composition (e.g. number of males and females, size of pack etc). (7) Hunting / feeding patterns of the pack (e.g. hunting as a pack, how prey is killed etc.) (8) Reproductive behaviour of the pack (e.g. who takes care of the young, who is allowed to mate etc). (8) Teacher could show a video about social patterns in general or of the animal that was studied e.g. wild dogs. (Obtainable from libraries or the EDULIS media centre)
- 45 -
Step 2 Teachers use the class project information to teach the learners how to write a Science Essay: (1) by giving them the basic structure and (2) the kind of language appropriate for scientific essays. Learners now write the essay with support from the teacher. (This is important preparation for the formal assessment task 4 in week 30) Extended learning: Learners are given a group project of other social patterns and examples not dealt with in class to do a project similar to the one done in class. (This could be used as one of the term assessment tasks.) Check the learner’s knowledge. Can the learners: • List different social patterns found in animal populations?. • Describe the social pattern in an animal of their choice?. • Write a science essay on a given topic?
METHODOLOGY Research, discussion, co-operative work.
RESOURCES Pictures, encyclopaedia, posters, research materials such as videos, world map etc..
NS strands Planet Earth & Beyond – animal evolution
INTEGRATION Learning Areas
Life Orientation – social development, Language – functional writing (scientific essays)
Self assessment □ Peer assessment □ Group assessment □ Teacher assessment □
Investigation activities □
Case studies □
Mind mapping □
Projects √
Simulations □
Concept mapping □
Research √
Role-play □
Brainstorming tasks □
Assignment □
Translation task □
Functional writing √
Performance based assess. □
Interviews □
Presentations √
Practical demonstration □
Questionnaires □ Other:
ASSESSMENT Reminder :
Record learner performance on
Formal Assessment Tasks
Test □
Structured questions √ Other:
WEEK 28 FOOD CHAIN
SCIENTIFIC LITERACY
Define the following concepts: • Food chain: a food chain shows ‘who eats whom’ in an ecosystem • Interaction: living organisms affect one another (the living environment) and
are affected by the non-living environment • Producer (e.g. plants): an organism, at the start of a food chain, that does
not need to eat, but makes its own food • Primary consumers (herbivores): animals which only eat plants • Secondary consumers (omnivores or carnivores): second level consumers
- animals which eat both plants and animals or only eat other animals • Carnivores: animals which eat other animals • Tertiary consumers (e.g. human, crocodile, etc.): third level consumers • Decomposer: organisms that break down the dead bodies of plants and
animals
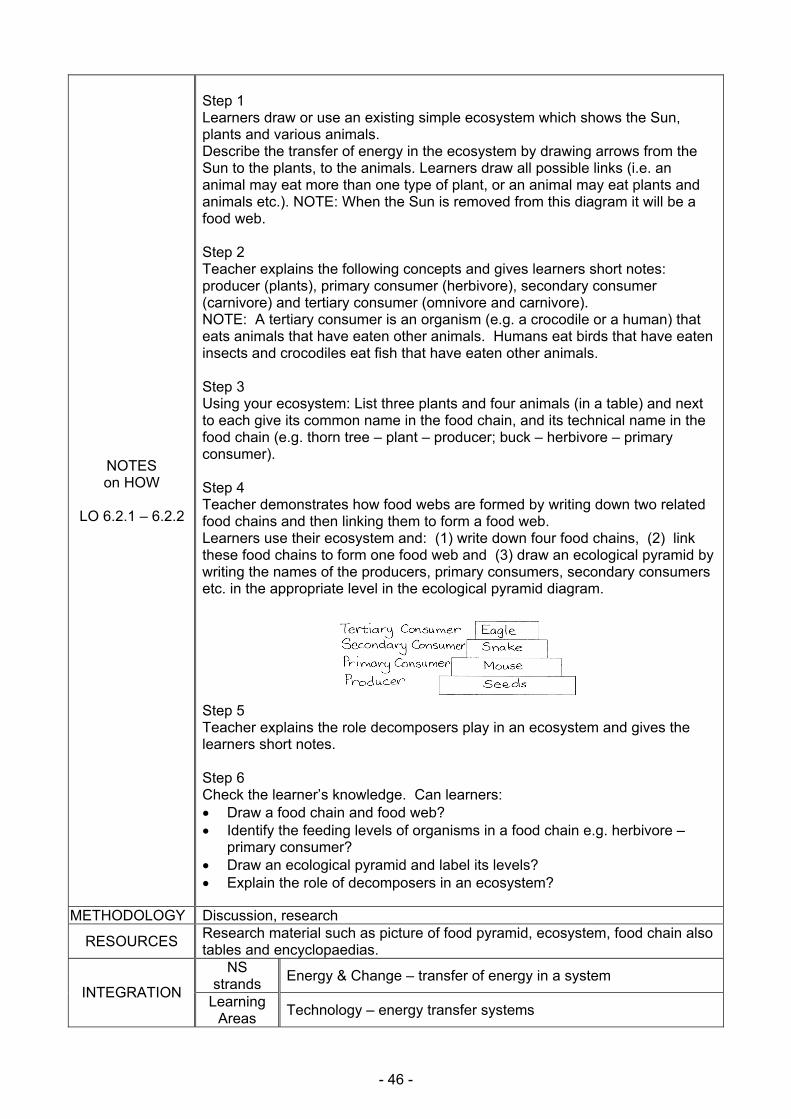
- 46 -
NOTES on HOW
LO 6.2.1 – 6.2.2
Step 1 Learners draw or use an existing simple ecosystem which shows the Sun, plants and various animals. Describe the transfer of energy in the ecosystem by drawing arrows from the Sun to the plants, to the animals. Learners draw all possible links (i.e. an animal may eat more than one type of plant, or an animal may eat plants and animals etc.). NOTE: When the Sun is removed from this diagram it will be a food web. Step 2 Teacher explains the following concepts and gives learners short notes: producer (plants), primary consumer (herbivore), secondary consumer (carnivore) and tertiary consumer (omnivore and carnivore). NOTE: A tertiary consumer is an organism (e.g. a crocodile or a human) that eats animals that have eaten other animals. Humans eat birds that have eaten insects and crocodiles eat fish that have eaten other animals. Step 3 Using your ecosystem: List three plants and four animals (in a table) and next to each give its common name in the food chain, and its technical name in the food chain (e.g. thorn tree – plant – producer; buck – herbivore – primary consumer).
Step 4 Teacher demonstrates how food webs are formed by writing down two related food chains and then linking them to form a food web. Learners use their ecosystem and: (1) write down four food chains, (2) link these food chains to form one food web and (3) draw an ecological pyramid by writing the names of the producers, primary consumers, secondary consumers etc. in the appropriate level in the ecological pyramid diagram.
Step 5 Teacher explains the role decomposers play in an ecosystem and gives the learners short notes. Step 6 Check the learner’s knowledge. Can learners: • Draw a food chain and food web? • Identify the feeding levels of organisms in a food chain e.g. herbivore –
primary consumer? • Draw an ecological pyramid and label its levels? • Explain the role of decomposers in an ecosystem?
METHODOLOGY Discussion, research
RESOURCES Research material such as picture of food pyramid, ecosystem, food chain also tables and encyclopaedias.
NS strands Energy & Change – transfer of energy in a system
INTEGRATION Learning Areas Technology – energy transfer systems

- 47 -
Self assessment □ Peer assessment □ Group assessment □
Teacher assessment □ Investigation activities □
Case studies □
Mind mapping □
Projects □
Simulations □
Concept mapping □
Research □
Role-play □
Brainstorming tasks □
Assignment □
Translation task □
Functional writing √
Performance based assess. □
Interviews □
Presentations √
Practical demonstration □
Questionnaires □ Other:
ASSESSMENT Reminder :
Record learner performance on
Formal Assessment Tasks
Test □
Structured questions □ Other:
WEEK 29 FOOD CHAINS ON SCHOOL GROUNDS
SCIENTIFIC LITERACY
Briefly define concepts: Revise concepts of week 28.
NOTES on HOW
LO 6.1.1 – 6.1.3
Investigation: Food chains on our school grounds. Focus question: Which food chains are found on our school grounds? Step 1 PLAN Clarify a focus question to start an investigation. Describe information needed to answer the focus question.
Step 2 CONDUCT Collect all equipment to investigate. Conduct a survey of the school ground: in the garden, trees, under rocks, in the soil etc. Record observations. Write down the names of the plants, and observe and record the animals that are found on the plants. Record all other animals on the school ground even if there are only signs left by animals e.g. droppings, tracks, feathers.
Step 3 EVALUATE Evaluate data (use different sources e.g. books, internet to show ‘who eats whom’). Relate observations to focus questions. Present the data in the form of food chains and food webs; make mobiles of food webs. Step 4 Check the learner’s knowledge. Can learners: • Describe, listing the information needed to carry out the survey of plants
and animals in the school? • Work out and describe the food chains correctly? • Present the food chains in any form of their choice?
METHODOLOGY Research and investigation RESOURCES Materials for investigation, reference materials
- 48 -
NS strands
Planet Earth & Beyond – soil types Energy & Change – transfer of energy INTEGRATION Learning
Areas Language Skills – recording, reporting, presenting
Self assessment □ Peer assessment □ Group assessment □ Teacher assessment □
Investigation activities □
Case studies □
Mind mapping □
Projects □
Simulations □
Concept mapping □
Research □
Role-play □
Brainstorming tasks □
Assignment □
Translation task □
Functional writing √
Performance based assess. □
Interviews □
Presentations √
Practical demonstration □
Questionnaires □ Other:
ASSESSMENT Reminder :
Record learner performance on
Formal Assessment Tasks
Test □
Structured questions □ Other:
WEEK 30 - 31 CONSOLIDATION & FORMAL ASSESSMENT TASK 4
Consolidation • ‘Show and tell’ about food from a recipe and explain the food groups used in the recipe. • Make a rap song about the parts of the human skeleton (name the parts). • Draw and label a picture to show photosynthesis. Write to explain how photosynthesis benefits
us. • Using a picture of an ecosystem: write down three food chains, a food web, three predators
and their prey, a social pattern. Part A LO2 AS 1,2,3
• Learners write a scientific essay of 20 lines or more to discuss one of the following topics. Note: learners should write ‘rough notes’ first and the teacher checks these before learners write final drafts.
• They use information from their science notebooks and any other sources. • Everyone in the class can do the same one or learners can choose from the list below. • Learners have to add pictures, graphs and a bibliography to support facts. • Presentation must be structured with facts and flow.
Four possible scenarios for Research: 1. Diets that promote healthy living. • Explain the difference between a balanced diet and a diet that is not balanced. • Write an example of a balanced diet that can be followed for an entire week. • Explain two diseases that people may get who constantly follow a diet that is not balanced. 2. Without photosynthesis human life on Earth would come to an end. • Describe the process of photosynthesis • Explain its importance to human life on Earth • Describe in a sequence what would happen if all plants stopped photosynthesising, until all
human life ceases to exist.

- 49 -
3. We are all know about animal predators, but the idea of plant predators is just weird. • Explain what is meant by the term predator. • Give many examples of animal predators and the strategies they use to catch their prey
(include vertebrates and invertebrates) • Describe some plants that prey on insects. • Explain the different strategies that plant predators use to catch their prey. 4. Who eats whom in an ecosystem? • Describe two or more food chains and a food web in an ecosystem of your choice. • Explain the role of the following in a food web: producers, primary consumers, secondary
consumers, tertiary consumers etc. • Explain the role of decomposers in an ecosystem. Note to teacher: each bullet above can be a separate paragraph in the essay. REFERENCING: 1. Why do we have to reference? • to prove which of our opinions are supported by fact • to prove that you have conducted research • to acknowledge other authors' hard work.
2. What does a bibliography look like? It includes the following components in this order or sequence: • Writer / author's surname and initials • The year of publication • The title of the source / book • The place of publication (country, city or institution) • The name of the publisher • Page or paragraph numbering (if available) Here is an example of a reference with correct punctuation: Joseph, G.J. 2008. Teaching Science, Intermediate Phase. Saldanha: Distrik Uitgewers 3. How do you reference something from the Internet? • Writer / Author's surname and initials • The title of the particular page or part of a bigger web page (see the bar above your "browser") • Title of the website.
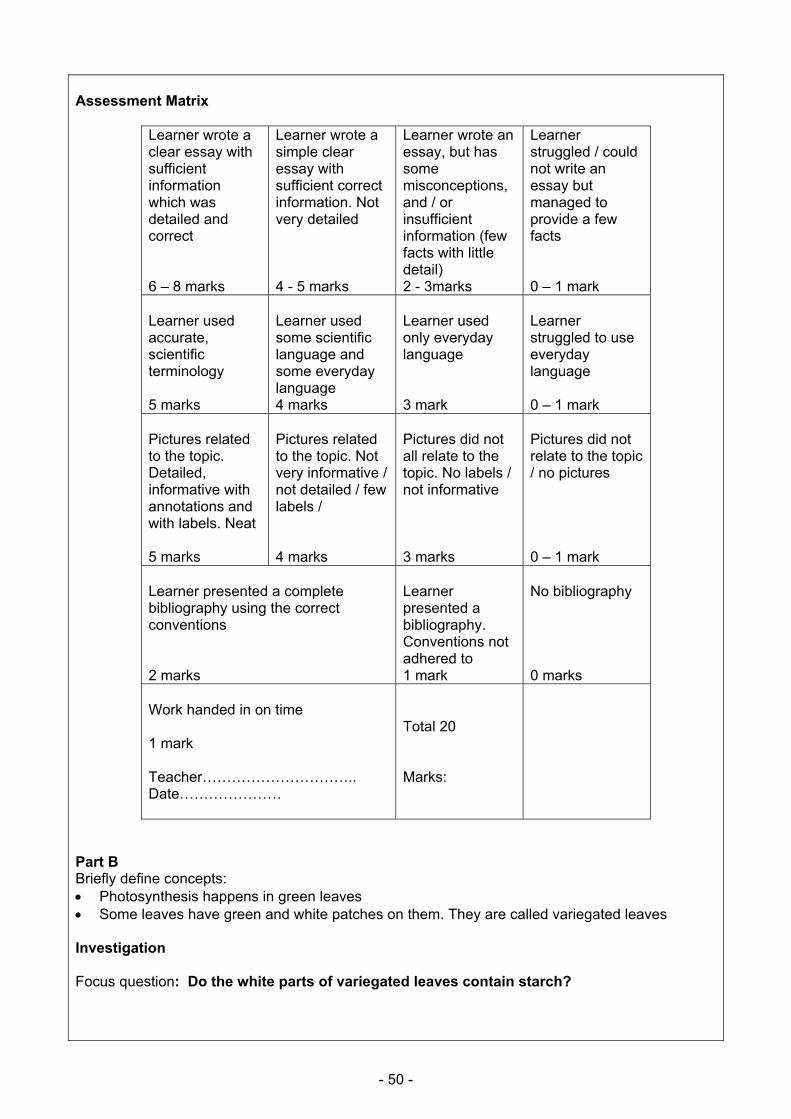
- 50 -
Assessment Matrix
Learner wrote a clear essay with sufficient information which was detailed and correct 6 – 8 marks
Learner wrote a simple clear essay with sufficient correct information. Not very detailed 4 - 5 marks
Learner wrote an essay, but has some misconceptions, and / or insufficient information (few facts with little detail) 2 - 3marks
Learner struggled / could not write an essay but managed to provide a few facts 0 – 1 mark
Learner used accurate, scientific terminology 5 marks
Learner used some scientific language and some everyday language 4 marks
Learner used only everyday language 3 mark
Learner struggled to use everyday language 0 – 1 mark
Pictures related to the topic. Detailed, informative with annotations and with labels. Neat 5 marks
Pictures related to the topic. Not very informative / not detailed / few labels / 4 marks
Pictures did not all relate to the topic. No labels / not informative 3 marks
Pictures did not relate to the topic / no pictures 0 – 1 mark
Learner presented a complete bibliography using the correct conventions 2 marks
Learner presented a bibliography. Conventions not adhered to 1 mark
No bibliography 0 marks
Work handed in on time 1 mark Teacher………………………….. Date…………………
Total 20 Marks:
Part B Briefly define concepts: • Photosynthesis happens in green leaves • Some leaves have green and white patches on them. They are called variegated leaves Investigation Focus question: Do the white parts of variegated leaves contain starch?
- 51 -
Step 1 PLAN Clarify a focus question to start an investigation. Describe information needed to answer the focus question.
Step 2 CONDUCT Collect all equipment to investigate. Conduct the starch tests on variegated leaves. Record your observations. Step 3 REPORT AND EVALUATE Write a report with the following headings: • Focus question • Method (draw and write) • Result (draw and label) • What I learnt about starch and variegated leaves • Questions I still have about leaves and photosynthesis (write your questions). Step 4 Check the learner’s knowledge. Can learners: • List what they need in order to carry out the investigation? • Correctly select the materials they need? • Carry out the investigation, using the equipment correctly and safely? • Record their results accurately? • Write a clear, accurate, logical report? See the Format for Investigations and Assessment for Grade 6 in APPENDIX C

- 52 -
TERM 4: PLANET EARTH AND BEYOND
WEEK 31 continued + 32 BASELINE ASSESSMENT - FORMAL ASSESSMENT TASK 5
SCIENTIFIC LITERACY
Baseline assessment - Earth and Beyond (based on Grade 5 work ) FORMAL ASSESSMENT TASK 5 Teacher may use the questions as part of the assessment task. LO 2 AS 1 Name and describe (write and draw) the different structures / celestial bodies in our galaxy. LO 2 AS 1 Describe the difference between:
• an asteroid and a comet • a star and a planet • a planet and a moon
LO 2 AS 1 Explain (write and draw) the phases of the Moon. LO 2 AS 1 Describe (write and draw) how day and night happens with reference to the movement of the Earth in relation to the Sun. LO 2 AS 1 Draw and describe the water cycle. LO 2 AS 1 Explain: weathering, erosion and deposition. LO 1 AS 1 Describe how you would do an investigation on erosion. LO 2 AS 1 Name and describe (write and draw) some general causes of water pollution. LO 2 AS 1 Name and describe what causes soil erosion. LO 2 AS 2 Categorise the causes of soil erosion into two groups, namely natural causes and human causes. Learners engage in discussion on the following topics to show understanding: • The Moon: our nearest neighbour in space orbiting around the Earth • Seasons: a traditional division of the year based on characteristic climate
conditions • Gas: a phase of matter • Deposition: when soil particles are washed or blown away and deposited
somewhere else • Water cycle: the natural recycling of water between water, air and land • Greenhouse gases: the gases in our atmosphere which insulate the Earth
e.g. carbon dioxide • Greenhouse effect: a phenomenon where greenhouses gases trap sunlight
energy in the atmosphere • Global warming: worldwide temperatures increase, due to trapped sunlight
energy, caused by ‘greenhouse’ gases. Some results of global warming are melting of polar ice caps, rise in sea – level etc.
• Sustainability: consuming natural resources without destroying the ecological balance.
METHODOLOGY Practical work with support.
- 53 -
RESOURCES Research material
NS strands
Matter and Materials – properties of matter & materials Life & Living – changing environment, plant and animal adaptations INTEGRATION
Learning Areas
EMS – sustainable growth and development Social Sciences – people, resources and the environment
Self assessment □ Peer assessment □ Group assessment □ Teacher assessment □
Investigation activities □
Case studies □
Mind mapping □
Projects □
Simulations □
Concept mapping □
Research √
Role-play □
Brainstorming tasks □
Assignment □
Translation task □
Functional writing √
Performance based assess. □
Interviews □
Presentations √
Practical demonstration □
Questionnaires □ Other:
ASSESSMENT Reminder :
Record learner performance on
Formal Assessment
Tasks
Test □
Structured questions □ Other:
WEEK 33 THE STARS
SCIENTIFIC LITERACY
Briefly define concepts: Space objects • Galaxy: an assembly of stars, gas and space dust • Stars: gaseous masses in space which generate energy • Constellation: patterns of stars as seen from Earth. The patterns remain
fixed but seem to move across the sky as the Earth moves • Solar System: A system around a Sun consisting of planets, asteroids,
moons and dwarf planets • Sun: the star at the centre of our Solar System • Planets: space objects which move in orbit round a star Movement and position of objects in space • Orbit: the path a planet takes as it orbits / moves around the Sun • Relative position: Position of Sun, Moon, and Earth in relation to each other
in the universe e.g. The Sun is at the centre of the solar system and the planets in fixed orbits around it
• Relative motion: the movement of the Earth in relation to the Sun e.g. Earth orbiting (moving around) the Sun; the movement of the Moon in relation to the Earth, Moon orbits (moves around) the Earth etc.
• Rotation: the spinning movement of planets and moons on their own axes • Revolution: the movement of a planet in an orbit as it circles around the
Sun. The movement of a moon in orbit as it circles around a planet.
NOTES on HOW
LO 2
Step 1 The sun is a star Learners describe a star we know (e.g. the Sun) by referring to the following: The features of a star (e.g. our Sun radiates light); size; its place in the universe (centre of our solar system, part of the Milky Way galaxy); its effect on planets etc. Explain the birth, life and death cycle of stars.
- 54 -
Step 2 The Sun, Earth and Moon • Explain the movements of the Earth: around its own axis (rotation) and
around the Sun (revolution). • Learners act out or make models of the Sun and Earth (play dough or
papier maché) and demonstrate rotation and revolution. • Provide information for learners to make a table comparing the Sun, the
Earth and the Moon. Headings for columns across the top of table; Sun, Earth, Moon. Questions for rows down side of table: What does it look like? What is it made of? How does it get its light? How big is it? How does it move? Any other interesting features?
Step 3 Solar System Provide information about the Solar System. Learners make models of the Solar System and name and describe the planets. Learners research and present recent discoveries (e.g. Pluto is now classified as a dwarf planet). This demonstrates that knowledge changes with new discoveries. Step 4 Constellations • Explain that certain star patterns can be seen at night and do not change.
They are called constellations. Ask learners to watch the night sky over the weekend.
• They can draw their own star pattern. • They can make up a name for the star pattern. • Describe the features (positions and movement across the sky of
constellations (e.g. stars remain in their fixed pattern, the Earth rotates and therefore different star patterns become visible).
Step 5 Show learners pictures of different constellations (e.g. Southern Cross constellation, Scorpio constellation etc.). Explain that they move to different parts of the sky in different seasons. Ask learners to look for these constellations in the night sky. (Visit a planetarium or observatory or any other place where the sky can be observed.) Step 6 Learners draw and write about star patterns and how the nightly position of the star patterns change and that different constellations become visible in different seasons. Note that the position of the stars in relation to each other does not change. Step 7 Extended learning: Learners do research on the life cycle of a star. Learners research and present on star patterns, or relate indigenous stories about the formation of stars and star patterns.
Step 8 Check the learners’ knowledge. Can learners: • Describe the Sun, Planets, Moon and Stars using suitable vocabulary
(referring to their structure and features)?
- 55 -
• Understand the differences and similarities between Sun, Moon and Earth? • Understand the relative positions in the universe of the Galaxies, Sun,
Earth and planets, and the Moon? • Make suitable observations of star patterns and draw and write about them
METHODOLOGY Practical work with support on research RESOURCES Reference material.
NS strands
Energy & Change – solar energy Matter and Materials – composition of the Sun, Moon and Earth INTEGRATION Learning
Areas Social Sciences – people, resources and the environment, the role of astronomy in exploration
Self assessment □ Peer assessment □ Group assessment □ Teacher assessment □
Investigation activities □
Case studies □
Mind mapping □
Projects □
Simulations √
Concept mapping □
Research √
Role-play □
Brainstorming tasks □
Assignment □
Translation task √
Functional writing √
Performance based assess. □
Interviews □
Presentations □
Practical demonstration √
Questionnaires □ Other:
ASSESSMENT Reminder :
Record learner performance on
Formal Assessment
Tasks
Test □
Structured questions □ Other:
WEEK 34 ROCKS
SCIENTIFIC LITERACY
Briefly define concepts: • Igneous rock: rock formed by intense heat and solidification of volcanic
magma • Sedimentary rock: rocks formed from material deposited as layers of
sediment in water • Metamorphic rock: rocks which have undergone a change in physical form,
appearance or character.
NOTES on HOW
LO 2
Step 1 Explain to learners the layers of the Earth (crust, mantle, outer core, inner core). Learners make a play dough or plasticine model of the layers inside of the Earth. They must know that below the crust is a hot semi liquid layer called the mantle. The crust drifts on the mantle and this causes the crust to move. Molten rock bursts through weak spot in the crust to cause eruptions. The magma cools down to form igneous rocks. Step 2 Explain the rock cycle; how igneous, sedimentary and metamorphic rocks are formed in the Earth’s crust. Provide information for learners to write annotated labels for a picture of the rock cycle. Learners write to describe the rock cycle in their own words.

- 56 -
Step3 Learners collect rocks and describe them (differentiate between natural rocks and concrete). They speculate on the origin of the rocks they have collected and sort them into categories, giving reasons based on their properties such as colour, texture etc. Step 4 Provide learners with samples of rocks. Igneous: (pumice and granite etc.) Sedimentary: (sandstone, shale, limestone, coal etc). Metamorphic: (slate, marble etc.) Learners categorize rocks into igneous, sedimentary and metamorphic types. Learners describe each rock and say why it belongs to a particular category. Extended learning: Learners can research information about gemstones (they are classified in a different way to igneous, sedimentary and metamorphic rocks.) Learners research and present the uses of different types of rock (granite and marble are used for gravestones etc.) Step 5 Check the learners’ knowledge. Can learners: • Describe different rocks using suitable vocabulary (referring to their
properties)? • Explain the rock cycle correctly? • Sort their own rock samples according to their properties? • Describe and correctly sort rock samples provided by the teacher /
collected by learners into igneous, metamorphic and sedimentary rocks?
METHODOLOGY Discussion and recall of information.
RESOURCES Play dough or plasticine (4 different colours), picture of the rock cycle. Samples of granite, pumice, shale, sandstone, limestone, coal, slate and marble.
NS strands
Energy & Change – the formation of igneous and metamorphic rock INTEGRATION Learning
Areas Social Sciences – people, resources and the environment
Self assessment □ Peer assessment □ Group assessment □ Teacher assessment □
Investigation activities □
Case studies □
Mind mapping □
Projects □
Simulations □
Concept mapping □
Research √
Role-play □
Brainstorming tasks □
Assignment □
Translation task √
Functional writing √
Performance based assess. □
Interviews □
Presentations □
Practical demonstration □
Questionnaires □ Other:
ASSESSMENT Reminder :
Record learner performance on
Formal Assessment
Tasks
Test □
Structured questions □ Other:
- 57 -
WEEK 35 SOIL
SCIENTIFIC LITERACY
Briefly define concepts: • Weathered rocks: rocks which have been damaged by exposure to the
weather • Decomposed: fully decayed remains of animals and plants • Organic material: comes from living things • Bacteria: very tiny living organisms • Texture: the feel and appearance of a surface, especially how rough or
smooth it is • Capacity: a measure of an amount which can be held by something • Retain water: to store water • Support growth: to provide all the substances needed to continue with
development • Food supply: to make food available • Pliable: something that can be rolled or bent into sausage and ring shapes.
NOTES on HOW
LO 6.2.1 – 6.2.2
Step1 Explain that soil consists of a mixture of sand, silt and clay particles. Sand particles are large. Silt particles are smaller. Clay particles are the smallest. The proportions of these particles in the soil give the soil its particular properties. Clayey soil has a high proportion of clay particles. Sandy soil contains a high proportion of sand particles. Silty soil contains a high proportion of silt particles. Loamy soil has a mixture of all three particles and humus (decayed plant and animal matter). Step 2 Collect soil samples from different areas. Learners distinguish between the properties of the different soils. They look at appearance, texture, smell, pliability when they have added a little water to each sample. Step 3 Learners make an annotated diagram to illustrate how soil is formed by natural processes. They refer to weathering (wind, water, heat and cold); transportation of particles (by wind and water); and deposition of particles; mixing of particles (by earthworms etc). Step 4 Learners do a research assignment on: how humans make use of soil; what constitutes good and poor soil; ways in which technological products and processes (irrigation, furrows, wind breaks, organic composting, mulching, etc) can improve the quality of infertile soil for growing crops. Step 5 Check the learners’ knowledge. Can learners: • Describe different soils using suitable vocabulary (referring to their
properties)? • Explain the weathering of rock, transportation and deposition of soil
particles correctly? • Describe ways in which soil fertility is improved providing correct detailed
information?

- 58 -
METHODOLOGY Class discussion, research RESOURCES Resource materials
NS strands
Matter & Materials – properties of soil Life & Living – soil as a habitat for plants and animals Energy and Change - wind and water INTEGRATION
Learning Areas
Social Sciences – people, resources and the environment, population distribution
Self assessment □ Peer assessment □ Group assessment □ Teacher assessment □
Investigation activities □
Case studies □
Mind mapping □
Projects □
Simulations □
Concept mapping □
Research √
Role-play □
Brainstorming tasks □
Assignment √
Translation task □
Functional writing √
Performance based assess. □
Interviews □
Presentations □
Practical demonstration □
Questionnaires □ Other:
ASSESSMENT Reminder :
Record learner performance on
Formal Assessment Tasks
Test □
Structured questions □ Other:
WEEK 36 THE PROPERTIES OF SOIL
SCIENTIFIC LITERACY
Briefly define concepts: • Soil: the top layer of land which consists of tiny particles • Texture: the feel and appearance of a surface, especially how rough or how
smooth it is • Capacity: a measure of the amount which can be held or contained by
something • Fertile soil: describes soil which is rich in nutrients, needed to sustain the
growth of healthy plants • Sustainability: consuming natural resources without destroying the
ecological balance • Properties of soil: type of particles making up the soil; capacity to retain
water; ability to absorb and then radiate heat.
NOTES on HOW
LO 6.2.1 – 6.2.3 6.3.3
Investigations on soil Step 1 PLAN Clarify a focus question to start an investigation on the properties of soil. Examples of Questions:
What is the proportion of sand, clay, silt and humus in different soils? How much water do different soils hold? How much heat do different soils absorb and radiate? Do different soils weigh the same (if you take the same volume)?
What does their weight depend on? What is the best mixture of soil for growing plants?
Step 2 Describe the information needed to answer the focus question
- 59 -
Self assessment □ Peer assessment □ Group assessment □ Teacher assessment □
Investigation activities √
Case studies □
Mind mapping □
Projects □
Simulations □
Concept mapping □
Research □
Role-play □
Brainstorming tasks □
Assignment □
Translation task □
Functional writing √
Performance based assess. √
Interviews □
Presentations √
Practical demonstration □
Questionnaires □ Other:
ASSESSMENT
Reminder : Record learner performance on
Formal Assessment Tasks
Test □
Structured questions □ Other:
Step 3 CONDUCT Conduct the investigation by setting up apparatus and measuring aspects of soil properties. (Make several observations or measurement over a period of time). Record observations on a recording sheet. Step 4 EVALUATE Write a report which contains the following:
Focus question Method Results (make several observations or measurements over a period of
time) Graphs; drawings, specimens, models (which ever is applicable). What have you learnt about the properties of soil? Did the investigation answer your question? (explain)
Check the learners’ knowledge. Can learners: • Formulate appropriate questions for investigating different properties of
soil? • Set up activities to investigate the soils? • Make appropriate and accurate observations? • Record their observations accurately? • Write an accurate, detailed report? • Draw graphs if appropriate (suitable heading, suitable scale, labelled axes
with units, correctly plotted points)?
METHODOLOGY Investigation activities
RESOURCES Soil samples, bottles , water, measuring cylinders and jugs, paper cups, thermometers, seeds (seedlings), balances for weighing, etc
NS strands
Life & Living – the link between soil and plant growth Matter & Materials – properties of materials INTEGRATION Learning
Areas Mathematics – measurement, graphic representation of data
- 60 -
WEEK 37 FOSSILS
SCIENTIFIC LITERACY
Briefly define concepts: • Fossils: remains of an animal / plant preserved from an earlier time inside a
rock • Fossil fuels: energy-giving substances derived from prehistoric organisms • Fossilization: the process by which fossils are formed. The organic
chemicals in a dead animal or plant body are replaced with inorganic chemicals, which make the body harden like stone
• Natural disasters: Events like earthquakes, volcanoes, severe droughts, floods etc.
• Fossil imprints: Footprints of animals or prints of leaves etc. which were made in mud that has since hardened to become rock
• Fossil casts: exact three dimensional copies of the parts of plants or animals that have fossilized
• Sedimentary rock: rocks formed from layers of mud or sediment • Sedimentary rock strata: the layers which can be seen in sedimentary rock.
NOTES on HOW
LO 6.2.1 – 6.2.3
LO 6.3.1
Step 1 Explain how the climate and environment on Earth has changed over millions of years. At the same time living things have changed. The evidence of these changing life forms is found preserved as fossils. Fossils are found in sedimentary rocks. Different fossils are found in different strata of sedimentary rocks. The position of the strata helps to determine the age of the fossils. Other scientific methods are also used to find how old the fossils are (e.g. radio carbon dating etc.). Step 2 Learners describe the features which distinguish one category of fossils (from pictures or real fossils) from another category of fossils (e.g. plants, shells, animals etc.). Many fossils look similar to living plants and animals but are not exactly the same. Learners describe the similarities and differences between living organisms and related fossils. Step 3 Provide information about how fossils are formed. Learners research how fossils are formed in sedimentary rocks. They compile their own notes. Make a drawing of fossilization. Include explanatory labels.
Step 4 Learners describe the environmental problems in the past, present and possible future that affect adaptation by plants and animals or cause extinction as a result of climate or environmental change. Step 5 Visit a museum or fossil park to see specimens of real fossils. Show DVDs about fossils. Step 6 Check the learners’ knowledge. Can learners: • Describe different fossils using suitable vocabulary (referring to their
structure)?

- 61 -
• Compare different fossils with living organisms by referring to their
similarities and differences? • Explain the formation of fossils correctly by writing and drawing? • Understand that some environmental problems could affect the survival of
species on Earth?
METHODOLOGY Discussion and recall of information, research RESOURCES Pictures of fossils, DVDs and books about fossils
NS strands
Life & Living – plant and animal adaptations to changing environmental conditions INTEGRATION Learning
Areas Social Sciences – fossils and investigating the past
Self assessment □ Peer assessment □ Group assessment □ Teacher assessment □
Investigation activities □
Case studies □
Mind mapping □
Projects □
Simulations □
Concept mapping □
Research √
Role-play □
Brainstorming tasks □
Assignment □
Translation task □
Functional writing √
Performance based assess. □
Interviews □
Presentations √
Practical demonstration □
Questionnaires □ Other:
ASSESSMENT Reminder :
Record learner performance on
Formal Assessment Tasks
Test □
Structured questions □ Other:
WEEK 38 FOSSIL FUELS
SCIENTIFIC LITERACY
Briefly define concepts: • Fossil fuels: crude oil, coal and natural gas (formed from the fossilized
remains of ancient plants and animals) o Coal: a fossil fuel formed in sedimentary rock from the remains of
ancient plants o Crude oil: a fossil fuel formed in sedimentary rock from the remains of
ancient marine animals o Natural gas: a fossil fuel formed in sedimentary rock from the remains
of ancient marine animals; found in association with crude oil o Greenhouse gases: gases such as methane and carbon dioxide which
trap sunlight energy in the atmosphere and are the possible cause of global warming
o Greenhouse effect: The warming of the Earth’s atmosphere when gases in the atmosphere trap sunlight energy
o Global warming: an overall rise in the average temperature of the Earth’s atmosphere
o Climate change: long term changes in the weather of the Earth’s climatic regions.
NOTES on HOW
LO 6.2.1 ; 6.2.3
6.3.1
Step 1 Formation of fossil fuels Explain how coal, crude oil and natural gas are formed. Learners make a drawing with notes to explain how oil and coal are formed.
- 62 -
Step 2. Burning fossil fuels Demonstrate burning a teaspoon of motor car oil ( made from crude oil) in a tin outside. Let learners notice the smoke and bad smell. Explain how burning fossil fuels give off greenhouse gases (methane and carbon dioxide) and pollution (soot etc.). The greenhouse gases trap sunlight energy and are the possible cause of global warming. Global warming may result in climate change. Rapid climate change may threaten the survival of many species of life, including humans, if they cannot adapt quickly. Step 3 Learners research and write about ways to use less fossil fuel (e.g. ways to save electricity and petrol etc.). Step4 Explain the possible negative effects that global warming (as a result of using fossil fuels) might have on South Africa’s weather (i.e. severe weather - climate change). Learners explain (draw and write) how climate change may increase or decrease soil erosion. Learners suggest (write and draw) how climate change may threaten plant and animal species (e.g. polar bears etc.) Step 5 Check the learners’ knowledge. Can learners: • Describe how different fossils fuels are formed using suitable vocabulary? • Understand how burning fossil fuels affect the environment? • Find suitable information about ways to use fossil fuels sparingly? • Understand that more severe weather conditions, as a result of global
warming may speed up or reduce soil erosion?
METHODOLOGY Demonstration, discussion , writing and drawing RESOURCES Books, motor car oil, tin, matches, teaspoon, DVDs
NS strands
Energy & Change – different fuels as sources of energy Life & Living – the impact of a changing environment on plants and animals INTEGRATION
Learning Areas
Technology – looking at ‘green inventions’ (energy saving devices)
Self assessment □ Peer assessment □ Group assessment □ Teacher assessment □
Investigation activities □
Case studies □
Mind mapping □
Projects □
Simulations □
Concept mapping □
Research √
Role-play □
Brainstorming tasks □
Assignment □
Translation task √
Functional writing √
Performance based assess. □
Interviews □
Presentations □
Practical demonstration □
Questionnaires □ Other:
ASSESSMENT Reminder :
Record learner performance on
Formal Assessment Tasks
Test □
Structured questions □ Other:
- 63 -
WEEK 39 SUGGESTIONS FOR CONSOLIDATION
o Constellations: Research (find) stories of constellations from other cultures and report by
telling the stories. o Rocks: Research, write and draw how different kinds of rocks and gems are used for
buildings, jewellery, statues, gravestones. o Soils: Research, write and present information about different farming methods with
different soils (e.g. growing rice in paddies). o Fossils: Find out, draw and write about plants and animal fossils in South Africa (e.g.
Karoo fossils). o South Africa is often referred to as the “Cradle of Humankind’. Explain and elaborate.
(Write and draw). o Extinction: Find out, draw and write about plants and animals that became or could
become extinct (e.g. the quagga).
WEEK 40 FORMAL ASSESSMENT TASK 6
Teacher may use the questions as part of an assessment task
LO 2 AS 1 Ask vocabulary and spelling words. LO 2 AS 1 Learners name and describe (write and present) different celestial (space, heavenly) bodies. LO 2 AS 1 Describe the difference between rocks. (igneous, sedimentary and metamorphic) Give examples with their uses. LO 2 AS 2 Provide a list of 3-6 properties of soil. Learners can categorise them into 3 groups. LO 2 AS 1 Ask learners to describe an ecosystem and a habitat with reference to all living and non-living factors in the ecosystem. LO 1 AS 1 Give a focus question to test for the best soil for a plant. LO 1 AS 2 Explain how you will record the test. LO 1 AS 3 Describe what you predict is the best possible soil for a plant. LO3 AS 1 Describe similar problems and solutions in our own and other societies in the present and the past and the possible future by referring to fossils. LO 3 AS 1 How has the discovery of fossils helped us to understand past, present and possible future events?
PART THREE: APPENDIX
SCIENTIFIC INVESTIGATION: GRADE 6 A guide to investigations for teachers and their learners Identify an aspect of a natural phenomenon (plants, animals, weather, rocks, burning, electricity etc.) that you want to investigate. When you investigate something you find out more about it by observing or measuring something that occurs naturally (e.g. observing and measuring the natural daily changes in the weather). You can also investigate what happens when you do something to influence a natural phenomenon (e.g. adding salt or sugar to the water to see if it influences the temperature of boiling water). You can also investigate how to make something that relates to a natural phenomenon (e.g. how to make your house cooler in hot weather). You can use the following format to guide you through an investigation. LO1 AS1: PLAN AN INVESTIGATION NB: This part to be done as a class with teacher and learners A. What do we know already?
1. Choose a topic / natural phenomenon to be investigated 2. Make a mind map of everything you know about the topic / natural phenomenon
B. What more do we want to find out?
1. Teacher assists learners to pose questions about what they would like to know further about the topic.
2. Teacher writes all questions on the board. 3. Teacher and learners decide which of the questions are possible to investigate in a classroom
situation and which are not (could be researched in books). 4. Teacher and learners identify one specific question to investigate.
LO1 AS1 : PLAN NB: the following part to be done by learners What do we want to find out?
1. Decide on the following: • What information, apparatus or materials will you need? • What will you have to observe or measure or collect? • How many times will you make observations or take measurements? • What measuring instruments will you need? • Where will you record your observations? (on what format) • What safety measures must you carry out?
2. Topic / natural phenomenon to be investigated (write) 3. Your investigation question (write) 4. Make a hypothesis about your investigation question. (Write: I think the following will happen
because...) LO1 AS2 : CONDUCT THE INVESTIGATION & COLLECT DATA C. What must we do to find out?
1. Write down all the steps you must carry out to do the investigation. 2. Use the apparatus to carry out a suitable procedure (explore the materials, make a series of
observations or measurements etc.) 3. Record your observations and measurements in a suitable way (on table, drawing etc.)
LO1 AS3 : EVALUATE DATA & COMMUNICATE FINDINGS D. What do the results tell us?
1. Report on what you did. 2. Explain what you have learnt. (write, draw, answer questions) 3. Decide whether the investigation has answered your original question successfully or not
(write) 4. Decide whether your hypothesis was true or not. (write) 5. Do you have any new questions for further investigation? (write) 6. Give an everyday example of something you have learnt from this investigation.
Assessment instrument for NS Investigations Strand : ________________________ Topic_____________ ASSESSMENT TASK ________________________________ Form of assessment: SCIENTIFIC INVESTIGATION for Grade 6 NS LO 1 AS 1 Plan Learner could contribute prior knowledge Learner was able to identify an aspect to investigate Learner was able to describe the information needed to answer the question 1 mark each = 3 marks
Comments:
LO1 AS2 Conduct
Could decide (work out) on their own what appropriate information, materials and apparatus is needed for the investigation 3 marks
Could decide (work out) what appropriate information, materials and apparatus is needed for the investigation with the teachers’ help 2 marks
Learners struggled to decide (work out) / had misconceptions about what was the appropriate information, materials and apparatus needed for the investigation 1 mark
Not done 0
Could write the correct steps and carry them out safely and carefully on their own 5 marks
Could write the correct steps and carry them out correctly with teachers’ help 3 marks
Learners struggled to write the steps and carry them out even with teachers’ help 1 mark
Not done 0
Could make careful, detailed and accurate measurements and observations on their own 6 marks
Could make measurements and observations correctly with teachers help 4 marks
Learners struggled to make observations and measurements even with teachers help 2 mark
Not done 0
LO1 AS3 Evaluate
Could report correctly on their procedure in detail on their own (writing, drawing and labelling) 5 marks
Could report on their procedure correctly with teachers’ help (writing, drawing and labelling) 3 marks
Struggled to report on their procedure (speaking, writing, drawing and labelling) 1 mark
Not done 0
Could explain in detail what was learnt without teachers’ help, could connect this knowledge to other situations. 6 marks
Could explain what was learnt with help from the teacher 4 marks
Learner struggled to explain what was learnt, had some misconceptions 2 marks
Not done. 0
Learner’s behaviour was good. Work was diligently done. Work was neatly done. Half a mark each = total 2 marks : ________ Learner did clean up.
Total marks 30:______ Teacher: _______________ Date: ___/___/2009
- i -
PART 4: SCIENTIFIC LITERACY Glossary
A Absorbed energy: when energy is gained / absorbed or has been added to an object or material. Adapted: plants and animals that have changed to suit the present circumstances. Atmosphere: (air) mixture of gases around a planet. Axis: the imaginary axis on which the Earth rotates.
B Balanced diet: when foods containing the important nutrients are eaten in the correct amounts to ensure health. Biodiversity: “bio” means “life”; “diversity” means a variety – i.e. the many different kinds of living organisms (plants and animals). Boiling point: the temperature at which a liquid turns into a gas. Boiling water: water heated until it has enough energy to change into gas. Breathing: the action of taking in air that is rich in oxygen and breathing out air that is rich in carbon dioxide. Breed: to reproduce.
C Carbohydrates: foods which serve as a major energy source in human diets. Sugars, starches and cellulose are all carbohydrates. Carnivores: animals that eat other animals. Carpel / pistil: female part of a flower consisting of the stigma, style and ovary. Catastrophic events: events causing widespread damage or death (e.g. floods). Catchment area: a natural area where rainwater collects, like wetlands, lakes etc. Categorise: to sort / group things together which have the same visible appearance or properties. Ceramics: materials made of baked clay e.g. china cups, flower pots, tiles. They are rigid, can shatter, they make a ringing sound, are durable and waterproof. Circuit: the circular pathway for electricity to flow from the source to the appliance and back to the source. The electricity will not flow if the path is not complete. Classes of materials – fibres, glass, ceramics, polymers (plastics), paper, wood, metals. Classify: Arrangement of objects or living organisms into related groups according to their similarities. Clay: very small (fine) rock particles (sometimes reddish, orange-brown or white in colour). Clay holds water and is sticky when wet. Clayey soil: Soil which has a high proportion of clay particles in it. Climate change: long term changes in the weather of the Earth’s climatic regions. Climate: weather conditions observed and measured over a long period of time in a certain region. Coal: a fossil fuel formed in sedimentary rock from the remains of ancient plants. Combustion: the process of burning which involves oxygen, a fuel and heat. Condensation: when water vapour (a gas) cools down and changes to a liquid. Condenses: when a gas cools (loses heat) and changes to a liquid. Constellation: patterns of stars as seen from Earth. The patterns remain fixed but move across the sky as the Earth moves. Consumer (herbivores, carnivores and omnivores): an organism that feeds on other organisms in a food chain. Crops: plants that are cultivated on a large scale for food or other use. Crude oil: a fossil fuel formed in sedimentary rock from the remains of ancient marine animals. Crystallisation: a process of forming crystals by heating a saturated solution to evaporate the solvent.
D Decomposer: an organism that breaks down the dead bodies of plants and animals. Degree Celsius (ºC): the unit to measure heat energy. Deposition: when soil particles are washed or blown away and deposited somewhere else. Diabetes: a disorder where the body is incapable of keeping its blood glucose levels normal. Digestion: the process by which food is broken down into simple chemical compounds. Digestive System: the organs which help with the process of digesting food; it consists of mouth, salivary glands, gullet, stomach, liver, pancreas, small intestine, large intestine.
- ii -
Dissolve: when a substance mixes with a liquid and seems to disappear inside the liquid, and so cannot be seen. Distillation: a process where a liquid is heated to produce vapour. The vapour is then condensed by cooling to form a pure liquid.
E Earth materials: air, water, rocks and soil Earth year: the period of time it takes the Earth to complete one revolution (orbit) around the Sun. (365¼ days) Ecosystem: an ecosystem includes the living and non-living things in an area and their interaction with one another; a community of plants, animals and micro-organisms living together in an environment. Eggs: the female sex cells of animals. Electricity: is a secondary energy source (it is produced from another source such as coal), and is used as a source for electrical appliances. Energy gain: this happens when matter absorbs energy because its surroundings are warmer. Energy loss: this happens when matter releases its energy because its surroundings are cooler. Energy sources: a source that stores or supplies a form of energy (e.g. battery, falling water). Some sources consist of stored chemical or mechanical energy e.g. electrical cells, stretched or wound up elastic band, wood, coal, oil etc. Some energy sources are moving already and their movement is used as an energy source e.g. falling water, moving waves, wind (moving air) etc. Energy transfer systems: a system made of two or more parts that transfers (moves) energy from one place to another e.g. a food chain, an electric circuit, an ecosystem etc. Energy transfer: when energy is passed on from one part of a system to another. Energy transformation: when energy is changed from one form to another, e.g. electrical energy is changed to light energy in a light bulb. Energy: energy is needed to make everything work or move or live. Environment: the living and non-living surroundings that affect living things. Erosion: soil or rock wearing away over a long period of time caused by wind and water etc. Evaporate: When a liquid is heated and changes to a gas. Evaporation: the process by which a liquid (e.g. water) becomes a gas (water vapour). Excretion: the removal of the waste products of metabolism (sweat and urine) by a living organism.
F Factors affecting solubility: processes or actions that make a solute dissolve faster or slower in a liquid such as: amount of stirring; temperature of liquid; size of the particles of the solid; amount of solid compared to liquid. Fats and oils: foods (olive oil, butter, meat fat) which serve as a source of energy and maintain parts of the body such as the nervous system. Fertilization: the joining of male and female sex cells to form a new individual. Flexibility: ability to bend / change shape without breaking. Food chain: a food chain shows ‘who eats whom’ in an ecosystem; the flow of energy in nature through living organisms. A series of organisms through which food energy is passed in an ecosystem. Food pyramid: a pyramid-shaped diagram which is a guide to the main food groups and the recommended quantities to be eaten for a balanced diet. Forms of energy: e.g. light, sound, heat, electricity, movement. Fossil casts: exact three dimensional copies of the parts of plants or animals that have fossilised. They are made by researchers. Fossil fuels: crude oil, coal and natural gas (formed from the fossilised remains of ancient plants and animals). Fossil imprints: Footprints of animals or prints of leaves etc. which were made in mud that has since hardened to become rock. Fossilisation: the process by which fossils are formed. The organic chemicals in a dead animal or plant body are replaced by inorganic chemicals, which make the body harden like stone. Fossils: remains of an animal / plant preserved from an earlier time inside rock. Fuels: sources of energy (we usually need to burn them to produce heat energy). Full Moon: a Moon phase where the full face of the Moon is visible (when the Moon looks round), it occurs about half way through the Moon cycle.
- iii -
G Galaxy: an assembly of stars, planets, gas and space dust. Gas: a phase of matter consisting of particles moving rapidly and spaced very far apart; gas has no definite form. Germination: seeds germinate when they start to grow and develop their first root and shoot. Glass: a material made by melting sand mixed with limestone and sodium carbonate. Properties of glass: rigid, can shatter, makes a ringing sound, is durable and waterproof, brittle, and transparent. Global warming: worldwide temperature increases, due to trapped sunlight energy, caused by ‘greenhouse’ gases. Some results of global warming are: melting of polar ice caps, rise in sea level and climate change. Greenhouse effect: a phenomenon where greenhouse gases trap sunlight energy in the atmosphere. Greenhouse gases: gases (such as carbon dioxide, methane and other gases) that absorb and trap heat in the Earth’s atmosphere and are the possible cause of global warming.
H Habitat: a specific place, within an ecosystem, where plants and animals live and reproduce. Hardness: ability to withstand physical wear and tear. Hazardous: materials or substances which can be harmful to health and can damage the environment. Heat conduction: the way in which a material allows heat to travel through it. Heat insulation: the way in which a material stops heat energy from moving through it. Heating wires: special wire that heats up when an electric current passes through it e.g. found in irons, heaters, geysers, kettles. HIV/AIDS patients: people who are infected with the Human Immuno-deficiency Virus (HIV), which breaks down the immune system. Hydrosphere: (water and water vapour) that part of the Earth that is made up of water.
I Igneous rock: rock formed by intense heat and solidification of volcanic magma. Indigenous knowledge: knowledge from our own country. Indigenous: home grown, originating in, native, growing naturally. Infiltration: movement of water into soil or porous rock. Insoluble substances: substances which cannot dissolve in a liquid (e.g. tea leaves or sand particles in water). Interdependence: living organisms depending on one another for survival. They provide food, shelter, etc for each other. Invertebrates: (insects, worms, molluscs, crustaceans, arachnids, myriapods) most have an external skeleton (exoskeleton).
J Joints: the place on a skeleton where two bones meet. Joints allow movement.
K Kilojoules (kJ): the unit for measuring energy is the Joule (J). A kilojoule is 1000 Joules. Kinetic energy (movement energy): the energy in moving objects or particles; energy sources that move e.g. electricity, falling water, wind.
L Landforms: natural physical features of the Earth’s surface e.g. mountains, rivers, valleys etc. Length of day: the number of daylight hours from sunrise to sunset. Length of night: the number of hours from sunset to sunrise. Life processes: the processes that all living things carry out: movement, reproduction, sensitivity, growth, excretion, respiration, feeding. Ligament: the tissue that holds bones together in a joint. Liquid: a phase of matter; particles in a liquid move in relation one another, can be poured, takes the shape of the container, takes up space, particles touching but further apart than in solids. Lithify: to change from loose sediments into solid rock. Lithosphere: (rocks and soil) solid layer of the Earth consisting of the crust. Loamy soil: a high quality soil made up of a mixture of sand, silt and clay particles, and humus (decomposing plant and animal material).
- iv -
M Magnetism: the way in which a material is attracted to a magnet or not. Materials: solid matter is divided into groups e.g. metals, ceramics and polymers etc; solids that are useful for making things. Mating: when the male and female animals of the same species come together so that the male can deposit sperm cells into the female’s body to fertilize her eggs. Matter: anything which has mass and occupies space; everything on the Earth and in the Universe is made of matter. Matter is made of atoms. Measuring weather: a thermometer measures the temperature; a wind gauge measures wind speed and direction; a rain gauge measures rainfall. Mechanical systems: systems that have two or more moving parts e.g. the moving parts of an engine. Melting ice: ice melts when it gains enough energy to change into a liquid. Melting point: the temperature at which a solid turns into a liquid. Melting: change of state from a solid to a liquid, usually caused by heat energy. Metals: materials which conduct electricity and heat e.g. copper, tin, silver, gold, lead etc.; shiny, hard, malleable, pure substances such as iron, copper, gold and silver. Metals are made into objects such as nails, pipes, metal sharpener, metal ruler. Metamorphic: rocks which have undergone a change in physical form, appearance, or character. Mixtures: two or more substances mixed together and can be separated again. Movement of heat energy: Energy always moves from a warmer place or object to a cooler place or object. Muscles: body tissue that contracts to cause movement; types of muscles e.g. biceps, triceps.
N Natural disasters: Events like earthquakes, volcanoes, severe droughts, floods etc. Natural fibres: long, flexible, strong strings that come from plants or animals e.g. in wood and paper, cotton, wool, linen etc. Natural gas: a fossil fuel formed in sedimentary rock from the remains of ancient marine plants and animals; found in association with crude oil. New Moon: this Moon phase occurs when the Moon is not illuminated (lit up) by direct sunlight and is not visible to the naked eye. The New Moon usually signals the start of a new Moon cycle. Nuclear energy: a form of energy that is released by radioactive materials e.g. by uranium and plutonium. Nutrients: substances in our food which provide nourishment: carbohydrates, proteins, vitamins and minerals, fats and oils.
O Orbit: the path a planet takes as it orbits around the Sun. The path a moon takes as it moves around a planet. Organisms: any living things e.g. animals and plants. Ovary and uterus and vagina: female sexual organs in animals. Ovule: contains the female sex cells of a flowering plant.
P Paraffin: energy source in a household: liquid fuel used to cook food. When paraffin catches fire by accident, its flames are very hot and difficult to control. Penis and testes: male sex organs in animals. Phase change: to change from one state to the other (solids, liquids, gases). Phases of matter: solids, liquids and gases. Heating changes the phase from solid to liquid to gas, and cooling (loss of heat) reverses the change of phase. Phases of the Moon: when seen from Earth, the appearance of the Moon changes in a cycle over a period of time i.e. full moon, new moon, gibbous moon, quarter moon. Photosynthesis: the process by which green plants use sunlight, carbon dioxide and water to make food substances. Pistil / carpel: Female part of a flower consisting of the stigma, style and ovary. Pitch: high or low sounds. Notes have a high pitch (high sound) or a low pitch (low sound). The pitch depends on the amount of material or air that is vibrating in an object or musical instrument; the faster the vibrations the higher the pitch. Planets: space objects which move in an orbit around a star. Pliable: something that can be rolled or bent into a sausage and / or a ring shape.
- v -
Pollen: contains the male sex cells of a flowering plant. Pollination: when pollen is carried from the male part (stamen) to the female part (carpel) of a plant. Polymers (plastics and natural fibres): giant long-chained molecules made up of a large number of smaller molecules joined together e.g. plastics, rubber, plant fibre, polyester etc. Polymers are flexible, strong insulators of heat and electricity, durable, burn when set alight. Some plastics are transparent and some are opaque (cannot see through them). Potential energy (stored energy): energy in a stored form that is able to do work when it is released e.g. battery, cell, elastic band, chemicals, fuel etc. Precipitation: when water falls from the atmosphere to the Earth’s surface, such as rain, snow, sleet, hail and dew. Primary consumers (herbivores): animals which only eat plants. Producer: an organism (e.g. a plant), at the start of a food chain, that does not need to eat, but makes its own food. Properties of soil: size of particles, colour, texture, smell and pliability. Properties: how something looks, feels and behaves e.g. flexibility, hardness, texture, colour and solubility etc. Proteins: foods which are used for building up the body. Meat, fish, eggs, beans and nuts contain proteins.
R Rainfall: the amount of rain that falls in an area at a certain time. Reflected light: light energy which hits an object and then bounces off again. Relative motion: e.g. the movement of the Earth in relation to the Sun - Earth orbiting around the sun. The movement of the Moon in relation to the Earth - Moon orbits around the Earth, etc. Relative position: Position of Sun, Moon and Earth in relation to each other in the universe e.g. The Sun is at the centre of the solar system and the planets are in orbit at fixed distances around it. Moons orbit around planets which together orbit around the Sun. Revolution: the movement of a planet in orbit as it circles around the Sun. The movement of a moon in orbit as it circles around a planet. Rock particles: very small pieces of rock. Rotation: the spinning movement of planets and moons on their own axes. Runoff: rain water that does not get soaked into the ground. Rust: A chemical reaction between iron (where ever it is) and oxygen from the air.
S Sand: larger, light-coloured grains (rock particles), such as desert sand and beach sand. Sandy soil: soil which contains a high proportion of sand particles Satellite: any object in space that orbits around another object. Seasons: a period of the year defined by a distinct climate (e.g. winter, spring). Secondary consumers (omnivores or carnivores): second level consumers - animals which eat both plants and animals or only eat other animals. Sedimentary rocks: rocks formed from material deposited as layers of sediment in water. Seed dispersal: to spread seeds in different directions. Separation: a process where solid substances are separated. Sexual reproduction: reproduction which involves two parents. Fertilisation takes place in sexual reproduction. In plants seeds are produced after fertilisation. Silt: very small powdery rock particles found in soil. Silty soil: Soil that has a large proportion of silt particles. Skeleton (human) – parts: skull, jaw, backbone (vertebrae), rib cage, front leg or arm (humerus, radius and ulna), back leg or legs (femur, tibia, fibula), shoulder (shoulder blade, collar bone) and hip girdle, feet and hands. Social patterns: solitary animals, pairs, packs, prides, herds, troops, colonies. Soil: the loose upper layer of the Earth made up of a mixture of different sized rocks / stones and soil particles, and decayed organic matter. Solar heating: using energy from the Sun to heat water. Solar System: a star together with the planets, moons, asteroids, comets and dust which orbit around it. Solid: matter with a fixed shape, takes up space, cannot be poured, particles very close together. Solidification: when a substance, like water becomes solid. Solidifies: when a liquid cools (loses heat) and changes to a solid. Solubility: the ability of a substance to dissolve.
- vi -
Soluble substances: substances which dissolve (seem to disappear) when mixed with a liquid (e.g. sugar mixed into water). Soluble: substances which can dissolve in a liquid are soluble (e.g. sugar). Solute: a solid that dissolves in a liquid, forming a solution. Solution: a special mixture in which a solid, liquid or gas is dissolved in a liquid e.g. salty water. Solvent: the liquid in which a solid dissolves. Sound: is a form of energy that is produced by a vibrating object. Sound can only travel through a medium (liquid, solid, gas). Sound cannot travel through a vacuum (i.e. no air); sound travels away from sources (e.g. radio, clapping hands, shouting etc); sound gets fainter as it moves away from the source. Source of energy: See energy source. Species: organisms with the same visible characteristics and that can only reproduce with their own kind. Sperm cells: the male sex cells of animals. Stamen: the male part (reproductive organs) of a flower, consists of a filament and anther. Stars: gaseous masses in space which generate energy. Strata: the layers which can be seen in sedimentary rock. Substances: types of matter that can exist naturally or can be made. Sun: the star at the centre of our Solar System. Sustainability: consuming natural resources without destroying the ecological balance. Switches: the components in an electric circuit that either open (break) or close (complete) the circuit. System: a system is made of two or more parts that work together. In a system energy is transferred from one part of the system to another.
T Technology: things that people have made to help them to do things and solve problems. Temperature: a numerical measure of hotness or coldness in degrees Celsius (°C). Temporary change: change to a substance that is not permanent – it can change back again to its original form. Tendons: the tissue that attaches a muscle to the bone. Tertiary consumers: e.g. human, crocodile etc.; third level consumers. Texture: the way a material feels when you touch or rub it between your fingers. The Moon: our nearest neighbour in space orbiting around the Earth. Thermal energy: heat energy. Thermometer: an instrument used to measure temperature.
V Vegetative reproduction: reproduction in plants without seeds. A type of asexual reproduction in plants. The parent plant can make a new plant from part of its stem, root or leaf. Vertebrates: (Fish, Amphibians, Reptiles, Birds, Mammals) have an internal skeleton (endoskeleton). Vibrations: rapid movements made by an object (e.g. feel the vibrations coming from a speaker). Vitamins and minerals: special food substances which are needed in small amounts for normal growth and activity of the body. Volume: how soft or loud a sound is. The volume depends on the amount of energy used to generate the sound.
W Warning signs / hazard symbols: signs indicating danger or risky areas. Water cycle: the natural recycling of water between the land, bodies of water and the atmosphere; processes by which the Earth's water circulates through the environment. Water resources: sources of water that are useful or potentially useful to people. Weather: temperature, wind, sunlight and rain measured on a daily basis; the state of the atmosphere (temperature, wind, etc.) at a particular time and place. Weathered rocks: rocks which have been damaged by exposure to the weather. Weathering: physical or chemical or biological breakdown of rock into smaller pieces: the breaking of rocks into smaller pieces by wind, water, heat and cold. Wind sock / Wind-vane: instrument for showing wind direction.