pharmadmit overview
DESCRIPTION
PharmAdMIT Overview. Introduction to PharmAdMIT from an Admissions Perspective. What is PharmAdMIT?. PharmAdMIT is a desktop database program for admissions officers. PharmAdMIT can be loaded on multiple computers and share data via MS Windows ™ networking. - PowerPoint PPT PresentationTRANSCRIPT
PharmAdMIT Overview
Introduction to PharmAdMIT from an Admissions Perspective
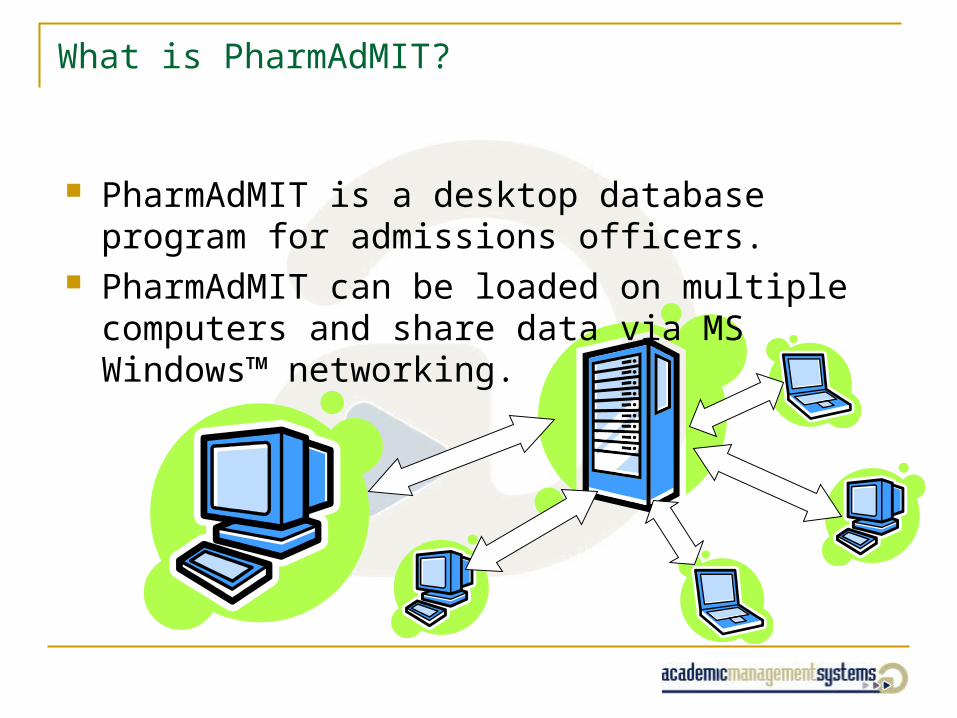
What is PharmAdMIT?
PharmAdMIT is a desktop database program for admissions officers.
PharmAdMIT can be loaded on multiple computers and share data via MS Windows™ networking.

Features
Status Levels Local Score Setup Correspondence Applicant Information Interview Scheduling Global status changes General & Custom Reports Graphical Drilldown Applicant Lists

Sample Admissions Process: Flow & Status
Application is received Status changes from un-reviewed to reviewed PCAT scores
No: Holding for PCAT Email is sent saying holding the review pending
PCAT scores Yes: Application is reviewed
Application is reviewed Interviewed
Interview pending – requests to set up an interview Interview scheduled – they are scheduled & receive
confirmation of interview Interview completed – receive a thank you and interview
assessment survey

Determination of Request to be Interviewed
For example: Undergraduate GPA >2.80 and the following PCAT criteria: Composite > 50%tile BIO, Quant & Chem > 50%tile Verbal & Reading >25%tile Automatic request to schedule an interview
Those that do not meet the above evaluated by the Admissions Committee

Interviewed Candidates
Academic advisor performs a detailed review of prerequisites and calculates a prerequisite GPAs (cum & sci)
Candidates evaluated on nonacademic factors (extracurricular activities, honors, work experience)
Interview evaluation

Decisions
Accepts are determined based upon the candidates overall score Set score that if a candidate is above that score
and is above minimum required interview score, an offer e-mail is sent and followed by a hard copy offer letter
Admissions Committee determines the score which generates an offer and discusses candidates that are close to decision points or close to established cut-off values

Decisions
Rapid decisions can be made with fast communication to the applicants
Keep the applicants in the admissions loop and connected with your admission’s office during the admissions cycle
Staff Support/Activities
Academic advisor can limit applicant review to only those who are asked to be interviewed
Staff schedules interviews and communicates with the applicants on the interview process
Staff prepares the hard copy offer letters and hard copy rejection letters for those who interviewed.

Support Activities
Prepare documents for admissions committee/dean etc. Download custom reports weekly for the
admissions committee review
2008/2009 Schedule
June 2, 2008 - PharmCAS application portal opened
Late June new PharmAdMIT software available
July – November: Reviewed process and established interview dates
Interviews November – February depending on deadline
Process Completed April 1

Technical Training
Introduction to PharmAdMIT from an Technical Perspective

System Specifications
System Requirements OS: Windows 2000, Windows XP SP2. (Windows XP Professional
recommended) CPU: Minimum 500Mhz. (1Ghz or faster processor recommended) RAM: Minimum 256MB (512MB recommended) Hard Drive: Minimum 300MB of free space (500MB recommended)
Networking Requirements PharmAdMIT requires a 100Mbps network connection to its data files for
optimal performance. A mapped network drive with full read/write/modify access for the logged in
user/computer. SMTP server access (usually provided by your school/ISP) is required for e-
mail. MS Windows 2000 Server (or later) recommended.* Nightly backups of all network resources is highly recommended.
*Due to client connection problems and compatibility issues, Novell Netware is not a supported network operating system for PharmAdMIT.

What can PharmAdMIT do?
PharmAdMIT can help perform many tasks... Import data from PharmCAS (demographics, tests, grades,
coursework) Track application status’s (“Accept”, “Reject”, “Hold”, etc) Filter the applicant data and work with only the applications you
need to see. Correspond with applicants (Mail Merge letters, e-mail,
uploads back to the web portal) Calculate custom scores (and Local GPAs) Schedule & score interviews Track contact with applicants Track fees Report on applicant data in pre-formatted, easy to use reports. Export applicant data to external systems

Section 1: The Applicant Information Screen
Applicant Applicant Information

Applicant Applicant InformationThis screen is the main day-to-day data input screen for PharmAdMIT.
The top half of the screen displays information about the currently selected applicant.
Section 1: Applicant Info Screen
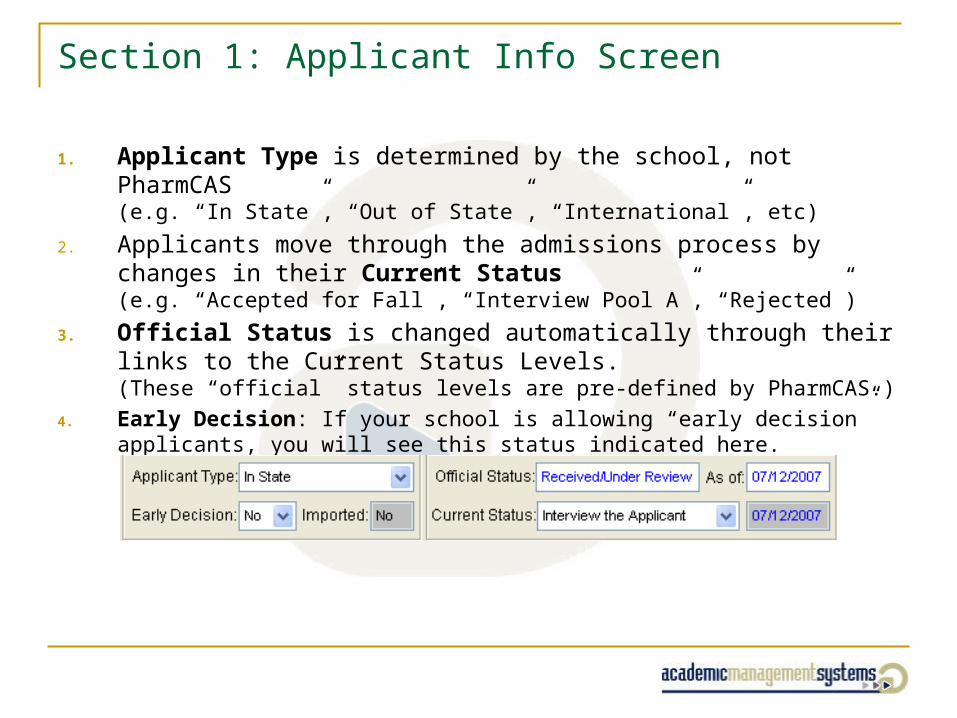
1. Applicant Type is determined by the school, not PharmCAS(e.g. “In State”, “Out of State”, “International”, etc)
2. Applicants move through the admissions process by changes in their Current Status(e.g. “Accepted for Fall”, “Interview Pool A”, “Rejected”)
3. Official Status is changed automatically through their links to the Current Status Levels. (These “official” status levels are pre-defined by PharmCAS.)
4. Early Decision: If your school is allowing “early decision” applicants, you will see this status indicated here.
Section 1: Applicant Info Screen

Status tracking
Triggered letters
Schools can define their own Current Status’s for applicants, and link them to a common, “official” list for reporting purposes.
Changes in Current Status can be linked to automatically generate correspondence (letters/e-mail)
Section 1: Applicant Info Screen
Section 1: Applicant Info Screen
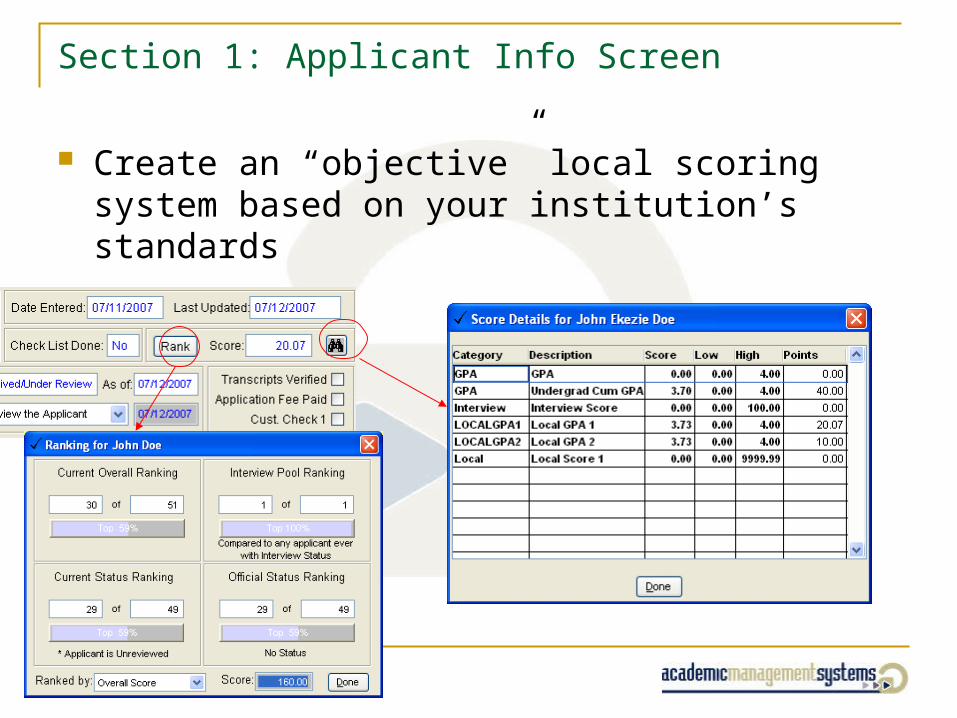
Create an “objective” local scoring system based on your institution’s standards

Applicant Applicant InformationAdditionally, the top half of the screen displays:
•The date entered/last updated
•Checklist status
•Applicant rank and score
•Customized fields
Section 1: Applicant Info Screen

The applicant information is divided into tabs.
Each of the tabs displays a different aspect of the applicant’s record
Section 1: Applicant Info Screen

The List tab is the only exception. The List tab is used to navigate through the database, and displays information about multiple applicants.
• Use the “Search” box to search for applicants
• Use the Applicant Lists dropdown to load filtered lists
• Use the Send Email to All button to send e-mail to the current list of applicants
Note: The navigation buttons on the toolbar at the top of the screen can be used to move through the database, too.
Section 1: List Tab

Applicant information is divided into tabs.
Tabs display applicant data Some display info reported by PharmCAS (name,
transcripts, demographics) Some display info collected during the application
process by the admissions department (interviews, checklist items, custom fields).
Section 1: The tabs

The PCAT Tab Displays PCAT scores, either provided by the
applicant or by the PharmCAS
TOEFL/TSE tab - displays TOEFL/TSE scores
Section 1: Tests

Section 1: Supplemental Items
The Supplemental Tab Used to track items not supplied by PharmCAS Used to report “comments” back to applicants via Output
Supplemental Item Export
Note: When all items are marked “yes” (or “N/A”), the “Check List Done” field will change to “yes”, indicating that the checklist has been completed.
The items, comments, and deadlines available on the supplemental tab are determined by Setup Supplemental Status
Section 1: General Information
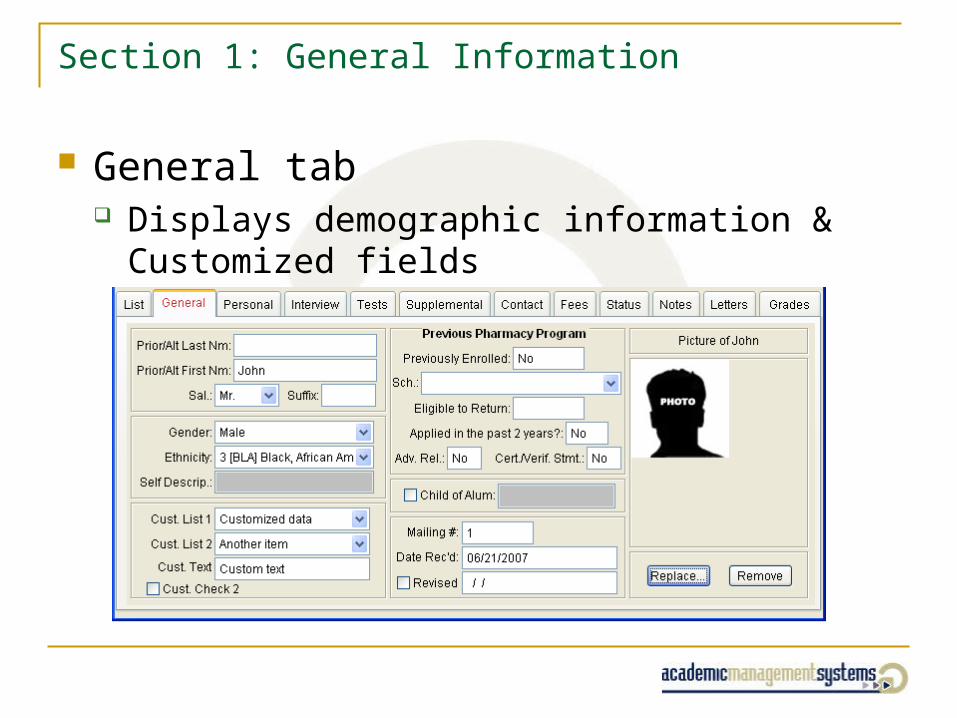
General tab Displays demographic information & Customized
fields
Section 1: Correspondence Letters
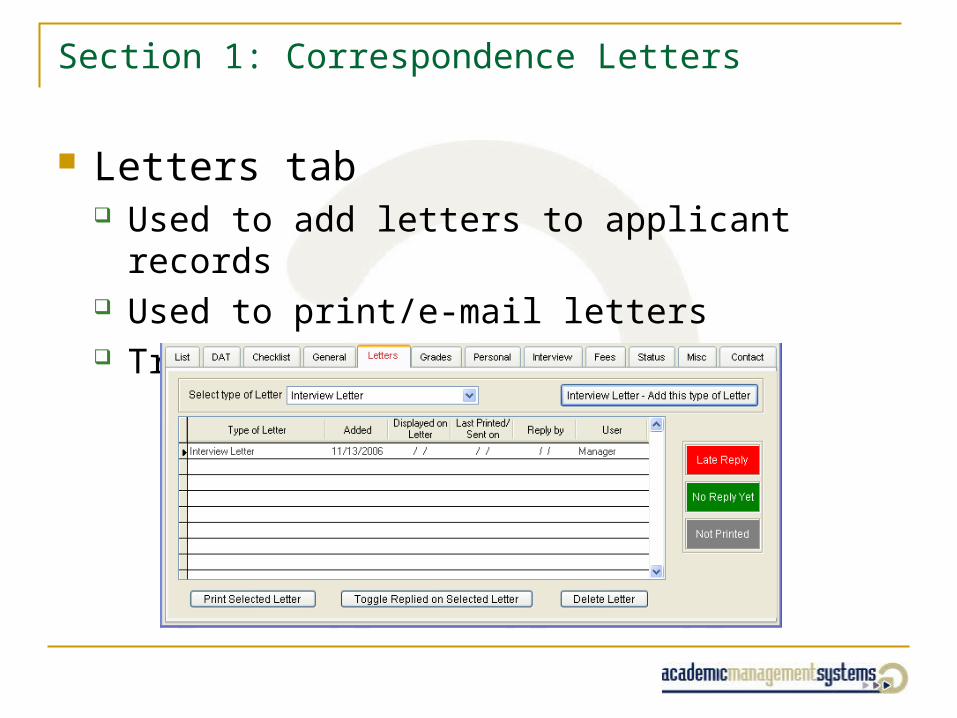
Letters tab Used to add letters to applicant records Used to print/e-mail letters Track replies to letters

Section 1: Applicant Grades
Grades tab Display grades provided by PharmCAS Display transcript information Calculate local GPAS
The Grades screen has 5 sub tabs:
• GPA
• Subject Course GPA
• Courses
• College Summary
• Academic Requirements

Section 1: Grades – GPAs
Grades Tab: GPA* Displays GPAs provided from PharmCAS, as well
as the LOCAL GPAs

Section 1: Grades – Subject Course GPAs
Grades Tab: Subject Course GPA* Displays GPAs provided from PharmCAS for
grades by SUBJECT

Section 1: Grades – Courses
Grades: Courses Lists all coursework provided by PharmCAS Select courses to determine LOCAL GPAs
Courses in red are planned, in progress, or missing a grade.

Section 1: Grades – College Summary
Grades Tab: College Summary Displays the colleges attended in detail Scroll to the right for college-specific information

Section 1: Personal Information
Personal Tab Displays demographic and other information
provided by PharmCAS Addresses Citizenship Parents information Work experience, essays, honors, awards, etc
Note: The applicant’s e-mail address is located on the Personal sub-tab. To send an e-mail, click Send Email

Section 1: Interview tab
Interview Tab Schedule interviews, enter scores Local scores (Other Scores) 1 – 8 are entered here.
1. The Setup Interview Schedule must be in place before booking interviews
2. The applicant’s “Official Status” cannot be “No status”
3. The “Other Scores” are defined in Setup Local Scoring Setup

Section 1: Fees
Fees tab Used to enter fees collected by the admissions
office (not the PharmCAS fee, that’s assumed!) Defined in Setup Fee Setup

Section 1: Status log
Status Tab A log of all of the changes to the applicant’s
Current Status

Section 1: Contact with Applicants
Contact tab Used to track communication with the applicant Items in the dropdown can (and should) be
customized!) View/print logs
Click List… to edit the list of reasons for calls.
Section 2: Settings and Management
Setup Menu
Management Menu

Section 2: Setup and Management
Setup Menu Used to define the database, in order of hierarchy:
Applicant Type Status Levels Supplemental Items
Scoring Local Scoring Setup Local GPA Setup
Interviews Interview Schedule Interviewers

Section 2: Applicant Types
Setup Applicant Types Most basic level Not determined automatically
The first one on the list gets assigned to all newly imported applicants
Suggestion: Create a type called “Unknown”, and make it the first item in the list. That’ll get assigned to all new applications, thus avoiding confusion.

Section 2: Current Status Setup
Setup Status Levels Used to define you application process Used to link status’s to trigger form
letters (or e-mails) Used to link your terms to those used by
PharmCAS. Can create different status’s for different
applicant types
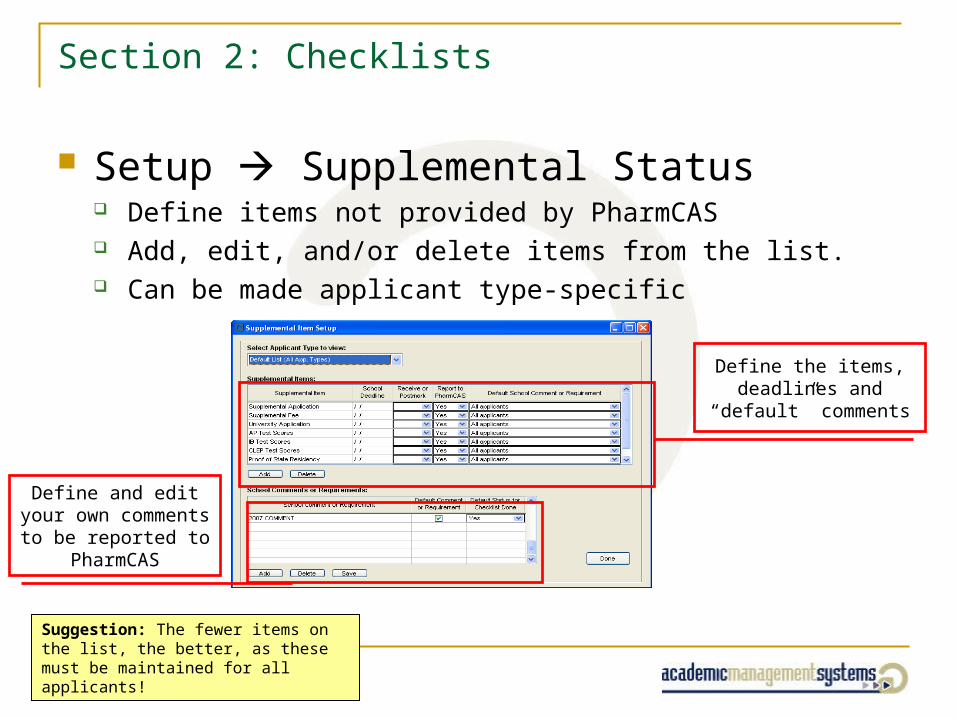
Section 2: Checklists
Setup Supplemental Status Define items not provided by PharmCAS Add, edit, and/or delete items from the list. Can be made applicant type-specific
Suggestion: The fewer items on the list, the better, as these must be maintained for all applicants!
Define the items, deadlines and “default”
comments
Define and edit your own comments to be
reported to PharmCAS

Section 2: Fee Types
Setup Fees Used to define fees seen on the Fees
tab Add/edit/delete fee types here Can link one fee (e.g. Application Fee)
to the checkbox on the Applicant Information screen

Section 2: Letter Template Setup
Setup Correspondence Setup Used to create and edit letter templates. 3 format options available:
Plain text Backwards compatible, limited options Good for simple e-mail letters
MS Word Merge Allows merging fields from database
MS Word Email Highly-formatted HTML-based e-mail Allows merging fields from database
Note: To create a new, blank template, click the “New” icon on the toolbar
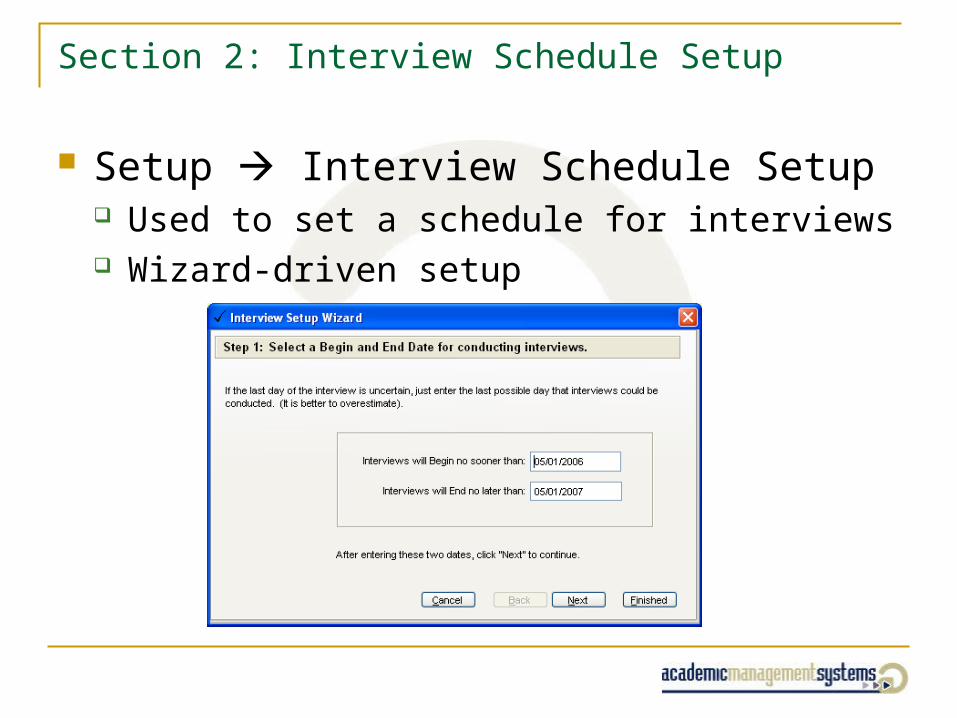
Section 2: Interview Schedule Setup
Setup Interview Schedule Setup Used to set a schedule for interviews Wizard-driven setup

Section 2: Setup and Management
Management Menu Program Options User Setup and System Security Email Settings System Logs

Section 2: Basic Program Options
Program Options Controls some basic system settings, most
notably: Custom Categories
Customize the checkboxes and dropdowns on the Applicant Information
Screen
PCAT Options Set which PCAT score is used in PharmAdMIT’s scoring

Section 2: Security Levels
Security Levels Defines users (and permissions) by groups “Database Manager” cannot be edited

Section 2: User Setup
User Setup Use the “new” icon on toolbar to create new users Use the List to select users Use this screen to reset user passwords

Section 2: E-mail Settings
Management Email Settings Required to send e-mail Usually provided by your IT
staff

Section 3: Working with PharmCAS Data
Data Import
Filtering Applicant Data
Sending E-mail
Global Status Update
Correspondence Queue

Imports are delivered online via the Admissions Officers’ Web Portal.
The PharmCAS Import Wizard guides the user through the import process in a step-by-step manner.
Section 3: Data Import
File Data Import PharmCAS Data Import

Section 3: Filtering Applicants
Applicant List Manager The List Manager allows users to filter applicants based on the data in
the system.(e.g. Current Status, State of Legal Residence, Gender)
The lists created here can be used in several features of PharmAdMIT(List tab, Quick Local Score Entry, Graphical Drilldown, Custom Export)
To create a new list, click Create New…

Section 3: Filtering Applicants (cont)
The Applicant List Wizard will guide you through the 5 step process of creating lists. Step 1: Static or Dynamic
Should the list update as applicant data changes? Step 2: Add Filters
Create filters to collect the desired applicants. Almost every data field is represented. There are 2 lists, the “Common” list and the “Detailed” list.
Multiple filters may be used. The “AND” operator is assumed, unless an “OR” is between two filters.
Step 3: Review the list Check the results of the filter
Step 4: Public or Private Usable to one or all PharmAdMIT users?
Step 5: Name and Description Name the list so that it can be identified easily in other utilities.

Section 3: Sending E-mail
There are 2 methods for sending e-mail in PharmAdMIT: Personal tab
Send Email: Sends a message to the current applicant List Tab
Send Email to All: Sends a message to the entire list
Note: Letters sent via e-mail are handled separately from standard e-mail messages.
These letters are attached in the Letters tab, or by changing applicant status.

Section 3: Sending E-mail (cont)
The E-mail composer Add CC or BCC groups Add attachments* Send in “plain text” or MS Word-based HTML format Save common messages as templates for re-use Stored in E-mail log
Contact Tab Management Email Log
*Attachments may be regulated by your IT department. If attachments are allowed, file sizes may be limited by local E-mail systems. Check with your IT department before sending large files.
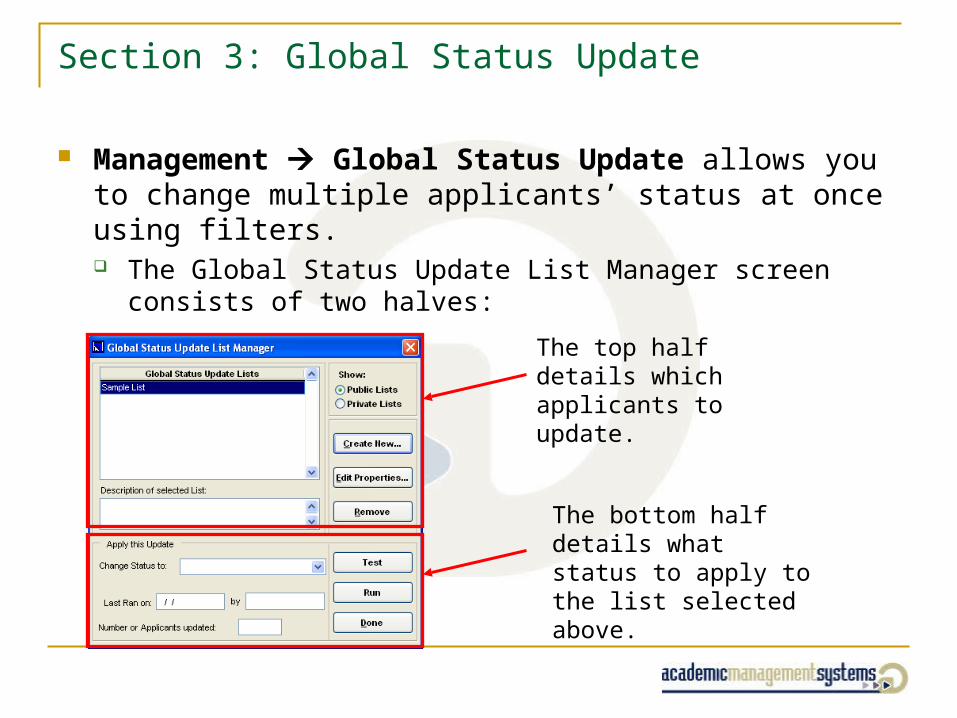
Section 3: Global Status Update
Management Global Status Update allows you to change multiple applicants’ status at once using filters. The Global Status Update List Manager screen consists of two
halves:
The top half details which applicants to update.
The bottom half details what status to apply to the list selected above.

Section 3: Global Status Update
To create a list, click Create New… This will start a list creation wizard utility, identical to the one
used in the List Manager. Follow the Wizard to create your list…

Section 3: Global Status Update
Once your list is created, select it in the Global Status Update Lists
To run the update:
• Click Run
• Always view the list of applicants to make sure it’s correct!
• If everything’s OK, click Commit Changes to make the change.
Once the update is complete, letters linked to the new Current Status will be added to the Output Correspondence Queue (if needed) for each applicant

Section 3: Correspondence Queue
The Correspondence Queue is used to work with letters in batches. Send out multiple e-mail letters
(e.g. letters added by Global Status Update) Remove a letter Print all of your letters at once Re-print letters from “Printed/E-mailed” list
Tip: The correspondence Queue can be used to send/print out large numbers of merge letters at once.
You can also print off a report detailing the letters in the queue, or the letters already sent.
Section 4: Reporting and Exporting
General Reports
Graphical Drilldown Reports
Custom Export

Section 4: Reporting and Exporting
Reporting Generate Pre-formatted reports through the
General Report Writer Generate customized graphs through the
Graphical Drilldown tool

Section 4: General Reports
Output General Reports Pre-built reports Easy to use Filterable

Section 4: General Reports
Output General Reports (cont) Area of Focus = Category of reports.
In most cases “All Applicants” will do.
Report Topic = The report template to be run. Select a report from the dropdown.
Text Report – Click to view options and print/preview the report.
The text report options allow you to change the order of data on the report, or add your own title and comments.

Section 4: Graphical Drilldown
Output Graphical Drilldown
Allows you to “mine” the data by clicking on the bar and selecting the filters real-time.
Hold your mouse over the bar to view the current numbers
Click “Preview” to view a report featuring the graph.
Use the “Current Drill Path” drop down to reset the path.

Section 4: Exporting Data
Exporting Data The Custom Export (Old Style) utility
allows users to export applicant data in 6 formats (.xls, .dbf, .txt, .sdf, .wk1, or .xml)
Use filtered lists to export only the applicants needed Select from a wide array of fields and export only the
data needed. Save settings and formats for re-use.

Section 4: Running a Custom Export
To create a Custom Export: Click Output Custom Export Select an applicant list to export.
(Any list created in Applicant List Manager can be selected here) Select a file type.
(in this case, choose “Excel Spreadsheet (xls)”)
Click Done

Section 4: Running a Custom Export (cont)
In the Custom Export File Setup screen: The fields included are determined by the “Order” column
Order > 0: field included Order = 0: skipped/ignored
Select fields by setting the ordernumber.
Once the fields are selected,click Create Export Fileand save the file.

Section 4: Running a New Custom Export
PharmAdMIT 2008 includes a new, improved Custom Export utility (Custom Export (New)) New ability to select fields as they appear in the Applicant
Information screens
Select the screen tab
with the desired
information
Select fields and
move them into your
export file.

Thank you!
If you have any questions, please contact me!
Christine Ferraraccio
(716) 204-0464 ext. 109
http://www.academicmanagement.com