pharmacy product system national (pps-n) … toolkits/the java... · 2.5.6 server logs and log4j...
TRANSCRIPT
Pharmacy Product System – National (PPS-N)
INSTALLATION GUIDE
Version 1.0.01
January 2014
Department of Veterans Affairs Office of Information and Technology (OIT)
Product Development

ii Pharmacy Product System – National (PPS-N) Version 1.0.01 January 2014
Installation Guide

January 2014 Pharmacy Product System – National (PPS-N) Version 1.0.01 i
Installation Guide
REVISION HISTORY
Date
Version
Description
Author
November 2013
1.0.01
Updated version number to 1.0.01,
updated the PPS-N EAR file name and
the PPSNS MUMPS KIDS file name.
Enterprise Application Maintenance
January 2013
1.0
Updated document to modify formatting
based on NRR Review.
SwRI
December 2012
1.0
No applicable updates for this document
SwRI
November 2012
1.0
Updated section 10.5.1 to include a
reference to other applications updating
the image folder
SwRI
October 2012
1.0
Version 1.0 updates
SwRI
September 2012
1.0
Version 1.0
SwRI

ii Pharmacy Product System – National (PPS-N) Version 1.0.01 January 2014
Installation Guide

January 2014 Pharmacy Product System – National (PPS-N) Version 1.0.01 iii
Installation Guide
TABLE OF CONTENTS
1 INTRODUCTION ........................................................................................................................ 1 1.1 Document Background ................................................................................................................... 1 1.2 Overview ........................................................................................................................................ 1
2 INSTALLATION INSTRUCTIONS .......................................................................................... 2 2.1 Terminology ................................................................................................................................... 3 2.2 Assumptions ................................................................................................................................... 4 2.3 Database Tier Installation ............................................................................................................... 4 2.3.1 Oracle Database (National) ............................................................................................................ 4 2.3.1.1 Oracle Installation .......................................................................................................................... 5 2.3.1.2 Oracle Components ........................................................................................................................ 5 2.3.1.3 Oracle User Creation ...................................................................................................................... 6 2.3.1.4 Oracle Configuration ...................................................................................................................... 7 2.3.1.4.1 Oracle Database Parameters ........................................................................................................... 7 2.3.1.4.2 Oracle Tablespaces ......................................................................................................................... 8 2.3.2 EPL Data Load ............................................................................................................................... 8 2.3.2.1 Dependency Installation ................................................................................................................. 8 2.3.2.1.1 Java SE Development Kit (JDK) Installation ................................................................................. 8 2.3.2.1.2 Apache Ant Installation .................................................................................................................. 9 2.3.2.2 Ant Build Data Load .................................................................................................................... 10 2.3.2.3 SQL Script Data Load (alternative to 2.3.2.2 Ant Build Data Load) ........................................... 11 2.3.3 Post Database Creation / Migration Scripts ................................................................................. 11 2.4 VistA/M System Installation User and Role Installation ............................................................. 12 2.5 WebLogic Installation Instructions .............................................................................................. 14 2.5.1 WebLogic Listen Address ............................................................................................................ 14 2.5.2 Dependency Installation ............................................................................................................... 15 2.5.3 Class Path ..................................................................................................................................... 15 2.5.4 JTA Transaction Timeout ............................................................................................................. 15 2.5.5 JDBC Data Source Configuration ................................................................................................ 18 2.5.6 Server Logs and Log4J configuration .......................................................................................... 24 2.5.6.1 Warning: Application Server’ Disk Space and Log Files ............................................................ 24 2.5.6.1.1 Domain Logging .......................................................................................................................... 25 2.5.6.1.2 Managed Server Logging ............................................................................................................. 26 2.5.6.2 Installation of Log4J ..................................................................................................................... 28 2.5.7 Site Deployment Configuration.................................................................................................... 31 2.5.7.1 Site Number property ................................................................................................................... 31 2.5.7.2 WebLogic Deployment Descriptor .............................................................................................. 32 2.5.7.3 KAAJEE Station Numbers ........................................................................................................... 32 2.5.8 Install SQL Load Script Files ....................................................................................................... 33 2.5.9 Deployment .................................................................................................................................. 34 2.5.10 Installation of FDB_Images ......................................................................................................... 44 2.5.10.1 Deployment of FDB_Images.zip .................................................................................................. 44
3 CHECKLIST .............................................................................................................................. 47 3.1 External Connectivity ................................................................................................................... 47 3.1.1 STS ............................................................................................................................................... 47 3.2 Database Connectivity .................................................................................................................. 47 3.3 Database Population ..................................................................................................................... 47 3.4 Database Permissions ................................................................................................................... 47
iv Pharmacy Product System – National (PPS-N) Version 1.0.01 January 2014
Installation Guide
3.5 Dependent WebLogic Deployments or Configurations ............................................................... 47 3.6 PPS-N Configuration .................................................................................................................... 47 3.7 Site Number.................................................................................................................................. 47
4 FUNCTIONALITY TEST ......................................................................................................... 48 4.1 Assumptions ................................................................................................................................. 48 4.2 Deployment Verification .............................................................................................................. 48
6 BACKOUT PROCEDURES ..................................................................................................... 49
8 PPS-N CONFIGURATION FILE ............................................................................................ 50
9 TROUBLESHOOTING ............................................................................................................. 51 9.1 In an SSL-enabled environment, the application’s responsiveness is extremely slow................. 51

January 2014 Pharmacy Product System – National (PPS-N) Version 1.0.01 v
Installation Guide
LIST OF FIGURES
Figure 3-1. WebLogic Console ..................................................................................................................... 3 Figure 3-2. Security Roles .......................................................................................................................... 13 Figure 3-3. Listen Address .......................................................................................................................... 14 Figure 3-4. Domain Structure .................................................................................................................. 16 Figure 3-5. Settings for PRE ....................................................................................................................... 16 Figure 3-6. JTA Timeout Seconds .............................................................................................................. 17 Figure 3-7. Domain Structure ..................................................................................................................... 18 Figure 3-8. Summary of JDBC Data Sources ............................................................................................. 19 Figure 3-9. JDBC Data Source Properties .................................................................................................. 19 Figure 3-10. Transaction Options ............................................................................................................... 20 Figure 3-11. Connection Properties ............................................................................................................ 21 Figure 3-12. Test Database Connection .................................................................................................. 22 Figure 3-13. Select Targets ......................................................................................................................... 23 Figure 3-14. Summary of JDBC Data Sources ........................................................................................... 23 Figure 3-15. Domain Log File Settings ...................................................................................................... 25 Figure 3-16. Managed Server Log File Settings ......................................................................................... 26 Figure 3-17. Managed Server Advanced Log File Settings ........................................................................ 27 Figure 3-18. Deployments .......................................................................................................................... 34 Figure 3-19. Install Deployment ................................................................................................................. 35 Figure 3-20. Install Application Assistant .................................................................................................. 35 Figure 3-21. Locate Deployment to Install and Prepare for Deployment ................................................... 36 Figure 3-22. Upload a Deployment to the admin server ............................................................................. 37 Figure 3-23. Choose Targeting Style .......................................................................................................... 38 Figure 3-24. Select Deployment Targets .................................................................................................... 39 Figure 3-25. Optional Settings .................................................................................................................... 40 Figure 3-26. Review Your Choices and Click Finish ................................................................................. 41 Figure 3-27. Settings for PRE-1.0-national ................................................................................................ 42 Figure 3-28. Domain Structure ................................................................................................................... 43 Figure 3-29. Summary of Deployments ...................................................................................................... 43 Figure 3-30. Summary of Deployments - PPS-N Deployment Active ....................................................... 44
LIST OF TABLES
Table 3-1. Terminology ................................................................................................................................ 3 Table 3-2. Oracle Users ................................................................................................................................ 6 Table 3-3. PPS-N Tablespaces ...................................................................................................................... 8 Table 3-4. Deployment Location Database Configuration ......................................................................... 18

vi Pharmacy Product System – National (PPS-N) Version 1.0.01 January 2014
Installation Guide

January 2014 Pharmacy Product System – National (PPS-N) Version 1.0.01 1
Installation Guide
1 INTRODUCTION
The information contained in this Pharmacy Product System (PPS) – National (PPS-N) Installation Guide
applies to PPS-N Version 1.0.01.
The purpose of this Installation Guide (IG) is to define the pre-requisites for the PPS-N application to
function, the artifacts that must be deployed and the configuration of those artifacts. The deployable
artifacts associated with this project will be the PPS-N Enterprise Product List (EPL), the PPS-N
deployable Enterprise Archive (EAR) file and the Massachusetts General Hospital Utility Multi-
Programming System (MUMPS) patches that will be deployed on the National Drug File Management
System (NDF MS). Additionally, the documentation associated with this project will discuss the
interfaces to the NDF MS system, the interfaces to the First DataBank (FDB) MedKnowledge
Framework, the interface to the Veterans Enterprise Terminology Service (VETS) system and the
methodology for connecting to the Federal Supply Service (FSS) database. The coding for the NDF MS
system and FDB MedKnowledge Framework interfaces will be done by the contractor. The VETS system
will be maintained by VETS personnel and the FSS database will be maintained by FSS personnel.
1.1 Document Background
This document details the steps required to install and configure the PPS-N v1.0.01 software, the
terminology used for the configuration and deployment of the software, and the assumptions for installing
the software. Additionally, this document details how to install and configure the database environment.
1.2 Overview
The following list provides a brief description of the sections included in this document:
Section 1: Provides introductory material delineating the purpose of the PRE
Initiative and the PPS projects.
Section 2: Presents an overview of the document
Section 3: Presents the installation instructions for PPS-N.
Section 4: Presents functionality tests to confirm that the installation was successful
Text in a Courier New font indicates text, commands, or settings that must be typed, executed, or
configured to complete the installation.

2 Pharmacy Product System – National (PPS-N) Version 1.0.01 January 2014
Installation Guide
2 INSTALLATION INSTRUCTIONS
The following sections detail the steps required to install the PPS-N software. Section 2.1 details the
terminology used for the configuration and deployment of the software. Section 2.2 outlines the
assumptions for installing the software. While the system may be configured to run outside the given
assumptions, doing so requires modifications that are not detailed in this document. Section 2.3 describes
how to install and configure the Oracle databases. Section 3.4 describes installation and configuration of
the VistA patches. Finally, Section 2.5 describes how to install and configure the PPS-N software in
WebLogic.
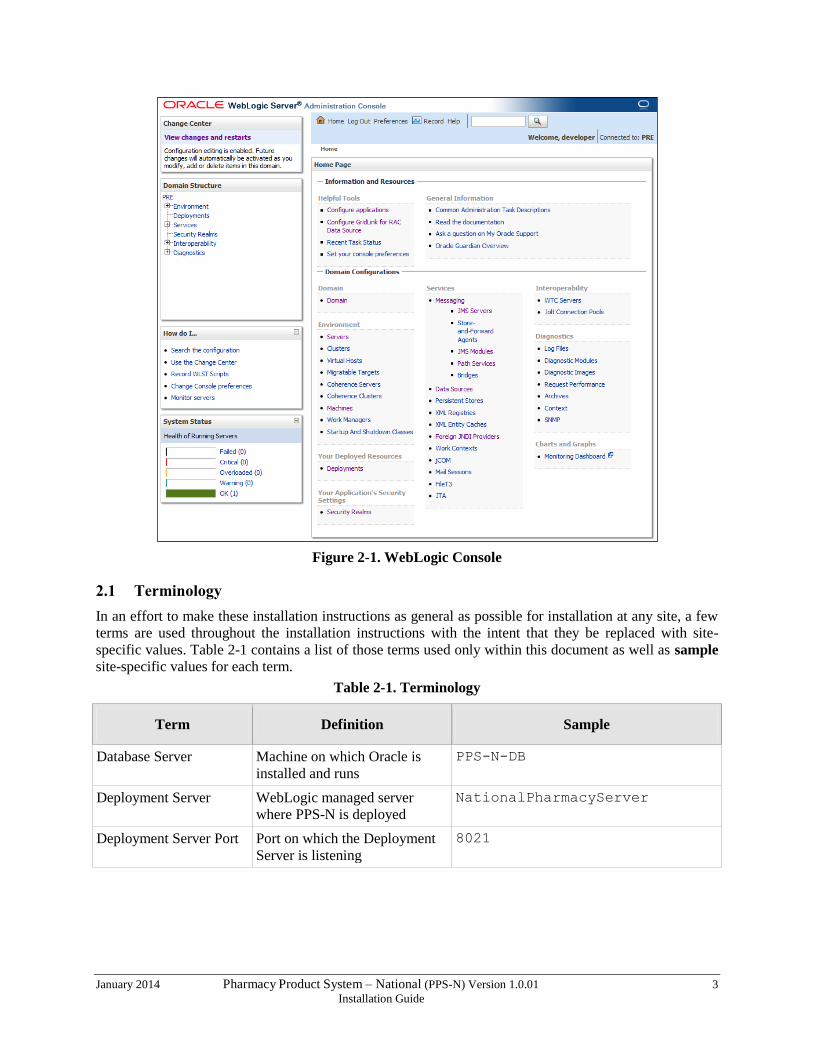
In order to understand the installation and verification process, the reader should be familiar with the
WebLogic console shown in Figure 2-1. The WebLogic console is a Web page viewable from any
Internet browser; however, Internet Explorer, Version 9, is recommended. The WebLogic console is
generally divided into two columns. The left column contains the Change Center, the Domain
Structure, and other informational panels. The right column displays panels containing additional
options or configuration details.
Note: With the exception of the Change Center and Domain Structure, all WebLogic console
panels shown in the figures contained in this document are found in the right column of the WebLogic
console. Whenever examples are given with the text, “For example,” the given value may be different
depending on the specific server configuration. When the text, “For example,” is not provided, the text
supplied must be entered exactly as specified for the PPS-N application to operate properly.
January 2014 Pharmacy Product System – National (PPS-N) Version 1.0.01 3
Installation Guide
Figure 2-1. WebLogic Console
2.1 Terminology
In an effort to make these installation instructions as general as possible for installation at any site, a few
terms are used throughout the installation instructions with the intent that they be replaced with site-
specific values. Table 2-1 contains a list of those terms used only within this document as well as sample
site-specific values for each term.
Table 2-1. Terminology
Term Definition Sample
Database Server Machine on which Oracle is
installed and runs
PPS-N-DB
Deployment Server WebLogic managed server
where PPS-N is deployed
NationalPharmacyServer
Deployment Server Port Port on which the Deployment
Server is listening
8021

4 Pharmacy Product System – National (PPS-N) Version 1.0.01 January 2014
Installation Guide
Term Definition Sample
Deployment Server class
path directory
Folder location on the
Deployment Server where
libraries on the class path are
located (see WebLogic
documentation for instructions
on setting a WebLogic managed
server class path)
/opt/oracle/middleware/domain
s/PRE/lib
Java Database
Connectivity (JDBC)
Universal Resource
Locator (URL)
URL to connect to Oracle
database
jdbc:Oracle://pps-n-
DB:1521/FDB_DIF
2.2 Assumptions
Hardware specifications for PPS-N are found in the PPS-N v1.0 Version Description Document which is
delivered as a companion document to this Installation Guide.
The installation instructions found within this guide are intended to be performed on a clean installation
of WebLogic 10.3.2 (10.3.5 is the latest as of July 2011), with a separate managed server to act as the
Deployment Server. For details on completing the installation of the following items, please refer to each
item’s installation and configuration documentation for WebLogic supplied by Oracle.
For successful deployment of the PPS-N software at a site, the following assumptions must be met:
The Deployment Server is configured and running via the WebLogic Node Manager.
WebLogic is configured to run with the Java Standard Edition Development Kit, Version
1.6.0_16 (or better).
Access to the WebLogic console is by means of any valid administrative user name and
password.
Oracle 11g database driver libraries are present on the class path for the respective Deployment
Servers.
Red Hat Enterprise Linux is properly installed.
Installation instructions are followed in the order presented within this Installation Guide.
2.3 Database Tier Installation
This section describes the operating system and software for the PPS-N Database Tier installation and
configuration. Initially, install and configure the operating system and software according to the
manufacturer’s specifications. Then configure as specified in Section 2.3.1 through Section 2.3.2 for PPS-
to function properly. An Oracle database is implemented at the national level. The installation
instructions in Section 2.3.1 should be carried out by a qualified individual, such as a certified
Database Administrator (DBA).
2.3.1 Oracle Database (National)
The National PPS-N EPL is designed to be operating system independent but these installation
instructions have been tested only on the Red Hat Linux operating system. Oracle 11g Enterprise Edition

January 2014 Pharmacy Product System – National (PPS-N) Version 1.0.01 5
Installation Guide
Release 11.2.0.n – Production must be properly installed and configured. The following sections describe
the installation, features, user creation, and configuration for the Oracle database.
2.3.1.1 Oracle Installation
A proper installation of the Oracle Relational Database Management System (RDBMS) is one in which
the Oracle Universal Installer was used to perform an error-free installation and a general purpose
instance was created. A properly configured Oracle RDBMS is one in which the associated Oracle
application development and configuration tools, namely SQL*Plus and Oracle Enterprise Manager, can
be used to connect to the instance through Transparent Network Substrate alias.
2.3.1.2 Oracle Components
During the installation of Oracle, described in the Oracle 11g Quick Installation Guide, several
components are selected for optional installation, as listed below. Given the platform independent nature
of these installation instructions for the database, platform dependent components are not listed here.
Instead, generic features and functions of the Oracle 11g database are identified.
The following features are required by the PPS-N system:
Procedural Language/Structured Query Language (PL/SQL) Native Compilation
PL/SQL API to LDAP – DBMS_LDAP
The following additional features have been tested with the PPS-N system:
Fail Safe
Integrated Clusterware
Automatic Workload Management
Password Management
Comprehensive eXtensible Markup Language (XML) Support in the Database
Enterprise Manager
Automatic Memory Management
Automatic Storage Management
Automatic Undo Management
Server Managed Backup and Recovery
The following features are not required and were not tested with the PPS-N system:
Flashback Query
Table, Database, and Transaction Query
Data Guard
Java Native Compilation
Encryption Toolkit
Virtual Private Database
Fine Grained Auditing
Java Support
JDBC Drivers on server
PL/SQL Server Pages
Java Server Pages

6 Pharmacy Product System – National (PPS-N) Version 1.0.01 January 2014
Installation Guide
COM (Component Object Model) Automation
Microsoft Transaction Server/COM+ Integration
Open Database Connectivity (ODBC) DB on server
Object Linking and Embedding, Database (OLE DB) on server
Data Compression
Transportable Tablespaces
Star Query Optimization
Summary Management
Materialized View Query Rewrite
Oracle Streams
Advanced Queuing
Workflow
Distributed Queries
Distributed Transactions
Database Workspace Management
Ultra Search
interMedia
Text
Oracle Analytic Functions
Demonstration Files
The following functions are not required and were not tested with the PPS-N system:
Replication
Materialized Views
Remote Authentication
Quotas
Profiles
Resource Plans
Stored Outlines
2.3.1.3 Oracle User Creation
Two users must be created within the Oracle database to support PPS-N. Table 2-2 presents example
username and password for each Oracle user. Note that user names and passwords used must match
exactly those used to configure the JDBC data sources in Section 2.5.4; these are only sample values.
Table 2-2. Oracle Users
Username Password
PPSNEPL pharmacy
FDB_DIF FDB_DIF123

January 2014 Pharmacy Product System – National (PPS-N) Version 1.0.01 7
Installation Guide
The PPSNEPL user will be the owner of the PPS-N schema. The FDB_DIF user will be the owner of the
FDB_DIF schema.
Both users must have the following roles and privileges:
CONNECT
RESOURCE
CREATE SESSION
CREATE VIEW
SELECT_CATALOG_ROLE
UNLIMITED TABLESPACE
2.3.1.4 Oracle Configuration
The PPS-N Oracle Database is the primary data repository for the PPS-N application on the National
PPS-N instance. The database should be installed and configured appropriately for the PPS-N operating
environment.
Two schemas must be created. If not already installed, the FDB_DIF schema can be created by running a
script, provided with the First DataBank software. Upon creation, the tables may be populated using First
DataBank Data Updater Installation. Update instructions are available in the FDB Data Updater Software
Users Guide.
The EPL schema must also be created in the database instance. The EPL table creation and population
scripts are run from a separate process. For instructions on loading the EPL data, refer to Section 2.3.2.
2.3.1.4.1 Oracle Database Parameters
The following Oracle database parameters are required for the PPS-N application:
NLS Language = American
NLS Territory = America
Character Set = AL32UTF8

8 Pharmacy Product System – National (PPS-N) Version 1.0.01 January 2014
Installation Guide
2.3.1.4.2 Oracle Tablespaces
The PPS-N application data is contained in two tablespaces. The size of each tablespace is shown in Table
2-3.
Table 2-3. PPS-N Tablespaces
Tablespace Name Size (MB)
TEMP 188
USERS 3,000
2.3.2 EPL Data Load
The following instructions should be followed to install the base EPL Data Load. Prior to following any
of the installation instructions, the dependencies in Section 2.3.2.1 must be installed. After the
dependencies have been installed, follow the instructions in Section 2.3.2.2 to load the data using the Ant
build.
2.3.2.1 Dependency Installation
Two other software packages must be installed prior to loading the EPL data.
Prior to installing the dependencies, follow these steps:
1. Copy the PPSN-1_SourceCode.zip file to the chosen target folder. The file is located on the
disk distributed with the Version Description Document. No particular location is required.
2. Unzip the file.
This will create the following folder structure: PS_PPS_Bld\PS_PPS_bld
PS_PPS_Bld\PS_PPS_lib
PS_PPS_Dev\PS_PPS_common
PS_PPS_Dev\PS_PPS_interface
PS_PPS_Dev\PS_PPS_domain
PS_PPS_Dev\PS_PPS_srv
PS_PPS_Dev\PS_PPS_ui
The PS_PPS_Dev\PS_PPS_domain folder contains the files necessary to create and load the EPL
tables.
2.3.2.1.1 Java SE Development Kit (JDK) Installation
Java SE Development Kit (JDK) Version 1.6.0_16 or greater, must be installed prior to loading the PPS-
N EPL data load. PPS-N was tested with the current JDK release (as of July 2011), 1.6.0_26. Please
follow the installation instructions provided by Sun to complete the installation. For the Microsoft
Windows operating system, refer to http://java.sun.com/javase/6/webnotes/install/jdk/install-
windows.html; for the Linux operating system, refer to
http://java.sun.com/javase/6/webnotes/install/jdk/install-linux.html. Once complete, this new installation
of Java must be set as the default Java distribution (i.e., the installation folder must be set as
JAVA_HOME).

January 2014 Pharmacy Product System – National (PPS-N) Version 1.0.01 9
Installation Guide
2.3.2.1.2 Apache Ant Installation
Apache Ant, version 1.7.1, must be installed prior to loading the PPS-N EPL data load. Please follow the
installation instructions provided by Apache at http://ant.apache.org/manual/install.html. Once complete,
a user must be able to execute Ant by typing ant at the command line from any folder on the system
(i.e., Ant’s bin folder must be on the system’s path).

10 Pharmacy Product System – National (PPS-N) Version 1.0.01 January 2014
Installation Guide
2.3.2.2 Ant Build Data Load
Please complete these steps to load the PPS-N data. Alternatively, you can skip this section and use the
instructions in section 2.3.2.3 to load data.
1. Navigate to the folder where the PPSN-1_SourceCode.zip file was extracted.
2. Navigate to the PS_PPS_Dev/PS_PPS_common/etc/build/template/properties folder.
3. Open the project.properties file for editing.
4. Change the deploy.environment attribute’s value to dataload. For example:
deploy.environment=dataload
5. Save the changes and close the project.properties file.
6. Navigate to the PS_PPS_Dev/PS_PPS_common/etc/build/template/properties/deploy
folder.
7. Open the dataload.properties file for editing.
8. Change the local.hosts attribute value to an empty value. For example: local.hosts=
This prevents the dataload from attempting to load the Local data, which is not applicable at this time.
9. Change the nationalserver.database.url.host attribute value to the hostname of the
database server. The default value is localhost. For example: nationalserver.database.url.host=localhost
This value pertains to the attribute key names for the user, password and schema in the next step.
10. Change all attribute key names of localhost under the nationalserver properties section to the
name of the database server used in step 9. For example: localhost.EPLN.user=ppsnepl
should change to <database>.EPLN.user=ppsnepl, localhost.EPLN.password
becomes <database>.EPLN.password and localhost.EPLN.schema becomes
<database>.EPLN.schema.
11. With respect to the previous step (which may have changed the key names to something other
than localhost), change localhost.EPLN.user, localhost.EPLN.password and
localhost.EPLN.schema attribute values to the correct values for the National PPS-N
database. For example: localhost.EPLN.user=ppsnepl and
localhost.EPLN.password=pharmacy.
12. If the database name used on the install was not EPLN, change the
nationalserver.national.database.names attribute value to the name of the
National EPL database. For example:
nationalserver.national.database.names=EPLN
Ensure all instances of “EPLN” occurring within key names of step 10 are also changed. For
example, if step 10 changed localhost to dbserver and this step changed EPLN to
EPLNAT, the following would be the final result:

January 2014 Pharmacy Product System – National (PPS-N) Version 1.0.01 11
Installation Guide
dbserver.EPLNAT.user=ppsnepl
dbserver.EPLNAT.password=pharmacy
dbserver.EPLNAT.schema=ppsnepl
13. Save the changes and close the dataload.properties file.
14. Navigate to the PS_PPS_Dev/PS_PPS_domain/etc/build/template/properties
folder.
15. Open the oracle.properties file for editing.
16. If the port on which Oracle is listening is not port 1521, change the database.url.port
attribute value to the correct port. For example: database.url.port=1522
17. Save the changes and close the oracle.properties file.
18. Navigate to the PS_PPS_Dev/PS_PPS_domain folder.
19. Run the ant build target desired.
refreshDatabase – Refresh the database with data used for non-migration test
procedures.
command: ant refreshDatabase
After the build completes, the current PPS-N EPL database instance has both its tables created and data
loaded.
2.3.2.3 SQL Script Data Load (alternative to 2.3.2.2 Ant Build Data Load)
As an alternative, you may load the database with the following SQL scripts found in
PPSNEPLRefreshDb-1.zip archive. Please use an appropriate database client (e.g. TOAD,
SQL*Plus, etc.) to execute these scripts. The order of execution is required:
1. NationalEPL.ddl
2. NationalEPL-FK.ddl
3. PPSNEPLRefreshDB15.sql
2.3.3 Post Database Creation / Migration Scripts
The following scripts will need to be run after table creation and data population. These scripts require
logging in to the database using an account that has SYS_DBA privileges.
This script also needs to be run after each Migration done from within the application.
1. Login to the SQL client using a database account that has SYS_DBA privileges
2. Execute the script below (also available in the SQL script archive: PPSNEPLRefreshDb-
1.zip)
--Script to create the PPSNEPL_READ_ONLY role.
--Provides read only access to PPSNEPL schema objects.
DROP ROLE PPSNEPL_READ_ONLY_ROLE;
CREATE ROLE PPSNEPL_READ_ONLY_ROLE NOT IDENTIFIED;
--suppress display of messages for building command file
SET TERM OFF

12 Pharmacy Product System – National (PPS-N) Version 1.0.01 January 2014
Installation Guide
SET ECHO OFF
SET HEADING OFF
SET FEEDBACK OFF
SET PAGESIZE 0
SET LINESIZE 1000
SET VERIFY OFF
spool grant_PPSN_read_only_role.sql
SELECT 'GRANT SELECT ON PPSNEPL.' || TABLE_NAME|| ' TO
PPSNEPL_READ_ONLY_ROLE; ' FROM ALL_TABLES WHERE OWNER ='PPSNEPL';
spool off
--reset display of messages for verification
SET TERM ON
SET ECHO ON
SET HEADING ON
SET FEEDBACK ON
SET PAGESIZE 300
SET VERIFY ON
spool grant_PPSN_read_only_role.log
start grant_PPSN_read_only_role.sql
GRANT PPSNEPL_READ_ONLY_ROLE TO SYSTEM WITH ADMIN OPTION;
spool off
3. This process creates and executes the file grant_PPSN_read_only_role.sql. This will
ensure that all necessary privileges are granted to the read-only role.
4. Open the grant_PPSN_read_only_role.log file and search the log file for any errors.
5. Execute the script below which will create the user and assign the required roles. The script is
also available in the SQL script archive, PPSNEPLRefreshDb-1.zip.
DROP USER PPSNEPL_READ_ONLY CASCADE;
CREATE USER PPSNEPL_READ_ONLY
IDENTIFIED BY PPSNEPL_READ_ONLY123
DEFAULT TABLESPACE USERS
TEMPORARY TABLESPACE TEMP
PROFILE DEFAULT
ACCOUNT UNLOCK;
-- 3 Roles for PPSNEPL_READ_ONLY
GRANT CONNECT TO PPSNEPL_READ_ONLY;
GRANT PPSNEPL_READ_ONLY_ROLE TO PPSNEPL_READ_ONLY;
GRANT FDB_DIF_READ_ONLY_ROLE TO PPSNEPL_READ_ONLY;
ALTER USER PPSNEPL_READ_ONLY DEFAULT ROLE ALL;
-- 1 Tablespace Quota for PPSNEPL_READ_ONLY
ALTER USER PPSNEPL_READ_ONLY QUOTA UNLIMITED ON USERS;
6. View screen output for any errors
2.4 VistA/M System Installation User and Role Installation
This section details the steps required to install patches, add users, assign roles, and install remote
procedure calls (RPCs) to the PPS-N VistA instance. For this code release, a user, for example one with
an access code of PNM1N1, with the ‘PSS_PPSN_MANAGER’ key and a user, for example one with an
access code of PMM1N1, with the ‘PSS_PPSN_MIGRATOR’ key are required. The following figure

January 2014 Pharmacy Product System – National (PPS-N) Version 1.0.01 13
Installation Guide
details the security role keys used within and recognized by this application. Please note prior “PEPS”
security role keys have been removed and are no longer recognized.
Security Role Keys
PSS_PPSN_SUPERVISOR
PSS_PPSN_MANAGER
PSS_PPSN_VIEWER
PSS_PPSN_SECOND_APPROVER
PSS_PPSN_MIGRATOR
Figure 2-2. Security Roles
PPS-N has two M patches, PPSN_11_15.KID (Migration) and PPSNS_11_16.KID
(Synchronization), which include versions of the migration and synchronization RPC code. These KIDS
patches need to be loaded and installed on the NDF server using the standard Kernel Installation &
Distribution Systems Option in the System Manager menu. After the PPSN_11_15.KID patch is
loaded, the PPSN*1.1*15 package can be installed. After the PPSNS_11_16.KID patch is loaded, the
PPSNS*1.1*16 package can be installed.
VistALink 1.6 must be installed on the NDF. See the VistALink documentation for installing VistALink.
Once installed, VistALink can be started using the D EN^XOBUM command. Once VistALink is
running, the listener must be started using the SL (Start Listener) option. If VistALink is already running,
the listener can be started using the Foundations Management menu found in the Operations Management
menu. If a connection proxy has not been specified for VistALink, the NPF CONNECTOR PROXY can
be specified using the CP (Enter/Edit Connector Proxy User) option on the Foundations Management
menu. Creating the Connector Proxy User via the Foundations Management menu should ensure that the
Connector Proxy User has the correct properties.
This release contains 3 Remote Procedure Calls “PPS NDFMS MIGR RPC”, “PPS NDFMS MIGR
SYNC” and “PPS NDFMS SYNC”. If not already in the XOBV VISTALINK TESTER option, these
RPCs must be added to the XOBV VISTALINK TESTER option. The RPCs can be added to the XOBV
VISTALINK TESTER option by using the FILEMAN ENTER OR EDIT FILE ENTRIES command to
modify the XOBV VISTALINK TESTER entry in the OPTION file by adding the options at the “Select
RPC” prompt (RPCKEY and RULES can be defaulted to null).
The PPS proxy user, for example PPUSER, APPLICATION PROXY, must have the XOBV
VISTALINK TESTER option as a secondary menu option. The XOBV VISTALINK TESTER option can
be added as a secondary menu option by using the FILEMAN ENTER OR EDIT FILE ENTRIES
command to modify the NEW PERSON entry for the PPS proxy user by adding XOBV VISTALINK
TESTER at the “Select SECONDARY MENU OPTIONS” prompt.
A line must be included in the /opt/oracle/middleware/domains/PRE/CommonServices/VL-1.6/
gov.va.med.vistalink.connectorConfig.xml file on the WebLogic server with the IP address and port of
the VistALink listener (selectable when the Listener is turned on); the primary station ID of the NDF; the
access and verify codes for the user being used for the connection, for example the XOBV VISTALINK
TESTER; and other information necessary for the connection to be made to the VistALink listener in the
NDF.
The DUZ and division of the PPS-N PROXY USER (the system user account capable of accessing the
RPC), the division where that user exists, the connection specification to be used (for example DUZ) and
14 Pharmacy Product System – National (PPS-N) Version 1.0.01 January 2014
Installation Guide
the RPC timeout (for example 60 seconds) must be entered into the PPS-NConfig.xml in the
…/domains/PRE/config directory on the WebLogic server. The configuration file is shown in Section 8
2.5 WebLogic Installation Instructions
This section details the steps required to configure and deploy PPS-N onto WebLogic.
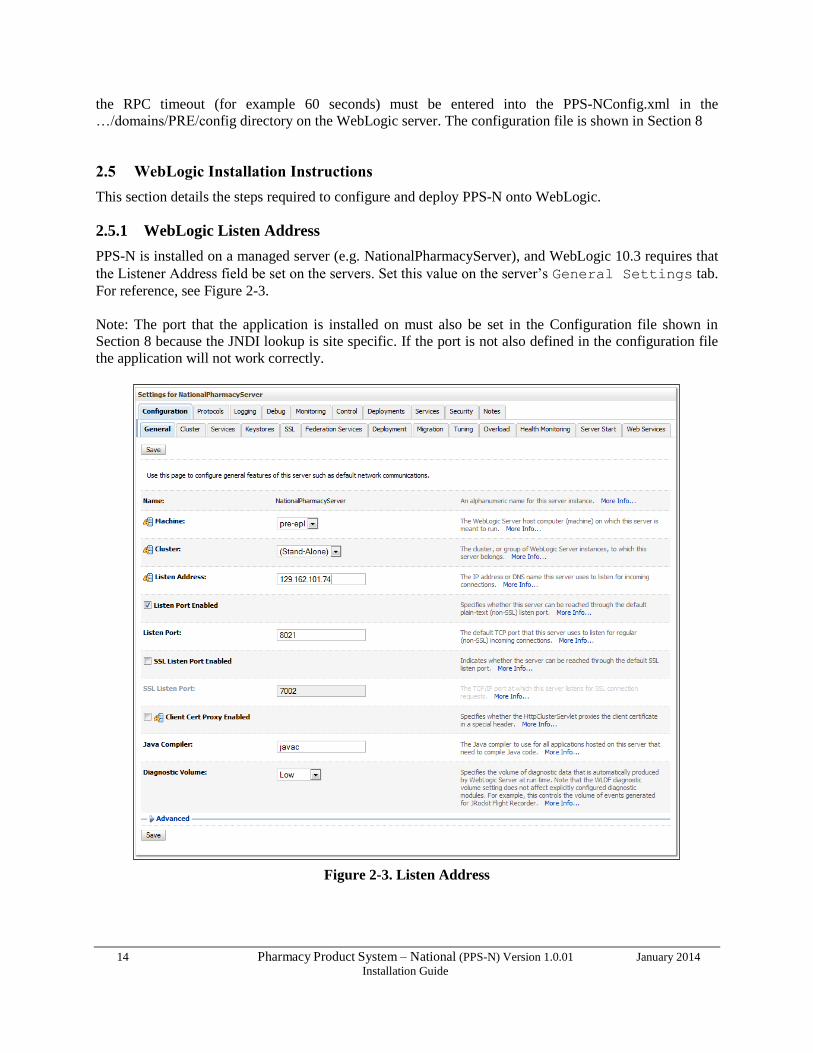
2.5.1 WebLogic Listen Address
PPS-N is installed on a managed server (e.g. NationalPharmacyServer), and WebLogic 10.3 requires that
the Listener Address field be set on the servers. Set this value on the server’s General Settings tab.
For reference, see Figure 2-3.
Note: The port that the application is installed on must also be set in the Configuration file shown in
Section 8 because the JNDI lookup is site specific. If the port is not also defined in the configuration file
the application will not work correctly.
Figure 2-3. Listen Address
January 2014 Pharmacy Product System – National (PPS-N) Version 1.0.01 15
Installation Guide
2.5.2 Dependency Installation
VistALink, Version 1.6.0.028 and KAAJEE Security Provider, Version 1.1.0.002 software packages must
be installed prior to deployment of PPS-N on to WebLogic. Follow the respective installation guides
supplied by the VA for this software prior to continuing with the PPS-N installation.
2.5.3 Class Path
In order for the JDBC data sources to be added to the WebLogic configuration, the JDBC driver must first
be added to the Deployment Server’s class path. Use the JDBC driver provided within the Oracle
distributions and the WebLogic documentation provided by Oracle (formerly BEA) to add the driver to
the class path.
Important: Third-party database drivers, e.g. JDBC drivers for MS SQL Server from Microsoft, will
need to be deployed onto the WebLogic server’s classpath, ${WL_HOME}/server/lib. Additionally,
any such third-party drivers will also need to be prepended to the WEBLOGIC_CLASSPATH variable
definition in the ${WL_HOME}/common/bin/commEnv.sh file. E.g.
“WEBLOGIC_CLASSPATH=”${WL_HOME}/server/lib/sqljdbc4.jar${CLASSPATHSEP}
……(rest of definition).” Any modification here requires the entire WebLogic server system to be
restarted. E.g. AdminServer and any Managed Servers.
The MS SQLServer JDBC driver can be extracted from the application, o PPS-1.0.01-national.ear\lib\database\sqljdbc4.jar
o Or from the source zip file: Common\lib\database\sqljdbc4.jar
The PPS-N EAR file contains all the remaining required libraries for the proper functioning of the
application. If any other applications have been deployed to the Deployment Server, there may be
conflicting third-party libraries in the Deployment Server’s class path directories that will cause the PPS-
N application to operate differently than expected. If versions on the Deployment Server’s class path
differ from those defined in the PPS-N 1.0 Version Description Document, then the preferred solution
would be to remove the library from the Deployment Server’s class path. If that is not possible, replace
the libraries with the PPS-N versions.
Two JAXB version 2.1.10 libraries must be at the very beginning of the class path due to PPS-N
incompatibility with the JAXB version bundled with WebLogic, JAXB version 2.1.9. The jaxb-api.jar
and jaxb-impl.jar files are available within the PPS-N EAR. These JAR files must come before any
WebLogic JAR files, as the classes found within the JAR files supersede the original WebLogic supplied
classes. The JAR files include JAXB bug fixes required for PPS-N to function properly, particularly
https://jaxb.dev.java.net/issues/show_bug.cgi?id=565.
2.5.4 JTA Transaction Timeout
The default WebLogic Java Transaction API (JTA) timeout is 30 seconds. This time is sufficient for all
transactions in PPS-N, with the exception of the FDB DIF update process, which can take several
minutes. Follow the instructions below to set the JTA timeout to 600 seconds, or 10 minutes. If the
migration database refresh scripts transaction times out even after ten minutes, additional time can be
allotted to the timeout setting by following the same process.
Perform the following instructions for each WebLogic domain where PPS-N will be deployed.
1. Open and log into the WebLogic console, using an administrative user name and password. The
WebLogic console is located at: http://<Deployment Machine>:7001/console.
16 Pharmacy Product System – National (PPS-N) Version 1.0.01 January 2014
Installation Guide
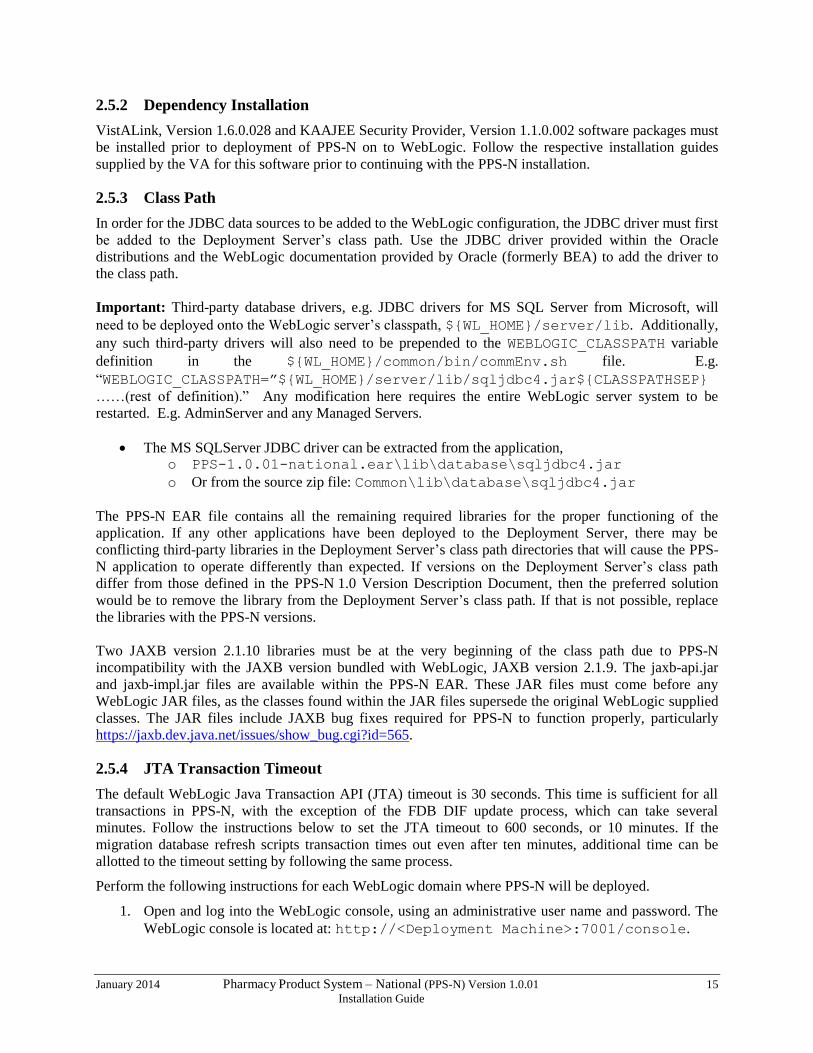
3. Within the Domain Structure panel found in the left column of the WebLogic console, click
on the WebLogic domain’s node. In Figure 2-5, the WebLogic domain is named PRE.
Figure 2-4. Domain Structure
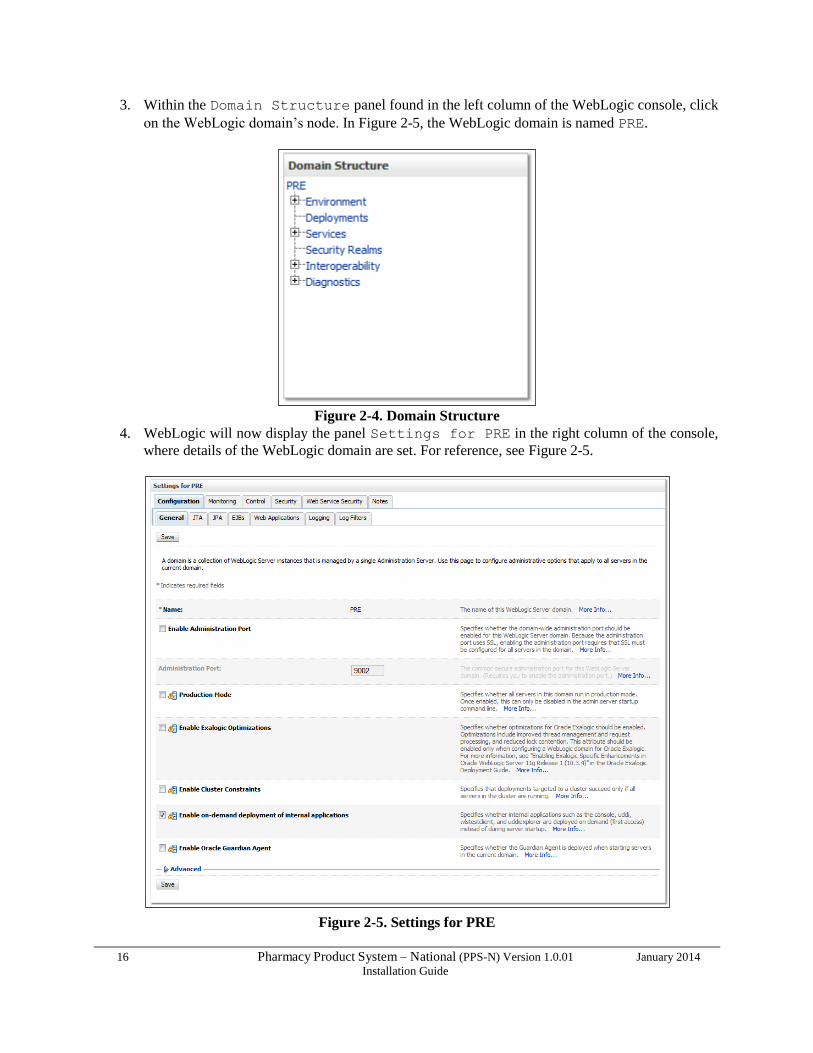
4. WebLogic will now display the panel Settings for PRE in the right column of the console,
where details of the WebLogic domain are set. For reference, see Figure 2-5.
Figure 2-5. Settings for PRE

January 2014 Pharmacy Product System – National (PPS-N) Version 1.0.01 17
Installation Guide
5. Select the JTA tab.
6. WebLogic will now display the panel Settings for PRE in the right column of the console.
Within the panel is JTA within the Configuration tab, where the JTA timeout will be
configured. For reference, see Figure 2-6.
Figure 2-6. JTA Timeout Seconds
7. For the Timeout Seconds, type 600. Please note this has changed since interim release 1.0.5
8. Click Save
18 Pharmacy Product System – National (PPS-N) Version 1.0.01 January 2014
Installation Guide
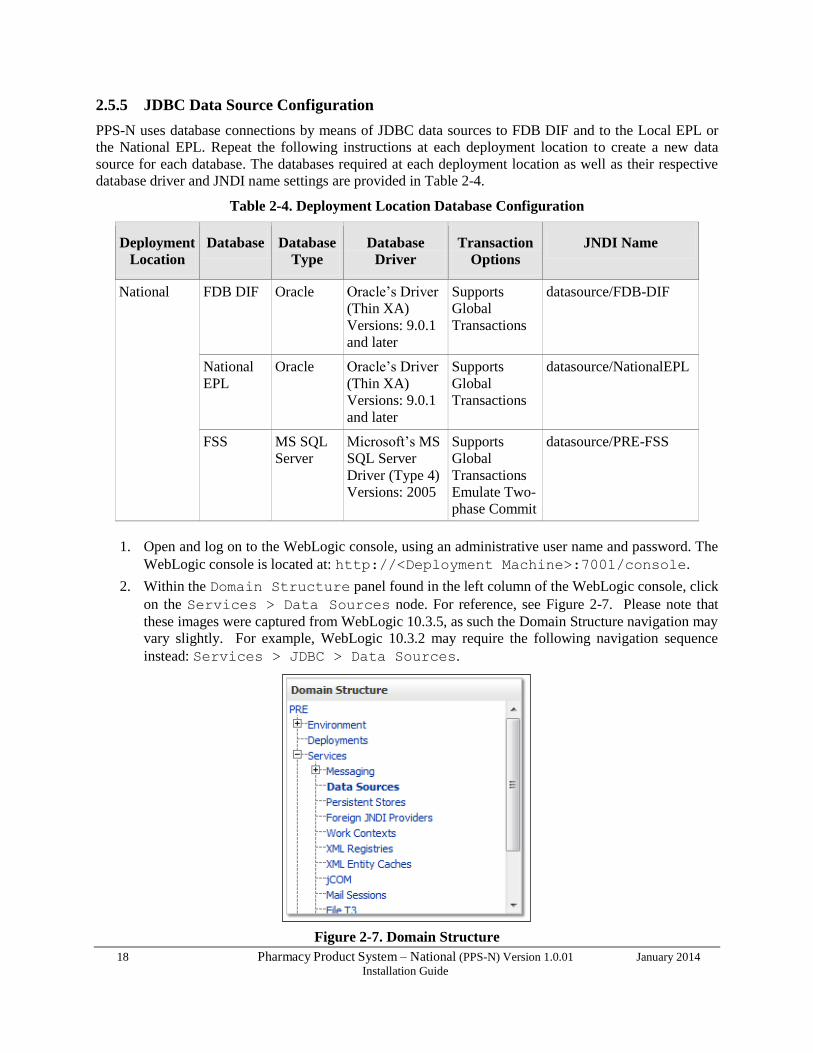
2.5.5 JDBC Data Source Configuration
PPS-N uses database connections by means of JDBC data sources to FDB DIF and to the Local EPL or
the National EPL. Repeat the following instructions at each deployment location to create a new data
source for each database. The databases required at each deployment location as well as their respective
database driver and JNDI name settings are provided in Table 2-4.
Table 2-4. Deployment Location Database Configuration
Deployment
Location
Database Database
Type
Database
Driver
Transaction
Options
JNDI Name
National FDB DIF Oracle Oracle’s Driver
(Thin XA)
Versions: 9.0.1
and later
Supports
Global
Transactions
datasource/FDB-DIF
National
EPL
Oracle Oracle’s Driver
(Thin XA)
Versions: 9.0.1
and later
Supports
Global
Transactions
datasource/NationalEPL
FSS MS SQL
Server
Microsoft’s MS
SQL Server
Driver (Type 4)
Versions: 2005
Supports
Global
Transactions
Emulate Two-
phase Commit
datasource/PRE-FSS
1. Open and log on to the WebLogic console, using an administrative user name and password. The
WebLogic console is located at: http://<Deployment Machine>:7001/console.
2. Within the Domain Structure panel found in the left column of the WebLogic console, click
on the Services > Data Sources node. For reference, see Figure 2-7. Please note that
these images were captured from WebLogic 10.3.5, as such the Domain Structure navigation may
vary slightly. For example, WebLogic 10.3.2 may require the following navigation sequence
instead: Services > JDBC > Data Sources.
Figure 2-7. Domain Structure

January 2014 Pharmacy Product System – National (PPS-N) Version 1.0.01 19
Installation Guide
4. Click New in the Summary of JDBC Data Sources panel found in the right column of the
WebLogic console and choose Generic Datasource from the drop down list. For reference,
see Figure 2-8.
Figure 2-8. Summary of JDBC Data Sources
5. WebLogic will now display the panel Create a New JDBC Data Source in the right
column of the console, where details of the new data source are set. For reference, see Figure 2-9.
Figure 2-9. JDBC Data Source Properties
6. For the Name, type a unique name. For example, FDB-DIF.

20 Pharmacy Product System – National (PPS-N) Version 1.0.01 January 2014
Installation Guide
7. For the JNDI Name, type the appropriate JNDI found in Figure 2-9. For example,
datasource/FDB-DIF.
8. For the Database Type, select the appropriate type found in Table 2-4. For example,
Oracle.
9. Click Next.
10. For the Database Driver, verify that the correct driver is selected as found in Table 2-4. For
example, Oracle’s Driver (Thin XA) Version: 9.0.1 and later.
11. Click Next.
12. WebLogic will now display the panel Transaction Options in the right column of the
console, where the transaction information for this data source is displayed. For reference, see
Figure 2-10.
Figure 2-10. Transaction Options
13. Click Next.
January 2014 Pharmacy Product System – National (PPS-N) Version 1.0.01 21
Installation Guide
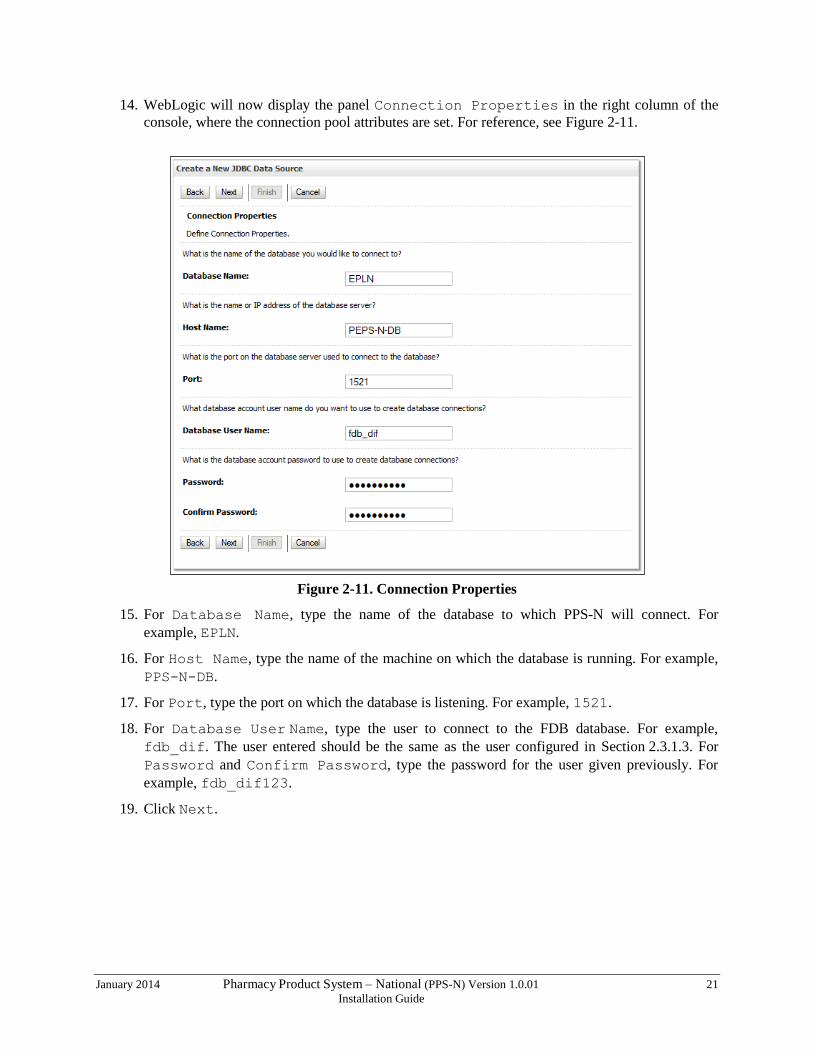
14. WebLogic will now display the panel Connection Properties in the right column of the
console, where the connection pool attributes are set. For reference, see Figure 2-11.
Figure 2-11. Connection Properties
15. For Database Name, type the name of the database to which PPS-N will connect. For
example, EPLN.
16. For Host Name, type the name of the machine on which the database is running. For example,
PPS-N-DB.
17. For Port, type the port on which the database is listening. For example, 1521.
18. For Database User Name, type the user to connect to the FDB database. For example,
fdb_dif. The user entered should be the same as the user configured in Section 2.3.1.3. For
Password and Confirm Password, type the password for the user given previously. For
example, fdb_dif123.
19. Click Next.
22 Pharmacy Product System – National (PPS-N) Version 1.0.01 January 2014
Installation Guide
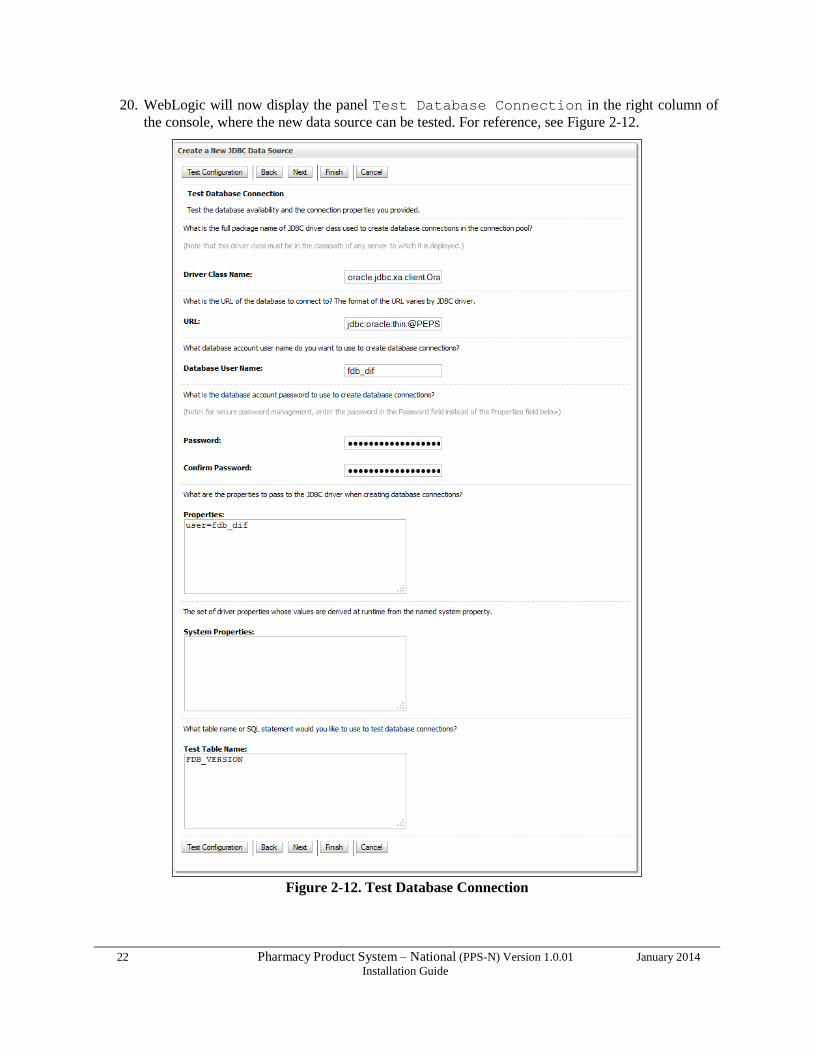
20. WebLogic will now display the panel Test Database Connection in the right column of
the console, where the new data source can be tested. For reference, see Figure 2-12.
Figure 2-12. Test Database Connection

January 2014 Pharmacy Product System – National (PPS-N) Version 1.0.01 23
Installation Guide
21. Leave all values as set by default, with the exception of Test Table Name. For FDB DIF
databases, type fdb_version. For EPL databases, type epl_products.
22. For the FSS datasource, you will be connecting to an MS SQL Server database, so items listed in
Figure 2-12. Test Database Connection will be slightly different and require changing to the
following:
URL: jdbc:sqlserver://hostname:1433
Driver Class Name: com.microsoft.sqlserver.jdbc.SQLServerDriver
Test Table Name: DI_DRUGITEMNDC
23. Click Next.
24. WebLogic will now display the panel Select Targets in the right column of the console,
where the target server is selected for the new data source. For reference, see Figure 2-13.
Figure 2-13. Select Targets
25. Select the Deployment Server as the target. For example, NationalPharmacyServer.
26. Click Finish.
27. WebLogic will now display the panel Summary of JDBC Data Sources in the right
column of the console, where the newly created data source is displayed. See Figure 2-14.
Figure 2-14. Summary of JDBC Data Sources

24 Pharmacy Product System – National (PPS-N) Version 1.0.01 January 2014
Installation Guide
28. On these summary page, click on the JDBC source that was just created. Click on the
Connection Pool tab. The Maximum Capacity value is likely set to 15 by default; adjust this
value to what is appropriate for the environment. A recommended value of 30 (or more) for
NationalEPL, FDB-DIF, and FSS should be sufficient for most cases.
29. After completing the previous steps, remember to repeat all the steps for each database listed in
Table 2-4.
2.5.6 Server Logs and Log4J configuration
PPS-N uses Log4j to provide debug and error logs. Although the application will function without Log4j
installed, using it can be helpful to troubleshoot potential issues. Because PPS-N can operate without
Log4j configured, all instructions within this section are only required if debugging deployed code.
If the installation of Log4j is desired, the Java Archive (JAR) file can be found within the PPS-N EAR, or
it can be downloaded from the Internet. Please refer to the PPS-N 1.0 Version Description Document for
the version required.
2.5.6.1 Warning: Application Server’ Disk Space and Log Files
Due to the sheer volume of log statements issued by the application, the log files can become very large in
a very short amount of time. In order to prevent the loss of log information, it is advisable that the
application server’s logging feature(s) be configured to “rollover” log files at 10MB and at restart with
retention [of older logs] set to 10 or less. Failure to observe this may result in the application behaving in
an unexpected, sluggish or error-prone manner as the log files can fill up the disk partition which may in
turn inhibit correct functionality of the server and/or the application.
Additionally, WebLogic has “standard out” log files for each server. This file does not get rotated. If
the log4j.xml configuration file has a “ConsoleAppender” and at least one logger that utilize this
appender, these log statements will be directed to the server’s out file, e.g.
domain/servers/NationalPharmacyServer/logs/NationalPharmacyServer.out.
It is absolutely critical to ensure that an appender reference to a ConsoleAppender is not listed in the
<root> section of the log4j.xml file, this can cause the “standard out” log file to grow at an
exceedingly fast rate.
A log4j.xml configuration that does not use a Console appender will produce no additional output to the
“standard out” log file.

January 2014 Pharmacy Product System – National (PPS-N) Version 1.0.01 25
Installation Guide
2.5.6.1.1 Domain Logging
Domain-level logging should have a limited number of retained files, and set rotation size as well.
Figure 2-15. Domain Log File Settings

26 Pharmacy Product System – National (PPS-N) Version 1.0.01 January 2014
Installation Guide
2.5.6.1.2 Managed Server Logging
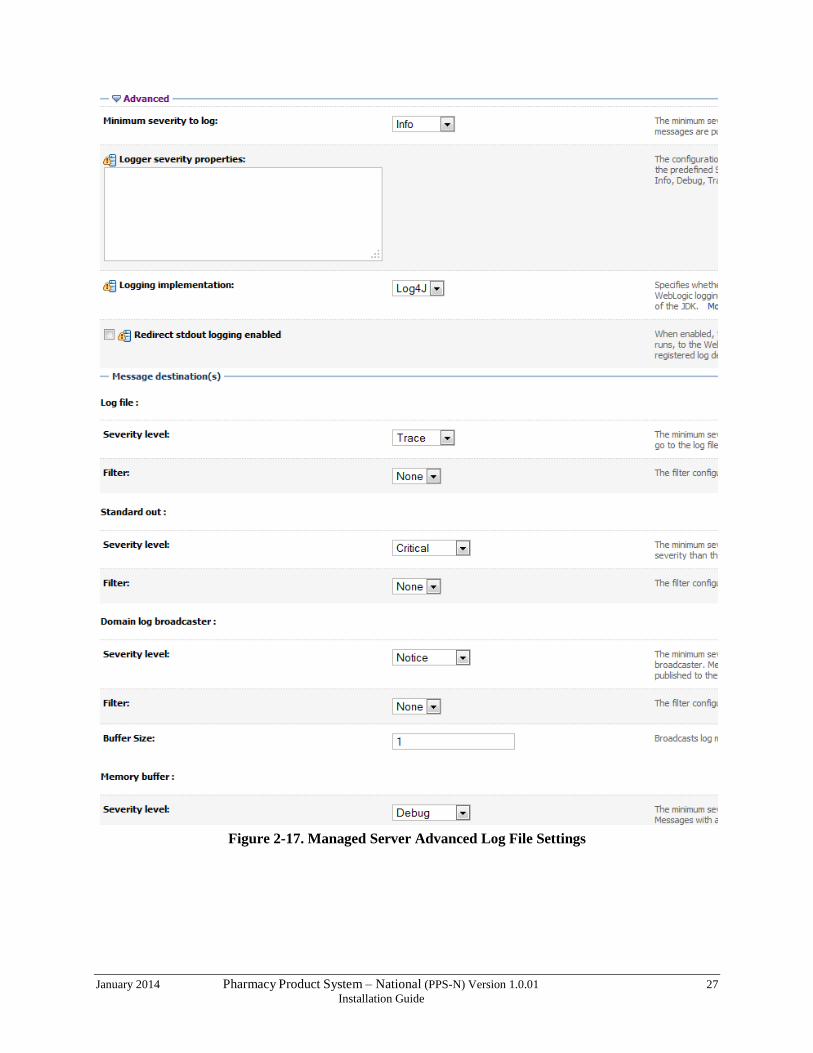
The managed server also allows the additional specification of log file settings. See the figures below as
a means of a reference example only.
Figure 2-16. Managed Server Log File Settings
January 2014 Pharmacy Product System – National (PPS-N) Version 1.0.01 27
Installation Guide
Figure 2-17. Managed Server Advanced Log File Settings

28 Pharmacy Product System – National (PPS-N) Version 1.0.01 January 2014
Installation Guide
2.5.6.2 Installation of Log4J
To install Log4j, the Log4j JAR must be placed on the Deployment Server’s class path and the
log4j.xml must be edited to include the PPS-N appenders and loggers. Follow the instructions below
to place the Log4j library on the Deployment Server’s class path. If Log4j is already installed on the
Deployment Server, these steps do not need to be completed.
1. Locate the Deployment Server’s Class Path Directory.
2. Copy the log4j-1.2.14.jar file into a folder within the class path.
3. Configure WebLogic to include the Log4j library in the Deployment Server’s class path. Please
refer to the WebLogic documentation provided by Oracle to complete this step.
4. Restart the Deployment Server to load Log4j.
With Log4j installed on the Deployment Server, the log4j.xml file must be modified to include the
PPS-N configuration. Note that the appenders place the logs under a log folder. This folder must be
created at the same directory level at which the Deployment Server is running. For example,
/opt/oracle/domains/PRE/log. Without this folder, Log4j will not be able to create the log files
specified in the PPS-N configuration. Alternatively, the file locations could be altered to be placed in a
different location. Also note that the ${log4j.logs.dir} Java system property found within the
Log4j configuration in Step 2 must either be set or these values must be replaced with the appropriate
path to a logs directory. Follow these steps to complete this process:
1. Locate the log4j.xml file used for the Deployment Server. If Log4j has not yet been
configured on the Deployment Server, either create a new log4j.xml file that is located in a
folder on the Deployment Server class path or use the log4j.configuration Java system
property to set the location of the file. Please refer to the WebLogic documentation provided by
BEA for configuring the Deployment Server’s class path and the Log4j documentation provided
by Apache to complete any of these operations.
2. Add the following configuration to the log4j.xml file:
<appender name="FileAppender"
class="org.apache.log4j.RollingFileAppender">
<param name="File" value="${log4j.logs.dir}/server.log"/>
<param name="Append" value="false"/>
<param name="MaxBackupIndex" value="10"/>
<layout class="org.apache.log4j.PatternLayout">
<param name="ConversionPattern" value="%d{dd MMM yyyy
hh:mm:ss a} %-5p [%c:%M] %m%n"/>
</layout>
</appender>
<appender name="HibernateAppender"
class="org.apache.log4j.RollingFileAppender">
<param name="File" value="${log4j.logs.dir}/hibernate.log"/>
<param name="Append" value="false"/>
<param name="MaxBackupIndex" value="10"/>
<layout class="org.apache.log4j.PatternLayout">
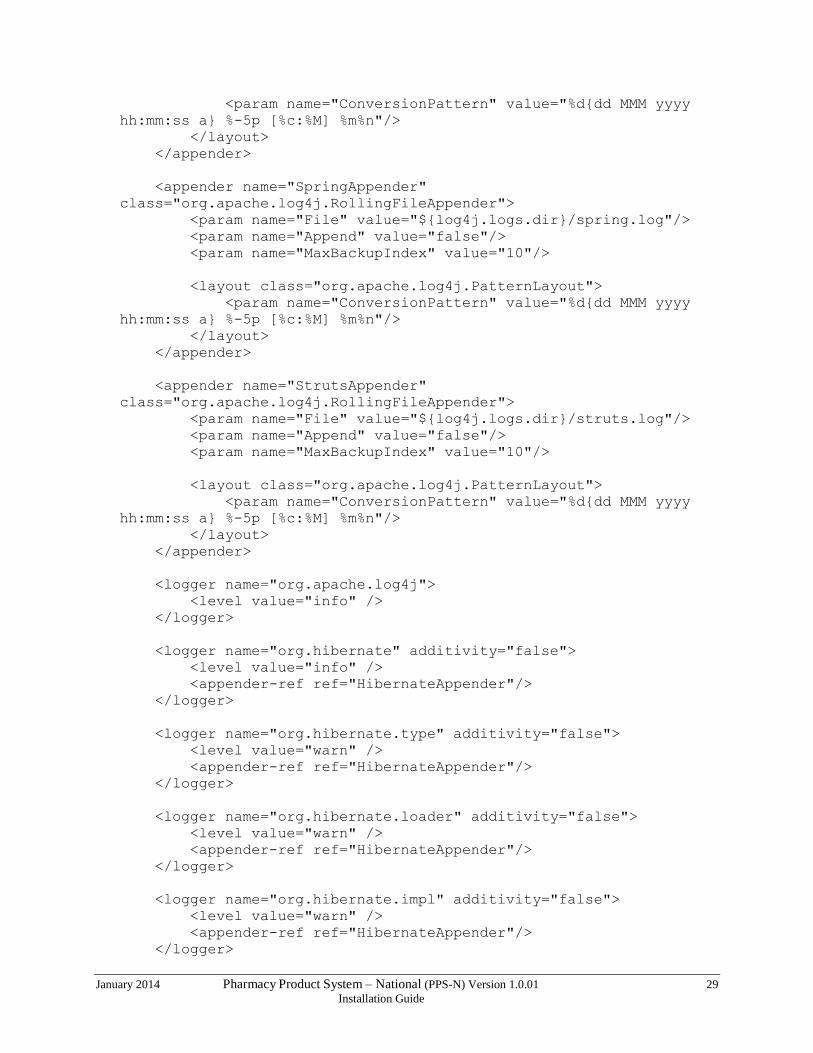
January 2014 Pharmacy Product System – National (PPS-N) Version 1.0.01 29
Installation Guide
<param name="ConversionPattern" value="%d{dd MMM yyyy
hh:mm:ss a} %-5p [%c:%M] %m%n"/>
</layout>
</appender>
<appender name="SpringAppender"
class="org.apache.log4j.RollingFileAppender">
<param name="File" value="${log4j.logs.dir}/spring.log"/>
<param name="Append" value="false"/>
<param name="MaxBackupIndex" value="10"/>
<layout class="org.apache.log4j.PatternLayout">
<param name="ConversionPattern" value="%d{dd MMM yyyy
hh:mm:ss a} %-5p [%c:%M] %m%n"/>
</layout>
</appender>
<appender name="StrutsAppender"
class="org.apache.log4j.RollingFileAppender">
<param name="File" value="${log4j.logs.dir}/struts.log"/>
<param name="Append" value="false"/>
<param name="MaxBackupIndex" value="10"/>
<layout class="org.apache.log4j.PatternLayout">
<param name="ConversionPattern" value="%d{dd MMM yyyy
hh:mm:ss a} %-5p [%c:%M] %m%n"/>
</layout>
</appender>
<logger name="org.apache.log4j">
<level value="info" />
</logger>
<logger name="org.hibernate" additivity="false">
<level value="info" />
<appender-ref ref="HibernateAppender"/>
</logger>
<logger name="org.hibernate.type" additivity="false">
<level value="warn" />
<appender-ref ref="HibernateAppender"/>
</logger>
<logger name="org.hibernate.loader" additivity="false">
<level value="warn" />
<appender-ref ref="HibernateAppender"/>
</logger>
<logger name="org.hibernate.impl" additivity="false">
<level value="warn" />
<appender-ref ref="HibernateAppender"/>
</logger>

30 Pharmacy Product System – National (PPS-N) Version 1.0.01 January 2014
Installation Guide
<logger name="org.springframework" additivity="false">
<level value="error" />
<appender-ref ref="SpringAppender"/>
</logger>
<logger name="org.apache.struts2" additivity="false">
<level value="error" />
<appender-ref ref="StrutsAppender" />
</logger>
<logger name="com.opensymphony.xwork2" additivity="false">
<level value="error" />
<appender-ref ref="StrutsAppender" />
</logger>
<logger name="org.apache.commons.digester" additivity="false">
<level value="error" />
<appender-ref ref="StrutsAppender" />
</logger>
<logger name="freemarker.cache" additivity="false">
<level value="error" />
<appender-ref ref="StrutsAppender" />
</logger>
<logger name="org.apache.tiles" additivity="false">
<level value="error" />
<appender-ref ref="StrutsAppender" />
</logger>
<logger name="net.sf.navigator" additivity="false">
<level value="error" />
<appender-ref ref="StrutsAppender" />
</logger>
<logger name="org.displaytag" additivity="false">
<level value="error" />
<appender-ref ref="StrutsAppender" />
</logger>
<logger name="org.apache.commons">
<level value="warn" />
</logger>
<root>
<priority value="debug" />
<appender-ref ref="FileAppender"/>
</root>
January 2014 Pharmacy Product System – National (PPS-N) Version 1.0.01 31
Installation Guide
3. If profiling is turned on and should be recorded, add the following configuration to the
log4j.xml file:
<appender name="ProfileAppender"
class="org.apache.log4j.RollingFileAppender">
<param name="File" value="log/profile.log" />
<param name="Append" value="false" />
<param name="MaxBackupIndex" value="10" />
<layout class="org.apache.log4j.PatternLayout">
<param name="ConversionPattern" value="%d{dd MMM yyyy hh:mm:ss
a} %-5p [%c%M] %m%n" />
</layout>
</appender>
<logger name="gov.va.med.pharmacy.peps.common.utility.profile"
additivity=”false”>
<level value="info" />
<appender-ref ref="ProfileAppender" />
</logger>
4. Restart the Deployment Server to load the Log4j configuration.
2.5.7 Site Deployment Configuration
The PPS-N deployment files must be altered to configure the WebLogic deployment descriptor and
KAAJEE configuration for each site. The first two sub sections detail configuring these settings. The third
sub section details the site configuration properties changed at local and national.
After configuring the application, the result should be EAR deployment files with the exact same file
structure as delivered, but with site specific configurations made. The kaajeeConfig.xml, and
weblogic.xml files now have the correct values for deployment. Use the original files located on the
disk distributed with the PPS-N v1.0 Version Description Document to verify that the file structure is the
same.
2.5.7.1 Site Number property
Prior to deploying the ear file a file must be created and placed on the managed server’s class path. This
file contains a single line of text that identifies an installation’s site number.
Create a file named gov.va.med.pharmacy.peps.siteConfig.properties. This
file will need to be placed on the managed server’s class path.
Edit the file, adding [or modifying] the following line:
site.number=<num>
Replace <num> with the site VistA Instance number. E.g. 521 (for Birmingham) or 999 for the
National instance.

32 Pharmacy Product System – National (PPS-N) Version 1.0.01 January 2014
Installation Guide
2.5.7.2 WebLogic Deployment Descriptor
Within the PPS-N deployment file, the weblogic.xml deployment descriptor found within the WAR
file must be updated to identify the WebLogic administrative user KAAJEE should operate under. To set
the user KAAJEE should operate under, follow these steps:
1. Copy the PPS-1.0.01-national.ear file to a chosen target folder. No particular location
is required.
2. Unzip the PPS-1.0.01-national.ear file.
3. Unzip the PRE.war file.
4. Open the WEB-INF/weblogic.xml file for editing. This file was contained within the
PRE.war file.
5. Change the run-as-principal-name element value to the correct WebLogic administrative
user under which KAAJEE should operate. For example: <run-as-principal-name>KAAJEE</run-as-principal-name>
6. Save the changes and close the weblogic.xml file.
7. Repackage (zip) the PRE.war file. The updated file must be located at the root folder of the
directly under the PPS-1.0.01-national.ear file. Delete the files unzipped in Step 3.
8. Repackage (zip) the PPS-1.0.01-national.ear file. Delete the files unzipped in Step 2.
2.5.7.3 KAAJEE Station Numbers
Within National PPS-N deployment files, the kaajeeConfig.xml file found within the PRE.war
file must be updated to identify the KAAJEE station numbers available for login. To set the KAAJEE
station numbers, follow these steps:
1. Copy the PPS-1.0.01-national.ear file to a chosen target folder. No particular location
is required.
2. Unzip the ear file.
3. Unzip the PRE.war file.
4. Open the WEB-INF/kaajeeConfig.xml file for editing. This file was contained within the
PRE.war file.
5. Change the station-number elements values to the correct KAAJEE station numbers.
Multiple station numbers can be configured by adding multiple station-number elements.
For example: <station-number>500</station-number>
6. Save the changes and close the kaajeeConfig.xml file.
7. Repackage (zip) the PRE.war file. The updated file must be located at the root folder of the
directly under the PPS-1.0.01-national.ear file. Delete the files unzipped in Step 3.
8. Repackage (zip) the PPS-1.0.01-national.ear file. Delete the files unzipped in Step 2.

January 2014 Pharmacy Product System – National (PPS-N) Version 1.0.01 33
Installation Guide
2.5.8 Install SQL Load Script Files
The database is reset to a known starting point as part of a user performing the migration process. This is
done by the J2EE application running a series of SQL scripts to drop the old data and load the starting
data when the user chooses the start migration activity from the PPS-N GUI. These SQL script files must
be placed in the config directory of the WebLogic domain. There are 17 files in total,
PPSNEPLRefreshData.sql, RefreshEPL_DB.sql and 15 files named
PPSEPLRefreshDB1.sql through PPSNEPLRefreshDB15.sql. These are located in the
PPSNEPLRefreshDb-1.zip file located on the delivered CD.
34 Pharmacy Product System – National (PPS-N) Version 1.0.01 January 2014
Installation Guide
2.5.9 Deployment
The following steps detail the deployment of the PPS-N application. All previous sections must be
complete prior to proceeding with the deployment. In addition, the Deployment Server and its WebLogic
domain must be restarted to load the changed configuration. Please refer to Section 2.3, Section 2.3.2.3,
and Section 2.5 for instructions concerning these configuration items.
After successfully modifying the PPS-N deployment file in Section 2.5.7, repeat the following steps to
deploy the application at all National PPS-N instances.
1. Open and log into the WebLogic console, using an administrative user name and password. The
WebLogic console is located at: http://<Deployment Machine>:7001/console.
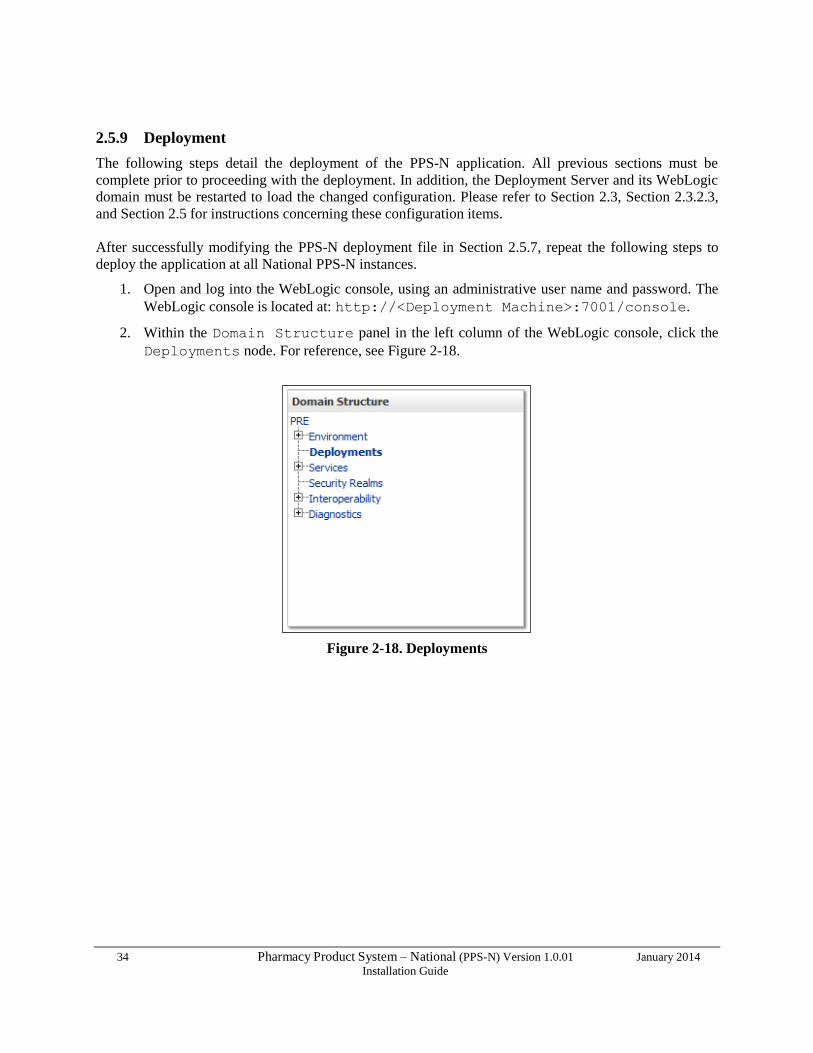
2. Within the Domain Structure panel in the left column of the WebLogic console, click the
Deployments node. For reference, see Figure 2-18.
Figure 2-18. Deployments
January 2014 Pharmacy Product System – National (PPS-N) Version 1.0.01 35
Installation Guide
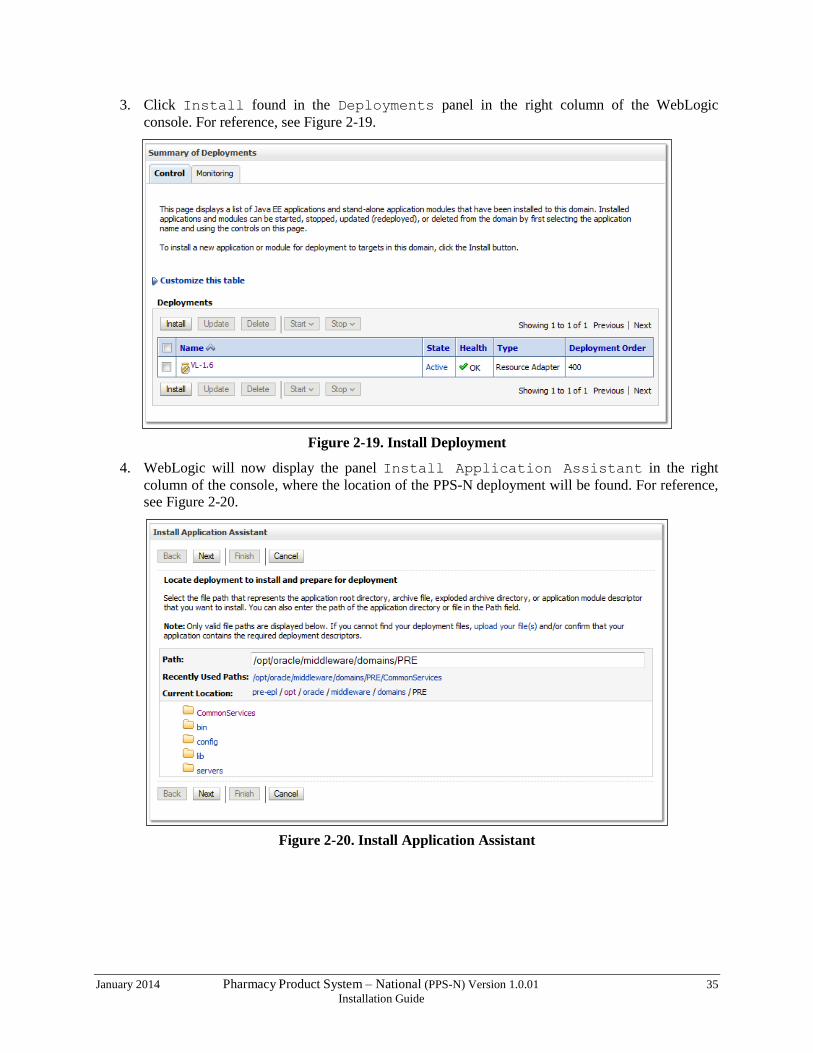
3. Click Install found in the Deployments panel in the right column of the WebLogic
console. For reference, see Figure 2-19.
Figure 2-19. Install Deployment
4. WebLogic will now display the panel Install Application Assistant in the right
column of the console, where the location of the PPS-N deployment will be found. For reference,
see Figure 2-20.
Figure 2-20. Install Application Assistant
36 Pharmacy Product System – National (PPS-N) Version 1.0.01 January 2014
Installation Guide
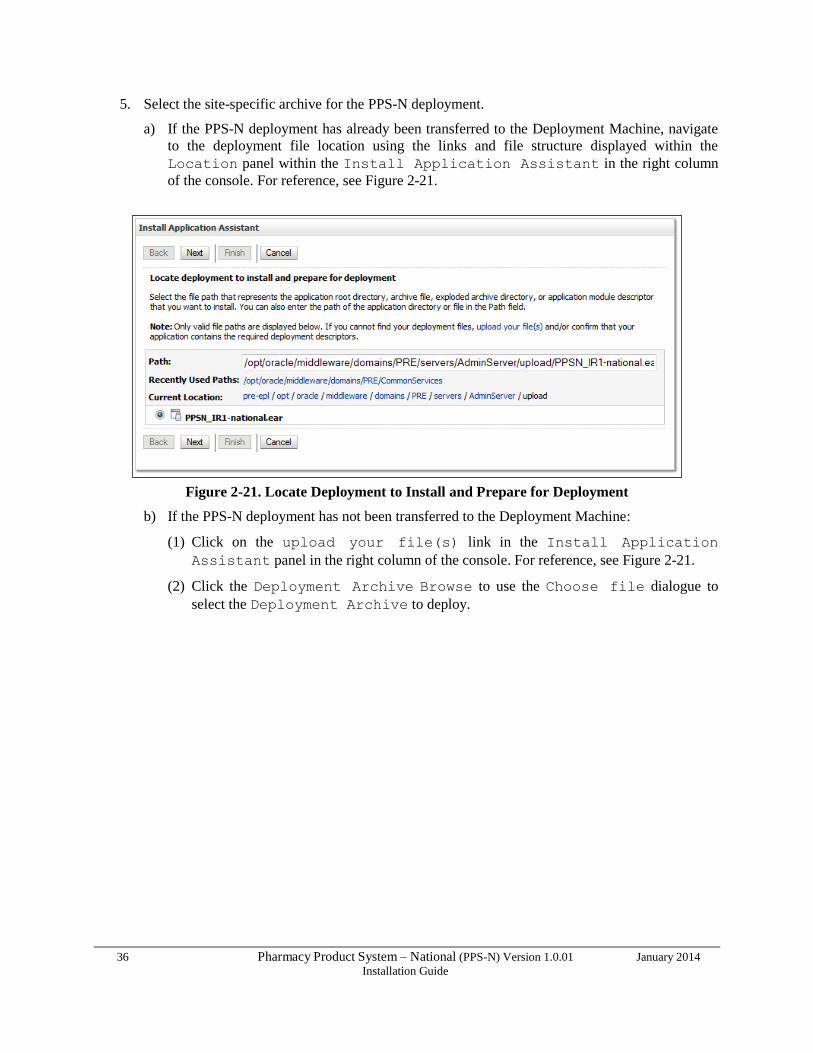
5. Select the site-specific archive for the PPS-N deployment.
a) If the PPS-N deployment has already been transferred to the Deployment Machine, navigate
to the deployment file location using the links and file structure displayed within the
Location panel within the Install Application Assistant in the right column
of the console. For reference, see Figure 2-21.
Figure 2-21. Locate Deployment to Install and Prepare for Deployment
b) If the PPS-N deployment has not been transferred to the Deployment Machine:
(1) Click on the upload your file(s) link in the Install Application
Assistant panel in the right column of the console. For reference, see Figure 2-21.
(2) Click the Deployment Archive Browse to use the Choose file dialogue to
select the Deployment Archive to deploy.
January 2014 Pharmacy Product System – National (PPS-N) Version 1.0.01 37
Installation Guide
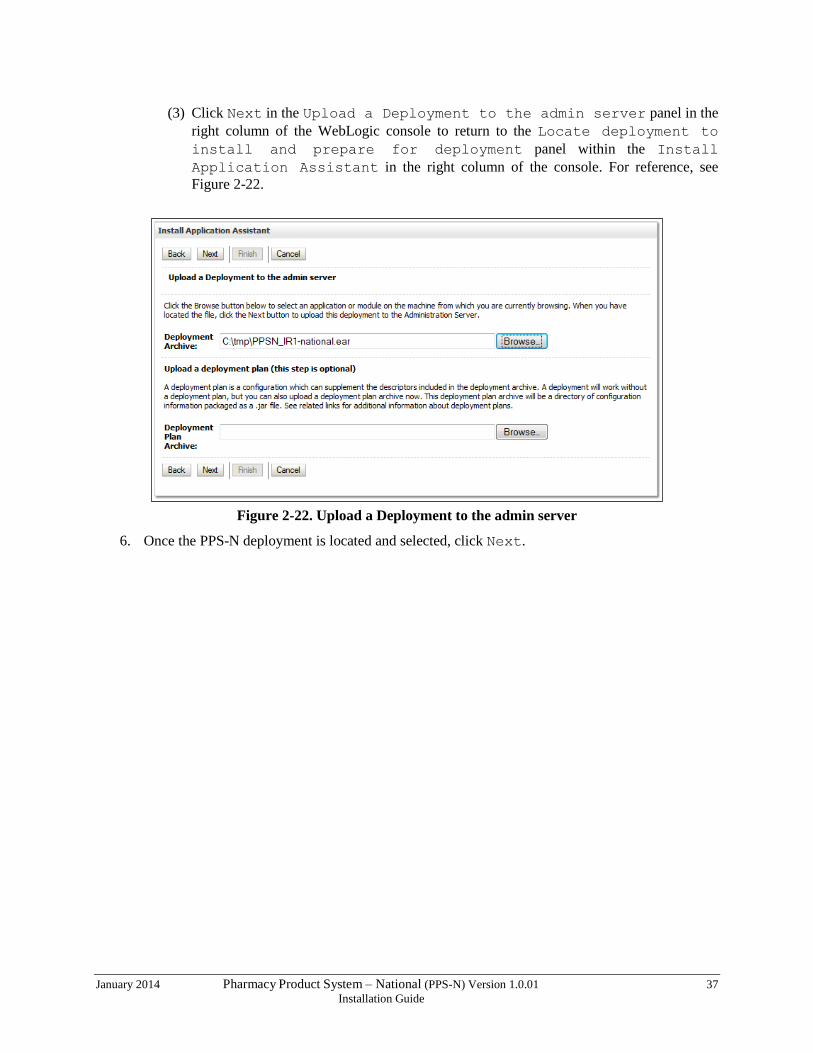
(3) Click Next in the Upload a Deployment to the admin server panel in the
right column of the WebLogic console to return to the Locate deployment to
install and prepare for deployment panel within the Install
Application Assistant in the right column of the console. For reference, see
Figure 2-22.
Figure 2-22. Upload a Deployment to the admin server
6. Once the PPS-N deployment is located and selected, click Next.
38 Pharmacy Product System – National (PPS-N) Version 1.0.01 January 2014
Installation Guide
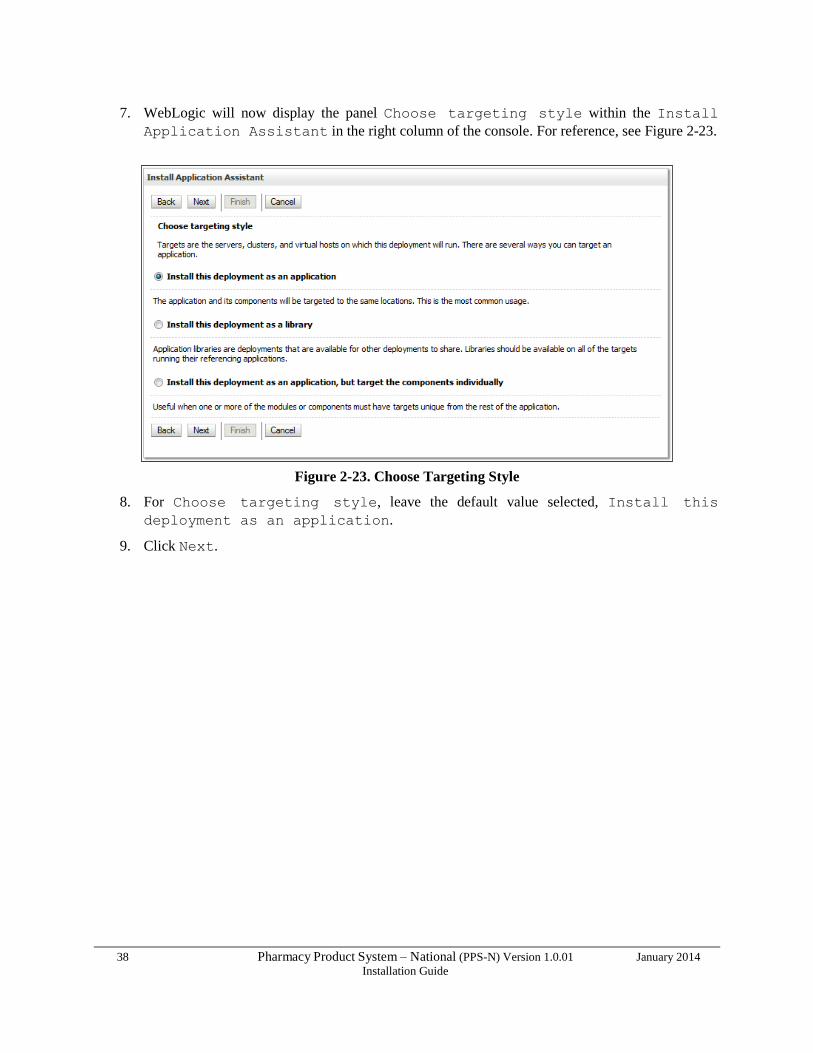
7. WebLogic will now display the panel Choose targeting style within the Install
Application Assistant in the right column of the console. For reference, see Figure 2-23.
Figure 2-23. Choose Targeting Style
8. For Choose targeting style, leave the default value selected, Install this
deployment as an application.
9. Click Next.
January 2014 Pharmacy Product System – National (PPS-N) Version 1.0.01 39
Installation Guide
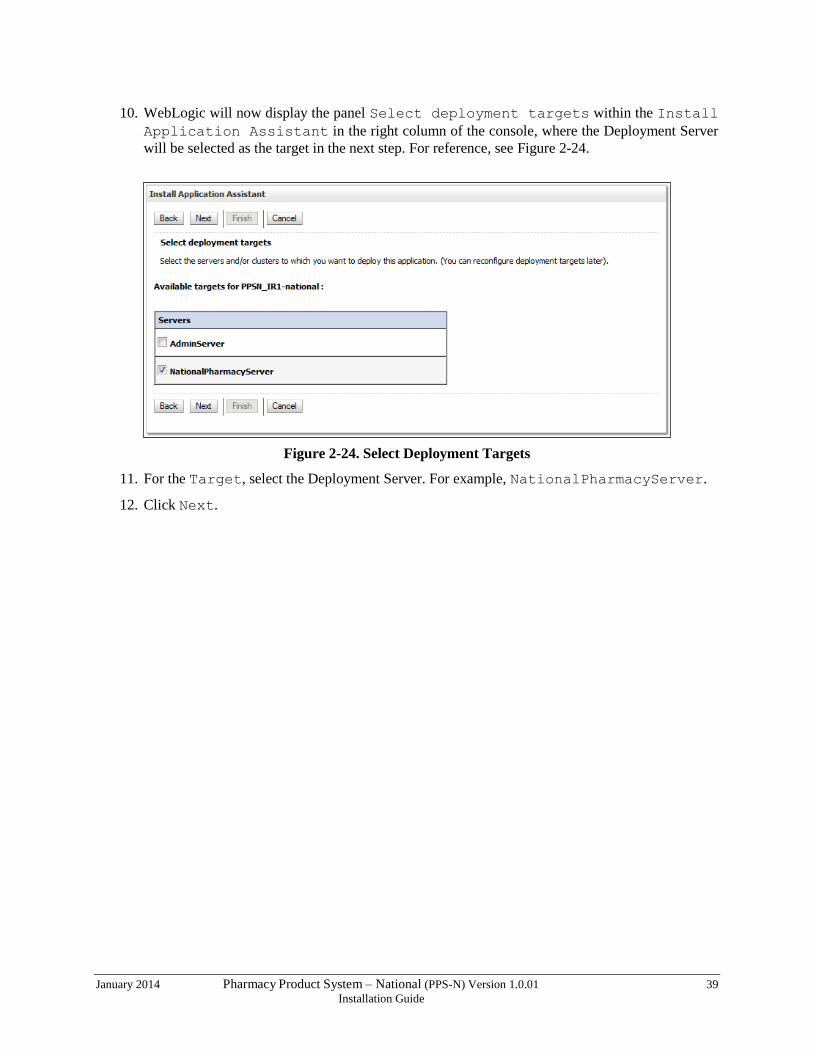
10. WebLogic will now display the panel Select deployment targets within the Install
Application Assistant in the right column of the console, where the Deployment Server
will be selected as the target in the next step. For reference, see Figure 2-24.
Figure 2-24. Select Deployment Targets
11. For the Target, select the Deployment Server. For example, NationalPharmacyServer.
12. Click Next.
40 Pharmacy Product System – National (PPS-N) Version 1.0.01 January 2014
Installation Guide
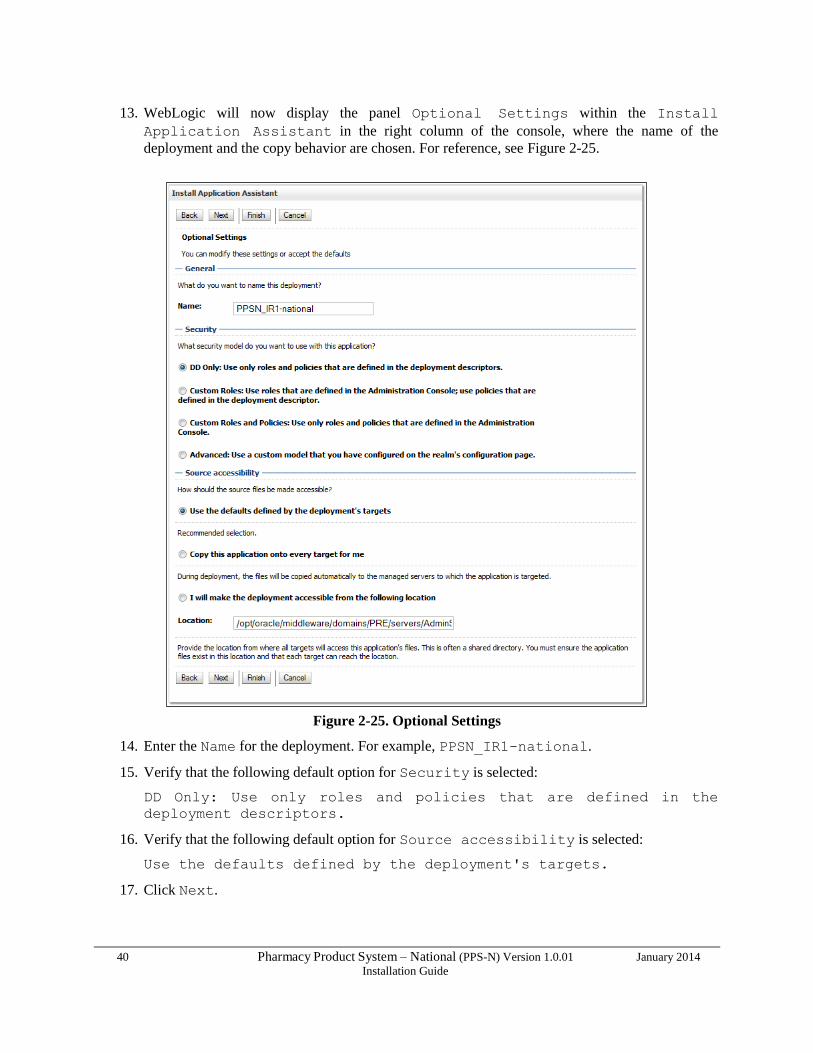
13. WebLogic will now display the panel Optional Settings within the Install
Application Assistant in the right column of the console, where the name of the
deployment and the copy behavior are chosen. For reference, see Figure 2-25.
Figure 2-25. Optional Settings
14. Enter the Name for the deployment. For example, PPSN_IR1-national.
15. Verify that the following default option for Security is selected:
DD Only: Use only roles and policies that are defined in the
deployment descriptors.
16. Verify that the following default option for Source accessibility is selected:
Use the defaults defined by the deployment's targets.
17. Click Next.

January 2014 Pharmacy Product System – National (PPS-N) Version 1.0.01 41
Installation Guide
18. WebLogic will now display the panel Review your choices and click Finish
within the Install Application Assistant in the right column of the console, which
summarizes the steps completed above. For reference, see Figure 2-26.
Figure 2-26. Review Your Choices and Click Finish
19. Verify that the values match those entered in Steps 5 through 18.
20. For Additional configuration, leave the default value Yes, take me to the
deployment’s configuration screen set.
21. Click Finish.

42 Pharmacy Product System – National (PPS-N) Version 1.0.01 January 2014
Installation Guide
22. WebLogic will now display the panel Settings for PPSN_IR1-national in the right
column of the console, where the values previously entered are available as well as a setting to
change the deployment order. For reference, see Figure 2-27.
Figure 2-27. Settings for PRE-1.0-national
23. Leave all the values as defaulted by WebLogic and click Save.
January 2014 Pharmacy Product System – National (PPS-N) Version 1.0.01 43
Installation Guide
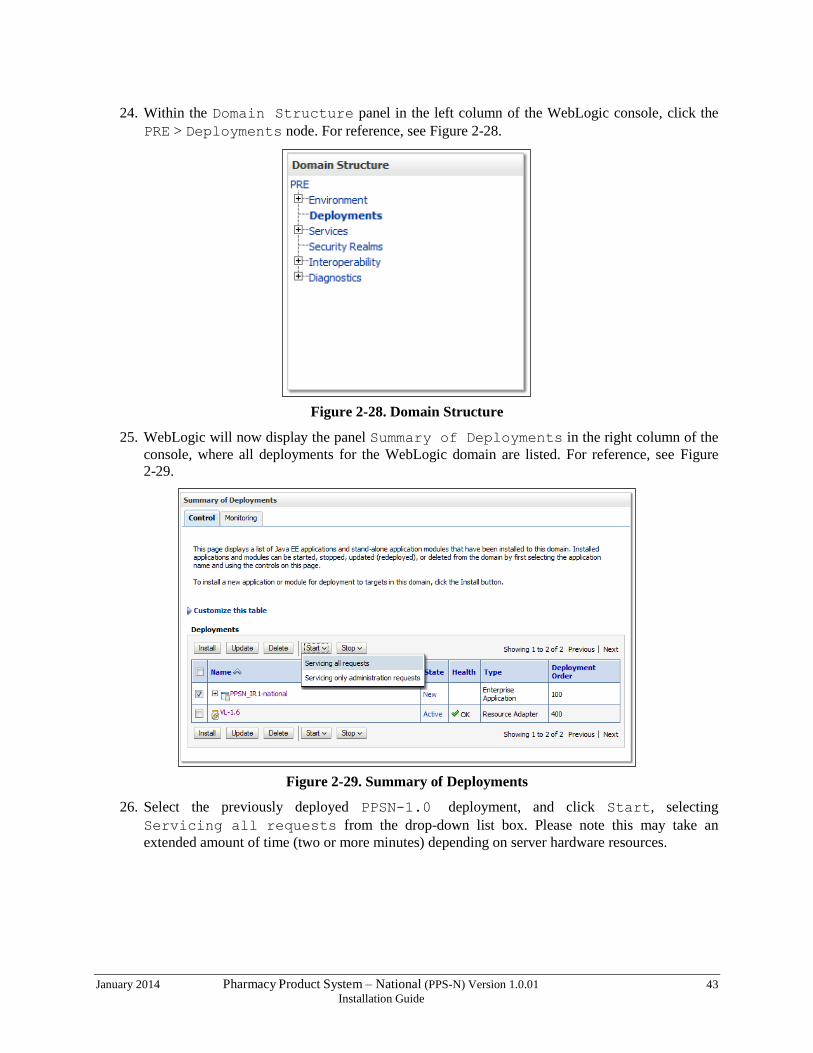
24. Within the Domain Structure panel in the left column of the WebLogic console, click the
PRE > Deployments node. For reference, see Figure 2-28.
Figure 2-28. Domain Structure
25. WebLogic will now display the panel Summary of Deployments in the right column of the
console, where all deployments for the WebLogic domain are listed. For reference, see Figure
2-29.
Figure 2-29. Summary of Deployments
26. Select the previously deployed PPSN-1.0 deployment, and click Start, selecting
Servicing all requests from the drop-down list box. Please note this may take an
extended amount of time (two or more minutes) depending on server hardware resources.

44 Pharmacy Product System – National (PPS-N) Version 1.0.01 January 2014
Installation Guide
27. WebLogic now returns to the Summary of Deployments panel in the right column of the
console. For reference, see Figure 2-30.
Figure 2-30. Summary of Deployments - PPS-N Deployment Active
28. Verify that the State of the current PPS-N deployment is Active. For example, PPSN_IR1-
national is in the Active state in Figure 2-30. The browser window may need to be
refreshed multiple times before the deployment reaches the Active state.
2.5.10 Installation of FDB_Images
FDB_Images is the name of the deployment that contains the images utilized by PPSN for the display of
images associated with various items within the application. FDB_Images is an open-directory type
deployment that needs to be added to the server so that PPSN works correctly. As a separate and open-
directory deployment, this allows the modification of the image contents within the deployment, such as
adding monthly image updates from First Data Bank.
2.5.10.1 Deployment of FDB_Images.zip
Deploying the FDB_Images directory consists of the following:
Unzip the FDB_Images.zip archive to an appropriate location on the server. This location must be
readable by the user account used by Web Logic. This is the folder where the FDB images that are
displayed in the PPSN are retrieved. Any application (such as DATUP) and any administrator that
updates the images should put the FDB images in this folder. 1.
2. Open a web browser to the WebLogic console
3. Click on the Deployments link
4. Click Install button
January 2014 Pharmacy Product System – National (PPS-N) Version 1.0.01 45
Installation Guide
5. Navigate to the directory that contains FDB_Images. E.g. /opt. It should have an entry listed
as “FDB_Images (open directory).”
6. Click on “FDB_Images (open directory)” radio button to its left.
7. Click the Next button.
8. Click “Install this deployment as an application”
9. Click Next
10. Select the server(s) this should be deployed to, e.g. “NationalPharmacyServer”
11. Click Next.
12. Optional settings:
Name: “FDB_Images” - required. This is the “deployment name”
Security, click “DD Only: Use only roles…”
Source accessibility, click “I will make the deployment accessible from the following
location”. The location listed should suffice. This tells WebLogic to use this directory
directly and to not copy it, so adequate permissions will be needed on the directory so
that it and its contents are readable to the web.
13. Click Next.
14. Click “Yes, take me to the deployment’s configuration screen”
15. Click Finish.
16. On the configuration screen, change Deployment Order to “200”
17. Click Save.
3 IF A DIFFERENT DEPLOYMENT NAME IS USED, YOU WILL NEED
TO ACCOUNT FOR THIS BY SPECIFYING THE NAME IN THE PPS-
N CONFIGURATION FILE’S FDBIMAGELOCATION ELEMENT. SEE
SECTION 8,

46 Pharmacy Product System – National (PPS-N) Version 1.0.01 January 2014
Installation Guide
PPS-N Configuration File.
January 2014 Pharmacy Product System – National (PPS-N) Version 1.0.01 47
Installation Guide
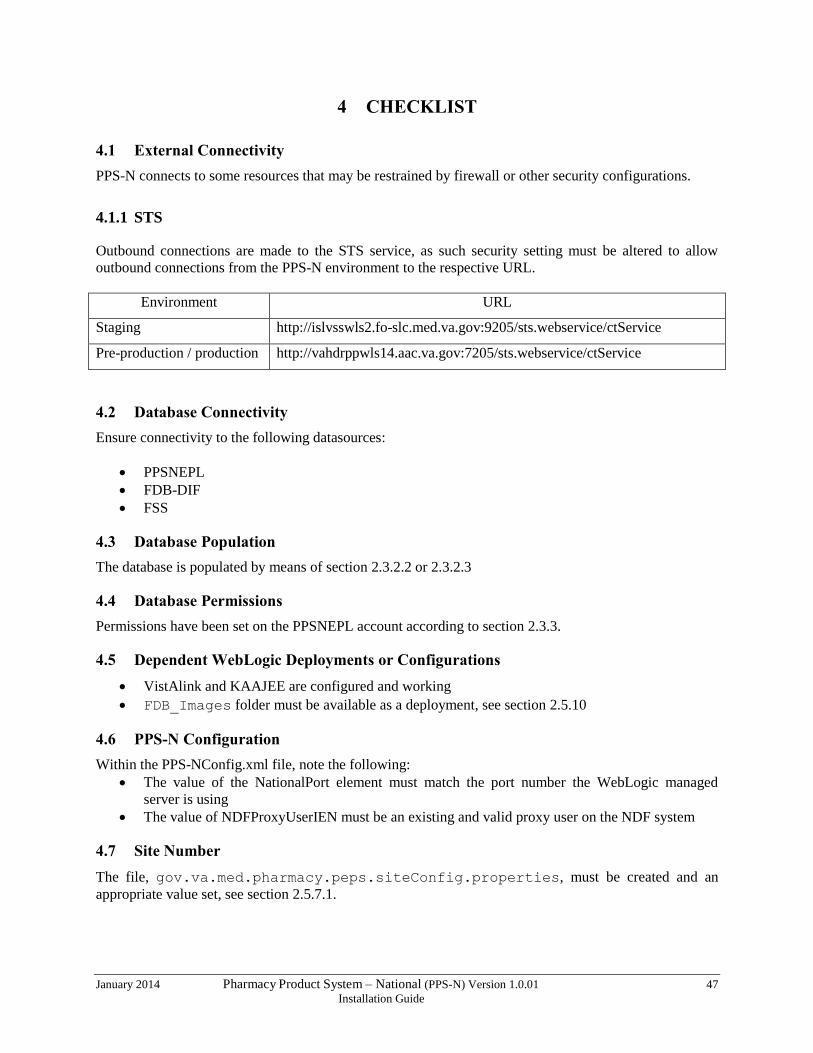
4 CHECKLIST
4.1 External Connectivity
PPS-N connects to some resources that may be restrained by firewall or other security configurations.
4.1.1 STS
Outbound connections are made to the STS service, as such security setting must be altered to allow
outbound connections from the PPS-N environment to the respective URL.
Environment URL
Staging http://islvsswls2.fo-slc.med.va.gov:9205/sts.webservice/ctService
Pre-production / production http://vahdrppwls14.aac.va.gov:7205/sts.webservice/ctService
4.2 Database Connectivity
Ensure connectivity to the following datasources:
PPSNEPL
FDB-DIF
FSS
4.3 Database Population
The database is populated by means of section 2.3.2.2 or 2.3.2.3
4.4 Database Permissions
Permissions have been set on the PPSNEPL account according to section 2.3.3.
4.5 Dependent WebLogic Deployments or Configurations
VistAlink and KAAJEE are configured and working
FDB_Images folder must be available as a deployment, see section 2.5.10
4.6 PPS-N Configuration
Within the PPS-NConfig.xml file, note the following:
The value of the NationalPort element must match the port number the WebLogic managed
server is using
The value of NDFProxyUserIEN must be an existing and valid proxy user on the NDF system
4.7 Site Number
The file, gov.va.med.pharmacy.peps.siteConfig.properties, must be created and an
appropriate value set, see section 2.5.7.1.
48 Pharmacy Product System – National (PPS-N) Version 1.0.01 January 2014
Installation Guide
5 FUNCTIONALITY TEST
The following instructions define a method of verifying the installation performed in Section 2. These
steps are not required to complete the PPS-N installation; they provide a way to verify that the installation
is complete and operational.
5.1 Assumptions
Prior to completing any of the deployment verification instructions in the remaining section of this
document, the following assumption must be met: The PPS-N Web interface is accessed using Internet
Explorer, Version 9.
5.2 Deployment Verification
The following instructions detail how to verify that the PPS-N system was deployed successfully. The
instructions do not verify all functionality of the application; they are only a simple way to show that the
deployment was successful.
For each deployment environment, follow these steps:
18. Store the SampleNDC.csv file in a directory on the computer that will run the Web browser.
19. Open a Web browser.
20. Navigate to http://<Deployment Machine>:<Deployment Server Port>/PRE/
21. Login using the following username: PNM1N1
22. Verify that the PPS-N home page appears.
23. Select the Migrate tab. Verify the Migration Start page appears.
24. Start a migration as follows:
Select the SampleNDC.csv file stored in step 1.
Select Start Migration button.
25. Wait for a partial migration (Drug Units and Dispense Units only) to complete. Press Stop button
if migration time exceeds two minutes.
26. On Migration Report page, review Drug Unit and VA Dispense Unit detailed reports by selecting
the appropriate links.
If the Web pages do not appear or the flow is not fully operational, verify that all the steps listed in
Section 2 were completed correctly.

January 2014 Pharmacy Product System – National (PPS-N) Version 1.0.01 49
Installation Guide
7 BACKOUT PROCEDURES
The current PPS-N Application is hosted on the NDF Management Server. When PPS-N goes online;
the users will simply stop using the MUMPS user interface in the NDF Management Server and begin
using the web interface to manage drug items. As new drugs items are added into PPS-N and existing
items are updated, the PPS-N java application will be automatically updating the NDF Management
System in the background.
If, at any time, the users decide to stop using the PPS-N web application and go back to using the NDF
Management user interface, it is simply a matter of stopping using the web service and starting using the
NDF interface. Since the PPS-N web interface keeps the NDF Management System updated in real-time
then no rollback procedure is to be performed.
There is already a procedure in place that is used to back up the NDF Management Server and that
process will continue as is with no changes. The periodic backup of the PPS-N EPL database is
described in the Productions Operational Manual.
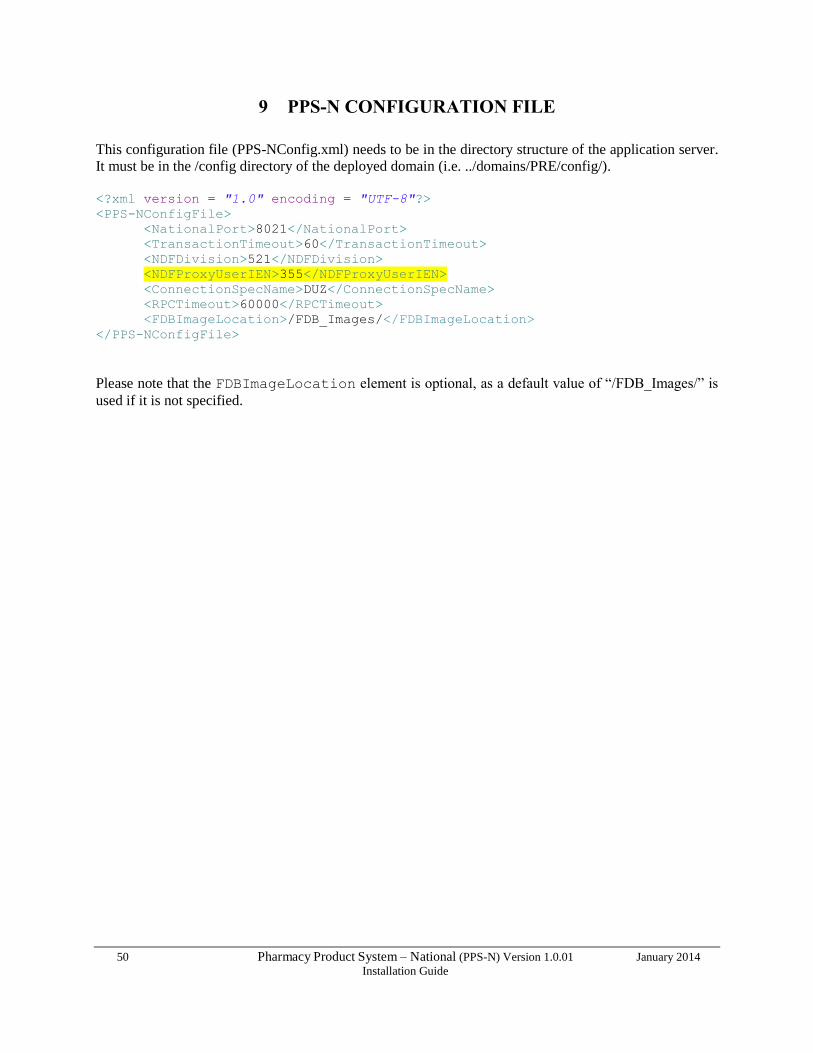
50 Pharmacy Product System – National (PPS-N) Version 1.0.01 January 2014
Installation Guide
9 PPS-N CONFIGURATION FILE
This configuration file (PPS-NConfig.xml) needs to be in the directory structure of the application server.
It must be in the /config directory of the deployed domain (i.e. ../domains/PRE/config/).
<?xml version = "1.0" encoding = "UTF-8"?>
<PPS-NConfigFile>
<NationalPort>8021</NationalPort>
<TransactionTimeout>60</TransactionTimeout>
<NDFDivision>521</NDFDivision>
<NDFProxyUserIEN>355</NDFProxyUserIEN>
<ConnectionSpecName>DUZ</ConnectionSpecName>
<RPCTimeout>60000</RPCTimeout>
<FDBImageLocation>/FDB_Images/</FDBImageLocation>
</PPS-NConfigFile>
Please note that the FDBImageLocation element is optional, as a default value of “/FDB_Images/” is
used if it is not specified.

January 2014 Pharmacy Product System – National (PPS-N) Version 1.0.01 51
Installation Guide
10 TROUBLESHOOTING
10.1 In an SSL-enabled environment, the application’s responsiveness is extremely slow
When using an Apache web server for SSL, ensure the KeepAlive directive is set to ON. By default,
the installation sets this value to OFF.