ph superflush and powerflush - raritan eng
TRANSCRIPT

1
PH SUPERFLUSH AND POWERFLUSH
THE FOLLOWING ARE CAUTIONARY STATEMENTS THAT MUST BE READ AND FOLLOWED DURING BOTH INSTALLATION AND OPERATION WARNING: Raritan Engineering Company, Inc. recommends that a qualified person or electrician in the case
of the POWERFLUSH, install this product. Equipment damage, injury to personnel or death could result from improper installation. Raritan Engineering Company, Inc. accepts no responsibility or liability for damage to equipment, or injury or death to personnel, that may result from improper installation or operation of this product.
WARNING: Hazard of Flooding - Any installation made below the waterline must have vented loops posi-tioned properly and all hose connections should be double-clamped. Both intake and discharge seacocks should always be in the closed position when the toilet is not in use. Failure to do so may result in flooding, property damage and loss of life.
WARNING: Do not operate POWERFLUSH series toilets with handle in place, serious bodily injury may occur.
All models are suitable for use in conjunction with Raritan’s Electroscan® and Purasan® Waste Treatment Systems. Both are U.S. Coast Guard Certified Type I flow-thru Marine Sanitation Device (MSD) and/or holding tanks.
1-856-825-4900www.raritaneng.com
L563v0320jlc
Model and Serial #:
The power of the legendary PHIIPUMP on a more universal and sleek base.
The PH SUPERFLUSH and PH POWERFLUSH combines the efficient flushing action of the PHII and PHEII with a more "universal base" for easier upgrades from competitive models. They both include a slow close seat.
Installation, Operation and Maintenance Instructions
PH SUPERFLUSH
PH POWERFLUSH
2Super Lube® is a registered trademark of Synco Chemical Corp.
OPE
RAT
ION
\CL
EA
NIN
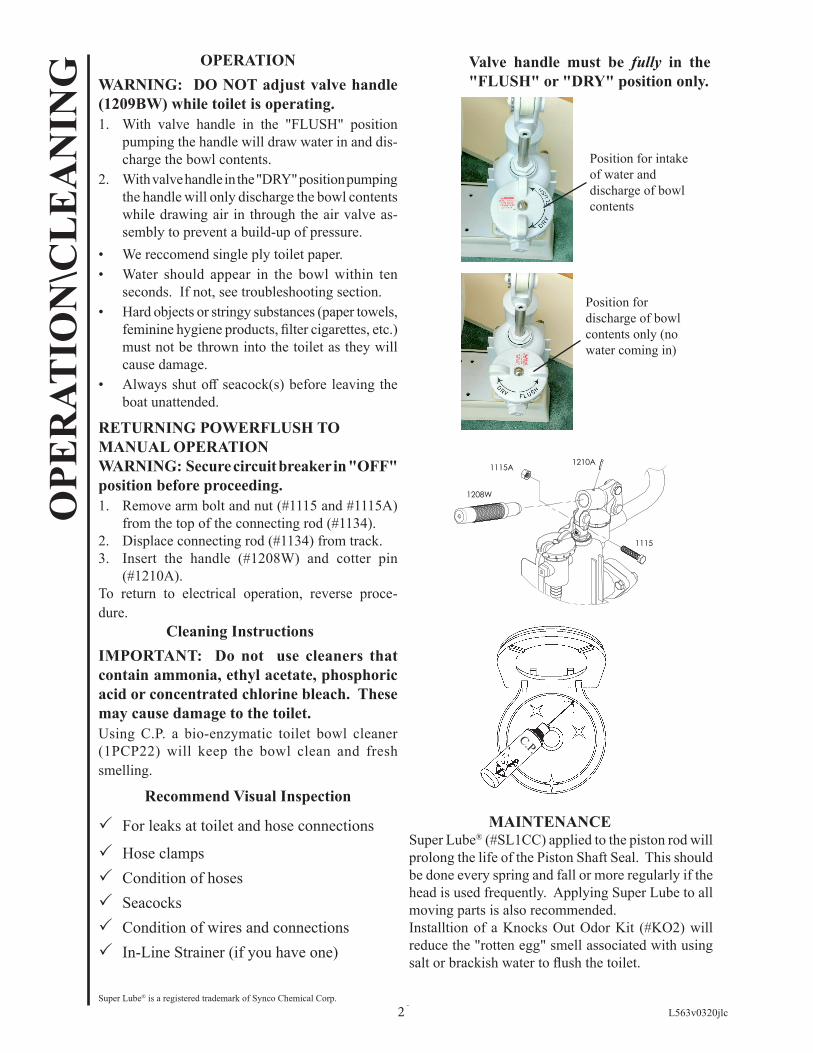
G OPERATIONWARNING: DO NOT adjust valve handle (1209BW) while toilet is operating.1. With valve handle in the "FLUSH" position
pumping the handle will draw water in and dis-charge the bowl contents.
2. With valve handle in the "DRY" position pumping the handle will only discharge the bowl contents while drawing air in through the air valve as-sembly to prevent a build-up of pressure.
• We reccomend single ply toilet paper.• Water should appear in the bowl within ten
seconds. If not, see troubleshooting section.• Hard objects or stringy substances (paper towels,
feminine hygiene products, filter cigarettes, etc.) must not be thrown into the toilet as they will cause damage.
• Always shut off seacock(s) before leaving the boat unattended.
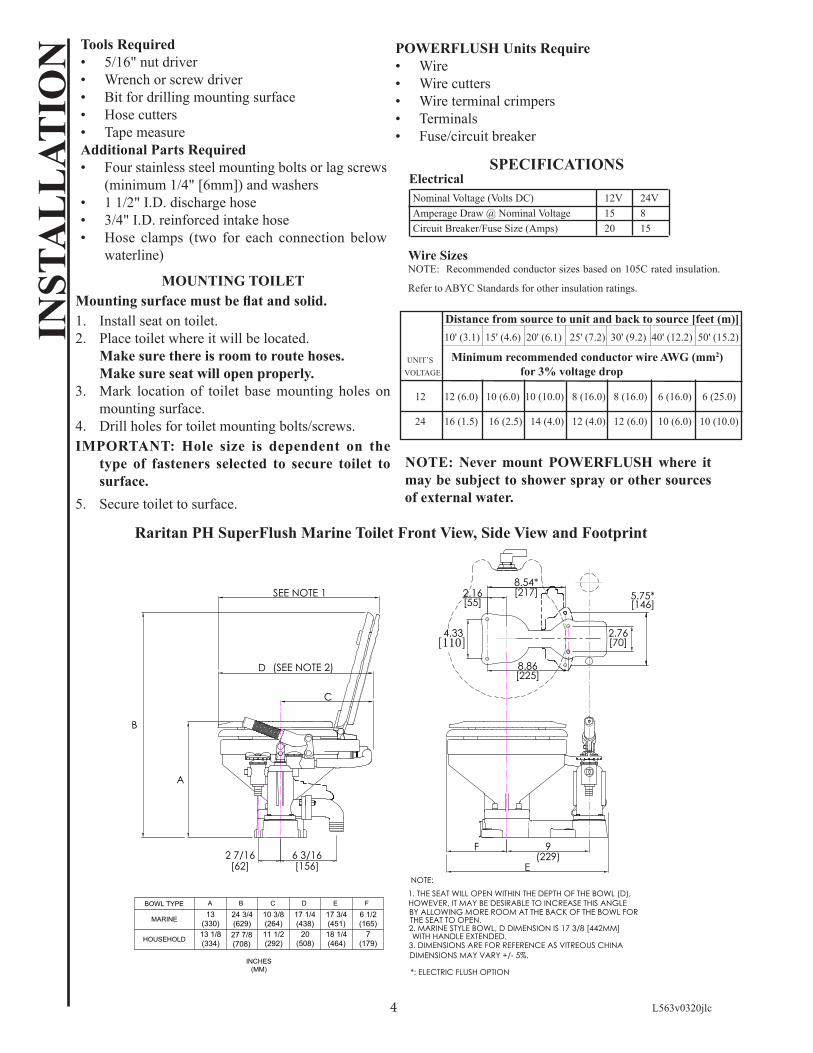
RETURNING POWERFLUSH TO MANUAL OPERATIONWARNING: Secure circuit breaker in "OFF" position before proceeding.1. Remove arm bolt and nut (#1115 and #1115A)
from the top of the connecting rod (#1134).2. Displace connecting rod (#1134) from track. 3. Insert the handle (#1208W) and cotter pin
(#1210A). To return to electrical operation, reverse proce-dure. Cleaning InstructionsIMPORTANT: Do not use cleaners that contain ammonia, ethyl acetate, phosphoric acid or concentrated chlorine bleach. These may cause damage to the toilet.Using C.P. a bio-enzymatic toilet bowl cleaner (1PCP22) will keep the bowl clean and fresh smelling.
Recommend Visual Inspection
For leaks at toilet and hose connections
Hose clamps Condition of hoses Seacocks Condition of wires and connections In-Line Strainer (if you have one)
Position for intake of water and discharge of bowl contents
Position for discharge of bowl contents only (no water coming in)
Valve handle must be fully in the "FLUSH" or "DRY" position only.
C.P.
L563v0320jlc2
1210A
1208W
1115A
1115
MAINTENANCE Super Lube® (#SL1CC) applied to the piston rod will prolong the life of the Piston Shaft Seal. This should be done every spring and fall or more regularly if the head is used frequently. Applying Super Lube to all moving parts is also recommended.Installtion of a Knocks Out Odor Kit (#KO2) will reduce the "rotten egg" smell associated with using salt or brackish water to flush the toilet.

3 3
WIN
TE
RIZ
ATIO
NBefore attempting repairs, refer to the Troubleshooting section of this manual.
NOTE: Before reinstalling 1209BW valve handle, be sure points "A" and "B" on the inlet valve body (#1203BW) are positioned as shown by the double arrow.
POINT "B"
POINT "A"
FIG 3
L563v0320jlc
WINTERIZINGImproper winter lay up is a major cause of marine toilet failures. Parts Required• 3/4" I.D. intake hose approximately 3 feet long. • 1 1/2" I.D. discharge hose approximately 3 feet
long. • Two buckets • Nontoxic antifreeze approximately 1 quart 1. Close the intake and discharge seacock.
Disconnect and drain the intake and discharge hoses.
2. Connect short hoses to toilet’s intake and discharge.
3. Place one bucket under short hose on discharge.4. Pour nontoxic antifreeze in other bucket.5. Place hose connected to intake into bucket with
antifreeze.6. Flush toilet until antifreeze begins to be
discharged from toilet. 7. Antifreeze should remain in the toilet until
recommissioning. This will protect both intake and discharge sides of the pump. Pouring antifreeze into the bowl will only protect the discharge.
NOTE: Holding tanks, seacocks and treatment systems need to be independently winterized, stored and recommissioned (see manufacturer’s instructions).
RECOMMISSIONING 1. Lubricate piston rod with Super Lube®. 2. Using the buckets, hoses and a gallon (3.8
liters) of clean water, flush the antifreeze out of the toilet. Dispose of antifreeze properly, in accordance with local and federal regulations.
3. Reconnect the hoses and open both seacocks.4. Check all connections for leaks with several
test flushes.
Toilet Base
Toilet Base
Correct Orientation of#1228CW Flapper Valves
FIG 2
CORRECT!
WRONG!
INSTALLATION OF REPLACEMENT PARTS
1. Refer to Fig. #2 when replacing part #1228CW.
2. If valve body (#1203BW) is removed it must be positioned as in Fig. #3 for proper operation.
Overhaul kits and individual parts for your toilet may be ordered through your dealer or direct from the factory.
4
INST
AL
LAT
ION
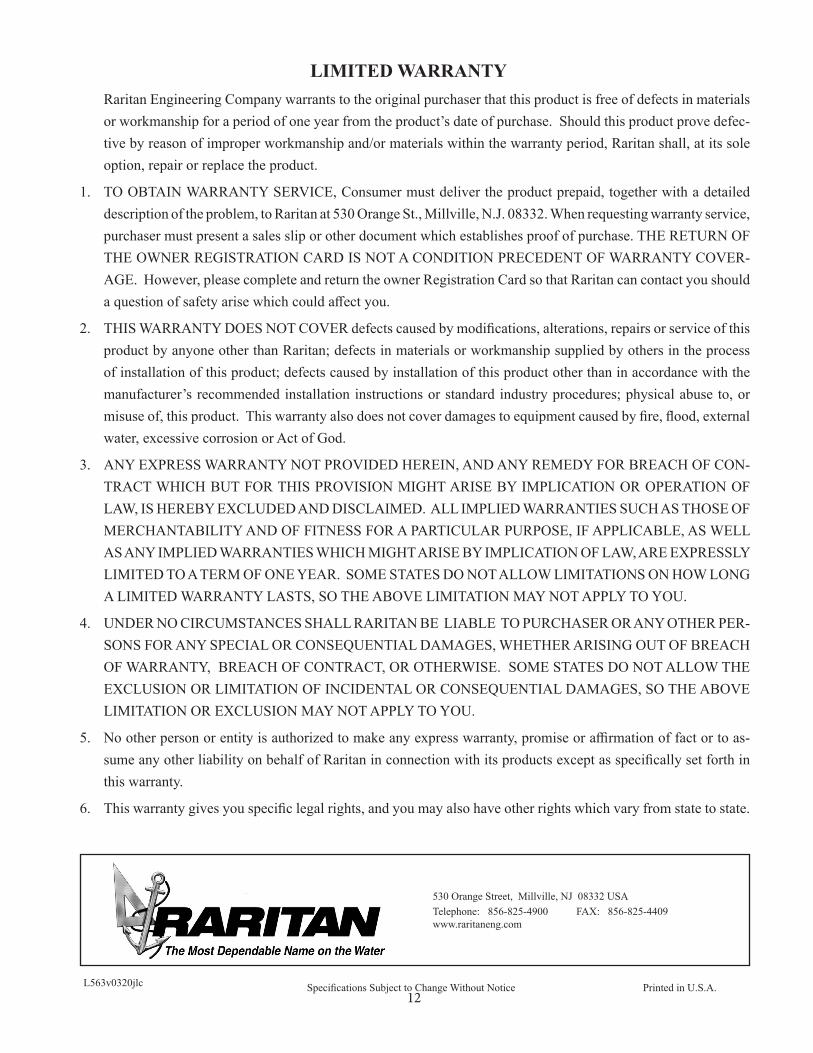
Raritan PH SuperFlush Marine Toilet Front View, Side View and Footprint
Tools Required• 5/16" nut driver• Wrench or screw driver • Bit for drilling mounting surface • Hose cutters• Tape measureAdditional Parts Required • Four stainless steel mounting bolts or lag screws
(minimum 1/4" [6mm]) and washers • 1 1/2" I.D. discharge hose • 3/4" I.D. reinforced intake hose • Hose clamps (two for each connection below
waterline)
MOUNTING TOILETMounting surface must be flat and solid.1. Install seat on toilet.2. Place toilet where it will be located. Make sure there is room to route hoses. Make sure seat will open properly.3. Mark location of toilet base mounting holes on
mounting surface.4. Drill holes for toilet mounting bolts/screws.IMPORTANT: Hole size is dependent on the
type of fasteners selected to secure toilet to surface.
5. Secure toilet to surface.
L563v0320jlc 4
2.76[70]
8.86[225]
4.33[110]
2.16[55]
E
9(229)
F6 3/16[156]
A
B
C
D
SEE NOTE 1
INCHES
(MM)
11 1/2
(292)
10 3/8
(264)
BOWL TYPE
MARINE
BA
13 1/8
(334)
13
(330)
24 3/4
(629)
18 1/4
(464)
17 3/4
(451)
DC
20
(508)
17 1/4
(438)
FE
7
(179)
6 1/2
(165)
HOUSEHOLD
NOTE:
1. THE SEAT WILL OPEN WITHIN THE DEPTH OF THE BOWL (D),
HOWEVER, IT MAY BE DESIRABLE TO INCREASE THIS ANGLE BY ALLOWING MORE ROOM AT THE BACK OF THE BOWL FOR THE SEAT TO OPEN.2. MARINE STYLE BOWL, D DIMENSION IS 17 3/8 [442MM]WITH HANDLE EXTENDED.27 7/8
(708)
2 7/16[62]
(SEE NOTE 2)
3. DIMENSIONS ARE FOR REFERENCE AS VITREOUS CHINA
DIMENSIONS MAY VARY +/- 5%.
5.75*[146]
8.54*[217]
*: ELECTRIC FLUSH OPTION
[110]
POWERFLUSH Units Require• Wire• Wire cutters• Wire terminal crimpers • Terminals • Fuse/circuit breaker
UNIT’S VOLTAGE
12 12 (6.0) 10 (6.0) 10 (10.0) 8 (16.0) 8 (16.0) 6 (16.0) 6 (25.0)
24 16 (1.5) 16 (2.5) 14 (4.0) 12 (4.0) 12 (6.0) 10 (6.0) 10 (10.0)
Nominal Voltage (Volts DC) 12V 24V Amperage Draw @ Nominal Voltage 15 8 Circuit Breaker/Fuse Size (Amps) 20 15
ElectricalSPECIFICATIONS
Minimum recommended conductor wire AWG (mm2) for 3% voltage drop
10' (3.1) 15' (4.6) 20' (6.1) 25' (7.2) 30' (9.2) 40' (12.2) 50' (15.2)
Distance from source to unit and back to source [feet (m)]
Wire SizesNOTE: Recommended conductor sizes based on 105C rated insulation.
Refer to ABYC Standards for other insulation ratings.
NOTE: Never mount POWERFLUSH where it may be subject to shower spray or other sources of external water.

5
INSTA
LL
ATIO
N/PL
UM
BIN
GPLUMBING
WARNING: HAZARD OF FLOODINGToilets mounted at or below the waterline, at greatest angle of heel, and connected to a Seacock/Thru Hull Fitting(s) MUST have VENTED LOOPS installed in toilet discharge plumbing and between raw water intake pump and toilet bowl. Install vented loops per manufacturer’s instructions. Double clamp all below-waterline connections.
IMPORTANT• Fittings and 90° bends should be kept to a minimum.• In-Line Strainer (Raritan part # 163000) may be installed. This will help prevent clogs.• Discharging untreated sewage is forbidden in all U. S. waters within the three-mile limit.• Thru-hull fittings and seacocks must be installed where they are easily accessible.• Use only quality reinforced hoses such as Raritan Saniflex (SFH)• Secure all hoses properly.
PH SuperFlush Toilet
Vent Outside Hull or Deck
Waterline Waterline
Vented Loop
In-Line Strainer
Intake Thru-Hull and Seacock
Discharge Thru-Hull and Seacock
FIG 4
FIG 5
Sanitation Device
*Drawing not to scale
*Drawing not to scale
PH SuperFlush Toilet
Waterline Waterline
Discharge Thru-Hull and Seacock
Intake Thru-Hull and
Seacock
Vented Loops
Sanitation Device
Holding Tank
Deck Pumpout
Y Valve
In-Line Strainer
Above Waterline Installation
Below Waterline Installation
L563v0320jlc 5
1. Route discharge hose above discharge outlet with a vented loop. This will enable the toilet to discharge more efficiently and will help to prevent backflow.
2. An In-Line Strainer (#163000) is recommended. This will help minimize odors and help prevent clogging.
3. Intake and discharge thru-hull fittings should be located far enough apart to prevent discharge water from being drawn through the intake.
4. The optional Raritan Knocks Out Odors Kit (#KO2) enables the use of Cleans Potties (#1PCP22). Raritan Cleans Potties deodorizes the bowl and lubricates internal parts.
5. Flush and check for leaks.

6 6
WIRING
WARNING: Hazard of Shock and Fire• Always use proper wire, wire connectors
and fuse/circuit breaker. See Specification Chart.
• Secure wire properly.• Do not connect appliances to toilet circuit.• Make sure power is off before proceeding.• Use proper wire terminals for all wire
connections.1. Determine proper wire size by measuring
distance from: • Power Source to push-button to toilet motor
and back to power source.2. Select proper wire and fuse/circuit breaker size
from Specifications on Installation page.3. Install fuse/circuit breaker in positive line at
source.4. Connect positive wire from fuse/circuit breaker
to 1/4" Q.C. Switch.5. Connect wire from Push Button Switch to red
wire on motor(s).6. Connect wire from battery negative or power
source ground buss to black wire (negative) on motor(s).
RARITAN
FLUSH
Wiring the POWERFLUSH(DC Unit with POWERSWITCH Switch)
- (NEG. Black Motor Wire)
POWERFLUSH Motor
+ (POS. Red Motor Wire)
Fuse or Circuit Breaker
- NEG
+ POS
Battery
See Specifications on Installation Page for proper wire and fuse/circuit breaker size.
RARITAN
FLUSH
1.87 [47]
2.77 [70]
1.61 [41]
1.99 [51]
1.83
[46.5]
0.87
[22.0]
2.27
[57.8]
1.37
[34.7]
CUT
OUT
SCREW PILOT
HOLE LOCATIONS
(4X)
NOT ACTUAL SIZE
MOUNTING SWITCH1. Cut out hole for switch. (Actual size template
available on page 10)2. Use panel to mark screw pilot hole locations.
NOTE: #6 screws are provided, pilot hole size is dependent on material.
3. Route wire and connect to switch.4. Mount switch to wall.
L563v0320jlc

7
TR
OU
BL
ESH
OO
TIN
G
Units requiring extensive repairs may be returned to the Millville, NJ or Fort Lauderdale, FL office for overhaul. In-structions, including name, address and phone number MUST accompany returned units to ensure proper handling. See additional FAQ's at: www.raritaneng.com/tech-support/faq
Water not being drawn in • Check Ball Stuck Shutoff seacock and remove intake hose Using an eraser end of pencil be sure check ball is moving freely• Debris lodged in intake valve body Check and clean valve body• Piston O-ring worn Replace Piston O-ring• Inlet valve in wrong position Inlet valve should only rotate 1/4 turn
Leak around piston shaft• Cartridge seal worn Replace cartridge seal Inspect and replace piston shaft if scored
Water accumulates in the bowl too fast• Flapper valve not seated properly Close intake valve and pump dry - clean or repalce flapper valve as necessary• Joker valve not closing or opening properly Clog or restriction in discharge line Close intake valve and pump dry - clean or replace joker valve as necessary
Not enough water to rinse bowl• Intake valve positioned improperly Be sure inlet knob only turns 1/4 see fig. #3• Debris around intake or discharge check balls Remove check balls, clean and replace as necessary• Scored pump housing or worn piston "O" ring Inspect inside of housing replace "O" ring and housing as necessary• Intake line or strainer clogged Clean line and strainer
Water rises in bowl • Vented loop(s) not breaking siphon Close discharge seacock, then intake seacock to determine which is causing the problem. Clean or replace vented loop(s) parts. • Joker valve worn Inspect, clean or replace as needed
Odor comes from head area when flushed• Marine vegetation lodged in bowl Remove bowl and attach pressure water at spud assy. Install strainer in intake line• Intake water is foul (most common in salt and brackish) Install Knocks Out Odors Kit (KO2) to help deodorize intake water• Back pressure from holding tank Tank full or vent clogged, inspect and clean• Permeated discharge hose rub with warm damp rag if smell transfers to rag replace hose
Electric motor labors or manually hard to pump• Low voltage at motor while running Check condition of batteries, terminals and wire connections for corrosion. Check gauge of wire to be sure it is not undersized. • Holding tank vent clogged or tank full Clean holding tank vent or empty tank• Discharge line obstructed
Test by putting a short piece of hose on discharge fitting and pump into bucket if OK then - Check thru-hull fitting and hose for clog
• MSD CloggedTest as above if OK - then see the MSD instruc-tion manual
• Discharge seacock closed Open discharge seacock
7L563v0320jlc

8
RARITAN INSTALLATION ACCESSORIESPart No. Description163000 In-Line Strainer1PCP22 C.P., Cleans Potties, Bio-enzymatic, 22oz.CHTII Compact holding tank - 5 gallonSFH Sani-Flex Hose SL1CC Super Lube 1cc tubeKO2 Knocks Out Odor KitTD90319 Vented Loop 3/4" TD90323 Vented Loop 1 1/2" TD90314W "Y" ValveOVERHAUL KITSPart No. DescriptionPHRKIIC PHII&PHEII-Repair kitPHIIPUMP PHII Pump replacement assemblyCONVERSION KIT P104E** PH SUPERFLUSH to PH POWERFLUSH
Conversion Kit
ADDITIONAL PARTS FOR RARITAN PH SUPERFLUSH AND PH POWERFLUSH
Part No. Description3 25101 Base4 25102 Base Plug5 25103 Base O-Ring6 25104 Base mounting plug 8 F081 Bowl Bolt 1/4"-20 x 2 S/S Hex head9 RNI Nylon Shoulder Washer10 1226B Nut, 1/4"-20 S/S (8) 12 1208W Retractable handle13 1236E Bowl Elbow14 CH43P Hose Clamp (2)15 CH42 Hose (¾" I.D.)17 221361 Sealing Washer19 F408 Screw: 1/4-20 x 5/820 1200CW Pump Housing21 1214W Piston Shaft Seal Cartridge Assy
(1214, 1214A, 1214B)23 1214A Cartridge Shaft seal24 1214B Cartridge O-ring25 1203BW Intake Valve Body w/"O" Rings,
(Includes 1203B, 1203B1, 1203B2, 1203B3)
29 1204B Intake Valve Cap30 1202 Intake and Discharge Valve Gasket (2)31 1209BW Valve Handle32 1124 1/4"- 20 x 1/2" R.H. Machine Screw33 1217 Discharge Valve Cap34 LWS Intake and Discharge Valve Spring (2)35 1201 Intake and Discharge Valve Ball (2)36 1212W Piston Rod Assembly w/"O" Ring
(1232MS)37 1232MS Piston "O" Ring38 1203W Air Valve Assembly39 1228CW Flapper valve with embedded weight40 C253 Joker Valve41 1222AW 90° Discharge w/Flange (Std.)42 1222B Straight Discharge (Opt.)43 1115 3/8"-16 x 1 1/2" Hex Head S/S Bolt(2)44 1223B Flange Nut 3/8"-16 S/S (2)45 1210 Handle Socket46 1211PL Piston Rod Yoke47 F005 1/4" - 20 x 5/16" S/S set screw48 1218 Fulcrum Link (2)49 1216 Clevis Pin (3)50 1210A Cotter Pin
PARTS FOR RARITAN PH SUPERFLUSH AND PH POWERFLUSH
L563v0320jlc
BOWL & SEATPart No. Description16 1236AW Spud assy.1 1237W Marine-size Bowl assy.1 1244W White Household-style Bowl assy.7 25105 Bowl Gasket2 1238SC Marine-size seat & cover; Slow Close2 1245SC Household-style seat & cover; Slow Close11 VCAP Vinyl Cap
**Voltage: 12 (12VDC) 24 (24VDC) 12T (115V/230V AC)

9
Correct Orientation of Flapper Valves
WRONG!
L563v0320jlc
PH SUPERFLUSH EXPLODED VIEW
Model Bowl (white) Size Operation Voltage
P10 1 -Marine Size 2 -Household Size3 -Lower Assy (no bowl) 4 -Electric Conversion Kit
None -Manual E -Electric
None -Manual 12 -12V DC 24 -24V DC 12T -115V/230V DC
ORDERING INFO: Sample Part: P101E12 = Marine size bowl, Electric drive, 12V DC

10
Part No. Description 1 1130** Electric Gear Box Assembly2 1131**P Motor and Gearbox Assy.3 1132 Gear Box Assembly Base4 1133 Gear Box Assembly Cover5 1134 Connecting Rod6 1135 Link7 1136 Roller8 1137 Roller Washer9 F359 Gear Box Mounting Screws (3)10 F360 Roller Screw11 F149VT Set Screw12 F408 Assembly Mounting Screws (2)13 1115 3/8-16 x 1 1/2" Bolt14 1115A 3/8-16 Nut
L563v0320jlc
**Voltage: 12 (12VDC) 24 (24VDC) 12T (115V/230V AC)
POWERFLUSH EXPLODED VIEW
PRS Power Rocker Switch 1.83
[46.5]
0.87
[22.0]
2.27
[57.8]
1.37
[34.7]
CUT
OUT
SCREW PILOT
HOLE LOCATIONS
(4X)
ACTUAL SIZE
1.37 [34.7]
1.83 [46.5]
0.87 [22.0]
2.27 [57.8]
Power Rocker Switch Template Screw Pilot Hole Locations (4X)
2
3
4
5
6
7
8
9
10
11
12
13
14
9
9
1

11
The PHRKIIC Repair Kit Includes: 1201: ¾ Valve Ball (2)1202: Valve Cap Gasket (2)1203BW: Intake Valve Body w/"O" Rings (includes: 1203B, 1203B1, 1203B2, 1203B3)1214W: Piston Shaft Seal Cartridge Assembly (includes: 1214, 1214A, 1214B) 1226C: Plastic Spacer Washer (4)1228CW: Flapper Valve Assembly1232MS: Piston Multi-Seal O-Ring1234: Bowl Gasket (White)C253: Joker ValveRNI: Nylon Shoulder Washer (4)SL1CC: Super Lube: 1cc Packet (3)
Inlet Valve/ Handle Orientation and Repair
AD
VAN
CE
D R
EPA
IR
Tools you will need: Channel type pliers.Flatblade (med) screwdriver
Gaining access to the inlet valve
To clean out debris or dismantle the valve it is neces-sary to access the inlet valve spring (part# LWS) and ball (#1201).
It is only necessary to unscrew the inlet valve cap (part #1204B) approximately 5 revolutions with channel type pliers. Note: It is not necessary to remove or loosen any other part.
Then by grasping the 1209BW handle and gently lifting upwards, the entire assembly (down to part #1203BW) can be removed.
Clean out any debris in this area.
Replace gasket (part#1202) if necessary and apply a small amount of Super Lube (#SL1CC) to the O-ring area of the 1203BW.
Reassemble in the reverse order making sure that the alignment post of the 1200CW housing protrudes between the two limiting stops in the underside of the 1209BW. This allows for the proper position of the inlet valve.If installed properly this creates a maximum of a 1/4 turn from "Dry" to "Flush" not 3/4 turn.
Note: Do not overtighten #1204B as gasket #1202 will displace
L563v0320jlc
12
Raritan Engineering Company warrants to the original purchaser that this product is free of defects in materials or workmanship for a period of one year from the product’s date of purchase. Should this product prove defec-tive by reason of improper workmanship and/or materials within the warranty period, Raritan shall, at its sole option, repair or replace the product.
1. TO OBTAIN WARRANTY SERVICE, Consumer must deliver the product prepaid, together with a detailed description of the problem, to Raritan at 530 Orange St., Millville, N.J. 08332. When requesting warranty service, purchaser must present a sales slip or other document which establishes proof of purchase. THE RETURN OF THE OWNER REGISTRATION CARD IS NOT A CONDITION PRECEDENT OF WARRANTY COVER-AGE. However, please complete and return the owner Registration Card so that Raritan can contact you should a question of safety arise which could affect you.
2. THIS WARRANTY DOES NOT COVER defects caused by modifications, alterations, repairs or service of this product by anyone other than Raritan; defects in materials or workmanship supplied by others in the process of installation of this product; defects caused by installation of this product other than in accordance with the manufacturer’s recommended installation instructions or standard industry procedures; physical abuse to, or misuse of, this product. This warranty also does not cover damages to equipment caused by fire, flood, external water, excessive corrosion or Act of God.
3. ANY EXPRESS WARRANTY NOT PROVIDED HEREIN, AND ANY REMEDY FOR BREACH OF CON-TRACT WHICH BUT FOR THIS PROVISION MIGHT ARISE BY IMPLICATION OR OPERATION OF LAW, IS HEREBY EXCLUDED AND DISCLAIMED. ALL IMPLIED WARRANTIES SUCH AS THOSE OF MERCHANTABILITY AND OF FITNESS FOR A PARTICULAR PURPOSE, IF APPLICABLE, AS WELL AS ANY IMPLIED WARRANTIES WHICH MIGHT ARISE BY IMPLICATION OF LAW, ARE EXPRESSLY LIMITED TO A TERM OF ONE YEAR. SOME STATES DO NOT ALLOW LIMITATIONS ON HOW LONG A LIMITED WARRANTY LASTS, SO THE ABOVE LIMITATION MAY NOT APPLY TO YOU.
4. UNDER NO CIRCUMSTANCES SHALL RARITAN BE LIABLE TO PURCHASER OR ANY OTHER PER-SONS FOR ANY SPECIAL OR CONSEQUENTIAL DAMAGES, WHETHER ARISING OUT OF BREACH OF WARRANTY, BREACH OF CONTRACT, OR OTHERWISE. SOME STATES DO NOT ALLOW THE EXCLUSION OR LIMITATION OF INCIDENTAL OR CONSEQUENTIAL DAMAGES, SO THE ABOVE LIMITATION OR EXCLUSION MAY NOT APPLY TO YOU.
5. No other person or entity is authorized to make any express warranty, promise or affirmation of fact or to as-sume any other liability on behalf of Raritan in connection with its products except as specifically set forth in this warranty.
6. This warranty gives you specific legal rights, and you may also have other rights which vary from state to state.
LIMITED WARRANTY
L563v0320jlc Specifications Subject to Change Without Notice Printed in U.S.A. 12
530 Orange Street, Millville, NJ 08332 USATelephone: 856-825-4900 FAX: 856-825-4409 www.raritaneng.com