personalbrain 5.5 transition guide
TRANSCRIPT

Companion for transitioning to Version 5.5 of PersonalBrain. Posted November 16, 2009 © 2009. TheBrain Technologies LP. All Rights Reserved. TheBrain, PersonalBrain, Brain, Thoughts, and Work the Way You Think are trademarks or registered trademarks of TheBrain Technologies LP. Other trademarks or service marks appearing herein are the property of their respective owners.

Table of Contents
Transitioning to PersonalBrain 5.5 i
Table of Contents Introduction .................................................................................................................. 1
About this Guide ................................................................................................. 2 Platform-Specific Enhancements ........................................................................ 2
Windows Only ................................................................................................2 Mac OS X Only ..............................................................................................2
Easier, More Powerful Reports .................................................................................... 2 Creating and Saving Custom Reports ................................................................. 3 Managing Custom Reports ................................................................................. 5 Display Filtering .................................................................................................. 6
Faster, More Flexible Visualizations ........................................................................... 7 Expanded View Enhancements .......................................................................... 7
Collapsing and Expanding Thoughts ..............................................................8 Spacing and Sizing Thoughts .........................................................................8
Outline View Enhancements ............................................................................... 8 Streamlined User Interface .......................................................................................... 9
Improved Animation and Links ............................................................................ 9 View Selection .................................................................................................. 10 Better Display of Highlighted Thoughts ............................................................. 10 Forgetting, Deleting, and Unlinking ................................................................... 10 Types and Tags ................................................................................................ 10
Tags and Types Menus ................................................................................ 10 Tags ............................................................................................................. 11
Selecting Colors ................................................................................................ 11 Calendar .......................................................................................................................13
Reocurring Events ............................................................................................ 14 Reminders ........................................................................................................ 15
Customizable Keyboard Shortcuts ............................................................................16 Integrated Screen Captures ........................................................................................19 Spell Checking .............................................................................................................21 New and Enhanced Preferences ................................................................................21
New Views Tab ................................................................................................. 22 Expanded View ............................................................................................ 22 Expanded Normal View Setup ..................................................................... 22 Outline View Setup ...................................................................................... 23
New Advanced Tab ........................................................................................... 23 Wander Animation Setup ............................................................................. 24
Other Enhancements ..................................................................................................24

Table of Contents
Transitioning to PersonalBrain 5.5 ii
Notes ................................................................................................................ 24 Inserting Images .......................................................................................... 24 Default Notes Styles..................................................................................... 24
Virtual Thoughts ................................................................................................ 25 Importing Word Outlines ................................................................................... 25 Copying Outlines with Notes ............................................................................. 26 Search for Missing Files .................................................................................... 26 Copy from Outlook as Drag and Drop ............................................................... 26 Export to Folder ................................................................................................ 26 Improved Printing .............................................................................................. 26 Search and Replace Attachment Locations....................................................... 27 Searching Inside Mind Maps ............................................................................. 27 SiteBrain Improvements .................................................................................... 27 BrainZip Improvements ..................................................................................... 27 Firefox Bookmark Import ................................................................................... 27
Index .............................................................................................................................28
Introduction
Transitioning to PersonalBrain 5.5 1
Introduction
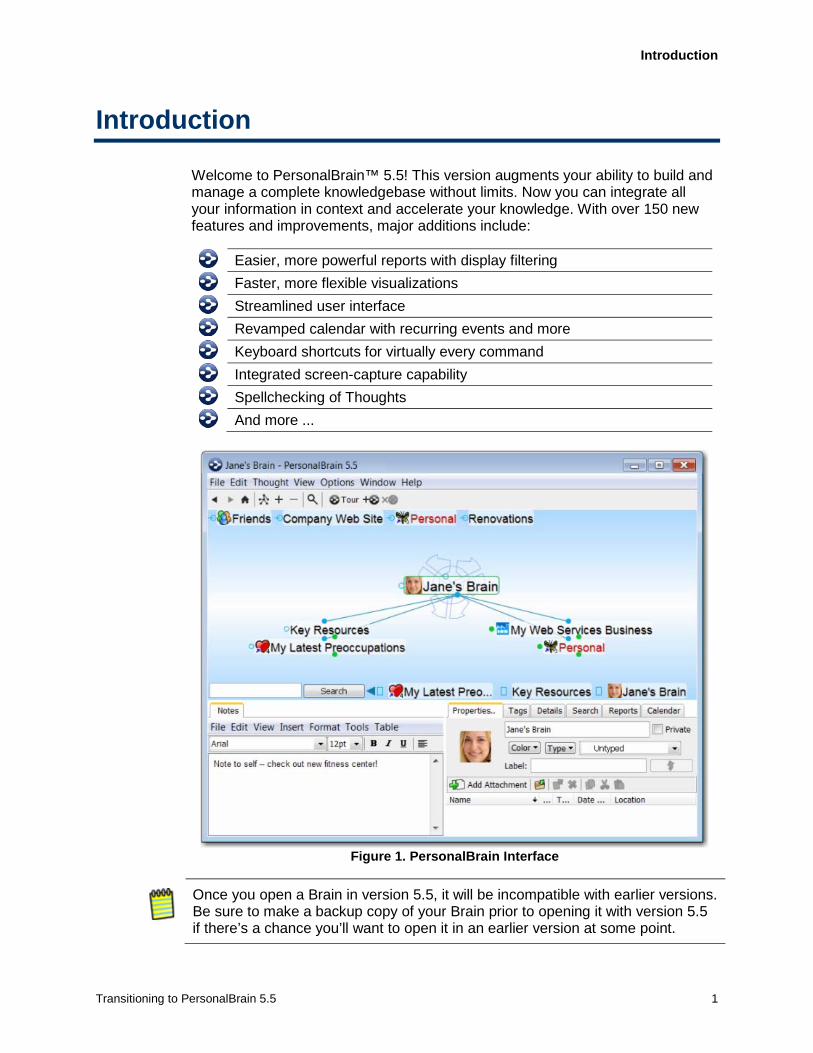
Welcome to PersonalBrain™ 5.5! This version augments your ability to build and manage a complete knowledgebase without limits. Now you can integrate all your information in context and accelerate your knowledge. With over 150 new features and improvements, major additions include:
Easier, more powerful reports with display filtering
Faster, more flexible visualizations
Streamlined user interface
Revamped calendar with recurring events and more
Keyboard shortcuts for virtually every command
Integrated screen-capture capability
Spellchecking of Thoughts
And more ...
Figure 1. PersonalBrain Interface
Once you open a Brain in version 5.5, it will be incompatible with earlier versions. Be sure to make a backup copy of your Brain prior to opening it with version 5.5 if there’s a chance you’ll want to open it in an earlier version at some point.
Easier, More Powerful Reports
Transitioning to PersonalBrain 5.5 2
About this Guide
This guide covers the new features and changes in PersonalBrain 5.5 that have been made since version 5.0. It is intended for people who are already familiar with version 5.0.
This icon is used to indicate that the feature is available in the Pro edition only.
Platform-Specific Enhancements
The following enhancements are important changes and improvements that are specific to a particular operating system.
Windows Only Auto-hide on multiple monitors: The auto-hide tab can now be dragged from
one monitor to the next and it will automatically position itself on the monitor where the application is, instead of always using the primary monitor
“Hot key”: The “hot key” now works whether or not the PersonalBrain window is in auto-hide mode
Context menu key: Pressing this key (between the Windows key and the Ctrl key to the right of the space bar) opens the context menu for the active Thought
Mac OS X Only Apple Mail: Now you can drag and drop messages from Apple Mail―first select
the items you wish to drop into PersonalBrain, then begin the drag and drop process
Presentation mode: Now uses the full screen, covering the menu bar and the dock
iCal, Address Book and Mail: Improved icons in the attachments list for these items (Properties & Attachments
Easier, More Powerful Reports
tab)
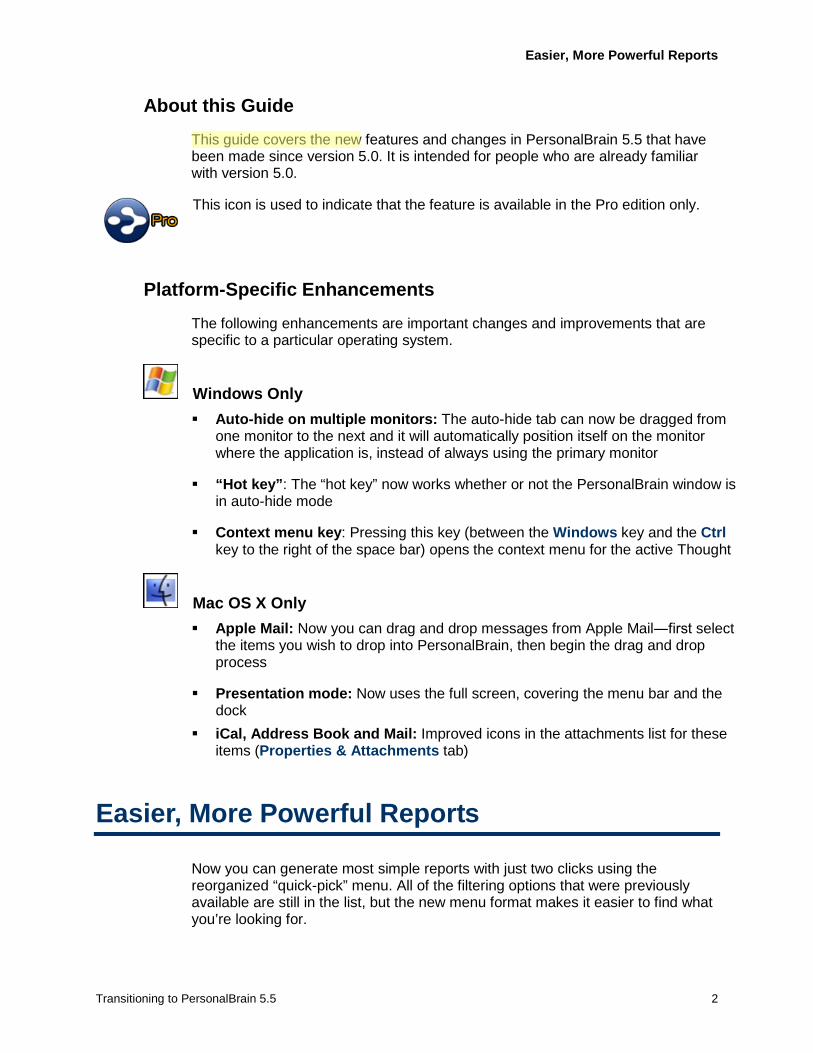
Now you can generate most simple reports with just two clicks using the reorganized “quick-pick” menu. All of the filtering options that were previously available are still in the list, but the new menu format makes it easier to find what you’re looking for.
Easier, More Powerful Reports
Transitioning to PersonalBrain 5.5 3
Figure 2. Reorganized Reports “Quick-Pick” Menu
You can also create powerful custom reports using multiple criteria including multiple types, tags, and date ranges based on when Thoughts were activated, modified, or created, and attachment information. You can even name and save custom reports so you can access them again easily.
Creating and Saving Custom Reports
Custom reports can be saved and used again at any time. You can define custom reports using multiple types, tags, attachments, and other criteria.
To create a custom report:
1. Click the Reports
2. Click the
tool tab, then click the “quick-pick” button (which shows “All” by default).
Custom command, then click Custom report. You’ll see the Custom Report dialog box.

Easier, More Powerful Reports
Transitioning to PersonalBrain 5.5 4
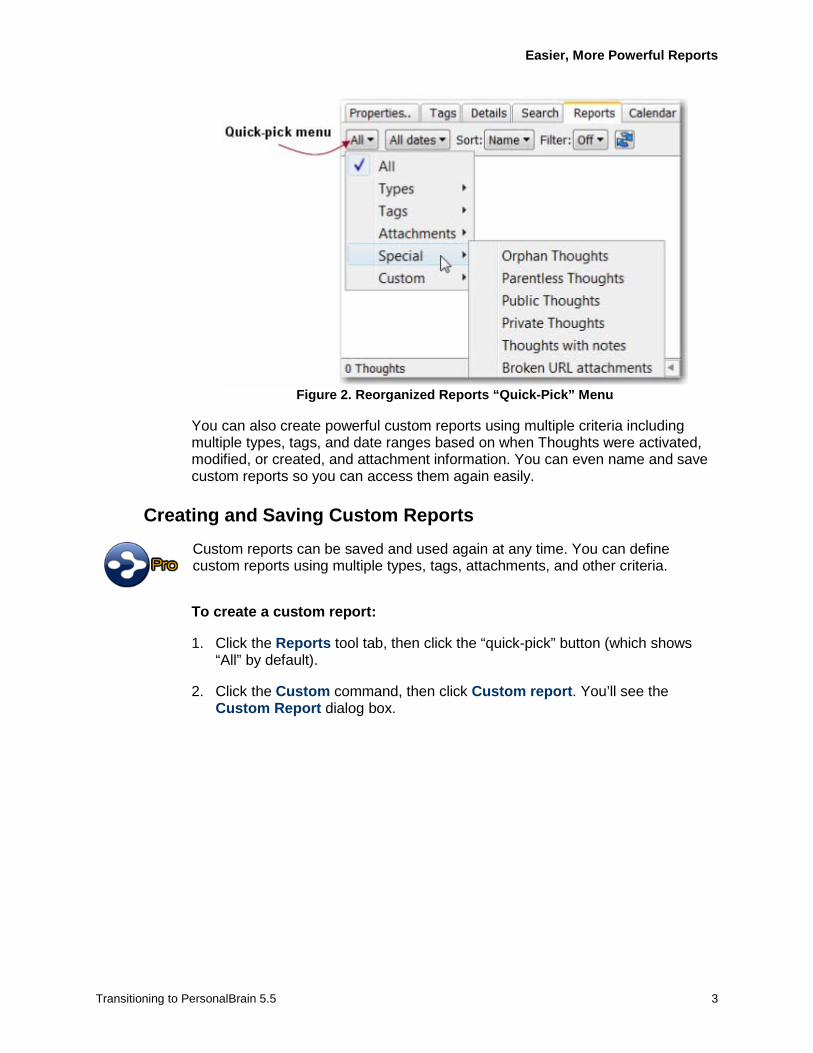
Figure 3. Custom Report Dialog Box
Your custom report may include multiple Thought types and multiple tags. You can also request specific types of attachments, or accept the default of ignoring attachments.

Easier, More Powerful Reports
Transitioning to PersonalBrain 5.5 5
To select a type, click its check box. The report will include Thoughts whose type matches any of the selected types. To select a tag, click it and it will be marked with a plus (+) sign. Clicking the tag again marks it with a minus (-) sign. Clicking a third time clears the tag. The report will include Thoughts with all of the tags marked with a plus sign and none of the tags marked with a minus sign. Tags that are not marked are ignored.
3. Make your selections, then click the OK button (or click the Reset
To save a custom report:
button to return to the original settings).
1. Click the “quick-pick” button (which shows “Custom report” when you have just created a custom report).
2. Click the Custom command, then click Save custom report. You’ll see the Save Report
3. Type a name for your report, then click the
dialog box.
OK
To open a saved custom report:
button. The “quick-pick” button will now display the name of your new report.
1. Click the “quick-pick” button on the Reports
2. Click the
tool tab.
Custom command, click Load custom report
Managing Custom Reports
, then click the name of the report you want to open.
You can rename or delete the custom reports you create. You can also save a custom report using a new name, which preserves the original report.
To rename a custom report:
1. Click the Reports
2. Click the
tool tab, then click the “quick-pick” button (which shows “All” by default or the name of the open custom report).
Custom command, then click Manage saved reports. You’ll see the Saved Reports
3. Click on the report of your choice, then click the
dialog box.
Rename
4. Type the new name, then click the
button.
OK button. Click the Close button to close the Saved Reports dialog box.
If the custom report you renamed was open at the time, you will still see its original name in the “quick-pick” button until you select a different report option. Then you can open the newly-named custom report.
Easier, More Powerful Reports
Transitioning to PersonalBrain 5.5 6
To save the open custom report using a new name:
1. Click the “quick-pick” button (which shows the name of the open custom report).
2. Click the Custom command, then click Save custom report as. You’ll see the Save Report As
3. Type the new name, then click the
dialog box.
OK
To delete a custom report:
button.
1. Click the “quick-pick” button.
2. Click the Custom command, then click Manage saved reports. You’ll see the Saved Reports
3. Click on the report of your choice, then click the
dialog box.
Delete
4. Click the
button.
OK button to confirm, then click the Close button to close the Saved Reports dialog box.
If the custom report deleted was open at the time, you will still see its name in the “quick-pick” button until you select a different report. Note that custom reports are unique for each Brain you create.
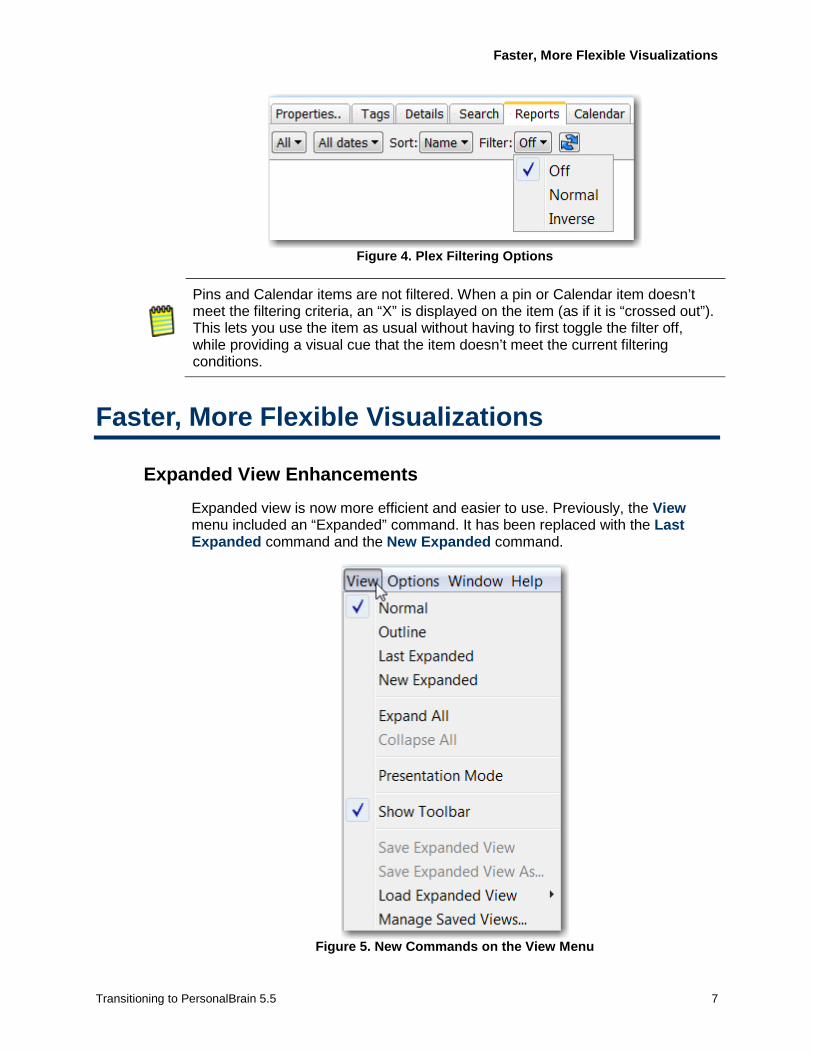
Display Filtering
You can temporarily hide or show Thoughts in the Plex based on the current report. This new display filtering feature lets you apply your report criteria to the display. This can be used to show or hide only Thoughts that match the criteria you select. Filter by tag, type, date range, attachment, or anything else you can report on.
To filter the display in the Plex:
1. Create a report or select a saved custom report. Then:
Select “Normal” in the drop-down Filter
Select “Inverse” in the drop-down
list on the report toolbar to hide all Thoughts that are not included in the report.
Filter
Select “Off” in the drop-down
list to hide all Thoughts that meet your report’s criteria. This is called “inverse filtering.”
Filter list to stop filtering the Plex based on report criteria.
Faster, More Flexible Visualizations
Transitioning to PersonalBrain 5.5 7
Figure 4. Plex Filtering Options
Pins and Calendar items are not filtered. When a pin or Calendar item doesn’t meet the filtering criteria, an “X” is displayed on the item (as if it is “crossed out”). This lets you use the item as usual without having to first toggle the filter off, while providing a visual cue that the item doesn’t meet the current filtering conditions.
Faster, More Flexible Visualizations
Expanded View Enhancements
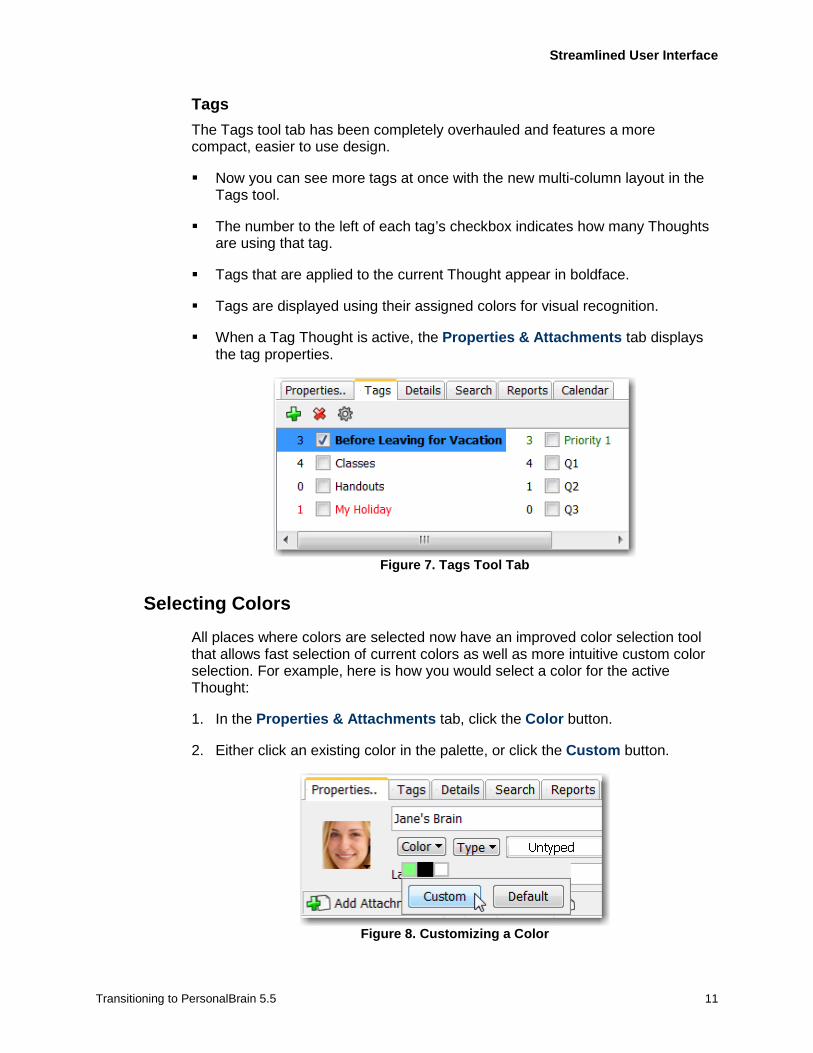
Expanded view is now more efficient and easier to use. Previously, the View menu included an “Expanded” command. It has been replaced with the Last Expanded command and the New Expanded command.
Figure 5. New Commands on the View Menu

Faster, More Flexible Visualizations
Transitioning to PersonalBrain 5.5 8
Maintains the current active Thought and other linked Thoughts and switches the Plex to Expanded view.
New Expanded
Returns to how the Plex looked the last time it was in Expanded view, reactivating whatever Thought was active at that time.
Last Expanded
Collapsing and Expanding Thoughts New visual cues appear when the mouse is over a Thought’s collapse or expand control.
Pointing at the collapse control displays a line crossing out each Thought that will be hidden.
Pointing at the expand control displays a rounded rectangle around each Thought that will be expanded.
Spacing and Sizing Thoughts Expanded view now lets you adjust the spacing between Thoughts and the size of Thought text independently. Just spin the mouse wheel over an empty area of the Plex to adjust spacing and spin the mouse wheel over the active Thought to adjust text size.
Outline View Enhancements
Outline view now features unlimited expansion in a parent-ward direction. Parents can be expanded to show grandparents, great-grandparents, and so on, just like children―but in reverse. The expand all and collapse all controls affect both children and parents.

Streamlined User Interface
Transitioning to PersonalBrain 5.5 9
Figure 6. Outline View
Streamlined User Interface
Improved Animation and Links
In PersonalBrain 5.5, you will notice many improvements throughout all of the views.
The behavior of links has been enhanced as well:
When the mouse pointer is over a link, if either of the Thoughts connected by the link is off-screen, it is displayed onscreen while the link is being highlighted. This is particularly useful when you are looking at a large Outline or Expanded view.
Links retain their assigned colors even when they are highlighted. This allows you to use link colors meaningfully and interpret those colors consistently.

Streamlined User Interface
Transitioning to PersonalBrain 5.5 10
View Selection
PersonalBrain now automatically remembers the last view you used and selects it by default. For example, if you select Outline view and then close PersonalBrain, the next time you open it, Outline view will be active.
Better Display of Highlighted Thoughts
When a Thought is highlighted, it now remains in place and never moves regardless of the length of its name. Very long names can now be seen more easily as they are displayed on multiple lines during mouseover. This also keeps Thought icons stationary so they are easier to click.
Forgetting, Deleting, and Unlinking There is a new setting in Preferences under the Advanced icon―Forget Thoughts before deleting. Unchecking this setting lets you skip the process of forgetting Thoughts if you don’t want to use this feature.
There are also new ways to forget, delete, and unlink Thoughts using the Delete key:
If the Forgetting feature is enabled, pressing Delete
If Forgetting is disabled or the
forgets the highlighted Thought.
Shift key is pressed, pressing Delete
If a link is highlighted, pressing
deletes the highlighted Thought.
Delete
Types and Tags
removes the link.
Tags and Types Menus The Thought Tags and Types menus are more powerful and have the following enhancements:
If you click the Tags command on the Thought menu, you can hold down the Ctrl key as you click on each tag to select multiple tags at the same time. The same is true when you right-click a Thought and use the Tags command on the context menu. (Alternatively, the Shift
key can be used to accomplish the same thing.)
New Tag and New Type commands have been added to the top of the Tag and Type sub-menus (accessed via the Thought
The items in the Tags and Types menus are displayed using the colors that have been assigned to them so that they are easier to identify.
menu).
Streamlined User Interface
Transitioning to PersonalBrain 5.5 11
Tags The Tags tool tab has been completely overhauled and features a more compact, easier to use design.
Now you can see more tags at once with the new multi-column layout in the Tags tool.
The number to the left of each tag’s checkbox indicates how many Thoughts are using that tag.
Tags that are applied to the current Thought appear in boldface.
Tags are displayed using their assigned colors for visual recognition.
When a Tag Thought is active, the Properties & Attachments tab displays the tag properties.
Figure 7. Tags Tool Tab
Selecting Colors
All places where colors are selected now have an improved color selection tool that allows fast selection of current colors as well as more intuitive custom color selection. For example, here is how you would select a color for the active Thought:
1. In the Properties & Attachments tab, click the Color
2. Either click an existing color in the palette, or click the
button.
Custom button.
Figure 8. Customizing a Color

Streamlined User Interface
Transitioning to PersonalBrain 5.5 12
Figure 9. Selecting a Color
3. Use any of the controls or combination of controls, as described below, to select a color. The controls let you adjust the colors while locking a specific dimension. The squares and circles in the Choose a Color
Method
dialog box help you visualize the interplay with the colors so you can make adjustments at a glance without needing to manipulate individual sliders.
Notes Click in the circle Click on any color in the large circle.
Use the slider After you click any color in the large circle, drag the slider up or down to make the color more or less intense. The long vertical slider becomes a control for whatever you have selected. For example, if you have red selected, then the slider adjusts the level of red ranging from 0 to 255. Or, to quickly adjust the amount of blue, you can click in a blue area, then adjust the vertical slider.

Calendar
Transitioning to PersonalBrain 5.5 13
Method Notes Use the radio buttons and spinner arrows
Selecting a radio button not only changes the large circle to a square (or changes the square back to a circle depending on the option.) This also locks or selects that color. For example, if you select the radio button next to red, and click within the square it will change the color, but it will not change the level of red in the color. It's locked down at whatever setting you selected for red.
Hue: Using the Hue spinner arrows moves the slider indicator up or down, based on the values.
Sat: Using the Saturation spinner arrows moves the small selection circle within the large color square left or right, based on the values.
Bri: Using the Brightness spinner arrows moves the small selection circle within the large color square up or down, based on the values. The Bri radio button is selected by default each time the Choose a Color
Red: Adjust the amount of red in the current color, or click the radio button to lock in the shade.
dialog box is accessed.
Green: Adjust the amount of green in the current color, or click the radio button to lock in the shade.
Blue: Adjust the amount of blue in the current color, or click the radio button to lock in the shade.
Enter a hex value If you know the hex value for the shade of your choice, you can type it in the corresponding field.
360 is equivalent to 0 for the Hue control.
4. Click the OK
Calendar
button to activate your choice.
The Calendar tool has been enhanced with many new features including recurring events, new event details, reminder flexibility and more.

Calendar
Transitioning to PersonalBrain 5.5 14
Reocurring Events
Reoccurring events can be set daily, weekly, monthly, yearly, and virtually everything in between.
To create a reocurring event:
1. Make sure the Thought with which the event will be associated is active, then click the Calendar tool tab.
2. Click the Add button to open the Edit Event
3. Enter the name of the event in the
dialog box.
What
4. Select beginning and ending dates and times in the
field.
When fields, or click the All day checkbox.
You can also add an event to a Thought by right-clicking on it and selecting Add Event
from the context menu.
Figure 10. Inserting Dates and Times

Calendar
Transitioning to PersonalBrain 5.5 15
By default, events are set to a duration of one hour.
5. Select “Daily,” “Weekly,” “Monthly,” or” Yearly” in the Repeats field, then select the number of recurrences you want in the Repeat Every
6. The name of the field immediately below the
field.
Repeats field will reflect what you have selected in the Repeats
For Weekly events, choose the day of the week
field. Select the appropriate option.
For Monthly events, choose either the day of the month or the day of the week on which you want the event to repeat
7. Select either “Never ends” or “Until” (and then select a date) for the Event Range
8. Optionally, type information in the
field.
Where and Description
9. Click the
fields, set up a reminder (see the Reminders section below), and indicate the priority of this event.
Save button when you’re finished.
Events lasting more than 31 days will not be displayed for their entire duration on the Calendar. An information box on the Edit Event
Reminders
dialog box will notify you of this if you are creating an event where this would apply.
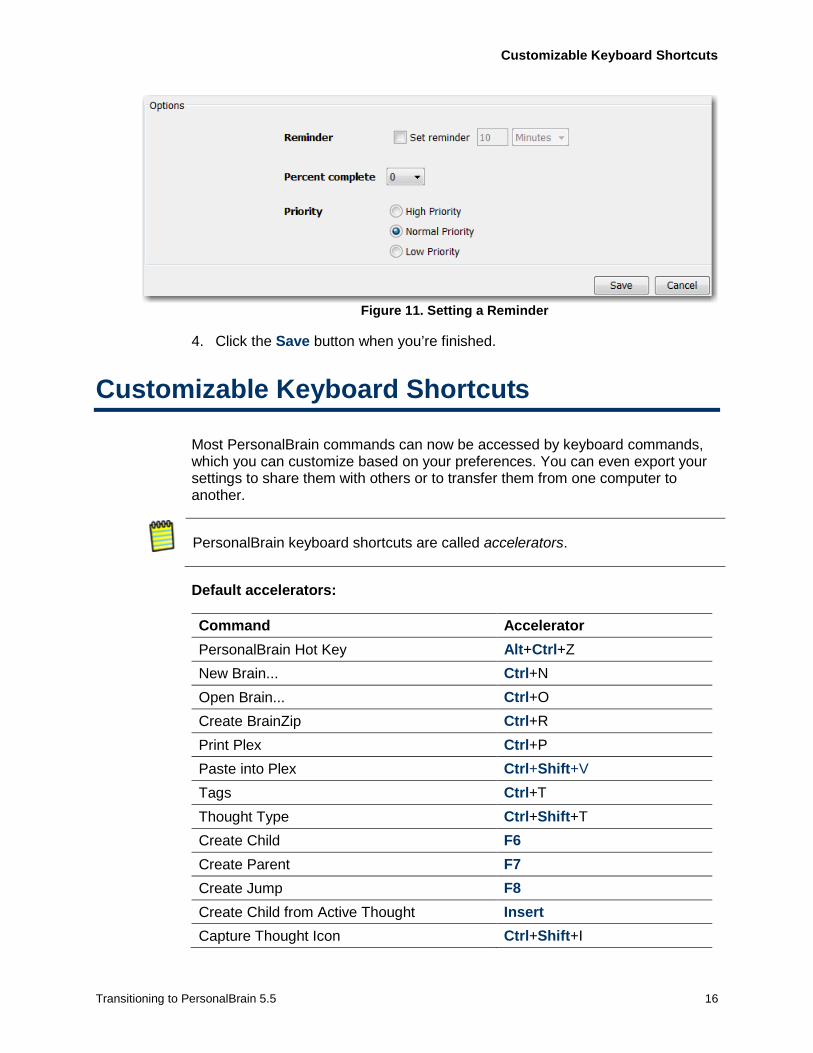
Reminders are now optional and you can customize how far in advance of the event the reminder should be activated.
To set a reminder:
1. If the Edit Event
2. Select the
dialog box for the event isn’t already open, double-click the event in the event list or the Calendar to open it.
Set reminder
3. Select a unit of measure in the
check box.
Reminder field that has a drop-down arrow, then type an appropriate number in the field to the left of the unit of measure.
Customizable Keyboard Shortcuts
Transitioning to PersonalBrain 5.5 16
Figure 11. Setting a Reminder
4. Click the Save
Customizable Keyboard Shortcuts
button when you’re finished.
Most PersonalBrain commands can now be accessed by keyboard commands, which you can customize based on your preferences. You can even export your settings to share them with others or to transfer them from one computer to another.
PersonalBrain keyboard shortcuts are called accelerators.
Default accelerators:
Command Accelerator PersonalBrain Hot Key Alt+CtrlNew Brain...
+Z Ctrl
Open Brain... +N
CtrlCreate BrainZip
+O Ctrl
Print Plex +R
CtrlPaste into Plex
+P
Tags Ctrl+Shift+V Ctrl
Thought Type +T
Ctrl+ShiftCreate Child
+T
Create Parent F6
Create Jump F7
Create Child from Active Thought F8
Capture Thought Icon Insert Ctrl+Shift+I

Customizable Keyboard Shortcuts
Transitioning to PersonalBrain 5.5 17
Command Accelerator Open Thought Folder Ctrl+ShiftCreate Duplicate Child Thought
+F Ctrl
Rename +D
Normal View F2 Ctrl+Shift
Outline View +1
Ctrl+ShiftLast Expanded View
+2 Ctrl+Shift
New Expanded View +3
Ctrl+ShiftExpand All
+4 Ctrl
Collapse All += (equal sign)
CtrlPresentation Mode
+- (minus sign) Ctrl+Shift
Search Web +P
Getting Started F4
Back F1 Alt
Forward +Left
AltHome
+Right
Focus on Plex (Instant Activate) Home
Focus on Notes F3
Maximize Plex F5 Ctrl+Backquote (` above Tab
Pin 1 )
CtrlPin 2
+1 Ctrl
Pin 3 +2
CtrlPin 4
+3 Ctrl
Pin 5 +4
CtrlPin 6
+5 Ctrl
Pin 7 +6
CtrlPin 8
+7 Ctrl
Pin 9 +8
CtrlPin 10
+9 Ctrl
Advanced Search +0
Arrow Up F9 (up arrow key)
Arrow Down (down arrow key) Arrow Left (left arrow key) Arrow Right (right arrow key) Expand/Collapse Thought in outline view Space bar Forget/Delete highlighted Thought or link Delete

Customizable Keyboard Shortcuts
Transitioning to PersonalBrain 5.5 18
Command Accelerator Activate Thought Open/Add Attachment
Enter Shift+
To define your own accelerators:
Enter
1. Open the Preferences dialog box by either clicking the Options menu, then clicking the Preferences command or by right-clicking in a blank area of the Plex, and then clicking the Preferences
2. Click the
command.
Accelerators
3. Click on the command of your choice in the left column, then press the Function key or keyboard combination of your choice. For example, you might choose to assign the “Create Pin” command to
icon.
Ctrl+Shift+P.
Figure 12. Accelerators Section of Preferences
Integrated Screen Captures
Transitioning to PersonalBrain 5.5 19
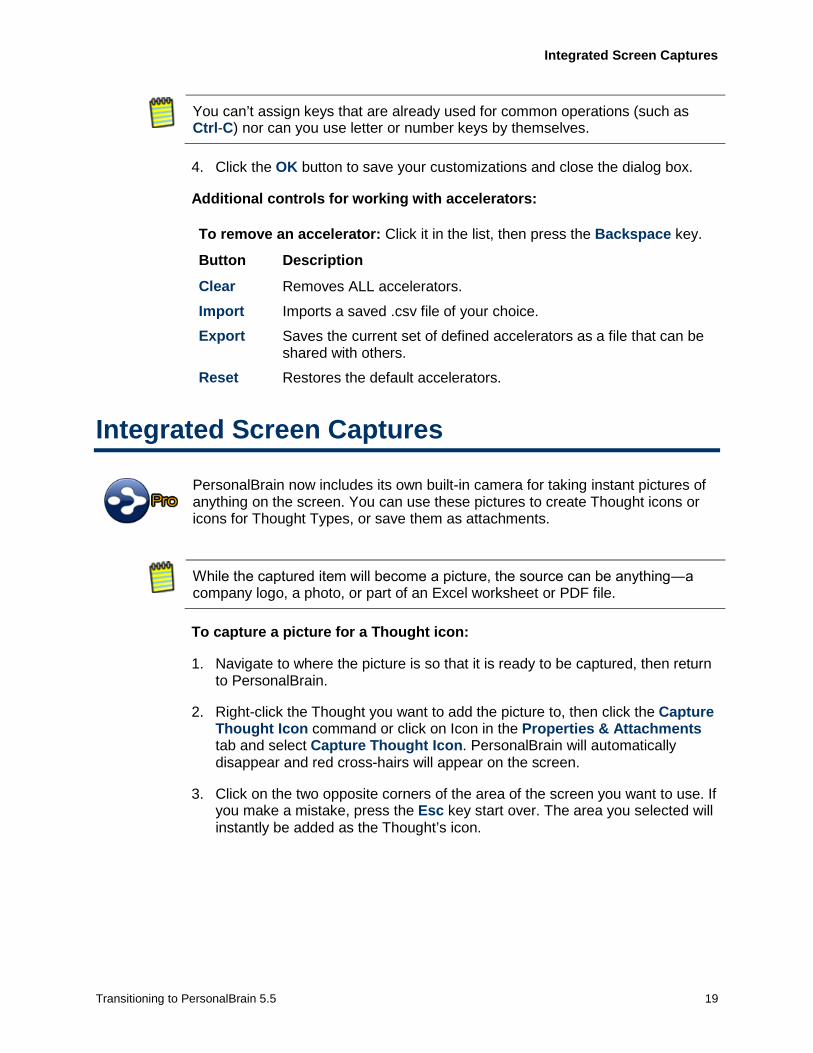
You can’t assign keys that are already used for common operations (such as Ctrl-C
4. Click the
) nor can you use letter or number keys by themselves.
OK
Additional controls for working with accelerators:
button to save your customizations and close the dialog box.
To remove an accelerator: Click it in the list, then press the Backspace
Button
key.
Description
Removes ALL accelerators. Clear Imports a saved .csv file of your choice. Import Saves the current set of defined accelerators as a file that can be shared with others.
Export
Restores the default accelerators. Reset
Integrated Screen Captures
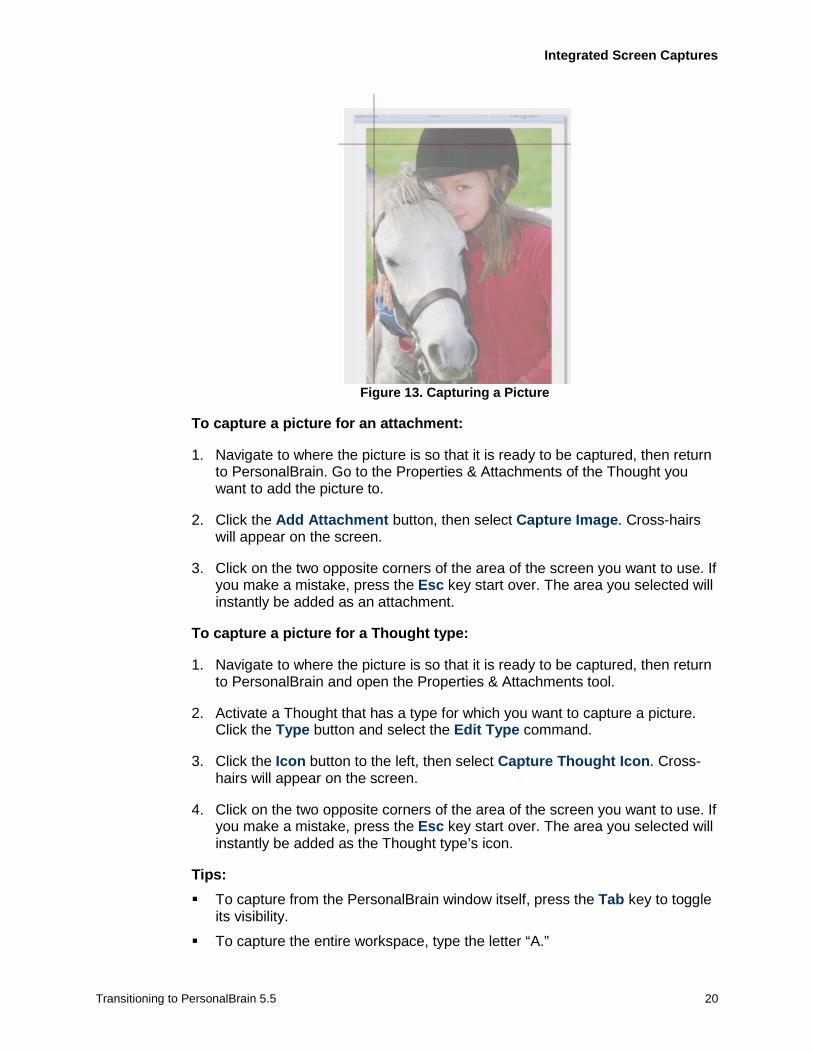
PersonalBrain now includes its own built-in camera for taking instant pictures of anything on the screen. You can use these pictures to create Thought icons or icons for Thought Types, or save them as attachments.
While the captured item will become a picture, the source can be anything―a company logo, a photo, or part of an Excel worksheet or PDF file.
To capture a picture for a Thought icon:
1. Navigate to where the picture is so that it is ready to be captured, then return to PersonalBrain.
2. Right-click the Thought you want to add the picture to, then click the Capture Thought Icon command or click on Icon in the Properties & Attachments tab and select Capture Thought Icon
3. Click on the two opposite corners of the area of the screen you want to use. If you make a mistake, press the
. PersonalBrain will automatically disappear and red cross-hairs will appear on the screen.
Esc key start over. The area you selected will instantly be added as the Thought’s icon.
Integrated Screen Captures
Transitioning to PersonalBrain 5.5 20
Figure 13. Capturing a Picture
To capture a picture for an attachment:
1. Navigate to where the picture is so that it is ready to be captured, then return to PersonalBrain. Go to the Properties & Attachments of the Thought you want to add the picture to.
2. Click the Add Attachment button, then select Capture Image
3. Click on the two opposite corners of the area of the screen you want to use. If you make a mistake, press the
. Cross-hairs will appear on the screen.
Esc
To capture a picture for a Thought type:
key start over. The area you selected will instantly be added as an attachment.
1. Navigate to where the picture is so that it is ready to be captured, then return to PersonalBrain and open the Properties & Attachments tool.
2. Activate a Thought that has a type for which you want to capture a picture. Click the Type button and select the Edit Type
3. Click the
command.
Icon button to the left, then select Capture Thought Icon
4. Click on the two opposite corners of the area of the screen you want to use. If you make a mistake, press the
. Cross-hairs will appear on the screen.
Esc
Tips:
key start over. The area you selected will instantly be added as the Thought type’s icon.
To capture from the PersonalBrain window itself, press the Tab
To capture the entire workspace, type the letter “A.”
key to toggle its visibility.

Spell Checking
Transitioning to PersonalBrain 5.5 21
Spell Checking
Thoughts can now be easily spell checked in real time as you are creating or renaming them. Misspelled words are automatically highlighted with a red squiggly underline. When you right-click the word, suggested corrections are listed. You can toggle this feature by selecting the Spell Check Thoughts command on the Options
The default dictionary is selected based on your computer’s language settings. You can change the language by clicking the Set Dictionary command on the Options menu.
menu. This feature also works in the Properties & Attachment tool tab.
Select the Add to Dictionary
New and Enhanced Preferences
command after you right-click a highlighted word if you want to add that spelling to the dictionary. The custom dictionary is shared with the notes editor.
The expanded Preferences dialog box helps you further fine-tune the way you use PersonalBrain.

New and Enhanced Preferences
Transitioning to PersonalBrain 5.5 22
New Views Tab
Figure 14. The View Tab of the Preferences Dialog Box
Expanded View The following options are available on the Advanced tab:
Option Default Setting
Collapse on activate Not selected
Automatically recenter Not selected
Expanded Normal View Setup Use the four sliders in this section to specify the size and spacing of Thoughts when the Plex is in Expanded view. The farther to the right, the larger and more spaced out the Thoughts will be:
Distant Thought size

New and Enhanced Preferences
Transitioning to PersonalBrain 5.5 23
Spacing
Distant Thought Spacing
Distant Thought Columns
Outline View Setup Use the two sliders in this section to specify the distance between Thoughts and the indentation of Thoughts when the Plex is in Outline view.
Active Thought Distance (drag the slider towards “far” for greater separation between the active Thought and the other Thoughts)
Thought Indentation (drag the slider towards “far” for a larger indentation between Thoughts at different levels of the outline)
New Advanced Tab
Figure 15. The Advanced Tab of the Preferences Dialog Box

Other Enhancements
Transitioning to PersonalBrain 5.5 24
The following options are available on the Advanced tab:
Option Default Setting
Open the last used Brain at startup Selected
Hide temporary files in Thought folders Selected
Forget Thoughts before deleting Selected
Highlight recently created Thoughts Selected
Sort instant results by most recently activated Selected
Enable context-sensitive names Selected
Show siblings Selected
Copy/cut/paste as text always Not selected
Wander Animation Setup The “Wander Animation Setup” section lets you specify the amount of delay between activations. You can drag the slider left or right for faster or slower action. Optionally, you can select the Show Activated Thought as Background checkbox, which is deselected by default.
Other Enhancements
Notes
Inserting Images Now you can insert a picture into a Note:
1. In the Notes tool, click where you want the picture to display, click the Image menu, then click the Insert Image
2. Click the
command.
Browse button to navigate to the image file of your choice. After you click the filename, click the Insert
3. Click the
button.
OK button. The picture will display in the Notes tab.
To change the size of the inserted picture, click it once to select it, then drag any of the handles to make the picture larger or smaller. To delete the picture, just click on it, then press the Delete
Default Notes Styles
key.
Default Notes styles let you easily modify colors and fonts for all of the Notes within your Brain. You can set defaults from within the Notes tool or by using the
Other Enhancements
Transitioning to PersonalBrain 5.5 25
General tab of the Preferences dialog box. The steps below describe the method using the Notes tool.
To set default styles for Notes:
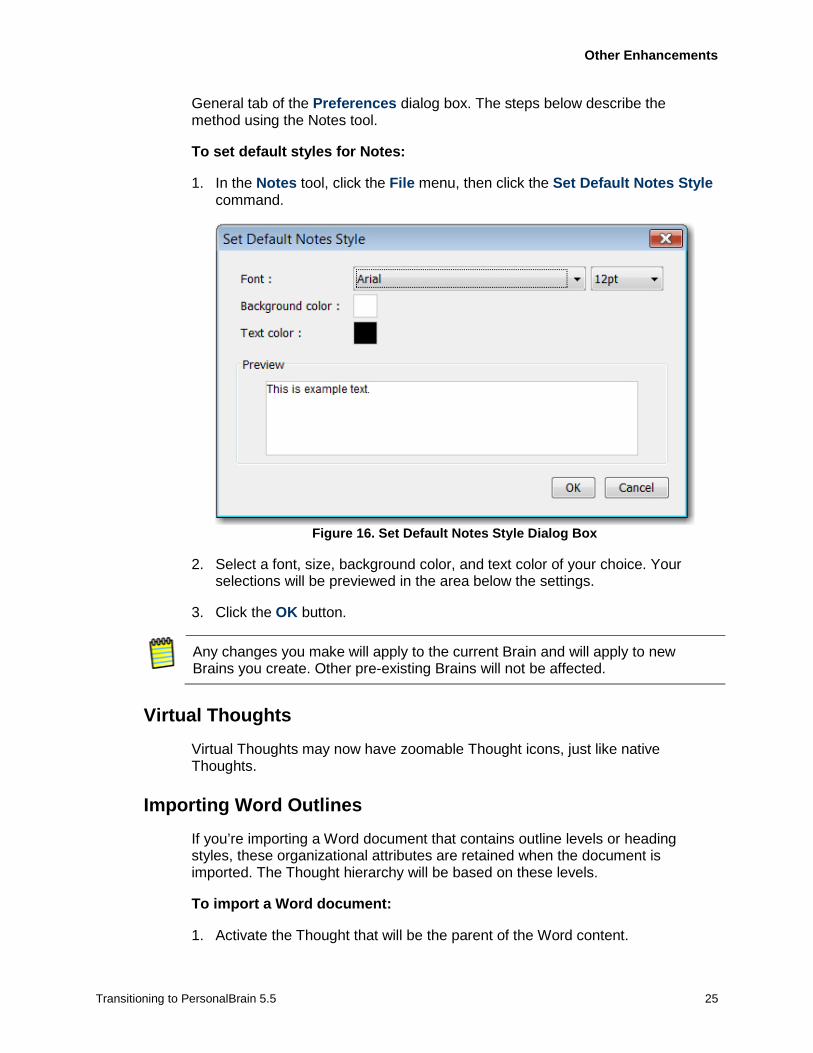
1. In the Notes tool, click the File menu, then click the Set Default Notes Style command.
Figure 16. Set Default Notes Style Dialog Box
2. Select a font, size, background color, and text color of your choice. Your selections will be previewed in the area below the settings.
3. Click the OK button.
Any changes you make will apply to the current Brain and will apply to new Brains you create. Other pre-existing Brains will not be affected.
Virtual Thoughts
Virtual Thoughts may now have zoomable Thought icons, just like native Thoughts.
Importing Word Outlines
If you’re importing a Word document that contains outline levels or heading styles, these organizational attributes are retained when the document is imported. The Thought hierarchy will be based on these levels.
To import a Word document:
1. Activate the Thought that will be the parent of the Word content.
Other Enhancements
Transitioning to PersonalBrain 5.5 26
2. Click the File menu, click the Import command, then click Word Outline (.docx)
3. Navigate to the Word file of your choice and when the filename is selected, click the
.
Open
4. Click
button.
OK
Copying Outlines with Notes
in the confirmation dialog box.
There’s a new command for copying the selected Thoughts along with their notes and placing them in tabbed outline.
1. Select the Thoughts to be copied, then right-click in the Selection box to open the context menu.
2. Click the Copy as Text Outline with Notes
3. Switch to Word or any other text application of your choice and press
command.
Ctrl
Search for Missing Files
-V (or use the program’s command for pasting).
If an external file attachment is moved to a different folder and then the link to that attachment is clicked, PersonalBrain offers to search for the missing file automatically.
Copy from Outlook as Drag and Drop Hold down the Ctrl
Export to Folder
key while dragging and dropping to create a copy of the item instead of linking to the item that is stored inside Outlook.
The Export To Folders command on the File
Improved Printing
menu exports Thoughts, attachments, and notes into a flat or hierarchical set of folders with a single command. You can export your entire Brain or limit the export using PersonalBrain’s Thought selection feature.
When printing, instead of scaling the edges of the display to match the page edges, all Thoughts currently displayed are now scaled to fit the page.
The default margins for the printed copy are 0.25” on all sides. (Previously, the margins were all 1”.)
The margins and page orientation preferences are saved.

Other Enhancements
Transitioning to PersonalBrain 5.5 27
Matching colors for printouts:
A new Print using a white background check box has been added. It appears automatically after you click OK to save your Page Setup options. When selected, the background will automatically be set to white. When not selected, printouts will show the same background as onscreen, including wallpapers.
Figure 17. Print Settings Dialog Box
Search and Replace Attachment Locations
The Utilities Replace Attachment Locations command on the File menu lets you search and replace attachment locations. This is useful when all of the attachments at a given location have moved. An example of when this may happen is if the server hosting them is renamed.
Searching Inside Mind Maps
Search now indexes the contents of MindManager and FreeMind files that have been attached to a Thought.
SiteBrain Improvements
SiteBrain export includes tags in mouseover labels.
TheBrain logo in the upper right corner of exported SiteBrains can be hidden by changing the “licenseKey” value in settings.js to “PB”.
BrainZip Improvements
There is a new option for including search index information in BrainZip files. Select this option if you do not want to have to regenerate the index, but note that this will make the BrainZip file larger.
Firefox Bookmark Import
Firefox bookmark import now connects to the Firefox database to import more accurately and reliably.

Index
Transitioning to PersonalBrain 5.5 28
Index
A Advanced tab · 24 Apple Mail · 2 auto-hide tab · 2 B BrainZip · 27 C Calendar tool · 13 collapse Thought · 8 colors · 11 Copy as Text Outline with Notes · 26 custom reports · 3 custom reports, create · 3 custom reports, delete · 6 custom reports, manage · 5 custom reports, open · 5 custom reports, save · 5 custom reports, save as · 6 D display filtering · 6 E events · 14 expand Thought · 8 Expanded view · 7 Expanded view setup · 22 F filter display · 6 H hot key · 2 I iCal · 2 importing · 25 K keyboard shortcuts · 16 L Last Expanded · 8 links · 9 M Mac Address Book · 2
Mac Mail · 2 N New Expanded · 8 Notes styles · 24 O Outline view · 8 Outline view setup · 23 Outlook · 26 P pictures for attachments · 20 pictures for Thought types · 20 pictures for Thoughts · 19 pictures in Notes · 24 Preferences · 21 Presentation mode, Mac · 2 Print using a white background · 27 printing · 26 Q quick-pick menu · 2 R recurring events · 14 reminders · 15 Replace Attachment Locations · 27 S screen captures · 19 SiteBrain · 27 spell check · 21 T Tag Thoughts · 11 Tags · 10 Types · 10 V Views tab · 22 Virtual Thoughts · 25 W Wander Animation Setup · 24 Word outlines · 25 word wrap · 10