personal preferences in neurosurgery - university of washington
TRANSCRIPT

David T. Pitkethly, M.D. July 15, 2003
1
Personal Preferences in Neurosurgery David Pitkethly, M.D. Illustrations by Raquel Abreu Imaging support by Janet Schukar Department of Neurological Surgery University of Washington Introduction and General Principles 2 1. Lumbar Herniated Disc 5 2. Recurrent Lumbar Herniated Disc 14 3. Far Lateral Lumbar Disc Herniation 21 4. Laminectomy for Lumbar Spinal Stenosis 25 5. Anterior Cervical Discectomy and Fusion 30 6. Posterior Cervical Foraminotomy for Herniated Disc 40 7. Carpal Tunnel Release 45 Personal Instruments (Pitkethly) 50

2
Introduction and General Principles
This booklet is a compendium of my observations and techniques in neurosurgery over
many years. It is intended as a guide for residents to help in preparation for surgery. The format
is such that chapters can be revised and added. Suggestions from all readers are welcome. I am
writing about a select group of operations that are commonly done by neurosurgeons, and that I
have modified over many years so they work well for me. I hope they work for you also.
An operation is to be savored like a fine meal or an intimate relationship. The pace
should be economical and not hurried. The surgeon needs to devote his entire attention to the
task at hand. Be thinking ahead one or two steps. What instruments are to be used? What are
possible complications with each step?
The surgeon needs to be thinking about the operation well before knife is placed against
skin. The more complex the operation, the more thinking and reading needs to be done to prepare
properly. Beware of everything that can go wrong and what steps are required to correct any
complication. Before the operation you must review in your mind the pertinent history and
physical findings. Go over the diagnostic studies one last time. Check the patient’s position. Is
the operation to be performed from the right side or the left? Are all the correct instruments in
the room?
I have a personal small set of instruments that are mostly dissectors, nerve hooks, probes,
and retractors. These items I have used for a long time, they are comfortable to me, and they are
not necessarily part of standard sterile trays. It works for me, and if it makes sense to you, create
one for yourself, just keep it small and compact. The downside of this personal instrument set is
that your tools may get lost or misplaced.

3
Always do careful anatomic dissections following avascular planes as much as possible.
Always stop bleeding as it occurs. Post-operative hematomas in any operation are usually caused
by some breakdown in technique. Treat tissues kindly and gently, and they will heal cleanly.
I am compulsive about skin preparation. I prefer Iodine and alcohol because it dries
without soap residue, unlike Betadine. Therefore, Ioban will stick to the skin surface. I do not
like to see irrigating solution, blood, etc., pooling between skin and Ioban, or any other material.
To me, skin harbors bacteria, even if it has been prepped. When drapes are stapled, the staple
gun should not touch the skin.
In neurosurgery, as in any other endeavor, we learn by our mistakes. In neurosurgery the
mistakes are just much more serious. There is no doubt that you will make mistakes, the
importance of this is to use them as learning tools. Analyze why they were made and how to
prevent them from occurring again. Your ultimate surgical skills are a result of input from many
sources: teachers, your own experiences, assisting, journals, meetings, etc. The wise surgeon
keeps that which works and discards that which does not. It takes a thinking, creative person to
anticipate all the nuances of a successful operation.
Always dictate your operative report immediately after the operation. This is an
important part of the record for the patient and for you. Vital parts of the case can disappear form
memory very quickly. The operative report tells the story in detail of what happened, so be
accurate and always describe the pathology. Doing a prompt and detailed operative report is just
the right thing to do.
Neurosurgery is a lifelong study for excellence. Our specialty continues to evolve at an
amazing pace. Read the literature, ask questions, never hesitate to ask a colleague for advise,

4
take advantage of every source of knowledge available to be certain that you are doing the very
best you can for your patient.
Have a sense of the history of neurosurgery. It is a noble calling. Many good people have
trod the same path on which you now embark. Respect and learn from the masters of the past.
Chapter 1 Lumbar Herniated Disc

5
The patient is placed on a Wilson frame. Check positioning carefully. The anatomical
spot where the incision is made should be at the highest point and parallel to the floor. Crank the
frame all the way to full flexion. The pads are adjustable, so be sure they are not too far apart or
close together.
Figure 1.1: Position for lumbar disc surgery demonstrating localization technique.
Place a skin marker over the herniated disc (Fig. 1.1), and confirm with a cross table X-
ray. I like to use a bent K-wire or the malleable stylette used by anesthesiologists for guiding
endotracheal tubes as a marker. These external radio-opaque markers avoid skin penetration
with needles. Center the incision on the disc space to be operated on. Remember that this is a
micro discectomy so keep the incision on the small side, keeping in mind that the deeper layers
can be expanded proximally and distally in the manner of a trapezoid to give greater exposure
when laminae are reached.

6
I like to hold a Cobb elevator in one hand and the monopolar cautery in the other. The
assistant holds a Cobb in one hand and a suction in the other as the incision is carried in the
midline down to the lumbodorsal fascia. Then again, using the cautery the lumbodorsal fascia is
incised in the midline and, staying next to the bone of the spinous processes and lamina, the
fascia and paraspinous muscles are dissected free. Be sure to leave the capsule of the facet joint
intact. Carry the dissection laterally to expose the medial 1/3 of the facet joint and place a self-
retaining retractor. Take a cross table X-ray with a marker (Penfield #4) directly over where you
anticipate the disc space to be.
At this point you should have excellent visualization of the lamina above and below the
disc space and the ligamentum flavum should be cleaned of all muscle. Bring in the operating
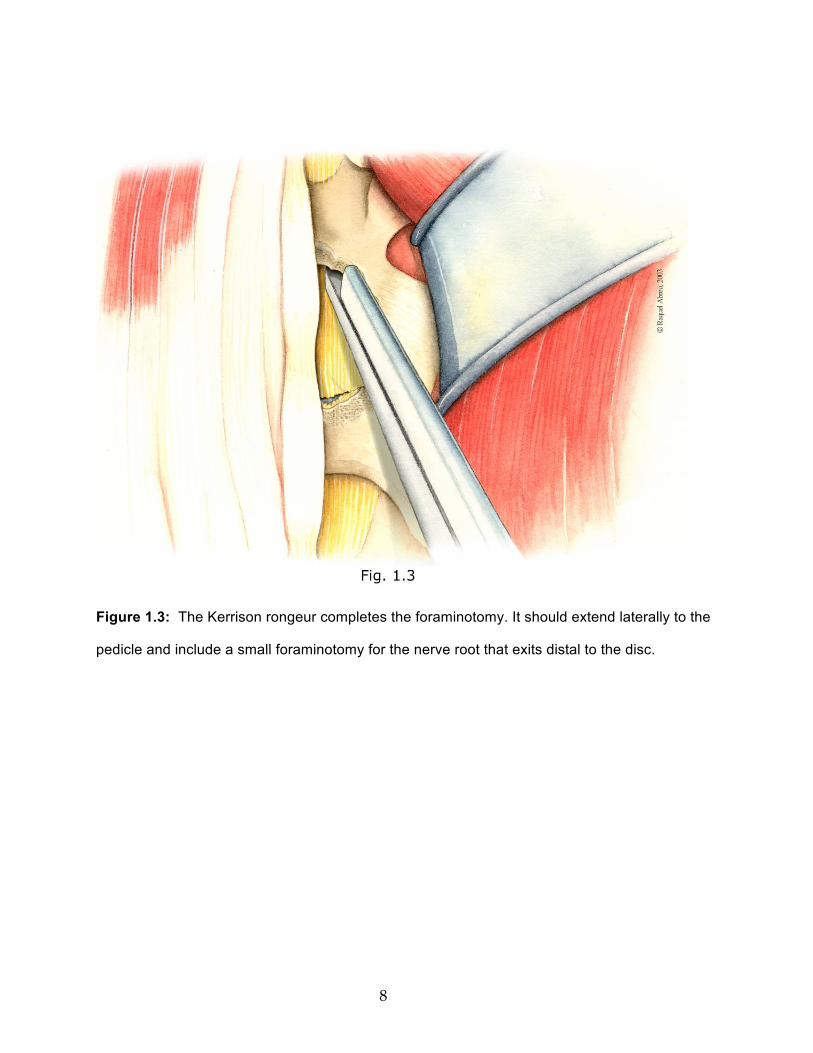
microscope and rotate the table toward you about 10-150. Use the high-speed drill (Fig. 1.2) to
widen the interlaminar space and thin the bone of the laminae above and below. Use the Kerrison
rongeur to complete the foraminotomy (Fig. 1.3). I like to open the ligamentum flavum with a
#15 blade while holding upward tension with a toothed Cushing forceps (Fig. 1.4). A common
error is to make this cut in the ligamentum too far laterally. The lateral edge of the ligamentum
flavum becomes very thick, and extends downward to the floor of the spinal canal without
entering the epidural space. Removal of ligamentum flavum can also be done with Kerrison
rongeurs. A small cottonoid patty should be used to protect the dura. Continue the bone exposure
until the pedicle is reached laterally and do a small foraminotomy over the exiting nerve root. Be
sure to remove enough lamina cephalad so all of the annulus is visualized including attachments
above and below the disc space.

7
Figure 1.2: The laminae, ligamentum flavum and medial facet joint have been exposed. The
high-speed drill is used to widen the interlaminar space and thin the laminae.
8
Figure 1.3: The Kerrison rongeur completes the foraminotomy. It should extend laterally to the
pedicle and include a small foraminotomy for the nerve root that exits distal to the disc.

9
Figure 1.4: The ligamentum flavum is incised by maintaining upward pressure with the Cushing
forceps and cutting with a #15 blade. Just before entering the epidural space the thinned
ligamentum takes a bluish hue. Push through the last millimeter with the handle end of the knife
blade.
A note about the proper use of the Kerrison rongeur to avoid injuries to nerve roots and
dural tears: always be sure that there is separation of dura from the underside surface of the bone
or ligamentum flavum before biting with the rongeur. This can be accomplished by direct
visualization, holding the dura away with cottonoid or small spatula, and by moving the lower
jaw of the rongeur back and forth to use it like a dissector. Always be sure that the lower jaw of

10
the rongeur is in contact with, and directly under what you want to remove. Try to keep the
orientation of the jaw of the rongeur parallel to the fibers of the underlying dura and the shaft of
the rongeur perpendicular to the dura. In my experience, dural tears occur because the rongeur is
angled and the dura gets caught in the jaws of the rongeur. Finally, as the size of the rongeur
increases, so does the risk of injury. The technique for closure of dural tears is covered in the
next chapter on recurrent herniated disc.
I like to use a stubby, blunt nerve hook to explore the nerve root. The root can usually be
freed easily by running the nerve hook underneath and sweeping it off the annulus in a gentle
manner. Free fragments are usually found with this maneuver. They should be removed first with
the pituitary rongeurs (Fig. 1.5).

11
Figure 1.5: Remove fragments of disc with the pituitary rongeur.
Now check the annulus. On those rare occasions when a free fragment has been removed, the
annulus is flat, and there is no defect in the annulus on close inspection it is okay to leave it alone
and not enter the disc space. If there is any doubt, go into the disc space. In the usual situation
where the annulus is bulging it is best to cut a window out of the annulus using a #11 or #15
blade. This removes disc material that is contiguous with the annulus and gives wide access to
the disc space. The nucleus pulposus is then removed as completely as possible with curettes and
pituitary rongeurs Fig. 1.6, 1.7).

12
Figure 1.6: Curetting the disc space. Figure 1.7: Removal of disc with the pituitary rongeur.
Use all the various sizes and shapes of these instruments to get a thorough clean out. The down
angled curette is especially useful to push disc material into the interspace and then remove it
with pituitary rongeurs. Here is another good method of removing disc material that is bulging
medial to the nerve root: insert the largest straight curette that will fit into the disc space. Wedge
it medial to the root until about ½ of the cup of the curette is into the disc space. As you twist the
handle the cutting edge of the curette will neatly slice off the bulging annulus and underlying
disc. When you think you have completely removed the disc contents, place the sucker tip into
the middle of the evacuated disc space and irrigate thoroughly. You should be able to “suck dry”.
If you cannot, there may be more disc material to remove.
Before closing, check one more time with the nerve hook or Woodson under the nerve
root, axilla of nerve root, and out the foramen for any fragments of disc that may have been
missed. All bleeding should be stopped with bipolar and bone wax. If there is pesky bleeding
from epidural veins that cannot be easily stopped, try covering the area with thrombin soaked

13
Gelfoam. Then crank the Wilson frame down until it is completely flat. This maneuver takes the
stretch out of the veins, allowing them to collapse and coagulate. When you remove the Gelfoam
the bleeding will probably have stopped. Irrigate again. I like to use a piece of subcutaneous fat
to lay over the exposed dura and nerve root. I do not use a drain unless there is some bleeding
that cannot be stopped. The lumbodorsal fascia should be closed with an O absorbable suture and
there should be no overlap of the ligament. I prefer to use a running stitch, but interrupted is also
okay. If there has been a CSF leak, this stitch has to be watertight. My routine is to close the
subcutaneous layer with interrupted inverted sutures and skin with a subcuticular stitch and 1/2”
Steri-Strips. I give Toradol 30-mg IV at the conclusion of the operation and repeat q 6 h X2 more
doses. These patients can ambulate as soon as they have fully recovered from the anesthetic.
They can usually go home the same day of surgery or the next day. A clean meticulous,
bloodless operation usually results in a quick recovery and a happy patient.
Addendum Sometimes I cut the annulus longitudinally rather than making a window. The reason
for this is the hope of preserving the annulus so that it will heal across the disc space, and there
will be less chance for a recurrent herniation. However, because nucleus pulposus is usually
contiguous with the annulus (especially in young people), I usually have to make the window.
Getting rid of the bulge of annulus and disc material trumps leaving annulus behind in hopes of
healing.
Chapter 2
Recurrent Lumbar Herniated Disc

14
The previously made incision should be used unless it is far off midline. Since the paraspinous
muscles are scarred and difficult to retract, the incision should extend from the disc space above
to the disc space below the herniation. The monopolar cautery works very well to dissect scar
tissue off the spinous processes and laminae. Since tissue planes no longer exist one has to be
guided by the bony anatomy. It is imperative that the dissection not be carried below the plane of
the laminae to avoid opening the dura. The dissection is then extended laterally to the medial 1/3
of the facet joint. In those patients who have had a prior laminectomy it is prudent to obtain a
preoperative CT scan to visualize what bone remains. In these situations the vertical dissection
from skin incision downward has to stop a safe distance above the dura and is then extended
laterally to the facet joint. Cobb periosteal elevators are excellent for removing scar tissue from
facet joint capsules after they have been exposed with the cautery.

15
Figure 2.1: Ligamentum flavum has been replaced by dense scar tissue.
At this point the self-retaining retractor is inserted (Fig. 2.1), a localizing marker placed and a
cross-table X-ray performed. It is helpful to identify the relationship of the retractor blade to the
disc space by X-ray. Since the normal anatomy is distorted by scar tissue, the surgeon can
ascertain whether the disc space is in the middle, above or below the center of the retractor blade.
The next step in this operation is to identify and expose the bony landmarks. Fortunately,
most patients in this era have had microdiscectomies and the laminae are still present. The

16
curette is your best friend in this operation. Use the straight curette to remove scar from the
edges of the old bone opening and laminae.
Figure 2.2: Using the curette to remove scar from the bone edges, and to separate the
underside of the lamina from scar and dura.
An up-angled curette (Fig. 2.2) is used to expose the underside of the bone edges all the way
around. Now the plane between lamina and dura can be accurately visualized. The Leksell
rongeur can be used to carefully remove excess scar overlying the dura and to reduce bulk. Next,
the operating microscope is positioned.

17
Figure 2.3: The high-speed drill to widen the bony opening and thin laminae.
The high-speed drill (Fig. 2.3) works very well to thin the lamina so the Kerrison rongeur
will fit easily under the bone edge. The old laminotomy is thus expanded until unscarred dura is
encountered. The enlarged laminotomy created should be generous and include a foraminotomy
for the exiting nerve root below the disc space, as well as removal of the overhanging superior
facet until flush with the pedicle. At this point, this exiting root can usually be identified as it
emerges from the surrounding scar. Staying lateral to the root is now safe as the dissection is
carried in a cephalad direction toward the disc space. A freer elevator or curette work well to
dissect down to the floor of the spinal canal and then sweep the nerve root medially. Nerve hooks

18
are usually not helpful when dealing with dense scar and may injure the nerve root. If the scar is
particularly thick and hard, sharp dissection with a #11 blade is effective. To avoid injury to the
nerve there should be a 1 to 2 mm margin between the knife cut and the approximated lateral
edge of the nerve root. This meticulous exposure of the lateral and then the underside of the root
is extended the entire length of the laminotomy. Frequently, a large fragment of the extruded disc
will be encountered during this exposure. These extruded fragments are usually found at the
level of the disc space in a pocket under the nerve and surrounded by scar. In surgery for
recurrent herniated disc the epidural veins are usually scarred and bleeding is rarely a problem.
In those patients with previous laminectomy and/or dense scar, which makes
identification of the root impossible, it is best to go out laterally to the pedicle. From the medial
side of the pedicle work downward toward the floor of the spinal canal using sharp (#11 blade or
curette) dissection. Then with sharp and blunt dissection gradually mobilize the scar and push it
medially. Continuing in this manner, move in a cephalad direction to the disc space. Entering the
disc space and removing its contents will almost always reveal the root and extruded fragments.
If the expected disc fragment is found during the dissection of the nerve root it will
usually be in a pouch that will lead directly to the disc space. Then it is a matter of cleaning out
the disc material in the usual way with curettes and pituitary rongeurs. If the fragment is not
found as the root is freed, then go directly to the disc space. Here it is helpful to review the
relationship of the disc space to the retractor blade as seen on the earlier X-ray, because the
annulus will rarely be visible as a landmark. If the retractor blade has been moved, or if precise
identification of the disc space is needed, a cross-table X-ray with a marker near the disc will
reveal the location. The disc space can be entered with a #15 blade or the edge of a dissector.
The disc contents are then removed as described above. Particular attention must always be made

19
to the medial side of the root. The down-angled curette is especially helpful in establishing a
plane between the nerve root and the disc. Disc material is pushed downward into the disc space
and removed with pituitary rongeurs. Patience and care is needed during this dissection medial to
the root and under the thecal sac, as it is a blind area. When all the disc material seems to have
been removed, I recommend one last pass with the pituitary rongeur as a fragment of the disc
may be found. In those situations where the disc space is very narrow, the expected free
fragment found, and there is no apparent opening into the disc space; it is not necessary to create
an opening and attempt to clean out what little disc remains. Before closing a search should be
made along the root and out the foramen for any missed fragments.
The most common complication of this operation is a dural tear with CSF leak. This is
usually caused by the Kerrison rongeur as lamina is being removed from scarred dura. With the
gush of spinal fluid there is usually a gush of blood as the tamponading effect of the full thecal
sac on epidural veins is relaxed. The initial steps in fixing this problem are to control loss of CSF
with a cottonoid patty, and stop the bleeding with the use of the bipolar cautery and thrombin
soaked Gelfoam. Next, a wide exposure of the dural tear is essential. One of the most frustrating
jobs in neurosurgery is trying to close the dura when the lamina is in the way. If the tear is in
unscarred normal dura it is best closed with 7-0 Prolene. If the dura is thick and scarred, 4-0
Neurilon is preferred. Sutures may be interrupted or running, depending on the surgeon’s
preference. The important thing is to get a watertight closure and to be certain that no nerve
rootlets are injured. After the dura is closed have the anesthesiologist perform a Valsalva to be
sure there is no further leak. My preference is to finish with the disc removal at this time and
wait to reinforce the suture line when ready to close. My technique to reinforce the dural closure
is to cover the sutures with a very thin layer of Fibrillar and then drip on fibrin glue, e.g. Tisseel.

20
I repeat this layering of Fibrillar and fibrin glue two or three more times. Incidentally, this
technique is good for closing dural leaks or dural suture lines in any location.
Some dural tears such as those around the nerve root or ventral dura are not accessible or
repairable. These leaks can almost always be stopped with the Fibrillar/fibrin glue technique as
described above. A drain should not be used, so it is essential to get excellent hemostasis before
wound closure. The last important point in dealing with CSF leaks is to close the lumbodorsal
fascia in a watertight manner.
The anticipation of performing surgery for a recurrent herniated disc can be very
intimidating. The risk of nerve injury and spinal fluid leak are significant. However, with careful
planning and attention to detail, this can be a very rewarding experience both for the surgeon and
the patient.
Chapter 3
Far Lateral Lumbar Disc

21
When the herniated disc is presenting in the lateral part of the foramen or completely
outside the foramen, the lateral approach is preferred. The main reason for this is to preserve the
facet joint. We are most familiar with removing herniated discs by using the standard midline
incision and entering the spinal canal via laminotomy. However, if there is any question that this
approach will destabilize the spine by removing the pars and inferior facet, the lateral approach
should be utilized.
Some surgeons advocate a midline incision for far lateral disc herniations. However, this
requires a lot of skin and muscle retraction laterally to get lateral to the facet joint. Then the facet
joint is in the way of visualizing the disc. I much prefer the lateral muscle splitting approach.
Once you have decided to use the lateral muscle splitting approach, plan the angle of
attack. Using the axial MR or CT scan you can visualize how far lateral to the midline the
vertical incision should be made. In general it is a line from disc herniation to lateral facet joint
to skin. Therefore, the closer the herniation is to the foramen, the more lateral from the midline is
the incision. I generally make the incision about 5 cm lateral to the midline. The length of the
incision is about 5 to 6 cm, depending on the patient’s size, and it should be centered at the disc
space.

22
Figure 3.1: The far lateral herniated disc. Figure 3.2: Drilling necessary to expose the far lateral herniated disc.
The skin incision is carried directly down through subcutaneous tissue to the lumbodorsal
fascia. The fascia is split vertically with the monopolar cautery. The underlying multifidus
muscle is split in a vertical plane with large Cobb elevators. Aim slightly medially so you come
down at the root of the transverse processes above and below the disc space. Using the Cobb,
remove muscle laterally from the transverse processes, and then place a self-retaining retractor.
This should be a two bladed retractor. A short blade is placed medially to retract muscle over the
top of the facet joint and a longer lateral blade exposes the transverse processes. Now take a
localizing X-ray and bring in the operating microscope.

23
With the microscope in position the first thing that is usually evident is that there is a lot of
muscle overlying the facet joint. This muscle can be best removed with the monopolar cautery
and Kerrison rongeur so that the entire lateral aspect of the facet joint is cleaned off. Next the
high-speed drill is used to remove the cephalad portion of the transverse process below the disc
space. This transverse process should be drilled at its base where it joins the pedicle and superior
facet. Then drill off the lateral facet where it overhangs the disc space. This removal of the
lateral part of the facet joint can also be accomplished with rongeurs. You now have an approach
that will bring you to the disc first and then to the axilla of the nerve root. Some surgeons
recommend drilling off the transverse process above the disc space, exposing the foramen, nerve
root, and then the disc; and that is an acceptable approach as well. Assuming you have used my
preferred approach caudal to the disc and nerve root, the next step is to remove the
intertransverse ligament. Usually the attachment to the transverse process below the disc space is
removed during the drilling. Remnants of the ligament can be removed with a Kerrison rongeur.
Just beneath the intertransverse ligament you will find an assortment of veins and arteries that
need to be cauterized with the bipolar. As you work in a cephalad direction the nerve root and
herniated disc will be encountered. If you are not sure of the anatomy, take another X-ray with a
marker where you judge the disc space to be. Frequently, the part of the nerve root exposed is the
dorsal root ganglion. It can look a lot like a herniated disc, so be sure of the anatomy before
doing any cutting. With this approach toward the axilla of the nerve root there is not a need for
much retraction. The herniated disc should show itself below the nerve, and then it is a matter of
removing it with curettes and rongeurs. Be sure to extend the disc removal well medially under
the facet joint so the foramen is wide open at the conclusion. Stop all bleeding, irrigate and close.

24
I do not use a drain. The muscle layer comes together once the retractor is removed. The
fascia is closed with a running 2-0 stitch. Subcutaneous and subcuticular layers are closed and
Steri-Strips applied. I give Toradol 30 mg IV at the conclusion of the operation. There is less
post-operative pain with this operation than with the usual interlaminar approach.

25
Chapter 4 Laminectomy for Lumbar Spinal Stenosis
Figure 4.1: Normal lumbar vertebra.
Lumbar spinal stenosis is most commonly caused by a combination of a congenitally small
spinal canal (short pedicles), hypertrophy of ligamentum flavum, and hypertrophy of the facet
joints (Fig. 4.2, 4.3). Exiting nerve roots are frequently entrapped by the overlying superior facet
(lateral recess stenosis). Spinal stenosis is usually a disease of the elderly and is most frequent at
L4-5. For the purposes of this discussion I will assume that the level to be decompressed is L4-5.

26
Figure 4.2: Spinal stenosis. Note the short pedicles and thickened facet joint.
Figure 4.3: Spinal stenosis. Note the thickened ligamentum flavum.
The positioning and marking for X-ray is the same as for a lumbar herniated disc. The
center point of the incision is the L4-5 disc space and will need to be 7 to 8 cm in length,
depending on the size of the patient. Take the incision down to the lumbodorsal fascia. The
fascia is incised in the midline with the monopolar cautery from above the spinous process of L4
to below the spinous process of L5. Now take down the lumbodorsal fascia and paraspinous
muscles using the Cobb periosteal elevator and monopolar cautery. Be sure to stay directly on
the bone of spinous processes and laminae to decrease bleeding. You will notice on these
patients that the facet joints are hypertrophied and the laminae seem short. Therefore, just as you
get to the base of the spinous process you seem to be at the bottom of a deep gully as the facet
joint rises up laterally. Just patiently dissect the paraspinous muscles away from the capsule of
the facet joint and then retract bilaterally with a self-retaining retractor. Take a cross table X-ray
to be sure you are at the correct level.

27
There is some debate as to how much lamina should be removed to achieve adequate
decompression. The traditional teaching is to perform complete laminectomies above and below
the stenotic segment. This is safe and effective.
In patients who are young and the stenotic area is well localized, you may consider leaving a thin
rim of lamina above and below (In this instance a rim of proximal lamina of L4 and distal lamina
of L5). The incidence of spondylolisthesis following decompressive laminectomy for a spinal
stenosis, even in the presence of a grade I degenerative spondylolisthesis is low as long as the
integrity of the facet joints are preserved.
Figure 4.4: Technique for thinning lamina with high-speed drill.
Figure 4.5: Technique for removing lamina and ligamentum flavum with Kerrison rongeur.
My technique for removing bone in this operation is as follows: 1.) Spinous processes are
removed with a large Leksell rongeur or spine cutter (Horsley). 2.) Laminae are thinned with the
high-speed drill (Fig. 4.4). 3.) Remaining bone is removed with Kerrison rongeurs (Fig. 4.5). The

28
primary pathology in degenerative spinal stenosis is hypertrophy of ligamentum flavum, so it is
imperative to perform a wide removal of the ligamentum. It must be removed the entire length of
the bony opening, laterally to the pedicles, and to the floor of the spinal canal. Medial
facetectomies must be done as well as foraminotomies to be sure the exiting nerve roots are well
decompressed. Use the drill to thin the bone laterally and then undercut with Kerrison rongeurs
so that as much bone as possible is preserved while at the same time achieving full
decompression of neural elements (Fig. 4.6). Be sure to preserve the pars interarticularis and as
much of the facet joints as possible.
Figure 4.6: The completed decompression. Note that the facet joints are undercut to preserve
their integrity.
I use the operating microscope when the dura is exposed. This gives the best visualization
as ligamentum flavum and lamina are removed with the Kerrison. It also allows your assistant to
see what is happening. Rotate the operating table away from you when you are working on the
side away from you. Rotate the operating table toward you when you are working on the near

29
side. Use cottonoid patties or have your assistant use a Woodson dissector to depress the dura as
you are using the Kerrison. This protects the dura from an inadvertent tear.
In some patients the dura is stuck to ligamentum flavum and bony surfaces. In these cases
an up-angled curette works well to gently separate the dura. Sometimes the scar is so dense that
there is no way to free the dura without tearing it. Then it is best to work around these areas,
decompress the neural elements the best you can and leave the scar behind. That is better than
getting a dural tear. I might add that in patients with very tight spinal stenosis it is sometimes
safer to remove ligamentum flavum with a curette rather than a Kerrison, especially the
thickened ligamentum that extends laterally around nerve roots.
Always check the disc when doing this operation. Sometimes if is difficult to tell if there is
a herniation on pre-op MR scans. Most patients with spinal stenosis have advanced degenerative
disc disease with a hard, thick annulus (spondyosis), and it is best to leave the disc alone to
maintain post-operative stability. However, if there is a frank herniation or if the annulus is soft,
thin, and significantly bulging, it is best to perform a discectomy.
There are some surgeons who perform the decompression for degenerative spinal stenosis
using the technique of bilateral laminotomies. The approach is the same as for a unilateral
herniated disc. The main advantage of this approach is maintenance of the integrity of the
posterior tension band (lamina, spinous processes and interspinous ligament). The disadvantages
are: 1.) It is a more time consuming and technically more difficult operation. 2.) There is
increased risk for dural tear or nerve injury. 3.) The failure rate is probably higher than the
conventional approach because it is easy to miss some of the hypertrophied ligamentum flavum
with the limited exposure. I use this technique only in young, athletic people.

30
I always place a drain in the epidural space. The paraspinous muscles should be
approximated (snug, not tight) with interrupted sutures. When closing the lumbodorsal fascia
the edges should come together evenly and not overlap. The remainder of the closure is routine.
Chapter 5
Anterior Cervical Discectomy and Fusion
(Smith-Robinson technique)
Before starting this operation consider the risk of recurrent laryngeal nerve palsy. The
right recurrent laryngeal nerve has a more oblique path than does the left as it ascends behind the
subclavian artery to its resting spot between the esophagus and trachea. Thus, the right nerve is
slightly more susceptible to injury when surgery is performed at C6-7 and below. For this reason
it is recommended that operations below C6-7 be performed from the left side.
There is a second and probably more common cause of laryngeal nerve palsy that is caused by
compression of the nerve between the self-retaining retractor blade and the inflated endotracheal
tube cuff. Therefore, always instruct the anesthesiologist to deflate the cuff every 30 minutes
after the self-retaining retractor has been set.
A final caveat in preparation for surgery is to assess vocal cord function in patients who
have had prior anterior cervical surgery on the side contralateral to your intended incision. An
occult vocal cord paralysis may be present that can only be determined by laryngoscopy.

31
Bilateral vocal cord paralysis is one of the most dreaded complications of this operation and it is
very preventable.
The patient is placed in a supine position on the operating table (Fig. 5.1). I roll up a bath
towel and place it between the shoulder blades to give slight extension of the neck. The head is
held with a horseshoe headrest. The shoulders must be taped down with a lot of pressure so X-
ray can visualize the lower cervical spine. The problem is how to keep the patient from sliding
down the table from the force of the tape. I use a padded footboard to prevent this. Head halter
traction with about 15 lbs. helps to keep the neck extended and visible by X-ray.
Figure 5.1: Position on operating table for anterior cervical discectomy.
Another (and superior, in my opinion) positioning technique utilizes the Caspar apparatus
(Fig. 5.2). This has the advantage of holding the head firmly in position as the shoulders are
taped down, thus avoiding the problem of sliding down the table and obscuring the lower
cervical spine.

32
Figure 5.2: Positioning for anterior cervical fusion using the Caspar traction technique.
Since the skin incision is to be horizontal it is important to center it directly over the middle
of the disc to be removed. In general, the C5-6 disc lies directly under the notch between the
thyroid cartilage and the cricoid cartilage, but this is quite variable. Use the marking pen to mark
an incision starting at the midline and following a skin crease laterally to just behind the belly of
the sternocleidomastoid muscle. I use a K-wire bent in a J-shape and taped to the skin for the
cross table X-ray marker.
The skin incision is carried down to the platysma muscle. Using a Metzenbaum scissors
undermine between subcutaneous tissue and platysma muscle about 2 cm in each direction. I

33
prefer to cut the platysma muscle in a vertical direction in the direction of its fibers along the
medial border of the sternocleidomastoid muscle. The exposure is just as good as a transverse cut
of the platysma and the cosmetic effect is much better. After opening the platysma, grasp the
medial border of the sternocleidomastoid with a forceps and pull it laterally with a lifting motion
so you can cut the fascial plane between the sternocleidomastoid and the underlying
sternothyroid muscle. Continue this dissection as far proximally and distally as can be reached.
As this is being performed a transverse muscle bundle will be encountered which is the
omohyoid muscle. At C5-6 and above, always work above the omohyoid. At C6-7 and below,
always work below the omohyoid. Always dissect extensively along border of the omohyoid and
free it up completely. It is amazing how much this muscle can be mobilized and moved out of
the way. Now you are at the lateral border of the sternothyroid muscle. Pull the muscle medially
with a forceps and with a finger swipe the carotid artery pulsation can be felt. Medial to the
carotid the anterior cervical spine is palpated. This fascial plane medial to the carotid artery is
dissected down to the anterior spine (Fig. 5.3).

34
Figure 5.3: Anatomical landmarks for the approach to the anterior cervical spine.
A marking needle is placed in a disc space and a lateral X-ray performed. The disc to be
removed is deeply scored with the monopolar cautery for positive identification. Next dissect the
longus colli muscles off the vertebral bodies (Fig. 5.4) with the monopolar cautery. I like to
extend this dissection up and down until one disc space above and one below the disc to be
removed. The longer the cuff of the longus colli muscle on each side, the less likely the self-
retaining retractor will slip.

35
Figure 5.4: Elevating the longus colli muscles.
Next position the self-retaining retractor to fully expose the disc as well as the vertebral bodies
above and below . Notify the anesthesiologist to deflate the endotracheal tube cuff and then re-
inflate just enough to prevent an air leak. If there are any osteophytic “lips” projecting anteriorly,
remove them with a large Leksell rongeur until flush with the vertebral bodies. The high-speed
drill can also be used to flatten and shape the vertebrae for later plating. Next place the Casper
posts and retract vertically. Remove the entire disc using curettes and rongeurs. The lateral

36
corners are best removed with the Kerrison rongeur. Since the lateral disc space curves upward it
will be “smiling” back at you when your discectomy is complete.
Figure 5.5: Drilling off remaining disc and cartilaginous endplate.
I prefer to use the operating microscope at this point. Use the high-speed drill to partially
decorticate the vertebral bodies (Fig. 5.5). Start at the top; sweep back and forth until you reach
the posterior part of the disc space. Repeat the process with the opposing vertebral body. Be sure
to keep the sides parallel to each other. Also, remember to leave enough cortex so the bone graft
will not recess into cancellous bone. In a few random spots touch the cortical end plate with the

37
drill bit hard enough to see a small area of red cancellous bone to give the bone graft a better
chance of fusion. Now it is time to remove the most posterior part of the disc. Just as there are
osteophytic “lips” anteriorly, they will be posteriorly as well. They are best removed with the
high-speed drill. If you are very careful this can be done with the cutting drill bit, but a diamond
bit is safer. Carry this drilling out laterally to begin the foraminotomies. Finish the bilateral
foraminotomies with Kerrison rongeurs. The posterior annulus and the posterior longitudinal
ligament are next for removal. These ligaments become thinner as you work laterally, and
sometimes the epidural space can be visualized as the foraminotomy is being performed. If not,
there are several ways to safely reach the epidural space:
1.) Wedge a micro nerve hook (sharp point usually works better than dull) under the
ligament, elevate and cut with a #11 blade.
2.) Push the footplate of a small Kerrison rongeur against the ligament until it bunches up,
and then bite.
3.) Remove piecemeal with small curettes and rongeurs.
Once a small opening is made in the epidural pace, complete the removal of the posterior
longitudinal ligament with Kerrison rongeurs until the anterior decompression of the spinal
canal, and bilateral foraminotomies are complete. Remember, as you go out laterally to do the
foraminotomies that the nerve roots angle anteriorly, and if you are not careful they can be
pinched and pulled with the Kerrison. Check one last time with a small blunt nerve hook for any
free disc fragments and to be sure the foramina are open.
The next step is to prepare the bone graft. The selection of autograft vs. allograft should
have been discussed with the patient before surgery. When taking an iliac graft always start the

38
incision 2 to 3 cm posterior to the anterior superior iliac spine to avoid the lateral femoral
cutaneous nerve. There is usually a small groove just under the iliac crest. This is where the
incision should be made to avoid a scar directly over the crest at the belt line. Once through the
subcutaneous tissue, move the incision directly over the iliac crest. Using the monopolar cautery
cut down to the exact center of the crest. Still using the cautery do a subperiosteal dissection on
both sides of the ileum staying directly on the bone. Now measure the bone graft and harvest
with the oscillating saw.
A precaution about the bone graft – it is easy to make it with too much height. The crank
on the Caspar post vertical retractor is spread widely to gain excellent access to the deepest
reaches of the disc space. Before measuring and taking the graft, loosen the crank all the way
down to assess the height of the disc space in a neutral position. Fashion the bone graft so it is
about 2-3 mm higher than this neutral measurement. This should give a very solid, tight graft
without over-distracting the disc space.
Now spread the disc space vertically with the Caspar retractor and tap in the bone graft
until it is slightly counter-sunk. Release the retractor and pull on the graft with a Kocher clamp.
It should be solid. Next apply the plate and screw. When you have selected the correct length of
the plate, check again with a cross table X-ray or C-arm. The screws should go into the middle of
the vertebral bodies. Be sure to bend the plate so it fits flush with the spine. The centering of the
plate and the placement of the screws is straightforward.
I always use a drain for this operation, even if everything is dry at closing. A neck
hematoma is a very serious complication. The platysma muscle is closed with interrupted

39
sutures. I then close subcutaneous and subcuticular layers, and apply steri-strips. This concludes
the operation.
Chapter 6
Posterior Cervical Foraminotomy for Herniated Disc

40
The main indication for this operation is a lateral soft disc herniation with radiculopathy.
Patients with central and para-central herniations as well as those with myelopathy secondary to
disc herniation should be approached anteriorly.
Figure 6.1: Position for posterior cervical foraminotomy.
Proper positioning of the patient (Fig. 6.1) is crucial in this operation. The patient is placed
prone on chest rolls and the head fixed with the Mayfield head clamp. The chin should be
tucked in a military position and slightly flexed. Forced flexion of the neck can result in spinal
cord injury and should be avoided. The restraining belt (“butt strap”) should be anchored to the
operating table at the upper abdominal level and tightly cinched, so it acts as a sling to prevent
the patient from sliding down the table as the table is placed in reverse Trendelenburg. Next
bring the head up using reverse Trendelenburg until the neck is parallel to the floor. Tape down

41
the shoulders. Localizing cross-table X-ray can be helpful in people who are thin and have higher
levels of disc herniation. Sometimes the shoulders get in the way and X-rays are of little value.
By palpating the spinous processes there is usually a step off from C7 to C6, which is the most
helpful landmark in placement of the incision. Look at the pre-operative lateral X-ray to get the
best image of the length of the spinous processes as you mark the skin for the incision. Also keep
in mind that the spinous processes slant in a caudal direction. For example, the disc space at C6-
7 is more likely to lie under the C6 spinous process rather than the space between the spinous
processes of C6 and C7.
The skin incision should be about 3 to 4 cm in length (depending on the size of the patient)
and centered over the disc space to be operated. As mentioned in the chapter on lumbar herniated
disc, the exposure can be expanded cephalad and caudally as you go through the tissue layers
down to the laminae. The subcutaneous tissues and ligamentum nuchae are opened in the
midline. Then the paraspinous muscles on the side of the disc herniation are dissected off the
spinous processes and laminae using the monopolar cautery. At this point, it is time to take a
cross table X-ray. If it is anticipated that the shoulders will be in the way, move up 2 or 3 levels.
I like to place a Kocher clamp on a spinous process and also place a #4 Penfield over a disc
space as markers for X-ray. Once the level to be operated is positively established, place the self-
retaining retractor. Be sure the retraction exposes the medial 1/2 to 3/4 of the facet joint. Now
bring in the operating microscope.
42
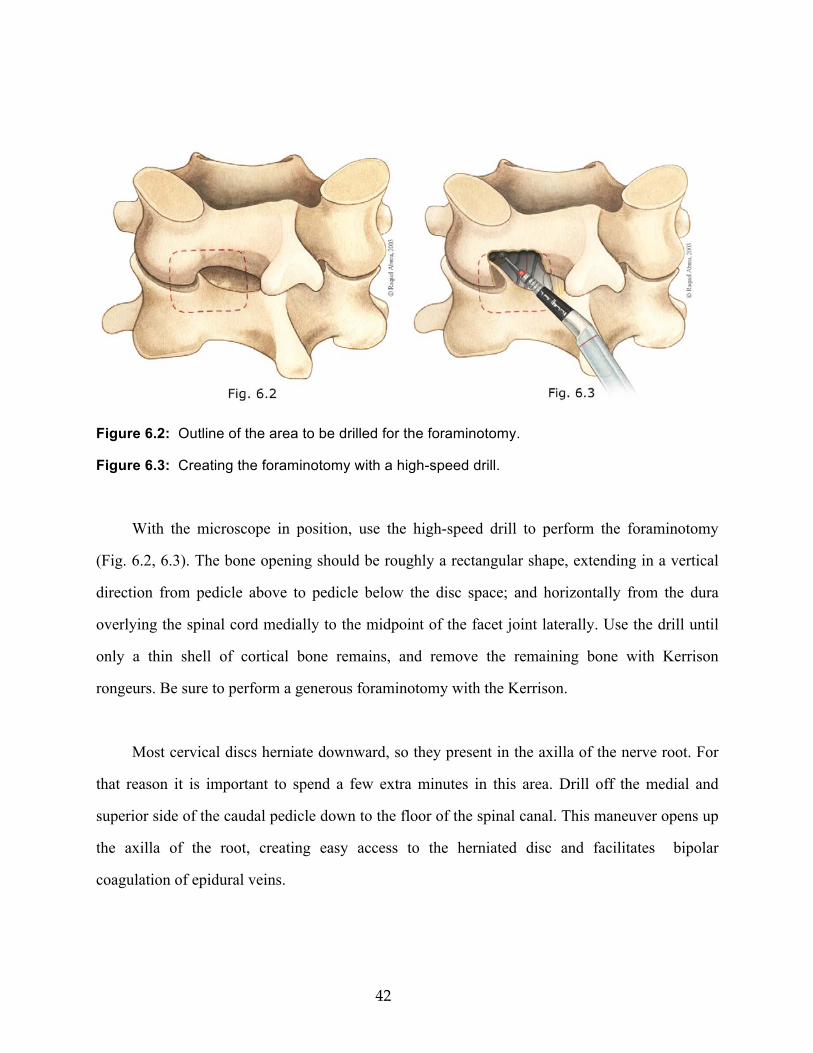
Figure 6.2: Outline of the area to be drilled for the foraminotomy.
Figure 6.3: Creating the foraminotomy with a high-speed drill.
With the microscope in position, use the high-speed drill to perform the foraminotomy
(Fig. 6.2, 6.3). The bone opening should be roughly a rectangular shape, extending in a vertical
direction from pedicle above to pedicle below the disc space; and horizontally from the dura
overlying the spinal cord medially to the midpoint of the facet joint laterally. Use the drill until
only a thin shell of cortical bone remains, and remove the remaining bone with Kerrison
rongeurs. Be sure to perform a generous foraminotomy with the Kerrison.
Most cervical discs herniate downward, so they present in the axilla of the nerve root. For
that reason it is important to spend a few extra minutes in this area. Drill off the medial and
superior side of the caudal pedicle down to the floor of the spinal canal. This maneuver opens up
the axilla of the root, creating easy access to the herniated disc and facilitates bipolar
coagulation of epidural veins.

43
Figure 6.4: Coagulation of epidural veins.
The next step is to prevent bleeding from epidural veins (Fig. 6.4). These veins thin out and
end as you follow the dura overlying the spinal cord medially. When you find the medial edge of
the epidural veins, free them up from the dura between the blades of the bipolar cautery. Then
coagulate the veins all the way laterally over the nerve root to the open foramen, cutting with
micro scissors as you go. The bipolar will also shrink the veins back and away from the dura.
Now you should have a good look at the nerve root. There are usually some additional epidural
veins in the axilla, which should be coagulated.
Use a micro nerve hook to mobilize the nerve root and expose the underlying disc. You
will probably see a free fragment or a bulging of the annulus. Now it is just a matter of opening
the annulus with a #11 blade and removing all disc material with a micro pituitary rongeur (Fig.
6.5).

44
Figure 6.5: Removal of the herniated disc.
Be sure to do a thorough exploration with an assortment of nerve hooks to remove all fragments
of disc that can be reached. The down-angled curette works well to remove osteophytes and
thickened annulus. If this is a negative exploration look at the cephalad side of the nerve root and
take an X-ray to be sure you are at the correct level. Closure is then routine. Patients are
discharged the same day or next day after surgery. A soft cervical collar may be used for patient
comfort.

45
Chapter 7 Carpal Tunnel Release This is an outpatient procedure. The patient is brought to the operating room, and moved to the
operating table in a supine position. An arm board should be in place on the correct side. The
anesthesiologist starts an IV and gives Fentanyl, Versed and Propofol for a light sedation. I do
not use a tourniquet. The incision

46
Figure 7.1: The incision for carpal tunnel release.
is marked on the skin before prepping (Fig. 7.1). Pick the most distal wrist crease and find the
exact midpoint. The incision should start at this point and be directed toward the middle finger
and extend for about 3 cm into the palm. This will create an opening directly over or slightly to
the ulnar side of the median nerve.
My prep routine is Betadine soap and Betadine solution. I like to use a stockinet to cover
the hand and forearm. There are many ways to hold the hand in position. I prefer to lay the hand
on a stack of 3 or 4 hand towels, slit the stockinet from the middle of the middle finger to above
the wrist, and then tack the stockinet to the hand towels with 3 towel clips. One towel clip holds
the thumb, one the little finger and the third anchors the stockinet over the middle three fingers
and tacks to the middle of the hand towel stack. This spreads the hand very nicely.
The local anesthetic is infiltrated along the incisional line and to a point about 2 cm above
the wrist crease. The incision itself is then made from midline of the most distal wrist crease into
the palm of the hand. Use the bipolar for hemostasis, and retract laterally with the thumb
retractor. Using the #15 blade cut carefully through the transverse carpal ligament (flexor
retinaculum) until the median nerve is exposed

47
Figure 7.2: Exposure of the median nerve in the hand.
(Fig. 7.2). Use the Metzenbaum scissors to cut the ligament into the palm of the hand. Stay to the
ulnar side of the median nerve to avoid the motor branch to the thenar muscles. This motor
branch has many anatomical variations including penetration of carpal ligament, so stay alert.
Extend the cut distally until a little fat is seen and the nerve is obviously decompressed. Next,
open the ligament proximally with the #15 blade until you are about 1 cm from the wrist crease
at which point the ligament gets very thick. My technique to cut the proximal ligament is quick
and efficient. First I undermine the subcutaneous tissue with Metzenbaum scissors to a point

48
about 2 cm above the wrist crease. Then, I position a Senn retractor to hold up the skin, and cut
the remainder of the proximal ligament with a Mayo scissors (Fig. 7.3).
Figure 7.3: The final cut with the Mayo scissors to decompress the median nerve.
At this point, a probe can easily be passed along the nerve to be sure it is well decompressed.
The incision is irrigated and all bleeding points stopped with the bipolar. Place 2 or 3
subcuticular stitches. I close the skin with a running 4-0 nylon. A piece of Iodoform gauze is cut
to the length of the incision and placed over the suture line. This I cover with 4x4’s, then fluffed

49
gauze, and finally wrap with Kerlix. I wrap the Kerlix so it is snug and passes between all fingers
and thumb, keeping the wrist in slight extension during the wrap. The patient is given an arm
sling upon discharge and instructed to keep the forearm and hand elevated. In 3-5 days the bulky
dressing is removed and a light dressing applied. These patients usually have wrist splints at
home as part of their conservative treatment program, and I ask them wear their splints after the
bulky dressing is removed. Sutures are removed in 14 days.

50
Personal Instruments (Pitkethly)
1) Woodson separator-packer (groove director). Codman #65-1135 a) Feeling along nerve root and epidural space in disc operations. b) Groove director for opening dura over spinal cord.
2) Woodson elevator. Stortz #N2351 a) Nice little angled dissector for separating dura from other tissues, e.g. craniotomies in old people with dura stuck to inner table, decompressive laminectomy for spinal stenosis. 3) Rhoton delicate nerve hook. V. Mueller #3785-16
a) Probe foramina and extract disc fragments, especially in cervical disc surgery. b) Dissect arachnoid around necks of aneurysms, cranial nerves, etc.
4) Hurd tonsil dissector/pillar retractor. Codman #65-6600 a) Similar to a small Cobb elevator. Best use in retracting longus colli muscle as it is
being removed from vertebral bodies in anterior cervical disc surgery.
5) Narrow Love nerve root retractor. Aesculap #FF708 a) Nerve root retraction in disc surgery.
6) Gigli saw guide. Jarit #260-112. a) Sweeps the dura from inner table between burr holes before using craniotome.
7) Gelpi retractor (two sharp ones). Codman #50-1210 a) Retract abdominal muscles when inserting peritoneal catheter in shunts. b) Retract scalp in small craniotomies.
8) Sharp nerve hook. Codman #38-1030. a) In anterior approach to cervical discs this will lift up the posterior longitudinal ligament so that it can be cut with a #11 blade, thus exposing the dura.
Acknowledgement
I extend my thanks to Dr. Ludwig Kempe, my mentor and professor, for his encouragement and critique of this endeavor; and for his generosity in allowing use of his classic two volume textbook, Operative Neurosurgery (Springer-Verlag).