peoplesoft budget preparation system - umb … · 2017-05-23 · the peoplesoft budget preparation...
TRANSCRIPT

PEOPLESOFT BUDGET
PREPARATION
SYSTEM Office of Budget and Financial Analysis

1
Table of Contents INTRODUCTION .................................................................................................................................... 2 NEW LOOK – SAME SYSTEM ............................................................................................................. 3 GENERAL INFORMATION ................................................................................................................... 4 GETTING STARTED .............................................................................................................................. 4
ORGANIZATION SUMMARY .............................................................................................................. 5 UPDATE BUDGET ITEM DATA .......................................................................................................... 6 SALARY DETAIL LIST BY BUDGET CENTER ................................................................................. 8 UPDATE POSITION ITEM DATA ........................................................................................................ 9 EMPLOYEE SUMMARY PAGE .......................................................................................................... 11
ADD VACANT POSITION ................................................................................................................... 12 ADD EXISTING EMPLOYEE .............................................................................................................. 12 SALARY DETAIL LIST BY BUD CTR ............................................................................................... 13
BUDGET CENTER FLAGS .................................................................................................................. 13 REPORTS ............................................................................................................................................... 14 DOWNLOADING TO EXCEL ............................................................................................................. 15
2
INTRODUCTION
The PeopleSoft Budget Preparation System uses many of the same features as RAVEN, HRMS, and
eUMB Financials. The budget worksheets generated by the system look like other eUMB reports.
You will be able to print them yourself, either with detailed information or as a summary.
Security in this system is based on HRMS access. You will be able to access the budget for all
projects that you have HRMS access to (State and Auxiliary projects only). The system will not
recognize revolving, DRIF, or grant project id’s.
A feature of this system is that it can be downloaded to an Excel spreadsheet where it can be sorted,
modified, updated, formatted, etc., and used as a tool for your budget preparation. Departments can
receive their budgets as an e-mail attachment, make updates, and e-mail them back to the budget entry
center (dean’s office or budget office). See page 14 for details on how to download the budget.
As with other PeopleSoft products, this module requires training before access is allowed. Users will
be assigned roles relating to their security level. These levels are: department, school, budget office,
and budget director. Higher security levels can perform the functions of lower levels. All users can
enter or change information until it has been approved by the Budget and Financial Analysis Office.
Only the Budget and Financial Analysis Office can approve the budget. After this occurs, users
can view the information but they cannot change it. An approver (B&FA) can reject the budget if it
does not meet expectations.
Once you have completed entering your budget into the Budget Prep System, e-mail Budget and
Financial Analysis and state what school or department you are from and that you have completed your
entries.
Here are some things to watch out for in this system:
Your access to the screens may be timed out if you leave your computer for any length of
time, and sometimes even while you are working in the system. Be sure to save your work
often.
Save your changes before exiting a screen. The program will not remind you to do this if
you are closing a screen.
Personnel changes require an automatic overnight processing to be final. Do not assume
your budgets have undergone this process. Double check the totals to be sure they are
correct.
3
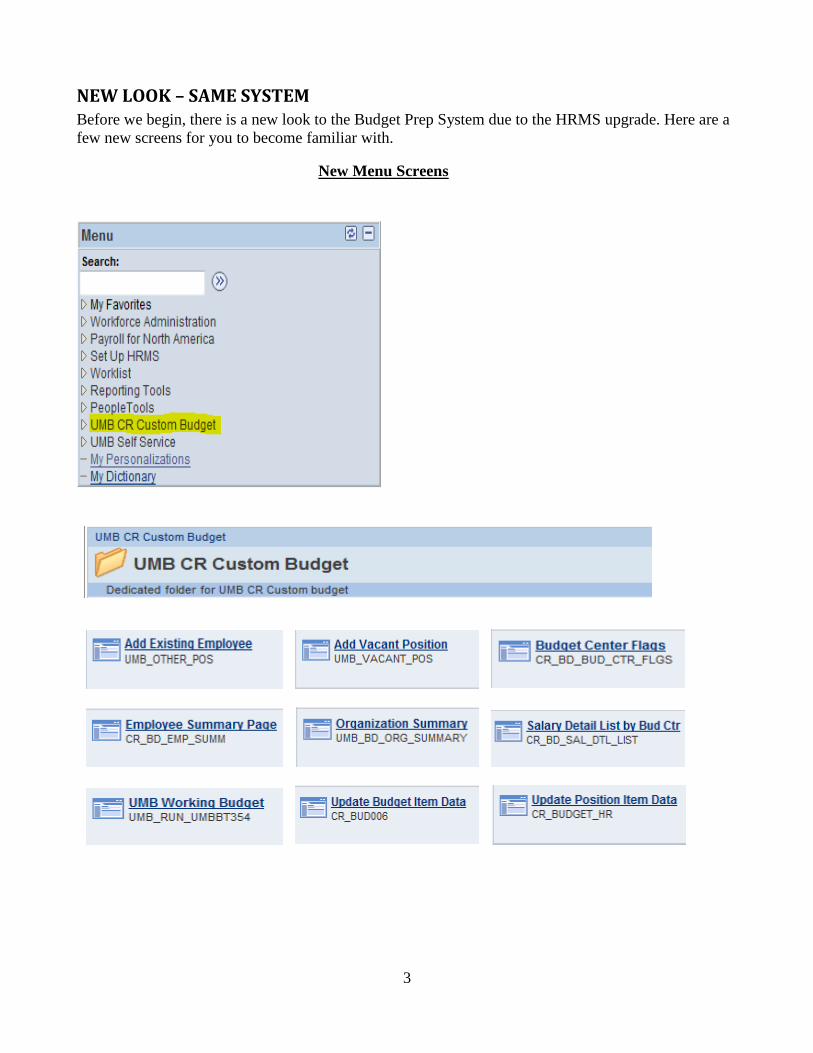
NEW LOOK – SAME SYSTEM Before we begin, there is a new look to the Budget Prep System due to the HRMS upgrade. Here are a
few new screens for you to become familiar with.
New Menu Screens

4
GENERAL INFORMATION
The Budget Preparation System is part of the HRMS PeopleSoft program. The navigation path to the
menu items is through the eUMB Portal: eUMB HRMS > Main Menu > UMB CR Custom Budget.
The menu screens you will be using are:
Organization Summary
Update Budget Item Data
Update Position Item Data
Add Vacant Position
Add Existing Employee
Salary Detail List by Bud Ctr
Employee Summary Page
Budget Center Flags
UMB Working Budget – For Reports
Budget Center is another term for Project ID.
The salary information in the Update Budget Item Data page reflects the salaries of all employees with
EFP’s in that project and account as of a certain date. The current year working budget is found in the
column labeled Original Budget and any current year adjustments will be reflected in the Adjusted
Budget column.
The Actuals Column found on the Budget Item Detail screen is not being used at this time. In future
years, it may be used or eliminated. For the time being please disregard it.
Ignore the links which say Budget Center Updates. This link is only used by Budget and Financial
Analysis.
When entering data you may have to wait for processing to take place before continuing, especially
when using the Tab key to navigate. Watch the screen to learn when this occurs.
When you click on a link in this system, it will open a new window. If you have used a lot
of links, you need to close the windows by clicking on the X in the upper right corner.
Try to limit the number of open windows you have at any time to six.
GETTING STARTED
Access to the system is obtained by submitting a CITS IT Access form and assignment of a role. The
Budget Preparation module is in the HRMS System. If you are unable to access the Budget Prep
System and you have an assigned role, please contact the CITS Help Desk at 6-4357 (6-HELP). If you
have questions or problems with your budget or using the system, contact Budget and Financial
Analysis.

5
ORGANIZATION SUMMARY
Organized in a roll-up tree format like RAVEN, this function displays all of your State and Auxiliary
Projects. Use it for information. This is also where budgets are approved (or rejected) at all security
levels.
Enter the Fiscal Year (required) and department. If you don’t select a department, you will get all of
the departments you have access to. Scroll to the right and click the blue Fetch button.
This screen has two tabs, Totals and Actions. The Totals tab shows the budget totals for all of your
projects by the following categories: Salaries, GRA, Other Payroll, Total Payroll, FTE, Operating
Expense, Total Expense, Total Revenue, and Net Total Revenue and Expense. It also gives the
approval status of each project. Like RAVEN, you can expand out for greater levels of detail. The
magnifying glass next to the approval status column provides a link which opens a new window to
bring up the Update Budget Item Data screen. The Actions tab is where you can see the approval
status of your projects.
6
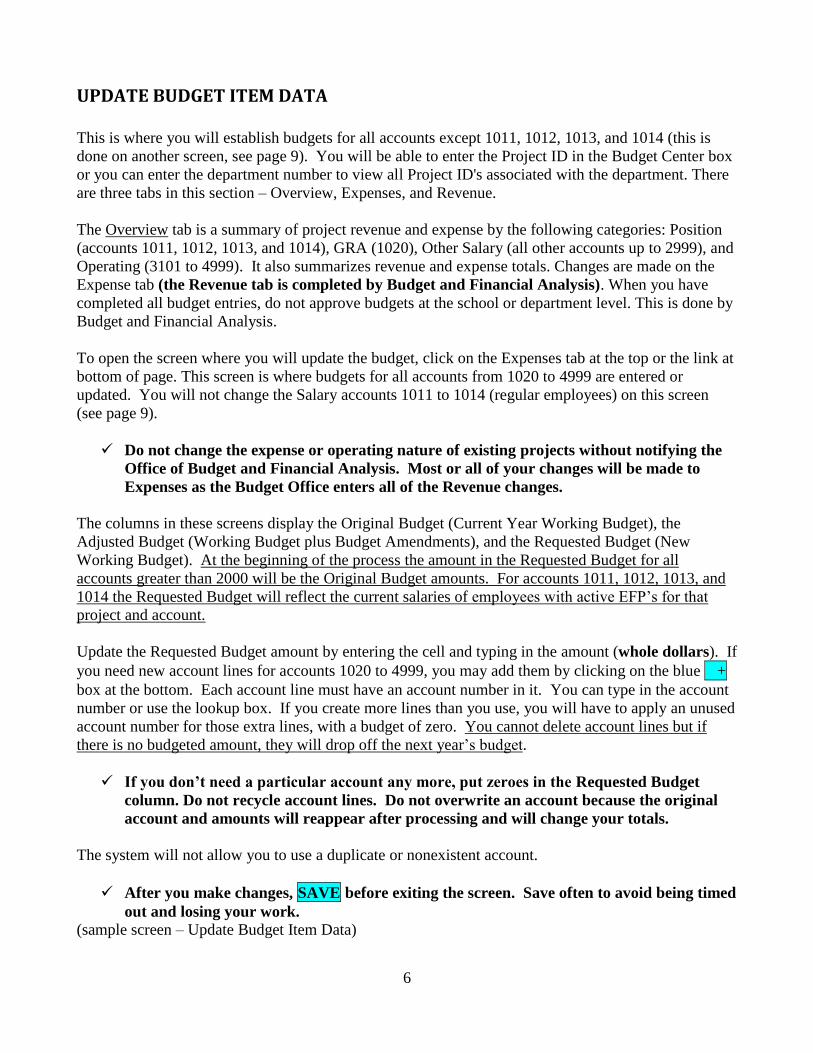
UPDATE BUDGET ITEM DATA
This is where you will establish budgets for all accounts except 1011, 1012, 1013, and 1014 (this is
done on another screen, see page 9). You will be able to enter the Project ID in the Budget Center box
or you can enter the department number to view all Project ID's associated with the department. There
are three tabs in this section – Overview, Expenses, and Revenue.
The Overview tab is a summary of project revenue and expense by the following categories: Position
(accounts 1011, 1012, 1013, and 1014), GRA (1020), Other Salary (all other accounts up to 2999), and
Operating (3101 to 4999). It also summarizes revenue and expense totals. Changes are made on the
Expense tab (the Revenue tab is completed by Budget and Financial Analysis). When you have
completed all budget entries, do not approve budgets at the school or department level. This is done by
Budget and Financial Analysis.
To open the screen where you will update the budget, click on the Expenses tab at the top or the link at
bottom of page. This screen is where budgets for all accounts from 1020 to 4999 are entered or
updated. You will not change the Salary accounts 1011 to 1014 (regular employees) on this screen
(see page 9).
Do not change the expense or operating nature of existing projects without notifying the
Office of Budget and Financial Analysis. Most or all of your changes will be made to
Expenses as the Budget Office enters all of the Revenue changes.
The columns in these screens display the Original Budget (Current Year Working Budget), the
Adjusted Budget (Working Budget plus Budget Amendments), and the Requested Budget (New
Working Budget). At the beginning of the process the amount in the Requested Budget for all
accounts greater than 2000 will be the Original Budget amounts. For accounts 1011, 1012, 1013, and
1014 the Requested Budget will reflect the current salaries of employees with active EFP’s for that
project and account.
Update the Requested Budget amount by entering the cell and typing in the amount (whole dollars). If
you need new account lines for accounts 1020 to 4999, you may add them by clicking on the blue +
box at the bottom. Each account line must have an account number in it. You can type in the account
number or use the lookup box. If you create more lines than you use, you will have to apply an unused
account number for those extra lines, with a budget of zero. You cannot delete account lines but if
there is no budgeted amount, they will drop off the next year’s budget.
If you don’t need a particular account any more, put zeroes in the Requested Budget
column. Do not recycle account lines. Do not overwrite an account because the original
account and amounts will reappear after processing and will change your totals.
The system will not allow you to use a duplicate or nonexistent account.
After you make changes, SAVE before exiting the screen. Save often to avoid being timed
out and losing your work.
(sample screen – Update Budget Item Data)

7
The totals for the Salary accounts cannot be changed on this screen. They will change when individual
position data is changed. The blue box called Salary next to the totals in 1011, 1012, 1013, or 1014 is
a link to the Salary Detail List by Budget Center screen which lists all of the employees who have
EFP’s in that project in that account as of a set date. This screen is also a menu item with links to an
employee’s update screen.

8
SALARY DETAIL LIST BY BUDGET CENTER
The Salary Detail List by Budget Center page lists the employees in an account alphabetically. To
access an employee’s information for updating, you can click on the magnifying glass by their Empl
ID or on the blue 0 link under their record number. If you use a link to open a screen, remember to
exit by closing that screen to avoid having many unwanted open screens. If you make changes, SAVE
before closing. The next section gives detailed instructions for updating an employee’s information.

9
UPDATE POSITION ITEM DATA
The Update Position Item Data page provides the most efficient way of updating your employee
salary amounts for budget purposes. When you enter a person’s Empl Id or name, it brings you
immediately to the update screen without going through all the links in the Update Budget Item Data
function and opening an excessive number of windows.
This screen has two tabs, Working Budget and Base Budget. On the Working Budget (default)
page, the FTE box at the top shows the employee’s total FTE at the University, from all fund sources
paid through UMB Payroll. The Annual Salary box is their total salary, from all fund sources paid
through UMB Payroll. Put the new total salary in the box on top. If the total FTE is changing, put
the new FTE in the box. Check that the six-character job code is correct. Note that the system uses
HRMS titles. If you use the lookup feature for Exempt employees, type the letter E in the Job Code
box and press the blue Lookup button to bring up the correct part of the list. For Nonexempt employee
job codes, type in the letter N.
The bottom box shows only the State and Auxiliary account(s) from which the employee is paid.
These rows can be changed, deleted, or added to.
If an employee is coming off your budget, scroll to the right for the Delete button ---- and click it to
remove the information from your budget data. It is not necessary to change the information in the
box at the top if you are deleting an employee.
To add other projects to an employee’s record, use one of the Add + buttons. The system will allow
you to add your employee to a project which you do not have access to. Make certain that the
Allocated Salary and the Distributed FTE are correct for each project and that the totals match their
total State and Auxiliary pay and FTE. The accounts must match the job code (Exempt = 1013,
Faculty = 1011 or 1012, Nonexempt =1014). SAVE This screen may not remind you to save when
you exit.
10
If your department “owns” an employee who is moving partly or fully to another school or campus
unit, add a line with the new project number, account, and distribution percentage to put the person
there. You can do this even if you do not have access to that project. You will have to coordinate
this with the employee’s new department because they will not have access to the employee even
though the person appears in their budget. This is similar to HRMS rules. If you “own” them you
must be the one to move them. Similarly, if you are acquiring an employee from another school or
unit, you will have to coordinate with the unit who “owns” the employee so they can put the person in
your budget. An employee can be moved from one department to another by changing the owner
department in the upper box.
Ownership of a shared or moved employee does not matter for the budgeting process as
long as the budget information is correct.
If an employee’s funding is changed in the budget system, you still need to submit an EFP
and a Job Action form to Human Resources. HRMS will not be updated by the budget
system.
The Additional Pay Field is not included in the budget and should not be used in your
budget preparation.
When you have finished your changes and saved them, click the Return to Search button at the bottom
to bring up the next employee you wish to update
The Base Budget tab shows the original salary and FTE from the EFP. It is only for reference use.
11
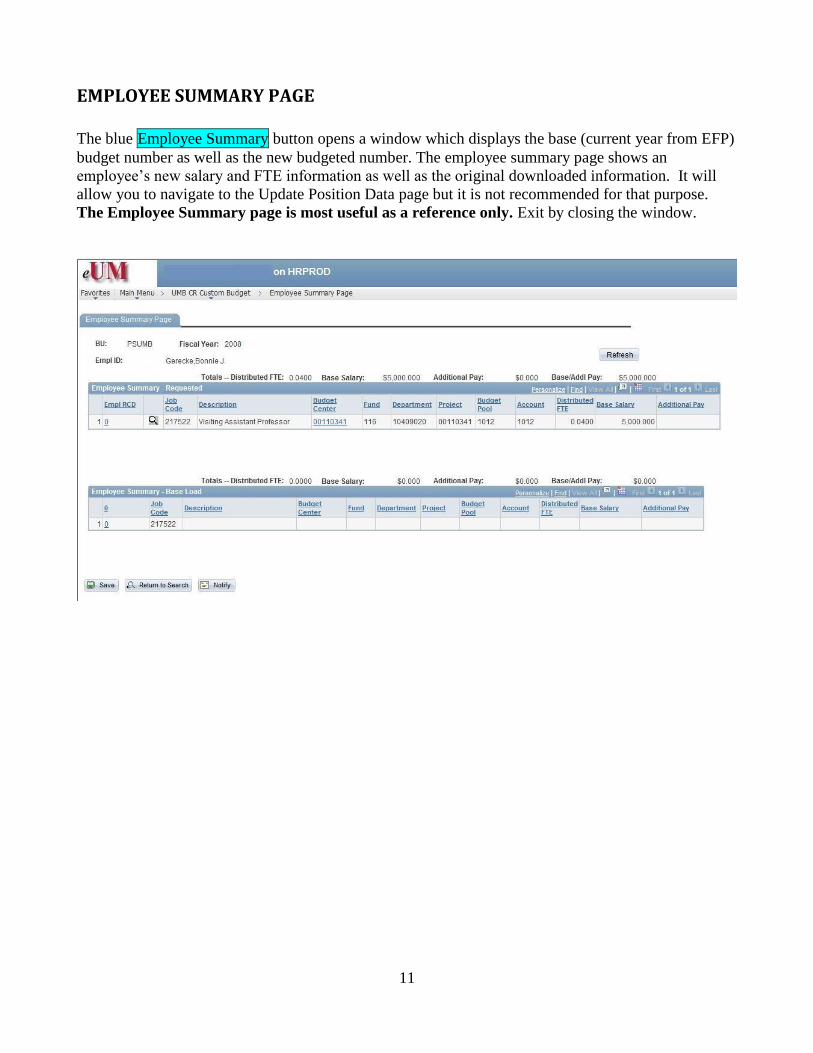
EMPLOYEE SUMMARY PAGE
The blue Employee Summary button opens a window which displays the base (current year from EFP)
budget number as well as the new budgeted number. The employee summary page shows an
employee’s new salary and FTE information as well as the original downloaded information. It will
allow you to navigate to the Update Position Data page but it is not recommended for that purpose.
The Employee Summary page is most useful as a reference only. Exit by closing the window.
12
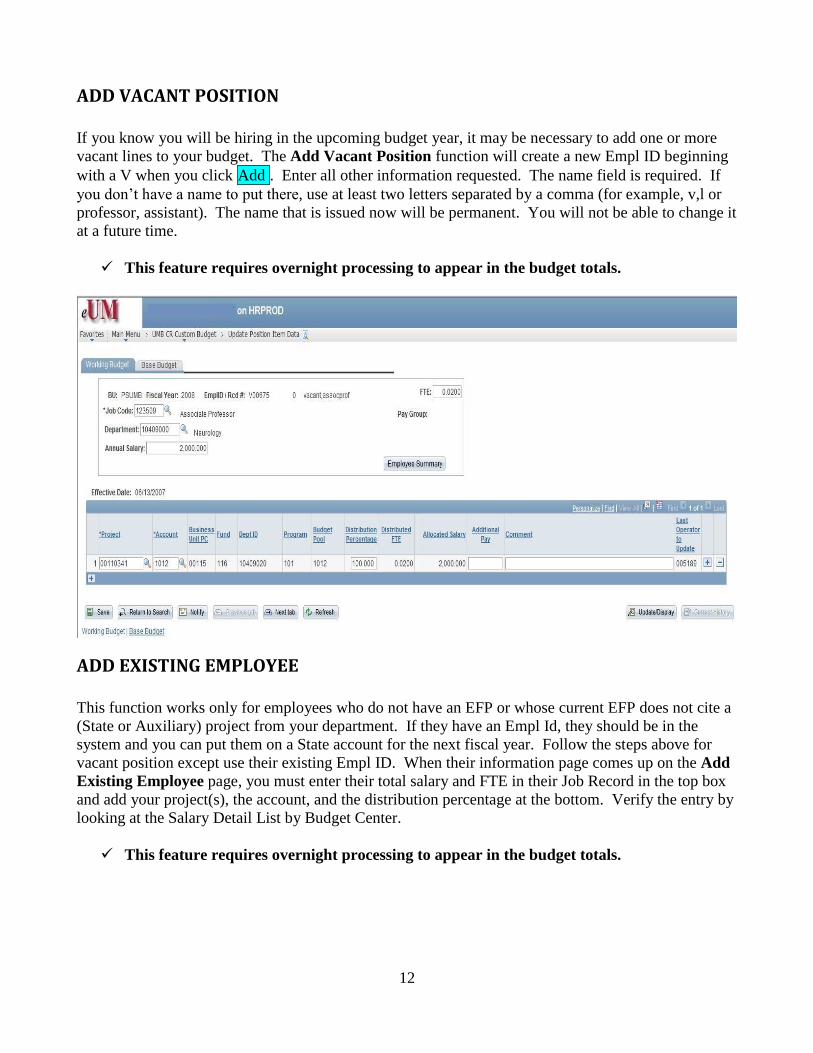
ADD VACANT POSITION
If you know you will be hiring in the upcoming budget year, it may be necessary to add one or more
vacant lines to your budget. The Add Vacant Position function will create a new Empl ID beginning
with a V when you click Add . Enter all other information requested. The name field is required. If
you don’t have a name to put there, use at least two letters separated by a comma (for example, v,l or
professor, assistant). The name that is issued now will be permanent. You will not be able to change it
at a future time.
This feature requires overnight processing to appear in the budget totals.
ADD EXISTING EMPLOYEE
This function works only for employees who do not have an EFP or whose current EFP does not cite a
(State or Auxiliary) project from your department. If they have an Empl Id, they should be in the
system and you can put them on a State account for the next fiscal year. Follow the steps above for
vacant position except use their existing Empl ID. When their information page comes up on the Add
Existing Employee page, you must enter their total salary and FTE in their Job Record in the top box
and add your project(s), the account, and the distribution percentage at the bottom. Verify the entry by
looking at the Salary Detail List by Budget Center.
This feature requires overnight processing to appear in the budget totals.
13
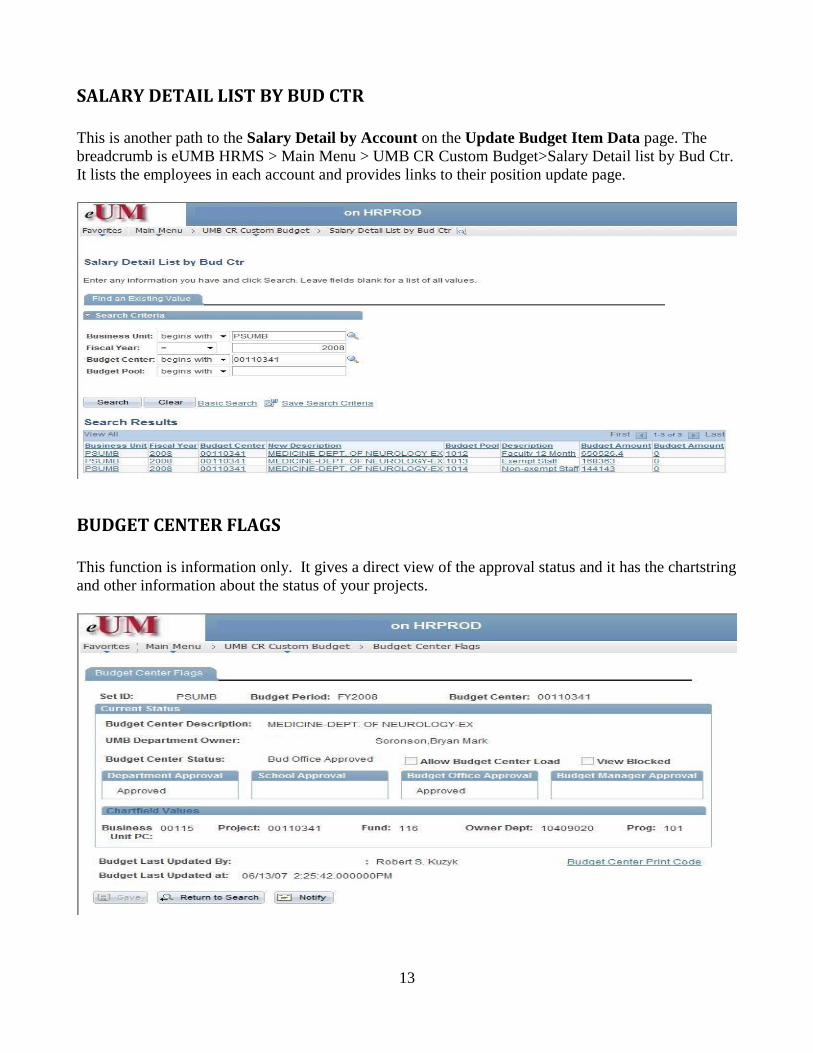
SALARY DETAIL LIST BY BUD CTR
This is another path to the Salary Detail by Account on the Update Budget Item Data page. The
breadcrumb is eUMB HRMS > Main Menu > UMB CR Custom Budget>Salary Detail list by Bud Ctr.
It lists the employees in each account and provides links to their position update page.
BUDGET CENTER FLAGS
This function is information only. It gives a direct view of the approval status and it has the chartstring
and other information about the status of your projects.
14
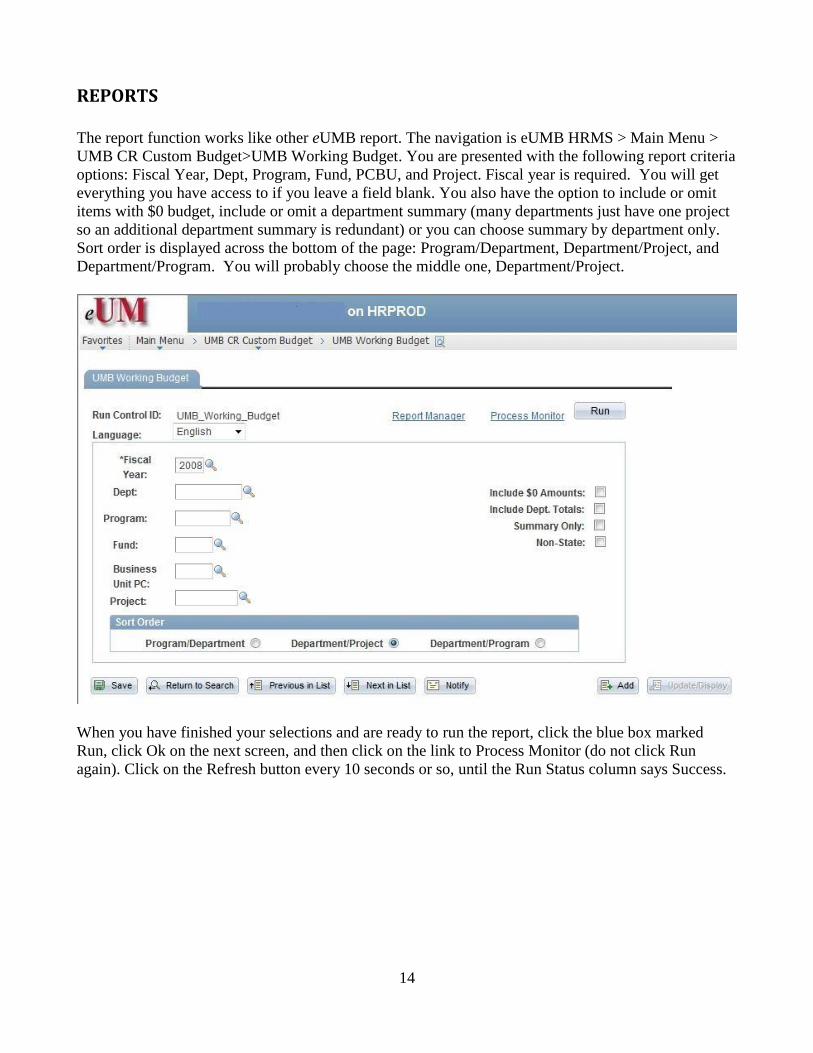
REPORTS
The report function works like other eUMB report. The navigation is eUMB HRMS > Main Menu >
UMB CR Custom Budget>UMB Working Budget. You are presented with the following report criteria
options: Fiscal Year, Dept, Program, Fund, PCBU, and Project. Fiscal year is required. You will get
everything you have access to if you leave a field blank. You also have the option to include or omit
items with $0 budget, include or omit a department summary (many departments just have one project
so an additional department summary is redundant) or you can choose summary by department only.
Sort order is displayed across the bottom of the page: Program/Department, Department/Project, and
Department/Program. You will probably choose the middle one, Department/Project.
When you have finished your selections and are ready to run the report, click the blue box marked
Run, click Ok on the next screen, and then click on the link to Process Monitor (do not click Run
again). Click on the Refresh button every 10 seconds or so, until the Run Status column says Success.
15
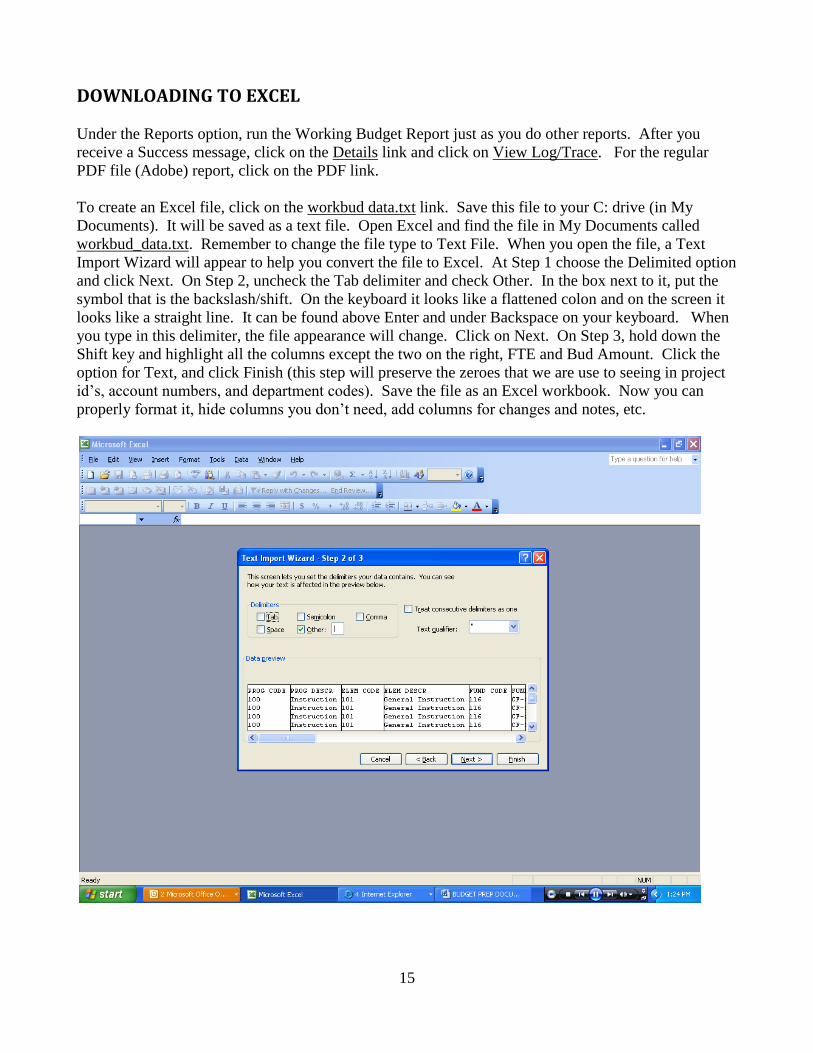
DOWNLOADING TO EXCEL
Under the Reports option, run the Working Budget Report just as you do other reports. After you
receive a Success message, click on the Details link and click on View Log/Trace. For the regular
PDF file (Adobe) report, click on the PDF link.
To create an Excel file, click on the workbud data.txt link. Save this file to your C: drive (in My
Documents). It will be saved as a text file. Open Excel and find the file in My Documents called
workbud_data.txt. Remember to change the file type to Text File. When you open the file, a Text
Import Wizard will appear to help you convert the file to Excel. At Step 1 choose the Delimited option
and click Next. On Step 2, uncheck the Tab delimiter and check Other. In the box next to it, put the
symbol that is the backslash/shift. On the keyboard it looks like a flattened colon and on the screen it
looks like a straight line. It can be found above Enter and under Backspace on your keyboard. When
you type in this delimiter, the file appearance will change. Click on Next. On Step 3, hold down the
Shift key and highlight all the columns except the two on the right, FTE and Bud Amount. Click the
option for Text, and click Finish (this step will preserve the zeroes that we are use to seeing in project
id’s, account numbers, and department codes). Save the file as an Excel workbook. Now you can
properly format it, hide columns you don’t need, add columns for changes and notes, etc.