peoplesoft 9.2 requisition entry - financialservices.umbc.edu · v.1 peoplesoft 9.2 requisitions:...
TRANSCRIPT

PeopleSoft 9.2 Requisitions: Training Guide
P E O P L E S O F T 9 . 2 R E Q U I S I T I O N E N T R Y
CONTENTS
REQUISITION OVERVIEW .................................................................................................................................... 2
CAMPUS WORKCENTER: Requisition .............................................................................................................. 3
Requisition Settings .......................................................................................................................................... 4
Line Defaults ........................................................................................................................................................ 5
Shipping and Distribution Defaults............................................................................................................. 8
EDIT REQUISITION PAGE ..................................................................................................................................... 9
CHECKOUT - REVIEW AND SUBMIT .............................................................................................................. 11
Requisition Summary ..................................................................................................................................... 11
Change Requisition Settings ........................................................................................................................ 11
Cart Summary ................................................................................................................................................... 13
Line Item Details .............................................................................................................................................. 15
Edit Comments .................................................................................................................................................. 16
Add Lines to Favorites ................................................................................................................................... 18
Delete Line(s) or Mass Change .................................................................................................................... 19
Shipping Summary Section .......................................................................................................................... 21
Requisition Comments and Attachments Section ................................................................................ 21
REQUISITION SUBMIT OPTIONS ..................................................................................................................... 23
CONFIRMATION PAGE .................................................................................................................................... 24
CONFIRMATION PAGE - BUDGET CHECK ................................................................................................ 26
MANAGE REQUISTIONS ...................................................................................................................................... 27

V.1 PeopleSoft 9.2 Requisitions: Training Guide
REQUISITION OVERVIEW
Requisitions should be opened for:
Invoices over $600
Recurring payments
Requisitions should *NOT* be opened for:
Invoices less than $600
Miscellaneous reimbursements
Small dollar amounts
Tuition Reimbursement
R*STARS Payments
Alcohol (PO’s cannot be opened for alcohol related purchases)
Travel
Moving expenses

V.1 PeopleSoft 9.2 Requisitions: Training Guide
CAMPUS WORKCENTER: REQUISITION
After logging in, go to the Campus WorkCenter.
On the left hand side, under Links, select the dropdown arrow next to Requisition. Requisition, fill in the appropriate Requestor information and click OK.

V.1 PeopleSoft 9.2 Requisitions: Training Guide
REQUISITION SETTINGS
UMBC1 Business Unit will Default, along with the name of the default Requestor’s name. A magnifying glass is available to search for other names. In 9.2, instead of submitting a requisition on behalf of someone else, you can now leave the Requestor as yourself, and put in details of what the requisition purpose in the Requisition Name field.
Default:
The values specified in the Supplier, Shipping, and Distribution (Accounting) sections will carry over to the requisition lines when there are no predefined values for those fields.
Override:
Select Override to update the values specified in the Supplier, Shipping, and Distribution (Accounting) sections will override any predefined values for those fields. Only non-blank values are assigned. This may need to be done more than once if multiple lines are entered.

V.1 PeopleSoft 9.2 Requisitions: Training Guide
LINE DEFAULTS
Enter the Supplier ID if you know it. If you do not know it, click on the magnifying glass icon to do a formal lookup.
From here you can put in a partial name in the name field, or data in any of the other fields to help narrow down your search results.
Click Find to have the search results populated beneath the search fields.
If what you are looking for does not show up right away, click on the left and right arrows to scroll through all search results, or click View All to have all search results show up in the same window.
Select the Radio button next to the appropriate supplier and click Select to have the correct information populated on the Requisition Entry page.
Notice that both the Supplier ID and the Supplier Location is now filled in on Line Defaults.

V.1 PeopleSoft 9.2 Requisitions: Training Guide
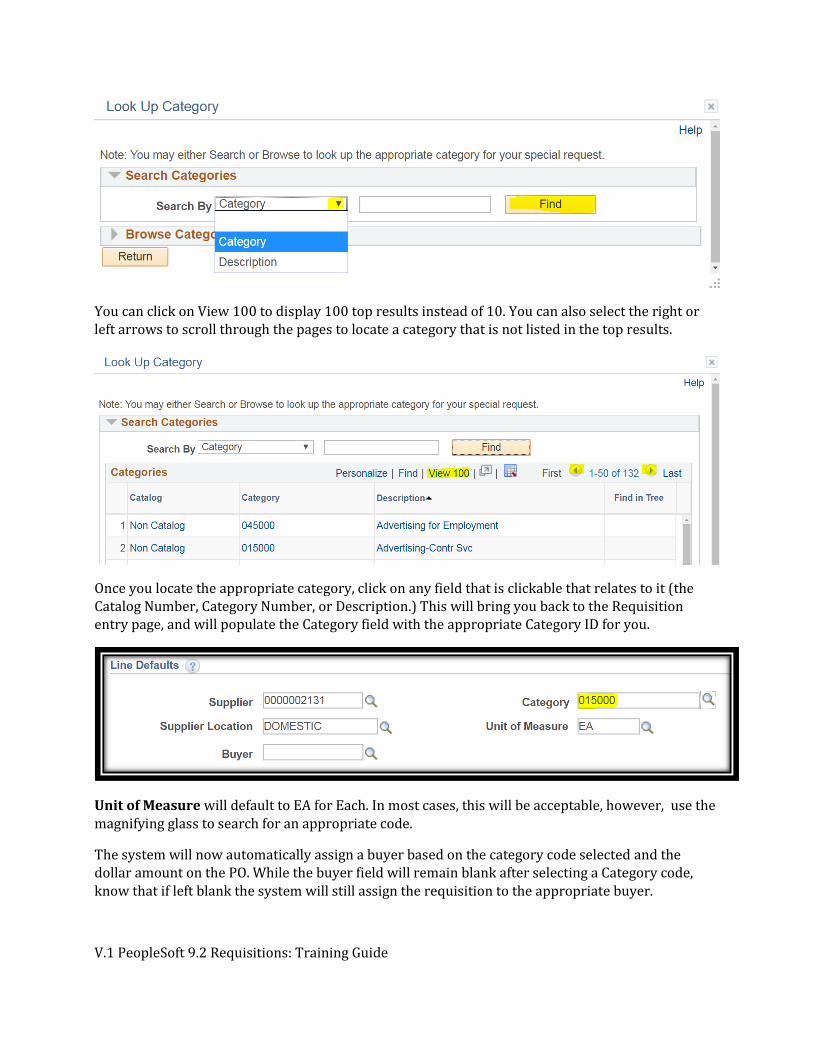
Next, enter the Category number if you know it. Please note that categories and their associated numbers have recently changed. As a result, for the first couple of Requisitions entered, it might be beneficial to double check the Category by using the look up tool.
If you do not know the category number or if you would like to verify you have the correct Category ID, click on the magnifying glass next to Category to do a more formal lookup
Ignore the Browse Category Tree section for now. It only pulls back a tree we do not currently use.
Instead, focus on the Search Categories section.
From here, you can specify search terms for Category or Description, or you can leave the field blank to find all Categories.
Click Find to show results.
V.1 PeopleSoft 9.2 Requisitions: Training Guide
You can click on View 100 to display 100 top results instead of 10. You can also select the right or left arrows to scroll through the pages to locate a category that is not listed in the top results.
Once you locate the appropriate category, click on any field that is clickable that relates to it (the Catalog Number, Category Number, or Description.) This will bring you back to the Requisition entry page, and will populate the Category field with the appropriate Category ID for you.
Unit of Measure will default to EA for Each. In most cases, this will be acceptable, however, use the magnifying glass to search for an appropriate code.
The system will now automatically assign a buyer based on the category code selected and the dollar amount on the PO. While the buyer field will remain blank after selecting a Category code, know that if left blank the system will still assign the requisition to the appropriate buyer.

V.1 PeopleSoft 9.2 Requisitions: Training Guide
If you would like to put in a specific buyer for those rare occasions when the situation calls for a non-default selection, you can input that buyer’s User ID in the Buyer field to override the system default buyer for that category code.
Use the magnifying glass next to Buyer to search for a buyer’s name.
Avoid buyers with (RETIRED) next to their name, which will soon be deactivated.
To select an active buyer, click on the hyperlink for the User ID or Name of the buyer to be assigned. This will populate that Buyer’s User ID on the Requisition Settings page.
SHIPPING AND DISTRIBUTION DEFAULTS
UMBC’s Shipping Default is WHSE.
The Attention field holds the “Attention To” information for the shipping label.
Input your chartstring in the Distribution Defaults section.
Fund
Department
PC Business Unit (PC Business Unit Must be populated BEFORE entering Project ID.)
Project
Activity
Program FIN
Account will populate from the Category selected
Click OK
V.1 PeopleSoft 9.2 Requisitions: Training Guide
EDIT REQUISITION PAGE
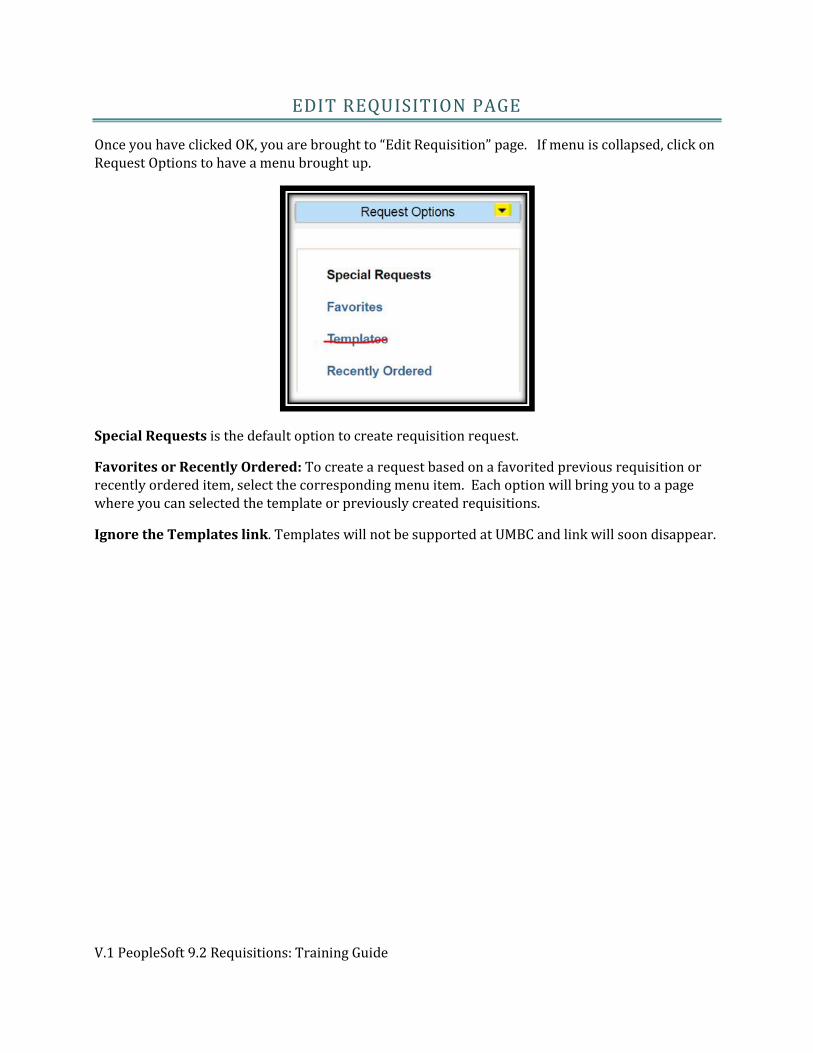
Once you have clicked OK, you are brought to “Edit Requisition” page. If menu is collapsed, click on Request Options to have a menu brought up.
Special Requests is the default option to create requisition request.
Favorites or Recently Ordered: To create a request based on a favorited previous requisition or recently ordered item, select the corresponding menu item. Each option will bring you to a page where you can selected the template or previously created requisitions.
Ignore the Templates link. Templates will not be supported at UMBC and link will soon disappear.
V.1 PeopleSoft 9.2 Requisitions: Training Guide
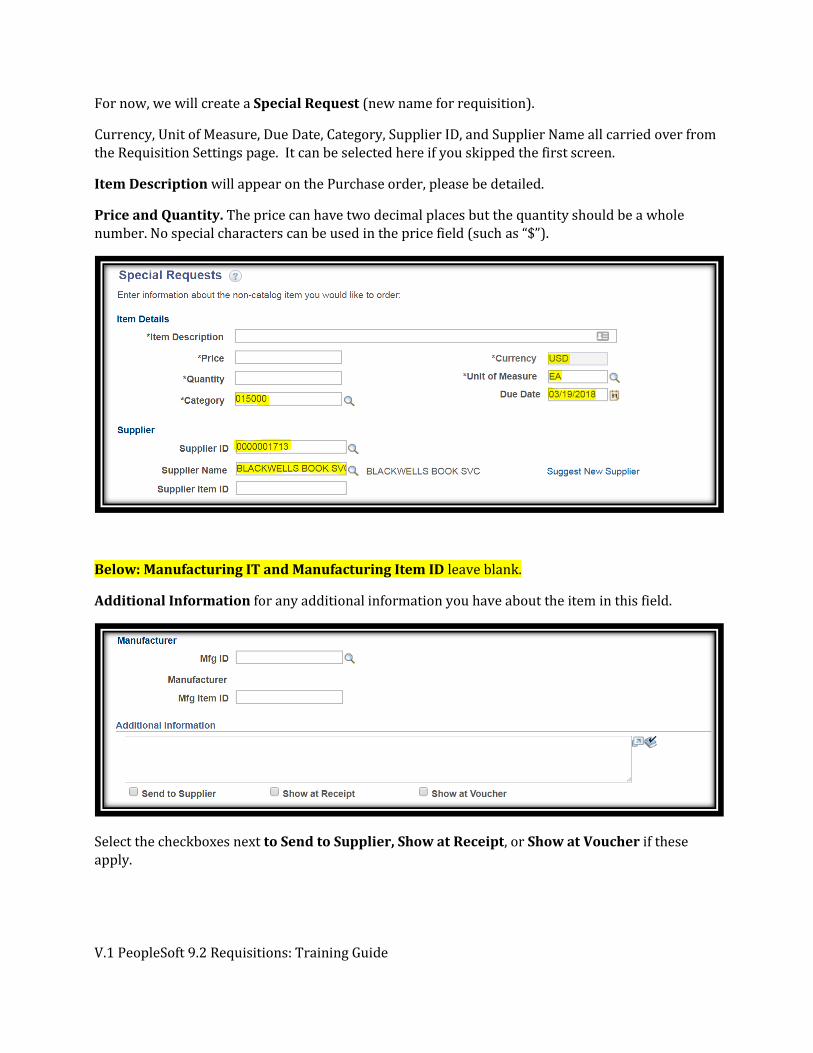
For now, we will create a Special Request (new name for requisition).
Currency, Unit of Measure, Due Date, Category, Supplier ID, and Supplier Name all carried over from the Requisition Settings page. It can be selected here if you skipped the first screen.
Item Description will appear on the Purchase order, please be detailed.
Price and Quantity. The price can have two decimal places but the quantity should be a whole number. No special characters can be used in the price field (such as “$”).
Below: Manufacturing IT and Manufacturing Item ID leave blank.
Additional Information for any additional information you have about the item in this field.
Select the checkboxes next to Send to Supplier, Show at Receipt, or Show at Voucher if these apply.

V.1 PeopleSoft 9.2 Requisitions: Training Guide
At the bottom of the screen is Request New Item.
If this is a new item, select the checkbox next to Request New Item. A notification is sent to the buyer regarding the request.
When finished, click Add to Cart at the bottom of the page.
Once added to the cart, the Special Request page clears out and you will see that the cart icon in the top right hand corner has a number next to it. Every time you add an item, the number increases. You can click on the cart icon to review all items added to the Requisition.
Fill in the fields that are blank for each new item on the Requisition.
When finished, click on the Checkout button at the top right hand corner.
CHECKOUT - REVIEW AND SUBMIT
REQUISITION SUMMARY
In the Requisition Summary section you will see a review of the Requisition Settings again. From here you can change the Requestor and the Requisition Name.
CHANGE REQUISITION SETTINGS
You can change the Requisition Settings by clicking on the Requisition Settings hyperlink in the top right hand corner.
From here you can change the Requestor, Requisition Name,, Default Options (Default or Override), Supplier ID, Supplier Location, Buyer, Category, Unit of Measure, Ship To field, Due Date, Attention
V.1 PeopleSoft 9.2 Requisitions: Training Guide
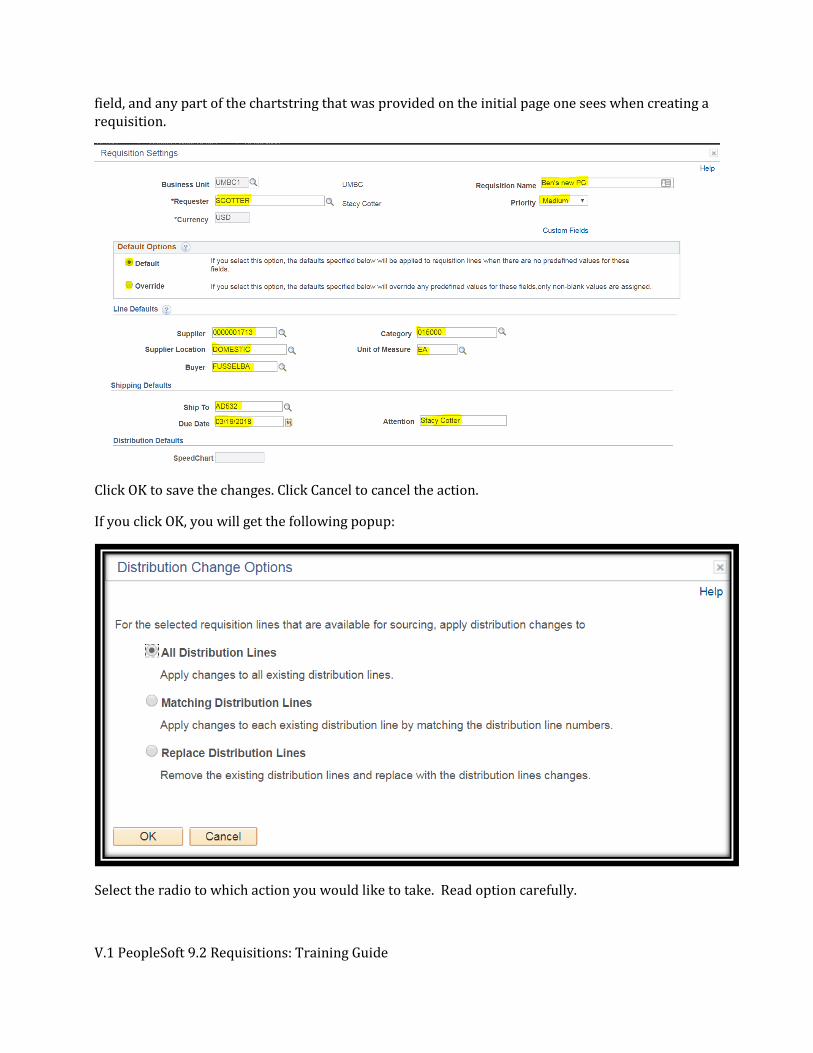
field, and any part of the chartstring that was provided on the initial page one sees when creating a requisition.
Click OK to save the changes. Click Cancel to cancel the action.
If you click OK, you will get the following popup:
Select the radio to which action you would like to take. Read option carefully.

V.1 PeopleSoft 9.2 Requisitions: Training Guide
CART SUMMARY
When you get to the final page, you can see all lines that you have added to the order. Verify the information is accurate on this page.
In the Cart Summary section, you can add more items by clicking on Add More Items. Clicking Add More Items will bring you back to the Special Request page, where you can add additional lines and then come back to the checkout screen by clicking the Checkout button.
Back on the Final Checkout page, you can see all the line details by clicking the dropdown arrow next to the individual lines.
In addition, you can see the full details by clicking on the details icon. You can edit comments on the line by clicking the Edit button under the Comment column. And you can delete the line by clicking on the trashcan icon under the Delete column.
V.1 PeopleSoft 9.2 Requisitions: Training Guide
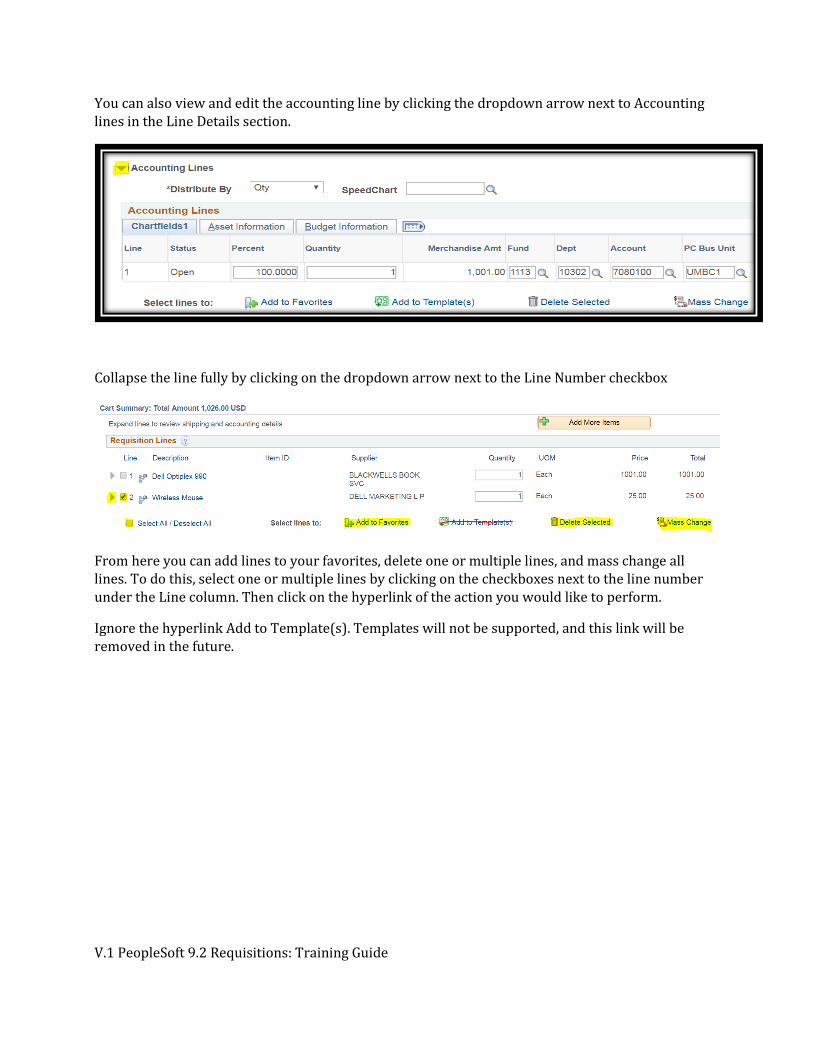
You can also view and edit the accounting line by clicking the dropdown arrow next to Accounting lines in the Line Details section.
Collapse the line fully by clicking on the dropdown arrow next to the Line Number checkbox
From here you can add lines to your favorites, delete one or multiple lines, and mass change all lines. To do this, select one or multiple lines by clicking on the checkboxes next to the line number under the Line column. Then click on the hyperlink of the action you would like to perform.
Ignore the hyperlink Add to Template(s). Templates will not be supported, and this link will be removed in the future.

V.1 PeopleSoft 9.2 Requisitions: Training Guide
LINE ITEM DETAILS
With the Requisition lines collapsed, click on the Details icon of the line item you would like to see in detail. This will bring up a pop-up that shows the full details of the line - make sure you have popups enabled for this site.
Notice that some fields are editable here. In Item Details, you can select checkboxes next to RFQ Required, Amount Only, and Inspection Required.
You can change the Supplier ID, search for a new one.
Please IGNORE ‘Suggest a New Supplier’ and ‘Custom Fields’ Section on your screen.
You can change the Supplier Item ID, the Supplier’s Catalog.
In addition, you can drill down even further. Click on the Line Description hyperlink at the top of the screen (in this screenshot, it’s labeled as “Dell Optiplex 990”).
V.1 PeopleSoft 9.2 Requisitions: Training Guide
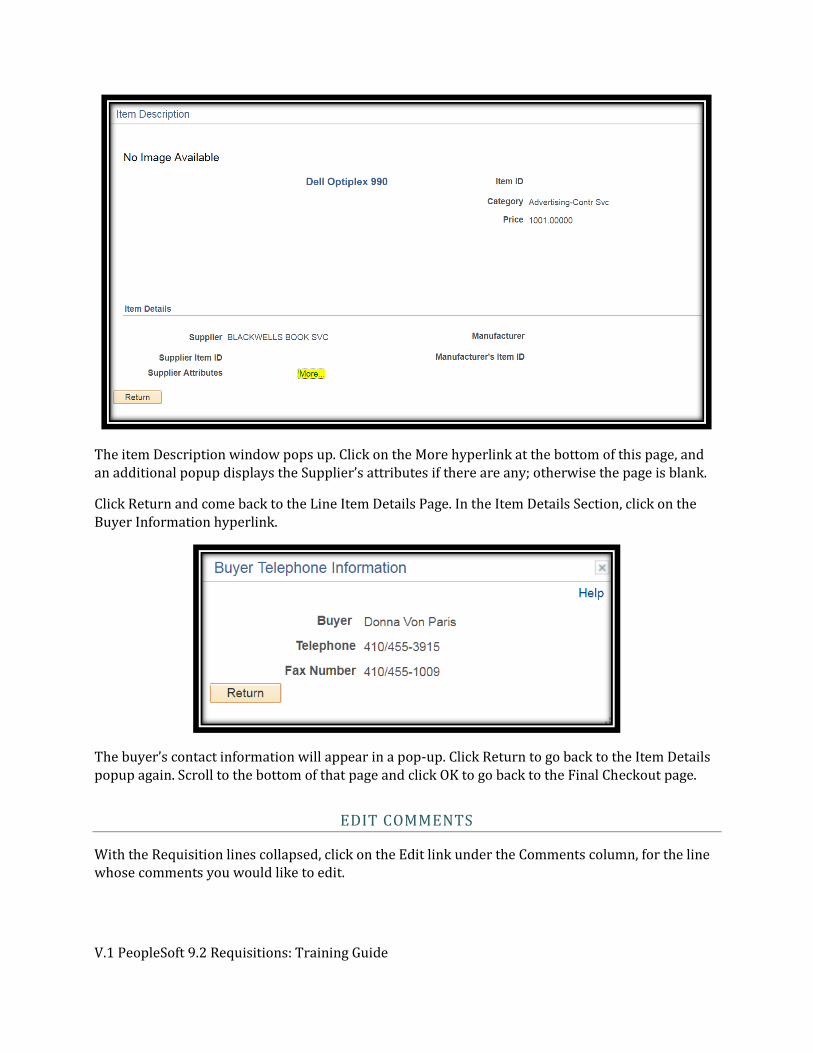
The item Description window pops up. Click on the More hyperlink at the bottom of this page, and an additional popup displays the Supplier’s attributes if there are any; otherwise the page is blank.
Click Return and come back to the Line Item Details Page. In the Item Details Section, click on the Buyer Information hyperlink.
The buyer’s contact information will appear in a pop-up. Click Return to go back to the Item Details popup again. Scroll to the bottom of that page and click OK to go back to the Final Checkout page.
EDIT COMMENTS
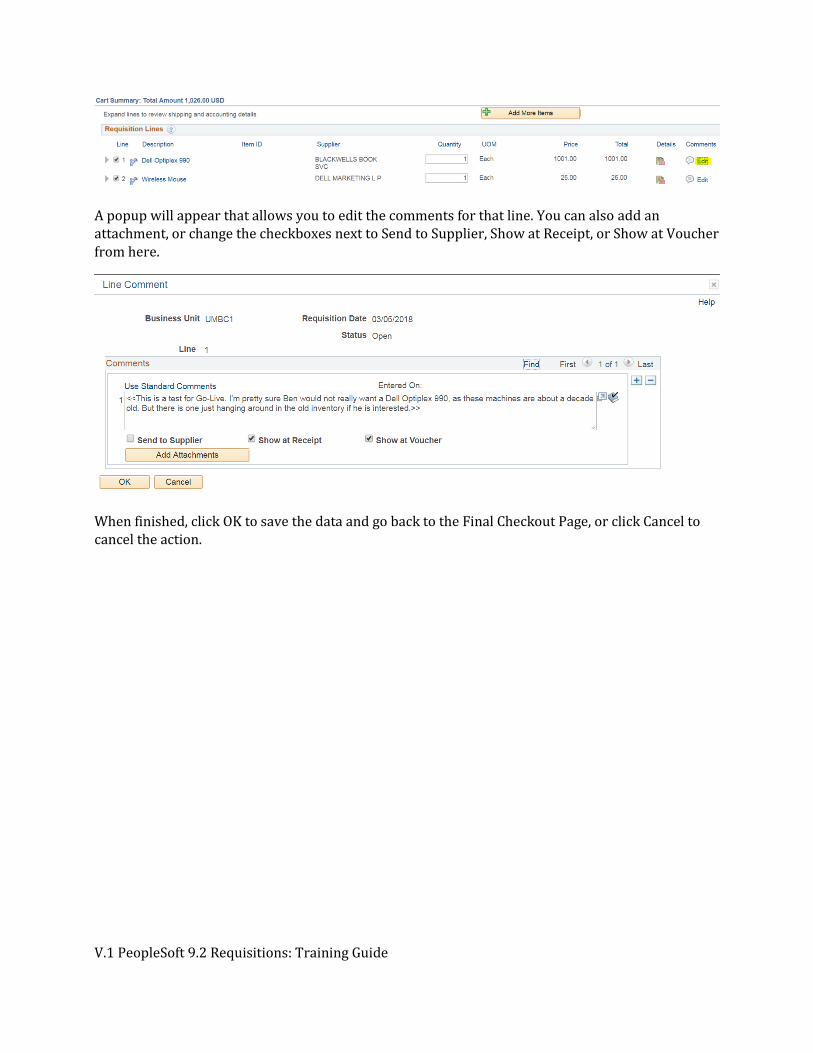
With the Requisition lines collapsed, click on the Edit link under the Comments column, for the line whose comments you would like to edit.
V.1 PeopleSoft 9.2 Requisitions: Training Guide
A popup will appear that allows you to edit the comments for that line. You can also add an attachment, or change the checkboxes next to Send to Supplier, Show at Receipt, or Show at Voucher from here.
When finished, click OK to save the data and go back to the Final Checkout Page, or click Cancel to cancel the action.

V.1 PeopleSoft 9.2 Requisitions: Training Guide
ADD LINES TO FAVORITES
With the Requisition lines collapsed, select the checkbox next to the line item(s) you would like to add to your Favorites. Click on the Add to Favorites link.
A pop-up will appear that will show a confirmation page - make sure your pop-up blocker is turned off for this site.
Click OK to add it to your favorites, Cancel to cancel the action. Be sure to select the checkbox next to “Do not show this message again” if you would like the system to automatically add items to your favorites without prompting you to do so in the future.
V.1 PeopleSoft 9.2 Requisitions: Training Guide
DELETE LINE(S) OR MASS CHANGE
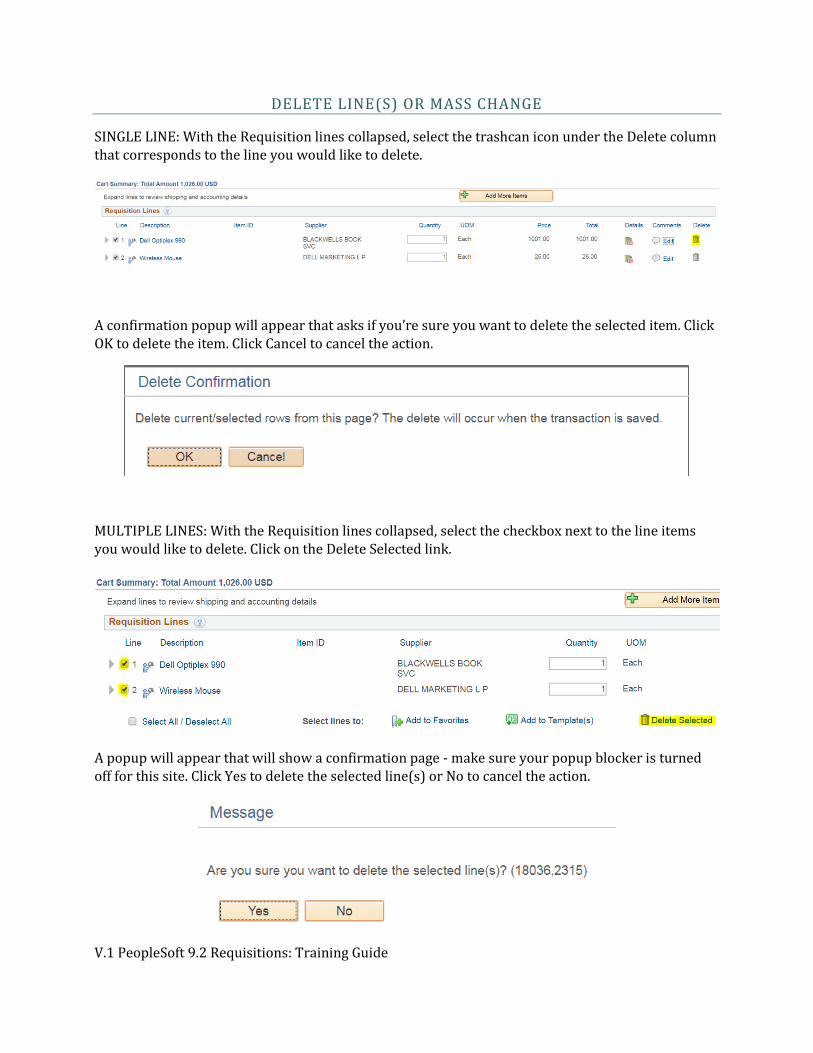
SINGLE LINE: With the Requisition lines collapsed, select the trashcan icon under the Delete column that corresponds to the line you would like to delete.
A confirmation popup will appear that asks if you’re sure you want to delete the selected item. Click OK to delete the item. Click Cancel to cancel the action.
MULTIPLE LINES: With the Requisition lines collapsed, select the checkbox next to the line items you would like to delete. Click on the Delete Selected link.
A popup will appear that will show a confirmation page - make sure your popup blocker is turned off for this site. Click Yes to delete the selected line(s) or No to cancel the action.

V.1 PeopleSoft 9.2 Requisitions: Training Guide
A mass change will allow you to change multiple lines of data using one form. You can change one or many fields for multiple lines using this popup page.
With the Requisition lines collapsed, select the checkbox next to the line item(s) you would like to mass change. Click on the Mass Change link.
As the Note says, the information in the popup form does not reflect the data in the selected requisition lines. When the “OK” button is clicked, the data entered on the page will replace the data in the corresponding fields on the selected lines that are available for sourcing.
From here you can change the Supplier ID, Supplier location, Buyer, Category, Ship To Location, Due Date, Attention, Comments, and all Chartfield fields.

V.1 PeopleSoft 9.2 Requisitions: Training Guide
SHIPPING SUMMARY SECTION
To edit the shipping summary information, you have to edit it for all lines.
Click on the link Edit for All Lines
From here a popup will display with blank fields. You can enter new data related to the shipping and chartstring lines, and it will overwrite the data on all lines in the requisition.
As the Note says, the information in the popup form does not reflect the data in the selected requisition lines. When the “OK” button is clicked, the data entered on the page will replace the data in the corresponding fields on the selected lines that are available for sourcing.
REQUISITION COMMENTS AND ATTACHMENTS SECTION
In the Requisition Comments and Attachments section, you can leave additional comments that apply to the requisition as a whole. These are labeled as Header Comments.
You can also select the checkboxes next to Send to Supplier, Show at Receipt, or Shown at Voucher if those apply to this comment.
To add attachments, click on the link in the bottom right hand corner that says Add more Comments and Attachments.
This will produce a popup that allows you to leave multiple comments and to add attachments to each one. For each comment you can check the checkboxes next to Send to Supplier, Show at Receipt, or Shown at Voucher if it applies.

V.1 PeopleSoft 9.2 Requisitions: Training Guide
Click the + or – symbol if you would like to add or delete a comment.
Each comment comes with its own Add Attachments button. While you can only upload one attachment at a time, the Add Attachments button will remain so you can add multiple attachments for each comment if you would like.
PeopleSoft will store these attachments with the Requisition for the entire life of the Requisition. If an audit is performed, attachments related to the Requisition can be easily pulled up.
It is encouraged to include as much detail and as much related documentation you can to aid in the approval process.
V.1 PeopleSoft 9.2 Requisitions: Training Guide
REQUISITION SUBMIT OPTIONS
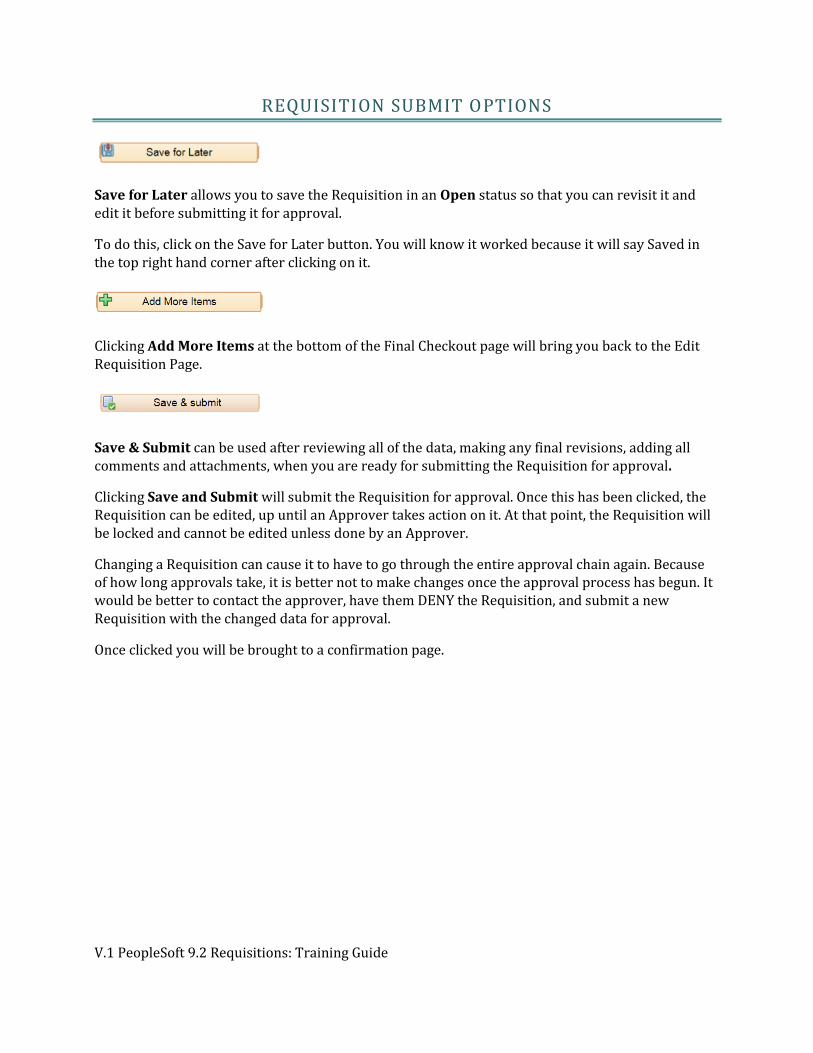
Save for Later allows you to save the Requisition in an Open status so that you can revisit it and edit it before submitting it for approval.
To do this, click on the Save for Later button. You will know it worked because it will say Saved in the top right hand corner after clicking on it.
Clicking Add More Items at the bottom of the Final Checkout page will bring you back to the Edit Requisition Page.
Save & Submit can be used after reviewing all of the data, making any final revisions, adding all comments and attachments, when you are ready for submitting the Requisition for approval.
Clicking Save and Submit will submit the Requisition for approval. Once this has been clicked, the Requisition can be edited, up until an Approver takes action on it. At that point, the Requisition will be locked and cannot be edited unless done by an Approver.
Changing a Requisition can cause it to have to go through the entire approval chain again. Because of how long approvals take, it is better not to make changes once the approval process has begun. It would be better to contact the approver, have them DENY the Requisition, and submit a new Requisition with the changed data for approval.
Once clicked you will be brought to a confirmation page.

V.1 PeopleSoft 9.2 Requisitions: Training Guide
CONFIRMATION PAGE
The Confirmation Page shows the basic details of the Requisition. There are a number of actions you can take from this page.
Edit This Requisition will take you back to the Edit Requisition Page.
Check Budget is an internal process that is required to run on this Requisition. Please run Check Budget.
V.1 PeopleSoft 9.2 Requisitions: Training Guide
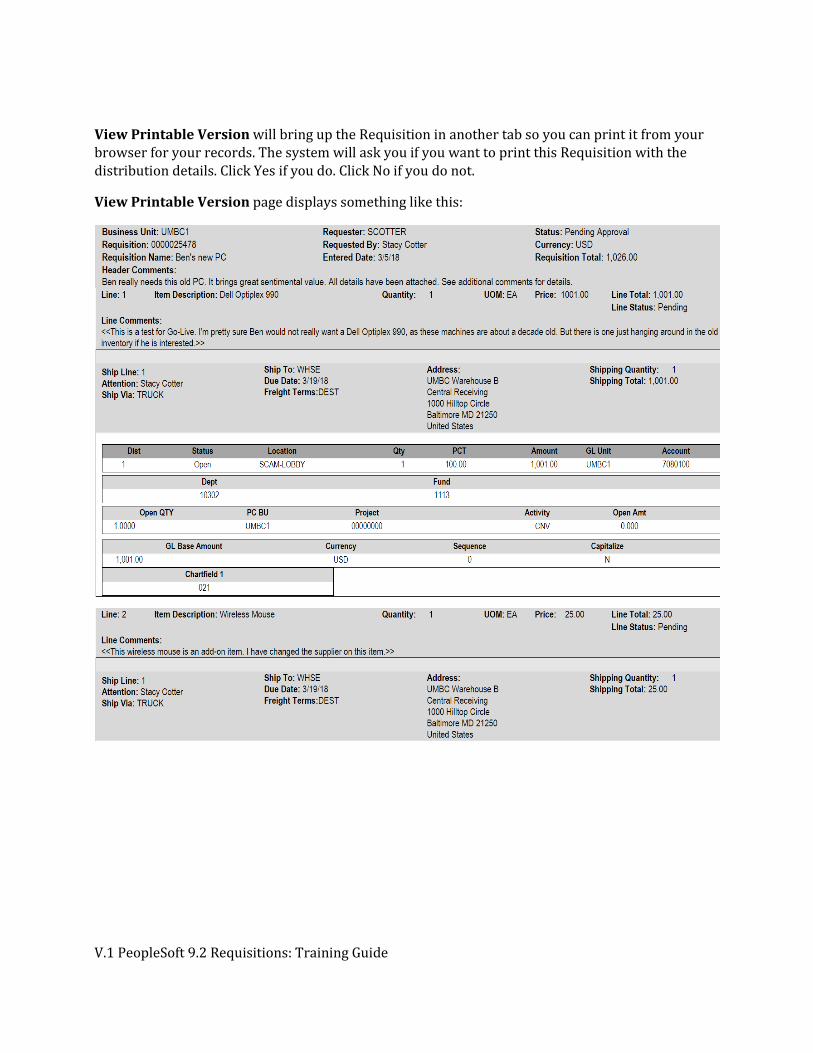
View Printable Version will bring up the Requisition in another tab so you can print it from your browser for your records. The system will ask you if you want to print this Requisition with the distribution details. Click Yes if you do. Click No if you do not.
View Printable Version page displays something like this:

V.1 PeopleSoft 9.2 Requisitions: Training Guide
CONFIRMATION PAGE - BUDGET CHECK
Check Budget is an internal process that is required to run on this Requisition.
Please click Check Budget.

V.1 PeopleSoft 9.2 Requisitions: Training Guide
MANAGE REQUISTIONS
This menu option can be used to perform different functions on The Requisition.
Check Requisition Status
To check the status of any Requisition you have submitted, go to the Manage Requisitions link from the Campus Workcenter.
At the bottom of the page, under Requisitions, is a list of any Requisitions initiated or ones you are listed as an approver for, and what stage they are in. If it says Pending Approval, it could be in any of the three approval stages mentioned in the Approving a Payment Request Section.
Edit Requisition
This menu option can also be used to Edit a Requisition. Click on the dropdown menu that has the title [Select Action]. Select Edit, and then the Go button.
A popup will appear warning you that the Requisition is in the Pending Approval Status, and that by editing it, it will have to go through the approval process again.
Click OK to continue. Click Cancel to cancel the action.