zambia revenue authority taxonline project page 1 of 41 zambia revenue authority taxonline project...
TRANSCRIPT

ZRA_TaxOnline_User_Manual_e-Registration_v1.0
Page 1 of 41
Zambia Revenue Authority
TaxOnline Project
User Manual e-Registration Web Portal
September, 2013
Version 1.0

ZRA_TaxOnline_User_Manual_e-Registration_v1.0
Page 2 of 41
Contents
1. Introduction ........................................................................................................................................... 7
2. Introduction to e-Registration ............................................................................................................... 8
3. Navigation of e-Registration ................................................................................................................. 9
3.1 Getting Started .............................................................................................................................. 9 3.1.1 Starting with e-Registration ................................................................................................... 9 3.1.2 Downloading Necessary Template ...................................................................................... 11 3.1.3 Filling the Detail for Template .............................................................................................. 13 3.1.4 Upload and Submit the Form .............................................................................................. 17 3.1.5 Continue with the Process Registration .............................................................................. 23
3.2 Additional Place of Business Annexure Form Submission ......................................................... 23 3.3 PAYE Annexure Form Submission .............................................................................................. 26
3.3.1 Acknowledgement Receipt ................................................................................................. 29 3.3.2 Upload Document ............................................................................................................... 29
3.4 Approval of e-Registration .......................................................................................................... 32 3.4.1 Opening Task of Approval ................................................................................................... 32 3.4.2 Approval of the Application ................................................................................................. 38
3.5 Notice/Certificate Printing ........................................................................................................... 40 3.5.1 Approval Notice ................................................................................................................... 40

ZRA_TaxOnline_User_Manual_e-Registration_v1.0
Page 3 of 41
List of Figures
Figure 1: Home Page .................................................................................................................................... 9 Figure 2: Tax Payer Registration Form ....................................................................................................... 10 Figure 3: Taxpayer Registration Form ........................................................................................................ 10 Figure 4: Downloading Tax Payer Registration Template ........................................................................... 11 Figure 5: Save/Open Downloaded Tax Payer Registration Template......................................................... 12 Figure 6: Saving Template for Registration ................................................................................................. 12 Figure 7: Template for Tax Payer Registration Sheet ................................................................................. 13 Figure 8: Filling the Details for Tax Payer Registration ............................................................................... 14 Figure 9: Validate Tax Payer Registration ................................................................................................... 15 Figure 10: Upload File................................................................................................................................. 16 Figure 11: Upload File Confirmation ........................................................................................................... 17 Figure 12: Confirmation for Register of OTP .............................................................................................. 18 Figure 13: OTP Details ............................................................................................................................... 18 Figure 14: Filling the OTP Details ............................................................................................................... 19 Figure 15: Confirmation of OTP Submission .............................................................................................. 20 Figure 16: Uploading Registration Page ..................................................................................................... 20 Figure 17: Uploading File for Registration .................................................................................................. 21 Figure 18: Confirmation of Uploading File .................................................................................................. 22 Figure 19: Transaction ID Generating ......................................................................................................... 22 Figure 20: Continue With the Process Registration Screen ....................................................................... 23 Figure 21: Confirmation of Continue Process ............................................................................................. 23 Figure 22: Upload Sheet Validated Confirmation for Additional Place of Business .................................... 24 Figure 23: Validation Confirmation for Save File ........................................................................................ 24 Figure 24: Uploading File for Additional Place of Business ........................................................................ 25 Figure 25: Confirmation for Uploading File ................................................................................................. 25 Figure 26: Summary of Uploading File ....................................................................................................... 25 Figure 27: Downloading PAYE Annexure ................................................................................................... 26 Figure 28: Filling the PAYE Application Sheet ............................................................................................ 27 Figure 29: Validation for PAYE .................................................................................................................... 28 Figure 30: Upload PAYE File ...................................................................................................................... 28 Figure 31: Summary of Upload ................................................................................................................... 29 Figure 32: Acknowledgment Receipt for Tax Payer Registration................................................................ 29 Figure 33: Upload Document Screen ......................................................................................................... 30 Figure 34: Uploading the Documents for Attachments ............................................................................... 30 Figure 35: Browsing the Attachment Document Screen ............................................................................. 30 Figure 36: Document Uploaded Screen ..................................................................................................... 31 Figure 37: Confirmation of Uploading Documents ...................................................................................... 31 Figure 38: Submission Confirmation of Upload Documents ....................................................................... 32 Figure 39: After Submitting Documents Uploaded Screen ......................................................................... 32 Figure 40: Path to Open Approval e-Registration ....................................................................................... 33 Figure 41: List of Approval Task for e-Registration ..................................................................................... 33 Figure 42: e-Registration Approval Page 1 ................................................................................................. 34 Figure 43: e-Registration Approval Page 2 ................................................................................................. 35 Figure 44: e-Registration Approval Page 3 ................................................................................................. 36 Figure 45: e-Registration Approval Page 4 ................................................................................................. 37 Figure 46: Additional Place of Business Page ............................................................................................ 38 Figure 47: Filling the Approval Details ........................................................................................................ 38 Figure 48: View Uploading Attachments ..................................................................................................... 39

ZRA_TaxOnline_User_Manual_e-Registration_v1.0
Page 4 of 41
Figure 49: Confirmation of Submission....................................................................................................... 39 Figure 50: TPIN Generating Page .............................................................................................................. 40 Figure 51: Path to Open Notice for Approval .............................................................................................. 40 Figure 52: Approval Notice Pending Task List ............................................................................................ 40 Figure 53: Approval Notice for TPIN ........................................................................................................... 41

ZRA_TaxOnline_User_Manual_e-Registration_v1.0
Page 5 of 41
List of Tables
Table 1: Description of Buttons ................................................................................................................... 16 Table 2: Description of Labels Boxes .......................................................................................................... 16 Table 3: Description of Button ..................................................................................................................... 17 Table 4: Description of Label Boxes ............................................................................................................ 18 Table 5: Description of Buttons ................................................................................................................... 19 Table 6: Description of Label Boxes ............................................................................................................ 21

ZRA_TaxOnline_User_Manual_e-Registration_v1.0
Page 6 of 41
List of Abbreviations
Abbreviation Expansion
FAQ Frequently Asked Question
TPIN Tax Payer Identification Number
UM User Manual
URL Uniform Resource Locator
VAT Value Added Tax
WHT Withholding Tax
ZRA Zambia Revenue Authority

ZRA_TaxOnline_User_Manual_e-Registration_v1.0
Page 7 of 41
1. Introduction
The Zambia Revenue Authority (ZRA) has launched a web portal with Uniform Resource Locator (URL): http://www.zra.org.zm. This web portal offers different kind of information on domestic taxes in Zambia.
The portal offers the following major functionalities:
1. e-Services namely e-Registration, e-Returns, e-Amendment, e-Communication, e-Payment and
also other e-Services for Motor Vehicle Registration, Driving Permit, Stamp Duty and so on.
2. News, updates, circulars and notifications
3. „Search‟ functionality
4. Tracking the status of various applications on-line
5. Virtual keyboard for entering password
6. FAQs, Query posting and replying
7. Subscribe/view the RSS feeds introduction

ZRA_TaxOnline_User_Manual_e-Registration_v1.0
Page 8 of 41
2. Introduction to e-Registration
e-Registration is designed to enable the dealers to get them registered online. They need not go to the
Excise and Taxation Department for registration.
This functionality‟s architecture can be described as following two units:
1. e-Registration: This module is designed to enable dealers to get them registered. An
acknowledgement receipt is generated on successfully filing of all the required forms.
2. Track Your Status: This module is designed to enable dealers to view their request form and
also track the status of registration request made by them through the portal. By entering the
acknowledgement number. And the search code provided in the acknowledgement receipt, the
dealer can re-print the acknowledgement receipt and registration form uploaded by them on
portal.

ZRA_TaxOnline_User_Manual_e-Registration_v1.0
Page 9 of 41
3. Navigation of e-Registration
e-Registration shall allow the tax payer to apply online for registration in domestic taxes.
3.1 Getting Started The web portal visitors provide with an e-Registration link under e-Services on the web portal. On selection of the link portal prompts the user to select a New Registration or To Continue with a Previous Registration. The section of New Registration, allows the Tax Payer to file a New Registration Application while selection of Continue with Previous Registration allows the Tax Payer to continue ahead with a previously incomplete Registration Application.
3.1.1 Starting with e-Registration
To start the application:
1. Click the Internet Explore icon. The Browser appears. Type the URL: http://www.zra.org.zm.in the
address bar. The website at this URL will be replaced with new website developed whose screen
shots are attached from development/ staging servers.
2. Once the website is connected ZRA home page will appears as shown in Figure 1.
3. Click the e-Registration link which appears on the left hand corner of the home page.
Figure 1: Home Page

ZRA_TaxOnline_User_Manual_e-Registration_v1.0
Page 10 of 41
After clicking the e-Registration link, the following screen appears.
Figure 2: Tax Payer Registration Form
4. Select the form type from the Tax Payer Registration drop-down list.
Figure 3: Taxpayer Registration Form
After selecting the form type from the drop-down list, the new TAX PAYER REGISTRATION form appears
(as shown in Figure 3). This screen display the details that dealer should be complete while applying for
the new registration.

ZRA_TaxOnline_User_Manual_e-Registration_v1.0
Page 11 of 41
3.1.2 Downloading Necessary Template
To apply for registration dealer has to download the template from the website. It is advisable to always
download the latest template for application. The user should have Microsoft Office Excel (version may be
97, 2000, 2003 or 2007) installed in the computer for this purpose.
To download the necessary templates:
1. Click the Tax Payer Registration on NEW TAX PAYER REGISTRATION form.
2. Download template for the respective tax payer registration.
Figure 4: Downloading Tax Payer Registration Template

ZRA_TaxOnline_User_Manual_e-Registration_v1.0
Page 12 of 41
3. Click the Save button to save template in the system.
Figure 5: Save/Open Downloaded Tax Payer Registration Template
4. Open the saved template for the tax payer registration.
Figure 6: Saving Template for Registration
5. Fill the respective tax payer registration details in the template for name, physical address, tax
type, business details.
ZRA_TaxOnline_User_Manual_e-Registration_v1.0
Page 13 of 41
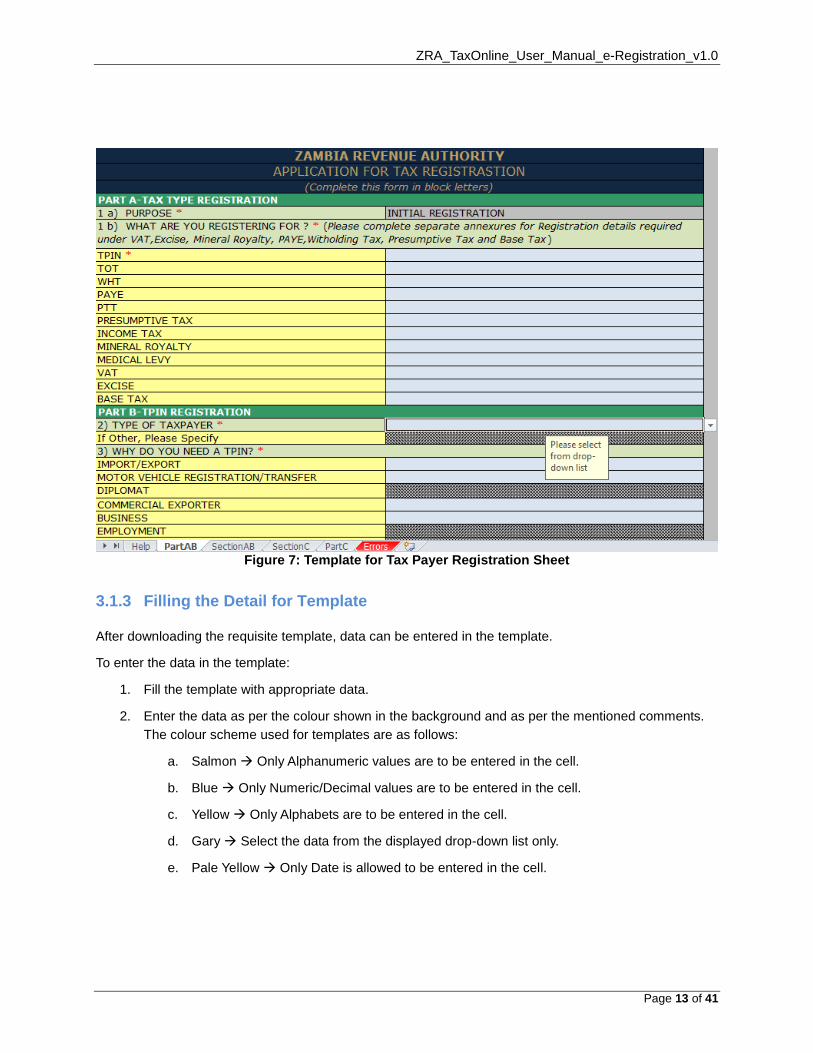
Figure 7: Template for Tax Payer Registration Sheet
3.1.3 Filling the Detail for Template
After downloading the requisite template, data can be entered in the template.
To enter the data in the template:
1. Fill the template with appropriate data.
2. Enter the data as per the colour shown in the background and as per the mentioned comments.
The colour scheme used for templates are as follows:
a. Salmon Only Alphanumeric values are to be entered in the cell.
b. Blue Only Numeric/Decimal values are to be entered in the cell.
c. Yellow Only Alphabets are to be entered in the cell.
d. Gary Select the data from the displayed drop-down list only.
e. Pale Yellow Only Date is allowed to be entered in the cell.

ZRA_TaxOnline_User_Manual_e-Registration_v1.0
Page 14 of 41
Following figure depicts the sample template for tax payer registration.
Figure 8: Filling the Details for Tax Payer Registration
3. Click the Validate button to validate the data and to generate the validated sheet which you need
to upload. After uploading the data template size will be increased to 20 kb. The Registration
dialog box with the message „Your sheet is validated successfully, Do you want to generate
upload sheet‟.

ZRA_TaxOnline_User_Manual_e-Registration_v1.0
Page 15 of 41
Figure 9: Validate Tax Payer Registration
4. After entering the form details will be validate by the system and if they are found correct, system
will give no error message box will appear otherwise list of error messages will be displayed.
5. Click the Yes button. The Save As pop-up window appears.

ZRA_TaxOnline_User_Manual_e-Registration_v1.0
Page 16 of 41
Figure 10: Upload File
Following tables explains the data to be filled in fields for uploading registration.
Table 1: Description of Buttons
Sr. No. Button Description
1. Save Save the Template at the desired location.
2. Cancel Cancel the process.
Table 2: Description of Labels Boxes
Sr. No. Labels Description
1. File Name Enter the Name of the file.
2. Save as type Select Excel files from the Dropdown (default).

ZRA_TaxOnline_User_Manual_e-Registration_v1.0
Page 17 of 41
6. Type relevant name in file name and click to save button. You will get following dialog box (as shown in Figure 11).
Figure 11: Upload File Confirmation
7. On upload file is generate which has to be uploaded for the registration process.
Following table explains the data to be filled in fields for upload confirmation.
Table 3: Description of Button
Sr. No. Button Description
1. Ok Confirm with the process.
3.1.4 Upload and Submit the Form
1. After downloading the templates please fill the templates as per the comments mentioned. For uploading the filled template Tax Payer Registration page again.
2. Click the Register for OTP, an alert will pop up for confirmation message as shown in Figure 12.

ZRA_TaxOnline_User_Manual_e-Registration_v1.0
Page 18 of 41
Figure 12: Confirmation for Register of OTP
3. Click on OK from confirmation message, an alert will pop up with OTP details as shown in Figure
13.
Figure 13: OTP Details Following table explains the data to be filled in fields for OTP registration. Table 4: Description of Label Boxes
Sr. No. Label Type Data Type Action to be performed
1. Applicant Name Characters Name of the Applicant.
2. Email Id Characters Enter a valid email Id.
3. Mobile Number Numeric Enter Mobile number.

ZRA_TaxOnline_User_Manual_e-Registration_v1.0
Page 19 of 41
Table 5: Description of Buttons
Sr. No. Button Description
1. Ok Confirm with the process.
2. Cancel Cancel the process.
3. Register for OTP Register with the process.
4. Re-Generate OTP Re-Generate OTP details.
5. Verify OTP Verify OTP details.
Fill the OTP details for following screen.
Figure 14: Filling the OTP Details
4. On clicking Verify OTP Button, will pop up confirmation message for whether asking “Want to Continue” or not. Click ok, the uploading page will be open as shown in Figure 16.

ZRA_TaxOnline_User_Manual_e-Registration_v1.0
Page 20 of 41
Figure 15: Confirmation of OTP Submission
Figure 16: Uploading Registration Page 5. Check all the detail and tick on “I Agree to terms and conditions”. On clicking Upload, an alert
will pop up for confirmation message as shown in Figure 18.

ZRA_TaxOnline_User_Manual_e-Registration_v1.0
Page 21 of 41
Following table explains the data to be filled in fields for upload document.
Table 6: Description of Label Boxes
Sr. No. Label Type Data Type Action to be performed
1. Upload File Select the downloaded filled template for Tax Payer Registration form. The dealer can upload filled template in .xls format or upload file generated by validating the filled template.
2. Back Button Back from current page.
6. After filling up the details as mentioned above click on the Browse button to select the generated upload file. Clicking the Submit button will upload the file. After uploading the form details will be verified by the system and if they are found correct, system will give no error message otherwise list of error messages will be displayed. Dealer needs to correct the data and upload the template again.
7. On uploading the template, it will show you status of the process running on the portal.
Figure 17: Uploading File for Registration
8. Following are the screen layouts showing that the template is getting uploaded status. If there are
no errors in the uploaded template you will find a submit button on the summary page.

ZRA_TaxOnline_User_Manual_e-Registration_v1.0
Page 22 of 41
Figure 18: Confirmation of Uploading File
9. After uploading, an alert will pop up for Transaction Id as shown in Figure 19.
10. This transaction id has been displayed randomly. This code will be used continues with previous
registration. Click ok button, directly it's going to next process.
11. On click the Submit button to Save the Tax Payer Registration data.
Figure 19: Transaction ID Generating
Note: The system will not allow submission/upload of registration sheet till the errors are corrected.

ZRA_TaxOnline_User_Manual_e-Registration_v1.0
Page 23 of 41
3.1.5 Continue with the Process Registration
The section of New Registration, allows the Tax Payer to file a New Registration Application while selection of Continue with Previous Registration allows the Tax Payer to continue ahead with a previously incomplete Registration Application.
Entering the Transactional Id and click Submit button, will pop up confirmation message asking whether “want to continue” or not. Click ok, directly going to summary of upload page.
Figure 20: Continue With the Process Registration Screen
Figure 21: Confirmation of Continue Process
3.2 Additional Place of Business Annexure Form Submission
1. To apply for registration dealer has to download the template from the website. It is advisable to
always download the latest template for application. The user should have Microsoft Office Excel
(version may be 97, 2000, 2003 or 2007) installed in the computer for this purpose.

ZRA_TaxOnline_User_Manual_e-Registration_v1.0
Page 24 of 41
2. Click on the download link next to the form name to download the template for the respective
Additional Place of Business Annexure.
3. Have to fill respective details in application for Additional Place of Business Annexure.
4. Once you have completed filling of the sheet, press Validate button to validate the data and to
generate validated sheets which you need to upload.
Figure 22: Upload Sheet Validated Confirmation for Additional Place of Business
Figure 23: Validation Confirmation for Save File
5. After filling up the details as mentioned above click on the Browse button to select the generated
upload file. Clicking the submit button will upload the file. After uploading the form details will be
verified by the system and if they are found correct, system will give no error message otherwise
list of error messages will be displayed.
6. After validation if there is any error in data, then the error list showing the error message with the
row number and sheet details will be displayed. Dealer needs to correct the data and upload the
template again.

ZRA_TaxOnline_User_Manual_e-Registration_v1.0
Page 25 of 41
Figure 24: Uploading File for Additional Place of Business
7. Click on Submit button, will pop up confirmation message asking whether “Want to Continue” or
not. Click Ok, will displaying submission confirmation for summary of upload.
Figure 25: Confirmation for Uploading File
8. On clicking Submit button, will displaying acknowledgement receipt for e-Registration.
Figure 26: Summary of Uploading File

ZRA_TaxOnline_User_Manual_e-Registration_v1.0
Page 26 of 41
3.3 PAYE Annexure Form Submission
1. To apply for registration dealer has to download the template from the website. It is advisable to
always download the latest template for application. The user should have Microsoft Office Excel
(version may be 97, 2000, 2003 or 2007) installed in the computer for this purpose.
2. Click on the download link next to the form name to download the template for the respective
PAYE type.
3. Click Have to fill the respective details in application for Pay as Your Earn (PAYE).
4. Once you have completed filling of the sheet, press Validate button to validate the data and to
generate validated sheets which you need to upload.
Figure 27: Downloading PAYE Annexure

ZRA_TaxOnline_User_Manual_e-Registration_v1.0
Page 27 of 41
Figure 28: Filling the PAYE Application Sheet
Following are the steps to save a XLS file:
i. Fill the template according to the comments and the background colour used.
ii. Click on validate button.
iii. After entering the form details will be validate by the system and if they are found correct,
system will give no error message box will appear otherwise list of error messages will be
displayed.
iv. Click on Yes and you will get following dialogue box as shown in Figure 30.
v. An Upload file is generated which has to be uploaded for PAYE process

ZRA_TaxOnline_User_Manual_e-Registration_v1.0
Page 28 of 41
Figure 29: Validation for PAYE
Figure 30: Upload PAYE File
5. After filling up the details as mentioned above click on the Browse button to select the generated
upload file. Clicking the submit button will upload the file. After uploading the form details will be verified by the system and if they are found correct, system will give no error message otherwise list of error messages will be displayed.
6. After validation if there is any error in data, then the error list showing the error message with the row number and sheet details will be displayed. Dealer needs to correct the data and upload the template again.
7. Click on Submit button, directly going to next process.

ZRA_TaxOnline_User_Manual_e-Registration_v1.0
Page 29 of 41
Note: The system will not allow submission/upload of registration sheet till the errors are corrected.
3.3.1 Acknowledgement Receipt
After completing all individual/Non Individual applications, you will have screen which shows list of registration made in group registration. User requires to generate acknowledgment receipt by clicking on submit for each application.
Figure 32: Acknowledgment Receipt for Tax Payer Registration
3.3.2 Upload Document
1. Click Continue to Online Document Upload, Upload Document screen will displaying with
Figure 31: Summary of Upload

ZRA_TaxOnline_User_Manual_e-Registration_v1.0
Page 30 of 41
acknowledgement number with search code. Click Search, new screen will open as shown as Figure 34.
Figure 33: Upload Document Screen
Figure 34: Uploading the Documents for Attachments
2. Select document for mandatory attachments for Tax Payer Document Type from drop down list
and Browse the respective documents. Click Upload button, document details have added by row (as shown as Figure 36).
Figure 35: Browsing the Attachment Document Screen

ZRA_TaxOnline_User_Manual_e-Registration_v1.0
Page 31 of 41
Figure 36: Document Uploaded Screen
3. On clicking Submit button, will pop up confirmation message asking whether “Final Submission
of Documents” or not.
Figure 37: Confirmation of Uploading Documents

ZRA_TaxOnline_User_Manual_e-Registration_v1.0
Page 32 of 41
9. Click Ok, will pop up confirmation message for “Successfully Submitted”.
Figure 38: Submission Confirmation of Upload Documents
Figure 39: After Submitting Documents Uploaded Screen
3.4 Approval of e-Registration
This section describes the process for approval, which includes the following:
a) Opening of task of Approval
b) Initiation of Interview/Inspection
c) Approval of Application
3.4.1 Opening Task of Approval
You can do so by traversing through TasksApprove Registration First Time e-
Registration TPIN e-Registration on the home page. A list of acknowledgement numbers will be
displayed.

ZRA_TaxOnline_User_Manual_e-Registration_v1.0
Page 33 of 41
Figure 40: Path to Open Approval e-Registration
On clicking TPIN e-Registration link, a page with the list of task pending for approval will be displayed as
shown in Figure 41. On clicking the Reference number, the form will open for approval.
Figure 41: List of Approval Task for e-Registration

ZRA_TaxOnline_User_Manual_e-Registration_v1.0
Page 34 of 41
During approval process if any details are found in correct authority can modify the data.
Figure 42: e-Registration Approval Page 1

ZRA_TaxOnline_User_Manual_e-Registration_v1.0
Page 35 of 41
Figure 43: e-Registration Approval Page 2

ZRA_TaxOnline_User_Manual_e-Registration_v1.0
Page 36 of 41
Figure 44: e-Registration Approval Page 3

ZRA_TaxOnline_User_Manual_e-Registration_v1.0
Page 37 of 41
Figure 45: e-Registration Approval Page 4

ZRA_TaxOnline_User_Manual_e-Registration_v1.0
Page 38 of 41
Figure 46: Additional Place of Business Page
3.4.2 Approval of the Application
Once the Acknowledgement completed, system will consider this application for Approval process. During
Approval/Rejection process if any details are found in correct authority can modify the data.
Figure 47: Filling the Approval Details

ZRA_TaxOnline_User_Manual_e-Registration_v1.0
Page 39 of 41
User can view the uploaded documents details. Click View Upload Document button, new screen will pop up with documents details.
Figure 48: View Uploading Attachments
After filling the Approval remarks, click on Approval button. Will pop up confirmation message asking weather “Process the Application” or not. Click Ok, submission confirmation page will be open.
Figure 49: Confirmation of Submission

ZRA_TaxOnline_User_Manual_e-Registration_v1.0
Page 40 of 41
Figure 50: TPIN Generating Page
3.5 Notice/Certificate Printing
After the completion of approval/rejection process, printing of notice takes place. To open the task for Notice Printing.
3.5.1 Approval Notice
You can do so by traversing through by Task Notice/Certificate Printing Registration
Registration Notice for Approval.
Figure 51: Path to Open Notice for Approval
After click the Notice for TPIN Approval, you can click on respective acknowledgment number to open
the Notice of Approval.
Figure 52: Approval Notice Pending Task List
ZRA_TaxOnline_User_Manual_e-Registration_v1.0
Page 41 of 41
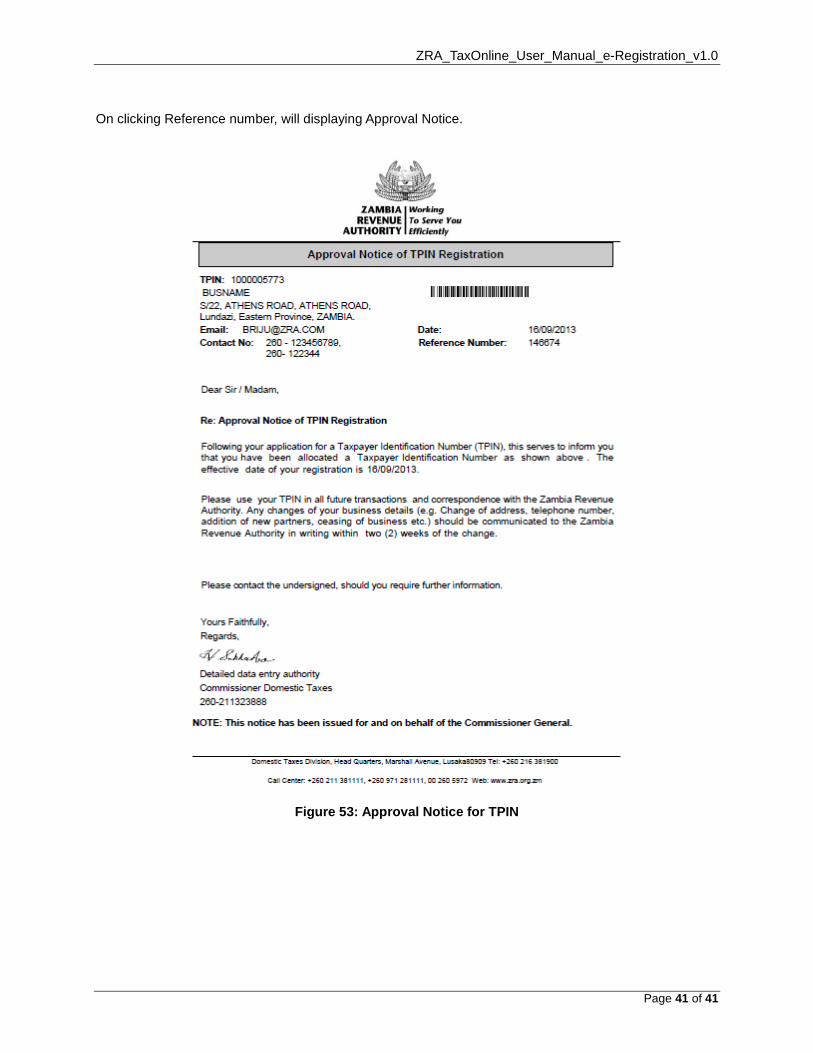
On clicking Reference number, will displaying Approval Notice.
Figure 53: Approval Notice for TPIN