th cavalry in vietnam - flames of war cavalry in vietnam flechette rounds every rifle squad has two...
TRANSCRIPT
7th Cavalry in VietnamThe 7th Cavalry were made famous by Colonel Custer’s famous last stand at the Battle of Little Bighorn. Despite this disaster, they continued as one of the US Army’s finest cavalry regiments until they were finally dismounted and converted to infantry during the Second World War. The battalions and squadrons of the 7th Cavalry fought in Korea as infantry and reconnaissance troops before being deactivated in 1957.
The lineage of this famous regiment remained dormant until June 15, 1965 when the 11th Air Assault Division was redesignated the 1st Cavalry Division (Airmobile), absorbing the 2nd Infantry Division in the process. This gave the division 9,500 men out of its required 15,900 men. Of these, half were due for discharge or ineligible for overseas deployment.
The division was quickly brought up to strength and the new arrivals trained in air assault tactics before being shipped out for Vietnam. By the end of October 1965, the division was fully assembled at An Khe in the Central Highlands. Their new base of operations at Camp Radcliff (named for the division’s first combat casualty in Vietnam) was quickly nicknamed the ‘Golf Course’.
The division was nicknamed ‘The First Team’ and the ‘Skysoldiers’. It had three brigades. The 1st ‘All the Way’ Brigade was parachute qualified and contained the 1st and 2nd Battalions, 8th Cavalry and the 1st Battalion, 12th Cavalry. The 2nd ‘Black Horse’ Brigade had the 1st and 2nd Battalions, 5th Cavalry and the 2nd Battalion, 12th Cavalry. The 3rd Brigade was nicknamed ‘Garry Owen’ after the regimental march of the 7th Cavalry. The brigade was smaller than the others having just the 1st and 2nd Battalions, 7th Cavalry.
Flying from the Golf Course and other small forward bases, the 1st Brigade flew to the aid of the besieged ARVN (Army of the Republic of Vietnam) base at Plei Me and then hunted the Vietnamese 33rd and 320th Regiments as they retreated back to their bases on the Chu Pong Massif. The fighting consisted of a series of air assaults ranging from patrol to battalion strength as the brigade attempted to locate and attack the retreating PAVN (Peoples Army of Vietnam) troops.
After three weeks of heavy fighting, the 1st Brigade was rested and the Garry Owen’s took over the pursuit in Operation Silver Bayonet. After several days of searching, it appeared that the Vietnamese forces had gotten clean away. A lead suggesting that there were Vietnamese forces around the Chu Pong Massif, 14 miles (22 km) southwest of Plei Me led to a reconnaissance in force.
The mission was given to the 1st Battalion, 7th Cavalry under Lieutenant Colonel Hal Moore. He selected a landing zone codenamed LZ X-ray northeast of the Chu Pong Massif. Soon after landing Moore learned from a prisoner that he had found what he was looking for. His battalion was landing right in the middle of a the newly-arrived PAVN 66th Regiment. By mid afternoon his battalion was landed and heavily engaged by elements of two Vietnamese battalions. B Company of the 2nd Battalion, 7th Cavalry was sent in to reinforce them. The next morning the Vietnamese attacks intensified as the remainder of the second battalion was committed. About to be overrun, Moore requested help from every aircraft available. This additional firepower turned the tide.
Later that morning the 2nd Battalion, 5th Cavalry arrived having marched cross-country from LZ Victor. The afternoon, night and next morning saw further attacks by the Vietnamese regiment, but the Cavalry’s perimeter held. On the afternoon of the second day the exhausted troopers of the 1st Battalion were withdrawn with the rest of 2nd Battalion taking their place.
After a relatively quiet night the Cavalry marched out of LZ X-ray to be picked up from LZ Columbus and LZ Albany. The 2nd Battalion, 5th Cavalry reached LZ Columbus safely, but the 2nd Battalion, 7th Cavalry ran into the Vietnamese 66th Regiment’s third battalion. The battle raged all afternoon with both sides suffering heavily. The next day LZ Columbus was attacked by fire, but the Vietnamese were driven off by air attacks. Operation Silver Bayonet was over.
Eager to maintain the pressure, the 1st Cavalry Division immediately started Operation Silver Bayonet II aimed at pushing the PAVN forces back across the Cambodian border.
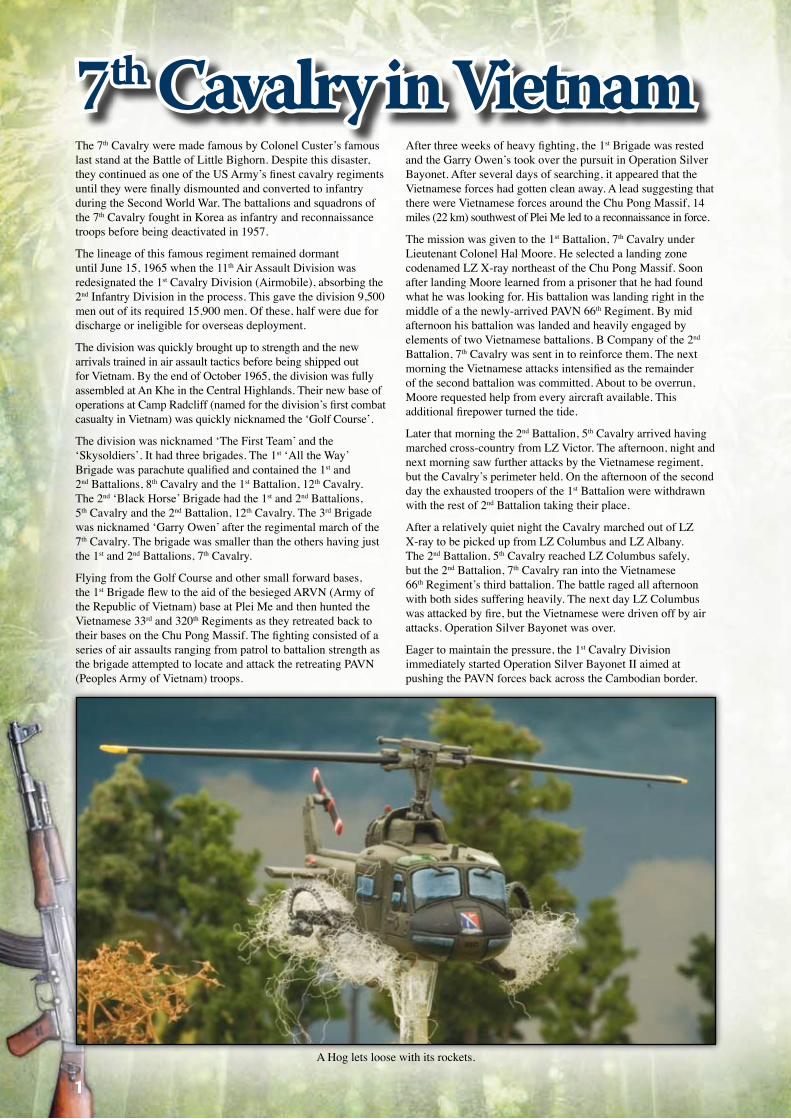
A Hog lets loose with its rockets.
1
7th Cavalry in Vietnam
Flechette RoundsEvery rifle squad has two M79 grenade launchers, one per fire team. While they boost the squad’s long-range firepower, the M79 grenade launchers really shine up close when they fire flechette rounds like a giant shotgun.
M16 Rifle teams (other than Command teams and Observer teams) roll one extra die to hit in Defensive Fire during Assaults. This gives them three dice if they are not Pinned Down, or two dice if they are.
Light Anti-tank WeaponEvery rifle squad also has numerous M72 LAW anti-tank rockets. These are essentially disposable versions of the Second World War bazooka. In Vietnam their main role was silencing bunkers and demolishing termite mounds.
M16 Rifle teams may fire one of their M72 LAW rocket launchers instead of their normal shooting. If they do so they use the second line of characteristics shown in the arsenal.
MedicThe company medics treat the wounded and prepare them for medevac, freeing the combat troops from needing to care for their wounded. They tend to be unusually brave as the wounded are relying on them to keep working, no matter how dangerous the situation.
Medic teams are Independent teams. As non-combatants, they cannot Shoot and do not fight in assaults. If assaulted, a Medic team will break off at the earliest opportunity.
When a Medic team is Destroyed, roll a die.
On a score of 4+, the team treats its own wounded and carries on.
Otherwise it is Destroyed and removed as normal.
Medic teams use the Medevac rules in the Hot LZ and Indian Country mission pdfs. By taking over the care of wounded soldiers, they can free the remainder of the team to return to combat.
•
•
7th Cavalry Special rules
Excellent CommunicationsEvery rifle platoon has its own RTO (Radio-telephone Operator) manning an PRC-25 radio. This enables them to request artillery fire without needing an artillery observer.
A Rifle Company (Airmobile) uses the Excellent Communications special rule on page 161 of the rulebook.
In addition, if the Platoon Command team has been Destroyed, each turn a single team from the platoon can act as a spotting team as if it were the platoon commander.
Hit ‘em With Everything You’ve GotThe artillery observers are connected to their whole battalion and can reinforce their fire with a second battery if available.
A Rifle Company (Airmobile) uses the Hit ‘em With Everything You’ve Got special rule on page 161 of the rulebook.
Time On TargetModern fire control methods allow the field artillery to coordinate the fire of their guns so that the first round from every gun arrives at the same time.
A Rifle Company (Airmobile) uses the Time On Target special rule on page 161 of the rulebook.
Under CommandOfficers are trained to call for fire from their battalion mortars. Constant practice allows them to bring in quick, effective fire.
A Rifle Company (Airmobile) uses the Under Command special rule on page 161 of the rulebook. In addition, they do not suffer their normal +1 penalty to range in when calling for artillery bombardments from their company’s own mortars.
Artillery
As well as their own special rules shown to the right, the 7th Cavalry use the US Artillery special rules from the rulebook.
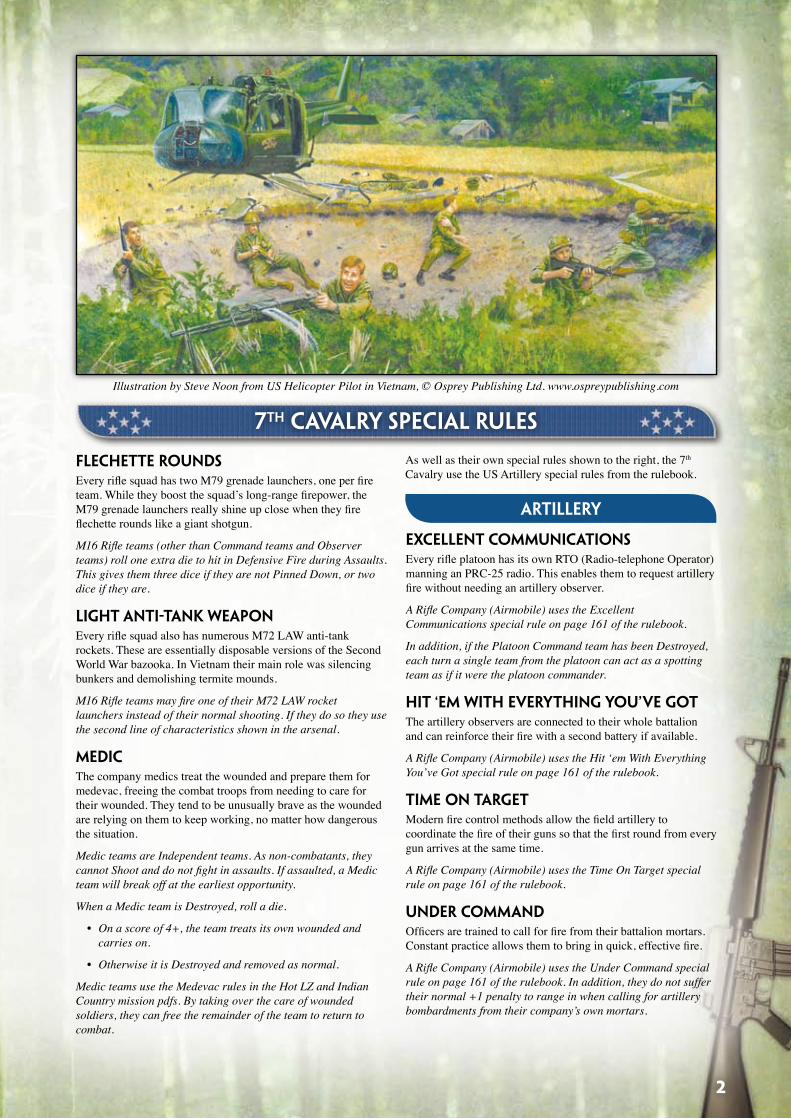
Illustration by Steve Noon from US Helicopter Pilot in Vietnam, © Osprey Publishing Ltd. www.ospreypublishing.com
2

Basil Plumley was born in 1920 in West Virginia. He enlisted in the US Army on 31 March 1942 as a private and volunteered to join the US paratroopers. He was assigned to the 82nd ‘All American’ Airborne Division and fought with the unit throughout World War II. He made all four combat jumps with the division in WWII including Sicily, Salerno, D-Day and Market Garden. He remained in the army after the war and participated in another combat jump during the Korean War with the 187th Airborne Infantry Regiment.
Plumley met Hal Moore at Fort Benning while Moore was testing experimental parachutes. He soon attained the rank of Sergeant Major and together with Moore began training their battalion in the new 1st Cavalry Division (Air Mobile). The Sergeant Major was known affectionately by his soldiers as ‘Old Iron Jaw’ owing to his being hardened veteran.
In 1965, Plumley entered his third war when he went into action with the 1st Battalion, 7th Cavalry Regiment at the Ia Drang Valley. During the battle, Plumley stood with his Colt .45 Automatic blasting the enemy if they came too close. Plumley’s rough commands were heard over the chaos of the battle and his stalwart nature gave the men someone to rally behind. Like Lieutenant Colonel Moore, Plumley was among the last to leave the Ia Drang Valley.
Plumley retired as a Command Sergeant Major having earned an impressive amount of awards, including a Silver Star with an Oak Leaf Cluster, a Bronze Star with an Oak Leaf Cluster, a Purple Heart with three Oak Leaf Clusters, and various other medals.
Lieutenant Colonel Hal Moore
Sergeant Major Basil L Plumley
Hal Moore was born in 1922 in Kentucky. From a young age Moore was interested in joining the military and he worked hard to get into the United States Military Academy at West Point. He graduated from the academy in 1945 and commissioned as a second Lieutenant.
In 1948 Moore was reassigned to the 82nd Airborne Divison at Fort Bragg, North Carolina, where he volunteered to test experimental parachutes, completing nearly 150 jumps over two years.
When the Korean War broke out in 1950, Moore was promoted to Captain and first saw action in 1952 as an infantry company commander in the 7th Infantry Division.
Between the Korean and Vietnam Wars, Moore continued his studies in tactics, achieving the rank of Lieutenant Colonel. In 1965 he transferred to Fort Benning to command a battalion in the new 11th Air Assault Division which pioneered air assault tactics using UH-1D ‘Huey’ helicopters. In July 1965, the division was reformed as the 1st Cavalry Division (Air Mobile) and Moore took command of the 1st Battalion, 7th Cavalry Regiment (General Custer’s old command at the Battle of Little Bighorn).
Shortly thereafter the 7th Cavalry deployed to Vietnam. Moore personally led his men into their first battle, despite his superiors’ objections. He firmly believed that the commander should be the first soldier in and the last out of any engagement, so it was no surprise when he was aboard the first helicopter into the battle of the Ia Drang Valley.
Once on the ground Moore quickly discovered that the valley was teaming with North Vietnamese troops and the fight was on. The battalion was heavily outnumbered. The enemy nearly overran the battalion when Moore called in a dangerously close air strike with every available aircraft in the area to save the day. He then took the offensive and forced the Vietnamese to abandon their positions.
With the battle won, Moore ordered his battalion to evacuate, and true to his word he was the last to board a helicopter back to base.
After the Vietnam War, Hal Moore continued to serve in the army and eventually retired as a Lieutenant General in 1977. Moore wrote about his Vietnam experience in We Were Soldiers Once, and Young, which was later made into a movie simply called We Were Soldiers.
Colonel Hal Moore touches down on LZ X-ray
3
In November 1965, ‘Broken Arrow’ was the code word for a position about to be overrun. When headquarters received this call, every available aircraft is diverted to support the endangered unit.
Once during a game when his force is required to take a Company Morale Check, Colonel Moore can send the code word Broken Arrow and automatically pass the Company Morale Check.
If he does, then his side immediately loses one Victory Point from their score for the game and the opposing side immediately gains one Victory Point.
In the Shooting Step the player who called Broken Arrow rolls two Aircraft Dice (or two dice on the How Many Aircraft Table on page 139 of the rulebook) treating the total number of aircraft rolled as the number of air strikes available to them.
For each of these air strikes the player places an Artillery Template centred over an enemy team as normal for a Ground-attack Aircraft strike.
There is no anti-aircraft fire as the fast moving jets are impossible to track with manually-aimed weapons. However, the number of air strikes being made in close succession means that there is more possibility for error.
I love the smell of napalm in the morning —Colonel Kilgore, Apocalypse Now.
Range in each air strike as normal for a Ground-attack Aircraft attack. If they range in successfully, the US player must now roll a die to see if the pilots hit the right area.
On a roll of 2+ they do.
On a roll of 1, the pilots make a mistake and miss the intended target. The opposing player can move the template by up to 12”/30cm.
Once the template is in its final position, roll to hit targets under the template as normal. Each attack is made by two aircraft. The aircraft have the following characteristics:
ToHit Anti-tank Firepower 4+ - 5+As the aircraft are dropping napalm canisters, treat all teams hit as if they were hit by a Flame-thrower (see page 84 of the rulebook). This means that Infantry and Gun teams do not get a Save when hit by this attack.
Platoons Pinned Down by a Broken Arrow strike are marked with two Pinned Down markers and must Rally from both of them.
•
•
That’s a Nice Day!Plumley was an imposing figure on the battlefield. Often descibed as a veteran’s veteran, he never flinched, even as the enemy threatened to overrun the battalion HQ. Plumley simply pulled out his Colt .45 automatic pistol and stopped the enemy cold.
When conducting Defensive Fire, Plumley uses his pistol to defend himself and Moore. As a result, you may re-roll any failed To Hit rolls in Defensive Fire.
Any hits on Moore and Plumley do not count towards Pinning Down the Platoon.
Getting Pretty Sporty Down Here!Moore and Plumley kept the battalion fighting despite seeminly impossible odds, and led them to victory.
Moore and any platoon he is currently leading, always passes Motivation Tests on a roll of 3+.
First to Set Foot on the FieldMoore firmly believed that he should be the first to step off the helicopter and the last to leave the battlefield in order to provide the best leadership for his men during the fight.
Moore and Plumley do not take up a box on the Helicopter Loading Chart when aboard a UH-1D Slick helicopter. They can be carried in addition to the helicopter’s normal passengers.
Lieutenant Colonel Hal Moore and Sergeant Major Plumley are based together. They are Warriors and a Higher Command M16 Rifle team rated FearlessVeteran. They are an Independent Team.
Lieutenant Colonel Hal Moore and Sergeant Major Plumley may join a Rifle Company (Air Mobile) for +50 points.
Broken Arrow
Characteristics
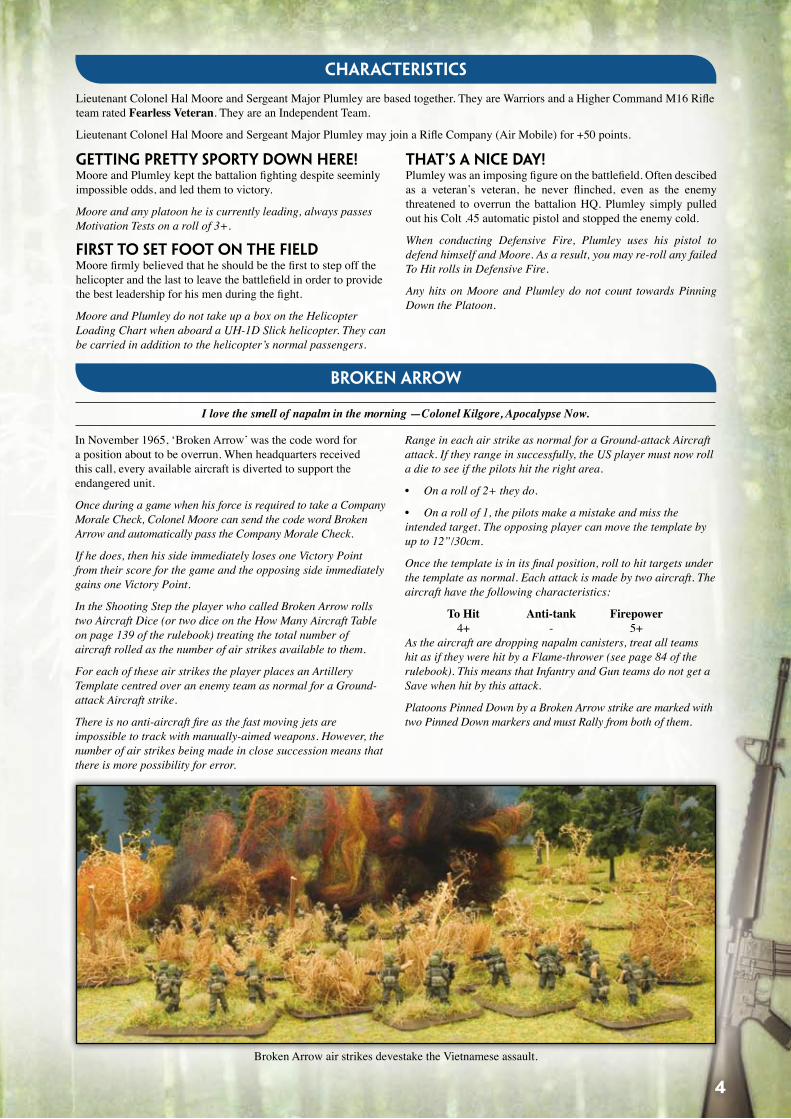
Broken Arrow air strikes devestake the Vietnamese assault.
4
Rifle Company (Airmobile)
Headquarters
Company HQ 40 points
OptionsAddM2981mmmortarsfor+25pointspermortar.AddMedicteamfor+5points.
••
HEADQUARTERS
Company HQ
(Infantry Company)
COMPANY HQ
CAPTAIN
STAFF SERGEANT
MORTAR SECTION
M29 81mm Mortar M29 81mm Mortar M29 81mm Mortar
Subaltern
HQ Section
Company Command M16 Rifle Team
2iC Command M16 Rifle Team
Medic Team
Com
bat
Plat
oo
ns
Hea
dq
ua
rter
s
Wea
pon
s P
lato
on
s
HEADQUARTERS
Company HQ
5
INFANTRY
Rifle Platoon (Airmobile)
6
ARTILLERY
Mortar Platoon (Airmobile)
6
INFANTRY
Rifle Platoon (Airmobile)
6 D
ivis
ion
al
supp
ort
Pla
too
ns
INFANTRY
Rifle Platoon (Airmobile)
6
INFANTRY
Rifle Platoon (Airmobile)
6
ARTILLERY
Field Artillery Battery
7
AIRCRAFTAeroweapons Platoon (UH-1B Hog)
7
TRANSPORT
Aviation (Airmobile) Platoon (UH-1D Slick)
7
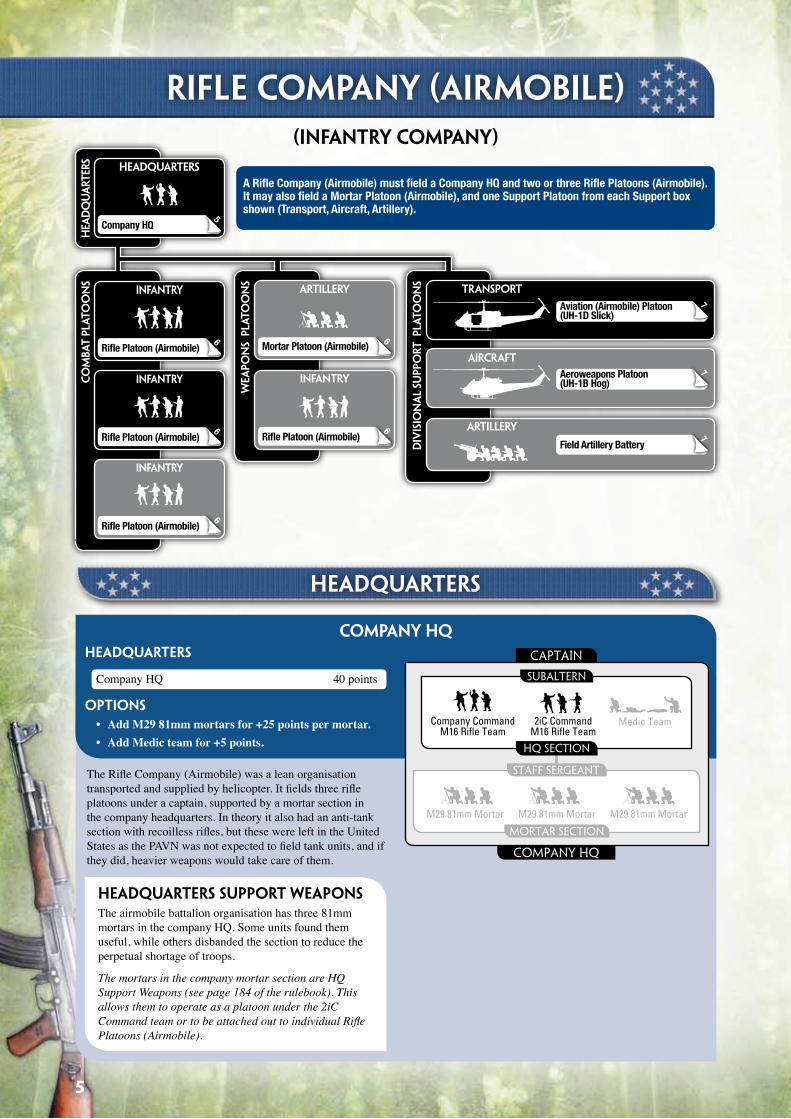
A Rifle Company (Airmobile) must field a Company HQ and two or three Rifle Platoons (Airmobile). It may also field a Mortar Platoon (Airmobile), and one Support Platoon from each Support box shown (Transport, Aircraft, Artillery).
The Rifle Company (Airmobile) was a lean organisation transported and supplied by helicopter. It fields three rifle platoons under a captain, supported by a mortar section in the company headquarters. In theory it also had an anti-tank section with recoilless rifles, but these were left in the United States as the PAVN was not expected to field tank units, and if they did, heavier weapons would take care of them.
Headquarters Support WeaponsThe airmobile battalion organisation has three 81mm mortars in the company HQ. Some units found them useful, while others disbanded the section to reduce the perpetual shortage of troops.
The mortars in the company mortar section are HQ Support Weapons (see page 184 of the rulebook). This allows them to operate as a platoon under the 2iC Command team or to be attached out to individual Rifle Platoons (Airmobile).
5
Rifle Platoon (Airmobile)Platoon
HQSectionwith:
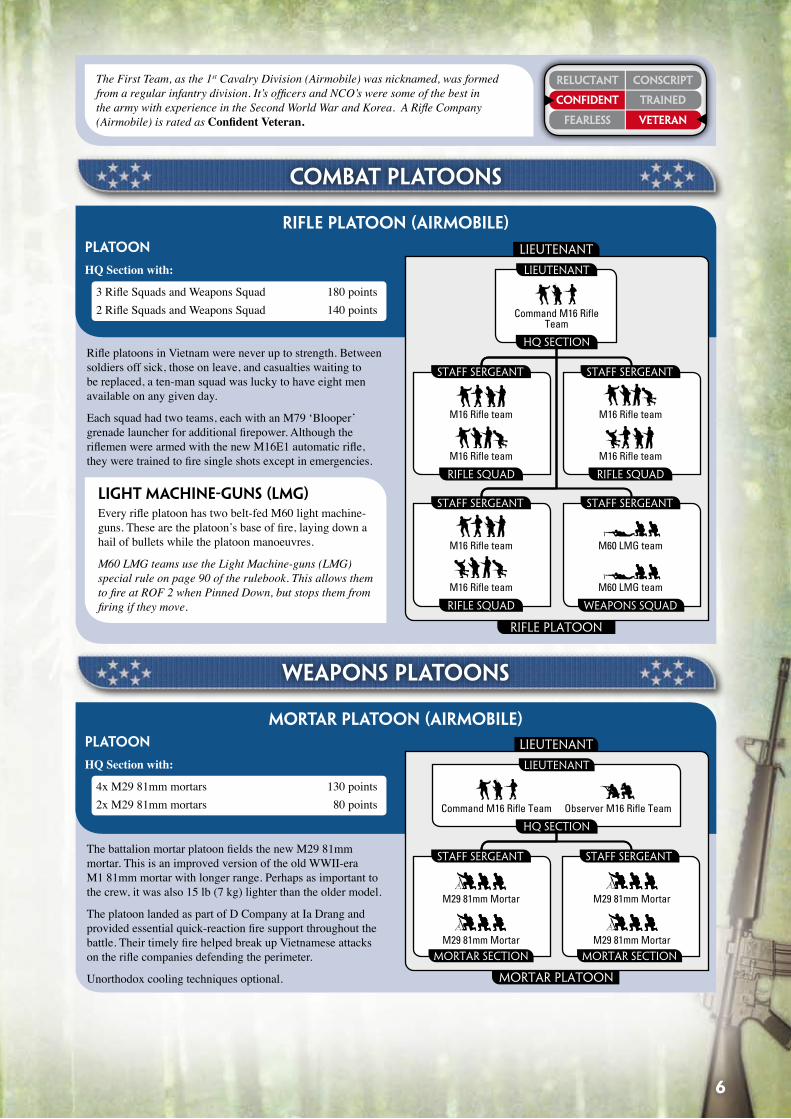
3 Rifle Squads and Weapons Squad 180 points2 Rifle Squads and Weapons Squad 140 points
Platoon
HQSectionwith:
4x M29 81mm mortars 130 points2x M29 81mm mortars 80 points
Reluctant
confident
feaRless
conscRipt
tRained
VeteRan
Mortar Platoon (Airmobile)
mortar platoon
Lieutenant
STAFF SERGEANT
MORTAR SECTION
M29 81mm Mortar
M29 81mm Mortar
M29 81mm Mortar
M29 81mm Mortar
lieutenant
HQ Section
Command M16 Rifle Team Observer M16 Rifle Team
STAFF SERGEANT
MORTAR SECTION
rifle platoon
lieutenant
STAFF SERGEANT
rifle squad
M16 Rifle team
M16 Rifle team
STAFF SERGEANT
rifle squad
M16 Rifle team
M16 Rifle team
STAFF SERGEANT
rifle squad
M16 Rifle team
M16 Rifle team
STAFF SERGEANT
weapons squad
M60 LMG team
M60 LMG team
lieutenant
HQ Section
Command M16 Rifle Team
COMBAT PLATOONS
Weapons PLATOONS
Light Machine-guns (LMG)Every rifle platoon has two belt-fed M60 light machine-guns. These are the platoon’s base of fire, laying down a hail of bullets while the platoon manoeuvres.
M60 LMG teams use the Light Machine-guns (LMG) special rule on page 90 of the rulebook. This allows them to fire at ROF 2 when Pinned Down, but stops them from firing if they move.
The battalion mortar platoon fields the new M29 81mm mortar. This is an improved version of the old WWII-era M1 81mm mortar with longer range. Perhaps as important to the crew, it was also 15 lb (7 kg) lighter than the older model.
The platoon landed as part of D Company at Ia Drang and provided essential quick-reaction fire support throughout the battle. Their timely fire helped break up Vietnamese attacks on the rifle companies defending the perimeter.
Unorthodox cooling techniques optional.
The First Team, as the 1st Cavalry Division (Airmobile) was nicknamed, was formed from a regular infantry division. It’s officers and NCO’s were some of the best in the army with experience in the Second World War and Korea. A Rifle Company (Airmobile) is rated as Confident Veteran.
Rifle platoons in Vietnam were never up to strength. Between soldiers off sick, those on leave, and casualties waiting to be replaced, a ten-man squad was lucky to have eight men available on any given day.
Each squad had two teams, each with an M79 ‘Blooper’ grenade launcher for additional firepower. Although the riflemen were armed with the new M16E1 automatic rifle, they were trained to fire single shots except in emergencies.
6
FIELD ARTILLERY BATTERY (Airmobile)
Divisional support platoons
field artillery battery
captain
lieutenant
gun SECTION
M101A1 105mm howitzer
M101A1 105mm howitzer
M101A1 105mm howitzer
M101A1 105mm howitzer
M101A1 105mm howitzer
M101A1 105mm howitzer
captain
HQ Section
Command M16 Rifle Team
Observer M16 Rifle Team
Staff Team
lieutenant
gun SECTION
Aviation (Airmobile) platoonPlatoon
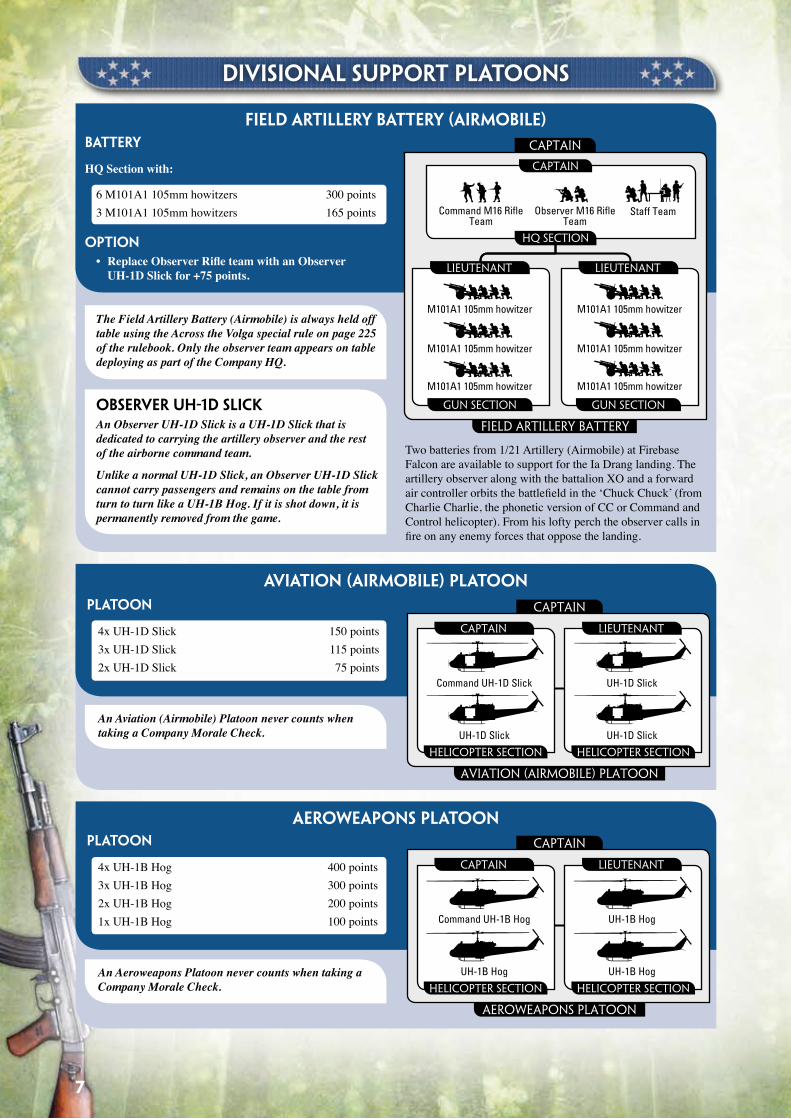
4x UH-1D Slick 150 points3x UH-1D Slick 115 points2x UH-1D Slick 75 points
An Aviation (Airmobile) Platoon never counts when taking a Company Morale Check.
Aeroweapons platoonPlatoon
4x UH-1B Hog 400 points3x UH-1B Hog 300 points2x UH-1B Hog 200 points1x UH-1B Hog 100 points
An Aeroweapons Platoon never counts when taking a Company Morale Check.
aviation (airmobile) platoon
captain
captain
helicopter section
Command UH-1D Slick
UH-1D Slick
lieutenant
helicopter section
UH-1D Slick
UH-1D Slick
aeroweapons platoon
captain
captain
helicopter section
Command UH-1B Hog
UH-1B Hog
lieutenant
helicopter section
UH-1B Hog
UH-1B Hog
Battery
HQSectionwith:
6 M101A1 105mm howitzers 300 points3 M101A1 105mm howitzers 165 points
OptionReplace Observer Rifle team with an Observer UH-1DSlickfor+75points.
The Field Artillery Battery (Airmobile) is always held off table using the Across the Volga special rule on page 225 of the rulebook. Only the observer team appears on table deploying as part of the Company HQ.
•
Two batteries from 1/21 Artillery (Airmobile) at Firebase Falcon are available to support for the Ia Drang landing. The artillery observer along with the battalion XO and a forward air controller orbits the battlefield in the ‘Chuck Chuck’ (from Charlie Charlie, the phonetic version of CC or Command and Control helicopter). From his lofty perch the observer calls in fire on any enemy forces that oppose the landing.
Observer UH-1D SlickAn Observer UH-1D Slick is a UH-1D Slick that is dedicated to carrying the artillery observer and the rest of the airborne command team.
Unlike a normal UH-1D Slick, an Observer UH-1D Slick cannot carry passengers and remains on the table from turn to turn like a UH-1B Hog. If it is shot down, it is permanently removed from the game.
7
US arsenalTeam Mobility Range ROF Anti-tank Firepower Notes
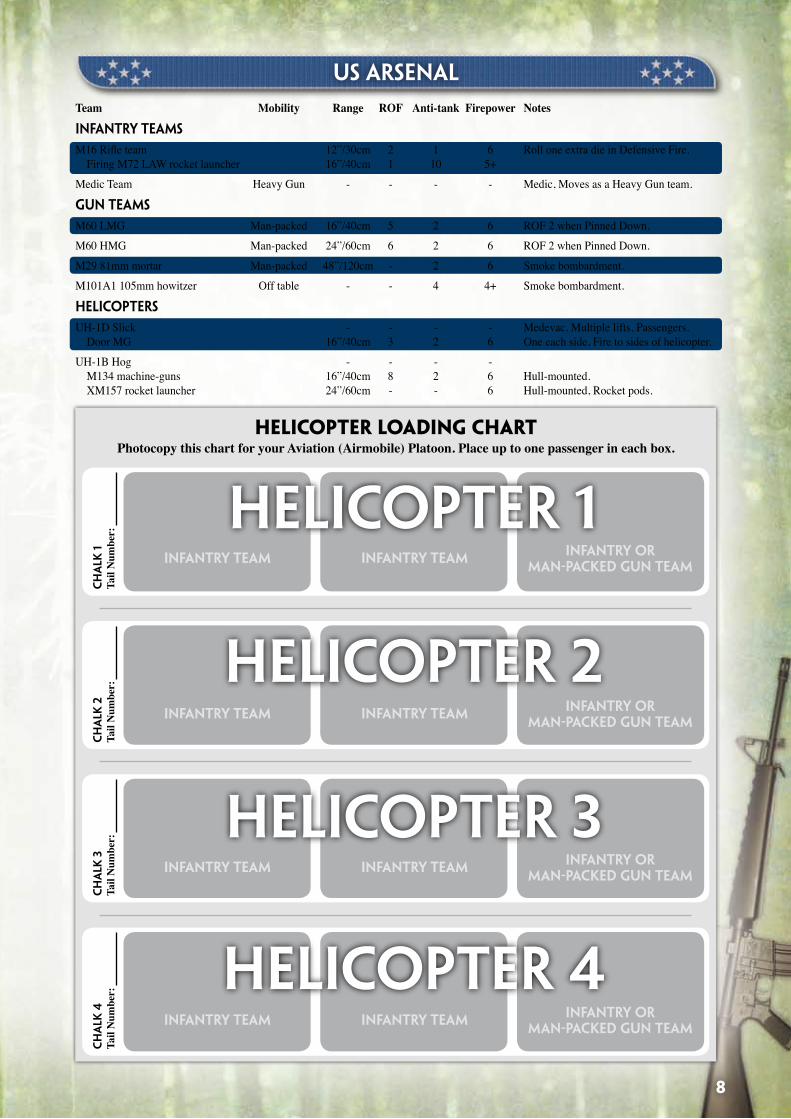
Infantry teamsM16 Rifle team 12”/30cm 2 1 6 Roll one extra die in Defensive Fire. Firing M72 LAW rocket launcher 16”/40cm 1 10 5+
Medic Team Heavy Gun - - - - Medic, Moves as a Heavy Gun team.
Gun teamsM60 LMG Man-packed 16”/40cm 5 2 6 ROF 2 when Pinned Down.
M60 HMG Man-packed 24”/60cm 6 2 6 ROF 2 when Pinned Down.
M29 81mm mortar Man-packed 48”/120cm - 2 6 Smoke bombardment.
M101A1 105mm howitzer Off table - - 4 4+ Smoke bombardment.
HelicoptersUH-1D Slick - - - - Medevac, Multiple lifts, Passengers. Door MG 16”/40cm 3 2 6 One each side, Fire to sides of helicopter.
UH-1B Hog - - - - M134 machine-guns 16”/40cm 8 2 6 Hull-mounted. XM157 rocket launcher 24”/60cm - - 6 Hull-mounted, Rocket pods.
PhotocopythischartforyourAviation(Airmobile)Platoon.Placeuptoonepassengerineachbox.Helicopter Loading Chart
Infantry team
CH
ALK
1
Tail
Num
ber:
CH
ALK
4
Tail
Num
ber:
CH
ALK
3
Tail
Num
ber:
CH
ALK
2
Tail
Num
ber:
Infantry team Infantry or man-packed gun team
Infantry team Infantry team Infantry or man-packed gun team
Infantry team Infantry team Infantry or man-packed gun team
Infantry team Infantry team Infantry or man-packed gun team
Helicopter 1
Helicopter 2
Helicopter 3
Helicopter 4
8
The UH-1 ‘Huey’ helicopter was the essence of the 1st Cavalry Division. Helicopters provided mobility, firepower and supplies. They come in two varieties: the passenger-carrying UH-1D ‘Slick’, and the UH-1B ‘Hog’ gunship. Helicopters are more like airborne trucks than normal fixed-wing aircraft. As such they remain on table from turn to turn like vehicles, and they are shot at in the opponent’s Shooting Step like vehicles rather than in the owning player’s Shooting Step like aircraft.
Helicopters operate as vehicles rather than aircraft.
Helicopter PlatoonsLike any army unit helicopters operate as platoons, usually of four ‘ships’—although sometimes less from mechanical failure.
Aviation (Airmobile) and Aeroweapons Platoons operate like any other platoon and follow the Command and Control rules on pages 48 and 49 of the rulebook. Teams cannot be attached to or join an Aviation (Airmobile) and Aeroweapons Platoon.
Helicopter rules
Shooting with helicopters
The Hogs acted more like tanks than aircraft, flying to the hottest danger points to give the hard-pressed infantry fire support before racing to the next crisis.
Door MGSlicks have a door gunner firing an M60 machine-gun suspended from the ceiling by a bungee cord in each side door.
A Slick has two door MG’s. One door MG can shoot from each side of a helicopter. The Field of Fire of a door MG covers 180 degrees directly to the side of the helicopter.
Wargamers are far more precise in positioning their helicopters than pilots under fire, so each of the two door MG’s on a helicopter must fire at a different platoon, but both can fire at their full ROF of 3.
Rocket PodsThe XM157 rocket pods are fired in pairs for aiming and then a salvo for effect. If the first rockets are on target, the full effect of the rockets makes a mess of the target. The more rockets spent on getting the range, the fewer left to saturate the target.
The Hog must point directly at its aiming point when firing rockets. XM157 rocket pods use the Stuka zu Fuss rules on page 167 of the rulebook. Like a Stuka zu Fuss, XM157 rocket pods get six attempts to range in and the failures to range in and failures to range in reduce the number of weapons counted as firing in the bombardment. Each Hog can only fire one bombardment per game.
Unlike normal artillery, Hogs can fire Artillery Bombardments after moving, and can fire the M134 machine-guns in same turn as firing rocket pods. The M134 machine-guns must fire at the same enemy platoon as the rocket pods, but fire at their full ROF. If a Hog is firing both its XM157 rocket pods and its machine-guns, resolve the rocket bombardment before rolling to hit with the machine-gun attacks.
Helicopters operate close to the ground in direct support of the army, more like highly-mobile vehicles than aircraft.
Helicopters are shot at like vehicles in the opponent’s Shooting Step, rather than being shot at like aircraft in the owning player’s Shooting Step.
Flying and Landed HelicoptersHelicopters normally fly too high and fast for most weapons to be able to hit them. The big exception is Slicks bringing in troops. They have to come in low and land (even if only for 15 to 30 seconds), exposing themselves to all sorts of ground fire.
Hogs and empty Slicks are Flying helicopters. Flying helicopters can shoot over and be shot at over friendly troops.
Slicks carrying passengers are Landed helicopters.
Who can Shoot at HelicoptersEven though they are flying low, helicopters are still too fast moving and high for anything but a shoulder-fired infantry weapon or dedicated anti-aircraft gun to hit.
Only Anti-aircraft weapons and Infantry teams can shoot at Flying helicopters. Any weapon can shoot at Landed helicopters.
Infantry and Man-packed Anti-aircraft guns firing at a Flying helicopter determine their Line of Sight treating the helicopter as a vehicle. This allows them to shoot at a helicopter
Shooting at helicopters
Flying over all obstacles at over one hundred miles an hour and, a Huey covers ground much faster than any ground vehicle can.
Helicopters do not have a Movement Distance. Simply place the helicopter where you want it to be in the Movement Step. Remember, helicopters operate in platoons and must remain In Command when moving.
Moving helicopters
Measure to the FuselageA helicopter’s rotors make it theoretically occupy a huge area. However, it is only the fuselage that really matters.
Always ignore the rotors when measuring to or from a helicopter model.
flying above them in a wood for instance, it will of course, be Concealed. Other Anti-aircraft weapons have the same restrictions they have when firing at aircraft (see Who Can Shoot on page 141 of the rulebook).
When shooting at Landed helicopters, teams determine Line of Sight as normal for vehicles on the ground.
Helicopter SavesDespite their lack of armour, helicopters are remarkably robust. They can fly with a lot of damage to the non-critical parts, so it takes a lucky hit or a big shell to shoot them down.
Helicopters have a 5+ Unarmoured Vehicle Save when hit. However, they are not automatically Destroyed if they fail the save. Instead, the opponent must make a Firepower Test to Destroy them, otherwise they fly on unharmed.
Enemy on the Landing ZoneIf a Slick on its final approach to the LZ discovers that the enemy have overrun its planned touchdown point, it will abort the landing, coming back later when the LZ is safe again.
Helicopters cannot assault or be assaulted. If any enemy team approaches within 4”/10cm of a Landed helicopter, it immediately returns to the Pick-up Zone. Flying helicopters are unaffected by enemy teams moving beneath them.
9
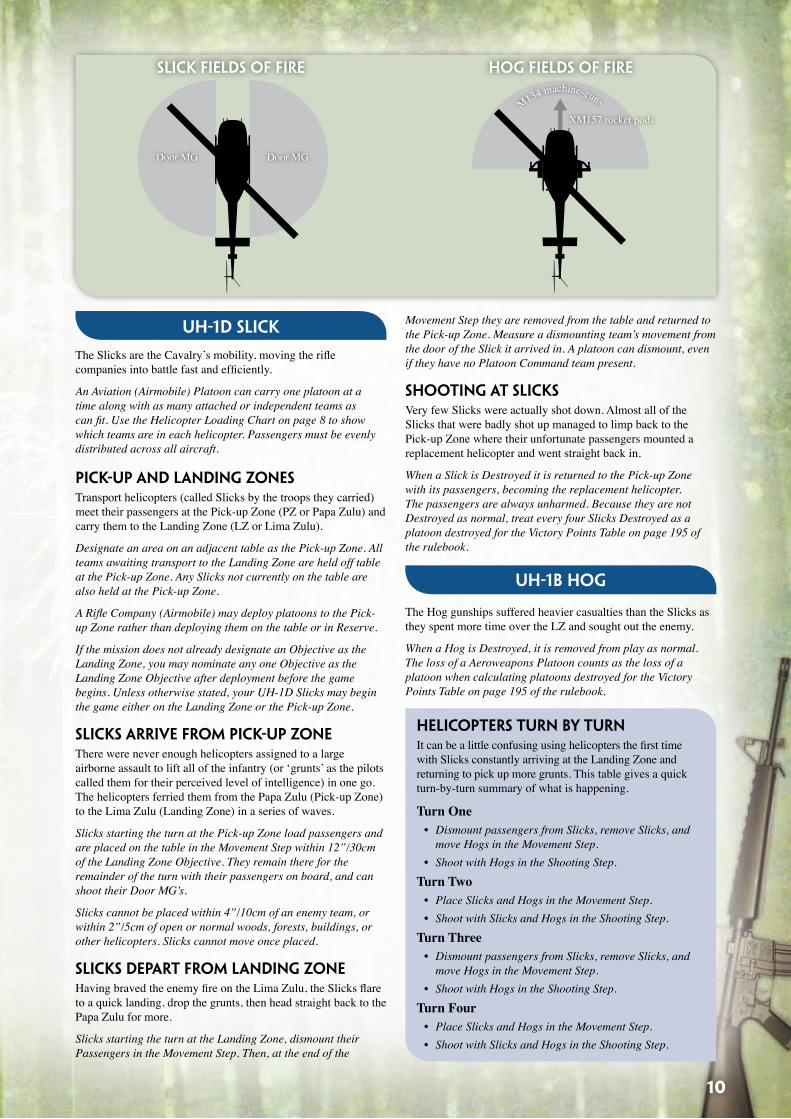
Hog Fields of FireSlick Fields of Fire
Door MGDoor MG
M134 machine-guns
XM157 rocket pods
UH-1B Hog
The Hog gunships suffered heavier casualties than the Slicks as they spent more time over the LZ and sought out the enemy.
When a Hog is Destroyed, it is removed from play as normal. The loss of a Aeroweapons Platoon counts as the loss of a platoon when calculating platoons destroyed for the Victory Points Table on page 195 of the rulebook.
The Slicks are the Cavalry’s mobility, moving the rifle companies into battle fast and efficiently.
An Aviation (Airmobile) Platoon can carry one platoon at a time along with as many attached or independent teams as can fit. Use the Helicopter Loading Chart on page 8 to show which teams are in each helicopter. Passengers must be evenly distributed across all aircraft.
Pick-up and Landing ZonesTransport helicopters (called Slicks by the troops they carried) meet their passengers at the Pick-up Zone (PZ or Papa Zulu) and carry them to the Landing Zone (LZ or Lima Zulu).
Designate an area on an adjacent table as the Pick-up Zone. All teams awaiting transport to the Landing Zone are held off table at the Pick-up Zone. Any Slicks not currently on the table are also held at the Pick-up Zone.
A Rifle Company (Airmobile) may deploy platoons to the Pick-up Zone rather than deploying them on the table or in Reserve.
If the mission does not already designate an Objective as the Landing Zone, you may nominate any one Objective as the Landing Zone Objective after deployment before the game begins. Unless otherwise stated, your UH-1D Slicks may begin the game either on the Landing Zone or the Pick-up Zone.
Slicks Arrive from Pick-up ZoneThere were never enough helicopters assigned to a large airborne assault to lift all of the infantry (or ‘grunts’ as the pilots called them for their perceived level of intelligence) in one go. The helicopters ferried them from the Papa Zulu (Pick-up Zone) to the Lima Zulu (Landing Zone) in a series of waves.
Slicks starting the turn at the Pick-up Zone load passengers and are placed on the table in the Movement Step within 12”/30cm of the Landing Zone Objective. They remain there for the remainder of the turn with their passengers on board, and can shoot their Door MG’s.
Slicks cannot be placed within 4”/10cm of an enemy team, or within 2”/5cm of open or normal woods, forests, buildings, or other helicopters. Slicks cannot move once placed.
Slicks Depart from Landing ZoneHaving braved the enemy fire on the Lima Zulu, the Slicks flare to a quick landing, drop the grunts, then head straight back to the Papa Zulu for more.
Slicks starting the turn at the Landing Zone, dismount their Passengers in the Movement Step. Then, at the end of the
UH-1D Slick
Helicopters Turn by TurnIt can be a little confusing using helicopters the first time with Slicks constantly arriving at the Landing Zone and returning to pick up more grunts. This table gives a quick turn-by-turn summary of what is happening.
TurnOneDismount passengers from Slicks, remove Slicks, and move Hogs in the Movement Step.Shoot with Hogs in the Shooting Step.
TurnTwoPlace Slicks and Hogs in the Movement Step.Shoot with Slicks and Hogs in the Shooting Step.
TurnThreeDismount passengers from Slicks, remove Slicks, and move Hogs in the Movement Step.Shoot with Hogs in the Shooting Step.
TurnFourPlace Slicks and Hogs in the Movement Step.Shoot with Slicks and Hogs in the Shooting Step.
•
•
••
•
•
••
Movement Step they are removed from the table and returned to the Pick-up Zone. Measure a dismounting team’s movement from the door of the Slick it arrived in. A platoon can dismount, even if they have no Platoon Command team present.
Shooting at SlicksVery few Slicks were actually shot down. Almost all of the Slicks that were badly shot up managed to limp back to the Pick-up Zone where their unfortunate passengers mounted a replacement helicopter and went straight back in.
When a Slick is Destroyed it is returned to the Pick-up Zone with its passengers, becoming the replacement helicopter. The passengers are always unharmed. Because they are not Destroyed as normal, treat every four Slicks Destroyed as a platoon destroyed for the Victory Points Table on page 195 of the rulebook.
10