best practices for web dynpro abap -...
TRANSCRIPT

BEST PRACTICES FOR WEB DYNPRO ABAP
CD360
Exercises / Solutions SAP AG Version 1.2

2
EXERCISE 1: FORM LAYOUT
Development Objectives Within this exercise a Web Dynpro View will be created to display information of a business partner in a form. This is achieved by using the new Form Layout. It will be possible to switch between a display mode and an edit mode. The goal is to arrange three container forms in two newspaper panels with two container forms on the left side and one container form on the right side. The tab order goes first down on the left panel. At the end of the left panel the tab goes to the top of the right panel. Optional: Add an additional container form below the three container forms. The new container should span over the whole screen width and contain a label and a TextEdit.
Sample Solution: Web Dynpro Component ZCD360_FORM_LAYOUT_SOL
Procedure:
1. The Web Dynpro component ZCD360_FORM_LAYOUT and the application ZCD360_FORM_LAYOUT are already prepared for your exercise. Please start the application ZCD360_FORM_LAYOUT and try it out. The screen shows two container forms side by side. Press toolbar button „Display‟ and „Edit‟ respectively. The screen switches from display mode to edit mode and back. With exception input field „Bus. Part. ID‟ and link „Web‟.
2. Change view BUSINESS_PARTNER so that container form TC_COMMUNICATION appears below container
form TC_PERSONAL_DATA.
3. Create a new container form using the context menu function „Create Container Form‟. Please use context
node COMPANY. Create the Form in a new container with a FormLayout (8:1) and a section header. Enter „Company‟ as section header text.
4. Activate and test the Web Dynpro application. The new container form „Company‟ is shown below container
form „Communication‟. The new section header is not underlined. The input fields of the new container form cannot switch between edit mode and display mode.
5. Change container form „Company‟ so that it will be displayed on the right side of container form „Personal
Data‟.
6. Use design „underline‟ for section header „Company‟.
7. The company name and the legal form should be displayed in one line. Change the lines with „Company
Name‟ and „Legal Form‟ so that label „Company Name‟, input field „Company Name‟ and input field „Legal Form‟ are displayed in one line. Use the column span of one column for input field „Legal Form‟ to reduce its width.
8. Bind property „displayOnly‟ of the new input fields to context attribute „DISPLAY_MODE‟.
9. Activate and test your application again. Check the changes of step 5 until 8.
3
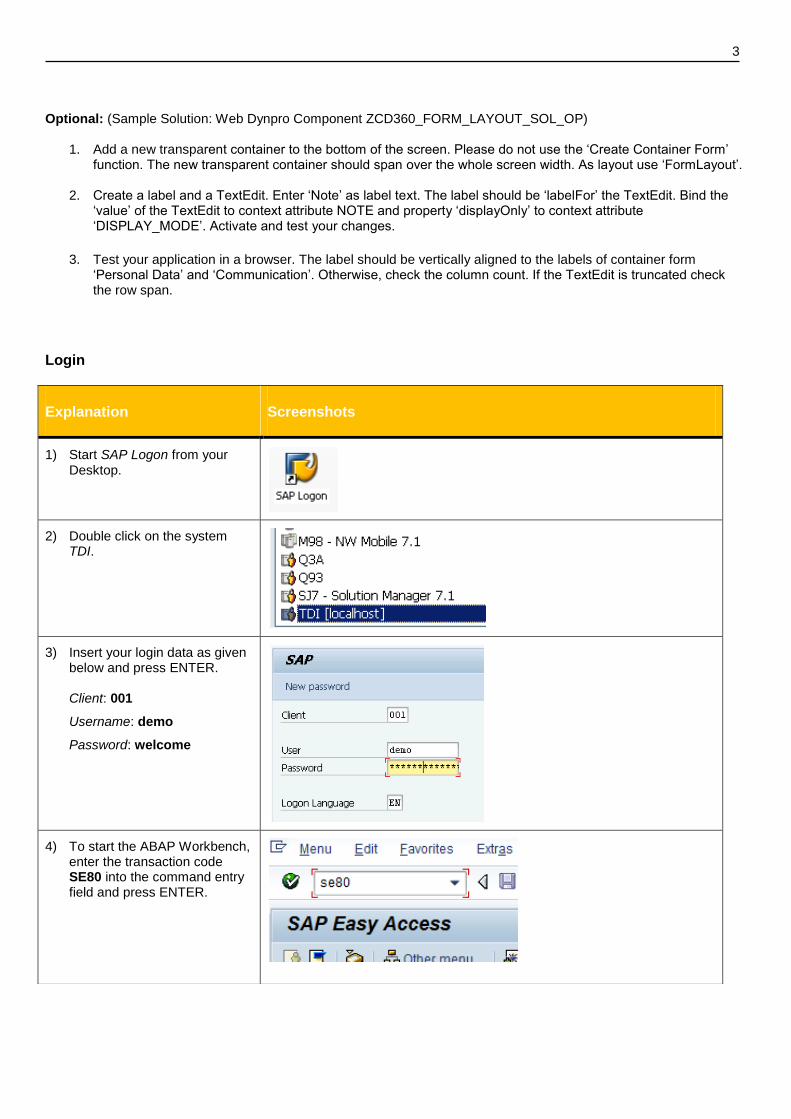
Optional: (Sample Solution: Web Dynpro Component ZCD360_FORM_LAYOUT_SOL_OP)
1. Add a new transparent container to the bottom of the screen. Please do not use the „Create Container Form‟
function. The new transparent container should span over the whole screen width. As layout use „FormLayout‟.
2. Create a label and a TextEdit. Enter „Note‟ as label text. The label should be „labelFor‟ the TextEdit. Bind the „value‟ of the TextEdit to context attribute NOTE and property „displayOnly‟ to context attribute „DISPLAY_MODE‟. Activate and test your changes.
3. Test your application in a browser. The label should be vertically aligned to the labels of container form
„Personal Data‟ and „Communication‟. Otherwise, check the column count. If the TextEdit is truncated check the row span.
Login
Explanation Screenshots
1) Start SAP Logon from your Desktop.
2) Double click on the system TDI.
3) Insert your login data as given below and press ENTER. Client: 001
Username: demo
Password: welcome
4) To start the ABAP Workbench, enter the transaction code SE80 into the command entry field and press ENTER.
4
SOLUTION FOR EXERCISE 1: FORM LAYOUT
Procedure:
1. Goto Web Dynpro Component ZCD360_FORM_LAYOUT. Expand the node applications in the tree on the left hand side. Select application ZCD360_FORM_LAYOUT. To start the application, press toolbar button „Test/Execute‟, key „F8‟ or choose context menu item „Test‟ from the application context menu. After the application has started press toolbar button „Display‟ and „Edit‟ respectively. The screen switches from display mode to edit mode and back. With exception input field „Bus. Part. ID‟ and link „Web‟.
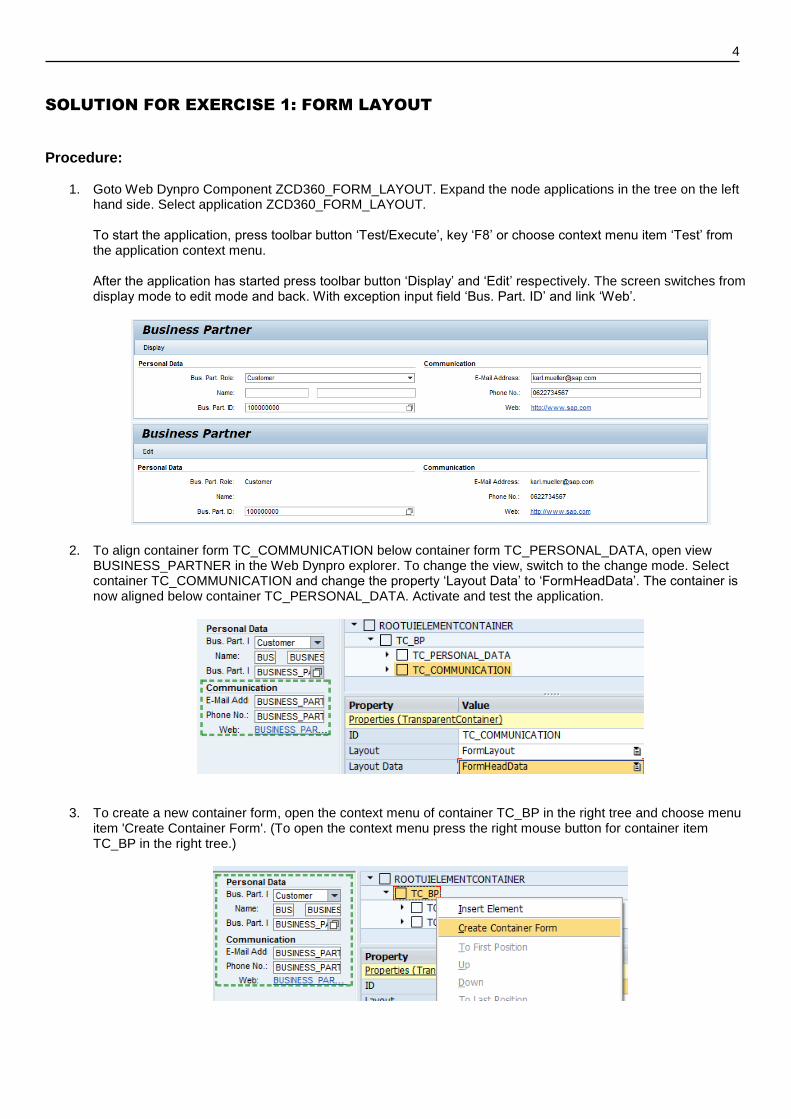
2. To align container form TC_COMMUNICATION below container form TC_PERSONAL_DATA, open view BUSINESS_PARTNER in the Web Dynpro explorer. To change the view, switch to the change mode. Select container TC_COMMUNICATION and change the property „Layout Data‟ to „FormHeadData‟. The container is now aligned below container TC_PERSONAL_DATA. Activate and test the application.
3. To create a new container form, open the context menu of container TC_BP in the right tree and choose menu item 'Create Container Form'. (To open the context menu press the right mouse button for container item TC_BP in the right tree.)

5
A popup appears. Press button „Context‟. A second popup appears. Select context node COMPANY and confirm the second popup.
The second popup disappears. Now check checkbox „Create Form in New Container‟ and checkbox „Create Section Header‟ in the first popup. The layout must be „FormLayout (8:1)‟. On the right side of the checkbox „Create Section Header‟, enter „Company‟ in the input field for a section header text.

6
Now confirm the first popup. A new transparent container FORM_CONTAINER appears below container TC_COMMUNICATION.
4. Activate and test the Web Dynpro application. The new container form „Company‟ is below container form
„Communication‟. The new section header is not underlined and the input fields of the new container form cannot switch from edit mode to display mode.
5. To align the new container at the top right side, change the property „Layout Data‟ of the new container to „FormTopData‟. Activate and test your changes in the browser.
6. Select the section header of the new container and change property „design‟ to „underline‟.
7. Please delete label TC_BP_LEGAL_FORM_LBL. This is an easy way to append the „Legal Form‟ input field to the „Company Name‟ line. Select „Legal Form‟ input field TC_BP_LEGAL_FORM and change property „colSpan‟ to „1‟.
7
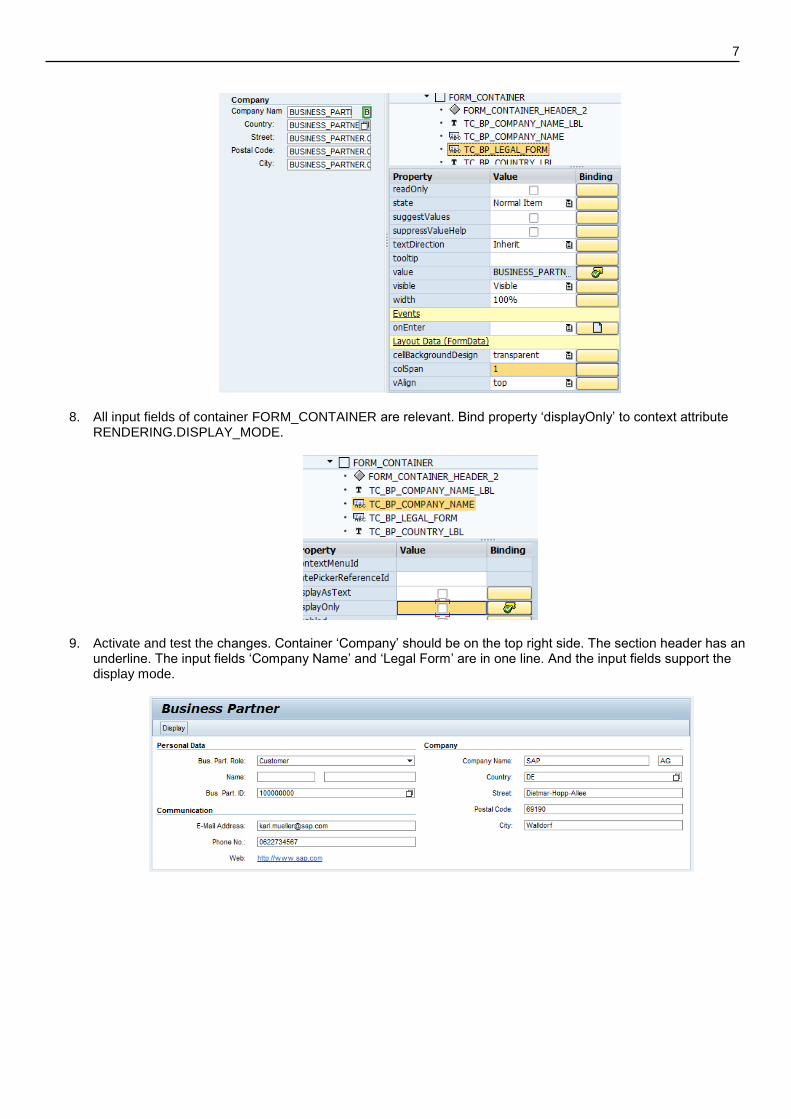
8. All input fields of container FORM_CONTAINER are relevant. Bind property „displayOnly‟ to context attribute RENDERING.DISPLAY_MODE.
9. Activate and test the changes. Container „Company‟ should be on the top right side. The section header has an underline. The input fields „Company Name‟ and „Legal Form‟ are in one line. And the input fields support the display mode.

8
Optional:
1. Create a new transparent container via right click on „ROOTUIELEMENTCONTAINER‟. Select menu item „Insert Element‟. A popup appears. Enter as ID „TC_NOTE‟ and choose „TransparentContainer‟ as „Typ‟.
Now confirm the popup. The ROOTUIELEMENTCONTAINER contains now a new transparent container. Unfortunately, the new container appears on the right side and has a wrong layout. Therefore, select this new container and change property „Layout Data‟ to „MatrixHeadData‟ and property „Layout‟ to „FormLayout‟.
2. Insert a label and a TextEdit UI element into container TC_NOTE via context menu „Insert Element‟. Please use „NOTE_LBL‟ as label ID and „NOTE‟ as TextEdit ID. Choose TextEdit „NOTE‟ for label property „labelFor‟ and enter „Note‟ as label text. Bind the TextEdit property „value‟ to context attribute MISCELLANEOUS.NOTE and property „displayOnly‟ to context attribute RENDERING.DISPLAY_MODE.
3. Activate and test your application. The label is not aligned to the labels above and the TextEdit is truncated.

9
Please check label property „colCount‟. The value of this property is „8‟. A label has a column span of three columns per default. The two newspaper panels above have a column count of 2 x 8 = 16 columns. Please change property „colCount‟ of label „NOTE_LBL‟ to „16‟. Now the label alignment is correct.
To prevent the truncation, check the property „rowSpan‟ of label „NOTE_LBL‟. The value is „-1‟. In this case the FormLayout uses a default row span of one row. The TextEdit is higher than one layout row. Therefore, the TextEdit is truncated. Change property „rowSpan‟ of label „NOTE_LBL‟ to „4‟ to prevent the truncation. Activate and test the application.

10
EXERCISE 2: 100% HEIGHT IN BROWSERS
Development Objectives Within this exercise you will learn how to achieve full 100% vertical stretching of an UI element integrated into nested layout containers.
Procedure: Within this exercise an existing Web Dynpro component with two Tabs will be optimized regarding rendering
1. The Web Dynpro component ZCD360_STRETCH_VERT and the application ZCD360_STRETCH_VERT are already prepared for your exercise. Please start the application ZCD360_STRETCH_VERT and try it out.
2. Set the layout of the ROOTUIELEMENTCONTAINER to Matrix Layout, set the height and width to 100% and
check the stretchedHorizontally and stretchedVertically checkboxes.
3. Select the GRID_LAYOUT_CONTAINER and set the LayoutData to MatrixHeadData. Set the height and width property of the Transparent Container to 100%. Check the stretchedHorizontally and stretchedVertically checkboxes of the corresponding Layout. Set the height and width of the corresponding LayoutData to 100%.
4. Select the PDF Interactive Form UI element and change the height and width properties from 300px to 100%
Set also the height property of the LayoutData to 100% and its width to 50%. Change the valign property of the LayoutData from bottomline to to top.
5. Select the OTHER_STUFF Transparent Container and set the width of its LayoutData to 50%.

11
SOLUTION FOR EXERCISE 3: 100% HEIGHT IN BROWSERS
Procedure:
1. Goto Web Dynpro Component ZCD360_STRETCH_VERT. Expand the node applications in the tree on the left
hand side. Select application ZCD360_STRETCH_VERT. To start the application, press toolbar button „Test/Execute‟, key „F8‟ or choose context menu item „Test‟ from the application context menu.
2. Switch to the layout of the MAIN view and select the ROOTUIELEMENTCONTAINER. Set the layout of the ROOTUIELEMENTCONTAINER to Matrix Layout, set the height and width to 100% and check the stretchedHorizontally and stretchedVertically checkboxes.
12
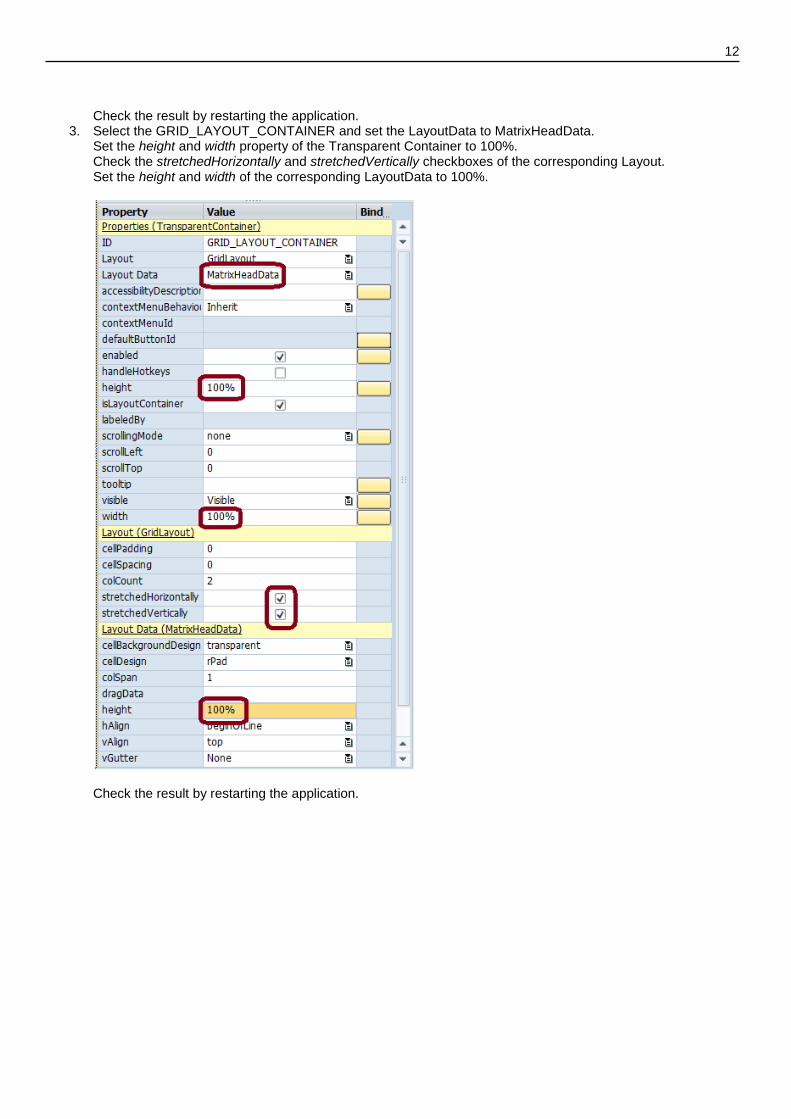
Check the result by restarting the application.
3. Select the GRID_LAYOUT_CONTAINER and set the LayoutData to MatrixHeadData. Set the height and width property of the Transparent Container to 100%. Check the stretchedHorizontally and stretchedVertically checkboxes of the corresponding Layout. Set the height and width of the corresponding LayoutData to 100%.
Check the result by restarting the application.
13
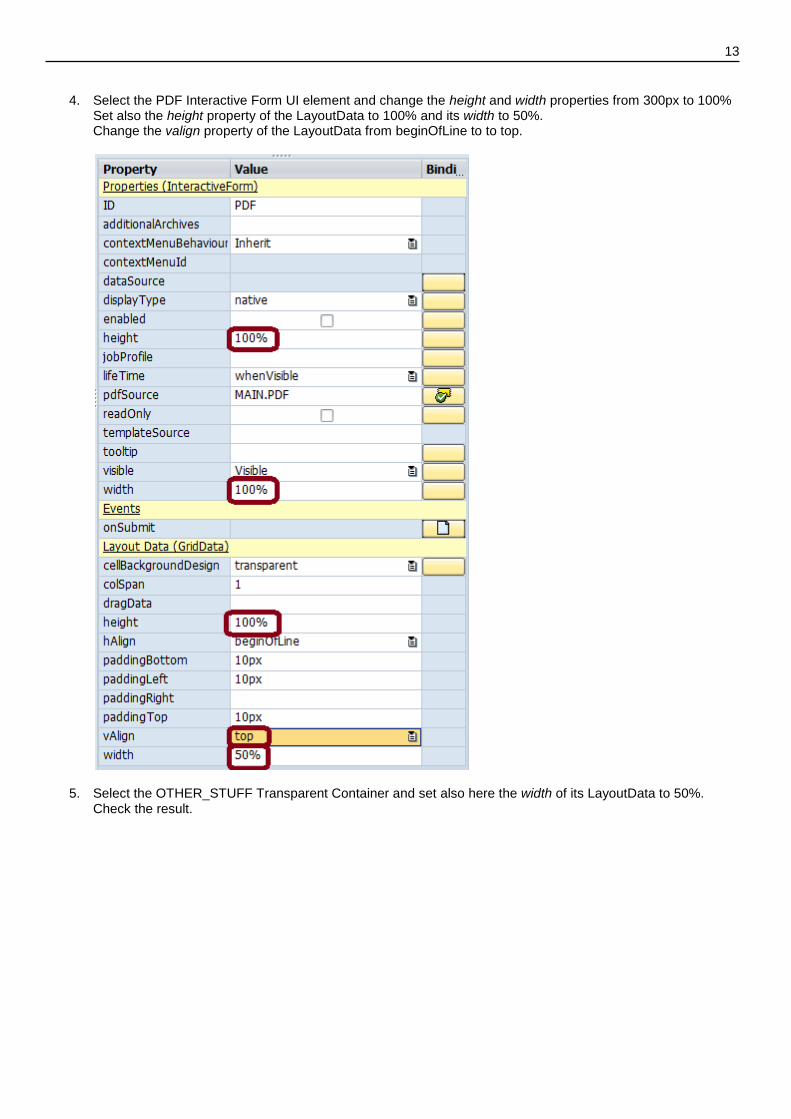
4. Select the PDF Interactive Form UI element and change the height and width properties from 300px to 100% Set also the height property of the LayoutData to 100% and its width to 50%. Change the valign property of the LayoutData from beginOfLine to to top.
5. Select the OTHER_STUFF Transparent Container and set also here the width of its LayoutData to 50%. Check the result.
14
EXERCISE 3: PERFORMANCE OPTIMIZATION
Development Objectives Within this exercise an existing Web Dynpro component with two Tabs will be optimized regarding rendering performance and server memory usage. This is achieved by rendering the content of the visible tab only.
Procedure: Within this exercise an existing Web Dynpro component with two Tabs will be optimized regarding rendering
1. The Web Dynpro component ZCD360_PERF_TABSTRIP and the application ZCD360_STRETCH_VERT are already prepared for your exercise. Please start the application ZCD360_STRETCH_VERT and try it out.
2. Check with the Web Dynpro Performance Monitor (Ctrl-Alt-Shift-P or TA WD_TRACE_TOOL) the end to end response time and memory usage of the application.
3. Add four outbound plugs to the MAIN view SHOW_TAB1, SHOW_TAB2, HIDE_TAB1, and HIDE_TAB2.
4. Go to the Window of the component and embed the EMPTYVIEW to both view containers VC1 and VC2.
5. Define the navigation between the four outbound plugs of the MAIN view and the inbound plugs of the Views and EMPTYVIEWS, so that the navigation to the hidden tab will navigate to the EMPTYVIEW.
6. Add an action ON_SELECT to the onSelect event of the TABSTRIP UI element in the MAIN view.
7. Implement in the action handler method the navigation to the outbound plugs dependent of the currently
selected tab.
8. Check the memory consumption of the initial start of the application and after switching between the Tabs.
9. Change the Lifetime property of the Views VIEW1 and VIEW2 from “framework controlled” to “when visible”.
10. Check again the memory consumption after switching between the tabs.

15
SOLUTION FOR EXERCISE 3: PERFORMANCE OPTIMIZATION
Procedure:
1. Goto Web Dynpro Component ZCD360_PERF_TABSTRIP. Expand the node applications in the tree on the left hand side. Select application ZCD360_PERF_TABSTRIP. To start the application, press toolbar button „Test/Execute‟, key „F8‟ or choose context menu item „Test‟ from the application context menu.
Check with the Web Dynpro Performance Monitor (Ctrl-Alt-Shift-P or TA WD_TRACE_TOOL) the end to end response time and memory usage of the application which is displayed at the top right corner:
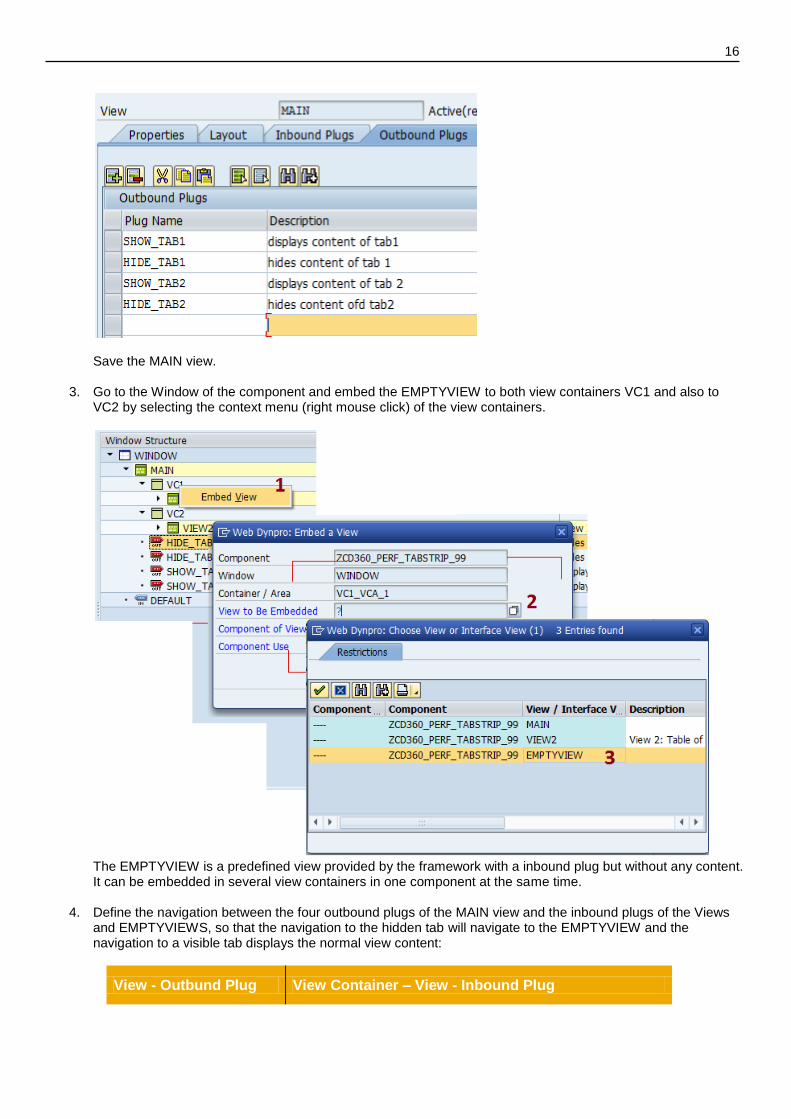
2. Select the MAIN view and add four outbound plugs to the MAIN view: SHOW_TAB1, HIDE_TAB1, SHOW_TAB2, and HIDE_TAB2.
16
Save the MAIN view.
3. Go to the Window of the component and embed the EMPTYVIEW to both view containers VC1 and also to VC2 by selecting the context menu (right mouse click) of the view containers.
The EMPTYVIEW is a predefined view provided by the framework with a inbound plug but without any content. It can be embedded in several view containers in one component at the same time.
4. Define the navigation between the four outbound plugs of the MAIN view and the inbound plugs of the Views and EMPTYVIEWS, so that the navigation to the hidden tab will navigate to the EMPTYVIEW and the navigation to a visible tab displays the normal view content:
View - Outbund Plug View Container – View - Inbound Plug

17
MAIN – SHOW_TAB1 VC1 - VIEW1 – IN
MAIN – HIDE_TAB1 VC1 - EMPTYVIEW – SHOWEMPTYVIEW
MAIN – SHOW_TAB2 VC2 – VIEW2 – IN
MAIN – HIDE_TAB2 VC2 - EMPTYVIEW – SHOWEMPTYVIEW
The navigation links can be created by dragging the outbound plugs directly onto the inbound plugs.
5. Go to the MAIN view in the editor add an action ON_SELECT to the onSelect event of the TABSTRIP UI element in the MAIN view. Make sure to check the “Transfer UI Event Parameters” checkbox. This ensures that you have access to the currently selected tab in the event handler method to decide which outbound plug has to be fired.

18

19
6. Switch to the ABAP editor of the event handler method ONACTIONON_SELECT and implement in the action handler method the navigation to the outbound plugs dependent of the currently selected tab. The tab is available in the signature of the method as the string TAB.
Save and activate the MAIN view and window of the component.
7. Check the memory consumption of the initial start of the application.
The memory consumption at the initial start is now smaller because the content of the second tab is not rendered, the table with the Suppliers is not instantiated at the server. However if the second tab is selected the second view VIEW2 is instantiated with all its data resulting in the same memory as in the example before because the first view is still in the memory.
20
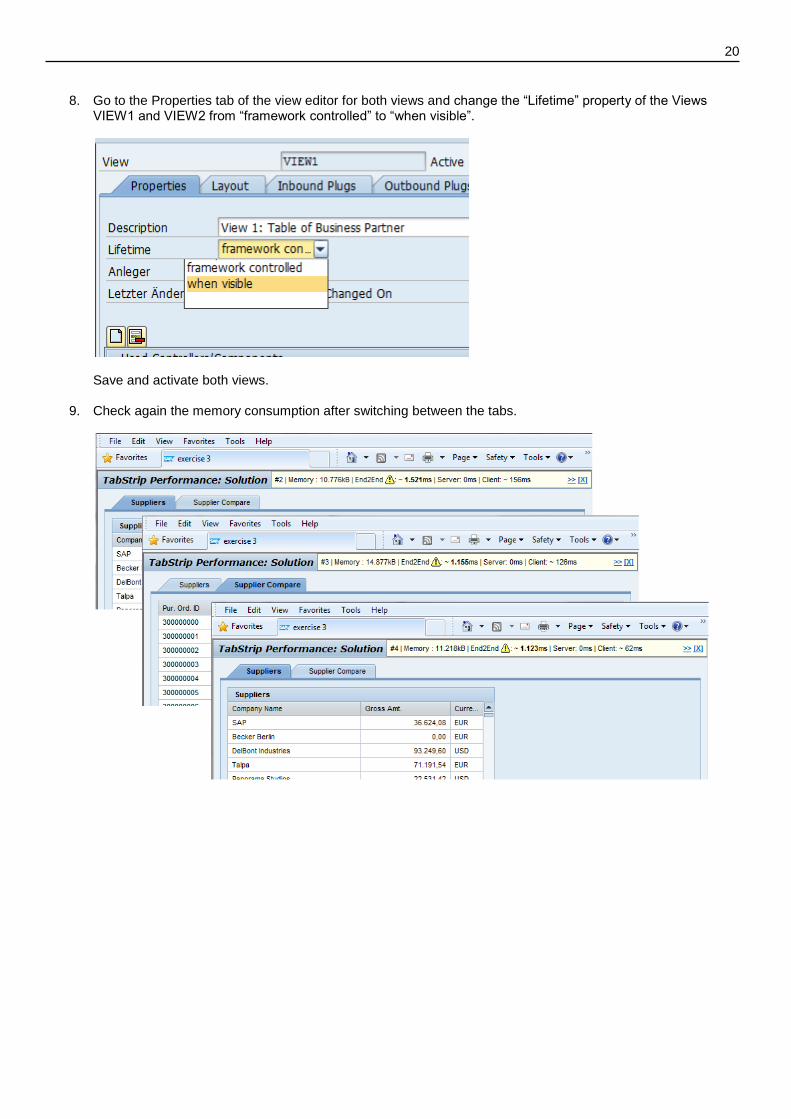
8. Go to the Properties tab of the view editor for both views and change the “Lifetime” property of the Views VIEW1 and VIEW2 from “framework controlled” to “when visible”.
Save and activate both views.
9. Check again the memory consumption after switching between the tabs.

21
EXERCISE 4: SERVER PUSH EMULATION
Development Objectives Within this exercise an existing Web Dynpro component will be optimized regarding loading time. The issue to resolve is that the Web Dynpro application contains a long running process that shows a chart with additional information. Solution can be achieved by using Notification Service to load additional information in the background and show them once processing is done.
Sample Solution: ZCD360_SERVER_PUSH_SOL
Prerequisites: The following objects are provided for the exercise:
Web Dynpro component ZCD360_SERVER_PUSH
Web Dynpro application ZCD360_SERVER_PUSH
function module ZFM_CD360_SERVER_PUSH (included in function group ZFG_CD360_SERVER_PUSH)
Class ZCL_CD360_SERVER_PUSH
Procedure:
1. Add an importing parameter named NOTIFICATION_ID of type WDR_NOTIFICATION_ID to function module ZFM_CD360_SERVER_PUSH with "Pass Value" property set.
2. Add also such an importing parameter named NOTIFICATION_ID of type WDR_NOTIFICATION_ID to method LOAD_CHART of assistance class ZCL_CD360_SERVER_PUSH.
3. Change method LOAD_CHART of assistance class ZCL_CD360_SERVER_PUSH to call function module passing the parameter NOTIFICATION_ID.
4. Change Method LOAD_CHART_DATA of view PO_CHART in component ZCD360_SERVER_PUSH to create a notification id, register an event for action SET_CHART_DATA and call LOAD_CHART method of assistance class passing this notification id.
5. Update the status of the registered event in function module ZFM_CD360_SERVER_PUSH after processing of chart data. Set status to done.
6. Test the changes.
22
SOLUTION FOR EXERCISE 4: SERVER PUSH EMULATION
The templates that you'll need to copy are located in package $CD360.
Procedure We want to change this behaviour in a way, the application refreshes the chart data once processing has finished.
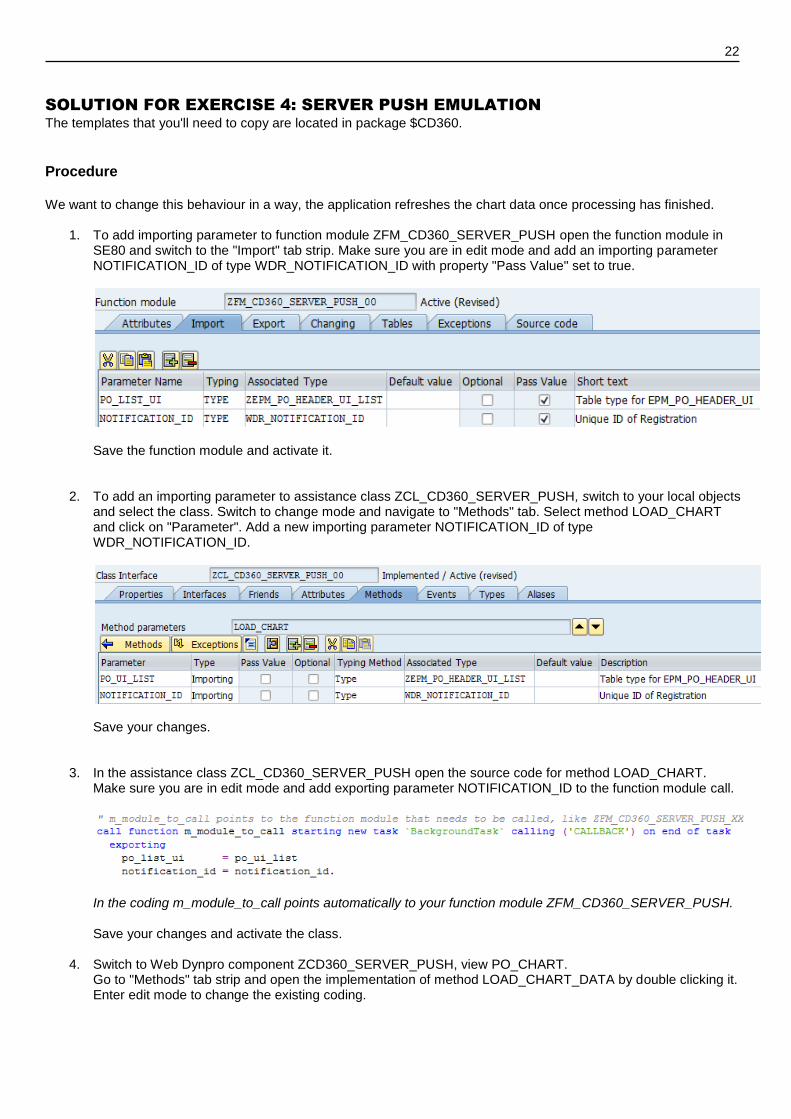
1. To add importing parameter to function module ZFM_CD360_SERVER_PUSH open the function module in SE80 and switch to the "Import" tab strip. Make sure you are in edit mode and add an importing parameter NOTIFICATION_ID of type WDR_NOTIFICATION_ID with property "Pass Value" set to true.
Save the function module and activate it.
2. To add an importing parameter to assistance class ZCL_CD360_SERVER_PUSH, switch to your local objects and select the class. Switch to change mode and navigate to "Methods" tab. Select method LOAD_CHART and click on "Parameter". Add a new importing parameter NOTIFICATION_ID of type WDR_NOTIFICATION_ID.
Save your changes.
3. In the assistance class ZCL_CD360_SERVER_PUSH open the source code for method LOAD_CHART. Make sure you are in edit mode and add exporting parameter NOTIFICATION_ID to the function module call.
In the coding m_module_to_call points automatically to your function module ZFM_CD360_SERVER_PUSH. Save your changes and activate the class.
4. Switch to Web Dynpro component ZCD360_SERVER_PUSH, view PO_CHART. Go to "Methods" tab strip and open the implementation of method LOAD_CHART_DATA by double clicking it. Enter edit mode to change the existing coding.
23
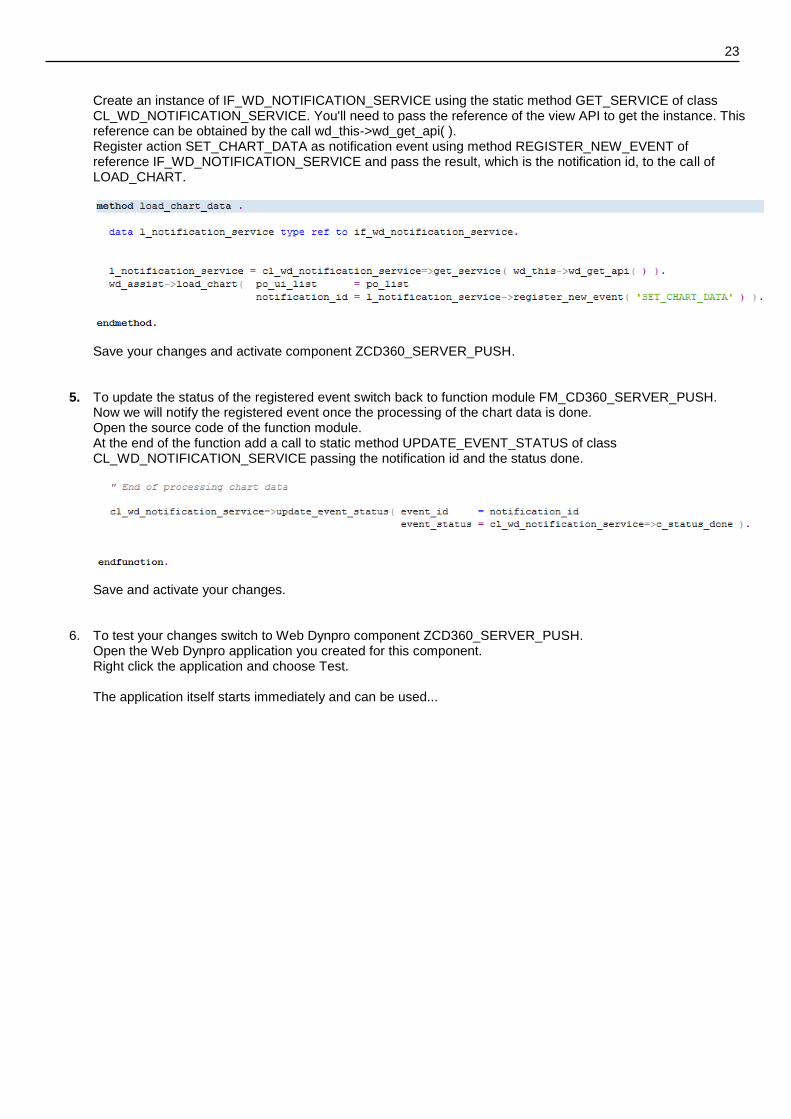
Create an instance of IF_WD_NOTIFICATION_SERVICE using the static method GET_SERVICE of class CL_WD_NOTIFICATION_SERVICE. You'll need to pass the reference of the view API to get the instance. This reference can be obtained by the call wd_this->wd_get_api( ). Register action SET_CHART_DATA as notification event using method REGISTER_NEW_EVENT of reference IF_WD_NOTIFICATION_SERVICE and pass the result, which is the notification id, to the call of LOAD_CHART.
Save your changes and activate component ZCD360_SERVER_PUSH.
5. To update the status of the registered event switch back to function module FM_CD360_SERVER_PUSH. Now we will notify the registered event once the processing of the chart data is done. Open the source code of the function module. At the end of the function add a call to static method UPDATE_EVENT_STATUS of class CL_WD_NOTIFICATION_SERVICE passing the notification id and the status done.
Save and activate your changes.
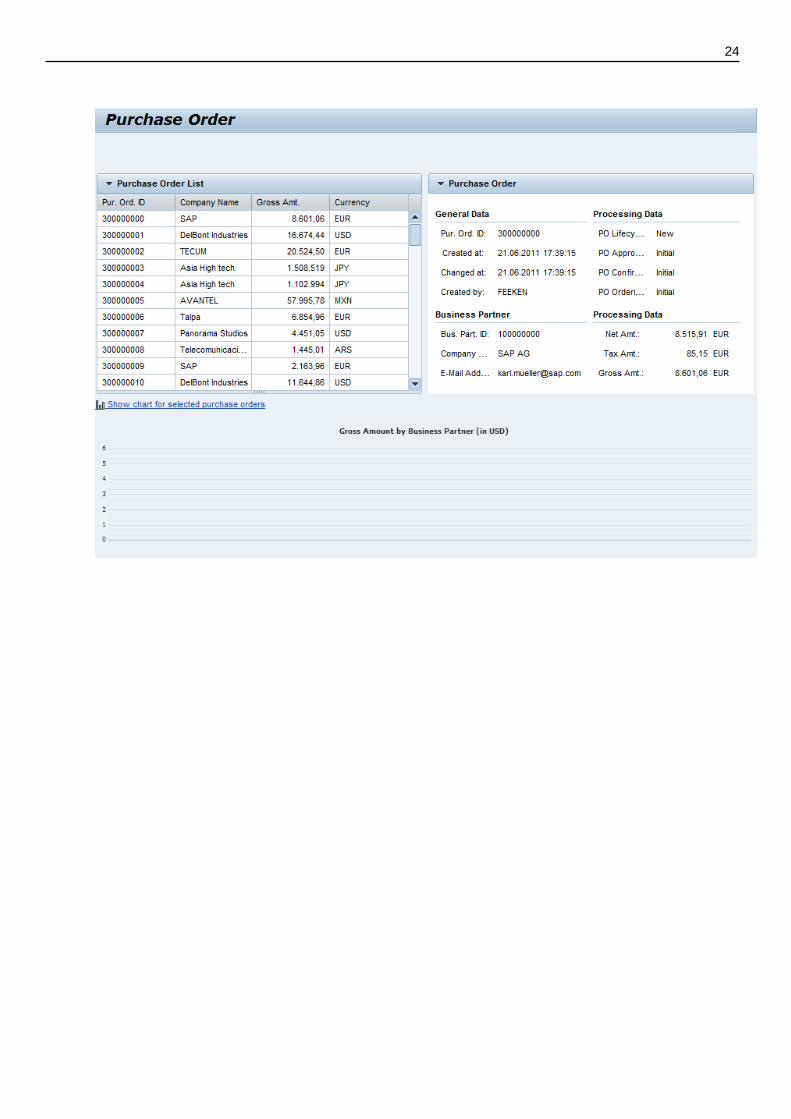
6. To test your changes switch to Web Dynpro component ZCD360_SERVER_PUSH. Open the Web Dynpro application you created for this component. Right click the application and choose Test. The application itself starts immediately and can be used...
24
25
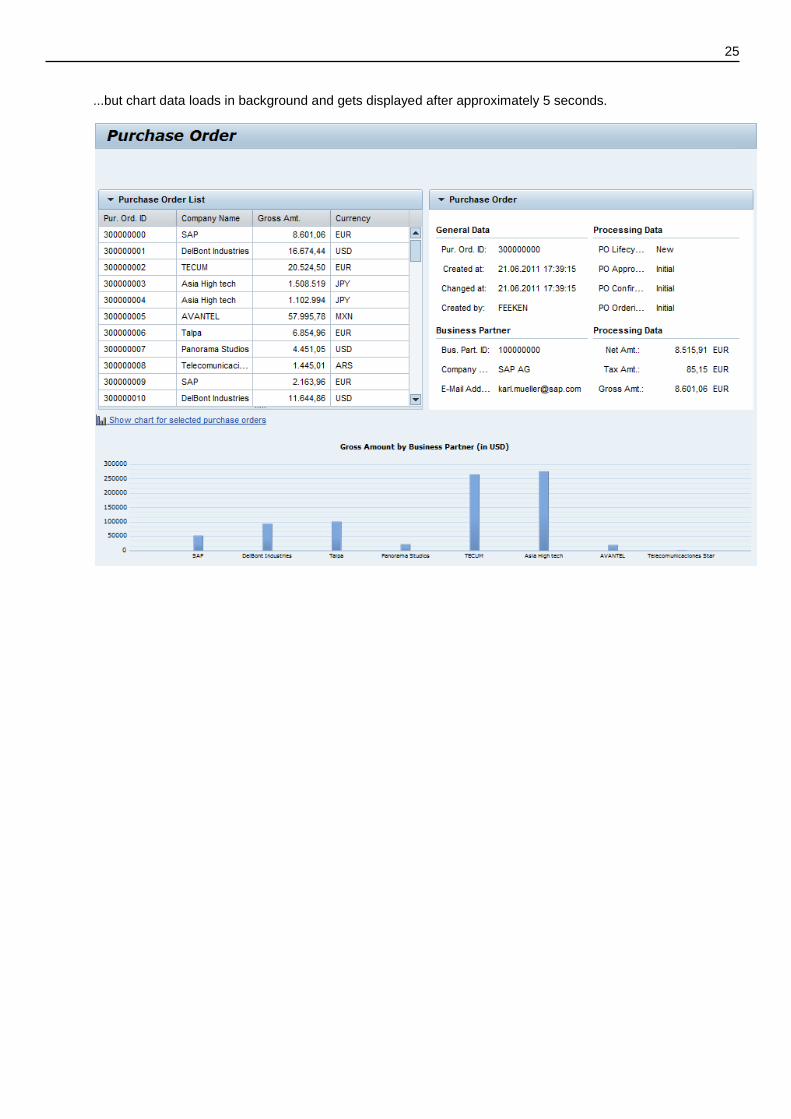
...but chart data loads in background and gets displayed after approximately 5 seconds.
26
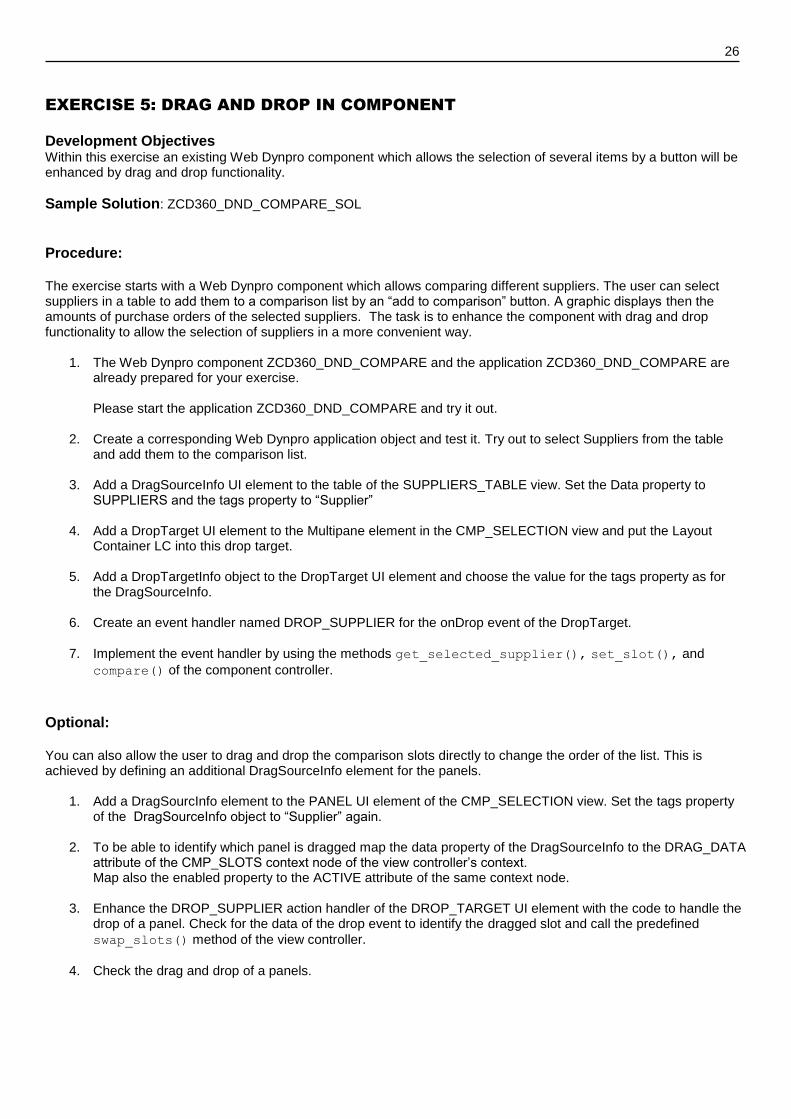
EXERCISE 5: DRAG AND DROP IN COMPONENT
Development Objectives Within this exercise an existing Web Dynpro component which allows the selection of several items by a button will be enhanced by drag and drop functionality.
Sample Solution: ZCD360_DND_COMPARE_SOL
Procedure: The exercise starts with a Web Dynpro component which allows comparing different suppliers. The user can select suppliers in a table to add them to a comparison list by an “add to comparison” button. A graphic displays then the amounts of purchase orders of the selected suppliers. The task is to enhance the component with drag and drop functionality to allow the selection of suppliers in a more convenient way.
1. The Web Dynpro component ZCD360_DND_COMPARE and the application ZCD360_DND_COMPARE are already prepared for your exercise. Please start the application ZCD360_DND_COMPARE and try it out.
2. Create a corresponding Web Dynpro application object and test it. Try out to select Suppliers from the table and add them to the comparison list.
3. Add a DragSourceInfo UI element to the table of the SUPPLIERS_TABLE view. Set the Data property to SUPPLIERS and the tags property to “Supplier”
4. Add a DropTarget UI element to the Multipane element in the CMP_SELECTION view and put the Layout
Container LC into this drop target.
5. Add a DropTargetInfo object to the DropTarget UI element and choose the value for the tags property as for the DragSourceInfo.
6. Create an event handler named DROP_SUPPLIER for the onDrop event of the DropTarget.
7. Implement the event handler by using the methods get_selected_supplier(), set_slot(), and
compare() of the component controller.
Optional: You can also allow the user to drag and drop the comparison slots directly to change the order of the list. This is achieved by defining an additional DragSourceInfo element for the panels.
1. Add a DragSourcInfo element to the PANEL UI element of the CMP_SELECTION view. Set the tags property of the DragSourceInfo object to “Supplier” again.
2. To be able to identify which panel is dragged map the data property of the DragSourceInfo to the DRAG_DATA attribute of the CMP_SLOTS context node of the view controller‟s context. Map also the enabled property to the ACTIVE attribute of the same context node.
3. Enhance the DROP_SUPPLIER action handler of the DROP_TARGET UI element with the code to handle the
drop of a panel. Check for the data of the drop event to identify the dragged slot and call the predefined
swap_slots() method of the view controller.
4. Check the drag and drop of a panels.
27
SOLUTION FOR EXERCISE 5: DRAG AND DROP IN COMPONENT
Procedure:
1. Goto Web Dynpro Component ZCD360_DND_COMPARE. Expand the node applications in the tree on the left hand side. Select application ZCD360_DND_COMPARE. To start the application, press toolbar button „Test/Execute‟, key „F8‟ or choose context menu item „Test‟ from the application context menu.
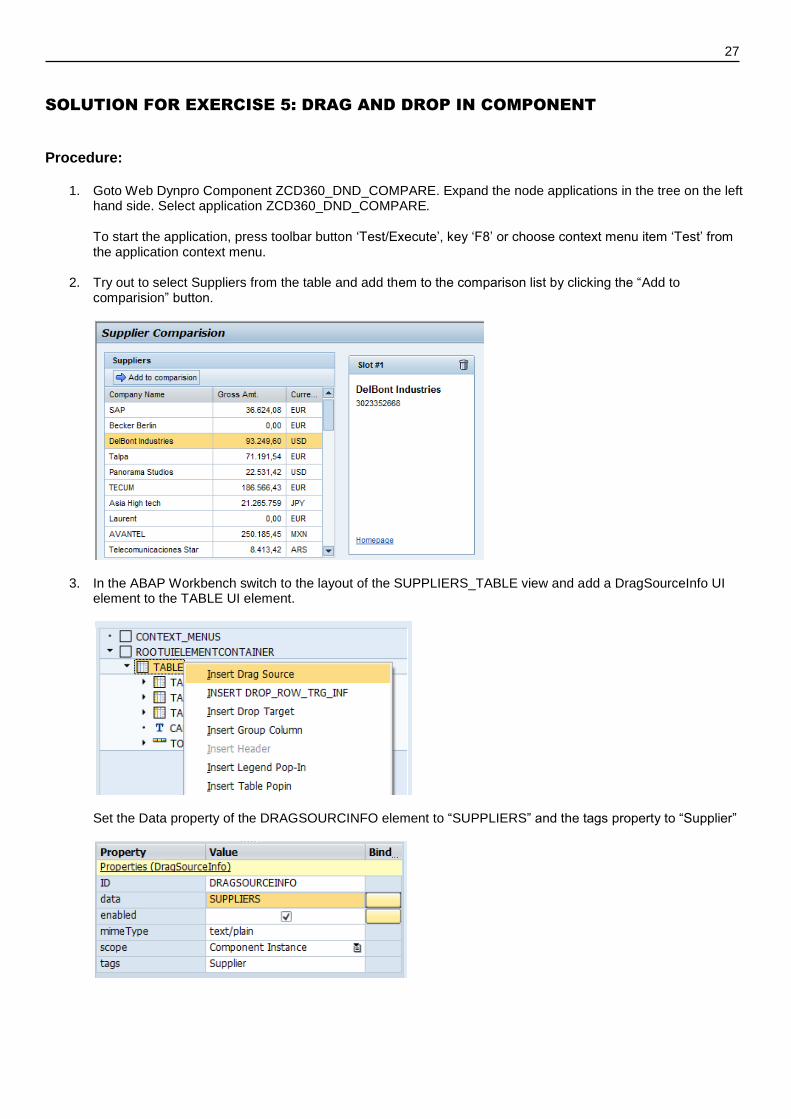
2. Try out to select Suppliers from the table and add them to the comparison list by clicking the “Add to comparision” button.
3. In the ABAP Workbench switch to the layout of the SUPPLIERS_TABLE view and add a DragSourceInfo UI element to the TABLE UI element.
Set the Data property of the DRAGSOURCINFO element to “SUPPLIERS” and the tags property to “Supplier”
28
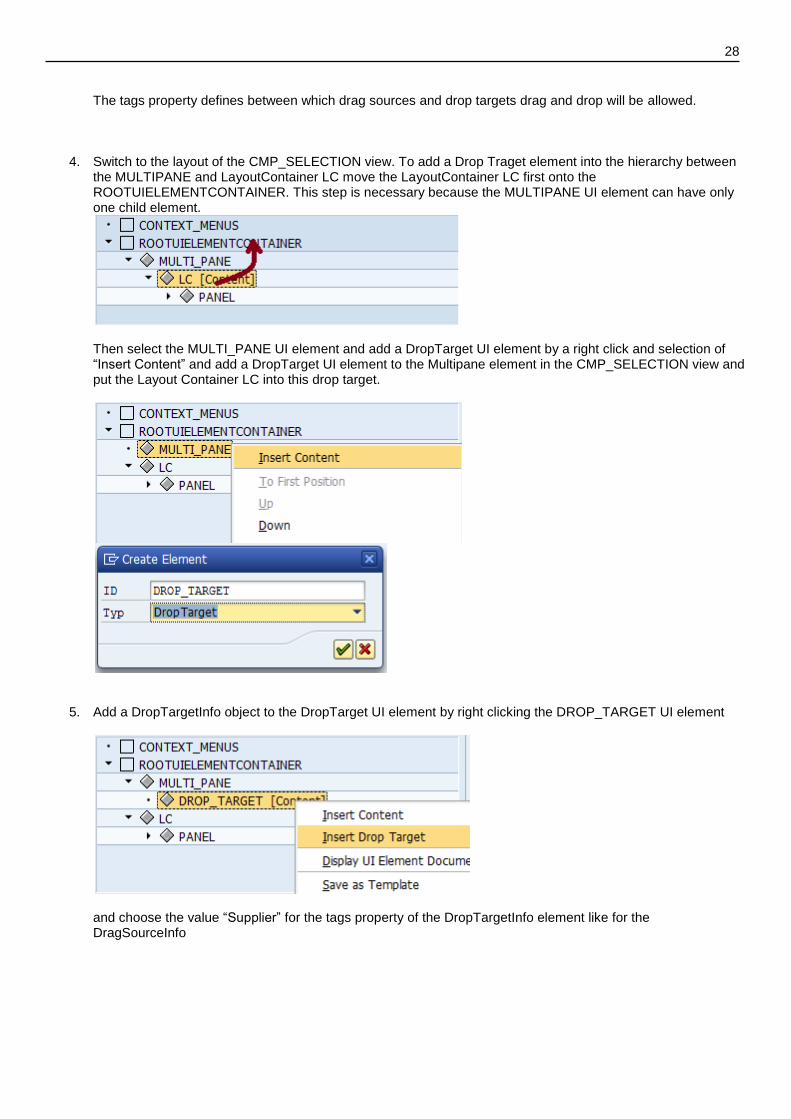
The tags property defines between which drag sources and drop targets drag and drop will be allowed.
4. Switch to the layout of the CMP_SELECTION view. To add a Drop Traget element into the hierarchy between the MULTIPANE and LayoutContainer LC move the LayoutContainer LC first onto the ROOTUIELEMENTCONTAINER. This step is necessary because the MULTIPANE UI element can have only one child element.
Then select the MULTI_PANE UI element and add a DropTarget UI element by a right click and selection of “Insert Content” and add a DropTarget UI element to the Multipane element in the CMP_SELECTION view and put the Layout Container LC into this drop target.
5. Add a DropTargetInfo object to the DropTarget UI element by right clicking the DROP_TARGET UI element
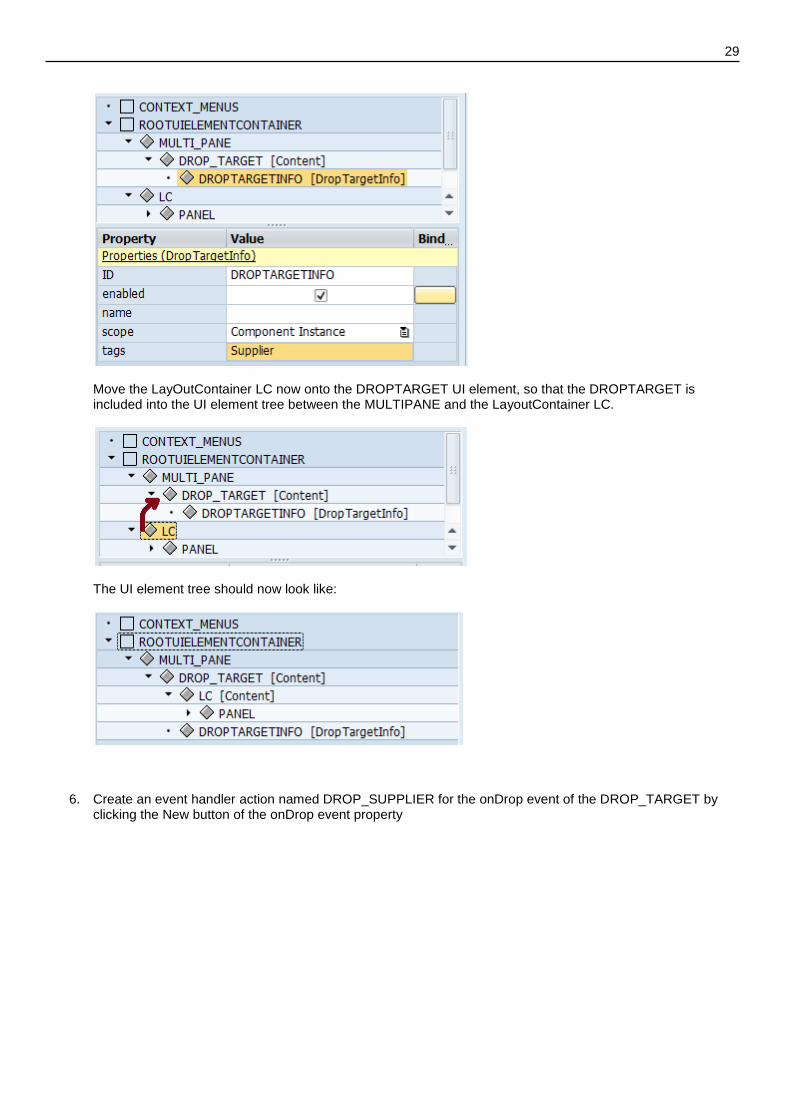
and choose the value “Supplier” for the tags property of the DropTargetInfo element like for the DragSourceInfo
29
Move the LayOutContainer LC now onto the DROPTARGET UI element, so that the DROPTARGET is included into the UI element tree between the MULTIPANE and the LayoutContainer LC.
The UI element tree should now look like:
6. Create an event handler action named DROP_SUPPLIER for the onDrop event of the DROP_TARGET by clicking the New button of the onDrop event property

30
Name the event handler action DROP_SUPPLIER and check the “Transfer UI Event Parameters” checkbox.
7. Jump to the implementation of the event handler method. Implement the event handler by using the methods
get_selected_supplier(), set_slot(), and compare() of the component controller:
These methods are already used in the original component for the selection by the “Add to...” button and are

31
not specific for the drag and drop functionality.
8. Test the Web Dynpro application and check the drag and drop functionality.
Solution for the optional part:
1. Add a DragSourceInfo element to the PANEL UI element of the CMP_SELECTION view.
Set the tags property of the DragSourceInfo element to “Supplier” again. This ensures that the panel can be dropped to the already defined DropTarget of the MULTIPANE.
2. To be able to identify which panel is dragged bind the data property of the DragSourceInfo element to the DRAG_DATA attribute of the CMP_SLOTS context node of the view controller‟s context.
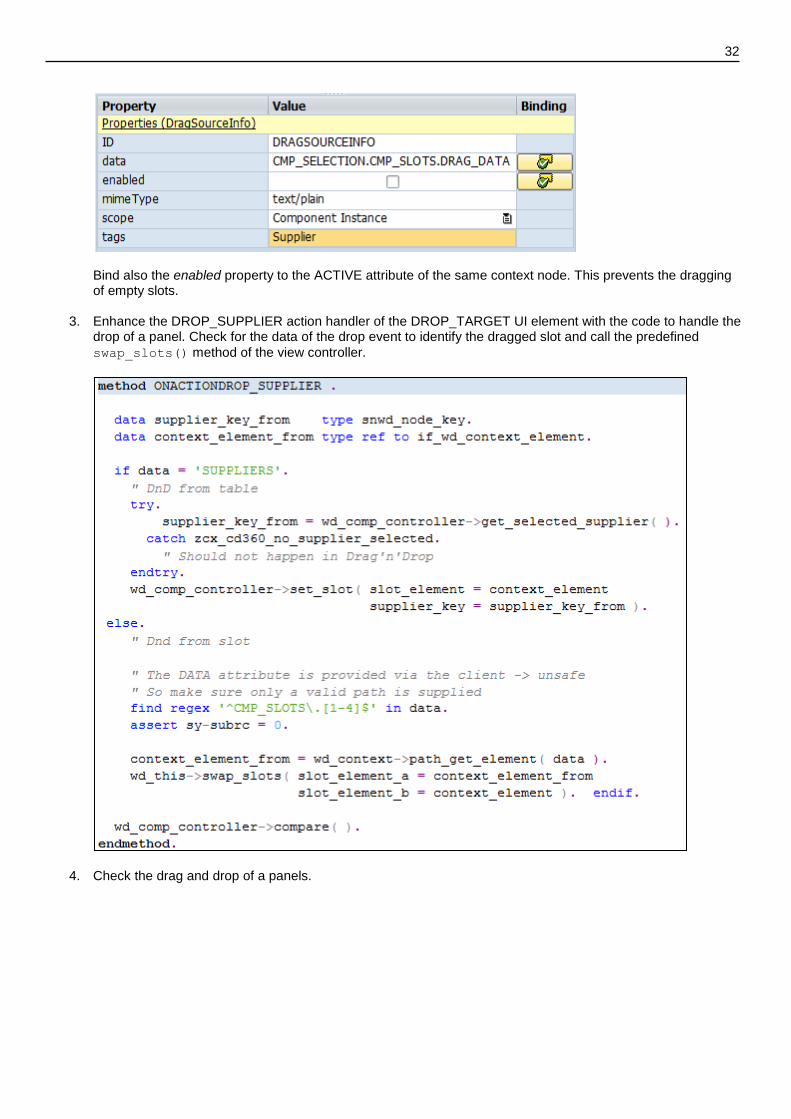
32
Bind also the enabled property to the ACTIVE attribute of the same context node. This prevents the dragging of empty slots.
3. Enhance the DROP_SUPPLIER action handler of the DROP_TARGET UI element with the code to handle the drop of a panel. Check for the data of the drop event to identify the dragged slot and call the predefined
swap_slots() method of the view controller.
4. Check the drag and drop of a panels.

© 2011 by SAP AG. All rights reserved. SAP and the SAP logo are registered trademarks of SAP AG in Germany and other countries. Business Objects and the Business Objects logo are trademarks or registered trademarks of Business Objects Software Ltd. Business Objects is an SAP company.Sybase and the Sybase logo are registered trademarks of Sybase Inc.
Sybase is an SAP company such products and services, if any. Nothing herein should be construed as constituting an additional warranty.