pdf precapture data massage - real vision software · the pdf pre‐capture data massage has the...
TRANSCRIPT

PDF PRE‐CAPTURE
DATA MASSAGE

PDF documents are becoming more and more complex. Those containing text that can be extracted and
used as indexing information are no exception. What originally was a plain page containing a fixed font
such as Courier (think: typewriter print) has now become a labyrinth of variable sized fonts mixed in
with logos and other images. To even begin to extract text data from a PDF document, the following
must be true:
The text cannot be encoded in anything other than ASCII or its UNICODE equivalent. In other
words, it cannot be defined through a table such that hexadecimal value X’00’ is really the value
zero, hexadecimal value X’01’ is really the value ‘A’, etc.
Compression of the text data is supported if the compression is FLATE/DEFLATE.
To transform that mix of multiple sized fonts into a plane containing fixed width characters can leave us
with a confusing jumble of gibberish. This is especially true when, for example, you have a one inch strip
running across the page and within that strip you have a half dozen different font sizes. All might map to
the same location on the fixed plane.
Words in a PDF document can be placed using any of these methods: character at a time, partial word
at a time, full word at a time, and multiple words at a time which would include an entire line of words.
Naturally, the more words used at once to place text data within the PDF, the easier it is to extract it.
However, very few applications that generate PDF documents place a full line of words.
A major obstacle in mapping text data into fixed locations is the use of what the printing world calls
“kerning.” PDF documents are derivatives of PostScript, which is used in printer drivers. Kerning makes
optimal use of the space in a printed line, moving each successive character as close as possible to the
preceding character. That means each character is placed individually. These types of PDF documents
are the most difficult to map and extract because the letter “T” with an “I” will actually have the “i”
tucked in underneath the “T” and will always map to the exact same location in the “fixed width” world.
A similar problem occurs within the RVI’s PC Screen Scrape. When we scrape the text from a PC
application, user BETTY may have her window sized one way and user JIM has it maxed out on his 27
inch monitor. The PC screen scrape will contain the same data, but the difference in window sizes will
skew the output. In other words, the word “INVOICE#” may appear in one location on BETTY’s scraped
text but on JIM’s it will not only be in a different position but may also be on a totally different line. That
led to the creation of the PC Pre‐Scrape Data Massage which allows us to freely scan for the information
we want and place what we are looking for it in a consistent location.
Likewise, we now have a PDF Pre‐Capture Data Massage that basically allows us to do the same thing.
Our “mapped” output may totally omit the phrase “INVOICE# 1234567” because the spot it maps to is
already occupied, but using the pre‐capture data massage, we might be able to actually pick out that
phrase and transfer the invoice number to line one, position one. If we then set up our form profile
accordingly, we should find the invoice number at line one, position one on a consistent basis.
What follows is a step‐by‐step guide to consistently getting the information you need from text‐based
PDF documents. Please note that PDF’s containing only image data cannot be used – they have no text.
It is suggested that you read this document in its entirety before attempting any of this. You may find
yourself having questions that are answered a little further on.
The PDF Pre‐capture Data Massage has the following objectives:
1) To allow automated determination of a form profile and pre‐capture profile. The thing to
remember is that if you are using a pre‐capture profile named INVOICE, then the form profile
that will be used to capture the text will also be named INVOICE. This is not a required
component of the pre‐capture data massage. In other words, you can force the use of a specific
form profile.
2) To provide a consistent interface to locating, formatting, and placing the desired text
information where it can be easily captured.
FINDING OUT WHAT IS AVAILABLE
The first thing we need is to find out what we have to work with. The PDF Pre‐Capture Data Massage is
based on the actual text data that is placed, regardless of where it is placed. This is a top‐down
approach. In other words, when rendering the text to the page, the placement of characters, words, or
phrases can take place in any order, so the approach is to take the character, word or phrase as it is
rendered. It may be that the character, word or phrase is the first thing rendered even though it is
rendered at the bottom of the page, but since it is rendered first, then it will be at the top of our list.
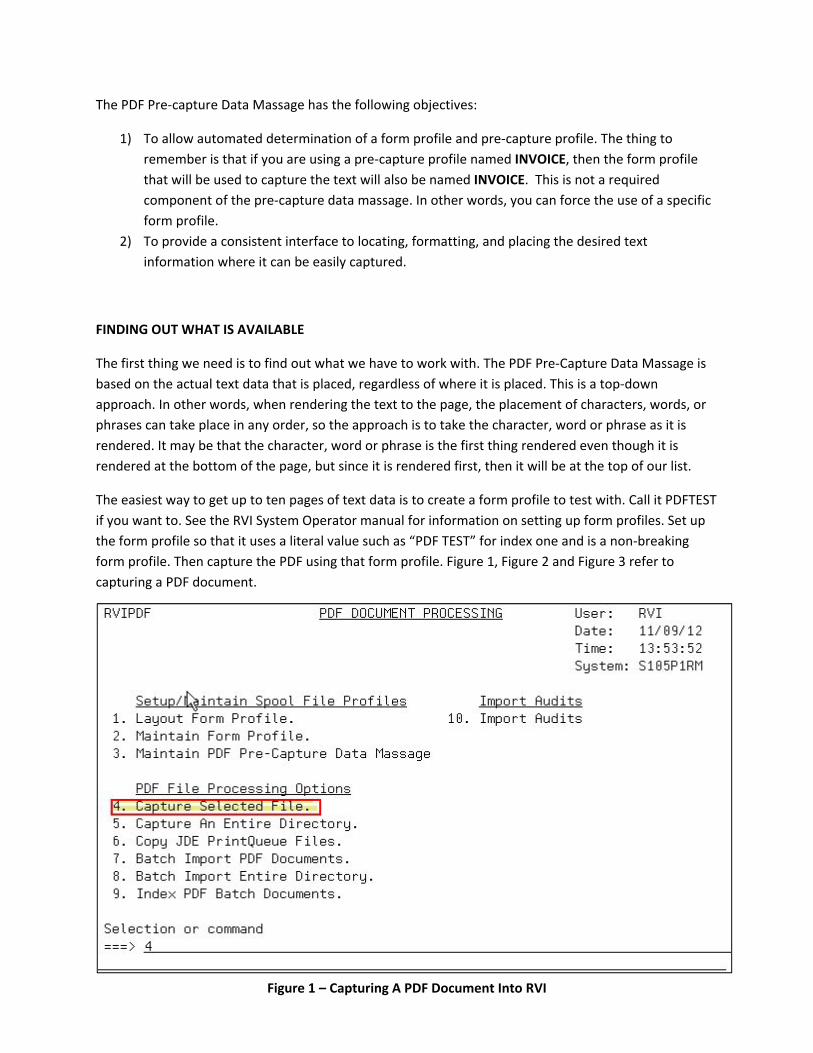
The easiest way to get up to ten pages of text data is to create a form profile to test with. Call it PDFTEST
if you want to. See the RVI System Operator manual for information on setting up form profiles. Set up
the form profile so that it uses a literal value such as “PDF TEST” for index one and is a non‐breaking
form profile. Then capture the PDF using that form profile. Figure 1, Figure 2 and Figure 3 refer to
capturing a PDF document.
Figure 1 – Capturing A PDF Document Into RVI

Figure 2 ‐ Capturing A PDF Document Into RVI
Figure 3 ‐ Capturing A PDF Document Into RVI

Set up a control file parameter named PDFRVIHK and set the value to Y. This will instruct the process to
use the pre‐capture data massage if a form profile can be determined, which is true since we passed on
in. See the RVI System Operator manual for information on creating/modifying control file parameters.
You can now delete the capture you just executed. You can use the RVI SPOOL menu option #16, Delete
A Report Capture. In this case you would use Form Profile PDFTEST for the selection criteria. For further
information on deleting report captures, see the RVI System Operator Manual.
Now we can take a look at what we hope to extract from the PDF. Figure 4 shows what the document
looks like.
Figure 4 – The PDF Document To Be Captured
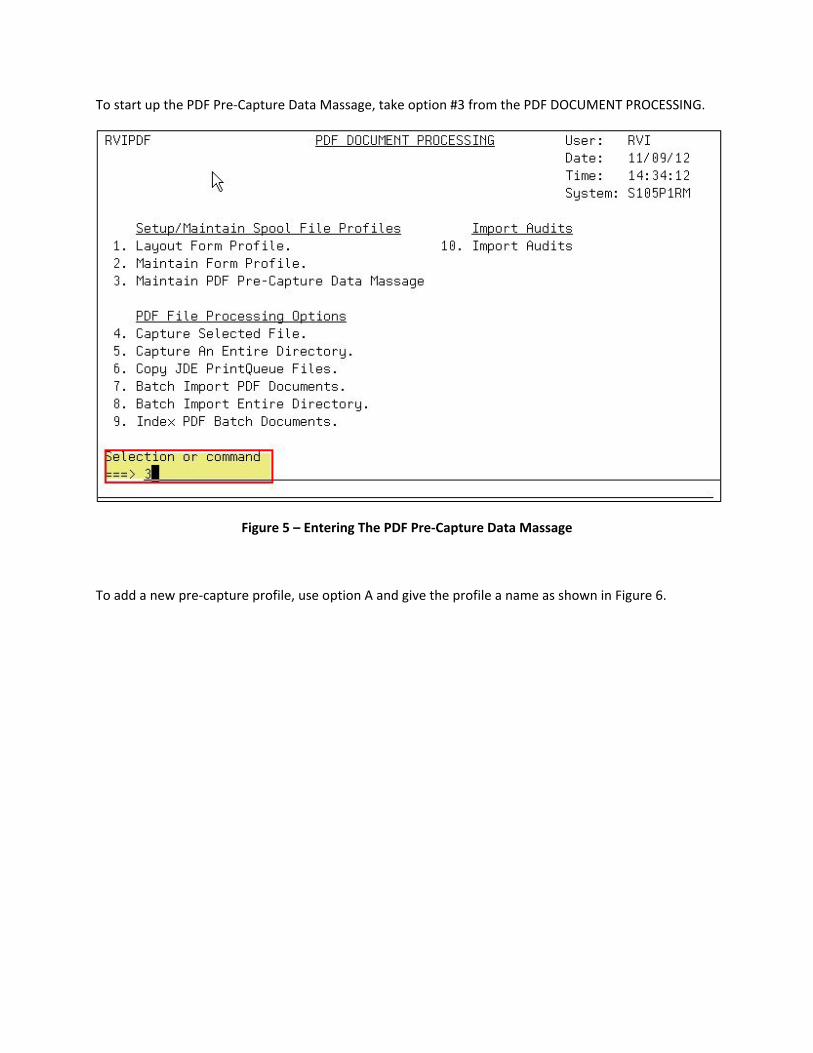
To start up the PDF Pre‐Capture Data Massage, take option #3 from the PDF DOCUMENT PROCESSING.
Figure 5 – Entering The PDF Pre‐Capture Data Massage
To add a new pre‐capture profile, use option A and give the profile a name as shown in Figure 6.

Figure 6 – Adding A New Pre‐Capture Profile
The first screen is where the rules for determining the use of this profile are specified. A PDF document
containing the specs defined here will automatically default to this profile. The words and/or phrases
listed here should be something that is unique to the document. This is a good place to take a look at
the extracted words that we obtained through the PDF Capture. Press function key F9 to take a look at
the text file(s) containing those extracted words. See Figure 7.
You should then see a list of the text files that contain extracted words. These files are listed in the order
of most recent first. If there is any information on the first line of the file, you will see it in yellow on the
line beneath the text file name. The format of the text file name is:
RVPDF‐MMDDYYHHMMSS‐<original‐file‐name.> followed by either MDM.TXT or PDF.TXT
MMDDYY = Month, day and year from the creation date of the text file
HHMMSS = Hours, minutes, seconds from the creation date of the text file
Original filename. = May be either the original PDF file name or the workstation name
MDM.TXT = the PDF file had to be uncompressed (FLATE/DEFLATE) to process it
PDF.TXT = the PDF file did NOT have to be uncompressed to process it
Figure 8 shows the list of text files obtained from using the F9 function key.

Figure 7 – Profile Selection Rule Screen
Figure 8 – Text Files Containing Extracted Words
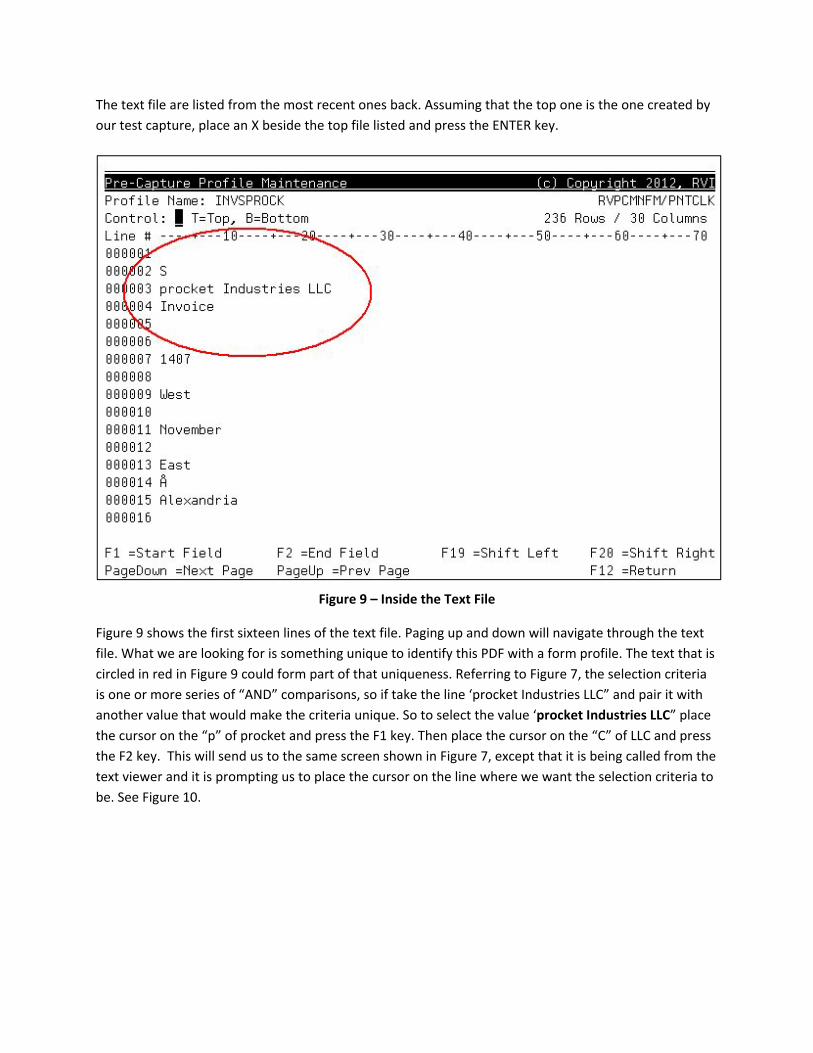
The text file are listed from the most recent ones back. Assuming that the top one is the one created by
our test capture, place an X beside the top file listed and press the ENTER key.
Figure 9 – Inside the Text File
Figure 9 shows the first sixteen lines of the text file. Paging up and down will navigate through the text
file. What we are looking for is something unique to identify this PDF with a form profile. The text that is
circled in red in Figure 9 could form part of that uniqueness. Referring to Figure 7, the selection criteria
is one or more series of “AND” comparisons, so if take the line ‘procket Industries LLC” and pair it with
another value that would make the criteria unique. So to select the value ‘procket Industries LLC” place
the cursor on the “p” of procket and press the F1 key. Then place the cursor on the “C” of LLC and press
the F2 key. This will send us to the same screen shown in Figure 7, except that it is being called from the
text viewer and it is prompting us to place the cursor on the line where we want the selection criteria to
be. See Figure 10.

Figure 10 – Place Cursor On The Line With Sequence 10 and Press ENTER
Leave the values for Line and In Position blank means search for the value anywhere on the page. So, by
searching down the page of the text contents we find the value Invoice, we can establish the selection
criteria to be the value ‘procket Industries LLC’ on any line, in any position *AND* the value ‘Invoice’ on
any line, in any position. If those two criteria are met, we will use the profile INVSPROCK. Figure 11
shows the finished selection page. Press ENTER to save it and go on the pre‐capture data massage.
Setting up the Pre‐Capture Data Massage is a little more complicated but it is also a very powerful and
flexible tool for getting the data we want where we want it at capture time.
There are four ways to manipulate data for our PDF capture:
Combine fields
Float for specific values and manipulate the data at or near that location
Literal values, that is, define an actual literal value
Value at a location
Optionally we can tell the system to use the final value in our actual form profile. See Figure 12 to see
the basic screen for the data massage.

Figure 11 – Completed Pre‐Capture Profile Selection Screen
Figure 12 – The Pre‐Capture Data Massage Screen

FLOAT
The float operation is probably the most useful and thus the most commonly used function of the pre‐
capture data massage. It gets its name from the fact that it floats around the page of information
looking for a certain value. The location of the item being searched for is not static, allowing for more
flexibility. For the purpose of an example, let’s assume that we are looking for an invoice number to use
as an index value. Figure 13 shows where we can find the invoice number (and invoice date) in the text
file.
Figure 13 – Location Of Invoice Number (and Invoice date) In The Text File
The invoice number appears on line 32. The invoice date is two lines above the invoice number. The
word Invoice on line 24 could be our search criteria for the float except that it is not the first occurrence
of the word Invoice in the text file (see Figure 9). However, the crosshatch (#) on line 26 is the first
occurrence of that character, so we can say that we want the 10 bytes six lines below the crosshatch (#).
So we would type 10 for the Data Length, F for the Control Type, make sure the cursor is location within
the control field (refer to Figure 14) and press function key F4.
Figure 14 – Enter 10 for Data Length, F for Control Type, Press F4

Note that we didn’t enter anything in the Starting Line or Position. This means we don’t care where it
occurs. Just find the first occurrence of the crosshatch (#) character. Note that the value to be floated
for is case‐sensitive. Figure 15 shows the screen that results from pressing F4 with the Float Option
specified in the Control Field.
Figure 15 – Float Options
This screen explains it all. To determine the first index value (the index number is the Seq#), we will float
on any line and in any position for the value “#” and if that value is found, we will do one of the
following, dependent on which option is selected:
1) We can float for the first non‐space value from the position relative to the location immediately
following the value we floated for and extract the number of bytes in Length to the left or right;
‐or‐
2) Get the number of bytes specified in Length from the position relative to the location
immediately following the value we floated for and the number of lines above or below the
location of the value floated for;
‐or‐
3) Float to the first value that is either numeric or non‐numeric, whichever is specified, beginning
in the position relative to the location immediately following the value we floated for and the
number of lines specified above or below. Numeric characters are 0‐9 and special numeric signs
(math op signs, dollar sign, cent sign, comma and period). Everything else is non‐numeric.
Note that the three options are mutually exclusive. That is, only one can be used. Also note that what is
referred to as position zero (0), refers to the byte immediately following the character, word, or phrase

being floated for. So if we were floating for the phrase Invoice Date, the current location would be the
byte immediately following the “e” in Date, or position 13 relative to the location of Invoice Date.
Edit Fields
The edit fields pertain to each of the three options and do the following:
Right Adjust – The extracted value is right adjusted and padded with leading blanks.
Zero Fill – Any blanks are changed to zeroes.
Upper Case – Any lower case alphabetic characters are converted to upper case.
Trim Leading and Intermediate Spaces – Left adjust the extracted value. If any location within the value
contains more than one consecutive space, the extraneous spaces are removed and the value left
adjusted accordingly.
Remove Non‐Alphanumeric and Compress – Any characters that are not alphanumeric, a‐z, A‐Z, and 0‐
9) are removed. The resulting value is then compressed, e.g., all spaces removed.
Remove Non‐Numeric – Any non‐numeric characters are removed.
Compress – Leading and intermediate spaces are removed.
For our example, getting the invoice number from the line six lines below the crosshatch (#) can be done
as shown in Figure 16. We will also right‐adjust the value and zero‐fill it. This will result in an invoice
Figure 16 – Float Options For Getting The Invoice Number

number of 0000063192 and will be placed in position one, line one of the data that will be used to
capture the PDF document.
Enter the values desired and press ENTER. Note that at the bottom of the screen is a prompt that says:
Hit ENTER Again To Save. F3/F12 To Cancel And Exit
If you press F3 or F12 at this point you will lose the changes you just made. Press ENTER to save it. To
make sure that the entire profile gets saved, press ENTER one more time and get the screen shown in
Figure 17.
Figure 17 – Saving The Entire Profile
Press ENTER to save the profile. You will get the confirmation screen shown below in Figure 18.
We will make a similar entry to get the Invoice date into Index 2. Another field we might be interested in
extracting is the Purchase Order number. Figure 4 shows the PDF Invoice. Around the middle of the page
is the purchase order number, AB‐00034150. From the text file (see Figure 19) we can see the purchase
oder number, but somehow it has lost the dash between the AB and 00034150. This is not a problem
and will allows us to demonstrate the use of the Combine and Literal Control Types. Select the profile
INVSPROCK and press ENTER until you get back to the Pre‐Capture Profile Maintenance Screen.

Figure 18 – Pre‐Scrape Profile Added
Figure 19 – Purchase Order Number In The Text File

To set up index 3, we are going to combine three fields: the “AB” plus a literal dash (‐) plus the
“00034150” and to do this we will extract the “AB” into field 4, write the dash into field 5, and extract
the “00034150” into field 6. The Maintenance Utility won’t skip over an index field, so we need to go
ahead and get the Combine field into place. Our final index value will be eleven bytes, so we enter that
for the Data Length and C for the Control Type. We could prompt for the fields to combine by press F4
or we can take a short cut and enter this in the Literal field: *CC F04 F05 F06
This literally means we are combining fields 4, 5 and 6. Hit ENTER twice to save this line. The screen
should then look like that shown in Figure 20.
Figure 20 – Pre‐Capture Profile Maintenance Screen
We can see that the purchase order number resides right above the value “Net” at the bottom of the
screen. So we will set up index 4 the same way we did the invoice number and invoice date. The “AB” is
only two bytes so that is the Data Length. Control Type is F and “Net” is the value we float for. Pressing
F4 we get the value in position one that is four lines above the location of Net.
Set up index 5 with a a Data Length of one, Control Type L, and the value is a dash (‐). So quite literally,
we are saying insert the literal value “‐“ into index 5.
Index 6 is the same as index 4 except our Data Length is eight. Control Type is F and the value to float for
is Net.

Figure 21 – Pre‐Capture Profile Maintenance Screen
One more thing left to do is to edit our Combine field. If we left it as is, the combine would place a blank
between the three fields that it is combining so that we would end up with the value “AB – 00034150”
and that’s not exactly what we want. We don’t want the embedded spaces, so placing the cursor on the
field *CC F04 F05 F06 press F4 and go down to the Edits and put a Y beside Compress. See Figure 22.
This will remove the embedded spaces so that we end up with “AB‐00034150” which is the value we
want.
Figure 22 – Selecting The Compress Edit

Using The FLOAT TO Option
Within the Float Control Type, there is an option to “Float To” the first numeric or non‐numeric value.
Why is there such an option? This option exists to get around the headaches created when the data
within a PDF document is laid out using print kerning. Remember that from the initial paragraphs of this
document? Figure 23 shows the extracted text from an invoice document that utilizes this type of data
layout. What we are looking for is the invoice number.
Figure 23 – Illustration Of Text Laid Out With Print Kerning
How in the world are we supposed to extract something meaningful from this? And if you look on the
first eight lines as well, you can see that the Invoice Date is laid out the same way! This is where the
“Float To” option comes into play. Suppose that we could say that if we float for the value “e #” (see line
11 above) then get the value starting with the next line and floating to the first non‐numeric value
encountered. That would the 6, 3, 19, and 2. It would be understood that these values would be
concatenated so that the end result would be 63192. The Float To option values for this scenario are
shown in Figure 24.
Getting the Invoice Date would be done the same way.

Figure 24 – Using the “Float To” Option
AUTOMATICALLY MAINTAINING THE FORM PROFILE
One more thing to consider in the PDF Pre‐Scrape Data Massage is the ability to automatically transfer
the Pre‐Scrape Output information to the Form Profile that will be used to capture the indexing
information that we’ve formatted.
To accomplish this, simply navigate to the Pre‐Scrape Profile Maintenance Screen by selecting the Pre‐
Scrape Profile INVSPROCK by placing an X next to it on the Profile Selection Screen (see Figure 18). Press
ENTER twice and you will be on the Pre‐Scrape Profile Maintenance Screen. As shown in Figure 25,
placing an X beside the first three index entries flags the system to give you the option to automatically
update the Form Profile with the values from the Pre‐Scrape Profile. These values include the start line
and position and data length. It will also create the Form Profile if it does not exist.
Using our example, we are only interested in the first three fields that we’ve put together. Index 1 is the
Invoice Number, Index 2 is the Invoice Date, and Index 3 is the Purchase Order number. The other fields
in our Pre‐Scrape Profile were work fields used to derive the value for index 3.

Figure 25 – Marking Indexes For Automatic Update Of The Form Profile
When we press ENTER to save our changes, we will be prompted, asking if we want to automatically
update the Form Profile with values from this Pre‐Scrape Profile. See Figure 26.
Figure 26 – Prompt To Update The Form Profile

Taking the Y option to update the form profile takes us to the Form Profile Maintenance where you can
see that the form profile index fields have been updated with information from the Pre‐Capture Data
Massage. Figure 27 illustrates this.
Figure 27 – The Form Profile With The Pre‐Capture Data Massage Information
Press ENTER to save the updated Form Profile.
You can use the Pre‐Capture Data Massage for the purposes shown here. You can also use it simply to
automate Form Profile selection in the capture process. To do that, you only fill out the Pre‐Capture
Profile Selection screen (Figure 11). Leave the second, more complicated, screen blank. To automate the
Form Profile selection, pass in a Form Profile value of *CALC.