pclinuxos magazine scribus layout guide -...
TRANSCRIPT

PCLinuxOS Magazine Page 1
by Paul ArnotePCLinuxOS Magazine Chief Editor
You've signed up to be a part of the PCLinuxOSMagazine staff. There are numerous ways tocontribute. You can help edit articles. You can createartwork. You can write articles. You can be a"technical advisor," ensuring that the magazinearticles are technically accurate. Or, you can helptypeset the articles for the magazine. It's the latterthat we will concentrate on.
Preliminary "Stuff"
Before we can get started on learning how to lay outthe magazine articles, we have to define thespecifications that are used in laying out themagazine. Adherence to these specifications areimportant, so the magazine has a unified andcongruent appearance from article to article.
The magazine is laid out using Scribus, the opensource desktop publishing program that is in thePCLinuxOS repository. So, if you have not alreadydone so, you will need to open Synaptic and installScribus to your computer.
Next, you will want to have some templates.Thankfully, there are several templates for themagazine. While they vary in length, they are allbased on the one page template, created by me andMeemaw. Archie Arevalo created the first template,and it was wonderful but we have changed to a newone. From the PCLinuxOS Connect page, you candownload the one page, four page, eight page, 12page, and 20 page three (3) column templates.There are also three two (2) column layouts,covering four pages, six pages, and 12 pages. All
the templates are in the NEW-Mag-Layout-Templates.tar.gz file. The preferred layout templatefor the magazine is the three column version.However, the two column versions came aboutbecause articles that contain large amounts of codesnippets, or articles that have a lot of graphics, don'tnecessarily lend themselves well to the three columnlayouts.
The only one you are required to use is the onepage template. However, all the work has been donefor you on the other templates, and they make yourlife a lot easier when having to lay out articles longerthan one page. Obviously, you will want to use thelonger templates for longer articles. I have yet tohave an article submitted that wouldn't fit within one
of these templates. Using Ark (or your preferredcompressed file utility, such as File Roller orSqueeze), un-compress the templates to the~/.scribus/templates directory. Alternatively, you canuncompress the files to a folder in your /homedirectory, preferably named the same as thecompressed file. Bear in mind that the .scribusdirectory is a hidden directory in your /homedirectory, so you will need to enable "View HiddenFiles" in your file manager software (Konqueror,Dolphin, Nautalis, PCFileMan or Thunar).
When you start to lay out a new article, simply openone of these template files as an existing document.Before you do anything else, re-save the file with thename you will call the new article layout. This will
PCLinuxOS Magazine Scribus Layout Guide
PCLinuxOS Magazine Page 2
prevent you from potentially corrupting your "clean"templates. Don't worry if you corrupt them, as theyare readily available for download from thePCLinuxOS Connect page, should you need themagain. Alternatively, you can mark your "clean"templates as "read only" files, preventing you fromaccidentally overwriting them and their contents.
Let's Get Started
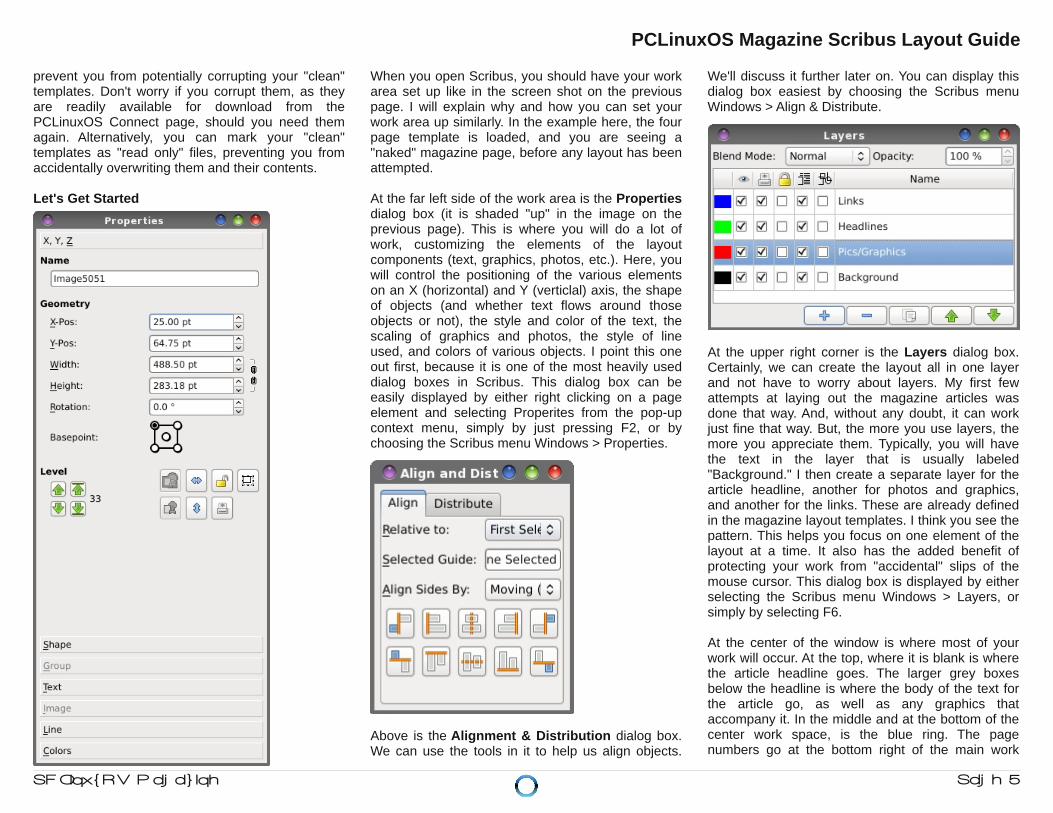
When you open Scribus, you should have your workarea set up like in the screen shot on the previouspage. I will explain why and how you can set yourwork area up similarly. In the example here, the fourpage template is loaded, and you are seeing a"naked" magazine page, before any layout has beenattempted.
At the far left side of the work area is the Propertiesdialog box (it is shaded "up" in the image on theprevious page). This is where you will do a lot ofwork, customizing the elements of the layoutcomponents (text, graphics, photos, etc.). Here, youwill control the positioning of the various elementson an X (horizontal) and Y (verticlal) axis, the shapeof objects (and whether text flows around thoseobjects or not), the style and color of the text, thescaling of graphics and photos, the style of lineused, and colors of various objects. I point this oneout first, because it is one of the most heavily useddialog boxes in Scribus. This dialog box can beeasily displayed by either right clicking on a pageelement and selecting Properites from the pop-upcontext menu, simply by just pressing F2, or bychoosing the Scribus menu Windows > Properties.
Above is the Alignment & Distribution dialog box.We can use the tools in it to help us align objects.
We'll discuss it further later on. You can display thisdialog box easiest by choosing the Scribus menuWindows > Align & Distribute.
At the upper right corner is the Layers dialog box.Certainly, we can create the layout all in one layerand not have to worry about layers. My first fewattempts at laying out the magazine articles wasdone that way. And, without any doubt, it can workjust fine that way. But, the more you use layers, themore you appreciate them. Typically, you will havethe text in the layer that is usually labeled"Background." I then create a separate layer for thearticle headline, another for photos and graphics,and another for the links. These are already definedin the magazine layout templates. I think you see thepattern. This helps you focus on one element of thelayout at a time. It also has the added benefit ofprotecting your work from "accidental" slips of themouse cursor. This dialog box is displayed by eitherselecting the Scribus menu Windows > Layers, orsimply by selecting F6.
At the center of the window is where most of yourwork will occur. At the top, where it is blank is wherethe article headline goes. The larger grey boxesbelow the headline is where the body of the text forthe article go, as well as any graphics thataccompany it. In the middle and at the bottom of thecenter work space, is the blue ring. The pagenumbers go at the bottom right of the main work
PCLinuxOS Magazine Scribus Layout Guide
PCLinuxOS Magazine Page 3
area when final assembly of the magazine occurs.Unless you are doing the final assembly, you will notbe doing anything with these.
One thing that you might notice early on, is that theunits of measure with the magazine templatesdefaults to points, abbreviated pts. Points is thestandard measurement in the publishing world fordefining the size of type. So, before we can go muchfurther, we need to know what the "standard"magazine measurements are in the template.
Under the X, Y, Z tab of the Properties dialog box,we will find the sizes of the following elements. All ofthese "properties" are predefined in the magazinelayout templates, but you will need to know whatthey are.
Headline (first page):X-Pos: 30.00 ptY-Pos: 45.00 ptWidth: 732.00 ptHeight: 40.00 ptRotation: 0.00
Headline (subsequent pages):X-Pos: 364.00Y-Pos: 25.00Width: 404.00Height: 25.00Rotation: 0.00
Left Column Text Box (first page):X-Pos: 25.00 ptY-Pos: 106.00 ptWidth: 235.00 pt (362.00 pt in two column pages)Height: 470.00 ptRotation: 0.00
Left Column Text Box (subsequent pages):X-Pos: 25.00 ptY-Pos: 54.00 ptWidth: 235.00 pt (362.00 pt in two column pages)Height: 522.00 ptRotation: 0.00
Center Column Text Box (first page):X-Pos: 278.50 ptY-Pos: 106.00 ptWidth: 235.00 ptHeight: 470.00 ptRotation: 0.00
Center Column Text Box (subsequent pages):X-Pos: 278.50 ptY-Pos: 54.00 ptWidth: 235.00 ptHeight: 522.00 ptRotation: 0.00
Right Column Text Box (first page):X-Pos: 532.00 pt (405.00 pt in two column pages)Y-Pos: 106.00 ptWidth: 235.00 pt (362.00 pt in two column pages)Height: 470.00 ptRotation: 0.00
Right Column Text Box (subsequent pages):X-Pos: 532.00 pt (405.00 pt in two column pages)Y-Pos: 54.00 ptWidth: 235.00 pt (362.00 pt in two column pages)Height: 522.00 ptRotation: 0.00
Under the Text tab of the Properties dialog box, wecan further define the attributes of the text placed intheir respective places on the page.
Headline (first page):Font: Bitstream Vera SansStyle: Bold ObliqueSize: 30.0 ptLine Spacing: AutomaticScaling Width of Characters: 100.0%Offset to Baseline of Characters: 0.0%Manual Tracking: 0%Scaling Height of Characters: 100.0%Color of Font: BlackAlign Text: Center
Headline (subsequent pages):Font: Liberation SansStyle: BoldSize: 14.0 ptLine Spacing: AutomaticColor of Font: BlackAlign Text: Right
Body Text:Font: Liberation SansStyle: RegularSize: 10.0 ptLine Spacing: AutomaticScaling Width of Characters: 100.0%Offset to Baseline of Characters: 0.0%Manual Tracking: 0.0%Scaling Height of Characters: 100%Color of Font: BlackAlign Text: Justified
Are you feeling overwhelmed? DON'T! You mostlikely won't have to mess with many of thesesettings. However, to insure that the magazine has auniform and coherent appearance, we need to listthe specifications. And, nearly all of the articles inthe magazine will need to adhere to thesespecifications. On occasion, there will be somedeviation from these specifications, but that will bedecided on a case-by-case basis by the magazine'schief editor.
Often, the headline font size will vary, and will beadjusted (downward only in size ... we don't wantSCREAMING headlines) to allow a desired headlineto fit.
On another note about the headline, did you noticethe last item under the definitions that appear in theText tab of the Properties dialog? It says "NOShadowed Text." I need to explain why. While it maybe tempting to allow Scribus to create the shadowedtext, problems arise whenever the end user attemptsto print out a page with a PDF viewer. It maySEVERELY slow down the print rendering, often tothe point of locking up a user's computer. So, it's
PCLinuxOS Magazine Scribus Layout Guide
PCLinuxOS Magazine Page 4
best to avoid its use. The magazine's current layouttemplates have gone completely away from usingany kind of text shadowing, real or not.
Placing the Text
Now this part is very easy. Simply left click within thefirst column (the left column) on the first page, andselect "Get Text" from the context menu that popsup. This will allow you to select text from a file onyour computer. By far, the best results come fromusing plain, ordinary text (*.txt) files. While you canimport the text from an OpenOffice/LibreOffice Writerfile, you end up adding an additional layer ofcomplexity due to the formatting in theOpenDocument file. My motto, when I was teaching,was KISS ... Keep It Super Simple. Using plain textfiles is the most simple way, and works exceptionallywell.
Since the templates have the text flow from textframe to text frame predefined for you, the textshould flow from one text frame to the next,seamlessly.
Once you have the text placed in the text frames, itis possible to edit that text and change itsappearance. While you can perform minor editswithin the text frame itself (such as misspellings,punctuation, etc.), it's often much easier to performthe text edits en-masse. Such edits as changing thestyle of portions of the text are much more easilydone by right clicking on a text frame and selecting"Edit Text" from the context menu that pops up. Thiswill open up an Edit Text dialog box, with the textpreloaded into it. Now, simply highlight the text in thedialog box that you want to change the style of (sayyou want to make the byline of an article bold), andchange the font to Liberation Sans Bold. The exactsame thing applies if you want some text to appearas italics, only you would choose Liberation SansItalic as the font to use to display the highlighted textwith. You can do a similar thing with color, althoughcolored text must be used sparingly. The default
color of the text for the body of the magazine articlesis black, and for the most part, should remain blackto maintain and increase readability. One suchexample is maintaining readability for those readerswho may experience color blindness.
Graphics, Screenshots, Quotes and Photos
Endless pages of text is, in a word, boring. Just takea look at any technical or scientific article. Page afterpage of nothing but text makes the pages appearvery gray, and lack visual appeal. Without anythingto break up the grayish appearance of the text,there's nothing to anchor the eye and people tend tolose their place much more easily, making readingmore difficult and decreasing comprehension.Typically, it takes a very disciplined mind to be ableto read page after page of grayish text and maintaina high level of comprehension. This is why, in otherpublications (like magazines and textbooks),frequent use is made of other graphical elementslike charts, graphs, screenshots, and photographs.Plus, the old adage "a picture is worth a 1,000words" is true, as adding other graphical elementshelp improve comprehension.
Some articles don't lend themselves well tographics, especially if you are attempting to presenta concept or idea. Often, concepts or ideas are justthat – conceptual, and don't have any physicalrepresentation, or at least are difficult to representwith any kind of physical representation. In thosecases, it's possible to break up the grayness of thetext by pulling out quotes from the article to displayas an extra graphical element, displayed in a largerfont size in a complimentary font face.
In any case, whether we are adding graphics,screenshots, photos, or quotes, the method is thesame. We want to add the visual element and havethe text flow around it. (Don't forget that we areadding things in layers, so you will place these visualelements in their own layer.) This is also whereknowing the template measurements is important.
So the X-Pos, Y-Pos, and column widthmeasurements (in the X, Y, Z tab of the Propertiesdialog box) take on some added importance.
For example, if we want to place a photo orscreenshot in the upper left column of the first pageof an article (in a three column layout), we will wantthe object placed so its X-Pos is 25, its Y-Pos is 106,and (if the photo or screenshot is to only be onecolumn wide) the width of that object is 235 pts. Theeasiest way to achieve this is to manually adjust thevalues in the Properties box. Simply select theimage tool from the Scribus toolbar, and click anddrag to the object's approximate size. Use thevalues in the Properties dialog box to refine themeasurements. Similarly, a two column wide imagewill be 488.50 pts wide, and a three column wideimage will be 742.00 pts wide. With the two columnlayout, a one column wide image will be 362.00 ptswide, and a two column wide image will be 742.00pts wide.
You should now see a marker on the screen for thenew object. If it's an image, right click on it andselect "Get Image" from the context menu. Point tothe file you want to use and double click it (you mayhave to change to the directory where you've storedyour images). Go to the Image tab in the Propertiesdialog and select "Scale To Frame Size." The imagewill be automatically scaled to fit into the spaceyou've defined. By default, the image will be scaledproportionally, so that the image doesn't appear tobe distorted. You may need to make some slightadjustments in the image frame (typically, eitherlenghen or shorten the height) to fill the space youhave in mind for the image. Right click on the imageframe, and select "Adjust Frame to Image" from thecontext menu that pops up. Next, click on the Shapetab in the Properties dialog, and select "Text FlowsAround Frame." Magically, you will see the text shiftand adjust to flow around the new image frame.
Were you to do this with a quote, you would selectthe text frame tool from the Scribus toolbar, and youwould see a text frame, instead of an image frame.
PCLinuxOS Magazine Scribus Layout Guide
PCLinuxOS Magazine Page 5
You would still select the Shape tab in the Propertiesdialog box, and select "Text Flows Around Frame" toget a similar effect. You would then specify the textto display, along with the font size, font face, andfont style in the Text tab in the Properties dialog box,instead of the image tab. As a shortcut, after definingthe text frame, right click on it and select "Edit Text"from the pop-up context menu, and simply enter thetext there, making all the changes there at once.This is the same method that I use when creatingcaptions for images.
Article submission guidelines specify that graphicfiles be in the PNG file format, due to its losslesscompression (whenever possible). Most images forthe magazine, however, will be converted to JPGfiles, and resized (downward only) to reduce the filesize of the magazine's PDF file, and to speed uploading of the magazine's HTML pages.
Finishing Up
By this point, you should be pretty much done withthe layout of the magazine article. Now, it's time topackage everything up for the final assembly of themagazine, which will be done either by the chiefeditor, the assistant editor, or someone theydesignate. That person will not only proof read thearticle again, but will also pay close attention toinsure that all the style rules for the magazine layoutare followed. Then, they will assemble the individualarticles into the one, common PDF file that you havecome to expect for the PCLinuxOS Magazine.
First, we need to make sure all the files you used inthe page layout are available to be delivered to thefinal assembler. To do this, from the Scribus menu,select File > Collect For Output. You will beprompted to pick a directory to place the output filesinto. I recommend creating a separate directory foreach magazine article. Once you click on OK, youScribus will place a copy of each of the pageelements into that one directory.
Next, it's time to create a PDF of your layout. Selectthe PDF icon on the Scribus toolbar, and you will bepresented with the PDF Export dialog box. We willbe creating the PDF file to be compatible with PDFversion 1.4 (right side of the dialog box, about 1/3 ofthe way down). Towards the bottom of the Generaltab, we need to change Compression fromAutomatic, to None. Using compression makes thePDF file load very, very slowly in KPDF, so we wantto avoid its use. Under the Fonts tab, we want toembed all the fonts used in the article to create thePDF file. This insures that readers viewing this oncomputers that may not have all the included fontsinstalled on are able to view the document as it wasintended to be viewed. Like it or not, there will beusers who will be viewing the magazine on aWindows computer (possibly while at work), andWindows will not have the free open source fontsinstalled; hence, it's difficult to predict the results thereader will get on a "foreign" computer.
Finally, change the directory where the PDF file isstored to the same directory used for the Collect ForOutput step. Then select Save.
Once you have the PDF file created in the CollectFor Output directory, compress the entire contents ofthe directory into a tar.gz file. Then, upload theresulting tar.gz file to the magazine group's mailinglist (maximum file size for upload is unknown, butformerly was 5 MB ... we've lately been able toupload files quite a bit bigger).
There you have it. A step by step guide to how tolayout articles for the magazine. It might take you alittle extra time to layout your first few articles, buttrust us ... it gets way faster the more you do it.
Hints & Tips
Make liberal use of layers. We would prefer that youuse and stick to the layers that are alreadypredefined in the magazine's layout templates. This
will make our jobs much easier when it's time forfinal assembly of the magazine PDF.
After you have elements placed on the screen, lockthem in place by right clicking on the item andchoosing "Is Locked" from the pop-up context menu.
Group related objects together.Don't try to position things precisely with the mouse.Instead, use the X, Y, Z tab of the Properties dialogbox. It's much easier.
Extra Additions (gathered from emails)
Screenshot Showcase Layout:(useful only for those doing the "final assembly" ofthe magazine. Those individuals have a template intheir Scribus Scrapbook to greatly speed up theprocess.)
1) Copy the header from the page, and fit itPRECISELY (width-wise) in the remaining twocolumns.
2) Make the "header" deeper, to precisely fill thecolumn height (two column should be 488.50 ptwide, 438.00 pt high, XPos = 278.50 pt, YPos =95.00 pt)
3) Place headline (max 30 pt) at top of two columnblock, just as we do for the main headlines, usingBitstream Vera Sans Roman Oblique. Duplicate theheadline, re-do the positioning, and create yourheadline shadow.
4) Place a 2 pt line under the headline, after youhave created the headline shadow.
5) Position an image frame within the colored blockso that (initially) there is a 5 pt "margin" on bothsides (L and R).
PCLinuxOS Magazine Scribus Layout Guide
PCLinuxOS Magazine Page 6
6) Right click on the image frame, and select "GetImage." Choose your image (should have alreadybeen resized, to 600 px wide and converted to aJPG file).
7) If necessary, re-center the image within the colorblock.
8) Add text frame under image, same width asimage. Use Liberation Serif, 10 pt, BoldItalic. Placeposters name, date, and desktop environment. Youhave probably noticed that I have all that info in thefile name of the images in the .tar.gz file.
Creating hyperlinks in Scribus:
1) You need to change the text color to blue yourself,because Scribus won't do it. The color to use iscalled Blue.
2) On the Scribus PDF toolbar, there is an icon withtwo "shoe-prints" on it. Click on it, and draw a tightrectangle around your blue text. If the PDF Toolbarisn't visible, click on Windows in the menu bar, andat the bottom make sure PDF Tools has a checkmark in front of it. Mine shows up to the right of thepage I'm working on. You might have anotherwindow obscuring its view.
3) Double click the rectangle you just drew on thescreen.
4) At the top of the dialog box that appears, select"Link To External Web Site."
5) Then, enter the URL in the entry box in the middleof the dialog box. Then click OK.
Updated September 2017 by Paul ArnotePCLinuxOS Magazine Chief Editor
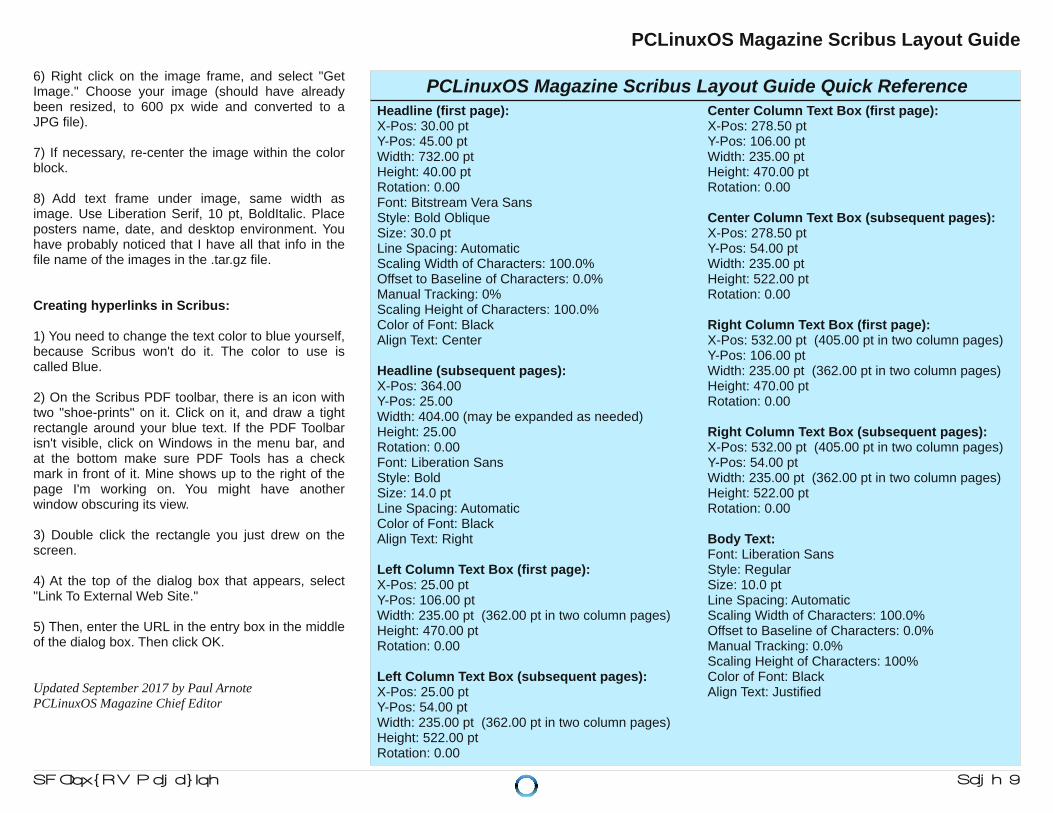
Headline (first page):X-Pos: 30.00 ptY-Pos: 45.00 ptWidth: 732.00 ptHeight: 40.00 ptRotation: 0.00Font: Bitstream Vera SansStyle: Bold ObliqueSize: 30.0 ptLine Spacing: AutomaticScaling Width of Characters: 100.0%Offset to Baseline of Characters: 0.0%Manual Tracking: 0%Scaling Height of Characters: 100.0%Color of Font: BlackAlign Text: Center
Headline (subsequent pages):X-Pos: 364.00Y-Pos: 25.00Width: 404.00 (may be expanded as needed)Height: 25.00Rotation: 0.00Font: Liberation SansStyle: BoldSize: 14.0 ptLine Spacing: AutomaticColor of Font: BlackAlign Text: Right
Left Column Text Box (first page):X-Pos: 25.00 ptY-Pos: 106.00 ptWidth: 235.00 pt (362.00 pt in two column pages)Height: 470.00 ptRotation: 0.00
Left Column Text Box (subsequent pages):X-Pos: 25.00 ptY-Pos: 54.00 ptWidth: 235.00 pt (362.00 pt in two column pages)Height: 522.00 ptRotation: 0.00
Center Column Text Box (first page):X-Pos: 278.50 ptY-Pos: 106.00 ptWidth: 235.00 ptHeight: 470.00 ptRotation: 0.00
Center Column Text Box (subsequent pages):X-Pos: 278.50 ptY-Pos: 54.00 ptWidth: 235.00 ptHeight: 522.00 ptRotation: 0.00
Right Column Text Box (first page):X-Pos: 532.00 pt (405.00 pt in two column pages)Y-Pos: 106.00 ptWidth: 235.00 pt (362.00 pt in two column pages)Height: 470.00 ptRotation: 0.00
Right Column Text Box (subsequent pages):X-Pos: 532.00 pt (405.00 pt in two column pages)Y-Pos: 54.00 ptWidth: 235.00 pt (362.00 pt in two column pages)Height: 522.00 ptRotation: 0.00
Body Text:Font: Liberation SansStyle: RegularSize: 10.0 ptLine Spacing: AutomaticScaling Width of Characters: 100.0%Offset to Baseline of Characters: 0.0%Manual Tracking: 0.0%Scaling Height of Characters: 100%Color of Font: BlackAlign Text: Justified
PCLinuxOS Magazine Scribus Layout Guide Quick Reference
PCLinuxOS Magazine Scribus Layout Guide