pcgenesis payroll system operations guide · pcgenesis payroll system operations guide ... 42 pm...
TRANSCRIPT

PCGENESIS PAYROLL SYSTEM
OPERATIONS GUIDE
3/19/2018 Section B: Payroll Update Processing
[Topic 2: Add a New Payroll Employee and
Hire a Third Party Contractor Employee,
V2.19]

Georgia Department of Education
March 19, 2018 3:42 PM Page i of ii
All Rights Reserved.
Revision History
Date Version Description Author
3/19/2018 2.19 18.01.00 – Add the E-mail Address and Cell Phone Number fields. D. Ochala
04/03/2017 2.18 17.01.00 – Add the GHI BOE Transfer field. D. Ochala
12/30/2016 2.17 16.04.00 – Update Procedure D: New Employee Import Process and add three
new fields: the Hours Per Day field, the ‘No Pension’ Code field, and the
Sick Bank field.
D. Ochala
11/04/2016 2.16 16.03.00 – Change GHI Coverage Effective Date to GHI First Deduction Date
field. D. Ochala
06/17/2016 2.15 16.02.00 – Delete GHI Date of Last Deduction from screen. D. Ochala
07/15/2015 2.14 15.02.00 – Add TRS & ERS Pens Gross Adj field back to screen. Add No
Pension Code field. D. Ochala
03/16/2015 2.13 14.04.00 – Update file names in Procedure D New Employee Import Process.
Delete TRS & ERS Pens Gross Adj field. Add Substitute Rank field. D. Ochala
04/10/2014 2.12 14.01.00 – Add Budget Flag to Add New Employee screenshots. D. Ochala
10/09/2013 2.11 13.03.00 – Add Hours Per Week to Add New Employee screenshots. D. Ochala
07/13/2012 2.10 12.02.00 – Add New PSERS and GHI % Distribution. Add Print Screen
information. Update screenshots. D. Ochala
05/24/2011 2.9 11.02.00 – Add EEO-5 Job Code. Change ‘GHI Eligible Date’ to ‘GHI 1st
Day Worked’. Update screenshots. D. Ochala
01/24/2011 2.8 10.04.01 – Remove AEIC switch from screen. Update screenshots. D. Ochala
10/01/2010 2.7 10.03.00 – Add Procedure D New Employee Import Process. D. Ochala
06/30/2010 2.6 10.02.00 – Update State Marital Status Indicator. D. Ochala
03/31/2009 2.5 09.01.00 – Added Data Collection ethnicity code information and instructions,
and Procedure C: Adding a New Third Party Contractor Employee. C. W. Jones
10/02/2008 2.4 08.04.00 – Added TRS-Pension Switch ‘R’ and DOE Paid ERCON field edit
information and instructions.
C. W. Jones
10/02/2008 2.3 08.03.00 – Added Long Term Substitute information and instructions. C. W. Jones
06/02/2008 2.2 08.02.00 – Added pension code ‘0’ (No Pension Participation) and TRS ‘R’
(TRS: Employer Pays BOTH employer and employee shares – SB327) code
entry information and instructions.
C. W. Jones
03/25/2008 2.1 08.01.00 – Added Annuity 3 – Annuity 5 information and screenshot example. C. W. Jones
09/25/2007 2.0 07.03.00 – Added GHI option and tier drop-down selection icon
information and instructions.
C. W. Jones
Georgia Department of Education
March 19, 2018 3:42 PM Page ii of ii
All Rights Reserved.
Table of Contents
Overview .......................................................................................................................................................1
Procedure A: Setting/Clearing Employee Search Criteria .....................................................................4
Procedure B: Adding a New Payroll Employee .......................................................................................5
Procedure C: Converting a Third Party Contractor Employee to a PCGenesis Payroll Employee...28
Procedure D: New Employee Import Process ..........................................................................................38
D1. Downloading the PCG_New_One_Employee.xlsx Template .......................................................... 38
D1.1. PCG_New_One_Employee.xlsx Template – Example .......................................................... 39
D2. Saving the PCG_New_One_Employee.xlsx Template as a Microsoft® Excel
Spreadsheet/Workbook ........................................................................................................................... 40 D3. Using the PCGenesis Template to Create a New Employee ........................................................... 42
D4. Modifying and Saving the PCG_New_One_Employee.csv File in Microsoft® Excel .................... 52 D5. Importing the PCG_New_One_Employee.csv File into PCGenesis ............................................... 55
D5.1. Performing a PCGenesis Data Backup ................................................................................... 55
D5.2. Importing the Microsoft Excel PCG_New_One_Employee.csv File into PCGenesis ........ 56
Appendix A: Formatting the PCG_New_One_Employee.csv File (Multiple Files, One Employee
Per File) .........................................................................................................................................................67
Appendix B: PCGenesis Automatic Record Creation .............................................................................73
B1. Payroll System Deduction Screen – Examples ................................................................................ 73 B2. Certified/Classified Personnel Information (CPI) Screens – Examples .......................................... 74
B2.1. Certificate File - Biographical Screen – Example ................................................................... 74 B2.2. Certificate File Maintenance Screen – Example ..................................................................... 75 B2.3. Certificate File – Assignment Screen – Example.................................................................... 75
PCGenesis Payroll System Operations Guide
Georgia Department of Education
March 19, 2018 3:42 PM Page 1 of 75
All Rights Reserved.
Overview
PCGenesis new employee record entries allows for the entry of new, terminated, and inactive
employees’ personal, job-related, and supplementary payroll information. The procedure also allows
CPI-Third Party Contractor employee information to be converted to new employee records.
Based on the Add New Employee screen’s entries, PCGenesis creates additional information for the
employee within other PCGenesis components, where appropriate. For example, after entering State
Health Benefit Plan (SHBP) options, tiers, and deduction codes, and saving the employee’s information,
PCGenesis automatically creates the appropriate deduction amount entries on the employee’s Deduction
Data screen. Likewise, for certified employees, PCGenesis creates corresponding Certified/Classified
Personnel (CPI) employee biographical, assignment and certification records for the new employee
when updating the CS1 Job (from CPI) and Include on CPI? fields, and saving the record. When doing
so for classified employee entries, PCGenesis automatically creates a CPI biographical information
record for the employee. Although not included in the Add New Employee procedure, Appendix B1.
Payroll System Deduction Screen – Examples and Appendix B2. Certified/Classified Personnel
Information (CPI) Screens – Examples provide screenshots to illustrate PCGenesis’ automatic creation
of the additional components’ records. For new employees, PCGenesis defaults the SEC125 (Cafeteria
Plan) field to ‘Y’ (Yes) on the employee’s Deduction Data screen.
Import for New Hire Data: The PCG_New_One_Employee.xlsx template is provided for use during
the New Employee Import file procedure. The new hire import process will facilitate gathering
employee information from multiple departments and/or schools into Microsoft® Excel
Spreadsheets/Workbooks which can then be loaded into the PCGenesis system either individually, or in
batch mode. Refer to Section D: New Employee Import Process for the instructions on using the
PCG_New_One_Employee.xlsx template in the creation of new employees through the Add New
Employee on-line screen. Refer to the Payroll System Operations Guide, Section I: Special Functions,
Topic 8: Payroll Export and Import File Processing, Topic 8E: Payroll New Hire Export and Import
File Processing for instructions on loading the new employee import files in batch mode.
Refer to Payroll System Operations Guide, Topic 4: Update/Display Payroll Information for the
instructions on entering additional payroll information for the new employee. As the Professional
Standards Commission (PSC) bases certified employee salaries on job assignments with corresponding
issued and in-progress certifications, it is imperative that all employee assignment and certification
record information be complete and valid. The Certified/Classified Personnel Information (CPI) System
Operations Guide, Section A: Displaying/Updating Individual Employee Information provides detailed
instructions for completing the CPI module’s entries.
Third Party Contract Employee Information: Generally, PCGenesis does not permit access to the
third party contractor information from the PCGenesis payroll module. PCGenesis users must access
third party contractor information via the Certified/Classified Personnel Information (CPI) module.
However, PCGenesis supports the conversion of third party contractor employee information to a
PCGenesis payroll employee from within the Add New Employee module. Refer to Procedure C:
Converting a Third Party Contractor Employee to a PCGenesis Payroll Employee for the instructions
on changing a third party contractor to a payroll employee.
PCGenesis Payroll System Operations Guide
Georgia Department of Education
March 19, 2018 3:42 PM Page 2 of 75
All Rights Reserved.
Ethnicity Code Change Information: To meet Federal and CPI reporting requirements for calendar
year 2010, the Display/Update Personnel Data screen adds race/ethnicity definitions to employees’
information. CPI processing now requires a two-question format to collect data on ethnicity and race
and requires two distinct responses. The first question concerns the broad category of ethnicity, and the
second question is concerned with the less broad designation of an employee’s specific race category.
The first part asks the respondent to identify his or her ethnicity as a Hispanic/Latino or Non-Hispanic.
The second part asks the respondent to identify his or her race or races. User must select at least one
race code.
Long Term Substitute Information: Substitute employees, payroll class type ‘S’, who are employed
by the school district for six (6) weeks or more, are considered “Long Term Substitutes”. These
employees should have the Include on CPI? field set to ‘Y’ (Yes) and should have a valid entry in the
CS1 Job (from CPI) field. Setting Include on CPI? to ‘Y’ will cause these long term substitute
employees to be included within the Certified/Classified Personnel Information (CPI) module.
Teacher Retirement System (TRS) Reporting: The Retire Elig Date (Retirement Eligibility Date)
field identifies the date on which the employee becomes eligible to participate in the assigned retirement
plan. For normal TRS employees, PCGenesis defaults the Amt/% field’s entry to the normal TRS
employee share as defined within the TRS tax table.
The TRS DOE Paid ERCON (Teacher Retirement System-Georgia Department of Education Paid
Employer Contribution) field identifies the Georgia Department of Education (GaDOE) as the
employer-paid contributor for the employee’s TRS retirement plan.
For HB210/SB 327 TRS Retirees: Use Pension Switch ‘R’ for rehired TRS retirees. HB210/SB 327
allows retirees to return to work full-time, and requires the employer to pay both the employee’s share
and the employer’s share of the TRS premium. When using Pension Switch ‘R’, ensure that the Pension
code field reflects ‘2’ (TRS), the Pens Amt/% field reflects ‘0.00’, and the Service Ind field reflects ‘1’
(In-Service).
State Health Benefit Plan (SHBP)/Georgia Health Insurance (GHI) Requirements: SHBP/GHI
eligibility information must be tracked for all employees. The employee’s county of residence, coverage
dates, and coverage options are required entries for GHI participants. SHBP/GHI eligibility tracking
allows school districts and systems to prepare for the yearly Open Enrollment health insurance period.
The entries in the GHI Eligible?, Participate in GHI? and the GHI Option and GHI Tier fields must
correspond. For example, if N (No) is entered in the Participate in GHI? field, NC (No Coverage) or NE
(Not Eligible) must be entered in the GHI Option field, and 00 (No Coverage) must be entered in the
GHI Tier field. PCGenesis processes this information when creating the GHI Monthly Deduction File
(PUF). Refer to Payroll System Operations Guide, Section D: Processing
Monthly/Quarterly/Annual/Fiscal Report Processing, Topic 1: Processing Monthly Reports for
additional SHBP/GHI requirements.
GHI Change Code/GHI Change Date Fields: The GHI change code and change date fields track
employee changes impacting GHI processing. PCGenesis defaults to NEMP (New Employee Hire) for
new employee information. PCGenesis exports this information when users create the GHI Recent
Changes to Employee (AUF) file. Refer to the Payroll System Operations Guide, Section D: Processing
Monthly/Quarterly/Annual/Fiscal Report Processing, Topic 1: Processing Monthly Reports for the
instructions on performing this procedure.

PCGenesis Payroll System Operations Guide
Georgia Department of Education
March 19, 2018 3:42 PM Page 3 of 75
All Rights Reserved.
State Exemptions (Allowances): PCGenesis divides exemptions into two separate fields for payroll
calculation. PCGenesis users may perform this payroll calculation at different rates for the two
allowances where appropriate. These fields include State Allow Mar[ ] to enter the allowances for
marital status from Line 3 of the G-4 form, and State Allow Dep[ ] to enter the sum of dependent and
additional allowances from Line 4 and Line 5 of the G-4 form.
Account Number Codes: Entries in the Acct# Yr Fnd F Prgm Fnct Objct Fcty B Addt’l fields must
exist in the Budget Account Master file. Refer to the Financial Accounting and Reporting (FAR) System
Operations Guide, Section A: Budget Account Master Processing for instructions.
Payroll/Annuity Codes: All description codes must exist in the payroll Description file and all annuity
company codes must exist in the payroll Annuity file before using the codes to update employees’
payroll information. Although PCGenesis allows up to five annuity company entries per employee
record, PCGenesis users must create the corresponding annuity control codes before entering the
information for employees. Refer to Section F: Payroll Description/Deduction/Annuity File Processing
for instructions.
Screen Print: The screen print feature allows the user to obtain a screen print of selected payroll
screens. The screen print feature is available on display/inquiry screens which have the button.
The screen print file will be available in the print queue with the name ‘PSCNnnnn’.
Selecting the drop-down selection icon , (F15 – Code Lookup) or (F28 – Help Screens)
when offered provides additional assistance with the entry of information.

PCGenesis Payroll System Operations Guide
Georgia Department of Education
March 19, 2018 3:42 PM Page 4 of 75
All Rights Reserved.
Procedure A: Setting/Clearing Employee Search
Criteria
Refer to the Payroll System Operations Guide, Section B: Payroll Update Processing, Topic 1:
Set/Clear Employee Search Criteria for instructions.

PCGenesis Payroll System Operations Guide
Georgia Department of Education
March 19, 2018 3:42 PM Page 5 of 75
All Rights Reserved.
Procedure B: Adding a New Payroll Employee
Step Action
1 From the Business Applications Master Menu, select (F2 - Payroll System).
The following screen displays:
Step Action
2 Select (F2 - Payroll Update Menu).
PCGenesis Payroll System Operations Guide
Georgia Department of Education
March 19, 2018 3:42 PM Page 6 of 75
All Rights Reserved.
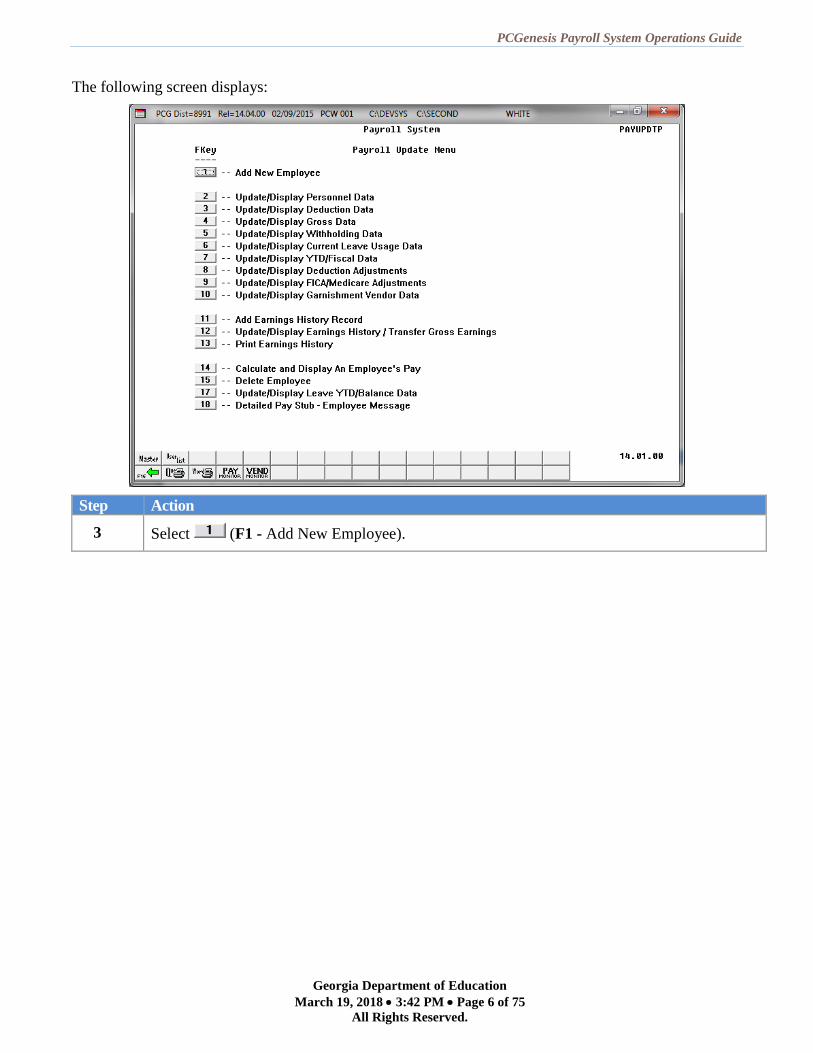
The following screen displays:
Step Action
3 Select (F1 - Add New Employee).
PCGenesis Payroll System Operations Guide
Georgia Department of Education
March 19, 2018 3:42 PM Page 7 of 75
All Rights Reserved.
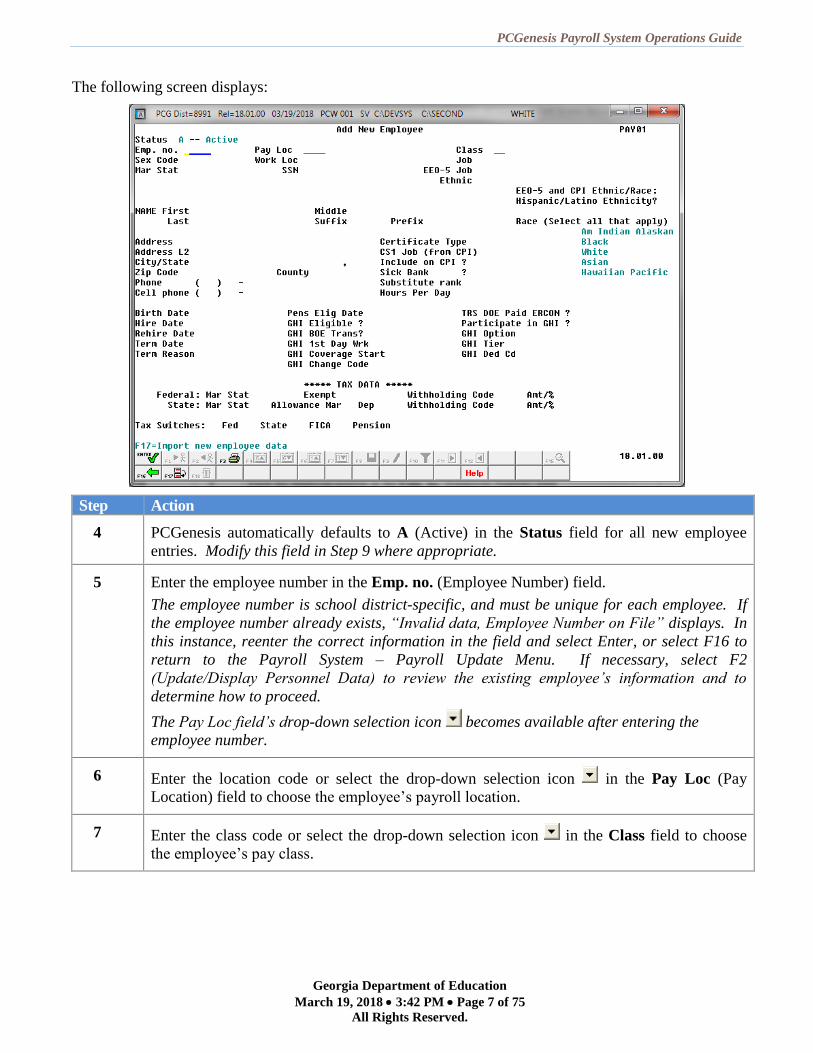
The following screen displays:
Step Action
4 PCGenesis automatically defaults to A (Active) in the Status field for all new employee
entries. Modify this field in Step 9 where appropriate.
5 Enter the employee number in the Emp. no. (Employee Number) field.
The employee number is school district-specific, and must be unique for each employee. If
the employee number already exists, “Invalid data, Employee Number on File” displays. In
this instance, reenter the correct information in the field and select Enter, or select F16 to
return to the Payroll System – Payroll Update Menu. If necessary, select F2
(Update/Display Personnel Data) to review the existing employee’s information and to
determine how to proceed.
The Pay Loc field’s drop-down selection icon becomes available after entering the
employee number.
6 Enter the location code or select the drop-down selection icon in the Pay Loc (Pay
Location) field to choose the employee’s payroll location.
7 Enter the class code or select the drop-down selection icon in the Class field to choose
the employee’s pay class.

PCGenesis Payroll System Operations Guide
Georgia Department of Education
March 19, 2018 3:42 PM Page 8 of 75
All Rights Reserved.
Step Action
8 Select (Enter).
Although a certified employee’s field entries display in the screenshot examples, the page
following also includes the initial entry screen for a classified employee and a certificated
substitute employee.
For certified and classified employees the following screen displays:
PCGenesis Payroll System Operations Guide
Georgia Department of Education
March 19, 2018 3:42 PM Page 9 of 75
All Rights Reserved.
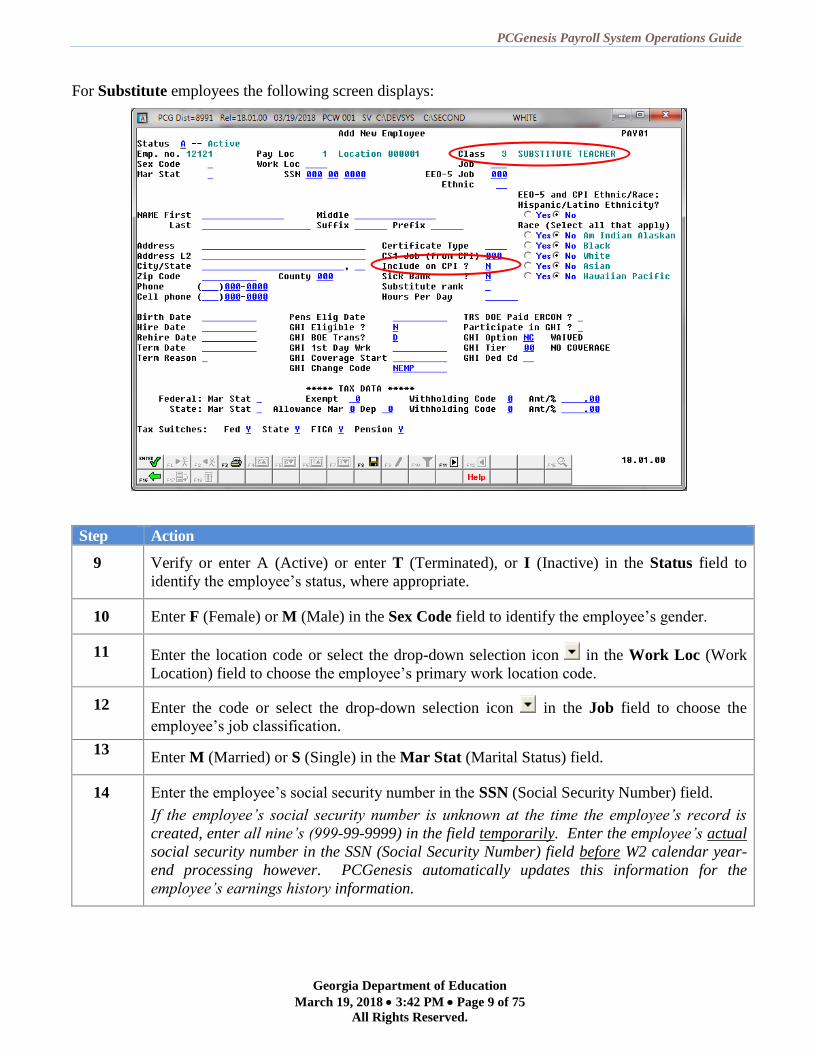
For Substitute employees the following screen displays:
Step Action
9 Verify or enter A (Active) or enter T (Terminated), or I (Inactive) in the Status field to
identify the employee’s status, where appropriate.
10 Enter F (Female) or M (Male) in the Sex Code field to identify the employee’s gender.
11 Enter the location code or select the drop-down selection icon in the Work Loc (Work
Location) field to choose the employee’s primary work location code.
12 Enter the code or select the drop-down selection icon in the Job field to choose the
employee’s job classification.
13 Enter M (Married) or S (Single) in the Mar Stat (Marital Status) field.
14 Enter the employee’s social security number in the SSN (Social Security Number) field.
If the employee’s social security number is unknown at the time the employee’s record is
created, enter all nine’s (999-99-9999) in the field temporarily. Enter the employee’s actual
social security number in the SSN (Social Security Number) field before W2 calendar year-
end processing however. PCGenesis automatically updates this information for the
employee’s earnings history information.
PCGenesis Payroll System Operations Guide
Georgia Department of Education
March 19, 2018 3:42 PM Page 10 of 75
All Rights Reserved.
Step Action
15 Enter the code or select the drop-down selection icon in the EEO-5 Job field to choose
the employee’s EEO-5 job code.
The EEO-5 Job code is necessary in order to support EEO-5 reporting and file transmission
to the Federal government.
16 Enter the code or select the drop-down selection icon in the Ethnic field to choose the
employee’s ethnicity.
17 EEO-5 and CPI Ethnic/Race:
Select the (Radio Button) to left of the appropriate response in the Hispanic/Latino
Ethnicity? field.
The Hispanic/Latino Ethnicity field is necessary in order to support EEO-5 reporting and
file transmission to the Federal government.
18 EEO-5 and CPI Ethnic/Race:
Select the (Radio Button) to left of all of the responses which apply in the Race (Select
all that apply) fields.
Select at least one response.
The Race fields are necessary in order to support EEO-5 reporting and file transmission to
the Federal government.
19 Enter the employee’s first name and middle name or middle initial, up to fifteen (15)
characters each in the (NAME) First and (NAME) Middle fields.
The First name is a required field. The Middle name or initial is an optional field.
20 Enter the employee’s last name, up to fifteen (15) characters in the (NAME) Last field.
The last name field is a required field.
21 Enter the suffix for the employee’s name in the Suffix field.
Examples of this entry include Sr. (Senior) or Jr. (Junior).
22 Enter the employee’s professional title in the (NAME) Prefix field.
PCGenesis uses this field for such processes as contract processing. An example of an entry
would include Dr. (Doctor).
23 Enter the employee’s street/mailing address, up to thirty (30) characters per field, in the
Address and Address L2 fields.
24 Enter the employee’s city in the first field, up to twenty-seven (27) characters, and the two-
character state code in the second City/State field.
The comma (,) already exists to separate the two entries.

PCGenesis Payroll System Operations Guide
Georgia Department of Education
March 19, 2018 3:42 PM Page 11 of 75
All Rights Reserved.
Step Action
25 Enter the employee’s postal code, including the Zip+4 postal codes where appropriate, in the
Zip code field.
26 SHBP/GHI (Required): Enter the county of residence code in the County field.
Refer to the “Georgia County Code Listing” for a complete listing of Georgia counties and
county codes.
27 Enter the employee’s telephone number(s) including the area code (###-###-####) in the
Phone field and the Cell Phone field, if applicable.
28 For Certified employees only: Enter the employee’s certificate type in the Certificate
Type field.
The GaDOE provides a complete listing of certificate types at:
http://www.gadoe.org/Technology-Services/Data-Collections/Pages/FY2017-CPI-
Resources.aspx
29 Enter the employee’s CPI job code in the CS1 Job (from CPI) field.
The GaDOE provides a complete listing of CPI Job Codes at:
http://www.gadoe.org/Technology-Services/Data-Collections/Pages/FY2017-CPI-
Resources.aspx
30 Enter Y (Yes) or N (No) in the Include on CPI? field to identify the employee’s inclusion
in, or exclusion from CPI reporting.
For Long Term Substitutes, enter Y (Yes) in the field.
31 Enter Y (Yes) or N (No) in the Sick Bank? field to choose the employee’s participation in
your system’s sick bank program.
32 Enter the code or select the drop-down selection icon in the Substitute Rank field to
choose the employee’s substitute rank code.
The Substitute Rank code is necessary when the Enhanced Substitute Pay and Employee
Leave System is enabled on the Tax/Withholding/Control Menu.
33 Enter the hours per day in the Hours Per Day field, where appropriate.
The Hours Per Day field is necessary when the Enhanced Substitute Pay and Leave System
has been enabled on the Tax/Withholding/Control Menu. This field allows the system to
convert hours to days when entering time off in the Substitute Pay and Leave System.
34 Enter the employee’s date of birth (MM/DD/CCYY) in the Birth Date field.
35 Enter the employee’s initial hire date (MM/DD/CCYY) in the Hire Date field.
36 Enter the employee’s rehire date (MM/DD/CCYY) in the Rehire Date field, where
appropriate.
PCGenesis Payroll System Operations Guide
Georgia Department of Education
March 19, 2018 3:42 PM Page 12 of 75
All Rights Reserved.
Step Action
37 Enter the employee’s termination date (MM/DD/CCYY) in the Term date (Termination
date) field, where appropriate.
38 Enter the termination code or select the drop-down selection icon in the Term reason
(Termination reason) field to choose the termination reason where appropriate
39 TRS/ERS Reporting - Required: Enter the date (MM/DD/CCYY) in the Pens Elig Date
(Pension Eligibility Date) to identify when the employee becomes eligible to participate in
the TRS or ERS pension plan.
TRS uses the pension eligibility date to precisely identify when an employee became eligible
for their current pension. This is most important for TRS reporting in the case that a PSERS
or Substitute employee changes job functions and becomes eligible to enroll in TRS. In this
instance, the employee would retain their original hire date, but have a pension eligibility
date tied to the date of the change of their job role.
40 GHI Eligible? field:
Enter Y (Yes – Employee is eligible to receive benefits) or N (No – Employee is not eligible
to receive benefits) in the field to choose the employee’s plan eligibility.
This is a required field for SHBP/GHI reporting.
41 GHI BOE Trans? (GHI Board of Education Transfer) field – Required if the GHI Eligible?
field is set to ‘Y’.
Indicate whether or not the employee transferred from another school district.
Valid values:
Y – Yes, the employee transferred from another school district
N – No, the employee did not transfer from another school district
D – Don’t know whether or not the employee transferred from another school district
The GHI BOE Trans? field is mostly informational; however, this data should be
discovered from the employee so that SHBP benefits are transferred to the new school
district correctly. If the GHI BOE Transfer field is set to ‘Y’, but a GHI Coverage Start
Date has not been entered, a warning message will be displayed.
42 GHI 1st Day Wrk (GHI 1
st Day Worked) field – Required if the GHI Eligible? field is set
to ‘Y’.
Enter the first date (MM/DD/CCYY) for which the employee is compensated.

PCGenesis Payroll System Operations Guide
Georgia Department of Education
March 19, 2018 3:42 PM Page 13 of 75
All Rights Reserved.
Step Action
43 GHI Coverage Start (GHI Coverage Start Date) field – Optional, but the GHI Eligible?
field must be set to ‘Y’.
Enter the date (MM/DD/CCYY) when the employee’s GHI benefit coverage starts. The
GHI Coverage Start field is an optional field on the screen and is typically used for an
employee transferring from another school district.
The GHI Coverage Start field is an optional field on the Add New Employee screen. Per
instructions from the Georgia State Health Agency, the GHI Coverage Start field should
only be used for summer transfers from May 1 through October 31. During this
timeframe, the date provided in this field will be used to replace the hire date when
determining the benefit start date in the ADP system. According to the Georgia State Health
Agency, the BOE Coverage Start Date field will allow payroll locations to start a
transferring employee’s coverage on the exact date selected by the BOE without the date
rolling forward an additional month.
NOTE: If the GHI BOE Transfer field is set to ‘Y’, but a GHI Coverage Start Date has
not been entered, a warning message will be displayed.
44 GHI Change Code field - Required if the GHI Eligible? field is set to ‘Y’.
Select the drop-down selection icon in the field to identify the reason for the employee’s
GHI coverage change.
45 Enter Y (Yes) or N (No) in the TRS DOE Paid ERCON? (Teacher Retirement System-
Georgia Department of Education Paid Employer Contribution) field to identify the Georgia
Department of Education’s employer-paid contribution to the school district’s retirement
plan.
When the Step 60 - Tax Switches: Pension field’s entry is 'R' (TRS: Employer Pays both
employer and employee shares), the TRS DOE Paid ERCON (Department of Education
pays the Employer’s Contribution) field may not contain Y (Yes) as the two settings are
mutually exclusive. Additionally, the TRS DOE Paid ERCON? flag may only be set to Y
(Yes) when the Step 69 - ‘Pension Code’ field’s entry is 2 (TRS).

PCGenesis Payroll System Operations Guide
Georgia Department of Education
March 19, 2018 3:42 PM Page 14 of 75
All Rights Reserved.
Step Action
46 Participate in GHI? field:
Enter Y (Yes – Employee participates in SHBP) or N (No – Employee does not participate in
the SHBP) to choose the employee’s plan participation.
Enter N (No) if the GHI Option field will be NC (No Coverage) or NE (Not Eligible),
and the GHI Tier field will be 00 (No Coverage).
Enter Y (Yes) if the employee GHI Option and the GHI Tier fields will be codes other
than NC (No Coverage) or NE (Not Eligible), and 00 (No Coverage).
Starting July 1, 2012, Direct Billing for certificated employees covered by SHBP takes
effect. SHBP moves from a percentage of state-based salaries for every SHBP-eligible
certificated employee and instead begins paying a “direct” per member per month (PMPM)
rate (i.e., a flat rate) for each certificated employee enrolled in the SHBP. Therefore, an
employer contribution will NOT be billed for employees with a GHI Option field of NC (No
Coverage) or NE (Not Eligible).
47 GHI Option field - Required if the Participate in GHI? field is set to ‘Y’.
Using the SHBP’s supporting documentation for the current year, enter or select the drop-
down selection icon in the field to choose the employee’s health plan code.
PCGenesis defaults this entry to NC (Waived Coverage).
While not included in the Add New Employee procedure, PCGenesis automatically enters
the GHI deduction amount for the GHI deduction code on the employee’s Deduction screen.
The Update/Display Deduction Data screen is accessed by selecting F3 (Update/Display
Deduction Data) from the Payroll System – Payroll Update Menu.
48 GHI Tier field - Required if the Participate in GHI? field is set to ‘Y’.
Enter or select the drop-down selection icon in the field to choose the employees’ level of
coverage (tier) code.
PCGenesis defaults this entry to 00 (SHBP Waived).
49 GHI Ded Cd (GHI Deduction Code) field - Required if the Participate in GHI? field is
set to ‘Y’.
Enter or select the drop-down selection icon in the field to choose the deduction code.
An invalid entry in this field will generate the “Deduction Code not valid or not set up as
SHBP Deduction” message. Refer to Section F: Description/Deduction/Annuity File
Processing for the instructions on the entry of this code.
50 Verify or enter the employee’s federal income tax marital status code in the Federal: Mar
Stat (Federal: Marital Status) field.
Valid Values: M = Married
S = Single

PCGenesis Payroll System Operations Guide
Georgia Department of Education
March 19, 2018 3:42 PM Page 15 of 75
All Rights Reserved.
Step Action
51 Verify or enter the number of federal income tax exemptions in the Federal: Exempt
(Federal: Exemptions) field.
When the number of federal income tax exemptions exceeds ten (10), submit the employee’s
W-4 form to the Internal Revenue Service. Refer to Line 5 of the W-4 form for the Federal:
Exempt field’s information.
52 Verify or enter the employee’s federal income tax withholding code in the Federal:
Withholding Code field.
Valid Values: 0 = Normal Federal tax from tax table
1 = Normal Federal tax from tax table + flat amount
2 = Flat amount only
3 = Flat percentage only
53 The Federal: Amt/% field is used in conjunction with the Federal Withholding Code. If
the Federal: Amt/% value is a whole number, it will be treated as a flat amount (codes 1 &
2). If the value is less than 1, it will be treated as a percentage (code 3). Verify or enter the
employee’s additional federal income tax amount or the tax percentage in the Federal:
Amt/% (Federal: Amount/Percentage) field, where appropriate.
Required for Federal Withholding Code entries of 1, 2, or 3. Values less than 1.00 are
regarded as percentages (%).
54 Verify or enter the employee’s state income tax marital status code in the State: Mar Stat
(State: Marital Status) field.
Valid Values: A = Single
B = Married Filing Joint, both spouses working
C = Married Filing Joint, one spouse working
D = Married Filing Separate
E = Head of Household
8 = Exempt – Servicemembers Civil Relief Act
A marital status of ‘8’ will cause all wages to be exempt from reporting for Georgia state
wages, and will cause zero Georgia tax to be withheld from the employee’s paycheck. The
Department of Labor Quarterly Payroll Report and Wages Data File, and the W-2 forms
will both treat any wages on the Earnings History records with a Georgia marital status of ‘8’
as Georgia exempt wages, and these wages will not be included in these tax reports.
55 Verify or enter the total number of marital allowances from Line 3 of the G-4 form in the
State: Allowance Mar (State: Marital Allowance) field.
Verify or enter the sum total of both dependent allowances (Line 4 of the G-4 form) and
additional allowances (Line 5 of the G-4 form) in State: Allowance Dep (State: Dependent
Allowance) field.
When the number of State of Georgia income tax exemptions exceeds fourteen (14), submit
the employee’s G-4 form to the Georgia Department of Revenue. Refer to Line 4 and Line 5
of the G-4 form for State: Allowance information.
PCGenesis Payroll System Operations Guide
Georgia Department of Education
March 19, 2018 3:42 PM Page 16 of 75
All Rights Reserved.
Step Action
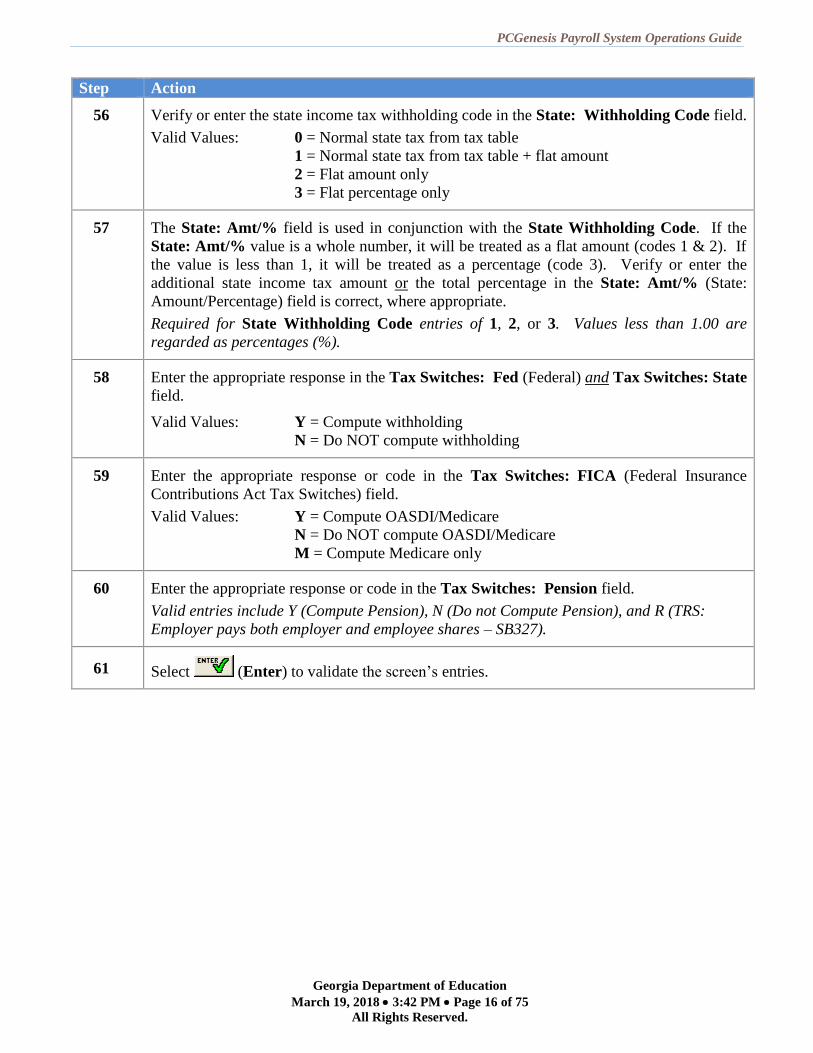
56 Verify or enter the state income tax withholding code in the State: Withholding Code field.
Valid Values: 0 = Normal state tax from tax table
1 = Normal state tax from tax table + flat amount
2 = Flat amount only
3 = Flat percentage only
57 The State: Amt/% field is used in conjunction with the State Withholding Code. If the
State: Amt/% value is a whole number, it will be treated as a flat amount (codes 1 & 2). If
the value is less than 1, it will be treated as a percentage (code 3). Verify or enter the
additional state income tax amount or the total percentage in the State: Amt/% (State:
Amount/Percentage) field is correct, where appropriate.
Required for State Withholding Code entries of 1, 2, or 3. Values less than 1.00 are
regarded as percentages (%).
58 Enter the appropriate response in the Tax Switches: Fed (Federal) and Tax Switches: State
field.
Valid Values: Y = Compute withholding
N = Do NOT compute withholding
59 Enter the appropriate response or code in the Tax Switches: FICA (Federal Insurance
Contributions Act Tax Switches) field.
Valid Values: Y = Compute OASDI/Medicare
N = Do NOT compute OASDI/Medicare
M = Compute Medicare only
60 Enter the appropriate response or code in the Tax Switches: Pension field.
Valid entries include Y (Compute Pension), N (Do not Compute Pension), and R (TRS:
Employer pays both employer and employee shares – SB327).
61 Select (Enter) to validate the screen’s entries.
PCGenesis Payroll System Operations Guide
Georgia Department of Education
March 19, 2018 3:42 PM Page 17 of 75
All Rights Reserved.
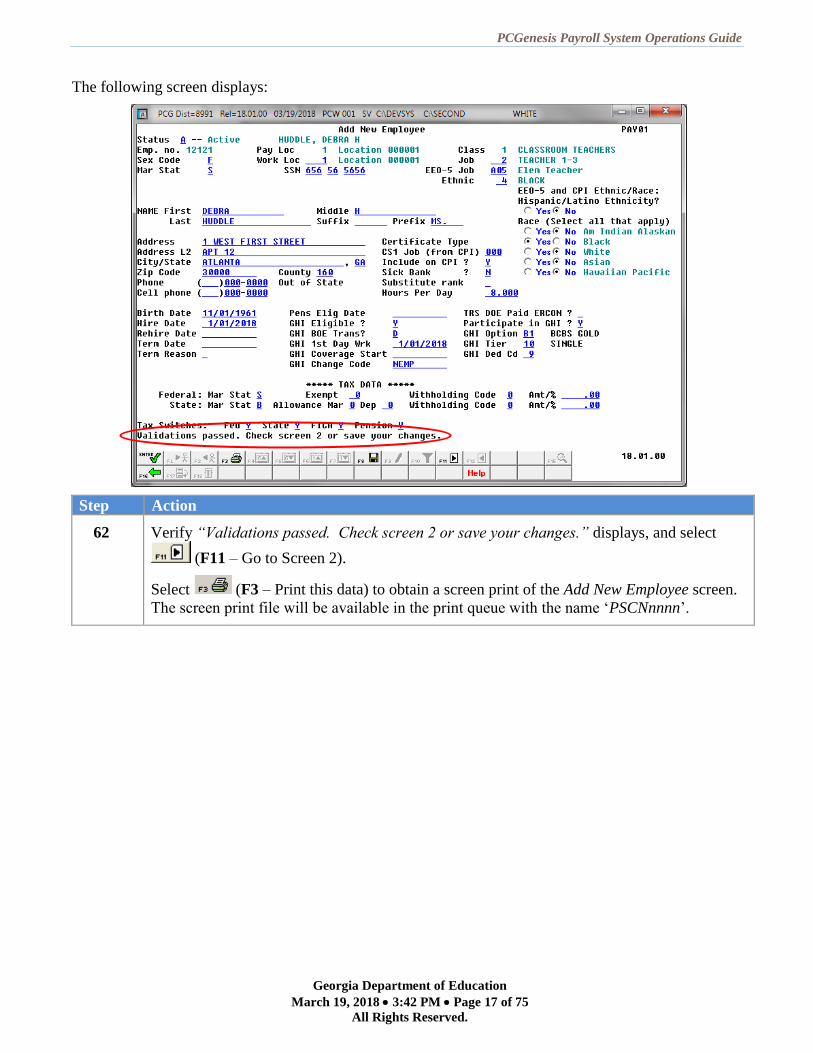
The following screen displays:
Step Action
62 Verify “Validations passed. Check screen 2 or save your changes.” displays, and select
(F11 – Go to Screen 2).
Select (F3 – Print this data) to obtain a screen print of the Add New Employee screen.
The screen print file will be available in the print queue with the name ‘PSCNnnnn’.
PCGenesis Payroll System Operations Guide
Georgia Department of Education
March 19, 2018 3:42 PM Page 18 of 75
All Rights Reserved.
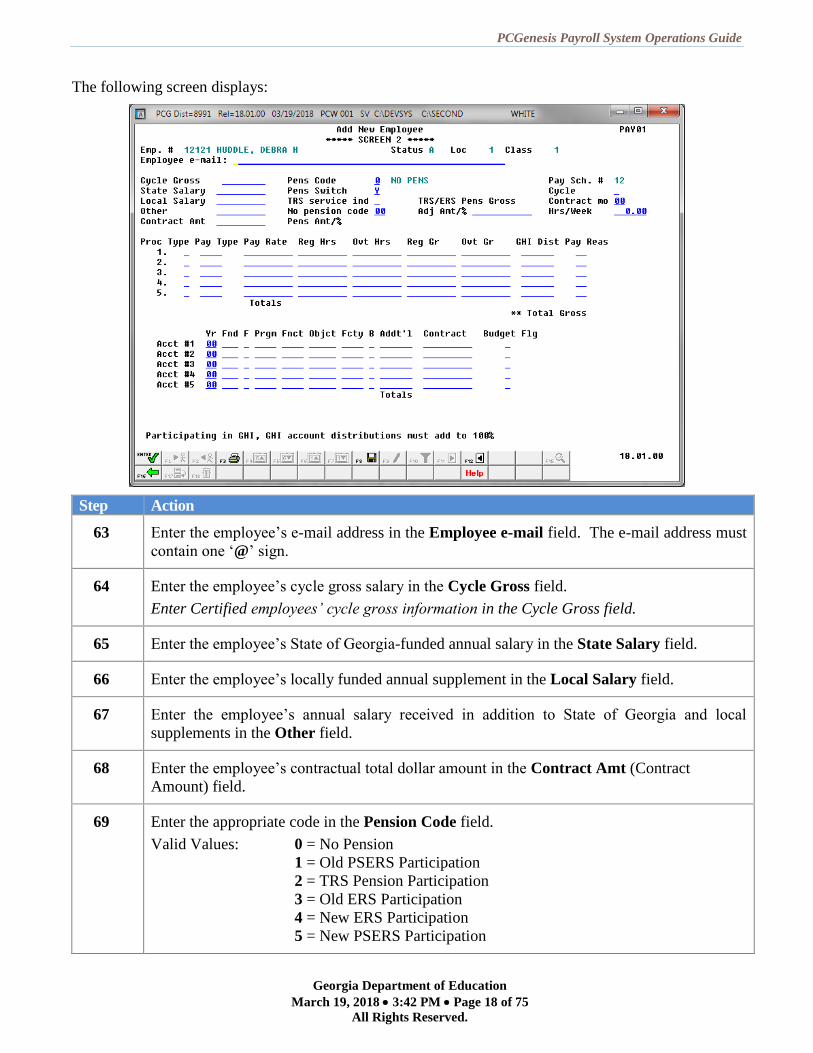
The following screen displays:
Step Action
63 Enter the employee’s e-mail address in the Employee e-mail field. The e-mail address must
contain one ‘@’ sign.
64 Enter the employee’s cycle gross salary in the Cycle Gross field.
Enter Certified employees’ cycle gross information in the Cycle Gross field.
65 Enter the employee’s State of Georgia-funded annual salary in the State Salary field.
66 Enter the employee’s locally funded annual supplement in the Local Salary field.
67 Enter the employee’s annual salary received in addition to State of Georgia and local
supplements in the Other field.
68 Enter the employee’s contractual total dollar amount in the Contract Amt (Contract
Amount) field.
69 Enter the appropriate code in the Pension Code field.
Valid Values: 0 = No Pension
1 = Old PSERS Participation
2 = TRS Pension Participation
3 = Old ERS Participation
4 = New ERS Participation
5 = New PSERS Participation
PCGenesis Payroll System Operations Guide
Georgia Department of Education
March 19, 2018 3:42 PM Page 19 of 75
All Rights Reserved.
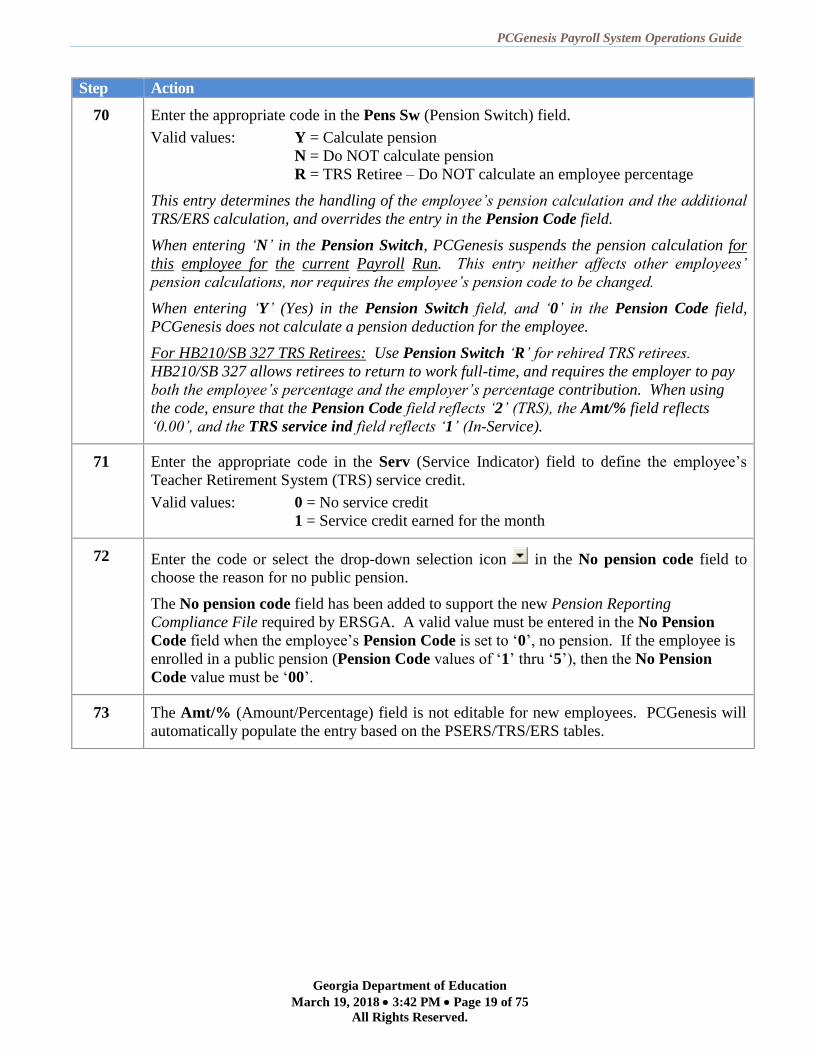
Step Action
70 Enter the appropriate code in the Pens Sw (Pension Switch) field.
Valid values: Y = Calculate pension
N = Do NOT calculate pension
R = TRS Retiree – Do NOT calculate an employee percentage
This entry determines the handling of the employee’s pension calculation and the additional
TRS/ERS calculation, and overrides the entry in the Pension Code field.
When entering ‘N’ in the Pension Switch, PCGenesis suspends the pension calculation for
this employee for the current Payroll Run. This entry neither affects other employees’
pension calculations, nor requires the employee’s pension code to be changed.
When entering ‘Y’ (Yes) in the Pension Switch field, and ‘0’ in the Pension Code field,
PCGenesis does not calculate a pension deduction for the employee.
For HB210/SB 327 TRS Retirees: Use Pension Switch ‘R’ for rehired TRS retirees.
HB210/SB 327 allows retirees to return to work full-time, and requires the employer to pay
both the employee’s percentage and the employer’s percentage contribution. When using
the code, ensure that the Pension Code field reflects ‘2’ (TRS), the Amt/% field reflects
‘0.00’, and the TRS service ind field reflects ‘1’ (In-Service).
71 Enter the appropriate code in the Serv (Service Indicator) field to define the employee’s
Teacher Retirement System (TRS) service credit.
Valid values: 0 = No service credit
1 = Service credit earned for the month
72 Enter the code or select the drop-down selection icon in the No pension code field to
choose the reason for no public pension.
The No pension code field has been added to support the new Pension Reporting
Compliance File required by ERSGA. A valid value must be entered in the No Pension
Code field when the employee’s Pension Code is set to ‘0’, no pension. If the employee is
enrolled in a public pension (Pension Code values of ‘1’ thru ‘5’), then the No Pension
Code value must be ‘00’.
73 The Amt/% (Amount/Percentage) field is not editable for new employees. PCGenesis will
automatically populate the entry based on the PSERS/TRS/ERS tables.
PCGenesis Payroll System Operations Guide
Georgia Department of Education
March 19, 2018 3:42 PM Page 20 of 75
All Rights Reserved.
Step Action
74 Enter the dollar amount or percentage in the TRS / ERS Pens Gross Adj Amt/% (Teacher
Retirement System Pension Gross Adjustment Amount/Percentage) field where appropriate.
The TRS / ERS Pens Gross Adj Amt/% field is needed by some districts who do not
participate in Social Security for many classes of employees. In certain cases, the district’s
board of education can vote to contribute a certain percentage (for example, 4%) on all
classes of employees to a reputable 403(b) in lieu of Social Security. Therefore, the salary
reported to TRS can be increased by this percentage as a supplement type for
employees. For example: Employee ‘A’ has a gross salary of $4,000 per month, but is
reported to TRS as $4,160 (which includes the 4%). The TRS / ERS Pens Gross Adj
Amt/% field allows PCGenesis to increase the TRS/ERS reported wages by the 4%.
According to the TRS Employer’s Reference Guide, a tax sheltered annuity plan is listed as
other earnable compensation.
75 The Pay Sch.# (Payroll Schedule Number) field is not editable in PCGenesis.
PCGenesis automatically populates this entry based on the employee’s pay class.
76 Enter the appropriate code in the Cycle field to define the manner in which year-to-date
(YTD) figures will accrue on the employee’s pay stub.
Valid Values: 1 = Calendar Year
2 = School Year
3 = Fiscal Year
77 Enter the total number of contract months the employee works in the Contmo (Contract
Months) field.
78 Hrs/Week: Required for State Health Benefit Plan (SHBP)/Georgia Health Insurance (GHI)
Report and Extract File Creation. For more information, refer to Section D:
Monthly/Quarterly/Annual/ Fiscal Report Processing, Topic 1: Processing Monthly Reports.
Enter the number of hours per week the employee works in the Hrs/Week (Hours per Week)
field.
PCGenesis Payroll System Operations Guide
Georgia Department of Education
March 19, 2018 3:42 PM Page 21 of 75
All Rights Reserved.
Step Action
79 Enter the processing line type or select the drop-down selection icon in the Proc Type
(Processing Type) field to identify the processing type.
Valid Values: D = Regular daily with pension and taxes
H = Regular hourly with pension and taxes
S = Regular salary with pension and taxes
80 Pay Type: Optional. Used only for the new detailed pay stub.
Enter the pay type or select the drop-down selection icon in the Pay Type field to define
the employee’s pay type.
The new detailed check stub contains a new section of data entitled Current Hours and
Earnings. The current earnings will print based upon the Pay Type entered for the gross
data line. The Current Hours and Earnings section on the detailed check stub will list the
pay type descriptions, along with the pay rates, regular and overtime hours, regular and
overtime pay, and contract amounts.
In order to get a proper breakdown of the earnings, users will need to categorize their
employees’ Gross Data earnings by Pay Type before utilizing the new detailed pay check
statement. All gross data lines with the same Pay Type and Pay Rate will be summarized
(and accumulated) on ONE earning line on the check stub.
The pay types are user-defined. Detailed instructions for setting up Pay Type codes are in
the Payroll System Operations Guide, Section F. – Description/Deduction/Annuity File
Processing.
NOTE: The names Pay Type and Compensation Type are used interchangeably. The codes
used to define Pay Type on the Update/Display Gross Data screen are called
Compensation Type (code ‘P’) on the Maintain Description Records screen. The Pay
Type table is defined in the Description File under ‘P – Compensation Type’.
The defaulting entry ‘0000’ prints as ‘Regular Pay’ on the detailed check stub.
81 Enter the employee’s pay rate in the Pay Rate field, where applicable.
If entering ‘D’ or ‘H’ in the Proc Type field, also make an entry in the Pay Rate field.
82 Enter the number of regular hours or days the employee works during the current payroll
cycle in the numbered Reg Hrs (Regular Hours) field(s), where applicable.
If entering ‘D’ or ‘H’ in the Proc Type field, also make an entry in the Reg Hrs field.
Minutes are entered in the quarterly hour decimal format i.e., for example, thirty (30)
minutes are entered as 0.50.
83 No entry is required in the Ovt Hrs (Overtime Hours) field for new employees.
84 For Salaried employees: Enter the employee’s cycle gross salary amount in the Reg Gr
(Regular Gross) field.
PCGenesis automatically calculates the Regular Gross for Hourly and Daily employees.
PCGenesis Payroll System Operations Guide
Georgia Department of Education
March 19, 2018 3:42 PM Page 22 of 75
All Rights Reserved.
Step Action
85 No entry is required in the Ovt Gr (Overtime Gross) field for new employees.
86 GHI Dist: Enter the GHI distribution percentage for the corresponding General Ledger
account number. The GHI distribution percentage indicates the percentage of the employer
GHI contribution to distribute to this GL account line. The GHI distribution percentage is
valid only with Process Types ‘H’, ‘D’, or ‘S’.
All GL accounts must add to 100%. (1.0000 equals 100%, 0.2500 equals 25%)
The GHI distribution percentage must be zero if the GHI Participation Switch is ‘N’, and
the GHI Option field is NC (No Coverage) or NE (Not Eligible). An employer contribution
will NOT be billed for employees with a GHI Option field of NC (No Coverage) or NE (Not
Eligible), and therefore, the GHI Dist field must be zero.
87 Pay Reas: Enter the pay reason code or select the drop-down selection icon in the Pay
Reas (Pay Reason) field to set a reason code for payroll adjustments and changes to payroll
records.
For example, if an employee receives a certificate upgrade and receives a retroactive pay
increase, a reason code of ‘01’ is entered on the employees adjusted new salary line, as well
as any one time retroactive salary adjustment lines entered for the employee. PCGenesis
clears the pay reason code during payroll setup.
The Pay Reas field identifies the reason for a change in an employee’s regular pay and is
required for TRS reporting. Proper use of this field will eliminate manual follow-up
reporting with TRS for pay variances.
88 Enter the employee’s gross salary account information, or select the select the drop-down
selection icon within the numbered Acct# Yr Fnd F Prgm Fnct Objct Fcty B Addt’l
(Account number/Year/Fund/Fiscal/Prgm/Function/Object/Facility/Building/Additional)
field(s) to choose the account information.
After saving these entries, they may be modified on the employee’s Gross Data screen.
89 Enter the employee’s annual contract amount in the Contract field.

PCGenesis Payroll System Operations Guide
Georgia Department of Education
March 19, 2018 3:42 PM Page 23 of 75
All Rights Reserved.
Step Action
90 The Budget Flg (Budget Flag) field on each account line determines what formulas are
applied to generate new salary amounts in the budget SANDBOX directory. The Budget
Flag field is used with the PCGenesis Budget System.
Valid values for the Budget Flag are as follows:
A = Move the account number over to the budget, but do NOT bring over any
amounts.
L = Budget as a local supplement/extra salary. Apply either an amount or percent
increase or decrease to the line salary or the line rate.
M = Move the account line over to the budget, but do NOT apply any increase or
decrease to the line amount.
N = Budget as state salary, but do not apply a salary schedule. Apply either an
amount or percent increase or decrease to the line salary or the line rate.
(Usually used for non-certified employees)
S = Budget as state salary using the state CPI salary schedule.
(Used for the ‘S’ account lines of certified employees only)
T = Budget as local supplement using a local salary schedule.
(Used for the ‘S’ account lines of certified employees only)
X = Do not bring the account line over to the budget process.
(Generally used for substitute pay, etc.)
spaces = Do not bring the account line over to the budget process.
91 Select (Enter).
Select (F3 – Print this data) to obtain a screen print of the Add New Employee screen.
The screen print file will be available in the print queue with the name ‘PSCNnnnn’.
PCGenesis Payroll System Operations Guide
Georgia Department of Education
March 19, 2018 3:42 PM Page 24 of 75
All Rights Reserved.
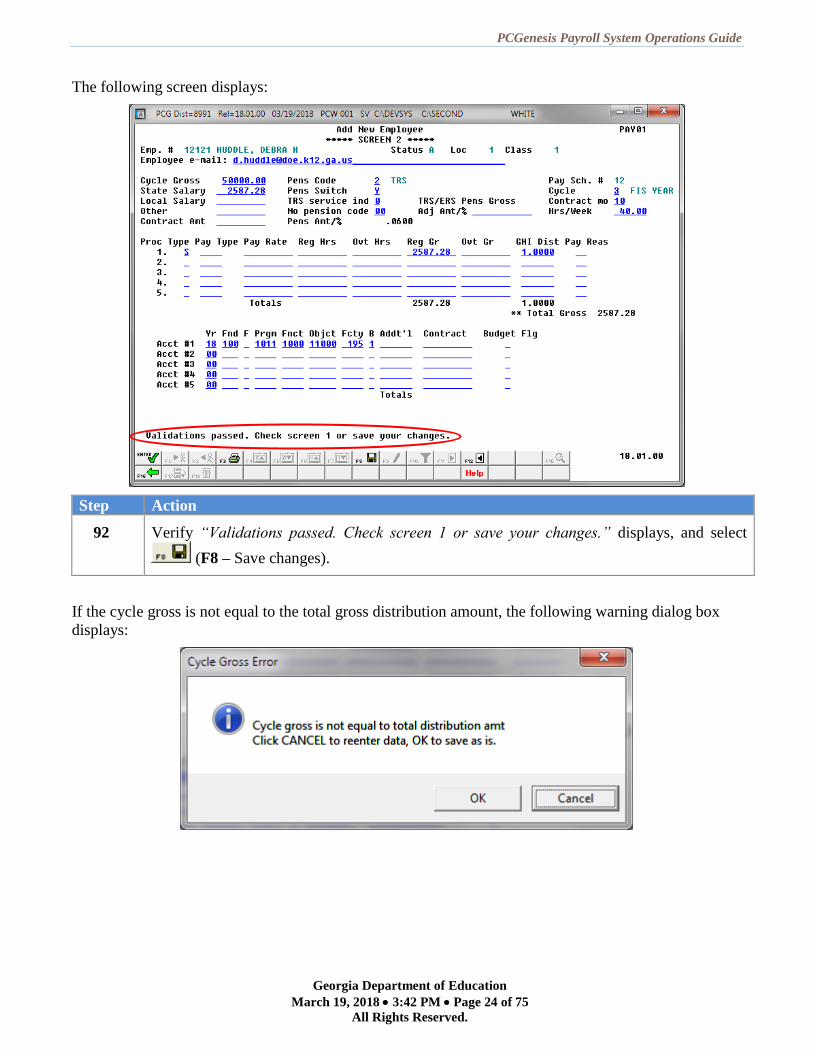
The following screen displays:
Step Action
92 Verify “Validations passed. Check screen 1 or save your changes.” displays, and select
(F8 – Save changes).
If the cycle gross is not equal to the total gross distribution amount, the following warning dialog box
displays:
PCGenesis Payroll System Operations Guide
Georgia Department of Education
March 19, 2018 3:42 PM Page 25 of 75
All Rights Reserved.
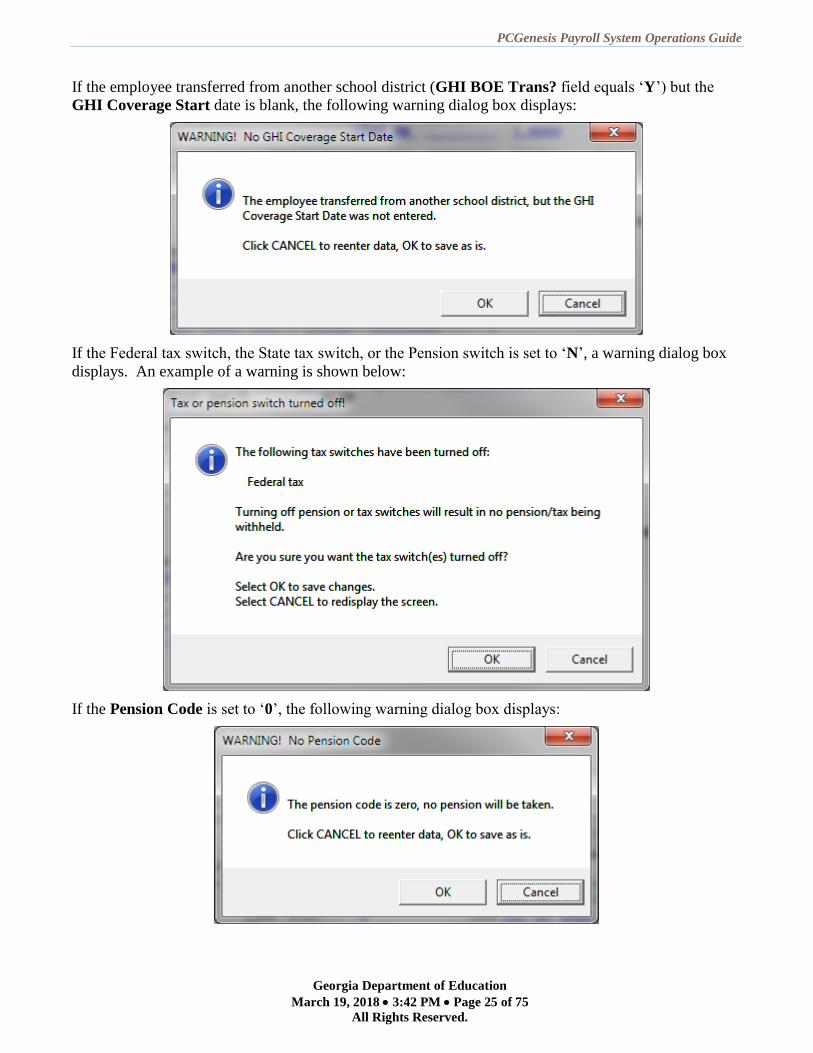
If the employee transferred from another school district (GHI BOE Trans? field equals ‘Y’) but the
GHI Coverage Start date is blank, the following warning dialog box displays:
If the Federal tax switch, the State tax switch, or the Pension switch is set to ‘N’, a warning dialog box
displays. An example of a warning is shown below:
If the Pension Code is set to ‘0’, the following warning dialog box displays:

PCGenesis Payroll System Operations Guide
Georgia Department of Education
March 19, 2018 3:42 PM Page 26 of 75
All Rights Reserved.
Step Action
93 Several conditions may cause the system to display a warning dialog box. For these
instances, review the displayed information, and select (OK) if the information
is correct. If the information is incorrect, select (Cancel), and then make the
appropriate modifications to the data fields referenced in the message.
The following screen displays:
Step Action
94 Verify “Employee: ###### (Employee Name) was saved.” displays, and select (F16 –
Exit) to return to the Payroll System – Payroll Update Menu.
PCGenesis Payroll System Operations Guide
Georgia Department of Education
March 19, 2018 3:42 PM Page 27 of 75
All Rights Reserved.
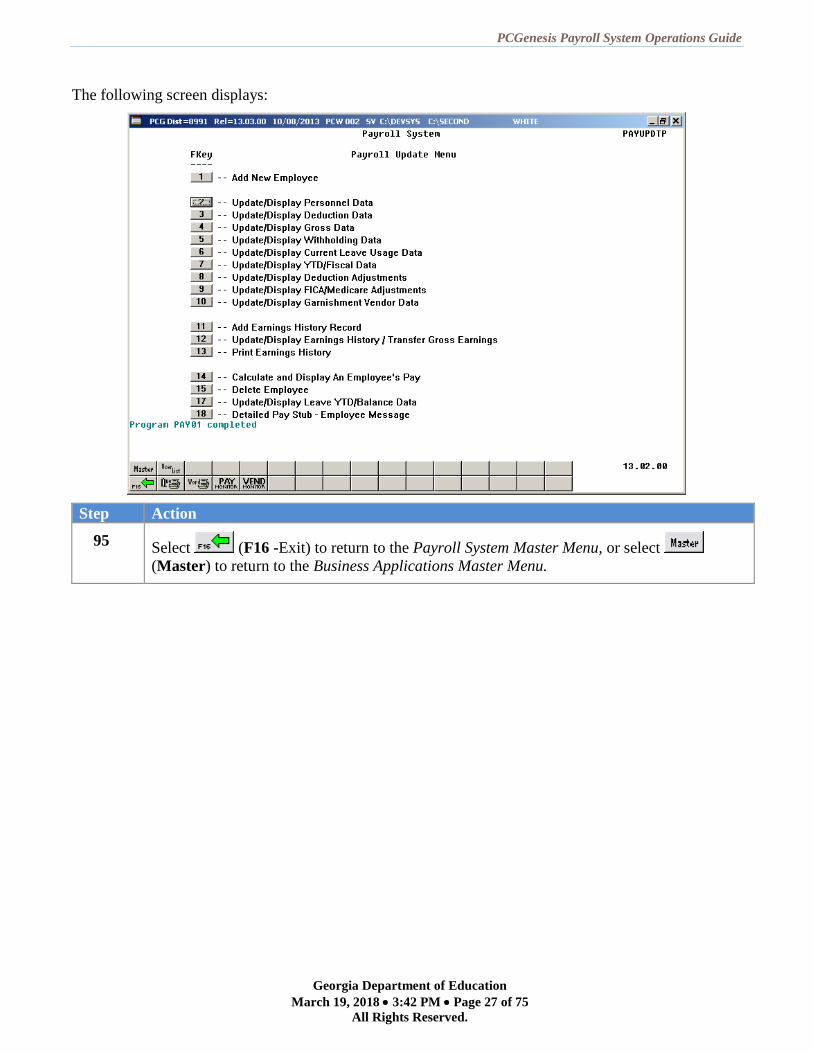
The following screen displays:
Step Action
95 Select (F16 -Exit) to return to the Payroll System Master Menu, or select
(Master) to return to the Business Applications Master Menu.

PCGenesis Payroll System Operations Guide
Georgia Department of Education
March 19, 2018 3:42 PM Page 28 of 75
All Rights Reserved.
Procedure C: Converting a Third Party Contractor
Employee to a PCGenesis Payroll Employee
Step Action
1 From the Business Applications Master Menu, select (F2 - Payroll System).
The following screen displays:
Step Action
2 Select (F2 - Payroll Update Menu).

PCGenesis Payroll System Operations Guide
Georgia Department of Education
March 19, 2018 3:42 PM Page 29 of 75
All Rights Reserved.
The following screen displays:
Step Action
3 Select (F1 - Add New Employee).

PCGenesis Payroll System Operations Guide
Georgia Department of Education
March 19, 2018 3:42 PM Page 30 of 75
All Rights Reserved.
The following screen displays:
Step Action
4 PCGenesis automatically defaults to A (Active) in the Status field for all new employee
entries. Modify this field in Step 11 where appropriate.
5 Enter the third party contractor’s employee number in the Emp. no. (Employee Number)
field.
The employee number is school district-specific, and must be unique for each employee.
Otherwise, if the employee number already exists, “Invalid data, Employee Number on File”
displays. In this instance, reenter the correct information in the field and select Enter, or
select F16 to return to the Payroll System – Payroll Update Menu. If necessary, select F2
(Update/Display Personnel Data) to review the existing employee’s information and to
determine how to proceed.
6 Select (Enter – Validate).

PCGenesis Payroll System Operations Guide
Georgia Department of Education
March 19, 2018 3:42 PM Page 31 of 75
All Rights Reserved.
The following dialog box displays:
Step Action
7 Select (Yes) to hire the third party contractor, otherwise select ‘NO’, and return
to Step 5 to enter a different employee number.
The following screen displays:
Step Action
8 Enter or verify the location code, or select the drop-down selection icon in the Pay Loc
(Pay Location) field to choose the employee’s payroll location.
PCGenesis Payroll System Operations Guide
Georgia Department of Education
March 19, 2018 3:42 PM Page 32 of 75
All Rights Reserved.
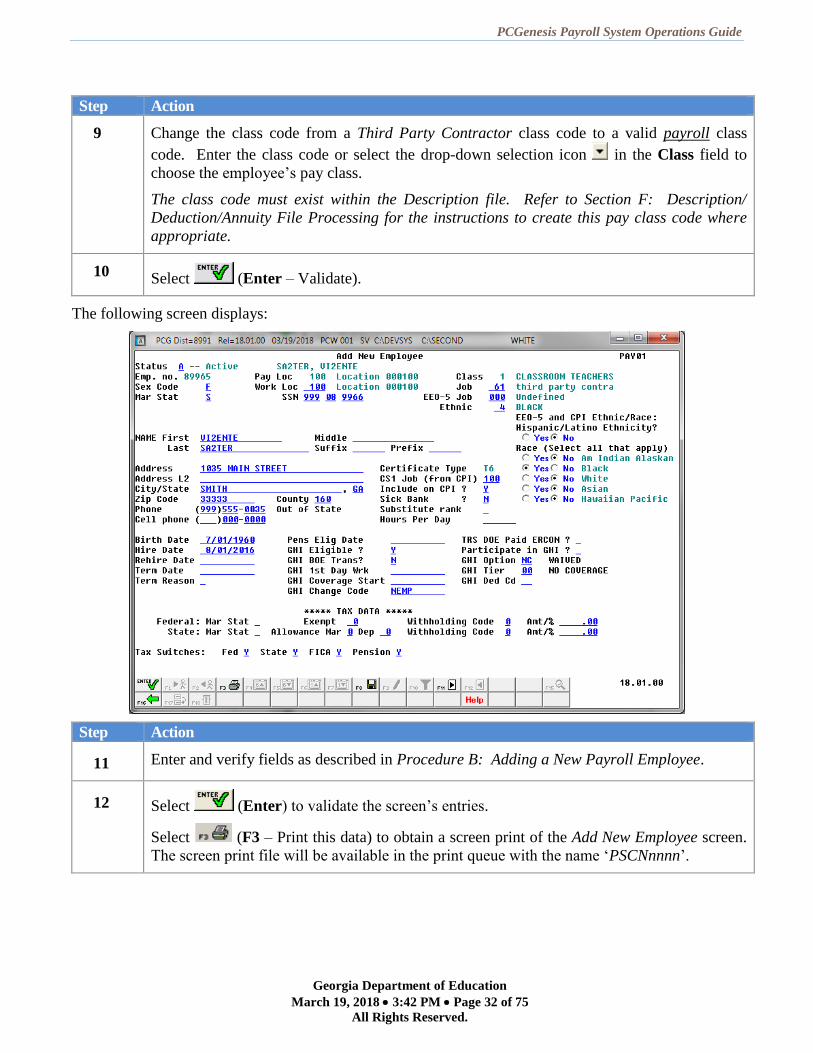
Step Action
9 Change the class code from a Third Party Contractor class code to a valid payroll class
code. Enter the class code or select the drop-down selection icon in the Class field to
choose the employee’s pay class.
The class code must exist within the Description file. Refer to Section F: Description/
Deduction/Annuity File Processing for the instructions to create this pay class code where
appropriate.
10 Select (Enter – Validate).
The following screen displays:
Step Action
11 Enter and verify fields as described in Procedure B: Adding a New Payroll Employee.
12 Select (Enter) to validate the screen’s entries.
Select (F3 – Print this data) to obtain a screen print of the Add New Employee screen.
The screen print file will be available in the print queue with the name ‘PSCNnnnn’.

PCGenesis Payroll System Operations Guide
Georgia Department of Education
March 19, 2018 3:42 PM Page 33 of 75
All Rights Reserved.
The following screen displays:
Step Action
13 Verify “Validations passed. Check screen 2 or save your changes.” displays, and select
(F11 – Go to Screen 2).

PCGenesis Payroll System Operations Guide
Georgia Department of Education
March 19, 2018 3:42 PM Page 34 of 75
All Rights Reserved.
The following screen displays:
Step Action
14 Enter and verify fields as described in Procedure B: Adding a New Payroll Employee.
15 Select (Enter).
Select (F3 – Print this data) to obtain a screen print of the Add New Employee screen.
The screen print file will be available in the print queue with the name ‘PSCNnnnn’.

PCGenesis Payroll System Operations Guide
Georgia Department of Education
March 19, 2018 3:42 PM Page 35 of 75
All Rights Reserved.
The following screen displays:
Step Action
16 Verify “Validations passed. Check screen 1 or save your changes.” displays, and select
(F8 – Save changes).

PCGenesis Payroll System Operations Guide
Georgia Department of Education
March 19, 2018 3:42 PM Page 36 of 75
All Rights Reserved.
The following screen displays:
Step Action
17 Verify “Employee: ###### (Employee Name) was saved.” displays, and select (F16 –
Exit) to return to the Payroll System – Payroll Update Menu.
PCGenesis Payroll System Operations Guide
Georgia Department of Education
March 19, 2018 3:42 PM Page 37 of 75
All Rights Reserved.
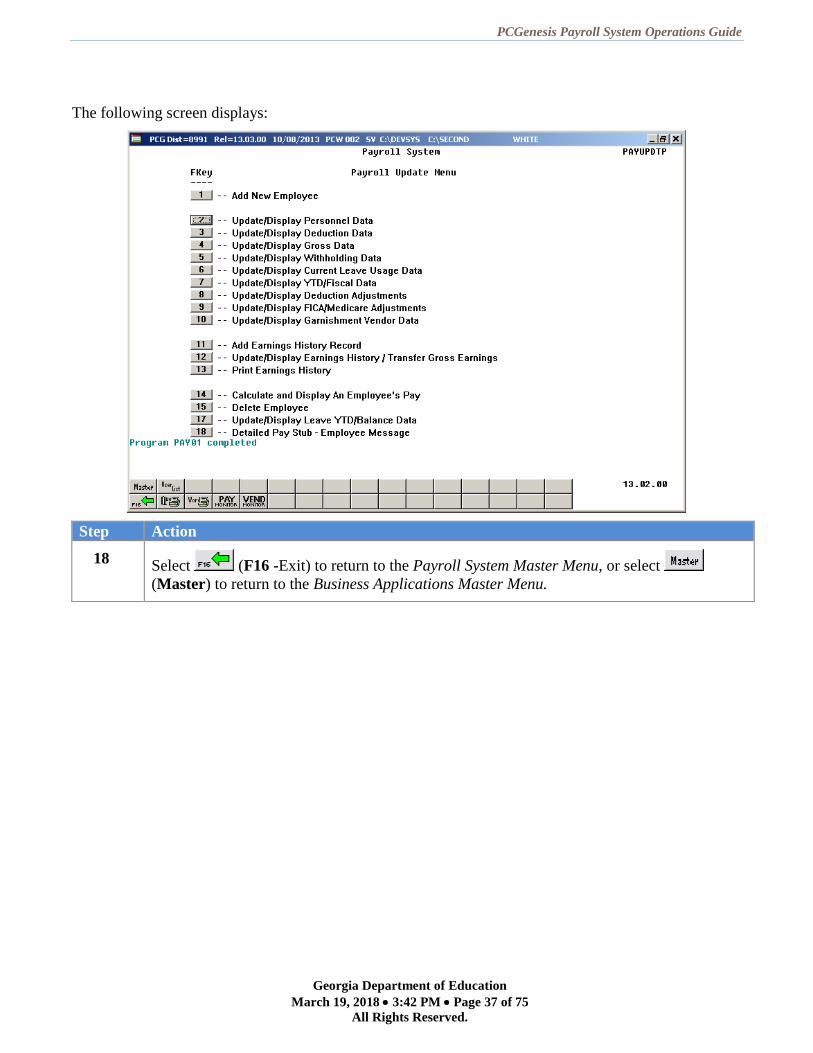
The following screen displays:
Step Action
18 Select (F16 -Exit) to return to the Payroll System Master Menu, or select
(Master) to return to the Business Applications Master Menu.
PCGenesis Payroll System Operations Guide
Georgia Department of Education
March 19, 2018 3:42 PM Page 38 of 75
All Rights Reserved.
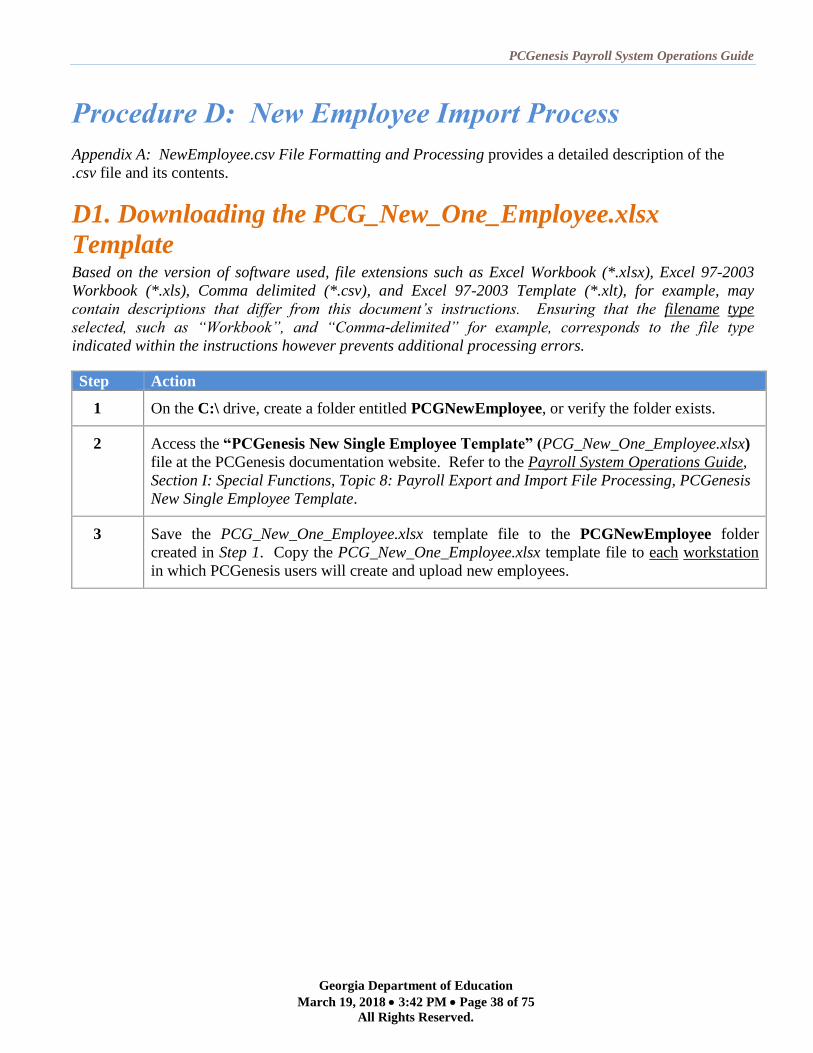
Procedure D: New Employee Import Process
Appendix A: NewEmployee.csv File Formatting and Processing provides a detailed description of the
.csv file and its contents.
D1. Downloading the PCG_New_One_Employee.xlsx
Template Based on the version of software used, file extensions such as Excel Workbook (*.xlsx), Excel 97-2003
Workbook (*.xls), Comma delimited (*.csv), and Excel 97-2003 Template (*.xlt), for example, may
contain descriptions that differ from this document’s instructions. Ensuring that the filename type
selected, such as “Workbook”, and “Comma-delimited” for example, corresponds to the file type
indicated within the instructions however prevents additional processing errors.
Step Action
1 On the C:\ drive, create a folder entitled PCGNewEmployee, or verify the folder exists.
2 Access the “PCGenesis New Single Employee Template” (PCG_New_One_Employee.xlsx)
file at the PCGenesis documentation website. Refer to the Payroll System Operations Guide,
Section I: Special Functions, Topic 8: Payroll Export and Import File Processing, PCGenesis
New Single Employee Template.
3 Save the PCG_New_One_Employee.xlsx template file to the PCGNewEmployee folder
created in Step 1. Copy the PCG_New_One_Employee.xlsx template file to each workstation
in which PCGenesis users will create and upload new employees.
PCGenesis Payroll System Operations Guide
Georgia Department of Education
March 19, 2018 3:42 PM Page 39 of 75
All Rights Reserved.
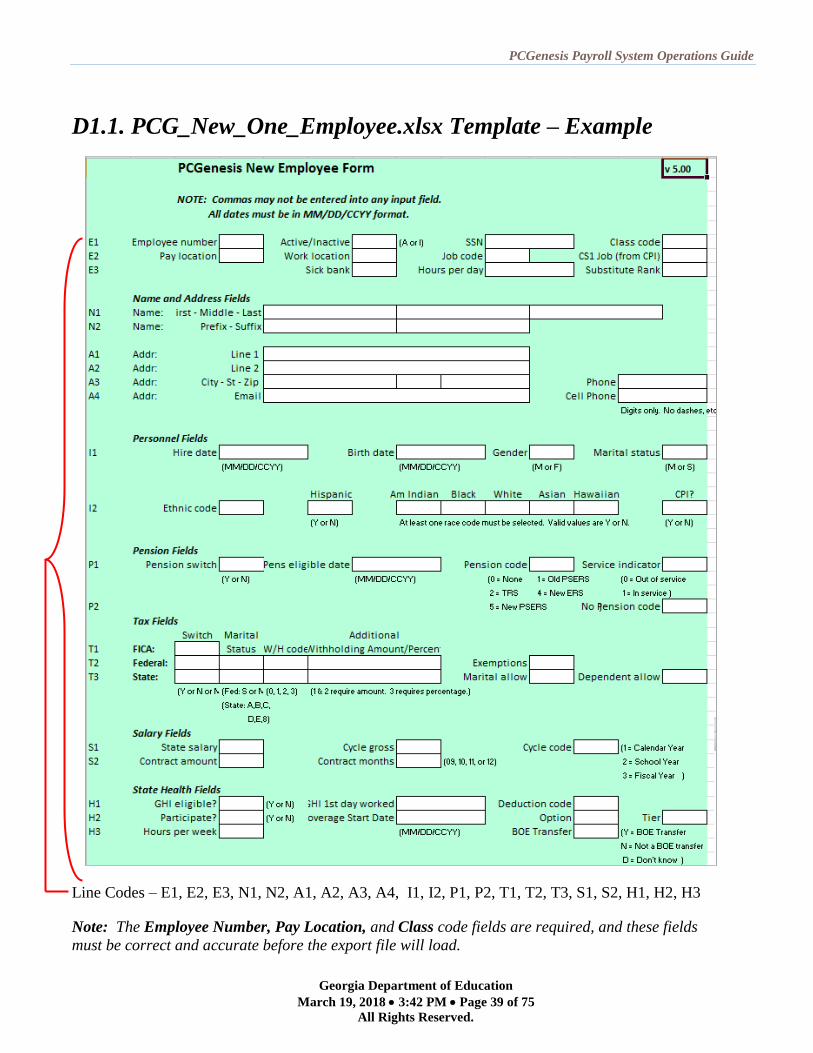
D1.1. PCG_New_One_Employee.xlsx Template – Example
Line Codes – E1, E2, E3, N1, N2, A1, A2, A3, A4, I1, I2, P1, P2, T1, T2, T3, S1, S2, H1, H2, H3
Note: The Employee Number, Pay Location, and Class code fields are required, and these fields
must be correct and accurate before the export file will load.
PCGenesis Payroll System Operations Guide
Georgia Department of Education
March 19, 2018 3:42 PM Page 40 of 75
All Rights Reserved.
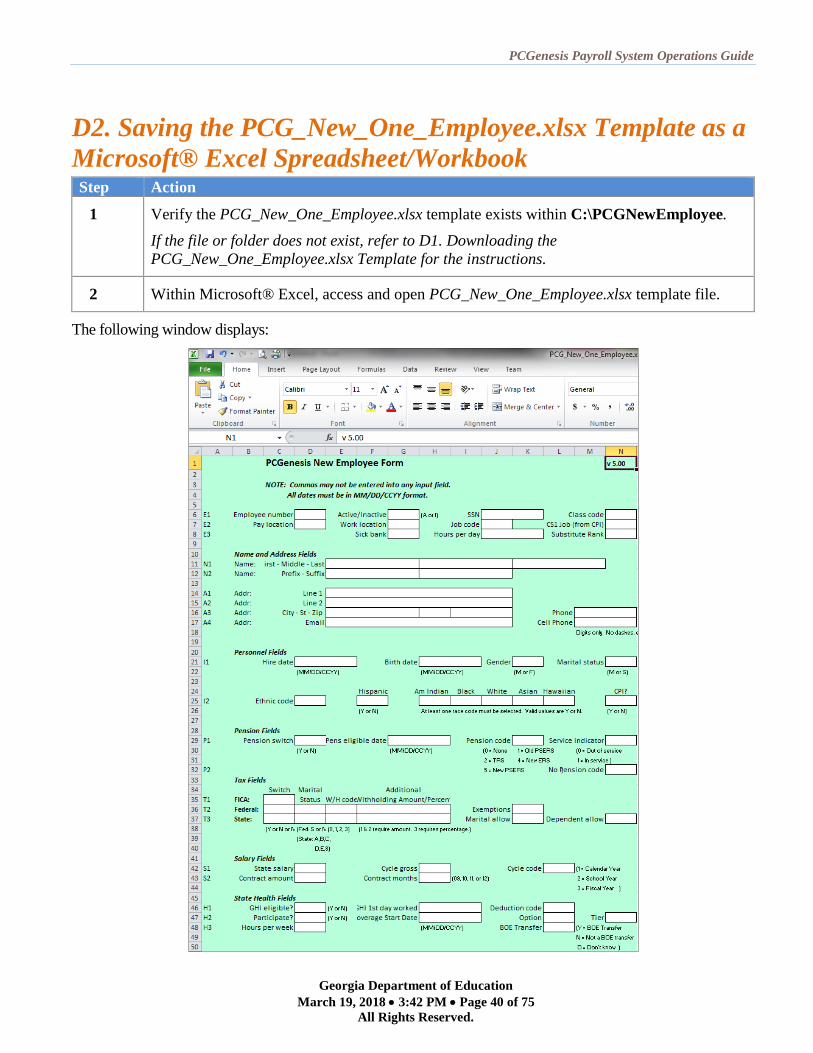
D2. Saving the PCG_New_One_Employee.xlsx Template as a
Microsoft® Excel Spreadsheet/Workbook Step Action
1 Verify the PCG_New_One_Employee.xlsx template exists within C:\PCGNewEmployee.
If the file or folder does not exist, refer to D1. Downloading the
PCG_New_One_Employee.xlsx Template for the instructions.
2 Within Microsoft® Excel, access and open PCG_New_One_Employee.xlsx template file.
The following window displays:

PCGenesis Payroll System Operations Guide
Georgia Department of Education
March 19, 2018 3:42 PM Page 41 of 75
All Rights Reserved.
Step Action
3 Select (Save), or from the Menu Bar, select File Save As.
4 Within the Save in: field, navigate to the C:\PCGNewEmployee folder, or to the
appropriate file location.
Within the screenshot examples, a folder entitled “New_Hires_CWJ” was created to easily
identify the user’s new employee files.
The following window displays:
Step Action
5 Optional: Enter NewEmployeeTemplate in the File name field.
This step is optional. Saving the files in this step provides a safeguard against the
selection of the wrong template file during the import process while maintaining the
integrity of the original template.
6 Verify the selection of, or select the drop-down selection icon within the Save as type
field to choose Microsoft Excel Workbook (.xlsx).
Saving the file initially as a Microsoft® Excel spreadsheet/workbook simplifies making
modifications for PCGenesis users.
7 Select (Save).
PCGenesis Payroll System Operations Guide
Georgia Department of Education
March 19, 2018 3:42 PM Page 42 of 75
All Rights Reserved.
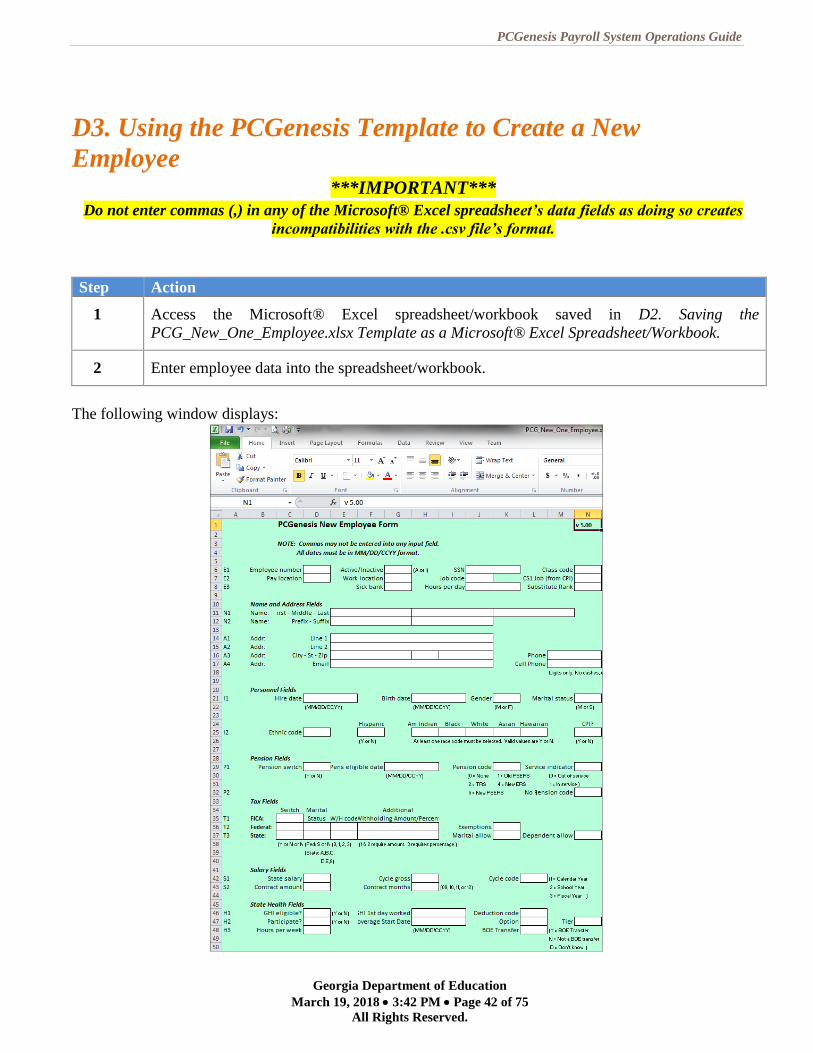
D3. Using the PCGenesis Template to Create a New
Employee ***IMPORTANT***
Do not enter commas (,) in any of the Microsoft® Excel spreadsheet’s data fields as doing so creates
incompatibilities with the .csv file’s format.
Step Action
1 Access the Microsoft® Excel spreadsheet/workbook saved in D2. Saving the
PCG_New_One_Employee.xlsx Template as a Microsoft® Excel Spreadsheet/Workbook.
2 Enter employee data into the spreadsheet/workbook.
The following window displays:

PCGenesis Payroll System Operations Guide
Georgia Department of Education
March 19, 2018 3:42 PM Page 43 of 75
All Rights Reserved.
Step Action
Line Code E1 Fields
3 Enter the employee number in the Emp. no. (Employee Number) field.
The employee number is school district-specific, and must be unique for each employee.
The Employee Number is required, and must be correct and accurate before the export file
will load.
4 Verify or enter A (Active) or I (Inactive) in the Active/Inactive field to identify the
employee’s status.
Note: T (Terminated) is not a valid status code for a new employee, and will cause an error
during processing.
5 Enter the employee’s social security number in the SSN (Social Security Number) field in
either of the following two formats:
Eleven (11) alphanumeric characters representing the employee’s social security
number in the format ###-##-#### (with dashes).
Nine (9) digits representing the social security number in the format #########
(without dashes).
If the employee’s social security number is unknown at the time the employee’s record is
created, enter all nine’s (999-99-9999) in the field temporarily. Enter the employee’s actual
social security number in the SSN (Social Security Number) field before W2 calendar year-
end processing. PCGenesis automatically updates this information for the employee’s
earnings history information.
6 Enter the class code in the Class field to choose the employee’s pay class.
The Class code is required, and must be correct and accurate before the export file will load.
Line Code E2 Fields
7 Enter the location code in the Pay Location field to choose the employee’s payroll location.
The Pay Location code is required, and must be correct and accurate before the export file
will load.
8 Enter the location code in the Work Location field to choose the employee’s primary work
location code.
9 Enter the job code in the Job Code field to choose the employee’s job classification.
10 Enter the employee’s CPI job code in the CS1 Job (from CPI) field.
The GaDOE provides a complete listing of CPI job codes at http://app.doe.k12.ga.us/ows-
bin/owa/cpi_pack_codes01.entry_form.
PCGenesis Payroll System Operations Guide
Georgia Department of Education
March 19, 2018 3:42 PM Page 44 of 75
All Rights Reserved.
Step Action
Line Code E3 Fields
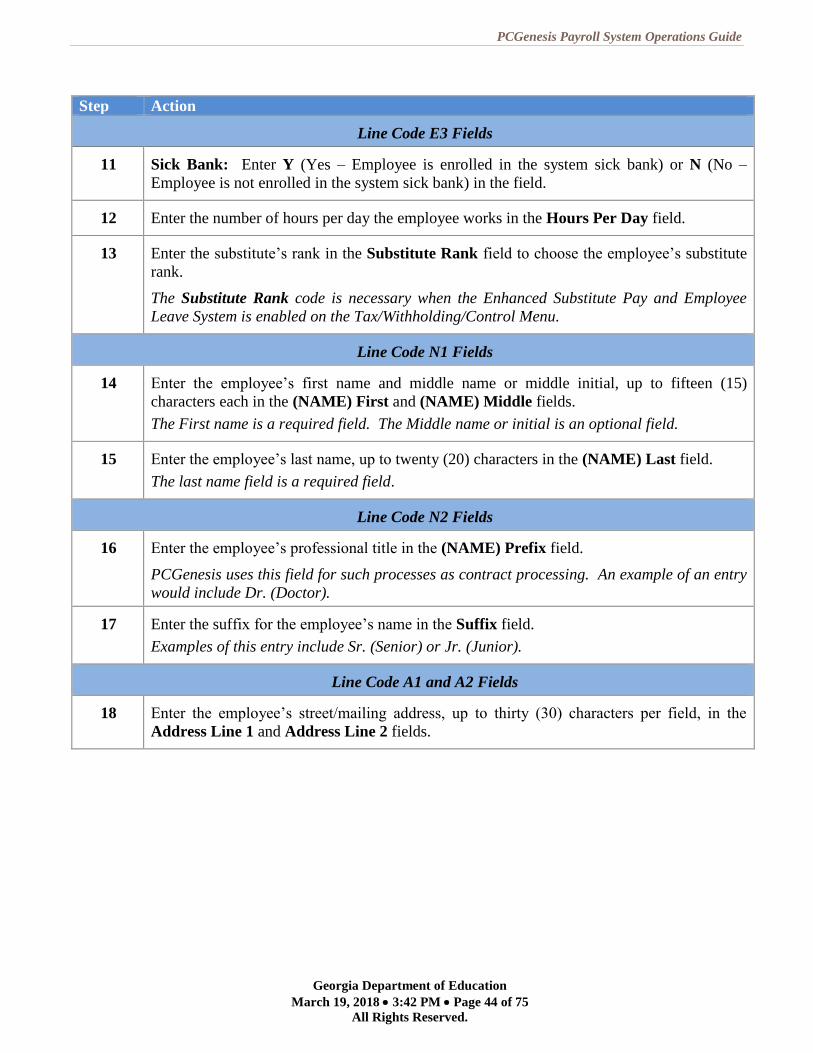
11 Sick Bank: Enter Y (Yes – Employee is enrolled in the system sick bank) or N (No –
Employee is not enrolled in the system sick bank) in the field.
12 Enter the number of hours per day the employee works in the Hours Per Day field.
13 Enter the substitute’s rank in the Substitute Rank field to choose the employee’s substitute
rank.
The Substitute Rank code is necessary when the Enhanced Substitute Pay and Employee
Leave System is enabled on the Tax/Withholding/Control Menu.
Line Code N1 Fields
14 Enter the employee’s first name and middle name or middle initial, up to fifteen (15)
characters each in the (NAME) First and (NAME) Middle fields.
The First name is a required field. The Middle name or initial is an optional field.
15 Enter the employee’s last name, up to twenty (20) characters in the (NAME) Last field.
The last name field is a required field.
Line Code N2 Fields
16 Enter the employee’s professional title in the (NAME) Prefix field.
PCGenesis uses this field for such processes as contract processing. An example of an entry
would include Dr. (Doctor).
17 Enter the suffix for the employee’s name in the Suffix field.
Examples of this entry include Sr. (Senior) or Jr. (Junior).
Line Code A1 and A2 Fields
18 Enter the employee’s street/mailing address, up to thirty (30) characters per field, in the
Address Line 1 and Address Line 2 fields.
PCGenesis Payroll System Operations Guide
Georgia Department of Education
March 19, 2018 3:42 PM Page 45 of 75
All Rights Reserved.
Step Action
Line Code A3 Fields
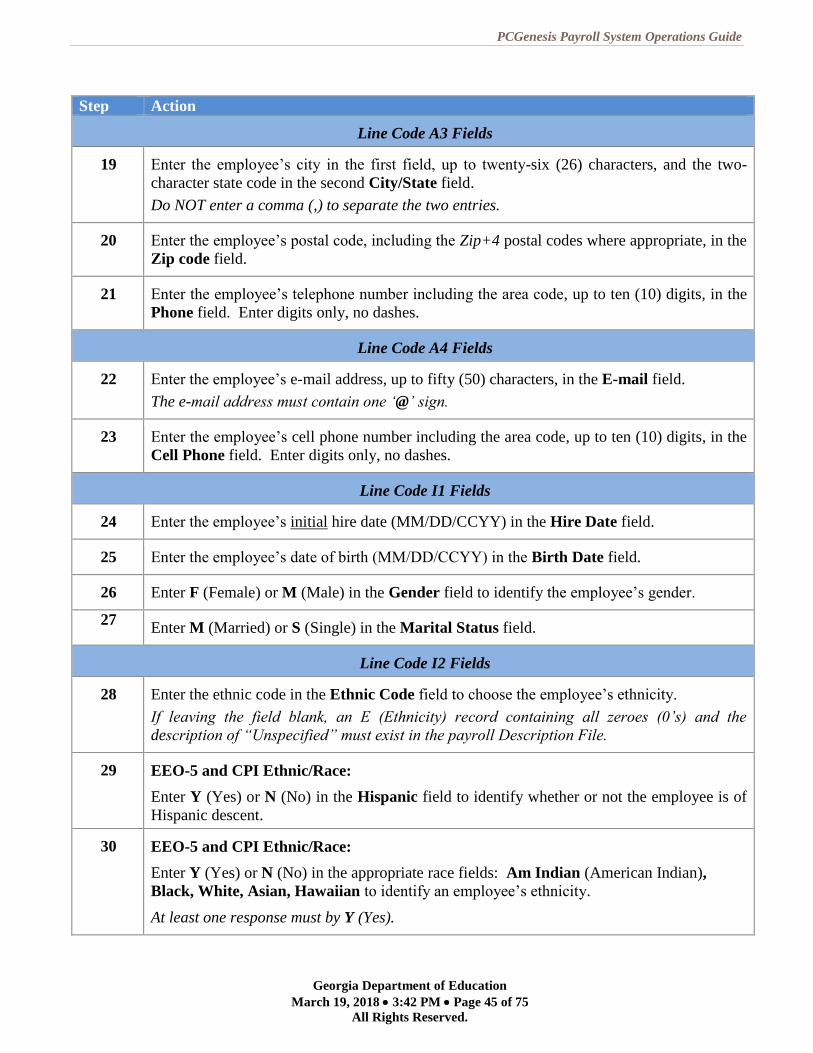
19 Enter the employee’s city in the first field, up to twenty-six (26) characters, and the two-
character state code in the second City/State field.
Do NOT enter a comma (,) to separate the two entries.
20 Enter the employee’s postal code, including the Zip+4 postal codes where appropriate, in the
Zip code field.
21 Enter the employee’s telephone number including the area code, up to ten (10) digits, in the
Phone field. Enter digits only, no dashes.
Line Code A4 Fields
22 Enter the employee’s e-mail address, up to fifty (50) characters, in the E-mail field.
The e-mail address must contain one ‘@’ sign.
23 Enter the employee’s cell phone number including the area code, up to ten (10) digits, in the
Cell Phone field. Enter digits only, no dashes.
Line Code I1 Fields
24 Enter the employee’s initial hire date (MM/DD/CCYY) in the Hire Date field.
25 Enter the employee’s date of birth (MM/DD/CCYY) in the Birth Date field.
26 Enter F (Female) or M (Male) in the Gender field to identify the employee’s gender.
27 Enter M (Married) or S (Single) in the Marital Status field.
Line Code I2 Fields
28 Enter the ethnic code in the Ethnic Code field to choose the employee’s ethnicity.
If leaving the field blank, an E (Ethnicity) record containing all zeroes (0’s) and the
description of “Unspecified” must exist in the payroll Description File.
29 EEO-5 and CPI Ethnic/Race:
Enter Y (Yes) or N (No) in the Hispanic field to identify whether or not the employee is of
Hispanic descent.
30 EEO-5 and CPI Ethnic/Race:
Enter Y (Yes) or N (No) in the appropriate race fields: Am Indian (American Indian),
Black, White, Asian, Hawaiian to identify an employee’s ethnicity.
At least one response must by Y (Yes).
PCGenesis Payroll System Operations Guide
Georgia Department of Education
March 19, 2018 3:42 PM Page 46 of 75
All Rights Reserved.
Step Action
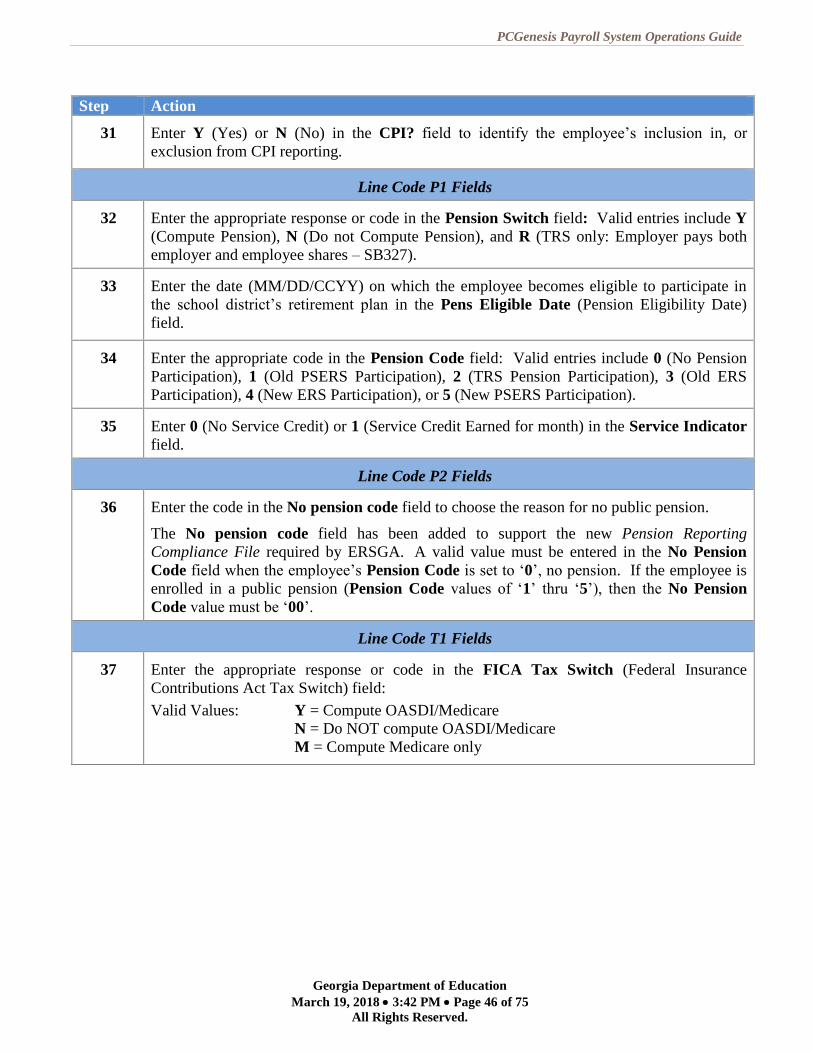
31 Enter Y (Yes) or N (No) in the CPI? field to identify the employee’s inclusion in, or
exclusion from CPI reporting.
Line Code P1 Fields
32 Enter the appropriate response or code in the Pension Switch field: Valid entries include Y
(Compute Pension), N (Do not Compute Pension), and R (TRS only: Employer pays both
employer and employee shares – SB327).
33 Enter the date (MM/DD/CCYY) on which the employee becomes eligible to participate in
the school district’s retirement plan in the Pens Eligible Date (Pension Eligibility Date)
field.
34 Enter the appropriate code in the Pension Code field: Valid entries include 0 (No Pension
Participation), 1 (Old PSERS Participation), 2 (TRS Pension Participation), 3 (Old ERS
Participation), 4 (New ERS Participation), or 5 (New PSERS Participation).
35 Enter 0 (No Service Credit) or 1 (Service Credit Earned for month) in the Service Indicator
field.
Line Code P2 Fields
36 Enter the code in the No pension code field to choose the reason for no public pension.
The No pension code field has been added to support the new Pension Reporting
Compliance File required by ERSGA. A valid value must be entered in the No Pension
Code field when the employee’s Pension Code is set to ‘0’, no pension. If the employee is
enrolled in a public pension (Pension Code values of ‘1’ thru ‘5’), then the No Pension
Code value must be ‘00’.
Line Code T1 Fields
37 Enter the appropriate response or code in the FICA Tax Switch (Federal Insurance
Contributions Act Tax Switch) field:
Valid Values: Y = Compute OASDI/Medicare
N = Do NOT compute OASDI/Medicare
M = Compute Medicare only
PCGenesis Payroll System Operations Guide
Georgia Department of Education
March 19, 2018 3:42 PM Page 47 of 75
All Rights Reserved.
Step Action
Line Code T2 Fields
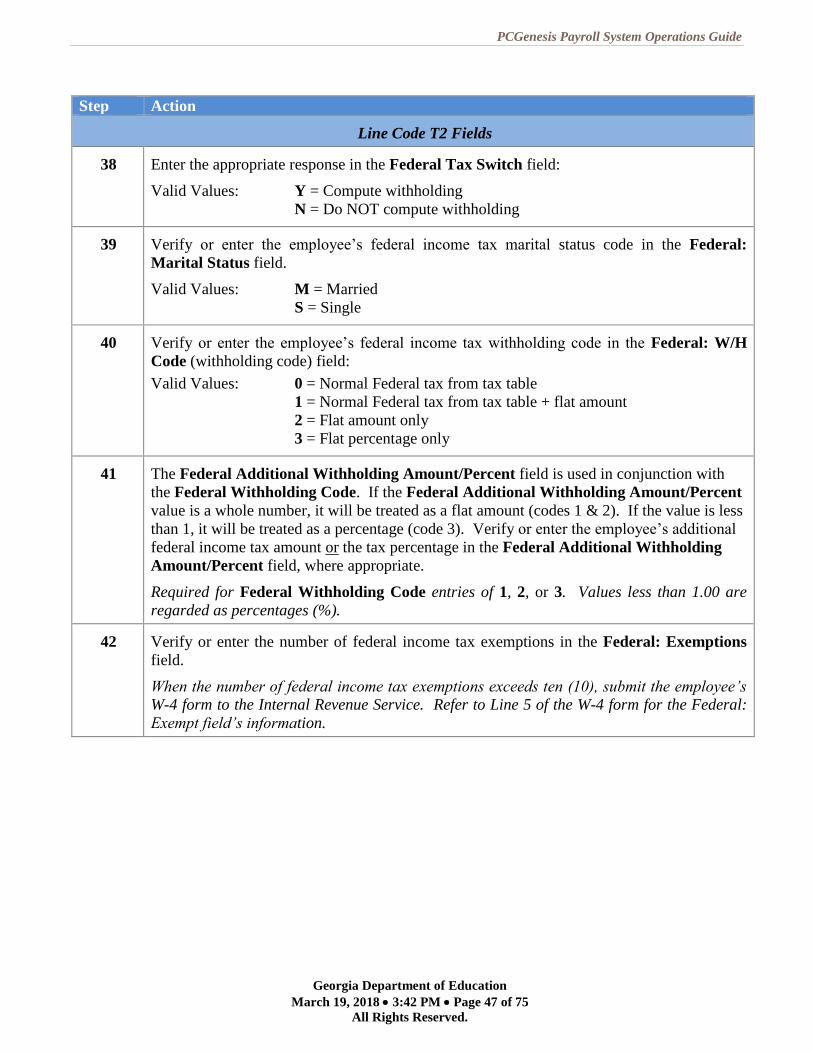
38 Enter the appropriate response in the Federal Tax Switch field:
Valid Values: Y = Compute withholding
N = Do NOT compute withholding
39 Verify or enter the employee’s federal income tax marital status code in the Federal:
Marital Status field.
Valid Values: M = Married
S = Single
40 Verify or enter the employee’s federal income tax withholding code in the Federal: W/H
Code (withholding code) field:
Valid Values: 0 = Normal Federal tax from tax table
1 = Normal Federal tax from tax table + flat amount
2 = Flat amount only
3 = Flat percentage only
41 The Federal Additional Withholding Amount/Percent field is used in conjunction with
the Federal Withholding Code. If the Federal Additional Withholding Amount/Percent
value is a whole number, it will be treated as a flat amount (codes 1 & 2). If the value is less
than 1, it will be treated as a percentage (code 3). Verify or enter the employee’s additional
federal income tax amount or the tax percentage in the Federal Additional Withholding
Amount/Percent field, where appropriate.
Required for Federal Withholding Code entries of 1, 2, or 3. Values less than 1.00 are
regarded as percentages (%).
42 Verify or enter the number of federal income tax exemptions in the Federal: Exemptions
field.
When the number of federal income tax exemptions exceeds ten (10), submit the employee’s
W-4 form to the Internal Revenue Service. Refer to Line 5 of the W-4 form for the Federal:
Exempt field’s information.
PCGenesis Payroll System Operations Guide
Georgia Department of Education
March 19, 2018 3:42 PM Page 48 of 75
All Rights Reserved.
Step Action
Line Code T3 Fields
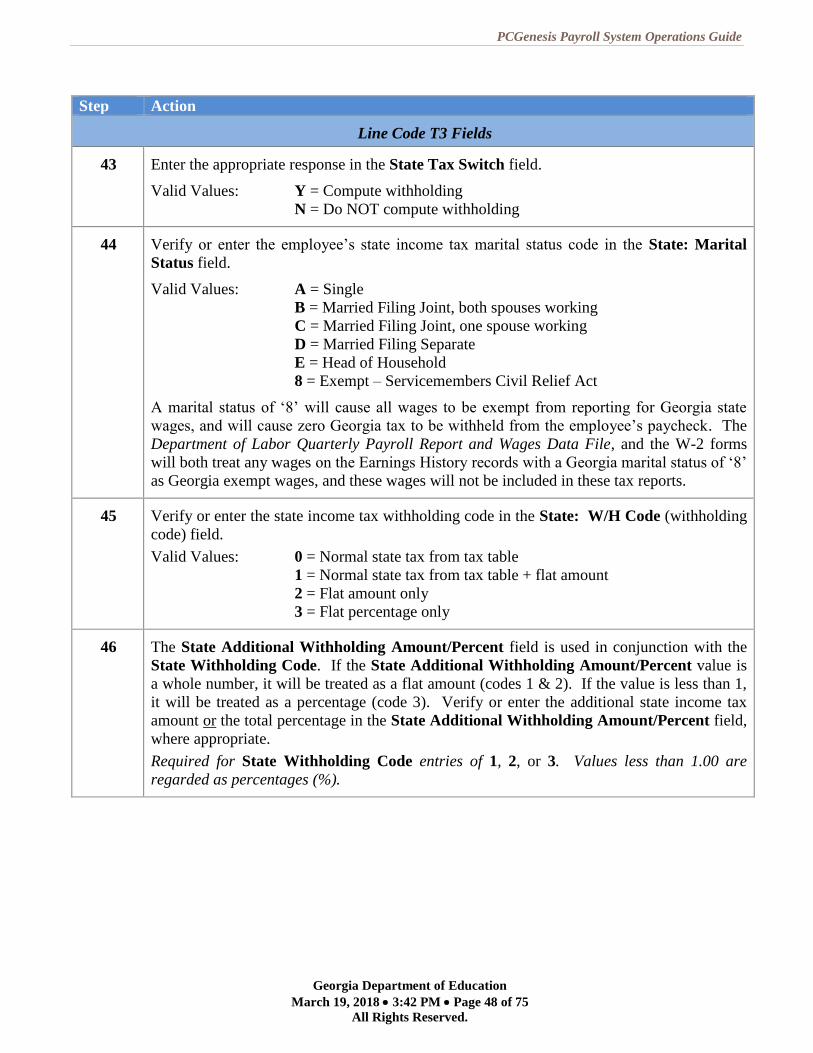
43 Enter the appropriate response in the State Tax Switch field.
Valid Values: Y = Compute withholding
N = Do NOT compute withholding
44 Verify or enter the employee’s state income tax marital status code in the State: Marital
Status field.
Valid Values: A = Single
B = Married Filing Joint, both spouses working
C = Married Filing Joint, one spouse working
D = Married Filing Separate
E = Head of Household
8 = Exempt – Servicemembers Civil Relief Act
A marital status of ‘8’ will cause all wages to be exempt from reporting for Georgia state
wages, and will cause zero Georgia tax to be withheld from the employee’s paycheck. The
Department of Labor Quarterly Payroll Report and Wages Data File, and the W-2 forms
will both treat any wages on the Earnings History records with a Georgia marital status of ‘8’
as Georgia exempt wages, and these wages will not be included in these tax reports.
45 Verify or enter the state income tax withholding code in the State: W/H Code (withholding
code) field.
Valid Values: 0 = Normal state tax from tax table
1 = Normal state tax from tax table + flat amount
2 = Flat amount only
3 = Flat percentage only
46 The State Additional Withholding Amount/Percent field is used in conjunction with the
State Withholding Code. If the State Additional Withholding Amount/Percent value is
a whole number, it will be treated as a flat amount (codes 1 & 2). If the value is less than 1,
it will be treated as a percentage (code 3). Verify or enter the additional state income tax
amount or the total percentage in the State Additional Withholding Amount/Percent field,
where appropriate.
Required for State Withholding Code entries of 1, 2, or 3. Values less than 1.00 are
regarded as percentages (%).

PCGenesis Payroll System Operations Guide
Georgia Department of Education
March 19, 2018 3:42 PM Page 49 of 75
All Rights Reserved.
Step Action
47 Verify or enter the total number of marital allowances from Line 3 of the G-4 form in the
State: Marital Allow (State: Marital Allowance) field.
Verify or enter the sum total of both dependent allowances (Line 4 of the G-4 form) and
additional allowances (Line 5 of the G-4 form) in State: Dependent Allow (State:
Dependent Allowance) field.
When the number of State of Georgia income tax exemptions exceeds fourteen (14), submit
the employee’s G-4 form to the Georgia Department of Revenue. Refer to Line 4 and Line 5
of the G-4 form for State: Marital Allowance information.
Line Code S1 Fields
48 Enter the employee’s State of Georgia-funded annual salary in the State Salary field.
49 Enter the employee’s cycle gross salary in the Cycle Gross field.
Enter Certified employees’ cycle gross information in the Cycle Gross field.
50 Enter the appropriate code in the Cycle Code for year-to-date amount accumulations.
Valid entries include 1 (Calendar Year), 2 (School Year) and 3 (Fiscal Year).
Line Code S2 Fields
51 Enter the employee’s contractual total dollar amount in the Contract Amount field.
52 Enter the total number of contract months the employee works in the Contract Months
field.
For Contract Months field entries, PCGenesis requires an entry in the Contract Amount field
at Step 51.
Line Code H1 Fields
53 GHI Eligible? field (Required for SHBP/GHI reporting): Enter Y (Yes – Employee is
eligible to receive benefits) or N (No – Employee is not eligible to receive benefits) in the
field to choose the employee’s plan eligibility.
54 GHI 1st Day Wrk (GHI 1
st Day Worked) field – Required if the GHI Eligible? field is set
to ‘Y’.
Enter the first date (MM/DD/CCYY) for which the employee is compensated.
55 GHI Deduction Code field - Required if the Participate in GHI? field is set to ‘Y’.
Enter the system deduction code which represents the SHBP/GHI deduction.
An invalid entry in this field will generate the “Deduction Code not valid or not set up as
SHBP Deduction” message. Refer to Section F: Description/Deduction/Annuity File
Processing for the instructions on the entry of this code.
PCGenesis Payroll System Operations Guide
Georgia Department of Education
March 19, 2018 3:42 PM Page 50 of 75
All Rights Reserved.
Step Action
Line Code H2 Fields
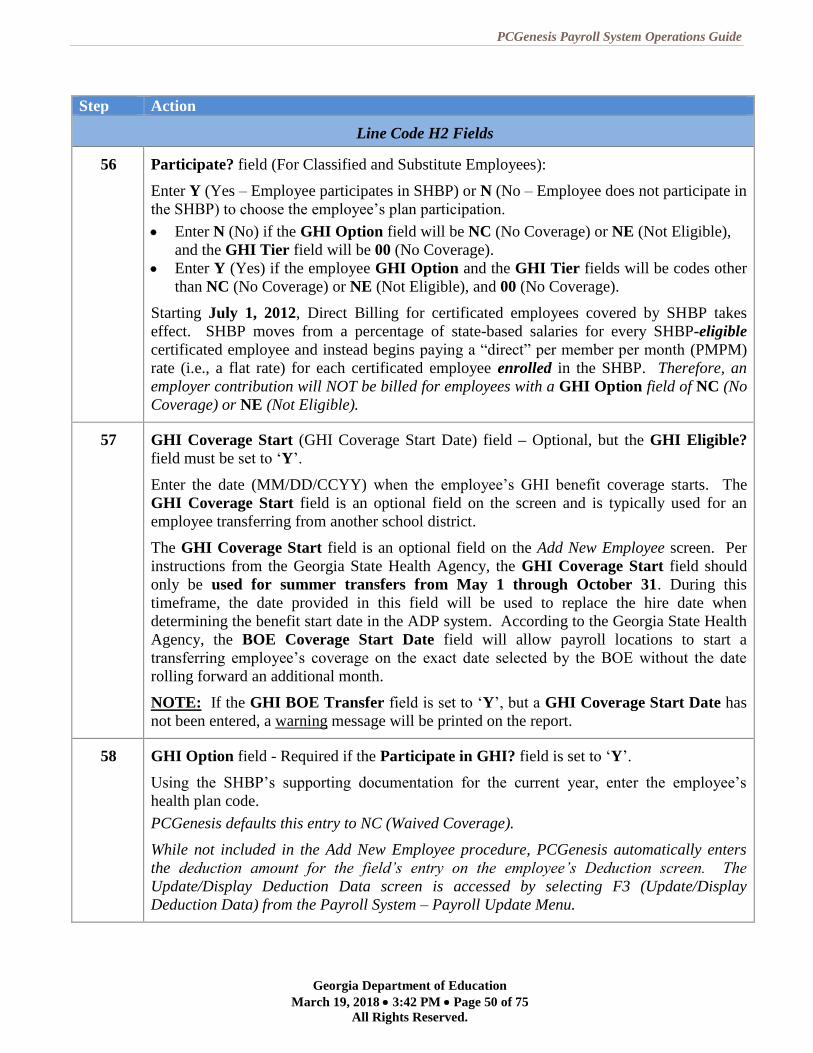
56 Participate? field (For Classified and Substitute Employees):
Enter Y (Yes – Employee participates in SHBP) or N (No – Employee does not participate in
the SHBP) to choose the employee’s plan participation.
Enter N (No) if the GHI Option field will be NC (No Coverage) or NE (Not Eligible),
and the GHI Tier field will be 00 (No Coverage).
Enter Y (Yes) if the employee GHI Option and the GHI Tier fields will be codes other
than NC (No Coverage) or NE (Not Eligible), and 00 (No Coverage).
Starting July 1, 2012, Direct Billing for certificated employees covered by SHBP takes
effect. SHBP moves from a percentage of state-based salaries for every SHBP-eligible
certificated employee and instead begins paying a “direct” per member per month (PMPM)
rate (i.e., a flat rate) for each certificated employee enrolled in the SHBP. Therefore, an
employer contribution will NOT be billed for employees with a GHI Option field of NC (No
Coverage) or NE (Not Eligible).
57 GHI Coverage Start (GHI Coverage Start Date) field – Optional, but the GHI Eligible?
field must be set to ‘Y’.
Enter the date (MM/DD/CCYY) when the employee’s GHI benefit coverage starts. The
GHI Coverage Start field is an optional field on the screen and is typically used for an
employee transferring from another school district.
The GHI Coverage Start field is an optional field on the Add New Employee screen. Per
instructions from the Georgia State Health Agency, the GHI Coverage Start field should
only be used for summer transfers from May 1 through October 31. During this
timeframe, the date provided in this field will be used to replace the hire date when
determining the benefit start date in the ADP system. According to the Georgia State Health
Agency, the BOE Coverage Start Date field will allow payroll locations to start a
transferring employee’s coverage on the exact date selected by the BOE without the date
rolling forward an additional month.
NOTE: If the GHI BOE Transfer field is set to ‘Y’, but a GHI Coverage Start Date has
not been entered, a warning message will be printed on the report.
58 GHI Option field - Required if the Participate in GHI? field is set to ‘Y’.
Using the SHBP’s supporting documentation for the current year, enter the employee’s
health plan code.
PCGenesis defaults this entry to NC (Waived Coverage).
While not included in the Add New Employee procedure, PCGenesis automatically enters
the deduction amount for the field’s entry on the employee’s Deduction screen. The
Update/Display Deduction Data screen is accessed by selecting F3 (Update/Display
Deduction Data) from the Payroll System – Payroll Update Menu.
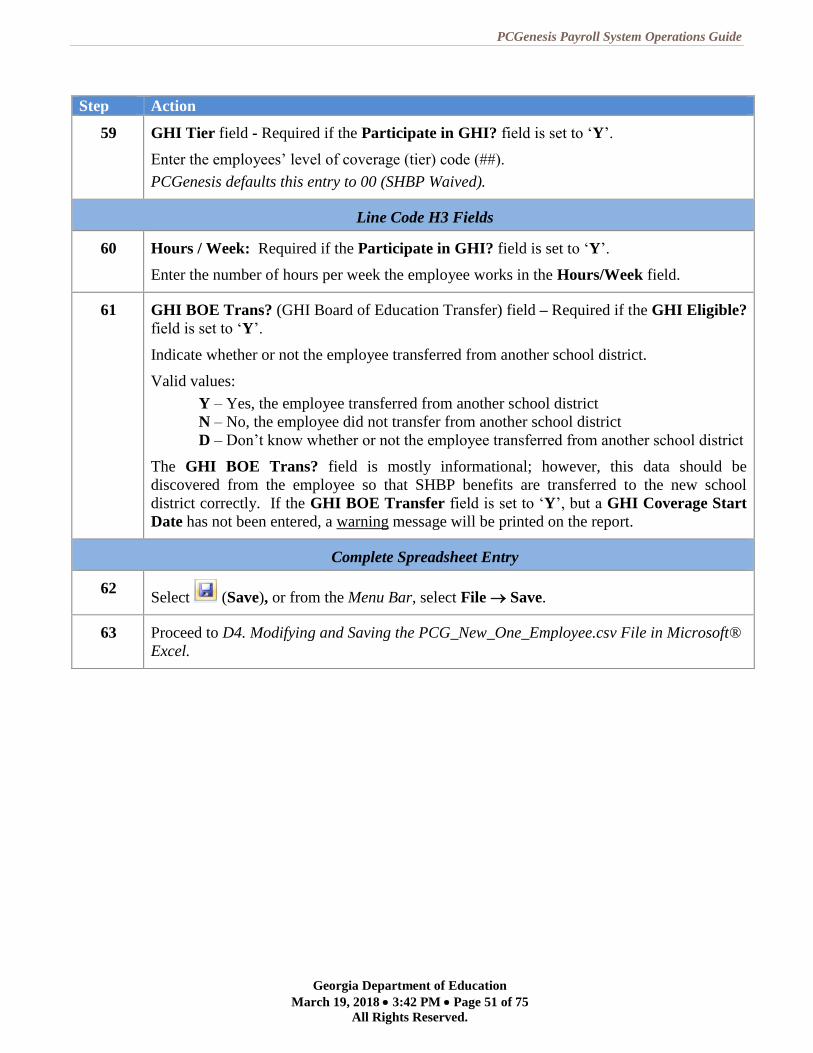
PCGenesis Payroll System Operations Guide
Georgia Department of Education
March 19, 2018 3:42 PM Page 51 of 75
All Rights Reserved.
Step Action
59 GHI Tier field - Required if the Participate in GHI? field is set to ‘Y’.
Enter the employees’ level of coverage (tier) code (##).
PCGenesis defaults this entry to 00 (SHBP Waived).
Line Code H3 Fields
60 Hours / Week: Required if the Participate in GHI? field is set to ‘Y’.
Enter the number of hours per week the employee works in the Hours/Week field.
61 GHI BOE Trans? (GHI Board of Education Transfer) field – Required if the GHI Eligible?
field is set to ‘Y’.
Indicate whether or not the employee transferred from another school district.
Valid values:
Y – Yes, the employee transferred from another school district
N – No, the employee did not transfer from another school district
D – Don’t know whether or not the employee transferred from another school district
The GHI BOE Trans? field is mostly informational; however, this data should be
discovered from the employee so that SHBP benefits are transferred to the new school
district correctly. If the GHI BOE Transfer field is set to ‘Y’, but a GHI Coverage Start
Date has not been entered, a warning message will be printed on the report.
Complete Spreadsheet Entry
62 Select (Save), or from the Menu Bar, select File Save.
63 Proceed to D4. Modifying and Saving the PCG_New_One_Employee.csv File in Microsoft®
Excel.

PCGenesis Payroll System Operations Guide
Georgia Department of Education
March 19, 2018 3:42 PM Page 52 of 75
All Rights Reserved.
D4. Modifying and Saving the
PCG_New_One_Employee.csv File in Microsoft® Excel Saving the Microsoft® Excel spreadsheet/workbook as a comma-delimited (.csv) file allows PCGenesis
to read the NewEmployeeTemplate.xlsx template’s data.
Step Action
1 Access the Microsoft® Excel spreadsheet/workbook saved in D3. Using the PCGenesis
Template to Create a New Employee.
2 From the Menu Bar, select File Save As.
3 Within the Save in: field, navigate to the New_Hires_CWJ or to the appropriate file
location.
The following window displays:
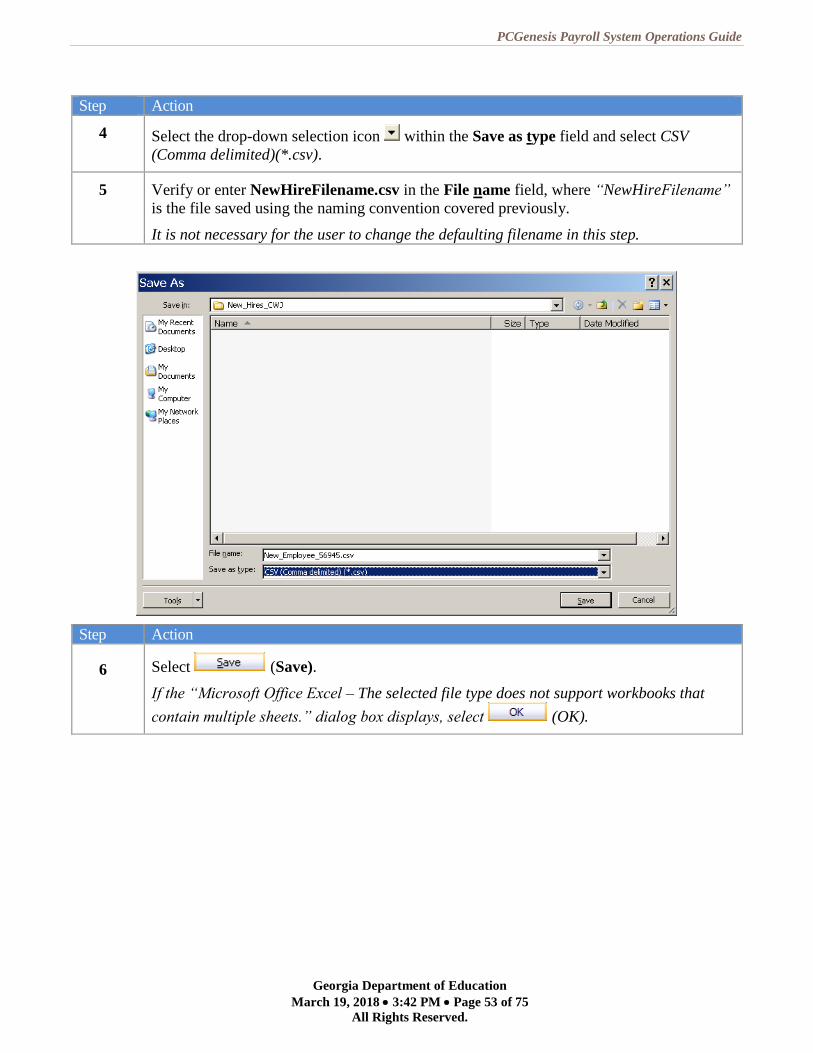
PCGenesis Payroll System Operations Guide
Georgia Department of Education
March 19, 2018 3:42 PM Page 53 of 75
All Rights Reserved.
Step Action
4 Select the drop-down selection icon within the Save as type field and select CSV
(Comma delimited)(*.csv).
5 Verify or enter NewHireFilename.csv in the File name field, where “NewHireFilename”
is the file saved using the naming convention covered previously.
It is not necessary for the user to change the defaulting filename in this step.
The following window displays:
Step Action
6 Select (Save).
If the “Microsoft Office Excel – The selected file type does not support workbooks that
contain multiple sheets.” dialog box displays, select (OK).

PCGenesis Payroll System Operations Guide
Georgia Department of Education
March 19, 2018 3:42 PM Page 54 of 75
All Rights Reserved.
The following dialog box displays:
Do not become alarmed, this dialog box always displays.
Step Action
7 Select (Yes).
8 From the Menu Bar, select File → Close to close the current file or select File → Exit to
completely exit Microsoft® Excel.
The .csv file must be closed before it can be imported into PCGenesis.
The following dialog box displays:
Step Action
9 If no additional modifications were made since Step 6: Select (No).
For additional modifications since Step 6: Select (Yes), and repeat Steps 1 – 8
to save the file.

PCGenesis Payroll System Operations Guide
Georgia Department of Education
March 19, 2018 3:42 PM Page 55 of 75
All Rights Reserved.
D5. Importing the PCG_New_One_Employee.csv File into
PCGenesis
D5.1. Performing a PCGenesis Data Backup
* * * ATTENTION * * *
Performing a Data backup before the beginning of the import of new employee
information into PCGenesis is strongly encouraged.
Step Action
1 Log out of PCGenesis.
2 Make sure all other users are log out of PCGenesis.
3 Close Uspool at the server.
4 Perform a PCGenesis full backup to CD or DVD.
5 When the PCGenesis backup completes, label the backup media “PCG Data Backup
BEFORE New Hire Import - MMDDCCYY”.
6 Maintain the Data backup media and the Backup Log until completing the import, and
verifying the results.
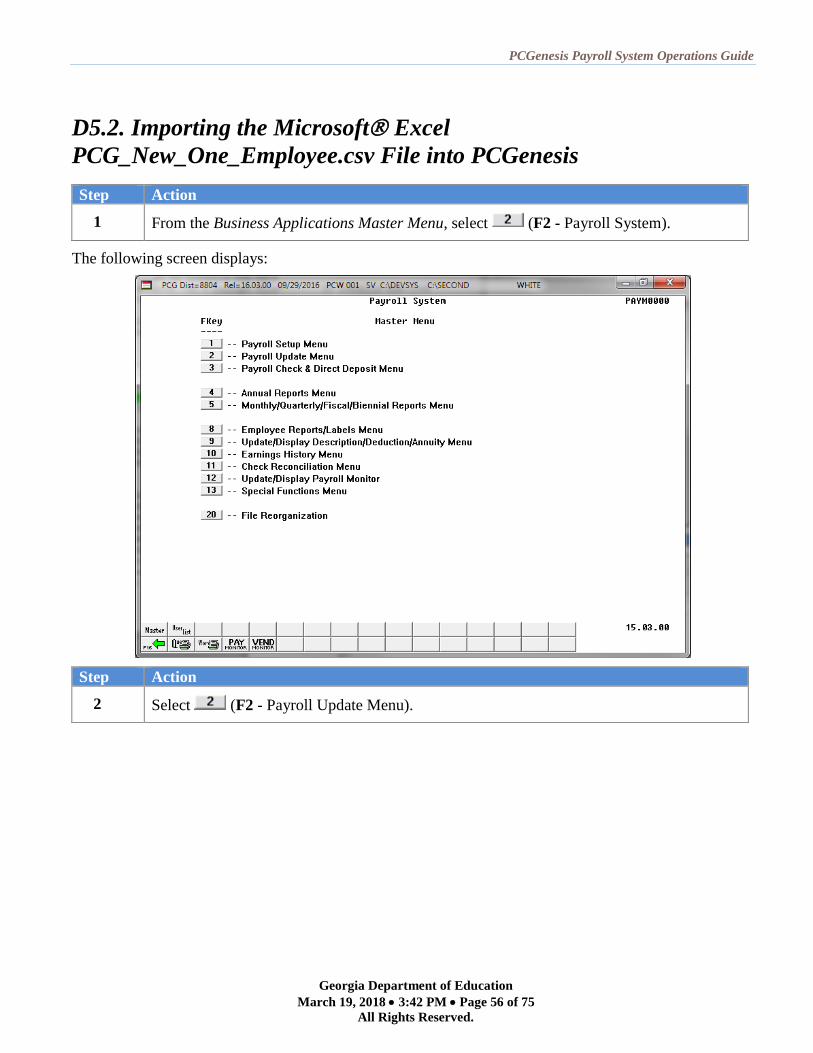
PCGenesis Payroll System Operations Guide
Georgia Department of Education
March 19, 2018 3:42 PM Page 56 of 75
All Rights Reserved.
D5.2. Importing the Microsoft Excel
PCG_New_One_Employee.csv File into PCGenesis
Step Action
1 From the Business Applications Master Menu, select (F2 - Payroll System).
The following screen displays:
Step Action
2 Select (F2 - Payroll Update Menu).

PCGenesis Payroll System Operations Guide
Georgia Department of Education
March 19, 2018 3:42 PM Page 57 of 75
All Rights Reserved.
The following screen displays:
Step Action
3 Select (F1 - Add New Employee).

PCGenesis Payroll System Operations Guide
Georgia Department of Education
March 19, 2018 3:42 PM Page 58 of 75
All Rights Reserved.
The following screen displays:
Step Action
4 Select F17 (Import new employee data).

PCGenesis Payroll System Operations Guide
Georgia Department of Education
March 19, 2018 3:42 PM Page 59 of 75
All Rights Reserved.
The following screen displays:
Step Action
5 Enter the file and pathname in the field using the naming convention from D4. Modifying
and Saving the PCGenesis PCG_New_One_Employee.csv File in Microsoft® Excel.
For (F10 - Browse for file) selections, PCGenesis defaults the Browse window to
the .csv file type where appropriate. PCGenesis users may select either the CSV (Comma
delimited) (*.csv) or the All Files (*.*) options from the drop down file listing for file type
selection. PCGenesis displays a warning message dialog box when an import filename
does not contain the .csv file extension.
6 Select (Enter) twice.
“**Scanning Import File**” briefly displays.
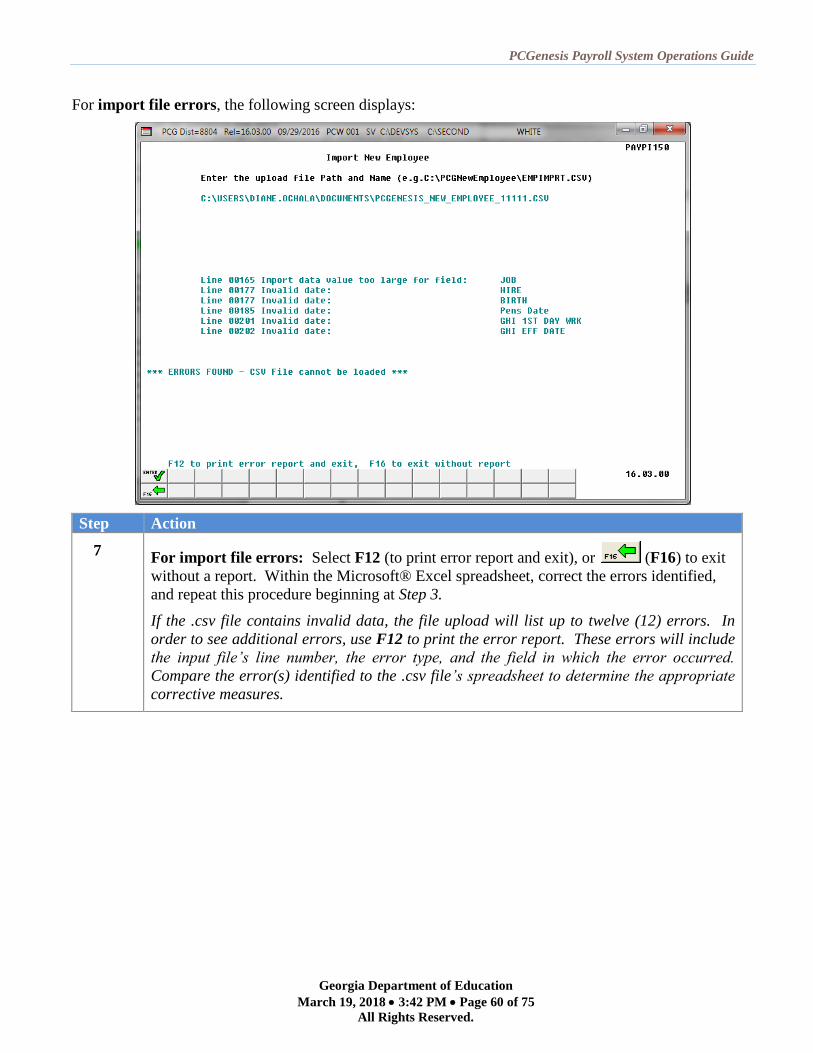
PCGenesis Payroll System Operations Guide
Georgia Department of Education
March 19, 2018 3:42 PM Page 60 of 75
All Rights Reserved.
For import file errors, the following screen displays:
Step Action
7 For import file errors: Select F12 (to print error report and exit), or (F16) to exit
without a report. Within the Microsoft® Excel spreadsheet, correct the errors identified,
and repeat this procedure beginning at Step 3.
If the .csv file contains invalid data, the file upload will list up to twelve (12) errors. In
order to see additional errors, use F12 to print the error report. These errors will include
the input file’s line number, the error type, and the field in which the error occurred.
Compare the error(s) identified to the .csv file’s spreadsheet to determine the appropriate
corrective measures.
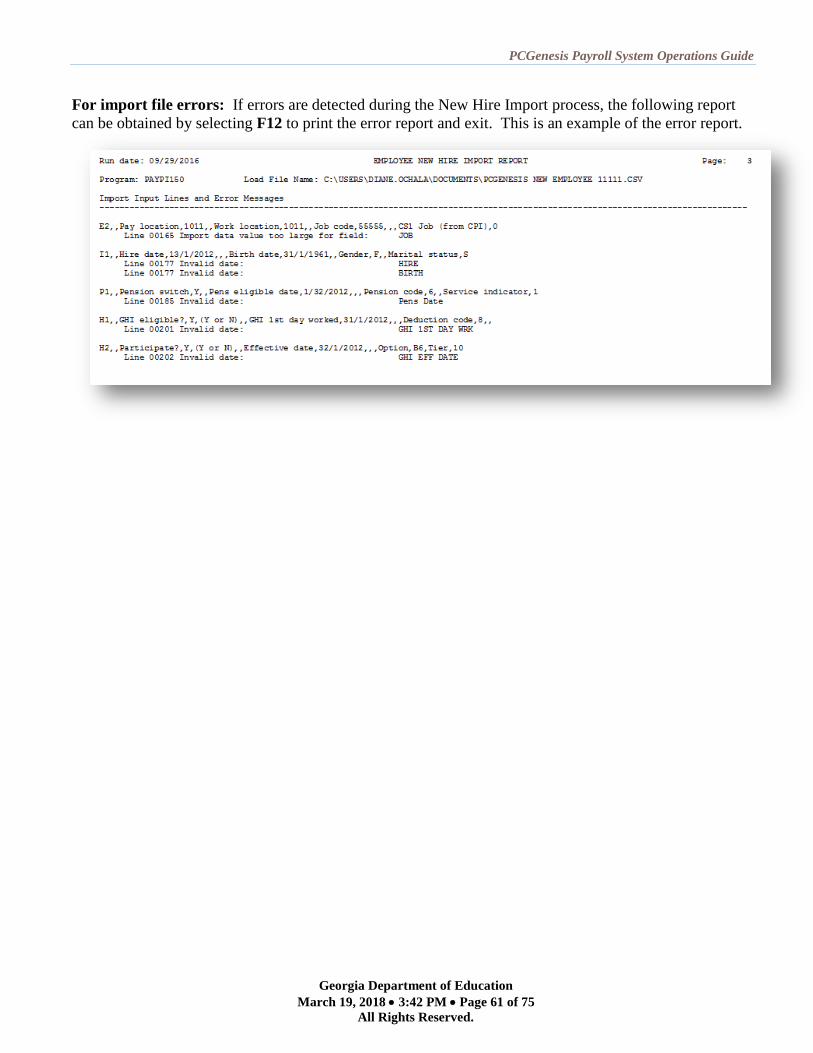
PCGenesis Payroll System Operations Guide
Georgia Department of Education
March 19, 2018 3:42 PM Page 61 of 75
All Rights Reserved.
For import file errors: If errors are detected during the New Hire Import process, the following report
can be obtained by selecting F12 to print the error report and exit. This is an example of the error report.
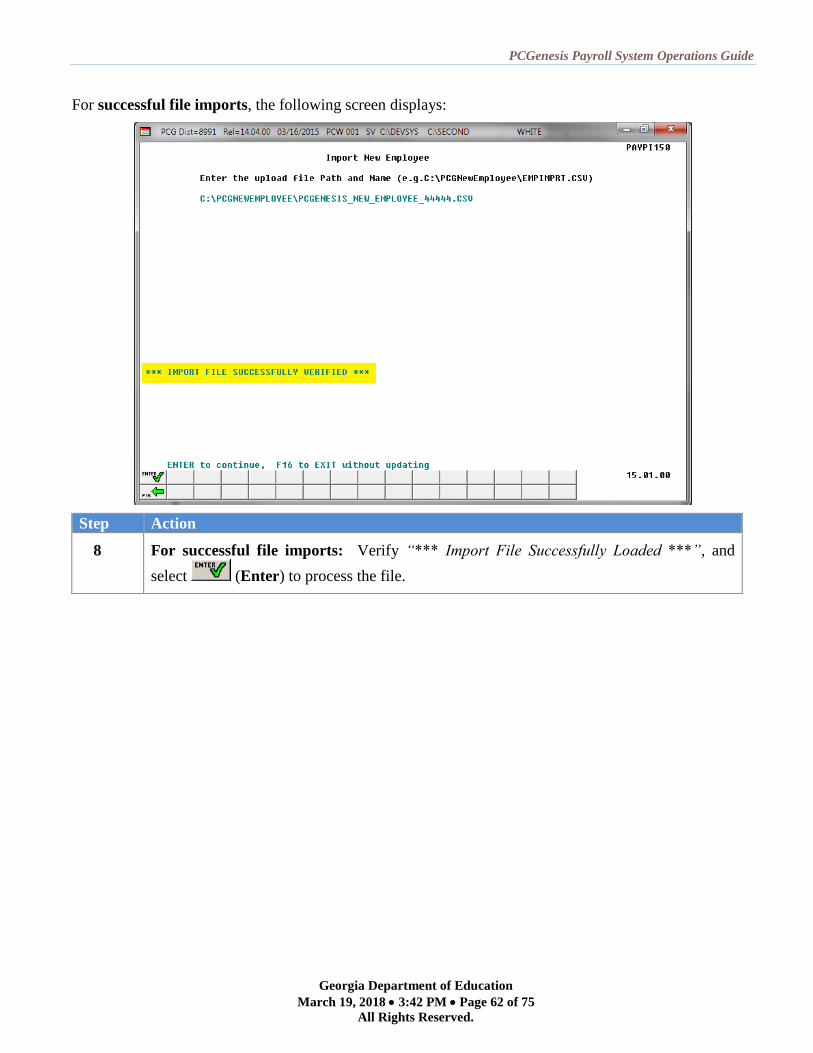
PCGenesis Payroll System Operations Guide
Georgia Department of Education
March 19, 2018 3:42 PM Page 62 of 75
All Rights Reserved.
For successful file imports, the following screen displays:
Step Action
8 For successful file imports: Verify “*** Import File Successfully Loaded ***”, and
select (Enter) to process the file.

PCGenesis Payroll System Operations Guide
Georgia Department of Education
March 19, 2018 3:42 PM Page 63 of 75
All Rights Reserved.
The following screen displays:
Step Action
9 Verify the information displayed is correct, make the appropriate entries in the fields, and
select (Enter) to validate the entries.
When detecting errors during validation, PCGenesis highlights the fields containing
errors. In this instance, correct the error(s) indicated and select (Enter) to validate
the employee’s information again. After correcting all “normal” errors, PCGenesis
checks several other conditions and where appropriate, displays various cautionary
warning messages. Acknowledge these messages by selecting (Enter).
Select (F3 – Print this data) to obtain a screen print of the Add New Employee
screen. The screen print file will be available in the print queue with the name
‘PSCNnnnn’.
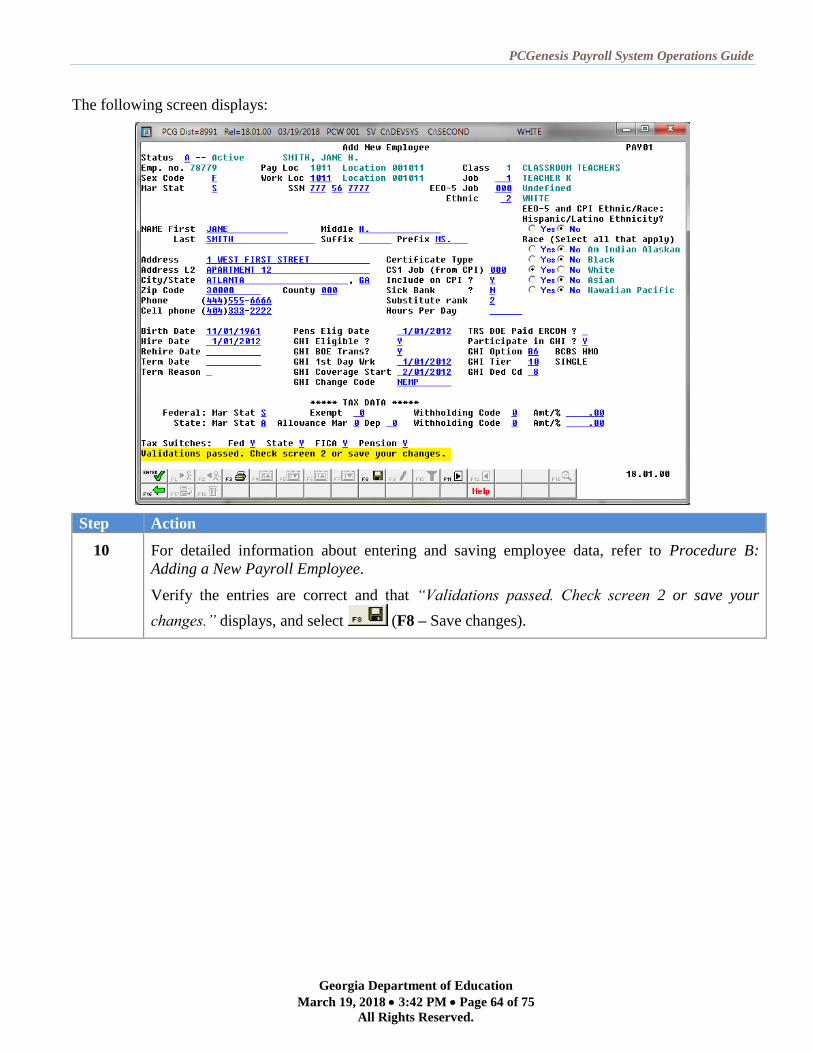
PCGenesis Payroll System Operations Guide
Georgia Department of Education
March 19, 2018 3:42 PM Page 64 of 75
All Rights Reserved.
The following screen displays:
Step Action
10 For detailed information about entering and saving employee data, refer to Procedure B:
Adding a New Payroll Employee.
Verify the entries are correct and that “Validations passed. Check screen 2 or save your
changes.” displays, and select (F8 – Save changes).
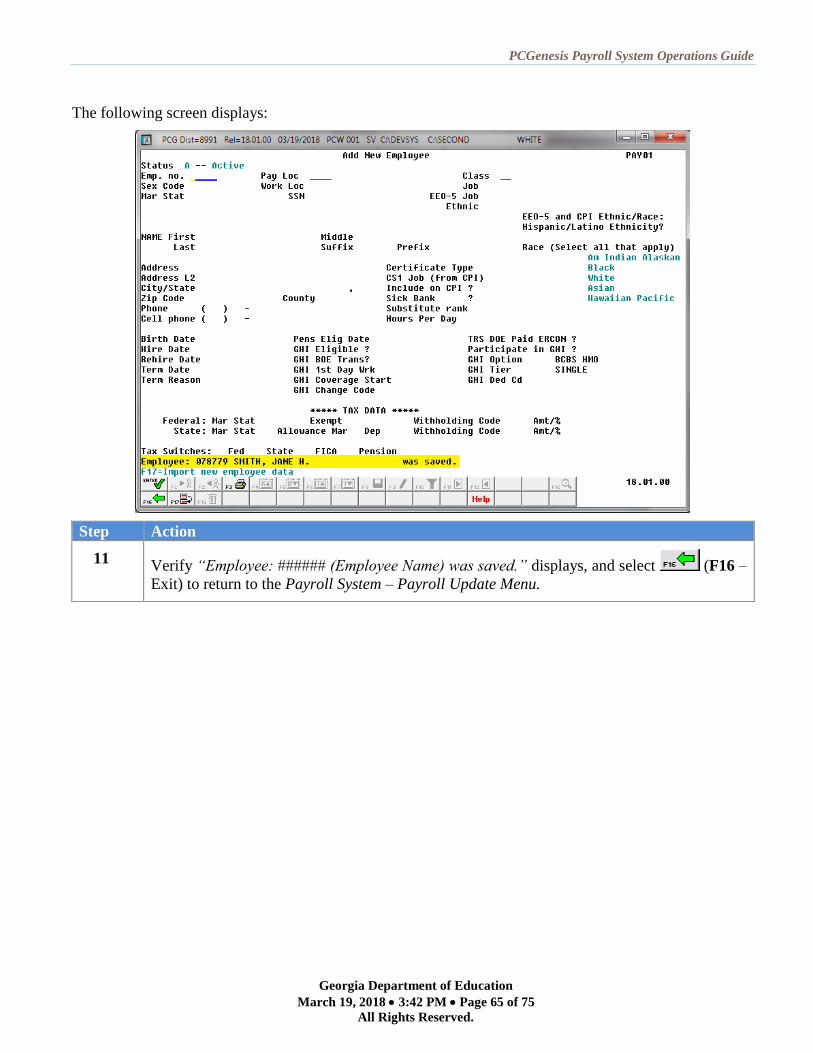
PCGenesis Payroll System Operations Guide
Georgia Department of Education
March 19, 2018 3:42 PM Page 65 of 75
All Rights Reserved.
The following screen displays:
Step Action
11 Verify “Employee: ###### (Employee Name) was saved.” displays, and select (F16 –
Exit) to return to the Payroll System – Payroll Update Menu.

PCGenesis Payroll System Operations Guide
Georgia Department of Education
March 19, 2018 3:42 PM Page 66 of 75
All Rights Reserved.
The following screen displays:
Step Action
12 Select (F16 -Exit) to return to the Payroll System Master Menu, or select
(Master) to return to the Business Applications Master Menu.
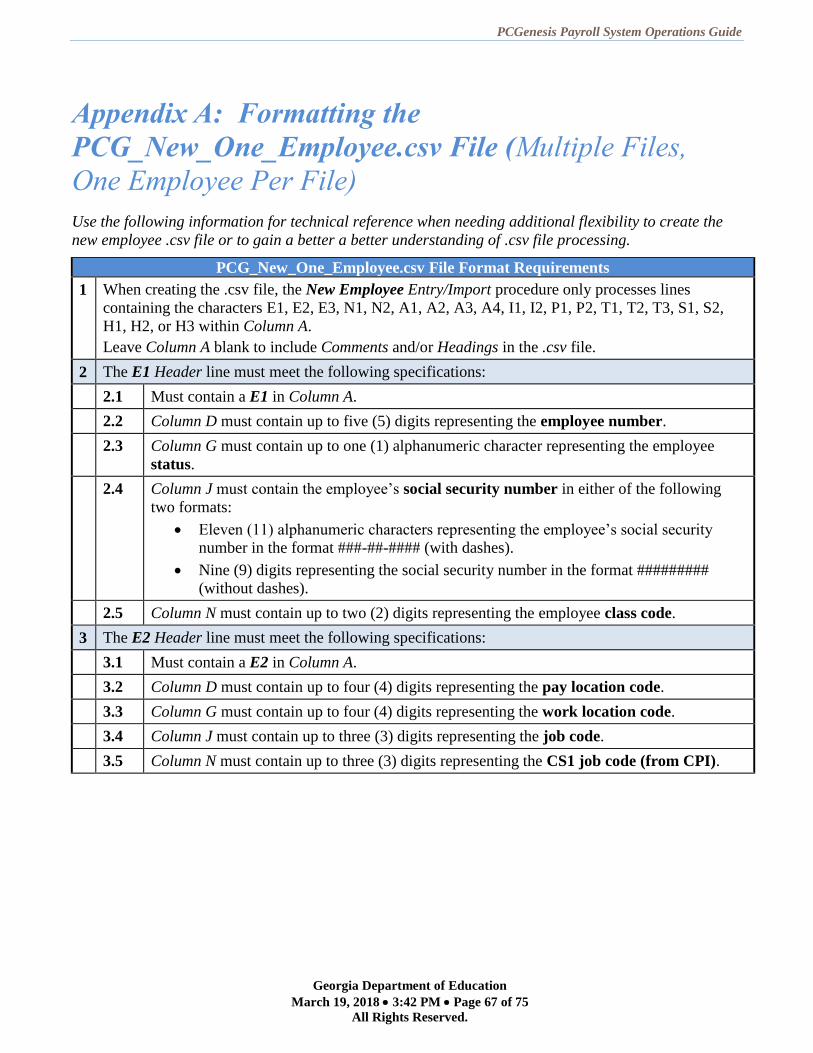
PCGenesis Payroll System Operations Guide
Georgia Department of Education
March 19, 2018 3:42 PM Page 67 of 75
All Rights Reserved.
Appendix A: Formatting the
PCG_New_One_Employee.csv File (Multiple Files,
One Employee Per File)
Use the following information for technical reference when needing additional flexibility to create the
new employee .csv file or to gain a better a better understanding of .csv file processing.
PCG_New_One_Employee.csv File Format Requirements
1 When creating the .csv file, the New Employee Entry/Import procedure only processes lines
containing the characters E1, E2, E3, N1, N2, A1, A2, A3, A4, I1, I2, P1, P2, T1, T2, T3, S1, S2,
H1, H2, or H3 within Column A.
Leave Column A blank to include Comments and/or Headings in the .csv file.
2 The E1 Header line must meet the following specifications:
2.1 Must contain a E1 in Column A.
2.2 Column D must contain up to five (5) digits representing the employee number.
2.3 Column G must contain up to one (1) alphanumeric character representing the employee
status.
2.4 Column J must contain the employee’s social security number in either of the following
two formats:
Eleven (11) alphanumeric characters representing the employee’s social security
number in the format ###-##-#### (with dashes).
Nine (9) digits representing the social security number in the format #########
(without dashes).
2.5 Column N must contain up to two (2) digits representing the employee class code.
3 The E2 Header line must meet the following specifications:
3.1 Must contain a E2 in Column A.
3.2 Column D must contain up to four (4) digits representing the pay location code.
3.3 Column G must contain up to four (4) digits representing the work location code.
3.4 Column J must contain up to three (3) digits representing the job code.
3.5 Column N must contain up to three (3) digits representing the CS1 job code (from CPI).
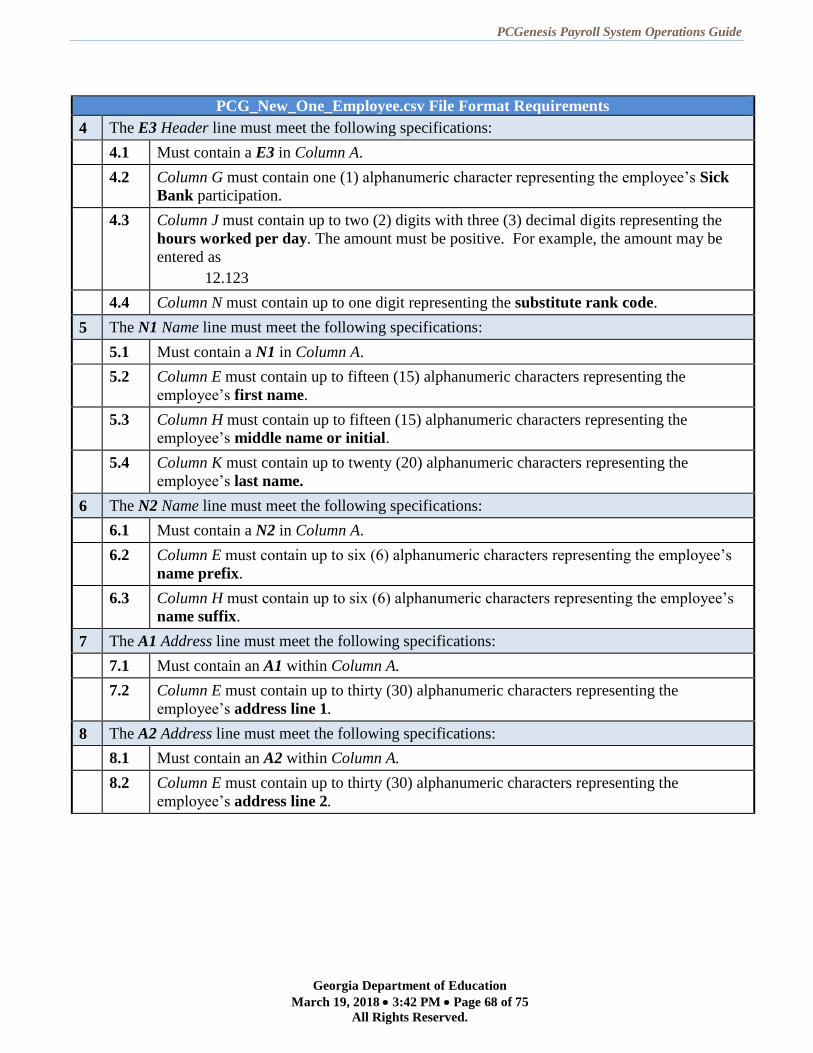
PCGenesis Payroll System Operations Guide
Georgia Department of Education
March 19, 2018 3:42 PM Page 68 of 75
All Rights Reserved.
PCG_New_One_Employee.csv File Format Requirements
4 The E3 Header line must meet the following specifications:
4.1 Must contain a E3 in Column A.
4.2 Column G must contain one (1) alphanumeric character representing the employee’s Sick
Bank participation.
4.3 Column J must contain up to two (2) digits with three (3) decimal digits representing the
hours worked per day. The amount must be positive. For example, the amount may be
entered as
12.123
4.4 Column N must contain up to one digit representing the substitute rank code.
5 The N1 Name line must meet the following specifications:
5.1 Must contain a N1 in Column A.
5.2 Column E must contain up to fifteen (15) alphanumeric characters representing the
employee’s first name.
5.3 Column H must contain up to fifteen (15) alphanumeric characters representing the
employee’s middle name or initial.
5.4 Column K must contain up to twenty (20) alphanumeric characters representing the
employee’s last name.
6 The N2 Name line must meet the following specifications:
6.1 Must contain a N2 in Column A.
6.2 Column E must contain up to six (6) alphanumeric characters representing the employee’s
name prefix.
6.3 Column H must contain up to six (6) alphanumeric characters representing the employee’s
name suffix.
7 The A1 Address line must meet the following specifications:
7.1 Must contain an A1 within Column A.
7.2 Column E must contain up to thirty (30) alphanumeric characters representing the
employee’s address line 1.
8 The A2 Address line must meet the following specifications:
8.1 Must contain an A2 within Column A.
8.2 Column E must contain up to thirty (30) alphanumeric characters representing the
employee’s address line 2.
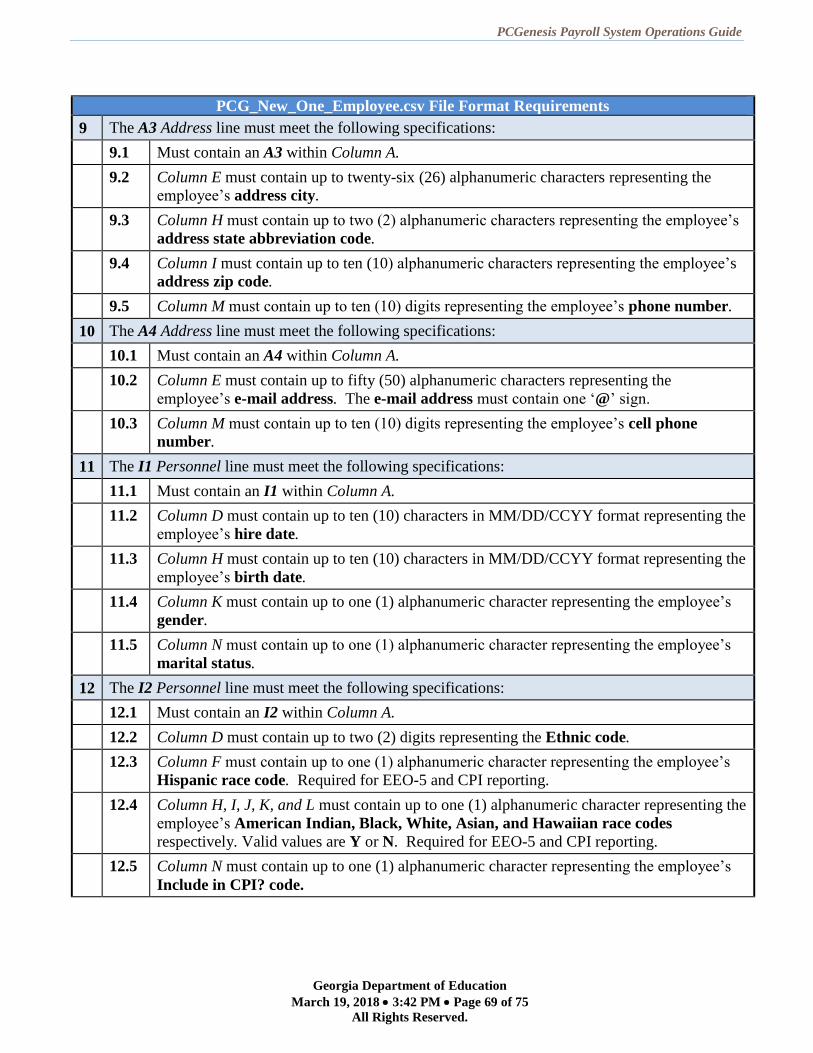
PCGenesis Payroll System Operations Guide
Georgia Department of Education
March 19, 2018 3:42 PM Page 69 of 75
All Rights Reserved.
PCG_New_One_Employee.csv File Format Requirements
9 The A3 Address line must meet the following specifications:
9.1 Must contain an A3 within Column A.
9.2 Column E must contain up to twenty-six (26) alphanumeric characters representing the
employee’s address city.
9.3 Column H must contain up to two (2) alphanumeric characters representing the employee’s
address state abbreviation code.
9.4 Column I must contain up to ten (10) alphanumeric characters representing the employee’s
address zip code.
9.5 Column M must contain up to ten (10) digits representing the employee’s phone number.
10 The A4 Address line must meet the following specifications:
10.1 Must contain an A4 within Column A.
10.2 Column E must contain up to fifty (50) alphanumeric characters representing the
employee’s e-mail address. The e-mail address must contain one ‘@’ sign.
10.3 Column M must contain up to ten (10) digits representing the employee’s cell phone
number.
11 The I1 Personnel line must meet the following specifications:
11.1 Must contain an I1 within Column A.
11.2 Column D must contain up to ten (10) characters in MM/DD/CCYY format representing the
employee’s hire date.
11.3 Column H must contain up to ten (10) characters in MM/DD/CCYY format representing the
employee’s birth date.
11.4 Column K must contain up to one (1) alphanumeric character representing the employee’s
gender.
11.5 Column N must contain up to one (1) alphanumeric character representing the employee’s
marital status.
12 The I2 Personnel line must meet the following specifications:
12.1 Must contain an I2 within Column A.
12.2 Column D must contain up to two (2) digits representing the Ethnic code.
12.3 Column F must contain up to one (1) alphanumeric character representing the employee’s
Hispanic race code. Required for EEO-5 and CPI reporting.
12.4 Column H, I, J, K, and L must contain up to one (1) alphanumeric character representing the
employee’s American Indian, Black, White, Asian, and Hawaiian race codes
respectively. Valid values are Y or N. Required for EEO-5 and CPI reporting.
12.5 Column N must contain up to one (1) alphanumeric character representing the employee’s
Include in CPI? code.

PCGenesis Payroll System Operations Guide
Georgia Department of Education
March 19, 2018 3:42 PM Page 70 of 75
All Rights Reserved.
PCG_New_One_Employee.csv File Format Requirements
13 The P1 Pension line must meet the following specifications:
13.1 Must contain an P1 within Column A.
13.2 Column D must contain up to one (1) alphanumeric character representing the pension
switch.
13.3 Column G must contain up to ten (10) characters in MM/DD/CCYY format representing the
employee’s pension eligible date.
13.4 Column K must contain up to one (1) digit representing the pension code.
13.5 Column N must contain up to one (1) digit representing the TRS service indicator code.
14 The P2 Pension line must meet the following specifications:
14.1 Must contain an P2 within Column A.
14.2 Column N must contain up to two (2) digits representing the ‘No pension’ code.
15 The T1 FICA Tax line must meet the following specifications:
15.1 Must contain an T1 within Column A.
15.2 Column C must contain up to one (1) alphanumeric character representing the FICA
switch.
16 The T2 Federal Tax line must meet the following specifications:
16.1 Must contain an T2 within Column A.
16.2 Column C must contain up to one (1) alphanumeric character representing the Federal
switch.
16.3 Column D must contain up to one (1) alphanumeric character representing the employee’s
Federal marital filing status.
16.4 Column E must contain up to one (1) digit representing the Federal withholding code.
16.5 Column F must contain up to six (6) digits with two (2) decimal digits representing the
Federal additional withholding amount/percent. The amount may contain a sign so that
either positive or negative amounts may be entered. For example, the amount may be
entered as
-123456.12
16.6 Column K must contain up to two (2) digits representing the number of Federal
exemptions.
17 The T3 State Tax line must meet the following specifications:
17.1 Must contain an T3 within Column A.
17.2 Column C must contain up to one (1) alphanumeric character representing the State switch.
17.3 Column D must contain up to one (1) alphanumeric character representing the employee’s
State marital filing status.
17.4 Column E must contain up to one (1) digit representing the State withholding code.
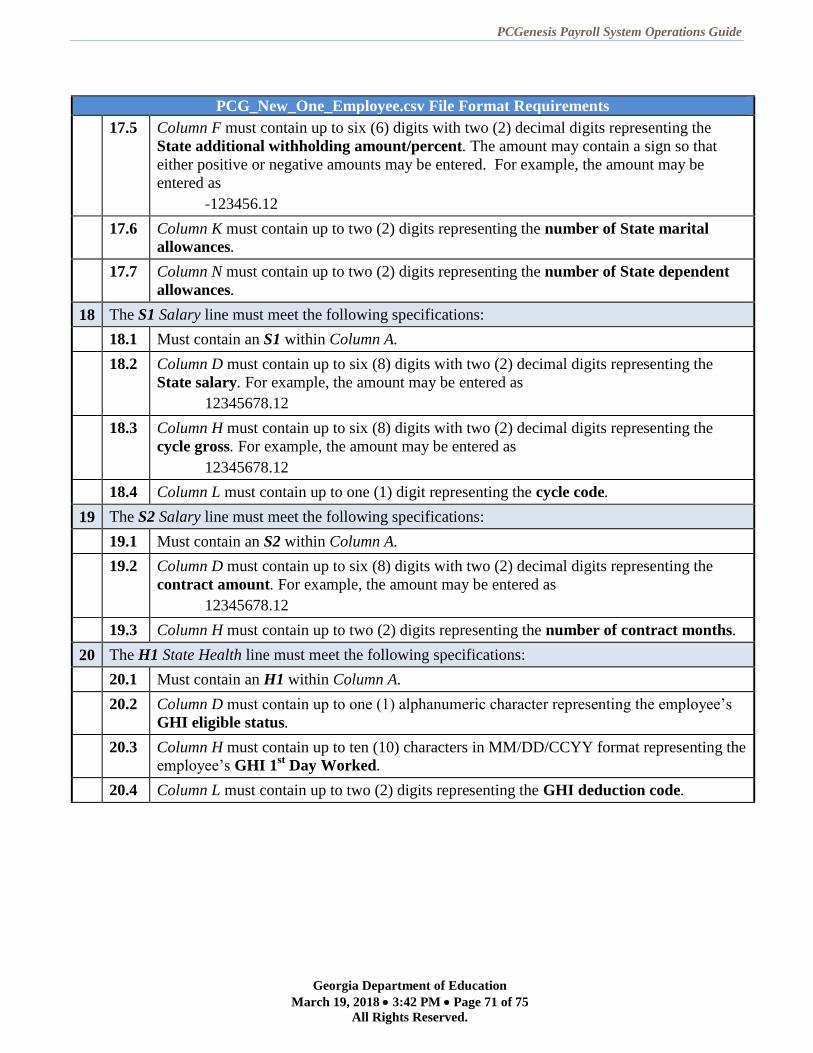
PCGenesis Payroll System Operations Guide
Georgia Department of Education
March 19, 2018 3:42 PM Page 71 of 75
All Rights Reserved.
PCG_New_One_Employee.csv File Format Requirements
17.5 Column F must contain up to six (6) digits with two (2) decimal digits representing the
State additional withholding amount/percent. The amount may contain a sign so that
either positive or negative amounts may be entered. For example, the amount may be
entered as
-123456.12
17.6 Column K must contain up to two (2) digits representing the number of State marital
allowances.
17.7 Column N must contain up to two (2) digits representing the number of State dependent
allowances.
18 The S1 Salary line must meet the following specifications:
18.1 Must contain an S1 within Column A.
18.2 Column D must contain up to six (8) digits with two (2) decimal digits representing the
State salary. For example, the amount may be entered as
12345678.12
18.3 Column H must contain up to six (8) digits with two (2) decimal digits representing the
cycle gross. For example, the amount may be entered as
12345678.12
18.4 Column L must contain up to one (1) digit representing the cycle code.
19 The S2 Salary line must meet the following specifications:
19.1 Must contain an S2 within Column A.
19.2 Column D must contain up to six (8) digits with two (2) decimal digits representing the
contract amount. For example, the amount may be entered as
12345678.12
19.3 Column H must contain up to two (2) digits representing the number of contract months.
20 The H1 State Health line must meet the following specifications:
20.1 Must contain an H1 within Column A.
20.2 Column D must contain up to one (1) alphanumeric character representing the employee’s
GHI eligible status.
20.3 Column H must contain up to ten (10) characters in MM/DD/CCYY format representing the
employee’s GHI 1st Day Worked.
20.4 Column L must contain up to two (2) digits representing the GHI deduction code.
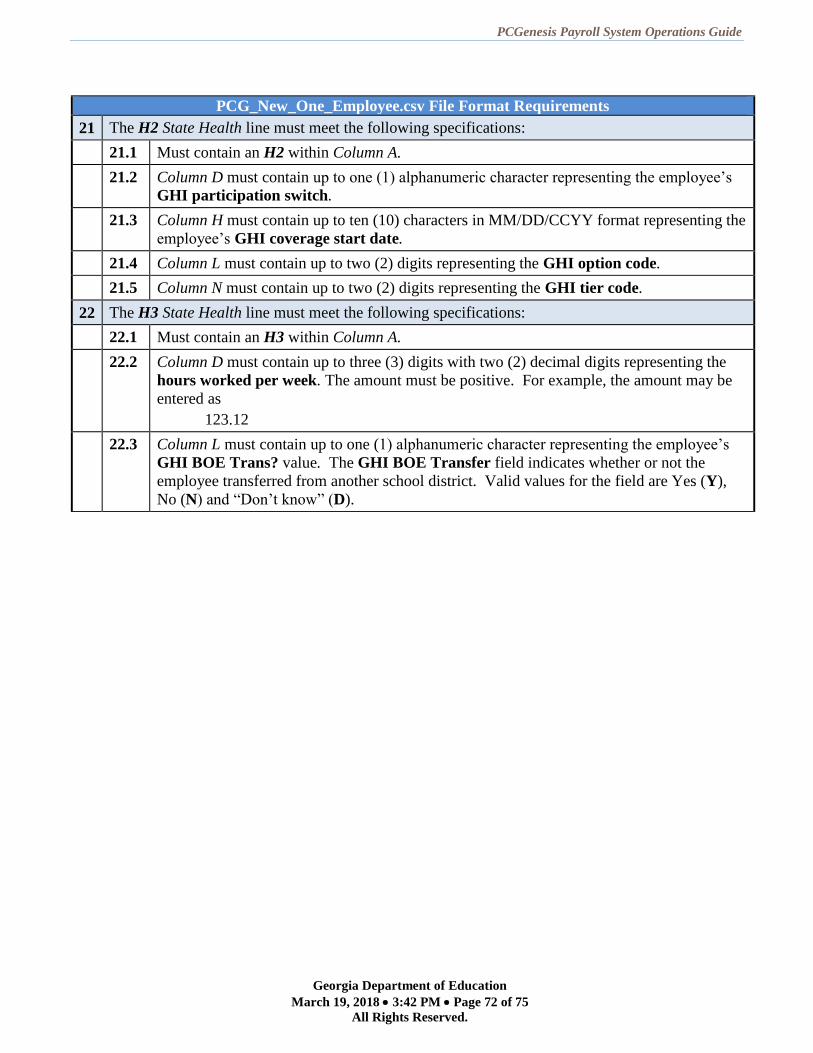
PCGenesis Payroll System Operations Guide
Georgia Department of Education
March 19, 2018 3:42 PM Page 72 of 75
All Rights Reserved.
PCG_New_One_Employee.csv File Format Requirements
21 The H2 State Health line must meet the following specifications:
21.1 Must contain an H2 within Column A.
21.2 Column D must contain up to one (1) alphanumeric character representing the employee’s
GHI participation switch.
21.3 Column H must contain up to ten (10) characters in MM/DD/CCYY format representing the
employee’s GHI coverage start date.
21.4 Column L must contain up to two (2) digits representing the GHI option code.
21.5 Column N must contain up to two (2) digits representing the GHI tier code.
22 The H3 State Health line must meet the following specifications:
22.1 Must contain an H3 within Column A.
22.2 Column D must contain up to three (3) digits with two (2) decimal digits representing the
hours worked per week. The amount must be positive. For example, the amount may be
entered as
123.12
22.3 Column L must contain up to one (1) alphanumeric character representing the employee’s
GHI BOE Trans? value. The GHI BOE Transfer field indicates whether or not the
employee transferred from another school district. Valid values for the field are Yes (Y),
No (N) and “Don’t know” (D).

PCGenesis Payroll System Operations Guide
Georgia Department of Education
March 19, 2018 3:42 PM Page 73 of 75
All Rights Reserved.
Appendix B: PCGenesis Automatic Record Creation
B1. Payroll System Deduction Screen – Examples
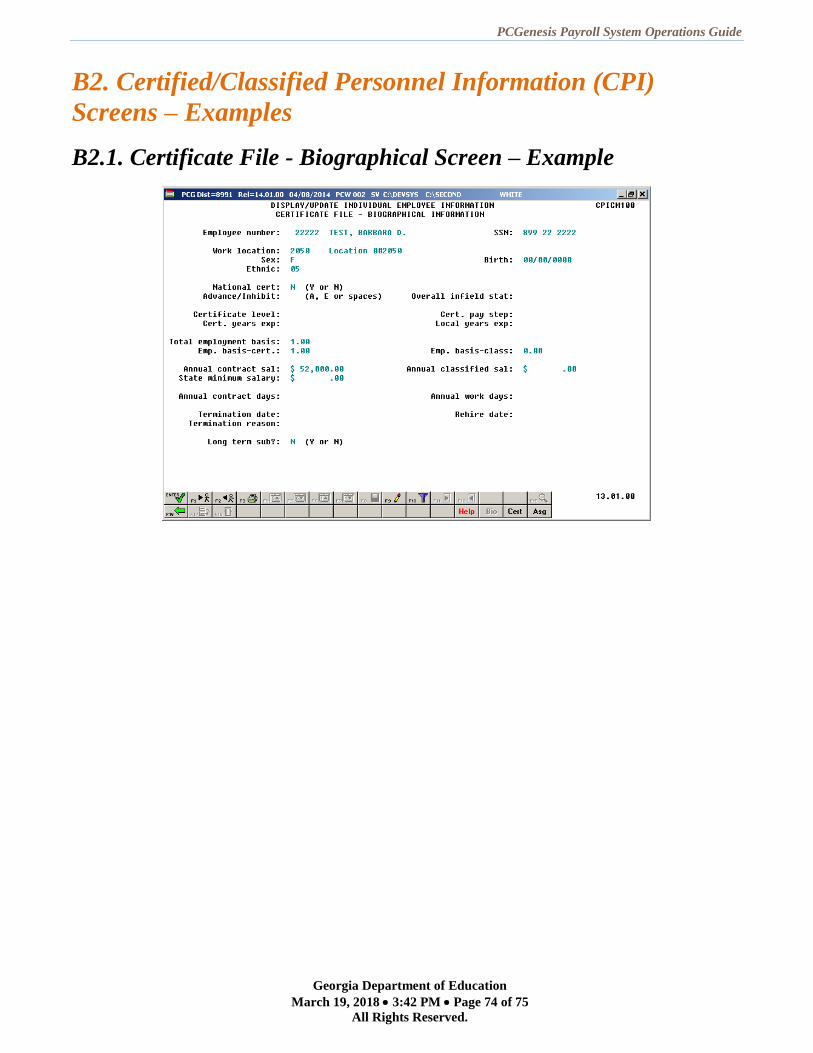
PCGenesis Payroll System Operations Guide
Georgia Department of Education
March 19, 2018 3:42 PM Page 74 of 75
All Rights Reserved.
B2. Certified/Classified Personnel Information (CPI)
Screens – Examples
B2.1. Certificate File - Biographical Screen – Example

PCGenesis Payroll System Operations Guide
Georgia Department of Education
March 19, 2018 3:42 PM Page 75 of 75
All Rights Reserved.
B2.2. Certificate File Maintenance Screen – Example
B2.3. Certificate File – Assignment Screen – Example