pcb cover la cubierta del tablero back coverfiles/installation+files/... · mounting bracket...
TRANSCRIPT

LQM L.E.D. Exit Sign US Patent No. 5,611,163, 5,739,639 and 5,526,251US Patent No. 5,954,423, 5,988,825, 6,152,581, 6,502,044,D495,751, and D383,501Canada Patent No. 2,204,218. Other Patents Pending.
READ AND FOLLOW ALL SAFETY INSTRUCTIONSSave these instructions and deliver to owner after installation.
WARNING: FAILURE TO FOLLOW THESE INSTRUCTIONS AND WARNINGS MAY
RESULT IN DEATH, SERIOUS INJURY OR SIGNIFICANT PROPERTY DAMAGE – For yourprotection, read and follow these warnings and instructions carefully before installing or main-taining this equipment. These instructions do not attempt to cover all installation and mainte-nance situations. If you do not understand these instructions or additional information is re-quired, contact Lithonia Lighting or your local Lithonia Lighting distributor.
WARNING: RISK OF ELECTRIC SHOCK – NEVER CONNECT TO, DISCONNECT
FROM OR SERVICE WHILE EQUIPMENT IS ENERGIZED.
WARNING: RISK OF FIRE – Lamps are hot. Keep combustibles material away from
hot parts. Observe lamp manufacturer’s warnings, recommendations and restrictions on lampoperation and maintenance. Make sure lamps are correctly installed.
WARNING: DO NOT USE ABRASIVE MATERIALS, OR OTHER SOLVENTS. USE
OF THESE SUBSTANCES MAY DAMAGE FIXTURE, WHICH MAY RESULT IN PERSONALINJURY.
• Before wiring to power supply, turn off electricity at fuse or circuit breaker.
• Disconnect A.C. power and unplug battery before servicing.
• Consult your local building code for approved wiring and installation.
• Do not use outdoors.
• Do not let power supply cord touch hot surfaces.
• Do not mount near gas or electric heater.
• Do not install a damaged fixture.
• This product must be installed in accordance with the applicable installation codes andordinances.
• Proper grounding is required to ensure personal safety. (WHERE APPLICABLE)
• All service shall be performed by qualified service personnel. This product must beinstalled and maintained in accordance with the applicable installation codes by aperson familiar with the construction and operation of the product and the hazardsinvolved.
• Equipment should be mounted in locations and at heights where it will not readily besubjected to tampering by unauthorized personnel.
• The use of accessory equipment not recommended by the manufacturer may cause anunsafe condition.
• Do not use this equipment for other than intended use.
SAVE THESE INSTRUCTIONS
L.E.D. LETRERO DE SALIDA
LEA Y SIGA TODAS LAS INSTRUCCIONES DE SEGURIDADGuarde estas instrucciones y entreguesela al dueño despues de
la instalacion.ADVERTENCIA: INCUMPLIMIENTO EN SEGUIR ESTAS INSTRUCCIONES Y
ADVERTENCIAS PUEDE RESULTAR EN LA MUERTE, LESIONES GRAVE O DAÑOSIGNIFICANTE A LA PROPIEDAD – Para su protección, lea y siga estas instrucciones yadvertencias con mucho cuidado antes de instalar o proveer mantenimiento a este equipo. Estasinstrucciones no procuran cubrir todas situaciones de instalación y mantenimiento. Si usted nocomprende estas instrucciones o requiere información adicional, contacte Lithonia Lighting o sudistribuidor de Lithonia Lighting.
ADVERTENCIA: RIESGO DE DESCARGA ELECTRICA - NUNCA CONECTE A O
DESCONECTE DEL SERVICIO O PROVEE MANTENIMIENTO MIENTRAS EL EQUIPO ESTEPRENDIDO.
ADVERTENCIA : RIESGO DE FUEGO – Lámparas están caliente. Mantenga
materia combustibles lejos de las piezas calientes. Observe las advertencias del fabricante dela lámpara, recomendaciones y restricciones en la operación de lámpara y mantenimiento.Asegúrese que las lámparas estén instaladas correctamente.
ADVERTENCIA : NO UTILICE MATERIAS ABRASIVAS, NI OTROS SOLVENTES.
EL USO DE ESTAS SUSTANCIAS PUEDEN DAÑAR EL LUMINARIO Y CAUSAR LESIONPERSONAL.• Antes alambrarlo al suministro eléctrico, apague la electricidad en la caja de fusibles o
cortacircuitos.• Desconecte corriente C.A. y desenchufe la batería antes de proveerle servicio.• Consulte su código de construcción local para métodos de alambrado e instalación
aprobados.• No use al aire libre.• No permita que el cordón eléctrico toque superficies calientes.• No monte cerca de calentador de gas o eléctricos.• No instale un luminario dañado.• Este producto debe ser instalado de acuerdo con los códigos aplicables de instalación y
las ordenanzas locales.• Método apropiado para poner a tierra es requerido para asegurar la seguridad personal.
(DONDE APLICABLE).• Todo servicio será realizado por personal calificado del servicio. Este producto debe ser
instalado y debe ser mantenido de acuerdo con los códigos aplicables de instalación poruna persona familiarizada con la construcción y la operación del producto y los peligrosimplicados.
• Equipo debe ser montado en ubicaciones y a alturas donde no será fácilmente sujeto amanipulación por personal no autorizado.
• El uso de equipo accesorio no recomendado por el manufacturero puede causar unacondición peligrosa.
• No utilice este equipo de otra manera que el uso destinado.
GUARDE ESTAS INSTRUCCIONES

Mounting BracketSoporte de la Caja Electrica
CanopyCapota
Circuit BoardTablero de Circuito
Back CoverCuviert a Tracera
Cam Locking PinClavija de Seguridad
Sign PanelPanel del Aviso
Batteryla Bateria
EL N and WRS onlyPCB Cover
La Cubiert a del Tablerode circuitos
FaceplateCuvierta Delantera
HousingCaja
Mounting Hole CoverCuvierta Lateral
Directional ChevronsFlechas Direccionales

Ø Rotate bracket to desired alignment position and tightenscrews. Be careful not to over-tighten screws, as thismay cause misalignment of canopy to mounting surface.
Ø Gire parentesis a la posicion descada del alignment yapriete. Tener cuidado de no apretar mucho los tornillos,esto puede causar un desaliniamiento de la montura y lasupeficie de montar.
Ø Connect provided jumper leads to AC input in J-Box.Using keyhole slots insert screws through bracket.
Ø Conecte los cables dados a input de CA dentro de cajaelectrica. Conecte los alambres a la entrada de la C.A.en la caja J. Usando ranuras de ojo la cerradura metenlos tornillos por parentesis.
Ø Place canopy over mounting bracket.
Ø Coloque la capota sobre el parentesis que monta.
Ø Dress leads through Housing wire channel. Snaphousing onto canopy. Insert proper input wires intocorresponding pushnut to connect power to unit.
Ø Pase los cables por el canal en la caja. Asgure la caja ala capota. Meta alambres apropiados en el pushnutcorresponiente para conectar el poder del equipo.
Ø Snap cam-lock pin into retaining hooks. Rotate handleof locking pin up to lock.
Ø Asegure la clavija de seguridad a los ganchos. Gire lamanija de cerrar hasta que cierre.
Ø Snap Faceplate onto housing.
Ø Asegure la cuvierta delantera a la caja.
TOP/SIDE MOUNTINSTALACION PARA ENCIMA O DE LADO
1 2
4 5
3
6

Ø To remove directional chevrons; removecolored sign panel and push chevron fromrear of panel.
Ø Para quitar las flechas direccionales quiteel panel de color del aviso y empuje laflecha por detras de la cuvierta delantera.
Ø To remove back cover press in andrelease latches and snaps.
Ø Para quitar la cuvierta tracera apriete ysuelte los ganchos.
Ø To remove canopy, remove cam-lock pin,squeeze snaps and push out.
Ø Para quitar capota, apriete ganchos yenpuje afuera.
Ø Dress leads through center knockout in BackCover. Fasten Back Cover to J-Box. SnapHousing onto Back Cover.
120 or 277 V - Connect input leads to Circuit Boardleads using provided pushnuts. See wiringdiagrams.
Ø Pase los cables por la apertura central en lacuvierta tracera. Asegure la cuvierta tracera a lacaja. Asegure la caja a la cuvierta tracera.
120 or 277V - Conecte cables de input a los cablesdel Tablero de Circuito usando los connectadoresdados. Vea esquema del cableado.
Ø Power PCB cover should always be installed as shownexcept in mounting configurations where the backcover is installed on the reverse side.
Ø La Cubierta de TCI de poder siempre se debe insalarcomo mostrada menos a montar configuracionesdonde la cubierta de espalda se instala enel ladoinverso.
Ø On Emergency units with a battery, plug batteryconnector onto the circuit board to complete installationafter continuous power has been applied .
Ø En equipo de Emergencia con una bateria, tape elconector de bateria en el tablero de circuitos paracompetar la instalacion despues de que se hayaaplicado la energia continua.
GENERAL INFORMATIONINFORMACION GENERAL
NOTE: Allow battery to charge 24 hours before initial testing, and168 hours to fully charge battery.NOTA: Deje que la bateria se carge 24 horas antes de probar por primera vez y 168 horas para completamente cargar la bateria.BATTERY REPLACEMENT: Remove A.C. power from unit. Remove battery from housing location and unplug from circuit board. Replace batteryonly with manufacturer's recommended replacement. Install replacement battery and reconnect on Circuit Board .REMPLASO DE LA BATERIA: Corte la corriente CA del equipo. Quite la bateria de la localizacion de la cubierta y desenchfela del tablero decircuito. Substituya la bateria solamente por el reemplaza recomendado del fabricante. Instale la bateria del reemplazo y vuelva a conectar en eltablero de circuito.CAUTION: Prolonged absence of AC power could cause battery damage.
PRECAUCION: La prolongada falta de alimentación de CA batería podría causar daños.
Clearing a Failure Indication :A failure indication may be cleared manually by pressing the manual testswitch. This will clear the failure indication provided the failed componenthas been corrected.Despejando una Indicación de Falla:Una indicación de falla puede ser despejada manualmente apretandoel interruptor manual de prueba. Esto despejara la indicación de fallasi el componente con la falla ha sido corregido.
Manual Test Initiation:Import ant Note:The self-diagnostics option performs tests to satisfy local codes in mostareas. A 30 second test of the batteries, lamp and charger circuit may bemanually initiated with a sufficiently charged battery by pressing themanual test switch. The manual test will not actuate any flashing option.Iniciación de la Prueba Manual:Nota import ante:La opción auto-diagnóstica realiza las pruebas necesarias parasatisfacer los códigos locales en la mayoría de las áreas. Una pruebade 30 segundos de las baterías, lámpara y circuito cargador puedeser iniciada manualmente con una batería suficientemente cargadaapretando el interruptor manual de prueba. La puebra del manualno activarà el interfaz la alarma de inciendo de opcionesaudiblesque contellean (SDFIFA).
Fire Alarm Operation (SDFIF A option):When fire alarm system (24 VDC) is engaged the lamps will flashapproximately once per second.For FA or FI operation See Figure A.Operación de Alarma de Incendios (Opción de SDFIF A):Cuándo el sistema de alarma de incendio (24 VDC) esta activada laslámparas parpadean aproximadamente una vez por segundo. Paraoperación FA o FI Vea Figura A.
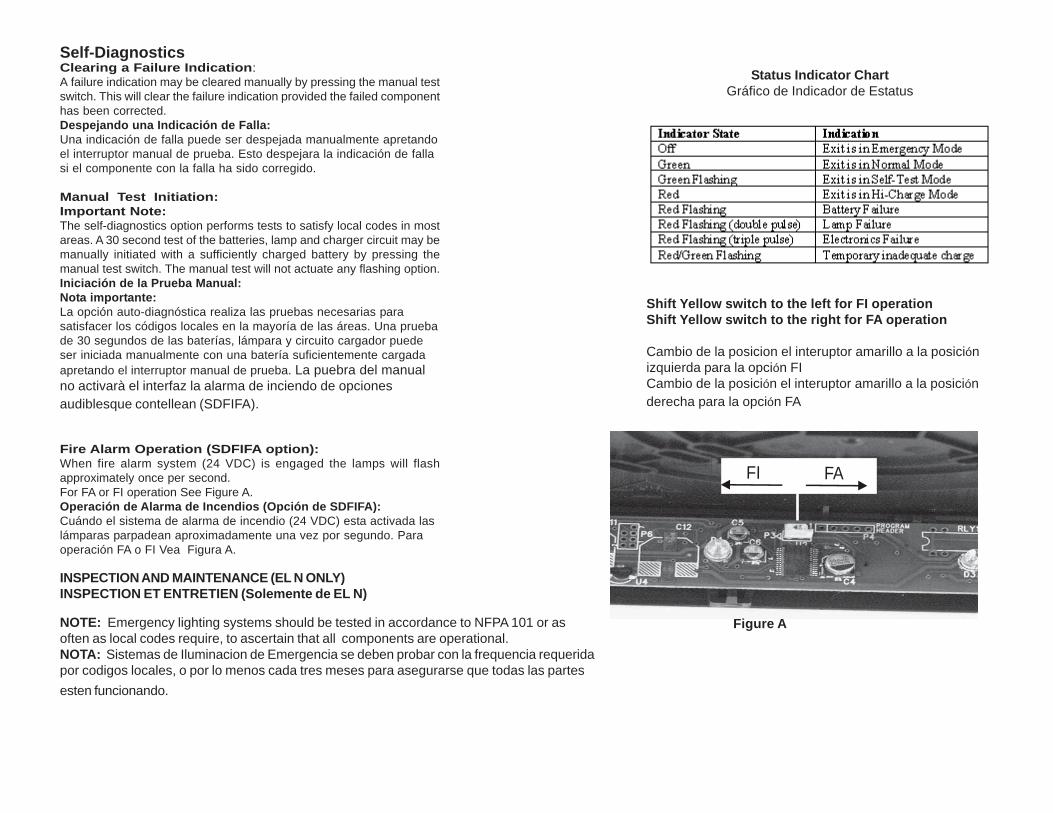
Self-DiagnosticsStatus Indicator Chart
Gráfico de Indicador de Estatus
Shift Yellow switch to the left for FI operationShift Yellow switch to the right for FA operation
Cambio de la posicion el interuptor amarillo a la posiciónizquierda para la opción FICambio de la posición el interuptor amarillo a la posiciónderecha para la opción FA
INSPECTION AND MAINTENANCE (EL N ONLY)INSPECTION ET ENTRETIEN (Solemente de EL N)
NOTE: Emergency lighting systems should be tested in accordance to NFPA 101 or asoften as local codes require, to ascertain that all components are operational.NOTA: Sistemas de Iluminacion de Emergencia se deben probar con la frequencia requeridapor codigos locales, o por lo menos cada tres meses para asegurarse que todas las partes
esten funcionando.
Figure A
FI FA

WIRING DIAGRAMESQUEMA DEL CABLEADO
EMCSA00754Rev D
ACUITY BRANDS LIGHTING, INC., ONE LITHONIA WAY, CONYERS, GEORGIA 30012,Tel: 800-334-8694
Acuity Brands Lighting de México, S. de R.L. de C.V ., Av. La Silla No. 771 1, ParqueIndustrial la Silla, Gpe., Nvo León, C.P , Tel: 52 81 8318 0460
www.lithonia.com
MADE IN CHINA
ESPECIFICACIONES ELECTRICASConsulte la etiqueta de marcado adherida al luminario.
WIRING DIAGRAM(LQM SD90 AND LQM WRS ONLY)ESQUEMA DEL CABLEADO(LQM SD90 y LQM WRS SÓLO)
Bateria (Solamente EL) Battery (EL Only)
LED
Cir
cuit
Boa
rdTa
bler
o de
Cir
cuito
Power Supply
Orange: 277V
Ready Light (EL ONLY)
Test Switch (EL Only)
Luz Ready
Boton de Prueba
Black: 120V
White: NeutralBlanco:
Negro:
Naranja:
Linea
FI harness
24V DC
Blue
Red/white
Common
Bateria (Solamente EL) Battery (EL Only)
LED
Circ
uit
Bo
ard
Tabl
ero
de
Circ
uito
Power Supply
Ready Light (EL ONLY)
Test Switch (EL Only)
Luz Ready
Boton de Prueba
Black: 120-277V
White: NeutralBlanco:
Negro:
LineaFI harness
24V DC
Blue
Red/white
Common