payroll user's guide
TRANSCRIPT

Payroll User's Guide
MIP Fund Accounting

This is a publication of Community Brands HoldCo, LLC.
Version 2021.x
© 2021 Community Brands HoldCo, LLC. and its affiliated entities. All rights reserved.
MIP®, the MIP logos, and the MIP product and service names mentioned herein are registered trademarks or
trademarks of Community Brands HoldCo, LLC. or its affiliated entities. All other trademarks are the property of
their respective owners.
Contents
Chapter 1: Introducing the Payroll Module 1
Set Up Payroll Module 1
Chapter 2: Setting Up and Maintaining Payroll 4
Distribution Codes 4
Distribution Code Buttons 7
Federal Taxes 10
Federal Taxes - Federal Tab 10
Federal Taxes - Employee FICA Taxes Tab 11
Federal Taxes - Employer FICA Taxes Tab 13
Federal Taxes - FUTA Taxes Tab 15
Federal Taxes - Distribution Tab 16
State Taxes 17
State Taxes - State Tab 17
State Taxes - Tax Tab 20
State Taxes - Distribution Tab 22
Other Taxes 23
Other Taxes - Tax Code Tab 24
Other Taxes - Employee Taxes Tab 25
Other Taxes - Employer Taxes Tab 35
Other Taxes - Distribution Tab 37
Processing Groups 37
Processing Groups - Group Tab 39
Processing Groups - Pay Schedule Tab 40
Employee Information 41
Employee Information - Employee Tab 41
MIP Fund Accounting
Payroll User's Guide
iii

Contents
Employee Information - Address Tab 44
Employee Information - Job and Pay Tab 45
Employee Information - Direct Deposit Tab 48
Employee Information - Federal Tax Tab 50
Employee Information - State Tax Tab 52
Employee Information - Other Taxes Tab 55
Employee Information - W-2 Tab 56
Employee Information - Email Tab 57
Employee Information - Notes Tab 60
Employee Information - User Defined Fields Tab 61
Employee Information Buttons 61
Earning Codes 63
Earning Codes - Earning Tab 63
Earning Codes - Calculation Tab 65
Earning Codes - Schedule Tab 67
Earning Codes - Taxes Tab 68
Benefit Codes 68
Benefit Codes - Benefit Tab 69
Benefit Codes - Calculation Tab 71
Benefit Codes - Earnings Tab 73
Benefit Codes - Schedule Tab 73
Benefit Codes - Taxes Tab 74
Benefit Codes - Distribution Tab 75
Deduction Codes 76
Deduction Codes - Deduction Tab 76
Deduction Codes - Calculation Tab 77
Deduction Codes - Earnings Tab 79
Deduction Codes - Schedule Tab 79
MIP Fund Accounting
Payroll User's Guide
iv

Contents
Deduction Codes - Taxes Tab 80
Workers' Compensation Codes 81
Workers' Compensation Codes - Workers' Compensation Tab 81
Workers' Compensation Codes - Calculation Tab 83
Workers' Compensation Codes - Earnings Tab 84
Workers' Compensation Codes - Distribution Tab 85
Leave Codes 86
Leave Codes - Leave Tab 86
Leave Codes - Calculation Tab 87
Leave Codes - Earnings Tab 88
Leave Codes - Schedule Tab 89
Email Templates 90
Chapter 3: Timesheets 94
Enter Default Timesheets 94
Enter Default Timesheets - Select Tab 94
Enter Default Timesheets - Earnings Tab 96
Enter Default Timesheets - Benefits Tab 97
Enter Default Timesheets - Deductions Tab 98
Enter Default Timesheets - Workers' Compensation Tab 99
Enter Default Timesheets - Leave Tab 100
Enter Default Timesheets - Summary Tab 101
Enter Regular/Supplemental Timesheets 102
Enter Regular/Supplemental Timesheets - Select Tab 102
Enter Regular/Supplemental Timesheets - Earnings Tab 105
Enter Regular/Supplemental Timesheets - Benefits Tab 106
Enter Regular/Supplemental Timesheets - Deductions Tab 107
Enter Regular/Supplemental Timesheets - Workers' Compensation Tab 108
MIP Fund Accounting
Payroll User's Guide
v

Contents
Enter Regular/Supplemental Timesheets - Leave Tab 109
Enter Regular/Supplemental Timesheets - Summary Tab 110
Timesheet Buttons 111
Chapter 4: Calculating Payroll 116
Calculate Payroll 116
Calculate Garnishments 119
Calculate Garnishments Buttons 121
Setting Up Garnishment Deductions 122
Review/Modify Calculated Payroll 123
Review/Modify Calculated Payroll - Select Tab 124
Review/Modify Calculated Payroll - Earnings Tab 126
Review/Modify Calculated Payroll - Benefits Tab 128
Review/Modify Calculated Payroll - Deductions Tab 129
Review/Modify Calculated Payroll - Workers' Compensation Tab 131
Review/Modify Calculated Payroll - Taxes Tab 133
Review/Modify Calculated Payroll - Leave Tab 134
Print/Email Checks and Vouchers 135
Printing Payroll Checks and Vouchers 139
Printing Both Checks and Vouchers and Emailing Vouchers 139
Emailing Payroll Vouchers 141
Load Checks/Vouchers (Print or Email) 142
Select Unprinted or Damaged Checks/Vouchers 143
Enter Manual Checks 144
Enter Manual Checks - Select Tab 145
Enter Manual Checks - Earnings Tab 147
Enter Manual Checks - Benefits Tab 148
Enter Manual Checks - Deductions Tab 149
MIP Fund Accounting
Payroll User's Guide
vi

Contents
Enter Manual Checks - Workers' Compensation Tab 149
Enter Manual Checks - Taxes Tab 150
Enter Manual Checks - Leave Tab 151
Void Checks 151
Void Checks Buttons 153
Void Check Dates 154
Check Spoilage 155
Set Up/Adjust Employee Balances 155
Set Up/Adjust Employee Balances - Select Tab 156
Set Up/Adjust Employee Balances - Earnings Tab 158
Set Up/Adjust Employee Balances - Benefits Tab 158
Set Up/Adjust Employee Balances - Deductions Tab 159
Set Up/Adjust Employee Balances - Workers' Compensation Tab 160
Set Up/Adjust Employee Balances - Taxes Tab 161
Set Up/Adjust Employee Balances - Leave Tab 163
Reprint Pay Stubs 164
Reprint Pay Stub 165
Distribute Labor Hours/Earnings 165
Chapter 5: Transferring Payroll 167
Transfer to Accounting 167
Using Accruals 169
Rounding Accruals 173
How Rounding Affects Distributions 177
Undo Transfer to Accounting 178
Undo Transfer to Accounting Example 180
Undo Transfer to Accounting Buttons 180
Filter 180
MIP Fund Accounting
Payroll User's Guide
vii

Contents
Chapter 6: Tax Reporting 182
Tax Forms and eFiling by Aatrix 182
Chapter 7: Payroll Reporting 185
Overview of Payroll Reports 185
Chapter 8: List Reports 187
Distribution Codes List 187
Federal Taxes List 188
State Taxes List 191
Other Taxes List 194
Processing Groups List 198
Quick Employee Information 199
Employee Information List 201
Earning Codes List 208
Benefit Codes List 213
Deduction Codes List 219
Workers' Compensation Codes List 223
Leave Codes List 226
Email Templates List 230
Chapter 9: Processing Reports 232
Quick Timesheets 232
Timesheets 233
Calculated Check Register 237
Quick Calculated Check Register 241
Pre-Transfer Register 243
Voucher Register 245
MIP Fund Accounting
Payroll User's Guide
viii

Contents
Chapter 10: History Reports 248
Pay Codes History 248
Earnings History 255
Benefits History 260
Deductions History 264
Workers' Compensation History 268
Taxes History 273
Leave History 279
Quick Check/Transaction Register 283
Summary Check/Transaction Register 285
Quick Employee Payroll Summary 287
Labor Distribution 289
Leave Liability 292
Chapter 11: Tax Worksheet Reports 296
Federal Tax Worksheet 296
Other Tax Worksheet 299
941 Worksheet 302
Calculate W-2 Information 303
Calculate W-2s 303
W-2 Information 305
Index 311
MIP Fund Accounting
Payroll User's Guide
ix

Chapter 1: Introducing the Payroll Module
The Payroll module provides the full-featured payroll processing and reporting necessary to manage
today's payroll needs.
With the flexible payroll code system, define how the payroll module tracks types of payments, benefits,
deductions, and leave time for each employee. Payroll Processing Groups allow the production of
payrolls divided by processing cycle, department, program, or other type of grouping. Whether
employees are hourly or salaried, part-time or full-time, the Payroll module can produce a payroll with
minimum effort and maximum efficiency.
The Payroll module features timesaving tools like the default timesheet, which allows entry of all
applicable payroll codes and regular earnings for each employee. With this feature, employee timesheet
data entry is required for only those timesheets that change from cycle to cycle. This module also
provides full reporting for internal controls, federal, state, other withholding tax reports, and W-2 and W-3
production using Tax Forms and eFiling by Aatrix®.
To Add This Module
1. First the Payroll module must be added to an organization by the Administrator.
2. Either add Payroll to a current organization (Organization>Add a Module Wizard - Module Panel), or
select the Payroll module when creating a new organization (File>New Organization Wizard -
Modules Panel). For more information on these wizards, see the Administration guide.
3. Once the Payroll module has been applied to an organization, the Payroll menu selections are
available. These selections are integrated into the MIP Fund Accounting menu selections.
4. There are Checklists available for setting up this module and its processes. Please refer to the online
help (Help>Contents and Index>Reference) for modular specific menu selections, checklists, and
common questions.
Set Up Payroll Module
Access this form with Administrative user rights using Organization>Set Up Modules>Payroll. It
is only available with the Payroll module; it is not available for Payroll Link users.
Use this form to specify the disbursing account information for the Payroll organization. Each Payroll
organization can have one Cash disbursing account and one Accrual account (optional). As a Fraud
MIP Fund Accounting
Payroll User's Guide
1

Chapter 1: Introducing the Payroll Module
MIP Fund Accounting
Payroll User's Guide
2
preventative, select these options to display a system User ID to associate with an employee, change
the User ID status to Inactive upon employment termination, and display a warning message before
automatically revoking privileges in the system once an employee has been terminated.
More...
If the organization disburses its payroll through a single Fund, you can specify that disbursing fund
here. In this case, credits in your payroll entries (to various liability accounts and cash for net pay) are
recorded to this fund, even though payroll expenses may be allocated to multiple funds. If you enter a
disbursing Fund, then you must also enter the Interfund Accounts, Due To and Due From. If payroll
expense is allocated to funds other than the disbursing fund, the system can balance the payroll
entries between funds using these interfund accounts.
If you use more than one disbursing fund for your payroll, you can skip the Fund box, as well as the
Interfund Accounts boxes. In this case, credits in your payroll entries (to various liability accounts and
cash for net pay) are recorded in each fund to which payroll expense is recorded.
Fields
Disbursing Accounts
Cash: Enter an existing General Ledger "Cash" type account. You must select a cash account with a
currency type of USD (US Dollars). If more than one fund code is used to disburse payroll, complete
this box only.
Accrual: Enter an existing APO (Accounts Payable), OA (Other Assets), or OL (Other Liabilities) GL
account for the current organization.
Fund: Enter an existing fund disbursing account.
Interfund Accounts Due From, Due To: Enter the interfund account numbers. The accounts must be
existing General Ledger accounts with an account type of Interfund Receivable (IFR), Interfund Payable
(IFP), or Interfund Transfers (IFT).
Fraud Prevention Options: Often, if someone in your organization is using the MIP Fund Accounting
system, they are also an employee. So, when there is a separation between the employee and the
organization, the probability of fraud tends to increase if the organization does not take steps to ensure
that access to the system is revoked for the terminated employee. Select these options as a fraud
preventative: to display User ID association with an Employee ID; change the User ID status to Inactive
upon employment termination; display a warning message before automatically revoking privileges in
the system, once an employee has been terminated,

Set Up Payroll Module
Lock Employee ID and User ID Association: Select this check box to change the User ID field on the
Maintain>Payroll>Employee Information form to be display only after a User ID is selected and the form
is saved.
Enable Deactivation of User ID Upon Employee Termination: Select this check box to enable the
system to change the associated system User ID status to Inactive, upon employment termination. The
association between the Employee ID and system User ID is set up on the Maintain>Payroll>Employee
Information form. The system User ID is set up by the Administrator using Security>Maintain Users. It is
recommended to use unique User IDs, otherwise, if the User ID is shared and one of the associated
Employee IDs is terminated, the User ID will be set to Inactive and the remaining Users will be locked
out of the system as well.
Warn Upon Employee Termination Linked User ID Deactivation: Select this check box to display a
warning message, when that Employee ID is changed to Terminated, about the Employee ID and
system User ID association. The Enable Deactivation of User ID Upon Employee Termination check
box must be selected in order for this option to be available.
Hide Earning Code Rates and Amounts During Timesheet Processing: Select this check box to hide
rates and amounts when entering timesheet information using Timesheets>Enter Default or Enter
Regular/Supplemental Timesheets. The Rates and Amounts will display on the
Activities>Payroll>Review/Modify Calculated Payroll form. Otherwise to view earning code rates and
amounts during timesheet entry, clear this check box.
Include Historical Pay Code Information on Stubs: Select this check box to include pay codes that do not
have current activity on a stub using Activities>Payroll>Print/Email Checks and Vouchers, or to include the
pay codes that do not have current activity on a stub using Activities>Payroll>Reprint Pay Stubs.
Tip: When setting up security for users (Security>Set Up Organization Menus), we recommend limiting
access to this form to include only system administrator-type users.
MIP Fund Accounting
Payroll User's Guide
3

Chapter 2: Setting Up and Maintaining Payroll
Distribution Codes
Access this form using Maintain>Payroll>Distribution Codes.
Use this form to enter a standard entry template, called a Distribution Code. Distribution Codes allow you
to specify, in advance, the funds and/or other account segments to which you want to distribute
transaction amounts. Distribution Codes help to reduce transaction entry time and increase accuracy for
common entries. Distribution codes are used for the Payroll transaction entry that is created when Payroll
is transferred to Accounting. They are the basis for all payroll transactions created by the system. Note
that the Payroll module can use the same Distribution Codes as Accounting. You can designate the code
to Apply To Payroll, both Accounting and Payroll, or to Accounting.
More...
When Hours are entered on a line, the system automatically calculates (or recalculates) percentages
for each line item. Note that you cannot enter percentages on your own. Generally, use Hours to
distribute payroll based upon direct labor hours rather than specifying a fixed distribution (see the
following note for further discussion).
Note: Do you want to distribute a payroll based on direct labor hours?
If the payroll distribution is based upon direct labor hours, enter the direct labor hours under the Hours
column, and the system automatically computes the related percentage for each line item. Simply set
up the initial Distribution Code with all the line items or potential line items that represent the codes to
which you will distribute payroll. Then, during timesheet entry, enter the actual direct labor hours for
each line item. Payroll will be distributed according to the direct Hours you enter for each line on the
timesheet.
All Distribution Codes must have Percentages that equal 100 percent. Dollar amounts are applied first,
and any remainder is applied according to percentages.
General Ledger accounts for Distribution Codes are not entered on this form. They are obtained from
the Payroll and Tax Code information (Maintain>Payroll>Benefit Codes and Workers' Compensation
Codes; and Maintain>Payroll>Federal Taxes, State Taxes, and Other Taxes).
MIP Fund Accounting
Payroll User's Guide
4

Chapter 2: Setting Up and Maintaining Payroll
MIP Fund Accounting
Payroll User's Guide
5
Fields
Code: Enter a code that describes the payroll transaction template you are creating. We recommend
limiting your entry to strictly alphabetic characters (A through Z) or numeric characters (0 through 9), and
avoiding the use of symbols, such as: | " '.
Status: Specify the status of the Distribution Code. When creating a new code, accept the default status,
A (Active), or select I (Inactive) or D (Discontinued), from the drop-down list. The status can be changed
at any time. Below are valid status entries and their descriptions:
Active - An active status allows payroll to be processed using this code.
Inactive - Set a code to inactive when it is not used regularly, but it still may need to be used at some
point. A warning message appears when attempting to use an inactive code. The warning message is
for notification only; the code can still be used in a transaction.
Discontinued - Designate a code as discontinued when it is no longer being used. The system does
not allow any processing using a code with a discontinued status.
Apply To: Select whether to apply Distribution Codes to Payroll only (P), both Accounting and Payroll
(B), or Accounting only (A).
Description: Enter the description of the Distribution Code.
Distribution Codes: The distribution code must equal 100%. Therefore, if you only enter Dollar amounts,
you must add an additional line that equals 100%.
Segment Codes: Enter the codes for the account segments displayed. (All of the segments that were
specified when the Chart of Accounts were set up (Maintain>Chart of Accounts Codes) are available
here.) All of the segments must be completed on each line. Click Display/Hide Titles to see the
codes titles at the bottom left of the form.
Percent: Enter the percentage to distribute to the current line item. There must be at least one line
item with a percentage and the total percent must be 100. When entering percentages, do not include
a decimal point. For fractional percentages, enter the leading zeroes. The system calculates up to four
places to the right of the decimal point.

Distribution Codes
You type… System displays…
0005 .5%
005, 05, or 5 5%
50 50%
Hours: Enter a value for all line items other than those designating a dollar amount. The system
automatically calculates the resulting percentages; percentages cannot be manually entered on any
line.
Amount: Enter the fixed amount you want distributed to the current line item. During transfer (when the
Accounting entry is created), the system first distributes amounts. If more than one line has an amount,
then the system distributes amounts in the order in which they were entered. Any remaining amount is
distributed according to percentages.
MIP Fund Accounting
Payroll User's Guide
6

Chapter 2: Setting Up and Maintaining Payroll
MIP Fund Accounting
Payroll User's Guide
7
Tips: Use the Reports>Payroll>Lists>Distributions Codes form, to print the data entered on this form.
Distribution Codes are required for Payroll. When entering timesheets, specify, for each Earning
Code, the related Distribution Code. The Distribution Codes tell the system—through the transfer
process—how to distribute salary-, benefit- and tax-related expenses among the various Account Code
segments in the system.
When Tracking Labor Hours, use one line item per distribution. So that each Distribution Code
contains one distribution only. This is the most accurate way to track labor hours and earnings.
For other employer expense-related items—such as benefits, workers' compensation, and federal,
state, and other taxes—specify how the expense is distributed using the Distribution tabs on the
various Tax and Code forms (such as the Benefit Codes form, the Federal Taxes form, or the State
Taxes form). The Distribution tab allows you to designate whether you want the benefit or tax expense
to follow the Distribution Code(s) related to earnings, or to follow a separate Distribution Code.
Distribution Codes distribute amounts according to the dollar amounts (if any) and percentages or
hours entered. Use dollar amounts when there are line items with fixed distribution amounts (that is,
the same dollar amount each time, regardless of the total amount of the distribution).
You can have as many or as few Distribution Codes as required, based on the complexity of
allocations. Different types of earnings may be distributed differently. Also, each employee might have
a different mix of segments to which payroll is normally distributed. In this case, create a Distribution
Code for each employee (you might use each employee's ID as the Distribution Code ID for easier
identification). Otherwise, create one Distribution Code and use it for all earnings/employees.
All distribution codes can be viewed, including those that are specified as Accounting only. However,
Accounting only distribution codes cannot be edited in Payroll. Accounting only distribution codes can
be copied to a Payroll only code using Copy , as long as the two distribution codes have unique
code names.
Distribution Code Buttons
Copy Distribution Code: Use this button to create an exact copy of an existing
Distribution Code.
Display/Hide Titles: Use this button to show or hide the account titles for each of
the codes in the Distribution Codes table.

Distribution Codes
Copy Distribution Code
Access this form using Maintain>Payroll>Distribution Codes> Copy.
Use this form to create an exact copy of a Distribution Code. Select an existing Distribution Code that you
want to copy, and then enter the name of the new Distribution Code, a Description, and designate which
system the code Applies To—Payroll, both Accounting and Payroll, or Accounting only. This process
produces an exact duplicate of the original Distribution Code.
Fields
Copy From Distribution Code: Select an existing Distribution Code that you want to copy.
Copy To
Distribution Codes: Enter the name of the new Distribution Code. The Drop-Down Lookup displays
existing Distribution Codes that are not available. Using a word for the code makes selecting the
appropriate Distribution Code easier at transaction entry time.
Apply To: Select whether to apply the Distribution Codes to Payroll (P), both Accounting and Payroll
(B), or Accounting (A).
Description: Enter the description for the new Distribution Code.
MIP Fund Accounting
Payroll User's Guide
8

Chapter 2: Setting Up and Maintaining Payroll
MIP Fund Accounting
Payroll User's Guide
9
Display/Hide Titles
Access this feature using Maintain>Payroll>Distribution Codes> Display/Hide Titles.
Use this button to show or hide the Display Account Titles table.
When this button is "on," the system displays the Display Account Titles table in the lower left-hand
corner of the form. This table shows the account titles for each of the codes (GL, Fund, Program, and
so on) in the Transaction Entry table. When you are in the Transaction Entry table, and you click a
segment code, the system displays its title.
When this button is "off," the totals display in the left-hand corner of the form.
Display/Hide Titles Example
The following example shows the account titles when the button is "on."
This example hides the account titles when the button is "off."

Federal Taxes
Federal TaxesUse this form to specify how the system is to account for the federal tax withheld from employees' checks.
This not only accommodates the employee's federal tax withholding, but also the employer-paid federal
tax expense. Also, you can specify the federal unemployment tax information.
Federal Taxes - Federal Tab
Access this tab using Maintain>Payroll>Federal Taxes.
Use this form to specify how the system is to account for the federal tax withheld from employees' checks.
This not only accommodates the employee's federal tax withholding, but also the employer-paid federal
tax expense. Also, you can specify the federal unemployment tax information.
On this tab, select the Liability and Expense Accounts that the system should use to account for Social
Security Taxes, Medicare, and Federal Unemployment Taxes.
Fields
Federal Taxes Tax Account, Code, Title: The Tax Account column, displays the types of federal tax
accounts to apply account assignments. Select an existing account code or enter a new one in the Code
column. The system displays a description for the code in the Title column. All Expense and Liability
accounts must be existing, active or inactive General Ledger accounts that are not subledger-type
accounts.
FIT Withholding Liability: This is the liability account for Federal Withholding Taxes.
Social Security Expense: This is the General Ledger expense account for Social Security Taxes.
Social Security Liability: This is the General Ledger liability account for Social Security Taxes.
Medicare Expense: This is the General Ledger expense account for Medicare.
Medicare Liability: This is the General Ledger liability account for Medicare.
Federal Unemployment Expense: This is the General Ledger expense account for Federal
Unemployment Tax.
Federal Unemployment Liability: This is the General Ledger liability account for Federal
Unemployment Tax.
MIP Fund Accounting
Payroll User's Guide
10

Chapter 2: Setting Up and Maintaining Payroll
MIP Fund Accounting
Payroll User's Guide
11
Tips:
Click Distribution Codes Information to open the Maintain>Payroll>Distribution Codes form,
where you can create or modify a distribution code. Each time this button is selected, a new
Distribution Codes form is opened.
The FUTA rate is based on the existence of SUTA. When state tax information was set up
(Maintain>Payroll>State Taxes), if the State Unemployment Tax check box (on the State tab) was not
selected, or if the SUTA Percentage of Wages was 0% (on the Tax tab), the amount of FUTA
calculated for the state will be 6.0%. Otherwise, FUTA will be calculated at .6%.
The calculation of federal tax FIT and MC are provided by the system; the official values for FUTA,
FICA, and SS are also provided but can be manually maintained if mid-year adjustments occur before
a normal software update. The earning, benefit, and deduction amounts that are flagged as subject to
the specified federal tax are used in the calculation of the tax.
Expense Accounts are only used for the employer portion of applicable taxes.
Federal Taxes - Employee FICA Taxes Tab
Access this tab using Maintain>Payroll>Federal Taxes.
Use this tab to edit the employee's federal withholding tax information for Social Security. The system
defaults to the current federal values for Maximum Annual Subject Wages and Percent of Wages.
Use the Calculation Method current if mid-year rate changes occur that are not retroactive. Alternatively,
select year-to-date to perform an all-in-one catch up. When selected, this will adjust the employee’s next
payroll check to ensure year-to-date withholding and expense accruals are accurate to the point in time
when the check is calculated.
Fields
Social Security Tax: Change the Maximum Annual Subject Wages, Percent of Wages, and Calculation
Method for the Employee's Social Security Tax. This will effect every employee's federal taxes. The
system displays the current and past year's official federal withholding tax values.
Override Official Values: Select this check box to enable the Maximum Annual Subject Wages and
Percent of Wages fields, so that you can manually enter the wage information for these fields.

Federal Taxes
Maximum Annual Subject Wages: Accept the default or enter the employee's maximum subject wages
for the Social Security tax.
Percent of Wages: Accept the default or enter the employee's percentage of maximum subject wages
for the Social Security tax.
Calculation Method: Accept the default of Y (Year-to-Date) or select a Calculation Method of C
(Current). Select current if mid-year rate changes occur that are not retroactive. Alternatively, select
year-to-date to perform an all-in-one catch up. When selected, this will adjust the next payroll check to
ensure year-to-date withholding and expense accruals are accurate to the point in time when the check
is calculated.
Medicare Tax: The system displays the Maximum Annual Subject Wages and Percent of Wages for the
Employee's Medicare Tax. This effects every employee's federal taxes. The system displays the current
and past year's official federal withholding tax values.
Maximum Annual Subject Wages: The system displays the employee's maximum subject wages for
the Medicare tax.
Percent of Wages: The system displays the employee's percentage of maximum subject wages for the
Medicare tax.
2019 Official Values: The values displayed in these fields are the official federal rates for the current year.
Displayed are the Maximum Annual Subject Wages and Percent of Wages for both Social Security and
Medicare taxes.
2018 Official Values: The values displayed in these fields are the official federal rates for the past year.
Displayed are the Maximum Annual Subject Wages and Percent of Wages for both Social Security and
Medicare taxes.
MIP Fund Accounting
Payroll User's Guide
12

Chapter 2: Setting Up and Maintaining Payroll
MIP Fund Accounting
Payroll User's Guide
13
Tips:
Click Distribution Codes Information to open the Maintain>Payroll>Distribution Codes form,
where you can create or modify a distribution code. Each time this button is selected, a new
Distribution Codes form is opened.
The FUTA rate is based on the existence of SUTA. When state tax information was set up
(Maintain>Payroll>State Taxes), if the State Unemployment Tax check box (on the State tab) was not
selected, or if the SUTA Percentage of Wages was 0% (on the Tax tab), the amount of FUTA
calculated for the state will be 6.0%. Otherwise, FUTA will be calculated at .6%.
The calculation of federal tax FIT and MC are provided by the system; the official values for FUTA,
FICA, and SS are also provided but can be manually maintained if mid-year adjustments occur before
a normal software update. The earning, benefit, and deduction amounts that are flagged as subject to
the specified federal tax are used in the calculation of the tax.
Additional Medicare Tax for high income wage earners: When an employee’s wages subject to
Medicare exceed $200,000.00 for the calendar year an additional .09% of Medicare tax will be added
to the Employee portion and withheld at 2.35%. For those employees who exceed the $200,000.00
threshold, this additional amount is reported separately on the 941 Worksheet report.
Federal Taxes - Employer FICA Taxes Tab
Access this tab using Maintain>Payroll>Federal Taxes.
Use this tab to edit the employer paid federal withholding tax information for Social Security. The system
defaults to the current federal values for Maximum Annual Subject Wages and Percent of Wages.
Fields
Social Security Tax: Change the Maximum Annual Subject Wages, Percent of Wages, and Calculation
Method for the Social Security Tax. This will effect the employer paid federal taxes. The system displays
the current and past year's official federal withholding tax values.
Override Official Values: Select this check box to enable the Maximum Annual Subject Wages and
Percent of Wages fields, so that you can manually enter the wage information for these fields.
Maximum Annual Subject Wages: Accepts the default or enter the maximum subject wages for the
Social Security tax.

Federal Taxes
Percent of Wages: Accept the default or enter the percentage of maximum subject wages for the Social
Security tax.
Calculation Method: Accept the default of Y (Year-to-Date) or select a Calculation Method of C
(Current). Select current if mid-year rate changes occur that are not retroactive. Alternatively, select
year-to-date to perform an all-in-one catch up. When selected, this will adjust the employee’s next
payroll check to ensure year-to-date withholding and expense accruals are accurate to the point in time
when the check is calculated.
Medicare Tax: The system displays the Maximum Annual Subject Wages and Percent of Wages for the
Medicare Tax. This effects the employer paid federal taxes. The system displays the current and past
year's official federal withholding tax values.
Maximum Annual Subject Wages: The system displays the maximum subject wages for the Medicare
tax.
Percent of Wages: The system displays the percentage of maximum subject wages for the Medicare
tax.
2019 Official Values: The values displayed in these fields are the official federal rates for the current year.
Displayed are the Maximum Annual Subject Wages and Percent of Wages for both Social Security and
Medicare taxes.
2018 Official Values: The values displayed in these fields are the official federal rates for the past year.
Displayed are the Maximum Annual Subject Wages and Percent of Wages for both Social Security and
Medicare taxes.
MIP Fund Accounting
Payroll User's Guide
14

Chapter 2: Setting Up and Maintaining Payroll
MIP Fund Accounting
Payroll User's Guide
15
Tips:
Click Distribution Codes Information to open the Maintain>Payroll>Distribution Codes form,
where you can create or modify a distribution code. Each time this button is selected, a new
Distribution Codes form is opened.
The FUTA rate is based on the existence of SUTA. When state tax information was set up
(Maintain>Payroll>State Taxes), if the State Unemployment Tax check box (on the State tab) was not
selected, or if the SUTA Percentage of Wages was 0% (on the Tax tab), the amount of FUTA
calculated for the state will be 6.0%. Otherwise, FUTA will be calculated at .6%.
The calculation of federal tax FIT and MC are provided by the system; the official values for FUTA,
FICA, and SS are also provided but can be manually maintained if mid-year adjustments occur before
a normal software update. The earning, benefit, and deduction amounts that are flagged as subject to
the specified federal tax are used in the calculation of the tax.
Federal Taxes - FUTA Taxes Tab
Access this tab using Maintain>Payroll>Federal Taxes.
Use this tab to edit the employer paid federal unemployment tax information. The system defaults to the
current federal values for Maximum Annual Subject Wages and Percent of Wages.
Fields
FUTA Tax: Select the override check box, then enter changes to the Maximum Annual Subject Wages
and Percent of Wages for the FUTA Tax. The system displays the current and past year's official federal
withholding tax values.
Override Official Values: Select this check box to enable the Maximum Annual Subject Wages and
Percent of Wages fields, so that you can manually enter the wage information for these fields.
Maximum Annual Subject Wages: Accept the default or enter the maximum subject wages for the
Federal Unemployment tax.
Percent of Wages: Accept the default or enter the percentage of maximum subject wages for the
Federal Unemployment tax. This percent cannot be less then the lowest FUTA Credit Rate entered for
any State in the system, using Maintain>Payroll>State Taxes>Tax tab.

Federal Taxes
2019 Official Values: The values displayed in these fields are the official federal rates for the current year.
Displayed are the Maximum Annual Subject Wages and Percent of Wages for the FUTA tax.
2018 Official Values: The values displayed in these fields are the official federal rates for the past year.
Displayed are the Maximum Annual Subject Wages and Percent of Wages for the FUTA tax.
Tips:
Click Distribution Codes Information to open the Maintain>Payroll>Distribution Codes form, where
you can create or modify a distribution code. Each time this button is selected, a new Distribution Codes
form is opened.
If the override check box is un-checked after you made changes to the Maximum Annual Subject
Wages or Percent of Wages fields, the system returns to the default current year official values.
The FUTA rate is based on the existence of SUTA. When state tax information was set up
(Maintain>Payroll>State Taxes), if the State Unemployment Tax check box (on the State tab) was not
selected, or if the SUTA Percentage of Wages was 0% (on the Tax tab), the amount of FUTA calculated
for the state will be 6.0%. Otherwise, FUTA will be calculated at .6%.
The calculation of federal tax FIT and MC are provided by the system; the official values for FUTA,
FICA, and SS are also provided but can be manually maintained if mid-year adjustments occur before a
normal software update. The earning, benefit, and deduction amounts that are flagged as subject to the
specified federal tax are used in the calculation of the tax.
Federal Taxes - Distribution Tab
Access this tab using Maintain>Payroll>Federal Taxes.
Use this tab to specify how to distribute the employer's portion of the federal tax expense. Choose to have
federal tax amounts distributed the same way the employee's earnings are distributed; distribution can be
limited to the earnings used to calculate the federal tax; or distribute federal tax expense using the specific
Distribution Code entered on this tab.
Fields
Distribution of the Employer-Paid Federal Tax Expense Should: Select one of the three options (Follow
Earnings on Timesheet, Follow Earnings Used to Calculate the Tax, or Use Distribution Code) for the
system to distribute employer paid federal taxes. If Use Distribution Code is selected, enter an existing
Distribution Code.
MIP Fund Accounting
Payroll User's Guide
16

Chapter 2: Setting Up and Maintaining Payroll
MIP Fund Accounting
Payroll User's Guide
17
Tips:
Click Distribution Codes Information to open the Maintain>Payroll>Distribution Codes form,
where you can create or modify a distribution code. Each time this button is selected, a new
Distribution Codes form is opened.
Many grants and contracts allow federal taxes to be charged directly to the funding source. In this
case, choose Follow Earnings on Timesheet or Follow Earnings Used to Calculate the Tax. The
employer's portion of the federal taxes is distributed to the same Account Codes (Fund and any other
account segments except General Ledger) as the employee's earnings. In other words, the
Distribution Codes used to distribute the employee's earnings are also used to distribute the federal
tax. If more than one Distribution Code is used to distribute the employee's earnings, the federal taxes
are distributed based upon a weighted average of the distributed earnings.
If there are one or more funding sources to which you do not distribute federal taxes (because you
may have a negotiated rate or federal taxes are simply disallowed), you can choose the Use
Distribution Code Distribution method. For this method, specify the exact Distribution Code to
distribute the federal taxes, which may be entirely or partially distributed to overhead. If a Distribution
Code is specified on this tab, it should be an existing Distribution Code.
This only applies to employer-paid taxes, such as FUTA, Social Security, and Medicare.
State TaxesUse this form to specify how the system is to account for the state tax withheld from employees' checks.
This not only accommodates the employee's state tax withholding, but also the employer-paid state tax
expense. Also, you can specify the federal unemployment tax credit rate information.
State Taxes - State Tab
Access this tab using Maintain>Payroll>State Taxes.
Use this form to specify how the system is to account for the state tax withheld from employees' checks.
This not only accommodates the employee's state tax withholding, but also the employer-paid state tax
expense. Also, you can specify the federal unemployment tax credit rate information.
On this tab, set up codes for the states in which employees are subject to tax. Also, specify which taxes
are included: state withholding and/or state unemployment. A calculation method is also required for
State Unemployment Tax. And finally, enter the organization's Employer Tax ID number.

State Taxes
Fields
Code: Enter a two-character state or territory code.
State Withholding State Withholding Tax, Tax Account ID: Select State Withholding Tax, if applicable,
and enter the SWT tax account ID number for the selected state.
State Unemployment State Unemployment Tax, Tax Account ID, Calculation Method: Select State
Unemployment Tax, if applicable. Enter the SUTA tax account ID number for the selected state and a
Calculation Method of Current or Year-to-Date (historical) must be selected.
MIP Fund Accounting
Payroll User's Guide
18

Chapter 2: Setting Up and Maintaining Payroll
MIP Fund Accounting
Payroll User's Guide
19
Tips:
Click Distribution Codes Information to open the Maintain>Payroll>Distribution Codes form,
where you can create or modify a distribution code. Each time this button is selected, a new
Distribution Codes form is opened.
Each applicable state's withholding tables do not have to be entered. These are built into the system.
Once a state has been entered, the system automatically accesses that state's tax tables.
Note that once a particular state has been activated for either state withholding and/or state
unemployment, this state must be included on the employee's Maintain>Payroll>Employee
Information form to make it applicable for that employee.
If the State Withholding Tax box is selected, a liability account is required on the Tax tab. If the State
Unemployment box is selected, the following are required on the Tax tab:
Expense Account (if Employer is selected),
Liability Account (if Employer and/or Employee are selected),
Maximum Annual Subject Wages for the Employer (if Employer is selected), or Maximum Annual
Subject Wages for the Employee (if Employee is selected), and
Percent of Wages for the Employer (if Employer is selected), or Percent of Wages for the Employee
(if Employee is selected).
If your organization is not subject to SUTA and your state does not require SUTA reporting, then clear
the State Unemployment Tax check box. If your organization is not subject to SUTA but your state
does require SUTA reporting, select the State Unemployment Tax check box, then enter a percentage
of "0" in the Percentage of Wages box on the Tax tab. In both cases, the amount of FUTA will be
calculated at 6.0%. Otherwise, FUTA will be calculated at .6%.
Select a calculation method of current to allow for mid-year rate changes. Alternatively, select year-to-date to average the history of the SUTA tax calculated. With this method, if there is a rate change for
SUTA, the increase or decrease is averaged year-to-date.

State Taxes
State Taxes - Tax Tab
Access this tab using Maintain>Payroll>State Taxes.
Use this tab to specify the accounts the system should use to create entries for state withholding taxes,
and to specify the Expense and Liability Accounts to which the taxes apply. Also, you can specify a state’s
federal unemployment tax credit rate information.
Fields
State Withholding Tax
Liability Account: Enter the General Ledger liability account for state withholding. This box is required if
the State Withholding Tax box was selected on the State tab.
State Unemployment Tax
Employer, Employee: Select the party or parties that are responsible for paying State Unemployment
Taxes.
Maximum Annual Subject Wages: Enter the maximum subject wages for the employer and/or
employee.
Percent of Wages: Enter the percentage of maximum subject wages for employer and/or employee. If
zero is entered here, no SUTA tax is calculated, however, subject earnings and gross earnings are
accumulated for SUTA reporting purposes. Note that FUTA will be calculated at a rate of 6.0%.
When entering percentages, do not include a decimal point. For fractional percentages, enter the
leading zeroes. For example, enter the following numbers to indicate the following percentages:
0005 = .5%
005, 05, or 5 = 5%
50 = 50%
Liability Account: Enter the General Ledger liability account to which the State Unemployment Taxes
apply. The account should not be a subledger type account. This box is required if the State
Unemployment box was selected on the State tab.
Expense Account: if the Employer pays the tax, enter the General Ledger expense account to which
the state Unemployment Taxes apply. The account should not be a subledger-type account. This box is
MIP Fund Accounting
Payroll User's Guide
20

Chapter 2: Setting Up and Maintaining Payroll
MIP Fund Accounting
Payroll User's Guide
21
required if the State Unemployment box was selected on the State tab, and if Employer is selected on
this tab.
Federal Unemployment Tax: Select the override check box, if you need to enter changes to the FUTA
Credit Rate for the FUTA Tax. The system defaults to 5.4%, which is the maximum allowed by the
federal government. Check the federal regulations as some states are required to reduce the amount of
credit taken below 5.4%.
Override Default Credit Rate: Select this check box to enable the FUTA Credit Rate field, so that you
can manually enter the credit rate information for the selected State.
FUTA Credit Rate: Accept the default of 5.4% or enter a rate that is lower than the maximum allowed
for the Federal Unemployment tax credit. For example, if your state is required to reduce the Federal
Unemployment tax credit by .3%, you would enter 5.1% in this field. This value must be greater than or
equal to zero and less than the active Percent of Wages defined on the Maintain>Payroll>Federal
Taxes>FUTA Taxes form.

State Taxes
Tips:
Click Distribution Codes Information to open the Maintain>Payroll>Distribution Codes form, where
you can create or modify a distribution code. Each time this button is selected, a new Distribution Codes
form is opened.
All Expense and Liability Accounts must be existing General Ledger accounts, and should be either
Active or Inactive. They cannot be subledger-type accounts.
If State Withholding Tax was chosen on the previous tab, the corresponding portion of this tab is
available for entering accounting information. Likewise, if State Unemployment Tax was chosen on the
previous tab, the State Unemployment Tax portion of this tab is available.
For State Unemployment Tax, if Employer is selected, the Employee-related Maximum Subject Wages
and Percent of Wages are not available. Likewise, if Employee is selected, the Employer-related
Maximum Annual Subject Wages, Percent of Wages, and Expense Account are not available. If both of
them are selected, all boxes are available.
Even if State Unemployment Tax is employer paid, the appropriate state must be entered on the
Employee Information form (Maintain>Payroll>Employee Information - State Tax Tab). Otherwise,
State Unemployment Taxes are not calculated.
If your organization is not subject to SUTA and your state does not require SUTA reporting, then clear
the State Unemployment Tax check box. If your organization is not subject to SUTA but your state does
require SUTA reporting, select the State Unemployment Tax check box, then enter a percentage of "0"
in the Percentage of Wages box on the Tax tab. In both cases, the amount of FUTA will be calculated at
6.0%. Otherwise, FUTA will be calculated at .6%.
State Taxes - Distribution Tab
Access this tab using Maintain>Payroll>State Taxes.
Use this tab to specify how to distribute State Unemployment Taxes only if paid by the Employer. Choose
to have state unemployment amounts distributed the same way the employee's earnings are distributed;
limit distribution to the earnings used to calculate the state tax; or distribute State Unemployment Taxes
using a specific Distribution Code selected on this tab.
MIP Fund Accounting
Payroll User's Guide
22

Chapter 2: Setting Up and Maintaining Payroll
MIP Fund Accounting
Payroll User's Guide
23
Fields
Distribution of the Employer-Paid State Unemployment Tax Expense Should: Select one of the three
options (Follow Earnings on Timesheet, Follow Earnings Used to Calculate the Tax, or Use Distribution
Code) for the system to distribute the accounting entry for the employer paid SUTA. If Use Distribution
Code is selected, enter an existing Distribution Code or select one from the drop-down list. Click
Distribution Codes Information to open the Maintain>Payroll>Distribution Codes form, where you
can create or modify a distribution code. Each time this button is selected, a new Distribution Codes form
is opened.
Tips: Many grants and contracts allow State Unemployment Taxes to be charged directly to the funding
source. In this case, choose Follow Earnings on Timesheet or Follow Earnings Used to Calculate the
Tax. The State Unemployment Taxes are distributed to the same Account Codes (Fund and any other
account segments except General Ledger) as the employee's earnings. In other words, the
Distribution Codes used to distribute the employee's earnings are also used to distribute the State
Unemployment Tax. If more than one Distribution Code is used to distribute the employee's earnings,
the State Unemployment Taxes are distributed based upon a weighted average of the distributed
earnings. (State Withholding is not an expense of the employer and therefore does not require
allocation.)
If there are more funding sources to which you do not distribute State Unemployment Taxes (because
you may have a negotiated rate or State Unemployment Taxes are simply disallowed), choose the
Use Distribution Code distribution method. For this method, specify the exact Distribution Code to
distribute the State Unemployment Taxes, which may be entirely or partially distributed to overhead. If
a Distribution Code is specified on this tab, it must be an existing Distribution Code.
Other TaxesUse this form to set up tax codes for the localities in which your employees are subject to tax, as well as
most State Disability Insurance (SDI), and Temporary Disability Insurance (TDI) withholding and
expensing formulas. On the subsequent tabs, specify how to calculate and account for these other
taxes. Additionally, you will specify how to distribute the Employer tax (if any).

Other Taxes
Other Taxes - Tax Code Tab
Access this tab using Maintain>Payroll>Other Taxes.
Use this form to set up tax codes for the localities in which your employees are subject to tax, as well as
most State Disability Insurance (SDI), and Temporary Disability Insurance (TDI) withholding and
expensing formulas. On the subsequent tabs, specify how to calculate and account for these other taxes.
Additionally, you will specify how to distribute the Employer tax (if any).
On this tab, create tax codes, enter your organization's Employer Tax ID number, and specify which
withholding taxes apply: Employee and/or Employer.
Fields
Tax Code: Enter a new tax code. Make the first few characters of the code unique so that the paycheck
displays a useful identifier. We recommend limiting your entry to strictly alphabetic characters (A through
Z) or numeric characters (0 through 9), and avoiding the use of symbols.
Status: Specify the status of the tax code . When creating a new code, accept the default status, A
(Active), or select I (Inactive) or D (Discontinued), from the drop-down list. The status can be changed at
any time. Below are valid status entries and their descriptions:
Active - An active status allows payroll to be processed using this code.
Inactive - Set a code to inactive when it is not being used regularly for payroll, but it could be used at
some point. A warning message appears when attempting to use an inactive code. The warning
message is for notification only; the code can still be used in the payroll process.
Discontinued - Designate a code as discontinued when it is no longer being used. The system does not
allow payroll to be processed using a code with a discontinued status.
Title: Enter the description of the tax code.
Aatrix ® Tax Type: Click Find to select the appropriate Aatrix Tax Type for local or other tax types.
Use the Filter to display the most applicable items. This is for Aatrix reporting purposes only, and displays
on the Other Taxes List report.
Employer Tax ID: Enter the employer tax ID number for the tax code.
MIP Fund Accounting
Payroll User's Guide
24

Chapter 2: Setting Up and Maintaining Payroll
MIP Fund Accounting
Payroll User's Guide
25
Applicable Taxes Employee, Employer: Select whether the tax is paid by the Employee and/or
Employer for the designated code. Note that Employee is not an employer expense and therefore is not
distributed as an expense.
Tips:
Click Distribution Codes Information to open the Maintain>Payroll>Distribution Codes form,
where you can create or modify a distribution code. Each time this button is selected, a new
Distribution Codes form is opened.
If the Employee Applicable Taxes check box is selected, the Employee Taxes tab becomes available
and the following fields are required: A Calculation Basis, Liability Account, Calculation Type, and at
least one line in the Employee Rate table.
Likewise, if the Employer Applicable Taxes check box is selected, the Employer Taxes and
Distribution tabs become available and the following fields are required: An Expense Account, Liability
Account, Calculation Type, at least on line in the Employer Rate table must be completed, and select
the distribution that the Employer Other Tax expense should follow.
Other Taxes - Employee Taxes Tab
Access this tab using Maintain>Payroll>Other Taxes.
Use this tab to specify how the system should account for the employee withholding tax. Select the
Withholding Tax's calculation basis, the General Ledger Liability Account, and the calculation type. The
Employee Rate Table displays columns based on the Calculation Type selected. Enter
exemptions/deductions, if applicable.
Fields
Calculation Basis: Select a calculation basis to determine the subject wages to be used for calculating
the other tax.
Taxable Earnings: Earnings, benefits, and deductions used in the employee's timesheet that are
flagged as subject to other withholding tax.
Federal Withholding: Earnings, benefits, and deductions used in the employee's timesheet that are
flagged as subject to both federal and other withholding tax.

Other Taxes
State Withholding: Earnings, benefits, and deductions used in the employee's timesheet that are
flagged as subject to both state and other withholding tax.
Liability Account: Enter the General Ledger Liability Account for withholding tax. The Liability Account
must be an existing Active or Inactive General Ledger account that is not a subledger-type account.
Calculation Type: Select the calculation type and use the employee rate table to set up the tax
calculation. The following describes each calculation type:
Annual Base Tax - Taxes are calculated according to a fixed amount.
Annual Tiered Tax - Tax rates change based on income levels, multiple lines are needed.
Annual Tiered Tax with Cap Option - Tax rates change based on income levels, multiple lines are
needed.
Base Tax per Period with Minimum Wage Threshold - Taxes are calculated according to a fixed amount
after a minimum wage amount is met for the pay period.
Percent of Annual Wages with Cap Option - Taxes are calculated on a year-to-date or current pay
period basis according to a flat percentage.
Percent of Wages with Pay Cycle Cap Option - Taxes are calculated on a pay period basis according to
a flat percentage.
Employee Rate Table: The amounts and percentages entered in this table are used in the calculation of
the withholding tax. You must complete at least one line of this table if the Employee Applicable Taxes
check box was selected on the Tax Code tab. The following describes the possible Calculation Type
selection and what columns display in the Employee Rate Table:
When entering percentages, do not include a decimal point. For fractional percentages, enter the leading
zeroes. For example, enter the following numbers to indicate the following percentages:
0005 = .5%
005, 05, or 5 = 5%
50 = 50%
The system calculates up to four places to the right of the decimal point.
"Annual Base Tax" (page 29) - Enter the annual amount in the Base Tax column, the system divides the
amount by the number of annual pay periods (selected on the Maintain>Payroll>Processing
Groups>Group tab>Pay Cycle) to determine the employee's tax for each pay period. Note that the
MIP Fund Accounting
Payroll User's Guide
26

Chapter 2: Setting Up and Maintaining Payroll
MIP Fund Accounting
Payroll User's Guide
27
Exemptions/Deductions table is not available.
"Annual Tiered Tax" (page 29) - Enter the Annual amount in the Base Tax column. To apply a
maximum amount of earnings taxed, enter the amount in the Taxable Amount Under column. For a
very large number, enter 999,999,999.99. If no maximum is needed, enter 0. If there is an Exclusion
amount, the system reduces the annualized taxable wages by the exclusion amount. The system then
applies the Percent rate to the resulting number, and adds the base tax to get the total annual tax
amount. This amount is then divided by the employee's number of pay periods to get the tax
withholding for a specific pay period. (The system first locates the line in the rate table that applies to
the employee's annualized taxable wages (annualized gross taxable earnings less
exemptions/deductions).)
"Annual Tiered Tax with Cap Option" (page 30) - Enter the Annual amount in the Base Tax column. To
apply a maximum amount of earnings taxed, enter the amount in the Taxable Amount Under column.
For a very large number, enter 999,999,999.99. If no maximum is needed, enter 0. If there is an
Exclusion amount, the system reduces the annualized taxable wages by the exclusion amount. The
system then applies the Percent rate to the resulting number, and adds the base tax to get the total
annual tax amount. This amount is then divided by the employee's number of pay periods to get the
tax withholding for a specific pay period. (The system first locates the line in the rate table that applies
to the employee's annualized taxable wages (annualized gross taxable earnings less
exemptions/deductions).) The CAP is applied if the YTD Tax Withheld is greater than the calculated
Annualized Tax then subtracting the calculated Annualized Tax from the YTD Tax Withheld.
"Base Tax per Period with Minimum Wage Threshold" (page 32) - Enter the amount in the Base Tax
column. Enter the Wage Threshold amount and select the Wage Threshold Period of Calendar Month or Calendar Year. The base tax is applied once per wage threshold period after the wage
threshold is met or exceeded. Note that the Exemptions/Deductions table is not available.
"Percent of Annual Wages with Cap Option" (page 33) - Enter the Percent and select the Calculation
Method of Year To Date or Current. To apply a maximum amount of earnings taxed, enter the amount
in the Taxable Amount Under column. If there is no maximum amount of earnings taxed, the Taxable
Amount Under may be left at 0 and no maximum will be applied, or you can enter a large number such
as 999,999,999.99 to be applied as the maximum.
"Percent of Wages with Pay Cycle Cap Option" (page 34) - Enter the Percent and the Pay Cycle Cap
amount for each of the Pay Cycles (Monthly, Semimonthly, Biweekly, Weekly). The system applies a
flat percentage that is capped at a certain amount for each pay cycle.

Other Taxes
Exemptions/Deductions Code, Description, Annual Amount: For each applicable exemption/deduction,
enter a code, description, and the annual amount according to the taxing authority. This only applies to the
Annual Tiered Tax with Cap Option and Percent of Annual Wages with Cap Option Calculation Types.
Tips:
Click Distribution Codes Information to open the Maintain>Payroll>Distribution Codes form, where
you can create or modify a distribution code. Each time this button is selected, a new Distribution Codes
form is opened.
To calculate an employee's withholding taxes, the system uses the information that was entered on the
following two forms:
Other Taxes (Maintain>Payroll>Other Taxes) could be used for local taxes, State Disability Insurance
(SDI), and Temporary Disability Insurance for your organization.
Employee Information (Maintain>Payroll>Employee Information) customizes that tax information for
each employee.
For detailed calculation information, see Calculating Other Withholding Taxes.
Other Taxes - Rate Table Example
This table shows which calculation type is available to the Employee and/or Employer:
Calculation Type Employee Employer
Annual Base Tax X
Annual Tiered Tax X
Annual Tiered Tax with Cap Option X
Base Tax per Period with Minimum Wage Threshold X X
Fixed Amount X
Percent of Annual Wages with Cap Option X
Percent of Wages with Cap Option X
Percent of Wages with Pay Cycle Cap Option X
MIP Fund Accounting
Payroll User's Guide
28

Chapter 2: Setting Up and Maintaining Payroll
MIP Fund Accounting
Payroll User's Guide
29
The following are examples of the Other Taxes Calculation Types:
Annual Base Tax
Suppose you have a tax that is a set annual amount of $60, regardless of income. The annual amount
is entered in the Base Tax column. Below is an example of the Annual Base Tax:
In this case, the system simply divides the tax by the employee's number of pay periods to determine
the employee's tax per paycheck. So, employees that are paid monthly would be assessed a $5 tax
every pay period (60/12 = 5).
Annual Tiered Tax
Suppose you have a tax that has rate changes based on income levels, such as follows:
If the taxable earnings are $0.00 to $20,000.00, the base tax is $0.00, the rate is 4.86%, and there
is no exclusion amount.
If the taxable earnings are $20,000.01 to $90,000.00, the base tax is $972.00, the rate is 6.85%,
and there is an exclusion of $20,000.00.
If the taxable earnings are $90,000.01 to $150,000.00, the base tax is $5,767.00, the rate is 8.06%,
and there is an exclusion of $90,000.00.
If the taxable earnings are over $150,000.01, the base tax is $10,603.00, the rate is 7.35%, and
there is an exclusion of $150,000.00.
If no limitation on taxable earnings , enter a large value such as 999,999,999.99 as the Taxable
Amount Under value in the last row of the table.
The base taxes are entered in the Base Tax column, the rates are entered in the Percent column, the
ranges in taxable earnings are represented in the Taxable Amount Under column, and the exclusions
are entered in the Exclusion column. The cap will be applied based on the last value entered as the
Taxable Amount Under in the last row of the table. Below is an example of the Annual Tiered Tax.

Other Taxes
In this case, an employee has annualized taxable wages of $62,000. The system uses line 2 to
determine the exclusion tax as follows:
The system taxes the second tier, based on the example of a $62,000 salary, equates to $42,000
(62,000-20,000) and is taxed at 6.85%; which equals an additional $2877.00 in taxes. Finally, the
system adds the base tax of $972.00 to the second tiers tax of $2877, and gets a total annual Other Tax
of $3849.00. Assuming the employee is paid semi-monthly, the system divides $3849.00 by 24 to get
$160.375 and deducts that amount from the employee's paycheck each pay period.
Annual Tiered Tax with Cap Option
Suppose you have a tax that has rate changes based on income levels, such as follows:
If the taxable earnings are $0.00 to $30,001.00, the base tax is $1,650.00, the rate is .23%, and there
is an exclusion of $15,000.
If the taxable earnings are $30,000.01 to $60,000.00, the base tax is $5,100.00, the rate is .35%, and
there is an exclusion of $30,000.
If the taxable earnings are $60,000.01 to $9,999,999.00, the base tax is $15,600.00, the rate is .4%,
and there is an exclusion of $60,000.
If no limitation on taxable earnings, enter a large value such as 999,999,999.99 as the Taxable
Amount Under value in the last row of the table.
The base taxes are entered in the Base Tax column, the rates are entered in the Percent column, the
ranges in taxable earnings are represented in the Taxable Amount Under column, and the exclusions
are entered in the Exclusion column. The cap will be applied based on the last value entered as the
Taxable Amount Under in the last row of the table. Below is an example of the Annual Tiered Tax with
Cap Option.
MIP Fund Accounting
Payroll User's Guide
30

Chapter 2: Setting Up and Maintaining Payroll
MIP Fund Accounting
Payroll User's Guide
31
In this case, an employee has annualized taxable wages of $58,000. The system uses line 2 to
determine the exclusion tax as follows:
The system taxes the second tier, based on the example of a $58,000 salary, equates to $28,000
(58,000-30,000) and is taxed at .35%; which equals an additional $98.00 in taxes. Finally, the system
adds the base tax of $5,100.00 and gets a total annual Other Tax of $5,198.00. Assuming the
employee is paid bi-monthly, the system divides $5,198.00 by 26 to get $216.5833 and deducts that
amount from the employee's paycheck each pay period.
View detailed calculation steps
Calculate the total annualized tax amount for the current check/voucher
Gross taxable earnings multiplied by the number of pay periods to annualize the earnings
Subtract the annual exemption amount based the number of exemptions for the employee
Determine the applicable tier for the annualized subject taxable earnings
Subtract the applicable Exclusion amount from the annualized subject taxable earnings
Multiple the annualized subject taxable earnings over the exclusion by the Percentage
Add the Base Tax amount to the calculated tax amount which results in the total annualized
tax amount
Calculate the YTD tax amount withheld for the year
Calculate the maximum tax amount for the current check/voucher
Take the applicable tier Taxable Amount Under minus the Exclusion and multiplied by the
Percentage
Add the Base Tax

Other Taxes
Determine the amount of LWT tax to be withheld
Add the total annualized tax amount to the YTD tax amount
If the current YTD tax amount is less than the maximum tax for the tier
Divided the total annualized tax amount by the number of pay periods to get the LWT tax to
withhold
If the current YTD tax amount is greater than the maximum tax for the tier
Subtract the YTD tax amount from the maximum tax amount
If the tax amount is less than zero then set it to zero
Base Tax per Period with Minimum Wage Threshold
Suppose you have a flat amount of tax that must accrue once a month, after a minimum amount (or
threshold) of taxable wages are earned during that month.
If the employee that is paid semimonthly and earns $800 during the first pay period of the month, will
have the base tax of $6.00 withheld from their pay check. Then, in the second pay period of the
month, nothing will be withhold for the tax. Since the Wage Threshold of $600 was met in the first pay
period. Note that because the wage threshold period is Calendar Month, the Base Tax will reset in
the first pay period of the following months.
If the employee is paid $400 and does not meet the Wage Threshold in the first pay period of the
Wage Threshold Period, no Base Tax will be withheld on the pay check. In the next pay period, the
employee is paid $400, if the pay period occurs within the same Wage Threshold Period, and the
employee's total earnings at that time equals or exceeds the Wage Threshold
($400+$400=$800>$600), then the Base Tax $6 will be withheld.
If the Wage Threshold is not met in the Wage Threshold Period, the Base Tax will not be withheld
MIP Fund Accounting
Payroll User's Guide
32

Chapter 2: Setting Up and Maintaining Payroll
MIP Fund Accounting
Payroll User's Guide
33
from the employee's pay check for that Wage Threshold Period.
Note: The withholding tax is only accrued once per Wage Threshold Period.
Note: In the event this calculation type is applied as an employer tax, all the rules are the same
except the system will accrue a tax expense rather than withholding from the employee.
Fixed Amount
Suppose you have a tax that is set at $10 per pay period, regardless of income and paid by the
employer. The amount is entered in the Fixed Amount column. Below is an example of the Fixed
Amount Tax:
In this case, the system accrues $10 of tax expense every pay cycle the employee is paid.
Percent of Annual Wages with Cap Option
Suppose you have a withholding tax that has a maximum amount of earnings taxed at $12,000 and a
rate of .5%. Below is an example of the Percent of Annual Wages with Cap Option Tax:
In this case, if the employee earns $5,000 monthly in taxable wages, the system multiplies the rate of
.5% (entered in the Percent column) by the taxable wages ($5000x.005=$25). The employee has $25
withheld for this pay check until the maximum amount of earning $12,000 (entered in the Taxable
Amount Under column) is met which would be in the third pay period
($5000+$5000+$5000=$15000>$12000).
If the calculation Method is Current, then in the above scenario, the system calculates tax based on
the current check only. It does not consider year-to-date accrued taxes.

Other Taxes
If the Calculation Method is Year to Date, then in the above scenario the system will perform a Year to
Date approximation and adjusts the current withholding tax to match what the tax should be according
to the approximation. See Calculating Other Withholding Taxes for more information.
Note: In the event this calculation type is applied as an employer tax, all the rules are the same
except the system will accrue a tax expense rather than withholding from the employee.
Percent of Wages with Cap Option
Suppose you have a withholding tax that has a maximum amount of earnings taxed at $25,000 and a
rate of 1.2%. Below is an example of the Percent of Wages with Cap Option Tax:
In this case, if the employee earns $6,000 monthly in taxable wages, the system multiplies the rate of
1.2% (entered in the Percent column) by the taxable wages ($6000x.012=$72). The system accrues
$72 of tax expense every pay cycle from the employee until the maximum annual tax cap is met. To
determine the maximum annual tax cap, divide $25,000 (entered in the Taxable Amount Under column)
by 1.2% to get $300. To determine when the Taxable Amount Under is met, you will need to add the
current tax for each pay period to get the Total YTD Tax of $300. In this example, the Taxable Amount
Under will be exceeded in the fifth pay period ($72+$72+$72+$72+$72=$360>$300). To calculate the
Final Current Tax, subtract the Total YTD taxable wages of $24000 ($6,000 x 4) from $25,000 the
maximum annual tax cap. The difference is $1,000. And then multiply $1,000 x 1.2% to get the Final
Current Tax of $12.
Percent of Wages with Pay Cycle Cap Option
Suppose you have a flat rate with an amount cap by payroll period, such as some state disability
insurance or temporary disability insurance. In this case, an employee has a state disability insurance
base of .5% to maximum of $0.60 per week rate. Below is an example of the Percent of Wages with Pay
Cycle Cap Option.
MIP Fund Accounting
Payroll User's Guide
34

Chapter 2: Setting Up and Maintaining Payroll
MIP Fund Accounting
Payroll User's Guide
35
In this case, an employee has annualized taxable wages of $50,000 and is paid Biweekly. Their state
disability insurance has an amount cap of $1.20 per pay period. The system uses line 3 to determine
the pay cycle cap as follows:
Because the employee get's paid Biweekly, the annualized taxable wages of $50,000 are divided by
26 (the number of pay cycles in one year) to get the pay cycle cap amount of 1923.08. The rate is
multiplied by the amount to get $9.62 per pay check. However, the employee cannot pay more then
$1.20 per pay check, so $1.20 is deducted from the employee's pay check for state disability
insurance.
Other Taxes - Employer Taxes Tab
Access this tab using Maintain>Payroll>Other Taxes.
Use this tab to specify how to account for and calculate employer paid taxes, if any.
Fields
Expense Account: Enter the General Ledger expense account for the Employer's Paid Tax. The
Expense Account must be existing, Active or Inactive General Ledger account that is not a subledger-
type account.
Liability Account: Enter the General Ledger liability account for the Employer's Paid Tax. The Liability
Account must be an existing, Active or Inactive General Ledger account that is not a subledger-type
account.
Calculation Type: Select the calculation type and use the employer rate table to set up the tax
calculation. The following describes each calculation type:
Base Tax per Period with Minimum Wage Threshold - Taxes are calculated according to a fixed
amount after a minimum wage amount is met for the pay period.
Fixed Amount -Taxes require a fixed amount deduction per pay period.

Other Taxes
Percent of Wages with Cap Option - Taxes are calculated on a year-to-date or current pay period basis
according to a percentage.
Employer Rate Table: The amounts and percentages entered in this table are used in the calculation of
the withholding tax. You must complete at least one line of this table if the Employer Applicable Taxes
check box was selected on the Tax Code tab. The following describes the possible Calculation Type
selection and what columns display in the Employer Rate Table:
When entering percentages, do not include a decimal point. For fractional percentages, enter the leading
zeroes. For example, enter the following numbers to indicate the following percentages:
0005 = .5%
005, 05, or 5 = 5%
50 = 50%
The system calculates up to four places to the right of the decimal point.
"Base Tax per Period with Minimum Wage Threshold" (page 32) - Enter the amount in the Base Tax
column. Enter the Wage Threshold amount and select the Wage Threshold Period of Calendar Month
or Calendar Year. The base tax is applied once per wage threshold period after the wage threshold is
met or exceeded. Note that the Exemptions/Deductions table is not available.
"Fixed Amount" (page 33) - Enter the per pay period amount in the Fixed Amount column, the system
applies the amount as a deduction at every pay cycle.
"Percent of Wages with Cap Option" (page 34) - Enter the Percent and select the Calculation Method
of Year To Date or Current. To apply a maximum amount of earnings taxed, enter the amount in the
Taxable Amount Under column. If there is no maximum amount of earnings taxed, the Taxable Amount
Under may be left at 0 and no maximum will be applied, or you can enter a large number such as
999,999,999.99 to be applied as the maximum.
Tips:
Click Distribution Codes Information to open the Maintain>Payroll>Distribution Codes form, where
you can create or modify a distribution code. Each time this button is selected, a new Distribution Codes
form is opened.
For detailed calculation information, see Calculating Other Withholding Taxes.
MIP Fund Accounting
Payroll User's Guide
36

Chapter 2: Setting Up and Maintaining Payroll
MIP Fund Accounting
Payroll User's Guide
37
Other Taxes - Distribution Tab
Access this tab using Maintain>Payroll>Other Taxes.
Use this tab to specify how to distribute applicable employer paid taxes. (This tab is not used for
applicable employee taxes.) Choose to have employer other withholding taxes distributed the same way
the employee's earnings are distributed; limit distribution to the earnings used to calculate the other
withholding tax; or distribute employer taxes using the specific Distribution Code entered on this tab.
Fields
Distribution of Employer Other Tax Expense Should: Select one of the three options (Follow Earnings
on Timesheet, Follow Earnings Used to Calculate the Tax, or Use Distribution Code) for the system to
distribute the accounting entry for applicable employer taxes. If Use Distribution Code is selected, enter
an existing Distribution Code.
Tips:
Click Distribution Codes Information to open the Maintain>Payroll>Distribution Codes form,
where you can create or modify a distribution code. Each time this button is selected, a new
Distribution Codes form is opened.
Many grants and contracts allow employer paid taxes to be charged directly to the funding source. In
this case, choose Follow Earnings on Timesheet or Follow Earnings Used to Calculate the Tax. The
employer paid taxes are distributed to the same Account Codes (Fund and any other account
segments except General Ledger segments) as the employee's earnings. In other words, the
Distribution Codes used to distribute the employee's earnings are also used to distribute the employer
paid taxes. If more than one Distribution Code is used to distribute the employee's earnings, the
employer paid taxes are distributed based upon a weighted average of the distributed earnings.
If there are one or more funding sources to which you do not distribute employer paid taxes (because
you may have a negotiated rate or employer paid taxes are simply disallowed), choose Use
Distribution Code and specify the exact Distribution Code to distribute the employer paid taxes, which
may be entirely or partially distributed to overhead.
Processing GroupsUse this form to set up new processing groups, which are required for processing payroll. Processing
groups are used throughout the system to group several employees together so that the employees can

Processing Groups
be processed and reported together. Employees are assigned to these groups later using the
Maintain>Payroll>Employee Information form.
MIP Fund Accounting
Payroll User's Guide
38

Chapter 2: Setting Up and Maintaining Payroll
MIP Fund Accounting
Payroll User's Guide
39
Processing Groups - Group Tab
Access this tab using Maintain>Payroll>Processing Groups.
Use this form to set up new processing groups, which are required for processing payroll. Processing
groups are used throughout the system to group several employees together so that the employees can
be processed and reported together. Employees are assigned to these groups later using the
Maintain>Payroll>Employee Information form.
On this tab, create the code for the processing group and select its Pay Cycle.
Fields
Code: Enter a new processing group code. Make the first eight characters of this code unique so that the
paycheck displays a useful identifier. We recommend limiting your entry to strictly alphabetic characters
(A through Z) or numeric characters (0 through 9), and avoiding the use of symbols.
Status: Specify the status of the Processing Group Code. When creating a new code, accept the default
status, A (Active), or select I (Inactive) or D (Discontinued) from the drop-down list. The status can be
changed at any time. Below are valid status entries and their descriptions:
Active - An active status allows payroll to be processed using this code.
Inactive - Set a code to inactive when it is not used regularly, but it still may need to be used at some
point. A warning message appears when attempting to use an inactive code. The warning message is
for notification only; the code can still be used in a payroll process.
Discontinued - Designate a code as discontinued when it is no longer being used. The system does
not allow payroll to be processed using a code with a discontinued status.
Title: Enter a description of the processing group.
Pay Cycle: Select a pay cycle of W (Weekly), B (Biweekly), S (Semimonthly), or M (Monthly).
Tips: Generally, create only as many processing groups as pay cycles. However, create more than one
processing group for a specific pay cycle to segregate employees for reasons other than when they
are paid.
Note that once processing has begun for any pay date for a pay cycle, the pay cycle can no longer be
changed.

Processing Groups
Processing Groups - Pay Schedule Tab
Access this tab using Maintain>Payroll>Processing Groups.
Use this tab to specify the pay dates for the processing group that was set up on the previous tab.
Use the First Pay Date and First Pay Period End Date boxes to have the system automatically schedule
pay periods and dates based on the pay cycle that was entered on the Group tab. You can then change
the information in the Pay Dates table as appropriate. If you enter a new First Pay Date, the system
overwrites the previously entered dates.
Fields
Year: Enter the tax year for which you want to enter pay dates.
First Pay Date: Enter the date for the first payroll of the year. The system uses this information to
complete the Pay Dates table.
First Pay Period End Date: Enter the Pay Period End Date for the first Pay Period of the year. The system
uses this information to complete the Pay Dates table.
Pay Dates Pay Period, Date, Pay Period Begin Date, Pay Period End Date, SUTA Weeks: If you are
reviewing an existing processing group, the Pay Dates previously entered are displayed. If you have
begun processing payroll for a pay date within the processing group (Activities>Payroll>Calculate Payroll)
its pay date, pay period begin date, pay period end date, and number of SUTA (State Unemployment Tax)
weeks appears gray and it cannot be edited. Other dates may be changed as long as processing has not
begun. SUTA weeks must be an integer, or whole number, between 0 and 9.
Tips: Be sure to enter a valid pay date so that when you calculate payroll (using Activities>Payroll>Calculate
Payroll), the processing group is available for selection.
You must enter pay schedule information before you can process a payroll.
Once a timesheet (Timesheets>Enter Regular/Supplemental Timesheets) has been entered for a pay
date, you have begun processing a payroll for that date.
The Pay Period Begin Date and Pay Period End Date are collected for reporting SUTA weeks and
information.
MIP Fund Accounting
Payroll User's Guide
40
Chapter 2: Setting Up and Maintaining Payroll
MIP Fund Accounting
Payroll User's Guide
41
Employee InformationUse this form to enter or change information related specifically to an employee. To specify your
employees' state and other tax information, you must first set up tax codes using the
Maintain>Payroll>State Taxes form and Other Taxes form.
The system uses the information entered on the Employee Information form in calculations throughout
the system. The pay rate and federal tax information must be completed, so that later, a payroll can be
processed correctly.
In the following circumstances, more than one Employee ID must be set up for an employee so that more
than one W-2 form can be filed for that employee:
If the employee must file taxes in more than one state (because the employee worked in more than
one state during the year), refer to the documentation about the Employee Information - State Tax tab.
If the employee must file taxes in more than one locality (because the employee worked in more than
one area during the year), refer to the documentation about the Employee Information - Other Tax tab.
If the employee is a Medicare Qualified Government Employee only part of the year, refer to the
documentation about the Employee Information - W-2 tab.
Employee Information - Employee Tab
Access this tab using Maintain>Payroll>Employee Information.
Use this form to enter or change information related specifically to an employee. To specify your
employees' state and other tax information, you must first set up tax codes using the
Maintain>Payroll>State Taxes form and Other Taxes form.
The system uses the information entered on the Employee Information form in calculations throughout
the system. The pay rate and federal tax information must be completed, so that later, a payroll can be
processed correctly.
In the following circumstances, more than one Employee ID must be set up for an employee so that more
than one W-2 form can be filed for that employee:
If the employee must file taxes in more than one state (because the employee worked in more than
one state during the year), refer to the documentation about the Employee Information>Payroll>State
Tax tab.

Employee Information
If the employee must file taxes in more than one locality (because the employee worked in more than
one area during the year), refer to the documentation about the Employee Information>Payroll>Other
Tax tab.
If the employee is a Medicare Qualified Government Employee only part of the year, refer to the
documentation about the Maintain>Payroll>Employee Information>W-2 tab.
Use this tab to set up employees. Later, use employee IDs when entering timesheets for your payroll. For
Human Resource purposes, check if an I-9 is on file, enter the employee’s citizenship, marital status,
gender, and ethnicity. Also, enter their work telephone number and important dates, such as Hire, Birth
date and any action item dates. If the Fraud prevention options were selected on the Organization>Set Up
Alerts form and a system User ID is associated with an Employee, if in the future, the employee is
terminated, the system can automatically change the User ID status to Inactive and block access to your
organization's system.
Important! If you cannot add a user, have your Administrator verify your menu rights in the organization
using Security>Set Up Organization Menu. Note that when adding/modifying user rights for the
Payroll>Maintain>Employee Information menu, the Display Sensitive Data check box is automatically
selected. If you clear the Display Sensitive Data check box, the system automatically clears the Add
New Records check box as well. So that the user or group will not be able to add New Records. You will
need to select the Add New Records check box after selecting the Display Sensitive Data check box.
Fields
Employee ID: Enter a new employee ID. We recommend limiting your entry to strictly alphabetic
characters (A through Z) or numeric characters (0 through 9), and avoiding the use of symbols, such as: , |
" '.
Status: Enter a status of (A) Active, (I) Inactive, or (D) Terminated for the employee ID.
First, MI, Last Name: Enter the first name, middle initial, and last name for this employee. A middle initial
is not required.
Social Security Number: Enter the social security number for this employee.
If a social security number is not entered, the following message displays.
MIP Fund Accounting
Payroll User's Guide
42

Chapter 2: Setting Up and Maintaining Payroll
MIP Fund Accounting
Payroll User's Guide
43
Important! In order to view the entire Social Security Number, you must have been granted Display Sensitive Data rights for Maintain>Payroll>Employee Information in the active organization. These
rights are granted by the Administrator using Security>Set Up Organization Menus form. Otherwise,
only the last four digits of the Social Security Number displays.
I-9 on File: Select this check box if an I-9 has been filed.
Citizenship: Enter the country in which the employee is a citizen.
Marital Status: Enter the employee's marital status, such as single, married, divorced, or widowed.
Gender: Enter the employee's gender, such as male or female. This editable field is limited to 20
characters.
Ethnicity: Enter the ethnic origin of the employee.
Work Telephone: Enter the work telephone number for this employee.
User ID: Select the employee's system user ID. User IDs are set up by the Administrator using
Security>Maintain Users. If the Fraud prevention options were selected by the Administrator in the
system (Organization>Set Up Modules>Payroll) and a system User ID is associated to an employee ID,
one of the following could occur:
Employee Information
If the Lock Employee ID and User ID Association option is selected in the system, this field will change
to display only after a User ID is selected and the form is saved.
If the Enable Deactivation of User ID Upon Employee Termination option is selected in the system and
the employee's status is changed to D-Terminated, the system automatically changes the User ID
status to Inactive, which would block that user's access to your organization's database.
If the Enable Deactivation of User ID Upon Employee Termination and Warn Upon Employee Termination Linked User ID Deactivation options are selected in the system and the employee's status
is changed to D-Terminated, the system displays a warning message before automatically changing the
User ID status to Inactive. You can choose to save the status changes of the employee ID and the
system User ID, return to the form and change the employee's status to anything other than D-
Terminated, or return to the form and delete the User ID associated with the Employee ID.
If all three options are selected in the system and the employee's status is changed to D-Terminated,
the system displays a warning message before automatically changes the User ID status to Inactive.
You can choose to save the status changes of the employee ID and the system User ID or return to the
form and change the employee's status to anything other than D-Terminated. You will not be able to
delete or change the User ID association with the Employee ID.
Dates Hired, Last Day Worked, Birth Date, Action, Terminated: Enter the hire date, last day worked,
birthday, termination date, or action date for this employee.
Tips: Employee data can be printed using Reports>Payroll>Lists>Employee Information List.
This form allows you to enter an Action date. This is an optional date field used for internal purposes, as
appropriate for your organization. For example, if an employee was placed on probation, this could be
the date the probation begins (or ends).
The system uses the information you enter on the Employee Information form in calculations throughout
the system. If you do not complete the pay rate and federal tax information on this form, the system uses
default values in calculations that use that information. In such a case, you must return to the form and
complete all the information before you can process a payroll correctly.
Although a hire date is not required when you enter an employee's information, a hire date is required to
produce a SUTA report for the employee.
Employee Information - Address Tab
Access this tab using Maintain>Payroll>Employee Information.
MIP Fund Accounting
Payroll User's Guide
44

Chapter 2: Setting Up and Maintaining Payroll
MIP Fund Accounting
Payroll User's Guide
45
Use this tab to enter or update the address and emergency contact information for an employee.
Fields
Employee Residence Address, City, State, ZIP, Country, Voice, Fax, Email: Enter the employee's
home address, including the city, state, ZIP code, country, telephone and fax numbers, and email
address. Only one email address per employee residence can be entered.The Country field only
contains United States in the drop-down list; however, you can enter more countries.
Emergency Contact Name, Voice, Relationship, Email: Enter an emergency contact name, including
the contact's telephone number, email address, and relationship to the employee. Only one email
address per employee emergency contact can be entered.
Tips: Although an address is not required when you enter an employee's information, an address is required
to produce a SUTA report or W-2 form for the employee.
The Employee Residence Email address also displays in the Electronic Employee W-2 Email address
on the W-2 tab.
The Employee Residence Email and Emergency Contact Email addresses are hyperlinks. When
clicking the respective email address, the local email client opens with the email address in the To:
field.
Employee Information - Job and Pay Tab
Access this tab using Maintain>Payroll>Employee Information.
Use this tab to specify job and pay-related information for an employee.
Enter pay information based on either a Salaried or Hourly basis. If a salary is entered for an employee,
the system calculates an Equivalent Hourly Rate for use in calculations that require an Hourly Rate, such
as wages, benefits, or deductions.
Fields
Processing Group: Enter the employee's processing group code. Note that if an employee changes
processing groups, any existing Regular and Supplemental Timesheets for this employee must be
deleted prior to making changes to the processing groups. If the employee has only a Default Timesheet,
it is automatically updated to the new processing group.

Employee Information
Class: Enter the job class for the designated employee.
Position: Enter the employee's job title.
Occupation Code: Enter the employee's occupational code. This entry will be passed to the state tax filing
forms.
Employee Type: Enter an employee type, such as part-time or full-time.
Military Status: Enter a military status, such as active, retired, or none.
Driver's License
Number: Enter the employee's driver's license number.
State: Enter the state where the license was issued.
Expiration: Enter the date when the license expires.
Class: Enter a vehicle class, such as C or A.
Pay Rate Salaried Salary per Pay Cycle, Equivalent Hourly Rate for Calculations: Enter the salary per
pay cycle and the equivalent hourly rate for calculations for a salaried employee.
Pay Rate Hourly Hourly Rate: Enter the hourly rate for an hourly employee. This rate is printed on the
check stub.
Direct Deposit: Select this check box if the employee's pay is directly deposited into a bank account.
(Enter the employee's direct deposit information on the Direct Deposit tab of this form if using the Direct
Deposit module.)
Important! In order to view the Direct Deposit check box, you must have been granted Sensitive Data
rights for Maintain>Payroll>Employee Information. These rights are granted by the Administrator using
Security>Set Up Organization Menus form.
MIP Fund Accounting
Payroll User's Guide
46

Chapter 2: Setting Up and Maintaining Payroll
MIP Fund Accounting
Payroll User's Guide
47
Tips: You can designate classes and positions to employees, and use these designations for reporting
purposes.
If you select the Direct Deposit check box and you are not using the Direct Deposit module, check
information is written to an external file for the designated employee; a voucher is printed in place of a
check. Print a report with check information using the Reports>Payroll>Processing>Voucher Register.
Note this is not an ACH (Automated Clearing House) file, but it can be read by your bank's proprietary
software to create an ACH file for transmission.
If you are using the Direct Deposit module, enter the employee's banking information on the Direct
Deposit tab, and then create and send the direct deposit file to your financial institution using the
Activities>Payroll>Create/Send Direct Deposit File form.

Employee Information
Employee Information - Direct Deposit Tab
Access this tab using Maintain>Payroll>Employee Information. It is only available if the Direct
Deposit or Payroll Link module is installed. You must have Sensitive Data rights to view all of the
fields. These rights are granted by the Administrator using Security>Set Up Organization
Menus.
Use this tab to set up the employee's direct deposit information—Bank Routing Number, Account Number,
Percentage, Amount, and the Type of account. You can also determine whether or not to send a Pre-note
to the employee's bank.
Please note that the Direct Deposit check box must be selected on the Maintain>Payroll>Employee
Information - Job and Pay Tab, for this employee, in order to enter information on this tab.
Important! In order to view the Account Number field, you must have been granted Sensitive Data rights
for Maintain>Payroll>Employee Information. These rights are granted by the Administrator using
Security>Set Up Organization Menus form.
More...
Use Pre-Notes to verify the file. The first payroll calculated with Direct Deposit creates a check and a
Pre-Note 0.00 amount record that is sent to your financial institution. When the next payroll is
calculated for the employee, the normal Direct Deposit record is created and sent—no check is sent—
only the voucher prints. (This payroll must be 3 banking days after the Pre-Note.)
The pre-note function is based on the last changed setting on either the Maintain>Payroll>Employee
Information - Direct Deposit Tab or by the Administrator on the Organization>Set Up
Modules>Electronic Funds Transfer - Bank Information Tab.
Fields
Banking Information: Use this table to enter the bank information needed to set up direct deposit for this
employee. The employee can distribute the funds (Net Pay) between several different accounts and
financial institutions.
Bank Routing Number: Enter the employee's bank routing number. This is the 9 digit routing number
that prints on the bottom of the check or deposit slip.
Account Number: Enter the employee's checking or savings account number.
MIP Fund Accounting
Payroll User's Guide
48

Chapter 2: Setting Up and Maintaining Payroll
MIP Fund Accounting
Payroll User's Guide
49
% (Percentage): Enter the percentage of the Net Pay to be deposited into the employee's bank
account. At least one line item must contain a percentage, and the Percentage (%) column must total
100, regardless of whether any amounts have been entered.
When entering percentages, do not include a decimal point. For fractional percentages, enter the
leading zeroes. For example, enter the following numbers to indicate the following percentages:
0005 = .5%
005, 05, or 5 = 5%
50 = 50%
The system calculates up to four places to the right of the decimal point.
Amount: Enter the amount to be deposited into the employee's bank account. During transfer, the
system first distributes monetary amounts. If more than one line has an amount, then the system
distributes amounts in the order in which they were entered. Any remaining amount is distributed
according to percentages.
Type: Select the type of account for the funds to be deposited—either Checking or Savings. The
system displays either a code of 22 for checking deposit or 32 for savings deposit.
Disable Pre-note: Select this check box so that a pre-note for this employee is not created and sent to
the financial institution. The system sends pre-notes based on the last changed setting in either the
Maintain>Payroll>Employee Information - Direct Deposit Tab or by the Administrator on the
Organization>Set Up Modules>Electronic Funds Transfer - Bank Information Tab. This box is only
available if you are entering a new employee or making changes to the Bank Routing Number,
Account Number, or Type.
In order for the Pre-note control to work at the Employee level, the employee record must be updated
after any updates occur at the Bank Account level.
Disable Pre-note Last Updated: The system displays the date of the last time the pre-note check box
was cleared.
Pre-note Sent: The system displays the date when the pre-note was sent.
Banking Information Last Updated: The system displays the date for the last time the bank routing
number, account number, percentage, amount, and type was changed for this employee.
Voucher Available: The system displays the date when the payroll voucher was available.

Employee Information
Tips: To print the data entered on this tab, use Reports>Payroll>Lists>Employee Bank Information List.
Use the Amount column when certain line items that have fixed amounts need to be deposited into the
employee's account.
It is a good idea to obtain a voided check or deposit slip from the employee, in order to have the bank
routing number and account number needed to complete this tab.
To display a warning message every time MIP Fund Accounting system is opened and there is a Direct
Deposit file that has not been transmitted, select the "Warn if Direct Deposit File Not Sent" check box on
the Options>Customize Workstation Settings>Alerts tab in the system.
Employee Information - Federal Tax Tab
Access this tab using Maintain>Payroll>Employee Information.
Use this tab to enter the employee's federal tax information.
Fields
Filing Status Single, Married, Head of Household: Select a marital status of single, married, or head of
household for this employee. This information is for Federal Income Tax purposes only.
Nonresident Alien: Check this box if the employee is a Nonresident alien.
Exempt from Withholding: Check this box if the employee is exempt from federal tax withholding.
Employee completed W-4 Prior to 2020: Select if the W-4 for the employee was filled out prior to 2020.
Note: Some states utilize the federal W-4 to calculate state withholding. If the employee has completed
their W-4 in 2020 and forward, this setting may affect the state tax withholding calculations for such
states.
W-4 2020 and Forward
Fill out these fields if the employee completed their W-4 in 2020 or after.
Multiple Jobs: Select if the employee is employed at multiple jobs.
Dependent Amount: Enter the amount the employee claims for their dependents.
Other Income Amount: Enter the amount of other income the employee claims.
MIP Fund Accounting
Payroll User's Guide
50

Chapter 2: Setting Up and Maintaining Payroll
MIP Fund Accounting
Payroll User's Guide
51
Deduction Amount: Enter the amount of deductions the employee claims.
Additional Withholding: Enter the amount of any additional Federal Income Tax withheld, to be
deducted on a per pay period basis.
W-4 Prior to 2020
Fill out these fields if the employee completed their W-4 prior to 2020.
Number of Withholding Allowances: Enter the number of Federal Income Tax exemptions.
Additional Withholding: Enter the amount of any additional Federal Income Tax withheld, to be
deducted on a per pay period basis.
Tips: The information on this tab pertains to Federal Income Tax.
An employee's pay period is designated by the processing group to which the employee is assigned
(Maintain>Payroll>Employee Information>Job and Pay tab).

Employee Information
Employee Information - State Tax Tab
Access this tab using Maintain>Payroll>Employee Information.
Use this tab to enter the employee's state tax information. The State Withholding Tax boxes change
according to the state selected. Other boxes could appear on this tab, depending on the state that is
selected.
Note: Do not change the State Tax setup for an existing employee, for whom a paycheck has been
entered. Instead, create another Employee ID, using the employee's current information and the new
State Tax setup. At year-end a single W-2 form for each Employee ID is created based on the
employee's payroll information. The system reports information for only one state, per Employee ID; any
additional State Tax information is not calculated or reported. Because you cannot create multiple W-2
forms per Employee ID, nor report more than one state on a single W-2, a separate Employee ID must
be created for each W-2 you want to file.
Fields
State Unemployment Tax State: Select the appropriate state code for State Unemployment Tax. The
only states available for selection are the ones that were previously set up using the
Maintain>Payroll>State Taxes form.
State Withholding Tax
State: Select a state code. The only states available for selection are the ones that were previously set
up.
Additional Withholding: Enter the amount for additional withholding to be deducted on a per pay period
basis.
Note: Some states utilize the federal W-4 to calculate state withholding. If the employee has completed
their W-4 in 2020 and forward and the box on the Federal Taxes tab is unchecked, the state tax
calculation may change to accommodate the new rules. Additionally, the Withholding Allowances value
may be ignored as allowances have been discontinued for W-4 2020 and forward.
Filing Status: Select a filing status from the drop-down list.
MIP Fund Accounting
Payroll User's Guide
52
Chapter 2: Setting Up and Maintaining Payroll
MIP Fund Accounting
Payroll User's Guide
53
Exemptions, Deductions, Allowances for Deductions, Credits: Enter a number of exemptions,
deductions, allowances, or credits for State Withholding Tax. The boxes shown here vary according to
the tax laws in the state for which information is being entered.
Spouse SSN: If the withholding tax state is Puerto Rico, enter the social security number of the
employee's spouse if the employee is married. The system no longer writes the social security number
to the MMREF file; however, Civil Status continues to be set to "M" for married. If you have entered a
number in this field and "S" for single, this field is empty.
Important! In order to view the entire Spouse SSN field, you must have been granted Display Sensitive Data rights for Maintain>Payroll>Employee Information in the active organization. These
rights are granted by the Administrator using Security>Set Up Organization Menus form. Otherwise,
only the last four digits of the Spouse Social Security Number displays.
Tips: An employee's pay period is designated by the processing group to which the employee is assigned
(Maintain>Payroll>Employee Information>Job and Pay tab).
The state tax information for Mississippi, Marianas Protectorate, Massachusetts, Republic of Marshall
Islands, and Republic of Palau are slightly more complex.
Mississippi State Tax
If the filing status is married and both spouses are working, the spouses may divide the joint personal
exemption of $12,000 between them, in multiples of $500. Therefore, the number of exemptions
specified on this form need to be multiplied by $500 to reach the appropriate exemption amount (such as
24 x $500 = $12,000).
Consequently, enter the following numbers of exemptions in order to get the correct standard exemption
amounts:
Single: 12 Exemptions ($500 x 12 = $6000)
Head of Household: 19 Exemptions ($500 x 19 = $9500)
Married: 24 Exemptions ($500 x 24 = $12,000)
Dependents: 3 Exemptions each ($500 x 3 = $1500)

Employee Information
Marianas Protectorate Tax Code
The Commonwealth of the Northern Marianas (MP) requires the calculation of two taxes—Chapter 2 taxes
and Chapter 7 taxes. To accommodate these separate taxes, two state tax codes—SWT and SWT2—are
created during the calculation process (Activities>Payroll>Calculate Payroll). These state tax codes are
only available if you have set up the employee as a resident of MP (Maintain>Payroll>Employee
Information).
To view or modify these amounts, select the MP employee using the Activities>Payroll>Review/Modify
Calculated Payroll form. On the taxes tab, the Tax Type drop-down list displays "SWT-State Withholding
Tax-C2" for Chapter 2 tax and "SWT2-State Withholding Tax-C7" for Chapter 7 tax.
In order to enter manual checks (Activities>Payroll>Enter Manual Checks) and/or set up or adjust entries
(Activities>Payroll>Set Up/Adjust Employee Balances), the employee must be established as an MP
resident on the Maintain>Payroll>Employee Information>State Tax tab.
For more information, review the documentation for the Maintain>Payroll>State Taxes form.
Massachusetts State Tax
If the employee files a blind exemption, this must be indicated in the Blind Exemption Factor box.
Republic of Marshall Islands Tax Code
The Republic of Marshall Islands (MH) requires the calculation of a State Withholding tax and two
separate Federal withholding taxes, Social Security and Medicare. Social Security and Medicare taxes are
to be paid by the employee and employer as a percentage of employee wages and cannot exceed the
Quarterly wage base limit (calculated on a calendar quarter basis).
To accommodate these separate taxes, you must set up a tax code for MH and specify the accounts the
system should use to create entries for state withholding taxes (Maintain>Payroll>State Tax). The system
calculates the state tax, Social Security, and Medicare using the Maintain>Payroll>Employee
Information>State Tax tab.
To view or modify the State Withholding tax amount, select the MH employee using the
Activities>Payroll>Review/Modify Calculated Payroll form. On the taxes tab, the Tax Type drop-down list
displays "SWT - State Withholding Tax" and the Jurisdiction column displays "MH."
In order to enter manual checks (Activities>Payroll>Enter Manual Checks) and/or set up or adjust entries
(Activities>Payroll>Set Up/Adjust Employee Balances), the state code must be MH on the
Maintain>Payroll>Employee Information>State Tax tab.
For more information, review the documentation for the Maintain>Payroll>State Taxes form.
MIP Fund Accounting
Payroll User's Guide
54
Chapter 2: Setting Up and Maintaining Payroll
MIP Fund Accounting
Payroll User's Guide
55
Republic of Palau Tax Code
The Republic of Palau (PW) requires the calculation of a State Withholding tax and a separate Federal
withholding tax, Social Security. The Social Security tax is to be paid by the employee and employer as a
percentage of employee wages and cannot exceed the Quarterly wage base limit (calculated on a
calendar quarter basis).
To accommodate this separate tax, you must set up a tax code for PW and specify the accounts the
system should use to create entries for state withholding taxes (Maintain>Payroll>State Tax). The
system calculates the state tax and Social Security using the Maintain>Payroll>Employee
Information>State Tax tab.
To view or modify the State Withholding tax amount, select the PW employee using the
Activities>Payroll>Review/Modify Calculated Payroll form. On the taxes tab, the Tax Type drop-down list
displays "SWT-State Withholding Tax" and the Jurisdiction displays "PW."
In order to enter manual checks (Activities>Payroll>Enter Manual Checks) and/or set up or adjust entries
(Activities>Payroll>Set Up/Adjust Employee Balances), the state code must be PW on the
Maintain>Payroll>Employee Information>State Tax tab.
For more information, review the documentation for the Maintain>Payroll>State Taxes form.
Employee Information - Other Taxes Tab
Access this tab using Maintain>Payroll>Employee Information.
Use this tab to enter the employee's other tax information. Multiple localities for each employee can be
entered. Note that all other tax information is optional.
Fields
Assign Other Taxes
Tax Code: Select a tax code for the employee. These codes were set up using
Maintain>Payroll>Other Taxes.
Additional Withholding: Enter any additional tax to withhold from each paycheck.
Exemptions/Deductions Code, Description, Number: Select an exemption/deduction code, it's
description, and the number of exemptions/deductions. The number entered is multiplied by the annual

Employee Information
amount entered for the exemptions/deductions code. These exemptions/deductions were set up on the
Maintain>Payroll>Other Taxes>Employee Taxes tab and are not always applicable.
Tips: The employee pays withholding as Employee Paid Tax (LWT), and the employer pays withholding as
Employer Paid Tax (LER).
An employee's pay period is designated by the processing group to which the employee is assigned
(Maintain>Payroll>Employee Information>Job and Pay tab).
Employee Information - W-2 Tab
Access this tab using Maintain>Payroll>Employee Information.
Use this tab to enter information about this employee's W-2 and to indicate if this is a Medicare Qualified
Government Employee (MQGE).
When a W-2 Box 13 item is selected, the system prints the information on the employee's W-2.
Also, select to issue the employee's W-2 and/or 1095 electronically using Aatrix® and include the
employee' email address.
Fields
Medicare Qualified Government Employee: Select this check box if you are a government employer and
the employee is a Medicare Qualified Government Employee.
Box 13 Items Statutory Employee, Retirement Plan, Third-Party Sick Pay: Select the check box for
each category that applies to this employee.
Electronic Employee W-2/1095
Issue employee W-2 electronically using Aatrix®: Select the check box if the employee wants Aatrix®
to issue their W-2 electronically.
Issue Electronic Form 1095: Select the check box if the employee wants Aatrix® to issue their Form
1095 electronically. Aatrix® will notify the employee by email and the employee Form 1095 for
employee electronic download.
Email: The system displays the email address if available; otherwise, enter the employee's email
address to send their W-2/1095 notification. (The default is the Employee Residence Email address
MIP Fund Accounting
Payroll User's Guide
56

Chapter 2: Setting Up and Maintaining Payroll
MIP Fund Accounting
Payroll User's Guide
57
entered on the Maintain>Payroll>Employee Information>Address Tab.) Only one email address per
employee can be entered, and the address is required if the Issue employee W-2 electronically using
Aatrix check box is selected. Aatrix® will notify the employee by email and the employee W-2s for
employee electronic download.
Tip: To see how W-2 data is set up in the system, see the Tips section of the "Calculate W-2s" (page
303) information. (Reports>Payroll>Payroll Tax Worksheets>Calculate W-2 Information).
Medicare Qualified Government Employees
If you are a government employer—not a private sector employer—you may have Medicare Qualified
Government Employees. Note that a Medicare Qualified Government Employee's wages and tips are
subject to withholding only for Medicare, not Social Security, for part or all of the year.
Checking the Medicare Qualified Government Employee box on the "Employee Information" (page 41)
form tells the system to classify the employee as MQGE. This affects certain reports, as well as internal
edits that the system makes to the employee's data.
Checking the Medicare Qualified Government Employee box does not affect tax calculations.
Special Earning, Benefit, and Deduction Codes need to be set up for Medicare Qualified Government
Employees. That way, employees who use a standard tax setup (FIT, FUTA, Social Security, and
Medicare) will have one set of payroll codes, and employees with an MQGE tax setup (FIT, FUTA, and
Medicare) will have another set of payroll codes.
If an employee is an MQGE for only part of the year, two Employee IDs must be created for the
employee: one for MQGE W-2 filing, and one for standard W-2 filing. This is because, at year-end, the
system creates a single W-2 form for each Employee ID, based on the employee's payroll information.
The system only supports split filing for Medicare Qualified Government Employees, for which you must
file two W-2 forms. Therefore, because the system cannot create multiple W-2 forms for one Employee
ID, a separate Employee ID must be created for each W-2 you want to file.
Employee Information - Email Tab
Access this tab using Maintain>Payroll>Employee Information.
Use this tab to select whether employee payroll vouchers should be printed on paper and/or emailed. By
default, payroll vouchers are printed. However, you can elect to email only, print only, or email and print.
If the employee wants to receive vouchers by email, enter the email address and select the appropriate
process template.

Employee Information
In order to Save the form, a selection of print and/or email must be selected for the Payroll Voucher
section. Also, if email is selected, an Email Address must be entered and a Process Template must be
selected or accept <Default>.
Note: Process Templates are created using Maintain>Payroll>Email Templates. Also, if a customized
Process Template gets deleted, the <Default> Process Template will be used. Be sure to create a
<Default> Process Template for each process type.
To Set Up an Employee to Receive Emailed Direct Deposit Vouchers:
1. The Administrator must have first set up the SMTP connection information in the system
(Organization>Organization Information - SMTP Email Tab).
2. Next, you must have previously set up a default email process template for the Voucher to use for all
Employee's with Direct Deposit in the Payroll module (Maintain>Payroll>Email Templates).
If you do not want to use a generic form, you can create customized process templates. Be sure to
select the right one on the appropriate Employee’s Email Tab.
3. Then, using the Maintain>Payroll>Employee Information>Email Tab, select whether to print and/or
email the employee's Payroll Voucher.
To continue printing just paper vouchers, accept the defaults and skip to Step 4.
To go paperless, clear the Print Paper Voucher check box (to no longer print a copy of the direct
deposit payroll voucher for this employee). Then select the Email Voucher check box and enter the
Email Address that will be used to send the payroll voucher to the employee. Verify the email
address is correct.
To print and email a payroll voucher, select both the Print Paper Voucher and Email Voucher check
boxes, and enter an email address that will be used to send payroll vouchers to the employee.
Verify the email address is correct.
Select a Voucher Process Template, or accept <Default>.
Note: Use the Calculate Payroll and Review/Modify Calculated Payroll forms to setup and filter the
employee payroll information. Click the Print/Email Check/Vouchers form to first print and then email
the pay checks, then the direct deposit vouchers for employees for the select pay period. You will be
given an opportunity to preview both the pay stub and then the voucher information during this
process prior to sending the email.
4. Click Save.
MIP Fund Accounting
Payroll User's Guide
58

Chapter 2: Setting Up and Maintaining Payroll
MIP Fund Accounting
Payroll User's Guide
59
Troubleshooting
You should communicate to your employees, who elect to receive payroll vouchers via email, that if
they have never received any voucher emails from your organization to do the following:
Check to see if their email server is full or blocking your email address; this could cause them not to
receive emails from you. This could be resolved by having your employees add your organization’s
email address to their address book.
Ask that they check their mailbox regularly and ensure that your organization’s email address is not
being marked as SPAM by their mail server. This could be resolved by having your employees
check their spam filter folder and marking your emails as “not spam.” This will clear the way for
future emails from your organization.
Your employee does not have their Direct Deposit information set up in the system.
On the Organization>Set Up Modules>Electronic Funds Transfer, ensure that all the tabs on the
form are complete.
On the Maintain>Payroll>Employee Information>Job and Pay Tab, ensure that the Direct Deposit
check box is selected.
On the Maintain>Payroll>Employee Information>Direct Deposit Tab, ensure that the Bank Routing
Number, Account Number, Percentage, Amount, and Type are complete.
You only have customized Process Templates and the system changed your Email option to Print.
If you do not set up a <Default> Process Template (Maintain>Payroll>Email Templates form) for
the Vouchers and later delete the customize process template being used on the
Maintain>Payroll>Employee Information>Email Tab, the system will change your Email option to
Print for every employee that used that customize process template on the
Maintain>Payroll>Employee Information>Email Tab.
Note that if you are printing and emailing vouchers, the system uses the print Laser format on the Load
Checks/Vouchers Print and Email Tab. The Continuous format is not available
Fields Payroll Voucher:
Print Paper Voucher: Accept the default, or clear this check box if you do not want to print paper a
payroll voucher for this employee.

Employee Information
Important! For Direct Deposit Users: In order to be able to email a Payroll Voucher, the Direct Deposit
check box must be selected for this employee on the Maintain>Payroll>Employee Information>Job and
Pay Tab and the Disable Pre-Note check box is selected on the Maintain>Payroll>Employee
Information>Direct Deposit Tab. If this check box is not selected, the employee is still receiving a printed
pay check and cannot receive an emailed voucher from the system.
Email Voucher: Select this check box to email electronic payroll vouchers to this employee.
Email Addresses: If the Email Voucher check box is selected, you must enter an email address where
the voucher will be sent. The system defaults to the employee's Residence Email address entered on
the Address tab.
If you are entering multiple email addresses, each address must be separated with a semicolon and a
space. Example, [email protected]; [email protected].
Voucher Process Template: Accept the <Default> template, or select one from the drop-down list.
Process Templates were created for the Employee Voucher Process Type using
Maintain>Payroll>Email Templates. The template contains defined email routing information (From, Cc,
and Bcc email addresses), a subject line, and a customized message.
Tip: To print the data entered on this tab, use Reports>Payroll>Lists>Employee Bank Information List.
Employee Information - Notes Tab
Access this tab using Maintain>Payroll>Employee Information.
Use this tab to record any specific notes or reminders about this employee. These notes are useful as
reminders of historical events or information about the employee. For example, if an employee received a
promotion, you can note title and salary changes.
This is a free-form area; each line can be longer than the width of the form. Press Enter to move down to
the next line.
Tip: These notes can be printed using Reports>Payroll>Lists>Employee Information List.
MIP Fund Accounting
Payroll User's Guide
60

Chapter 2: Setting Up and Maintaining Payroll
MIP Fund Accounting
Payroll User's Guide
61
Employee Information - User Defined Fields Tab
Access this tab using Maintain>Payroll>Employee Information.
Use this tab to enter employee data for any user defined fields. These fields were previously created and
assigned characteristics by the Administrator using the Organization>Set Up User Defined Fields -
Setup Tab. When entering data in the Value column, you must adhere to the pre-defined settings, such
as field type, length, and decimal places. For example, if the field was set up with a field type of Number,
you cannot enter alphabetic characters for that field.
More...
Once fields have been created, the system automatically creates the User Defined Fields tab.
Otherwise, the Employee Information form is available, but without the tab and any user defined
fields.
Fields
Display Name: The system displays the name that was assigned to this field. This name cannot be
edited here, but it can be changed by the Administrator on the Organization>Set Up User Defined
Fields>Setup tab.
Value: Enter the data for this user defined field. Data for Currency fields can only be entered in US Dollar
(USD). This field is required for new codes if the "Required" check box was selected by the Administrator
when the field was created in the system.
Tip: Employee data can be printed using Reports>Payroll>Lists>Employee Information List.
Employee Information Buttons
Rename Employee ID: Use this button to rename an Employee ID. It is
available when the Employee Information form is blank (no Employee ID is
selected.)
Manage Attachments: Use this button to attach, view, or delete a document.
The button changes to when attachments already exist.

Employee Information
Rename Employee ID
Access this form using Maintain>Payroll>Employee Information> Rename Employee ID.
Use this form to rename an Employee ID. This would be helpful if, for example, an employee changed her
name through marriage. Keep in mind that once the rename process starts (after clicking OK), it cannot be
canceled.
Note: This form is only available when the Maintain>Payroll>Employee Information form is blank (no
Employee ID is selected). Click the New button to open a blank form.
Fields
Current Employee ID: Select an existing Employee ID from the drop-down list.
New Employee ID: Enter a new, unique Employee ID. The Drop-Down Lookup displays existing
Employee IDs that are already in use and cannot be used.
Comments: Enter any comments or reasons for changing the Employee ID, such as date of change, old
Employee ID. This will provide an audit trail, so you can quickly identify the renamed Employee IDs.
Tips: To print the data entered on this form, use Reports>Payroll>Lists>Employee Information List.
Employee IDs can be renamed if their status is Active or Inactive.
An Employee ID cannot be renamed if there are pending transfers, regular or supplemental timesheets,
calculated payrolls, or pending direct deposits.
Since you are only renaming the Employee ID, all employee information is kept intact.
How Do I Rename an Employee ID
This process simply renames the Employee ID in all records.
1. Open the Maintain>Payroll>Employee Information form. Click the New button to open a blank form.
2. Click Rename Employee ID to open this form.
3. Select the Current Employee ID that you want to rename.
MIP Fund Accounting
Payroll User's Guide
62

Chapter 2: Setting Up and Maintaining Payroll
MIP Fund Accounting
Payroll User's Guide
63
4. Enter a New Employee ID.
5. Enter any Comments.
6. Click OK. The original Employee ID is changed to the new ID, and all employee records are kept
intact.
Earning CodesUse this form to add a new Earning Code or edit an existing one. Distribution of Earnings is determined
on the timesheet.
Earning Codes must be set up before using the Activities>Payroll>Set Up/Adjust Employee Balances
form or any of the other Payroll Codes forms (Maintain>Payroll>Benefit Codes, Deduction Codes,
Workers' Compensation Codes, and Leave Codes). Note that Earning Codes are used later, when
entering timesheets and manual checks (Timesheets and Activities>Payroll> menus), and when
reviewing/modifying calculated payroll (Activities>Payroll> menu). Furthermore, the system uses the
Earning Codes specified when it is calculating pay, creating an accounting entry for payroll, calculating
and reporting W-2 information and other tax reports, and reporting.
Earning Codes - Earning Tab
Access this tab using Maintain>Payroll>Earning Codes.
Use this form to add a new Earning Code or edit an existing one. Distribution of Earnings is determined
on the timesheet.
Use this tab to set up earnings. Later, use an earning code when entering employee’s timesheets for
your payroll.
You must assign a General Ledger expense account on this tab, in order to create an accounting entry.
Fields
Code: Enter an Earning Code. You should make the first eight characters of the code unique so that the
paycheck displays a useful identifier. We recommend limiting your entry to strictly alphabetic characters
(A through Z) or numeric characters (0 through 9), and avoiding the use of symbols.
Status: Specify the status of the Earning Code. When creating a new code, accept the default status, A
(Active), or select I (Inactive) or D (Discontinued), from the drop-down list. The status can be changed at
any time. Below are valid status entries and their descriptions:

Earning Codes
Active - An active status allows payroll to be processed using this code.
Inactive - Set a code to inactive when it is not used regularly for payroll, but it could be used at some
point. A warning message appears when attempting to use an inactive code. The warning message is
for notification only; the code can still be used in a payroll process.
Discontinued - Designate a code as discontinued when it is no longer being used. The system does not
allow payroll to be processed using a code with a discontinued status.
Title: Enter the title of the Earning Code.
Expense Account: Enter the General Ledger expense account for this Earning Code. The account must
be an existing General Ledger account that is not a subledger-type account. The account must have a
status of Active or Inactive.
Track Labor Hours: Select this check box to track the employee labor hours entered on any timesheet.
The system distributes the hours entered on the timesheet, using the same percentages applied to the
earnings dollars when the distribution codes were created (Maintain>Payroll>Distribution Codes). This
check box defaults to track the employee labor hours.
Contribute to Net Pay Only: Select this check box to process employee reimbursement and advances
through regular payroll processing (by applying the net pay amount without the amount being subject to
taxes and fringe benefits). To enable the Contribute to Net Pay Only check box, clear the Track Labor
Hours check box. The Calculation Method defaults to "Amount on Timesheet" and the Taxes tab is
disabled.
Note that if selected, this Earning Code is unavailable to use for a calculation using
Maintain>Payroll>Benefit Codes, Deduction Codes, Leave Codes, and Worker's Compensation Codes.
W-2 Information Box Number, Box Code: Select W-2 Box Number 7, 8, 10, 11, 12, or 14 if this Earning
Code falls into one of those W-2 categories.
Box 12 requires a corresponding box code, and cannot be used for anything other than the items
specified by the box codes. You must enter one of the following Box Codes: A-H, J-N, P, R-T, V, W, Y,
Z, AA, BB, CC, DD, EE, FF, GG, or HH.
Box 14 should be used for any other information you want to give your employee. You can enter up to
five alphanumeric characters. The Box Code serves as a "label" for the optional amount displayed in
box 14.
MIP Fund Accounting
Payroll User's Guide
64

Chapter 2: Setting Up and Maintaining Payroll
MIP Fund Accounting
Payroll User's Guide
65
To have the earnings and taxes from this Earning Code appear in W-2 boxes 1-6, 16, 17, 18, and/or 19
(for Federal, State, and Other Taxes), select the check boxes on the Taxes tab and leave the W-2 Box
Number box on this tab blank.
Tips: See IRS W-2 instructions for more information.
On the Earning tab, a General Ledger expense account is assigned in order to create an accounting
entry. To distribute expenses across all other segments, enter a Distribution Code on the
Timesheets>Enter Regular/Supplemental Timesheets>Summary tab.
Earnings are moneys that are paid to an employee (they increase net pay). A benefit, on the other
hand, is something provided to the employee for which the employer pays a third party (they do not
increase net pay). For example, life insurance for an employee that exceeds the federally allowed
maximum, and use of a company car for personal reasons, are benefits. These benefits do not
increase the employee's net pay, but must be included as taxable income to the employee (and thus
they increase taxable earnings and applicable taxes). Use this distinction when determining whether
to enter an item as an Earning or a Benefit Code.
Enter as many Earning Codes as needed and apply as many as are necessary to each employee's
timesheet.
For Salaried employees, you can distribute wage hours based on earning codes. Using Timesheets,
select multiple earning codes with the Calculation Method Employee Pay Rate (ER) and enter the
employee’s Hours and Distribution Codes; the system will use the hours to break down earnings by
dollar amount for each wage code. Use Reports>Payroll>Processing>Timesheets, to view the wages
with hours and net check amount that was contributed by that wage code.
Note that there is no internal default Earning Code for wages. The code must be created on the
Earnings tab, then assign it a Calculation Method of Employee Pay Rate on the Calculation tab.
To see how W-2 data is set up in the system, see the Tips section of the "Calculate W-2s" (page 303)
information (Reports>Payroll>Payroll Tax Worksheets >Calculate W-2 Information).
Ensure that your timesheet labor hours match your distribution labor hours.
Earning Codes - Calculation Tab
Access this tab using Maintain>Payroll>Earning Codes.

Earning Codes
Use this tab to select a calculation method for the Earning Codes, choose from various calculation
methods built into the system. When the designated Earning Code is assigned to an employee, the
calculation method specified on this tab is used to calculate that employee's earnings.
Fields
Employee Pay Rate: Select this method to calculate earnings using the employee's salary or hourly pay
rate (Maintain>Payroll>Employee Information>Job and Pay tab). This calculation method is typically used
for standard employee wages. If an employee is salaried, the employee's salary per pay cycle is the
earning amount. However, if multiple earning codes are used, then the amount is divided between the
hours entered on the timesheet for each earning code. If the employee is hourly, the earning amount is the
employee's hourly rate multiplied by the hours on the timesheet for that earning code.
Rate Multiplier: Select this method to have the system take the employee's hourly rate (or the equivalent
hourly rate if the employee is salaried) from the Employee Information form (Maintain>Payroll>Employee
Information>Job and Pay tab), and multiply it by the value specified in the Rate box. The result is then
multiplied by the hours on the employee's timesheet for the earning code. This calculation method is
typically used for cases such as time and one half for overtime hours, where a multiplier of 1.5 would be
set.
Fixed Hourly Amount: Select this method to have the system multiply the amount specified in the Amount
box, by the number of hours specified on the employee's timesheet. When using an earning code that is
set up with a fixed amount, the fixed hourly amount is substituted for the pay rate that was set up for the
employee on the Employee Information form (Maintain>Payroll>Employee Information>Job and Pay tab).
You might set up one or more of these codes if an employee worked on several projects where different
hourly rates are charged.
Fixed Amount: Select this method when an earning is based on a fixed amount per pay cycle. Enter a
fixed earning amount (in the Amount box) to calculate payroll. Use this calculation method if a fixed
amount is needed for an earning in addition to an employee's regular wages.
Amount on Timesheet: Select this method to have the system use the fixed amount that is entered on the
employee's timesheet. Use this method to enter an actual amount on the timesheet for earnings.
Rate on Timesheet: Select this method to have the system calculate the number of hours, by the hourly
rate which are both entered on the employee's timesheet. The rate entered on the timesheet is substituted
for the pay rate that was set up for the employee on the Employee Information form
(Maintain>Payroll>Employee Information>Job and Pay tab). You might set up one or more of these codes
if an employee worked on several projects where different hourly rates are charged. Use this calculation
MIP Fund Accounting
Payroll User's Guide
66

Chapter 2: Setting Up and Maintaining Payroll
MIP Fund Accounting
Payroll User's Guide
67
method to pay employees different pay rates based on jobs preformed, or if you have paid shift
differentials, such as different rates if they work the "graveyard" shift.
Rate, Amount: Enter a rate or amount, depending on the calculation method selected. You should enter
a rate for Rate Multiplier, or an amount for Fixed Hourly Amount or Fixed Amount.
Tip: Because there is no internal default Earning Code for wages, at least one Earning Code must be
entered to represent the employee's basic pay. You need to use a calculation method of Employee Pay
Rate for these earnings.
Earning Codes - Schedule Tab
Access this tab using Maintain>Payroll>Earning Codes.
Use this tab to assign a payroll schedule to the Earning Code. This schedule helps the system determine
whether or not to use an Earning Code when creating a Regular/Supplemental timesheet for an
employee.
Fields
Frequency Pay Cycle, Regular Payroll, Supplemental Payroll: A schedule is required for all cycles
and payroll types. If no changes are made to this tab, the system uses the default, Always.
Monthly: Choose from Always or Never for Regular and Supplemental Payroll.
Semimonthly: Select Always, 1st Payroll of the Month, 2nd Payroll of the Month, or Never for Regular
Payroll. Select Always or Never for Supplemental Payroll.
Biweekly: Select Always, 1st Payroll of the Month, 2nd Payroll of the Month, 1st Two Payrolls in the
Month, or Never for Regular Payroll. Select Always or Never for Supplemental Payroll.
Weekly: Select Always, 1st Four Payrolls of the Month, 1st Payroll of the Month, 2nd Payroll of the
Month, 3rd Payroll of the Month, 4th Payroll of the Month, 1st and 3rd Payroll of the Month, 2nd and
4th Payroll of the Month, or Never for Regular Payroll. Select Always or Never for Supplemental
Payroll.
Tip: Generally, use the calculation schedule only if there is an earning that you do not want to pay
every pay cycle.
Benefit Codes
Earning Codes - Taxes Tab
Access this tab using Maintain>Payroll>Earning Codes.
Use this tab to determine which federal, state, and other taxes to apply for this Earning Code.
Note: If the Contribute to Net Pay Only check box is selected on the Earning tab, taxes do not apply so
this tab is not available.
Fields
Subject to the Following Federal Taxes FIT, Social Security, Medicare, FUTA: Select Federal Income
(FIT), Social Security, Medicare, and/or Federal Unemployment (FUTA), as appropriate for this earning
code.
Subject to the Following State Taxes SWT, SUTA: Select State Withholding Tax (SWT) and/or State
Unemployment Tax (SUTA), as appropriate for this earning code.
Subject to the Following Other Taxes Employee Paid (LWT), Employer Paid (LER): Select Employee
Paid (LWT) and/or Employer Paid (LER), as appropriate for this earning code.
Tips: For State and/or other taxes, you must assign State and/or Other tax codes to an employee
(Maintain>Payroll>Employee Information), to calculate these selected taxes.
Since earnings are typically taxable, the system automatically has all check boxes selected.
Benefit CodesUse this form to add a new Benefit Code or edit an existing one. The benefit codes entered are used
throughout the system. Since the system uses benefit codes when it is calculating pay, creating an
accounting entry for payroll, calculating and reporting W-2 information and other tax reports, and reporting,
you must set up your benefit codes in order to use many of the forms on the Timesheets and
Activities>Payroll> menus.
You must assign a General Ledger expense and liability account on the Benefits tab, in order to create an
accounting entry. Use the Distribution tab to determine the distribution of the benefit expense across all
other segments.
MIP Fund Accounting
Payroll User's Guide
68

Chapter 2: Setting Up and Maintaining Payroll
MIP Fund Accounting
Payroll User's Guide
69
Benefit Codes - Benefit Tab
Access this tab using Maintain>Payroll>Benefit Codes.
Use this form to add a new Benefit Code or edit an existing one. The benefit codes entered are used
throughout the system. Since the system uses benefit codes when it is calculating pay, creating an
accounting entry for payroll, calculating and reporting W-2 information and other tax reports, and
reporting, you must set up your benefit codes in order to use many of the forms on the Timesheets and
Activities menus.
You must assign a General Ledger expense and liability account on the Benefits tab, in order to create
an accounting entry. Use the Distribution tab to determine the distribution of the benefit expense across
all other segments.
Use this tab to add a new Benefit Code or edit an existing one. You must assign a General Ledger
expense and liability account in order to create an accounting entry.
Fields
Code: Enter a Benefit Code. You should make the first eight characters of the code unique so that the
paycheck displays a useful identifier. We recommend limiting your entry to strictly alphabetic characters
(A through Z) or numeric characters (0 through 9), and avoiding the use of symbols.
Status: Specify the status of the Benefit Code . When creating a new code, accept the default status, A
(Active), or select I (Inactive) or D (Discontinued), from the drop-down list. The status can be changed at
any time. Below are valid status entries and their descriptions:
Active - An active status allows payroll to be processed using this code.
Inactive - Set a code to inactive when it is not being used regularly for payroll, but it could be used at
some point. A warning message appears when attempting to use an inactive code. The warning
message is for notification only; the code can still be used in the payroll process.
Discontinued - Designate a code as discontinued when it is no longer being used. The system does
not allow payroll to be processed using a code with a discontinued status.
Title: Enter the title of the Benefit Code.
Expense Account: Enter the General Ledger expense account for this Benefit Code. The account must
be an existing General Ledger account that is not a subledger-type account. The account must have a
status of Active or Inactive.

Benefit Codes
Liability Account: Enter the General Ledger liability account for this Benefit Code. The account must be an
existing General Ledger account that is not a subledger-type account. The account must have a status of
Active or Inactive.
Show Code on Check Stub: Select this check box to display the Benefit Code information on the check
stub.
W-2 Information Box Number, Box Code: Select W-2 Box Number 7, 8, 10, 11, 12, or 14 if this Benefit
Code falls into one of those W-2 categories.
Box 12 requires a corresponding box code, and cannot be used for anything other than the items
specified by the box codes. You must enter one of the following Box Codes: A-H, J-N, P, R-T, V, W, Y,
Z, AA, BB, CC, DD, EE, FF, GG, or HH.
Box 14 should be used for any other information you want to give your employee. You can enter up to
five alphanumeric characters. The Box Code serves as a "label" for the optional amount displayed in
box 14.
To have the benefits and taxes from this Benefit Code appear in W-2 boxes 1-6, 16, 17, 18, and/or 19 (for
Federal, State, and Other Taxes), select the check boxes on the Taxes tab and leave the W-2 Box Number
box on this tab blank.
MIP Fund Accounting
Payroll User's Guide
70

Chapter 2: Setting Up and Maintaining Payroll
MIP Fund Accounting
Payroll User's Guide
71
Tips:
Click Distribution Codes Information to open the Maintain>Payroll>Distribution Codes form
where you can create or modify a distribution code. Each time this button is selected a new
Distribution Codes form is opened.
See IRS W-2 instructions for more W-2 information.
Earnings are money paid to an employee, which increases net pay. A benefit, on the other hand, is
something provided to the employee for which the employer pays a third party (they do not increase
net pay). For example, life insurance for an employee that exceeds the federally allowed maximum,
and use of a company car for personal reasons, are benefits. These benefits do not increase the
employee's net pay, but must be included as taxable income to the employee (and thus they increase
taxable earnings and applicable taxes). Use this distinction when determining whether to enter an item
as an Earning or a Benefit Code.
Enter as many Benefit Codes as needed and apply as many as are necessary to each employee's
timesheet.
To see how W-2 data is set up in the system, see the Tips section of the "Calculate W-2s" (page 303)
form (Reports>Payroll>Payroll Tax Worksheets>Calculate W-2 Information).
Benefit Codes - Calculation Tab
Access this tab using Maintain>Payroll>Benefit Codes.
Use this tab to select a calculation method for the Benefit Codes. You can choose from various
calculation methods built into the system. When the benefit code is assigned to an employee, the
calculation method specified on this tab is used to calculate that employee's benefits.
Fields
Fixed Percentage of Earnings: Select this method to have an employee accrue benefits based on a
percentage of earnings. The system first takes the total earning amount for just those earnings that are
tied to the Benefit Code (as indicated on the Earnings tab). This earning amount is then multiplied by the
percentage indicated in the Percentage box, to get a fixed percentage of earnings. Note that when using
this calculation method, benefits vary with earnings.
Fixed Hourly Amount: Select this method to have the system base benefits on a fixed rate per hour
worked. The system multiplies only the earning hours that are tied to the Benefit Code (as indicated on

Benefit Codes
the Earnings tab), by the hourly amount specified in the Amount box. Note that when using this calculation
method, benefits vary with hours worked.
Fixed Amount: Select this method when a benefit is based on a fixed amount per pay cycle. Enter a fixed
benefit amount (in the Amount box) to calculate payroll.
Amount on Timesheet: Select this method to use the fixed amount, entered on the employee's timesheet,
for benefits.
Percentage on Timesheet: Select this method to use a fixed percentage, entered on the employee's
timesheet, for benefits.
Percentage, Amount: Enter a percentage or amount, depending on the calculation method selected. You
should enter a percentage for Fixed Percentage of Earnings, or an amount for Fixed Hourly Amount or
Fixed Amount.
When entering percentages, do not include a decimal point. For fractional percentages, enter the leading
zeroes. For example, enter the following numbers to indicate the following percentages:
0005 = .5%
005, 05, or 5 = 5%
50 = 50%
The system calculates up to four places to the right of the decimal point.
Maximum Per Year: Enter the maximum amount allowed for benefits per calendar year. If there is no limit,
enter a large number like 9,999,999,999 to be applied as the maximum. If the box is left at 0, 0 is applied
as the maximum per year, and you will not get a benefit amount.
Maximum Percentage: Enter the maximum percentage allowed for a benefit, when Percentage on
Timesheet is selected. When entering percentages include a decimal point. The percentage can range
from zero to 100 percent. The system calculates up to four places to the right of the decimal point.
Tip: Click Distribution Codes Information to open the Maintain>Payroll>Distribution Codes form
where you can create or modify a distribution code. Each time this button is selected a new Distribution
Codes form is opened.
MIP Fund Accounting
Payroll User's Guide
72
Chapter 2: Setting Up and Maintaining Payroll
MIP Fund Accounting
Payroll User's Guide
73
Benefit Codes - Earnings Tab
Access this tab using Maintain>Payroll>Benefit Codes.
Use this tab to select the Earning Codes to use when calculating this benefit. This tab is only available if
Fixed Percentage of Earnings, Fixed Hourly Amount, or Percentage on Timesheet was selected on the
Calculation tab.
Note: Any Earning Code set up with Contribute to Net Pay Only (Maintain>Payroll>Earning Codes) is
not available to use when calculating this benefit.
Fields
Earnings to Use for This Calculation Available Items, Selected Items: Select the Earning Codes to
use when calculating this benefit. Move a code from the Available Items box to the Selected Items box by
clicking it twice or by using the Mover buttons (>, >>). The codes may be moved in any order. At least
one earning code must be moved to the Selected Items box.
Tip: Click Distribution Codes Information to open the Maintain>Payroll>Distribution Codes form
where you can create or modify a distribution code. Each time this button is selected a new Distribution
Codes form is opened.
Benefit Codes - Schedule Tab
Access this tab using Maintain>Payroll>Benefit Codes.
Use this tab to assign a payroll schedule to the Benefit Code. This schedule helps the system determine
whether or not to use a particular benefit code when creating a Regular/Supplemental timesheet for an
employee.
Fields
Frequency Pay Cycle, Regular Payroll, Supplemental Payroll: A schedule is required for all cycles
and payroll types (regular and supplemental). If no changes are made to this tab, the system uses the
default, Always.

Benefit Codes
Monthly: Choose from Always or Never for Regular and Supplemental Payroll.
Semimonthly: Select Always, 1st Payroll of the Month, 2nd Payroll of the Month, or Never for Regular
Payroll. Select Always or Never for Supplemental Payroll.
Biweekly: Select Always, 1st Payroll of the Month, 2nd Payroll of the Month, 1st Two Payrolls in the
Month, or Never for Regular Payroll. Select Always or Never for Supplemental Payroll.
Weekly: Select Always, 1st Four Payrolls of the Month, 1st Payroll of the Month, 2nd Payroll of the
Month, 3rd Payroll of the Month, 4th Payroll of the Month, 1st and 3rd Payroll of the Month, 2nd and 4th
Payroll of the Month, or Never for Regular Payroll. Select Always or Never for Supplemental Payroll.
Tips:
Click Distribution Codes Information to open the Maintain>Payroll>Distribution Codes form where
you can create or modify a distribution code. Each time this button is selected a new Distribution Codes
form is opened.
Generally, use the schedule only if there is a benefit that you do not want to include in every pay cycle.
Benefit Codes - Taxes Tab
Access this tab using Maintain>Payroll>Benefit Codes.
Use this tab to determine which federal, state, and other taxes to apply for this Benefit Code.
Important!For more information about increasing taxable earnings, please contact your Tax Advisor.
Fields
Increase Taxable Earnings for the Following Federal Taxes FIT, Social Security, Medicare, FUTA:
Select Federal Income (FIT), Social Security, Medicare, and/or Federal Unemployment (FUTA), as
appropriate for this benefit code.
Increase Taxable Earnings for the Following State Taxes SWT, SUTA: Select State Withholding Tax
(SWT) and/or State Unemployment Tax (SUTA), as appropriate for this benefit code.
Increase Taxable Earnings for the Following Other Taxes Employee Paid (LWT), Employer Paid
(LER): Select Employee Paid (LWT) and/or Employer Paid (LER), as appropriate for this benefit code.
MIP Fund Accounting
Payroll User's Guide
74

Chapter 2: Setting Up and Maintaining Payroll
MIP Fund Accounting
Payroll User's Guide
75
Tips:
Click Distribution Codes Information to open the Maintain>Payroll>Distribution Codes form
where you can create or modify a distribution code. Each time this button is selected a new
Distribution Codes form is opened.
Since benefits are not typically taxable, by default, the check boxes are not selected on this tab.
Benefit Codes - Distribution Tab
Access this tab using Maintain>Payroll>Benefit Codes.
Use this tab to specify how the system should distribute the benefit.
Fields
Distribution of Benefit Expense Should
Follow Earnings on Timesheet Distribution Code to Use if no Earnings Exist: Select to have benefit
amounts distributed the same way the employee's earnings are distributed. Select an alternate
distribution code to use when no earnings are present on the timesheet. When earnings exist, the
benefit is distributed to the same Account Codes (Fund and any other account segments except
General Ledger) as the employee's earnings. Also, if more than one distribution code is used to
distribute the employee's earnings, the benefits are distributed based upon a weighted average of the
distributed earnings.
Follow Earnings Used to Calculate the Benefit: Select to limit distribution to the earnings used to
calculate the benefit (from the Earning Codes specified on the Earnings tab). Many grants and
contracts allow benefits to be charged directly to the funding source. The benefit is distributed to the
same Account Codes (Fund and any other account segments except General Ledger) as the
employee's earnings. If more than one distribution code is used to distribute the employee's earnings,
the benefits are distributed based upon a weighted average of the distributed earnings.
Use Distribution Code: Select an existing distribution code to distribute the benefit, which may be
entirely or partially distributed to overhead. Use this distribution method if there is one or more funding
sources to which you do not distribute benefits (because there is a negotiated rate or benefits are
simply disallowed). Distribution codes must have been previously created using
Maintain>Payroll>Distribution Codes with Apply To set to Payroll only (P), or both Accounting and
Payroll (B).

Deduction Codes
Tip: Click Distribution Codes Information to open the Maintain>Payroll>Distribution Codes form
where you can create or modify a distribution code. Each time this button is selected a new Distribution
Codes form is opened.
Deduction CodesUse this form to add a new Deduction Code or edit an existing one. The deduction codes entered are used
throughout the system. Since the system uses deduction codes when it's calculating pay, creating an
accounting entry for payroll, calculating and reporting W-2 information and other tax reports, and reporting;
you must set up these codes in order to use many of the forms on the Timesheets and Activities menus.
Deduction Codes - Deduction Tab
Access this tab using Maintain>Payroll>Deduction Codes.
Use this form to add a new Deduction Code or edit an existing one. The deduction codes entered are used
throughout the system. Since the system uses deduction codes when it's calculating pay, creating an
accounting entry for payroll, calculating and reporting W-2 information and other tax reports, and reporting;
you must set up these codes in order to use many of the forms on the Timesheets and Activities menus.
Use this tab to add a new Deduction Code or edit an existing one. You must assign a General Ledger
liability account on this tab, in order to create an accounting entry.
Fields
Code: Enter a Deduction Code. You should make the first eight characters of the code unique so that the
paycheck displays a useful identifier. We recommend limiting your entry to strictly alphabetic characters (A
through Z) or numeric characters (0 through 9), and avoiding the use of symbols.
Status: Specify the status of the Deduction Code. When creating a new code, accept the default status, A
(Active), or select I (Inactive) or D (Discontinued), from the drop-down list. The status can be changed at
any time. Below are valid status entries and their descriptions:
Active - An active status allows payroll to be processed using this code.
Inactive - Set a code to inactive when it is not used regularly, but it could be used at some point. A
warning message appears when attempting to use an inactive code. The warning message is for
notification only; the code can still be used in a payroll process.
MIP Fund Accounting
Payroll User's Guide
76

Chapter 2: Setting Up and Maintaining Payroll
MIP Fund Accounting
Payroll User's Guide
77
Discontinued - Designate a code as discontinued when it is no longer being used. The system does
not allow payroll to be processed using a code with a discontinued status.
Title: Enter the title of the Deduction Code.
Liability Account: Enter the General Ledger liability account for this Deduction Code. The account must
be an existing General Ledger account that is not a subledger-type account. The account must have a
status of Active or Inactive.
W-2 Information Box Number, Box Code: Select W-2 Box Number 7, 8, 10, 11, 12, or 14 if this
Deduction Code falls into one of those W-2 categories.
Box 12 requires a corresponding box code, and cannot be used for anything other than the items
specified by the box codes. You must enter one of the following Box Codes: A-H, J-N, P, R-T, V, W, Y,
Z, AA, BB, CC, DD, EE, FF, GG, or HH.
Box 14 should be used for any other information you want to give your employee. You can enter up to
five alphanumeric characters. The Box Code serves as a "label" for the optional amount displayed in
box 14.
To have the deductions and taxes from this Deduction Code appear in W-2 boxes 1-6, 16, 17, 18, and/or
19 (for Federal, State, and Other Taxes), select the check boxes on the Taxes tab and leave the W-2
Box Number box on this tab blank.
Tips: See IRS W-2 instructions for more information.
Deductions reduce net pay and create a liability, since the amount withheld from the employee's pay
must be paid to another entity. Deductions are not an employer expense.
Enter as many Deduction Codes as needed and apply as many as are necessary to each employee's
timesheet.
To see how W-2 data is set up in the system, see the Tips section of the "Calculate W-2s" (page 303)
information (Reports>Payroll>Payroll Tax Worksheets>Calculate W-2 Information).
Deduction Codes - Calculation Tab
Access this tab using Maintain>Payroll>Deduction Codes.

Deduction Codes
Use this tab to select a calculation method for the Deduction Codes. You can choose from various
methods built into the system. When the deduction code is assigned to an employee, the calculation
method specified on this tab is used to calculate that employee's deductions.
Fields
Fixed Percentage of Earnings: Select this method to have an employee accrue deductions based on a
percentage of earnings. The system first takes the total earning amount for just those earnings that are
tied to the Deduction Code, (as indicated on the Earnings tab). This earning amount is then multiplied by
the percentage indicated in the Percentage box, to get a fixed percentage of earnings. Note that when
using this calculation method, deductions vary with earnings.
Fixed Hourly Amount: Select this method to have the system base deductions on a fixed rate per hour
worked. The system multiplies the earning hours that are tied to the Deduction Code (as indicated on the
Earnings tab), by the hourly amount specified in the amount box. Note that when using this calculation
method, deductions vary with hours worked.
Fixed Amount: Select this method when a deduction is based on a fixed amount per pay cycle. Enter a
fixed deduction amount (in the Amount box) to calculate payroll.
Amount on Timesheet: Select this method to use a fixed amount, entered on the employee's timesheet,
for deductions.
Percentage on Timesheet: Select this method to use a fixed percentage, entered on the employee's
timesheet, for deductions.
Percentage, Amount: Enter a percentage or amount depending on the calculation method selected. You
should enter a percentage for Fixed Percentage of Earnings, or an amount for Fixed Hourly Amount or
Fixed Amount.
When entering percentages, do not include a decimal point. For fractional percentages, enter the leading
zeroes. For example, enter the following numbers to indicate the following percentages:
0005 = .5%
005, 05, or 5 = 5%
50 = 50%
The system calculates up to four places to the right of the decimal point.
MIP Fund Accounting
Payroll User's Guide
78

Chapter 2: Setting Up and Maintaining Payroll
MIP Fund Accounting
Payroll User's Guide
79
Maximum Per Year: Enter the maximum amount allowed for deductions per calendar year. If there is no
limit, enter a large number like 9,999,999,999 to be applied as the maximum. If the box is left at 0, 0 is
applied as the maximum per year, and you will not get a benefit amount.
Maximum Percentage: Enter the maximum percentage allowed for a deduction, when Percentage on
Timesheet is selected. When entering percentages include a decimal point. The percentage can range
from zero to 100 percent. The system calculates up to four places to the right of the decimal point.
Deduction Codes - Earnings Tab
Access this tab using Maintain>Payroll>Deduction Codes.
Use this tab to select the Earning Codes to use when calculating this deduction. This tab is only available
if Fixed Percentage of Earnings, Fixed Hourly Amount, or Percentage on Timesheet was selected on the
Calculation tab.
Note: Any Earning Code set up with Contribute to Net Pay Only (Maintain>Payroll>Earning Codes) is
not available to use when calculating this deduction.
Fields
Earnings to Use for This Calculation Available Items, Selected Items: Select the Earning Codes to
use when calculating this deduction. Move a code from the Available Items box to the Selected Items
box by clicking it twice or by using the Mover buttons (>, >>). The codes may be moved in any order. At
least one earning code must be moved to the Selected Items box.
Deduction Codes - Schedule Tab
Access this tab using Maintain>Payroll>Deduction Codes.
Use this tab to assign a payroll schedule to the Deduction Code. This schedule helps the system to
determine whether or not to use a particular deduction code when creating a Regular/Supplemental
timesheet for an employee.
Fields
Frequency Pay Cycle, Regular Payroll, Supplemental Payroll: A schedule is required for all cycles
and payroll types. If no changes are made to this tab, the system uses the default, Always.

Deduction Codes
Monthly: Choose from Always or Never for Regular and Supplemental Payroll.
Semimonthly: Select Always, 1st Payroll of the Month, 2nd Payroll of the Month, or Never for Regular
Payroll. Select Always or Never for Supplemental Payroll.
Biweekly: Select Always, 1st Payroll of the Month, 2nd Payroll of the Month, 1st Two Payrolls in the
Month, or Never for Regular Payroll. Select Always or Never for Supplemental Payroll.
Weekly: Select Always, 1st Four Payrolls of the Month, 1st Payroll of the Month, 2nd Payroll of the
Month, 3rd Payroll of the Month, 4th Payroll of the Month, 1st and 3rd Payroll of the Month, 2nd and 4th
Payroll of the Month, or Never for Regular Payroll. Select Always or Never for Supplemental Payroll.
Tip: Generally, use the schedule only if there is a deduction that you do not want to include in every pay
cycle.
Deduction Codes - Taxes Tab
Access this tab using Maintain>Payroll>Deduction Codes.
Use this tab to determine which federal, state, and other taxes to apply for this Deduction Code. When a
check box is selected, the employee's earnings are decreased by the amount of the deduction for the
selected tax.
Important!For more information about decreasing taxable earnings, please contact your Tax Advisor.
Fields
Decrease Taxable Earnings for the Following Federal Taxes FIT, Social Security, Medicare, FUTA:
Select Federal Income (FIT), Social Security, Medicare, and/or Federal Unemployment (FUTA), as
appropriate for this deduction code.
Decrease Taxable Earnings for the Following State Taxes SWT, SUTA: Select State Withholding Tax
(SWT) and/or State Unemployment Tax (SUTA), as appropriate for this deduction code.
Decrease Taxable Earnings for the Following Other Taxes Employee Paid (LWT), Employer Paid
(LER): Select Employee Paid (LWT) and/or Employer Paid (LER), as appropriate for this deduction code.
Deduction Codes - Taxes Example
Suppose your earnings are $1000. You create a non-taxable deduction of $200. Select all the check boxes
for federal taxes on this tab. The federal taxable earnings would be $800. Since the state and other taxes
MIP Fund Accounting
Payroll User's Guide
80

Chapter 2: Setting Up and Maintaining Payroll
MIP Fund Accounting
Payroll User's Guide
81
are not selected, the taxable earnings for state and other taxes would be $1000.
Workers' Compensation CodesUse this form to add a new Workers' Compensation Code or edit an existing one. Note that Workers'
Compensation Codes are used later when entering timesheets and manual checks (Timesheets and
Activities>Payroll> menus), and when reviewing/modifying calculated payroll (Activities>Payroll> menu).
Furthermore, the system uses the Workers' Compensation Codes specified when it is calculating pay,
creating the accounting entry for payroll, calculating and reporting tax reports, and reporting.
A General Ledger expense and liability account must be assigned on the Workers’ Compensation tab, in
order to create an accounting entry. Use the Distribution tab to indicate the distribution of the worker's
compensation expense across all other segments.
Workers' Compensation Codes - Workers' Compensation Tab
Access this tab using Maintain>Payroll>Workers' Compensation Codes.
Use this form to add a new Workers' Compensation Code or edit an existing one. Note that Workers'
Compensation Codes are used later when entering timesheets and manual checks (Timesheets and
Activities>Payroll> menus), and when reviewing/modifying calculated payroll (Activities>Payroll> menu).
Furthermore, the system uses the Workers' Compensation Codes specified when it is calculating pay,
creating the accounting entry for payroll, calculating and reporting tax reports, and reporting.
A General Ledger expense and liability account must be assigned on this tab, in order to create an
accounting entry. Use the Distribution tab to indicate the distribution of the worker's compensation
expense across all other segments.
Fields
Code: Enter a Workers' Compensation code. You should make the first eight characters of the code
unique so that the check stub displays a useful identifier. We recommend limiting your entry to strictly
alphabetic characters (A through Z) or numeric characters (0 through 9), and avoiding the use of
symbols.
Status: Specify the status of the Workers' Compensation Code. When creating a new code, accept the
default status, A (Active), or select I (Inactive) or D (Discontinued) from the drop-down list. The status
can be changed at any time. Below are valid status entries and their descriptions:

Workers' Compensation Codes
Active - An active status allows payroll to be processed using this code.
Inactive - Set a code to inactive when it is not used regularly, but it could be used at some point. A
warning message appears when attempting to use an inactive code. The warning message is for
notification only; the code can still be used in a payroll process.
Discontinued - Designate a code as discontinued when it is no longer being used. The system does not
allow payroll to be processed using a code with a discontinued status.
Title: Enter the title of the Workers' Compensation code.
Aatrix® Tax Type: Accept the default of <None>, or select a state to be associated with this Workers’
Compensation code for Aatrix payroll reporting.
Paid By Employer, Employee: Select which party is paying the workers' compensation amount for this
code—the employer or the employee.
Show Code on Check Stub: If the Employer is paying the workers' compensation, select this check box to
display the Employer Workers' Compensation Code information below the Employee Workers'
Compensation Code information on the check stub.
Expense Account: Select the General Ledger expense account for this Workers' Compensation code.
The account must be an existing General Ledger account that is not a subledger-type account. The
account must have a status of Active or Inactive. This box is only available if the Employer pays the
workers' compensation.
Liability Account: Enter the General Ledger liability account for this Workers' Compensation code. The
account must be an existing General Ledger account that is not a subledger-type account. The account
must have a status of Active or Inactive.
MIP Fund Accounting
Payroll User's Guide
82

Chapter 2: Setting Up and Maintaining Payroll
MIP Fund Accounting
Payroll User's Guide
83
Tips:
Click Distribution Codes Information to open the Maintain>Payroll>Distribution Codes form
where you can create or modify a distribution code. Each time this button is selected a new
Distribution Codes form is opened.
Enter as many Workers' Compensation Codes as needed and apply as many as are necessary to
each employee's timesheet.
If both the employer and employee pay workers' compensation, set up two different codes and apply
each to the employee's timesheet.
If you select the "Show Code on Check Stub" check box, the following applies when the check is
printed (Activities>Payroll>Print/Email Checks and Vouchers):
Employee Workers' Compensation information prints first, followed by employer information.
Employer paid Workers' Compensation amounts are included in the Workers' Compensation totals.
Employer paid Workers' Compensation amounts are not included in the net pay.
Employee paid Workers' Compensation amounts are printed in the detail and totals area of the
check stub.
Workers' Compensation Codes - Calculation Tab
Access this tab using Maintain>Payroll>Workers' Compensation Codes.
Use this tab to select a calculation method for the Workers' Compensation Codes. You can choose from
various methods built into the system. When the Workers' Compensation Code is assigned to an
employee, the calculation method specified on this tab is used to calculate that employee's workers'
compensation.
Fields
Rate per Hours Worked: Select this method to have the system take the hours associated with all the
earning codes (specified in the Earnings to Use for This Calculation box on the Earnings tab), and
multiply them by the rate specified in the Rate box of this tab. The result is then multiplied by the
Adjustment Factor, if one is supplied.

Workers' Compensation Codes
Rate per Workers' Compensation Hours: Select this method to provide a Rate which is then multiplied by
the hours you specify later, on the timesheet, for workers' compensation hours. This result is then
multiplied by the Adjustment Factor, if one is supplied. There are no Earning Codes associated with this
method.
Rate per $100 Earnings: Select this method to have the system take all earnings on the timesheet (for the
Earning Codes specified in the Earnings to Use for this Calculation box on the Earnings tab), and add in
the year-to-date subject earnings. This sum is then compared to the Maximum Subject Earnings on this
tab.
If the Maximum Subject Earnings amount is greater than this sum, then the current period subject
earnings are used to calculate the workers' compensation amount.
If the Maximum Subject Earnings amount is less than this sum, then the amount used to calculate
workers' compensation is the Maximum Subject Earnings less the year-to-date earnings. The resulting
amount is then divided by 100 to get the rate per $100 earnings. The system uses this number to
multiply by the Rate and Adjustment Factor indicated.
Rate, Adjustment Factor, Maximum Subject Earnings: Enter the rate, adjustment factor, and, if you
selected the Rate Per $100 Earnings calculation method, the maximum subject wages allowed in
calculating workers' compensation.
Tip: Click Distribution Codes Information to open the Maintain>Payroll>Distribution Codes form
where you can create or modify a distribution code. Each time this button is selected a new Distribution
Codes form is opened.
Workers' Compensation Codes - Earnings Tab
Access this tab using Maintain>Payroll>Workers' Compensation Codes.
Use this tab to select the Earning Codes to use when calculating workers' compensation. This tab is only
available if you selected Rate per Hours Worked or Rate per $100 Earnings on the Calculation tab.
Note: Any Earning Code set up with the Contribute to Net Pay Only check box selected
(Maintain>Payroll>Earning Codes) is not available to use when calculating worker's compensation.
MIP Fund Accounting
Payroll User's Guide
84

Chapter 2: Setting Up and Maintaining Payroll
MIP Fund Accounting
Payroll User's Guide
85
Fields
Earnings to Use for This Calculation Available Items, Selected Items: Select the Earning Codes to
use when calculating workers' compensation. Move a code from the Available Items box to the Selected
Items box by clicking it twice or by using the Mover buttons (>, >>). The codes may be moved in any
order. At least one earning code must be moved to the Selected Items box.
Tip: Click Distribution Codes Information to open the Maintain>Payroll>Distribution Codes form
where you can create or modify a distribution code. Each time this button is selected a new Distribution
Codes form is opened.
Workers' Compensation Codes - Distribution Tab
Access this tab using Maintain>Payroll>Workers' Compensation Codes.
Use this tab to specify how to distribute the workers' compensation expense (if employer paid). Note that
this tab is only available if Employer was selected on the Workers' Compensation tab. Click Distribution
Codes Information to open the Maintain>Payroll>Distribution Codes form where you can create or
modify a distribution code. Each time this button is selected a new Distribution Codes form is opened.
Fields
Distribution of the Employer's Workers' Compensation Expense Should
Follow Earnings on Timesheet: Select to have workers' compensation amounts distributed the same
way the employee's earnings are distributed. The workers' compensation is distributed to the same
Account Codes (Fund and any other account segments except General Ledger) as the employee's
earnings. Also, when more than one distribution code is used to distribute the employee's earnings,
the workers' compensation is distributed based upon a weighted average of the distributed earnings.
Follow Earnings Used to Calculate the Workers' Compensation: Select to limit distribution to the
earnings used to calculate the workers' compensation (from the Earning Codes specified on the
Earnings tab). Many grants and contracts allow workers' compensation to be charged directly to the
funding source. The workers' compensation is distributed to the same Account Codes (Fund and any
other account segments except General Ledger) as the employee's earnings. When more than one
distribution code is used to distribute the employee's earnings, the workers' compensation is
distributed based upon a weighted average of the distributed earnings.

Leave Codes
Use Distribution Code: Select an existing distribution code to distribute the workers' compensation,
which may be entirely or partially distributed to overhead. Use this distribution method if there is one or
more funding sources to which you do not distribute workers' compensation (because there is a
negotiated rate or workers' compensation is simply disallowed). Distribution codes were set up using
Maintain>Payroll>Distribution Codes.
Leave CodesUse this form to add a new Leave Code or edit an existing one. The system uses leave codes to calculate
leave for each employee, as well as the pay dates on which to calculate leave.
Note that Leave Codes are used later when entering timesheets and manual checks (Timesheets and
Activities>Payroll> menus), and when reviewing/modifying calculated payroll (Activities>Payroll> menu).
Furthermore, the system uses the Leave Codes specified when it is calculating pay, creating the
accounting entry for payroll, and reporting.
Leave Codes - Leave Tab
Access this tab using Maintain>Payroll>Leave Codes.
Use this form to add a new Leave Code or edit an existing one. The system uses leave codes to calculate
leave for each employee, as well as the pay dates on which to calculate leave.
Note that Leave Codes are used later when entering timesheets and manual checks (Timesheets and
Activities>Payroll> menus), and when reviewing/modifying calculated payroll (Activities>Payroll> menu).
Furthermore, the system uses the Leave Codes specified when it is calculating pay, creating the
accounting entry for payroll, and reporting.
Use this tab to add a new Leave Code or edit an existing one. The system uses leave codes to calculate
leave for each employee, as well as the pay dates on which to calculate leave.
Fields
Code: Enter a Leave Code. You should make the first eight characters of the code unique so that the
check stub displays a useful identifier. We recommend limiting your entry to strictly alphabetic characters
(A through Z) or numeric characters (0 through 9), and avoiding the use of symbols.
Status: Specify the status of the Leave Code. When creating a new code, accept the default status, A
(Active), or select I (Inactive) or D (Discontinued), from the drop-down list. The status can be changed at
any time. Below are valid status entries and their descriptions:
MIP Fund Accounting
Payroll User's Guide
86

Chapter 2: Setting Up and Maintaining Payroll
MIP Fund Accounting
Payroll User's Guide
87
Active - An active status allows payroll to be processed using this code.
Inactive - Set a code to inactive when it is not used regularly, but it could be used at some point. A
warning message appears when attempting to use an inactive code. The warning message is for
notification only; the code can still be used in a payroll process.
Discontinued - Designate a code as discontinued when it is no longer being used. The system does
not allow payroll to be processed using a code with a discontinued status.
Title: Enter the title of the Leave Code.
Maximum Annual Accrual (Hours): Enter the maximum number of hours allowed to accrue for leave
during one calendar year (January-December). For example, if your organization allows the addition of
no more than 80 hours per calendar year to each employee's leave balance, enter 80 in this box. If there
is no maximum, enter a very large number, such as 9999.
Maximum Accrual Balance (Hours): Enter the maximum number of hours allowed to accrue for leave
for a lifetime. When leave is calculated, the total leave must not be more than the Maximum Accrual
Balance allowed. If it is, the leave accrual is reduced so that the Maximum Accrual Balance does not
exceed it. It is used by the Calculate Payroll process and represents the lifetime accrual that cannot be
exceeded for that Leave Code/Employee.
Tips: Leave does not affect net pay, nor does it create an accounting entry.
Enter as many Leave Codes as needed and apply as many as are necessary to each employee's
timesheet.
Leave Codes - Calculation Tab
Access this tab using Maintain>Payroll>Leave Codes.
Use this tab to select a calculation method for the Leave Codes. You can choose from various methods
built in to the system. When the Leave Code is assigned to an employee (Timesheets>Enter Default
Timesheets or Enter Regular/Supplemental Timesheets), the calculation method specified on this tab is
used to calculate that employee's leave.
Fields
Fixed Number of Hours: Select this method to accrue by the number of hours indicated in the Hours box
per pay cycle.

Leave Codes
Fixed Percentage of Hours Worked: Select this method to base leave on a fixed rate per hour worked.
The system multiplies only the earning hours that are tied to the Leave Code (as indicated on the Earnings
tab) by the amount specified in the Percentage box. Note that when using this calculation method, leave
varies with hours worked.
Amount on Timesheet: Select this method to have the system use the fixed amount that is entered on the
employee's timesheet. Use this method to enter an actual amount on the timesheet for leave.
Percentage on Timesheet: Select this method to have the system use the fixed percentage that is
entered on the employee's timesheet. Use this method to enter the percent on the timesheet for leave.
Hours, Percentage: Enter the number of hours or a percentage, depending on the calculation method
selected. You should enter the number of hours to accrue for Fixed Number of Hours, or a percentage for
Fixed Percentage of Hours Worked.
When entering percentages, do not include a decimal point. For fractional percentages, enter the leading
zeroes. For example, enter the following numbers to indicate the following percentages:
0005 = .5%
005, 05, or 5 = 5%
50 = 50%
The system calculates up to four places to the right of the decimal point.
Maximum Subject Hours Per Pay Period: Enter the maximum subject hours per pay period allowed
when calculating leave, if the Fixed Percentage of Hours Worked or Percentage on Timesheet calculation
method was selected. This box is not used with the Fixed Number of Hours calculation method.
Maximum Percentage: Enter the maximum percentage allowed for leave, when Percentage on
Timesheet is selected. When entering percentages include a decimal point. The percentage can range
from zero to 100 percent. The system calculates up to four places to the right of the decimal point.
Leave Codes - Earnings Tab
Access this tab using Maintain>Payroll>Leave Codes.
Use this tab to select the Earning Codes to use when calculating this leave. This tab is only available if
Fixed Percentage of Hours Worked or Percentage on Timesheet was selected on the Calculation tab.
MIP Fund Accounting
Payroll User's Guide
88
Chapter 2: Setting Up and Maintaining Payroll
MIP Fund Accounting
Payroll User's Guide
89
Note: Any Earning Code set up with Contribute to Net Pay Only (Maintain>Payroll>Earning Codes) is
not available to use when calculating leave.
Fields
Earnings to Use for This Calculation Available Items, Selected Items: Select the Earning Codes to
use when calculating leave. Move a code from the Available Items box to the Selected Items box by
clicking it twice or by using the Mover buttons (>, >>). The codes may be moved in any order. At least
one earning code must be moved to the Selected Items box.
Leave Codes - Schedule Tab
Access this tab using Maintain>Payroll>Leave Codes.
Use this tab to assign a payroll schedule to the Leave Code. This schedule helps the system determine
whether or not to use a particular leave code when creating a Regular/Supplemental timesheet for an
employee.
Fields
Frequency Pay Cycle, Regular Payroll, Supplemental Payroll: A schedule is required for all cycles
and payroll types. If no changes are made to this tab, the system uses the default, Always.
Monthly: Choose from Always or Never for Regular and Supplemental Payroll.
Semimonthly: Select Always, 1st Payroll of the Month, 2nd Payroll of the Month, or Never for Regular
Payroll. Select Always or Never for Supplemental Payroll.
Biweekly: Select Always, 1st Payroll of the Month, 2nd Payroll of the Month, 1st Two Payrolls of the
Month, or Never for Regular Payroll. Select Always or Never for Supplemental Payroll.
Weekly: Select Always, 1st Four Payrolls of the Month, 1st Payroll of the Month, 2nd Payroll of the
Month, 3rd Payroll of the Month, 4th Payroll of the Month, 1st and 3rd Payroll of the Month, 2nd and
4th Payroll of the Month, or Never for Regular Payroll. Select Always or Never for Supplemental
Payroll.
Tip: Use a Schedule other than Always, if there is leave that you do not want to accrue every pay cycle.
Otherwise, allow the system to use the default, Always, as the calculation schedule; leave will then be
accrued every pay cycle.

Email Templates
Email Templates
Access this form using Accounting or Payroll>Maintain>Email Templates. This form is only
available if you have installed and added the Accounts Receivable Billing or the Payroll and
Direct Deposit modules.
Use this form to create default and customized email templates for forms that are emailed from MIP Fund
Accounting. You must set up default preferences, such as a subject and message for each type of form in
the system before creating any customized email templates. (At this time, email templates are only
available for the Accounts Receivable and Payroll and Direct Deposit modules.) Also, the <Default>
template cannot be deleted.
To Set Up an Email Template
1. Email Templates work in conjunction with the SMTP Connection information that was set up by the
Administrator using the Organization>Organization Information>SMTP Email tab.
Important! We recommend that the SMTP Connection information be set up and tested by the
Administrator before creating an email template (Organization>Organization Information>SMTP
Email tab).
2. On the Email Templates form, select a Process Type.
3. Enter a Process Template. Before creating customized email templates, you must select the
<Default> process template, then complete the form and save it. A <Default> Process Template is
recommended for each Process Type. That way you have a generic or standard email format
composed that can be sent to customers who want emailed statements and/or invoices, or employees
who want their direct deposit voucher information emailed.
4. Enter a From email address. A From email address is required in order to send emails.
5. Enter a Cc or Bcc email address. To receive a copy of the emails being sent, we recommend that you
enter your email address in the Cc or Bcc fields. If you do not want your customers or employees to
see your email address, you should use the Bcc field.
6. Enter a default Subject and Message for each process type.
For example, for A/R Invoices, you might include a subject of “Monthly Invoice from ABC
Organization” and a message of “Attached is a copy of your monthly invoice. Please call if you have
any questions or concerns. Thank you for your continued support!”
MIP Fund Accounting
Payroll User's Guide
90

Chapter 2: Setting Up and Maintaining Payroll
MIP Fund Accounting
Payroll User's Guide
91
7. Click Send Test Email. Click this button to test the connectivity with the server and that SMTP will
work with the system to email forms. The addresses entered by the Administrator on the
Organization>Organization Information>SMTP Email tab will be used when this button is clicked to
test that your connection is set up correctly.
8. Click Save.
9. Now, you’re ready to select which customers will receive their invoices and/or statement via email,
as well as which employees will receive their pay stubs via email.
Open the Maintain>Accounts Receivable>Customers form,
On the Customers tab, select a Customer ID.
On the Email tab, select the Email check box, enter the email address, and select the process
template, or accept the default process template.
You will need to select this for each customer and decide if they want to receive their invoices,
customer statements, or both through email.
Open the Payroll>Maintain>Employee Information form,
On the Employee tab, select an Employee ID.
On the Email tab, select the Email check box, enter the email address, and select the process
template, or accept the default process template.
You will need to select this for each employee who wants to receive their direct deposit
voucher information through email.
Fields Process Type: Select a process type from the drop-down list, such as A/R Invoice. Then you will define
the default email preferences for each process type, such as From email address, and subject.
Process Template: Select <Default> or enter a process template for this Process Type. It is
recommended that you create and save a <Default> process template for each process type before
creating any additional Process Templates. Also, we recommend that the <Default> process template
be defined with internal email routing information and generic messaging content.
That way you have a generic or standard email format composed for customers who want statements
emailed, and another for those who want their invoices emailed.

Email Templates
You can get creative and customize email templates for each individual customer per process type or
create customized email templates for specific purposes, such as Final Notice or Past Due Invoices;
however, you will need to select each one individually on each Customer’s Email Tab before processing
invoices and/or statements.
Define Email Routing:
From: Enter the email address from where the email is being sent. (This is required to email.) For
example, you might want to enter your company’s email address; if you have rights to monitor it.
Important! If the Use Custom Credentials check box was selected and a User name was entered by the
Administrator on the Organization>Organization Information>SMTP Email Tab, the “From” email
address here must match the User name, in order to use the selected Process Type’s format.
You cannot use a User name with someone else’s email address when the Use Custom Credentials
check box was selected.
Cc, Bcc: To send emails for this process type to another email address, enter that email address here.
(The email address entered displays on the email being sent; however, the Bcc email address will not
display on the email.
If you are entering multiple email addresses, each address must be separated with a semicolon and a
space. Example, [email protected]; [email protected].
Note: We recommend that the organization include their email address as a Cc or Bcc, so that you can
collect historical information about the emails being sent from MIP Fund Accounting. Do not delete these
emails, as they are your only historical record.
Send Test Email: Click this button to test the email connection. The addresses entered by the
Administrator on the Organization>Organization Information>SMTP Email tab will be used when this
button is clicked to test that your connection is set up correctly. Note that if the From and To email
address fields were left blank, the system will only verify that the Server, Port, and User and Password
(if applicable) fields have information but a test email will not be sent when this button is clicked.
Customize Email Content:
Subject: Enter the subject line for the process type selected. This text displays in the subject line of
every email sent for this process type.
Message: Enter a message to be included in the email for the process type selected. For example, it
could include information such as a contact person and telephone number that would be applicable to
all customer’s receiving an emailed invoice.
MIP Fund Accounting
Payroll User's Guide
92

Chapter 2: Setting Up and Maintaining Payroll
MIP Fund Accounting
Payroll User's Guide
93
Tips: As the Administrator, be sure to set up proper security for the Maintain>Email Templates forms using
Security>Set Up Organization Menus. (For Accounting, select the type and ID, expand
Accounting>Maintain and highlight Email Templates, and then check the Rights for this field. For
Payroll, select the type and ID, expand Accounting>Maintain>Payroll and highlight Email Templates,
and then check the Rights for this field.)
You only have customized Process Templates and the system changed your option from "Email" to
"Print".
For Customers, if you did not set up a <Default> Process Template (Maintain>Email Templates
form) for both your Invoices and Customer Statements (Process Type) and later delete the
customized process template being used on the Maintain>Accounts
Receivable>Customers>Email Tab, the system will change your Email option to Print for every
customer that used that customized process template on the Maintain>Accounts
Receivable>Customers>Email Tab.
For Employees, if you did not set up a <Default> Process Template (Maintain>Email Templates
form) for your Vouchers (Process Type) and later delete the customized process template being
used on the Payroll>Maintain>Employee Information>Email Tab , the system will change your
Email option to Print for every employee that used that customized process template on the
Payroll>Maintain>Employee Information>Email Tab.

Chapter 3: Timesheets
Enter Default TimesheetsUse this form to enter Default Timesheet information for an employee. Total Hours and Gross Pay are
displayed at the bottom of each tab and reflect the entries made on the Earnings tab.
Note: This form is only available with the Payroll module; it is not available for Payroll Link Users.
Enter Default Timesheets - Select Tab
Access this tab using Timesheets>Enter Default Timesheets. It is only available with the Payroll
module; it is not available for Payroll Link users.
Use this form to enter Default Timesheet information for an employee. Total Hours and Gross Pay are
displayed at the bottom of each tab and reflect the entries made on the Earnings tab.
Use this tab to enter the employee for which to create a timesheet. Total Hours and Gross Pay are
displayed at the bottom of each tab and reflect the entries made on the Earnings tab. Additionally, enter a
Timesheet Reference number for internal use to help track the timesheets.
It is recommended that you assign the specific timesheet in the following situations:
Default Timesheets (Timesheets>Enter Default Timesheets) to employees who have the same payroll
information week after week. The information entered on the Default Timesheets form automatically
displays on the Timesheet Entry form for both Regular and Supplemental Timesheets. Default
Timesheets should contain information to use every time payroll is processed. Although you do not
have to use Default Timesheets for employees, using them, saves you from having to enter
employees' timesheet information each time payroll is processed.
Regular Timesheets (Timesheets>Enter Regular/Supplemental Timesheets) to employees whose
payroll information varies from payroll to payroll (enter a Regular Timesheet to change an employee's
Default Timesheet for a particular payroll). Information that changes with each payroll should be
entered on a Regular Timesheet, such as number of hours worked for hourly employees.
Supplemental Timesheets (Timesheets>Enter Regular/Supplemental Timesheets) to employees who
are receiving off-cycle or other non-standard payments.
MIP Fund Accounting
Payroll User's Guide
94

Chapter 3: Timesheets
MIP Fund Accounting
Payroll User's Guide
95
Fields
Employee ID: Enter an employee ID.
Timesheet Reference: Enter a reference number for this timesheet for tracking purposes, if desired.
Total Hours: This is the employee's total for the Hours column entered on the Earnings tab, excluding
any Earnings Code that is "Contribute to Net Pay Only."
Gross Pay: This is the employee's total for the Amount column entered on the Earnings tab, excluding
any Earnings Code that is "Contribute to Net Pay Only."
Tips: You can print this data using Reports>Payroll>Processing>Timesheets or Quick Timesheets.
Complete the Maintain>Payroll>Earning Codes, Benefit Codes, Deduction Codes, Worker's
Compensation Codes, and Leave Codes forms before creating a Default Timesheet for an employee.
Also, specify the appropriate Distribution Code for each Earning Code entered on the Default
Timesheet. Use the Maintain>Distribution Codes form to enter those codes before setting up Default
Timesheets.
Timesheet information consists of Earning Codes, Benefit Codes, Deduction Codes, Workers'
Compensation Codes, and Leave Codes. The codes assigned to an employee's timesheet are applied
to that employee when payroll is processed.
Fast data entry is imperative in timesheet processing. Use the Sort Order button to sort the timesheets
to a specific order and then use the Next Record button and Previous Record button to move through
the employee timesheets. When a change is made to a timesheet and the Next Record button is
clicked, the record is saved before moving to the next employee timesheet for that tab. The Employee
ID displays at the top of each form, making it easy to identify each employee when entering timesheet
information.
The system uses Default and/or Regular Timesheets to process Regular Payrolls, and Supplemental
Timesheets to process Supplemental Payrolls.
To delete a group of default timesheets, select the Find button, and then delete selected employee
timesheets.
To view Earning code rates and amounts, has the Administrator clear the Hide Earning Code Rates
and Amounts During Timesheet Processing check box using Organization>Set Up Modules>Payroll.

Enter Default Timesheets
Enter Default Timesheets - Earnings Tab
Access this tab using Timesheets>Enter Default Timesheets. It is only available with the Payroll
module; it is not available for Payroll Link users.
Use this tab to enter earning codes for the employee's default timesheet. You must also specify the
appropriate Distribution Code for each Earning Code entered on this timesheet. Use the
Maintain>Distribution Codes form to enter those codes before setting up Default Timesheets.
You must have previously completed the Maintain>Payroll>Earning Codes, Benefit Codes, Deduction
Codes, Worker's Compensation Codes, and Leave Codes forms before you can create a Default
Timesheet for an employee.
Fields
Earnings Table Code, Calculation Method, Hours, Rate, Amount, Distribution Code: The Earnings
table is used to select earning codes, enter hours, rates, or amounts, and select distribution codes. The
system displays an abbreviation for the calculation method on each row. An amount is required if the
selected earning code uses a calculation method of Amount on Timesheet (AT). A rate is required if the
selected earning code uses a calculation method of Rate on Timesheet (RT). Furthermore, hours are
required if the selected earning code uses Rate Multiplier (RM), Fixed Hourly Amount (FH), Employee Pay
Rate (ER), or Rate on Timesheet (RT). Also note that a Distribution Code is required for every code.
Total Hours: This is the employee's total for the Hours column entered on the Earnings tab, excluding any
Earnings Code that is "Contribute to Net Pay Only."
Gross Pay: This is the employee's total for the Amount column entered on the Earnings tab, excluding any
Earnings Code that is "Contribute to Net Pay Only."
MIP Fund Accounting
Payroll User's Guide
96

Chapter 3: Timesheets
MIP Fund Accounting
Payroll User's Guide
97
Tips: All codes assigned to an employee's timesheet are applied to that employee when payroll is
processed.
Calculation methods were assigned to earning codes using Maintain>Payroll>Earning Codes.
Therefore, earning information for codes with a calculation method of Fixed Amount (FA), Amount on
Timesheet (AT), Employee Pay Rate (ER), Rate Multiplier (RM), Fixed Hourly Amount (FH), and Rate
on Timesheet (RT), were entered on the Earnings Codes form.
If you want to process employee reimbursement and advances through regular payroll processing (by
applying the net pay amount without the amount being subject to taxes and fringe benefits), create an
Earning Code with the Contribute to Net Pay Only check box selected (Maintain>Payroll>Earning
Codes).
To view Earning code rates and amounts, clear the Hide Earning Code Rates and Amounts During
Timesheet Processing check box using Organization>Set Up Modules>Payroll.
Click Refresh Rates and Amounts to open the Select Timesheets to Refresh form. Use this form
to refresh the rates and amounts on the timesheets for individuals or all employees. This is especially
helpful if you make a change to an existing rate or amount.
Enter Default Timesheets - Benefits Tab
Access this tab using Timesheets>Enter Default Timesheets. It is only available with the Payroll
module; it is not available for Payroll Link users.
Use this tab to enter default benefit information for an employee. Benefit information includes a Benefit
Code, a Rate, and an Amount (if required for the calculation method).
Fields
Benefits Table
Code: Select a benefit code. Select as many benefits as are appropriate for this employee.
Calculation Method: The system displays an abbreviation of the calculation method for each benefit
code selected.
Rate: The system displays a percentage, if the Fixed Percentage of Earnings (FP) calculation method
was selected for the benefit. Enter an amount if the calculation method is Percentage on Timesheet

Enter Default Timesheets
(PT). The percentage you enter must be positive or zero, however it cannot exceed the Maximum
Percentage set on the Maintain>Payroll>Benefit Codes form.
Amount: The system displays an amount if a Fixed Hourly Amount (FH) or Fixed Amount (FA)
calculation method was selected for the benefit. Enter an amount if the calculation method is Amount on
Timesheet (AT). The amount you enter can be positive, negative, or zero. (Use the minus key or the
space bar to enter a negative amount.)
Total Hours: This is the employee's total for the Hours column entered on the Earnings tab, excluding any
Earnings Code that is "Contribute to Net Pay Only."
Gross Pay: This is the employee's total for the Amount column entered on the Earnings tab, excluding any
Earnings Code that is "Contribute to Net Pay Only."
Tip: Calculation methods were assigned to benefit codes using Maintain>Payroll>Benefit Codes.
Therefore, benefit information for codes with a calculation method of Fixed Amount (FA), Fixed
Percentage of Earnings (FP), Fixed Hourly Amount (FH), and Amount on Timesheet (AT), were entered
on the Benefit Codes form.
Enter Default Timesheets - Deductions Tab
Access this tab using Timesheets>Enter Default Timesheets. It is only available with the Payroll
module; it is not available for Payroll Link users.
Use this tab to enter default deduction information for an employee. Deduction information includes a
Deduction Code, a Rate, and an Amount (if required for the calculation method).
Fields
Deductions Table
Code: Select a deduction code. Enter as many deductions as are appropriate for this employee.
Calculation Method: The system displays the calculation method for each deduction code selected.
Rate: The system displays a percentage, if the Fixed Percentage of Earnings (FP) calculation method
was selected for the deduction. Enter an amount if the calculation method is Percentage on Timesheet
(PT). The percentage you enter must be positive or zero, however it cannot exceed the Maximum
Percentage set on the Maintain>Payroll>Deduction Codes form.
MIP Fund Accounting
Payroll User's Guide
98

Chapter 3: Timesheets
MIP Fund Accounting
Payroll User's Guide
99
Amount: The system displays an amount if a Fixed Hourly Amount (FH) or Fixed Amount (FA)
calculation method was selected for the deduction. Enter an amount if the calculation method is
Amount on Timesheet (AT). The amount you enter can be positive, negative, or zero. (Use the minus
key or the space bar to enter a negative amount.)
Total Hours: This is the employee's total for the Hours column entered on the Earnings tab, excluding
any Earnings Code that is "Contribute to Net Pay Only."
Gross Pay: This is the employee's total for the Amount column entered on the Earnings tab, excluding
any Earnings Code that is "Contribute to Net Pay Only."
Tip: Calculation methods were assigned to deduction codes using Maintain>Payroll>Deduction
Codes. Therefore, deduction information for codes with a calculation method of Fixed Amount (FA),
Fixed Percentage of Earnings (FP), Fixed Hourly Amount (FH), and Amount on Timesheets (AT), were
entered on the Deductions Codes form.
Enter Default Timesheets - Workers' Compensation Tab
Access this tab using Timesheets>Enter Default Timesheets. It is only available with the Payroll
module; it is not available for Payroll Link users.
Use this tab to enter workers' compensation information for an employee. Workers' compensation
information includes a Workers' Compensation Code, Rate, and Hours (if appropriate).
Fields
Workers' Compensation
Code: Select a Workers' Compensation code.
Calculation Method: The system displays an abbreviation of the calculation method for each code
selected—RW (Rate per Hours Worked), RH (Rate per Workers' Compensation Hours), or RE (Rate
per $100 Earnings).
Rate: The system displays the rate associated with this code.
Hours: Enter the number of hours if the calculation method is Rate per Workers' Compensation
Hours—RH.
Total Hours: This is the employee's total for the Hours column entered on the Earnings tab, excluding
any Earnings Code that is "Contribute to Net Pay Only."

Enter Default Timesheets
Gross Pay: This is the employee's total for the Amount column entered on the Earnings tab, excluding any
Earnings Code that is "Contribute to Net Pay Only."
Tips: Calculation methods were assigned to workers' compensation codes using Maintain>Payroll>Workers'
Compensation Codes. Therefore, workers' compensation information for codes with a calculation
method of Rate per Hours Worked (RW), Rate per Workers' Compensation Hours (RH), or Rate per
$100 Earnings (RE), were entered on the Workers' Compensation Codes form.
The amount you enter can be positive, negative, or zero. (Use the minus key or the space bar to enter a
negative amount.)
Enter Default Timesheets - Leave Tab
Access this tab using Timesheets>Enter Default Timesheets. It is only available with the Payroll
module; it is not available for Payroll Link users.
Use this tab to enter default leave information for an employee. Leave information includes a Leave Code,
Beginning Balance, Hours Accrued, Hours Taken, and Ending Balance.
Fields
Leave Table Code, Calculation Method, Beginning Balance, Rate, Hours Accrued, Hours Taken,
Ending Balance: The Leave table is used to select leave codes, enter rates and hours taken. The system
displays an abbreviation for the calculation method on each row. A rate is required if the selected leave
code uses a calculation method of Percentage on Timesheet (PT). The number of hours accrued is
required if the selected leave code uses a calculation method of Amount on Timesheet (AT). Select as
many leave codes as are appropriate for this employee and paycheck.
Note: The percentage you enter for the Percentage on Timesheet calculation method must be positive
or zero, however it cannot exceed the Maximum Percentage set on the Maintain>Payroll>Leave Codes
form.
Total Hours: This is the employee's total for the Hours column entered on the Earnings tab, excluding any
Earnings Code that is "Contribute to Net Pay Only."
Gross Pay: This is the employee's total for the Amount column entered on the Earnings tab, excluding any
Earnings Code that is "Contribute to Net Pay Only."
MIP Fund Accounting
Payroll User's Guide
100

Chapter 3: Timesheets
MIP Fund Accounting
Payroll User's Guide
101
Tips: Generally, default Hours Taken is not entered for an employee, since this varies each month. Instead,
Hours Taken should be entered on the employee's Regular or Supplemental Timesheet.
Beginning Balance is calculated using the system date.
Calculation methods were assigned to earning codes using Maintain>Payroll>Leave Codes.
Therefore, leave information for codes with a calculation method of Fixed Number of Hours (FN),
Fixed Percentage of Hours Worked (FP), Amount on Timesheet (AT), and Percentage on Timesheet
(PT), were entered on the Leave Codes form.
Enter Default Timesheets - Summary Tab
Access this tab using Timesheets>Enter Default Timesheets. It is only available with the Payroll
module; it is not available for Payroll Link users.
Use this tab to view a summary of the information that was entered on the Select, Earnings, Benefits,
Deductions, Workers' Compensation, and Leave tabs. The Summary Table displays all the information
together for the selected employee.
Earnings, Benefits, Deductions, Workers' Compensation, and Leave codes were created using
Maintain>Payroll>Earnings, Benefits, Deductions, Workers' Compensation, and Leave. All calculation
methods were set up on the Calculation Method tab of each of these forms.
Note: To view earning code rates and amounts, clear the Hide Earning Code Rates and Amounts
During Timesheet Processing check box using Organization>Set Up Modules>Payroll.
Fields
Summary: The system displays a line for each payroll code that was selected on the previous tabs.
Payroll Code: The system displays a code type of Earning, Benefit, Deduction, Workers
Compensation, or Leave.
Code: The system displays the name assigned to the payroll code.
Calculation Method: The system displays one of the following calculation method codes: Amount on
Timesheet (AT), Employee Pay Rate (ER), Fixed Amount (FA), Fixed Hourly Amount (FH), Fixed
Number of Hours (FN), Fixed Percentage of Earnings (FP), Fixed Percentage of Hours Worked (FP),

Enter Regular/Supplemental Timesheets
Percentage on Timesheet (PT), Rate Multiplier (RM), Rate on Timesheet (RT), Rate per $100 Earnings
(RE), Rate per Hours Worked (RW), and Rate per Workers' Compensation Hours (RH).
Hours: If applicable, the system displays the number of hours associated with the code.
Rate: If applicable, the system displays the rate associated with the code.
Amount: If applicable, the system displays the amount associated with the code.
Distribution Code: If the associated code is Earning, the system displays the Distribution Code
assigned.
Total Hours: This is the employee's total for the Hours column entered on the Earnings tab, excluding any
Earnings Code that is "Contribute to Net Pay Only."
Gross Pay: This is the employee's total for the Amount column entered on the Earnings tab, excluding any
Earnings Code that is "Contribute to Net Pay Only."
Enter Regular/Supplemental TimesheetsUse this form to enter the Earning, Benefit, Deduction, Workers' Compensation, and Leave Codes to use
to calculate an employee's paycheck. Total Hours and Gross Pay are displayed at the bottom of each tab
and reflect the entries made on the Earnings tab.
Note: This form is only available with the Payroll module; it is not available for Payroll Link Users.
Enter Regular/Supplemental Timesheets - Select Tab
Access this tab using Timesheets>Enter Regular/Supplemental Timesheets. It is only available
with the Payroll module; it is not available for Payroll Link users.
Use this form to enter the Earning, Benefit, Deduction, Workers' Compensation, and Leave Codes to use
to calculate an employee's paycheck. Total Hours and Gross Pay are displayed at the bottom of each tab
and reflect the entries made on the Earnings tab.
Use this tab to enter the Processing Group, Timesheet Type, Pay Date, Pay Period Begin Date, Pay
Period End Date, Employee ID, SUTA Weeks, and Timesheet Reference (if appropriate), for which to
enter timesheets.
Use the Regular or Supplemental Timesheet for an employee in the following situations:
MIP Fund Accounting
Payroll User's Guide
102

Chapter 3: Timesheets
MIP Fund Accounting
Payroll User's Guide
103
Enter Regular Timesheets for employees who do not have Default Timesheets (perhaps because their
payroll information varies from payroll to payroll), or to change an employee's Default Timesheet
information for one particular payroll.
Enter Supplemental Timesheets to give employees off-schedule or other non-standard payments; for
example, you would use a Supplemental Timesheet to create a replacement check for a voided
Regular Payroll check. Note that timesheets entered using this form are for a particular processing
group, pay date, pay period begin date, and pay period end date.
If Default Timesheets (Timesheets>Enter Default Timesheets) have already been set up for all
employees, you do not need to use this form to process a Regular Payroll. Note that the information
entered on the Timesheets>Enter Default Timesheets form automatically displays on this form, for
both Regular and Supplemental Timesheets.
Fields
Processing Group: Select the processing group for which to enter timesheets.
Timesheet Type: Select a payroll type of Regular (R) or Supplemental (S).
Pay Date: Enter the pay date for this timesheet.
Pay Period Begin Date: Enter the pay period begin date for a supplemental type timesheet. A default
pay period begin date displays for regular type timesheets. (Pay Dates were created on the Pay
Schedule tab in the Maintain>Payroll>Processing Groups form.)
Pay Period End Date: Enter the pay period end date for a supplemental type timesheet. A default pay
period end date displays for regular type timesheets. (Pay Dates were created on the Pay Schedule tab
in the Maintain>Payroll>Processing Groups form.)
Employee ID: Enter an employee ID.
SUTA Weeks: Enter the number of SUTA (State Unemployment Tax) Weeks for this pay period, if
applicable.
Timesheet Reference: Enter a timesheet reference number for tracking purposes, if desired.
Total Hours: This is the employee's total for the Hours column entered on the Earnings tab, excluding
any Earnings Code that is "Contribute to Net Pay Only."
Gross Pay: This is the employee's total for the Amount column entered on the Earnings tab, excluding
any Earnings Code that is "Contribute to Net Pay Only."

Enter Regular/Supplemental Timesheets
Tips: Processing groups must have been previously set up using the Maintain>Payroll>Processing Groups
form.
When creating a Regular Timesheet, the pay date entered must be a valid pay date for the selected
processing group (Maintain>Payroll>Processing Groups). A valid pay date is one that is part of the
processing group's pay cycle and has not yet been calculated and printed. Furthermore, only active and
inactive processing groups are available for selection.
Keep in mind that timesheet information consists of Earning Codes, Benefit Codes, Deduction Codes,
Workers' Compensation Codes, and Leave Codes. The codes assigned to an employee's timesheet are
applied to that employee when payroll is processed.
For Regular and Supplemental Payrolls, only active employees are available for selection.
The system uses Default and/or Regular Timesheets to process Regular Payrolls, and Supplemental
Timesheets to process Supplemental Payrolls.
Fast data entry is imperative in timesheet processing. Use the Sort Order button to sort the timesheets
to a specific order and then use the Next Record button and Previous Record button to move through
the employee timesheets. When a change is made to a timesheet and the Next Record button is clicked,
the record is saved before moving to the next employee timesheet for that tab. The Employee ID
displays at the top of each form, making it easy to identify each employee when entering timesheet
information.
To view Earning code rates and amounts, clear the Hide Earning Code Rates and Amounts During
Timesheet Processing check box using Organization>Set Up Modules>Payroll.
If using a Supplemental Timesheet, and zero is entered in the SUTA Weeks box, the system records
zero as the SUTA weeks, and then calculates a sum.
For a regular timesheet, the SUTA weeks default to the number of weeks specified in
Maintain>Payroll>Processing Groups. If a different number of SUTA weeks is entered other than the
default value, that new number is used in the calculation process. This means that a zero may be
entered to have no SUTA calculated.
MIP Fund Accounting
Payroll User's Guide
104

Chapter 3: Timesheets
MIP Fund Accounting
Payroll User's Guide
105
Enter Regular/Supplemental Timesheets - Earnings Tab
Access this tab using Timesheets>Enter Regular/Supplemental Timesheets. It is only available
with the Payroll module; it is not available for Payroll Link users.
Use this tab to enter the employee's earning information. You need to enter an Earning Code and a
value in the Hours, Rate, or Amount column, as required by the calculation method. You must also
specify the appropriate Distribution Code for each Earning code entered on this timesheet. Distribution
Codes were set up using Maintain>Payroll>Distribution Codes.
If a Default Timesheet has been set up for this employee (Timesheets>Enter Default Timesheets), that
default earnings information appropriate for this pay period appears on this tab. You can complete,
change, or delete any of the default information displayed. If there is no Default Timesheet for the
employee, all applicable timesheet information must be entered on this tab.
Codes assigned on an employee's Default Timesheet, that are not valid for the specified pay period
because of the related Calculation Schedule, are not displayed on this form. However, they may be
added. For example, if an employee is assigned a "Bonus" Earning Code that has a Calculation
Schedule of Never, but the code needs to be used for the specified pay period, it can be added to the
current Regular or Supplemental Timesheet.
Fields
Earnings Code, Calculation Method, Hours, Rate, Amount, Distribution Code: Once the earning code
has been entered for this employee, the system displays the associated calculation method. Enter the
hours worked for this earning code. If the calculation method is Amount on Timesheet (AT), enter the
amount associated with this earning code. Also, if the calculation method is Rate on Timesheet (RT),
enter the rate associated with this earning code. For all earning codes, enter the appropriate Distribution
Code. Enter as many earning codes as appropriate for this employee and paycheck.
Total Hours: This is the employee's total for the Hours column entered on the Earnings tab, excluding
any Earnings Code that is "Contribute to Net Pay Only."
Gross Pay: This is the employee's total for the Amount column entered on the Earnings tab, excluding
any Earnings Code that is "Contribute to Net Pay Only."

Enter Regular/Supplemental Timesheets
Tips: For Regular or Supplemental Payrolls, at least one Earning or Benefit Code is required.
For Salaried employees, you can distribute wage hours based on earning codes. Select multiple
earning codes with the Calculation Method Employee Pay Rate (ER) and enter the employee’s Hours
and Distribution Codes; the system will use the hours to break down earnings by dollar amount for each
wage code. Use Reports>Payroll>Processing>Timesheets, to view the wages with hours and net check
amount that was contributed by that wage code.
You can choose the same or different Distribution Codes for each earning code, even if there are
multiple earning lines. Remember, Distribution Codes are used to allocate earnings; use the Distribution
Codes form (Maintain>Payroll>Distribution Codes) to edit Distribution Codes.
If you want to process employee reimbursement and advances through regular payroll processing (by
applying the net pay amount without the amount being subject to taxes and fringe benefits), create an
Earning Code with the Contribute to Net Pay Only check box selected (Maintain>Payroll>Earning
Codes).
To view Earning code rates and amounts, clear the Hide Earning Code Rates and Amounts During
Timesheet Processing check box using Organization>Set Up Modules>Payroll.
Click Refresh Rates and Amounts to open the Select Timesheets to Refresh form. Use this form to
refresh the rates and amounts on the timesheets for individuals or all employees. This is especially
helpful if you make a change to an existing rate or amount.
Enter Regular/Supplemental Timesheets - Benefits Tab
Access this tab using Timesheets>Enter Regular/Supplemental Timesheets. It is only available
with the Payroll module; it is not available for Payroll Link users.
Use this tab to enter the employee's benefit information. You need to enter a Benefit Code and an Amount,
as required by the calculation method.
If a Default Timesheet has been set up for this employee (Timesheets>Enter Default Timesheets), the
default benefit information appropriate for this pay period appears on this tab. You can complete, change,
or delete any of the default information displayed. If there is no Default Timesheet for the employee, all
applicable timesheet information must be entered on this tab.
MIP Fund Accounting
Payroll User's Guide
106

Chapter 3: Timesheets
MIP Fund Accounting
Payroll User's Guide
107
Fields
Benefits
Code: Select a benefit code. Enter as many benefit codes as appropriate for this employee and
paycheck.
Calculation Method: The system displays an abbreviation of the calculation method for each benefit
code selected.
Rate: The system displays a percentage, if the Fixed Percentage of Earnings (FP) calculation method
was selected for the benefit. Enter an amount if the calculation method is Percentage on Timesheet
(PT). The percentage you enter must be positive or zero, however it cannot exceed the Maximum
Percentage set on the Maintain>Payroll>Benefit Codes form.
Amount: The system displays an amount if a Fixed Hourly Amount (FH) or Fixed Amount (FA)
calculation method was selected for the benefit. Enter an amount if the calculation method is Amount
on Timesheet (AT). The amount you enter can be positive, negative, or zero. (Use the minus key or
the space bar to enter a negative amount.)
Total Hours: This is the employee's total for the Hours column entered on the Earnings tab, excluding
any Earnings Code that is "Contribute to Net Pay Only."
Gross Pay: This is the employee's total for the Amount column entered on the Earnings tab, excluding
any Earnings Code that is "Contribute to Net Pay Only."
Tips: For Regular or Supplemental payrolls, at least one Earning or Benefit Code is required.
The amount you enter can be positive, negative, or zero. (Use the minus key or the space bar to enter
a negative amount.)
Enter Regular/Supplemental Timesheets - Deductions Tab
Access this tab using Timesheets>Enter Regular/Supplemental Timesheets. It is only available
with the Payroll module; it is not available for Payroll Link users.
Use this tab to enter the employee's deduction information. You need to enter a Deduction Code and an
Amount, as required by the calculation method.
If a Default Timesheet has been set up for this employee (Timesheets>Enter Default Timesheets), the
default deduction information appropriate for this pay period appears on this tab. You can complete,

Enter Regular/Supplemental Timesheets
change, or delete any of the default information displayed. If there is no Default Timesheet for the
employee, all applicable timesheet information must be entered on this tab.
Fields
Deductions
Code: Select a deduction code. Enter as many deduction codes as appropriate for this employee and
paycheck.
Calculation Method: The system displays the calculation method for each deduction code selected.
Rate: The system displays a percentage, if the Fixed Percentage of Earnings (FP) calculation method
was selected for the deduction. Enter an amount if the calculation method is Percentage on Timesheet
(PT). The percentage you enter must be positive or zero, however it cannot exceed the Maximum
Percentage set on the Maintain>Payroll>Deduction Codes form.
Amount: The system displays an amount if a Fixed Hourly Amount (FH) or Fixed Amount (FA)
calculation method was selected for the deduction. Enter an amount if the calculation method is Amount
on Timesheet (AT). The amount you enter can be positive, negative, or zero. (Use the minus key or the
space bar to enter a negative amount.)
Total Hours: This is the employee's total for the Hours column entered on the Earnings tab, excluding any
Earnings Code that is "Contribute to Net Pay Only."
Gross Pay: This is the employee's total for the Amount column entered on the Earnings tab, excluding any
Earnings Code that is "Contribute to Net Pay Only."
Tip: The amount you enter can be positive, negative, or zero. (Use the minus key or the space bar to
enter a negative amount.)
Enter Regular/Supplemental Timesheets - Workers' Compensation Tab
Access this tab using Timesheets>Enter Regular/Supplemental Timesheets. It is only available
with the Payroll module; it is not available for Payroll Link users.
Use this tab to enter the employee's workers' compensation information. You need to enter a Workers'
Compensation Code and Hours, as required by the calculation method.
If a Default Timesheet has been set up for this employee (Timesheets>Enter Default Timesheets), the
default workers' compensation information appropriate for this pay period appears on this tab. You can
MIP Fund Accounting
Payroll User's Guide
108

Chapter 3: Timesheets
MIP Fund Accounting
Payroll User's Guide
109
complete, change, or delete any of the default information displayed. If there is no Default Timesheet for
the employee, all applicable timesheet information must be entered on this tab.
Fields
Workers' Compensation
Code: Select a Workers' Compensation code. Enter as many workers' compensation codes as
appropriate for this employee and paycheck.
Calculation Method: The system displays an abbreviation of the calculation method for each code
selected—RW (Rate per Hours Worked), RH (Rate per Workers' Compensation Hours), or RE (Rate
per $100 Earnings).
Rate: The system displays the rate associated with this code.
Hours: Enter the number of hours if the calculation method is Rate per Workers' Compensation
Hours—RH. Otherwise, hours cannot be entered.
Total Hours: This is the employee's total for the Hours column entered on the Earnings tab, excluding
any Earnings Code that is "Contribute to Net Pay Only."
Gross Pay: This is the employee's total for the Amount column entered on the Earnings tab, excluding
any Earnings Code that is "Contribute to Net Pay Only."
Tip: The amount you enter can be positive, negative, or zero. (Use the minus key or the space bar to
enter a negative amount.)
Enter Regular/Supplemental Timesheets - Leave Tab
Access this tab using Timesheets>Enter Regular/Supplemental Timesheets. It is only available
with the Payroll module; it is not available for Payroll Link users.
Use this tab to enter the employee's leave information. You need to enter a Leave Code, Rate, Hours
Accrued, and Hours Taken, as required by the calculation method. You can also view Beginning and
Ending Balances.
If a Default Timesheet has been set up for this employee (Timesheets>Enter Default Timesheets), the
default leave information appropriate for this pay period appears on this tab. You can complete, change,
or delete any of the default information displayed. If there is no Default Timesheet for the employee, all
applicable timesheet information must be entered on this tab.

Enter Regular/Supplemental Timesheets
Fields
Leave Code, Calculation Method, Beginning Balance, Rate, Hours Accrued, Hours Taken, Ending
Balance: Once a leave code has been entered for this employee, the system displays the associated
calculation method. Enter a rate if the calculation method is Percentage on Timesheet (PT). Enter the
number of hours of leave that the employee has taken. If the calculation method is Amount on Timesheet
(AT), enter the number of hours of leave that the employee has accrued. Enter as many leave codes as
appropriate for this employee and paycheck.
Note: The percentage you enter for the Percentage on Timesheet calculation method must be positive
or zero, however it cannot exceed the Maximum Percentage set on the Maintain>Payroll>Leave Codes
form.
Total Hours: This is the employee's total for the Hours column entered on the Earnings tab, excluding any
Earnings Code that is "Contribute to Net Pay Only."
Gross Pay: This is the employee's total for the Amount column entered on the Earnings tab, excluding any
Earnings Code that is "Contribute to Net Pay Only."
Enter Regular/Supplemental Timesheets - Summary Tab
Access this tab using Timesheets>Enter Regular/Supplemental Timesheets. It is only available
with the Payroll module; it is not available for Payroll Link users.
Use this tab to view a summary of the information that was entered on the Select, Earnings, Benefits,
Deductions, Workers' Compensation, and Leave tabs. The Summary Table displays all the information
together for the selected employee.
Note: To view earning code rates and amounts, clear the Hide Earning Code Rates and Amounts During
Timesheet Processing check box using Organization>Set Up Modules>Payroll.
Fields
Summary: The system displays a line for each payroll code that was selected on the previous tabs.
Payroll Code: The system displays a code type of Earning, Benefit, Deduction, Workers Compensation,
or Leave.
Code: The system displays the name assigned to the payroll code.
MIP Fund Accounting
Payroll User's Guide
110

Chapter 3: Timesheets
MIP Fund Accounting
Payroll User's Guide
111
Calculation Method: The system displays one of the following calculation method codes: Amount on
Timesheet (AT), Employee Pay Rate (ER), Fixed Amount (FA), Fixed Hourly Amount (FH), Fixed
Number of Hours (FN), Fixed Percentage of Earnings (FP), Fixed Percentage of Hours Worked (FP),
Percentage on Timesheet (PT), Rate Multiplier (RM), Rate on Timesheet (RT), Rate per $100
Earnings (RE), Rate per Hours Worked (RW), and Rate per Workers' Compensation Hours (RH).
Hours: If applicable, the system displays the number of hours associated with the code.
Rate: If applicable, the system displays the rate associated with the code.
Amount: If applicable, the system displays the amount associated with the code.
Distribution Code: If the associated code is Earning, the system displays the Distribution Code
assigned.
Total Hours: This is the employee's total for the Hours column entered on the Earnings tab, excluding
any Earnings Code that is "Contribute to Net Pay Only."
Gross Pay: This is the employee's total for the Amount column entered on the Earnings tab, excluding
any Earnings Code that is "Contribute to Net Pay Only."
Timesheet Buttons
Distribution Code Information: Use this button to open the
Maintain>Payroll>Distribution Codes form where you can create or modify a
distribution code. Each time this button is selected a new Distribution Codes
form is opened.
Refresh Rates and Amounts: Use this button to open the Select Timesheets to
Refresh form. Use this form to refresh the rates and amounts on any timesheet
form for individuals or all employees.
Sort Order: Use this button to display the records by the currently selected sort
order. Sort the timesheets by: Employee ID, Employee Last Name, Class, or
Type.
First Record: Use this button to display the first timesheet record in the payroll.
Previous Record: Use this button to display the previous timesheet record in the
payroll.

Enter Regular/Supplemental Timesheets
Next Record: Use this button to display the next timesheet record in the payroll.
Last Record: Use this button to display the last timesheet record in the payroll.
Select Timesheets to Refresh
Access this form using Timesheets>Default Timesheet or Enter Regular/Supplemental
Timesheet> Refresh Rates and Amounts. It is only available with the Payroll module; it is
not available for Payroll Link users.
Use this form to refresh the rates and amounts for an Employee ID, Processing Group, Employee Type,
Class, Position, or Pay Type, or all employees. The code changes are reflected in the Default, Regular, or
Supplemental Timesheets. The system quickly checks each Earning, Benefit, Deduction, Workers’
Compensation, and Leave Code and refreshes the rates and amounts (if applicable) for the selected
employees. Click OK to begin the refresh.
While the Timesheets are refreshing, a Progress Dialogue displays at the bottom of the window. When the
progress reaches 100%, a message displays the number of timesheets that were refreshed. This is to
inform you of the number of timesheets that were reviewed, it does not reflect the number of changes that
were made.
For example, if your Health Insurance Benefit Code premium was changing at the beginning of your fiscal
year, during that pay cycle, you could:
Update the Amount on the Maintain>Payroll>Benefits>Calculation tab
Open the Default Timesheets form
Click the Refresh Rates and Amounts button
Select all the employees and
Click OK.
The system would check every employee and apply any changes at that time. Those employees who have
that Benefit Code, would get the updated change. Those who did not would get checked but no changes
would be made since they do not have that Benefit Code.
MIP Fund Accounting
Payroll User's Guide
112

Chapter 3: Timesheets
MIP Fund Accounting
Payroll User's Guide
113
Fields
Filters: The filter allows you to limit which items are displayed in the Available Items table. Click Display
Records to view the results in the Available Items table.
Available Filter, Selected Filter: Select an item in the Available Filter column, and click the Mover ( >
) to move it to the Selected Filter column. Once an item is in the Selected Filter column, set up its
filtering criteria. Then, the table is limited to the data that falls within the designated filter criteria.
Compares To: Select an operator from the drop-down list. The operator compares the value in the
Selected Filter column with the values in Criteria 1 and Criteria 2 to determine which items are
displayed in the Available Items table.
Criteria 1: Enter a value to compare with the item in the Selected Filter column. When using Like or
Not Like, you can use "%" to represent any number of characters.
Criteria 2: Enter a value for the end of a range if the Compares To column contains the Between or
Not Between operators.
Timesheets: Upon opening, the system displays all records for the selected Timesheet form. You can
choose to sort records by any column by clicking the column title. Click the check boxes to select the
record you want to refresh. No documents are selected the first time this form is opened. The column on
which items are sorted has (ascending order) or (descending order) in the column
heading.Records are initially sorted on the first data column in ascending order. However, records can
be sorted based on any column by clicking on the column heading.
Records per Page: Select how many items per page to display using the Records per Page drop-
down list. You can view items in the table in increments of 10, 25, 50, 100, 250, 500, or 1000. The
default value for the Records per Page drop-down list was selected using the Options>Customize
Workstation Settings>Preferences tab.
Processing Group: The processing group code assigned to the employee using the
Maintain>Employee Information form. The report shows the code's name, such as Admin or PartTime.
Employee ID: The ID assigned to the employee.
Employee Type: The employee type, such as full-time or part-time.
Class: The job class entered.

Enter Regular/Supplemental Timesheets
Position: The employee's job title, such as Administrator or Program Rep.
Pay Type: A designation of Salaried or Hourly, depending on what pay type was selected.
Select Timesheets to Refresh Buttons
Select All: Use this button to select all items in the table.
Deselect All: Use this button to clear all items in the table.
Display/Hide Filter: Use this button to display or hide the Filters group box.
Clear Filter: Use this button to clear all of the selected filter items. The filter is
used for display purposes only; it limits what the system displays in the table.
You cannot save the filter items.
Display Records: Use this button to display only the records that match the
currently selected filter items. If you are not using the filter (it is blank), the
Display Records button displays all of the items you currently have.
View First Page: Use this button to display the first page of data in the table.
View Previous Page: Use this button to display the previous page of data in the
table.
View Next Page: Use this button to display the next page of data in the table.
View Last Page: Use this button to display the last page of data in the table.
MIP Fund Accounting
Payroll User's Guide
114

Chapter 3: Timesheets
MIP Fund Accounting
Payroll User's Guide
115
Sort Order
Access this form using Timesheets>Default Timesheet or Enter Regular/Supplemental
Timesheet> Sort Order. It is only available with the Payroll module; it is not available for
Payroll Link users.
Use this form to set a sort order for entering timesheets. Select Employee ID, Employee Last Name,
Class, or Employee Type and then use First Record , Previous Record , Next Record , or
Last Record to move between the records.

Chapter 4: Calculating Payroll
Calculate Payroll
Access this form using Activities>Payroll>Calculate Payroll. It is only available with the Payroll
module; it is not available for Payroll Link users.
Use this form to calculate payroll from timesheets.
For a Regular Payroll using Default Timesheets, you must have entered Default Timesheets using the
Timesheets>Enter Default Timesheets form. Select the Use Default Timesheet When No Other
Timesheet Type is Entered for the Pay Date check box. The Available Items box only displays the
processing groups that have a pay date within the range of the Pay Date boxes.
For a Regular Payroll using Regular Timesheets, you must first enter Regular Timesheets using the
Timesheets>Enter Regular/Supplemental Timesheets form. The Available Items box only displays the
processing groups that have a pay date within the range of the Pay Date boxes.
For Supplemental Payrolls, you must first enter Supplemental Timesheets using the
Timesheets>Enter Regular/Supplemental Timesheets form. The Available Items box contains only the
processing groups for which you have entered a Supplemental Timesheet that has a pay date within
the range of the Pay Date boxes.
In order to process payroll:
At least one timesheet must be entered, or
At least one default timesheet must be entered, plus you must select "Use Default Timesheet When No
Other Timesheet Type is Entered for the Pay Date" on this form.
Note: Depending on the amount of data being calculated, this process could be quite lengthy.
The payroll amounts calculated here are used when printing payroll checks
(Activities>Payroll>Print/Email Checks and Vouchers). Once checks have been printed for a Regular
Payroll, you cannot calculate that payroll again; you must use a Supplemental Payroll.
Prior to printing, the calculation process can be canceled and recalculated as outlined below.
MIP Fund Accounting
Payroll User's Guide
116

Chapter 4: Calculating Payroll
MIP Fund Accounting
Payroll User's Guide
117
Canceling Calculation
To cancel during the calculation process, press the Esc key. The system finishes calculating the
employee that is currently being calculated, and then stops the process. All processing groups that were
processed are moved back to the Available Items box, while uncalculated groups remain in the Selected
Items box. At some point, you need to recalculate the groups in the Selected Items box.
Recalculating
The system saves calculated data for each payroll until you print that payroll's checks. Prior to printing
checks, a particular payroll can be calculated as many times as needed. For example, if you need to add
additional employees to a calculated payroll, that payroll may be calculated again.
Payroll calculation is incremental. Therefore, each time you calculate a particular payroll, it is calculated
only for any new employees added to the processing groups for the specified pay date. Payroll is not
recalculated for any of that payroll's previously calculated employees. If you need to review or make
changes to an employee's calculated payroll data, you must use the Activities>Payroll>Review/Modify
Calculated Payroll form. You must also use the Review/Modify Calculated Payroll form to delete
calculated payroll information.
Fields
Type of Payroll Regular, Supplemental: Select either Regular or Supplemental to indicate the type of
payroll you want to calculate.
Pay Date From, Through: Enter the date range for the calculated payroll, if necessary. This date range
defaults to a From date of 14 days prior to the current system date, while the Through date is 14 days
after. This range can be modified to include pay dates which fall outside the default date range.
Use Default Timesheet When No Other Timesheet Type is Entered for the Pay Date: This option is
available only for Regular Payrolls. Select this box to use any Default Timesheets that have been
entered for employees. This option causes default timesheets in the selected processing groups to be
calculated when no regular timesheet exists for that employee. If unchecked, only regular timesheets are
calculated for this processing group.
More...
Suppose you calculate a Regular Payroll for a processing group that includes some employees for
which you must enter timesheets and some employees for which the system uses Default
Timesheets. If you forget to check the "Use Default Timesheet When No Other Timesheet Type is
Calculate Payroll
Entered for the Pay Date" box before you calculate payroll, the system will not calculate payroll for the
employees that have Default Timesheets. Therefore, the payroll calculation will be incomplete.
To remedy the situation, calculate the same payroll again, making sure to select the Use Default
Timesheet When No Other Timesheet Type is Entered for the Pay Date box. The system only
calculates payroll for those employees that have Default Timesheets because the other employees
have already been calculated. The new calculations are added to the Calculated Payroll file, and when
pay checks are printed, all of the employees are included.
Processing Groups Available Items, Selected Items: The Available Items list displays processing
groups that have a pay date that falls within the Pay Date range. If a processing group is not available for
the specified pay date, verify the pay schedule using the Maintain>Payroll>Processing Groups - Group
Tab. Assign a processing group by clicking the group in the Available box twice to move it to the Selected
box. You can also use the Mover buttons (>, >>) to move one or more highlighted groups to the Selected
box. Resize the columns by clicking the line between the headings and moving it until the columns are the
size you want.
Tips: If you want to calculate two timesheets, and only one of the timesheets is calculated and printed, delete
the timesheet that was not calculated. You can delete it using the Find form, which can be accessed
using the Find button on the Timesheets>Regular/Supplemental Timesheets form.
If a Default Timesheet has already been set up for an employee, and you do not need to make any
changes to it, you can process payroll (Activities>Payroll>Calculate Payroll) for the employee without
entering a timesheet.
Remember the benefits and deduction amounts calculated can be positive, negative, or zero.
Once payroll has been calculated, it is a good idea to run the Reports>Payroll>Processing>Quick
Calculated Check Register to see employee information and calculations before printing payroll checks.
MIP Fund Accounting
Payroll User's Guide
118

Chapter 4: Calculating Payroll
MIP Fund Accounting
Payroll User's Guide
119
Calculate Garnishments
Access this form using Activities>Payroll>Calculate Garnishments. It is only available if the
Human Resource Management and Payroll modules are installed; it is not available for Payroll
Link users.
Use this form to calculate garnished wages from employee payroll checks. This form calculates the
employee's disposable income and applies the garnishment to that employee's pay check. This form
also displays the gross earnings and taxes. It includes all the details needed to calculate the net pay.
Before calculating garnishments, you must:
Set up the garnishment deduction in the Payroll and Human Resource Management modules, see
"Setting Up Garnishment Deductions" (page 122) for steps to setting up the garnishment.
Enter Default, Regular/Supplemental Timesheets. (Do not add the garnishment to the employee's
Timesheet. You must enter garnishments on the Details>Employee Information - Garnishments tab in
the Human Resource Management module.
"Calculate Payroll" (page 116).
Select Calculate Garnishments to calculate the garnishment amounts. Click Update to apply the
garnishments information to the current calculated payroll.
Review and modify the calculated payroll before printing the checks and payroll vouchers.
Fields
Employee ID: The employee ID.
Name: The employee's first and last name.
Process Group: This is the processing group code entered on the MIP Fund
Accounting>Maintain>Payroll>Employee Information>Job and Pay tab. The report shows the code's
name, such as Admin or PartTime.
Priority: The order of the garnishment's priority from first to last. The order was entered on the HR
module>Details>Employee Info>Garnishments tab.
Garnishment Type: This the garnishment type entered on the HR module>HR Codes>Garnishment
Types HR Codes form.

Calculate Garnishments
Deduct Code: This is the deduction code selected on the HR module>Details>Employee
Info>Garnishments tab and set up using the MIP Fund Accounting>Maintain>Payroll>Deduction Codes
form.
Garnishment Rate: If Percent of Pay check box was selected, the percentage entered for the garnishment
displays.
Garnishment Amount: The amount entered for the garnishment displays.
Adjustment Amount: This is the garnished amount for this line item and will be applied to the employee's
paycheck. To view or modify the formula used to calculate adjustment amount, click the
Garnishment Calc button.
Running Total: If the employee has more than one garnishment, the garnishment are set up in a order by
priority. Each row will be add to the previous garnished amount for that employee making a running total
amount. Note that if more than one priority is used for the employee, then each row will add the previous
garnished amount in the form of a running total.
Running Adjusted Amount: This column displays the calculation of the Running Total with Max
Garnishment applied.
Disposable Income: The disposable income which is calculated by taking the grossing earnings less
taxes. To view or modify the formula used to calculate disposable income, click the Disposable
Income button.
Total Deducted:The gross deductions for the employee.
Max Garnishment: This is the maximum amount that can be garnished per pay cycle.
Gross Earnings: The gross earnings for the employee.
Federal Tax: The total of all calculated federal taxes for this employee displays. These taxes were
selected for the employee using Maintain>Payroll>Employee Information>Federal Taxes and calculated
when the "Calculate Payroll" was selected.
State Tax: The total of all calculated state taxes displays.
Social Security Tax: The total of all calculated social security taxes displays.
Medicare Tax: The total of all medicare taxes displays.
Local Tax: The total of all other taxes displays.
MIP Fund Accounting
Payroll User's Guide
120

Chapter 4: Calculating Payroll
MIP Fund Accounting
Payroll User's Guide
121
Retirement: The total of all retirement codes display. Retirement codes were assigned using the Human
Resources module>Details>Garnishments tab for the employee.
Health: The total of all health codes display. Health Premium codes were assigned using the Human
Resources module>Details>Garnishments tab for the employee.
Net Pay: This amount is the sum of all of the earnings, deductions, taxes, and so on, that were entered
for the employee.
Payroll Type: The payroll type—Adjust, Manual, Regular, Supplemental, or Void.
Tips: If the row does not immediately recalculate, you might want to open and close the form. Or just tab out
of the cell.
Use the Reports>Deductions History form to print the historical data entered on the garnishment
deduction codes.
Calculate Garnishments Buttons
Disposable Income: Click this button to modify how to calculate the disposable
income. The formula builder form displays. Here you can select any garnishment
information, that is available, to build your own calculation.
Garnishment Calc: Click this button to modify how to calculate the garnishment.
The formula builder form displays. Here you can select any garnishment
information, that is available, to build your own calculation. (Issued by the Court
Order)
Disposable Income
Access this form using Activities>Payroll>Calculate Garnishments> Disposable Income. It
is only available if the Human Resource Management and Payroll modules are installed; it is not
available for Payroll Link users.
Use this form to modify how to calculate the disposable income. You can build a formula, by selecting
any garnishment information, that is available, to build your own calculation.The system checks the
formula for errors. If any syntax error or invalid character is found in the calculation, the system will not

Calculate Garnishments
let you save the calculation. Use the function screen to view all available characters. The results display in
the Disposable Income column. Below is a calculation example:
[GrossEarnings]-([FedTax]+[StateTax]+[SSTax]+[MCTax]+[LocTax]+[Retirement]+ [Health])
Garnishment Calc
Access this form using Activities>Payroll>Calculate Garnishments> Garnishment Calc. It
is only available if the Human Resource Management and Payroll modules are installed; it is not
available for Payroll Link users.
Use this form to modify how to calculate a garnishment. You can build your own formula, by selecting any
garnishment information, that is available, to build your own calculation (Issued by the Court Order). The
system checks the formula for errors. If any syntax error or invalid character is found in the calculation, the
system will not let you save the calculation. Below is a calculation example:
if([GarnishmentType]='Family',[Amount],if(if([RunningTotal]<([DisposableIncome]*.25),[Amount],
([DisposableIncome]*.25)-[RunningTotal]+[Amount])<0,0,if ([RunningTotal]<([DisposableIncome]*.25),
[Amount],([DisposableIncome]*.25)-[RunningTotal]+[Amount])))
Setting Up Garnishment Deductions
Using MIP MIP
Complete the following steps to Set Up Garnishment Deductions in the System:
1. In the Payroll module, open the Deduction Codes form using Maintain>Payroll>Deduction Codes.
2. Create a deduction code for a Garnishment. Enter a new Code, Title, and select a Liability Account.
3. On the Calculation Tab, select Amount on Timesheet and enter the Maximum per Year amount.
4. The Earnings Tab is not available.
5. On the Schedule Tab, set up the Pay Cycle Frequency.
6. On the Taxes Tab, select all Federal, State, Other, and SUTA taxes that are applicable to this
garnishment deduction.
7. Click the Save button and close the form.
MIP Fund Accounting
Payroll User's Guide
122

Chapter 4: Calculating Payroll
MIP Fund Accounting
Payroll User's Guide
123
Using Human Resource Management
Complete the following steps to Set Up Garnishment Deductions on the Employee Timesheet:
1. In the HR Management module, open the Employee Information form using Detail Info>Employee
Information.
2. Select an employee and select the Garnishments tab.
3. Select a Garnishment Type. These were created using HR Codes>Garnishment Types.
4. Enter the court order date in the Date Order column, even if the date is in the future.
5. Select a Deduction Code. These were created using MIP Fund
Accounting>Maintain>Payroll>Deduction Codes.
6. Enter the Percentage or flat Amount:
a. If it is a Percentage, select the % of Pay check box and enter the Percent.
b. If it is a flat dollar amount, enter the Amount.
7. Enter a Maximum Amount, if applicable.
8. Enter the applicable Creditor and Contact information.
9. If applicable, enter the Accounts Payable Vendor, Health Premium Code, Retirement Code, and/or
Notes.
10. Click the Save button.
Review/Modify Calculated PayrollUse this form to make changes to pay that was calculated for the specified employee. Changes may be
made to a calculated payroll only until the checks are printed for the specified pay date and processing
groups. Total Hours and Gross Pay are displayed at the bottom of each tab and reflect the entries made
on the Earnings tab.
Note: This form is only available with the Payroll module; it is not available for Payroll Link Users.

Review/Modify Calculated Payroll
Review/Modify Calculated Payroll - Select Tab
Access this tab using Activities>Payroll>Review/Modify Calculated Payroll. It is only available
with the Payroll module; it is not available for Payroll Link users.
Use this form to make changes to pay that was calculated for the specified employee. Changes may be
made to a calculated payroll only until the checks are printed for the specified pay date and processing
groups. Total Hours and Gross Pay are displayed at the bottom of each tab and reflect the entries made
on the Earnings tab.
Use this tab to view data from all other tabs. The Summary table contains totals from the rest of the form's
tabs (Earnings, Benefits, Deductions, Workers' Compensation, Taxes, and Leave). Furthermore, the table
calculates the net pay and total employer amount for the selected employee. The system automatically
recalculates these totals each time a new Employee ID is selected. These amounts also recalculate if you
move from any other tab to this one. Note that the Summary table is for viewing only; edits must be made
on the subsequent tabs.
Note that the changes made to an employee's calculated pay will in no way affect their payroll set up. In
other words, changes made are only for the payroll being modified.
Fields
Employee ID: Select an employee ID. The employee should be an existing employee for which pay has
been calculated.
Summary Item, Hours, Employee Amount, Employer Amount: Use this table to view the employee's
calculated payroll information.
Net Pay: This amount, in the Employee Amount column, is the sum of all of the earnings, deductions,
taxes, and so on, that were entered for the employee.
Total Employer Amount: This amount, in the Employer Amount column, is the sum of all of the workers'
compensations, taxes, and so on, that were entered for the employer.
Total Hours: This is the employee's total for the Hours column entered on the Earnings tab, excluding any
Earnings Code that is "Contribute to Net Pay Only."
Gross Pay: This is the employee's total for the Amount column entered on the Earnings tab, excluding any
Earnings Code that is "Contribute to Net Pay Only."
MIP Fund Accounting
Payroll User's Guide
124

Chapter 4: Calculating Payroll
MIP Fund Accounting
Payroll User's Guide
125
Tips: If you need to delete a calculated payroll for a specific employee, select the Employee's ID, then click
the Delete button.
Employees cannot be added to this form, instead use the Maintain>Payroll>Employee Information
form to add employees.
If you have changed the amounts of any earnings, benefits, or deductions that are used in the
calculation of any federal, state, or other withholding taxes, or workers' compensation, the related tax,
benefits, deductions, workers' compensation, and/or leave amounts can be incorrect. Furthermore, be
aware that any changes made to earnings can affect benefits, deductions, workers' compensation,
and leave.
When you click Save, the system asks you if you want to recalculate.
Select "Yes" to automatically recalculate any federal, state, or other withholding taxes and related
taxable subject earnings.
Select "No" to save without recalculating. Therefore, you must manually adjust taxes, workers'
compensation, benefits, deductions, leave, and any related subject earnings, for any such changes
you make. Or, you can delete the affected employee's calculated payroll, perform the edits in the
employee's Regular or Supplemental Timesheet, (Timesheets>Enter Regular/Supplemental
Timesheets), and then recalculate payroll.
When performing an all-in-one catch up, due to the Employee’s Social Security Tax Percent of Wages
increased after the first pay date of the year has occurred. If you made the appropriate changes using
the Maintain>Payroll>Federal Taxes>Employee FICA Taxes tab, the system adjusts the employee’s
payroll check to ensure year-to-date withholding and expense accruals are accurate to the point in
time when the check is calculated. A zero net earnings amount is possible due to prior under
withholding.
Modifying Calculated Payroll Checks
If you have changed the amounts of any earnings, benefits, or deductions that are used in the calculation
of any federal, state, or other withholding taxes, or workers' compensation, the related tax, benefits,
deductions, workers' compensation, and/or leave amounts can be incorrect. Furthermore, be aware that
any changes made to earnings can affect benefits, deductions, workers' compensation, and leave.
To modify the earnings, benefits, or deductions and to ensure accurate benefits, deductions, workers'
compensation, and/or leave calculations, use the following steps outlined in this procedure:

Review/Modify Calculated Payroll
1. On the Activities>Payroll>Review/Modify Calculated Checks>Select tab, delete the specified
employee's calculated payroll by selecting the Employee's ID or use Find, and then clicking the Delete
button.
2. Return to the employee's Regular or Supplemental Timesheet (Timesheets>Enter
Regular/Supplemental Timesheets).
Select the Processing Group, Timesheet Type, Pay Date, and Employee ID for the payroll being
processed.
Make changes to the Earnings, Benefits, Deductions, Workers' Compensation, and/or Leave tabs
on the Timesheet for this employee.
Click the Save button.
After all employee changes are made, click the Close button on the timesheet.
3. Calculate payroll (Activities>Payroll>Calculate Payroll). Select the Payroll Type, Pay Date range, and
then move the Processing Group. Click the Calculate button. This only calculates the timesheets that
have not been calculated. (A message displays when the Payroll calculation is complete. It also details
employee timesheets that had been previously calculated but not re-calculated.)
4. Review and/or edit calculated payroll (Activities>Payroll>Review/Modify Calculated Payroll). All
changes should be reflected for the employee.
Review/Modify Calculated Payroll - Earnings Tab
Access this tab using Activities>Payroll>Review/Modify Calculated Payroll. It is only available
with the Payroll module; it is not available for Payroll Link users.
Use this tab to review and modify earning information for the employee specified on the Select tab. This
tab displays the Title, Rate, Hours/Amount, and Distribution Code for each applicable Earning Code.
Fields
Earnings Code, Title, Rate, Hours, Amount, Distribution Code: The Earnings table contains detailed
earnings information for the specified employee. Use the Earnings table to view, enter, or change the
earning codes, rates, hours/amounts, and Distribution Codes. Code, Amount, and Distribution Code are
required boxes.
MIP Fund Accounting
Payroll User's Guide
126

Chapter 4: Calculating Payroll
MIP Fund Accounting
Payroll User's Guide
127
Total Hours: This is the employee's total for the Hours column entered on the Earnings tab, excluding
any Earnings Code that is "Contribute to Net Pay Only."
Gross Pay: This is the employee's total for the Amount column entered on the Earnings tab, excluding
any Earnings Code that is "Contribute to Net Pay Only."
Tips: You must specify a Distribution Code for each Earning Code selected on this form. Click Distribution
Codes Information to open the Maintain>Payroll>Distribution Codes form, where you can create
or modify a distribution code. Each time this button is selected, a new Distribution Codes form is
opened.
If you have changed the amounts of any earnings, benefits, or deductions that are used in the
calculation of any federal, state, or other withholding taxes, or workers' compensation, the related tax,
benefits, deductions, workers' compensation, and/or leave amounts can be incorrect. Furthermore, be
aware that any changes made to earnings can affect benefits, deductions, workers' compensation,
and leave.
When you click Save, the system asks you if you want to recalculate.
Select "Yes" to automatically recalculate any federal, state, or other withholding taxes and related
taxable subject earnings. (If you want workers' compensation, deductions, leave, and/or benefits to
recalculate you need to delete the affected employee's calculated payroll, perform the edits in the
employee's Regular or Supplemental Timesheet, using Timesheets>Enter Regular/Supplemental
Timesheets, and then recalculate payroll.)
Select "No" to save without recalculating. Therefore, you must manually adjust taxes, workers'
compensation, benefits, deductions, and/or leave for any such changes you make. If you do manually
adjust taxes, benefits, deductions, workers' compensation, or leave amounts, remember to also adjust
the related subject earnings.
If you want to process employee reimbursement and advances through regular payroll processing (by
applying the net pay amount without the amount being subject to taxes and fringe benefits), create an
Earning Code with the Contribute to Net Pay Only check box selected (Maintain>Payroll>Earning
Codes).
If you enter data in the Rate and/or Hours columns, the system automatically calculates the Amount
column. To override the calculated amount, enter the desired amount in the Amount column.

Review/Modify Calculated Payroll
Review/Modify Calculated Payroll - Benefits Tab
Access this tab using Activities>Payroll>Review/Modify Calculated Payroll. It is only available
with the Payroll module; it is not available for Payroll Link users.
Use this tab to review and modify benefit information for the employee specified on the Select tab. This tab
displays the Title, Rate, Applicable Earning Hours, Applicable Earnings, and Amount for each Benefit
Code.
Fields
Benefits Code, Title, Rate, Applicable Earning Hours, Applicable Earnings, Amount: The Benefits table
contains detailed benefit information for the specified employee. Use the Benefits table to view, enter, or
change the benefit codes, rates, applicable earning hours, applicable earnings, and amounts. Code and
Amount are required boxes. The amount you enter can be positive, negative, or zero. (Use the minus key
or the space bar to enter a negative amount.)
Total Hours: This is the employee's total for the Hours column entered on the Earnings tab, excluding any
Earnings Code that is "Contribute to Net Pay Only."
Gross Pay: This is the employee's total for the Amount column entered on the Earnings tab, excluding any
Earnings Code that is "Contribute to Net Pay Only."
MIP Fund Accounting
Payroll User's Guide
128

Chapter 4: Calculating Payroll
MIP Fund Accounting
Payroll User's Guide
129
Tips: If you have changed the amounts of any earnings, benefits, or deductions that are used in the
calculation of any federal, state, or other withholding taxes, or workers' compensation, the related tax,
benefits, deductions, workers' compensation, and/or leave amounts can be incorrect. Furthermore, be
aware that any changes made to earnings can affect benefits, deductions, workers' compensation,
and leave.
When you click Save, the system asks you if you want to recalculate.
Select "Yes" to automatically recalculate any federal, state, or other withholding taxes and related
taxable subject earnings. (If you want workers' compensation, deductions, leave, and/or benefits to
recalculate you need to delete the affected employee's calculated payroll, perform the edits in the
employee's Regular or Supplemental Timesheet, using Timesheets>Enter Regular/Supplemental
Timesheets, and then recalculate payroll.)
Select "No" to save without recalculating. Therefore, you must manually adjust taxes, workers'
compensation, benefits, deductions, and/or leave for any such changes you make. If you do
manually adjust taxes, benefits, deductions, workers' compensation, or leave amounts, remember
to also adjust the related subject earnings.
If you enter data in the Rate and/or Applicable Earning Hours columns, the system automatically
calculates the Amount column. To override the calculated amount, enter the desired amount in the
Amount column.
Review/Modify Calculated Payroll - Deductions Tab
Access this tab using Activities>Payroll>Review/Modify Calculated Payroll. It is only available
with the Payroll module; it is not available for Payroll Link users.
Use this tab to review and modify deduction information for the employee specified on the Select tab.
This tab displays the Title, Rate, Applicable Earning Hours, Applicable Earnings, and Amount for each
Deduction Code.
Fields
Deductions Code, Title, Rate, Applicable Earning Hours, Applicable Earnings, Amount: The
Deductions table contains detailed deduction information for the specified employee. Use the
Deductions table to view, enter, or change deduction codes, titles, rates, earning hours, earnings, and

Review/Modify Calculated Payroll
amounts. Code and Amount are required boxes. The amount you enter can be positive, negative, or zero.
(Use the minus key or the space bar to enter a negative amount.)
Total Hours: This is the employee's total for the Hours column entered on the Earnings tab, excluding any
Earnings Code that is "Contribute to Net Pay Only."
Gross Pay: This is the employee's total for the Amount column entered on the Earnings tab, excluding any
Earnings Code that is "Contribute to Net Pay Only."
Tips: If you have changed the amounts of any earnings, benefits, or deductions that are used in the
calculation of any federal, state, or other withholding taxes, or workers' compensation, the related tax,
benefits, deductions, workers' compensation, and/or leave amounts can be incorrect. Furthermore, be
aware that any changes made to earnings can affect benefits, deductions, workers' compensation, and
leave.
When you click Save, the system asks you if you want to recalculate.
Select "Yes" to automatically recalculate any federal, state, or other withholding taxes and related
taxable subject earnings. (If you want workers' compensation, deductions, leave, and/or benefits to
recalculate you need to delete the affected employee's calculated payroll, perform the edits in the
employee's Regular or Supplemental Timesheet, using Timesheets>Enter Regular/Supplemental
Timesheets, and then recalculate payroll.)
Select "No" to save without recalculating. Therefore, you must manually adjust taxes, workers'
compensation, benefits, deductions, and/or leave for any such changes you make. If you do
manually adjust taxes, benefits, deductions, workers' compensation, or leave amounts, remember to
also adjust the related subject earnings.
If you enter data in the Rate and/or Applicable Earning Hours columns, the system automatically
calculates the Amount column. To override the calculated amount, enter the desired amount in the
Amount column.
MIP Fund Accounting
Payroll User's Guide
130

Chapter 4: Calculating Payroll
MIP Fund Accounting
Payroll User's Guide
131
Review/Modify Calculated Payroll - Workers' Compensation Tab
Access this tab using Activities>Payroll>Review/Modify Calculated Payroll. It is only available
with the Payroll module; it is not available for Payroll Link users.
Use this tab to review and modify workers' compensation information for the employee that was
specified on the Select tab. This tab displays the Title, Rate, Adjustment Factor, Subject Hours, and
Amount for each Workers' Compensation Code.
Fields
Workers' Compensation Code, Title, Rate, Adjustment Factor, Subject Hours, Subject Earnings,
Amount: The Workers' Compensation table contains detailed workers' compensation information for the
specified employee. Use the Workers' Compensation table to view, enter, or change workers'
compensation codes, rates, adjustment factors, subject hours, subject earnings, and amounts. Code
and Amount are required boxes.
Total Hours: This is the employee's total for the Hours column entered on the Earnings tab, excluding
any Earnings Code that is "Contribute to Net Pay Only."
Gross Pay: This is the employee's total for the Amount column entered on the Earnings tab, excluding
any Earnings Code that is "Contribute to Net Pay Only."

Review/Modify Calculated Payroll
Tips: If you have changed the amounts of any earnings, benefits, or deductions that are used in the
calculation of any federal, state, or other withholding taxes, or workers' compensation, the related tax,
benefits, deductions, workers' compensation, and/or leave amounts can be incorrect. Furthermore, be
aware that any changes made to earnings can affect benefits, deductions, workers' compensation, and
leave.
When you click Save, the system asks you if you want to recalculate.
Select "Yes" to automatically recalculate any federal, state, or other withholding taxes and related
taxable subject earnings. (If you want workers' compensation, deductions, leave, and/or benefits to
recalculate you need to delete the affected employee's calculated payroll, perform the edits in the
employee's Regular or Supplemental Timesheet, using Timesheets>Enter Regular/Supplemental
Timesheets, and then recalculate payroll.)
Select "No" to save without recalculating. Therefore, you must manually adjust taxes, workers'
compensation, benefits, deductions, and/or leave for any such changes you make. If you do
manually adjust taxes, benefits, deductions, workers' compensation, or leave amounts, remember to
also adjust the related subject earnings.
If you enter data in the Rate and/or Subject Hours columns, the system automatically calculates the
Amount column. To override the calculated amount, enter the desired amount in the Amount column.
MIP Fund Accounting
Payroll User's Guide
132

Chapter 4: Calculating Payroll
MIP Fund Accounting
Payroll User's Guide
133
Review/Modify Calculated Payroll - Taxes Tab
Access this tab using Activities>Payroll>Review/Modify Calculated Payroll. It is only available
with the Payroll module; it is not available for Payroll Link users.
Use this tab to review and modify tax information for the employee that was specified on the Select tab.
This tab displays the Jurisdiction, SUTA Weeks, Employee Subject Earnings, Employer Subject
Earnings, Gross Taxable Earnings, Employee Amount, and/or Employer Amount for each Tax Type.
Please use discretion when editing or deleting any tax information.
Fields
Taxes: The Taxes table contains detailed tax information for the specified employee. Use the Taxes
table to view, enter, or change the tax types, jurisdictions, SUTA (State Unemployment) weeks,
employee subject earnings, employer subject earnings, gross taxable earnings, employee amounts,
and/or employer amounts. Tax Type, Jurisdiction (if tax type is SWT, SUTA, Employee Paid (LWT), or
Employer Paid (LER), and Employee/Employer Amount are required boxes.
Total Hours: This is the employee's total for the Hours column entered on the Earnings tab, excluding
any Earnings Code that is "Contribute to Net Pay Only."
Gross Pay: This is the employee's total for the Amount column entered on the Earnings tab, excluding
any Earnings Code that is "Contribute to Net Pay Only."

Review/Modify Calculated Payroll
Tips: If you have changed the amounts of any earnings, benefits, or deductions that are used in the
calculation of any federal, state, or other withholding taxes, or workers' compensation, the related tax,
benefits, deductions, workers' compensation, and/or leave amounts can be incorrect. Furthermore, be
aware that any changes made to earnings can affect benefits, deductions, workers' compensation, and
leave.
When you click Save, the system asks you if you want to recalculate.
Select "Yes" to automatically recalculate any federal, state, or other withholding taxes and related
taxable subject earnings. (If you want workers' compensation, deductions, leave, and/or benefits to
recalculate you need to delete the affected employee's calculated payroll, perform the edits in the
employee's Regular or Supplemental Timesheet, using Timesheets>Enter Regular/Supplemental
Timesheets, and then recalculate payroll.)
Select "No" to save without recalculating. Therefore, you must manually adjust taxes, workers'
compensation, benefits, deductions, and/or leave for any such changes you make. If you do
manually adjust taxes, benefits, deductions, workers' compensation, or leave amounts, remember to
also adjust the related subject earnings.
When performing an all-in-one catch, due to the Employee’s Social Security Tax Percent of Wages
decreased after the first pay date of the year has occurred. If you entered the Percent of Wages and
selected the Year-to-Date Calculation Method using the Maintain>Payroll>Federal Taxes - Employee
FICA Taxes tab, the system adjusts the employee's payroll check to ensure year-to-date withholding
and expense accruals are accurate to the point in time when the check is calculated. A negative
employee subject earnings amount is possible due to prior over withholding.
On the Timesheet, taxes are not calculated for any Earnings Code with the Contribute to Net Pay Only
check box (Maintain>Payroll>Earning Codes) selected.
Review/Modify Calculated Payroll - Leave Tab
Access this tab using Activities>Payroll>Review/Modify Calculated Payroll. It is only available
with the Payroll module; it is not available for Payroll Link users.
Use this tab to review and modify leave information for the employee that was specified on the Select tab.
MIP Fund Accounting
Payroll User's Guide
134
Chapter 4: Calculating Payroll
MIP Fund Accounting
Payroll User's Guide
135
Fields
Leave Code, Title, Rate, Applicable Earning Hours, Hours Accrued, Hours Taken: The Leave table
contains detailed leave information for the specified employee. Use the Leave table to view, enter, or
change the leave codes, titles, rates, applicable earning hours, hours accrued and hours taken. Code
and Hours (either Accrued, Taken, or both) are required boxes.
Total Hours: This is the employee's total for the Hours column entered on the Earnings tab, excluding
any Earnings Code that is "Contribute to Net Pay Only."
Gross Pay: This is the employee's total for the Amount column entered on the Earnings tab, excluding
any Earnings Code that is "Contribute to Net Pay Only."
Tips: Be aware that any changes you make to earnings can affect Leave. Therefore, you must manually
adjust Leave for any such changes made.
If you enter data in the Rate and/or Applicable Earning Hours columns, the system automatically
calculates the Hours Accrued column. To override the calculated amount, enter the desired amount in
the Hours Accrued column.
Print/Email Checks and Vouchers
Access this form using Activities>Payroll>Print/Email Checks and Vouchers. It is only available
with the Payroll module; it is not available for Payroll Link users.
Use this form to print checks for the selected processing group, pay date, and payroll type. Prior to using
this form, there must be at least one processing group calculated (Activities>Payroll>Calculate Payroll),
with one or more checks generated. We recommend that you do not attempt to send more than 50
Processing Groups through the Print Check process at one time. After completing the information on this
form, click OK to display the Load Checks/Vouchers form.
Important! During the printing process or after the email vouchers are sent, all payroll history files are
updated, and the calculated payroll and regular/supplemental timesheets are deleted. Therefore, it is
a good idea to make a backup of the organization data files (using File>Backup) before proceeding
with the check printing process.

Print/Email Checks and Vouchers
Nonprofit Online Users
MIP manages database backups automatically for you; therefore, the Backup menu selection is not
available. Full backups are performed weekly and differential backups are performed daily. See
Nonprofit Online.
Troubleshooting
When calculating Payroll with employees who have both Print and Email vouchers selected; if you print
and then cancel out of the Email Preview form, the system will update the payroll history files, delete the
calculated payroll and regular/supplemental timesheets, and create an ACH file, however the email
vouchers will not be available to send as attachments to the employees.
You should communicate to your employees who elect to receive payroll vouchers via email, that if they
have never received any voucher emails from your organization to do the following:
Check to see if their email server is full or blocking your email address; this could cause them not to
receive emails from you. This could be resolved by having your employees add your organization’s
email address to their address book.
Ask that they check their mailbox regularly and ensure that your organization’s email address is not
being marked as SPAM by their mail server. This could be resolved by having your employees check
their spam filter folder and marking your emails as “not spam.” This will clear the way for future
emails from your organization.
You only have customized Process Templates and the system changed your Email option to Print.
If you do not set up a <Default> Process Template (Maintain>Payroll>Email Templates form) for
Vouchers and later delete the customized process template being used on the
Maintain>Payroll>Employee Information>Email Tab, the system will change your Email option to
Print for every employee that used that customized process template on the Maintain>Employee
Information>Email Tab.
If you are unable to email the employee vouchers, check the following items:
Is the Direct Deposit module installed and set up? (As the Administrator, access Organization>Set
Up Modules>Electronic Funds Transfer)
Is the SMTP Email Tab set up and Connected? (As the Administrator, access
Organization>Organization Information)
MIP Fund Accounting
Payroll User's Guide
136

Chapter 4: Calculating Payroll
MIP Fund Accounting
Payroll User's Guide
137
Is the Email Template for Process Type Voucher set up? Is the <Default> created?
(Maintain>Payroll>Email Templates)
Is the Employee set up completely? (Maintain>Payroll>Employee Information)
Is the Direct Deposit check box selected on the Job and Pay Tab?
Is the Bank Information complete on the Direct Deposit Tab?
Is the Disable Pre-note check box selected on the Direct Deposit Tab?
Is the Email Voucher check box selected on the Email Tab?
Is there an email address on the Email Tab?
Is the correct Voucher Process Template selected?
Fields
Document Date: Enter the date to be printed on the check. This date must have the same year as the
calculation. Consequently, you cannot calculate payroll for 12/31/15 and print checks with a date in the
year 2016; the check date would also have to be in 2015.
Print Order: Select the order to print the checks or vouchers, either by Employee Class, Employee ID,
Employee Last Name, or Processing Group. They print in the following order based on the selection
made:
If you select… The print order will be…
(No Selection) Processing Group ascending, then Employee ID ascending
Employee Class Class ascending
Employee ID Employee ID ascending
Employee Last Name Last Name ascending
Processing Group Processing Group ascending
Print Pay Period Dates on Stub: Select this check box to print the pay period date range on the check
stub or voucher.
Override Direct Deposit and Print Checks for All Employees: Select this check box to print checks for
all employees. Checks will be printed for those employees that usually receive direct deposit. This
feature is only available if the Direct Deposit module is installed.

Print/Email Checks and Vouchers
Processing Groups Available Items, Selected Items: The Available Items list displays the processing
group code, pay date, payroll type, and processing group title for all calculated payrolls. Select the
processing group for which you want to print checks.
Tips: Note that the system retrieves SUTA information according to paycheck date, not pay period or pay
date. For example, if you calculate payroll on 3/31, and print checks on 4/1, the system retrieves the
SUTA information from those paychecks only when you produce a second quarter SUTA report.
Set up the disbursing accounts (Cash Account and Accrual Account) prior to using this form, with
Administrative user rights using Organization>Set Up Modules>Payroll) .
Labor hours and labor earnings are tracked and distributed by account code combinations if Earning
Codes were set up with the Track Labor Hours check box selected on the Maintain>Payroll>Earning
Codes>Earning tab.
After a payroll is printed, the distribution code assigned to the earning code cannot be changed.
However, the percentage distribution can be edited for that code (Maintain>Payroll>Distribution Codes)
and the associated distribution of labor hours/earnings can be updated using
Activities>Payroll>Distribute Labor Hours/Earnings.
If you select the "Show Code on Check Stub" check box on the Maintain>Payroll>Workers'
Compensation Codes>Workers' Compensation tab, the following applies when the check is printed:
Employee Workers' Compensation information prints first, followed by employer information.
Employer paid Workers' Compensation amounts are included in the Workers' Compensation totals.
Employer paid Workers' Compensation amounts are not included in the net pay.
Employee paid Workers' Compensation amounts are printed in the detail and totals area of the check
stub.
Your data is designed to print on a preprinted check or voucher available online. Refer to Preprinted
Checks and Forms for a list of part numbers to use when ordering.
MIP Fund Accounting
Payroll User's Guide
138

Chapter 4: Calculating Payroll
MIP Fund Accounting
Payroll User's Guide
139
Printing Payroll Checks and Vouchers
The following steps outline how to print checks and vouchers:
1. Enter appropriate information on the Print/Email Checks and Vouchers form, and then click OK.
Important! During the check printing process, all payroll history files are updated, and the
calculated payroll and regular/supplemental timesheets are deleted. Therefore, it is a good idea to
make a backup of the organization data files. Note for Nonprofit Online Users: MIP manages
database backups automatically for you; therefore, the Backup menu selection is not available.
Full backups are performed weekly and differential backups are performed daily. (See Nonprofit
Online.)
2. Complete the Load Checks/Vouchers (Print) form.
a. Click the Check/Voucher Number and Format.
b. Click the Print Alignment button to ensure that the checks are aligned properly prior to printing.
c. Click OK to begin the printing process.
3. Click Yes to complete the printing process.
Note: If some of the checks were damaged or did not print, click No to reselect the items on the
Select Unprinted or Damaged Checks/Vouchers form, and then click OK.
4. If processing vouchers for direct deposit payments, repeat steps 1 - 3 above.
Printing Both Checks and Vouchers and Emailing Vouchers
The following steps outline how to print both checks and vouchers and then email vouchers:
1. Enter appropriate information on the Print/Email Checks and Vouchers form, and then click OK.
Important! During the check printing process, all payroll history files are updated, and the
calculated payroll and regular/supplemental timesheets are deleted. Therefore, it is a good idea to
make a backup of the organization data files. Note for Nonprofit Online Users: MIP manages
database backups automatically for you; therefore, the Backup menu selection is not available.
Full backups are performed weekly and differential backups are performed daily. (See Nonprofit
Online.)

Print/Email Checks and Vouchers
a. If printing checks,
Complete the Print: Load Checks form.
Click the Print Alignment button to ensure that the checks are aligned properly prior to printing.
Click OK to begin the printing process.
Click Yes to complete the printing process.
Note: If some of the checks were damaged or did not print, click No to reselect the checks on the
Select Unprinted or Damaged Checks form, and then click OK.
b. If printing vouchers for direct deposit payments,
Complete the Print: Load Vouchers form,
Click the Print Alignment button to ensure that the vouchers are aligned properly prior to
printing.
Click OK to begin the printing process.
Click Yes to complete the printing process.
Note: If some of the vouchers were damaged or did not print, click No to reselect the vouchers on
the Select Unprinted or Damaged Vouchers form, and then click OK.
c. If you are also emailing vouchers to employees,
Complete the Email: Load Vouchers form and click the OK button
On the Email Preview form, double-click on each row to preview the voucher for each employee.
Click the X at the top-right of the open voucher form to close the document.
Once you have previewed the vouchers, click Send to begin generating and sending the email
attachments.
You must click the Finish button to close the Processing form.
Click OK to close the final Status message box.
MIP Fund Accounting
Payroll User's Guide
140

Chapter 4: Calculating Payroll
MIP Fund Accounting
Payroll User's Guide
141
Notes: If vouchers are selected to be both printed and emailed, the system automatically applies the Print
Laser Format to the emailed vouchers.
You still need to create and send the direct deposit file to the bank (Activities>Payroll>Create/Send
Direct Deposit File) or third-party.
Emailing Payroll Vouchers
The following steps outline how to email payroll vouchers for direct deposit payments:
1. Enter appropriate information on the Print/Email Checks and Vouchers form, and then click OK.
Important! It is a good idea to make a backup of the organization data files.
Nonprofit Online Users
MIP manages database backups automatically for you; therefore, the Backup menu selection is
not available. Full backups are performed weekly and differential backups are performed daily.
See Nonprofit Online.
2. The Email: Load Vouchers form displays. Complete the voucher information and then click OK to
create the payroll vouchers as attachments.
3. On the Email Preview form, double-click on each row to preview the voucher for each employee.
Click the X at the top-right of the open voucher form to close the document.
4. Once you have previewed the vouchers, click Send to begin generating and sending the email
attachments.
Note: After the system completes sending the vouchers, all payroll history files are updated, and
the calculated payroll and regular/supplemental timesheets are deleted.
5. You must click the Finish button to close the Processing form.
6. Click OK to close the final Status message box.
Note: You still need to create and send the direct deposit file to the bank
(Activities>Payroll>Create/Send Direct Deposit File) or third-party.

Print/Email Checks and Vouchers
Load Checks/Vouchers (Print or Email)
Access this form using Activities>Payroll>Print/Email Checks and Vouchers>OK button. It is
only available with the Payroll module; it is not available for Payroll Link users.
This form is preceded by the Print/Email Checks and Vouchers form. Depending on if you are printing
checks and/or emailing vouchers, the appropriate Load form displays after you click the OK button on the
Print/Email Checks and Vouchers form.
Use this form to specify the Check Number/Voucher Number, select a Format (continuous or laser), set up
printer information, print employee payroll checks and vouchers, and email employee payroll vouchers.
The system prints all of the checks and vouchers selected for "Print Only" or "Print and Email" before it
begins processing the vouchers for "Email Only."
More...
Note that the Cash Account and Accrual Account boxes are read-only; they display the disbursing
accounts for the checks. If either of these accounts needs to be changed, perform the following steps:
1. Exit the MIP Fund Accounting system.
2. As the Administrator, open the MIP Fund Accounting system.
3. In the Set Up Payroll form (Organization>Set Up Modules>Payroll), change the disbursing account.
4. Exit the MIP Fund Accounting system.
5. Re-open the MIP Fund Accounting system and access the Payroll module.
Fields
Check/Voucher Number: Enter the check number to use for the first actual check. You can set the Last
Used Check Number for General Ledger type cash accounts using the Maintain>Payroll>Chart of
Accounts Codes form. When a payroll uses that cash account, the system automatically displays the next
check number for that account, regardless of the form the check is being generated from.
Format: Select the type of form that matches the printer: either laser or continuous forms.
Cash Account: The system displays the cash account for which you are printing checks. This default was
set up by the Administrator using the Organization>Set Up Modules>Payroll form.
MIP Fund Accounting
Payroll User's Guide
142

Chapter 4: Calculating Payroll
MIP Fund Accounting
Payroll User's Guide
143
Accrual Account: The system displays the accrued expense payable account for which you are printing
checks. This default was set up by the Administrator using the Organization>Set Up Modules>Payroll
form.
Print Alignment: Click this button to properly align forms before beginning the print process.
OK: For Print, click this button to print the checks and/or vouchers. After the checks have printed, the
system asks if they printed correctly. If you click No, the Select Unprinted or Damaged Checks/Vouchers
form displays. You can then select the checks that need to be reprinted. Note that if you are printing both
checks and vouchers, the checks will print first and if everything prints correctly, the vouchers print next;
so that you can exchange the pre-printed check stock in the printer.
For Email, click this button to begin the process. Click Finish to display the Email Preview form to view
vouchers by Voucher Number, Employee ID, or Employeee Name. (Double-click on the row to open the
attachement.
Note: Note that if vouchers are both printed and emailed, the system automatically applies the Print
Laser Format to the emailed vouchers.
Tips: The system does not use the beginning Check Number/Voucher Number for alignment
checks/vouchers; the Check Number/Voucher Number is the number of the first actual check or
voucher.
Your data is designed to print on a preprinted check or voucher available online. Refer to Preprinted
Checks and Forms for a list of part numbers to use when ordering.
Select Unprinted or Damaged Checks/Vouchers
Access this form using Activities>Payroll>Print Checks/Vouchers>OK button>OK button. It is
only available with the Payroll module; it is not available for Payroll Link users.
This form contains a list of the checks and/or vouchers the system produced when you printed for the
specified processing group/pay date/payroll type. Specify the checks that did not print properly by
clicking in the left-most column.
Any checks that are selected remain in the calculated payroll file. Payroll information for these
employees will not be updated in the system, since the checks have not yet printed. You can either print
the checks, or delete them using the Payroll>Review/Modify Calculated Payroll form.

Enter Manual Checks
Fields
Select Unprinted or Damaged Checks/Vouchers: Select any checks or vouchers that need to be
reprinted.
Tips: Records are initially sorted on the first data column in ascending order. (The column on which items are
sorted has the symbol in the column heading.) However, you can sort records based on any column
by clicking on the column heading.
Furthermore, by double clicking a sorting column heading again, you can change the displayed items
from ascending to descending order, or vice versa. Column sort order is indicated by the symbol which
appears next to the column title; indicates ascending order, and indicates descending order.
To select or clear all employees in the table, click or respectively.
Enter Manual ChecksUse this form to enter information about payroll checks that were not created using the system. Total
Hours and Gross Pay are displayed at the bottom of each tab and reflect the entries made on the Earnings
tab.
The system will not calculate any amounts for this form, including taxes. You must calculate and enter, on
this form's subsequent tabs, the amounts necessary to record this employee's information correctly. After
clicking the Save button, the information is updated in the system. Manual checks are available for transfer
(Activities>Payroll>Transfer to Accounting) once they are saved.
Note: This form is only available with the Payroll module; it is not available for Payroll Link Users.
More...
Use this form, if you receive an employee's timesheet after calculating a scheduled Regular Payroll,
and decide to write that employee's check manually. Because you have physically given them a check,
you need to enter the check information into the system.
Note that the system calculates the employee's information for you if—rather than writing a manual
check—you enter a Supplemental Timesheet (Timesheets>Enter Regular/Supplemental Timesheets)
for the employee and process a Supplemental Payroll (Activities>Payroll>Calculate Payroll). The
system calculates the employee's information, and you are able to print the employee's check.
MIP Fund Accounting
Payroll User's Guide
144

Chapter 4: Calculating Payroll
MIP Fund Accounting
Payroll User's Guide
145
Note: Although manual checks can have a zero balance, they must have at least one Earning. To
adjust an employee's Leave balance, use the Set Up/Adjust Employee Balances form
(Activities>Payroll>Set Up/Adjust Employee Balances), not the Enter Manual Checks form.
Enter Manual Checks - Select Tab
Access this tab using Activities>Payroll>Enter Manual Checks. It is only available with the
Payroll module; it is not available for Payroll Link users.
Use this form to enter information about payroll checks that were not created using the system. Total
Hours and Gross Pay are displayed at the bottom of each tab and reflect the entries made on the
Earnings tab.
The system will not calculate any amounts for this form, including taxes. You must calculate and enter,
on this form's subsequent tabs, the amounts necessary to record this employee's information correctly.
After clicking the Save button, the information is updated in the system. Manual checks are available for
transfer (Activities>Payroll>Transfer to Accounting) once they are saved.
Use this tab to specify the employee ID, pay date, check date, the pay period begin and end dates, and
check number for the manual check.
Fields
Employee ID: Enter an employee ID.
Pay Date: Enter the pay date for the manual check.
Check Date: Enter the date for the manual check.
Pay Period Begin Date: Enter the pay period begin date.
Pay Period End Date: Enter the pay period end date.
Check Number: Enter the check number for the check. You can set the Last Used Check Number for
General Ledger type cash accounts using the Maintain>Payroll>Chart of Accounts Codes form. When a
check uses that cash account, the system automatically displays the next check number for that
account, regardless of the form the check is being generated from.
Summary Item, Hours, Employee Amount, Employer Amount: Use this table to view the designated
employee's manual check information. You must first select this form's subsequent tabs and enter

Enter Manual Checks
applicable information for earnings, benefits, deductions, workers' compensation, taxes, and leave, before
those items appear in this table.
Note that the system calculates and displays the Net Pay/Total Employer Amount row on the Summary
table.
Net Pay: This item (in the Employee Amount column) is the sum of all of the earnings, deductions,
taxes, and so on, that was entered for the employee, including any Earning Codes that "Contribute to
Net Pay Only."
Total Employer Amount: This item (in the Employer Amount column) is the sum of all of the workers'
compensation, taxes, and so on, that was entered for the employer.
Total Hours: This is the employee's total for the Hours column entered on the Earnings tab, excluding any
Earnings Code that is "Contribute to Net Pay Only."
Gross Pay: This is the employee's total for the Amount column entered on the Earnings tab, excluding any
Earnings Code that is "Contribute to Net Pay Only."
MIP Fund Accounting
Payroll User's Guide
146

Chapter 4: Calculating Payroll
MIP Fund Accounting
Payroll User's Guide
147
Tips: You can print this data using Reports>Payroll>History>Quick Check/Transaction Register and Filter
on Payroll Type = M (Manual).
When on any other tab of this form, if you want to recalculate these totals, click the Select tab.
Use the bottom buttons to apply any modifications made for the entire form. For example, click the
Update button to updated all of the changes made to every tab and close the form; click Undo to undo
everything entered for every tab (since the last save) and close the form; or click Save to save all of
the changes made to every tab on the form.
A Disbursing Account must be set up by the Administrator on the Set Up Modules form
(Organization>Set Up Modules>Payroll) before a manual check can be entered.
Labor hours and labor earnings are tracked and distributed by account code combinations if Earning
Codes were set up with the Track Labor Hours check box selected on the Maintain>Payroll>Earning
Codes>Earning tab.
After a manual check has been entered, it can be changed using the Transactions>Payroll>Edit
Payroll Manual Checks form. Alternatively, click the Undo button before saving the manual check to
clear any information that was entered and start over. Once a manual payroll check has been saved, if
it is incorrect, it can be voided (Activities>Payroll>Void Checks).
To view Earning code rates and amounts, clear the Hide Earning Code Rates and Amounts During
Timesheet Processing check box (Organization>Set Up Modules>Payroll).
Enter Manual Checks - Earnings Tab
Access this tab using Activities>Payroll>Enter Manual Checks. It is only available with the
Payroll module; it is not available for Payroll Link users.
Use this tab to select earning codes and their attributes to apply to the employee's manual check. These
codes were previously set up using Maintain>Payroll>Earning Codes.
Fields
Earnings Code, Title, Hours, Rate, Amount, Distribution Code: The Earnings table allows you to enter
an earning code, number of hours, rate, amount, and distribution code. You can select as many earning
codes as are appropriate for this check.

Enter Manual Checks
Total Hours: This is the employee's total for the Hours column entered on the Earnings tab, excluding any
Earnings Code that is "Contribute to Net Pay Only."
Gross Pay: This is the employee's total for the Amount column entered on the Earnings tab, excluding any
Earnings Code that is "Contribute to Net Pay Only."
Tips: Click the Select tab to recalculate the form's totals for all the tabs. Earning Codes that "Contribute to Net
Pay Only" are calculated on the Net Pay/Total Employer Amount row of the Summary table on the
Select tab. The total earnings hours and amounts for this check, excluding any Earnings Code that is
"Contribute to Net Pay Only," display in the Total Hours and Gross Pay fields (at the bottom of each tab).
Labor hours and labor earnings are tracked and distributed by account code combinations if Earning
Codes were set up with the Track Labor Hours check box selected on the Maintain>Payroll>Earning
Codes>Earning tab.
To view Earning code rates and amounts, clear the Hide Earning Code Rates and Amounts During
Timesheet Processing check box using Organization>Set Up Modules>Payroll.
Enter Manual Checks - Benefits Tab
Access this tab using Activities>Payroll>Enter Manual Checks. It is only available with the
Payroll module; it is not available for Payroll Link users.
Use this tab to select benefit codes and their attributes to apply to the employee's manual check. These
codes were previously set up using Maintain>Payroll>Benefit Codes.
Fields
Benefits Code, Title, Amount: The Benefits table allows you to enter a benefit code and amount. You can
select as many benefit codes as are appropriate for this employee. The amount you enter can be positive,
negative, or zero. (Use the minus key or the space bar to enter a negative amount.)
Total Hours: This is the employee's total for the Hours column entered on the Earnings tab, excluding any
Earnings Code that is "Contribute to Net Pay Only."
Gross Pay: This is the employee's total for the Amount column entered on the Earnings tab, excluding any
Earnings Code that is "Contribute to Net Pay Only."
Tip: The system does not calculate any amounts on this tab. You must specify the amounts necessary to
record this benefit correctly. Click the Select tab to recalculate the form's totals.
MIP Fund Accounting
Payroll User's Guide
148

Chapter 4: Calculating Payroll
MIP Fund Accounting
Payroll User's Guide
149
Enter Manual Checks - Deductions Tab
Access this tab using Activities>Payroll>Enter Manual Checks. It is only available with the
Payroll module; it is not available for Payroll Link users.
Use this tab to select deduction codes and their attributes to apply to the employee's manual check.
These codes were previously set up using Maintain>Payroll>Deduction Codes.
Fields
Deductions Code, Title, Amount: The Deductions table allows you enter a deduction code and amount.
The amount you enter can be positive, negative, or zero. (Use the minus key or the space bar to enter a
negative amount.) You can select as many deduction codes as are appropriate for this employee.
Total Hours: This is the employee's total for the Hours column entered on the Earnings tab, excluding
any Earnings Code that is "Contribute to Net Pay Only."
Gross Pay: This is the employee's total for the Amount column entered on the Earnings tab, excluding
any Earnings Code that is "Contribute to Net Pay Only."
Tip: The system does not calculate any amounts on this tab. You must specify the amounts necessary
to record this deduction correctly. Click the Select tab to recalculate the form's totals.
Enter Manual Checks - Workers' Compensation Tab
Access this tab using Activities>Payroll>Enter Manual Checks. It is only available with the
Payroll module; it is not available for Payroll Link users.
Use this tab to select workers' compensation codes and their attributes to apply to the employee's
manual check. These codes were previously set up using Maintain>Payroll>Workers' Compensation
Codes.
Fields
Workers' Compensation Code, Title, Hours, Subject Earnings, Amount: The Workers' Compensation
table allows you to enter a workers' compensation code, hours, subject earnings, and amount. You can
select as many workers' compensation codes as are appropriate for this employee.
Total Hours: This is the employee's total for the Hours column entered on the Earnings tab, excluding
any Earnings Code that is "Contribute to Net Pay Only."

Enter Manual Checks
Gross Pay: This is the employee's total for the Amount column entered on the Earnings tab, excluding any
Earnings Code that is "Contribute to Net Pay Only."
Tip: The system does not calculate any amounts on this tab. You must specify the hours, subject
earnings, and amounts necessary to record this workers' compensation correctly. Click the Select tab to
recalculate the form's totals.
Enter Manual Checks - Taxes Tab
Access this tab using Activities>Payroll>Enter Manual Checks. It is only available with the
Payroll module; it is not available for Payroll Link users.
Use this tab to select taxes and their attributes to apply to the employee's manual check. Remember for
manual checks, the system does not automatically calculate taxes for the employee—you must calculate
and enter them here.
The Tax Types you can specify include federal, state, and other taxes. If the Tax Type is SWT (State
Withholding Tax), SUTA (State Unemployment Tax), LWT (Other Taxes Employee Paid Tax) or LER
(Other Taxes Employer Paid Tax), you must specify a Jurisdiction. Jurisdiction is the state or other taxes
code you set up using the Maintain>Payroll>State Taxes form and/or Other Taxes form.
The tax types are as follows:
Code Name Jurisdiction
Required
FIT Federal Income Tax No
SS Social Security Taxes No
MC Medicare Taxes No
FUTA Federal Unemployment Tax No
SWT State Withholding Taxes Yes
SUTA State Unemployment Taxes Yes
LWT Other Taxes Employee Paid
Taxes
Yes
LER Other Taxes Employer Paid
Taxes
Yes
MIP Fund Accounting
Payroll User's Guide
150

Chapter 4: Calculating Payroll
MIP Fund Accounting
Payroll User's Guide
151
Fields
Taxes: The Taxes table allows you to enter a tax type, jurisdiction (when appropriate), SUTA weeks,
employee subject earnings, employer subject earnings, employee amount, and employer amount.
Total Hours: This is the employee's total for the Hours column entered on the Earnings tab, excluding
any Earnings Code that is "Contribute to Net Pay Only."
Gross Pay: This is the employee's total for the Amount column entered on the Earnings tab, excluding
any Earnings Code that is "Contribute to Net Pay Only."
Tip: Click the Select tab to recalculate the form's totals for all of the tabs.
Enter Manual Checks - Leave Tab
Access this tab using Activities>Payroll>Enter Manual Checks. It is only available with the
Payroll module; it is not available for Payroll Link users.
Use this tab to enter leave balances for the employee's manual check. These codes were previously set
up using Maintain>Payroll>Leave Codes.
If you just need to adjust an employee's Leave balance, you should use the Set Up/Adjust Employee
Balances form (Activities>Payroll>Set Up/Adjust Employee Balances), not the Enter Manual Checks
form.
Fields
Leave Code, Title, Hours Accrued, Hours Taken: The Leave table allows you to enter a leave code,
hours accrued, and hours taken. You can select as many leave codes as are appropriate for this
employee.
Total Hours: This is the employee's total for the Hours column entered on the Earnings tab, excluding
any Earnings Code that is "Contribute to Net Pay Only."
Gross Pay: This is the employee's total for the Amount column entered on the Earnings tab, excluding
any Earnings Code that is "Contribute to Net Pay Only."
Void Checks
Access this form using Activities>Payroll>Void Checks. It is only available with the Payroll
module; it is not available for Payroll Link users.
Void Checks
Use this form to select checks that you want to void. Click Display Filter to limit which checks are
displayed in the Checks table. Select any or all of the checks displayed, and then click OK.
More...
For example, to view only checks written after a certain date, click Display Records to view only
the records that match the filter criteria. If you are not using the filter (it is blank), the Display Records
button displays all of the outstanding checks you currently have.
In the Checks table, you can sort the data based on any column. Double-click on a column heading to
sort according to that column.
Note: The sorting functionality is only for table display and does not affect printing. Print uses the data
from the database and is therefore not reflective of how the items were sorted.
Fields
Filters: The filter is for display purposes only; it simply allows you to limit which checks are displayed in the
Checks table.
Available Filter, Selected Filter: Select an item in the Available Filter column, and then click the Mover
( > ) to move it to the Selected Filter column. Your choices for filtering checks are: Cash Account, Check
Number, Check Date, Amount, Employee ID, Payee, and Transferred.
Compares To: Select an operator. The operator compares the value in the Selected Filter column with
the values in Criteria 1 and Criteria 2 to determine which checks are displayed in the Checks table.
Criteria 1: Enter a value to compare with the item in the Selected Filter column. When using Like or Not
Like, you can use "%" to represent any number of characters.
Criteria 2: Enter a value for the end of a range if the Compares To column contains the Between or Not
Between operators.
Checks: Checks are initially sorted in Cash Account order. You can choose to sort records based on any
column by clicking the column title. Click the check boxes to select the checks you want to void. No checks
are selected the first time this form is opened.
Records per Page: Select how many checks per page to display. You can view checks in the table in
increments of 10, 25, 50, 100, 250, 500, or 1000. The default value for the Records per Page drop-down
list was selected using the Options>Customize Workstation Settings>Preferences tab.
MIP Fund Accounting
Payroll User's Guide
152
Chapter 4: Calculating Payroll
MIP Fund Accounting
Payroll User's Guide
153
Cash Account: The system displays the account code for the check.
Check Number: The system displays the check number.
Check Date: The system displays the check date.
Amount: The system displays the net amount of the check.
Employee ID: The system displays the employee ID.
Payee: The system displays the payee—to whom the check was issued.
Transferred: The system indicates if the check has been transferred to accounting by displaying
either YES or NO in this column.
Tips: Void entries can be transferred to Accounting (Activities>Payroll>Transfer to Accounting), even if the
original check has not yet been transferred. For accurate record keeping and reconciliation purposes,
be sure to transfer the original check before or at the same time as the void entry you create here.
When filtering data, select Operators to determine which data to display. Also, view a list of Filter
Examples that are useful throughout the system and examples of How to Use Wildcards characters
with Like and Not Like.
For larger organizations with many records, you can clear the Use Drop-Down List on Find Forms
check box on the Options>Customize Workstation Settings>Preferences tab. By doing so, it
eliminates the time it takes to load the Void Checks form.
Labor hours and labor earnings are tracked and distributed by account code combinations if Earning
Codes were set up with the Track Labor Hours check box selected on the Maintain>Payroll>Earning
Codes>Earning tab.
Void Checks Buttons
Select All: Use this button to select all items in the table.
Deselect All: Use this button to clear all items in the table.
Display/Hide Filter: Use this button to display or hide the Filters group box.

Void Checks
Clear Filter: Use this button to clear all of the selected filter items. The filter is
used for display purposes only; it limits what the system displays in the table.
You cannot save the filter items.
Display Records: Use this button to display only the records that match the
currently selected filter items. If you are not using the filter (it is blank), the
Display Records button displays all of the items you currently have.
View First Page: Use this button to display the first page of data in the table.
View Previous Page: Use this button to display the previous page of data in the
table.
View Next Page: Use this button to display the next page of data in the table.
View Last Page: Use this button to display the last page of data in the table.
Void Check Dates
Access this form using Activities>Payroll>Void Checks>OK button. It is only available with the
Payroll module; it is not available for Payroll Link users.
Use this form to determine if you want to use the Original Effective Date for the voided checks or designate
a New Effective Date.
Fields
Use Original Effective Date: Select this box to use the original document's effective date for the void
entries. The effective date is used for all transaction lines of the reversing entry. Note The system prohibits
and/or warns you with a message when the documents' original effective date is posting into a closed
year.
New Effective Date: Enter a new effective date, if you do not want to use the original effective date. Note
The system prohibits and/or warns you with a message when a new effective date is posting into a closed
year.
MIP Fund Accounting
Payroll User's Guide
154

Chapter 4: Calculating Payroll
MIP Fund Accounting
Payroll User's Guide
155
Check Spoilage
Access this form using Activities>Check Writing>Check Spoilage or Activities>Payroll>Check
Spoilage. It is only available with the Payroll module; it is not available for Payroll Link users.
Use this form to record information about checks that are spoiled or destroyed and report this information
using Reports>Check/Voucher Register or Reports>Payroll>History>Summary Check/Transaction
Register.
Note: This form is shared within the MIP Fund Accounting system; you only need to enter the
information once. Also, multiple users are not able to enter information into the same Cash Account
simultaneously.
Fields
Cash Account: Select a valid General Ledger cash account using the drop-down list, and then press the
Tab key.
Date: Enter a date.
Description: Enter a description of how the check was damaged.
Check Selection
Single Check Check Number: Select Single Check, and then enter the check number to be removed.
Range of Checks Starting, Ending: Select Range of Checks, and then enter the starting and ending
numbers for the range of checks to be removed.
Set Up/Adjust Employee Balances Use this form to implement payroll at a time other than the beginning of the calendar year. You can
specify year-to-date payroll amounts processed for the current year, prior to implementing the Payroll
module. Begin by selecting the appropriate tabs and entering applicable information for Earnings,
Benefits, Deductions, Workers' Compensation, Taxes, and Leave.
Note: This form is only available with the Payroll module; it is not available for Payroll Link Users.

Set Up/Adjust Employee Balances
Set Up/Adjust Employee Balances - Select Tab
Access this tab using Activities>Payroll>Set Up/Adjust Employee Balances. It is only available
with the Payroll module; it is not available for Payroll Link users.
Use this form to implement payroll at a time other than the beginning of the calendar year. You can specify
year-to-date payroll amounts processed for the current year, prior to implementing the Payroll module.
Begin by selecting the appropriate tabs and entering applicable information for Earnings, Benefits,
Deductions, Workers' Compensation, Taxes, and Leave.
Use this tab to select an employee, and assign an effective date and adjustment number to your changes.
Please note that if you use the tabs on this form to change the amounts of any earnings, benefits, or
deductions that have been used in the calculation of any federal, state, or other withholding taxes; or
workers' compensation; the related tax and/or workers' compensation amounts may be incorrect.
Furthermore, be aware that any changes you make to earnings may affect benefits, deductions, and
leave. Therefore, you must manually adjust taxes, workers' compensation, benefits, deductions, and/or
leave for any such changes you make. If you do manually adjust either taxes or workers' compensation
amounts, remember to also adjust the related subject earnings and/or hours.
When on any other tab of this form, if you want to recalculate these totals, click the Select tab.
Note: Adjustments cannot be transferred to Accounting. Remember to separately record these
transactions in Accounting, if needed.
Fields Employee ID: Enter an employee ID.
Adjustment Number: You must enter an adjustment number for each adjustment, or use the + key to
automatically increment from the last adjustment number used.
Effective Date: Enter the date the payroll adjustments and/or balances should become effective. The
system defaults to the current system date.
Select Code, Hours, Employee Amount, Employer Amount: Use this table to view the designated
employee's adjustment items. You must first enter applicable information for Earnings, Benefits,
Deductions, Workers' Compensation, Taxes, and Leave, on the subsequent tabs, before those items
appear in the table.
Note that the system calculates and displays a Net Adjustment/Total Employer Amount row in this table.
MIP Fund Accounting
Payroll User's Guide
156

Chapter 4: Calculating Payroll
MIP Fund Accounting
Payroll User's Guide
157
Employee Amount: The Employee Amount column is the sum of each of the employee-paid items,
that was entered for the employee. The total, or net adjustment, for this employee is displayed on the
Net Adjustment/Total Employer Amount row.
Employer Amount: The Employer Amount column is the sum of each of the employer-paid items, that
was entered for the employer. The Total Employer Amount is displayed on the Net Adjustment/Total
Employer Amount row.
Tips: If you do not implement the Payroll module at the beginning of the year, you need to enter the amounts
from your previous payroll system using this form. For example, if you implement the system on July 1,
you need to enter the amounts for the period of January 1 through June 30. Generally, this is the only
time you will use this selection.
However, you may find that you need to adjust an amount the system is currently using. Once
adjustments are saved, changes cannot be made to the adjustments and they cannot be deleted. A
new adjustment must be entered to correct or change a previously saved one; you cannot edit it
directly.
The proper Effective Date is determined by your implementation schedule and your reporting needs. If
you are implementing any time after the beginning of the second quarter, you need to decide what
reporting information is needed later in the year. For instance, if you have taxes for which you want to
see quarterly reports that include the first quarter as a separate amount, make a separate adjustment
to specify those tax amounts for the first quarter, and use an Effective Date within the first quarter for
that adjustment. You also need a separate adjustment for each quarter of the calendar year before
you implement. If, however, you can get quarterly reports from your previous payroll system, you can
enter a single adjustment for the tax amounts to make the system current, using the implementation
date as the Effective Date.
The Adjustment Number can be used as an audit trail for your adjustments. For maximum benefit,
note the Adjustment Number on the source document you use to determine the adjustment amounts.
That way, you can trace adjustments back to their source. The adjustment number is a required entry
that must be unique to each employee record.
Note that this menu selection does not create any accounting entries. The amounts you enter are
used by the payroll module only for reporting purposes and as a starting place to calculate payroll
amounts and taxes.

Set Up/Adjust Employee Balances
Set Up/Adjust Employee Balances - Earnings Tab
Access this tab using Activities>Payroll>Set Up/Adjust Employee Balances. It is only available
with the Payroll module; it is not available for Payroll Link users.
Use this tab to enter adjustments to earnings for an employee.
Fields
Earnings Code, Title, Hours, Amount: The Earnings table allows you to set up or adjust an employee's
earning codes, hours, and amounts. You can select as many earning codes and related information as is
appropriate for the employee and Effective Date. The amount you enter can be positive, negative, or zero.
Tips: If you implement the Payroll module mid-year, and you want to produce reports for previous quarters
that include earnings, enter a separate adjustment for earnings for each quarter using an Effective Date
within that quarter. If, however, you are implementing mid-year and you do not need previous quarterly
reports that include earnings, you can enter a single adjustment using the implementation date as the
Effective Date. Remember that the Effective Date is entered on the Select tab.
To view the recalculated totals, click the Select Tab.
Use the minus key or the space bar to enter a negative amount.
Set Up/Adjust Employee Balances - Benefits Tab
Access this tab using Activities>Payroll>Set Up/Adjust Employee Balances. It is only available
with the Payroll module; it is not available for Payroll Link users.
Use this tab to enter adjustments to benefits for an employee.
Fields
Benefits Code, Title, Amount: The Benefits table allows you to set up or adjust an employee's benefit
codes and amounts. You can select as many benefit codes and related information as is appropriate for
the employee and Effective Date. The amount you enter can be positive, negative, or zero.
MIP Fund Accounting
Payroll User's Guide
158
Chapter 4: Calculating Payroll
MIP Fund Accounting
Payroll User's Guide
159
Tips: If you implement the Payroll module mid-year and want to produce reports for previous quarters that
include benefits, enter a separate adjustment for benefits for each quarter using an Effective Date
within that quarter. If, however, you are implementing mid-year and you do not need previous
quarterly reports that include benefits, you can enter a single adjustment using the implementation
date as the Effective Date. Remember that the Effective Date is entered on the Select tab.
To view the recalculated totals, click the Select Tab.
Use the minus key or the space bar to enter a negative amount.
Set Up/Adjust Employee Balances - Deductions Tab
Access this tab using Activities>Payroll>Set Up/Adjust Employee Balances. It is only available
with the Payroll module; it is not available for Payroll Link users.
Use this tab to enter adjustments to deductions for an employee.
Fields
Deductions Code, Title, Amount: The Deductions table allows you to set up or adjust an employee's
deduction codes and amounts. You can select as many deduction codes and related information as is
appropriate for the employee and Effective Date. The amount you enter can be positive, negative, or
zero.
Tips: If you implement the Payroll module mid-year, and you want to produce reports for previous quarters
that include deductions, enter a separate adjustment for deductions for each quarter using an
Effective Date within that quarter. If, however, you are implementing mid-year and you do not need
previous quarterly reports that include deductions, you can enter a single adjustment using the
implementation date as the Effective Date. Remember that the Effective Date is entered on the Select
tab.
To view the recalculated totals, click the Select Tab.
Use the minus key or the space bar to enter a negative amount.
Set Up/Adjust Employee Balances
Set Up/Adjust Employee Balances - Workers' Compensation Tab
Access this tab using Activities>Payroll>Set Up/Adjust Employee Balances. It is only available
with the Payroll module; it is not available for Payroll Link users.
Use this tab to enter adjustments to workers' compensation for an employee. You need to enter either
Hours or Subject Earnings according to how the Workers' Compensation Code was set up on the
Maintain>Payroll>Workers' Compensation Codes form.
Please note that if you use the tabs on this form to change the amounts of any earnings, benefits, or
deductions that have been used in the calculation of any federal, state, or other withholding taxes; or
workers' compensation; the related tax and/or workers' compensation amounts may be incorrect.
Furthermore, be aware that any changes you make to earnings may affect benefits, deductions, and
leave. Therefore, you must manually adjust taxes, workers' compensation, benefits, deductions, and/or
leave for any such changes you make. If you do manually adjust either taxes or workers' compensation
amounts, remember to also adjust the related subject earnings and/or hours.
Fields
Workers' Compensation Code, Title, Hours, Subject Earnings, Amount: The Workers' Compensation
table allows you to set up or adjust an employee's workers' compensation codes, hours, subject earnings,
and amounts. You can select as many workers' compensation codes and related information as is
appropriate for the employee and Effective Date. The hours and subject earnings you enter can be
positive, negative, or zero.
Tips: If you implement the Payroll module mid-year, and you want to produce reports for previous quarters
that include Workers' Compensation amounts, enter a separate adjustment for workers' compensation
for each quarter using an Effective Date within that quarter. If, however, you are implementing mid-year
and you do not need previous quarterly reports that include Workers' Compensation amounts, enter one
adjustment for the amount of workers' compensation for the previous quarters. This should contain an
Effective Date of the last day of the preceding quarter and, if needed, a catch-up adjustment for the
current quarter with an effective date prior to the first payroll date processed in the system.
To view the recalculated totals, click the Select Tab.
Use the minus key or the space bar to enter a negative amount.
MIP Fund Accounting
Payroll User's Guide
160

Chapter 4: Calculating Payroll
MIP Fund Accounting
Payroll User's Guide
161
Set Up/Adjust Employee Balances - Taxes Tab
Access this tab using Activities>Payroll>Set Up/Adjust Employee Balances. It is only available
with the Payroll module; it is not available for Payroll Link users.
Use this tab to enter adjustments to taxes for an employee. The Tax Types you specify include federal,
state, and other withholding taxes. You can only enter amounts for SUTA Weeks, Employee Amount,
and Employer Amount if these columns are applicable to the designated Tax Type. Furthermore, if the
Tax Type is SWT (State Withholding Tax), SUTA (State Unemployment Tax), LWT (Other Taxes
Employee Paid Tax) or LER (Other Taxes Employer Paid Tax), you must specify a Jurisdiction.
Jurisdiction is the State or Locality Code you set up using the Maintain>Payroll>State Taxes form and/or
Other Taxes form.
The tax types are as follows:
Code Name Jurisdiction
Required
FIT Federal Income Tax No
FUTA Federal Unemployment Tax No
SS Social Security Taxes No
MC Medicare Taxes No
EIC Earned Income Credit No
SWT State Withholding Taxes Yes
SUTA State Unemployment Taxes Yes
LWT Other Taxes Employee Paid Taxes Yes
LER Other Taxes Employer Paid Taxes Yes
Please note that if you use the tabs on this form to change the amounts of any earnings, benefits, or
deductions that have been used in the calculation of any federal, state, or other withholding taxes; or
workers' compensation; the related tax and/or workers' compensation amounts may be incorrect.
Furthermore, be aware that any changes you make to earnings may affect benefits, deductions, and
leave. Therefore, you must manually adjust taxes, workers' compensation, benefits, deductions, and/or

Set Up/Adjust Employee Balances
leave for any such changes you make. If you do manually adjust either taxes or workers' compensation
amounts, remember to also adjust the related subject earnings and/or hours.
Fields
Taxes: The Taxes table allows you to set up or adjust the following items for an employee.
Tax Type: Enter a tax type.
Jurisdiction: Enter a jurisdiction if the tax type is SWT, SUTA, LWT or LER.
SUTA Weeks: Enter SUTA weeks only if the tax type is SUTA. To enter a negative number, press the
minus key, and then enter the number.
Employee Subject Earnings, Employer Subject Earnings: Enter the maximum taxable earnings that
are subject to the designated tax type for the Employee or Employer. The amount you enter can be
positive, negative, or zero.
Gross Taxable Earnings: Enter earnings—regardless of maximums—that are subject to the designated
tax type. The amount you enter can be positive, negative, or zero.
Employee Amount, Employer Amount: Enter either, or both, depending on the tax type. Employee
amount is required for FIT, EIC, SWT, SUTA (if set up to be employee paid), and LWT. Employer
amount is required for FUTA, SUTA (if set up to be employer paid), and LER. Both columns are required
for FICA, and SUTA (if set up to be paid by both). MC and SS are generally paid by both employee and
employer, but amounts are not required to be entered in both columns. The Employee Amount you
enter can be positive, negative, or zero.
Tips: Tax amounts set up here also appear on tax reports.
If you implement the Payroll module mid-year, and you want to produce reports for previous quarters
that include taxes, enter a separate adjustment for taxes for each quarter using an Effective Date within
that quarter. If, however, you are implementing mid-year and you do not need previous quarterly reports
that include taxes, you can enter a single adjustment using the implementation date as the Effective
Date. Remember that the Effective Date is entered on the Select tab.
To view the recalculated totals, click the Select Tab.
Use the minus key or the space bar to enter a negative amount.
MIP Fund Accounting
Payroll User's Guide
162
Chapter 4: Calculating Payroll
MIP Fund Accounting
Payroll User's Guide
163
Set Up/Adjust Employee Balances - Leave Tab
Access this tab using Activities>Payroll>Set Up/Adjust Employee Balances. It is only available
with the Payroll module; it is not available for Payroll Link users.
Use this tab to enter adjustments to leave amounts for an employee.
Fields
Leave Code, Title, Hours Accrued, Hours Taken: The Leave table allows you to set up or adjust an
employee's leave codes, hours accrued, and hours taken. You can select as many leave codes and
related information as is appropriate for the employee and Effective Date. The hours accrued and hours
taken you enter can be positive, negative, or zero.
Tips: If you implement the Payroll module mid-year, and you want to produce reports for previous quarters
that include leave amounts, enter a separate adjustment for leave for each quarter using an Effective
Date within that quarter. If, however, you are implementing mid-year and you do not need previous
quarterly reports that include leave amounts, you can enter a single adjustment using the
implementation date as the Effective Date. Remember that the Effective Date is entered on the Select
tab.
To view the recalculated totals, click the Select Tab.
Use the minus key or the space bar to enter a negative amount.
Set Up/Adjust Employee Balances - Leave Example
Maximum Annual Accrual (Hours) is on an annual basis, not a total accrual basis. Consider the following
example. You are implementing payroll for the first time on 9/1/15. You enter a Leave code with a
Maximum Annual Accrual (Maintain>Payroll>Leave Codes) of 80 because you do not want your
employees to accrue more than 80 hours of leave per year. In the case of Employee X, you do not need
to enter a payroll check history, but you do need to enter Employee X's correct leave balance as of
9/1/15. Employee X has a leave balance of 32 hours from 2014; he has also accrued 53 hours so far in
2015 (for a total accrual of 85 hours).
In this case, you must make two entries for this employee in the Activities>Payroll>Set Up/Adjust
Employee Balances form: one for 32 hours (on the Leave tab) with an effective date of 12/31/14 (on the
Select tab), and another for 53 hours (on the Leave tab) with an effective date of 8/31/15 (on the Select
tab). You should only enter one adjustment of 85 hours with an effective date of 8/31/15, because the

Reprint Pay Stubs
system treats that as more than 80 hours of leave accrual for 2015 and makes adjustments accordingly,
the next time you calculate payroll.
Reprint Pay Stubs
Access this form using Activities>Payroll>Reprint Pay Stubs. It is only available with the Payroll
module; it is not available for Payroll Link users.
Use this form to lookup an employee's payroll check or voucher pay stub and reprint it as a voucher for an
employee.
Select the employee ID and Check number from a previously printed check or voucher using the drop-
down lists , and click Find to display the employee's pay information in the summary section.
Click Reprint Pay Stub to reprint this information as a voucher on plain paper with a VOID stamp over
the signature line.
Note: Prior to using this form, a check or voucher must have been printed using
Activities>Payroll>Print/Email Checks and Vouchers or Activities>Payroll>Enter Manual Checks.
Fields Employee ID: Select the employee from the drop-down list.
Check/Voucher Number: Select the employee's check or voucher number from the drop-down list. Once
selected, the name printed on the check/voucher displays next to the Employee ID. Note that the
employee's check can be one of the following payroll types: Regular, Supplemental, or Manual.
Note: If an employee has a duplicate check or voucher number, only the latest document will be
available.
Check/Voucher Date: The check date displays.
Pay Date: The pay date displays.
Pay Period Begin Date: The pay period begin date displays.
Pay Period End Date: The pay period end date displays.
Summary Item, Hours, Employee Amount, Employer Amount: The system displays the employee's
payroll information including Net Pay/Total Employer Amount and Leave. The reprinted pay stub summary
MIP Fund Accounting
Payroll User's Guide
164

Chapter 4: Calculating Payroll
MIP Fund Accounting
Payroll User's Guide
165
information will include Benefit and Workers' Compensation Code information associated to the pay
code.
Reprint Pay Stub
Access this form using Activities>Payroll>Reprint Pay Stubs> Reprint Pay Stub. It is only
available with the Payroll module; it is not available for Payroll Link users.
This form is preceded by the Reprint Pay Stubs form and displays after you click the OK button on the
Reprint Pay Stubs form.
Use this form to reprint an employee payroll check or voucher as a voucher. You are able to select a
Format (continuous or laser) and set up printer information.
Fields
Format: Select the type of form that matches the printer: either laser or continuous forms.
Print Alignment: Click this button to print a sample voucher for John Q. Public.
OK: Click this button to print the employee's voucher.
Distribute Labor Hours/Earnings
Access this menu selection using Activities>Payroll>Distribute Labor Hours/Earnings. It is only
available with the Payroll module; it is not available for Payroll Link users.
Use this feature to update the distribution of labor hours and labor earnings when changes to Earning
Codes (using the Track Labor Hours check box on Maintain>Payroll>Earning Codes) and/or Distribution
Codes (changing percentage distribution on Maintain>Payroll>Distribution Codes) occur after the payroll
checks/vouchers (Activities>Payroll>Print Checks/Vouchers) were printed and prior to the transfer of the
payroll to accounting (Activities>Payroll>Transfer to Accounting). The process deletes the existing labor
hours/earnings distribution and replaces it with the new percentage distribution and/or applicability of
"Track Labor Hours."
Distribute Labor Hours/Earnings
Tips: When labor hours are distributed and the distribution code includes a fixed amount, the fixed amount is
ignored and only the percentages are distributed.
Prior to transferring payroll data to Accounting (Activities>Payroll>Transfer to Accounting), you must
complete any changes to distribution codes that effect Labor Hours/Earnings.
MIP Fund Accounting
Payroll User's Guide
166
Chapter 5: Transferring Payroll
Transfer to Accounting
Access this form using Activities>Payroll>Transfer to Accounting. It is only available with the
Payroll module; it is not available for Payroll Link users.
Use this form to transfer payroll data to Accounting. Note that the entries created by this process are not
posted; you must post them using Activities>Manage Sessions>Post Transactions.
Pre-transfer reports—which can be printed only before transferring the payroll data—show the entry that
will be created in Accounting. Use the Pre-Transfer button to create the data necessary to print the report.
Print the report using the Reports>Payroll>Processing>Pre-Transfer Register. When you print the report
or transfer the data, you can do so in Detail or in Summary. A detail transfer creates a separate document
for each check. When you transfer in summary, the system creates a single document for each payroll.
When transferring in summary, the system ensures that the Payroll information in the accounting entries
is confidential.
After completing this form, click the Transfer button to transfer the entries to Accounting. Reminder, if for
some reason you need to undo the transfer (you need to transfer a payroll again), use the
Activities>Payroll>Undo Transfer to Accounting form.
Depending on the amount of data being transferred, this process can be quite lengthy. To cancel during
the transfer process, press the Esc key. The system stops the process and no data is transferred.
More...
- If using an invalid account code combination in the system that affects the Payroll module, the
combinations or Payroll transactions need to be removed or they will not be transferred to Accounting.
- If using accruals, you can also enter a check percent, accrual date, and accrual percent on this form.
We recommend creating two pre-transfer reports—one without the accrual and a second one with the
accrual—prior to transferring the Payroll data to Accounting. Printing, reviewing, and filing these two
reports will provide you and your auditors with comparative information about the accrual you applied.
Keep in mind that the Accrual account must be set up on the Set Up Payroll form by the Administrator
(Organization>Set Up Modules>Payroll) before the payroll calculations can be done.
MIP Fund Accounting
Payroll User's Guide
167

Chapter 5: Transferring Payroll
MIP Fund Accounting
Payroll User's Guide
168
Note: Once you have transferred a payroll to Accounting, you can only identify that transfer by the
Session ID entered here. Therefore, you may want to print a Pre-transfer report each time you create a
session, in order to keep track of which payroll is in which session. If you do not print a Pre-transfer
report, and you are not certain what a session contains, you can print the session
(Reports>Transactions>Unposted General Ledger Transactions and Posted General Ledger
Transactions).
Fields
Session Information
Session ID: Enter a session ID for the transferred entries. Use the Drop-Down Lookup to view a list of
previously transferred session IDs. Select the items to transfer by clicking on the appropriate check
box. The table contains only payrolls for which you have printed, voided, or manually entered
checks/vouchers. Furthermore, you can transfer only payrolls that have not yet been transferred. We
recommend using all numeric session IDs. We also recommend limiting your entry to strictly
alphabetic characters (A through Z) or numeric characters (0 through 9), and avoiding the use of
symbols.
Session Date: Enter the date for this transfer session.
Description: Enter a description for this session. The default description is "Transferred from Payroll."
Transfer Type
Detail, Summary: Select a transfer type of either Summary or Detail. A detail transfer creates a
separate document for each check. While a summary transfer creates a single document for each
payroll. Transferring in summary sacrifices the detailed information but effectively reduces the size of
the transaction.
Document: If Summary is selected, enter a unique document number or accept the number that the
system assigned. When generating a Summary type Payroll Transfer, the system displays the next
available number; you can also accomplish this by pressing the + key. (P/R System Generated
System Check number options were set up by the Administrator using Organization>Organization
Preferences>Document Number tab).
Transfer to Accounting: This table displays untransferred payrolls for which you have printed checks,
voided checks, or manually entered checks. The table displays a processing group code, its Pay Date,
Payroll Type (Regular, Void, Manual, or Supplemental), and Check Date.

Transfer to Accounting
You can also enter a Check Percent, Accrual Date, and Accrual Percent in this table. The check and
accrual percentage must equal 100% when combined, and the accrual date must be prior to the check
date. Accrual entries are only created if the Check % does not equal 100%.
Tips: Because numbers must be rounded when calculating amounts by certain percentages, the end result
could be skewed by a few cents.
In order for the system to calculate accruals, a check and accrual percentage (other than zero) must be
entered in the table.
Even if the system preferences are set to Online Posting, transferred entries are designated as Batch-
To Post. You must use the Activities>Manage Sessions>Post Transactions form to post transferred
entries.
To transfer accounting data for benefits when no earnings are entered on the timesheet, select Follow
Earnings on Timesheet and enter a distribution code to use if no Earnings exist on the Benefit Codes -
Distribution tab (Maintain>Payroll>Benefit Codes>Distribution tab).
During the transfer process, labor hours and earnings are redistributed using their account code
combinations. So, changing distribution codes while transferring data, affects labor hours and labor
earnings. To track labor hours and labor earnings by account code combinations set up Earning Codes
with the Track Labor Hours check box selected on the Maintain>Payroll>Earning Codes>Earning tab.
If you want to process employee reimbursement and advances through regular payroll processing (by
applying the net pay amount without the amount being subject to taxes and fringe benefits), create an
Earning Code with the Contribute to Net Pay Only check box selected (Maintain>Payroll>Earning
Codes).
Using Accruals
The following examples describe the accrual process and rounding issues associated with accruals.
These examples are based on US Currency.
Original Entry
The following table displays the transaction entry lines for a payroll check. This check is for the amount of
$0.04 and needs to have an accrual applied to it. For simplicity, GL is the only segment included in the
following example.
MIP Fund Accounting
Payroll User's Guide
169

Chapter 5: Transferring Payroll
MIP Fund Accounting
Payroll User's Guide
170
Table A
GL Type DR CR Entry Type Effective Date Description
11000 CSH 0.04 Normal 11/3/2015 Cash
50003 EXP 0.04 Normal 11/3/2015 Bonus Exp
Prior to Transferring or Pre-transferring data to Accounting, you must have:
Entered timesheets (Timesheets>Enter Regular/Supplemental Timesheets),
Printed and reviewed timesheets,
Calculated Payroll (Activities>Payroll>Calculate Payroll),
Set Up an accrual account (As the Administrator, access Organization>Set Up Modules>Payroll), and
Printed checks and/or vouchers (Activities>Payroll>Print/Email Checks and Vouchers).
Transfer to Accounting Table
Now, we need to transfer the check to Accounting. The following table displays the processing group
code for the check. Note that the amount of $0.04 needs to be split between the accrual (20%) and check
(80%).
Table B
Group Code Pay Date Check Date Check % Accrual Date Accrual %
Admin 11/03/15 11/03/15 080.0000 10/31/15 020.0000
Accrual Entry
Now, apply the 20/80 percentages from Table B. After completing the Transfer to Accounting form, click
the Pre-Transfer or Transfer buttons to generate accruals. During the generation of accrual entries, the
system uses the original entry (Table A), and splits it into separate entries as shown in the table below:
1. The system takes each line of the original entry and distributes it to the Accrual % first, then the
Check % (see the table below). You entered these percentages on the Transfer to Accounting form
(Table B).

Transfer to Accounting
The accrual distribution is calculated by multiplying $0.04 by 20%. Similarly, the check distribution is
calculated by multiplying $0.04 by 80%. Note that the system rounds the credits and debits. See
"Rounding Accruals" (page 173) for more information.
GL Type DR CR Effective
Date
Description
11000 CSH 0.01 10/31/15 Accrual
Distribution
11000 CSH 0.03 11/03/15 Check
Distribution
50003 EXP 0.01 10/31/15 Accrual
Distribution
50003 EXP 0.03 11/03/15 Check
Distribution
2. Next, the system replaces the Cash (CSH) transaction lines of the original entry with the Accrual
payable account (such as APO and OL) that the Administrator created using the Organization>Set Up
Modules>Payroll form. Now you have two entries to accounting—one for the accrual date and one for
the check date, both of which are found in Table B. The cash account is temporarily removed from the
calculation in this step; however, it is added back in the next step.
GL Type DR CR Effective Date
11000
21001
CSH
OL
0.01 10/31/15
11000
21001
CSH
OL
0.03 11/03/15
50003 EXP 0.01 10/31/15
50003 EXP 0.03 11/03/15
3. Add the original Cash transaction lines from the original entry (row 1 in Table A). Then, add another
transaction line by reversing the cash entry and changing it to the accrual account. Both lines use the
Check Date from Table B.
MIP Fund Accounting
Payroll User's Guide
171

Chapter 5: Transferring Payroll
MIP Fund Accounting
Payroll User's Guide
172
GL Type DR CR Effective
Date
Add 11000 CSH 0.04 11/03/15
Rev 21001 OL 0.04 11/03/15
21001 OL 0.01 10/31/15
21001 OL 0.03 11/03/15
50003 EXP 0.01 10/31/15
50003 EXP 0.03 11/03/15
4. The last step is to combine all transaction lines that have the same GL Code and Effective Date. You
need to net all current accrual entries (OL) with the same effective date into a single entry with a debit
of $0.01.
GL Type DR CR Effective
Date
11000 CSH 0.04 11/03/15
21001 OL 0.01 10/31/15
Combine 21001 OL 0.04 11/03/15
Combine 21001 OL 0.03 11/03/15
50003 EXP 0.01 10/31/15
50003 EXP 0.03 11/03/15
5. Your final entry looks like the following table:
GL Type DR CR Effective Date
11000 CSH 0.04 11/03/15
21001 OL 0.01 10/31/15
21001 OL 0.01 11/03/15

Transfer to Accounting
GL Type DR CR Effective Date
50003 EXP 0.01 10/31/15
50003 EXP 0.03 11/03/15
Rounding Accruals
Distributions are made to the Accrual % first, then the Check %. (See "Using Accruals" (page 169) for
more information.) Consequently, if the Accrual % is less than 50%, any cent adjustments are going to be
distributed to the Check % transactions. As you can see from the following examples, the amount could
vary slightly due to numbers being rounded by certain percentages. These examples are based on US
Currency.
10% Accrual
For an accrual of 10%, there would be no accrual amount because 10% of $0.04 is $0.004, which rounds
down to $0.00.
GL Type DR CR Effective
Date
Description
11000 CSH 0.04 11/3/15 Cash
50003 EXP 0.04 11/3/15 Bonus Exp
20% Accrual
For an accrual of 20%, there would be an accrual amount of $0.01 because 20% of $0.04 is $0.008, which
rounds up $0.01.
GL Type DR CR Effective
Date
Description
21001 OL 0.01 10/31/15 Accrual Exp
50003 EXP 0.01 10/31/15 Bonus Exp
21001 OL 0.01 11/03/15 Accrual Exp
50003 EXP 0.03 11/03/15 Bonus Exp
11000 CSH 0.04 11/03/15 Cash
MIP Fund Accounting
Payroll User's Guide
173

Chapter 5: Transferring Payroll
MIP Fund Accounting
Payroll User's Guide
174
30% Accrual
For an accrual of 30%, there would be an accrual amount of $0.01 because 30% of $0.04 is $0.012,
which rounds down to $0.01.
GL Type DR CR Effective
Date
Description
21001 OL 0.01 10/31/15 Accrual Exp
50003 EXP 0.01 10/31/15 Bonus Exp
21001 OL 0.01 11/03/15 Accrual Exp
50003 EXP 0.03 11/03/15 Bonus Exp
11000 CSH 0.04 11/03/15 Cash
40% Accrual
For an accrual of 40%, there would be an accrual amount of $0.02 because 40% of $0.04 is $0.016,
which rounds up to $0.02.
GL Type DR CR Effective
Date
Description
21001 OL 0.02 10/31/15 Accrual Exp
50003 EXP 0.02 10/31/15 Bonus Exp
21001 OL 0.02 11/03/15 Accrual Exp
50003 EXP 0.02 11/03/15 Bonus Exp
11000 CSH 0.04 11/03/15 Cash
50% Accrual
For an accrual of 50%, there would be an accrual amount of $0.02 because 50% of $0.04 is $0.02.

Transfer to Accounting
GL Type DR CR Effective
Date
Description
21001 OL 0.02 10/31/15 Accrual Exp
50003 EXP 0.02 10/31/15 Bonus Exp
21001 OL 0.02 11/03/15 Accrual Exp
50003 EXP 0.02 11/03/15 Bonus Exp
11000 CSH 0.04 11/03/15 Cash
60% Accrual
For an accrual of 60%, there would be an accrual amount of $0.02 because 60% of $0.04 is $0.024, which
rounds down to $0.02.
GL Type DR CR Effective
Date
Description
21001 OL 0.02 10/31/15 Accrual Exp
50003 EXP 0.02 10/31/15 Bonus Exp
21001 OL 0.02 11/03/15 Accrual Exp
50003 EXP 0.02 11/03/15 Bonus Exp
11000 CSH 0.04 11/03/15 Cash
70% Accrual
For an accrual of 70%, there would be an accrual amount of $0.03 because 70% of $0.04 is $0.028, which
rounds up to $0.03.
GL Type DR CR Effective
Date
Description
21001 OL 0.03 10/31/15 Accrual Exp
50003 EXP 0.03 10/31/15 Bonus Exp
21001 OL 0.03 11/03/15 Accrual Exp
MIP Fund Accounting
Payroll User's Guide
175

Chapter 5: Transferring Payroll
MIP Fund Accounting
Payroll User's Guide
176
GL Type DR CR Effective
Date
Description
50003 EXP 0.01 11/03/15 Bonus Exp
11000 CSH 0.04 11/03/15 Cash
80% Accrual
For an accrual of 80%, there would be an accrual amount of $0.03 because 80% of $0.04 is $0.032,
which rounds to $0.03.
GL Type DR CR Effective
Date
Description
21001 OL 0.03 10/31/15 Accrual Exp
50003 EXP 0.03 10/31/15 Bonus Exp
21001 OL 0.03 11/03/15 Accrual Exp
50003 EXP 0.01 11/03/15 Bonus Exp
11000 CSH 0.04 11/03/15 Cash
90% Accrual
For an accrual of 90%, there would be an accrual amount of $0.04 because 90% of $0.04 is $0.036,
which rounds to $0.04. There would be no check amount because 10% of $0.04, rounded down, would
be $0.00.
GL Type DR CR Effective
Date
Description
21001 OL 0.04 10/31/15 Accrual Exp
50003 EXP 0.04 10/31/15 Bonus Exp
21001 OL 0.04 11/03/15 Accrual Exp
11000 CSH 0.04 11/03/15 Cash

Transfer to Accounting
How Rounding Affects Distributions
Suppose that we want to accrue checks using all nine examples. Keep in mind, the accrual is based on
$0.04 (US Dollars).
Notice that the Accrual Amounts must be adjusted up or down to accommodate for rounding. Using this
example, you can see how debits and credits could get out of balance. If debits do not equal credits, the
system adjusts them to get the transactions back to a balanced amount for Effective Date, Fund, Pay
Type, and balancing segments.
Ex. Accrual % Accrual
Amount
(.04 * %)
Round Amount
Used
1 10 0.004 Down 0.00
2 20 0.008 Up 0.01
3 30 0.0120 Down 0.01
4 40 0.0160 Up 0.02
5 50 0.0200 -- 0.02
6 60 0.0240 Down 0.02
7 70 0.0280 Up 0.03
8 80 0.0320 Down 0.03
9 90 0.0360 Up 0.04
Note: If you have more entries rounding up or more rounding down, the system has to make greater
adjustments in order to balance debit and credit amounts. See "Rounding Accruals" (page 173) for more
information.
MIP Fund Accounting
Payroll User's Guide
177

Chapter 5: Transferring Payroll
MIP Fund Accounting
Payroll User's Guide
178
Undo Transfer to Accounting
Access this form using Activities>Payroll>Undo Transfer to Accounting. It is only available with
the Payroll module; it is not available for Payroll Link users.
Use this form to "undo" a previously transferred payroll. In other words, if you need to transfer a payroll
again, select its Session ID here to make it available for re-transfer. Only payrolls that have been
previously transferred are displayed in the Undo Transfer to Accounting table.
To select a session, place a check mark next to it in the Selection (the left-most) column. After clicking
the OK button, the system updates the payroll records, allowing the selected payrolls to be re-
transferred.
More...
The Session ID column may list a Session ID more than once. This is because, when sessions are
transferred, the system divides each session into three possible Session Types:
- Payroll System Generated Checks
- Payroll Manual Checks
- Payroll Void Checks
Therefore, when you want to re-transfer, you should make sure to select all of the Session ID
combinations for the session you want to re-transfer.
Note: To make corrections to the entry amounts from payroll records, either use the
Activities>Payroll>Set Up/Adjust Employee Balances form or the Activities>Payroll>Void Checks form.
Fields
Session ID: The system displays all sessions that have been transferred to Accounting using the
Activities>Payroll>Transfer to Accounting form.
Transaction Source: The system displays the transaction source code for the transferred session.
Description: The system displays the description associated with the transferred session ID.
Session Date: The system displays the session's date, which was entered on the
Activities>Payroll>Transfer to Accounting form.

Undo Transfer to Accounting
Posted: The system displays "Yes" or "No" to indicate if the session was posted in the system
(Activities>Manage Sessions>Post Transactions).
Undo Accounting: Select this check box to undo posted or unposted sessions in the system. If the session
has been posted, enter a Session ID in the Reverse Session ID box. A reversal is automatically made in
the system.
If this box is selected and the session has not been posted in Accounting, the system deletes the
unposted session, and its accounting entries generated by the previously transferred payroll.
If this box is cleared, this session will be undone only in the Payroll module; you will need to manually
delete or reverse the session (which includes its accounting entries) in the system. The Payroll module
recognizes these sessions as "not transferred" and allows them to be transferred again.
Reverse Session ID: Enter a session ID if you are undoing a posted session. Once a reversal has been
made in Accounting, the session no longer appears on this form.
Tips: If you did not print Pre-transfer reports for all transferred payroll sessions, and you are not certain what a
specific session contains, you can print the session (Reports>Transactions>Unposted General Ledger
Transactions and Posted General Ledger Transactions).
The Undo Transfer to Accounting form designates the selected payroll as transferable; it does not change Employee History or other payroll records, nor does it affect the entry originally transferred to
Accounting. You can delete any unposted accounting entry generated by a previously transferred
payroll by selecting the Undo Accounting check box. A reversal is made in Accounting if the entry was
posted—just select the Undo Accounting check box and enter the reversal session number in the
Reverse Session ID box of the appropriate row.
To remove the entry amounts from payroll records, either use the Activities>Payroll>Set Up/Adjust
Employee Balances form or the Activities>Payroll>Void Checks form.
Labor hours and labor earnings are tracked and distributed by account code combinations if Earning
Codes were set up with the Track Labor Hours check box selected on the Maintain>Payroll>Earning
Codes>Earning tab.
When you undo the accounting transfer, accruals that were posted are also undone.
MIP Fund Accounting
Payroll User's Guide
179

Chapter 5: Transferring Payroll
MIP Fund Accounting
Payroll User's Guide
180
Undo Transfer to Accounting Example
You might want to undo a transfer to Accounting if, for example, a previously transferred payroll
contained Distribution Codes that had been incorrectly set up. In such a case, use this form to undo the
transfer in the payroll records. Then, correct the Distribution Codes in the Payroll module
(Maintain>Payroll>Distribution Codes), and transfer the payroll again.
Undo Transfer to Accounting Buttons
Filter: Use this button to limit the display to only certain records. For example,
you might only want to see records for a specific Session ID.
Select All: Use this button to select all items in the list by placing a check mark to
the left of each row.
Deselect All: Use this button to clear all items in the list by removing the check
mark to the left of each row.
Filter
Access this form using Filter. It is only available with the Payroll module; it is not available
for Payroll Link users.
Use this form to narrow down and more explicitly specify the data to include on a form.
To filter data, select an item in the Available Filter column, and then click the Mover to move it to the
Selected Filter column. Once an item is in the Selected Filter column, set up its filtering criteria. Then, the
form is limited to the data that falls within the designated filter criteria.
Fields
Available Filter, Selected Filter: To filter data, move an item from the Available Filter column to the
Selected Filter column.
Compares To: Select an operator, or accept the default operator. The operator compares the value in
the Selected Filter column with the values in Criteria 1 (and Criteria 2, if applicable) to determine which
records to display.
Criteria 1: Enter a value to compare with the item in the Selected Filter column. When using Like or Not
Like, use "%" to represent any number of characters.

Undo Transfer to Accounting
Criteria 2: Enter a value for the end of a range if the Compares To contains the Between or Not Between
operators.
MIP Fund Accounting
Payroll User's Guide
181

Chapter 6: Tax Reporting
Tax Forms and eFiling by Aatrix
Access this form using Activities>Payroll>Tax Forms and eFiling by Aatrix®.
Use this form to filter the data to produce or eFile print-ready W-2 and W-3 forms, as well as 1094 and
1095 forms for employees, and Federal and State agencies.
First, select the Form Type, State, and Form, then use the Form Description to verify that you are using to
view and/or print W-2 information. Next, select the Date Range.
For Federal 1095/1094-C or 1095/1094-B forms, accept the default for Full-time Employees option in
order to calculate using Payroll hours. Or select Calculate using Web/Imported Timesheet Hours if the
HR Management module is owned and used.
You can filter the data, and then click OK to begin the output process. The system creates a data file
(.auf), which Aatrix® uses to populate the forms. You can create, verify, and print your state tax forms on
plain paper. Or eFile them, for a fee — no printing, folding, or mailing required. You can also create,
calculate, and verify your W-2 tax information, then choose to print and distribute your employee copies
in-house with the government mandated plain perforated paper or let Aatrix® handle the rest. Aatrix® will
produce and mail your employees their W-2s plus post employee W-2s for employee electronic download
(in case they lose their W-2) and Aatrix® will file the State and Federal copies including the W-3. You now
have the choice of printing the W-2 and W-3 Federal and State copies on plain paper or eFiling them with
only the State eFile charge being applied.
For 1099 instructions, see article 4461 or article 4471 for W-2 instructions, in the Knowledgebase.
Nonprofit Online Users
MIP manages tax form updates automatically for you; therefore, the Form Updates button is not
available. See Nonprofit Online.
Payroll Link Users
The system uses the employee's hired date and terminated date to determine whether to include them
in the AUF file. If an employee is terminated before the end of the year, the employee information for
that year will be included in Aatrix. If the employee is terminated before the reporting year, that
employee's information will not be included in Aatrix. Also, if an organization switches to the Payroll
MIP Fund Accounting
Payroll User's Guide
182

Chapter 6: Tax Reporting
MIP Fund Accounting
Payroll User's Guide
183
Link module during the calendar year all payroll history for the year will be ignored since it is a partial
year.
Fields
Select Form
Form Type: Select from the following Federal, State, or History.
State: If the State Form Type was selected, select the abbreviated State.
Form: Select a form for Federal or State.
Form Description: A description of the selected form displays.
Form Updates: If available, use this button to check for Aatrix® updates and the most current forms; as
there may be Aatrix® software and/or form changes.
Full-time Employees Calculate using Payroll Hours, Calculate using Web Timesheet Hours: If
available, accept the default option to calculate full-time employees using the Calculate using Payroll Hours if the Payroll module is owned. If the HR Management and/or EWS modules are owned and are
importing or using Web Timesheets, select Calculate using Web Timesheet Hours. Full-time
Employees option is only available when Select Form: Form Type Federal and Form 1095/1094-C or
1095/1094-B were selected. See FTE Rate for more information about how the system calculates full-
time employees.
Select Date Range
Period Type: Select a period type, such as One Year, One Quarter, or Date Range.
Period: Select a period, such as 1st Quarter or January.
Year: Enter a year or accept the current year default.
Date From: If Daily or Date Range Period Type was selected, enter a date or accept the default date.
Date To: If Date Range Period Type was selected, you are required to specify the date range. Enter a
date or accept the default date.
Filters: Use the filter to limit which items are included in the data file. Note that processing tax files in
smaller batches could result in multiple charges from Aatrix.
Available Filter, Selected Filter: Select an item in the Available Filter column, and then click the
Mover ( > ) to move it to the Selected Filter column.

Tax Forms and eFiling by Aatrix
Once an item is in the Selected Filter column, set up its filtering criteria. Then, the data is limited to what
falls within the designated filter criteria.
Compares To: Select an operator. The operator compares the value in the Selected Filter column with
the values in Criteria 1 and Criteria 2 to determine which items are displayed in the Available Items
table.
Criteria 1: Enter a value to compare with the item in the Selected Filter column. When using Like or Not
Like, you can use "%" to represent any number of characters.
Criteria 2: Enter a value for the end of a range if the Compares To column contains the Between or Not
Between operators.
Tips: Your data is designed to print on plain paper and government mandated plain perforated paper
available online. Refer to Preprinted Checks and Forms for a list of part numbers to use when ordering.
In order for Aatrix to notify your employees when their W-2s are available via email, you will need to
verify that each employee has the Issue employee W-2 electronically using Aatrix® check box selected
and that the Employee W-2 Email address was entered correctly on the Maintain>Payroll>Employee
Information - W-2 Tab.
In order for Aatrix to notify your employees when their 1095 B or Cs are available via email, you will
need to verify that each employee has the Issue Electronic Form 1095 check box selected and that the
Employee Residence Email address was entered correctly on the Maintain>Payroll>Employee
Information - Address Tab.
Use Reports>Payroll>History>Taxes for a comparable employee count. Set up the report by selecting
the following: Content Tab - Employee ID (such as Employee ID, Employee Name, or Social Security
Number), Tax Type, Jurisdiction, and Employee Count; Filter Tab - Tax Type = SUTA; and Options Tab
- Summarize Amounts check box. The report displays the number one in the column for each employee
row and sums the total at the end of the column.
When filtering data, select Operators to determine which data to display. Also, view a list of Filter
Examples that are useful throughout the system and examples of How to Use Wildcards characters with
Like and Not Like.
MIP Fund Accounting
Payroll User's Guide
184

Chapter 7: Payroll Reporting
Overview of Payroll ReportsThe system provides numerous report selections so you can create custom reports that satisfy the
reporting needs in your organization. This reporting gives you the flexibility you need, from specifying
which columns appear, to sorting and totaling the information presented. You control the output so you
get just the reports you want.
Below is a list of all the reports available in the Payroll module:
Report Menu Selections Reports
Payroll>Lists> "Distribution Codes List" (page 187)
"Federal Taxes List" (page 188)
"State Taxes List" (page 191)
"Other Taxes List" (page 194)
"Processing Groups List" (page 198)
"Quick Employee Information" (page 199)
"Employee Information List" (page 201)
"Earning Codes List" (page 208)
"Benefit Codes List" (page 213)
"Deduction Codes List" (page 219)
"Workers' Compensation Codes List" (page
223)
"Leave Codes List" (page 226)
Email Templates List
Payroll>Processing> "Quick Timesheets" (page 232)
"Timesheets" (page 233)
MIP Fund Accounting
Payroll User's Guide
185

Chapter 7: Payroll Reporting
MIP Fund Accounting
Payroll User's Guide
186
Report Menu Selections Reports
"Calculated Check Register" (page 237)
"Quick Calculated Check Register" (page 241)
"Pre-Transfer Register" (page 243)
"Voucher Register" (page 245)
Payroll>History> "Pay Codes History" (page 248)
"Earnings History" (page 255)
"Benefits History" (page 260)
"Deductions History" (page 264)
"Workers' Compensation History" (page 268)
"Taxes History" (page 273)
"Leave History" (page 279)
"Quick Check/Transaction Register" (page 283)
"Summary Check/Transaction Register" (page
285)
"Quick Employee Payroll Summary" (page 287)
"Labor Distribution" (page 289)
"Leave Liability" (page 292)
Payroll>Payroll Tax
Worksheets>
"Federal Tax Worksheet" (page 296)
"Other Tax Worksheet" (page 299)
"941 Worksheet" (page 302)
"W-2 Information" (page 305)
For an overview of the report tabs and buttons, refer to the "Report Setup" chapter of the General Ledger Reports guide.

Chapter 8: List Reports
Distribution Codes List
Access this report using Reports>Payroll>Lists>Distribution Codes.
Use this report to obtain a list of the distribution codes entered using Maintain>Payroll>Distribution
Codes.
Report Criteria
Use this tab to assign a report name and determine whether or not to include it on the actual
report. The report name can be printed in the header or the footer of the report.
Use this tab to determine what data to include in the report and to define the report layout.
By selecting Available Items, the data is divided onto separate pages. The report starts a new page for
each item, and the item is printed in the page header of the report.
By selecting Available Columns, the data that appears in the body of the report is determined.
Column Description
Distribution Code Pre-defined assignments that allow you to specify, in advance,
the funds and/or other account segments to which you want to
distribute transaction amounts, such as ALLOC, PROF, or
RENT.
Status The status of the code—Active, Inactive, or Discontinued.
Apply To How the distribution codes are applied—Payroll, Accounting, or
Both Accounting and Payroll.
Description A description of the distribution code, such as Allocation,
Professional Services, or Rent Expense.
Entry Order The order that transactions were entered. This column allows
you to have more control over the order the records print on the
report.
MIP Fund Accounting
Payroll User's Guide
187
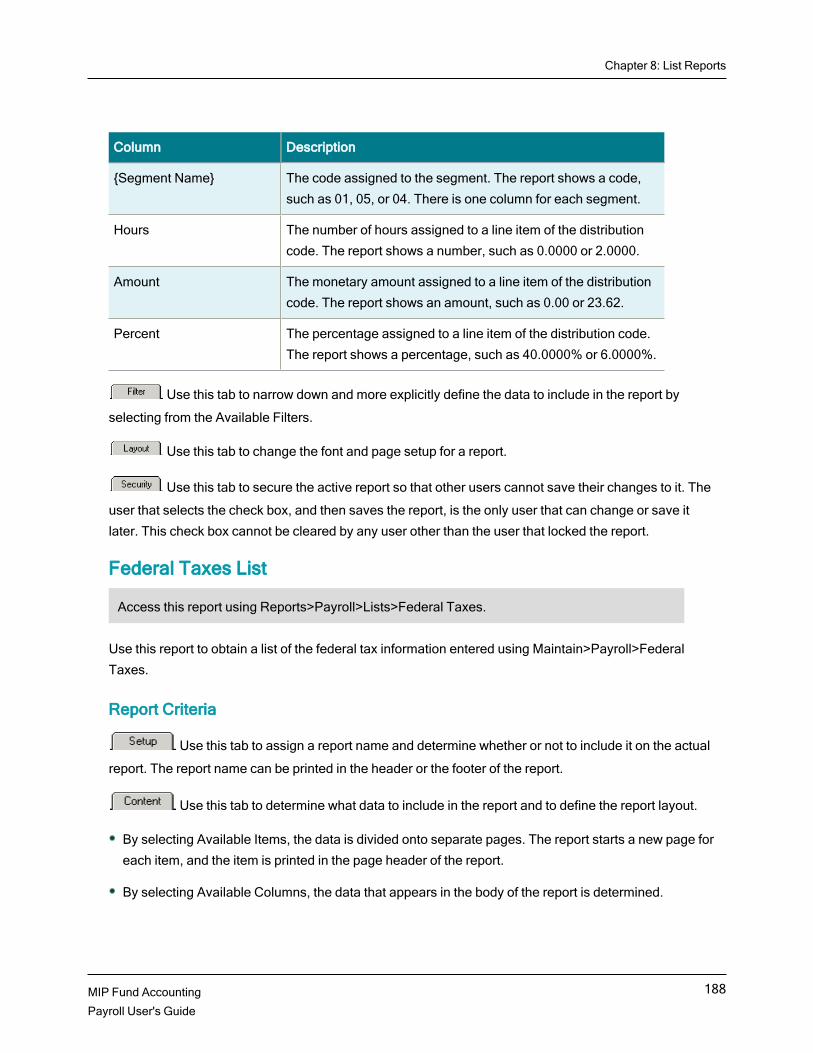
Chapter 8: List Reports
MIP Fund Accounting
Payroll User's Guide
188
Column Description
{Segment Name} The code assigned to the segment. The report shows a code,
such as 01, 05, or 04. There is one column for each segment.
Hours The number of hours assigned to a line item of the distribution
code. The report shows a number, such as 0.0000 or 2.0000.
Amount The monetary amount assigned to a line item of the distribution
code. The report shows an amount, such as 0.00 or 23.62.
Percent The percentage assigned to a line item of the distribution code.
The report shows a percentage, such as 40.0000% or 6.0000%.
Use this tab to narrow down and more explicitly define the data to include in the report by
selecting from the Available Filters.
Use this tab to change the font and page setup for a report.
Use this tab to secure the active report so that other users cannot save their changes to it. The
user that selects the check box, and then saves the report, is the only user that can change or save it
later. This check box cannot be cleared by any user other than the user that locked the report.
Federal Taxes List
Access this report using Reports>Payroll>Lists>Federal Taxes.
Use this report to obtain a list of the federal tax information entered using Maintain>Payroll>Federal
Taxes.
Report Criteria
Use this tab to assign a report name and determine whether or not to include it on the actual
report. The report name can be printed in the header or the footer of the report.
Use this tab to determine what data to include in the report and to define the report layout.
By selecting Available Items, the data is divided onto separate pages. The report starts a new page for
each item, and the item is printed in the page header of the report.
By selecting Available Columns, the data that appears in the body of the report is determined.

Federal Taxes List
Column Description
Tax Type The federal tax type code. A list of available codes are as
follows:
FIT (Federal Income Tax)
SS (Social Security Tax)
MC (Medicare)
FUTA (Federal Unemployment Tax)
Tax Type Title The name of the Tax Type, such as, Federal Income Tax, Social
Security Tax, Medicare, Federal Unemployment Tax.
Expense GL Code The General Ledger expense account number for the federal
taxes.
Liability GL Code The General Ledger liability account number for the federal
taxes.
Employee Social Security
Tax Override Official
Values
A designation of Yes or No, depending on whether "Override
Official Values” was selected for the Social Security Tax on the
Employee FICA Taxes tab.
Employee Social Security
Tax Maximum Annual
Subject Wages
The amount entered as the employee’s maximum annual
subject wages for the Social Security tax on the Employee FICA
Taxes tab.
Employee Social Security
Tax Percent of Wages
The percentage entered as the employee’s maximum annual
subject wages for the Social Security tax on the Employee FICA
Taxes tab.
Employee Social Security
Tax Calculation Method
The selected employee’s calculation method for the Social
Security tax, such as, Year to Date or Current on the Employee
FICA Taxes tab.
Employee Medicare Tax
Percent of Wages
The percentage entered as the employee’s maximum annual
subject wages for the Medicare tax on the Employee FICA
Taxes tab.
Employee Medicare Tax The percentage calculated when an employee’s wages subject
MIP Fund Accounting
Payroll User's Guide
189

Chapter 8: List Reports
MIP Fund Accounting
Payroll User's Guide
190
Column Description
Percent over $200,000 to Medicare exceed $200,000.00 for the calendar year.
Employer Social Security
Tax Override Official
Values
A designation of Yes or No, depending on whether "Override
Official Values” was selected for the Social Security Tax on the
Employer FICA Taxes tab.
Employer Social Security
Tax Maximum Annual
Subject Wages
The amount entered as the employer paid maximum annual
subject wages for the Social Security tax on the Employer FICA
Taxes tab.
Employer Social Security
Tax Percent of Wages
The percentage entered as the employer paid maximum annual
subject wages for the Social Security tax on the Employer FICA
Taxes tab.
Employer Social Security
Tax Calculation Method
The selected employer paid calculation method for the Social
Security tax, such as, Year to Date or Current on the Employer
FICA Taxes tab.
Employer Medicare Tax
Percent of Wages
The percentage entered as the employer paid maximum annual
subject wages for the Medicare tax on the Employer FICA
Taxes tab.
FUTA Tax Override Official
Values
A designation of Yes or No, depending on whether "Override
Official Values” was selected for the employer paid federal
unemployment taxes on the FUTA Taxes tab.
FUTA Tax Maximum
Annual Subject Wages
The amount entered as the employer paid maximum annual
subject wages for the Federal Unemployment tax.
FUTA Tax Percent of
Wages
The percentage entered as the employer paid maximum annual
subject wages for the Federal Unemployment tax.
Distribution Method The distribution method of employer paid federal unemployment
taxes. The system displays one of the following methods:
AE (Follow Earnings on Timesheet)
CE (Follow Earnings Used to Calculate the Tax)
DC (Use Distribution Code)

State Taxes List
Column Description
Distribution Method
Description
The description of the distribution method.
Distribution Code The distribution code entered, if "DC" was selected as
Distribution Method.
Distribution Code
Description
The description of the distribution code.
Use this tab to narrow down and more explicitly define the data to include in the report by
selecting from the Available Filters.
Use this tab to change the font and page setup for a report.
Use this tab to secure the active report so that other users cannot save their changes to it. The
user that selects the check box, and then saves the report, is the only user that can change or save it later.
This check box cannot be cleared by any user other than the user that locked the report.
State Taxes List
Access this report using Reports>Payroll>Lists>State Taxes.
Use this report to obtain a list of the state tax information entered using Maintain>Payroll>State Taxes.
Report Criteria
Use this tab to assign a report name and determine whether or not to include it on the actual
report. The report name can be printed in the header or the footer of the report.
Use this tab to determine what data to include in the report and to define the report layout.
By selecting Available Items, the data is divided onto separate pages. The report starts a new page for
each item, and the item is printed in the page header of the report.
By selecting Available Columns, the data that appears in the body of the report is determined.
MIP Fund Accounting
Payroll User's Guide
191

Chapter 8: List Reports
MIP Fund Accounting
Payroll User's Guide
192
Column Description
State Code The code used to represent a state, such as TX or NM
(Maintain>Payroll>State Taxes>State tab).
SWT Tax Account ID The employer's state withholding tax identification number.
SUTA Tax Account ID The employer's state unemployment tax identification number.
Calculation Method The selected state unemployment calculation method, such as,
Year to Date or Current.
Distribution Method The distribution method of state unemployment taxes. The
system displays one of the following methods:
AE (Follow Earnings on Timesheet)
CE (Follow Earnings Used to Calculate the Tax)
DC (Use Distribution Code)
Distribution Method
Description
The description of the distribution method.
SWT Tax A designation of Yes or No, depending on whether "State
Withholding Tax" was selected.
SUTA Tax A designation of Yes or No, depending on whether "State
Unemployment Tax" was selected.
SWT Liability Account The General Ledger liability account number for the state
withholding tax.
SWT Liability Title The title of the General Ledger liability account for the state
withholding tax.
SUTA Paid by Employer A designation of Yes or No, depending on whether the employer
pays the state unemployment tax.
SUTA Paid by Employee A designation of Yes or No, depending on whether the
employee pays the state unemployment tax.
SUTA Employer Maximum
Annual Subject Wages
If the employer pays the taxes, this is the amount entered as the
maximum subject wages for the employer.

State Taxes List
Column Description
SUTA Employer
Percentage
If the employer pays the taxes, this is the percentage entered as
the maximum subject wages for the employer.
SUTA Employee Maximum
Annual Subject Wages
If the employee pays the taxes, this is the amount entered as the
maximum subject wages for the employee.
SUTA Employee
Percentage
If the employee pays the taxes, this is the percentage entered
as the maximum subject wages for the employee.
SUTA Liability Account The General Ledger liability account number for the state
unemployment tax.
SUTA Liability Title The title of the General Ledger liability account for the state
unemployment tax.
SUTA Expense Account The expense account number used to apply state
unemployment taxes, paid by the employer.
SUTA Expense Title The title of the state unemployment tax expense account.
Override FUTA Default
Credit Rate
A designation of Yes or No, depending on whether the Federal
Unemployment Tax Override Default Credit Rate check box was
selected.
FUTA Credit Rate If the FUTA Override Default Credit Rate check box was
selected, this is the percentage entered as the Federal
Unemployment tax credit.
Distribution Code The distribution code entered if "DC" was selected as
Distribution Method.
Distribution Code
Description
The description of the distribution code, such as Allocation,
Professional Services, or Rent Expense.
Use this tab to narrow down and more explicitly define the data to include in the report by
selecting from the Available Filters.
Use this tab to change the font and page setup for a report.
MIP Fund Accounting
Payroll User's Guide
193

Chapter 8: List Reports
MIP Fund Accounting
Payroll User's Guide
194
Use this tab to secure the active report so that other users cannot save their changes to it.
The user that selects the check box, and then saves the report, is the only user that can change or save it
later. This check box cannot be cleared by any user other than the user that locked the report.
Other Taxes List
Access this report using Reports>Payroll>Lists>Other Taxes.
Use this report to obtain a list of the other withholding tax information that was entered using
Maintain>Payroll>Other Taxes.
Report Criteria
Use this tab to assign a report name and determine whether or not to include it on the actual
report. The report name can be printed in the header or the footer of the report.
Use this tab to determine what data to include in the report and to define the report layout.
By selecting Available Items, the data is divided onto separate pages. The report starts a new page for
each item, and the item is printed in the page header of the report.
By selecting Available Columns, the data that appears in the body of the report is determined.
Column Description
Tax Code The code assigned to the other withholding tax
(Maintain>Payroll>Other Taxes>Taxes tab).
Status The status of the tax code, such as Active, Inactive, and
Discontinued.
Title The title of the tax code.
Aatrix Tax Type The Aatrix tax type of the Other Taxes code. This is for Aatrix
reporting purposes only.
Aatrix Tax Type - State The state associated with the Aatrix tax type of the Other Taxes
code.
Distribution Method The distribution method of the state unemployment taxes. The
system displays one of the following methods:

Other Taxes List
Column Description
AE (Follow Earnings on Timesheet)
CE (Follow Earnings Used to Calculate the Tax)
DC (Use Distribution Code)
Distribution Method
Description
The description of the distribution method.
Distribution Code The distribution code entered if "DC" was selected as
Distribution Method.
Distribution Code
Description
The description of the distribution code, such as Allocation,
Professional Services, or Rent Expense.
Employer Tax ID The employer's tax identification number.
Calculation Basis The calculation basis for the employee's other withholding tax.
Employee Applicable
Taxes
A designation of Yes or No, depending on whether "Employee"
was selected.
Employer Applicable Taxes A designation of Yes or No, depending on whether "Employer"
was selected.
Paid By Employee A designation of Yes or No, depending on whether "Employee"
was selected (Maintain>Payroll>Other Taxes>Taxes tab).
Employee Taxes Liability
Account
The General Ledger liability account number for the Employee
applicable (LWT) withholding tax.
Employee Taxes Liability
Title
The title of the General Ledger liability account for the Employee
applicable Tax (LWT) withholding tax.
Employee Taxes
Calculation Type
The calculation type for the employee taxes.
Employee Taxes Base Tax The base tax entered if "Annual Base Tax," "Annual Tiered Tax
with Cap Option," or "Base Tax per Period with Minimum Wage
Threshold" was selected as Calculation Type.
Employee Taxes Percent The percent entered if "Annual Tiered Tax with Cap Option,"
"Percent of Annual Wages with Cap Option," or "Percent of
MIP Fund Accounting
Payroll User's Guide
195

Chapter 8: List Reports
MIP Fund Accounting
Payroll User's Guide
196
Column Description
Wages with Pay Cycle Cap Option" was selected as Calculation
Type.
Employee Taxes Taxable
Amount Under
The taxable amount under entered if "Annual Tiered Tax with
Cap Option" or "Percent of Annual Wages with Cap Option" was
selected as Calculation Type.
Employee Taxes Exclusion The exclusion entered if "Annual Tiered Tax with Cap Option"
was selected as Calculation Type.
Employee Taxes Wage
Threshold Amount
The wage threshold amount entered if "Base Tax per Period
with Minimum Wage Threshold" was selected as Calculation
Type.
Employee Taxes Wage
Threshold Period
The wage threshold period of Calendar Month or Calendar Year
displays if "Base Tax per Period with Minimum Wage
Threshold" was selected as Calculation Type.
Employee Taxes Wage
Threshold Pay Cycle
The pay cycle of Monthly, Semimonthly, Biweekly, or Weekly
displays if "Percent of Wages with Pay Cycle Cap Option" was
selected as Calculation Type.
Employee Taxes Wage
Threshold Pay Cycle Cap
The pay cycle cap amount entered if "Percent of Wages with
Pay Cycle Cap Option" was selected as Calculation Type.
Employee Taxes
Calculation Method
The calculation method of Year to Date or Current displays if
"Percent of Annual Wages with Cap Option" was selected as
Calculation Type.
Employee
Exemptions/Deductions
Code
The code entered in the Exemptions/Deductions table.
Employee
Exemptions/Deductions
Description
The description of the code entered in the
Exemptions/Deductions table.
Employee
Exemptions/Deductions
Annual Amount
The annual amount entered for the Exemptions/Deductions.

Other Taxes List
Column Description
Entry Order The order that line items were entered. This column allows you
to have more control over the order the records print on the
report.
Paid By Employer A designation of Yes or No, depending on whether "Employer"
was selected (Maintain>Payroll>Other Taxes>Taxes tab).
Employer Taxes Expense
Account
This is the expense account to apply to other taxes.
Employer Taxes Expense
Title
The title of the employer tax expense account.
Employer Taxes Liability
Account
The liability account to apply to Employer applicable taxes
(LER).
Employer Taxes Liability
Title
The title of the employer applicable tax (LER) liability account.
Employer Taxes
Calculation Type
The calculation type for the employer taxes.
Employer Taxes Base Tax The base tax entered if "Base Tax per Period with Minimum
Wage Threshold" was selected as Calculation Type.
Employer Taxes Percent The percent entered if "Percent of Wages with Cap Option" was
selected as Calculation Type.
Employer Taxes Taxable
Amount Under
The taxable amount under entered if "Percent of Wages with
Cap Option" was selected as Calculation Type.
Employer Taxes Fixed
Amount
The fixed amount entered if "Fixed Amount" was selected as
Calculation Type.
Employer Taxes Wage
Threshold Amount
The wage threshold amount entered if "Base Tax per Period
with Minimum Wage Threshold" was selected as Calculation
Type.
MIP Fund Accounting
Payroll User's Guide
197

Chapter 8: List Reports
MIP Fund Accounting
Payroll User's Guide
198
Column Description
Employer Taxes Wage
Threshold Period
The wage threshold period of Calendar Month or Calendar Year
displays if "Base Tax per Period with Minimum Wage
Threshold" was selected as Calculation Type.
Employer Taxes
Calculation Method
The calculation method of Year to Date or Current displays if
"Percent of Wages with Cap Option" was selected as
Calculation Type.
Use this tab to narrow down and more explicitly define the data to include in the report by
selecting from the Available Filters.
Use this tab to change the font and page setup for a report.
Use this tab to secure the active report so that other users cannot save their changes to it.
The user that selects the check box, and then saves the report, is the only user that can change or save it
later. This check box cannot be cleared by any user other than the user that locked the report.
Processing Groups List
Access this report using Reports>Payroll>Lists>Processing Groups.
Use this report to obtain a list of the processing groups and pay dates that were entered using
Maintain>Payroll>Processing Groups.
Report Criteria
Use this tab to assign a report name and determine whether or not to include it on the actual
report. The report name can be printed in the header or the footer of the report.
Use this tab to determine what data to include in the report and to define the report layout.
By selecting Available Items, the data is divided onto separate pages. The report starts a new page for
each item, and the item is printed in the page header of the report.
By selecting Available Columns, the data that appears in the body of the report is determined.

Quick Employee Information
Column Description
Processing Group Code The code assigned to a processing group
(Maintain>Payroll>Processing Groups>Group tab).
Status The status of the processing group—Active, Inactive, or
Discontinued.
Pay Cycle The pay cycle selected for the processing group—Weekly,
Biweekly, Semimonthly, or Monthly.
Title The title of the processing group.
Year The tax year assigned to the processing group.
Pay Period The pay period entered.
Pay Date The pay date entered.
SUTA Weeks The number of SUTA (State Unemployment Tax) weeks for the
pay date.
Pay Period Begin Date The pay period beginning date entered.
Pay Period End Date The pay period ending date entered.
Use this tab to narrow down and more explicitly define the data to include in the report by
selecting from the Available Filters.
Use this tab to change the font and page setup for a report.
Use this tab to secure the active report so that other users cannot save their changes to it. The
user that selects the check box, and then saves the report, is the only user that can change or save it later.
This check box cannot be cleared by any user other than the user that locked the report.
Quick Employee Information
Access this report using Reports>Payroll>Lists>Quick Employee Information.
Use this report to print employee information. This report includes the information entered using
Maintain>Payroll>Employee Information. Note that this is a fixed-format report. You cannot customize the
MIP Fund Accounting
Payroll User's Guide
199

Chapter 8: List Reports
MIP Fund Accounting
Payroll User's Guide
200
columns in the report; the system has already determined them. However, you can arrange the data
using sort order on the Items by Page and Available Filters.
Important! In order to view the entire Social Security Number, you must have been granted Display Sensitive Data rights for Maintain>Payroll>Employee Information in the active organization. These
rights are granted by the Administrator using Security>Set Up Organization Menus form. Otherwise,
only the last four digits of the Social Security Number displays.
Report Criteria
Use this tab to assign a report name and determine whether or not to include it on the actual
report. The report name can be printed in the header or the footer of the report.
Use this tab to determine the order that the data prints on the report. The Items by Page
group box is used to divide the data onto separate pages, where as the Report Body group box is used to
select the sort order (ascending or descending) of the columns. Selecting columns in the Report Body
has no bearing on what appears on the report; the columns are for sorting purposes only.
By selecting Employee ID in the Available Items group box, the data is divided onto separate pages.
The report starts a new page for each Employee ID. Sort the Employee IDs by ascending or
descending order in the Sort column. If Employee ID is selected here, it is not available in the
Available Columns.
Below is a list of the Available Columns to sort on. Keep in mind, that the report includes additional
columns; these are the only ones that have sorting capabilities.
Processing Group
Class
Position
Employee Status
Employee ID
Employee Last Name
Use this tab to narrow down and more explicitly define the data to include in the report by
selecting from the Available Filters. For example, if you want to filter employees by hire date, select "Hire
Employee Information List
Date," then "=" in the Compares To column. Finally, enter the date to filter on in the Criteria 1 column. The
system only prints data that has the same hire date that is entered.
Use this tab to secure the active report so that other users cannot save their changes to it. The
user that selects the check box, and then saves the report, is the only user that can change or save it later.
This check box cannot be cleared by any user other than the user that locked the report.
Tip: Additional filters are available if any user defined fields were created by the Administrator using
Organization>Set Up User Defined Fields.
Employee Information List
Access this report using Reports>Payroll>Lists>Employee Information.
Use this report to obtain a list of the employees that were entered using Maintain>Payroll>Employee
Information.
Additional items, columns, and filters are available if any user defined fields were created by the
Administrator using Organization>Set Up User Defined Fields. Only user defined fields with a field type of
String, Editable Drop-Down List, Non-Editable Drop-Down List, Date, or Yes/No are available in the Items
by Page group box on the Content tab.
Report Criteria
Use this tab to assign a report name and determine whether or not to include it on the actual
report. The report name can be printed in the header or the footer of the report.
Use this tab to determine what data to include in the report and to define the report layout.
By selecting Available Items, the data is divided onto separate pages. The report starts a new page for
each item, and the item is printed in the page header of the report.
By selecting Available Columns, the data that appears in the body of the report is determined.
MIP Fund Accounting
Payroll User's Guide
201

Chapter 8: List Reports
MIP Fund Accounting
Payroll User's Guide
202
Column Description
Processing Group Code This is the processing group code entered on the
Maintain>Payroll>Employee Information>Job and Pay tab. The
report shows the code's name, such as Admin or PartTime.
Processing Group Title The title of the processing group code.
Class The job class entered.
Position The employee's job title, such as Administrator or Program Rep.
Employee ID The employee ID.
Employee Status The status of the employee—Active, Inactive, or Terminated.
Employee Last Name The employee's last name.
Employee First Name The employee's first name.
First, MI Name The employee's first name and middle initial.
Employee Name The employee's full name, including the middle initial.
Social Security Number The employee's social security number. Note that only the last
four digits of the number display. To view the entire social
security number, you must have been granted Display Sensitive
Data rights for Maintain>Payroll>Employee Information. These
rights are granted by the Administrator using Security>Set Up
Organization Menus form.
Spouse's Social Security
Number
The spouse's social security number for the employee. This only
applies if the withholding tax state is Puerto Rico. Note only the
last four digits of the number display. To view the entire social
security number, you must have been granted Display Sensitive
Data rights for Maintain>Payroll>Employee Information. These
rights are granted by the Administrator using Security>Set Up
Organization Menus form.
Previous Employee ID The Employee ID before it was modified on the
Maintain>Payroll>Employee Information>Rename Employee ID
form.
Date of Rename Employee The date and time the Employee ID was last modified.
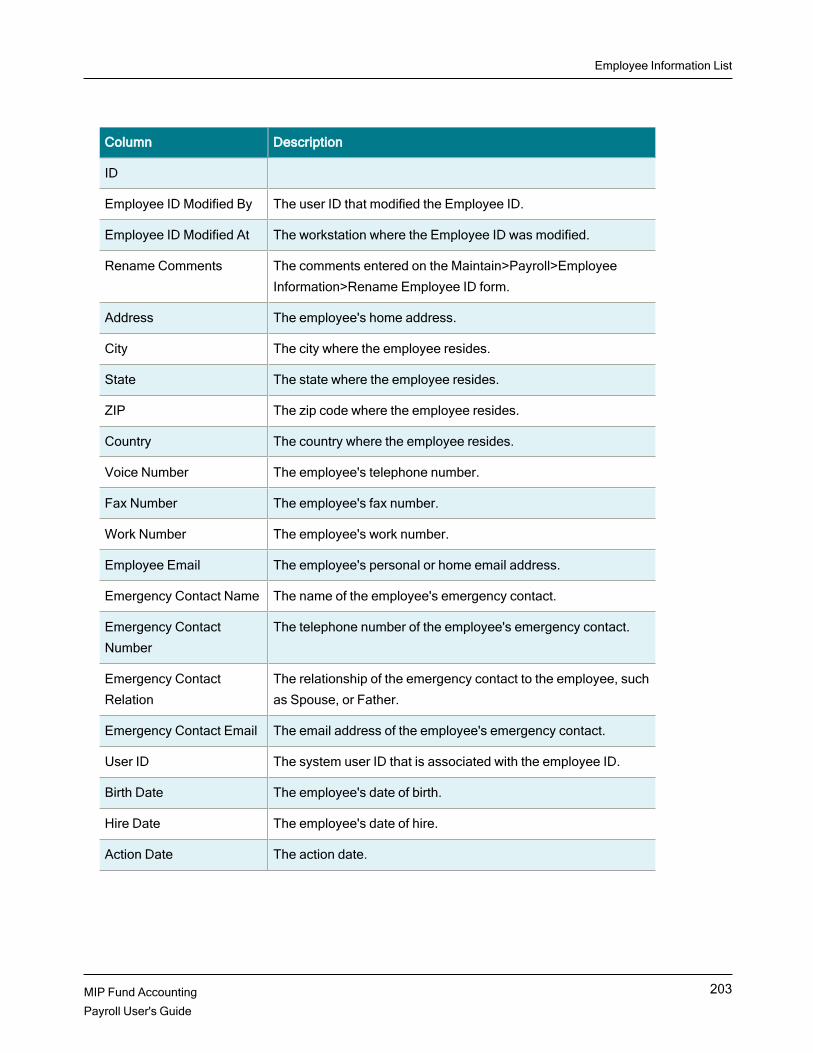
Employee Information List
Column Description
ID
Employee ID Modified By The user ID that modified the Employee ID.
Employee ID Modified At The workstation where the Employee ID was modified.
Rename Comments The comments entered on the Maintain>Payroll>Employee
Information>Rename Employee ID form.
Address The employee's home address.
City The city where the employee resides.
State The state where the employee resides.
ZIP The zip code where the employee resides.
Country The country where the employee resides.
Voice Number The employee's telephone number.
Fax Number The employee's fax number.
Work Number The employee's work number.
Employee Email The employee's personal or home email address.
Emergency Contact Name The name of the employee's emergency contact.
Emergency Contact
Number
The telephone number of the employee's emergency contact.
Emergency Contact
Relation
The relationship of the emergency contact to the employee, such
as Spouse, or Father.
Emergency Contact Email The email address of the employee's emergency contact.
User ID The system user ID that is associated with the employee ID.
Birth Date The employee's date of birth.
Hire Date The employee's date of hire.
Action Date The action date.
MIP Fund Accounting
Payroll User's Guide
203

Chapter 8: List Reports
MIP Fund Accounting
Payroll User's Guide
204
Column Description
Last Day Worked The employee's last day of work.
Termination Date The date the employee was terminated.
Years of Service The number of years the employee has been with the company.
I-9 on File A designation of Yes or No, depending on if "I-9" was selected.
Citizenship The country where the employee is a citizen.
Marital Status The marital status of the employee, such as single, married,
widowed.
Occupation Code The occupational code of the employee, such as 4000 - AK
Occupational Code and 4029 - LA Occupational Code.
Gender The employee's gender—Female or Male.
Ethnicity The ethnic origin of the employee.
Pay Type A designation of Salaried or Hourly, depending on what pay type
was selected.
Salary per Pay Cycle The salary per pay cycle displays an amount for salaried
employees.
Hourly Rate The hourly rate entered. For salary employees, the amount of the
"Equivalent Hourly Rate for Calculations" displays.
Direct Deposit A designation of Yes or No, depending on if "Direct Deposit" was
selected.
Disable Pre-note A designation of Yes or No depending on if a Disable Pre-note
was specified for the employee.
Disable Pre-note Last
Updated Date
The date and time that the Disable Pre-note was last updated.
Bank Information Last
Updated Date
The date and time that any information related to Bank
Information was changed.
Pre-note Sent Date This is the date that starts the three (3) day period for which pre-
notes will be created in the system.
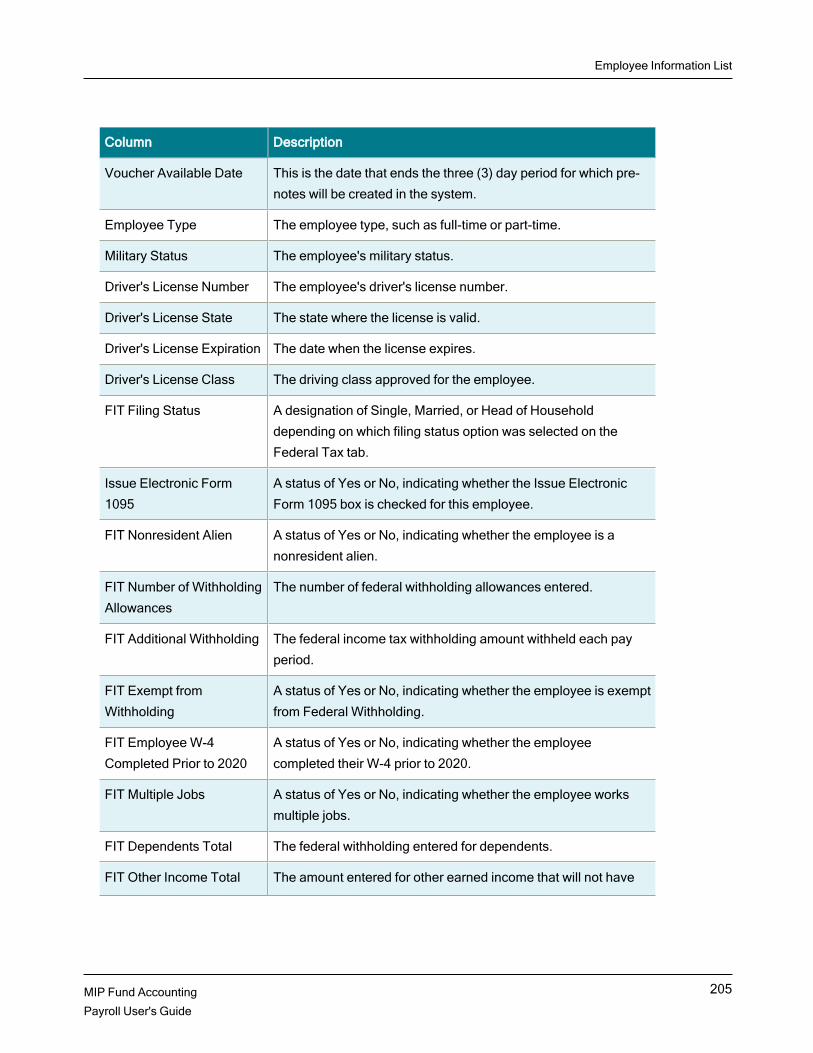
Employee Information List
Column Description
Voucher Available Date This is the date that ends the three (3) day period for which pre-
notes will be created in the system.
Employee Type The employee type, such as full-time or part-time.
Military Status The employee's military status.
Driver's License Number The employee's driver's license number.
Driver's License State The state where the license is valid.
Driver's License Expiration The date when the license expires.
Driver's License Class The driving class approved for the employee.
FIT Filing Status A designation of Single, Married, or Head of Household
depending on which filing status option was selected on the
Federal Tax tab.
Issue Electronic Form
1095
A status of Yes or No, indicating whether the Issue Electronic
Form 1095 box is checked for this employee.
FIT Nonresident Alien A status of Yes or No, indicating whether the employee is a
nonresident alien.
FIT Number of Withholding
Allowances
The number of federal withholding allowances entered.
FIT Additional Withholding The federal income tax withholding amount withheld each pay
period.
FIT Exempt from
Withholding
A status of Yes or No, indicating whether the employee is exempt
from Federal Withholding.
FIT Employee W-4
Completed Prior to 2020
A status of Yes or No, indicating whether the employee
completed their W-4 prior to 2020.
FIT Multiple Jobs A status of Yes or No, indicating whether the employee works
multiple jobs.
FIT Dependents Total The federal withholding entered for dependents.
FIT Other Income Total The amount entered for other earned income that will not have
MIP Fund Accounting
Payroll User's Guide
205

Chapter 8: List Reports
MIP Fund Accounting
Payroll User's Guide
206
Column Description
withholding, such as interest, dividends, and retirement income.
This amount should not include income from other jobs.
FIT Deductions Total The amount of deductions claimed.
FIT Additional Withholding
for 2020
The additional federal withholding withheld each pay period.
Earned Income Credit A designation of None or Single/Married with one Filing,
depending on which earned income credit was selected.
SUTA State The state code for the state unemployment tax entered.
SWT State The state code for the state withholding tax entered.
SWT Filing Status A designation of Married or Single or Head of Household,
depending on which filing status was selected.
SWT Exemptions The number of exemptions entered for the state unemployment
tax.
SWT Deductions The number of deductions entered for the state unemployment
tax.
SWT Credits The number of credits entered for the state unemployment tax.
SWT Allowances The number of allowances for deductions entered for the state
unemployment tax.
SWT Additional
Withholding
The number of additional withholdings entered for the state
unemployment tax.
Other Taxes Tax Code The tax code assigned for the other withholding tax.
Other Taxes Paid By A designation of Employee, Employer, or Both, depending on
which "Applicable Taxes" was selected (Maintain>Payroll>Other
Taxes).
Other Taxes Additional
Withholding
The number of additional withholdings entered for the other
withholding tax code.
Other Taxes
Exemptions/Deductions
The exemptions/deductions code entered for the other
withholding tax code, if applicable.

Employee Information List
Column Description
Code
Other Taxes
Exemptions/Deductions
Descriptions
The description of the exemptions/deductions code.
Other Taxes
Exemptions/Deductions
Number
The number of exemptions/deductions entered for the other
withholding tax code.
Medicare Qualified
Governmental Employee
A designation of Yes or No, depending on if "Medicare Qualified
Governmental Employee" was selected.
Statutory Employee A designation of Yes or No, depending on if the Box 13 Item,
"Statutory Employee" was selected.
Retirement Plan A designation of Yes or No, depending on if the Box 13 Item,
"Retirement Plan" was selected.
Third Party Sick Pay A designation of Yes or No, depending on if the Box 13 Item,
"Third Party Sick Pay" was selected.
Issue Electronic W-2 A designation of Yes or No, depending on if "Issue employee W-
2 electronically using Aatrix®.
Electronic Filing Email The employee's email address used for electronically file W-2s
using Aatrix®.
Print Paper Voucher A status of Yes or No, indicating whether the Print Paper
Voucher box is checked for this employee.
Email Voucher A status of Yes or No, indicating whether the Email Voucher box
is checked for this employee.
Voucher Email Address The email addresses used to send vouchers to this employee.
Voucher Email Process
Template
The email process template used to send vouchers to this
employee.
MIP Fund Accounting
Payroll User's Guide
207

Chapter 8: List Reports
MIP Fund Accounting
Payroll User's Guide
208
Column Description
Notes Any notes entered on the Maintain>Payroll>Employee
Information>Notes tab.
{User Defined Field} -
Employees
An employee type user defined field and its data. There is a
separate column for each field that was created by the
Administrator using Organization>Set Up User Defined Fields.
Use this tab to narrow down and more explicitly define the data to include in the report by
selecting from the Available Filters.
Use this tab to change the font and page setup for a report.
Use this tab to secure the active report so that other users cannot save their changes to it.
The user that selects the check box, and then saves the report, is the only user that can change or save it
later. This check box cannot be cleared by any user other than the user that locked the report.
Earning Codes List
Access this report using Reports>Payroll>Lists>Earning Codes.
Use this report to obtain a list of the earning codes that were entered using Maintain>Payroll>Earning
Codes.
Report Criteria
Use this tab to assign a report name and determine whether or not to include it on the actual
report. The report name can be printed in the header or the footer of the report.
Use this tab to determine what data to include in the report and to define the report layout.
By selecting Available Items, the data is divided onto separate pages. The report starts a new page for
each item, and the item is printed in the page header of the report.
By selecting Available Columns, the data that appears in the body of the report is determined.

Earning Codes List
Column Description
Earning Code This is the earning code entered on the
Maintain>Payroll>Earning Codes>Earning tab. The report
shows the code's name, such as Wages, Bonus, or OT.
Status The status of the code—Active, Inactive, or Discontinued.
Expense Account The expense account number for the earning code.
Calculation Method Code The calculation method for the earning code. The system
displays one of the following codes:
ER (Employee Pay Rate)
RM (Rate Multiplier)
FH (Fixed Hourly Amount)
FA (Fixed Amount)
AT (Amount on Timesheet)
RT (Rate on Timesheet)
Calculation Method Title The title of the calculation method, such as, Employee Pay
Rate, Rate Multiplier, Fixed Hourly Amount, Fixed Amount,
Amount on Timesheet, or Rate on Timesheet.
Title The title of the earning code. The report shows the title, such as
Base Wages, Bonus Earnings, or Overtime Earnings.
Expense Title The title of the General Ledger expense account, such as
Salaries, Bonus Expense, or Overtime Expense.
W-2 Box Number The number entered for the W-2 Box Number.
W-2 Box Code The code entered for the W-2 Box Code.
Rate The rate entered in the Rate Box to be used for the calculation
method of "Rate Multiplier."
Amount The amount entered in the Amount Box to be used for the
calculation methods of "Fixed Hourly Amount" and "Fixed
Amount."
MIP Fund Accounting
Payroll User's Guide
209

Chapter 8: List Reports
MIP Fund Accounting
Payroll User's Guide
210
Column Description
Monthly Regular
Frequency
A designation of A (Always) or N (Never), depending on which
regular frequency was selected for the monthly pay cycle.
Monthly Regular
Frequency Description
The description of the selected monthly regular frequency
designation, such as Always or Never.
Monthly Supplemental
Frequency
A designation of A (Always) or N (Never), depending on which
supplemental frequency was selected for the monthly pay cycle.
Monthly Supplemental
Frequency Description
The description of the selected monthly supplemental frequency
designation, such as Always or Never.
Semimonthly Regular
Frequency
The regular frequency for the semimonthly pay cycle. The
system displays one of the following codes:
A (Always)
1M (1st Payroll of the Month)
2M (2nd Payroll of the Month)
N (Never)
Semimonthly Regular
Frequency Description
The description of the selected semimonthly regular frequency
designation, such as Always, 1st Payroll of the Month, 2nd
Payroll of the Month, or Never.
Semimonthly Supplemental
Frequency
A designation of A (Always) or N (Never), depending on which
supplemental frequency was selected for the semimonthly pay
cycle.
Semimonthly Supplemental
Frequency Description
The description of the selected semimonthly supplemental
frequency designation, such as Always or Never.
Biweekly Regular
Frequency
The regular frequency for the biweekly pay cycle. The system
displays one of the following codes:
A (Always)
1M (1st Payroll of the Month)
2M (2nd Payroll of the Month)
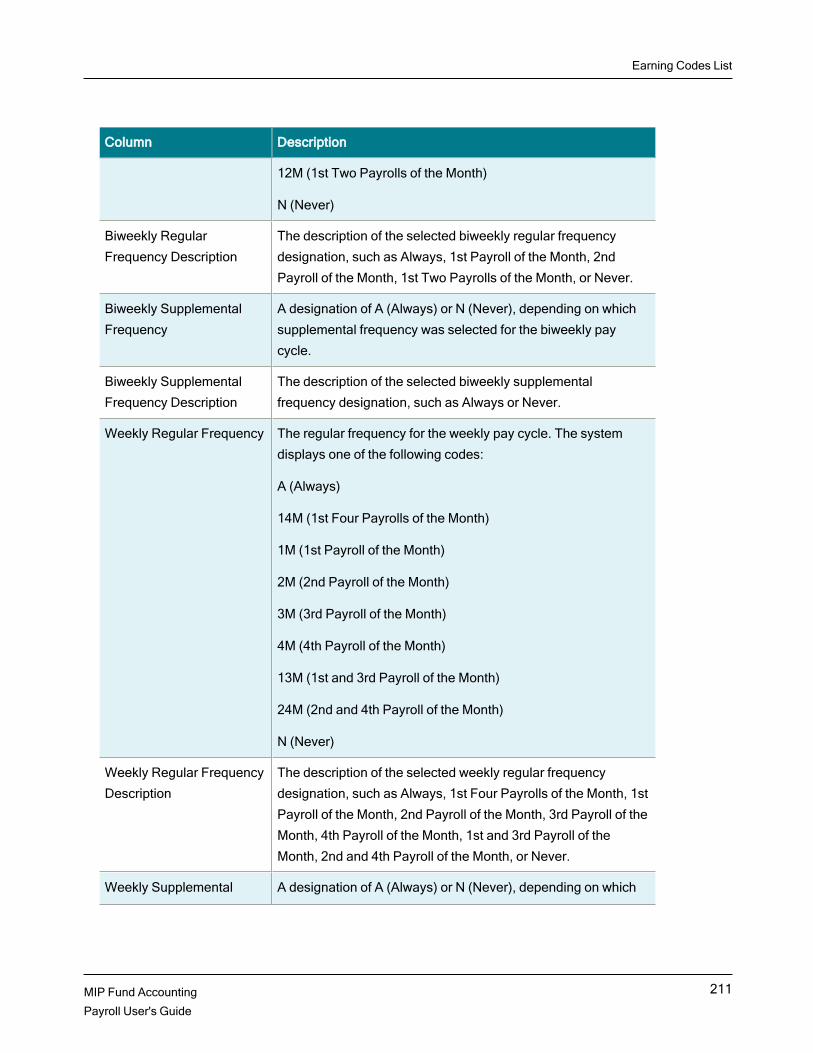
Earning Codes List
Column Description
12M (1st Two Payrolls of the Month)
N (Never)
Biweekly Regular
Frequency Description
The description of the selected biweekly regular frequency
designation, such as Always, 1st Payroll of the Month, 2nd
Payroll of the Month, 1st Two Payrolls of the Month, or Never.
Biweekly Supplemental
Frequency
A designation of A (Always) or N (Never), depending on which
supplemental frequency was selected for the biweekly pay
cycle.
Biweekly Supplemental
Frequency Description
The description of the selected biweekly supplemental
frequency designation, such as Always or Never.
Weekly Regular Frequency The regular frequency for the weekly pay cycle. The system
displays one of the following codes:
A (Always)
14M (1st Four Payrolls of the Month)
1M (1st Payroll of the Month)
2M (2nd Payroll of the Month)
3M (3rd Payroll of the Month)
4M (4th Payroll of the Month)
13M (1st and 3rd Payroll of the Month)
24M (2nd and 4th Payroll of the Month)
N (Never)
Weekly Regular Frequency
Description
The description of the selected weekly regular frequency
designation, such as Always, 1st Four Payrolls of the Month, 1st
Payroll of the Month, 2nd Payroll of the Month, 3rd Payroll of the
Month, 4th Payroll of the Month, 1st and 3rd Payroll of the
Month, 2nd and 4th Payroll of the Month, or Never.
Weekly Supplemental A designation of A (Always) or N (Never), depending on which
MIP Fund Accounting
Payroll User's Guide
211

Chapter 8: List Reports
MIP Fund Accounting
Payroll User's Guide
212
Column Description
Frequency supplemental frequency was selected for the weekly pay cycle.
Weekly Supplemental
Frequency Description
The description of the selected weekly supplemental frequency
designation, such as Always or Never
FIT Tax A designation of Yes or No, depending on if "FIT" was selected.
Social Security Tax A designation of Yes or No, depending on if "Social Security"
was selected.
Medicare Tax A designation of Yes or No, depending on if "Medicare" was
selected.
FUTA Tax A designation of Yes or No, depending on if "FUTA" was
selected.
SWT Tax A designation of Yes or No, depending on if "SWT" was
selected.
SUTA Tax A designation of Yes or No, depending on if "SUTA" was
selected.
Employee Paid Tax (LWT) A designation of Yes or No, depending on if "Employee Paid Tax
(LWT)" was selected.
Employer Paid Tax (LER) A designation of Yes or No, depending on if "Employer Paid Tax
(LER)" was selected.
Track Labor Hours A designation of Yes or No, depending on if "Track Labor Hours"
was selected.
Contribute to Net Pay Only A designation of Yes or No, depending on if "Contribute to Net
Pay Only" was selected.
Use this tab to narrow down and more explicitly define the data to include in the report by
selecting from the Available Filters.
Use this tab to change the font and page setup for a report.

Benefit Codes List
Use this tab to secure the active report so that other users cannot save their changes to it. The
user that selects the check box, and then saves the report, is the only user that can change or save it later.
This check box cannot be cleared by any user other than the user that locked the report.
Benefit Codes List
Access this report using Reports>Payroll>Lists>Benefit Codes.
Use this report to obtain a list of the benefit codes that were entered using Maintain>Payroll>Benefit
Codes.
Report Criteria
Use this tab to assign a report name and determine whether or not to include it on the actual
report. The report name can be printed in the header or the footer of the report.
Use this tab to determine what data to include in the report and to define the report layout.
By selecting Available Items, the data is divided onto separate pages. The report starts a new page for
each item, and the item is printed in the page header of the report.
By selecting Available Columns, the data that appears in the body of the report is determined.
Column Description
Benefit Code This is the benefit code entered on the Maintain>Payroll>Benefit
Codes>Benefit tab, such as Health, Life, or Ret.
Status The status of the code—Active, Inactive, or Discontinued.
Title The title of the benefit code, such as Health Insurance, Life
Insurance, or Employer Retirement Match.
Expense Account The General Ledger expense account number.
Expense Title The title of the General Ledger expense account, such as
Health Insurance, Life Insurance Exp, or Retirement Matching
Exp.
Liability Account The General Ledger liability account number.
Liability Title The title of the General Ledger liability account, such as Health
MIP Fund Accounting
Payroll User's Guide
213

Chapter 8: List Reports
MIP Fund Accounting
Payroll User's Guide
214
Column Description
Ins Payable, Life Ins Payable, or Retirement Payable.
Calculation Method Code The calculation method for the benefit code. The system
displays one of the following codes:
FP (Fixed Percentage of Earnings)
FH (Fixed Hourly Amount)
FA (Fixed Amount)
AT (Amount on Timesheet)
PT (Percentage on Timesheet)
Calculation Method Title The title of the calculation method, such as Fixed Percentage of
Earnings, Fixed Hourly Amount, Fixed Amount, Amount on
Timesheet, or Percentage on Timesheet.
Distribution Method The distribution method of the benefit expense. The system
displays one of the following codes:
AE (Following Earnings on Timesheet)
CE (Follow Earnings Used to Calculate the Benefit)
DC (Use Distribution Code)
Distribution Method
Description
The description of the distribution method.
Show Codes on Check
Stub
A designation of Yes or No, depending on if "Show Code on
Check Stub" was selected.
W-2 Box Number The number entered for the W-2 Box Number.
W-2 Box Code The code entered for the W-2 Box Code.
Percentage The percentage entered in the Percentage box to be used for
the calculation method of "Fixed Percentage of Earnings."
Amount The amount entered in the Amount box to be used for the
calculation methods of "Fixed Hourly Amount" and "Fixed
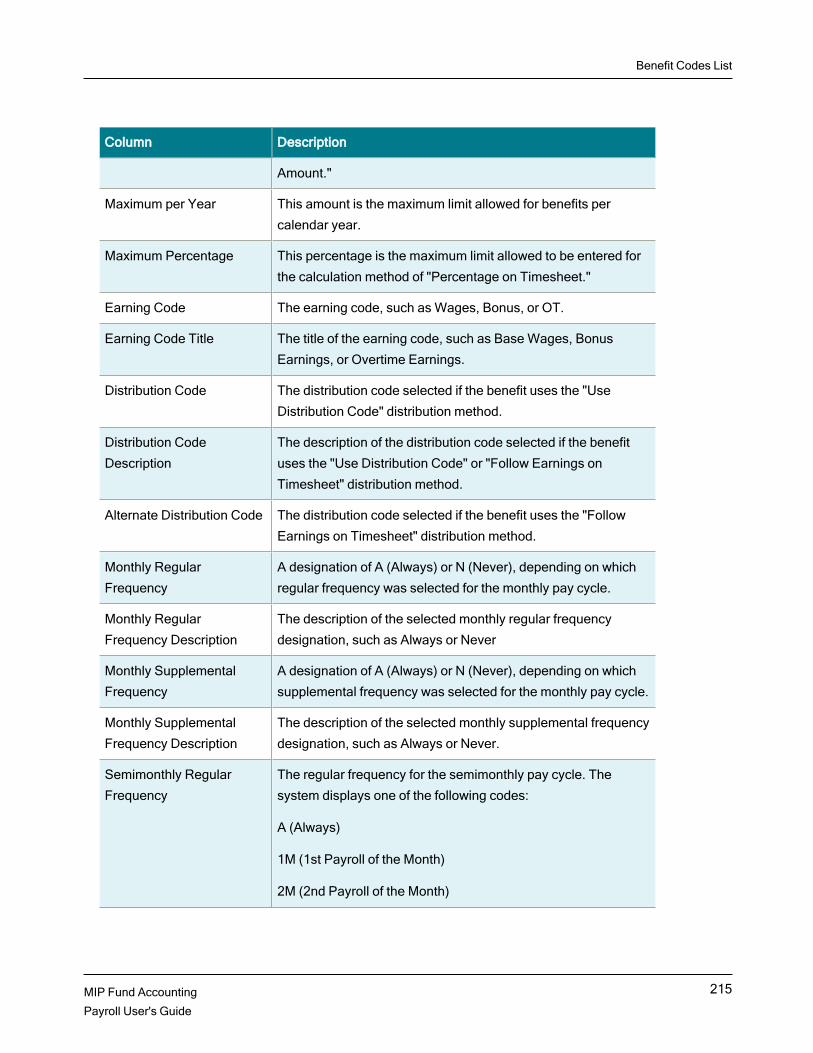
Benefit Codes List
Column Description
Amount."
Maximum per Year This amount is the maximum limit allowed for benefits per
calendar year.
Maximum Percentage This percentage is the maximum limit allowed to be entered for
the calculation method of "Percentage on Timesheet."
Earning Code The earning code, such as Wages, Bonus, or OT.
Earning Code Title The title of the earning code, such as Base Wages, Bonus
Earnings, or Overtime Earnings.
Distribution Code The distribution code selected if the benefit uses the "Use
Distribution Code" distribution method.
Distribution Code
Description
The description of the distribution code selected if the benefit
uses the "Use Distribution Code" or "Follow Earnings on
Timesheet" distribution method.
Alternate Distribution Code The distribution code selected if the benefit uses the "Follow
Earnings on Timesheet" distribution method.
Monthly Regular
Frequency
A designation of A (Always) or N (Never), depending on which
regular frequency was selected for the monthly pay cycle.
Monthly Regular
Frequency Description
The description of the selected monthly regular frequency
designation, such as Always or Never
Monthly Supplemental
Frequency
A designation of A (Always) or N (Never), depending on which
supplemental frequency was selected for the monthly pay cycle.
Monthly Supplemental
Frequency Description
The description of the selected monthly supplemental frequency
designation, such as Always or Never.
Semimonthly Regular
Frequency
The regular frequency for the semimonthly pay cycle. The
system displays one of the following codes:
A (Always)
1M (1st Payroll of the Month)
2M (2nd Payroll of the Month)
MIP Fund Accounting
Payroll User's Guide
215

Chapter 8: List Reports
MIP Fund Accounting
Payroll User's Guide
216
Column Description
N (Never)
Semimonthly Regular
Frequency Description
The description of the selected semimonthly regular frequency
designation, such as Always, 1st Payroll of the Month, 2nd
Payroll of the Month, or Never.
Semimonthly Supplemental
Frequency
A designation of A (Always) or N (Never), depending on which
supplemental frequency was selected for the semimonthly pay
cycle.
Semimonthly Supplemental
Frequency Description
The description of the selected semimonthly supplemental
frequency designation, such as Always or Never.
Biweekly Regular
Frequency
The regular frequency for the biweekly pay cycle. The system
displays one of the following codes:
A (Always)
1M (1st Payroll of the Month)
2M (2nd Payroll of the Month)
12M (1st Two Payrolls of the Month)
N (Never)
Biweekly Regular
Frequency Description
The description of the selected biweekly regular frequency
designation, such as Always, 1st Payroll of the Month, 2nd
Payroll of the Month, 1st Two Payrolls of the Month, or Never.
Biweekly Supplemental
Frequency
A designation of A (Always) or N (Never), depending on which
supplemental frequency was selected for the biweekly pay
cycle.
Biweekly Supplemental
Frequency Description
The description of the selected biweekly supplemental
frequency designation, such as Always or Never.
Weekly Regular Frequency The regular frequency for the weekly pay cycle. The system
displays one of the following codes:
A (Always)

Benefit Codes List
Column Description
14M (1st Four Payrolls of the Month)
1M (1st Payroll of the Month)
2M (2nd Payroll of the Month)
3M (3rd Payroll of the Month)
4M (4th Payroll of the Month)
13M (1st and 3rd Payroll of the Month)
24M (2nd and 4th Payroll of the Month)
N (Never)
Weekly Regular Frequency
Description
The description of the selected weekly regular frequency
designation, such as Always, 1st Four Payrolls of the Month, 1st
Payroll of the Month, 2nd Payroll of the Month, 3rd Payroll of the
Month, 4th Payroll of the Month, 1st and 3rd Payroll of the
Month, 2nd and 4th Payroll of the Month, or Never.
Weekly Supplemental
Frequency
A designation of A (Always) or N (Never), depending on which
supplemental frequency was selected for the weekly pay cycle.
Weekly Supplemental
Frequency Description
The description of the selected weekly supplemental frequency
designation, such as Always or Never.
FIT Tax A designation of Yes or No, depending on if "FIT" was selected.
Social Security Tax A designation of Yes or No, depending on if "Social Security"
was selected.
Medicare Tax A designation of Yes or No, depending on if "Medicare" was
selected.
FUTA Tax A designation of Yes or No, depending on if "FUTA" was
selected.
SWT Tax A designation of Yes or No, depending on if "SWT" was
selected.
SUTA Tax A designation of Yes or No, depending on if "SUTA" was
MIP Fund Accounting
Payroll User's Guide
217

Chapter 8: List Reports
MIP Fund Accounting
Payroll User's Guide
218
Column Description
selected.
Employee Paid Tax (LWT) A designation of Yes or No, depending on if "Employee Paid Tax
(LWT)" was selected.
Employer Paid Tax (LER) A designation of Yes or No, depending on if "Employer Paid Tax
(LER)" was selected.
Use this tab to narrow down and more explicitly define the data to include in the report by
selecting from the Available Filters.
Use this tab to change the font and page setup for a report.
Use this tab to secure the active report so that other users cannot save their changes to it.
The user that selects the check box, and then saves the report, is the only user that can change or save it
later. This check box cannot be cleared by any user other than the user that locked the report.

Deduction Codes List
Deduction Codes List
Access this report using Reports>Payroll>Lists>Deduction Codes.
Use this report to obtain a list of the deduction codes that were entered using Maintain>Payroll>Deduction
Codes.
Report Criteria
Use this tab to assign a report name and determine whether or not to include it on the actual
report. The report name can be printed in the header or the footer of the report.
Use this tab to determine what data to include in the report and to define the report layout.
By selecting Available Items, the data is divided onto separate pages. The report starts a new page for
each item, and the item is printed in the page header of the report.
By selecting Available Columns, the data that appears in the body of the report is determined.
Column Description
Deduction Code This is the deduction code entered on the
Maintain>Payroll>Deduction Codes>Deduction tab, such as
401K, Cafe, or Spouse.
Status The status of the code—Active, Inactive, or Discontinued.
Title The title of the deduction code, such as 401K Contribution,
Cafeteria Plan, or Employee Paid Spouse Insurance.
Liability Account The General Ledger liability account number for the deduction
code.
Liability Title The title of the General Ledger liability account, such as
Retirement Payable, Cafeteria Plan Payable, or Health Ins
Payable.
Calculation Method Code The calculation method for the deduction code. The system
displays one of the following codes:
FP (Fixed Percentage of Earnings)
MIP Fund Accounting
Payroll User's Guide
219
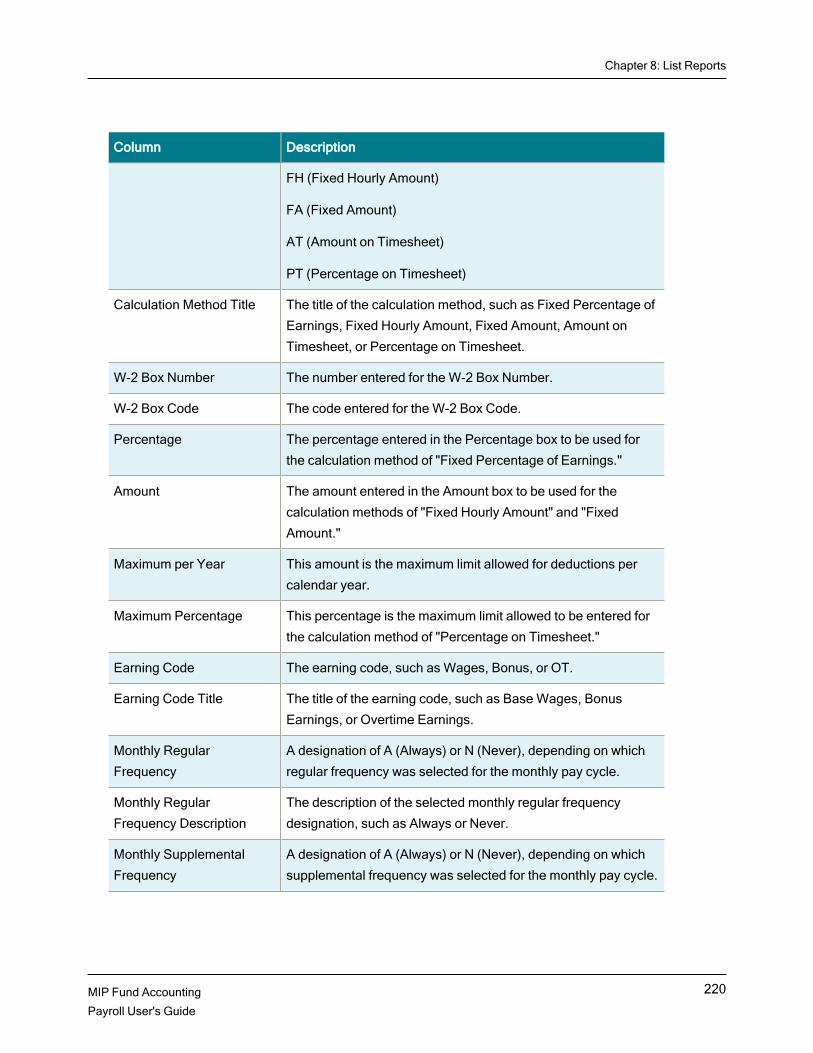
Chapter 8: List Reports
MIP Fund Accounting
Payroll User's Guide
220
Column Description
FH (Fixed Hourly Amount)
FA (Fixed Amount)
AT (Amount on Timesheet)
PT (Percentage on Timesheet)
Calculation Method Title The title of the calculation method, such as Fixed Percentage of
Earnings, Fixed Hourly Amount, Fixed Amount, Amount on
Timesheet, or Percentage on Timesheet.
W-2 Box Number The number entered for the W-2 Box Number.
W-2 Box Code The code entered for the W-2 Box Code.
Percentage The percentage entered in the Percentage box to be used for
the calculation method of "Fixed Percentage of Earnings."
Amount The amount entered in the Amount box to be used for the
calculation methods of "Fixed Hourly Amount" and "Fixed
Amount."
Maximum per Year This amount is the maximum limit allowed for deductions per
calendar year.
Maximum Percentage This percentage is the maximum limit allowed to be entered for
the calculation method of "Percentage on Timesheet."
Earning Code The earning code, such as Wages, Bonus, or OT.
Earning Code Title The title of the earning code, such as Base Wages, Bonus
Earnings, or Overtime Earnings.
Monthly Regular
Frequency
A designation of A (Always) or N (Never), depending on which
regular frequency was selected for the monthly pay cycle.
Monthly Regular
Frequency Description
The description of the selected monthly regular frequency
designation, such as Always or Never.
Monthly Supplemental
Frequency
A designation of A (Always) or N (Never), depending on which
supplemental frequency was selected for the monthly pay cycle.

Deduction Codes List
Column Description
Monthly Supplemental
Frequency Description
The description of the selected monthly supplemental frequency
designation, such as Always or Never.
Semimonthly Regular
Frequency
The regular frequency for the semimonthly pay cycle. The
system displays one of the following codes:
A (Always)
1M (1st Payroll of the Month)
2M (2nd Payroll of the Month)
N (Never)
Semimonthly Regular
Frequency Description
The description of the selected semimonthly regular frequency
designation, such as Always, 1st Payroll of the Month, 2nd
Payroll of the Month, or Never.
Semimonthly Supplemental
Frequency
A designation of A (Always) or N (Never), depending on which
supplemental frequency was selected for the semimonthly pay
cycle.
Semimonthly Supplemental
Frequency Description
The description of the selected semimonthly supplemental
frequency designation, such as Always or Never.
Biweekly Regular
Frequency
The regular frequency for the biweekly pay cycle. The system
displays one of the following codes:
A (Always)
1M (1st Payroll of the Month)
2M (2nd Payroll of the Month)
12M (1st Two Payrolls of the Month)
N (Never)
Biweekly Regular
Frequency Description
The description of the selected biweekly regular frequency
designation, such as Always, 1st Payroll of the Month, 2nd
Payroll of the Month, 1st Two Payrolls of the Month, or Never.
Biweekly Supplemental A designation of A (Always) or N (Never), depending on which
MIP Fund Accounting
Payroll User's Guide
221

Chapter 8: List Reports
MIP Fund Accounting
Payroll User's Guide
222
Column Description
Frequency supplemental frequency was selected for the biweekly pay
cycle.
Biweekly Supplemental
Frequency Description
The description of the selected biweekly supplemental
frequency designation, such as Always or Never.
Weekly Regular Frequency The regular frequency for the weekly pay cycle. The system
displays one of the following codes:
A (Always)
14M (1st Four Payrolls of the Month)
1M (1st Payroll of the Month)
2M (2nd Payroll of the Month)
3M (3rd Payroll of the Month)
4M (4th Payroll of the Month)
13M (1st and 3rd Payroll of the Month)
24M (2nd and 4th Payroll of the Month)
N (Never)
Weekly Regular Frequency
Description
The description of the selected weekly regular frequency
designation, such as Always, 1st Four Payrolls of the Month, 1st
Payroll of the Month, 2nd Payroll of the Month, 3rd Payroll of the
Month, 4th Payroll of the Month, 1st and 3rd Payroll of the
Month, 2nd and 4th Payroll of the Month, or Never.
Weekly Supplemental
Frequency
A designation of A (Always) or N (Never), depending on which
supplemental frequency was selected for the weekly pay cycle.
Weekly Supplemental
Frequency Description
The description of the selected weekly supplemental frequency
designation, such as Always or Never.
FIT Tax A designation of Yes or No, depending on if "FIT" was selected.
Social Security Tax A designation of Yes or No, depending on if "Social Security"
was selected.

Workers' Compensation Codes List
Column Description
Medicare Tax A designation of Yes or No, depending on if "Medicare" was
selected.
FUTA Tax A designation of Yes or No, depending on if "FUTA" was
selected.
SWT Tax A designation of Yes or No, depending on if "SWT" was
selected.
SUTA Tax A designation of Yes or No, depending on if "SUTA" was
selected.
Employee Paid Tax (LWT) A designation of Yes or No, depending on if "Employee Paid Tax
(LWT)" was selected.
Employer Paid Tax (LER) A designation of Yes or No, depending on if "Employer Paid Tax
(LER)" was selected.
Use this tab to narrow down and more explicitly define the data to include in the report by
selecting from the Available Filters.
Use this tab to change the font and page setup for a report.
Use this tab to secure the active report so that other users cannot save their changes to it. The
user that selects the check box, and then saves the report, is the only user that can change or save it later.
This check box cannot be cleared by any user other than the user that locked the report.
Workers' Compensation Codes List
Access this report using Reports>Payroll>Lists>Workers' Compensation Codes.
Use this report to obtain a list of the workers' compensation codes that were entered using
Maintain>Payroll>Workers' Compensation Codes.
Report Criteria
Use this tab to assign a report name and determine whether or not to include it on the actual
report. The report name can be printed in the header or the footer of the report.
MIP Fund Accounting
Payroll User's Guide
223

Chapter 8: List Reports
MIP Fund Accounting
Payroll User's Guide
224
Use this tab to determine what data to include in the report and to define the report layout.
By selecting Available Items, the data is divided onto separate pages. The report starts a new page for
each item, and the item is printed in the page header of the report.
By selecting Available Columns, the data that appears in the body of the report is determined.
Column Description
Workers' Compensation
Code
This is the workers' compensation code entered on the
Maintain>Payroll>Workers' Compensation Codes>Workers'
Compensation tab, such as Clerical, Executive, or ProgRep.
Status The status of the code—Active, Inactive, or Discontinued.
Paid By This designation determines who is paying the workers'
compensation amount—either Employer or Employee.
Expense Account The General Ledger expense account number for the workers'
compensation code.
Liability Account The General Ledger liability account number for the workers'
compensation code.
Calculation Method Code The calculation method for the workers' compensation code.
The system displays one of the following codes:
RW (Rate per Hours Worked)
RH (Rate per Workers' Compensation Hours)
RE (Rate per $100 Earnings)
Calculation Method Title The title of the calculation method, such as Rate per Hours
Worked, Rate per Workers' Compensation Hours, or Rate per
$100 Earnings.
Distribution Method The distribution method of the Employer's Workers'
Compensation Expense. The system displays one of the
following codes:
AE (Following Earnings on Timesheet)
CE (Follow Earnings Used to Calculate the Workers'

Workers' Compensation Codes List
Column Description
Compensation)
DC (Use Distribution Code)
Distribution Method
Description
The description of the distribution method.
Title The title of the workers' compensation code, such as Clerical
Staff, Executive Director, or Program Representative.
Expense Title The title of the General Ledger expense account, such as
Workers' Comp Expenses.
Liability Title The title of the General Ledger liability account, such as
Workers' Comp Payable.
Show Code on Check Stub A designation of Yes or No, depending on if "Show Code on
Check Stub" was selected.
Rate The rate entered to calculate the employee's workers'
compensation, such as $.25, $.32, or $.29 (in USD).
Adjustment Factor The amount of the adjustment factor.
Maximum Subject Earnings The amount entered as the Maximum Subject Earnings allowed
for calculating workers' compensation—$999,999.99 (USD).
Earning Code The earning code, such as Wages, Bonus, or OT.
Earning Code Title The title of the earning code, such as Base Wages, Bonus
Earnings, or Overtime Earnings.
Distribution Code The distribution code specifies how the workers' compensation
expense, paid by the employer, was distributed—Follow
Earnings on Timesheet, Follow Earnings Used to Calculate the
Workers' Compensation, or Use Distribution Codes.
Distribution Code
Description
The description of the distribution code selected if the benefit
uses the "Use Distribution Code" or "Follow Earnings on
Timesheet" distribution method.
Aatrix Tax Type The state assigned to the Workers’ Compensation code. This is
for Aatrix reporting purposes only.
MIP Fund Accounting
Payroll User's Guide
225

Chapter 8: List Reports
MIP Fund Accounting
Payroll User's Guide
226
Use this tab to narrow down and more explicitly define the data to include in the report by
selecting from the Available Filters.
Use this tab to change the font and page setup for a report.
Use this tab to secure the active report so that other users cannot save their changes to it.
The user that selects the check box, and then saves the report, is the only user that can change or save it
later. This check box cannot be cleared by any user other than the user that locked the report.
Leave Codes List
Access this report using Reports>Payroll>Lists>Leave Codes.
Use this report to obtain a list of the leave codes that were entered using Maintain>Payroll>Leave
Codes.
Report Criteria
Use this tab to assign a report name and determine whether or not to include it on the actual
report. The report name can be printed in the header or the footer of the report.
Use this tab to determine what data to include in the report and to define the report layout.
By selecting Available Items, the data is divided onto separate pages. The report starts a new page for
each item, and the item is printed in the page header of the report.
By selecting Available Columns, the data that appears in the body of the report is determined.
Column Description
Leave Code This is the leave code entered on the Maintain>Payroll>Leave
Codes>Leave tab, such as Sick or Vac.
Status The status of the code—Active, Inactive, or Discontinued.
Calculation Method Code The calculation method for the leave code. The system displays
one of the following codes:
FN (Fixed Number of Hours)
FP (Fixed Percentage of Hours Worked)

Leave Codes List
Column Description
AT (Amount on Timesheet)
PT (Percentage on Timesheet)
Calculation Method Title The title of the calculation method, such as Fixed Number of
Hours, Fixed Percentage of Hours Worked, Amount on
Timesheet, or Percentage on Timesheet.
Title The title of the leave code, such as Sick Pay Accrued or
Vacation Accrued.
Maximum Annual Accrued
Hours
The maximum number of hours allowed to accrue for leave per
annual basis.
Maximum Accrued Balance
Hours
The maximum number of hours allowed to accrue for leave.
Hours The number of hours entered in the Hours box to be used for the
calculation method of "Fixed Number of Hours."
Percentage The percentage entered in the Percentage box to be used for
the calculation method of "Fixed Percentage of Hours Worked."
Maximum Subject Hours
per Pay Period
The number entered in the Maximum Subject Hours per Pay
Period box to be used for the calculation method of "Fixed
Percentage of Hours Worked."
Maximum Percentage This percentage is the maximum limit allowed to be entered for
the calculation method of "Percentage on Timesheet."
Earning Code The earning code, such as Wages, Bonus, or OT.
Earning Code Title The title of the earning code, such as Base Wages, Bonus
Earnings, or Overtime Earnings.
Monthly Regular
Frequency
A designation of A (Always) or N (Never), depending on which
regular frequency was selected for the monthly pay cycle.
Monthly Regular
Frequency Description
The description of the selected monthly regular frequency
designation, such as Always or Never.
Monthly Supplemental A designation of A (Always) or N (Never), depending on which
MIP Fund Accounting
Payroll User's Guide
227

Chapter 8: List Reports
MIP Fund Accounting
Payroll User's Guide
228
Column Description
Frequency supplemental frequency was selected for the monthly pay cycle.
Monthly Supplemental
Frequency Description
The description of the selected monthly supplemental frequency
designation, such as Always or Never.
Semimonthly Regular
Frequency
The regular frequency for the semimonthly pay cycle. The
system displays one of the following codes:
A (Always)
1M (1st Payroll of the Month)
2M (2nd Payroll of the Month)
N (Never)
Semimonthly Regular
Frequency Description
The description of the selected semimonthly regular frequency
designation, such as Always, 1st Payroll of the Month, 2nd
Payroll of the Month, or Never.
Semimonthly Supplemental
Frequency
A designation of A (Always) or N (Never), depending on which
supplemental frequency was selected for the semimonthly pay
cycle.
Semimonthly Supplemental
Frequency Description
The description of the selected semimonthly supplemental
frequency designation, such as Always or Never.
Biweekly Regular
Frequency
The regular frequency for the biweekly pay cycle. The system
displays one of the following codes:
A (Always)
1M (1st Payroll of the Month)
2M (2nd Payroll of the Month)
12M (1st Two Payrolls of the Month)
N (Never)
Biweekly Regular
Frequency Description
The description of the selected biweekly regular frequency
designation, such as Always, 1st Payroll of the Month, 2nd
Payroll of the Month, 1st Two Payrolls of the Month, or Never.

Leave Codes List
Column Description
Biweekly Supplemental
Frequency
A designation of A (Always) or N (Never), depending on which
supplemental frequency was selected for the biweekly pay
cycle.
Biweekly Supplemental
Frequency Description
The description of the selected biweekly supplemental
frequency designation, such as Always or Never.
Weekly Regular Frequency The regular frequency for the weekly pay cycle. The system
displays one of the following codes:
A (Always)
14M (1st Four Payrolls of the Month)
1M (1st Payroll of the Month)
2M (2nd Payroll of the Month)
3M (3rd Payroll of the Month)
4M (4th Payroll of the Month)
13M (1st and 3rd Payroll of the Month)
24M (2nd and 4th Payroll of the Month)
N (Never)
Weekly Regular Frequency
Description
The description of the selected weekly regular frequency
designation, such as Always, 1st Four Payrolls of the Month, 1st
Payroll of the Month, 2nd Payroll of the Month, 3rd Payroll of the
Month, 4th Payroll of the Month, 1st and 3rd Payroll of the
Month, 2nd and 4th Payroll of the Month, or Never.
Weekly Supplemental
Frequency
A designation of A (Always) or N (Never), depending on which
supplemental frequency was selected for the weekly pay cycle.
Weekly Supplemental
Frequency Description
The description of the selected weekly supplemental frequency
designation, such as Always or Never.
Use this tab to narrow down and more explicitly define the data to include in the report by
selecting from the Available Filters.
MIP Fund Accounting
Payroll User's Guide
229

Chapter 8: List Reports
MIP Fund Accounting
Payroll User's Guide
230
Use this tab to change the font and page setup for a report.
Use this tab to secure the active report so that other users cannot save their changes to it.
The user that selects the check box, and then saves the report, is the only user that can change or save it
later. This check box cannot be cleared by any user other than the user that locked the report.
Email Templates List
Access this report using Reports>Payroll>Lists>Email Templates List.
Use this report to print email template information. Email templates were created for Accounts
Receivable Billing Invoices and Customer Statements, as well as Payroll Employee Vouchers.
Report Criteria
Use this tab to assign a report name and determine whether or not to include it on the actual
report. The report name can be printed in the header or the footer of the report.
Use this tab to determine what data to include in the report and to define the report layout.
By selecting Available Items, the data is divided onto separate pages. The report starts a new page for
each item, and the item is printed in the page header of the report.
By selecting Available Columns, the data that appears in the body of the report is determined.
Column Description
Process Type The process type selected for the email template, such as A/R
Invoice or Customer Statement. This is the type of form
associated to this email template.
Process Template The process template is the type of email being composed.
<Default> is the generic or standard email format that can be
sent to any customer who want their statements or invoices
emailed. Process Templates can also be customized based on
process type and even each individual customer.
Email Routing From The From email address entered on the email template.
Email Routing Cc The Cc email address entered on the email template. The Cc
email address displays on the email.

Email Templates List
Column Description
Email Routing Bcc The Bcc email address entered on the email template for the
process type selected. The Bcc email address does not display
on the email.
Email Content Subject The subject line entered on the email template for the process
type selected.
Email Content Message The message included in the email for the process type
selected.
Use this tab to narrow down and more explicitly define the data to include in the report by
selecting from the Available Filters.
Use this tab to change the font and page setup for a report.
Use this tab to secure the active report so that other users cannot save their changes to it. The
user that selects the check box, and then saves the report, is the only user that can change or save it later.
This check box cannot be cleared by any user other than the user that locked the report.
Tip: Be sure to have the Administrator set up proper security for the Reports>Lists>Email Template
using Security>Set Up Organization Menus. (For Accounting, select the type and ID, expand
Accounting>Reports>Lists and highlight Email Templates, and then check the Rights for this folder. For
Payroll, select the type and ID, expand Accounting>Reports>Payroll>Lists and highlight Email
Templates, and then check the Rights for this folder.)
MIP Fund Accounting
Payroll User's Guide
231

Chapter 9: Processing Reports
Quick Timesheets
Access this report using Reports>Payroll>Processing>Quick Timesheets. It is only available
with the Payroll module; it is not available for Payroll Link users.
Use this report during a payroll cycle to verify which payroll codes are being used to calculate an
employee's pay, as well as the time and amounts entered on the timesheet for a pay date range. This
report provides you with information about the timesheets entered using Timesheets>Enter Default
Timesheets and Enter Regular/Supplemental Timesheets. Note that this is a fixed-format report. You
cannot customize the columns in the report; the system has already determined them. However, you can
arrange the data using sort order on the Report Body and Available Filters.
Important! In order to view the entire Social Security Number, you must have been granted Display Sensitive Data rights for Maintain>Payroll>Employee Information in the active organization. These
rights are granted by the Administrator using Security>Set Up Organization Menus form. Otherwise,
only the last four digits of the Social Security Number displays.
Report Criteria
Use this tab to assign a report name and determine whether or not to include it on the actual
report. The report name can be printed in the header or the footer of the report.
Use this tab to determine the order that the data prints on the report. By selecting Available
Columns, the sort order for each column is determined. Sort the columns by ascending or descending
order. For example, if you want the Employee IDs to be listed in alphabetical order, select "Employee ID,"
then sort by "ASC." Selecting columns in the Report Body has no bearing on what appears on the report;
the columns are for sorting purposes only. Below is a list of the columns available to sort on. Keep in
mind, that the report includes additional columns; these are the only ones that have sorting capabilities.
Processing Group
Timesheet Type
Pay Date
MIP Fund Accounting
Payroll User's Guide
232
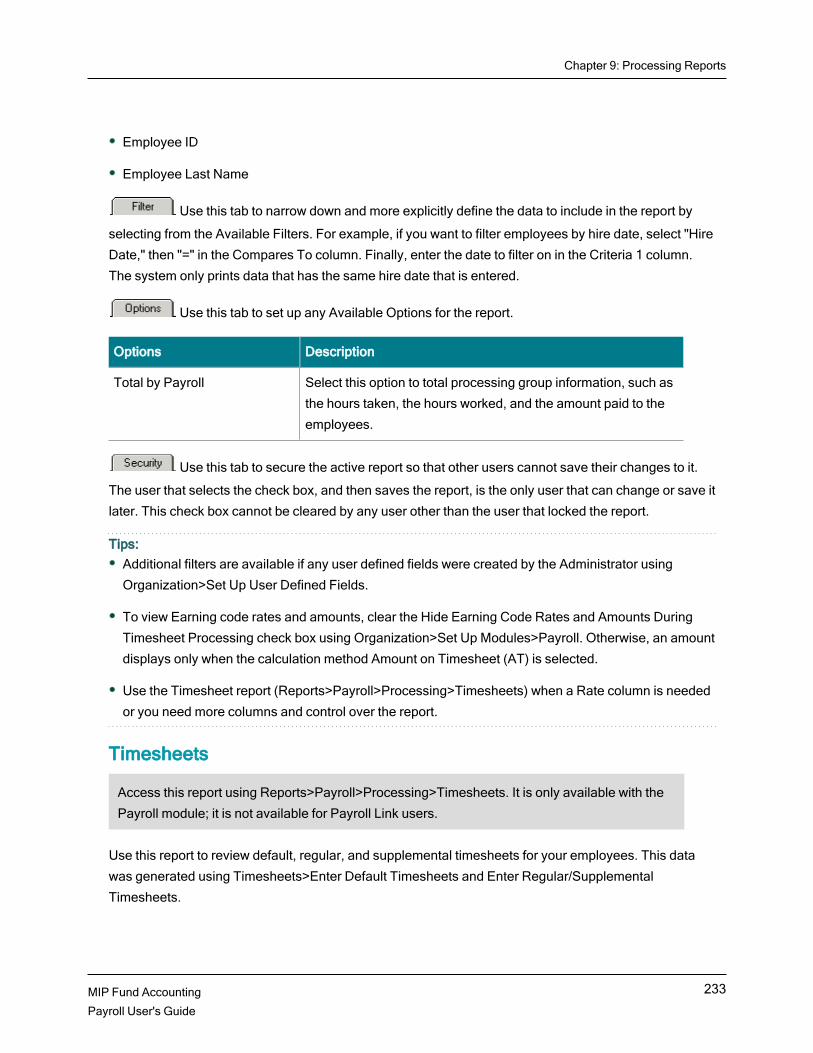
Chapter 9: Processing Reports
MIP Fund Accounting
Payroll User's Guide
233
Employee ID
Employee Last Name
Use this tab to narrow down and more explicitly define the data to include in the report by
selecting from the Available Filters. For example, if you want to filter employees by hire date, select "Hire
Date," then "=" in the Compares To column. Finally, enter the date to filter on in the Criteria 1 column.
The system only prints data that has the same hire date that is entered.
Use this tab to set up any Available Options for the report.
Options Description
Total by Payroll Select this option to total processing group information, such as
the hours taken, the hours worked, and the amount paid to the
employees.
Use this tab to secure the active report so that other users cannot save their changes to it.
The user that selects the check box, and then saves the report, is the only user that can change or save it
later. This check box cannot be cleared by any user other than the user that locked the report.
Tips: Additional filters are available if any user defined fields were created by the Administrator using
Organization>Set Up User Defined Fields.
To view Earning code rates and amounts, clear the Hide Earning Code Rates and Amounts During
Timesheet Processing check box using Organization>Set Up Modules>Payroll. Otherwise, an amount
displays only when the calculation method Amount on Timesheet (AT) is selected.
Use the Timesheet report (Reports>Payroll>Processing>Timesheets) when a Rate column is needed
or you need more columns and control over the report.
Timesheets
Access this report using Reports>Payroll>Processing>Timesheets. It is only available with the
Payroll module; it is not available for Payroll Link users.
Use this report to review default, regular, and supplemental timesheets for your employees. This data
was generated using Timesheets>Enter Default Timesheets and Enter Regular/Supplemental
Timesheets.

Timesheets
Alternatively, you can run Reports>Payroll>Processing>Quick Timesheets to generate a limited, fixed-
format report.
Report Criteria
Use this tab to assign a report name and determine whether or not to include it on the actual
report. The report name can be printed in the header or the footer of the report.
Use this tab to determine what data to include in the report and to define the report layout.
By selecting Available Items, the data is divided onto separate pages. The report starts a new page for
each item, and the item is printed in the page header of the report.
By selecting Available Columns, the data that appears in the body of the report is determined.
Column Description
Processing Group The processing group code assigned to the employee using the
Maintain>Payroll>Employee Information form. The report shows
the code's name, such as Admin or PartTime.
Processing Group Title The title associated with the processing group code.
Employee ID The ID assigned to the employee.
Employee Status The status of the employee—Active, Inactive, or Terminated.
Employee Last Name The employee's last name.
Employee First Name The employee's first name.
First, MI Name The employee's first name and middle initial.
Employee Name The employee's full name, including the middle initial.
Social Security Number The employee's social security number. Note that only the last
four digits of the number display. To view the entire social
security number, you must have been granted Display Sensitive
Data rights for Maintain>Payroll>Employee Information. These
rights are granted by the Administrator using Security>Set Up
Organization Menus form.
Class The class entered on the Maintain>Payroll>Employee
Information>Job and Pay tab.
MIP Fund Accounting
Payroll User's Guide
234

Chapter 9: Processing Reports
MIP Fund Accounting
Payroll User's Guide
235
Column Description
Position The employee's job title, such as Administrator or Program Rep.
Gender The employee's gender—Female or Male.
Ethnicity The ethnic origin of the employee.
Employee Type The employee type, such as full-time or part-time.
Timesheet Type The type of timesheet, such as Regular or Supplemental.
Pay Date The pay date entered in the Pay Date table
(Maintain>Payroll>Processing Groups>Pay Schedule tab).
Timesheet Reference The Timesheet Reference that was entered on the
Timesheets>Enter Default Timesheets or Enter
Regular/Supplemental Timesheets>Select tab.
SUTA Weeks The number of SUTA (state unemployment tax) weeks for the
pay date on the Maintain>Payroll>Processing Groups form.
Code Type The payroll code assigned by the system—Earning, Benefit,
Deduction, W/C, or Leave.
Pay Code The name assigned to your earning, benefit, deduction, workers'
compensation, and leave codes, such as Health, 401K, OT,
Sick8, and Executive. These codes were created using
Maintain>Payroll>Earning, Benefit, Deduction, Workers'
Compensation, or Leave Codes.
Calculation Method Code Any of the following methods can be assigned using the tabs:
Amount on Timesheet (AT), Employee Pay Rate (ER), Fixed
Amount (FA), Fixed Hourly Amount (FH), Fixed Number of
Hours (FN), Fixed Percentage of Earnings (FP), Fixed
Percentage of Hours (FP), Percentage on Timesheet (PT), Rate
Multiplier (RM), Rate on Timesheet (RT), Rate per $100
Earnings (RE), Rate per Hours Worked (RW), and Rate per
Workers' Compensation Hours (RH).
Calculation Method Title The title of the calculation method, such as, Amount on
Timesheet, Employee Pay Rate, Fixed Amount, Fixed Hourly

Timesheets
Column Description
Amount, Fixed Number of Hours, Fixed Percentage of Earnings,
Fixed Percentage of Hours, Percentage on Timesheet, Rate
Multiplier, Rate on Timesheet, Rate per $100 Earnings, Rate
per Hours Worked, and Rate per Workers' Compensation
Hours.
Hours Depending on the calculation method, these are the hours
entered on one of the tabs.
Rate Depending on the calculation method, this is the rate entered on
one of the tabs.
Amount Depending on the calculation method, this is the amount
entered on one of the tabs.
Distribution Code The distribution code selected on the Earnings tab.
Distribution Code
Description
The description of the distribution code.
Pay Period Begin Date The pay period beginning date entered on the
Maintain>Payroll>Processing Groups form.
Pay Period End Date The pay period ending date entered on the
Maintain>Payroll>Processing Groups form.
{User Defined Field} -
Employees
An employee type user defined field and its data. There is a
separate column for each field that was created by the
Administrator using Organization>Set Up User Defined Fields.
Use this tab to narrow down and more explicitly define the data to include in the report by
selecting from the Available Filters.
Use this tab to set up any Available Options for the report.
Options Description
Summarize Amounts Select this option to add amounts together and display one line
item with the total amount. All document information must be
identical for the system to add items together.
MIP Fund Accounting
Payroll User's Guide
236

Chapter 9: Processing Reports
MIP Fund Accounting
Payroll User's Guide
237
Use this tab to change the font and page setup for a report.
Use this tab to secure the active report so that other users cannot save their changes to it. The
user that selects the check box, and then saves the report, is the only user that can change or save it
later. This check box cannot be cleared by any user other than the user that locked the report.
Tip: To view Earning Code rates and amounts, clear the Hide Earning code Rates and Amounts During
Timesheet Processing check box using Organization>Set Up Modules>Payroll. Otherwise, an amount
displays only when the calculation method Amount on Timesheet (AT) is selected.
Calculated Check Register
Access this report using Reports>Payroll>Processing>Calculated Check Register. It is only
available with the Payroll module; it is not available for Payroll Link users.
Use this report during a payroll cycle to verify the current paycheck information and amounts prior to
printing paychecks. It is recommended that you print this report prior to printing checks for each pay
cycle. The report uses the calculated information from the Payroll Type and Pay Dates selected on the
Calculated Payroll form (Activities>Payroll>Calculate Payroll).
Alternatively, you can run Reports>Payroll>Processing>Quick Calculated Check Register to generate a
limited, fixed-format report.
Important! You must calculate payroll (Activities>Payroll>Calculate Payroll) in order for this report to
work. The report displays the calculated information selected on the Payroll Type and Pay Dates .
Report Criteria
Use this tab to assign a report name and determine whether or not to include it on the actual
report. The report name can be printed in the header or the footer of the report.
Use this tab to determine the order that the data prints on the report. The Items by Page
group box is used to divide the data onto separate pages, where as the Report Body group box is used to
select the sort order (ascending or descending) of the columns. Selecting columns in the Report Body
has no bearing on what appears on the report; the columns are for sorting purposes only.
By selecting Available Items, the data is divided onto separate pages. The report starts a new page for
each item, and the item is printed in the page header of the report.
By selecting Available Columns, the data that appears in the body of the report is determined.

Calculated Check Register
Column Description
Processing Group The processing group code assigned to the employee using the
Maintain>Payroll>Employee Information form. The report shows
the code's name, such as Admin or PartTime.
Processing Group Title The title associated with the processing group code.
Payroll Type The payroll type—Adjust, Manual, Regular, Supplemental, or
Void
Pay Date The date on the Payroll check (Activities>Payroll>Calculate
Payroll).
Pay Period Begin Date The pay period beginning date entered on the
Maintain>Payroll>Processing Groups form.
Pay Period End Date The pay period ending date entered on the
Maintain>Payroll>Processing Groups form.
SUTA Weeks The number of SUTA (state unemployment tax) weeks for the
pay date on the Maintain>Payroll>Processing Groups form.
Employee ID The ID assigned to the employee.
Employee Last Name The employee's last name.
Employee First Name The employee's first name.
Employee Name The employee's full name, including the middle initial.
First, MI Name The employee's first name and middle initial.
Class The employee's class, such as Admin or Staff.
Position The employee's job title, such as Administrator or Program Rep.
Social Security Number The employee's social security number. Note that only the last
four digits of the number display. To view the entire social
security number, you must have been granted Display Sensitive
Data rights for Maintain>Payroll>Employee Information. These
rights are granted by the Administrator using Security>Set Up
Organization Menus form.
MIP Fund Accounting
Payroll User's Guide
238

Chapter 9: Processing Reports
MIP Fund Accounting
Payroll User's Guide
239
Column Description
Timesheet Reference A unique tracking number provided for timesheets.
Pay/Tax Code The name assigned to your earning, benefit, deduction, workers'
compensation, leave codes, and federal, state, and other
withholding taxes, such as Health, 401K, OT, Sick8, and
Executive. These codes were created using
Maintain>Payroll>Federal Taxes, State Taxes, Other Taxes,
Earning, Benefit, Deduction, Workers' Compensation, or Leave
Codes.
Code Title The title of the Payroll Pay Code.
Code Type The payroll code assigned by the system—Earnings, Benefits,
Deductions, Workers' Compensation, Leave, or Taxes.
Jurisdiction The state or other withholding taxing authority, such as TX for
Texas.
Distribution Code The distribution code of the earnings. This information was
entered using the Timesheets>Enter Default Timesheets or
Enter Regular/Supplemental Timesheets form.
Rate Depending on the calculation method, this is the rate entered on
one of the tabs.
Hours Depending on the calculation method, these are the hours
entered on one of the tabs.
Applicable Earning Hours The earning hours applicable to the earning codes on the
employee's current pay date.
Applicable Earnings The earning amount based on the employee’s current pay.
For Benefits, Deductions and Workers Compensation Codes
Applicable Earnings are the earnings used to calculate the
amounts (given earnings were applicable to the calculation
method assigned to the code).
The Tax Codes Applicable Earnings are the Subject Earnings
used to calculate the tax.
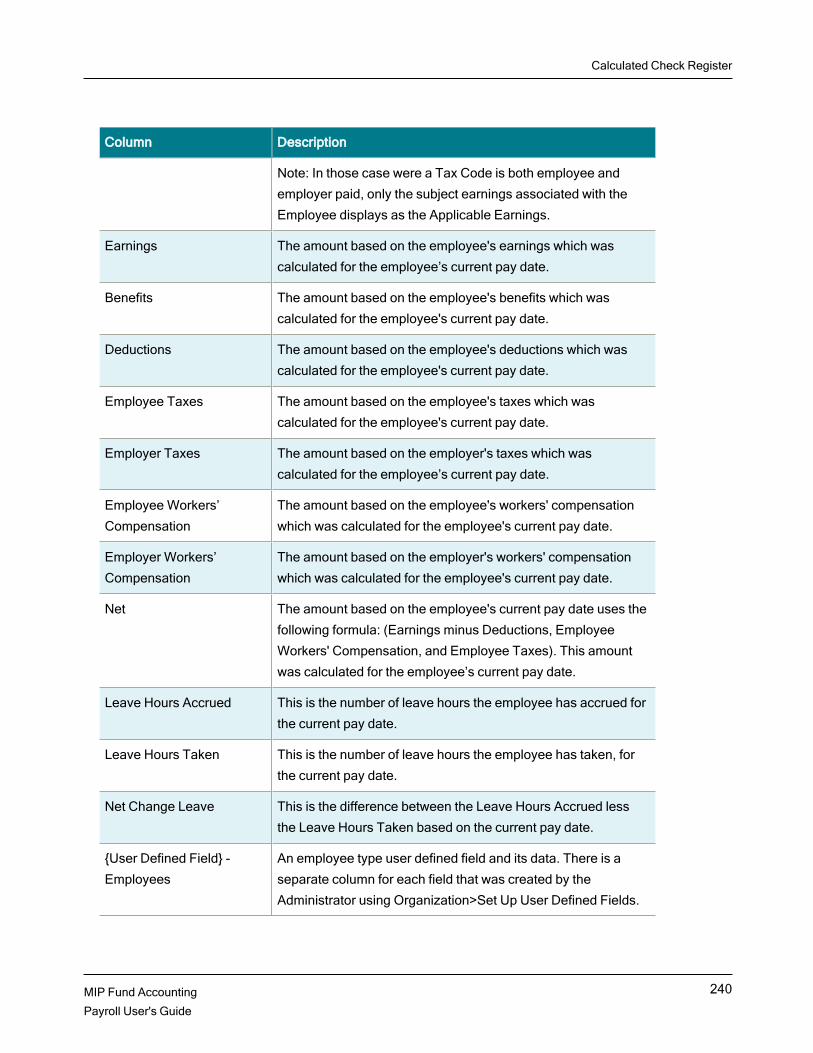
Calculated Check Register
Column Description
Note: In those case were a Tax Code is both employee and
employer paid, only the subject earnings associated with the
Employee displays as the Applicable Earnings.
Earnings The amount based on the employee's earnings which was
calculated for the employee’s current pay date.
Benefits The amount based on the employee's benefits which was
calculated for the employee's current pay date.
Deductions The amount based on the employee's deductions which was
calculated for the employee's current pay date.
Employee Taxes The amount based on the employee's taxes which was
calculated for the employee's current pay date.
Employer Taxes The amount based on the employer's taxes which was
calculated for the employee’s current pay date.
Employee Workers’
Compensation
The amount based on the employee's workers' compensation
which was calculated for the employee's current pay date.
Employer Workers’
Compensation
The amount based on the employer's workers' compensation
which was calculated for the employee's current pay date.
Net The amount based on the employee's current pay date uses the
following formula: (Earnings minus Deductions, Employee
Workers' Compensation, and Employee Taxes). This amount
was calculated for the employee’s current pay date.
Leave Hours Accrued This is the number of leave hours the employee has accrued for
the current pay date.
Leave Hours Taken This is the number of leave hours the employee has taken, for
the current pay date.
Net Change Leave This is the difference between the Leave Hours Accrued less
the Leave Hours Taken based on the current pay date.
{User Defined Field} -
Employees
An employee type user defined field and its data. There is a
separate column for each field that was created by the
Administrator using Organization>Set Up User Defined Fields.
MIP Fund Accounting
Payroll User's Guide
240

Chapter 9: Processing Reports
MIP Fund Accounting
Payroll User's Guide
241
Use this tab to narrow down and more explicitly define the data to include in the report by
selecting from the Available Filters.
Use this tab to set up any Available Options for the report.
Options Description
Summarize Amounts Select this option to add amounts together and display one line
item with the total amount. All document information must be
identical for the system to add items together.
Use this tab to change the font and page setup for a report.
Use this tab to secure the active report so that other users cannot save their changes to it.
The user that selects the check box, and then saves the report, is the only user that can change or save it
later. This check box cannot be cleared by any user other than the user that locked the report.
Quick Calculated Check Register
Access this report using Reports>Payroll>Processing>Quick Calculated Check Register. It is
only available with the Payroll module; it is not available for Payroll Link users.
Use this report during a payroll cycle to verify paycheck information and amounts prior to printing
paychecks. It is recommended that you print this report prior to printing checks for each pay cycle. Note
that this is a fixed-format report. You cannot customize the columns in the report; the system has already
determined them. However, you can arrange the data using sort order on the Items by Page and
Available Filters. The Calculated Check Register provides information about the payrolls that were
calculated using Activities>Payroll>Calculate Payroll.
Important! In order to view the entire Social Security Number, you must have been granted Display Sensitive Data rights for Maintain>Payroll>Employee Information in the active organization. These
rights are granted by the Administrator using Security>Set Up Organization Menus form. Otherwise,
only the last four digits of the Social Security Number displays.
Report Criteria
Use this tab to assign a report name and determine whether or not to include it on the actual
report. The report name can be printed in the header or the footer of the report.

Quick Calculated Check Register
Use this tab to determine the order that the data prints on the report. The Items by Page group
box is used to divide the data onto separate pages, where as the Report Body group box is used to select
the sort order (ascending or descending) of the columns. Selecting columns in the Report Body has no
bearing on what appears on the report; the columns are for sorting purposes only.
By selecting Employee ID in the Available Items group box, the data can be divided onto separate
pages. The report starts a new page for each Employee ID. Sort the Employee IDs by ascending or
descending order in the Sort column. If Employee ID is selected here, it is not available in the Available
Columns.
Below is a list of the Available Columns to sort on. Keep in mind, that the report includes additional
columns; these are the only ones that have sorting capabilities.
Processing Group
Payroll Type
Pay Date
Employee ID
Employee Last Name
Use this tab to narrow down and more explicitly define the data to include in the report by
selecting from the Available Filters. For example, if you want to filter employees by pay date, select "Pay
Date," then "=" in the Compares To column. Finally, enter the date to filter on in the Criteria 1 column. The
system only prints data that has the same pay date that is entered.
Use this tab to set up any Available Options for the report.
Options Description
Total by Payroll Select this option to total processing group information, such as
the hours taken, the hours worked, and the amount paid to the
employees.
Use this tab to secure the active report so that other users cannot save their changes to it. The
user that selects the check box, and then saves the report, is the only user that can change or save it later.
This check box cannot be cleared by any user other than the user that locked the report.
MIP Fund Accounting
Payroll User's Guide
242

Chapter 9: Processing Reports
MIP Fund Accounting
Payroll User's Guide
243
Tip: Additional filters are available if any user defined fields were created by the Administrator using
Organization>Set Up User Defined Fields.
Pre-Transfer Register
Access this report using Reports>Payroll>Processing>Pre-Transfer Register. It is only available
with the Payroll module; it is not available for Payroll Link users.
Use this report to print the transaction entries prior to transferring to Accounting. The totals for this report
were calculated using the Activities>Payroll>Transfer to Accounting form. You should have entered the
session information and selected the groups to transfer, and then clicked the Pre-Transfer button. Once
the report has been calculated, a message notifies you if there were any errors or if it calculated
successfully.
Note: Depending on the criteria you set up for the report, this process could be quite lengthy. We
strongly recommend filtering (using the Filter tab) on the current Session ID every time this report is
processed.
Report Criteria
Use this tab to assign a report name and determine whether or not to include it on the actual
report. The report name can be printed in the header or the footer of the report.
Use this tab to determine what data to include in the report and to define the report layout.
By selecting Available Items, the data is divided onto separate pages. The report starts a new page for
each item, and the item is printed in the page header of the report.
By selecting Available Columns, the data that appears in the body of the report is determined.
Column Description
Transaction Source The document's transaction type, such as PRC, PRS, or PRV.
Session ID The session ID assigned to this batch of documents entered on
the Activities>Payroll>Transfer to Accounting form.
Session Date The date of the session entered on the Transfer to Accounting
form.

Pre-Transfer Register
Column Description
Document Number When transferring in detail, this is the check number; however, if
transferring in summary, this is a sequential number beginning
with "1" for each combination of processing group and pay date
for the transaction entry that you are transferring. This
information was entered on the Activities>Payroll>Print
Checks/Vouchers>Load Checks form or on the Enter Manual
Checks form.
Document Date The document or check date entered on the
Activities>Payroll>Print Checks/Vouchers form or the Enter
Manual Checks form.
Effective Date The line item effective date assigned during transaction entry.
Document Description The employee ID and pay date if transferring in detail, or
processing group and pay date if transferring in summary.
{Segment Name} Code The code assigned to the segment. The report shows a segment
code—01, 201,11001, for example. The report prints one column
for each segment, such as Fund Code or GL Code. This is
determined by the distribution code associated with this check.
Debit The amount of the check that is debited according to how the
distribution code was set up.
Credit The amount of the check that is credited according to how the
distribution code was set up.
Use this tab to narrow down and more explicitly define the data to include in the report by
selecting from the Available Filters.
Use this tab to set up any Available Options for the report.
MIP Fund Accounting
Payroll User's Guide
244

Chapter 9: Processing Reports
MIP Fund Accounting
Payroll User's Guide
245
Options Description
Summarize Amounts Select this option to add amounts together and display one line
item with the total amount. All document information must be
identical for the system to add items together.
This option is used to control the "Detail" or "Summary" on this
report. If "Summary" was selected on the
Activities>Payroll>Transfer to Accounting form, and the
Summarize Amounts option is selected here, a "Summary" Pre-
Transfer Register is produced.
Use this tab to change the font and page setup for a report.
Use this tab to secure the active report so that other users cannot save their changes to it.
The user that selects the check box, and then saves the report, is the only user that can change or save it
later. This check box cannot be cleared by any user other than the user that locked the report.
Voucher Register
Access this report using Reports>Payroll>Processing>Voucher Register. It is only available with
the Payroll module; it is not available for Payroll Link users.
Use this report to determine which direct deposit entries to make if you are not using the Direct Deposit
module. The report prints the information to a printer or if the Data Import/Export module is installed, you
can export the data to a file type of your choice.
Direct Deposit Users
You may want to review the Reports>Payroll>Lists>Employee Bank Information and the
Reports>Payroll>History>Direct Deposit File Register reports in the Direct Deposit guide.
Report Criteria
Use this tab to assign a report name and determine whether or not to include it on the actual
report. The report name can be printed in the header or the footer of the report.
Current Transaction Dates are required to specify the date range for the data included in the report.
Use this tab to determine what data to include in the report and to define the report layout.

Voucher Register
By selecting Available Items, the data is divided onto separate pages. The report starts a new page for
each item, and the item is printed in the page header of the report.
By selecting Available Columns, the data that appears in the body of the report is determined.
Column Description
Processing Group The processing group code that was set up using the
Maintain>Payroll>Processing Groups form.
Pay Date The first pay date that was set up using the Processing Groups
form.
Pay Period Begin Date The pay period beginning date entered on the
Maintain>Payroll>Processing Groups form.
Pay Period End Date The pay period ending date entered on the
Maintain>Payroll>Processing Groups form.
Employee ID The ID assigned to the employee.
Employee Status The status of the employee—Active, Inactive, or Terminated.
Employee Last Name The employee's last name.
Employee First Name The employee's first name.
First, MI Name The employee's first name and middle initial.
Employee Name The employee's full name, including the middle initial.
Social Security Number The social security number associated with the Employee ID.
Note that only the last four digits of the number display. To view
the entire social security number, you must have been granted
Display Sensitive Data rights for Maintain>Payroll>Employee
Information. These rights are granted by the Administrator using
Security>Set Up Organization Menus form.
Class The employee's class, such as Admin or Staff.
Voucher Email Address The email addresses used to send vouchers to this employee.
Voucher Number The voucher number entered on the Activities>Payroll>Print
Checks/Vouchers>Load Vouchers form.
MIP Fund Accounting
Payroll User's Guide
246

Chapter 9: Processing Reports
MIP Fund Accounting
Payroll User's Guide
247
Column Description
Voucher Date The document date entered on the Print Checks/Vouchers form.
(It defaults to today's date.)
Payee The full name associated with the employee ID.
Net Pay The net pay on the payroll voucher.
Use this tab to narrow down and more explicitly define the data to include in the report by
selecting from the Available Filters.
Use this tab to change the font and page setup for a report.
Use this tab to secure the active report so that other users cannot save their changes to it.
The user that selects the check box, and then saves the report, is the only user that can change or save it
later. This check box cannot be cleared by any user other than the user that locked the report.

Chapter 10: History Reports
Pay Codes History
Access this report using Reports>Payroll>History>Pay Codes. It is only available with the
Payroll module; it is not available for Payroll Link users.
Use this report to review an employee's pay codes history in summary or detail. The totals provided by
this report only include the activity defined by the date range selected on the Setup tab.
Note: It is recommended to separate leave codes from an employee's pay codes history report by using
the Filter tab. Because the Leave Codes' opening balances cannot adhere to the Current Transaction
Dates, this results in detailed information outside of the date range for the other codes. Create one
report to view employee pay code history by the selected date range, and filter out the Code Type
"Leave", for example, Code Type <> Leave. Create another report to view employee pay code history
specific to leave codes, which would include opening balances, by only filtering on the Code Type
"Leave", for example, Code Type = Leave.
Report Criteria
Use this tab to assign a report name and determine whether or not to include it on the actual
report. The report name can be printed in the header or the footer of the report.
Current Transaction Dates are required to specify the date range for the data included in the report.
Use this tab to determine what data to include in the report and to define the report layout.
By selecting Available Items, the data is divided onto separate pages. The report starts a new page for
each item, and the item is printed in the page header of the report.
By selecting Available Columns, the data that appears in the body of the report is determined.
Column Description
Processing Group This is the processing group code assigned to the employee
using the Maintain>Payroll>Employee Information form.
Processing Group Title The title of the processing group code.
MIP Fund Accounting
Payroll User's Guide
248

Chapter 10: History Reports
MIP Fund Accounting
Payroll User's Guide
249
Column Description
Employee ID The employee's ID.
Employee Status The status of the employee—Active, Inactive, or Terminated.
Employee Last Name The employee's last name.
Employee First Name The employee's first name.
First, MI Name The employee's first name and middle initial.
Employee Name The employee's full name, including the middle initial.
Social Security Number The social security number. Note that only the last four digits of
the number display. To view the entire social security number,
you must have been granted Display Sensitive Data rights for
Maintain>Payroll>Employee Information. These rights are
granted by the Administrator using Security>Set Up
Organization Menus form.
Address The employee's home address entered on the
Maintain>Payroll>Employee Information form.
City The city where the employee resides entered on the
Maintain>Payroll>Employee Information form.
State The state where the employee resides entered on the
Maintain>Payroll>Employee Information form.
ZIP The zip code where the employee resides entered on the
Maintain>Payroll>Employee Information form.
Country The country where the employee resides entered on the
Maintain>Payroll>Employee Information form.
Hire Date The employee's date of hire entered on the
Maintain>Payroll>Employee Information form.
Termination Date The date the employee was terminated entered on the
Maintain>Payroll>Employee Information form.
Code Type The payroll code assigned by the system—Earnings, Benefits,
Deductions, Workers' Compensation, Leave, or Taxes.

Pay Codes History
Column Description
Pay Code The name assigned to your earning, benefit, deduction, workers'
comp, leave codes, and federal, state, and other withholding
taxes, such as Health, 401K, OT, Sick8, and Executive. These
codes were created using Maintain>Payroll>Federal Taxes,
State Taxes, Other Taxes, Earning, Benefit, Deduction,
Workers' Compensation, or Leave Codes.
Pay Code Title The title of the Payroll Pay Code.
Calculation Method Code The calculation method for the pay code. The system displays
one of the following codes:
AT (Amount on Timesheet)
ER (Employee Pay Rate)
FA (Fixed Amount)
FH (Fixed Hourly Amount)
FN (Fixed Number of Hours)
FP (Fixed Percentage of Earnings)
FP (Fixed Percentage of Hours Worked)
PT (Percentage on Timesheet)
RE (Rate per $100 Earnings)
RH (Rate per Workers' Compensation Hours)
RM (Rate Multiplier)
RT (Rate on Timesheet)
RW (Rate per Hours Worked)
Calculation Method Title The title of the calculation method for the pay code, such as
Amount on Timesheet, Fixed Amount, Fixed Percentage of
Hours Worked, Percentage on Timesheet, or Rate per Hours
Worked.
MIP Fund Accounting
Payroll User's Guide
250
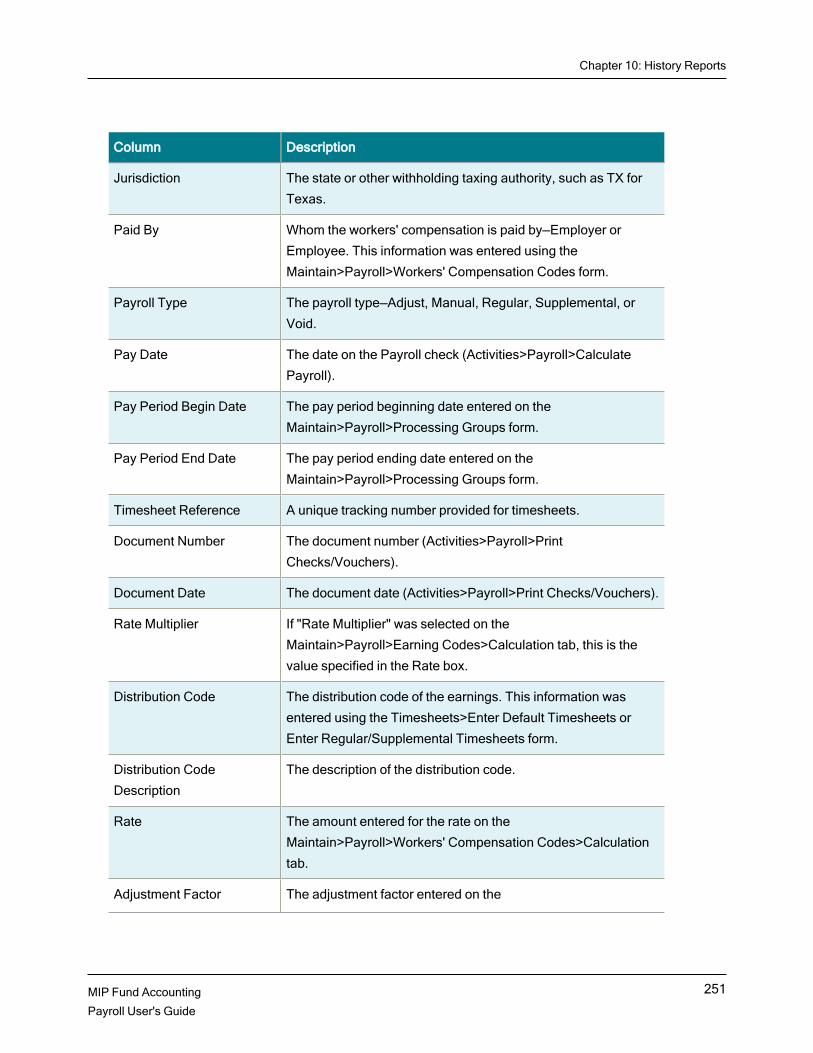
Chapter 10: History Reports
MIP Fund Accounting
Payroll User's Guide
251
Column Description
Jurisdiction The state or other withholding taxing authority, such as TX for
Texas.
Paid By Whom the workers' compensation is paid by—Employer or
Employee. This information was entered using the
Maintain>Payroll>Workers' Compensation Codes form.
Payroll Type The payroll type—Adjust, Manual, Regular, Supplemental, or
Void.
Pay Date The date on the Payroll check (Activities>Payroll>Calculate
Payroll).
Pay Period Begin Date The pay period beginning date entered on the
Maintain>Payroll>Processing Groups form.
Pay Period End Date The pay period ending date entered on the
Maintain>Payroll>Processing Groups form.
Timesheet Reference A unique tracking number provided for timesheets.
Document Number The document number (Activities>Payroll>Print
Checks/Vouchers).
Document Date The document date (Activities>Payroll>Print Checks/Vouchers).
Rate Multiplier If "Rate Multiplier" was selected on the
Maintain>Payroll>Earning Codes>Calculation tab, this is the
value specified in the Rate box.
Distribution Code The distribution code of the earnings. This information was
entered using the Timesheets>Enter Default Timesheets or
Enter Regular/Supplemental Timesheets form.
Distribution Code
Description
The description of the distribution code.
Rate The amount entered for the rate on the
Maintain>Payroll>Workers' Compensation Codes>Calculation
tab.
Adjustment Factor The adjustment factor entered on the
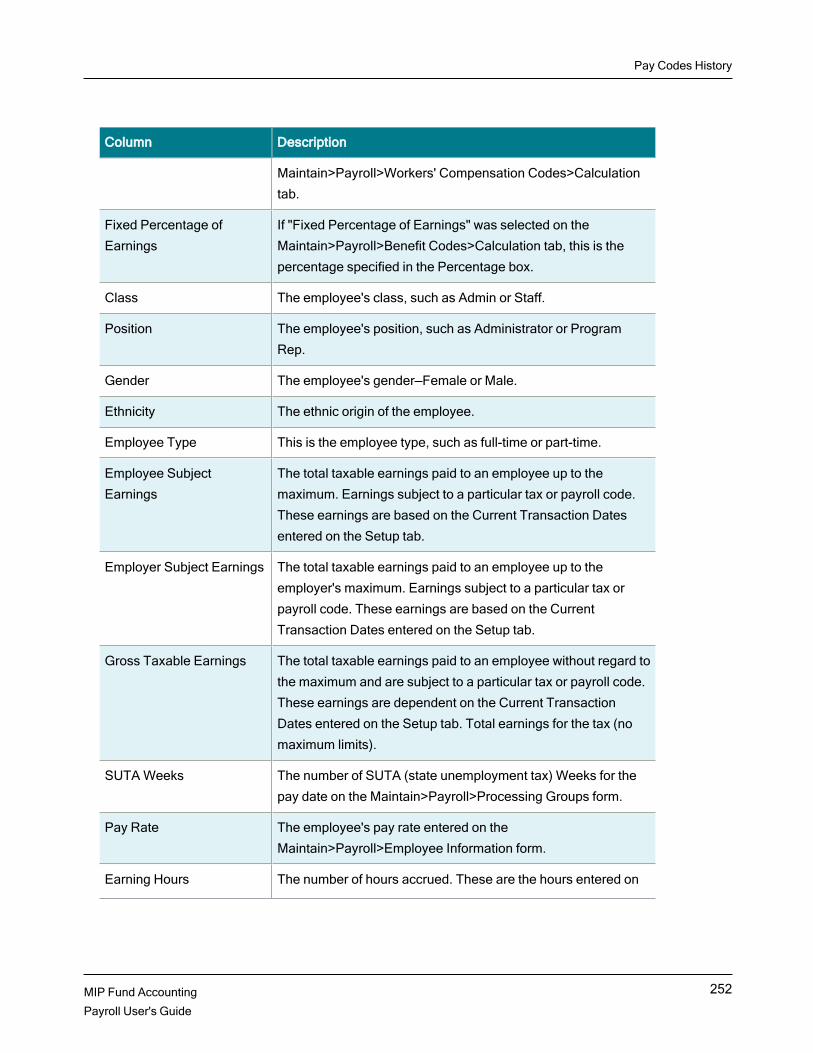
Pay Codes History
Column Description
Maintain>Payroll>Workers' Compensation Codes>Calculation
tab.
Fixed Percentage of
Earnings
If "Fixed Percentage of Earnings" was selected on the
Maintain>Payroll>Benefit Codes>Calculation tab, this is the
percentage specified in the Percentage box.
Class The employee's class, such as Admin or Staff.
Position The employee's position, such as Administrator or Program
Rep.
Gender The employee's gender—Female or Male.
Ethnicity The ethnic origin of the employee.
Employee Type This is the employee type, such as full-time or part-time.
Employee Subject
Earnings
The total taxable earnings paid to an employee up to the
maximum. Earnings subject to a particular tax or payroll code.
These earnings are based on the Current Transaction Dates
entered on the Setup tab.
Employer Subject Earnings The total taxable earnings paid to an employee up to the
employer's maximum. Earnings subject to a particular tax or
payroll code. These earnings are based on the Current
Transaction Dates entered on the Setup tab.
Gross Taxable Earnings The total taxable earnings paid to an employee without regard to
the maximum and are subject to a particular tax or payroll code.
These earnings are dependent on the Current Transaction
Dates entered on the Setup tab. Total earnings for the tax (no
maximum limits).
SUTA Weeks The number of SUTA (state unemployment tax) Weeks for the
pay date on the Maintain>Payroll>Processing Groups form.
Pay Rate The employee's pay rate entered on the
Maintain>Payroll>Employee Information form.
Earning Hours The number of hours accrued. These are the hours entered on
MIP Fund Accounting
Payroll User's Guide
252

Chapter 10: History Reports
MIP Fund Accounting
Payroll User's Guide
253
Column Description
the Timesheets>Regular/Supplemental Timesheets. This
number is dependent on the Current Transaction Dates entered
on the Setup tab.
Earnings The amount based on the employee's earnings history. This
amount is dependent on the Current Transaction Dates entered
on the Setup tab.
Benefits The amount based on the employee's benefits history. This
amount is dependent on the Current Transaction Dates entered
on the Setup tab.
Deductions The amount based on the employee's deductions history. This
amount is dependent on the Current Transaction Dates entered
on the Setup tab.
Employee Workers'
Compensation
The amount based on the employee's workers' compensation
history. This amount is dependent on the Current Transaction
Dates entered on the Setup tab.
Employer Workers'
Compensation
The amount based on the employer's workers' compensation
history. This amount is dependent on the Current Transaction
Dates entered on the Setup tab.
Employee Taxes The amount based on the employee's taxes history. This
amount is dependent on the Current Transaction Dates entered
on the Setup tab.
Employer Taxes The amount based on the employer's taxes history. This amount
is dependent on the Current Transaction Dates entered on the
Setup tab.
Net The amount based on the employee's history using the following
formula: (Earnings minus Deductions, Employee Workers'
Compensation, and Employee Taxes). This amount is
dependent on the Current Transaction Dates entered on the
Setup tab.
Leave Hours Accrued This is the number of leave hours the employee has accrued.
This number is dependent on the Current Transaction Dates

Pay Codes History
Column Description
entered on the Setup tab.
Leave Hours Taken This is the number of leave hours the employee has taken. This
number is dependent on the Current Transaction Dates entered
on the Setup tab.
Leave Ending Balance This is calculated by taking the opening balance plus the activity
total amount. This number is dependent on the Current
Transaction Dates entered on the Setup tab.
Employee Maximum
Subject
This is the employee's maximum annual subject wage for each
tax code.
Employer Maximum
Subject
This is the employer's maximum annual subject wage for each
tax code.
State Withholding Tax ID The employer's state withholding tax identification number
entered on the Maintain>Payroll>State Taxes>Tax tab.
State Unemployment Tax
ID
The employer's state unemployment tax identification number
entered on the Maintain>Payroll>State Taxes>Tax tab.
GL Expense Account Code The General Ledger expense account number, assigned to the
Pay Code, which were created on the
Maintain>Payroll>Federal, State, or Other Taxes, or
Maintain>Earning, Benefit, Deduction, or Workers'
Compensation Codes, and was selected on the Employee's
timesheet.
GL Liability Account Code The General Ledger liability account number, assigned to the
Pay Code, which were created on the
Maintain>Payroll>Federal, State, or Other Taxes, or
Maintain>Earning, Benefit, Deduction, or Workers'
Compensation Codes, and was selected on the Employee's
timesheet.
Use this tab to narrow down and more explicitly define the data to include in the report by
selecting from the Available Filters.
Use this tab to set up any Available Options for the report.
MIP Fund Accounting
Payroll User's Guide
254

Chapter 10: History Reports
MIP Fund Accounting
Payroll User's Guide
255
Options Description
Summarize Amounts Select this option to add amounts together and display one line
item with the total amount. All document information must be
identical for the system to add items together.
Use this tab to change the font and page setup for a report.
Use this tab to secure the active report so that other users cannot save their changes to it.
The user that selects the check box, and then saves the report, is the only user that can change or save it
later. This check box cannot be cleared by any user other than the user that locked the report.
Earnings History
Access this report using Reports>Payroll>History>Earnings. It is only available with the Payroll
module; it is not available for Payroll Link users.
Use this report to review an employee's gross earning history in summary or detail based on Period-to-
Date (PTD), Quarter-to-Date (QTD), and Year-to-Date (YTD) amounts. Also, review FTE and FTE
equivalent count on employees in summary.
Additional items, columns, and filters are available if any user defined fields were created by the
Administrator using Organization>Set Up User Defined Fields. Only user defined fields with a field type
of String, Editable Drop-Down List, Non-Editable Drop-Down List, Date, or Yes/No are available in the
Items by Page group box on the Content tab.
Report Criteria
Use this tab to assign a report name and determine whether or not to include it on the actual
report. The report name can be printed in the header or the footer of the report.
Current Transaction Dates are required to specify the date range for the data included in the report.
Use this tab to determine what data to include in the report and to define the report layout.
By selecting Available Items, the data is divided onto separate pages. The report starts a new page for
each item, and the item is printed in the page header of the report.
By selecting Available Columns, the data that appears in the body of the report is determined.

Earnings History
Column Description
Processing Group This is the processing group code that was set up for the
employee using the Maintain>Payroll>Employee Information
form.
Employee ID The employee's ID.
Employee Last Name The employee's last name.
Employee First Name The employee's first name.
First, MI Name The employee's first name and middle initial.
Employee Name The employee's full name, including the middle initial.
Employee Status The status of the employee—Active, Inactive, or Terminated.
Social Security Number The social security number. Note that only the last four digits of
the number display. To view the entire social security number,
you must have been granted Display Sensitive Data rights for
Maintain>Payroll>Employee Information. These rights are
granted by the Administrator using Security>Set Up
Organization Menus form.
Hire Date The employee's date of hire entered on the
Maintain>Payroll>Employee Information form.
Action Date The action date entered on the Maintain>Payroll>Employee
Information form.
Earning Code The earning code selected on the employee's timesheet.
Processing Group Title The title of the processing group code.
Earning Title The title of the earning code.
Calculation Method Code The calculation method for the pay code. The system displays
one of the following codes:
ER (Employee Pay Rate)
RM (Rate Multiplier)
FH (Fixed Hourly Amount)
MIP Fund Accounting
Payroll User's Guide
256

Chapter 10: History Reports
MIP Fund Accounting
Payroll User's Guide
257
Column Description
FA (Fixed Amount)
AT (Amount on Timesheet)
RT (Rate on Timesheet)
Calculation Method Title The title of the calculation method, such as, Employee Pay
Rate, Rate Multiplier, Fixed Hourly Amount, Fixed Amount,
Amount on Timesheet, or Rate on Timesheet.
W-2 Box Number The W-2 Box Number entered on the Maintain>Payroll>Earning
Codes form.
W-2 Box Code The W-2 Box Code entered on the Maintain>Payroll>Earning
Codes form.
Payroll Type The payroll type—Adjust, Manual, Regular, Supplemental, or
Void.
Pay Date The date on the Payroll check (Activities>Payroll>Calculate
Payroll).
Timesheet Reference A unique tracking number provided for timesheets.
Document Number The document number (Activities>Payroll>Print
Checks/Vouchers).
Document Date The document date (Activities>Payroll>Print Checks/Vouchers).
Rate Multiplier If "Rate Multiplier" was selected on the
Maintain>Payroll>Earning Codes>Calculation tab, this is the
value specified in the Rate box.
Distribution Code The distribution code of the earnings. This information was
entered using the Timesheets>Enter Default Timesheets or
Enter Regular/Supplemental Timesheets form.
Distribution Code
Description
The description of the distribution code.
Class The employee's class, such as Admin or Staff.
Position The employee's position, such as Administrator or Program

Earnings History
Column Description
Rep.
Gender The employee's gender—Female or Male.
Ethnicity The ethnic origin of the employee.
Employee Type This is the employee type, such as full-time or part-time.
Pay Rate The employee's pay rate entered on the
Maintain>Payroll>Employee Information form.
PTD Hours The period-to-date hours based on the employee's history.
These hours are dependent on the Current Transaction Dates
entered on the Setup tab.
PTD Amount The period-to-date amount based on the employee's history.
This amount is dependent on the Current Transaction Dates
entered on the Setup tab.
QTD Hours The quarter-to-date hours based on the employee's history.
These hours are determined by one of the four quarters in a
calendar year.
QTD Amount The quarter-to-date amount based on the employee's history.
This amount is determined by one of the four quarters in a
calendar year.
YTD Hours The year-to-date hours based on the employee's history. These
hours are determined by the current calendar year.
YTD Amount The year-to date amount based on the employee's history. This
amount is determined by the current calendar year.
FTE Year The full-time equivalent reporting year, such as 2016.
FTE Month Name The name of the month in which the full-time employee
equivalency is being reported, such as May.
FTE Month Number The number of the month in which the full-time employee
equivalency is being reported, such as 5; which is the 5th
month. Month Number is based on the 12 month calendar and
the first month is January. Note: When reporting FTE and FTE
MIP Fund Accounting
Payroll User's Guide
258

Chapter 10: History Reports
MIP Fund Accounting
Payroll User's Guide
259
Column Description
equivalent count of employees, it is best to sort on this column in
ascending order.
Full-Time Employees A full-time employee will display as 1.00, when the employee's
total labor hours (entered on any timesheet, a document date
which falls within a calender month) are 130 hours or more a
month. A part-time employee will display as 0.00. Note that only
the earning codes which have Track Labor Hours checked are
used in the calculation.
Part-Time Hours When Full-Time Employees column displays as 0.00, the
employee's total labor hours (entered on any timesheet, a
document date which falls within a calender month) displays. If
the hours total over 120 but less then 130, only 120 displays.
Note that only the earning codes which have Track Labor Hours
checked are used in the calculation.
Full-Time Equivalents The full time equivalent rate displays for Part-time employees.
The actual calculated rate displays for a part-time employee,
such as 0.34.
Part-time hours are calculated (the employee's total labor hours
(entered on any timesheet, a document date which falls within a
calender month) is divided by 120) to get this rate.
Note that only the earning codes which have Track Labor Hours
checked are used in the calculation.
Total FTE The Full-Time Employees or Full-Time Equivalents column
displays for each employee.
{User Defined Field} -
Employees
An employee type user defined field and its data. There is a
separate column for each field that was created by the
Administrator using Organization>Set Up User Defined Fields.
Use this tab to narrow down and more explicitly define the data to include in the report by
selecting from the Available Filters.
Use this tab to set up any Available Options for the report.

Benefits History
Options Description
Summarize Amounts Select this option to add amounts together and display one line
item with the total amount. All document information must be
identical for the system to add items together.
Suppress Lines with All Zeros Select this option so that documents with zero amounts do not
print. This eliminates records having zero in all amount columns.
If it is not selected, every line prints, even if it has a zero value.
Use this tab to change the font and page setup for a report.
Use this tab to secure the active report so that other users cannot save their changes to it. The
user that selects the check box, and then saves the report, is the only user that can change or save it later.
This check box cannot be cleared by any user other than the user that locked the report.
Benefits History
Access this report using Reports>Payroll>History>Benefits. It is only available with the Payroll
module; it is not available for Payroll Link users.
Use this report to review an employee's benefit history in summary or detail based on Period-to-Date
(PTD), Quarter-to-Date (QTD), and Year-to-Date (YTD) amounts.
Report Criteria
Use this tab to assign a report name and determine whether or not to include it on the actual
report. The report name can be printed in the header or the footer of the report.
Current Transaction Dates are required to specify the date range for the data included in the report.
Use this tab to determine what data to include in the report and to define the report layout.
By selecting Available Items, the data is divided onto separate pages. The report starts a new page for
each item, and the item is printed in the page header of the report.
By selecting Available Columns, the data that appears in the body of the report is determined.
MIP Fund Accounting
Payroll User's Guide
260

Chapter 10: History Reports
MIP Fund Accounting
Payroll User's Guide
261
Column Description
Processing Group This is the processing group code that was set up for the
employee using the Maintain>Payroll>Employee Information
form.
Employee ID The employee's ID.
Employee Last Name The employee's last name.
Employee First Name The employee's first name.
First, MI Name The employee's first name and middle initial.
Employee Name The employee's full name, including the middle initial.
Employee Status The status of the employee—Active, Inactive, or Terminated.
Social Security Number The social security number. Note that only the last four digits of
the number display. To view the entire social security number,
you must have been granted Display Sensitive Data rights for
Maintain>Payroll>Employee Information. These rights are
granted by the Administrator using Security>Set Up
Organization Menus form.
Hire Date The employee's date of hire entered on the
Maintain>Payroll>Employee Information form.
Action Date The action date entered on the Maintain>Payroll>Employee
Information form.
Last Day Worked The employee's last day of work.
Termination Date The date the employee was terminated.
Class The employee's class, such as Admin or Staff.
Position The employee's position, such as Administrator or Program
Rep.
Employee Type This is the employee type, such as full-time or part-time.
Benefit Code The benefit code selected on the employee's timesheet.
Processing Group Title The title of the processing group code.

Benefits History
Column Description
Benefit Title The title of the benefit code.
Calculation Method Code The calculation method for the benefit code. The system
displays one of the following codes:
FP (Fixed Percentage of Earnings)
FH (Fixed Hourly Amount)
FA (Fixed Amount)
AT (Amount on Timesheet)
PT (Percentage on Timesheet)
Calculation Method Title The title of the calculation method, such as Fixed Percentage of
Earnings, Fixed Hourly Amount, Fixed Amount, Amount on
Timesheet, or Percentage on Timesheet.
W-2 Box Number The W-2 Box Number entered on the Maintain>Payroll>Benefit
Codes form.
W-2 Box Code The W-2 Box Code entered on the Maintain>Payroll>Benefit
Codes form.
Payroll Type The payroll type—Adjust, Manual, Regular, Supplemental, or
Void.
Pay Date The date on the Payroll check (Activities>Payroll>Calculate
Payroll).
Pay Period Begin Date The pay period beginning date entered on the
Maintain>Payroll>Processing Groups form.
Pay Period End Date The pay period ending date entered on the
Maintain>Payroll>Processing Groups form.
Timesheet Reference A unique tracking number provided for timesheets.
Document Number The document number (Activities>Payroll>Print
Checks/Vouchers).
Document Date This is the document date (Activities>Payroll>Print/Email
MIP Fund Accounting
Payroll User's Guide
262

Chapter 10: History Reports
MIP Fund Accounting
Payroll User's Guide
263
Column Description
Checks and Vouchers).
Fixed Percentage of
Earnings
If "Fixed Percentage of Earnings" was selected on the
Maintain>Payroll>Benefit Codes>Calculation tab, this is the
percentage specified in the Percentage box.
PTD Subject Earnings The period-to-date subject earnings based on the employee's
history. These earnings are dependent on the Current
Transaction Dates entered on the Setup tab.
PTD Hours The period-to-date hours based on the employee's history.
These hours are dependent on the Current Transaction Dates
entered on the Setup tab.
PTD Amount The period-to-date amount based on the employee's history.
This amount is dependent on the Current Transaction Dates
entered on the Setup tab.
QTD Subject Earnings The quarter-to-date subject earnings based on the employee's
history. These earnings are determined by one of the four
quarters in a calendar year.
QTD Hours The quarter-to-date hours based on the employee's history.
These hours are determined by one of the four quarters in a
calendar year.
QTD Amount The quarter-to-date amount based on the employee's history.
This amount is determined by the four quarters in a calendar
year.
YTD Subject Earnings The year-to date subject earnings based on the employee's
history. These earnings are determined by the current calendar
year.
YTD Hours The year-to-date hours based on the employee's history. These
hours are determined by the current calendar year.
YTD Amount The year-to date amount based on the employee's history. This
amount is determined by the current calendar year.

Deductions History
Use this tab to narrow down and more explicitly define the data to include in the report by
selecting from the Available Filters.
Use this tab to set up any Available Options for the report.
Options Description
Summarize Amounts Select this option to add amounts together and display one line
item with the total amount. All document information must be
identical for the system to add items together.
Use this tab to change the font and page setup for a report.
Use this tab to secure the active report so that other users cannot save their changes to it. The
user that selects the check box, and then saves the report, is the only user that can change or save it later.
This check box cannot be cleared by any user other than the user that locked the report.
Deductions History
Access this report using Reports>Payroll>History>Deductions. It is only available with the
Payroll module; it is not available for Payroll Link users.
Use this report to review an employee's deduction history in summary or detail based on Period-to-Date
(PTD), Quarter-to-Date (QTD), and Year-to-Date (YTD) amounts.
Report Criteria
Use this tab to assign a report name and determine whether or not to include it on the actual
report. The report name can be printed in the header or the footer of the report.
Current Transaction Dates are required to specify the date range for the data included in the report.
Use this tab to determine what data to include in the report and to define the report layout.
By selecting Available Items, the data is divided onto separate pages. The report starts a new page for
each item, and the item is printed in the page header of the report.
By selecting Available Columns, the data that appears in the body of the report is determined.
MIP Fund Accounting
Payroll User's Guide
264

Chapter 10: History Reports
MIP Fund Accounting
Payroll User's Guide
265
Column Description
Processing Group This is the processing group code that was set up for the
employee using the Maintain>Payroll>Employee Information
form.
Employee ID The employee's ID.
Employee Last Name The employee's last name.
Employee First Name The employee's first name.
First, MI Name The employee's first name and middle initial.
Employee Name The employee's full name, including the middle initial.
Employee Status The status of the employee—Active, Inactive, or Terminated.
Social Security Number The social security number. Note that only the last four digits of
the number display. To view the entire social security number,
you must have been granted Display Sensitive Data rights for
Maintain>Payroll>Employee Information. These rights are
granted by the Administrator using Security>Set Up
Organization Menus form.
Hire Date The employee's date of hire entered on the
Maintain>Payroll>Employee Information form.
Action Date The action date entered on the Maintain>Payroll>Employee
Information form.
Class The employee's class, such as Admin or Staff.
Position The employee's position, such as Administrator or Program
Rep.
Employee Type This is the employee type, such as full-time or part-time.
Deduction Code The deduction code selected on the employee's timesheet.
Processing Group Title The title of the processing group code.
Deduction Title The title of the deduction code.
Calculation Method Code The calculation method for the deduction code. The system

Deductions History
Column Description
displays one of the following codes:
FP (Fixed Percentage of Earnings)
FH (Fixed Hourly Amount)
FA (Fixed Amount)
AT (Amount on Timesheet)
PT (Percentage on Timesheet)
Calculation Method Title The title of the calculation method, such as Fixed Percentage of
Earnings, Fixed Hourly Amount, Fixed Amount, Amount on
Timesheet, or Percentage on Timesheet.
W-2 Box Number The W-2 Box Number entered on the
Maintain>Payroll>Deduction Codes form.
W-2 Box Code The W-2 Box Code entered on the Maintain>Payroll>Deduction
Codes form.
Payroll Type The payroll type—Adjust, Manual, Regular, Supplemental, or
Void.
Pay Date The date on the payroll check (Activities>Payroll>Calculate
Payroll).
Pay Period Begin Date The pay period beginning date entered on the
Maintain>Payroll>Processing Groups form.
Pay Period End Date The pay period ending date entered on the
Maintain>Payroll>Processing Groups form.
Timesheet Reference A unique tracking number provided for timesheets.
Document Number The document number (Activities>Payroll>Print
Checks/Vouchers).
Document Date The document date (Activities>Payroll>Print Checks/Vouchers).
Fixed Percentage of
Earnings
If "Fixed Percentage of Earnings" was selected on the
Maintain>Payroll>Deduction Codes>Calculation tab, this is the
MIP Fund Accounting
Payroll User's Guide
266

Chapter 10: History Reports
MIP Fund Accounting
Payroll User's Guide
267
Column Description
percentage specified in the Percentage box.
PTD Subject Earnings The period-to-date subject earnings based on the employee's
history. These earnings are dependent on the Current
Transaction Dates entered on the Setup tab.
PTD Hours The period-to-date hours based on the employee's history.
These hours are dependent on the Current Transaction Dates
entered on the Setup tab.
PTD Amount The period-to-date amount based on the employee's history.
This amount is dependent on the Current Transaction Dates
entered on the Setup tab.
QTD Subject Earnings The quarter-to-date subject earnings based on the employee's
history. These earnings are determined by one of the four
quarters in a calendar year.
QTD Hours The quarter-to-date hours based on the employee's history.
These hours are determined by one of the four quarters in a
calendar year.
QTD Amount The quarter-to-date amount based on the employee's history.
This amount is determined by one of the four quarters in a
calendar year.
YTD Subject Earnings The year-to date subject earnings based on the employee's
history. These earnings are determined by the current calendar
year.
YTD Hours The year-to-date hours based on the employee's history. These
hours are determined by the current calendar year.
YTD Amount The year-to date amount based on the employee's history. This
amount is determined by the current calendar year.
Maximum per Year This amount is the maximum limit allowed for deductions per
calendar year.
Maximum per Year
Exceeded
A designation of Yes or No, depending on if the maximum limit
allowed for deductions per calendar year has been exceeded.

Workers' Compensation History
Use this tab to narrow down and more explicitly define the data to include in the report by
selecting from the Available Filters.
Use this tab to set up any Available Options for the report.
Options Description
Summarize Amounts Select this option to add amounts together and display one line
item with the total amount. All document information must be
identical for the system to add items together.
Use this tab to change the font and page setup for a report.
Use this tab to secure the active report so that other users cannot save their changes to it. The
user that selects the check box, and then saves the report, is the only user that can change or save it later.
This check box cannot be cleared by any user other than the user that locked the report.
Tip: It is recommended that when you select the Maximum per Year Exceeded column, that you also
select "Summarize Amounts" on the Options tab. By summarizing the amounts, the system can
accurately identify if the Maximum per Year amount has been exceeded.
Workers' Compensation History
Access this report using Reports>Payroll>History>Workers' Compensation. It is only available
with the Payroll module; it is not available for Payroll Link users.
Use this report to review an employee's workers' compensation history in summary or detail based on
Period-to-Date (PTD), Quarter-to-Date (QTD), and Year-to-Date (YTD) amounts.
Report Criteria
Use this tab to assign a report name and determine whether or not to include it on the actual
report. The report name can be printed in the header or the footer of the report.
Current Transaction Dates are required to specify the date range for the data included in the report.
Use this tab to determine what data to include in the report and to define the report layout.
MIP Fund Accounting
Payroll User's Guide
268
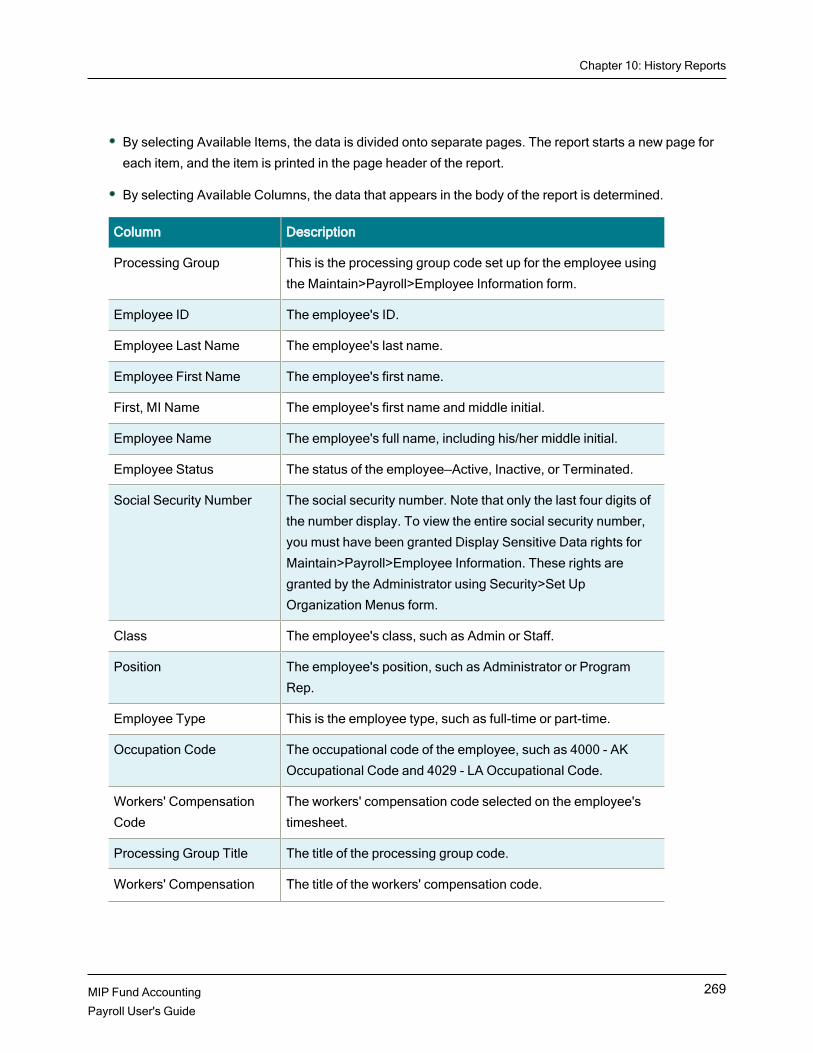
Chapter 10: History Reports
MIP Fund Accounting
Payroll User's Guide
269
By selecting Available Items, the data is divided onto separate pages. The report starts a new page for
each item, and the item is printed in the page header of the report.
By selecting Available Columns, the data that appears in the body of the report is determined.
Column Description
Processing Group This is the processing group code set up for the employee using
the Maintain>Payroll>Employee Information form.
Employee ID The employee's ID.
Employee Last Name The employee's last name.
Employee First Name The employee's first name.
First, MI Name The employee's first name and middle initial.
Employee Name The employee's full name, including his/her middle initial.
Employee Status The status of the employee—Active, Inactive, or Terminated.
Social Security Number The social security number. Note that only the last four digits of
the number display. To view the entire social security number,
you must have been granted Display Sensitive Data rights for
Maintain>Payroll>Employee Information. These rights are
granted by the Administrator using Security>Set Up
Organization Menus form.
Class The employee's class, such as Admin or Staff.
Position The employee's position, such as Administrator or Program
Rep.
Employee Type This is the employee type, such as full-time or part-time.
Occupation Code The occupational code of the employee, such as 4000 - AK
Occupational Code and 4029 - LA Occupational Code.
Workers' Compensation
Code
The workers' compensation code selected on the employee's
timesheet.
Processing Group Title The title of the processing group code.
Workers' Compensation The title of the workers' compensation code.

Workers' Compensation History
Column Description
Title
Paid By Whom the workers' compensation is paid by—Employer or
Employee. This information was entered using the
Maintain>Payroll>Workers' Compensation Codes form.
Calculation Method Code The calculation method for the workers' compensation code.
The system displays one of the following codes:
RW (Rate per Hours Worked)
RH (Rate per Workers' Compensation Hours)
RE (Rate per $100 Earnings)
Calculation Method Title The title of the calculation method, such as Rate per Hours
Worked, Rate per Workers' Compensation Hours, or Rate per
$100 Earnings.
Payroll Type The payroll type—Adjust, Manual, Regular, Supplemental, or
Void.
Pay Date The date on the Payroll check (Activities>Payroll>Calculate
Payroll).
Pay Period Begin Date The pay period beginning date entered on the
Maintain>Payroll>Processing Groups form.
Pay Period End Date The pay period ending date entered on the
Maintain>Payroll>Processing Groups form.
Timesheet Reference A unique tracking number provided for timesheets.
Document Number The document number (Activities>Payroll>Print
Checks/Vouchers).
Document Date The document date (Activities>Payroll>Print Checks/Vouchers).
Rate The amount entered for the rate on the
Maintain>Payroll>Workers' Compensation Codes>Calculation
tab.
MIP Fund Accounting
Payroll User's Guide
270

Chapter 10: History Reports
MIP Fund Accounting
Payroll User's Guide
271
Column Description
Adjustment Factor The adjustment factor entered on the Calculation tab.
PTD Employee Subject
Earnings
The period-to-date subject earnings based on the employee's
history. These earnings are dependent on the Current
Transaction Dates entered on the Setup tab.
PTD Employer Subject
Earnings
The period-to-date subject earnings based on the employee's
history but paid by the employer. These earnings are dependent
on the Current Transaction Dates entered on the Setup tab.
PTD Hours The period-to-date hours based on the employee's history.
These hours are dependent on the Current Transaction Dates
entered on the Setup tab.
PTD Employee Amount The period-to-date amount based on the employee's history.
This amount is dependent on the Current Transaction Dates
entered on the Setup tab.
PTD Employer Amount The period-to-date amount based on the employee's history but
paid by the employer. This amount is dependent on the Current
Transaction Dates entered on the Setup tab.
QTD Employee Subject
Earnings
The quarter-to-date subject earnings based on the employee's
history. These earnings are determined by the last quarter,
using the Through date for the Current Transaction Dates
entered on the Setup Tab.
QTD Employer Subject
Earnings
The quarter-to-date subject earnings based on the employee's
history but paid by the employer. These earnings are
determined by the last quarter, using the Through date for the
Current Transaction Dates entered on the Setup Tab.
QTD Hours The quarter-to-date hours based on the employee's history.
These hours are determined by the last quarter, using the
Through date for the Current Transaction Dates entered on the
Setup Tab.
QTD Employee Amount The quarter-to-date amount based on the employee's history.
This amount is determined by the last quarter, using the
Through date for the Current Transaction Dates entered on the

Workers' Compensation History
Column Description
Setup Tab.
QTD Employer Amount The quarter-to-date amount based on the employee's history
but paid by the employer. This amount is determined by the last
quarter, using the Through date for the Current Transaction
Dates entered on the Setup Tab.
YTD Employee Subject
Earnings
The year-to date subject earnings based on the employee's
history. These earnings are determined by the current calendar
year.
YTD Employer Subject
Earnings
The year-to date subject earnings based on the employee's
history but paid by the employer. These earnings are
determined by the current calendar year.
YTD Hours The year-to-date hours based on the employee's history. These
hours are determined by the current calendar year.
YTD Employee Amount The year-to date amount based on the employee's history. This
amount is determined by the current calendar year.
YTD Employer Amount The year-to date amount based on the employee's history but
paid by the employer. This amount is determined by the current
calendar year.
Use this tab to narrow down and more explicitly define the data to include in the report by
selecting from the Available Filters.
Use this tab to set up any Available Options for the report.
Options Description
Summarize Amounts Select this option to add amounts together and display one line
item with the total amount. All document information must be
identical for the system to add items together.
Use this tab to change the font and page setup for a report.
MIP Fund Accounting
Payroll User's Guide
272
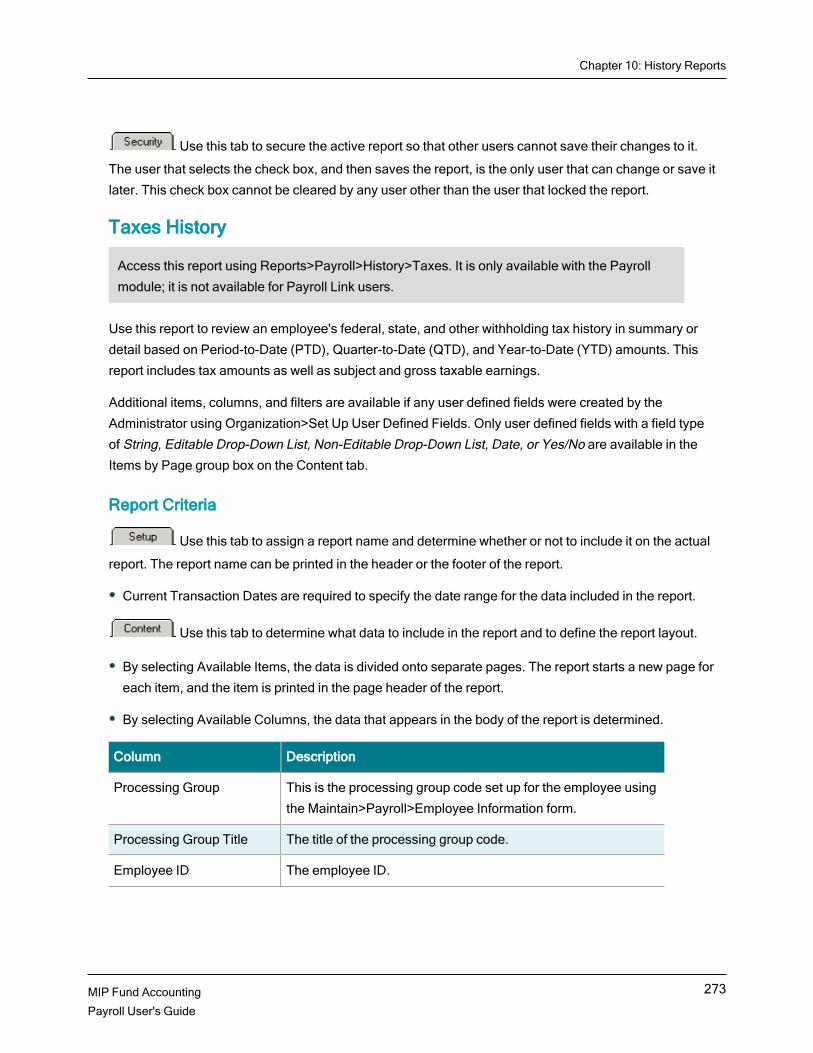
Chapter 10: History Reports
MIP Fund Accounting
Payroll User's Guide
273
Use this tab to secure the active report so that other users cannot save their changes to it.
The user that selects the check box, and then saves the report, is the only user that can change or save it
later. This check box cannot be cleared by any user other than the user that locked the report.
Taxes History
Access this report using Reports>Payroll>History>Taxes. It is only available with the Payroll
module; it is not available for Payroll Link users.
Use this report to review an employee's federal, state, and other withholding tax history in summary or
detail based on Period-to-Date (PTD), Quarter-to-Date (QTD), and Year-to-Date (YTD) amounts. This
report includes tax amounts as well as subject and gross taxable earnings.
Additional items, columns, and filters are available if any user defined fields were created by the
Administrator using Organization>Set Up User Defined Fields. Only user defined fields with a field type
of String, Editable Drop-Down List, Non-Editable Drop-Down List, Date, or Yes/No are available in the
Items by Page group box on the Content tab.
Report Criteria
Use this tab to assign a report name and determine whether or not to include it on the actual
report. The report name can be printed in the header or the footer of the report.
Current Transaction Dates are required to specify the date range for the data included in the report.
Use this tab to determine what data to include in the report and to define the report layout.
By selecting Available Items, the data is divided onto separate pages. The report starts a new page for
each item, and the item is printed in the page header of the report.
By selecting Available Columns, the data that appears in the body of the report is determined.
Column Description
Processing Group This is the processing group code set up for the employee using
the Maintain>Payroll>Employee Information form.
Processing Group Title The title of the processing group code.
Employee ID The employee ID.
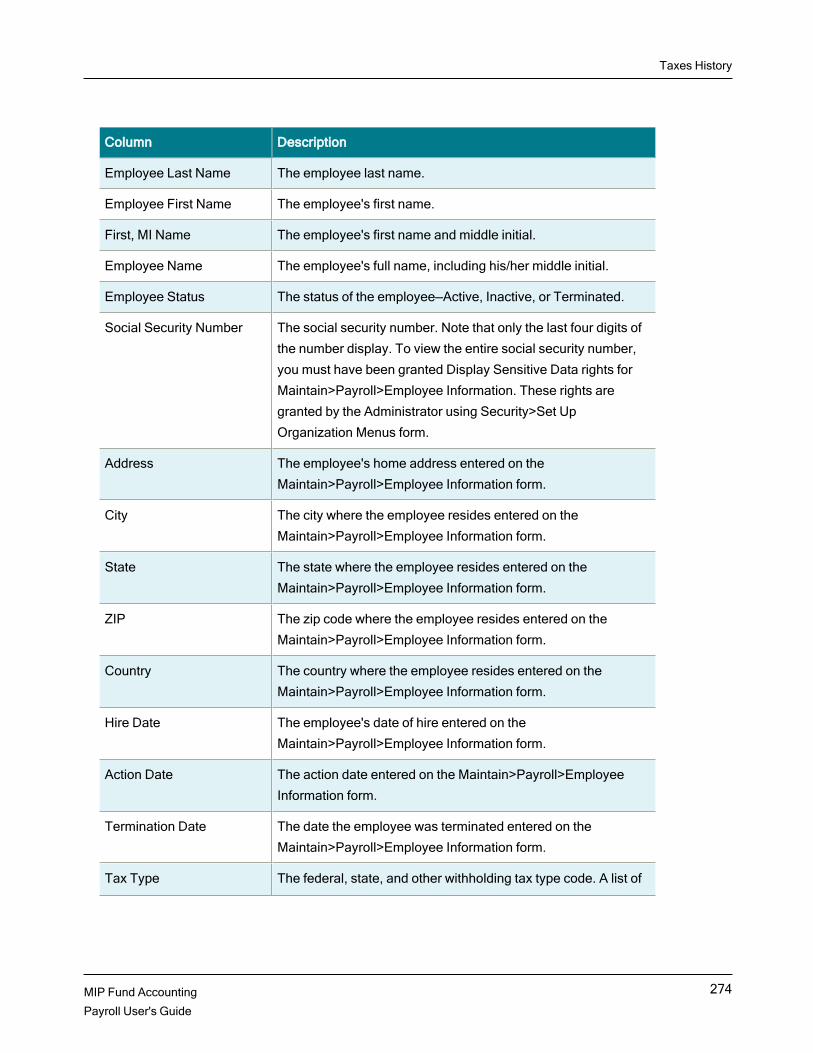
Taxes History
Column Description
Employee Last Name The employee last name.
Employee First Name The employee's first name.
First, MI Name The employee's first name and middle initial.
Employee Name The employee's full name, including his/her middle initial.
Employee Status The status of the employee—Active, Inactive, or Terminated.
Social Security Number The social security number. Note that only the last four digits of
the number display. To view the entire social security number,
you must have been granted Display Sensitive Data rights for
Maintain>Payroll>Employee Information. These rights are
granted by the Administrator using Security>Set Up
Organization Menus form.
Address The employee's home address entered on the
Maintain>Payroll>Employee Information form.
City The city where the employee resides entered on the
Maintain>Payroll>Employee Information form.
State The state where the employee resides entered on the
Maintain>Payroll>Employee Information form.
ZIP The zip code where the employee resides entered on the
Maintain>Payroll>Employee Information form.
Country The country where the employee resides entered on the
Maintain>Payroll>Employee Information form.
Hire Date The employee's date of hire entered on the
Maintain>Payroll>Employee Information form.
Action Date The action date entered on the Maintain>Payroll>Employee
Information form.
Termination Date The date the employee was terminated entered on the
Maintain>Payroll>Employee Information form.
Tax Type The federal, state, and other withholding tax type code. A list of
MIP Fund Accounting
Payroll User's Guide
274

Chapter 10: History Reports
MIP Fund Accounting
Payroll User's Guide
275
Column Description
available codes are as follows:
FIT (Federal Income Tax)
SS (Social Security Tax)
MC (Medicare)
FUTA (Federal Unemployment Tax)
EIC (Earned Income Credit—no longer applies after Year 2011)
SWT (State Withholding Tax)
SWT2 (State Withholding Tax—applies to the Commonwealth of
the Northern Marianas Islands.)
SUTA (State Unemployment Tax)
LWT (Other Taxes Employee Paid Tax)
LER (Other Taxes Employer Paid Tax)
Jurisdiction The state or other withholding taxing authority, such as TX for
Texas.
Payroll Type The payroll type—Adjust, Manual, Regular, Supplemental, or
Void.
Pay Date The date on the Payroll check (Activities>Payroll>Calculate
Payroll).
Pay Period Begin Date The pay period beginning date entered on the
Maintain>Payroll>Processing Groups - Pay Schedule Tab.
Pay Period End Date The pay period ending date entered on the
Maintain>Payroll>Processing Groups - Pay Schedule Tab.
Timesheet Reference A unique tracking number provided for timesheets.
Document Number The document number (Activities>Payroll>Print
Checks/Vouchers).

Taxes History
Column Description
Document Date The document date (Activities>Payroll>Print Checks/Vouchers).
Class The employee's class, such as Admin or Staff.
Position The employee's position, such as Administrator or Program
Rep.
Gender The employee's gender—Female or Male.
Ethnicity The ethnic origin of the employee.
Employee Type The employee type, such as full-time or part-time.
PTD Hours The period-to-date hours based on the employee's history.
These hours are dependent on the Current Transaction Dates
entered on the Setup tab.
PTD Employee Subject
Earnings
The period-to-date subject earnings based on the employee's
history. These earnings are dependent on the Current
Transaction Dates entered on the Setup tab.
PTD Employer Subject
Earnings
The period-to-date subject earnings based on the employee's
history but paid by the employer. These earnings are dependent
on the Current Transaction Dates entered on the Setup tab.
PTD Gross Taxable
Earnings
The period-to-date gross earnings based on the employee's
history. These earnings are dependent on the Current
Transaction Dates entered on the Setup tab.
PTD Employee Tax The period-to-date employee tax. This tax is based on the
Current Transaction Dates entered on the Setup tab.
PTD Employer Tax The period-to-date employer tax. This tax is based on the
Current Transaction Dates entered on the Setup tab.
PTD SUTA Weeks The period-to-date number of SUTA (State Unemployment Tax)
Weeks.
QTD Hours The quarter-to-date hours based on the employee's history.
These hours are determined by one of the four quarters in a
calendar year.
MIP Fund Accounting
Payroll User's Guide
276

Chapter 10: History Reports
MIP Fund Accounting
Payroll User's Guide
277
Column Description
QTD Employee Subject
Earnings
The quarter-to-date subject earnings based on the employee's
history. These earnings are determined by one of the four
quarters in a calendar year.
QTD Employer Subject
Earnings
The quarter-to-date subject earnings based on the employee's
history but paid by the employer. These earnings are
determined by one of the four quarters in a calendar year.
QTD Gross Taxable
Earnings
The quarter-to-date subject earnings based on the employee's
history. These earnings are determined by one of the four
quarters in a calendar year.
QTD Employee Tax The quarter-to-date employee tax. This tax is based on the four
quarters in a calendar year.
QTD Employer Tax The quarter-to-date employer tax. This tax is based on the four
quarters in a calendar year.
QTD SUTA Weeks The quarter-to-date number of SUTA (State Unemployment
Tax) Weeks.
YTD Hours The year-to-date hours based on the employee's history. These
hours are determined by the current calendar year.
YTD Employee Subject
Earnings
The year-to-date subject earnings based on the employee's
history. These earnings are determined by the current calendar
year.
YTD Employer Subject
Earnings
The year-to-date subject earnings based on the employee's
history but paid by the employer. These earnings are
determined by the current calendar year.
YTD Gross Taxable
Earnings
The year-to-date gross earnings based on the employee's
history. These earnings are determined by the current calendar
year.
YTD Employee Tax The year-to-date employee tax based on the current calendar
year.
YTD Employer Tax The year-to-date employer tax based on the current calendar
year.

Taxes History
Column Description
YTD SUTA Weeks The year-to-date number of SUTA (State Unemployment Tax)
Weeks.
Employee Maximum
Subject
The employee's maximum annual subject wages for each tax
code.
Employer Maximum
Subject
The employer's maximum annual subject wages for each tax
code.
Employee Rate This is the rate or percentage of wages which applies to
employee-paid taxes, such as Social Security, Medicare, State
Unemployment Tax, and Other Taxes Employee Paid Tax. Note
that when a flat amount or a tiered tax is applied, a zero
displays.
Employer Rate This is the rate or percentage of employee's wages which
applies to employer-paid taxes, such as FUTA, Social Security,
Medicare, State Unemployment Tax, and Other Taxes
Employer Paid Tax. Note that when a flat amount or a tiered tax
is applied, a zero displays.
Employee Count The number one displays in the column next to each employee
id (Employee ID, Employee Name, or Social Security Number)
and sums the column. For a comparable employee count, set up
the report by selecting the following: Content Tab - Employee ID
(such as Employee ID, Employee Name, or Social Security
Number), Tax Type, Jurisdiction, and Employee Count; Filter
Tab - Tax Type = SUTA; and Options Tab - Summarize
Amounts check box.
Employee Calculation
Method
This is the Calculation method that was selected on the
Maintain>Payroll>Federal Taxes>Employee FICA Taxes Tab.
Employer Calculation
Method
This is the Calculation method that was selected on the
Maintain>Payroll>Federal Taxes>Employer FICA Taxes Tab.
Employee Override A designation of Yes or No, depending on if “Override Official
Values” was selected on the Maintain>Payroll>Federal
Taxes>Employee FICA Taxes Tab.
MIP Fund Accounting
Payroll User's Guide
278

Chapter 10: History Reports
MIP Fund Accounting
Payroll User's Guide
279
Column Description
Employer Override A designation of Yes or No, depending on if “Override Official
Values” was selected on the Maintain>Payroll>Federal
Taxes>Employer FICA Taxes Tab.
{User Defined Field} -
Employees
An employee type user defined field and its data. There is a
separate column for each field that was created by the
Administrator using Organization>Set Up User Defined Fields.
Use this tab to narrow down and more explicitly define the data to include in the report by
selecting from the Available Filters.
Use this tab to set up any Available Options for the report.
Options Description
Summarize Amounts Select this option to add amounts together and display one line
item with the total amount. All document information must be
identical for the system to add items together.
Suppress Lines with All Zeros Select this option so that documents with zero amounts do not
print. This eliminates records having zero in all amount columns.
If it is not selected, every line prints, even if it has a zero value.
Use this tab to change the font and page setup for a report.
Use this tab to secure the active report so that other users cannot save their changes to it.
The user that selects the check box, and then saves the report, is the only user that can change or save it
later. This check box cannot be cleared by any user other than the user that locked the report.
Leave History
Access this report using Reports>Payroll>History>Leave. It is only available with the Payroll
module; it is not available for Payroll Link users.
Use this report to review an employee's leave history in summary or detail. The totals provided by this
report only include the activity defined by the date range selected on the Setup tab. This report is an
activity report not a balance report.

Leave History
The system automatically displays the last column of this report; it does not need to be selected on the
Setup tab. This column does not have a heading, but prints Opening Balance or Current Balance each
time the report changes from one employee name to the next or the leave code changes.
Opening Balance - If the Show Total check box is selected next to a column on the Setup tab, and the
employee name/leave code changes from one name/code to next one, and it is the beginning balance,
the label displays Opening Balance. The Opening Balance always prints an amount, even when it is
zero. Opening balances print for the Net Hours column.
Current Balance - If the Show Total check box is selected next to a column on the Setup tab, and the
employee name/leave code changes from one name/code to next one, and there is no detail to be
printed related to the beginning balance, the balance label displays Current Balance. The Current
Balance always prints an amount, even when it is zero.
Ending Balance - If the Show Total check box is selected next to a column on the Setup tab, the label
displays Balance {Leave Code}. This is calculated by taking the opening balance plus the activity total
amount.
Report Criteria
Use this tab to assign a report name and determine whether or not to include it on the actual
report. The report name can be printed in the header or the footer of the report.
Current Transaction Dates are required to specify the date range for the data included in the report.
Use this tab to determine what data to include in the report and to define the report layout.
By selecting Available Items, the data is divided onto separate pages. The report starts a new page for
each item, and the item is printed in the page header of the report.
By selecting Available Columns, the data that appears in the body of the report is determined.
Column Description
Processing Group This is the processing group code assigned to the employee
using the Maintain>Payroll>Employee Information form. The
report shows the code's name, such as Admin or Parttime.
Employee ID The ID assigned to the employee.
Employee Last Name The employee's last name.
MIP Fund Accounting
Payroll User's Guide
280
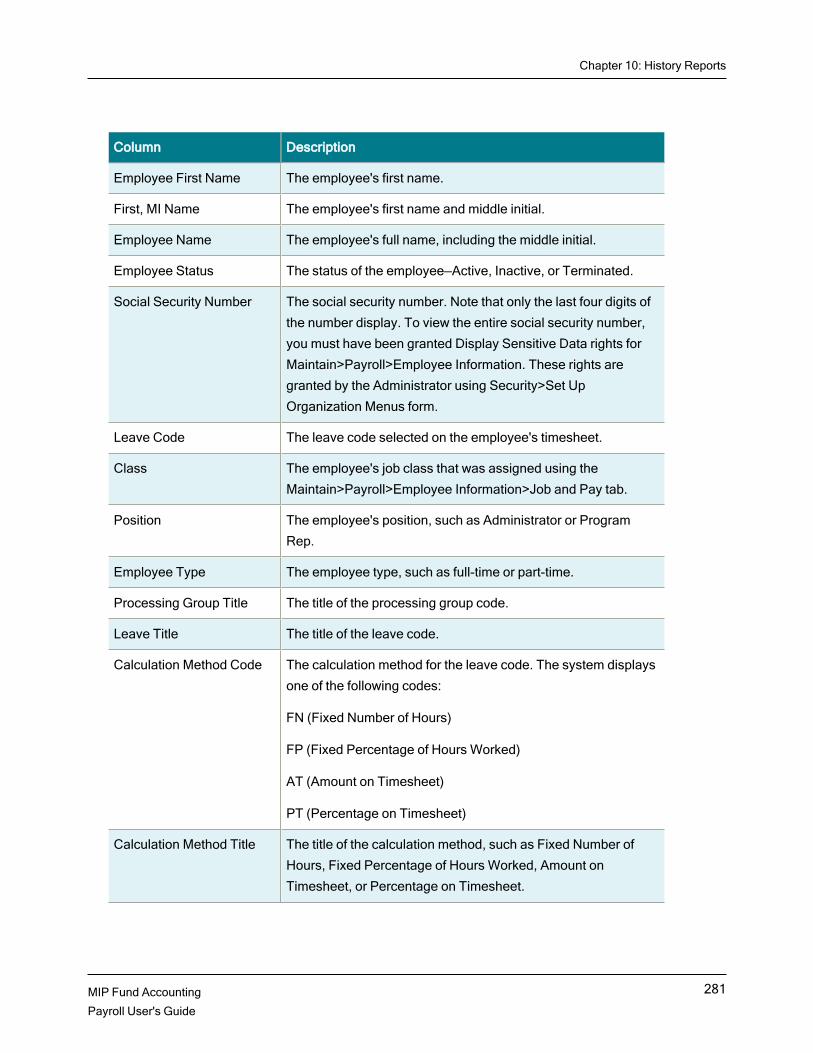
Chapter 10: History Reports
MIP Fund Accounting
Payroll User's Guide
281
Column Description
Employee First Name The employee's first name.
First, MI Name The employee's first name and middle initial.
Employee Name The employee's full name, including the middle initial.
Employee Status The status of the employee—Active, Inactive, or Terminated.
Social Security Number The social security number. Note that only the last four digits of
the number display. To view the entire social security number,
you must have been granted Display Sensitive Data rights for
Maintain>Payroll>Employee Information. These rights are
granted by the Administrator using Security>Set Up
Organization Menus form.
Leave Code The leave code selected on the employee's timesheet.
Class The employee's job class that was assigned using the
Maintain>Payroll>Employee Information>Job and Pay tab.
Position The employee's position, such as Administrator or Program
Rep.
Employee Type The employee type, such as full-time or part-time.
Processing Group Title The title of the processing group code.
Leave Title The title of the leave code.
Calculation Method Code The calculation method for the leave code. The system displays
one of the following codes:
FN (Fixed Number of Hours)
FP (Fixed Percentage of Hours Worked)
AT (Amount on Timesheet)
PT (Percentage on Timesheet)
Calculation Method Title The title of the calculation method, such as Fixed Number of
Hours, Fixed Percentage of Hours Worked, Amount on
Timesheet, or Percentage on Timesheet.

Leave History
Column Description
Payroll Type The payroll type—Adjust, Manual, Regular, Supplemental, or
Void.
Pay Date The date on the check (Activities>Payroll>Calculate Payroll).
Pay Period Begin Date The pay period beginning date entered on the
Maintain>Payroll>Processing Groups - Pay Schedule Tab.
Pay Period End Date The pay period ending date entered on the
Maintain>Payroll>Processing Groups - Pay Schedule Tab.
Timesheet Reference A unique tracking number provided for timesheets.
Document Number The document number (Activities>Payroll>Print
Checks/Vouchers).
Document Date The document date (Activities>Payroll>Print Checks/Vouchers).
Rate If "Fixed Percentage of Hours Worked," "Fixed Number of
Hours," or "Percentage on Timesheet" was selected on the
Maintain>Payroll>Leave Codes>Calculation tab, the data
displays in this column (either hours or percentage).
Applicable Earning Hours The earning hours based on the employee's history.
Hours Accrued The hours the employee has accrued for the pay period.
Hours Taken The hours the employee has taken for the pay period.
Net Hours The net hours for the pay period.
Use this tab to narrow down and more explicitly define the data to include in the report by
selecting from the Available Filters.
Use this tab to set up any Available Options for the report.
Options Description
Summarize Amounts Select this option to add amounts together and display one line
item with the total amount. All document information must be
identical for the system to add items together.
MIP Fund Accounting
Payroll User's Guide
282

Chapter 10: History Reports
MIP Fund Accounting
Payroll User's Guide
283
Use this tab to change the font and page setup for a report.
Use this tab to secure the active report so that other users cannot save their changes to it.
The user that selects the check box, and then saves the report, is the only user that can change or save it
later. This check box cannot be cleared by any user other than the user that locked the report.
Quick Check/Transaction Register
Access this report using Reports>Payroll>History>Quick Check/Transaction Register. It is only
available with the Payroll module; it is not available for Payroll Link users.
Use this report to print a detailed listing of check, voucher, and adjustment information.
Quick Check/Transaction Register is a fixed-format report, making it easier and quicker for you to run the
report. You cannot customize the columns in the report; the system has already determined them.
However, you can:
Change the order in which the data is arranged by sorting (ascending or descending order) on the
columns displayed in the Report Body group box on the Content tab. For example, if you want
Employee IDs to be listed in alphabetical order, select "Employee ID," then sort by "ASC."
Determine the way information is printed by changing criteria on the Filter tab. For example, if you
want to filter employees by pay date, select "Pay Date," then "=" in the Compares To column. Finally,
enter the date to filter on in the Criteria 1 column. The system only prints data that has the same pay
date that is entered.
Additional filters are available if any user defined fields were created by the Administrator using
Organization>Set Up User Defined Fields.
Important! In order to view the entire Social Security Number, you must have been granted Display Sensitive Data rights for Maintain>Payroll>Employee Information in the active organization. These
rights are granted by the Administrator using Security>Set Up Organization Menus form. Otherwise,
only the last four digits of the Social Security Number displays.
Report Criteria
Use this tab to assign a report name and determine whether or not to include it on the actual
report. The report name can be printed in the header or the footer of the report.
Current Transaction Dates are required to specify the date range for the data included in the report.

Quick Check/Transaction Register
Use this tab to determine the order that the data prints on the report. The Items by Page group
box is used to divide the data onto separate pages, where as the Report Body group box is used to select
the sort order (ascending or descending) of the columns. Selecting columns in the Report Body has no
bearing on what appears on the report; the columns are for sorting purposes only.
By selecting Employee ID in the Available Items group box, the data can be divided onto separate
pages. The report starts a new page for each Employee ID. Sort the Employee IDs by ascending or
descending order in the Sort column. If Employee ID is selected here, it is not available in the Report
Body group box.
By selecting Available Columns, the sort order for each column is determined. Sort the columns by
ascending or descending order. Below is a list of the columns available to sort on. Keep in mind, that the
report includes additional columns; these are the only ones that have sorting capabilities.
Processing Group
Pay Date
Employee ID
Employee Last Name
Document Number
Use this tab to narrow down and more explicitly define the data to include in the report by
selecting from the Available Filters.
Use this tab to set up any Available Options for the report.
Options Description
Year-End Adjustments Select this option to include year-end adjustments on the report.
This entry type was designated during transaction entry.
Total by Payroll Select this option to total processing group information, such as
the hours taken and the hours accrued for the employees.
Use this tab to secure the active report so that other users cannot save their changes to it. The
user that selects the check box, and then saves the report, is the only user that can change or save it later.
This check box cannot be cleared by any user other than the user that locked the report.
MIP Fund Accounting
Payroll User's Guide
284

Chapter 10: History Reports
MIP Fund Accounting
Payroll User's Guide
285
Tip: To print totals by processing group, select "Total by Payroll" on the Options tab. You can also
include year-end adjustments by selecting "Year-End Adjustments."
Summary Check/Transaction Register
Access this report using Reports>Payroll>History>Summary Check/Transaction Register. It is
only available with the Payroll module; it is not available for Payroll Link users.
Use this report to print a summarized listing of checks, vouchers, and adjustments in a register style.
Report Criteria
Use this tab to assign a report name and determine whether or not to include it on the actual
report. The report name can be printed in the header or the footer of the report.
Current Transaction Dates are required to specify the date range for the data included in the report.
Use this tab to determine what data to include in the report and to define the report layout.
By selecting Available Items, the data is divided onto separate pages. The report starts a new page for
each item, and the item is printed in the page header of the report.
By selecting Available Columns, the data that appears in the body of the report is determined.
Column Description
Processing Group This is the processing group code assigned to the employee
using the Maintain>Payroll>Employee Information form.
Processing Group Title The title of the processing group code.
Payroll Type The payroll type—Adjust, Manual, Regular, Supplemental, or
Void.
Pay Date The date associated with the Payroll adjustment, check, or
voucher.
Pay Period Begin Date The pay period beginning date entered on the
Maintain>Payroll>Processing Groups - Pay Schedule Tab.
Pay Period End Date The pay period ending date entered on the
Maintain>Payroll>Processing Groups - Pay Schedule Tab.

Summary Check/Transaction Register
Column Description
Employee ID The employee's ID.
Employee Last Name The employee's last name.
Employee First Name The employee's first name.
First, MI Name The employee's first name and middle initial.
Employee Name The employee's full name including the middle initial.
Employee Status The status of the employee—Active, Inactive, or Terminated.
Social Security Number The social security number. Note that only the last four digits of
the number display. To view the entire social security number,
you must have been granted Display Sensitive Data rights for
Maintain>Payroll>Employee Information. These rights are
granted by the Administrator using Security>Set Up
Organization Menus form.
Class The employee's job class that was assigned using the
Maintain>Payroll>Employee Information>Job and Pay tab.
Payment Type The type of payment—Check, Voucher, or blank (for
adjustments).
Document Number The document number (Activities>Payroll>Print
Checks/Vouchers).
Document Date The document date (Activities>Payroll>Print Checks/Vouchers).
Timesheet Reference A unique tracking number provided for timesheets.
Document Description The document description.
Amount The amount of the check, voucher, or adjustment.
Spoiled A designation of Yes or No depending on if the check was
recorded as spoiled (Activities>Payroll>Check Spoilage).
Cash Account The system displays the cash account for which you are printing
checks. This default was set up by the Administrator using
Organization>Set Up Modules>Payroll>Load Checks/Vouchers
(Print).
MIP Fund Accounting
Payroll User's Guide
286

Chapter 10: History Reports
MIP Fund Accounting
Payroll User's Guide
287
Column Description
Accrual Account The system displays the accrued expenses payable account for
which you are printing checks. This default was set up by the
Administrator using Organization>Set Up
Modules>Payroll>Load Checks/Vouchers (Print).
Fund Code The code assigned to the fund segment. The report shows a
fund code—01, 02, 03, for example.
Interfund Due to Account The Due To Account, used to keep the funds in balance.
Accounts display when a Fund segment and the transaction
entry fund account is different from the automatic offset fund
account.
Interfund Due from Account The Due From Account, used to keep the funds in balance.
Accounts display when a Fund segment and the transaction
entry fund account is different from the automatic offset fund
account.
Use this tab to narrow down and more explicitly define the data to include in the report by
selecting from the Available Filters.
Use this tab to change the font and page setup for a report.
Use this tab to secure the active report so that other users cannot save their changes to it.
The user that selects the check box, and then saves the report, is the only user that can change or save it
later. This check box cannot be cleared by any user other than the user that locked the report.
Quick Employee Payroll Summary
Access this report using Reports>Payroll>History>Quick Employee Payroll Summary. It is only
available with the Payroll module; it is not available for Payroll Link users.
Use this report to review an employee's payroll balances which includes columns for Period-to-Date
(PTD), Quarter-to-Date (QTD), and Year-to-Date (YTD) amounts. You can also include associated
employer amounts on your report by selecting "Employer Amounts" on the Options tab. Employee
Payroll Summary is a fixed-format report. You cannot customize the columns in the report; the system

Quick Employee Payroll Summary
has already determined them. However, you can arrange the data using sort order on the Items by Page
and Available Filters.
Important! In order to view the entire Social Security Number, you must have been granted Display Sensitive Data rights for Maintain>Payroll>Employee Information in the active organization. These
rights are granted by the Administrator using Security>Set Up Organization Menus form. Otherwise,
only the last four digits of the Social Security Number displays.
Report Criteria
Use this tab to assign a report name and determine whether or not to include it on the actual
report. The report name can be printed in the header or the footer of the report.
Current Transaction Dates are required to specify the date range for the data included in the report.
Use this tab to determine the order that the data prints on the report. The Items by Page group
box is used to divide the data onto separate pages, where as the Report Body group box is used to select
the sort order (ascending or descending) of the columns. Selecting columns in the Report Body has no
bearing on what appears on the report; the columns are for sorting purposes only.
By selecting Employee ID in the Available Items group box, the data can be divided onto separate
pages. The report starts a new page for each Employee ID. Sort the Employee IDs by ascending or
descending order in the Sort column. If Employee ID is selected here, it is not available in the Report
Body group box.
By selecting Available Columns, the sort order for each column is determined. Sort the columns by
ascending or descending order. For example, if you want Employee IDs to be listed in alphabetical
order, select "Employee ID," then sort by "ASC." Below is a list of the columns available to sort on. Keep
in mind, that the report includes additional columns; these are the only ones that have sorting
capabilities.
Processing Group
Employee ID
Employee Last Name
Employee Status
Class
MIP Fund Accounting
Payroll User's Guide
288

Chapter 10: History Reports
MIP Fund Accounting
Payroll User's Guide
289
Position
Employee Type
Use this tab to narrow down and more explicitly define the data to include in the report by
selecting from the Available Filters.
For example, if you want to filter employees by processing group Admin, select "Processing Group,"
then "=" in the Compares To column. Finally, select "Admin" in the Criteria 1 column. The system only
prints data for the employees who have a processing group of Admin.
Use this tab to set up any Available Options for the report.
Options Description
Employer Amounts Select this option if you entered employer amounts and would
like to print them on the report.
Total by Payroll Select this option to total processing group information, such as
the hours taken and the hours accrued for the employees.
Use this tab to secure the active report so that other users cannot save their changes to it.
The user that selects the check box, and then saves the report, is the only user that can change or save it
later. This check box cannot be cleared by any user other than the user that locked the report.
Tip: To print totals by processing group, select "Total by Payroll" on the Options tab. You can also
include employer amounts on the report by selecting "Employer Amounts."
Labor Distribution
Access this report using Reports>Payroll>History>Labor Distribution. It is only available with the
Payroll module; it is not available for Payroll Link users.
Use this report to display a break down of labor hours and earnings by segment codes which was
entered on the Timesheets>Regular/Supplemental Timesheets form.
Advanced Security Users
Account Level Security is available for this report. This feature allows the Administrator to define the
account codes and related amounts a user can view in the report. When account level security is

Labor Distribution
activated by the Administrator for the organization (Security>Set Up Account Level Segments) and
enabled for a user or group (Security>Set Up Account Level Security), the report will only print account
information the user is allowed to see. Note that if a user does not have Account Level Security
enabled, the user will see all account codes.
If the "Print Disclaimer on Report" check box is selected on the Security>Set Up Account Level
Segments form, "This report may be affected by Account Level Security" prints in the header of this
report. In that case, an * also prints after the report title.
Report Criteria
Use this tab to assign a report name and determine whether or not to include it on the actual
report. The report name can be printed in the header or the footer of the report.
Current Transaction Dates are required to specify the date range for the data included in the report.
Use this tab to determine what data to include in the report and to define the report layout.
By selecting Available Items, the data is divided onto separate pages. The report starts a new page for
each item, and the item is printed in the page header of the report.
By selecting Available Columns, the data that appears in the body of the report is determined.
Column Description
Processing Group This is the processing group code assigned to the employee
using the Maintain>Payroll>Employee Information form.
Processing Group Title The title of the processing group code.
Employee ID The employee's ID.
Employee Last Name The employee's last name.
Employee First Name The employee's first name.
First, MI Name The employee's first name and middle initial.
Employee Name The employee's full name, including the middle initial.
Employee Status The status of the employee—Active, Inactive, or Terminated.
Class The employee's job class that was assigned using the
Maintain>Payroll>Employee Information>Job and Pay tab.
MIP Fund Accounting
Payroll User's Guide
290

Chapter 10: History Reports
MIP Fund Accounting
Payroll User's Guide
291
Column Description
Position The employee's position, such as Administrator or Program
Rep.
Employee Type The employee type, such as full-time or part-time.
Earning Code The earning code selected on the employee's timesheet.
Earning Title The title of the earning code.
Payroll Type The payroll type—Adjust, Manual, Regular, Supplemental, or
Void.
Pay Date The date on the Payroll check (Activities>Payroll>Calculate
Payroll).
Pay Period Begin Date The pay period beginning date entered on the
Maintain>Payroll>Processing Groups - Pay Schedule Tab.
Pay Period End Date The pay period ending date entered on the
Maintain>Payroll>Processing Groups - Pay Schedule Tab.
Document Date The document date (Activities>Payroll>Print Checks/Vouchers).
Effective Date The Accrual Date entered on the Activities>Payroll>Transfer to
Accounting form.
Transferred A designation of Yes or No depending on if the payroll data has
been transferred to Accounting (Activities>Payroll>Transfer to
Accounting).
{Segment Name} Code The code assigned to the segment. The report shows a segment
code—01, 201, 11001, for example. The report prints one
column for each segment, such as Fund Code or GL Code.
Distribution Code The distribution code of the labor earnings.
Distribution Code
Description
The description of the distribution code.
Hours (four decimals) The hours based on the labor hours. Displays in a four decimal
format. (X.XXXX)
Hours (two decimals) The hours based on the labor hours. Displays in a two decimal

Leave Liability
Column Description
format. (X.XX)
Earnings The amount based on the labor earnings.
{User Defined Field} -
Employees
An employee type user defined field and its data. There is a
separate column for each field that was created by the
Administrator using Organization>Set Up User Defined Fields.
Use this tab to narrow down and more explicitly define the data to include in the report by
selecting from the Available Filters.
Use this tab to set up any Available Options for the report.
Options Description
Summarize Amounts Select this option to add amounts together and display one line
item with the total amount. All document information must be
identical for the system to add items together.
Use this tab to change the font and page setup for a report.
Use this tab to secure the active report so that other users cannot save their changes to it. The
user that selects the check box, and then saves the report, is the only user that can change or save it later.
This check box cannot be cleared by any user other than the user that locked the report.
Leave Liability
Access this report using Reports>Payroll>History>Leave Liability. It is only available with the
Payroll module; it is not available for Payroll Link users.
Use this report to calculate the leave liability (a monetary amount) based on accrued leave hours and
employee hourly rates (or equivalent hourly rates for salaried employees).
Report Criteria
Use this tab to assign a report name and determine whether or not to include it on the actual
report. The report name can be printed in the header or the footer of the report.
MIP Fund Accounting
Payroll User's Guide
292

Chapter 10: History Reports
MIP Fund Accounting
Payroll User's Guide
293
Use this tab to determine what data to include in the report and to define the report layout.
By selecting Available Items, the data is divided onto separate pages. The report starts a new page for
each item, and the item is printed in the page header of the report.
By selecting Available Columns, the data that appears in the body of the report is determined.
Column Description
Processing Group The processing group code that was assigned to the employee
using the Maintain>Payroll>Employee Information form.
Processing Group Title The title of the processing group code.
Employee ID The employee's ID.
Employee Last Name The employee's last name.
Employee First Name The employee's first name.
First, MI Name The employee's first name and middle initial.
Employee Name The employee's full name, including the middle initial.
Employee Status The status of the employee—Active, Inactive, or Terminated.
Social Security Number The social security number. Note that only the last four digits of
the number display. To view the entire social security number,
you must have been granted Display Sensitive Data rights for
Maintain>Payroll>Employee Information. These rights are
granted by the Administrator using Security>Set Up
Organization Menus form.
Class The employee's job class that was assigned using the
Maintain>Payroll>Employee Information>Job and Pay tab.
Position The employee's position, such as Administrator or Program
Rep.
Employee Type This is the employee type, such as full-time or part-time.
Pay Type A designation of Salaried or Hourly, depending on what pay type
was selected.

Leave Liability
Column Description
Hire Date The employee's date of hire.
Termination Date The date the employee was terminated.
Leave Code The leave code selected on the employee's timesheet.
Leave Code Status The status of the leave code—Active, Inactive, or Discontinued.
The report shows A, I, or D.
Leave Title The title of the leave code.
Calculation Method Code The calculation method for the leave code. The system displays
one of the following codes:
FN (Fixed Number of Hours)
FP (Fixed Percentage of Hours Worked)
AT (Amount on Timesheet)
PT (Percentage on Timesheet)
Calculation Method Title The title of the calculation method for the leave code, such as
Fixed Number of Hours, Fixed Percentage of Hours Worked,
Amount on Timesheet, or Percentage on Timesheet.
Hours The number of hours accrued for a leave code.
Rate An employee's hourly pay rate. This rate was set up on the Job
and Pay tab.
Liability The monetary amount calculated for an employee's leave
(eligible hours times their hourly pay rate).
Service Years The number of years the employee has been employed with the
organization.
Use this tab to narrow down and more explicitly define the data to include in the report by
selecting from the Available Filters.
Use this tab to set up any Available Options for the report.
MIP Fund Accounting
Payroll User's Guide
294
Chapter 10: History Reports
MIP Fund Accounting
Payroll User's Guide
295
Options Description
Summarize Amounts Select this option to add amounts together and display one line
item with the total amount. All document information must be
identical for the system to add items together.
Suppress Lines with All Zeros Select this option so that documents with zero amounts do not
print. This eliminates records having zero in all amount columns.
If it is not selected, every line prints, even if it has a zero value.
Use this tab to change the font and page setup for a report.
Use this tab to secure the active report so that other users cannot save their changes to it.
The user that selects the check box, and then saves the report, is the only user that can change or save it
later. This check box cannot be cleared by any user other than the user that locked the report.
Chapter 11: Tax Worksheet Reports
Federal Tax Worksheet
Access this report using Reports>Payroll>Payroll Tax Worksheets>Federal. It is only available
with the Payroll module; it is not available for Payroll Link users.
Use this report to view summarized federal tax employee amounts, employer amounts, subject and gross
taxable earnings in Period-to-Date (PTD), Quarter-to-Date (QTD), and Year-to-Date (YTD) columns.
Report Criteria
Use this tab to assign a report name and determine whether or not to include it on the actual
report. The report name can be printed in the header or the footer of the report.
Current Transaction Dates are required to specify the date range for the data included in the report.
Use this tab to determine what data to include in the report and to define the report layout.
By selecting Available Items, the data is divided onto separate pages. The report starts a new page for
each item, and the item is printed in the page header of the report.
By selecting Available Columns, the data that appears in the body of the report is determined.
Column Description
Tax Type The tax type code (Maintain>Payroll>Federal Taxes). A list of
available codes are as follows:
FIT (Federal Income Tax)
SS (Social Security Tax)
MC (Medicare)
FUTA (Federal Unemployment Tax)
Processing Group This is the processing group code assigned to the employee
using the Maintain>Payroll>Employee Information form. The
report shows the code's name, such as Admin or Parttime.
MIP Fund Accounting
Payroll User's Guide
296

Chapter 11: Tax Worksheet Reports
MIP Fund Accounting
Payroll User's Guide
297
Column Description
Class The employee's job class that was assigned using the
Maintain>Payroll>Employee Information>Job and Pay tab.
Employee ID The employee's ID.
Employee Last Name The employee's last name.
Employee First Name The employee's first name.
First, MI Name The employee's first name and middle initial.
Employee Name The employee name associated with the Employee ID.
Employee Status The status of the employee—Active, Inactive, or Terminated.
Social Security Number The employee's social security number. Note that only the last
four digits of the number display. To view the entire social
security number, you must have been granted Display Sensitive
Data rights for Maintain>Payroll>Employee Information. These
rights are granted by the Administrator using Security>Set Up
Organization Menus form.
Tax Title The title of the tax type—Federal Income Tax, Social Security
Tax, Medicare, and Federal Unemployment Tax
(Maintain>Payroll>Federal Taxes).
Employee Tax PTD The period-to-date employee tax. This tax is based on the
Current Transaction Dates entered on the Setup tab.
Employer Tax PTD The period-to-date employer tax. This tax is based on the
Current Transaction Dates entered on the Setup tab.
Subject Earnings PTD The period-to-date subject earnings. This amount is based on
the Current Transaction Dates entered on the Setup tab.
Gross Taxable Earnings
PTD
The period-to-date gross subject earnings. This amount is
based on the Current Transaction Dates entered on the Setup
tab.
Employee Tax QTD The quarter-to-date employee tax. This tax is based on the four
quarters in a calendar year.

Federal Tax Worksheet
Column Description
Employer Tax QTD The quarter-to-date employer tax. This tax is based on the four
quarters in a calendar year.
Subject Earnings QTD The quarter-to-date subject earnings. This amount is based on
the four quarters in a calendar year.
Gross Taxable Earnings
QTD
The quarter-to-date gross subject earnings. This amount is
based on the four quarters in a calendar year.
Employee Tax YTD The year-to-date employee tax based on the current calendar
year.
Employer Tax YTD The year-to-date employer tax based on the current calendar
year.
Subject Earnings YTD The year-to-date subject earnings based on the current
calendar year.
Gross Taxable Earnings
YTD
The year-to-date gross subject earnings based on the current
calendar year.
Use this tab to narrow down and more explicitly define the data to include in the report by
selecting from the Available Filters.
Use this tab to change the font and page setup for a report.
Use this tab to secure the active report so that other users cannot save their changes to it. The
user that selects the check box, and then saves the report, is the only user that can change or save it later.
This check box cannot be cleared by any user other than the user that locked the report.
MIP Fund Accounting
Payroll User's Guide
298
Chapter 11: Tax Worksheet Reports
MIP Fund Accounting
Payroll User's Guide
299
Other Tax Worksheet
Access this report using Reports>Payroll>Payroll Tax Worksheets>Other. It is only available
with the Payroll module; it is not available for Payroll Link users.
Use this report to view summarized other withholding tax employee amounts, employer amounts,
subject and gross taxable earnings in Period-to-Date (PTD), Quarter-to-Date (QTD), and Year-to-Date
(YTD) columns.
Report Criteria
Use this tab to assign a report name and determine whether or not to include it on the actual
report. The report name can be printed in the header or the footer of the report.
Current Transaction Dates are required to specify the date range for the data included in the report.
Use this tab to determine what data to include in the report and to define the report layout.
By selecting Available Items, the data is divided onto separate pages. The report starts a new page for
each item, and the item is printed in the page header of the report.
By selecting Available Columns, the data that appears in the body of the report is determined.
Column Description
Tax Type The tax type code (Maintain>Payroll>Other Taxes). A list of
available codes are as follows:
LWT (Employee Paid Tax)
LER (Employer Paid Tax)
Processing Group This is the processing group code assigned to the employee
using the Maintain>Payroll>Employee Information form. The
report shows the code's name, such as Admin or Parttime.
Other Tax Code The code for the other tax.
Employer Tax ID The employer's tax identification number that was assigned
using the Maintain>Payroll>Other Taxes form.
Class The employee's job class that was assigned using the

Other Tax Worksheet
Column Description
Maintain>Payroll>Employee Information>Job and Pay tab.
Employee ID The employee's ID.
Employee Last Name The employee's last name.
Employee First Name The employee's first name.
First, MI Name The employee's first name and middle initial.
Employee Name The employee name associated with the Employee ID.
Employee Status The status of the employee—Active, Inactive, or Terminated.
Social Security Number The employee's social security number.Note that only the last
four digits of the number display. To view the entire social
security number, you must have been granted Display Sensitive
Data rights for Maintain>Payroll>Employee Information. These
rights are granted by the Administrator using Security>Set Up
Organization Menus form.
Tax Title The title of the tax type—Employee Paid Tax (LWT) and
Employer Paid Tax (LER) that was entered using the
Maintain>Payroll>Other Taxes.
Other Tax Title The title associated with the other tax code.
Employee Tax PTD The period-to-date employee tax. This tax is based on the
Current Transaction Dates entered on the Setup tab.
Employer Tax PTD The period-to-date employer tax. This tax is based on the
Current Transaction Dates entered on the Setup tab.
Employee Subject
Earnings PTD
The period-to-date employee subject earnings. This amount is
based on the Current Transaction Dates entered on the Setup
tab.
Employer Subject Earnings
PTD
The period-to-date employee subject earnings. This amount is
paid by the employer and based on the Current Transaction
Dates entered on the Setup tab.
Gross Taxable Earnings The period-to-date gross subject earnings. This amount is
MIP Fund Accounting
Payroll User's Guide
300

Chapter 11: Tax Worksheet Reports
MIP Fund Accounting
Payroll User's Guide
301
Column Description
PTD based on the Current Transaction Dates entered on the Setup
tab.
Employee Tax QTD The quarter-to-date employee tax. This tax is based on the four
quarters in a calendar year.
Employer Tax QTD The quarter-to-date employer tax. This tax is based on the four
quarters in a calendar year.
Employee Subject
Earnings QTD
The quarter-to-date employee subject earnings. This amount is
based on the four quarters in a calendar year.
Employer Subject Earnings
QTD
The quarter-to-date employee subject earnings. This amount is
paid by the employer and based on the four quarters in a
calendar year.
Gross Taxable Earnings
QTD
The quarter-to-date gross subject earnings. This amount is
based on the four quarters in a calendar year.
Employee Tax YTD The year-to-date employee tax based on the current calendar
year.
Employer Tax YTD The year-to-date employer tax based on the current calendar
year.
Employee Subject
Earnings YTD
The year-to-date employee subject earnings, based on the
current calendar year.
Employer Subject Earnings
YTD
The year-to-date employee subject earnings, paid by the
employer, and based on the current calendar year.
Gross Taxable Earnings
YTD
The year-to-date gross subject earnings based on the current
calendar year.
Use this tab to narrow down and more explicitly define the data to include in the report by
selecting from the Available Filters.
Use this tab to change the font and page setup for a report.

941 Worksheet
Use this tab to secure the active report so that other users cannot save their changes to it. The
user that selects the check box, and then saves the report, is the only user that can change or save it later.
This check box cannot be cleared by any user other than the user that locked the report.
941 Worksheet
Access this report using Reports>Payroll>Payroll Tax Worksheets>941 Worksheet. It is only
available with the Payroll module; it is not available for Payroll Link users.
Use this report to summarize federal tax amounts and tax liability—except for Federal Unemployment Tax.
This report helps when completing the Form 941 and the Schedule B (Form 941). The 941 Worksheet is a
fixed-format report. You cannot customize the columns in the report; the system has already determined
them.
Earning Codes with Contribute to Net Pay Only check box selected, are excluded from the amounts.
These Earning Codes were set up to process Employee Reimbursement and Advances through regular
payroll processing (Maintain>Payroll>Earning Codes).
Note: Additional Medicare Tax for high income wage earners: When an employee’s wages subject to
Medicare exceed $200,000.00 for the calendar year an additional .09% of Medicare tax will be added to
the Employee portion and withheld at 2.35%. For those employees who exceed the $200,000.00
threshold, this additional amount is reported separately on the report.
Report Criteria
Use this tab to assign a report name and determine whether or not to include it on the actual
report. The report name can be printed in the header or the footer of the report.
Current Transaction Dates are required to specify the date range for the data included in the report.
Use this tab to secure the active report so that other users cannot save their changes to it. The
user that selects the check box, and then saves the report, is the only user that can change or save it later.
This check box cannot be cleared by any user other than the user that locked the report.
MIP Fund Accounting
Payroll User's Guide
302

Chapter 11: Tax Worksheet Reports
MIP Fund Accounting
Payroll User's Guide
303
Tips: Additional Medicare Reporting in Aatrix:
The system accommodates the break-out of Additional Medicare Wages and Additional Medicare
Withholding needed for 941 reporting by taking the difference between the Employee’s Medicare
Withholding and the Employer’s Medicare Tax, recorded in the system for each Pay Date. These
values will always be the same unless Additional Medicare Tax has been withheld from the employee
because their annual earnings have exceeded $200,000.00. If this is the case the Medicare
Withholding will be greater than the Employer’s Medicare Tax. The system then divides the difference
by.09% to derive the break-out for Additional Medicare Wages.
Adjustments:
If adjustments are needed to the Additional Medicare Tax or Additional Medicare Wages reported
on the 941 this can be accomplished by going to Setup/ Adjust Employee Balances and entering a
Medicare tax adjustment for both Employee Amount and Employer Amount. As long as the
Employee Amount is larger than the Employer Amount being adjusted the system will generate an
Additional Medicare Withholding and an Additional Medicare Wage adjustment based on the
formula described above.
Calculate W-2 InformationPrior to running the W-2 Information report, you must calculate the W-2 totals for the tax year using
Reports>Payroll>Payroll Tax Worksheets>Calculate W-2 Information.
Calculate W-2s
Access this form using Reports>Payroll>Payroll Tax Worksheets>Calculate W-2 Information. It
is only available with the Payroll module; it is not available for Payroll Link users.
Use this form to calculate W-2 information for your employees. You must first enter the appropriate tax
year, and then select the employees for which you want to calculate W-2s. Once you click the Start
button, the system calculates the amount of wages paid and taxes withheld for each employee for the
selected tax year. Once this calculation process is completed, you can run and review records using the
Reports>Payroll>Payroll Tax Worksheet>W-2 Information report.
Earning Codes with Contribute to Net Pay Only check box selected, are excluded from the amounts.
These Earning Codes were set up to process Employee Reimbursement and Advances through regular
payroll processing (Maintain>Payroll>Earning Codes).

Calculate W-2 Information
You are required to file a Form W-2 for each employee from whom income, social security, or Medicare
taxes have been withheld.
To produce or eFile print-ready W-2 and W-3 forms, use "Tax Forms and eFiling by Aatrix" (page 182)
(Activities>Payroll>Tax Reporting>Tax Forms and eFiling by Aatrix ®).
Note: You must file electronically, if you need to file 250 or more W-2 Forms.
Fields
Tax Year: Enter the year for which the W-2 forms are being produced, or accept the default year.
Calculate W-2s: The system displays the Employee ID, Name, Status, State, Processing Group, Class,
and Position. A check mark displays in the Calculated column if the record has already been calculated.
This table lists all employees who need a W-2 form for the year that is specified in the Tax Year box.
Click the column heading to sort by that group. This allows employee records to be calculated in smaller
groups.
MIP Fund Accounting
Payroll User's Guide
304

Chapter 11: Tax Worksheet Reports
MIP Fund Accounting
Payroll User's Guide
305
Tips: When you click Start, if the system displays a message asking if you want to recalculate, this means
you have selected an employee that has already been calculated. Click OK to recalculate; click
Cancel to return to the form and clear previously calculated employee records.
To delete an employee record, select the record by placing a check mark in the first column, and then
click Delete.
To select or clear all employees in the table, click or respectively.
When you produce W-2 forms, you are not actually calculating the W-2 information. The system
performs these calculations every time you calculate payroll (Activities>Payroll>Calculate Payroll).
When you were setting up payroll, be sure to include the correct box information, so that the data in
your W-2s are accurate.
On the Maintain>Payroll>Federal, State and Other Taxes forms, you must enter all relevant information
(such as GL expense and liability accounts), including an Employer Tax ID for each state and other taxes.
On the Maintain>Payroll>Employee Information form, enter:
The employee's tax information (Federal, State, and Other Tax tabs)
The employee's Medicare Qualified Government Employee status (W-2 tab)
The employee's W-2 Box 13 items (W-2 tab)
On the first tab of the Maintain>Payroll>Earning, Benefit, and/or Deduction Codes forms, enter (when
necessary) W-2 Box Number 7, 8, 10, 11, 12, or 14. Also, enter applicable federal, state, and other taxes
on the Applicable Taxes tab.
If a W-2 form is incorrect, or if you are not getting any totals on the form, you need to make sure you have
entered this information correctly. If you have not, the system will not calculate taxes correctly during
payroll calculation, and your W-2 form will be incorrect.
W-2 Information
Access this report using Reports>Payroll>Payroll Tax Worksheets>W-2 Information. It is only
available with the Payroll module; it is not available for Payroll Link users.

W-2 Information
Use this report to review all W-2 information for your employees. Prior to running this report, you must
calculate the W-2 totals for the tax year using Reports>Payroll>Payroll Tax Worksheets>Calculate W-2
Information. Once it has been successfully calculated, you can access the W-2 Information report.
In the header of the report, the system prints the Preliminary W-2 Count. This is the number of W-2
records; however, the actual W-2s that are printed may vary. For example, you could have multiple W-2s if
you have more than four Box 12 Items. The remaining Box 12 Items will print on the additional W-2 Forms.
Report Criteria
Use this tab to assign a report name and determine whether or not to include it on the actual
report. The report name can be printed in the header or the footer of the report.
Use this tab to determine what data to include in the report and to define the report layout.
By selecting Available Items, the data is divided onto separate pages. The report starts a new page for
each item, and the item is printed in the page header of the report.
By selecting Available Columns, the data that appears in the body of the report is determined.
Column Description
Processing Group Code The processing group code was assigned to the employee
using the Maintain>Payroll>Employee Information form.
Processing Group Title The title of the processing group code.
Class The employee's class, such as Admin or Staff.
Position The employee's position, such as Administrator or Program
Rep.
W-2 Year The tax year that was used to calculate W-2s for the associated
employee (Reports>Payroll>Payroll Tax Worksheets>Calculate
W-2 Information).
Employee ID The employee ID for the calculated W-2s.
Employee Status The status of the employee—Active, Inactive, or Terminated.
Employee Last Name The employee's last name.
Employee First Name The employee's first name.
MIP Fund Accounting
Payroll User's Guide
306

Chapter 11: Tax Worksheet Reports
MIP Fund Accounting
Payroll User's Guide
307
Column Description
First, MI Name The employee's first name and middle initial.
Employee Name The employee's full name, including the middle initial.
Social Security Number The social security number associated with the Employee ID.
Note that only the last four digits of the number display. To view
the entire social security number, you must have been granted
Display Sensitive Data rights for Maintain>Payroll>Employee
Information. These rights are granted by the Administrator using
Security>Set Up Organization Menus form.
Spouse's Social Security
Number
The spouse's social security number (only used if employee is
married and withholding tax state is Puerto Rico). Note that only
the last four digits of the number display. To view the entire
social security number, you must have been granted Display
Sensitive Data rights for Maintain>Payroll>Employee
Information. These rights are granted by the Administrator using
Security>Set Up Organization Menus form.
Address The employee's address entered on the
Maintain>Payroll>Employee Information>Address tab.
City The city where the employee resides entered on the
Maintain>Payroll>Employee Information form.
State The state where the employee resides entered on the
Maintain>Payroll>Employee Information form.
ZIP The zip code where the employee resides entered on the
Maintain>Payroll>Employee Information form.
Country The country where the employee resides entered on the
Maintain>Payroll>Employee Information form.
Hire Date The employee's date of hire entered on the
Maintain>Payroll>Employee Information form.
MQGE A designation of Yes or No, depending on if "Medicare Qualified
Governmental Employee" was selected on the
Maintain>Payroll>Employee Information>W-2 tab.

W-2 Information
Column Description
Wages, Tips, Other
Compensation (Box 1)
The wages, tips, and other compensation that was paid to the
employee for the W-2 year.
Federal Income Tax
Withheld (Box 2)
The Federal Income Tax Withholding calculated for Box 2.
Social Security Wages
(Box 3)
The Social Security wages calculated for Box 3.
Social Security Tax
Withheld (Box 4)
The Social Security tax withholding calculated for Box 4.
Medicare Wages and Tips
(Box 5)
The Medicare wages and tips calculated for Box 5.
Medicare Tax Withheld
(Box 6)
The Medicare tax withholding calculated for Box 6.
Social Security Tips (Box 7) The Social Security tips calculated for Box 7.
Allocated Tips (Box 8) The Allocated tips calculated for Box 8.
Advance EIC Payment
(Box 9)
The Advance EIC payment calculated for Box 9.
Dependant Care Benefits
(Box 10)
The Dependent Care Benefits calculated for Box 10.
Nonqualified Plans (Box 11
- Section 457)
The Nonqualified plans—Section 457—calculated for Box 11.
Nonqualified Plans (Box 11
- Other)
The total of all Nonqualified plans—except for Section 457.
Codes (Box 12 Code) If Box 12 was selected when setting up W-2 information
(Maintain>Payroll>Earning, Benefit, and Deduction Codes), the
system displays its code here. This is the Box 12 code (such as,
A-H, J-N, P, R-T, V, W, Y, Z, AA, BB, CC, DD, EE, FF, GG or
HH) which prints on the left side of the vertical bar on the W-2.
Codes (Box 12 Amount) The Box 12 amount, which prints on the right side of the vertical
bar on the W-2.
MIP Fund Accounting
Payroll User's Guide
308

Chapter 11: Tax Worksheet Reports
MIP Fund Accounting
Payroll User's Guide
309
Column Description
Statutory Employee (Box
13)
A designation of Y (Yes) or N (No), depending on if the Box 13
Item, "Statutory Employee" was selected.
Retirement Plan (Box 13) A designation of Y (Yes) or N (No), depending on if the Box 13
Item, "Retirement Plan" was selected.
Third Party Sick Pay (Box
13)
A designation of Y (Yes) or N (No), depending on if the Box 13
Item, "Third Party Sick Pay" was selected.
Other (Box 14 Code) Any other information you want to give your employee. For this
box number you could have entered any single-character code
you wanted. The Box Code serves as a "label" for the optional
amount displayed in Box 14 Amount.
Other (Box 14 Amount) An optional amount paid for any other information you want to
give your employee (such as, health insurance premiums
deducted, nontaxable income, voluntary after-tax contributions,
education assistance payments, and parsonage allowance).
State Code (Box 15) The state code associated with this W-2.
Employer's State ID
Number (Box 15)
The state tax ID that is assigned to the organization.
State Wages, Tips, etc.
(Box 16)
The amount subject to state tax.
State Income Tax (Box 17) The state tax amount withheld from the employee's paycheck.
Other Taxes Wages, Tips,
etc. (Box 18)
The amount subject to other withholding tax.
Other Taxes Income Tax
(Box 19)
The other withholding tax amount withheld from the employee's
paycheck.
Other Taxes Name (Box
20)
The name for the other withholding tax.
Other Taxes Employer ID The employer tax ID that is assigned to the organization. This is
not printed on the W-2.

W-2 Information
Use this tab to narrow down and more explicitly define the data to include in the report by
selecting from the Available Filters.
Use this tab to set up any Available Options for the report.
Options Description
Summarize Amounts Select this option to add amounts together and display one line
item with the total amount. All document information must be
identical for the system to add items together.
Use this tab to change the font and page setup for a report.
Use this tab to secure the active report so that other users cannot save their changes to it. The
user that selects the check box, and then saves the report, is the only user that can change or save it later.
This check box cannot be cleared by any user other than the user that locked the report.
MIP Fund Accounting
Payroll User's Guide
310

MIP Fund Accounting
Payroll User's Guide
311
Index
9
941 Worksheet 302
A
accruals
examples 169, 173, 177
setting up 1
transferring payroll 167
addresses
employees 44
adjustments
employee balances 156
B
benefit codes
calculation methods 71
distribution 75
earnings 73
pay schedules 73
printing 213
reporting on 213
setting up 69
taxes 74
W-2 information 69
Benefits History report 260
Box 13 items 56
C
Calculated Check Register 237, 241
calculating
garnishments 119
payroll 116
W-2s 303
calculation methods
benefit codes 71
deduction codes 77
earning codes 65
leave codes 87
other employee taxes 25
other employer taxes 35
workers’ compensation codes 83
Check/Transaction Register 283
checks
laser and continuous 142
manual payroll 145
paying employees 135
payroll 135
spoilage 155

Index
voiding 151
codes
benefit 69
deduction 76
distribution 4
leave 86
processing group 39
workers’ compensation 81
continuous forms 142
copying
distribution codes 8
customer statements
email templates 90
D
deduction codes
calculation methods 77
earnings 79
garnishments 119, 122
pay schedules 79
printing 219
reporting on 219
setting up 76
taxes 80
W-2 information 76
Deductions History report 264
default timesheets
benefits 97
deductions 98
earnings 96
leave 100
setting up 94
summarization 101
workers’ compensation 99
direct deposit
employee information 48
reporting on 245
disbursing accounts 1
Distribute Labor Hours/Earnings 165
distributing
earnings 165
labor hours 165
distributing labor hours/earnings 165
distribution codes
copying 8
federal taxes 16
payroll 4
printing 187
reporting on 187
setting up 4
E
earning codes
calculation methods 65
pay schedules 67
printing 208
reporting on 208
taxes 68
MIP Fund Accounting
Payroll User's Guide
312

Index
tracking labor hours 165
Earnings History report 255
eFiling by Aatrix 182
Email Templates report 230
emailing
payroll vouchers 135
setting up templates 90
template reporting 230
employee information
addresses 44
direct deposit 48
email vouchers 57
federal taxes 50
jobs 45
local taxes 55
notes 60
other taxes 55
printing 199, 201
renaming 62
reporting on 199, 201
salaries 45
setting up 41
state taxes 52
user defined fields 61
W-2s 56
employees
adjusting balances 156
calculating payroll 116
calculating W-2s 303
email vouchers 57
emailing vouchers 135
federal taxes 11
garnishments 119, 122
manual checks 145
modifying payroll 124
paying 135
payroll summary 287
printing checks/vouchers 135
renaming 62
reprinting pay stub 164
reviewing payroll 124
setting up 41
employer
federal taxes 13
local taxes 35, 55
other taxes 35, 55
paid taxes 55
employer local taxes 55
F
federal taxes
distribution 16
employee 11
employees 50
employer 13
FUTA 15
printing 188
reporting on 188
MIP Fund Accounting
Payroll User's Guide
313

Index
setting up 10
worksheet 296
FICA
employee 11
employer 13
FTE 255
full-time equivalent 255
FUTA
credit rate by state 20
federal taxes 15
G
general ledger reports
Email Templates List 230
H
history
benefits 260
deductions 264
earnings 255
labor distribution 289
leave 279
leave liability 292
payroll checks/transactions 285
taxes 273
workers’ compensation 268
I
interfund accounts 1
invoices
email templates 90
L
Labor Distribution History report 289
laser forms 142
leave codes
calculation methods 87
earnings 88
pay schedules 89
printing 226
reporting on 226
setting up 86
Leave History report 279
Leave Liability report 292
local taxes
distribution 37
employees 55
employer 35, 55
printing 194
reporting on 194
setting up 24
withholding 24-25, 55
withholding rate tables 25
worksheet 299
MIP Fund Accounting
Payroll User's Guide
314

Index
M
manual checks
benefits 148
deductions 149
earnings 147
entering 145
leave 151
taxes 150
workers’ compensation 149
medicare qualified government employees 57
module setup 1
O
other taxes
distribution 37
employees 55
employer 35, 55
printing 194
reporting on 194
setting up 24
withholding 24-25, 55
withholding rate tables 25
worksheet 299
P
pay cycles 39
pay rates 45
pay schedules 40
paying
employees 135
payroll
adjusting employee balances 156
benefit codes 69
calculating 116
calculating W-2s 303
check spoilage 155
deduction codes 76
default timesheets 94
distributing labor hours/earnings 165
distribution codes 4
email employee vouchers 57
emailing vouchers 135
employee information 41
federal taxes 10
garnishments 119, 122
leave codes 86
local taxes 24
manual checks 145
modifying calculated 124
other taxes 24
paying employees 135
printing checks/vouchers 135
processing groups 39
regular timesheets 102
renaming employee 62
reprinting employee pay stub 164
MIP Fund Accounting
Payroll User's Guide
315

Index
reviewing calculated 124
setting up module 1
state taxes 17
supplemental timesheets 102
transferring to accounting 167
undo transfer to accounting 178
voiding checks 151
workers’ compensation codes 81
payroll reports 185
941 Worksheet 302
Benefit Codes List 213
Benefits History 260
Calculated Check Register 237, 241
Check/Transaction Register 283
Deduction Codes List 219
Deductions History 264
Distribution Codes List 187
Earning Codes List 208
Earnings History 255
Employee Information 199
Employee Information List 201
Employee Payroll Summary 287
Federal Tax Worksheet 296
Federal Taxes List 188
Labor Distribution History 289
Leave Codes List 226
Leave History 279
Leave Liability 292
Other Tax Worksheet 299
Other Taxes List 194
Pre-Transfer Register 243
Processing Groups List 198
State Taxes List 191
Summary Check/Transaction
Register 285
Taxes History 273
Timesheets 232-233
Voucher Register 245
W-2 Information 305
Workers’ Compensation Codes List 223
Workers’ Compensation History 268
percentages 4, 25, 35
Pre-Transfer Register 243
printing
benefit codes 213
deduction codes 219
distribution codes 187
earning codes 208
employee information 199, 201
federal taxes 188
leave codes 226
local taxes 194
other taxes 194
payroll checks/vouchers 135
processing groups 198
state taxes 191
timesheets 232-233
workers’ compensation codes 223
MIP Fund Accounting
Payroll User's Guide
316

Index
processing groups
calculating payroll 116
pay schedule 40
printing 198
reporting on 198
setting up 39
R
rate tables 25
registers
calculate payroll 237
calculated payroll 241
payroll checks/transactions 283, 285
payroll pre-transfer 243
regular timesheets
benefits 106
deductions 107
earnings 105
leave 109
setting up 102
summary 110
workers’ compensation 108
renaming employees 62
reports 185
941 Worksheet 302
Benefit Codes List 213
Benefits History 260
Calculated Check Register 237, 241
Check/Transaction Register 283
Deduction Codes List 219
Deductions History 264
Distribution Codes List 187
Earning Codes List 208
Earnings History 255
Email Templates 230
Employee Information 199
Employee Information List 201
Employee Payroll Summary 287
Federal Tax Worksheet 296
Federal Taxes List 188
Labor Distribution History 289
Leave Codes List 226
Leave History 279
Leave Liability 292
Other Tax Worksheet 299
Other Taxes List 194
Pay Codes History 248
payroll history 248, 255, 260, 264, 268,
273, 279, 283, 285, 287, 292
payroll lists 187-188, 191, 194, 198-199,
201, 208, 213, 219, 223, 226
payroll processing 232-233, 237, 241, 243,
245, 305
payroll tax worksheets 296, 299, 302
Pre-Transfer Register 243
Processing Groups List 198
State Taxes List 191
Summary Check/Transaction Register 285
Taxes History 273
MIP Fund Accounting
Payroll User's Guide
317

Index
Timesheets 232-233
Voucher Register 245
W-2 Information 305
Workers’ Compensation Codes List 223
Workers’ Compensation History 268
reprint
employee pay stub 165
reprinting
employee pay stub 164
S
salaries 45
setting up garnishments 122
spoilage
payroll checks 155
state taxes
distribution 22
employees 52
forms 182
FUTA credit rate 20
printing 191
reporting on 191
setting up 17
unemployment 20, 52
withholding 20, 52
Summary Check/Transaction Register 285
supplemental timesheets
benefits 106
deductions 107
earnings 105
leave 109
setting up 102
summary 110
workers’ compensation 108
T
Tax Forms by Aatrix 182
tax worksheets
941 302
federal 296
local 299
other 299
taxable earnings
benefit codes 74
deduction codes 80
earning codes 68
taxes
employee manual checks 150
employees 50, 52, 55, 182
federal 10, 182
FICA 11, 13
local 24
other 24
reporting history 273
state 17, 182
timesheets
default 94
printing 232-233
MIP Fund Accounting
Payroll User's Guide
318

Index
regular 102
reporting on 232-233
supplemental 102
tracking
distribute labor hours/earnings 165
transferring
payroll to accounting 167
undo accounting 178
U
user defined fields 61
V
voiding
payroll checks 151
Voucher Register 245
vouchers
laser and continuous 142
payroll 135
W
W-2s
benefit codes 69
calculating 303
deduction codes 76
eFiling 182
employee information 56
printing 182
reporting on 305
W-3s 182
workers’ compensation codes
calculation methods 83
distribution 85
earnings 84
printing 223
reporting on 223
setting up 81
Workers’ Compensation History report 268
worksheets
941 302
federal taxes 296
local taxes 299
other taxes 299
MIP Fund Accounting
Payroll User's Guide
319