payment provider guide - the sitecore developer network
TRANSCRIPT

Sitecore E-Commerce Services 2.1 Payment Provider Guide Rev: 2013-07-23
Sitecore® is a registered trademark. All other brand and product names are the property of their respective holders. The contents of this document are the property of Sitecore. Copyright © 2001-2013 Sitecore. All rights reserved.
Sitecore E-Commerce Services 2.1
Payment Provider Guide The payment methods supported by the Sitecore E-Commerce Services

Sitecore E-Commerce Services 2.1
Sitecore® is a registered trademark. All other brand and product names are the property of their respective holders. The contents of this document are the property of Sitecore. Copyright © 2001-2013 Sitecore. All rights reserved.
Page 2 of 26
Table of Contents
Chapter 1 Introduction .......................................................................................................................... 3 1.1 Terminology............................................................................................................................. 4 1.2 Payment Options in the Example Pages ................................................................................ 5
1.2.1 Sitecore E-Commerce Payment Providers ......................................................................... 6 1.3 Installing a Payment Provider ................................................................................................. 8
Chapter 2 Integrating a Payment Provider ......................................................................................... 11 2.1 Hosted Payment Forms ........................................................................................................ 12 2.2 The Payment Provider API .................................................................................................... 14
Chapter 3 Payment Option Configuration .......................................................................................... 16 3.1 Configuring a Payment Option .............................................................................................. 17 3.2 Ticket Reservation ................................................................................................................ 20 3.3 Implementing a New Payment Provider ................................................................................ 22

Payment Provider Guide
Sitecore® is a registered trademark. All other brand and product names are the property of their respective holders. The contents of this document are the property of Sitecore. Copyright © 2001-2013 Sitecore. All rights reserved.
Page 3 of 26
Chapter 1
Introduction
Online payment methods allow payments and money transfers to be made over the Internet. Payment portals are an electronic alternative to traditional paper methods of payment such as checks and money orders which have been involved in many cases of litigation concerning fraud.
Sitecore E-Commerce Services can be integrated with several different online payment services. These services accept electronic payments by a variety of payment methods including credit cards, bank-based payments, such as direct debit, bank transfer, and real-time bank transfer based on online banking.
Sitecore distributes a number of packages that contain payment providers. The payment provider packages contain the code and the Sitecore item you need to configure the payment options on your webshop that use the different online payment services.
This document contains the following chapters:
Chapter 1 — Introduction This chapter lists the different payment providers that are supported by Sitecore E-Commerce Services and describes how to install them.
Chapter 2 — Integrating a Payment Provider This chapter describes how Sitecore E-Commerce Services integrates with payment providers.
Chapter 3 — Payment Option Configuration This chapter describes how to configure a payment option in Sitecore E-Commerce Services.

Sitecore E-Commerce Services 2.1
Sitecore® is a registered trademark. All other brand and product names are the property of their respective holders. The contents of this document are the property of Sitecore. Copyright © 2001-2013 Sitecore. All rights reserved.
Page 4 of 26
1.1 Terminology
Payment Service
Payment service is an external internet service that facilitates online payments. A payment service is a third party organization. If you want to use a particular payment service, such as Amazon, you must install and configure the payment provider for this payment service.
Payment Gateway
Payment gateway is the user interface of a payment service to which a customer is redirected from the webshop during payment. When the payment is completed, the customer is redirected back to the webshop.
Payment Provider
Payment provider is a client implementation in your webshop that makes it possible to use a particular payment service during a payment. A payment provider is a class that interacts with the corresponding payment service (for example, PayPal) using the corresponding payment system settings.
Payment Option
A payment option is a set of configuration settings for a payment provider. A payment option typically includes the following settings:
URL of the payment service
Webshop Name
Merchant ID
Password

Payment Provider Guide
Sitecore® is a registered trademark. All other brand and product names are the property of their respective holders. The contents of this document are the property of Sitecore. Copyright © 2001-2013 Sitecore. All rights reserved.
Page 5 of 26
1.2 Payment Options in the Example Pages
In the Example Pages package, the Payment page is the second page in the checkout process. In the example pages the Payment page displays the following options.
Sitecore also distributes a number of packages that contain payment providers. These payment provider packages contain the code and the item you need to configure the corresponding payment option.
You can install as many of these packages as you need in your E-Commerce Services solution. You can also implement various credit card solutions.
On the Payment page, you decide how to pay for the products you are buying. After you click the Confirm Payment button, you are redirected to the web page of the payment option you selected. This is where you submit your credit card data after which the payment is either approved or cancelled.
The payment options that are displayed on this page are stored in the Webshop Business Settings folder of your webshop.
Sitecore E-Commerce Services 2.1
Sitecore® is a registered trademark. All other brand and product names are the property of their respective holders. The contents of this document are the property of Sitecore. Copyright © 2001-2013 Sitecore. All rights reserved.
Page 6 of 26
For more information about configuring the Webshop Business Settings, see SES Installation and Configuration Guide.
1.2.1 Sitecore E-Commerce Payment Providers
Sitecore distributes the online payment providers as separate Sitecore packages. You can download these packages from the SDN and install them individually on your Sitecore E-Commerce Services installation.
The payment providers are not part of the Sitecore E-Commerce Services core package or of the Sitecore E-Commerce Example Pages package.
Important The payment providers supplied with SES 2.1 allows customers to pay for their purchases through online payment services. SES 2.1 does not allow you to create your own payment forms.
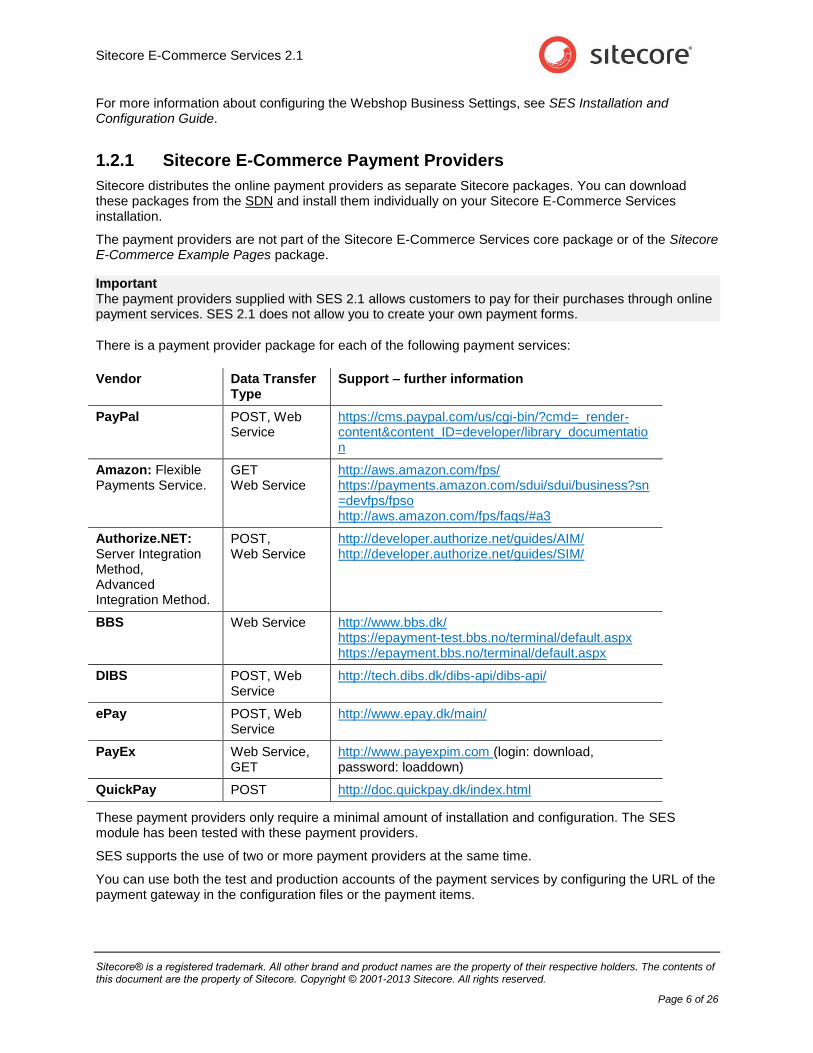
There is a payment provider package for each of the following payment services:
Vendor Data Transfer Type
Support – further information
PayPal POST, Web Service
https://cms.paypal.com/us/cgi-bin/?cmd=_render-content&content_ID=developer/library_documentation
Amazon: Flexible Payments Service.
GET Web Service
http://aws.amazon.com/fps/ https://payments.amazon.com/sdui/sdui/business?sn=devfps/fpso http://aws.amazon.com/fps/faqs/#a3
Authorize.NET: Server Integration Method, Advanced Integration Method.
POST, Web Service
http://developer.authorize.net/guides/AIM/ http://developer.authorize.net/guides/SIM/
BBS Web Service http://www.bbs.dk/ https://epayment-test.bbs.no/terminal/default.aspx https://epayment.bbs.no/terminal/default.aspx
DIBS POST, Web Service
http://tech.dibs.dk/dibs-api/dibs-api/
ePay POST, Web Service
http://www.epay.dk/main/
PayEx Web Service, GET
http://www.payexpim.com (login: download, password: loaddown)
QuickPay POST http://doc.quickpay.dk/index.html
These payment providers only require a minimal amount of installation and configuration. The SES module has been tested with these payment providers.
SES supports the use of two or more payment providers at the same time.
You can use both the test and production accounts of the payment services by configuring the URL of the payment gateway in the configuration files or the payment items.

Payment Provider Guide
Sitecore® is a registered trademark. All other brand and product names are the property of their respective holders. The contents of this document are the property of Sitecore. Copyright © 2001-2013 Sitecore. All rights reserved.
Page 7 of 26
All the payment providers support:
Money reservation and ticket booking.
Ticket cancellation and payment capturing in the Order Catalog. You can also use the API for this.

Sitecore E-Commerce Services 2.1
Sitecore® is a registered trademark. All other brand and product names are the property of their respective holders. The contents of this document are the property of Sitecore. Copyright © 2001-2013 Sitecore. All rights reserved.
Page 8 of 26
1.3 Installing a Payment Provider
To install a payment provider package:
1. Download the appropriate package.
2. Upload the package to your Sitecore installation.
3. In the Sitecore Desktop, click Sitecore, Development Tools, Installation Wizard, and the Install Package Wizard will guide you through the installation process.
During the installation you must add the appropriate registration information to the
App_Config/Include/Unity.config file.
For example, if you are installing ePay, you must make the following changes:
Register the payment provider alias:
<alias
alias="EPayPaymentProvider"
type="Sitecore.Ecommerce.Payments.EPay.EPayPaymentProvider,
Sitecore.Ecommerce.Payments.EPay" />
Register the payment provider in the container section of the Unity.config file:
<register type="PaymentProvider" mapTo="EPayPaymentProvider" name="EPay" />
After that the payment provider is presented as the
master://sitecore/system/Modules/Ecommerce/Payment Options/<Provider>
item. Copy this item to the Payment Options folder in the content tree, where your webshop is located.
You must configure the payment providers for each individual webshop. Different webshops can offer different payment options to their customers.
PayPal
Register your solution and create a test account in the PayPal sandbox:
https://developer.paypal.com/
After you receive a username and password, enter this information in the PayPal form fields.
You can also use the sandbox to manage your test accounts. To manage a test account, choose the account you want and click Enter test account. You can also use the PayPal API to obtain the credentials that you need to perform a transaction.
Enter the following data in the Settings parameter:
<setting id="APIUsername">parten_1299487089_biz_api1.mail.ru</setting>
<setting id="APIPassword">SCT4S4W5Q4SPXB3H</setting>
<setting
id="APISignature">AzicKvQdO37MzkHbKNXvi9pLpM5rAYjY72rYeECW2pBkSklW4JwVYQEg</setting>
<setting id="Environment">sandbox</setting>
When you have finished testing, register a live account.
Amazon
To configure this payment provider, create a new Flexible Payments Service (FPS) account. For more information about how to configure the payment provider by creating a new FPS account, see http://aws.amazon.co m/fps/
After you are registered, you receive the login credentials to use the service. In the Amazon item, enter the appropriate values in the Username and Password fields.

Payment Provider Guide
Sitecore® is a registered trademark. All other brand and product names are the property of their respective holders. The contents of this document are the property of Sitecore. Copyright © 2001-2013 Sitecore. All rights reserved.
Page 9 of 26
Authorize.Net
Create a test account on the following page:
https://developer.authorize.net/testaccount
Fill in the Username (merchant ID) and Password fields.
To manage your account and the transactions, use the following URL:
https://test.authorize.net/
BBS
Create a new test account on the following page.
https://epayment-test.bbs.no/
The BBS payment provider contains a configuration file.
You can switch to production by setting the following configuration URL:
<applicationSettings>
<Sitecore.Ecommerce.Payments.Bbs.Properties.Settings>
<setting name="Sitecore_Ecommerce_Payments_Bbs"
serializeAs="String">
<value>https://epayment.bbs.no/Netaxept.svc</value>
</setting>
</Sitecore.Ecommerce.Payments.Bbs.Properties.Settings>
</applicationSettings>
DIBS
Create a new test account and you receive a username, password, and two secret keys to verify your requests.
In the Setting field, enter key1 and key2 settings.
To manage your account, use the following URL:
https://payment.architrade.com/login/login.action?pwc=1 (login as admin)
ePay
Contact the payment provider to obtain the username or merchant ID and password to use the service.
To manage your account, use the following URL:
https://ssl.ditonlinebetalingssystem.dk/admin/
PayEx
Create a new test account. Enter the username or merchant ID and password that you receive from the payment provider.
To manage your account, use the following URL:
http://secure.payex.com/Admin/
When you finished testing, you can make the payment provider use the live service endpoints within the configuration file:
<applicationSettings>
<Sitecore.Ecommerce.Payments.PayEx.Properties.Settings>
<setting name="Sitecore_Ecommerce_Payments_PayEx_PayExTest_PxOrder"
serializeAs="String">
<value>https://external.payex.com/pxorder/pxorder.asmx</value>
</setting>

Sitecore E-Commerce Services 2.1
Sitecore® is a registered trademark. All other brand and product names are the property of their respective holders. The contents of this document are the property of Sitecore. Copyright © 2001-2013 Sitecore. All rights reserved.
Page 10 of 26
</Sitecore.Ecommerce.Payments.PayEx.Properties.Settings>
</applicationSettings>
QuickPay
Create a new test account. Enter the username or merchant ID and password that you receive from the payment provider.
To manage your account, use the following URL:
https://manager.quickpay.net/

Payment Provider Guide
Sitecore® is a registered trademark. All other brand and product names are the property of their respective holders. The contents of this document are the property of Sitecore. Copyright © 2001-2013 Sitecore. All rights reserved.
Page 11 of 26
Chapter 2
Integrating a Payment Provider
The Sitecore E-Commerce payment provider model uses invoice payment forms that are hosted by the payment services.
This chapter contains the following section:
Hosted Payment Forms
The Payment Provider API
Sitecore E-Commerce Services 2.1
Sitecore® is a registered trademark. All other brand and product names are the property of their respective holders. The contents of this document are the property of Sitecore. Copyright © 2001-2013 Sitecore. All rights reserved.
Page 12 of 26
2.1 Hosted Payment Forms
The payment services offer a hosted payment processing solution that handles all the steps in processing a transaction, including:
Collecting customer payment information through a secure, hosted form.
Generating a receipt for the customer.
Secure transmission to the payment processing networks.
Transfer of funds to the merchant’s bank account.
Secure storage of credit cardholder information.
The security of a payment transaction is assured through the use of a unique digital signature or fingerprint that is sent with each transaction. The payment providers use this fingerprint to authenticate both the merchant and the transaction. Merchants are not required to collect, transmit, or store sensitive cardholder information to process transactions. Additionally, the hosted payment forms used by the payment services do not require merchants to purchase and install a Secure Sockets Layer (SSL) digital certificate.
This simplifies the process of securely handling and storing cardholder information, and makes it easier to comply with the Payment Card Industry (PCI) Data Security Standard.
In a typical webshop scenario, as demonstrated in the example pages, the workflow of the hosted payment forms used on the payment gateway is:
1. The customer adds some goods their shopping cart and goes to the checkout.
2. In the checkout process, on the Payment page, the customer selects a payment provider from the list of payment providers configured for the webshop (for example, Pay Pal or Amazon).
3. The customer’s order data is transferred, using a secure protocol, to the payment service they selected and they are redirected to the payment gateway’s hosted payment form pages.
4. On the payment gateway the customer enters their credentials, credit card number, and submits the form for processing.
This is done externally from the web-shop. The Sitecore E-Commerce payment provider model supports several types of payments transactions:
o Authorize and capture.
o Authorize only and capture or cancel at a later point.
5. The payment gateway transfers the customer back to the Webshop Return page of the checkout.
If there is an error, the example implementation displays a standard error message enabling the customer to try again or to select another payment method.
If the customer cancels the payment, the example implementation shows a cancel error message that lets the customer try again.

Payment Provider Guide
Sitecore® is a registered trademark. All other brand and product names are the property of their respective holders. The contents of this document are the property of Sitecore. Copyright © 2001-2013 Sitecore. All rights reserved.
Page 13 of 26
o If the transaction is completed successfully, the order is created and the order confirmation page is displayed.
Checkout
Payment Page
Payment
Gateway Hosted
Form
Payment transfer
Checkout Return
Page
Transfer back
Order
Confirmation
Create Order
CancelError
The user selects the payment
method and
confirms the amount
User enters the credit card
information and the payment
is authorized (or authorized
and captured).
Transaction is validated and
processed.
Displays the order
confirmation.
The SES supports different data transfer methods for the payment gateway integrations:
1. GET method: HTTP GET parameters transfer the data and initiate the payment.
2. Web service call: The payment gateway provides a web reference for activating remote methods and uses web service calls to transfer data
3. POST method: The payment provider provides a URL that accepts form fields with payment data and then transfers them with the HTTP POST method.

Sitecore E-Commerce Services 2.1
Sitecore® is a registered trademark. All other brand and product names are the property of their respective holders. The contents of this document are the property of Sitecore. Copyright © 2001-2013 Sitecore. All rights reserved.
Page 14 of 26
2.2 The Payment Provider API
The following classes and interfaces are at the top of the hierarchy:
All the specific payment providers like EPayPaymentProvider, QuickPayPaymentProvider are
inherited from the OnlinePaymentProvider class and implement the IReservable interface.
The OnlinePaymentProvider class defines how online payments are processed. It supports both one-
stage transactions, for example a sale, and two-stage transactions — authorization and subsequent capturing.
The Invoke (PaymentSystem paymentSystem, PaymentArgs paymentArgs) method
generates and transfers data to the payment provider for authorization or sale transaction.
The ProcessCallBack (PaymentSystem paymentSystem, PaymentArgs
paymentArgs) method processes the call from the payment gateway to validate payment for
the transaction and create a reservation ticket, if necessary.
The IReservable interface processes online payments with separate authorization and capturing
actions (postponed).
The Capture (PaymentSystem paymentSystem, PaymentArgs paymentArgs,
ReservationTicket reservationTicket, decimal amount) method generates and
transfers data to the payment provider to capture the transaction and reserve the money.
The CancelReservation(PaymentSystem paymentSystem, PaymentArgs
paymentArgs, ReservationTicket reservationTicket) method cancels the ticket
reservation.
Note The default implementation of the Capture and Cancel order states contain business logic that calls the respective Capture and Cancel methods in the payment provider API. This means that when you use the order state buttons in the Content Editor to change the state of an order, the reserved payment is either captured or cancelled for the whole order. The payment provider API supports both partial and full capturing of money and the cancellation of reservations. However, partial handling of orders is not implemented in the current state logic and UI.

Payment Provider Guide
Sitecore® is a registered trademark. All other brand and product names are the property of their respective holders. The contents of this document are the property of Sitecore. Copyright © 2001-2013 Sitecore. All rights reserved.
Page 15 of 26
The SEFE core package also includes the following classes for storing and transmitting payment related information:
ReservationTicket — contains information about the reserved payment.
AuthorizationCode — a secure code. Each provider uses different logic to create and
process the payment.
TransactionNumber — the number of the authorization transaction.
InvoiceNumber — the number of the order (invoice).
Amount — the amount of money that is reserved.
PaymentArgs — a unified list of the data that is required by the payment providers.
PaymentUrls:
o SuccessPageUrl — the URL of the local page that is called if the payment transaction is
successful.
o FailurePageUrl — the URL of the local page that is called if the payment transaction fails.
o CancelPageUrl — the URL to the local page that is called if the customer cancels the
payment transaction.
o ReturnPageUrl — the URL of the default local return page.
Description — a short explanation of the purchase. The webshop supplies this information.
Shopping cart — contains all the information about the purchase, such as prices, VAT, goods,
and so on. This information is supplied by the webshop.
Sitecore E-Commerce Services 2.1
Sitecore® is a registered trademark. All other brand and product names are the property of their respective holders. The contents of this document are the property of Sitecore. Copyright © 2001-2013 Sitecore. All rights reserved.
Page 16 of 26
Chapter 3
Payment Option Configuration
This chapter describes how to configure a payment option in Sitecore E-Commerce Services.
This chapter contains the following sections:
Configuring a Payment Option
Ticket Reservation
Implementing a New Payment Provider

Payment Provider Guide
Sitecore® is a registered trademark. All other brand and product names are the property of their respective holders. The contents of this document are the property of Sitecore. Copyright © 2001-2013 Sitecore. All rights reserved.
Page 17 of 26
3.1 Configuring a Payment Option
When you install a payment provider package, an item is created in the
/sitecore/system/Modules/Ecommerce/Payment Options folder.
To configure a payment provider and ensure that it appears on the Checkout Payment page of the example pages, you must copy the corresponding new payment option item from here and place it in the
Webshop Business Settings folder for your webshop, for example, E-Commerce
Examples/Home/Webshop Business settings/Payment Options.
After you copy the payment option item to the Webshop Business Settings folder, you must fill in the following fields:
Field Name Description
Title The name displayed in the drop down list on the Payment page.
Short Description The description of the payment option that is displayed on the Payment page.
Icon The icon for the payment provider that is displayed on the Payment page.
Name An optional field used by external systems when they import the item. Used to give an understandable description to the Code field.
Code The unique identifier of the payment provider option. This is used throughout the system and is reflected on the order. This must be unique for all the payment option items in your business catalog.
Username The name that identifies the merchant ID account for the online provider. This is obtained from the provider.

Sitecore E-Commerce Services 2.1
Sitecore® is a registered trademark. All other brand and product names are the property of their respective holders. The contents of this document are the property of Sitecore. Copyright © 2001-2013 Sitecore. All rights reserved.
Page 18 of 26
Field Name Description
Password The password/ token-id /security-key supplied by the payment provider. This is often used to encrypt data before sending it to the payment provider.
PaymentProviderUrl The URL used to send data to the provider. This URL is generally different in the test and the production environments.
PaymentProviderSecondaryUrl An optional field that is used if the payment integration needs to use different URLs for various parts of the integration. This can be used if the authentication payment form is located on one server and the web service calls point to another location.
Settings This field that enables the webshop owner to change the settings that are used to configure the behavior of the client. This data is either sent to the payment provider at the beginning of the payment transaction or can serve as directives for our engine. The values are entered as XML.
The format of these settings are: <settings id=”{settingName}”>{some value}</settings>
You must copy the payment option items that you want to use from the E-Commerce
Examples/Home/Webshop Business settings/Payment Options folder and place them in the
Webshop Business Settings folder for each webshop installation that you want to run.

Payment Provider Guide
Sitecore® is a registered trademark. All other brand and product names are the property of their respective holders. The contents of this document are the property of Sitecore. Copyright © 2001-2013 Sitecore. All rights reserved.
Page 19 of 26
Here is an example of a payment option in SES.
When you install a payment provider package, most of the fields in the payment option item are already filled in. However, you must edit the User Name (Merchant ID) and Password fields.

Sitecore E-Commerce Services 2.1
Sitecore® is a registered trademark. All other brand and product names are the property of their respective holders. The contents of this document are the property of Sitecore. Copyright © 2001-2013 Sitecore. All rights reserved.
Page 20 of 26
3.2 Ticket Reservation
The individual Sitecore E-Commerce Services payment provider packages can work with or without ticket reservation. The IReservable interface has been implemented for all these providers, and they are configured to work in reservable mode by default.
Reservable means that when a customer completes a payment and is redirected back to the Return Page, only authorization is performed. The money is not drawn from the customer’s account before an explicit capture request to the payment provider is processed. The initial response from the payment provider contains the unique ticket information indicating that the order amount has been reserved. The reservation ticket is stored along with the order, and must be used to capture the money later.
To capture the money, additional actions must be performed.
You can capture the money by:
Using the providers administration interface.
Using the SES API.
Managing the order.
Basic order management is implemented in SES 2.1. When you capture or cancel an order in any of the order states the business logic calls the payment provider and either uses the reservation ticket to capture the money or cancels the reservation ticket.
In SES, you can use the provider settings to configure each payment provider to work in reservable mode:
Amazon
A) <setting id="transactionType">AUTHORIZATION</setting> - “reservable” mode.
B) <setting id="transactionType">SALE</setting> - one-stage transaction mode.
Authorize.Net
A) <setting id="x_type">AUTH_ONLY</setting> - “reservable” mode.
B) <setting id="transactionType">AUTH_CAPTURE</setting> - one-stage transaction
mode.
BBS
A) <setting id="operation">AUTH</setting> - “reservable” mode.
B) <setting id="operation">SALE</setting> - one-stage transaction mode.
DIBS
A) <setting id="preauth">false</setting>
<setting id="capturenow">yes</setting> - “reservable” mode.
B) <setting id="preauth">true</setting> - one-stage transaction mode.
ePay
A) <setting id="instantcapture">0</setting> - “reservable” mode.
B) <setting id="instantcapture">1</setting> - one-stage transaction mode.

Payment Provider Guide
Sitecore® is a registered trademark. All other brand and product names are the property of their respective holders. The contents of this document are the property of Sitecore. Copyright © 2001-2013 Sitecore. All rights reserved.
Page 21 of 26
PayEx
A) <setting id="purchaseOperation">AUTHORIZATION</setting> - “reservable” mode.
B) <setting id="purchaseOperation">SALE</setting> - one-stage transaction mode.
PayPal
A) <setting id="paymentaction">AUTHORIZATION</setting> - “reservable” mode.
B) <setting id="paymentaction">SALE</setting> - one-stage transaction mode.
QuickPay
A) <setting id="autocapture">0</setting> - “reservable” mode.
B) <setting id="autocapture">1</setting> - one-stage transaction mode.

Sitecore E-Commerce Services 2.1
Sitecore® is a registered trademark. All other brand and product names are the property of their respective holders. The contents of this document are the property of Sitecore. Copyright © 2001-2013 Sitecore. All rights reserved.
Page 22 of 26
3.3 Implementing a New Payment Provider
In a growing e-commerce market and with the emergence of new online payment services, Sitecore developers may need to implement new payment providers.
SES allows developers to implement a provider that adheres to the contracts.
To implement a custom SES payment provider:
1. Create a new .NET class library.
2. Add references to the Microsoft.Practices.Unity,
Sitecore.Ecommerce.DomainModel and the Sitecore.Ecommerce.Kernel assemblies.
3. Create a new class and make it inherit from
Sitecore.Ecommerce.Payments.OnlinePaymentProvider.
4. Make the class implement the
Sitecore.Ecommerce.DomainModel.Payments.IReservable interface:
namespace <Any_Namespace>
{
using Sitecore.Ecommerce.DomainModel.Payments;
using Sitecore.Ecommerce.Payments
/// <summary>
/// PayPal online payment provider
/// </summary>
public class <SomeProvider>PaymentProvider : OnlinePaymentProvider, IReservable
{
}
}
5. Override the Invoke(PaymentSystem, PaymentArgs) method and the
ProcessCallback(PaymentSystem, PaymentArgs) method.
6. Use the Invoke method to prepare the data that must be sent to the online payment provider
and redirect to the service page. Some payment services accept the POST requests and others provide web methods to perform payment transactions.
In the following example, we use the PayPal provider as an example of how to implement a custom payment provider.
The PayPal implementation uses the POST method to communicate with the service:
public override void Invoke(PaymentSystem paymentSystem, PaymentArgs paymentArgs)
{
// Fill the variables with the appropriate data.
// You can find the necessary parameters in the online documentation
// of the payment service.
NameValueCollection requestData = new NameValueCollection
{
{ "cmd", Command },
{ "paymentaction", paymentaction },
{ "business", merchant },
{ "item_name", description },
{ "item_number", ordernumber },
{ "amount", amount },
{ "currency_code", currency },
{ "return", returnUrl },
{ "cancel_return", cancelUrl },
{ "notify_url", returnUrl },

Payment Provider Guide
Sitecore® is a registered trademark. All other brand and product names are the property of their respective holders. The contents of this document are the property of Sitecore. Copyright © 2001-2013 Sitecore. All rights reserved.
Page 23 of 26
};
this.PostData(paymentSystem.PaymentUrl, requestData);
}
7. The ProcessCallBack() method must be called after redirection from the providers hosted
form.
Check the incoming parameters in the request or use web methods to perform additional interaction.
Depending on the response, set the appropriate PaymentStatus for the Sitecore payment
provider and handle it in the necessary way:
o Create the order and display the receipt.
or
o Redirect to the PaymentCancel page.
or
o Redirect to the PaymentError page.
Here is the example from the PayPal client:
public override void ProcessCallback(PaymentSystem paymentSystem, PaymentArgs
paymentArgs)
{
this.PaymentStatus = PaymentStatus.Failure;
HttpRequest request = HttpContext.Current.Request;
string paymentStatus = request.Form["payment_status"].ToUpper();
string transactionNumber = request.Form["txn_id"];
string orderid = request.Form["item_number"];
string currency = request.Form["mc_currency"];
string amount = request.Form["mc_gross"];
if (paymentStatus != "FAILED" && paymentStatus != "DENIED")
{
this.PaymentStatus = PaymentStatus.Succeeded;
// Save the data after successful transaction, in HTTP Session by default
if (/*Condition to check that your provider work in “reservable” mode*/)
{
ReservationTicket reservationTicket = new ReservationTicket
{
InvoiceNumber = orderid,
Amount = TypeUtil.TryParse(amount, decimal.Zero),
AuthorizationCode = PaymentConstants.EmptyAuthorizationCode,
TransactionNumber = transactionNumber
};
/* Save the reservation ticket after successful transaction, in HTTP Session by
default */
}
}
}
else
{
this.PaymentStatus = PaymentStatus.Canceled;
}
if (this.PaymentStatus != PaymentStatus.Succeeded)
{
/* Save the information that the transaction was cancelled or failed, in HTTP
Session by default */
}

Sitecore E-Commerce Services 2.1
Sitecore® is a registered trademark. All other brand and product names are the property of their respective holders. The contents of this document are the property of Sitecore. Copyright © 2001-2013 Sitecore. All rights reserved.
Page 24 of 26
}
8. To make your payment provider work in reservable mode, you should also implement the following methods defined by the IReservable interface:
Capture(PaymentSystem, PaymentArgs, ReservationTicket, decimal amount),
Cancel(PaymentSystem, PaymentArgs, ReservationTicket).
The first method interacts with the payment service and captures the amount from the reserved ticket.
The second method cancels the reservation.
Note
The Capture method accepts a parameter called Amount, which enables partial capture. The original
reserved amount is a part of the reservation ticket stored in SES. A full capture will withdraw the full authorized/reserved amount from the customer’s account. Sometimes only a part of an order can be shipped initially or the order has been modified to contain less products. In these cases a partial capture withdraws only the specified amount and not the full amount. It’s not possible to withdraw more money than has been originally authorized/reserved. If the amount in the order has changed and exceeds the original amount a new reservation must be performed.
Here is an example that uses the PayPal implementation:
/// <summary>
/// Captures the payment
/// </summary>
/// <param name="paymentSystem">The payment system.</param>
/// <param name="paymentArgs">The payment args.</param>
/// <param name="reservationTicket">The reservation ticket.</param>
/// <param name="amount">The amount.</param>
public void Capture(PaymentSystem paymentSystem, PaymentArgs paymentArgs, ReservationTicket
reservationTicket, decimal amount)
{
var configuration = new PaymentSettingsReader(paymentSystem);
var credentials = new CustomSecurityHeaderType
{
Credentials = new UserIdPasswordType
{
Username = configuration.GetSetting("APIUsername"),
Password = configuration.GetSetting("APIPassword"),
Signature = configuration.GetSetting("APISignature"),
}
};
using (var client = new PayPalAPIAASoapBinding())
{
client.RequesterCredentials = credentials;
DoCaptureReq request = new DoCaptureReq
{
DoCaptureRequest = new DoCaptureRequestType
{
AuthorizationID = reservationTicket.TransactionNumber,
Amount = new BasicAmountType { currencyID = CurrencyCodeType.USD, Value =
amount.ToString() },
Version = configuration.GetSetting("requestVersion")
}
};
var response = client.DoCapture(request);
string captureResult = response.Ack.ToString();
ITransactionData transactionDataProvider =
Context.Entity.Resolve<ITransactionData>();
transactionDataProvider.SavePersistentValue(reservationTicket.InvoiceNumber,
captureResult == "Success" ? PaymentConstants.CaptureSuccess :
response.Errors.Aggregate("UnCaptured:", (current, error) => string.Format("{0}{1};", current,
error.ShortMessage)));

Payment Provider Guide
Sitecore® is a registered trademark. All other brand and product names are the property of their respective holders. The contents of this document are the property of Sitecore. Copyright © 2001-2013 Sitecore. All rights reserved.
Page 25 of 26
}
}
/// <summary>
/// Cancels the payment reservation
/// </summary>
/// <param name="paymentSystem">The payment system.</param>
/// <param name="paymentArgs">The payment args.</param>
/// <param name="reservationTicket">The reservation ticket.</param>
public void CancelReservation(PaymentSystem paymentSystem, PaymentArgs paymentArgs,
ReservationTicket reservationTicket)
{
var configuration = new PaymentSettingsReader(paymentSystem);
var credentials = new CustomSecurityHeaderType
{
Credentials = new UserIdPasswordType
{
Username = configuration.GetSetting("APIUsername"),
Password = configuration.GetSetting("APIPassword"),
Signature = configuration.GetSetting("APISignature"),
}
};
using (var client = new PayPalAPIAASoapBinding())
{
client.RequesterCredentials = credentials;
DoVoidReq request = new DoVoidReq
{
DoVoidRequest = new DoVoidRequestType
{
AuthorizationID = reservationTicket.TransactionNumber,
Version = configuration.GetSetting("requestVersion")
}
};
var response = client.DoVoid(request);
string cancelResult = response.Ack.ToString();
ITransactionData transactionDataProvider =
Context.Entity.Resolve<ITransactionData>();
transactionDataProvider.SavePersistentValue(reservationTicket.InvoiceNumber, cancelResult
== "Success" ? PaymentConstants.CancelSuccess : response.Errors.Aggregate("UnCanceled:",
(current, error) => string.Format("{0}{1};", current, error.ShortMessage)));
}
}
9. Compile your assembly and place it in the /bin folder of your web site.
10. Register your provider in the <root>/App_Config/Unity.config file:
o Set the payment provider:
<alias alias="<PROVIDER_NAME>" type="<YOUR_NAMESPACE>.<PROVIDER_CLASS_NAME>,
<ASSEMBLY_NAME" />;
o Set the payment provider in the <container /> section:
<register type="PaymentProvider" mapTo="<PROVIDER_NAME>"
name="<CUSTOM_SHORT_NAME>" />
11. Create a new payment provider item in the Payment Options item of the Business Catalog from
the master://sitecore/templates/Ecommerce/Business Catalog/Payment
template.
12. Fill in the necessary fields. The value of the Code field should be equal to:
13. <CUSTOM_SHORT_NAME>
14. Register the account on the service side and obtain the credentials.
15. Enter the URL, Merchant ID, and Password in the appropriate fields.
Sitecore E-Commerce Services 2.1
Sitecore® is a registered trademark. All other brand and product names are the property of their respective holders. The contents of this document are the property of Sitecore. Copyright © 2001-2013 Sitecore. All rights reserved.
Page 26 of 26
Publish the item.