pavlovs house rules v9 - mcssl.com · introduction pavlov’s house was a fortified apartment...
TRANSCRIPT


CONTENTS
PAGE 1 Introduction
PAGE 2 Setup PAGE 3
Counters and Cards
PAGE 4 Playing the Game PAGE 5
Soviet Card Phase
PAGE 9 Wehrmacht Card Phase
PAGE 19 Soviet Counter Phase
PAGE 25 First Aid
PAGE 26 Ending the Game
PAGE 27 Variants
PAGE 31 References
CREATED BY David Thompson
Proofreading and copyediting: Mark Hansen and Emery Gallant
A WWII tactical and operational strongpoint defense game
60 - 75 minutes ages: 12+ 1-3 players
In Pavlov’s House, you take control of the valiant defenders of a Soviet strongpoint in Stalingrad as they hold out against constant German attacks for almost two months. You also control the key leaders throughout the Soviet 62nd Army that made the defense of Pavlov’s House possible.
Object of the Game The goal of Pavlov’s House is to last until the defenders of Pavlov’s House are tasked with storming a key German strongpoint during the Battle of Stalingrad. In the game, this is depicted by playing through a deck of cards representing elements of the German 6th Army.
Game play examples in this rulebook are placed in gray tone boxes.

IntroductionPavlov’s House was a fortified apartment building used as a strongpoint by the Soviet 62nd Army during the pivotal Battle of Stalingrad in WW2. Soviet defenders - primarily from the 7th Rifle Company and 3rd Machine Gun Company, 3rd Rifle Battalion, 42nd Guards Rifle Regiment of the 13th Guards Division - held out for almost two months from a constant German assault. The building’s name was drawn from Yakov Pavlov, a sergeant who led the initial storm group assault that resulted in the capture of the building from the Germans. The story of Pavlov’s House was a key piece of Soviet propaganda and was used as a symbol of the incredible resistance of Soviet forces during the Battle of Stalingrad.
1
1
28 37
10
4 5
9
11
6
Setup Illustration

1) Game Board
2) Wehrmacht Cards (61) and Resupply Cards (6) O n l y u s e t h e s p e c i a l Riflemen Card from the “1” deck marked “Competitive” for the competitive variant (p. 30). Otherwise, remove it from the game.
Sort the Wehrmacht Cards by the number on the lower right of the front of the card. Shuffle each deck of cards separately and place each of the decks face down. Shuffle the six Resupply cards and place one Resupply card (with the Resupply side face up) on top of the “2”, “3”, and “4” Wehrmacht decks. Without looking at them, remove the remaining three Resupply cards from the game. Stack the decks face down on top of one another in order, with the “5” deck at the bottom and the “1” deck on top.
3) Tactic Cards (30) If this is your first time playing, do not use the Tactics Cards. They are only used in the more difficult versions of the game (p. 28).
4) Operational Support Cards (8) These cards are used with the Operational Support variant rules (p. 27).
5) Soviet Cards (35) Separate the 7 Fog of War cards from the deck. Shuffle 3 of the Fog of War cards into the deck and place the deck face down. Place the remaining 4 Fog of War cards face up in the stock.
6) Soviet Counters (34) Arrange the Soviet Counters near the board. Place the four Soviet Counters with the white squares on the lower right of the counters in the Reserves box on the board.
7) Weapon Counters (7) Arrange the Weapon Counters near the board.
8) Wehrmacht Counters (62) Sort the Wehrmacht Counters and place them near the board.
9) Tokens (99) • 4 Action Tokens (Dark Red) • 9 Command Tokens (Red) • 36 Disrupted Tokens (Orange) • 20 Suppression Tokens (Gray) • 6 Sapper Tokens (Brown) • 4 Ammunition Tokens (Black) • 4 First Aid Tokens (White) • 4 Wire Communications Tokens (Tan) • 2 Artillery Tokens (Purple) • 6 Food Tokens (Blue) • 4 Anti-aircraft Tokens (Green) Place 10 of the gray Suppression Tokens and 2 of the blue Food Tokens in the Supplies box on the board. Place the other 10 Suppression Tokens and 4 Food Tokens with the rest of the tokens near the board.
10) Dice (5)
11) Defense Value Tokens (3) Place a Defense Value Token on the three #6 Defense Value shield icons for each track.
Note: The game also includes 59 special Kickstarter designated Soviet Counters that you can swap out with the 34 standard Soviet Counters.
2
Setup
Key Terms
Removed from Game: Any time a rule instructs you to remove something from the game, the component can no longer be used in the current game.
Stock: Any components that are off the board, but available for use in the game.

Name
Suppress Value
Defense Value
Counters and Cards
Soviet Counter
Wehrmacht Infantry Counter
3
Attack Value / Suppress Value
Type
Deployment Cost
Attack Value / Suppress Value
Name
Deployment Cost
Weapon Counter
Wehrmacht Armor Counter
Attack Value
Defense Value
Type
Soviet Card
Action 1
Action 2
Name
Dice Value and Action Type
Card Effect Description
Deck
Wehrmacht Card
Special Action
Special Actions and Attributes
1.1 Game Overview Pavlov’s House is divided into turns. Each turn consists of the following phases:
• Soviet Card Phase: Take three actions with Soviet Cards • Wehrmacht Card Phase: Play three Wehrmacht Cards • Soviet Counter Phase: Move three Soviet Counters, then take three actions with Soviet Counters
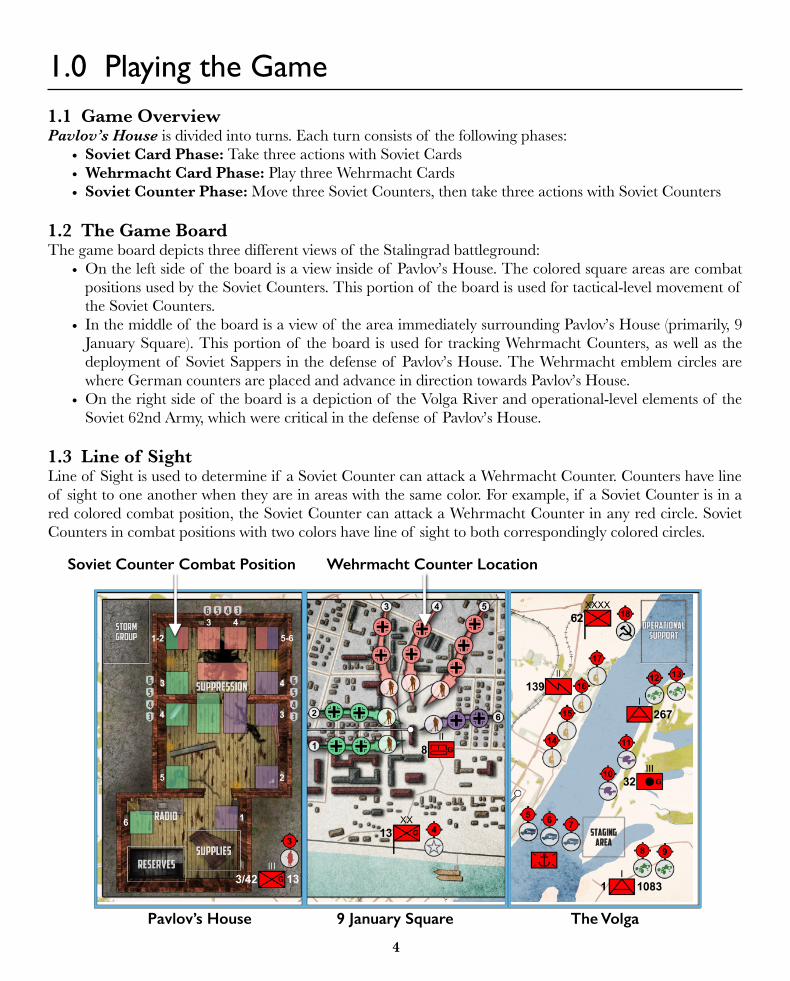
1.2 The Game Board The game board depicts three different views of the Stalingrad battleground:
• On the left side of the board is a view inside of Pavlov’s House. The colored square areas are combat positions used by the Soviet Counters. This portion of the board is used for tactical-level movement of the Soviet Counters.
• In the middle of the board is a view of the area immediately surrounding Pavlov’s House (primarily, 9 January Square). This portion of the board is used for tracking Wehrmacht Counters, as well as the deployment of Soviet Sappers in the defense of Pavlov’s House. The Wehrmacht emblem circles are where German counters are placed and advance in direction towards Pavlov’s House.
• On the right side of the board is a depiction of the Volga River and operational-level elements of the Soviet 62nd Army, which were critical in the defense of Pavlov’s House.
1.3 Line of Sight Line of Sight is used to determine if a Soviet Counter can attack a Wehrmacht Counter. Counters have line of sight to one another when they are in areas with the same color. For example, if a Soviet Counter is in a red colored combat position, the Soviet Counter can attack a Wehrmacht Counter in any red circle. Soviet Counters in combat positions with two colors have line of sight to both correspondingly colored circles.
1.0 Playing the Game
Wehrmacht Counter Location
4
Soviet Counter Combat Position
Pavlov’s House 9 January Square The Volga
The Soviet Cards represent the operational-level actions taken by elements of the Soviet 62nd Army during the Battle of Stalingrad that contributed to the successful defense of Pavlov’s House.
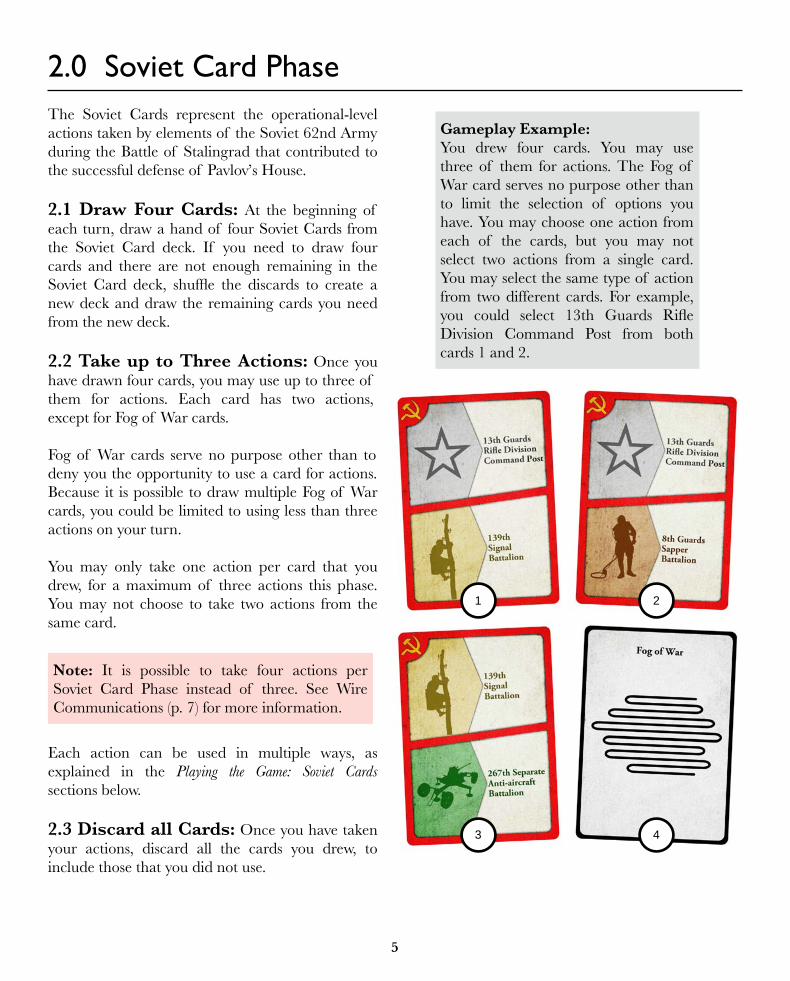
2.1 Draw Four Cards: At the beginning of each turn, draw a hand of four Soviet Cards from the Soviet Card deck. If you need to draw four cards and there are not enough remaining in the Soviet Card deck, shuffle the discards to create a new deck and draw the remaining cards you need from the new deck.
2.2 Take up to Three Actions: Once you have drawn four cards, you may use up to three of them for actions. Each card has two actions, except for Fog of War cards.
Fog of War cards serve no purpose other than to deny you the opportunity to use a card for actions. Because it is possible to draw multiple Fog of War cards, you could be limited to using less than three actions on your turn.
You may only take one action per card that you drew, for a maximum of three actions this phase. You may not choose to take two actions from the same card.
Each action can be used in multiple ways, as explained in the Playing the Game: Soviet Cards sections below.
2.3 Discard all Cards: Once you have taken your actions, discard all the cards you drew, to include those that you did not use.
Gameplay Example: You drew four cards. You may use three of them for actions. The Fog of War card serves no purpose other than to limit the selection of options you have. You may choose one action from each of the cards, but you may not select two actions from a single card. You may select the same type of action from two different cards. For example, you could select 13th Guards Rifle Division Command Post from both cards 1 and 2.
5
2.0 Soviet Card Phase
1 2
3
Note: It is possible to take four actions per Soviet Card Phase instead of three. See Wire Communications (p. 7) for more information.
4

62nd Army Command Post: You can use this action to do one of the following: • Recover: Remove a Disrupted Token from the 62nd Army Command Post
location (position 18, on the game board). • Resupply: Place any combination of up to 5 Ammunition, First Aid, Food,
and Sapper Tokens from the stock onto the Staging Area box on the game board. There is no limit to the number of tokens that can be placed in the Staging Area. You cannot take this action if the 62nd Army Command Post location on the game board has a Disrupted Token.
• Storm Group: Initiate a Storm Group Raid using Soviet counters that are in Pavlov’s House. See Storm Group (p. 18) for more information. You cannot take this action if the 62nd Army Command Post location has a Disrupted Token.
13th Guards Rifle Division Command Post: You can use this action to do one of the following:
• Recover: Remove a Disrupted Token from the 13th Guards Rifle Division Command Post location (4, on the game board).
• Send Reinforcements: You get 6 points to spend on deploying Soviet and Weapon Counters from the stock to Pavlov’s House. You can use the 6 points to purchase any combination of Soviet and Weapon Counters. Place the newly purchased counters in the Reserves box in Pavlov’s House. You cannot take this action if the 13th Guards Rifle Division Command Post location has a Disrupted Token.
8th Guards Sapper Battalion: You can use this action to do one of the following:
• Buttress: To use this action, you must have a Sapper Token in the Supply box in Pavlov’s House. Place the Sapper Token back in the stock. Increase the value of one of the Defense Value Tokens in Pavlov’s House by 1; or, remove a Disrupted Token from the 3rd Rifle Battalion, 42nd Guards Rifle Regiment location (3, on the game board).
• Field Defenses: To use this action, you must have a Sapper Token in the Supply box in Pavlov’s House. Move the Sapper Token from the Supply box to one of the six Sapper locations on the game board. See Place Wehrmacht Counters (p. 13) for more information on the effect of Sapper Tokens on the game board.
6
Playing the Game: Soviet Cards

7
139th Signal Battalion: You can use this action to do one of the following: • Recover: Remove a Disrupted Token from one of the 139th Signal
Battalion locations (14 - 17, on the game board). • Tactical Decision: Place one Fog of War card that you drew into the stock
and draw a new Soviet Card. You cannot take this action if all the 139th Signal Battalion locations have Disrupted Tokens.
• Wire Communications: Place one Wire Communications Token from the stock onto one of the 139th Signal Battalion locations on the game board.
32nd Guards Artillery Regiment: You can use this action to do one of the following:
• Recover: Remove a Disrupted Token from one of the 32nd Guards Artillery Regiment locations (10, 11, on the game board).
• Ready Artillery: Place one Artillery Token from the stock onto one of the 32nd Guards Artillery Regiment locations on the game board. See Forward Observer (p. 22) for more information on how to use readied Artillery Tokens.
Volga Military Flotilla: You can use this action to do one of the following: • Recover: Remove a Disrupted Token from one of the Volga Military Flotilla
locations (5 - 7, on the game board). • Load Supplies: Move any combination of up to three Ammunition, First
Aid, Food, and Sapper Tokens from the Staging Area box onto the empty Volga Military Flotilla locations. You may place only one supply token per non-disrupted Flotilla location. If a Flotilla location is already disrupted, you are prohibited from placing a supply token on it. Hence, in some circumstances you might only have the option of placing one or two supply tokens along the flotilla.
• Deliver Supplies: Move any First Aid, Food, and Sapper Tokens that are on Volga Military Flotilla locations to the Supplies box in Pavlov’s House. Any Ammunition Tokens that are delivered are instantly placed back in the stock; for each Ammunition Token that was delivered, five Suppression Tokens are placed in the Supplies box in Pavlov’s House from the stock.
Playing the Game: Soviet Cards
Special Rule: Improved Communications If you begin the Soviet Card Phase of your turn and all four 139th Signal Battalion locations on the game board are occupied with Wire Communication Tokens, you can take up to four actions instead of three.
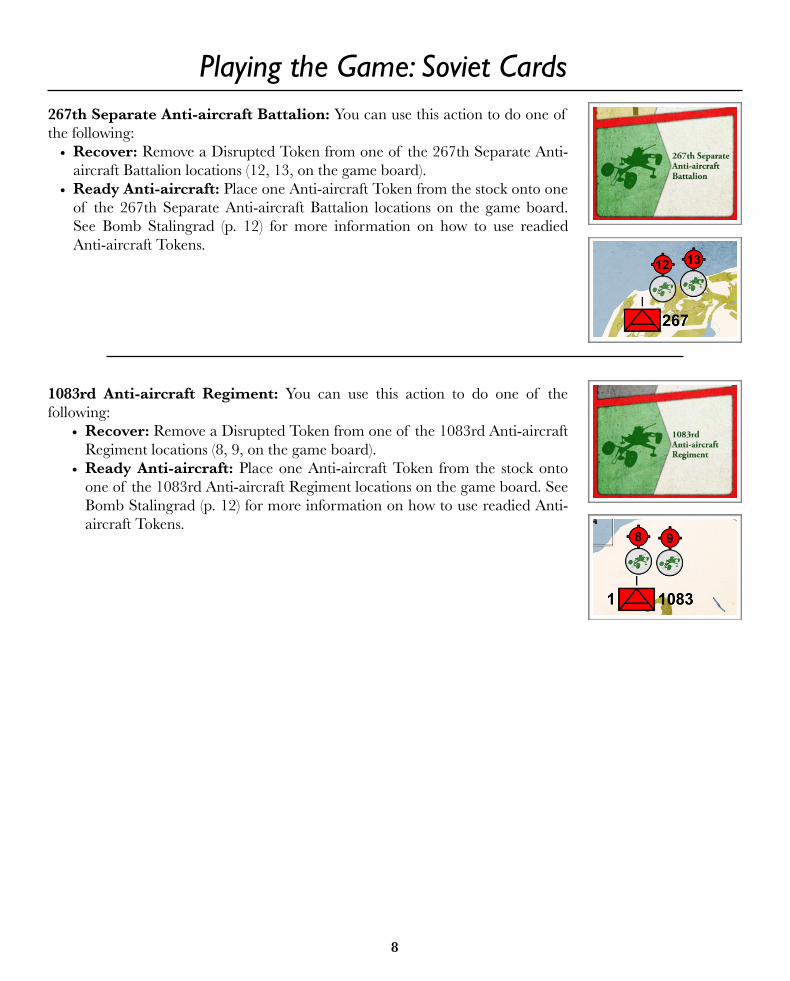
267th Separate Anti-aircraft Battalion: You can use this action to do one of the following:
• Recover: Remove a Disrupted Token from one of the 267th Separate Anti-aircraft Battalion locations (12, 13, on the game board).
• Ready Anti-aircraft: Place one Anti-aircraft Token from the stock onto one of the 267th Separate Anti-aircraft Battalion locations on the game board. See Bomb Stalingrad (p. 12) for more information on how to use readied Anti-aircraft Tokens.
1083rd Anti-aircraft Regiment: You can use this action to do one of the following:
• Recover: Remove a Disrupted Token from one of the 1083rd Anti-aircraft Regiment locations (8, 9, on the game board).
• Ready Anti-aircraft: Place one Anti-aircraft Token from the stock onto one of the 1083rd Anti-aircraft Regiment locations on the game board. See Bomb Stalingrad (p. 12) for more information on how to use readied Anti-aircraft Tokens.
8
Playing the Game: Soviet Cards

Once you have completed the Soviet Card Phase, you are ready to begin the Wehrmacht Card Phase. The Wehrmacht Cards represent the tactical-level actions taken by elements of the German 6th Army that assaulted Pavlov’s House. Reveal three Wehrmacht Cards from the Wehrmacht Card deck, one at a time, resolving the effect of each one before moving to the next. After all three Wehrmacht Cards have been resolved, the Wehrmacht Card Phase is over and Soviet Counter Phase begins.
There are six different categories of Wehrmacht Cards, based on the card effect:
• Attack Defender • Suppress Defender • Attack Building • Bomb Stalingrad • Place Wehrmacht Counter • Assault (Suppress Defender and Attack Building)
Attack Defender There is one type of Wehrmacht Card with the Attack Defender effect: the Sniper. When you reveal the Sniper Card, roll a die and check the result against the numbers on the Sniper Card. The result indicates the color of combat positions that will be targeted. If there are no Soviet Counters in the corresponding color, the attack has no effect. Once the color has been determined, roll again to see which specific combat position is targeted by comparing the result to the number on the board. If the result of the roll is a combat position that is empty, go to the next highest number. If no higher number is occupied, go to the next lower number. Once a Soviet Counter has been identified as the target, roll four dice and compare the result against the current Defense Value of the location. If at least one of the dice rolled is equal to or higher than the Defense Value, the Soviet Counter becomes a casualty and is removed from the game.
3.0 Wehrmacht Card Phase
9
Gameplay Example: A Sniper Card is revealed. You roll a 3, which corresponds to red on the Sniper Card. You roll to see which red-colored combat position will be targeted, and the result is a 2, indicating Pavlov will be the target. If Pavlov had not been present, Glushenko would have been targeted instead. Now that the target has been identified as Pavlov, you roll four dice. The current Defense Value of the red combat positions where Pavlov is located is 5. If at least one of the dice rolled is equal to or higher than 5, Pavlov becomes a casualty and is removed from the game. Attack Defender

Suppress Defender There is one type of Wehrmacht Card with the Suppress Defender effect: the Mortar. When you reveal the Mortar Card, roll one die and check the result against the numbers on the Mortar Card. The result indicates the color of combat positions that will be targeted. If there are no Soviet Counters in the corresponding color, the attack has no effect. Once the color has been determined, roll again to see which specific combat position is targeted by comparing the result to the number on the board. If the result of the roll is a combat position that is empty, go to the next highest number. If no higher number is occupied, go to the next lower number. Once a combat position has been identified as the target, roll four dice and compare the result against the current Defense Value of the location. If at least one of the dice rolled is equal to or higher than the Defense Value, place a Disrupted Token on the Soviet Counter. If a Soviet Counter already has a Disrupted Token on it and is supposed to receive another Disrupted Token, the Soviet Counter has become a casualty. Remove it from the game.
10
Playing the Game: Wehrmacht Cards
Suppress Defender
Gameplay Example: A Mortar Card is revealed. You roll a 5, which corresponds to purple on the Mortar Card. You roll to see which purple-colored combat position will be targeted, and the result is a 4, which is empty. First you check to see if any space higher than 4 is occupied, which there is not. Then you check to see which space lower than 4 is occupied. Pavlov, who is in space 3, is closer to the original target space than Glushenko, so Pavlov is the target. Now that the target has been identified as Pavlov, you roll four dice. The current Defense Value of the purple combat positions where Pavlov is located is 4. If at least one of the dice rolled is equal to or higher than 4, Pavlov will be Suppressed (you would place a Disrupted Token on Pavlov). However, since there was already a Disrupted Token on Pavlov, he becomes a casualty and is removed from the game.

Attack Building There are four different types of Wehrmacht Cards with the Attack Building effect. These cards represent artillery at different echelons: 15cm sFH 18 and 10.5cm leFH 18 at the divisional artillery regiment level; and 7.5cm leIG 18 and 15cm sIG 33 cards at the infantry regiment artillery company level. When you reveal one of these cards, roll one die and compare the result to the card. The result indicates the color-coded area of combat positions that is attacked. Now roll a number of dice equal to the dice value (5 for the 15cm sFH 18, 4 for the 10.5cm leFH 18, and 3 for the 7.5cm leIG 18 and 15cm sIG 33). If at least one of the dice rolled is equal to or higher than the area’s Defense Value, reduce the Defense Value by one. If the Defense Value was already at 3 and at least one of the dice is equal to or higher than 3, every Soviet Counter in a combat position that matches the area’s color is given a Disrupted Token as if it had been Suppressed (p. 10).
11
Gameplay Example: A 15cm sFH 18 card is revealed. You roll a 3, which corresponds to red on the 15cm sFH 18 card. You roll 5 dice (the dice value for the 15cm sFH 18). The current Defense Value of the area with red combat positions is 5. If at least one of the dice rolled is 5 or higher, the Defense Value for the red locations is reduced to 4. If the Defense Value had been at 3 and you rolled at least one 3 or higher, both Soviet Counters would have been given Disrupted Tokens.
Playing the Game: Wehrmacht Cards
Attack Building

Bomb Stalingrad There is one type of Wehrmacht Card with the Bomb Stalingrad effect: the Junkers Ju 87. Information on the Ju 87 card differs from most of the other Wehrmacht Cards. Each Ju 87 card has the number of aircraft participating in a bombing raid (ranging from 2-4) as well as the Defense Value of the Ju 87.
Anti-aircraft Defense: When you reveal a Ju 87 card, check the current status of your readied Anti-aircraft Tokens on the game board. For each Anti-aircraft Token you use in defense against the Ju 87 bombing raid, you can roll two dice. For each dice you roll that is equal to or higher than the Ju 87 Defense Value of 4, one of the Ju 87 aircraft is removed from the raid. Anti-aircraft Tokens that are used in this way are placed back in the stock.
Bombing: Each remaining Ju 87 then bombs a location in Stalingrad corresponding to the red target circles on the game board. Roll three dice and total the result for each Ju 87, resolving the roll for each one before moving to the next. If there is a token (other than a Disrupted Token) on the location that corresponds to the number rolled, place the token in the stock. If there was no token on the location that corresponds to the number rolled, place a Disrupted Token on the location. • Fog of War: If you place a Disrupted Token on locations 14 - 17, also add a Fog of War card from the
stock to the Soviet Card discard pile. • Location 3: If this location already has a Disrupted Token and is targeted, every Soviet Counter in a
combat position in Pavlov’s House is given a Disrupted Token as if it had been Suppressed (p. 10). • Locations 4 - 17: If there is a Disrupted Token on the location that corresponds to the number rolled,
go to the next highest number. If this process would result in you placing a second Disrupted Token on location 18, you lose the game immediately.
Gameplay Example: A Junkers Ju 87 card is revealed with a 4 for the number of Ju 87s in the raid. You have Anti-aircraft Tokens on locations 8, 12, and 13. You decide to use the tokens on locations 8 and 13 to defend against the raid and place the Anti-Aircraft Tokens in the stock. Each token provides two dice to roll. You roll the four dice and get the following result: 2, 3, 4 and 4. The 4s are equal to the Ju 87 Defense value, which means that two of the four Ju 87s are removed from the raid. You now roll a bombing result for each of the two remaining Ju 87s. For the first one, you roll three dice and get a result of 14. There was already a Wire Communications Token on location 14, which means that the Wire Communications Token is placed in the stock. For the second Ju 87, you roll three dice and get a result of 10. There is already a Disrupted Token on the location so you go to the next higher number without a Disrupted Token, which is 11. A Disrupted Token is then placed on location 11.
Playing the Game: Wehrmacht Cards
Number of Ju 87 in Raid
Defense Value
12 Bomb Stalingrad

13
Playing the Game: Wehrmacht CardsPlace Wehrmacht Counter There are seven types of Wehrmacht Cards with the place Wehrmacht counter effect, which are divided into two groups. The first group is infantry, which includes Machine Gunners, Riflemen, and Scouts. The second group is amor, which includes Panzer II, Panzer III, Panzer IV, and StuG IIIb. Infantry Wehrmacht Counters suppress Soviet Counters, while amor Wehrmacht Counters attack Pavlov’s House. Both infantry and armor Wehrmacht are advanced towards Pavlov’s House.
Placing each Wehrmacht Counter has two or three steps:
• Roll to determine Wehrmacht Counter placement • If the counter is infantry, decide whether to attempt to suppress • Advance Wehrmacht Counters
Roll to Determine Wehrmacht Counter Placement When you reveal a Wehrmacht Card that places a Wehrmacht Counter, roll one die to determine which Wehrmacht Counter placement location the Wehrmacht Counter should be placed on.
Decide Whether to Attempt to Suppress the Wehrmacht Counter If the Wehrmacht Counter is infantry (Machine Gunners, Riflemen, or Scouts) and if you have Suppression Tokens in the Suppression box in Pavlov’s House that matches the color where the new Wehrmacht infantry counter is to be placed, you can use as many Suppression Tokens as you want to roll an equal number of dice. If any of the dice rolled are equal to or higher than the Wehrmacht Counter’s Defense Value, don’t place the Wehrmacht Counter. Any Suppression Tokens you used are placed back in the stock.
Advance Wehrmacht Counters Each Wehrmacht counter location on the arrow track can only be occupied by a single counter. Wehrmacht Counters move in the direction of the arrow track (from the perimeter of 9 January Square, towards Pavlov’s House). If you place a counter on a location that is already occupied, advance the other Wehrmacht Counter(s) already on the Wehrmacht arrow track toward Pavlov's House. Continue this process until the leading counters are moved into the first open location available. If advancing Wehrmacht Counters in this way would advance a counter beyond the end of the arrow track, it is considered to have entered Pavlov’s House and you lose the game immediately.
Sapper Defenses If a Wehrmacht Counter advances into a Wehrmacht counter location with a Sapper Token, place the Sapper Token in the stock and roll three dice. If at least one of the dice rolled is equal to or higher than the Wehrmacht Counter’s Defense Value, the Wehrmacht Counter is returned to the stock.

Playing the Game: Wehrmacht Cards
Gameplay Example: A Machine Gunners card is revealed. You roll a die and the result is a 4. A Machine Gunners counter should be placed on the first Wehrmacht counter location on the “4” track. You have the option of whether to attempt to Suppress the Machine Gunners. If you try to Suppress the counter, you choose any number of Suppression Tokens in the red colored Suppression box in Pavlov’s House and roll one die for each Suppression Token. If you rolled a 4 or higher (the Machine Gunners’ Defense) you would Suppress the Machine Gunners counter and it would be placed back in the stock. If you chose not to Suppress or if you attempted and failed to Suppress the Machine Gunners, you would place the counter in the first location on the “4” track. Because the first location is occupied with a Riflemen counter, you would advance the Riflemen and the Scout counters forward. This would advance the Scouts counter into the Wehrmacht counter location with a Sapper token. You would immediately roll three dice for the Sapper Token. If at least one of the dice resulted in a 5 or higher (the Scouts’ Defense), the Scouts counter would be removed.
14
Place Wehrmacht Counter

Assault There is one type of Wehrmacht Card with the Assault effect: the Assault Card. When you reveal an Assault Card, all infantry (Machine Gunners, Riflemen, and Scouts) on Wehrmacht counter locations will Suppress Defenders in Pavlov’s House, while all armor (Panzer II, Panzer III, Panzer IV, and StuG IIIb) on Wehrmacht counter locations will attack Pavlov's House (with Attack Building actions).
You will work through each set of Wehrmacht tracks on the board, determining whether groups of Wehrmacht counters in like-colored circles are able to Suppress Defenders in correspondingly colored combat positions. Work through the suppression in this sequence:
- Begin with the green-colored Wehrmacht tracks (numbered 1 and 2). - Add the suppress values for all Wehrmacht infantry counters on those tracks. - Now complete a “Suppress Defender” action as outlined on p. 10. - Continue this process for the red-colored tracks (numbered 3, 4, and 5) and then for the purple-colored
track (numbered 6).
Now you will work through each set of Wehrmacht tracks, determining whether groups of Wehrmacht Counters in like-colored circles are able to take Attack Building actions. Work through the attack in this sequence:
- Begin with the green-colored Wehrmacht tracks (numbered 1 and 2). - Add the attack values for all Wehrmacht armor counters on those tracks. - Now complete an “Attack Building” action as outlined on p. 11. - Continue this process for the red-colored tracks (numbered 3, 4, and 5) and then for the purple-colored
track (numbered 6).
15
Playing the Game: Wehrmacht Cards

Gameplay Example: An Assault card is revealed. You check the green-colored “1” and “2” Wehrmacht tracks. The total Suppress Value for the Machine Gunners (2), Riflemen (1), and Scouts (1) is 4; this is the number of dice rolled against the Defense Value for suppression. You roll one die and the result is 3. However, there is no target in the green-colored 3 combat position. Therefore, you target Glushenko, since he is in the next higher combat position. The current Defense Value of the green combat positions where Glushenko is located is 5. If at least one of the dice rolled is equal to or higher than 5, Glushenko will be Suppressed (you would place a Disrupted Token on Glushenko). Now total the Attack Value of the armor counters on the green-colored “1” and “2” Wehrmacht tracks. The total Attack Value for the Panzer II (1, 1) and StuG IIIb (3) is 5, so you roll 5 dice . The current Defense Value of the green combat positions is 5. If at least one of the dice rolled is 5 or higher, the Defense Value for the green locations is reduced to 4. Now complete this process for the red (3, 4, and 5) and purple (6) Wehrmacht tracks.
16
Playing the Game: Wehrmacht Cards
Assault (Suppress Defender and Attack Building)

Special Cards There are special cards in the Wehrmacht cards deck that affect the Soviet Counters in Pavlov’s House: Resupply/Storm Group Cards.
Resupply Cards represent the challenge of the defenders of Pavlov’s House maintaining enough food and water to hold out against constant German assaults in the strongpoint for months. When a Resupply Card is drawn from the Wehrmacht deck, check the number of Food Tokens in the Supply box in Pavlov’s House and the number of Soviet Counters in Pavlov’s House (including those in the Reserves). You must place one Food Token for every five Soviet Counters in Pavlov’s House back in the stock. If you did not have enough Food Tokens to account for the Soviet Counters, you must discard Soviet Counters from the game as casualties. If this process would result in you removing all Soviet Counters from Pavlov’s House, you lose the game immediately.
After resolving the Resupply side of the card, flip it over to the Storm Group side (p. 18).
17
Playing the Game: Wehrmacht Cards
Gameplay Example: A Resupply Card is revealed. You have three Food Tokens in the Supply box in Pavlov’s House, and you have 17 Soviet Counters in Pavlov’s House. You place all three Food Tokens in the stock to account for 15 of the Soviet Counters. Two of the Sovie t Counter s must be removed from the game as casualties, because you did not have enough Food Tokens.
Resupply
Note: There is one Storm Group card (the Milk House card that is part of the Wehrmacht card deck “5”) that does not have a Resupply side.
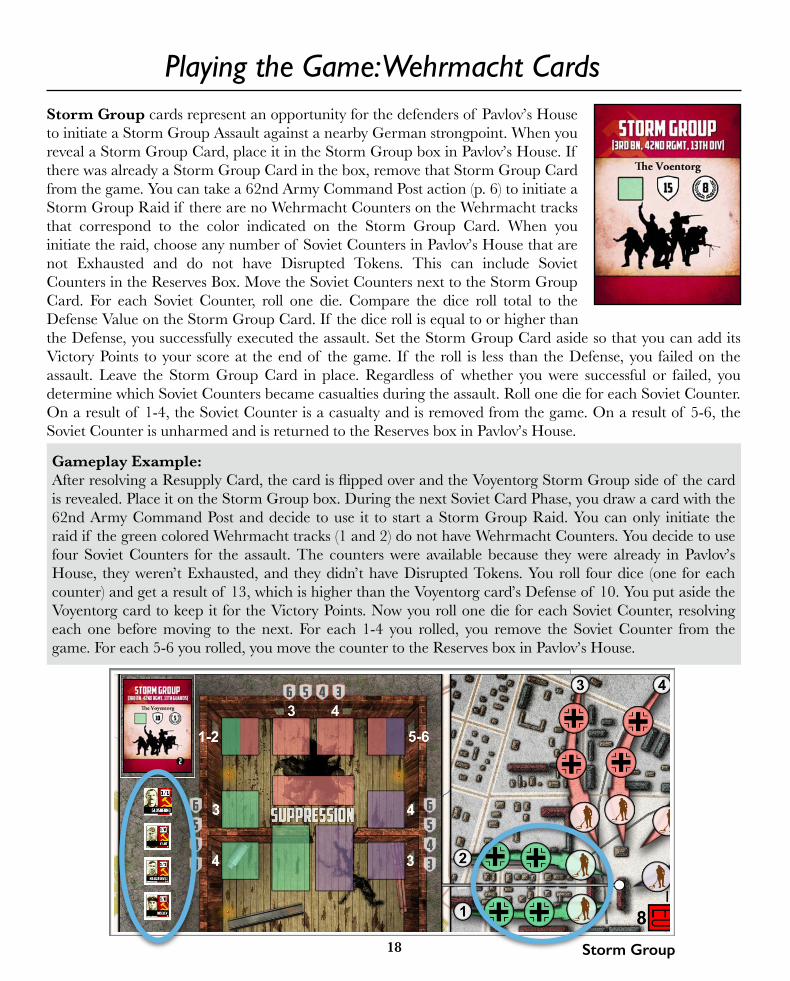
Storm Group cards represent an opportunity for the defenders of Pavlov’s House to initiate a Storm Group Assault against a nearby German strongpoint. When you reveal a Storm Group Card, place it in the Storm Group box in Pavlov’s House. If there was already a Storm Group Card in the box, remove that Storm Group Card from the game. You can take a 62nd Army Command Post action (p. 6) to initiate a Storm Group Raid if there are no Wehrmacht Counters on the Wehrmacht tracks that correspond to the color indicated on the Storm Group Card. When you initiate the raid, choose any number of Soviet Counters in Pavlov’s House that are not Exhausted and do not have Disrupted Tokens. This can include Soviet Counters in the Reserves Box. Move the Soviet Counters next to the Storm Group Card. For each Soviet Counter, roll one die. Compare the dice roll total to the Defense Value on the Storm Group Card. If the dice roll is equal to or higher than the Defense, you successfully executed the assault. Set the Storm Group Card aside so that you can add its Victory Points to your score at the end of the game. If the roll is less than the Defense, you failed on the assault. Leave the Storm Group Card in place. Regardless of whether you were successful or failed, you determine which Soviet Counters became casualties during the assault. Roll one die for each Soviet Counter. On a result of 1-4, the Soviet Counter is a casualty and is removed from the game. On a result of 5-6, the Soviet Counter is unharmed and is returned to the Reserves box in Pavlov’s House.
Gameplay Example: After resolving a Resupply Card, the card is flipped over and the Voyentorg Storm Group side of the card is revealed. Place it on the Storm Group box. During the next Soviet Card Phase, you draw a card with the 62nd Army Command Post and decide to use it to start a Storm Group Raid. You can only initiate the raid if the green colored Wehrmacht tracks (1 and 2) do not have Wehrmacht Counters. You decide to use four Soviet Counters for the assault. The counters were available because they were already in Pavlov’s House, they weren’t Exhausted, and they didn’t have Disrupted Tokens. You roll four dice (one for each counter) and get a result of 13, which is higher than the Voyentorg card’s Defense of 10. You put aside the Voyentorg card to keep it for the Victory Points. Now you roll one die for each Soviet Counter, resolving each one before moving to the next. For each 1-4 you rolled, you remove the Soviet Counter from the game. For each 5-6 you rolled, you move the counter to the Reserves box in Pavlov’s House.
18
Playing the Game: Wehrmacht Cards
Storm Group

Once you have completed the Wehrmacht Card Phase, you are ready to begin the Soviet Counter Phase. The Soviet Counters represent the tactical-level actions taken by elements of the 7th Rifle Company and 3rd Machine Gun Company, 3rd Rifle Battalion, 42nd Guards Rifle Regiment, 13th Guards Division that defended Pavlov’s House. During each Soviet Counter Phase, you can move three Soviet Counters and then take actions with three Soviet Counters. You can only take one action with a counter on a turn. When you take an action with a counter, place an Action Token on the counter. If you take an action that Exhausts a counter, flip the counter to its Exhausted (grayed out) side.
Move (Does not Exhaust a counter)
Actions that Exhaust a counter • Attack • Suppress • Command • Request Reinforcements • Forward Observer • Anti-tank • Machine Gun • Mortar
Actions that do not Exhaust a counter • Recover
19
4.0 Soviet Counter Phase
Note: It is possible to move four Soviet Counters instead of three, and take four actions per Soviet Counter Phase instead of three. See Command Team (p. 21) for more information.
Move (Does not Exhaust Counter) At the beginning of each Soviet Counter Phase, you can move three Soviet Counters. Each combat position in Pavlov’s House may only be occupied by a single Soviet Counter, unless the combat position is occupied by two Soviet Counters with the same Weapon Special Action designation (p. 23). You can move a Soviet Counter from the Reserve box to a combat position or between combat positions. If a Soviet Counter moves to a combat position that is already occupied, the counter that is being replaced must move into an empty combat position or to the Reserves box (this movement is free). However, a counter cannot move to a combat position that is occupied by a counter that is Exhausted or has a Disrupted token.
Gameplay Examples: [1] Glushenko can move to Masijashvili’s combat position, because Masijashvili is not Exhausted and doesn’t have a Disrupted Token. Masijashvili would have to then move to an empty combat position (to include the one vacated by Glushenko) or the Reserves box. [2] Glushenko cannot move into Chait’s combat position because Chait has a Disrupted Token. [3] Kiselev can move to the empty combat position.
1
2
3
Move

Suppress20
Gameplay Example: Chekhov has line of sight to the Riflemen because they are both on green. Chekhov Attacks the Riflemen. Chekhov has a 4 Attack Value and rolls four dice. Chekhov rolls 1, 2, 2, and 4. The 4 is equal to the Riflemen’s defense. The Riflemen is removed from the board and placed with the Wehrmacht Counters in the stock.
After completing movement with your Soviet counters, you are ready to take actions.
Playing the Game: Soviet Counters
Attack (Exhausts Counter) A Soviet Counter must have line of sight to a Wehrmacht infantry counter to take an Attack action. Declare the Soviet Counter that will take the action and the Wehrmacht infantry counter that will be the target of the attack. Then roll a number of dice equal to the Soviet Counter’s Attack Value and compare it to the Wehrmacht infantry counter’s Defense Value. If at least one of the dice rolled is equal to or exceeds the Wehrmacht infantry counter’s Defense Value, the Wehrmacht infantry counter is removed from the board and placed back into the stock.
Attack
Suppress (Exhausts Counter) Move a number of Suppression Tokens equal to the Soviet Counter’s Suppress Value from the Supplies box, to the suppress square on the game board that matches the color square where the Soviet Counter is located. Suppression Tokens are used when Wehrmacht Counters are placed (p. 13).
Gameplay Example: Glushenko Suppresses. Glushenko has a 1 Suppress value, and places one Suppression Token in the green colored suppression box in Pavlov’s House.
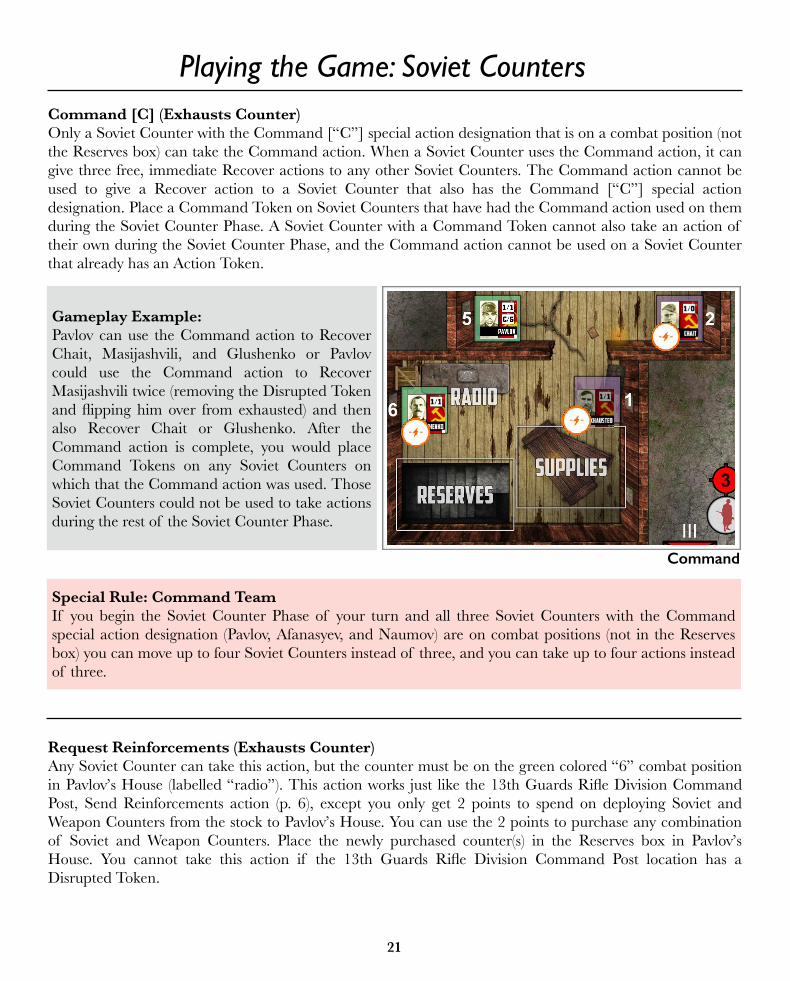
Command [C] (Exhausts Counter) Only a Soviet Counter with the Command [“C”] special action designation that is on a combat position (not the Reserves box) can take the Command action. When a Soviet Counter uses the Command action, it can give three free, immediate Recover actions to any other Soviet Counters. The Command action cannot be used to give a Recover action to a Soviet Counter that also has the Command [“C”] special action designation. Place a Command Token on Soviet Counters that have had the Command action used on them during the Soviet Counter Phase. A Soviet Counter with a Command Token cannot also take an action of their own during the Soviet Counter Phase, and the Command action cannot be used on a Soviet Counter that already has an Action Token.
Request Reinforcements (Exhausts Counter) Any Soviet Counter can take this action, but the counter must be on the green colored “6” combat position in Pavlov’s House (labelled “radio”). This action works just like the 13th Guards Rifle Division Command Post, Send Reinforcements action (p. 6), except you only get 2 points to spend on deploying Soviet and Weapon Counters from the stock to Pavlov’s House. You can use the 2 points to purchase any combination of Soviet and Weapon Counters. Place the newly purchased counter(s) in the Reserves box in Pavlov’s House. You cannot take this action if the 13th Guards Rifle Division Command Post location has a Disrupted Token.
21
Gameplay Example: Pavlov can use the Command action to Recover Chait, Masijashvili, and Glushenko or Pavlov could use the Command action to Recover Masijashvili twice (removing the Disrupted Token and flipping him over from exhausted) and then also Recover Chait or Glushenko. After the Command action is complete, you would place Command Tokens on any Soviet Counters on which that the Command action was used. Those Soviet Counters could not be used to take actions during the rest of the Soviet Counter Phase.
Special Rule: Command Team If you begin the Soviet Counter Phase of your turn and all three Soviet Counters with the Command special action designation (Pavlov, Afanasyev, and Naumov) are on combat positions (not in the Reserves box) you can move up to four Soviet Counters instead of three, and you can take up to four actions instead of three.
Playing the Game: Soviet Counters
Command

Forward Observer [F] (Exhausts Counter) Only a Soviet Counter with the Forward Observer [“F”] special action designation can take the Forward Observer action. When a Soviet Counter uses the Forward Observer action, move one Artillery Token on a 32nd Guards Artillery Regiment location to the stock (if there is not an Artillery token on a 32nd Guards Artillery Regiment location, you cannot use this action). The Soviet Counter using the Forward Observer action chooses two adjacent Wehrmacht Counters that it has line of sight to. Roll an attack against each of the two Wehrmacht Counters, using two dice for each attack, and compare it to each Wehrmacht Counter’s Defense Value. If at least one of the dice rolled is equal to or exceeds the Wehrmacht Counter’s Defense Value, the Wehrmacht Counter is removed from the board and placed back into the stock.
22
Gameplay Example: Potanski can use a Forward Observer action to attack the two Wehrmacht Counters on the green colored Wehrmacht track because he has line of sight to the two Wehrmacht Counters (Potanski and the Wehrmacht Counters are both on green) and because there is a Artillery Token on one of the 32nd Guards Artillery Regiment locations. Potanski rolls two dice against the StuG IIIb and gets a 2 and a 4. Neither of those rolls is equal to or higher than the StuG IIIb’s Defense Value of 5, so the StuG IIIb is unaffected. Potanski also rolls two dice against the Machine Gunners and gets a 5 and a 6. Both 5 and 6 are higher than the Machine Gunners’ Defense Value of 4, so the Machine Gunners counter is removed and placed back in the Wehrmacht Counter stock.
Playing the Game: Soviet Counters
Forward Observer

Soviet Counters and Weapon Counters There are three actions that are associated with the relationship between Soviet Counters and Weapon Counters: Anti-tank [A], Machine Gun [G], and Mortar [M]. There are some basic rules that apply any time Soviet Counters use a Weapon Counter:
• When a Soviet Counter moves, it can take a Weapon Counter with the same special action designation with it.
• Two Soviet Counters can occupy the same combat position if they have the same special action designation and if there is a Weapon Counter with the same special action designation also in the combat position.
• If two Soviet Counters are in the same combat position and they are successfully targeted by an attack, you can choose which of the two Soviet Counters is affected by the attack. If the combat position is successfully suppressed, both of the Soviet Counters take a Disrupted Token.
• If a Weapon Counter is ever left alone in a combat position (most likely because Soviet Counters were removed from the game), the Weapon Counter is immediately placed in the Reserves box.
Anti-tank [A] (Exhausts Two Counters) If two Soviet Counters and a Weapon Counter all have the Anti-tank special action designation and are in the same combat position, then the two Soviet Counters can take the Anti-tank action. This allows the two Soviet Counters to use the Weapon Counter’s Attack Value to take an Attack action against a Wehrmacht armor counter that is in line of sight. This counts as two actions and exhausts both Soviet Counters.
Machine Gun [G] (Exhausts Two Counters) If two Soviet Counters and a Weapon Counter all have the Machine Gun special action designation and are in the same combat position, then the two Soviet Counters can take the Machine Gun action. This allows the two Soviet Counters to use the Weapon Counter for an Attack or Suppress action. This counts as two actions and exhausts both Soviet Counters.
Mortar [M] (Exhausts Two Counters) If two Soviet Counters and a Weapon Counter all have the Mortar special action designation and are in the same combat position, then the two Soviet Counters can take the Mortar action. This allows the two Soviet Counters to use the Weapon Counter for a Suppress action. This counts as two actions and exhausts both Soviet Counters.
Playing the Game: Soviet Counters
23
Gameplay Example: Sobgayda moves to the green combat position and takes the M1937 anti-tank rifle with him. Sobgayda can take the rifle because both he and the rifle have the Anti-tank special action designation. Murzaev also takes a Move action to move to the same combat position. Sobgayda and Murzaev can occupy the same position because they both have the Anti-tank special action designation and because a Weapon Counter with the Anti-tank special action designation is also present. During the next Wehrmacht Card Phase, the green combat position is attacked by a Sniper. You can choose which of the two Soviet Counters becomes a casualty and is removed from the game.

Recover (Does Not Exhaust Counter) Soviet Counters that are flipped to their grayed out side are Exhausted and cannot take an action. Additionally, when a Soviet Counter has a Disrupted Token on it, it cannot take an action. The only exception to either of these rules is the Recover action. The Recover action allows a Soviet Counter to be flipped back over from its Exhausted side. The Recover action can also be used to remove a Disrupted Token from the Soviet Counter and place the Disrupted Token back in the stock. Remember that a Soviet Counter can only be used for one action each turn. Therefore, a Soviet Counter cannot take multiple Recover actions or a Recover action and a different action in the same turn.
Attributes Some Soviet Counters have special Attributes. These Attributes are not treated as actions. Instead, they are special conditions that are always in effect. Attributes include:
• Inspire [I] • Storm Group [S]
Inspire [I] Soviet Counters with the Inspire attribute improve the effectiveness of Anti-tank or Machine Gun actions. If a Soviet Counter with the Inspire attribute and the Anti-tank attribute is in a combat position (not the Reserves box), Anti-tank actions get one extra die for Attacks. If a Soviet Counter with the Inspire attribute and the Machine Gun attribute is in a combat position (not the Reserves box), Machine Gun actions that are used to Suppress get one extra Suppression Token and Machine Gun actions that are used to Attack get one extra die.
Storm Group [S] A Soviet Counter with the Storm Group attribute allows you to roll two extra dice when the Soviet Counter is part of a Storm Group assault (p. 18)
Ending the Soviet Counter Phase Once you have completed your Soviet Counter Phase actions (three actions, unless the Command Team special rule was in effect), remove all the Action and Command Tokens you placed on the Soviet Counters.
Now start a new turn with the Soviet Card Phase.
24
Playing the Game: Soviet Counters

25
Any time a Soviet Counter would become a casualty, you can move a First Aid Token to the stock to ignore the casualty. To use a First Aid Token it must be in the Supplies box in Pavlov’s House. Using a First Aid Token does not cost an action and can be done at any time in the game. First Aid Tokens can be used to ignore the following:
• An Attack from a Sniper Wehrmacht Card (p. 9). • Becoming a casualty due to taking a second Disrupted Token (p. 10). • Becoming a casualty during a Storm Group assault (p. 18). • Becoming a casualty because you did not have enough Food Tokens during a Resupply (p 17).
5.0 First Aid
Gameplay Example: During the Wehrmacht Card Phase, a Sniper Card is revealed. The Sniper successfully attacks Sobgayda, which would result in a casualty. You use a First Aid Token to ignore the Sniper’s attack. Later in the same Wehrmacht Card Phase, a Mortar Card is revealed. The Mortar successfully targets the combat position that Sobgayda and Murzaev are in. Sobgayda and Murzaev are already suppressed, so adding a second Disrupted Token to each of them would result in casualties. You use two First Aid Tokens to ignore the Mortar’s suppression.
First Aid
Ending the Game
At the end of the turn when the Wehrmacht card deck is exhausted (after completing the Soviet Counter Phase), initiate a free Storm Group Raid (p. 18) for the Storm Group “Milk House” Card if there are no Wehrmacht Counters on the red colored Wehrmacht counter tracks. Once the Storm Group Raid has been resolved as normal, the game is over.
You Win if you have a score of at least 1.
You Draw if you scored between -9 and 0.
You Lose if you scored -10 or less.
You Lose immediately if, at any time during the game, a Wehrmacht Counter advances beyond the end of its track, if you place a second Disrupted Token the 62nd Army Command Post location (18), or if you have no Soviet Counters left in Pavlov’s House.
Score: The goal in Pavlov’s House is to score as many Victory Points as possible. To determine your score, do the following:
• Total the points you earned through successful Storm Group Raids; • Add one point for every Soviet Counter in Pavlov’s House; • Subtract three points for every Wehrmacht Counter remaining on the board.
6.0 Ending the Game
Score Award Victory Level
50+ Hero of the Soviet Union Epic Victory
40 - 49 Order of Victory
Major Victory30 - 39 Order of the Red Banner
20 - 29 Order of Suvorov
10 - 19 Order of the Patriotic WarMinor Victory
1 - 9 Order of the Red Star
-9 to 0 None Draw
-19 to -10 None Minor Defeat
-20 and lower None Major Defeat
26

7.1 Operational Support Cards Once you are familiar with the core rules of Pavlov’s House, you can add the Operational Support cards to the Soviet Card Phase. The Operational Support cards represent other key Stalingrad battlegrounds. By allocating limited resources to these battlegrounds, the 62nd Army leaves the defenders of Pavlov’s House more vulnerable.
Setup: Shuffle the eight Operational Support cards and place them face down near the board. Take the top card from the deck and place it face up on the Operational Support space on the board.
62nd Army Command Post: Add the Operational Support action to the normal options for the 62nd Army Command Post.
• Operational Support: To satisfy the requirements of a Operational Support card, you must remove the tokens indicated on the card from the game. The tokens must be removed from the stock. In addition, the areas identified on the card cannot have Disrupted Tokens on them. When you satisfy the requirements for the Operational Support card, set it aside so that you can add its Victory Points to your score at the end of the game. Replace the Operational Support card with the one on top of the deck.
7.0 Variants
27
Gameplay Example: During the Soviet Card Phase, you take a 62nd Army Command Post action to satisfy the requirements of the Mamayev Kurgan Operational Support card. You must remove from the game one Ammunition Token, one Food Token, one First Aid Token, and one Sapper Token. None of the following locations on the board can have Disrupted Tokens: the 62nd Army Command Post, 13th Guards Rifle Division Command Post, 139th Signal Battalion, and Volga Military Flotilla. When you satisfy the requirements for the Mamayev Kurgan Operational Support card, set it aside for its Victory Points. Flip over the next card from the Operational Support deck.
Operational Support

7.2 Tactics Cards [Increased Difficulty] Once you have beaten the normal version of Pavlov’s House, you can try the game with increased difficulty. Tactics cards represent strategic planning by the elements of the German 6th Army that are assaulting Pavlov’s House.
7.2.1 Veteran: At the Veteran difficulty level, one Tactics Card will be in play during the Wehrmacht Card Phase.
Setup: • Sort the Tactics Cards by the number on the lower right of the front of the
card. • Shuffle each deck of cards separately and place each of the decks face down. • Take the top three cards from the 1 deck and remove them from the game. • Take the top two cards from the 2, 3, and 4 decks and remove them from the
game. • Stack the decks face down on top of one another in order, with the 4 deck at
the bottom and the 1 deck on top.
In Play: On the first turn of the game at the beginning of the Wehrmacht Card Phase, deal one Tactics Card face up next to the Tactics Cards deck and apply the effects of the card for the rest of the turn. On the second turn of the game and for all subsequent turns, deal a new Tactics Card face up at the beginning of the Wehrmacht Card Phase and remove the Tactics Card that was previously in play.
Variants
28
Gameplay Example: At the beginning of the Wehrmacht Card Phase on the first turn of the game, you flip over the Artillery Barrage Tactics Card. During this phase, all artillery will gain the benefit of rolling one extra die. At the beginning of the Wehrmacht Card Phase on the second turn of the game, you remove the Artillery Barrage Tactics Card and replace it with the top card of the deck - Air Superiority.
Turn 1 Turn 2 and All Subsequent Turns

7.2.2 Elite: At the Elite difficulty level, two Tactics Cards will be in play during the Wehrmacht Card Phase.
Setup: • Sort the Tactics Cards by the number on the lower right of the front of the card. • Shuffle each deck of cards separately and place each of the decks face down. • Take the top two cards from each of the decks and remove them from the game. • Stack the decks face down on top of one another in order, with the 4 deck at the bottom and the 1
deck on top.
In Play: On the first turn of the game at the beginning of the Wehrmacht Card Phase, deal two Tactics Cards face up next to the Tactics Cards deck and apply the effects of the cards for the rest of the turn. On the second turn of the game and for all subsequent turns, remove the Tactics Card that was farthest away from the Tactics Card deck from play, shift over the remaining Tactics Card, and draw a new Tactics Card to replace the card that was shifted. Apply the effects of the Tactics Cards for the rest of the turn.
29
Gameplay Example: At the beginning of the Wehrmacht Card Phase on the first turn of the game, you flip over the Artillery Barrage and Air Superiority Tactics Cards. During this phase, all artillery will gain the benefit of rolling one extra die and the Defense value for Ju 87s is increased. At the beginning of the Wehrmacht Card Phase on the second turn of the game, you remove the Artillery Barrage Tactics Card, slide the Air Superiority Tactics Card over, and flip over the top card of the deck - Recon. Air Superiority and Recon will be in effect for the rest of the turn.
Variants
Turn 2 and all subsequent turns
Turn 1
7.3 Cooperative (Two Players) Pavlov’s House can be played as a two player cooperative game with no modifications. One player takes the role of the operational-level commanders that contributed to the defense of the strongpoint by performing all of the actions during the Soviet Card Phase. The other player takes the role of the command team in Pavlov’s House by performing all of the actions during the Soviet Counter Phase. Either player can resolve the effects of the Wehrmacht Card Phase. The two players are allowed to communicate and coordinate their actions, but each player is responsible for the final decisions for their actions during their chosen phase.
7.4 Competitive (Two Players or Three Players) In this variant, one or two players take on the role of the Soviet defenders. An additional player takes on the role of the German player.
Setup: • Add the Wehrmacht Riflemen card marked “Competitive” to the “1” deck, then set up the
Wehrmacht and Resupply cards as normal. • Sort the Tactics Cards by the number on the lower right of the front of the card. • Shuffle each deck of Tactics Cards separately and place each of the decks face down. • Take the top card from the 1 deck and remove it from the game. • Take the top two cards from the 2, 3, and 4 decks and remove them from the game. • Stack the decks face down on top of one another in order, with the 4 deck at the bottom and the 1
deck on top.
New Phase - Wehrmacht Planning: At the beginning of the first turn of the game, the German player draws four cards from the top of the Wehrmacht deck and the top three cards from the Tactics Cards deck. The German player chooses three Wehrmacht Cards to use for the turn and places them face down in an order of their choosing as their order pile. The top card will be the first order, the middle card the second order, and the bottom card will be the last order. In addition, the German player chooses one Tactics Card and places it face down alongside the chosen order cards. After placing the Wehrmacht and Tactics Cards, the German player draws three new Wehrmacht Cards and one new Tactics Card. The Soviet player then begins the Soviet Card Phase.
• Restriction: The German player must always choose to play Resupply and Storm Group cards. The German player cannot choose to keep one of those cards.
• Note: At the end of the game, the German player will have one Wehrmacht Card and two Tactics Cards remaining. Do not play another turn. The game still ends on the turn the Milk House Storm Group card is revealed.
• Wehrmacht Card Phase: At the beginning of the Wehrmacht Card Phase, the Tactics Card is revealed and its effect applies for the rest of the turn. The three chosen Wehrmacht Cards are resolved from top to bottom.
Variants
30

31
Sources Used in the Design of this Game
• Afanasyev, I. (1970). Дом Солдатской Славы (House of Soldier’s Glory). Moscow: ИЗДАТЕЛЬСТВО ДОСААФ (DOSAAF)
• Antill, P. D., & Dennis, P. (2007). Stalingrad 1942. Oxford: Osprey Publishing, Westminster, Maryland, U.S.A.
• Beevor, A. (2007). Stalingrad. London: Penguin Books. • Bull, S., & Dennis, P. (2008). World War II street-fighting tactics. Oxford: Osprey Pub. • Glantz, D. M., House, J. M., & Glantz, C. D. M. (2009). Armageddon in Stalingrad: September-
November 1942 (the Stalingrad trilogy, volume 2). Lawrence, KS: University Press of Kansas. • Hellbeck, J. (2015). Stalingrad: the Ccity that Defeated the Third Reich. New York: PublicAffairs. • Jones, M. K., & Glantz, D. M. (2010). Stalingrad: How the red army triumphed. Barnsley: Pen & Sword
Military. • Kirchubel, R. (2015). Atlas of the eastern front: 1941-45. London, United Kingdom: Osprey Publishing. • Joly, A. (2013). Stalingrad battle Atlas: Volume I. United States: Staldata Publications. • Joly, A. (2014). Stalingrad battle Atlas: Volume II. United States: Staldata Publications. • Joly, A. (2014). Stalingrad battle Atlas: Volume III. United States: Staldata Publications. • Moynahan, B. (2008). Forgotten soldiers. London: Quercus. • Pennington, R. (2010). Offensive Women: Women in Combat in the Red Army in the Second World War.
The Journal of Military History, 74, 775-820. • Rottman, G. L., & Taylor, C. (2007). Soviet field fortifications: 1941-45. Oxford: Osprey Publishing. • Saveliev, L. I. (1960). Дом сержанта Павлова (The House of Sergeant Pavlov). Воениздат МО СССР
(Military Publishing House of the USSR Ministry of Defense). • V’iunenko, N. P., and R. N. Mordvinov. Voennye flotilii v Velikoi Otechestvennoi voine. Moscow, 1957. • War Department (USA), Handbook on USSR Military Forces: Chapter , Tactics: 1 November 1945.
Pavlov’s House Scenarios for other Games
• ASL scenario, published in AH GENERAL volume 19 number 5. • ASL scenario, ASL Journal #5. • ASL scenario, The General, Volume 29, Issue 6. • LnLP's Lock 'n Load Tactical: Heroes of the Motherland. • LnLP's Lock 'n Load: Not One Step Back. • 1A Games' Tide of Iron: Next Wave. • L2 Design Group's Streets of Stalingrad (third edition). • Critical Hit, Inc.'s Advanced Tobruk System Basic Game II: Streets of Stalingrad.
References and Additional Resources