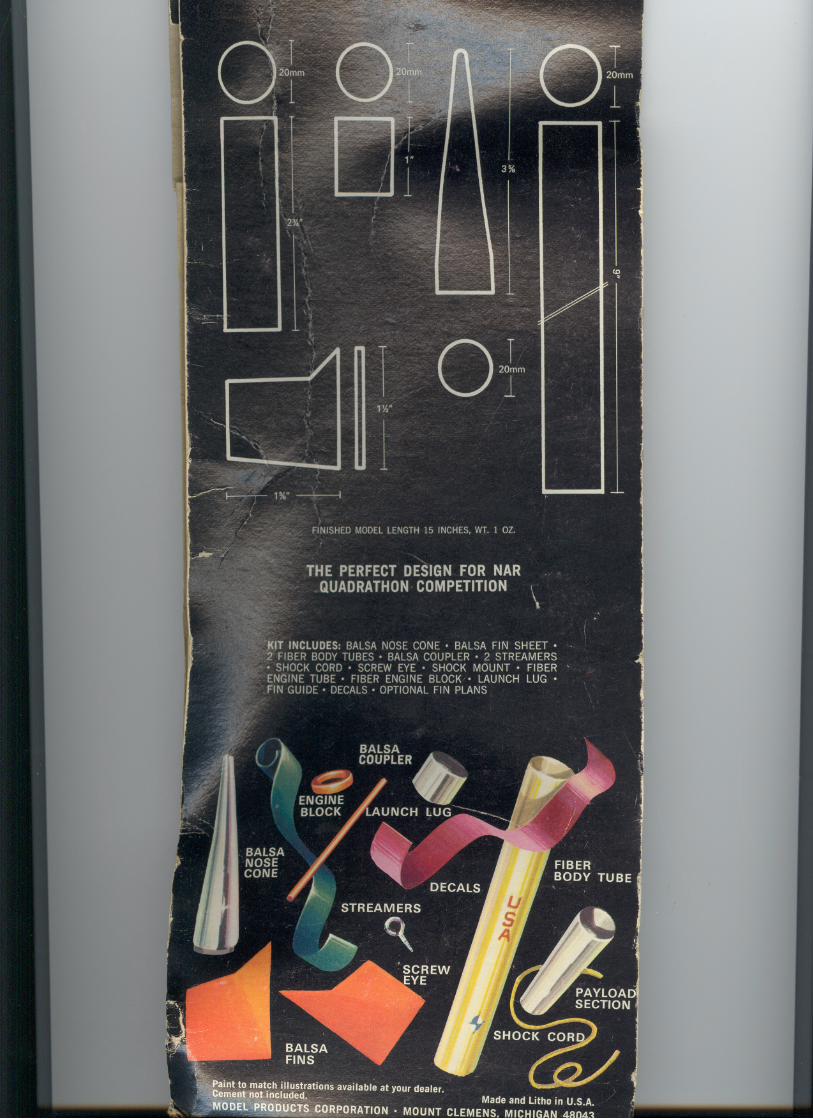
parts list - ye olde rocket plans · this model rocket has been designed and developed to give you...
TRANSCRIPT

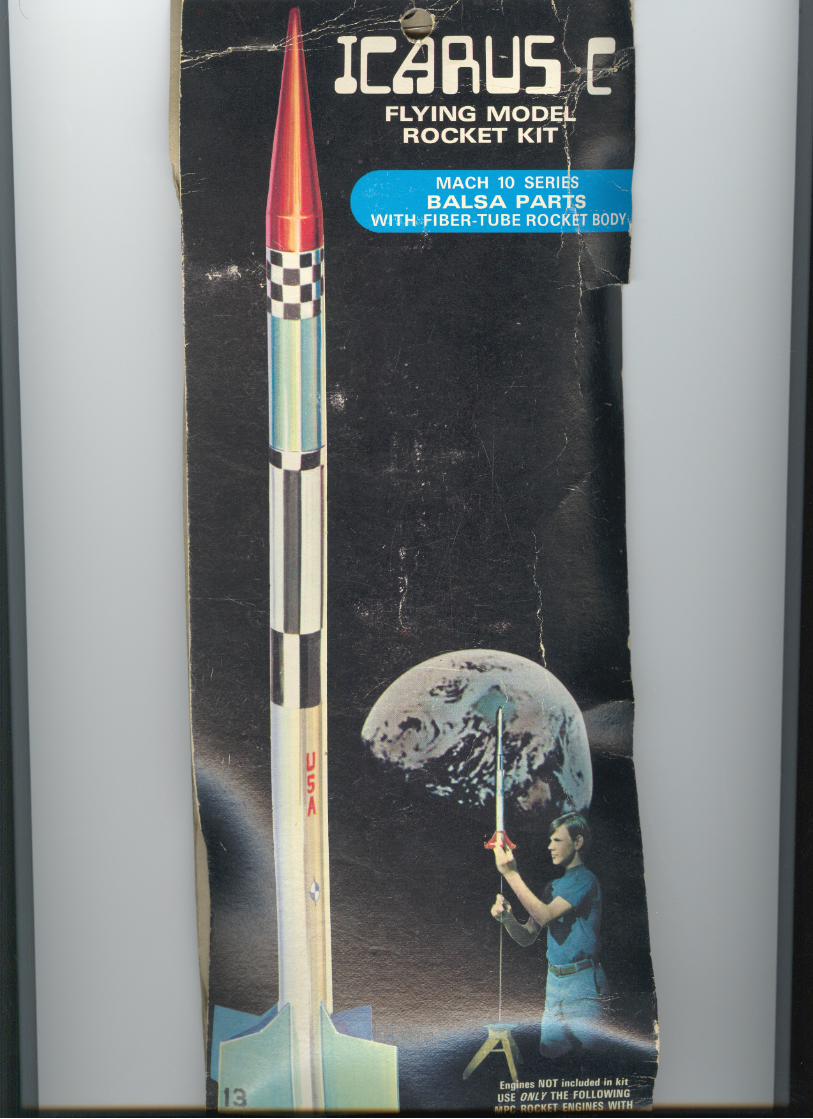
ICARU5-CCONTEST PROVEN FOR NAR PAYLOAD COMPETITION
This model rocket has been designed and developed to give you astraight, high flight if the instructions are followed carefully. The excitingand educational sport of model rocketry has grown into a full scalenational activity, and will continue to grow every time you fly yourrocket safely. Formation of a rocket club in your area will provide youwith hours of enjoyment, even when you're not launching rockets. Lookfor our new models appearing on your dealer's shelves soon.
n \
'~IVIODEL PRODUCTS
R-205
RECOMMENDEDTQOLS-- --FOR ROCKET BUILDING
Modeling knifeScissorsExtra strong white glueBall point pen or pencilFine grit sandpaperPaint, in desired colorsWood sealer
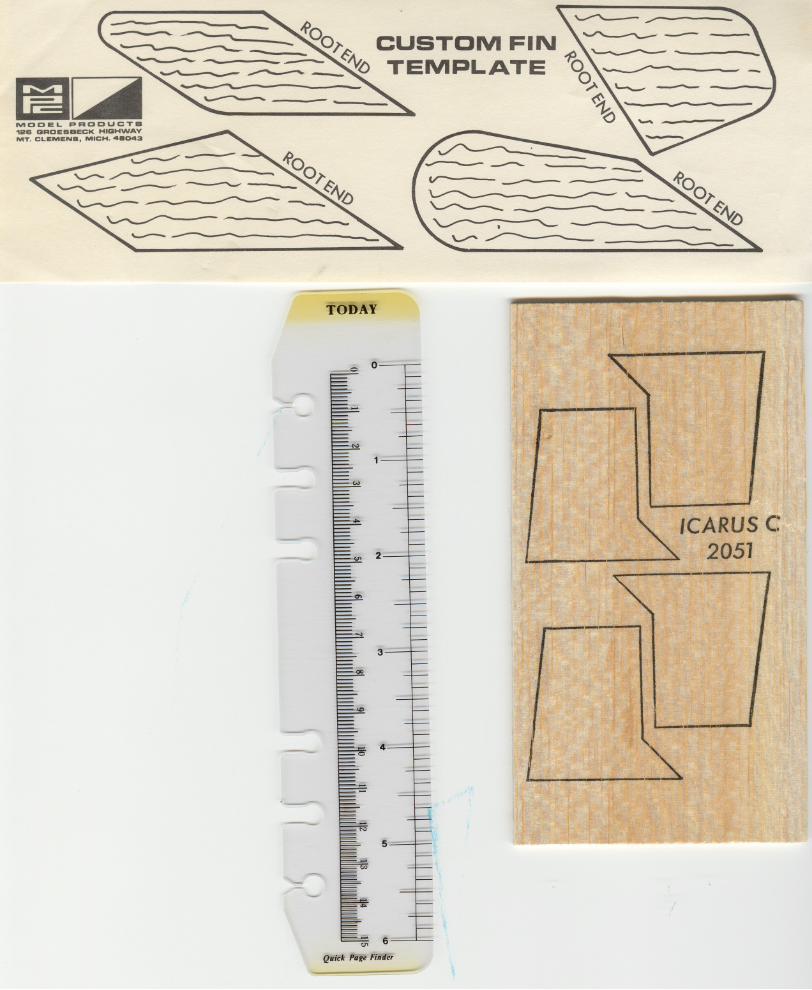
Before you begin building, look over the instructionscarefully. Following the procedure given, test fitparts together without gluing. This way you will bemore familiar with the location of parts when it be-comes time to use glue. You should have no troubleassembling your kit if the instructions are followedproperly. The parts list will acquaint you with thepieces in the kit. This kit includes a custom fin tem-plate. If the use of these fins is desired over the useof the standard fins, follow instructions on template.
«11
DJJJJJ III~ II~. 3
RECOMMENDED ENGINES A3-2, 83-3, C6-4
- ~~...
PARTS LIST1 ENGINE BLOCK
2 ENGINE COMPARTMENT
3 DECALS
4 LAUNCHING LUG
5 FIN SHEET
6 FIN GUIDE
7 BODY TUBE(PAYLOAD)8 BODY TUBE
9 NOSE CONE
10 COUPLER
11 SCREW EYE
12 STREAMERS
13 CORD,
14 SHOCI)' MOUNT15 WADDING
16 CUSTOM FIN TEMPLATE
17 ADDRESS LABEL
\
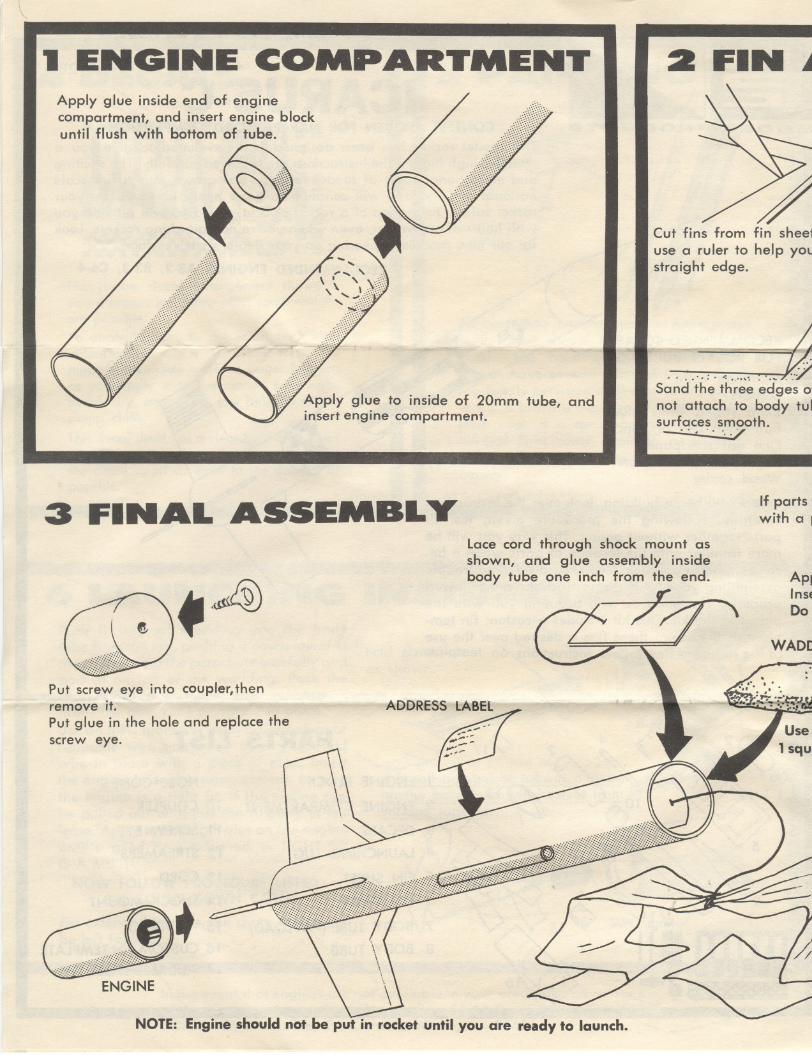
1 ENGINE COMPARTMENT 2 FIN ~
Cut fins from fin shee1
use a ruler to help yol.straight edge.
Apply glue to inside of 20mm tube, andinsert engine compartment.
--~:~
Sand the three edges 0not attach to body tulsurfaces smooth.
~-"J'
3 FINAL ASSEMBLY If partswith a I
.~Lace cord through shock mount asshown, and glue assembly insidebody tube one inch from the end. ApI
Ins.Do
NOTE: Engine should not be put in rocket until you are ready to launch.
WAD[
Put screw eye into coupler, thenremove it.Put glue in the hole and replace thescrew eye.
~~~
ENGINE

\
~SSEMBL Y
~If possible~et a good
~
fins that do!. Sand the
Wrap fin guide around body tubewhere fins will be attached. Markthe body tube near the arrow tips.Remove the fin guide and connectthese marks with a straight line toshow attaching points.
For best adhesion of paint and glue,sand tubes until all gloss is removed.
NOTE:
The coupler must fit snug in. thebody tube, but must be loose enoughto eject. If the coupler is too tightsand lightly until a good fit isachieved. The upper section can beused for a 1 ounce payload. If thisis desired, don't glue nose cone, butbe sure of a snug fit.
, loose in body tubes, wrapece of tape.
'( glue inside short body tube.i coupler so half of it is exposed.Jt glue this exposed end.
~G
~"'." ,.' :.,/:~--- -,
Ipprox.'e inch.
-- ~
Cut 241/' cord in half attaching onelength to streamer and main bodytube. Attach the other length to theother streamer and nose cone.
If you don't want the nose cone andbody tube to descend separately,
..don't cut the cord. Tie to streamersas shown. '
!
, \--
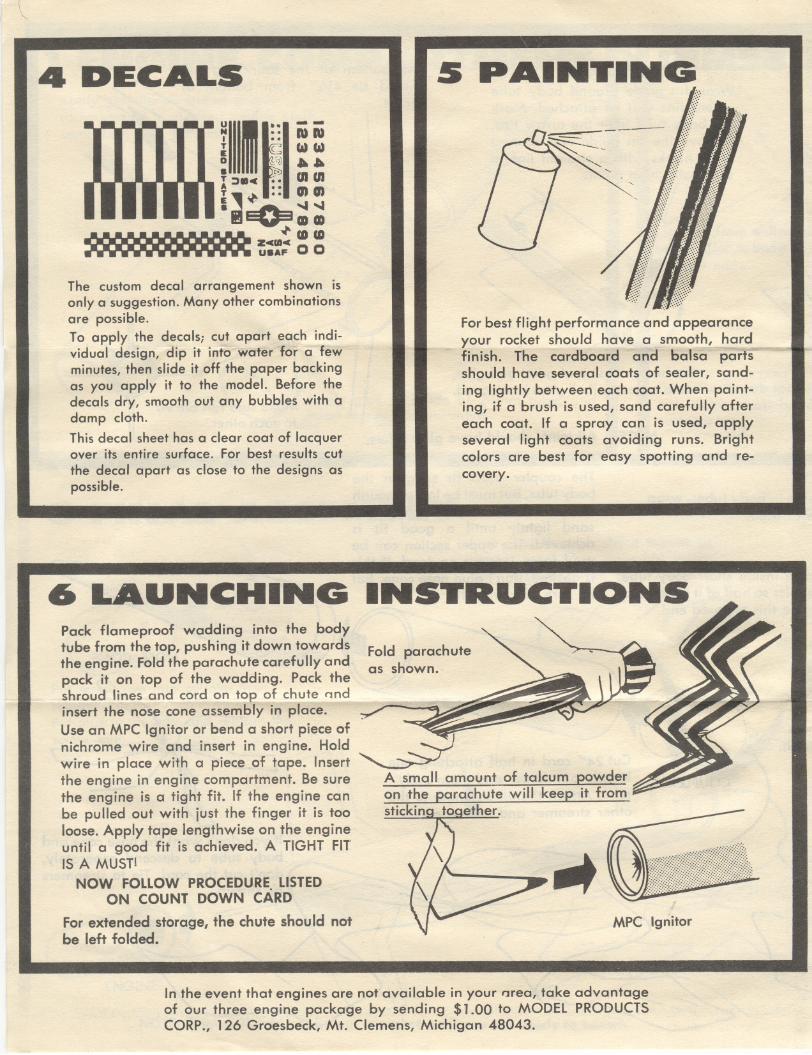
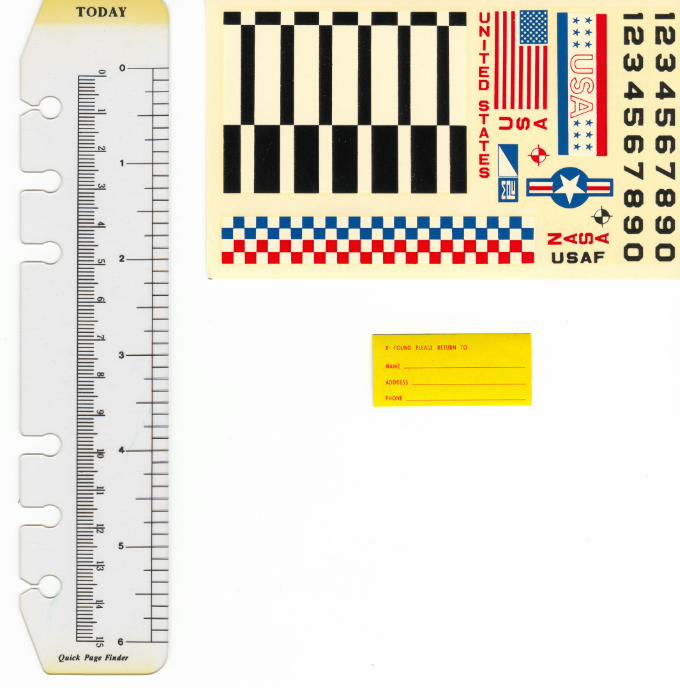
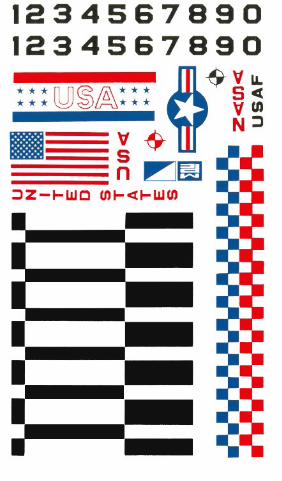
4 DECALSu
II
..
1
--~ :: N N~ c Ww
! :)8c ~ ~ ~I"~ :: enen. ., ~ ....-II~CDCD
ZcUl~ co coU8AF 0 0
.. .. . . . . . . . . .... .. . . . . . ..
The custom decal arrangement shown isonly a suggestion. Many other combinationsare possible.To apply the decals; cut apart each indi-vidual design, Clip it info water for a fewminutes, then slide it off the paper backingas you apply it to the model. Before thedecals dry, smooth out any bubbles with adamp cloth.This decal sheet has a clear coat of lacquerover its entire surface. For best results cutthe decal apart as close to the designs aspossible.
5 PAINTING
For best flight performance and appearanceyour rocket should have a smooth, hardfinish. The cardboard and balsa parts -should have several coats of sealer, sand-ing lightly between each coat. When paint-ing, if a brush is used, sand carefully aftereach coat. If a spray can is used, applyseveral light coats avoiding runs. Brightcolors are best for easy spotting and re-covery.
6 LAUNCHING INSTRUCTIONSPack flameproof wadding into the bodytube from the top, pushing it down towardsthe engine. Fold the parachute carefully andpack it on top of the wadding. Pack theshroud lines and cord o_nt<.?E?of chute /1ndinsert the nose cone assembly in place.Use an MPC Ignitor or bend a short piece ofnichrome wire and insert in engine. Holdwire in place with a piece of tape. Insertthe engine in engine compartment. Be surethe engine is a tight fit. If the engine canbe pulled out with just the finger it is tooloose. Apply tape lengthwise on the engineuntil a good fit is achieved. A TIGHT FITIS A MUST!
NOW FOLLOW PROCEDURE.LISTEDON COUNT DOWN CARD
For extended storage, the chute should notbe left folded.
Fold parachuteas shown.
~A small amount of talcum powderon the parachute will keep it fromstickina toaether.
MPC Ignitor
In the event that engines are not available in your area, take advantageof our three engine package by sending $1.00 to MODEL PRODUCTSCORP., 126 Groesbeck, Mt. Clemens, Michigan 48043.
:if
TODAY
-0 0
:;0-
2
3
'7
4
J
-
... .. IJI!I
f
III
--
ICARUSt2051
- -- - - -. - --....
~
<:l1 6---
Quick Page Findery
~~ '-'"
~, ,;'
~~
~'"
~'"
,.....",,-.-'"
TODAY
Quick PIJge Fi"der
<:> 0
3
U II ** .-11.-11
~ 1111 ~ ::TA :)(,,« * * (II (II**~~~ ** enens~~~~m~CDCD
~z<tm<t CD CDUSAF 0 0
-
IF FOUND PlEA;> RETURN TO
NAME
ADDRESS
PHONE
\