participant guide - nter learning€¦ · · 2013-06-19nter authoring participant guide (01/2012...
TRANSCRIPT
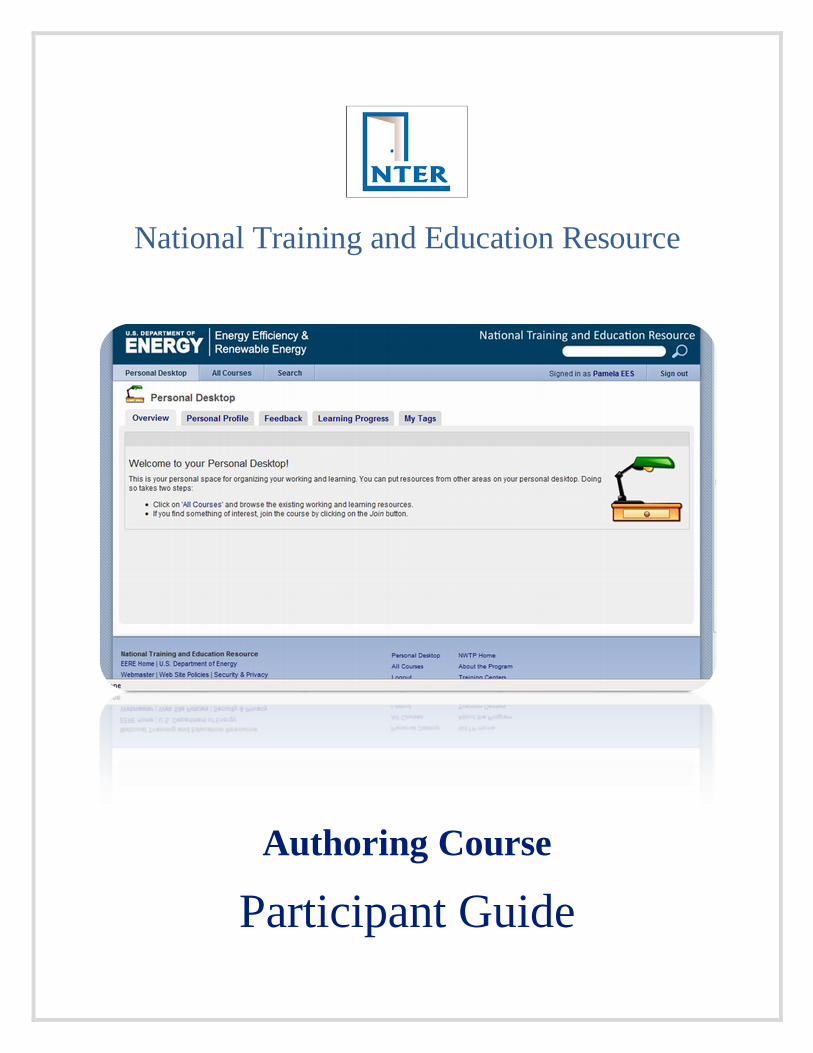
National Training and Education Resource
Authoring Course
Participant Guide
NTER Authoring Participant Guide (01/2012 pw)
2
Table of Contents:
OBJECTIVES .......................................................................................................................................... 4
OVERVIEW OF NTER ............................................................................................................................ 5
System Requirements ........................................................................................................................... 5
NTER Capabilities ............................................................................................................................... 6
What is the SCORM PlayerWhat is SCORM? ...................................................................................... 7
Roles and Permissions ......................................................................................................................... 8
Learning System Concepts & Design Guidelines .................................................................................. 9
LOGIN .................................................................................................................................................. 10
INTRODUCTION TO NTER .................................................................................................................. 11
Personal Desktop .............................................................................................................................. 11
All Course Tab .................................................................................................................................. 12
Learning Module/Authoring Mode ..................................................................................................... 13
CREATING A LEARNING MODULE .................................................................................................... 14
Place a Course on the Desktop .......................................................................................................... 14
Learning Module Design Plan ........................................................................................................... 15
Add a Learning Module to a Course .................................................................................................. 16
Add a Chapter to a Learning Module ................................................................................................. 17
Add a Lesson (SCO) to a Chapter ...................................................................................................... 18
Add a Page to a Lesson (SCO) ........................................................................................................... 19
Add a Template Page to a Lesson ...................................................................................................... 20
ADDING AND FORMATTING TEXT .................................................................................................... 21
Add Text to a Page ............................................................................................................................ 21
Formatting Text ................................................................................................................................. 22
Built-in Style Class ............................................................................................................................ 23
Styles and In-Line Formatting............................................................................................................ 24
Built in Syntax Shortcuts .................................................................................................................... 25
Add an Advanced Table ..................................................................................................................... 26
Add Content to a Table ...................................................................................................................... 27
Format a Table .................................................................................................................................. 28
Add, Move or Delete Rows and Columns within a Table................................................................ 28
Refine Table Cell Properties .......................................................................................................... 29
Using Advanced Lists: Bullets............................................................................................................ 30
Using Advanced Lists: Numbered (within a template) ........................................................................ 31
ADD MULTIMEDIA CONTENT ........................................................................................................... 32
NTER Authoring Participant Guide (01/2012 pw)
3
Add a Media Asset ............................................................................................................................. 32
PUBLISHING THE LEARNING MODULE ........................................................................................... 33
Publishing Task Flow ........................................................................................................................ 33
Preview the Learning Module ........................................................................................................ 34
Export a Learning Module ............................................................................................................. 35
Add a New Item to a Course .......................................................................................................... 36
Import the Learning Module .......................................................................................................... 37
Set Learning Module Properties ..................................................................................................... 38
Set Time Estimates ........................................................................................................................ 39
CREATING A MEDIA POOL ................................................................................................................ 40
Create a Media Pool.......................................................................................................................... 40
Create Media Pool Folders................................................................................................................ 41
Add an Item to a Media Pool ............................................................................................................. 42
KNOWLEDGE CHECK QUESTIONS ................................................................................................... 43
Types of Knowledge Check Questions ................................................................................................ 43
Add Knowledge Check Questions ....................................................................................................... 44
Add a Multiple Choice Question (with multiple correct answers) ....................................................... 45
FINISHING TOUCHES ......................................................................................................................... 46
Last Page Notice ............................................................................................................................... 46
Encouraging Feedback ...................................................................................................................... 47
HELP .................................................................................................................................................... 48
NTER Authoring Participant Guide (01/2012 pw)
4
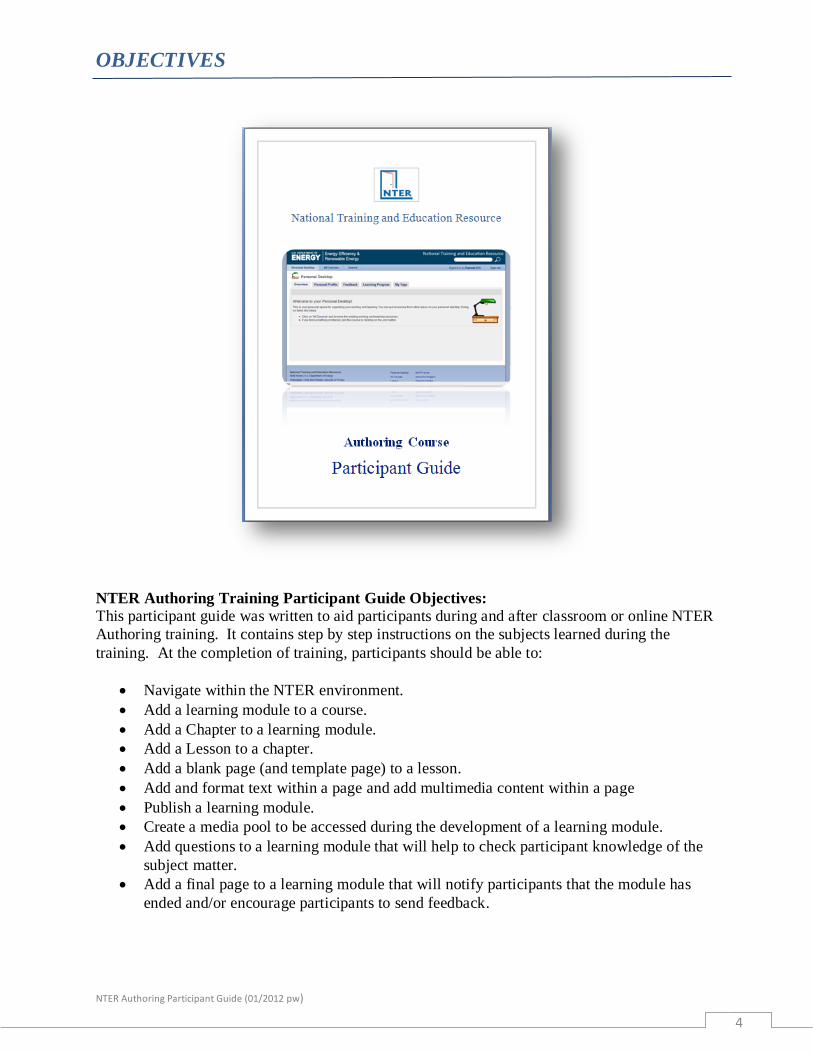
OBJECTIVES
NTER Authoring Training Participant Guide Objectives:
This participant guide was written to aid participants during and after classroom or online NTER
Authoring training. It contains step by step instructions on the subjects learned during the
training. At the completion of training, participants should be able to:
Navigate within the NTER environment.
Add a learning module to a course.
Add a Chapter to a learning module.
Add a Lesson to a chapter.
Add a blank page (and template page) to a lesson.
Add and format text within a page and add multimedia content within a page
Publish a learning module.
Create a media pool to be accessed during the development of a learning module.
Add questions to a learning module that will help to check participant knowledge of the
subject matter.
Add a final page to a learning module that will notify participants that the module has
ended and/or encourage participants to send feedback.
NTER Authoring Participant Guide (01/2012 pw)
5
OVERVIEW OF NTER
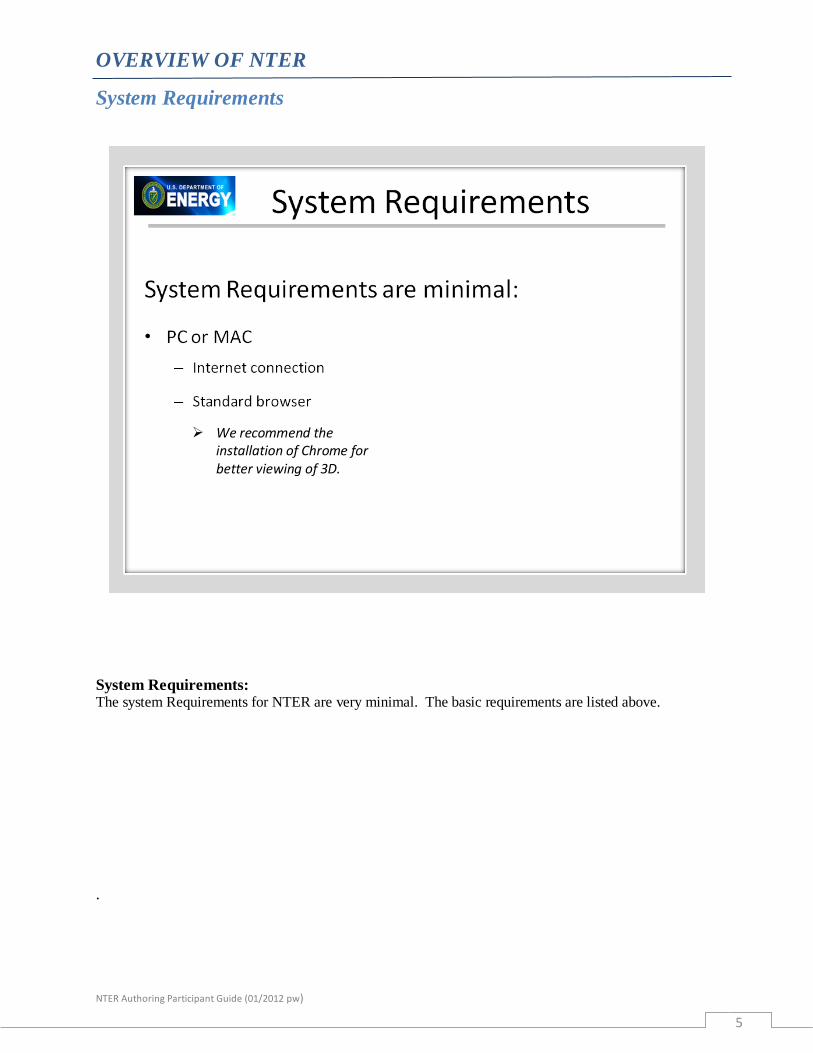
System Requirements
System Requirements: The system Requirements for NTER are very minimal. The basic requirements are listed above.
.
We recommend the installation of Chrome for better viewing of 3D.
NTER Authoring Participant Guide (01/2012 pw)
6
NTER Capabilities
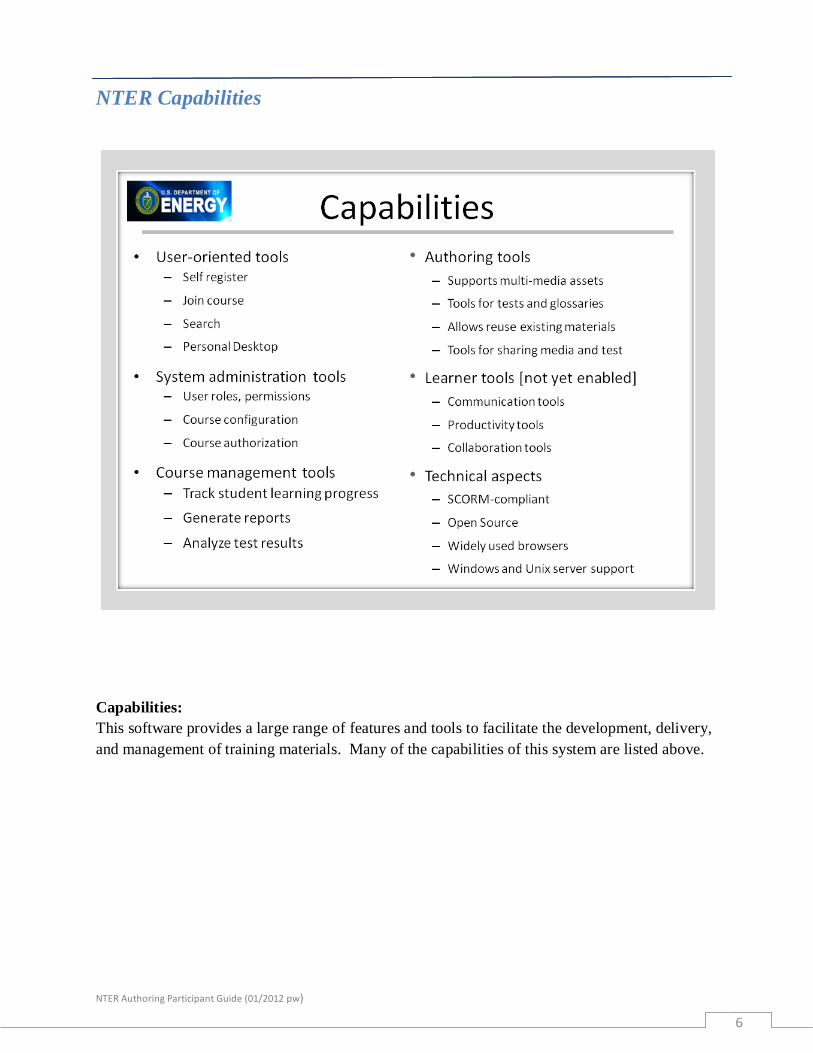
Capabilities:
This software provides a large range of features and tools to facilitate the development, delivery,
and management of training materials. Many of the capabilities of this system are listed above.
NTER Authoring Participant Guide (01/2012 pw)
7
What is the SCORM PlayerWhat is SCORM?
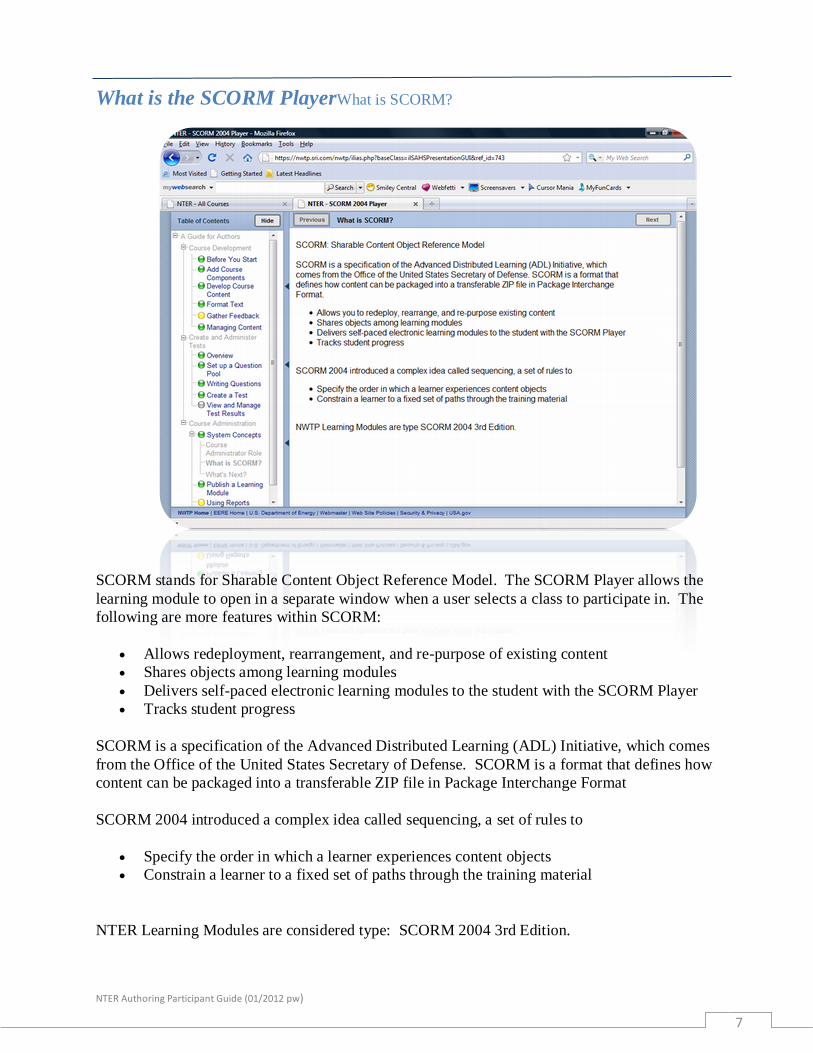
SCORM stands for Sharable Content Object Reference Model. The SCORM Player allows the
learning module to open in a separate window when a user selects a class to participate in. The
following are more features within SCORM:
Allows redeployment, rearrangement, and re-purpose of existing content
Shares objects among learning modules
Delivers self-paced electronic learning modules to the student with the SCORM Player
Tracks student progress
SCORM is a specification of the Advanced Distributed Learning (ADL) Initiative, which comes
from the Office of the United States Secretary of Defense. SCORM is a format that defines how
content can be packaged into a transferable ZIP file in Package Interchange Format
SCORM 2004 introduced a complex idea called sequencing, a set of rules to
Specify the order in which a learner experiences content objects
Constrain a learner to a fixed set of paths through the training material
NTER Learning Modules are considered type: SCORM 2004 3rd Edition.
NTER Authoring Participant Guide (01/2012 pw)
8
Roles and Permissions
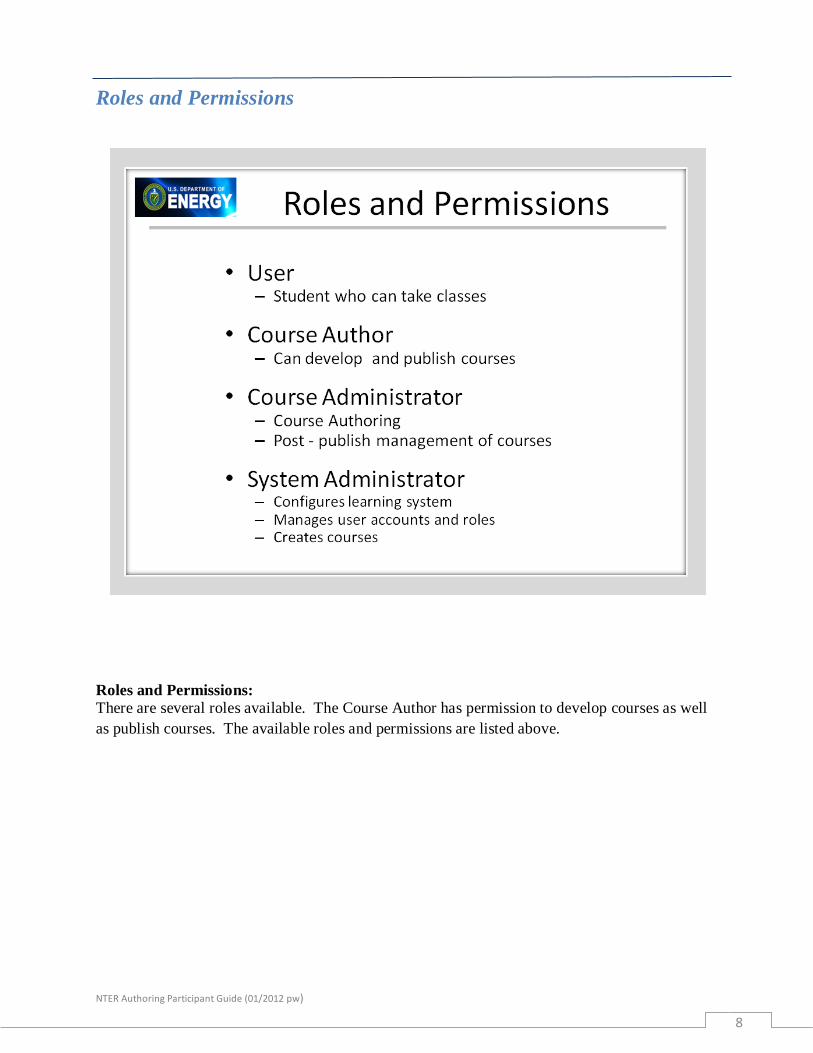
Roles and Permissions:
There are several roles available. The Course Author has permission to develop courses as well
as publish courses. The available roles and permissions are listed above.
NTER Authoring Participant Guide (01/2012 pw)
9
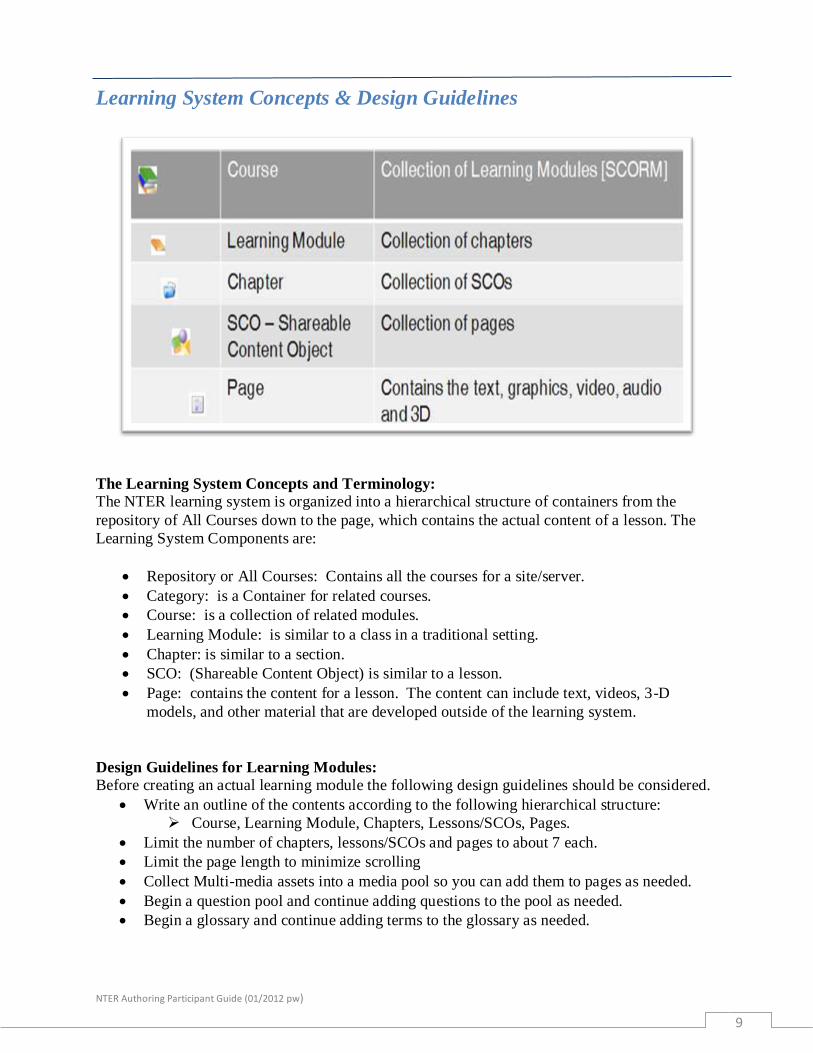
Learning System Concepts & Design Guidelines
The Learning System Concepts and Terminology:
The NTER learning system is organized into a hierarchical structure of containers from the
repository of All Courses down to the page, which contains the actual content of a lesson. The
Learning System Components are:
Repository or All Courses: Contains all the courses for a site/server.
Category: is a Container for related courses.
Course: is a collection of related modules.
Learning Module: is similar to a class in a traditional setting.
Chapter: is similar to a section.
SCO: (Shareable Content Object) is similar to a lesson.
Page: contains the content for a lesson. The content can include text, videos, 3-D
models, and other material that are developed outside of the learning system.
Design Guidelines for Learning Modules:
Before creating an actual learning module the following design guidelines should be considered.
Write an outline of the contents according to the following hierarchical structure:
Course, Learning Module, Chapters, Lessons/SCOs, Pages.
Limit the number of chapters, lessons/SCOs and pages to about 7 each.
Limit the page length to minimize scrolling
Collect Multi-media assets into a media pool so you can add them to pages as needed.
Begin a question pool and continue adding questions to the pool as needed.
Begin a glossary and continue adding terms to the glossary as needed.
NTER Authoring Participant Guide (01/2012 pw)
10
LOGIN
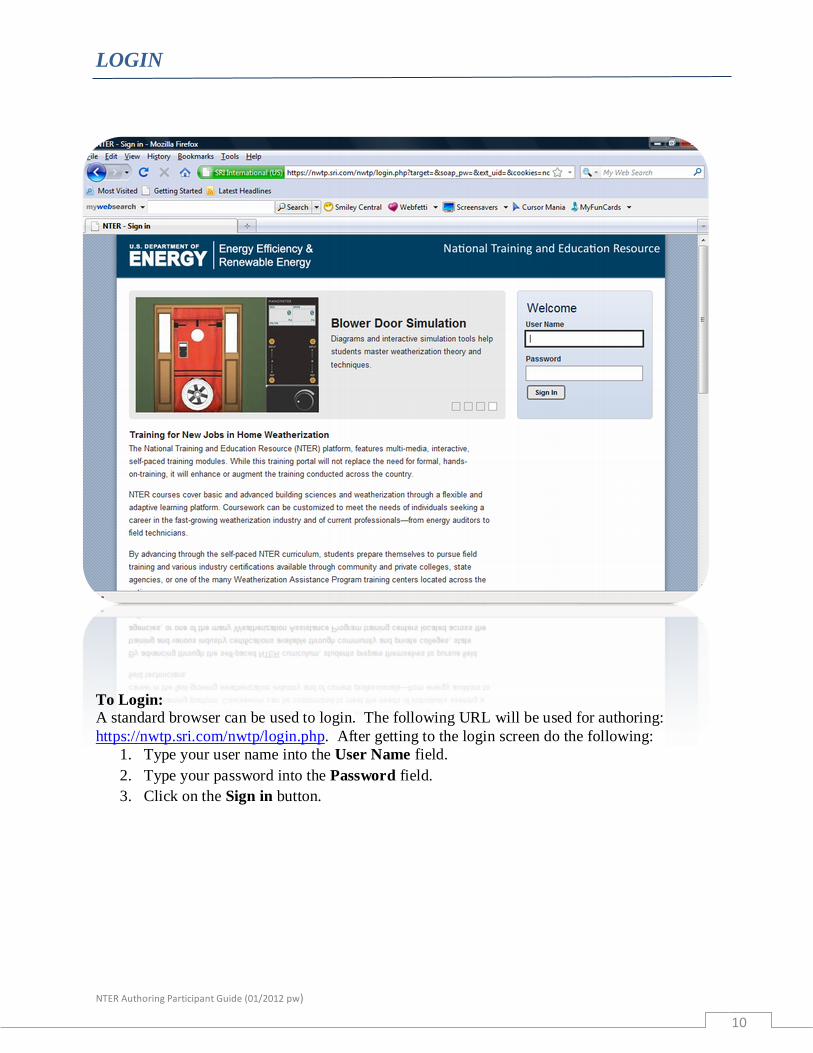
To Login:
A standard browser can be used to login. The following URL will be used for authoring:
https://nwtp.sri.com/nwtp/login.php. After getting to the login screen do the following:
1. Type your user name into the User Name field.
2. Type your password into the Password field.
3. Click on the Sign in button.
NTER Authoring Participant Guide (01/2012 pw)
11
INTRODUCTION TO NTER
Personal Desktop
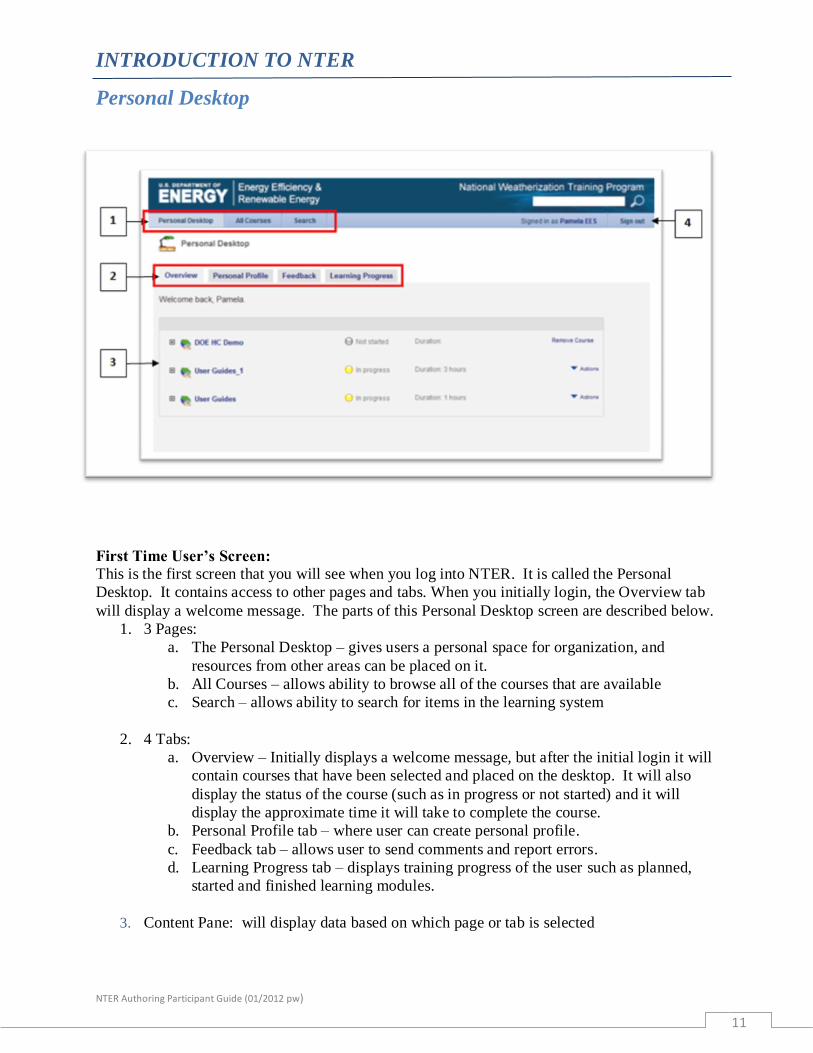
First Time User’s Screen:
This is the first screen that you will see when you log into NTER. It is called the Personal
Desktop. It contains access to other pages and tabs. When you initially login, the Overview tab
will display a welcome message. The parts of this Personal Desktop screen are described below.
1. 3 Pages:
a. The Personal Desktop – gives users a personal space for organization, and
resources from other areas can be placed on it.
b. All Courses – allows ability to browse all of the courses that are available
c. Search – allows ability to search for items in the learning system
2. 4 Tabs:
a. Overview – Initially displays a welcome message, but after the initial login it will
contain courses that have been selected and placed on the desktop. It will also
display the status of the course (such as in progress or not started) and it will
display the approximate time it will take to complete the course.
b. Personal Profile tab – where user can create personal profile.
c. Feedback tab – allows user to send comments and report errors.
d. Learning Progress tab – displays training progress of the user such as planned,
started and finished learning modules.
3. Content Pane: will display data based on which page or tab is selected
NTER Authoring Participant Guide (01/2012 pw)
12
All Course Tab
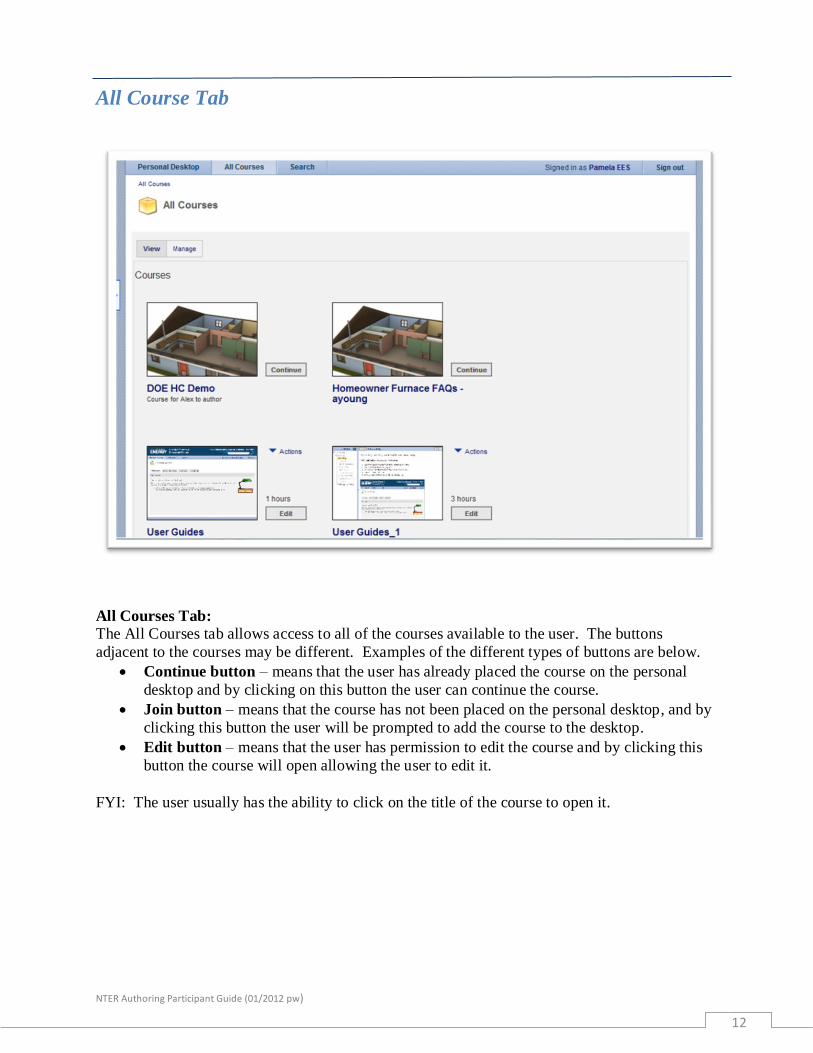
All Courses Tab:
The All Courses tab allows access to all of the courses available to the user. The buttons
adjacent to the courses may be different. Examples of the different types of buttons are below.
Continue button – means that the user has already placed the course on the personal
desktop and by clicking on this button the user can continue the course.
Join button – means that the course has not been placed on the personal desktop, and by
clicking this button the user will be prompted to add the course to the desktop.
Edit button – means that the user has permission to edit the course and by clicking this
button the course will open allowing the user to edit it.
FYI: The user usually has the ability to click on the title of the course to open it.
NTER Authoring Participant Guide (01/2012 pw)
13
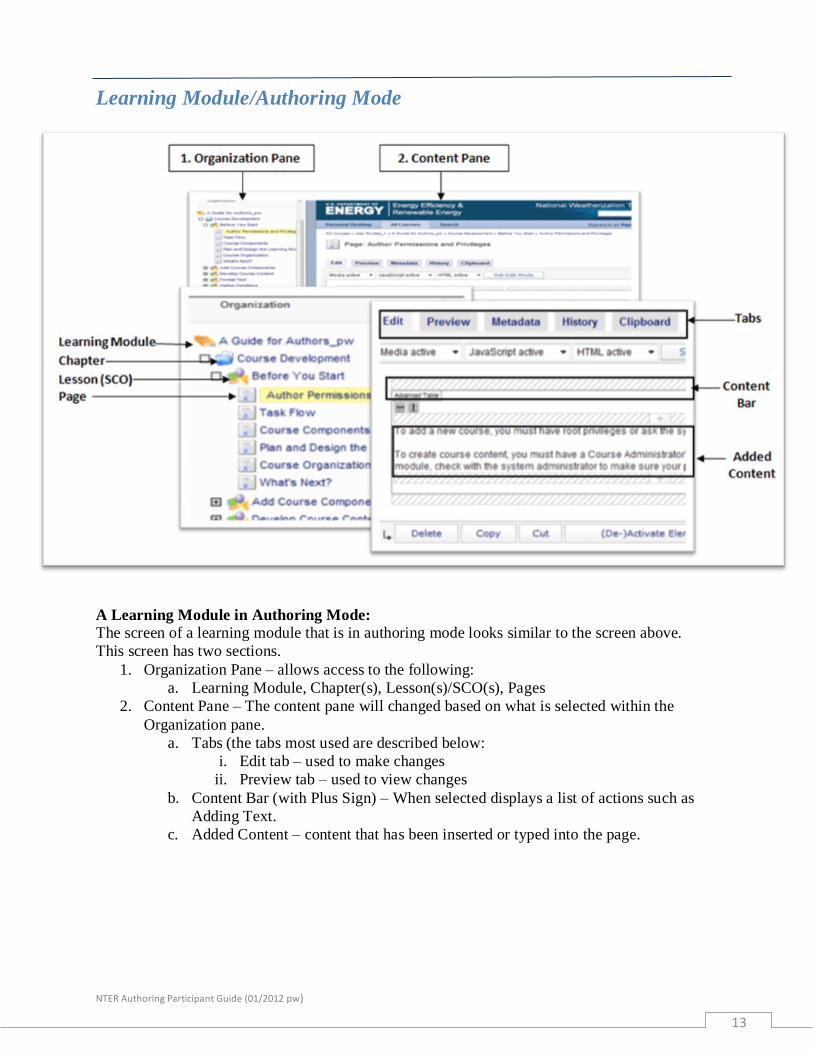
Learning Module/Authoring Mode
A Learning Module in Authoring Mode:
The screen of a learning module that is in authoring mode looks similar to the screen above.
This screen has two sections.
1. Organization Pane – allows access to the following:
a. Learning Module, Chapter(s), Lesson(s)/SCO(s), Pages
2. Content Pane – The content pane will changed based on what is selected within the
Organization pane.
a. Tabs (the tabs most used are described below:
i. Edit tab – used to make changes
ii. Preview tab – used to view changes
b. Content Bar (with Plus Sign) – When selected displays a list of actions such as
Adding Text.
c. Added Content – content that has been inserted or typed into the page.
NTER Authoring Participant Guide (01/2012 pw)
14
CREATING A LEARNING MODULE
Place a Course on the Desktop
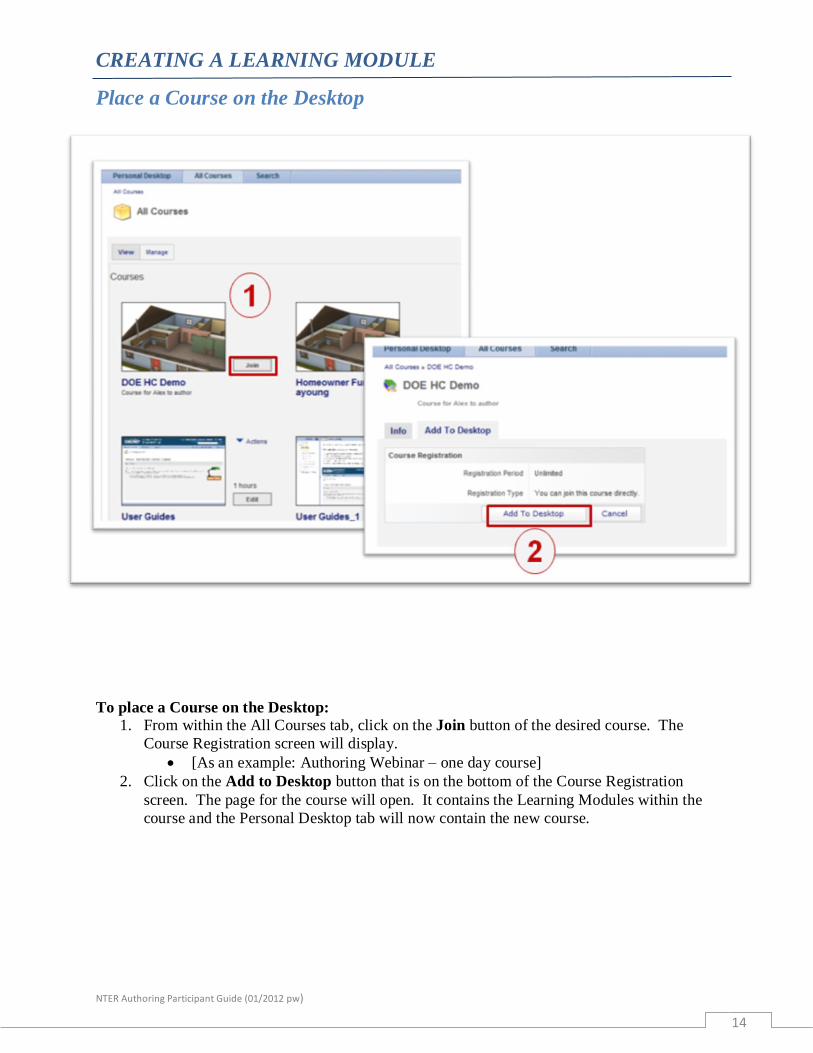
To place a Course on the Desktop:
1. From within the All Courses tab, click on the Join button of the desired course. The
Course Registration screen will display.
[As an example: Authoring Webinar – one day course]
2. Click on the Add to Desktop button that is on the bottom of the Course Registration
screen. The page for the course will open. It contains the Learning Modules within the
course and the Personal Desktop tab will now contain the new course.
NTER Authoring Participant Guide (01/2012 pw)
15
Learning Module Design Plan
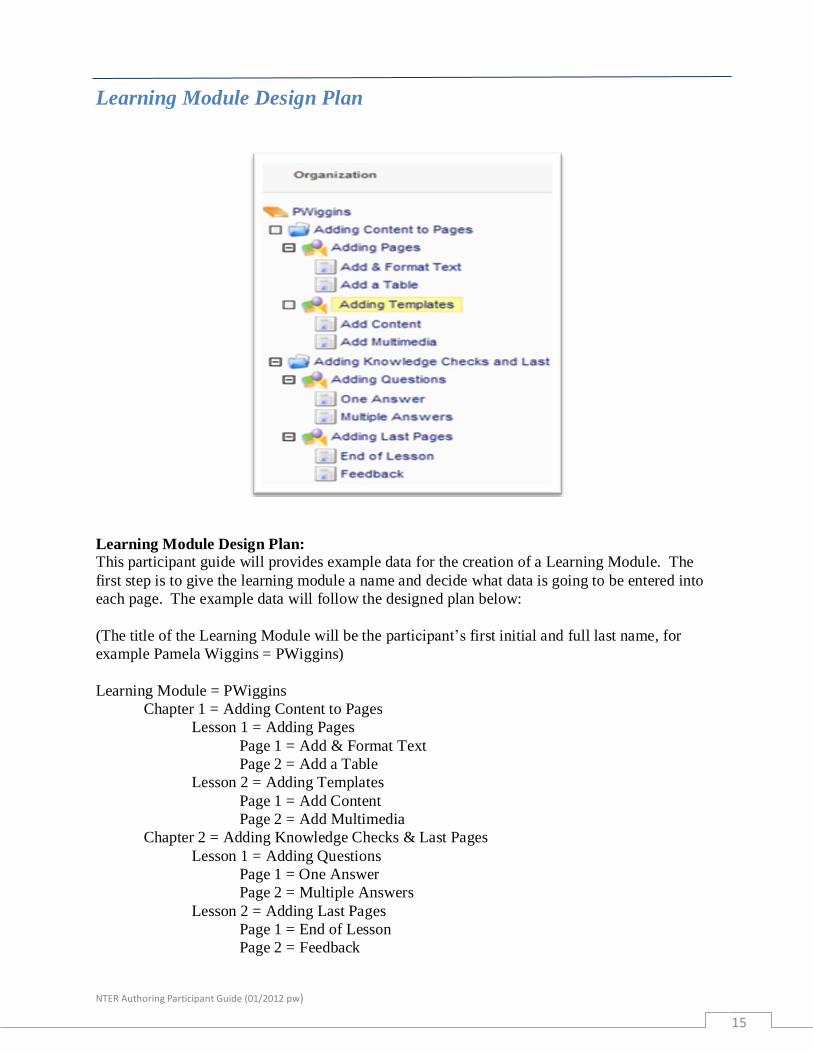
Learning Module Design Plan:
This participant guide will provides example data for the creation of a Learning Module. The
first step is to give the learning module a name and decide what data is going to be entered into
each page. The example data will follow the designed plan below:
(The title of the Learning Module will be the participant’s first initial and full last name, for
example Pamela Wiggins = PWiggins)
Learning Module = PWiggins
Chapter 1 = Adding Content to Pages
Lesson 1 = Adding Pages
Page 1 = Add & Format Text
Page 2 = Add a Table
Lesson 2 = Adding Templates
Page 1 = Add Content
Page 2 = Add Multimedia
Chapter 2 = Adding Knowledge Checks & Last Pages
Lesson 1 = Adding Questions
Page 1 = One Answer
Page 2 = Multiple Answers
Lesson 2 = Adding Last Pages
Page 1 = End of Lesson
Page 2 = Feedback
NTER Authoring Participant Guide (01/2012 pw)
16
Add a Learning Module to a Course
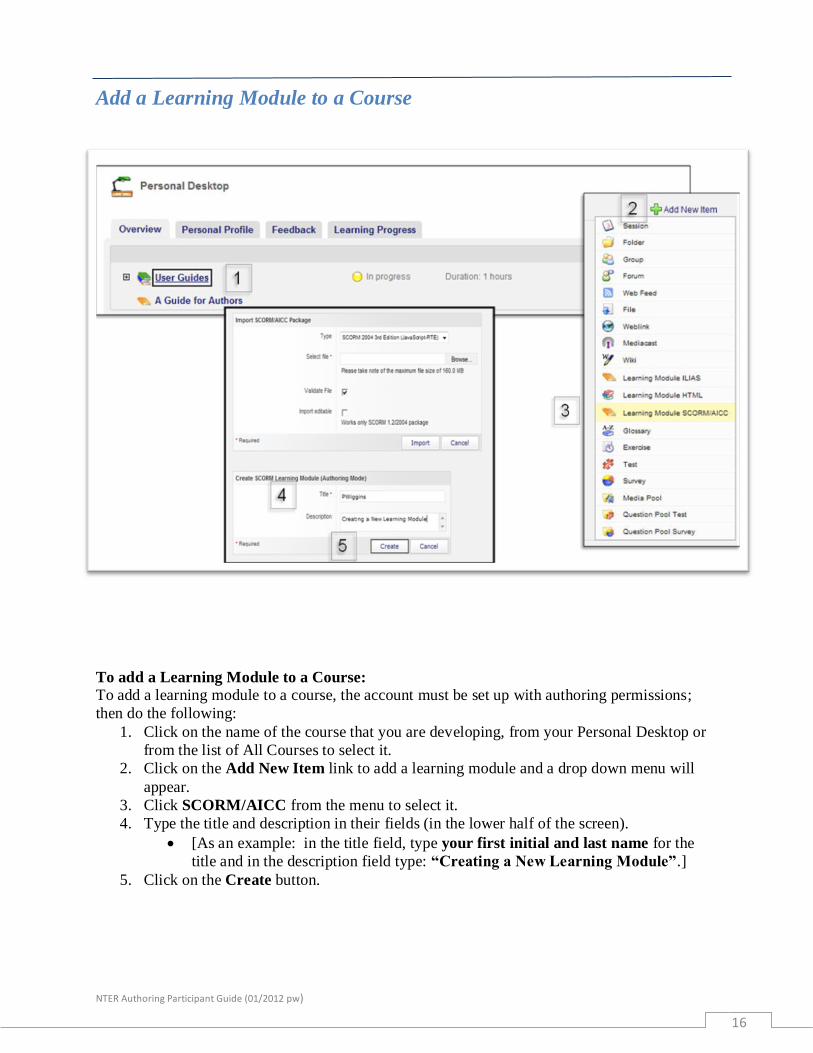
To add a Learning Module to a Course:
To add a learning module to a course, the account must be set up with authoring permissions;
then do the following:
1. Click on the name of the course that you are developing, from your Personal Desktop or
from the list of All Courses to select it.
2. Click on the Add New Item link to add a learning module and a drop down menu will
appear.
3. Click SCORM/AICC from the menu to select it.
4. Type the title and description in their fields (in the lower half of the screen).
[As an example: in the title field, type your first initial and last name for the
title and in the description field type: “Creating a New Learning Module”.]
5. Click on the Create button.
NTER Authoring Participant Guide (01/2012 pw)
17
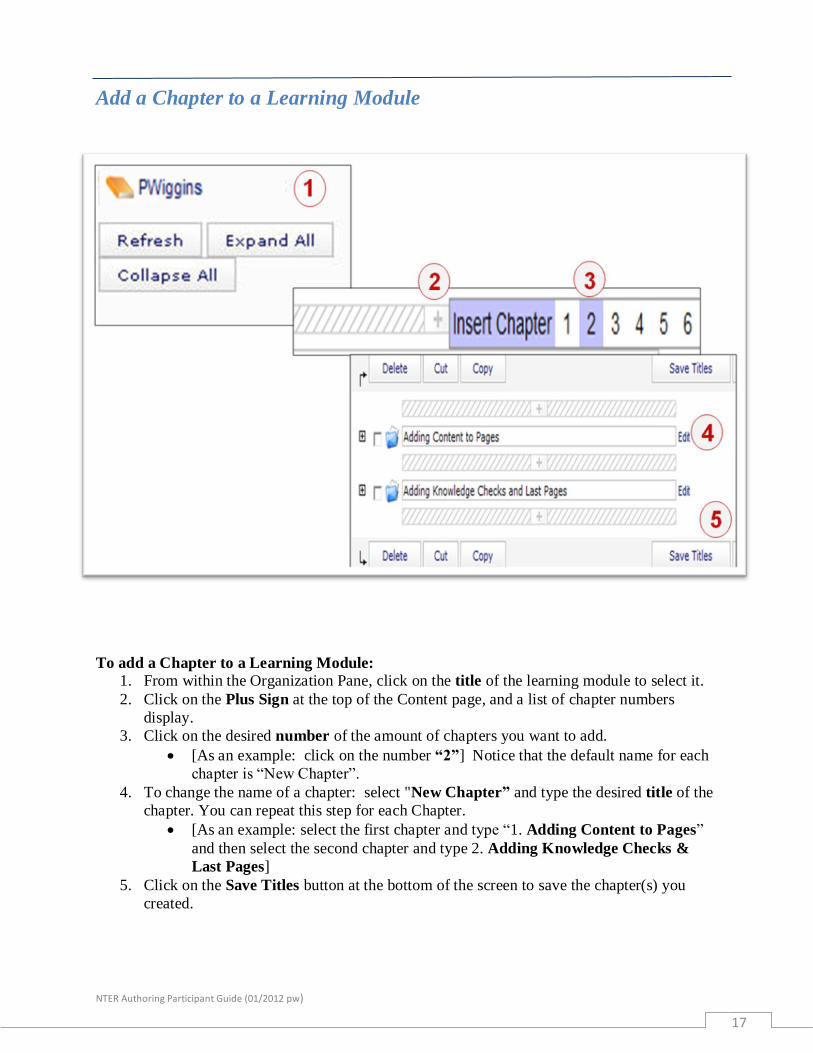
Add a Chapter to a Learning Module
To add a Chapter to a Learning Module:
1. From within the Organization Pane, click on the title of the learning module to select it.
2. Click on the Plus Sign at the top of the Content page, and a list of chapter numbers
display.
3. Click on the desired number of the amount of chapters you want to add.
[As an example: click on the number “2”] Notice that the default name for each
chapter is “New Chapter”.
4. To change the name of a chapter: select "New Chapter” and type the desired title of the
chapter. You can repeat this step for each Chapter.
[As an example: select the first chapter and type “1. Adding Content to Pages”
and then select the second chapter and type 2. Adding Knowledge Checks &
Last Pages]
5. Click on the Save Titles button at the bottom of the screen to save the chapter(s) you
created.
NTER Authoring Participant Guide (01/2012 pw)
18
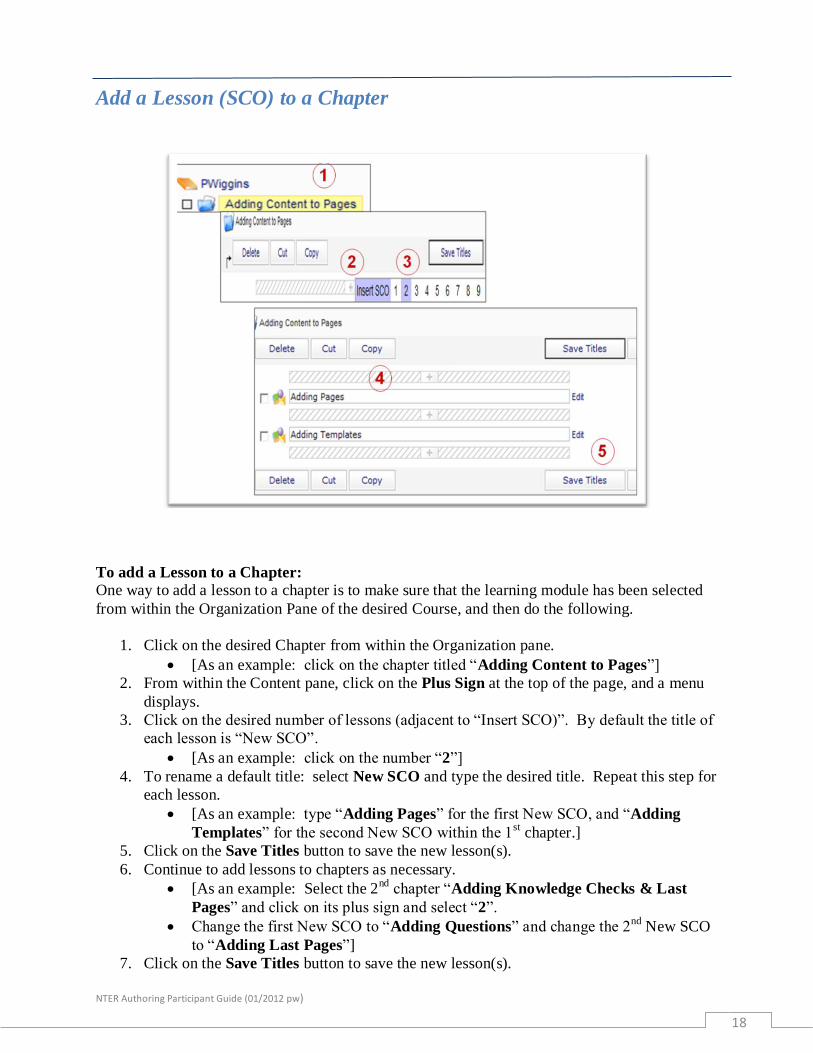
Add a Lesson (SCO) to a Chapter
To add a Lesson to a Chapter:
One way to add a lesson to a chapter is to make sure that the learning module has been selected
from within the Organization Pane of the desired Course, and then do the following.
1. Click on the desired Chapter from within the Organization pane.
[As an example: click on the chapter titled “Adding Content to Pages”]
2. From within the Content pane, click on the Plus Sign at the top of the page, and a menu
displays.
3. Click on the desired number of lessons (adjacent to “Insert SCO)”. By default the title of
each lesson is “New SCO”.
[As an example: click on the number “2”]
4. To rename a default title: select New SCO and type the desired title. Repeat this step for
each lesson.
[As an example: type “Adding Pages” for the first New SCO, and “Adding
Templates” for the second New SCO within the 1st chapter.]
5. Click on the Save Titles button to save the new lesson(s).
6. Continue to add lessons to chapters as necessary.
[As an example: Select the 2nd
chapter “Adding Knowledge Checks & Last
Pages” and click on its plus sign and select “2”.
Change the first New SCO to “Adding Questions” and change the 2nd
New SCO
to “Adding Last Pages”]
7. Click on the Save Titles button to save the new lesson(s).
NTER Authoring Participant Guide (01/2012 pw)
19
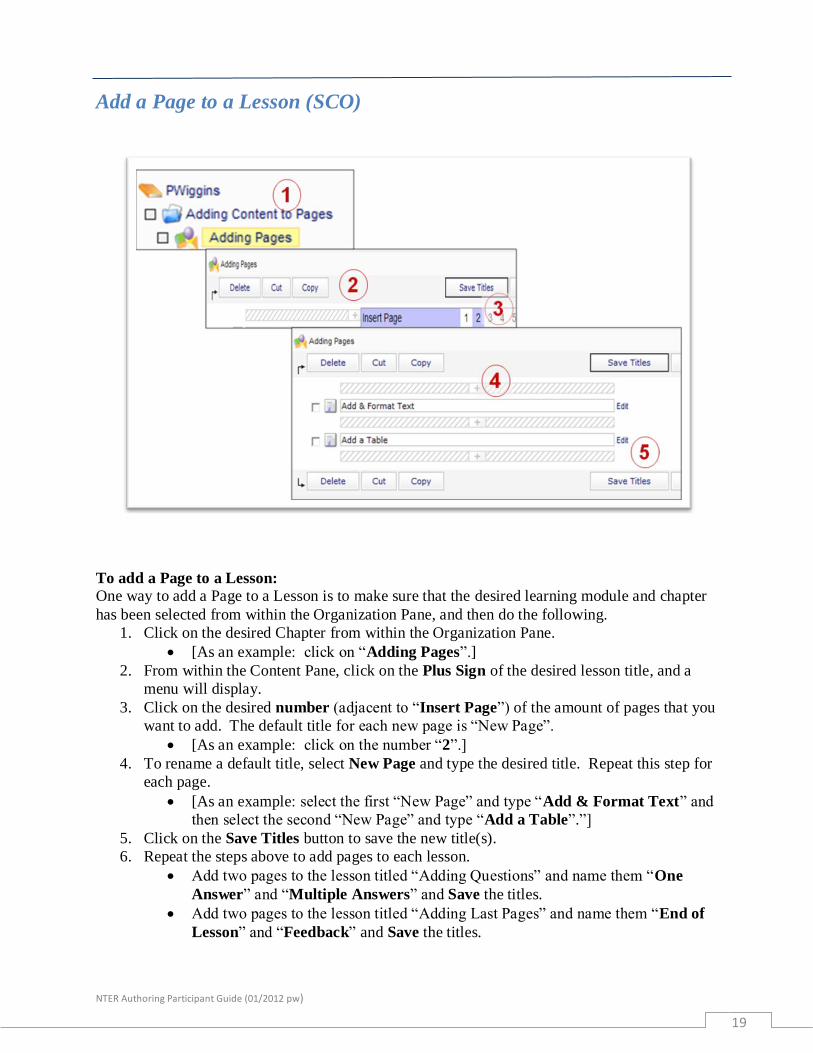
Add a Page to a Lesson (SCO)
To add a Page to a Lesson:
One way to add a Page to a Lesson is to make sure that the desired learning module and chapter
has been selected from within the Organization Pane, and then do the following.
1. Click on the desired Chapter from within the Organization Pane.
[As an example: click on “Adding Pages”.]
2. From within the Content Pane, click on the Plus Sign of the desired lesson title, and a
menu will display.
3. Click on the desired number (adjacent to “Insert Page”) of the amount of pages that you
want to add. The default title for each new page is “New Page”.
[As an example: click on the number “2”.]
4. To rename a default title, select New Page and type the desired title. Repeat this step for
each page.
[As an example: select the first “New Page” and type “Add & Format Text” and
then select the second “New Page” and type “Add a Table”.”]
5. Click on the Save Titles button to save the new title(s).
6. Repeat the steps above to add pages to each lesson.
Add two pages to the lesson titled “Adding Questions” and name them “One
Answer” and “Multiple Answers” and Save the titles.
Add two pages to the lesson titled “Adding Last Pages” and name them “End of
Lesson” and “Feedback” and Save the titles.
NTER Authoring Participant Guide (01/2012 pw)
20
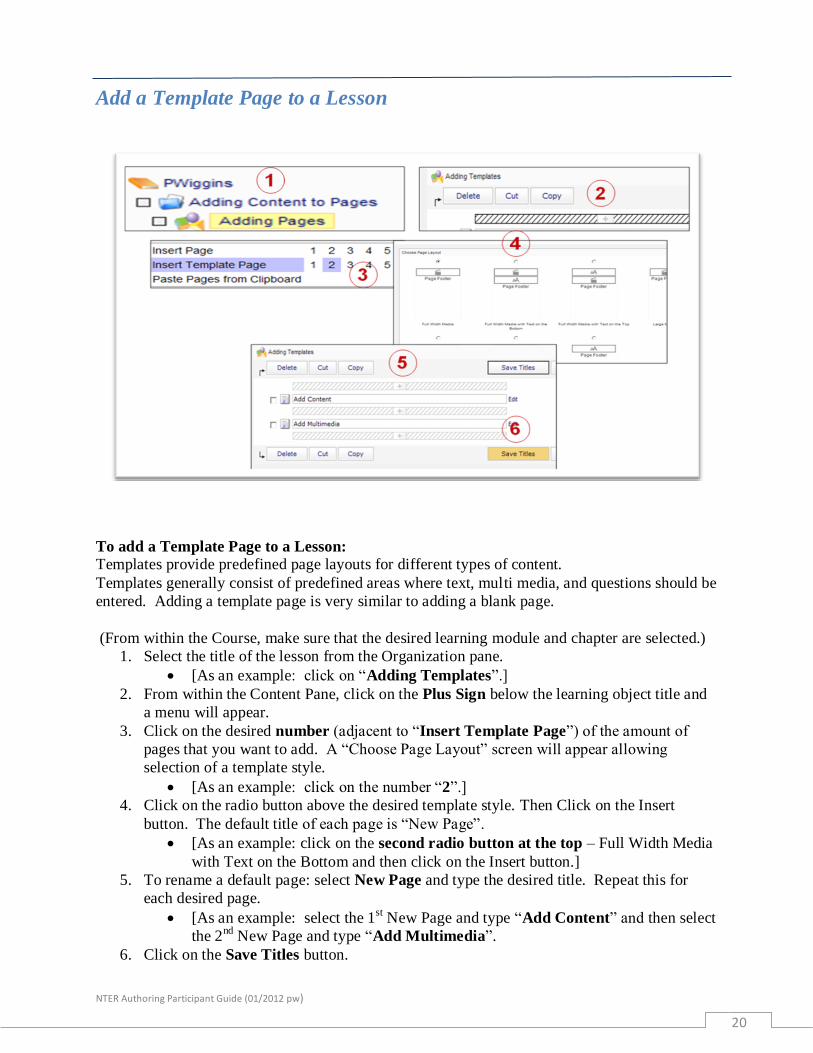
Add a Template Page to a Lesson
To add a Template Page to a Lesson: Templates provide predefined page layouts for different types of content.
Templates generally consist of predefined areas where text, multi media, and questions should be
entered. Adding a template page is very similar to adding a blank page.
(From within the Course, make sure that the desired learning module and chapter are selected.)
1. Select the title of the lesson from the Organization pane.
[As an example: click on “Adding Templates”.]
2. From within the Content Pane, click on the Plus Sign below the learning object title and
a menu will appear.
3. Click on the desired number (adjacent to “Insert Template Page”) of the amount of
pages that you want to add. A “Choose Page Layout” screen will appear allowing
selection of a template style.
[As an example: click on the number “2”.]
4. Click on the radio button above the desired template style. Then Click on the Insert
button. The default title of each page is “New Page”.
[As an example: click on the second radio button at the top – Full Width Media
with Text on the Bottom and then click on the Insert button.]
5. To rename a default page: select New Page and type the desired title. Repeat this for
each desired page.
[As an example: select the 1st New Page and type “Add Content” and then select
the 2nd
New Page and type “Add Multimedia”.
6. Click on the Save Titles button.
NTER Authoring Participant Guide (01/2012 pw)
21
ADDING AND FORMATTING TEXT
Add Text to a Page
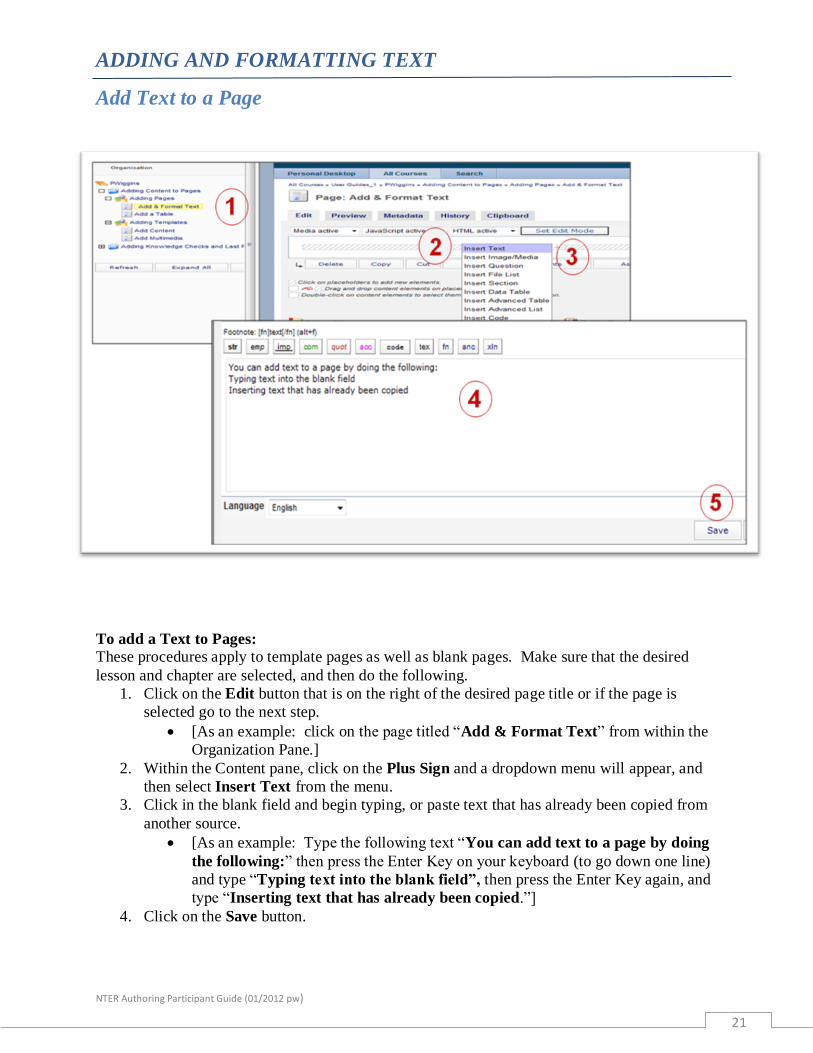
To add a Text to Pages: These procedures apply to template pages as well as blank pages. Make sure that the desired
lesson and chapter are selected, and then do the following.
1. Click on the Edit button that is on the right of the desired page title or if the page is
selected go to the next step.
[As an example: click on the page titled “Add & Format Text” from within the
Organization Pane.]
2. Within the Content pane, click on the Plus Sign and a dropdown menu will appear, and
then select Insert Text from the menu.
3. Click in the blank field and begin typing, or paste text that has already been copied from
another source.
[As an example: Type the following text “You can add text to a page by doing
the following:” then press the Enter Key on your keyboard (to go down one line)
and type “Typing text into the blank field”, then press the Enter Key again, and
type “Inserting text that has already been copied.”]
4. Click on the Save button.

NTER Authoring Participant Guide (01/2012 pw)
22
Formatting Text
Style class Sets the style for an entire box of text
In-line styles Sets the style for a selected word or phrase
Style syntax Sets the style or format for text within a box of text
Advanced tables Formats text into rows and columns
Advanced lists Sets numbers, bullets, indents for more complex lists
Formatting Text:
There are several built in formatting options within this system. The table above displays
options for formatting text. The next section will demonstrate the various techniques.
NTER Authoring Participant Guide (01/2012 pw)
23
Built-in Style Class
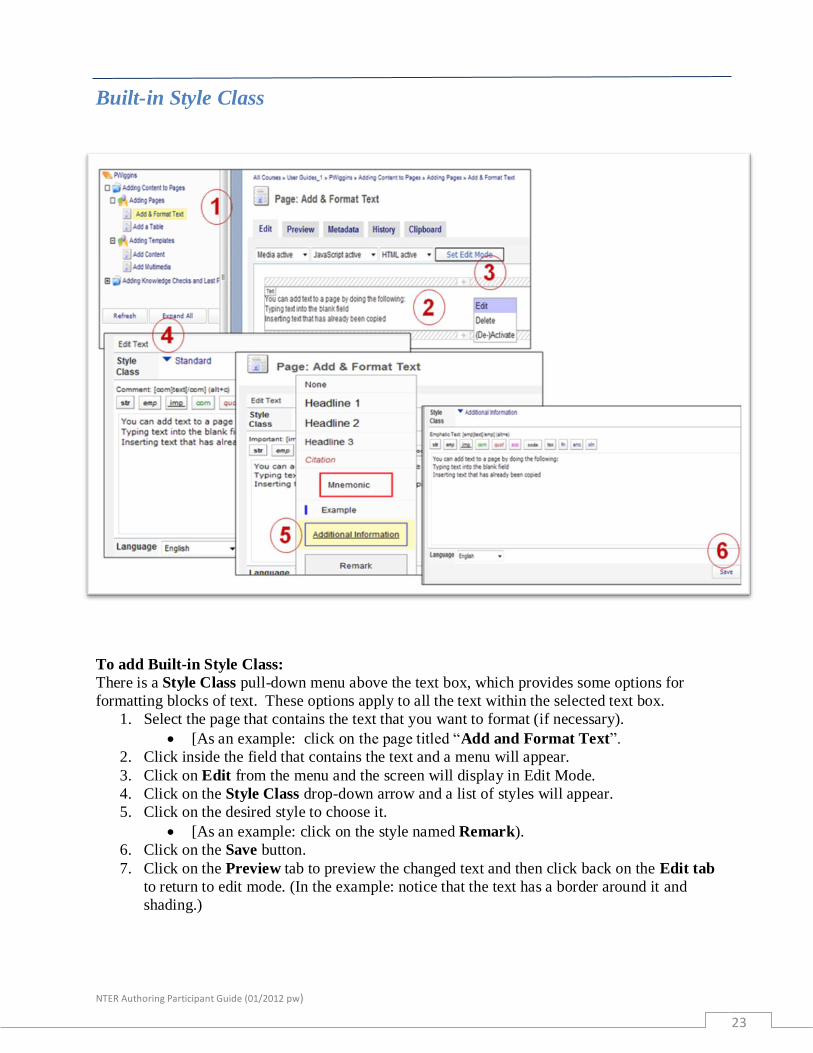
To add Built-in Style Class:
There is a Style Class pull-down menu above the text box, which provides some options for
formatting blocks of text. These options apply to all the text within the selected text box.
1. Select the page that contains the text that you want to format (if necessary).
[As an example: click on the page titled “Add and Format Text”.
2. Click inside the field that contains the text and a menu will appear.
3. Click on Edit from the menu and the screen will display in Edit Mode.
4. Click on the Style Class drop-down arrow and a list of styles will appear.
5. Click on the desired style to choose it.
[As an example: click on the style named Remark).
6. Click on the Save button.
7. Click on the Preview tab to preview the changed text and then click back on the Edit tab
to return to edit mode. (In the example: notice that the text has a border around it and
shading.)
NTER Authoring Participant Guide (01/2012 pw)
24
Styles and In-Line Formatting
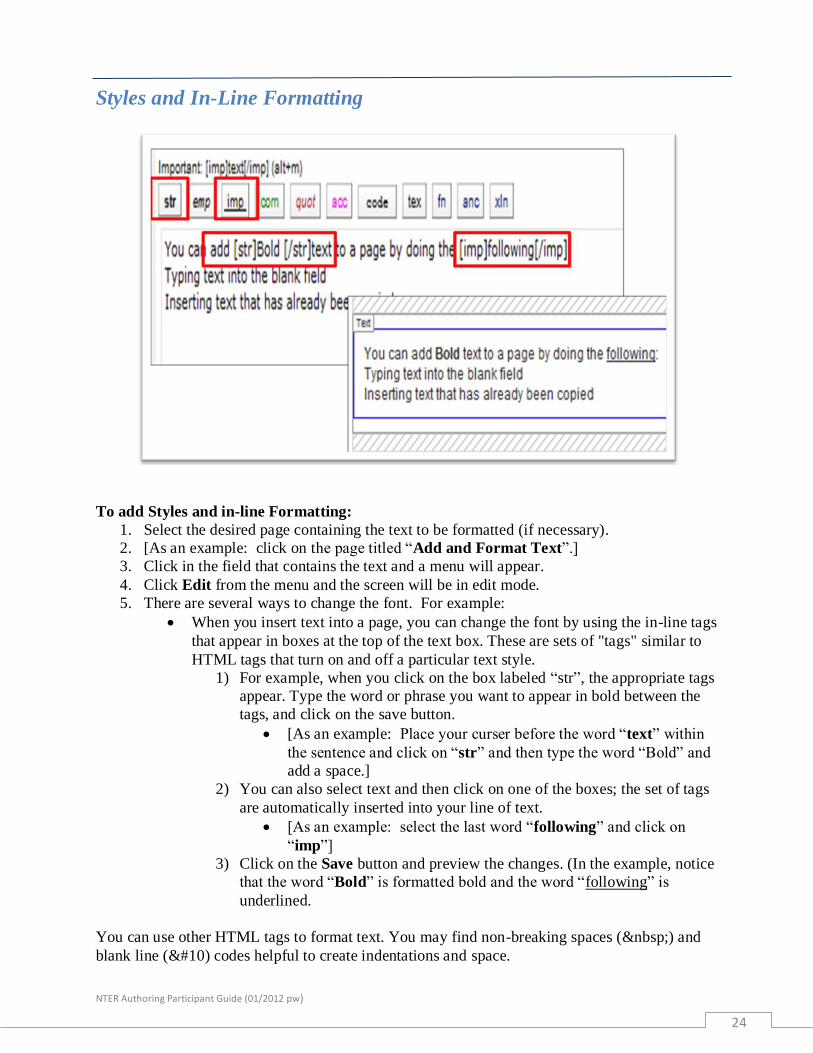
To add Styles and in-line Formatting:
1. Select the desired page containing the text to be formatted (if necessary).
2. [As an example: click on the page titled “Add and Format Text”.]
3. Click in the field that contains the text and a menu will appear.
4. Click Edit from the menu and the screen will be in edit mode.
5. There are several ways to change the font. For example:
When you insert text into a page, you can change the font by using the in-line tags
that appear in boxes at the top of the text box. These are sets of "tags" similar to
HTML tags that turn on and off a particular text style.
1) For example, when you click on the box labeled “str”, the appropriate tags
appear. Type the word or phrase you want to appear in bold between the
tags, and click on the save button.
[As an example: Place your curser before the word “text” within
the sentence and click on “str” and then type the word “Bold” and
add a space.]
2) You can also select text and then click on one of the boxes; the set of tags
are automatically inserted into your line of text.
[As an example: select the last word “following” and click on
“imp”]
3) Click on the Save button and preview the changes. (In the example, notice
that the word “Bold” is formatted bold and the word “following” is
underlined.
You can use other HTML tags to format text. You may find non-breaking spaces ( ) and
blank line (
) codes helpful to create indentations and space.
NTER Authoring Participant Guide (01/2012 pw)
25
Built in Syntax Shortcuts
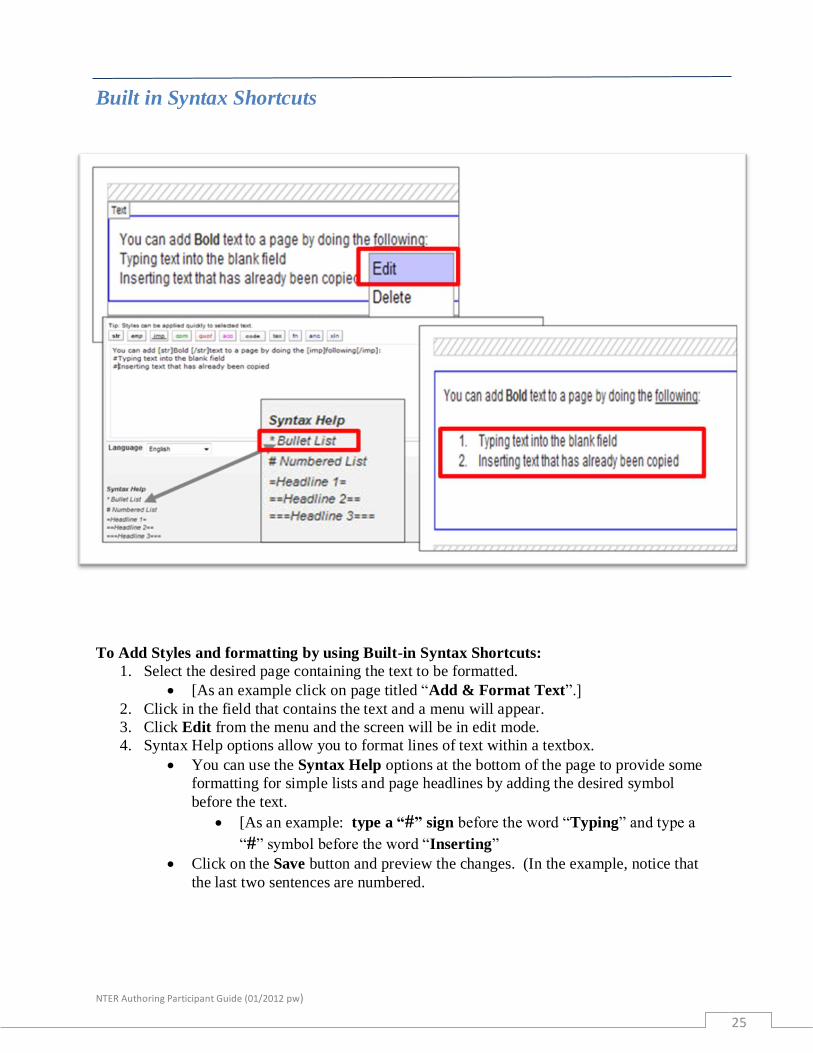
To Add Styles and formatting by using Built-in Syntax Shortcuts:
1. Select the desired page containing the text to be formatted.
[As an example click on page titled “Add & Format Text”.]
2. Click in the field that contains the text and a menu will appear.
3. Click Edit from the menu and the screen will be in edit mode.
4. Syntax Help options allow you to format lines of text within a textbox.
You can use the Syntax Help options at the bottom of the page to provide some
formatting for simple lists and page headlines by adding the desired symbol
before the text.
[As an example: type a “#” sign before the word “Typing” and type a
“#” symbol before the word “Inserting”
Click on the Save button and preview the changes. (In the example, notice that
the last two sentences are numbered.
NTER Authoring Participant Guide (01/2012 pw)
26
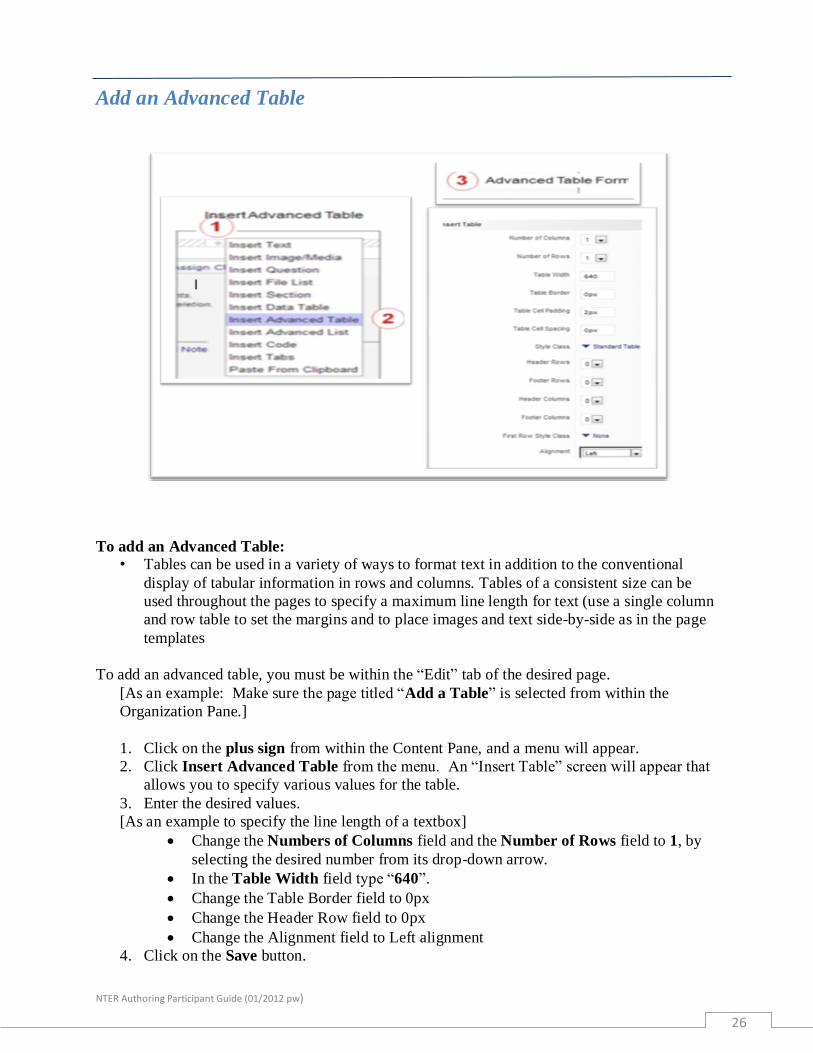
Add an Advanced Table
To add an Advanced Table: • Tables can be used in a variety of ways to format text in addition to the conventional
display of tabular information in rows and columns. Tables of a consistent size can be
used throughout the pages to specify a maximum line length for text (use a single column
and row table to set the margins and to place images and text side-by-side as in the page
templates
To add an advanced table, you must be within the “Edit” tab of the desired page.
[As an example: Make sure the page titled “Add a Table” is selected from within the
Organization Pane.]
1. Click on the plus sign from within the Content Pane, and a menu will appear.
2. Click Insert Advanced Table from the menu. An “Insert Table” screen will appear that
allows you to specify various values for the table.
3. Enter the desired values.
[As an example to specify the line length of a textbox]
Change the Numbers of Columns field and the Number of Rows field to 1, by
selecting the desired number from its drop-down arrow.
In the Table Width field type “640”.
Change the Table Border field to 0px
Change the Header Row field to 0px
Change the Alignment field to Left alignment
4. Click on the Save button.

NTER Authoring Participant Guide (01/2012 pw)
27
Add Content to a Table
To add Content to a Table:
Adding contents to a table cell is similar to adding text and graphics and other content items to a
page.
1. Click on the Plus Sign within the desired table cell and a menu will appear. Then select
the desired type of content from the menu such as text, media, question, or other type of
content.
[As an example: make sure that the page titled “Add a Table” is selected.
2. When inserting text, click inside the blank field and type or copy and paste the desired
text. You can embed lists and other tables in table cells. Then click on the Save button.
[As an example:
A. Click on the first plus sign, within the table and choose “Insert Text” and
type the following into the textbox.
“Tables can be used in a variety of ways to format text. In addition
to the conventional display of tabular information in rows and
columns, you can use tables of a consistent size throughout the
pages to specify a maximum line length for text and to place
images and text side-by-side which is similar to using a template.”
B. Click on the Save button.
3. Preview the content by clicking on the Preview tab and click on the Edit tab when
finished previewing.
NTER Authoring Participant Guide (01/2012 pw)
28
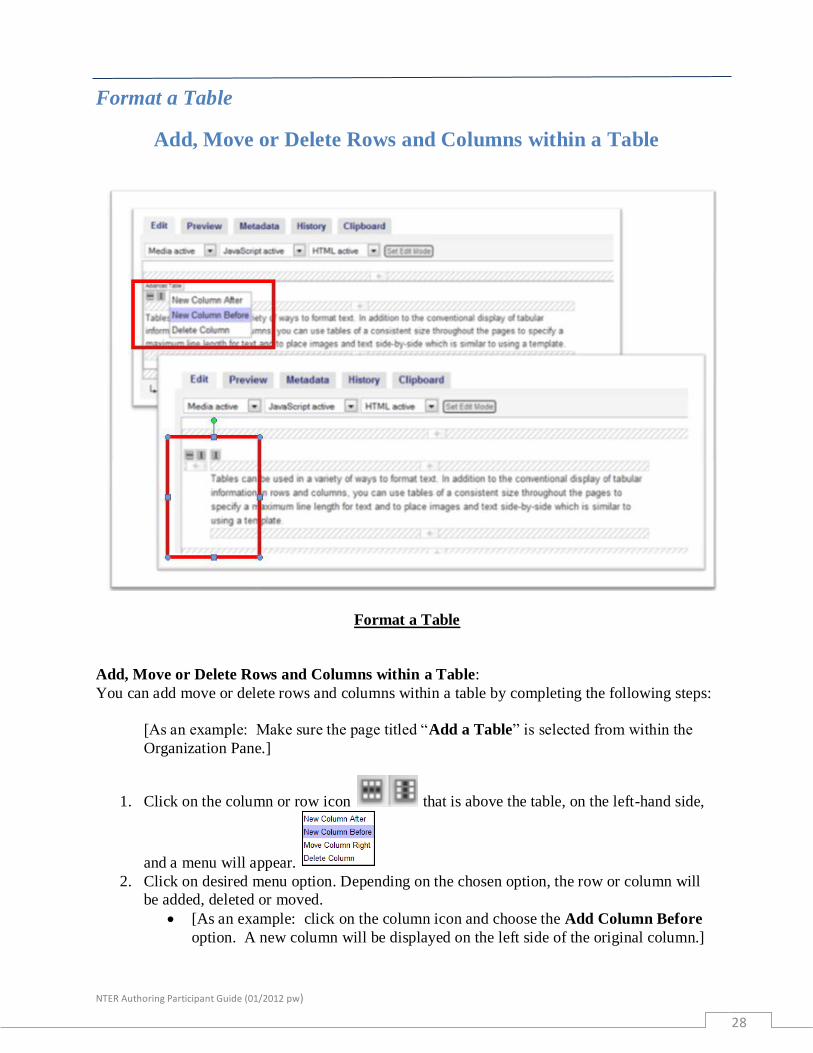
Format a Table
Add, Move or Delete Rows and Columns within a Table
Format a Table
Add, Move or Delete Rows and Columns within a Table:
You can add move or delete rows and columns within a table by completing the following steps:
[As an example: Make sure the page titled “Add a Table” is selected from within the
Organization Pane.]
1. Click on the column or row icon that is above the table, on the left-hand side,
and a menu will appear.
2. Click on desired menu option. Depending on the chosen option, the row or column will
be added, deleted or moved.
[As an example: click on the column icon and choose the Add Column Before
option. A new column will be displayed on the left side of the original column.]
NTER Authoring Participant Guide (01/2012 pw)
29
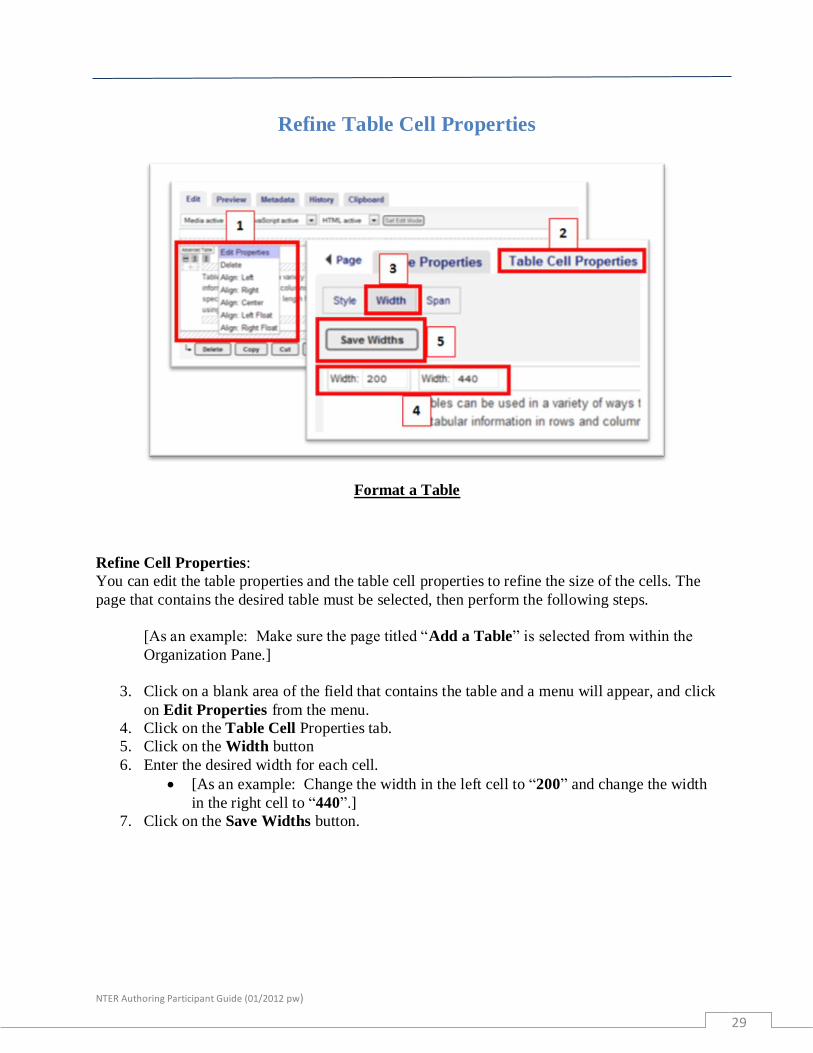
Refine Table Cell Properties
Format a Table
Refine Cell Properties:
You can edit the table properties and the table cell properties to refine the size of the cells. The
page that contains the desired table must be selected, then perform the following steps.
[As an example: Make sure the page titled “Add a Table” is selected from within the
Organization Pane.]
3. Click on a blank area of the field that contains the table and a menu will appear, and click
on Edit Properties from the menu.
4. Click on the Table Cell Properties tab.
5. Click on the Width button
6. Enter the desired width for each cell.
[As an example: Change the width in the left cell to “200” and change the width
in the right cell to “440”.]
7. Click on the Save Widths button.
NTER Authoring Participant Guide (01/2012 pw)
30
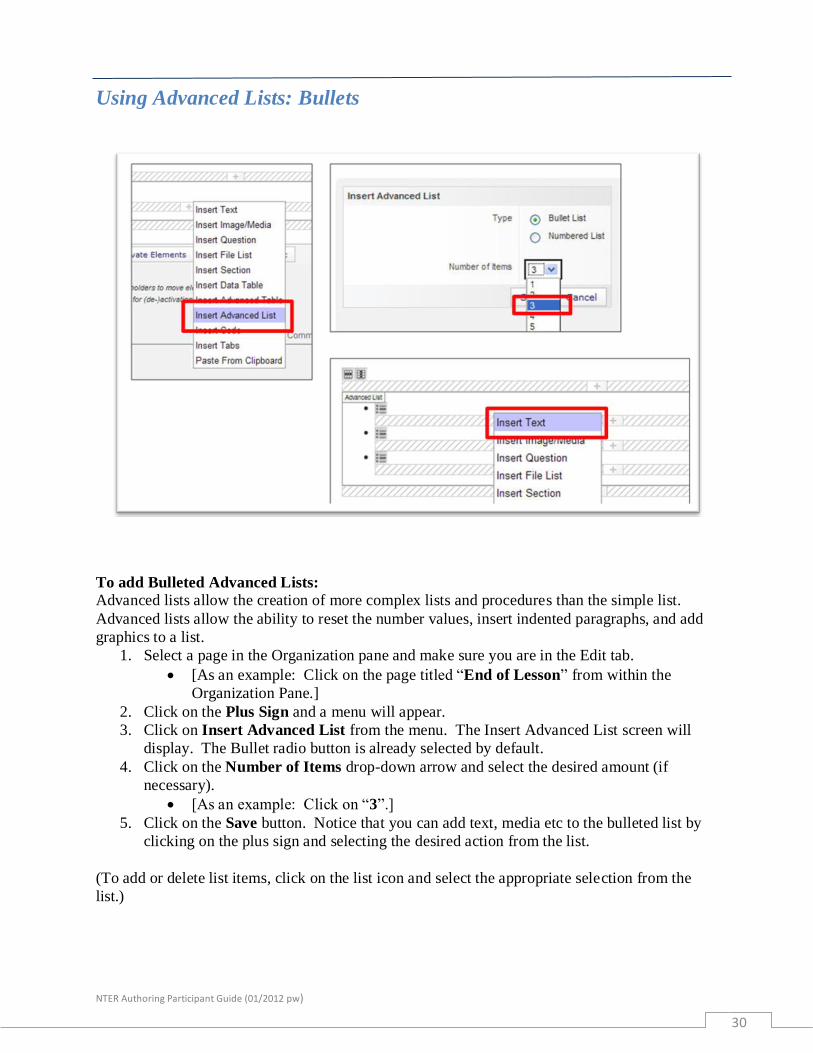
Using Advanced Lists: Bullets
To add Bulleted Advanced Lists:
Advanced lists allow the creation of more complex lists and procedures than the simple list.
Advanced lists allow the ability to reset the number values, insert indented paragraphs, and add
graphics to a list.
1. Select a page in the Organization pane and make sure you are in the Edit tab.
[As an example: Click on the page titled “End of Lesson” from within the
Organization Pane.]
2. Click on the Plus Sign and a menu will appear.
3. Click on Insert Advanced List from the menu. The Insert Advanced List screen will
display. The Bullet radio button is already selected by default.
4. Click on the Number of Items drop-down arrow and select the desired amount (if
necessary).
[As an example: Click on “3”.]
5. Click on the Save button. Notice that you can add text, media etc to the bulleted list by
clicking on the plus sign and selecting the desired action from the list.
(To add or delete list items, click on the list icon and select the appropriate selection from the
list.)

NTER Authoring Participant Guide (01/2012 pw)
31
Using Advanced Lists: Numbered (within a template)
Adding Numbered Advanced Lists (within a template): Adding numbered lists for writing instructional steps is similar to adding a bullet list. The form
for defining the numbered list is a little different. It allows you to specify the style for the
numbers and the starting number for the step. This allows you to interrupt a procedure with text
or graphics and then resume the same procedure.
1. Select a page in the Organization pane and make sure you are within the Edit tab.
[As an example: select the page titled “Add Content”.}
2. Click in the bottom field that states (“Click and edit to insert text”), and a menu will
appear.
3. Click on Edit from the menu and a “Select Text Item” screen displays.
4. Click on the “Advanced List” radio button.
5. Click on the Insert button.
6. Click on the Numbered List radio button.
7. Click on the Number Type drop-down arrow and select a desired type.
[For this example, do not change the default type “Standard”.]
8. Click in the Start Value field and type the desired value.
[As an example: Type 1]
9. Click on the Number of Items drop-down arrow and select the desired amount (if
necessary).
[For this example, do not change the default number “2”.]
10. Click on the Save button. Notice that you can add text, media etc to the bulleted list by
clicking on the plus sign and selecting the desired action from the list.
NTER Authoring Participant Guide (01/2012 pw)
32
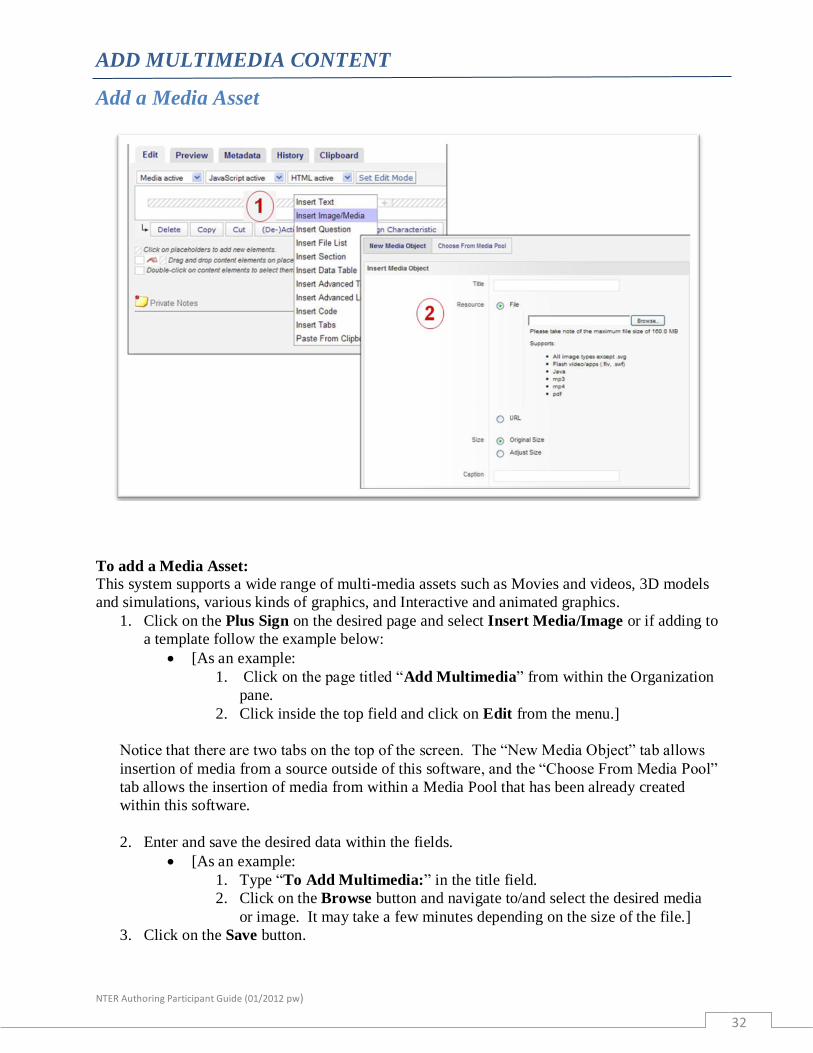
ADD MULTIMEDIA CONTENT
Add a Media Asset
To add a Media Asset: This system supports a wide range of multi-media assets such as Movies and videos, 3D models
and simulations, various kinds of graphics, and Interactive and animated graphics.
1. Click on the Plus Sign on the desired page and select Insert Media/Image or if adding to
a template follow the example below:
[As an example:
1. Click on the page titled “Add Multimedia” from within the Organization
pane.
2. Click inside the top field and click on Edit from the menu.]
Notice that there are two tabs on the top of the screen. The “New Media Object” tab allows
insertion of media from a source outside of this software, and the “Choose From Media Pool”
tab allows the insertion of media from within a Media Pool that has been already created
within this software.
2. Enter and save the desired data within the fields.
[As an example:
1. Type “To Add Multimedia:” in the title field.
2. Click on the Browse button and navigate to/and select the desired media
or image. It may take a few minutes depending on the size of the file.]
3. Click on the Save button.
NTER Authoring Participant Guide (01/2012 pw)
33
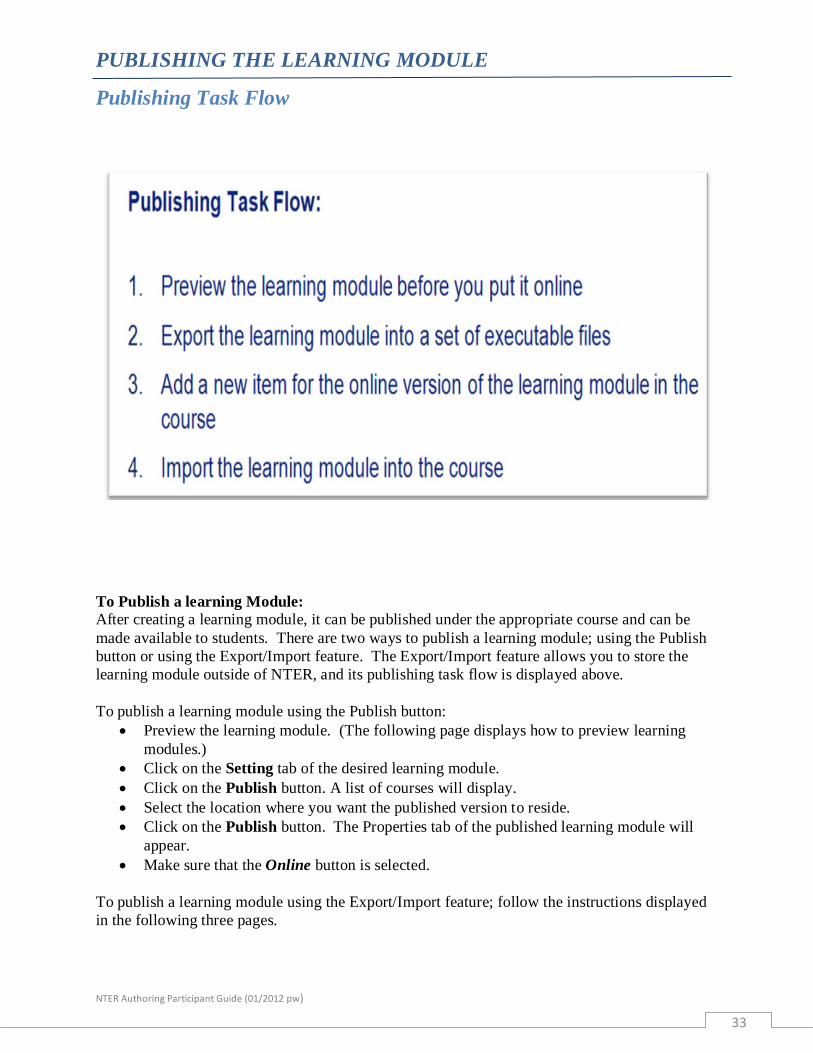
PUBLISHING THE LEARNING MODULE
Publishing Task Flow
To Publish a learning Module:
After creating a learning module, it can be published under the appropriate course and can be
made available to students. There are two ways to publish a learning module; using the Publish
button or using the Export/Import feature. The Export/Import feature allows you to store the
learning module outside of NTER, and its publishing task flow is displayed above.
To publish a learning module using the Publish button:
Preview the learning module. (The following page displays how to preview learning
modules.)
Click on the Setting tab of the desired learning module.
Click on the Publish button. A list of courses will display.
Select the location where you want the published version to reside.
Click on the Publish button. The Properties tab of the published learning module will
appear.
Make sure that the Online button is selected.
To publish a learning module using the Export/Import feature; follow the instructions displayed
in the following three pages.
NTER Authoring Participant Guide (01/2012 pw)
34
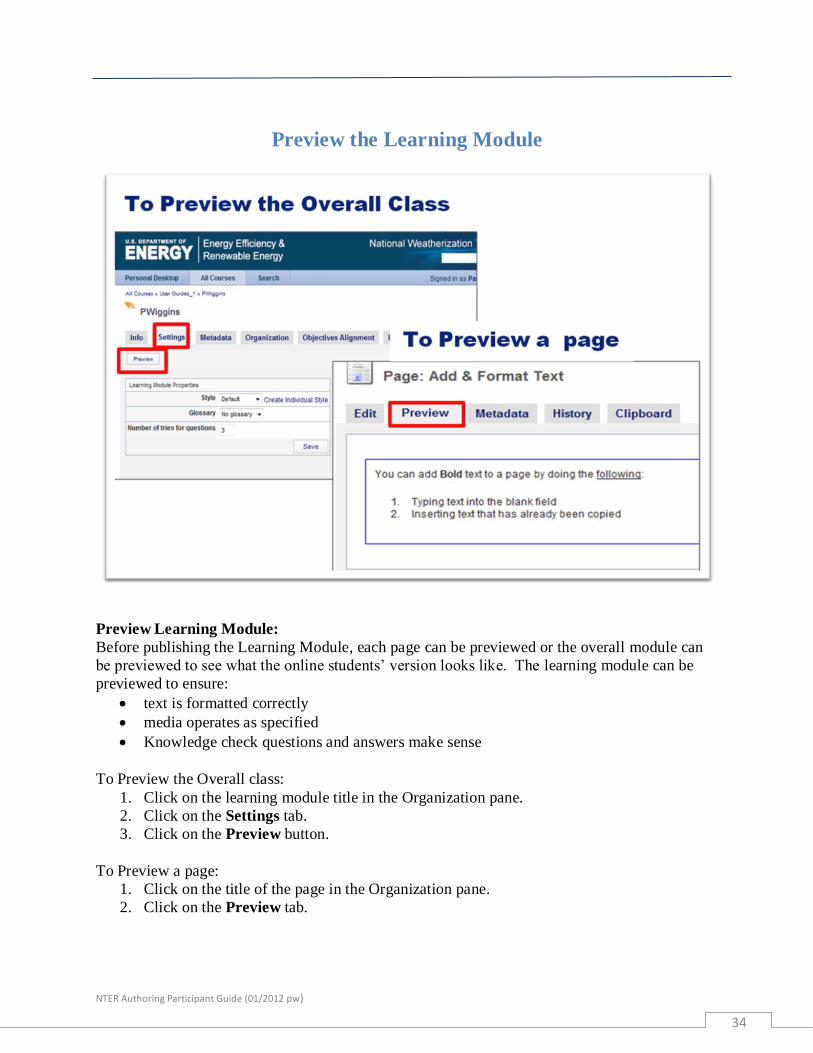
Preview the Learning Module
Preview Learning Module:
Before publishing the Learning Module, each page can be previewed or the overall module can
be previewed to see what the online students’ version looks like. The learning module can be
previewed to ensure:
text is formatted correctly
media operates as specified
Knowledge check questions and answers make sense
To Preview the Overall class:
1. Click on the learning module title in the Organization pane.
2. Click on the Settings tab.
3. Click on the Preview button.
To Preview a page:
1. Click on the title of the page in the Organization pane.
2. Click on the Preview tab.
NTER Authoring Participant Guide (01/2012 pw)
35
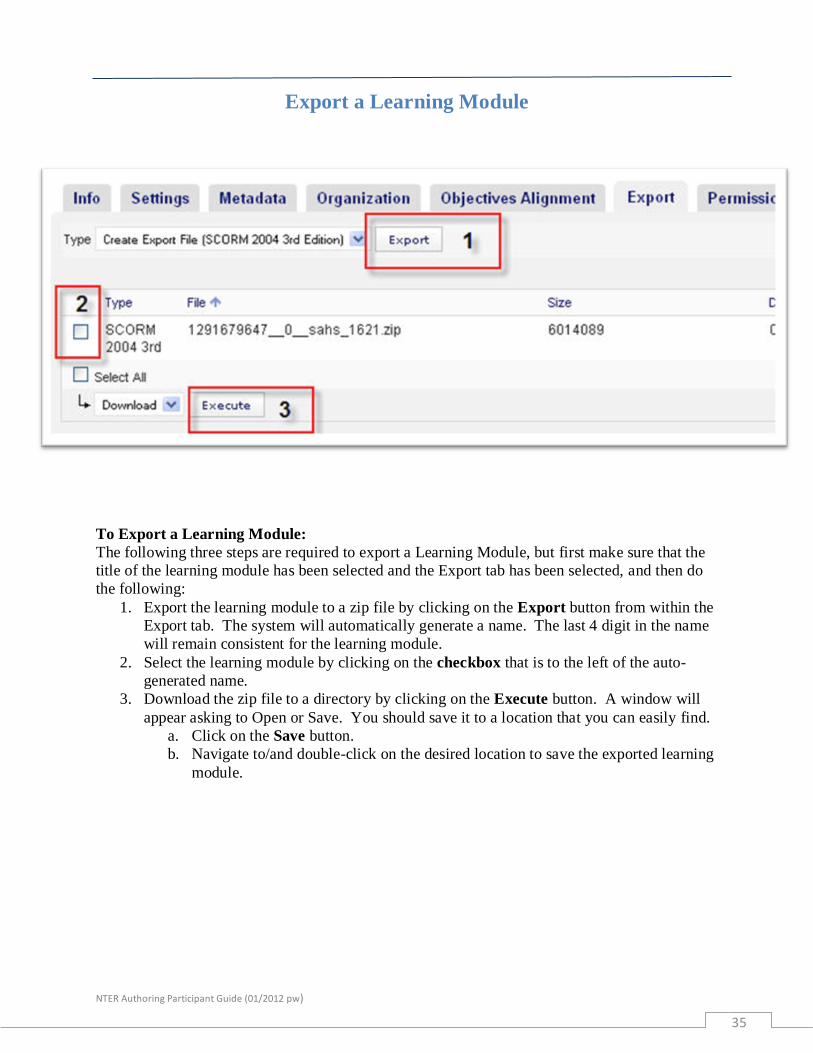
Export a Learning Module
To Export a Learning Module:
The following three steps are required to export a Learning Module, but first make sure that the
title of the learning module has been selected and the Export tab has been selected, and then do
the following:
1. Export the learning module to a zip file by clicking on the Export button from within the
Export tab. The system will automatically generate a name. The last 4 digit in the name
will remain consistent for the learning module.
2. Select the learning module by clicking on the checkbox that is to the left of the auto-
generated name.
3. Download the zip file to a directory by clicking on the Execute button. A window will
appear asking to Open or Save. You should save it to a location that you can easily find.
a. Click on the Save button.
b. Navigate to/and double-click on the desired location to save the exported learning
module.
NTER Authoring Participant Guide (01/2012 pw)
36
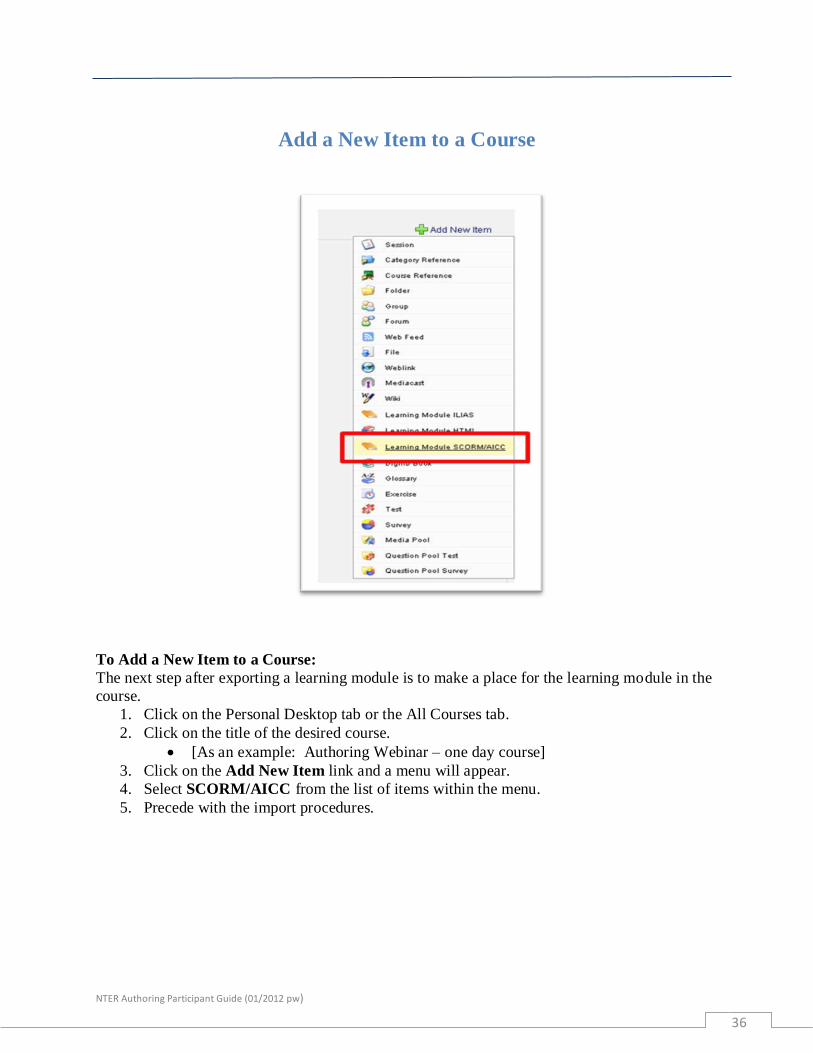
Add a New Item to a Course
To Add a New Item to a Course:
The next step after exporting a learning module is to make a place for the learning module in the
course.
1. Click on the Personal Desktop tab or the All Courses tab.
2. Click on the title of the desired course.
[As an example: Authoring Webinar – one day course]
3. Click on the Add New Item link and a menu will appear.
4. Select SCORM/AICC from the list of items within the menu.
5. Precede with the import procedures.
NTER Authoring Participant Guide (01/2012 pw)
37
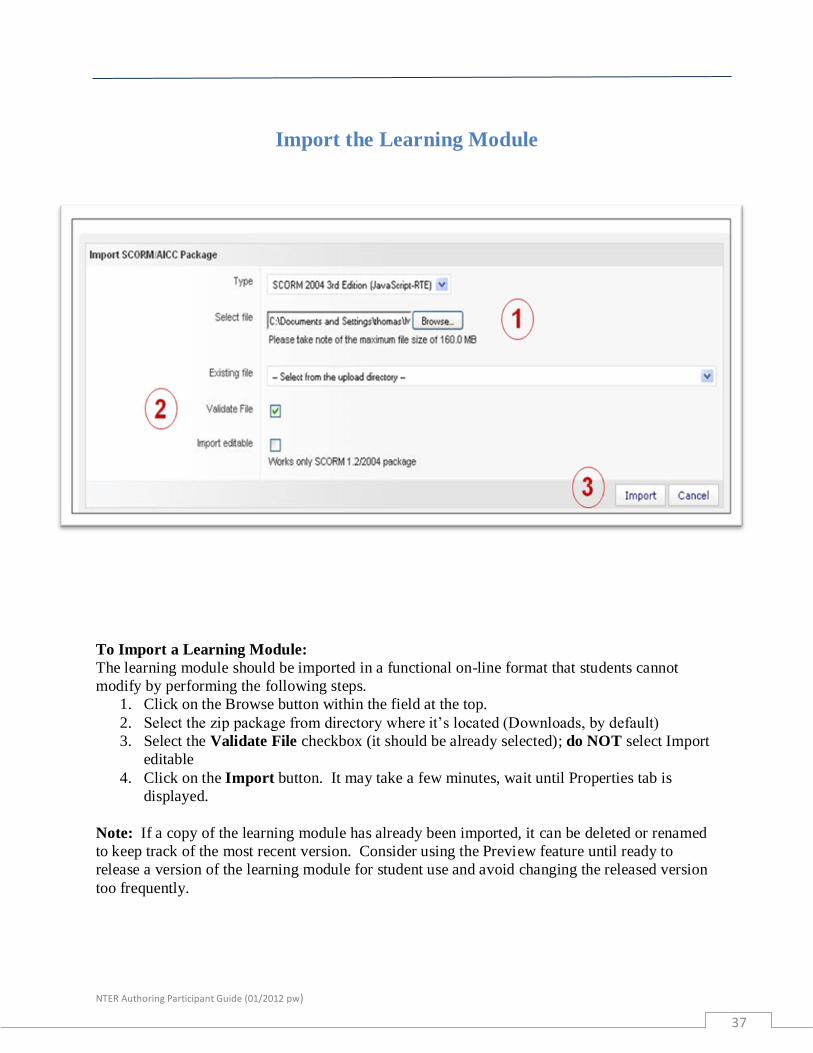
Import the Learning Module
To Import a Learning Module:
The learning module should be imported in a functional on-line format that students cannot
modify by performing the following steps.
1. Click on the Browse button within the field at the top.
2. Select the zip package from directory where it’s located (Downloads, by default)
3. Select the Validate File checkbox (it should be already selected); do NOT select Import
editable
4. Click on the Import button. It may take a few minutes, wait until Properties tab is
displayed.
Note: If a copy of the learning module has already been imported, it can be deleted or renamed
to keep track of the most recent version. Consider using the Preview feature until ready to
release a version of the learning module for student use and avoid changing the released version
too frequently.
NTER Authoring Participant Guide (01/2012 pw)
38
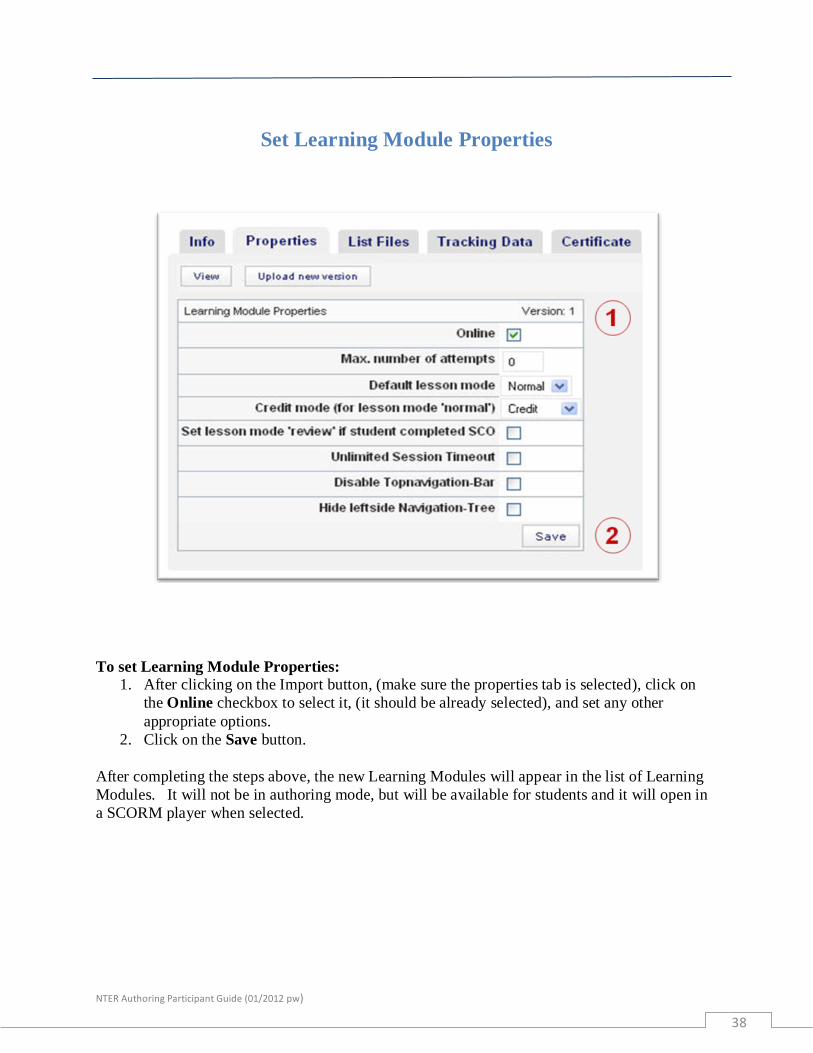
Set Learning Module Properties
To set Learning Module Properties:
1. After clicking on the Import button, (make sure the properties tab is selected), click on
the Online checkbox to select it, (it should be already selected), and set any other
appropriate options.
2. Click on the Save button.
After completing the steps above, the new Learning Modules will appear in the list of Learning
Modules. It will not be in authoring mode, but will be available for students and it will open in
a SCORM player when selected.
NTER Authoring Participant Guide (01/2012 pw)
39
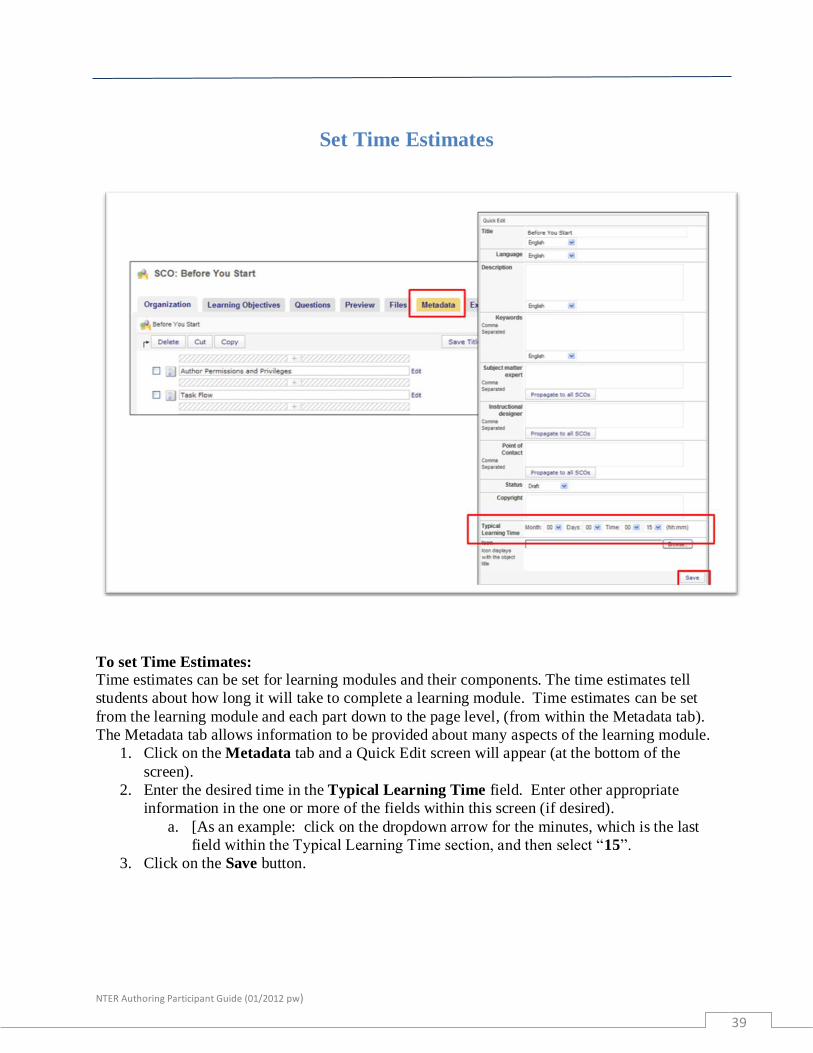
Set Time Estimates
To set Time Estimates:
Time estimates can be set for learning modules and their components. The time estimates tell
students about how long it will take to complete a learning module. Time estimates can be set
from the learning module and each part down to the page level, (from within the Metadata tab).
The Metadata tab allows information to be provided about many aspects of the learning module.
1. Click on the Metadata tab and a Quick Edit screen will appear (at the bottom of the
screen).
2. Enter the desired time in the Typical Learning Time field. Enter other appropriate
information in the one or more of the fields within this screen (if desired).
a. [As an example: click on the dropdown arrow for the minutes, which is the last
field within the Typical Learning Time section, and then select “15”.
3. Click on the Save button.
NTER Authoring Participant Guide (01/2012 pw)
40
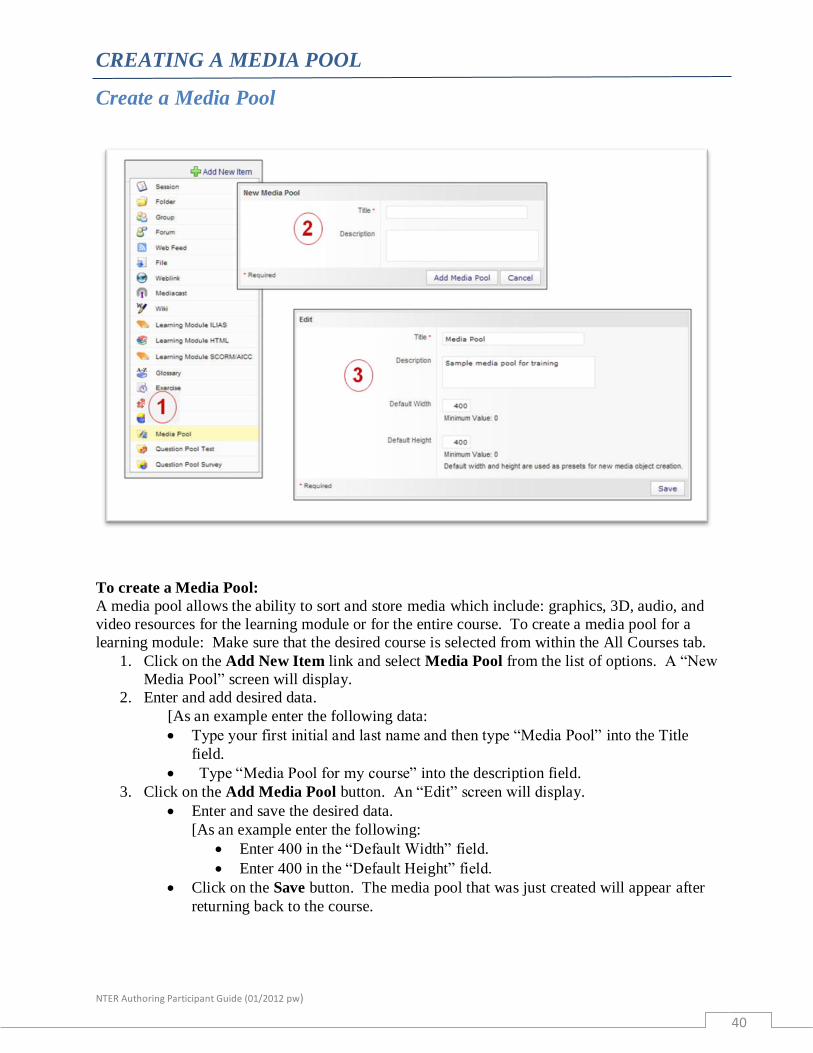
CREATING A MEDIA POOL
Create a Media Pool
To create a Media Pool:
A media pool allows the ability to sort and store media which include: graphics, 3D, audio, and
video resources for the learning module or for the entire course. To create a media pool for a
learning module: Make sure that the desired course is selected from within the All Courses tab.
1. Click on the Add New Item link and select Media Pool from the list of options. A “New
Media Pool” screen will display.
2. Enter and add desired data.
[As an example enter the following data:
Type your first initial and last name and then type “Media Pool” into the Title
field.
Type “Media Pool for my course” into the description field.
3. Click on the Add Media Pool button. An “Edit” screen will display.
Enter and save the desired data.
[As an example enter the following:
Enter 400 in the “Default Width” field.
Enter 400 in the “Default Height” field.
Click on the Save button. The media pool that was just created will appear after
returning back to the course.
NTER Authoring Participant Guide (01/2012 pw)
41
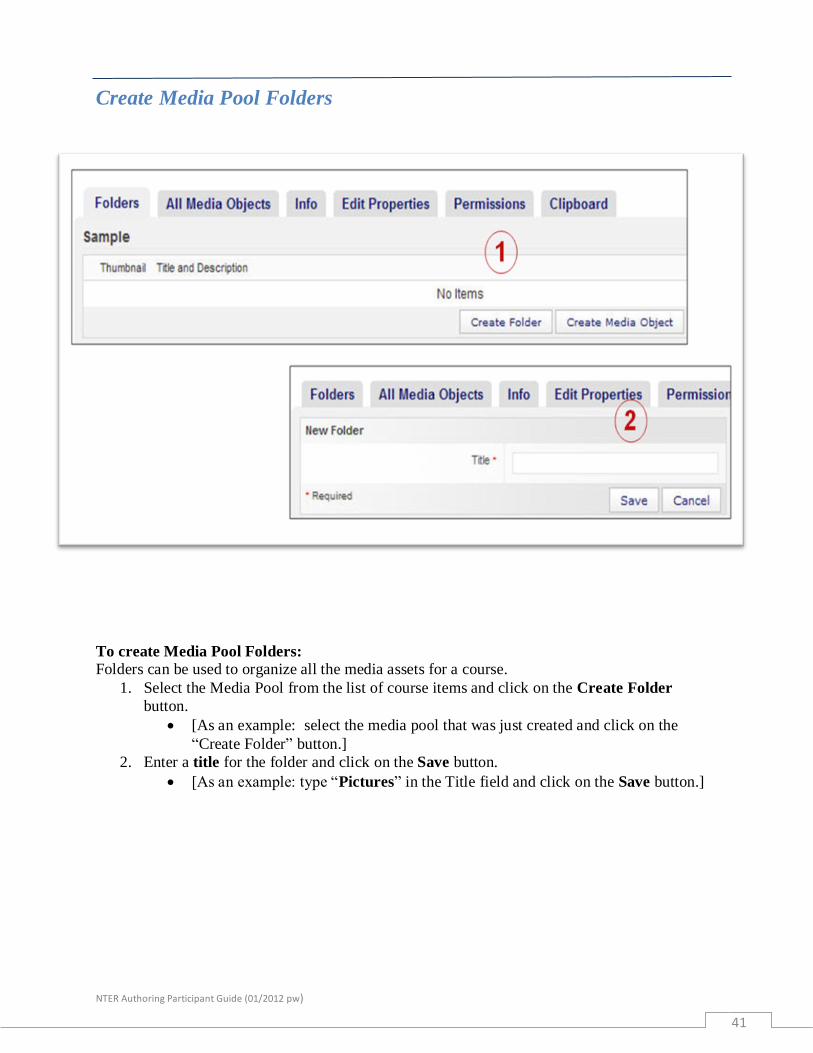
Create Media Pool Folders
To create Media Pool Folders: Folders can be used to organize all the media assets for a course.
1. Select the Media Pool from the list of course items and click on the Create Folder
button.
[As an example: select the media pool that was just created and click on the
“Create Folder” button.]
2. Enter a title for the folder and click on the Save button.
[As an example: type “Pictures” in the Title field and click on the Save button.]

NTER Authoring Participant Guide (01/2012 pw)
42
Add an Item to a Media Pool
To add an Item to a Media Pool:
This same procedure can be used whether adding media to the general pool, or within folders to
organize media pool assets.
(After selecting a Media Pool from the list of course objects do the following)
[As an example: Choose the Media Pool and then the folder that was just created.]
1. Click on Create Media Object
(Fill out the form – same as for adding a media object to a page.)
2. Enter and save the desired data within the fields.
[As an example: type your first and last initial and the word “Picture” within the
title field.
3. Click on the Browse button and navigate to/and select the desired media or image.
[As an example: navigate to your pictures folder and select the desired picture.]
4. Click the Save button.
To add an object from a media pool to a page in a learning module:
1. Click on the Choose from Media Pool tab.
2. Select the course from a list of options and select the media pool you are using and
specify the particular media asset to add to the page.
(To add an item to a Media Pool folder: Click on the title of the folder first and then follow the
procedures above.)
NTER Authoring Participant Guide (01/2012 pw)
43
KNOWLEDGE CHECK QUESTIONS
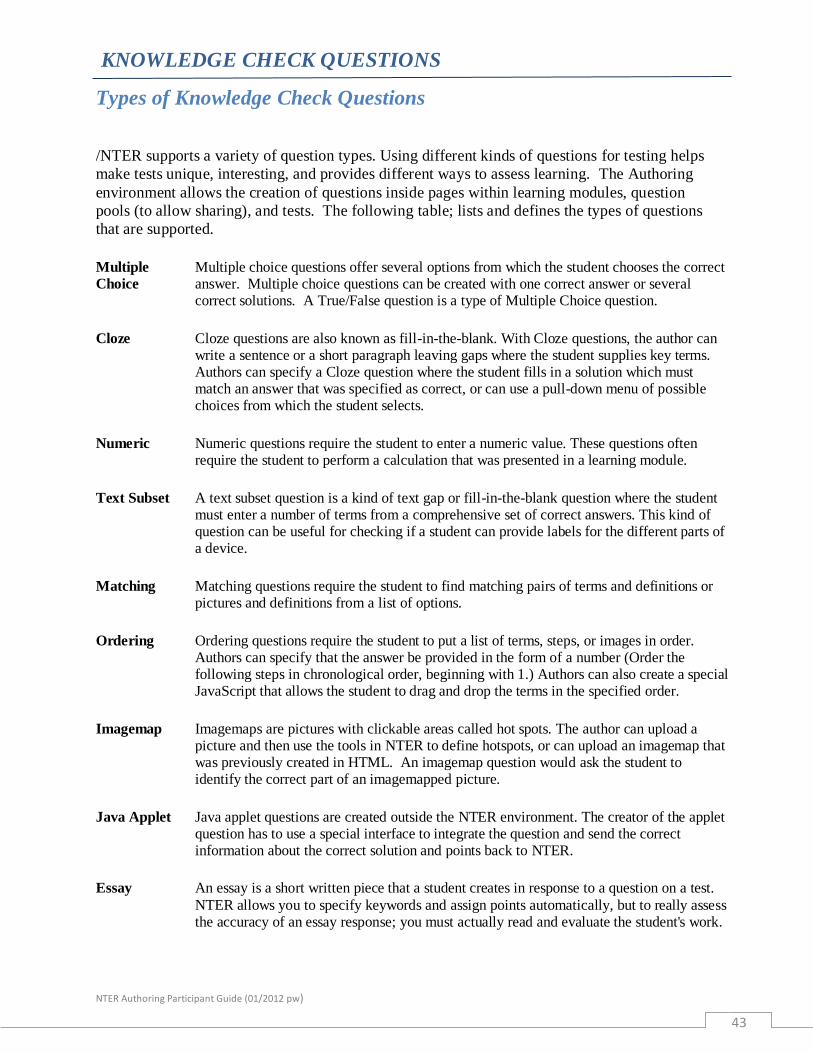
Types of Knowledge Check Questions
/NTER supports a variety of question types. Using different kinds of questions for testing helps
make tests unique, interesting, and provides different ways to assess learning. The Authoring
environment allows the creation of questions inside pages within learning modules, question
pools (to allow sharing), and tests. The following table; lists and defines the types of questions
that are supported.
Multiple
Choice
Multiple choice questions offer several options from which the student chooses the correct answer. Multiple choice questions can be created with one correct answer or several correct solutions. A True/False question is a type of Multiple Choice question.
Cloze Cloze questions are also known as fill-in-the-blank. With Cloze questions, the author can write a sentence or a short paragraph leaving gaps where the student supplies key terms. Authors can specify a Cloze question where the student fills in a solution which must match an answer that was specified as correct, or can use a pull-down menu of possible choices from which the student selects.
Numeric Numeric questions require the student to enter a numeric value. These questions often require the student to perform a calculation that was presented in a learning module.
Text Subset A text subset question is a kind of text gap or fill-in-the-blank question where the student must enter a number of terms from a comprehensive set of correct answers. This kind of question can be useful for checking if a student can provide labels for the different parts of a device.
Matching Matching questions require the student to find matching pairs of terms and definitions or pictures and definitions from a list of options.
Ordering Ordering questions require the student to put a list of terms, steps, or images in order. Authors can specify that the answer be provided in the form of a number (Order the following steps in chronological order, beginning with 1.) Authors can also create a special JavaScript that allows the student to drag and drop the terms in the specified order.
Imagemap Imagemaps are pictures with clickable areas called hot spots. The author can upload a picture and then use the tools in NTER to define hotspots, or can upload an imagemap that was previously created in HTML. An imagemap question would ask the student to identify the correct part of an imagemapped picture.
Java Applet Java applet questions are created outside the NTER environment. The creator of the applet question has to use a special interface to integrate the question and send the correct information about the correct solution and points back to NTER.
Essay An essay is a short written piece that a student creates in response to a question on a test.
NTER allows you to specify keywords and assign points automatically, but to really assess the accuracy of an essay response; you must actually read and evaluate the student's work.
NTER Authoring Participant Guide (01/2012 pw)
44
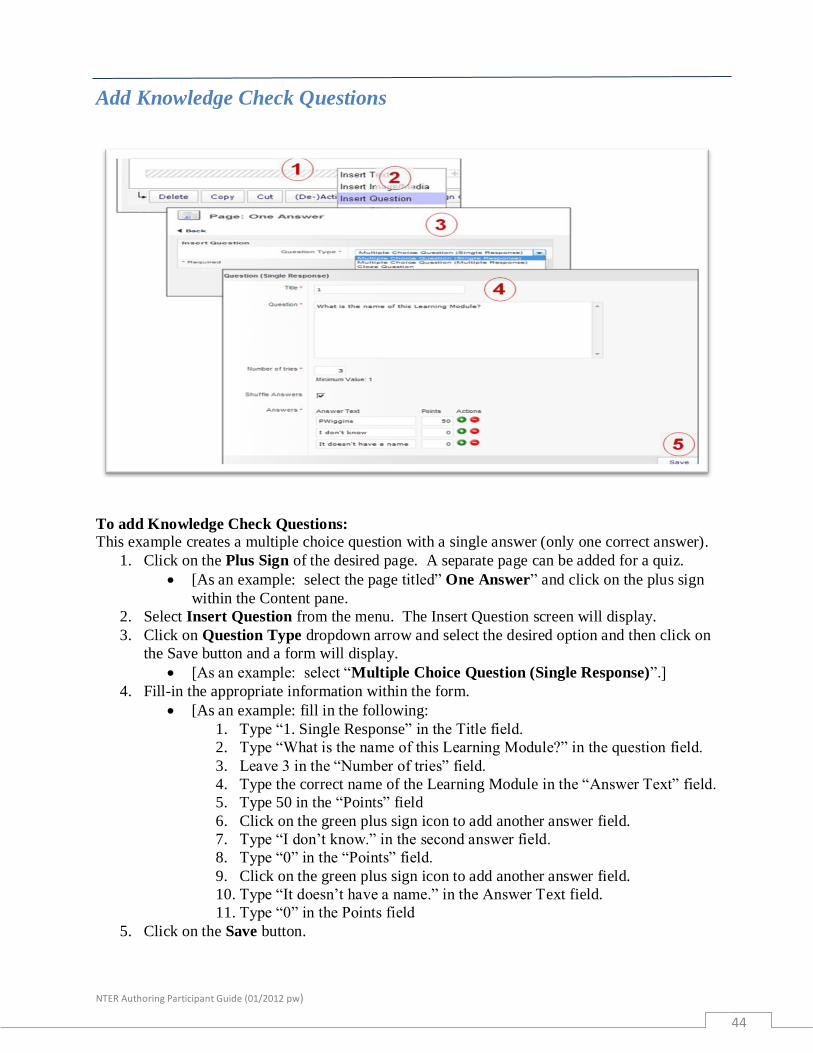
Add Knowledge Check Questions
To add Knowledge Check Questions:
This example creates a multiple choice question with a single answer (only one correct answer).
1. Click on the Plus Sign of the desired page. A separate page can be added for a quiz.
[As an example: select the page titled” One Answer” and click on the plus sign
within the Content pane.
2. Select Insert Question from the menu. The Insert Question screen will display.
3. Click on Question Type dropdown arrow and select the desired option and then click on
the Save button and a form will display.
[As an example: select “Multiple Choice Question (Single Response)”.]
4. Fill-in the appropriate information within the form.
[As an example: fill in the following:
1. Type “1. Single Response” in the Title field.
2. Type “What is the name of this Learning Module?” in the question field.
3. Leave 3 in the “Number of tries” field.
4. Type the correct name of the Learning Module in the “Answer Text” field.
5. Type 50 in the “Points” field
6. Click on the green plus sign icon to add another answer field.
7. Type “I don’t know.” in the second answer field.
8. Type “0” in the “Points” field.
9. Click on the green plus sign icon to add another answer field.
10. Type “It doesn’t have a name.” in the Answer Text field.
11. Type “0” in the Points field
5. Click on the Save button.
NTER Authoring Participant Guide (01/2012 pw)
45
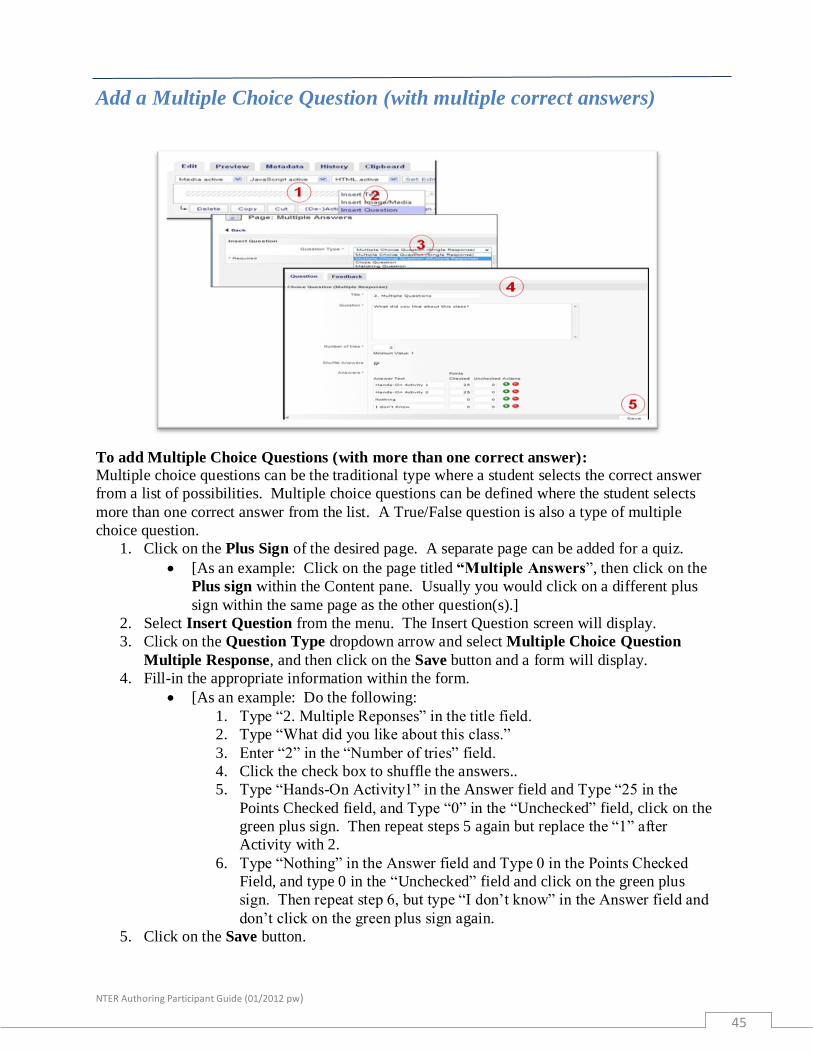
Add a Multiple Choice Question (with multiple correct answers)
To add Multiple Choice Questions (with more than one correct answer):
Multiple choice questions can be the traditional type where a student selects the correct answer
from a list of possibilities. Multiple choice questions can be defined where the student selects
more than one correct answer from the list. A True/False question is also a type of multiple
choice question.
1. Click on the Plus Sign of the desired page. A separate page can be added for a quiz.
[As an example: Click on the page titled “Multiple Answers”, then click on the
Plus sign within the Content pane. Usually you would click on a different plus
sign within the same page as the other question(s).]
2. Select Insert Question from the menu. The Insert Question screen will display.
3. Click on the Question Type dropdown arrow and select Multiple Choice Question
Multiple Response, and then click on the Save button and a form will display.
4. Fill-in the appropriate information within the form.
[As an example: Do the following:
1. Type “2. Multiple Reponses” in the title field.
2. Type “What did you like about this class.”
3. Enter “2” in the “Number of tries” field.
4. Click the check box to shuffle the answers..
5. Type “Hands-On Activity1” in the Answer field and Type “25 in the
Points Checked field, and Type “0” in the “Unchecked” field, click on the
green plus sign. Then repeat steps 5 again but replace the “1” after
Activity with 2.
6. Type “Nothing” in the Answer field and Type 0 in the Points Checked
Field, and type 0 in the “Unchecked” field and click on the green plus
sign. Then repeat step 6, but type “I don’t know” in the Answer field and
don’t click on the green plus sign again.
5. Click on the Save button.
NTER Authoring Participant Guide (01/2012 pw)
46
FINISHING TOUCHES
Last Page Notice
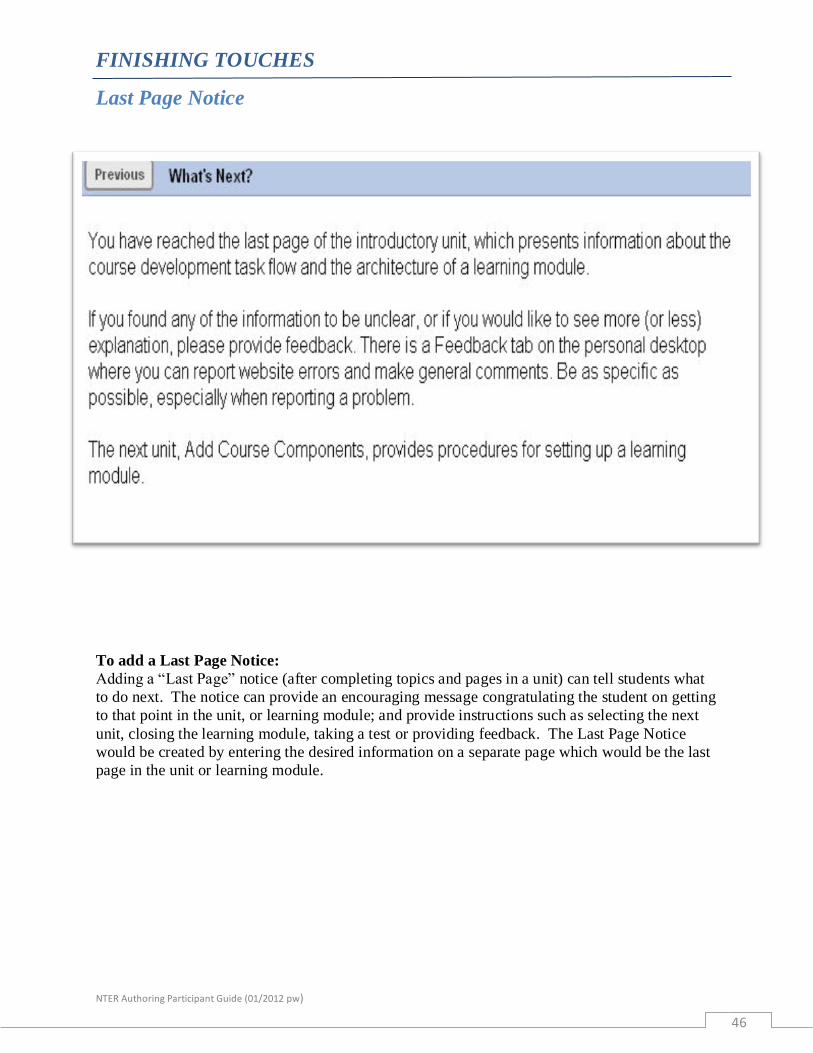
To add a Last Page Notice:
Adding a “Last Page” notice (after completing topics and pages in a unit) can tell students what
to do next. The notice can provide an encouraging message congratulating the student on getting
to that point in the unit, or learning module; and provide instructions such as selecting the next
unit, closing the learning module, taking a test or providing feedback. The Last Page Notice
would be created by entering the desired information on a separate page which would be the last
page in the unit or learning module.

NTER Authoring Participant Guide (01/2012 pw)
47
Encouraging Feedback
Encouraging Feedback:
Consider using a last page in each lesson to review and encourage students to use the feedback
tab to submit questions and comments. The feedback tab allows students to submit questions
about learning modules, using the system, and reporting website errors.
NTER Authoring Participant Guide (01/2012 pw)
48
HELP
Need Help:
There are other learning modules within NTER that may help, which can be found in the
User Guide that is within the Documentation and Training category within NTER.