part one drilling manual - itacanet.orgitacanet.org/eng/water/section 3...
TRANSCRIPT

Foundation
Rota Sludge &
Stone Hammer drilling
Part one Drilling Manual
A. van Herwijnen
July 28th, 2005
(The complete manual consist of three volumes: this part 1 is the Drilling manual, part 2 is the manual for making the necessary equipment, called the Production manual) and part 3 is the hydro geology manual.

Disclaimer Any parts of this manual, including the illustrations, may be copied, reproduced, or adapted to meet local needs, without permission from the author or publisher, provided the parts reproduced are distributed free or at nominal cost, not for profit and reference to the source is made. The author would appreciate being sent a copy of any materials in which text or pictures have been used. For any reproduction with commercial ends, permission must first be obtained from the Technical Training Programme of the ETC Foundation (TTP/ETC) and/or Practica foundation
This manual is often used in technical training courses organised for the intended users. In case, you want to organize such training, you may contact TTP/ETC for further information and support.
Note to those considering translation or modification: To avoid duplication of efforts, unintended mistakes, and for suggestions about adapting the ideas and information in this manual, please contact TTP/ETC before beginning any translation or modification.
This publication was made possible by a financial contribution of the HPF Foundation, through the Technical Training Programme of the ETC-Foundation.
While every care has been taken to ensure the accuracy of the information given in this manual, neither the publisher(s) nor the author(s) can be held responsible for any damage resulting from the application of the described methods. Any liability in this respect is excluded. Technical Training Programme ETC-Foundation, The Netherlands P.O. Box 64, 3830 AB Leusden The Netherlands E-mail: [email protected] PRACTICA foundation Maerten Tromp str. 31 NL-2628 RC Delft The Netherlands Info @practicafoundation.nl www.practicafoundation.nl


Rota Sludge & Stone hammer drilling Manual page 1
Contents Page 1 Introduction 3 Background
General description of the Rota-sludge drilling General description of the Stone-hammer drilling
2 Borehole design 6 Depth of the well Depth of the aquifer and groundwater Seasonal influences Collecting soil samples 3 Rota sludge drilling 7 Required equipment Preparing for drilling The drilling Connecting and disconnecting pipes. Flushing the well for temporary stops Difficult situations Maintenance of the Rota-sludge equipment 4 Stone-hammer drilling. 22 Required equipment Setting up for the Stone-hammer Preparing the Stone-hammer for use Operating the Stone-hammer
Maintenance of the hammer after use 5 Placing the screen, casing pipes and gravel pack 26 Requirements
Washing the well Placing screen, casing Gravel pack Flushing

Rota Sludge & Stone hammer drilling Manual page 2
Rota Sludge & Stone hammer drilling Manual page 3
1. Introduction Background There are various techniques for drilling a drinking water or irrigation tube well. The drilling method used is related to the soil conditions and the financial means available. In general, drilling techniques can be divided into two categories i.e. drilling with a machine or manually. The greatest difference between the two methods is that drilling with a machine is much more expensive than drilling by hand. The manual method is thus the preferred choice for low-cost wells but it obviously has its limitations. If the ground is too hard like for instance solid rock, manual drilling is often not feasible and only machine drilling can be considered. In certain circumstances, digging the well by hand may be an option. However, there are certain disadvantages regarding the so-called “dug well”: the dangers while undertaking the work, the difficulty of penetrating deep enough into the aquifer, the relatively high costs and the poor hygienic conditions. Practica has since 1999, conducted research into the possibilities of manually drilling low cost tube wells. The objective is to make this method as efficient and inexpensive as possible so as to make wells affordable for a larger part of the rural population in developing countries. The research was initiated in North Bengal, India. There, drilling was done using the traditional Hand-sludge method. This technique could not pass hard layers or boulders and so additional tools were developed resulting in the Stone-hammer method. In 2001 these methods were further tested in Nicaragua. Here, a rotary movement was added, resulting in the Rota- sludge method. The Rota-sludge and the Stone- hammer methods together form a package. Basically one drills with the Rota Sludge until one hits a layer with boulders or stones, then one uses the Stone-hammer to pass through this layer and finally one switches back to Rota Sludge when the boulders are passed. Part 1 of this manual describes, step by step, how the Rota sludge and Stone hammer method must be used and part 2 provides detailed drawings of the equipment.
Rota Sludge & Stone hammer drilling Manual page 4
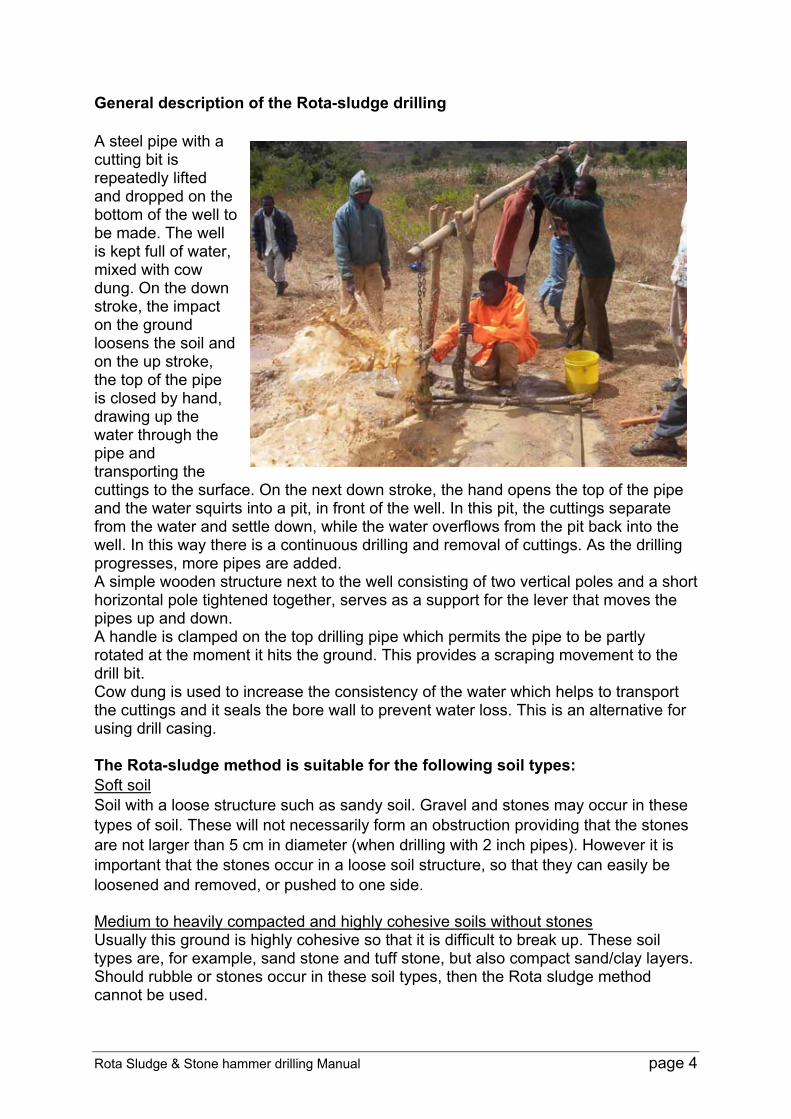
General description of the Rota-sludge drilling A steel pipe with a cutting bit is repeatedly lifted and dropped on the bottom of the well to be made. The well is kept full of water, mixed with cow dung. On the down stroke, the impact on the ground loosens the soil and on the up stroke, the top of the pipe is closed by hand, drawing up the water through the pipe and transporting the cuttings to the surface. On the next down stroke, the hand opens the top of the pipe and the water squirts into a pit, in front of the well. In this pit, the cuttings separate from the water and settle down, while the water overflows from the pit back into the well. In this way there is a continuous drilling and removal of cuttings. As the drilling progresses, more pipes are added. A simple wooden structure next to the well consisting of two vertical poles and a short horizontal pole tightened together, serves as a support for the lever that moves the pipes up and down. A handle is clamped on the top drilling pipe which permits the pipe to be partly rotated at the moment it hits the ground. This provides a scraping movement to the drill bit. Cow dung is used to increase the consistency of the water which helps to transport the cuttings and it seals the bore wall to prevent water loss. This is an alternative for using drill casing. The Rota-sludge method is suitable for the following soil types: Soft soil Soil with a loose structure such as sandy soil. Gravel and stones may occur in these types of soil. These will not necessarily form an obstruction providing that the stones are not larger than 5 cm in diameter (when drilling with 2 inch pipes). However it is important that the stones occur in a loose soil structure, so that they can easily be loosened and removed, or pushed to one side. Medium to heavily compacted and highly cohesive soils without stones Usually this ground is highly cohesive so that it is difficult to break up. These soil types are, for example, sand stone and tuff stone, but also compact sand/clay layers. Should rubble or stones occur in these soil types, then the Rota sludge method cannot be used.
Rota Sludge & Stone hammer drilling Manual page 5
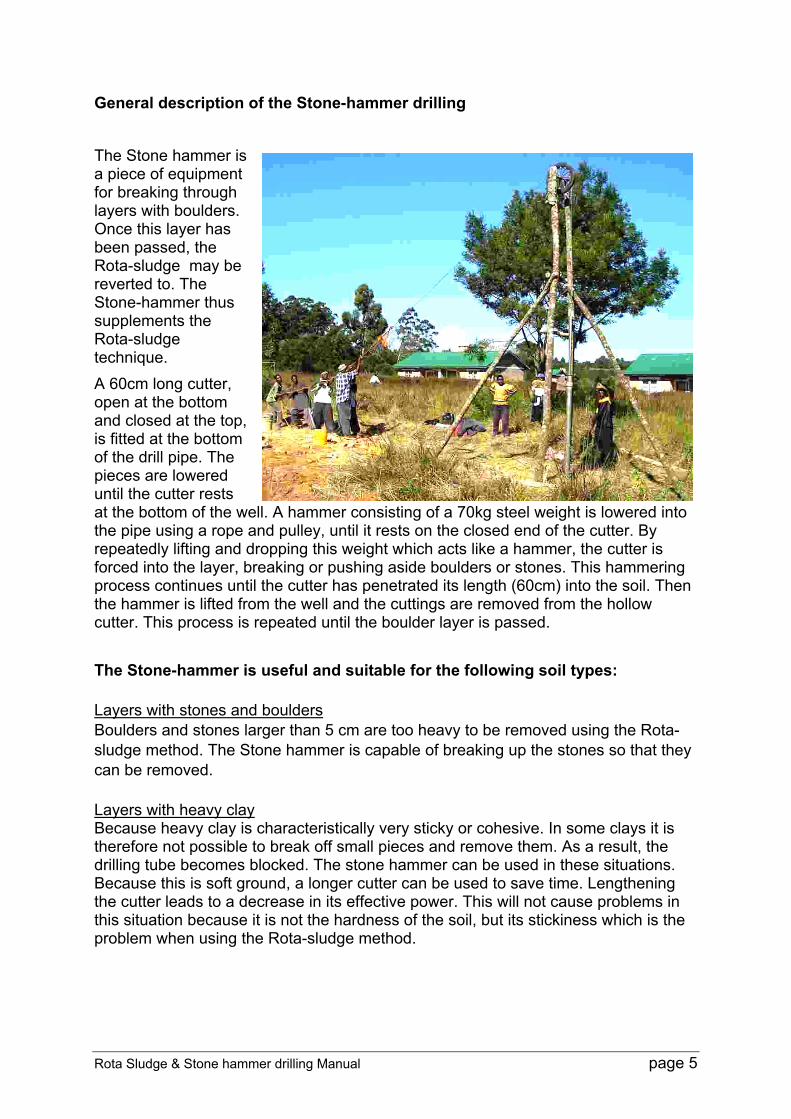
General description of the Stone-hammer drilling The Stone hammer is a piece of equipment for breaking through layers with boulders. Once this layer has been passed, the Rota-sludge may be reverted to. The Stone-hammer thus supplements the Rota-sludge technique. A 60cm long cutter, open at the bottom and closed at the top, is fitted at the bottom of the drill pipe. The pieces are lowered until the cutter rests at the bottom of the well. A hammer consisting of a 70kg steel weight is lowered into the pipe using a rope and pulley, until it rests on the closed end of the cutter. By repeatedly lifting and dropping this weight which acts like a hammer, the cutter is forced into the layer, breaking or pushing aside boulders or stones. This hammering process continues until the cutter has penetrated its length (60cm) into the soil. Then the hammer is lifted from the well and the cuttings are removed from the hollow cutter. This process is repeated until the boulder layer is passed.
The Stone-hammer is useful and suitable for the following soil types: Layers with stones and boulders Boulders and stones larger than 5 cm are too heavy to be removed using the Rota-sludge method. The Stone hammer is capable of breaking up the stones so that they can be removed. Layers with heavy clay Because heavy clay is characteristically very sticky or cohesive. In some clays it is therefore not possible to break off small pieces and remove them. As a result, the drilling tube becomes blocked. The stone hammer can be used in these situations. Because this is soft ground, a longer cutter can be used to save time. Lengthening the cutter leads to a decrease in its effective power. This will not cause problems in this situation because it is not the hardness of the soil, but its stickiness which is the problem when using the Rota-sludge method.

Rota Sludge & Stone hammer drilling Manual page 6
2. Borehole design Depth of the well The depth to which the well should be drilled depends on the soil type, water level and the length of the screen to be used. The basic principle is that the screen has to be installed in the water bearing layer (aquifer) and the depth into the aquifer depends on the screen length to be used. The screen length in turn depends on the permeability of the aquifer i.e. good permeability needs only a short screen and poor permeability will need a long screen. Depth of the aquifer and groundwater If possible, inquire from people who own wells in the vicinity, at what level the water enters the well. This is often where the sand begins. If the wells are far away, this information may be somewhat imprecise, nevertheless, an estimate can still be made. While drilling, collect samples of the material that is brought to the surface and when this becomes loose, it may indicate an aquifer. For more details on hydro geology related to Rota-sludge drilling, please refer to part three of this manual. Seasonal influences The groundwater level is usually not the same in the dry season as in the rainy season. In most cases, owners of wells in the vicinity will be able to quite accurately indicate the fluctuation. Collecting soil samples. During drilling, an experienced driller can feel the structure of the soil with his hand (sand or loam percentage). By placing a bucket in the pit, the cuttings can be collected during drilling. The samples can be washed clean to reveal the sand percentage. During the collection of the sample, the bucket will overflow. This does not matter because the soil particles will settle on the bottom of the bucket.
The general principle is: sand has been reached when the drilling speed is at least 1 metre per hour.
Rota Sludge & Stone hammer drilling Manual page 7
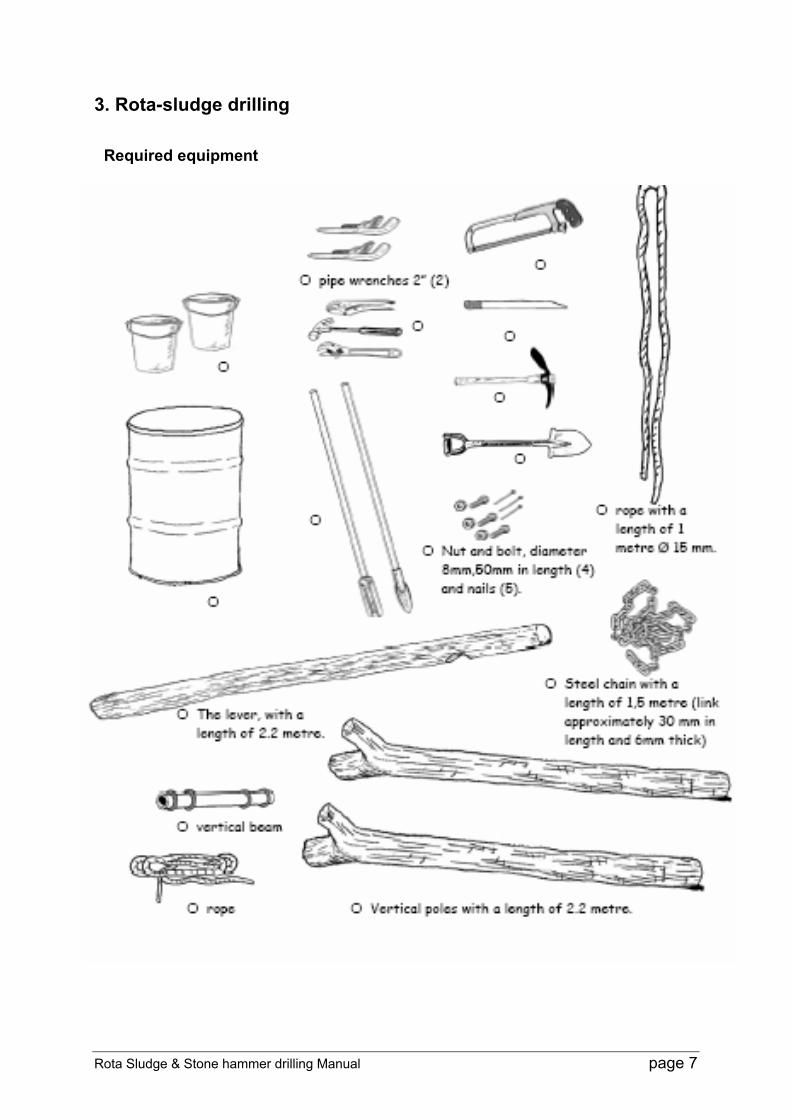
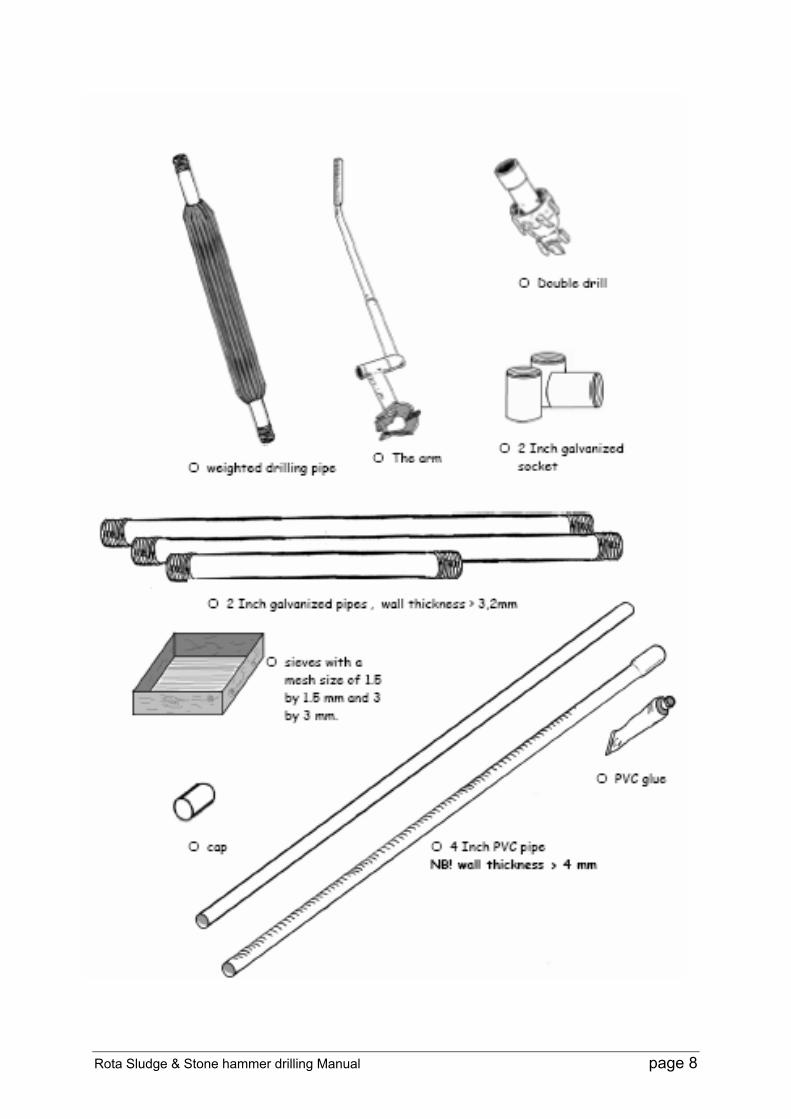
3. Rota-sludge drilling Required equipment
Rota Sludge & Stone hammer drilling Manual page 8

Rota Sludge & Stone hammer drilling Manual page 9
Preparing for drilling
First, the poles are put into place. The poles form the frame of the lever construction.
They are dug in at a depth of 80 cm. The distance between them is 40 cm. Place large flat stones under the poles to prevent sinking in while drilling. In clay and loam soil, fill space around poles with compacted stones and soil.

Rota Sludge & Stone hammer drilling Manual page 10
The lever is placed on the cross bar resting in the notches. The separate parts are then connected using a rope. The lever is fitted with the chain. This is attached to the lever with a nut and bolt 30 cm from the cross bar. To ensure that the chain cannot move, it is secured with a thick nail.
The cross bar is placed on the poles. The height of the cross bar should be equal to the average shoulder height of the drillers.
Rota Sludge & Stone hammer drilling Manual page 11
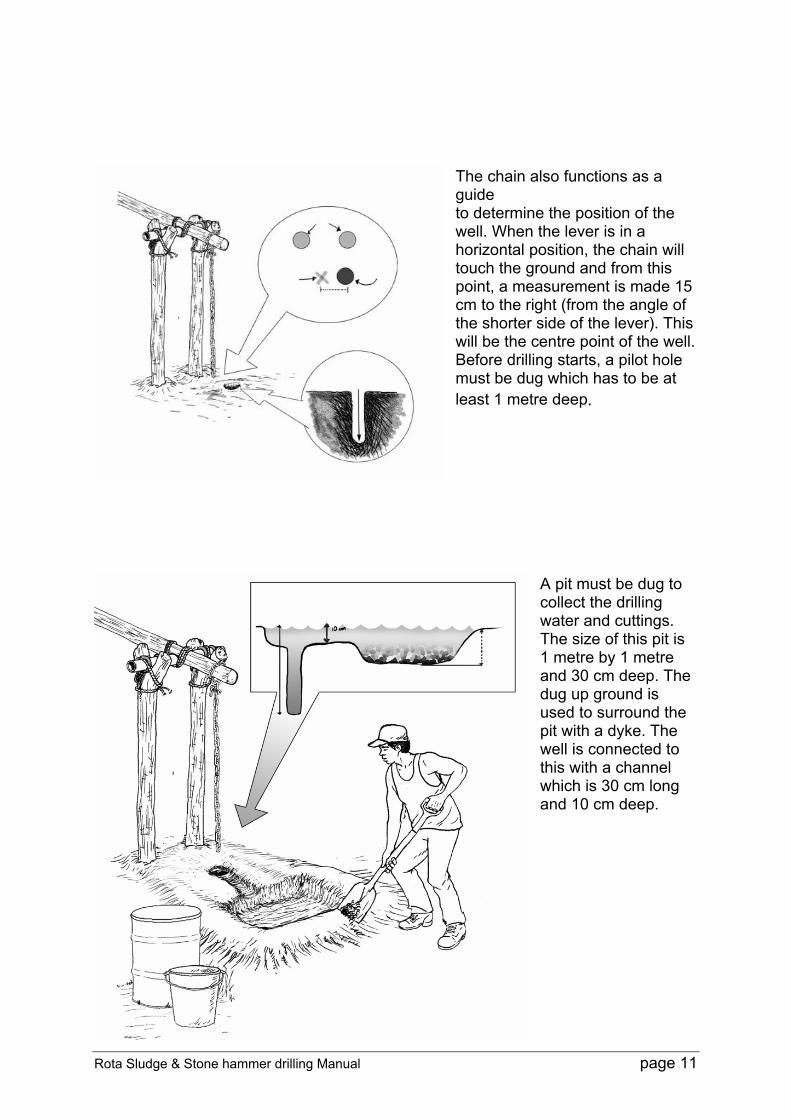
The chain also functions as a guide to determine the position of the well. When the lever is in a horizontal position, the chain will touch the ground and from this point, a measurement is made 15 cm to the right (from the angle of the shorter side of the lever). This will be the centre point of the well. Before drilling starts, a pilot hole must be dug which has to be at least 1 metre deep.
A pit must be dug to collect the drilling water and cuttings. The size of this pit is 1 metre by 1 metre and 30 cm deep. The dug up ground is used to surround the pit with a dyke. The well is connected to this with a channel which is 30 cm long and 10 cm deep.
Rota Sludge & Stone hammer drilling Manual page 12
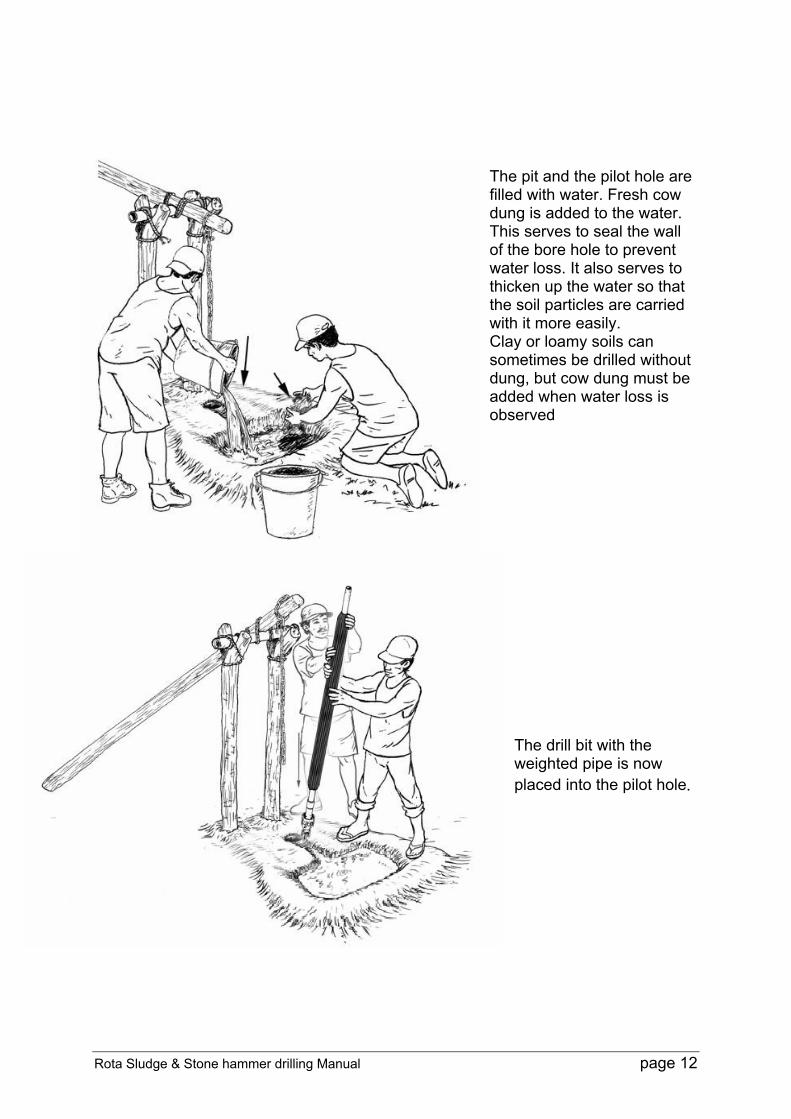
The pit and the pilot hole are filled with water. Fresh cow dung is added to the water. This serves to seal the wall of the bore hole to prevent water loss. It also serves to thicken up the water so that the soil particles are carried with it more easily. Clay or loamy soils can sometimes be drilled without dung, but cow dung must be added when water loss is observed
The drill bit with the weighted pipe is now placed into the pilot hole.

Rota Sludge & Stone hammer drilling Manual page 13
The chain is connected to the drilling pipe. It is loosely wound once round the drilling pipe and secured with a nut and bolt. This must be done in such a way that when the chain is stretched tight it clamps onto the pipe. The chain is wedged in place by means of a rope. The rope supports the chain with a bowline knot on either side. This is to prevent the chain from sliding along the pipe. If the chain is not stretched too tight, it is possible to slide it along the drilling pipe with two hands. In this way, a
good working height of the lever may be set. The arm is attached in order to rotate the pipe. The set up of the system is now complete and drilling can begin
Rota Sludge & Stone hammer drilling Manual page 14
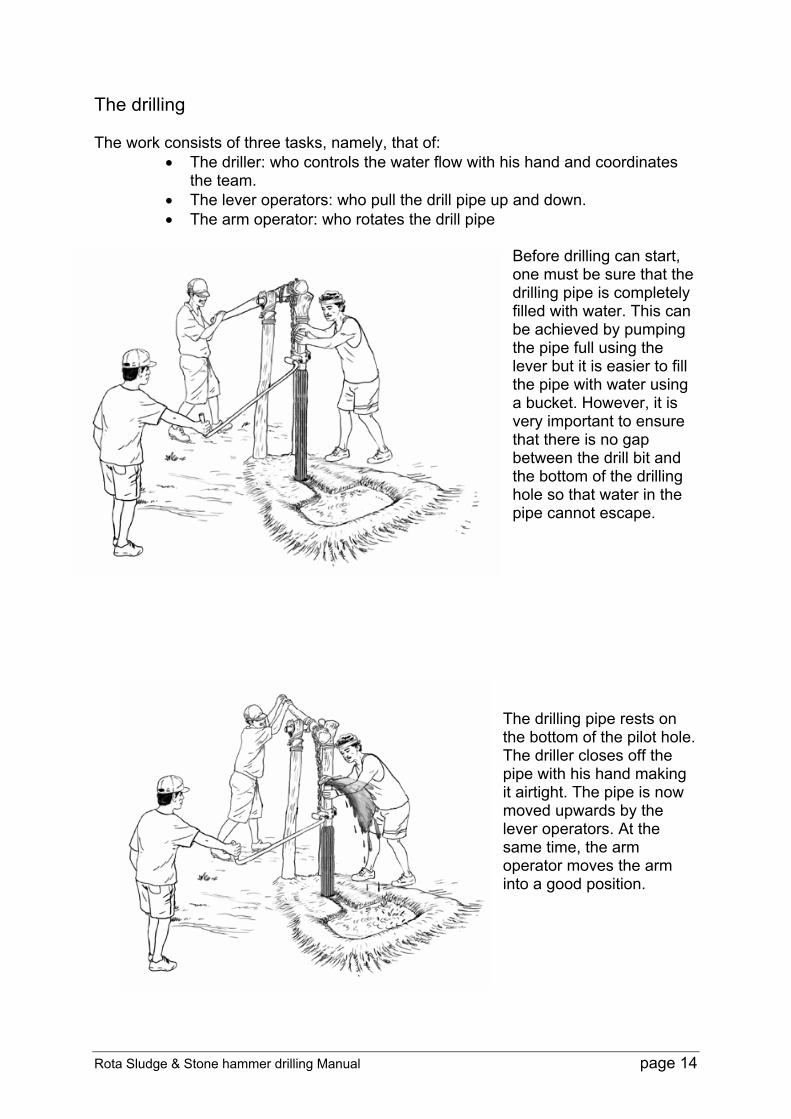
The drilling
The work consists of three tasks, namely, that of: • The driller: who controls the water flow with his hand and coordinates
the team. • The lever operators: who pull the drill pipe up and down. • The arm operator: who rotates the drill pipe
Before drilling can start, one must be sure that the drilling pipe is completely filled with water. This can be achieved by pumping the pipe full using the lever but it is easier to fill the pipe with water using a bucket. However, it is very important to ensure that there is no gap between the drill bit and the bottom of the drilling hole so that water in the pipe cannot escape.
The drilling pipe rests on the bottom of the pilot hole. The driller closes off the pipe with his hand making it airtight. The pipe is now moved upwards by the lever operators. At the same time, the arm operator moves the arm into a good position.
Rota Sludge & Stone hammer drilling Manual page 15
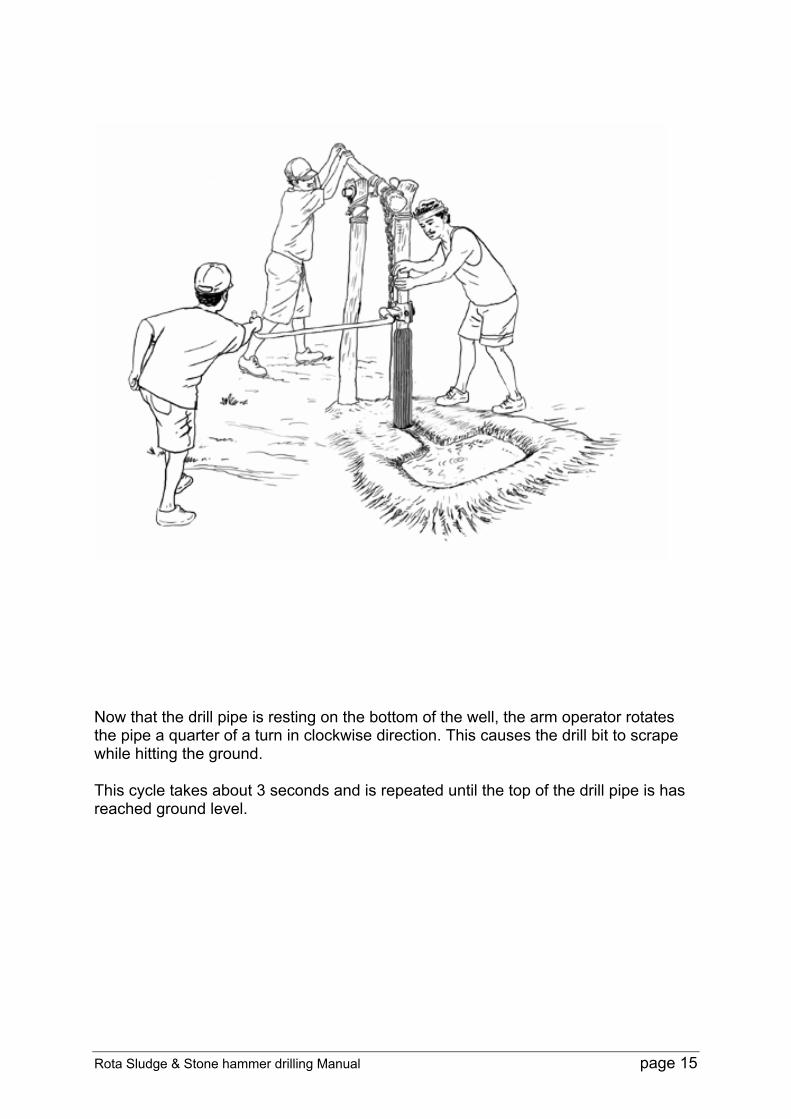
Now that the drill pipe is resting on the bottom of the well, the arm operator rotates the pipe a quarter of a turn in clockwise direction. This causes the drill bit to scrape while hitting the ground. This cycle takes about 3 seconds and is repeated until the top of the drill pipe is has reached ground level.
Rota Sludge & Stone hammer drilling Manual page 16
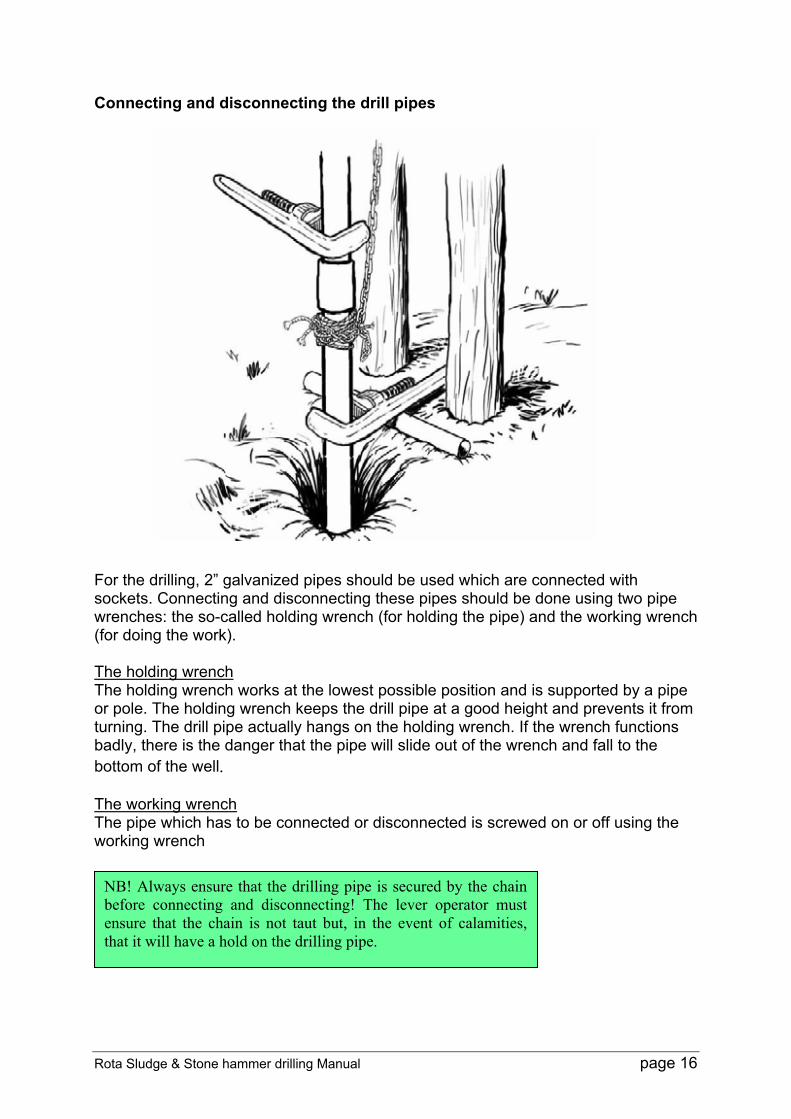
Connecting and disconnecting the drill pipes For the drilling, 2” galvanized pipes should be used which are connected with sockets. Connecting and disconnecting these pipes should be done using two pipe wrenches: the so-called holding wrench (for holding the pipe) and the working wrench (for doing the work). The holding wrench The holding wrench works at the lowest possible position and is supported by a pipe or pole. The holding wrench keeps the drill pipe at a good height and prevents it from turning. The drill pipe actually hangs on the holding wrench. If the wrench functions badly, there is the danger that the pipe will slide out of the wrench and fall to the bottom of the well. The working wrench The pipe which has to be connected or disconnected is screwed on or off using the working wrench
NB! Always ensure that the drilling pipe is secured by the chain before connecting and disconnecting! The lever operator must ensure that the chain is not taut but, in the event of calamities, that it will have a hold on the drilling pipe.

Rota Sludge & Stone hammer drilling Manual page 17
The drill pipes have a length of 3m To maintain a good working height, a coupling pipe of 1.5 metres should be used
Start with a weight of 1.5 metres. When this is at ground level, the 1.5 metre coupling should be connected.
This is likewise drilled to ground level.
Now the drilling pipe should be raised to the level of the socket of the weight. The coupling pipe is then removed and replaced by a 3 metre drill pipe.
Another 1.5 metres can now be drilled after which the coupling pipe is attached. The cycle is then repeated until the desired depth has been reached.
Rota Sludge & Stone hammer drilling Manual page 18
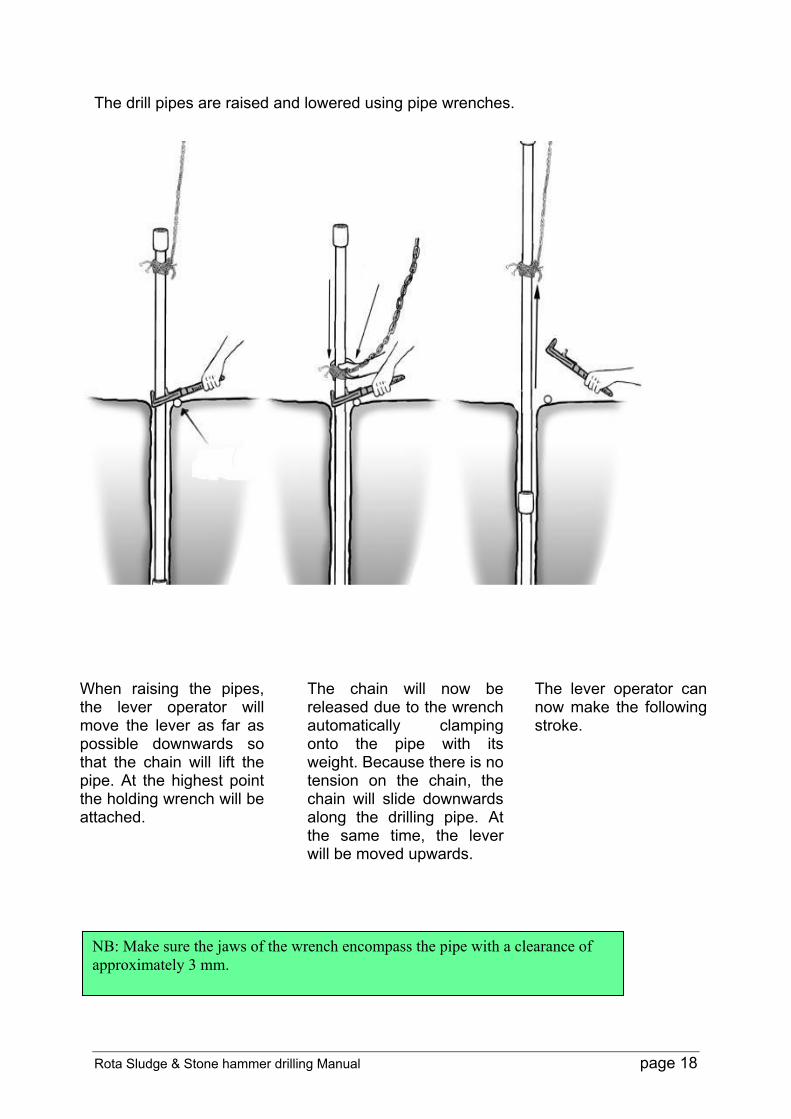
The drill pipes are raised and lowered using pipe wrenches.
When raising the pipes, the lever operator will move the lever as far as possible downwards so that the chain will lift the pipe. At the highest point the holding wrench will be attached.
The chain will now be released due to the wrench automatically clamping onto the pipe with its weight. Because there is no tension on the chain, the chain will slide downwards along the drilling pipe. At the same time, the lever will be moved upwards.
The lever operator can now make the following stroke.
NB: Make sure the jaws of the wrench encompass the pipe with a clearance of approximately 3 mm.
Rota Sludge & Stone hammer drilling Manual page 19
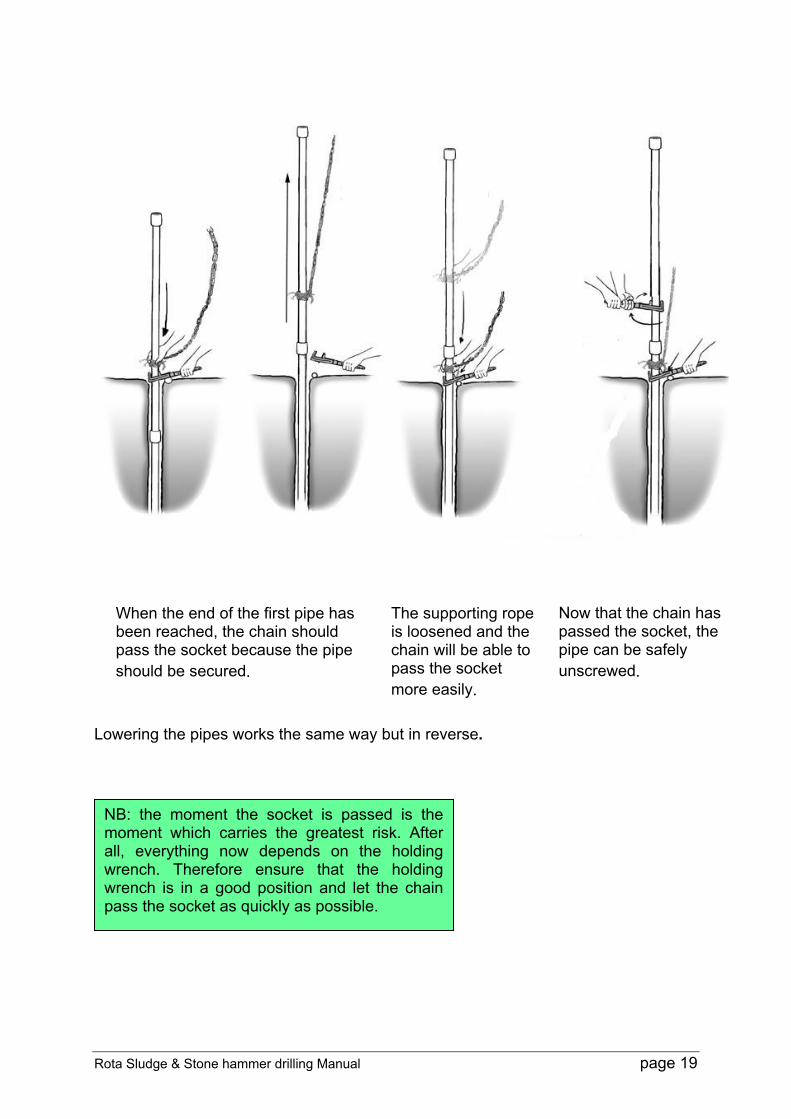
Lowering the pipes works the same way but in reverse.
When the end of the first pipe has been reached, the chain should pass the socket because the pipe should be secured.
NB: the moment the socket is passed is the moment which carries the greatest risk. After all, everything now depends on the holding wrench. Therefore ensure that the holding wrench is in a good position and let the chain pass the socket as quickly as possible.
Now that the chain has passed the socket, the pipe can be safely unscrewed.
The supporting rope is loosened and the chain will be able to pass the socket more easily.
Rota Sludge & Stone hammer drilling Manual page 20
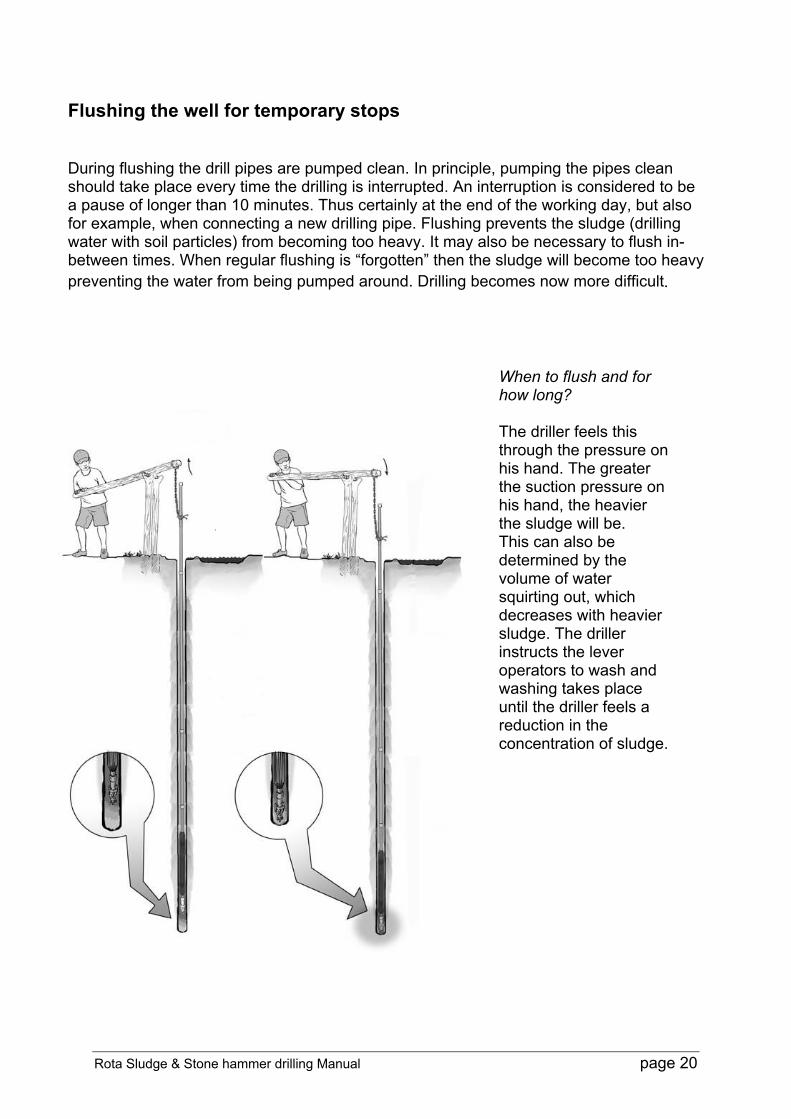
Flushing the well for temporary stops
During flushing the drill pipes are pumped clean. In principle, pumping the pipes clean should take place every time the drilling is interrupted. An interruption is considered to be a pause of longer than 10 minutes. Thus certainly at the end of the working day, but also for example, when connecting a new drilling pipe. Flushing prevents the sludge (drilling water with soil particles) from becoming too heavy. It may also be necessary to flush in-between times. When regular flushing is “forgotten” then the sludge will become too heavy preventing the water from being pumped around. Drilling becomes now more difficult.
When to flush and for how long? The driller feels this through the pressure on his hand. The greater the suction pressure on his hand, the heavier the sludge will be. This can also be determined by the volume of water squirting out, which decreases with heavier sludge. The driller instructs the lever operators to wash and washing takes place until the driller feels a reduction in the concentration of sludge.
Rota Sludge & Stone hammer drilling Manual page 21
Difficult situations The use of a second weight In hard compact ground such as, for example, tuff stone and sandstone, it may be necessary to connect a second weighted pipe. This will exert more pressure on the teeth rendering the drilling more effective. Caving in Well walls in soil types with poor cohesion such as sandy soils are susceptible to collapsing. A high drilling speed in combination with sand often presents an increased risk for caving in. To prevent caving-in extra cow dung is added. In these cases one bucket of cow dung is used per metre instead of one bucket per three meters. In particularly bad cases of caving-in, additionally heavy clay can be mixed through the cow dung to strengthen the well wall even more. In these conditions, make sure the hole is always full of water, also during the night. Stone-hammer required When friction while rotating the drill pipe on the well bottom is no longer felt through the arm, the drill pipe begins to “bounce” and there is practically no drilling material coming to the surface. This is, in most cases, an indication of the presence of stones or boulders. Experienced drillers can hear this from the sound made by the falling pipe. In such cases, the stone-hammer can be employed. In compact soil layers the stone-hammer does not operate efficiently because it has to be able to push through the material. This is because the cutter requires space to push through the hard material. Maintenance of the Rota sludge equipment The maintenance of the equipment mainly consists of cleaning and greasing the threads of the pipes. Although in practice it appears that there is little wear and tear of the teeth of the drill bit, it is nevertheless recommended that the teeth should be sharpened after each drilling.
• Cleaning of the threads is done with a steel brush. After cleaning the threads are greased.
• All teeth from the first and the second ring are sharpened using an angle-
grinder
• Inspection of the chains and ropes
Rota Sludge & Stone hammer drilling Manual page 22
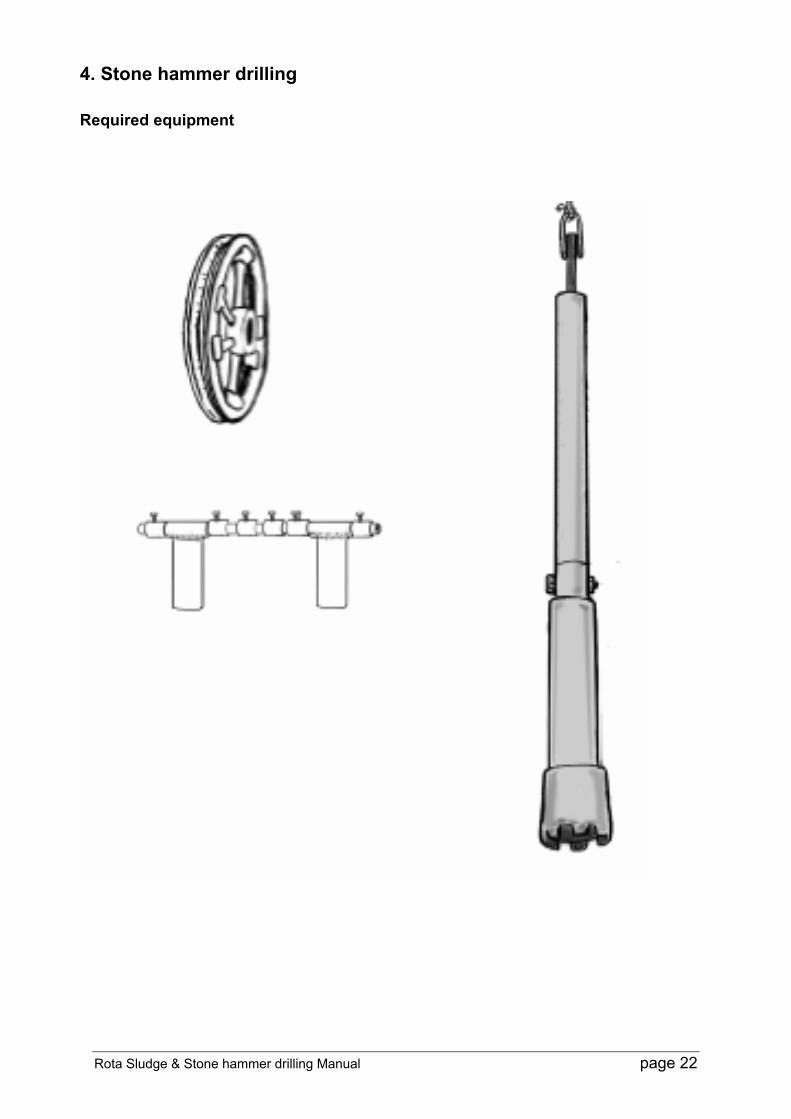
4. Stone hammer drilling
Required equipment
Rota Sludge & Stone hammer drilling Manual page 23
Changing from Rota-sludge to the Stone-hammer Before the stone hammer is installed and the Rota-sludge equipment is removed, the well has to be flushed as described in section 3. Whilst the stone hammer is in use, the well has to remain full of water. This will ensure that the pressure on the well wall is maintained, reducing the risk of collapsing. The water level needs regular inspection and should be equal to ground level. Preparing the Stone-hammer The wooden poles are connected to the beam and the pulley wheel to form a whole. This takes place while the poles are still lying horizontally on the ground. Measurements are taken to determine where the holes for the poles should come. In doing this, the rope should be at right angles above the well and the poles placed at a 80 cm distance from each other. The holes are 1.5 metres in depth. Once the holes are ready, the construction can be erected. The wooden poles are installed and the pulley is placed 3 metres above ground level. Place large flat stones under the poles and compact the soil/stones in the space around the poles. The packing Ensure that there are three rings of packing in the stuffing-box. Apply bearing grease to each ring. This will grease the weight rod and, moreover, improve its sealing. Compress the packing with the bolts in such a way that the piston rod just can be moved by hand. If water still enters the system during the hammering, drain this off using the drain plug and tighten the packing bolts a couple of turns. Repeat this until a water-tight seal has been created which nevertheless enables the piston rod to function. Drain plug. The drain plug should have a water-tight fit, using Teflon tape.

Rota Sludge & Stone hammer drilling Manual page 24
Operating the Stone-hammer
(1) (2) Operating the stone-hammer is simple. The stone hammer is lowered to the bottom of the well. The weight of the stone hammer is now resting on the iron bottom. The weight is then slowly raised until the top of the stone hammer can be felt. (1) The rope is now paid out so that the weight falls onto the welded bottom(2). This is repeated until the drill bit has been driven 60 cm into the ground (this can be measured by marking the rope). Raising the Stone-hammer The weight will now be accelerated from the bottom causing it to hit the top of stone hammer with force. This so-called knocking loose continues until the Stone-hammer is “free” and can then be hoisted up.

Rota Sludge & Stone hammer drilling Manual page 25
Maintenance of the hammer after use
• If dirty water has entered the hammer whilst it was in use, it can be rinsed clean using the drain plug.
• Then grease the entire length of the connecting rod and slide the weight until it rests on the floor.
• The stuffing box and the stuffing box ring should then be greased. • Store the stone hammer at a slight angle of inclination with the opening of the
drain plug facing downwards. • When in storage, the drain plug should be removed.

Rota Sludge & Stone hammer drilling Manual page 26
5. Placing the screen, casing pipes and gravel pack Requirements Before the drilling is at depth, the following components should have already been prepared;
• screen, • casing pipes • gravel pack material • supply of clean water
The screen is made from a 4 Inch PVC pipe (wall thickness > 4 mm) by simply sawing grooves, so-called slots, in the pipe with a hacksaw. First, 6 parallel lines are drawn down the full length of the pipe. These lines form the guide lines for sawing the slots. The distance between the lines should be 5 to 6cm. Within the 6 cm lineation the slots are sawn at an angle of 45 degrees to the vertical. The distance between the slots should be 2 cm. The length of the screen depends on the aquifer The bottom of the filter is closed with a PVC cap.
Rota Sludge & Stone hammer drilling Manual page 27
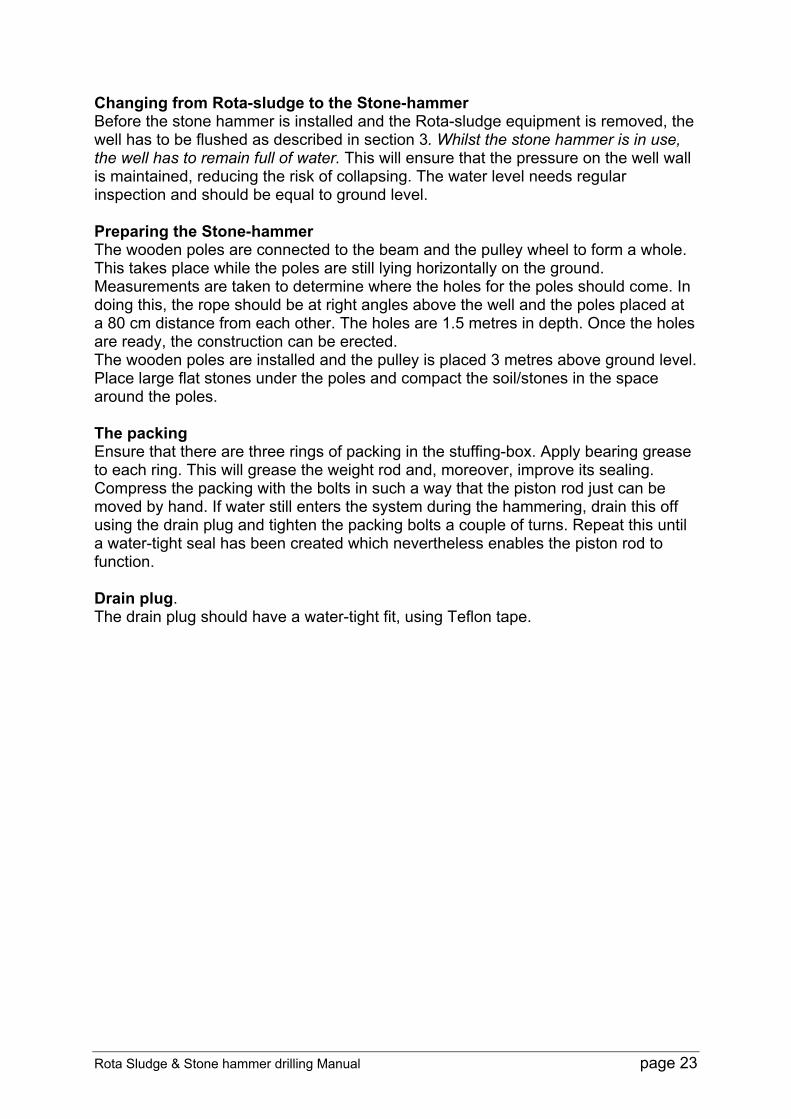
Washing the well After the drilling has reached the right depth, the well should be first washed before the drilling pipes are removed. (Please see chapter
Placing screen and casing pipes Casing pipes Ensure that the PVC casing pipes have a minimum thickness of 4 mm. If thinner material is used there is the chance that the pipe may collapse! The first PVC casing pipe is glued onto the screen. The glue is applied on both pipes. The screen is then lowered. Because the drilling hole is filled with water and the screen pipe contains air, the pipe will provide resistance. This can be prevented by pouring clean water into the filter while it is being lowered
NB! During the removal of the drilling pipes, the drilling hole should be filled with water. The water pressure will prevent the well walls from collapsing.
Rota Sludge & Stone hammer drilling Manual page 28
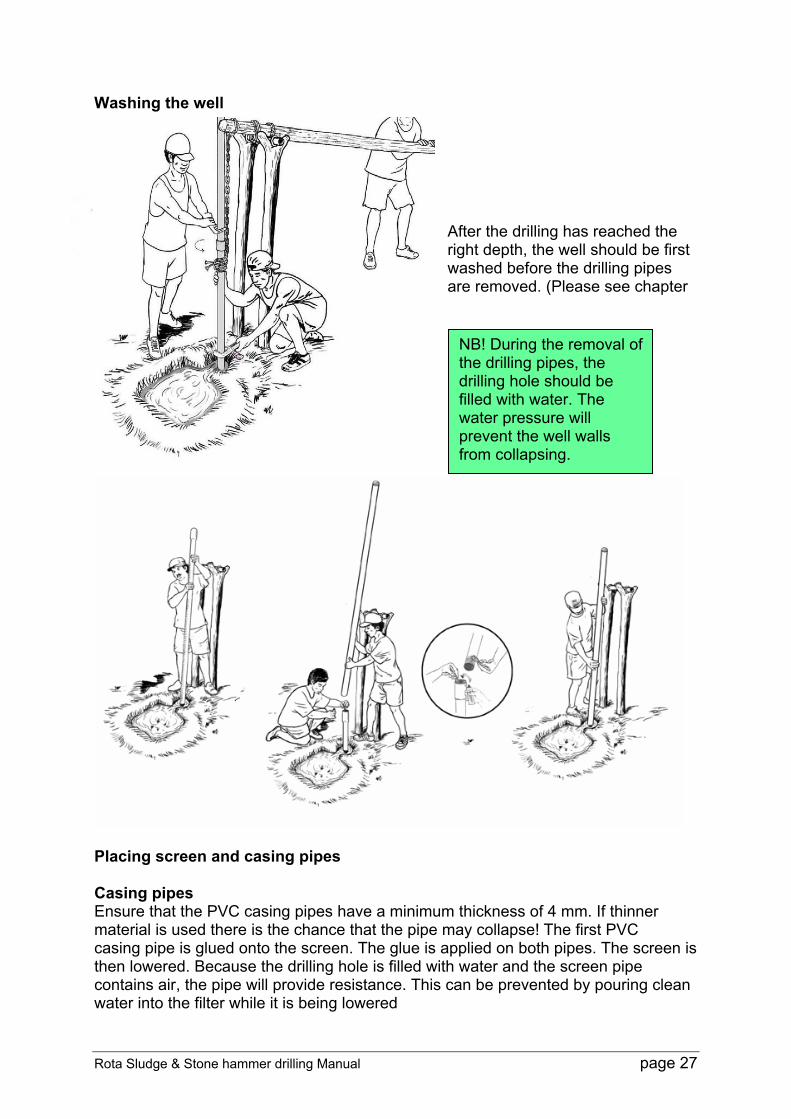
Flushing Once all the PVC pipes have been glued together and lowered, the well is flushed by pouring water into the PVC pipe. The dirty water which is still present, is flushed out through the screen and up through the space between the casing pipe and bore wall to the surface where it flows into the pit. This dirty water is removed from the pit. Once relatively clean water comes to the surface the washing can cease. Clean Water is used to wash the well clean. Approximately 250 litres of water is necessary. Gravel pack Coarse sand is to be used for the gravel pack. This sand is poured around the screen. The gravel pack functions as a primary screen and prevents fine sand particles from being drawn in which could block the screen.
The right grain size of the gravel pack is obtained by sieving the sand. The finer particles can first be separated using a sieve with a mesh size of 1.5 by 1.5 mm. The sand remaining in the sieve is now deposited in a container using a sieve 3 by 3 mm. The sand in the container now has the right grain size. The course sand of the gravel pack is now poured in the annular space around the casing. This is done by hand so that it is distributed evenly. At the same time the PVC pipe is moved from side to side to guarantee an easy assage for the sand to the screen. Completely fill the open space between the casing pipe and the drilling wall.
Plugging the aquifer After placing the gravel pack, it is advisable to pour a few buckets of concrete on top of the gravel in order to prevent surface contaminants to percolate down into the aquifer. The drilling log shows at which depth the aquifer begins and where the concrete plug should be located.
Flushing The well is now ready and can be completed with a cement platform for the installation of a pump. After installation of the pump, pump for about 30 minutes to
NB! At all times keep pressure on the PVC pipe because it has the tendency to move upwards whilst the gravel pack is being installed.
Rota Sludge & Stone hammer drilling Manual page 29
further wash the well. During the subsequent use of the well, it will produce clean water after approximately 5 days of regular use.