part iii: basic survey observations - university of …plaza.ufl.edu/katrinas/route/dsm03.pdf ·...
TRANSCRIPT

3.1
Figure 3.1Simple odometer used to measure distance.
PART III: Basic Survey Observations
3.1. Horizontal Distance
One of the most basic surveying operations is the measurement of distance. It is essential thatdistances be referenced to the same plane such that subsequent measurements can be compared tothe original. In the case of distances, measurements are always referenced to the horizontal plane,even if the actual measurements were measured in some other plane.
3.1.1. Odometer, Mileage Recorder, Pacing, etc.
Among the less precise means of measuring distance is pacing, although it can be effectively usedfor rough estimates of length. The problem with pacing is that the length of a pace varies with slopeand fatigue of the individual that is doing the pacing. It is very clear that as a person becomes moretired, the length of their step decreases. In addition, when the terrain is sloping, the length of thepace will also differ. For example, when going down a hill, a person has a tendency to shorten theirpace to keep balance. When using pacing as a means of estimating distance, the individual must usea normal gait. If they are not careful, there is a tendency to lengthen the step slightly thereby creatingmore error. As a rule of thumb, a pace is only accurate to about one foot over short distances wherethe terrain is flat and the pacer is walking at their normal pace.
To determine the length of a pace, set out two points on level terrain about 60 meters apart. Thenwalk the distance back and forth a couple of times counting the number of paces between the points.Then simply divide the distance between the points by the number of steps to arrive at the distanceper step. When using this value, adjust for slope and fatigue.
Another approximate means of measuringdistance is by an odometer. This instrumentconsists of a wheel (Figure 3.1) that counts therevolutions between the two points. Knowing thediameter of the wheel, the distance can bemeasured better than pacing. There are errorsassociated with the use of the odometer. First, thedistance measured is along the ground thereforeany dip or hump that exists along the length of theline will be measured. This means that the actuallength of the distance will be too long. Second, if the person operating the odometer walks too fastthen there is a tendency for the wheel to bounce and not maintain proper contact with the groundsurface. Nonetheless, the odometer can be used very effectively for rough distance measurement.One finds their use frequently on construction projects where contractors use these distances forestimating the amount of material, such as concrete, used on a particular project.
3.2
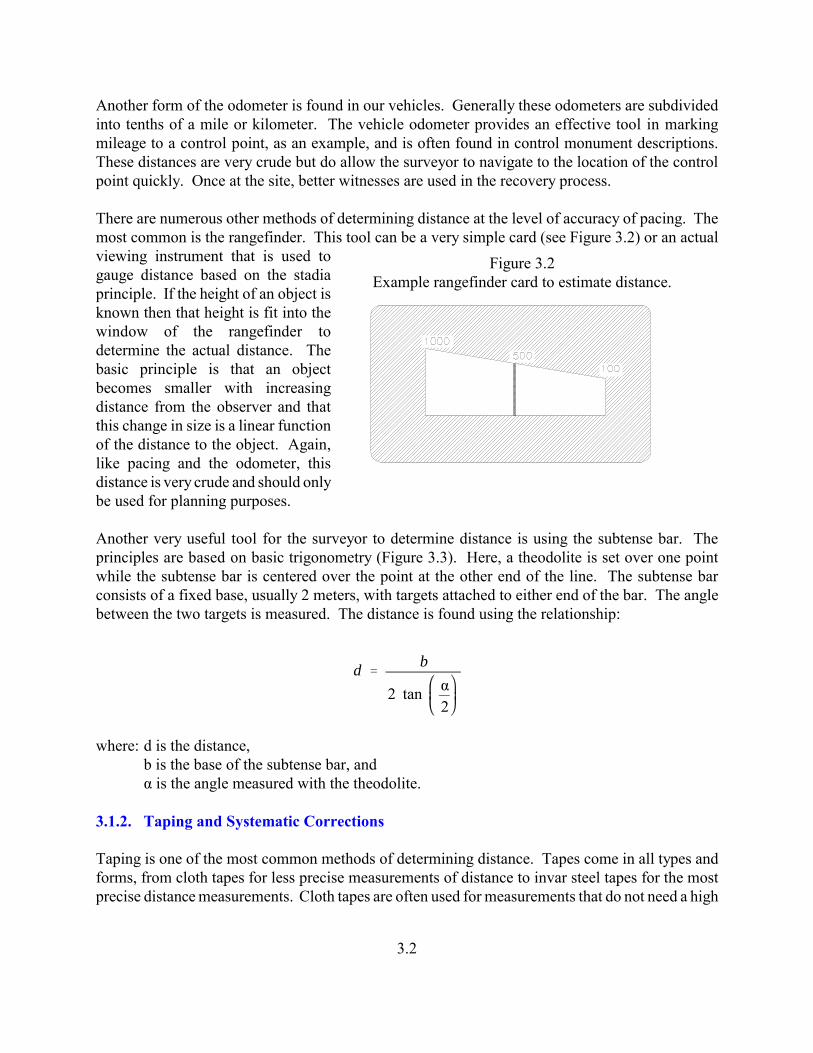
Figure 3.2Example rangefinder card to estimate distance.
Another form of the odometer is found in our vehicles. Generally these odometers are subdividedinto tenths of a mile or kilometer. The vehicle odometer provides an effective tool in markingmileage to a control point, as an example, and is often found in control monument descriptions.These distances are very crude but do allow the surveyor to navigate to the location of the controlpoint quickly. Once at the site, better witnesses are used in the recovery process.
There are numerous other methods of determining distance at the level of accuracy of pacing. Themost common is the rangefinder. This tool can be a very simple card (see Figure 3.2) or an actualviewing instrument that is used togauge distance based on the stadiaprinciple. If the height of an object isknown then that height is fit into thewindow of the rangefinder todetermine the actual distance. Thebasic principle is that an objectbecomes smaller with increasingdistance from the observer and thatthis change in size is a linear functionof the distance to the object. Again,like pacing and the odometer, thisdistance is very crude and should onlybe used for planning purposes.
Another very useful tool for the surveyor to determine distance is using the subtense bar. Theprinciples are based on basic trigonometry (Figure 3.3). Here, a theodolite is set over one pointwhile the subtense bar is centered over the point at the other end of the line. The subtense barconsists of a fixed base, usually 2 meters, with targets attached to either end of the bar. The anglebetween the two targets is measured. The distance is found using the relationship:
d �b
2 tan α2
where: d is the distance,b is the base of the subtense bar, andα is the angle measured with the theodolite.
3.1.2. Taping and Systematic Corrections
Taping is one of the most common methods of determining distance. Tapes come in all types andforms, from cloth tapes for less precise measurements of distance to invar steel tapes for the mostprecise distance measurements. Cloth tapes are often used for measurements that do not need a high

3.3
Figure 3.3Basic principles of subtense bar.
degree of precision. They are susceptible to dimensional change due to tension and the elements.Newer cloth tapes have steel threads interwoven in the cloth that helps maintain their dimensionalstability better than regular cloth tapes. These kinds of tapes are frequently used to measure the sizeof objects and distances to witnesses for control monumentation.
Invar tapes are used for high precision taping because they have a very low coefficient of thermalexpansion. The measurement of high accuracy distance by taping is an elaborate process as shownin Figure 3.4. The process begins by placing taping bucks over the points. A simple approach wouldbe to use 2"x4" lumber where the horizontal cross-member is placed over the point. Then, a scale,such as a box-wood scale, is clamped vertically over the point. The scale is not set to zero over thepoint. Instead, the scale is read by projecting the point vertically by use of a theodolite. Then thedistance between the two points is measured.
The measurement process involves two individuals at either end who hold the tape in place. Onehas a tension handle from which the proper tension is applied to the tape. Also at each end are the“contact” individuals who read the 0-m and 30-m ends of the tape on the appropriate scales.Interspersed along the length of the tape are additional personnel who will keep the tape suspendedto eliminate the effects of sag. The rear contact person signals when to make the scale readings.This procedure is continued along the entire length of the line.
Most taping procedures do not require this level of care. In fact, for precise distance measurements,most surveyors will use electronic distance measurement (EDM) equipment (see section III.1.C).Nonetheless, taping does require both skill in the measurement process and care to ensure thatsystematic errors are removed from the final distance.

3.4
Figure 3.4Precise taping process.
One of the most common systematic errors that needs to be applied to taping is called the standardlength correction. This error is the difference between the nominal length of the tape and thecalibrated length. Because of inherent manufacturing defects, the distance between the two ends ofthe tape may not be the exact distance as shown on the tape. From calibration, the true length of thetape can be determined. The correction is generally shown as:
Co� lS � 30m
where: Co = the standard length correction,
lS = the actual length of the tape determined from calibration, and30 m = the nominal tape length for a 30-meter tape.
This correction is then added to each tape length along the line. It can also be applied to the totallength of the line by multiplying this correction by the total number of tape lengths along the line.
The next major error in taping is due to temperature. When a tape is manufactured, its nominallength is correct at a standard temperature, usually 20o C. When the temperature of the tape differsfrom this standard temperature then the tape is susceptible to dimensional change. When the tapeis too hot, it expands and when it is too cold it contracts. Thus, the distance measured will not becorrect. The temperature correction is defined, for metric tapes, as
Ct � α l t � tS

3.5
where: Ct = the correction for temperature,α = the coefficient of thermal expansion, 0.0000116 per 1o C,t = the temperature of the tape, andtS = the standardized temperature.
Like the standard length correction, the temperature correction can be applied individually to eachtape length or to the total length of the line by multiplying Ct by the total number of tape lengthsalong the line.
When the tape is suspended at its ends during the taping process, the center of the tape will sag,forming a catenary curve. To alleviate this error, one can hold the tape suspended along the lengthof the tape as was shown in Figure 3.4. Generally, though, the tape is not suspended throughout andan error ensues. The correction for sag is defined as
CS � �W 2 l24p 2
where: CS = the correction due to sag,W = the weight of that portion of the tape that is suspended,l = the length of that portion of the tape that was suspended, andp = the applied tension to the tape.
This correction can also be shown in a slightly different form with the weight of the tape per meter(w) being used.
CS � �w 2 l 3
24p 2
Note that the correction due to sag will always result in a distance that is too long.
The next correction that may need to be applied to taping is the tension correction. This is usedwhen the applied tension of the tape is different than the standard tension. This correction is:
CP �
p �pS lAE
where: CP = the correction due to tension,p = the applied tension to the tape,pS = the standard tension,l = length of the tapeA = the cross-sectional area of the tape, andE = Young’s modulus of elasticity.
Young’s modulus of elasticity is usually taken as 2.1 x 10⁶ kg/cm2 (kilograms per square centimeter).

3.6
Figure 3.5Geometry for correcting slope measurements to the
horizontal.
The cross-sectional area will depend on the tape with heavy 30-m tapes having a value of around0.058 cm2 while light-weight 30-m tapes having a value of A of about 0.019 cm2.
The final major error source in taping is the slope correction. This is applied to distancemeasurements that were made along the slope of the ground. This error always results in a distancethat is too long. The correction is based upon the known information, either the vertical angle or thedifference in height. If a correction factor is to be applied, for vertical angles it is presented as:
Ch � s cos α � 1
where: Ch = the correction for slope,s = distance measured along the slope, andα = the vertical angle.
If the difference in height (h) between the two points is known, then the correction term is givenexpressed as:
Ch � s 2� h 2
� s
Sometimes this correction term is expressed in terms of the binomial theorem.
Ch � �h 2
2s�
h 4
8s 3�
h 6
16s 5�
5h 8
128s 7
Generally, only the first term isused in this last equation, althoughadditional terms may be necessaryif the slope is great and theaccuracy of the survey is high.While a correction term can beapplied to the slope measurements,it is often easier to compute thehorizontal distance (H) directlyusing either a trigonometricfunction or the PythagoreanTheorem (Figure 3.5). Thus, if thevertical angle is known, then thehorizontal distance is computedusing the cosine function
H � scosα
whereas if the difference in elevation between the two stations is known then the Pythagorean

3.7
Theorem is employed.
H � s 2� h 2
3.1.3. Electronic Distance Measurement
By far the easiest and most common method of measuring distances is with electronic distancemeasuring (EDM) equipment. EDM come in all different forms but are generally classified by theirform of electronic signal. Electro-optical instruments employ infrared light or lasers whileelectromagnetic use microwave transmissions. The most common is the electro-magnetic. EDMcan also be classified by their range. Short-range EDM measure distances up to about 2 kilometers.Intermediate-range instrument have a range up to about 10 kilometers while long-range EDM canmeasure distances (depending on the type) up to 50 kilometers. Short-range EDM are usually lighterand more compact and are favored by many surveyors. EDM accuracy is expressed in two terms:a constant part and a proportional part. The constant error is present in all measurements, no matterwhat the length and it does not vary. The proportional part is a function of the distance measured.Thus, an example accuracy might be expressed as: ± (5 mm + 5 ppm) where ppm represents partsper million. If a distance of 1,000 meters was measured (assume that there are no other errors in thismeasurement), then the uncertainty in the distance due to the instrument alone is ± 1 cm.
When using EDM, it is critical that the total system be calibrated periodically. This includes not onlythe instrument itself but also the tribrach used to center the EDM over the point and the reflector thatis used with that particular EDM. If multiple prisms are used, then they should be calibratedseparately. There are a number of EDM comparison ranges located throughout the state from whichdistance comparisons can be made. The procedures for performing these comparisons are shown inAppendix D.
3.1.4. Basic Principles
In general, the EDM computes distance by measuring the time the signal takes to go from thetransmitter to the receiver. Generally, both the transmitter and the receiver are located in the sameinstrument. In this case, the actual distance measured by the EDM is twice the length of the line.The transmitter sends out a modulated signal with a known frequency (f) and wavelength, λ (Figure3.6). The basic equation for determining the wavelength is
λ �Vf
where V is the velocity of light through the atmosphere. If the instrument emits a signal at apredefined frequency and wavelength, then the velocity can be measured. From basic principles ofphysics, one can recognize that the velocity will be affected by the atmospheric conditions.

3.8
Figure 3.6Modulated light wavelength emitted from an EDM.
Figure 3.7Basic principles of EDM measurement.
The EDM sends out a signal of a defined wavelength towards the prism (reflector) where it isreflected back to the EDM instrument (Figure 3.7). The unknown in the measurements is thenumber of full wavelengths it takes to travel the length of the line and back. This is solved by usingmultiple wavelengths to resolve this ambiguity. At the receiver, the phase of the incoming signalis measured with respect to the transmitted wave and the phase offset is determined. Then, knowing

3.9
Figure 3.8Reflector constant
the length of the wavelength (λ), the number of integer wavelengths along the line (m), and the phasedelay (d), the distance between the two ends of the line can be determined using
D �12
mλ � d
One of the considerations that needs to be accounted for in EDM measurements is the prismconstant. As the light wave enters the prism, it is slowed down because of the refractive index ofthe glass. Since the processor onboard the EDM does not recognize this, it assumes that the lightray is traveling through the atmosphere. The distance the light wave travels within the prism is(Figure 3.8)
a � b � c � 2t
where t is the thickness of the prism from the front face to the corner of the cube. The EDMprocessor assumes that the light ray actually traveled to a point R which is the effective corner of thecube. Therefore, the distance that the EDM thinks the light wave traveled through the prism isactually 1.57 x 2t. The distance between R and the location of the plumb line from which the prismis centered over the point is the prism constant, CR. Care must be taken with this prism constant.For example, some instruments that are sold with a particular prism already have the offset insertedwithin their processor and this may be displayed on the display panel as having no reflector offset.If another prism is used that has, as an example, an offset of zero, then the measured distance maybe in error. The best practice is to use the correct prism with the correct instrument and to treat any

2Fronczek, Charles J., 1977. “Use of Calibration Base Line”, NOAA TechnicalMemorandum NOS NGS-10, Rockville, MD.
3.10
other prism carefully.
3.1.5. Correction for Ray Path
There are two corrections that the EDM ray path may need to be taken into account. The first iscalled the first velocity correction, or commonly referred to as the atmospheric correction. Thiscorrection is necessary whenever the EDM ray passed through the atmosphere which has a differentrefractive index than the modeled atmosphere within the EDM processor. This correction isinstrument dependent and can be applied by either dialing in the atmospheric conditions (temperatureand pressure) into the instrument and letting its processor use those values to correct the measureddistance or the instrument operator can input the parts per million (ppm) correction into theinstrument directly. Normally this value is found through a nomogram supplied with the instrumentwhich shows the correction given the atmospheric temperature and pressure. In addition to these twomethods, one can also apply no correction into the instrument directly and then use the atmosphericequation model most manufacturers provide with the instrument.
The second correction to the ray path also involves the atmosphere and is referred to as the secondvelocity correction. This correction is necessary to compensate for the different layers of atmospherethat the ray path may be traveling through. Since temperature and pressure readings are taken onlyat the ends of the line and an average value used, there is no account for the existence of otheratmospheric layers along the ray path. The correction for the second velocity is given as:
K ��� � k � k 2 d � 3
12R 2
where: = the second velocity correction,K ��
k = the coefficient of refraction = the distance displayed on the instrument, andd �
R = the mean radius of curvature along the line.
The corrected ray path is then determined by adding these two correction to the distance as shownon the instrument display. The effects of the second velocity correction are more significant withmicrowave instruments than electro-optical instruments. Moreover, the effects are more importantfor longer lines than shorter lines.
3.1.6. Reduction Using Elevation Differences
Before any adjustments can be performed on the survey data, distances must be reduced to theirappropriate plane. Figure 3.9 shows the geometric relationships between the different types ofdistance that can be reported2. The distances are defined as follows:

3.11
Figure 3.9Geometric relationship between different forms of surveying measurements.
D0 = Observed distance corrected for the first velocity correction, instrument and mirrorconstant, etc.
D1 = Observed distance corrected for first velocity correctionD2 = Chord distance at the elevation of the instrumentD3 = Mark-to-mark chord distance at the station elevationsD4 = Geoidal distance (also sometimes called the sea level distance) D5 = Chord distance at either the geoid or sea level surfaceD6 = Ellipsoid or geodetic distance D7 = Chord distance on the ellipsoid
The mathematical reductions are given in Fronczek (1977) and are summarized here. The chorddistance at the instrument elevations (D2) is found from
D2 � 2R �sinD1
2R �
where R’ is radius of the arc distance of the measured line and it is defined as where k isR ��
Rk
the coefficient of refraction. The radius of curvature, R, can be determined using the relationship
R �N
1 � e � 2 cos2φ cos2α
where is the second eccentricity of the ellipse which is found from with a ande � e � 2�
a 2� b 2
b 2

3.12
b being the semi-major and semi-minor axes of the ellipse respectively.The value N is the radius of curvature in the prime vertical and it can be determined from
N �a 2
b 1 � e � 2cos2φ12
The chord distance at sea level is computed as
D5 �
D 22 � ∆H 2
1 �
H �
1
R1 �
H �
2
R
12
where: H �
1 � H1 � ∆H1
H �
2 � H2 � ∆H2
∆H � H �
1 � H �
2
The corresponding chord distance along the geoid or sea level is computed using the next formula.
D4 � 2Rsin�1 D5
2R
To determine the mark-to-mark distance, use
D3 � D 25 1 �
H1
R1 �
H2
R� H1 � H2
212
The chord distance at the ellipsoid is computed from
D7 �
D 22 � ∆h 2
1 �
h1
R1 �
h2
R
12
where: h1 � H �
1 � N1

3.13
Figure 3.10Reciprocal vertical (or zenith) angles.
h2 � H �
2 � N2
∆h � h1 � h2
Finally, the geodetic distance is found as
D6 � sin�1 D7
2R
3.1.7. Reciprocal Vertical Angles
While the reduction of EDM distances has been presented when elevation differences are known,it is common to observe the vertical angles in the field at the point and use these angles in thereduction of measured distances. Generally, it is the zenith angle that is actually measured (Figure3.10). This is the complement to the vertical angle. Vertical angles are very susceptible to theeffects of refraction therefore they are weaker than the use of elevation differences. Nonetheless,acceptable results can be used when reciprocal vertical angles are measured. This means that theangle is measured at both ends of the line and an average value used for subsequent computations.It is also preferable if the reciprocal vertical angles were measured simultaneously because thisensures that the same atmospheric conditions exist for both sets of observations.
To perform the reduction, most of the relationships that were presented in the previous section canbe employed. The major difference is in the slope reduction. Designating DH as the horizontal

3.14
Figure 3.11Equipotential surfaces are not parallel to each other or the reference surface.
distance at the mean elevation of the two stations, this distance can be found from
DH � D0 sinzA �
D 20 2 � k
4Rsin2zA
where z is the zenith angle measured at point A. For increased accuracy, the average zenith angleshould be employed. Then, to determine the chord distance on the geoid, a correction factor can becomputed using
D5 � DH �
H1
RDH
3.2. Vertical Distance
Distance measurements can also be made in the vertical direction. These distances are often referredto as elevations or differences in elevations. The determination of height is generally carried out byleveling, although vertical distances can also be determined from the global positioning system andby measuring the vertical angle and distance to the object.
3.2.1. Definitions
The height system most commonly used in reporting elevations is referred to as orthometric heights.Gravity will form a series of surfaces, each which are perpendicular to the direction of gravity, thatform equipotential surfaces (Figure 3.11). Along these surfaces, there is a constant gravity potential.One can note these surfaces are not parallel. It is also evident that the distance from the reference

3.15
Figure 3.12Relationship between the ellipsoid and orthometric height.
surface will vary along these equipotential surfaces, increasing as the line heads towards the equator.Since leveling depends upon the direction of gravity, discrepancies will occur in the heightmeasurements.
The geoid is a special reference surface from which all orthometric heights are referenced. It is thatequipotential surface that closely approximates the figure of the earth. Sometimes the geoid isenvisioned as that surface that follows the mean sea level over the entire world and is thus referredto as the mean sea level surface.
Ellipsoid height is the height of a point above the ellipsoid. It is measured along a line that isperpendicular to the ellipsoid that passes through the point (Figure 3.12). The ellipsoid height isdesignated as h whereas the orthometric height is depicted as H. The difference between the geoidand the ellipsoid is called the geoid height or geoid undulation. It is the difference between the geoidand the ellipsoid. Hence, N = h - H. The significance of this relationship is that if the ellipsoidheight were measured, as from GPS, and if the geoid undulation is known or can be computed, thenthe orthometric height can be easily calculated.
3.2.2. Curvature and Refraction
We have already seen that the surface of the earth is not a plane but is curved. Yet, the level linefrom the level defines a plane that is tangent to the curve at the instrument. The effect is that thereading on the level rod will be too high by the amount that the horizontal line of sight deviates fromthe level surface.
Since the light ray is traveling through the atmosphere, it also bends according to the law of

3.16
Figure 3.13Effects of curvature and refraction on leveling.
refraction. The effect of refraction is to bend the light ray towards the earth. Thus, it tends tocounter, to some extent, the effects of earth curvature. The combined effect of curvature andrefraction are expressed as
(c � r ) � 0.0675K 2 meters
where (c + r) is the combined effect of curvature and refraction and K is the distance in kilometers.The effects of curvature and refraction can be reduced if the backsight and foresight distances arethe same. These errors are generally insignificant for most leveling operations but do affect preciseleveling surveys.
3.2.3. Orthometric Correction
As it was pointed out in Part 3.2.1, the equipotential surfaces (level surfaces) are not parallel andthus the difference between these surfaces will vary with latitude. This means that level lines runbetween two points in a north and south direction will yield two different height differences.Therefore, it is important for precise surveys to account for the convergence of the level surfaces.This is called the orthometric correction. It is given as:
Corthometric � �0.005288 sin2φ h ∆φ ρ
where: φ = the latitude of the beginning of the line,h = the elevation of the first point,∆φ = the difference in latitude between the two point in minutes, and

3.17
ρ = the conversion of the units for ∆φ into radian measure (arc 1' = 0.000290).
The sign for ∆φ is positive when the level line runs from the south to the north (towards the pole)and negative otherwise.
3.2.4. Methods of Leveling
Like all survey operations, there are a number of different methods in which elevations can bemeasured. The most common is the direct method whereby a level is used to measure the differencein height between points by observing on a level staff. Indirect methods of leveling includereciprocal, trigonometric, and gravimetric leveling and the use of GPS for height determination.
3.2.4.1. Direct
The direct methods of determining elevation involves the use of a level where the differences inheight between points is observed directly using a level staff or rod. There are four basic methodsof determining the elevation using this method: single wire, three wire, automatic (using a bar code),and use of a wedge reticle.
3.2.4.1.1. Single Wire
Most of the leveling performed by surveyors involves setting up the level between two points andreading the level rod where the center horizontal cross-wire intersects the level rod. An example ofa simple reticle pattern where only one horizontal cross-wire is shown along with the levelingconfiguration in Figure 3.14. The instrument is set up between two points and leveled as always.Once the instrument is leveled, the center of the objective lens and the center of the reticle patternwill define a level line. Leveling begins by observing the reading on a level rod over a point whoseelevation is either known or assumed. This is the backsight. Next, the level rod is moved to asecond point and the level is pointed to that rod and a foresight reading is taken on that rod. Forprecise leveling, two rods with invar steel ribbons are used. The difference in height between theforesight and backsight is the difference in readings on those two points.
∆HAB � RFS � RBS
One of the problems with the use of a single wire in leveling is that there are no internal checks onthe observations. If a blunder in reading occurred, there is no way to find this out unless the levelrod was read again before the instrument was moved to its next position. Therefore, carefulobservational procedures must be employed to ensure that blunders, such as misreading the level rod,do not occur.

3.18
Figure 3.14Single reticule pattern with basic leveling procedure.
Figure 3.15Three-wire reticle pattern.
3.2.4.1.2. Three Wire
For precise leveling, other techniques are employed. One of these is called three-wire leveling. Here,the level reticle pattern contains three horizontal lines (Figure 3.15). Level rod readings are taken onall three wires on the reticle. The three readings are checked for accuracy in that the differencesbetween the middle and both the top and bottom cross-wires (half intercepts) should be about thesame. Moreover, the difference between the top and bottom should be about twice the half intercepts.Once these checks are acceptable, the rod reading is the average of the three readings. This approachto leveling minimizes the possibility ofblunders in reading the level rod. Anotheradvantage of this procedure is that the distanceto the level rod can be found using the stadiaprinciples. This is very helpful in subsequentdata reduction when determining whether thesum of the backsight and foresight distanceswere equal throughout the level loop. Thedisadvantage is that three-wire leveling triplesthe number of observations that need to betaken and requires additional processing.
3.2.4.1.3. Automatic (Bar Code)
The newest level in use today is the digital, self-leveling level that is used with an associated bar codelevel rod. The level is very similar to the optical automatic level except that a beam splitter is insertedalong the optical path of the instrument. The image from the object space is sent to both the eyepiece

3.19
Figure 3.16Optical wedge geometry.
and to a CCD (charge coupled device) where the bar-coded image is captured and processed in thedetermination of the horizontal line of sight. Because of the design of the level rod, distance to therod can also be determined. One of the advantages of the digital level is that it minimizes thepossibility of blunders in reading the rod. In addition, the data can be automatically recorded into adata collector for subsequent processing.
3.2.4.1.4. Use of Wedge Reticle
Another method of performing precise leveling is using the wedge reticle with an optical micrometeron the level. The principle of this level is simple. When light passes through a lens in a directionother than perpendicular to the surface of that lens, then the light ray is bent (Figure 3.16). If the lensis flat and both surfaces are parallel to each other, then when the light ray emerges from the lens itis bent again such that the emergent light ray is parallel to the incident light ray. The amount ofdisplacement can be determined and this vertical shift is added to the rod reading for a more refinedmeasurement. The reticle pattern consists of a wedge (Figure 3.17) which appears to move up anddown until the wedge is coincident with one of the markings on the level rod. The rod reading istaken and the amount of lateral displacement from the optical wedge is also recorded and added tothe rod level reading. This allows for a finer reading on the rod staff.
3.2.4.2. Reciprocal Leveling
Sometimes it is impossible to keep sight distances within the limits recommended for leveling. Aperfect example is when crossing a river or ravine. In this case, reciprocal leveling must be employed(Figure 3.18). The instrument is first set up at point A and the backsight is taken on point 1. Next,take a foresight reading on point 2. The instrument is moved to B and the process is repeated. The

3.20
Figure 3.17Wedge reticle pattern.
Figure 3.18Reciprocal leveling.
average difference between the two sets of readings are then used. This approach has a number ofhazards and should not be used unless prior approval is given from the Design Survey Manager.
3.2.4.3. Trigonometric Leveling
Trigonometric leveling involves the measurement of either the zenith angle (z) or vertical angle (α)and usually the slope distance from the instrument to a target at the other point. With most totalstations, the measurement of the zenith angle and the slope distance can be processed on-board theinstrument. Output could be, for example, the elevation of point B. The difference in height betweenpoints A and B is given as:
∆HAB � DAE � DDF � DEC cosz � DBC
∆HAB � DAE � DDF � DEC sinα � DBC

3.21
Figure 3.19Trigonometric leveling.
3.2.4.4. Gravimetric
Elevations can also be derived from gravimetric measurements. Using a gravimeter, the value ofgravity at a station can be calculated based on the principle that the magnitude of the gravity vectordecreases with elevation. This can be correlated with differences in elevation (see 3.2.A. for adiscussion). One of the weaknesses in using gravity observations lies in the fact that the levelsurfaces are not parallel to each other.
3.2.5. Level Rods
Level rods come in all shapes and configurations. Level rods for precision surveys consist of an invarribbon upon which the graduations are marked. This kind of ribbon has a low coefficient of thermalexpansion making the level rods more stable than conventional level rods. For precise surveys, therods must be calibrated and maintained properly. A current calibration report must be provided tothe Design Survey Manager for leveling projects that comply with NGS standards and specifications.
3.3. Direction
Survey lines are vectors and, as such, requires two values to define them. The first is distance whichwas discussed earlier. The second is a direction. Directions tell the reader where the line is heading.

3.22
3.3.1. Meridians
A meridian is a reference line that is used for determining direction. Ideally, it is a line whosedirection is either due north or due south. There are several methods of determining a meridian.
3.3.1.1. True (Astronomic)
The true or astronomic meridian is a line that is found using astronomical observations. It is calledthe true meridian because it is a reproducible value since it remains unchanged. The direction of thisline is true north-south.
3.3.1.2. Grid Meridian
When projecting a spherical surface onto a flat surface, one of the meridians within the project isdesignated as the north direction. On a grid, a Cartesian coordinate system is employed where theX and Y axes are perpendicular to each other. Because of this kind of geometry, the meridional lineswill be drawn parallel to the Y-axis and will not converge at the poles, like true meridians will do.
3.3.1.3. Magnetic
The magnetic meridian defines the north direction in terms of the compass heading. The magneticnorth pole does not coincide with the true north pole and is susceptible to considerable variation.Because of magnetic declination, magnetic directions should not be used for MDOT surveys unlessthose directions are used for rough estimates of direction such as when determining the direction ofwitness ties.
3.3.1.4. Assumed
The least favorable means of defining the direction of a line is by using an assumed direction.Generally this is used when surveys of plats and adjacent parcels give a bearing or azimuth of a linethat will be used in the existing survey. Otherwise, assumed bearings should never be used. Theycannot be reproduced independently in the field.
3.3.2. Bearings and Azimuths
There are two methods of delineating directions: bearings and azimuths (see Figure 3.20). A bearingis an angle measured either from the north or south to the east or west. Bearing can never exceed 90b.Bearings can be measured from the right or left and can point to either direction as well. Bearings willcontain two parts: the angular value, and the direction to which the line is facing. An azimuth is anangle measured in a clockwise direction from north to the line. It has a range up to 360b.

3.23
Figure 3.20Relationship between bearings and azimuths
Azimuths (α) can be convertedinto bearings (β) by applying thegeometry shown in Figure 3.20.The conversion is shown inTable 3.1. In a similar fashion,bearings can also be transformedinto azimuths using therelationships shown in Table 3.1and geometry from Figure 3.20.
3.3.3. Measuring HorizontalAngles by Repetition
Accurate measurements ofangles require that redundancybe incorporated into themeasurement. This means repeating the measurement of angles to reduce the possibility of theoccurrence of blunders. Horizontal angles are measured by repetition by accumulating the circlereading on the horizontal circle of the theodolite/transit. The instrument sights on the backsight anda value of 0b is input into the horizontal circle. Then the instrument is turned, by unlocking the uppermotion, to the foresight and the angle is read. By releasing only the lower clamp, the instrument canbe pointed back at the backsight with the initial angle value still on the horizontal circle. Sight on the
Quadrant Azimuth toBearingConversion
Bearing toAzimuthConversion
NE β = α α = β
SE β = 180b - α α = 180b - β
SW β = α - 180b α = 180b + β
NW β = 360b - α α = 360b - β
Table 3.1 Relationships between azimuths and bearings.

3.24
backsight again and then release the upper motion and center on the foresight again. The angle onthe horizontal circle should represent twice the measured angle. This process is continued for thedesired number of repetitions. The final angle is then divided by the number of times the angle wasmeasured. It is also important to use double centering when measuring the angles to account for anyinstrumental problems and biases. Double centering is the process of inverting the telescope tubesuch that half of the observations are taken in the direct or normal position (sometimes called faceleft) and half in the reverse or inverted position (also called face right).
Directional theodolites do not have an upper motion to lock the horizontal circle to the alidade whenmeasuring angles. In this case the observations are broken down into sets. Each set consists of abacksight and foresight(s) measured in both the direct and reverse positions. Table 3.2 shows anexample with 4 sets using one foresight, although multiple foresights can be incorporated into themeasurement scheme. Station A is the backsight and station C is the foresight.
To reduce these notes, the direct and reverse readings are averaged as
Mean �D � R � 180o
2If the reverse reading is less than the direct reading, add 360b to the reverse reading before taking themean. The reduced mean is found by forcing the backsight reading to 0b. When doing this, it is alsonecessary to reduce the foresight(s) by the exact same amount for each set. The angle is the reducedmean reading. Then simply take the arithmetic mean of the set angles to obtain the mean angle. Inthis case the mean is 56b 17' 20"
Different instruments may have slightly different reduction forms. It is also important, as shown inTable 3.2, that the horizontal circle be advanced by some value during the observation. The desireis to use different parts of the horizontal circle during the measurement process. To determine howmuch to advance the circle, use the ratio 180b/n, where n is the number of sets. It is also importantto advance the micrometer scale as well between sets.
3.3.4. Measuring Vertical Angles by Repetition
Unlike horizontal angles, vertical angles (this also applies to zenith angles) cannot be accumulatedon the vertical circle. Instead, the vertical angles should be read the required number of times in boththe direct and reverse directions. Then the average of the measured values can be used for subsequentprocessing of the survey.
3.4. Collimation (C-factor)
Collimation exists when the line of sight is not truly horizontal when the instrument is accuratelyleveled. This error can be eliminated by keeping the foresight and backsight distance equal since thecollimation error is linear and a function of the distance from the instrument.

3.25
3.4.1. Determination
The determination of the correction and performing the peg test to obtain the C-factor for the level
SET STA D/R READING MEAN REDUCEDMEAN
SET ANGLE
1 A D 0b 00' 15" 0b 00' 18" 0b 00' 00"
R 180b 00' 21"
B D 56b 17' 32" 56b 17' 35" 56b 17' 17" 56b 17' 17"
R 236b 17' 38"
2 A D 45b 02' 26" 45b 02' 28" 0b 00' 00"
R 225b 02' 30"
B D 101b 19' 51" 101b 19' 50" 56b 17' 22" 56b 17' 22"
R 281b 19' 49"
3 A D 90b 04' 42" 90b 04' 53" 0b 00' 00"
R 270b 05' 04"
B D 146b 22' 13" 146b 22' 11" 56b 17' 18" 56b 17' 18"
R 326b 22' 09"
4 A D 135b 07' 58" 135b 08' 01" 0b 00' 00"
R 315b 08' 04"
B D 191b 25' 22" 191b 25' 25" 56b 17 24"' 56b 17 24"'
R 371b 25' 28"
Table 3.2Sample reduction of directional theodolite notes.
3.26
Figure 3.21Examples of closed and open traverses.
are described in Appendix D.
3.4.2. Application
The C-factor is applied to elevation differences in elevations between two stations based on thedifference in the accumulated distances between the backsights and foresights. The correcteddifference in height is shown as:
∆Hcorrect � ∆Hobserved � C ˆ BSdist � ˆ FSdist
If the distances between the backsights and foresights were equal, then the effects of the collimationerror are not applicable.
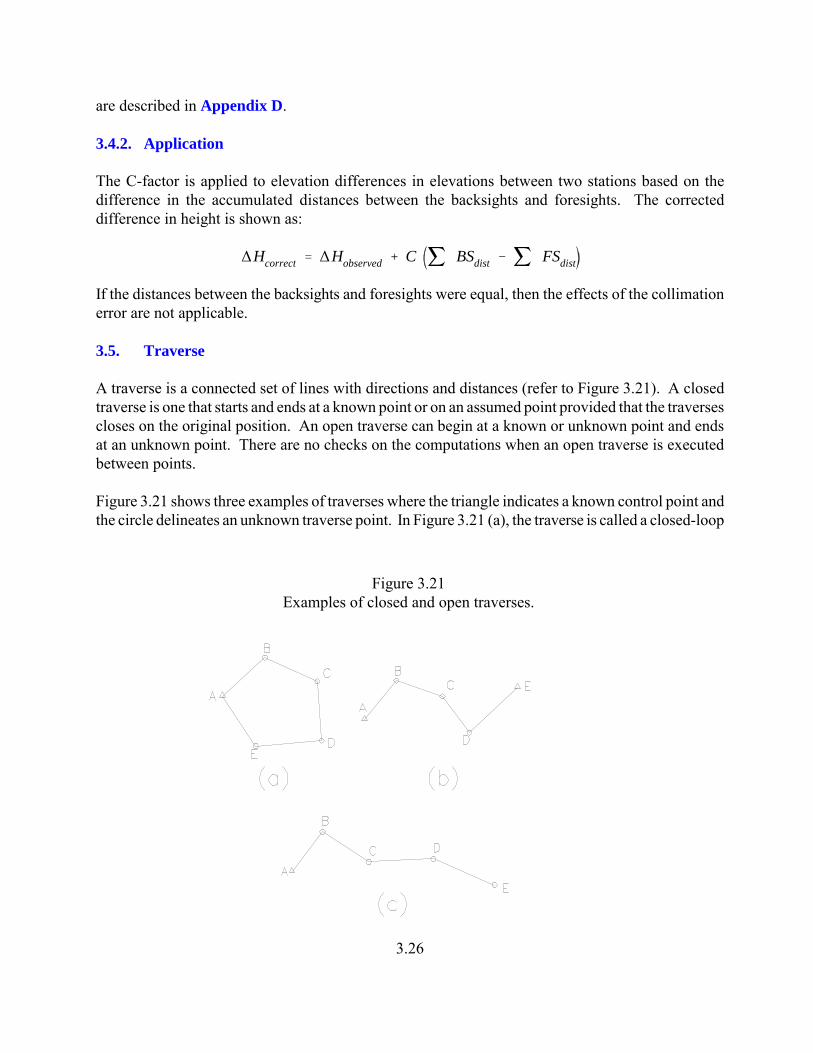
3.5. Traverse
A traverse is a connected set of lines with directions and distances (refer to Figure 3.21). A closedtraverse is one that starts and ends at a known point or on an assumed point provided that the traversescloses on the original position. An open traverse can begin at a known or unknown point and endsat an unknown point. There are no checks on the computations when an open traverse is executedbetween points.
Figure 3.21 shows three examples of traverses where the triangle indicates a known control point andthe circle delineates an unknown traverse point. In Figure 3.21 (a), the traverse is called a closed-loop

3.27
Figure 3.22Example of a deflection angle traverse.
traverse since it terminates at the same station that it started with (point A in this example). Figure3.21 (b) is also a closed traverse, but not a closed-loop traverse, provided that the control points, Aand E in this example, are in the same coordinate system. By inversing between the two controlpoints, the traverse is closed and a check on the field measurements can be made. Finally, Figure 3.21(c) shows an open traverse because the terminus point, E, is not known. Traverses for MDOTprojects must be closed traverses unless prior approval is given by the Design Survey Manager.
3.5.1. Purpose
The purpose of a traverse is to determine the location of points along a survey with respect to eachother. Traverses are performed to locate or establish boundaries and for establishing control fortopographic, construction, and photogrammetric control surveys.
3.5.2. Types of Traverse
The types of traverse are dependent upon the method of angle measurement. For example, adeflection angle traverse is one whose angle are all deflection angles (Figure 3.22). The mainadvantages of the deflection angle traverse is that the computation of azimuths is very easy.Moreover, deflection angles are used in circular curves which has advantages in route surveys. Thedisadvantage is that the angle can never be greater than 180b. Therefore, it is essential to notewhether the angle is to the right or left. For a closed deflection angle traverse, one can perform acheck on the angles to see if they meet the specifications for the project. The general form is givenas:

3.28
Figure 3.23Example of an interior angle traverse.
Azorigin � ˆn
i�1èR � ˆ
n
i�1èL � Azclose � 360o
� 0
where the azimuth at the origin is the forward azimuth and the azimuth at the close is the azimuth ofthe closing line.
In the traverse in Figure 3.22, assume that the azimuth of the line from A to the Reference Point is148b 50' 30" and the azimuth of the closing line E to F is 76b 08' 20". Then, the angular error canbe found as:
328b50'30" + (86b04'00" + 58b45'00" + 38b02'00") - (35b58'40" + 39b35'00") - 76b08'20" - 360b = -30"
Thus, there is a 30" error in the angles. The corrected angles can be found by dividing this numberby the number of angles (5) and then subtracting this error per angle from each of the angles. Treatthe angles to the left as negative numbers.
An interior angle traverse is one where all of the internal angles in the polygon have been measured(Figure 3.23). The geometric relationship that exists between the angles is that the sum of the interiorangles must equal 180b (n - 2) where n is the number of angles measured within the traverse. Thiscan be written as
n � 2 180o� 360o
� 0

3.29
Figure 3.24Local Coordinate System.
In the traverse shown in Figure 3.23, the error is -15". Again, by dividing by 5, the error per angleis -3" which can be subtracted from each of the angles to arrive at the adjusted angular values.
3.5.3. Traverse in Two Dimensions
The conventional approach is to perform the traversing on a two-dimensional, horizontal plane.Horizontal angles and distances along the traverse sides are the only values measured. There is noregard for the vertical component. This is how the examples above have been presented.
3.5.4. Traverse in Three Dimensions
With the onset of GPS, there is a renewed interest in three-dimensional traversing. GPS measuresin a 3-D mode yielding X, Y, and Z coordinates (or some derivative). For a conventional traverse tobe placed in a three dimensional coordinate framework, the vertical component must be measured.This normally implies that the vertical angle/zenith distance be measured at each point along thetraverse. With total stations, this process is easy to perform since a 3-D mode can be programmedinto the processor and data recorded automatically within the data recorder.
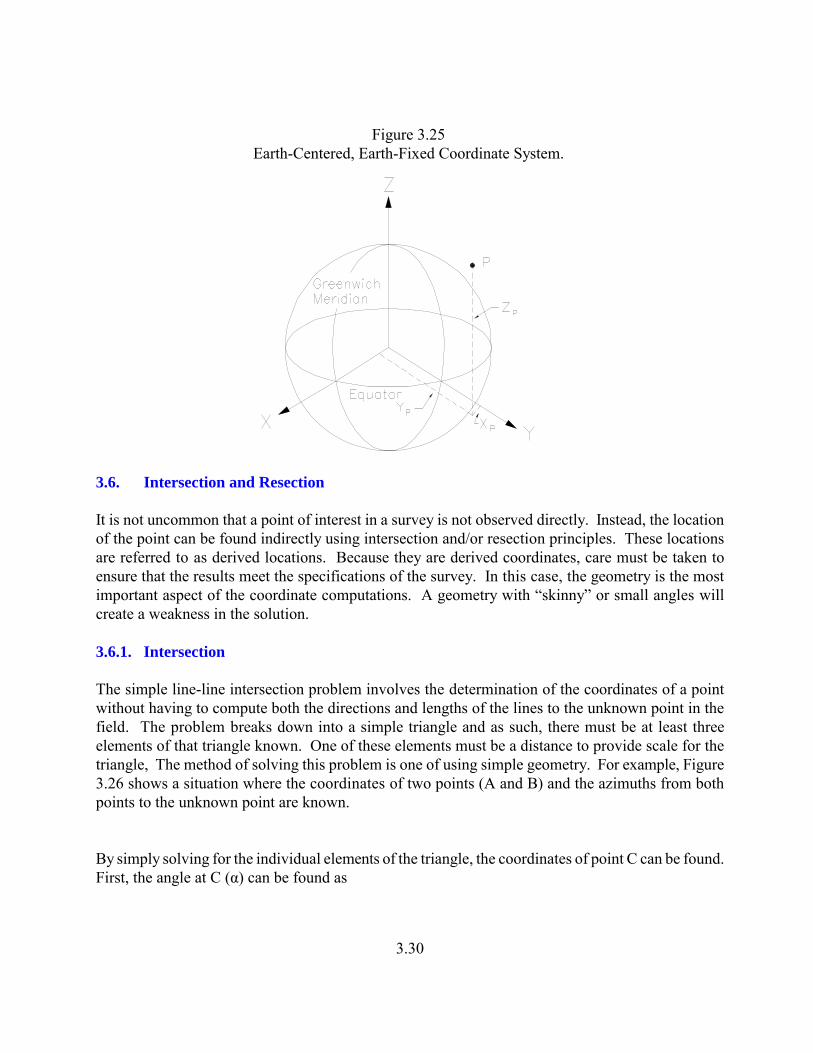
When traversing in 3-D, most surveyors will employ a local coordinate system. This is shown inFigure 3.24. Unfortunately, GPS measures in an earth-centered, earth-fixed (ECEF) coordinateframework as shown in Figure 3.25. It is essential that the local coordinate system be transformedinto the ECEF coordinate system (see Appendix H).
3.30
Figure 3.25Earth-Centered, Earth-Fixed Coordinate System.
3.6. Intersection and Resection
It is not uncommon that a point of interest in a survey is not observed directly. Instead, the locationof the point can be found indirectly using intersection and/or resection principles. These locationsare referred to as derived locations. Because they are derived coordinates, care must be taken toensure that the results meet the specifications of the survey. In this case, the geometry is the mostimportant aspect of the coordinate computations. A geometry with “skinny” or small angles willcreate a weakness in the solution.
3.6.1. Intersection
The simple line-line intersection problem involves the determination of the coordinates of a pointwithout having to compute both the directions and lengths of the lines to the unknown point in thefield. The problem breaks down into a simple triangle and as such, there must be at least threeelements of that triangle known. One of these elements must be a distance to provide scale for thetriangle, The method of solving this problem is one of using simple geometry. For example, Figure3.26 shows a situation where the coordinates of two points (A and B) and the azimuths from bothpoints to the unknown point are known.
By simply solving for the individual elements of the triangle, the coordinates of point C can be found.First, the angle at C (α) can be found as

3.31
Figure 3.26Example Line-Line Intersection Problem.
α � AzC�A � AzC�B
�154o 48�47��� 128o39�58��
�26o08�49��
The azimuth from A to B can be determined using the arctangent function.
AzA�B � tan�1 XB � XA
YB � YA
� 45o 48� 04��
The corresponding distance is found using the Pythagorean theorem.
DA�B � XB � XC2� YB � YC
2� 426.079
The angle at A can also be found by finding the difference in the azimuths of lines AB and AC.
β � AzA�B � AzA�C � 70o 59�� 17��

3.32
The distance from B to C is found using the sine law.
DB�C �
DA�B
sin αsin β � 914.136
Now, the coordinates of C can be computed from point B.
XC � XB � DB�C sin AzB�C � 5039.038
YC � YB � DB�C cos AzB�C � 4948.999
As a check, compute the coordinates of C from point A. An alternative method of solving thisproblem is to use the base-line method. In the example above, the angles β and γ are computed fromthe azimuths, like shown in the example above. Then, the coordinates of point C can be solveddirectly as
XC �
YB � YA � XA cot γ � XB cot αcot α � cot γ
YC �
XA � XB � YA cot γ � YB cot αcot α � cot γ
3.6.2. Resection
The three point resection problem has been conventionally defined as occupying an unknown pointand measuring the angles between three, or more, stations whose coordinates are known. With thecommon use of total stations, it is more reasonable to expect that the situation today will also involvethe measurement of distances as well as the angles. In this case, the situation is similar in approachto that of the line-line intersection problem.
The classical approach to resection is shown in Figure 3.27. The point P is occupied and the anglesα, β, and γ are observed between the control points A, B, and C. There are numerous approaches tosolving this problem. The easiest is called the Tienstra method.
The solution is to first compute the angles at each of the control points (�A, �B, and �C). Then,

3.33
Figure 3.27Three-Point Resection Problem.
1K1
� cot �A � cot α
1K2
� cot �B � cot β
1K1
� cot �C � cot γ
The coordinates of point P are then computed from the relationships:
XP �
K1XA � K2XB � K3XC
K1 � K2 � K3
YP �
K1YA � K2YB � K3YC
K1 � K2 � K3
Geometry is critical for the solution of the three-point resection problem. If the unknown point P lies

3.34
on a circle defined by the three known control points then the solution is indeterminate or notuniquely possible. In addition, there is no solution when all the points lie on a straight line or nearlystraight line.