parameter definition editor reference guide - honeywell · r110 experion lx parameter definition...
TRANSCRIPT

Honeywell Process Solutions
Experion LX
Parameter Definition Editor Reference Guide
EXDOC-XX83-en-110A R110
February 2014
Release 110 Honeywell

ii Experion LX Parameter Definition Editor Reference Guide R110 Honeywell February 2014
Notices and Trademarks
Copyright 2014 by Honeywell International Sárl. Release 110 February 2014
While this information is presented in good faith and believed to be accurate, Honeywell disclaims the implied warranties of merchantability and fitness for a particular purpose and makes no express warranties except as may be stated in its written agreement with and for its customers.
In no event is Honeywell liable to anyone for any indirect, special or consequential damages. The information and specifications in this document are subject to change without notice.
Honeywell, Experion® LX are registered trademarks of Honeywell International Inc.
Other brand or product names are trademarks of their respective owners.
Honeywell Process Solutions
1860 W. Rose Garden Lane
Phoenix, AZ 85027 USA
1-800 822-7673

R110 Experion LX Parameter Definition Editor Reference Guide iii February 2014 Honeywell
About This Document This document describes the functional and operational aspects of the Parameter Definition Editor. The document describes the functionality of the Parameter Definition Editor with respect to the creation or editing of the parameters and Configuration Forms for Custom Data block types, Custom Algorithm block types, and Phase block types.
Release Information
Document Name Document ID Release Number
Publication Date
Parameter Definition Editor Reference Guide - CVDOC-XX83-en-100A
110 February 2014
Document Category
Reference

Support and Other Contacts
iv Experion LX Parameter Definition Editor Reference Guide R110 Honeywell February 2014
Support and Other Contacts
People’s Republic of China Contact:
Phone: Mail: Email:
Honeywell Global TAC – China +86- 21-2219-6888 800-820-0237 400-820-0386 Honeywell (China) Co., Ltd 33/F, Tower A, City Center, 100 Zunyi Rd. Shanghai 200051, People’s Republic of China [email protected]

Terms
R110 Experion LX Parameter Definition Editor Reference Guide v February 2014 Honeywell
Terms Following are the terms used in this document.
• CAB Custom Algorithm Block
• CDB Custom Data Block
• CDP Custom Data Parameter
• EHI Error Handling Infrastructure
• ERDB Engineering Repository Database
• FP Formula Parameter
• MDI Multiple Document Interface
• PBT Phase Block Type
• PDE Parameter Definition Editor
• RCM Recipe Control Module
• RP Report Parameter
• SCM Sequential Control Module

Symbol Definitions
vi Experion LX Parameter Definition Editor Reference Guide R110 Honeywell February 2014
Symbol Definitions The following table lists those symbols used in this document to denote certain conditions.
Symbol Definition
ATTENTION: Identifies information that requires special consideration.
TIP: Identifies advice or hints for the user, often in terms of performing a task.
REFERENCE -EXTERNAL: Identifies an additional source of information outside of the bookset.
REFERENCE - INTERNAL: Identifies an additional source of information within the bookset.
CAUTION
Indicates a situation which, if not avoided, may result in equipment or work (data) on the system being damaged or lost, or may result in the inability to properly operate the process.
CAUTION: Indicates a potentially hazardous situation which, if not avoided, may result in minor or moderate injury. It may also be used to alert against unsafe practices.
CAUTION symbol on the equipment refers the user to the product manual for additional information. The symbol appears next to required information in the manual.
WARNING: Indicates a potentially hazardous situation, which, if not avoided, could result in serious injury or death.
WARNING symbol on the equipment refers the user to the product manual for additional information. The symbol appears next to required information in the manual.
WARNING, Risk of electrical shock: Potential shock hazard where HAZARDOUS LIVE voltages greater than 30 Vrms, 42.4 Vpeak, or 60 VDC may be accessible.

Symbol Definitions
R110 Experion LX Parameter Definition Editor Reference Guide vii February 2014 Honeywell
Symbol Definition
ESD HAZARD: Danger of an electro-static discharge to which equipment may be sensitive. Observe precautions for handling electrostatic sensitive devices.
Protective Earth (PE) terminal: Provided for connection of the protective earth (green or green/yellow) supply system conductor.
Functional earth terminal: Used for non-safety purposes such as noise immunity improvement. NOTE: This connection shall be bonded to Protective Earth at the source of supply in accordance with national local electrical code requirements.
Earth Ground: Functional earth connection. NOTE: This connection shall be bonded to Protective Earth at the source of supply in accordance with national and local electrical code requirements.
Chassis Ground: Identifies a connection to the chassis or frame of the equipment shall be bonded to Protective Earth at the source of supply in accordance with national and local electrical code requirements.

Symbol Definitions
viii Experion LX Parameter Definition Editor Reference Guide R110 Honeywell February 2014

R110 Experion LX Parameter Definition Editor Reference Guide ix February 2014 Honeywell
Contents
1. INTRODUCTION .......................................................................... 13
1.1 Overview ........................................................................................................ 13
2. REVIEWING CONTAINER TYPES IN PDE ................................. 15
2.1 Overview ........................................................................................................ 15
2.2 General considerations ................................................................................ 15 Custom Algorithm Block ....................................................................................................... 15 Custom Data Block .............................................................................................................. 16 Phase Block ......................................................................................................................... 16
3. REVIEWING CUSTOM DATA BLOCKS ...................................... 17
3.1 Overview ........................................................................................................ 17 Considerations ..................................................................................................................... 17 General editing functions...................................................................................................... 17
3.2 Reviewing the Value CDPs tab .................................................................... 18
3.3 Reviewing the Form Layout tab ................................................................... 18
3.4 Reviewing the Symbol Attribute tab............................................................ 18
4. REVIEWING CUSTOM ALGORITHM BLOCKS .......................... 19
4.1 Overview ........................................................................................................ 19 Considerations ..................................................................................................................... 19 General editing functions...................................................................................................... 20
4.2 Reviewing the Fixed parameter tab ............................................................. 20
4.3 Reviewing the Value CDPs tab .................................................................... 20
4.4 Reviewing the Parameter References tab .................................................. 20
4.5 Reviewing the Form Layout tab ................................................................... 21
4.6 Reviewing the Symbol Attribute tab............................................................ 21
5. REVIEWING PHASE BLOCKS .................................................... 23

Contents
x Experion LX Parameter Definition Editor Reference Guide R110 Honeywell February 2014
5.1 Overview ......................................................................................................... 23 Considerations .................................................................................................................... 23 General editing functions ..................................................................................................... 24
6. REVIEWING TAB TYPES ............................................................ 25
6.1 Overview ......................................................................................................... 25 Basic tab information ........................................................................................................... 26
6.2 Accessing the Form Layout tab ................................................................... 26 Overview ............................................................................................................................. 26 Considerations .................................................................................................................... 26 CDB form layout considerations .......................................................................................... 27 CAB form layout considerations .......................................................................................... 27 Form Layout tab attributes .................................................................................................. 32 Form Layout tab selections ................................................................................................. 32 Form Layout tab functions ................................................................................................... 33
6.3 Accessing the Fixed (parameters) tab ......................................................... 33 Overview ............................................................................................................................. 33 Considerations .................................................................................................................... 34 Fixed tab attributes .............................................................................................................. 34
6.4 Accessing the Value CDPs tab ..................................................................... 35 Overview ............................................................................................................................. 35 Considerations .................................................................................................................... 35 Value CDPs tab attributes ................................................................................................... 36 Reviewing min/max values of data types ............................................................................ 37 Reviewing valid parameter values ....................................................................................... 38 Reviewing and Editing parameter attributes ........................................................................ 40
6.5 Accessing the Symbol Attribute tab ............................................................ 41 Overview ............................................................................................................................. 41 Considerations .................................................................................................................... 42 Symbol Attribute tab attributes ............................................................................................ 43 Configuring Pins .................................................................................................................. 43 Reviewing parameter picker ................................................................................................ 46 Considerations .................................................................................................................... 46
6.6 Accessing the Parameter References tab ................................................... 47 Overview ............................................................................................................................. 47 Considerations .................................................................................................................... 47 Parameter References tab attributes ................................................................................... 48 Configuring the Size attribute .............................................................................................. 48 Reviewing attribute default values ....................................................................................... 49 Reviewing valid parameter values ....................................................................................... 49
6.7 Accessing the Formula Parameters tab ...................................................... 50 Overview ............................................................................................................................. 50

Contents
R110 Experion LX Parameter Definition Editor Reference Guide xi February 2014 Honeywell
Considerations ..................................................................................................................... 50 Formula Parameters tab attributes ....................................................................................... 51
6.8 Accessing the Report Parameters tab ........................................................ 52 Overview .............................................................................................................................. 52 Considerations ..................................................................................................................... 52 Report Parameters tab attributes ......................................................................................... 53
7. PARAMETER DEFINITION EDITOR BASICS ............................. 55
7.1 Reviewing general editing functions .......................................................... 55 Considerations ..................................................................................................................... 55 Inserting, deleting, or appending rows ................................................................................. 55 Using copy and paste functions ........................................................................................... 56 Saving block definitions ........................................................................................................ 56 Save As block definition ....................................................................................................... 57
7.2 Reviewing general block type functions .................................................... 57 Inserting, deleting, renaming, and appending tabs ............................................................... 57
7.3 Reviewing the group box ............................................................................. 59 Considerations ..................................................................................................................... 59 Creating the left group box ................................................................................................... 60 Creating the right group box ................................................................................................. 61 Configuration Form with grouped parameters ...................................................................... 62 Ungrouping parameters in a group box ................................................................................ 63
7.4 Reviewing the grid ........................................................................................ 65 Using the grid ....................................................................................................................... 65 Considerations ..................................................................................................................... 65 Creating a grid ...................................................................................................................... 66 Deleting a grid ...................................................................................................................... 69
7.5 Reviewing general parameter functions ..................................................... 69 Using cut/copy/paste for custom parameters ....................................................................... 69 Cutting parameters ............................................................................................................... 69 Copying parameters ............................................................................................................. 70 Pasting parameters .............................................................................................................. 70
7.6 Automatic form layout .................................................................................. 71 Generating automatic form layouts ...................................................................................... 71
8. REVIEWING PDE VIEWS ............................................................ 73
8.1 Reviewing PDE views for CAB and CDB .................................................... 73 Considerations ..................................................................................................................... 73 Launching Configure PDE views dialog for CAB .................................................................. 74 Launching Configure PDE views dialog for CDB .................................................................. 75

Contents
xii Experion LX Parameter Definition Editor Reference Guide R110 Honeywell February 2014
9. LAUNCHING AND CLOSING PDE ............................................. 77
9.1 Overview ......................................................................................................... 77 Launching PDE ................................................................................................................... 77 Closing/re-opening PDE in VS.NET IDE when using CAB .................................................. 77
10. ERROR MESSAGES ................................................................... 79
10.1 Overview ..................................................................................................... 79
10.2 Editing parameter names .......................................................................... 79
10.3 Editing cells ................................................................................................ 79
10.4 Editing array values ................................................................................... 80
10.5 Validating ranges ....................................................................................... 80
10.6 Editing the Symbol attribute tab ............................................................... 81
10.7 Editing form layouts .................................................................................. 82
10.8 Validating manage views........................................................................... 84
10.9 Saving PDE data ......................................................................................... 84

R110 Experion LX Parameter Definition Editor Reference Guide 13 February 2014 Honeywell
1. Introduction
1.1 Overview The Parameter Definition Editor (PDE) is a user interface to create and edit the block types using a grid interface that is similar to the Microsoft Excel grid. The PDE grid is configurable and can be customized specific to the block type being edited. The PDE provides user interfaces to edit the parameters attributes, symbol attributes, and form layout. These items are grouped into sections and shown in the PDE as separate grids.
The PDE provides the following functionality:
• Validating data type and range
• Combo boxes to pick enumeration
• Advanced grid to edit the bit string values
• Advanced grid to edit arrayed parameters
• Automatic form layout generation
• Basic business rules to be applied in editing block types
• Manage views
There are cases in which all of the parameter attributes need not be shown in the parameter grid. To switch the parameter attributes on and off in the grid, the PDE provides a Manage View feature. The view is a set of parameter attributes that are selected for showing in the parameter grid. Views can be defined specific to the user or specific to the block type. In the case of views specific to the block type (Custom Algorithm, Custom Data Block), the view information will be carried along with the block type definition.

1. Introduction 1.1. Overview
14 Experion LX Parameter Definition Editor Reference Guide R110 Honeywell February 2014
The PDE is launched within Control Builder as an MDI child window to edit CDB types. The PDE is also launched within the Visual Studio .NET IDE to edit the CAB types. Both Control Builder and Visual Studio .NET will configure the PDE environment based on their requirement of editing block types. For example, the PDE will show the following:
• Fixed, Custom, and Parameter References parameters for the CAB types
• Custom parameters for the CDB types
• Formula and Report parameters for the Phase Block types (PBT)
See the Custom Algorithm Block User’s Guide for more information on CAB/CDB usage.

R110 Experion LX Parameter Definition Editor Reference Guide 15 February 2014 Honeywell
2. Reviewing Container Types in PDE
2.1 Overview There are three different container types supported by the PDE within Control Builder: They are:
• Custom Algorithm Block (CAB)
• Custom Data Block (CDB)
• Phase Block Type (PBT)
2.2 General considerations Custom Algorithm Block
The Custom Algorithm Block (CAB) container of the PDE provides options for:
• Editing the Fixed, Value CDPs (Custom Data Parameters), and Parameter References parameter attributes,
• Defining form layout, and
• Define symbol attributes of the CAB block type.
See "Overview" under "Reviewing Custom Algorithm Blocks" for more details.

2. Reviewing Container Types in PDE 2.2. General considerations
16 Experion LX Parameter Definition Editor Reference Guide R110 Honeywell February 2014
Custom Data Block The Custom Data Block (CDB) container of the PDE provides options to:
• Create/edit the Value CDPs (Custom Data Parameters) attributes,
• Define form layout, and
• Define symbol attributes of the block type.
See "Overview" under "Reviewing Custom Data Blocks" for more details.
Phase Block The Phase Block container of the PDE provides options to:
• Create/edit the Formula Parameters attributes, and
• Create/edit the Report Parameters attributes.
See "Overview" under "Reviewing Phase Blocks" for more details.

R110 Experion LX Parameter Definition Editor Reference Guide 17 February 2014 Honeywell
3. Reviewing Custom Data Blocks
3.1 Overview The Custom Data Block container of the PDE provides options to
• Create/edit the Value CDPs (Custom Data Parameters) attributes,
• Define form layout, and
• Define symbol attributes of the block type.
ATTENTION
When a new block type is edited and/or created, a new MDI child window containing the PDE user interface is created within Control Builder.
Considerations • The PDE container is configured to edit only Fixed and Custom parameter attributes.
• The Value CDPs tab lets you create/delete/modify custom data parameters.
• The defined custom parameters are assigned a pin value in the Symbol Attribute tab.
• The PDE shows the following tabs to edit the CDB block type definition:
− Value CDPs (Custom Data Parameters) tab
− Form Layout tab
− Symbol Attribute tab
General editing functions Use the following links under "Parameter Definition Editor Basics" to access the PDE general editing functions:
• "Considerations"
• "Inserting, deleting, or appending rows"
• "Using copy and paste functions"
• "Saving block definitions"
• "Save As block definition"
• "Reviewing general block type functions"

3. Reviewing Custom Data Blocks 3.2. Reviewing the Value CDPs tab
18 Experion LX Parameter Definition Editor Reference Guide R110 Honeywell February 2014
3.2 Reviewing the Value CDPs tab For details, use the following links under "Accessing the Custom Data Parameters tab:"
• "Overview"
• "Considerations"
− "Reviewing min/max values of data types"
− "Reviewing valid parameter values"
− "Reviewing and Editing parameter attributes"
3.3 Reviewing the Form Layout tab For details, use the following links under "Accessing the Form Layout tab:"
• "Overview"
• "Considerations"
• "Form Layout tab attributes"
• "Form Layout tab selections"
Also see "Automatic form layout" under "Parameter Definition Editor Basics."
3.4 Reviewing the Symbol Attribute tab For details, use the following links under "Accessing the Symbol Attribute tab":
• "Overview"
• "Considerations"
• "Symbol Attribute tab attributes"
• "Configuring Pins"

R110 Experion LX Parameter Definition Editor Reference Guide 19 February 2014 Honeywell
4. Reviewing Custom Algorithm Blocks
4.1 Overview The CAB container of the PDE provides options to:
• Edit the Fixed, Value CDPs (Custom Data Parameters), and Parameter References parameter attributes,
• Define form layout, and
• Define symbol attributes of the CAB block type.
ATTENTION
The container for CAB is the Visual Studio .NET IDE editing environment. An instance of PDE will be created within the Visual Studio .NET IDE.
Considerations
• CAB uses the Visual Studio .NET Integrated Development Environment (IDE).
• An instance of PDE will be created within the Visual Studio.NET IDE, and the following tabs are available to edit the block type definition:
− Fixed parameters tab
− Value CDPs (Custom Data Parameter) tab
− Parameter References tab
− Form Layout tab
− Symbol Attribute tab
• Only the default values of fixed parameters can be edited in the Fixed parameters tab.
• The Value CDPs tab and Parameter References tab allows you to create, delete, or modify custom and parameter reference parameters.
• User-defined custom parameters can be assigned a pin value in the Symbol Attribute tab.
• The parameter will also be shown on the faceplate of the block.

4. Reviewing Custom Algorithm Blocks 4.2. Reviewing the Fixed parameter tab
20 Experion LX Parameter Definition Editor Reference Guide R110 Honeywell February 2014
General editing functions Use the following links under "Parameter Definition Editor Basics" to access the PDE general editing functions:
• "Considerations"
• "Inserting, deleting, or appending rows"
• "Using copy and paste functions"
• "Saving block definitions"
• "Save As block definition"
• "Reviewing general block type functions"
4.2 Reviewing the Fixed parameter tab For details, use the following links under "Accessing the Fixed parameter tab":
• "Overview"
• "Considerations"
• "Fixed tab attributes"
4.3 Reviewing the Value CDPs tab For details, use the following links under "Accessing the Value CDPs tab":
• "Overview"
• "Considerations"
• "Value CDPs tab attributes"
− "Reviewing min/max values of data types"
− "Reviewing valid parameter values"
− "Reviewing and Editing parameter attributes"
4.4 Reviewing the Parameter References tab For details, use the following links under "Accessing the Parameter References tab":
• "Overview"

4. Reviewing Custom Algorithm Blocks 4.5. Reviewing the Form Layout tab
R110 Experion LX Parameter Definition Editor Reference Guide 21 February 2014 Honeywell
• "Considerations"
• "Parameter References tab attributes"
• "Reviewing attribute default values"
• "Reviewing valid parameter values"
4.5 Reviewing the Form Layout tab For details, use the following links under "Accessing the Form Layout tab:"
• "Overview"
• "Form Layout tab attributes"
• "Form Layout tab selections"
Also see "Automatic form layout" under "Parameter Definition Editor Basics."
4.6 Reviewing the Symbol Attribute tab For details, use the following links under "Accessing the Symbol Attribute tab":
• "Overview"
• "Considerations"
• "Symbol Attribute tab attributes"
• "Configuring Pins"

4. Reviewing Custom Algorithm Blocks 4.6. Reviewing the Symbol Attribute tab
22 Experion LX Parameter Definition Editor Reference Guide R110 Honeywell February 2014

R110 Experion LX Parameter Definition Editor Reference Guide 23 February 2014 Honeywell
5. Reviewing Phase Blocks
5.1 Overview The Phase function block is a type block for use only in a Recipe Control Module (RCM).
The Phase function block is used to initiate and monitor execution of the associated Equipment Module (SCM). The Phase function block can also be used to acquire the Equipment Module, such as SCM, for another Phase Block.
The Phase Block container of the PDE provides options to:
• Edit the Formula Parameter definitions, and
• Edit the Report Parameter definitions.
An RCM contains Phases, Steps, Transitions and Synchronized blocks. A phase is based on Phase Block Type created with the PDE.
The input values for the Phase Block type are defined as Formula Parameters. The output values for the Phase Block type are defined as Report Parameters.
The Enabled flag defines if a parameter is used in a phase.
ATTENTION
When a new block type is edited or created, a new MDI child window is created within Control Builder, containing the PDE user interface.
Considerations • Phase Block does not support custom algorithms.
TIP
Optionally, a Phase Block can be connected to an Equipment Module, such as an SCM, where the input values (Formula parameters) are used and output values (Report parameters) are generated.
• An instance of PDE will be created within Control Builder, and the following tabs
are available to edit the block type definition:
− Formula Parameters tab (see "Accessing the Formula Parameters tab")
− Report References tab (see "Accessing the Report Parameters tab")

5. Reviewing Phase Blocks 5.1. Overview
24 Experion LX Parameter Definition Editor Reference Guide R110 Honeywell February 2014
General editing functions Use the following links under "Parameter Definition Editor Basics" to access the PDE general editing functions:
• "Considerations"
• "Inserting, deleting, or appending rows"
• "Using copy and paste functions"
• "Saving block definitions"
• "Save As block definition"
• "Reviewing general block type functions"

R110 Experion LX Parameter Definition Editor Reference Guide 25 February 2014 Honeywell
6. Reviewing Tab Types
6.1 Overview The following table lists the block types supported by the PDE. Each block type configuration form has multiple tabs to properly configure the block. The tabs associated with each block type are also listed in the table.
Tab Name on PDE CDB CAB Phase Block
Form Layout Yes Yes -
Fixed - Yes -
Value CDPs Yes Yes -
Symbol Attribute Yes Yes -
Parameter References - Yes -
Formula Parameters - - Yes
Report Parameters - - Yes
6. Reviewing Tab Types 6.2. Accessing the Form Layout tab
26 Experion LX Parameter Definition Editor Reference Guide R110 Honeywell February 2014
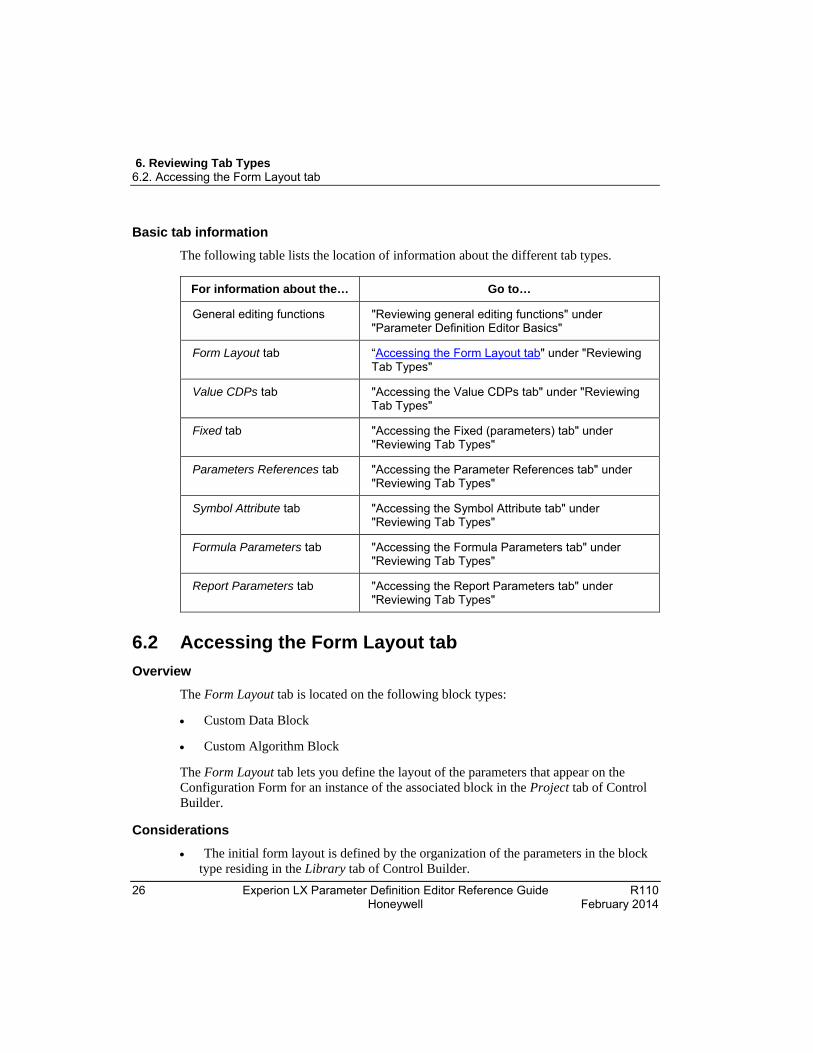
Basic tab information The following table lists the location of information about the different tab types.
For information about the… Go to…
General editing functions "Reviewing general editing functions" under "Parameter Definition Editor Basics"
Form Layout tab “Accessing the Form Layout tab" under "Reviewing Tab Types"
Value CDPs tab "Accessing the Value CDPs tab" under "Reviewing Tab Types"
Fixed tab "Accessing the Fixed (parameters) tab" under "Reviewing Tab Types"
Parameters References tab "Accessing the Parameter References tab" under "Reviewing Tab Types"
Symbol Attribute tab "Accessing the Symbol Attribute tab" under "Reviewing Tab Types"
Formula Parameters tab "Accessing the Formula Parameters tab" under "Reviewing Tab Types"
Report Parameters tab "Accessing the Report Parameters tab" under "Reviewing Tab Types"
6.2 Accessing the Form Layout tab Overview
The Form Layout tab is located on the following block types:
• Custom Data Block
• Custom Algorithm Block
The Form Layout tab lets you define the layout of the parameters that appear on the Configuration Form for an instance of the associated block in the Project tab of Control Builder.
Considerations • The initial form layout is defined by the organization of the parameters in the block
type residing in the Library tab of Control Builder.

6. Reviewing Tab Types 6.2. Accessing the Form Layout tab
R110 Experion LX Parameter Definition Editor Reference Guide 27 February 2014 Honeywell
• You can insert, delete, and rename tabs in the Form Layout tab.
• Tabs can be re-arranged using drag and drop.
• You can add and delete parameters from the tabs in the Form Layout tab.
• The Main, Alarms, and Source tabs (CAB) are read-only and cannot be edited. This means you cannot rename the tabs nor insert a tab before or in between them.
• You can only use a parameter once across all the tabs defined in the Form Layout tab.
• A shaded cell is not available for edit.
• Parameters can be defined under grid using the grid functionality (CAB and CDB).
• A drop-down menu can also be invoked using the right click on the tab. In this case, the selected option will be applied to the tab on which the right click was done.
CDB form layout considerations • The Value CDPs tab on the Form Layout is the tab where all the Custom parameters
defined in the Value CDPs main tab are shown.
• The order of the parameters in the Value CDPs tab on the form layout will be the same order as defined in the Value CDPs main tab. This layout is automatically generated when the new CDP is defined or deleted in the Value CDPs main tab. This is called "Automatic Form layout generation."
• Any change in the order of the definition of the CDPs in the Value CDPs main tab will be reflected in the Value CDPs tab on the Form Layout.
CAB form layout considerations • The Value CDPs is the tab where all the Custom parameters defined in the Value
CDPs main tab will be shown.
• The order of the parameters in the Value CDPs tab on the form layout will be the same order as defined in the Value CDPs main tab. This layout is automatically

6. Reviewing Tab Types 6.2. Accessing the Form Layout tab
28 Experion LX Parameter Definition Editor Reference Guide R110 Honeywell February 2014
generated when the new CDP is defined or deleted in the Value CDPs main tab. This is called "Automatic Form layout generation."
• Any change in the order of the definition of the CDPs in the Value CDPs main tab will be reflected in the Value CDPs tab on the Form Layout.
• The Parameter References tab is where all the parameter references defined in the Parameter References main tab will be shown.
• The order of the parameters in the Parameter References tab on the Form Layout will be the same order as defined in the Parameter References main tab. This layout is automatically generated when the new parameter reference is defined or deleted in the Parameter References main tab. This is called "Automatic Form layout generation."
• Any change in the order of the definition of the Parameter References in the Parameter References main tab will be reflected in the Parameter References tab on the Form Layout.
• Rows can be inserted using the INS key and can be deleted using the DEL key. Alternatively, a right click menu is also available for inserting and deleting the row.
CAB/CDB blocks The layout and content of the Value CDPs and Parameter References tabs can be modified. Custom tabs can also be added with their own content and layout.
In the next figure, custom parameters were added to the Value CDPs tab.
ATTENTION
Although these parameters are automatically placed on the Value CDPs Form tab (and they could be left on that form), they have all been moved to a custom tab. All of these values will be used later on that custom tab of the Form Layout.

6. Reviewing Tab Types 6.2. Accessing the Form Layout tab
R110 Experion LX Parameter Definition Editor Reference Guide 29 February 2014 Honeywell
Figure 1 Value CDPs Tab with Custom Parameters Added

6. Reviewing Tab Types 6.2. Accessing the Form Layout tab
30 Experion LX Parameter Definition Editor Reference Guide R110 Honeywell February 2014
Figure 2 New Tab (OPC_14) Created with Value CDPs Parameters Added

6. Reviewing Tab Types 6.2. Accessing the Form Layout tab
R110 Experion LX Parameter Definition Editor Reference Guide 31 February 2014 Honeywell
Figure 3 Properties Form showing Custom Tab
TIP
AC_P1, AC_P2, and AC_P3 have been configured as five-position arrays.

6. Reviewing Tab Types 6.2. Accessing the Form Layout tab
32 Experion LX Parameter Definition Editor Reference Guide R110 Honeywell February 2014
Form Layout tab attributes The following table lists the parameter attributes that can be shown on this tab.
Layout Attribute Description
Left field name Define parameters you want to be included on the left-hand side of the Configuration Form associated with the block in the Project tab of Control Builder.
Right Field name Define parameters you want to be included on the right-hand side of the Configuration Form associated with the block in the Project tab of Control Builder.
Form Layout tab selections The Form Layout tab has several standard second level tabs that can be accessed from the top of the Form Layout. These second level tabs are described in the following table.
Tab Name Used with
Block Type
Purpose
Main CAB/CDB Displays Fixed Definition Parameters that apply for CAB and CDB. This tab is read-only.
Value CDPs CAB/CDB This tab contains the Custom Data Parameters defined for CAB and CDB as a default. It can be modified with the PDE Form Layout to include Parameter References or Fixed Definition Parameters that do not appear on the Main tab.
Parameter References
CAB This tab contains the Parameter References that are defined for CAB as a default. It can be modified with PDE Form Layout to include Parameter References or Fixed Definition Parameters that do not appear on the Main tab.
Source CAB Contains the SRCDATA parameter. The SRCDATA parameter allows the user to view the main source file for the selected CAB type. In the case of instances, it allows a user to view the source to see what the CAB program algorithm is without opening the CAB type in Edit or View only mode. In the case of Operators on a station, this gives them access to view the program because they cannot open the CAB type in edit or View only from a Station. This tab is read-only.

6. Reviewing Tab Types 6.3. Accessing the Fixed (parameters) tab
R110 Experion LX Parameter Definition Editor Reference Guide 33 February 2014 Honeywell
Tab Name Used with Block Type
Purpose
Alarms CAB This tab allows the engineer to change the severity (from 0 to 15) and priority of each of the four CAB alarm types for a CAB instance. The possible priorities are:
• NONE
• JOURNAL
• LOW
• HIGH
• URGENT
An alarm will be triggered (when the priority is LOW, MEDIUM, or HIGH) for parameter reference read errors, parameter reference write errors, CAB termination (caused by block overrun or user abort), and CAB exceptions.
A NONE priority will not trigger an alarm and a JOURNAL priority will trigger a journal event.
This tab is read-only. Form Layout tab functions
The following are additional functions that can be performed using the Form Layout tab. These functions can be found under "Parameter Definition Editor Basics."
• "Reviewing the group box"
• "Reviewing the grid"
• "Inserting, deleting, renaming, and appending tabs"
6.3 Accessing the Fixed (parameters) tab Overview
The Fixed parameters tab is located on the CAB block type.
The Fixed tab lists all the fixed parameters of the block type. This tab is used to edit the default value of the parameters. All other parameter attributes are read-only.

6. Reviewing Tab Types 6.4. Accessing the Value CDPs tab
34 Experion LX Parameter Definition Editor Reference Guide R110 Honeywell February 2014
Considerations • All the fixed parameters will be shown in this tab.
• Only the default value attribute is editable.
• Editing of the default value is based on the data type of the parameter attribute.
• New parameters cannot be added in this tab.
• Existing parameters cannot be deleted from this tab.
• All predefined fixed parameters will start with the characters X_.
ATTENTION
If a new fixed parameter is created, do not start the name of this new parameter with the characters X_. X_ fixed parameters are predefined parameters. This will prevent parameter name duplication of the block parameters that have already been predefined by Honeywell.
Figure 4 Predefined Fixed Parameters
Fixed tab attributes The following table lists the parameter attributes that can be shown on this tab.
Parameter Attribute Description
Parameter Name The name of the parameter.
Parameter Description The short description of the parameter.
Data Type The data type of the parameter.
Default Value The default value of the parameter. Only this attribute is editable.

6. Reviewing Tab Types 6.4. Accessing the Value CDPs tab
R110 Experion LX Parameter Definition Editor Reference Guide 35 February 2014 Honeywell
6.4 Accessing the Value CDPs tab Overview
The Value CDPs (Custom Data Parameters) tab is located on the CDB and CAB block types.
The Value CDPs tab is used to define the custom parameters. New custom parameters can be added and deleted from this tab. Designated parameter attributes can be edited.
Considerations • All the custom parameters are shown in this tab.
• New parameters can be added.
• Existing parameters can be deleted subject to the rules defined in "Reviewing and Editing parameter attributes" under "Accessing the Value CDPs tab."
• Editing of the default value is based on the data type of the parameters subject to the rules defined in "Reviewing and Editing parameter attributes" under "Accessing the Value CDPs tab."
• Access lock, Configuration load, and Data type can be selected using the combo box.
• Manage View is supported in this tab to switch ON/OFF the parameter attributes that are to be shown in the tab.
• The parameters defined in this tab are used to generate an automatic form layout in the Value CDPs tab of the form layout.
• The parameter description, parameter help string, and default value attributes are the only case sensitive attributes.
• Cut/Copy/Paste Parameters feature is available in this tab.

6. Reviewing Tab Types 6.4. Accessing the Value CDPs tab
36 Experion LX Parameter Definition Editor Reference Guide R110 Honeywell February 2014
ATTENTION
If a new custom parameter is created, do not start the name of this new parameter with the characters X_. X_ custom parameters are predefined parameters.
Value CDPs tab attributes
The Value CDPs tab lists the parameter attributes shown below. Some parameter attributes are exposed by default. The other parameter attributes can be made visible/invisible on the tab using "Launching Configure PDE views dialog" under "Reviewing PDE views."
Parameter Attribute Description Exposed
by Default
Parameter Name The name of the parameter. Yes
Parameter Description
The short description of the parameter restricted to 255 characters. This description will be used in the Configure Parameters dialog in CB.
Yes
First Dimension Array Size
The first dimension of the array if the parameter is to be arrayed.
Yes
Second Dimension Array Size
The second dimension of the arrayed parameter.
No
First Dimension Lower bound
The lower bound of the first array dimension. No
Second Dimension Lower bound
The lower bound of the second array dimension.
No
Configuration Load The attribute indicating whether the parameter value is to be loaded to ACE.
Yes
Access Lock Attribute describing what kind of users can write to the parameter.
Yes
Data Type The data type of the parameter. Yes
Default Value The default value of the parameter. Yes
Minimum Value The minimum value of the parameter. This attribute is applicable only to the integer and float data types
No

6. Reviewing Tab Types 6.4. Accessing the Value CDPs tab
R110 Experion LX Parameter Definition Editor Reference Guide 37 February 2014 Honeywell
Parameter Attribute Description Exposed by Default
Maximum Value The maximum value of the parameter. This attribute is applicable only to the integer and float data types.
No
Size The size of the default value of the string data type. This attribute is applicable only to the string data type.
No
Parameter Help String
The long description of the parameter that will be used in the Knowledge Builder to show the help on the parameter.
No
Reviewing min/max values of data types
The minimum and maximum values of the different data types are listed below.
Data type Minimum Value Maximum Value
INT32 -2147483648 2147483647
FLOAT64 2.2250738585072014e-308 1.7976931348623158e+308
STRING --- 255 Characters

6. Reviewing Tab Types 6.4. Accessing the Value CDPs tab
38 Experion LX Parameter Definition Editor Reference Guide R110 Honeywell February 2014
Reviewing valid parameter values The valid values for the parameter attribute are listed below.
Parameter Attribute Valid values
Parameter Name The first character of the parameter name should be an alpha character.
Only "_" character is allowed in the parameter name other than alphanumeric characters.
The maximum length of the parameter name is 12 characters.
The parameter name will always be converted to upper case letters.
Parameter Description
Any character with maximum length of 255.
First Dimension Array Size
>= 0 and <= 10,000
0 - means parameter is not arrayed
Note
Second Dimension Array Size
: The product of the First Dimension and the Second Dimension cannot exceed 10,000. Therefore, if the First Dimension Array Size = 5000, then the maximum value for the Second Dimension Array Size would be 2, i.e., (2 X 5000 = 10,000).
>= 0 and <= 10,000
0 - means second dimension is not specified
The First Dimension Array Size should be specified to enter the second dimension array size.
Note
First Dimension Lower bound
: The product of the First Dimension and the Second Dimension cannot exceed 10,000. Therefore, if the First Dimension Array Size = 5000, then the maximum value for the Second Dimension Array Size would be 2, i.e., (2 X 5000 = 10,000).
Positive/Negative INT16 value.
First dimension array size should be specified to enter this attribute.

6. Reviewing Tab Types 6.4. Accessing the Value CDPs tab
R110 Experion LX Parameter Definition Editor Reference Guide 39 February 2014 Honeywell
Parameter Attribute Valid values
Second Dimension Lower bound
Positive/Negative INT16 value.
Second dimension array size should be specified to enter this attribute.
Configuration Load LOAD - Load the parameter
NOLOAD - Do not load the parameter
Access Lock APPDEVONLY ENGINEER OPERATOR PROGRAM SUPERVISOR
Data Type BOOLEAN DELTATIME FLOAT64 INT32 STRING TIME TIMEOFDAY
Default Value Specific to data type attribute
Minimum Value Specific to data type attribute
Maximum Value Specific to data type attribute
Size >= 0
Parameter Help String
No limit

6. Reviewing Tab Types 6.4. Accessing the Value CDPs tab
40 Experion LX Parameter Definition Editor Reference Guide R110 Honeywell February 2014
Reviewing and Editing parameter attributes
Default
ATTENTION
The Default Value attribute cannot be edited if the Configuration Load attribute is "NOLOAD" and the default value will be reset to nothing.
Setting the Access Lock attribute to "ViewOnly" sets the Configuration Load to "NOLOAD." This makes the Default Value attribute read-only. The default value resets to nothing.
The attribute default values of the parameters are listed in the table below.
Parameter Attribute Attribute Default Value
Configuration load NO LOAD
First dimension array size 0
Second dimension array size 0
First dimension array lower bound 0
Second dimension array lower bound 0
Default Size for the string data type 32
Custom parameter restrictions Changing some of the attributes of a custom parameter will not allow saving the block with the same name if instances of the block with custom parameters exists. Below is the list of such scenarios:
• Changing the Data Type of the custom parameter
• Deleting the custom parameter from the block
• Renaming any custom parameter of the block
• Changing a CDP from a scalar to an array or vice versa
When such scenarios occur, the "Save As block definition" function will be invoked.

6. Reviewing Tab Types 6.5. Accessing the Symbol Attribute tab
R110 Experion LX Parameter Definition Editor Reference Guide 41 February 2014 Honeywell
Using cut/copy/paste for custom parameters The Value CDPs tab will not show all the attributes of the parameters. There are some attributes, which are internally managed. When using the "Manage views" feature, the attributes can also be hidden. In such scenarios the need arises to copy the whole parameter definition irrespective of whether attribute is internally managed or hidden through views. The cut/copy/paste parameters features will allow copying the whole parameter definition and pasting the definition as a new parameter. This feature will also work across the PDE, meaning PDE the parameters can be copied and pasted in one instance of the PDE.
If you want to... Go to...
Copy parameters "Copying parameters" under "Reviewing general parameter functions"
Paste parameters
"Pasting parameters" under "Reviewing general parameter functions"
Cut parameters "Cutting parameters" under "Reviewing general parameter functions"
6.5 Accessing the Symbol Attribute tab Overview
The Symbol Attribute tab is located on the CDB and CAB block types.
The Symbol Attribute tab is used to associate a pin number with the parameter for a block type. The parameter will also be shown on the faceplate of the block. The parameter, which has valid pin exposure permission, can be used to assign the block pin. The individual elements of an arrayed parameter can be used to assign a block pin.

6. Reviewing Tab Types 6.5. Accessing the Symbol Attribute tab
42 Experion LX Parameter Definition Editor Reference Guide R110 Honeywell February 2014
The Symbol Attribute tab lists the following pins for which the parameter is assigned:
• Input Top pin
• Input Left pin
• Output Bottom pin
• Output Right pin
• Config face
• Monitor face
Considerations • The parameter to be exposed will be defined in the "Parameter name" column.
• Any parameter that has the pin exposure permission set can be configured on the Symbol Attribute tab.
• NOLOAD parameter cannot be configured on the Configuration faceplate.
• Parameter name can be picked by clicking on the button provided in the right of the Parameter name cell. This will show the dialog listed under "Accessing the Symbol Attribute tab."
• For arrayed parameters, individual array indices can be used to define the symbol attribute. The arrayed parameter should be defined with the syntax, <parameter name>[[first dimension index], [second dimension]].
• For arrayed parameters, the whole array transfer can be specified on the symbol attribute with the syntax, <parameter name>[.<space>].
• A pin number for a parameter can be assigned by keying in the pin number in the provided pin columns.
• If a pin is to be hidden for parameters, the relevant cell in the grid should be blank.
• The pin values in the column are unique and a positive number starting from zero.
• The top pin and the left pin are mutually exclusive.
• The bottom pin and the right pin are mutually exclusive.
• Copy/Paste of symbol attribute information can be done using the right click menu and accelerator keys CTRL+C and CTRL+V, respectively.
• Columns can be sorted by double-clicking on the column header, toggling between ascending and descending sort order.

6. Reviewing Tab Types 6.5. Accessing the Symbol Attribute tab
R110 Experion LX Parameter Definition Editor Reference Guide 43 February 2014 Honeywell
Symbol Attribute tab attributes The following table lists the parameter attributes that can be shown on this tab.
Parameter Attribute Description
Parameter Name The name of the parameter.
Input Top pin The location to define the top pin for a block.
Input Left pin The location to define the left pin for a block.
Output Bottom pin The location to define the bottom pin for a block.
Output Right pin The location to define the right pin for a block.
Config Face The location to define the configuration face for a block.
Monitor Face The location to define the monitor face for a block. Configuring Pins
ATTENTION
You will have to delete and re-add instances in a Control Module if you make changes in the PDE Symbol Attributes tab if any instances exist on the configuration/monitor side.
Configuring a parameter for an input To configure a parameter for an input, the pin order should be entered in the "Input Top pin" or "Input Left pin" column. The input pins are shown below in Control Builder.
Parameter Configured in PDE as "Input Left pin"
Parameter Configured in Control Builder as "Input Left pin"

6. Reviewing Tab Types 6.5. Accessing the Symbol Attribute tab
44 Experion LX Parameter Definition Editor Reference Guide R110 Honeywell February 2014
Parameter Configured in PDE as "Input Top pin"
Parameter Configured in Control Builder as "Input Top pin"
Configuring a parameter for an output To configure the parameter for an output, the pin order should be entered in the "Output Bottom pin" or "Output Right pin" column. The output pins are shown below in Control Builder.
Parameter Configured in PDE as "Output Right pin"
Parameter Configured in Control Builder as "Output Right pin"
Parameter Configured in PDE as "Output Bottom pin"

6. Reviewing Tab Types 6.5. Accessing the Symbol Attribute tab
R110 Experion LX Parameter Definition Editor Reference Guide 45 February 2014 Honeywell
Parameter Configured in Control Builder as "Output Bottom pin"
Configuring a pin on the configuration faceplate To configure the pin on the configuration faceplate, enter the pin order in the "Config face" column. The parameter value will be shown on the block in the configuration side only.
Parameter Configured in PDE to be shown on "Config face"
Parameter Shown on Faceplate in Control Builder
Configuring a pin on the monitor faceplate To configure the pin on the monitor faceplate, enter the pin order in the Monitor face column. The parameter value will be shown on the block in the monitor side only.
Parameter Configured in PDE to be shown on "Monitor face"

6. Reviewing Tab Types 6.6. Accessing the Parameter References tab
46 Experion LX Parameter Definition Editor Reference Guide R110 Honeywell February 2014
Reviewing parameter picker The Parameter Picker dialog provides an option to search for a parameter to configure the symbol attribute. The dialog lists all the parameters that have valid pin exposure permissions with an edit box for searching the parameter.
Considerations • The list of parameters defined in the block that has a valid pin exposure permission
set will be listed in the parameters list.
• If the parameter is arrayed, then the parameter name will be shown in these formats:
− <parameter name>[<space>] to pin for whole array transfer.
− <parameter name>[N] for a single dimension array where N is the dimension of single dimension array to be entered.
− <parameter name>[N, M] for a two-dimensional array, where N is the first dimension of array and M is the second dimension of array.
• Typing the parameter in the parameter edit box will select the nearest matching parameter in the parameter list
• If an individual array element of a parameter is to be pinned, then the arrayed parameter should be selected and the valid index should be specified in the Parameter Name column of the Symbol Attribute tab.
• Parameters can be selected by double clicking on the parameter name. The index must be specified for arrayed parameters.

6. Reviewing Tab Types 6.6. Accessing the Parameter References tab
R110 Experion LX Parameter Definition Editor Reference Guide 47 February 2014 Honeywell
6.6 Accessing the Parameter References tab Overview
The Parameter References tab is located on the CAB block type.
Considerations The Parameter References allow defining the parameter alias. New parameter references can be added defining the data type and the data flow of the parameter.
• All the Parameter references are shown in the tab.
• New parameters can be added.
• Existing parameters can be deleted.
• The parameters defined in this tab are used to generate an automatic form layout in the Parameter References tab of the form layout.
• The parameter description attribute is the only attribute that is case sensitive.
• Cut/Copy/Paste Parameters feature is available in this tab.

6. Reviewing Tab Types 6.6. Accessing the Parameter References tab
48 Experion LX Parameter Definition Editor Reference Guide R110 Honeywell February 2014
Parameter References tab attributes The tab will list the parameter attributes as shown below.
Parameter Attribute Description
Parameter Name The name of the reference parameter.
Parameter Description
The short description of the parameter attribute is restricted to 255 characters. This description will be used in the Configure Parameters dialog in Control Builder.
Reference data type The data type of the reference parameter.
Data flow The attribute specifying the reference is being used for input, output or both.
Dynamic Reference Configurable for either static referencing, or for Dynamic Referencing.
Dynamic Referencing allows the user to change the target for the reference "on the fly," even though the instance is loaded and executing.
For more information on Dynamic Referencing, see the Custom Algorithm Block and Custom Data Block User’s Guide, Dynamic re-referencing of parameter references.
Configuring the Size attribute
The size attribute is exposed and made configurable for CAB. This attribute only applies if the data type is String. It specifies the maximum number of characters the string may hold. Default value is eight characters. Maximum supported value is 255 characters. Note that sizes greater than eight characters are supported in peer-to-peer data access but impose a higher communications load.
When defining a PRef of type String, you must make a decision as to how large a string value is needed. In many applications, a string size of eight characters or less is sufficient. In other cases a larger string may be needed.
In general, strings should not be declared larger than is needed. In particular, note that peer-to-peer transport of strings depends on buffer allocations that are reserved for as long as the data reference is in use. These allocations are most efficient when the string size is eight characters or less, though larger allocations can also be used.

6. Reviewing Tab Types 6.7. Accessing the Formula Parameters tab
R110 Experion LX Parameter Definition Editor Reference Guide 49 February 2014 Honeywell
Reviewing attribute default values The attribute default values of the parameter attributes for the Parameter Reference tab are listed in the table below.
Parameter Attribute Attribute Default Value
Data Flow INPUT
Dynamic Reference Cleared Reviewing valid parameter values
The valid values for the parameter attributes are listed below.
Parameter Attribute Valid values
Parameter Name The first character of the parameter name should be alphabetic.
Only "_" character is allowed in the parameter name other than alphanumeric characters.
The maximum length for the parameter name is 32 characters.
The parameter name will be always converted to upper case letters.
Parameter Description
Any character with maximum length of 255.
Data Type BOOLEAN DELTATIME FLOAT64 INT32 STRING TIME TIMEOFDAY
Data flow INPUT - Only reading of Data is allowed
OUTPUT - Only writing of data is allowed
IN/OUT - Data can be either read or write.
Dynamic Reference Checked or Cleared

6. Reviewing Tab Types 6.7. Accessing the Formula Parameters tab
50 Experion LX Parameter Definition Editor Reference Guide R110 Honeywell February 2014
6.7 Accessing the Formula Parameters tab Overview
The Formula Parameters tab is located on the Phase Block type.
Considerations • The Formula Parameters tab contains all the user defined formula parameters for the
Phase block.
• All the formula parameters are shown in the tab.
• New parameters can be added.
• Existing parameters can be deleted.
TIP
If a parameter is deleted, the phase block type cannot be saved. Thus, a new phase block type must be created.
• The parameter description attribute is the only attribute that is case sensitive.
• Cut/Copy/Paste Parameters feature is available in this tab.
TIP
You can configure up to 250 formula and report parameters in a phase type. These 250 parameters can be all formula parameters or all report parameters, or a mixed number of both (example – 150 formula parameters and 100 report parameters). There is a limitation to the total data size of the entire parameter set. For example, you may only be allowed to configure 62 parameters if the data type is string and the size 255 characters.

6. Reviewing Tab Types 6.7. Accessing the Formula Parameters tab
R110 Experion LX Parameter Definition Editor Reference Guide 51 February 2014 Honeywell
Formula Parameters tab attributes The tab will list the parameter attributes shown below.
Parameter Attribute Description
Parameter Name Unique among all parameter names of the phase block.
Can be only modified in the PDE.
Parameter description This text is shown in the phase block form when the parameter values are edited and in the RCM detail displays when the parameter is used for operators. The text can contain localized characters, such as Kanji.
Can be only modified in the PDE.
Data type Choices are:
BOOLEAN FLOAT64 INT32 STRING
Can be only modified in the PDE.
Default value -
Minimum value Specifies the Minimum value.
Range depends on the selected data type. For floating point numbers, the limit values can be NaN. For integers, the smallest possible number is not available as a limit (it is used as invalid number for integers.)
NOTE: The usage of NaN implies that the limit is not used.
Maximum value Specifies the Maximum value.
Range depends on the selected data type. For floating point numbers, the limit values can be NaN.
NOTE: The usage of NaN implies that the limit is not used.
Use value reference Checked - use the run-time value retrieved from the source defined in the phase block form.
Unchecked - use the default value or the value edited in phase block form or RCM detail display.

6. Reviewing Tab Types 6.8. Accessing the Report Parameters tab
52 Experion LX Parameter Definition Editor Reference Guide R110 Honeywell February 2014
Parameter Attribute Description
Enabled Checked - parameter is used in the phase block instance.
Unchecked - parameter is not used in the phase block instance and not shown in the RCM detail display.
Size Defines the maximum length of string value.
Default = 32
Engineering Units Text defining the engineering units associated with the parameter.
Scalable Used only for formula parameters.
Checked - the value is scaled with the ratio between current batch size and the default batch size when the value is downloaded into the target parameter.
Unchecked - no scaling is done in the value download operation.
Access lock Used only for formula parameters.
Based on the AccessLocks enumeration type, values are Program, Engineer, Supervisor, Operator, AppDevOnly.
6.8 Accessing the Report Parameters tab Overview
The Report Parameters tab is located on the Phase Block type.
Considerations Report Parameter tab contains all the user defined report parameters for the Phase Block.
• All the report parameters are shown in the tab.
• New parameters can be added.
• Existing parameters can be deleted.
TIP
If a parameter is deleted, the phase block type cannot be saved. Thus, a new phase block type must be created.

6. Reviewing Tab Types 6.8. Accessing the Report Parameters tab
R110 Experion LX Parameter Definition Editor Reference Guide 53 February 2014 Honeywell
• The parameter description attribute is the only attribute that is case sensitive.
• Cut/Copy/Paste Parameters feature is available in this tab.
TIP
You can configure up to 250 formula and report parameters in a phase type. These 250 parameters can be all formula parameters or all report parameters, or a mixed number of both (example – 150 formula parameters and 100 report parameters). There is a limitation to the total data size of the entire parameter set. For example, you may only be allowed to configure 62 parameters if the data type is string and the size 255 characters.
Report Parameters tab attributes The tab will list the parameter attributes shown below:
Parameter Attribute Description
Parameter Name Unique among all parameter names of the phase block.
Can be only modified in the PDE.
Parameter description This text is shown in the phase block form when the parameter values are edited and in the RCM detail displays when the parameter is used for operators. The text can contain localized characters, such as Kanji.
Can be only modified in the PDE.
Data type Choices are:
BOOLEAN FLOAT64 INT32 STRING
Can be only modified in the PDE.
Default value -
Minimum value Specifies the Minimum value.
Range depends on the selected data type. For floating point numbers, the limit values can be NaN. For integers, the smallest possible number is not available as a limit (it is used as invalid number for integers.)
Note: The usage of NaN implies that the limit is not used.

6. Reviewing Tab Types 6.8. Accessing the Report Parameters tab
54 Experion LX Parameter Definition Editor Reference Guide R110 Honeywell February 2014
Parameter Attribute Description
Maximum value Specifies the Maximum value.
Range depends on the selected data type. For floating point numbers, the limit values can be NaN.
Note
Enabled
: The usage of NaN implies that the limit is not used.
Checked - parameter is used in the phase block instance.
Unchecked - parameter is not used in the phase block instance and not shown in the RCM detail display.
Size Defines the maximum length of string value.
Default = 32
Engineering Units Text defining the engineering units associated with the parameter.
Trend Used only for report parameters.
Checked - value will be trended.
Unchecked - value will not be trended.

R110 Experion LX Parameter Definition Editor Reference Guide 55 February 2014 Honeywell
7. Parameter Definition Editor Basics
7.1 Reviewing general editing functions Considerations
• You are familiar with interacting with Windows programs, such as Microsoft Excel.
• Read-only cells are shaded and are unavailable for editing.
• You must have Engineering access level or higher to make edits.
If You Want To… Then…
Resize a column Move cursor over column vertical dividing line so cursor changes shape and click and drag cursor left or right to decrease or increase the column width.
Navigate between cells
You can use many of the keyboard shortcuts that apply for the Microsoft Excel program. For example, press the TAB key to complete a cell entry and select the next cell to the right. Press SHIFT+TAB to complete a cell entry and select the previous cell to the left. Use ARROW keys to move one cell left, right, up, or down. Press HOME key to move to the beginning of the line.
Edit cell contents You can use many of the keyboard shortcuts that apply for the Microsoft Excel program. For example, press the F2 key to edit the active cell and put the insertion point at the end of the cell. Use BACKSPACE to edit the active cell and then clear it, or delete the preceding character in the active cell as you edit cell contents. Press ESC to cancel a cell entry.
Contents may be in the form of typical Windows style text box, check box, or combo box.
Inserting, deleting, or appending rows
The following procedure assumes that the PDE has been launched. You can only invoke these functions on tabs that allow edits. The following tabs allow edits.
• Form Layout tab
• Value CDPs tab
• Symbol Attribute tab
• Parameter References tab

7. Parameter Definition Editor Basics 7.1. Reviewing general editing functions
56 Experion LX Parameter Definition Editor Reference Guide R110 Honeywell February 2014
Step Action
1 Click the tab you want to edit.
2 • If you want to delete a row, go to Step 3.
• If you want to insert a row, go to Step 5.
• If you want to append a row, go to Step 6.
3 Click in row header to select (highlight) the entire row you want to delete. You can use SHIFT+CLICK or CTRL+CLICK to select multiple rows for deletion.
4 Right-click the selected row(s) and select Delete from the shortcut menu or, press the DELETE key. You will be prompted to confirm multiple row deletions.
5 Click anywhere in the row you want to insert a row above and press the INSERT key. Or, right-click anywhere in the row you want to insert a row above and select Insert from the shortcut menu. You can use SHIFT+CLICK or CTRL+CLICK to select multiple rows for insertion above the selected rows.
6 To append a row to the end of the list, right-click anywhere in an existing row and select Append row from the shortcut menu.
TIP
Appending can also be accomplished by scrolling via the down arrow at the end of the rows. Rows will be added as you scroll down.
Using copy and paste functions
You can use the typical keyboard shortcuts of CTRL+C and CTRL+V to copy and paste cell data on tabs that permit edits. You can also select these functions through the right-click shortcut menu.
Saving block definitions The following consideration should be observed when saving block definitions:
• Modifications to the block type definition in PDE enables the Save button in the tool bar and the File menu.
• To save PDE edits, click Save from the File menu selections or click the Save button in the tool bar if you are saving a CDB block. If you are saving a CAB block, saves are performed from the File menu Save All selection of the Visual Studio .NET IDE.

7. Parameter Definition Editor Basics 7.2. Reviewing general block type functions
R110 Experion LX Parameter Definition Editor Reference Guide 57 February 2014 Honeywell
TIP
Clicking the Save button or selecting File > Save PDE Data will save the PDE data to a block type definition file. See "Launching PDE" under "Launching and Closing PDE" for more details on saving the PDE data.
You will be prompted to save any unsaved edits upon closing the PDE. See "Launching PDE" under "Launching and Closing PDE."
Save As block definition The following procedure assumes the PDE has been launched and a parameter is being edited, and there is a need to create a new block definition. The following procedure applies to CAB and CDB blocks only.
Step Action
1 On the File menu, click Save As.
TIP
If you are saving a CAB block, saves are performed from the File > Save All selection of the Visual Studio NET IDE.
2 In the open Block Type text box, type the desired name for your new block type that is unique. Press the ENTER key.
Result
: The new block name is displayed in the Control Builder library tree, and the current editing session switched to the newly created block definition.
7.2 Reviewing general block type functions Inserting, deleting, renaming, and appending tabs
The following procedure assumes that the PDE has been launched. You can only invoke these functions on the Form Layout tab.

7. Parameter Definition Editor Basics 7.3. Reviewing the group box
58 Experion LX Parameter Definition Editor Reference Guide R110 Honeywell February 2014
Step Action
1 Click the Form Layout tab.
2 If you want to insert a tab, go to Step 3.
If you want to delete a tab, go to Step 6.
If you want to rename a tab, go to Step 9.
If you want to append a tab, go to Step 12.
ATTENTION
Remember that the Main tab on the CDB block type, and the Main, Alarms, and Source tabs on the CAB block, are read-only and you cannot insert a tab before them.
3 Click the tab that you want the new tab inserted before.
4 On the Options button, click the arrow and select Tabs > Insert. Or, right-click the tab and select Tabs > Insert.
5 In Tab Name dialog, type the desired name for the new tab in the Enter new tab name box. Click the OK button.
Result
6
: The new tab is inserted before the selected tab.
Click the tab that you want to delete.
7 On the Options button, click the arrow and select Tabs > Delete. Or, right-click the tab and select Tabs > Delete.
8 Click the Yes button in the PDE dialog to acknowledge the action and initiate the tab deletion.
9 Click the tab that you want to rename.
10 On the Options button, click the arrow and select Tabs > Rename. Or, right-click the tab and select Tabs > Rename.
11 In the Group Name dialog, type the desired new name for the tab in the Enter new group name box. Click the OK button.
Result
12
: The new name now appears on the tab.
On the Options button, click the arrow and select Tabs > Append. Or, right-click the tab and select Tab > Append.
13 Enter the name of the new tab. Click the OK button.

7. Parameter Definition Editor Basics 7.3. Reviewing the group box
R110 Experion LX Parameter Definition Editor Reference Guide 59 February 2014 Honeywell
7.3 Reviewing the group box
TIP
You can use the Group function to group similar parameter attributes to show logical parameter relationships on the block configuration form in Control Builder.
Considerations
• You can place Parameters on the left or right side of the tab. If the parameter is to be placed on the left side of the tab, enter the parameter name in the Left field name column. If it is to be placed on the right side, enter the parameter name in the Right field name column.
• You can group and ungroup selected parameters.
• The right group box is dependent on the definition of the left group box. The right group box cannot exist without a left group box.
• The blank rows in the group do not have any effect on the layout.
• The left group name is mandatory, if any parameters are defined in the left group.
• The right group name is mandatory, if any parameters are defined in the right group.
• You cannot have a parameter in the right group box without having parameters in the left group box.
• The height of the group box depends on the number of parameters in the left group box.
• Rows can be inserted using INS key and can be deleted using DEL key. Alternatively, a right click menu is also available for inserting and deleting the row.
• Parameters can be grouped/ungrouped using the group/ungroup functionality.
• Tabs can be added, deleted, and renamed by using the Menu item from the Options tool bar.
• Parameters can be used only once across all the tabs defined in the form layout.

7. Parameter Definition Editor Basics 7.3. Reviewing the group box
60 Experion LX Parameter Definition Editor Reference Guide R110 Honeywell February 2014
Creating the left group box
Step Action
1 Select the parameters that are to be grouped in the form layout grid. The selected parameters that are to be grouped should be in sequence.
2 From the drop-down Options tab, select the Parameters > Group menu item. Alternatively, a right-click menu will also provide an option to group parameters under the menu item Parameters > Group.
3 Once the menu item is selected, all the selected parameters will be grouped and shown inside a thick black rectangle around the selected parameters.
• The left field name cell in the first row of the group is for entering the name of the left group.
• Parameters can be added within the group box by inserting a new row using INS key and entering the parameter name in the left field name. Alternatively, rows can be added from the right click menu.
• Parameters can be deleted using DEL key by selecting the complete row. Alternatively, rows can be deleted from the right click menu.
The above defined parameter group will be shown as below in the Configure Parameters dialog in Control Builder.

7. Parameter Definition Editor Basics 7.3. Reviewing the group box
R110 Experion LX Parameter Definition Editor Reference Guide 61 February 2014 Honeywell
Creating the right group box Note
Step
: The following procedure assumes that the left group box exists.
Action
1 On the Form Layout grid, enter the parameters for the right field name in the right group box. The active area of the form is enclosed in a thick black rectangle.
2 Enter the right group box name at the top of the black rectangle.

7. Parameter Definition Editor Basics 7.3. Reviewing the group box
62 Experion LX Parameter Definition Editor Reference Guide R110 Honeywell February 2014
Configuration Form with grouped parameters
TIP
The parameter Auto Pump #1 was created as an arrayed parameter with an index of 5.
Figure 5 Example Tab with Parameters Grouped

7. Parameter Definition Editor Basics 7.3. Reviewing the group box
R110 Experion LX Parameter Definition Editor Reference Guide 63 February 2014 Honeywell
Ungrouping parameters in a group box You can use the Ungroup function to remove a group box. You can only invoke these functions on the Form Layout tab. The following procedure is for example purposes only to show how the Ungroup function may be used.
Step Action
1 Highlight the group that you want to delete by left clicking on the first row and dragging down until the entire group is highlighted, including the group name. In this example, the East Building group is highlighted.

7. Parameter Definition Editor Basics 7.4. Reviewing the grid
64 Experion LX Parameter Definition Editor Reference Guide R110 Honeywell February 2014
Step Action
2 Right-click anywhere on the group and select Parameters > Ungroup. The group box and group title, East Building, will be removed.
3 When an instance of this block is added to a project, the resulting edits of the group box tab will appear as follows:
Notice that the East Building group has been removed.

7. Parameter Definition Editor Basics 7.4. Reviewing the grid
R110 Experion LX Parameter Definition Editor Reference Guide 65 February 2014 Honeywell
7.4 Reviewing the grid Using the grid
The grid is an option available for CAB and CDB block types. Grids are used to show a group of parameters where each parameter is shown as one of the columns of the grid, and each parameter value is shown in the grid rows.
Considerations • The grid name is mandatory and must be entered in the left field name.
• The number of rows visible should be between 1 and 99.
• There is no right field name for the grid.
• Grid only supports array Custom Data Parameters. Grid does not support scalar CDPs or Parameter References.
• Only arrayed parameters are allowed in the grid.
• Parameter references are not allowed in the grid.

7. Parameter Definition Editor Basics 7.4. Reviewing the grid
66 Experion LX Parameter Definition Editor Reference Guide R110 Honeywell February 2014
Creating a grid Follow the steps in the following table to create a grid.
Step Action
1 Select the parameters that are to be defined within the grid in the Form Layout grid as shown below. The selected parameters must be in sequence.
2 From the drop-down Options tab, select Parameters > Define Grid. Right-clicking on the highlighted parameters will also provide a drop-down menu where Parameters > Define Grid can be selected.

7. Parameter Definition Editor Basics 7.4. Reviewing the grid
R110 Experion LX Parameter Definition Editor Reference Guide 67 February 2014 Honeywell
Step Action
3 The number of the lines for the grid should be typed in the "Right field name" column. This is the maximum number of rows that will be shown at a time in the grid on the Configuration Form. If there are more rows than visible lines, then a scroll bar will be shown on the grid.
The grid name can be entered in the first row of the grid under the "Left field name."
The resulting Configuration Form for this grid would look like the example below.
TIP
• Parameters can be added within the grid box by inserting a new row using the INS key and entering the parameter name or by right clicking and inserting a row.
• Parameters can be deleted by using the DEL key or by right clicking and deleting the row.

7. Parameter Definition Editor Basics 7.4. Reviewing the grid
68 Experion LX Parameter Definition Editor Reference Guide R110 Honeywell February 2014
When two-dimension arrayed parameter of size 5x5 is added to the grid, it is shown as below in the configuration form. Note that the first column shows the two-dimension array index.
When the grid is formed with the combination of two dimension arrayed parameter (5x5 size) and the one dimension arrayed parameter (ten elements), the grid is shown as below in the configuration form. Note that the first column displays just the row numbers.
TIP
If the grid has more than one arrayed parameter, then the first column will show just the row number.

7. Parameter Definition Editor Basics 7.5. Reviewing general parameter functions
R110 Experion LX Parameter Definition Editor Reference Guide 69 February 2014 Honeywell
Deleting a grid Follow the steps in the following table to delete a grid.
Step Action
1 Select the complete grid that you want to delete.
2 From the drop-down Options tab, select Parameters > Remove Grid. Right clicking on the highlighted parameters will also provide a drop-down menu where Parameters > Remove Grid can be selected.
7.5 Reviewing general parameter functions Using cut/copy/paste for custom parameters
The Value CDPs tab will not show all the attributes of the parameters. There are some attributes, which are internally managed. Using the Manage view feature can hide attributes. In such scenarios, the need arises to copy the whole parameter definition irrespective of whether the attribute is internally managed or hidden through views. The cut/copy/paste parameters will allow copying the whole parameter definition and pasting the definition as a new parameter. This feature will also work across PDEs, meaning the parameters can be copied from one instance and pasted in another instance of PDE.
Cutting parameters The following consideration should be observed when cutting parameters:
• When cutting parameters, be sure to select a complete row.
The following is used to cut parameters:
Step Action
1 Click a parameter on the active tab, and then right-click to open the right-click menu.
2 On the right-click menu, click Cut parameters to remove the parameter definition and copy it to the clipboard.

7. Parameter Definition Editor Basics 7.6. Automatic form layout
70 Experion LX Parameter Definition Editor Reference Guide R110 Honeywell February 2014
Copying parameters The following considerations should be observed when copying parameters:
• Copy parameter menu is enabled only if any of the selected rows has a parameter definition.
• Multiple rows can be selected to copy multiple parameters.
The following procedure is used to copy parameters:
Step Action
1 Click a parameter on the active tab, and then right-click to open the right-click menu.
2 On the right-click menu, click Copy parameters to copy the selected parameter.
Pasting parameters
The following considerations should be observed when pasting parameters:
• The paste parameter menu is enabled only if there are any parameters available in the clipboard for pasting.
• The pasting starts from the row where the menu was right-clicked.
• Pasting on the row, which has defined parameter, overwrites the parameter attributes.
• A new parameter name is generated if the parameter name already exists.
The following procedure is used to paste parameters:
Step Action
1 Click a parameter on the active tab and right-click to open the right-click menu.
2 On the right-click menu, click Paste parameters to paste the previously copied parameter in the selected row.

7. Parameter Definition Editor Basics 7.6. Automatic form layout
R110 Experion LX Parameter Definition Editor Reference Guide 71 February 2014 Honeywell
7.6 Automatic form layout Generating automatic form layouts
The automatic form layout generation is the feature that generates the form layout from the order of the parameters defined.
Considerations for CDB and CAB • Any update to the parameters in the Value CDPs main tab will be reflected in the
Value CDPs tab of the Form Layout.
• The order of the parameter in the Value CDPs main tab and the Value CDPs tab of the Form Layout will be same.
• The GUI control used for the parameter will be decided while populating the data to the Engineering Repository Database (ERDB) based on the data type of the parameter.
• In the case where the form layout is disturbed, the form layout can be regenerated from the Regenerate Layout selection in the Options menu. This will create a layout by placing all the custom parameters in the Left field name of the form layout.
Considerations for CDB This feature is only available to:
• The Value CDPs tab on the form layout CDB.
• The Value CDPs tab in Form Layout Value CDPs is designated as the tab in which the custom parameters will be shown. Any custom parameter added in the Value CDPs main tab, would also be added to the Value CDPs tab of the Form Layout tab. If the order of the parameters in the Form Layout tab is altered, then the automatic form layout generation will work minimally.
• Any difference in the order of the parameters in the Value CDPs main tab and the second tab of the form layout will cause the automatic form layout generation to work minimally.
• The following should be considered.

7. Parameter Definition Editor Basics 7.6. Automatic form layout
72 Experion LX Parameter Definition Editor Reference Guide R110 Honeywell February 2014
− The parameter will be added to the end of the Value CDPs tab if the appropriate place for the new parameter could not be identified.
− Even if the above case fails then the parameter will be added to the first tab of the Form Layout.
− Failure in both the above cases will generate an error and the parameter should be added manually.
Considerations for CAB This feature is only available to:
• The Value CDPs tab and Parameter References tab.
• The " Value CDPs tab and Parameter References tabs in the Form Layout are designated as the tabs in which the Custom and Parameter Reference parameters will be shown respectively. Any custom parameter added in the Value CDPs main tab would also be added to the Value CDPs tab of the Form Layout tab. Any parameter reference added in the Parameter References main tab, would also be added to the Parameter References tab of the Form Layout tab. If the order of the parameters in the Form Layout tab is altered, then the automatic form layout generation will work minimally.
• Any update to the parameters in the Parameter References main tab will be reflected in the Parameter References tab of the Form Layout.
• The order of the parameters in the Parameter References main tab and the Parameter References tab of the Form Layout will be same.
• Any difference in the order of the parameters in the Value CDPs/Parameter References main tab and the Value CDPs/Parameter References tab of the Form Layout respectively, will cause the automatic form layout generation to work minimally.
• The following should be considered.
− The parameter will be added to the end of the Value CDPs/Parameter References tab based on the parameter category, if the appropriate place for the new parameter could not be identified.
− Even if the above case fails the parameter will be added to the first tab of the Form Layout.
− Failure in both the above cases will generate an error and the parameter should be added manually.

R110 Experion LX Parameter Definition Editor Reference Guide 73 February 2014 Honeywell
8. Reviewing PDE Views You can customize the view of the Value CDPs tab in PDE to show only the parameter attributes that you select through view configuration.
8.1 Reviewing PDE views for CAB and CDB The view is an option in PDE to switch the columns of the grid on or off. The view information is stored with respect to the block type and is applied only to the Custom parameter grid (Value CDPs). The view information is carried along with the block type. If the block type opened by PDE has a view defined, then the block type view will be applied to the Custom parameter grid otherwise; the system default view will be applied.
Considerations • You configure the parameter attributes through a check box selection in the
Parameter Attributes list box.
• All the system default parameter attributes will be listed in the parameter attributes list.
• All the mandatory parameter attributes are shaded, since they are not available for configuration and they will always be selected.
• The grayed parameter attributes will always be selected and cannot be switched off.
• The parameter attributes list will have a check box to indicate the attributes to be shown in the grid. The checked items will be shown and un-checked items will not be shown in the grid.
• Clicking on the OK button will save the view information in memory with the block type definition.
• Only after the block type definition is written to disk, will the view information be physically written along with the block type definition.
• Clicking on the Cancel button will discard all the changes.

8. Reviewing PDE Views 8.1. Reviewing PDE views for CAB and CDB
74 Experion LX Parameter Definition Editor Reference Guide R110 Honeywell February 2014
Launching Configure PDE views dialog for CAB The PDE window should be opened to invoke the Configure PDE views dialog.
Selecting the menu item View > Configure PDE View will invoke the Configure PDE views dialog.
PDE Views Dialog

8. Reviewing PDE Views 8.1. Reviewing PDE views for CAB and CDB
R110 Experion LX Parameter Definition Editor Reference Guide 75 February 2014 Honeywell
Launching Configure PDE views dialog for CDB The PDE window should be opened to invoke the Configure PDE views dialog. Selecting the menu item View > Configure PDE Views will invoke the Configure PDE views dialog.
PDE Views Dialog

8. Reviewing PDE Views 8.1. Reviewing PDE views for CAB and CDB
76 Experion LX Parameter Definition Editor Reference Guide R110 Honeywell February 2014

R110 Experion LX Parameter Definition Editor Reference Guide 77 February 2014 Honeywell
9. Launching and Closing PDE
9.1 Overview Launching PDE
Control Builder is running and you have logged on with engineering access level or higher, if you want to edit parameters. If you log on with Operator access level, you will be granted read-only access.
Step Action
1 On the Library tab, click the plus sign for the device named folder.
2 Click the plus sign for the device icon to expose its blocks.
3 Double-click the desired device block.
4 The PDE for the selected block type opens in the Control Drawing area of Control Builder.
Closing/re-opening PDE in VS.NET IDE when using CAB
The PDE window can be closed at any time within the Visual Studio .NET IDE. This can be done using the menu option File > Close. The PDE window should be the active window when using this menu item.
If any data is to be saved before closing the PDE window, the following message will be displayed to save the PDE data changes.

9. Launching and Closing PDE 9.1. Overview
78 Experion LX Parameter Definition Editor Reference Guide R110 Honeywell February 2014
The closed PDE window can be opened any time using the menu option File > Open > Parameter Definition Editor.
This will re-open the PDE with the saved data.

R110 Experion LX Parameter Definition Editor Reference Guide 79 February 2014 Honeywell
10. Error Messages
10.1 Overview The error messages that are specific to the PDE will be stored internal to PDE and displayed by PDE. The error messages that are generated by the PDE are listed below. The messages are grouped based on the context in which the errors are generated.
10.2 Editing parameter names The following table identifies possible error messages when editing parameter names.
Error Message Error Description
"Parameter name already exist. Please enter new parameter name."
The new parameter entered is not unique.
"Parameter name cannot be empty. Please enter the parameter name."
Editing the parameter name results in an empty string.
"Invalid character in the parameter name."
Invalid characters are entered for the parameter name.
"Length of the Parameter name exceeds the maximum length."
The length of the parameter name exceeds the specified length.
"First character in the Parameter name should be alphabetic."
The first character of the parameter is invalid.
10.3 Editing cells The following table identifies possible error messages when editing cells.
Error Message Error Description
"Invalid value entered in the cell. Please enter valid value."
The value entered is the cell is invalid. The invalid value could be non-numeric characters in the numeric cell, and so on.
"The data type for the parameter is not defined. Cannot edit the cell."
A data type of the parameter is not defined and a cell is being edited that depends on the data type. This message is specific to the Default value, Min/Max value.

10. Error Messages 10.4. Editing array values
80 Experion LX Parameter Definition Editor Reference Guide R110 Honeywell February 2014
10.4 Editing array values The following table identifies possible error messages when editing array values.
Error Message Error Description
"Array value cannot be blank in the cell %1. Please enter the array value."
An intermediate array value is left blank in the array value editing grid.
"Invalid array size. Array size cannot be less than zero or empty."
Array size entered is invalid.
"First dimension of array should be defined to specify second dimension."
The second dimension is being edited without first specifying the first dimension.
"Invalid array value syntax. Cannot set the array value."
The syntax of the array definition is invalid. This message is applicable during paste operation.
10.5 Validating ranges The following table identifies possible error messages when validating ranges.
Error Message Error Description
"The value entered is less than the minimum value."
The default value of the parameter is less than its minimum value.
"The value entered is greater than the maximum value."
The default value of the parameter is greater than its maximum value.
"The minimum value cannot be greater than maximum value."
The minimum value of the parameter is greater than its maximum value.
"The maximum value cannot be less than the minimum value."
The maximum value of the parameter is less than its minimum value.
"Invalid string length. The length of the string cannot be zero."
The length of the string is entered as zero.
"The Default Value(s) is not in range due to change in the cell value. Cannot change the cell value."
The default value of the parameter is not within the range of minimum/maximum due to change in the minimum/maximum value.
"The value entered is greater than the maximum length allowed."
The default value entered for the string data type is greater than the length of the string specified.

10. Error Messages 10.6. Editing the Symbol attribute tab
R110 Experion LX Parameter Definition Editor Reference Guide 81 February 2014 Honeywell
Error Message Error Description
"The value does not fit into the size of the data type."
The value entered in the cell does not fit the size of the data type.
"The data size of the field is exceeding the maximum length of the field. The maximum length of the field is 255 characters."
The parameter description field exceeds the maximum length of 255 characters.
"One of the array values is invalid or does not fit into the size of the data type."
Multiple array values are being pasted or entered in the cell that resulted in an invalid value.
"The length of the string is greater than the maximum length allowed."
The length of the string is greater than the length specified in the size attribute.
10.6 Editing the Symbol attribute tab The following table identifies possible error messages when editing the Symbol Attribute tab.
Error Message Error Description
"The symbol attribute name is not defined. Cannot edit the cell."
The symbol attribute in the parameter name column is not defined and the pins are being assigned.
"The order is not unique in the column. Please enter the unique value."
The pin values entered in the symbol attributes tab is not unique.
The pin exposure permission of parameter "%1" does not allow to configure "%2" pin."
The parameter entered for specifying symbol attribute does not have valid pin exposure permission.
"Parameter is already defined in the row %1."
The same parameter has been used more than once in the symbol attribute.
"Invalid syntax in parameter name." The lexical syntax of the parameter name is invalid (as in using different character to specify the array index, etc.).
"Invalid array index specified in the parameter name."
The arrayed parameter is being referred, the array index is invalid.
"The array subscript is out of range." The arrayed parameter subscript is out of range.

10. Error Messages 10.7. Editing form layouts
82 Experion LX Parameter Definition Editor Reference Guide R110 Honeywell February 2014
Error Message Error Description
"Index for the parameter is invalid. The parameter is not an array."
The array index is specified for the non-arrayed parameter.
"Parameter is defined as array. But array subscript is not specified."
The array index is not specified for the arrayed parameter.
"Invalid parameter "%1". Please select the valid parameter."
An invalid parameter name is picked in the Parameter Picker dialog.
10.7 Editing form layouts The following table identifies possible error messages when editing form layouts.
Error Message Error Description
"Row [%1]: Invalid Parameter name entered in the row"
The parameter name for the form layout is invalid.
"Row [%1]: Group should have at least 1 parameter. Blank groups are not allowed!"
The group box does not have any parameter defined.
"Row [%1]: Grid should have at least 1 column. Blank grids are not allowed!"
The grid does not have any parameter associated with it.
"Row [%1]: The parameter in the row is already used once. Cannot use the same parameter in multiple tabs."
There are multiple instances of the same parameter in the form layout.
"Row [%1]: Invalid number of lines visible specified in the row. The value should be >0."
The number of visible lines for the grid is invalid.
"Form layout tab name cannot be empty."
The tab name entered is empty.
"Row[%1]: The left group name is mandatory."
The left group name is not specified.
"Row[%1]: The right group name is mandatory."
The right group name is not specified.
"Row[%1]: The grid name is mandatory."
The grid name is not specified.

10. Error Messages 10.8. Validating manage views
R110 Experion LX Parameter Definition Editor Reference Guide 83 February 2014 Honeywell
Error Message Error Description
"Row[%1] : Right field name is not allowed without left field name"
A row has only right field defined with a left field.
"Row[%1]: Right field name cannot be empty in the row."
A bottom row is left blank in the right field.
"The tab name "%1" is already used. Please enter the new tab name."
A new tab name entered already exist. The tab names should be unique.
"Cannot create/move tab before "%s" tab. "%s" tab position is fixed on form layout."
A user tries to create a new tab before the read-only tab. With CAB/CDB, it is the "Main" tab. Since the read-only tab position is fixed, no tabs can be created before the tab.
"Cannot DELETE any tab before "%s" tab. "%s" tab position is fixed on form layout."
User tries to delete a tab before any read-only tab. With CAB/CDB, it is the "Main" tab. Since read-only tab position is fixed, no tabs can be deleted before the tab.
"Cannot RENAME "%s" tab. "%s" tab is mandatory tab on form layout."
User tries to rename the read-only tab. With CAB/CDB, it is the "Main" tab. Since the read-only tab position and name are fixed, the tab cannot be renamed.
"Cannot DELETE "%s" tab. "%s" tab is mandatory tab on form layout."
A user tries to delete the read-only tab. With CAB/CDB, it is the "Main" tab. Since the read-only tab position and name are fixed, the tab cannot be deleted.
"Cannot MOVE "%1" tab. "%1" tab position is fixed on form layout."
User tries to drag and drop the read-only tab. With CAB/CDB, it is the "Main" tab. Since the read-only tab position and name are fixed, the tab cannot be deleted.
"Automatic form layout generation failed. The parameter "%1" was not added to the form layout. The parameter has to be added manually to the form layout."
The newly created parameter on the "Value CDPs"/Parameter References tab was not added on the form layout. User changing the parameter order could cause this.
"Row [%s]: Parameter ""%s"" with category ""%s"" is not allowed inside grid."
The parameter, which belongs to category that is not allowed on the grid, is added to the grid.

10. Error Messages 10.8. Validating manage views
84 Experion LX Parameter Definition Editor Reference Guide R110 Honeywell February 2014
Error Message Error Description
"Row [%1]: Non arrayed parameter ""%2"" is not allowed inside grid."
The non arrayed parameter is added as a column of the grid.
10.8 Validating manage views The following table identifies possible error messages when validating manage views.
Error Message Error Description
"%s - The view name already exists, please enter different view name!"
The duplicate view name is entered.
"No tabs are configured to be associated with views. Cannot configure views."
None of the tab is configured to show Manage views and the configure views dialog is invoked by the container.
"The active tab does not support views. Only the following tabs support views."
The tab configured for Manage views is not active and the configure views dialog is invoked.
10.9 Saving PDE data The following table identifies possible error messages when saving PDE data.
Error Message Error Description
"The parameter attribute ""%1"" is mandatory in the row ""%2""".
One of the mandatory parameter attributes is not specified. This message comes up while saving.
"Cannot save file. No file is opened to save".
No file is opened and the Save method of PDE is called.
"Error writing the XML file to the disk." Any Error occurred while saving the .DEF.XML file. More information about the error will be logged in the EHI error log file.

10. Error Messages 10.9. Saving PDE data
R110 Experion LX Parameter Definition Editor Reference Guide 85 February 2014 Honeywell

Honeywell Process Solutions 1860 W. Rose Garden Lane Phoenix, AZ 85027 USA