parallel rack systems - hussmann corporation documents/0427598_… · · 2017-01-04installation...
TRANSCRIPT

Installation & Operation Manual
P/N 0427598_DOctober 2016
IMPORTANTKeep in store forfuture reference!
Parallel Rack Systems
MANUAL- I/O PARALLEL RACK


Parallel Rack
P/N 0427598_D iii
HUSSMANN CORPORATION • BRIDGETON, MO 63044-2483 U.S.A.
INSTALLATION
Shipping Damage . . . . . . . . . . . . . . . . . . . . 1-1General Rack Description . . . . . . . . . . . . . 1-1General Rack Components . . . . . . . . . . . . 1-1Remote Satellite Components . . . . . . . . . 1-2Legend, Labels & Wiring Diagrams . . . . . 1-2Setup Sheet . . . . . . . . . . . . . . . . . . . . . . . . . 1-2Machine Room Requirements . . . . . . . . . . 1-3Handling . . . . . . . . . . . . . . . . . . . . . . . . . . . 1-4Rack Unit Placement . . . . . . . . . . . . . . . . . 1-5 Minimum Allowable Distances . . . . . . . . . . . . . . 1-5
Maximum Allowable Distances . . . . . . . . . . . . . . 1-5
Ventilation . . . . . . . . . . . . . . . . . . . . . . . . . 1-6Floor Drain . . . . . . . . . . . . . . . . . . . . . . . . 1-6Remote Condenser Placement . . . . . . . . . . 1-6Installing Vibration Pads . . . . . . . . . . . . . . 1-7Rack Sizing Charts . . . . . . . . . . . . . . . . . . . 1-8
COMPONENT PIPING & LINE SIZING
Rack Piping Overview . . . . . . . . . . . . . . . . 2-1Refrigeration Line Runs . . . . . . . . . . . . . . 2-1Insulation . . . . . . . . . . . . . . . . . . . . . . . . . . 2-3Special Piping for Open Rooms . . . . . . . . . 2-3Connecting Parallel 3-Way Valves . . . . . . 2-3Run Lengths and Equivalent Feet . . . . . . . 2-3Rack to Condenser Piping . . . . . . . . . . . . . 2-4Purge Valve Location . . . . . . . . . . . . . . . . . 2-4Receiver Safety Relief Valve . . . . . . . . . . . 2-4Connecting to Two Manifolds . . . . . . . . . . 2-5
Equalizing Line . . . . . . . . . . . . . . . . . . . . . . 2-5Condenser Piping w/ Heat Reclaim . . . . . . 2-6Split Condenser Piping . . . . . . . . . . . . . . . 2-7Split Condenser Piping (3-Way Valve) . . . 2-8Rack to Heat Reclaim . . . . . . . . . . . . . . . . 2-9Rack to Remote Header . . . . . . . . . . . . . . 2-9Rack to Remote Satellite . . . . . . . . . . . . . . 2-9 Discharge Lines for Two Satellites . . . . . . . . . . . . 2-9
Oil Lines for Remote Satellites . . . . . . . . . . . . . . 2-9
Offset and Expansion Loop Const . . . . . . 2-10Branch Line Piping . . . . . . . . . . . . . . . . . . 2-11Koolgas Defrost . . . . . . . . . . . . . . . . . . . . 2-12
REFRIGERATION
Overview . . . . . . . . . . . . . . . . . . . . . . . . . . . 3-1Basic Refrigeration Cycle . . . . . . . . . . . . . . 3-1Rack Diagram . . . . . . . . . . . . . . . . . . . . . . 3-2Thermostatic Expansion Valve . . . . . . . . . 3-3 Superheat . . . . . . . . . . . . . . . . . . . . . . . . . . . . . . . 3-3
Heat Reclaim Cycle . . . . . . . . . . . . . . . . . . 3-3Heat Reclaim Valve . . . . . . . . . . . . . . . . . . 3-4Flooding Valve and Receiver Pressure Regulating Valve . . . . . . . . . . . . . . . . . . . 3-4Koolgas Defrost Cycle . . . . . . . . . . . . . . . . 3-5Oil System . . . . . . . . . . . . . . . . . . . . . . . . . . 3-5Y825 Valve Adjustment . . . . . . . . . . . . . . . 3-6Ambient Subcooling . . . . . . . . . . . . . . . . . . 3-7
TABLE OF CONTENTS
IMPORTANTKEEP IN STORE FOR FUTURE REFERENCE
Quality that sets industry standards!
12999 St . Charles Rock Road • Bridgeton, MO 63044-2483
U .S . & Canada 1-800-922-1919 • Mexico 01-800-890-2900
www.hussmann.com© 2016 Hussmann Corporation
Continued on Page iv

P/N 0427598_D U.S. & Canada 1-800-922-1919 • Mexico 1-800-890-2900 • WWW.HUSSMANN.COM
iv
Mechanical Subcooling . . . . . . . . . . . . . . . 3-7Two Stage Mechanical Subcooling . . . . . . 3-7Liquid Injection . . . . . . . . . . . . . . . . . . . . . 3-8EPR Valve . . . . . . . . . . . . . . . . . . . . . . . . . 3-9CPR Valve . . . . . . . . . . . . . . . . . . . . . . . . 3-10Main Liquid Line Solenoid Valves . . . . . 3-11Branch Liquid Line Solenoid Valves . . . 3-113-Way Split Condensing Valves . . . . . . . . 3-12Surge Receiver Valves . . . . . . . . . . . . . . . 3-12Subcooling with Plate Heat Exchanger . 3-12Liquid Line Differential Valve Adjustment . . . . . . . . . . . . . . . . . . . . . . . . 3-13SORIT Evap Pressure Reg Adjustment . . 3-13Low Pressure Controls . . . . . . . . . . . . . . . 3-13Control Settings General Description . . . 3-15
ELECTRICAL
Electrical Overview . . . . . . . . . . . . . . . . . . . 4-1Field Wiring . . . . . . . . . . . . . . . . . . . . . . . . 4-1 For Remote Header Defrost Assembly . . . . . . . . 4-1
For 208-230/3/60 Compressor Units . . . . . . . . . . 4-1
Required Field Wire Size . . . . . . . . . . . . . . 4-1Merchandiser Electrical Data . . . . . . . . . . 4-2Merchandiser Field Wiring . . . . . . . . . . . . 4-2Electrical Connections . . . . . . . . . . . . . . . . 4-2Identification of Wiring . . . . . . . . . . . . . . . 4-2Electrical Diagrams . . . . . . . . . . . . . . . . . . 4-3 Unit Cooler Fan Wiring . . . . . . . . . . . . . . . . . . . . 4-3
Cooler Door Switch Wiring . . . . . . . . . . . . . . . . . 4-3
Component Wiring Guidelines . . . . . . . . . 4-3 Sizing Wire and Overcurrent Protectors . . . . . . . 4-3
Other Controls . . . . . . . . . . . . . . . . . . . . . . . . . . . 4-3
Compressor Control . . . . . . . . . . . . . . . . . . 4-3Electronic Controller . . . . . . . . . . . . . . . . . 4-4Time Delay . . . . . . . . . . . . . . . . . . . . . . . . . 4-4Pressure Switches . . . . . . . . . . . . . . . . . . . . 4-4Switchback Control (Optional) . . . . . . . . . 4-4Crankcase Heaters (Optional) . . . . . . . . . . 4-4Oil Failure Relay . . . . . . . . . . . . . . . . . . . . 4-4Current Relay (Optional) . . . . . . . . . . . . . . 4-4Defrost Controls . . . . . . . . . . . . . . . . . . . . . 4-5 Refrigeration Mode . . . . . . . . . . . . . . . . . . . . . . . 4-5
Defrost Mode . . . . . . . . . . . . . . . . . . . . . . . . . . . . 4-5
Temperature Controls . . . . . . . . . . . . . . . . 4-5 Refrigeration Thermostat (Alternate) . . . . . . . . . 4-5
Case Probe (Alternate) . . . . . . . . . . . . . . . . . . . . . 4-5
Defrost Termination Thermostat . . . . . . . . . . . . . 4-5
Master Defrost Valve . . . . . . . . . . . . . . . . . . . . . . 4-5
Alarm Control . . . . . . . . . . . . . . . . . . . . . . 4-6 Alarm System . . . . . . . . . . . . . . . . . . . . . . . . . . . . 4-6
Alarm Control (Electronic) . . . . . . . . . . . . . . . . . . 4-6
Alarm Systems . . . . . . . . . . . . . . . . . . . . . . . . . . . . 4-6
Inverter Control . . . . . . . . . . . . . . . . . . . . . 4-6 Unit Cooler Fan Wiring . . . . . . . . . . . . . . . . . . . . 4-7
Evaporator Mounted Liquid Line Solenoid . . . . 4-7
Cooler Door Switch Wiring . . . . . . . . . . . . . . . . . 4-7
Sizing Wire and Overcurrent Protectors . . . . . . . 4-7
START-UP
Leak Testing . . . . . . . . . . . . . . . . . . . . . . . . 5-1Pre-Charge Check List . . . . . . . . . . . . . . . . 5-1
Charging . . . . . . . . . . . . . . . . . . . . . . . . . . . 5-2
Oil Levels . . . . . . . . . . . . . . . . . . . . . . . . . . . . . . . 5-2
Evacuation . . . . . . . . . . . . . . . . . . . . . . . . . . . . . . . 5-3
Final Checks . . . . . . . . . . . . . . . . . . . . . . . . . . . . . 5-3
Thermostat Settings . . . . . . . . . . . . . . . . . . . . . . . 5-3
Liquid Drier Core Replacement . . . . . . . . 5-3Suction Filter Core Replacement . . . . . . . 5-3
MAINTENANCE
Compressor Replacement . . . . . . . . . . . . . 6-1Winter Condensing Pressure Controls . . . 6-2General Maintenance . . . . . . . . . . . . . . . . . 6-3Drier and Filter Cores Replacement . . . . . 6-4
SERVICE
Trouble Shooting Information . . . . . . . . . 7-1Trouble Shooting Guides . . . . . . . . . . . . . 7-2Supermarket Equipment . . . . . . . . . . . . . . 7-4
Parallel Rack
P/N 0427598_D v
REVISION HISTORY
Revision D - moved Nomenclature, vi, Added, Page
1-4 Lifting Details, Updated Page 1-6, Revised
Drawings in Section 2; Removed Line Sizing
Charts
Revision C - Added Trouble Shooting Guide
Revision B - Revised Vibration Pad Table, Page 1-6
ORIGINAL ISSUE — February 2013
* * * * * * * * * * * * * * * * * * * * * * * * * *
ANSI Z535.5 DEFINITIONS
• DANGER – Indicate[s] a hazardous situation which, if not avoided, will result in death or serious injury .
• WARNING – Indicate[s] a hazardous situation which, if not avoided, could result in death or serious injury .
• CAUTION – Indicate[s] a hazardous situation which, if not avoided, could result in minor or moderate injury .
• NOTICE – Not related to personal injury – Indicates[s] situations, which if not avoided, could result in damage to equipment .
HUSSMANN CORPORATION • BRIDGETON, MO 63044-2483 U.S.A.

vi
P/N 0427598_D U.S. & Canada 1-800-922-1919 • Mexico 1-800-890-2900 • WWW.HUSSMANN.COM
Voltage (K=208/3/60, M-460/3/60, P=575/3/60, U=380/3/50)
Temperature Application {L=Low, M=Medium, H=High, D=Dual (Split Header), T=Two Stage
Refrigerant Type (F=R407F, J=R134A, P=R507, Q=R407A, R=R449A, S=R404A, T=R448A)
Total number of compressors (Must be two digit i.e. 7 compressors = 07
Number of suction groups
Number of satellite Compressors
Compressor System Designation {C = parallel compressor system, R = Refrigeration System Solution}
CS 0 1 03 S L K
Rack Nomenclature

Parallel Rack
P/N 0427598_D 1-1
HUSSMANN CORPORATION • BRIDGETON, MO 63044-2483 U.S.A.
INSTALLATION
SHIPPING DAMAGE
All equipment should be thoroughly examined for shipping damage before and while unloading. This equipment has been carefully inspected at our factory and the carrier has assumed responsibility for safe arrival. If damaged, either apparent or con-cealed, claim must be made to the carrier. Hussmann parallel compressor systems are cling wrapped and taped prior to shipping via flatbed trailer.
Apparent Loss or DamageIf there is an obvious loss or damage, it must be noted on the freight bill or express receipt and signed by the carrier’s agent, otherwise, carrier may refuse claim. The carrier will supply the necessary claim forms.
GENERAL RACK DESCRIPTION
The Hussmann parallel rack operates with up to ten reciprocating or screw compressors or fourteen scroll compressors in parallel design. The compact design reduces space requirements, and its open construction provides convenient access to components for easy maintenance and service.
Typically, all supermarket refrigeration needs are handled by low and medium temperature racks.
An average low temperature rack runs below 0°F and may have a satellite operating as low as -40°F. Common medium temperature racks operate between 0°F and 40°F.
Concealed Loss or DamageWhen loss or damage is not apparent until after equipment is uncrated, a claim for concealed damage is made. Upon discovering damage, make request in writing to carrier for inspection within 15 days, and retain all packaging. The carrier will supply an inspection report and required claim forms.
GENERAL RACK COMPONENTS
Each parallel/custom rack contains the following components:
As many as fourteen Copeland Scrolls, or 2-10 Copeland, or 2-10 Carlyle semi-hermetic, or 2-10 Bitzer, or 2-10 Bitzer or Carlye screw compressors with:
• high and low pressure controls• oil pressure safety control• primary overload protection• compressor cooling fans on low temperature application
Factory piping with:
• suction, discharge, liquid header • defrost header (if applicable)• oil separator and return system • receiver• suction filters on each compressor• liquid filter drier and sight glass• liquid level indicator• liquid level switch

1-2 InstallatIon
P/N 0427598_D U.S. & Canada 1-800-922-1919 • Mexico 01-800-890-2900 • WWW.HUSSMANN.COM
Control Panel: The control panel contains all the necessary energy management compo-nents and motor controls factory-wired to the compressors. The interconnected compressors are cycled on and off, via low-pressure settings, by a central controller to match refrigeration capacity with load requirements.
Factory-wired control panel has:• pre-wired distribution power block• individual component circuit breakers and contactors• compressor time delays• color-coded wiring system Items supplied separately for field installation:• liquid dryer cores• vibration isolation pads• loose shipped items for accessories• suction filter cores
REMOTE SATELLITE COMPONENTS
Although the satellite is a separate compressor, its liquid refrigerant is supplied by the rack liquid manifold. The suction gases pulled by the satellite are discharged into the rack discharge manifold. The satellite components include:
One compressor with:• high and low pressure controls• oil pressure safety control• primary overload protection• compressor cooling fans on low temp
Factory piping with:• suction and discharge stubs• oil systems with connections• suction filter
Factory control panel with:• pre-wired distribution power block• individual component circuit breakers• compressor time delay relays
LEGEND, LABELS & WIRING DIAGRAMS
Each parallel rack is shipped with a detailed legend that identifies the specialized compo-nents used such as compressors, valves, oil separators, etc. The legend details line sizing requirements, BTUH loads, control valves, circuit information and suction temperatures.
Type of refrigerant and lubricant to be used are prominently displayed on the front of the rack.
All racks include complete wiring diagrams (control, primary power, board and point layout.) All wiring is color coded.
SETUP SHEET
All set points are to be on a setup sheet mounted inside the door of the rack’s electrical cabinet. This sheet includes all set points for field-adjusted components. (i.e. suction pressure, discharge pressure, subcooler setting).

Parallel Rack
P/N 0427598_D 1-3
HUSSMANN CORPORATION • BRIDGETON, MO 63044-2483 U.S.A.
MACHINE ROOM REQUIREMENTS
Equipment must be located in a dedicated operating area to provide enough working space for service personnel and meet electrical codes.
Hussmann recommends ventilation should be a minimum of 65 cfm per compressor unit horse power. The air inlet should be sized for a maximum of 500 fpm velocity. Ventilation fans should cycle by thermostatic control.
Proper ventilation provides needed air flow across the compressors that helps maintain the operation of the rack. Duct work may be necessary. All ventilation equipment is field-supplied and installed. Check national and local codes for ventilation requirements before installation.
The equipment room floor must solidly support the compressor unit as a live load. Ground level installation seldom presents problems, but a mezzanine installation must be carefully engineered.
A concrete base must be built on the mezzanine floor to keep mechanical vibrations and noise to an acceptable level.
NOTERecommended spacing is site specific. It is the installer’s responsibility to check local codes and standards.
6 in. Concrete Base for Mezzanine
Mezzanine Floor

1-4 InstallatIon
P/N 0427598_D U.S. & Canada 1-800-922-1919 • Mexico 01-800-890-2900 • WWW.HUSSMANN.COM
LIFTING DETAILS
HANDLING
Each compressor rack has lower base frame brackets for rigging and lifting. It is important to use the spreader bar to prevent the rigging from damaging the rack. Before placing the rack in the machine room, remove the ship-ping skid. For units with vertical receivers, be aware of the level sensor on top of the receiver. Lifting cables and other equipment must not come in contact with any unit piping or electri-cal components.

Parallel Rack
P/N 0427598_D 1-5
HUSSMANN CORPORATION • BRIDGETON, MO 63044-2483 U.S.A.
RACK UNIT PLACEMENT
Observe the minimum and maximum distances as described below for setting the rack in relation to other refrigeration equipment:
Minimum Allowable DistancesWater-cooled Condenser: The minimum allowable elevation is one foot from the outlet to the receiver inlet.
Air Cooled Condenser:The minimum allowable distance is 4 1/2 ft with no flooding valve from the mounting surface of the air-cooled condenser to the mounting surface of the custom rack. The minimum allowable distance is 6 feet with a flooding valve from the mounting sur-face of the air-cooled condenser to the center of the flooding valve.
Maximum Allowable DistancesRemote satellites: should not be placed below the level of the custom or parallel rack. The satellite may be positioned above the rack. The maximum allowable elevation is 6 feet from the bottom of the rack.
Remote Header: The maximum allowable piping equivalent is 50 feet when piping from the rack to the remote satellite. Piping should be given special consideration when going from the rack to the remote header.
Condenser:The maximum allowable piping equivalent is 100 feet when piping from the rack to the condenser.
NOTE: Piping equivalent is not the same length as linear distance.Condenser
W/ Flooding Valve 6 ft. Min.
Rack
Flooding Valve
1 ft Min.
Water Cooled Condenser
Condenser
W/O Flooding Valve 4.5 ft. Min.
Remote SatelliteRemote Header
6ft Max
Piping Equivalent 50ft Max
Piping Equivalent 50ft Max
Piping Equivalent 100ft Max

1-6 InstallatIon
P/N 0427598_D U.S. & Canada 1-800-922-1919 • Mexico 01-800-890-2900 • WWW.HUSSMANN.COM
VENTILATION
Cooler climates generally need less ventilation than warmer climates. A warm machine room is going to need a good amount of ventilation. Compressors with head fans can dissipate as much as 20 percent of the heat (or input watts). Air intake should pass over the top of the units where most of the heat remains. See machine room requirements for additional information on ventilation and sizing.
FLOOR DRAIN
Provide a floor drain for disposal of conden-sate that may form on the compressor unit or header defrost assembly.
REMOTE CONDENSER PLACEMENT
Locate the condenser with at least three feet of clearance on all sides to provide adequate air circulation if not otherwise specified by the condenser manufacturer. If roof mounted, place on column-supported beams or load-bearing walls. The mounting surface for the condenser should be at least six feet higher than the rack flooding valve. When a flooding valve is not used, the minimum distance from the base of the rack to the mounting surface of the condenser is 4.5 ft. If a Krack Microchannel (MX) is used, sufficient room on the right side of the unit must be available to remove the micro channel slabs. At least nine feet of clearance must be available.
Be careful when moving or lifting rack. Serious bodily injury or death could occur from falling equipment.
Typical Condenser Roof Mount Arrangement
Single Riser
Condenser Condenser
Double Riser
Typical Condenser Roof Mount Arrangement
Receiver Receiver

Parallel Rack
P/N 0427598_D 1-7
HUSSMANN CORPORATION • BRIDGETON, MO 63044-2483 U.S.A.
INSTALLING VIBRATION PADS
Each rack must be located in the machine room so that it is accessible from all sides. A minimum of 36 in. clearance is recommended to provide easy access to components.Vibration isolation pads are supplied with each rack. The entire weight of the rack must rest on these pads. The pads should be located as shown in the image below. Cross-level the compressor unit so all compressors are level with each other. To ensure both proper leveling and vibration isolation, perform the following:
1. Lift the rack in accordance with procedures detailed on Pages 1-3.
2. Place minimum 15 gauge 3 in. by 3 in. galvanized or stainless steel shims to compensate for uneven floors. (Shims must be field supplied.)
3. Place vibration isolation pads on top of shims. See vibration pad quantities in the table at right to determine the number of pads to be used.
4. Pads should be placed over structural joist members when rack is placed on sub-floor.
# of compressors per pack
Reciprocating or Scroll
ScrewCompressor
2 Compressors 4 Each 6 Each3 Compressors 4 Each 6 Each4 Compressors 6 Each 8 Each5 Compressors 6 Each 8 Each6 Compressors 6 Each 8 Each*7 Compressors 8 Each -----------8 Compressors 8 Each -----------9 Compressors 8 Each -----------
10 Compressors 10 Each -----------
Vibration Pad Quantities3 in. x 3 in. x 2 in.
*10 for Bitzer and Vertical Receiver
Vibration Pads

1-8 InstallatIon
P/N 0427598_D U.S. & Canada 1-800-922-1919 • Mexico 01-800-890-2900 • WWW.HUSSMANN.COM
# of Scroll Compressors
# of Reciprocating Compressors
Maximum number of circuits
Length of Rack (in.)
Approximate Operating Weight of Rack
3 or 4 3 11 98 33305 4 15 114 42906 5 19 138 52307 6 21 150 57208 7 24 178 6270
9 or 10 8 28 200 687011 9 32 222 747012 10 36 244 8070
# of Scroll Compressors
# of Reciprocating Compressors
Maximum number of circuits
Length of Rack (in.)
Approximate Operating Weight of Rack
3 or 4 3 11 128 33305 4 15 144 42906 5 19 168 52307 6 21 180 57208 7 24 208 6270
9 or 10 8 28 230 687011 9 32 252 747012 10 36 274 8070
Standard Rack Sizing Chart with Horizontal Receiver
Standard Rack Sizing Chart with Vertical Receiver
Note: Standard rack width is 39 in. Standard rack height is 78.5 in.
The charts above are acceptable for most compressor models except screw compressors
Dimensions may vary if optional accessories such as inverters, suction accumulators, electric defrost panels, etc. are applied

Parallel Rack
P/N 0427598_D 2-1
HUSSMANN CORPORATION • BRIDGETON, MO 63044-2483 U.S.A.
RACK PIPING OVERVIEW
This section provides information for installing the refrigeration lines for a rack. The compo-nents are piped as completely as practical at the factory. Field piping requires only interconnec-tion of the major components and the coolers, freezers and display cases. Piping must also be supported to minimize vibration. Pulsation of the refrigerant and compressor vibration can cause piping to vibrate. This vibration can cause line breakage and damage to components.
Use only clean, dehydrated, sealed refrigeration grade copper tubing. Use dry nitrogen at low pressure in the tubing during brazing to prevent the formation of copper oxide. All joints should be made with a 15 percent silver alloy brazing material. Use a 45 percent silver solder for dissimilar metals.
REFRIGERATION LINE RUNS
Liquid Lines and suction lines must be free to expand and contract independently of each other. Do not clamp or solder them together. Supports must allow tubing to expand and contract freely. Do not exceed 100 feet without a change of direction or/and offset. Plan proper pitching, expansion allowance, and waterseal at the base of all suction risers. Use long radius elbows to reduce line resistance and breakage. Avoid the use of 45 degree elbows. Install service valves at several locations for ease of maintenance and reduc-tion of service costs. These valves must be UL approved for the minimum design working pressure of the system.
Through Walls or FloorsRefrigeration lines that are run through walls or floors must have a waterseal installed, and the lines must be properly insulated. Avoid running lines through the refrigeration cases. When this is done the lines must be adequately insulated using a closed-cell elastomeric foam insulation.
COMPONENT PIPING & LINE SIZING
Always use a pressure regulator when operating nitrogen tanks.
Ceiling Run with Supports
Floor Piping Run
Riser
InsulationInsulation 2nd Layer
Insulating a Riser
Floor

2-2 Component piping & Line Sizing
P/N 0427598_D U.S. & Canada 1-800-922-1919 • Mexico 1-800-890-2900 • WWW.HUSSMANN.COM
From Machinery to Solid ObjectWhen mounting lines from machinery to a solid object allow line freedom for vibration to prevent metal fatigue.
Don’t over support piping that is in contact with the compressor racks. The machinery must not be tightly stressed from piping that does not allow for some vibration. If piping is too tight metal fatigue will occur.
Waterseal ConstructionWaterseals must be installed at the bottom of all suction risers to return oil to the compres-sors to avoid trapping oil.
Reduced RiserWhen a reduced riser is necessary, place the reduction coupling downstream of the waterseal.
Protecting Valves and Clamps When brazing near factory installed clamps or valves be sure to protect them with a wet rag to avoid overheating. Insulate all reduced risers.
All clamps must be properly anchored. Rubber gromets must be installed to prevent chafing of the lines.
Clamp Here
Factory Clamp 10 x Pipe Diameter
Keep this distance short as possible
Using Elbow Riser
Using Waterseal Riser
Waterseal Construction
Reduces Riser
Clamp
ClampClamp
Clamp
Clamp Clamp Clamp
Clamp
WRONG Avoid this Piping Arrangement
CORRECT Good for short piping runs
CORRECT Good for long piping runs

Parallel Rack
P/N 0427598_D 2-3
HUSSMANN CORPORATION • BRIDGETON, MO 63044-2483 U.S.A.
ElbowsOnly use long radius elbows. Long elbows have been shown to have less pressure drop and greater strength. It is especially important to use long radius elbows to hot gas discharge lines.
Factory Supplied StubsStub sizes provided from the manifolds do not automatically correspond to the line sizes necessary. It is the installer’s responsibility to supply reduction couplings.
INSULATION
All suction lines and subcooled liquid lines must be insulated. Subcooled liquid in the liquid line will warm if the lines are left unprotected, resulting in energy loss. Overtime this can lead to the liquid changing into a gas before it ever reaches the expansion valves. This is known as flashing. Flashing causes irregular flow through valves. If this occurs significant refrigerant loss and poor energy performance will occur. Compressor motors will fail if the suction line gas is too warm as it enters the compressors. For gas defrost applications, insulated suction lines help maintain temperature during defrost. Insulated lines also prevent sweating of the lines, thus eliminating drops of water on the floor below the line runs.
SPECIAL PIPING FOR OPEN ROOMS
An open food preparation room allows heat infiltration from the rest of the store at a rate which may jeopardize total refrigeration performance. To protect the rest of the refrigeration system, open preparation evaporators must be piped with a crankcase pressure regulating valve (CPR). The CPR is field installed in the suction line(s) from the
evaporator(s). And the installer is responsible for proper adjustment of the valve. (See CPR Valve Section for adjustment procedures.)
CONNECTING PARALLEL 3-WAY VALVES
Due to the size limitations of 3-way valves, some of the larger Koolgas systems will require parallel connection to 2 suction stubs at the header using an offset tee construction. Do not use a bull head tee.
RUN LENGTHS AND EQUIVALENT FEET
When figuring run lengths, angle valves and 90 degree elbows are figured as additional straight pipe. The chart below gives equivalent lengths for these.
Equivalent Feet for Angle Valve and 90°Elbow
Tubing Size Angle Valve Long Radius Elbow 90%
1/2 6 0.95/8 7 1.07/8 9 1.4
1 1/8 12 1.7
1 3/8 15 2.3
1 5/8 18 2.6
2 1/8 24 3.3
2 5/8 29 4.1
3 1/8 35 5.0
3 5/8 41 5.9
4 1/8 47 6.7
Connection to Parallel Suction Stubs

2-4 Component piping & Line Sizing
P/N 0427598_D U.S. & Canada 1-800-922-1919 • Mexico 1-800-890-2900 • WWW.HUSSMANN.COM
RACK TO CONDENSER PIPING
Discharge line will be routed directly to the condenser inlet stub with a purge valve at the highest point. Liquid return line will be pitched downstream, and purge valve location will provide trapless drainage to the rack.
PURGE VALVE LOCATION
The purge valve will be installed at the highest point of an inverted waterseal, with at least a 6 in. rise. (Use with approved recovery vessel.)
RECEIVER SAFETY RELIEF VALVE
The receiver safety relief valve must be properly vented in accordance with local codes.
NOTE: Liquid return lines must be free draining with no traps. Install solenoid valves inside equipment room. All interconnecting valving to be field supplied and installed.
CondenserDischarge Supply
6 in. Min Rise
6 Ft Min Drop before tee to main liquid line
Liquid Return
To Heat ReclaimFrom Heat Reclaim
Field Piping
Factory Piping
Rack to Condenser Piping

Parallel Rack
P/N 0427598_D 2-5
HUSSMANN CORPORATION • BRIDGETON, MO 63044-2483 U.S.A.
CONNECTING TO TWO MANIFOLDS
The discharge line will be “tee’d” upstream of the manifolds into expansion offsets with at least a one foot drop to the manifolds. Provide a purge valve at the highest point. The liquid return lines will be “tee’d” into the main liquid return line after six feet of vertical drop from the outlet stubs. The liquid return line will be pitched downstream, and provide trapless drainage to the rack.
EQUALIZING LINE
An equalizer line is piped between the parallel rack and the condenser. A check valve allowing flow only to the condenser and a shut off valve downstream of the check valve will be field supplied and installed.

2-6 Component piping & Line Sizing
P/N 0427598_D U.S. & Canada 1-800-922-1919 • Mexico 1-800-890-2900 • WWW.HUSSMANN.COM
From HeatReclaim
To HeatReclaim
Condenser
All Piping and Valves above this line are field supplied and installed
6 Ft Min Drop Before Tee to Main Liquid LineReturn
1" Min Drop After Tee from Main Discharge Line
6" MinRise
Condenser Piping w/ Heat Reclaim
INST & SER - 10
Discharge LinesLiquid Return LinesEqualizing Line
Note:Liquid Return Lines must be free draining with no TrapsInstall Ball valves to isolate Condenser (Field Supplied and Installed)All Inter-connecting Valving to be Field Supplied and Installed
Ball ValveCheck ValveService Valve
Purge Valve
Condenser ManifoldValve Solenoid
HS = Heat Reclaim
HS
Oil Separator
FloodingValve
Receiver Pressure Regulator
Condenser Piping w/ Heat Reclaim
Condenser
1” Min Drop After Tee from Main Discharge Line
6” Min Rise
6 Ft Min Drop Before Tee to Main Liquid Line Return
From Heat Reclaim
To Heat Reclaim All Piping and Valves
above this line are field supplied and installed
Flooding Valve
Oil Separator
Ball Valve
Check Valve
Service Valve
Purge Valve
Condenser Manifold
Valve Solenoid
HS = Heat Reclaim
Discharge Lines
Liquid Return Lines
Equalizing Line
Note:
Liquid Return Lines must be free draining with no TrapsInstall Ball valves to isolate Condenser (Field Supplied and Installed)All Interconnecting Valving to be Field Supplied and Installed

Parallel Rack
P/N 0427598_D 2-7
HUSSMANN CORPORATION • BRIDGETON, MO 63044-2483 U.S.A.
6” Min Rise
1” Min Drop
Split Condenser Piping 2 Solenoid Valve Method
w/Heat Reclaim
Condenser
6 Ft Min Drop Before Tee to Main Liquid Line Return
All Piping and Valves above this line are field supplied and installed
From Heat Reclaim
To Heat Reclaim Liquid Return
Bleed Line w/ Boil off Loops
Oil Separator
Suction Manifold
Flooding Valve
Ball Valve
Check Valve
Service Valve
Purge Valve
Condenser Manifold
Valve Solenoid
HS = Heat Reclaim
Discharge Lines
Liquid Return Lines
Equalizing Line
1/4” TubingPD = Pump DownSS = Split Condenser
Note:
Liquid Return Lines must be free draining with out TrapsInstall Solenoid valves to isolate Equipment RoomPump down Line should not enter the Suction Manifold over a Compressor InletInstall Ball Valves to isolate condenserAll Interconnecting Valving to be Field Supplied and Installed

2-8 Component piping & Line Sizing
P/N 0427598_D U.S. & Canada 1-800-922-1919 • Mexico 1-800-890-2900 • WWW.HUSSMANN.COM
Ft
Pump Out
Oil Separator
Receiver Pressurization Valve
Ball Valve
Check ValveService Valve
Purge Valve
Condenser Manifold
Valve Solenoid
HS = Heat Reclaim
Discharge Lines
Liquid Return Lines
Equalizing Line
1/4” TubingPD = Pump DownSS = Split Condenser
Note:
Liquid Return Lines must be free draining with no TrapsInstall Solenoid valves to isolate Equipment RoomPump down Line should not enter the Suction Manifold over a Compressor InletInstall Ball Valves to isolate condenserAll Interconnecting Valving to be Field Supplied and Installed
6” Min Rise
1” Min Drop
Condenser
6 Ft Min Drop Before Tee to Main Liquid Line Return
All Piping and Valves above this line are field supplied and installed
From Heat Reclaim
To Heat Reclaim
Suction Manifold
Flooding Valve
Split Condenser Piping 3-Way Valve Method
w/Heat Reclaim

Parallel Rack
P/N 0427598_D 2-9
HUSSMANN CORPORATION • BRIDGETON, MO 63044-2483 U.S.A.
RACK TO HEAT RECLAIM Because of the variety of heat reclaim systems, refer to the instructions accompanying the system to be installed at the site.
RACK TO REMOTE HEADER Separates compressors from defrost and temperature controls. The rack suction stub is connected as directly as possible to the suction header. The rack liquid line stub is connected as directly as possible to the liquid header. If equipped with Koolgas defrost the rack Koolgas stub is connected as directly as possible to the Koolgas header manifold. Note: The remote header may use a double suction riser to aid in oil return.
RACK TO REMOTE SATELLITE The compressor discharge line may be piped through a vibration absorber to its stub on the discharge header. The compressor suction line will be piped one of two ways depending on whether a low-end or high-end satellite is used. A low-end satellite suction line is piped to its check valve on the suction header, and from there to the evaporator. (If Koolgas defrost is used pipe through the proper Koolgas valve.) A high-end satellite is piped directly to the evaporator.
Discharge Lines for Two Satellites Installations having two Satellites are “tee’d” together upstream of the discharge manifold. Use an offset tee construction. Do not use a bullhead tee.
Oil Lines for Remote Satellites All oil lines are run in 3/8 copper. Lines will be installed securely and run under tapered cover plates when crossing walkways.
Figure 3-9 Satellite Piping
Pipin g 3-5
Offset Tee Construction
Satellite Piping

2-10 Component piping & Line Sizing
P/N 0427598_D U.S. & Canada 1-800-922-1919 • Mexico 1-800-890-2900 • WWW.HUSSMANN.COM
OFFSET AND EXPANSION LOOP CONSTRUCTION
For low temperature applications multiply the length of the run in feet by 0.0169.
For medium temperature application multiply the length of the run in feet by 0.0112. The product will be inches of linear expansion for the length of run.
Examples: Low temperature application, a run of 84 ft of 1 3/8 in. OD.
84 ft x .0169 = 1.4196 inches expansion.
Select the smallest “Inches Expansion” figure equal to or greater than the product in step one from the table below. Follow that column down until it intersects the OD line size of the run. The number listed at the intersection is the “L” valve for figuring offset an expansion loop sizes.
Example: The smallest “Inches Expansion” equal to or greater than 1.4196 is 1.5. The 1.5 column intersects with the 1 3/8 line at 21. Use “L” value 21. For an offset multiply the “L” value by 3 to determine the length of the offset.
Example: An “L” value of 21 would mean 3L = 3 X 21 or 3L = 63.
The offset distance required for low temperature application for an 84 ft run of 1
3/8 line is 63 inches. For an expansion loop multiply the “L” value by 2 if hard copper and long radius elbows are used. If the expansion loop is formed in soft copper the loop diameter equals “L.”
Example: For the same 84 ft run, a hard copper loop is 42 by 42 inches. A soft copper loop is 21 by 21 inches.
Offset Construction
Expansion Loop Piping
Equivalent Feet for Angle Valve and 90°Elbow
Inches Expansion0.5 1.0 1.5 2.0 OD Line Size10 15 19 22 7/811 16 20 24 1 1/811 17 21 26 1 3/812 18 23 28 1 5/814 20 25 31 2 1/816 22 27 32 2 5/818 24 30 34 3 1/820 28 34 39 4 1/8

Parallel Rack
P/N 0427598_D 3-1
HUSSMANN CORPORATION • BRIDGETON, MO 63044-2483 U.S.A.
OVERVIEW
This section details the refrigeration process by tracking the refrigerant flow through the rack components. Oil separation and return is explained as well.
The rack is designed with an adequately-sized receiver for proper refrigerant management. The compact design reduces height and width requirements as well as providing convenient access to components for easy maintenance and service. In the diagrams refrigerant flow direction is generally clockwise and indicated by directional arrows. Electrical solenoid valves carry the same initial abbreviations as in the electrical schematics.
Refrigeration lines not actually in the cycle being discussed are shown closed or removed. Pressure oil lines will retain a fixed pattern.
BASIC REFRIGERATION CYCLE
Beginning with the parallel compressors, refrigerant vapor is compressed and flows to the oil separator and returned to the compressors. A 3-way valve directs the super-heated discharge gas to either the condenser or a heat reclaim device when energized. When the reclaim solenoid is de-energized the valve directs the refrigerant to the condenser. The condenser rejects the heat that must be removed from the refrigerant to cause it to condense.
The flooding valve maintains head pressure in low ambient conditions by restricting liquid refrigerant flow from the condenser.
This causes liquid refrigerant flow to be backed up in the condenser, thus reducing available heat transfer surface and causing the discharge pressure to rise. The receiver is a holding vessel for liquid refrigerant. The receiver compensates for fluctuations in liquid requirements during changing loads, defrosts and weather.
The main liquid pressure differential valve functions during gas defrost to reduce pres-sure to the liquid header. The reduced pressure allows reverse flow of refrigerant gas through the evaporator necessary for an effective defrost.
The liquid header distributes liquid refrigerant to all branch liquid lines. The branch liquid line solenoid valve closes off refrigerant supply to the evaporator. The valve also allows back flow of refrigerant into the liquid header.
REFRIGERATION
Oil Separator
Flooding Valve
It is the installing contractor’s responsibility to consult local agencies
for local code requirements.

3-2 RefRigeRation
P/N 0427598_D U.S. & Canada 1-800-922-1919 • Mexico 1-800-890-2900 • WWW.HUSSMANN.COM
3-2 RefRigeRation
Heat Reclaim Condenser
Field PipingFactory Piping
Evaporator Off-Time
Evaporator Koolgas
Hr Valve
Discharge Header
Oil Separator
Suction Header
Koolgas Header
Liquid Header
Custom System Refrigeration

Parallel Rack
P/N 0427598_D 3-3
HUSSMANN CORPORATION • BRIDGETON, MO 63044-2483 U.S.A.
THERMOSTATIC EXPANSION VALVE (TEV)
The Thermostatic Expansion Valve (TEV) regulates refrigerant flow into the evaporator by responding to the temperature of superheated vapor at the outlet of the evaporator, and in some cases where a TEV is used with and external equalizer. The TEV also responds to the pressure at the outlet of the evaporator.
The TEV, located in the merchandiser, meters liquid refrigerant through its orifice to the low pressure side of the system where it absorbs heat from the coil causing the liquid to evaporate.
An evaporator pressure regulator (EPR) may be used to control the evaporator temperature by preventing the evaporator pressure from dropping below a preset pressure.
At critical locations along the refrigerant path, service valves or ball valves allow isolation of components.
Primary Method for Setting Expansion Valve Superheat:• Measure the temperature of the suction
line at the point the bulb is clamped.
• Obtain the suction pressure that exists in the suction line at the bulb location or by either of the following methods:
(1) If the valve is externally equalized, a gauge in the external equalizer line will indicate the desired pressure directly and accurately.
OR
(2) Read the gauge pressure at the suction valve of the compressor.
• Add the estimated pressure drop through the suction line between bulb location and compressor suction valve. The sum of the gauge reading and the estimated pressure drop will equal the approximate suction line pressure at the bulb.
• Convert the pressure obtained in (1) or (2) above to saturated evaporator temperature by using a temperature-pressure chart.
• Subtract the two temperatures obtained from these — the difference is superheat.
Secondary Method for Setting Expansion Valve Superheat:• Before attempting to set a TEV be sure the
merchandiser is within 10°F of its normal operating range.
• Attach temperature probes at both the TEV bulb location (under the clamps) and between the TEV and the evaporator inlet.
• While the valve is hunting the temperature difference between the two probes should not exceed 3-5°F. The differential may fall to zero. To reduce differential, turn the adjusting stem counter clockwise and wait at least 15 minutes before checking results.
HEAT RECLAIM CYCLE
The heat reclaim system returns heat to the store that has been removed from the refrigeration units. This heat, which would otherwise be wasted, is returned in useable form through a heat reclaim coil.
ThermostaticExpansion Valve

3-4 RefRigeRation
P/N 0427598_D U.S. & Canada 1-800-922-1919 • Mexico 1-800-890-2900 • WWW.HUSSMANN.COM
The heat reclaim 3-way valve energizes during reclaim mode diverting discharge gas to a remote mounted air reclaim coil or water heating coil or other heat exchanger. After the discharge gas passes through the reclaim coil, it returns to the system through a check valve and then to the condenser. The check valve assures no back flow and flooding when heat reclaim cycle is off. During heat reclaim, the heat reclaim coil rejects superheat from the refrigerant vapor and the condenser coil rejects latent heat and produces quality liquid for the refrigeration process. The heat reclaim coil should not be oversized.
HEAT RECLAIM VALVE
A 3-Way Heat Reclaim Valve directs the refrigerant to either the Condenser or a Heat Reclaim Coil. When the solenoid is de-ener-gized the valve directs the refrigerant to the condenser.
When the solenoid is de-energized the high pressure inlet is stopped and the passage between suction and valve chamber is open. When the solenoid is energized the suction outlet is stopped and the passage between high pressure and the valve chamber is open. Some manufacturers of the valve has a bleed port through the drive piston to the suction manifold. The bleed port provides a vent for fluids trapped in the heat reclaim circuits during normal operation.
There are three types of heat reclaim water, air, glycol. Water uses a special water tank that pre-heats water to 140°F. This helps reduce electric output of gas fired hot water heater. Air heat reclaim allows the waste heat to be used to either heat the store ambient air or to preheat air prior to air-conditioning. Glycol heat reclaim allows glycol to heat a cold aisle or a side walk-in or fryer, etc.
FLOODING VALVE AND RECEIVER PRESSURE REGULATING VALVE
The Flooding Valve and the Receiver Pressure Regulating Valve work together, the operation of one effects the operation of the other. The flooding valve responds to upstream pressure from the condenser. The receiver pressure regulating valve responds to downstream pressure in the receiver.
The Pressure Regulator Valve responds to receiver pressure. If the receiver pressure drops below its set point, the valve opens, directing hot high pressure vapor to the receiver.
Heat Reclaim Valve
Pressure Regulator Valve

Parallel Rack
P/N 0427598_D 3-5
HUSSMANN CORPORATION • BRIDGETON, MO 63044-2483 U.S.A.
The Flooding Valve maintains head pressure in low ambient conditions by reducing the available condensing area. Restricting liquid refrigerant flow from the condenser, the flooding valve prevents the liquid refrigerant from leaving the condenser as fast as it is forming, so the condenser floods with its own condensate.
KOOLGAS DEFROST CYCLE
Beginning with the receiver the Koolgas cycle splits in two directions – receiver vapor and receiver liquid. The high pressure liquid flowing from the receiver is throttled by the main liquid line solenoid valve causing a pressure reduction in the liquid header.
If a branch liquid line solenoid valve is used on a Koolgas circuit, the liquid circuit is designed to allow backflow into the reduced pressure liquid header by an external parallel check valve or by a special solenoid valve designed to allow reverse flow. When a branch of refrigeration cases enters the defrost cycle its branch valve allows refrigerant to flow into the liquid header.
The receiver vapor flows directly into the Koolgas header. This Koolgas Vapor maintains the same high pressure as the receiver. A 3-way valve closes the suction line to the suction header and opens the Koolgas line to the evaporator. Koolgas vapor flows backward through the evaporator, giving up heat to the evaporator for defrost.
The Koolgas vapor condenses and flows into the reduced pressure liquid line through a Bypass check valve around the TEV. From there it is returned to the liquid line header. If a suction stop or EPR with suction stop is used to control evaporator temperature, the 3-way valve is not used.
When defrost is called for, the suction line con-trol valve closes and a two-way Koolgas valves opens the line from the Koolgas header to the evaporator.
OIL SYSTEM Discharge refrigerant carries droplets of oil from the compressors’ lubrication system. The Turba-shed or other oil separator returns the oil from its reservoir along a high pressure line to the oil pressure differential regulator valve. This valve reduces the oil pressure to between 20 and 25 psig above the crankcase pressure of the compressor, providing even flow of oil to the oil level regulators or floats.
To balance oil level among the compressors an equalizing line returns any excess oil in one oil level regulator to the rest of the system. A check valve is placed in the equalizing line between the low end satellite and the rest of the system. The check valve is necessary to keep the low end satellite from filling up with oil. With a high end satellite, note that the satellite has no equalizing line.
Regulation Valve The special oil pressure differential valve is used to reduce the high pressure in the combination oil separator and reservoir to a pressure slightly above the suction pressure to prevent overfeeding of the compressor float. The valve has an adjustment range of 3 to 30 psi differential pressure. Typically, this pressure should be approximately 20 to 25 psig above the suction pressure.

3-6 RefRigeRation
P/N 0427598_D U.S. & Canada 1-800-922-1919 • Mexico 1-800-890-2900 • WWW.HUSSMANN.COM
NOTE: Every suction group or satellite com-pressor should has its own pressure differential valve.
Adjustments are made at the bottom of the valve. To adjust, remove the valve cap and turn the stem with a valve wrench. To increase the differential, screw the stem in; to decrease the differential, screw the stem out. One turn gives 4 psi of adjustment.
NOTE: An increase in differential means higher oil pressure into the floats.
Oil Level Regulators For any brand of oil level regulator to work accurately the unit and each compressor must be level. Both Sporlan and AC & R regulators may be damaged by over adjusting. Do not exceed 175 psig when testing to prevent damage to the floats. A sightglass filled with oil may indicate a damaged regulator. Before beginning adjusting, isolate the compressor by turning off its control circuit.
Sporlan Oil Level Control OL-1 Series The Sporlan Oil Level Regulator comes preset to maintain oil level at the center line of the sightglass. If there is any question as to the actual set point of the regulator, turn the adjustment stem counterclockwise until the top stop is reached. Then adjust the oil level down to the desired height by turning the stem clockwise. Each full turn will represent about .05 inches change in oil level. Do not exceed nine turns from the top, or the control may be damaged.
Y825 VALVE ADJUSTMENT
1) Close all the oil float service valves. This is done by turning the valve stem in the clock wise direction until they bottom out.
2) Connect a low pressure gauge to the suction header.
3) Connect the low side gauge hose of a gauge manifold set to the schrader connection at the end of the supply oil manifold.
4) Connect the center hose of the gauge mani fold set to the suction header.
5) Open the hand wheel on the gauge mani fold set for a few seconds then close it off again.
6) Subtract the suction header pressure from the oil header pressure.
7) If adjustment is necessary, turn Y825 valve adjustment stem in the clock wise direction to increase pressure and turn it counter clockwise to reduce pressure. Always open the hand wheel on the gauge manifold for a few seconds and recalculate oil pressure after every adjustment.
8) Remove all gauges from the system.
9) Open all the oil float service valves.

Parallel Rack
P/N 0427598_D 3-7
HUSSMANN CORPORATION • BRIDGETON, MO 63044-2483 U.S.A.
AMBIENT SUBCOOLING
The surge valve directs flow of refrigerant from the condenser through the receiver (flow through), or around the receiver (surge) in response to ambient subcooling obtained in the condenser. During low ambient conditions the receiver pressure regulator will aid in main-taining pressure in the liquid header. The surge valve reacts to liquid temperature from the condenser.
When the liquid temperature is below 75°F, the surge valve will open allowing subcooled liquid to bypass the receiver into the liquid header. When the liquid temperature is above 75°F, the surge valve will close forcing liquid into the receiver and then into the liquid header.
The Surge Valve is controlled by a t’stat that closes on drop of liquid drain temperature. The correct setting may have to be adjusted due to lower flooding valve settings.
MECHANICAL SUBCOOLING By lowering the temperature of the liquid supplied to the TEV, the efficiency of the evaporator is increased. The lower temperature liquid refrigerant produces less flash gas exiting the TEV. Since mechanical subcooling uses a direct expansion device, it is not limited by ambient temperature. A Liquid Line Solenoid Valve and a TEV control refrigerant to the subcooler. An EPR prevents the subcooler temperature from dropping below desired liquid temperature. Electrically, a thermostat responding to main liquid line temperature controls a solenoid valve on the liquid supply line.
TWO STAGE MECHANICAL SUBCOOLING Due to wide ranges of load requirements, a two stage subcooling control will be used. In two stage subcooling, there are two expansion valves piped in parallel; one valve approximately one-half the size of the other.
The largest valve will be in operation during full load conditions. When the load require-ments are reduced, the smaller valve will be turned on. At this time, the larger valve will be shut off. When the liquid drop leg reaches the subcooled liquid design point, both valves will be shut off.
Two-Stage Mechanical Subcooler ControlElectrically, a thermostat responding to liquid drop leg temperature will turn on the subcooler. The setpoint of this control will be the subcooling temperature design point.
The setpoint of the control for the one-half or full expansion valve is the liquid drop leg as well. This setpoint is determined by the expan-sion valve selection and will vary from store to store.

3-8 RefRigeRation
P/N 0427598_D U.S. & Canada 1-800-922-1919 • Mexico 1-800-890-2900 • WWW.HUSSMANN.COM
LIQUID INJECTION
The Liquid Injection System is designed to inject saturated refrigerant into the suction cavity when the compressor internal head temperature reaches the cut-in point. Injection continues until the temperature reaches the cut-out point. If the temperature remains above 310°F for one minute the control shuts down the compressor. After correcting the cause of shutdown, manual reset is required.
The System Parts:
Temperature Sensor Control Module Injection Valve.
The Temperature Sensor employees a Negative Temperature Coefficient (NTC) Thermistor to provide signals to the Control Module. The NTC resistance drops on temperature rise.
°F Reading77 90,000282 2,420292 2,110310 1,660
Control Module responds to the Temperature Sensor input by energizing the Injection Valve Solenoid when the cut-in temperature is reached. Too high or too low a resistance from the thermistor circuit will cause the Module to shutdown the compressor after one minute.
Injection Valve meters saturated refrigerant into the suction cavity of the compressor. The valve orifice is carefully sized to meet the requirements of a specific compressor. Valve sizes correspond to the four compressor bodies – 2D, 3D, 4D and 6D by Copeland Compressor. Newer compressors equipped with “Core Sense” will not heed this option.
Component Testing Remove power to the system. Unplug the Temperature Sensor from the Module. The Sensor should ohm out between 1,600 ohms and 100,000 ohms.
Leave the Sensor unplugged and restart the system. There should be no voltage between terminals “S” and “L2” on the Module. The inlet and outlet sides of the injection valve should feel the same temperature. After one minute, the alarm relay should trip. Remove power to the system. Press the manual reset on the Module.
Using a small piece of wire jump the Sensor circuit at the female plug in the module. Restart the system. There should be voltage between terminals “S” and “L2” on the module. The outlet side of the Injection Valve should feel colder than the inlet side. After one minute the alarm relay should trip.
Remove power to the system. Press the manual reset on the Module. Remove the jumper wire and plug in the Temperature Sensor. Restart the System.
Alarm Circuit The Alarm Circuit has three terminals in the Control Module: “L” – Common; “M” – Normally Closed; and“A” – Normally Open. “L” and “M” are wired into the compressor control circuit so an alarm condition removes the compressor from the line and power to the Module. A manual reset is required to call attention the alarm condition.
Parallel Rack
P/N 0427598_D 3-9
HUSSMANN CORPORATION • BRIDGETON, MO 63044-2483 U.S.A.
Alarm Relay The Alarm Relay is activated after a one minute delay under the following three conditions:
Compressor discharge temperature exceeds 310°F. A shorted circuit or very low Thermistor resistance. An open circuit or very high thermistor resistance. Operational notes liquid injection does NOT replace head cooling fans which are still required on low temperature applications. Temperature Sensor cable must not touch any hot surfaces or the cable will be damaged.
Liquid Injection Test 1) Turn off the compressor whose demand
cooling module you want to test.
2) Unplug sensor from liquid injection module then turn compressor back on.
3) Once the compressor starts it should run for about one minute before locking out on
liquid injection.
4) Turn off the compressor again, this time jump the temperature sensor at the demand cooling module.
5) Push the reset on the liquid injection module. When the compressor starts the liquid injection solenoid should be energized. The compressor should run for about one minute then lock out on demand cooling.
6) Turn off the compressor again, remove jumper and push reset button on the liquid injection module.
7) Plug the sensor back into the demand cooling module then turn compressor back on.
EPR VALVE
Evaporator pressure regulator valves respond to upstream pressure and are used to maintain a minimum evaporator temperature.
Two key points when working with rack mounted EPRs:
• Pressure drop from the merchandiser to the machine room. The final test for setting an EPR should always be evaporator discharge air temperature or product temperature.
• The second is that low pressure drop EPR valves, like those used on the rack, require an external high pressure supply to power the main piston chamber. This high pressure supply must maintain a positive
3-10 RefRigeRation
P/N 0427598_D U.S. & Canada 1-800-922-1919 • Mexico 1-800-890-2900 • WWW.HUSSMANN.COM
differential of at least 50 psig above the down stream side of the valves. Lower pressure differentials may cause valve malfunction.
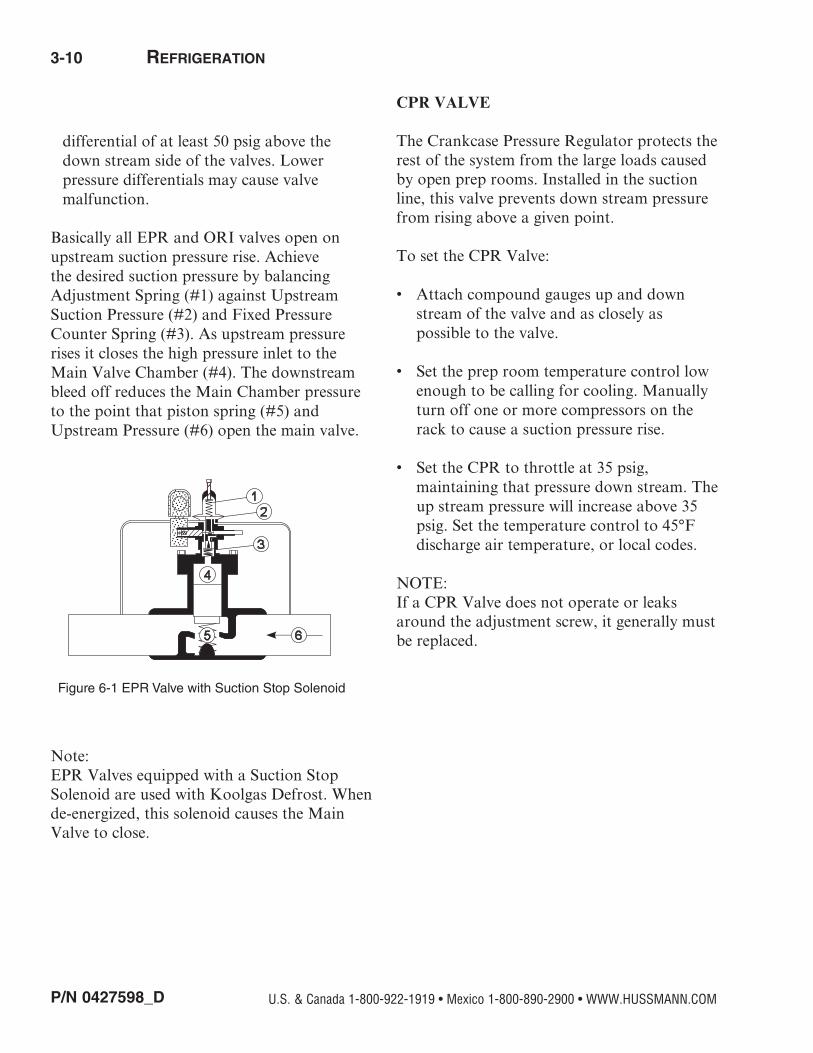
Basically all EPR and ORI valves open on upstream suction pressure rise. Achieve the desired suction pressure by balancing Adjustment Spring (#1) against Upstream Suction Pressure (#2) and Fixed Pressure Counter Spring (#3). As upstream pressure rises it closes the high pressure inlet to the Main Valve Chamber (#4). The downstream bleed off reduces the Main Chamber pressure to the point that piston spring (#5) and Upstream Pressure (#6) open the main valve.
Note:EPR Valves equipped with a Suction Stop Solenoid are used with Koolgas Defrost. When de-energized, this solenoid causes the Main Valve to close.
CPR VALVE
The Crankcase Pressure Regulator protects the rest of the system from the large loads caused by open prep rooms. Installed in the suction line, this valve prevents down stream pressure from rising above a given point.
To set the CPR Valve:
• Attach compound gauges up and down stream of the valve and as closely as possible to the valve.
• Set the prep room temperature control low enough to be calling for cooling. Manually turn off one or more compressors on the rack to cause a suction pressure rise.
• Set the CPR to throttle at 35 psig, maintaining that pressure down stream. The up stream pressure will increase above 35 psig. Set the temperature control to 45°F discharge air temperature, or local codes.
NOTE:If a CPR Valve does not operate or leaks around the adjustment screw, it generally must be replaced.
Figure 6-1 EPR Valve with Suction Stop SolenoidFigure 6-1 EPR Valve with Suction Stop Solenoid
Parallel Rack
P/N 0427598_D 3-11
HUSSMANN CORPORATION • BRIDGETON, MO 63044-2483 U.S.A.
MAIN LIQUID LINE SOLENOID VALVES
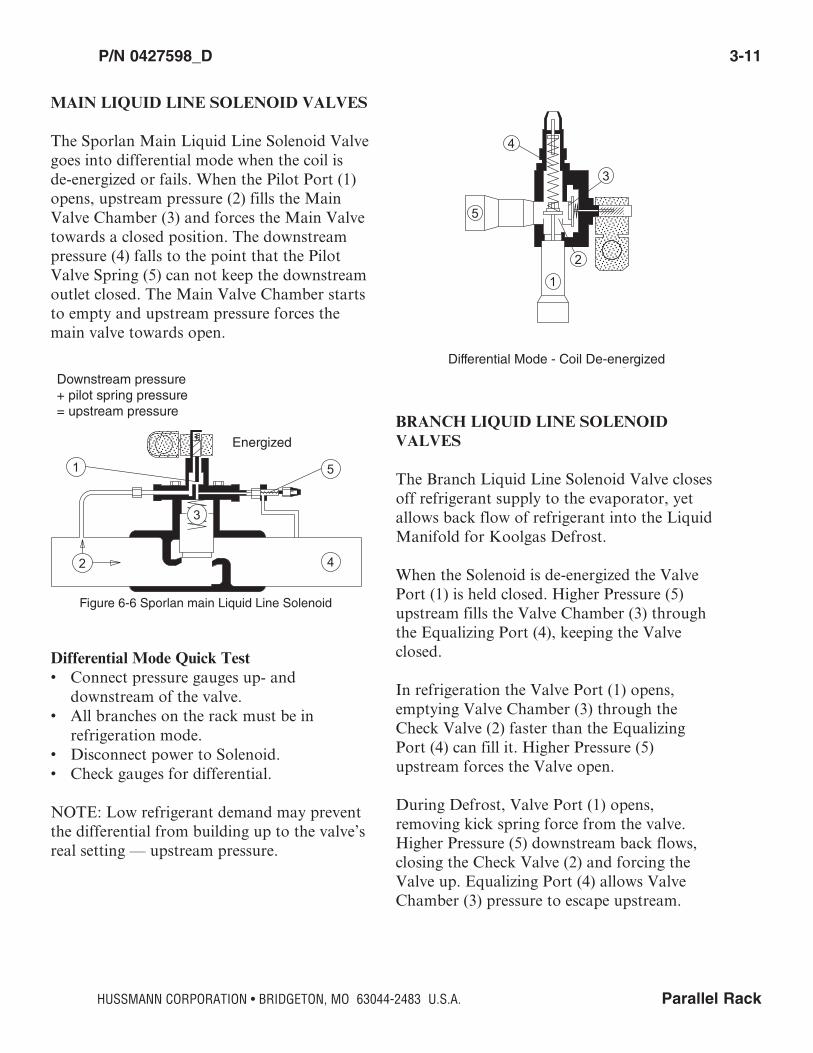
The Sporlan Main Liquid Line Solenoid Valve goes into differential mode when the coil is de-energized or fails. When the Pilot Port (1) opens, upstream pressure (2) fills the Main Valve Chamber (3) and forces the Main Valve towards a closed position. The downstream pressure (4) falls to the point that the Pilot Valve Spring (5) can not keep the downstream outlet closed. The Main Valve Chamber starts to empty and upstream pressure forces the main valve towards open.
Differential Mode Quick Test • Connect pressure gauges up- and
downstream of the valve. • All branches on the rack must be in
refrigeration mode. • Disconnect power to Solenoid. • Check gauges for differential.
NOTE: Low refrigerant demand may prevent the differential from building up to the valve’s real setting — upstream pressure.
BRANCH LIQUID LINE SOLENOID VALVES
The Branch Liquid Line Solenoid Valve closes off refrigerant supply to the evaporator, yet allows back flow of refrigerant into the Liquid Manifold for Koolgas Defrost.
When the Solenoid is de-energized the Valve Port (1) is held closed. Higher Pressure (5) upstream fills the Valve Chamber (3) through the Equalizing Port (4), keeping the Valve closed.
In refrigeration the Valve Port (1) opens, emptying Valve Chamber (3) through the Check Valve (2) faster than the Equalizing Port (4) can fill it. Higher Pressure (5) upstream forces the Valve open.
During Defrost, Valve Port (1) opens, removing kick spring force from the valve. Higher Pressure (5) downstream back flows, closing the Check Valve (2) and forcing the Valve up. Equalizing Port (4) allows Valve Chamber (3) pressure to escape upstream.
Downstream pressure+ pilot spring pressure= upstream pressure
energized
1
2
3
4
5
Figure 6-6 Sporlan main Liquid Line Solenoid
5
4
3
2
1
Differential Mode - coil De-energizedDifferential Mode - Coil De-energized
Downstream pressure+ pilot spring pressure= upstream pressure
Energized
Figure 6-6 Sporlan main Liquid Line Solenoid

3-12 RefRigeRation
P/N 0427598_D U.S. & Canada 1-800-922-1919 • Mexico 1-800-890-2900 • WWW.HUSSMANN.COM
NOTE: The Solenoid of the branch valve is energized during refrigeration and from back flow during defrost.
3 –WAY SPLIT CONDENSING VALVES
A 3-Way Split Condenser Valve directs the refrigerant to either both coils of a split condenser or one coil of a split condenser. When the solenoid is de-energized, the seat disc is in the position that evenly splits the flow between both coils of the condenser. When the solenoid is energized, the seat disc moves to close the upper port.
The refrigerant flow is then directed to the condenser coil that is set to operate all year. The “B” version of this valve has a small bleed port that pumps out the condenser coil that is not operating when the valve is energized.
Hussmann’s racks will have a split condenser pump-out on the liquid drop leg that consists of a solenoid valve in series with a small orifice expansion valve. When the split condenser valve is also energized, this solenoid valve is energized allowing for a quick pump-out through the expansion valve and through the bleed port of the 3-way valve.
SURGE RECEIVER VALVES
When the refrigerant temperature returning from the condenser drops below its set point, the surge valve directs the flow of refrigerant around energized (open) directing refrigerant flow around the Receiver (Surge) in response to ambient subcooling obtained in the condenser.
SUBCOOLING WITH PLATE HEAT EXCHANGER
The TEV should be set with the highest possible superheat that will still maintain the desired liquid temperature. EPR setting is listed on the store legend.
Electrically, a thermostat responding to main liquid line temperature immediately down stream of the plate subcooler controls a solenoid valve on the liquid supply line from the liquid manifold. This circuit is supplied with power through parallel auxiliary contactors on the compressor motor contactors.
De-energized1
23
4
5
Branch Liquid Line Solenoid Valve
Refrigeration - Forward Flow
Defrost - Back Flow
Valve Port
Check Valve
Upstream
Equalizing Port
Valve Detail
Energized1
23
4
5
Energized1
23
4
5
Valve Port
Check Valve
Valve Detail
Upstream
Equalizing Port
De-energized
Branch Liquid Line Solenoid Valve
Energized
Energized
Refrigeration - Forward Flow
Defrost - Back Flow

Parallel Rack
P/N 0427598_D 3-13
HUSSMANN CORPORATION • BRIDGETON, MO 63044-2483 U.S.A.
A liquid line solenoid valve and a TEV control refrigerant flow to the plate heat exchanger. An EPR on the return suction line prevents the subcooler temperature from dropping below desired liquid temperature.
Thermostat setting is 50°F with minimum differential, or customer specifications.
LIQUID LINE DIFFERENTIAL VALVE ADJUSTMENT
1) Shut off the Kool/Hot gas ball valve on the first gas defrost circuit and put that circuit in defrost. Make sure that no other circuits that are gas defrost, are in, or will go in defrost while adjustments are being made.
2) Connect two high side gauges, one on each side of the liquid line differential valve.
3) Subtract the outlet pressure from the inlet pressure, this is your differential pressure.
4) If adjustment is necessary, turn valve adjustment stem in the clock wise direction to increase the deferential pressure and turn it counter clock wise to reduce the deferential pressure.
5) Remove the high side gauges.
6) Take the first gas defrost circuit out of defrost and open the Kool/Hot gas ball valve for that circuit.
SORIT EVAPORATOR PRESSURE REGULATOR ADJUSTMENT
1) Connect a low pressure gauge to the suction manifold.
2) Connect a low pressure gauge to the evaporator side of the SORIT valve in need of adjustment.
3) Make sure the suction header pressure is 5 to 10 psig lower than the desired set point.
4) Turning the SORIT valve adjustment stem in the clock wise direction will cause the evaporator pressure to go up. Turning the stem in the counter clock wise direction will cause the evaporator pressure to go down.
5) Wait a few minutes to allow system pressures to stabilize then recheck the SORIT valve set point.
6) Remove the low side gauges.
LOW PRESSURE CONTROLS
1) Turn off the control circuit for the compressor that needs it’s low pressure control set.
2) Bypass any time delays, electronic rack control relay, electronic overload module with built in time delay and switch back relay if used.
3) Connect a low pressure gauge to the suction header.
4) Front seat oil supply and oil equalizer line service valves on the compressor whose low pressure control is being adjusted.

3-14 RefRigeRation
P/N 0427598_D U.S. & Canada 1-800-922-1919 • Mexico 1-800-890-2900 • WWW.HUSSMANN.COM
5) Make sure rack suction pressure is above the desired cut in point of the low pressure control. You may have to turn off the other compressors to raise the suction pressure.
6) Connect a low pressure gauge to the
compressor suction service valve on the compressor whose low pressure control is being adjusted.
7) Front seat the suction service valve.
8) Jump out the low pressure control and turn on the compressor. Look at the gauge connected to the suction service valve, when the pressure reaches 0 psig turn off the compressor.
9) Adjust the cut in point of the low pressure control 20 to 25 psig above the desired cut in point by looking at the scale on low pressure control.
10) Slowly open the suction service valve and watch the low pressure gauge. When the pressure reaches the desired cut in close off the suction service valve.
11) Remove the jumper on the low pressure control. Turn the compressor control circuit on. Slowly turn the cut in adjustment toward the desired cut in point. When the compressor turns on you have reached your desired cut in point.
12) Slowly open the suction service valve and watch the gauge connected to the suction service valve. Make sure the compressor cuts in at the proper pressure. If fine tuning of the low pressure control is needed, front seat the suction service valve again then adjust the cut in on the low pressure control.
13) Slowly open the suction service valve while watching the gauge connected to the suction service valve. Repeat until the desired cut in point is reached. When you are finished adjusting the cut in of the low pressure control open the suction service valve fully.
14) Turn the deferential adjustment on the low pressure control to a value greater than your desired cut out point.
15) Slowly front seat the suction service valve while watching the gauge connected to the suction service valve. When the desired cut point is reached stop turning the suction service valve.
16) Slowly turn the deferential adjustment on the low pressure control towards the desired cut out point. When the compressor turns off you have reached your desired cut out point.
17) Open the suction service valve fully then begin to front seat it while watching the gauge connected to the suction service valve. Make sure the compressor cuts out at the proper pressure. If fine tuning of the low pressure control is needed, adjust the cut out on the low pressure control. Repeat this step until the desired cut out point is reached. When you are finished adjusting the cut out of the low pressure control open the suction service valve fully.

Parallel Rack
P/N 0427598_D 3-15
HUSSMANN CORPORATION • BRIDGETON, MO 63044-2483 U.S.A.
18) Disconnect the low pressure gauges from the system.
19) Open oil supply and oil equalizer line service valves that were closed during Step 4.
20) Turn off the control circuit on the
compressor whose low pressure control you set.
21) Remove any jumpers you installed during Step 2.
22) Turn the compressor control circuit back on.
High Pressure Control Adjustment
1) Set the cut out of the high pressure control to the desired set point. Use the scale on the high pressure control to set cut out point.
2) Set the cut in of the high pressure control to the desired set point. Use the scale on the high pressure control to set cut in point.
CONTROL SETTINGS GENERAL DESCRIPTION
There are ten potential control settings required to be set up prior to startup. They are as follows: • Low Pressure Controls • Satellite Pressure Controls • Compressor Oil Failure Controls • Heat Reclaim Lockout • Split Condenser Control Settings • Condenser Settings • Winter Condensing Pressure Controls • EPR Pressure Settings • Defrost Timer Settings • Inverter Settings


Parallel Rack
P/N 0427598_D 4-1
HUSSMANN CORPORATION • BRIDGETON, MO 63044-2483 U.S.A.
ELECTRICAL OVERVIEW
Custom wiring schematics are located on the doors of each rack. Racks are wired for 208-230/3/60 or 460/3/60. Other voltages are available upon request. The control circuit is typically 208VAC but racks can be ordered with a single point connection (optional). Refer to the serial plate located on the control panel to determine MCA MOPD.
Refer to merchandiser Data Sheets for electrical supply requirements for cases.
FIELD WIRING
Rack components are wired as completely as possible at the factory with all work completed in accordance with the National Electrical Code (NEC). All deviations required by governing electric codes will be the responsibility of the installer.
The lugs on the circuit breaker package in the compressor control panel are sized for copper wire only. All wiring must be in compliance with governing electrical codes. For Remote Header Defrost Assembly: To the defrost control panel, provide one 208V, 1PH and 15A branch circuit, or one 120V, 1PH and 15A branch circuit for control power only. One 208V 3PH branch circuit for electric defrost power, one communications circuit for electronic controller output/input boards. The 120V and 208V circuits may originate at the parallel rack or from a separate source.
Consult the store legend or electrical plans for each installation.
For 208-230/3/60 Compressor Units: To each parallel rack compressor, provide one 208-230/3/60 branch circuit, one 120V or one 208V, 1PH and 15A circuit. Omit when single point connection kit is used.
Provide one 208-230/3/60 branch circuit to each remote air-cooled condenser. Dry contacts are made available upon request at the rack control panel. Contacts will close in alarm state. Contact rating is 10A at 208V. Alarm status may be configured through an electronic controller.
REQUIRED FIELD WIRE SIZE
Based on the full load amps of the system, select the largest connectable wire size from the table. (Based on no more than three wires in the wireway and 30°C environment per NEC.) Total Connected FLA Largest Connectable Wire:
140A (max) 00 per 248A (max) 350 mcm 408A (max) 2x (250 mcm) per 608A (max) 2x (500 mcm) per
Include control circuit amps if single point connection transformer option is used. 12A for 208V systems 6A for 460V systems (Refer to NEC for temperature duration factors.)
ELECTRICAL

4-2 ElEctrical
P/N 0427598_D U.S. & Canada 1-800-922-1919 • Mexico 1-800-890-2900 • WWW.HUSSMANN.COM
WIRING COLOR CODELeads for all electrical circuits are identified by a colored plastic band: neutral wire for each circuit has either White insulation or a White plastic sleeve in addition to the color band.
Pink ...........rEfrig. thErmostat low tEmP. orangE or
light BluE .rEfrig. thErmostat norm tEmP. tan ...........lights
Dark BluE .DEfrost tErm. thErmostat maroon ....rEcEPtaclEs
PurPlE .......conDEnsatE hEatErs YEllow .....DEfrost hEatErs 120VBrown ....... fan motors rED ..........DEfrost hEatErs 208VgrEEn* .......grounD *EithEr colorED slEEVE or colorED insulation
ELECTRICIAN NOTE: Use copper conductor wire only. CASE MUST BE GROUNDED
MERCHANDISER ELECTRICAL DATA
Technical data sheets are included with this manual. The data sheets provide merchandiser electrical data, electrical schematics, parts lists and performance data. Refer to the technical data sheets and merchandiser serial plate for electrical information.
MERCHANDISER FIELD WIRING
Field wiring must be sized for component amperes stamped on the serial plate. Actual ampere draw may be less than specified. Field wiring from the refrigeration control panel to the merchandisers is required for defrost termination thermostats and for optional refrigeration thermostats. When multiple merchandisers are on the same defrost circuit, the defrost termination thermostats are wired in series.
a l w a y s c h e c k t h e s e r i a l p l a t e f o r c o m p o n e n t a m p e r e s.
ELECTRICAL CONNECTIONS
All wiring must be in compliance with NEC and local codes. All electrical connections are to be made in the electrical wireway or Handy Box.
IDENTIFICATION OF WIRING
Leads for all electrical circuits are identified by colored plastic bands. These bands correspond to the color code sticker (shown below) located inside the merchandiser’s wireway cover.
The defrost heaters, defrost termination thermostats and refrigeration thermostats on the wide island models are tagged with identification as being either front or rear merchandiser display section defrost and refrigeration controls.

Parallel Rack
P/N 0427598_D 4-3
HUSSMANN CORPORATION • BRIDGETON, MO 63044-2483 U.S.A.
ELECTRICAL DIAGRAMS
All electrical schematics reflect the standard ladder diagram. Electrical schematics are included with each rack. Please keep in mind all diagrams in this manual are only examples! Wiring may vary, refer to the diagram included with each rack. To focus on circuit logic the diagram may separate a relay coil and it’s contacts. Electrical terminal connections are clearly numbered and aid in trouble shooting should a problem arise.
Unit Cooler Fan WiringSee manufacturer’s literature for wiring requirements. Evaporator mounted liquid line solenoid power for a liquid line solenoid can be picked up at the rack on terminals C and R for each respective circuit.
Cooler Door Switch Wiring Check the store legend for door switch requirements. The switch must be mounted to the cooler door frame, and must be wired to control the field installed liquid line solenoid and the fan circuit. For Koolgas applications, install a check valve to bypass the liquid line solenoid valve.
COMPONENT WIRING GUIDELINES
Check the store legend for components requiring electrical circuits to either the panel, which may include: • Remote alarm • Electronic temperature probe • Defrost termination thermostat • Thermostat controlling a liquid line solenoid • Satellite control • Heat reclaim contact or 24V supply All thermostat wires should be sized for rack control circuit breaker. Temperature sensor
wiring should refer to the controller manufacturer’s literature. Check field wiring requirements for appropriate quantity of wires.
Sizing Wire and Overcurrent Protectors Check the serial plate for minimum circuit ampacity (MCA) and maximum overcurrent protective devices (MOPD). Follow NEC guidelines.
Other Controls Refer to the wiring schematics included with the rack, when other controls are used.
COMPRESSOR CONTROL
Each control panel is wired with independent compressor control circuits so any compressor can be electrically isolated without causing the other compressors to be shut down. A typical compressor control will consist of the following:
• Electrical control • Switchback relay contacts (optional)• Switchback time delay (optional)• Low pressure switch • High pressure switch • Oil pressure switch• Overload contact (if used)• Contactor coil• Demand cooling control (if used) • Crankcase heater (optional) • Lighted toggle switch Terminal pins will be used between control points for easy testing and troubleshooting.

4-4 ElEctrical
P/N 0427598_D U.S. & Canada 1-800-922-1919 • Mexico 1-800-890-2900 • WWW.HUSSMANN.COM
ELECTRONIC CONTROLLER
The electronic controller uses a suction transducer to “read” the suction manifold pressure. From this, sequence compressors on or off through a relay board to achieve the target suction pressure.
TIME DELAY
Automatic time delays are built into most electronic controllers. This helps avoid short cycling. A solid state time delay will be used for backup in the unlikely event of a electronic controller failure. The time delay will only be in the circuit during switch back, if the system uses switch back control.
If the system does not have optional switch back control then it will be wired in series with the operating controls. Awareness of time delays will reduce frustration and confusion when starting or troubleshooting the system.
PRESSURE SWITCHES
There are basically three pressure switches in the compressor control circuit. A low pressure switch is used to close the control circuit during high suction and open the circuit during low suction pressure. A high pressure switch is used to open the control circuit during a critical high discharge pressure state. The high pressure switch is available in automatic or manual reset. An oil pressure switch senses the supply oil pressure when the compressor is running.
If the oil pressure falls below the preset setting, the control circuit will open. Oil pressure switches are preset for 6.5 psig differential (Carlyle) and 9 psig differential (Copeland). The oil failure time delays are preset for 45 seconds (Carlyle) and 120 seconds (Copeland).
*For proper setting of switches see control settings section.
SWITCHBACK CONTROL (OPTIONAL)
During “normal” operation, the switchback relay will be de-energized allowing the electronic controller to be in full control. When the controller looses power or malfunctions. the switchback relay will energize which in turn will bypass the control power around the electronic controller and through the low pressure switch and time delay.
CRANKCASE HEATERS (OPTIONAL)
A crankcase heater is used to alleviate liquid migration to the compressor during off cycle periods. The crankcase heater is interlocked through the compressor contactor to be powered when the compressor is not running.
OIL FAILURE RELAY
This relay is used during an oil failure to jump the electronic controller relay. This will eliminate multiple alarms if the suction pressure drops and the compressor control point opens without the oil failure relay, the suction pressure would eventually rise causing another oil failure alarm.
CURRENT RELAY (OPTIONAL)
A current relay is wired in series with the oil failure control heater. This will prevent a false oil trip if the compressor circuit breaker should trip or if the compressor goes off on internal overload.

Parallel Rack
P/N 0427598_D 4-5
HUSSMANN CORPORATION • BRIDGETON, MO 63044-2483 U.S.A.
DEFROST CONTROLS
There are many types of defrost circuits and they are shown on the Defrost diagram in the rack. These circuits may be repeated in multiple and intermixed in any one store. Each control panel is wired with independent defrost control circuits so any circuit can be electrically isolated without causing the other circuits to be shut down.
A typical defrost circuit will consist of the following:
• Lighted toggle switch. • Pins R and C for refrigeration power
circuit. • Pins D and C for defrost power circuit. • N.C. contacts for refrigeration. • N.O./N.C. contacts for defrost. • Pins E and F for defrost termination. (Dry
contact only) • Pins T and B for temperature control
thermostat (Dry contact only) or Temperature probes can be used for electronic controllers.
Refrigeration Mode: During refrigeration, both the defrost point and refrigeration point are de-energized allowing L1 power to flow to the SV valve (Sorit or Liquid Solenoid). If case probes are used with the controller the refrigeration point will open when a system reaches proper operation temperature. Thus closing the refrigeration valve.
Defrost Mode: The defrost point will energize opening power to the SV valve, refrigeration point. and closing power to the Kool/Hot gas valve (HGV) or defrost contactor (DC).
TEMPERATURE CONTROLS
Refrigeration Thermostat (Alternate) If it is desired to have the refrigeration thermostat operate the branch liquid line solenoid on the compressor unit, wire it to the control panel in the following manner. Determine the system number from the store legend. The system will be on the suffix of the appropriate “T” and “B” terminals.
a. Remove the jumper from the T and B terminal.b. Connect one thermostat wire to the T terminal.c. Connect the other thermostat wire to the B terminal.
Case Probe (Alternate) If it is desired to monitor case temperature and operate a branch liquid line circuit, wire a case probe from the case to an analog point on the electronic controller. Provisions for case probes may be made from the field or factory. Refer to the controller manual for setup.
Defrost Termination Thermostat For each system using defrost termination thermostats, run a two-wire control circuit from all termination thermostats (in series, one per case) to the E_ and F_ terminals in the control panel with a suffix corresponding to the system number.
Note: The defrost termination thermostat must supply a dry contact closure. An isolation relay must be used for a “hot” termination thermostat.
Master Defrost Valve The master defrost valve is used during a hot/kool gas defrost cycle to create a reverse flow through the evaporator.
4-6 ElEctrical
P/N 0427598_D U.S. & Canada 1-800-922-1919 • Mexico 1-800-890-2900 • WWW.HUSSMANN.COM
ALARM CONTROL Alarm System The rack basic alarm package includes alarms for: • Oil Failure (each compressor) • Phase Loss • Low Liquid Level* • High Suction* • High Discharge • Compressor Failure
*Time Delayed
A dry set of contacts are supplied to control a remote bell or other alarm device. These contacts are rated at 10.0 amps, 120V. An indicator light signifies what alarm condition has been activated.
Note: If an electronic rack controller is utilized, then the above alarms will performed by the rack controller.
Ladder diagrams emphasize the circuit continuity and logic. They aid troubleshooting and testing by identifying point-to-point connections, and color coding rather than just physical location. A ladder diagram normally moves from left to right so the user can “read” the series of switches, relays, terminals and components that make up a circuit.
Alarm Control (Electronic) When an Electronic Rack Controller is utilized all alarm functions are performed by the rack controller. High suction and high discharge pressures are “read” by transducers connected to the rack controller. The liquid level can either be a digital input (standard) or an analog type input.
The controller can display actual refrigerant level with the analog type (optional). Phase loss, oil failure, and the compressor failure alarms are connected to the rack controller through a digital input. An optional modem can be installed to allow the rack controller to call out any refrigeration alarms.
Alarm Systems The following alarms are available for use with the parallel rack system:
1. Refrigerant Loss Alarm/Indicator: An alarm trips if the refrigerant level in the
receiver drops below a set level. This alarm automatically compensates for changes in liquid level occurring during heat reclaim.
2. Single Phase Protection: This shuts down the control circuit during single phasing of the power circuit; automatically resets when three phase power is restored.
3. Remote Alarm: In event of a power outage or any alarm condition, an alarm will sound at another location, such as a burglar alarm monitoring station or answering service.
INVERTER CONTROL An inverter is used to vary the speed of a compressor which in turn varies the capacity of that compressor. With the ability to vary the capacity of a compressor, refrigeration requirements can be better matched to the load.

Parallel Rack
P/N 0427598_D 4-7
HUSSMANN CORPORATION • BRIDGETON, MO 63044-2483 U.S.A.
Unit Cooler Fan Wiring Provide a 120/1/60 fused power supply for each cooler. (Check the store legend to see if 208-230/1/60 is required at this location.)
Evaporator Mounted Liquid Line Solenoid Power for a liquid line solenoid in the merchandiser can be picked up from the fan circuit. (Check fan motor and solenoid voltages first.)
Cooler Door Switch Wiring Check the store legend or electrical plans, for door switch kits. The switch must be mounted to the cooler door frame, and must be wired to control the field-installed liquid line solenoid and evaporator fans. Door switches are wired in series. For Koolgas applications, kit M116 includes a check valve to bypass the liquid line solenoid valve.
Sizing Wire and Overcurrent Protectors Check the serial plate for Minimum Circuit Ampacity (MCA) and Maximum Overcurrent Protective Devices (MOPD). Follow NEC guidelines.

4-8 ElEctrical
P/N 0427598_D U.S. & Canada 1-800-922-1919 • Mexico 1-800-890-2900 • WWW.HUSSMANN.COM
NOTES:

Parallel Rack
P/N 0427598_D 5-1
HUSSMANN CORPORATION • BRIDGETON, MO 63044-2483 U.S.A.
LEAK TESTING
NOTE:Leaks harm the ozone layer and can be very expensive. It is very important to follow EPA Greenchill Installation Leak Tightness Guidelines as well as Greenchill Leak Prevention and Repair Guidelines.
Check that the compressor’s primary ON-OFF switch are all in the OFF position.
NOTE: Do not start any compressors without ensuring there is oil in them. Serious damage to the compressors may result from not having oil in them. Parallel racks are shipped with the oil loose.
Always use a pressure regulator with a nitrogen tank. Do not exceed two pounds of pressure and vent lines when brazing. Do not exceed 350 pounds of pressure for leak testing high side. Do not exceed 150 pounds of pressure for leak testing low side.
To check for system leaks do the following:
• Leave all valves closed to allow pressure into the rack. Close the suction, liquid or hot gas manifolds. Each rack system is shipped with dry Nitrogen. Build the pressure in the rack unit until it reaches 150 psi. Each individual circuit should be checked.
• Each circuit can be leak checked as the pressure increase to 150 psi. Ensure that
the pressure is the same throughout the assembly. Check connections and accessories for any leaks. Use an electronic leak detector. Inspect all joints. If the pressure drops sharply, this is an indication of a leak. Visually inspect all lines and joints for proper piping practices.
• Once the system has been thoroughly tested, evacuate the system to 1500 microns for the first evacuation.
• The evacuation is repeated. Install liquid and drier cores before the second evacuation. Suction filter cores are factory installed. After each evacuation, the system must be pressurized to 2 psig with dry nitrogen.
• Now evacuate the system to 500 microns for the second evacuation. Perform three evacuations in all.
PRE-CHARGE CHECK LIST
While the system is being evacuated preparation for charging can begin. During any of the pull downs check:
• Merchandiser’s electrical requirements and power supply electrical connections are tight and clean
• Check for proper fan operation and thermostat setting.
• Walk-in coolers and freezers electrical requirements and power supply
• Damper operation, if equipped. • Heat Reclaim and other systems
START-UP
Know whether a circuit is open at the power supply or not. Remove all power before
opening control panels. Note: Some equipment has more than one power supply.

5-2 Start-up
P/N 0427598_D U.S. & Canada 1-800-922-1919 • Mexico 1-800-890-2900 • WWW.HUSSMANN.COM
CHARGING
• Open compressors – backseat service valves on suction and discharge.
• Open oil supply line immediately down stream of the oil separator.
• Pressure transducers – open angle valves. connect defrost time clock and set proper time.
• Leave open ball valves – to branches, condenser, heat reclaim, receiver.
• Main liquid line solenoid valve – now under control of defrost clock.
• Branch liquid line solenoid valve – Back out manual open screws.
• Suction stop EPR – under control of defrost clock.
• Split condenser – operation under pressure controls.
Note: Remember to reinstate control to unit components jumpered to make test.
Set all mechanical pressure controls. Compressors should still be isolated from the rest of the system. Set all electronic compressor controls into switchback so the mechanical controls are in command of all system functions.
During the last evacuation look up and make a list of the required control settings for the system. A copy of the equipment legend will be needed to determine the system’s design operating points. High and low pressure, heat reclaim lockout, winter control settings, and other controls on the system should be noted.
Oil Levels Check oil levels for each compressor and the Turba-shed or other oil separator: Compressor sight glass 1/8 to ½ full, oil separator between two lower sight glasses. See legend for oil types used in parallel rack system.
If the oil is low, add the appropriate oil or lubricant to match the refrigerant used.
Additionally, check for the following during leak test:
Isolate compressors – front seat service valves on suction and discharge. close oil supply line immediately downstream of the oil separator.
Pressure transducers – close angle valves.
Open ball valves – to branches, condenser, heat reclaim, receiver.
Main liquid line solenoid valve - solenoid should be non regulating position.
Branch liquid line solenoid valve - solenoid should be energized or manual open used.
Suction stop EPR valves – suction stop EPR requires energized solenoid to be open.
Split condenser – both sides open. De-energize valve solenoid.
Defrost time clock – disconnect power to the clock or set electronic controllers in manual. Be sure all branches are in refrigeration mode.
Verify refrigerant requirements for system, Compressors, and TEVs in merchandisers and coolers.
Electrical supply and component requirements.
Always recapture test charge in approved recovery vessel.

Parallel Rack
P/N 0427598_D 5-3
HUSSMANN CORPORATION • BRIDGETON, MO 63044-2483 U.S.A.
Evacuation Nitrogen and moisture will remain in the system unless proper evacuation procedures are followed. Nitrogen left in the system may cause head pressure problems. Moisture causes TEV ice blockage, wax build up, acid oil and sludge formation.
• Do not simply purge the system. This procedure is expensive, harmful to the environment, and may leave moisture and nitrogen behind.
• Do not run the compressors to evacuate. This procedure introduces moisture into the compressor’s crankcase oil and does not produce adequate vacuum to remove moisture from the rest of the system at normal temperatures.
Final Checks Once the rack is up and running, it is the responsibility of the installer to see that all the fine adjustments are made so the rack delivers maximum temperature performance and efficiency for the customer.
These adjustments include:
• Defrost scheduling and timing • Condenser controls • Winter controls • Sub-cooling Compound System Operation
EPR, and ORI settings • TEV superheat adjustment • CPR settings High and low pressure
controls Main liquid line solenoid differential
Thermostat Settings Adjustments to electronic controls:
Thoroughly inspect all field piping while the equipment is running and add supports where line vibration occurs. Be sure additional supports do not conflict with pipe expansion and contraction.
When merchandisers are completely stocked, check the operation of the system again. At 48 hours of operation replace the liquid drier and suction filter cores.
At 90 days recheck the entire system, including all field wiring. Change the oil filter. Future maintenance costs may be reduced if an oil acidity test is run at this time. Replace acidic oil.
LIQUID DRIER CORE REPLACEMENT
Replace liquid drier cores 24 hours after initial startup.
After 48 hours of operation, replace the drier cores again. Any time the system is opened after this point, the dryer cores shall be replaced.
SUCTION FILTER CORE REPLACEMENT
Replace suction filter cores 24 hours after initial startup.
After 48 hours of operation, inspect suction filter cores and replace and repeat if they are full of dirt and debris.
Never trap liquid refrigerant between closed valves as this could cause a hydraulic explosion.

5-4 Start-up
P/N 0427598_D U.S. & Canada 1-800-922-1919 • Mexico 1-800-890-2900 • WWW.HUSSMANN.COM
NOTES:
Intentionally venting or discharging CFC, HFCand HCFC refrigerant violates Federal Law.
All CFC, HFC and HCFC refrigerants must be reclaimed and recycled in accordance with all
state, federal and local laws.

COMPRESSOR REPLACEMENT
Since each machine room tends to be unique, plan carefully as to how you will move the compressor without harming personnel, equipment or the building. Before beginning removal of an old compressor make replacement unit ready to install:
Verify Replacement compressor electrical requirements, refrigerant, application, capacity, piping hookup location and design suction and discharge gaskets.
Mounting requirements:Have compressor in an easily accessible position, uncrated and unbolted from shipping pallets.
Disconnect electrical supply: Turn off motor and control panel power supplies to the Rack. Turn off control circuit and open all compressor circuit breakers. Tag and remove electrical wires and conduit from the compressor.
Isolate compressor from rack: Front seat suction and discharge service valves. Close oil supply and equalizing lines. Bleed compressor pressure through both discharge and suction access ports into an approved recovery vessel.
Remove oil supply and equalizing lines. Remove externally mounted components which will be re-used on the replacement compressor. Plug holes to compressor manufacturer’s specifications.
Remove bolts from suction and discharge service valves.
Remove mounting bolts. When moving the compressor, use a come-along, hoist or hydraulic lift to carry the weight.
Do not use the rack piping or panel to support a hoist or come-along.
Do not use ceiling trusses to support a hoist or come-along.
The rear support channel on the rack or a properly constructed ceiling rail may be used to support a hoist or come-along.
To make hookup and lifting easier, an eye bolt may be installed in the rear top of the compressor head.
P/N 0427598_C 6-1
Parallel RackHUSSMANN CORPORATION • BRIDGETON, MO 63044-2483 U.S.A.
MAINTENANCE
If a compressor removal table is used, slide the compressor fully on to the table, then roll table to overhead hoist or hydraulic lift area.
When the old compressor has been removed, clean the suction and discharge service valve gasket surfaces to shiny metal. Clean the gasket surfaces on the new compressor to shiny metal. Be careful not to groove or round the surfaces. Gasket surfaces must be clean to prevent leaking.
Install the new compressor in reverse order of removal. Do not open the new compressor to the system until after it has been leak tested and triple evacuated.
Note: Oil level regulator sight glasses are designed to provide a hermetic seal when internally pressurized. Some leaking may occur when a deep vacuum is pulled.
Cleaning the Turba-Shed (Oil Separator)Should the oil separator require cleaning, first shut down the system. Isolate the oil separator and bleed off pressure into an approved recovery vessel. Remove the top and bottom sight glasses and the oil supply line. With a clean, dry, regulated pressure source like nitrogen, blow out any sludge or dirt. Install the sightglasses using new o-rings. Parker Number 2-23, Compound 557 Precision Rubber, number 023, Compound 2337
Leak test, evacuate, and charge with fresh oil refer to legend for oil type. Open valves closed to isolate the oil system and bring the rack back on line.
Replacing Drier and Filter Cores:Shut down the system. Isolate the core to be replaced and bleed off pressure into an approved recovery vessel. Open housing, replace core and close up. Pressurize, leak test and bring back into line.
WINTER CONDENSING PRESSURE CONTROLS
Five methods are used to control condensing pressure during cold weather operation.
1) Flooding valves must be applied to the compressor unit when winter temperatures are expected.
2) Temperature Control: Fans are thermostatically controlled and cycled accordingly to outside temperature. Can be applied to single circuited condensers.
3) Thermal Fantrol: Used with multi-circuited condensers. Fans are cycled according to outside temperatures.
4) Split Condensers (factory or field installed): Used on dual circuit condenser with or without heat reclaim, where a four-way solenoid valve (controlled by ambient sensing temperature control or pressure control) activates to cut off one half of the condensers. Field-installed situations will require double discharge and double condenser leg return piping.
6-2 Maintenance
P/N 0427598_C U.S. & Canada 1-800-922-1919 • Mexico 01-800-890-2900 • WWW.HUSSMANN.COM

GENERAL MAINTENANCE
Regular inspection and upkeep is critical to operation of the rack. Because of the numerous options and accessories that are unique to each store, it is impossible to list all of the maintenance guidance for individual systems.
Maintenance must be performed by a well qualified technician to diagnose and prevent problems before they may occur. The information below is a general guideline.
Recommended service intervals in your area may vary depending on the operating environment and equipment used. Contact your Hussmann representative for further information.
Generally, the following items should be checked on a weekly basis:
• System Pressures• Main Power Voltage• Oil Levels• Refrigerant Charge
Generally, the following items should be checked on a monthly basis:
• System pressures• System leak tests• All filters and drier cores• Insulation, conduit, electrical boxes and
control panels• Secondary systems, and accessories• Fan motors, contactors and electrical
connections• Check for tightness of fittings, fan blades
and motor mounts
Generally, the following items should be checked on a quarterly basis:
Investigate operating conditions for the following:
• Suction, liquid, and discharge pressures and temperatures
• Sub-cooling, superheat and ambient temperatures
• Safety controls, operating controls and alarms
• Amperage coming from Compressors
Each year, check the following:
• Clean the condenser coil• Straighten or replace all fan blades • Change the filter drier and suction cores• Get an oil sample and determine the quality
and change if required
DRIER AND FILTER CORES REPLACEMENT
Replacing Drier and Filter Cores Shut down the system. Isolate the core to be replaced and bleed off pressure into an approved recovery vessel. Open housing, replace core and close up. Pressurize, leak test and bring back into line.
P/N 0427598_C 6-3
Parallel RackHUSSMANN CORPORATION • BRIDGETON, MO 63044-2483 U.S.A.

NOTES:
6-4 Maintenance
P/N 0427598_C U.S. & Canada 1-800-922-1919 • Mexico 01-800-890-2900 • WWW.HUSSMANN.COM

P/N 0427598_B 6-5
Parallel RackHUSSMANN CORPORATION • BRIDGETON, MO 63044-2483 U.S.A.
P/N 0427598_C 7-1
SPORLANhttp://www.sporlanonline.com
EMERSONFault Finder app http://www.emersonclimate.com/en-us/
Resources/Mobile_Apps/Pages/mobileapps.aspx
SQUARE D HOTLINE888-SQUARED (888-778-2733) Tech Support Line. Level One provides
product initial Tech Support and can connect the Caller to Level 2, if required.
TROUBLE SHOOTING INFORMATION
SERVICE

P/N 0427598_C U.S. & Canada 1-800-922-1919 • Mexico 01-800-890-2900 • WWW.HUSSMANN.COM
7-2 Service
Ref
er to
Mot
or &
Bas
ic W
iring
Sec
tion
Cor
rect
Vol
tage
Sup
ply
Che
ck
-- E
xces
sive
Cab
le L
engt
h
-- U
nder
size
d C
able
-
- Pow
er S
uppl
y/U
tility
Grid
-
- Loo
se E
lect
rical
Con
nect
ions
-
- Bad
Tra
nsfo
rmer
s
-- W
orn
Ele
ctric
al C
onta
cts
Ref
er to
3 P
hase
Vol
tage
Mon
itor S
ectio
n of
Con
trols
Mod
ule
3R
epla
ce A
ppro
pria
te C
ompo
nent
s4
See
Com
plet
e S
yste
m O
pera
tion
Wor
kshe
et5
See
Pre
ssur
e C
ontro
l Sec
tion
of C
ontro
ls M
odul
eC
heck
for B
low
n G
aske
t or D
amag
ed D
isch
arge
Ree
ds7
Che
ck fo
r Los
s of
Cha
rge,
Res
trict
ion
or F
aulty
Con
trol
8C
heck
for D
irty
Con
dens
ers,
Def
ectiv
e C
onde
nser
, Fa
n &
Mot
or, R
efrig
eran
t Ove
rcha
rge,
etc
.
Com
pres
sor S
tart
sSh
ort C
ycle
Whi
ch C
ontro
l is
Sho
rt C
yclin
g?
Pro
tect
or
Che
ck V
olta
ge a
t C
ompr
esso
r Ter
min
als
Pro
per
Vol
tage
Impr
oper
Vol
tage
Che
ck A
mp
Dra
w
Hig
h or
Exc
essi
ve
Am
psN
orm
al A
mps
Che
ck W
indi
ng
Res
ista
nce
and
Res
ista
nce
to G
roun
d
Pro
per
Res
ista
nce
Impr
oper
Res
ista
nce
Rep
lace
Com
pres
sor
Wire
dIn
corr
ectly
Wire
dC
orre
ctly
Fix
Rep
lace
W
iring
Che
ck E
lect
rical
C
onne
ctio
ns
Goo
d
Bad Fix
Con
nect
ions
Are
The
Sta
rt C
ompo
nent
s (i.
e. R
elay
s, M
otor
Sta
rters
, C
onta
ctor
s, a
nd C
apac
itors
)O
K?
Yes
No
Rep
lace
Com
pone
nts
Verif
y Sy
stem
Ope
ratio
n
Ther
mos
tat
LPC
HP
C
Che
ckW
iring
Is th
e C
ompr
esso
r Pro
perly
A
pplie
d? P
rope
r Ref
riger
ant,
Vol
tage
App
licat
ion,
Tem
p R
ange
? No
Yes
Res
olve
App
licat
ion
Issu
es
Bal
ance
Sys
tem
Pre
ssur
e an
d A
ttem
pt to
R
esta
rt W
hile
Obs
ervi
ng A
mps
Res
tarts
Doe
s N
ot R
esta
rt
Hig
h A
mps
Not
Hig
h A
mps
Rep
lace
Com
pres
sor
Rep
lace
Com
pres
sor
Do
Not
Rep
lace
Com
pres
sor
Verif
y Sy
stem
Ope
ratio
n
Rep
lace
Pro
tect
or
(If A
cces
sibl
e) o
r C
ompr
esso
r
Do
Not
Rep
lace
Com
pres
sor
Fix
Volta
ge Is
sues
Verif
y Sy
stem
Ope
ratio
n
Do
Not
Rep
lace
Com
pres
sor
Verif
y Sy
stem
Ope
ratio
n
Fron
tsea
t Suc
tion
Ser
vice
Val
veD
AN
GER
!D
o N
ot F
ront
seat
Suc
tion
Ser
vice
V
alve
if D
oing
so
will
Isol
ate
the
LPC
from
the
Com
pres
sor!
Stil
l Sho
rt C
yclin
g?
Yes
No
Insp
ect/R
epla
ceC
ompr
esso
rD
o N
ot R
epla
ce C
ompr
esso
rVe
rify
Syst
em O
pera
tion
Is th
e D
isch
arge
Ser
vice
Val
ve B
ack
Sea
ted?
Yes
No
Bac
ksea
t It
Do
Not
Rep
lace
Com
pres
sor
Verif
y Sy
stem
Ope
ratio
n
Com
pres
sor S
tart
sIm
med
iate
ly T
rips
on P
rote
ctor
Allo
w T
ime
for C
ompr
esso
r P
rote
ctor
to R
eset
Com
pres
sor S
tart
sR
uns
Con
tinuo
usly
Verif
y Sy
stem
Ope
ratio
n
1
1
2
4,
2
1
6
68,
47 ,
4
55
4
4
4
4
3
Trou
ble
Sho
otin
g G
uide
Form
No.
200
4CC
-126
© 2
004
Cop
elan
d C
orpo
ratio
n

Ref
er to
Mot
or &
Bas
ic W
iring
Mod
ule
See
Com
plet
e S
yste
m O
pera
tion
Wor
kshe
etR
epla
ce A
ppro
pria
te C
ompo
nent
sC
heck
Ext
erna
l Wiri
ngC
orre
ct V
olta
ge S
uppl
y C
heck
-
- Exc
essi
ve C
able
Len
gth
-
- Und
ersi
zed
Cab
le
-- P
ower
Sup
ply/
Util
ity G
rid
-- L
oose
Ele
ctric
al C
onne
ctio
ns
-- B
ad T
rans
form
ers
-
- Wor
n E
lect
rical
Con
tact
sR
efer
to 3
Pha
se V
olta
ge M
onito
r Sec
tion
of C
ontro
ls M
odul
eC
heck
Fus
es, C
ircui
t Bre
aker
s, C
ontro
l Circ
uit/S
afet
y C
ontro
lsTh
erm
osta
t, C
onta
ctor
s, e
tc.
Com
pres
sor N
ot R
unni
ng
Allo
w T
ime
for C
ompr
esso
r P
rote
ctor
to R
eset
Che
ck V
olta
ge a
t C
ompr
esso
r Ter
min
als
Pro
per
Vol
tage
Impr
oper
Vol
tage
Che
ck A
mp
Dra
w
Hig
h or
E
xces
sive
No
Am
ps
Che
ck W
indi
ng
Res
ista
nce
and
Res
ista
nce
to G
roun
d
Pro
per
Res
ista
nce
Impr
oper
Res
ista
nce
Wire
dIn
corr
ectly
Wire
dC
orre
ctly
Fix
Rep
lace
Che
ck E
lect
rical
C
onne
ctio
ns
Goo
dB
ad Fix
Con
nect
ions
Are
The
Sta
rt C
ompo
nent
s (i.
e.R
elay
s, M
otor
Sta
rters
, C
onta
ctor
s, a
nd C
apac
itors
)O
K?
Yes
No
No
Vol
tage
Rep
lace
Com
pres
sor
Che
ckW
iring
Do
Not
Rep
lace
Com
pres
sor
Fix
Volta
ge Is
sues
Verif
y Sy
stem
Ope
ratio
n
Do
Not
Rep
lace
Com
pres
sor
Rep
lace
Com
pone
nts
Verif
y Sy
stem
Ope
ratio
n
Is th
e C
ompr
esso
r Pro
perly
A
pplie
d? P
rope
r Ref
riger
ant,
Vol
tage
App
licat
ion,
Tem
p R
ange
? No
Yes
Res
olve
App
licat
ion
Issu
es
Bal
ance
Sys
tem
Pre
ssur
e an
d A
ttem
pt to
R
esta
rt W
hile
Obs
ervi
ng A
mps
Res
tarts
Doe
s N
ot R
esta
rt
Hig
h A
mps
Not
Hig
h A
mps
Rep
lace
Com
pres
sor
Rep
lace
Com
pres
sor
Do
Not
Rep
lace
Com
pres
sor
Verif
y Sy
stem
Ope
ratio
n
Allo
w T
ime
for C
ompr
esso
r P
rote
ctor
to R
eset
Res
etD
id N
ot R
eset
Rep
lace
Pro
tect
or
(If A
cces
sibl
e) o
r C
ompr
esso
r
Doe
s N
ot S
tart
Inst
antly
Blo
wn
Fuse
s
Is C
ompr
esso
r Gro
unde
d?
Yes
No
Rep
lace
Com
pres
sor
Che
ck W
indi
ng
Res
ista
nce
Usi
ng a
n O
hmm
eter
Win
ding
s O
KW
indi
ngs
Not
OK
Do
Not
Rep
lace
Com
pres
sor
Che
ck C
ompo
nent
sVe
rify
Syst
em O
pera
tion
Rep
lace
Com
pres
sor
1
1
1
1
2
2
4,2
2
2
3
3
4 5 6
65
Trou
ble
Sho
otin
g G
uide
Form
No.
200
4CC
-126
© 2
004
Cop
elan
d C
orpo
ratio
n
P/N 0427598_C 7-3
Parallel RackHUSSMANN CORPORATION • BRIDGETON, MO 63044-2483 U.S.A.

Additional Sporlan ResourcesSPORLAN APPS
SPORLAN SELECTION PROGRAM
SUP
ERM
ARK
ET E
QU
IPM
ENT
www.sporlanonline.com
PR
OD
UCT
INFO
RM
ATIO
N
REFRIGERANTDISTRIBUTORS
SOLENOID VALVES XSP SERIES
GLYCOL SOLENOID VALVES
CATCH-ALL FILTER-DRIERS
THERMOSTATIC EXPANSION VALVES
HEAD PRESSURE CONTROL VALVES
KELVIN II SERIES
EVAPORATOR PRESSUREREGULATING VALVES
PRESSURE TRANSDUCERS & TEMPERATURE SENSORS
DEFROSTDIFFERENTIAL VALVE
ELECTRIC VALVESCDS SERIES
PSK CONTROLLERS MODEL 214
SOLENOID VALVES
ELECTRIC VALVESSER SERIES
Form 5-422

To obtain warranty information or other support, contact your
Hussmann representative. Please include the model and serial number of the product.
Hussmann Corporation, Corporate Headquarters: Bridgeton, Missouri, U.S.A. 63044-2483 October 2012

Hussmann Corporation, 12999 St. Charles Rock RoadBridgeton, MO 63044-2483
www.hussmann.com