paralenz® dive camera user manual advanced settings 6.7.1 format micro sd-card 6.7.2 set the camera...
TRANSCRIPT
PARALENZ® DIVE CAMERA
USER MANUAL
WWW.PARALENZ.COM
V9
PD
C-1
1 2
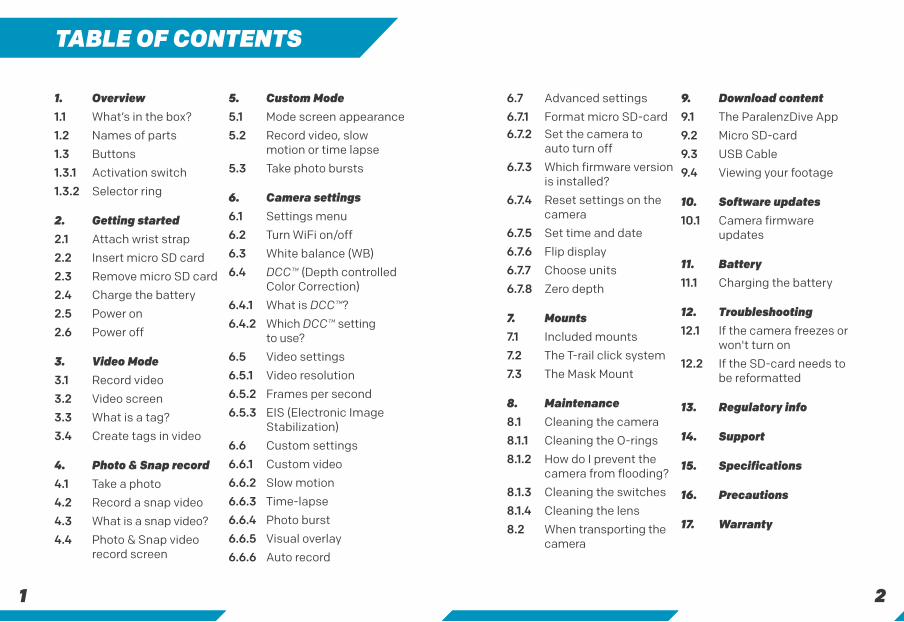
TABLE OF CONTENTS
1. Overview
1.1 What’s in the box?
1.2 Names of parts
1.3 Buttons
1.3.1 Activation switch
1.3.2 Selector ring
2. Getting started
2.1 Attach wrist strap
2.2 Insert micro SD card
2.3 Remove micro SD card
2.4 Charge the battery
2.5 Power on
2.6 Power off
3. Video Mode
3.1 Record video
3.2 Video screen
3.3 What is a tag?
3.4 Create tags in video
4. Photo & Snap record
4.1 Take a photo
4.2 Record a snap video
4.3 What is a snap video?
4.4 Photo & Snap video record screen
5. Custom Mode
5.1 Mode screen appearance
5.2 Record video, slow motion or time lapse
5.3 Take photo bursts
6. Camera settings
6.1 Settings menu
6.2 Turn WiFi on/off
6.3 White balance (WB)
6.4 DCC™ (Depth controlled Color Correction)
6.4.1 What is DCC™?
6.4.2 Which DCC™ setting to use?
6.5 Video settings
6.5.1 Video resolution
6.5.2 Frames per second
6.5.3 EIS (Electronic Image Stabilization)
6.6 Custom settings
6.6.1 Custom video
6.6.2 Slow motion
6.6.3 Time-lapse
6.6.4 Photo burst
6.6.5 Visual overlay
6.6.6 Auto record
6.7 Advanced settings
6.7.1 Format micro SD-card6.7.2 Set the camera to auto turn off
6.7.3 Which firmware version is installed?
6.7.4 Reset settings on the camera
6.7.5 Set time and date
6.7.6 Flip display
6.7.7 Choose units
6.7.8 Zero depth
7. Mounts
7.1 Included mounts
7.2 The T-rail click system
7.3 The Mask Mount
8. Maintenance
8.1 Cleaning the camera
8.1.1 Cleaning the O-rings
8.1.2 How do I prevent the camera from flooding?
8.1.3 Cleaning the switches
8.1.4 Cleaning the lens
8.2 When transporting the camera
9. Download content
9.1 The ParalenzDive App
9.2 Micro SD-card
9.3 USB Cable
9.4 Viewing your footage
10. Software updates
10.1 Camera firmware updates
11. Battery
11.1 Charging the battery
12. Troubleshooting
12.1 If the camera freezes or won't turn on
12.2 If the SD-card needs to be reformatted
13. Regulatory info
14. Support
15. Specifications
16. Precautions
17. Warranty
3 4
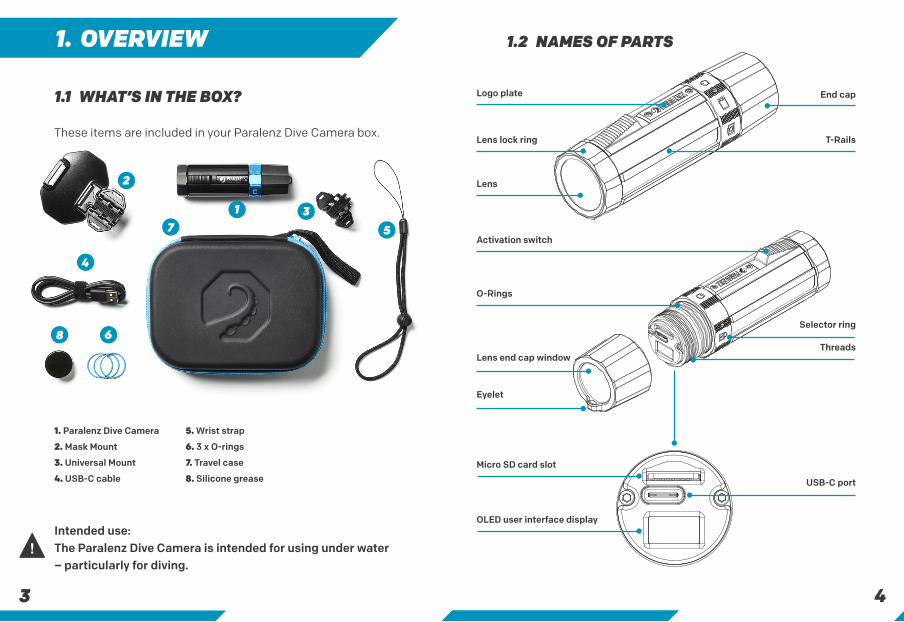
1.1 WHAT’S IN THE BOX?
These items are included in your Paralenz Dive Camera box.
1 37 5
4
2
Intended use: The Paralenz Dive Camera is intended for using under water– particularly for diving.
68
1. Paralenz Dive Camera
2. Mask Mount
3. Universal Mount
4. USB-C cable
5. Wrist strap
6. 3 x O-rings
7. Travel case
8. Silicone grease
1. OVERVIEW 1.2 NAMES OF PARTS
Selector ring
Threads
End cap
T-Rails
USB-C port
Logo plate
Lens lock ring
Lens
Activation switch
Eyelet
Lens end cap window
O-Rings
Micro SD card slot
OLED user interface display

5 6
2. GETTING STARTED1.3 BUTTONS1.3.1 Activation switch Pull back the activation switch once and release quickly to ‘click’. Hold the activation switch for 1 second or more to ‘hold’.
1.3.2 Selector ring To switch between modes, rotate the selector ring. The icon aligned with the logo plate will indicate the selected mode. Make sure that the selector ring is placed correctly (the selec-tor ring will snap to each position).
Power
Video
Photo &Snap record
Custom
Settings
Locked
You can select mode by rotating the ring and align the mode with the logo plate.
2.1 ATTACH WRIST STRAP1) Put the small cord of the strap through the eyelet on the camera. 2) Put the other end of the strap through the loop.3) Tighten the strap.
2.2 INSERT MICRO SD CARDTurn off the camera before inserting the micro SD card. Use only SanDisk class U3 or V30 SD cards (Extreme, Extreme PLUS and Extreme PRO series are compatible with this camera). A capacity of 32 GB or more is recommended. (Max. 128 GB)1) Unscrew the end cap. 2) Insert the micro SD card (logo side up).3) Screw on the end cap – do not cross thread the cap!
1 2 3
7 8
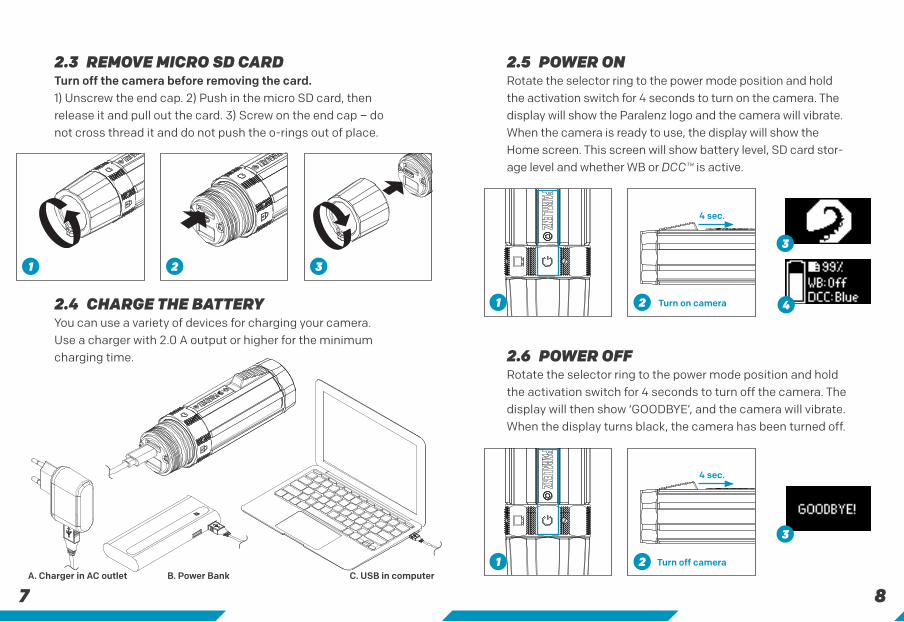
2.3 REMOVE MICRO SD CARDTurn off the camera before removing the card.1) Unscrew the end cap. 2) Push in the micro SD card, then release it and pull out the card. 3) Screw on the end cap – do not cross thread it and do not push the o-rings out of place.
1 2 3
2.4 CHARGE THE BATTERY You can use a variety of devices for charging your camera. Use a charger with 2.0 A output or higher for the minimum charging time.
C. USB in computerB. Power BankA. Charger in AC outlet
2.5 POWER ONRotate the selector ring to the power mode position and hold the activation switch for 4 seconds to turn on the camera. The display will show the Paralenz logo and the camera will vibrate. When the camera is ready to use, the display will show the Home screen. This screen will show battery level, SD card stor-age level and whether WB or DCC™ is active.
4 sec.
Turn on camera1 2
3
4
2.6 POWER OFFRotate the selector ring to the power mode position and hold the activation switch for 4 seconds to turn off the camera. The display will then show ‘GOODBYE’, and the camera will vibrate. When the display turns black, the camera has been turned off.
4 sec.
Turn off camera1 2
3
9 10
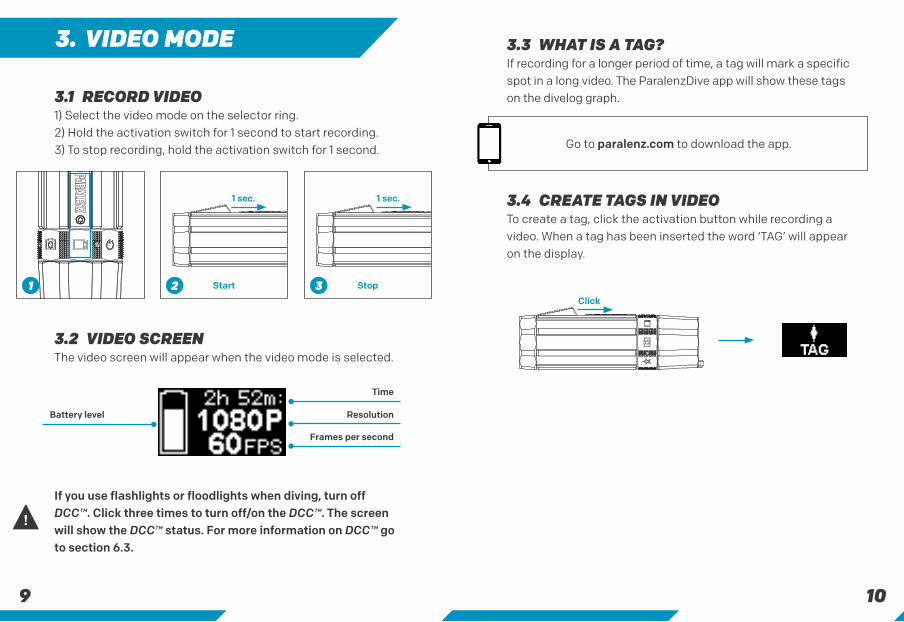
3. VIDEO MODE
3.1 RECORD VIDEO1) Select the video mode on the selector ring.2) Hold the activation switch for 1 second to start recording.3) To stop recording, hold the activation switch for 1 second.
1 sec. 1 sec.
Start Stop1 2 3
3.2 VIDEO SCREENThe video screen will appear when the video mode is selected.
Battery level
Time
Resolution
Frames per second
If you use flashlights or floodlights when diving, turn off DCC™. Click three times to turn off/on the DCC™. The screen will show the DCC™ status. For more information on DCC™ go to section 6.3.
3.3 WHAT IS A TAG?If recording for a longer period of time, a tag will mark a specific spot in a long video. The ParalenzDive app will show these tags on the divelog graph.
Go to paralenz.com to download the app.
3.4 CREATE TAGS IN VIDEOTo create a tag, click the activation button while recording a video. When a tag has been inserted the word ‘TAG’ will appear on the display.
Click
11 12
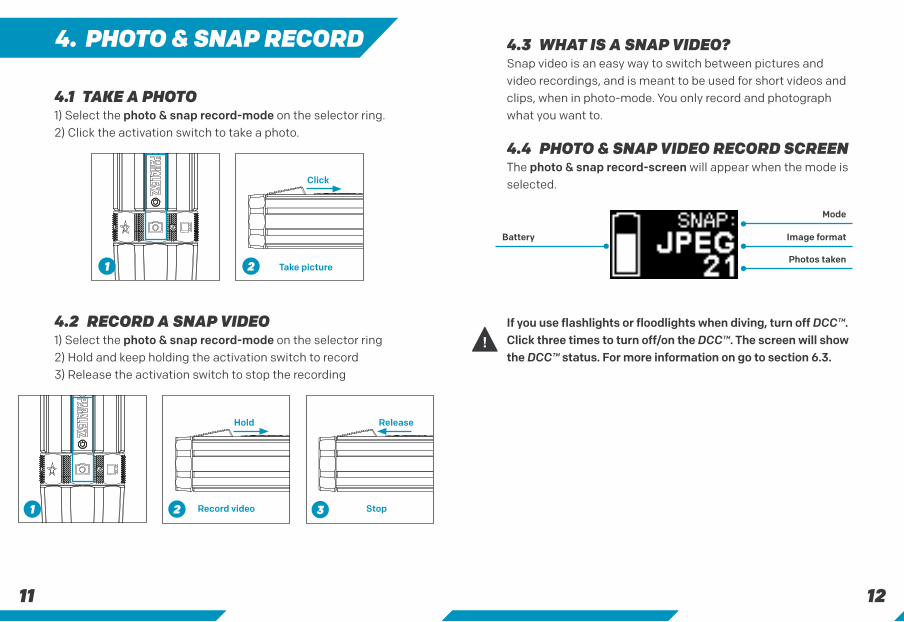
4. PHOTO & SNAP RECORD
4.1 TAKE A PHOTO1) Select the photo & snap record-mode on the selector ring.2) Click the activation switch to take a photo.
Click
Take picture21
4.2 RECORD A SNAP VIDEO1) Select the photo & snap record-mode on the selector ring2) Hold and keep holding the activation switch to record3) Release the activation switch to stop the recording
Hold Release
Record video Stop2 31
4.3 WHAT IS A SNAP VIDEO?Snap video is an easy way to switch between pictures and video recordings, and is meant to be used for short videos and clips, when in photo-mode. You only record and photograph what you want to.
4.4 PHOTO & SNAP VIDEO RECORD SCREENThe photo & snap record-screen will appear when the mode is selected.
Mode
Battery Image format
Photos taken
If you use flashlights or floodlights when diving, turn off DCC™. Click three times to turn off/on the DCC™. The screen will show the DCC™ status. For more information on go to section 6.3.
13 14
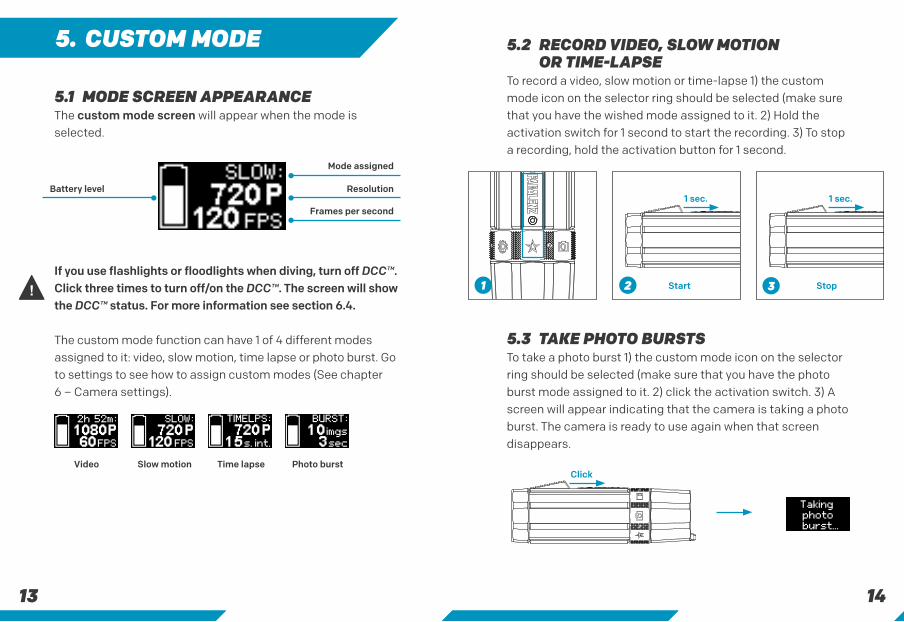
5. CUSTOM MODE
5.1 MODE SCREEN APPEARANCEThe custom mode screen will appear when the mode isselected.
Mode assigned
Battery level Resolution
Frames per second
If you use flashlights or floodlights when diving, turn off DCC™. Click three times to turn off/on the DCC™. The screen will show the DCC™ status. For more information see section 6.4.
The custom mode function can have 1 of 4 different modes assigned to it: video, slow motion, time lapse or photo burst. Go to settings to see how to assign custom modes (See chapter 6 – Camera settings).
Video Slow motion Time lapse Photo burst
5.2 RECORD VIDEO, SLOW MOTION OR TIME-LAPSE
To record a video, slow motion or time-lapse 1) the custommode icon on the selector ring should be selected (make sure that you have the wished mode assigned to it. 2) Hold the activation switch for 1 second to start the recording. 3) To stop a recording, hold the activation button for 1 second.
1 sec. 1 sec.
Start Stop2 31
5.3 TAKE PHOTO BURSTSTo take a photo burst 1) the custom mode icon on the selector ring should be selected (make sure that you have the photo burst mode assigned to it. 2) click the activation switch. 3) A screen will appear indicating that the camera is taking a photo burst. The camera is ready to use again when that screen disappears.
Click
15 16
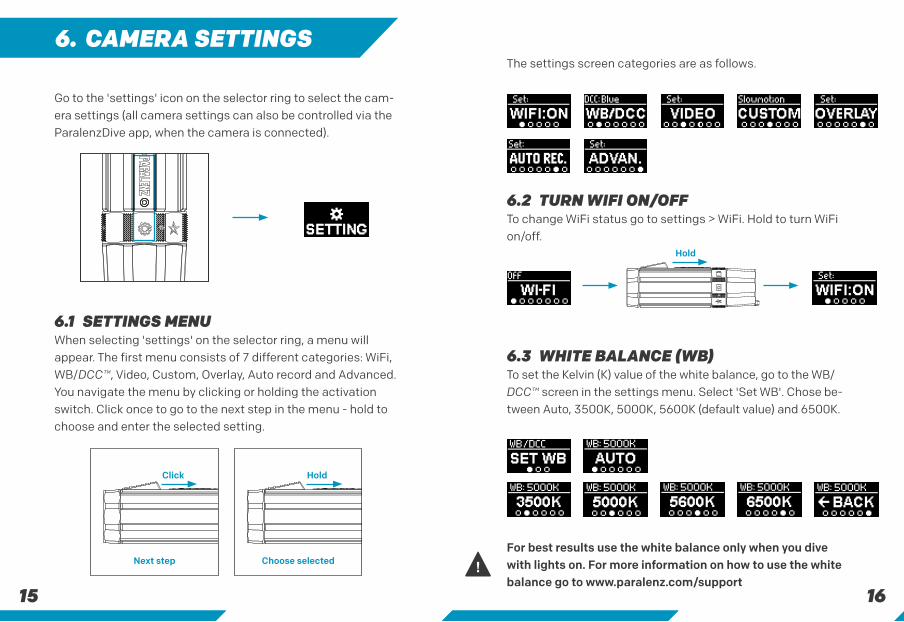
Go to the 'settings' icon on the selector ring to select the cam-era settings (all camera settings can also be controlled via the ParalenzDive app, when the camera is connected).
6.1 SETTINGS MENUWhen selecting 'settings' on the selector ring, a menu will appear. The first menu consists of 7 different categories: WiFi, WB/DCC™, Video, Custom, Overlay, Auto record and Advanced. You navigate the menu by clicking or holding the activation switch. Click once to go to the next step in the menu - hold to choose and enter the selected setting.
Click Hold
Next step Choose selected
6. CAMERA SETTINGSThe settings screen categories are as follows.
6.2 TURN WIFI ON/OFFTo change WiFi status go to settings > WiFi. Hold to turn WiFi on/off.
Hold
6.3 WHITE BALANCE (WB)To set the Kelvin (K) value of the white balance, go to the WB/DCC™ screen in the settings menu. Select 'Set WB'. Chose be-tween Auto, 3500K, 5000K, 5600K (default value) and 6500K.
For best results use the white balance only when you dive with lights on. For more information on how to use the white balance go to www.paralenz.com/support
17 18
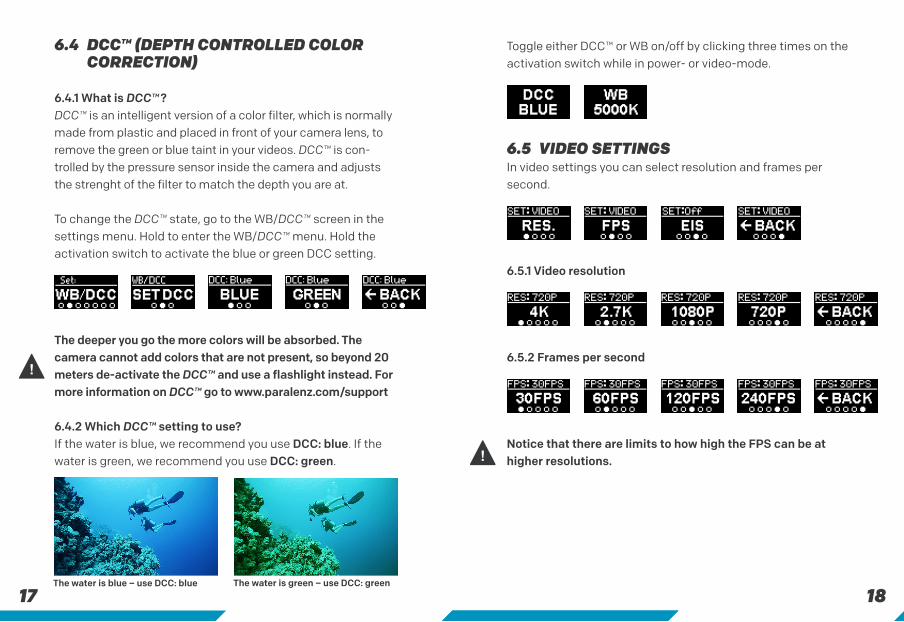
6.4 DCC™ (DEPTH CONTROLLED COLOR CORRECTION)
6.4.1 What is DCC™ ? DCC™ is an intelligent version of a color filter, which is normally made from plastic and placed in front of your camera lens, to remove the green or blue taint in your videos. DCC™ is con-trolled by the pressure sensor inside the camera and adjusts the strenght of the filter to match the depth you are at.
To change the DCC™ state, go to the WB/DCC™ screen in thesettings menu. Hold to enter the WB/DCC™ menu. Hold the activation switch to activate the blue or green DCC setting.
The deeper you go the more colors will be absorbed. The camera cannot add colors that are not present, so beyond 20 meters de-activate the DCC™ and use a flashlight instead. For more information on DCC™ go to www.paralenz.com/support
6.4.2 Which DCC™ setting to use? If the water is blue, we recommend you use DCC: blue. If the water is green, we recommend you use DCC: green.
The water is green – use DCC: greenThe water is blue – use DCC: blue
Toggle either DCC™ or WB on/off by clicking three times on the activation switch while in power- or video-mode.
6.5 VIDEO SETTINGSIn video settings you can select resolution and frames per second.
6.5.1 Video resolution
6.5.2 Frames per second
Notice that there are limits to how high the FPS can be at higher resolutions.
19 20
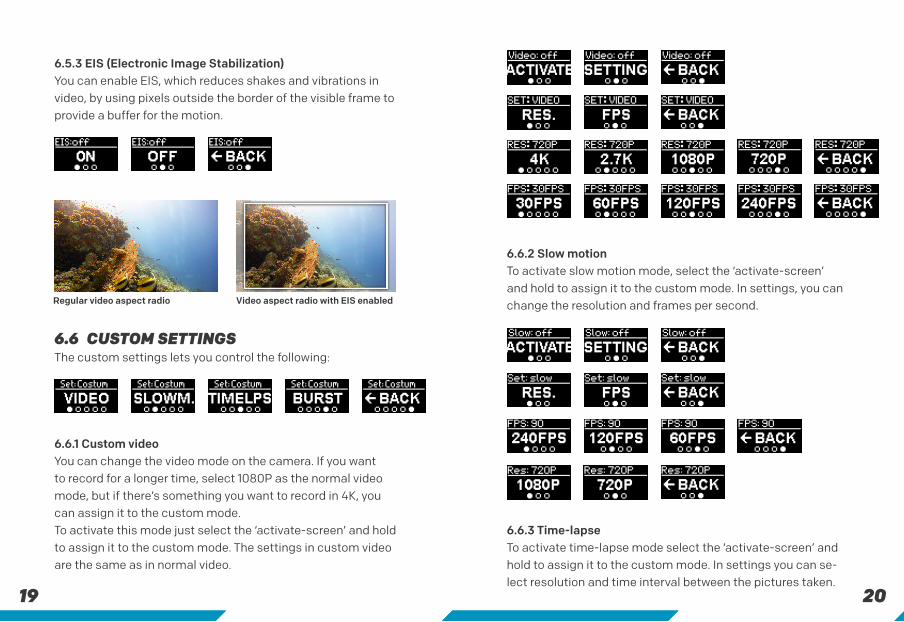
6.5.3 EIS (Electronic Image Stabilization)You can enable EIS, which reduces shakes and vibrations in video, by using pixels outside the border of the visible frame to provide a buffer for the motion.
Video aspect radio with EIS enabledRegular video aspect radio
6.6 CUSTOM SETTINGSThe custom settings lets you control the following:
6.6.1 Custom videoYou can change the video mode on the camera. If you want to record for a longer time, select 1080P as the normal video mode, but if there’s something you want to record in 4K, you can assign it to the custom mode.To activate this mode just select the ‘activate-screen’ and hold to assign it to the custom mode. The settings in custom video are the same as in normal video.
6.6.2 Slow motion To activate slow motion mode, select the ‘activate-screen’ and hold to assign it to the custom mode. In settings, you can change the resolution and frames per second.
6.6.3 Time-lapse To activate time-lapse mode select the ‘activate-screen’ and hold to assign it to the custom mode. In settings you can se-lect resolution and time interval between the pictures taken.
21 22
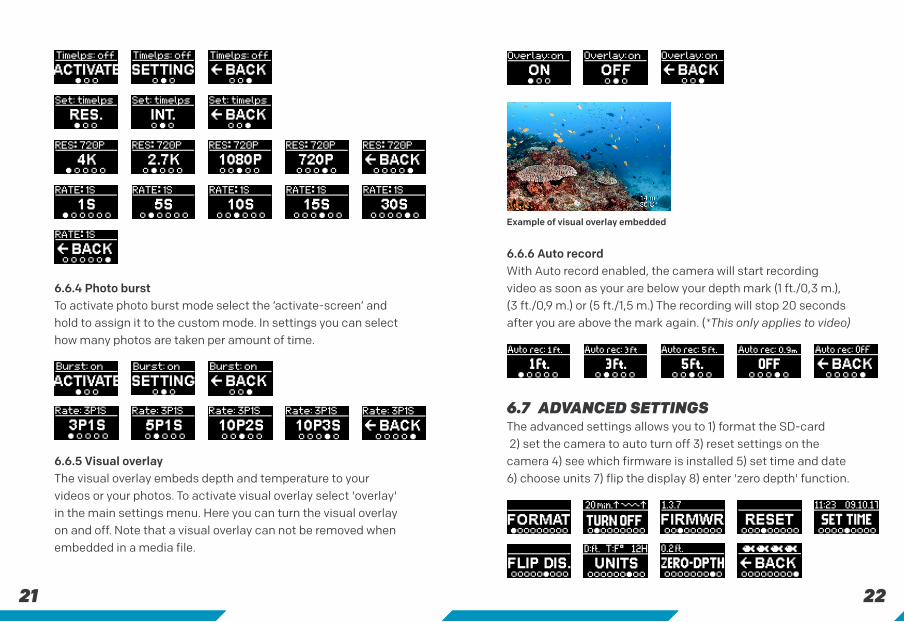
6.6.4 Photo burst To activate photo burst mode select the ‘activate-screen’ and hold to assign it to the custom mode. In settings you can select how many photos are taken per amount of time.
6.6.5 Visual overlayThe visual overlay embeds depth and temperature to your videos or your photos. To activate visual overlay select 'overlay' in the main settings menu. Here you can turn the visual overlay on and off. Note that a visual overlay can not be removed when embedded in a media file.
Example of visual overlay embedded
6.6.6 Auto recordWith Auto record enabled, the camera will start recording video as soon as your are below your depth mark (1 ft./0,3 m.), (3 ft./0,9 m.) or (5 ft./1,5 m.) The recording will stop 20 seconds after you are above the mark again. (*This only applies to video)
6.7 ADVANCED SETTINGSThe advanced settings allows you to 1) format the SD-card 2) set the camera to auto turn off 3) reset settings on the camera 4) see which firmware is installed 5) set time and date 6) choose units 7) flip the display 8) enter 'zero depth' function.
23 24
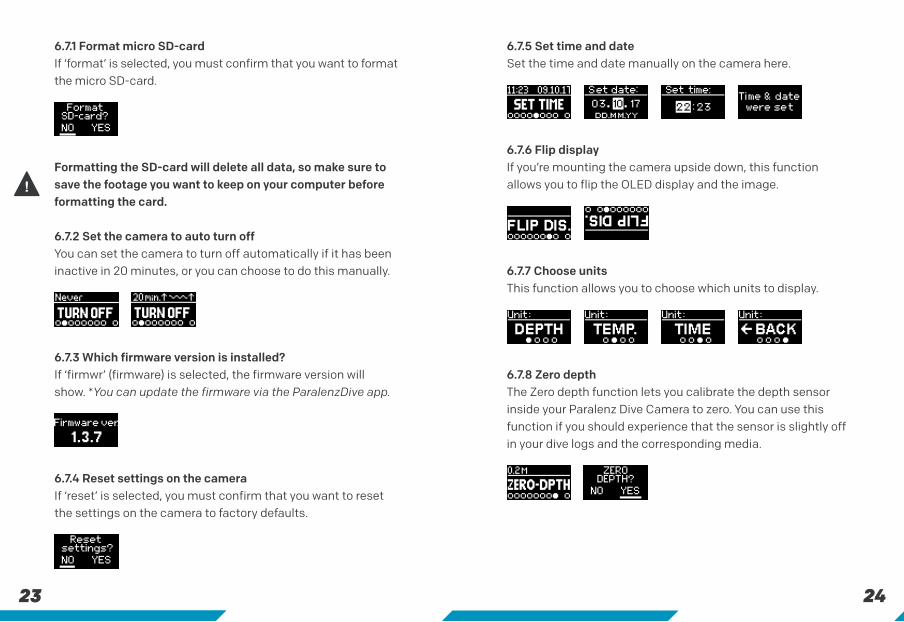
6.7.1 Format micro SD-card If ‘format’ is selected, you must confirm that you want to format the micro SD-card.
Formatting the SD-card will delete all data, so make sure to save the footage you want to keep on your computer before formatting the card.
6.7.2 Set the camera to auto turn offYou can set the camera to turn off automatically if it has been inactive in 20 minutes, or you can choose to do this manually.
6.7.3 Which firmware version is installed? If ‘firmwr’ (firmware) is selected, the firmware version will show. *You can update the firmware via the ParalenzDive app.
6.7.4 Reset settings on the camera If ‘reset’ is selected, you must confirm that you want to reset the settings on the camera to factory defaults.
6.7.5 Set time and dateSet the time and date manually on the camera here.
6.7.6 Flip displayIf you’re mounting the camera upside down, this function allows you to flip the OLED display and the image.
6.7.7 Choose unitsThis function allows you to choose which units to display.
6.7.8 Zero depthThe Zero depth function lets you calibrate the depth sensor inside your Paralenz Dive Camera to zero. You can use this function if you should experience that the sensor is slightly off in your dive logs and the corresponding media.
25 26
7. MOUNTS
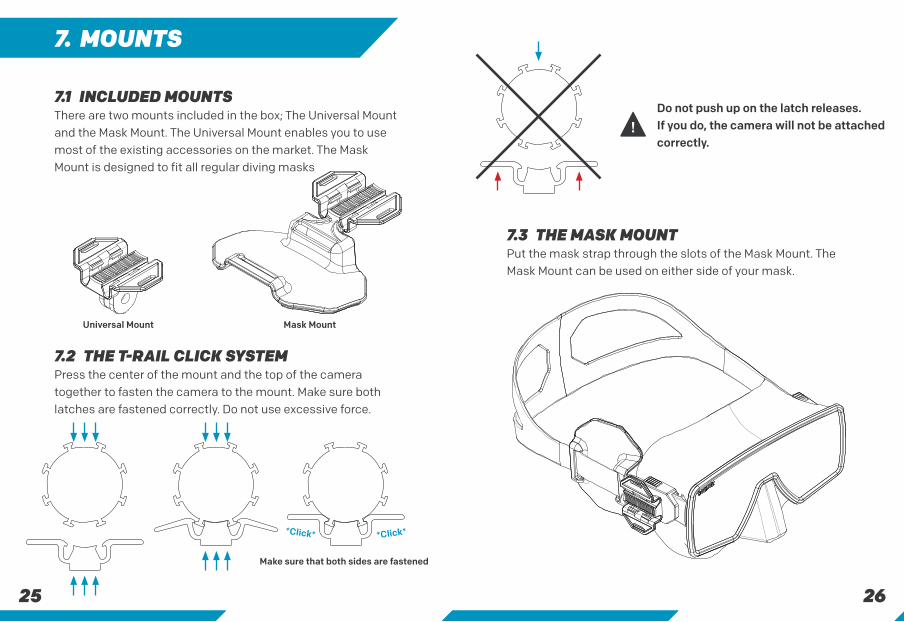
7.1 INCLUDED MOUNTSThere are two mounts included in the box; The Universal Mount and the Mask Mount. The Universal Mount enables you to use most of the existing accessories on the market. The Mask Mount is designed to fit all regular diving masks
Universal Mount Mask Mount
7.2 THE T-RAIL CLICK SYSTEMPress the center of the mount and the top of the camera together to fasten the camera to the mount. Make sure both latches are fastened correctly. Do not use excessive force.
*Click**Click*
Make sure that both sides are fastened
Do not push up on the latch releases.If you do, the camera will not be attached correctly.
7.3 THE MASK MOUNTPut the mask strap through the slots of the Mask Mount. The Mask Mount can be used on either side of your mask.
27 28
8. MAINTENANCE
8.1 CLEANING THE CAMERA 8.1.1 Cleaning the O-ringsAlways clean the camera in fresh water after use. Check that the O-rings have not been stretched and that they do not have any cuts or tears. To lubricate the O-rings apply grease and run them through your fingers while gently rubbing the grease into the O-ring (do not use spray lubricant or petroleum based grease).
8.1.2 How do I prevent the camera from flooding?The triple O-rings are tested to 250 m/820 ft./26 ATM. , so as long as you properly maintain the O-rings and don’t open the camera below water you should be fine. Remember to screw on the end cap correctly.
8.1.3 Cleaning the switchesIf sand grains should get stuck underneath the magnetic switches, you can easily remove the switches with a small Allen key, rinse in fresh water, and put them back on.
8.1.4 Cleaning the lensTo clean the lens, wipe it with a soft, lint-free cloth. You can use Eyeglass Cleaning Fluid – but do not use strong solvents such as benzene or alcohol.
8.2 WHEN TRANSPORTING THE CAMERAUse the included protection pouch for transporting your Para-lenz Camera. It has room for cables, SD-cards and grease.
9. DOWNLOAD CONTENT
9.1 THE PARALENZDIVE APPThe free ParalenzDive App makes downloading, sharing and viewing your photos and recordings easy. Download the app via App Store/Google Play. The app will guide you through the connection process. Note that you can also update the camera firmware through the app. The app will notify the user if there is a new firmware update available.
Go to paralenz.com to download the app.
9.2 MICRO SD-CARDYou can transfer your data from your micro SD-card by inserting the card into a card reader. See section 2.3 for information on how to remove the micro SD-card.
9.3 USB CABLEBy connecting your camera to a computer via the USB-C cable, you can access the content on the camera. Choose ‘data’ when connecting to the computer.
9.4 VIEWING YOUR FOOTAGEFor viewing your video content, use programs such as Windows Media Player, VLC Player, Quicktime etc.
29 30
10. SOFTWARE UPDATES
10.1 CAMERA FIRMWARE UPDATESFirmware updates are made through the ParalenzDive App. The app will give a notification when a new update is available.
Go to paralenz.com to download the app.
You can also download all firmware updates from our website. To install the firmware manually follow these steps:
1. Delete any file named “firmware.bin” in the folder you choose to download to.
2. Download the latest firmware for your camera from www.paralenz.com.
3. Copy the file firmware.bin onto the root of an empty SD-card (Not in a folder).
4. Make sure the battery has at least 30% power left. This is essential. You risk breaking your camera if this is not fol-lowed.Unplug the camera from the charger before checking the power percentage.
5. Turn off the camera. Insert the SD-card into the slot.6. Turn the camera on until you see the logo and wait for it to
turn off automatically. (The camera is now downloading the new firmware).
7. Turn the camera on again and wait for it to turn off automatically (The camera is now installing the firmware).
8. The camera is now ready to be turned on, with the new firmware installed.
11. BATTERY
The Paralenz Dive Camera comes with an integrated LiPo 1600 mAh battery.
11.1 CHARGING THE BATTERYUse the included USB-C cable for charging. Charge the cam-era through your computer or use a wallcharger – preferably a 2.1 A USB power adapter. See section 2.4 for information about how to charge the battery.
WARNING: Do not use the camera or the battery if it has been damaged – for example, if cracked or punctured. Disas-sembling or puncturing the battery can cause an explosion or fire. Do not store the camera where prolonged exposure to extreme temperatures can occur, because it can cause permanent damage. Do not dry the camera or battery with an external heat source such as a microwave oven or hair dryer.Do not store your battery with metal objects. If the battery terminals come in contact with metal objects, the battery may “shortout” and cause a fire. Do not attempt to remove or change the battery.
31 32
12. TROUBLESHOOTING
12.1 IF THE CAMERA FREEZES OR WON'T TURN ON
In case of the camera freezing and not responding, you can always do a hard-reset:1. Turn the selector ring to power position. 2. Plug in the charger.3. Hold the activation switch for 10 seconds.- The camera will now reboot.
12.2 IF THE SD-CARD NEEDS TO BE REFORMATTED
When formatting the memory card on a PC/MAC it needs to be formatted with the FAT32 format (32kb) for up to 32 GB and ex-FAT for 64 GB cards.
The SD-card can also be reformatted through the camera. See section 6.7.1 for information on how to format.
Reformatting the SD-card will delete all data, so make sure to save the footage you want to keep on your computerbefore reformatting the card.
13. REGULATORY INFO
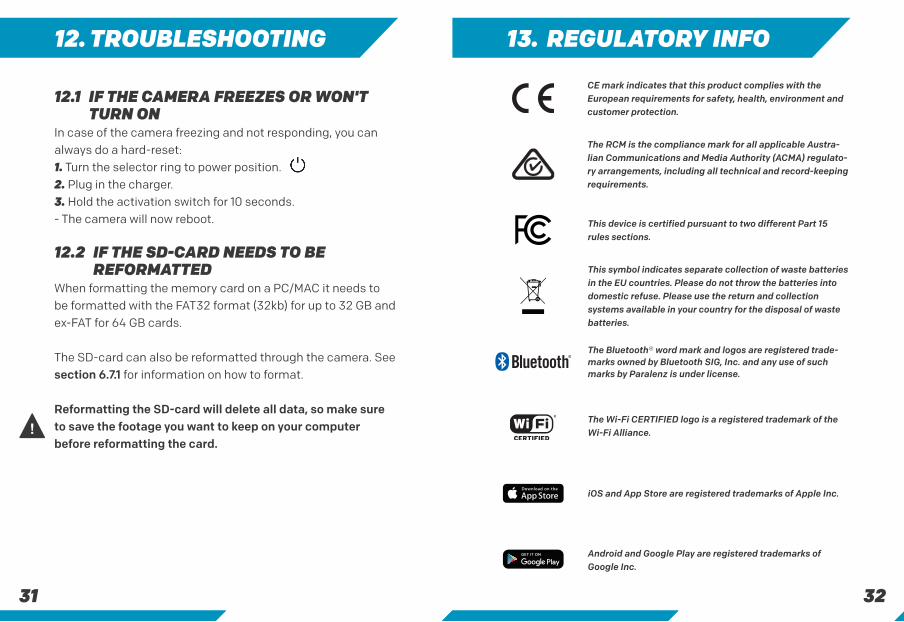
This symbol indicates separate collection of waste batteries in the EU countries. Please do not throw the batteries into domestic refuse. Please use the return and collection systems available in your country for the disposal of waste batteries.
The Wi-Fi CERTIFIED logo is a registered trademark of the Wi-Fi Alliance.
The Bluetooth® word mark and logos are registered trade-marks owned by Bluetooth SIG, Inc. and any use of such marks by Paralenz is under license.
iOS and App Store are registered trademarks of Apple Inc.
Android and Google Play are registered trademarks of Google Inc.
CE mark indicates that this product complies with the European requirements for safety, health, environment and customer protection.
The RCM is the compliance mark for all applicable Austra-lian Communications and Media Authority (ACMA) regulato-ry arrangements, including all technical and record-keeping requirements.
This device is certified pursuant to two different Part 15 rules sections.
33 34
FCCa. This device complies with Part 15 of FCC Rules. Operation is subject to the following two conditions: (1) this device may not cause harmful interference, and (2) this device must accept any interference received, including interference that may cause undesired operation.
b. Warning: Changes or modifications to this unit not express-ly approved by the part responsible for compliance could void the user’s authority to operate the equipment.
c. NOTE: This equipment has been tested and found to comply with the limits for a Class B digital device, pursuant to part 15 of the FCC Rules. These limits are designed to provide reasonable protection against harmful interference in a resi-dential installation. This equipment generates, uses and can radiate radio frequency energy and, if not installed and used in accordance with the instructions, may cause harmful interfer-ence to radio communications. However, there is no guarantee that interference will not occur in a particular installation. If this equipment does cause harmful interference to radio or television reception, which can be determined by turning the equipment off and on, the user is encouraged to try to correct the interference by one or more of the following measures:
– Reorient or relocate the receiving antenna.– Increase the separation between the equipment and receiver.– Connect the equipment into an outlet on a circuit different
from that to which the receiver is connected.– Consult the dealer or an experienced radio/TV technician for
help.
d. This device is also designed to meet the requirements for exposure to radio waves established by the Federal Communi-cations Commission (USA). The SAR limit adopted by the USA is 1.6 W/kg averaged over one gram of tissue. The highest SAR value reported to the FCC for this device type complies with this limit.
ICa. This device complies with CAN ICES-3 (B)/NMB-3(B).This device complies with Industry Canada licence-exempt RSS standard(s). Operation is subject to the following two conditions: (1) this device may not cause interference, and (2) this device must accept any interference, including interfer-ence that may cause undesired operation of the device.
b. Cet appareil est conforme à la norme CAN ICES-3 (B)/NMB-3 (B).Le présent appareil est conforme aux CNR d'Industrie Cana-da applicables aux appareils radio exempts de licence. Son fonctionnement est soumis aux conditions suivantes : (1) l'appareil ne doit pas causer d'interférence et (2) l'appareil doit accepter toute interférence, y compris une interférence pouvant entraîner un fonctionnement non désiré.
The frequency band(s) in which the radio equipment operates; maximum radio-frequency power transmitted in the frequency band(s) in which the radio equipment operates.
2.4 GHz Wi-Fi2402-2480 MHz for BTMaximum radio power: <20 dBm for 2.4 GHz Wi-Fi, <10 dBm for BT
35 36
14. SUPPORT
Paralenz is dedicated to providing the best possible service. To reach our Customer Support, visit paralenz.com/support or contact [email protected]
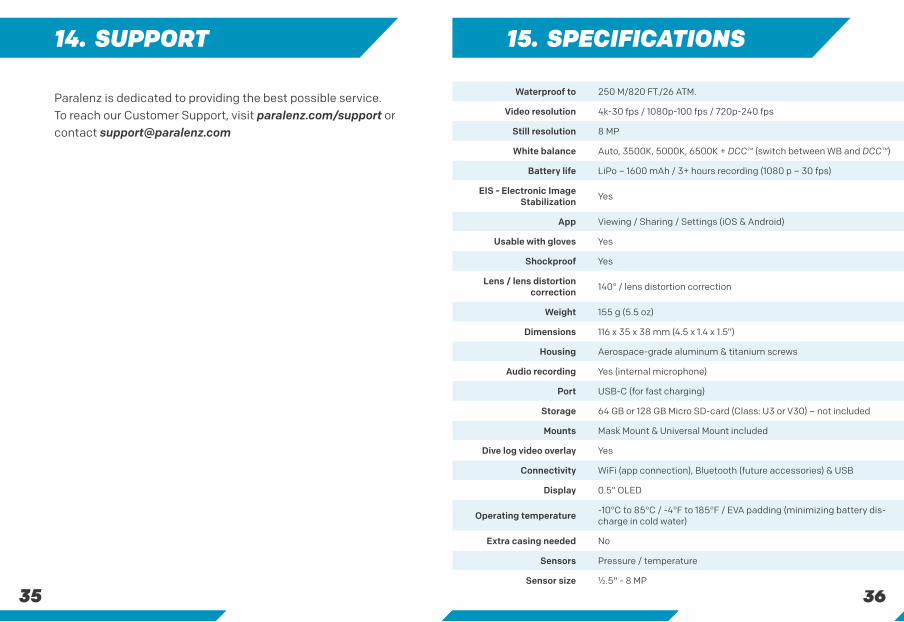
Waterproof to 250 M/820 FT./26 ATM.
Video resolution 4k-30 fps / 1080p-100 fps / 720p-240 fps
Still resolution 8 MP
White balance Auto, 3500K, 5000K, 6500K + DCC™ (switch between WB and DCC™)
Battery life LiPo – 1600 mAh / 3+ hours recording (1080 p – 30 fps)
EIS - Electronic ImageStabilization Yes
App Viewing / Sharing / Settings (iOS & Android)
Usable with gloves Yes
Shockproof Yes
Lens / lens distortion correction 140° / lens distortion correction
Weight 155 g (5.5 oz)
Dimensions 116 x 35 x 38 mm (4.5 x 1.4 x 1.5”)
Housing Aerospace-grade aluminum & titanium screws
Audio recording Yes (internal microphone)
Port USB-C (for fast charging)
Storage 64 GB or 128 GB Micro SD-card (Class: U3 or V30) – not included
Mounts Mask Mount & Universal Mount included
Dive log video overlay Yes
Connectivity WiFi (app connection), Bluetooth (future accessories) & USB
Display 0.5” OLED
Operating temperature -10°C to 85°C / -4°F to 185°F / EVA padding (minimizing battery dis-charge in cold water)
Extra casing needed No
Sensors Pressure / temperature
Sensor size ½.5" - 8 MP
15. SPECIFICATIONS
37 38
16. PRECAUTIONS
To avoid malfunction, explosion, or fire: Do not microwave, open, drop, puncture, take apart, bend, crush, paint, or incinerate the camera.
Do not solder or glue parts onto the camera and do not insert foreign objects into any openings, such as the Micro USB port.
Do not use the camera if it is damaged, this includes a punc-ture, missing O-ring, or water inside and do not attempt to remove or change the battery.
Do not dry the camera in an oven, with a hairdryer or any other external heat source, especially open fire.
Do not use the Paralenz Dive Camera for dives deeper than 250M/820F/26 ATM.
When opening and charging the camera, make sure that your hands are not wet, and that water from other sources cannot enter the camera or charger. This may cause electrical shock.
The Paralenz Dive Camera should not in any way be used as a dive computer, or as a supplement to a dive computer.
When charging, make sure the charger is a USB type charger, of max 5V, or use a USB plug on a computer.
If the front lens on the Paralenz Dive Camera should break, take care to avoid injury. Keep out of reach of children.
17. WARRANTY
The warranty covers all manufacturing defects and faults in design. During the warranty period, Paralenz will replace any defective units with a new or refurbished unit at our disgres-sion
The warranty does not cover depletion of the battery or results from normal wear and tear. It also does not cover unautho-rized repairs, negligence, improper use or accidents.
The warranty period begins from the date of purchase.
The warranty does not cover commercial or rental use.
In case you experience any fault with the Paralenz Dive Camera in the warranty period, please go to www.paralenz.com/support and fill in a warranty claim, to start the replacement process.
For further information on how the warranty applies to your country please visit www.paralenz.com/support.

39 40
DESIGNED AND DEVELOPED IN DENMARK– TESTED ALL OVER THE WORLD
The feedback and requests we receive from divers all over the world is the basis of every improvement we make. Whether it is deciding to add a camera feature, changing the packaging or developing a new accessory, our product development is guided by divers like you.
JOIN PARALENZ WORLD ON FACEBOOK
We at Paralenz love the enthusiasm and commitment in the diving community. This is why we have made the Paralenz World Facebook group for you to share your dives, get tips and tricks, and connect with us and other Paralenz users.
FCC ID: 2AL8V-PDC1AIC: 22808-PDC1AApplicant: Paralenz Group ApS.Refshalevej 163a ST.MF, Copenhagen K, 1432 Denmark

For more information, visit
WWW.PARALENZ.COM