paper sas491-2017: from source to target -- hadoop...
TRANSCRIPT
1
Paper SAS491-2017
From Source to Target—Hadoop Capabilities of SAS® Data Integration Studio
Darryl Yewchin and Todd Foreman, SAS Institute Inc.
ABSTRACT This paper demonstrates how to use the capabilities of SAS® Data Integration Studio to extract, load, and transform your data within a Hadoop environment. The transformations that can be used in each layer of the ELT process are illustrated using a sample use case, and the functionality of each is described. The use case steps through the process from source to target.
INTRODUCTION
For the sample use case, consider an organization that has information about its customers stored in three disparate source of record databases that support three independent lines of business. When a new customer is added to, or updated in, any of the three databases, an existing process sends the customer’s information to a third-party vendor to obtain enriched demographic information for that customer and this information is consolidated into a single batch feed back to the organization once per day.
The organization wishes to use SAS® Data Integration Studio to develop an end-to-end data integration process that will incrementally extract new and updated customer data from its three customer databases, and have that data consolidated and integrated with the customer demographic data, to create a single conformed customer dimension table in their Hadoop environment to be used for Analytics and Marketing initiatives in conjunction with their customer activity data.
Sample use case assumptions:
1. The customers in each line of business are unique, no master customer data management or entityresolution is done as part of this sample use case.
2. The customer demographic information has the necessary source system customer identifier to joinback to the customer information files.
3. Customer activity data is not included in the examples as this data would be integrated using thesame techniques described in the examples provided.
This paper provides examples on how to create SAS® Data Integration Studio jobs, using out of the box transformations, which will execute code within the Hadoop environment. A sample HDFS directory structure dividing HDFS into zones, the data process flow between those zones, and intended usage of each zone is also described. A discussion or analysis of architecting a Hadoop platform or efficiencies of the Hadoop platform is outside the scope of this paper.
2
PROCESS OVERVIEW
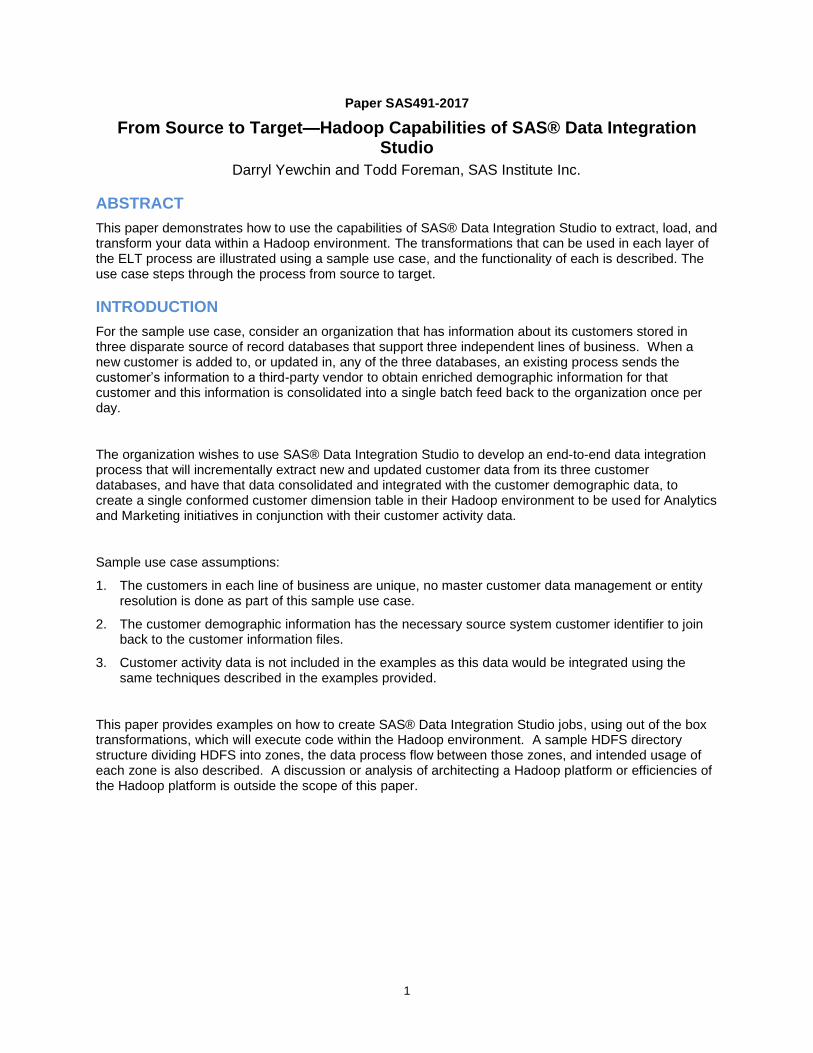
Figure 1 illustrates the end-to-end process flow.
Source Systems Extract & Ingest Transform Integrated Target
Hadoop
SAS® Data Integration Studio Transformations• Pig • Hive • SQL Join • User Written
HDFS Zones
Zone 1IncomingRaw Data
Zone 2Standardized
Data
Zone 3Enterprise Data
Zone 4Analytical Sandbox
Hadoop Distributed File System (HDFS)
HIVE Defined Metadata
Work
Edge NodeSAS Server
SAS
Incoming Raw Data
Files
PROC HADOOP
Secure File Transfer
PROC SQOOP
Source Systems
Source CCUSTOMER
Source ACUSTOMER
Source BCUSTOMER
CUSTOMERDEMOGRAPHICS
SAS/Access RDBMS
Secure File Transfer
SAS/ACCESS® Hadoop
Figure 1. Process Overview
The end-to-end process consists of the following steps:
1. Data is extracted or transferred from the source systems using various technologies and methods and ingested into HDFS Zone 1 in its original or raw extracted format. After a period of time, data can be purged from Zone 1.
2. Raw data from Zone 1 is reformatted, standardized, and conformed and stored into Zone 2. Zone 2 retains all of the history of updates to the Customer and Customer Demographic files by extract date.
3. Hive metadata structures are defined for files in Zone 2 and Zone 3.
4. The Customer and Customer Demographic files from Zone 2 are integrated into a target data structure and storage format in Zone 3 and will be the most current data for a customer. The data structure and storage format used in Zone 3 will be optimized for end-user access.
5. Data from Zone 2 and Zone3 can be manipulated further and used for analytical purposes in the Zone 4 Analytical Sandbox.
6. A temporary Work area of HDFS is used by the Data Integration process for storage of temporary in-process data. Data in this zone will use Hive metadata and storage formats for efficient data processing.
3
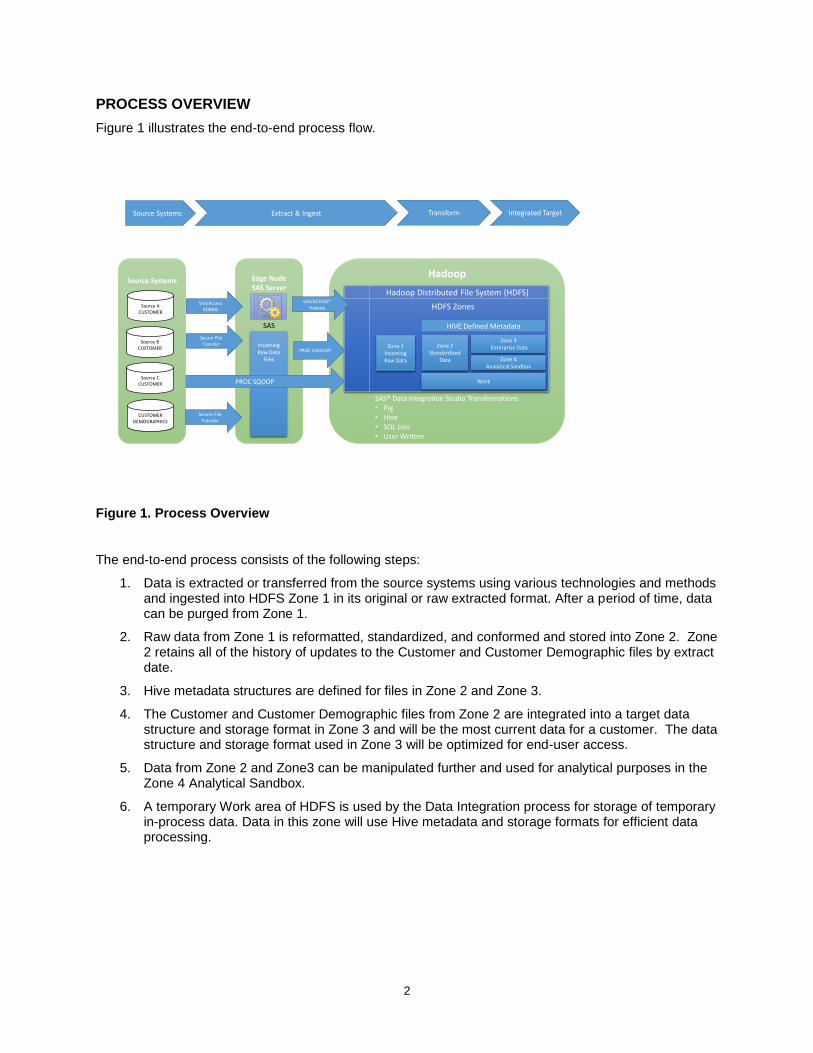
Table 1 summarizes the HDFS storage zones.
Zone Description Hive Metadata Usage
Zone 1 Raw incoming data organized by extract date.
May be purged after a period of time.
No Not accessible to end users.
Zone 2 Data with some formatting and standardization applied.
This zone contains a full history of transactions and incremental data (new and updated records) organized by extract date.
Yes Accessible to limited number of end users for discovery and historical data queries.
Zone 3 Enterprise Data that is fully integrated into purpose-driven target data structures.
Contains as-of-today view of data.
Yes Accessible to end users.
Data is structured and stored in a format to optimize end-user access.
Zone 4 Analytical Sandbox. Yes Data Scientist area for data discovery and model building.
May use data from Zone 2 and Zone 3.
Work Temporary work area for the data integration process.
Yes Not accessible to end users.
Data is stored in a format to optimize transformation processing.
Table 1. HDFS Storage Zones
The HDFS folder structure for Zones 1 – Zone 3 is organized as follows: /zone1/CUSTOMER_DEMOGRAPHICS
/SOURCE_A_CUSTOMER
/SOURCE_B_CUSTOMER
/SOURCE_C_CUSTOMER
/YYYYMMDD/ Extract Date
/zone2/CUSTOMER_DEMOGRAPHICS
/CUSTOMER
/YYYYMMDD/ Extract Date
/zone3/CUSTOMER
/YYYYMMDD/ Extract Date
4
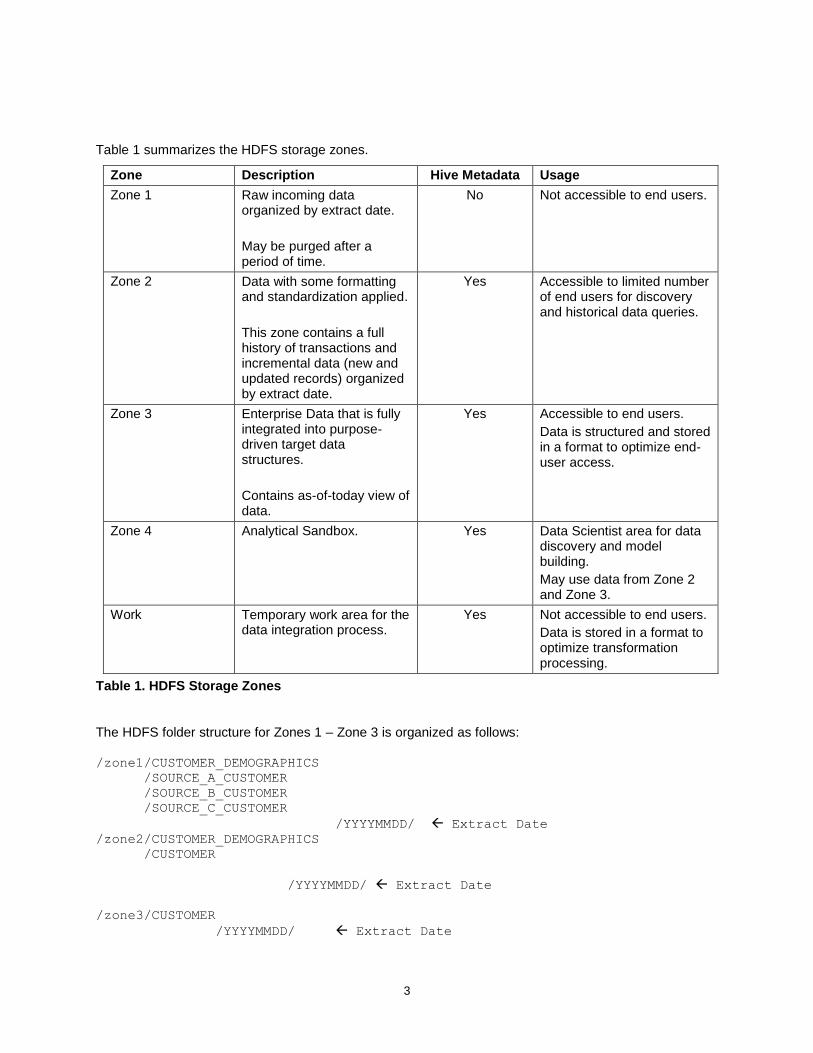
In order to organize the metadata objects within SAS® Data Integration Studio, the following metadata folder structure was created.
Display 1 illustrates the metadata folder structure.
Display 1. Metadata Folder Structure
5
SAS® DATA INTEGRATION STUDIO TRANSFORMATIONS
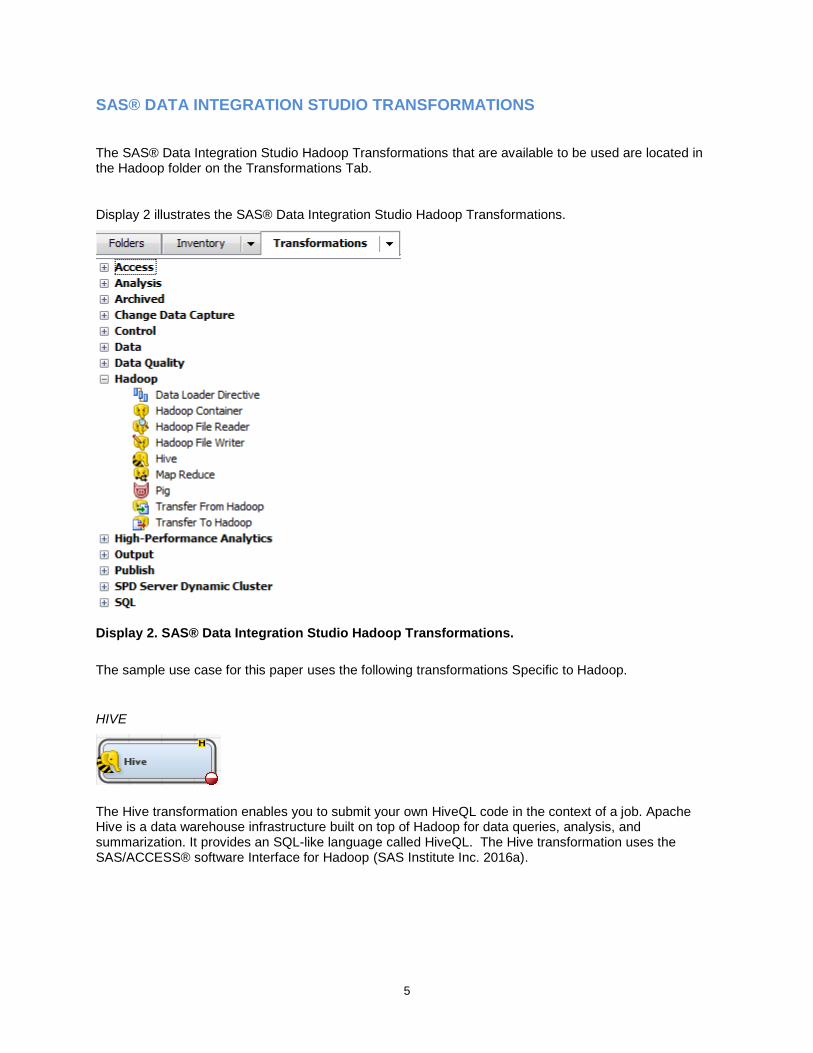
The SAS® Data Integration Studio Hadoop Transformations that are available to be used are located in the Hadoop folder on the Transformations Tab.
Display 2 illustrates the SAS® Data Integration Studio Hadoop Transformations.
Display 2. SAS® Data Integration Studio Hadoop Transformations.
The sample use case for this paper uses the following transformations Specific to Hadoop.
HIVE
The Hive transformation enables you to submit your own HiveQL code in the context of a job. Apache Hive is a data warehouse infrastructure built on top of Hadoop for data queries, analysis, and summarization. It provides an SQL-like language called HiveQL. The Hive transformation uses the SAS/ACCESS® software Interface for Hadoop (SAS Institute Inc. 2016a).
6
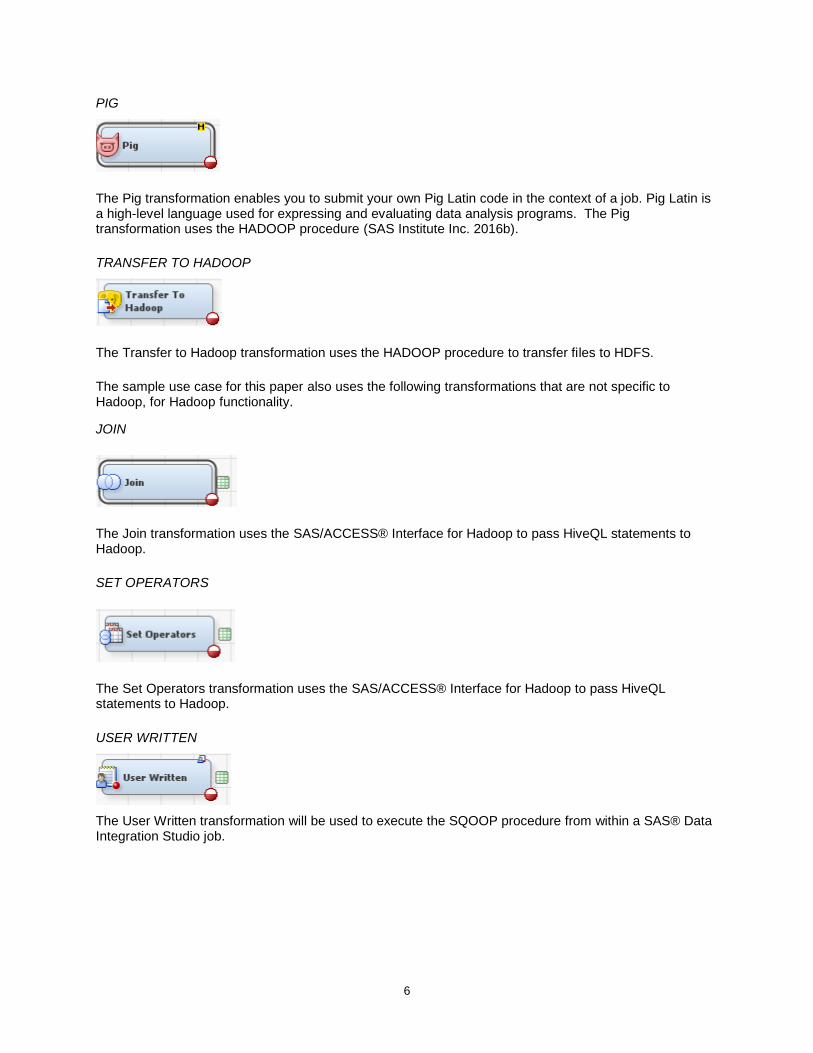
PIG
The Pig transformation enables you to submit your own Pig Latin code in the context of a job. Pig Latin is a high-level language used for expressing and evaluating data analysis programs. The Pig transformation uses the HADOOP procedure (SAS Institute Inc. 2016b).
TRANSFER TO HADOOP
The Transfer to Hadoop transformation uses the HADOOP procedure to transfer files to HDFS.
The sample use case for this paper also uses the following transformations that are not specific to Hadoop, for Hadoop functionality.
JOIN
The Join transformation uses the SAS/ACCESS® Interface for Hadoop to pass HiveQL statements to Hadoop.
SET OPERATORS
The Set Operators transformation uses the SAS/ACCESS® Interface for Hadoop to pass HiveQL statements to Hadoop.
USER WRITTEN
The User Written transformation will be used to execute the SQOOP procedure from within a SAS® Data Integration Studio job.
7
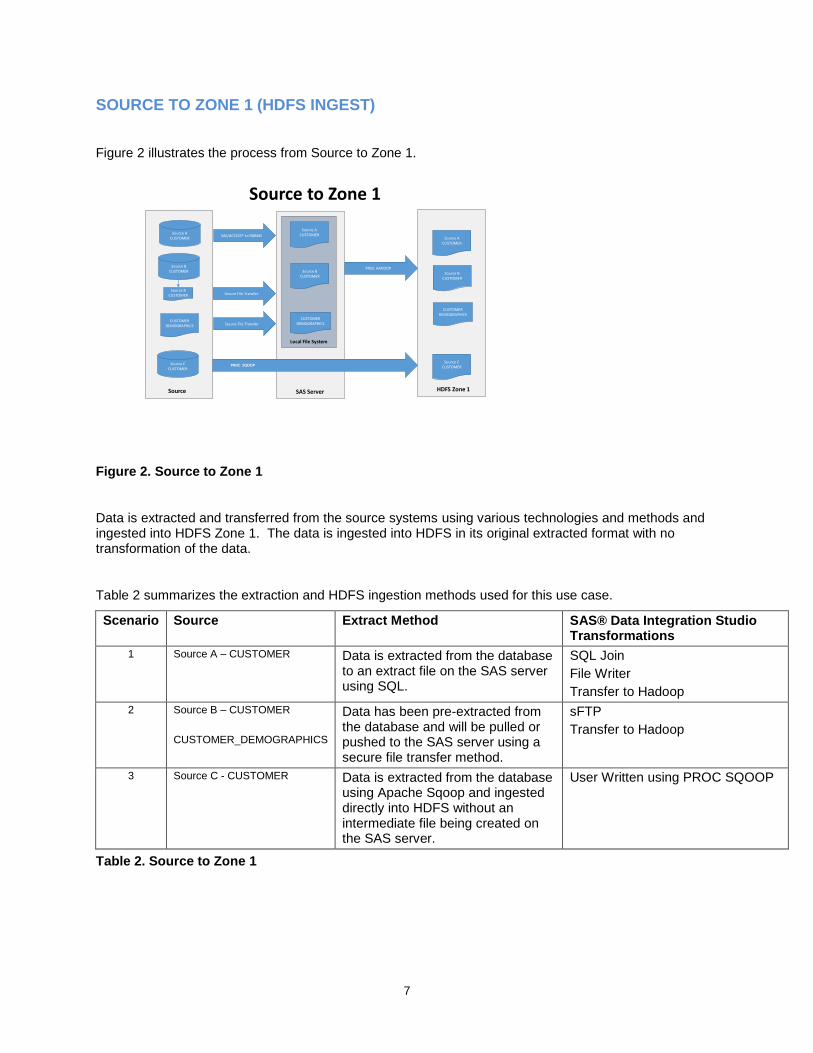
SOURCE TO ZONE 1 (HDFS INGEST)
Figure 2 illustrates the process from Source to Zone 1.
Source to Zone 1
HDFS Zone 1Source
Source ACUSTOMER
Source BCUSTOMER
Source CCUSTOMER
Source BCUSTOMER
Source ACUSTOMER
Source BCUSTOMER
Source CCUSTOMER
SAS Server
CUSTOMERDEMOGRAPHICS
CUSTOMERDEMOGRAPHICS
SAS/ACCESS® to RDBMS
Secure File Transfer
Secure File Transfer
PROC SQOOP
PROC HADOOP
Source ACUSTOMER
Source BCUSTOMER
CUSTOMERDEMOGRAPHICS
Local File System
Figure 2. Source to Zone 1
Data is extracted and transferred from the source systems using various technologies and methods and ingested into HDFS Zone 1. The data is ingested into HDFS in its original extracted format with no transformation of the data.
Table 2 summarizes the extraction and HDFS ingestion methods used for this use case.
Scenario Source Extract Method SAS® Data Integration Studio Transformations
1 Source A – CUSTOMER Data is extracted from the database to an extract file on the SAS server using SQL.
SQL Join
File Writer
Transfer to Hadoop
2 Source B – CUSTOMER
CUSTOMER_DEMOGRAPHICS
Data has been pre-extracted from the database and will be pulled or pushed to the SAS server using a secure file transfer method.
sFTP
Transfer to Hadoop
3 Source C - CUSTOMER Data is extracted from the database using Apache Sqoop and ingested directly into HDFS without an intermediate file being created on the SAS server.
User Written using PROC SQOOP
Table 2. Source to Zone 1
8
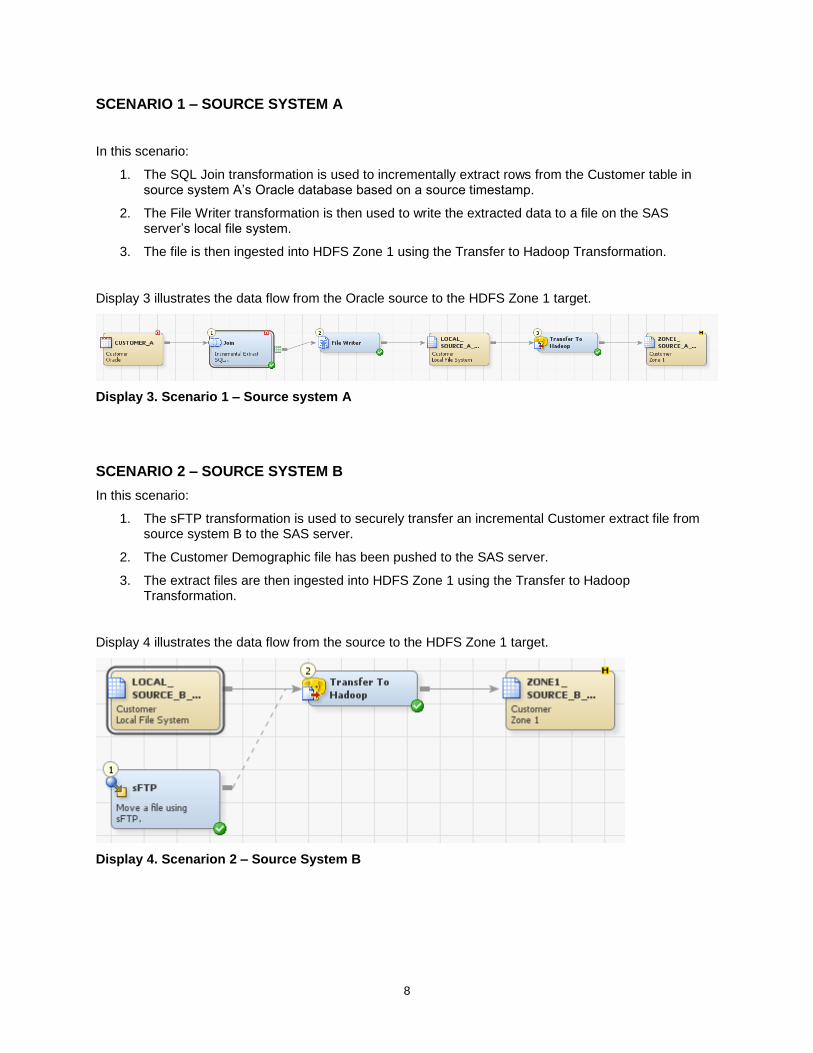
SCENARIO 1 – SOURCE SYSTEM A
In this scenario:
1. The SQL Join transformation is used to incrementally extract rows from the Customer table in source system A’s Oracle database based on a source timestamp.
2. The File Writer transformation is then used to write the extracted data to a file on the SAS server’s local file system.
3. The file is then ingested into HDFS Zone 1 using the Transfer to Hadoop Transformation.
Display 3 illustrates the data flow from the Oracle source to the HDFS Zone 1 target.
Display 3. Scenario 1 – Source system A
SCENARIO 2 – SOURCE SYSTEM B
In this scenario:
1. The sFTP transformation is used to securely transfer an incremental Customer extract file from source system B to the SAS server.
2. The Customer Demographic file has been pushed to the SAS server.
3. The extract files are then ingested into HDFS Zone 1 using the Transfer to Hadoop Transformation.
Display 4 illustrates the data flow from the source to the HDFS Zone 1 target.
Display 4. Scenarion 2 – Source System B
9
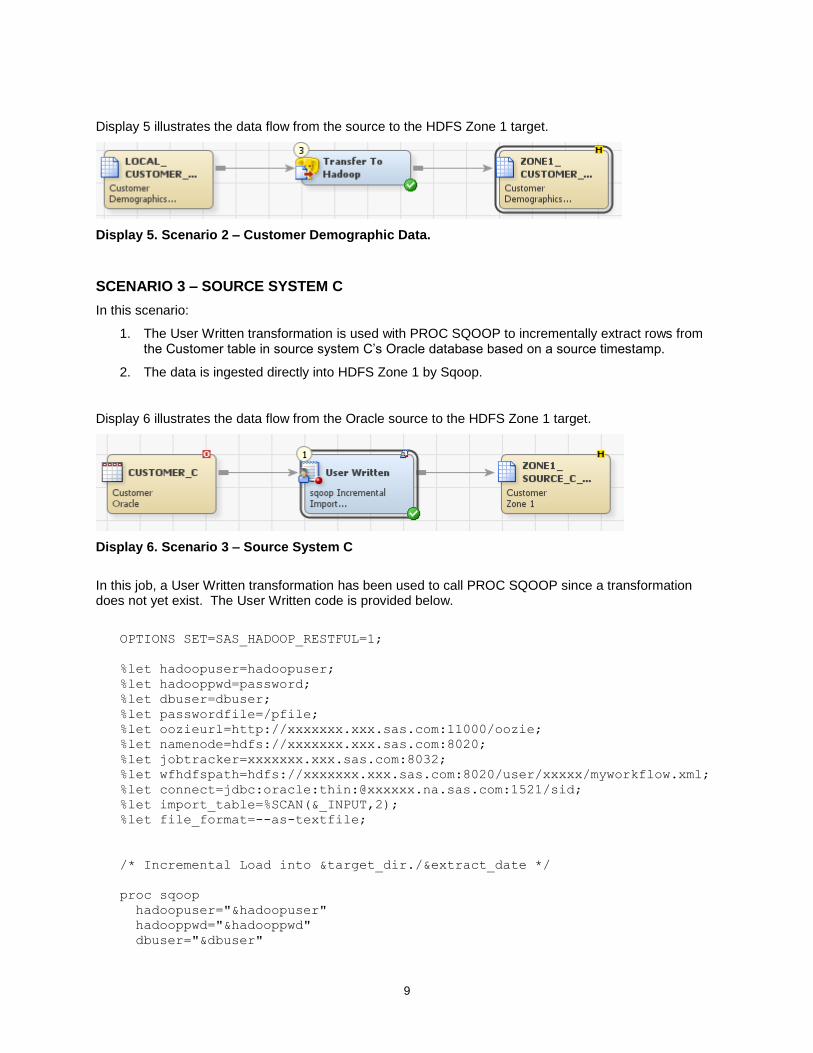
Display 5 illustrates the data flow from the source to the HDFS Zone 1 target.
Display 5. Scenario 2 – Customer Demographic Data.
SCENARIO 3 – SOURCE SYSTEM C
In this scenario:
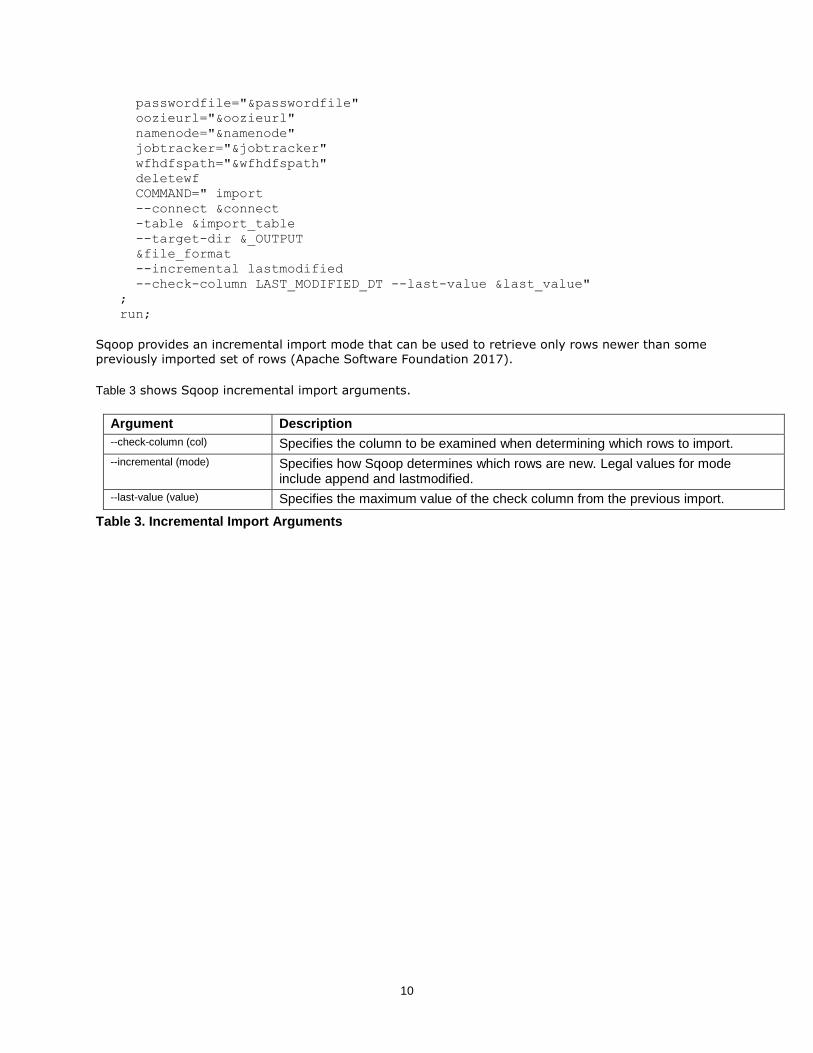
1. The User Written transformation is used with PROC SQOOP to incrementally extract rows from the Customer table in source system C’s Oracle database based on a source timestamp.
2. The data is ingested directly into HDFS Zone 1 by Sqoop.
Display 6 illustrates the data flow from the Oracle source to the HDFS Zone 1 target.
Display 6. Scenario 3 – Source System C
In this job, a User Written transformation has been used to call PROC SQOOP since a transformation does not yet exist. The User Written code is provided below.
OPTIONS SET=SAS_HADOOP_RESTFUL=1;
%let hadoopuser=hadoopuser;
%let hadooppwd=password;
%let dbuser=dbuser;
%let passwordfile=/pfile;
%let oozieurl=http://xxxxxxx.xxx.sas.com:11000/oozie;
%let namenode=hdfs://xxxxxxx.xxx.sas.com:8020;
%let jobtracker=xxxxxxx.xxx.sas.com:8032;
%let wfhdfspath=hdfs://xxxxxxx.xxx.sas.com:8020/user/xxxxx/myworkflow.xml;
%let connect=jdbc:oracle:thin:@xxxxxx.na.sas.com:1521/sid;
%let import_table=%SCAN(&_INPUT,2);
%let file_format=--as-textfile;
/* Incremental Load into &target_dir./&extract_date */
proc sqoop
hadoopuser="&hadoopuser"
hadooppwd="&hadooppwd"
dbuser="&dbuser"
10
passwordfile="&passwordfile"
oozieurl="&oozieurl"
namenode="&namenode"
jobtracker="&jobtracker"
wfhdfspath="&wfhdfspath"
deletewf
COMMAND=" import
--connect &connect
-table &import_table
--target-dir &_OUTPUT
&file_format
--incremental lastmodified
--check-column LAST_MODIFIED_DT --last-value &last_value"
;
run;
Sqoop provides an incremental import mode that can be used to retrieve only rows newer than some
previously imported set of rows (Apache Software Foundation 2017). Table 3 shows Sqoop incremental import arguments.
Argument Description
--check-column (col) Specifies the column to be examined when determining which rows to import.
--incremental (mode) Specifies how Sqoop determines which rows are new. Legal values for mode include append and lastmodified.
--last-value (value) Specifies the maximum value of the check column from the previous import.
Table 3. Incremental Import Arguments
11
ZONE1 TO ZONE2
Figure 3 illustrates the process from Zone 1 to Zone 2.
Standardize/Reformat/AppendSAS® Pig Transformation
Zone 1 to Zone 2
Zone 1
Source ACUSTOMER
Source BCUSTOMER
Source CCUSTOMER
CUSTOMER
Zone 2
CUSTOMER DEMOGRAPHICS
CUSTOMERDEMOGRAPHICS
Figure 3. Zone 1 to Zone 2
Raw Customer data from Zone 1 is reformatted into a common standardized format, appended and stored into Zone 2.
Table 4 summarizes the Zone 1 to Zone 2 methods used for this use case.
Source Transformation SAS® Data Integration Studio Transformations
Source A – CUSTOMER
Source B – CUSTOMER
Source C – CUSTOMER
Reformat into standardized conformed format.
Append files.
Write data to Zone 2.
Pig
CUSTOMER_DEMOGRAPHICS Reformat.
Write data to Zone 2.
Pig
Table 4. Zone 2 to Zone 3
12
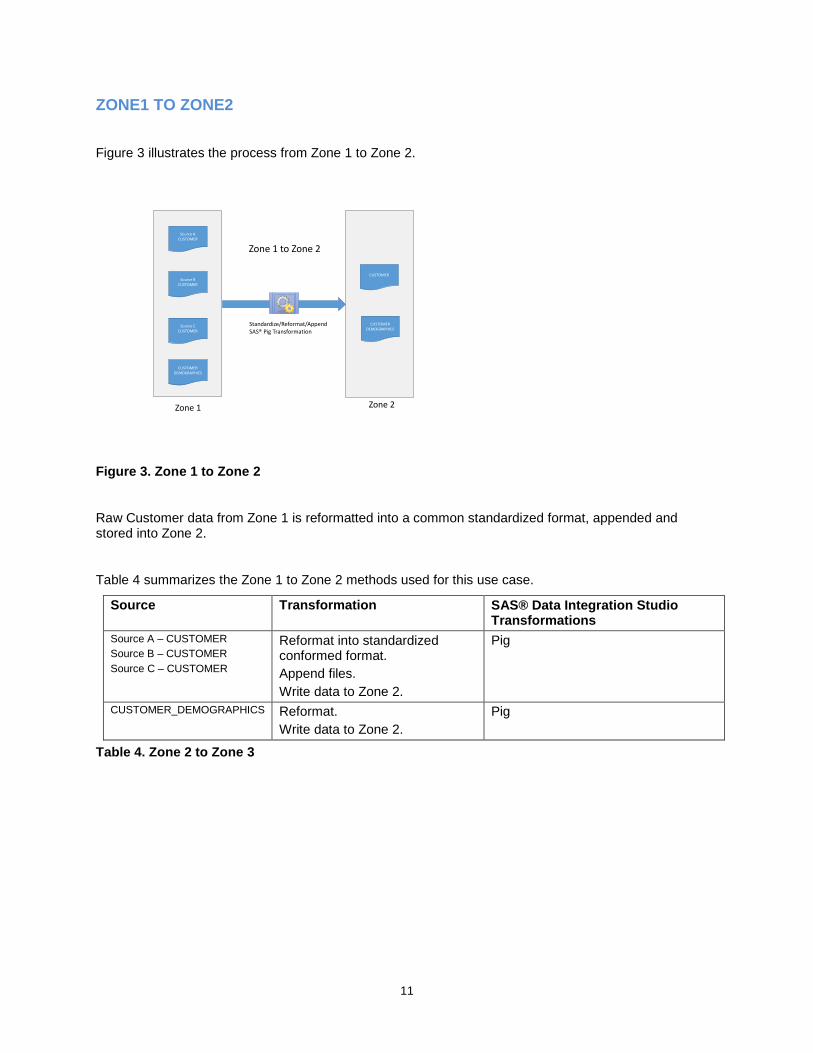
Display 7 illustrates the data flow from HDFS Zone 1 to the HDFS Zone 2 target.
Display 7. Zone 1 to Zone 2 - Customer
In this job, the Pig transformation has been used to reformat the three Customer files into a single common format and append the three files so that a Hive structure can be applied to the combined incremental data. Pig Latin was chosen for the use case to efficiently manipulate the raw text files ingested into Zone 1 into a standardized structure in Zone2.
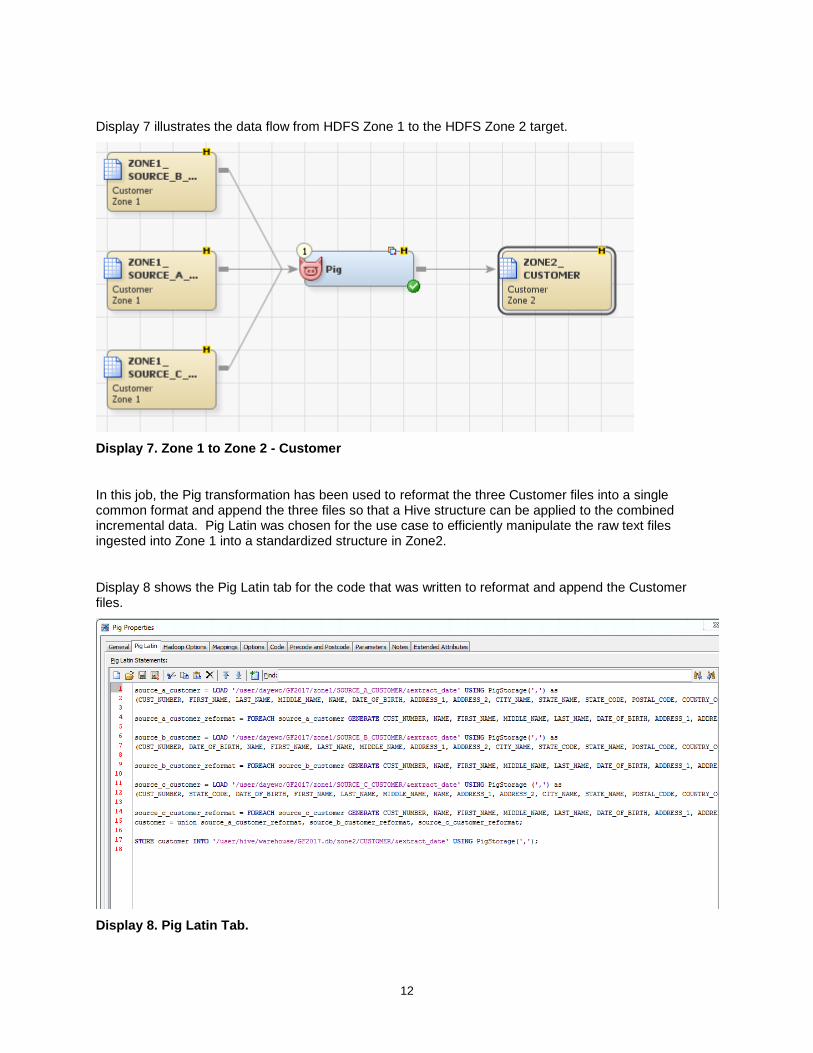
Display 8 shows the Pig Latin tab for the code that was written to reformat and append the Customer files.
Display 8. Pig Latin Tab.

13
Display 9 illustrates the data flow from HDFS Zone 1 to the HDFS Zone 2 target.
Display 9. Zone 1 to Zone 2 – Customer Demographics
ZONE 2 TO ZONE 3
Figure 4 illustrates the process from Zone 2 to Zone 3.
Zone2 to Zone3
CUSTOMER
CUSTOMERDEMOGRAPHICS
CUSTOMER
Zone 3
Integration and Merge/UpdateSAS® Data Integration Studio Hive and SQL Join Transformations
Zone 2 Work
Figure 4. Zone 2 to Zone 3
The customer dimension table will be updated in Zone 3 using the merge/update method described in Hadoop Application Architectures. (Grover et al. 2015) Since HDFS is a write-once filesystem and Hive has limited update capabilities, the general method is to re-create the target table by merging the new and changed records (Upserts) that were incrementally extracted from the source with the existing target table records and then update the Hive metastore so that the target table now points to the new updated file. This use case implements an SCD Type I update into Zone 3 but the sample job could easily be modified for a Type II update. In our use case, Zone 2 maintains all history of updates to the Customer and Customer Demographic tables and can be used for historical data queries.
Zone 2 to Zone 3 processing will use the SQL join transformation and the HDFS Work Zone extensively. In order to ensure that all generated HiveQL executes within the Hadoop cluster, the properties must be set on all SQL transformations as specified in Table 5. All intermediate and target Hive tables required by the SAS® Data Integration Studio jobs have been created and registered in the SAS® Metadata Repository and a Target Table Pass-Through Action of Truncate is used. All Hive tables are created as external Hive tables.
14
Table 5 Ensure the following SQL Transformation Properties are set accordingly:
Join Property Value
Pass Through Yes
Target Table is Pass Through Yes
Target Table Pass-Through Action Truncate
Table 5. SQL Transformation Properties.
This will ensure pass-through code generation in the form:
proc sql;
connect to HADOOP
(
SERVER="server" AUTHDOMAIN="auth" PORT=NNNN
);
execute
(
insert overwrite table …
…
) by HADOOP;
disconnect from HADOOP;
quit;
ZONE 2 TO ZONE 3 STEP-BY-STEP
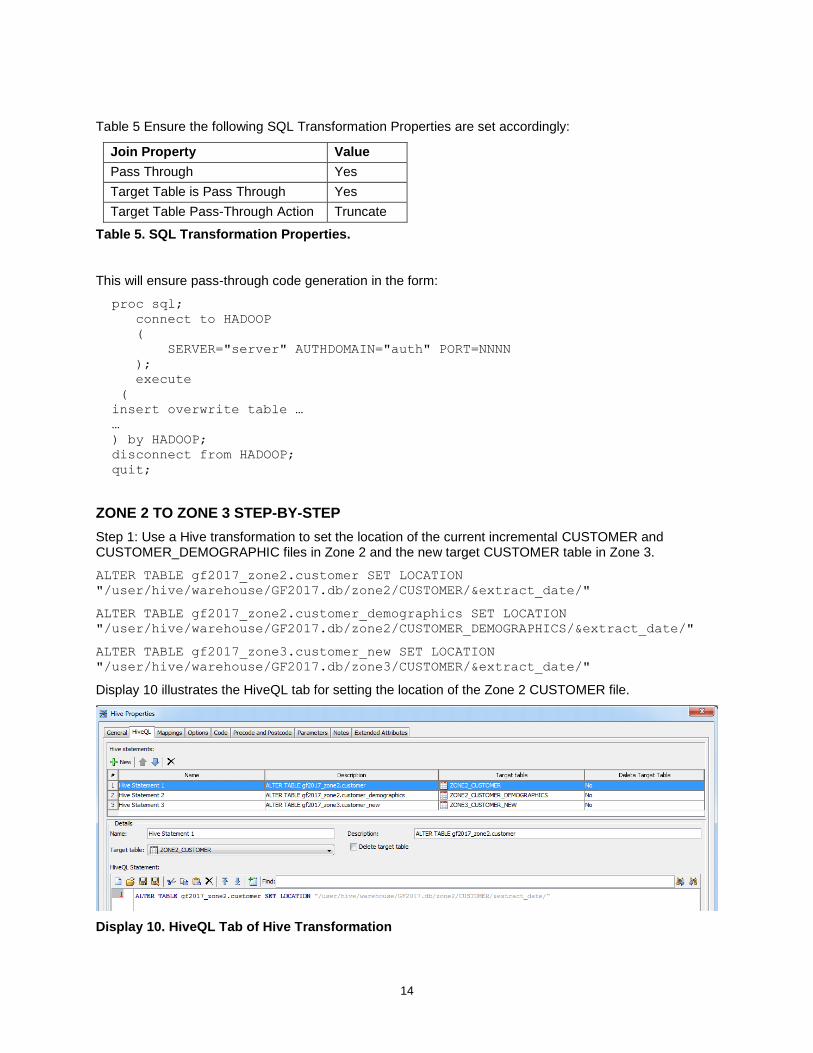
Step 1: Use a Hive transformation to set the location of the current incremental CUSTOMER and CUSTOMER_DEMOGRAPHIC files in Zone 2 and the new target CUSTOMER table in Zone 3.
ALTER TABLE gf2017_zone2.customer SET LOCATION
"/user/hive/warehouse/GF2017.db/zone2/CUSTOMER/&extract_date/"
ALTER TABLE gf2017_zone2.customer_demographics SET LOCATION
"/user/hive/warehouse/GF2017.db/zone2/CUSTOMER_DEMOGRAPHICS/&extract_date/"
ALTER TABLE gf2017_zone3.customer_new SET LOCATION
"/user/hive/warehouse/GF2017.db/zone3/CUSTOMER/&extract_date/"
Display 10 illustrates the HiveQL tab for setting the location of the Zone 2 CUSTOMER file.
Display 10. HiveQL Tab of Hive Transformation
15
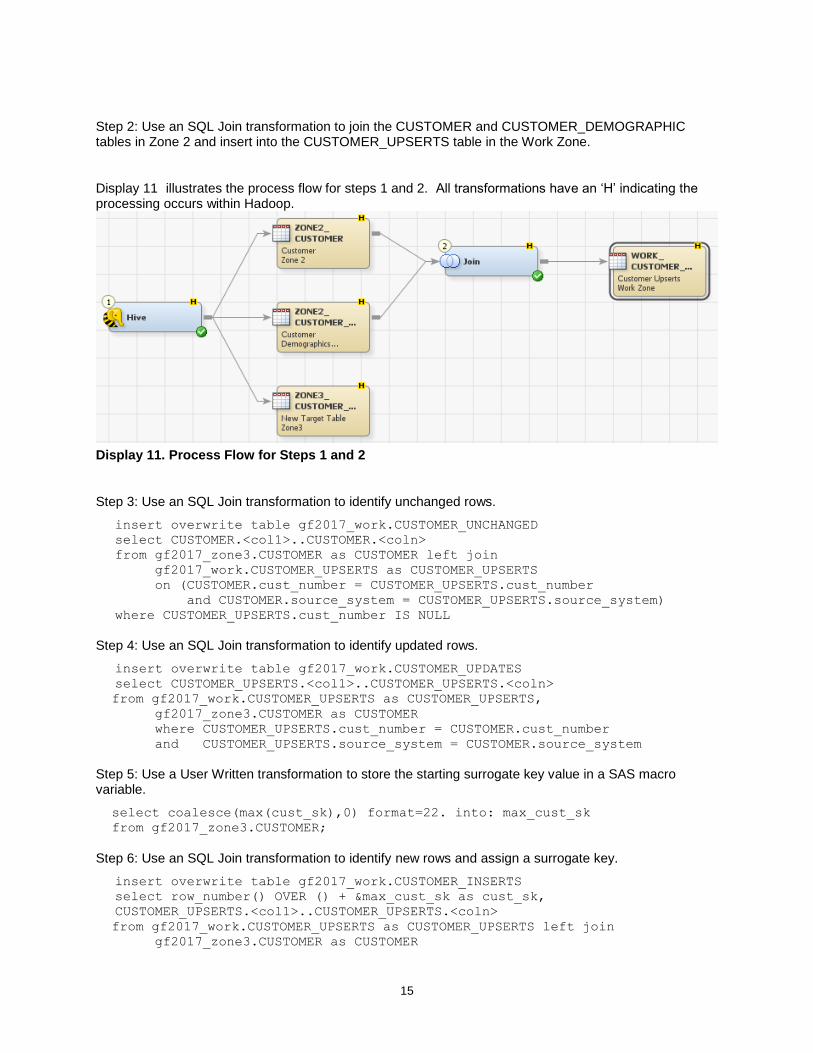
Step 2: Use an SQL Join transformation to join the CUSTOMER and CUSTOMER_DEMOGRAPHIC tables in Zone 2 and insert into the CUSTOMER_UPSERTS table in the Work Zone.
Display 11 illustrates the process flow for steps 1 and 2. All transformations have an ‘H’ indicating the processing occurs within Hadoop.
Display 11. Process Flow for Steps 1 and 2
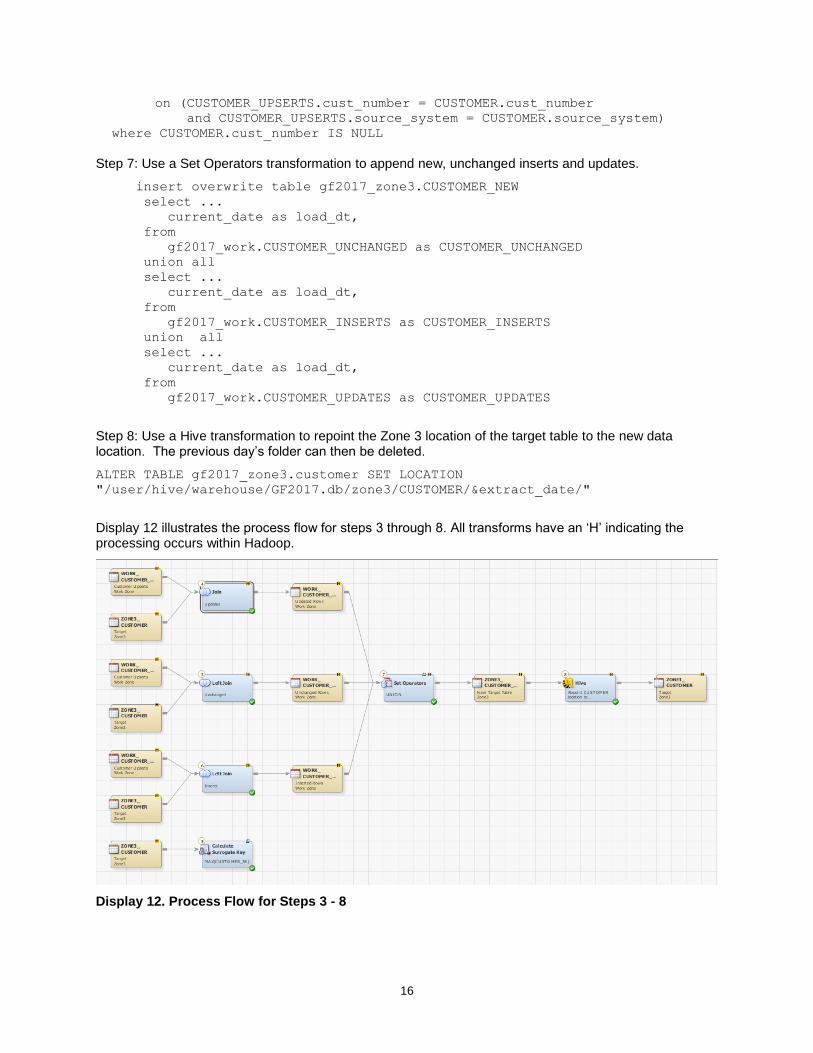
Step 3: Use an SQL Join transformation to identify unchanged rows.
insert overwrite table gf2017_work.CUSTOMER_UNCHANGED
select CUSTOMER.<col1>..CUSTOMER.<coln>
from gf2017_zone3.CUSTOMER as CUSTOMER left join
gf2017_work.CUSTOMER_UPSERTS as CUSTOMER_UPSERTS
on (CUSTOMER.cust_number = CUSTOMER_UPSERTS.cust_number
and CUSTOMER.source_system = CUSTOMER_UPSERTS.source_system)
where CUSTOMER_UPSERTS.cust_number IS NULL
Step 4: Use an SQL Join transformation to identify updated rows.
insert overwrite table gf2017_work.CUSTOMER_UPDATES
select CUSTOMER_UPSERTS.<col1>..CUSTOMER_UPSERTS.<coln>
from gf2017_work.CUSTOMER_UPSERTS as CUSTOMER_UPSERTS,
gf2017_zone3.CUSTOMER as CUSTOMER
where CUSTOMER_UPSERTS.cust_number = CUSTOMER.cust_number
and CUSTOMER_UPSERTS.source_system = CUSTOMER.source_system
Step 5: Use a User Written transformation to store the starting surrogate key value in a SAS macro variable.
select coalesce(max(cust_sk),0) format=22. into: max_cust_sk
from gf2017_zone3.CUSTOMER;
Step 6: Use an SQL Join transformation to identify new rows and assign a surrogate key.
insert overwrite table gf2017_work.CUSTOMER_INSERTS
select row_number() OVER () + &max_cust_sk as cust_sk,
CUSTOMER_UPSERTS.<col1>..CUSTOMER_UPSERTS.<coln>
from gf2017_work.CUSTOMER_UPSERTS as CUSTOMER_UPSERTS left join
gf2017_zone3.CUSTOMER as CUSTOMER
16
on (CUSTOMER_UPSERTS.cust_number = CUSTOMER.cust_number
and CUSTOMER_UPSERTS.source_system = CUSTOMER.source_system)
where CUSTOMER.cust_number IS NULL
Step 7: Use a Set Operators transformation to append new, unchanged inserts and updates.
insert overwrite table gf2017_zone3.CUSTOMER_NEW
select ...
current_date as load_dt,
from
gf2017_work.CUSTOMER_UNCHANGED as CUSTOMER_UNCHANGED
union all
select ...
current_date as load_dt,
from
gf2017_work.CUSTOMER_INSERTS as CUSTOMER_INSERTS
union all
select ...
current_date as load_dt,
from
gf2017_work.CUSTOMER_UPDATES as CUSTOMER_UPDATES
Step 8: Use a Hive transformation to repoint the Zone 3 location of the target table to the new data location. The previous day’s folder can then be deleted.
ALTER TABLE gf2017_zone3.customer SET LOCATION
"/user/hive/warehouse/GF2017.db/zone3/CUSTOMER/&extract_date/"
Display 12 illustrates the process flow for steps 3 through 8. All transforms have an ‘H’ indicating the processing occurs within Hadoop.
Display 12. Process Flow for Steps 3 - 8
17
CONCLUSION
As this paper demonstrates, it is possible to transition from a traditional data platform to a big data Hadoop platform fairly seamlessly by taking advantage of the existing capabilities within SAS® Data Integration Studio.
Using out of the box features of SAS® Data Integration Studio, a very robust ETL and data architecture can be implemented and maintained in the Hadoop ecosystem. Existing and new SAS data management professionals do not have to learn and maintain complex Map Reduce code, instead development is done using a familiar interface in SAS® Data Integration Studio, which captures all of the technical metadata about each job in the SAS® Metadata Repository. By doing so, SAS can provide cross platform (Hadoop to RDBMS) data lineage for auditing and impact analysis functions.
A major implementation limitation in Hadoop (limited UPDATE capabilities) was overcome, demonstrating the ability to create and maintain SCD Dimensional tables within a Hadoop environment. This allows for the use of Hadoop as more than a Data Lake, but also an end-user queryable platform for big data solutions.
This paper also demonstrates strategies to maximize the performance of the ETL subsystem by leveraging SAS® Data Integration Studio push-down processing that pushes the processing down into the Hadoop cluster thereby minimizing any data movement between data storage (HDFS) and the data processing engine (SAS).
The SAS® Data Integration Platform provides the tools you need to source, transform, and present your data in an effective and efficient manner by using the massively parallel processing power of Hadoop. By leveraging the SAS® Data Integration Platform you are ready to take on the challenges of the big data era!
18
REFERENCES
SAS Institute 2016a, Help for SAS® Data Integration Studio 4.9 Creating a Hive Job, Cary, NC: SAS Institute Inc.
SAS Institute 2016b, Help for SAS® Data Integration Studio 4.9 Creating a Pig Job, Cary, NC: SAS Institute Inc.
Apache Software Foundation, Sqoop User Guide (v1.4.6). Available http://sqoop.apache.org/docs/1.4.6/SqoopUserGuide.html. Accessed January 24, 2017.
Grover, Mark; Malaska, Ted; Seidman, Jonathan; Shapira, Gwen. Hadoop Application Architectures (Kindle Location 7399). O'Reilly Media. Kindle Edition.
ACKNOWLEDGMENTS
The authors extend their thanks and gratitude to the following individuals:
Tom Hahl, SAS Institute Inc.
Nancy Rausch, SAS Institute Inc.
Chris Watson, SAS Institute Inc.
Venu Kadari, SAS Institute Inc.
RECOMMENDED READING
SAS® Data Integration Studio 4.9: User's Guide
CONTACT INFORMATION
Your comments and questions are valued and encouraged. Contact the authors at:
Darryl Yewchin SAS Institute Inc. [email protected] Todd Foreman SAS Institute Inc. [email protected]
SAS and all other SAS Institute Inc. product or service names are registered trademarks or trademarks of SAS Institute Inc. in the USA and other countries. ® indicates USA registration.
Other brand and product names are trademarks of their respective companies.