panelgrip dry glaze system €¦ · #mkt hb 0005 r8 [email protected] toll free (888 ......
TRANSCRIPT

PanelGrip® Dry Glaze System www.panelgrip.comU.S. Patent 7,730,682; Other Patents Pending
© 2011 R & B Wagner, Inc. All Rights Reserved. #MKT HB 0005 R8
www.wagnercompanies.com
Toll Free (888) 243-6914Phone (414) 214-0444
Fax (414) 214-0450
The Wagner CompaniesP. O. Box 423
Butler, WI 53007-0423
How to Use PanelGrip – Go to www.panelgrip.com for full install instructions. a. PanelGrip is self-centering and self-plumbing. You must take the time to properly plumb the PanelGrip Shoe Moulding such
that it is installed plumb to +/- 1⁄8" at an extended height of 42". b. After plumbing, clear the PanelGrip Shoe Moulding of all debris. c. Place the PanelGrip Plastic Isolator into the Shoe Moulding. d. Space Plastic Isolators a maximum of 14" on center with a maximum of 4" in from the left and right edges of each panel –
4 isolators per 4 foot panel. e. Place the panel atop the Plastic Isolators in the Shoe Moulding. PanelGrip will work with nominal 1⁄2" or 3⁄4" tempered monolithic
glass or 3⁄8", 1⁄2" or 3⁄4" tempered laminated glass – actual dimension between .355" and .548", or .719" and .872". Warning: With Multi-Panel Railings, do not line up the edge of a panel with the end of the shoe – place the panels so that they span PanelGrip Shoe Moulding butt joints to assist in alignment.
f. Have someone hold the panel in place while you insert the aluminum PanelGrip mechanism into place on the opposite side of the glass in alignment with the Plastic Isolators. Make sure that the plastic pad on the PanelGrip is facing the glass.
g. Using a 3⁄16" hex head wrench, tighten the cap screw on the PanelGrip mechanism. While tightening, the plastic pad will break away from the aluminum as the unit expands.
h. Confirm alignment and make adjustments prior to final tightening which will compress and lock the panel into place. Remember, PanelGrip is self-centering and self-plumbing. You must take the time to properly plumb the PanelGrip Shoe Moulding such that it is installed plumb to +/- 1⁄8" at an extended height of 42".
i. Once you have confirmed plumb, use the 3⁄16" hex head wrench to make the PanelGrip Cap Screw snug-tight, then continue tightening to 10-15 ft/lbs of torque.
j. Repeat on all other PanelGrip units to secure the panel in position. k. Prior to installing gasket and/or cladding, confirm 10-15 ft/lbs of torque in all mechanisms. l. Should you need to remove a panel, this can be done simply by loosening the PanelGrip Cap Screw until loose. Note: The Cap Screw included in the PanelGrip contains a pressure-sensitive locking compound that insures the screw
remains tight over time and through cyclic loading. Each insertion and removal cycle diminishes its locking capacity. Individual results will vary but four cycles is the typical life span of the compound.
The Wagner PanelGrip System utilizes a unique locking mechanism of high-strength aluminum and PVC isolators combined with a specially designed aluminum Shoe Moulding. When assembled with 1⁄2" or 3⁄4" tempered monolithic glass or 3⁄8", 1⁄2" or 3⁄4" tempered laminated glass, PanelGrip enables the installer to fabricate a structural Glass Railing System with significant reductions in labor and freight costs. The PanelGrip System was tested per ASTM E935, Standard Test Methods for Performance of Permanent Railing Systems and Rails for Buildings. This test report and installation instructions may be downloaded at www.panelgrip.com.
• Reduce Labor Costs Up To 80% No sealing of shoe, no setting blocks, no plumbing of glass,
no multiple pours of cement, no waiting for cement to cure; no messy clean-up.
• Reduce Freight Costs Up To 30% PanelGrip shoe is almost 30% lighter than standard shoe
yet meets structural load requirements for railings.• Broadest Grip Range Of Any Dry Glaze Option Made for nominal 1⁄2" or 3⁄4" tempered monolithic glass or
3⁄8", 1⁄2" or 3⁄4" tempered laminated glass, but will work for any panel between .355" and .548", or .719" and .872".
• Other Grip Ranges are available upon request• No Special Tools Required All you need is an Allen wrench for installation or removal.• No Mess No mixing and pouring of expansion cement. No running of cement on incline.
Isolator
PanelGrip
GR9300 Gasket for use with cladding only.
TM
GR9354 Gasketfor use without
cladding.
PanelGrip® is a registered trademark of R & B WAGNER, INC. All specifications subject to change without notice. Information furnished by THE WAGNER COMPANIES is believed to be accurate and reliable. However, no responsibility or liability by THE WAGNER COMPANIES for its use, nor for infringement of patents or other rights of third parties which may result from its use. No license is granted by implication or otherwise.
PanelGrip® Dry Glaze System www.panelgrip.comU.S. Patent 7,730,682; Other Patents Pending
© 2011 R & B Wagner, Inc. All Rights Reserved. #MKT HB 0005 R8
www.wagnercompanies.com
Toll Free (888) 243-6914Phone (414) 214-0444
Fax (414) 214-0450
The Wagner CompaniesP. O. Box 423
Butler, WI 53007-0423
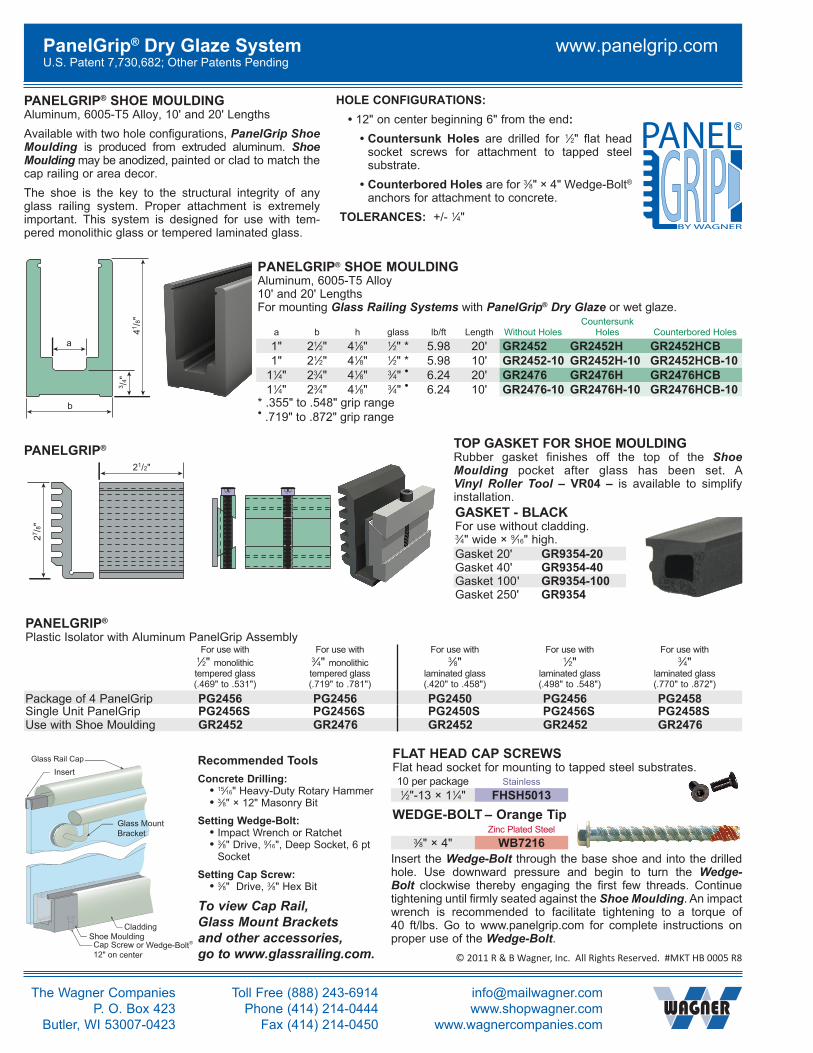
PANELGRIP® SHoE MoULDING Aluminum, 6005-T5 Alloy, 10' and 20' LengthsAvailable with two hole configurations, PanelGrip Shoe Moulding is produced from extruded aluminum. Shoe Moulding may be anodized, painted or clad to match the cap railing or area decor.The shoe is the key to the structural integrity of any glass railing system. Proper attachment is extremely important. This system is designed for use with tem-pered monolithic glass or tempered laminated glass.
HoLE CoNfIGURAtIoNS: • 12" on center beginning 6" from the end:
• Countersunk Holes are drilled for 1⁄2" flat head socket screws for attachment to tapped steel substrate.
• Counterbored Holes are for 3⁄8" × 4" Wedge-Bolt® anchors for attachment to concrete.
toLERANCES: +/- 1⁄4"
b
3 /4"
41 /8"
27 /8"
21/2"
a
PANELGRIP® SHoE MoULDINGAluminum, 6005-T5 Alloy10' and 20' LengthsFor mounting Glass Railing Systems with PanelGrip® Dry Glaze or wet glaze.
a b h glass lb/ft Length Without HolesCountersunk
Holes Counterbored Holes1" 21⁄2" 41⁄8" 1⁄2" * 5.98 20' GR2452 GR2452H GR2452HCB1" 21⁄2" 41⁄8" 1⁄2" * 5.98 10' GR2452-10 GR2452H-10 GR2452HCB-10
11⁄4" 23⁄4" 41⁄8" 3⁄4" • 6.24 20' GR2476 GR2476H GR2476HCB11⁄4" 23⁄4" 41⁄8" 3⁄4" • 6.24 10' GR2476-10 GR2476H-10 GR2476HCB-10
* .355" to .548" grip range• .719" to .872" grip range
fLAt HEAD CAP SCREwSFlat head socket for mounting to tapped steel substrates. 10 per package Stainless1⁄2"-13 × 11⁄4" fHSH5013
toP GASkEt foR SHoE MoULDINGRubber gasket finishes off the top of the Shoe Moulding pocket after glass has been set. A Vinyl Roller Tool – VR04 – is available to simplify installation.GASkEt - BLACkFor use without cladding.3⁄4" wide × 9⁄16" high.Gasket 20' GR9354-20Gasket 40' GR9354-40Gasket 100' GR9354-100Gasket 250' GR9354
b
3 /4"
4"
27 /8"
21/2"
a
PANELGRIP®
PANELGRIP®
Plastic Isolator with Aluminum PanelGrip AssemblyFor use with
1⁄2" monolithic tempered glass(.469" to .531")
For use with3⁄4" monolithic tempered glass(.719" to .781")
For use with3⁄8"
laminated glass(.420" to .458")
For use with1⁄2"
laminated glass(.498" to .548")
For use with3⁄4"
laminated glass(.770" to .872")
Package of 4 PanelGrip PG2456 PG2456 PG2450 PG2456 PG2458Single Unit PanelGrip PG2456S PG2456S PG2450S PG2456S PG2458SUse with Shoe Moulding GR2452 GR2476 GR2452 GR2452 GR2476
Cladding Shoe Moulding
Glass Mount Bracket
Insert
Cap Screw or Wedge-Bolt12" on center
®
To view Cap Rail, Glass Mount Brackets and other accessories, go to www.glassrailing.com.
Recommended ToolsConcrete Drilling:
• 15⁄16" Heavy-Duty Rotary Hammer• 3⁄8" × 12" Masonry Bit
Setting Wedge-Bolt:• Impact Wrench or Ratchet• 3⁄8" Drive, 9⁄16", Deep Socket, 6 pt
Socket
Setting Cap Screw:• 3⁄8" Drive, 3⁄8" Hex Bit
Insert the Wedge-Bolt through the base shoe and into the drilled hole. Use downward pressure and begin to turn the Wedge-Bolt clockwise thereby engaging the first few threads. Continue tightening until firmly seated against the Shoe Moulding. An impact wrench is recommended to facilitate tightening to a torque of 40 ft/lbs. Go to www.panelgrip.com for complete instructions on proper use of the Wedge-Bolt.
wEDGE-BoLt – orange tipZinc Plated Steel
3⁄8" × 4" wB7216