panchatantra application - anssird...
TRANSCRIPT

Rural Development and Panchayat Raj National Informatics Centre Department Karnataka State Unit M S Building, Bangalore Mini Tower, Bangalore
Government of Karnataka
Rural Development and Panchayat Raj
Department
National Informatics Centre
Bangalore
PanchaTantra Application User Manual

PanchaTantra
Rural Development and Panchayat Raj National Informatics Centre Department Karnataka State Unit M S Building, Bangalore Mini Tower, Bangalore
Prepared by:
NIC-RDPR Team,
National Informatics Centre,
KarnatakaState Unit,
Bangalore - 1
Approved by:
Deputy Director General and
State Informatics Officer
National Informatics Centre,
KarnatakaState Unit,
Bangalore - 1

PanchaTantra
Ver–2.0, Rel–2.12 Dated: 10-09-2015 User Manual Page i
Table of Contents
Background ....................................................................................................................................................................................... 1
Workflow Processes .......................................................................................................................................................................... 3
Pancha Tantra System ....................................................................................................................................................................... 5
Accessing the Pancha Tantra Application ......................................................................................................................................... 8
1. Masters .................................................................................................................................................................................... 10
1.1. Vehicle .............................................................................................................................................................................. 10
1.1.1 Adding the Vehicle Details .............................................................................................................................. 10
1.1.2 Modifying the Vehicle Details ......................................................................................................................... 11
1.2. Advertisement .................................................................................................................................................................. 11
1.2.1 Adding the Advertisement Details .................................................................................................................. 12
1.2.2 Modifying the Advertisement Details ............................................................................................................. 12
1.3. GP Assets .......................................................................................................................................................................... 13
1.3.1 Adding the GP Asset Details ........................................................................................................................... 14
1.3.2 Modifying or Deleting the GP Asset Details .................................................................................................... 15
1.3.3 Adding RR No to the Panchayat Assets/Private Assets: .................................................................................. 15
1.3.4 Modifying or Deleting the RR No Details ........................................................................................................ 16
1.4. Beneficiary Details ............................................................................................................................................................ 17
1.4.1 Adding the Beneficiary Details ........................................................................................................................ 17
1.4.2 Modifying the Beneficiary Details ................................................................................................................... 19
1.5. Contractors or Suppliers ................................................................................................................................................... 20
1.5.1 Adding the Contractor or Supplier Details ...................................................................................................... 21
1.5.2 Modifying the Contractor or Supplier Details ................................................................................................. 21
1.6. Bank Details ...................................................................................................................................................................... 22
1.6.1 Adding the Branch Details .............................................................................................................................. 22
1.6.2 Modifying the Branch or Bank Account Details ............................................................................................... 23
1.7. Scheme ............................................................................................................................................................................. 24
1.7.1 Adding the Scheme Details ............................................................................................................................. 25
1.7.2 Modifying the Scheme Details ........................................................................................................................ 25
1.8. Shelf of Works .................................................................................................................................................................. 26
1.8.1 Adding the Work Details ................................................................................................................................. 26
1.8.2 Modifying the Work Details ............................................................................................................................ 30
1.8.3 Deleting Works ............................................................................................................................................... 32
1.8.4 Adding GSK Works......................................................................................................................................... 323
1.9. Purchase Details ............................................................................................................................................................. 344
1.9.1 Adding the Purchase Details ......................................................................................................................... 344
1.9.2 Modifying the Purchase Details .................................................................................................................... 355
1.10. GP Members .............................................................................................................................................................. 36
1.10.1 Adding the GP Member Details ...................................................................................................................... 36
1.10.2 Modifying the GP Member Details
1.11. Ledger OB ................................................................................................................................................................ 377
1.11.1 Adding the Opening Balance Details ............................................................................................................... 37
1.11.2 Modifying the Opening Balance Details .......................................................................................................... 38
1.12. Ward .......................................................................................................................................................................... 38
PanchaTantra
Ver–2.1, Rel–9.10 Dated: 10-09-2015 User Manual Page ii
1.12.1 Adding or Modifying the Ward Details ........................................................................................................... 39
1.12.2 Mapping the Properties to the Ward .............................................................................................................. 40
1.12.3 Correcting the Properties Details of the Ward ................................................................................................ 40
1.13. Water Connection Details ......................................................................................................................................... 41
1.13.1 Adding the Water Connection Details ............................................................................................................. 42
1.13.2 Modifying the Water Connection Details ........................................................................................................ 42
1.14. Water Account ........................................................................................................................................................... 42
1.15. Remission or Write off or Demand Modification ...................................................................................................... 43
2. Demands .................................................................................................................................................................................. 46
2.1. Property Tax ..................................................................................................................................................................... 46
2.1.1 Adding Property from E-swathu ..................................................................................................................... 47
2.1.2 Adding Missing Property from E-swathu........................................................................................................ 48
2.2. Advertisement or Vehicle Tax ........................................................................................................................................... 48
2.3. Entertainment Tax ............................................................................................................................................................ 49
2.4. GP Property Rent .............................................................................................................................................................. 50
2.5. Pound Fine ........................................................................................................................................................................ 51
2.5.1 Adding the Pound Fine Details ........................................................................................................................ 52
2.5.2 Modifying the Pound Fine Details ................................................................................................................... 52
2.6. License Details .................................................................................................................................................................. 52
2.6.1 Adding the License Details .............................................................................................................................. 53
2.6.2 Modifying the License Details ......................................................................................................................... 54
3. Services .................................................................................................................................................................................... 56
3.1. Tax Receipts ...................................................................................................................................................................... 57
3.2. License Application ........................................................................................................................................................... 58
3.3. Complaint ......................................................................................................................................................................... 61
3.4. Suggestion ........................................................................................................................................................................ 61
3.5. Beneficiary Application ..................................................................................................................................................... 63
3.6. Remission Application ...................................................................................................................................................... 64
3.7. New Ration Card Application ............................................................................................................................................ 65
3.7.1 Applying for a New Ration Card Online .......................................................................................................... 65
3.7.2 Requesting for Duplicate RC ........................................................................................................................... 69
3.7.3 Capturing Photo and Biometric Details ........................................................................................................... 69
3.8. Guarantee of Services to Citizens ..................................................................................................................................... 69
3.8.1 Applying Service Request ............................................................................................................................... 69
3.8.2 Updating Service Request ............................................................................................................................... 72
3.8.3 Viewing the Duplicate Service Request Application ........................................................................................ 72
4. Receipts ................................................................................................................................................................................... 74
4.1. Property or Water Receipts ............................................................................................................................................ 754
4.2. Special Water Receipt ....................................................................................................................................................... 75
4.3. Other General Receipt ...................................................................................................................................................... 76
4.4. GP Grant Receipt .............................................................................................................................................................. 76
4.5. Scheme Grant Receipts ..................................................................................................................................................... 78
4.6. Other Receipts .................................................................................................................................................................. 78
4.7. Deposit Receipts ............................................................................................................................................................... 79
4.8. Advance Receipts .............................................................................................................................................................. 80
4.9. Public Contribution or Donations ..................................................................................................................................... 82
PanchaTantra
Ver–2.1, Rel–9.10 Dated: 10-09-2015 User Manual Page iii
4.10. Endorsement Receipts ............................................................................................................................................... 82
4.11. Encashment Receipts ................................................................................................................................................ 84
4.12. Loss on Sale or Disposal of Assets Receipts ............................................................................................................... 85
5. Payments ................................................................................................................................................................................. 86
5.1. Direct Payment ................................................................................................................................................................. 86
5.2. Beneficiary Payments ....................................................................................................................................................... 87
5.3. Bills ................................................................................................................................................................................... 88
5.4. Bills Payment .................................................................................................................................................................... 91
5.5. Journal Voucher ................................................................................................................................................................ 92
5.6. Transfer Voucher .............................................................................................................................................................. 93
5.7. Cash to Bank ..................................................................................................................................................................... 94
5.8. Refund of Grants............................................................................................................................................................... 97
6. Reports..................................................................................................................................................................................... 97
6.1. Financial Statements ........................................................................................................................................................ 97
6.1.1 Trial Balance ................................................................................................................................................... 98
6.1.2 Income – Exp .................................................................................................................................................. 98
6.1.3 Balance Sheet ................................................................................................................................................. 98
6.2. Financial Reports .............................................................................................................................................................. 99
6.2.1 Cash Book ....................................................................................................................................................... 99
6.2.2 Trial Balance ................................................................................................................................................. 100
6.2.3 Receipt / Payment ........................................................................................................................................ 101
6.2.4 Income / Expenditure ................................................................................................................................... 103
6.2.5 Balance Sheet ............................................................................................................................................... 104
6.2.6 Journal Ledger .............................................................................................................................................. 106
6.2.7 Schedules ..................................................................................................................................................... 106
6.2.8 Opening Balance ........................................................................................................................................... 107
6.3. Master Reports ............................................................................................................................................................... 108
6.3.1 GP Property .................................................................................................................................................. 108
6.3.2 Passbook ...................................................................................................................................................... 109
6.3.3 Daily Cash Book ............................................................................................................................................ 110
6.3.4 Daily Collection Book .................................................................................................................................... 110
6.3.5 Detailed Cash Book ....................................................................................................................................... 111
6.3.6 Forms ........................................................................................................................................................... 112
6.3.7 Acknowledgement........................................................................................................................................ 113
6.3.8 Advance Receipt Report ............................................................................................................................... 113
6.3.9 Voucher ........................................................................................................................................................ 113
6.3.10 Bank Wise Statement ................................................................................................................................... 114
6.4. Miscellaneous Reports ................................................................................................................................................... 115
6.5. Data Entry Statistics ........................................................................................................................................................ 115
6.5.1 Data Entry Details ........................................................................................................................................1166
6.5.2 Data Gap Analysis ......................................................................................................................................... 116
6.6. DCB Register ................................................................................................................................................................... 116
6.7. Asset Register ................................................................................................................................................................. 117
6.8. Beneficiary Report .......................................................................................................................................................... 118
6.8.1 Active Beneficiary Report ............................................................................................................................. 118
6.8.2 Inactive Beneficiary Report .......................................................................................................................... 118

PanchaTantra
Ver–2.1, Rel–9.10 Dated: 10-09-2015 User Manual Page iv
6.8.3 Beneficiary Payment Report ......................................................................................................................... 119
6.9. Water Demand or Collection Report .............................................................................................................................. 119
6.9.1 Demand Report ............................................................................................................................................ 119
6.9.2 Receipt Report .............................................................................................................................................. 120
6.9.3 Water Connection Report ............................................................................................................................. 120
6.10. Ashraya Loan Recovery Report ................................................................................................................................ 121
6.11. Report on Guarantee of Services to Citizens ........................................................................................................... 121
7. Works ..................................................................................................................................................................................... 123
7.1. Fund Source .................................................................................................................................................................... 123
7.2. Initiating the Work .......................................................................................................................................................... 124
7.3. Monthly Progress............................................................................................................................................................ 125
7.3.1 Adding the Monthly Progress Details ........................................................................................................... 125
7.3.2 Modifying the Monthly Progress Details....................................................................................................... 126
7.4. Measurement Book Entry ............................................................................................................................................... 127
7.5. Closure of Work or Package ........................................................................................................................................... 128
7.5.1 Closure of the Work ...................................................................................................................................... 129
7.5.2 Closure of the Package ................................................................................................................................. 130
8. Samanya Mahithi ................................................................................................................................................................... 131
8.1. Adding or Mapping the Habitation – Village .................................................................................................................. 131
8.1.1 Adding the Habitation Details to the Village ................................................................................................. 131
8.1.2 Modifying the Habitation Details of the Village ............................................................................................ 131
8.2. Viewing the Sectoral Information or Report .................................................................................................................. 132
8.2.1 Viewing the Sectoral Information ................................................................................................................. 132
8.2.2 Viewing the Sectoral Report ......................................................................................................................... 134
9. Others .................................................................................................................................................................................... 136
9.1. Changing the Password .................................................................................................................................................. 136
9.2. Adding or Modifying the Grama Sabha MOM Details .................................................................................................... 137
9.2.1 Adding the Grama Sabha MOM Details ........................................................................................................ 137
9.2.2 Modifying the Grama Sabha MOM Details ................................................................................................... 138
9.3. Panchayat Details ........................................................................................................................................................... 139
9.3.1 Adding or Modifying the Panchayat Profile .................................................................................................. 139
9.3.2 Adding or Modifying the Panchayat Staff Details ......................................................................................... 140
9.3.3 Adding or Modifying the Tender Details ....................................................................................................... 143
9.3.4 Uploading the Panchayat Details and Activity .............................................................................................. 145
9.4. Entering the GP Loan Details .......................................................................................................................................... 146
9.5. GP Investments Details ................................................................................................................................................... 147
9.5.1 Investment Details ....................................................................................................................................... 147
9.5.2 Maturity Details ........................................................................................................................................... 148
9.6. Ashraya Loan Recovery Details ....................................................................................................................................... 149
9.7. Ashraya Loan Recovery Transfer Details ........................................................................................................................ 150
9.8. Deleting the Voucher ...................................................................................................................................................... 150
9.9. Panchayat Infrastructure Details .................................................................................................................................... 151
9.9.1 Adding the Panchayat Infrastructure Details ................................................................................................ 152
9.9.2 Modifying the Panchayat Infrastructure Details ........................................................................................... 152
9.10. Creating GP Members Payment Bank Account ....................................................................................................... 153
9.10.1 Entering the GP Members Payment Bank Account ....................................................................................... 153

PanchaTantra
Ver–2.1, Rel–9.10 Dated: 10-09-2015 User Manual Page v
9.10.2 Modifying the GP Members Payment Bank Account .................................................................................... 154
9.11. Creating Bio-diversity Committee Bank Account .................................................................................................... 154
9.11.1 Entering the Bio-Diversity Committee Bank Account .................................................................................... 154
9.11.2 Modifying the Bio-Diversity Committee Bank Account ................................................................................. 155
9.12 Delete Schemes..………………………………………………………………………………………………………………………………….153
10. Monthly or Annual Statements ............................................................................................................................................. 158
10.1. Bank Reconciliation ................................................................................................................................................. 158
10.2. Previous Annual Statements ................................................................................................................................... 161
10.2.1 Previous Trial Balance .................................................................................................................................. 161
10.2.2 Previous IE Statement .................................................................................................................................. 162
10.2.3 Previous Balance Sheet Statement ............................................................................................................... 163
Yearend Process ............................................................................................................................................................................ 164

PanchaTantra
Ver–2.1, Rel–9.10 Dated: 10-09-2015 User Manual Page vi
General Guidelines
Do not share your login credentials (username and password) with anyone. Ensure that only authenticated person uses the application to work on the Online GP system.
Change the password frequently, at least once in 30-45 days.
After officers get transferred /retired then immediately change their login credentials.
Ensure that all the details are entered correctly and then save or submit by clicking the Save/Submit button.
After completing your work, sign out/logout the application by clicking the Signout button at the top-right side of the application screen.
For more information contact helpdesk at 080-22372029 (Extn: 121) or mailto:[email protected].

PanchaTantra
Ver–2.1, Rel–9.10 Dated: 10-09-2015 User Manual Page 1
Background
The Government of Karnataka (GoK) decided to introduce an ‘accrual basis, double entry accounting system’ in
Grama Panchayats (GPs), and replace the ‘Karnataka Panchayat Raj (Grama Panchayats Accounts and Budget) Rules,
1995’ with ‘Karnataka Panchayat Raj (Grama Panchayats Budgeting and Accounting) Rules, 2006’. The Karnataka
Panchayat Raj (Grama Panchayats Budgeting and Accounting) Rules, 2006, came into effect from 01/04/2007. It
prescribes the maintenance of a double entry and books of accounts and forms, accrual basis accounting, and the
accounting procedures, formats of financial statements and budget. This rule is applicable to all GPs in the state.
On this background, the Rural Development and Panchayat Raj (RDPR) Department requested the National
Informatics Center (NIC) to develop a web-based application for implementing the double entry accounting system
in GPs. As a result, NIC developed PanchaTantra application as per the requirements.
The PanchaTantra is a comprehensive application that meets the basic requirements of the GPs. It facilitates
maintaining the double entry accounting system while carrying out the regular functionalities / activities. This system
is developed, keeping in mind the understanding and knowledge of the panchayat staff in performing the operations
on the computer system.
About the NationalInformaticsCentre
The National Informatics Centre (NIC), Department of Information Technology (IT), Ministry of Communication and
IT, Government of India (GoI), is a premier organization in the field of Science and Technology. It provides state-of-
the-art solutions to the information management, dissemination, e-Governance and decision support requirements
of the Government and corporate sector. NICNET, with its Nationwide Network of state-of-the-art technology,
computers, communication equipments and expert IT specialists, is well rooted and is functioning at all Districts,
State / Union Territory capitals and Central Government and helping information exchange of vital nature. With its
‘Master Earth Station’ at New Delhi, micro earth station nodes have been established in all the State capitals, District
Head Quarters and selected commercial centers.
The NIC provides various services which include system study, design, coding, testing, training, implementation,
software maintenance and hand holding support.
The following are some of the e-Governance systems for the GoK designed and developed by the NIC:
PanchaTantra for Grama/Taluk panchayat
VAT soft for commercial taxes
Bhoomi for land records
Vaahan and Saarathi for transport offices
RDS (Nemmadi) for rural digital services
CIPA for police stations, court system, lokayukta system
e-mandi system for APMCs
Agrisnet for agriculture department
FMS/LMS for secretariat, water boards, websites, etc
PanchaTantra
Ver–2.1, Rel–9.10 Dated: 10-09-2015 User Manual Page 2
Double Entry Accounting System
We know that, every businesses or organizations uses the Double Entry System to record the financial transactions.
This is because all commercial transaction consists of exchange of one item for another in terms of credits and
debits. Thus, the double entry accounting system is used to show this two-fold effect. Debits and credits acts as a
device that enables to record the entries twice.During each transaction, the transaction details are recorded in at
least two places (accounts) using debits and credits.
The two important rules about the double entry system are as follows:
and
The double entry system also has built-in checks and balances. Due to the use of debits and credits, the double entry
system is self-balancing. The performance and effectiveness in the operations of the organizations can be measured
by the balance sheet, income and expenditure, and asset-liability statements.
When this system is used with the accrual method of accounting, the accounting system becomes complete and
focuses on the income statement and balance sheet.
The double entry accounting system generates the number of financial statements such as balance sheet, income
and expenditure, receipts, payments, and so on. These financial statements summarize the financial performance of
a GP during a period and its financial status as at the end of the year. By viewing the financial statements, it is
possible to recognize whether the GP has earned sufficient income during the year to meet developmental and other
expenditures, assets held and its obligation.
The financial statements information can be used by the GP, Government, funding agencies, and/or public in
decision making and in public interest.
The Double Entry Accounting System has been incorporated in the PanchaTantra application seamlessly. It is a user-
friendly and transparent. That is, the process will work even if the user does not have the knowledge of the double
entry system. The matrix of double entry accounts, and debit and credit accounts is built within the PanchaTantra
system. It generates the voucher after entering the transaction by the user, helps in assetization of the work-in-
progress and calculates the depreciation of the properties as per the written down value method. Thus, this system
avoids training the 5628 GP staff members in maintenance of the Double Entry Accounting System.
Total Debits = Total Credits
Assets = Claims (Liabilities and Owner’s Equity

PanchaTantra
Ver–2.1, Rel–9.10 Dated: 10-09-2015 User Manual Page 3
Workflow Processes
Workflow Process for Tax Demands
Figure 1 illustrates the workflow of the tax demand process.
Figure 1: Tax Demands Workflow
Repeat, if required
Start
Master Information
(Property/Advt/Entertainment/Vehicle/Rent)
Tax/Fee Demand Details
Tax Receipt
Stop
Firstly, you need to enter or add all the
information under Mastersoption.
Then, you need to enter or add the
demand details under Demands option.
Now, you can generate the receipts under
Receipts option, for those demand details
have been entered.

PanchaTantra
Ver–2.1, Rel–9.10 Dated: 10-09-2015 User Manual Page 4
Workflow for Development Process
Figure 2 illustrates the workflow of the development process.
Figure 2: Development Process Workflow
Repeat, if required
Start
Shelf of Works(list of
worksoft works)
Fund Source
(in worksoft)
Work Payment
(Payment Details Entry)
Stop
Add the work details under
Masters>Shelf of Works>Works Add
option.
Enter the fund details for the works under
Works>Fund Source option.
Initiate the work by entering the
implementing agency and time estimation
details of the work under Works>Initiate
option.
Work Bills(Bill Received for
Work done from worksoft)
Work Progress
(Inspection & Measurement
Entry from worksoft)
Work Initiate
(in Worksoft)
Enter the billing details of the work under
Payments>Bills option.
Enter the work progress details in month
wise under Works>Monthly Progress
option.
Enter the payment details of the bill
received for the work done under
Payments>Bills – Payment option.
Once the work is completed, close it
under Works>Closure option. Closure of Work
(List of Works)

PanchaTantra
Ver–2.1, Rel–9.10 Dated: 10-09-2015 User Manual Page 5
PanchaTantra System
The PanchaTantra is a web-based application with 3-tier architecture. It is a comprehensive application that meets
the basic requirements of the GPs. It has been built with number of features for easier use by the GP staff. The rules
and regulations defined in the Panchayat Act are incorporated while designing the PanchaTantra application. It
guides the officers to carry out the GP activities as per the rules.
This application helps you to submit the details of various properties, beneficiaries, works, and generate various
forms as required and to view various reports maintained by the department.
Pre-requisites to use this application are:
Client system with 486 system or above and 256 MB RAM or above
Dot Matrix or Laser printer
Windows 2000 Professional / Windows XP operating system (OS)
UPS
Internet connectivity
Table 1 lists the abbreviations with their meanings, used in this manual.
Table 1: Abbreviations with their Meanings
Abbreviation Meaning
ACK Acknowledgements
GP Grama Panchayat
ZP Zilla Panchayat
GOK Government of Karnataka
GOI Government of India
NIC National Informatics Centre
Cr Credit
Dr Debit
MB Measurement Book
JV Journal Voucher
EMD Earnest Money Deposit
NREG National Rural Employment Guarantee
PWD Public Works Department
CWIP Capital Work in Progress

PanchaTantra
Ver–2.1, Rel–9.10 Dated: 10-09-2015 User Manual Page 6
Table 2 illustrates the various features and benefits of the PanchaTantra application:
Table 2: Features and Benefits
Particulars Features Benefits
Language Supports both Kannada and English languages.
Easily understandable.
Inbuilt Double Entry Accounting System
Process the bills, payments, demands and receipts as per the double entry accounting system.
Works even if the user does not have the knowledge of the double entry accounting system.
The effort of the department in training 5628 GP staff to understand the double entry accounting system is not required. It helps the department in implementing the double entry accounting system as per the Act.
Online and User Friendly
All the activities at GP can be done online using Kannada or English languages as required.
The user with minimum knowledge of computer can use this application to do the work.
The need of preparing the number of reports at the GP for sending it to the higher offices is eliminated since the reports can be generated online. The vouchers are generated for each entry of receipts and payments.
The internal or external audit of the GP can be carried out easily as all the data required for the audit is available in the system. Using this data, the audit officers can verify the documents/registers/bills/bank accounts in the GP to prepare audit reports.
Business Rules Designed and developed as per the business rules defined in the Panchayat Act and Rules.
Business logic will not be deviated.
Inbuilt Public Interface
Helps users to pay the tax or apply / request for beneficiary / license or complaints / suggestions across the counter and collect the acknowledgement for the same. Based on the access level given, the senior officers and the public can monitor the status of the application online.
Workflow Based System
Wherever it is critical, workflow system has been incorporated so that the required accountability is built in this system. Even though the officials /operators of GP do the data entry, some of the critical entries will be approved or modified by the secretary only. The fund released by the Taluk Panchayat, Zilla Panchayat or State RDPR are made available to GP online.

PanchaTantra
Ver–2.1, Rel–9.10 Dated: 10-09-2015 User Manual Page 7
Particulars Features Benefits
Transparent The progress, performance and achievement of any offices can be viewed by the other offices. This helps in sharing the data.
The Taluk/District/State level officers can monitor the progress made by the GPs in implementing the various schemes.
The GP activities and achievements can be published on the website for general public. This provides the complete transparency of the department.
Controls The number of required controls has been incorporated so that it guides the GP to follow the procedures properly. The system will not allow passing the bills without the measurement book entries. After work completion, the system guides the user to convert it into the assetization. It will also automatically calculate the TDS and other deductions while passing the bills.
It guides the GP officials in proper utilization of funds without deviating to some other purposes.
Role based access As different level of users will be operating this system, the system provides the different options as per their roles. The Taluk/District/State office can monitor the progress and enter the fund release details, but can not modify the data of GPs.
It helps the Taluk/District/State level officers in releasing the funds based on the utilization of the fund and performance in implementing the schemes.
Table 3 illustrates the different types of users and their roles in accessing the modules in the PanchaTantra
application.
Table 3: Users and their Roles
User Role GP Operator Perform the data entry in the various modules of this application.
GP Secretary Approval and correction of the data besides the data entry work.
Taluk Officers Monitors the activities of the GP by viewing the various reports on the system. If the
taluk officer is assigned the role of fund releasing, they will perform this action using
the application.
ZP Officers Views the data of GP and monitor the progress in implementing the various schemes.
The fund releasing module is available to the CAO/AO officers of the ZP to enter the
fund releasing details.
State Officers Monitors the achievements and progresses made by the GPs in implementing the
various schemes. They will also have privilege to release the funds.
This manual describes various functionalities of the PanchaTantra application.
PanchaTantra
Ver–2.1, Rel–9.10 Dated: 10-09-2015 User Manual Page 8
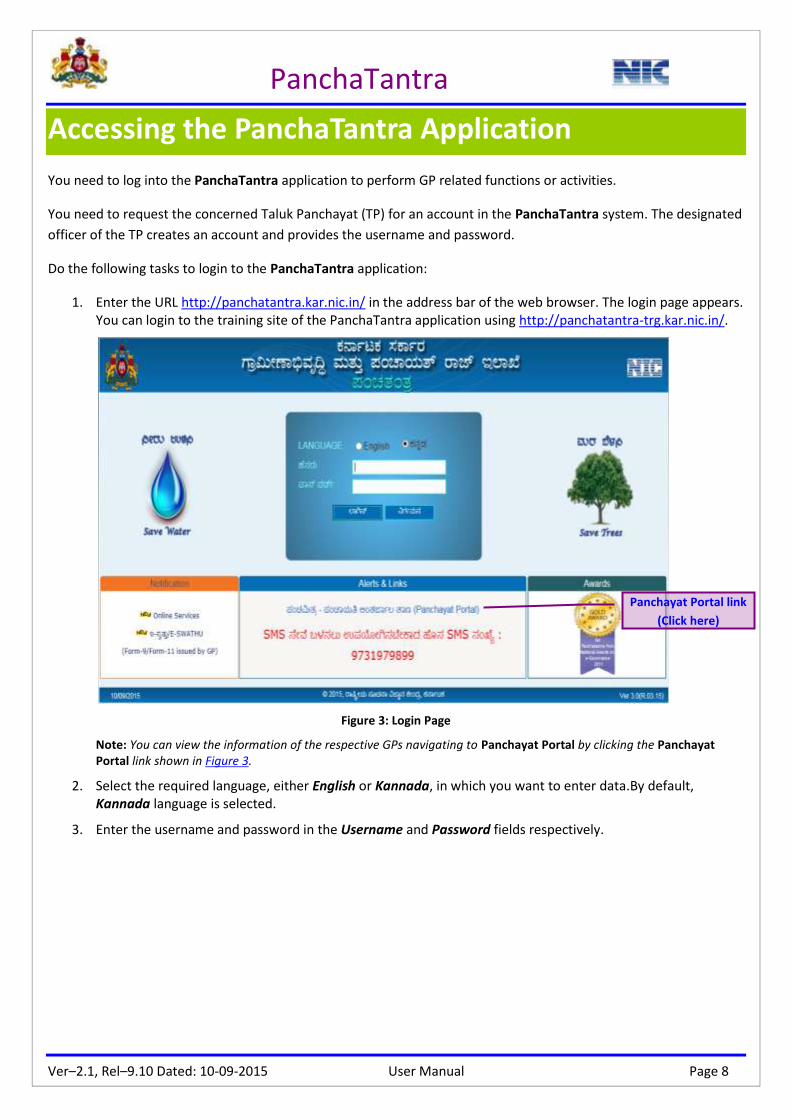
Accessing the PanchaTantra Application
You need to log into the PanchaTantra application to perform GP related functions or activities.
You need to request the concerned Taluk Panchayat (TP) for an account in the PanchaTantra system. The designated
officer of the TP creates an account and provides the username and password.
Do the following tasks to login to the PanchaTantra application:
1. Enter the URL http://panchatantra.kar.nic.in/ in the address bar of the web browser. The login page appears. You can login to the training site of the PanchaTantra application using http://panchatantra-trg.kar.nic.in/.
Figure 3: Login Page
Note: You can view the information of the respective GPs navigating to Panchayat Portal by clicking the Panchayat Portal link shown in Figure 3.
2. Select the required language, either English or Kannada, in which you want to enter data.By default, Kannada language is selected.
3. Enter the username and password in the Username and Password fields respectively.
Panchayat Portal link
(Click here)

PanchaTantra
Ver–2.1, Rel–9.10 Dated: 10-09-2015 User Manual Page 9
4. Click Login. Themain page appears. Or click Exit to exit from the application. You can navigate to the main page from any other page by clicking the Main Page option at the left-top side of the application. Also, you can logout by clicking the Signout option at the right-top side of the application.
Note: If you are logging in for the first time, the screen navigates to the Branch Details screen (see Figure 21). Refer to the Bank Details section for more information on how to enter the bank details for the selected panchayat.
Figure 4: Main Page

PanchaTantra
Ver–2.1, Rel–9.10 Dated: 10-09-2015 User Manual Page 10
1. Masters
You can access the various functionalities under Mastersoption (seeFigure 5).
Point to Masters. The list of sub-options appears.
Figure 5: Masters Options
1.1. Vehicle
You can add or modify the tax collectable vehicle details.
1.1.1 Adding the Vehicle Details
Do the following tasks to add the vehicle details:
1. Click Vehicle. The Vehicle Tax Demand Register (Format 12) screen appears.
Figure 6: Add Vehicle Tax Details
2. Enter the vehicle owner name in the Owner Name field.
3. Enter the description of the vehicle in the Vehicle Description field.
4. Enter the address of the vehicle owner in the Address field.
5. Enter the due date of renewal in the Due Date of Renewal field.
Saved vehicle tax details

PanchaTantra
Ver–2.1, Rel–9.10 Dated: 10-09-2015 User Manual Page 11
6. Click Add. The details are saved as shown in Figure 6.
1.1.2 Modifying the Vehicle Details
Do the following tasks to modify the vehicle details:
1. Click Vehicle. The Vehicle Tax Demand Register (Format 12) screen appears.
2. Click Select across the vehicle details you want to modify. The selected vehicle details appear.
Figure 7: Modify Vehicle Tax Details
3. Edit the required fields as needed.
4. Click Modify. The details will be saved as modified. You can also navigate to the main page without changing the information by clicking the Exit button.
1.2. Advertisement
You can add or modify the tax collectable advertisement details.

PanchaTantra
Ver–2.1, Rel–9.10 Dated: 10-09-2015 User Manual Page 12
1.2.1 Adding the Advertisement Details
Do the following tasks to add the advertisement details:
1. Click Advertisement. The Advertisement Tax Demand Register (Format 13) screen appears. The system populates the serial number of the advertisement added in the Sl. No field depending on the added advertisements details.
Figure 8: Add Advertisement Tax Details
2. Enter the advertisement serial number in the Advt Sl. No field.
3. Enter the advertisement place name in the Advt. Place field.
4. Enter the name and address of the advertiser in the Advtiser’s Name and Address fields respectively.
5. Enter the approval and renewal due dates in the Approval Date and Due Date of Renewal fields respectively.
6. Enter the description of business in the Business Description field.
7. Click Add. The advertisement details are saved as shown in Figure 8.
1.2.2 Modifying the Advertisement Details
Do the following tasks to modify the advertisement details:
1. Click Advertisement. The Advertisement Tax Demand Register (Format 13) screen appears.
Saved details

PanchaTantra
Ver–2.1, Rel–9.10 Dated: 10-09-2015 User Manual Page 13
2. Click Select across the advertisement details you want to modify.
Figure 9: Modify Advertisement Tax Details
3. Edit the required fields as needed.
4. Click Modify. The details will be saved as modified.
1.3. GP Assets
You can add, modify or delete the GP asset details.

PanchaTantra
Ver–2.1, Rel–9.10 Dated: 10-09-2015 User Manual Page 14
1.3.1 Adding the GP Asset Details
Do the following tasks to add the GP asset details:
1. Click GP Assets. The GP Assets screen appears.
Figure 10: Add GP Asset Details
2. Select the asset category from the Category drop-down list. If the asset category is Scheme or Grant, you need to select the scheme name from the Scheme Name drop-down list. For other options this field will be read-only.
3. Select the asset type from the Asset/Work Classification drop-down list.
4. Select the asset head from the Asset Head drop-down list.
5. Select Yes in the Revenue Yielding Property?section if the selected asset is the revenue yielding property else select No. If Yes is selected, the Asset/Work Place field becomes editable.
6. Select the village name from the Village drop-down list.
7. Enter the name and address of the asset in the Asset/Work Name and Asset/Work Description fields respectively.
8. If the selected asset head is a revenue yielding property, enter the work place in the Asset/Work Place field.
9. Enter the date of completion or transfer of the asset in the Date of Completion or Transfer field.
10. Enter the value of the asset as on the date of completion in the Asset Value on Date of Completion field. The 01/04/2011Asset Value as on (As per W.D.V) field populates depending on the value entered in the Asset Value on Date of Completion field.
11. Select the authority created the asset from the Asset Created By drop-down list.
12. Click Save. The asset details are saved as shown in Figure 10.
Note: You can navigate to the main page without adding the information by clicking the Exit button.
Saved details

PanchaTantra
Ver–2.1, Rel–9.10 Dated: 10-09-2015 User Manual Page 15
1.3.2 Modifying or Deleting the GP Asset Details
Do the following tasks to modify or delete the asset details
1. Click GP Assets. The GP Assets screen appears.
2. Click Select across the asset details you want to modify or delete. The selected asset details appear.
Figure 11: Modify/Delete the GP Asset Details
3. If you want to modify, edit the required fields as needed.
4. Click Modify. The asset details will be saved as modified. You can also delete the asset details by clicking the Delete button. The asset will be deleted from the database.
1.3.3 Adding RR No to the Panchayat Assets/Private Assets:
Do the following tasks to add the RR No to the Panchayat Assets/Private Assets:
1. Click on the Electricity RR Details of GP Assets. The following Screen appears in the given below.

PanchaTantra
Ver–2.1, Rel–9.10 Dated: 10-09-2015 User Manual Page 16
Figure 12: Adding RR No to Panchayat Assets/Private Assets
2. Select the Asset Type from the dropdown list.
3. Select the corresponding Asset name that is related to the Asset type from the dropdown list.
4. Asset Name and Address will be shown automatically after selecting the Asset Name.
5. Select the Circle Code to which the Asset belongs to.
6. Enter the RR No to that particular Asset.
1.3.4 Modifying or Deleting the RR No Details
Do the following tasks to modify or delete the RR details:
1. Click Electricity RR Details of GP Assets. The Electricity RR Details of GP Assets screen appears.
2. Click Select across the RR No details you want to modify or delete. The selected RR No details appear.

PanchaTantra
Ver–2.1, Rel–9.10 Dated: 10-09-2015 User Manual Page 17
Figure 13: Modifying/Deleting the RR No. details
3. If you want to modify, edit the required fields as needed.
4. Click Modify. The RR No details will be saved as modified. You can also delete the RR No details by clicking the Delete button. The asset will be deleted from the database.
1.4. Beneficiary Details
You can add or modify the beneficiary details.
1.4.1 Adding the Beneficiary Details
Do the following tasks to add the beneficiary details:
1. Click Beneficiary Details. The Beneficiary Details screen appears.
Figure 14: Add Beneficiary Details
2. Select the village name from the Village drop-down list.

PanchaTantra
Ver–2.1, Rel–9.10 Dated: 10-09-2015 User Manual Page 18
3. Select the beneficiary name from the Beneficiaries drop-down list. The Beneficiary Name and Beneficiary Address fields populate based on the selected beneficiary details.
4. Select Yes in the SC/ST section if the selected beneficiary belongs to schedule caste or schedule tribe category else select No.
5. Enter either the father or husband name of the beneficiary in the Beneficiary Father/Husband Name field accordingly.
6. Enter the contact number in the Telephone or Mobile No field.
7. If beneficiary having the Ration Card No, Job Card No, Aadhar Card No then enter the details of that and Mention RR No if YES then select circle code and enter RR No else Select No in that again mention which type .
8. Click Browse and search and select the photograph of the beneficiary to upload.
9. Select the bank and branch names from the Bank and Bank Branch drop-down lists.
10. Enter the bank account number in the Bank Account No. field.
11. Select the status from the Beneficiary Status drop-down list.
12. Click Add. The Enter Scheme Details section appears.
Figure 15: Scheme Details
13. Select the name of the scheme from the Scheme Name drop-down list.
14. Select Yes if the scheme is beneficiary from the This Scheme Beneficiary?drop-down list, else select No.
15. Enter the date of selection in the Selection Date field or select the date from the calendar.
16. Enter the amount paid in the scheme in the Already Paid Amount in this scheme section.
17. Click Add. The added scheme details appear as in Figure 14.
Note: You can navigate to the main page without adding the information by clicking the Exit button.

PanchaTantra
Ver–2.1, Rel–9.10 Dated: 10-09-2015 User Manual Page 19
1.4.2 Modifying the Beneficiary Details
You can modify the beneficiary details and add the scheme details for the existing beneficiaries.
Do the following tasks to modify the beneficiary details:
1. Click Beneficiary Details. The Beneficiary Details screen appears (see Figure 14).
2. Select the village name from the Village drop-down list.
3. Select the scheme name from the Scheme drop-down list.
4. Select the beneficiary name from the drop-down list next to Beneficiary Name field. The list of beneficiaries appears.
Figure 16(a): Modify Beneficiary Details

PanchaTantra
Ver–2.1, Rel–9.10 Dated: 10-09-2015 User Manual Page 20
Figure 17(b): Modify Beneficiary Details
4 Suppose if the benficiary name is already added in the benificiary list then that benificiary name is not found in the selected scheme then select the “ALL” option in that option select that benificiary and click Modify.
5 Edit the required fields in the first section as needed and click Modify.
6 Edit the fields in the Enter Scheme Details section and click Modify. The scheme details will be saved as modified. You can also add more scheme details by editing the fields in the Enter Scheme Details section and clicking the Add button.
1.5. Contractors or Suppliers
You can add or modify the contractor or supplier details.
Beneficiary details

PanchaTantra
Ver–2.1, Rel–9.10 Dated: 10-09-2015 User Manual Page 21
1.5.1 Adding the Contractor or Supplier Details
Do the following tasks to add the contractor or supplier details:
1. Click Contractors/Suppliers. The Contractor/Supplier Details screen appears.
Figure 18: Add Contractor/Supplier Details
2. Select the type of the client from the Type drop-down list.
3. Enter the name of the client, both in English and Kannada, in the Contractor/Supplier Name (English) and Contractor/Supplier Name (Kannada) fields respectively.
4. Enter the PAN number of the contractor or supplier in the PAN No field.
5. Enter the TIN number, if available, in the TIN No field.
6. Select the category from the Category drop-down list.
7. Enter the address of the contractor or supplier in the Address field.
8. Enter the contact number in the Land/Mobile No field.
9. Enter the registration number and the registered department in the Registration No. and Registered Dept fields respectively.
10. Click Save. The saved details appear as shown in the Figure 18.
1.5.2 Modifying the Contractor or Supplier Details
Do the following tasks to modify the existing contractor or supplier details:
1. Click Contractors/Suppliers. The Contractor/Supplier Details screen appears.
Saved contractors list

PanchaTantra
Ver–2.1, Rel–9.10 Dated: 10-09-2015 User Manual Page 22
2. Click Select across the added contractor or supplier you want to modify.
Figure 19: Modify the Contractor/Supplier Details
3. Edit the required fields as needed.
4. Click Modify. The contractor or supplier details will be saved as modified.
1.6. Bank Details
You can add the branch details of the bank and modify the branch and bank account details.
1.6.1 Adding the Branch Details
Do the following tasks to add the branch details:
1. Select Bank Details and click Branch. The Branch Details screen appears.
Figure 20: Add Bank Branch Details
2. Select the bank name from the Bank Name drop-down list.
3. Enter the branch name both in English and Kannada in the Branch Name (Eng) and Branch Name (Kan) fields respectively.
4. Enter the Indian Financial System Code (IFSC) code, if available, in the IFSC Code field.
5. Click ADD. The added branch details appear as shown in Figure 20.
Saved bank branches
PanchaTantra
Ver–2.1, Rel–9.10 Dated: 10-09-2015 User Manual Page 23
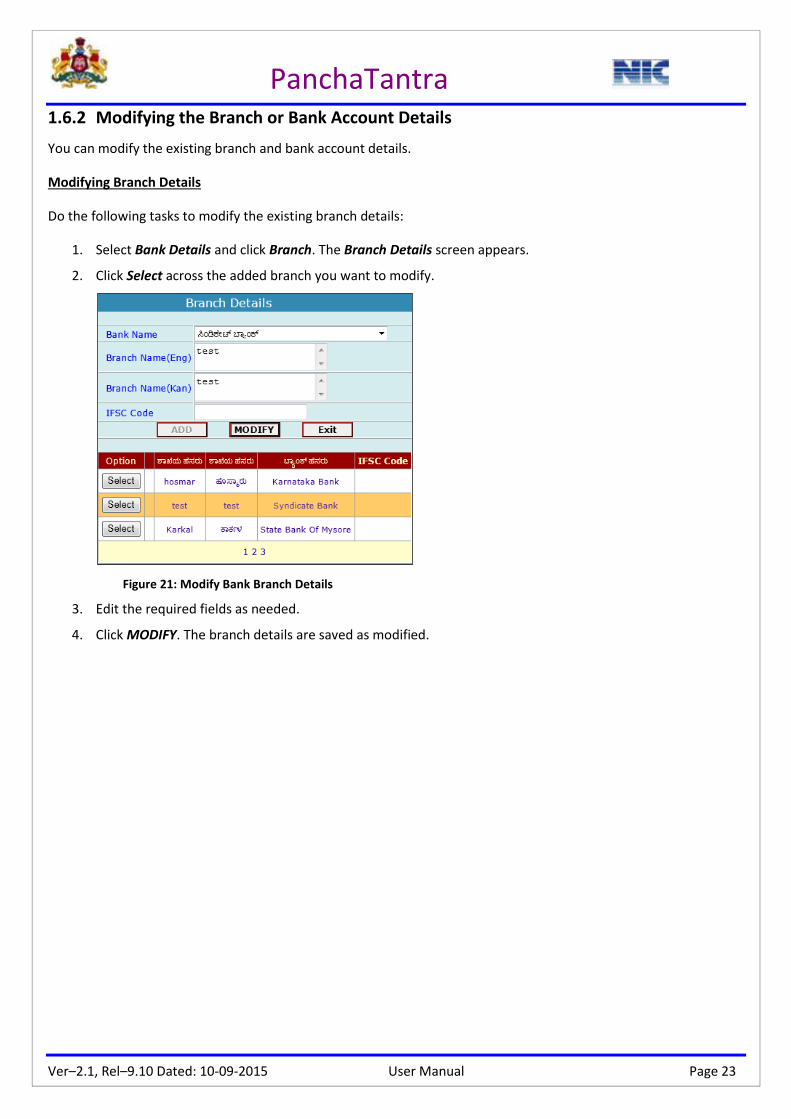
1.6.2 Modifying the Branch or Bank Account Details
You can modify the existing branch and bank account details.
Modifying Branch Details
Do the following tasks to modify the existing branch details:
1. Select Bank Details and click Branch. The Branch Details screen appears.
2. Click Select across the added branch you want to modify.
Figure 21: Modify Bank Branch Details
3. Edit the required fields as needed.
4. Click MODIFY. The branch details are saved as modified.

PanchaTantra
Ver–2.1, Rel–9.10 Dated: 10-09-2015 User Manual Page 24
Modifying Bank Account Details
Do the following tasks to modify the existing branch details:
1. Select Bank Details and click Bank Account Modification. The Bank Account Details screen appears.
Figure 22: Modify the Bank Account Details
2. Click Select across the existing bank details. The selected bank account details appear.
Figure 23: Modify the Bank Account Details (Contd…)
3. Edit the required fields as needed.
Note: You can also add the branch name for the selected bank account by clicking the Add Bank Branch button.
4. Click Modify. The bank account details will be saved as modified.
1.7. Scheme
You can add and modify the scheme details.

PanchaTantra
Ver–2.1, Rel–9.10 Dated: 10-09-2015 User Manual Page 25
1.7.1 Adding the Scheme Details
Do the following tasks to add the scheme details:
1. Click Scheme. The Scheme Details screen appears.
Figure 24: Add Scheme Details
2. Select the scheme name from the Scheme Name drop-down list.
3. Select the bank name from the Bank Name drop-down list.
4. Select the branch name of the selected bank from the Bank Branch Name drop-down list.
5. Enter the account number of the selected scheme in the Account No field.
6. Enter the amount left in the scheme account as on 01/04/2011 (current financial year) in the Amount Left With As on 01/04/2011 field.
7. Click Add. The bank details of the scheme are saved.
1.7.2 Modifying the Scheme Details
Do the following tasks to add the scheme details:
1. Click Scheme. The Scheme Details screen appears.
2. Select the scheme from the Scheme Name drop-down list, for which you have added the bank details. The selected scheme details appear.
Figure 25: Modify Scheme Details
3. Edit the required fields as needed.
4. Click Modify. The details are saved as modified.

PanchaTantra
Ver–2.1, Rel–9.10 Dated: 10-09-2015 User Manual Page 26
1.8. Shelf of Works
There are two types of Work, Individual and Package. You can add or modify the individual and package work details.
1.8.1 Adding the Work Details
Individual Work
Do the following tasks to add the work details individually:
1. Select Shelf of Works and click Work Add. The Work Details screen appears.
Figure 26: Work Categories

PanchaTantra
Ver–2.1, Rel–9.10 Dated: 10-09-2015 User Manual Page 27
2. Select Individual Work. The Works List screen appears.
Figure 27: Add Individual Work Details
3. Select the work category from the Work Category drop-down list. You need to select the scheme name from the Scheme Name drop-down list, if the selected work category is Scheme.
4. Select the type of work in the Work Type section. If the Spillover Works type is selected, you need to enter the amount already spent on that work in the Amount already Spent on this Work field.
5. Select the sub category of the work from the Work Classification drop-down list.
6. Select the sub category of the work from the Sub Category drop-down list.
7. Select the type of work in the Type of Work list. You can select more than one option by pressing Ctrl button in the keyboard.

PanchaTantra
Ver–2.1, Rel–9.10 Dated: 10-09-2015 User Manual Page 28
8. Enter the name of the work in the Work Name field.
9. Select the work place from the Village drop-down list in the Work Place section. If the village name is not available in the list, you need to enter the village name by clicking the Other option.
10. Enter the approval details of the work in the Work Approval Details field.
11. Enter the approval date of the work in the Work Approval Date field or select the date from the calendar.
12. Enter the estimated cost in the Estimated Cost field.
13. Fill in the optional fields if the information is available. The optional fields are:
Sanction Details
Technical: Select the technical person and enter the reference number and date.
Administrative: Select the administrative person and enter the reference number and date.
Work Location in Latitude/Longitude
Latitude (North/South): Enter the latitude information.
Longitude (East/West): Enter the longitude information.
Expected No. of Beneficiaries
General: Enter the expected beneficiaries count under BPL and woman in the general category.
SC: Enter the expected beneficiaries count under BPL and woman in the schedule caste (SC) category.
ST: Enter the expected beneficiaries count under BPL and woman in the schedule tribe (ST) category.
14. Click Save. The work details are saved.
Package Work
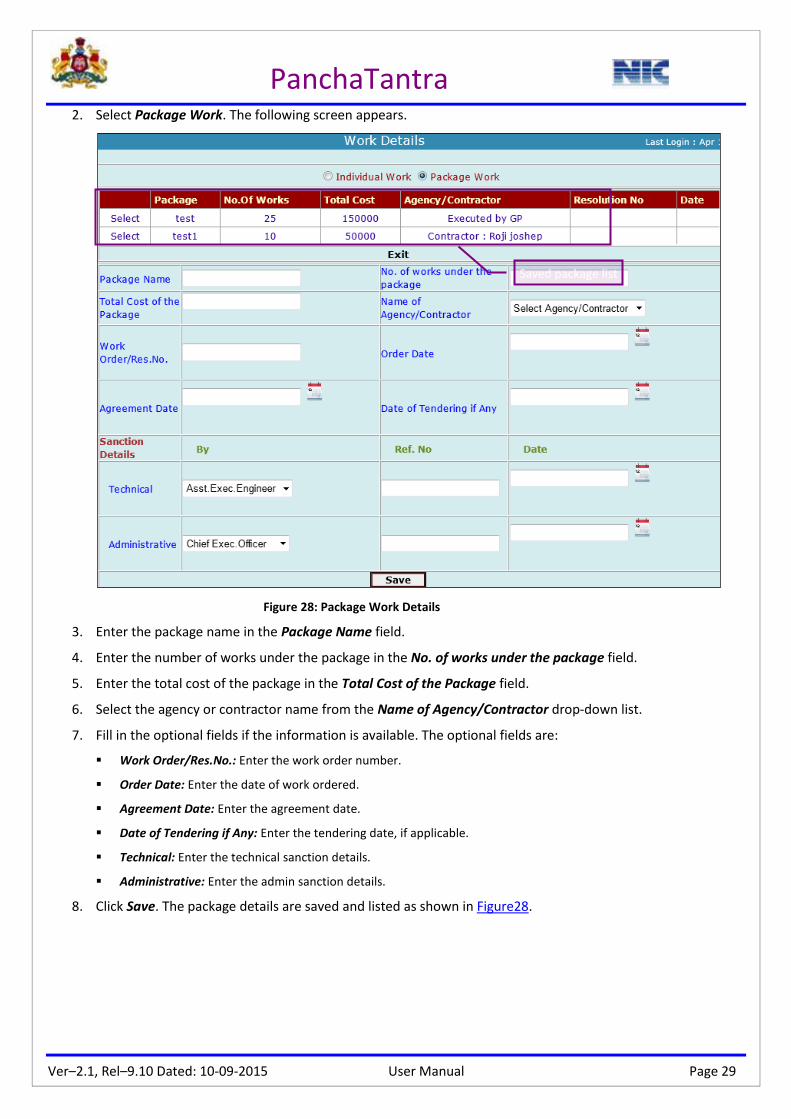
Do the following tasks to add the package work details:
1. Select Shelf of Works and click Work Add. The Work Details screen appears.
PanchaTantra
Ver–2.1, Rel–9.10 Dated: 10-09-2015 User Manual Page 29
2. Select Package Work. The following screen appears.
Figure 28: Package Work Details
3. Enter the package name in the Package Name field.
4. Enter the number of works under the package in the No. of works under the package field.
5. Enter the total cost of the package in the Total Cost of the Package field.
6. Select the agency or contractor name from the Name of Agency/Contractor drop-down list.
7. Fill in the optional fields if the information is available. The optional fields are:
Work Order/Res.No.: Enter the work order number.
Order Date: Enter the date of work ordered.
Agreement Date: Enter the agreement date.
Date of Tendering if Any: Enter the tendering date, if applicable.
Technical: Enter the technical sanction details.
Administrative: Enter the admin sanction details.
8. Click Save. The package details are saved and listed as shown in Figure28.
Saved package list

PanchaTantra
Ver–2.1, Rel–9.10 Dated: 10-09-2015 User Manual Page 30
If you want to add work details under a package, do the following tasks:
9. Click Select across the package to which you want to add works. The selected package details appear.
Figure 29: Add Works to a Package
10. Click Proceed to enter work details to enter the work details. You can select and add the existing individual works by clicking the Add Existing Work button
11. Follow steps 3 to 14 from the Individual Work section.
12. Repeat the previous step if you want to add more works under the same package, else click Exit to navigate to the main page.
1.8.2 Modifying the Work Details
Individual Work
Do the following tasks to modify the work details:
1. Select Shelf of Works and click Work Add. The Work Details screen appears.
2. Select Individual Work. The Work List screen appears.
3. Select the category of work in which you want to modify the work details, from the Work Category drop-down list. You need to select the scheme name from the Scheme Name drop-down list, if the selected work category is Scheme.
4. Select the work type in the Work Type section. If the Spillover Works type is selected, you need to enter the amount already spent on that work in the Amount already Spent on this Work field.

PanchaTantra
Ver–2.1, Rel–9.10 Dated: 10-09-2015 User Manual Page 31
5. Select the sub category of the work from the Work Classification drop-down list. The list of existing works under the selected categories appears.
Figure 30: Modify Individual Works
6. Click Select across the required work. The selected work details appear.
7. Edit the required fields as needed.
8. Click Modify. The work details will be saved as modified.
Saved works list

PanchaTantra
Ver–2.1, Rel–9.10 Dated: 10-09-2015 User Manual Page 32
Package Work
Do the following tasks to modify the package work details:
1. Select Shelf of Works and click Work Add. The Work Details screen appears.
2. Select Package Work. The screen appears as in Figure 28.
3. Click Select across the package you want to modify (refer to Figure 29).
4. Edit the required fields as needed.
5. Click Modify. The package details will be saved as modified.
6. If you want to modify the works under the selected package, click Proceed to enter the work details. The Work List screen appears.
7. Follow steps 3 to 8 from the Individual Work section.
8. Repeat the previous step if you want to modify other works under the selected package, else click Exit to navigate to the main page.
1.8.3 Deleting Works
Individual Work
Do the following tasks to delete the individual works:
1. Select Shelf of Works and click Work Delete. The Work Module screen appears.
Figure 31: Work Module
2. Select Individual Work. The list of individual works appears.
Figure 32: List of Individual Works
3. Select the checkbox (es) of the work you want to delete.
4. Click Delete. The selected work will be deleted from the database. You cannot delete those works having bills and respective check boxes appear as read-only.
Package Work
Do the following tasks to delete the package works:
1. Select Shelf of Works and click Work Delete. The Work Module screen appears (refer to Figure 32).
2. Select Package Work. The Package drop-down list appears.

PanchaTantra
Ver–2.1, Rel–9.10 Dated: 10-09-2015 User Manual Page 33
3. Select the package from the Package drop-down list.
4. Click Delete Package. A message ‘Package is deleted’ appears.
5. Click OK.
1.8.4 Add GSK Works
Do the following tasks to add the work details:
1. Select Shelf of Works and click GSK Work Add. The Work Details screen appears.
Figure 333: List of Works
2. Select Individual Work. The Work List screen appears.
Figure 34: GSK Works
3. Edit the required fields as needed.
4. Click Save. The work details will be saved.

PanchaTantra
Ver–2.1, Rel–9.10 Dated: 10-09-2015 User Manual Page 34
1.9. Purchase Details
You can add and modify the purchase details.
1.9.1 Adding the Purchase Details
Do the following tasks to add the purchase details:
1. Select Purchase Details and click Purchase Details. The Purchase Details screen appears.
Figure 35: Add Purchase Details
2. Select the purchase type in the Purchase Type section. By default, Non-Consumable is selected.
If Non-Consumable is selected, do the following tasks:
a. Select whether the purchase is movable or immovable in the Purchase Movable/Immovable section.
b. Select the purchase category in the Purchase Category section. If the selected category is Scheme or Grants, you need to select the scheme name from the Scheme Name drop-down list.
3. Select the purchase class from the Purchase Class drop-down list.
4. Select the sub class of the purchase from the Purchase Sub-Class drop-down list.
5. Enter the description of the purchase in the Purchase Description field.
6. Enter the approval date of the purchase in the Purchase Approval Date field or select from the calendar.
7. Enter the approval details in the Purchase Approval Details field.
8. Select the supplier name from whom it is purchased from the Purchased From drop-down list.
9. Enter the cost in the Purchase Cost field.
10. Click Add. The purchase details appear in the list as shown in Figure 32.
Saved purchase details

PanchaTantra
Ver–2.1, Rel–9.10 Dated: 10-09-2015 User Manual Page 35
1.9.2 Modifying the Purchase Details
Do the following tasks to modify the purchase details:
1. Select Purchase Details and click Purchase Details. The Purchase Details screen appears.
2. Click Select across the purchase details you want to modify. The selected purchase details appear.
Figure 36: Modify Purchase Details
3. Edit the required fields as needed.
4. Click Modify. The document will be saved as modified.

PanchaTantra
Ver–2.1, Rel–9.10 Dated: 10-09-2015 User Manual Page 36
1.10. GP Members
You can add or modify the GP member details.
1.10.1 Adding the GP Member Details
Do the following tasks to add the GP member details:
1. Click GP Members. The GP Member Details screen appears.
Figure 37: Add GP Member Details
2. Enter the name of the member in the Name field.
3. Select the designation from the Designation drop-down list.
4. Enter the date of membership in the From Date field or select from the calendar.
5. Select the gender of the member in the Gender section.
6. Select the category of the member from the Category drop-down list.
7. Optionally, click Browse and search and select the photograph of the member in the Photo section.
8. Click Add. The GP member details appear as shown in Figure 32.
1.10.2 Modifying the GP Member Details
You can modify the member details. While modifying the GP member details, make sure that there is only one
president and one vice president and the remaining are members of the GP.
Do the following tasks to modify the GP member details:
1. Click GP Members. The GP Member Details screen appears.
List of GP members

PanchaTantra
Ver–2.1, Rel–9.10 Dated: 10-09-2015 User Manual Page 37
2. Click Select across the GP member details you want to modify. The selected GP member details appear.
Figure 38: Modify GP Member Details
3. Edit the required fields as needed.
4. Click Modify. The member details are saved as modified. You can also delete the selected GP member details by clicking the Delete button.
1.11. Ledger OB
You can add or modify opening balance details to the ledger group. You can add only one opening balance to the
ledger group.
1.11.1 Adding the Opening Balance Details
Do the following tasks to add the opening balance (OB) to the ledger:
1. Click Ledger OB. The Opening Balance Details screen appears.
Figure 39: Add Ledger OB Details
2. Select the main group of the ledger from the Main Ledger Group drop-down list.
3. Select the main ledger from the Main Ledger drop-down list. The ADD button becomes available.
4. Select the sub ledger from the Sub Ledger drop-down list.
5. Enter either the debit or credit balance amount in the Debit Balance or Credit Balance field.
6. Click ADD. The opening balance details are saved for the selected ledger.

PanchaTantra
Ver–2.1, Rel–9.10 Dated: 10-09-2015 User Manual Page 38
1.11.2 Modifying the Opening Balance Details
Do the following tasks to modify the opening balance details of the ledger:
1. Click Ledger OB. The Opening Balance Details screen appears.
2. Select the main group of the ledger which you want to modify, from the Main Ledger Group drop-down list.
3. Select the main ledger and sub ledger from the Main Ledger and Sub Ledger drop-down lists. The credit and debit balance details appear.
Figure 40: Modify Ledger OB Details
4. Edit the debit or credit balance amount in the Debit Balance or Credit Balance field.
5. Click MODIFY. The data will be saved as modified.
1.12. Ward
You can add or modify the ward details and map the existing properties belonging to each ward.

PanchaTantra
Ver–2.1, Rel–9.10 Dated: 10-09-2015 User Manual Page 39
1.12.1 Adding or Modifying the Ward Details
Adding the Ward Details
Do the following tasks to add the ward details:
1. Select Ward and click Ward Details. The Ward Details screen appears.
Figure 41: Add Ward Details
Figure 42: Ward Details
2. Select village name from the Village drop-down list.
3. Enter the ward number in the Ward No. field.
4. Enter the ward description both in English and Kannada in the Ward Description in English and Ward Description in Kannada fields.
5. Click Save. The ward details are saved.

PanchaTantra
Ver–2.1, Rel–9.10 Dated: 10-09-2015 User Manual Page 40
Modifying the Ward Details
Do the following tasks to modify the ward details:
1. Select Ward and click Ward Details. The Ward Details screen appears.
2. Select the village name from the Village drop-down list.
Figure 43: Modify Ward Details
3. Click Select across the existing ward you want to modify. The ward details appear.
4. Edit the required fields as needed.
5. Click Modify. The ward details are saved as modified.
1.12.2 Mapping the Properties to the Ward
You can map the existing properties to the ward after adding the ward details in the database.
Do the following tasks to map the properties to the ward:
1. Select Ward and click Property-Ward Mapping. The Property To Ward Mapping screen appears.
Figure 44: Map Property to Ward
2. Select the village name from the Village drop-down list.
3. Select the type of property list you want to map to the ward from the Select Type drop-down list.
4. Select the ward number form the Ward No. drop-down list.
5. Click Save.
1.12.3 Correcting the Properties Details of the Ward
You can make corrections to the mapped details of the ward, in cases such as property which does not belongs to
the selected ward but is added wrongly.

PanchaTantra
Ver–2.1, Rel–9.10 Dated: 10-09-2015 User Manual Page 41
Do the following tasks to correct the property mapping details:
1. Select Ward and click Property-Ward Mapping Correction. The Property To Ward Mapping screen appears.
Figure 45: Property Map Correction
Figure 46: Property to Ward mapping
2. Select the village name from the Village drop-down list. The list of properties with ward numbers, under the selected village, appears.
3. Select the checkbox (es) across the properties that do not belong to the selected ward.
4. Select the ward number to which you want to modify from the Ward No. drop-down list.
5. Click Modify. The details are saved as modified.
1.13. Water Connection Details
You can add or modify the water connection details of the individual properties.

PanchaTantra
Ver–2.1, Rel–9.10 Dated: 10-09-2015 User Manual Page 42
1.13.1 Adding the Water Connection Details
Do the following tasks to add the water connection details:
1. Click Water Connection Details. The Water Connection Details screen appears.
Figure 47: Add the Water Connection Details
2. Select the village name from the Village drop-down list.
3. Select the property owner from the Property Owner drop-down list.
4. Select the type of the usage from the Usage Type drop-down list.
5. Enter the meter and tap numbers in the Meter No and Tap No fields respectively.
6. Click Save. The water connection details are saved (see Figure 47).
1.13.2 Modifying the Water Connection Details
Do the following tasks to modify the existing water connection details:
1. Click Water Connection Details. The Water Connection Details screen appears.
2. Click Select across the water connection you want to modify. The selected water connection details appear.
Figure 48: Modify the Water Connection Details
3. Edit the required fields as needed.
4. Click Modify. The selected water connection details are saved as modified.
1.14. Water Account
You need to assign the water account details to each wards of the selected village. In the water account details you
need to mention whether the tax collection frequency is monthly or annually.
Saved water connection list

PanchaTantra
Ver–2.1, Rel–9.10 Dated: 10-09-2015 User Manual Page 43
Do the following tasks to enter the water account details:
1. Click Water Account. The Water Account Details screen appears.
Figure 49: Water Account Details
2. Select the village name from the Village drop-down list. The list of wards to which water account details are not entered appears.
Figure 50: Frequency for Tax on Water
3. Select either Annually or Monthly under the Frequency for water rate collection section.
4. Click Save.
If the selected frequency is Monthly, do the following tasks:
Figure 51: Bank Details
a. Enter the VWSC (Village Water Sanitation Committee) account identity number in the VWSC Account ID field.
b. Select the bank and branch names from the Bank and Branch drop-down lists.
c. Click Update. You cannot modify the frequency for water rate collection of the wards once saved.
1.15. Remission or Write off or Demand Modification
You can enter the remission or write-off details of taxes for every property.

PanchaTantra
Ver–2.1, Rel–9.10 Dated: 10-09-2015 User Manual Page 44
Do the following tasks to enter remission or write-off details:
1. Click Remission/Writeoff/Demand Modification. The Remission and Write Off screen along with a web message appears.
Figure 52: Remission and Write-off Details
2. Click OK.
3. Select either Remission, Write Off or New Demand. By default the Reassessment and Demands Correction options are disabled or read-only.
4. Select the village name from the Village drop-down list.
5. Select the rule under which you are entering the remission or write-off details from the Under Rule drop-down list.
6. Select the financial year of the remission entry from the Remission For The Year drop-down list.
7. Enter the reason for remission in the Reason For Remission field.
8. Select the ward number from the ವಾರ್ಡ್ಆಯ್ಕೆಮಾಡಿ drop-down list.
9. Select All Properties or Selected Properties in the Range. The following section appears.

PanchaTantra
Ver–2.1, Rel–9.10 Dated: 10-09-2015 User Manual Page 45
If the Selected Properties in the Range is selected then do the following tasks:
a. Select the range property number wise, survey number wise, or house number wise as needed.
b. Enter the range in the From and To fields and click Go. The properties within the selected range will be listed under Property Owner drop-down list.
10. Select the main type and sub type of the remission, write-off or new demand from the of Main Type and of Type drop-down lists.
11. Select the owner of the property from the Property Owner drop-down list.
12. Select Increased or Decreased in the Is Assessment Increased/Decreased?section.
13. Select Amount or Percentage. Based on the selection a field appears.
14. Enter the amount or percentage of the increase or decrease in the remission or write-off assessment details.
15. Enter the effective date in the Effective date field or select the date from the calendar.
16. Enter the remarks in the Remark field.
17. Enter the number of months the selected property was vacant in the Period of Vacant field.
18. Enter the resolution details in the Resolution Details field.
19. Click Save. A web message ‘Saved successfully’ appears.
20. Click OK.

PanchaTantra
Ver–2.1, Rel–9.10 Dated: 10-09-2015 User Manual Page 46
2. Demands
You can access the various functionalities under Demands option.
Point to Demands. The list of sub-options appears.
Figure 53: Demands Options
2.1. Property Tax
2.1.1 Adding Property from E-swathu
Adding the Property from E-swathu
Do the following tasks to add the property tax details:
1. Select Property E-swathu and all type of properties appear.
Figure 54: Add Property Details
2. Select the type of property.

PanchaTantra
Ver–2.1, Rel–9.10 Dated: 10-09-2015 User Manual Page 47
3. Select New Property to add a property details.
Figure 55: Add Property Details
4. Enter the property or owner name and address in the Property/Owner Name and Property/Owner Address fields respectively.
5. Enter the house and survey numbers in the House No and Survey No fields.
6. Enter Mobile No, Mention RR No if YES then select circle code and enter RR No else Select No in that type again select the anyone options and Mention Toilet Facility if it is there then select Yes else Select No options.
7. Enter the property details to which direction it is located.
8. Enter the property identification number in the Property ID field. Alternatively, you can enter the Dimension and Measurement of the property and select the Unit of measurement.
9. Click ADD. The property tax details section appears.
Figure 56: Property Tax Details
10. Enter the old balance and/or current year demand details for various types of taxes, if necessary.
11. Click ADD. The property tax details are added to the property selected.

PanchaTantra
Ver–2.1, Rel–9.10 Dated: 10-09-2015 User Manual Page 48
2.1.2 Adding Missing Property from E-swathu
Adding the missing Property form E-swathu
Do the following tasks to add the property tax details:
1. Select Missing property(E-swathu) and all type of properties appear.
Figure 57: Add Property Details
2. Select the type of property.
3. Select Property to add a property details.
4. Enter the property or owner name and address in the Property/Owner Name and Property/Owner Address fields respectively.
5. Enter the house and survey numbers in the House No and Survey No fields.
6. Enter Mobile No, Mention RR No if YES then select circle code and enter RR No else Select No in that type again select the anyone options and Mention Toilet Facility if it is there then select Yes else Select No options.
7. Enter the property details to which direction it is located.
8. Enter the property identification number in the Property ID field. Alternatively, you can enter the Dimension and Measurement of the property and select the Unit of measurement.
9. Click ADD. The property tax details section appears.
10. Enter the old balance and/or current year demand details for various types of taxes, if necessary.
11. Click ADD. The property tax details are added to the property selected.
2.2. Advertisement or Vehicle Tax
You need to raise demands for the vehicle and advertisement details entered in the Masters.

PanchaTantra
Ver–2.1, Rel–9.10 Dated: 10-09-2015 User Manual Page 49
Do the following tasks to raise demand for the vehicle or advertisement:
1. Click Advt/Vehicle Tax. The Various Tax Demand Details screen appears.
Figure 58: Advertisement/Vehicle Tax
2. Select the financial year from the Financial Year drop-down list.
3. Select the village name from the Village Name drop-down list.
4. Select the type of tax from the Tax Type drop-down list.
5. Select the property number from the Property No drop-down list. The advertisement or vehicle details appear in the Advertisement or Vehicle Tax Demand Register (Form 12) section.
Figure 59: Advertisement Tax Details
6. If there is any balance amount left, enter the old balance amount in the Old Balance field.
7. Enter the current year demand amount in the Current Year Demand (Including All Cess) field. Based on the entries made in Old Balance and Current Year Demand (Including All Cess) fields, the Total Demand field populates automatically.
8. Click Save. The vehicle or advertisement details are saved.
2.3. Entertainment Tax
You can enter the entertainment tax details.

PanchaTantra
Ver–2.1, Rel–9.10 Dated: 10-09-2015 User Manual Page 50
Do the following tasks to add the entertainment tax details:
1. Click Entertainment Tax. The Entertainment Tax screen appears.
Figure 60: Entertainment Tax Details
2. Select the type of entertainment from the Entertainment Type drop-down list.
3. Enter the name of the entertainer in the Entertainer’s Name field.
4. Enter the place of entertainment in the Entertainment Place field.
5. Enter the per day value of total tax in the Total Tax Per Day field.
6. Enter the per show value of the tax in the Tax Per Show (In Rs.) field.
7. Enter the address of the entertainer in the Address field.
8. Enter the number of shows in a day in the No of Shows in a Day field.
9. Enter the number of days in the No of Days field.
10. Click Add. The entertainment tax details are saved.
2.4. GP Property Rent
You need to raise demands for the rented properties from the tenants, after entering the property details in the
Masters under GP Assets.

PanchaTantra
Ver–2.1, Rel–9.10 Dated: 10-09-2015 User Manual Page 51
Do the following tasks to add the GP property rent details:
1. Click GP Property Rent. The GP Property Rent screen appears.
Figure 61: GP Property Rent Details
2. Selected the revenue yielding property from the Property Details drop-down list. The selected property details appear in the green space in the Figure 54.
3. Enter the name of the contractor or tenant in the Contractor/Tenant Name field.
4. Enter the address in the Address field.
5. Enter the monthly demand in the Monthly Demand field.
6. Enter the balance amount in the Old Balance field, if any. Based on the entries made in Old Balance and Monthly Demandfields, the Total Demand field populates automatically.
7. Enter the start and end dates of tenancy in the Tenancy Start Date and Tenancy End Date fields. Based on the start and end dates on tenancy, the number of months of the tenancy period populates the Period (Months) field.
8. Click Add. The GP property rent details are saved as in Figure 54. You can delete the existing GP property rent details by clicking the Select button followed by the Delete button across the rent details you want to delete.
2.5. Pound Fine
You can add or modify the pound fine details.
Saved list
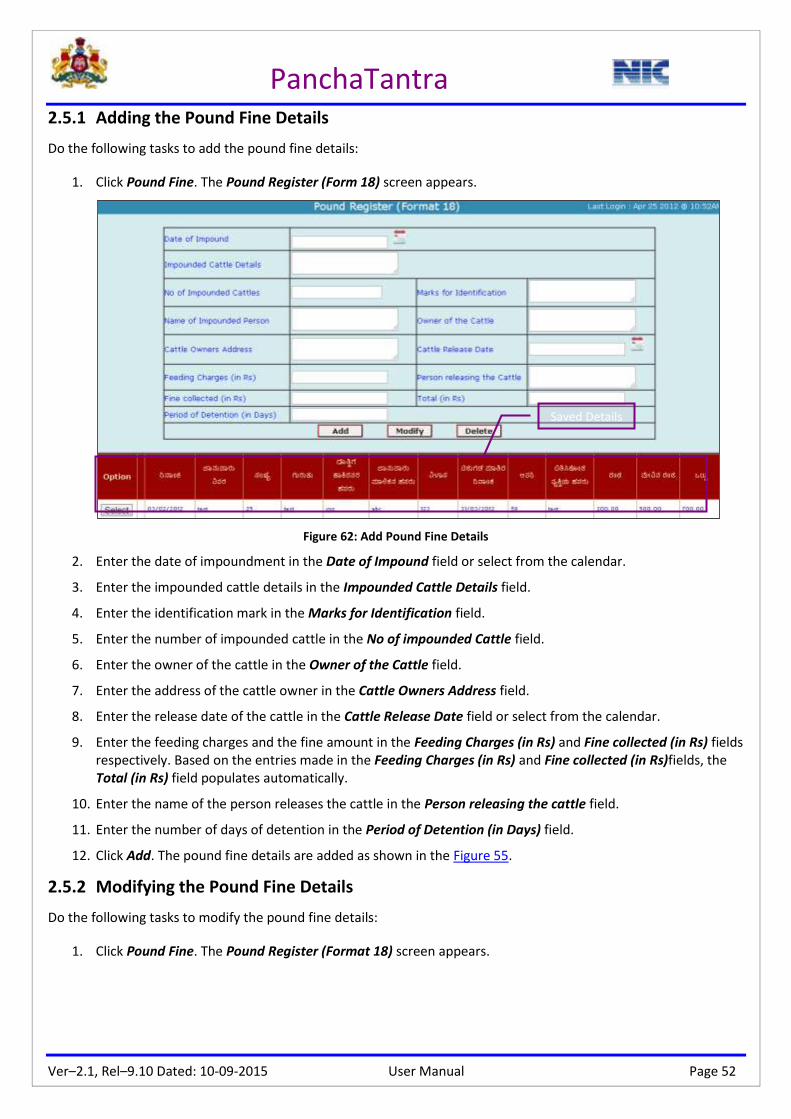
PanchaTantra
Ver–2.1, Rel–9.10 Dated: 10-09-2015 User Manual Page 52
2.5.1 Adding the Pound Fine Details
Do the following tasks to add the pound fine details:
1. Click Pound Fine. The Pound Register (Form 18) screen appears.
Figure 62: Add Pound Fine Details
2. Enter the date of impoundment in the Date of Impound field or select from the calendar.
3. Enter the impounded cattle details in the Impounded Cattle Details field.
4. Enter the identification mark in the Marks for Identification field.
5. Enter the number of impounded cattle in the No of impounded Cattle field.
6. Enter the owner of the cattle in the Owner of the Cattle field.
7. Enter the address of the cattle owner in the Cattle Owners Address field.
8. Enter the release date of the cattle in the Cattle Release Date field or select from the calendar.
9. Enter the feeding charges and the fine amount in the Feeding Charges (in Rs) and Fine collected (in Rs) fields respectively. Based on the entries made in the Feeding Charges (in Rs) and Fine collected (in Rs)fields, the Total (in Rs) field populates automatically.
10. Enter the name of the person releases the cattle in the Person releasing the cattle field.
11. Enter the number of days of detention in the Period of Detention (in Days) field.
12. Click Add. The pound fine details are added as shown in the Figure 55.
2.5.2 Modifying the Pound Fine Details
Do the following tasks to modify the pound fine details:
1. Click Pound Fine. The Pound Register (Format 18) screen appears.
Saved Details
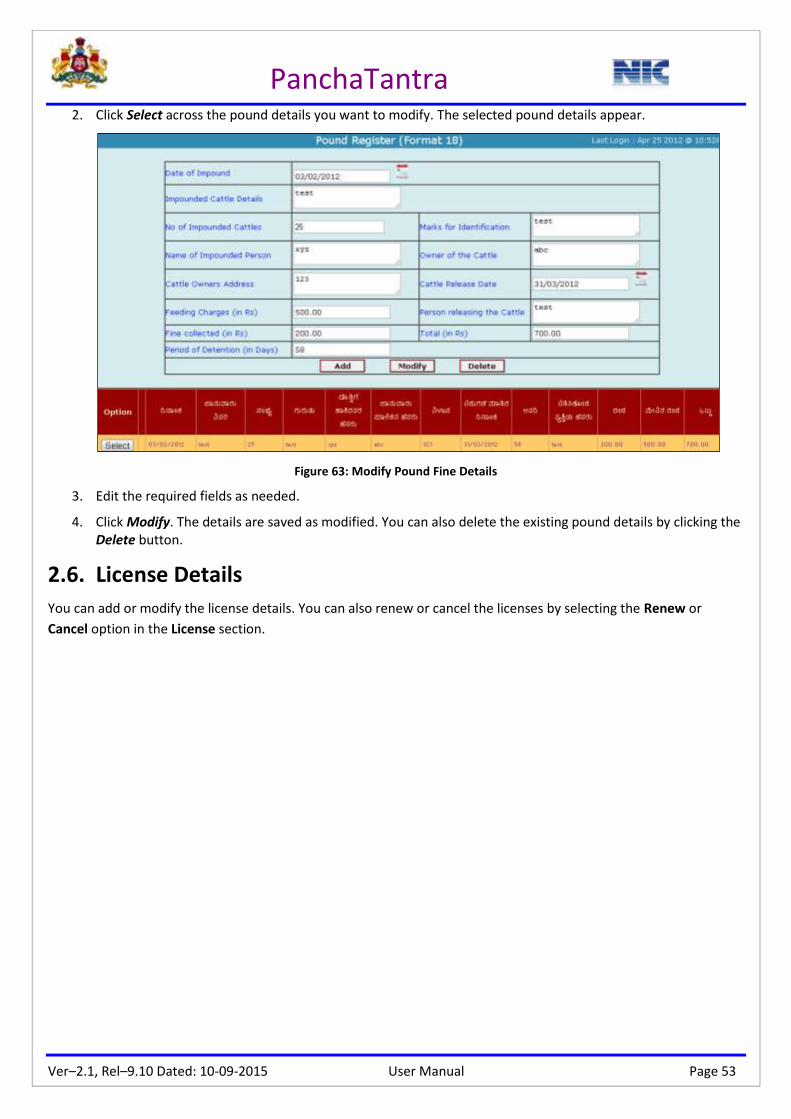
PanchaTantra
Ver–2.1, Rel–9.10 Dated: 10-09-2015 User Manual Page 53
2. Click Select across the pound details you want to modify. The selected pound details appear.
Figure 63: Modify Pound Fine Details
3. Edit the required fields as needed.
4. Click Modify. The details are saved as modified. You can also delete the existing pound details by clicking the Delete button.
2.6. License Details
You can add or modify the license details. You can also renew or cancel the licenses by selecting the Renew or
Cancel option in the License section.
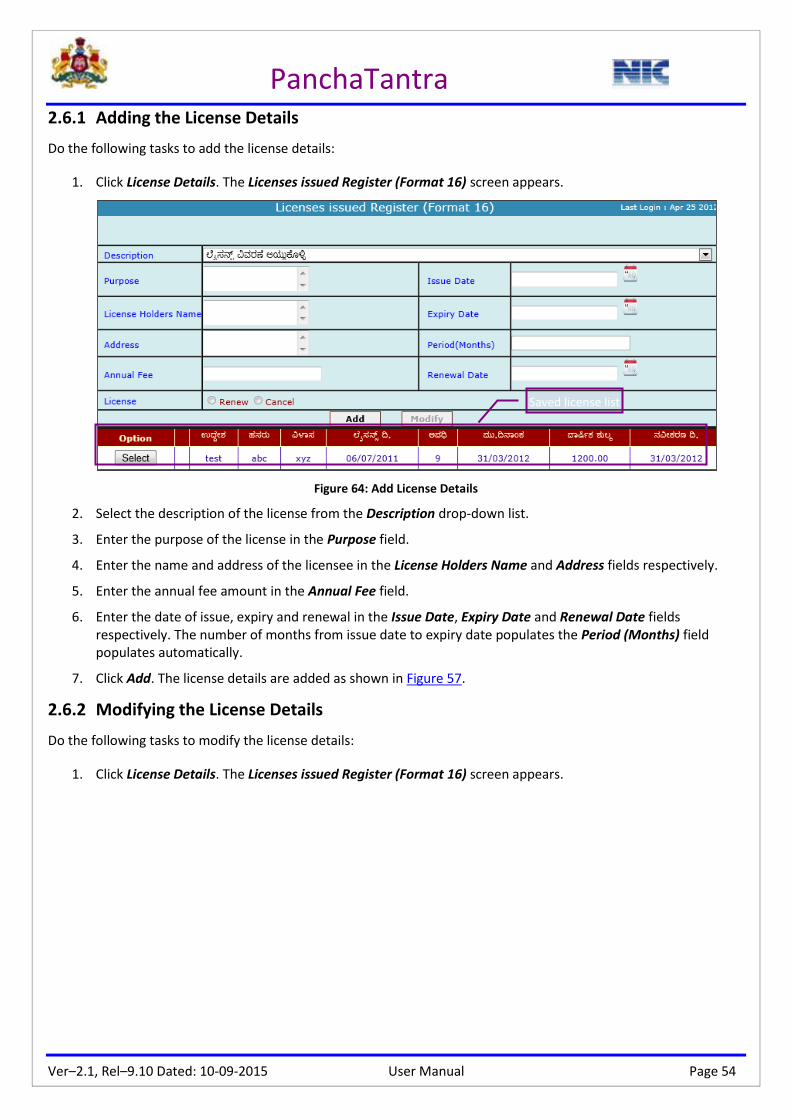
PanchaTantra
Ver–2.1, Rel–9.10 Dated: 10-09-2015 User Manual Page 54
2.6.1 Adding the License Details
Do the following tasks to add the license details:
1. Click License Details. The Licenses issued Register (Format 16) screen appears.
Figure 64: Add License Details
2. Select the description of the license from the Description drop-down list.
3. Enter the purpose of the license in the Purpose field.
4. Enter the name and address of the licensee in the License Holders Name and Address fields respectively.
5. Enter the annual fee amount in the Annual Fee field.
6. Enter the date of issue, expiry and renewal in the Issue Date, Expiry Date and Renewal Date fields respectively. The number of months from issue date to expiry date populates the Period (Months) field populates automatically.
7. Click Add. The license details are added as shown in Figure 57.
2.6.2 Modifying the License Details
Do the following tasks to modify the license details:
1. Click License Details. The Licenses issued Register (Format 16) screen appears.
Saved license list

PanchaTantra
Ver–2.1, Rel–9.10 Dated: 10-09-2015 User Manual Page 55
2. Click Select across the license details you want to modify. The selected license details appear.
Figure 65: Modify License Details
3. Edit the required fields as needed.
4. Click Modify. The details are saved as modified.

PanchaTantra
Ver–2.1, Rel–9.10 Dated: 10-09-2015 User Manual Page 56
3. Services
You can access the various functionalities under Services option (see Figure 57).
Point to Services. The list of sub-options appears.
Figure 66: Services Options
3.1. Tax Receipts
You can generate the tax receipts for the payment made by the public directly at the counter.
Refer to Receipts section for more information on how to generate receipts individually.
Do the following tasks to create the tax receipts:
5. Click Tax Receipt. The Receipts screen appears.
Figure 67: Receipts Screen
6. Select the village name from the Village drop-down list.
7. Select the main receipt type from the Receipt Main Type drop-down list.

PanchaTantra
Ver–2.1, Rel–9.10 Dated: 10-09-2015 User Manual Page 57
8. Select the receipt type from the Receipt Type drop-down list.
9. Click the icon in the Click to Search section and select All or Individual. The Payment Mode fields will be enabled.
a. When you select Individual, the following options appear:
Figure 68: Search Options
b. Select the criteria (example: name, etc) from the Select Criteria drop-down list and enter the name in the field next to the Select Criteria drop-down list.
c. Click Go. The property numbers within the range will be listed in the Property No drop-down list.
10. Select the property number from the Property No drop-down list.
11. Enter the receipt total amount in the Receipt Total field.
12. Enter the receipt number in the Receipt No field.
13. Enter the book number in the Book No field.
14. Enter the receipt date in the Receipt Date field or select from the calendar. By default, current date appears in this field.
15. Select the payment mode in the Payment Mode section.
Figure 69: Payment Mode
If you select Payment Mode as Cheque or DD/Challan, do the following:
a. Select the bank name from the Bank Name drop-down list.
b. Enter the cheque, DD or challan number in the Cheque/DD/Challan No field.
c. Enter the cheque, DD or challan date in the Cheque/DD/Challan Date field.
d. Select the endorsement number from the Endorsement No drop-down list.
16. Enter the receipt description in the Receipt Description field.

PanchaTantra
Ver–2.1, Rel–9.10 Dated: 10-09-2015 User Manual Page 58
17. Click Save. The receipt information appears.
Figure 70: Receipt
18. Click Print to take a photocopy or Exit to navigate to the main page.
3.2. License Application
You can add, modify and accept or reject the license application.
Adding the Application
Do the following tasks to add the license details:
1. Select License Application and click Entry. The License Details screen appears. By default current date appears in the Date field and ADVERTISEMENT in the License Category field.
Figure 71: License Details
2. Edit the Date field if required or select from the calendar.
3. Enter the applicant name and address in the Applicant Name and Applicant Address fields respectively.
4. Enter the phone number of the applicant in the Phone no field.

PanchaTantra
Ver–2.1, Rel–9.10 Dated: 10-09-2015 User Manual Page 59
5. Select the type of the license from the License Category drop-down list.
6. Enter the name of the document enclosed in the Doc Enclosed field.
7. Click Add. The license receipt appears.
Figure 72: License Receipt
8. Click Print to take a photocopy or Exit to navigate to the main page.
Modifying the Application
Do the following tasks to modify the existing license receipts:
1. Select License Application and click Modify. The Module Name screen appears.
Figure 73: Select the License

PanchaTantra
Ver–2.1, Rel–9.10 Dated: 10-09-2015 User Manual Page 60
2. Click Select across the required name. The application of the selected applicant appears.
Figure 74 Modify License Details
3. Edit the fields as required.
4. Click Mod. The details are saved as modified. You can delete the application by clicking the Del button.
Accepting or Rejecting the Application
For Complaint, Suggestion, Beneficiary Application and Remission Application options, once you click Accept, the
respective applications will be accepted and navigates to the main page.
Do the following tasks to accept or reject the application:
1. Select License Application and click Action. The Pending for Action screen appears.
Figure 75: Accept or Reject the Application
2. Click Accept across the applicant’s name to accept the application. The Licenses issued Register (Format 16) screen appears.
Figure 76: Licenses Issued Register
Note: You need to enter the reason for rejection in the Rejection Reason field and then click Reject to reject the application.
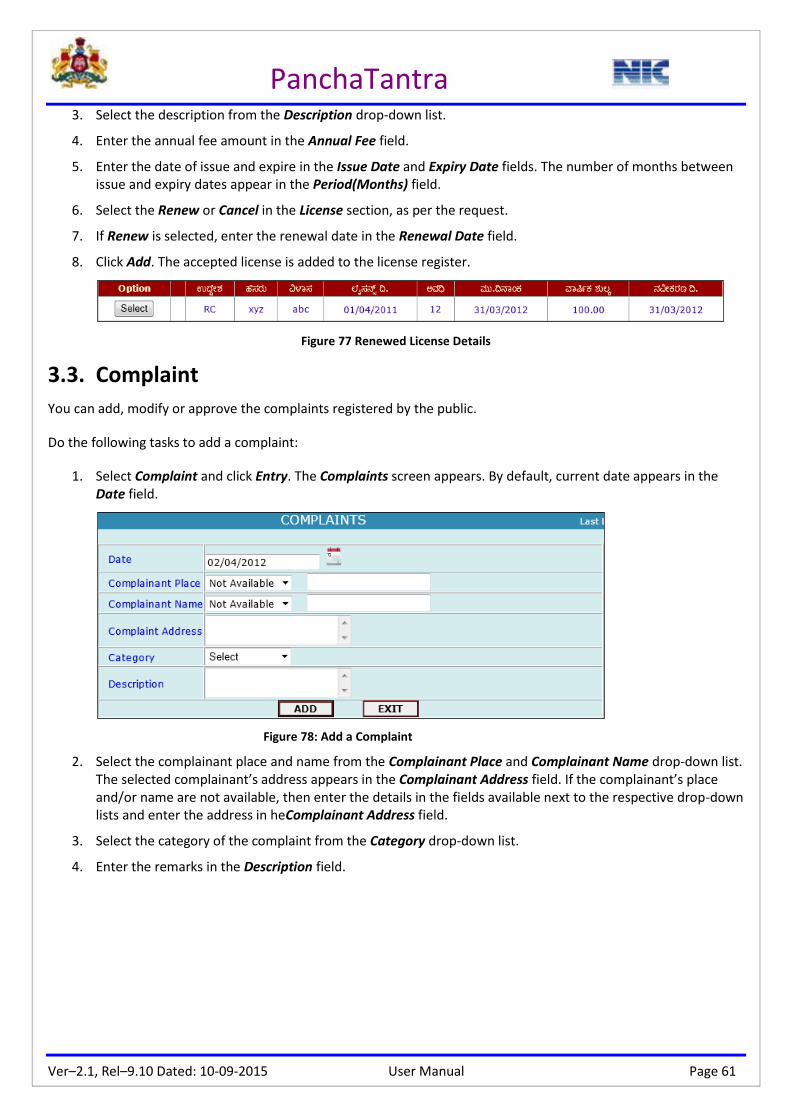
PanchaTantra
Ver–2.1, Rel–9.10 Dated: 10-09-2015 User Manual Page 61
3. Select the description from the Description drop-down list.
4. Enter the annual fee amount in the Annual Fee field.
5. Enter the date of issue and expire in the Issue Date and Expiry Date fields. The number of months between issue and expiry dates appear in the Period(Months) field.
6. Select the Renew or Cancel in the License section, as per the request.
7. If Renew is selected, enter the renewal date in the Renewal Date field.
8. Click Add. The accepted license is added to the license register.
Figure 77 Renewed License Details
3.3. Complaint
You can add, modify or approve the complaints registered by the public.
Do the following tasks to add a complaint:
1. Select Complaint and click Entry. The Complaints screen appears. By default, current date appears in the Date field.
Figure 78: Add a Complaint
2. Select the complainant place and name from the Complainant Place and Complainant Name drop-down list. The selected complainant’s address appears in the Complainant Address field. If the complainant’s place and/or name are not available, then enter the details in the fields available next to the respective drop-down lists and enter the address in heComplainant Address field.
3. Select the category of the complaint from the Category drop-down list.
4. Enter the remarks in the Description field.

PanchaTantra
Ver–2.1, Rel–9.10 Dated: 10-09-2015 User Manual Page 62
5. Click ADD. The complaint receipt appears.
Figure 79: Complaint Receipt
6. Click Print to take a photocopy or Exit to navigate to the main page.
Refer to Modifying the Application and Accepting or Rejecting the Application sections for more information on how
to modify and accept/reject the complaints.
3.4. Suggestion
You can add, modify and approve the suggestions registered by the public.
1. Select Suggestion and click Entry. The SUGGESTIONS screen appears. By default, current date appears in the Date field.
Figure 80: Add Suggestion
2. Select the complainant place and name from the Suggestor Place and Suggestor Name drop-down list. The selected complainant’s address appears in the Suggestor Address field. If the complainant’s place and/or name are not available, then enter the details in the fields available next to the respective drop-down lists and enter the address in the Suggestor Address field.
3. Select the category of the complaint from the Category drop-down list.
4. Enter the remarks in the Description field.

PanchaTantra
Ver–2.1, Rel–9.10 Dated: 10-09-2015 User Manual Page 63
5. Click ADD. The suggestion receipt appears.
Figure 81: Suggestion Receipt
6. Click Print to take a photocopy or Exit to navigate to the main page.
Refer to Modifying the Application and Accepting or Rejecting the Application sections for more information on how
to modify and accept/reject the suggestions.
3.5. Beneficiary Application
You can add, modify or approve the beneficiary applications.

PanchaTantra
Ver–2.1, Rel–9.10 Dated: 10-09-2015 User Manual Page 64
Do the following tasks to add the beneficiary details:
1. Select Beneficiary Application and click Entry. The Beneficiary Request screen appears.
Figure 82: Beneficiary Request
2. Select the village name from the Village drop-down list.
3. Select the property ID from the Property ID drop-down list. The name and address of the applicant appears in the Name and Address fields based on the property ID. If you do not know the property ID of the applicant, select Not Available from the Property ID drop-down list, then enter the name and address of the applicant in the Name and Address fields respectively.
4. Select the occupation of the applicant from the Profession drop-down list.
5. Enter the income amount in the Income field.
6. Select the beneficiary scheme from the Requested Scheme drop-down list.
7. Select any of the checkboxes in the DOC Attached section based on the attached documents.
8. Enter the remarks in the Remarks field.

PanchaTantra
Ver–2.1, Rel–9.10 Dated: 10-09-2015 User Manual Page 65
9. Click ADD. The beneficiary receipt appears.
Figure 83: Beneficiary Receipt
10. Click Print to take a photocopy or Exit to navigate to the main page.
Refer to Modifying the Application and Accepting or Rejecting the Application sections for more information on how
to modify and accept/reject the beneficiary applications.
3.6. Remission Application
You can add, modify, or approve the remission application.

PanchaTantra
Ver–2.1, Rel–9.10 Dated: 10-09-2015 User Manual Page 66
Do the following tasks to add the remission application details:
1. Select Remission Application and click Entry. The Remission Application screen appears.
Figure 84: Remission Request
Note: By default, current date appears in the Date field.
2. Select the village name from the Village drop-down list.
3. Select the year from the Remission For The Year drop-down list.
4. Select the remission main type from the Remission of Main Type drop-down list.
5. Select the remission type from the Remission of Type drop-down list.
6. Select the property owner from the Property Owner drop-down list.
7. Enter the number of months the property was vacant in the Period of Vacant field.
8. Enter the remarks in the Description field.
9. Click Save. A message ‘Data Saved’ appears.
10. Click OK.
Refer to Modifying the Application and Accepting or Rejecting the Application sections for more information on how
to modify and accept/reject the remission applications.
3.7. New Ration Card Application
You can apply for a new ration card or modify the existing ration cards and capture the photo and biometric
information.

PanchaTantra
Ver–2.1, Rel–9.10 Dated: 10-09-2015 User Manual Page 67
3.7.1 Applying for a New Ration Card Online
Do the following tasks to apply for a new ration card online:
1. Select New Ration Card Application and click Add New. The Online Application for Ration Card screen appears.
Figure 85: Online Application for New Ration Card
Note: By default the Place of Residence is selected as Rural and the login district, taluk and gramapanchayat names appear in the District, Taluk, and Grama Panchayat fields.
2. Select the village name from the Village drop-down list.
3. Select All Properties or Selected Properties in the Range. If the Selected Properties in the Rangeoption is selected, you need to select the type and range of the properties and click GO, to list the residence numbers within the range.
Figure 86: Select Type and Range
4. Select the residence number from the Residence No drop-down list. If the applicant has the ration card already, the ration card details attached to the selected property appears (see Figure 86).
Figure 87: Existing RC Details
5. Select the type of the ration card in the Card Type Applying For section.
6. If the applicant has the electricity connection, select Yes in the Do you have Electricity Connection?section else click No.
If the applicant has the electricity connection, do the following tasks:
a. Select the circle code from the drop-down list in the District / Taluk /ESCOM Circle Code section.
b. Enter the RR number in the R R No field.
c. Click Go.

PanchaTantra
Ver–2.1, Rel–9.10 Dated: 10-09-2015 User Manual Page 68
If the applicant does not have the electricity connection, do the following tasks:
a. Select any of the options in the If No RR, and then select any one section. If Group House/Quarters selected, then enter the company name or quarters number in the Company or Quarters No fields respectively.
b. By default, the property or survey number appears in the Property/Survey No field. Cross verify the same.
7. If you share the electricity bill with another family, then enter the average monthly share in the If you share electricity bill with another family, then your average monthly share in rupees field.
8. Enter the address in the Address field.
9. If you are applying tax for the property, select Yes in the Have Property Tax?section else select No. If you select No, then select the reason for not applying tax from the Reasons drop-down list.
10. Click Next Page. The following screen appears.
Figure 88: Online Application for New Ration Card (Contd...)
11. Enter the name of the applicant in the Name of the Applicant field.
12. Enter the residence and office address along with the pin code number in the Residence Address, Office Address and PIN fields.
13. Enter the landmark of the address in the Landmark field.
14. Enter the number of years since the applicant is residing in the address mentioned, in the Since how many years you are residing in the address?field.
15. Enter either the date of birth or the year of birth in the Date of Birth or Year of Birth field.
16. Select the gender of the applicant in the Gender section.
17. Enter the aadhar number in the Aadhar No field.
18. Select the occupation of the applicant from the Employment drop-down list.

PanchaTantra
Ver–2.1, Rel–9.10 Dated: 10-09-2015 User Manual Page 69
19. Select the residence type and marital status in the Residence Type and Marital Status sections respectively.
20. If married, select Yes in the Do you stay with your Family?section if the applicant is staying with family else select No.
21. Enter the residence address of the parents or family in the Address of Parents/Family field.
22. Enter the landline and mobile numbers and the email address of the applicant in the LandLine Phone No and Mobile Noand E-mailfields respectively. These fields are not mandatory.
23. Click Next Page. The next page appears to add the family members’ details.
Figure 89: Online Application for New Ration Card (Contd...)
24. Enter the name of the family member in the Name field.
25. Enter either the date of birth or the year of birth in the Date of Birth or Year of Birth field.
26. Select the gender in the Gender section.
27. Select the relationship and occupation of this family member from the Relation and Employment drop-down lists respectively.
28. Enter the aadhar number in the Aadhar No field.
29. Click Add and repeat steps from 24 to 28 to add another family member details, else click Next Page. The next page appears.
Figure 90: Online Application for New Ration Card (Contd...)
30. Enter the total annual income of the family in the Total Annual Income of the Family (from all sources)field.
31. Enter the PAN card number in the Income Tax Pan Card No field.
Added applicant’s details

PanchaTantra
Ver–2.1, Rel–9.10 Dated: 10-09-2015 User Manual Page 70
32. If the applicant has the LPG connection, select Yes in the LPG connection is available?section else select No. If the applicant does not have the LPG connection, select whether LPG connection is required or not and select Yes or No in the Do you need LPG Connection?section.
33. Select the reason for applying the ration card in the Reasons to Apply for Ration Card section.
34. Enter the remarks in the Remarks field.
35. Before submitting the application, cross check whether the entered details are correct by clicking the Previous Page button.
36. Click Submit. The following receipt appears.
Figure 91: RC Application
3.7.2 Requesting for Duplicate RC
Do the following tasks to generate the duplicate ration card:
1. Select New Ration Card Application and click Acknowledgement. The Get Duplicate Acknowledgement screen appears.
Figure 92: Duplicate Acknowledgement Number
2. Enter the acknowledgement number and date in the Ack No and Ack Date fields respectively.
3. Click Go. The duplicate copy of the RC appears (refer to Figure 84).
4. Click Print to take a photocopy or Exit to navigate to the main page.

PanchaTantra
Ver–2.1, Rel–9.10 Dated: 10-09-2015 User Manual Page 71
3.7.3 Capturing Photo and Biometric Details
1. Select New Ration Card Application and click Capture Photo / Bio Details. The Photo / Bio Capture screen appears.
Figure 93: Capture Photo and Biometric Details
2. Refer to Biometric and Photo Capture Process (Rural)_V 1.0 document for further information on how to capture the photo and biometric information.
3.8. Guarantee of Services to Citizens
3.8.1 Applying Service Request
Do the following tasks to raise a service request on behalf of the public:
1. Select Guarantee of Services to Citizens and click New Application. The Service Request screen appears.
Figure 94: Service Request Application

PanchaTantra
Ver–2.1, Rel–9.10 Dated: 10-09-2015 User Manual Page 72
2. Select the service type from the Service Requested drop-down list. Based on the selection, options in the Documents Submitted section appear.
Figure 95: Documents List
3. Enter the name and address of the applicant in the Name of the Applicant and Address of the Applicant fields respectively.
4. Enter the mobile number in the Mobile No field.
5. Select the respective check boxes based on the documents submitted by the applicant in the Documents Submitted section.
6. Select Yes, if the application or the documents are scrutinized and acceptable in the Application / Documents Scrutinized and Acceptable?section, else select No.
7. Click Submit. The acknowledgement receipt appears.
Figure 96: GSC Number

PanchaTantra
Ver–2.1, Rel–9.10 Dated: 10-09-2015 User Manual Page 73
8. Note down the GSC number to check the application status in future.
9. Click Exit. The screen navigates to the main page.
3.8.2 Updating Service Request
Do the following tasks to update the service request:
1. Select Guarantee of Services to Citizens and click Update Application Status. The Service Request Updation screen appears.
Figure 97: Service Request Update
2. Click Select across the service request application. The following screen appears. The Name of Applicant and Service Requested fields populate based on the selected application.
Figure 98: Update Application
3. Enter the sub service in the Sub Service field.
4. Select the status type in the Type of Status section.
If Final, click Accept or Reject. You need to enter the reason for rejection in the If Rejected, Reasons field if you want to reject the application.
If Interim, enter the reason of pause in the process in the If Interim, Details field.
5. Click Submit. The details are updated and navigates to the main page.
3.8.3 Viewing the Duplicate Service Request Application
Do the following tasks to view the duplicate service request application:
1. Select Guarantee of Services to Citizens and click View Duplicate Application. The View Acknowledgement screen appears.
2. Enter the GSC number in the GSC No field.
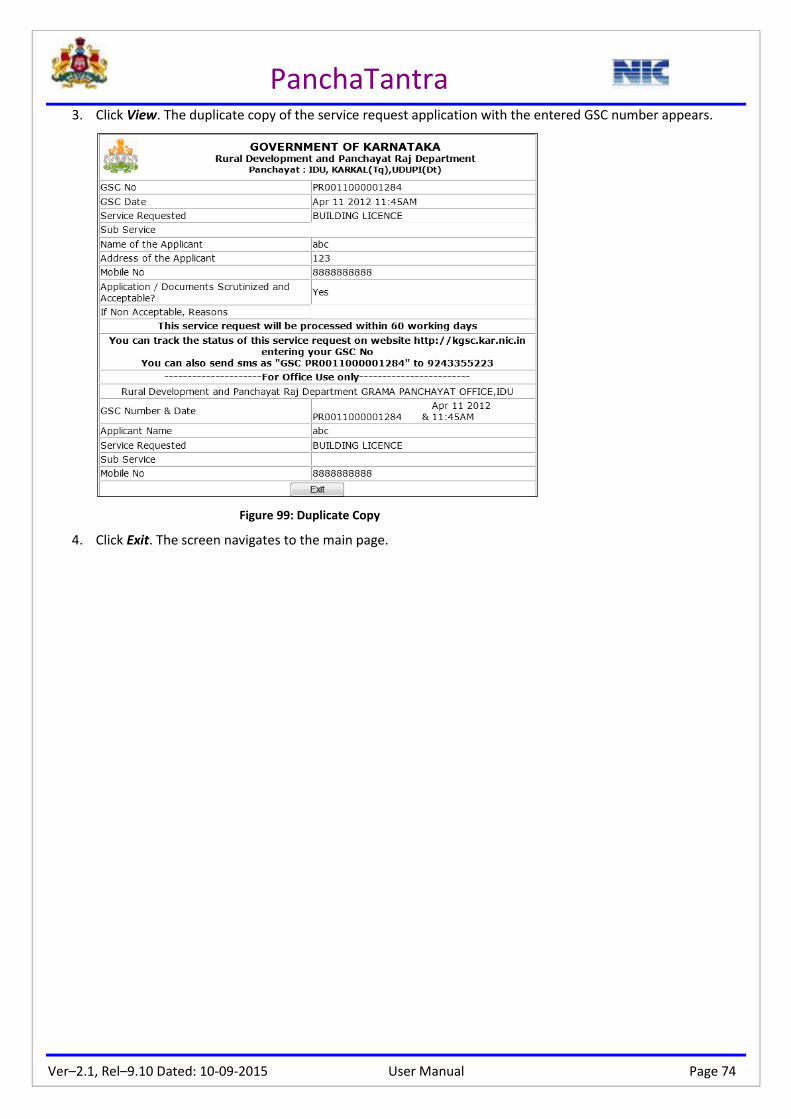
PanchaTantra
Ver–2.1, Rel–9.10 Dated: 10-09-2015 User Manual Page 74
3. Click View. The duplicate copy of the service request application with the entered GSC number appears.
Figure 99: Duplicate Copy
4. Click Exit. The screen navigates to the main page.

PanchaTantra
Ver–2.1, Rel–9.10 Dated: 10-09-2015 User Manual Page 75
4. Receipts
You can access the various functionalities under Receipts option (seeFigure 93).
Point to Receipts. The list of sub-options appears.
Figure 100: Receipts Options
4.1. Property or Water Receipts
You can generate the property or water demand receipts for individual owners, only if the demand exists.
Do the following tasks to generate the property or water receipt:
5. Click Property/Water Receipts. The Property Receipt screen appears.
Figure 101: Property Receipt
6. Select the village name from the Village drop-down list.
7. Select All Properties or Selected Properties in the Range. If the Selected Properties in the Range is selected, you need to select Property Number Wise, Survey Number Wise, or House Number Wise and enter the range in the From and To fields. Based on the range the list of property numbers appears.
8. Enter the receipt and book numbers in the Receipt No. and Book No. fields respectively.
9. Edit the Receipt Date field, if required. By default, the current date is populated.

PanchaTantra
Ver–2.1, Rel–9.10 Dated: 10-09-2015 User Manual Page 76
10. Select the property number from the Property No. drop-down list. The tax details of the selected property appear.
11. Enter the amount paid in the Payment Amount field.
12. Select the mode of payment in the Cash/Cheque/DD section. For Cheque/DD, select the endorsement number from the Endorsement No. drop-down list.
13. Click Save. The receipt information appears (refer to Figure 63).
14. Click Print to take a photocopy or Exit to navigate to the main page.
4.2. Special Water Receipt
In the previous version, the special water demand details, by default, were entered annually using the
Demands>Property Tax>Others option. However, in the current version, the Ward and Water Accountoptions are
added in which you need to enter the annual water account details of the ward and the receipt will be as usual. For
monthly water account details, you can enter the demand details and issue receipts using this option.
Do the following tasks to generate the special water receipt:
15. Click Spl. Water Receipt. The Special Water Demand And Receipt screen appears.
Figure 102: Special Water Demand and Receipt
16. Select the village from the Village Name drop-down list.
17. Select the month from the Month drop-down list.
18. Select All Properties or Properties With Tap connection. By default, All Properties is selected. If you select Properties With Tap connection, the list of properties having tap connection appears.
Figure 103: List of Properties
Saved demand details
These options appear only when the details are saved

PanchaTantra
Ver–2.1, Rel–9.10 Dated: 10-09-2015 User Manual Page 77
19. Enter the opening balance and current demand amounts in the Opening Balance and Current Demand fields of the desired property. The Total Demand field populates the sum of Opening Balance and Current Demand amount.
20. Click Save. The details will be saved and the fields become read-only. You can modify the entered details by clicking the Modify button. Also, if you want to delete the properties from the list, select the required checkboxes available under Select section and click Delete Selected. You can delete all the properties listed by clicking the Delete All button.
21. Click Receipt. The list of properties with the demand details appear.
Figure 104: List of Properties with Special Water Demand
22. Enter the receipt details in the Receipt Amount, Receipt No., Book No., Receipt date, and Receipt Mode fields. If the Cheque or DD/Chln is selected as Receipt Mode, you need to select the endorsement number from the Endorsement No drop-down list.
23. Click Save. The entered details will be saved. If the owner has paid more than the Demand amount, once after saving the details the extra amount appears in the Advance available field. You can navigate to the screen shown in Figure 38 without changing the receipt details by clicking the Back button.
24. Click Exit to navigate to the main page.
4.3. Other General Receipt
Refer to Tax Receipts section for more information on how to enter the receipt details.
4.4. GP Grant Receipt
You can enter the grant received details.
Do the following tasks to generate the GP grant receipt:
25. Click GP Grant. The Gram Panchayat Grants screen appears.
Figure 105: GP Grants

PanchaTantra
Ver–2.1, Rel–9.10 Dated: 10-09-2015 User Manual Page 78
26. Select the scheme name from the Scheme Name drop-down list. The grant details under the selected scheme appear, if any. The system populates the Grant Installment field based on the last installment number.
Figure 106: GP Grant Details of the Selected Scheme
27. Enter the release date of the grant in the Grant Release Date field or select the date from the calendar.
28. Enter the release amount in the Grants Amount field.
29. Enter the description of the grant in the Grant Description field.
30. If the total grant is added to the GP members, select Yes in the Whether Total Grant is added to GP members?section else click No. The highlighted portion of the Figure 100 appears if Yes is selected.
Figure 107: Total Grant Added to GP Members
31. Click Save. The grant details will be saved in the database.

PanchaTantra
Ver–2.1, Rel–9.10 Dated: 10-09-2015 User Manual Page 79
4.5. Scheme Grant Receipts
You can enter the grant received details for the existing scheme.
Do the following tasks to enter the grant details for the existing scheme:
32. Click Scheme Grant. The Scheme Grants screen appears.
Figure 108: Scheme Grants
33. Select the scheme name from the Scheme Name drop-down list. The system populates the Grant Installment field based on the last installment number.
Figure 109: Scheme Grant Details
34. Enter the release date of the grant in the Grant Release Date field or select the date from the calendar.
35. Enter the release amount in the Grants Amount field.
36. Enter the description of the grant in the Grant Description field.
37. Select Central, State or Both. By default, Central is selected.
38. Click Save. The grant details will be saved in the database.
4.6. Other Receipts
You can generate other receipts such as ‘Sale and Hire Charges’, ‘Profit on Sale or disposal of Assets’, and
‘Miscellaneous Income’.

PanchaTantra
Ver–2.1, Rel–9.10 Dated: 10-09-2015 User Manual Page 80
Do the following tasks to generate the miscellaneous receipts:
39. Click Other Receipts. The Miscellaneous Receipt Description screen appears.
Figure 110: Miscellaneous Receipts
40. Select the receipt type from the Receipt Type drop-down list.
41. Select the sub receipt type from the Sub Receipt Type drop-down list. If the Profit of sale or disposal of assets is selected, then you need to select the asset type and asset.
42. Select the mode of receipt as cash or bank account. If the Bank A/C is selected, you need to select the bank account from the Bank Accounts drop-down list.
43. Enter the receipt number in the Receipt No field.
44. Enter the date of the receipt issued in the Receipt Date field or select the date from the calendar.
45. Enter the description in the Receipt Details field.
46. Enter the receipt amount in the Receipt Amount field.
47. Enter the boo number in the Book No field.
48. Click Add. The receipt appears as in Figure 63.
49. Click Print to take a photocopy or Exit to navigate to the main page.
4.7. Deposit Receipts
You can generate receipts based on the various types of deposits such as security deposit, earnest money deposit
and so on.
Saved receipt

PanchaTantra
Ver–2.1, Rel–9.10 Dated: 10-09-2015 User Manual Page 81
Do the following tasks to generate the deposit receipts:
50. Click Deposit Receipts. The MiscellaneousDescription screen appears.
Figure 111: Deposit Receipts
51. Select the receipt mode as Cash or Chq/DD in the Receipt Mode section.
52. Enter the depositor name in the Depositor Name field.
53. Enter the description in the Deposit Description field.
54. Enter the amount deposited in the Deposit Amount field.
55. Enter the deposited date in the Deposit Date field or select from the calendar.
56. Enter the receipt and book numbers in the Receipt No and Book No fields respectively.
57. Click Add. The receipt appears as in Figure 63.
58. Click Print to take a photocopy or Exit to navigate to the main page.
4.8. Advance Receipts
You can generate the receipt for advance payment.

PanchaTantra
Ver–2.1, Rel–9.10 Dated: 10-09-2015 User Manual Page 82
Do the following tasks to generate the advance receipts:
59. Click Advance Receipts. The Advance Receipt Details screen appears.
Figure 112: Advance Receipt Details
60. Select the village from the Village drop-down list.
Note: By default, current date populates the Date field. You can edit the Date field if needed.
61. Select the debit account from the Debit Head drop-down list.
If you have selected the bank account as debit head, do the following tasks:
e. Select the bank from the Bank Name drop-down list.
f. Select the branch name from the Branch Name field.
g. Enter the cheque, DD or challan number in the Chq/DD/Challan No field.
h. Enter the cheque, DD or challan date in the Chq/DD/Challan Date field.
62. Select the credit account and sub account from the Credit Head and Sub Credit Head drop-down lists respectively.
63. Select the property number from the Property No drop-down list. The ownership details of the selected property appear.
Figure 113: Property Details
64. Select the receipt mode in the Receipt Mode section. If the Cheque or DD/Challan is selected, then you need to select the endorsement number from the Endorsement No drop-down list.
65. Enter the receipt and book numbers in the Receipt No and Book No fields respectively.

PanchaTantra
Ver–2.1, Rel–9.10 Dated: 10-09-2015 User Manual Page 83
66. Enter the receipt date in the Voucher Date field or select from the calendar.
67. Enter the receipt amount in the Amount field.
68. Enter the description in the Description field.
69. Click Save. The receipt appears as in Figure 63.
70. Click Print to take a photocopy or Exit to navigate to the main page.
4.9. Public Contribution or Donations
You can generate the public contribution or donation receipts.
Do the following tasks to generate the public contribution or donation receipts:
71. Click Public Contr/ Donations. The Public Contribution Details screen appears.
Figure 114: Public Contribution Details
72. Enter the name of the contributor in Contributor’s Name field.
73. Select the category of the contribution in the Contribution Category section.
74. Enter the amount contributed in the Amount (In Rs) field.
75. Enter the contribution details in the Contribution Details field.
76. Enter the receipt and book numbers in the Receipt No and Book No fields respectively.
77. Enter the contributed date in the Contribution Date field or select from the calendar.
78. Click Add. The receipt appears as in Figure 63.
79. Click Print to take a photocopy or Exit to navigate to the main page.
4.10. Endorsement Receipts
You can generate the endorsement receipts. The generated endorsement receipt will be in the Form 3a format.
Saved receipt

PanchaTantra
Ver–2.1, Rel–9.10 Dated: 10-09-2015 User Manual Page 84
Do the following tasks to generate the endorsement receipt:
80. Click Endorsement (Chq/DD/Chl). The Chq/DD/Challan Endorsement screen appears.
Figure 115: Endorsement Details
81. Edit the endorsement date in the Endorsement Date field, if required. By default the current date appears in this field.
82. Select the main receipt type from the Receipt Main Type drop-down list.
83. Select the receipt type from the Receipt Type drop-down list.
84. Enter the description in the Description field.
85. Enter the name of the payee in the Payee Name field.
86. Enter the book number in the Book No field.
87. Select the payment mode in the Payment Mode section.
88. Select Yes if the cheque or DD/challan amount is encashed in the Chq/DD/Challan Encashed?section. By default, No is selected and you can encash it later by selecting Encashment from Receipts.
89. Enter the cheque or DD/challan number and amount in the Chq/DD/Challan No and Chq/DD/Challan Amount fields respectively.
90. Select the bank name and the branch name of the bank from the Bank Name and Branch Name fields respectively.

PanchaTantra
Ver–2.1, Rel–9.10 Dated: 10-09-2015 User Manual Page 85
91. Click Save. The receipt appears.
Figure 116: Endorsement (Form 3a) Receipt
92. Click Print to take a photocopy or Exit to navigate to the main page.
4.11. Encashment Receipts
You can encash the cheque/DD/challan amount and generate the receipt for those cheques, challan or DD which has
not been encashed.
Do the following tasks to generate the encashment receipts:
93. Click Encashment (Chq/DD/Chl). The Chq/DD Encashment Details screen appears.
Figure 117: Encashment Details
94. Select the endorsement number of the cheque, challan or DD from the Endorsement No drop-down list. Only endorsement numbers of those cheque, challan, or DD which have not been encashed, in the Endorsement No drop-down appear.
Figure 118: Encashment
95. Select Yes in the Encashed?section.
96. Click Save. The amount will be encashed.
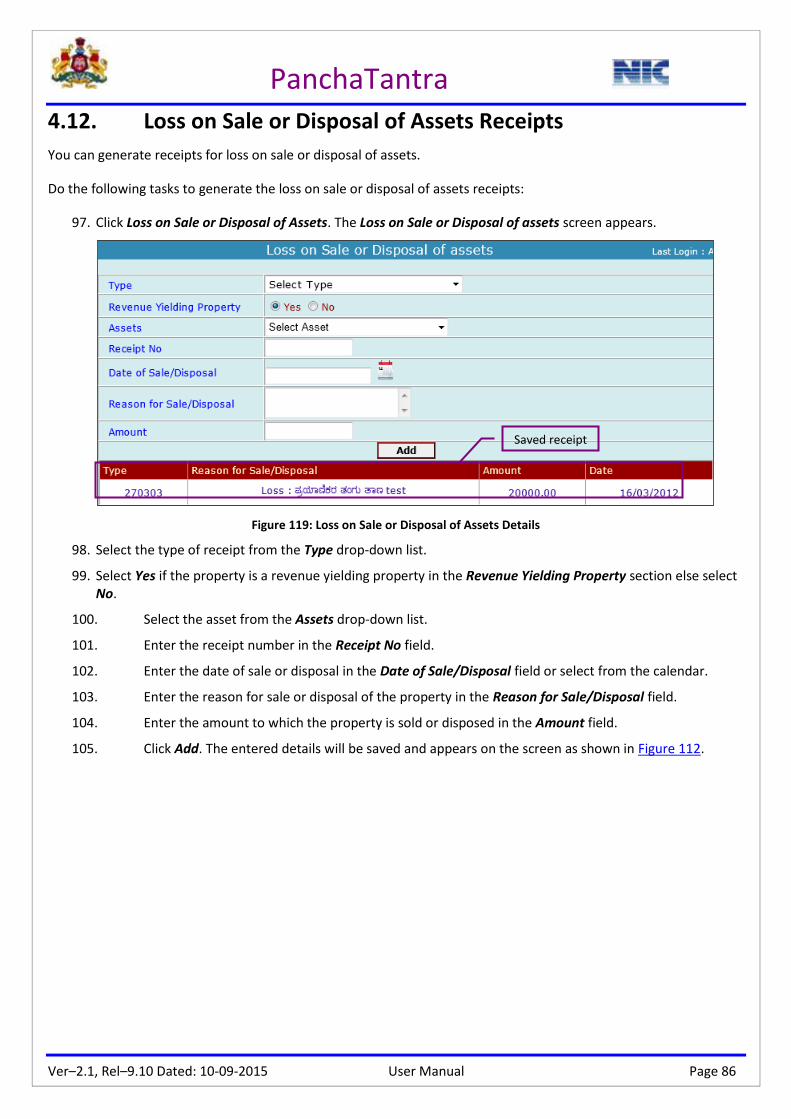
PanchaTantra
Ver–2.1, Rel–9.10 Dated: 10-09-2015 User Manual Page 86
4.12. Loss on Sale or Disposal of Assets Receipts
You can generate receipts for loss on sale or disposal of assets.
Do the following tasks to generate the loss on sale or disposal of assets receipts:
97. Click Loss on Sale or Disposal of Assets. The Loss on Sale or Disposal of assets screen appears.
Figure 119: Loss on Sale or Disposal of Assets Details
98. Select the type of receipt from the Type drop-down list.
99. Select Yes if the property is a revenue yielding property in the Revenue Yielding Property section else select No.
100. Select the asset from the Assets drop-down list.
101. Enter the receipt number in the Receipt No field.
102. Enter the date of sale or disposal in the Date of Sale/Disposal field or select from the calendar.
103. Enter the reason for sale or disposal of the property in the Reason for Sale/Disposal field.
104. Enter the amount to which the property is sold or disposed in the Amount field.
105. Click Add. The entered details will be saved and appears on the screen as shown in Figure 112.
Saved receipt

PanchaTantra
Ver–2.1, Rel–9.10 Dated: 10-09-2015 User Manual Page 87
5. Payments
You can access the various functionalities under Payments option (seeFigure 113).
Point to Payments. The list of sub-options appears.
Figure 120: Payments Options
5.1. Direct Payment
You can make a direct payment for the following:
Expense through scheme
Expense through own or GP fund
Expense through water account
GP members payment-bank account
Bio-diversity committee (Forest Department)-bank account
Do the following tasks to enter the direct payment details:
106. Click Direct Payment. The Payments (Revenue) screen appears.
Figure 121: Direct Payment Details
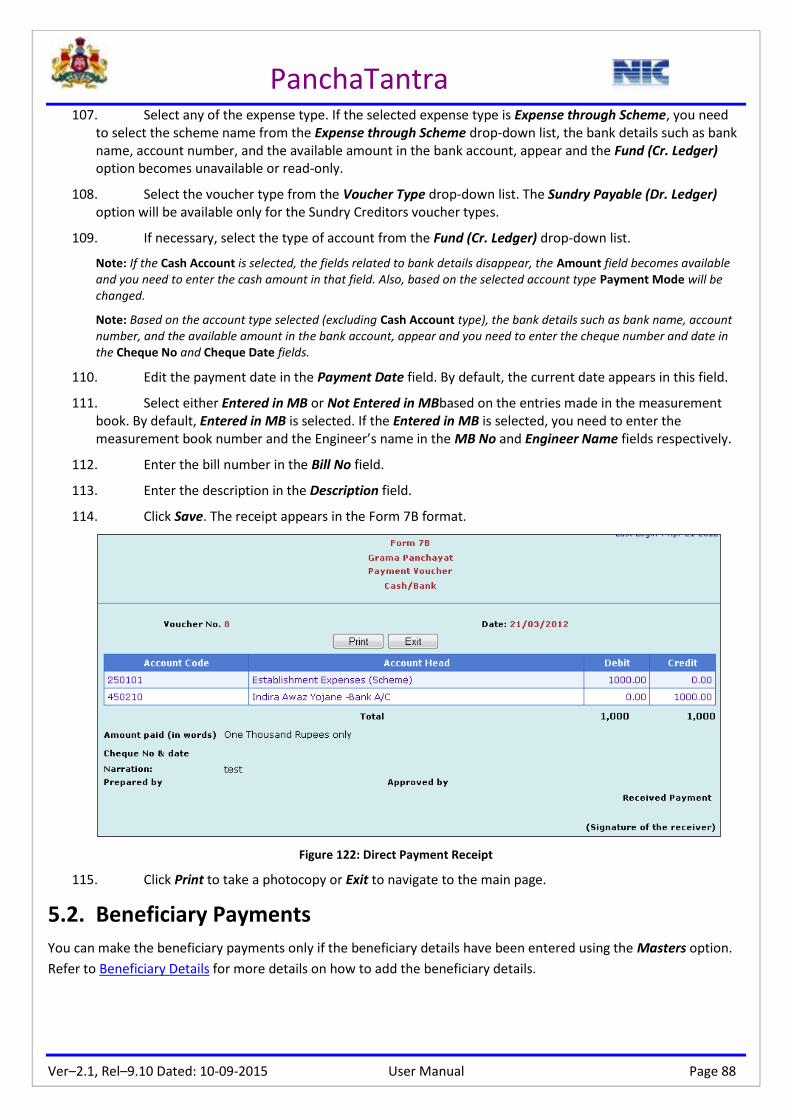
PanchaTantra
Ver–2.1, Rel–9.10 Dated: 10-09-2015 User Manual Page 88
107. Select any of the expense type. If the selected expense type is Expense through Scheme, you need to select the scheme name from the Expense through Scheme drop-down list, the bank details such as bank name, account number, and the available amount in the bank account, appear and the Fund (Cr. Ledger) option becomes unavailable or read-only.
108. Select the voucher type from the Voucher Type drop-down list. The Sundry Payable (Dr. Ledger) option will be available only for the Sundry Creditors voucher types.
109. If necessary, select the type of account from the Fund (Cr. Ledger) drop-down list.
Note: If the Cash Account is selected, the fields related to bank details disappear, the Amount field becomes available and you need to enter the cash amount in that field. Also, based on the selected account type Payment Mode will be changed.
Note: Based on the account type selected (excluding Cash Account type), the bank details such as bank name, account number, and the available amount in the bank account, appear and you need to enter the cheque number and date in the Cheque No and Cheque Date fields.
110. Edit the payment date in the Payment Date field. By default, the current date appears in this field.
111. Select either Entered in MB or Not Entered in MBbased on the entries made in the measurement book. By default, Entered in MB is selected. If the Entered in MB is selected, you need to enter the measurement book number and the Engineer’s name in the MB No and Engineer Name fields respectively.
112. Enter the bill number in the Bill No field.
113. Enter the description in the Description field.
114. Click Save. The receipt appears in the Form 7B format.
Figure 122: Direct Payment Receipt
115. Click Print to take a photocopy or Exit to navigate to the main page.
5.2. Beneficiary Payments
You can make the beneficiary payments only if the beneficiary details have been entered using the Masters option.
Refer to Beneficiary Details for more details on how to add the beneficiary details.

PanchaTantra
Ver–2.1, Rel–9.10 Dated: 10-09-2015 User Manual Page 89
Do the following tasks to make the beneficiary payment:
116. Click Benf. Payment. The Beneficiary Payments (Revenue) screen appears.
Figure 123: Beneficiary Payment
117. Select the type of payment in the Payment Type section.
If Payment Under Scheme is selected, do the following tasks:
Select the scheme name from the Scheme Name drop-down list. The Money Left With, Bank Name and Account No fields populate automatically based on the scheme details.
If Payment Under Grants/Own Funds is selected, the Money Left With, Bank Name and Account No fields populate automatically, then do the following tasks:
a. SelectExpenses Under Earmarked Fund for SC/STs or Others. The Debit Account field appears.
b. Select the debit account from the Debit Account drop-down list.
118. Select the village name from the Villageಹೆಸರುdrop-down list.
119. Select the beneficiary name from the Beneficiary Name drop-down list. If the selected beneficiary is already done transaction with the selected scheme, the transaction details appear in the
ಈಯೋಜನೆಯಲ್ಲಿಈಗಾಗಲೆೋಪಾವತಿಸಿದಹಣ section.
120. Enter the bill number in the Bill No field.
121. Enter the dates of the bill and payment in the Bill Date and Payment Date fields respectively, or select the date from the calendar.
122. Enter the bill amount paid to the selected beneficiary in the Bill Amount field. The same amount populates in the Net Payment field.
123. Enter the description in the Description field.
124. Enter the cheque number and date in the Cheque No and Cheque Date fields.
125. Click Save. A message ‘ಲೆಡ್ಜಗೆ್ರವಾನಿಸಲಾಗಿದೆ’ appears.
5.3. Bills
You can generate journal voucher for work and purchase, only after the fund source details have been assigned for
the work.

PanchaTantra
Ver–2.1, Rel–9.10 Dated: 10-09-2015 User Manual Page 90
Work Bill
Do the following tasks to generate the journal voucher for the work:
126. Click Bill. The Bills screen appears.
Figure 124: Bills
127. Select Work Bill. The Bill Details screen appears.
Figure 125: Bill Details
128. Select the work name from the Work Name drop-down list. The work details appear. The Work Description field populates the brief description of the work. Based on the selected work, Scheme Name, Amount left with the scheme, Debit Head, and Credit Head details appear (see Figure 125).

PanchaTantra
Ver–2.1, Rel–9.10 Dated: 10-09-2015 User Manual Page 91
Figure 126: Work Bill Details
129. Enter the journal voucher date in the JV Date field or select from the calendar.
130. Enter the bill number and date in the Bill No and Bill Date fields.
131. Enter the bill description in the Bill Description field.
132. Enter the gross amount in the Gross field.
133. If the bill is the final bill for the selected work, select Yes from the Is this Bill is the final Bill for this Work?drop-down list, else select No.
134. Enter the bill deduction amount with reference to TDS, Work Contract Tax, CBF Recovery, VAT, Royalty, and Others fields, as required. Based on the gross amount and the deduction amount entered, the Net field populates the net amount (Gross Amount - Sum of Deduction Amount) of the bill.
135. Click Choose File and, search and select the bill to upload the bill, if necessary.
136. Click Save. The Form 51 journal voucher receipt appears (refer to Figure 126). You can delete the bills for which payment is not made but the bill details can be made.
Purchase Bill
Do the following tasks to generate the journal voucher for the purchase:
137. Click Bill. The Bills screen appears.

PanchaTantra
Ver–2.1, Rel–9.10 Dated: 10-09-2015 User Manual Page 92
138. Select Purchase Bill. The following options appear.
Figure 127: Purchase Bill
139. Select Consumable or Non-Consumable.
If Consumable is selected, The Payments (Revenue) screen appears. Refer to Direct Payment section for more details on how to make the payment.
If Non-Consumable is selected, The Bill Details screen appears. Refer to Work Bill section for more details on how to make the payment.
5.4. Bills Payment
You can make the payment for the work and purchase bills once after the journal voucher for the respective work is
generated.
Work Bill
Do the following tasks to make the payment for the work bill:
140. Click Bill – Payment. The Bills screen appears (see Figure 126).
141. Select Work Bill. The Bill-Payment Details screen appears.
Figure 128: Bill-Payment Details
142. Select the work name from the Work Name drop-down list. The Work Description, Scheme and Amount left with the scheme fields populate automatically based on the selected work.

PanchaTantra
Ver–2.1, Rel–9.10 Dated: 10-09-2015 User Manual Page 93
143. Select the voucher number from the Voucher No drop-down list.
144. Enter the bill number in the Bill No field.
145. Enter the bill date in the Bill Date field or select from the calendar.
146. Enter the description of the bill in the Bill Description field.
147. Enter the payment date in the Payment Date field or select the date from the calendar.
148. Click Save. The receipt appears in the Form 7b format (refer to Figure 128).
149. Click Print to take a photocopy or Exit to navigate to the main page.
Purchase Bill
Do the following tasks to generate the journal voucher for the purchase:
150. Click Bill – Payment. The Bills screen appears (see Figure 128).
151. Select Purchase Bill. The options as in Figure 127 appear.
152. Select Consumable or Non-Consumable.
If Consumable is selected, The Payments (Revenue) screen appears. Refer to Direct Payment section for more details on how to make the payment.
If Non-Consumable is selected, The Bill Details screen appears. Refer to Work Bill section for more details on how to make the payment.
5.5. Journal Voucher
You can make the adjustments of accounts, which are not involving cash or bank.
Do the following tasks to modify the voucher details:
153. Click Journal Voucher. The General Voucher Details screen appears. Based on the number of vouchers modified, the voucher number populates the Voucher No field.
Figure 129: Journal Voucher Details
154. Enter the modified date in the Date field.
155. Select the main ledger for the debit head from the Main Ledger drop-down list.
156. Select the debit head from the Debit Head drop-down list.

PanchaTantra
Ver–2.1, Rel–9.10 Dated: 10-09-2015 User Manual Page 94
157. Select the main ledger for the credit head from the second Main Ledger drop-down list.
158. Select the credit head from the Credit Head drop-down list.
159. Enter the voucher date and description in the Voucher Date and Description fields respectively.
160. Enter the amount in the Amount field.
161. Click Save. The journal voucher receipt appears.
Figure 130: Journal Voucher Receipt
162. Click Print to take a photocopy or Exit to navigate to the main page.
5.6. Transfer Voucher
You can make the adjustments of accounts, which involve the cash and bank/treasure.
Do the following tasks to modify the voucher details:
163. Click Transfer Voucher. The General Voucher Details screen appears. Based on the number of vouchers modified, the voucher number populates the Voucher No field.
Figure 131: Transfer Voucher Details
164. Enter the modified date in the Date field.
165. Select the debit head from the Debit Head drop-down list.
166. Select the credit head from the Credit Head drop-down list. The amount in the Credit Head should be more than that of Debit Head to transfer the amount.

PanchaTantra
Ver–2.1, Rel–9.10 Dated: 10-09-2015 User Manual Page 95
167. Enter the voucher date in the Voucher Date field.
168. Enter the description in the Description field.
169. Enter the amount in the Amount field.
170. Click Save. The transfer voucher receipt appears.
Figure 132: Transfer Voucher Receipt
171. Click Print to take a photocopy or Exit to navigate to the main page.
5.7. Cash to Bank
You can make a transaction to transfer amount from the Bank Account to GP Fund Bank Account.
Do the following tasks to transfer the amount from the Bank Account to GP Fund Bank Account:
172. Click Cash To Bank. The Amount Credited to the Bank screen appears.
Figure 133: Transfer Amount

PanchaTantra
Ver–2.1, Rel–9.10 Dated: 10-09-2015 User Manual Page 96
173. Select the mode of payment from the Amount to be credited to the bank drop-down list.
If From: Cash is selected, do the following tasks:
a. Click the icon and select the date when the amount to be credited in the Date of Amount to be Credited to Bank field. The bank account details appear.
Figure 134: Transfer Cash Details
b. Enter the amount you want to transfer in the Challan Amount field. The Challan Amount should be less than or equal to the amount left with the bank, as in Amount to be Credited field.
If From: Water is selected, do the following tasks:
a. Select the village name from the Village drop-down list.
b. Select the ward name from the Ward drop-down list. If there is no bank associated with the selected ward, you can create a bank account by selecting Yes in the There is no bank account for the selected ward. Do you want to create it now?section else you can select the existing bank account by selecting No.
c. Click the icon and select the date when the amount to be credited in the Date of Amount to be Credited to Bank field. The bank account details appear (see Figure 126).
Note: If there is no sufficient balance in the bank account, a web message appears as shown below.
d. Enter the amount you want to transfer in the Challan Amount field. The Challan Amount should be less than or equal to the amount left with the bank, as in the Amount to be Credited field.
174. Click Save. The Form 7C transfer voucher receipt appears (see Figure 126).
175. Click Print to take a photocopy or Exit to navigate to the main page.
5.8. Refund of Grants
You can enter the refund details.
Do the following tasks to enter the refund details:
176. Click Refund of Grants. The Scheme Grant Refunds screen appears.
Bank Details

PanchaTantra
Ver–2.1, Rel–9.10 Dated: 10-09-2015 User Manual Page 97
177. Select the scheme name from the Scheme Name drop-down list. The refund and bank details of the selected scheme appear.
Figure 135: Scheme Grant Details
178. Enter the date of refund in the Refund Date field or select the date from the calendar.
179. Enter the amount of refund and description in the Refund Amount and Refund Description fields respectively.
180. Enter the cheque number and date in the Cheque No and Cheque Date fields respectively.
181. Click Save. The refund details will be saved as shown in Figure 128.
Saved details

PanchaTantra
Ver–2.1, Rel–9.10 Dated: 10-09-2015 User Manual Page 98
6. Reports
You can access the various functionalities under Reports option (seeFigure 129).
Point to Reports. The list of sub-options appears.
Figure 136: Reports Options
6.1. Financial Statements
You can view the financial statements on trial balance, income and expenditure, and balance sheet.
6.1.1 Trial Balance
You can view the debit and credit balances listed in separate columns. The trial balance sheet contains a complete
list of balances in all the accounts as on day, including cash and bank balances. The sum of the debit balance must
tally with the sum of the credit balance. You need to make corrections in case of any difference in the two balance
amounts due to mistakes in the book of accounts.
Do the following tasks to view the trial balance statements:
182. Select Fin. Statements and click Trial Balance. The TRIAL BALANCE screen appears.
Figure 137: Trial Balance Statement
183. ClickExport To PDFto save the trial balance statement in PDF format or Exit to navigate to the main page.

PanchaTantra
Ver–2.1, Rel–9.10 Dated: 10-09-2015 User Manual Page 99
184. Click on the description of which you want to view the detailed statement. The detailed statement of the selected type appears.
185. Click Main Page at the left-top end of the application screen to navigate to the main page.
6.1.2 Income – Exp
You can view the income or expenditure account details carried over under various heads including the surplus or
deficit in a year. You can also verify the total income and expenditure statements of the GP along with the income
and expenditure details.
Do the following tasks to view the income or expenditure details:
186. Select Fin. Statements and click Income-Exp. The Income & Expenditure Statement screen appears.
Figure 138: Income and Expenditure Statement
187. Click Export IE to download the statement in PDF format or Exit to navigate to the main page.
6.1.3 Balance Sheet
You can verify the balance sheet details, overall amount of liabilities and assets, of the GP. The balance sheet
represents the financial position of the organization as at the end of the year.

PanchaTantra
Ver–2.1, Rel–9.10 Dated: 10-09-2015 User Manual Page 100
Do the following tasks to view the balance sheet details:
188. Select Fin. Statement and click Balance Sheet. The Balance Sheet Statement screen appears.
Figure 139: Balance Sheet Statement
189. Click Export To PDF to download the statement in PDF format or Exit to navigate to the main page.
6.2. Financial Reports
You can view the financial reports such as cash book, trial balance, receipt / payment, balance sheet, income /
expenditure, journal ledger, schedules and opening balance.
6.2.1 Cash Book
You can view the list of cash and bank transactions entered from the vouchers for the selected period.
Do the following tasks to view the cash book transactions:
190. Select Fin. Reports and click Cash Book. The Cash Book screen appears.
191. Enter the range of period in the From and To fields or select the dates from the calendar.

PanchaTantra
Ver–2.1, Rel–9.10 Dated: 10-09-2015 User Manual Page 101
192. Click GO. The receipts and payments details for the selected period appear.
Figure 140: Cash Book Report
193. Click Print to take a photocopy of the report in any formats or Export To PDF to save in the PDF format.
194. Click Exit to navigate to the main page.
6.2.2 Trial Balance
You can generate the trial balance report for a selected range of period.
Do the following tasks to generate the trial balance:
195. Select Fin. Reports and click Trial Balance. The Trial Balance screen appears.
196. Enter the range of period in the From and To fields or select the dates from the calendar.

PanchaTantra
Ver–2.1, Rel–9.10 Dated: 10-09-2015 User Manual Page 102
197. Click Generate Trial Balance. The list of trial balance details appears for the selected range of period.
Figure 141: Trial Balance Report
198. Click on the required account description to view the detailed report. The detailed report of the selected account appears.
Figure 142: Detailed Report
199. Click Back. The screen navigates to the previous screen (see Figure 141).
200. Click Exit to navigate to the main page.
6.2.3 Receipt / Payment
You can view the receipt and payment report for the selected period.
Do the following tasks to view the receipts and payments report:
201. Select Fin. Reports and click Receipt / Payment. The Receipts And Payments screen appears.
202. Select All or Scheme Wise on how you want to view the report.
203. Enter the range of period in the From and To fields or select the dates from the calendar.

PanchaTantra
Ver–2.1, Rel–9.10 Dated: 10-09-2015 User Manual Page 103
204. Click GO. The receipts and payments report of the selected period appears.
Figure 143: Receipts and Payments Report
205. ClickExport To PDFto save the trial balance statement in PDF format or Print to take a photocopy.
206. Click Exit to navigate to the main page.
6.2.4 Income / Expenditure
You can view the income and expenditure report for the selected range of period.
Do the following tasks to view the income and expenditure report:
207. Select Fin. Reports and click Income / Expenditure. The Income and Expenditure screen appears.
208. Enter the range of period in the From and To fields or select the dates from the calendar.

PanchaTantra
Ver–2.1, Rel–9.10 Dated: 10-09-2015 User Manual Page 104
209. Click GO. The income and expenditure report of the selected period appears.
Figure 144: Income and Expenditure Report
210. Click Print to take a photocopy or Export To PDF to save in the PDF format.
211. Click Exit to navigate to the main page.
6.2.5 Balance Sheet
You can view the balance sheet report.
Do the following tasks to view the balance sheet report:
212. Select Fin. Reports and click Balance Sheet. The Balance Sheet screen appears.
213. Select the date (financial year date, example 01/04/2011) or For a given period in the Balance Sheet as on section. If the For a given period option is selected, you need to select the range or period of which you want to view the balance sheet report.

PanchaTantra
Ver–2.1, Rel–9.10 Dated: 10-09-2015 User Manual Page 105
214. Click Go. The balance sheet report appears for the selected period.
Figure 145: Balance Sheet Report
215. Click Print to take a photocopy or Export to PDF to save the report as a PDF file.
216. Click Exit to navigate to the main page.

PanchaTantra
Ver–2.1, Rel–9.10 Dated: 10-09-2015 User Manual Page 106
6.2.6 Journal Ledger
You can view the totaled and balanced journal ledger account details.
Do the following tasks to view the journal ledger details:
217. Select Fin. Reports and click Journal Ledger. The Ledger Description screen appears.
218. Select the ledger group from the Select Group drop-down list.
219. Select the ledger from the Select Ledger drop-down list. The selected ledger account details appear.
Figure 146: Journal Ledger Details
220. Click Exit to navigate to the main page.
6.2.7 Schedules
You can view the balance sheet details as per the schedule from I to XII.

PanchaTantra
Ver–2.1, Rel–9.10 Dated: 10-09-2015 User Manual Page 107
Do the following tasks to view the balance sheet details schedule wise:
221. Select Fin. Reports and click Schedules. The Schedules to Balance Sheet screen appears.
Figure 147: Schedules List
222. Click on the schedule under which you want to view the balance sheet details. The balance sheet details of the selected schedule appear. For example: the balance sheet details of the schedule IV appears as shown in Figure 141.
Figure 148: Schedule IV – Balance Sheet Details
223. Click Back to navigate to the Schedules to Balance Sheet screen.
224. Click Exit to navigate to the main page.
6.2.8 Opening Balance
You can view the opening balance details of the accounts maintained at GP.

PanchaTantra
Ver–2.1, Rel–9.10 Dated: 10-09-2015 User Manual Page 108
Do the following tasks to view the opening balance details:
225. Select Fin. Reports and click Opening Balance. The OPENING BALANCE screen appears.
Figure 149: Opening Balance Details
226. Click Select across the account you want to view the transaction details. The Details about the Transaction section appears as shown in Figure149.
227. Click Exit to navigate to the main page.
6.3. Master Reports
You can view the various master reports such as GP property, passbook, daily cash book, detailed cash book, daily
collection book, forms, acknowledgement, advance receipt report, voucher, and bank wise statement.
6.3.1 GP Property
You can view the property holders’ details of the GP.
Do the following tasks to view the property holders’ details of the GP:
228. Select Master Reports and click GP Property. The highlighted portion of the Figure 149 appears.
229. Select the village name from the Select Village drop-down list.
Opening balance
details

PanchaTantra
Ver–2.1, Rel–9.10 Dated: 10-09-2015 User Manual Page 109
230. Click Property List. The list of property holders’ details appear.
Figure 3450: Properties List of the GP
231. Use the Save As icon to save the selected screen in .xls, .doc or .pdf formats or the Print icon take a photocopy.
232. Click Home to navigate to the main page. You can use various other options such as, Go to page, Zoom, Find field and Refresh icons for navigating to the required page, zooming the screen, viewing the required property details, and refreshing the screen respectively.
6.3.2 Passbook
You can view the passbook details for the selected period.
Do the following tasks to view the passbook details for the selected period:
233. Select Master Reports and click Passbook. The highlighted portion of the Figure150 appears.
234. Enter the from and to dates in the From Date and To Date fields or select from the calendar.
Save As
Refresh
Zoom
Find field
Go to page
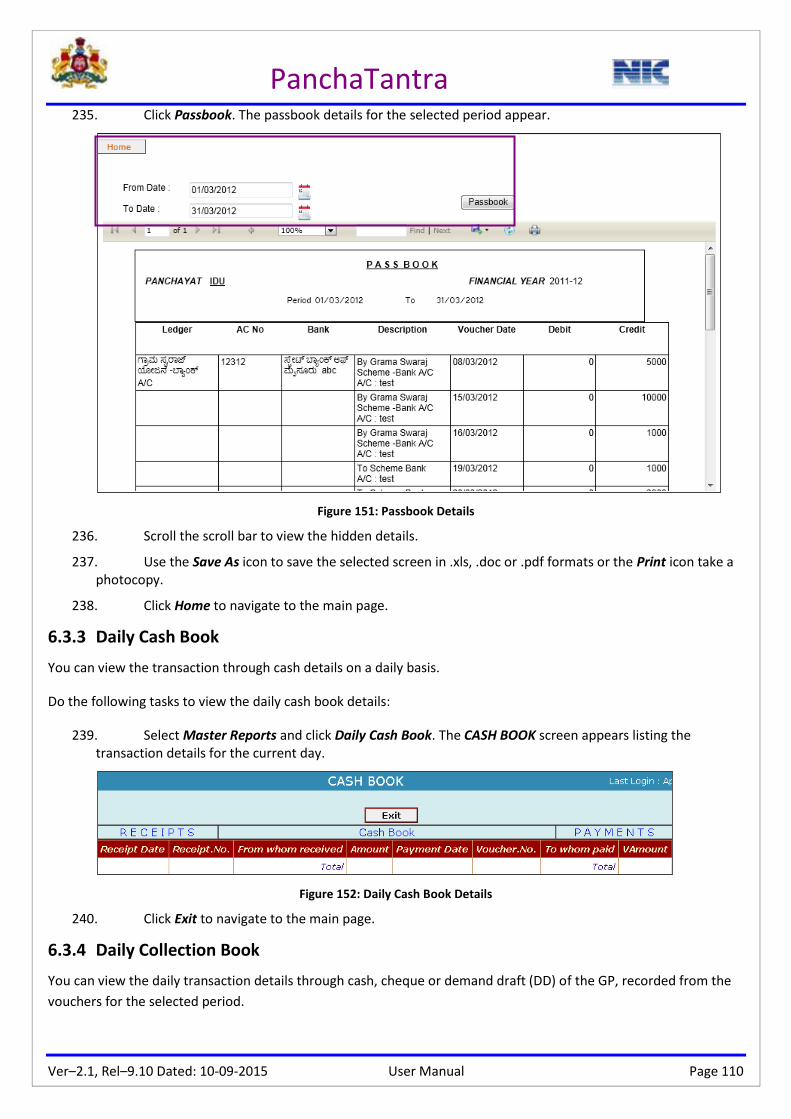
PanchaTantra
Ver–2.1, Rel–9.10 Dated: 10-09-2015 User Manual Page 110
235. Click Passbook. The passbook details for the selected period appear.
Figure 151: Passbook Details
236. Scroll the scroll bar to view the hidden details.
237. Use the Save As icon to save the selected screen in .xls, .doc or .pdf formats or the Print icon take a photocopy.
238. Click Home to navigate to the main page.
6.3.3 Daily Cash Book
You can view the transaction through cash details on a daily basis.
Do the following tasks to view the daily cash book details:
239. Select Master Reports and click Daily Cash Book. The CASH BOOK screen appears listing the transaction details for the current day.
Figure 152: Daily Cash Book Details
240. Click Exit to navigate to the main page.
6.3.4 Daily Collection Book
You can view the daily transaction details through cash, cheque or demand draft (DD) of the GP, recorded from the
vouchers for the selected period.

PanchaTantra
Ver–2.1, Rel–9.10 Dated: 10-09-2015 User Manual Page 111
Do the following tasks to view the daily collection book details:
241. Select Master Reports and click Daily Collection Book. The highlighted portion of the Figure 152 appears.
242. Enter the from and to dates in the From Date and To Date fields or select from the calendar.
243. Click Form - 7. The daily collection details appear.
Figure 153: Daily Collection Details
244. Scroll the scroll bar to view the hidden details.
245. Use the Save As icon to save the selected screen in .xls, .doc or .pdf formats or the Print icon take a photocopy.
246. Click Home to navigate to the main page.
6.3.5 Detailed Cash Book
You can view the day wise detailed report for the opening balance, closing balance, receipts and payments.
Do the following tasks to view the detailed cash book details:
247. Select Master Reports and click Detailed Cash Book. The Daywise Cash/Bank Transaction Details screen appears.
248. Enter the from and to dates in the From Date and To Date fields or select from the calendar.

PanchaTantra
Ver–2.1, Rel–9.10 Dated: 10-09-2015 User Manual Page 112
249. Click Go. The list of transaction details for the selected period appears.
Figure 154: Detailed Cash Book Details
250. Click Print to take a photocopy or Exit to navigate to the main page.
6.3.6 Forms
You can view the various reports in their respective forms.
Do the following tasks to view the reports in form wise:
251. Select Master Reports and click Forms. The Forms screen appears.
Figure 155: List of Various Forms

PanchaTantra
Ver–2.1, Rel–9.10 Dated: 10-09-2015 User Manual Page 113
252. Click on the form number you want to view the reports in the selected format. For example:Form 42 displays the register of loans details.
Figure 156: Form 42 Report
253. Click Print to take a photocopy or Exit to navigate to the main page.
6.3.7 Acknowledgement
You can view the acknowledgement receipts of various types.
Do the following tasks to view the required acknowledgement receipt:
254. Select Master Reports and click Acknowledgement. The following screen appears.
Figure 157: Select Acknowledgement Type
255. Select the acknowledge type from the Acknowledge Type drop-down list.
256. Select the category or profession from the Category/Profession drop-down list.
257. Select the acknowledgement number from the Acknowledgement No drop-down list. The select acknowledgement receipt appears.
6.3.8 Advance Receipt Report
You can view the advance receipts collected for all the properties based on the receipt type selected.
Do the following tasks to view the advance receipt reports:
258. Select Master Reports and click Advance Receipt Report. The following screen appears.
Figure 158: Select Receipt Type
259. Select the receipt main and sub types from the Receipt Main Type and Receipt Type drop-down list. The selected receipt details appear.
260. Click Print to take a photocopy or Exit to navigate to the main page.
6.3.9 Voucher
You can view all the vouchers you have generated.

PanchaTantra
Ver–2.1, Rel–9.10 Dated: 10-09-2015 User Manual Page 114
Do the following tasks to view the various voucher details:
261. Select Master Reports and click VOUCHER. The highlighted portion of the Figure 158 appears.
262. Select the voucher type from the Voucher Type drop-down list.
263. Select the voucher number from the Voucher No drop-down list. The selected voucher details appear.
Figure 159: Voucher Details
264. Click Print to take a photocopy or Exit to navigate to the main page.
6.3.10 Bank Wise Statement
You can view the receipts and payments details of the bank account for a selected period.
Do the following tasks to view the bank wise transaction details:
265. Select Master Reports and click Bankwise Statement. The Register of Cheques issued/received for a Bank Account screen appears.
Figure 160: Select Bank Details
266. Select the name of the account from the Account Name drop-down list.
267. Enter the from and to dates in the From Date and To Date fields or select from the calendar.
268. Select Receipts, Payments or Both of which report you want to view.
269. Click Generate Report. The transaction details of the selected bank account appear.

PanchaTantra
Ver–2.1, Rel–9.10 Dated: 10-09-2015 User Manual Page 115
270. Click Print to take a photocopy or Exit to navigate to the main page.
6.4. Miscellaneous Reports
You can view the various miscellaneous reports which include:
Bank account details: Lists the summary report on GP bank accounts.
Service details: Lists the summary report of the selected services.
Taxes received details: Lists the summary report of the received taxes.
Member details: Lists the member details of the GP.
GP sabha details: Lists the meeting details of the GP.
Contractor list: Lists the contractors’ details.
Work related reports: Lists the work related reports for the selected financial year.
Scheme wise financial status: Lists the bank account details of the schemes.
Ledger details: Lists the ledger details.
GP assets report: Lists the assets details of the GP.
GP liabilities report: Lists the liability details of the GP.
Panchayat profile report: Lists the profile details of the GP.
Payment details to contractor: Lists the payment details of the selected contractor or supplier.
Services details: Lists the details of the selected services.
BRS status: Lists the status of the bank reconciliation statement.
BRS reconcile report: Lists the bank reconciliation report of the selected bank account.
Cash to bank transactions: Lists the cash to bank transaction details for the selected period.
Panchayat infrastructure details: Displays the infrastructure details of the GP.
Grants reports: Lists the GP grant wise or scheme wise grants details.
Report on properties of demand to be paid: Download the report on the property details of the taxes to be paid.
Report on Electricity RR Details of GP Assets:Lists the Electricity RR Details of GP Assets.
6.5. Data Entry Statistics
You can view the data entry progress details and the data gap details for each panchayat.

PanchaTantra
Ver–2.1, Rel–9.10 Dated: 10-09-2015 User Manual Page 116
6.5.1 Data Entry Details
Do the following tasks to view the data entry details:
271. Select Data Entry Statistics and click Data Entry Details. The data entry progress details of each GP appear.
Figure 161: Data Entry Progress Details
272. Click Export To Excel to save the report or Back to navigate to the main page.
6.5.2 Data Gap Analysis
You can view the gap analysis details between the Panchayat and PanchaTantra data.
Do the following tasks to view the data gap analysis details:
273. Select Data Entry Statistics and click Data Gap Analysis. The Report in Charts screen appears.
Figure 162: Data Gap Chart
274. Click Close to navigate to the main page.
6.6. DCB Register
You can view the panchayat level demand collection and balance details.

PanchaTantra
Ver–2.1, Rel–9.10 Dated: 10-09-2015 User Manual Page 117
Do the following tasks to view the DCB register details:
275. Click DCB Register. The Summary on Demand Collection and Balance screen appears listing the panchayat wise details.
276. Click Select across the required panchayat. The list of tax details appear.
277. Click Select across the required tax. The property wise tax details appear.
Figure 163: DCB Register
278. Click Exit to navigate to the main page.
6.7. Asset Register
You can view the total asset value of each GP and the asset details of each asset type.
Do the following tasks to view the asset register details:
279. Click Asset Register. The list of the total asset values of each panchayat appears.
280. Click Select across the panchayat, if you want to view the list of asset types under the selected panchayat.
281. Click Select across the asset type to view the detailed information of the asset.
Figure 164: Asset Register
282. Click Exit to navigate to the main page.

PanchaTantra
Ver–2.1, Rel–9.10 Dated: 10-09-2015 User Manual Page 118
6.8. Beneficiary Report
You can view the beneficiary wise and scheme wise active or inactive beneficiary reports and beneficiary payment
report.
6.8.1 Active Beneficiary Report
You can view the beneficiary wise and scheme wise active beneficiary report.
Do the following tasks to view the active beneficiary report:
283. Select Beneficiary Report and click Active Beneficiary Report. The Beneficiary Report screen appears.
284. Select Beneficiary Wise or Scheme Wise. The list of active beneficiaries details appear. You need to select the scheme name from the Scheme Name drop-down list, if you have selected the Scheme Wise option.
Figure 165: Active Beneficiary Report
285. Click Exit to navigate to the main page.
6.8.2 Inactive Beneficiary Report
You can view the beneficiary wise and scheme wise inactive beneficiary report.
Do the following tasks to view the active beneficiary report:
286. Select Beneficiary Report and click Inactive Beneficiary Report. The Inactive Beneficiary Report screen appears.

PanchaTantra
Ver–2.1, Rel–9.10 Dated: 10-09-2015 User Manual Page 119
287. Select Beneficiary Wise or Scheme Wise. The list of inactive beneficiaries details appear. You need to select the scheme name from the Scheme Name drop-down list, if you have selected the Scheme Wise option.
Figure 166: Inactive Beneficiary Report
288. Click Exit to navigate to the main page.
6.8.3 Beneficiary Payment Report
Do the following tasks to view the beneficiaries’ details of which the payment is completed:
289. Select Beneficiary Report and click Beneficiary Payment Report. The Beneficiary Payment Details screen appears.
290. Select the village name from the Village drop-down list.
291. Select All Beneficiary Payment or Scheme Wise Beneficiary Payment. The list of beneficiaries’ details for which the payment is made appears.
Figure 167: Beneficiary Payment Report
Note: You need to select the scheme name from the Schemedrop-down list, if you have selected the Scheme Wise Beneficiary Payment option.
292. Click Print to take a photocopy or Exit to navigate to the main page.
6.9. Water Demand or Collection Report
6.9.1 Demand Report
You can view the report of the special water demands.

PanchaTantra
Ver–2.1, Rel–9.10 Dated: 10-09-2015 User Manual Page 120
Do the following tasks to view the water demands report:
293. Select Water Demand/Collection Report and click Demand Report. The Water Demand Details appears.
Figure 168: Water Demand Details
294. Select the village name from the Village drop-down list.
295. Select the month from the Month drop-down list, under which you want to view the report. The list of demands details appear for the selected month.
296. Click Print to take a photocopy or Exit to navigate to the main page.
6.9.2 Receipt Report
You can view the report of the special water receipts.
Do the following tasks to view the water receipts report:
297. Select Water Demand/Collection Report and click Receipt Report. The Water Receipt Details screen appears.
Figure 169: Water Receipt Details
298. Select the village name from the Village drop-down list.
299. Select the month from the Month drop-down list, under which you want to view the receipt details. The water receipt details appear for the selected month.
300. Click Print to take a photocopy or Exit to navigate to the main page.
6.9.3 Water Connection Report
You can view the water connection details of each GP.
Do the following tasks to view the water connection report:
301. Select Water Demand/Collection Report and click Water Connection Report. The Water Connection Details screen appears.
302. Select the village name from the Village drop-down list.

PanchaTantra
Ver–2.1, Rel–9.10 Dated: 10-09-2015 User Manual Page 121
303. Select the ward number or All from the Ward drop-down list. The list of water connection details appear.
Figure 170: Water Connection Details
304. Click Print to take a photocopy or Exit to navigate to the main page.
6.10. Ashraya Loan Recovery Report
You can view the recovery status of the Ashraya scheme loan for all the beneficiaries of the Ashraya scheme.
Do the following tasks to view the Ashraya loan recovery report:
305. Click Ashraya Loan Recovery Report. The following screen appears.
306. Select the village name from the Village drop-down list. The list of beneficiaries with the status of the Ashraya scheme loan details appears.
307. Click Print to take the photocopy or Exit to navigate to the main page.
6.11. Report on Guarantee of Services to Citizens
You can view the status of the services provided to the citizens.
Do the following tasks to view the statuses of the services provided:
308. Click Report on Guarantee of Services to Citizens. The GSC SERVICE DETAILS screen appears.
Figure 171: GSC Service Status

PanchaTantra
Ver–2.1, Rel–9.10 Dated: 10-09-2015 User Manual Page 122
309. Click on the number under the NO OF APPLICATION RECEIVED column. The service details appear.
Figure 172: GSC Service Details
310. Click Main Page at the left-top side of the application to navigate to the main page.

PanchaTantra
Ver–2.1, Rel–9.10 Dated: 10-09-2015 User Manual Page 123
7. Works
You can access the various functionalities under Works option (see Figure 173).
Point to Works. The list of sub-options appears.
Figure 173: Works Options
7.1. Fund Source
You need to enter the fund details of the work after adding the work details under Mastersoption.
Refer to Shelf of Works for more details on how to enter the work details.
Do the following tasks to enter the fund details for the work:
311. Click Fund Source. The Source of Fund Details screen appears.
312. Click Select across the work to which you want to add the fund details. The highlighted option appears.
Figure 174: Fund Source Details
313. Select Yes if the complete fund is given by the assigned Grant/Scheme in the Is Rs.<<amount as in the Estimate column>> completely funded from <<Scheme or Grant name assigned to this work under Masters>>?section, else select No.

PanchaTantra
Ver–2.1, Rel–9.10 Dated: 10-09-2015 User Manual Page 124
If No is selected, do the following tasks:
a. Select the schemes that fund along with the assigned scheme or grant in the Select the Schemes that Fund the work along with <<Scheme or Grant name assigned to this work under Masters>> section.
Figure 175: Scheme Fund Details
b. Click Continue. The highlighted section as in Figure 175 appears.
c. Enter the amount that each scheme is funding in the Fund Amount field.
314. Click Save. The entered data will be saved.Once the complete amount is funded for the work, this work will not be available under the Fund Source option. However, it will be available for the next process option, that is, Work Initiate option. You can add more schemes if they are funding for the same work by selecting the work which is already funded and adding other schemes by clicking the Add More Schemes button.
315. Click Exit to navigate to the main page.
7.2. Initiating the Work
You can initialize the work once after the complete amount is funded for the work.
Do the following tasks to initialize the work:
316. Click Initiate. The Work Initialize screen appears.

PanchaTantra
Ver–2.1, Rel–9.10 Dated: 10-09-2015 User Manual Page 125
317. Select Individual Work or Package Work. The list of funded works appears. You need to select the package name from the Package drop-down list, if the selected type is Package Work.
Figure 176: Work Initialization
318. Click Select across the work which you want to initialize. The selected work details as entered in the Shelf of Works appear.
319. Select the agency name implementing this work from the Implementing Agency drop-down list. You need to enter the Length in kms orStorage Capacity in cc if the work category is Roads or Minor Irrigation respectively.
320. Enter the tendering date in the Date of Tendering if Any field or select from the calendar.
321. Select the name of agency or contractor from the Name of Agency / Contractor drop-down list.
322. Enter the amount afforded for tendering in the Amount Put to Tender field.
323. Enter the amount awarded in the Amount awarded field.
324. Enter the work order number in the Work Order / Res. No field.
325. Enter the tendered date in the Date field or select from the calendar.
326. Enter the agreement date of the work in the Agreement Date field or select from the calendar.
327. Enter the expected start and completion date of the work in the Expected Date of Start and Expected Date of Completion fields respectively.
328. Click Add. The work is initialized. Once the work is initialized, it will not be available under Work Initializescreen, however it will be available for the next options.
7.3. Monthly Progress
Once after the work is initiated, you can add and modify the progress details of the work monthly with respect to
physical activity, percentage of completion, and financial expenses incurred.
7.3.1 Adding the Monthly Progress Details
Do the following tasks to add the work progress details:
329. Click Monthly Progress. The Work Progress screen appears.
330. Select the month from the Month drop-down list.
331. Select the type of work as Individual Work or Package Work. The list of works under the selected type appears.
Note: You need to select the package from the Package drop-down list for the Package type.
332. Click Select across the work for which you want to add the progress details. The highlighted section of the Figure 177 appears.

PanchaTantra
Ver–2.1, Rel–9.10 Dated: 10-09-2015 User Manual Page 126
333. Select the work progress type from the Physical Progress drop-down list.
334. Enter the percentage of the work completion in the Physical % field.
335. Enter the amount incurred for the work at this stage, in the Financial field.
336. Enter the current status of the work in the Present Status Of Work field.
337. Click Save. The saved details appear as shown in the Figure 177.
Figure 177: Add the Work Progress Details
338. If you want to enter the progress details for the same work, select the month from the Month drop-down list and repeat steps from 333 to 337.
339. Repeat step 338 for entering further progress details else click Exit to navigate to the main page.
7.3.2 Modifying the Monthly Progress Details
Do the following tasks to modify the existing work progress details:
340. Click Monthly Progress. The Work Progress screen appears.
341. Select the month from the Month drop-down list.
342. Select the type of work as Individual Work or Package Work. The list of initialized works appears. You need to select the package from the Package drop-down list for the Package type.
Saved work progress details
Initialized works list

PanchaTantra
Ver–2.1, Rel–9.10 Dated: 10-09-2015 User Manual Page 127
343. Click Select across the work you want to modify the progress details.
Figure 178: Modify the Work Progress Details
344. Edit the progress details as needed.
345. Click Modify. The data will be saved as modified. You can delete the work progress details by clicking the Delete button.
346. Click Exit to navigate to the main page.
7.4. Measurement Book Entry
Do the following tasks to enter the measurement book (MB) details:
347. Click M.B Entry. The Work Progress (M.B Details) screen appears.
348. Select the type of work as Individual Work or Package Work. The list of works appears.
Note: You need to select the package from the Package drop-down list for the Package type.

PanchaTantra
Ver–2.1, Rel–9.10 Dated: 10-09-2015 User Manual Page 128
349. Click Select across the work for which you want to enter the measurement book details. The following screen appears. The Work Name and Work Category fields are populated automatically based on the work details entered while adding the works.
[Screen shot is required]
Figure 35: Measurement Book Entry Details
350. Enter the inspection date in the Date of Visit/Inspection field or select the date from the calendar.
351. Enter the description of the measurement book entry in the Description field.
352. In the Entry Details in the Measurement Book section, enter the serial number, date and page number of the measurement book in the MB Sl. No., Date, and Page No fields respectively.
353. Enter the percentage of work completed in the Percentage of work completed field.
354. Select the dimension from the Dimension drop-down list.
355. Select the designation from the Measured by drop-down list and enter the officer name in the Officer Name field.
356. Enter the measured date in the Measured Date field.
357. Additionally, click Upload files to browse and select the files to be uploaded.
358. Click Add/Save. The details are saved.
7.5. Closure of Work or Package
You can close the work or the package once it is completed and the payment is done. You will be able to enter the
assetization details only if the MB/payment details are available for the work.

PanchaTantra
Ver–2.1, Rel–9.10 Dated: 10-09-2015 User Manual Page 129
7.5.1 Closure of the Work
Do the following tasks to close the completed work:
359. Select Closure and click Work Closure. The Work Complete screen appears.
360. Select the type of work as Individual Work or Package Work. The list of works appears.
361. Click Select across the work you want to close. The following screen appears. The Cost Over Run and Order Details sections appear only if the actual cost of the work has been exceeded than the estimated cost.
Figure 179: Closing the Individual Work
362. If the work is handed over to some one else then select Yes in the Handed Over?section. By default No is selected.
If Yes is selected, do the following tasks:
i. Select the panchayat to which the work is handed over from the To Whom Handed Over?drop-down list.
j. Enter the date when the work is handed over in the Date Of Handing Over field or select from the calendar.
363. Click Close.
Cost overrun details

PanchaTantra
Ver–2.1, Rel–9.10 Dated: 10-09-2015 User Manual Page 130
7.5.2 Closure of the Package
Do the following tasks to close the completed work:
364. Select Closure and click Package Closure. The Package Closure screen appears. The list of packages appears.
Figure 180: Package Closure
365. Click Select across the package you want to delete.
You need to close the works under the selected package before deleting the package. If not, an error message appears (see below) and the package will not be deleted.
366. Click Exit to navigate to the main page.

PanchaTantra
Ver–2.1, Rel–9.10 Dated: 10-09-2015 User Manual Page 131
8. SamanyaMahithi
You can access the various functionalities under SamanyaMahithi option (seeFigure 181).
Point to SamanyaMahithi. The list of sub-options appears.
Figure 181: SamanyaMahithi Options
8.1. Adding or Mapping the Habitation – Village
You can add or map the habitation with the village.
8.1.1 Adding the Habitation Details to the Village
Do the following tasks to add or map the village with habitation:
367. Select Add/Map and click Village – Habitation. The Module Name screen appears.
368. Select Habitation.
369. Select the village name from the Village drop-down list.
Figure 182: Village – Habitation Details
370. Enter the habitat name in English or Kannada in the Habitat Name (Eng) or ಆಲಯಹೆಸರು (Kan) fields.
371. Click Add New. The habitat details are saved under the selected village.
8.1.2 Modifying the Habitation Details of the Village
Do the following tasks to modify the existing habitation details:
372. Select Add/Map and click Village – Habitation. The Module Name screen appears.
373. Select Habitation.

PanchaTantra
Ver–2.1, Rel–9.10 Dated: 10-09-2015 User Manual Page 132
374. Select the village name from the Village drop-down list. The existing habitat details list appears.
375. Click Select across the habitat name. The selected habitat details appear.
Figure 363: Modify the Habitat Details
376. Edit the required fields as needed.
377. Click Modify. The details are saved as modified.
Note: You can delete the existing habitat details if the entered data are incorrect, by clicking the Delete button.
378. Click Exit to navigate to the main page.
8.2. Viewing the Sectoral Information or Report
You can view the sectoral information and reports.
8.2.1 Viewing the Sectoral Information
You can view and enter the sector information.
Do the following tasks to view and enter the sectoral information:
379. Click Sectoral Information. The SamanyaMahithi screen appears.
380. Select the financial year of which the information you want to view from the Financial Year drop-down list.
381. Select the village name from the Village drop-down list.
382. Select the habitation name from the Habitation drop-down list.

PanchaTantra
Ver–2.1, Rel–9.10 Dated: 10-09-2015 User Manual Page 133
383. Click GO. The SECTOR DETAILS section appears.
Figure 374: Sector Information
384. Click on the sector you want to view or enter the details. The respective screens appear.
For example: if you click Social Welfare, the following screen appears:
Figure 385: Social Welfare Details
385. Enter the details as required.
386. Click the icon to navigate to the next page and enter the further details.

PanchaTantra
Ver–2.1, Rel–9.10 Dated: 10-09-2015 User Manual Page 134
387. Click Save. The following screen appears.
Figure 396: Social Welfare Details (Contd…)
388. Click Yes and repeat the steps from 384 to 387 for all other sectors, if necessary, else click No.
389. Click Exit to navigate to the main page.
8.2.2 Viewing the Sectoral Report
Do the following tasks to view the sectoral report:
390. Click Sectoral Report. The SamanyaMahithi's Statistics Reports Menu screen appears.
391. Point to any of the options on how you want to view the sectoral reports. The list of sector details appears.
Figure 4087: Sectoral Report List
392. Click on the sector which you want to view the report. TheKARNATAKA STATE STATISTICS screen appears.
393. Based on the options appear in the KARNATAKA STATE STATISTICS screen, select the financial year, district, taluk, village, and so on from the respective drop-down lists.
List of various sectors

PanchaTantra
Ver–2.1, Rel–9.10 Dated: 10-09-2015 User Manual Page 135
394. Click Show. The statistics of the selected sector details appear.
For example: If you select the District Wise and click Education, the education statistics screen appears:
Figure 188: Education Statistics Details
395. Click Print to take a photocopy or Back to navigate to the screen as in Figure188.
396. Click Main Page at the top-left side of the application screen to navigate to the main page.

PanchaTantra
Ver–2.1, Rel–9.10 Dated: 10-09-2015 User Manual Page 136
9. Others
You can access the various functionalities under Others option (see Figure 183).
Point to Others. The list of sub-options appears.
Figure 4189: Others Options
9.1. Changing the Password
You can change the login password in this application. It is recommended to change the password once in 90 days.
Do the following tasks to change the password:
397. Click Change Password. The Change Password screen appears. By default, username used while logging in to the application appears in the Login field.
Figure 4290: Change Password Screen
398. Enter the current password in the Enter Current Password field.
399. Enter a new password in both the Enter New Password and Re-Enter New Password fields.
400. Click Change. A message ‘Password Change Successful’ appears.
401. Click Exit to navigate to the main page.
You have changed the password successfully.

PanchaTantra
Ver–2.1, Rel–9.10 Dated: 10-09-2015 User Manual Page 137
9.2. Adding or Modifying the Grama Sabha MOM Details
You can add or modify the Grama Sabha minutes of meeting (MOM) details.
9.2.1 Adding the Grama Sabha MOM Details
Do the following tasks to add the gramasabha meeting details:
402. Select Grama Sabha and click Entry. The Grama Sabha Proceedings screen appears.
Figure 431: Grama Sabha Details
403. Enter the date of the meeting in the Date of Meeting field or select from the calendar.
404. Select the meeting type in the Type of Meeting section.
405. Select the venue of the meeting held from the Venue of Meeting drop-down list.
406. Enter the number of participants attended the meeting in the No. of Participants field.
407. Select the member name, who has attended the meeting from the drop-down list and click ADD in the Members Present section. The member is added to the list as shown in Figure 191.
408. Repeat the step 407 to add more members.
409. In the Decision Taken section, select the subject of the meeting from the Category drop-down list, enter the description in the Description field and click ADD. The decision details of the meeting appear as shown in Figure 191.
Participants list
Discussion details list

PanchaTantra
Ver–2.1, Rel–9.10 Dated: 10-09-2015 User Manual Page 138
410. If required, repeat the step 409 to add more discussion details.
411. Click ADD. A message ‘Saved Successfully’ appears.
9.2.2 Modifying the Grama Sabha MOM Details
You can add or the members or the decision details of the existing MOM details.
Do the following tasks to modify the gramasabha minutes of meeting details:
412. Select Grama Sabha and click Modify. The Module Name screen appears.
Figure 442: List of Grama Sabha Meetings
413. Click Select across the meeting details you want to modify. The Grama Sabha Proceedings screen appears with the selected meeting details.
Figure 453: Grama Sabha MOM Details
414. Click Select across the members in the Members section and then select the member name and click Modify, if you want to replace that member.

PanchaTantra
Ver–2.1, Rel–9.10 Dated: 10-09-2015 User Manual Page 139
You cannot modify the members list if selected member name is already listed in the Members section. In this case, you can delete the member name which was added wrongly by clicking the DELETE button. You can also add the member if not listed, by selecting the member name from the drop-down list and clicking the ADD button in the Members Present section.
415. Click Select across the category you want to modify. The selected category details appear in the Decision Taken section.
416. Select the category name from the Category drop-down list or edit the description in the Description field and click Modify. You can delete the category name which is already added wrongly by clicking the DELETE button. You can also add the category if not listed, by selecting the category name from the Category drop-down list, entering the description in the Description field and clicking the ADD button in the Decision Taken section.
417. Click Exit to navigate to the main page. You can delete the selected MOM details by clicking the DELETE button at the bottom of the screen.
9.3. Panchayat Details
9.3.1 Adding or Modifying the Panchayat Profile
You can add or modify the panchayat profile details along with the secretary information.
Adding the Panchayat Profile Details
Do the following tasks to add the panchayat profile details:
418. Select Panchayat Details and click Panchayat Profile. The Panchayat Profile screen appears.
Figure 464: Panchayat Profile
419. Enter the name of the GP in both Kannada and English languages in the GP Name in Kannada and GP Name in English fields.
420. Enter the address of the panchayat in the GP Address field.
421. Enter the contact number and Fax number of the GP in the Phone and Fax fields respectively.
422. Enter the email address of the panchayat in the Email field.

PanchaTantra
Ver–2.1, Rel–9.10 Dated: 10-09-2015 User Manual Page 140
423. Click Browse to select and upload the panchayat image to the portal.
424. Enter the panchayat website address in the Website field.
425. Click Save. The panchayat details are saved.
Modifying the Panchayat Profile Details
Do the following tasks to modify the panchayat profile details:
426. Select Panchayat Details and click Panchayat Profile. The Panchayat Profile screen appears with the panchayat details.
Figure 475: Modify the Panchayat Profile Details
427. Edit the fields as needed.
428. Click Modify. The details are saved as modified.
9.3.2 Adding or Modifying the Panchayat Staff Details
You need to add or modify the details of the panchayat employees using the Panchayat Staff Profile link.
Adding the Panchayat Staff Details
Do the following tasks to add the panchayat employee details:
429. Select Panchayat Details and click Panchayat Profile. The Panchayat Profile screen appears (see Figure 195).

PanchaTantra
Ver–2.1, Rel–9.10 Dated: 10-09-2015 User Manual Page 141
430. Click the Panchayat Staff Profile link (refer to Figure 199). The Panchayat Staff Profile screen appears.
Figure 486: Panchayat Staff Profile
431. Select the designation of the employee from the Designation drop-down list.
432. Enter the name of the employee both in Kannada and English languages in the Name in Kannada and Name in English fields respectively.
433. Enter the employee communication address in the House Address field.
434. Enter the number of the employee in the House Phone and/or Mobile fields respectively.
435. Enter the joining date of the employee in the Charge Date field or click the icon and select the date from the calendar.
436. Click Browse to select and upload the employee image to the portal.
437. Select the category to which the employee belongs to from the Category drop-down list.
438. Click Save. The employee details are added to the list as shown in Figure199.
Modifying the Panchayat Staff Details:
Do the following tasks to modify the panchayat employee details:
439. Select Panchayat Details and click Panchayat Profile. The Panchayat Profile screen appears (see Figure 198).
440. Click the Panchayat Staff Profile link. The Panchayat Staff Profile screen appears (see Figure199).
Saved employee list

PanchaTantra
Ver–2.1, Rel–9.10 Dated: 10-09-2015 User Manual Page 142
441. Click Select across the employee name you want to modify the details. The selected employee details appear.
Figure 197: Modify the Panchayat Staff Details
442. Edit the required fields as needed.
You cannot modify the Charge Date of the employee.If you want to change the charge date, it will be considered as a new entry or new employee.
You need to select Yes in the Charge Date can be modified section and make the retirement entries for the old record and enter a new one. The retired employee details can be viewed through reports.
443. Click Modify. The employee details are saved as modified.

PanchaTantra
Ver–2.1, Rel–9.10 Dated: 10-09-2015 User Manual Page 143
To change the Charge Date field, do the following tasks:
444. Select Yes in the Charge Date can be modified section. The following screen appears.
Figure 198: Employee Retirement Details
445. Enter the retirement or transferred date of the current employee in the Retired/Transferred Date field across the employee name you want to replace or remove.
446. Click Save.
9.3.3 Adding or Modifying the Tender Details
You can add or modify the tender details called in the panchayat, which can be made available to view in the GP Portal.
Adding the Panchayat Tender Details
Do the following tasks to add the tender details:
447. Select Panchayat Details and click Panchayat Tender Details. The Current Tender Details (For Panchayat Portal) screen appears.
Figure 199: Panchayat Tender Details
448. Enter the description of the tender in the Tender Description field.
List of saved tender details

PanchaTantra
Ver–2.1, Rel–9.10 Dated: 10-09-2015 User Manual Page 144
449. Enter the tender calling date in the Tender Calling Date field or select from the calendar.
450. Enter the estimated cost of the tender in the Estimated Cost of Work field.
451. Enter the last date of submitting the tender in the Last Date of Submitting Tender field or select from the calendar.
452. Enter the earnest money deposit amount in the E.M.D field.
453. Enter the contact details and phone number in the Contact Details and Contact Phone fields respectively.
454. Enter the remarks in the Remarks field.
455. Click Add. The tender details are added to the list (see Figure 193).
Modifying the Panchayat Tender Details
Do the following tasks to modify the tender details:
456. Select Panchayat Details and click Panchayat Tender Details. The Current Tender Details (For Panchayat Portal) screen appears.
457. Click Select across the tender details you want to modify. The selected tender details appear.
Figure 200: Modify the Tender Details
458. Edit the required fields as needed.
459. Click Modify. The details are saved as modified.

PanchaTantra
Ver–2.1, Rel–9.10 Dated: 10-09-2015 User Manual Page 145
9.3.4 Uploading the Panchayat Details and Activity
Uploading the Panchayat Details
Do the following tasks to add the tender details:
460. Select Panchayat Details and click Panchayat Details Upload. The Panchayat Information screen appears.
Figure 201: Panchayat Profile Details
461. Enter about your panchayat in the Write few sentences about your panchayat field.
462. Click Choose File and select the image you want to upload. You can upload the images with .jpeg or .gif format and less than or equal to 150 KB only.
463. Click Save. The details are saved and appear in the GP portal.
Uploading the Panchayat Activity Details
Do the following tasks to upload the panchayat activity details:
464. Select Panchayat Details and click Panchayat Activity Upload. The Panchayat Event Images screen appears.
Figure 202: Panchayat Event Images Upload
465. Enter the description of the image in the Image Description field.
466. Click Choose File and select the image you want to upload. You can upload the images with .jpeg or .gif format and less than or equal to 150 KB only.
467. Click Save. The details will be saved and appear in the GP portal.

PanchaTantra
Ver–2.1, Rel–9.10 Dated: 10-09-2015 User Manual Page 146
9.4. Entering the GP Loan Details
You can enter the loans available for the particular GP from Government, banks or financial institutions.
Do the following tasks to enter the GP loan details:
468. Click GP Loan. The GP Loans screen appears.
Figure 203: GP Loan Details
469. Select the source from where the loan is issued from the Source of Loan drop-down list.
470. Enter the description of the source in the Source Description field.
471. Enter the order number in the Order No field.
472. Enter the date of the order sanctioned in the Date of Sanction of Order field or select from the calendar.
473. Enter the date or receipt issued in the Receipt Date field or select from the calendar.
474. Enter the loan amount in the Loan Amount field.
475. Enter the annual rate of interest in the Interest Rate/Annum field.
476. Enter the number of installments in the Installment Nos field.
477. Select the periodicity of the installment from the Periodicity of Installment drop-down list. The fields for entering the bank details appear.
478. Enter the installment amount in the Installment Amount field.
479. Select the bank name from the Bank drop-down list.
480. Select the branch name of the selected bank from the Branch drop-down list.
481. Enter the bank account number in the Account No field.

PanchaTantra
Ver–2.1, Rel–9.10 Dated: 10-09-2015 User Manual Page 147
482. Click Save. The FORM 42 (Rule 96) receipt appears.
Figure 204: GP Loan Receipt
483. Click Print to take a photocopy or Exit to navigate to the main page.
9.5. GP Investments Details
You can enter the investments details made by the GP from its additional funds in the interest-bearing investments such
as Fixed Deposits in bank or Government Securities.
9.5.1 Investment Details
Do the following tasks to enter the investment details of the GP:
484. Select GP Investments and click Investment Details. The GP Investments screen appears.
Figure 205: GP Investment Details
485. Select the type of investment from the Investment Group drop-down list.
486. Enter the investment and location details in the Investment Details and Location Details fields respectively.
487. Enter the investment date in the Date of Investment field or select from the calendar.

PanchaTantra
Ver–2.1, Rel–9.10 Dated: 10-09-2015 User Manual Page 148
488. Enter the invested amount in the Amount Invested field. The bank details of the GP such as Bank Name, Account No, and Balance fields appear.
489. Enter the rate of interest and the investment period in the Rate of Interest and Investment Period fields respectively. The Date of Maturity and Maturity Amount fields populate automatically based on the rate of interest and investment period.
490. Click Save. The FORM 41 (Rule 95) receipt appears.
Figure 206: GP Investment Receipt
491. Click Print to take a photocopy or Exit to navigate to the main page.
9.5.2 Maturity Details
Do the following tasks to enter the maturity details:
492. Select GP Investments and click Maturity Details. The Process of Interest on FD/Investments and Maturity of FD/Investments screen appears.
493. Click Select across the investment details. The selected investment details appear.
Figure 207: Maturity Details
494. Click Complete Process. The work process is completed.

PanchaTantra
Ver–2.1, Rel–9.10 Dated: 10-09-2015 User Manual Page 149
9.6. Ashraya Loan Recovery Details
You can enter the recovery details of the Ashraya scheme loans issued for the beneficiaries.
Do the following tasks to enter the recovery details of the Ashraya scheme loans:
495. Click Ashraya Loan Recovery Details. The Ashraya Loan Recovery Details screen appears. The Bank, Branch and Account No. fields will be available to enter the bank account details if the bank details are not assigned under Scheme option.
Figure 208: Ashraya Loan Recovery Details
Do the following tasks to enter the bank details:
k. Select the bank and bank branch name from the Bank and Branch drop-down lists respectively.
l. Enter the bank account number in the Account No. field.
m. Click Save.
496. Select the village name from the Village drop-down list.
497. Select the beneficiary name of the Ashraya scheme from the Ashraya Beneficiary ID drop-down list. The Sanction Date and Subsidy Amount fields populate automatically, if any. Additionally, you can enter the loan sanction year in the Sanction Year field.
498. Enter the loan amount and terms in the Loan Amount and Loan Terms fields respectively.
499. Enter the rate of interest in the Rate of Interest field.

PanchaTantra
Ver–2.1, Rel–9.10 Dated: 10-09-2015 User Manual Page 150
500. If the recovery is started, select Yes in the Recovery Started or Not section, else select No. If Yes is selected in the Recovery Started or Not section, you need to enter the recovered amount in the Recovered Amount field.
501. Enter the current month recovery amount and loan term in the Current Month Recovery and Current Loan Term fields respectively. Based on the entries made, the Installment Amount, Recovered Amount, Already Recovered Term, and Balance to be Recovered fields populate automatically.
502. Enter the date of recovery in the Date of Recovery field or select from the calendar.
503. Click Save. A message ‘Details saved successfully’ appears.
9.7. Ashraya Loan Recovery Transfer Details
After recovering the loan amount, it is required to transfer the recovered amount from the loan recovery bank account
to agency/scheme account and the cess collection charges to GP fund account.
Do the following tasks to enter the Ashraya loan recovery transfer details:
504. Click Ashraya Loan Recovery Transfer Details. The Ashraya Bank to Scheme screen appears.
Figure 209: Ashraya Loan Recovery Transfer Details
505. Enter the date of transaction in the Date of Transaction field or select from the calendar.
506. Enter the percentage of amount to be transferred to agency and GP bank accounts in the Agency A/C and GP Bank A/C fields respectively.
507. Click Go. The highlighted sections populate automatically and the Save button is enabled.
508. Click Save. The transaction is completed.
9.8. Deleting the Voucher
You can delete the various vouchers such as receipts, payments, grants, transfer, and journal.

PanchaTantra
Ver–2.1, Rel–9.10 Dated: 10-09-2015 User Manual Page 151
Do the following tasks to delete the voucher:
509. Click Delete Vouchers. The Module Name screen appears (see Figure204).
510. Select the voucher type you want to delete in the Voucher Type section.
511. In the Search by section, enter the voucher date in the Voucher Date field or enter the voucher number in the Voucher No field.
512. Click Search. The vouchers generated on the selected date or the voucher with the entered voucher number appears.
Figure 210: Delete Vouchers
513. Select the check box across the required voucher number that you want to delete. You can view the
selected voucher details by clicking the icon.
514. Click Delete. The selected voucher is deleted from the database.
9.9. Panchayat Infrastructure Details
You can add or modify the panchayat infrastructure details such as computers, printers, scanners, UPS (online and
offline), infrastructure, general information and other general information. You cannot modify the technical man power
details once saved and you can view the gap analysis chart in the Other General Information type.
Search list

PanchaTantra
Ver–2.1, Rel–9.10 Dated: 10-09-2015 User Manual Page 152
9.9.1 Adding the Panchayat Infrastructure Details
Do the following tasks to add the panchayat infrastructure details:
515. Click Panchayat Infrastructure Details. The Grama Panchayat Statistics screen appears.
Figure 211: Grama Panchayat Statistics
516. Select the type of infrastructure from the Select Infra-Structure Type drop-down list. The fields based on the selected type appear.
For example: If the selected type is Scanners, the following fields appear:
Figure 212: Scanner Details
517. Enter the required details.
518. Click Save. The saved details appear as in Figure 212.
9.9.2 Modifying the Panchayat Infrastructure Details
Do the following tasks to modify the panchayat infrastructure details:
519. Click Panchayat Infrastructure Details. The Grama Panchayat Statistics screen appears.
520. Select the type of infrastructure from the Select Infra-Structure Type drop-down list. The existing details appear as in Figure 212.
Saved list

PanchaTantra
Ver–2.1, Rel–9.10 Dated: 10-09-2015 User Manual Page 153
521. Click Select across the item you want to modify. The selected item details appear.
Figure 213: Modify the Infrastructure Details
522. Edit the required fields or modify the details as needed.
523. Click Update. The details are saved as modified. You can delete the infrastructure details by clicking the Delete button.
9.10. Creating GP Members Payment Bank Account
You can enter or modify the payment bank account details for GP staff members.
9.10.1 Entering the GP Members Payment Bank Account
Do the following tasks to add the GP members payment bank account details:
524. Click Create GP Members Payment-Bank A/C. The GP Staff Members Payment-Bank A/C screen appears.
Figure 214: Payment Bank Account Details
525. Select the bank name from the Bank drop-down list.
526. Select the bank branch name from the Branch drop-down list.
527. Enter the bank account number in the Bank Account No. field.
528. Click Save. The bank details are saved.

PanchaTantra
Ver–2.1, Rel–9.10 Dated: 10-09-2015 User Manual Page 154
9.10.2 Modifying the GP Members Payment Bank Account
Do the following tasks to modify the GP members payment bank account details:
529. Click Create GP Members Payment-Bank A/C. The GP Staff Members Payment-Bank A/C screen appears with the bank account details.
Figure 215: Modify Bank Account Details
530. Modify the required fields as needed.
531. Click Update. The details are saved as modified.
532. Click Exit to navigate to the main page.
9.11. Creating Bio-diversity Committee Bank Account
You can enter or modify the bank account details for bio-diversity committee members.
9.11.1 Entering the Bio-Diversity Committee Bank Account
You can create a separate bank account for crediting salary to the bio-diversity committee members.
Do the following tasks to add the bio-diversity committee bank account details:
533. Click Bio Diversity (Forest Department)-Bank A/C. The Bio-Diversity Committee (Forest Department)-Bank A/C screen appears.
Figure 216: Bio-Diversity Committee Bank Details
534. Select the bank name from the Bank drop-down list.
535. Select the bank branch name from the Branch drop-down list.
536. Enter the bank account number in the Bank Account No. field.
537. Click Save. The bank details are saved.

PanchaTantra
Ver–2.1, Rel–9.10 Dated: 10-09-2015 User Manual Page 155
9.11.2 Modifying the Bio-Diversity Committee Bank Account
Do the following tasks to modify the bio-diversity committee bank account details:
538. Click Bio Diversity (Forest Department)-Bank A/C. The Bio-Diversity Committee (Forest Department)-Bank A/C screen appears.
Figure 217: Modify the Bio-Diversity Bank Details
539. Modify the required fields as needed.
540. Click Update. The details are saved as modified.
541. Click Exit to navigate to the main page.
9.12 Delete Scheme
After Login the Panchatantra , In Main Page click on Others ->Delete Scheme.
Figure 218 : Delete scheme

PanchaTantra
Ver–2.1, Rel–9.10 Dated: 10-09-2015 User Manual Page 156
The below Screen appears.
Before closing the scheme read the note first that is display on the screen. Then select the scheme which is to be closed.
Then that selected scheme amount is display below. If that scheme amount is “0.00”, enter the voucher date and
description. Click on the ‘Delete’ button after clicking on that button the selected scheme has to be closed.

PanchaTantra
Ver–2.1, Rel–9.10 Dated: 10-09-2015 User Manual Page 157
If the selected scheme have an amount that amount is shown in the below screen.
Suppose if the selected scheme is to be closed then select the bank account for which the amount has to be transferred,
enter the voucher date and description. Click on the ‘Delete’ button after clicking on that button the selected scheme
has to be closed. Then the closed scheme amount has been transferred to the selected transfer bank account.

PanchaTantra
Ver–2.1, Rel–9.10 Dated: 10-09-2015 User Manual Page 158
10. Monthly or Annual Statements
You can access the various functionalities under Payments option (seeFigure 219).
Point to Payments. The list of sub-options appears.
Figure 219: Monthly/Annual Statements Options
10.1. Bank Reconciliation
The bank reconciliation process is one of the most important activities in the accounting system. The transaction details
with respect to bank account details in the panchayat cash book is compared with the actual bank passbook and
reconcile them, so that both the cash and bank passbooks are tallied.
Do the following tasks to complete the bank reconciliation process for the current financial year:
542. Click Bank Reconciliation. The Bank Reconciliation screen appears.
Figure 220: Bank Reconciliation Process Screen
543. Click Proceed. The following screen appears.
Figure 221: Bank Reconciliation Process
544. Select the account name from the Account drop-down list.
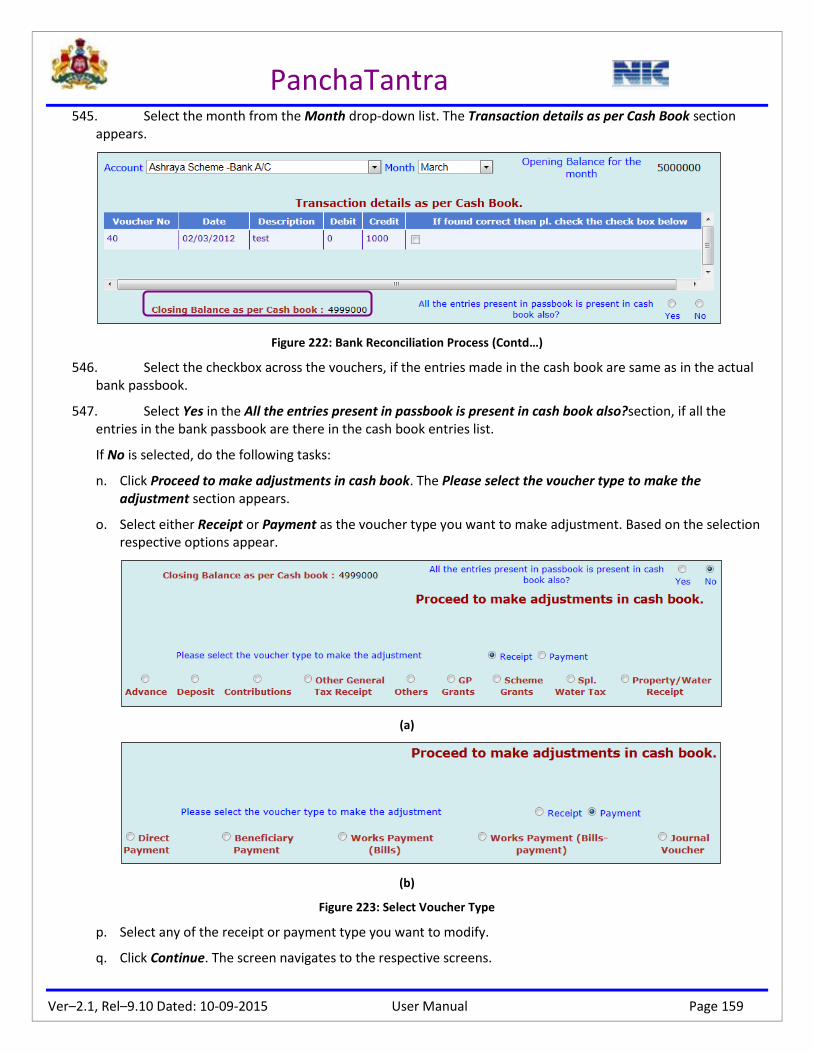
PanchaTantra
Ver–2.1, Rel–9.10 Dated: 10-09-2015 User Manual Page 159
545. Select the month from the Month drop-down list. The Transaction details as per Cash Book section appears.
Figure 222: Bank Reconciliation Process (Contd…)
546. Select the checkbox across the vouchers, if the entries made in the cash book are same as in the actual bank passbook.
547. Select Yes in the All the entries present in passbook is present in cash book also?section, if all the entries in the bank passbook are there in the cash book entries list.
If No is selected, do the following tasks:
n. Click Proceed to make adjustments in cash book. The Please select the voucher type to make the adjustment section appears.
o. Select either Receipt or Payment as the voucher type you want to make adjustment. Based on the selection respective options appear.
(a)
(b)
Figure 223: Select Voucher Type
p. Select any of the receipt or payment type you want to modify.
q. Click Continue. The screen navigates to the respective screens.

PanchaTantra
Ver–2.1, Rel–9.10 Dated: 10-09-2015 User Manual Page 160
r. Refer to the Receipts or Payments sections for more details on how to enter or modify the receipts or payments details.
s. Repeat from step 542 to complete the bank reconciliation process.
548. Click Proceed.
If any of the checkboxes across the vouchers are not selected, the highlighted section of the Figure 224 appears and you need to select a reason for the wrong entries from the Select a Reason drop-down list and click GO.
Figure 224: Bank Reconciliation Process (Contd…)
549. Click Proceed to generate BRS. The Enter Balance as per Pass Book field appears.
550. Enter the balance amount as per the bank pass book in the Enter Balance as per Pass Book field.
551. Click Submit. The balance details as highlighted in the following screen appear.
Figure 225: Bank Reconciliation Process (Contd…)
552. Verify the details whether the bank details are correct or not.
553. Click Save. The process is completed for the selected bank account and month.
554. Repeat the steps from 542 to 554 for all the bank accounts defined. Even if the water account is same for all the wards, you need to complete the bank reconciliation process for each account separately.
555. Click Main Page at the top-left end of the application screen to navigate to the main page.

PanchaTantra
Ver–2.1, Rel–9.10 Dated: 10-09-2015 User Manual Page 161
10.2. Previous Annual Statements
The previous annual statements represent the audits carried out by the auditors of the panchayat. You need to update
the un-audited figures, after the yearend process, with the audited figures for each of the ledgers. The three important
statements such as trial balance, income expenditure and balance sheet are audited by the auditors and then you need
to update the data into the system. Before saving the annual statements, make sure that all the details entered are
correct; because you cannot modify the details once the audit details are finalized and saved.
10.2.1 Previous Trial Balance
Do the following tasks to update the trial balance audit details:
556. Select Previous Annual Statementsand click Previous Trial Balance. The Trial Balance screen appears.
Figure 226: Audited or Un-Audited Trial Balance Details
557. Select Audited Trial Balance XXYY-(YY+1) [for example 2010-11] to view the audited trial balance report. By default, un-audited trial balance list appears.
558. Click Generate Pdf to save as a file or Exit to navigate to the main page.

PanchaTantra
Ver–2.1, Rel–9.10 Dated: 10-09-2015 User Manual Page 162
10.2.2 Previous IE Statement
Do the following tasks to update the income and expenditure audit details:
559. Select Previous Annual Statementsand click Previous IE Statement. The Income Expenditure screen appears.
Figure 227: Audited or Un-Audited Income Expenditure Details
560. Select Audited IE XXYY-(YY+1) [for example 2010-11].
561. Select Audited IE XXYY-(YY+1) [for example 2010-11] to view the audited income and expenditure report. By default, un-audited income and expenditure list appears.
562. Click Generate Pdf to save as a file or Exit to navigate to the main page.

PanchaTantra
Ver–2.1, Rel–9.10 Dated: 10-09-2015 User Manual Page 163
10.2.3 Previous Balance Sheet Statement
Do the following tasks to update the balance sheet audit details:
563. Select Previous Annual Statementsand click Previous Balance Sheet Statement. The Balance Sheet screen appears.
Figure 228: Audited or Un-Audited Balance Sheet Details
564. Select Audited Balance Sheet XXYY-(YY+1) [for example 2010-11].
565. Select Audited Balance Sheet XXYY-(YY+1) [for example 2010-11] to view the audited balance sheet report. By default, un-audited balance sheet list appears.
566. Click Generate Pdf to save as a file or Exit to navigate to the main page.

PanchaTantra
Ver–2.1, Rel–9.10 Dated: 10-09-2015 User Manual Page 164
Yearend Process
You need to take the trial balance, income expenditure statement and balance sheet reports of current year for your
reference. The bank reconciliation process must have been completed before processing the year end process. You can
also view and take photocopies of the trial balance, income expenditure and balance sheet reports by clicking the links
provided (see Figure 237).
Do the following tasks to complete the yearend process:
567. Login to the PanchaTantra application. The Year End Processing screen appears. Refer to Accessing the PanchaTantraApplication for more information on how to login to the PanchaTantra application.
Figure 229: Yearend Process
568. Make sure that the bank reconciliation process is completed and the trial balance, income expenditure statement, and balance sheet reports are taken for your reference.

PanchaTantra
Ver–2.1, Rel–9.10 Dated: 10-09-2015 User Manual Page 165
569. Click Proceed. The Year End Process screen appears. If you have already completed the bank reconciliation process the BRS checkbox is selected. The yearend process screens for each activity appear automatically one after the other.
Figure 230: Property Tax Yearend Process
570. Select Yes to proceed for entering the property tax yearend details in the Would you like to proceed with the Property Tax Yearend Processing?section. The following screen appears:
Figure 231: Property Tax Yearend Process (Contd…)
571. Select the village and the ward name from the available drop-down lists.
572. Click Proceed For Year End Processing. The property tax details are copied to next financial year and the Property Tax checkbox is selected.
Note: At this stage, all the properties details are copied from the current financial year to the next financial year and the opening balance for each property is computed for the next financial year based on the current year demand and payment details.
573. Select Yes to proceed for entering the works yearend details in the Would you like to proceed with the Works Yearend Processing?section. The following screen appears:
Figure 232: Works Yearend Process

PanchaTantra
Ver–2.1, Rel–9.10 Dated: 10-09-2015 User Manual Page 166
574. Click Proceed ForAssetization to complete the assetization process. The Work Complete screen appears.
Figure 233: Work Assetization Process
575. Perform the work closure process as explained in Closure of Work or Package.
576. Click Proceed For Yearend to complete the yearend process. The Deduction Details and Total Deductions to be paid sections appear.
Figure 234: Works Yearend Process
577. Click Select across the deduction type you want to make the payment. The Please select Account from which the payment has to be done and Deduction Payment sections appear.
Figure 235: Works Yearend Process (Contd…)
578. Click Select across the account type from which the payment is to be made.
579. Enter the payment details in the Deduction Payment section.

PanchaTantra
Ver–2.1, Rel–9.10 Dated: 10-09-2015 User Manual Page 167
580. Click Save.
581. Click Continue. The highlighted option in the following screen appears if there are deductions yet to be paid.
Figure 236: Works Yearend Process (Contd…)
582. Click YES if you want to carry these deductions to the next financial year. The following screen appears listing the work details for which the payment is not made.
Figure 237: Works Yearend Process (Contd…)

PanchaTantra
Ver–2.1, Rel–9.10 Dated: 10-09-2015 User Manual Page 168
583. Click Continue. The following screen appears listing the completed work with voucher details.
Figure 238: Works Yearend Process (Contd…)
584. Click Copy vouchers and work details to next financial year. The vouchers and work details for which complete payment is made are copied.
585. If there are works for which partial payment is made, the following screen appears.
Figure 239: Carry Over the Partial Paid Works

PanchaTantra
Ver–2.1, Rel–9.10 Dated: 10-09-2015 User Manual Page 169
586. Click Copy Partial Paid Works to Next Financial Year. The works for which partial payment is made are copied and the Works checkbox in the screen shown in Figure 239 gets selected. Alternatively, to make the payment, click Proceed to payments for these works(see Figure 240). The Bill Payment Details screen appears.
Figure 240: Bill Payment Process
587. Perform the bill payment process as explained in Bills Payment.
588. Select Yes to proceed for entering the GP assets yearend details in the Would you like to proceed with the GP Assets Yearend Processing?section. The following screen appears:
Figure 241: GP Assets Yearend Process

PanchaTantra
Ver–2.1, Rel–9.10 Dated: 10-09-2015 User Manual Page 170
589. Click Calculate Depreciation for the above assets. The depreciation for the listed GP assets is calculated and the following screen appears.
Figure 242: Copy GP Assets to Next Year
590. Click Copy above Assets to next financial year. The listed assets are copied to the next financial year and the list of GP revenue yielding properties appears.
Figure 243: Copy GP Revenue Yielding Property to Next Year
591. Click Copy all GP Revenue yielding property to next financial year. The GP revenue yielding property details are copied to the next financial year and the GP Assets checkbox in the screen shown in (Figure 242) gets selected.

PanchaTantra
Ver–2.1, Rel–9.10 Dated: 10-09-2015 User Manual Page 171
592. Select Yes to proceed for entering the income and expenditures, andassets and liabilities yearend details in the Would you like to proceed with the IE & AL Yearend Processing?section. The following screen appears:
Figure 244: Zeroing All Income and Expenditure Ledgers
593. Click Proceed across the Zero All Income and Expenditure ledgers section. The Income and Expenditure ledgers are zeroed or reset.
Figure 245: Copy All Assets and Liabilities
594. Click Proceed across the Copy all Assets and Liability Ledgers to the next financial year. The assets and liability details are copied to the next financial year and the login screen appears (see Figure1).
You have successfully completed the yearend process.