palm reader pro guide
DESCRIPTION
User's Guide to Palm Reader ProTRANSCRIPT

USER GUIDE
WINDOWSV2

Copyright Copyright © 2002 PalmSource, Inc. or its subsidiaries. All rights reserved. HotSync, Palm, and Palm OS are regis-tered trademarks of Palm, Inc. in one or more countries. The PalmSource logo is a trademark of PalmSource, Inc. Other product and brand names may be trademarks or registered trademarks of their respective owners.
Disclaimer and Limitation of Liability
PalmSource, Inc. and its subsidiaries assume no responsi-bility for any loss or claims by third parties which may arise through the use of this software or this guide.

CONTENTS
1 INTRODUCTIONAbout Palm™ Reader Pro 1–1Who Should Use Palm Reader Pro? 1–1System Requirements 1–1About this Guide 1–2Conventions 1–2
2 VIEWING EBOOKSStarting Palm Reader Pro 2–1Opening eBooks 2–2Displaying Facing Pages 2–5Displaying eBooks Using the Full Screen 2–6Changing How Text Displays 2–6Using Built-in Themes to Change Textures and
Colors 2–10Creating Themes 2–12Deleting Themes 2–17Sharing Themes 2–18
3 NAVIGATING THROUGH EBOOKSVisual Navigation Elements 3–1Turning Pages 3–3Following Links 3–8Searching for Text 3–12Using Bookmarks 3–13Highlighting Text 3–16

iv
Using Notes 3–21Using Reference Books 3–26Editing Text Selection Preferences 3–29
INDEX

1INTRODUCTION
About Palm™ Reader Pro
Welcome to Palm™ Reader Pro, a program that brings electronic books to your desktop computer. With Palm Reader Pro, you can read books in Palm Reader format and Palm Doc format. Both of these types of files end in the extension .pdb.
Who Should Use Palm Reader Pro?
Anyone with a desktop computer can use Palm Reader Pro. Thousands of titles are available from Palm Digital Media (www.palmdigitalmedia.com).
From within Palm Reader Pro, you can go directly to the Palm Digital Media website by selecting Get Books from the Help menu.
System Requirements
To run Palm Reader Pro on a computer running the Microsoft® Windows® operating system, you need:
■ A computer running Microsoft Windows 98, Windows ME, Windows NT 4.0, Windows 2000, or Windows XP
■ A hard drive with at least 11 MB of available disk space (2 MB for the application and 9 MB for this user guide)

1-2
C
HAPTER
1: I
NTRODUCTION
About this Guide This guide gives step-by-step instructions for reading eBooks in Palm Reader Pro. It describes the basics for working in the software, viewing an eBook, and navigat-ing through an eBook.
This guide assumes that you are familiar with the basic operations of your computer, such as opening and saving files, and clicking and dragging. If you are not familiar with these operations, see the documentation that came with your computer.
Conventions This guide uses the following conventions:
Single-step tasks An arrow in the left margin identifies a single-step task. For example:
➤ From the View menu, select Full Screen.
Nonessentialinformation
Information that is not essential to a task or to your understanding of the software is displayed in italics and preceded by the word Note. For example:
Note: To display information (such as ISBN or publisher) about an eBook you are reading, select Book Info from the View menu.
Keyboardshortcuts
In some places in the text, keyboard shortcuts are abbreviated. For example, the following abbreviation calls for you to hold down the Control key and press the letter f:
Control-f

2VIEWING EBOOKS
This chapter explains how to view eBooks using Palm Reader Pro. It covers:
■ Starting Palm Reader Pro, this page
■ Opening eBooks, page 2–2
■ Displaying Facing Pages, page 2–5
■ Displaying eBooks Using the Full Screen, page 2–6
■ Changing How Text Displays, page 2–6
■ Using Built-in Themes to Change Textures and Colors, page 2–10
■ Creating Themes, page 2–12
■ Deleting Themes, page 2–17
■ Sharing Themes, page 2–18
Starting Palm Reader Pro
Palm Reader Pro is located in the Palm Reader Pro folder.
To start Palm Reader Pro:
1 Open the Palm Reader Pro folder.
2 Double click the Palm Reader Pro icon:

2-2
C
HAPTER
2: V
IEWING
E
B
OOKS
Alternatively, from the Start menu, select Program Files, then Palm, and then Palm Reader Pro.
If you have previously used Palm Reader Pro, it opens the last book you had open, turning to the last page you viewed.
If you have not previously used Palm Reader Pro, you are prompted for an eBook to open. Follow steps 2 through 5 in the next section.
Opening eBooks Palm Reader Pro can open Palm Reader and Palm Doc files ending in the extension .pdb.
To open an eBook:
1 From the File menu, select Open.
You see the following dialog box:

Opening eBooks
2-3
2 Locate the eBook you want to read.
If the eBook you want to open is shaded out, it is not in a format that Palm Reader Pro can open.
3 Select the eBook and click Open.
If the eBook is not encrypted, Palm Reader Pro displays it in a new window. If the eBook is encrypted, you see the following dialog box:

2-4
C
HAPTER
2: V
IEWING
E
B
OOKS
4 To unlock the eBook, enter the purchaser’s name and unlock code (the credit card number used to purchase the eBook).
5 Click OK.
Palm Reader Pro displays the eBook in a new window, as in the following figure:
Note: To display information (such as ISBN or publisher) about an eBook you are reading, select Book Info from the View menu.

Displaying Facing Pages
2-5
Displaying Facing Pages
You can display facing pages in Palm Reader Pro. As with a printed book, this option allows you to see the left-hand and right-hand pages at the same time.
To display facing pages:
➤ From the View menu, select Two Pages.
The display changes so that the current page is dis-played alongside its facing page, as in the following fig-ure.
To return to the single page view, select Two Pages again from the View menu.
2-6
C
HAPTER
2: V
IEWING
E
B
OOKS
Displaying eBooks Using the Full Screen
While reading, you can choose to display only Palm Reader Pro by using the full screen for the application. This option allows you to concentrate on your eBook, eliminating distractions from other applications.
To display eBooks using the full screen:
➤ From the View menu, select Full Screen or press F11.
The current eBook appears in the center of your screen, which is otherwise dark gray except for the menu bar at the top of the screen.
To return to the normal view, select Full Screen again from the View menu or press Escape.
Changing How Text Displays
By default, eBooks display in Times New Roman with full justification and single-spacing between lines. The default font size varies depending on the size of your screen. You can:
■ Change the font family and size to any settings avail-able on your computer
■ Turn off full justification
■ Adjust the amount of space between lines

Changing How Text Displays
2-7
To change the font family, font size, or justification:
1 From the View Menu, select View Settings.
You see the following dialog box:
2 From the Font pop-up menu, select a font family.
The display area illustrates the styles (for example, under-lines, bold, and italic) of that font family.
3 Enter a font size in the Size field.
The display area illustrates the selected font size.
4 To turn off full justification (in other words, to have a jus-tified left margin and a ragged right margin), uncheck the Full Justification check box.

2-8
C
HAPTER
2: V
IEWING
E
B
OOKS
5 Click Apply.
The text of any currently open eBooks changes to reflect the new settings. Any eBooks you open will also appear with the new settings.
6 Click OK to close the dialog box.
To change the line spacing:
1 From the View Menu, select View Settings.
You see the following dialog box:
2 From the Line Spacing pop-up menu, select a new line spacing:
■ Tight — less than single-spacing
■ Normal (the default setting) — equivalent to single-spacing

Changing How Text Displays
2-9
■ Wide — equivalent to one-and-a-half spacing
■ Wider — equivalent to double-spacing
3 Click Apply.
The spacing of any currently open eBooks changes to reflect the new settings. Any eBooks you open will also appear with the new settings. In the following figure, the spacing is set to Wider. (To compare the same pages dis-played with normal spacing, see the figure on page 2–5.)
4 Click OK to close the dialog box.

2-10
C
HAPTER
2: V
IEWING
E
B
OOKS
Using Built-in Themes to Change Textures and Colors
You can choose from many different background textures and text colors (called themes) when reading an eBook. When you start Palm Reader Pro for the first time, the eBook is displayed using the Parchment theme: text appears brown on a golden background that resembles parchment paper, links appear in bright blue, and high-lighted text is shaded light brown. The eBook in the pre-vious figure illustrates the Parchment theme.
You can choose other built-in themes or create your own. To create themes, see page 2–12.
To download themes created by others (or to share your own), visit Theme Central on the Palm Digital Media website:
http://www.palmdigitalmedia.com/themes

Using Built-in Themes to Change Textures and Colors
2-11
The following table describes the built-in themes.
Built-In Themes
Theme Name Description
Plain Black text on a white background
Inverse White text on a black background
Parchment Brown text on a golden background
Canvas Black text on a textured creamy background
Marble Dark blue text on a marbled gray background
Note Paper Black text on a white lined background
Legal Pad Dark blue text on a yellow lined background
Torn Parchment Brown text on a golden background with rough edges
Sandstone Brown text on a striated light green background
Papyrus Brown text on a woven creamy background
Brushed Aluminum Dark green text on a striated gray background
Smoke and Mirrors Sky blue text on a light and dark gray background
Blue Denim Sky blue text on a woven dark blue background
Gothic Purple Lavender text on a checkered deep purple background
Deep Blue Sea Sky blue text on a medium purple background
Green Marble Light green text on a marbled dark green background
Sky Medium blue text on a white background with a left-hand border of white clouds against a blue sky
Molten Lava Medium yellow text on an orange and dark yellow back-ground
2-12
C
HAPTER
2: V
IEWING
E
B
OOKS
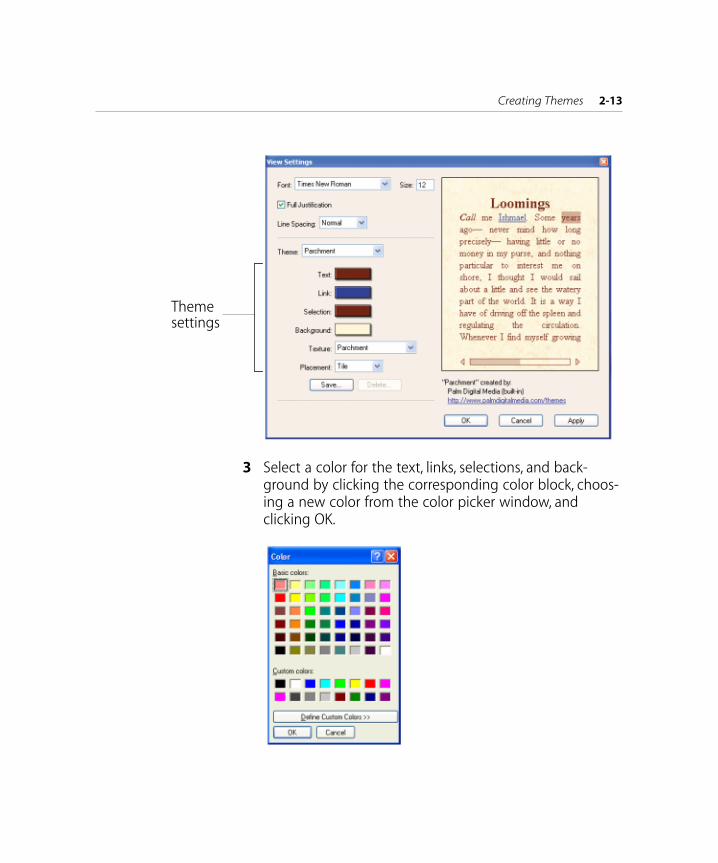
To choose a built-in theme:
1 From the View menu, select View Settings.
2 From the Theme pop-up menu, select a theme.
The display area illustrates how the book will appear using the new texture and text colors.
3 Click Apply.
The theme of any currently open eBooks changes to reflect the new settings. Any eBooks you open will also appear with the new settings.
4 Click OK.
Creating Themes In addition to the eighteen built-in themes provided with Palm Reader Pro, you can create an unlimited number of themes.
To create a new theme:
1 From the View menu, select View Settings.
2 From the Theme pop-up menu, select a theme to use as a starting point.
The settings for that theme are displayed, as in the fol-lowing figure.
Creating Themes
2-13
3 Select a color for the text, links, selections, and back-ground by clicking the corresponding color block, choos-ing a new color from the color picker window, and clicking OK.
Themesettings

2-14
C
HAPTER
2: V
IEWING
E
B
OOKS
The display area illustrates how the book will appear using the new colors.
4 Select a texture for the background:
a To use a built-in texture, select from the options in the Texture pop-up menu.
b To use your own background texture, select Other from the Texture pop-up menu and select an image from the dialog.
Note: Only PNG image files can be used as back-ground textures.
The display area illustrates how the book will appear using the new background.
5 From the Placement pop-up menu, select how you want the background texture to display:
a To repeat the texture until it fills up the background, select Tile. The number of times the texture will repeat depends on the size of the image.
b To use one instance of the texture stretched across the entire background, select Stretch.
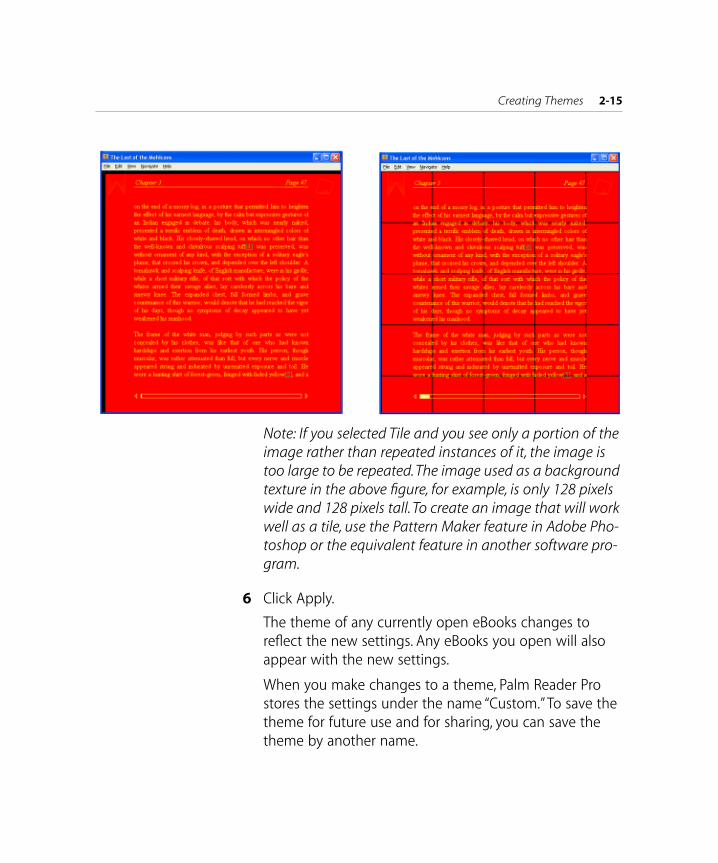
The display area illustrates how the book will appear using the placement option you have selected. The fol-lowing figure illustrates the difference between tiling and stretching background textures. Both versions use the same image (128 pixels by 128 pixels) as a background texture. The left-hand version has stretched the image, while the right-hand version has tiled it.
Creating Themes
2-15
Note: If you selected Tile and you see only a portion of the image rather than repeated instances of it, the image is too large to be repeated. The image used as a background texture in the above figure, for example, is only 128 pixels wide and 128 pixels tall. To create an image that will work well as a tile, use the Pattern Maker feature in Adobe Pho-toshop or the equivalent feature in another software pro-gram.
6 Click Apply.
The theme of any currently open eBooks changes to reflect the new settings. Any eBooks you open will also appear with the new settings.
When you make changes to a theme, Palm Reader Pro stores the settings under the name “Custom.” To save the theme for future use and for sharing, you can save the theme by another name.

2-16
C
HAPTER
2: V
IEWING
E
B
OOKS
7 To save a theme, click Save.
You see the following dialog box:
8 In the dialog box, enter the theme name. If you want to share the theme with others (see “Sharing Themes” on page 2-18), you may want to enter your name (in the Cre-ated By field) and a web location (in the URL field) where others can find the theme, as in the following figure:
9 Click Save.
The name of the theme, along with the creator and URL (if provided) appear in the display area of the View Set-tings dialog box whenever the theme is selected, as in the following figure:
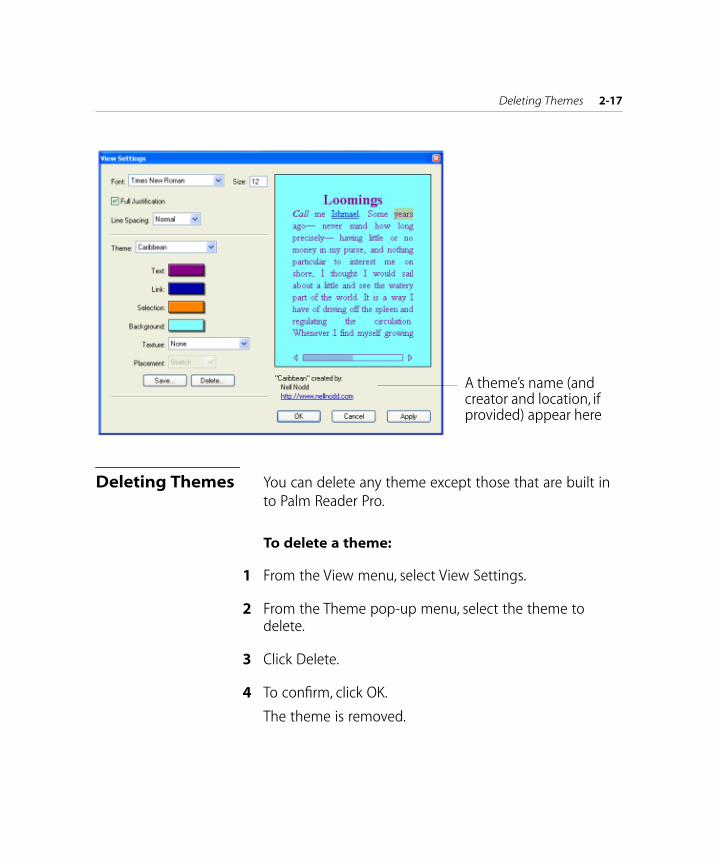
Deleting Themes
2-17
Deleting Themes You can delete any theme except those that are built in to Palm Reader Pro.
To delete a theme:
1 From the View menu, select View Settings.
2 From the Theme pop-up menu, select the theme to delete.
3 Click Delete.
4 To confirm, click OK.
The theme is removed.
A theme’s name (andcreator and location, ifprovided) appear here

2-18 CHAPTER 2: VIEWING EBOOKS
Sharing Themes After creating themes, you can share them with others. You can send them by email, publish them on your own website, or post them at Palm Digital Media.
To download themes created by others (or to share your own), visit Theme Central on the Palm Digital Media website:
http://www.palmdigitalmedia.com/themes

3NAVIGATING THROUGH EBOOKS
This chapter explains how to move around in an eBook in Palm Reader Pro. It describes:
■ Visual Navigation Elements, this page
■ Turning Pages, page 3–3
■ Following Links, page 3–8
■ Searching for Text, page 3–12
■ Using Bookmarks, page 3–13
■ Highlighting Text, page 3–16
■ Using Notes, page 3–21
■ Using Reference Books, page 3–26
■ Editing Text Selection Preferences, page 3–29
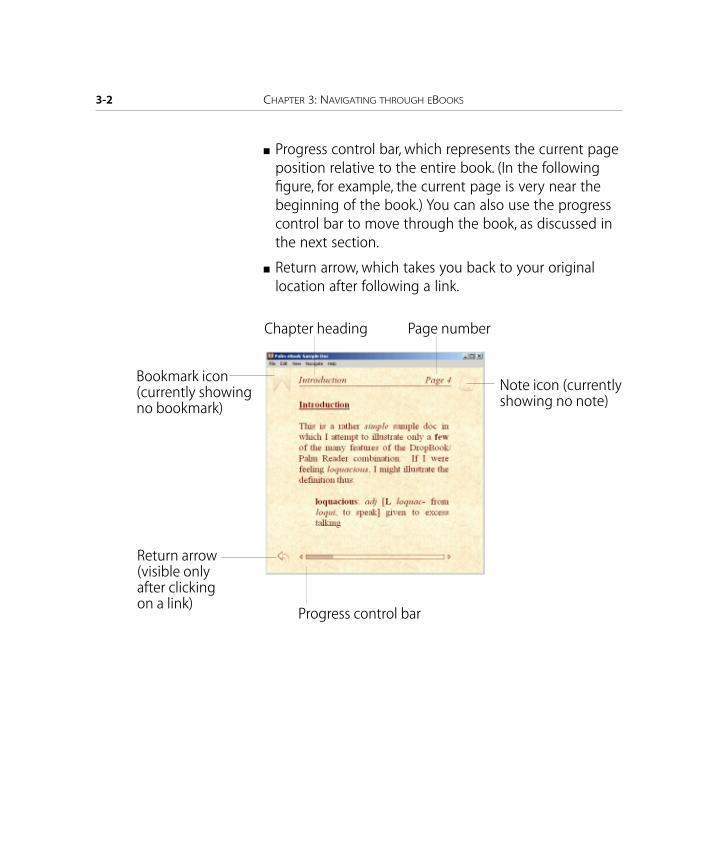
Visual Navigation Elements
Palm Reader Pro uses several visual elements to help you find your location within an eBook:
■ Chapter headings, which you can click on to move to another chapter
■ Page numbers, which you can click on to move to another page
■ Bookmarks, which you can add and remove (see page 3–13)
■ Notes, which you can add and remove (see page 3–21)
3-2 CHAPTER 3: NAVIGATING THROUGH EBOOKS
■ Progress control bar, which represents the current page position relative to the entire book. (In the following figure, for example, the current page is very near the beginning of the book.) You can also use the progress control bar to move through the book, as discussed in the next section.
■ Return arrow, which takes you back to your original location after following a link.
Bookmark icon
Progress control bar
Page number
(currently showingno bookmark)
Return arrow(visible only
Chapter heading
Note icon (currentlyshowing no note)
after clickingon a link)

Turning Pages 3-3
Turning Pages You can page through an eBook using the visual naviga-tion elements, the Navigate menu, and the keyboard. You can also configure Palm Reader Pro to turn pages when you click on the page.
Turning Pages Using Visual Navigation Elements
You can click on the chapter heading or page number to go to another chapter or page. You can also navigate using the progress control bar at the bottom of the eBook, which shows the position of the current page in relation to the rest of the eBook. These options are sum-marized in the following table.

3-4 CHAPTER 3: NAVIGATING THROUGH EBOOKS
Navigating with the Visual Navigation Elements
To… Do this…
Go to the beginning of a specific chapter
Click the chapter heading at the top of the page. In the Table of Contents dialog box, click the chapter and click OK.
Go to a specific page Click the page number at the top of the page. In the Go to Page dialog box, enter the page number and click OK.
Move forward one page Click the right arrow on the progress control bar
Move backward one page
Click the left arrow on the progress control bar
Move steadily forward through the eBook, one page at a time
Click and hold the right arrow on the progress control bar
Move steadily backward through the eBook, one page at a time
Click and hold the left arrow on the progress control bar
Jump to an approximate place in the eBook
Click inside the progress control bar where you want to move (for example, click the center of the bar to move to the middle of the eBook)
Thumb through the eBook
Click and drag the progress control bar

Turning Pages 3-5
Turning Pages Using the Navigate Menu
You can move to specific places in the eBook using the Navigate menu, as summarized in the following table.
Navigating with the Navigate Menu
To go to…Select this option from the Navigate menu And then…
A specific page number Go To Page (keyboard shortcut: Control-j)
Enter the page number and click OK.
A specific chapter Go To Chapter (keyboard short-cut: Control-d)
Select the chapter and click OK.
The first page Go To First Page (keyboard shortcut: Control-1)
The last page Go To Last Page (keyboard shortcut: Control-e)
3-6 CHAPTER 3: NAVIGATING THROUGH EBOOKS
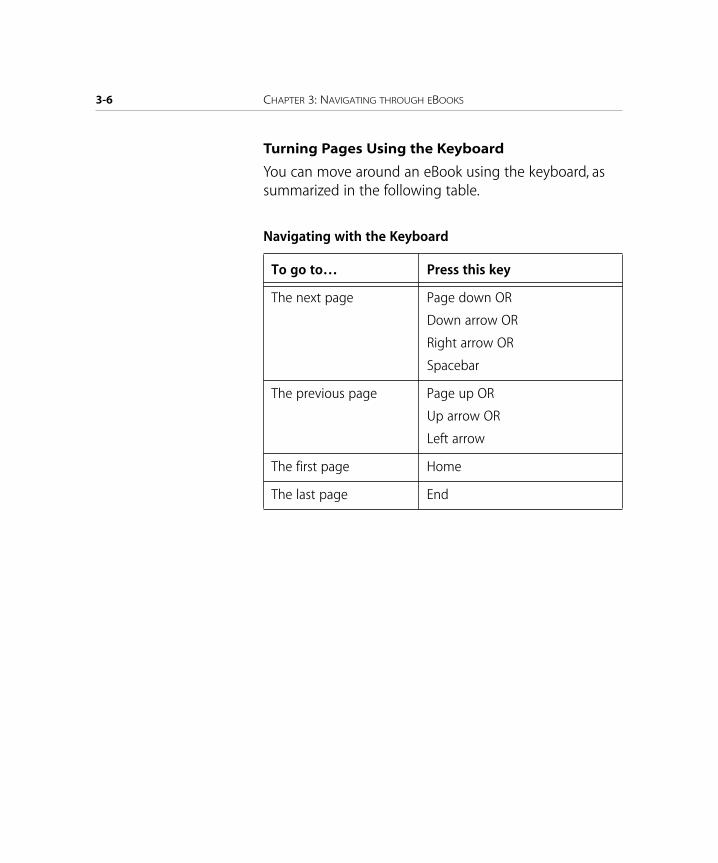
Turning Pages Using the Keyboard
You can move around an eBook using the keyboard, as summarized in the following table.
Navigating with the Keyboard
To go to… Press this key
The next page Page down OR
Down arrow OR
Right arrow OR
Spacebar
The previous page Page up OR
Up arrow OR
Left arrow
The first page Home
The last page End

Turning Pages 3-7
Turning Pages by Clicking on the Page
You can configure Palm Reader Pro so that you can move forward and backward by clicking the page.
1 From the Edit menu, select Preferences.
2 To enable page turning by clicking on pages, check the box at the top of the dialog box.
3 Select the page turning option you prefer:
a To turn pages by clicking the top or bottom of the screen to go backwards or forwards respectively, click the left-hand image at the top of the dialog box. Using this option, clicking the top half of the screen turns pages backward, while clicking the bottom half of the screen turns pages forward.
b To turn pages by clicking the left or right half of the screen to go backwards or forwards respectively, click the right-hand image. Using this option, clicking the left hand of the screen turns pages backward, while clicking the right half of the screen turns pages for-ward.
4 Click OK.
3-8 CHAPTER 3: NAVIGATING THROUGH EBOOKS
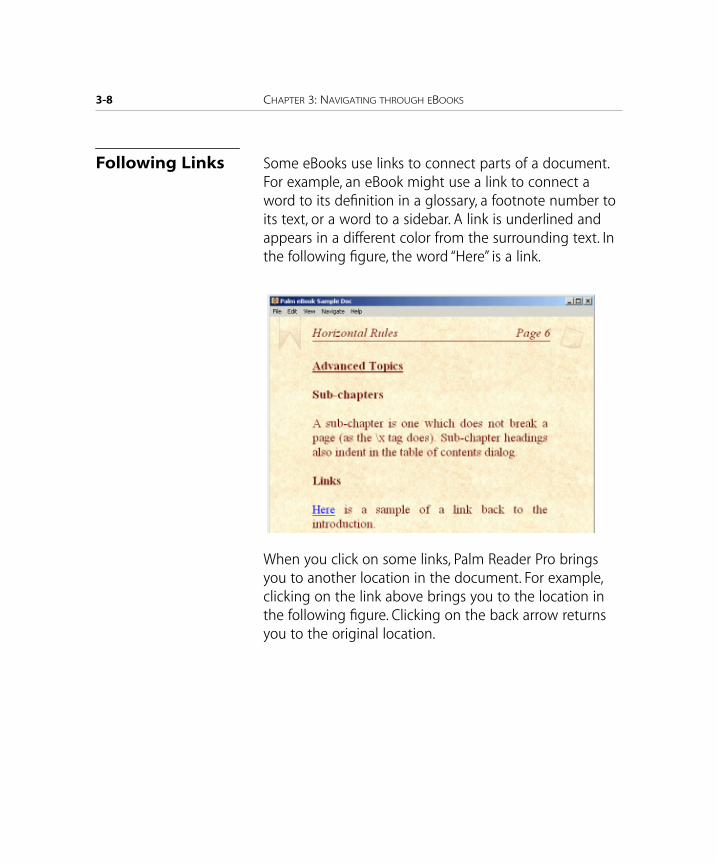
Following Links Some eBooks use links to connect parts of a document. For example, an eBook might use a link to connect a word to its definition in a glossary, a footnote number to its text, or a word to a sidebar. A link is underlined and appears in a different color from the surrounding text. In the following figure, the word “Here” is a link.
When you click on some links, Palm Reader Pro brings you to another location in the document. For example, clicking on the link above brings you to the location in the following figure. Clicking on the back arrow returns you to the original location.
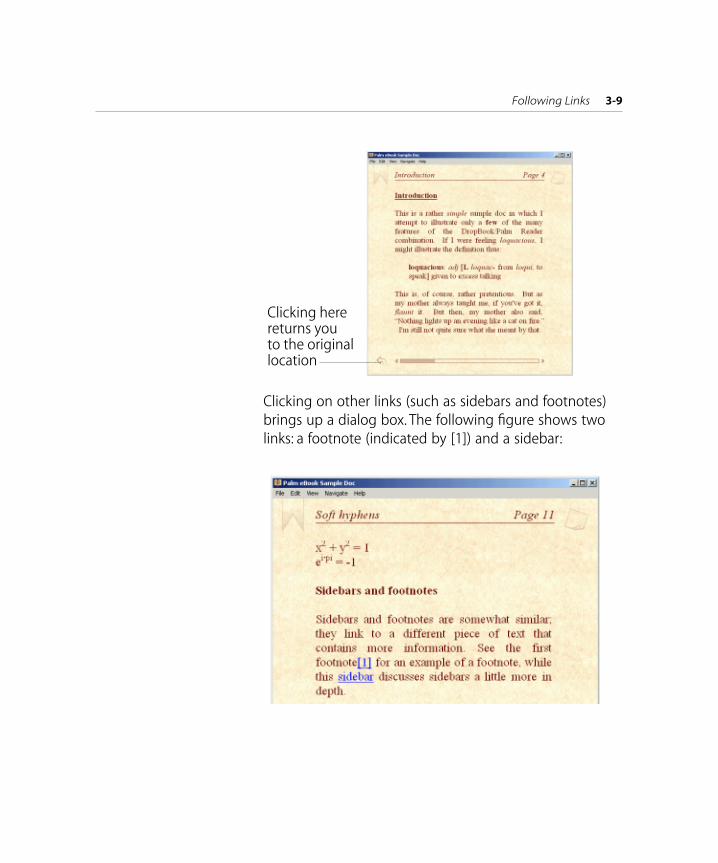
Following Links 3-9
Clicking on other links (such as sidebars and footnotes) brings up a dialog box. The following figure shows two links: a footnote (indicated by [1]) and a sidebar:
Clicking herereturns you to the originallocation

3-10 CHAPTER 3: NAVIGATING THROUGH EBOOKS
Clicking on the footnote link brings up the following dialog box, which contains the text of the footnote:

Following Links 3-11
Clicking on the sidebar link brings up another dialog box, which contains the text of the sidebar:
To follow a link:
➤ Click on text identified as a link (underlined and in a color different from the surrounding text).
To return to your original place in an eBook:
➤ Click on the back arrow.
3-12 CHAPTER 3: NAVIGATING THROUGH EBOOKS
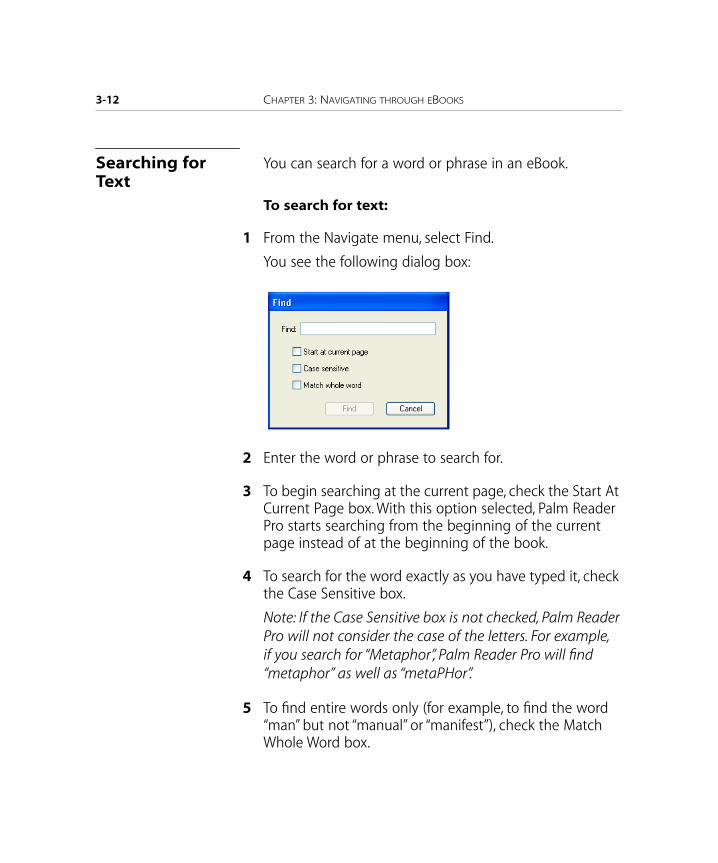
Searching for Text
You can search for a word or phrase in an eBook.
To search for text:
1 From the Navigate menu, select Find.
You see the following dialog box:
2 Enter the word or phrase to search for.
3 To begin searching at the current page, check the Start At Current Page box. With this option selected, Palm Reader Pro starts searching from the beginning of the current page instead of at the beginning of the book.
4 To search for the word exactly as you have typed it, check the Case Sensitive box.
Note: If the Case Sensitive box is not checked, Palm Reader Pro will not consider the case of the letters. For example, if you search for “Metaphor”, Palm Reader Pro will find “metaphor” as well as “metaPHor”.
5 To find entire words only (for example, to find the word “man” but not “manual” or “manifest”), check the Match Whole Word box.

Using Bookmarks 3-13
6 Click Find.
7 To find the same text again, select Find Next from the Navigate menu.
Note: Palm Reader Pro beeps when it has reached the end of an eBook. To continue the search from the beginning of the eBook, select Find Next.
Using Bookmarks
As with a printed book, you can use a bookmark to save your place. You can use an unlimited number of book-marks within an eBook.
To add a bookmark:
1 Go to the page where you want to add a bookmark.
2 From the Navigate menu, select Add Bookmark.
Alternatively, you can click the bookmark icon in the upper left-hand corner of the page, shown in the follow-ing figure.
Click hereto add abookmark

3-14 CHAPTER 3: NAVIGATING THROUGH EBOOKS
The icon extends and darkens to indicate a bookmark, as in the following figure:
To go to a bookmark:
1 From the Navigate menu, select Bookmarks.
You see the following dialog box:
The iconchanges toindicate theaddition of abookmark

Using Bookmarks 3-15
2 Select the bookmark for the location of where you want to go.
3 Click OK.
Palm Reader Pro goes to the location of the bookmark.
To remove a bookmark:
1 From the Navigate menu, select Bookmarks.
You see the following dialog box:
2 Select the bookmark to remove.
3 Click Remove.
4 Click OK.
3-16 CHAPTER 3: NAVIGATING THROUGH EBOOKS
The bookmark is removed.
Note: If you are already at the location of a bookmark you want to remove, you can remove it by clicking the book-mark icon or by selecting Remove Bookmark from the Navigate menu.
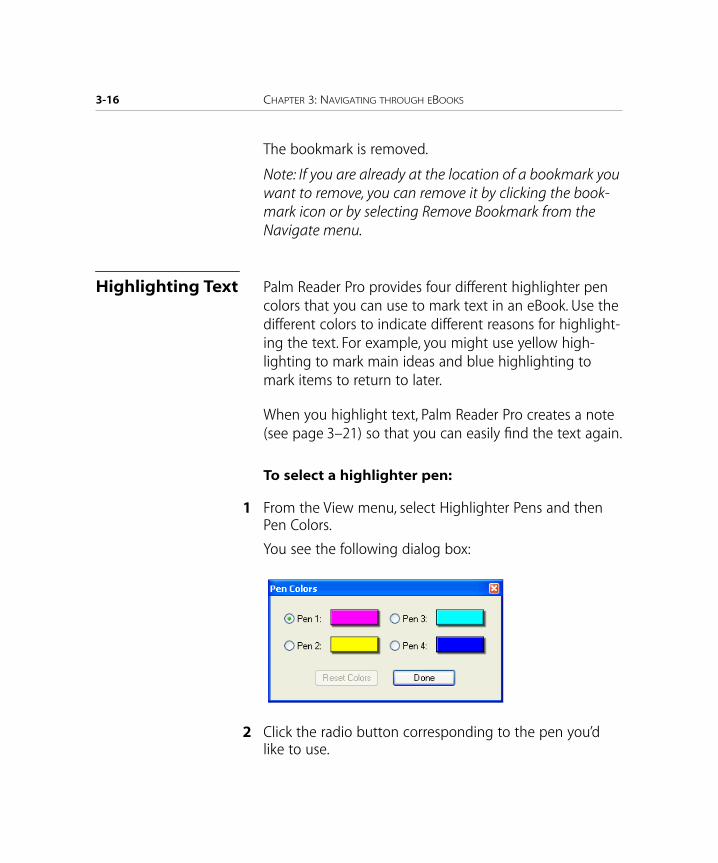
Highlighting Text Palm Reader Pro provides four different highlighter pen colors that you can use to mark text in an eBook. Use the different colors to indicate different reasons for highlight-ing the text. For example, you might use yellow high-lighting to mark main ideas and blue highlighting to mark items to return to later.
When you highlight text, Palm Reader Pro creates a note (see page 3–21) so that you can easily find the text again.
To select a highlighter pen:
1 From the View menu, select Highlighter Pens and then Pen Colors.
You see the following dialog box:
2 Click the radio button corresponding to the pen you’d like to use.

Highlighting Text 3-17
3 Click Done.
Note: You can also choose a highlighter pen by selecting Highlighter Pens from the View menu and then choosing the pen by number.
To change the color of a highlighter pen:
1 From the View menu, select Highlighter Pens and then Pen Colors.
You see the following dialog box:
2 Click the colored rectangle corresponding to the pen you’d like to change.
3 Select a new color from the color picker, as in the follow-ing figure.

3-18 CHAPTER 3: NAVIGATING THROUGH EBOOKS
Note: When you change the color of a highlighter pen, all text in the eBook that has been highlighted using that pen changes to the new color.
4 Click OK.
5 Click Done.
The color is changed and the pen becomes the default highlighter.

Highlighting Text 3-19
To reset pen colors to their default settings:
1 From the View menu, select Highlighter Pens and then Pen Colors.
If any of the pen colors is different from its default set-ting, the Reset Colors button is available, as in the follow-ing dialog box:
2 Click Reset Colors.
3 To return all pens to their default settings, click OK.
To highlight text:
1 Select a highlighter pen to use (see page 3–16).
2 Select the text to highlight by clicking and dragging.
When you release the mouse, a contextual menu is dis-played.
Note: You can configure Palm Reader Pro so that this con-textual menu is not displayed when you select text. Instead, selecting text instead always performs the same action (looking up a selection in a reference work, high-lighting the selection, or adding a note to the selection). See page 3–29 for more information.

3-20 CHAPTER 3: NAVIGATING THROUGH EBOOKS
3 From the contextual menu, select Highlight.
The text is highlighted using the selected highlighter pen. In the upper right-hand corner of the page, the note icon darkens to indicate that a note has been created, as in the following figure (see page 3–21 for information about using notes).
Note: To remove highlighting, you must delete the note that was created when the text was selected. See page 3–25 for instructions on removing notes.
The iconchanges toindicate theaddition of anote
The text appears in thecolor of the selectedhighlighter pen

Using Notes 3-21
Using Notes As you read, you can make notes and attach them to spe-cific locations in the eBook.
To add a note:
1 Go to the page where you want to add a note.
2 Highlight the text to which to attach the note.
When you release the mouse, a contextual menu is dis-played.
3 Select Add Note from the contextual menu, as in the fol-lowing figure:
Note: You can configure Palm Reader Pro so that this con-textual menu is not displayed when you select text. Instead, selecting text instead always performs the same action (looking up a selection in a reference work, high-

3-22 CHAPTER 3: NAVIGATING THROUGH EBOOKS
lighting the selection, or adding a note to the selection). See page 3–29 for more information.
A dialog box similar to the following appears:
Palm Reader Pro uses the first few words of the high-lighted text as the name of the note. To make the note easy to distinguish from other notes, you can give it a new name.
4 If you like, enter a new name in the Name field.

Using Notes 3-23
The new name is reflected in the list of Notes, as in the following figure:
5 Enter any additional text in the Note field.
The following figure shows additional text for the note:

3-24 CHAPTER 3: NAVIGATING THROUGH EBOOKS
6 Click Done.
The note is added, indicated by the highlighted text and the darkened note icon in the upper right-hand corner of the page, as shown in the following figure:
To edit a note:
1 From the Navigate menu, select Notes.
Alternatively, click the note icon in the upper right-hand corner of any page.
You see a dialog box that lists all the notes in the eBook, as in the following figure:
The iconchanges toindicate theaddition of anote
The text attached tothe note ishighlighted

Using Notes 3-25
2 Select the note to edit.
3 Edit the Name of the note in the Name field, or the text of the Note in the Note field.
4 Click Done.
Note: To edit a note, you can also right-click on high-lighted text and select Edit Note from the contextual menu.
To remove a note:
1 From the Navigate menu, select Notes.
Alternatively, click the note icon in the upper right-hand corner of any page.
2 In the dialog box, select the note to remove.
3 Click Remove.

3-26 CHAPTER 3: NAVIGATING THROUGH EBOOKS
4 To confirm the deletion, click OK.
5 Click Done.
Note: To remove a note, you can also right-click on high-lighted text and select Remove Note from the contextual menu.
Using Reference Books
While you are reading, Palm Reader Pro allows you to look up words in dictionaries or thesauruses. You may find it convenient to leave both a dictionary and a the-saurus open whenever you are reading.
To use this feature, you need to have a dictionary or the-saurus in Palm Reader format. You can purchase refer-ences books at http://www.palmdigitalmedia.com/.
To look up a selection in a reference book:
1 Select the text to look up by clicking and dragging.
When you release the mouse, a contextual menu is dis-played.
Note: You can configure Palm Reader Pro so that this con-textual menu is not displayed when you select text. Instead, selecting text instead always performs the same action (looking up a selection in a reference work, high-lighting the selection, or adding a note to the selection). See page 3–29 for more information.

Using Reference Books 3-27
2 From the contextual menu, select Look Up, as in the fol-lowing figure.
Palm Reader Pro looks up the selection in the last refer-ence book (dictionary or thesaurus) you had open. If the reference book contains the selection, a new window dis-plays it, as in the following figure:
If you have never opened a reference book in Palm Reader Pro, you are prompted to select one.

3-28 CHAPTER 3: NAVIGATING THROUGH EBOOKS
Note: If Palm Reader Pro opens a different reference book than the one you expect (for example, a thesaurus rather than a dictionary), open the reference book you want to use by selecting Open from the File menu. Then begin again with Step 1 on page 3–26.
3 If prompted, select a reference book to open:
a To select a reference book, click OK. If you don’t have a reference book, click Cancel.
You can purchase reference books at http://www.palmdigitalmedia.com/.
b In the Open dialog box, locate the reference book to use and click Open.
4 If the reference book does not find the exact selection, you can select from the closest matches, as in the follow-ing figure:
Select from the closest matches

Editing Text Selection Preferences 3-29
Editing Text Selection Preferences
When you select text, a contextual menu offers you sev-eral options. You can look the selection up in a reference work, highlight the selection, or attach a note, as illus-trated in the following figure:
You can configure Palm Reader Pro so that this contex-tual menu is not displayed. Instead, selecting text always performs one of these three options (looking up a selec-tion in a reference work, highlighting the selection, or attaching a note), as you specify.
To specify an action to perform when selecting text:
1 From the Edit menu, select Preferences.
2 In the lower half of the dialog box, click the radio button corresponding to the action you prefer.

3-30 CHAPTER 3: NAVIGATING THROUGH EBOOKS
3 Click OK.
Note: You can always display the contextual menu, regardless of the preference settings, by using the right mouse button to select text.

INDEX 1
INDEX
Aadding
bookmarks 3–13notes 3–21
Bbackground, changing 2–10bookmark icon 3–1bookmarks
adding 3–13going to 3–14removing 3–15
Cchanging
background 2–10font 2–7justification 2–7
conventions 1–2
Ddictionary, using a 3–26displaying
facing pages 2–5using the full screen 2–6
EeBooks
buying 1–1encrypted 2–3opening 2–2unlocking 2–3
editing notes 3–24encrypted eBooks 2–3
Ffile types 2–2font, changing 2–7
Hhighlighting text 3–16
Jjustification, changing 2–7
Lline spacing 2–8links 3–8
Nnavigation
visual elements 3–1notes
adding 3–21editing 3–24removing 3–25
Oopening eBooks 2–2

2 INDEX
Ppages
displaying two at once 2–5turning 3–3
Palm Reader Prostarting 2–1
pen colors 3–17preferences
page turning 3–7text selection 3–29
progress control bar 3–1
Rremoving
bookmarks 3–15notes 3–25themes 2–17
Ssearching for text 3–12starting Palm Reader Pro 2–1system requirements 1–1
Ttext
default 2–6highlighting 3–16searching 3–12
themescreating 2–12deleting 2–17sharing 2–18using built-in 2–10
thesaurus, using a 3–26turning pages 3–3
Uunlocking eBooks 2–3