pallet project: wine storage system and finishing technique
DESCRIPTION
This publication outlines the step by step instructions for building and faux finishing a wine storage system, made from individual crates and meant to replicate repurposed used wooden pallets . You can modify this plan to accomodate scraps of boards you have, left over from other projects, or purchase new boards. A detailed tutorial for creating an aged, worn, and weathered finish is included along with construction plans, and is meant to mimic the natural progression of pallets used for commercial purposes.TRANSCRIPT
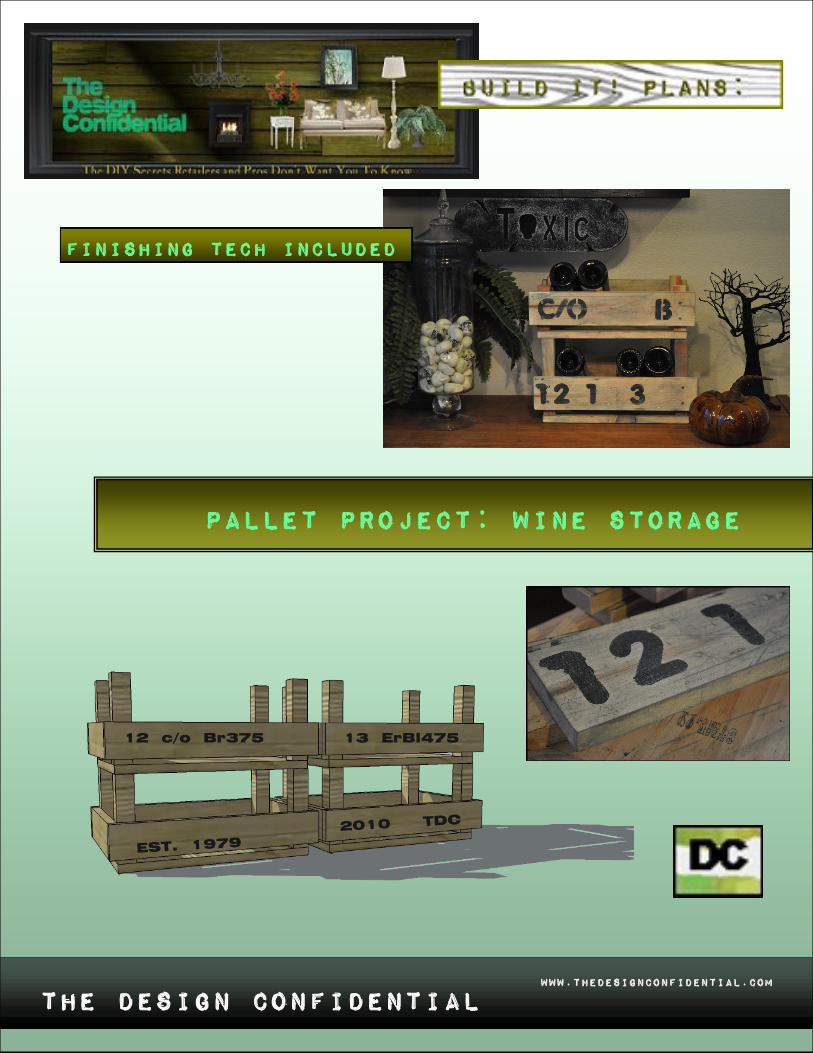
Pallet Project: wine storage
The Design Confidential Www.thedesignconfidential.com
12 c/o Br375 13 ErBl475
EST. 1979
2010 TDC
Finishing tech included

Pallet Project: wine Storage
Tape Measure
Sander
Saw Drill Hammer - optional Paint brush - any kind xill do. 1 1/2” or so is best.
Wood:
These measurements will yield 2 wine crates
1 - 1w3 at 10’ (can also use 1x4 or a combination of 1x3 and 1x2 for sides) 1 - 2w2 at 6’ (can also use 1w2’s in an L Shape in each corner) 1 - 1w10 at 36” (Can also use 3/4” or 1/2” ply, even a 1x10)
1 1/2” xood screws 1 1/2” nails - optional for creating a more realistic look Sandpaper
Black craft paint Light blue/green/gray paint Brownish red or orange paint
Www.thedesignconfidential.com

Begin by beating and marking your boards. Try not to make an accidental pattern that makes your damage appear contrived or forced. Use a chisel, screw driver, hammer (only a couple of these, since hammer marks are relatively circular and stand out, they look contrived easily), screws, even your drill. Do more markings on some boards than others and create a story for your pieces. If the front board was scraped by a fork lift, your back boards would not likely have the exact same markings, in the same areas. Just something to keep in mind. Less is more here, but some is a definite necessity! You will want to sand any rough edges, and create a rounded corner or edge here and there, since wearing usually softens edges. Leave any stampings or markings that come on your boards, these suit our purpose well, and should be placed in visible locations on your crate, whenever possible. Hold the board you are paining in one hand, and your brush in the other, and turn over on end, to cover all edges and sides. If you Use some of your boards as drying surfaces for setting the freshly finished boards, you may get a few random Markings, on the drying boards that lend to the overall look (see step 4 for an example of mine in blue). go slow, start with less, and build and layer your finish. this technique doesn’t lend itself to correction very easily, xithout sanding off and starting at the beginning again (though if you need to…you can always do so)
Www.thedesignconfidential.com
Finishing tech
Step 1: Proceed to the cut list on page 8, cut your boards to size and then return here to proceed with the finish

Using your stencils and black craft paint (make sure this is acrylic craft paint or flat latex interior paint), create a seemingly random or commercial pattern of letters and numbers. Feel free to use letters or numbers with meaning but attempt to place them in a way that makes it possible they are used for tracking or belong to a company in some way. Stippling or pouncing your brush up and down is the best way to use stencils because you tend to have less seepage under the edges and you don’t risk accidentally having your brush slide under an edge and create a totally different thing than you intended. Stencil lightly because you want this to ultimately appear worn, but we will be helping that along in a later step, so not to worry if your stencil turns out nice and dark.
Www.thedesignconfidential.com
Step 2:
Finishing tech

Www.thedesignconfidential.com
With the leftover paint from stenciling still on your brush (wipe off your brush and remove excess paint if you have quite a bit on your brush), you will lightly dry brush your boards on all sides. Now I really mean lightly here. A light touch and a very small (teeny tiny) amount of paint is required for this, and you will gently sweep your brush across the surfaces and edges, keeping a light sweeping and random pattern to your brush strokes. This will build up on the edges and will highlight your markings while giving your boards a bit of that dirty and worn appearance. It will also set the stage for that grayish brownish color happening on used pallets. You do not want your brush marks to be noticeable, and instead want it to merely look dirty and grimy, a bit dingy if you xill. Don’t xorry too much if this ends up a bit dark in places, or if you end up with unnatural looking marks as I did in the image above, along the top edge of the bottom board. It will add to the character and work itself out later.
Step 3:
Finishing tech
Www.thedesignconfidential.com
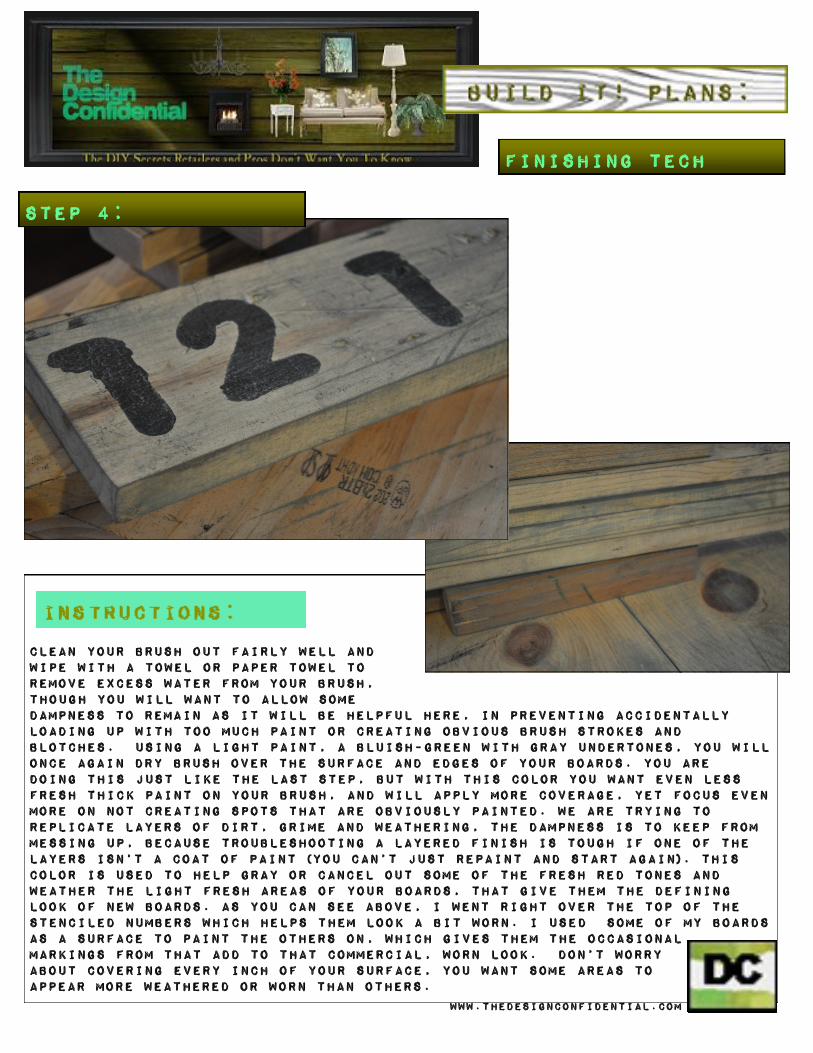
Clean your brush out fairly well and wipe with a towel or paper towel to remove excess water from your brush, though you will want to allow some dampness to remain as it will be helpful here, in preventing accidentally loading up with too much paint or creating obvious brush strokes and blotches. Using a light paint, a bluish-green with gray undertones, you will once again dry brush over the surface and edges of your boards. You are Doing this just like the last step, but with this color you want even less fresh thick paint on your brush, and will apply more coverage, yet focus even more on not creating spots that are obviously painted. we are trying to replicate layers of dirt, grime and weathering, the dampness is to keep from messing up, because troubleshooting a layered finish is tough if one of the layers isn’t a coat of paint (you can’t just repaint and start again). This color is used to help gray or cancel out some of the fresh red tones and weather the light fresh areas of your boards, that give them the defining look of new boards. As you can see above, I went right over the top of the stenciled numbers which helps them look a bit worn. I used some of my boards as a surface to paint the others on, which gives them the occasional markings from that add to that commercial, xorn look. Don’t xorry about covering every inch of your surface, you want some areas to appear more weathered or worn than others.
Step 4:
Finishing tech

Www.thedesignconfidential.com
Now we are actually going to create a wash, a very, very watery and diluted wash, that is one small drop of paint and a brush full of water, smeared and mixed around. This needs to be a medium toned orangey, red, brown, color. It may seem weird to add the color back in, that we just canceled out, however we are adding it back in a way that makes it appear as though the boards have aged, perhaps gotten wet several times, and all after it was marked up, labeled and covered in grease and grime. This needs to be lightly washed over the surfaces, paying special attention to wash areas you may have applied too much of your blue color and avoiding those areas of your boards that are already red naturally. Also be sure to pay special attention to any areas that are still light from being missed in the previous 2 steps. Above you can see how watery I have made my concoction, and In the image showing my washing, I purposely focused the left edge of the board and skipped the already red tones area above the knot. it isn’t an ewtreme result or very obvious, but you just xon’t have light and dirty boards very often, so this is a necessary step. just lightly xet your boards, in areas on each surface and edge, you don’t need to cover every inch, and should skip sections here and there since boards age in non-uniform pattern.
Step 5:
Finishing tech

The Design Confidential
Use either a drill and screxs or hammer and nails to attach your 2w2’s in each corner of the bottom board. They will sit flush with the outside edges of your bottom, directly on the corners. **Leave no more than 1/2” betxeen the top of the bottom board and the bottom of the front, back and side boards Attach your surrounding boards to the corner supports and each other, using either screws or nails.
2 - 1x3 at 18 1/2" (front back boards)
2 - 1w3 at 9 1/4” (side boards) 4 - 2w2 at 7 1/2” (corner supports - can be taller if you will be using larger bottles or larger scraps for front boards) 1 - 1w10 at 17” (bottom - can be plyxood at 9 1/4” w 17”. Any xider than 9 1/4” and your bottles xill be too short and will not sit properly)
Www.thedesignconfidential.com
Wine crate storage

Disclaimer:
For questions or comments, please visit my site:
Disclaimer: Some rights reserved. The information provided herein is intended for PERSONAL AND PRIVATE use only. Plans from this publication are not to be used for commercial purposes, REPREINTED, or republished without the express written consent of the publisher, Rayan Turner. All plans, materials lists, processes and graphics are considered to be the sole property of rayan turner, and is FOR THE GENERAL PURPOSE OF DOCUMENTING AND SHARING her PERSONAL EXPERIENCES, CREATIVE ENDEAVORS, AND INSPIRATION WITH THOSE INDIVIDUALS WHO SHARE this COMMON INTEREST AND ARE OF A LIKE-MIND, Any information is OFFERED SOLEY FOR THE ENJOYMENT AND ENTERTAINMENT OF SAID INDIIVIDUALS, Please be advised that any persons electing to build a plan shared by the publisher, do so at their own risk, and are thereby assuming full and complete responsibility for their safety and the integrity or stability of the piece. Prior to building, all individuals should understand basic carpentry concepts, procedures, and techniques to the extent they have the knowledge and foresight to recognize a possible inaccuracy, that may compromise the integrity or stability of a project, Accordingly they should have the ability to troubleshoot and modify plans as needed, and according to best building practices, to ensure the finished product is safe, stable, and well made. THE INFORMATION CONTAINED HEREIN should NOT TO BE construed as indicating a claim of expertise, or advise-ment, and that any information is subject to change or be modified at any point, for any reason. Changes made to a publication may include, but not be limited to, a change in readily available materials, new technologies, or any other factor that may alter the method of construction, the publisher wishes to feature. The publisher’s intent is to provide consistently accurate plans, depicting one possible building process, for a particular project, and for which there may be many alternative methods of construction. The publisher strives to provide well detailed descriptions, that are properly outlined, with accompanying graphics, and helpful personal insights throughout. however, there can be no guarantee of accuracy for any plan as Not every plan published, has been built and tested, Please contact the publisher immediately, if you should come across an error or inaccuracy so that It can remedied. you are building at your own risk, and the commencement of a project shall constitute and imply your express acceptance and agreement to indemnify and hold harmless, rayan turner and the design confidential, in the unfortunate event that you experience any form of loss, injury, or inconvenience, relating to any of the publisher’s content.
The Design Confidential Www.thedesignconfidential.com
Pallet project: wine storage