paint - m.media-amazon.com
TRANSCRIPT

A Simple Guide For Your DIY Paint Sprayer Projects
LIKE A PROPAIN T

Table of Contents
Three - How To Prepare For Spray PaintingSmall ProjectsInterior Walls and CeilingsCabinetry and WoodworkExterior Painting
Two - How To Spray PaintChoose and Install NozzleRotate the nozzle into the desired positionInsert and align the suction tubePrepare the MaterialAttach the Paint Sprayer CupAttach the TurbineSet the Air SpeedSet the Material FlowTest The SprayPractice Your Spray TechniquePaintRecoatHow To Clean The Paint Sprayer
One - Project IdeasProject IdeasUpdate Your Home’s Exterior With Paint and StainGet Creative With Interior Paint ProjectsGive Your Furniture A Makeover
4668 9
1112121314151616171818192020
2425252628

© Scuddles LLC 2020. All rights reserved.5
HOW TO PREPAREFOR SPRAY PAINTING
How To Prepare For Spray Painting
Before starting any spray- painting project, it’s important to prepare the surfaces you’ll be painting, and protect nearby items or surfaces from unwanted overspray. Areas to be painted need to be dry and clean, lightly sanded to help the paint adhere, and wiped down to make sure all traces of grease or wax are removed. Even a tiny amount of furniture polish or oils from hands or cooking can keep paint from gripping the surface. Taking the time to carefully prepare your paint surfaces takes a little more time, but it’s the best to way guarantee a professional finish that will look great for years.
One

© Scuddles LLC 2020. All rights reserved.76
© Scuddles LLC 2020. All rights reserved.
Small Projects
For painting small items, creating a small spray booth makes it easy to contain overspray. A large cardboard box, like an appliance box, is an ideal size. Set it on plastic sheeting in a well-ventilated area. You can also build a spray booth in the corner of a garage or porch by hanging plastic sheeting from the ceiling to create walls. Be sure to wear a mask, since a contained area can concentrate the paint spray. Make sure your item to be painted is clean and dry. Prepare glossy surfaces by sanding with 400 grit sandpaper or steel wool, then clean thoroughly with a slightly damp cloth. A 50/50 mixture of rubbing alcohol and water is ideal for removing any residue. Let the item dry for a couple of hours before painting; for wood items, wait 24 hours so they are thoroughly dry.
Interior Walls and Ceilings
Use a static duster to remove dust and cobwebs; wash off any dirt with a mild soap and water solution and a sponge. Allow walls to dry thoroughly. Patch any holes or dents with drywall patch, allow it to dry, and then sand the patched area until it’s flat and smooth. Remove dust with a dry cloth.
To paint walls, remove all covers from outlets and light switches, then cover the components with masking tape. Move furnishings into the center of the room and cover them completely with plastic sheeting. Take down wall-mounted light fixtures and cover the opening with masking tape. Cover the floor and any areas not being painted with plastic
sheeting, using masking tape to anchor it. Now you’re ready to paint! Once you’ve finished, let the paint fully dry before removing the plastic sheeting.
To paint ceilings, remove any light fixtures and cover the openings with masking tape. Move furnishings to the center of the room, and cover them completely with plastic sheeting. You can leave bookshelves or large furniture (like an armoire) against the walls. Using extra-wide plastic sheeting and masking tape, cover the walls and furniture by taping the sheeting along the ceiling line. Take care to create a straight line with the masking tape, since this will become the edge of your ceiling paint. Cover the floor and any areas not being painted with plastic sheeting, using masking tape to anchor it. Now you’re ready to paint! Remember, never point the sprayer straight up keep it at a 45-degree angle as you paint. Once you’ve finished, let the paint fully dry before removing the plastic sheeting.

© Scuddles LLC 2020. All rights reserved.98
© Scuddles LLC 2020. All rights reserved.
Cabinetry and Woodwork
For finished cabinets or interior woodwork, you’ll need to prepare the surface. Grease from cooking, oil from hands, or furniture polish will keep the paint from adhering. When it comes to painting cabinets, there is no such thing as a “no-prep” paint; the surface must be stripped of any waxes or oils, and then roughed up so the paint can grip. For new, unfinished cabinets, wipe off dust with a damp cloth and spray a coat of primer; then sand with 400 grit sandpaper before painting.
For existing cabinets, remove all cabinet doors and drawers, and take off all hardware. Using a sponge, wash all cabinet surfaces with a grease-cutting cleaner like Spic and Span or Dawn, and rinse thoroughly with clean water. If you’re changing the hardware, fill the old holes with wall patch or wood filler. Lightly sand all surfaces with 400 grit sandpaper. Wipe off dust with a slightly damp cloth; a 50/50 mixture of rubbing alcohol and water is best for removing all residue. Let the cabinets dry for 24 hours before painting.
Once the cabinets are dry, protect the ceilings and floors with plastic sheeting, carefully taping the edges in a straight line. If you’re not painting the cabinet interiors, mask them off with plastic sheeting or cardboard. Now you’re ready to paint! Lay the cabinet doors flat on plastic sheeting to spray them. Set the drawers on end so the drawer face is horizontal. Remember to thin the paint; two or three light coats will give you the smoothest finish.
Exterior Painting
Exterior surfaces must be cleaned before painting dust and pollen will keep the paint from adhering. First, take down shutters or decorative accents. Remove any loose paint with a scraper or wire brush, and patch any rotten wood surfaces. This is a good time to caulk around windows and fill any gaps in the siding. Pressure washing is ideal for removing dirt and loose paint, but you can also use a house washing product that connects to your garden hose. Scrub very dirty areas with a scrub brush. Let the surfaces dry for 24 hours before painting.

10© Scuddles LLC 2020. All rights reserved.
Protect any areas not being painted, like window frames or decks, with plastic sheeting, carefully taping the edges in a straight line. Be sure to put drop cloths over shrubs or landscaped areas that might receive overspray.
HOW TO SPRAY PAINTTwo

© Scuddles LLC 2020. All rights reserved.1312
© Scuddles LLC 2020. All rights reserved.
Choose and Install Nozzle
Select the spray nozzle that best suits your project. Remove the black anchor ring from the front of the nozzle, put the spray nozzle in place, and screw down the anchor ring.
Rotate the nozzle into the desired position
Vertical for spraying side-to-sideHorizontal for spraying up and downDiagonal for a small, circular spray pattern
Insert and align the suction tube
The suction tube is inserted into the intake opening on the underside of the nozzle; it is angled to match the angle of the sprayer while in use. When spraying downward, insert the tube with painting forward (away from you). When spraying upward, insert the tube pointing backward (toward you).
Never tilt the sprayer at more than a 45-degree angle — this can damage the turbine.

© Scuddles LLC 2020. All rights reserved.1514
© Scuddles LLC 2020. All rights reserved.
Prepare the Material
Most paints and stains must be thinned for spraying. Stir the paint, stain, or sealer very thoroughly, and make sure it is free of debris or lumpLatex paint typically needs to be thinned by at least 10%, but varies
with room temperature and weather. Start with 900ml of latex paint in the container, and add water to the 1000ml line. Stir thoroughly, and run a test for even, smooth spray. Add water if needed.To check dilution with the viscosity measuring cup, plug the bottom
and fill it with material, then let the material flow through. It should flow continuously, and not too fast — 15-20 seconds for the cup to empty is a common standard.However, check the manufacturer’s directions for diluting your specific paint or stain when applying with a sprayer.Be sure to use only the recommended solvent and amount of dilution.
Attach the Paint Sprayer Cup
Fill the paint cup to the desired level. Hold the sprayer upright. Keeping the cup level, slip it over the suction tube, and screw it onto the threads on the nozzle. Make sure it is firmly attached. Always keep the sprayer upright when there is material in the cup.

© Scuddles LLC 2020. All rights reserved.1716
© Scuddles LLC 2020. All rights reserved.
Attach the Turbine
The back of the nozzle attaches to the turbine with a push. Make sure the orange locking knob is Unlocked. Align the metal pin to the hole in the center of the orange trigger, then push the sections firmly together. Turn the orange locking knob to Locked. The sprayer should now be fully assembled.
Set the Air Speed
The large orange knob on top of the turbine controls the air pressure; use a higher setting for thicker materials like paint, and a lower setting for thinner materials like stain.
Set the Material Flow
The red knob behind the trigger rotates to control the amount of paint or stain that flows through the sprayer.
For thicker materials like paint, start with the a higher material flow setting. Gradually decrease the flow until the coverage meets your needs.
For thinner materials like stain, start with the a lower material flow setting. Gradually increase the flow until the coverage meets your needs.
© Scuddles LLC 2020. All rights reserved.1918
© Scuddles LLC 2020. All rights reserved.
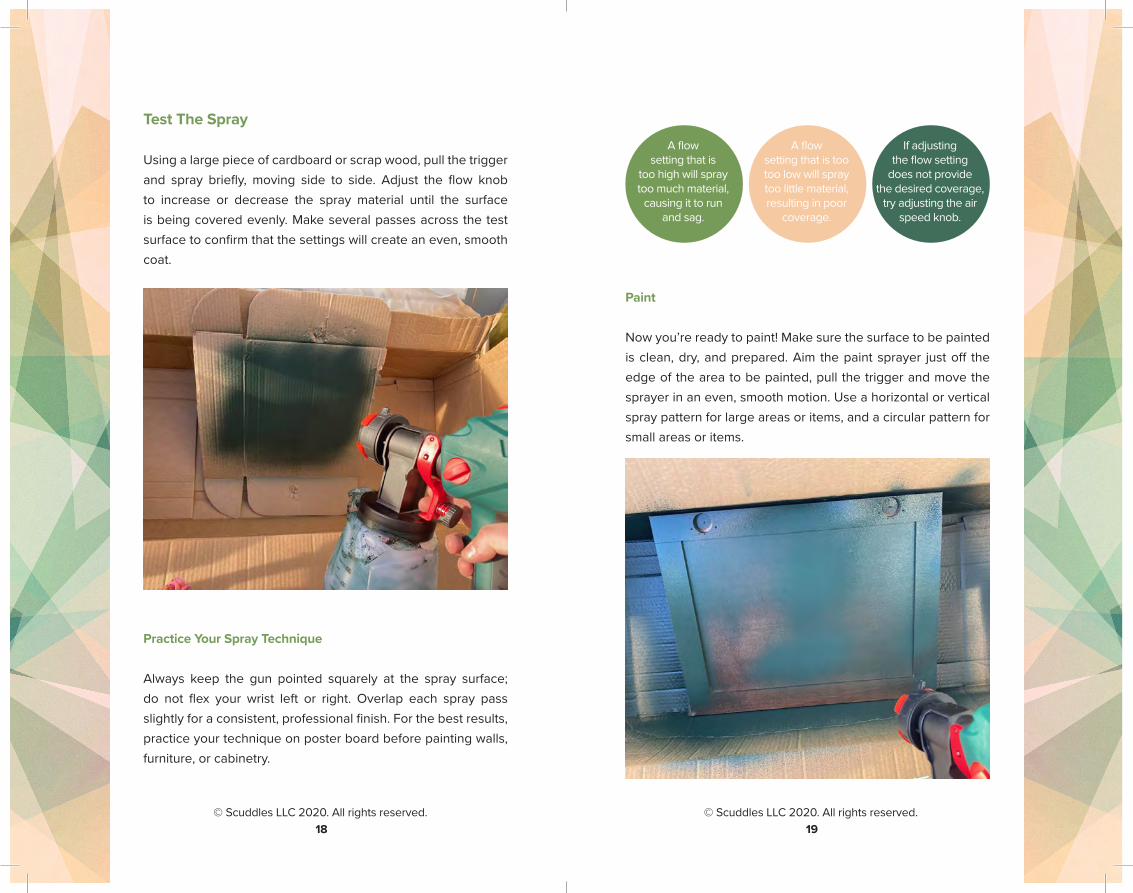
Test The Spray
Using a large piece of cardboard or scrap wood, pull the trigger and spray briefly, moving side to side. Adjust the flow knob to increase or decrease the spray material until the surface is being covered evenly. Make several passes across the test surface to confirm that the settings will create an even, smooth coat.
Practice Your Spray Technique
Always keep the gun pointed squarely at the spray surface; do not flex your wrist left or right. Overlap each spray pass slightly for a consistent, professional finish. For the best results, practice your technique on poster board before painting walls, furniture, or cabinetry.
Paint
Now you’re ready to paint! Make sure the surface to be painted is clean, dry, and prepared. Aim the paint sprayer just off the edge of the area to be painted, pull the trigger and move the sprayer in an even, smooth motion. Use a horizontal or vertical spray pattern for large areas or items, and a circular pattern for small areas or items.

© Scuddles LLC 2020. All rights reserved.2120
© Scuddles LLC 2020. All rights reserved.
Recoat
Allow each coat to dry thoroughly before adding a second coat. Multiple, thinner coats provide the best result.
HOW TO CLEAN THE PAINT SPRAYER
Unplug the sprayer. Place sprayer on a sheet of plastic or cardboard while taking it apart to catch any drips.Use mild dish soap and warm water, and scrub parts with a
soft brush if needed. A spray bottle with 1 part liquid dish soap mixed with 4 parts water makes cleaning easy.
Unscrew the paint container from the bottom of the nozzle; wash it out and rinse.

© Scuddles LLC 2020. All rights reserved.2322
© Scuddles LLC 2020. All rights reserved.
Detach the sprayer nozzle section from the turbine. Detach the suction tube from the sprayer; wash and rinse it. Use the small brush to clean inside the tube.
Spray soap generously inside the nozzle and run warm water through it from both directions, scrubbing with the small brush to remove material.
Unscrew the anchor ring from the front of the nozzle and take out the sprayer nozzle. Take apart the nozzle and thoroughly clean all parts. Use the small brush and wire tool to clean small openings.Leave clean parts to air dry.

© Scuddles LLC 2020. All rights reserved.25
Project Ideas Scuddles Paint Sprayer is so easy to use, it’s the perfect solution
for paint and stain projects all around your home.
Update Your Home’s Exterior With Paint and Stain
Finish home improvement projects quickly by spraying instead of using a paint roller or brush. Thoroughly clean all surfaces and let them dry completely before starting your project. Make your weathered deck or outdoor stairs look brand new with a fresh coat of deck stain or sealant. Give your home a colorful makeover by painting the facade in different shades of the same hue, or adding a contrasting trim color. With our easy-to-clean sprayer, changing paint colors is fast and simple. Board and batten siding, and stairs and handrails, are time consuming to paint by hand, but with a sprayer they make a quick weekend project. Smooth, even coating without brush strokes gives you a truly professional result.
PROJECT IDEASThree

© Scuddles LLC 2020. All rights reserved.2726
© Scuddles LLC 2020. All rights reserved.
Get Creative With Interior Paint Projects
Any interior designer will tell you that fresh paint is the fastest and least expensive way to redecorate a room. Updating your wall colors increases the value of your home too. Today’s popular colors are inspired by nature, offering cozy comfort in uncertain times. Pale gray and khaki tones are more interesting than plain white, and help white woodwork to stand out. Deep, rich colors like Sherwin-Williams’ Urbane Bronze, or Benjamin Moore’s Aegean Teal have a soothing, enveloping quality. PPG Paints’ Transcend is a warm beige; pair with Misty Aqua and their reddish-brown Big Cypress to evoke the sand and sea.
Here are some of our favorite quick, creative wall paint projects:
• Paint a custom headboard in a unique shape and color• Add impact to a plain fireplace by painting the surrounding
wall a dramatic shade• Update an all-white kitchen by painting lower cabinets a
deep green or blue• Change handrails on stairs, and interior doors, to a dark
stain or glossy black paint• Use a dark jewel tone to add glamour to a small powder
room• Spray a boring bath vanity with an unexpected bright color• Paint worn-out wood floors in white or black, instead of
refinishing them• Paint your ceilings sky blue instead of white

© Scuddles LLC 2020. All rights reserved.2928
© Scuddles LLC 2020. All rights reserved.
Using a paint sprayer makes carpentry projects easier too add wainscoting or board and batten trim to plain walls for a vintage look.
Give Your Furniture A Makeover
Scuddles paint sprayer makes it easy to tackle time-consuming painting projects like furniture. Ornate carvings, wicker pieces, and dining chairs that take hours to paint are coated in minutes. You’ll get excellent coverage of all the angles, and a smooth finish.
Decorative painters love the convenience of using a sprayer to prime large pieces of furniture, or several items at once, to prepare them for a specialty finish. Paint two or three coats in different colors and then distress them for an antique effect.
Add a crackle finish, modern graphics, or painted flowers for a farmhouse look. Custom color your porch furniture or flowerpots in the garden. Give new life to those dark wood heirlooms; you might even find yourself starting a decorative painting business!

© Scuddles LLC 2020. All rights reserved.