osteomed.com page 1 · oblong plate screw holes are used for providing ... page 14 osteomed.com...
TRANSCRIPT
osteomed.com Page 1
EXTREMILOCKFoot Plating System
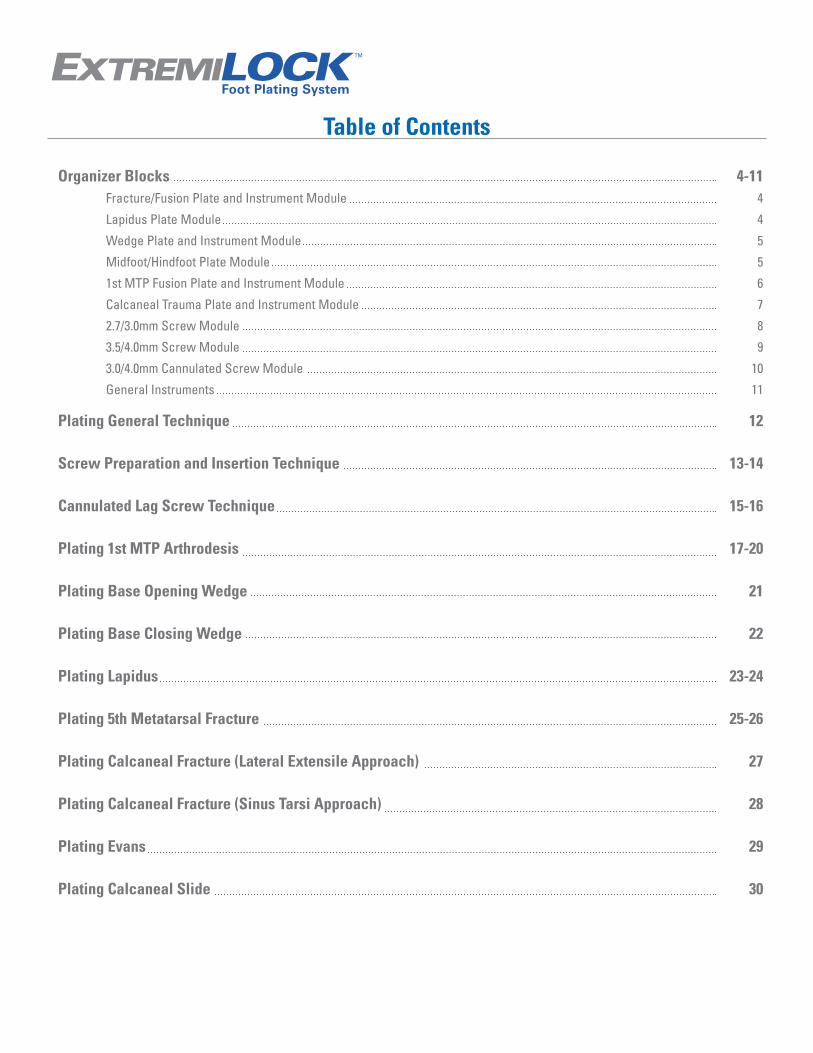
Table of Contents
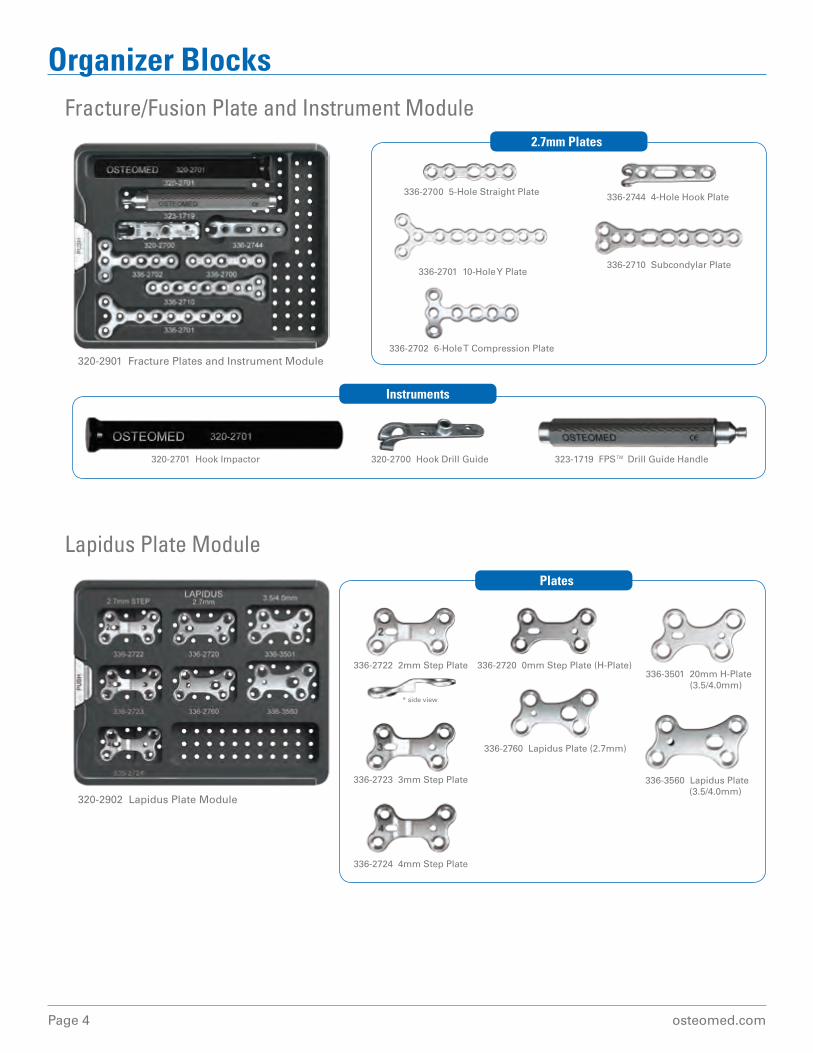
Organizer Blocks Fracture/Fusion Plate and Instrument Module
Lapidus Plate Module
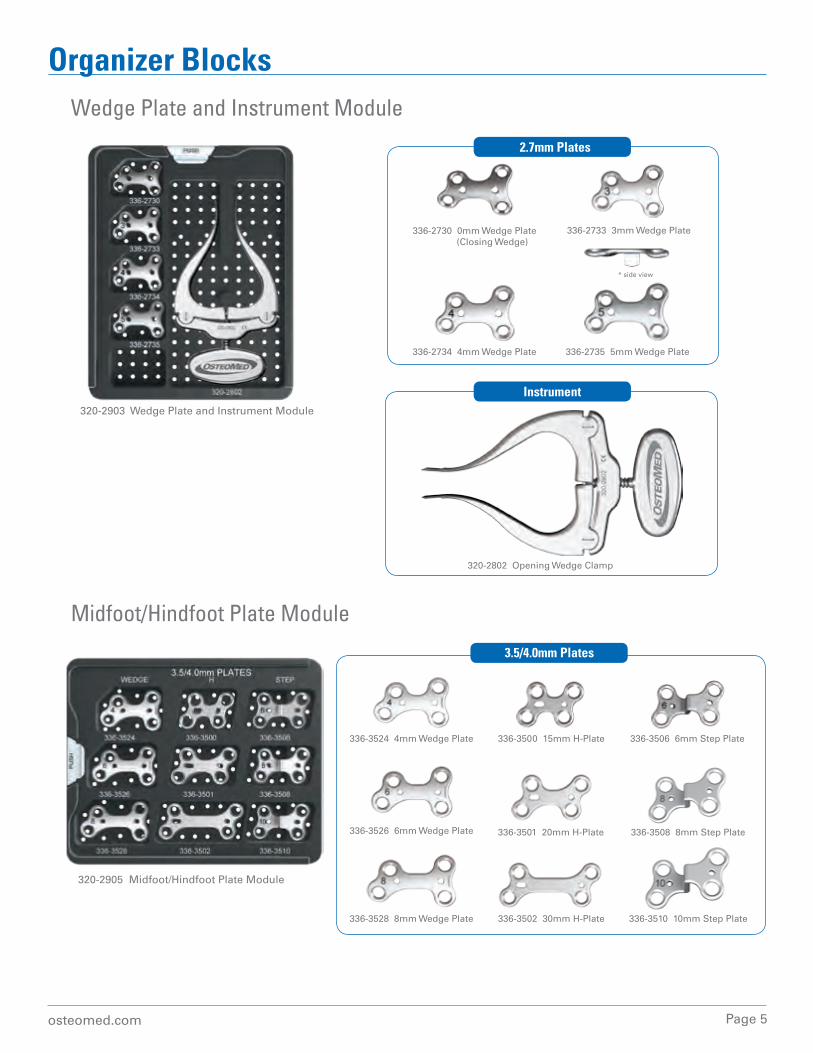
Wedge Plate and Instrument Module
Midfoot/Hindfoot Plate Module
1st MTP Fusion Plate and Instrument Module
Calcaneal Trauma Plate and Instrument Module
2.7/3.0mm Screw Module
3.5/4.0mm Screw Module
3.0/4.0mm Cannulated Screw Module
General Instruments
Plating General Technique
Screw Preparation and Insertion Technique
Cannulated Lag Screw Technique
Plating 1st MTP Arthrodesis
Plating Base Opening Wedge
Plating Base Closing Wedge
Plating Lapidus
Plating 5th Metatarsal Fracture
Plating Calcaneal Fracture (Lateral Extensile Approach)
Plating Calcaneal Fracture (Sinus Tarsi Approach)
Plating Evans
Plating Calcaneal Slide
4-114
4
5
5
6
7
8
9
10
11
12
13-14
15-16
17-20
21
22
23-24
25-26
27
28
29
30
Page 4 osteomed.com
Organizer BlocksFracture/Fusion Plate and Instrument Module
Lapidus Plate Module
2.7mm Plates
Instruments
Plates
320-2901 Fracture Plates and Instrument Module
320-2902 Lapidus Plate Module
336-2700 5-Hole Straight Plate
320-2700 Hook Drill Guide320-2701 Hook Impactor 323-1719 FPS™ Drill Guide Handle
336-2701 10-Hole Y Plate
336-2702 6-Hole T Compression Plate
336-2710 Subcondylar Plate
336-2744 4-Hole Hook Plate
336-2720 0mm Step Plate (H-Plate)336-3501 20mm H-Plate (3.5/4.0mm)
336-2760 Lapidus Plate (2.7mm)
336-3560 Lapidus Plate (3.5/4.0mm)
336-2722 2mm Step Plate
336-2723 3mm Step Plate
336-2724 4mm Step Plate
* side view
osteomed.com Page 5
Organizer BlocksWedge Plate and Instrument Module
Midfoot/Hindfoot Plate Module
2.7mm Plates
Instrument320-2903 Wedge Plate and Instrument Module
336-2730 0mm Wedge Plate (Closing Wedge)
336-2734 4mm Wedge Plate
320-2802 Opening Wedge Clamp
336-2733 3mm Wedge Plate
336-2735 5mm Wedge Plate
* side view
3.5/4.0mm Plates
336-3500 15mm H-Plate
336-3502 30mm H-Plate
336-3524 4mm Wedge Plate
336-3526 6mm Wedge Plate
336-3510 10mm Step Plate
336-3501 20mm H-Plate
336-3506 6mm Step Plate
336-3508 8mm Step Plate
320-2905 Midfoot/Hindfoot Plate Module
336-3528 8mm Wedge Plate
Page 6 osteomed.com
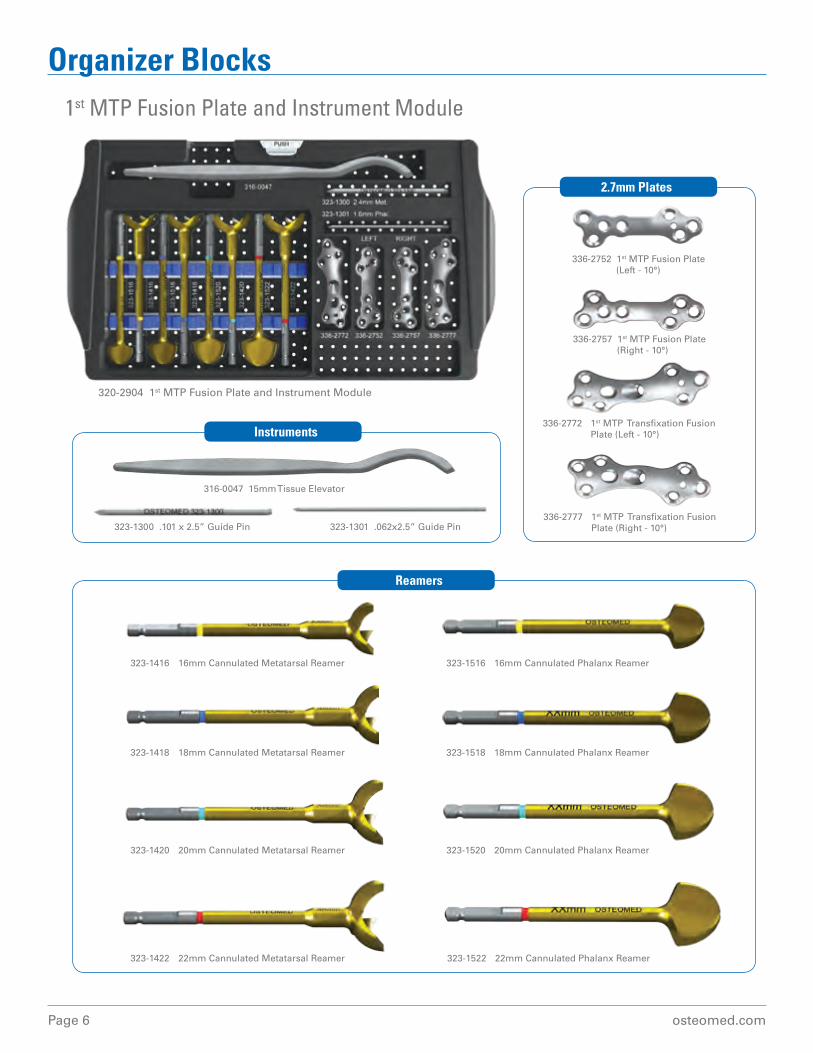
320-2904 1st MTP Fusion Plate and Instrument Module
2.7mm Plates
Reamers
Instruments336-2772 1st MTP Transfixation Fusion Plate (Left - 10°)
336-2777 1st MTP Transfixation Fusion Plate (Right - 10°)
316-0047 15mm Tissue Elevator
323-1300 .101 x 2.5” Guide Pin 323-1301 .062x2.5” Guide Pin
336-2752 1st MTP Fusion Plate (Left - 10°)
336-2757 1st MTP Fusion Plate (Right - 10°)
323-1416 16mm Cannulated Metatarsal Reamer 323-1516 16mm Cannulated Phalanx Reamer
323-1418 18mm Cannulated Metatarsal Reamer 323-1518 18mm Cannulated Phalanx Reamer
323-1420 20mm Cannulated Metatarsal Reamer 323-1520 20mm Cannulated Phalanx Reamer
323-1422 22mm Cannulated Metatarsal Reamer 323-1522 22mm Cannulated Phalanx Reamer
Organizer Blocks1st MTP Fusion Plate and Instrument Module
osteomed.com Page 7
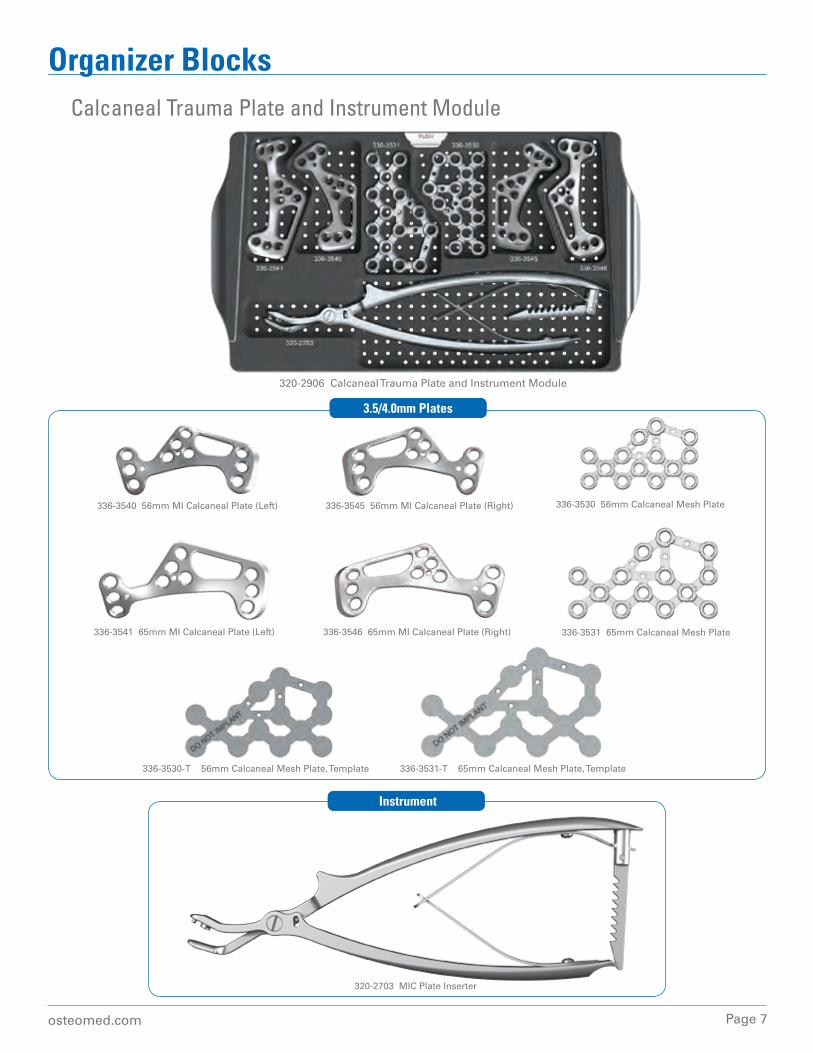
Organizer BlocksCalcaneal Trauma Plate and Instrument Module
320-2906 Calcaneal Trauma Plate and Instrument Module
3.5/4.0mm Plates
336-3540 56mm MI Calcaneal Plate (Left) 336-3545 56mm MI Calcaneal Plate (Right) 336-3530 56mm Calcaneal Mesh Plate
320-2703 MIC Plate Inserter
336-3541 65mm MI Calcaneal Plate (Left) 336-3546 65mm MI Calcaneal Plate (Right) 336-3531 65mm Calcaneal Mesh Plate
336-3530-T 56mm Calcaneal Mesh Plate, Template 336-3531-T 65mm Calcaneal Mesh Plate, Template
Instrument
Page 8 osteomed.com
Instruments
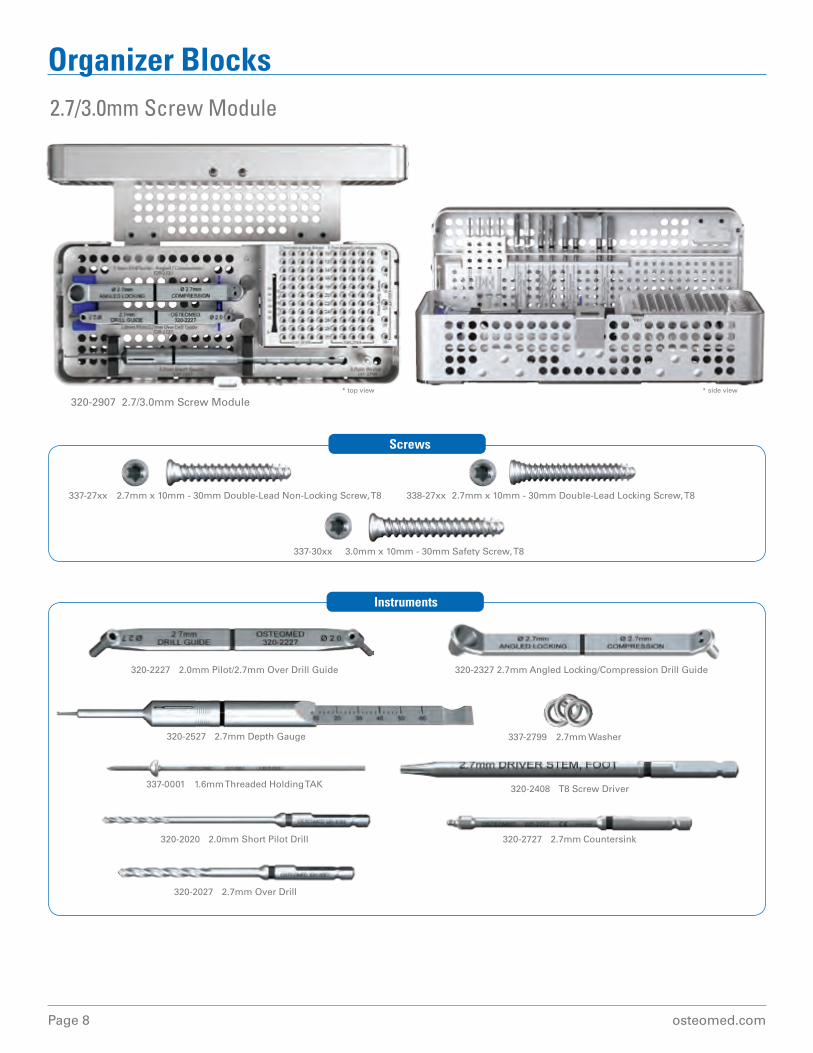
Organizer Blocks2.7/3.0mm Screw Module
* side view* top view
320-2907 2.7/3.0mm Screw Module
337-27xx 2.7mm x 10mm - 30mm Double-Lead Non-Locking Screw, T8 338-27xx 2.7mm x 10mm - 30mm Double-Lead Locking Screw, T8
337-30xx 3.0mm x 10mm - 30mm Safety Screw, T8
Screws
320-2327 2.7mm Angled Locking/Compression Drill Guide320-2227 2.0mm Pilot/2.7mm Over Drill Guide
320-2527 2.7mm Depth Gauge
337-0001 1.6mm Threaded Holding TAK
320-2020 2.0mm Short Pilot Drill
320-2408 T8 Screw Driver
320-2727 2.7mm Countersink
337-2799 2.7mm Washer
320-2027 2.7mm Over Drill
osteomed.com Page 9
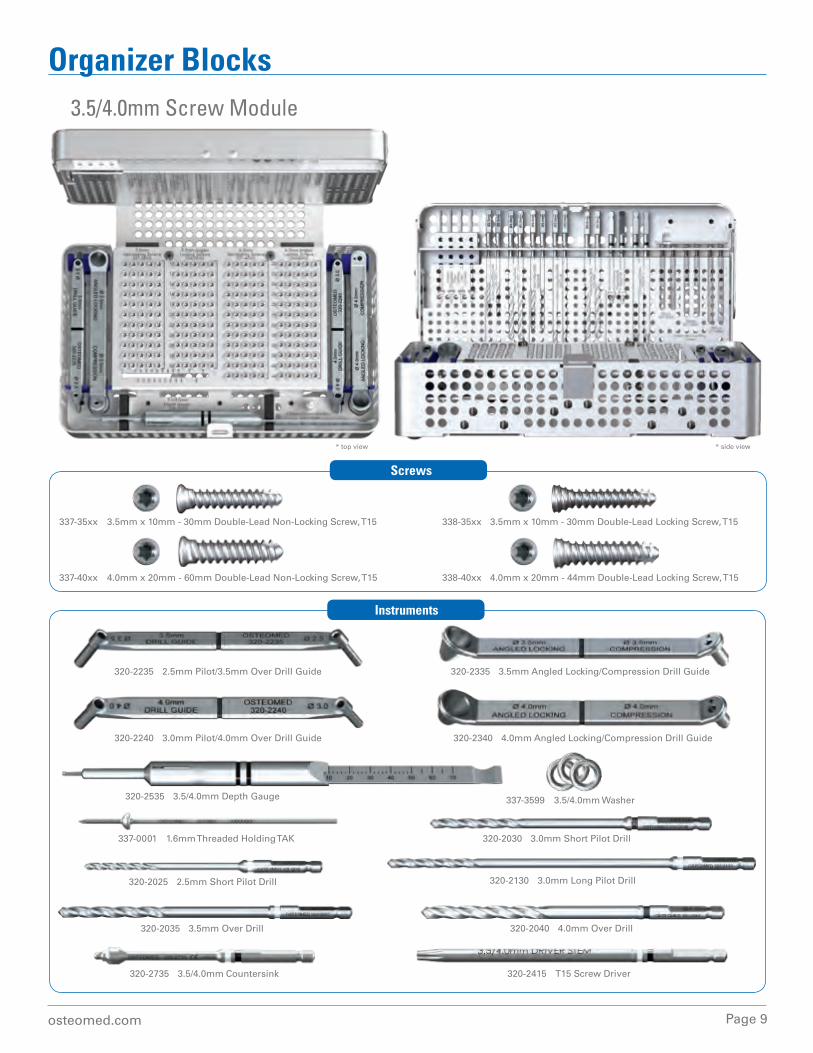
Organizer Blocks3.5/4.0mm Screw Module
* side view* top view
320-2335 3.5mm Angled Locking/Compression Drill Guide
320-2340 4.0mm Angled Locking/Compression Drill Guide
320-2235 2.5mm Pilot/3.5mm Over Drill Guide
320-2240 3.0mm Pilot/4.0mm Over Drill Guide
320-2535 3.5/4.0mm Depth Gauge
337-0001 1.6mm Threaded Holding TAK 320-2030 3.0mm Short Pilot Drill
337-3599 3.5/4.0mm Washer
337-35xx 3.5mm x 10mm - 30mm Double-Lead Non-Locking Screw, T15 338-35xx 3.5mm x 10mm - 30mm Double-Lead Locking Screw, T15
337-40xx 4.0mm x 20mm - 60mm Double-Lead Non-Locking Screw, T15 338-40xx 4.0mm x 20mm - 44mm Double-Lead Locking Screw, T15
Screws
Instruments
320-2025 2.5mm Short Pilot Drill
320-2035 3.5mm Over Drill
320-2130 3.0mm Long Pilot Drill
320-2040 4.0mm Over Drill
320-2415 T15 Screw Driver320-2735 3.5/4.0mm Countersink
Page 10 osteomed.com
Instruments
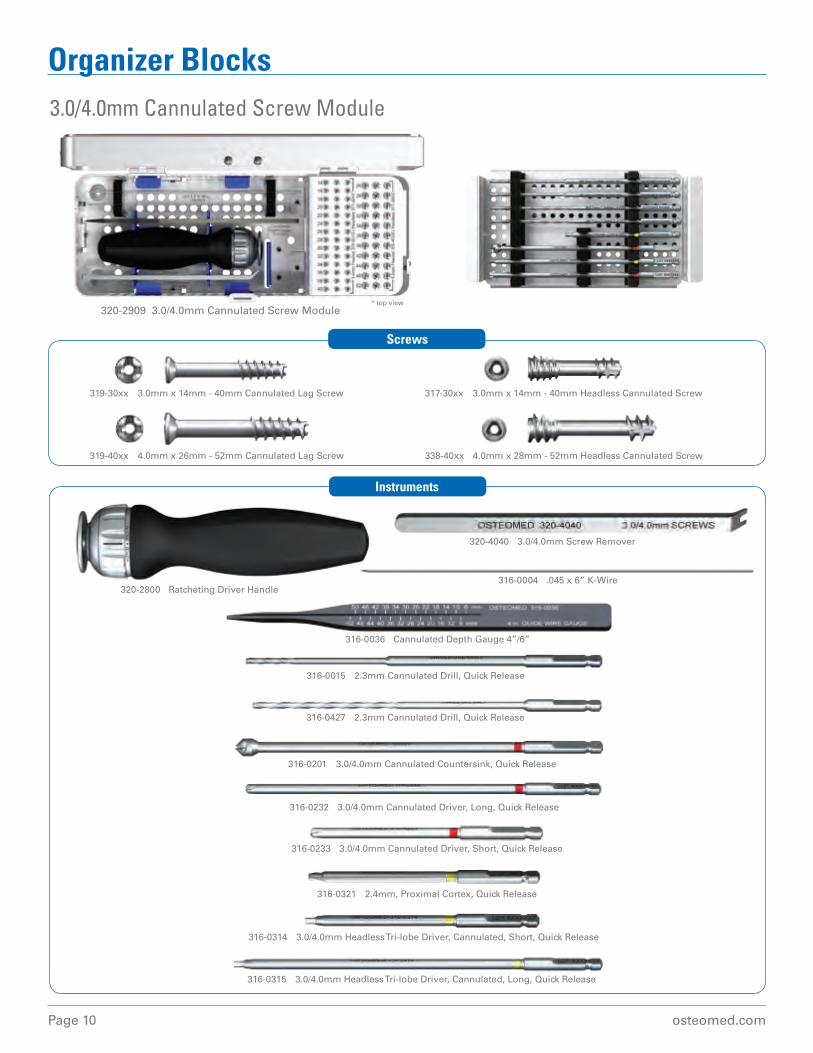
Organizer Blocks3.0/4.0mm Cannulated Screw Module
* top view
319-30xx 3.0mm x 14mm - 40mm Cannulated Lag Screw 317-30xx 3.0mm x 14mm - 40mm Headless Cannulated Screw
319-40xx 4.0mm x 26mm - 52mm Cannulated Lag Screw 338-40xx 4.0mm x 28mm - 52mm Headless Cannulated Screw
Screws
320-2800 Ratcheting Driver Handle
320-4040 3.0/4.0mm Screw Remover
316-0036 Cannulated Depth Gauge 4”/6”
316-0004 .045 x 6” K-Wire
320-2909 3.0/4.0mm Cannulated Screw Module
316-0015 2.3mm Cannulated Drill, Quick Release
316-0427 2.3mm Cannulated Drill, Quick Release
316-0201 3.0/4.0mm Cannulated Countersink, Quick Release
316-0321 2.4mm, Proximal Cortex, Quick Release
316-0233 3.0/4.0mm Cannulated Driver, Short, Quick Release
316-0232 3.0/4.0mm Cannulated Driver, Long, Quick Release
316-0314 3.0/4.0mm Headless Tri-lobe Driver, Cannulated, Short, Quick Release
316-0315 3.0/4.0mm Headless Tri-lobe Driver, Cannulated, Long, Quick Release
osteomed.com Page 11
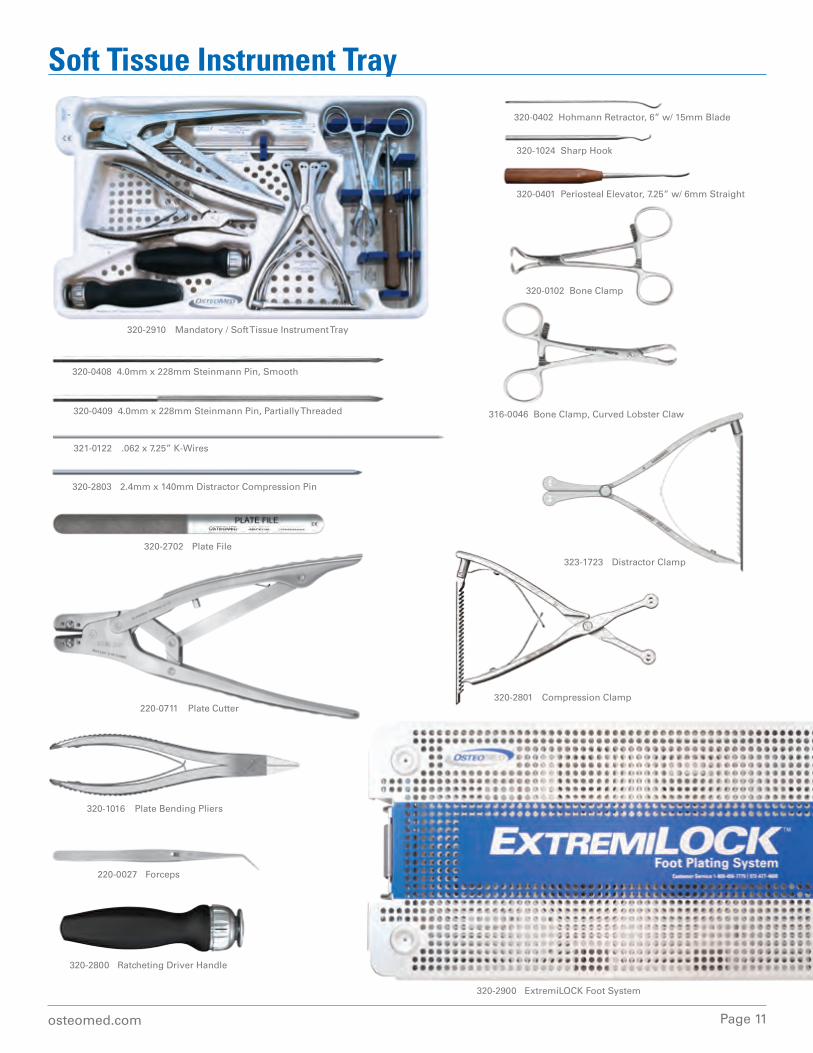
Soft Tissue Instrument Tray
320-2800 Ratcheting Driver Handle
320-0408 4.0mm x 228mm Steinmann Pin, Smooth
320-0409 4.0mm x 228mm Steinmann Pin, Partially Threaded
320-2702 Plate File
320-2803 2.4mm x 140mm Distractor Compression Pin
321-0122 .062 x 7.25” K-Wires
220-0711 Plate Cutter
320-1016 Plate Bending Pliers
220-0027 Forceps
320-0402 Hohmann Retractor, 6” w/ 15mm Blade
320-1024 Sharp Hook
320-0401 Periosteal Elevator, 7.25” w/ 6mm Straight
320-0102 Bone Clamp
316-0046 Bone Clamp, Curved Lobster Claw
320-2801 Compression Clamp
320-2900 ExtremiLOCK Foot System
320-2910 Mandatory / Soft Tissue Instrument Tray
323-1723 Distractor Clamp
Page 12 osteomed.com
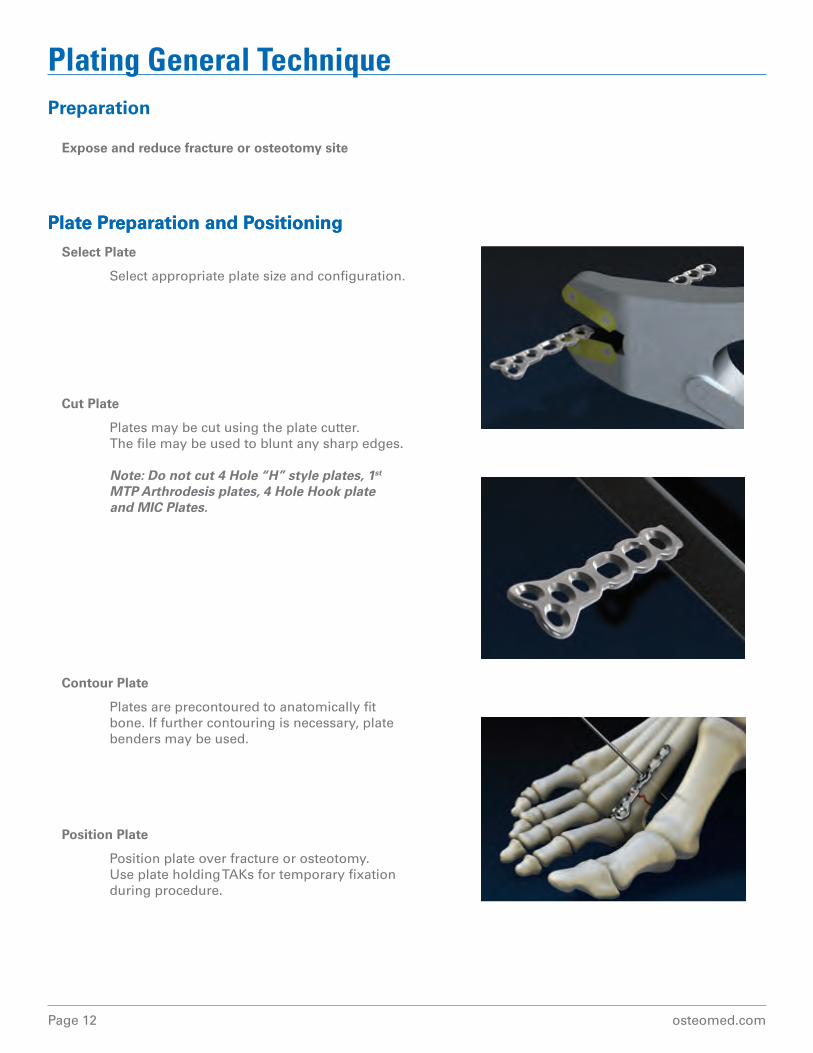
Plating General TechniquePreparation
Expose and reduce fracture or osteotomy site
Plate Preparation and PositioningSelect Plate
Select appropriate plate size and configuration.
Cut Plate
Plates may be cut using the plate cutter. The file may be used to blunt any sharp edges.
Note: Do not cut 4 Hole “H” style plates, 1st MTP Arthrodesis plates, 4 Hole Hook plate and MIC Plates.
Contour Plate
Plates are precontoured to anatomically fit bone. If further contouring is necessary, plate benders may be used.
Position Plate
Position plate over fracture or osteotomy. Use plate holding TAKs for temporary fixation during procedure.
Plate Preparation and Positioning
osteomed.com Page 13
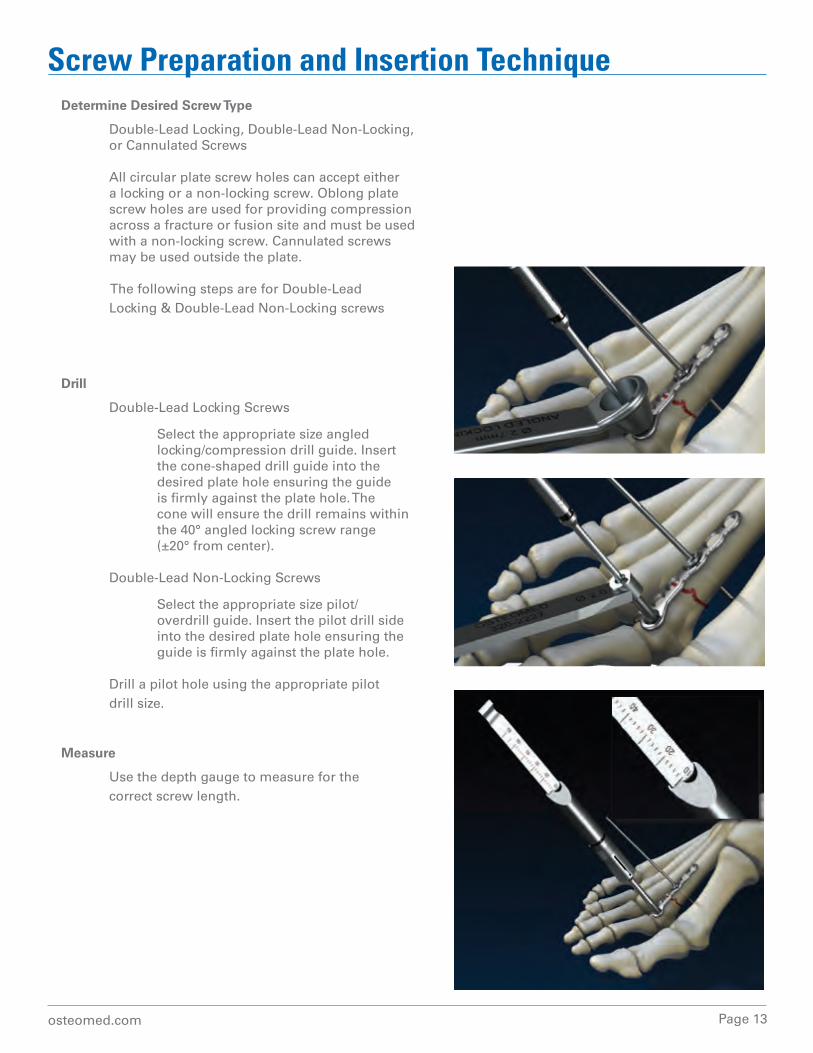
Screw Preparation and Insertion TechniqueDetermine Desired Screw Type
Double-Lead Locking, Double-Lead Non-Locking, or Cannulated Screws
All circular plate screw holes can accept either a locking or a non-locking screw. Oblong plate screw holes are used for providing compression across a fracture or fusion site and must be used with a non-locking screw. Cannulated screws may be used outside the plate. The following steps are for Double-Lead Locking & Double-Lead Non-Locking screws
Drill
Double-Lead Locking Screws Select the appropriate size angled locking/compression drill guide. Insert the cone-shaped drill guide into the desired plate hole ensuring the guide is firmly against the plate hole. The cone will ensure the drill remains within the 40° angled locking screw range (±20° from center).
Double-Lead Non-Locking Screws Select the appropriate size pilot/ overdrill guide. Insert the pilot drill side into the desired plate hole ensuring the guide is firmly against the plate hole.
Drill a pilot hole using the appropriate pilot drill size.
Measure
Use the depth gauge to measure for the correct screw length.

Page 14 osteomed.com
Screw Preparation and Insertion Technique
Select & Insert
Select the desired screw diameter and length. Verify the screw length with the gauge on the block. Insert screw manually using a self- retaining screwdriver shaft until the screw head is seated into the plate. Do not overtighten the screw. Fluoroscopy is recommended during screw insertion to ensure correct length and angle.
Locking screws can lock/unlock up to 3 times in a single screw hole.
Remaining Screw Holes
Repeat screw preparation and insertion technique until all necessary holes are filled.
Compression Hole TechniqueFixate plate
Fixate plate on opposite side of the compression hole using locking or non-locking screws
Position Compression Drill Guide
Place drill guide in compression hole. The arrow will be pointing toward fracture/fusion site to drill eccentrically.
NOTE: Turning the drill guide and pointing the arrow away from the fracture/fusion site will allow for placement of a neutral screw.
Drill
Measure
Insert Screw
Only insert a non-locking screw into a compression hole.
Screw Insertion
osteomed.com Page 15
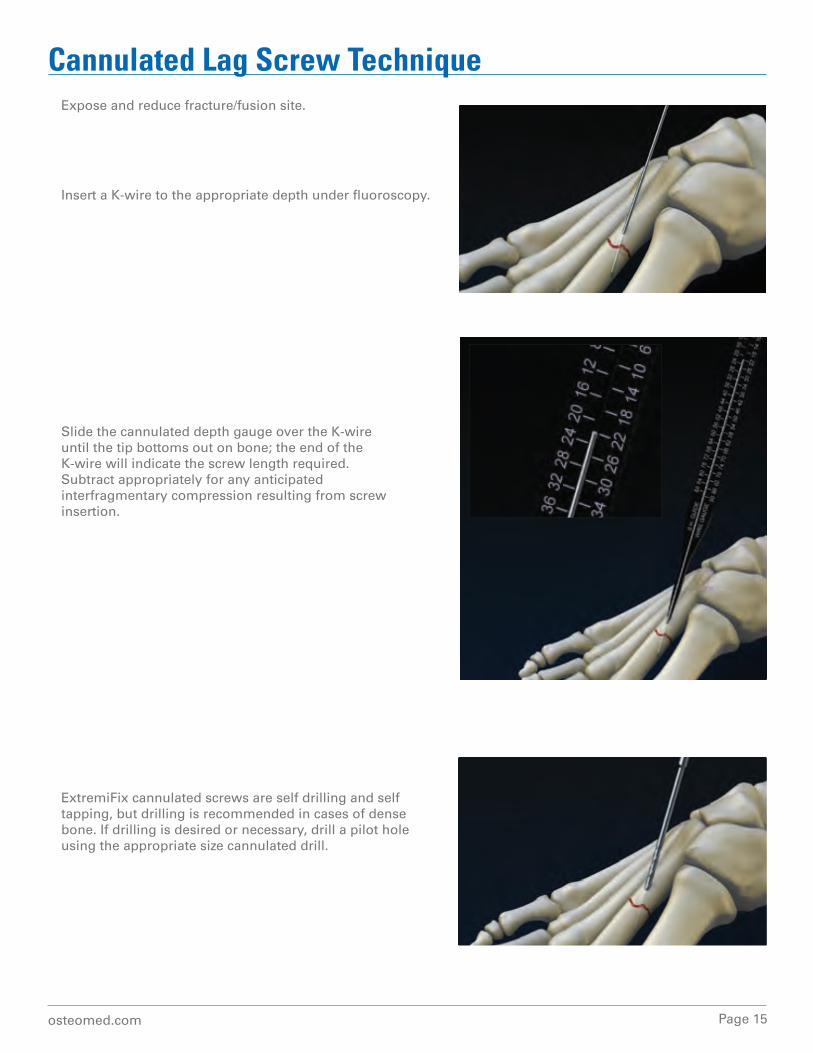
Cannulated Lag Screw TechniqueExpose and reduce fracture/fusion site.
Insert a K-wire to the appropriate depth under fluoroscopy.
Slide the cannulated depth gauge over the K-wire until the tip bottoms out on bone; the end of the K-wire will indicate the screw length required. Subtract appropriately for any anticipated interfragmentary compression resulting from screw insertion.
ExtremiFix cannulated screws are self drilling and self tapping, but drilling is recommended in cases of dense bone. If drilling is desired or necessary, drill a pilot hole using the appropriate size cannulated drill.
Page 16 osteomed.com
Cannulated Lag Screw Technique (cont.)
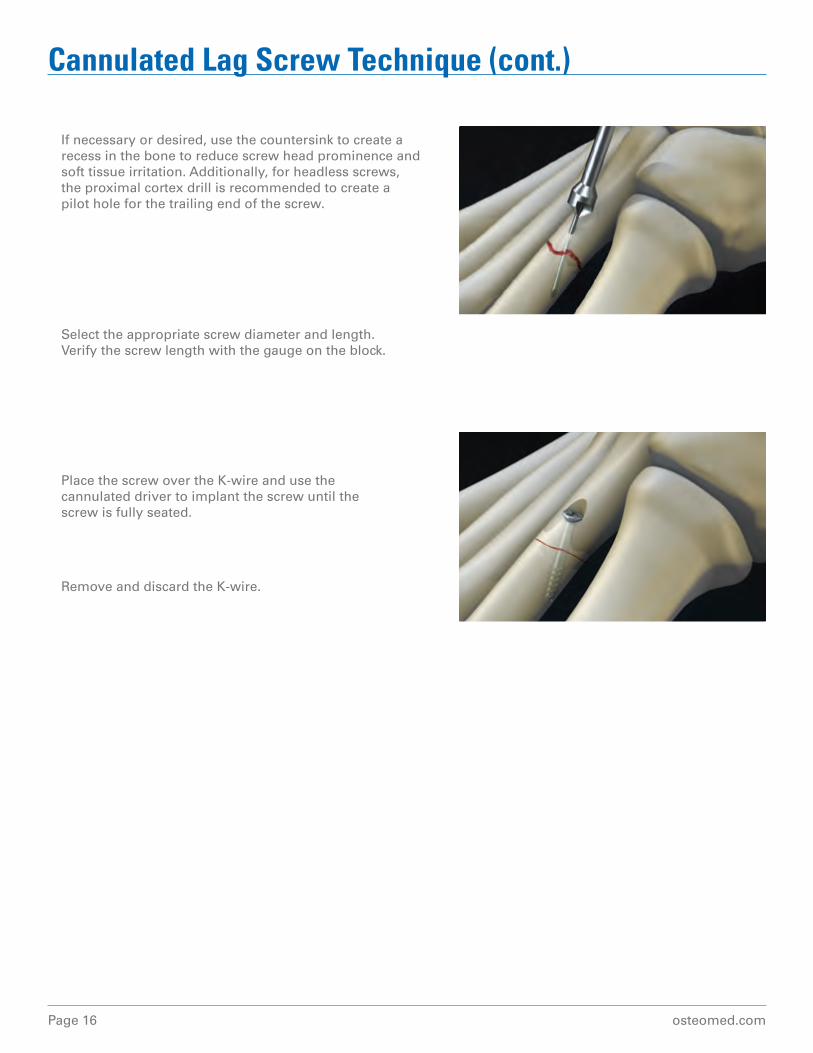
Place the screw over the K-wire and use the cannulated driver to implant the screw until the screw is fully seated.
Remove and discard the K-wire.
If necessary or desired, use the countersink to create a recess in the bone to reduce screw head prominence and soft tissue irritation. Additionally, for headless screws, the proximal cortex drill is recommended to create a pilot hole for the trailing end of the screw.
Select the appropriate screw diameter and length. Verify the screw length with the gauge on the block.
osteomed.com Page 17
Surgical Approach
Make a dorsomedial incision from the middle of the first metatarsal extending to the proximal phalanx of the hallux, medial to the extensor hallucis longus tendon. Incise and release the joint capsule exposing the base of the proximal phalanx and metatarsal head.
Metatarsal and Phalangeal Preparation
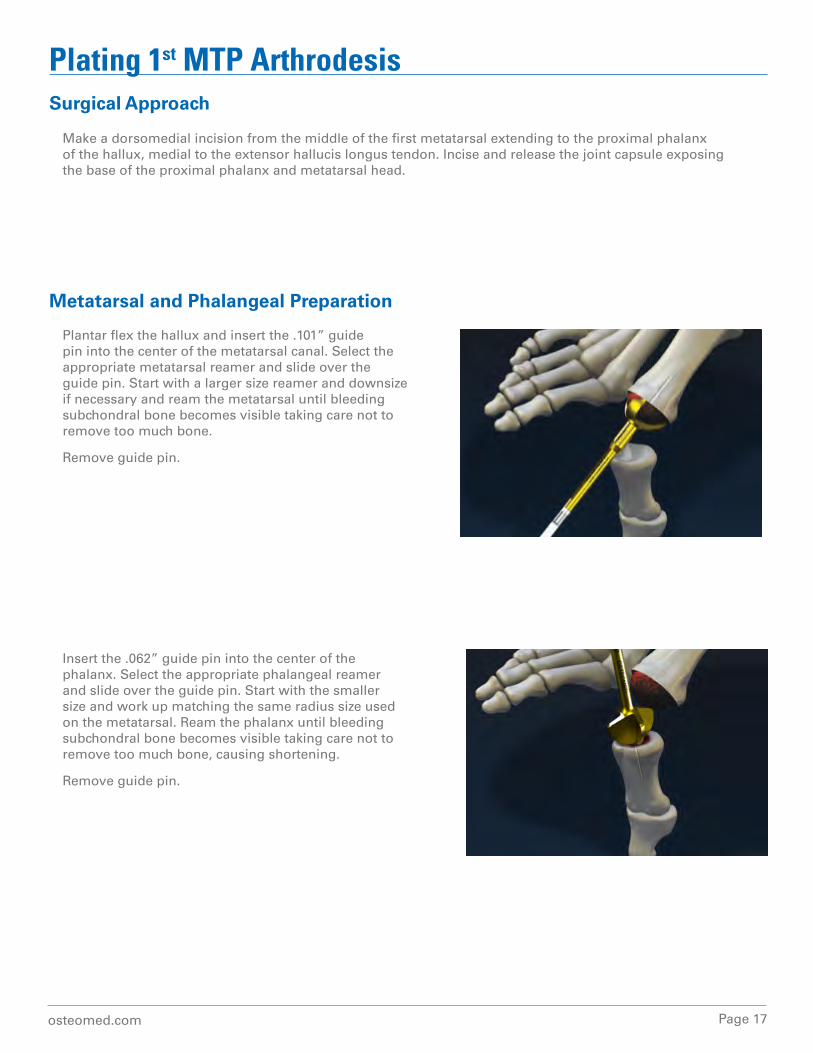
Plantar flex the hallux and insert the .101” guide pin into the center of the metatarsal canal. Select the appropriate metatarsal reamer and slide over the guide pin. Start with a larger size reamer and downsize if necessary and ream the metatarsal until bleeding subchondral bone becomes visible taking care not to remove too much bone.
Remove guide pin.
Insert the .062” guide pin into the center of the phalanx. Select the appropriate phalangeal reamer and slide over the guide pin. Start with the smaller size and work up matching the same radius size used on the metatarsal. Ream the phalanx until bleeding subchondral bone becomes visible taking care not to remove too much bone, causing shortening. Remove guide pin.
Plating 1st MTP Arthrodesis
Page 18 osteomed.com
Plating 1st MTP Arthrodesis (Cont.)Fusion Plate Technique
The 1st MTP Fusion plate has 10° of dorsiflexion correction and can accept locking and non-locking screws.
Plate Positioning and Compression Place the plate over the fusion site. Temporarily fixate the plate using TAKs or K-wires. Position the phalanx and metatarsal appropriately for fixation. Insert a .045” K-wire medially, either distal to proximal or proximal to distal, through the 1st MTP joint. Insert a cannulated screw following the cannulated lag screw technique.
Insert Screws
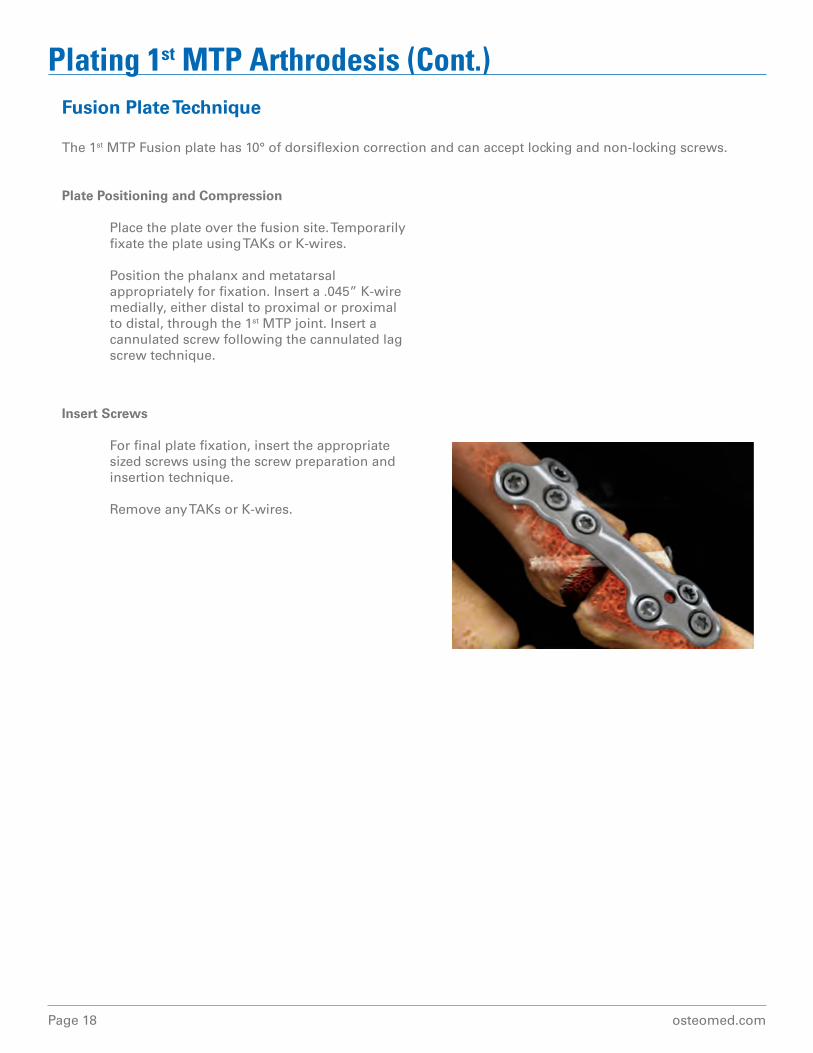
For final plate fixation, insert the appropriate sized screws using the screw preparation and insertion technique.
Remove any TAKs or K-wires.
osteomed.com Page 19
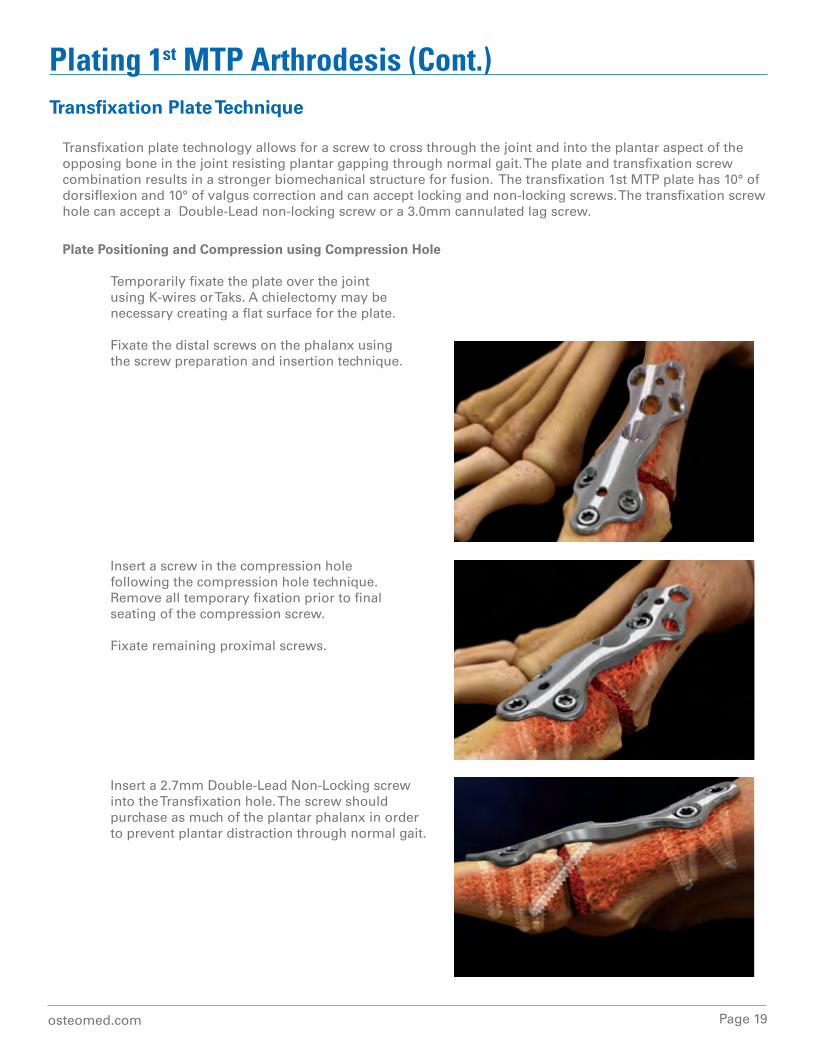
Transfixation Plate Technique
Transfixation plate technology allows for a screw to cross through the joint and into the plantar aspect of the opposing bone in the joint resisting plantar gapping through normal gait. The plate and transfixation screw combination results in a stronger biomechanical structure for fusion. The transfixation 1st MTP plate has 10° of dorsiflexion and 10° of valgus correction and can accept locking and non-locking screws. The transfixation screw hole can accept a Double-Lead non-locking screw or a 3.0mm cannulated lag screw.
Plate Positioning and Compression using Compression Hole
Temporarily fixate the plate over the joint using K-wires or Taks. A chielectomy may be necessary creating a flat surface for the plate. Fixate the distal screws on the phalanx using the screw preparation and insertion technique.
Insert a screw in the compression hole following the compression hole technique. Remove all temporary fixation prior to final seating of the compression screw.
Fixate remaining proximal screws.
Insert a 2.7mm Double-Lead Non-Locking screw into the Transfixation hole. The screw should purchase as much of the plantar phalanx in order to prevent plantar distraction through normal gait.
Plating 1st MTP Arthrodesis (Cont.)
Page 20 osteomed.com
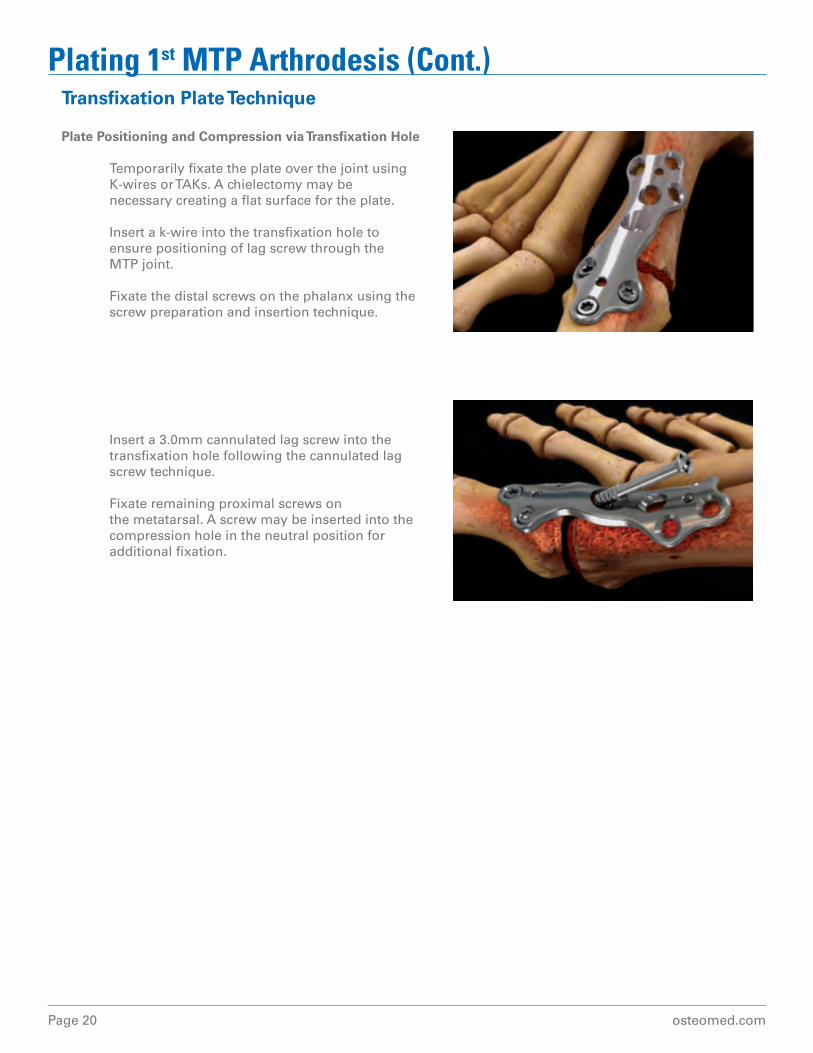
Plate Positioning and Compression via Transfixation Hole
Temporarily fixate the plate over the joint using K-wires or TAKs. A chielectomy may be necessary creating a flat surface for the plate.
Insert a k-wire into the transfixation hole to ensure positioning of lag screw through the MTP joint.
Fixate the distal screws on the phalanx using the screw preparation and insertion technique.
Insert a 3.0mm cannulated lag screw into the transfixation hole following the cannulated lag screw technique.
Fixate remaining proximal screws on the metatarsal. A screw may be inserted into the compression hole in the neutral position for additional fixation.
Plating 1st MTP Arthrodesis (Cont.)Transfixation Plate Technique
osteomed.com Page 21
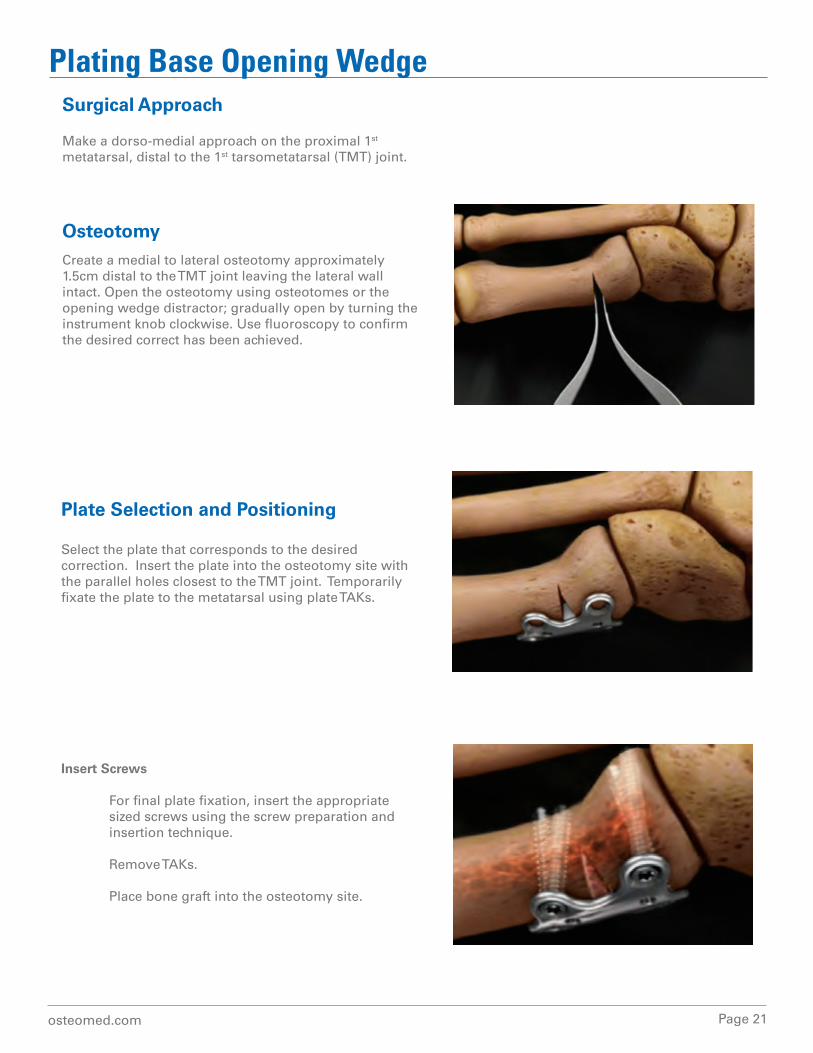
Plating Base Opening WedgeSurgical Approach
Make a dorso-medial approach on the proximal 1st metatarsal, distal to the 1st tarsometatarsal (TMT) joint.
OsteotomyCreate a medial to lateral osteotomy approximately 1.5cm distal to the TMT joint leaving the lateral wall intact. Open the osteotomy using osteotomes or the opening wedge distractor; gradually open by turning the instrument knob clockwise. Use fluoroscopy to confirm the desired correct has been achieved.
Plate Selection and Positioning
Select the plate that corresponds to the desired correction. Insert the plate into the osteotomy site with the parallel holes closest to the TMT joint. Temporarily fixate the plate to the metatarsal using plate TAKs.
Insert Screws
For final plate fixation, insert the appropriate sized screws using the screw preparation and insertion technique.
Remove TAKs. Place bone graft into the osteotomy site.
Page 22 osteomed.com
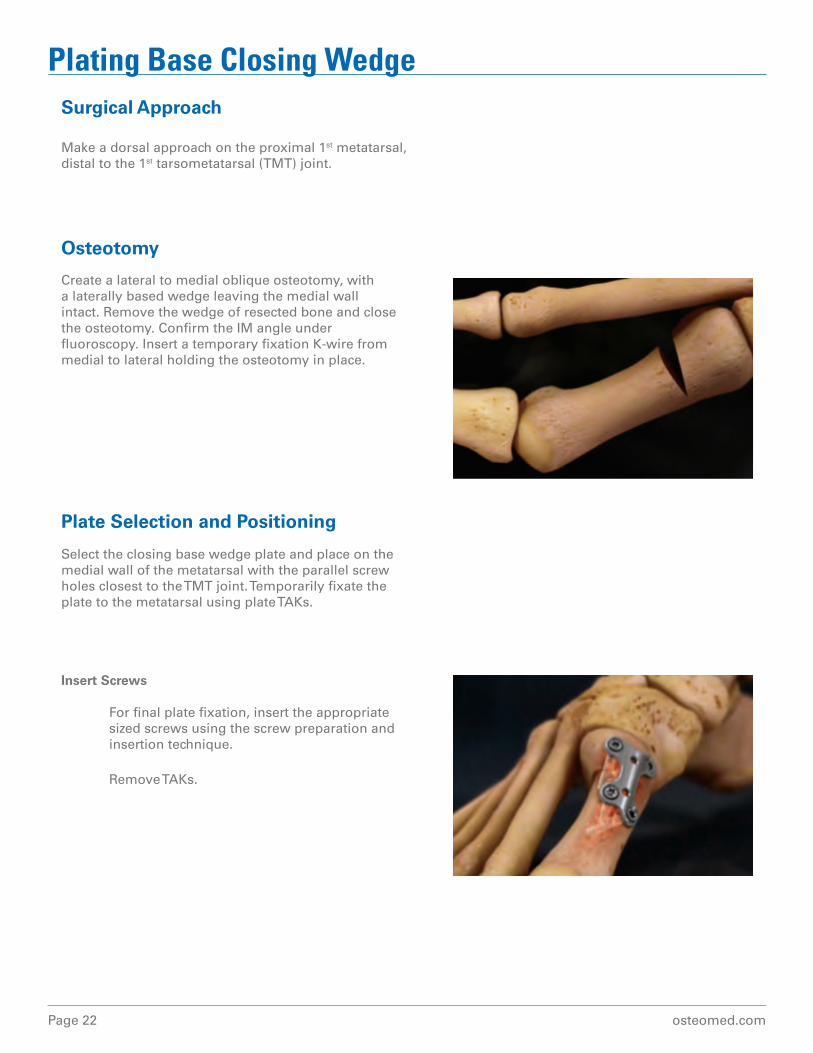
Plating Base Closing WedgeSurgical Approach
Make a dorsal approach on the proximal 1st metatarsal, distal to the 1st tarsometatarsal (TMT) joint.
Osteotomy
Create a lateral to medial oblique osteotomy, with a laterally based wedge leaving the medial wall intact. Remove the wedge of resected bone and close the osteotomy. Confirm the IM angle under fluoroscopy. Insert a temporary fixation K-wire from medial to lateral holding the osteotomy in place.
Plate Selection and Positioning
Select the closing base wedge plate and place on the medial wall of the metatarsal with the parallel screw holes closest to the TMT joint. Temporarily fixate the plate to the metatarsal using plate TAKs.
Insert Screws
For final plate fixation, insert the appropriate sized screws using the screw preparation and insertion technique.
Remove TAKs.
osteomed.com Page 23
Plating LapidusSurgical Approach
Make a dorsomedial incision over the 1st tarsometatarsal (TMT) joint, extending from the medial cuneiform to mid-shaft of the first metatarsal.
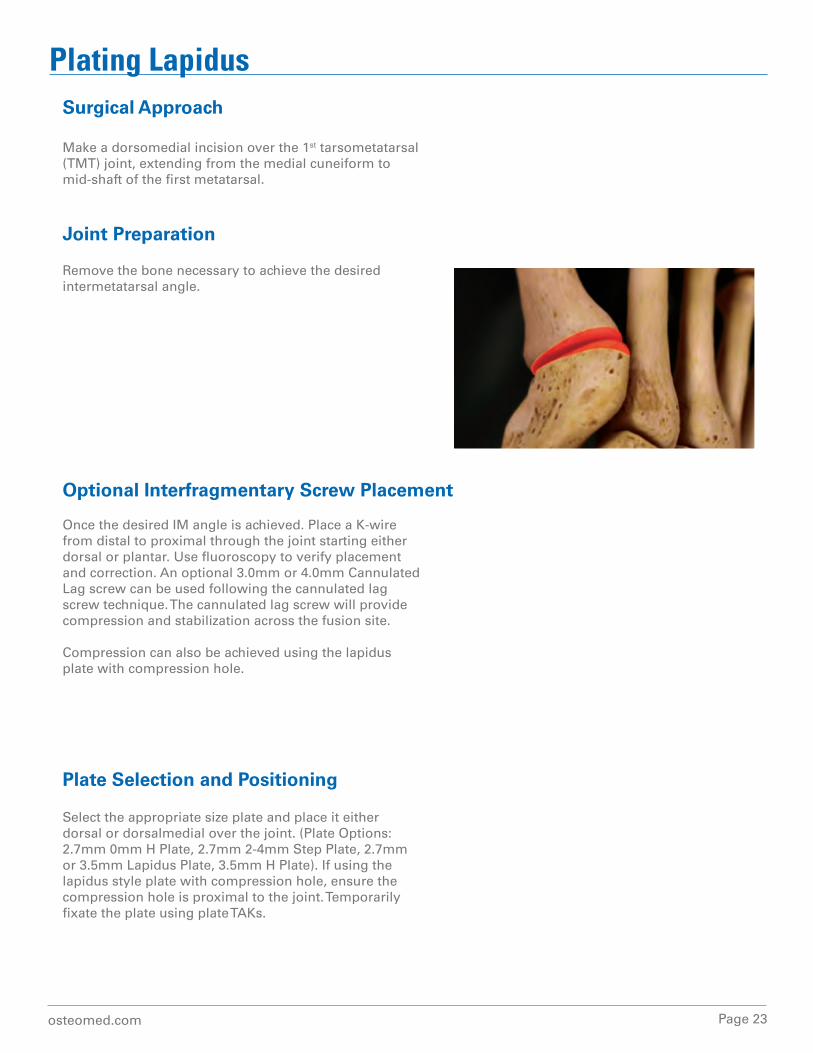
Joint Preparation
Remove the bone necessary to achieve the desired intermetatarsal angle.
Optional Interfragmentary Screw Placement
Once the desired IM angle is achieved. Place a K-wire from distal to proximal through the joint starting either dorsal or plantar. Use fluoroscopy to verify placement and correction. An optional 3.0mm or 4.0mm Cannulated Lag screw can be used following the cannulated lag screw technique. The cannulated lag screw will provide compression and stabilization across the fusion site.
Compression can also be achieved using the lapidus plate with compression hole.
Plate Selection and Positioning
Select the appropriate size plate and place it either dorsal or dorsalmedial over the joint. (Plate Options: 2.7mm 0mm H Plate, 2.7mm 2-4mm Step Plate, 2.7mm or 3.5mm Lapidus Plate, 3.5mm H Plate). If using the lapidus style plate with compression hole, ensure the compression hole is proximal to the joint. Temporarily fixate the plate using plate TAKs.
Page 24 osteomed.com
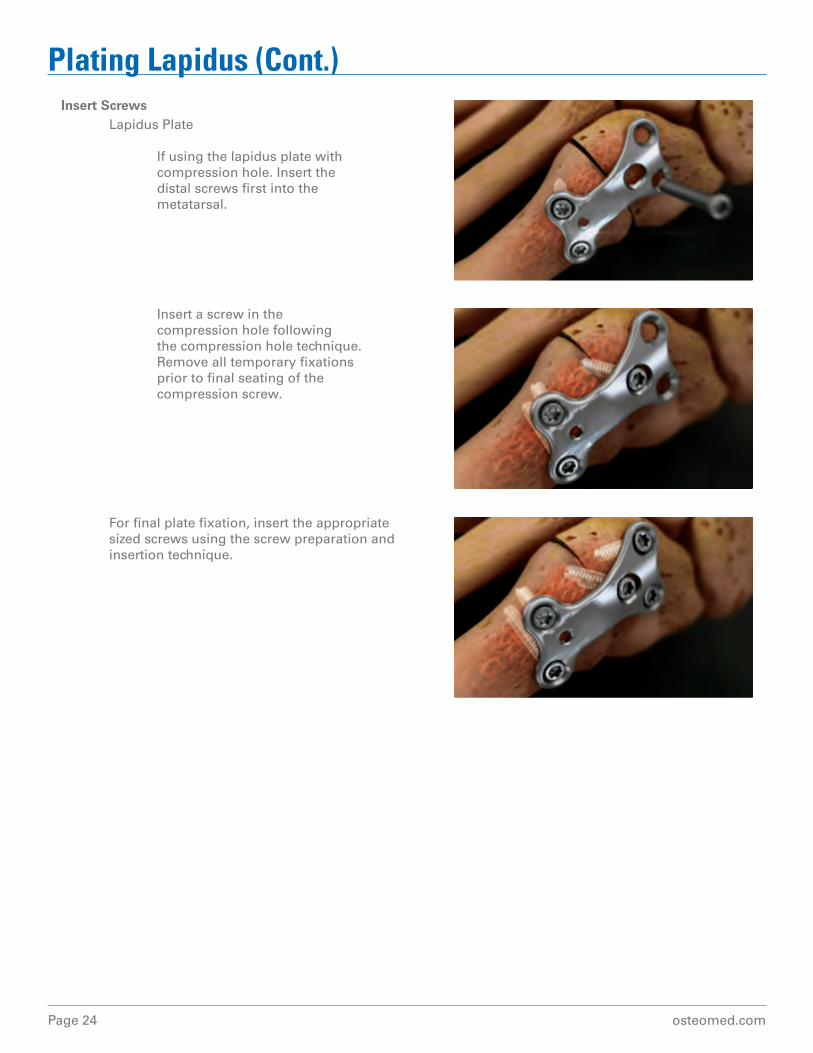
Plating Lapidus (Cont.)Insert Screws Lapidus Plate
If using the lapidus plate with compression hole. Insert the distal screws first into the metatarsal.
For final plate fixation, insert the appropriate sized screws using the screw preparation and insertion technique.
Insert a screw in the compression hole following the compression hole technique. Remove all temporary fixations prior to final seating of the compression screw.
osteomed.com Page 25
Plating 5th Metatarsal FractureSurgical Approach
Make a lateral incision along the base of the 5th metatarsal, exposing the tuberosity.
Reduce the fracture.
Plate Selection and Positioning
Contour the plate as needed using the plate benders.
Position the hook plate around the 5th metatarsal tuberosity and the peroneus brevis tendon. It may be necessary to pierce through the peroneus brevis tendon with the hooks. In cases with dense bone, use the hook drill guide to make guide channels using a .062” K-wire.
Insert Screws
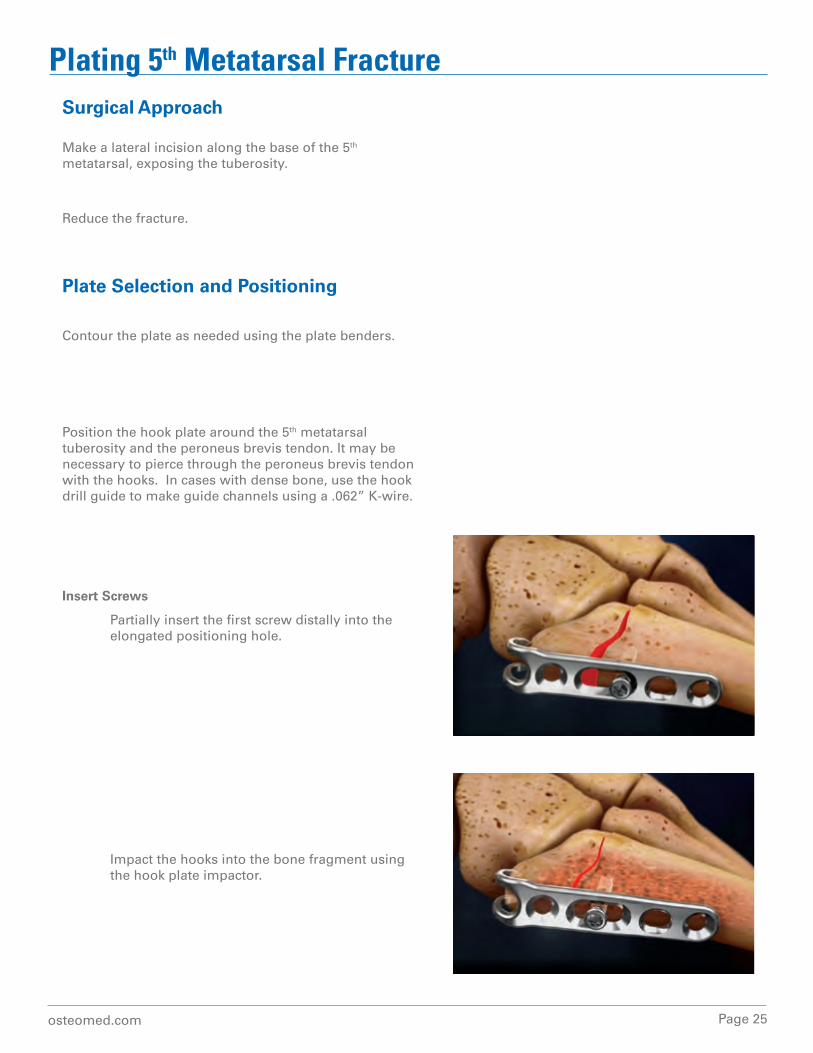
Partially insert the first screw distally into the elongated positioning hole.
Impact the hooks into the bone fragment using the hook plate impactor.
Page 26 osteomed.com
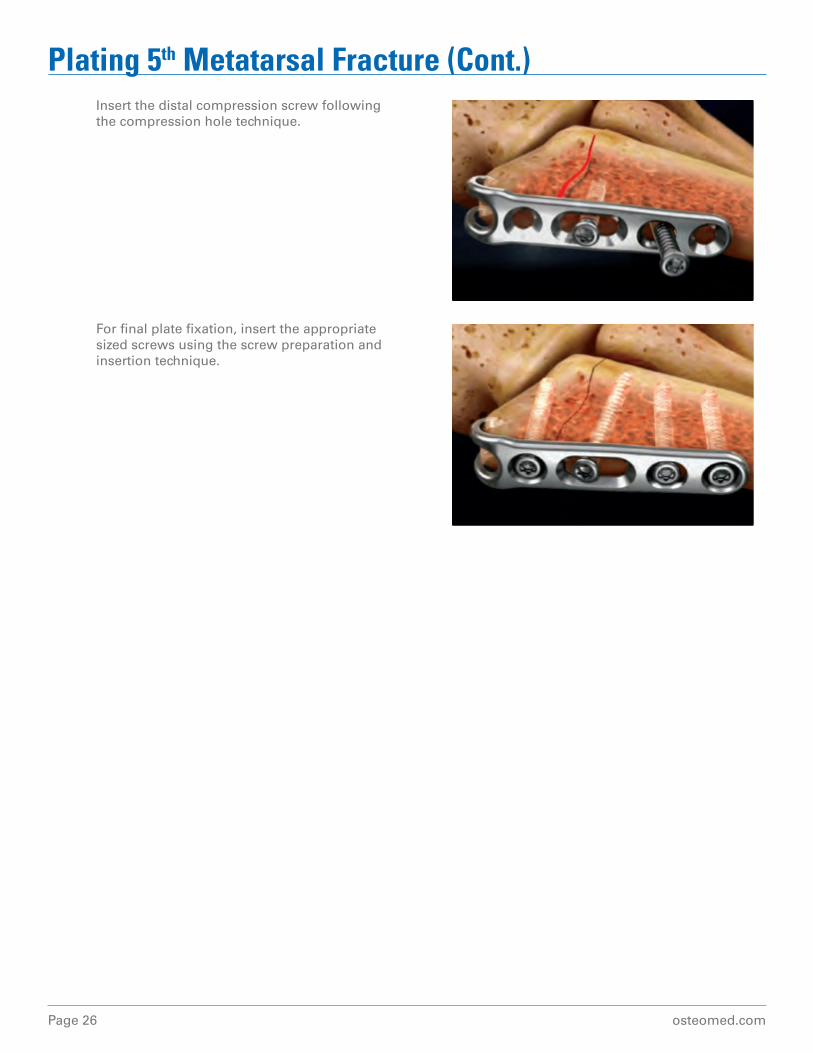
Plating 5th Metatarsal Fracture (Cont.) Insert the distal compression screw following the compression hole technique.
For final plate fixation, insert the appropriate sized screws using the screw preparation and insertion technique.
osteomed.com Page 27
Plating Calcaneal Fracture (Lateral Extensile Approach)Surgical Approach
Expose the fracture through a lateral extensile incision. Expose the calcaneus by elevating a full thickness flap.
Fracture Reduction
Reduce the fracture as required, restoring the subtalar joint along with the calcaneal height and width. A Steinmann pin may be placed in the posterior tuberosity to pull the fragment out of varus and returned to anatomic length. Maintain reduction with temporary fixation.
It may be necessary when restoring the anatomic joint surface to place a cannulated lag screw from the posterior facet to the sustentaculum.
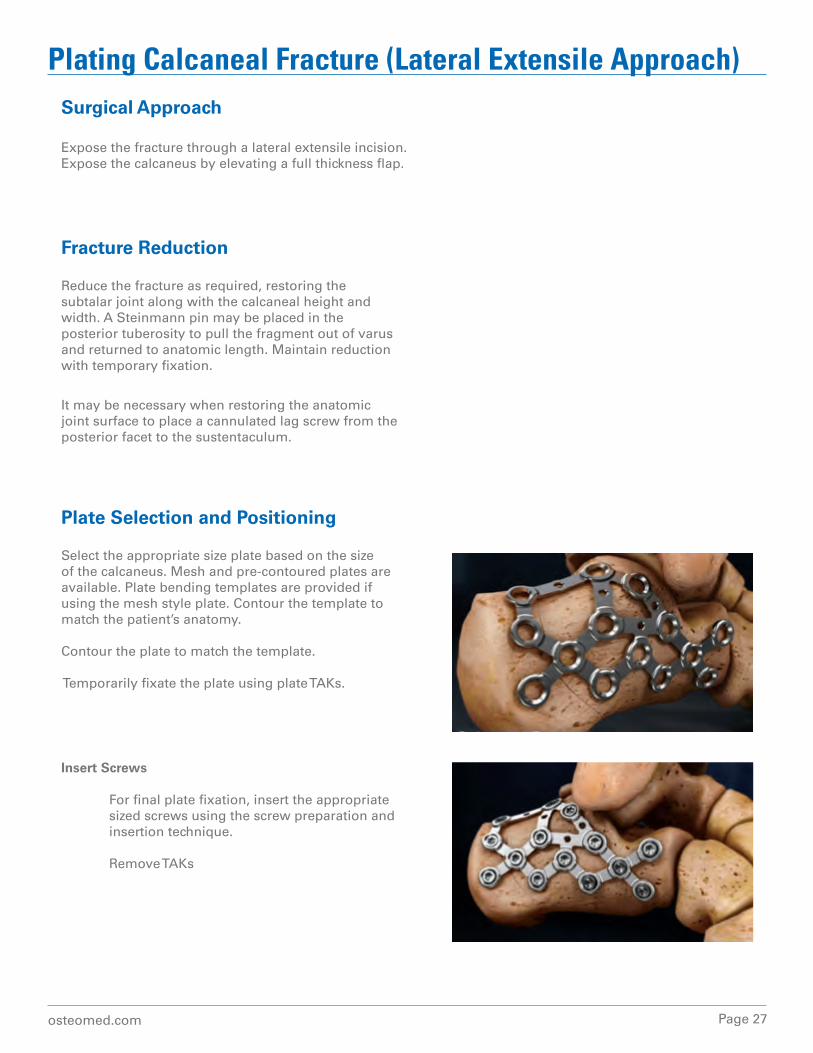
Plate Selection and Positioning
Select the appropriate size plate based on the size of the calcaneus. Mesh and pre-contoured plates are available. Plate bending templates are provided if using the mesh style plate. Contour the template to match the patient’s anatomy.
Contour the plate to match the template.
Temporarily fixate the plate using plate TAKs.
Insert Screws
For final plate fixation, insert the appropriate sized screws using the screw preparation and insertion technique.
Remove TAKs
Page 28 osteomed.com
Plating Calcaneal Fracture (Sinus Tarsi Approach)Surgical Approach
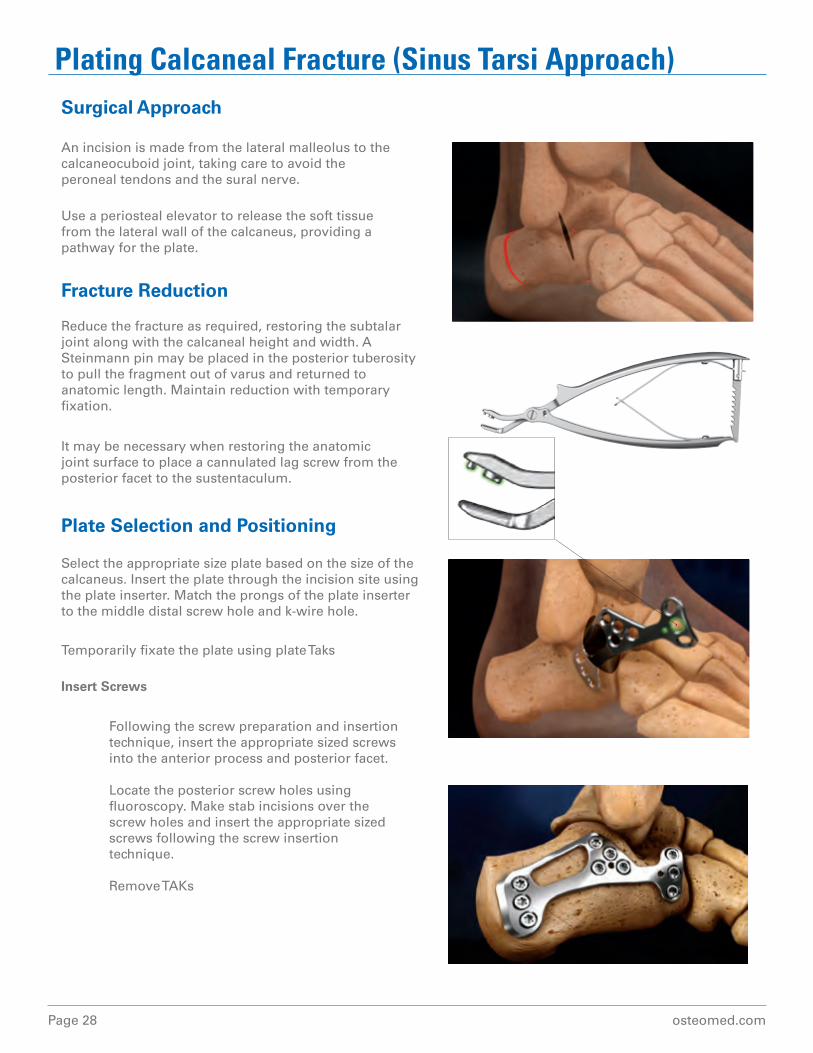
An incision is made from the lateral malleolus to the calcaneocuboid joint, taking care to avoid the peroneal tendons and the sural nerve.
Use a periosteal elevator to release the soft tissue from the lateral wall of the calcaneus, providing a pathway for the plate.
Fracture Reduction
Reduce the fracture as required, restoring the subtalar joint along with the calcaneal height and width. A Steinmann pin may be placed in the posterior tuberosity to pull the fragment out of varus and returned to anatomic length. Maintain reduction with temporary fixation.
It may be necessary when restoring the anatomic joint surface to place a cannulated lag screw from the posterior facet to the sustentaculum.
Plate Selection and Positioning
Select the appropriate size plate based on the size of the calcaneus. Insert the plate through the incision site using the plate inserter. Match the prongs of the plate inserter to the middle distal screw hole and k-wire hole.
Temporarily fixate the plate using plate Taks
Insert Screws
Following the screw preparation and insertion technique, insert the appropriate sized screws into the anterior process and posterior facet.
Locate the posterior screw holes using fluoroscopy. Make stab incisions over the screw holes and insert the appropriate sized screws following the screw insertion technique.
Remove TAKs

osteomed.com Page 29
Plating EvansSurgical Approach
Osteotomy
Plate Selection and Positioning
Make an oblique incision proximal to the calcaneal-cuboid joint, taking care to avoid the peroneal tendons and the sural nerve.
Create an osteotomy on the lateral wall of the calcaneus approximately 1cm proximal and parallel to the calcaneal-cuboid joint, leaving the medial wall intact.
Select the plate with the desired amount of correction. Insert the plate into the osteotomy site with the parallel holes closest to the calcaneal-cuboid joint. Temporarily fixate the plate to the metatarsal using plate Taks.
Insert Screws
For final plate fixation, insert the appropriate sized screws using the screw preparation and insertion technique.
Remove TAKs
Place bone graft into the osteotomy site.
Page 30 osteomed.com
Plating Calcaneal Slide
Osteotomy
Plate Selection and Positioning
Make an “L” shaped incision on the lateral side of the calcaneus, taking care to avoid the peroneal tendons and the sural nerve.
Create an osteotomy on the lateral wall of the calcaneus parallel to the posterior facet. Use an osteotome to break the medial cortex of the calcaneus.
The distal fragment is displaced medially and held with temporary fixation.
Select the plate with the desired amount of correction. Insert the plate over the osteotomy site. Temporarily fixate the plate to the metatarsal using plate TAKs.
Insert Screws
For final plate fixation, insert the appropriate sized screws using the screw preparation and insertion technique.
Remove TAKs
Surgical Approach
OSTEOMED3885 Arapaho Rd.
Addison, TX 75001Customer Service: 800.456.7779
Outside the U.S.: 001.972.677.4600Fax: 800.390.2620
Fax Outside the U.S.: 001.972.677.4709E-mail: [email protected]
www.osteomed.com
P/N 030-1808 Rev.B
SMALL BONE ORTHOPEDICS
Rethinking Possibilities, Reshaping Lives
OsteoMed Products
ExtremiFix Headless Cannulated Screws
ExtremiFix Cannulated Screws
Large Cannulated Screws
ExtremiFuse
EnCompass
EnCompass Lessers
Hemi
ReFlexion
InterPhlex
Talar-Fit
Inion
OsteoVationEX
OsteoVation QWIK